This is the multi-page printable view of this section. Click here to print.
Docs
1 - Getting Started
Welcome to the Gardener Getting Started section! Here you will be able to get accustomed to the way Gardener functions and learn how its components work together in order to seamlessly run Kubernetes clusters on various hyperscalers.
The following topics aim to be useful to both complete beginners and those already somewhat familiar with Gardener. While the content is structured, with Introduction serving as the starting point, if you’re feeling confident in your knowledge, feel free to skip to a topic you’re more interested in.
1.1 - Introduction to Gardener
Problem Space
Let’s discuss the problem space first. Why does anyone need something like Gardener?
Running Software
The starting point is this rather simple question: Why would you want to run some software?
Typically, software is run with a purpose and not just for the sake of running it. Whether it is a digital ledger, a company’s inventory or a blog - software provides a service to its user.
Which brings us to the way this software is being consumed. Traditionally, software has been shipped on physical / digital media to the customer or end user. There, someone had to install, configure, and operate it. In recent times, the pattern has shifted. More and more solutions are operated by the vendor or a hosting partner and sold as a service ready to be used.
But still, someone needs to install, configure, and maintain it - regardless of where it is installed. And of course, it will run forever once started and is generally resilient to any kind of failures.
For smaller installations things like maintenance, scaling, debugging or configuration can be done in a semi-automatic way. It’s probably no fun and most importantly, only a limited amount of instances can be taken care of - similar to how one would take care of a pet.
But when hosting services at scale, there is no way someone can do all this manually at acceptable costs. So we need some vehicle to easily spin up new instances, do lifecycle operations, get some basic failure resilience, and more. How can we achieve that?
Solution Space 1 - Kubernetes
Let’s start solving some of the problems described earlier with Container technology and Kubernetes.
Containers
Container technology is at the core of the solution space. A container forms a vehicle that is shippable, can easily run in any supported environment and generally adds a powerful abstraction layer to the infrastructure.
However, plain containers do not help with resilience or scaling. Therefore, we need another system for orchestration.
Orchestration
“Classical” orchestration that just follows the “notes” and moves from state A to state B doesn’t solve all of our problems as there are a lot of events from the environment that we should react to. Especially if they can lead to a broken system. We need something else.
Kubernetes operates on the principle of “desired state”. With it, you write a construction plan, then have controllers cycle through “observe -> analyze -> act” and transition the actual to the desired state. Those reconciliations ensure that whatever breaks there is a path back to a healthy state.
Summary
Containers (famously brought to the mainstream as “Docker”) and Kubernetes are the ingredients of a fundamental shift in IT. Similar to how the Operating System layer enabled the decoupling of software and hardware, container-related technologies provide an abstract interface to any kind of infrastructure platform for the next-generation of applications.
Solution Space 2 - Gardener
So, Kubernetes solves a lot of problems. But how do you get a Kubernetes cluster?
Either:
- Buy a cluster as a service from an external vendor
- Run a Gardener instance and host yourself a cluster with its help
Essentially, it was a “make or buy” decision that led to the founding of Gardener.
The Reason Why We Choose to “Make It”
Gardener allows to run Kubernetes clusters on various hyperscalers. It offers the same set of basic configuration options independent of the chosen infrastructure. This kind of harmonization supports any multi-vendor strategy while reducing adoption costs for the individual teams. Just imagine having to deal with multiple vendors all offering vastly different Kubernetes clusters.
Of course, there are plenty more reasons - from acquiring operational knowledge to having influence on the developed features - that made the pendulum swing towards “make it”.
What exactly is Gardener?

Gardener is a system to manage Kubernetes clusters. It is driven by the same “desired state” pattern as Kubernetes itself. In fact, it is using Kubernetes to run Kubernetes.
A user may “desire” clusters with specific configuration on infrastructures such as GCP, AWS, Azure, Alicloud, Openstack, vsphere, … and Gardener will make sure to create such a cluster and keep it running.
If you take this rather simplistic principle of reconciliation and add the feature-richness of Gardener to it, you end up with universal Kubernetes at scale.
Whether you need fleet management at minimal TCO or to look for a highly customizable control plane - we have it all.
On top of that, Gardener-managed Kubernetes clusters fulfill the conformance standard set out by the CNCF and we submit our test results for certification.
Have a look at the CNCF map for more information or dive into the testgrid directly.
Gardener itself is open-source. Under the umbrella of github.com/gardener we develop the core functionalities as well as the extensions and you are welcome to contribute (by opening issues, feature requests or submitting code).
Last time we counted, there were already 131 projects. That’s actually more projects than members of the organization.
As of today, there are multiple adopters of Gardener, among which are SAP, STACKIT, Telekom, and Finanz Informatik Technologie Services GmbH. For a full list of adopters, see the Adopters page.
1.2 - Architecture
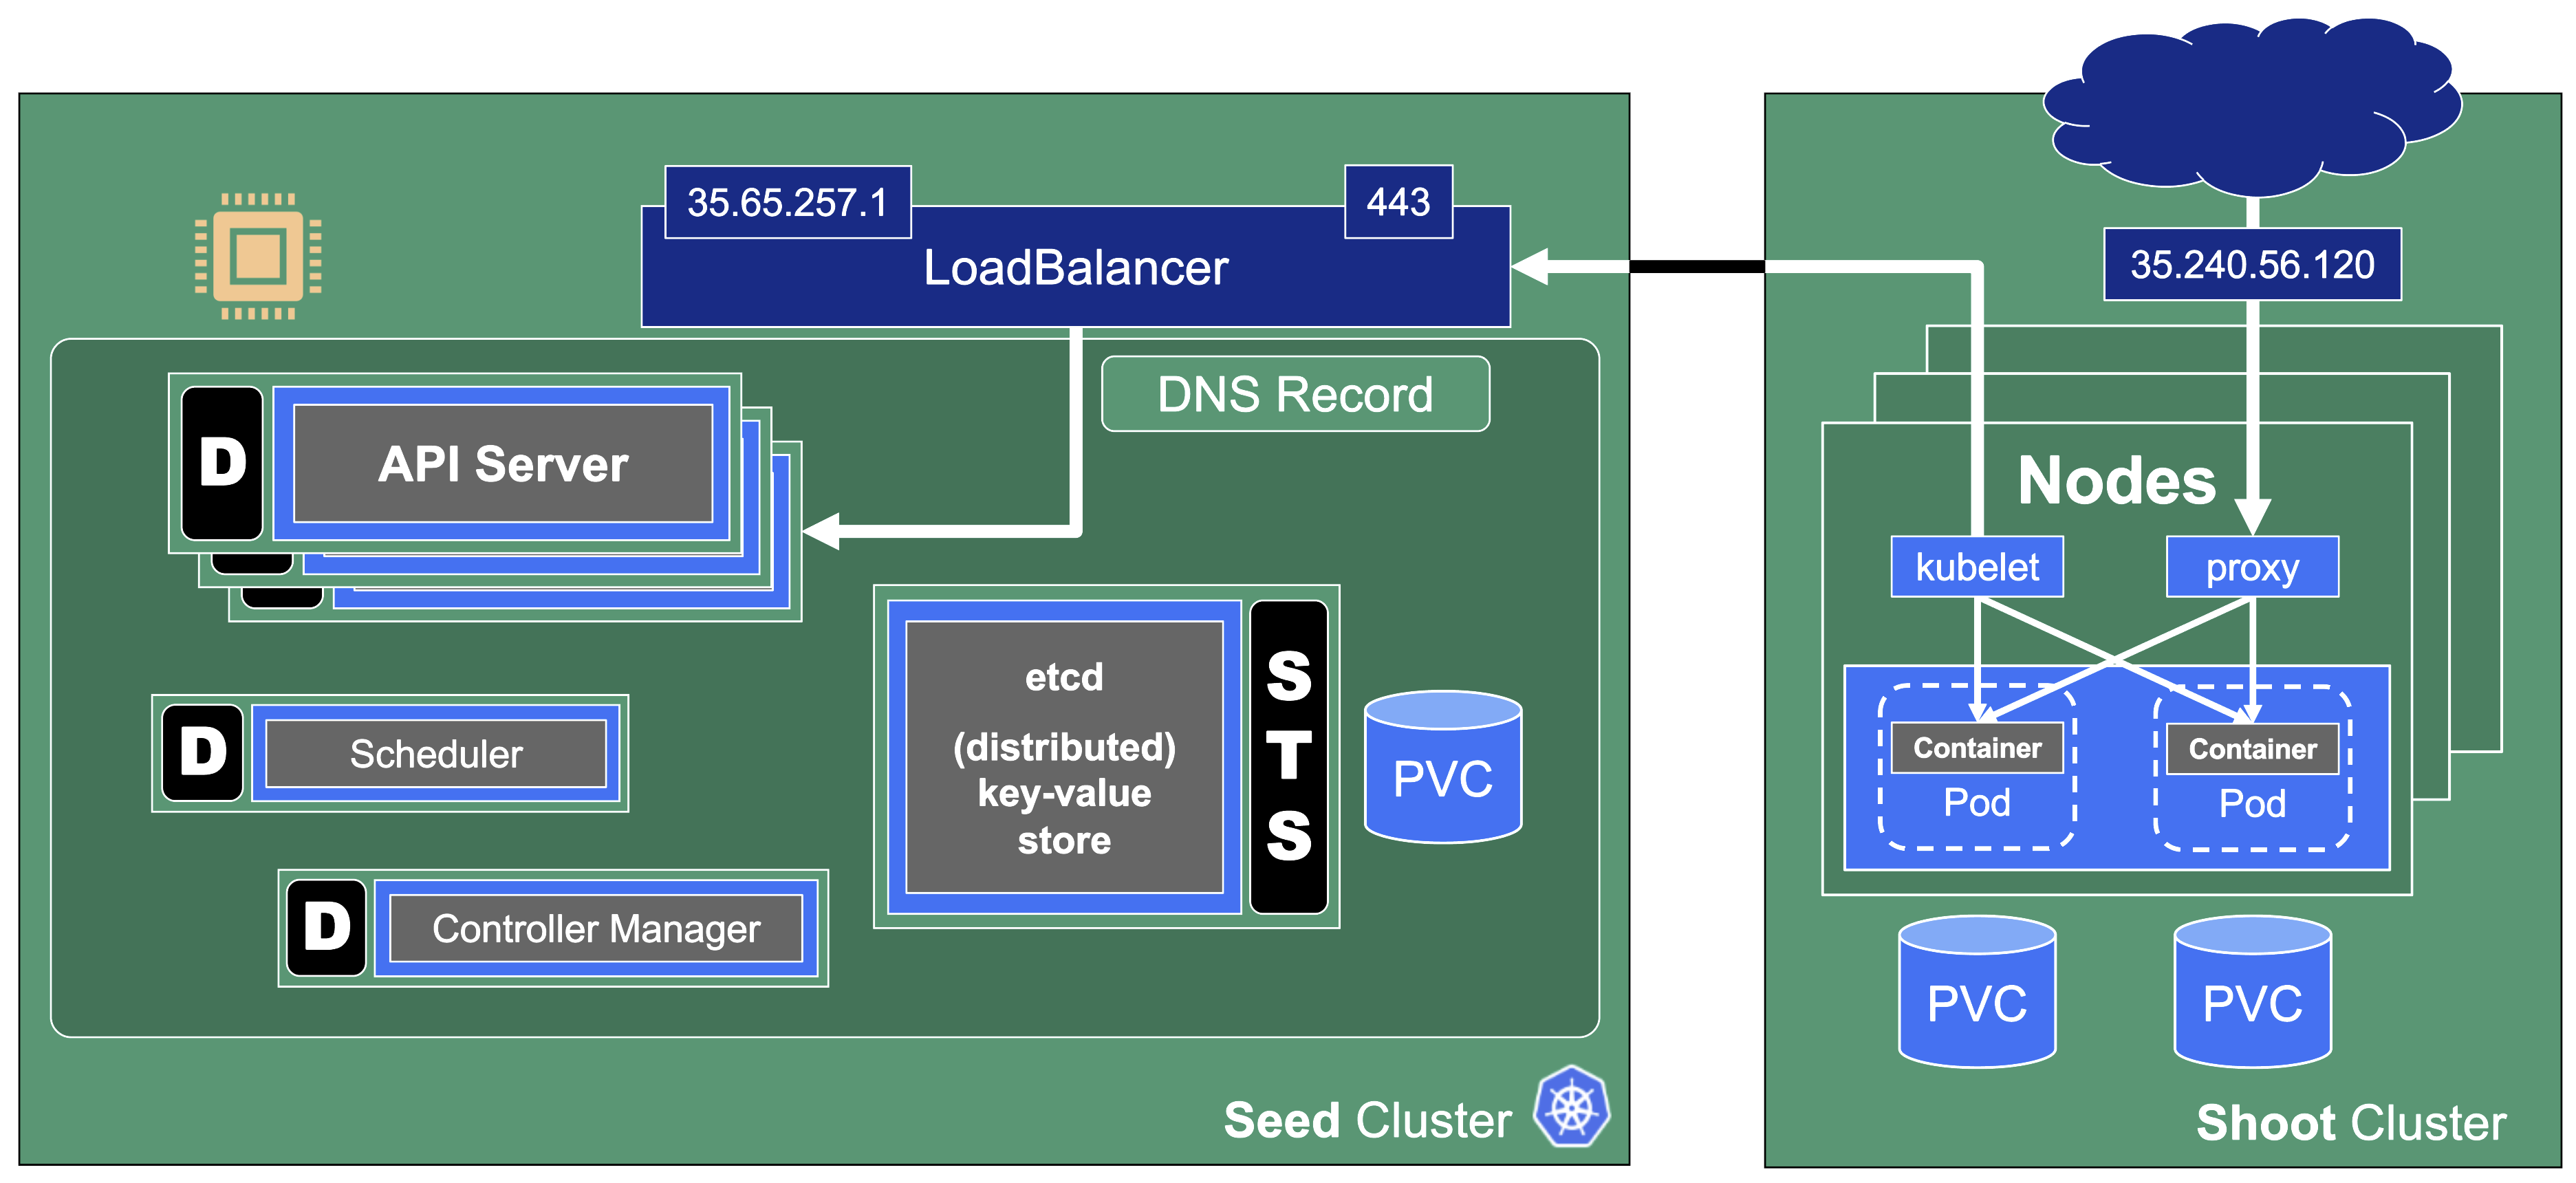
Kubeception
Kubeception - Kubernetes in Kubernetes in Kubernetes
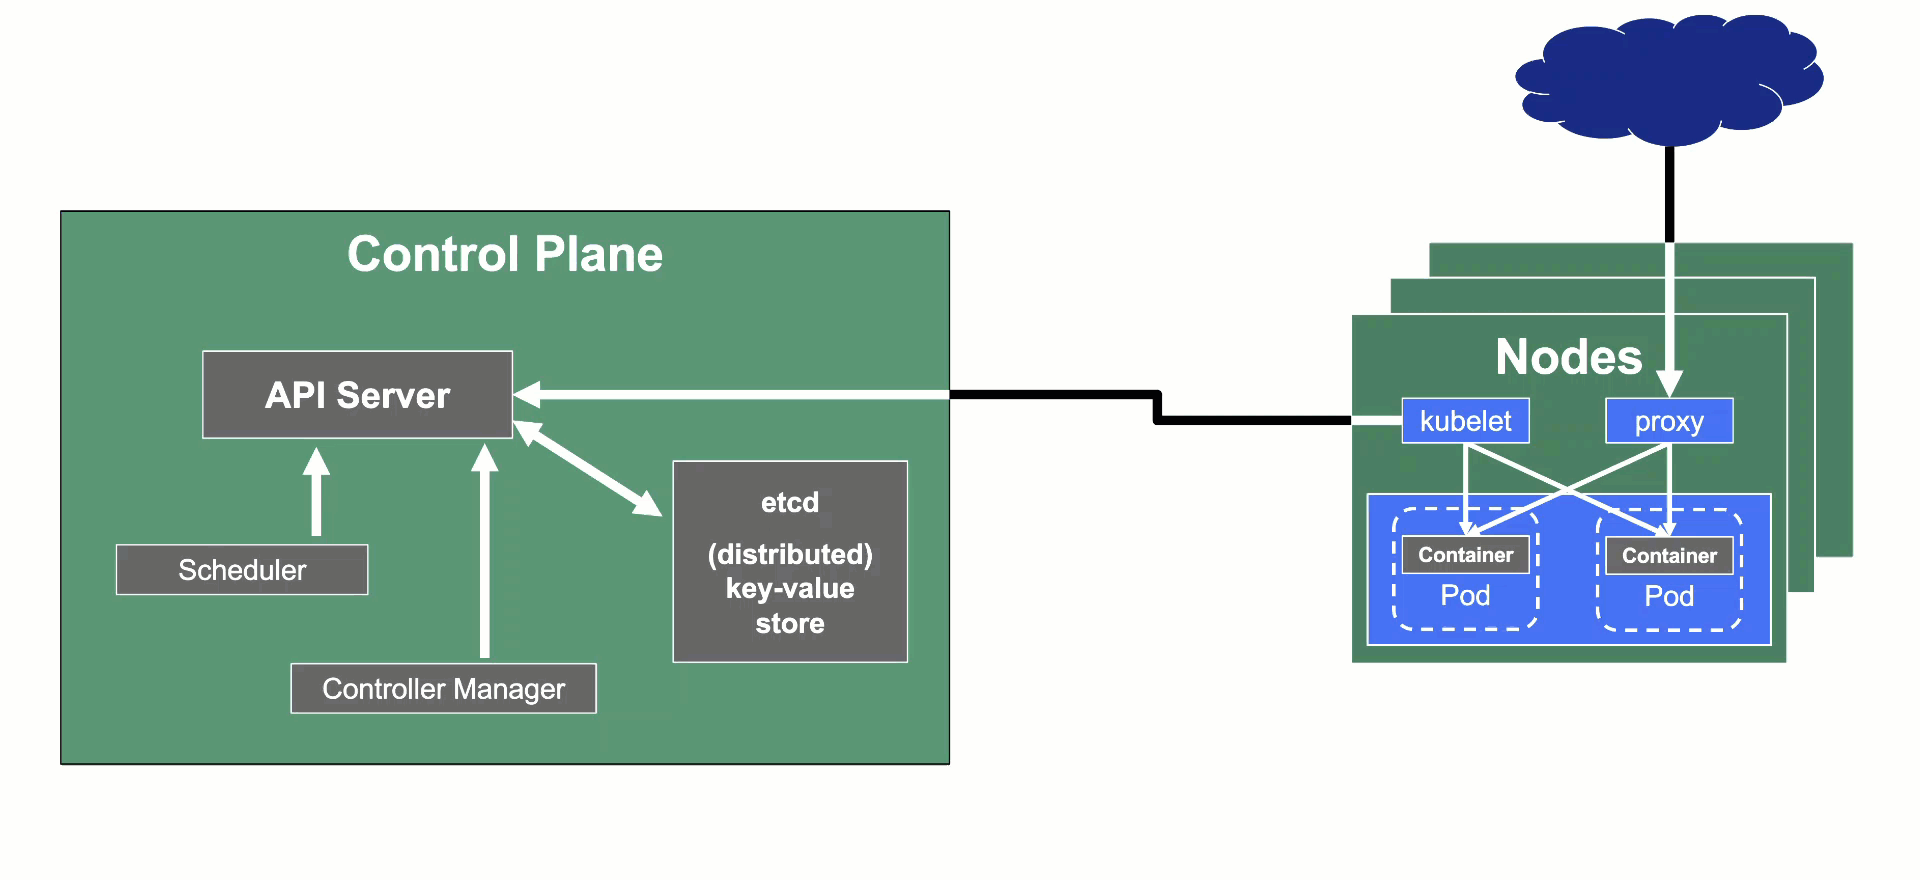
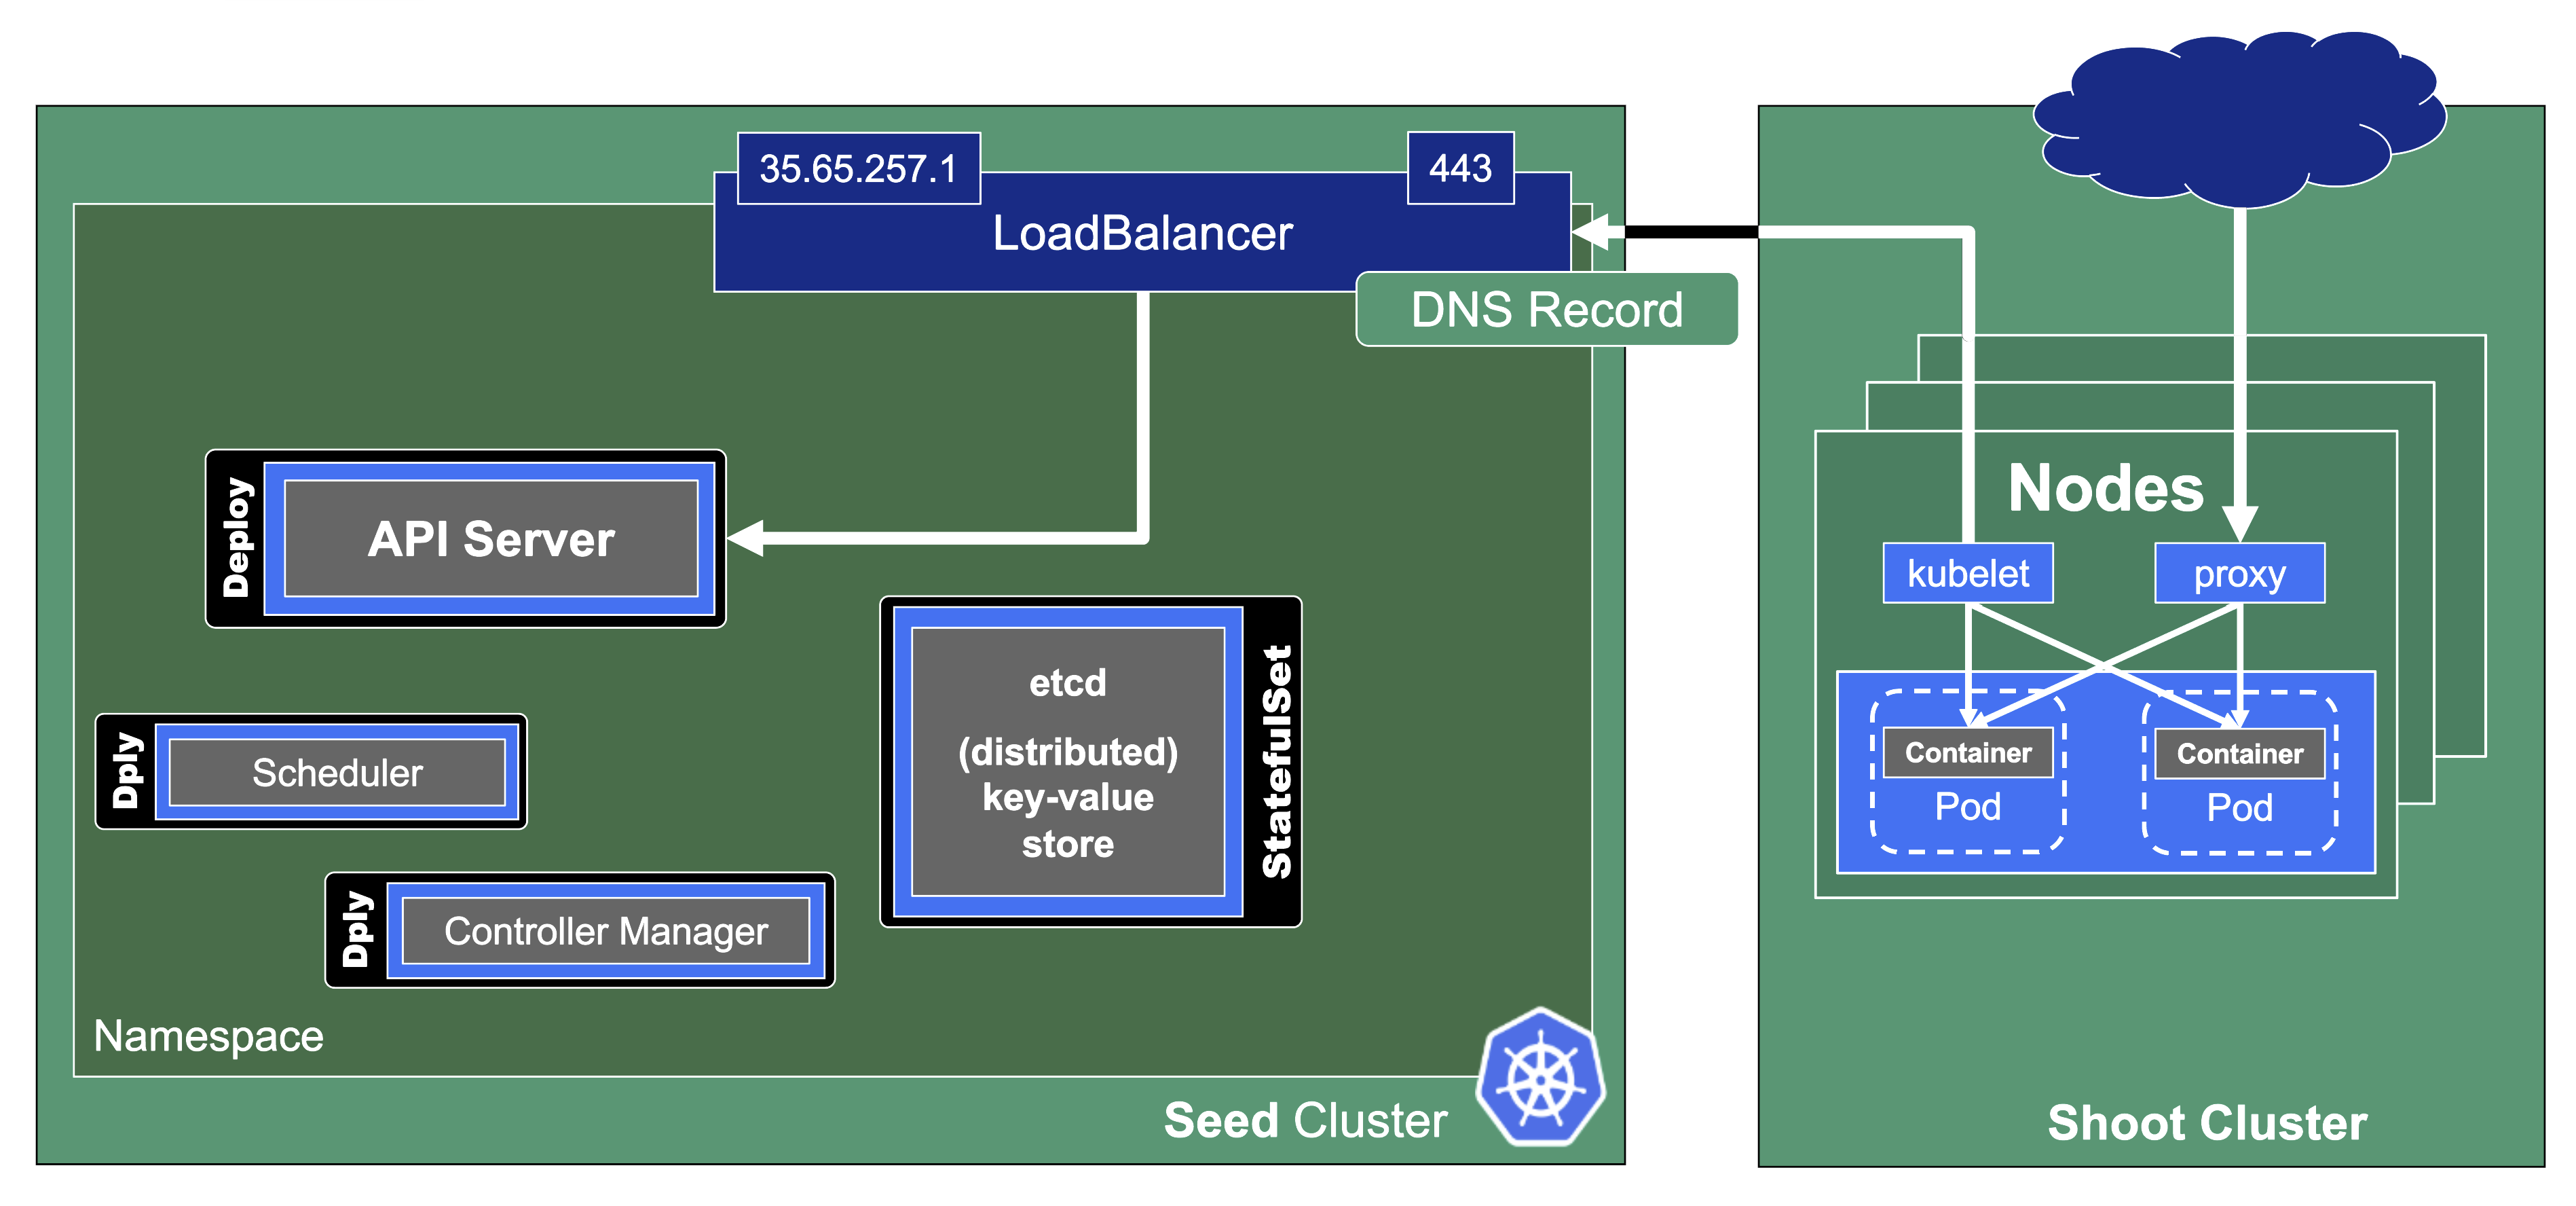
In the classic setup, there is a dedicated host / VM to host the master components / control plane of a Kubernetes cluster. However, these are just normal programs that can easily be put into containers. Once in containers, Kubernetes Deployments and StatefulSets (for the etcd) can be made to watch over them. And by putting all that into a separate, dedicated Kubernetes cluster you get Kubernetes on Kubernetes, aka Kubeception (named after the famous movie Inception with Leonardo DiCaprio).
But what are the advantages of running Kubernetes on Kubernetes?
- It makes use of resources more reasonably. Instead of providing a dedicated computer or virtual machine for the control plane of a Kubernetes cluster - which will probably never be the right size but either too small or too big - you can dynamically scale the individual control plane components based on demand and maximize resource usage by combining the control planes of multiple Kubernetes clusters.
- It helps introducing a first layer of high availability. What happens if the API server suddenly stops responding to requests? In a traditional setup, someone would have to find out and manually restart the API server. In the Kubeception model, the API server is a Kubernetes Deployment and of course, it has sophisticated liveness- and readiness-probes. Should the API server fail, its liveness-probe will fail too and the pod in question simply gets restarted automatically - sometimes even before anybody would have noticed about the API server being unresponsive.
- By running the control plane in a separate cluster where the user does not have access we reduce the possibility for the user to unintentionally modify the control plane resources (pods, secrets, configmaps, …) and break the cluster
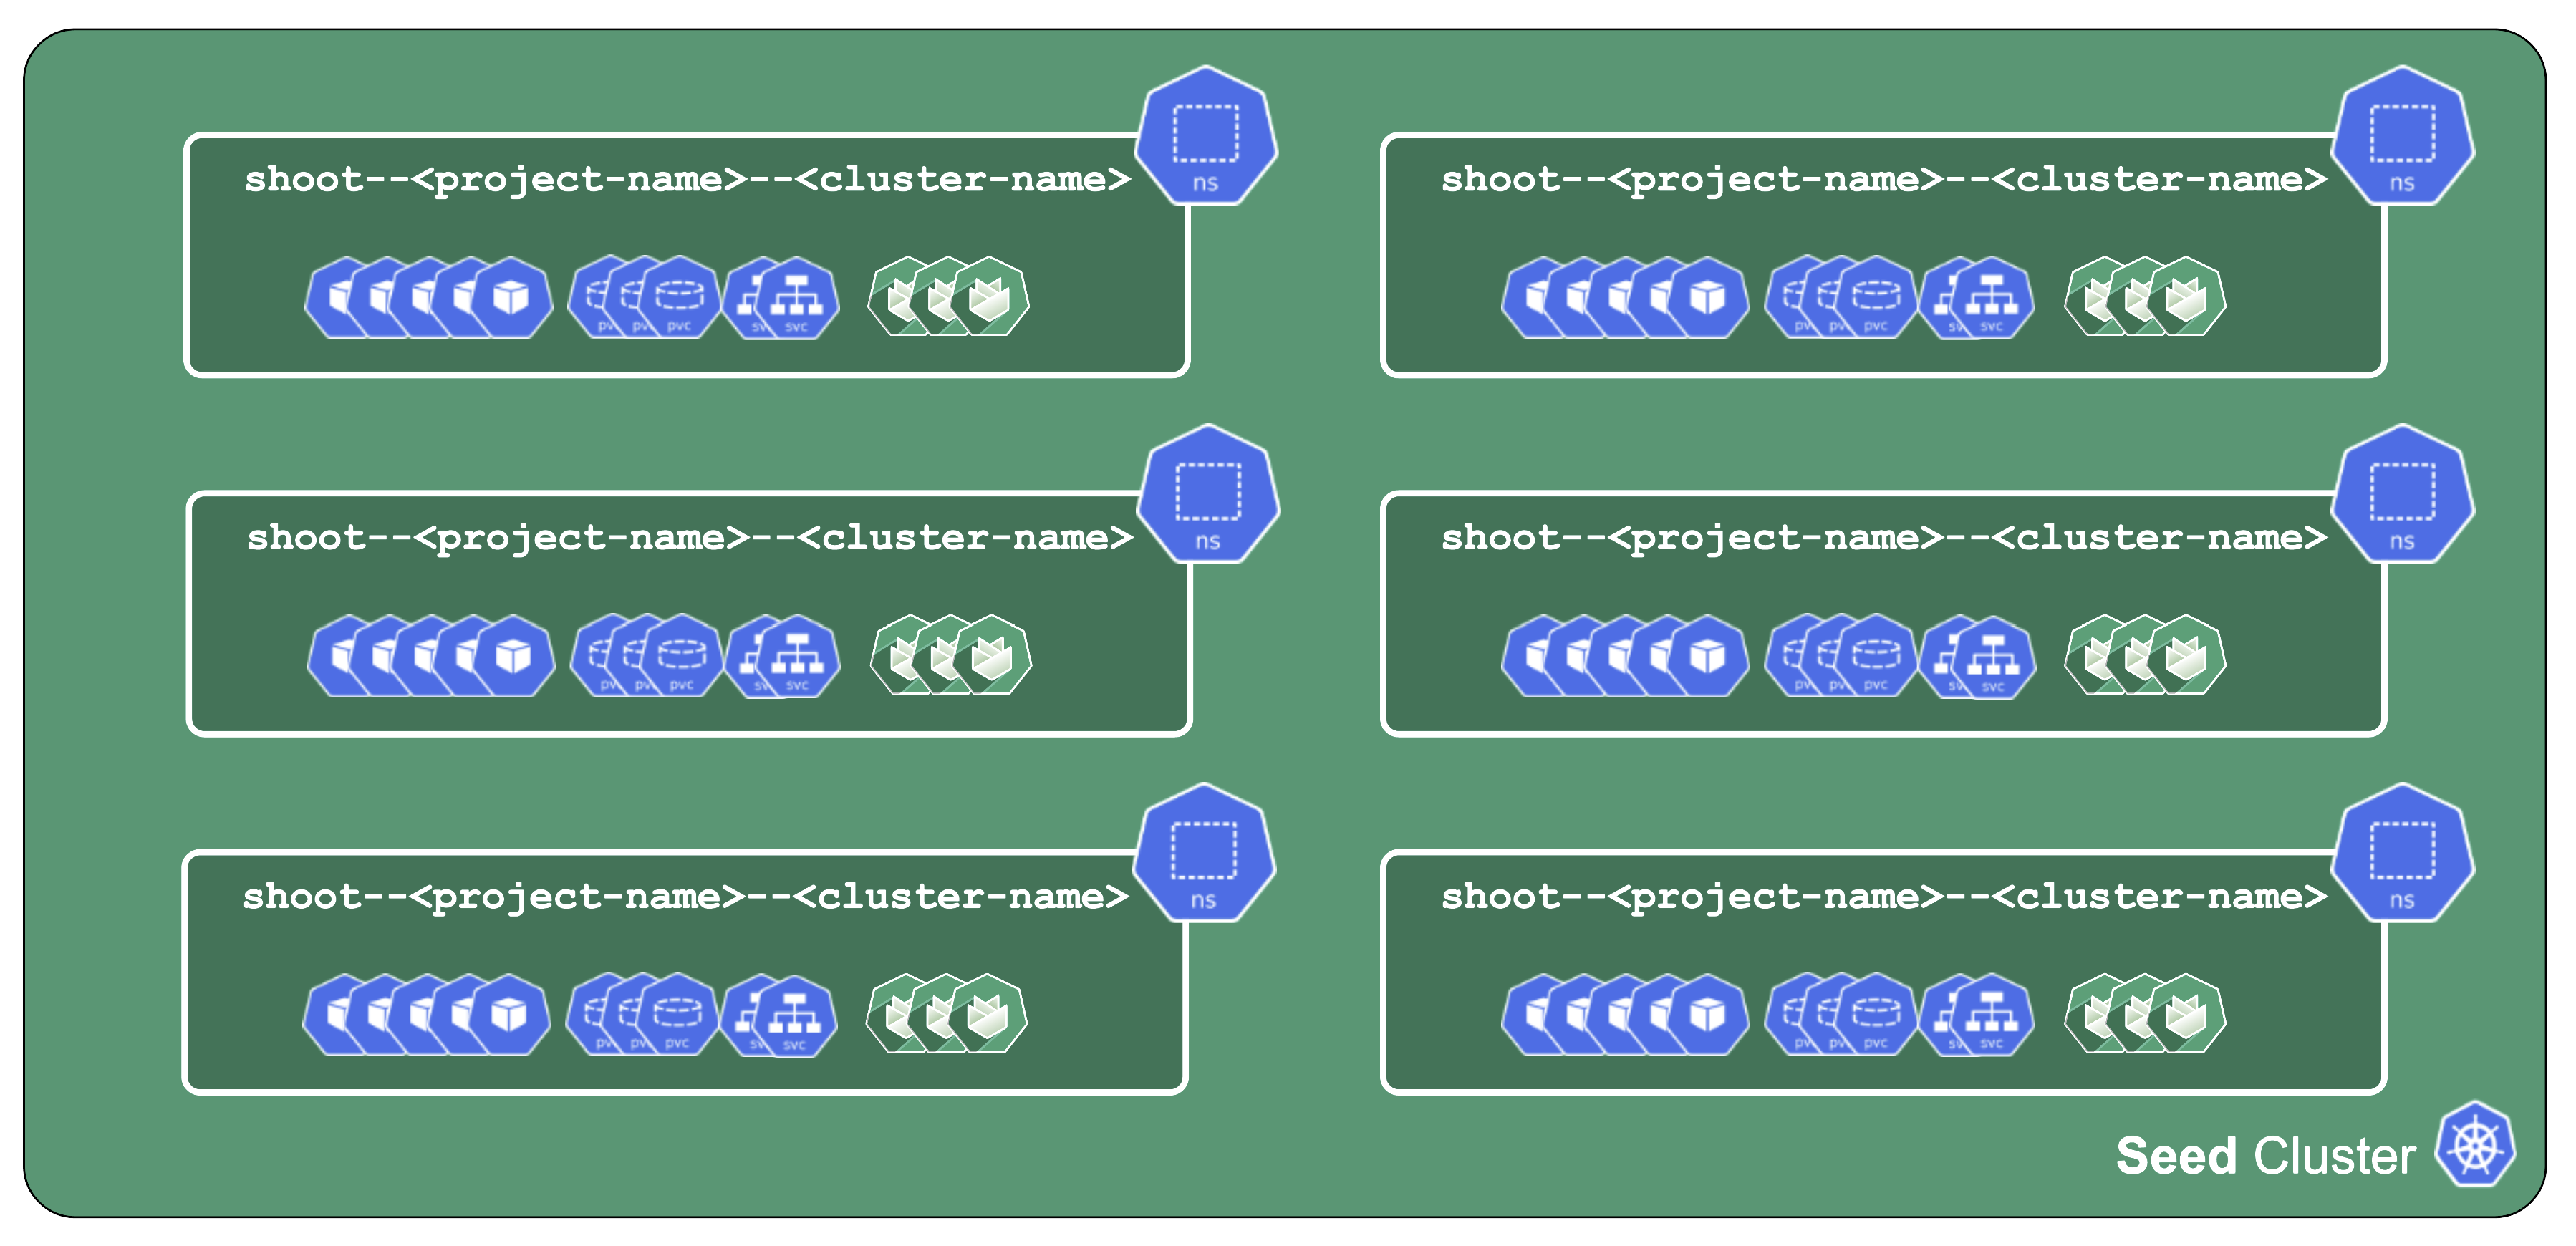
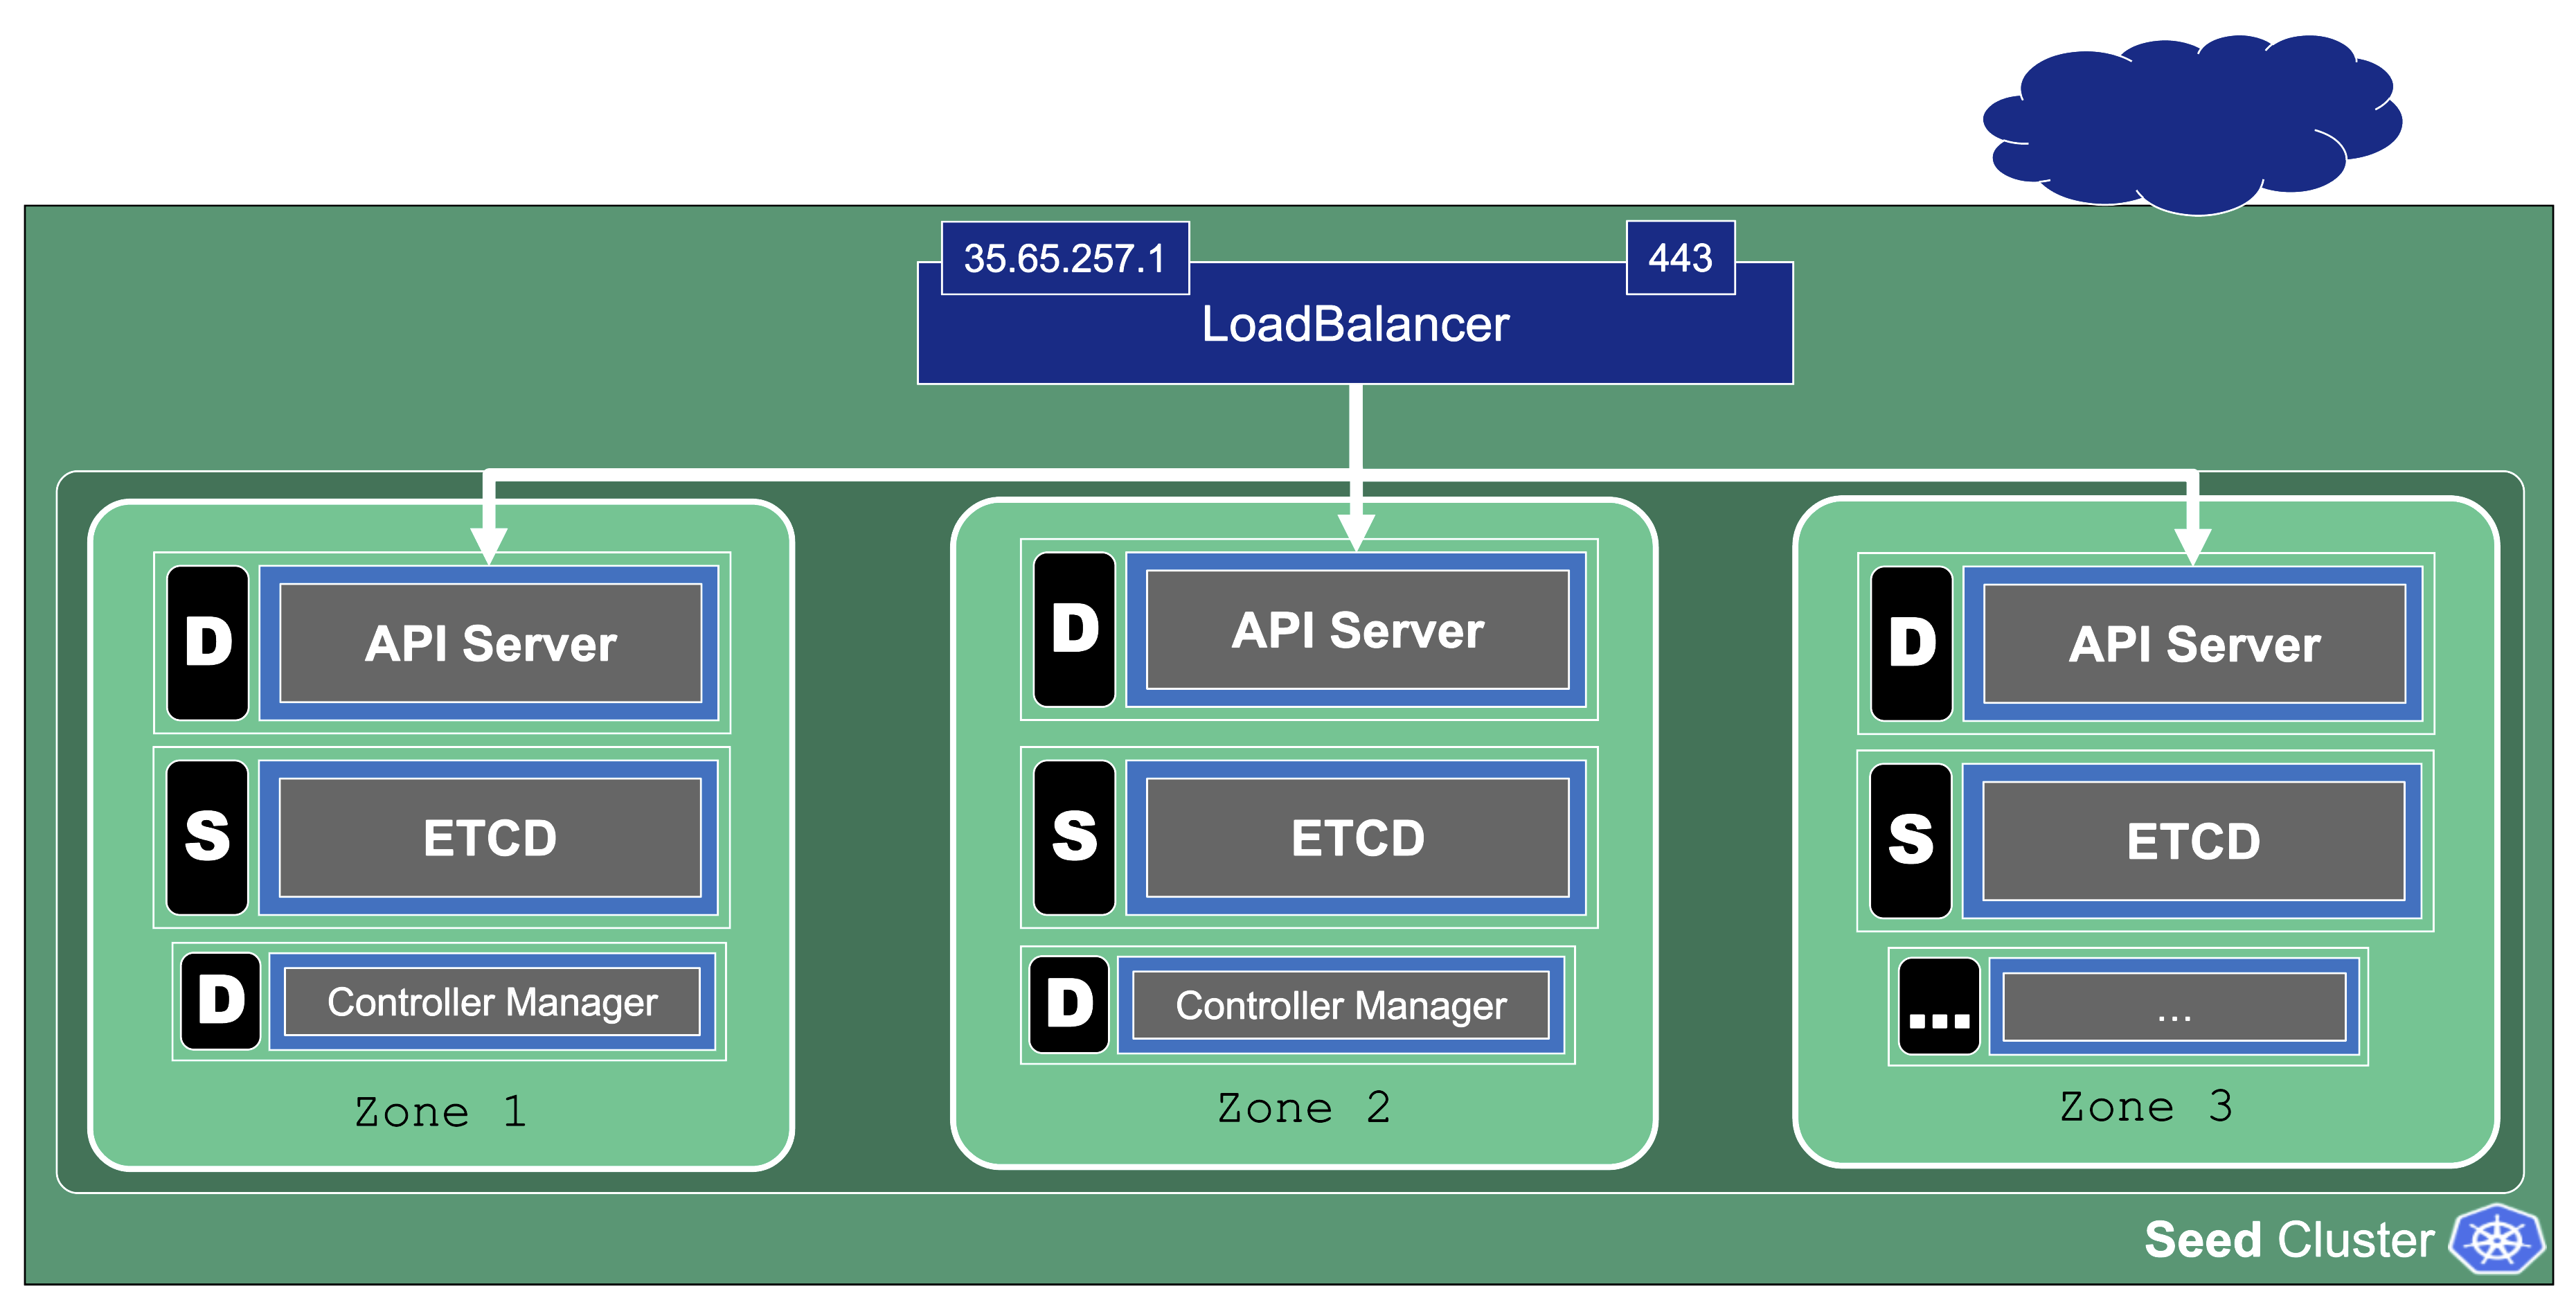
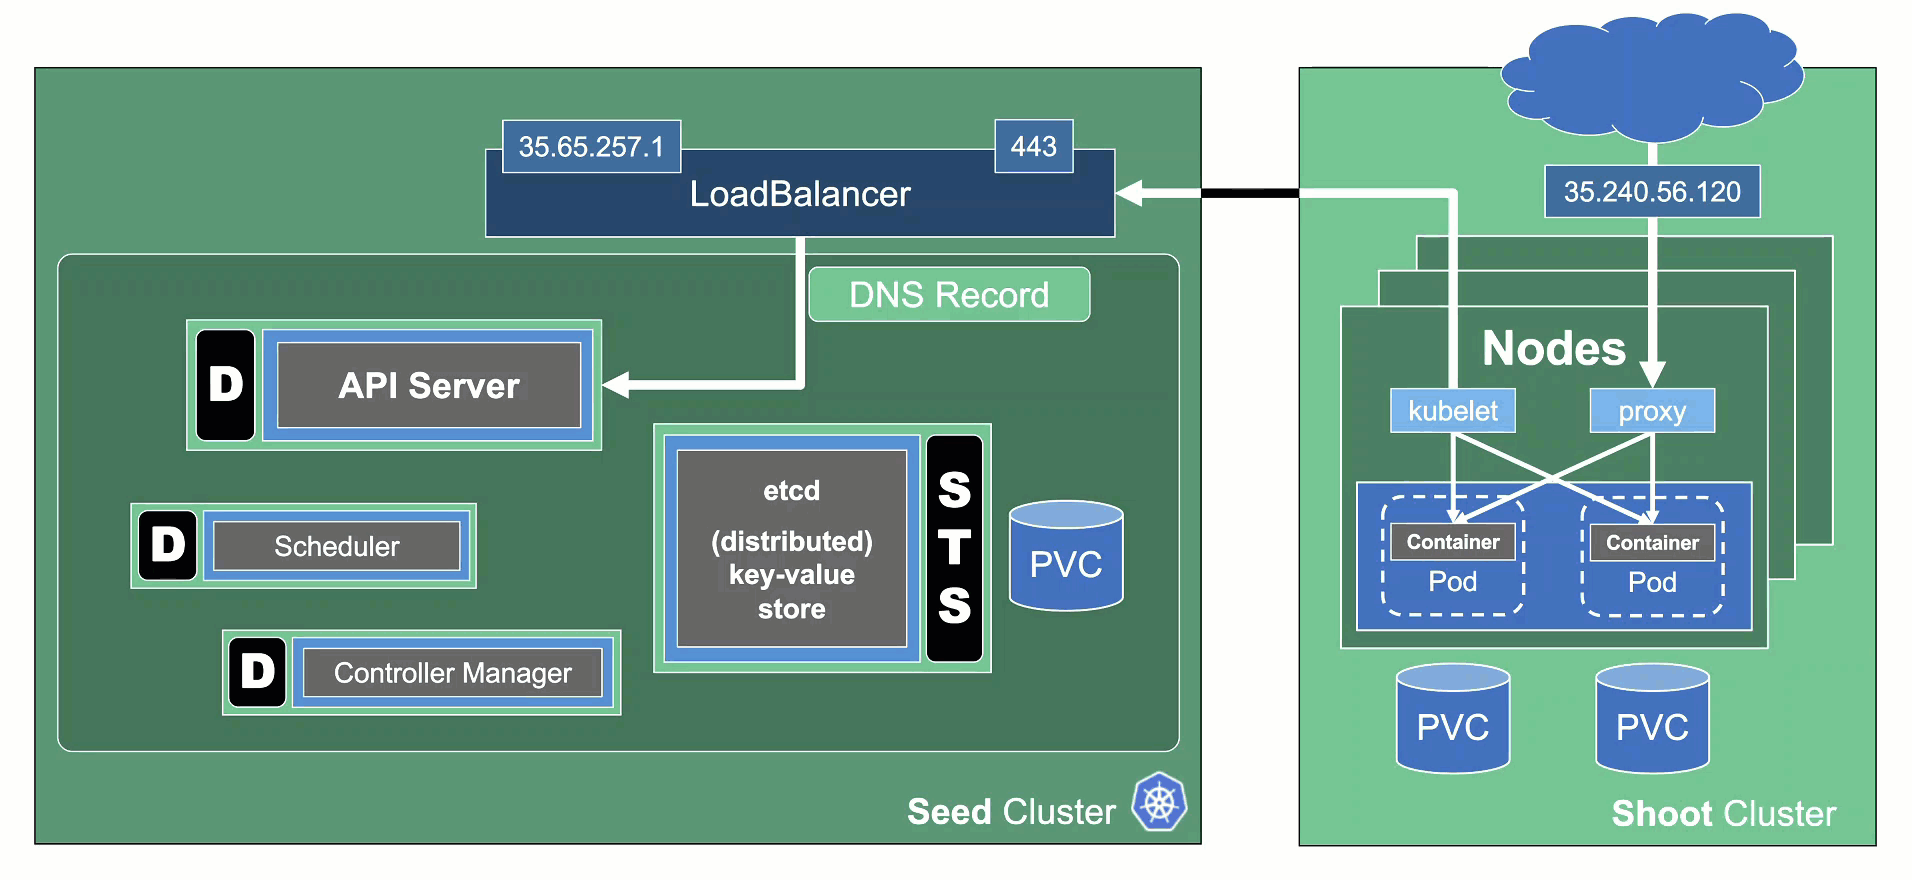
In Gardener’s terminology, the cluster hosting the control plane components is called a seed cluster. The cluster that end users actually use (and whose control plane is hosted in the seed) is called a shoot cluster.
The worker nodes of a shoot cluster are plain, simple virtual machines in a hyperscaler (EC2 instances in AWS, GCE instances in GCP or ECS instances in Alibaba Cloud). They run an operating system, a container runtime (e.g., containerd), and the kubelet that gets configured during node bootstrap to connect to the shoot’s API server. The API server in turn runs in the seed cluster and is exposed through an ingress. This connection happens over public internet and is - of course - TLS encrypted.
In other terms: you use Kubernetes to run Kubernetes.
Cluster Hierarchy in Gardener
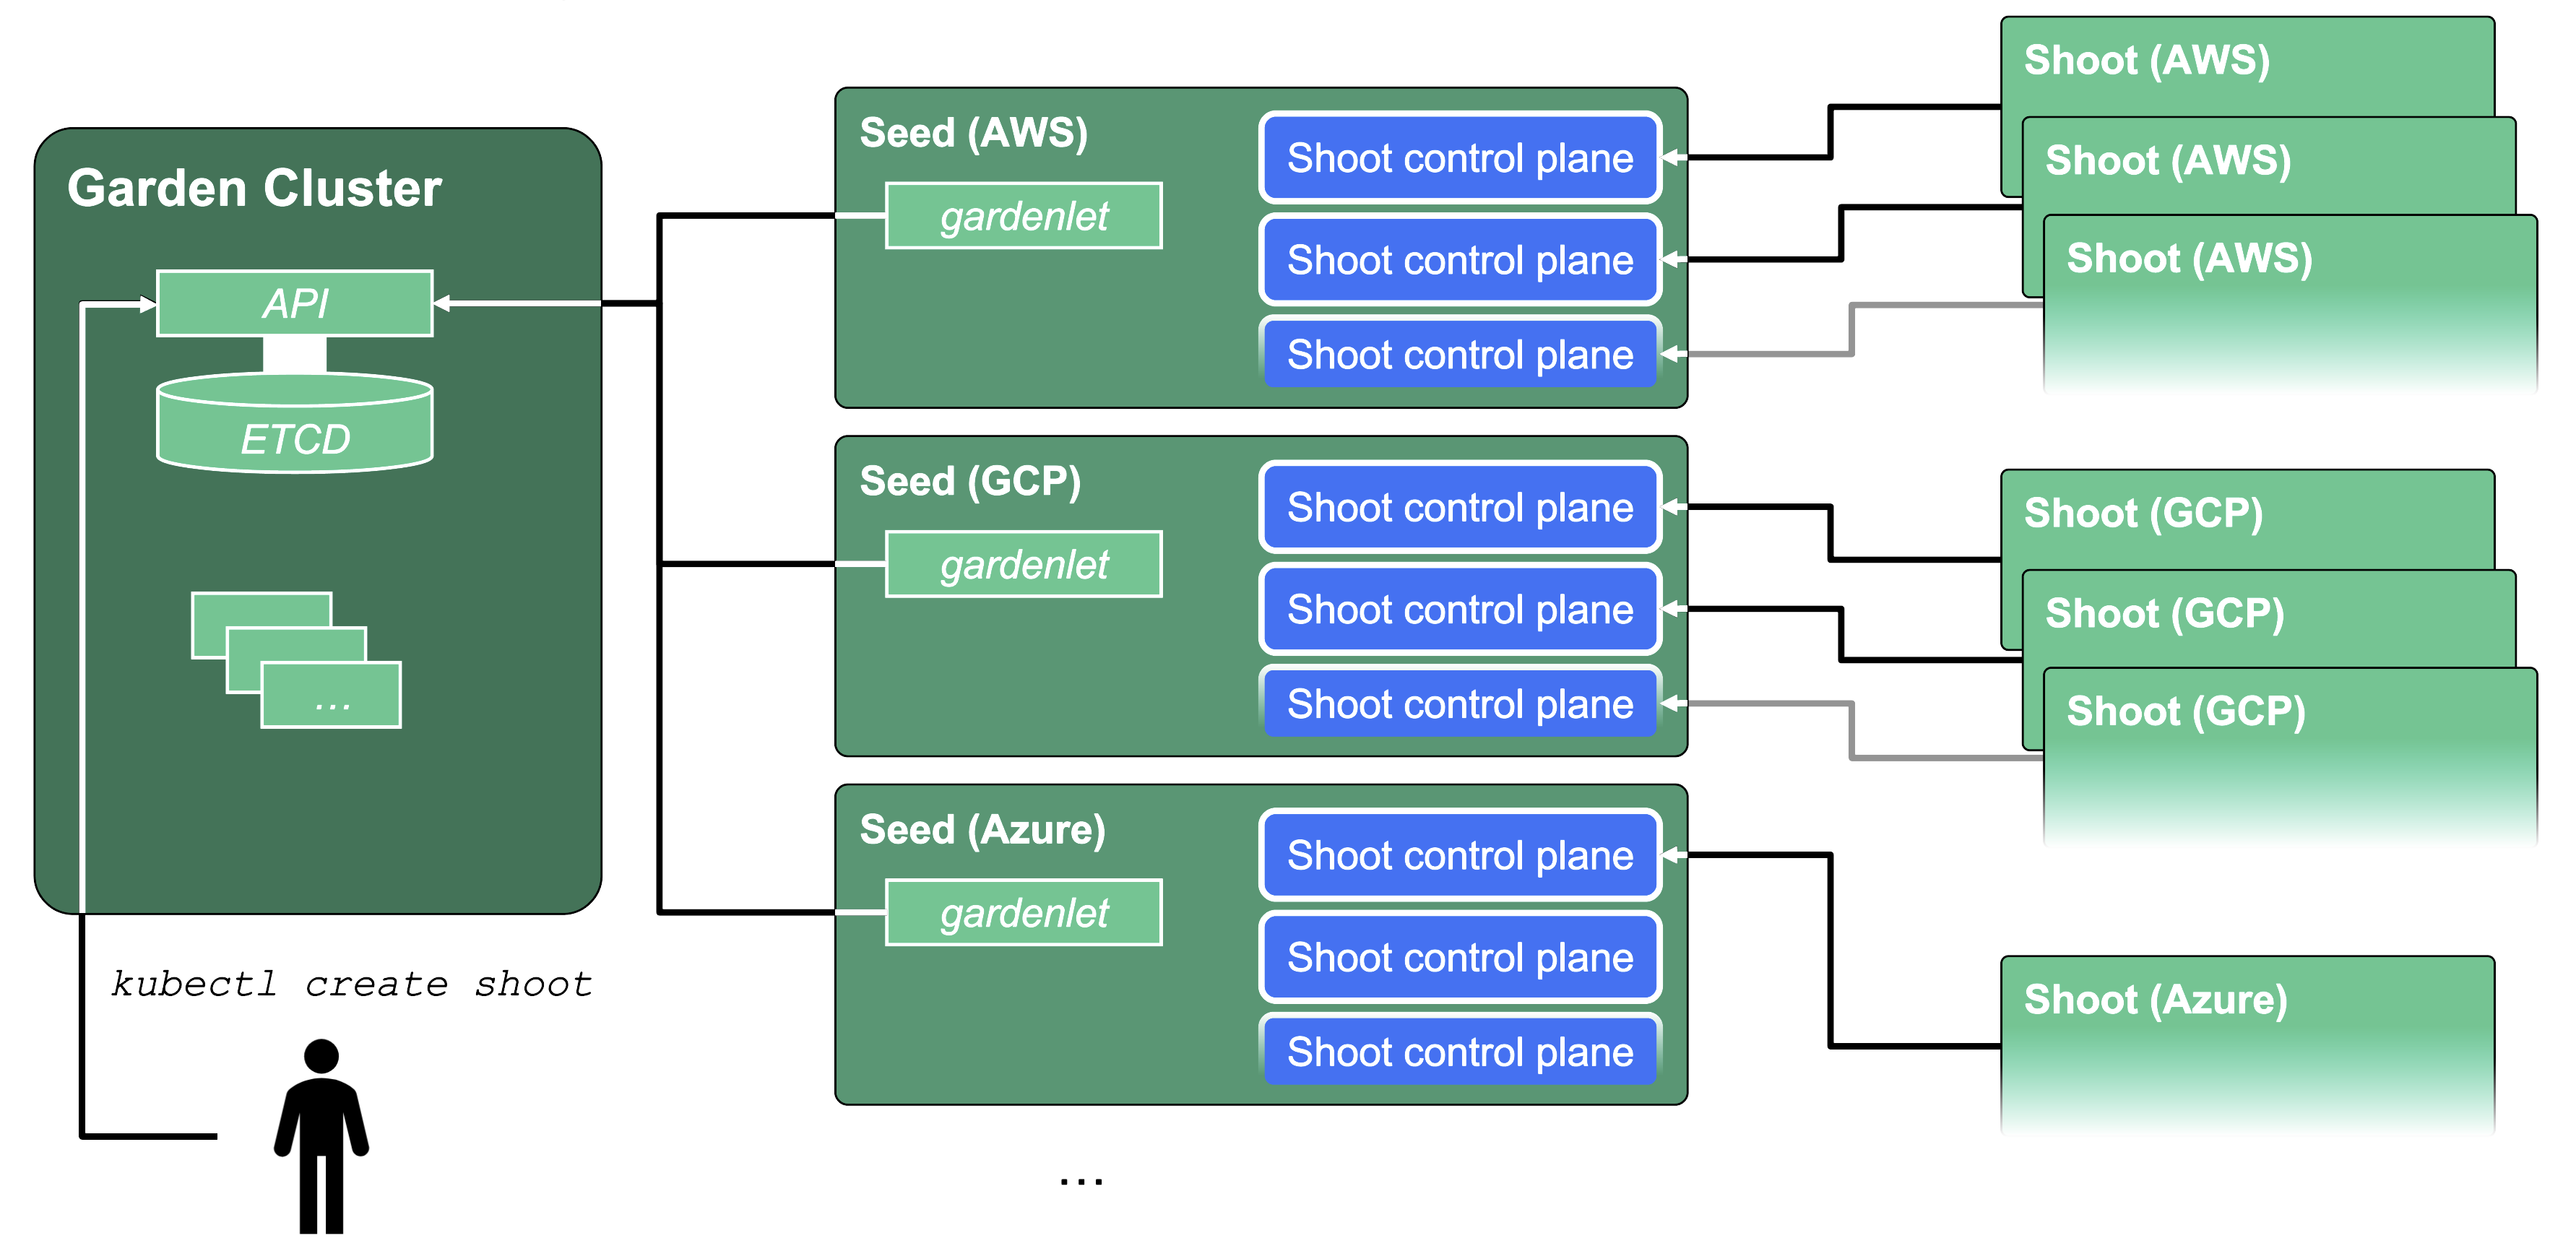
Gardener uses many Kubernetes clusters to eventually provide you with your very own shoot cluster.
At the heart of Gardener’s cluster hierarchy is the garden cluster. Since Gardener is 100% Kubernetes native, a Kubernetes cluster is needed to store all Gardener related resources. The garden cluster is actually nodeless - it only consists of a control plane, an API server (actually two), an etcd, and a bunch of controllers. The garden cluster is the central brain of a Gardener landscape and the one you connect to in order to create, modify or delete shoot clusters - either with kubectl and a dedicated kubeconfig or through the Gardener dashboard.
The seed clusters are next in the hierarchy - they are the clusters which will host the “kubeceptioned” control planes of the shoot clusters. For every hyperscaler supported in a Gardener landscape, there would be at least one seed cluster. However, to reduce latencies as well as for scaling, Gardener landscapes have several different seeds in different regions across the globe to keep the distance between control planes and actual worker nodes small.
Finally, there are the shoot clusters - what Gardener is all about. Shoot clusters are the clusters which you create through Gardener and which your workload gets deployed to.
Gardener Components Overview
From a very high level point of view, the important components of Gardener are:
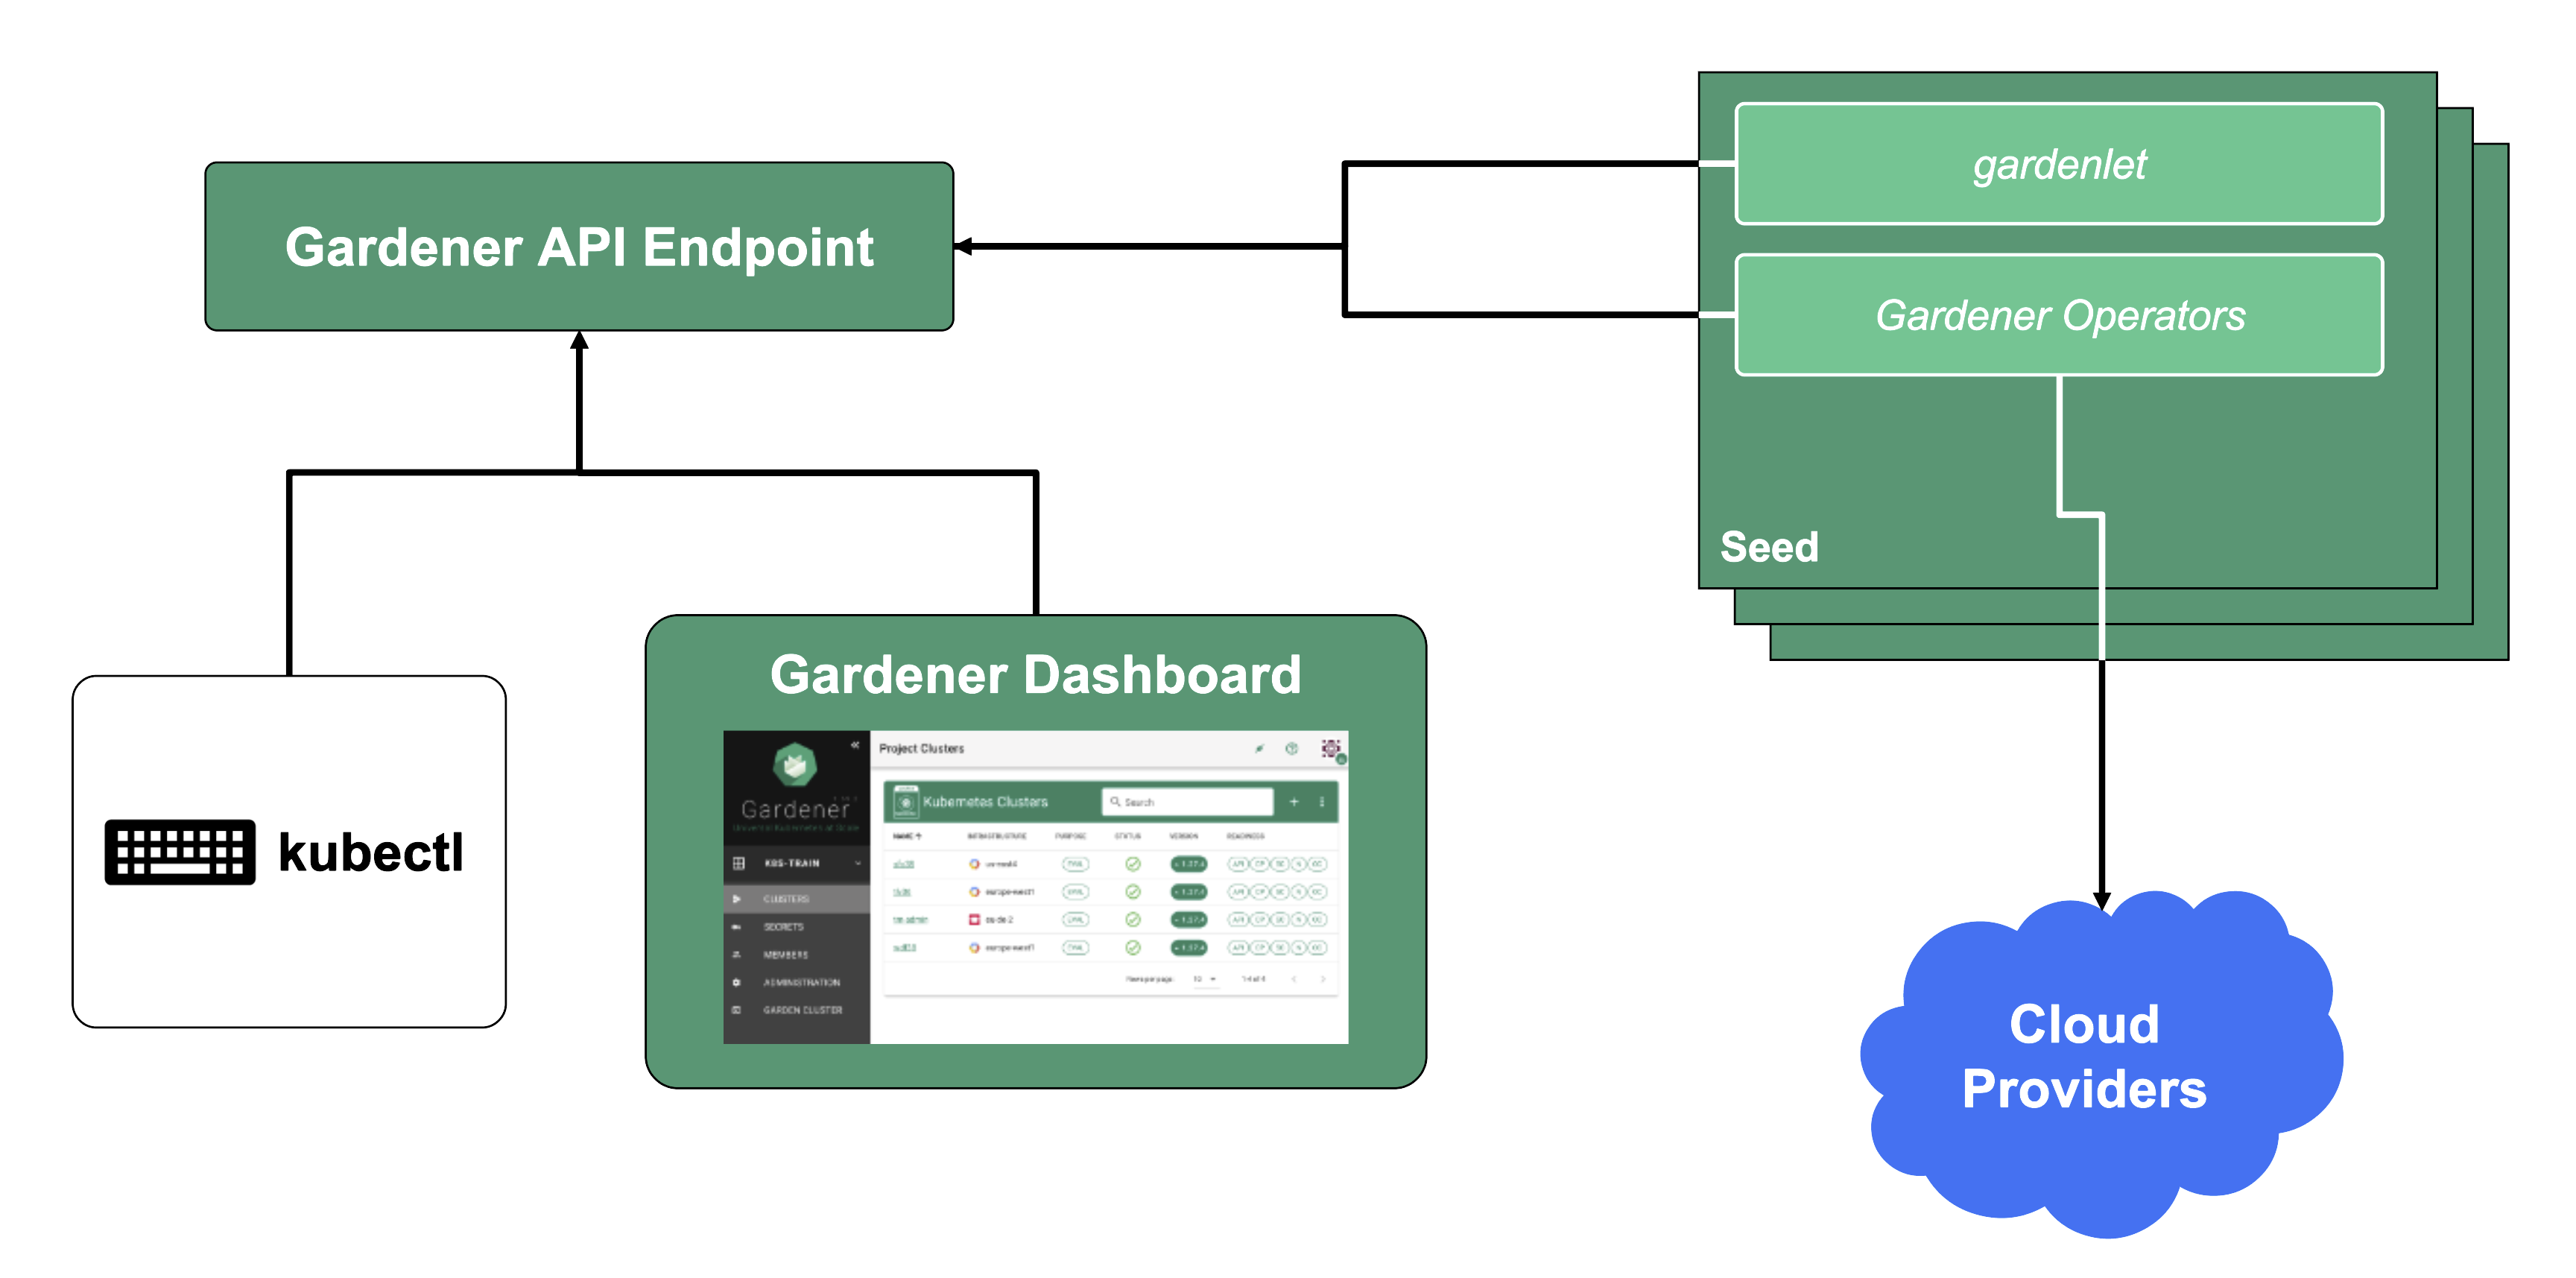
The Gardener API Endpoint
You can connect to the Gardener API Endpoint (i.e., the API server in the garden cluster) either through the dashboard or with kubectl, given that you have a proper kubeconfig for it.
The Seeds Running the Shoot Cluster Control Planes
Inside each seed is one of the most important controllers in Gardener - the gardenlet. It spawns many other controllers, which will eventually create all resources for a shoot cluster, including all resources on the cloud providers such as virtual networks, security groups, and virtual machines.
Gardener’s API Endpoint
Kubernetes’ API can be extended - either by CRDs or by API aggregation.
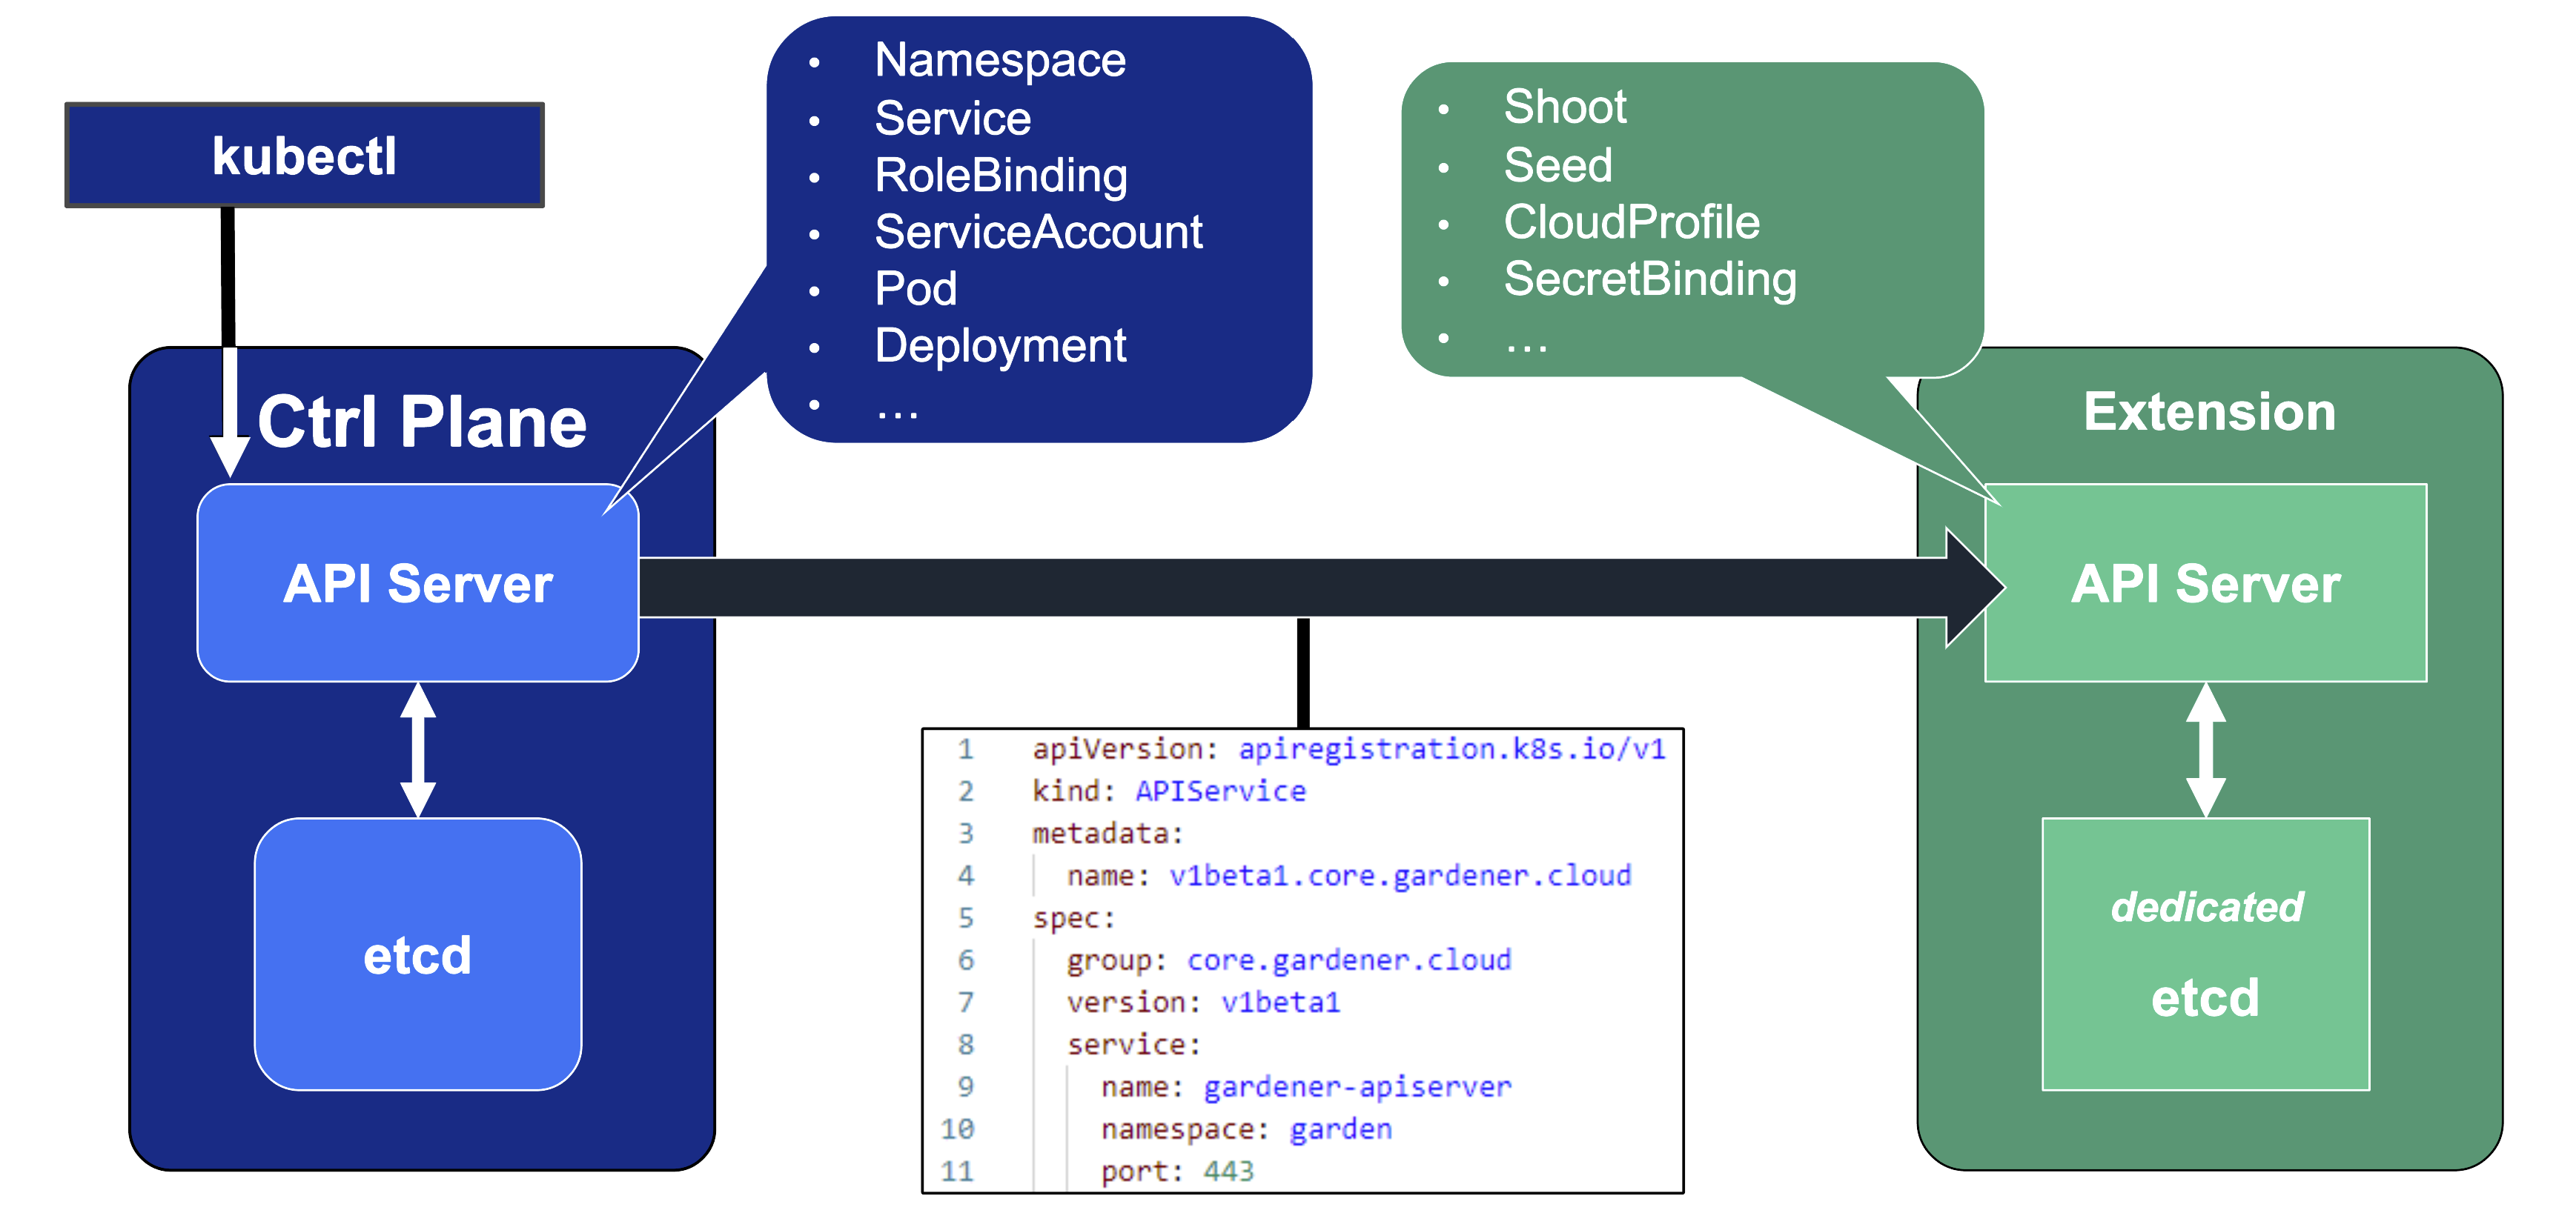
API aggregation involves setting up a so called extension-API-server and registering it with the main Kubernetes API server. The extension API server will then serve resources of custom-defined API groups on its own. While the main Kubernetes API server is still used to handle RBAC, authorization, namespacing, quotas, limits, etc., all custom resources will be delegated to the extension-API-server. This is done through an APIService resource in the main API server - it specifies that, e.g., the API group core.gardener.cloud is served by a dedicated extension-API-server and all requests concerning this API group should be forwarded the specified IP address or Kubernetes service name. Extension API servers can persist their resources in their very own etcd but they do not have to - instead, they can use the main API servers etcd as well.
Gardener uses its very own extension API server for its resources like Shoot, Seed, CloudProfile, SecretBinding, etc… However, Gardener does not set up a dedicated etcd for its own extension API server - instead, it reuses the existing etcd of the main Kubernetes API server. This is absolutely possible since the resources of Gardener’s API are part of the API group gardener.cloud and thus will not interfere with any resources of the main Kubernetes API in etcd.
In case you are interested, you can read more on:
Gardener API Resources
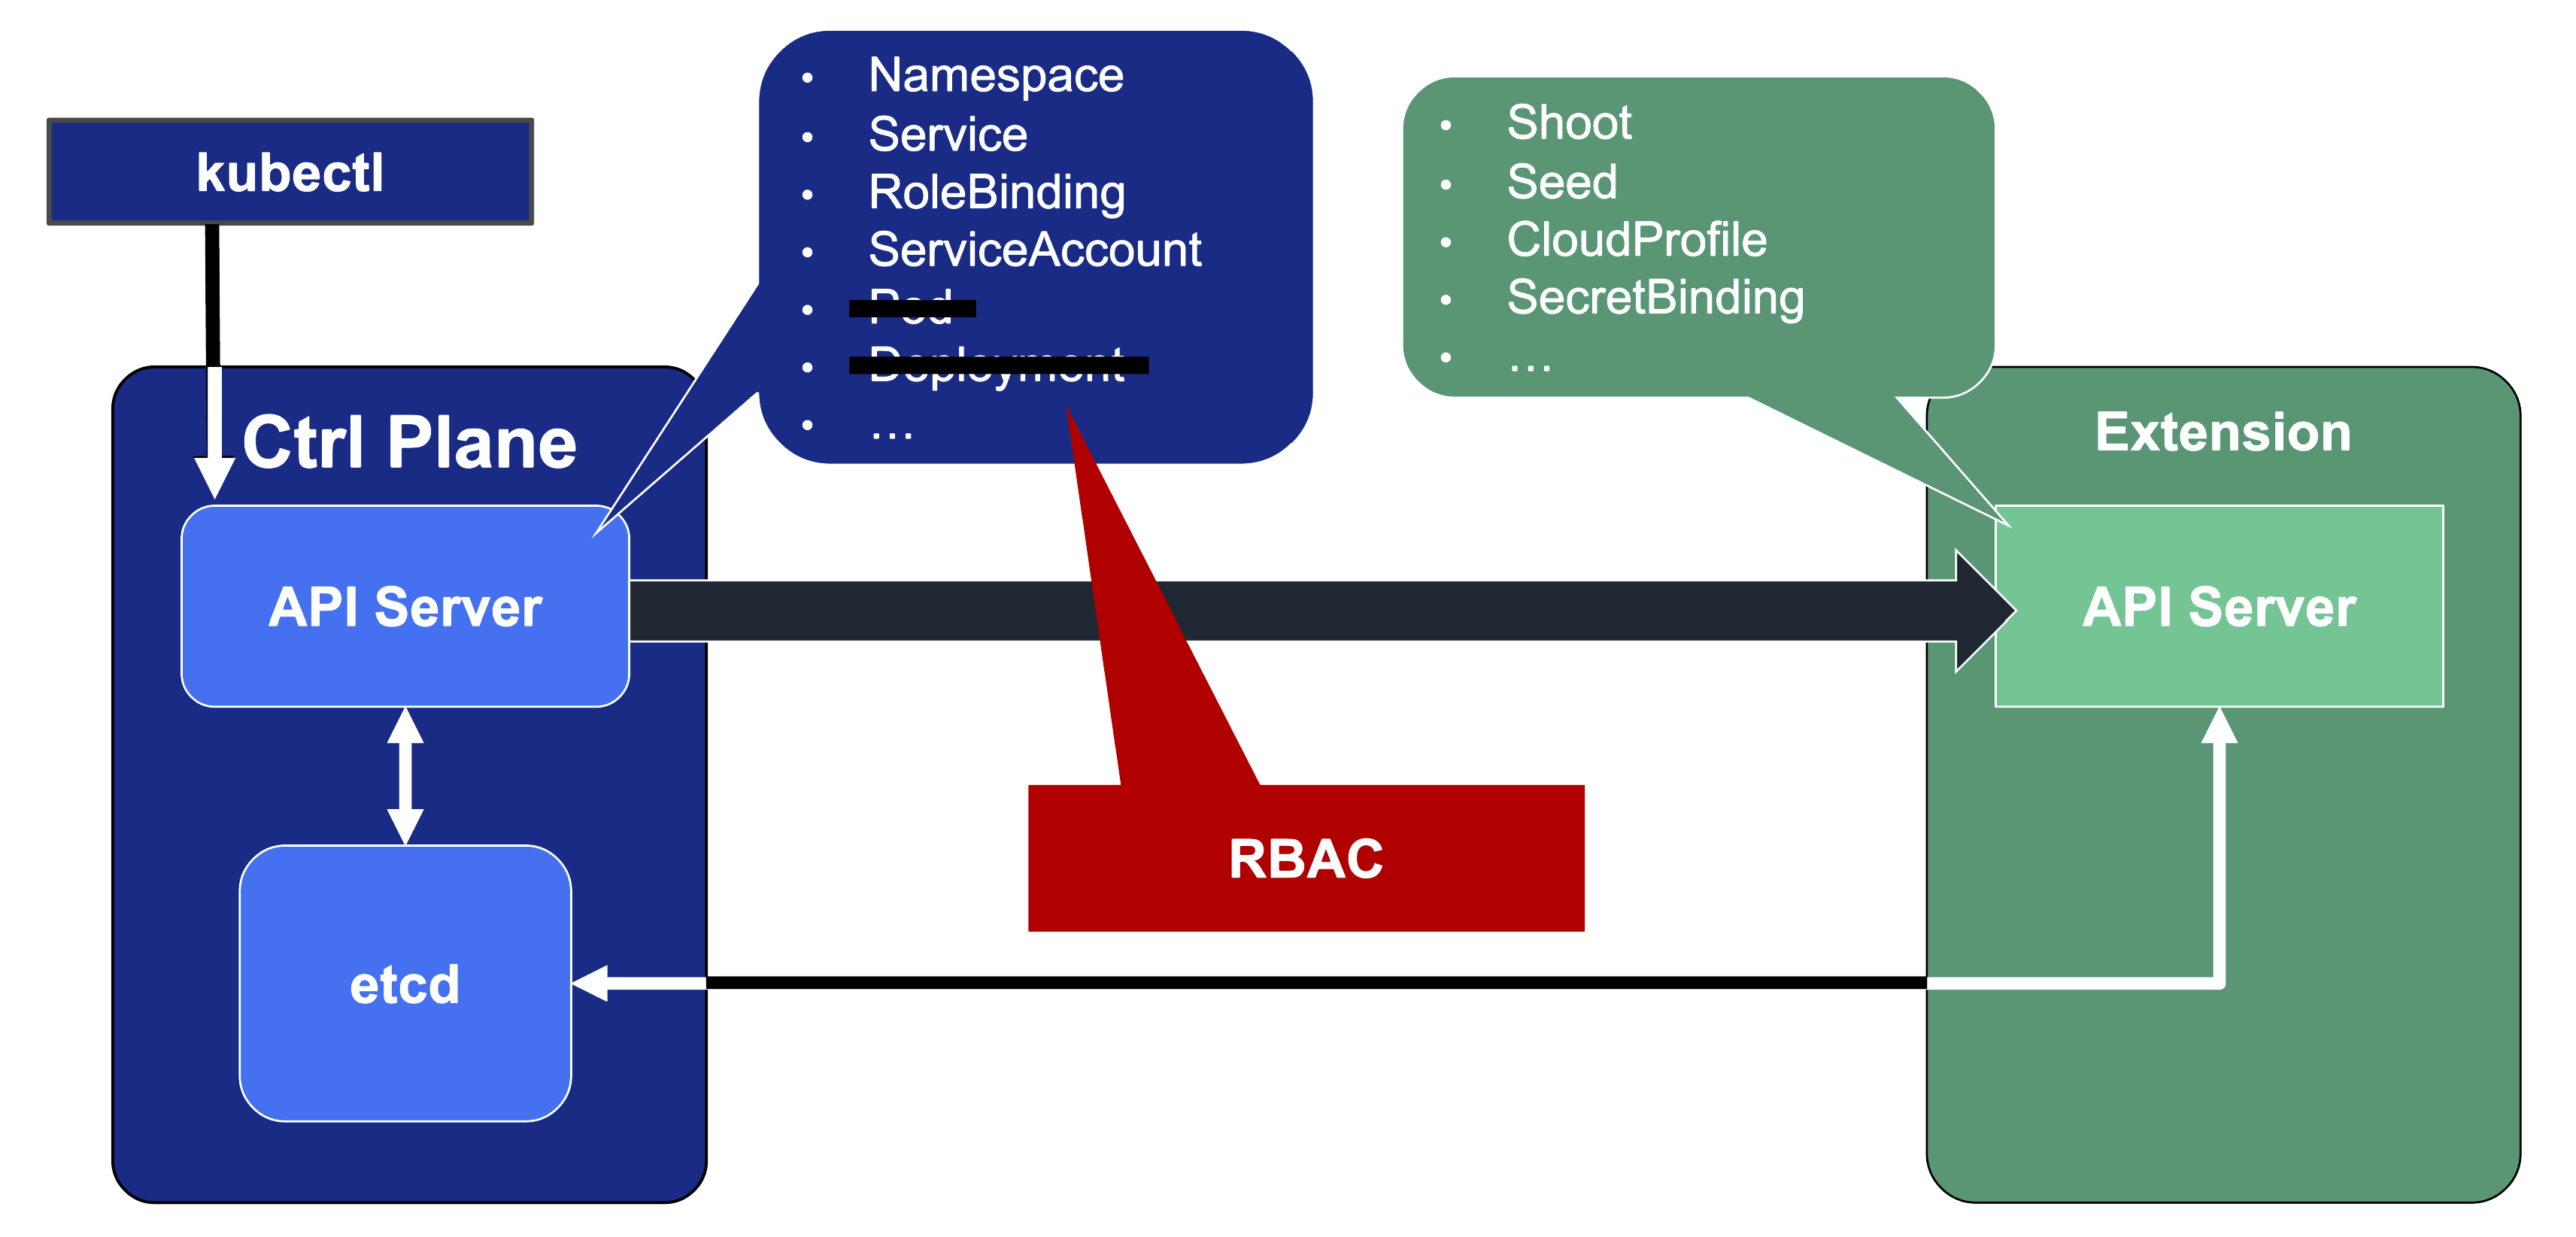
Since Gardener’s API endpoint is a regular Kubernetes cluster, it would theoretically serve all resources from the Kubernetes core API, including Pods, Deployments, etc. However, Gardener implements RBAC rules and disables certain controllers that make these resources inaccessible. Objects like Secrets, Namespaces, and ResourceQuotas are still available, though, as they play a vital role in Gardener.
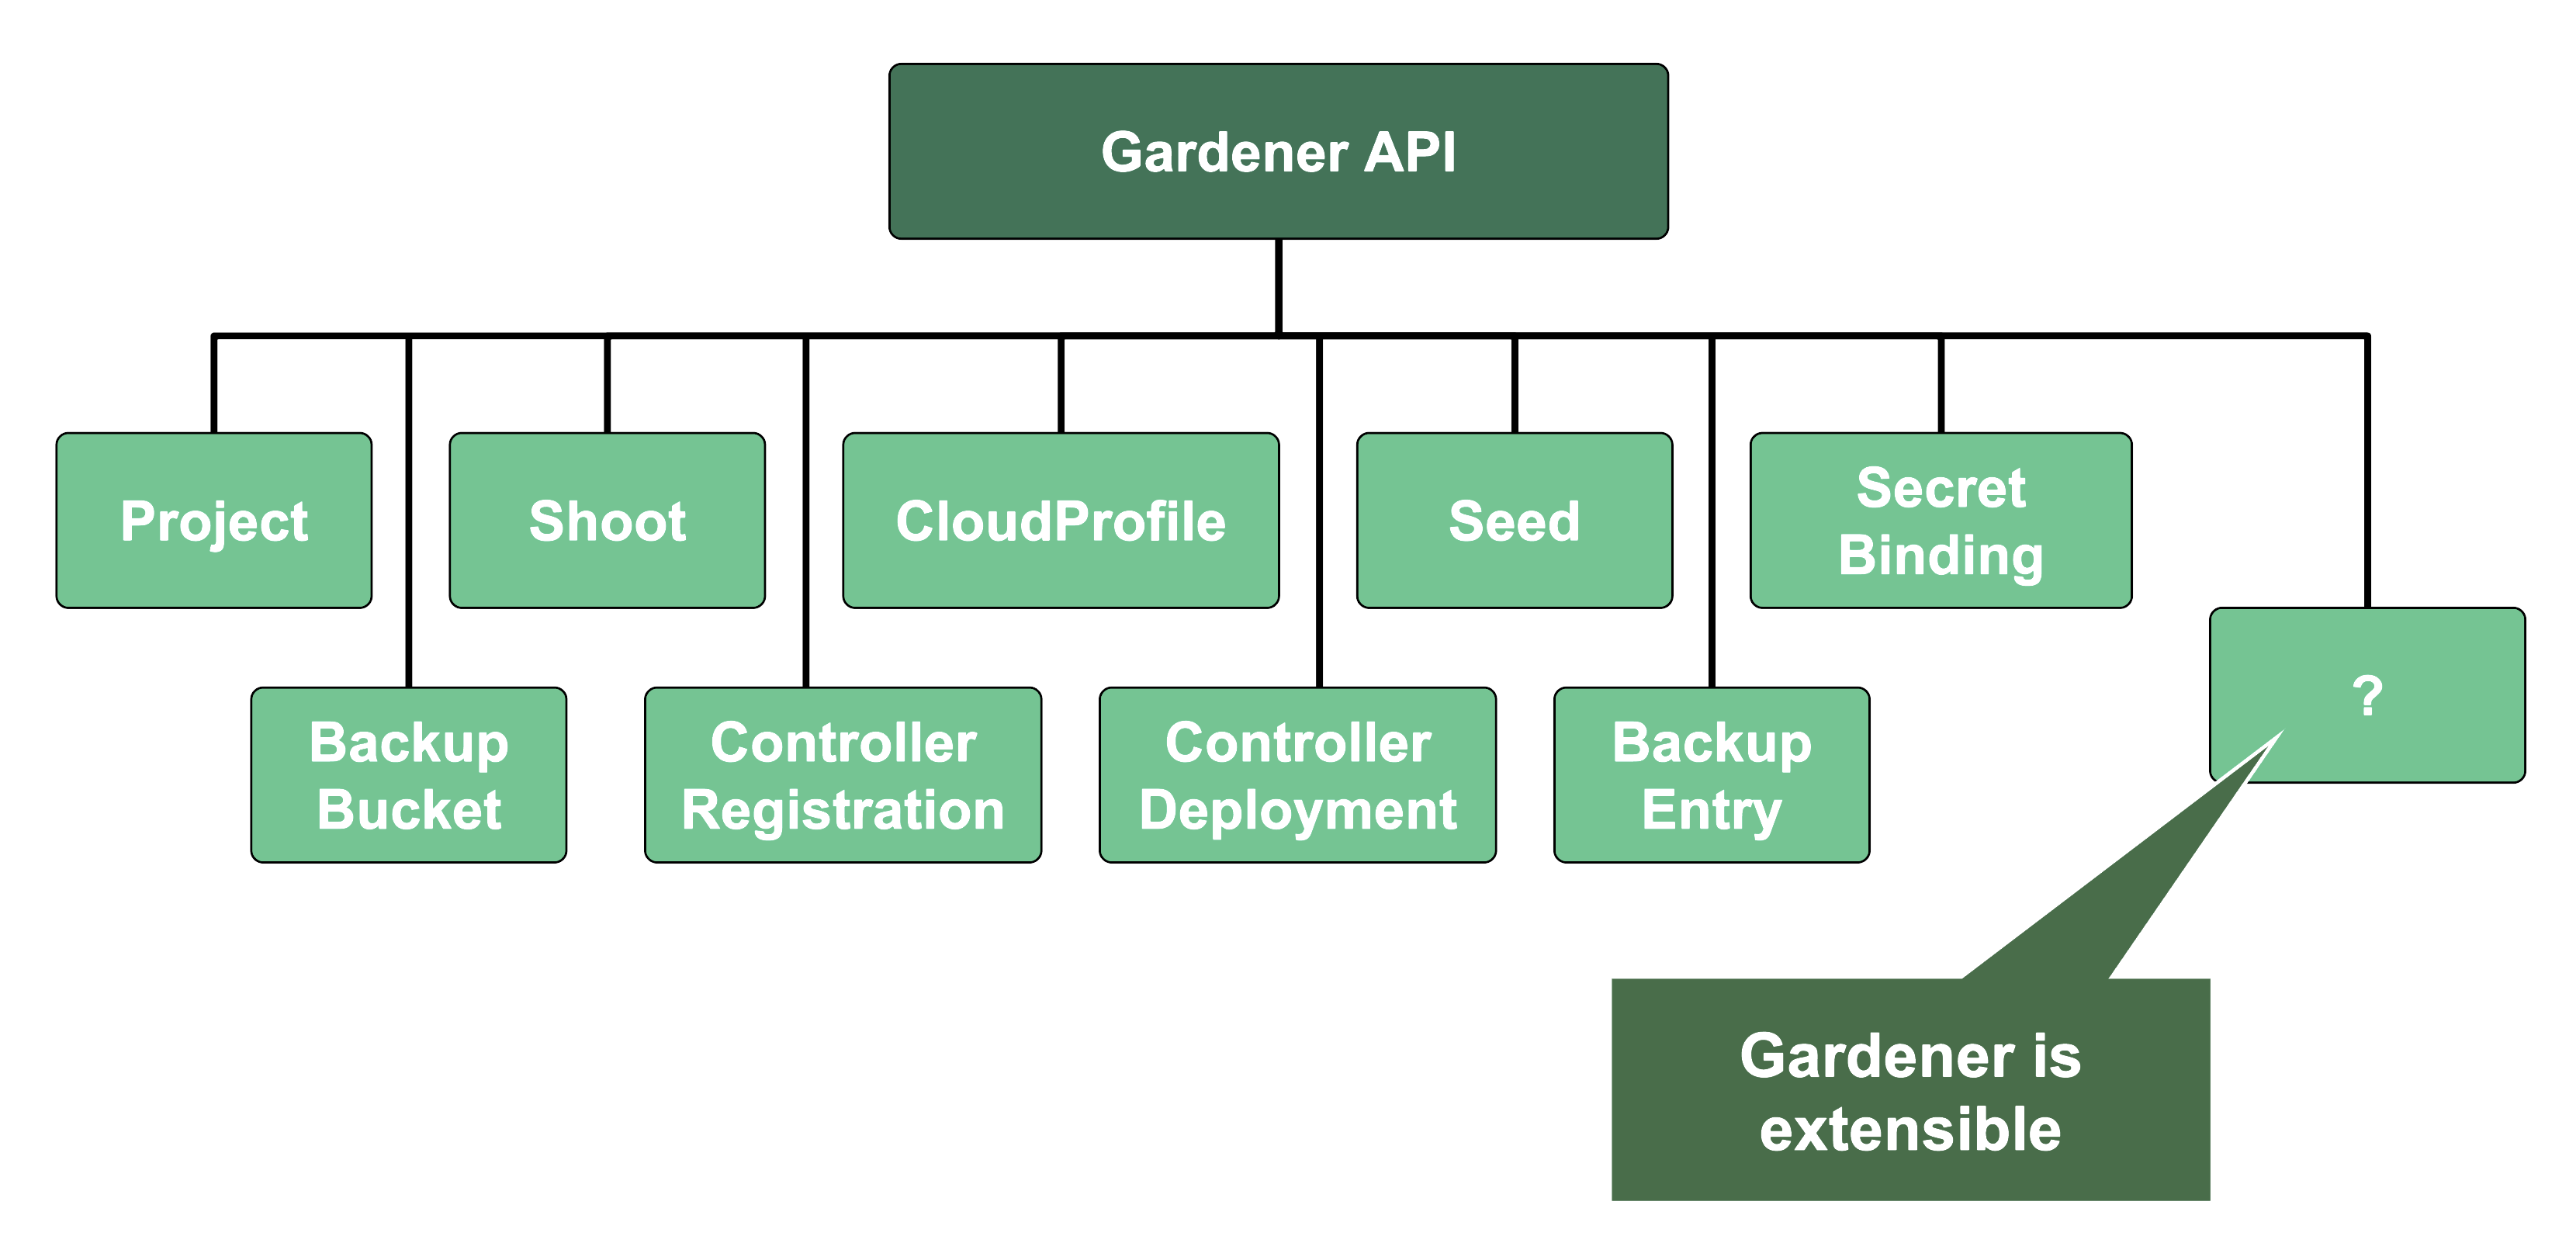
In addition, through Gardener’s extension API server, the API endpoint also serves Gardener’s custom resources like Projects, Shoots, CloudProfiles, Seeds, SecretBindings (those are relevant for users), ControllerRegistrations, ControllerDeployments, BackupBuckets, BackupEntries (those are relevant to an operator), etc.
1.3 - Gardener Projects
Overview
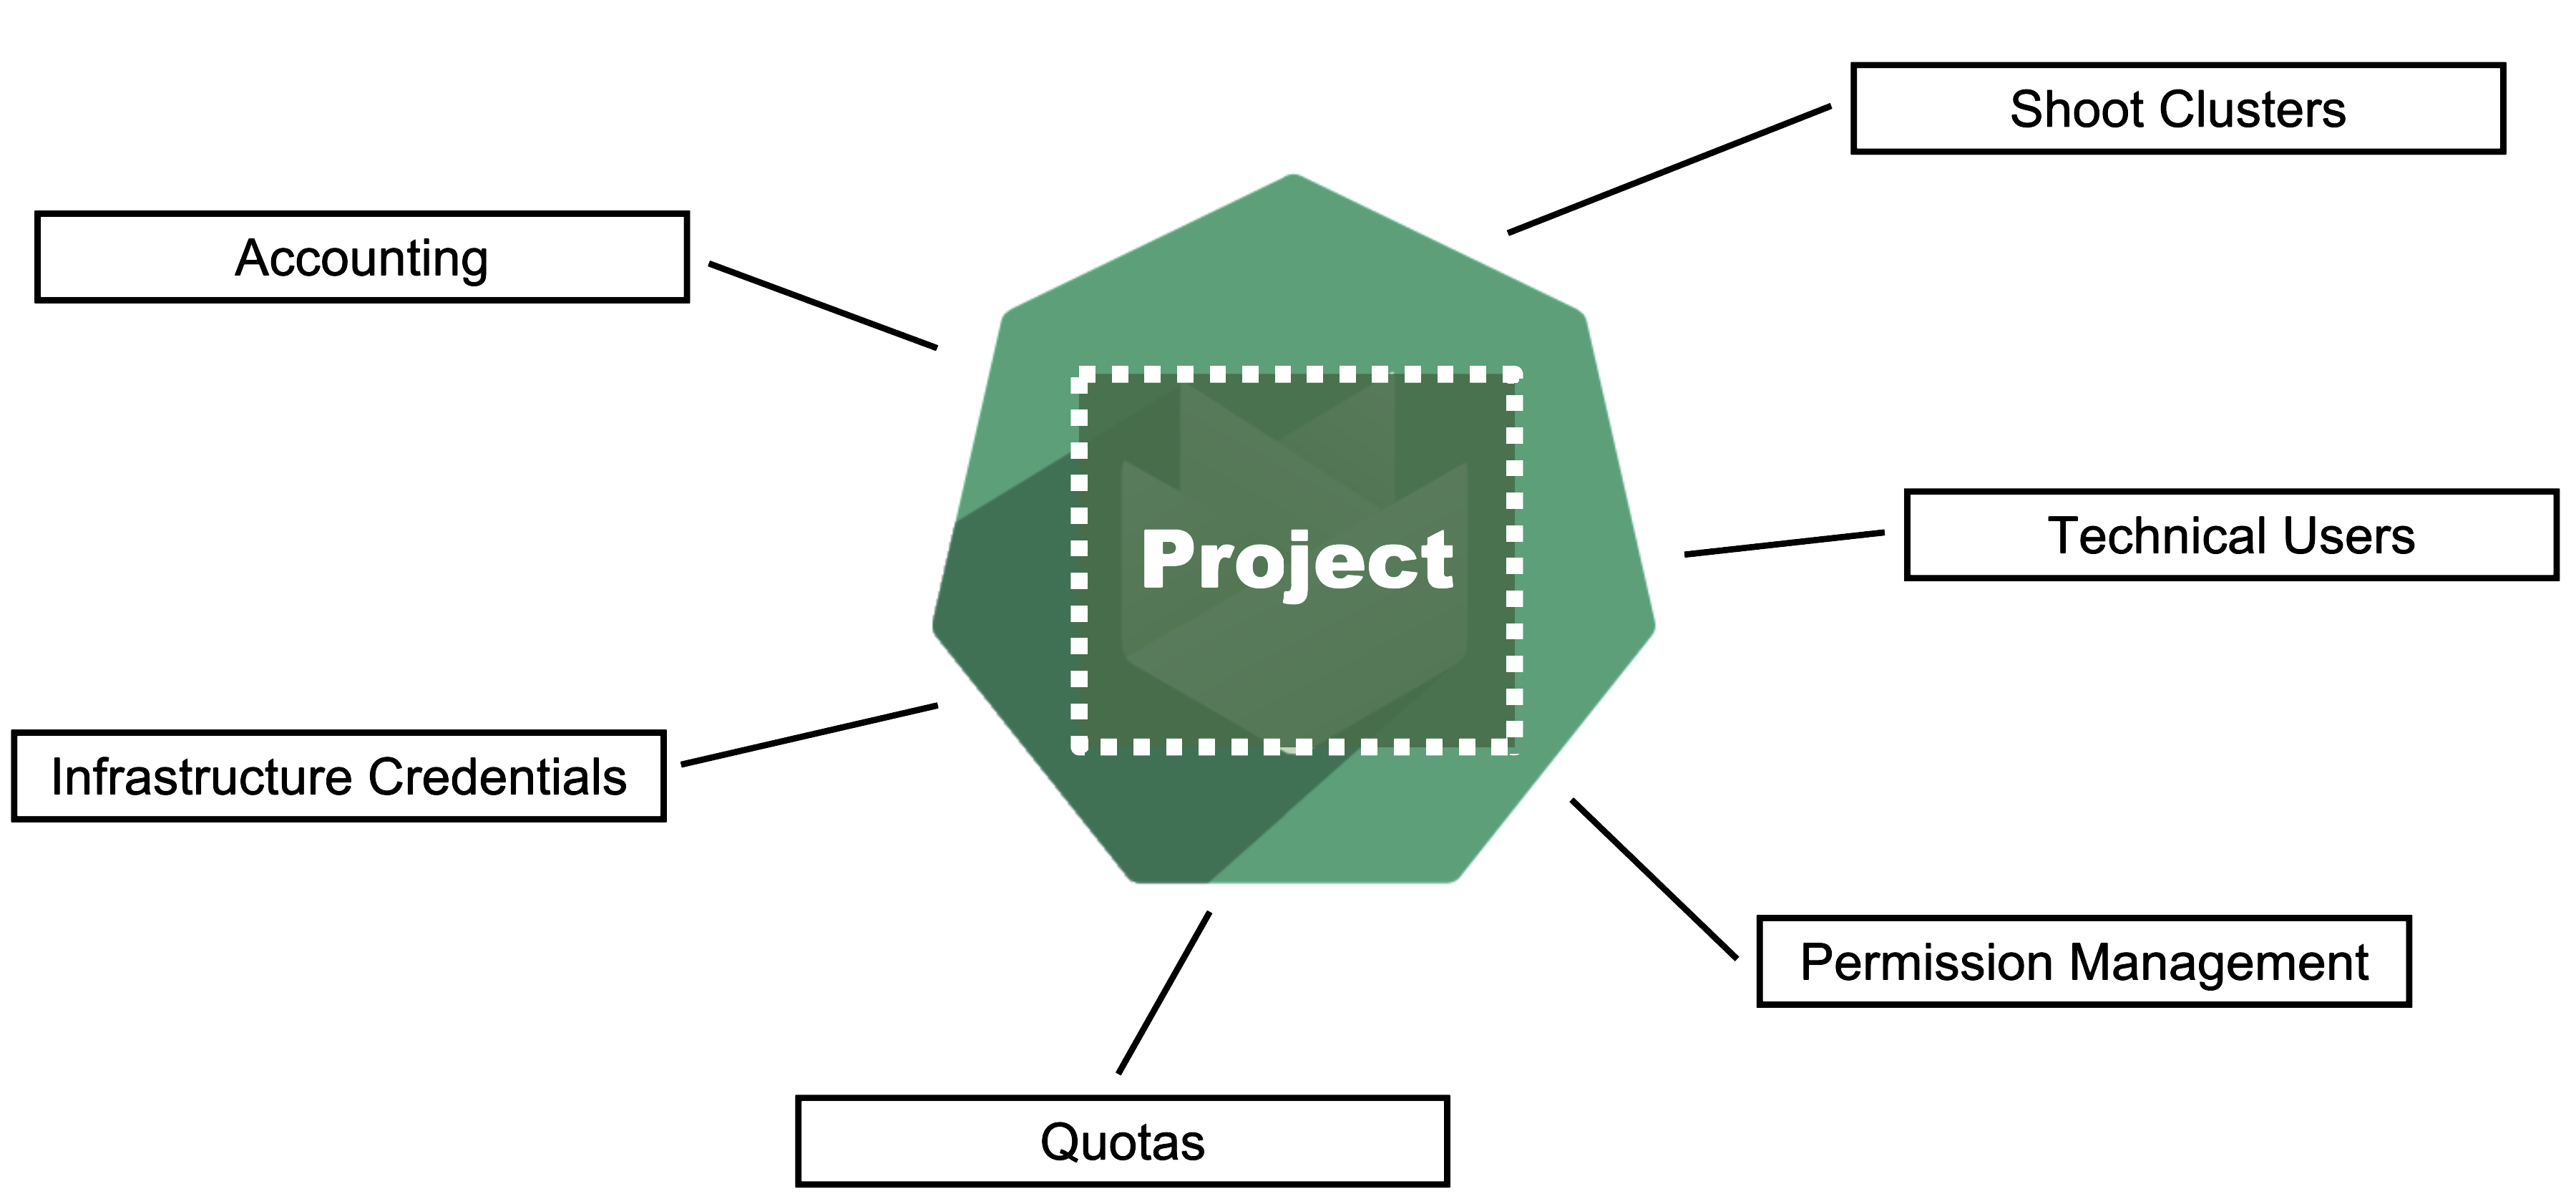
Gardener is all about Kubernetes clusters, which we call shoots. However, Gardener also does user management, delicate permission management and offers technical accounts to integrate its services into other infrastructures. It allows you to create several quotas and it needs credentials to connect to cloud providers. All of these are arranged in multiple fully contained projects, each of which belongs to a dedicated user and / or group.
Projects on YAML Level
Projects are a Kubernetes resource which can be expressed by YAML. The resource specification can be found in the API reference documentation.
A project’s specification defines a name, a description (which is a free-text field), a purpose (again, a free-text field), an owner, and members. In Gardener, user management is done on a project level. Therefore, projects can have different members with certain roles.
In Gardener, a user can have one of five different roles: owner, admin, viewer, UAM, and service account manager. A member with the viewer role can see and list all clusters but cannot create, delete or modify them. For that, a member would need the admin role. Another important role would be the uam role - members with that role are allowed to manage members and technical users for a project. The owner of a project is allowed to do all of that, regardless of what other roles might be assigned to him.
Projects are getting reconciled by Gardener’s project-controller, a component of Gardener’s controller manager. The status of the last reconcilation, along with any potential failures, will be recorded in the project’s status field.
For more information, see Projects.
In case you are interested, you can also view the source code for:
Gardener Projects and Kubernetes Namespaces
Note
Each Gardener project corresponds to a Kubernetes namespace and all project specific resources are placed into it.
Even though projects are a dedicated Kubernetes resource, every project also corresponds to a dedicated namespace in the garden cluster. All project resources - including shoots - are placed into this namespace.
You can ask Gardener to use a specific namespace name in the project manifest but usually, this field should be left empty. The namespace then gets created automatically by Gardener’s project-controller, with its name getting generated from the project’s name, prefixed by “garden-”.
ResourceQuotas - if any - will be enforced on the project namespace.
Since all Gardener resources are custom Kubernetes resources, the usual and well established concept of
resourceQuotasin Kubernetes can also be applied to Gardener resources. With aresourceQuotathat sets a hard limit on, e.g.,count/shoots.core.gardener.cloud, you can restrict the number of shoot clusters that can be created in a project.
Infrastructure Secrets
For Gardener to create all relevant infrastructure that a shoot cluster needs inside a cloud provider, it needs to know how to authenticate to the cloud provider’s API. This is done through regular secrets.
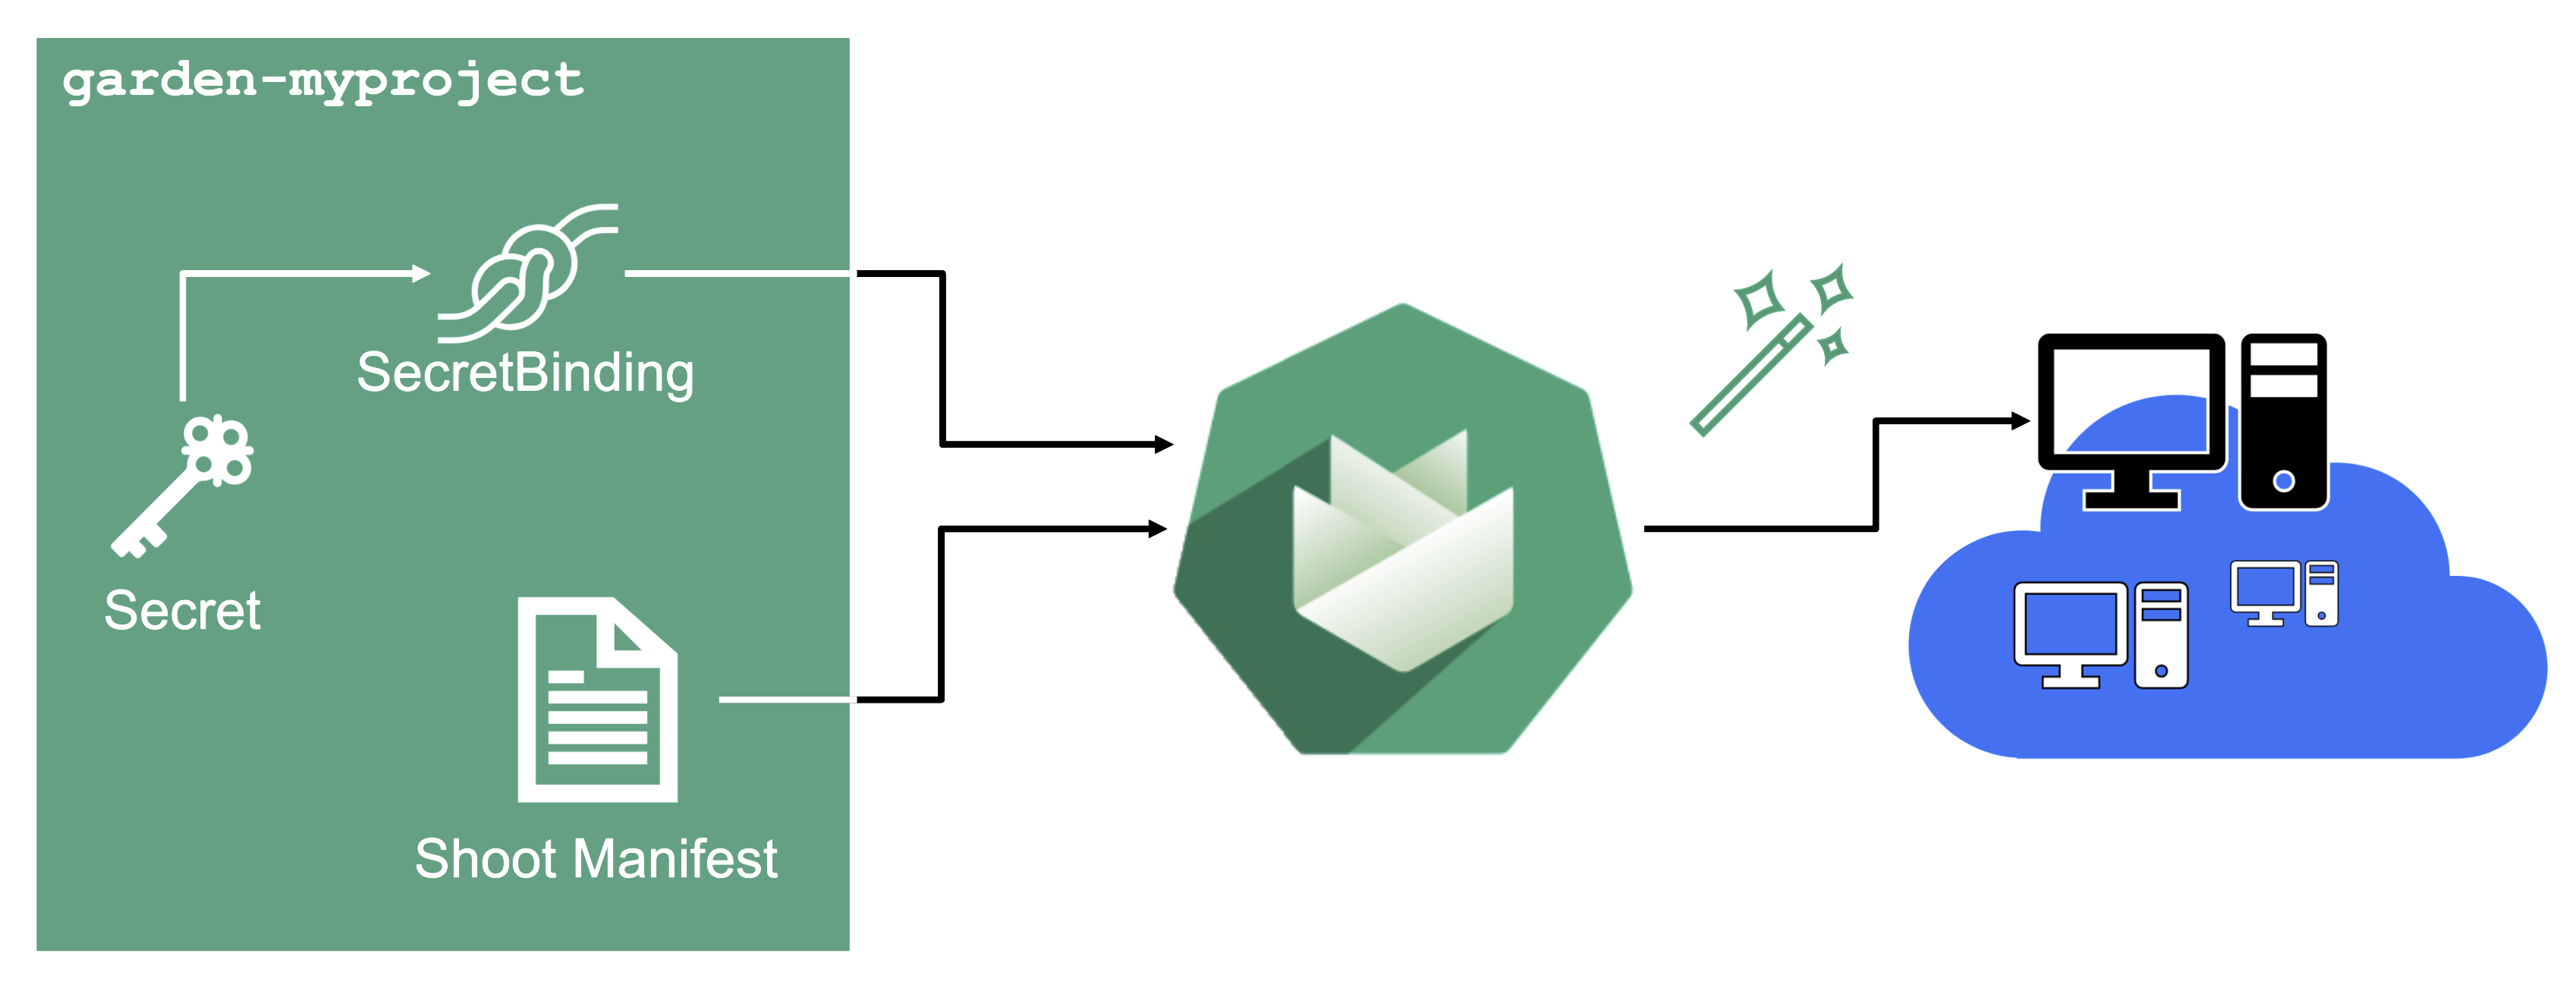
Through the Gardener dashboard, secrets can be created for each supported cloud provider (using the dashboard is the preferred way, as it provides interactive help on what information needs to be placed into the secret and how the corresponding user account on the cloud provider should be configured). All of that is stored in a standard, opaque Kubernetes secret.
Inside of a shoot manifest, a reference to that secret is given so that Gardener knows which secret to use for a given shoot. Consequently, different shoots, even though they are in the same project, can be created on multiple different cloud provider accounts. However, instead of referring to the secret directly, Gardener introduces another layer of indirection called a SecretBinding.
In the shoot manifest, we refer to a SecretBinding and the SecretBinding in turn refers to the actual secret.
SecretBindings

With SecretBindings, it is possible to reference the same infrastructure secret in different projects across namespaces. This has the following advantages:
- Infrastructure secrets can be kept in one project (and thus namespace) with limited access. Through SecretsBindings, the secrets can be used in other projects (and thus namespaces) without being able to read their contents.
- Infrastructure secrets can be kept at one central place (a dedicated project) and be used by many other projects. This way, if a credential rotation is required, they only need to be changed in the secrets at that central place and not in all projects that reference them.
Service Accounts
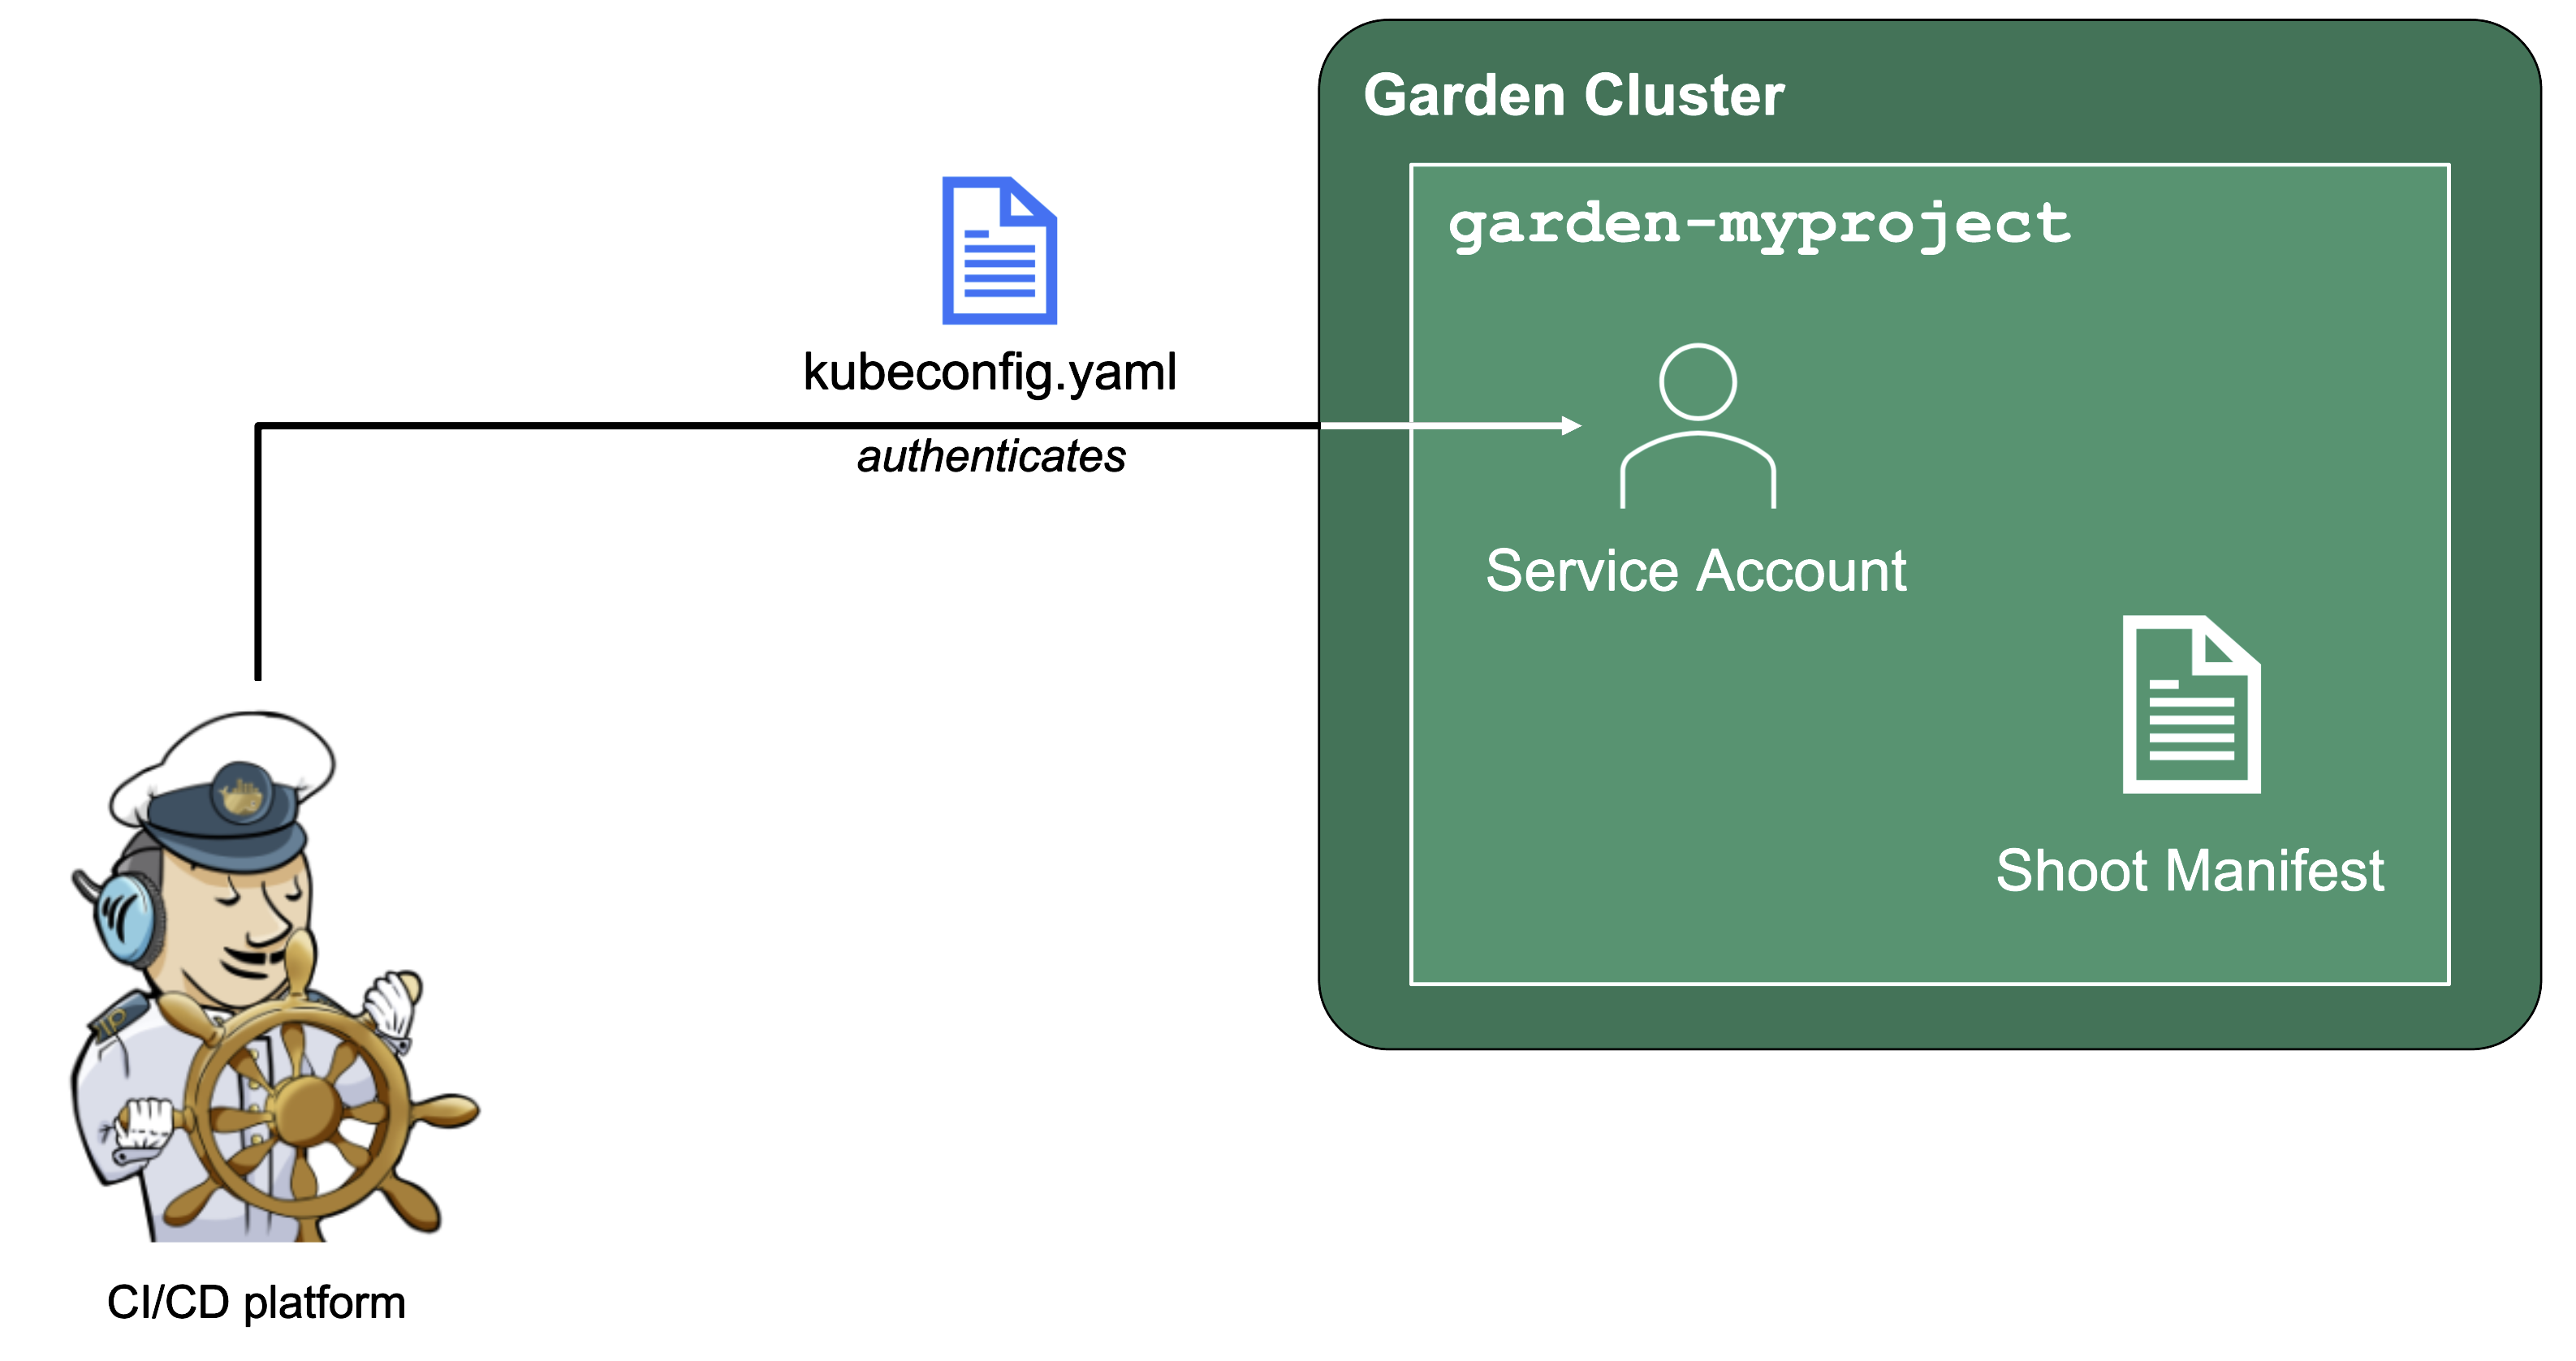
Since Gardener is 100% Kubernetes, it can be easily used in a programmatic way - by just sending the resource manifest of a Gardener resource to its API server. To do so, a kubeconfig file and a (technical) user that the kubeconfig maps to are required.
Next to project members, a project can have several service accounts - simple Kubernetes service accounts that are created in a project’s namespace. Consequently, every service account will also have its own, dedicated kubeconfig and they can be granted different roles through RoleBindings.
To integrate Gardener with other infrastructure or CI/CD platforms, one can create a service account, obtain its kubeconfig and then automatically send shoot manifests to the Gardener API server. With that, Kubernetes clusters can be created, modified or deleted on the fly whenever they are needed.
1.4 - Gardener Shoots
Overview
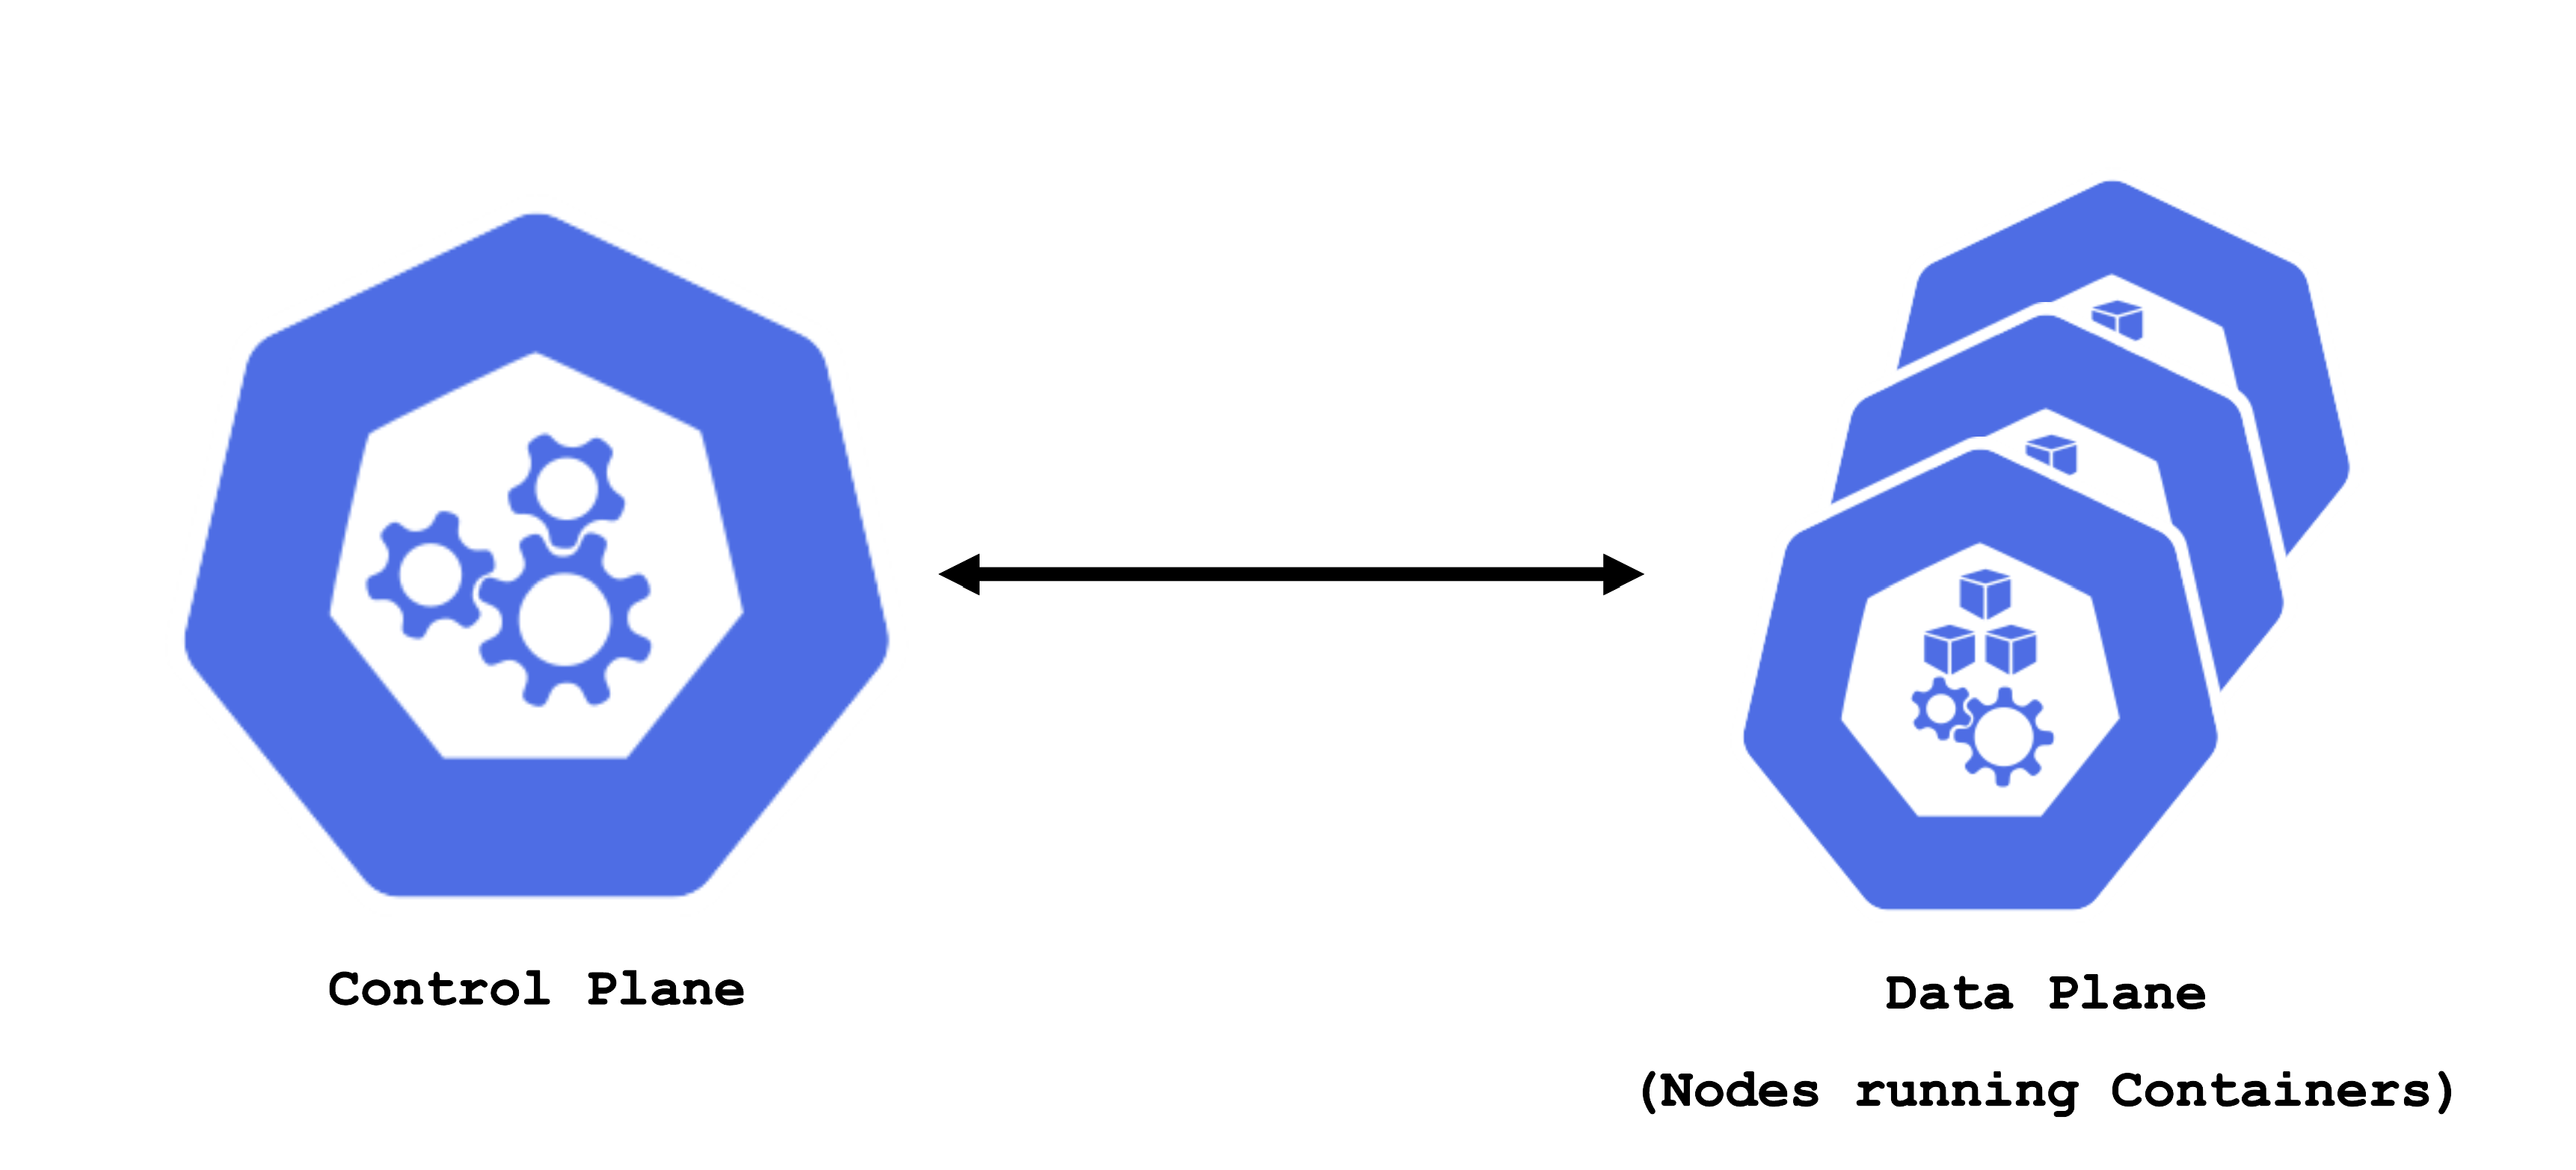
A Kubernetes cluster consists of a control plane and a data plane. The data plane runs the actual containers on worker nodes (which translate to physical or virtual machines). For the control and data plane to work together properly, lots of components need matching configuration.
Some configurations are standardized but some are also very specific to the needs of a cluster’s user / workload. Ideally, you want a properly configured cluster with the possibility to fine-tune some settings.
Concept of a “Shoot”
In Gardener, Kubernetes clusters (with their control plane and their data plane) are called shoot clusters or simply shoots. For Gardener, a shoot is just another Kubernetes resource. Gardener components watch it and act upon changes (e.g., creation). It comes with reasonable default settings but also allows fine-tuned configuration. And on top of it, you get a status providing health information, information about ongoing operations, and so on.
Luckily there is a dashboard to get started.
Basic Configuration Options
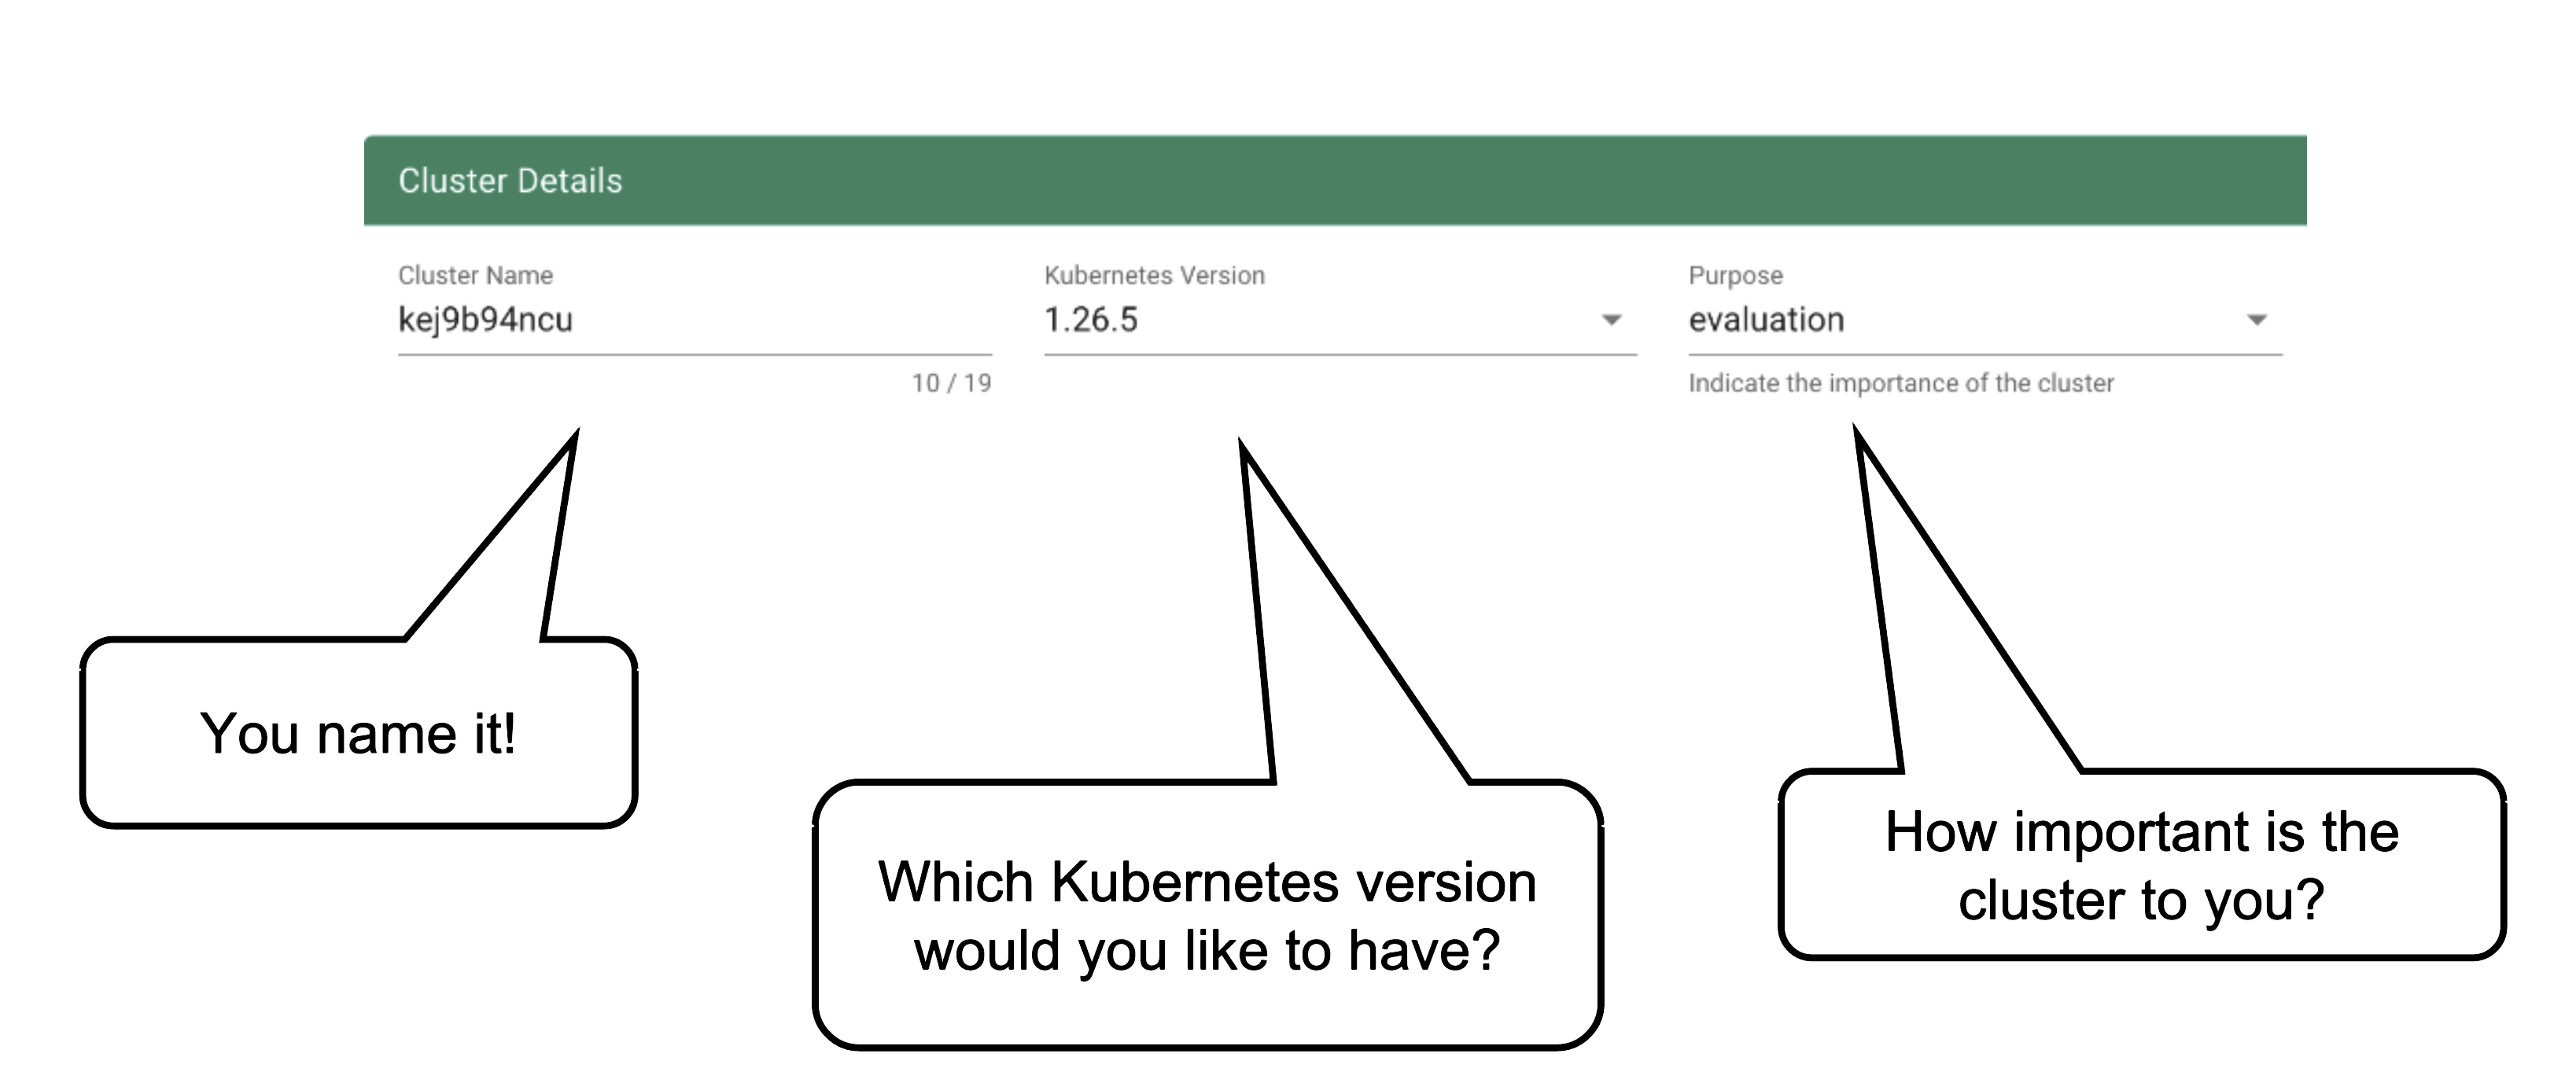
Every cluster needs a name - after all, it is a Kubernetes resource and therefore unique within a namespace.
The Kubernetes version will be used as a starting point. Once a newer version is available, you can always update your existing clusters (but not downgrade, as this is not supported by Kubernetes in general).
The “purpose” affects some configuration (like automatic deployment of a monitoring stack or setting up certain alerting rules) and generally indicates the importance of a cluster.
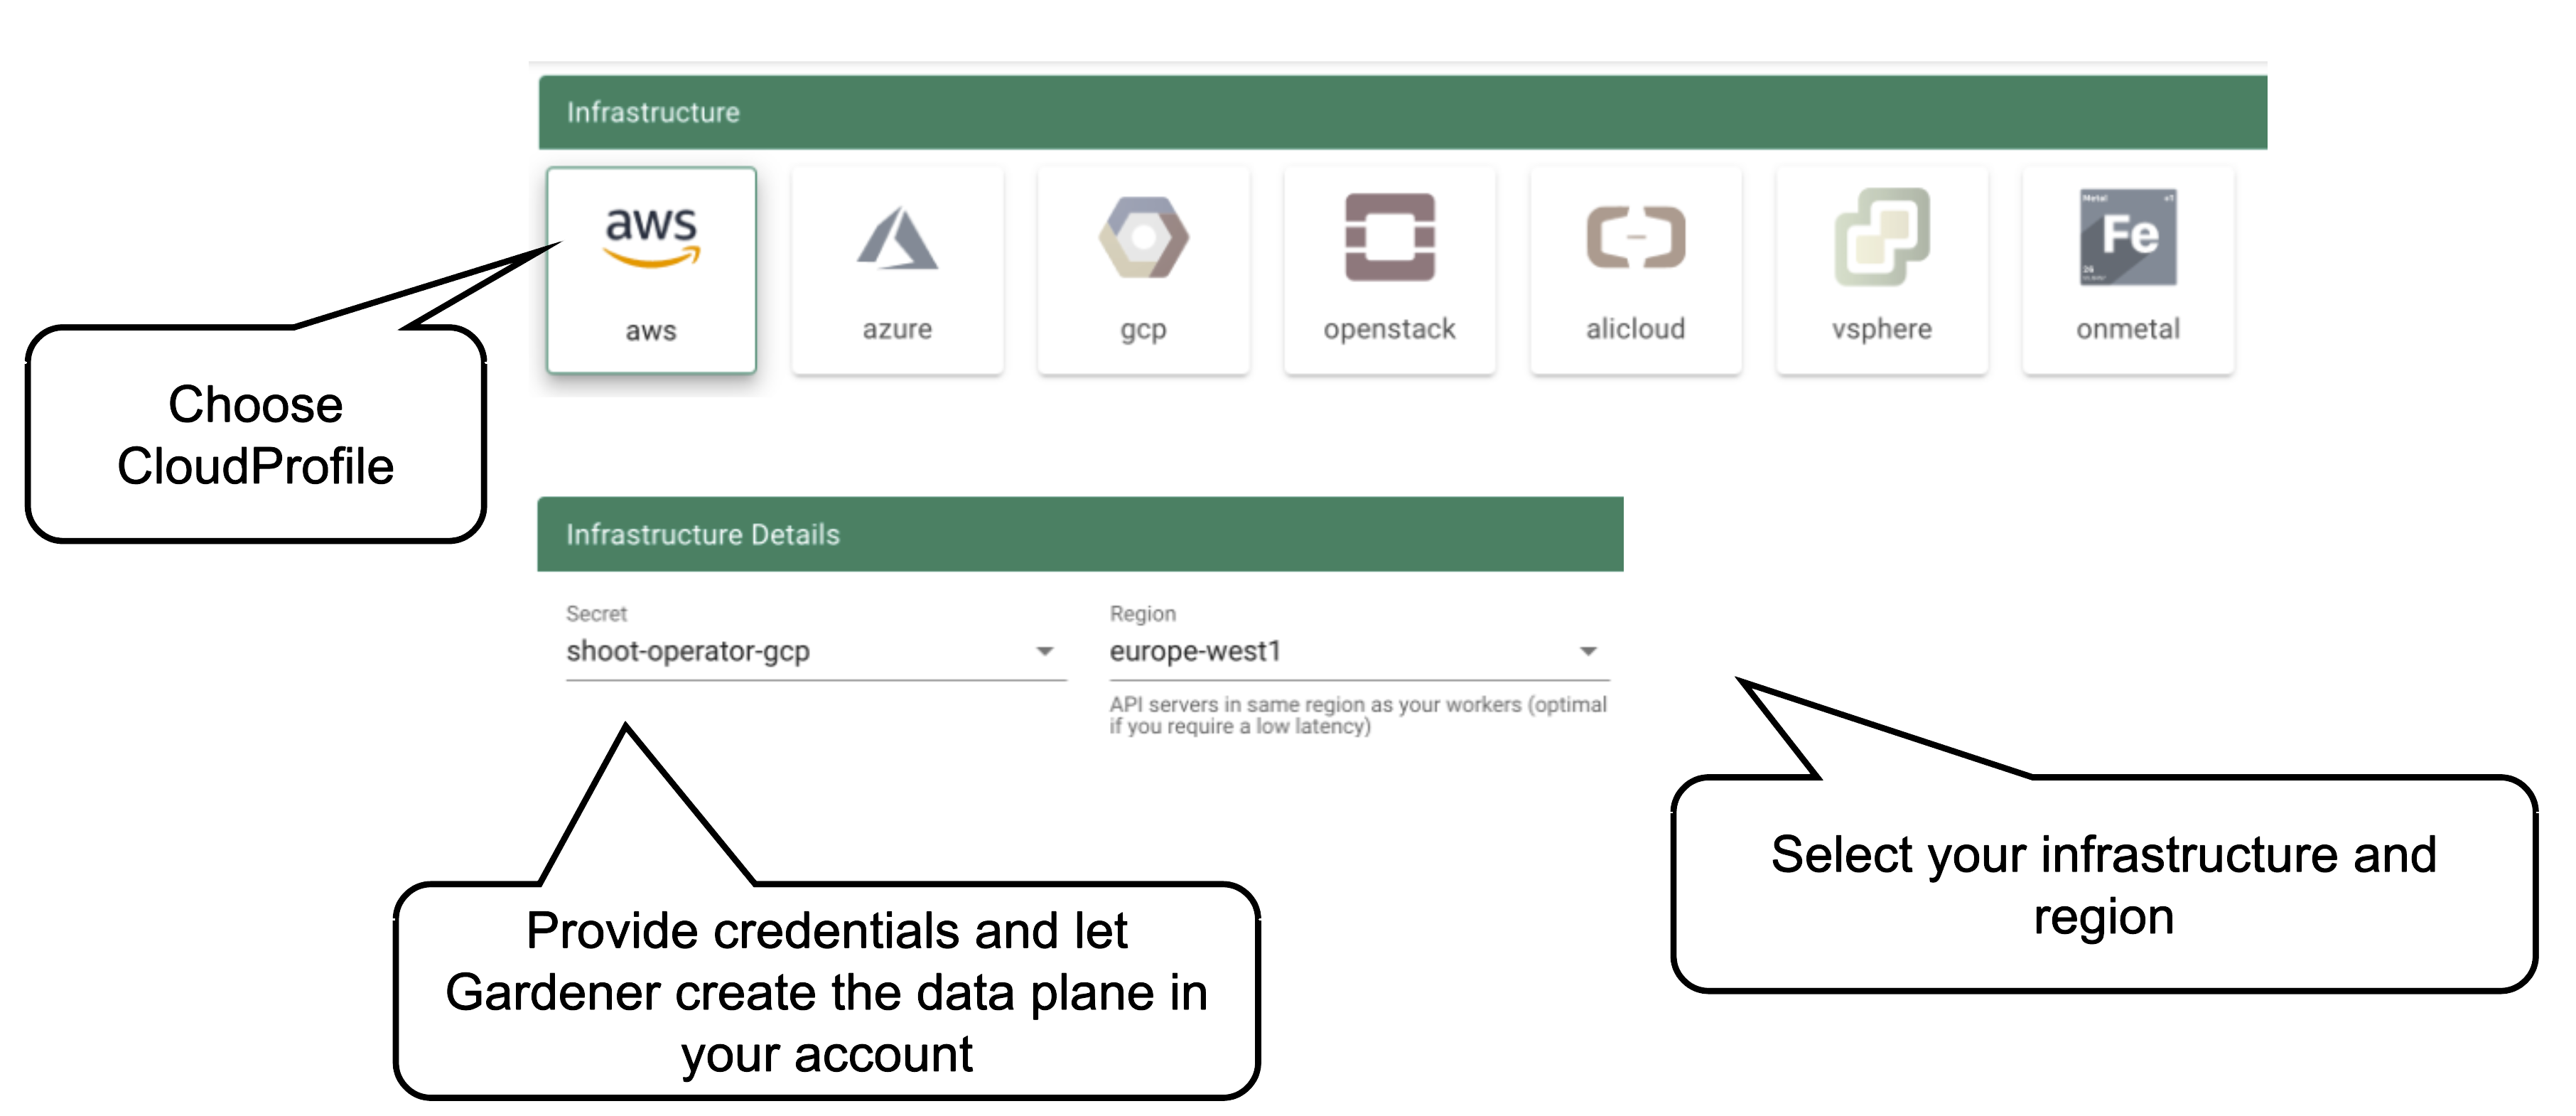
Start by selecting the infrastructure you want to use. The choice will be mapped to a cloud profile that contains provider specific information like the available (actual) OS images, zones and regions or machine types.
Each data plane runs in an infrastructure account owned by the end user. By selecting the infrastructure secret containing the accounts credentials, you are granting Gardener access to the respective account to create / manage resources.
Note
Changing the account after the creation of a cluster is not possible. The credentials can be updated with a new key or even user but have to stay within the same account.
Currently, there is no way to move a single cluster to a different account. You would rather have to re-create a cluster and migrate workloads by different means.
As part of the infrastructure you chose, the region for data plane has to be chosen as well. The Gardener scheduler will try to place the control plane on a seed cluster based on a minimal distance strategy. See Gardener Scheduler for more details.
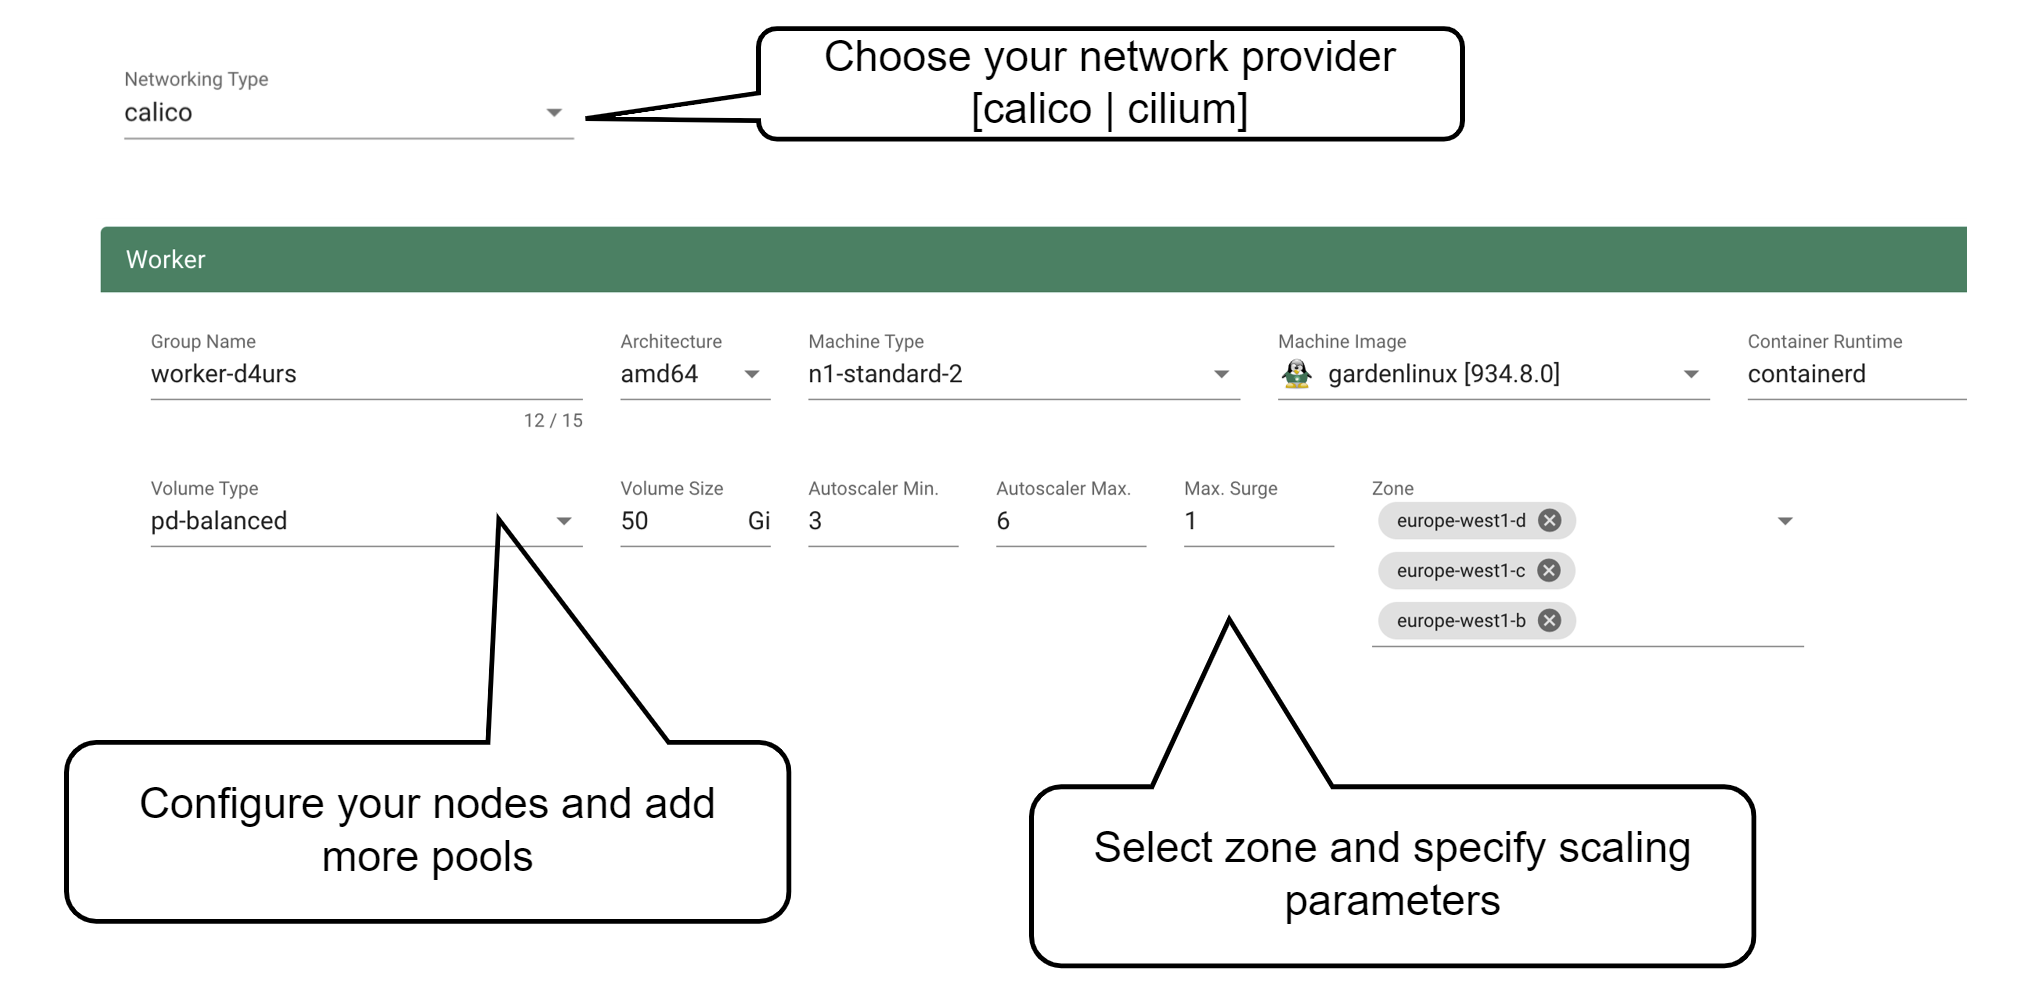
Up next, the networking provider (CNI) for the cluster has to be selected. At the point of writing, it is possible to choose between Calico and Cilium. If not specified in the shoot’s manifest, default CIDR ranges for nodes, services, and pods will be used.
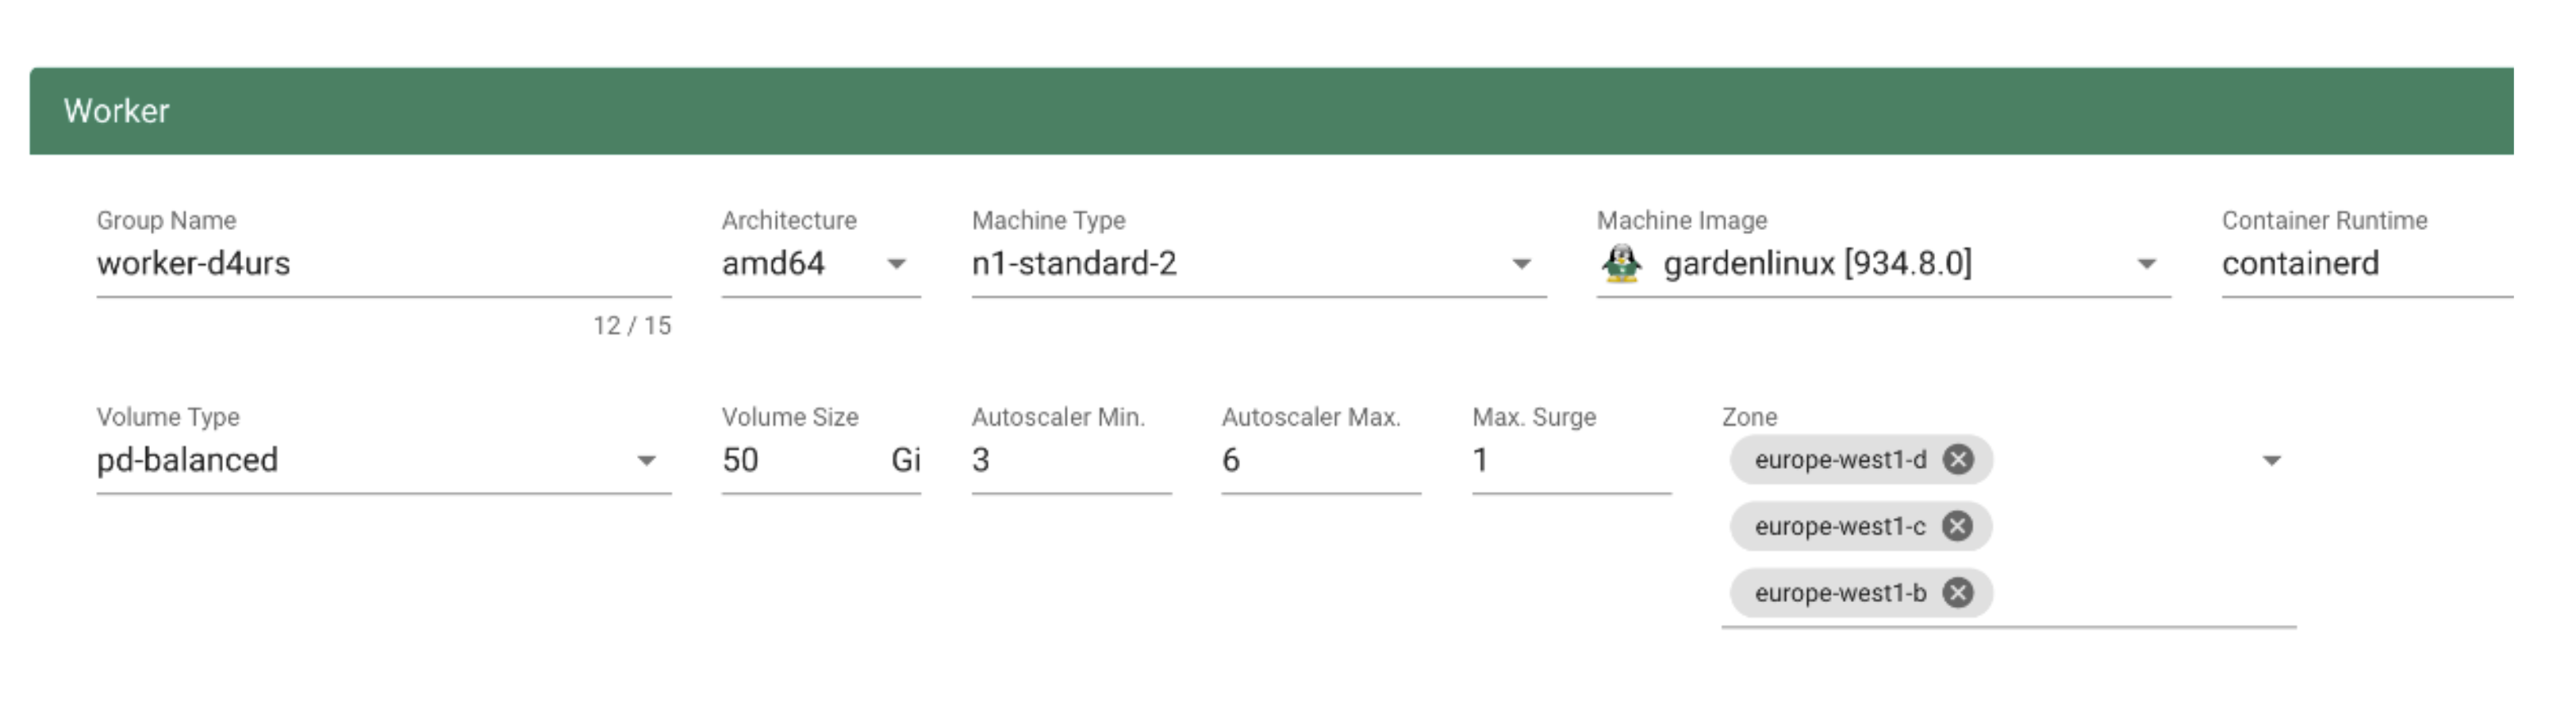
In order to run any workloads in your cluster, you need nodes. The worker section lets you specify the most important configuration options. For beginners, the machine type is probably the most relevant field, together with the machine image (operating system).
The machine type is provider-specific and configured in the cloud profile. Check your respective cloud profile if you’re missing a machine type. Maybe it is available in general but unavailable in your selected region.
The operating system your machines will run is the next thing to choose. Debian-based GardenLinux is the best choice for most use cases.
Other specifications for the workers include the volume type and size. These settings affect the root disk of each node. Therefore we would always recommend to use an SSD-based type to avoid i/o issues.
Some machine types (e.g., bare-metal machine types on OpenStack) require you to omit the volume type and volume size settings.
The autoscaler parameter defines the initial elasticity / scalability of your cluster. The cluster-autoscaler will add more nodes up to the maximum defined here when your workload grows and remove nodes in case your workload shrinks. The minimum number of nodes should be equal to or higher than the number of zones. You can distribute the nodes of a worker pool among all zones available to your cluster. This is the first step in running HA workloads.
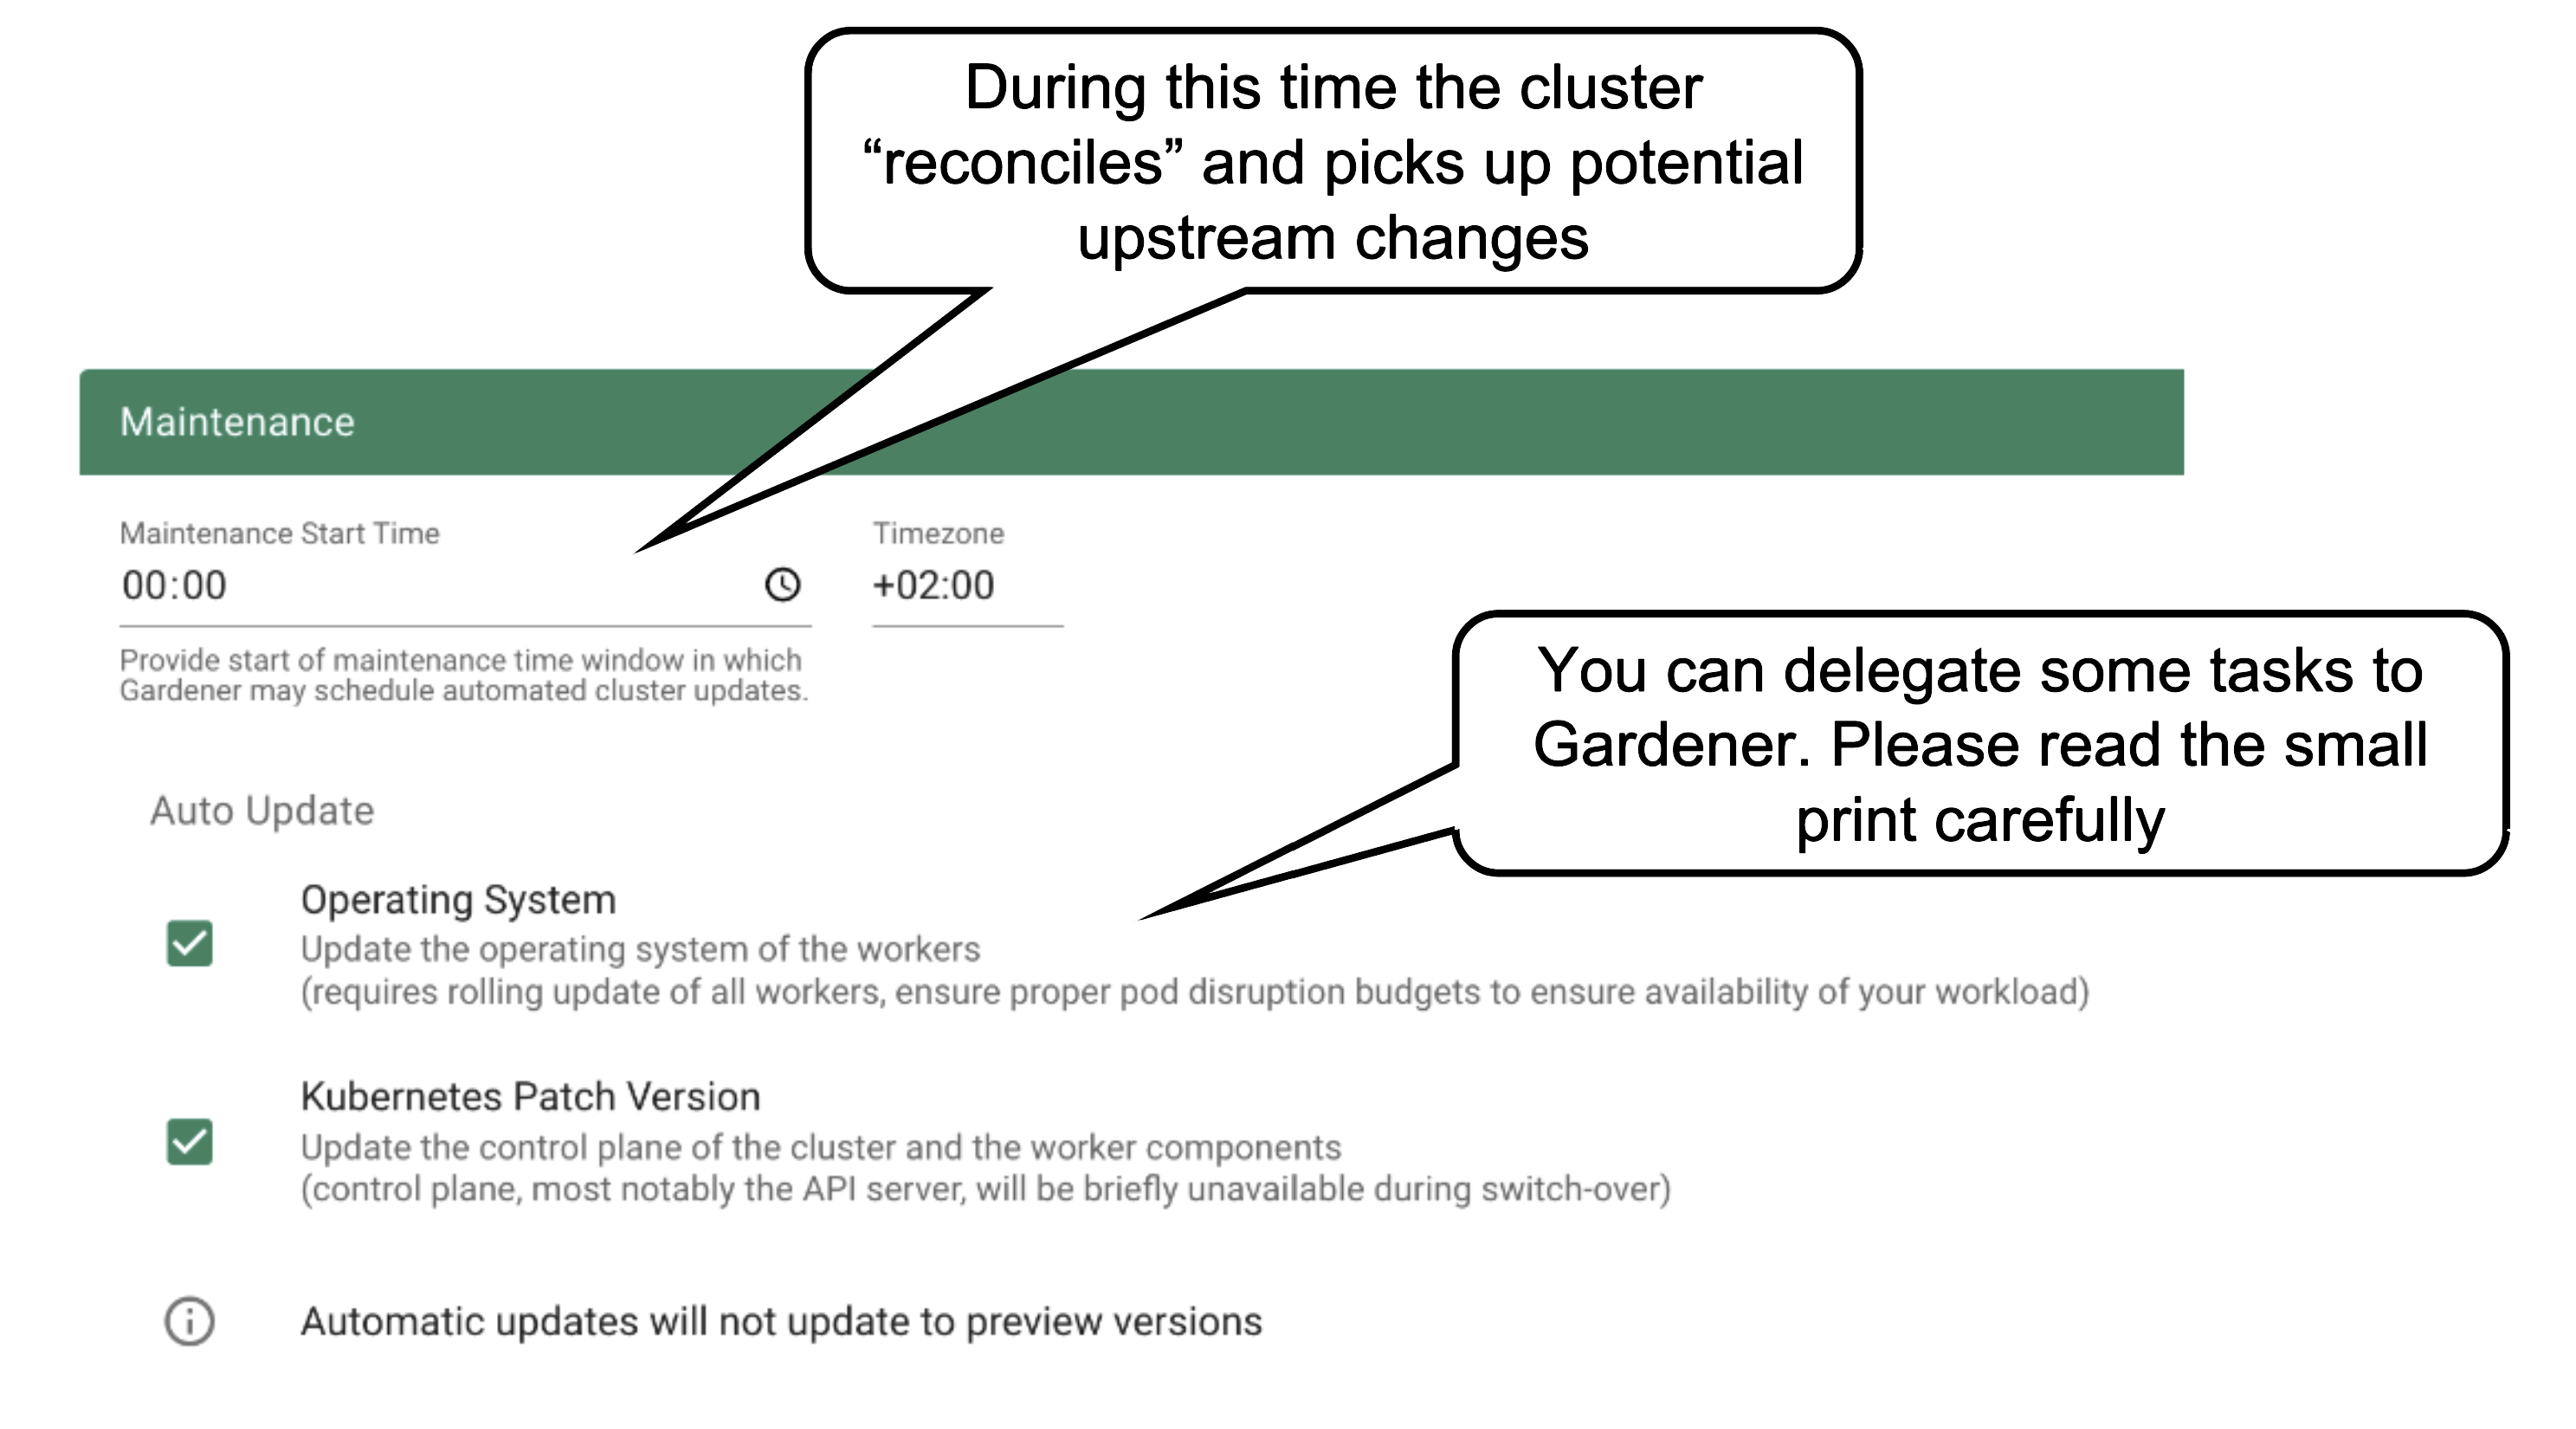
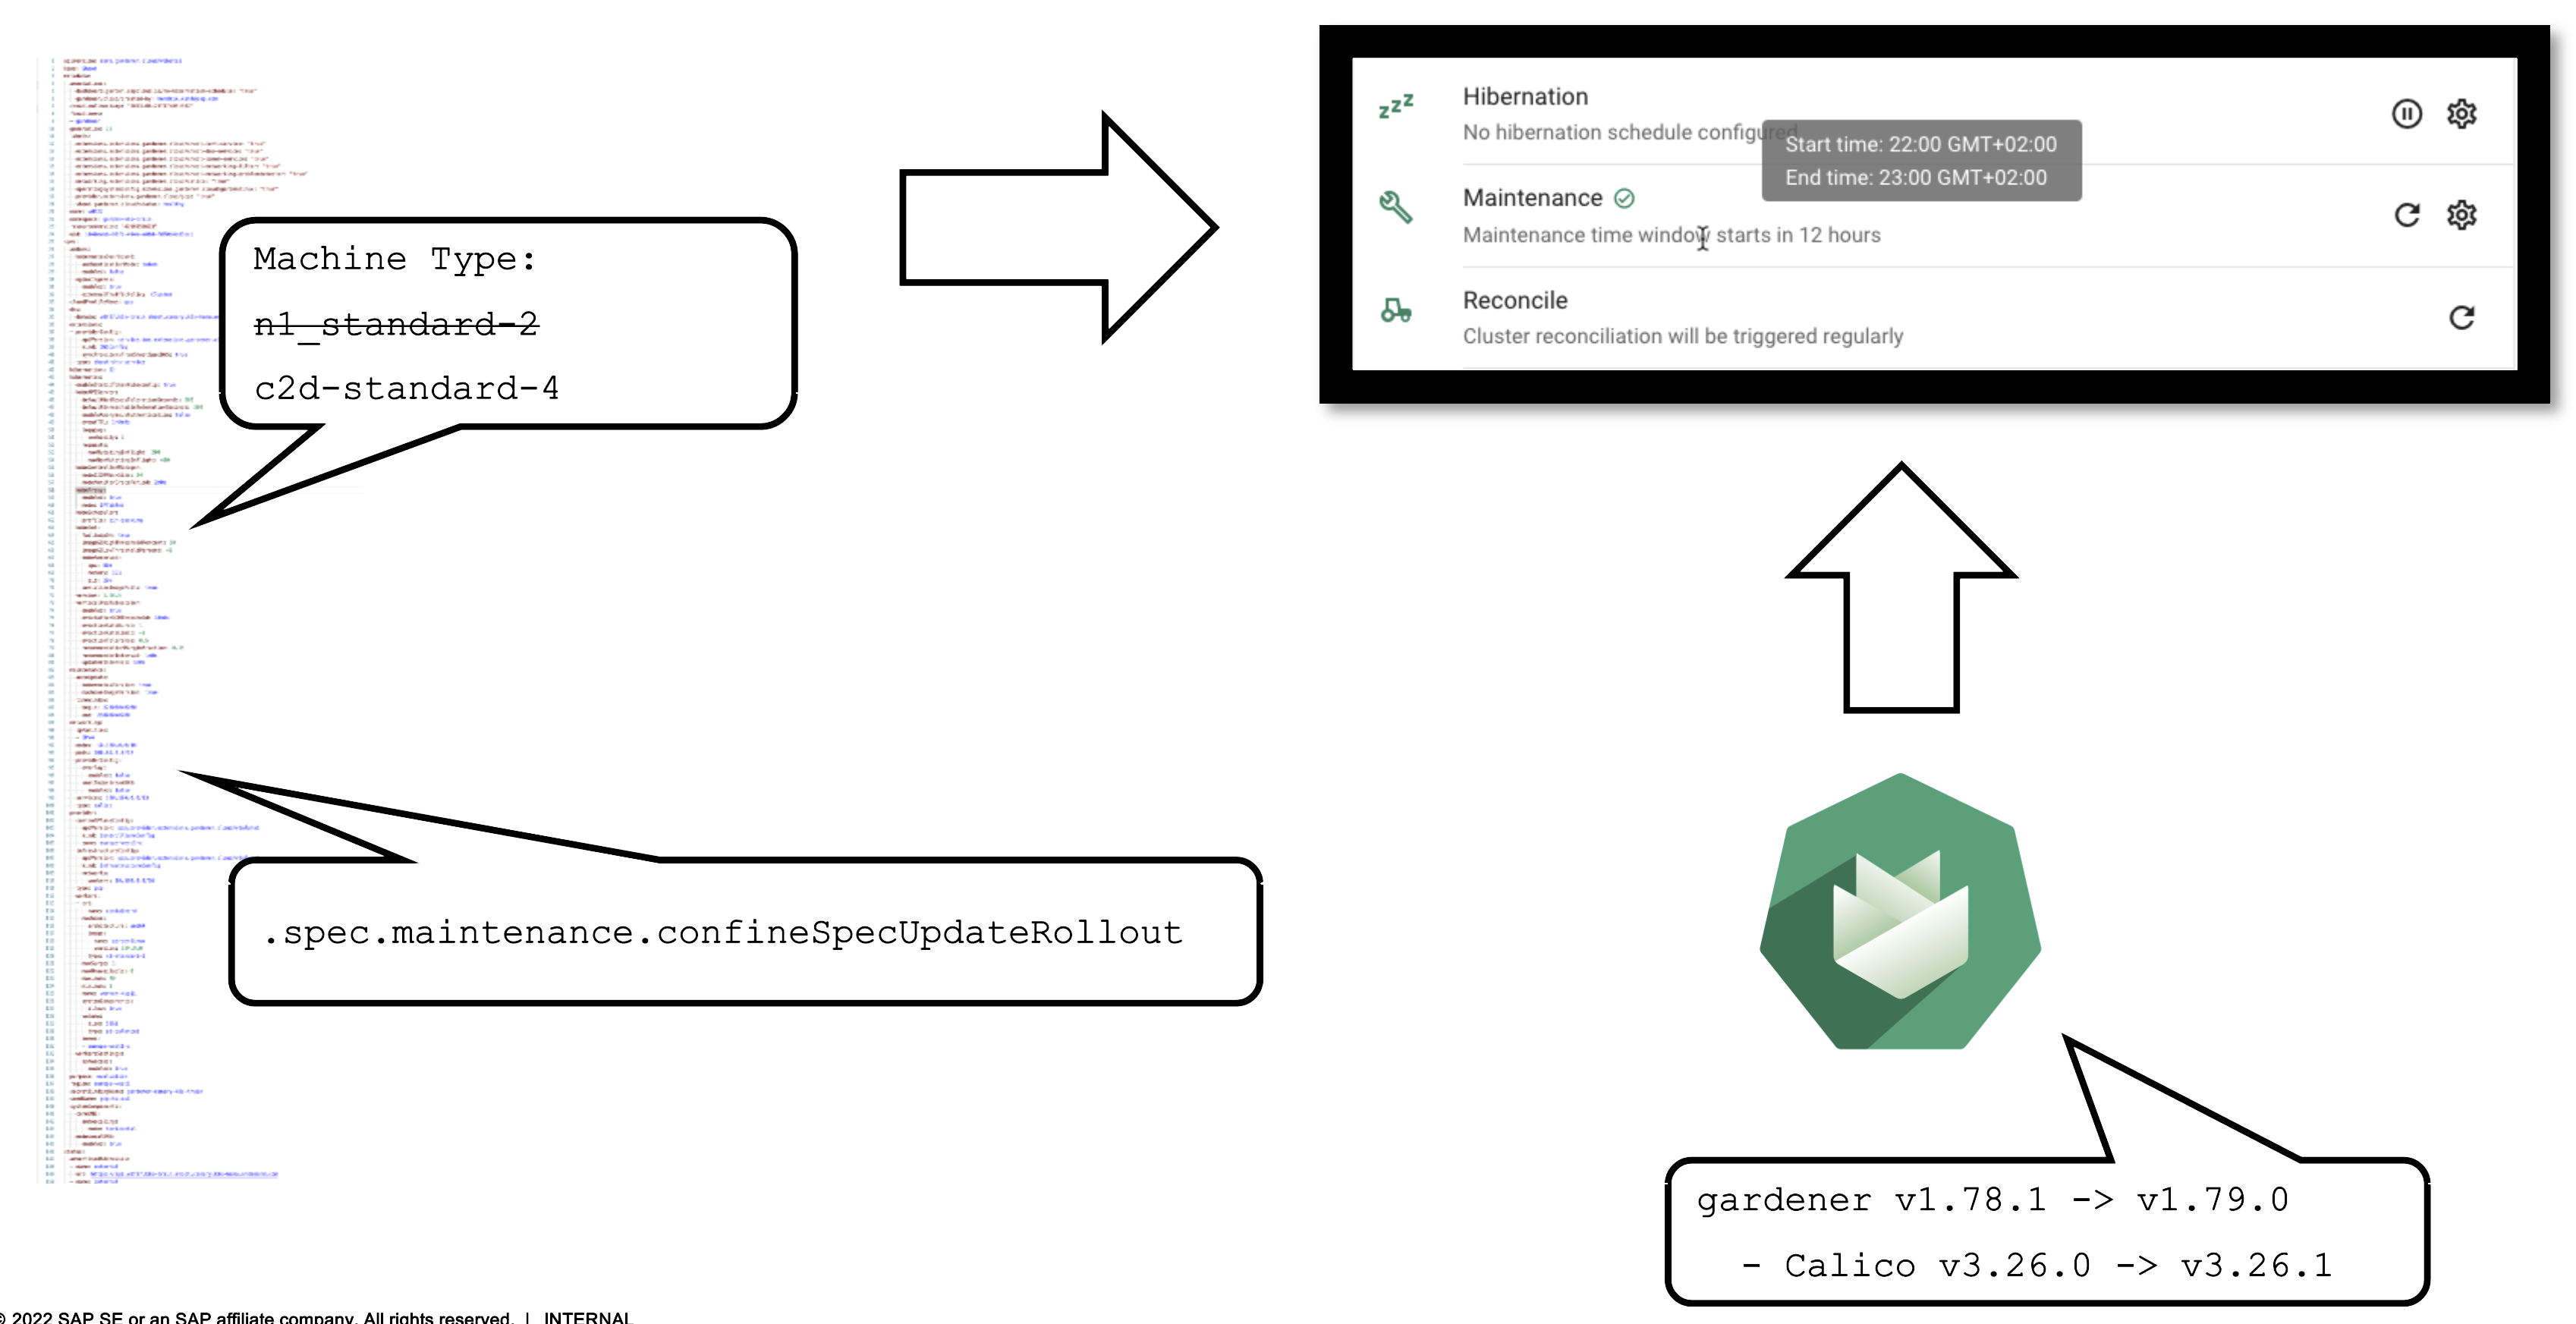
Once per day, all clusters reconcile. This means all controllers will check if there are any updates they have to apply (e.g., new image version for ETCD). The maintenance window defines when this daily operation will be triggered. It is important to understand that there is no opt-out for reconciliation.
It is also possible to confine updates to the shoot spec to be applied only during this time. This can come in handy when you want to bundle changes or prevent changes to be applied outside a well-known time window.
You can allow Gardener to automatically update your cluster’s Kubernetes patch version and/or OS version (of the nodes). Take this decision consciously! Whenever a new Kubernetes patch version or OS version is set to supported in the respective cloud profile, auto update will upgrade your cluster during the next maintenance window. If you fail to (manually) upgrade the Kubernetes or OS version before they expire, force-upgrades will take place during the maintenance window.
Result
The result of your provided inputs and a set of conscious default values is a shoot resource that, once applied, will be acted upon by various Gardener components. The status section represents the intermediate steps / results of these operations. A typical shoot creation flow would look like this:
- Assign control plane to a seed.
- Create infrastructure resources in the data plane account (e.g., VPC, gateways, …)
- Deploy control plane incl. DNS records.
- Create nodes (VMs) and bootstrap kubelets.
- Deploy kube-system components to nodes.
How to Access a Shoot
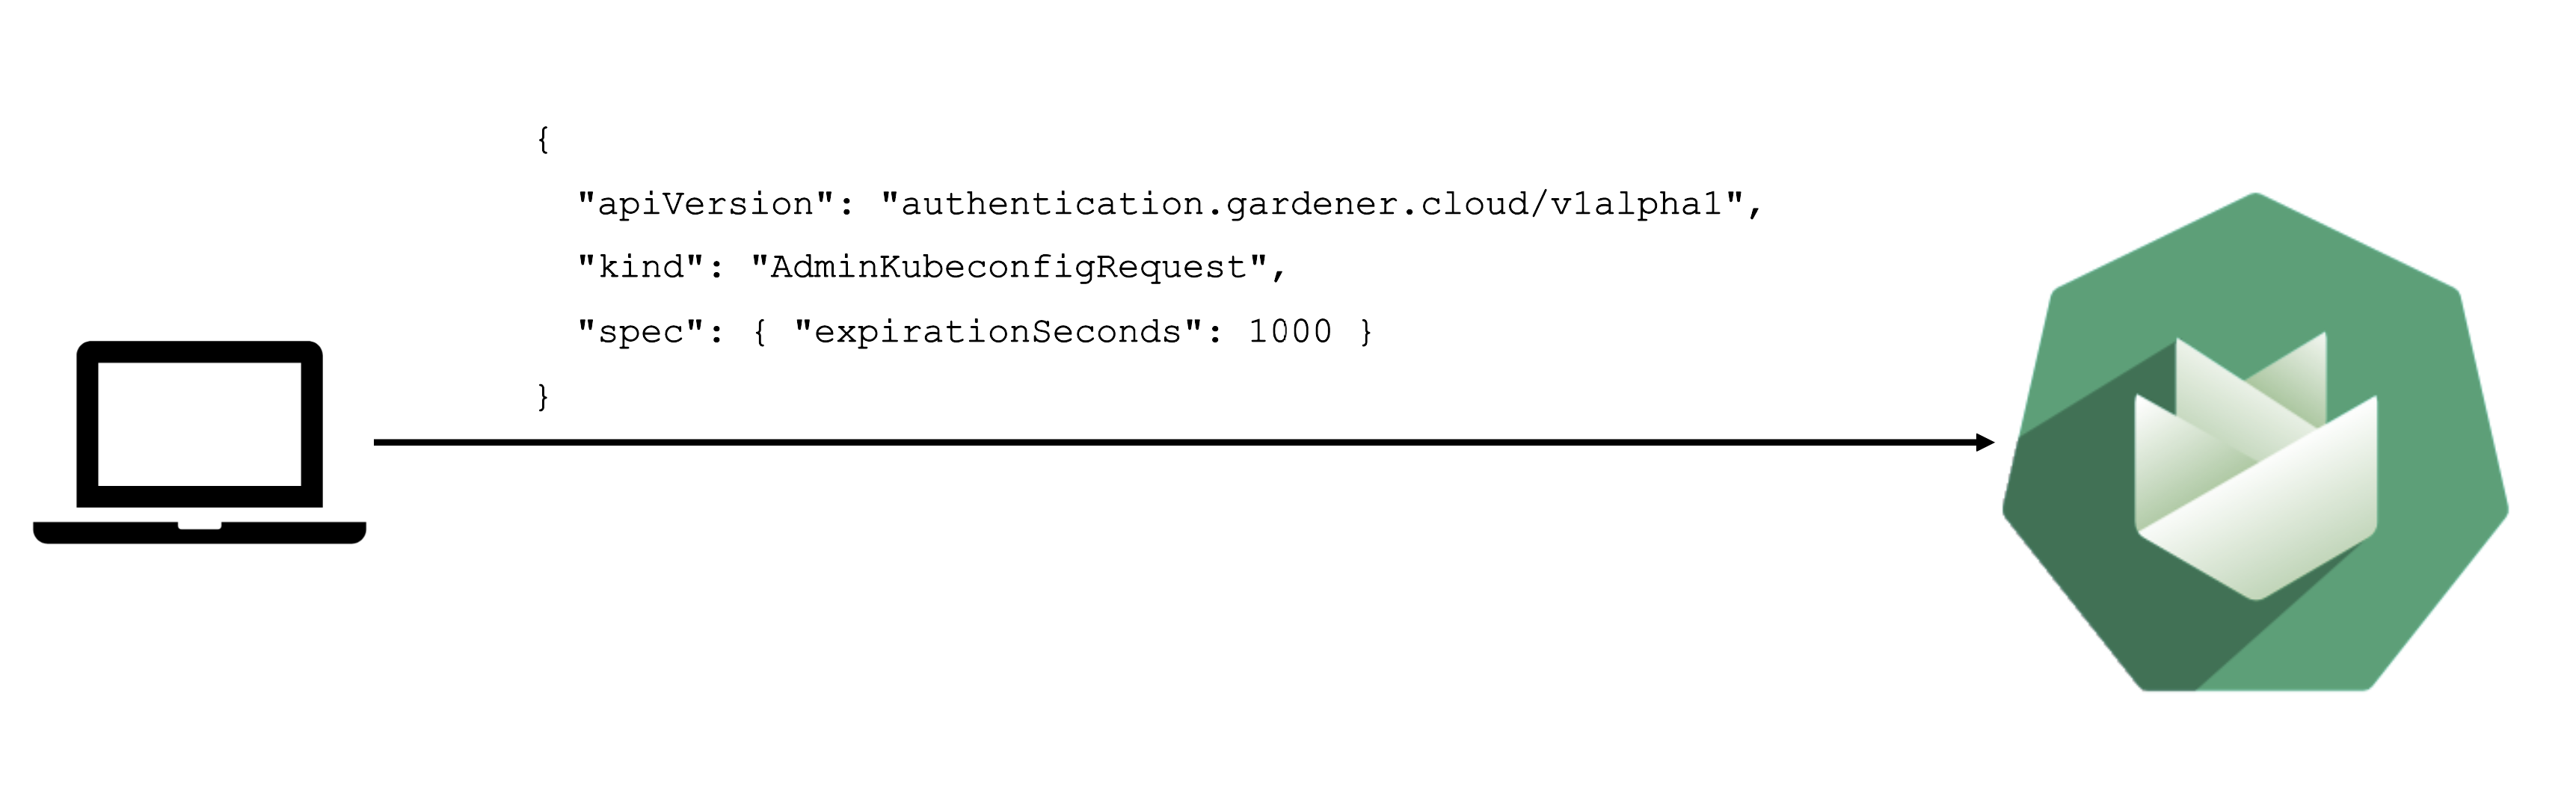
Static credentials for shoots were discontinued in Gardener with Kubernetes v1.27. Short lived credentials need to be used instead. You can create/request tokens directly via Gardener or delegate authentication to an identity provider.
A short-lived admin kubeconfig can be requested by using kubectl. If this is something you do frequently, consider switching to gardenlogin, which helps you with it.

An alternative is to use an identity provider and issue OIDC tokens.
What can you configure?
With the basic configuration options having been introduced, it is time to discuss more possibilities. Gardener offers a variety of options to tweak the control plane’s behavior - like defining an event TTL (default 1h), adding an OIDC configuration or activating some feature gates. You could alter the scheduling profile and define an audit logging policy. In addition, the control plane can be configured to run in HA mode (applied on a node or zone level), but keep in mind that once you enable HA, you cannot go back.
In case you have specific requirements for the cluster internal DNS, Gardener offers a plugin mechanism for custom core DNS rules or optimization with node-local DNS. For more information, see Custom DNS Configuration and NodeLocalDNS Configuration.
Another category of configuration options is dedicated to the nodes and the infrastructure they are running on. Every provider has their own perks and some of them are exposed. Check the detailed documentation of the relevant extension for your infrastructure provider.
You can fine-tune the cluster-autoscaler or help the kubelet to cope better with your workload.
Worker Pools
There are a couple of ways to configure a worker pool. One of them is to set everything in the Gardener dashboard. However, only a subset of options is presented there.
A slightly more complex way is to set the configuration through the yaml file itself.
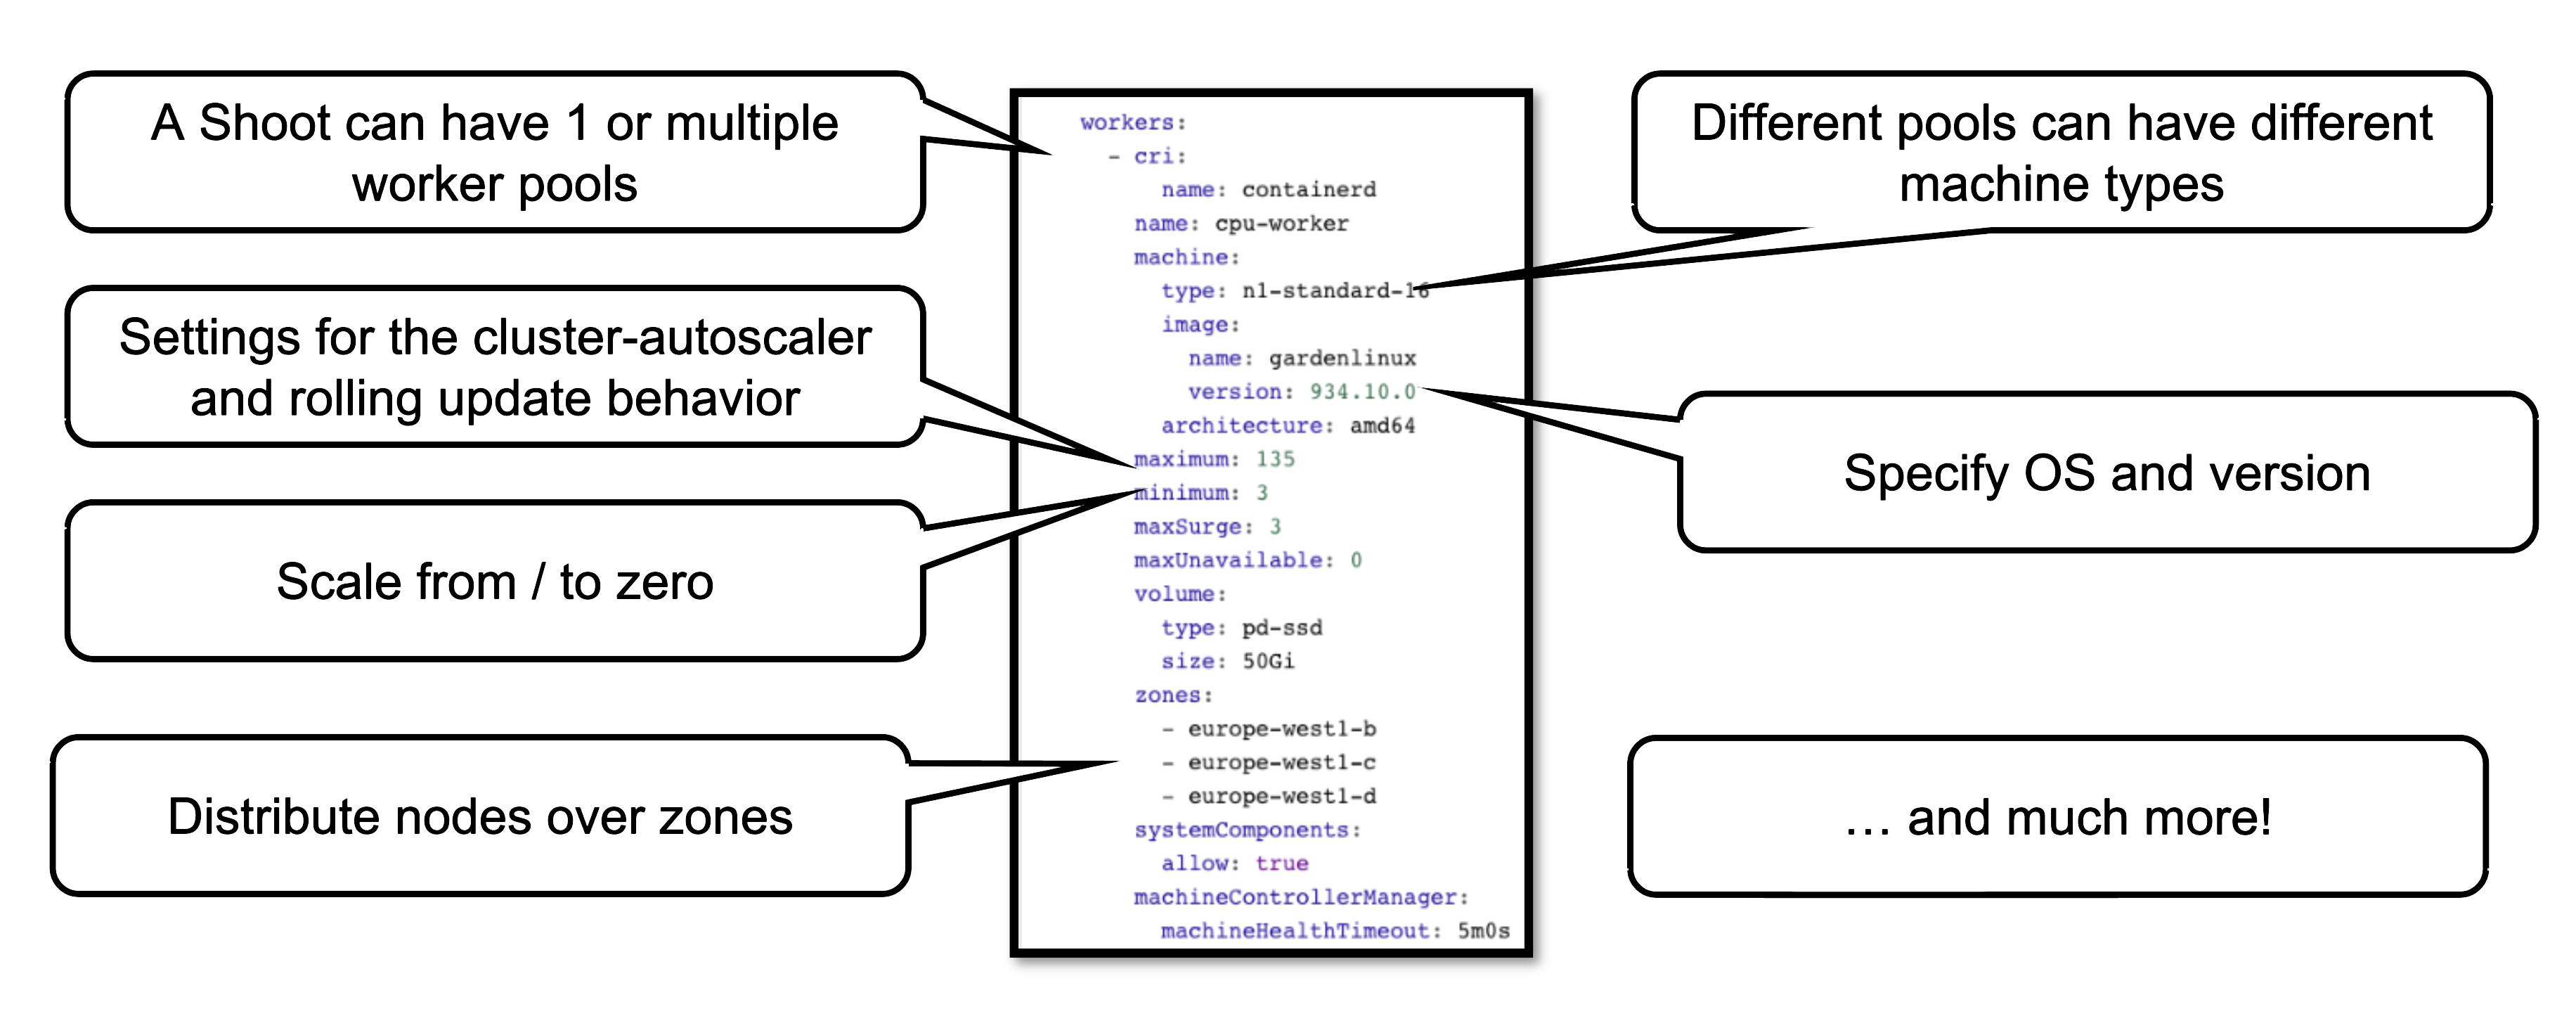
This allows you to configure much more properties of a worker pool, like the timeout after which an unhealthy machine is getting replaced. For more options, see the Worker API reference.
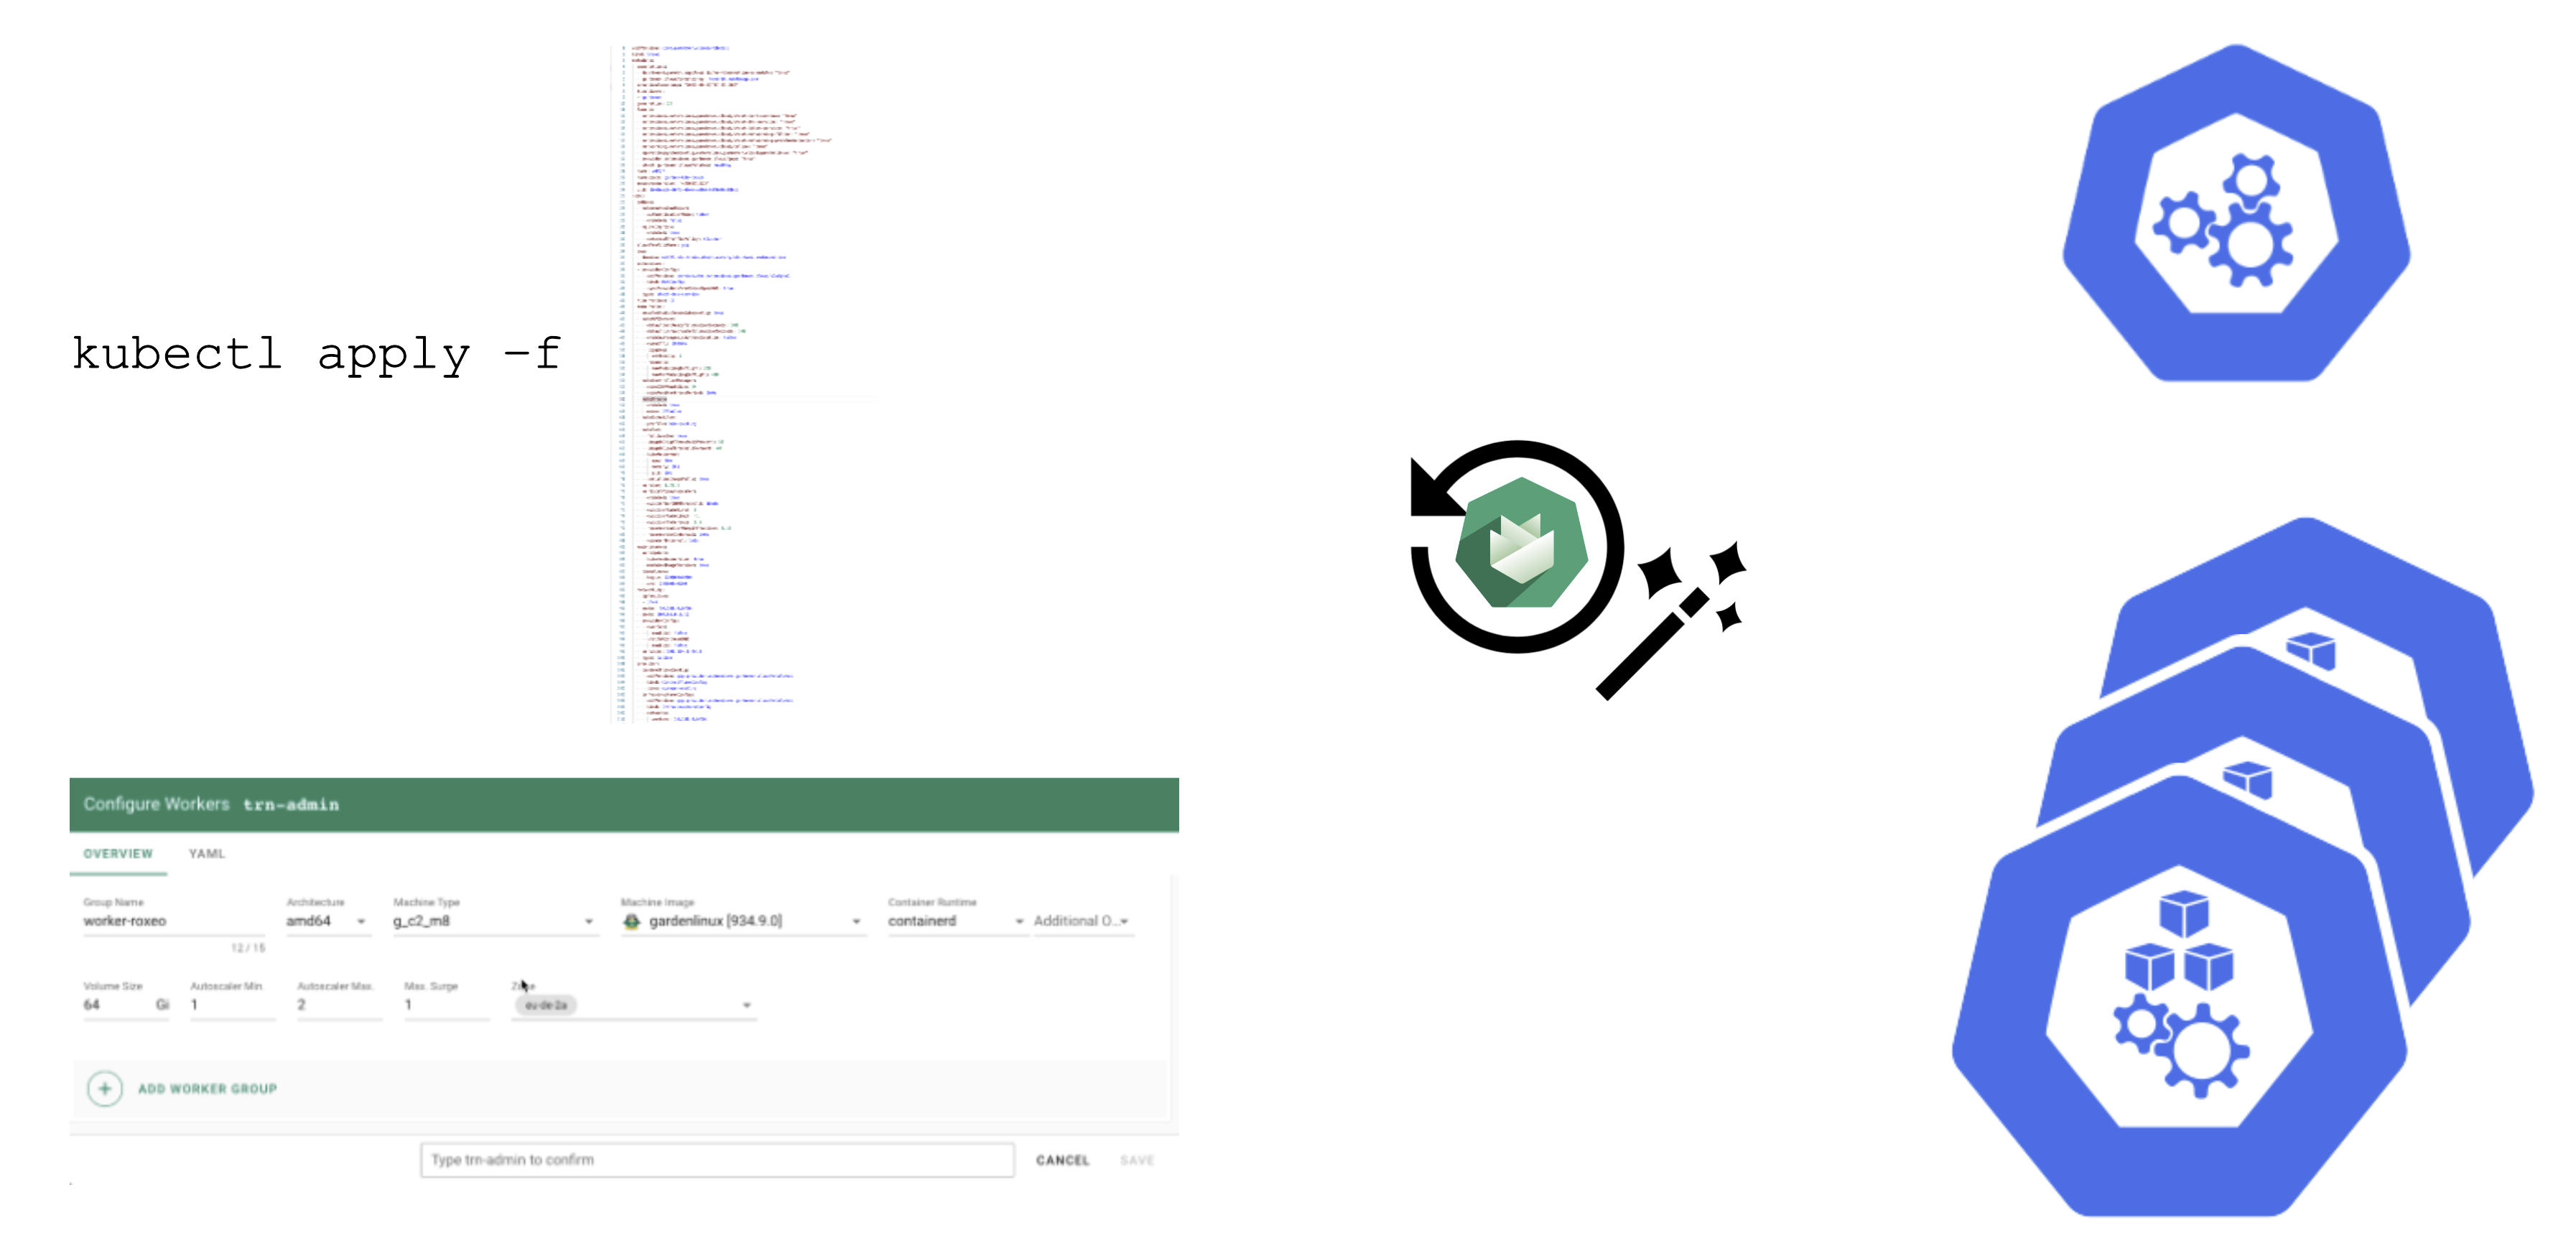
How to Change Things
Since a shoot is just another Kubernetes resource, changes can be applied via kubectl. For convenience, the basic settings are configurable via the dashboard’s UI. It also has a “yaml” tab where you can alter all of the shoot’s specification in your browser. Once applied, the cluster will reconcile eventually and your changes become active (or cause an error).
Immutability in a Shoot
While Gardener allows you to modify existing shoot clusters, it is important to remember that not all properties of a shoot can be changed after it is created.
For example, it is not possible to move a shoot to a different infrastructure account. This is mainly rooted in the fact that discs and network resources are bound to your account.
Another set of options that become immutable are most of the network aspects of a cluster. On an infrastructure level the VPC cannot be changed and on a cluster level things like the pod / service cidr ranges, together with the nodeCIDRmask, are set for the lifetime of the cluster.
Some other things can be changed, but not reverted. While it is possible to add more zones to a cluster on an infrastructure level (assuming that an appropriate CIDR range is available), removing zones is not supported. Similarly, upgrading Kubernetes versions is comparable to a one-way ticket. As of now, Kubernetes does not support downgrading. Lastly, the HA setting of the control plane is immutable once specified.
Crazy Botany
Since remembering all these options can be quite challenging, here is very helpful resource - an example shoot with all the latest options 🎉
1.5 - Control Plane Components
Overview
A cluster has a data plane and a control plane. The data plane is like a space station. It has certain components which keep everyone / everything alive and can operate autonomously to a certain extent. However, without mission control (and the occasional delivery of supplies) it cannot share information or receive new instructions.
So let’s see what the mission control (control plane) of a Kubernetes cluster looks like.
Kubeception
Kubeception - Kubernetes in Kubernetes in Kubernetes
In the classic setup, there is a dedicated host / VM to host the master components / control plane of a Kubernetes cluster. However, these are just normal programs that can easily be put into containers. Once in containers, we can make Kubernetes Deployments and StatefulSets (for the etcd) watch over them. And now we put all that into a separate, dedicated Kubernetes cluster - et voilà, we have Kubernetes in Kubernetes, aka Kubeception (named after the famous movie Inception with Leonardo DiCaprio).
In Gardener’s terminology, the cluster hosting the control plane components is called a seed cluster. The cluster that end users actually use (and whose control plane is hosted in the seed) is called a shoot cluster.
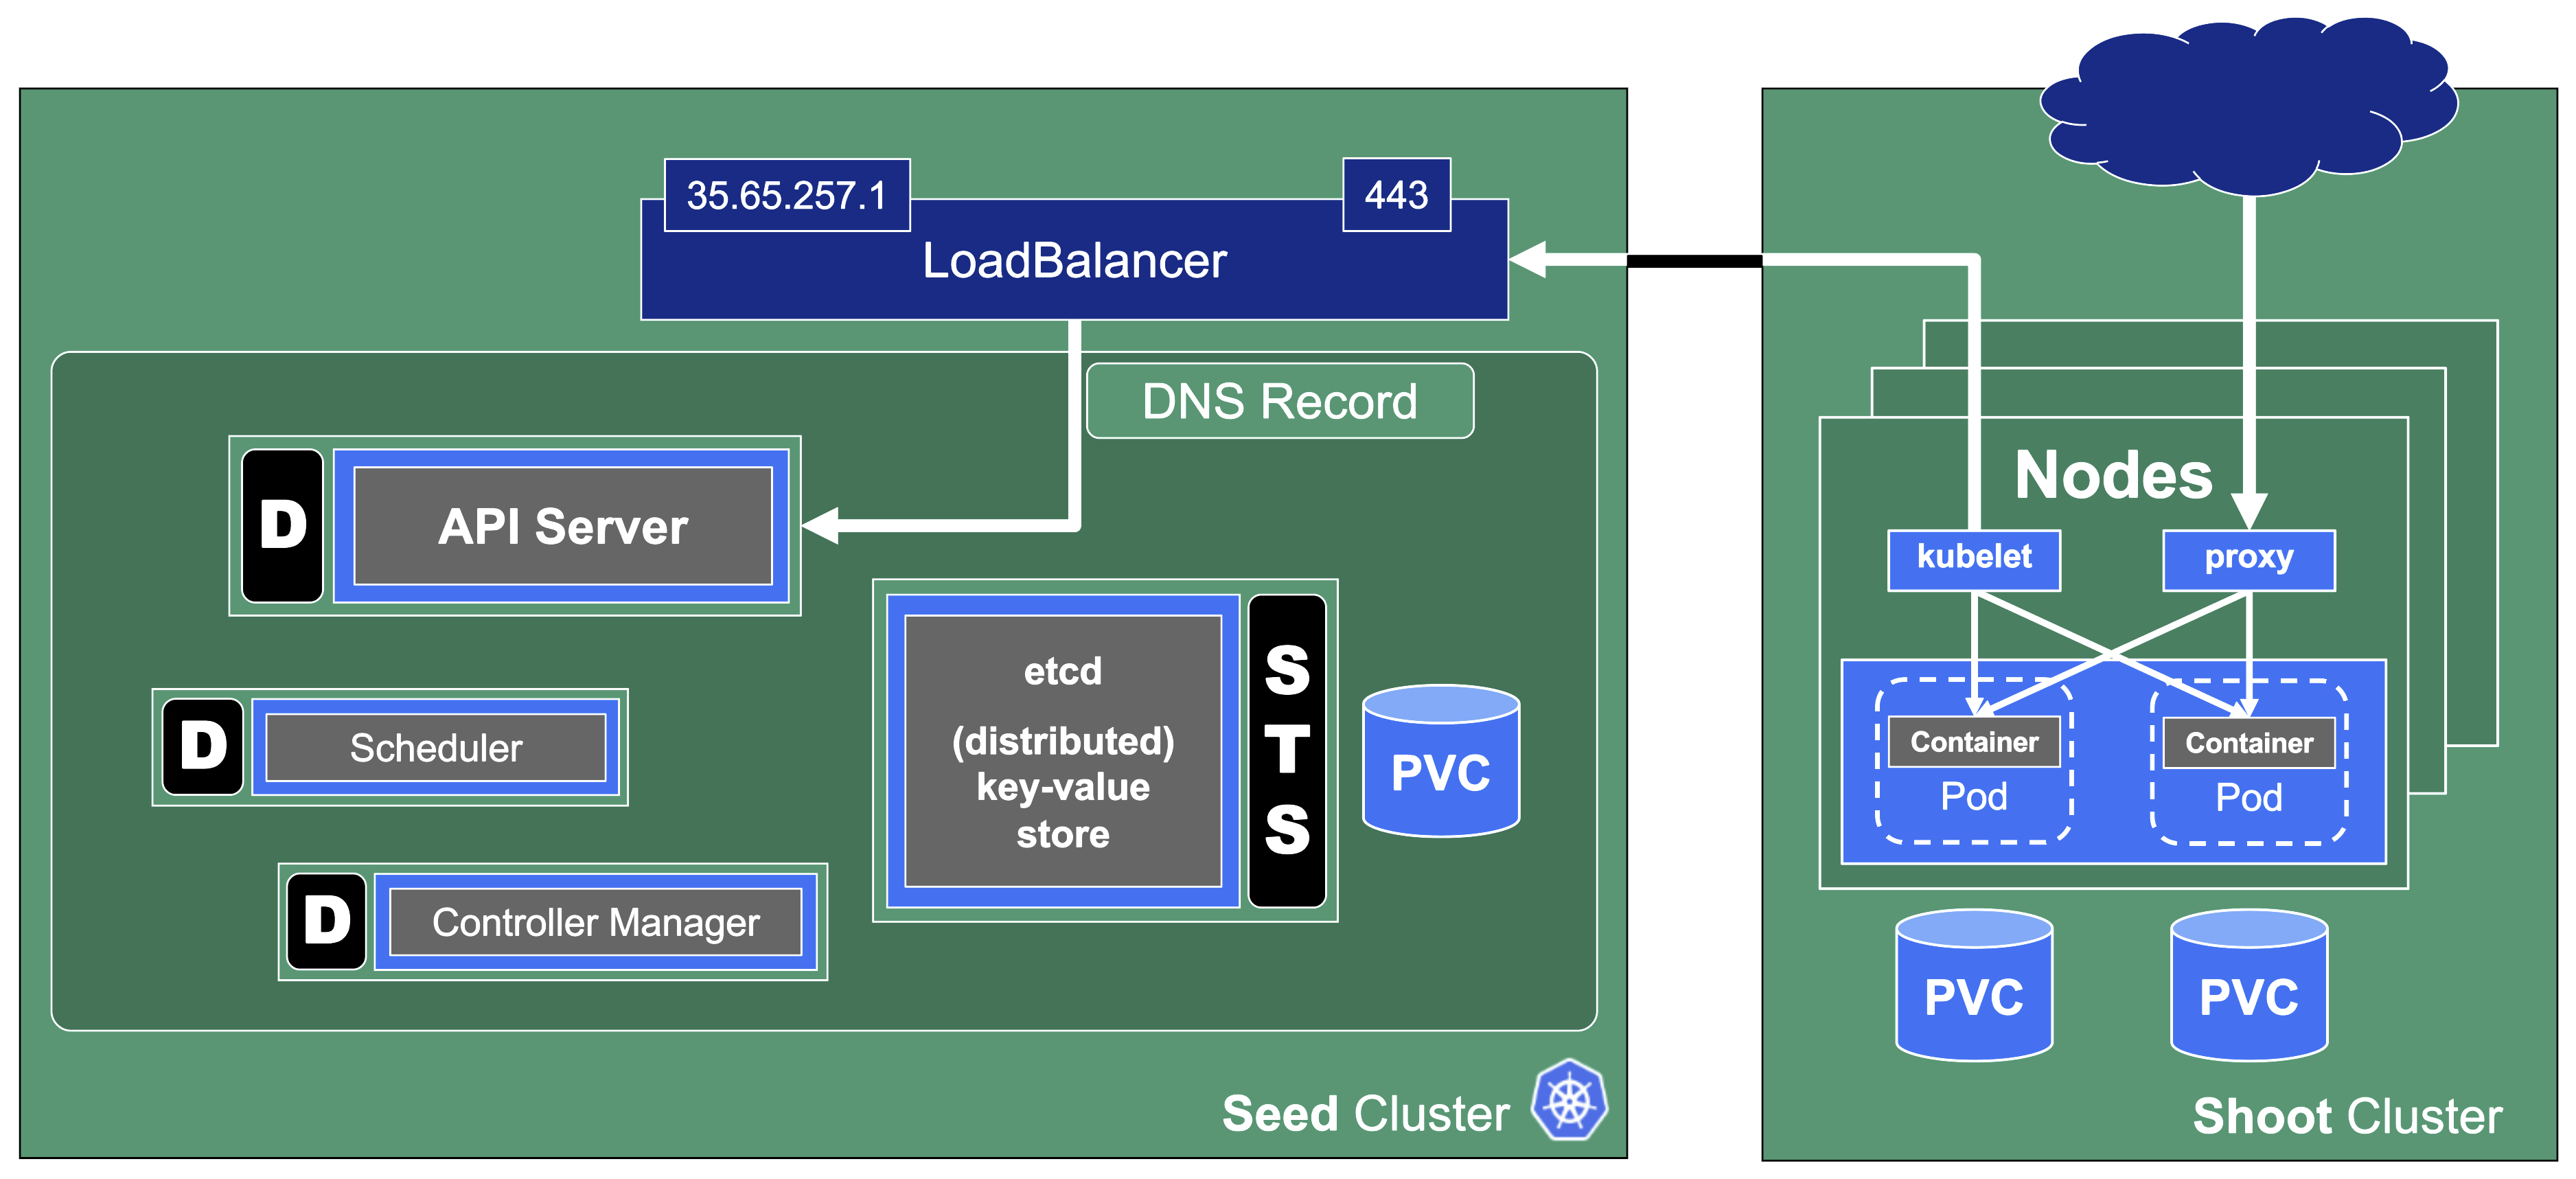
Control Plane Components on the Seed
All control-plane components of a shoot cluster run in a dedicated namespace on the seed.
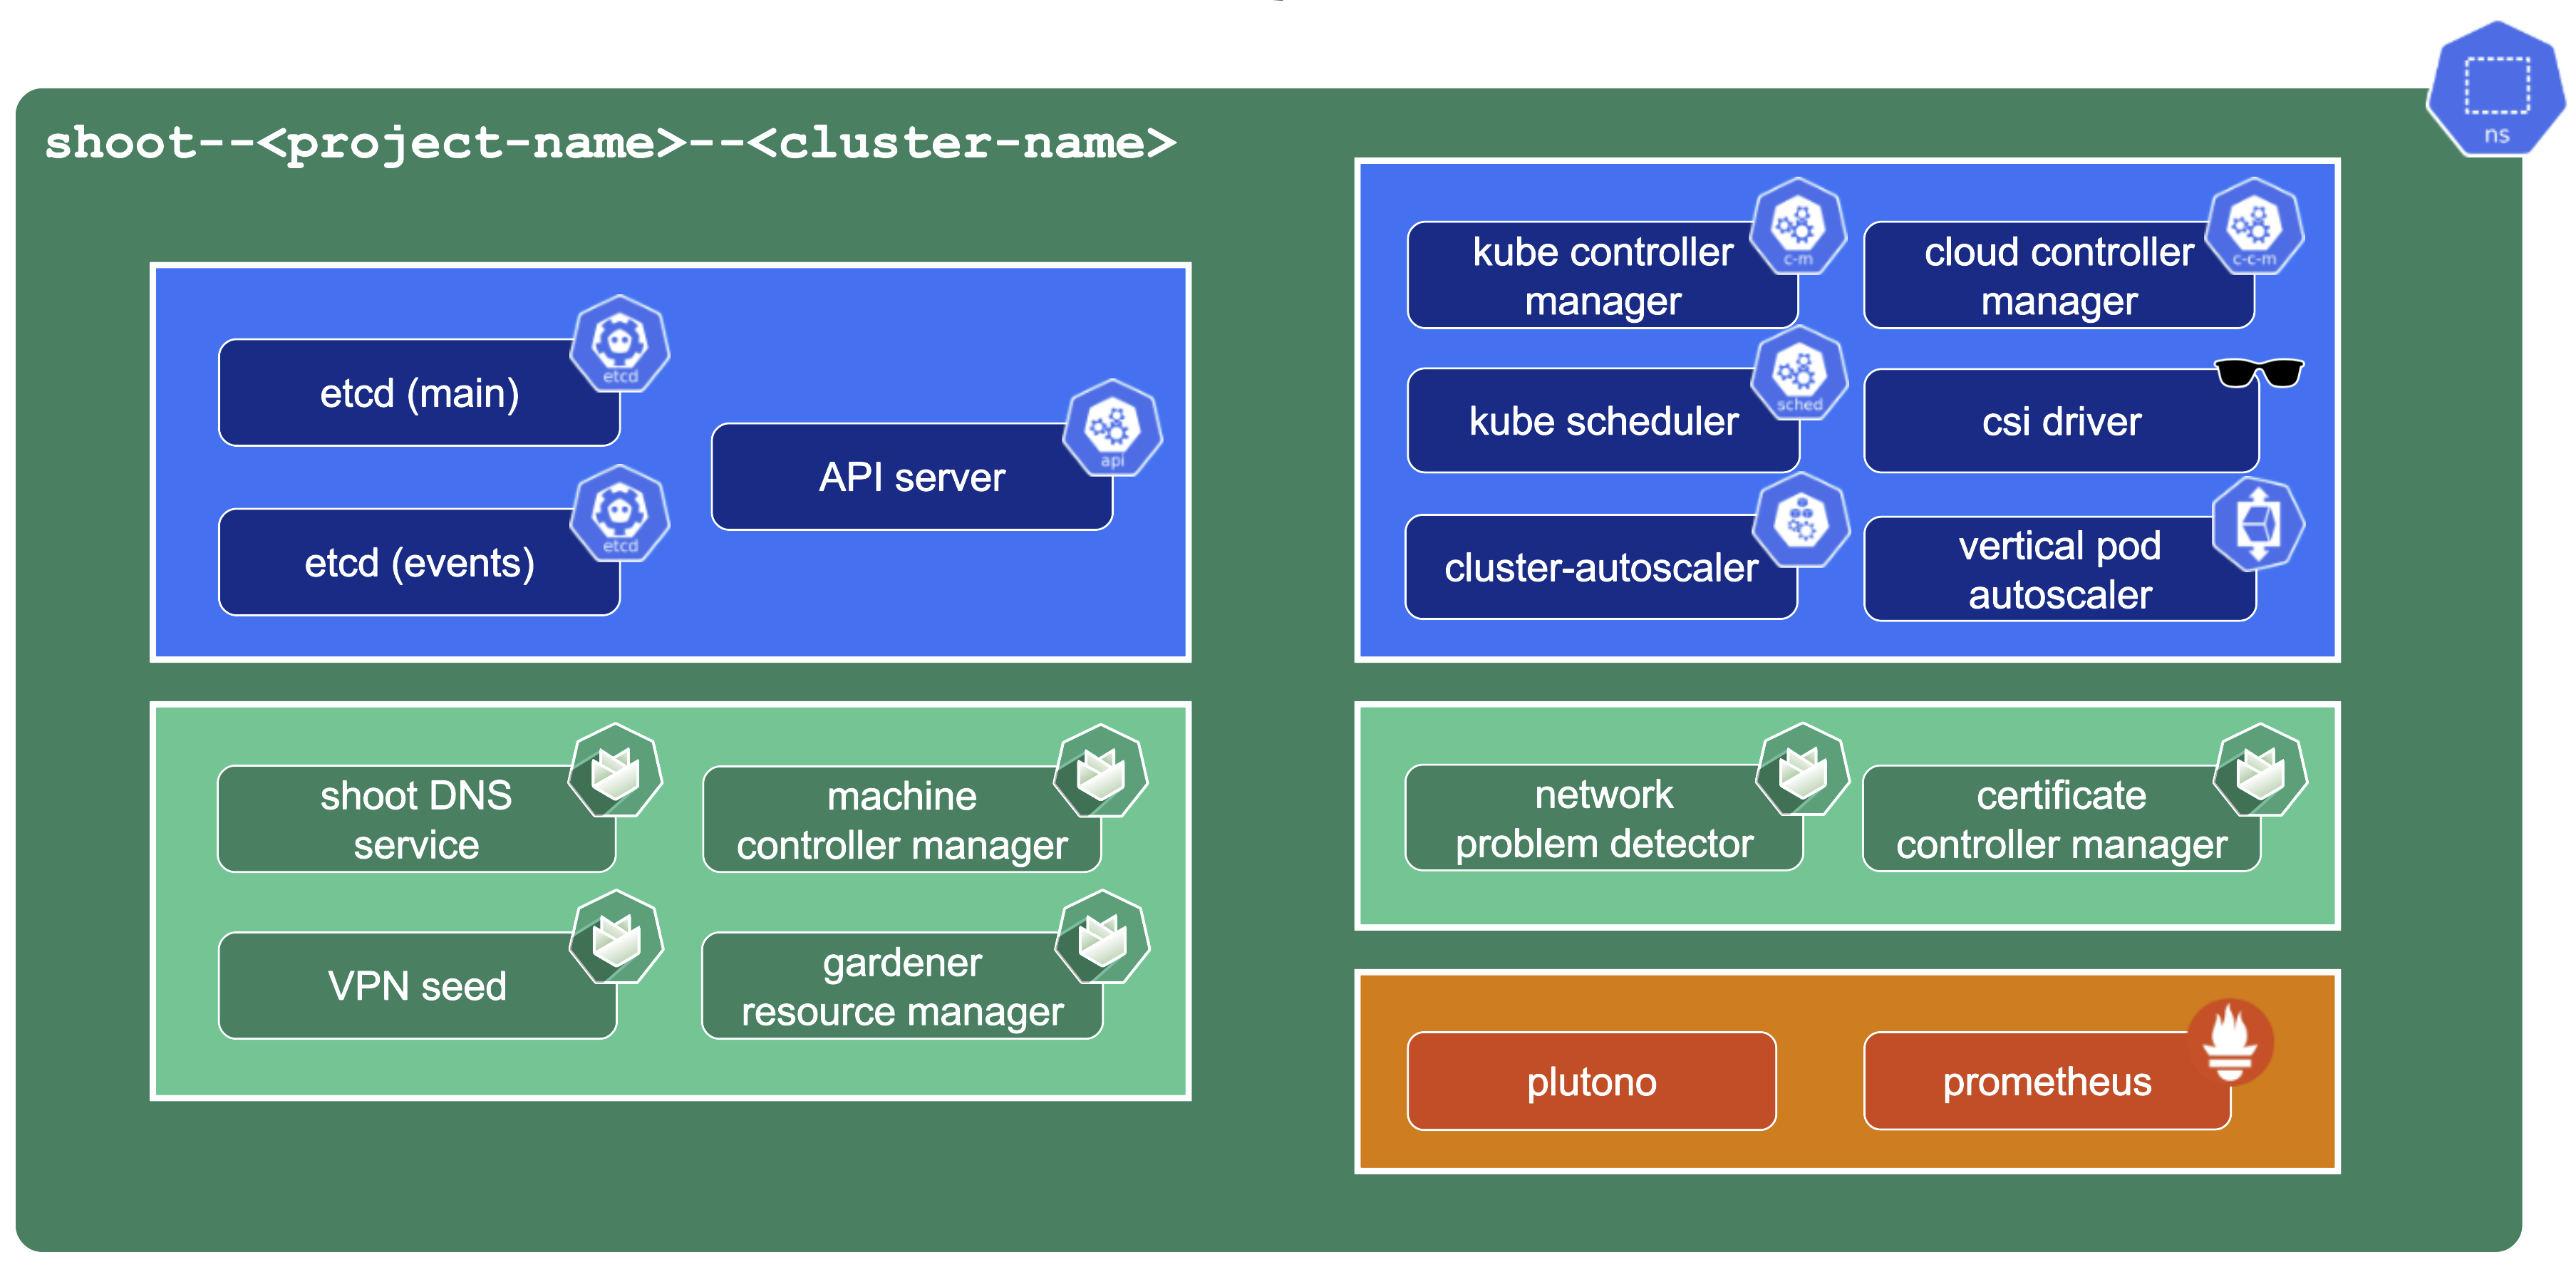
A control plane has lots of components:
- Everything needed to run vanilla Kubernetes
- etcd main & events (split for performance reasons)
- Kube-.*-manager
- CSI driver
Additionally, we deploy components needed to manage the cluster:
- Gardener Resource Manager (GRM)
- Machine Controller Manager (MCM)
- DNS Management
- VPN
There is also a set of components making our life easier (logging, monitoring) or adding additional features (cert manager).
Core Components
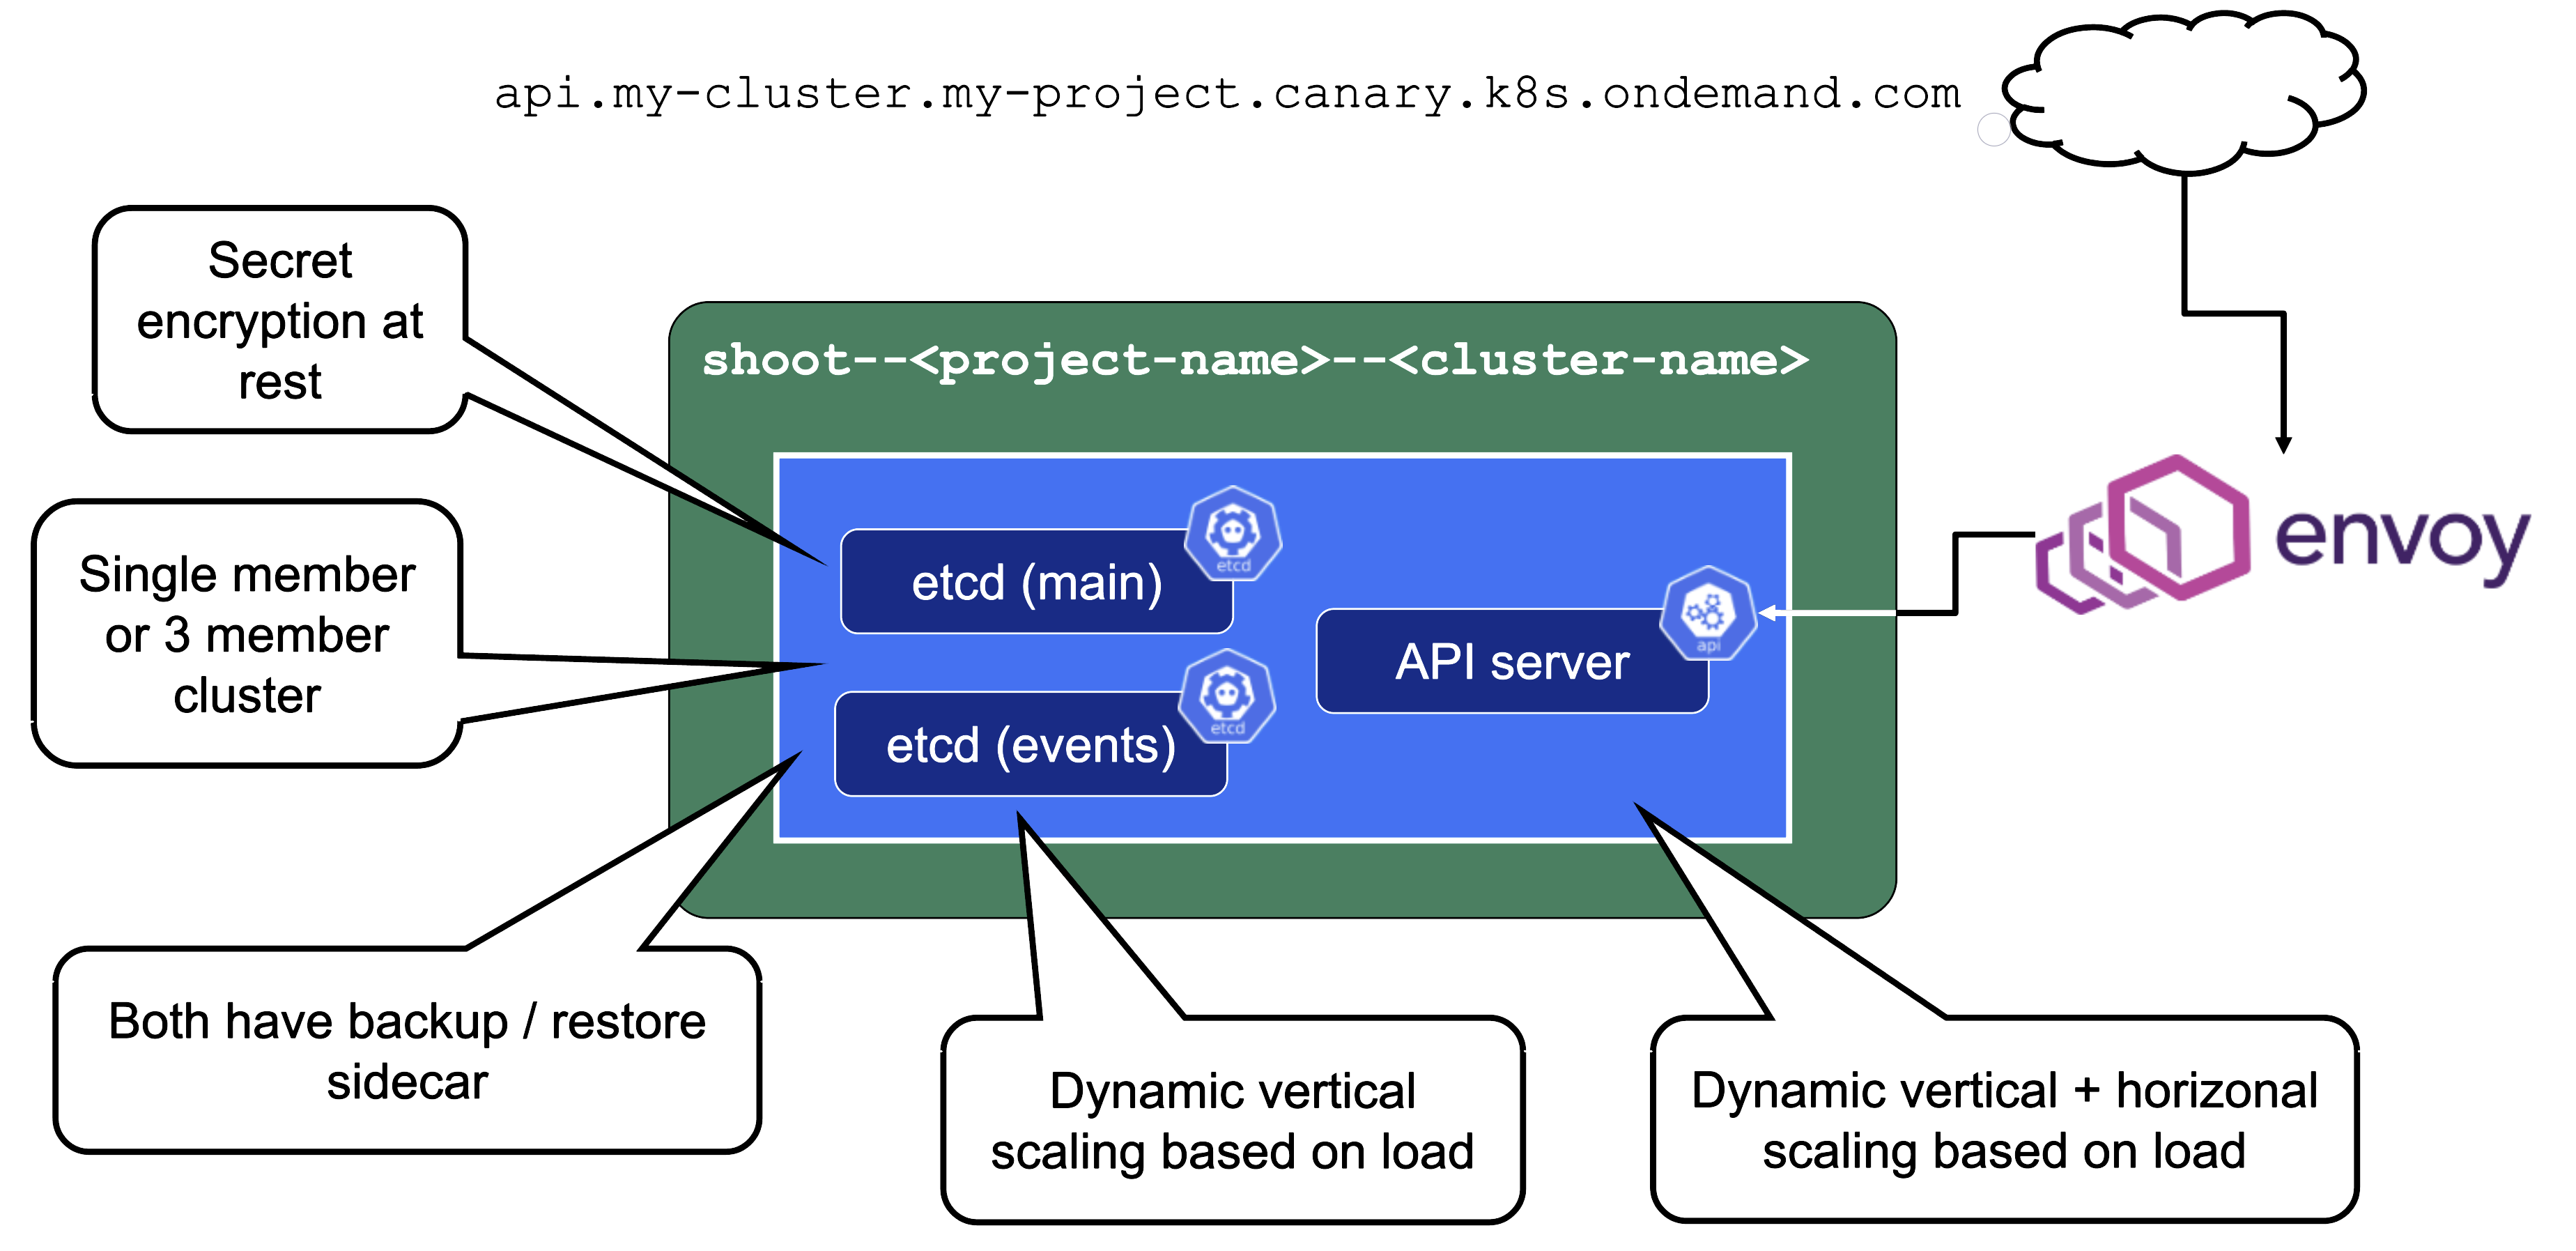
Let’s take a close look at the API server as well as etcd.
Secrets are encrypted at rest. When asking etcd for the data, the reply is still encrypted. Decryption is done by the API server which knows the necessary key.
For non-HA clusters etcd has only 1 replica, while for HA clusters there are 3 replicas.
One special remark is needed for Gardener’s deployment of etcd. The pods coming from the etcd-main StatefulSet contain two containers - one runs etcd, the other runs a program that periodically backs up etcd’s contents to an object store that is set up per seed cluster to make sure no data is lost. After all, etcd is the Achilles heel of all Kubernetes clusters. The backup container is also capable of performing a restore from the object store as well as defragment and compact the etcd datastore. For performance reasons, Gardener stores Kubernetes events in a separate etcd instance. By default, events are retained for 1h but can be kept longer if defined in the shoot.spec.
The kube API server (often called “kapi”) scales both horizontally and vertically.
The kube API server is not directly exposed / reachable via its public hostname. Instead, Gardener runs a single LoadBalancer service backed by an istio gateway / envoy, which uses SNI to forward traffic.

The kube-controller-manager (aka KCM) is the component that contains all the controllers for the core Kubernetes objects such as Deployments, Services, PVCs, etc.
The Kubernetes scheduler will assign pods to nodes.
The Cloud Controller Manager (aka CCM) is the component that contains all functionality to talk to Cloud environments (e.g., create LoadBalancer services).
The CSI driver is the storage subsystem of Kubernetes. It provisions and manages anything related to persistence.
Without the cluster autoscaler, nodes could not be added or removed based on current pressure on the cluster resources. Without the VPA, pods would have fixed resource limits that could not change on demand.
Gardener-Specific Components
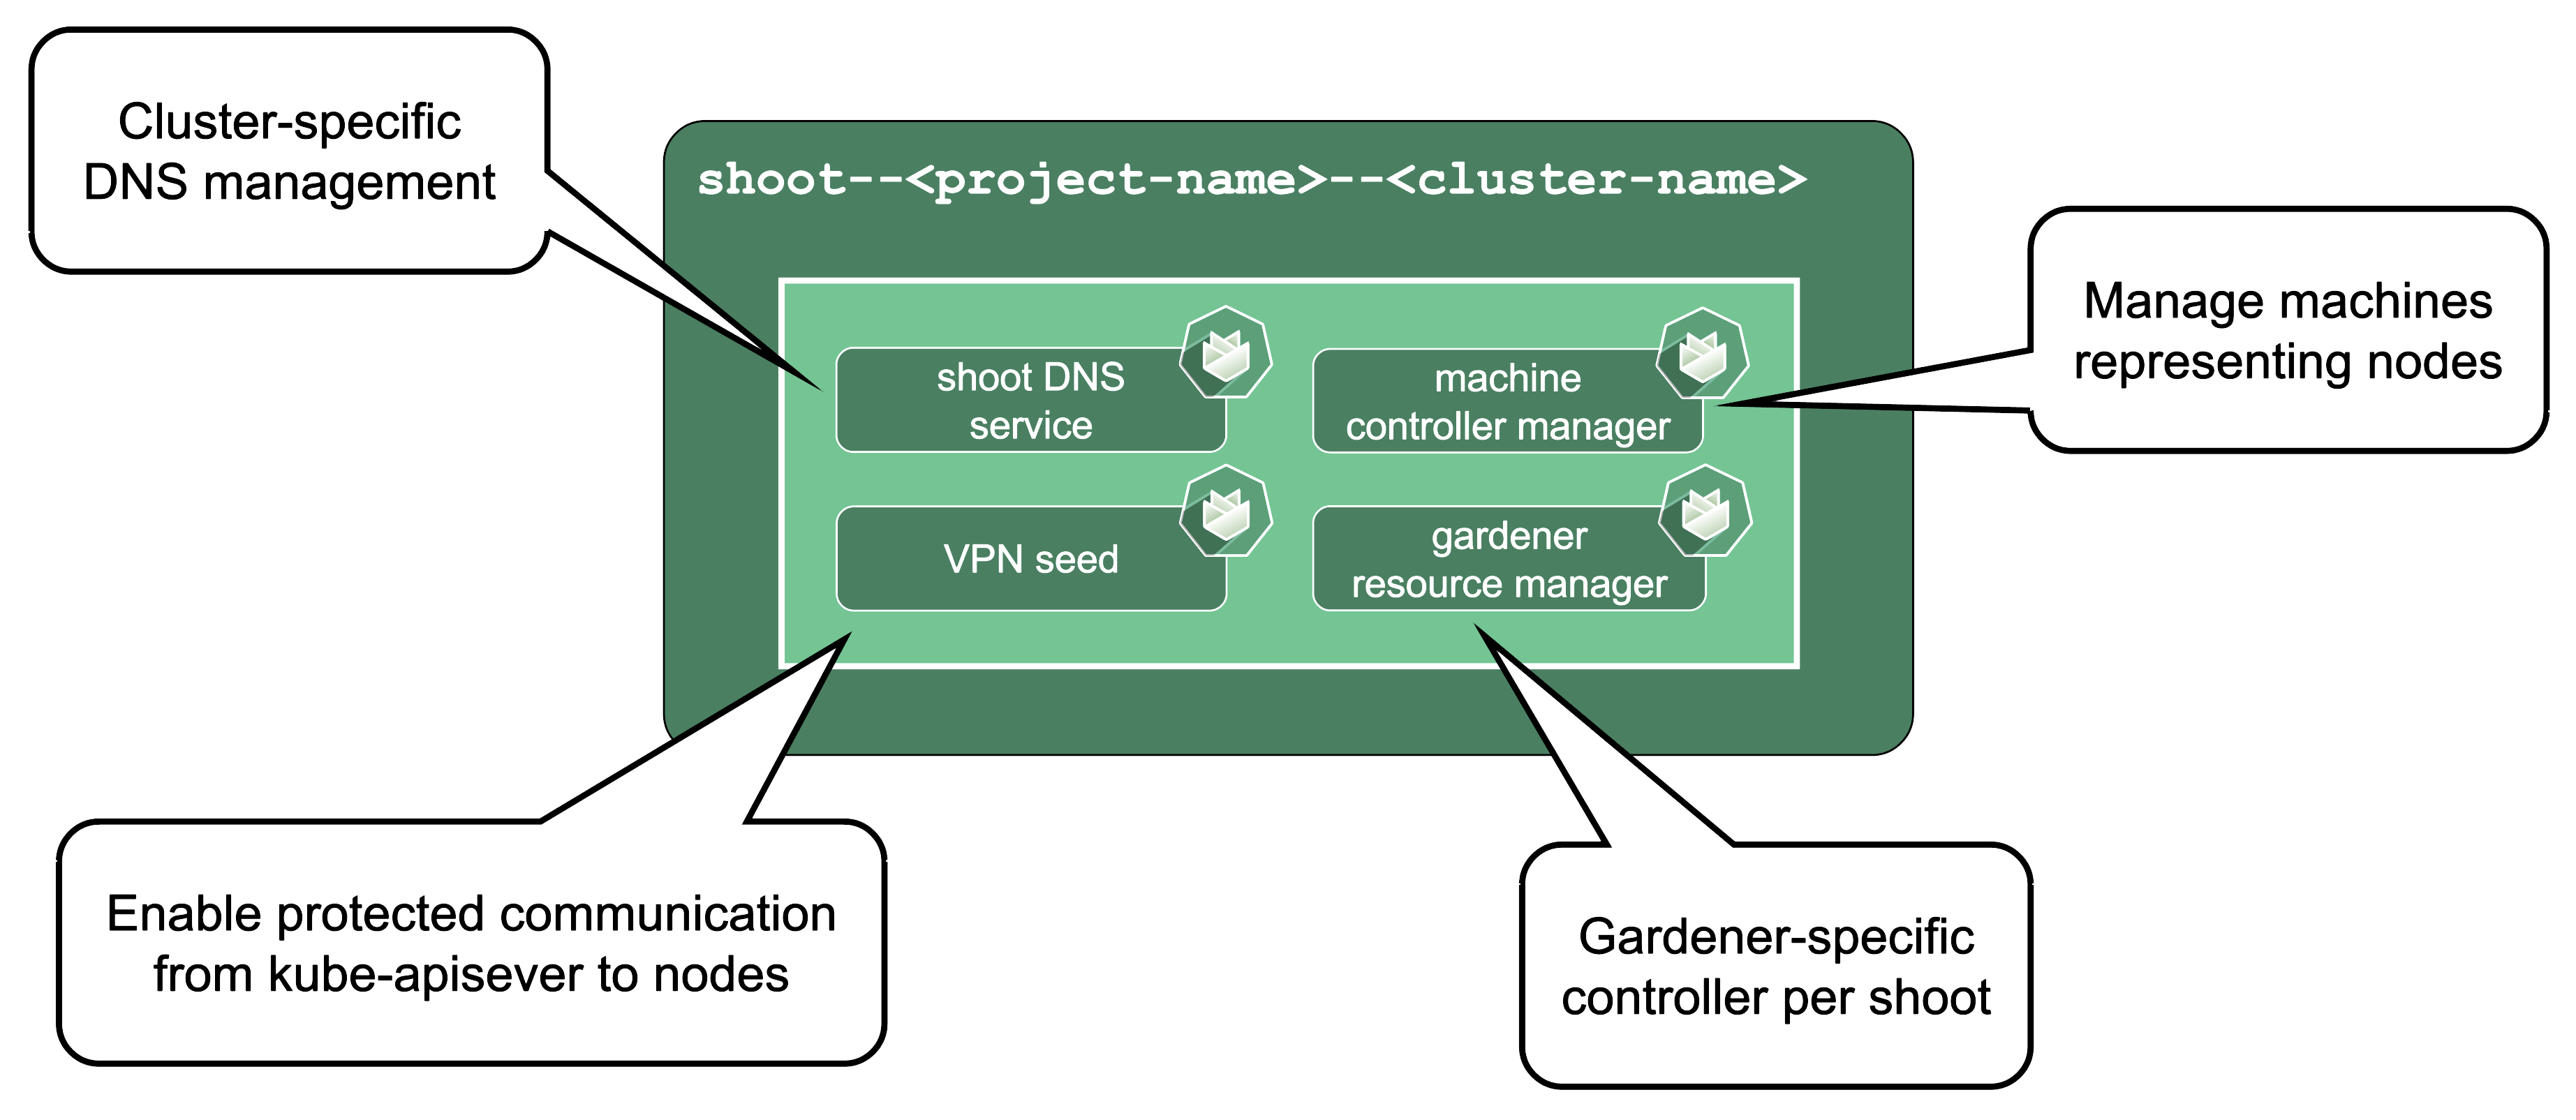
Shoot DNS service: External DNS management for resources within the cluster.
Machine Controller Manager: Responsible for managing VMs which will become nodes in the cluster.
Virtual Private Network deployments (aka VPN): Almost every communication between Kubernetes controllers and the API server is unidirectional - the controllers are given a kubeconfig and will establish a connection to the API server, which is exposed to all nodes of the cluster through a LoadBalancer. However, there are a few operations that require the API server to connect to the kubelet instead (e.g., for every webhook, when using kubectl exec or kubectl logs). Since every good Kubernetes cluster will have its worker nodes shielded behind firewalls to reduce the attack surface, Gardener establishes a VPN connection from the shoot’s internal network to the API server in the seed. For that, every shoot, as well as every control plane namespace in the seed, have openVPN pods in them that connect to each other (with the connection being established from the shoot to the seed).
Gardener Resource Manager: Tooling to deploy and manage Kubernetes resources required for cluster functionality.
Machines
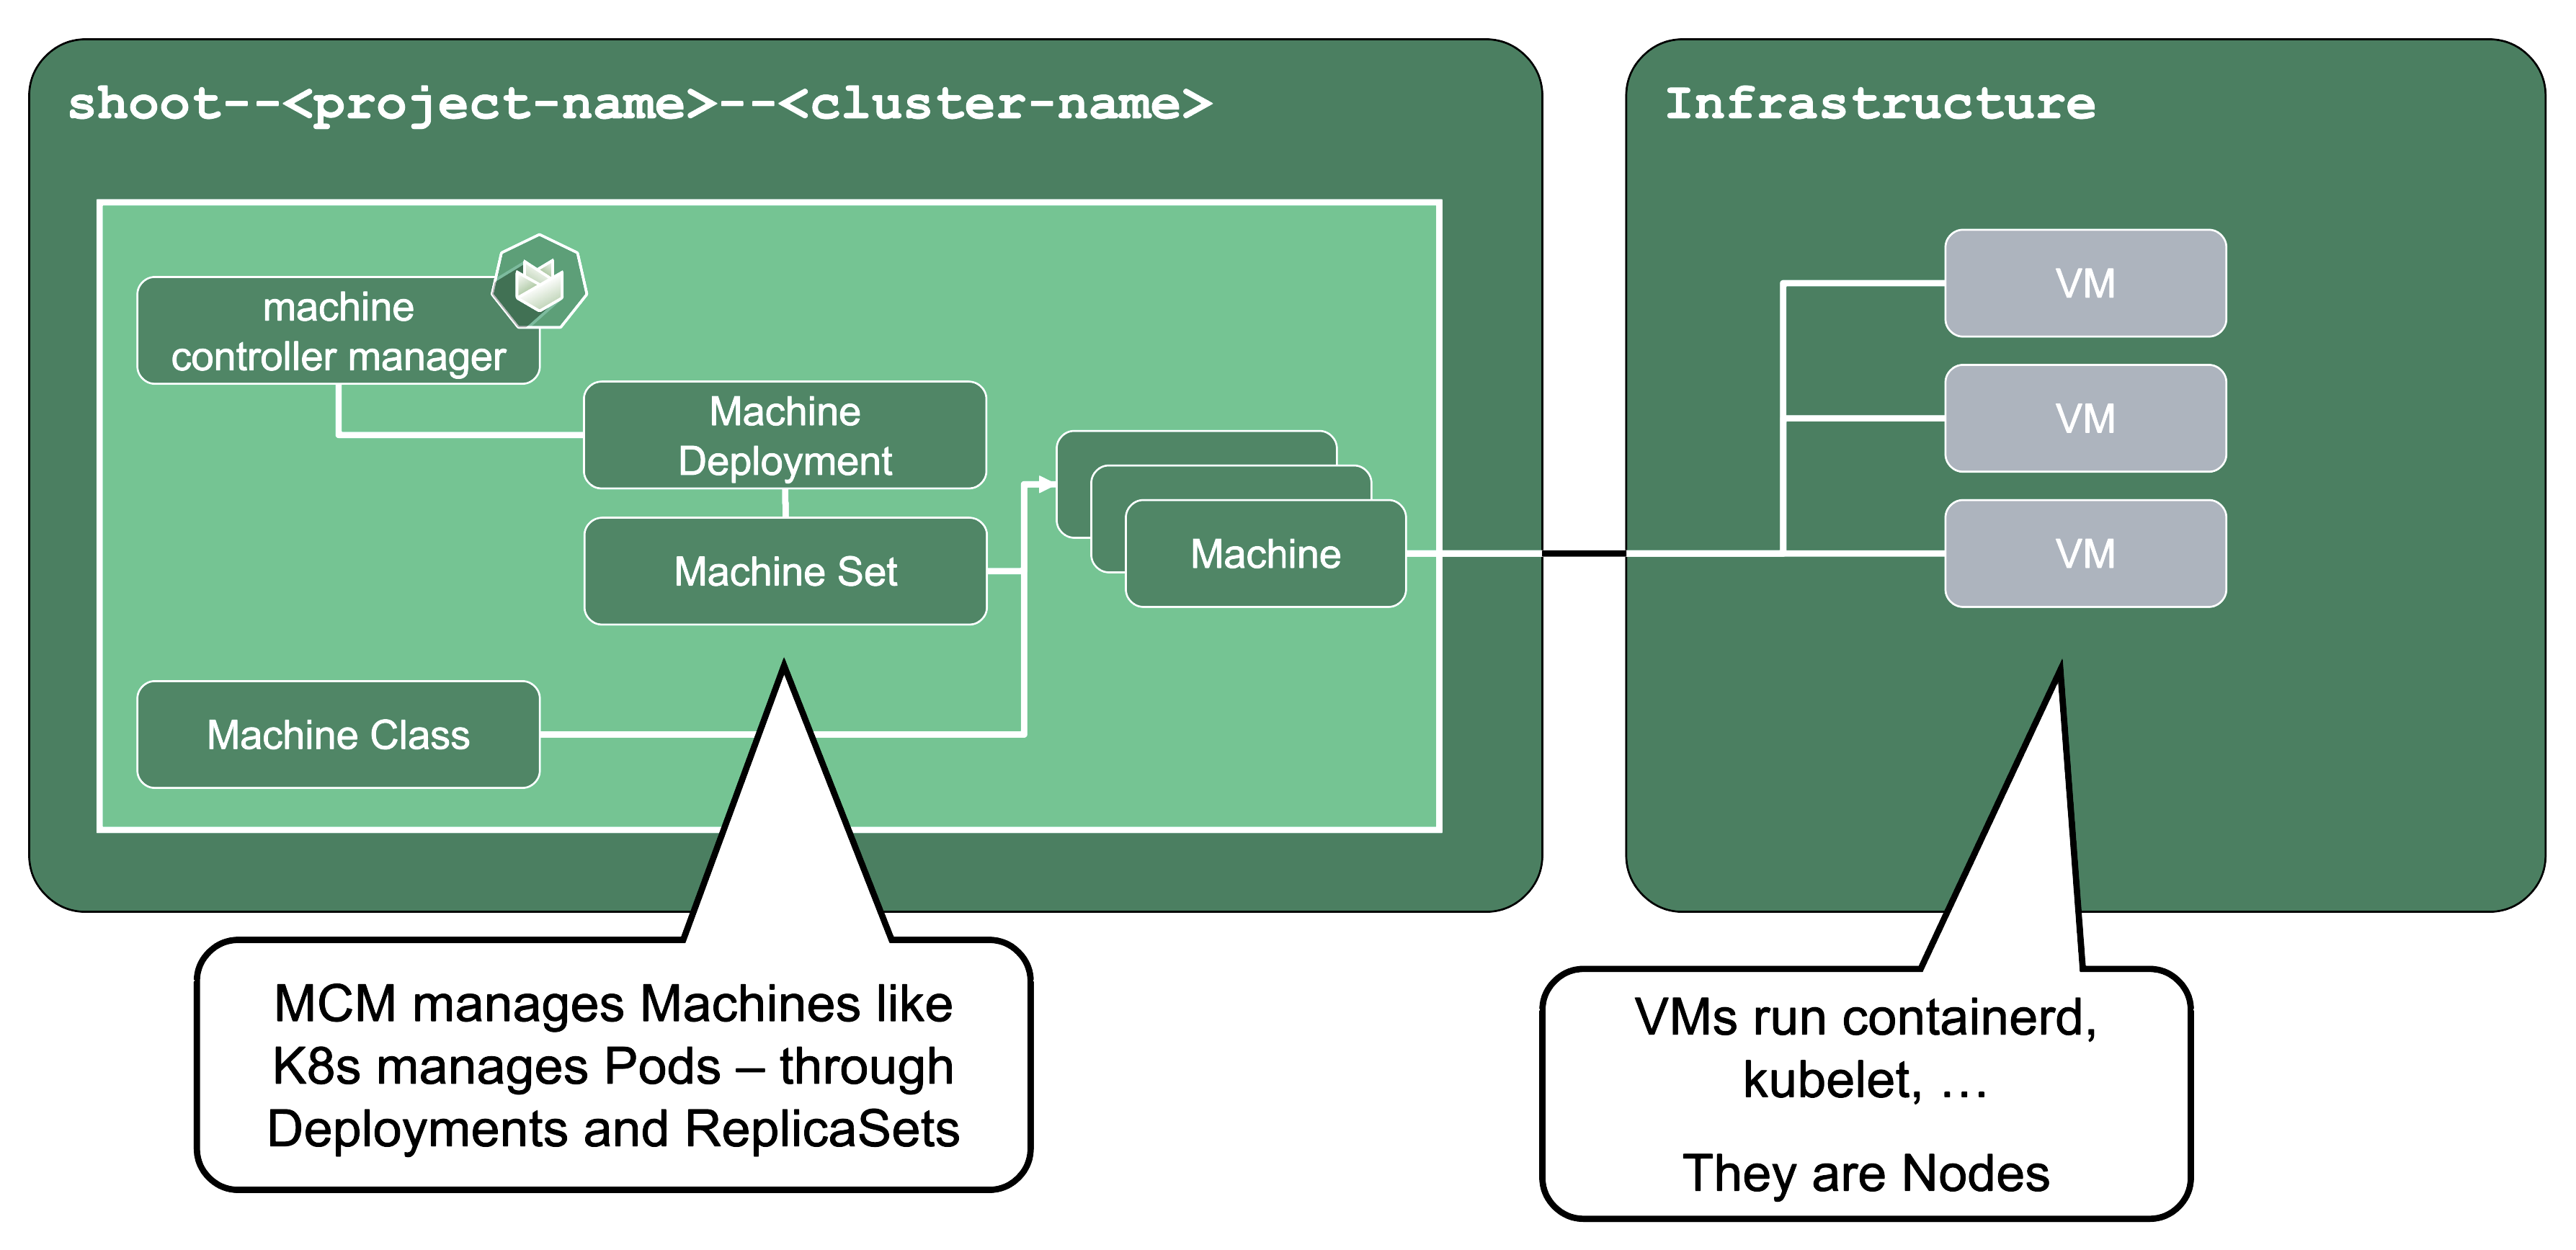
Machine Controller Manager (aka MCM):
The machine controller manager, which lives on the seed in a shoot’s control plane namespace, is the key component responsible for provisioning and removing worker nodes for a Kubernetes cluster. It acts on MachineClass, MachineDeployment, and MachineSet resources in the seed (think of them as the equivalent of Deployments and ReplicaSets) and controls the lifecycle of machine objects. Through a system of plugins, the MCM is the component that phones to the cloud provider’s API and bootstraps virtual machines.
For more information, see MCM and Cluster-autoscaler.
ManagedResources
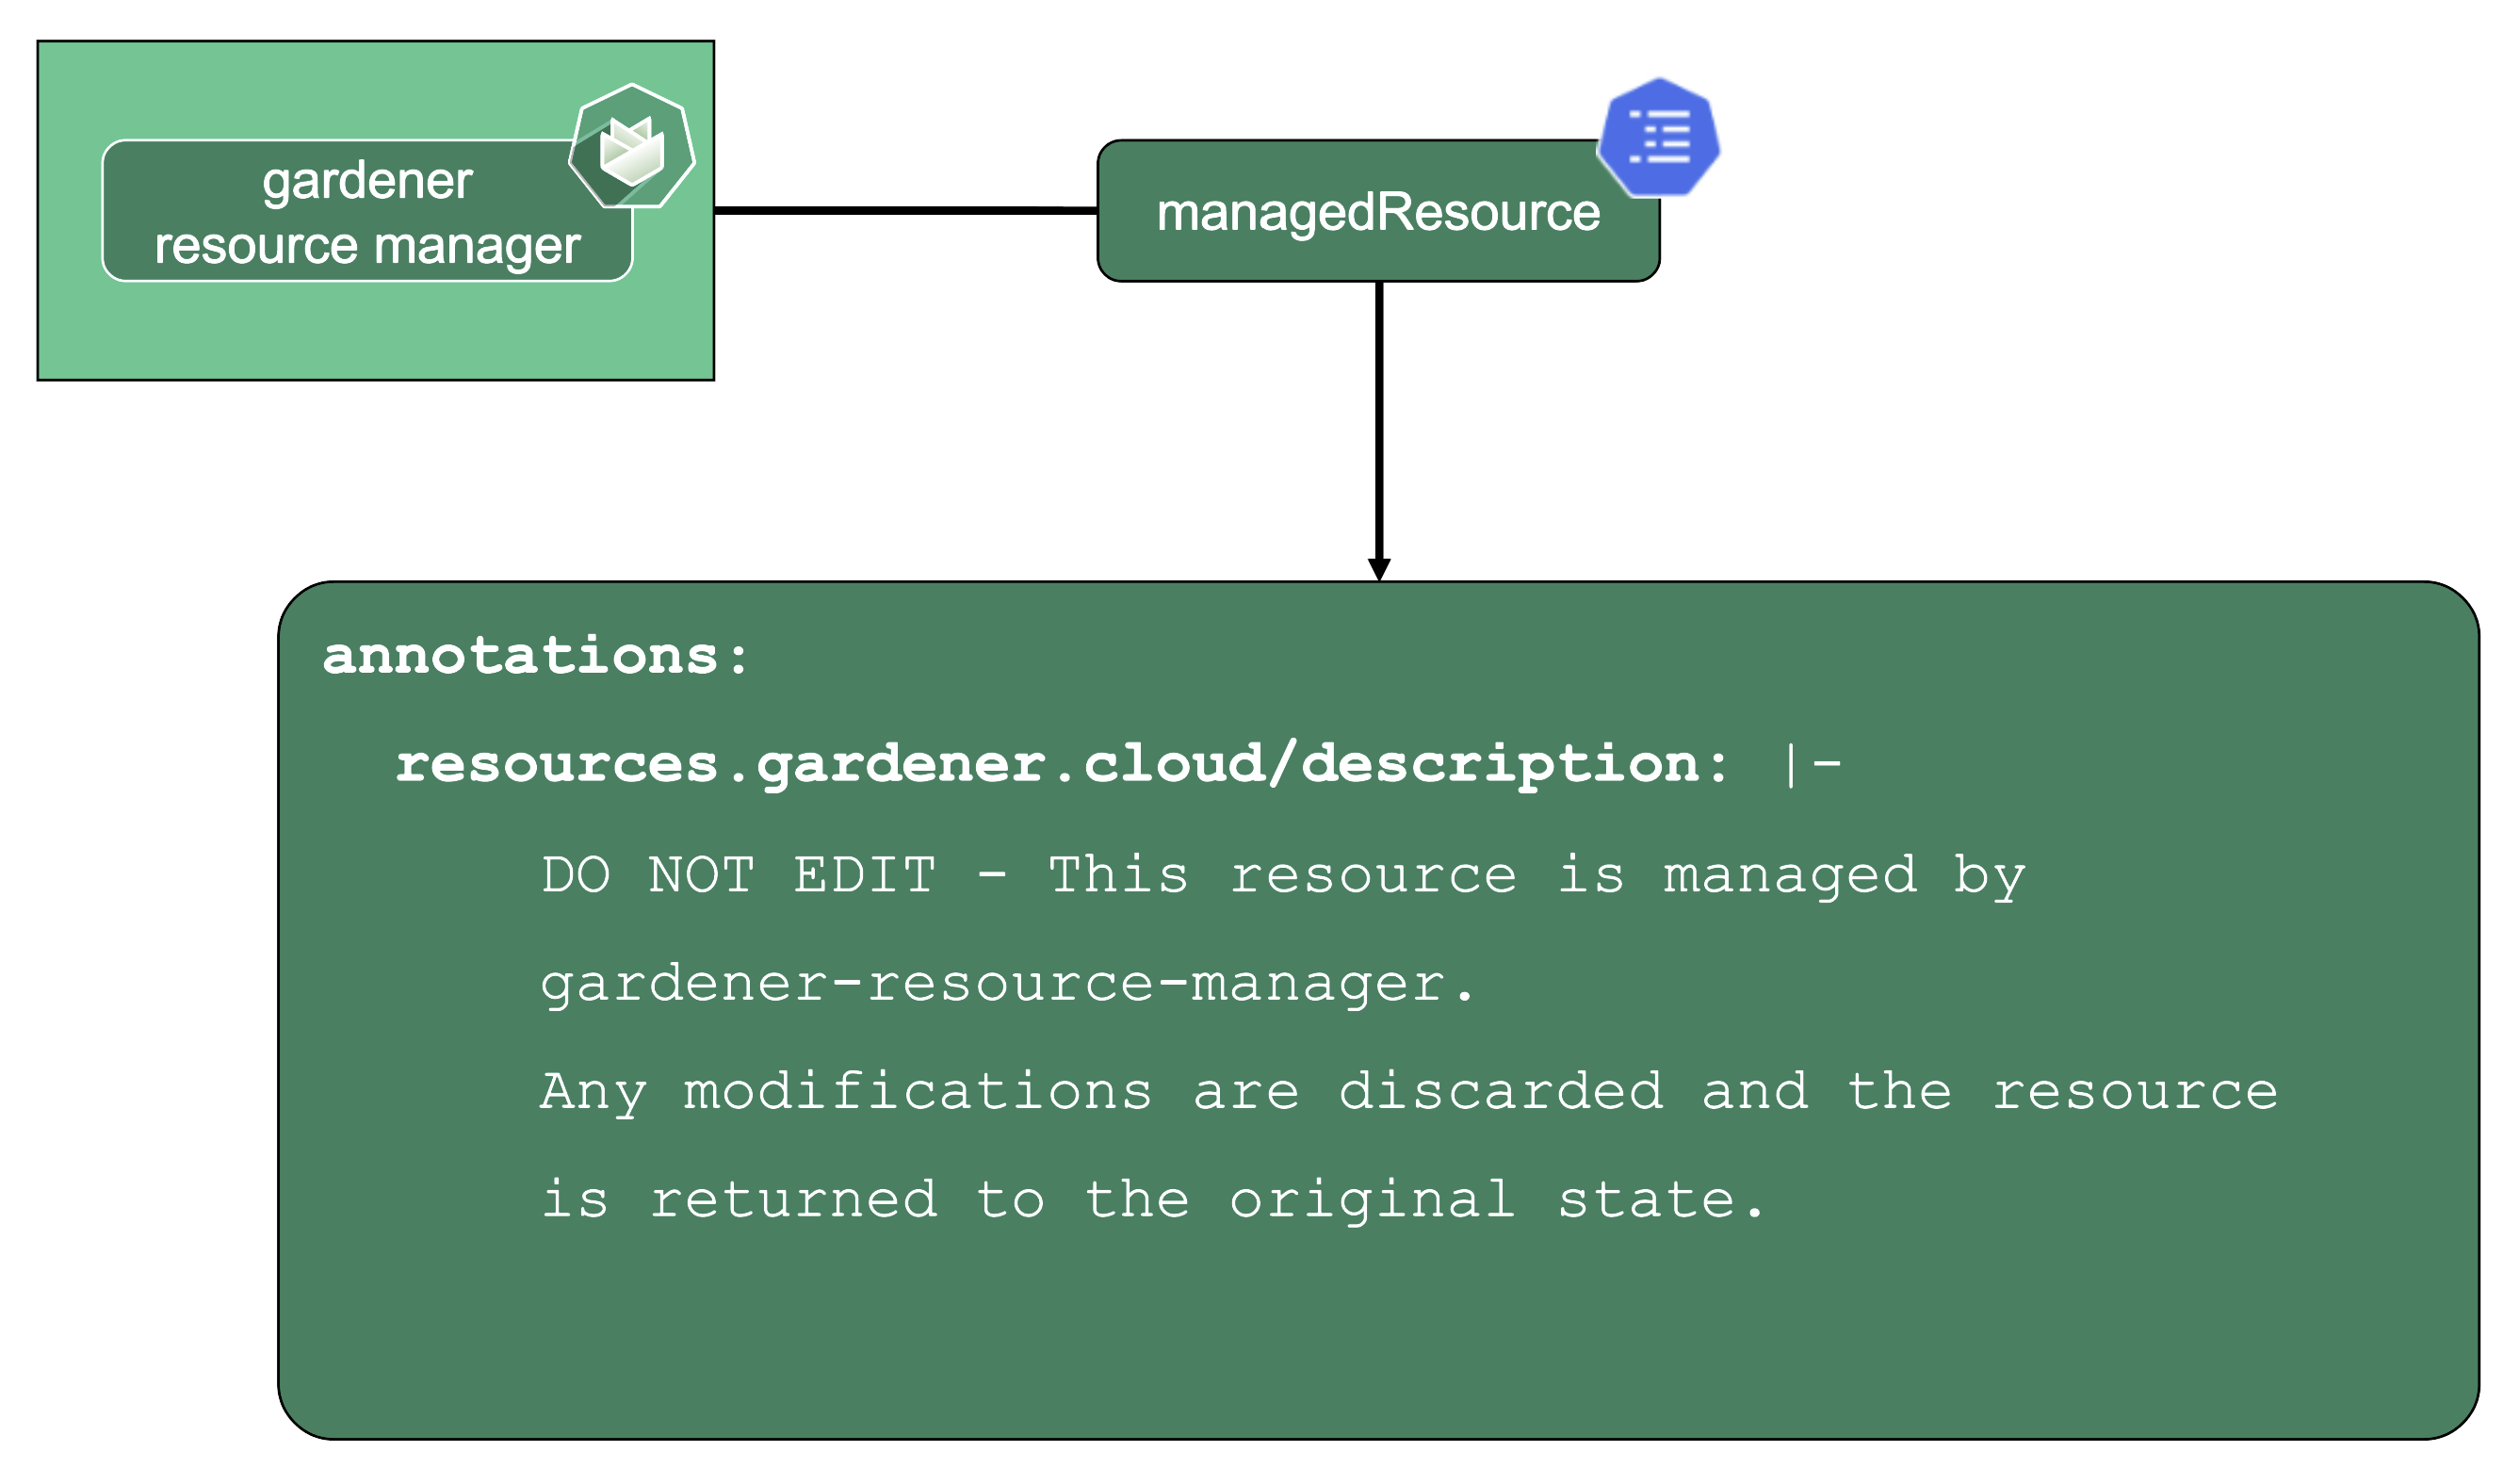
Gardener Resource Manager (aka GRM):
Gardener not only deploys components into the control plane namespace of the seed but also to the shoot (e.g., the counterpart of the VPN). Together with the components in the seed, Gardener needs to have a way to reconcile them.
Enter the GRM - it reconciles on ManagedResources objects, which are descriptions of Kubernetes resources which are deployed into the seed or shoot by GRM. If any of these resources are modified or deleted by accident, the usual observe-analyze-act cycle will revert these potentially malicious changes back to the values that Gardener envisioned. In fact, all the components found in a shoot’s kube-system namespace are ManagedResources governed by the GRM. The actual resource definition is contained in secrets (as they may contain “secret” data), while the ManagedResources contain a reference to the secret containing the actual resource to be deployed and reconciled. Another benefit of using ManagedResources is that when deleted, it will ensure that its resources will be cleaned up (useful if a finalizer of a resource remains for some reason). Also, it provides out of the box healthchecks for some resources (e.g., Pod, Deployment, DaemonSet, … ) that, if failing, will be propagated to the shoot status.
DNS Records - “Internal” and “External”
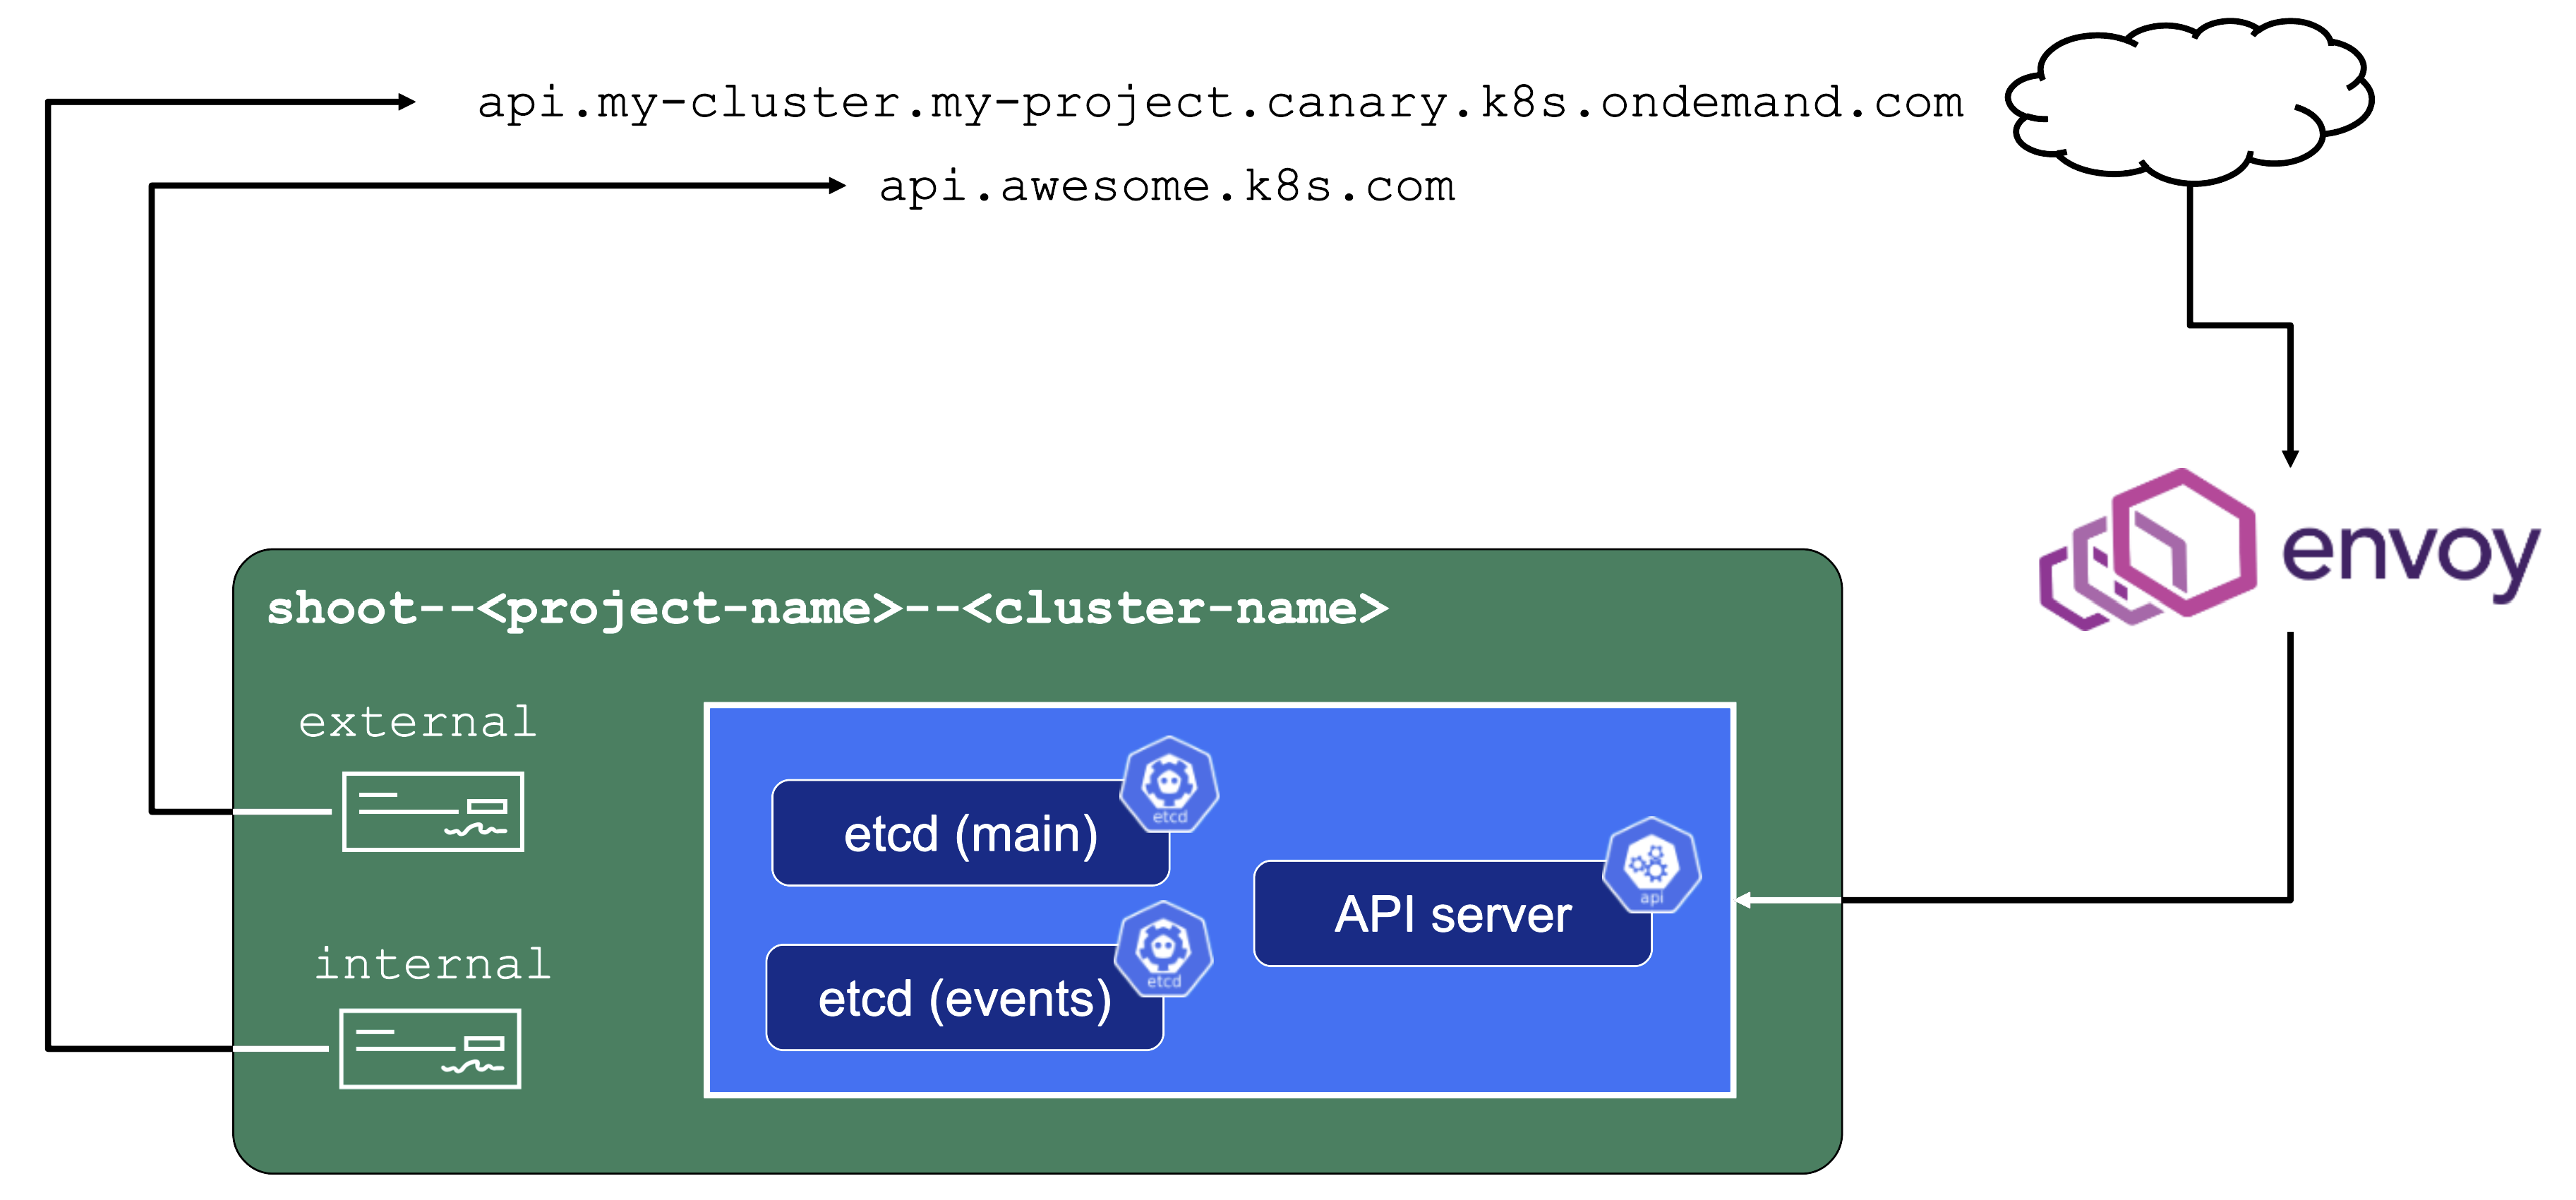
The internal domain name is used by all Gardener components to talk to the API server. Even though it is called “internal”, it is still publicly routable.
But most importantly, it is pre-defined and not configurable by the end user.
Therefore, the “external” domain name exists. It is either a user owned domain or can be pre-defined for a Gardener landscape. It is used by any end user accessing the cluster’s API server.
For more information, see Contract: DNSRecord Resources.
Features and Observability
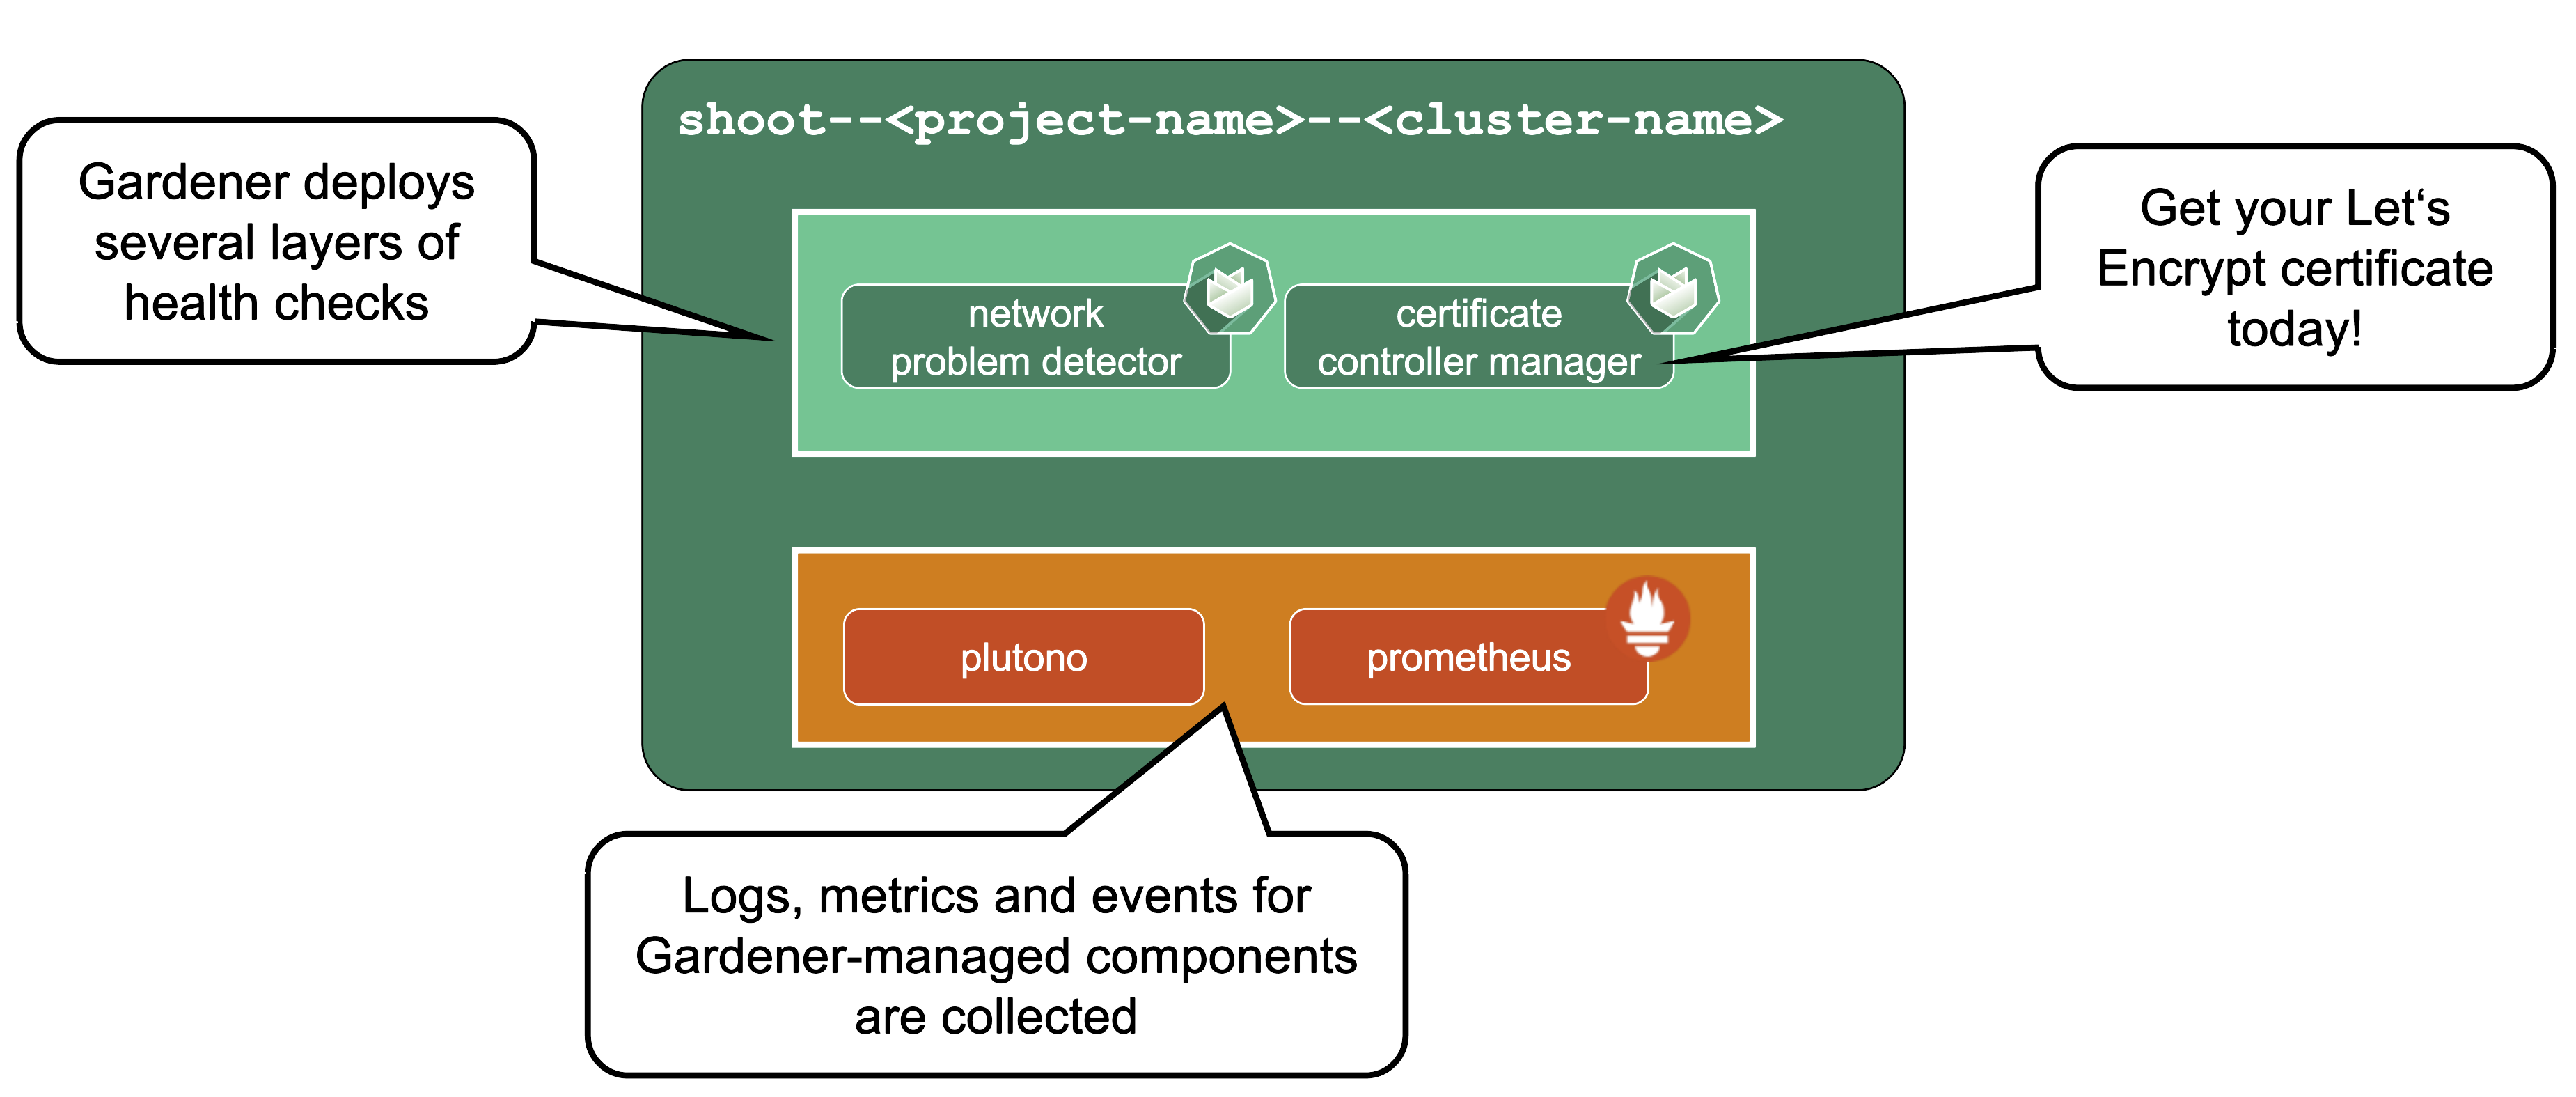
Gardener runs various health checks to ensure that the cluster works properly. The Network Problem Detector gives information about connectivity within the cluster and to the API server.
Certificate Management: allows to request certificates via the ACME protocol (e.g., issued by Let’s Encrypt) from within the cluster. For detailed information, have a look at the cert-manager project.
Observability stack: Gardener deploys observability components and gathers logs and metrics for the control-plane & kube-system namespace. Also provided out-of-the-box is a UI based on Plutono (fork of Grafana) with pre-defined dashboards to access and query the monitoring data. For more information, see Observability.
HA Control Plane

As the title indicates, the HA control plane feature is only about the control plane. Setting up the data plane to span multiple zones is part of the worker spec of a shoot.
HA control planes can be configured as part of the shoot’s spec. The available types are:
- Node
- Zone
Both work similarly and just differ in the failure domain the concepts are applied to.
For detailed guidance and more information, see the High Availability Guides.
Zonal HA Control Planes
Zonal HA is the most likely setup for shoots with purpose: production.
The starting point is a regular (non-HA) control plane. etcd and most controllers are singletons and the kube-apiserver might have been scaled up to several replicas.
To get to an HA setup we need:
- A minimum of 3 replicas of the API server
- 3 replicas for etcd (both main and events)
- A second instance for each controller (e.g., controller manager, csi-driver, scheduler, etc.) that can take over in case of failure (active / passive).
To distribute those pods across zones, well-known concepts like PodTopologySpreadConstraints or Affinities are applied.
kube-system Namespace

For a fully functional cluster, a few components need to run on the data plane side of the diagram. They all exist in the kube-system namespace. Let’s have a closer look at them.
Networking
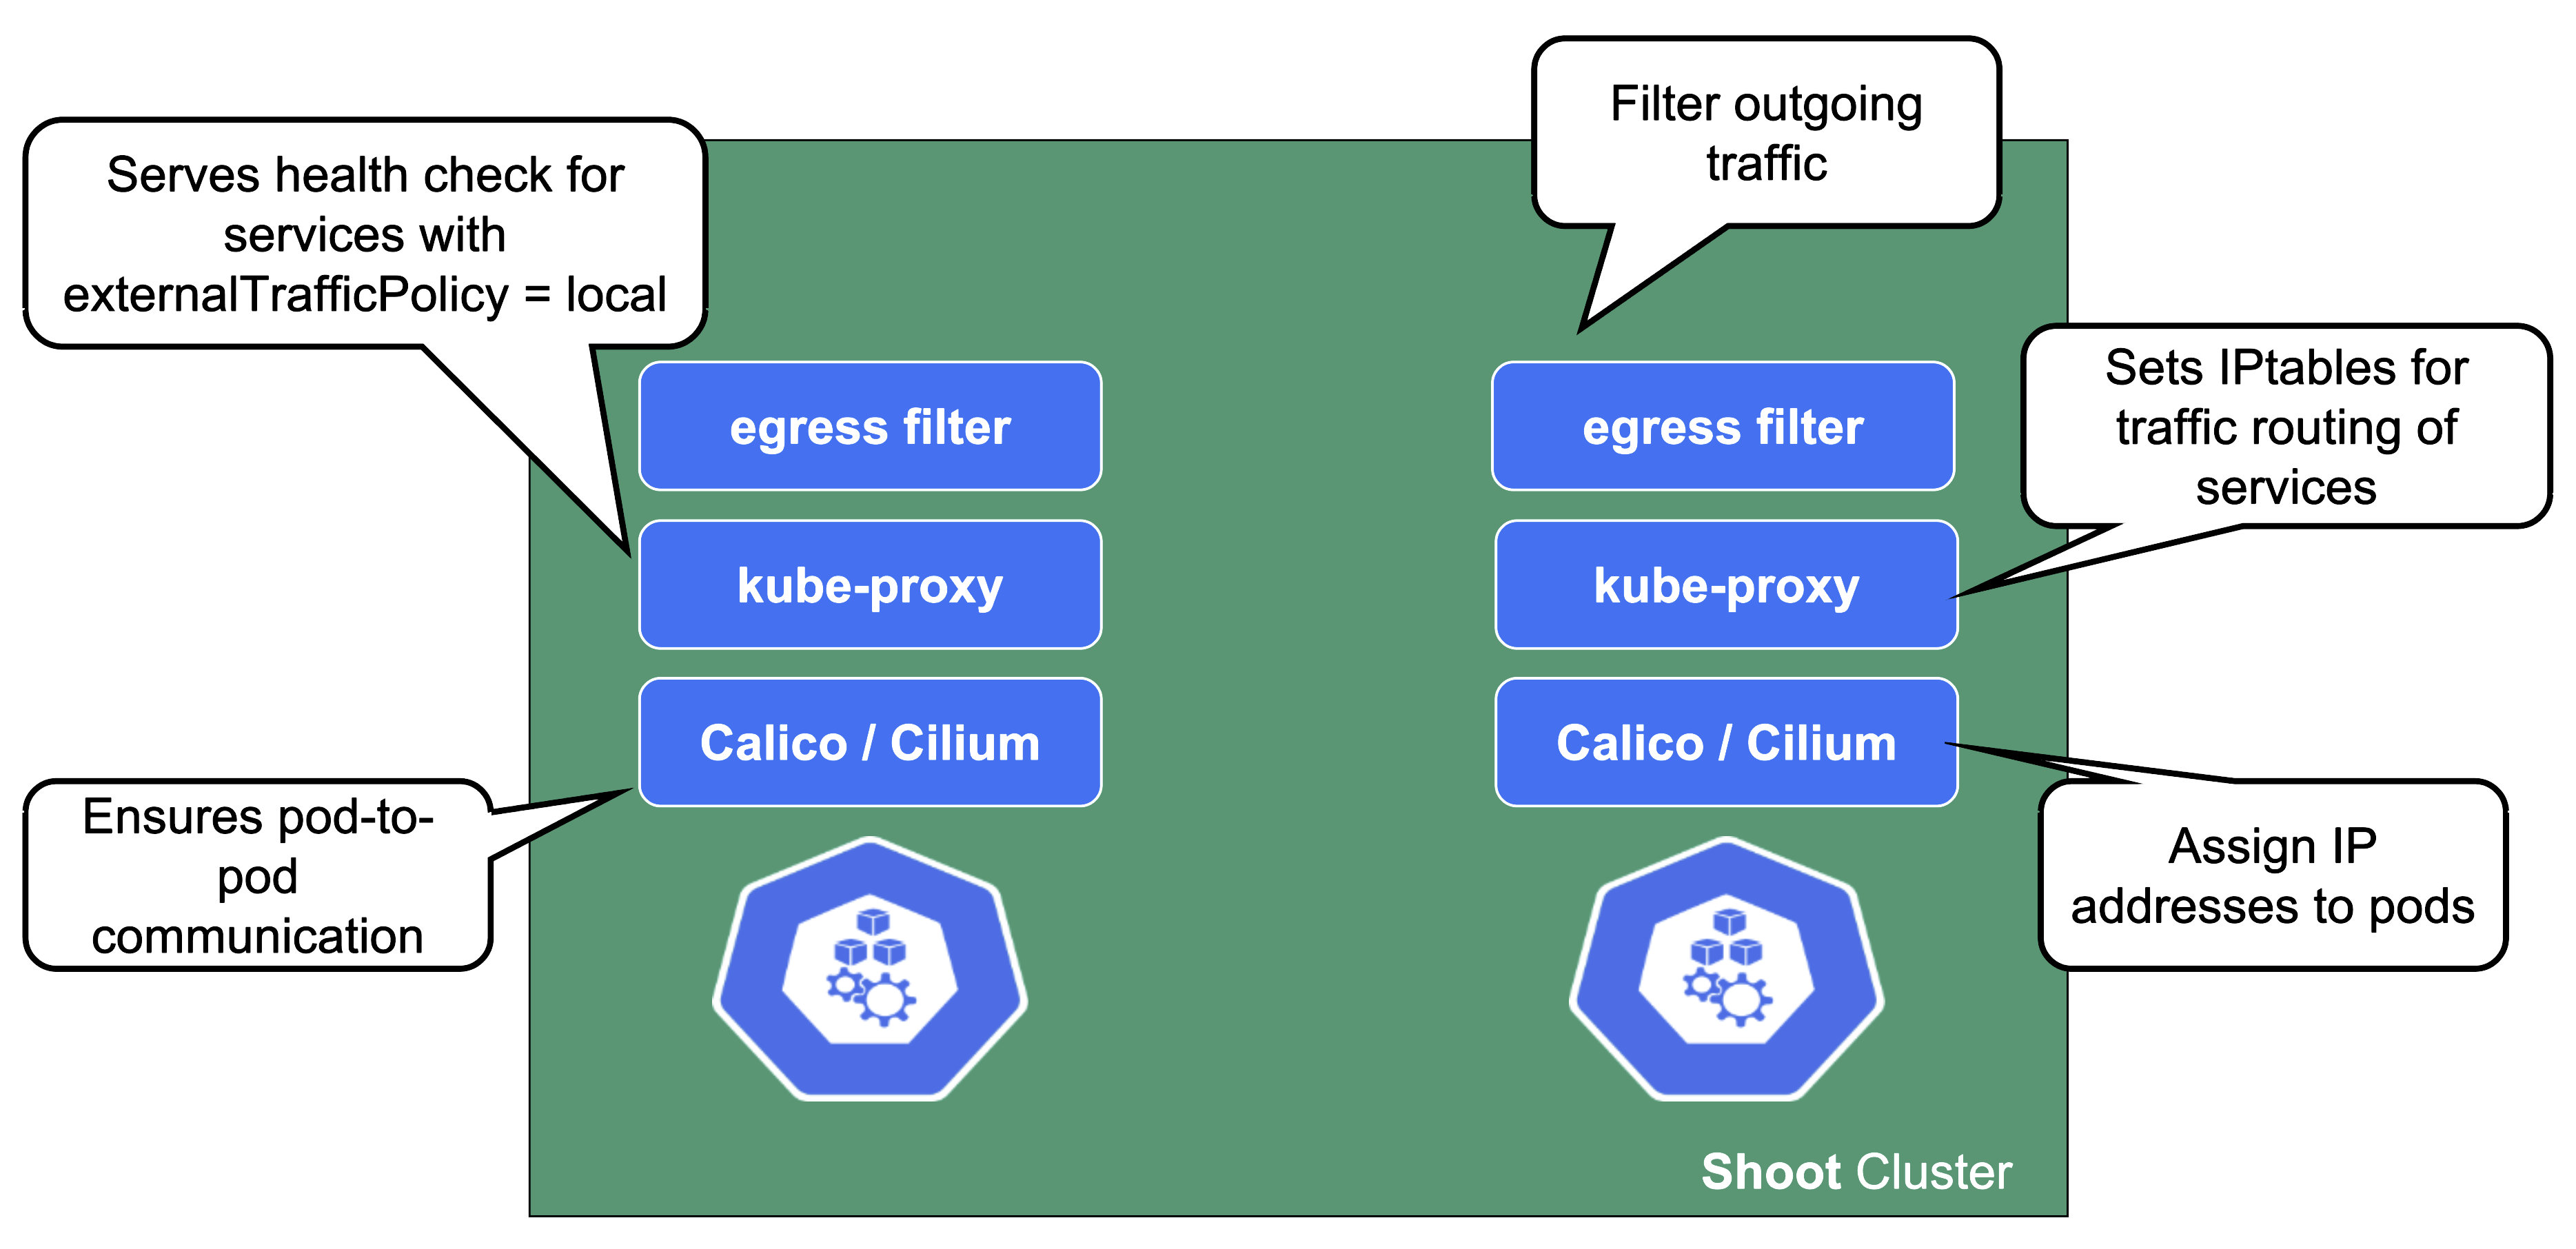
On each node we need a CNI (container network interface) plugin. Gardener offers Calico or Cilium as network provider for a shoot. When using Calico, a kube-proxy is deployed. Cilium does not need a kube-proxy, as it takes care of its tasks as well.
The CNI plugin ensures pod-to-pod communication within the cluster. As part of it, it assigns cluster-internal IP addresses to the pods and manages the network devices associated with them. When an overlay network is enabled, calico will also manage the routing of pod traffic between different nodes.
On the other hand, kube-proxy implements the actual service routing (cilium can do this as well and no kube-proxy is needed). Whenever packets go to a service’s IP address, they are re-routed based on IPtables rules maintained by kube-proxy to reach the actual pods backing the service. kube-proxy operates on endpoint-slices and manages IPtables on EVERY node. In addition, kube-proxy provides a health check endpoint for services with externalTrafficPolicy=local, where traffic only gets to nodes that run a pod matching the selector of the service.
The egress filter implements basic filtering of outgoing traffic in order to satisfy standard policy compliance requirements.
And what happens if the pods crashloop, are missing or otherwise broken?
Well, in case kube-proxy is broken, service traffic will degrade over time (depending on the pod churn rate and how many kube-proxy pods are broken).
When calico is failing on a node, no new pods can start there as they don’t get any IP address assigned. It might also fail to add routes to newly added nodes. Depending on the error, deleting the pod might help.
DNS System
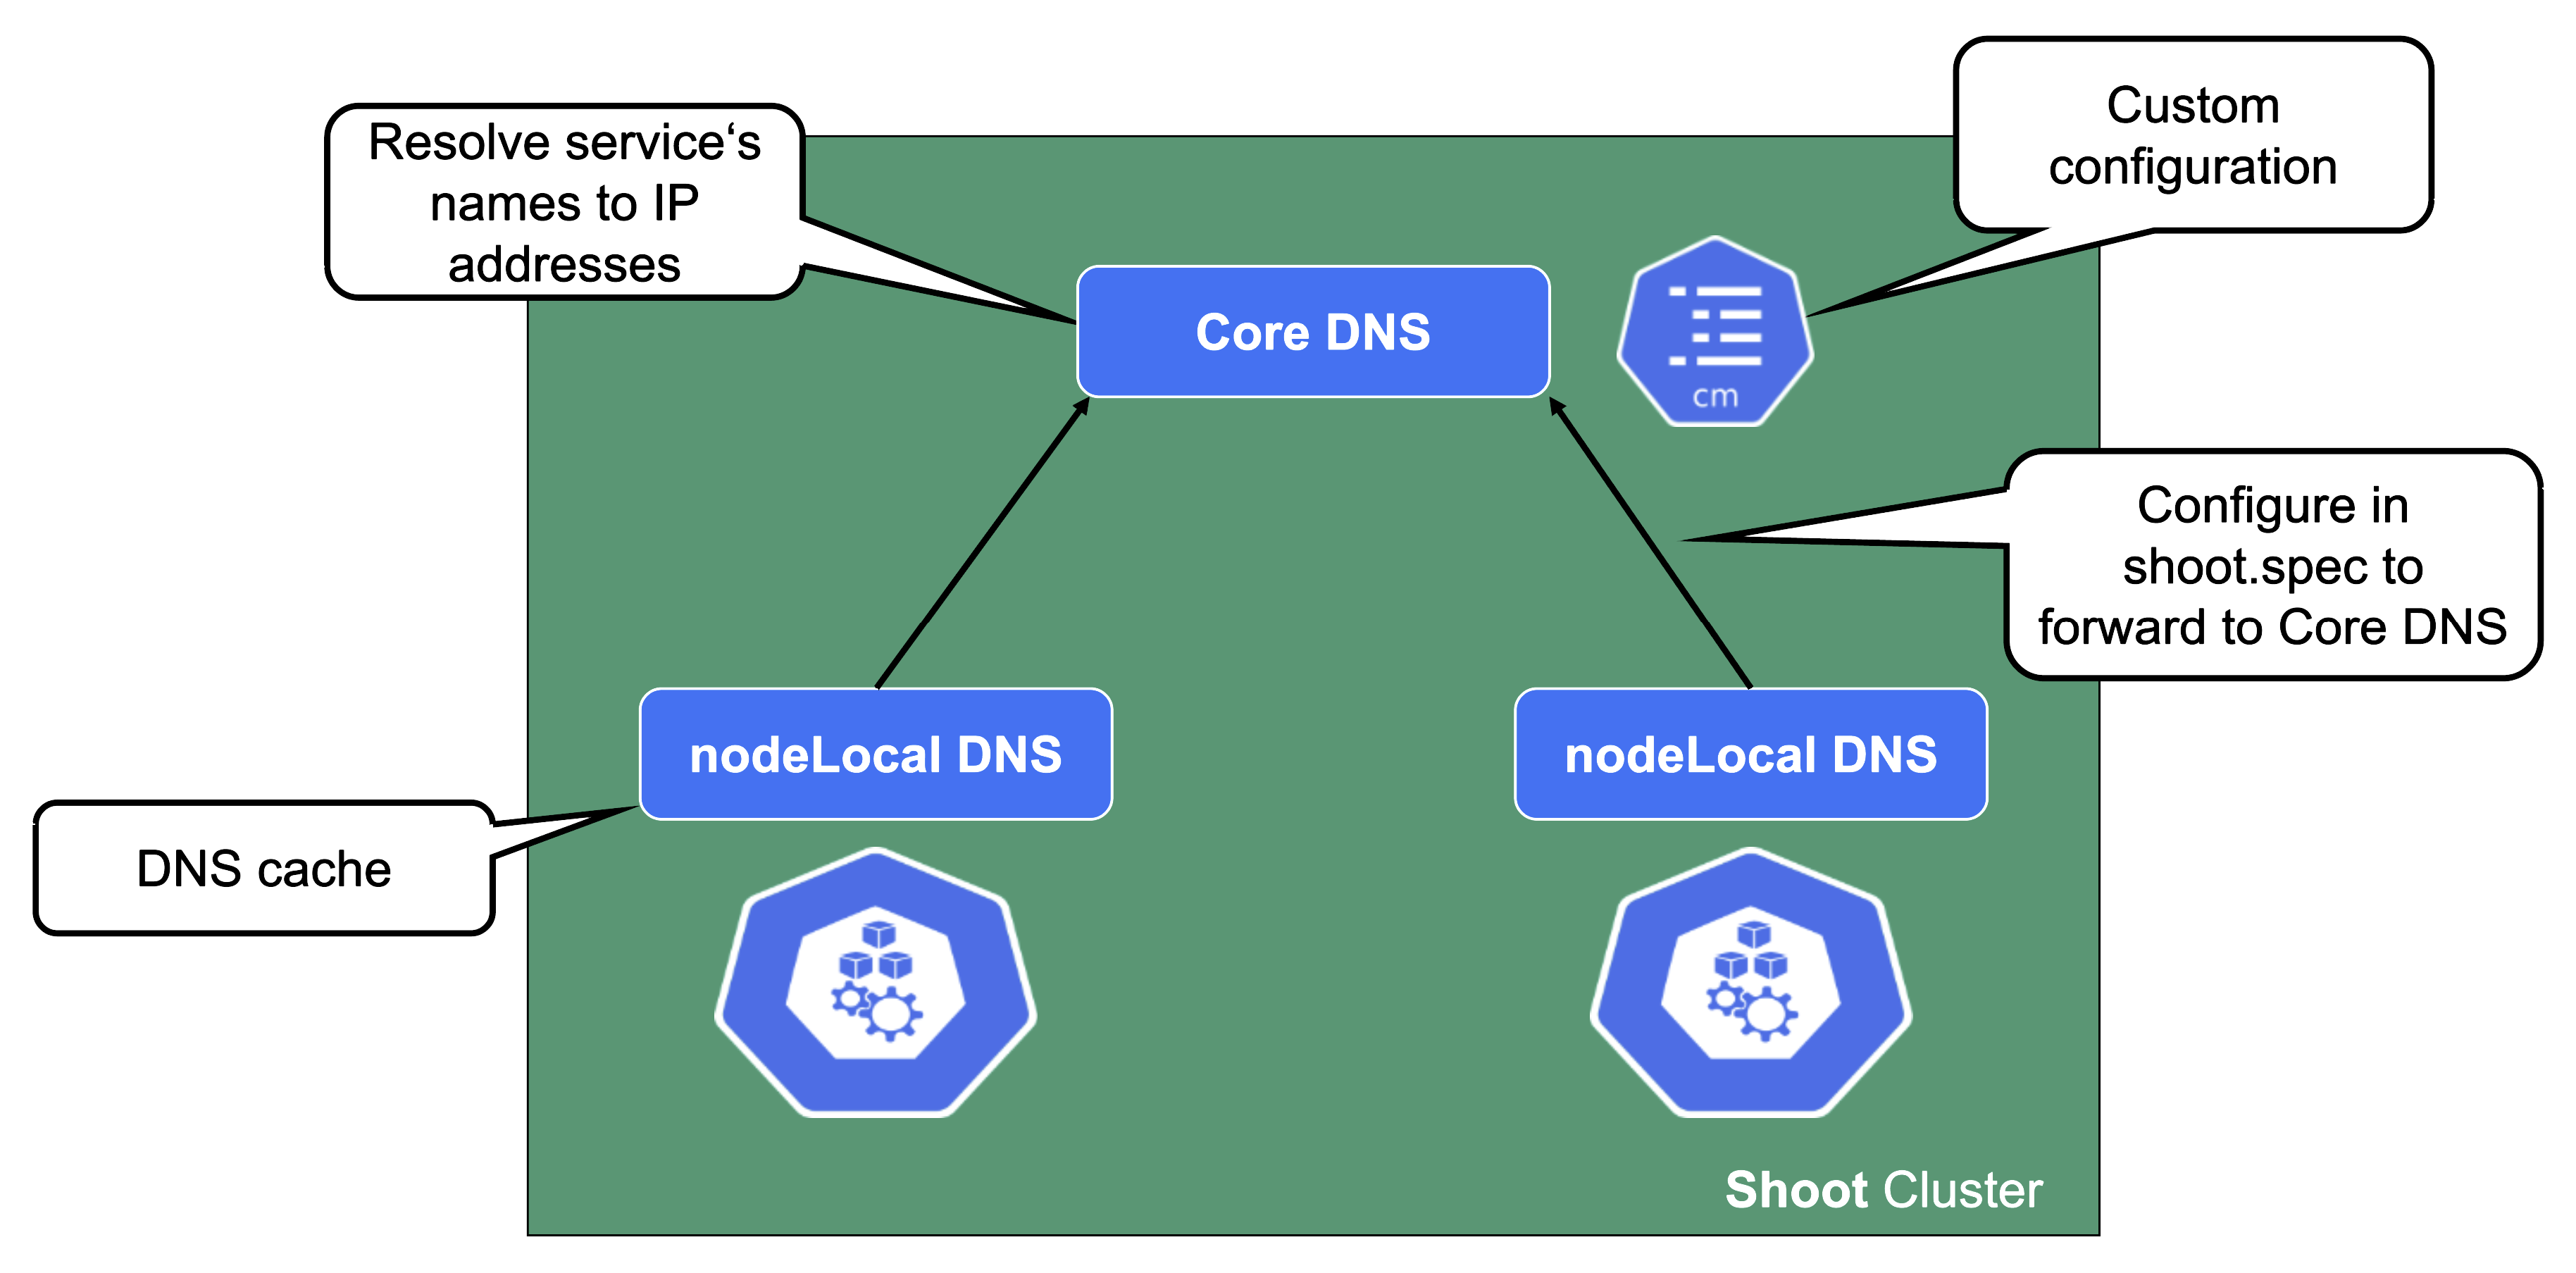
For a normal service in Kubernetes, a cluster-internal DNS record that resolves to the service’s ClusterIP address is being created. In Gardener (similar to most other Kubernetes offerings) CoreDNS takes care of this aspect. To reduce the load when it comes to upstream DNS queries, Gardener deploys a DNS cache to each node by default. It will also forward queries outside the cluster’s search domain directly to the upstream DNS server. For more information, see NodeLocalDNS Configuration and DNS autoscaling.
In addition to this optimization, Gardener allows custom DNS configuration to be added to CoreDNS via a dedicated ConfigMap.
In case this customization is related to non-Kubernetes entities, you may configure the shoot’s NodeLocalDNS to forward to CoreDNS instead of upstream (disableForwardToUpstreamDNS: true).
A broken DNS system on any level will cause disruption / service degradation for applications within the cluster.
Health Checks and Metrics
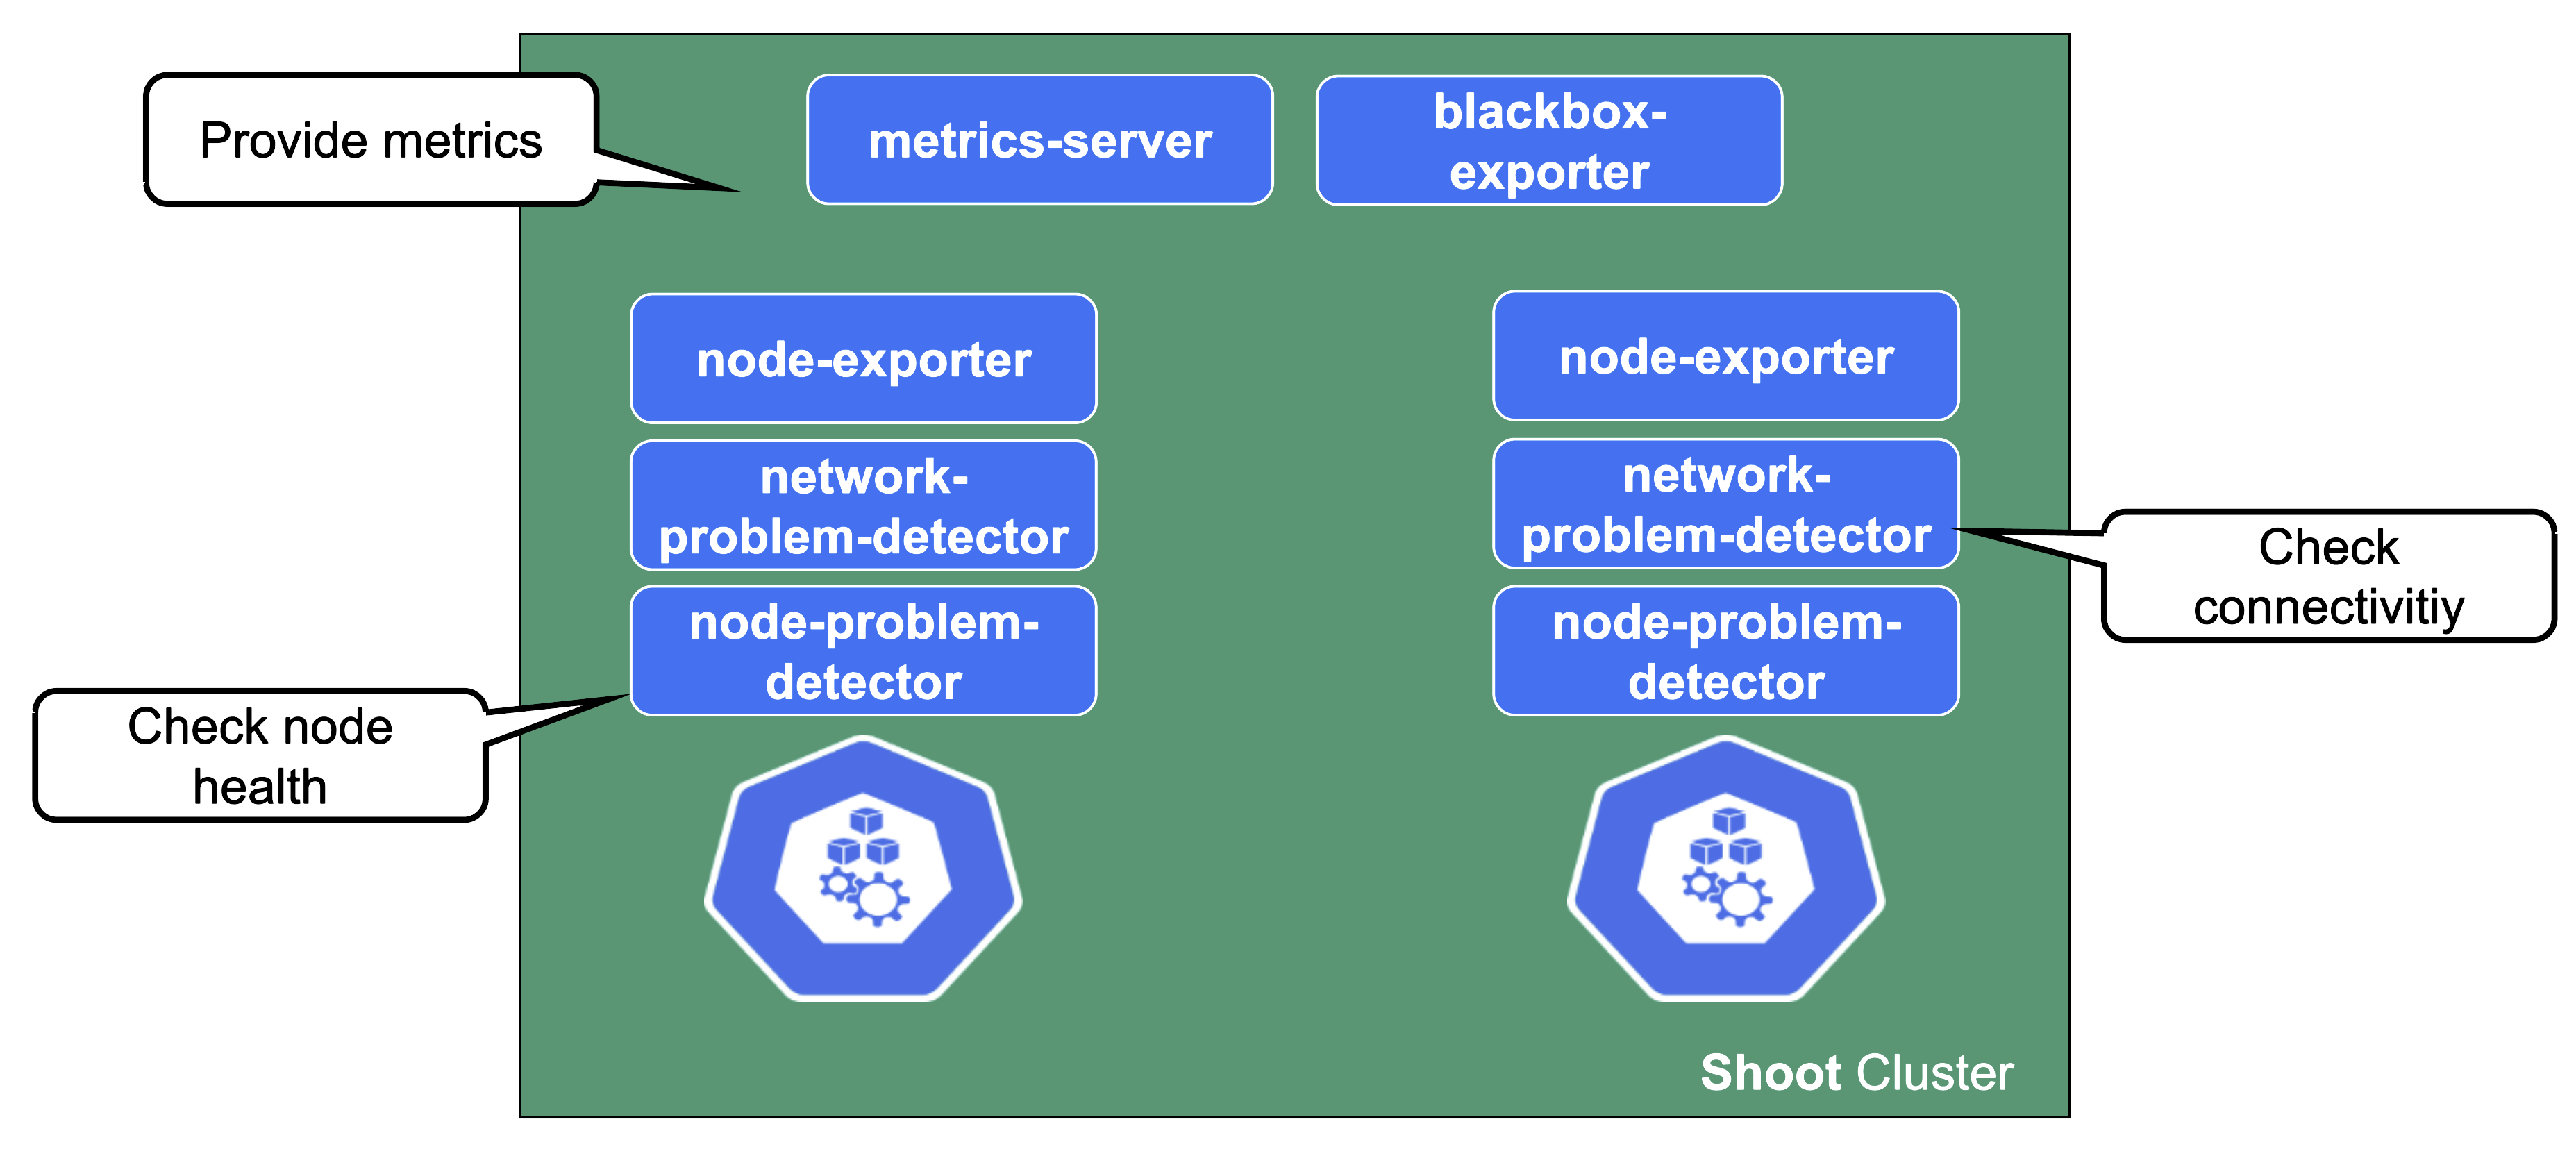
Gardener deploys probes checking the health of individual nodes. In a similar fashion, a network health check probes connectivity within the cluster (node to node, pod to pod, pod to api-server, …).
They provide the data foundation for Gardener’s monitoring stack together with the metrics collecting / exporting components.
Connectivity Components
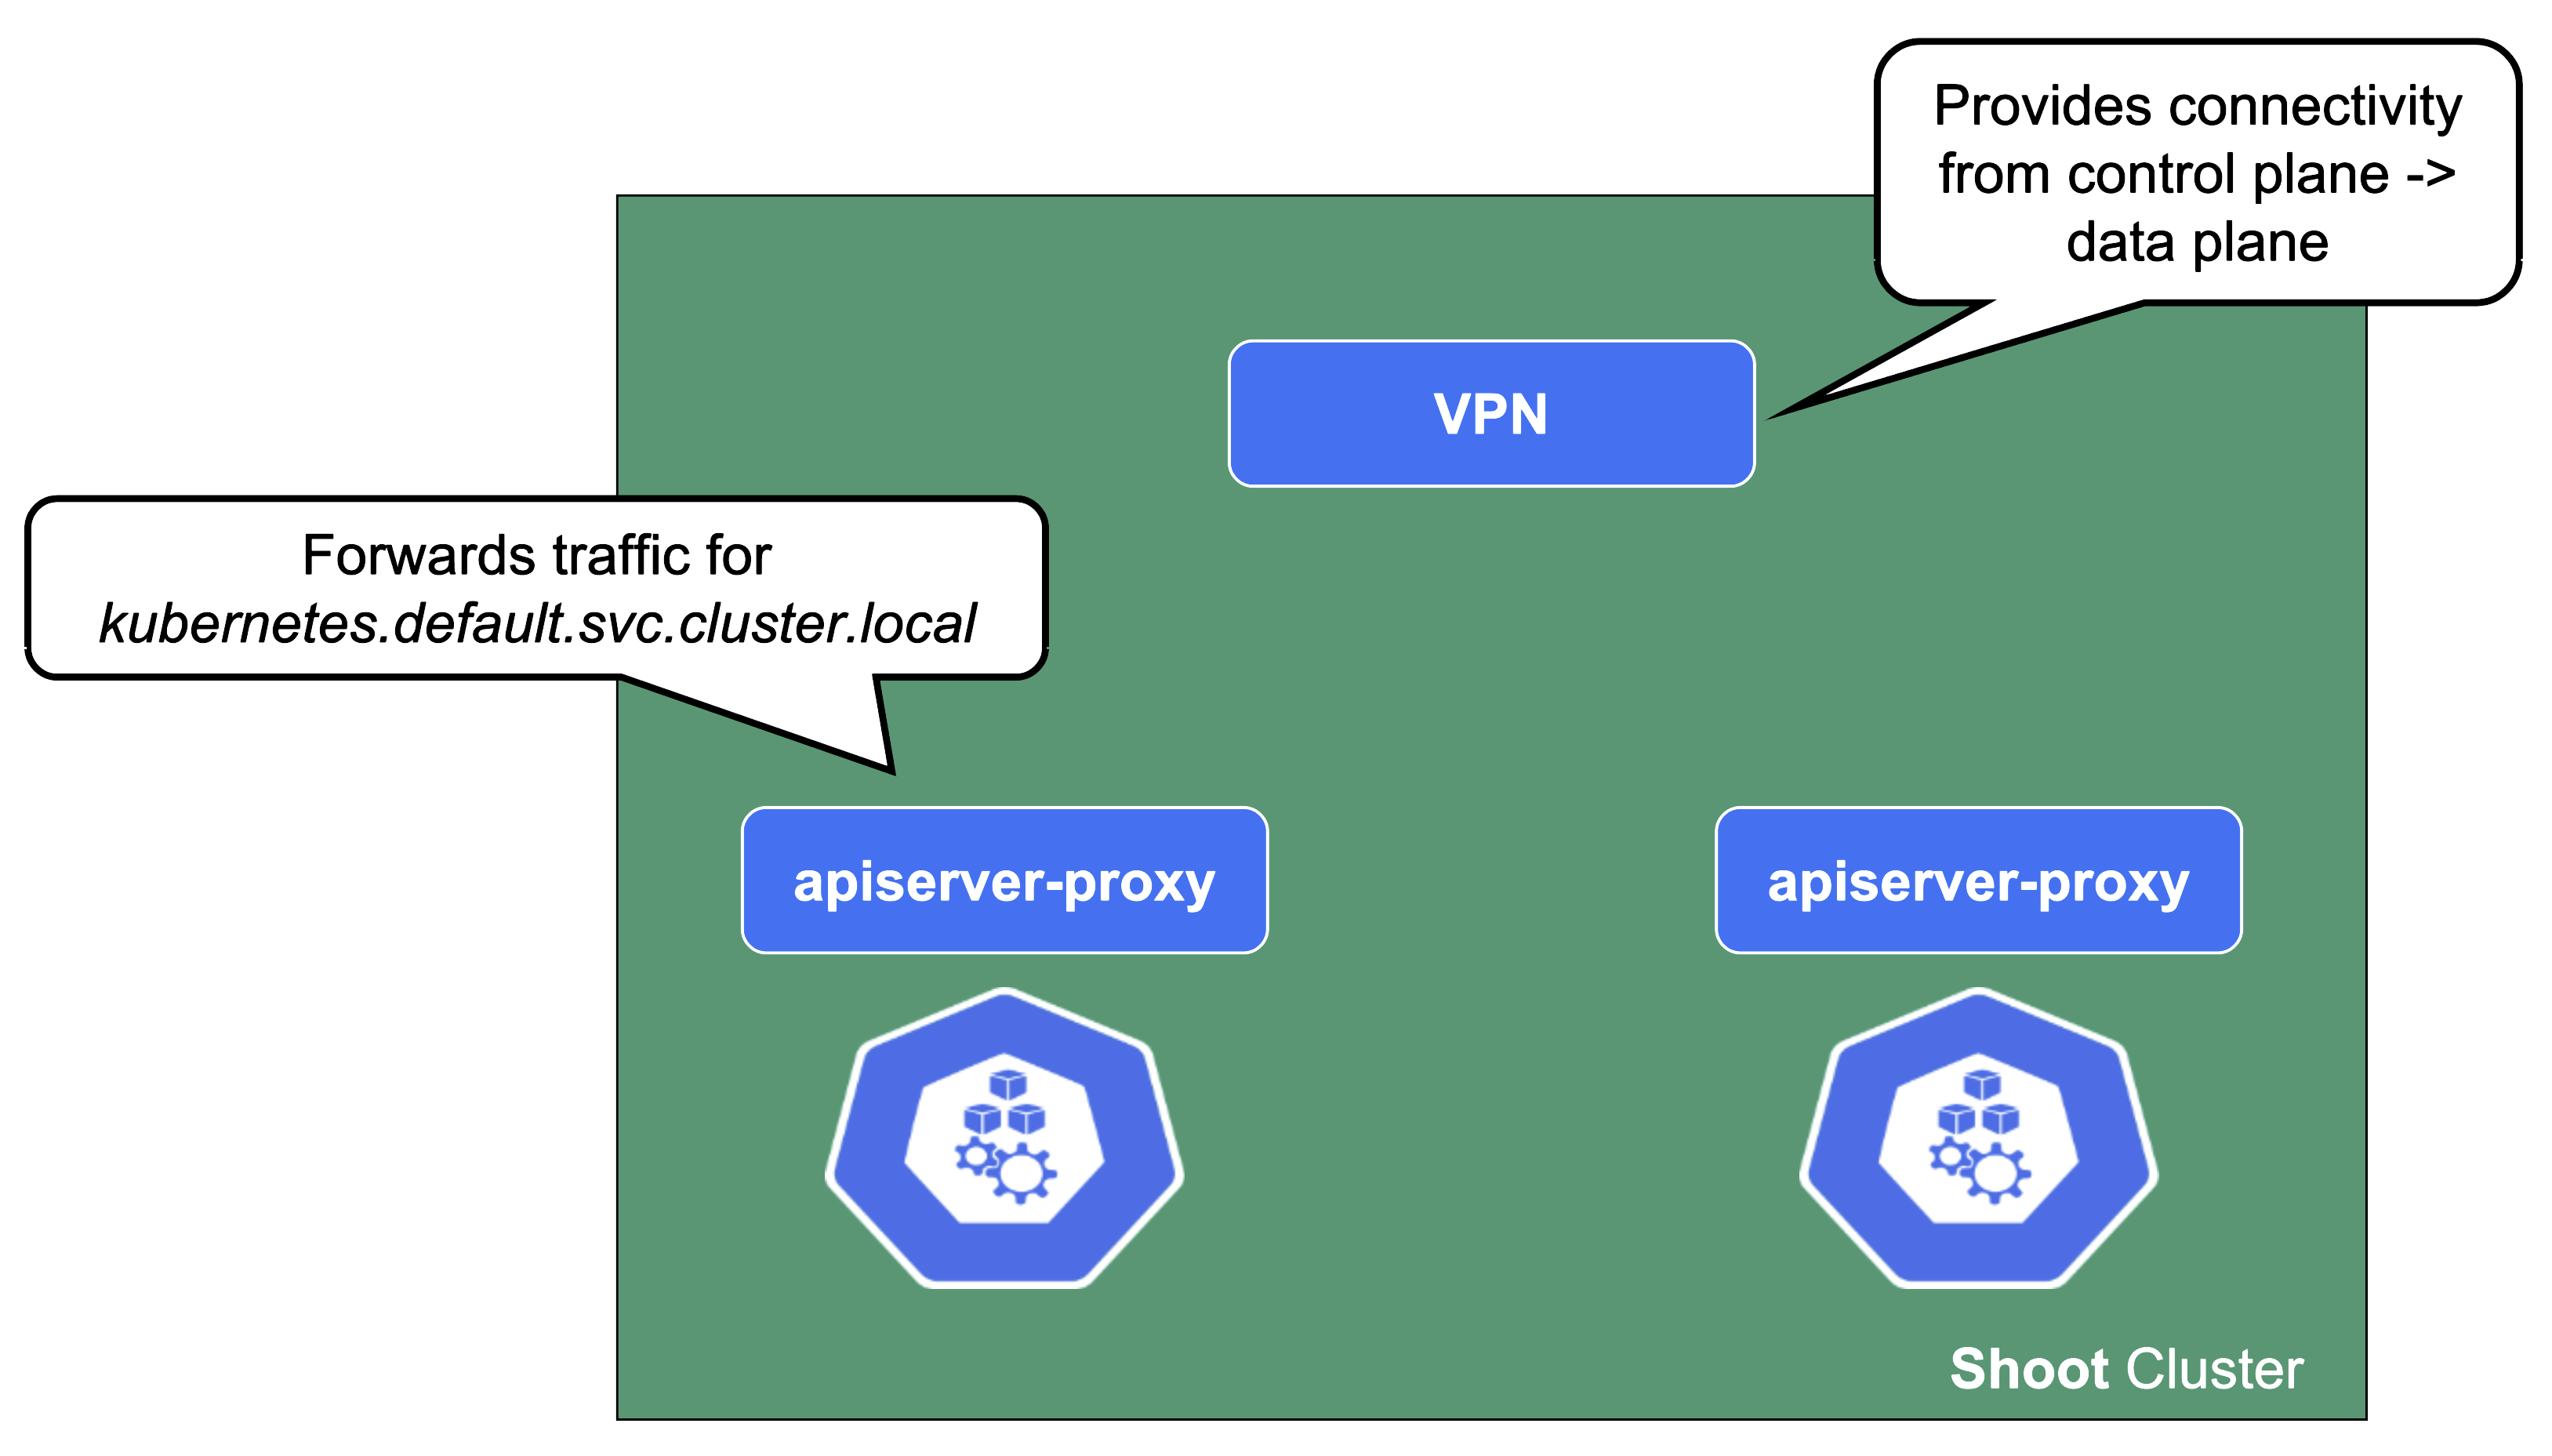
From the perspective of the data plane, the shoot’s API server is reachable via the cluster-internal service kubernetes.default.svc.cluster.local. The apiserver-proxy intercepts connections to this destination and changes it so that the traffic is forwarded to the kube-apiserver service in the seed cluster. For more information, see kube-apiserver via apiserver-proxy.
The second component here is the VPN shoot. It initiates a VPN connection to its counterpart in the seed. This way, there is no open port / Loadbalancer needed on the data plane. The VPN connection is used for any traffic flowing from the control plane to the data plane. If the VPN connection is broken, port-forwarding or log querying with kubectl will not work. In addition, webhooks will stop functioning properly.
csi-driver
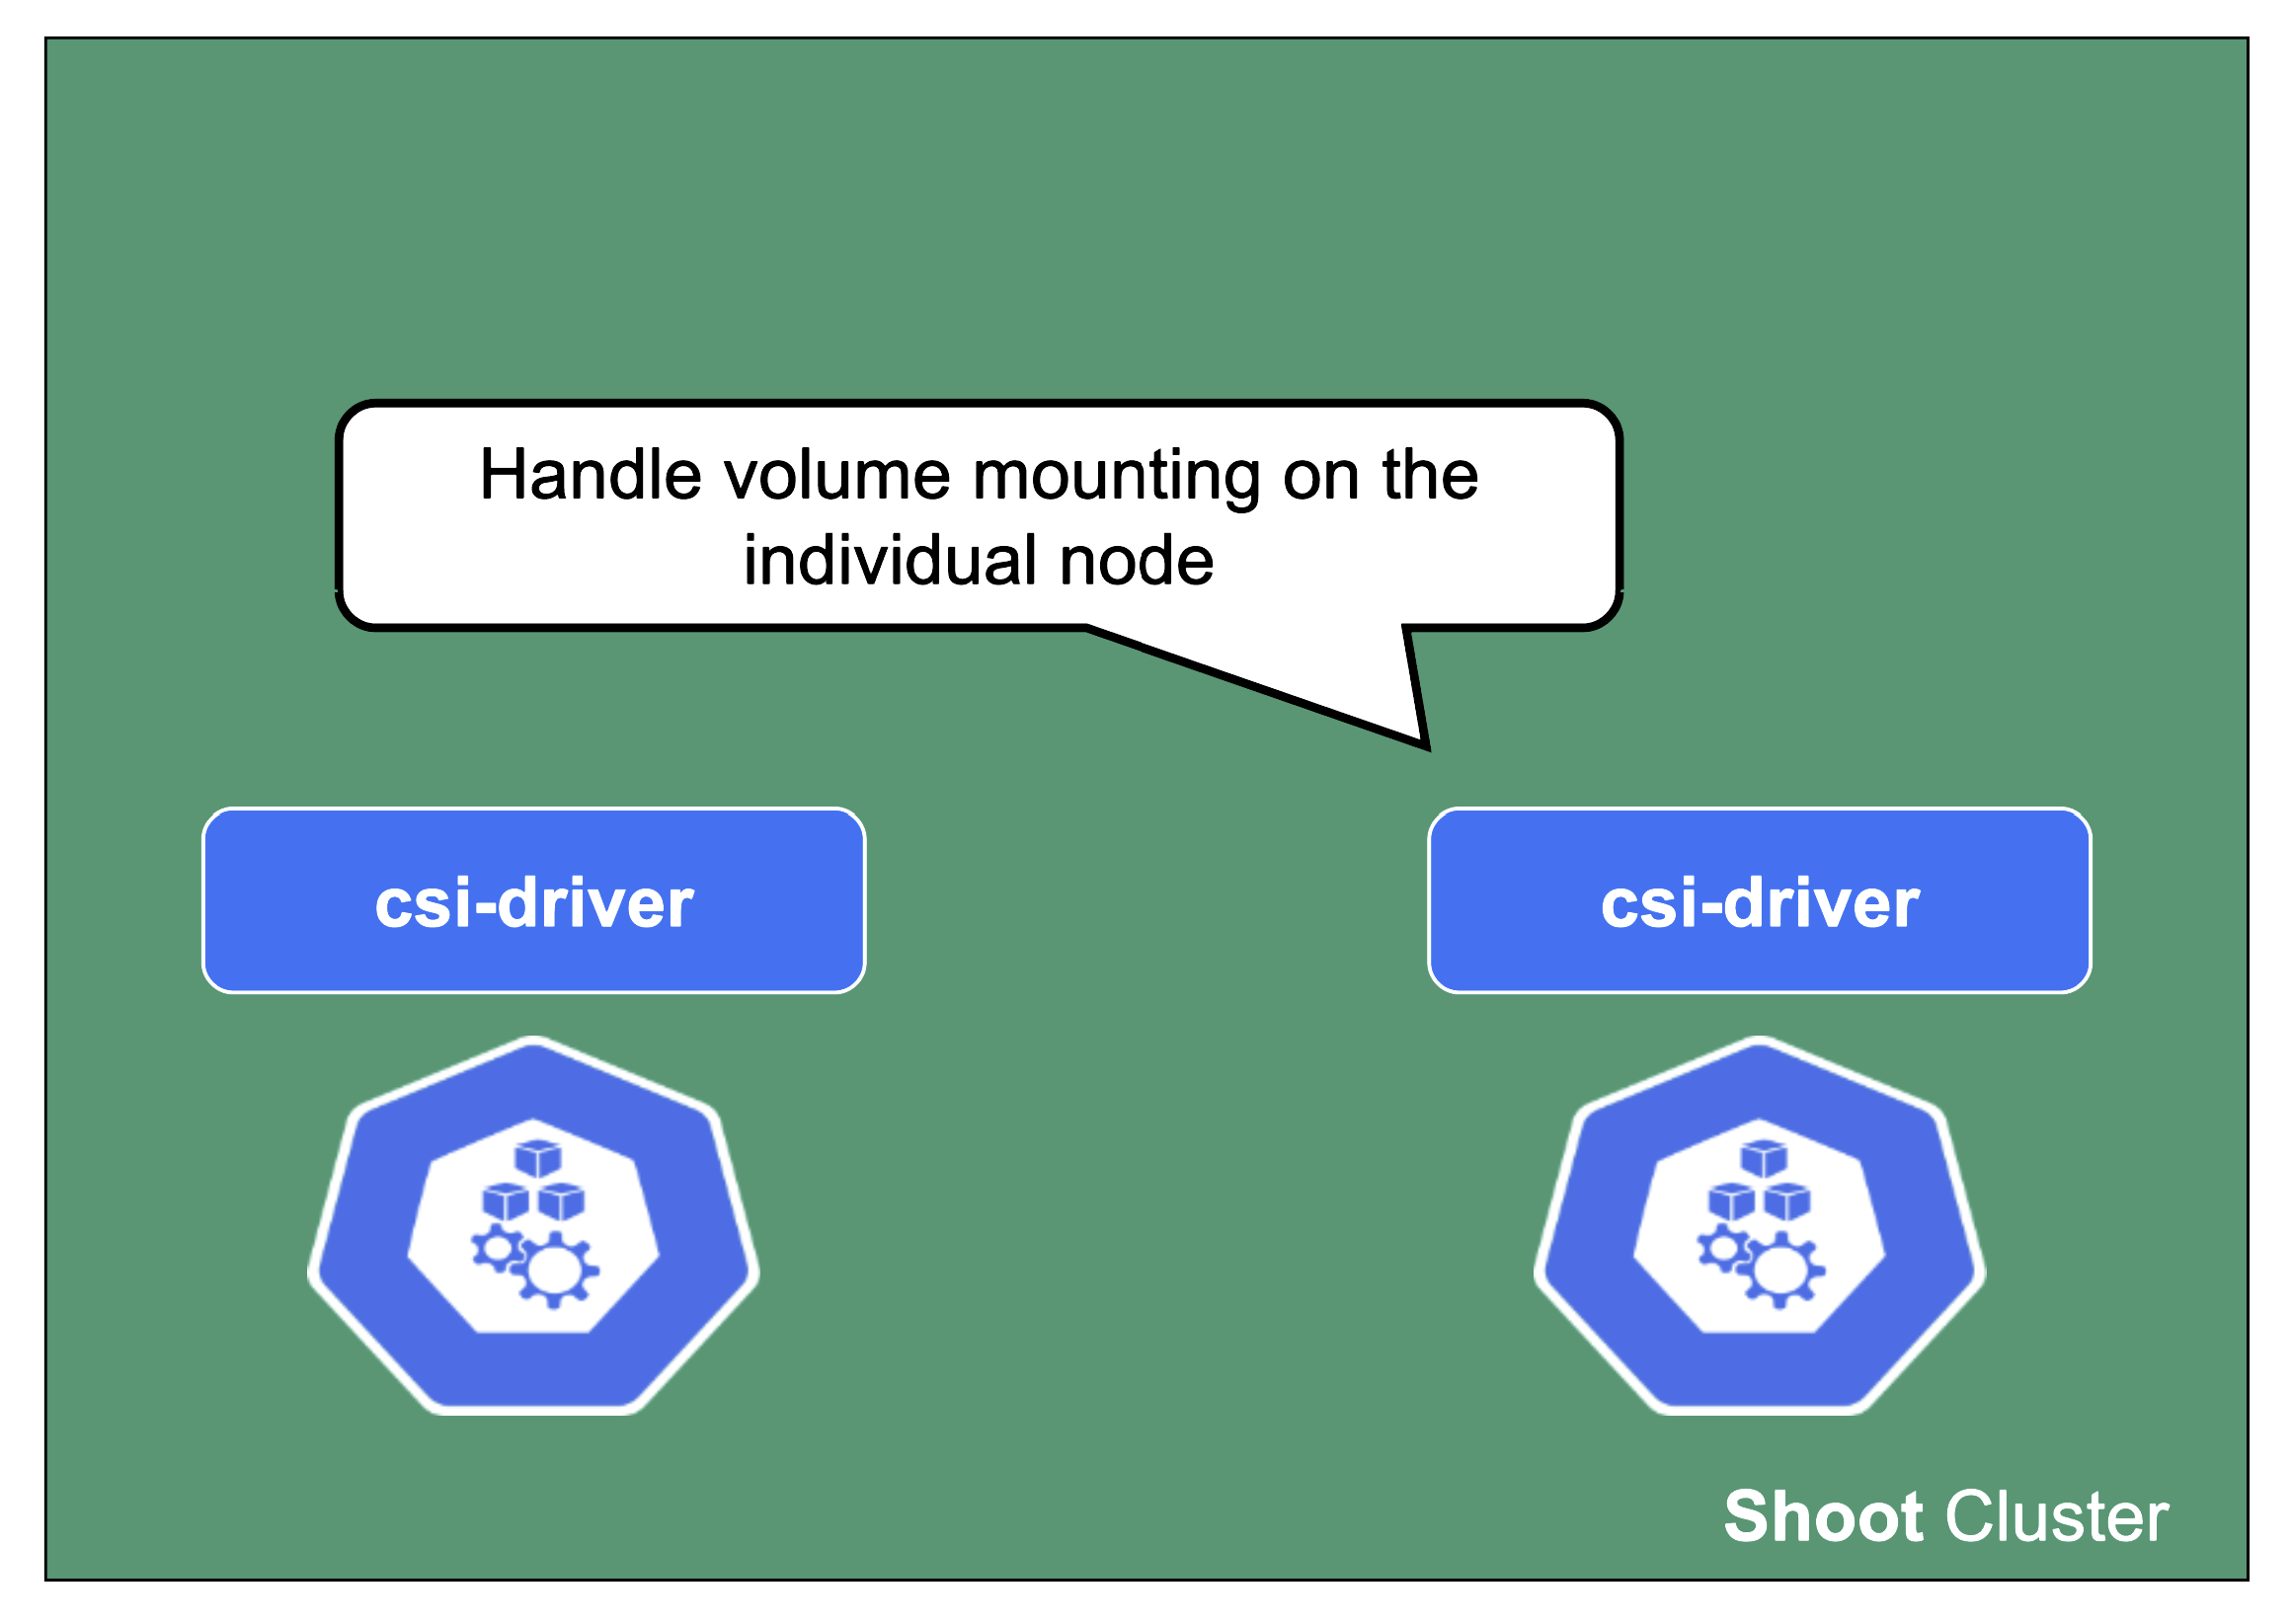
The last component to mention here is the csi-driver that is deployed as a Daemonset to all nodes. It registers with the kubelet and takes care of the mounting of volume types it is responsible for.
1.6 - Shoot Lifecycle
Reconciliation in Kubernetes and Gardener
The starting point of all reconciliation cycles is the constant observation of both the desired and actual state. A component would analyze any differences between the two states and try to converge the actual towards the desired state using appropriate actions. Typically, a component is responsible for a single resource type but it also watches others that have an implication on it.
As an example, the Kubernetes controller for ReplicaSets will watch pods belonging to it in order to ensure that the specified replica count is fulfilled. If one pod gets deleted, the controller will create a new pod to enforce the desired over the actual state.
This is all standard behaviour, as Gardener is following the native Kubernetes approach. All elements of a shoot cluster have a representation in Kubernetes resources and controllers are watching / acting upon them.
If we pick up the example of the ReplicaSet - a user typically creates a deployment resource and the ReplicaSet is implicitly generated on the way to create the pods. Similarly, Gardener takes the user’s intent (shoot) and creates lots of domain specific resources on the way. They all reconcile and make sure their actual and desired states match.
Updating the Desired State of a Shoot
Based on the shoot’s specifications, Gardener will create network resources on a hyperscaler, backup resources for the ETCD, credentials, and other resources, but also representations of the worker pools. Eventually, this process will result in a fully functional Kubernetes cluster.
If you change the desired state, Gardener will reconcile the shoot and run through the same cycle to ensure the actual state matches the desired state.

For example, the (infrastructure-specific) machine type can be changed within the shoot resource. The following reconciliation will pick up the change and initiate the creation of new nodes with a different machine type and the removal of the old nodes.
Maintenance Window and Daily Reconciliation
EVERY shoot cluster reconciles once per day during the so-called “maintenance window”. You can confine the rollout of spec changes to this window.
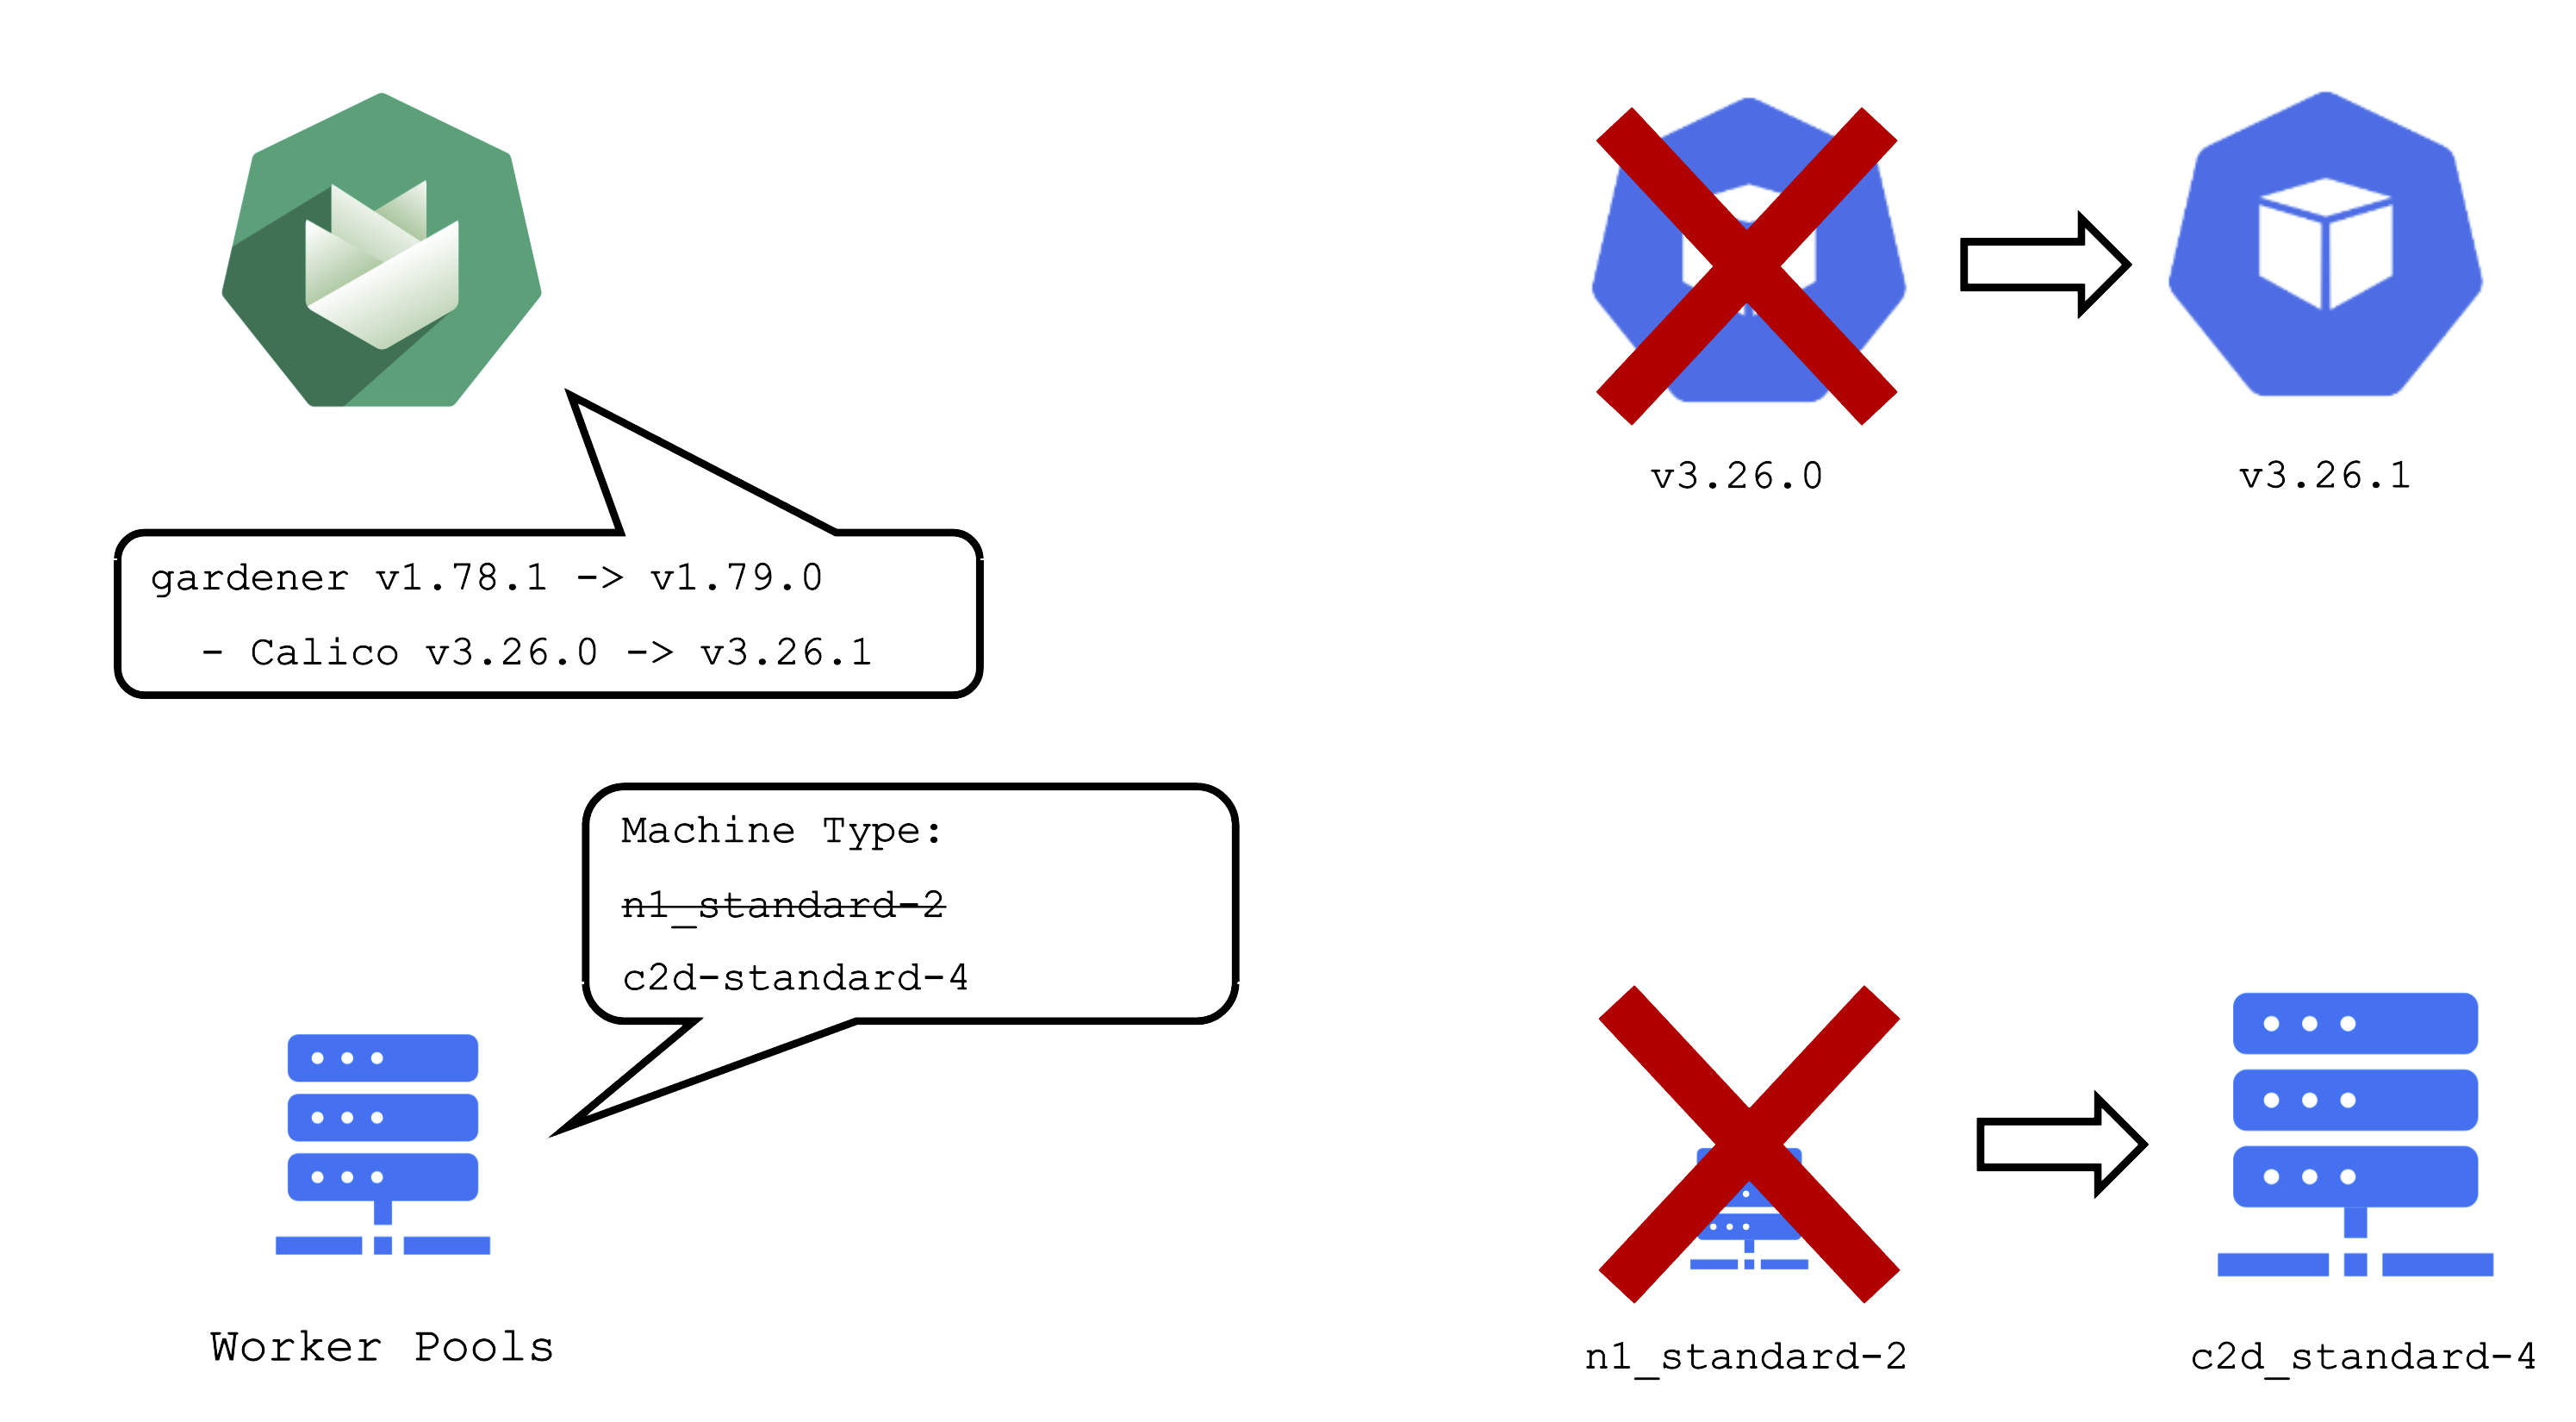
Additionally, the daily reconciliation will help pick up all kind of version changes. When a new Gardener version was rolled out to the landscape, shoot clusters will pick up any changes during their next reconciliation. For example, if a new Calico version is introduced to fix some bug, it will automatically reach all shoots.
Impact of a Change
It is important to be aware of the impacts that a change can have on a cluster and the workloads within it.
An operator pushing a new Gardener version with a new calico image to a landscape will cause all calico pods to be re-created. Another example would be the rollout of a new etcd backup-restore image. This would cause etcd pods to be re-created, rendering a non-HA control plane unavailable until etcd is up and running again.
When you change the shoot spec, it can also have significant impact on the cluster. Imagine that you have changes the machine type of a worker pool. This will cause new machines to be created and old machines to be deleted. Or in other words: all nodes will be drained, the pods will be evicted and then re-created on newly created nodes.
Kubernetes Version Update (Minor + Patch)
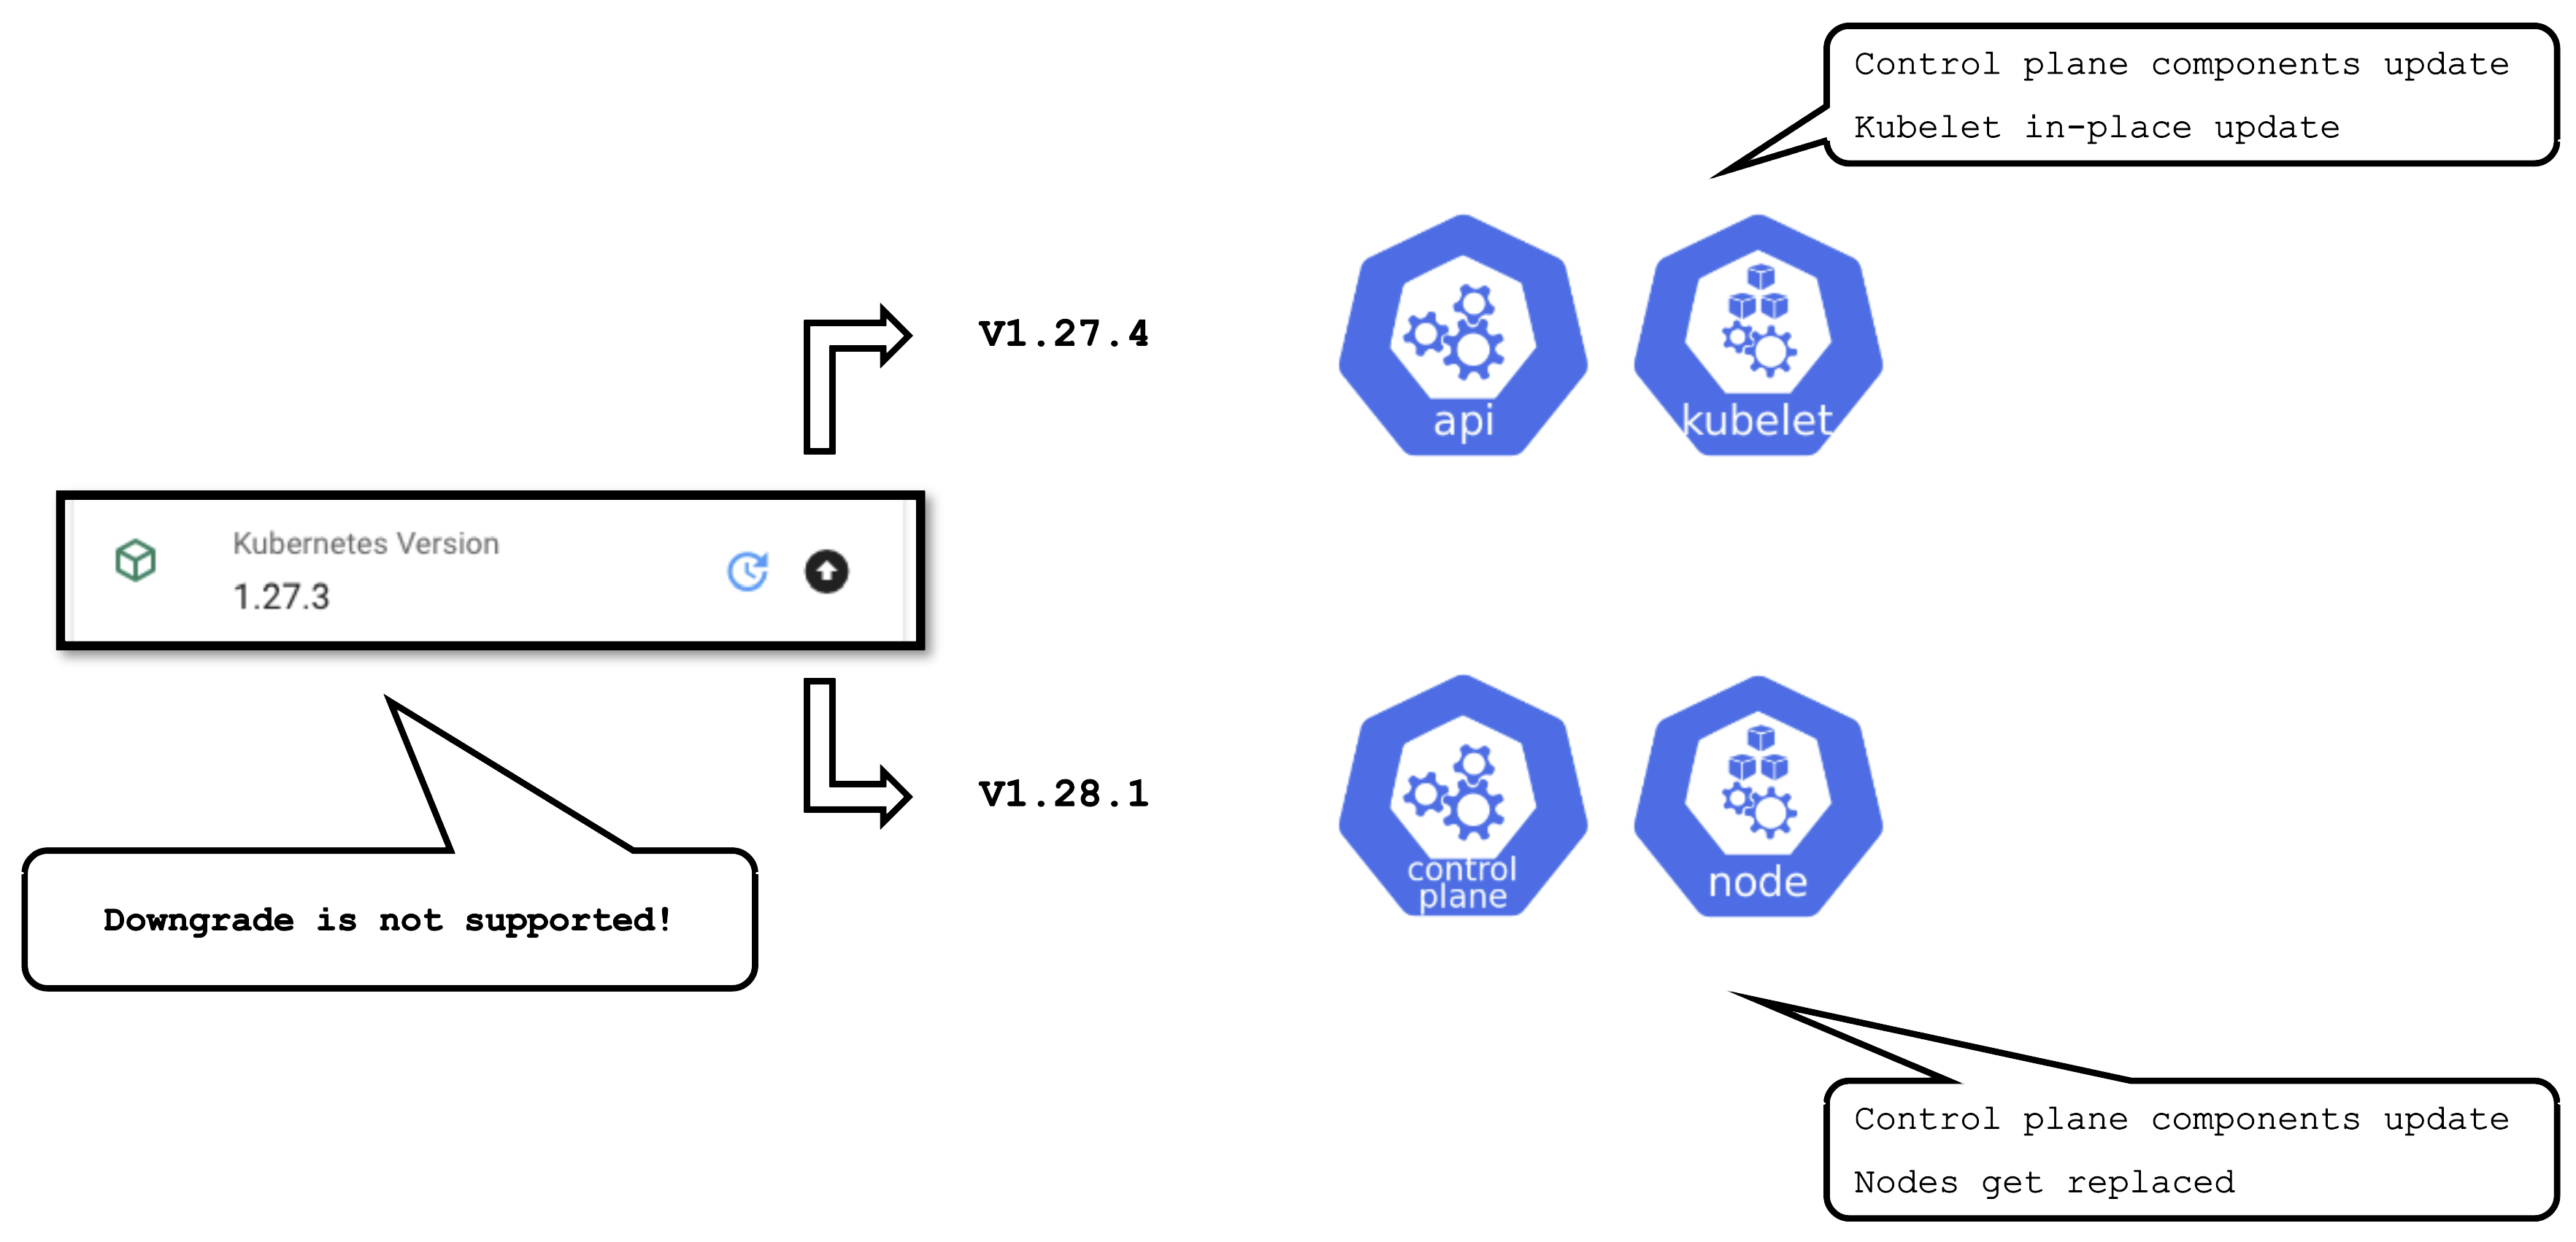
Some operations are rather common and have to be performed on a regular basis. Updating the Kubernetes version is one them. Patch updates cause relatively little disruption, as only the control-plane pods will be re-created with new images and the kubelets on all nodes will restart.
A minor version update is more impactful - it will cause all nodes to be recreated and rolls components of the control plane.
OS Version Update
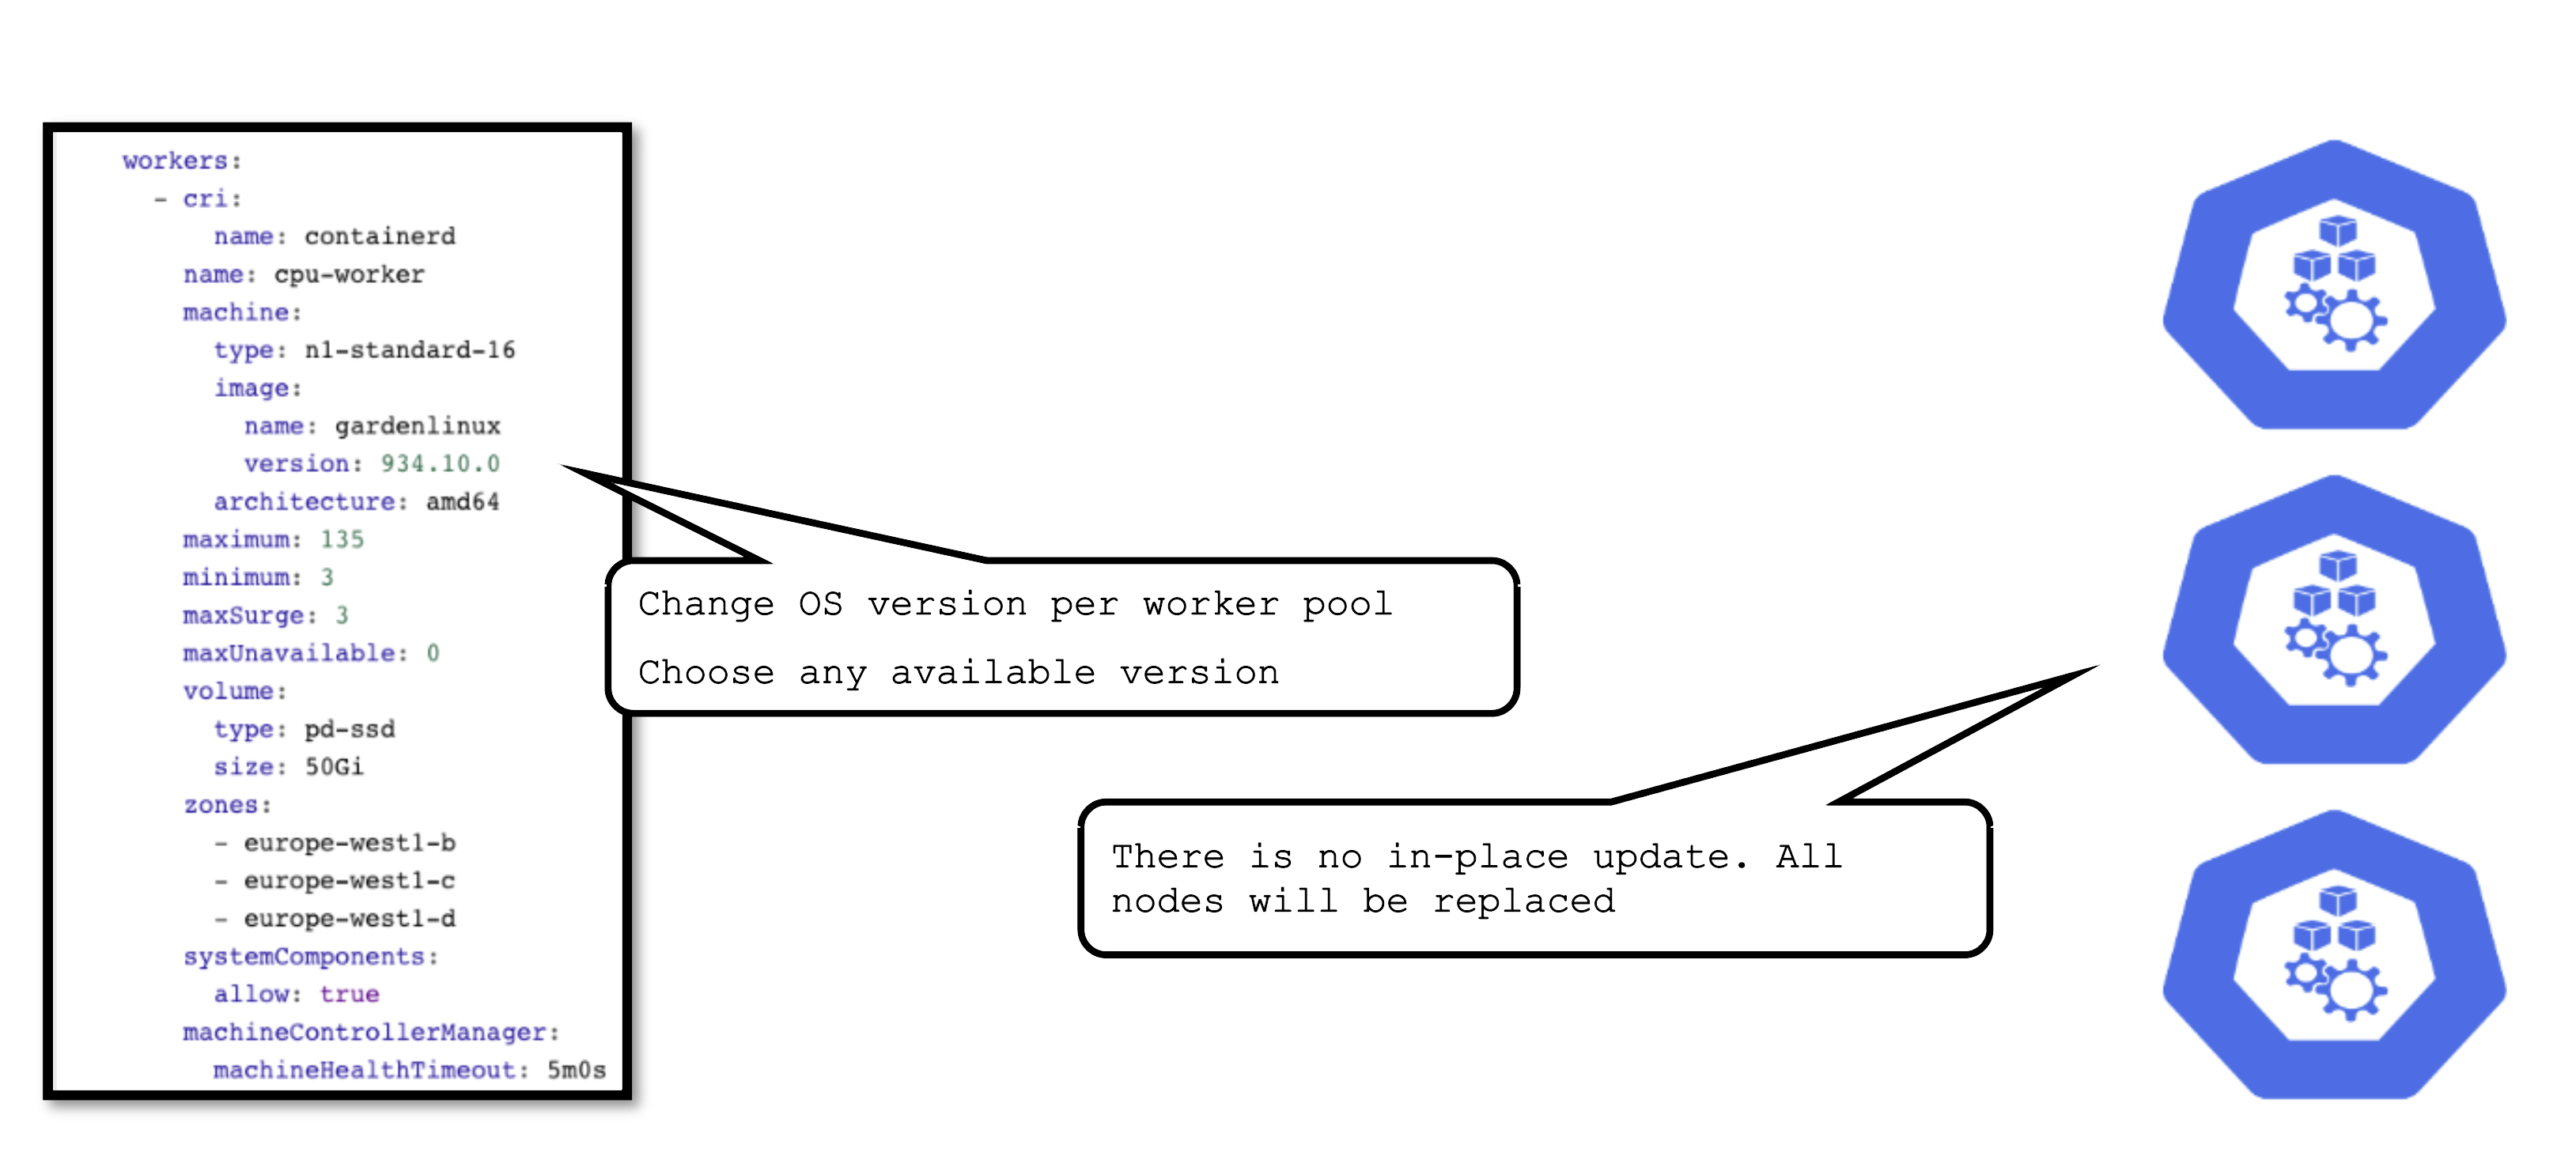
The OS version is defined for each worker pool and can be changed per worker pool. You can freely switch back and forth. However, as there is no in-place update, each change will cause the entire worker pool to roll and nodes will be replaced. For OS versions different update strategies can be configured. Please check the documentation for details.
Available Versions
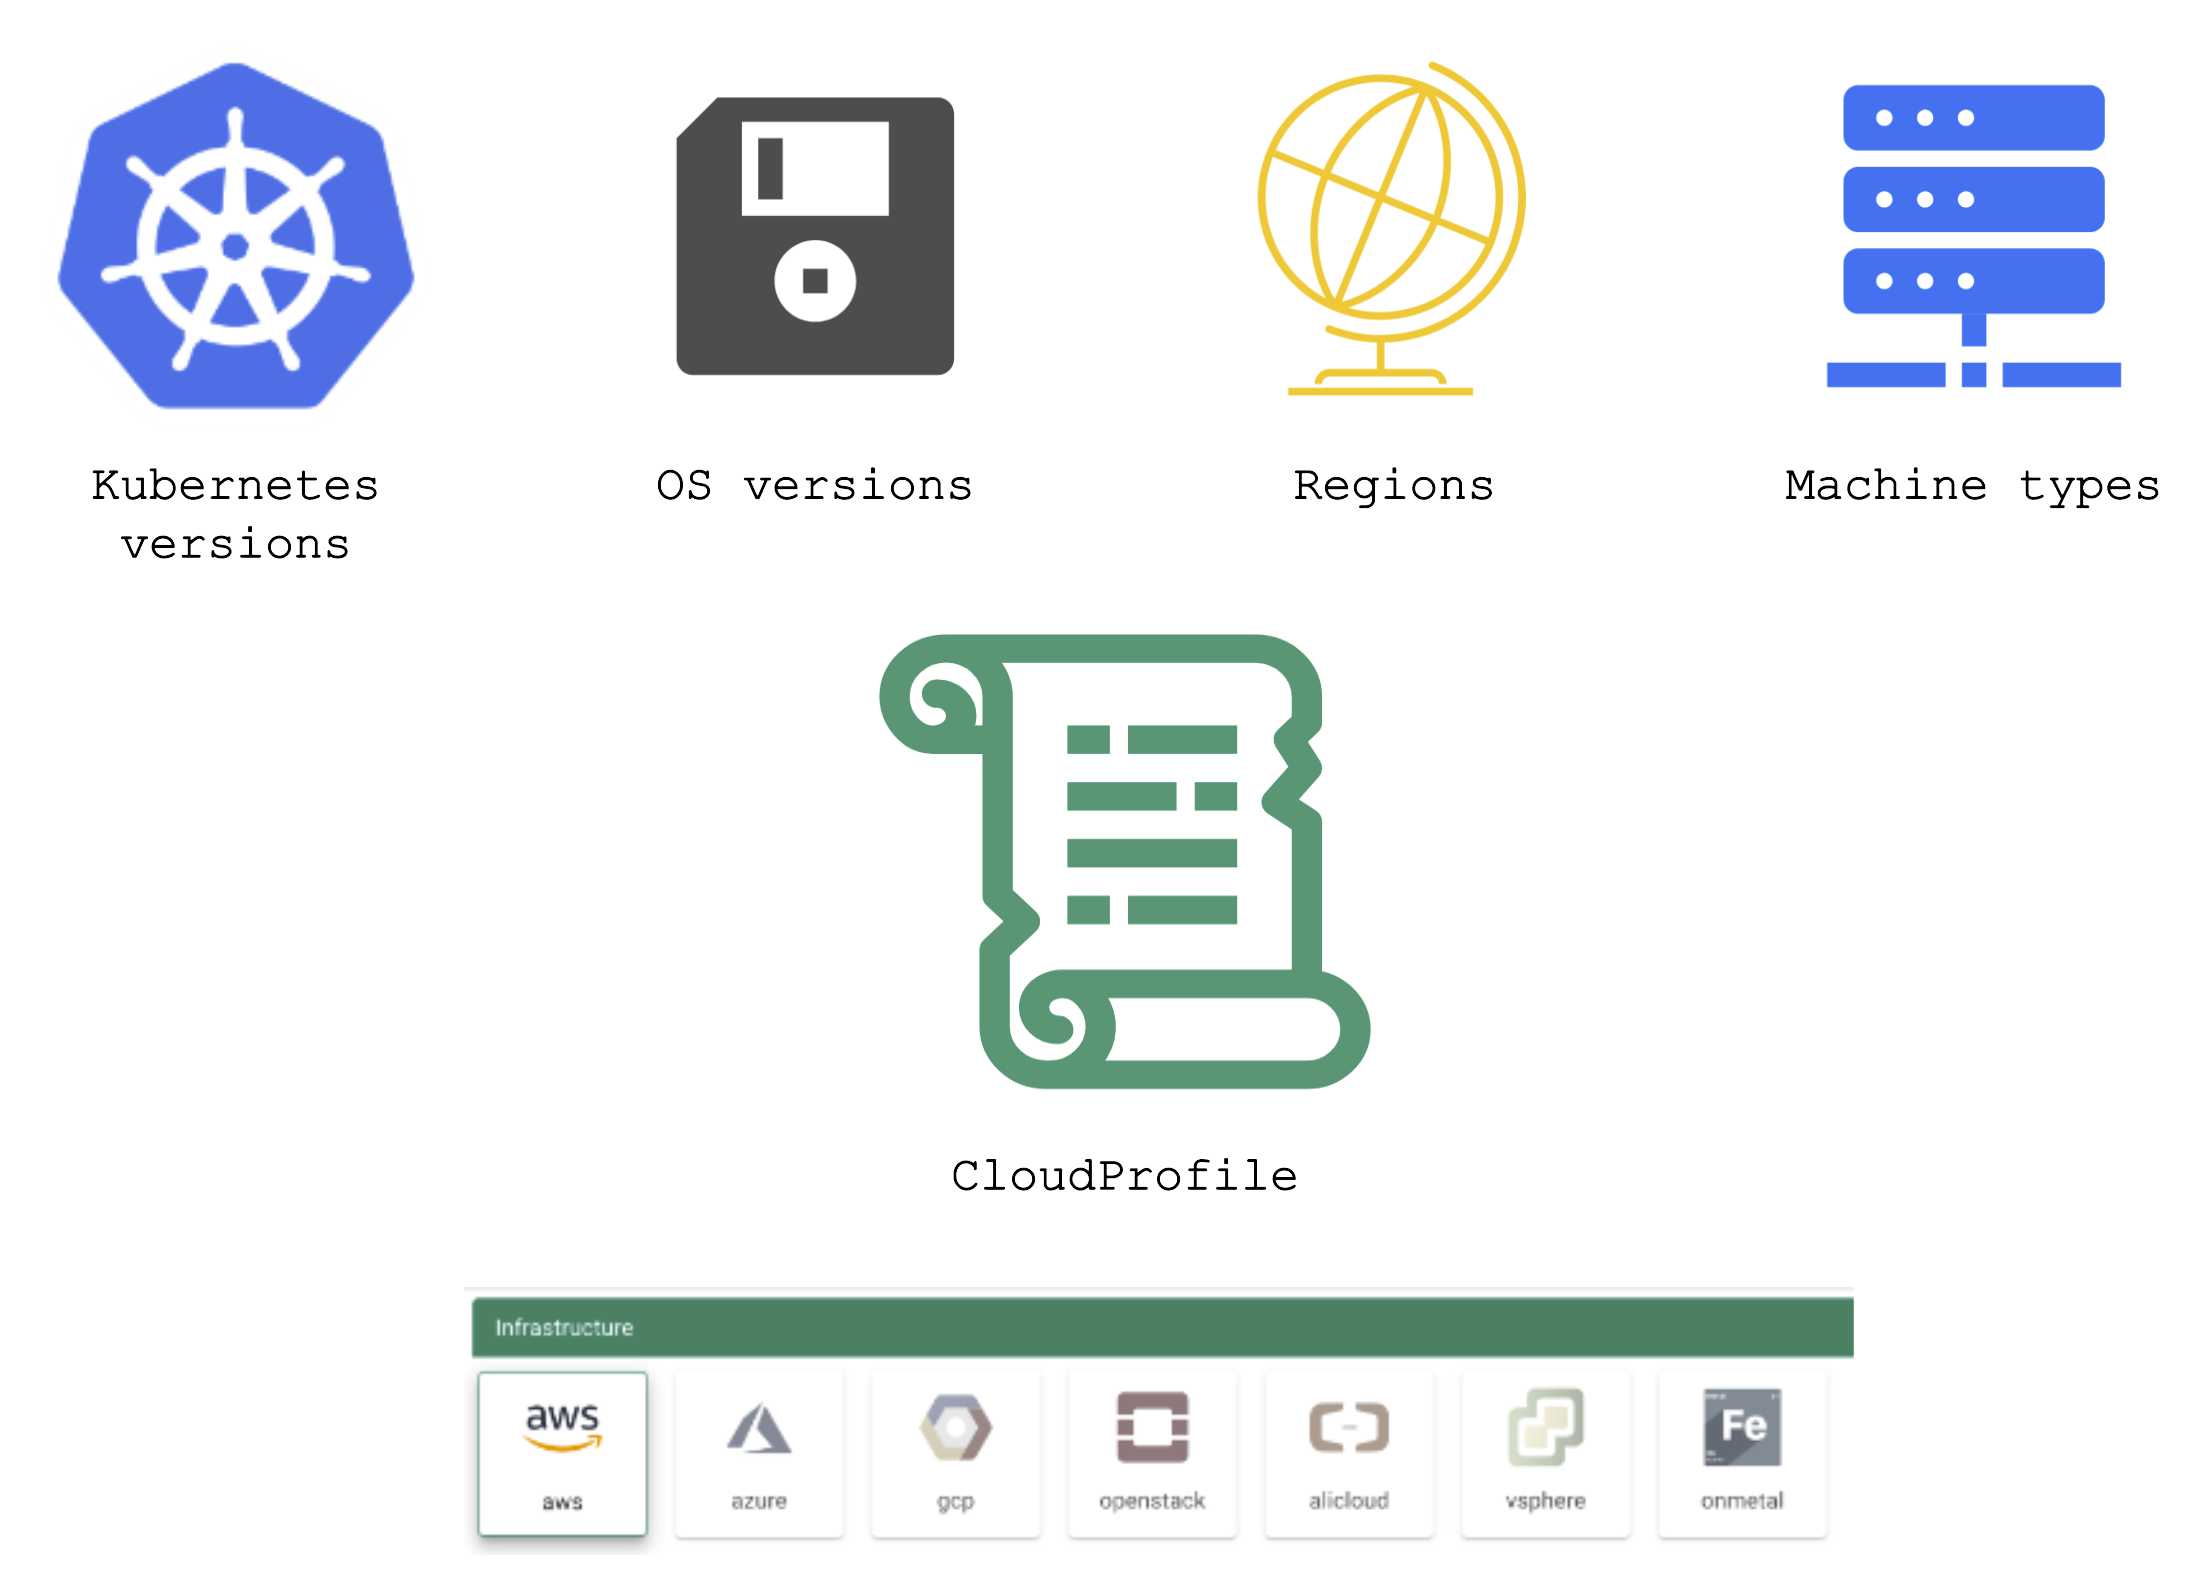
Gardener has a dedicated resource to maintain a list of available versions – the so-called cloudProfile.
A cloudProfile provides information about supported:
- Kubernetes versions
- OS versions (and where to find those images)
- Regions (and their zones)
- Machine types
Each shoot references a cloudProfile in order to obtain information about available / possible versions and configurations.
Version Classifications
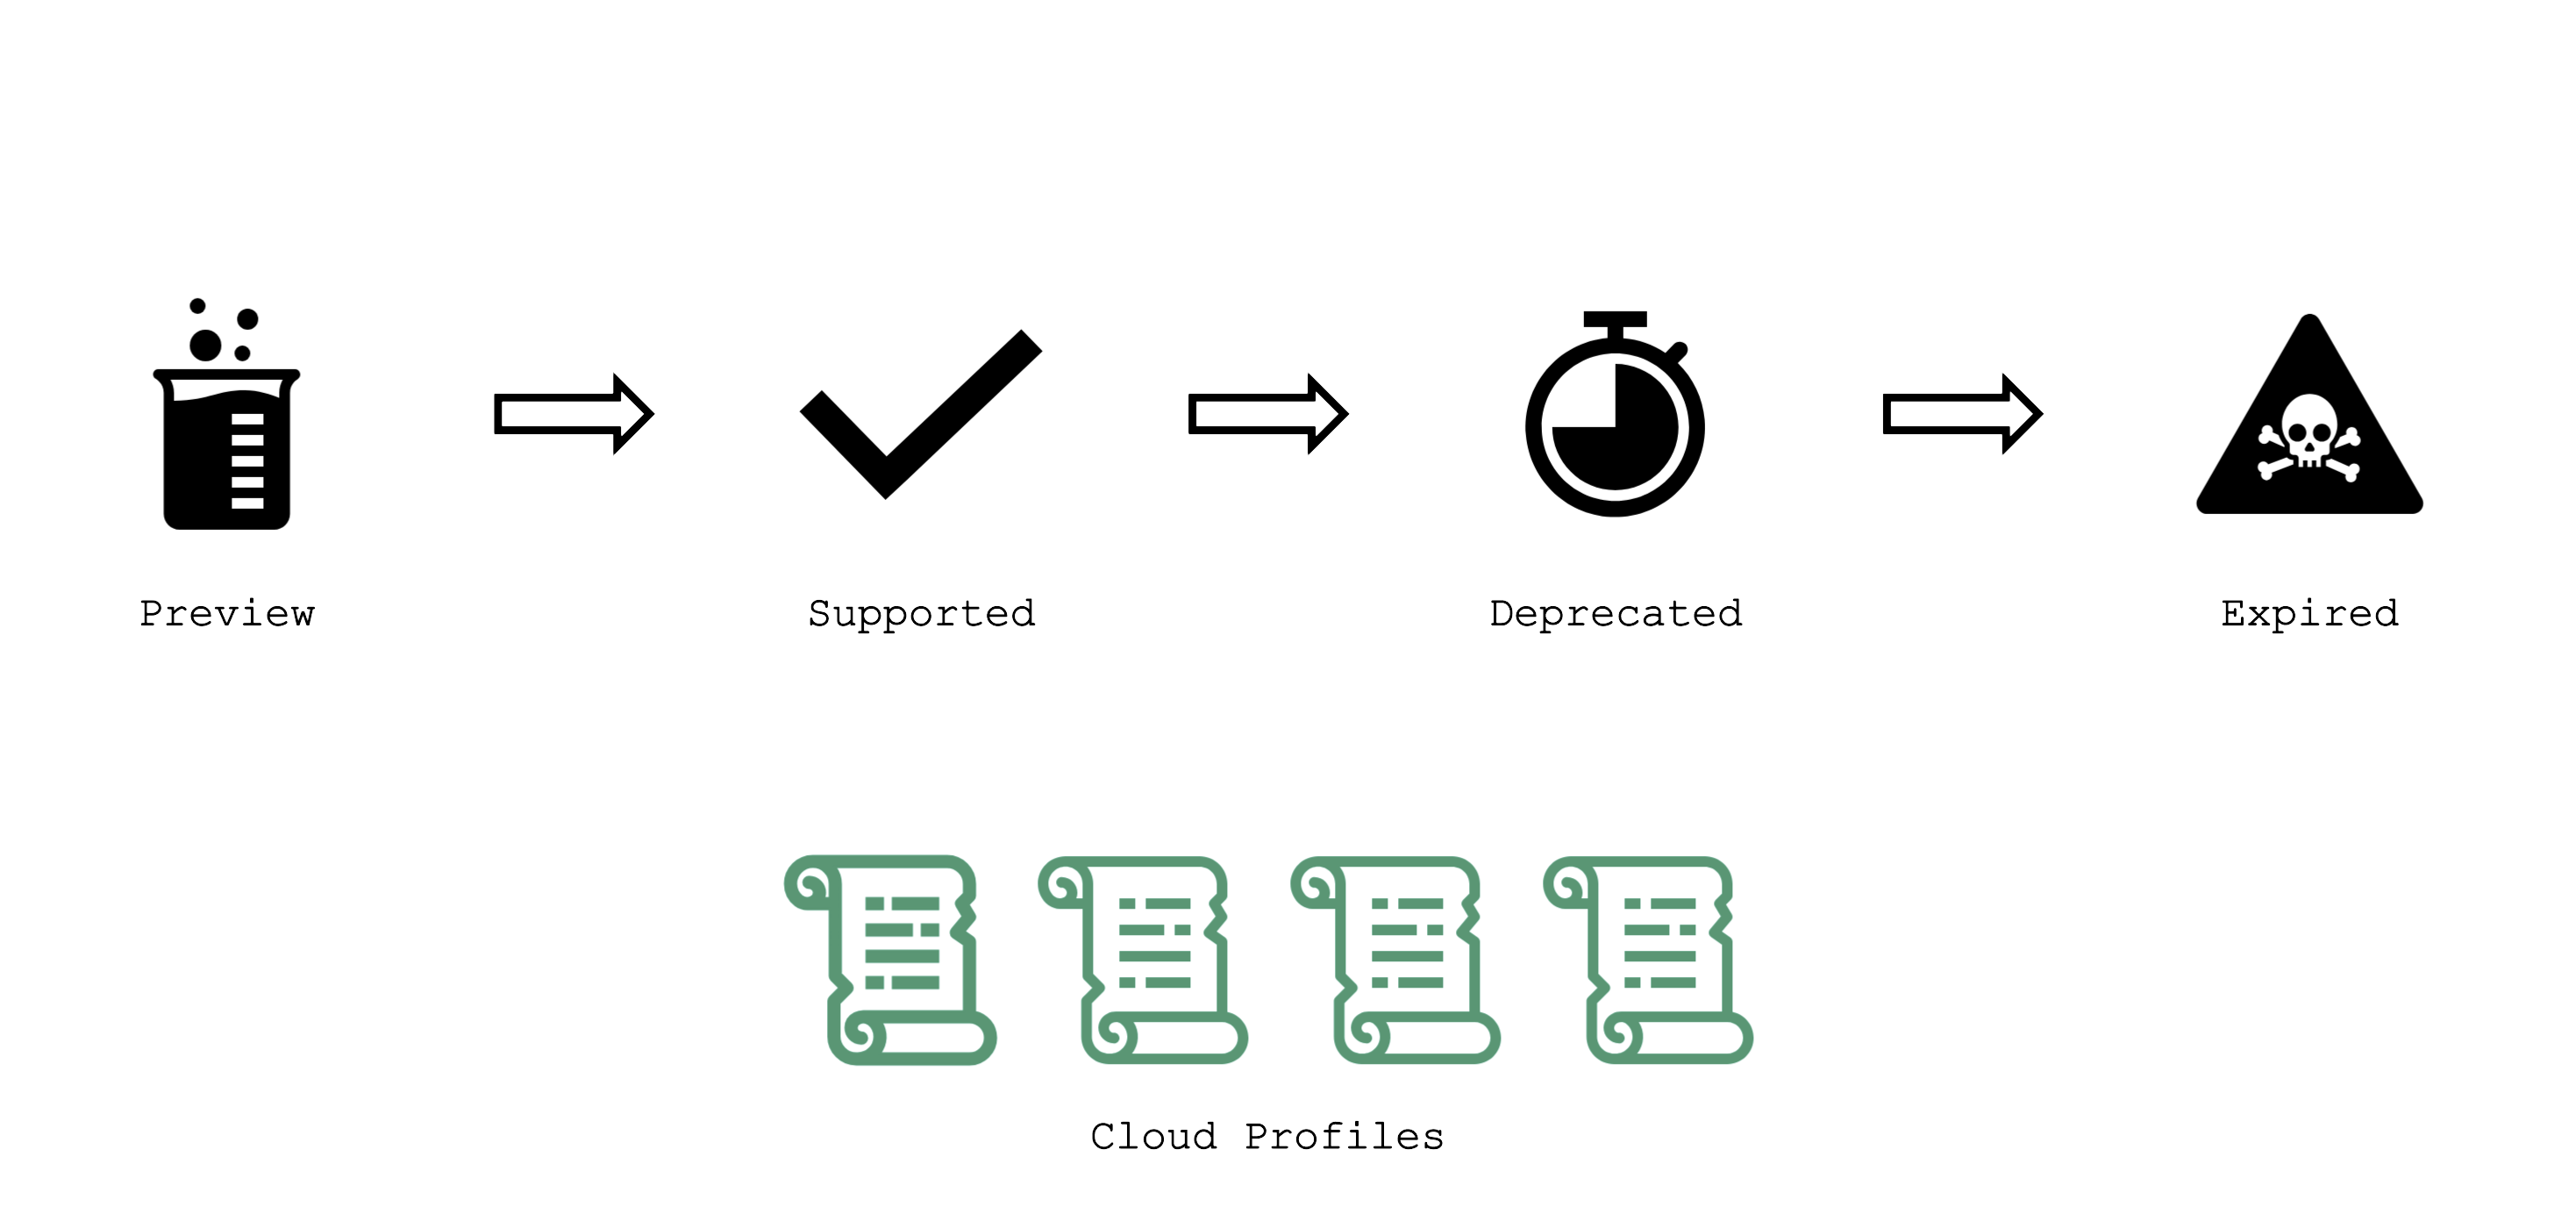
Gardener has the following classifications for Kubernetes and OS image versions:
preview: still in testing phase (several versions can be in preview at the same time)supported: recommended versiondeprecated: a new version has been set to “supported”, updating is recommended (might have an expiration date)expired: cannot be used anymore, clusters using this version will be force-upgraded
Version information is maintained in the relevant cloud profile resource. There might be circumstances where a version will never become supported but instead move to deprecated directly. Similarly, a version might be directly introduced as supported.
AutoUpdate / Forced Updates
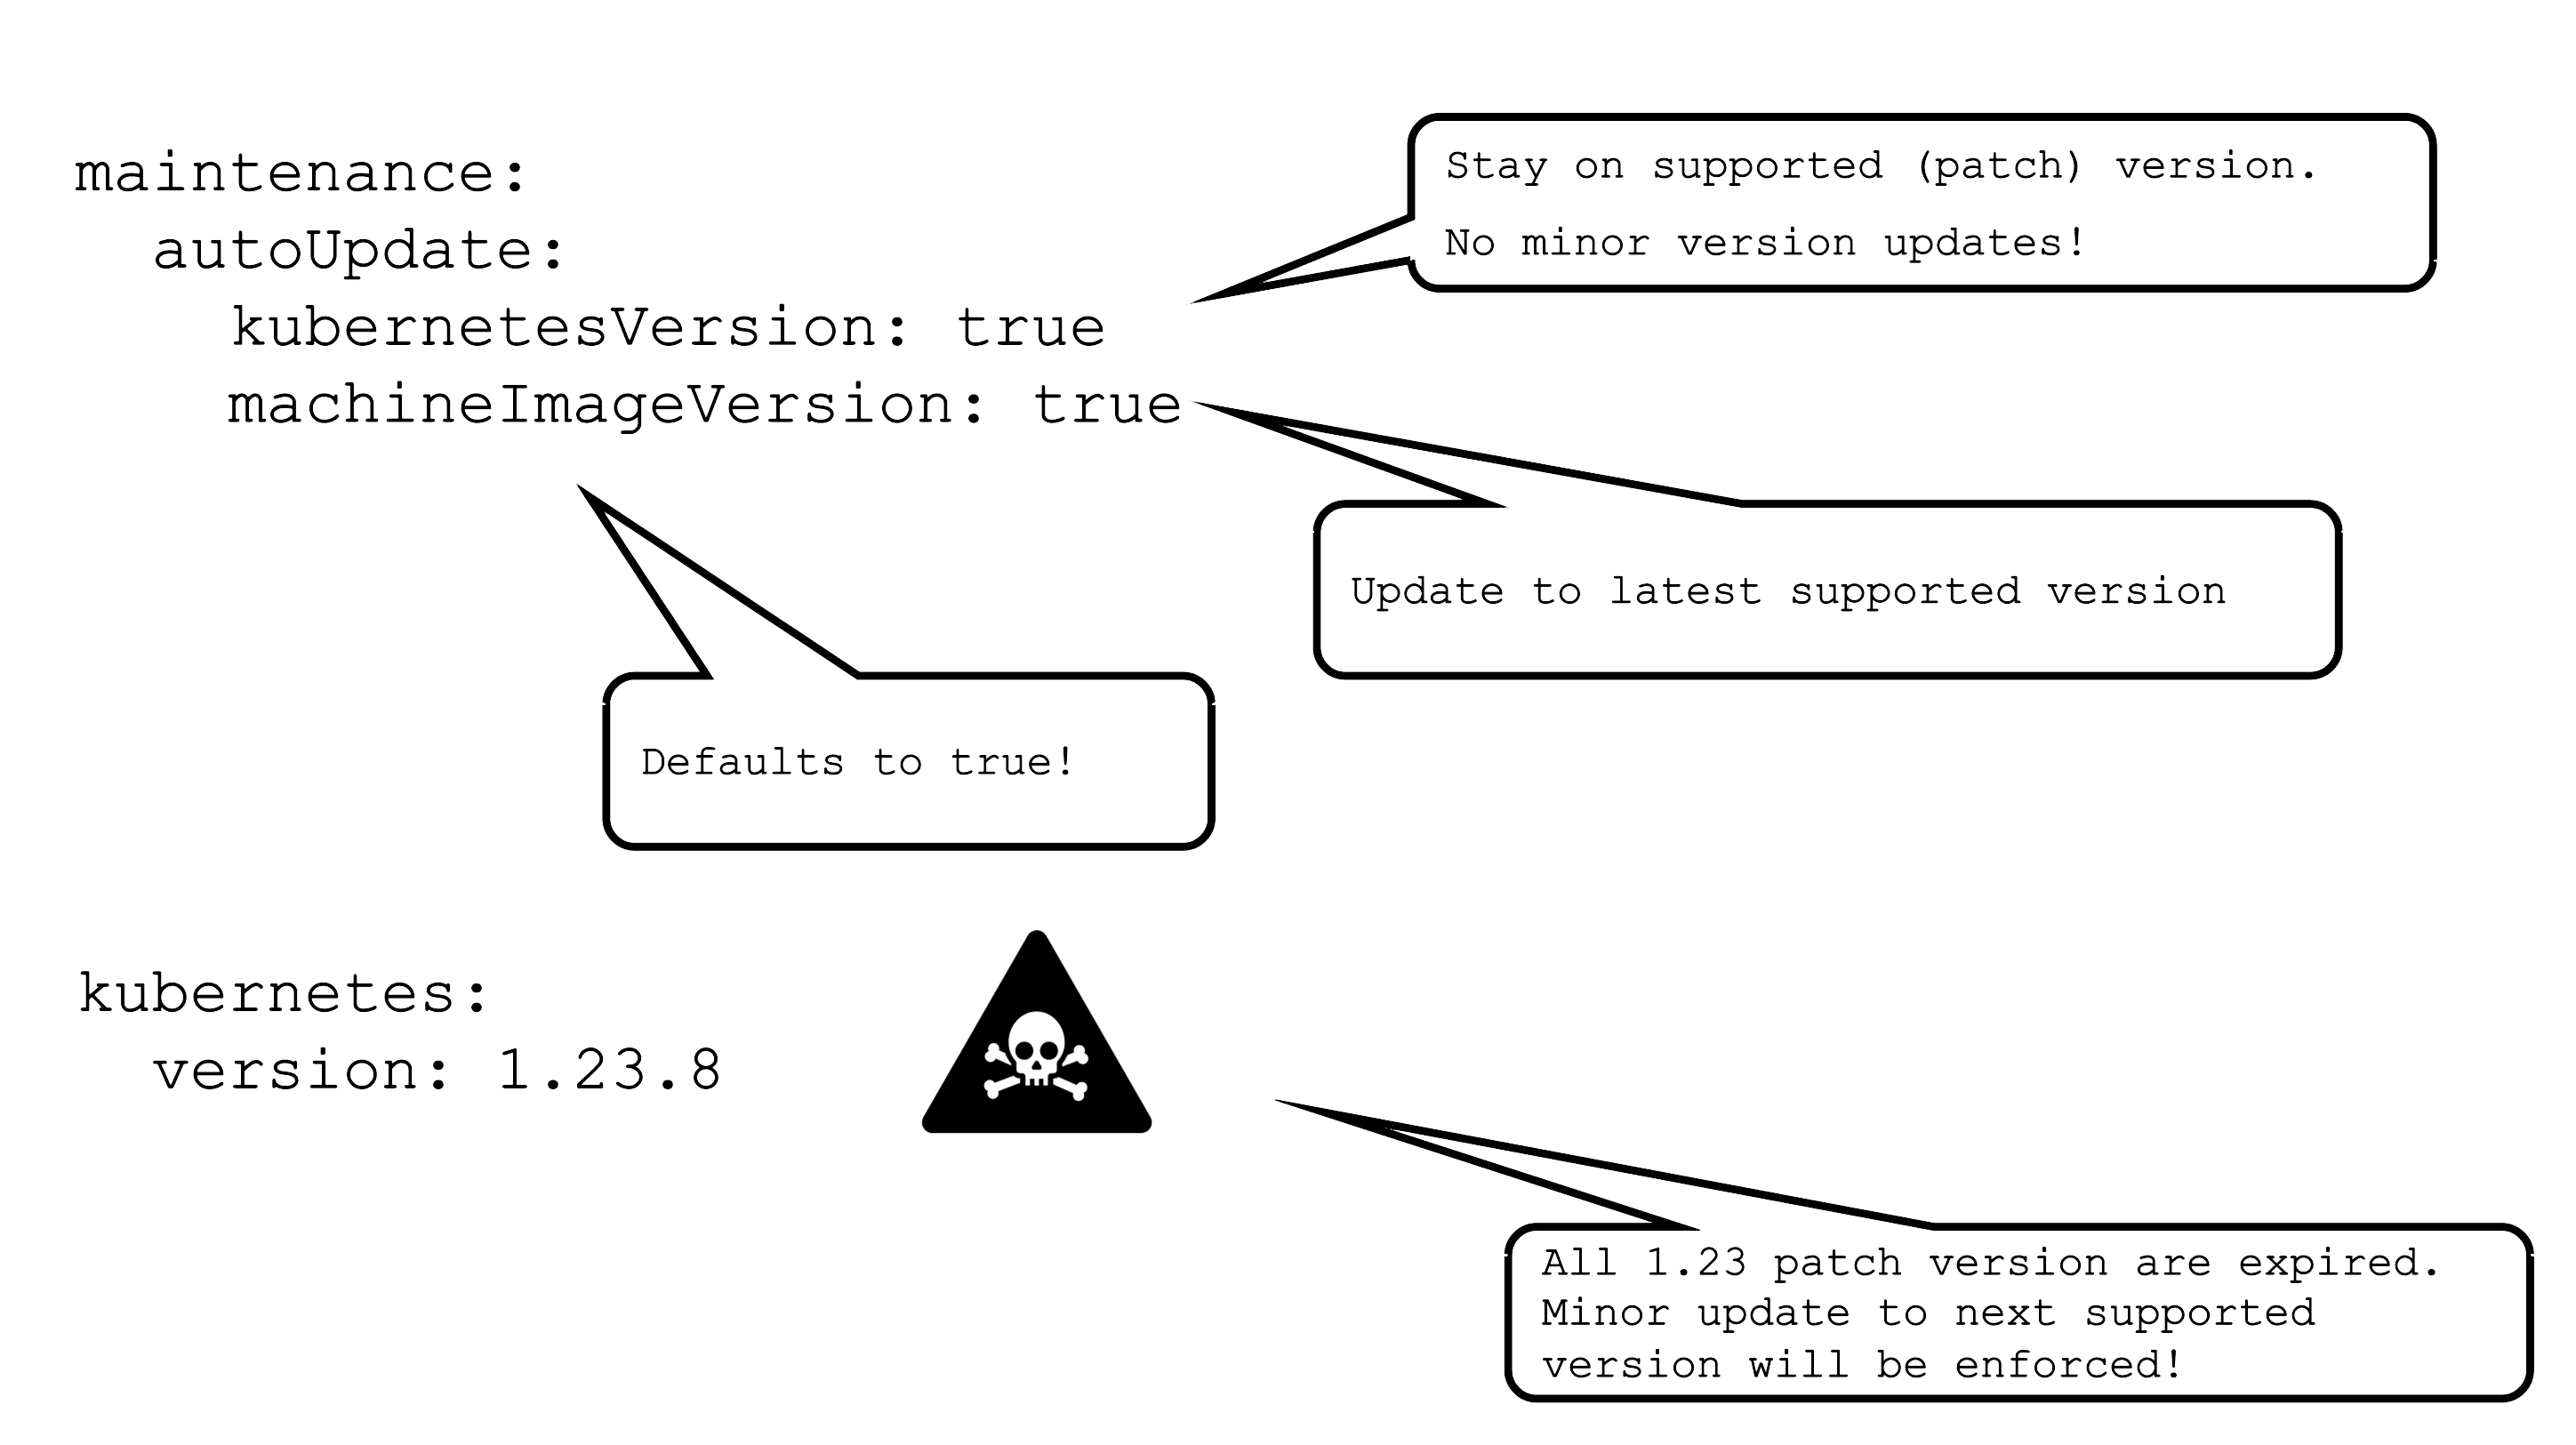
AutoUpdate for a machine image version will update all node pools to the latest supported version based on the defined update strategy. Whenever a new version is set to supported, the cluster will pick it up during its next maintenance window.
For Kubernetes versions the mechanism is the same, but only applied to patch version. This means that the cluster will be kept on the latest supported patch version of a specific minor version.
In case a version used in a cluster expires, there is a force update during the next maintenance window. In a worst case scenario, 2 minor versions expire simultaneously. Then there will be two consecutive minor updates enforced.
For more information, see Shoot Kubernetes and Operating System Versioning in Gardener.
Applying Changes to a Seed

It is important to keep in mind that a seed is just another Kubernetes cluster. As such, it has its own lifecycle (daily reconciliation, maintenance, etc.) and is also a subject to change.
From time to time changes need to be applied to the seed as well. Some (like updating the OS version) cause the node pool to roll. In turn, this will cause the eviction of ALL pods running on the affected node. If your etcd is evicted and you don’t have a highly available control plane, it will cause downtime for your cluster. Your workloads will continue to run ,of course, but your cluster’s API server will not function until the etcd is up and running again.
1.7 - Observability
Overview
Gardener offers out-of-the-box observability for the control plane, Gardener managed system-components, and the nodes of a shoot cluster.
Having your workload survive on day 2 can be a challenge. The goal of this topic is to give you the tools with which to observe, analyze, and alert when the control plane or system components of your cluster become unhealthy. This will let you guide your containers through the storm of operating in a production environment.
1.7.1 - Components
Core Components
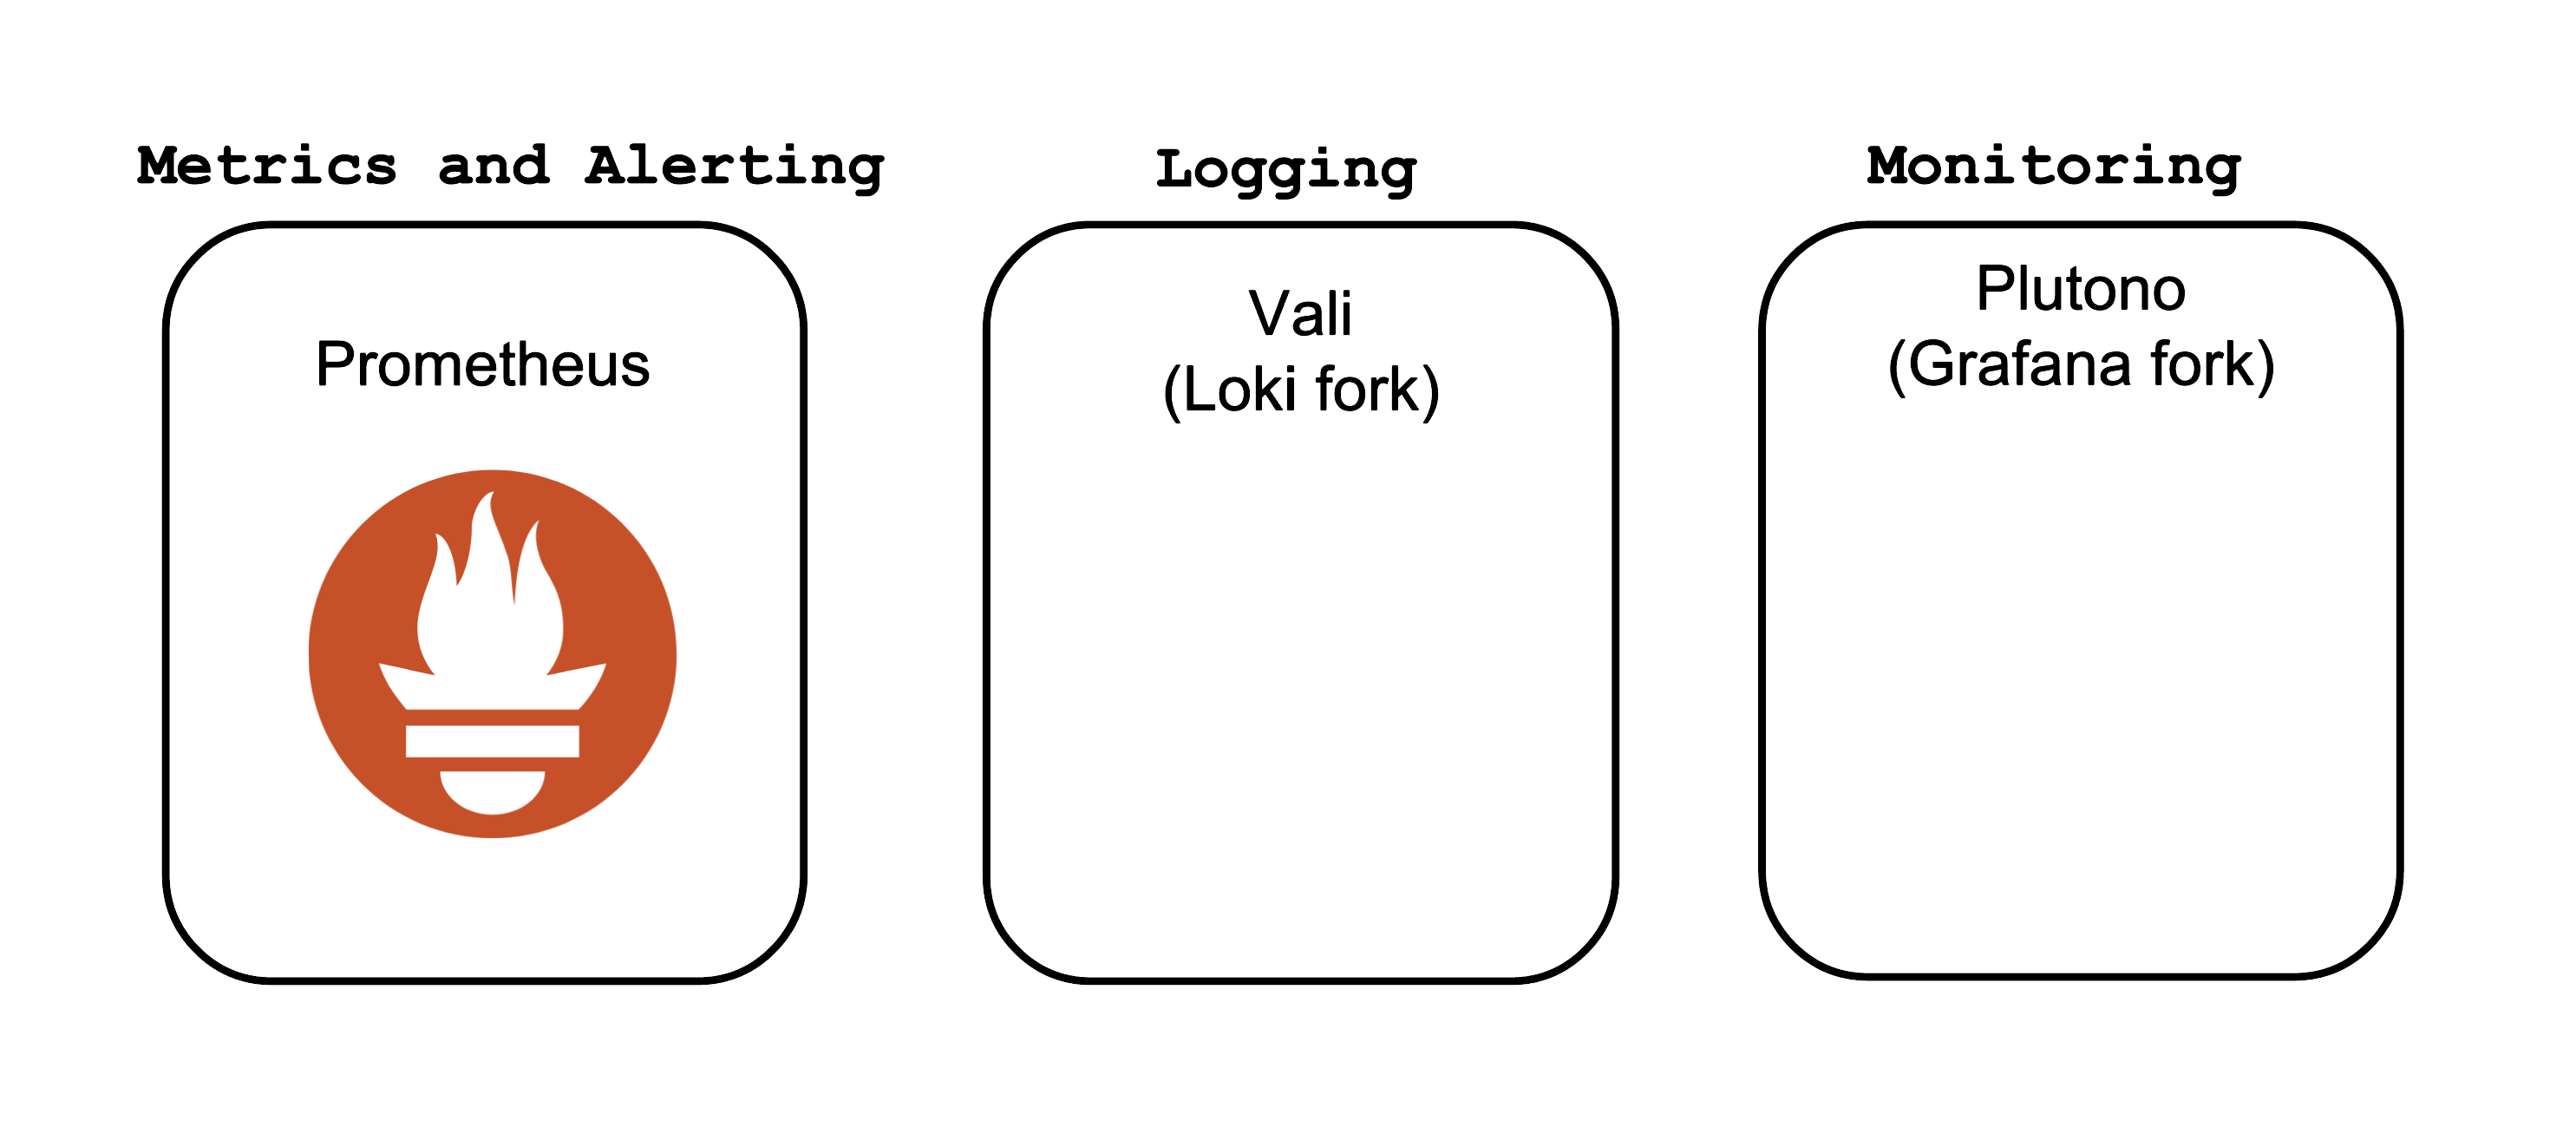
The core Observability components which Gardener offers out-of-the-box are:
- Prometheus - for Metrics and Alerting
- Vali - a Loki fork for Logging
- Plutono - a Grafana fork for Dashboard visualization
Both forks are done from the last version with an Apache license.
Control Plane Components on the Seed
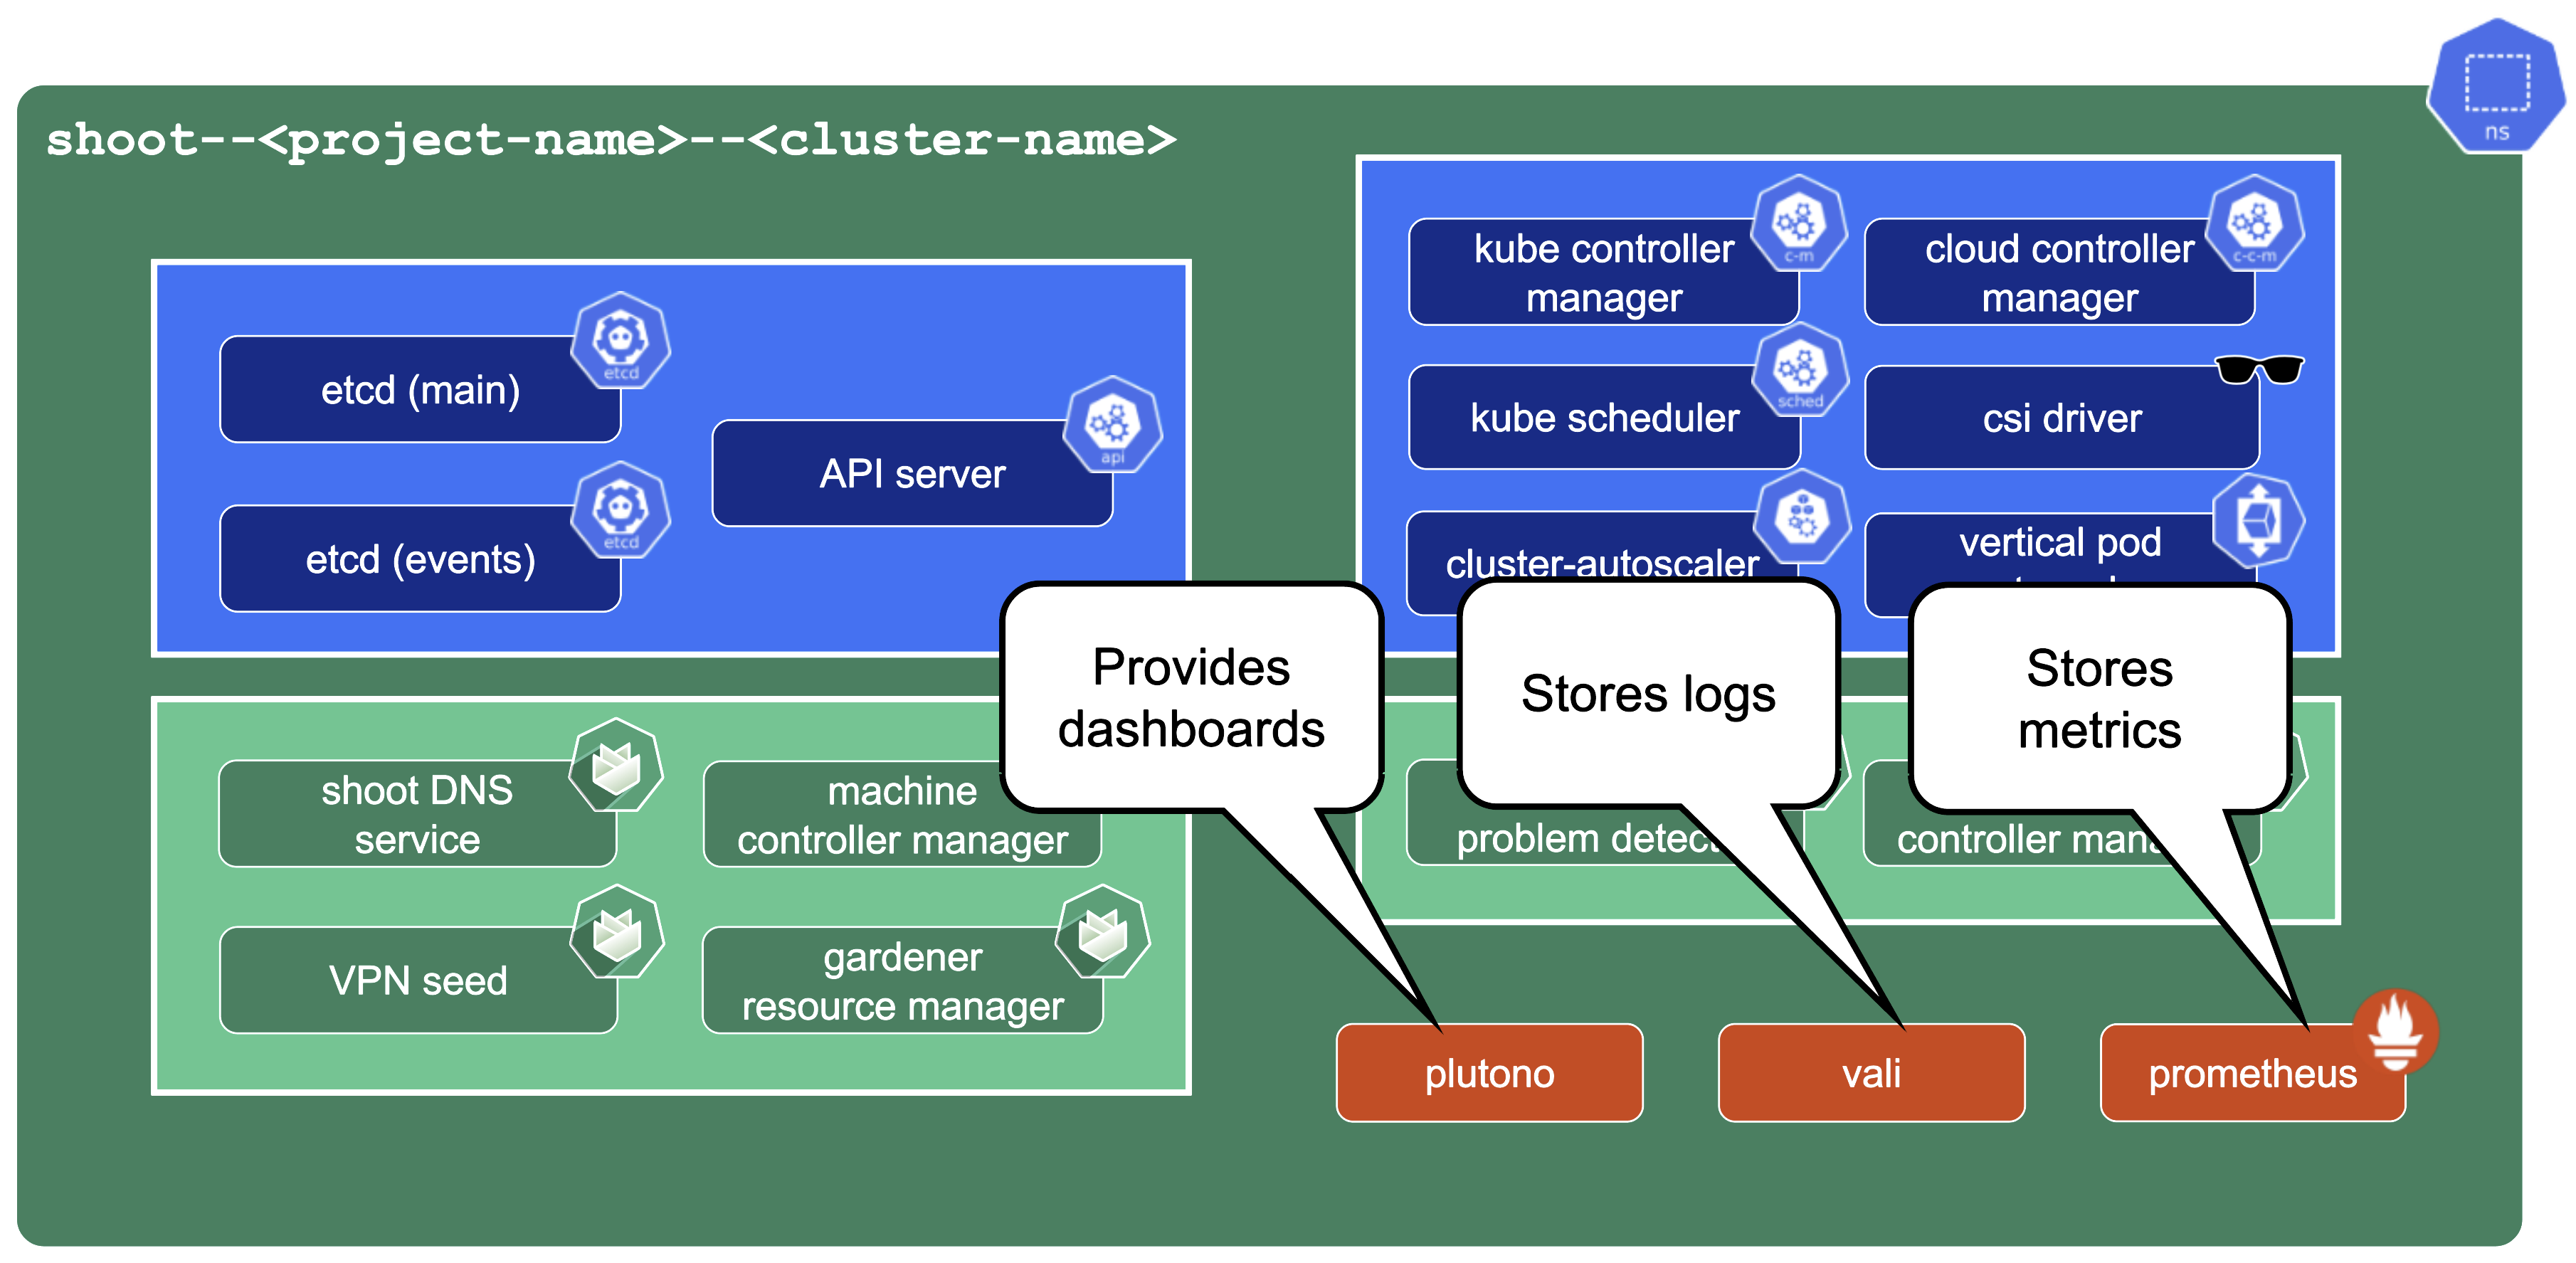
Prometheus, Plutono, and Vali are all located in the seed cluster. They run next to the control plane of your cluster.
The next sections will explore those components in detail.
Note
Gardener only provides monitoring for Gardener-deployed components. If you need logging or monitoring for your workload, then you need to deploy your own monitoring stack into your shoot cluster.
Note
Gardener only provides a monitoring stack if the cluster is not of
purpose: testing. For more information, see Shoot Cluster Purpose.
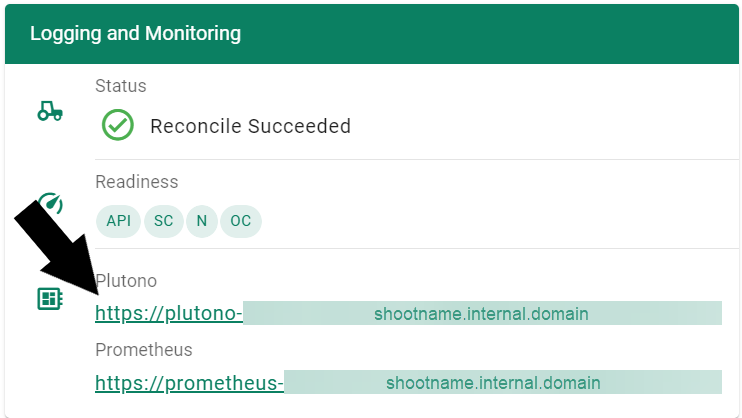
Logging into Plutono
Let us start by giving some visual hints on how to access Plutono. Plutono allows us to query logs and metrics and visualize those in form of dashboards. Plutono is shipped ready-to-use with a Gardener shoot cluster.
In order to access the Gardener provided dashboards, open the Plutono link provided in the Gardener dashboard. You will be automatically logged in through OIDC based authentication:
Access is still possible via the non-OIDC ingress using the credentials from the <clustername>.monitoring secret. It contains the HTTP basic auth credentials in base64-encoded form, as well as the Plutono ingress URL. The Plutono URL is present as an annotation on the .monitoring secret. It can be fetched with kubectl get secret <clustername>.monitoring -o jsonpath="{.metadata.annotations.url}". The Prometheus URL can be derived from the Plutono URL by replacing the gu prefix with p.
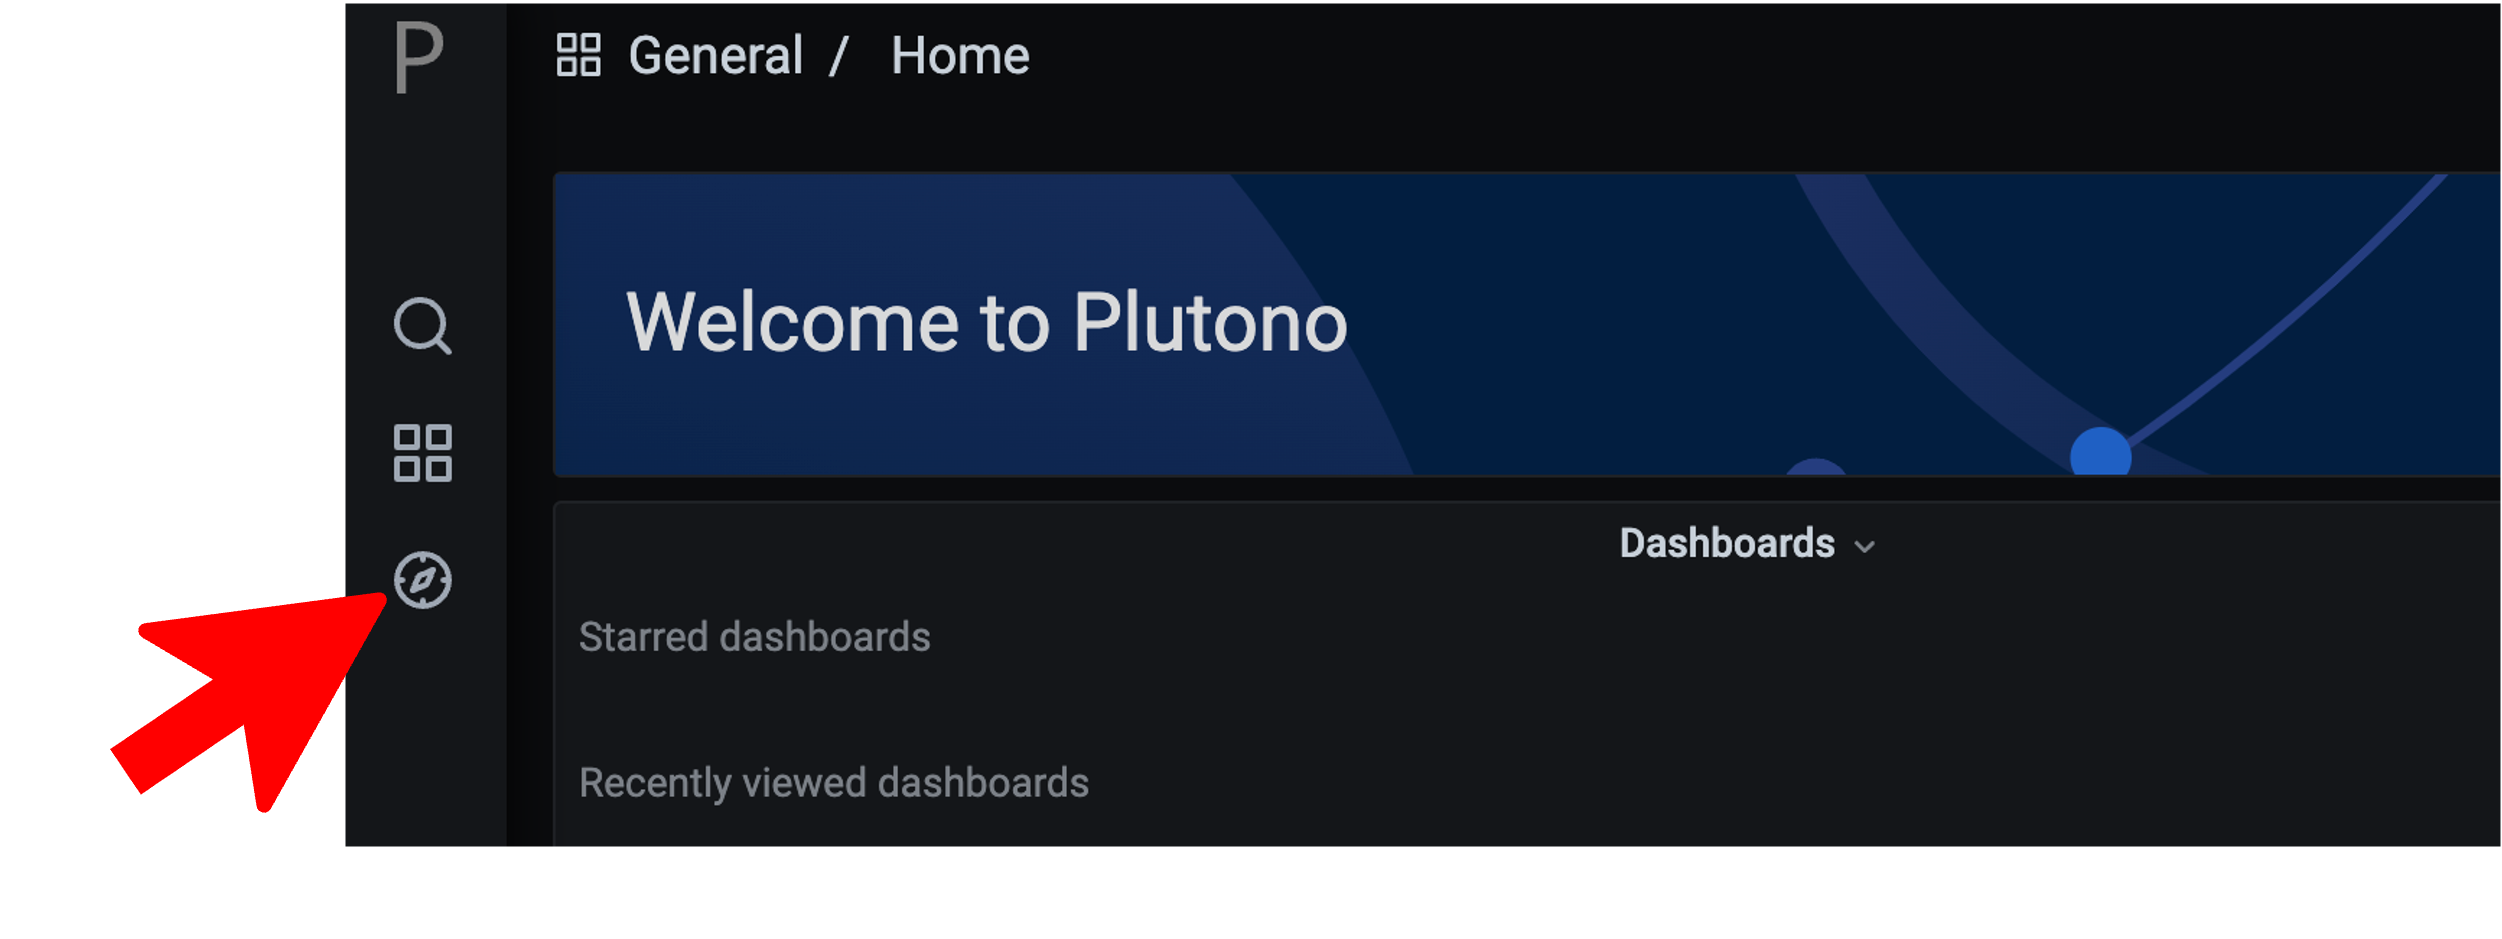
Accessing the Dashboards
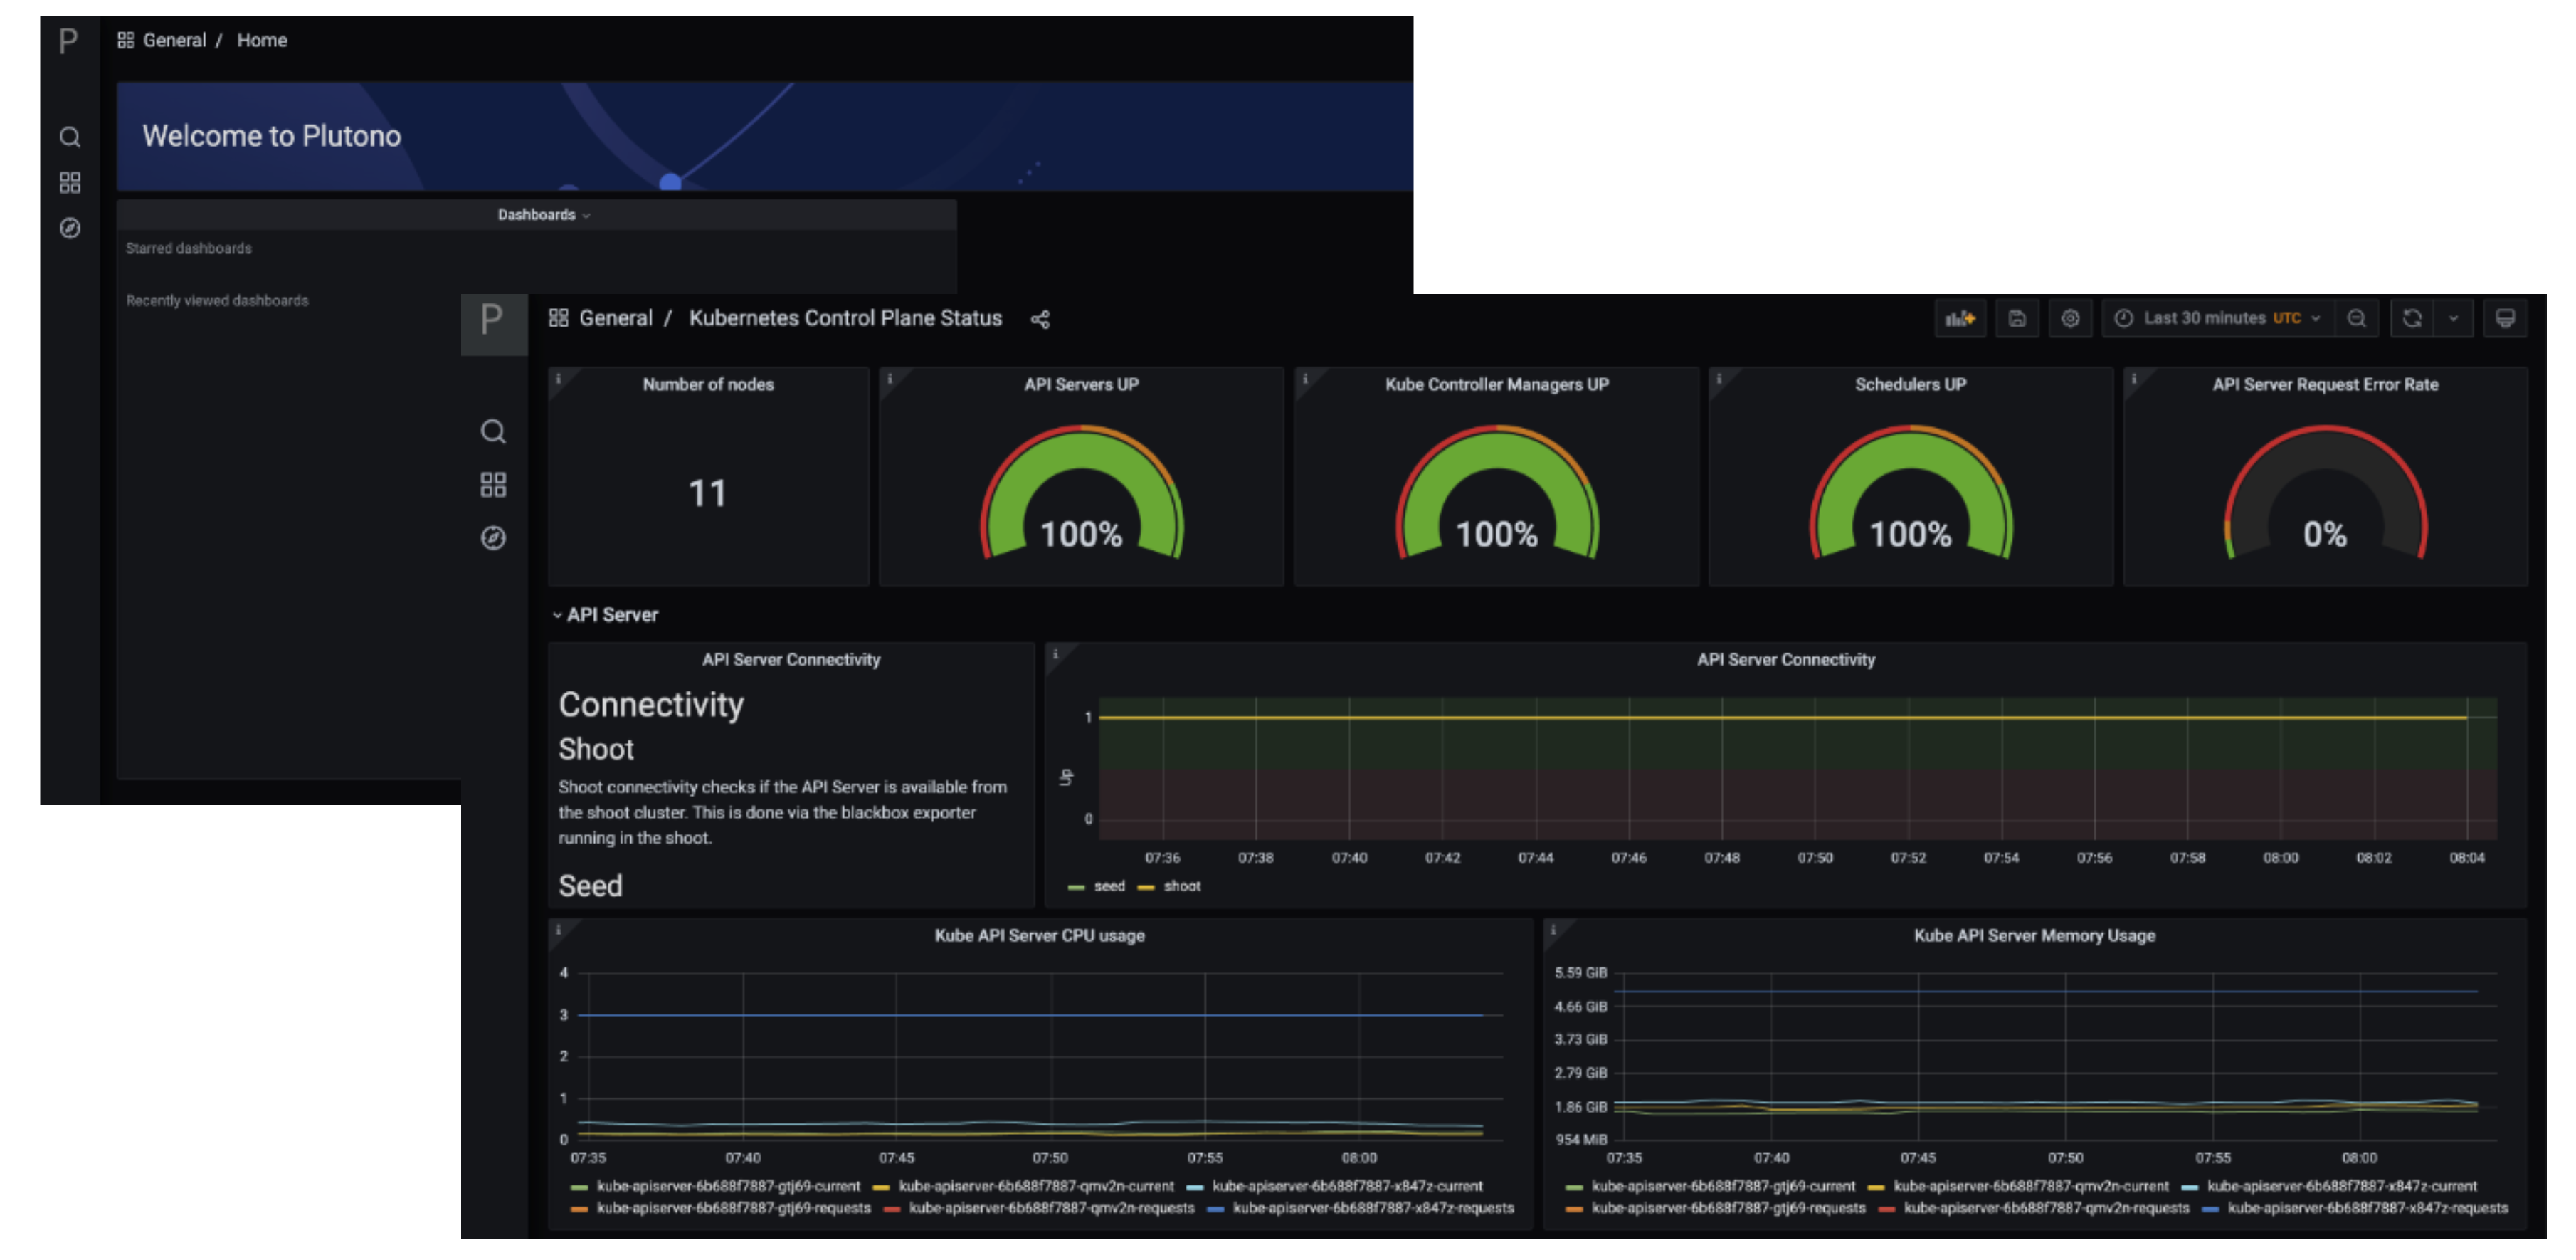
After logging in, you will be greeted with a Plutono welcome screen. Navigate to General/Home, as depicted with the red arrow in the next picture:

Then you will be able to select the dashboards. Some interesting ones to look at are:
- The
Kubernetes Control Plane Statusdashboard allows you to check control plane availability during a certain time frame. - The
API Serverdashboard gives you an overview on which requests are done towards your apiserver and how long they take. - With the
Node Detailsdashboard you can analyze CPU/Network pressure or memory usage for nodes. - The
Network Problem Detectordashboard illustrates the results of periodic networking checks between nodes and to the APIServer.
Here is a picture with the Kubernetes Control Plane Status dashboard.
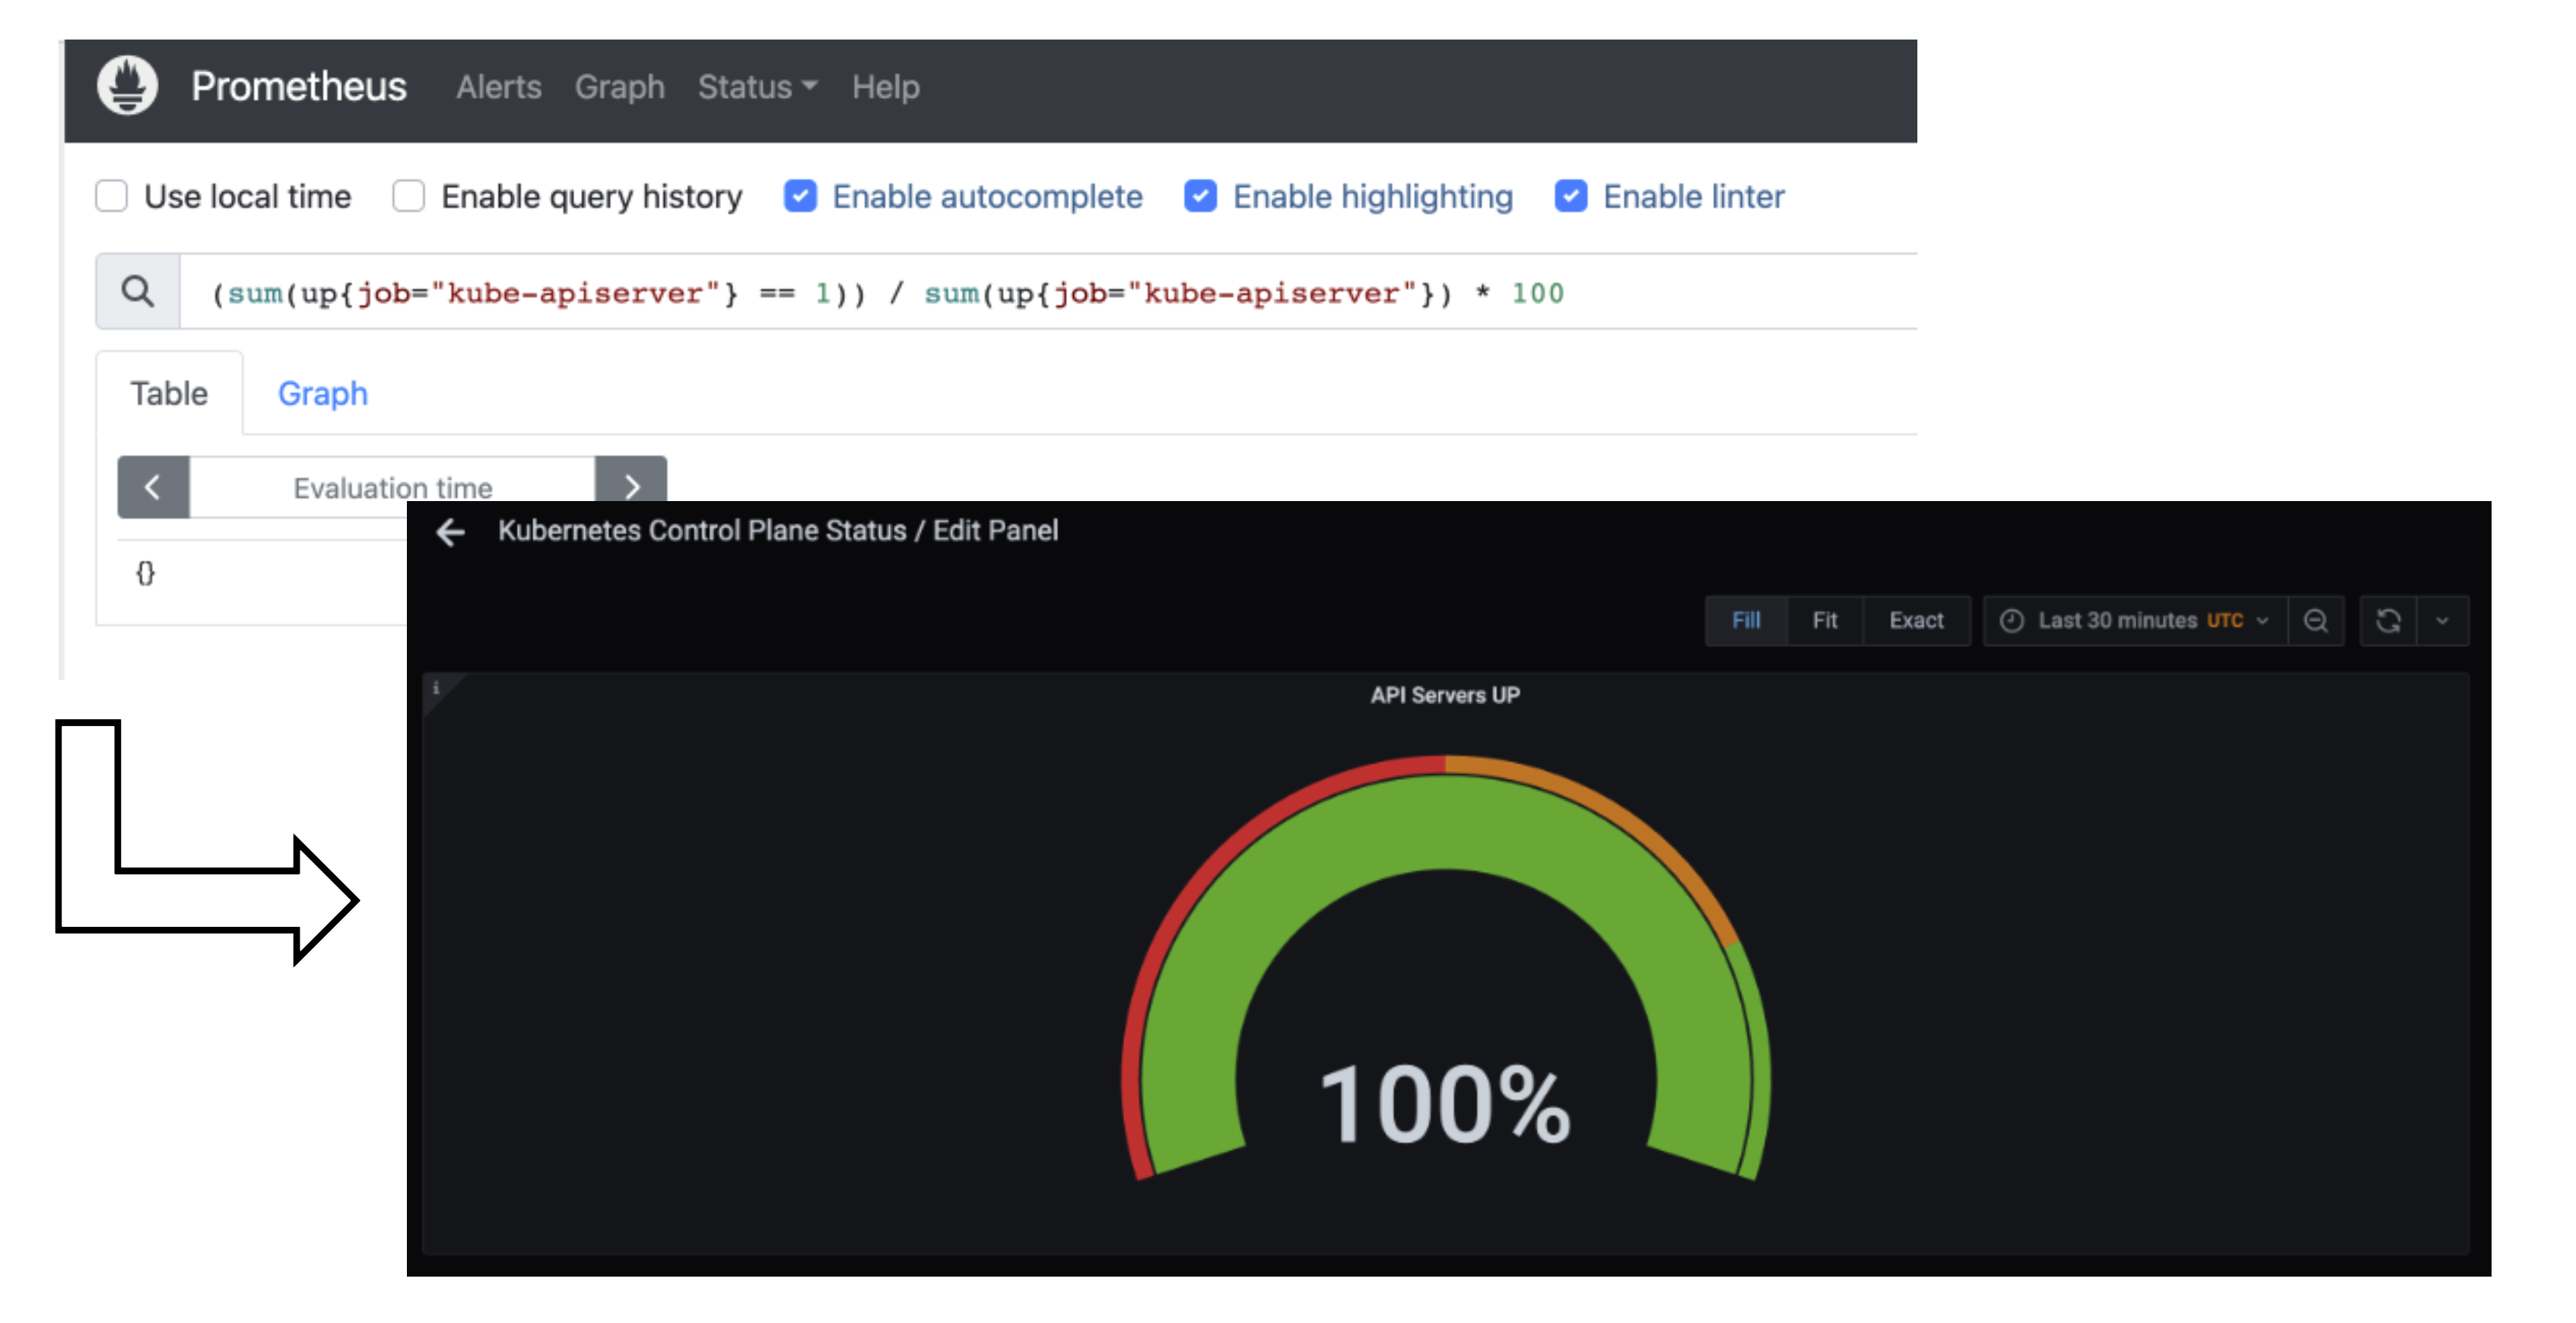
Prometheus
Prometheus is a monitoring system and a time series database. It can be queried using PromQL, the so called Prometheus Querying Language.

This example query describes the current uptime status of the kube apiserver.
Prometheus and Plutono
Time series data from Prometheus can be made visible with Plutono. Here we see how the query above which describes the uptime of a Kubernetes cluster is visualized with a Plutono dashboard.
Vali Logs via Plutono
Vali is our logging solution. In order to access the logs provided by Vali, you need to:
Choose
Explore, which is depicted as the little compass symbol:
- Select
Valiat the top left, as shown here:

There you can browse logs or events of the control plane components.
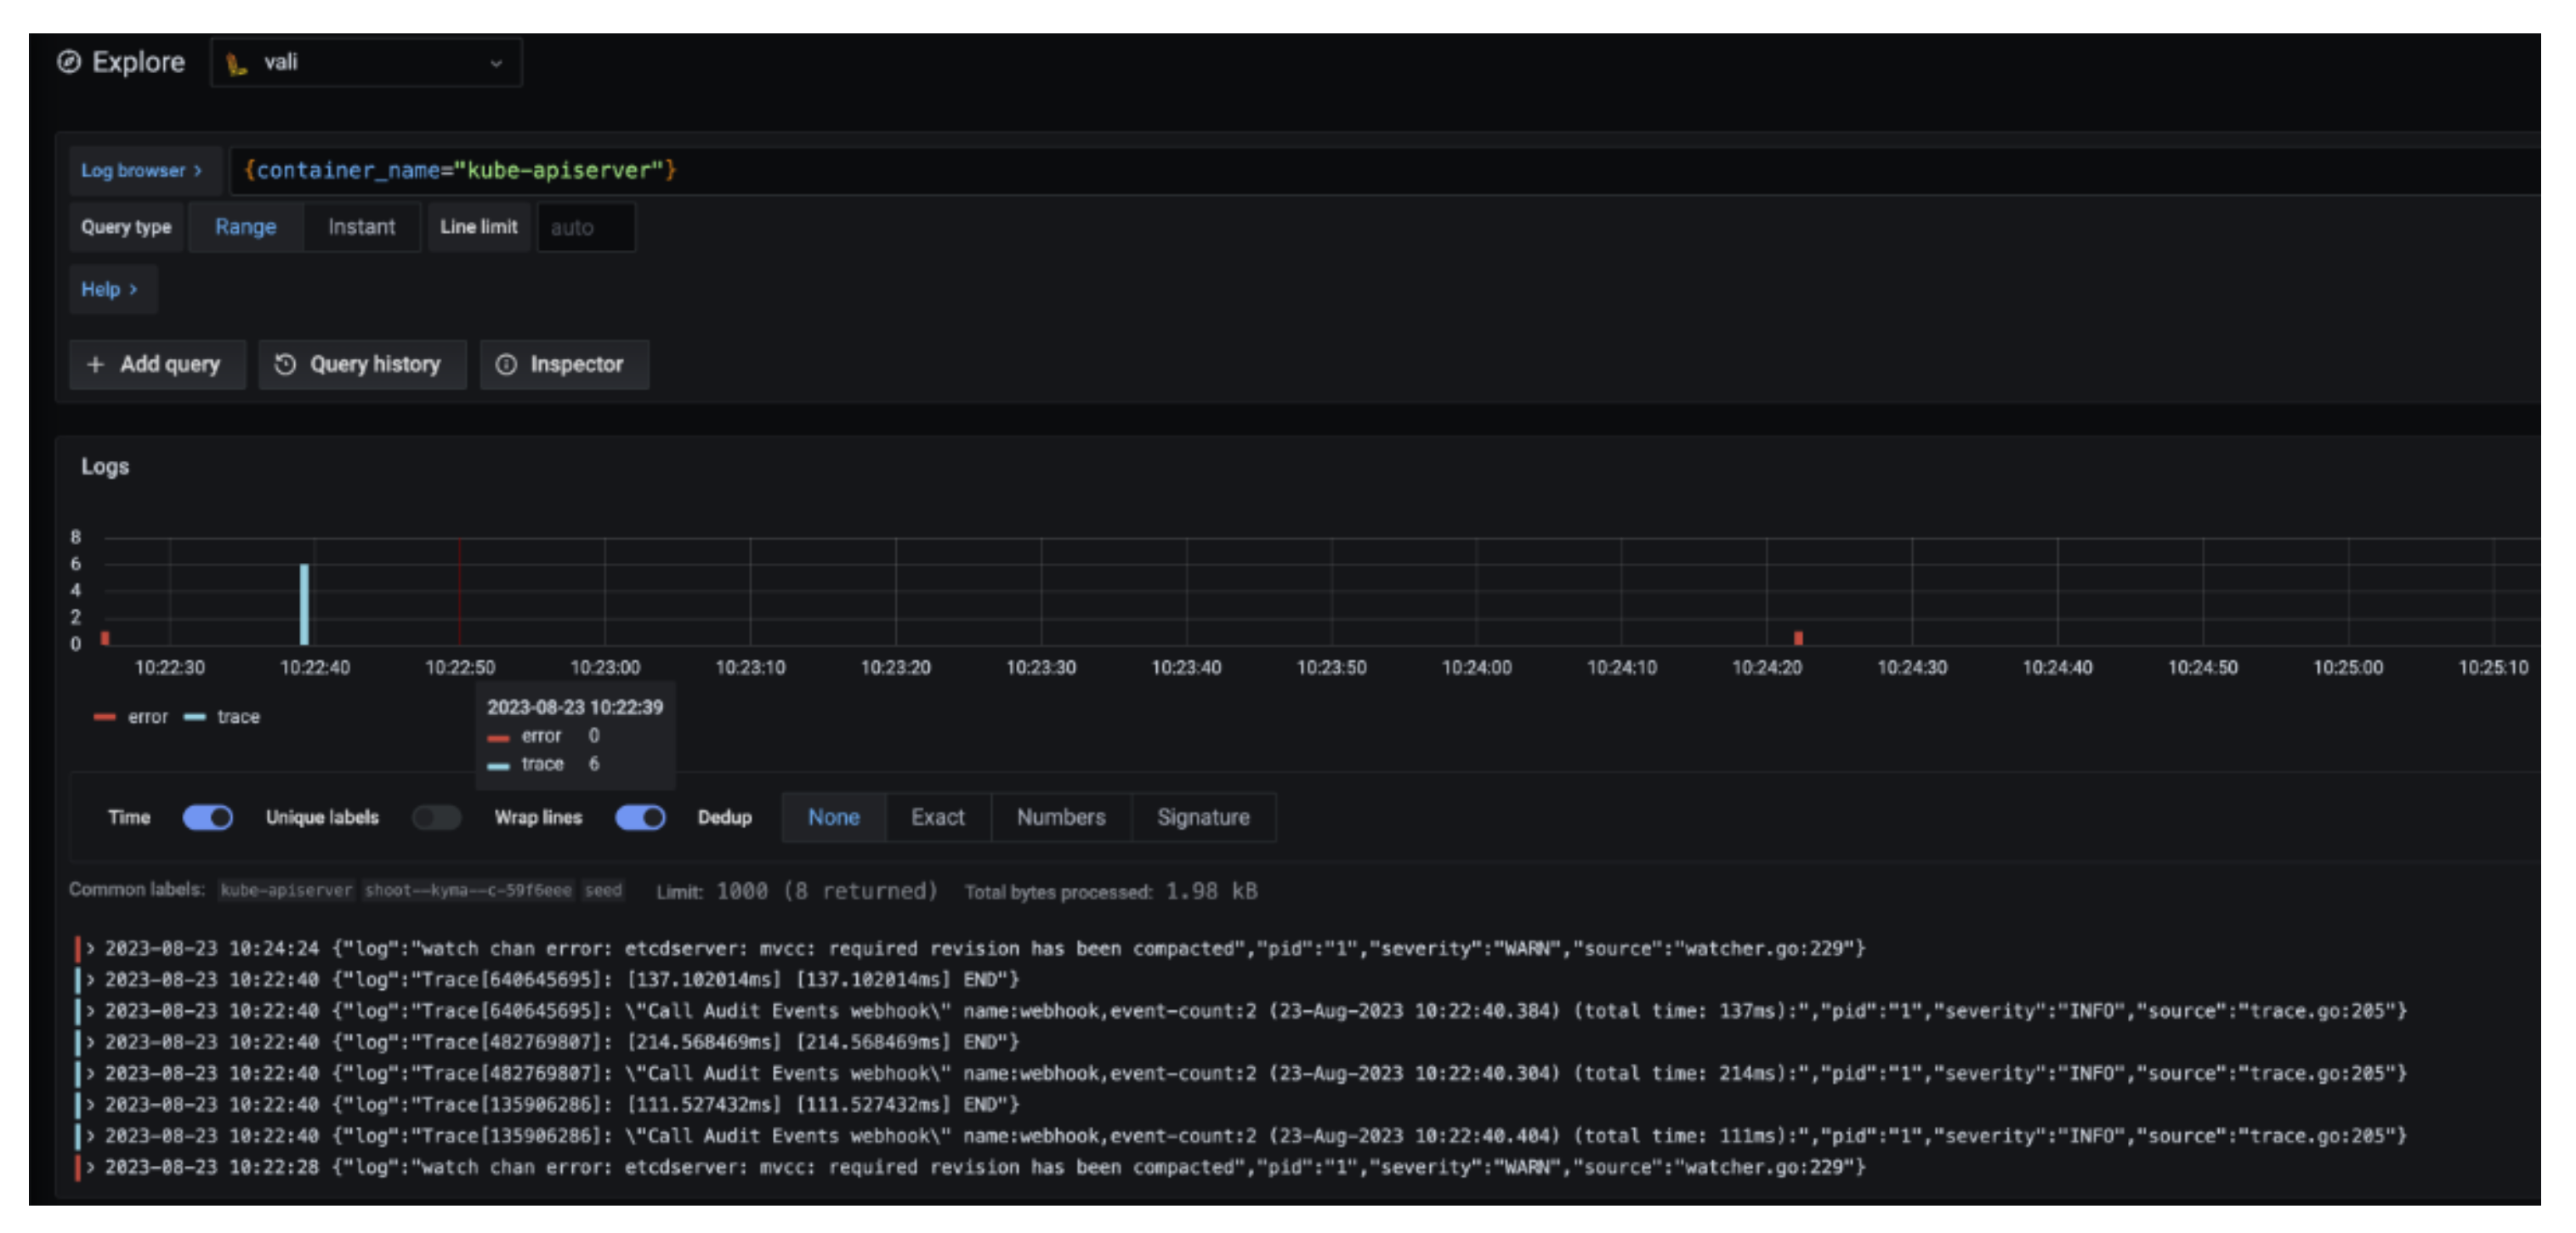
Here are some examples of helpful queries:
{container_name="cluster-autoscaler" }to get cluster-autoscaler logs and see why certain node groups were scaled up.{container_name="kube-apiserver"} |~ "error"to get the logs of the kube-apiserver container and filter for errors.{unit="kubelet.service", nodename="ip-123"}to get the kubelet logs of a specific node.{unit="containerd.service", nodename="ip-123"}to retrieve the containerd logs for a specific node.
Choose Help > in order to see what options exist to filter the results.
For more information on how to retrieve K8s events from the past, see How to Access Logs.
Detailed View
Data Flow
Our monitoring and logging solutions Vali and Prometheus both run next to the control plane of the shoot cluster.
Data Flow - Logging
The following diagram allows a more detailed look at Vali and the data flow.
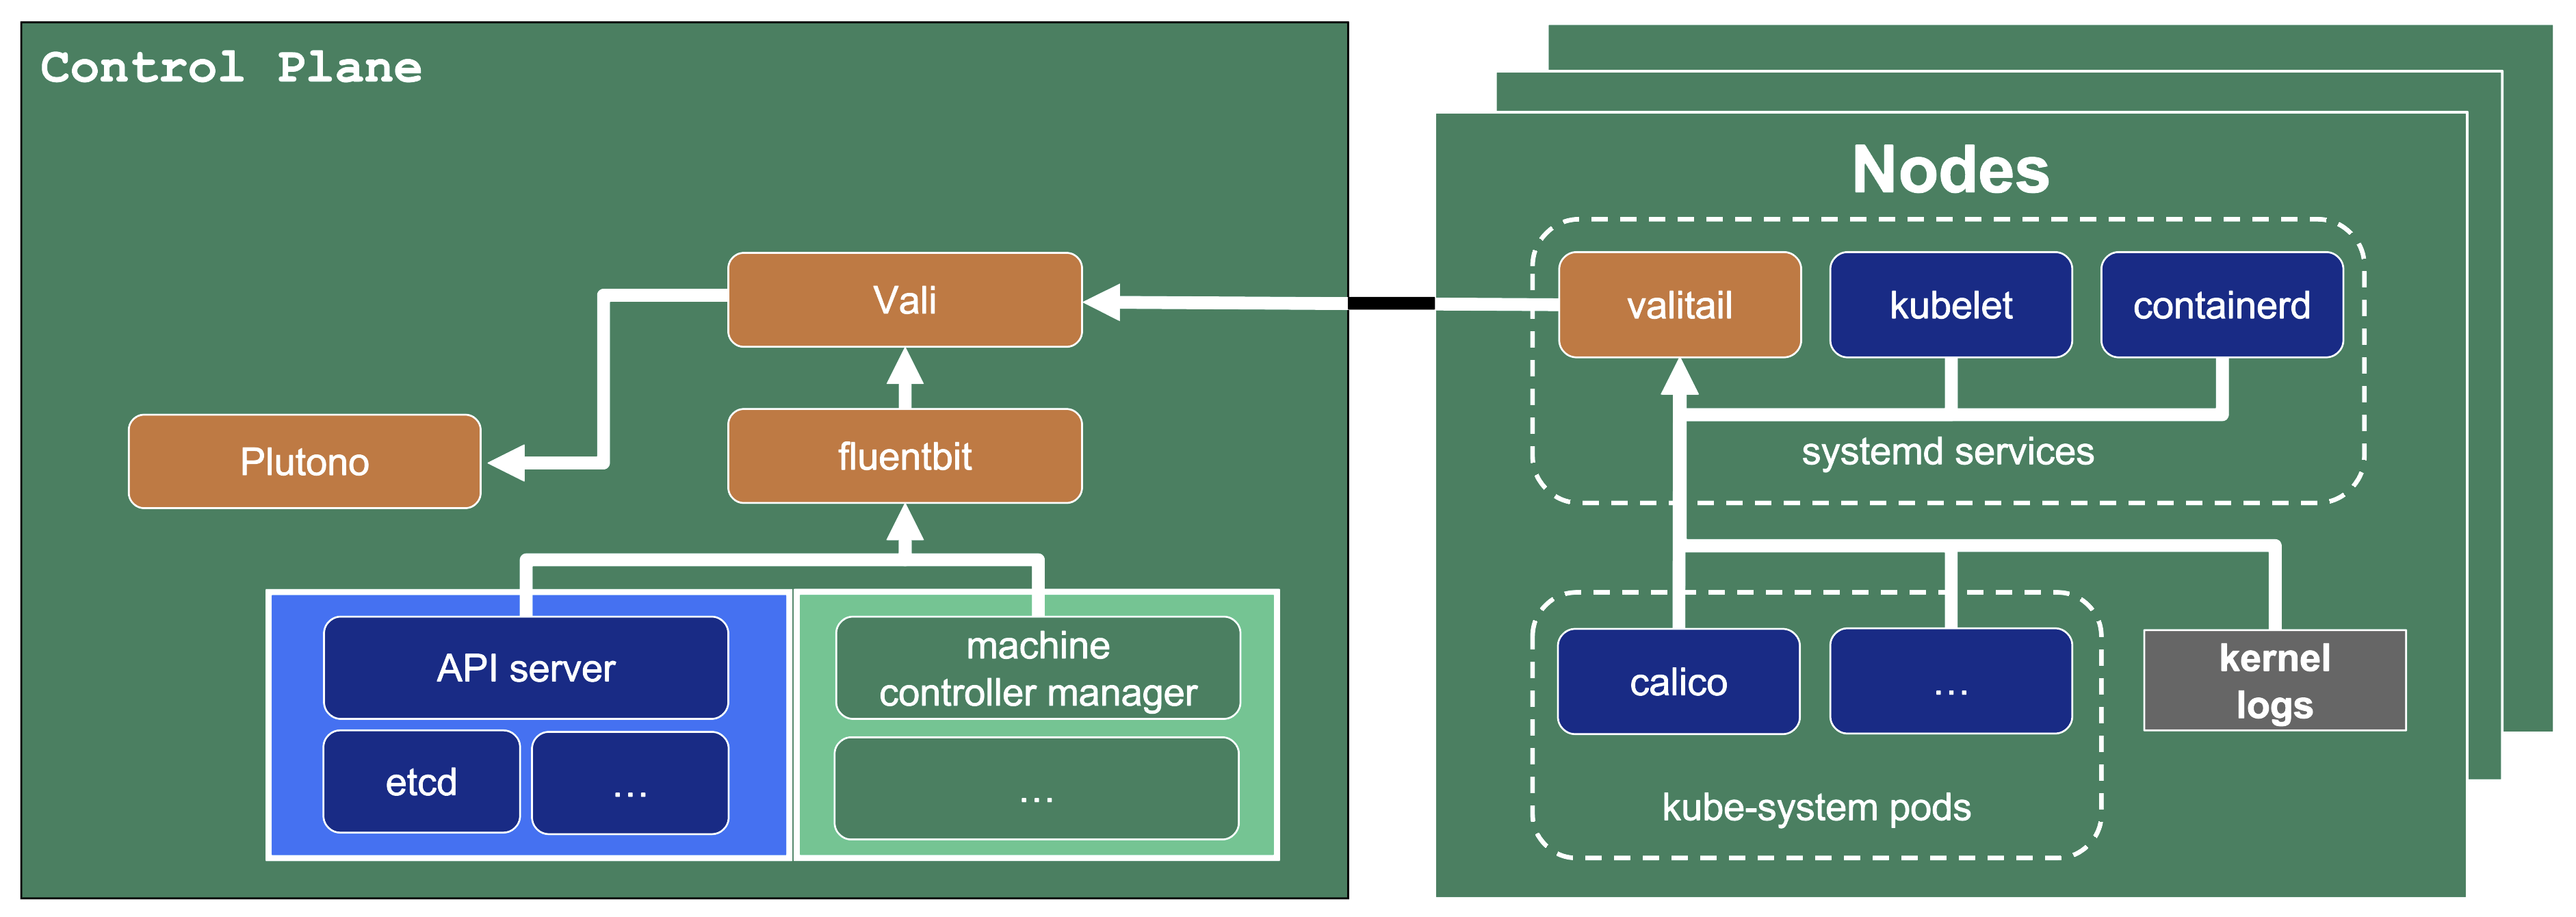
On the very left, we see Plutono as it displays the logs. Vali is aggregating the logs from different sources.
Valitail and Fluentbit send the logs to Vali, which in turn stores them.
Valitail
Valitail is a systemd service that runs on each node. It scrapes kubelet, containerd, kernel logs, and the logs of the pods in the kube-system namespace.
Fluentbit
Fluentbit runs as a daemonset on each seed node. It scrapes logs of the kubernetes control plane components, like apiserver or etcd.
It also scrapes logs of the Gardener deployed components which run next to the control plane of the cluster, like the machine-controller-manager or the cluster autoscaler. Debugging those components, for example, would be helpful when finding out why certain worker groups got scaled up or why nodes were replaced.
Data Flow - Monitoring
Next to each shoot’s control plane, we deploy an instance of Prometheus in the seed.
Gardener uses Prometheus for storing and accessing shoot-related metrics and alerting.
The diagram below shows the data flow of metrics. Plutono uses PromQL queries to query data from Prometheus. It then visualises those metrics in dashboards. Prometheus itself scrapes various targets for metrics, as seen in the diagram below by the arrows pointing to the Prometheus instance.
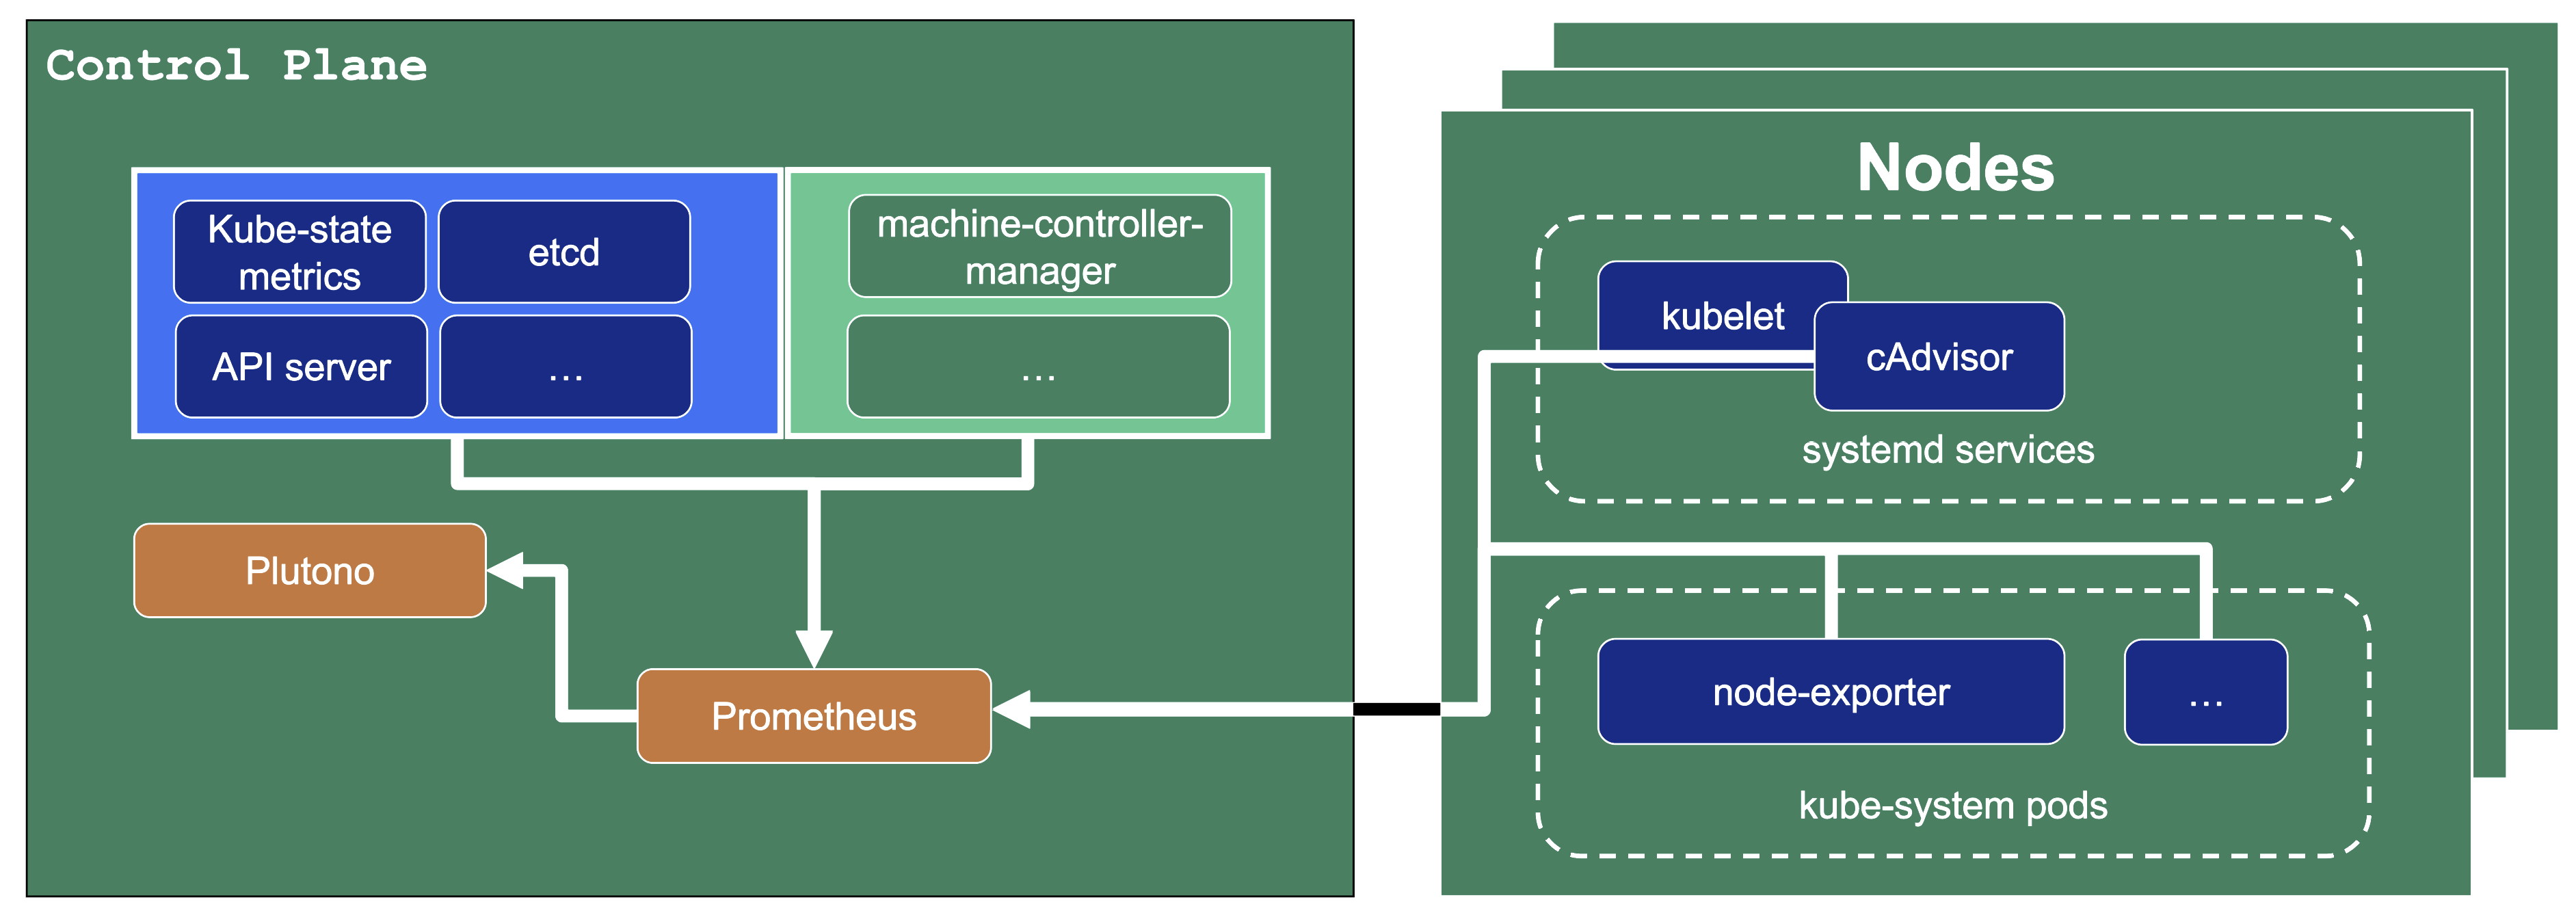
Let us have a look what metrics we scrape for debugging purposes:
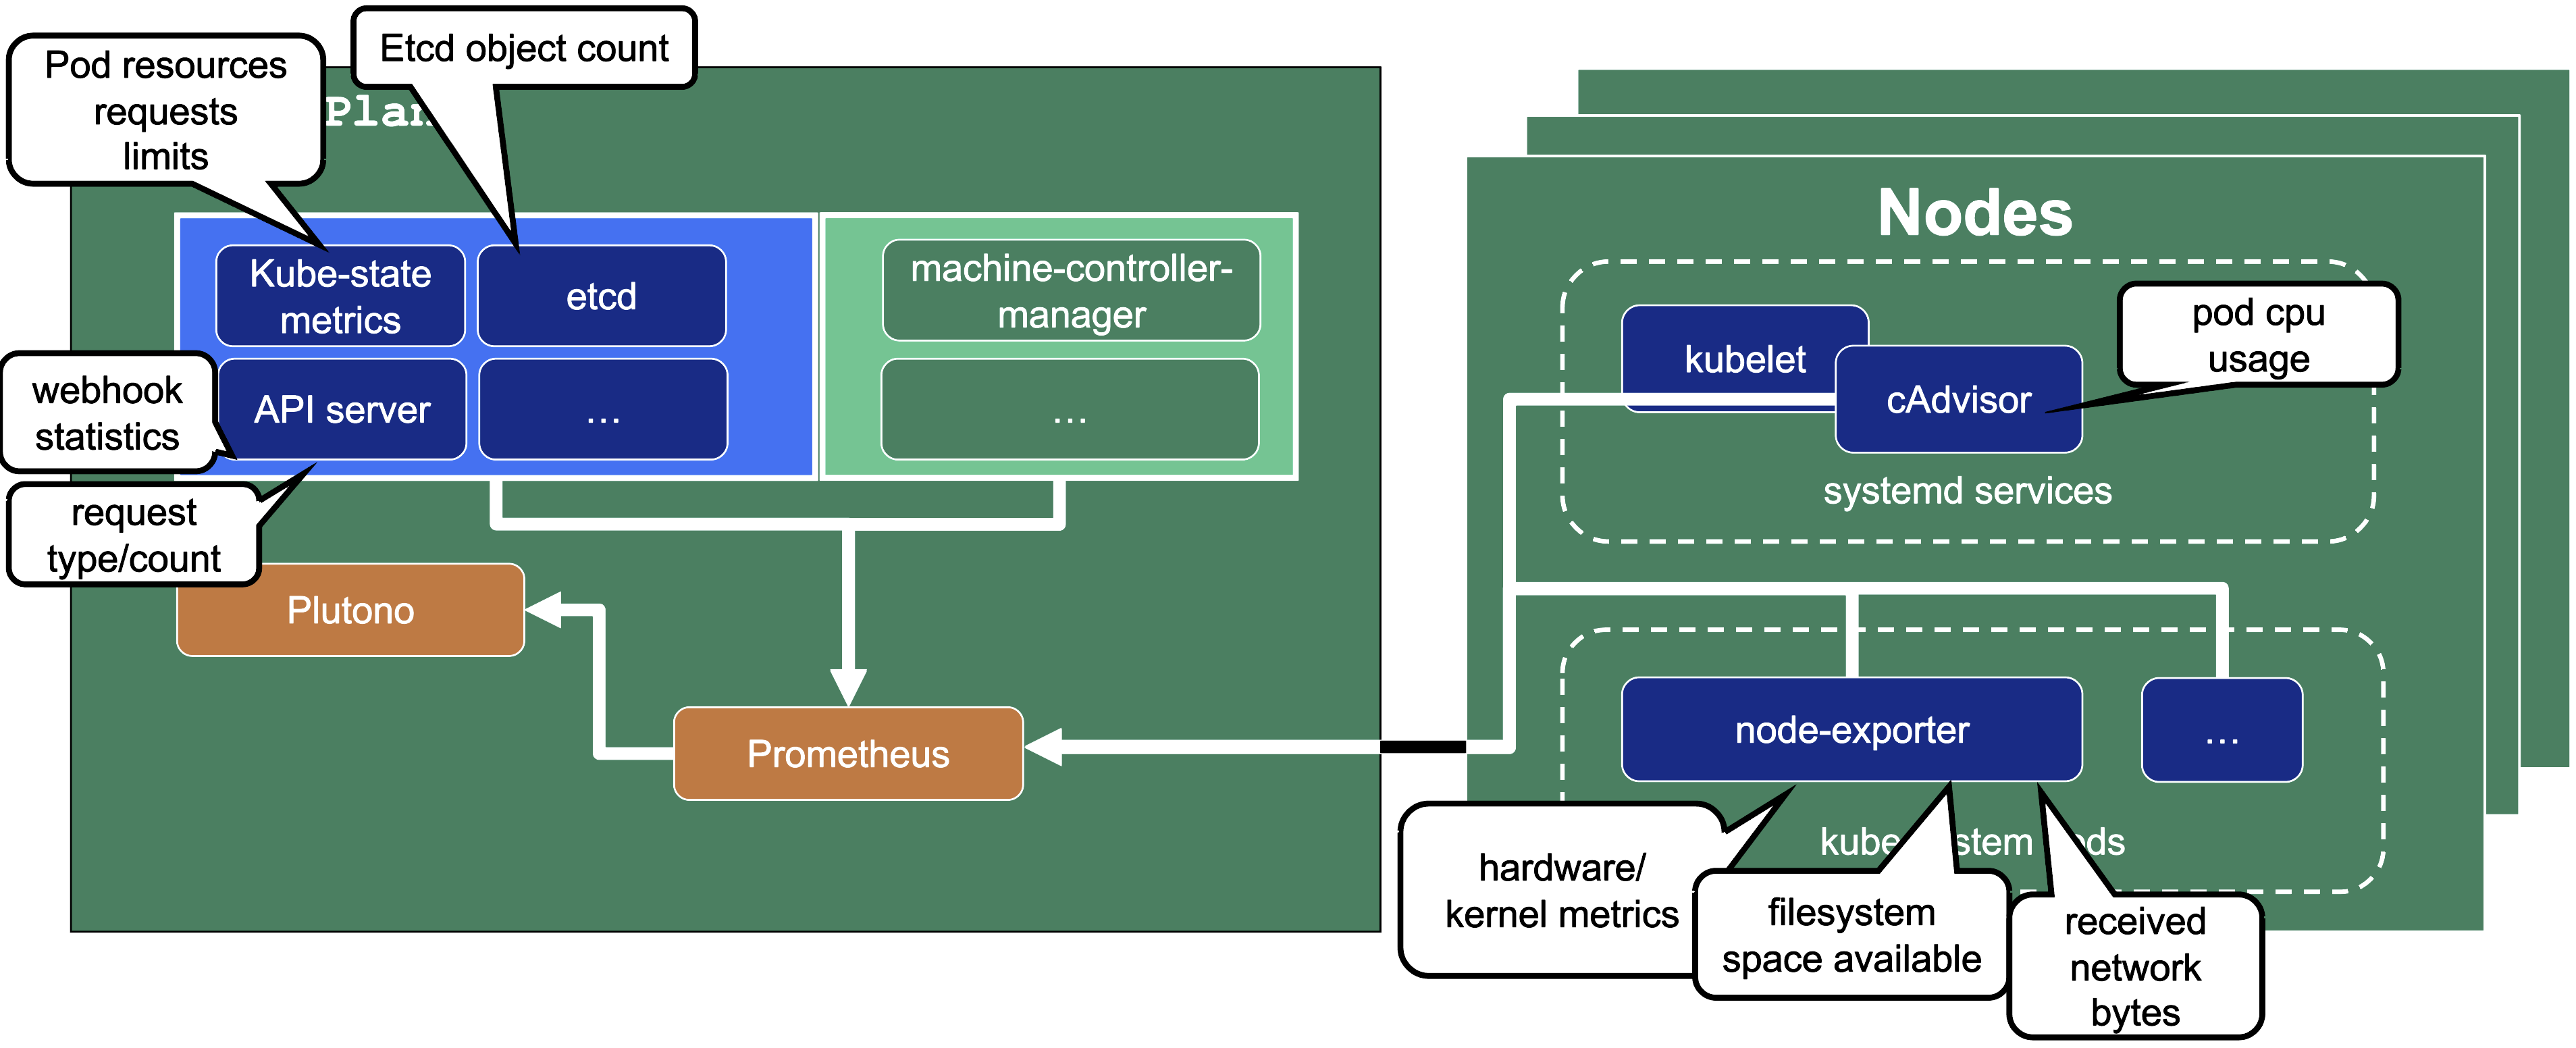
Container performance metrics
cAdvisor is an open-source agent integrated into the kubelet binary that monitors resource usage and analyzes the performance of containers. It collects statistics about the CPU, memory, file, and network usage for all containers running on a given node. We use it to scrape data for all pods running in the kube-system namespace in the shoot cluster.
Hardware and kernel-related metrics
The Prometheus Node Exporter runs as a daemonset in the kube-system namespace of your shoot cluster. It exposes a wide variety of hardware and kernel-related metrics. Some of the metrics we scrape are, for example, the current usage of the filesystem (node_filesystem_free_bytes) or current CPU usage (node_cpu_seconds_total). Both can help you identify if nodes are running out of hardware resources, which could lead to your workload experiencing downtimes.
Control plane component specific metrics
The different control plane pods (for example, etcd, API server, and kube-controller-manager) emit metrics over the /metrics endpoint. This includes metrics like how long webhooks take, the request count of the apiserver and storage information, like how many and what kind of objects are stored in etcd.
Metrics about the state of Kubernetes objects
kube-state-metrics is a simple service that listens to the Kubernetes API server and generates metrics about the state of the objects. It is not concerned with metrics about the Kubernetes components, but rather it exposes metrics calculated from the status of Kubernetes objects (for example, resource requests or health of pods).
In the following image a few example metrics, which are exposed by the various components, are listed:
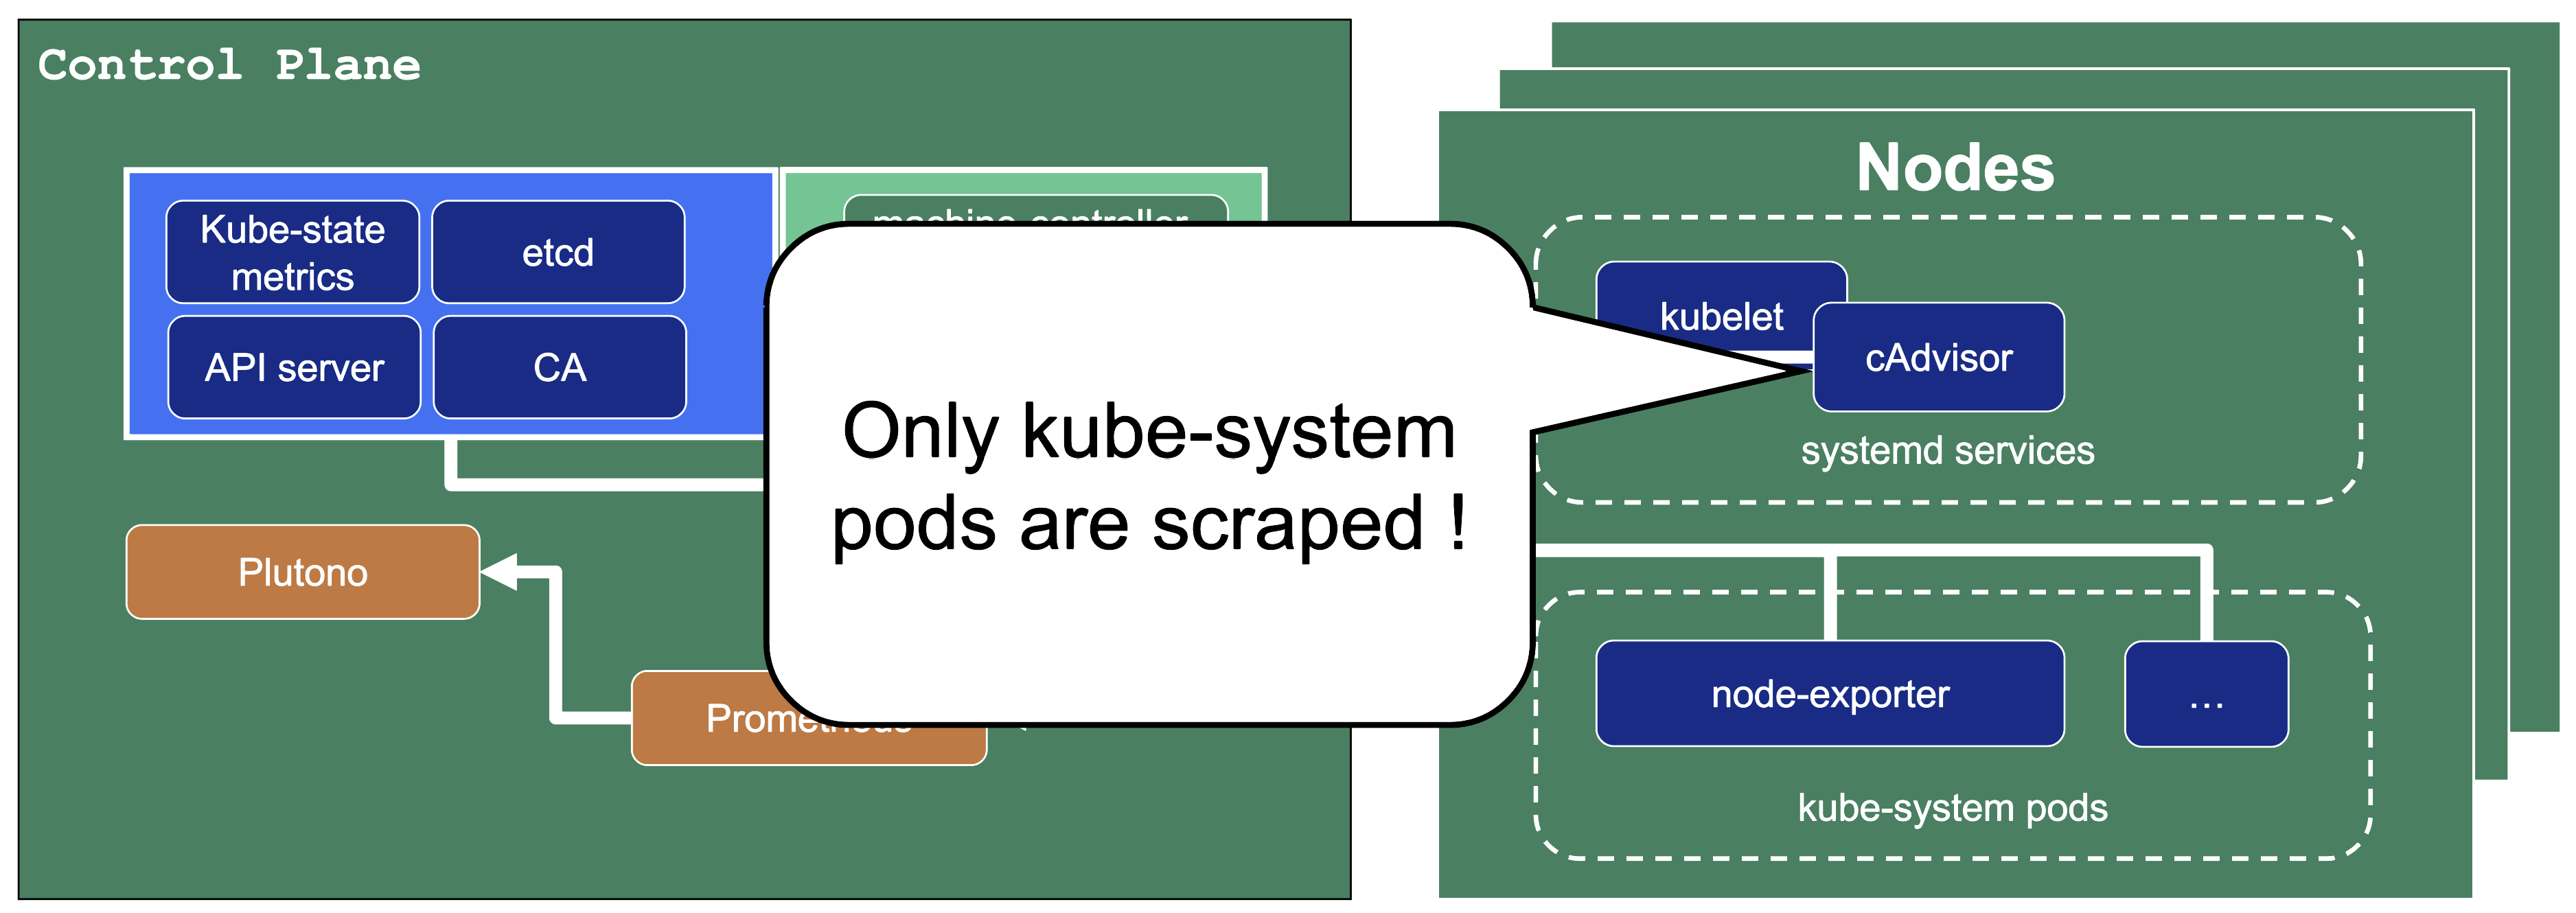
We only store metrics for Gardener deployed components. Those include the Kubernetes control plane, Gardener managed system components (e.g., pods) in the kube-system namespace of the shoot cluster or systemd units on the nodes. We do not gather metrics for workload deployed in the shoot cluster. This is also shown in the picture below.
This means that for any workload you deploy into your shoot cluster, you need to deploy monitoring and logging yourself.
Logs or metrics are kept up to 14 days or when a configured space limit is reached.
1.7.2 - Alerts
Overview
In this overview, we want to present two ways to receive alerts for control plane and Gardener managed system-components:
- Predefined Gardener alerts
- Custom alerts
Predefined Control Plane Alerts
In the shoot spec it is possible to configure emailReceivers. On this email address you will automatically receive email notifications for predefined alerts of your control plane. Such alerts are deployed in the shoot Prometheus and have visibility owner or all. For more alert details, shoot owners can use this visibility to find these alerts in their shoot Prometheus UI.
spec:
monitoring:
alerting:
emailReceivers:
- john.doe@example.com
For more information, see Alerting.
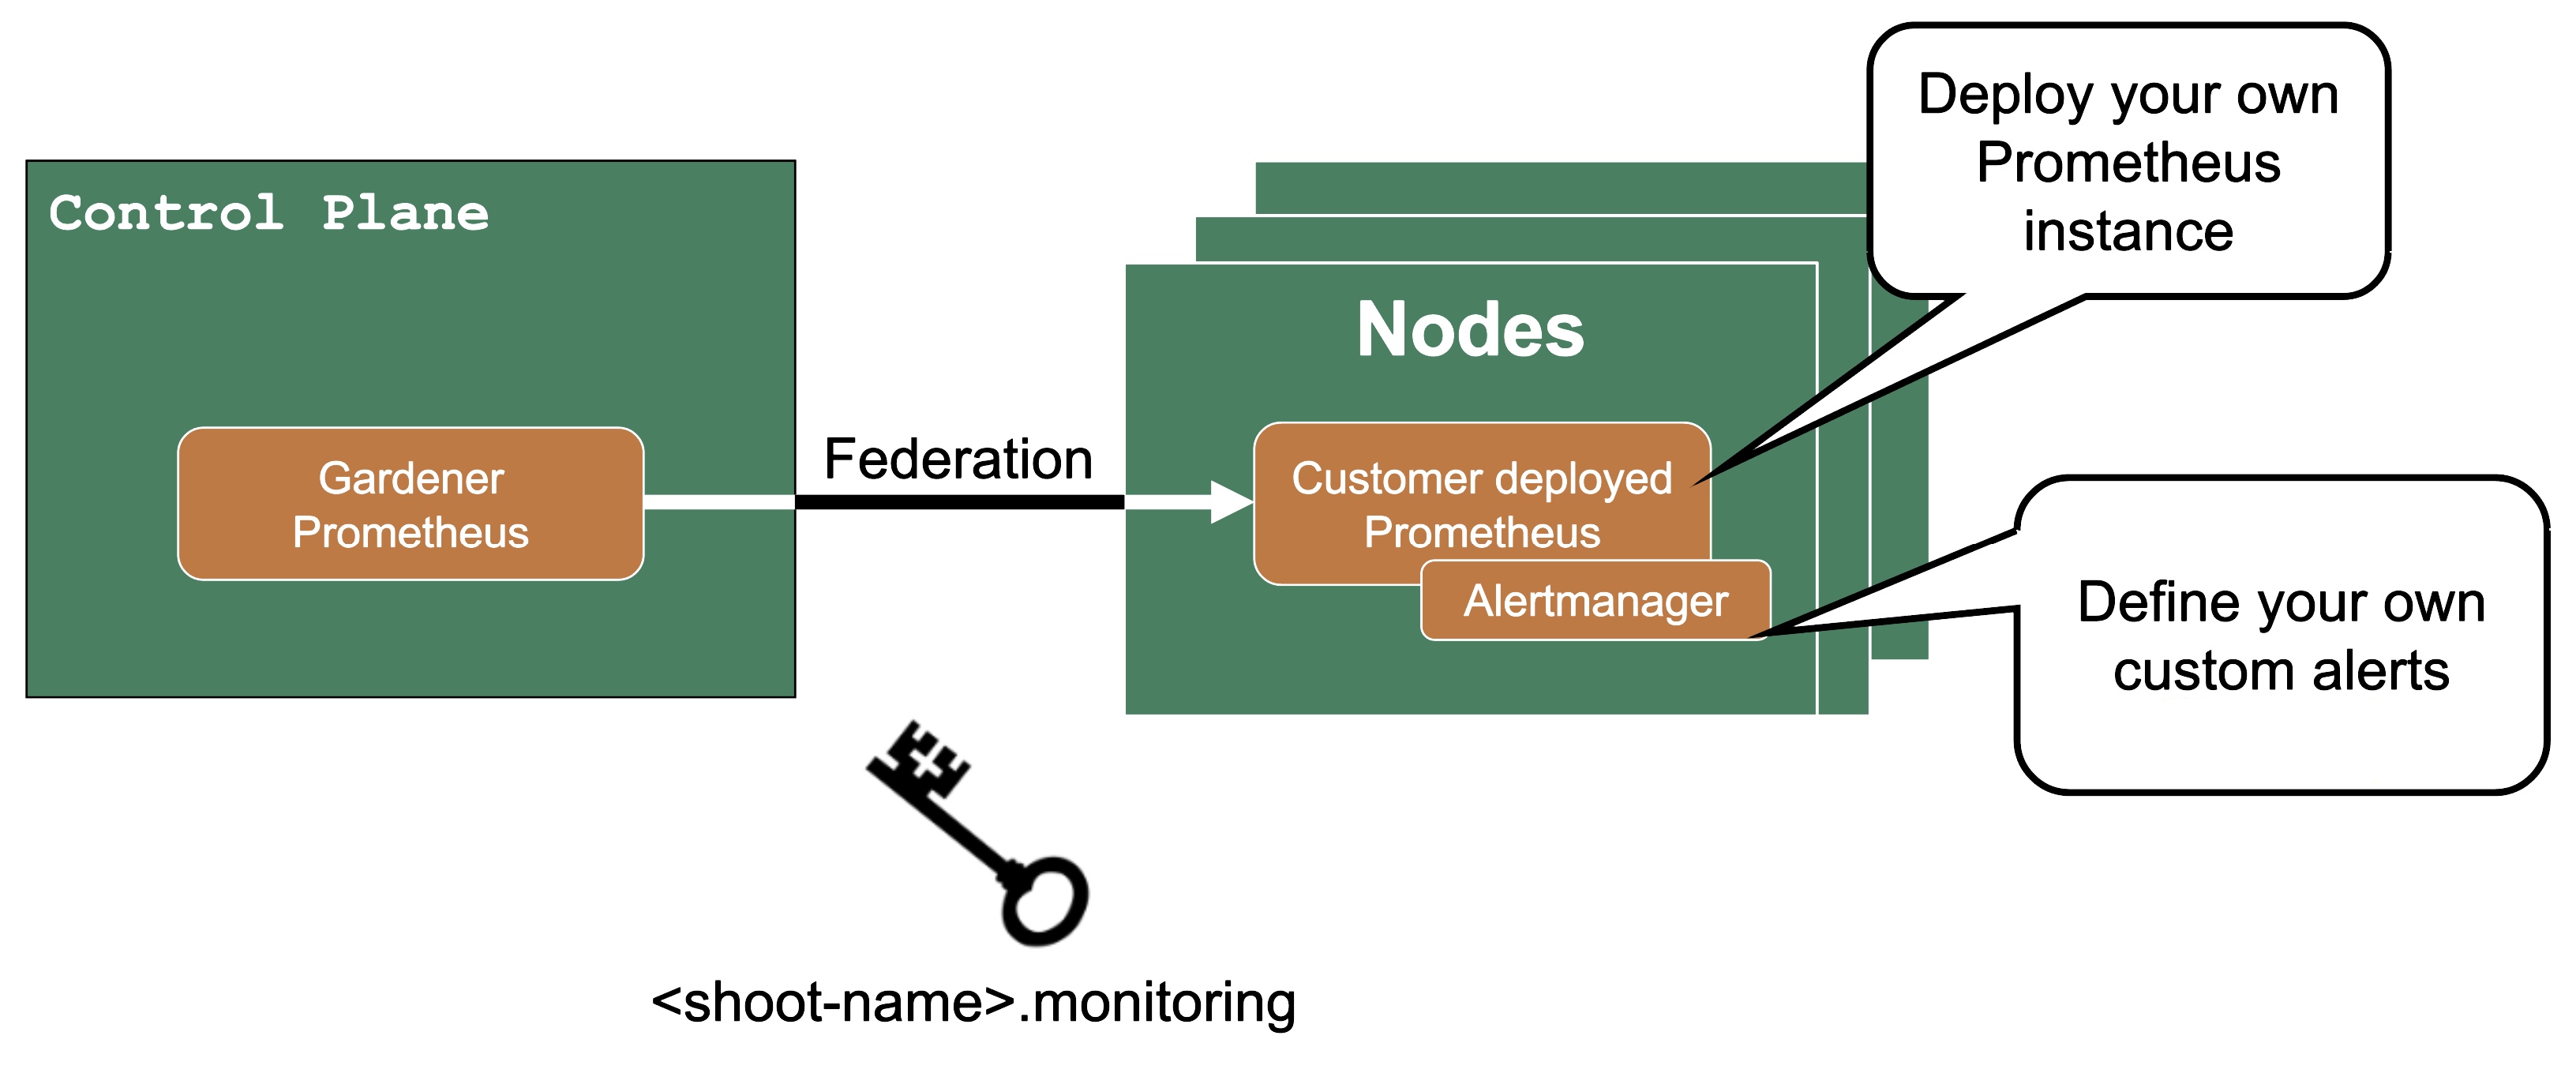
Custom Alerts – Federation
If you need more customization for alerts for control plane metrics, you have the option to deploy your own Prometheus into your shoot cluster.
Then you can use federation, which is a Prometheus feature, to forward the metrics from the Gardener managed Prometheus to your custom deployed Prometheus. Since as a shoot owner you do not have access to the control plane pods, this is the only way to get those metrics.
The credentials and endpoint for the Gardener managed Prometheus are exposed over the Gardener dashboard or programmatically in the garden project as a secret (<shoot-name>.monitoring).
1.7.3 - Shoot Status
Overview
In this topic you can see various shoot statuses and how you can use them to monitor your shoot cluster.
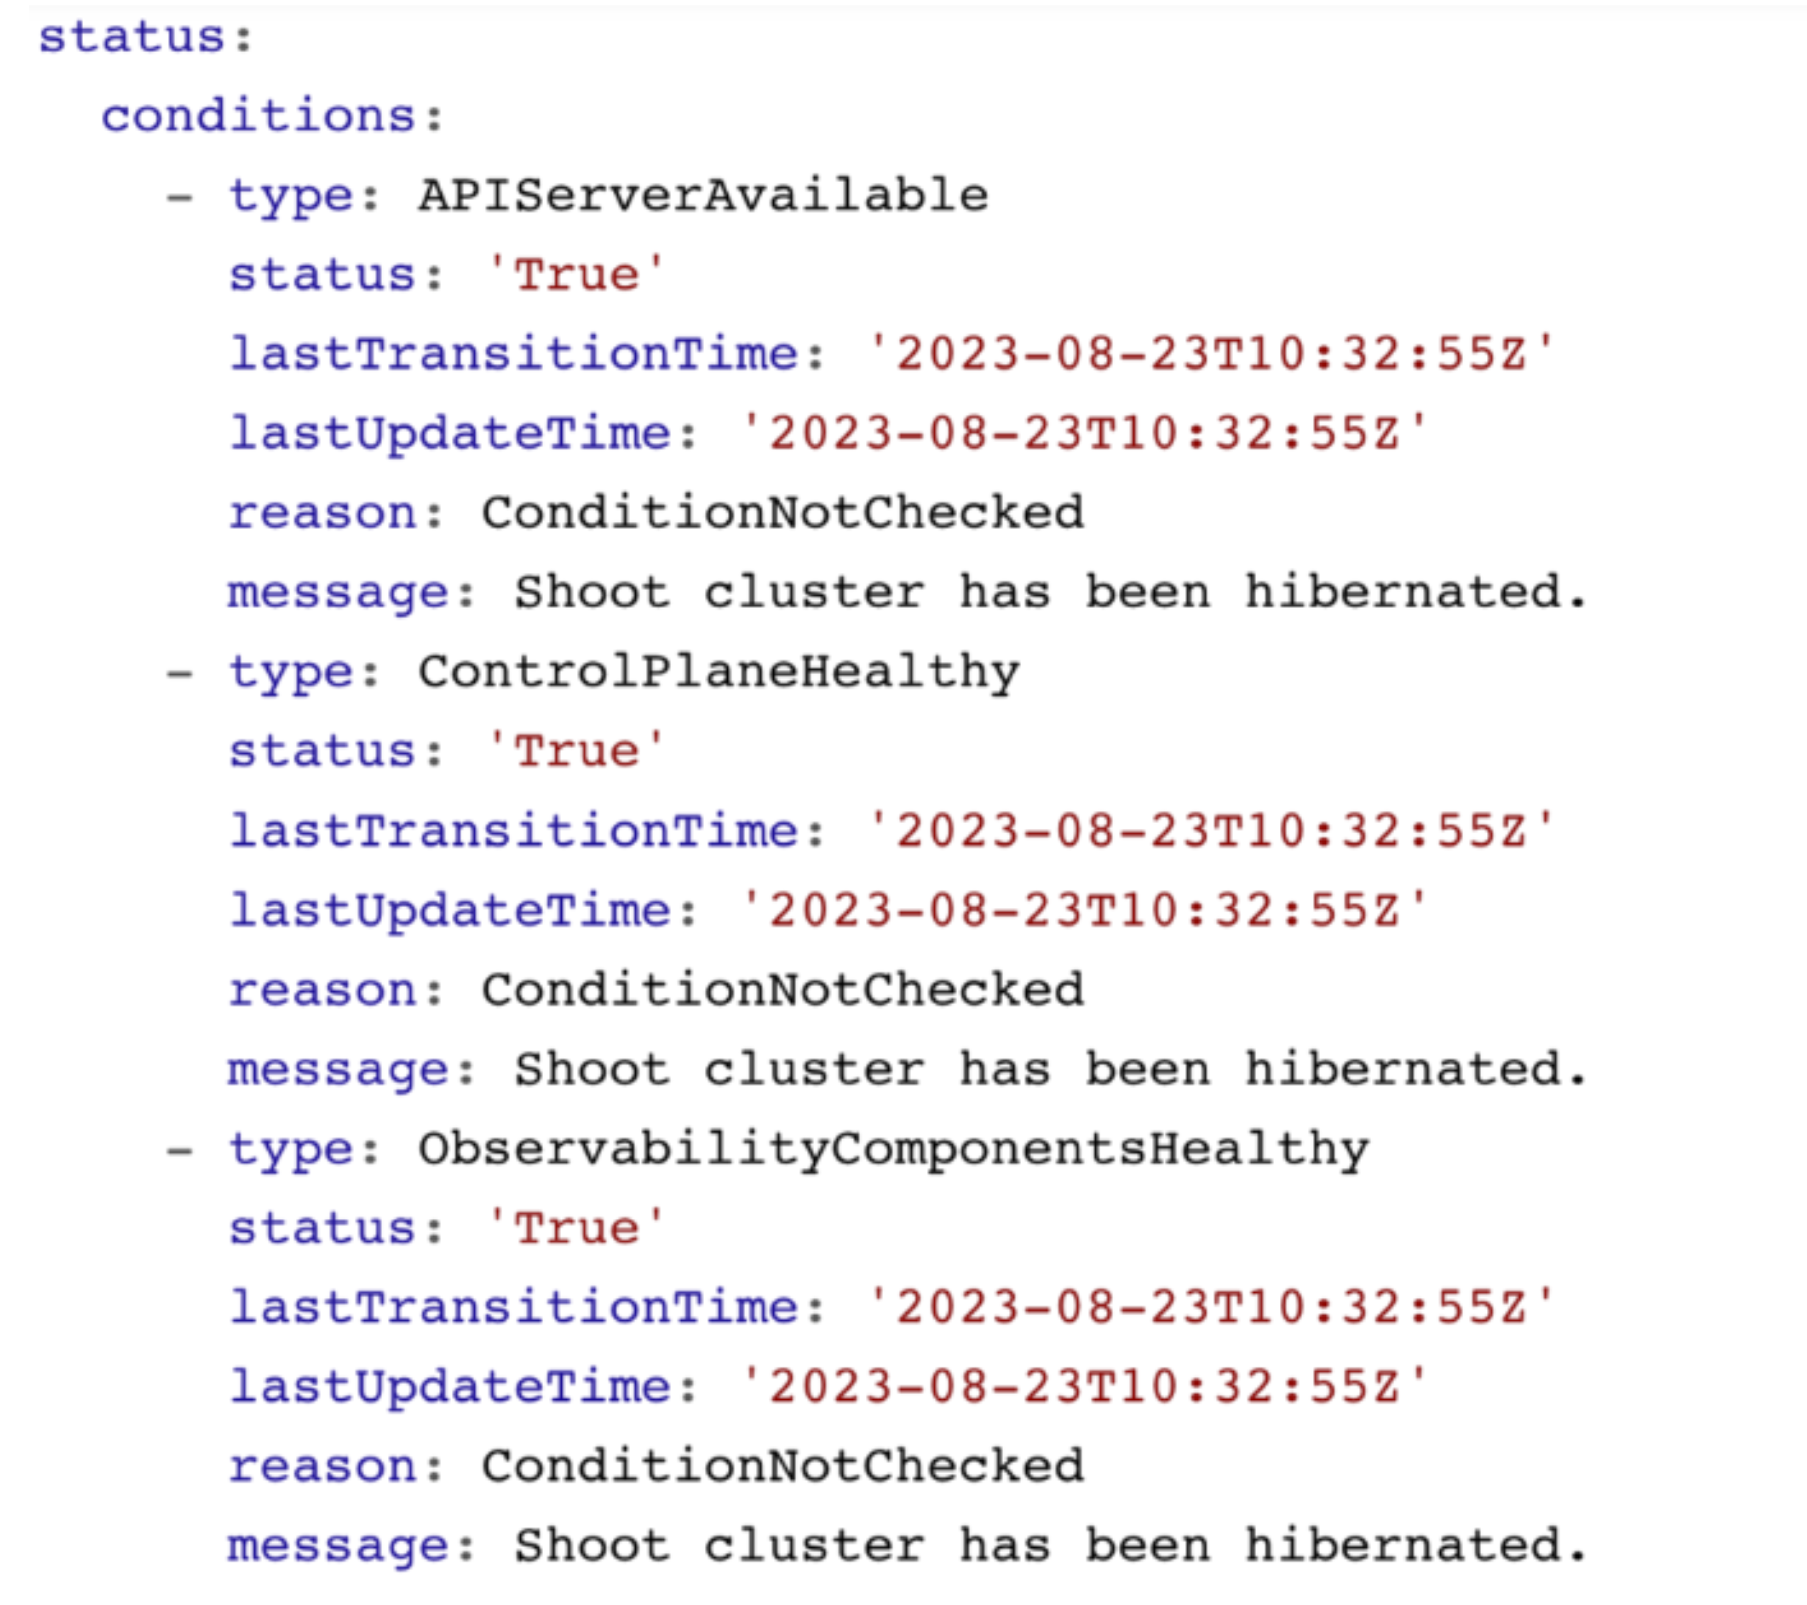
Shoot Status - Conditions
You can retrieve the shoot status by using kubectl get shoot -oyaml
It contains conditions, which give you information about the healthiness of your cluster. Those conditions are also forwarded to the Gardener dashboard and show your cluster as healthy or unhealthy.
Shoot Status - Constraints
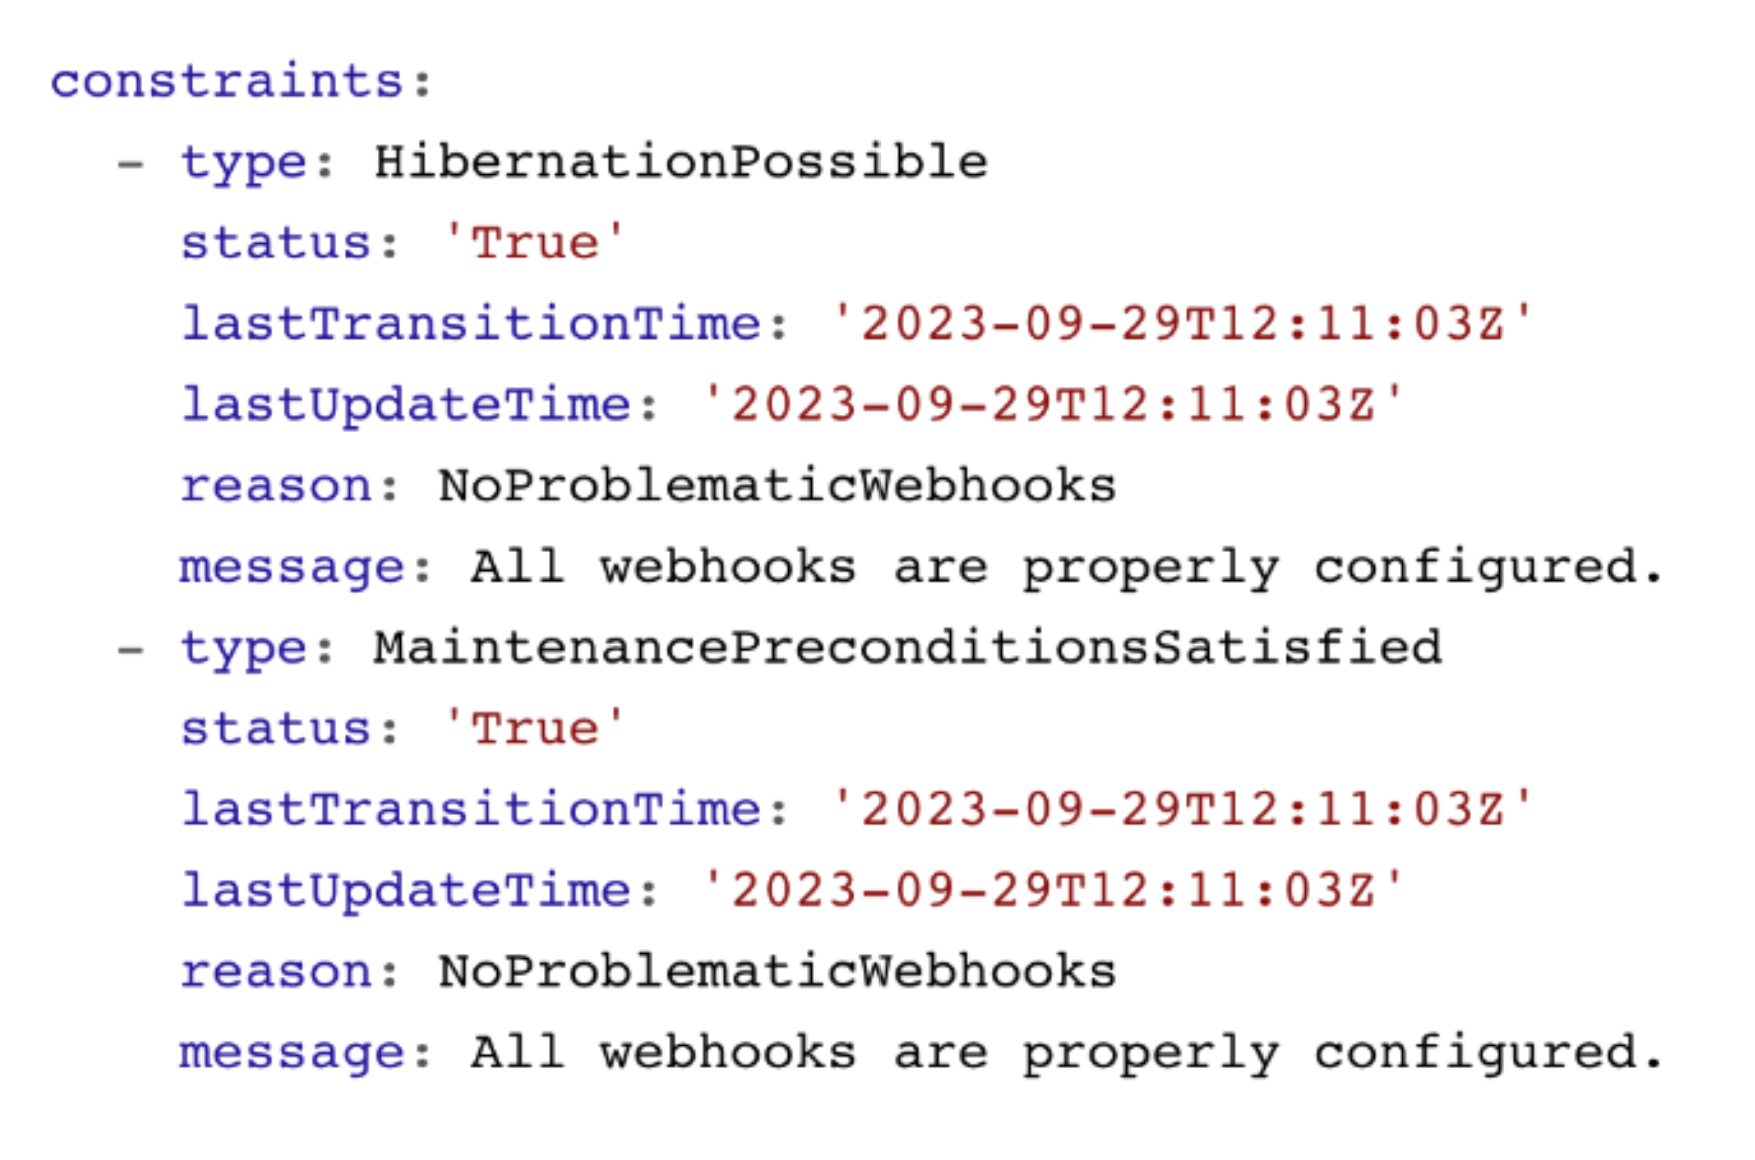
The shoot status also contains constraints. If these constraints are met, your cluster operations are impaired and the cluster is likely to fail at some point. Please watch them and act accordingly.
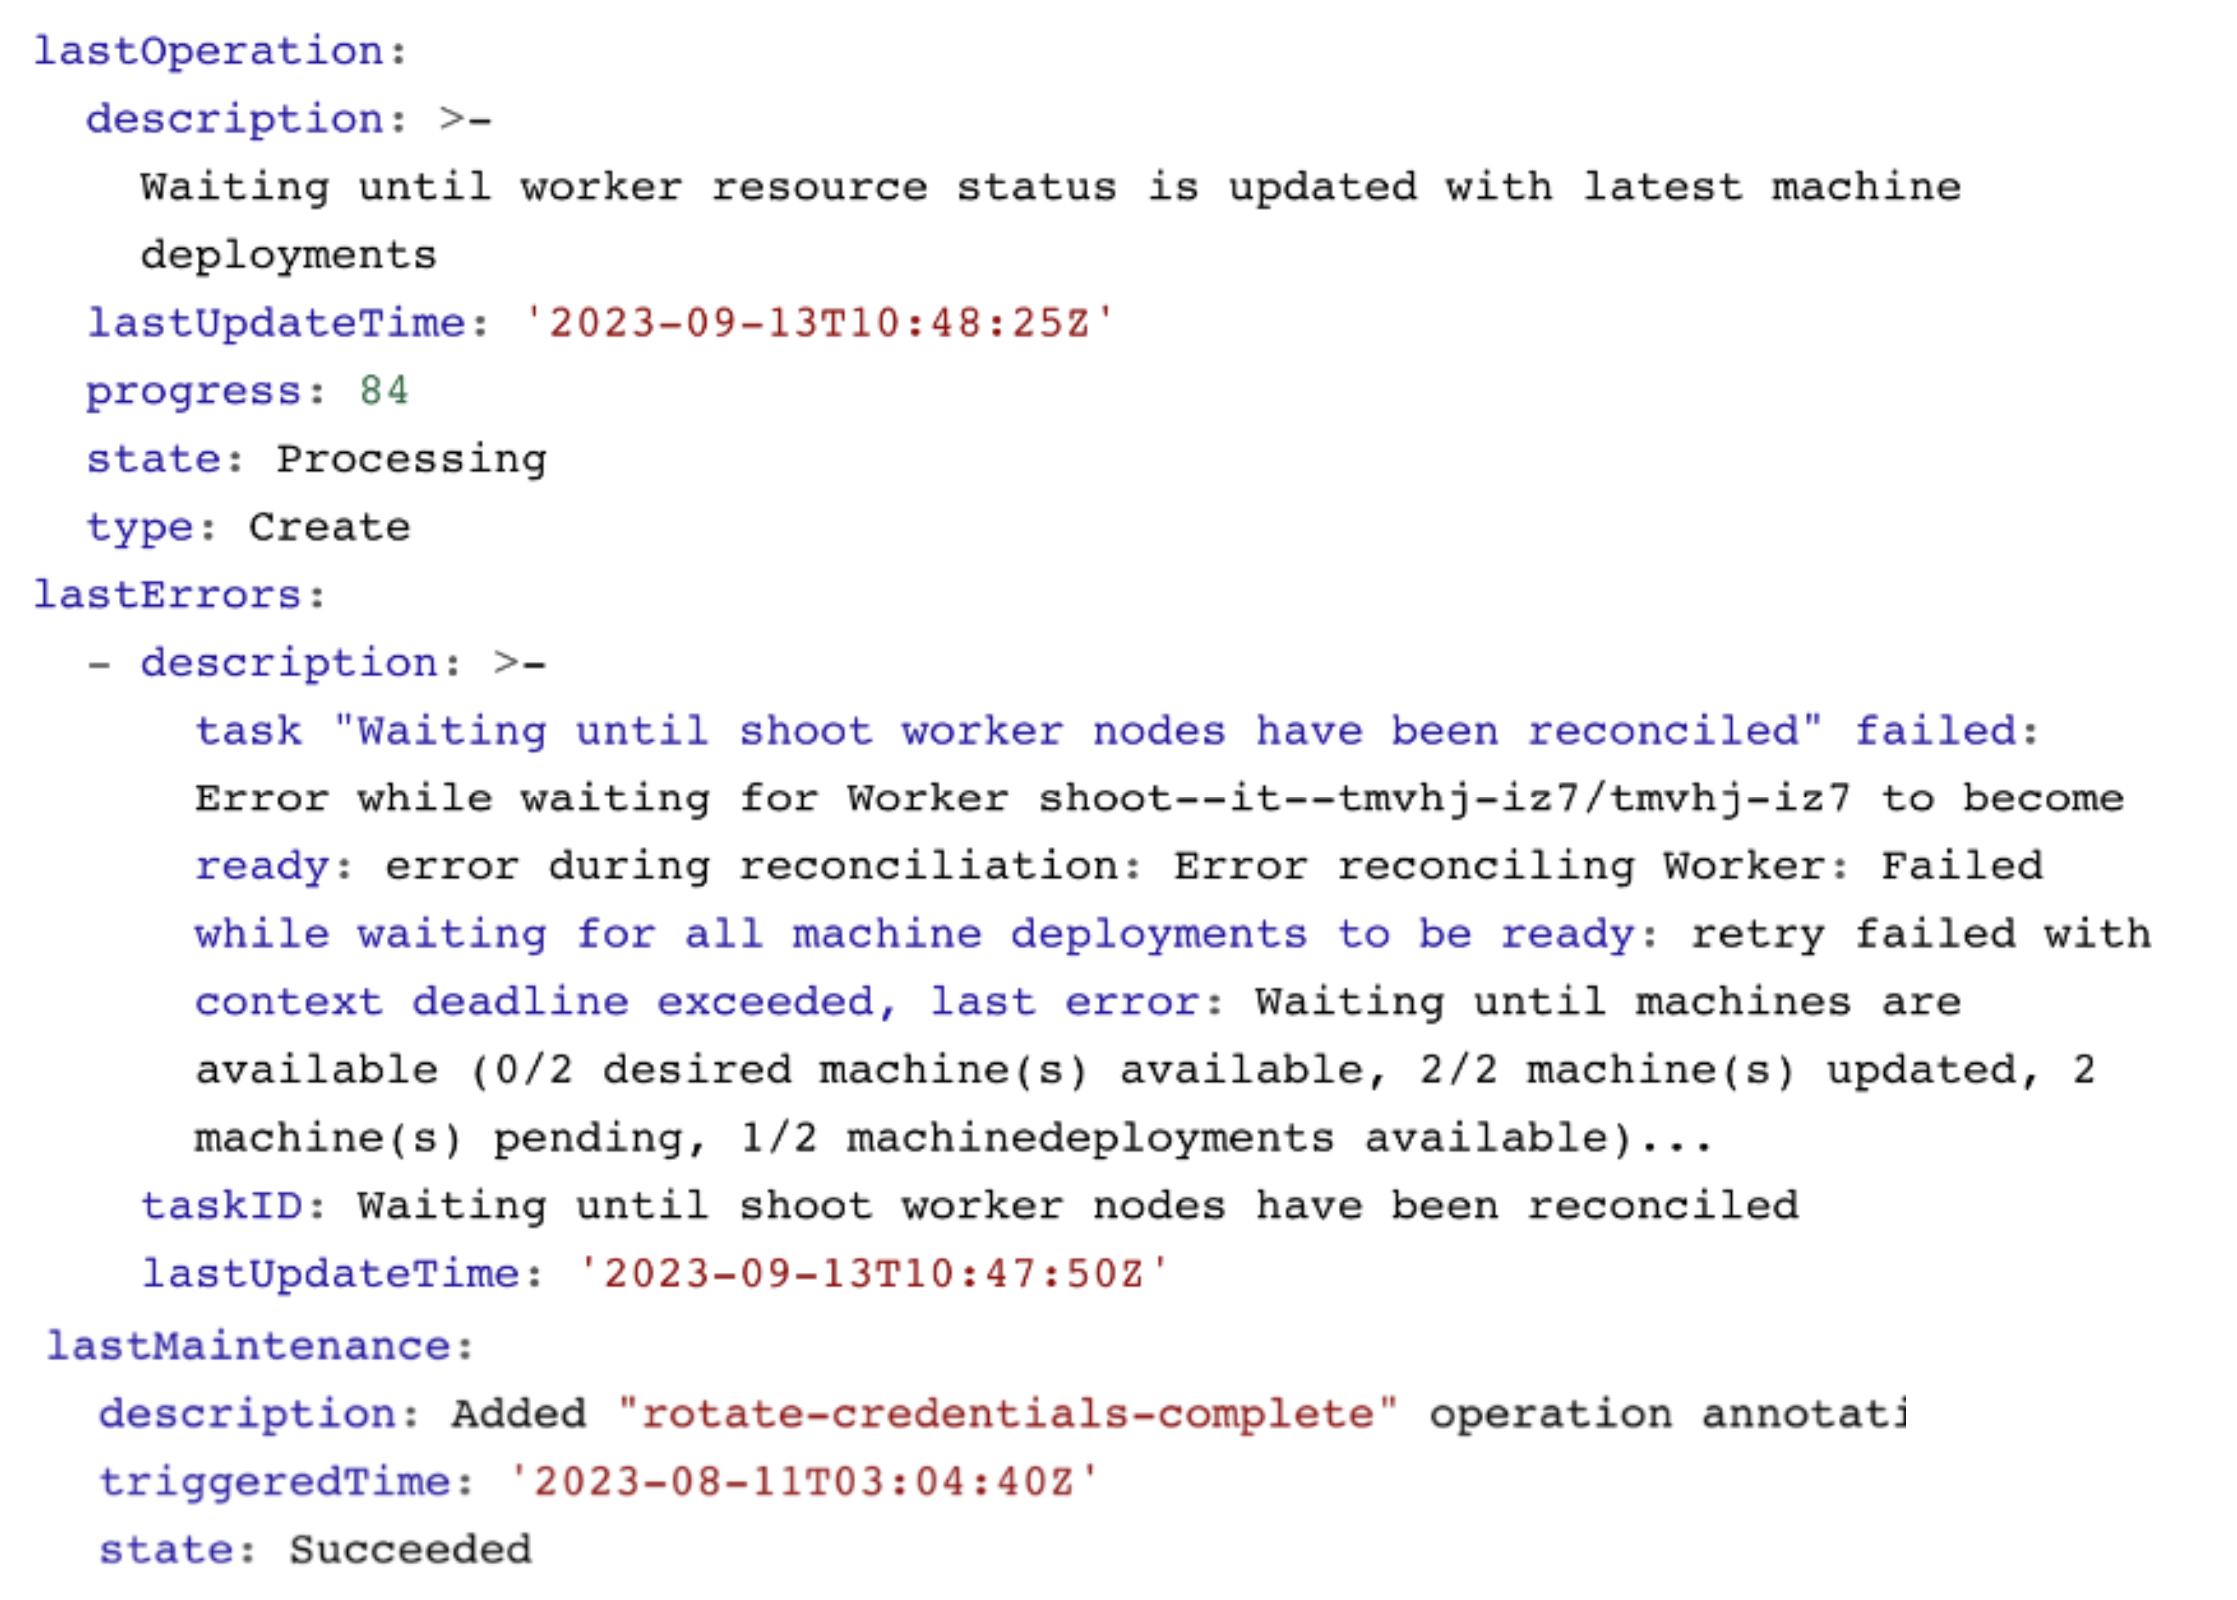
Shoot Status - Last Operation
The lastOperation, lastErrors, and lastMaintenance give you information on what was last happening in your clusters. This is especially useful when you are facing an error.
In this example, nodes are being recreated and not all machines have reached the desired state yet.
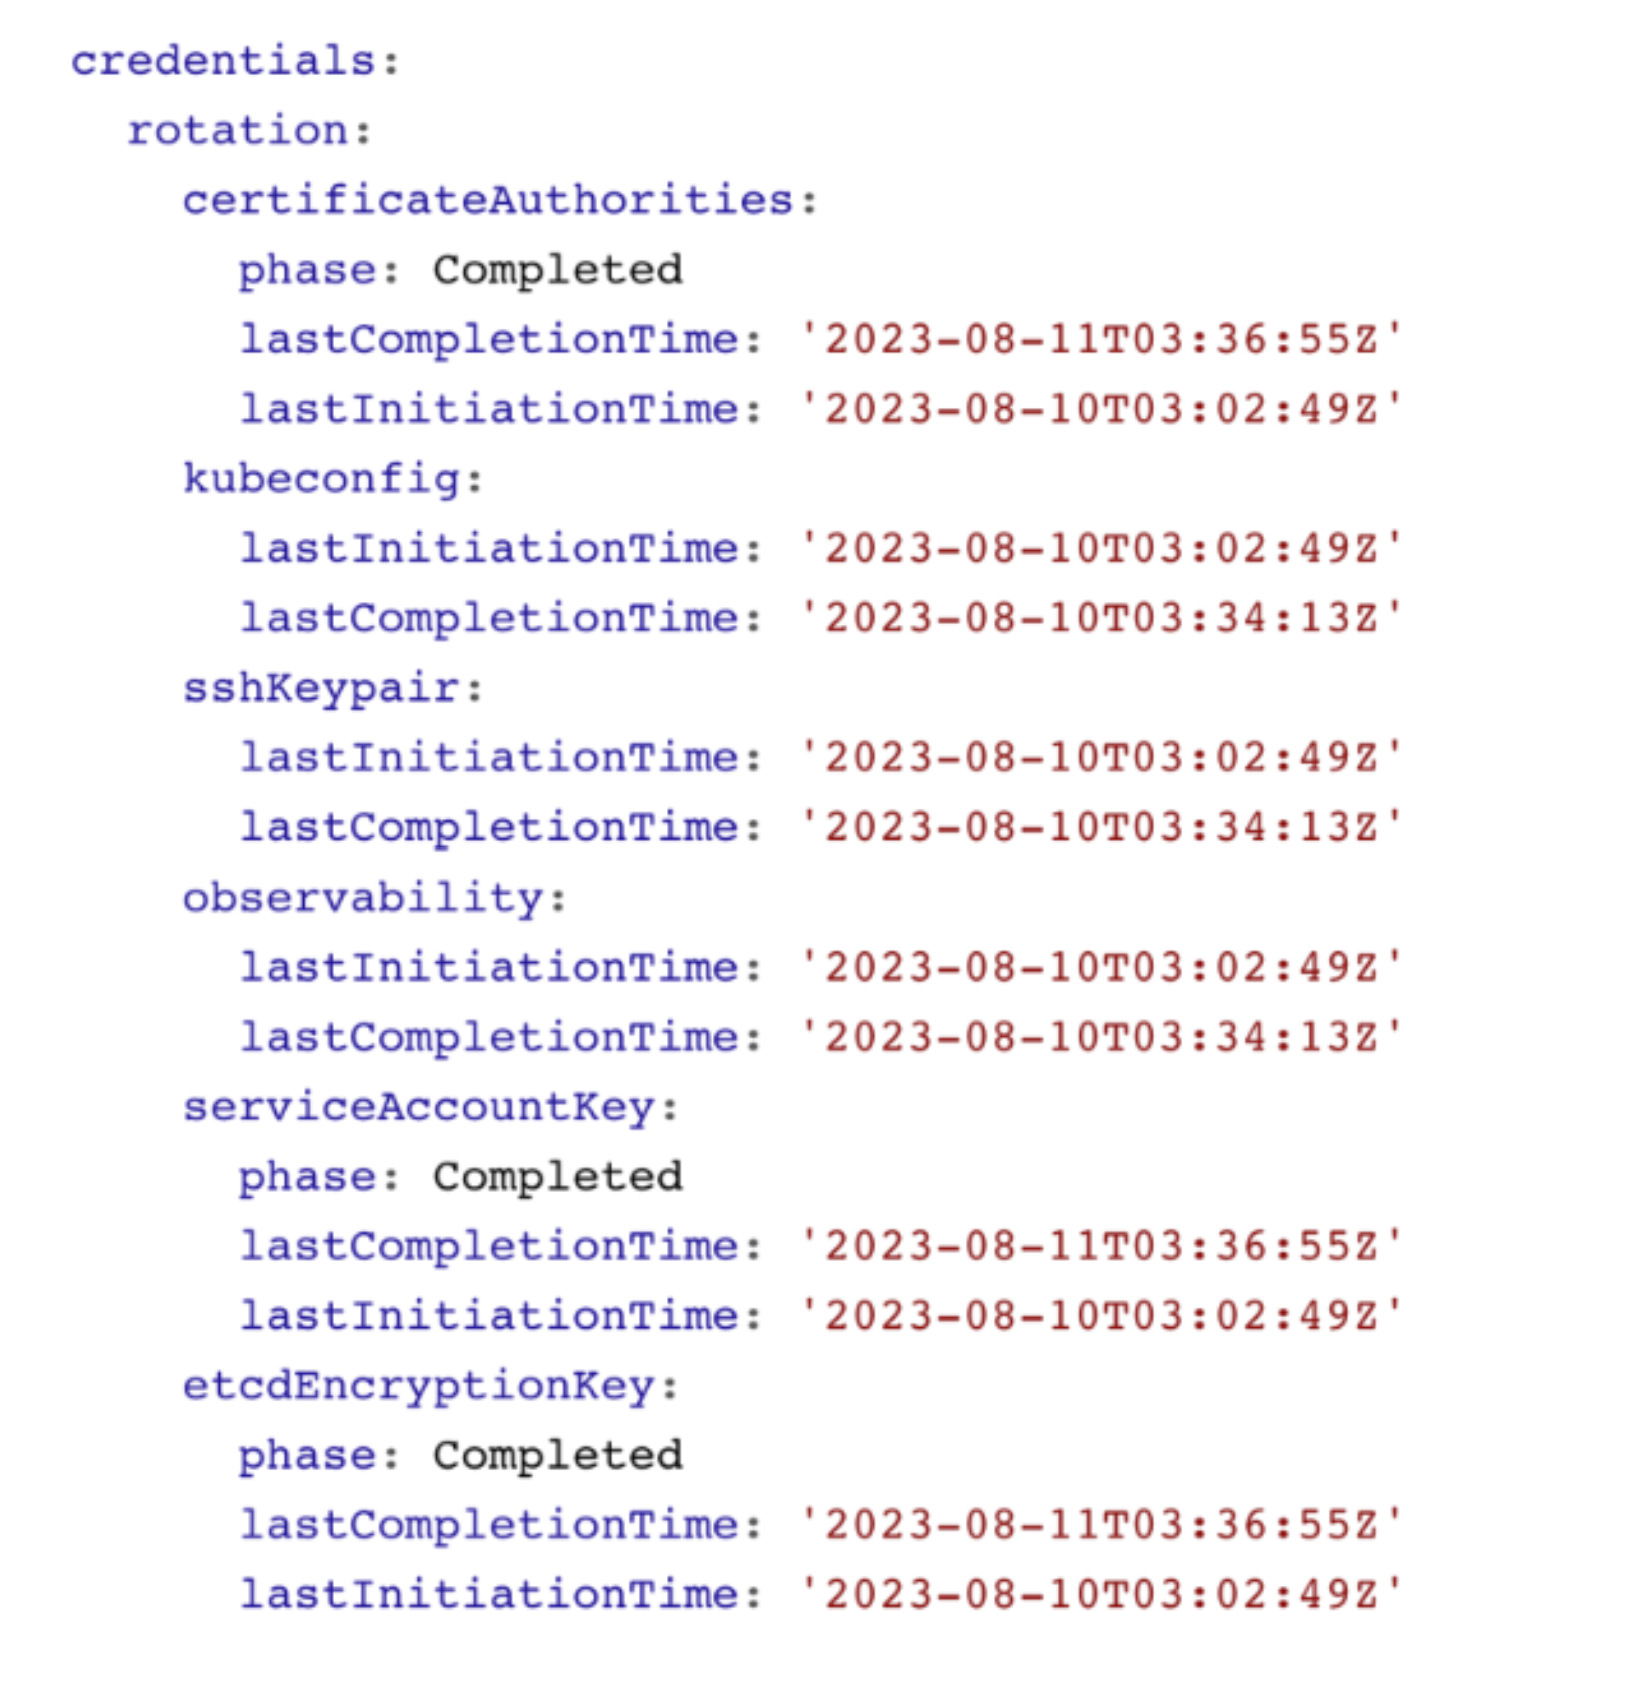
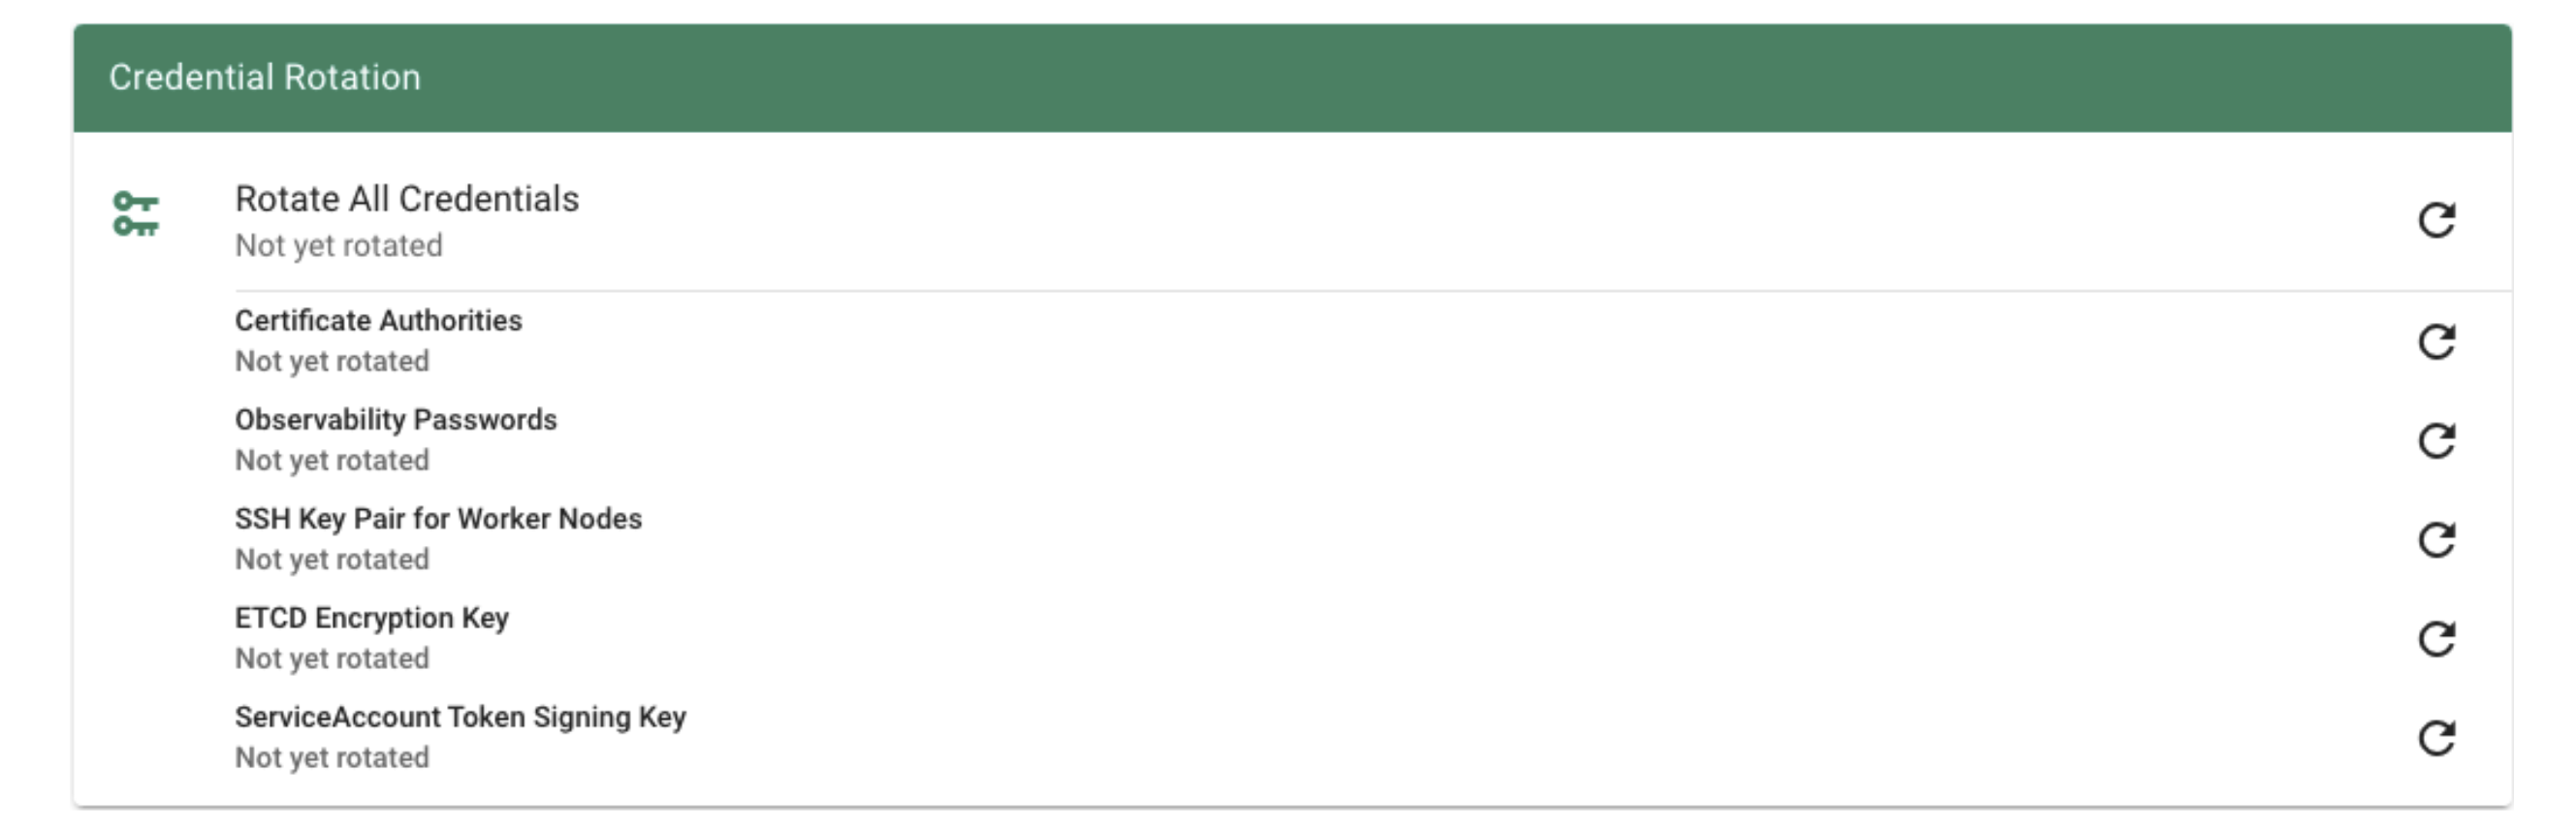
Shoot Status - Credentials Rotation
You can also see the status of the last credentials rotation. Here you can also programmatically derive when the last rotation was down in order to trigger the next rotation.
1.8 - Features
1.8.1 - Hibernation
Hibernation
Some clusters need to be up all the time - typically, they would be hosting some kind of production workload. Others might be used for development purposes or testing during business hours only. Keeping them up and running all the time is a waste of money. Gardener can help you here with its “hibernation” feature. Essentially, hibernation means to shut down all components of a cluster.
How Hibernation Works
The hibernation flow for a shoot attempts to reduce the resources consumed as much as possible. Hence everything not state-related is being decommissioned.
Data Plane
All nodes will be drained and the VMs will be deleted. As a result, all pods will be “stuck” in a Pending state since no new nodes are added. Of course, PVC / PV holding data is not deleted.
Services of type LoadBalancer will keep their external IP addresses.
Control Plane
All components will be scaled down and no pods will remain running. ETCD data is kept safe on the disk.
The DNS records routing traffic for the API server are also destroyed. Trying to connect to a hibernated cluster via kubectl will result in a DNS lookup failure / no-such-host message.
When waking up a cluster, all control plane components will be scaled up again and the DNS records will be re-created. Nodes will be created again and pods scheduled to run on them.
How to Configure / Trigger Hibernation
The easiest way to configure hibernation schedules is via the dashboard. Of course, this is reflected in the shoot’s spec and can also be maintained there. Before a cluster is hibernated, constraints in the shoot’s status will be evaluated. There might be conditions (mostly revolving around mutating / validating webhooks) that would block a successful wake-up. In such a case, the constraint will block hibernation in the first place.
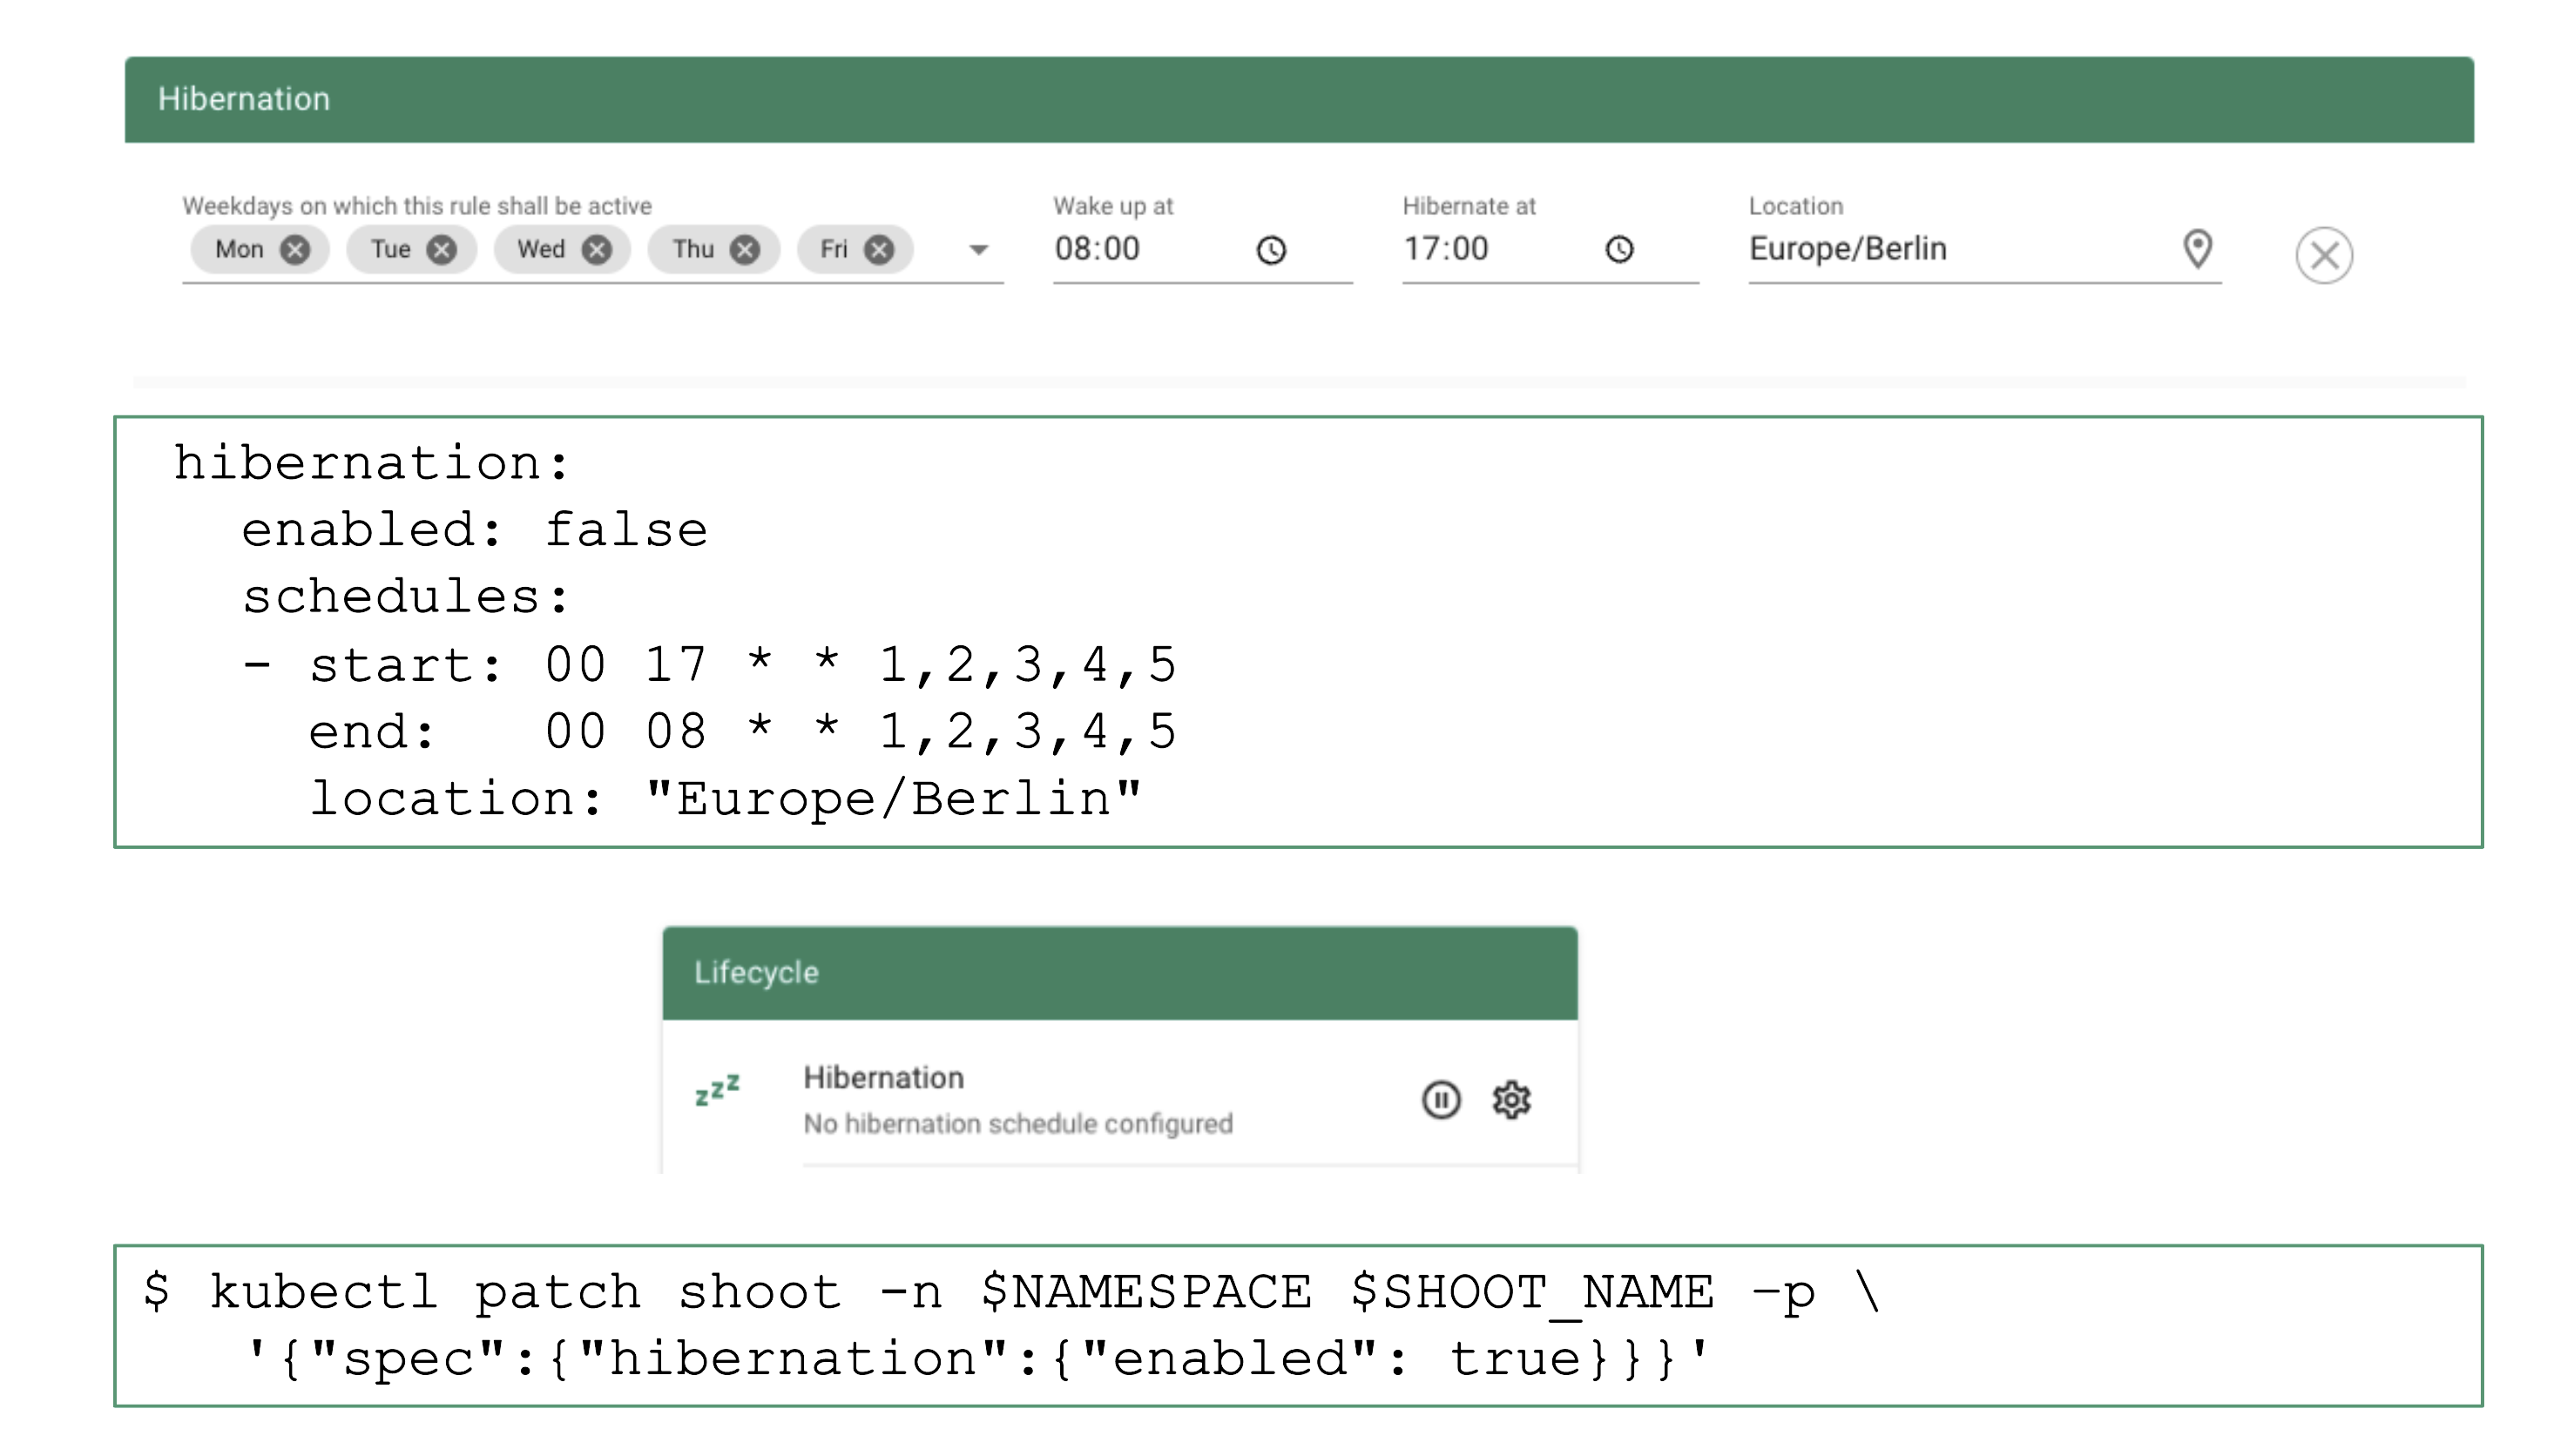
To wake-up or hibernate a shoot immediately, the dashboard can be used or a patch to the shoot’s spec can be applied directly.
1.8.2 - Workerless Shoots
Controlplane as a Service
Sometimes, there may be use cases for Kubernetes clusters that don’t require pods but only features of the control plane. Gardener can create the so-called “workerless” shoots, which are exactly that. A Kubernetes cluster without nodes (and without any controller related to them).
In a scenario where you already have multiple clusters, you can use it for orchestration (leases) or factor out components that require many CRDs.
As part of the control plane, the following components are deployed in the seed cluster for workerless shoot:
- etcds
- kube-apiserver
- kube-controller-manager
- gardener-resource-manager
- Logging and monitoring components
- Extension components (to find out if they support workerless shoots, see the Extensions documentation)
1.8.3 - Credential Rotation
Keys
There are plenty of keys in Gardener. The ETCD needs one to store resources like secrets encrypted at rest. Gardener generates certificate authorities (CAs) to ensure secured communication between the various components and actors and service account tokens are signed with a dedicated key. There is also an SSH key pair to allow debugging of nodes and the observability stack has its own passwords too.
All of these keys share a common property: they are managed by Gardener. Rotating them, however, is potentially very disruptive. Hence, Gardener does not do it automatically, but offers you means to perform these tasks easily. For a single cluster, you may conveniently use the dashboard.
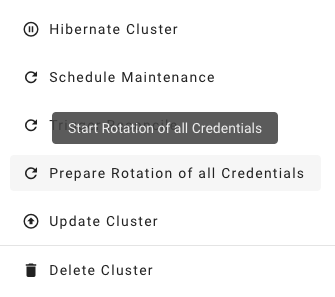
Where possible, the rotation happens in two phases - Preparing and Completing.
Prepare Rotation of All Credentials
The Preparing phase introduces new keys while the old ones are still valid. Users can safely exchange keys / CA bundles wherever they are used. It is possible to start the preparation by annotating the shoot resource accordingly:
kubectl -n <shoot-namespace> annotate shoot <shoot-name> gardener.cloud/operation=rotate-credentials-start
Complete Rotation of All Credentials
Afterward, the Completing phase will invalidate the old keys / CA bundles. Annotate the shoot resource accordingly:
kubectl -n <shoot-namespace> annotate shoot <shoot-name> gardener.cloud/operation=rotate-credentials-complete
Rotation Phases
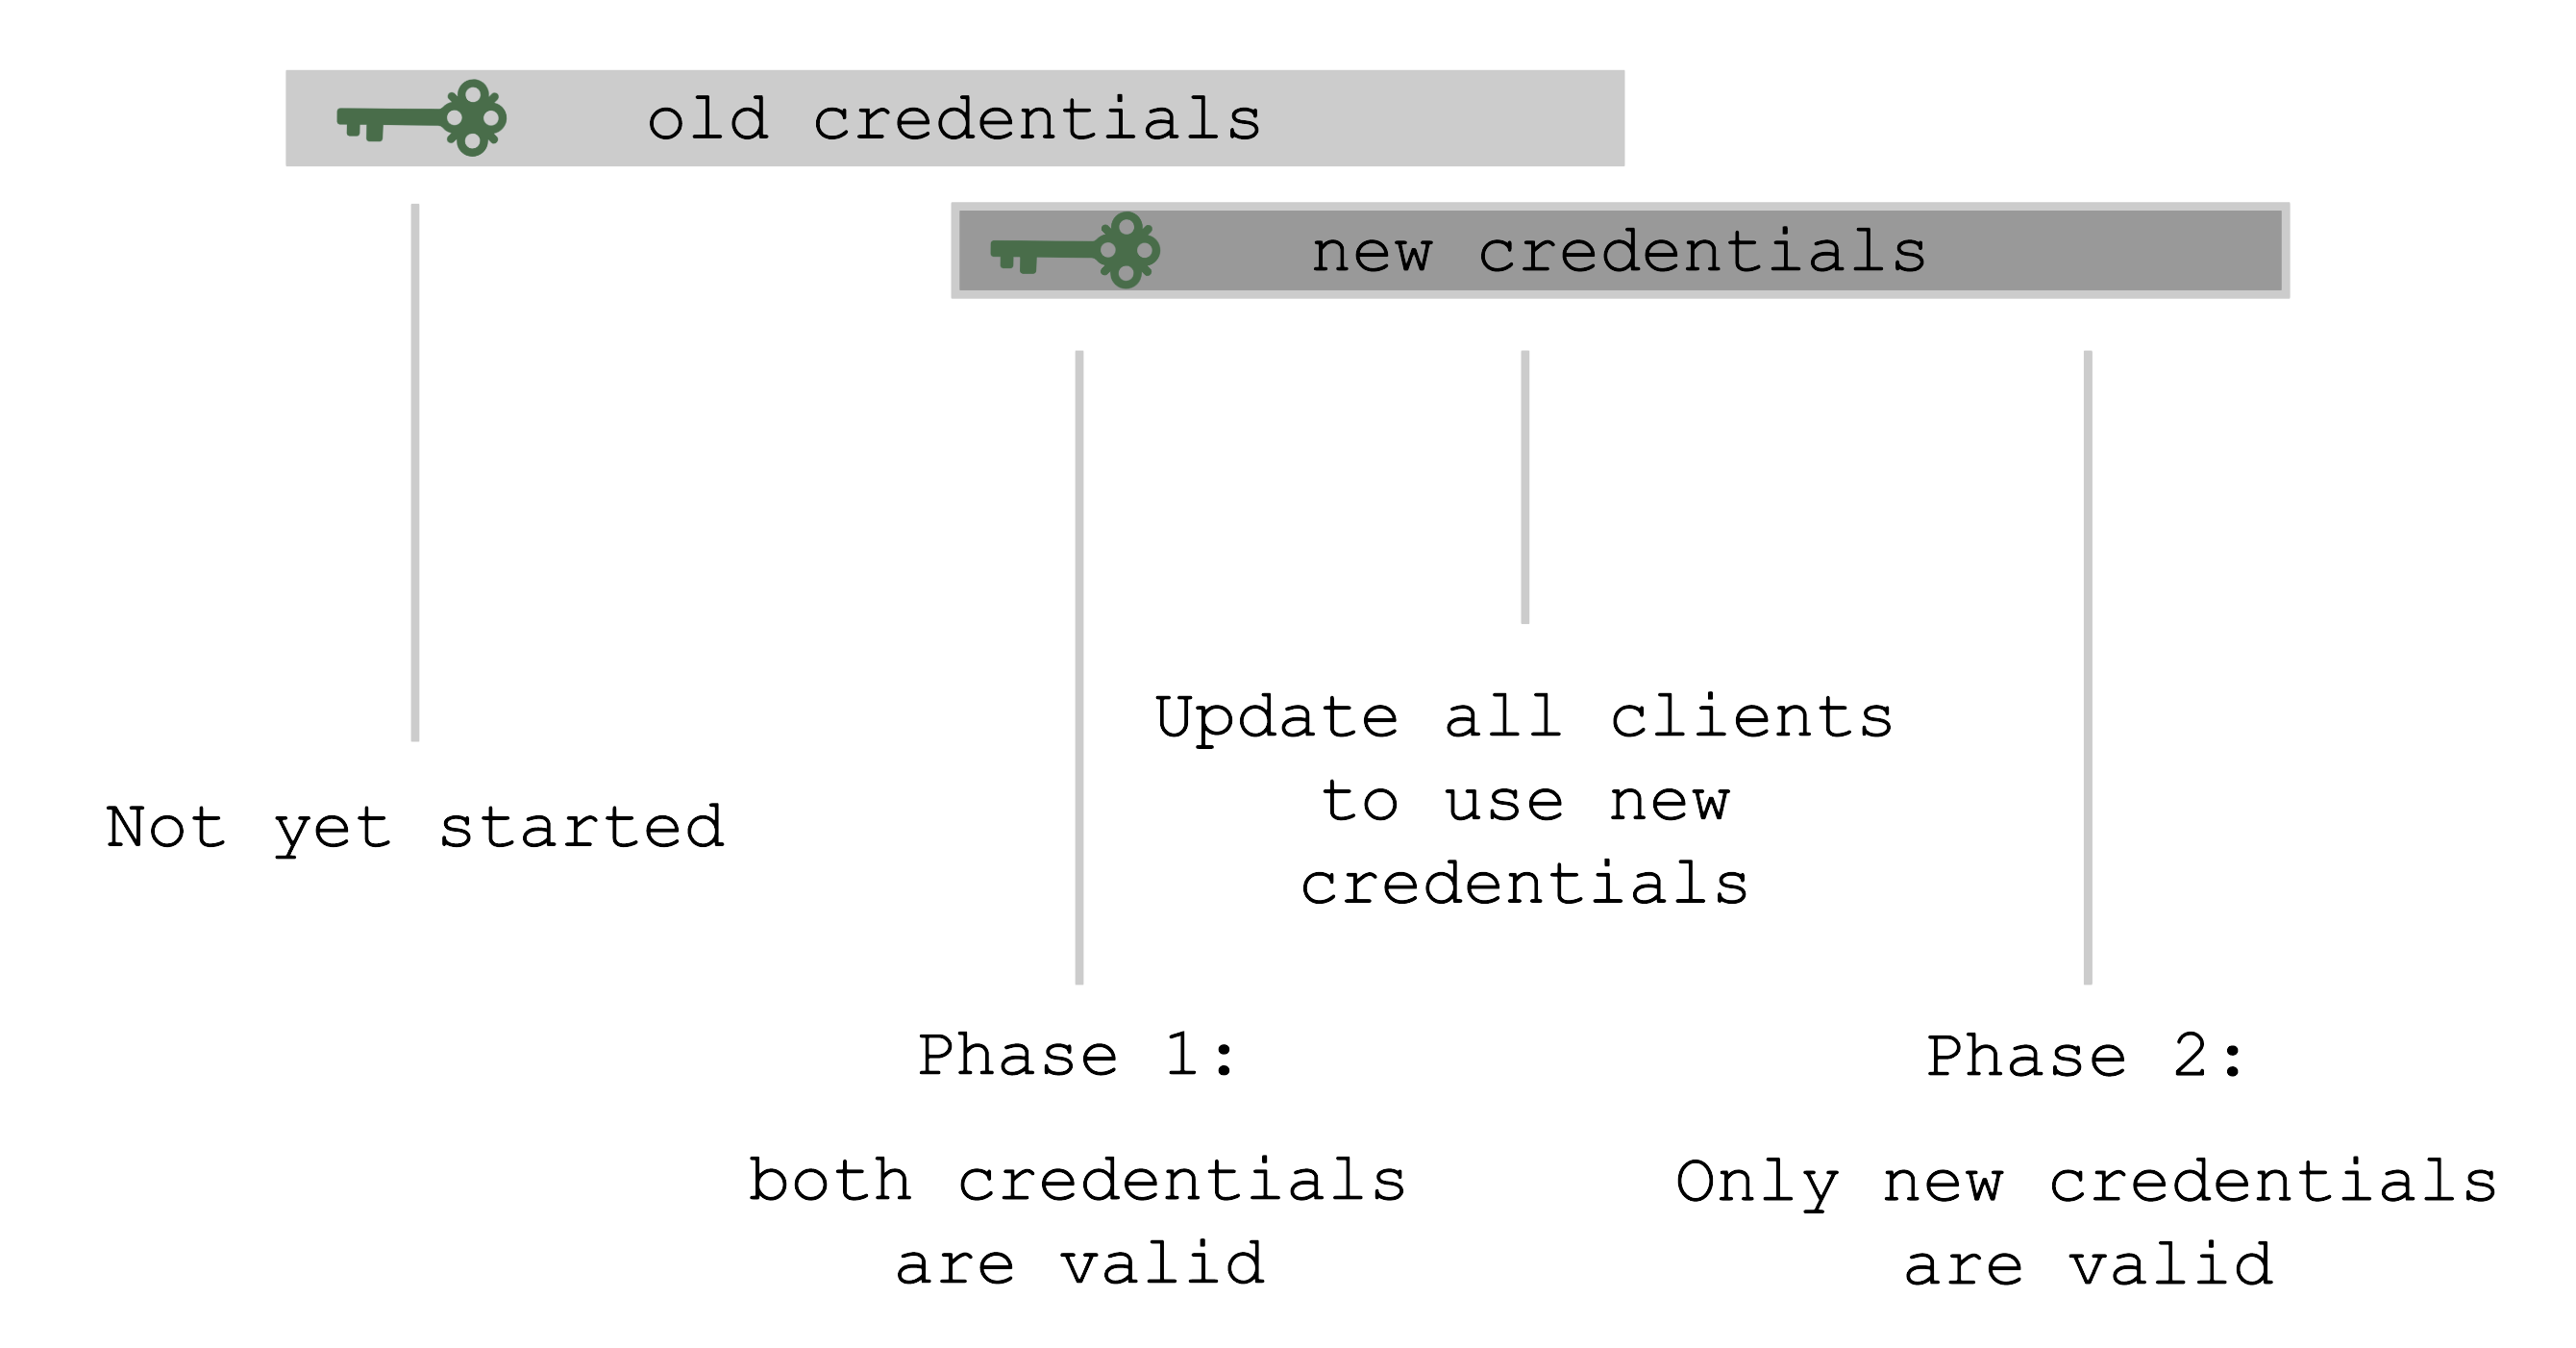
At the beginning, only the old set of credentials exists. By triggering the rotation, new credentials are created in the Preparing phase and both sets are valid. Now, all clients have to update and start using the new credentials. Only afterward it is safe to trigger the Completing phase, which invalidates the old credentials.
The shoot’s status will always show the current status / phase of the rotation.
For more information, see Credentials Rotation for Shoot Clusters.
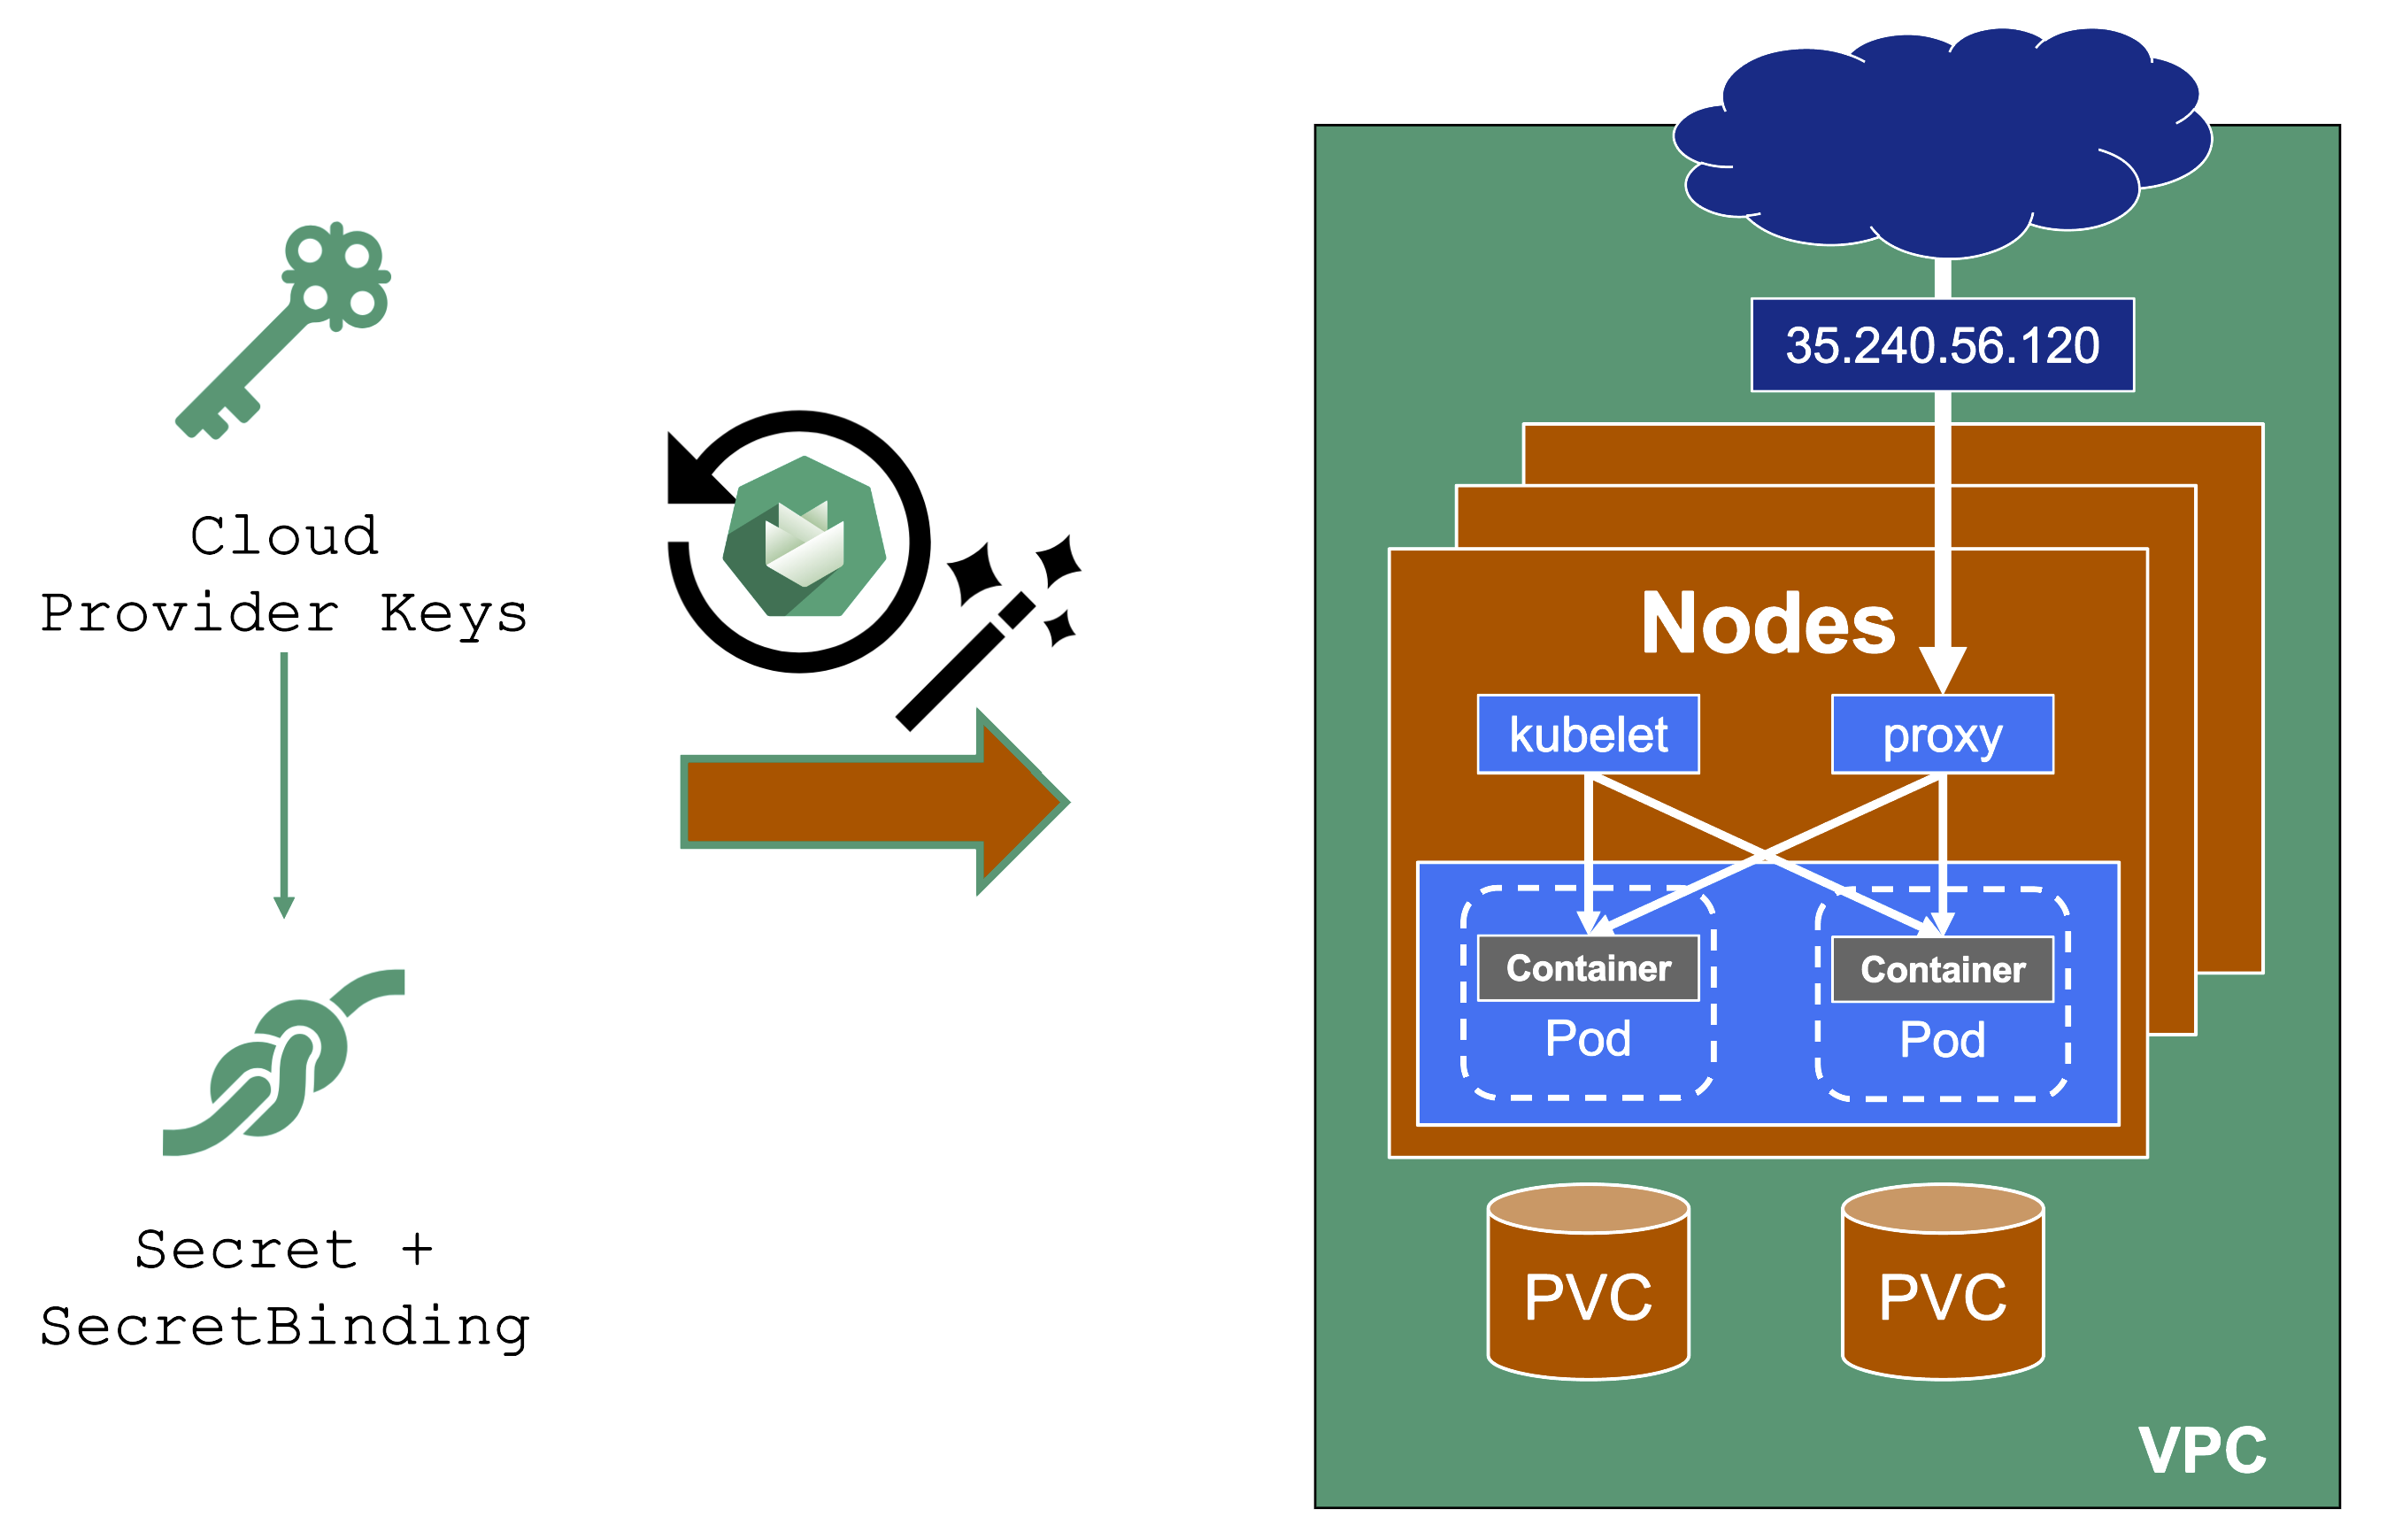
User-Provided Credentials

You grant Gardener permissions to create resources by handing over cloud provider keys. These keys are stored in a secret and referenced to a shoot via a SecretBinding. Gardener uses the keys to create the network for the cluster resources, routes, VMs, disks, and IP addresses.
When you rotate credentials, the new keys have to be stored in the same secret and the shoot needs to reconcile successfully to ensure the replication to every controller. Afterward, the old keys can be deleted safely from Gardener’s perspective.
While the reconciliation can be triggered manually, there is no need for it (if you’re not in a hurry). Each shoot reconciles once within 24h and the new keys will be picked up during the next maintenance window.
Note
It is not possible to move a shoot to a different infrastructure account (at all!).
1.8.4 - External DNS Management
External DNS Management
When you deploy to Kubernetes, there is no native management of external DNS. Instead, the cloud-controller-manager requests (mostly IPv4) addresses for every service of type LoadBalancer. Of course, the Ingress resource helps here, but how is the external DNS entry for the ingress controller managed?
Essentially, some sort of automation for DNS management is missing.
Automating DNS Management
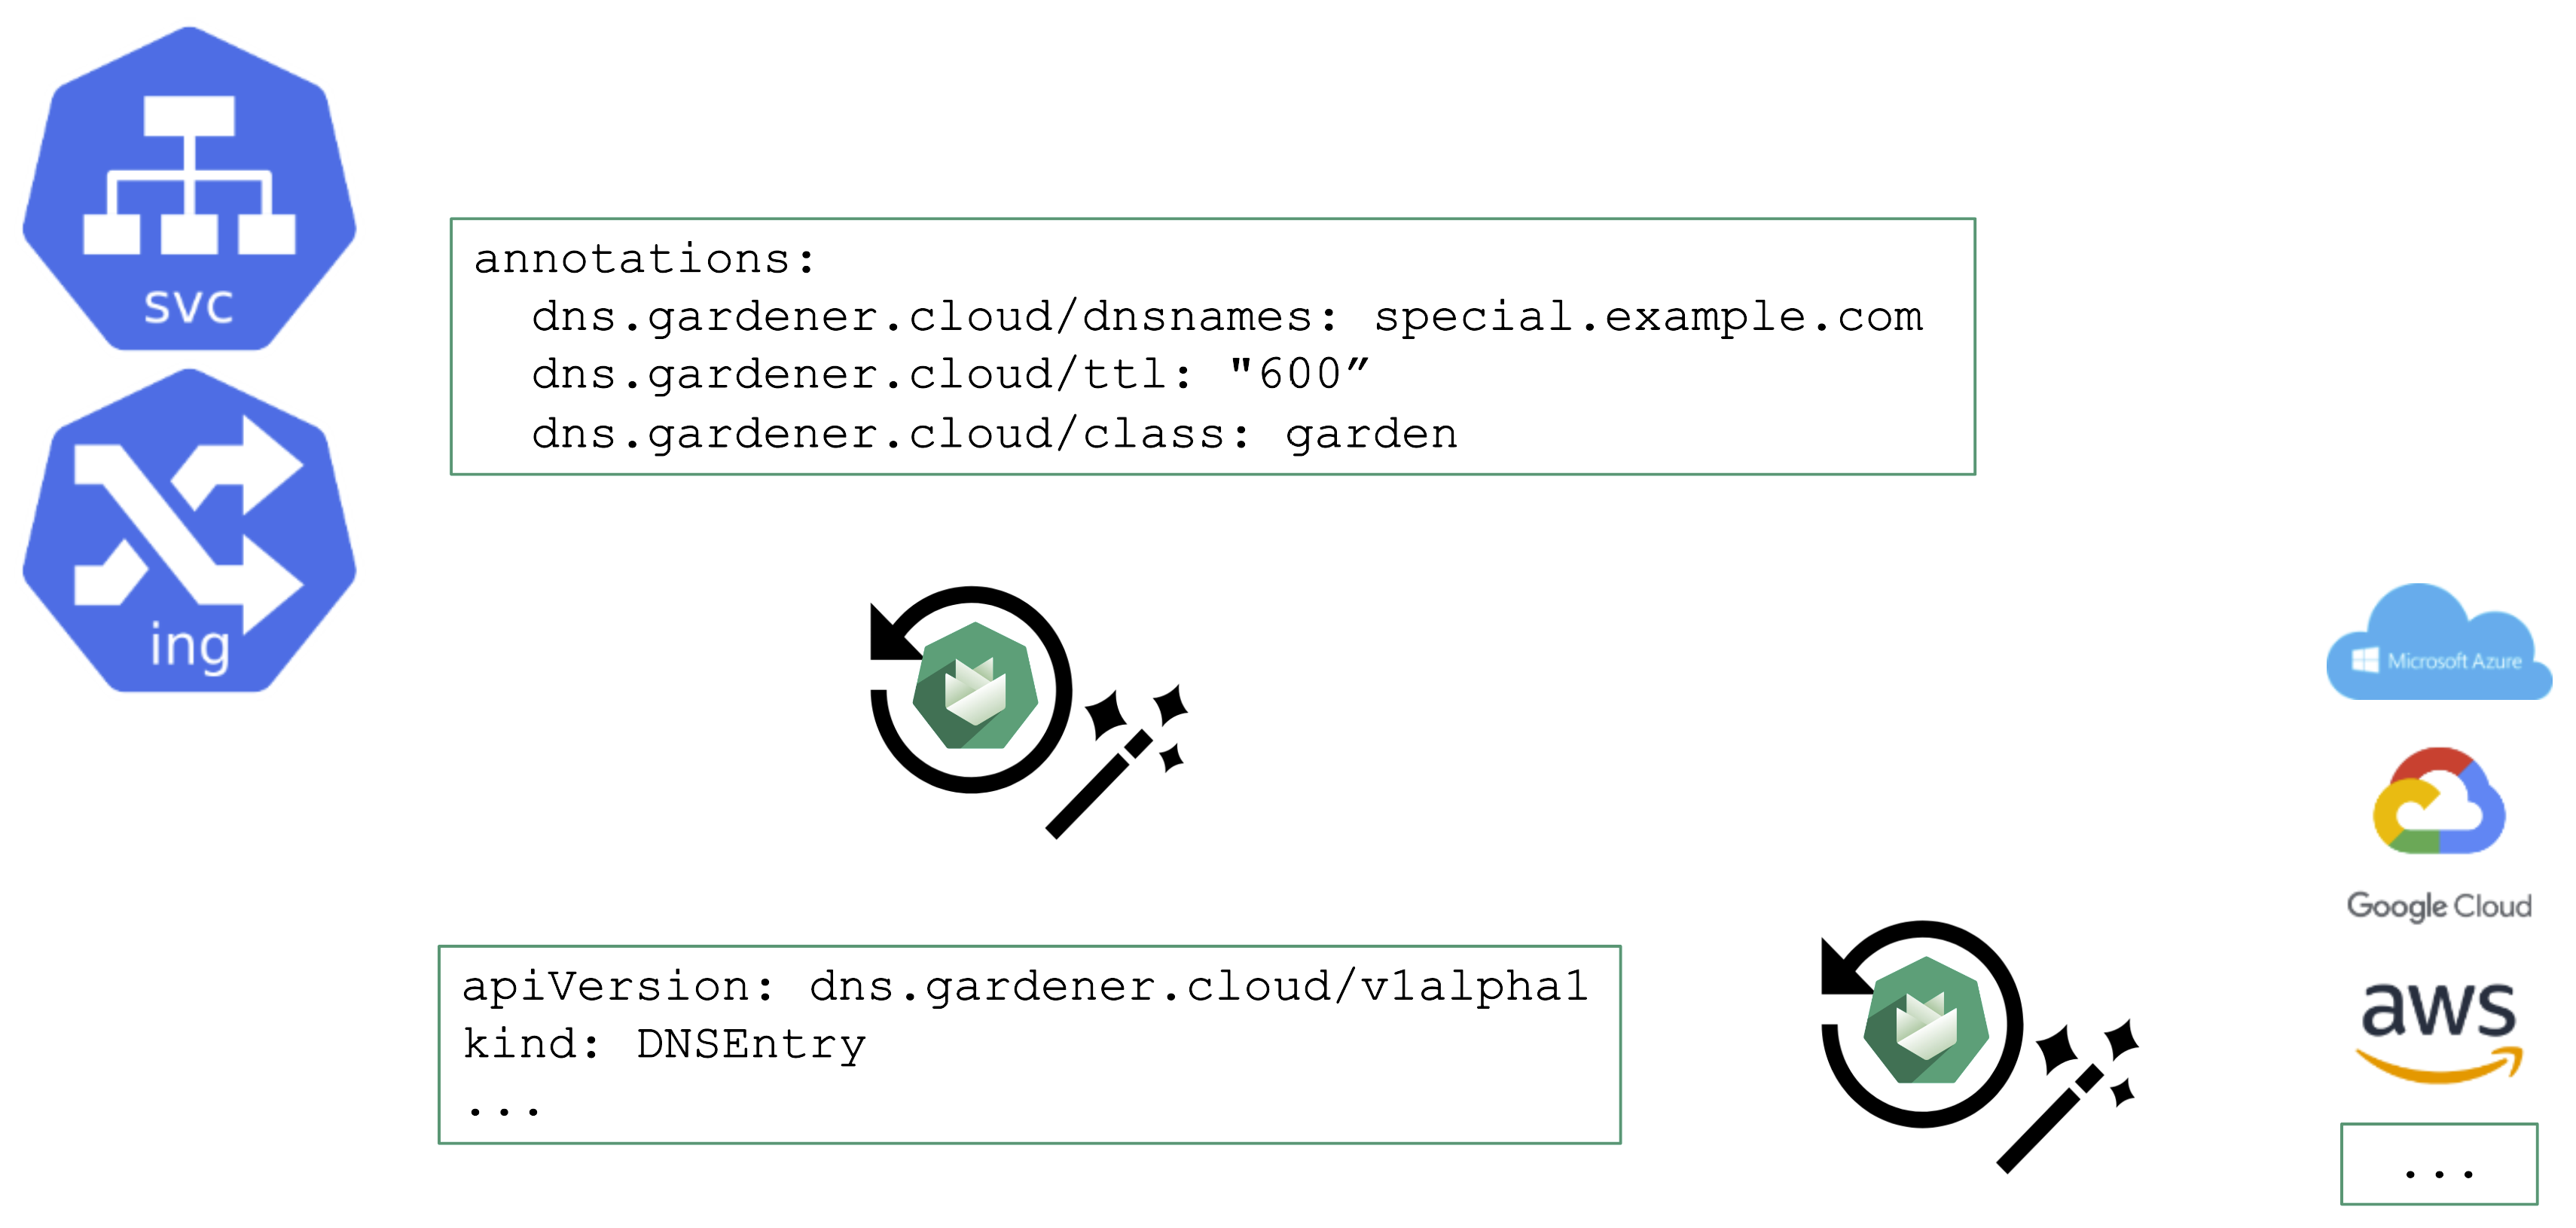
From a user’s perspective, it is desirable to work with already known resources and concepts. Hence, the DNS management offered by Gardener plugs seamlessly into Kubernetes resources and you do not need to “leave” the context of the shoot cluster.
To request a DNS record creation / update, a Service or Ingress resource is annotated accordingly. The shoot-dns-service extension will (if configured) will pick up the request and create a DNSEntry resource + reconcile it to have an actual DNS record created at a configured DNS provider. Gardener supports the following providers:
- aws-route53
- azure-dns
- azure-private-dns
- google-clouddns
- openstack-designate
- alicloud-dns
- cloudflare-dns
For more information, see DNS Names.
DNS Provider
For the above to work, we need some ingredients. Primarily, this is implemented via a so-called DNSProvider. Every shoot has a default provider that is used to set up the API server’s public DNS record. It can be used to request sub-domains as well.
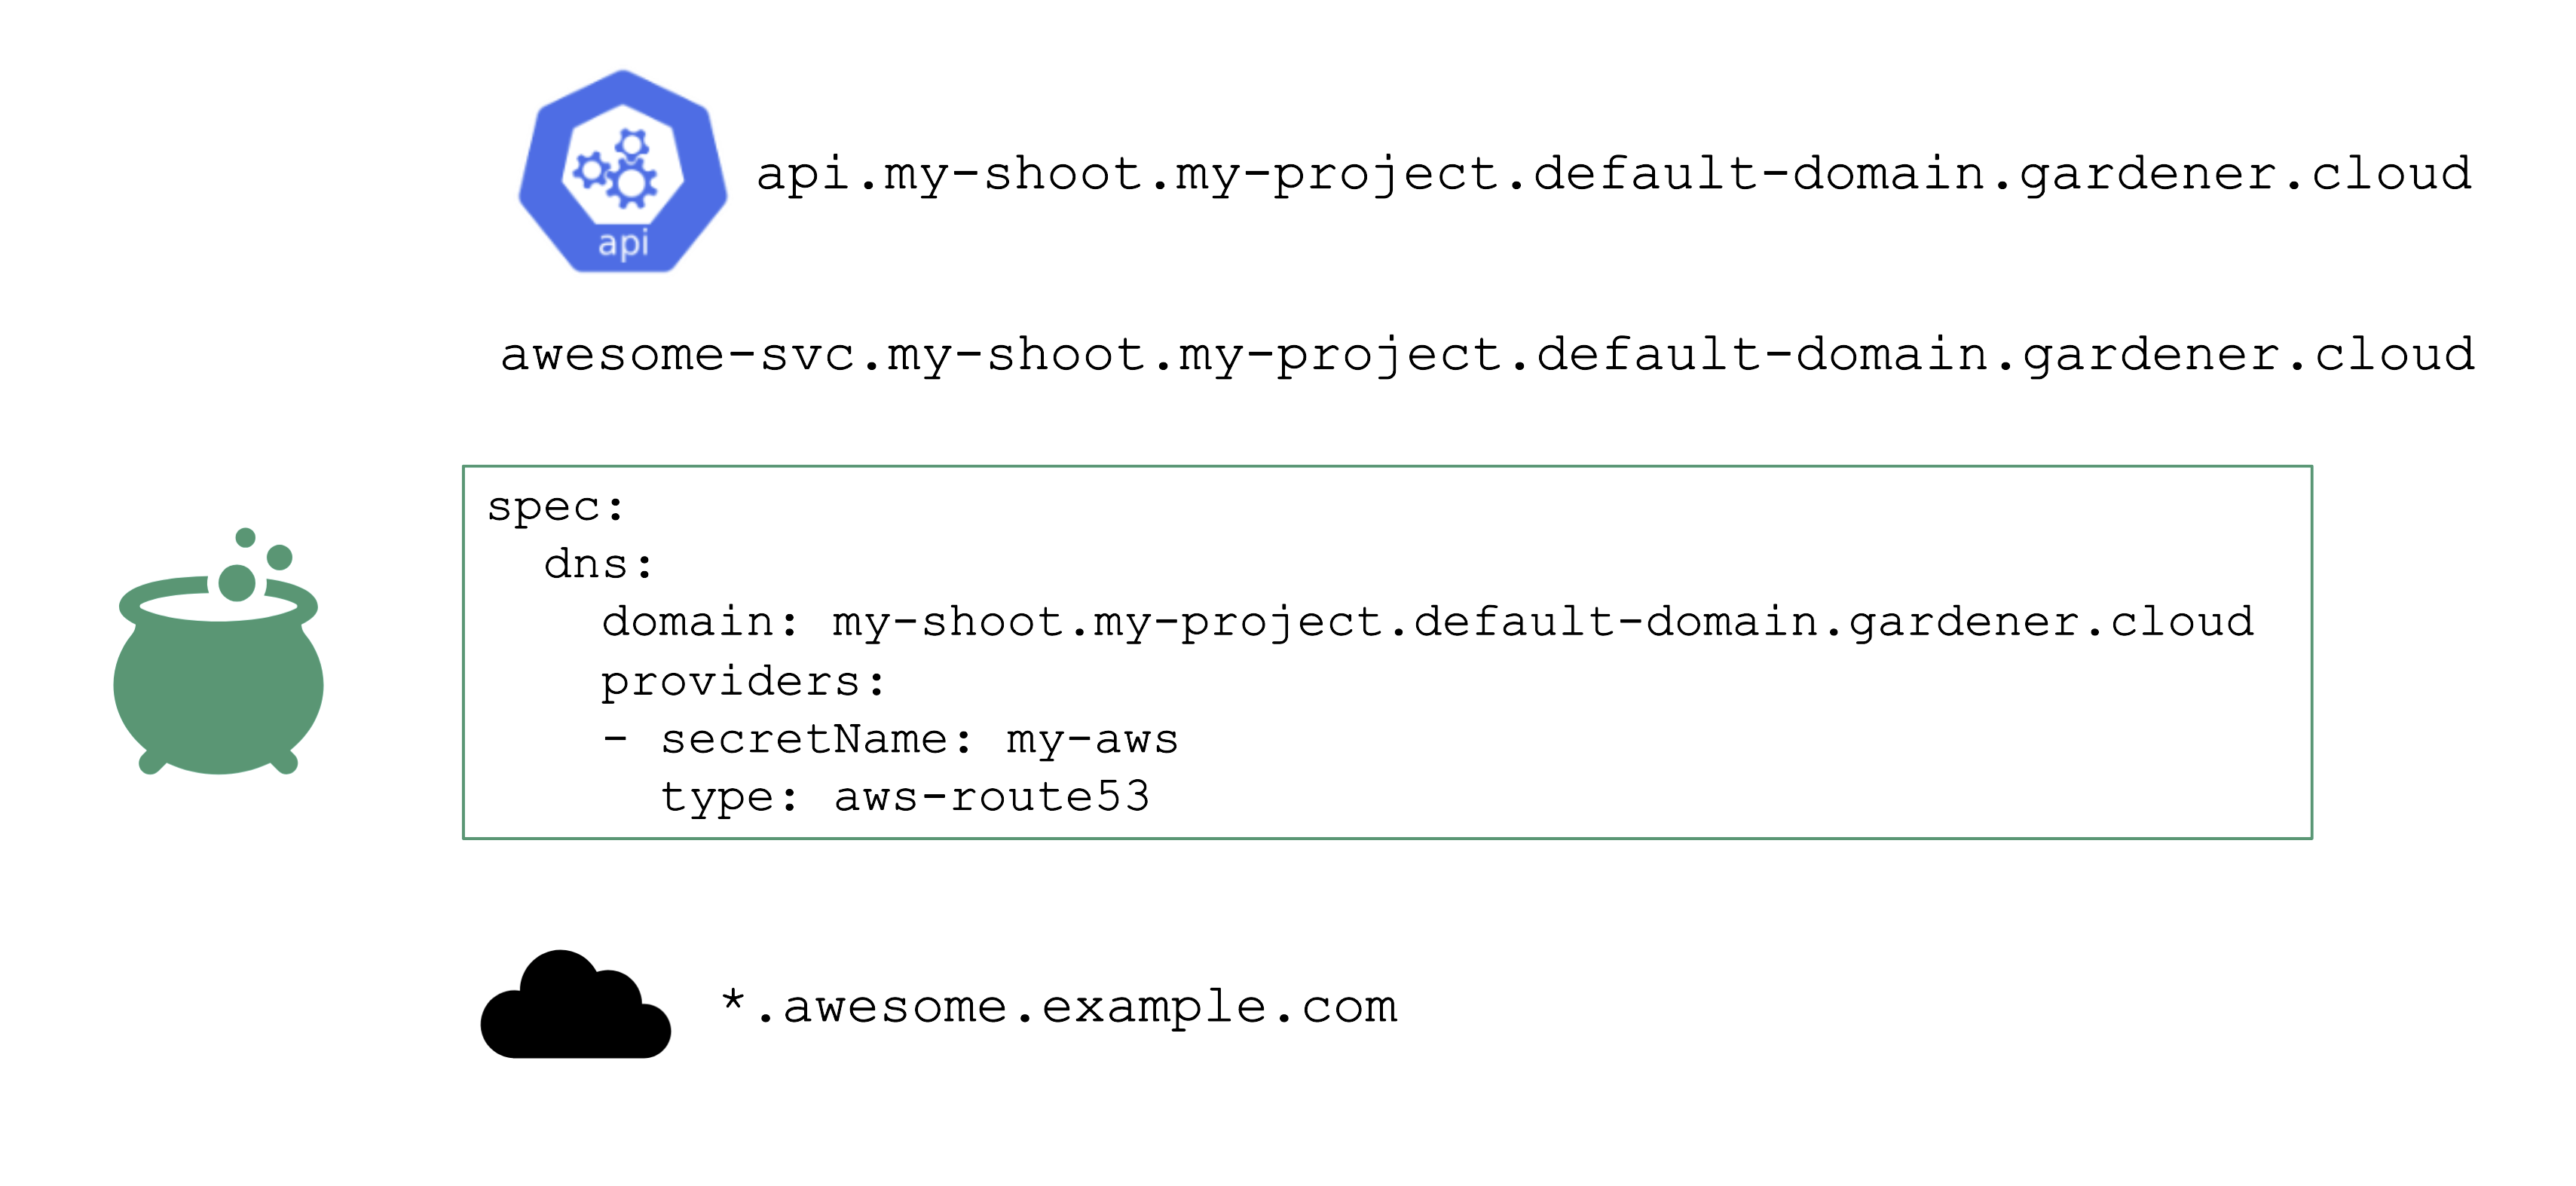
In addition, a shoot can reference credentials to a DNS provider. Those can be used to manage custom domains.
Please have a look at the documentation for further details.
1.8.5 - Certificate Management
Certificate Management
For proper consumption, any service should present a TLS certificate to its consumers. However, self-signed certificates are not fit for this purpose - the certificate should be signed by a CA trusted by an application’s userbase. Luckily, Issuers like Let’s Encrypt and others help here by offering a signing service that issues certificates based on the ACME challenge (Automatic Certificate Management Environment).
There are plenty of tools you can use to perform the challenge. For Kubernetes, cert-manager certainly is the most common, however its configuration is rather cumbersome and error prone. So let’s see how a Gardener extension can help here.
Manage Certificates with Gardener
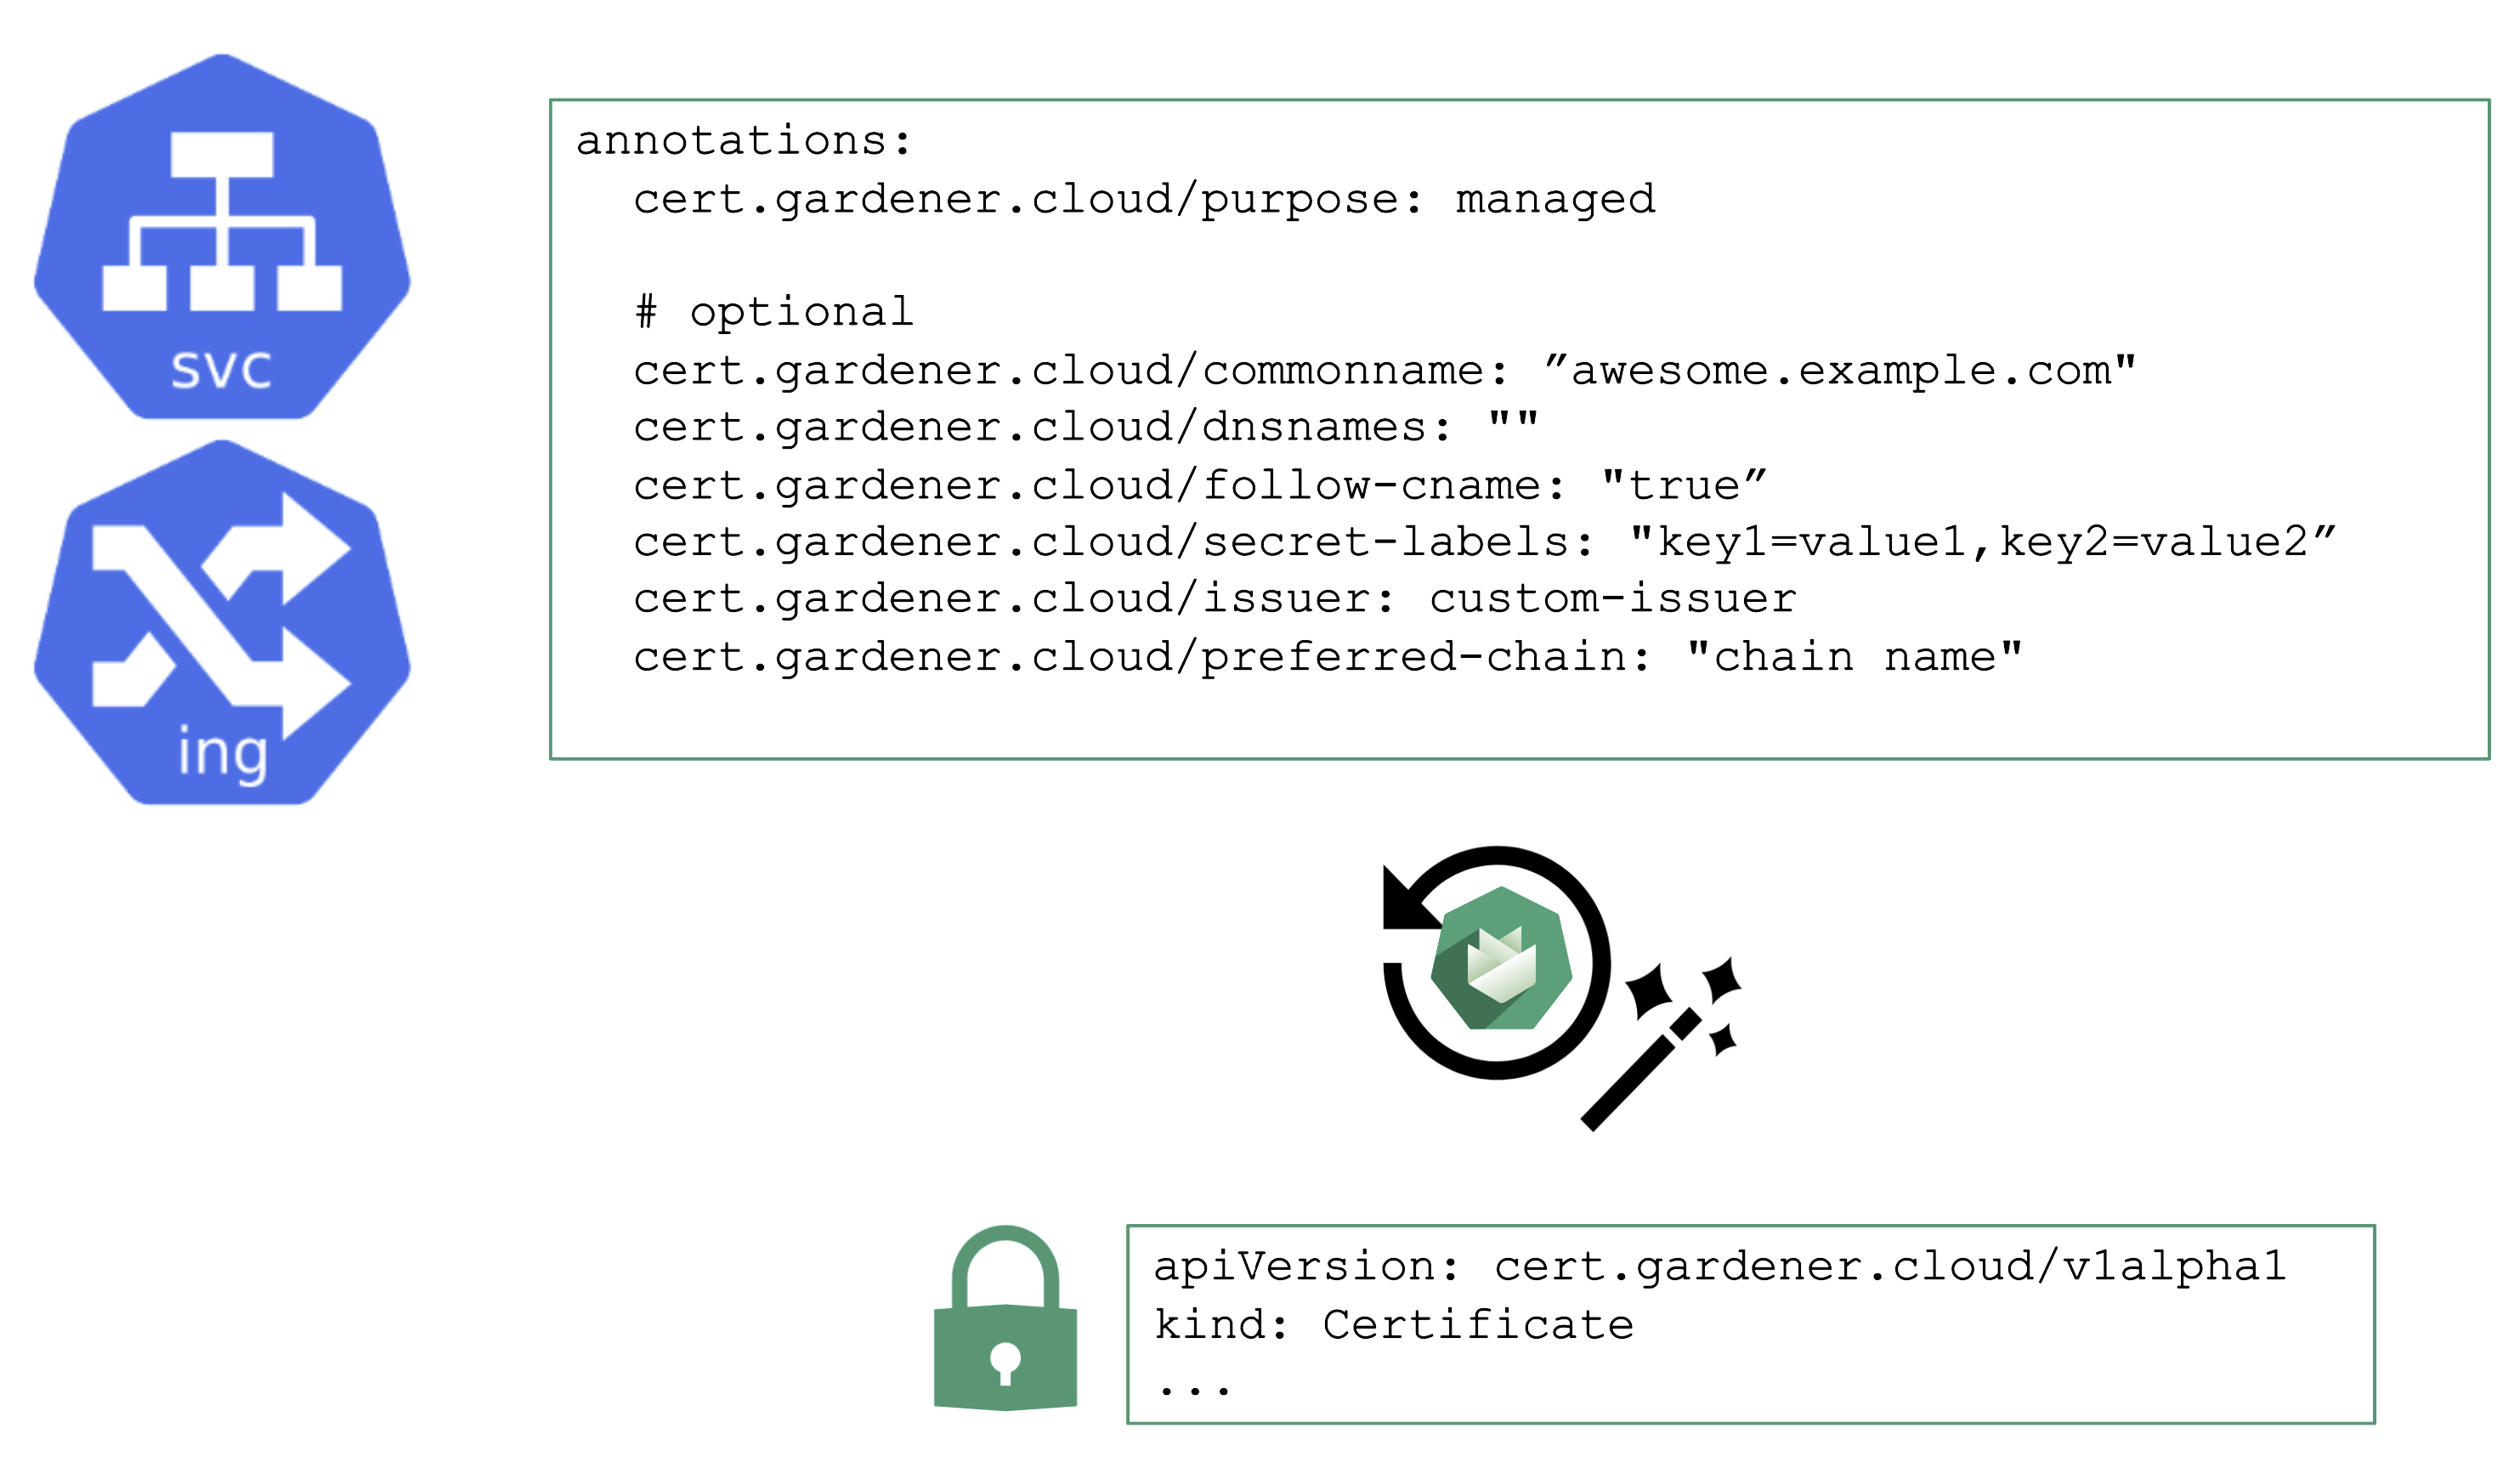
You may annotate a Service or Ingress resource to trigger the cert-manager to request a certificate from the any configured issuer (e.g. Let’s Encrypt) and perform the challenge. A Gardener operator can add a default issuer for convenience.
With the DNS extension discussed previously, setting up the DNS TXT record for the ACME challenge is fairly easy. The requested certificate can be customized by the means of several other annotations known to the controller. Most notably, it is possible to specify SANs via cert.gardener.cloud/dnsnames to accommodate domain names that have more than 64 characters (the limit for the CN field).
The user’s request for a certificate manifests as a certificate resource. The status, issuer, and other properties can be checked there.
Once successful, the resulting certificate will be stored in a secret and is ready for usage.
With additional configuration, it is also possible to define custom issuers of certificates.
For more information, see the Manage certificates with Gardener for public domain topic and the cert-management repository.
1.8.6 - Vertical Pod Autoscaler
Vertical Pod Autoscaler
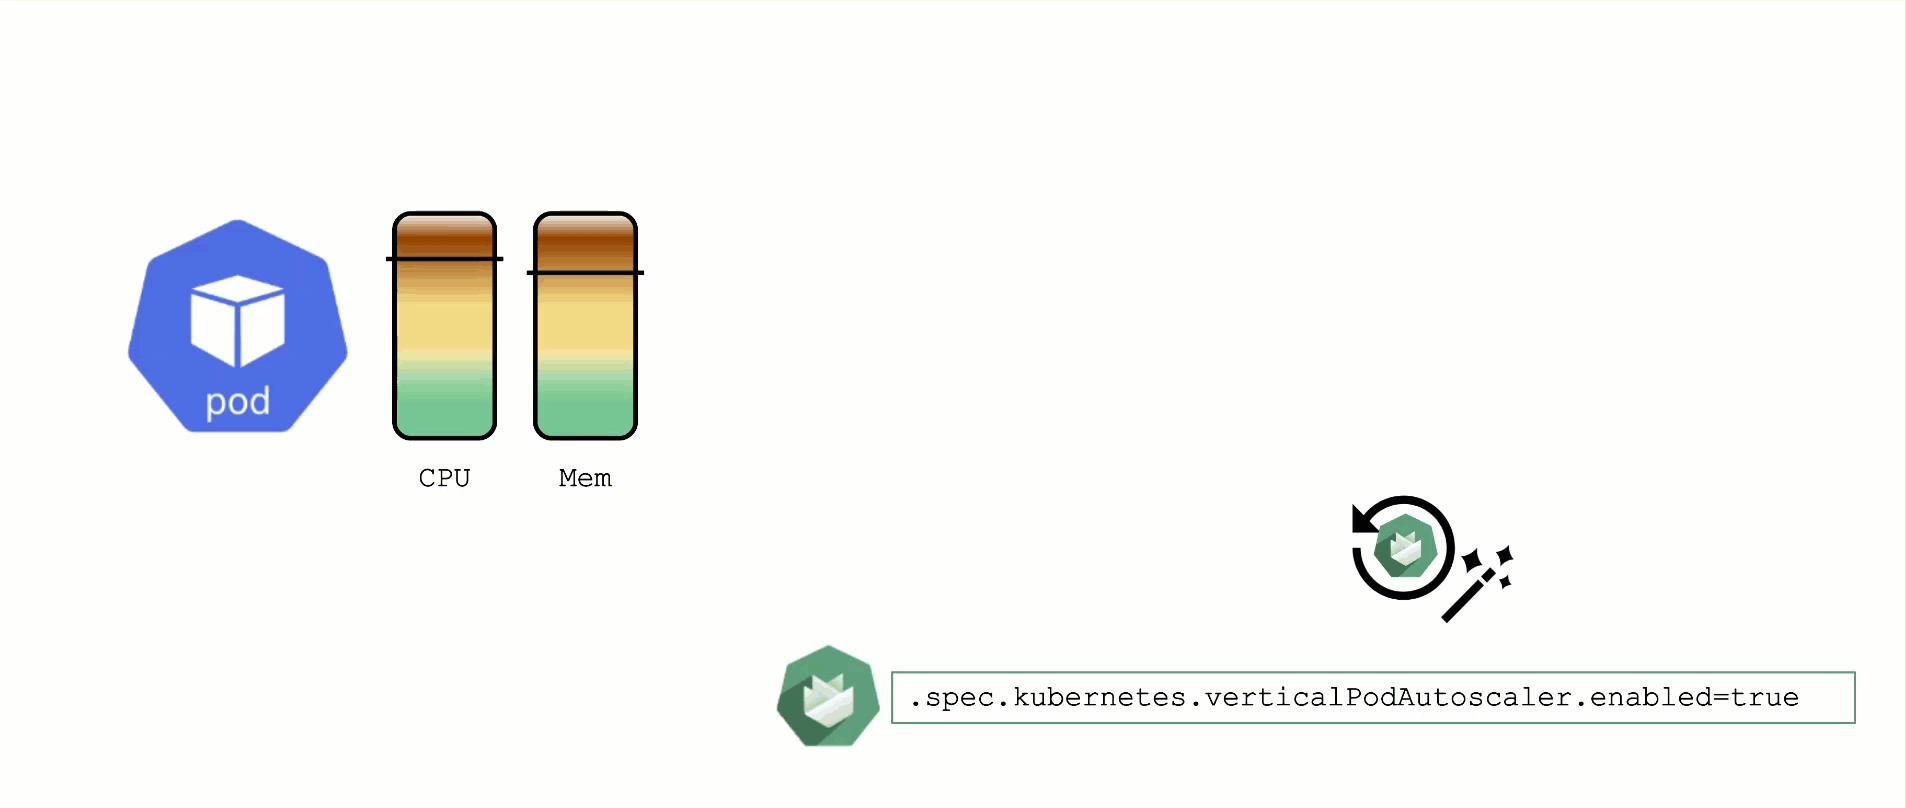
When a pod’s resource CPU or memory grows, it will hit a limit eventually. Either the pod has resource limits specified or the node will run short of resources. In both cases, the workload might be throttled or even terminated. When this happens, it is often desirable to increase the request or limits. To do this autonomously within certain boundaries is the goal of the Vertical Pod Autoscaler project.
Since it is not part of the standard Kubernetes API, you have to install the CRDs and controller manually. With Gardener, you can simply flip the switch in the shoot’s spec and start creating your VPA objects.
Please be aware that VPA and HPA operate in similar domains and might interfere.
A controller & CRDs for vertical pod auto-scaling can be activated via the shoot’s spec.
1.8.7 - Cluster Autoscaler
Obtaining Aditional Nodes
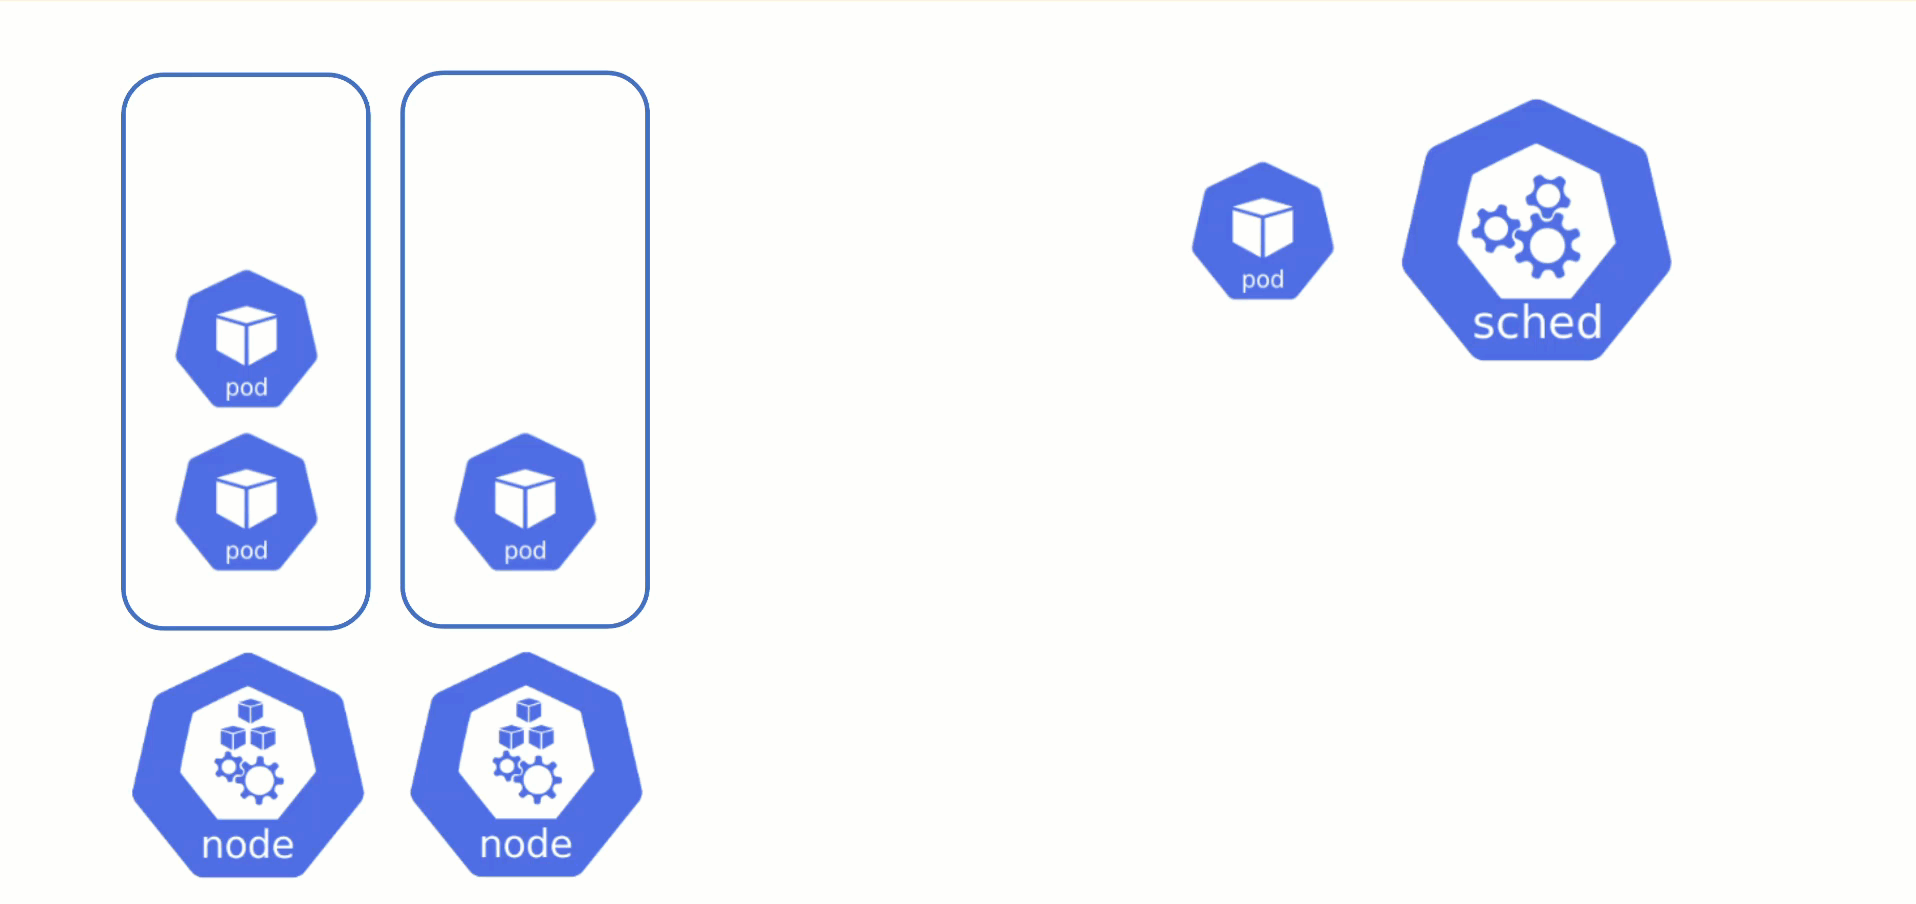
The scheduler will assign pods to nodes, as long as they have capacity (CPU, memory, Pod limit, # attachable disks, …). But what happens when all nodes are fully utilized and the scheduler does not find any suitable target?
Option 1: Evict other pods based on priority. However, this has the downside that other workloads with lower priority might become unschedulable.
Option 2: Add more nodes. There is an upstream Cluster Autoscaler project that does exactly this. It simulates the scheduling and reacts to pods not being schedulable events. Gardener has forked it to make it work with machine-controller-manager abstraction of how node (groups) are defined in Gardener. The cluster autoscaler respects the limits (min / max) of any worker pool in a shoot’s spec. It can also scale down nodes based on utilization thresholds. For more details, see the autoscaler documentation.
Scaling by Priority

For clusters with more than one node pool, the cluster autoscaler has to decide which group to scale up. By default, it randomly picks from the available / applicable. However, this behavior is customizable by the use of so-called expanders.
This section will focus on the priority based expander.
Each worker pool gets a priority and the cluster autoscaler will scale up the one with the highest priority until it reaches its limit.
To get more information on the current status of the autoscaler, you can check a “status” configmap in the kube-system namespace with the following command:
kubectl get cm -n kube-system cluster-autoscaler-status -oyaml
To obtain information about the decision making, you can check the logs of the cluster-autoscaler pod by using the shoot’s monitoring stack.
For more information, see the cluster-autoscaler FAQ and the Priority based expander for cluster-autoscaler topic.
1.9 - Common Pitfalls
Architecture
Containers will NOT fix a broken architecture!
Running a highly distributed system has advantages, but of course, those come at a cost. In order to succeed, one would need:
- Logging
- Tracing
- No singleton
- Tolerance to failure of individual instances
- Automated config / change management
- Kubernetes knowledge
Scalability
Most scalability dimensions are interconnected with others. If a cluster grows beyond reasonable defaults, it can still function very well. But tuning it comes at the cost of time and can influence stability negatively.
Take the number of nodes and pods, for example. Both are connected and you cannot grow both towards their individual limits, as you would face issues way before reaching any theoretical limits.
Reading the Scalability of Gardener Managed Kubernetes Clusters guide is strongly recommended in order to understand the topic of scalability within Kubernetes and Gardener.
A Small Sample of Things That Can Grow Beyond Reasonable Limits
When scaling a cluster, there are plenty of resources that can be exhausted or reach a limit:
- The API server will be scaled horizontally and vertically by Gardener. However, it can still consume too much resources to fit onto a single node on the seed. In this case, you can only reduce the load on the API server. This should not happen with regular usage patterns though.
- ETCD disk space: 8GB is the limit. If you have too many resources or a high churn rate, a cluster can run out of ETCD capacity. In such a scenario it will stop working until defragmented, compacted, and cleaned up.
- The number of nodes is limited by the network configuration (pod cidr range & node cidr mask). Also, there is a reasonable number of nodes (300) that most workloads should not exceed. It is possible to go beyond but doing so requires careful tuning and consideration of connected scaling dimensions (like the number of pods per node).
The availability of your cluster is directly impacted by the way you use it.
Infrastructure Capacity and Quotas
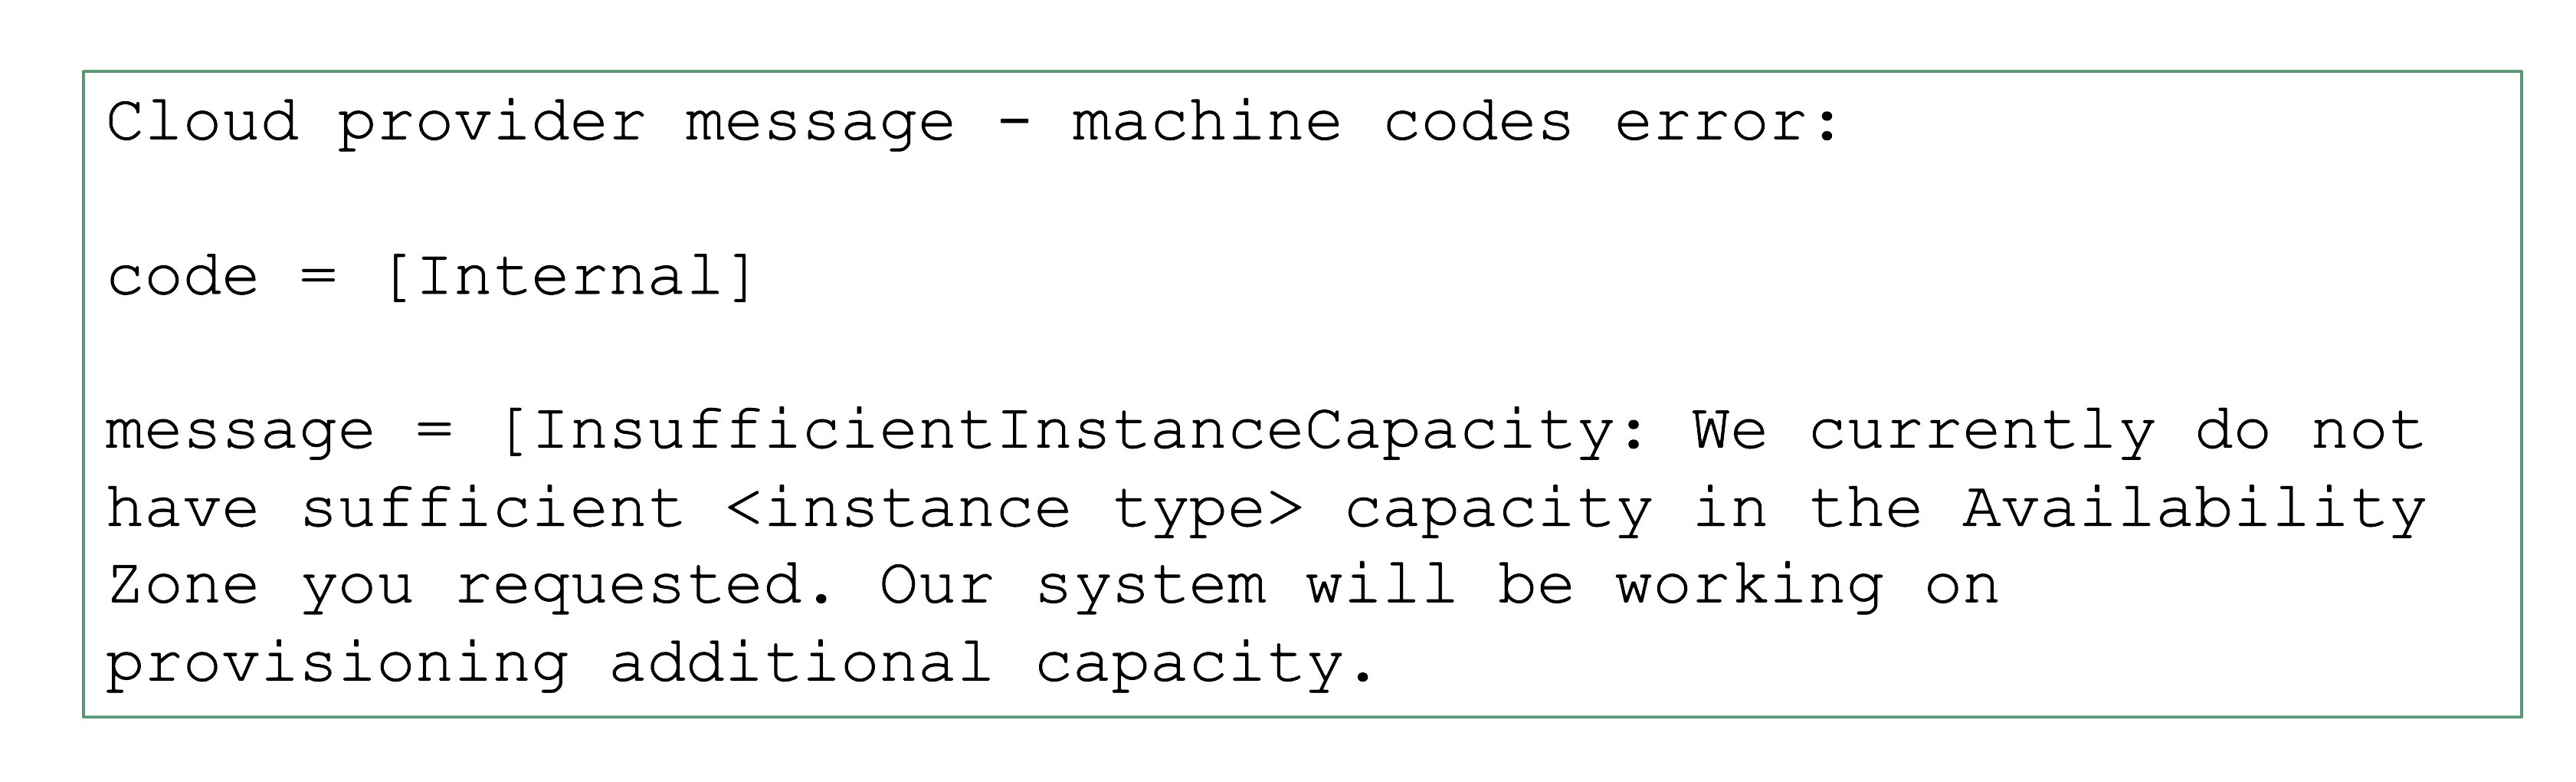
Sometimes requests cannot be fulfilled due to shortages on the infrastructure side. For example, a certain instance type might not be available and new Kubernetes nodes of this type cannot be added. It is a good practice to use the cluster-autoscaler’s priority expander and have a secondary node pool.
Sometimes, it is not the physical capacity but exhausted quotas within an infrastructure account that result in limits. Obviously, there should be sufficient quota to create as many VMs as needed. But there are also other resources that are created in the infrastructure that need proper quotas:
- Loadbalancers
- VPC
- Disks
- Routes (often forgotten, but very important for clusters without overlay network; typically defaults to around 50 routes, meaning that 50 nodes is the maximum a cluster can have)
- …
NodeCIDRMaskSize
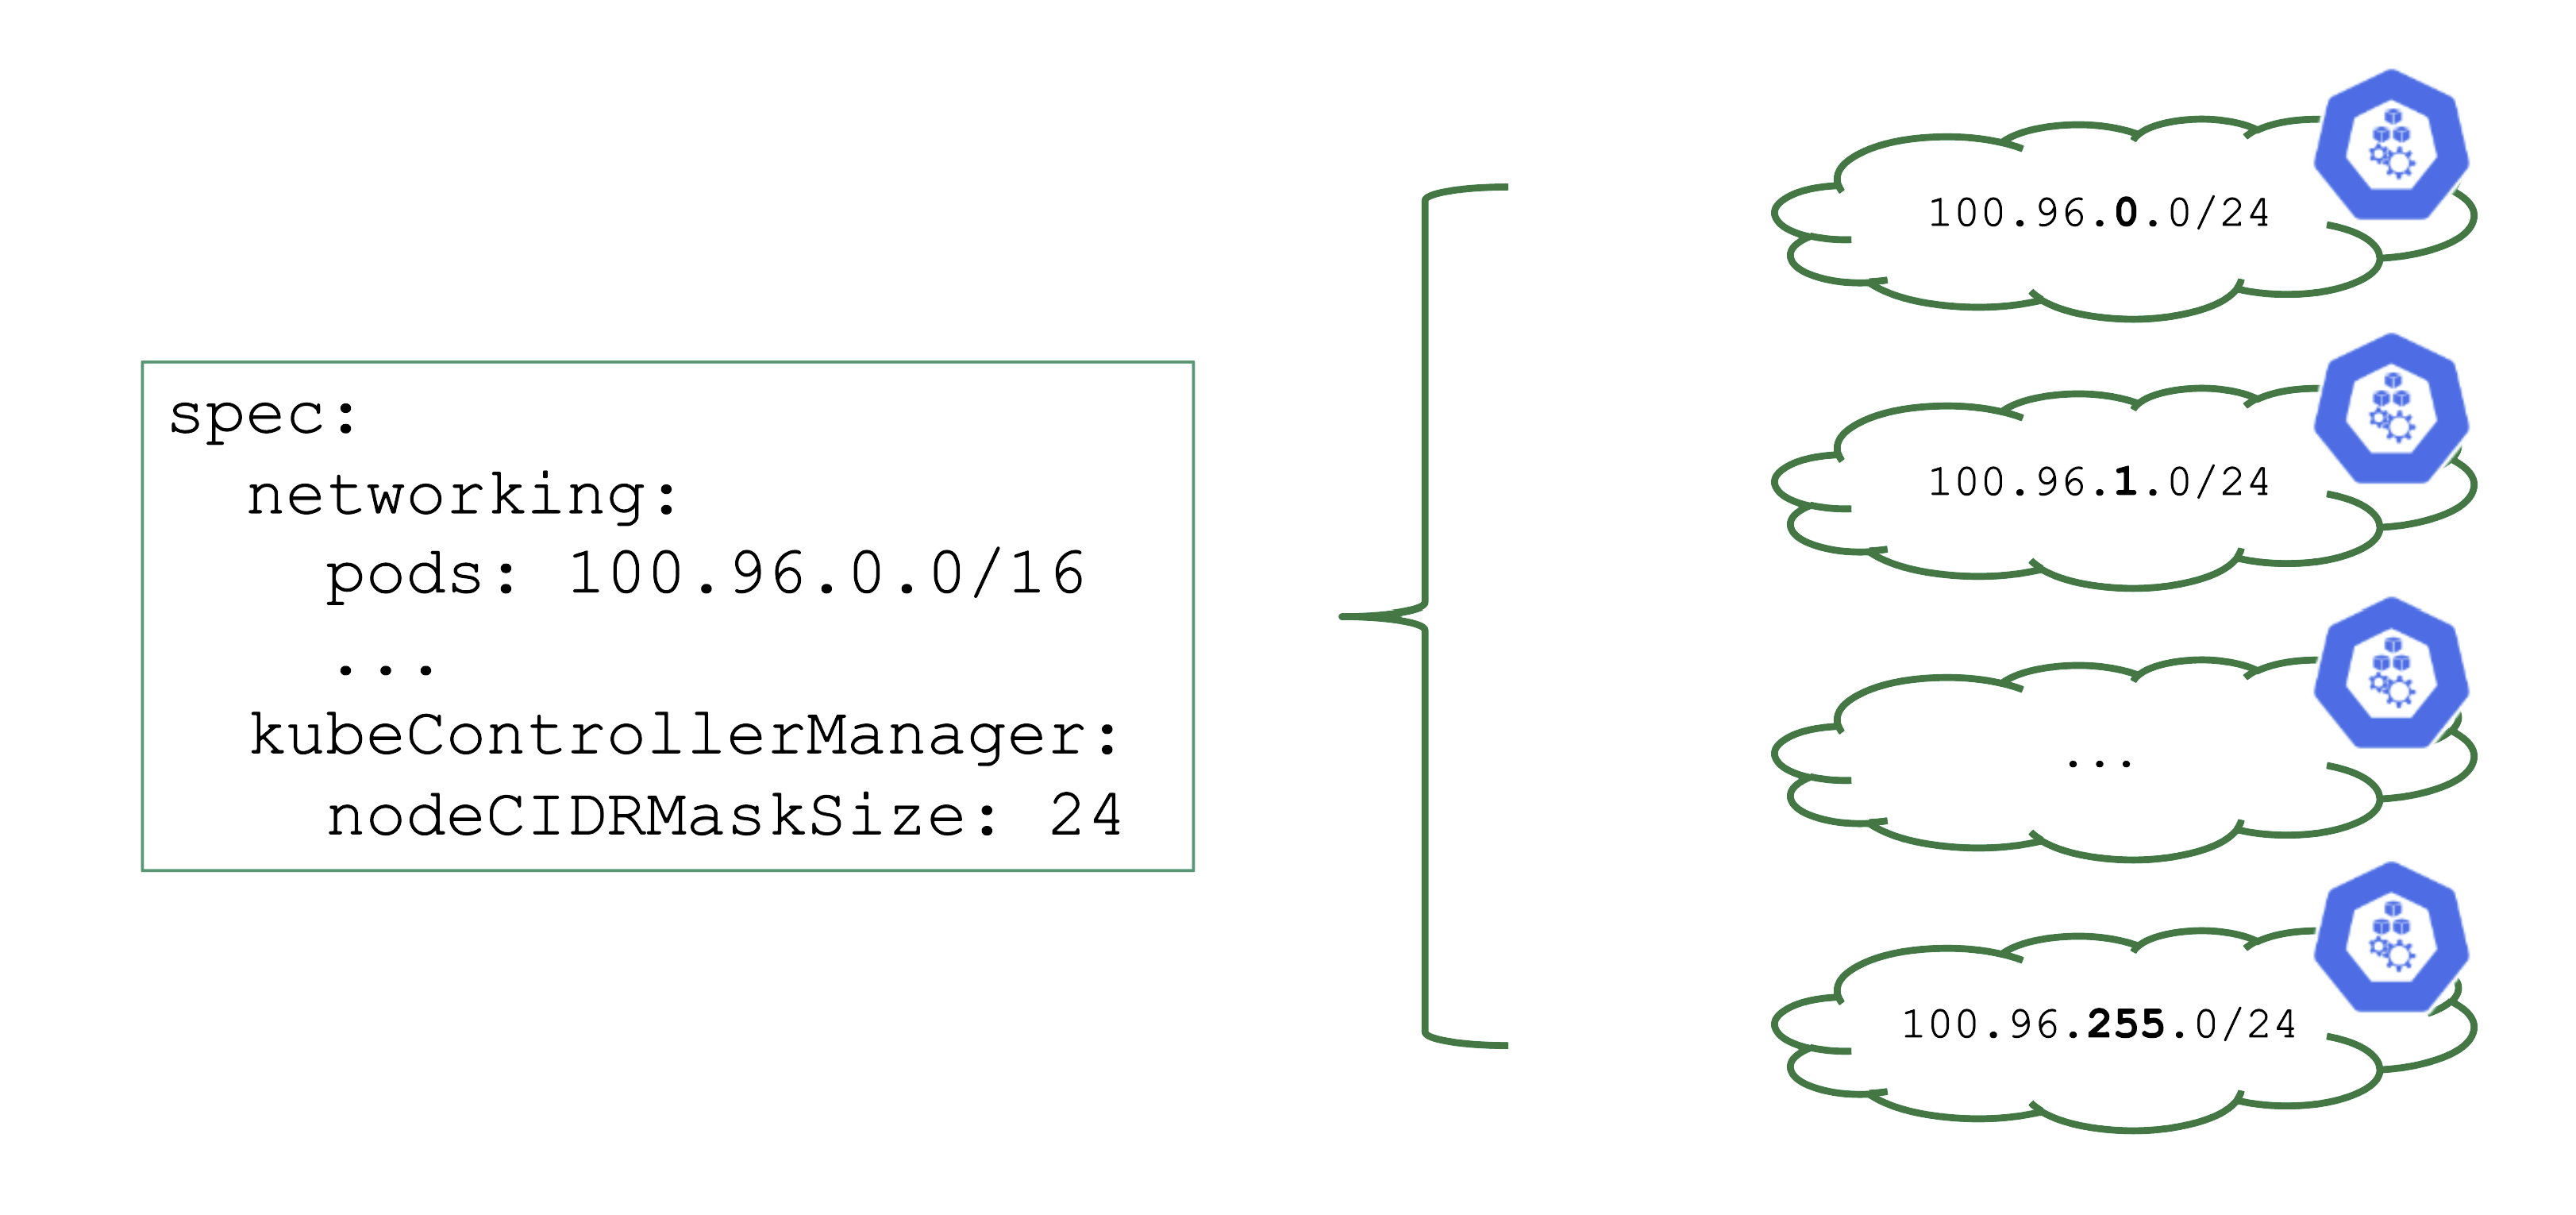
Upon cluster creation, there are several settings that are network related. For example, the address space for Pods has to be defined. In this case, it is a /16 subnet that includes a total of 65.536 hosts. However, that does not imply that you can easily use all addresses at the same point in time.
As part of the Kubernetes network setup, the /16 network is divided into smaller subnets and each node gets a distinct subnet. The size of this subnet defaults to /24. It can also be specified (but not changed later).
Now, as you create more nodes, you have a total of 256 subnets that can be assigned to nodes, thus limiting the total number of nodes of this cluster to 256.
For more information, see Shoot Networking.
Overlapping VPCs
Avoid Overlapping CIDR Ranges in VPCs
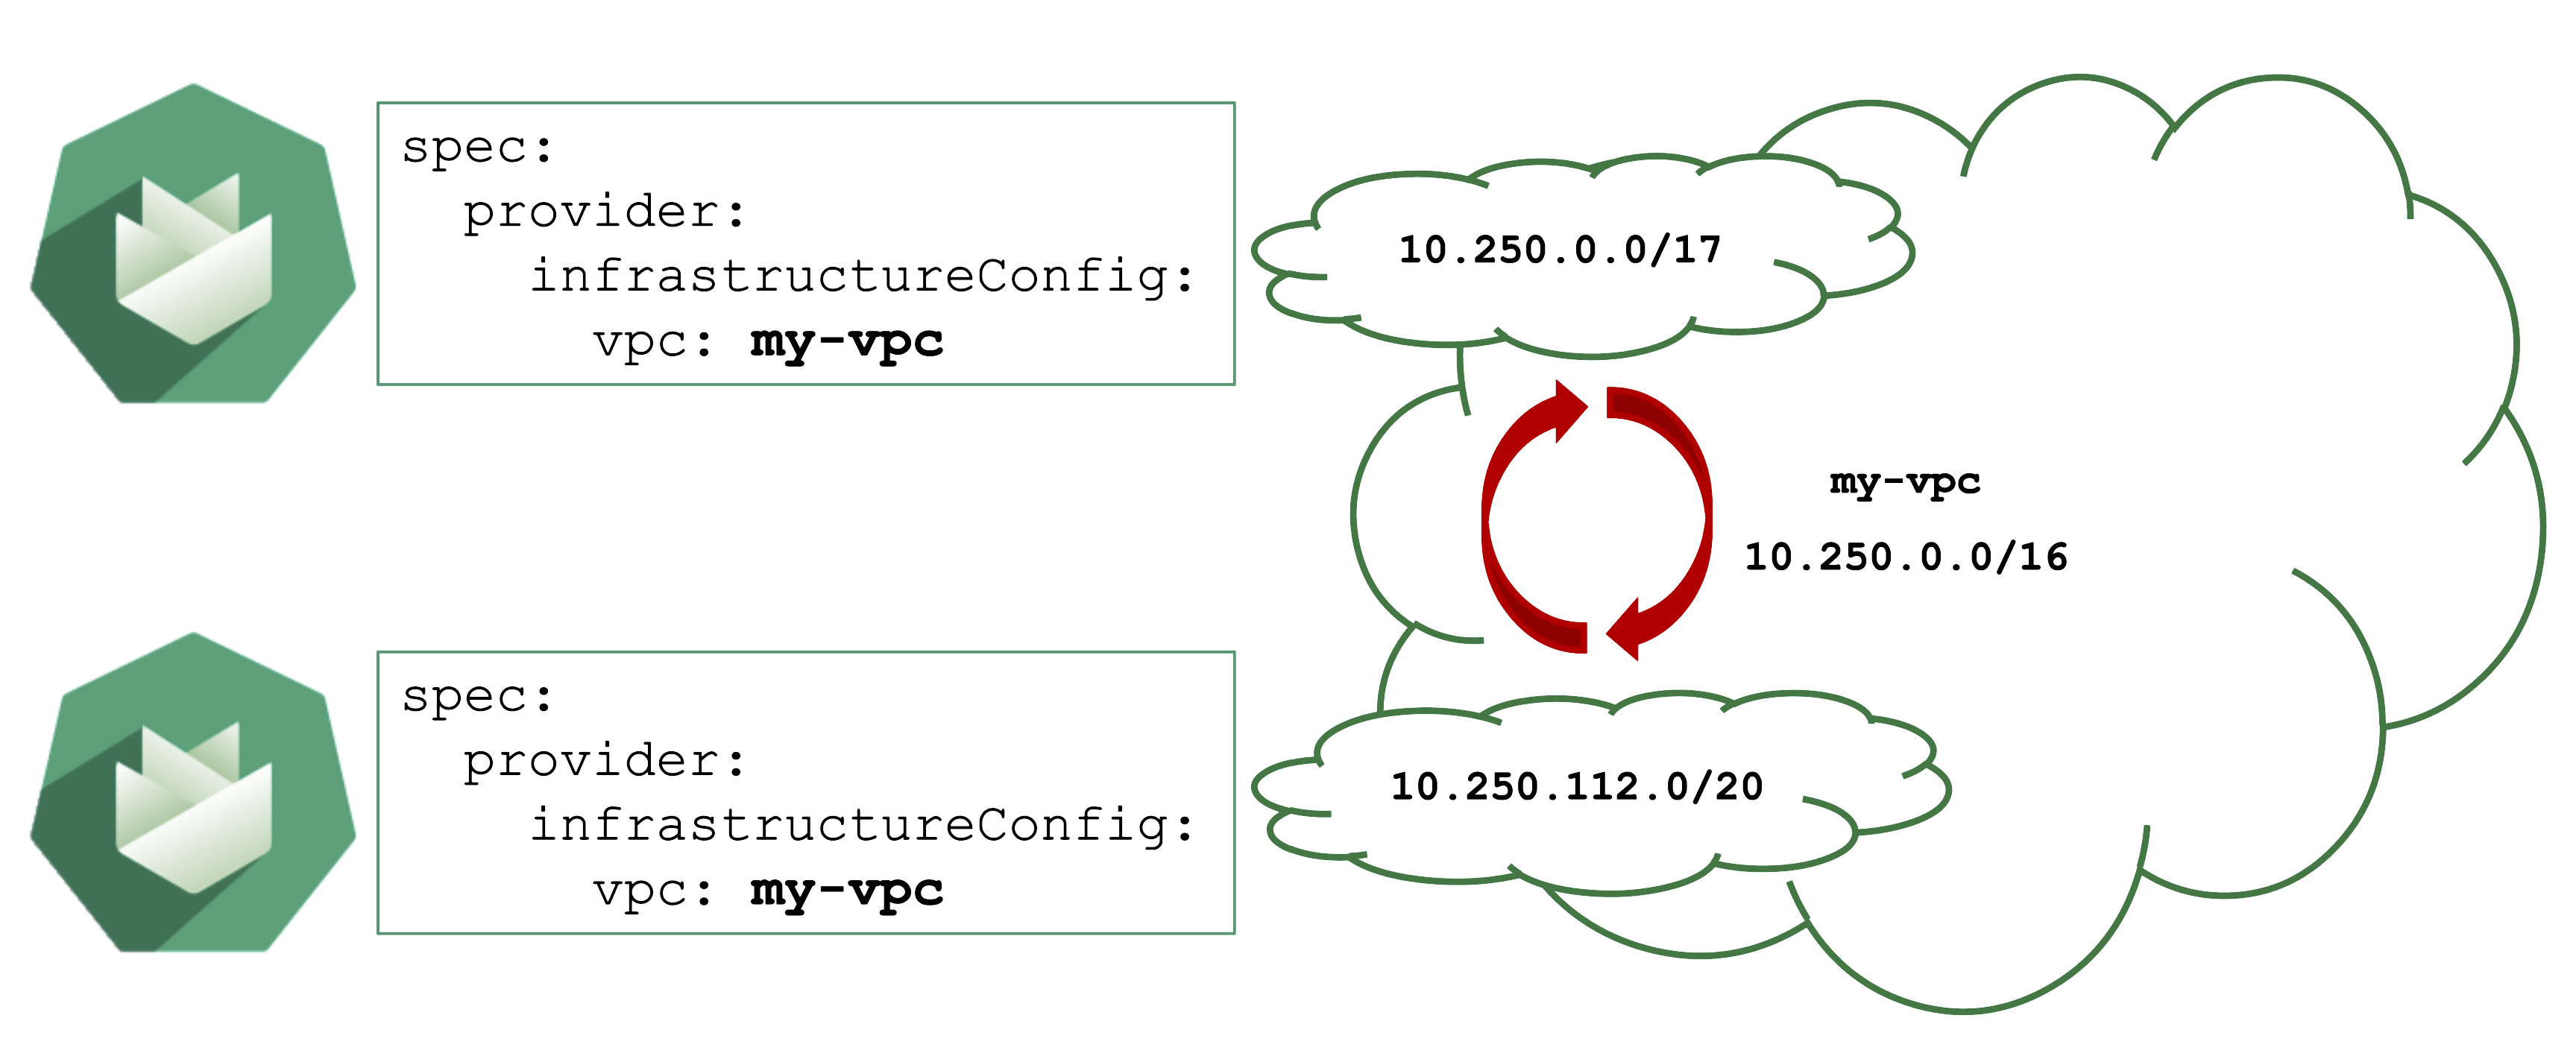
Gardener can create shoot cluster resources in an existing / user-created VPC. However, you have to make sure that the CIDR ranges used by the shoots nodes or subnets for zones do not overlap with other shoots deployed to the same VPC.
In case of an overlap, there might be strange routing effects, and packets ending up at a wrong location.
Expired Credentials
Credentials expire or get revoked. When this happens to the actively used infrastructure credentials of a shoot, the cluster will stop working after a while. New nodes cannot be added, LoadBalancers cannot be created, and so on.
You can update the credentials stored in the project namespace and reconcile the cluster to replicate the new keys to all relevant controllers. Similarly, when doing a planned rotation one should wait until the shoot reconciled successfully before invalidating the old credentials.
AutoUpdate Breaking Clusters
Gardener can automatically update a shoot’s Kubernetes patch version, when a new patch version is labeled as “supported”. Automatically updating of the OS images works in a similar way. Both are triggered by the “supported” classification in the respective cloud profile and can be enabled / disabled as part a shoot’s spec.
Additionally, when a minor Kubernetes / OS version expires, Gardener will force-update the shoot to the next supported version.
Turning on AutoUpdate for a shoot may be convenient but comes at the risk of potentially unwanted changes. While it is possible to switch to another OS version, updates to the Kubernetes version are a one way operation and cannot be reverted.
Control the version lifecycle separately for any cluster that hosts important workload.
Node Draining
Node Draining and Pod Disruption Budget
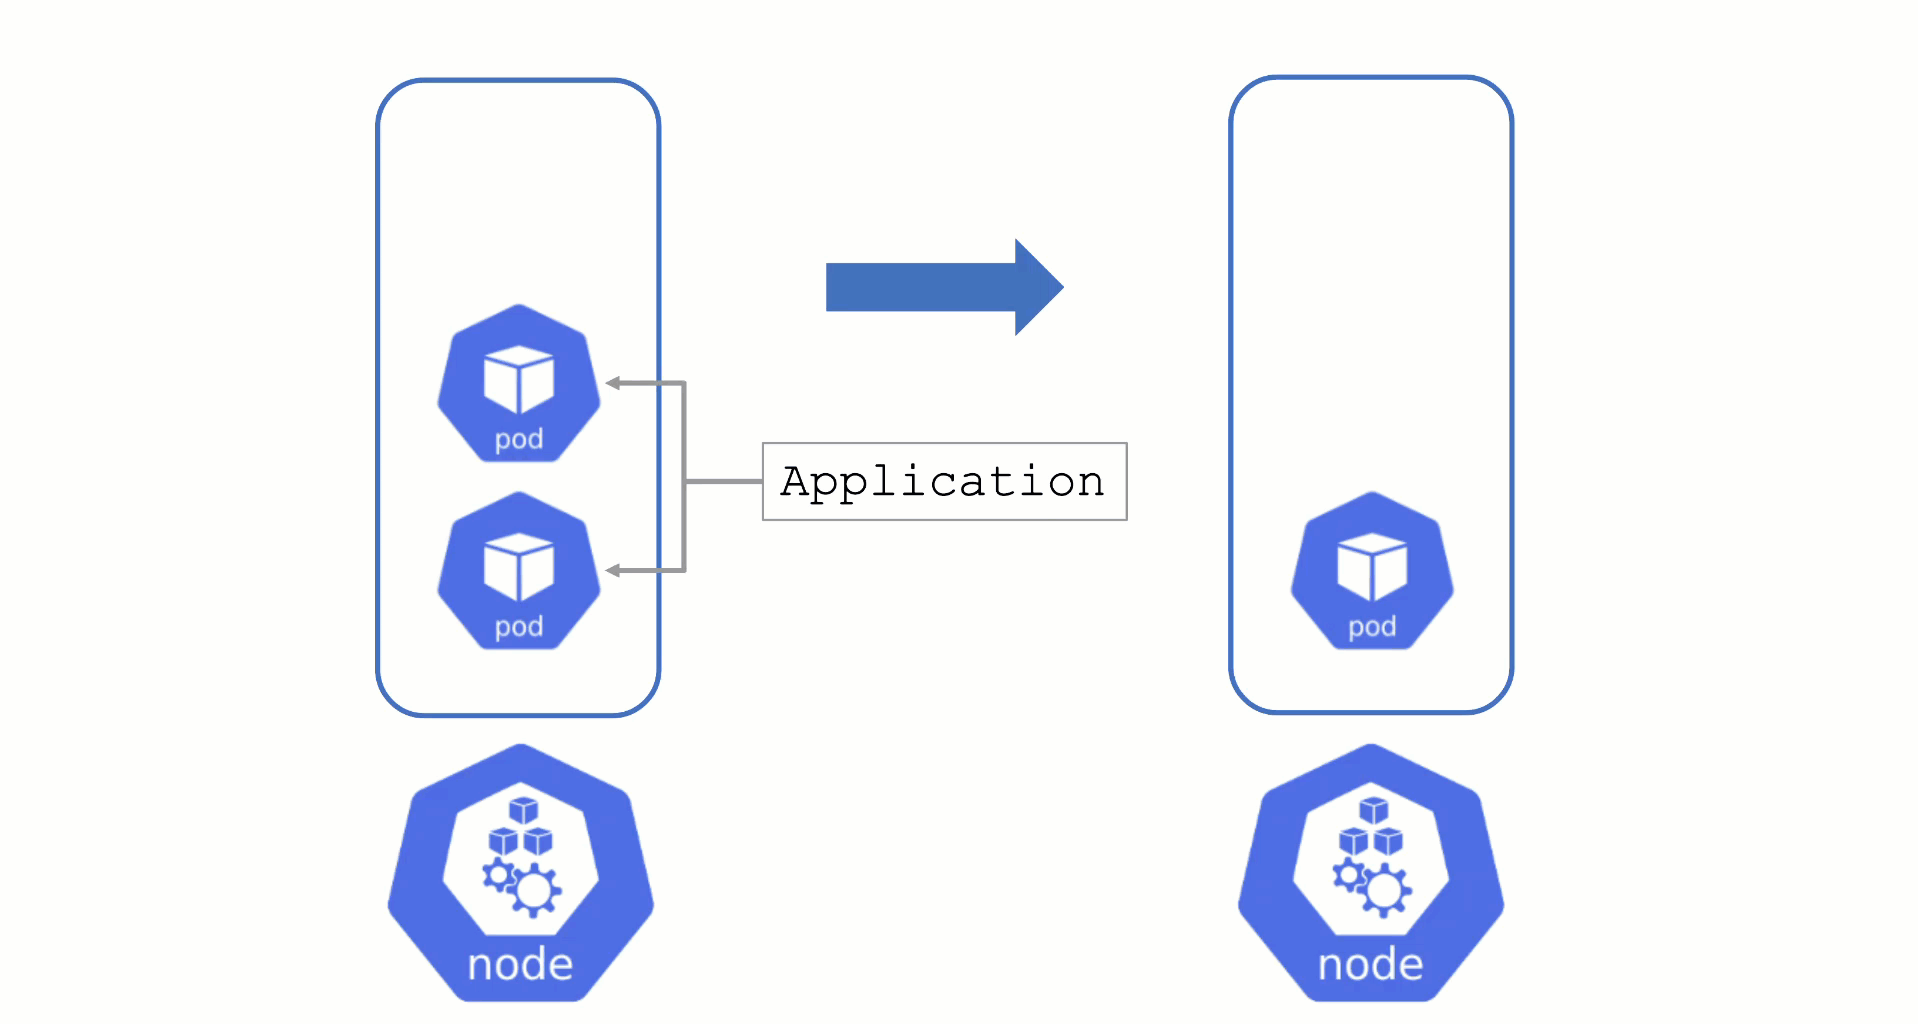
Typically, nodes are drained when:
- There is a update of the OS / Kubernetes minor version
- An Operator cordons & drains a node
- The cluster-autoscaler wants to scale down
Without a PodDistruptionBudget, pods will be terminated as fast as possible. If an application has 2 out of 2 replicas running on the drained node, this will probably cause availability issues.
Node Draining with PDB
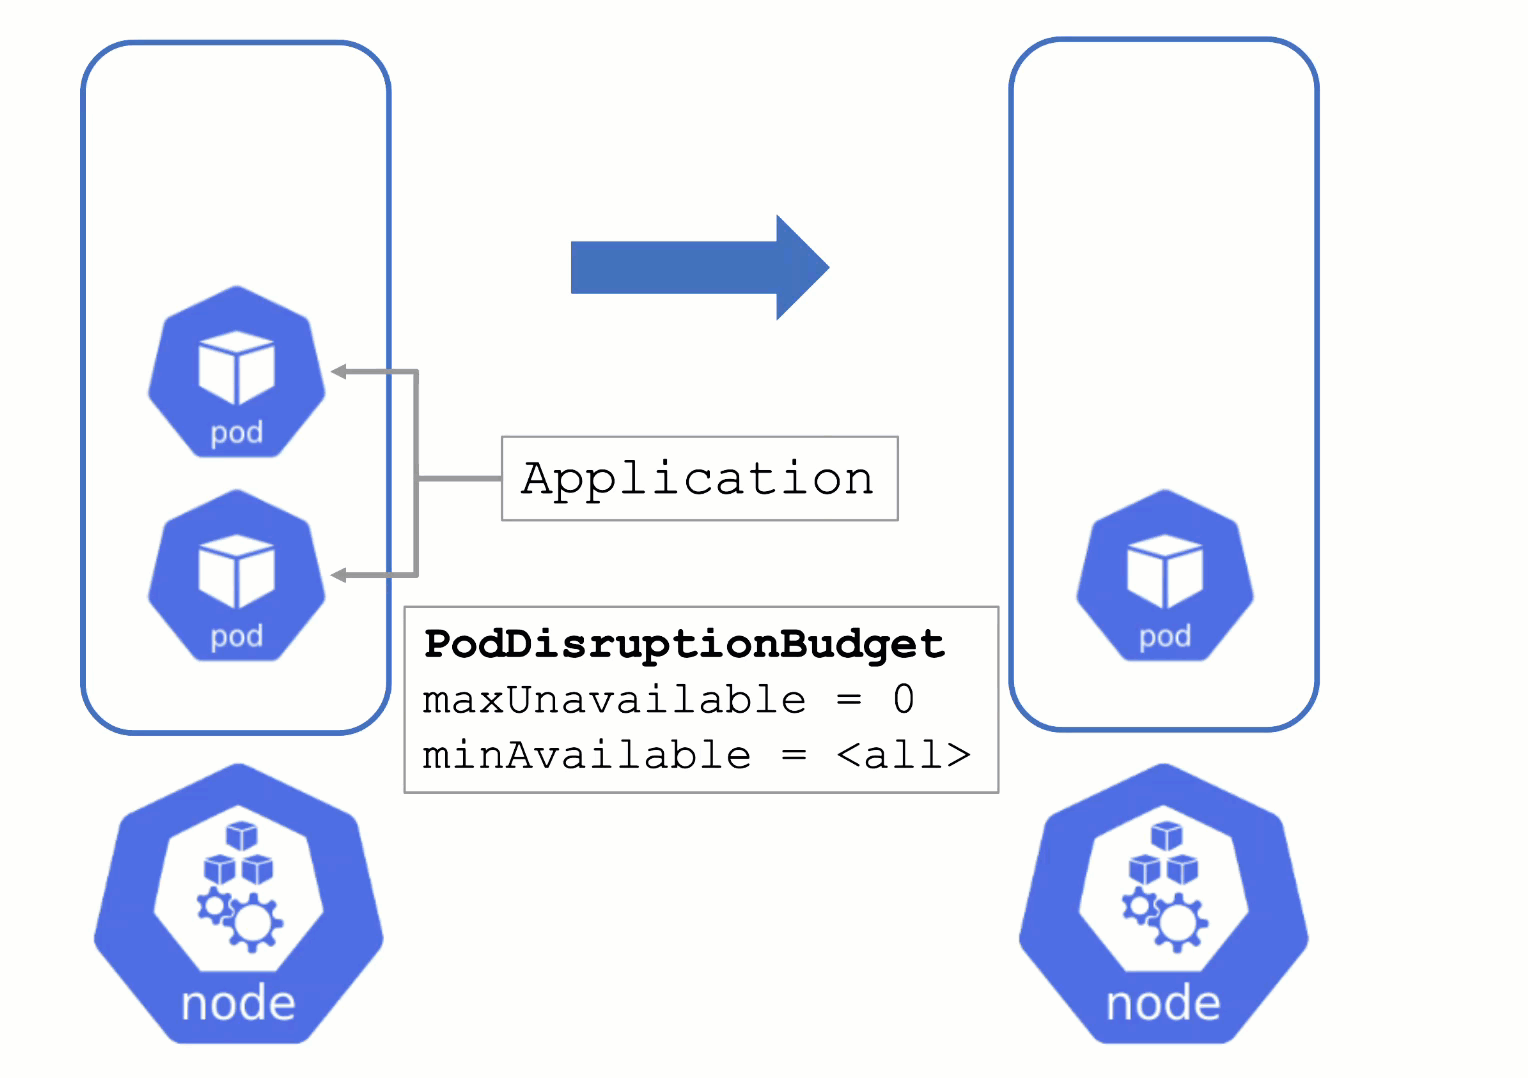
PodDisruptionBudgets can help to manage a graceful node drain. However, if no disruptions are allowed there, the node drain will be blocked until it reaches a timeout. Only then will the nodes be terminated but without respecting PDB thresholds.
Configure PDBs and allow disruptions.
Pod Resource Requests and Limits
Resource Consumption
Pods consume resources and, of course, there are only so many resources available on a single node. Setting requests will make the scheduling much better, as the scheduler has more information available.
Specifying limits can help, but can also limit an application in unintended ways. A recommendation to start with:
- Do not set CPU limits (CPU is compressible and throttling is really hard to detect)
- Set memory limits and monitor OOM kills / restarts of workload (typically detectable by container status exit code 137 and corresponding events). This will decrease the likelihood of OOM situations on the node itself. However, for critical workloads it might be better to have uncapped growth and rather risk a node going OOM.
Next, consider if assigning the workload to quality of service class guaranteed is needed. Again - this can help or be counterproductive. It is important to be aware of its implications. For more information, see Pod Quality of Service Classes.
Tune shoot.spec.Kubernetes.kubeReserved to protect the node (kubelet) in case of a workload pod consuming too much resources. It is very helpful to ensure a high level of stability.
If the usage profile changes over time, the VPA can help a lot to adapt the resource requests / limits automatically.
Webhooks
User-Deployed Webhooks in Kubernetes
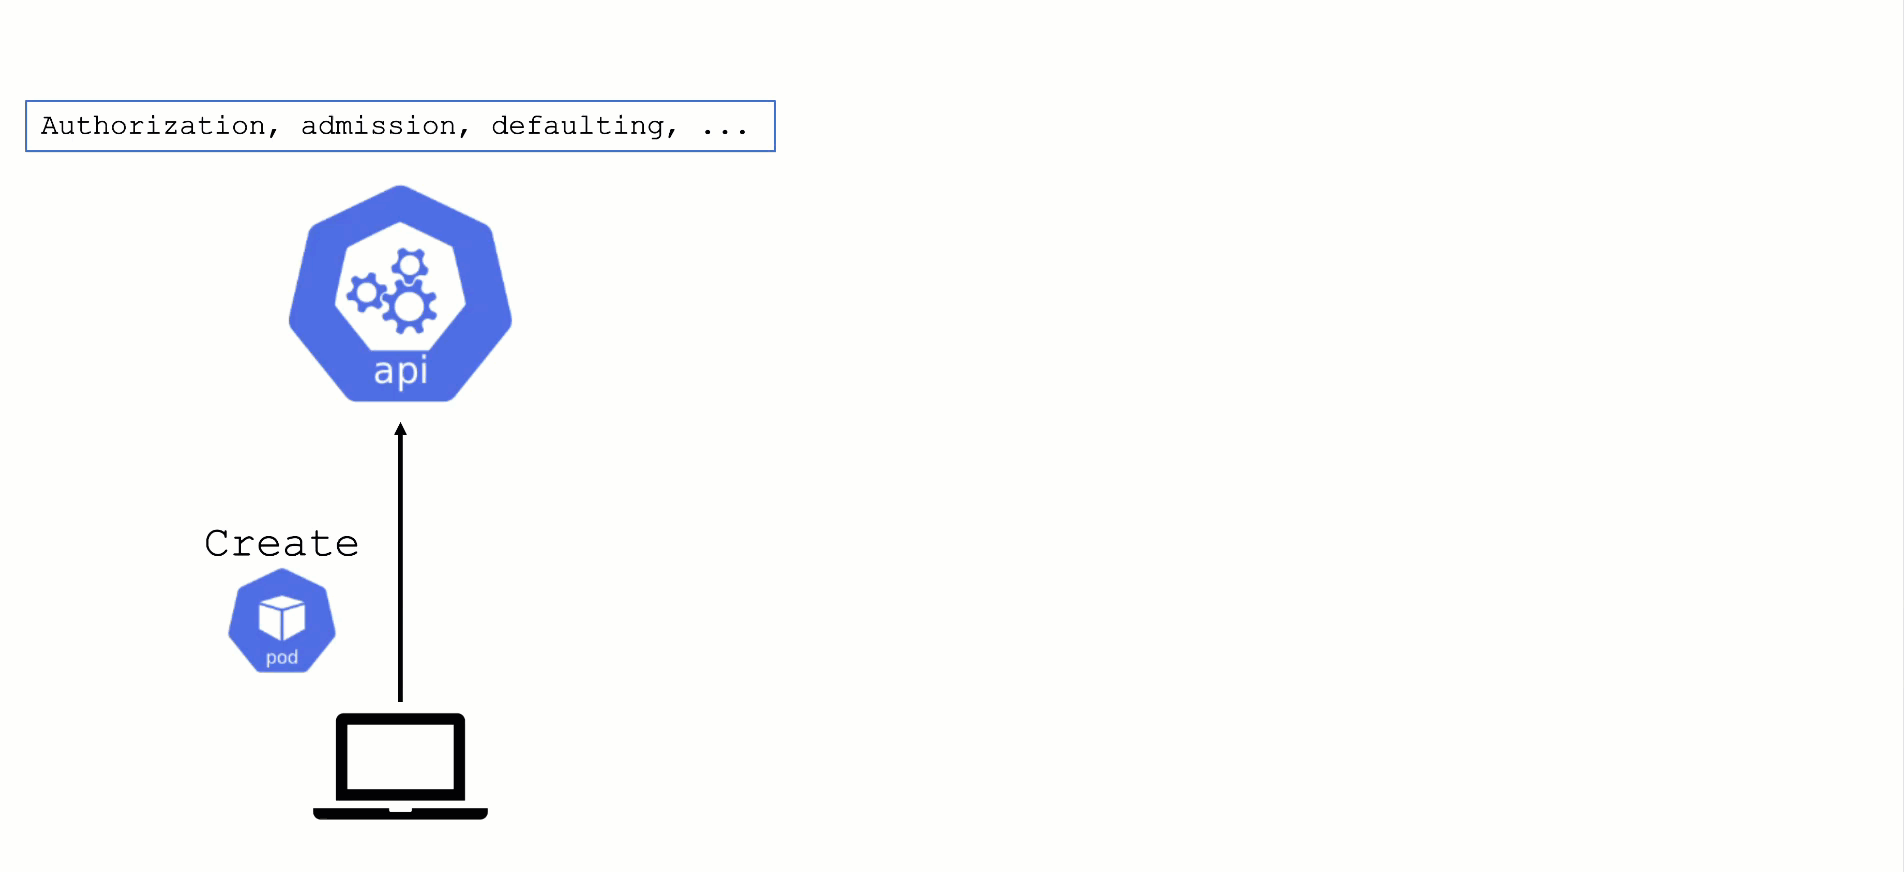
By default, any request to the API server will go through a chain of checks. Let’s take the example of creating a pod.
When the resource is submitted to the API server, it will be checked against the following validations:
- Is the user authorized to perform this action?
- Is the pod definitionactually valid?
- Are the specified values allowed?
Additionally, there is the defaulting - like the injection of the default service account’s name, if nothing else is specified.
This chain of admission control and mutation can be enhanced by the user. Read about dynamic admission control for more details.
ValidatingWebhookConfiguration: allow or deny requests based on custom rules
MutatingWebhookConfiguration: change а resource before it is actually stored in etcd (that is, before any other controller acts upon)
Both ValidatingWebhookConfiguration as well as MutatingWebhookConfiguration resources:
- specify for which resources and operations these checks should be executed.
- specify how to reach the webhook server (typically a service running on the data plane of a cluster)
- rely on a webhook server performing a review and reply to the
admissionReviewrequest
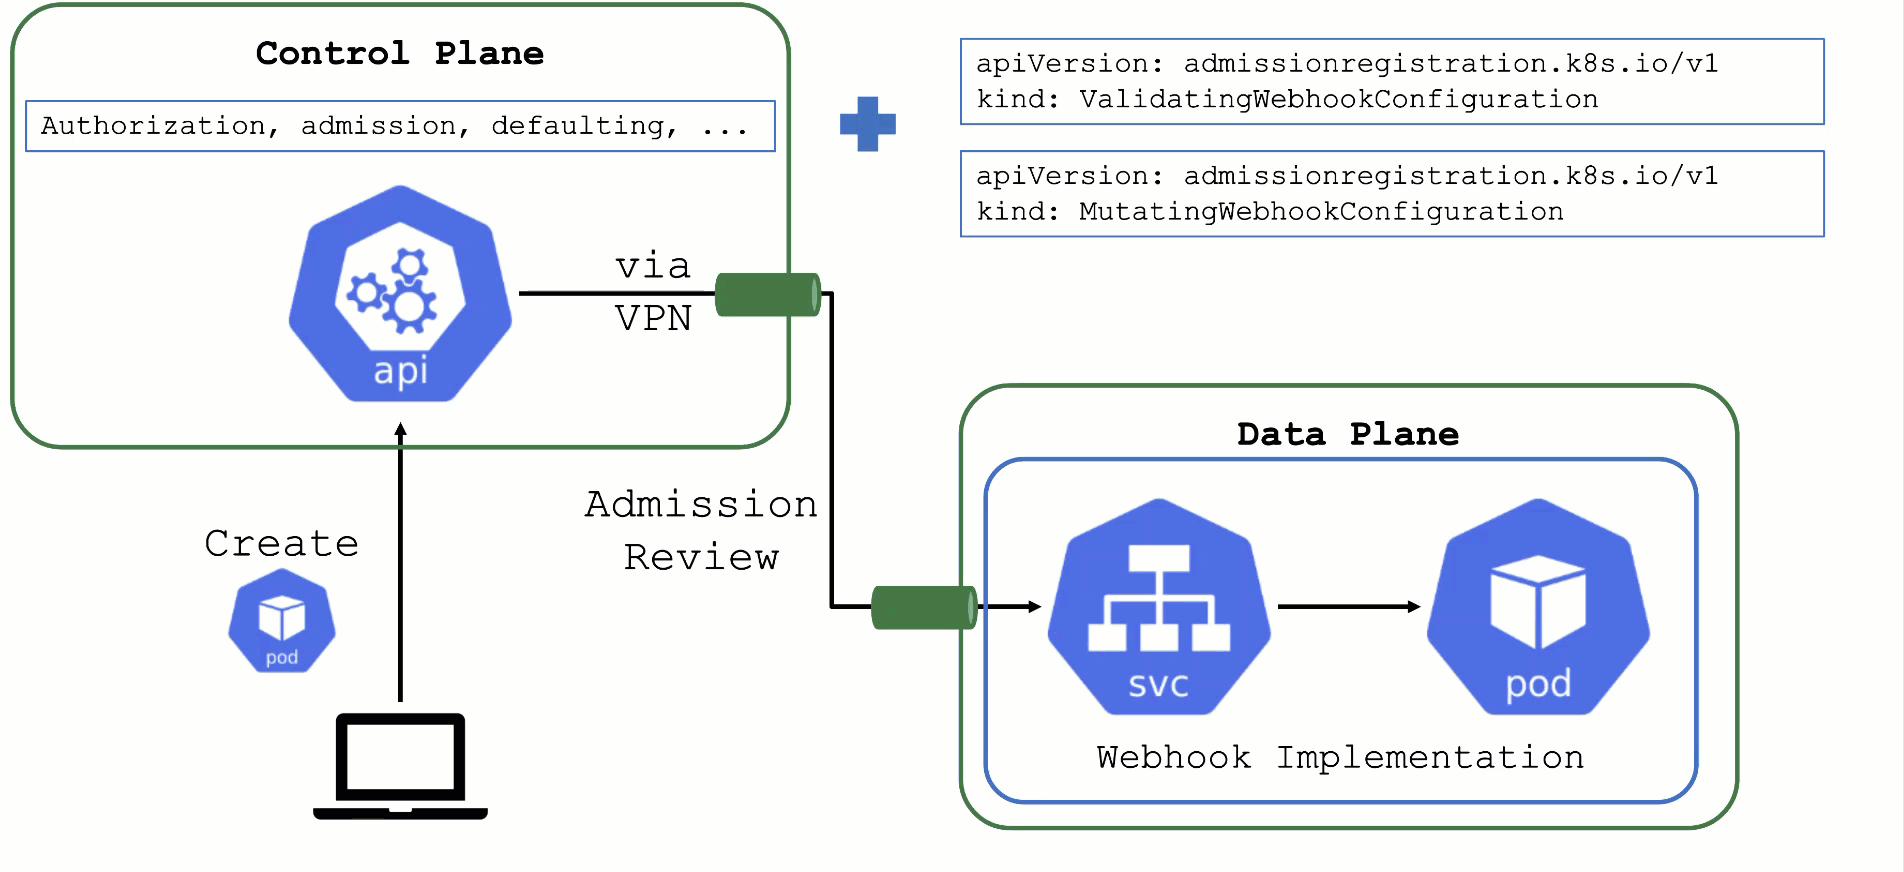
What could possibly go wrong? Due to the separation of control plane and data plane in Gardener’s architecture, webhooks have the potential to break a cluster. If the webhook server is not responding in time with a valid answer, the request should timeout and the failure policy is invoked. Depending on the scope of the webhook, frequent failures may cause downtime for applications. Common causes for failure are:
- The call to the webhook is made through the VPN tunnel. VPN / connection issues can happen both on the side of the seed as well as the shoot and would render the webhook unavailable from the perspective of the control plane.
- The traffic cannot reach the pod (network issue, pod not available)
- The pod is processing too slow (e.g., because there are too many requests)
Timeout
Webhooks are a very helpful feature of Kubernetes. However, they can easily be configured to break a shoot cluster. Take the timeout, for example. High timeouts (>15s) can lead to blocking requests of control plane components. That’s because most control-plane API calls are made with a client-side timeout of 30s, so if a webhook has timeoutSeconds=30, the overall request might still fail as there is overhead in communication with the API server and other potential webhooks.
Webhooks (esp. mutating) may be called sequentially and thus adding up their individual timeouts. Even with a
faliurePolicy=ignorethe timeout will stop the request.
Recommendations
Problematic webhooks are reported as part of a shoot’s status. In addition to timeouts, it is crucial to exclude the kube-system namespace and (potentially non-namespaced) resources that are necessary for the cluster to function properly. Those should not be subject to a user-defined webhook.
In particular, a webhook should not operate on:
- the
kube-systemnamespace EndpointsorEndpointSlicesNodesPodSecurityPoliciesClusterRolesClusterRoleBindingsCustomResourceDefinitionsApiServicesCertificateSigningRequestsPriorityClasses
Example:
A webhook checks node objects upon creation and has a failurePolicy: fail. If the webhook does not answer in time (either due to latency or because there is no pod serving it), new nodes cannot join the cluster.
For more information, see Shoot Status.
Conversion Webhooks
Who installs a conversion webhook?
If you have written your own CustomResourceDefinition (CRD) and made a version upgrade, you will also have consciously written & deployed the conversion webhook.
However, sometimes, you simply use helm or kustomize to install a (third-party) dependency that contains CRDs. Of course, those can contain conversion webhooks as well. As a user of a cluster, please make sure to be aware what you deploy.
CRD with a Conversion Webhook
Conversion webhooks are tricky. Similarly to regular webhooks, they should have a low timeout. However, they cannot be remediated automatically and can cause errors in the control plane. For example, if a webhook is invoked but not available, it can block the garbage collection run by the kube-controller-manager.
In turn, when deleting something like a deployment, dependent resources like pods will not be deleted automatically.
Try to avoid conversion webhooks. They are valid and can be used, but should not stay in place forever. Complete the upgrade to a new version of the CRD as soon as possible.
For more information, see the Webhook Conversion, Upgrade Existing Objects to a New Stored Version, and Version Priority topics in the Kubernetes documentation.
2 - Guides
2.1 - Set Up Client Tools
2.1.1 - Fun with kubectl Aliases
Speed up Your Terminal Workflow
Use the Kubernetes command-line tool, kubectl, to deploy and manage applications on Kubernetes. Using kubectl, you can inspect cluster resources, as well as create, delete, and update components.

You will probably run more than a hundred kubectl commands on some days and you should speed up your terminal workflow with with some shortcuts. Of course, there are good shortcuts and bad shortcuts (lazy coding, lack of security review, etc.), but let’s stick with the positives and talk about a good shortcut: bash aliases in your .profile.
What are those mysterious .profile and .bash_profile files you’ve heard about?
Note
The contents of a .profile file are executed on every log-in of the owner of the file
What’s the .bash_profile then? It’s exactly the same, but under a different name. The unix shell you are logging into, in this case OS X, looks for etc/profile and loads it if it exists. Then it looks for ~/.bash_profile, ~/.bash_login and finally ~/.profile, and loads the first one of these it finds.
Populating the .profile File
Here is the fantastic time saver that needs to be in your shell profile:
# time save number one. shortcut for kubectl
#
alias k="kubectl"
# Start a shell in a pod AND kill them after leaving
#
alias ksh="kubectl run busybox -i --tty --image=busybox --restart=Never --rm -- sh"
# opens a bash
#
alias kbash="kubectl run busybox -i --tty --image=busybox --restart=Never --rm -- ash"
# activate/exports the kuberconfig.yaml in the current working directory
#
alias kexport="export KUBECONFIG=`pwd`/kubeconfig.yaml"
# usage: kurl http://your-svc.namespace.cluster.local
#
# we need for this our very own image...never trust an unknown image..
alias kurl="docker run --rm byrnedo/alpine-curl"
All the kubectl tab completions still work fine with these aliases, so you’re not losing that speed.
Note
If the approach above does not work for you, add the following lines in your ~/.bashrc instead:
# time save number one. shortcut for kubectl
#
alias k="kubectl"
# Enable kubectl completion
source <(k completion bash | sed s/kubectl/k/g)
2.1.2 - Kubeconfig Context as bash Prompt
Overview
Use the Kubernetes command-line tool, kubectl, to deploy and manage applications on Kubernetes. Using kubectl, you can inspect cluster resources, as well as create, delete, and update components.

By default, the kubectl configuration is located at ~/.kube/config.
Let us suppose that you have two clusters, one for development work and one for scratch work.
How to handle this easily without copying the used configuration always to the right place?
Export the KUBECONFIG Environment Variable
bash$ export KUBECONFIG=<PATH-TO-M>-CONFIG>/kubeconfig-dev.yaml
How to determine which cluster is used by the kubectl command?
Determine Active Cluster
bash$ kubectl cluster-info
Kubernetes master is running at https://api.dev.garden.shoot.canary.k8s-hana.ondemand.com
KubeDNS is running at https://api.dev.garden.shoot.canary.k8s-hana.ondemand.com/api/v1/proxy/namespaces/kube-system/services/kube-dns
To further debug and diagnose cluster problems, use 'kubectl cluster-info dump'.
bash$
Display Cluster in the bash - Linux and Alike
I found this tip on Stackoverflow and find it worth to be added here.
Edit your ~/.bash_profile and add the following code snippet to show the current K8s context in the shell’s prompt:
prompt_k8s(){
k8s_current_context=$(kubectl config current-context 2> /dev/null)
if [[ $? -eq 0 ]] ; then echo -e "(${k8s_current_context}) "; fi
}
PS1+='$(prompt_k8s)'
After this, your bash command prompt contains the active KUBECONFIG context and you always know which cluster is active - develop or production.
For example:
bash$ export KUBECONFIG=/Users/d023280/Documents/workspace/gardener-ui/kubeconfig_gardendev.yaml
bash (garden_dev)$
Note the (garden_dev) prefix in the bash command prompt.
This helps immensely to avoid thoughtless mistakes.
Display Cluster in the PowerShell - Windows
Display the current K8s cluster in the title of PowerShell window.
Create a profile file for your shell under %UserProfile%\Documents\WindowsPowerShell\Microsoft.PowerShell_profile.ps1
Copy following code to Microsoft.PowerShell_profile.ps1
function prompt_k8s {
$k8s_current_context = (kubectl config current-context) | Out-String
if($?) {
return $k8s_current_context
}else {
return "No K8S contenxt found"
}
}
$host.ui.rawui.WindowTitle = prompt_k8s
If you want to switch to different cluster, you can set KUBECONFIG to new value, and re-run the file Microsoft.PowerShell_profile.ps1
2.1.3 - Organizing Access Using kubeconfig Files
Overview
The kubectl command-line tool uses kubeconfig files to find the information it needs to choose a cluster and communicate with the API server of a cluster.
Problem
If you’ve become aware of a security breach that affects you, you may want to revoke or cycle credentials in case anything was leaked. However, this is not possible with the initial or master kubeconfig from your cluster.

Pitfall
Never distribute the kubeconfig, which you can download directly within the Gardener dashboard, for a productive cluster.
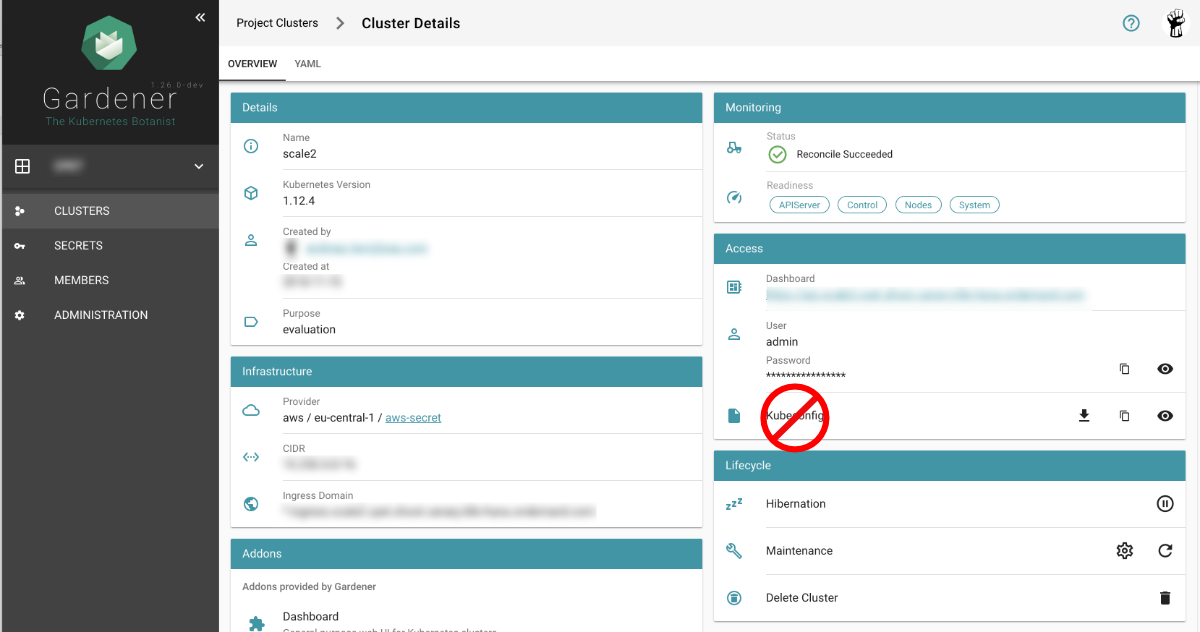
Create a Custom kubeconfig File for Each User
Create a separate kubeconfig for each user. One of the big advantages of this approach is that you can revoke them and control the permissions better. A limitation to single namespaces is also possible here.
The script creates a new ServiceAccount with read privileges in the whole cluster (Secrets are excluded).
To run the script, Deno, a secure TypeScript runtime, must be installed.
#!/usr/bin/env -S deno run --allow-run
/*
* This script create Kubernetes ServiceAccount and other required resource and print KUBECONFIG to console.
* Depending on your requirements you might want change clusterRoleBindingTemplate() function
*
* In order to execute this script it's required to install Deno.js https://deno.land/ (TypeScript & JavaScript runtime).
* It's single executable binary for the major OSs from the original author of the Node.js
* example: deno run --allow-run kubeconfig-for-custom-user.ts d00001
* example: deno run --allow-run kubeconfig-for-custom-user.ts d00001 --delete
*
* known issue: shebang does works under the Linux but not for Windows Linux Subsystem
*/
const KUBECTL = "/usr/local/bin/kubectl" //or
// const KUBECTL = "C:\\Program Files\\Docker\\Docker\\resources\\bin\\kubectl.exe"
const serviceAccName = Deno.args[0]
const deleteIt = Deno.args[1]
if (serviceAccName == undefined || serviceAccName == "--delete" ) {
console.log("please provide username as an argument, for example: deno run --allow-run kubeconfig-for-custom-user.ts USER_NAME [--delete]")
Deno.exit(1)
}
if (deleteIt == "--delete") {
exec([KUBECTL, "delete", "serviceaccount", serviceAccName])
exec([KUBECTL, "delete", "secret", `${serviceAccName}-secret`])
exec([KUBECTL, "delete", "clusterrolebinding", `view-${serviceAccName}-global`])
Deno.exit(0)
}
await exec([KUBECTL, "create", "serviceaccount", serviceAccName, "-o", "json"])
await exec([KUBECTL, "create", "-o", "json", "-f", "-"], secretYamlTemplate())
let secret = await exec([KUBECTL, "get", "secret", `${serviceAccName}-secret`, "-o", "json"])
let caCRT = secret.data["ca.crt"];
let userToken = atob(secret.data["token"]); //decode base64
let kubeConfig = await exec([KUBECTL, "config", "view", "--minify", "-o", "json"]);
let clusterApi = kubeConfig.clusters[0].cluster.server
let clusterName = kubeConfig.clusters[0].name
await exec([KUBECTL, "create", "-o", "json", "-f", "-"], clusterRoleBindingTemplate())
console.log(kubeConfigTemplate(caCRT, userToken, clusterApi, clusterName, serviceAccName + "-" + clusterName))
async function exec(args: string[], stdInput?: string): Promise<Object> {
console.log("# "+args.join(" "))
let opt: Deno.RunOptions = {
cmd: args,
stdout: "piped",
stderr: "piped",
stdin: "piped",
};
const p = Deno.run(opt);
if (stdInput != undefined) {
await p.stdin.write(new TextEncoder().encode(stdInput));
await p.stdin.close();
}
const status = await p.status()
const output = await p.output()
const stderrOutput = await p.stderrOutput()
if (status.code === 0) {
return JSON.parse(new TextDecoder().decode(output))
} else {
let error = new TextDecoder().decode(stderrOutput);
return ""
}
}
function clusterRoleBindingTemplate() {
return `
apiVersion: rbac.authorization.k8s.io/v1
kind: ClusterRoleBinding
metadata:
name: view-${serviceAccName}-global
subjects:
- kind: ServiceAccount
name: ${serviceAccName}
namespace: default
roleRef:
kind: ClusterRole
name: view
apiGroup: rbac.authorization.k8s.io
`
}
function secretYamlTemplate() {
return `
apiVersion: v1
kind: Secret
metadata:
name: ${serviceAccName}-secret
annotations:
kubernetes.io/service-account.name: ${serviceAccName}
type: kubernetes.io/service-account-token`
}
function kubeConfigTemplate(certificateAuthority: string, token: string, clusterApi: string, clusterName: string, username: string) {
return `
## KUBECONFIG generated on ${new Date()}
apiVersion: v1
clusters:
- cluster:
certificate-authority-data: ${certificateAuthority}
server: ${clusterApi}
name: ${clusterName}
contexts:
- context:
cluster: ${clusterName}
user: ${username}
name: ${clusterName}
current-context: ${clusterName}
kind: Config
preferences: {}
users:
- name: ${username}
user:
token: ${token}
`
}
If edit or admin rights are to be assigned, the ClusterRoleBinding must be adapted in the roleRef section
with the roles listed below.
Furthermore, you can restrict this to a single namespace by not creating a ClusterRoleBinding but only a RoleBinding
within the desired namespace.
| Default ClusterRole | Default ClusterRoleBinding | Description |
|---|---|---|
| cluster-admin | system:masters group | Allows super-user access to perform any action on any resource. When used in a ClusterRoleBinding, it gives full control over every resource in the cluster and in all namespaces. When used in a RoleBinding, it gives full control over every resource in the rolebinding’s namespace, including the namespace itself. |
| admin | None | Allows admin access, intended to be granted within a namespace using a RoleBinding. If used in a RoleBinding, allows read/write access to most resources in a namespace, including the ability to create roles and rolebindings within the namespace. It does not allow write access to resource quota or to the namespace itself. |
| edit | None | Allows read/write access to most objects in a namespace. It does not allow viewing or modifying roles or rolebindings. |
| view | None | Allows read-only access to see most objects in a namespace. It does not allow viewing roles or rolebindings. It does not allow viewing secrets, since those are escalating. |
2.2 - High Availability
2.2.1 - Best Practices
Implementing High Availability and Tolerating Zone Outages
Developing highly available workload that can tolerate a zone outage is no trivial task. You will find here various recommendations to get closer to that goal. While many recommendations are general enough, the examples are specific in how to achieve this in a Gardener-managed cluster and where/how to tweak the different control plane components. If you do not use Gardener, it may be still a worthwhile read.
First however, what is a zone outage? It sounds like a clear-cut “thing”, but it isn’t. There are many things that can go haywire. Here are some examples:
- Elevated cloud provider API error rates for individual or multiple services
- Network bandwidth reduced or latency increased, usually also effecting storage sub systems as they are network attached
- No networking at all, no DNS, machines shutting down or restarting, …
- Functional issues, of either the entire service (e.g. all block device operations) or only parts of it (e.g. LB listener registration)
- All services down, temporarily or permanently (the proverbial burning down data center 🔥)
This and everything in between make it hard to prepare for such events, but you can still do a lot. The most important recommendation is to not target specific issues exclusively - tomorrow another service will fail in an unanticipated way. Also, focus more on meaningful availability than on internal signals (useful, but not as relevant as the former). Always prefer automation over manual intervention (e.g. leader election is a pretty robust mechanism, auto-scaling may be required as well, etc.).
Also remember that HA is costly - you need to balance it against the cost of an outage as silly as this may sound, e.g. running all this excess capacity “just in case” vs. “going down” vs. a risk-based approach in between where you have means that will kick in, but they are not guaranteed to work (e.g. if the cloud provider is out of resource capacity). Maybe some of your components must run at the highest possible availability level, but others not - that’s a decision only you can make.
Control Plane
The Kubernetes cluster control plane is managed by Gardener (as pods in separate infrastructure clusters to which you have no direct access) and can be set up with no failure tolerance (control plane pods will be recreated best-effort when resources are available) or one of the failure tolerance types node or zone.
Strictly speaking, static workload does not depend on the (high) availability of the control plane, but static workload doesn’t rhyme with Cloud and Kubernetes and also means, that when you possibly need it the most, e.g. during a zone outage, critical self-healing or auto-scaling functionality won’t be available to you and your workload, if your control plane is down as well. That’s why, even though the resource consumption is significantly higher, we generally recommend to use the failure tolerance type zone for the control planes of productive clusters, at least in all regions that have 3+ zones. Regions that have only 1 or 2 zones don’t support the failure tolerance type zone and then your second best option is the failure tolerance type node, which means a zone outage can still take down your control plane, but individual node outages won’t.
In the shoot resource it’s merely only this what you need to add:
apiVersion: core.gardener.cloud/v1beta1
kind: Shoot
spec:
controlPlane:
highAvailability:
failureTolerance:
type: zone # valid values are `node` and `zone` (only available if your control plane resides in a region with 3+ zones)
This setting will scale out all control plane components for a Gardener cluster as necessary, so that no single zone outage can take down the control plane for longer than just a few seconds for the fail-over to take place (e.g. lease expiration and new leader election or readiness probe failure and endpoint removal). Components run highly available in either active-active (servers) or active-passive (controllers) mode at all times, the persistence (ETCD), which is consensus-based, will tolerate the loss of one zone and still maintain quorum and therefore remain operational. These are all patterns that we will revisit down below also for your own workload.
Worker Pools
Now that you have configured your Kubernetes cluster control plane in HA, i.e. spread it across multiple zones, you need to do the same for your own workload, but in order to do so, you need to spread your nodes across multiple zones first.
apiVersion: core.gardener.cloud/v1beta1
kind: Shoot
spec:
provider:
workers:
- name: ...
minimum: 6
maximum: 60
zones:
- ...
Prefer regions with at least 2, better 3+ zones and list the zones in the zones section for each of your worker pools. Whether you need 2 or 3 zones at a minimum depends on your fail-over concept:
- Consensus-based software components (like ETCD) depend on maintaining a quorum of
(n/2)+1, so you need at least 3 zones to tolerate the outage of 1 zone. - Primary/Secondary-based software components need just 2 zones to tolerate the outage of 1 zone.
- Then there are software components that can scale out horizontally. They are probably fine with 2 zones, but you also need to think about the load-shift and that the remaining zone must then pick up the work of the unhealthy zone. With 2 zones, the remaining zone must cope with an increase of 100% load. With 3 zones, the remaining zones must only cope with an increase of 50% load (per zone).
In general, the question is also whether you have the fail-over capacity already up and running or not. If not, i.e. you depend on re-scheduling to a healthy zone or auto-scaling, be aware that during a zone outage, you will see a resource crunch in the healthy zones. If you have no automation, i.e. only human operators (a.k.a. “red button approach”), you probably will not get the machines you need and even with automation, it may be tricky. But holding the capacity available at all times is costly. In the end, that’s a decision only you can make. If you made that decision, please adapt the minimum, maximum, maxSurge and maxUnavailable settings for your worker pools accordingly (visit this section for more information).
Also, consider fall-back worker pools (with different/alternative machine types) and cluster autoscaler expanders using a priority-based strategy.
Gardener-managed clusters deploy the cluster autoscaler or CA for short and you can tweak the general CA knobs for Gardener-managed clusters like this:
apiVersion: core.gardener.cloud/v1beta1
kind: Shoot
spec:
kubernetes:
clusterAutoscaler:
expander: "least-waste"
scanInterval: 10s
scaleDownDelayAfterAdd: 60m
scaleDownDelayAfterDelete: 0s
scaleDownDelayAfterFailure: 3m
scaleDownUnneededTime: 30m
scaleDownUtilizationThreshold: 0.5
In addition to that, it is also possible to configure the cluster-autoscaler priority expander by adding priorities to the worker groups like this:
apiVersion: core.gardener.cloud/v1beta1
kind: Shoot
spec:
provider:
workers:
- name: worker1
priority: 40 # priority of this worker group
machine:
type: local
- name: worker2
machine:
type: local
When at least one worker group has a priority defined, the respective ConfigMap will be generated and deployed, which the cluster-autoscaler uses.
When only a part of the worker groups have priorities configured, those who do not have these configured, will be defaulted to 0.
If you want to be ready for a sudden spike or have some buffer in general, over-provision nodes by means of “placeholder” pods with low priority and appropriate resource requests. This way, they will demand nodes to be provisioned for them, but if any pod comes up with a regular/higher priority, the low priority pods will be evicted to make space for the more important ones. Strictly speaking, this is not related to HA, but it may be important to keep this in mind as you generally want critical components to be rescheduled as fast as possible and if there is no node available, it may take 3 minutes or longer to do so (depending on the cloud provider). Besides, not only zones can fail, but also individual nodes.
Replicas (Horizontal Scaling)
Now let’s talk about your workload. In most cases, this will mean to run multiple replicas. If you cannot do that (a.k.a. you have a singleton), that’s a bad situation to be in. Maybe you can run a spare (secondary) as backup? If you cannot, you depend on quick detection and rescheduling of your singleton (more on that below).
Obviously, things get messier with persistence. If you have persistence, you should ideally replicate your data, i.e. let your spare (secondary) “follow” your main (primary). If your software doesn’t support that, you have to deploy other means, e.g. volume snapshotting or side-backups (specific to the software you deploy; keep the backups regional, so that you can switch to another zone at all times). If you have to do those, your HA scenario becomes more a DR scenario and terms like RPO and RTO become relevant to you:
- Recovery Point Objective (RPO): Potential data loss, i.e. how much data will you lose at most (time between backups)
- Recovery Time Objective (RTO): Time until recovery, i.e. how long does it take you to be operational again (time to restore)
Also, keep in mind that your persistent volumes are usually zonal, i.e. once you have a volume in one zone, it’s bound to that zone and you cannot get up your pod in another zone w/o first recreating the volume yourself (Kubernetes won’t help you here directly).
Anyway, best avoid that, if you can (from technical and cost perspective). The best solution (and also the most costly one) is to run multiple replicas in multiple zones and keep your data replicated at all times, so that your RPO is always 0 (best). That’s what we do for Gardener-managed cluster HA control planes (ETCD) as any data loss may be disastrous and lead to orphaned resources (in addition, we deploy side cars that do side-backups for disaster recovery, with full and incremental snapshots with an RPO of 5m).
So, how to run with multiple replicas? That’s the easiest part in Kubernetes and the two most important resources, Deployments and StatefulSet, support that out of the box:
apiVersion: apps/v1
kind: Deployment | StatefulSet
spec:
replicas: ...
The problem comes with the number of replicas. It’s easy only if the number is static, e.g. 2 for active-active/passive or 3 for consensus-based software components, but what with software components that can scale out horizontally? Here you usually do not set the number of replicas statically, but make use of the horizontal pod autoscaler or HPA for short (built-in; part of the kube-controller-manager). There are also other options like the cluster proportional autoscaler, but while the former works based on metrics, the latter is more a guesstimate approach that derives the number of replicas from the number of nodes/cores in a cluster. Sometimes useful, but often blind to the actual demand.
So, HPA it is then for most of the cases. However, what is the resource (e.g. CPU or memory) that drives the number of desired replicas? Again, this is up to you, but not always are CPU or memory the best choices. In some cases, custom metrics may be more appropriate, e.g. requests per second (it was also for us).
You will have to create specific HorizontalPodAutoscaler resources for your scale target and can tweak the general HPA knobs for Gardener-managed clusters like this:
apiVersion: core.gardener.cloud/v1beta1
kind: Shoot
spec:
kubernetes:
kubeControllerManager:
horizontalPodAutoscaler:
syncPeriod: 15s
tolerance: 0.1
downscaleStabilization: 5m0s
initialReadinessDelay: 30s
cpuInitializationPeriod: 5m0s
Resources (Vertical Scaling)
While it is important to set a sufficient number of replicas, it is also important to give the pods sufficient resources (CPU and memory). This is especially true when you think about HA. When a zone goes down, you might need to get up replacement pods, if you don’t have them running already to take over the load from the impacted zone. Likewise, e.g. with active-active software components, you can expect the remaining pods to receive more load. If you cannot scale them out horizontally to serve the load, you will probably need to scale them out (or rather up) vertically. This is done by the vertical pod autoscaler or VPA for short (not built-in; part of the kubernetes/autoscaler repository).
A few caveats though:
- You cannot use HPA and VPA on the same metrics as they would influence each other, which would lead to pod trashing (more replicas require fewer resources; fewer resources require more replicas)
- Scaling horizontally doesn’t cause downtimes (at least not when out-scaling and only one replica is affected when in-scaling), but scaling vertically does (if the pod runs OOM anyway, but also when new recommendations are applied, resource requests for existing pods may be changed, which causes the pods to be rescheduled). Although the discussion is going on for a very long time now, that is still not supported in-place yet (see KEP 1287, implementation in Kubernetes, implementation in VPA).
VPA is a useful tool and Gardener-managed clusters deploy a VPA by default for you (HPA is supported anyway as it’s built into the kube-controller-manager). You will have to create specific VerticalPodAutoscaler resources for your scale target and can tweak the general VPA knobs for Gardener-managed clusters like this:
apiVersion: core.gardener.cloud/v1beta1
kind: Shoot
spec:
kubernetes:
verticalPodAutoscaler:
enabled: true
evictAfterOOMThreshold: 10m0s
evictionRateBurst: 1
evictionRateLimit: -1
evictionTolerance: 0.5
recommendationMarginFraction: 0.15
updaterInterval: 1m0s
recommenderInterval: 1m0s
While horizontal pod autoscaling is relatively straight-forward, it takes a long time to master vertical pod autoscaling. We saw performance issues, hard-coded behavior (on OOM, memory is bumped by +20% and it may take a few iterations to reach a good level), unintended pod disruptions by applying new resource requests (after 12h all targeted pods will receive new requests even though individually they would be fine without, which also drives active-passive resource consumption up), difficulties to deal with spiky workload in general (due to the algorithmic approach it takes), recommended requests may exceed node capacity, limit scaling is proportional and therefore often questionable, and more. VPA is a double-edged sword: useful and necessary, but not easy to handle.
For the Gardener-managed components, we mostly removed limits. Why?
- CPU limits have almost always only downsides. They cause needless CPU throttling, which is not even easily visible. CPU requests turn into
cpu shares, so if the node has capacity, the pod may consume the freely available CPU, but not if you have set limits, which curtail the pod by means ofcpu quota. There are only certain scenarios in which they may make sense, e.g. if you set requests=limits and thereby define a pod withguaranteedQoS, which influences yourcgroupplacement. However, that is difficult to do for the components you implement yourself and practically impossible for the components you just consume, because what’s the correct value for requests/limits and will it hold true also if the load increases and what happens if a zone goes down or with the next update/version of this component? If anything, CPU limits caused outages, not helped prevent them. - As for memory limits, they are slightly more useful, because CPU is compressible and memory is not, so if one pod runs berserk, it may take others down (with CPU,
cpu sharesmake it as fair as possible), depending on which OOM killer strikes (a complicated topic by itself). You don’t want the operating system OOM killer to strike as the result is unpredictable. Better, it’s the cgroup OOM killer or even thekubelet’s eviction, if the consumption is slow enough as it takes priorities into consideration even. If your component is critical and a singleton (e.g. node daemon set pods), you are better off also without memory limits, because letting the pod go OOM because of artificial/wrong memory limits can mean that the node becomes unusable. Hence, such components also better run only with no or a very high memory limit, so that you can catch the occasional memory leak (bug) eventually, but under normal operation, if you cannot decide about a true upper limit, rather not have limits and cause endless outages through them or when you need the pods the most (during a zone outage) where all your assumptions went out of the window.
The downside of having poor or no limits and poor and no requests is that nodes may “die” more often. Contrary to the expectation, even for managed services, the managed service is not responsible or cannot guarantee the health of a node under all circumstances, since the end user defines what is run on the nodes (shared responsibility). If the workload exhausts any resource, it will be the end of the node, e.g. by compressing the CPU too much (so that the kubelet fails to do its work), exhausting the main memory too fast, disk space, file handles, or any other resource.
The kubelet allows for explicit reservation of resources for operating system daemons (system-reserved) and Kubernetes daemons (kube-reserved) that are subtracted from the actual node resources and become the allocatable node resources for your workload/pods. All managed services configure these settings “by rule of thumb” (a balancing act), but cannot guarantee that the values won’t waste resources or always will be sufficient. You will have to fine-tune them eventually and adapt them to your needs. In addition, you can configure soft and hard eviction thresholds to give the kubelet some headroom to evict “greedy” pods in a controlled way. These settings can be configured for Gardener-managed clusters like this:
apiVersion: core.gardener.cloud/v1beta1
kind: Shoot
spec:
kubernetes:
kubelet:
kubeReserved: # explicit resource reservation for Kubernetes daemons
cpu: 100m
memory: 1Gi
ephemeralStorage: 1Gi
pid: 1000
evictionSoft: # soft, i.e. graceful eviction (used if the node is about to run out of resources, avoiding hard evictions)
memoryAvailable: 200Mi
imageFSAvailable: 10%
imageFSInodesFree: 10%
nodeFSAvailable: 10%
nodeFSInodesFree: 10%
evictionSoftGracePeriod: # caps pod's `terminationGracePeriodSeconds` value during soft evictions (specific grace periods)
memoryAvailable: 1m30s
imageFSAvailable: 1m30s
imageFSInodesFree: 1m30s
nodeFSAvailable: 1m30s
nodeFSInodesFree: 1m30s
evictionHard: # hard, i.e. immediate eviction (used if the node is out of resources, avoiding the OS generally run out of resources fail processes indiscriminately)
memoryAvailable: 100Mi
imageFSAvailable: 5%
imageFSInodesFree: 5%
nodeFSAvailable: 5%
nodeFSInodesFree: 5%
evictionMinimumReclaim: # additional resources to reclaim after hitting the hard eviction thresholds to not hit the same thresholds soon after again
memoryAvailable: 0Mi
imageFSAvailable: 0Mi
imageFSInodesFree: 0Mi
nodeFSAvailable: 0Mi
nodeFSInodesFree: 0Mi
evictionMaxPodGracePeriod: 90 # caps pod's `terminationGracePeriodSeconds` value during soft evictions (general grace periods)
evictionPressureTransitionPeriod: 5m0s # stabilization time window to avoid flapping of node eviction state
You can tweak these settings also individually per worker pool (spec.provider.workers.kubernetes.kubelet...), which makes sense especially with different machine types (and also workload that you may want to schedule there).
Physical memory is not compressible, but you can overcome this issue to some degree (alpha since Kubernetes v1.22 in combination with the feature gate NodeSwap on the kubelet) with swap memory. You can read more in this introductory blog and the docs. If you chose to use it (still only alpha at the time of this writing) you may want to consider also the risks associated with swap memory:
- Reduced performance predictability
- Reduced performance up to page trashing
- Reduced security as secrets, normally held only in memory, could be swapped out to disk
That said, the various options mentioned above are only remotely related to HA and will not be further explored throughout this document, but just to remind you: if a zone goes down, load patterns will shift, existing pods will probably receive more load and will require more resources (especially because it is often practically impossible to set “proper” resource requests, which drive node allocation - limits are always ignored by the scheduler) or more pods will/must be placed on the existing and/or new nodes and then these settings, which are generally critical (especially if you switch on bin-packing for Gardener-managed clusters as a cost saving measure), will become even more critical during a zone outage.
Probes
Before we go down the rabbit hole even further and talk about how to spread your replicas, we need to talk about probes first, as they will become relevant later. Kubernetes supports three kinds of probes: startup, liveness, and readiness probes. If you are a visual thinker, also check out this slide deck by Tim Hockin (Kubernetes networking SIG chair).
Basically, the startupProbe and the livenessProbe help you restart the container, if it’s unhealthy for whatever reason, by letting the kubelet that orchestrates your containers on a node know, that it’s unhealthy. The former is a special case of the latter and only applied at the startup of your container, if you need to handle the startup phase differently (e.g. with very slow starting containers) from the rest of the lifetime of the container.
Now, the readinessProbe helps you manage the ready status of your container and thereby pod (any container that is not ready turns the pod not ready). This again has impact on endpoints and pod disruption budgets:
- If the pod is not ready, the endpoint will be removed and the pod will not receive traffic anymore
- If the pod is not ready, the pod counts into the pod disruption budget and if the budget is exceeded, no further voluntary pod disruptions will be permitted for the remaining ready pods (e.g. no eviction, no voluntary horizontal or vertical scaling, if the pod runs on a node that is about to be drained or in draining, draining will be paused until the max drain timeout passes)
As you can see, all of these probes are (also) related to HA (mostly the readinessProbe, but depending on your workload, you can also leverage livenessProbe and startupProbe into your HA strategy). If Kubernetes doesn’t know about the individual status of your container/pod, it won’t do anything for you (right away). That said, later/indirectly something might/will happen via the node status that can also be ready or not ready, which influences the pods and load balancer listener registration (a not ready node will not receive cluster traffic anymore), but this process is worker pool global and reacts delayed and also doesn’t discriminate between the containers/pods on a node.
In addition, Kubernetes also offers pod readiness gates to amend your pod readiness with additional custom conditions (normally, only the sum of the container readiness matters, but pod readiness gates additionally count into the overall pod readiness). This may be useful if you want to block (by means of pod disruption budgets that we will talk about next) the roll-out of your workload/nodes in case some (possibly external) condition fails.
Pod Disruption Budgets
One of the most important resources that help you on your way to HA are pod disruption budgets or PDB for short. They tell Kubernetes how to deal with voluntary pod disruptions, e.g. during the deployment of your workload, when the nodes are rolled, or just in general when a pod shall be evicted/terminated. Basically, if the budget is reached, they block all voluntary pod disruptions (at least for a while until possibly other timeouts act or things happen that leave Kubernetes no choice anymore, e.g. the node is forcefully terminated). You should always define them for your workload.
Very important to note is that they are based on the readinessProbe, i.e. even if all of your replicas are lively, but not enough of them are ready, this blocks voluntary pod disruptions, so they are very critical and useful. Here an example (you can specify either minAvailable or maxUnavailable in absolute numbers or as percentage):
apiVersion: policy/v1
kind: PodDisruptionBudget
spec:
maxUnavailable: 1
selector:
matchLabels:
...
And please do not specify a PDB of maxUnavailable being 0 or similar. That’s pointless, even detrimental, as it blocks then even useful operations, forces always the hard timeouts that are less graceful and it doesn’t make sense in the context of HA. You cannot “force” HA by preventing voluntary pod disruptions, you must work with the pod disruptions in a resilient way. Besides, PDBs are really only about voluntary pod disruptions - something bad can happen to a node/pod at any time and PDBs won’t make this reality go away for you.
PDBs will not always work as expected and can also get in your way, e.g. if the PDB is violated or would be violated, it may possibly block whatever you are trying to do to salvage the situation, e.g. drain a node or deploy a patch version (if the PDB is or would be violated, not even unhealthy pods would be evicted as they could theoretically become healthy again, which Kubernetes doesn’t know). In order to overcome this issue, it is now possible (alpha since Kubernetes v1.26 in combination with the feature gate PDBUnhealthyPodEvictionPolicy on the API server, beta and enabled by default since Kubernetes v1.27) to configure the so-called unhealthy pod eviction policy. The default is still IfHealthyBudget as a change in default would have changed the behavior (as described above), but you can now also set AlwaysAllow at the PDB (spec.unhealthyPodEvictionPolicy). For more information, please check out this discussion, the PR and this document and balance the pros and cons for yourself. In short, the new AlwaysAllow option is probably the better choice in most of the cases while IfHealthyBudget is useful only if you have frequent temporary transitions or for special cases where you have already implemented controllers that depend on the old behavior.
Pod Topology Spread Constraints
Pod topology spread constraints or PTSC for short (no official abbreviation exists, but we will use this in the following) are enormously helpful to distribute your replicas across multiple zones, nodes, or any other user-defined topology domain. They complement and improve on pod (anti-)affinities that still exist and can be used in combination.
PTSCs are an improvement, because they allow for maxSkew and minDomains. You can steer the “level of tolerated imbalance” with maxSkew, e.g. you probably want that to be at least 1, so that you can perform a rolling update, but this all depends on your deployment (maxUnavailable and maxSurge), etc. Stateful sets are a bit different (maxUnavailable) as they are bound to volumes and depend on them, so there usually cannot be 2 pods requiring the same volume. minDomains is a hint to tell the scheduler how far to spread, e.g. if all nodes in one zone disappeared because of a zone outage, it may “appear” as if there are only 2 zones in a 3 zones cluster and the scheduling decisions may end up wrong, so a minDomains of 3 will tell the scheduler to spread to 3 zones before adding another replica in one zone. Be careful with this setting as it also means, if one zone is down the “spread” is already at least 1, if pods run in the other zones. This is useful where you have exactly as many replicas as you have zones and you do not want any imbalance. Imbalance is critical as if you end up with one, nobody is going to do the (active) re-balancing for you (unless you deploy and configure additional non-standard components such as the descheduler). So, for instance, if you have something like a DBMS that you want to spread across 2 zones (active-passive) or 3 zones (consensus-based), you better specify minDomains of 2 respectively 3 to force your replicas into at least that many zones before adding more replicas to another zone (if supported).
Anyway, PTSCs are critical to have, but not perfect, so we saw (unsurprisingly, because that’s how the scheduler works), that the scheduler may block the deployment of new pods because it takes the decision pod-by-pod (see for instance #109364).
Pod Affinities and Anti-Affinities
As said, you can combine PTSCs with pod affinities and/or anti-affinities. Especially inter-pod (anti-)affinities may be helpful to place pods apart, e.g. because they are fall-backs for each other or you do not want multiple potentially resource-hungry “best-effort” or “burstable” pods side-by-side (noisy neighbor problem), or together, e.g. because they form a unit and you want to reduce the failure domain, reduce the network latency, and reduce the costs.
Topology Aware Hints
While topology aware hints are not directly related to HA, they are very relevant in the HA context. Spreading your workload across multiple zones may increase network latency and cost significantly, if the traffic is not shaped. Topology aware hints (beta since Kubernetes v1.23, replacing the now deprecated topology aware traffic routing with topology keys) help to route the traffic within the originating zone, if possible. Basically, they tell kube-proxy how to setup your routing information, so that clients can talk to endpoints that are located within the same zone.
Be aware however, that there are some limitations. Those are called safeguards and if they strike, the hints are off and traffic is routed again randomly. Especially controversial is the balancing limitation as there is the assumption, that the load that hits an endpoint is determined by the allocatable CPUs in that topology zone, but that’s not always, if even often, the case (see for instance #113731 and #110714). So, this limitation hits far too often and your hints are off, but then again, it’s about network latency and cost optimization first, so it’s better than nothing.
Networking
We have talked about networking only to some small degree so far (readiness probes, pod disruption budgets, topology aware hints). The most important component is probably your ingress load balancer - everything else is managed by Kubernetes. AWS, Azure, GCP, and also OpenStack offer multi-zonal load balancers, so make use of them. In Azure and GCP, LBs are regional whereas in AWS and OpenStack, they need to be bound to a zone, which the cloud-controller-manager does by observing the zone labels at the nodes (please note that this behavior is not always working as expected, see #570 where the AWS cloud-controller-manager is not readjusting to newly observed zones).
Please be reminded that even if you use a service mesh like Istio, the off-the-shelf installation/configuration usually never comes with productive settings (to simplify first-time installation and improve first-time user experience) and you will have to fine-tune your installation/configuration, much like the rest of your workload.
Relevant Cluster Settings
Following now a summary/list of the more relevant settings you may like to tune for Gardener-managed clusters:
apiVersion: core.gardener.cloud/v1beta1
kind: Shoot
spec:
controlPlane:
highAvailability:
failureTolerance:
type: zone # valid values are `node` and `zone` (only available if your control plane resides in a region with 3+ zones)
kubernetes:
kubeAPIServer:
defaultNotReadyTolerationSeconds: 300
defaultUnreachableTolerationSeconds: 300
kubelet:
...
kubeScheduler:
featureGates:
MinDomainsInPodTopologySpread: true
kubeControllerManager:
nodeMonitorGracePeriod: 40s
horizontalPodAutoscaler:
syncPeriod: 15s
tolerance: 0.1
downscaleStabilization: 5m0s
initialReadinessDelay: 30s
cpuInitializationPeriod: 5m0s
verticalPodAutoscaler:
enabled: true
evictAfterOOMThreshold: 10m0s
evictionRateBurst: 1
evictionRateLimit: -1
evictionTolerance: 0.5
recommendationMarginFraction: 0.15
updaterInterval: 1m0s
recommenderInterval: 1m0s
clusterAutoscaler:
expander: "least-waste"
scanInterval: 10s
scaleDownDelayAfterAdd: 60m
scaleDownDelayAfterDelete: 0s
scaleDownDelayAfterFailure: 3m
scaleDownUnneededTime: 30m
scaleDownUtilizationThreshold: 0.5
provider:
workers:
- name: ...
minimum: 6
maximum: 60
maxSurge: 3
maxUnavailable: 0
zones:
- ... # list of zones you want your worker pool nodes to be spread across, see above
kubernetes:
kubelet:
... # similar to `kubelet` above (cluster-wide settings), but here per worker pool (pool-specific settings), see above
machineControllerManager: # optional, it allows to configure the machine-controller settings.
machineCreationTimeout: 20m
machineHealthTimeout: 10m
machineDrainTimeout: 60h
systemComponents:
coreDNS:
autoscaling:
mode: horizontal # valid values are `horizontal` (driven by CPU load) and `cluster-proportional` (driven by number of nodes/cores)
On spec.controlPlane.highAvailability.failureTolerance.type
If set, determines the degree of failure tolerance for your control plane. zone is preferred, but only available if your control plane resides in a region with 3+ zones. See above and the docs.
On spec.kubernetes.kubeAPIServer.defaultUnreachableTolerationSeconds and defaultNotReadyTolerationSeconds
This is a very interesting API server setting that lets Kubernetes decide how fast to evict pods from nodes whose status condition of type Ready is either Unknown (node status unknown, a.k.a unreachable) or False (kubelet not ready) (see node status conditions; please note that kubectl shows both values as NotReady which is a somewhat “simplified” visualization).
You can also override the cluster-wide API server settings individually per pod:
spec:
tolerations:
- key: "node.kubernetes.io/unreachable"
operator: "Exists"
effect: "NoExecute"
tolerationSeconds: 0
- key: "node.kubernetes.io/not-ready"
operator: "Exists"
effect: "NoExecute"
tolerationSeconds: 0
This will evict pods on unreachable or not-ready nodes immediately, but be cautious: 0 is very aggressive and may lead to unnecessary disruptions. Again, you must decide for your own workload and balance out the pros and cons (e.g. long startup time).
Please note, these settings replace spec.kubernetes.kubeControllerManager.podEvictionTimeout that was deprecated with Kubernetes v1.26 (and acted as an upper bound).
On spec.kubernetes.kubeScheduler.featureGates.MinDomainsInPodTopologySpread
Required to be enabled for minDomains to work with PTSCs (beta since Kubernetes v1.25, but off by default). See above and the docs. This tells the scheduler, how many topology domains to expect (=zones in the context of this document).
On spec.kubernetes.kubeControllerManager.nodeMonitorGracePeriod
This is another very interesting kube-controller-manager setting that can help you speed up or slow down how fast a node shall be considered Unknown (node status unknown, a.k.a unreachable) when the kubelet is not updating its status anymore (see node status conditions), which effects eviction (see spec.kubernetes.kubeAPIServer.defaultUnreachableTolerationSeconds and defaultNotReadyTolerationSeconds above). The shorter the time window, the faster Kubernetes will act, but the higher the chance of flapping behavior and pod trashing, so you may want to balance that out according to your needs, otherwise stick to the default which is a reasonable compromise.
On spec.kubernetes.kubeControllerManager.horizontalPodAutoscaler...
This configures horizontal pod autoscaling in Gardener-managed clusters. See above and the docs for the detailed fields.
On spec.kubernetes.verticalPodAutoscaler...
This configures vertical pod autoscaling in Gardener-managed clusters. See above and the docs for the detailed fields.
On spec.kubernetes.clusterAutoscaler...
This configures node auto-scaling in Gardener-managed clusters. See above and the docs for the detailed fields, especially about expanders, which may become life-saving in case of a zone outage when a resource crunch is setting in and everybody rushes to get machines in the healthy zones.
In case of a zone outage, it is critical to understand how the cluster autoscaler will put a worker pool in one zone into “back-off” and what the consequences for your workload will be. Unfortunately, the official cluster autoscaler documentation does not explain these details, but you can find hints in the source code:
If a node fails to come up, the node group (worker pool in that zone) will go into “back-off”, at first 5m, then exponentially longer until the maximum of 30m is reached. The “back-off” is reset after 3 hours. This in turn means, that nodes must be first considered Unknown, which happens when spec.kubernetes.kubeControllerManager.nodeMonitorGracePeriod lapses (e.g. at the beginning of a zone outage). Then they must either remain in this state until spec.provider.workers.machineControllerManager.machineHealthTimeout lapses for them to be recreated, which will fail in the unhealthy zone, or spec.kubernetes.kubeAPIServer.defaultUnreachableTolerationSeconds lapses for the pods to be evicted (usually faster than node replacements, depending on your configuration), which will trigger the cluster autoscaler to create more capacity, but very likely in the same zone as it tries to balance its node groups at first, which will fail in the unhealthy zone. It will be considered failed only when maxNodeProvisionTime lapses (usually close to spec.provider.workers.machineControllerManager.machineCreationTimeout) and only then put the node group into “back-off” and not retry for 5m (at first and then exponentially longer). Only then you can expect new node capacity to be brought up somewhere else.
During the time of ongoing node provisioning (before a node group goes into “back-off”), the cluster autoscaler may have “virtually scheduled” pending pods onto those new upcoming nodes and will not reevaluate these pods anymore unless the node provisioning fails (which will fail during a zone outage, but the cluster autoscaler cannot know that and will therefore reevaluate its decision only after it has given up on the new nodes).
It’s critical to keep that in mind and accommodate for it. If you have already capacity up and running, the reaction time is usually much faster with leases (whatever you set) or endpoints (spec.kubernetes.kubeControllerManager.nodeMonitorGracePeriod), but if you depend on new/fresh capacity, the above should inform you how long you will have to wait for it and for how long pods might be pending (because capacity is generally missing and pending pods may have been “virtually scheduled” to new nodes that won’t come up until the node group goes eventually into “back-off” and nodes in the healthy zones come up).
On spec.provider.workers.minimum, maximum, maxSurge, maxUnavailable, zones, and machineControllerManager
Each worker pool in Gardener may be configured differently. Among many other settings like machine type, root disk, Kubernetes version, kubelet settings, and many more you can also specify the lower and upper bound for the number of machines (minimum and maximum), how many machines may be added additionally during a rolling update (maxSurge) and how many machines may be in termination/recreation during a rolling update (maxUnavailable), and of course across how many zones the nodes shall be spread (zones).
Gardener divides minimum, maximum, maxSurge, maxUnavailable values by the number of zones specified for this worker pool. This fact must be considered when you plan the sizing of your worker pools.
Example:
provider:
workers:
- name: ...
minimum: 6
maximum: 60
maxSurge: 3
maxUnavailable: 0
zones: ["a", "b", "c"]
- The resulting
MachineDeployments per zone will getminimum: 2,maximum: 20,maxSurge: 1,maxUnavailable: 0. - If another zone is added all values will be divided by
4, resulting in:- Less workers per zone.
- ⚠️ One
MachineDeploymentwithmaxSurge: 0, i.e. there will be a replacement of nodes without rolling updates.
Interesting is also the configuration for Gardener’s machine-controller-manager or MCM for short that provisions, monitors, terminates, replaces, or updates machines that back your nodes:
- The shorter
machineCreationTimeoutis, the faster MCM will retry to create a machine/node, if the process is stuck on cloud provider side. It is set to useful/practical timeouts for the different cloud providers and you probably don’t want to change those (in the context of HA at least). Please align with the cluster autoscaler’smaxNodeProvisionTime. - The shorter
machineHealthTimeoutis, the faster MCM will replace machines/nodes in case the kubelet isn’t reporting back, which translates toUnknown, or reports back withNotReady, or the node-problem-detector that Gardener deploys for you reports a non-recoverable issue/condition (e.g. read-only file system). If it is too short however, you risk node and pod trashing, so be careful. - The shorter
machineDrainTimeoutis, the faster you can get rid of machines/nodes that MCM decided to remove, but this puts a cap on the grace periods and PDBs. They are respected up until the drain timeout lapses - then the machine/node will be forcefully terminated, whether or not the pods are still in termination or not even terminated because of PDBs. Those PDBs will then be violated, so be careful here as well. Please align with the cluster autoscaler’smaxGracefulTerminationSeconds.
Especially the last two settings may help you recover faster from cloud provider issues.
On spec.systemComponents.coreDNS.autoscaling
DNS is critical, in general and also within a Kubernetes cluster. Gardener-managed clusters deploy CoreDNS, a graduated CNCF project. Gardener supports 2 auto-scaling modes for it, horizontal (using HPA based on CPU) and cluster-proportional (using cluster proportional autoscaler that scales the number of pods based on the number of nodes/cores, not to be confused with the cluster autoscaler that scales nodes based on their utilization). Check out the docs, especially the trade-offs why you would chose one over the other (cluster-proportional gives you more configuration options, if CPU-based horizontal scaling is insufficient to your needs). Consider also Gardener’s feature node-local DNS to decouple you further from the DNS pods and stabilize DNS. Again, that’s not strictly related to HA, but may become important during a zone outage, when load patterns shift and pods start to initialize/resolve DNS records more frequently in bulk.
More Caveats
Unfortunately, there are a few more things of note when it comes to HA in a Kubernetes cluster that may be “surprising” and hard to mitigate:
- If the
kubeletrestarts, it will report all pods asNotReadyon startup until it reruns its probes (#100277), which leads to temporary endpoint and load balancer target removal (#102367). This topic is somewhat controversial. Gardener uses rolling updates and a jitter to spread necessarykubeletrestarts as good as possible. - If a
kube-proxypod on a node turnsNotReady, all load balancer traffic to all pods (on this node) under services withexternalTrafficPolicylocalwill cease as the load balancer will then take this node out of serving. This topic is somewhat controversial as well. So, please remember thatexternalTrafficPolicylocalnot only has the disadvantage of imbalanced traffic spreading, but also a dependency to the kube-proxy pod that may and will be unavailable during updates. Gardener uses rolling updates to spread necessarykube-proxyupdates as good as possible.
These are just a few additional considerations. They may or may not affect you, but other intricacies may. It’s a reminder to be watchful as Kubernetes may have one or two relevant quirks that you need to consider (and will probably only find out over time and with extensive testing).
Meaningful Availability
Finally, let’s go back to where we started. We recommended to measure meaningful availability. For instance, in Gardener, we do not trust only internal signals, but track also whether Gardener or the control planes that it manages are externally available through the external DNS records and load balancers, SNI-routing Istio gateways, etc. (the same path all users must take). It’s a huge difference whether the API server’s internal readiness probe passes or the user can actually reach the API server and it does what it’s supposed to do. Most likely, you will be in a similar spot and can do the same.
What you do with these signals is another matter. Maybe there are some actionable metrics and you can trigger some active fail-over, maybe you can only use it to improve your HA setup altogether. In our case, we also use it to deploy mitigations, e.g. via our dependency-watchdog that watches, for instance, Gardener-managed API servers and shuts down components like the controller managers to avert cascading knock-off effects (e.g. melt-down if the kubelets cannot reach the API server, but the controller managers can and start taking down nodes and pods).
Either way, understanding how users perceive your service is key to the improvement process as a whole. Even if you are not struck by a zone outage, the measures above and tracking the meaningful availability will help you improve your service.
Thank you for your interest.
2.2.2 - Chaos Engineering
Overview
Gardener provides chaostoolkit modules to simulate compute and network outages for various cloud providers such as AWS, Azure, GCP, OpenStack/Converged Cloud, and VMware vSphere, as well as pod disruptions for any Kubernetes cluster.
The API, parameterization, and implementation is as homogeneous as possible across the different cloud providers, so that you have only minimal effort. As a Gardener user, you benefit from an additional garden module that leverages the generic modules, but exposes their functionality in the most simple, homogeneous, and secure way (no need to specify cloud provider credentials, cluster credentials, or filters explicitly; retrieves credentials and stores them in memory only).
Installation
The name of the package is chaosgarden and it was developed and tested with Python 3.9+. It’s being published to PyPI, so that you can comfortably install it via Python’s package installer pip (you may want to create a virtual environment before installing it):
pip install chaosgarden
ℹ️ If you want to use the VMware vSphere module, please note the remarks in requirements.txt for vSphere. Those are not contained in the published PyPI package.
The package can be used directly from Python scripts and supports this usage scenario with additional convenience that helps launch actions and probes in background (more on actions and probes later), so that you can compose also complex scenarios with ease.
If this technology is new to you, you will probably prefer the chaostoolkit CLI in combination with experiment files, so we need to install the CLI next:
pip install chaostoolkit
Please verify that it was installed properly by running:
chaos --help
Usage
ℹ️ We assume you are using Gardener and run Gardener-managed shoot clusters. You can also use the generic cloud provider and Kubernetes chaosgarden modules, but configuration and secrets will then differ. Please see the module docs for details.
A Simple Experiment
The most important command is the run command, but before we can use it, we need to compile an experiment file first. Let’s start with a simple one, invoking only a read-only 📖 action from chaosgarden that lists cloud provider machines and networks (depends on cloud provider) for the “first” zone of one of your shoot clusters.
Let’s assume, your project is called my-project and your shoot is called my-shoot, then we need to create the following experiment:
{
"title": "assess-filters-impact",
"description": "assess-filters-impact",
"method": [
{
"type": "action",
"name": "assess-filters-impact",
"provider": {
"type": "python",
"module": "chaosgarden.garden.actions",
"func": "assess_cloud_provider_filters_impact",
"arguments": {
"zone": 0
}
}
}
],
"configuration": {
"garden_project": "my-project",
"garden_shoot": "my-shoot"
}
}
We are not yet there and need one more thing to do before we can run it: We need to “target” the Gardener landscape resp. Gardener API server where you have created your shoot cluster (not to be confused with your shoot cluster API server). If you do not know what this is or how to download the Gardener API server kubeconfig, please follow these instructions. You can either download your personal credentials or project credentials (see creation of a serviceaccount) to interact with Gardener. For now (fastest and most convenient way, but generally not recommended), let’s use your personal credentials, but if you later plan to automate your experiments, please use proper project credentials (a serviceaccount is not bound to your person, but to the project, and can be restricted using RBAC roles and role bindings, which is why we recommend this for production).
To download your personal credentials, open the Gardener Dashboard and click on your avatar in the upper right corner of the page. Click “My Account”, then look for the “Access” pane, then “Kubeconfig”, then press the “Download” button and save the kubeconfig to disk. Run the following command next:
export KUBECONFIG=path/to/kubeconfig
We are now set and you can run your first experiment:
chaos run path/to/experiment
You should see output like this (depends on cloud provider):
[INFO] Validating the experiment's syntax
[INFO] Installing signal handlers to terminate all active background threads on involuntary signals (note that SIGKILL cannot be handled).
[INFO] Experiment looks valid
[INFO] Running experiment: assess-filters-impact
[INFO] Steady-state strategy: default
[INFO] Rollbacks strategy: default
[INFO] No steady state hypothesis defined. That's ok, just exploring.
[INFO] Playing your experiment's method now...
[INFO] Action: assess-filters-impact
[INFO] Validating client credentials and listing probably impacted instances and/or networks with the given arguments zone='world-1a' and filters={'instances': [{'Name': 'tag-key', 'Values': ['kubernetes.io/cluster/shoot--my-project--my-shoot']}], 'vpcs': [{'Name': 'tag-key', 'Values': ['kubernetes.io/cluster/shoot--my-project--my-shoot']}]}:
[INFO] 1 instance(s) would be impacted:
[INFO] - i-aabbccddeeff0000
[INFO] 1 VPC(s) would be impacted:
[INFO] - vpc-aabbccddeeff0000
[INFO] Let's rollback...
[INFO] No declared rollbacks, let's move on.
[INFO] Experiment ended with status: completed
🎉 Congratulations! You successfully ran your first chaosgarden experiment.
A Destructive Experiment
Now let’s break 🪓 your cluster. Be advised that this experiment will be destructive in the sense that we will temporarily network-partition all nodes in one availability zone (machine termination or restart is available with chaosgarden as well). That means, these nodes and their pods won’t be able to “talk” to other nodes, pods, and services. Also, the API server will become unreachable for them and the API server will report them as unreachable (confusingly shown as NotReady when you run kubectl get nodes and Unknown in the status Ready condition when you run kubectl get nodes --output yaml).
Being unreachable will trigger service endpoint and load balancer de-registration (when the node’s grace period lapses) as well as eventually pod eviction and machine replacement (which will continue to fail under test). We won’t run the experiment long enough for all of these effects to materialize, but the longer you run it, the more will happen, up to temporarily giving up/going into “back-off” for the affected worker pool in that zone. You will also see that the Kubernetes cluster autoscaler will try to create a new machine almost immediately, if pods are pending for the affected zone (which will initially fail under test, but may succeed later, which again depends on the runtime of the experiment and whether or not the cluster autoscaler goes into “back-off” or not).
But for now, all of this doesn’t matter as we want to start “small”. You can later read up more on the various settings and effects in our best practices guide on high availability.
Please create a new experiment file, this time with this content:
{
"title": "run-network-failure-simulation",
"description": "run-network-failure-simulation",
"method": [
{
"type": "action",
"name": "run-network-failure-simulation",
"provider": {
"type": "python",
"module": "chaosgarden.garden.actions",
"func": "run_cloud_provider_network_failure_simulation",
"arguments": {
"mode": "total",
"zone": 0,
"duration": 60
}
}
}
],
"rollbacks": [
{
"type": "action",
"name": "rollback-network-failure-simulation",
"provider": {
"type": "python",
"module": "chaosgarden.garden.actions",
"func": "rollback_cloud_provider_network_failure_simulation",
"arguments": {
"mode": "total",
"zone": 0
}
}
}
],
"configuration": {
"garden_project": {
"type": "env",
"key": "GARDEN_PROJECT"
},
"garden_shoot": {
"type": "env",
"key": "GARDEN_SHOOT"
}
}
}
ℹ️ There is an even more destructive action that terminates or alternatively restarts machines in a given zone 🔥 (immediately or delayed with some randomness/chaos for maximum inconvenience for the nodes and pods). You can find links to all these examples at the end of this tutorial.
This experiment is very similar, but this time we will break 🪓 your cluster - for 60s. If that’s too short to even see a node or pod transition from Ready to NotReady (actually Unknown), then increase the duration. Depending on the workload that your cluster runs, you may already see effects of the network partitioning, because it is effective immediately. It’s just that Kubernetes cannot know immediately and rather assumes that something is failing only after the node’s grace period lapses, but the actual workload is impacted immediately.
Most notably, this experiment also has a rollbacks section, which is invoked even if you abort the experiment or it fails unexpectedly, but only if you run the CLI with the option --rollback-strategy always which we will do soon. Any chaosgarden action that can undo its activity, will do that implicitly when the duration lapses, but it is a best practice to always configure a rollbacks section in case something unexpected happens. Should you be in panic and just want to run the rollbacks section, you can remove all other actions and the CLI will execute the rollbacks section immediately.
One other thing is different in the second experiment as well. We now read the name of the project and the shoot from the environment, i.e. a configuration section can automatically expand environment variables. Also useful to know (not shown here), chaostoolkit supports variable substitution too, so that you have to define variables only once. Please note that you can also add a secrets section that can also automatically expand environment variables. For instance, instead of targeting the Gardener API server via $KUBECONFIG, which is supported by our chaosgarden package natively, you can also explicitly refer to it in a secrets section (for brevity reasons not shown here either).
Let’s now run your second experiment (please watch your nodes and pods in parallel, e.g. by running watch kubectl get nodes,pods --output wide in another terminal):
export GARDEN_PROJECT=my-project
export GARDEN_SHOOT=my-shoot
chaos run --rollback-strategy always path/to/experiment
The output of the run command will be similar to the one above, but longer. It will mention either machines or networks that were network-partitioned (depends on cloud provider), but should revert everything back to normal.
Normally, you would not only run actions in the method section, but also probes as part of a steady state hypothesis. Such steady state hypothesis probes are run before and after the actions to validate that the “system” was in a healthy state before and gets back to a healthy state after the actions ran, hence show that the “system” is in a steady state when not under test. Eventually, you will write your own probes that don’t even have to be part of a steady state hypothesis. We at Gardener run multi-zone (multiple zones at once) and rolling-zone (strike each zone once) outages with continuous custom probes all within the method section to validate our KPIs continuously under test (e.g. how long do the individual fail-overs take/how long is the actual outage). The most complex scenarios are even run via Python scripts as all actions and probes can also be invoked directly (which is what the CLI does).
High Availability
Developing highly available workload that can tolerate a zone outage is no trivial task. You can find more information on how to achieve this goal in our best practices guide on high availability.
Thank you for your interest in Gardener chaos engineering and making your workload more resilient.
Further Reading
Here some links for further reading:
- Examples: Experiments, Scripts
- Gardener Chaos Engineering: GitHub, PyPI, Module Docs for Gardener Users
- Chaos Toolkit Core: Home Page, Installation, Concepts, GitHub
2.2.3 - Control Plane
node and zone. Possible mitigations for zone or node outagesHighly Available Shoot Control Plane
Shoot resource offers a way to request for a highly available control plane.
Failure Tolerance Types
A highly available shoot control plane can be setup with either a failure tolerance of zone or node.
Node Failure Tolerance
The failure tolerance of a node will have the following characteristics:
- Control plane components will be spread across different nodes within a single availability zone. There will not be more than one replica per node for each control plane component which has more than one replica.
Worker poolshould have a minimum of 3 nodes.- A multi-node etcd (quorum size of 3) will be provisioned, offering zero-downtime capabilities with each member in a different node within a single availability zone.
Zone Failure Tolerance
The failure tolerance of a zone will have the following characteristics:
- Control plane components will be spread across different availability zones. There will be at least one replica per zone for each control plane component which has more than one replica.
- Gardener scheduler will automatically select a
seedwhich has a minimum of 3 zones to host the shoot control plane. - A multi-node etcd (quorum size of 3) will be provisioned, offering zero-downtime capabilities with each member in a different zone.
Shoot Spec
To request for a highly available shoot control plane Gardener provides the following configuration in the shoot spec:
apiVersion: core.gardener.cloud/v1beta1
kind: Shoot
spec:
controlPlane:
highAvailability:
failureTolerance:
type: <node | zone>
Allowed Transitions
If you already have a shoot cluster with non-HA control plane, then the following upgrades are possible:
- Upgrade of non-HA shoot control plane to HA shoot control plane with
nodefailure tolerance. - Upgrade of non-HA shoot control plane to HA shoot control plane with
zonefailure tolerance. However, it is essential that theseedwhich is currently hosting the shoot control plane should bemulti-zonal. If it is not, then the request to upgrade will be rejected.
Note: There will be a small downtime during the upgrade, especially for etcd, which will transition from a single node etcd cluster to a multi-node etcd cluster.
Disallowed Transitions
If you already have a shoot cluster with HA control plane, then the following transitions are not possible:
- Upgrade of HA shoot control plane from
nodefailure tolerance tozonefailure tolerance is currently not supported, mainly because already existing volumes are bound to the zone they were created in originally. - Downgrade of HA shoot control plane with
zonefailure tolerance tonodefailure tolerance is currently not supported, mainly because of the same reason as above, that already existing volumes are bound to the respective zones they were created in originally. - Downgrade of HA shoot control plane with either
nodeorzonefailure tolerance, to a non-HA shoot control plane is currently not supported, mainly because etcd-druid does not currently support scaling down of a multi-node etcd cluster to a single-node etcd cluster.
Zone Outage Situation
Implementing highly available software that can tolerate even a zone outage unscathed is no trivial task. You may find our HA Best Practices helpful to get closer to that goal. In this document, we collected many options and settings for you that also Gardener internally uses to provide a highly available service.
During a zone outage, you may be forced to change your cluster setup on short notice in order to compensate for failures and shortages resulting from the outage.
For instance, if the shoot cluster has worker nodes across three zones where one zone goes down, the computing power from these nodes is also gone during that time.
Changing the worker pool (shoot.spec.provider.workers[]) and infrastructure (shoot.spec.provider.infrastructureConfig) configuration can eliminate this disbalance, having enough machines in healthy availability zones that can cope with the requests of your applications.
Gardener relies on a sophisticated reconciliation flow with several dependencies for which various flow steps wait for the readiness of prior ones.
During a zone outage, this can block the entire flow, e.g., because all three etcd replicas can never be ready when a zone is down, and required changes mentioned above can never be accomplished.
For this, a special one-off annotation shoot.gardener.cloud/skip-readiness helps to skip any readiness checks in the flow.
The
shoot.gardener.cloud/skip-readinessannotation serves as a last resort if reconciliation is stuck because of important changes during an AZ outage. Use it with caution, only in exceptional cases and after a case-by-case evaluation with your Gardener landscape administrator. If used together with other operations like Kubernetes version upgrades or credential rotation, the annotation may lead to a severe outage of your shoot control plane.
2.3 - Networking
2.3.1 - Enable IPv4/IPv6 (dual-stack) Ingress on AWS
Using IPv4/IPv6 (dual-stack) Ingress in an IPv4 single-stack cluster
Motivation
IPv6 adoption is continuously growing, already overtaking IPv4 in certain regions, e.g. India, or scenarios, e.g. mobile. Even though most IPv6 installations deploy means to reach IPv4, it might still be beneficial to expose services natively via IPv4 and IPv6 instead of just relying on IPv4.
Disadvantages of full IPv4/IPv6 (dual-stack) Deployments
Enabling full IPv4/IPv6 (dual-stack) support in a kubernetes cluster is a major endeavor. It requires a lot of changes and restarts of all pods so that all pods get addresses for both IP families. A side-effect of dual-stack networking is that failures may be hidden as network traffic may take the other protocol to reach the target. For this reason and also due to reduced operational complexity, service teams might lean towards staying in a single-stack environment as much as possible. Luckily, this is possible with Gardener and IPv4/IPv6 (dual-stack) ingress on AWS.
Simplifying IPv4/IPv6 (dual-stack) Ingress with Protocol Translation on AWS
Fortunately, the network load balancer on AWS supports automatic protocol translation, i.e. it can expose both IPv4 and IPv6 endpoints while communicating with just one protocol to the backends. Under the hood, automatic protocol translation takes place. Client IP address preservation can be achieved by using proxy protocol.
This approach enables users to expose IPv4 workload to IPv6-only clients without having to change the workload/service. Without requiring invasive changes, it allows a fairly simple first step into the IPv6 world for services just requiring ingress (incoming) communication.
Necessary Shoot Cluster Configuration Changes for IPv4/IPv6 (dual-stack) Ingress
To be able to utilize IPv4/IPv6 (dual-stack) Ingress in an IPv4 shoot cluster, the cluster needs to meet two preconditions:
dualStack.enabledneeds to be set totrueto configure VPC/subnet for IPv6 and add a routing rule for IPv6. (This does not add IPv6 addresses to kubernetes nodes.)loadBalancerController.enabledneeds to be set totrueas well to use the load balancer controller, which supports dual-stack ingress.
apiVersion: core.gardener.cloud/v1beta1
kind: Shoot
...
spec:
provider:
type: aws
infrastructureConfig:
apiVersion: aws.provider.extensions.gardener.cloud/v1alpha1
kind: InfrastructureConfig
dualStack:
enabled: true
controlPlaneConfig:
apiVersion: aws.provider.extensions.gardener.cloud/v1alpha1
kind: ControlPlaneConfig
loadBalancerController:
enabled: true
...
When infrastructureConfig.networks.vpc.id is set to the ID of an existing VPC, please make sure that your VPC has an Amazon-provided IPv6 CIDR block added.
After adapting the shoot specification and reconciling the cluster, dual-stack load balancers can be created using kubernetes services objects.
Creating an IPv4/IPv6 (dual-stack) Ingress
With the preconditions set, creating an IPv4/IPv6 load balancer is as easy as annotating a service with the correct annotations:
apiVersion: v1
kind: Service
metadata:
annotations:
service.beta.kubernetes.io/aws-load-balancer-ip-address-type: dualstack
service.beta.kubernetes.io/aws-load-balancer-scheme: internet-facing
service.beta.kubernetes.io/aws-load-balancer-nlb-target-type: instance
service.beta.kubernetes.io/aws-load-balancer-type: external
name: ...
namespace: ...
spec:
...
type: LoadBalancer
In case the client IP address should be preserved, the following annotation can be used to enable proxy protocol. (The pod receiving the traffic needs to be configured for proxy protocol as well.)
service.beta.kubernetes.io/aws-load-balancer-proxy-protocol: "*"
Please note that changing an existing Service to dual-stack may cause the creation of a new load balancer without
deletion of the old AWS load balancer resource. While this helps in a seamless migration by not cutting existing
connections it may lead to wasted/forgotten resources. Therefore, the (manual) cleanup needs to be taken into account
when migrating an existing Service instance.
For more details see AWS Load Balancer Documentation - Network Load Balancer.
DNS Considerations to Prevent Downtime During a Dual-Stack Migration
In case the migration of an existing service is desired, please check if there are DNS entries directly linked to the corresponding load balancer. The migrated load balancer will have a new domain name immediately, which will not be ready in the beginning. Therefore, a direct migration of the domain name entries is not desired as it may cause a short downtime, i.e. domain name entries without backing IP addresses.
If there are DNS entries directly linked to the corresponding load balancer and they are managed by the
shoot-dns-service, you can identify this via
annotations with the prefix dns.gardener.cloud/. Those annotations can be linked to a Service, Ingress or
Gateway resources. Alternatively, they may also use DNSEntry or DNSAnnotation resources.
For a seamless migration without downtime use the following three step approach:
- Temporarily prevent direct DNS updates
- Migrate the load balancer and wait until it is operational
- Allow DNS updates again
To prevent direct updates of the DNS entries when the load balancer is migrated add the annotation
dns.gardener.cloud/ignore: 'true' to all affected resources next to the other dns.gardener.cloud/... annotations
before starting the migration. For example, in case of a Service ensure that the service looks like the following:
kind: Service
metadata:
annotations:
dns.gardener.cloud/ignore: 'true'
dns.gardener.cloud/class: garden
dns.gardener.cloud/dnsnames: '...'
...
Next, migrate the load balancer to be dual-stack enabled by adding/changing the corresponding annotations.
You have multiple options how to check that the load balancer has been provisioned successfully. It might be useful
to peek into status.loadBalancer.ingress of the corresponding Service to identify the load balancer:
- Check in the AWS console for the corresponding load balancer provisioning state
- Perform domain name lookups with
nslookup/digto check whether the name resolves to an IP address. - Call your workload via the new load balancer, e.g. using
curl --resolve <my-domain-name>:<port>:<IP-address> https://<my-domain-name>:<port>, which allows you to call your service with the “correct” domain name without using actual name resolution. - Wait a fixed period of time as load balancer creation is usually finished within 15 minutes
Once the load balancer has been provisioned, you can remove the annotation dns.gardener.cloud/ignore: 'true' again
from the affected resources. It may take some additional time until the domain name change finally propagates
(up to one hour).
2.3.2 - Support for IPv6 on AWS
Support for IPv6
Overview
Gardener supports different levels of IPv6 support in shoot clusters. This document describes the differences between them and what to consider when using them.
In IPv6 Ingress for IPv4 Shoot Clusters, the focus is on how an existing IPv4-only shoot cluster can provide dual-stack services to clients. Section IPv6-only Shoot Clusters describes how to create a shoot cluster that only supports IPv6. Finally, Dual-Stack Shoot Clusters explains how to create a shoot cluster that supports both IPv4 and IPv6.
IPv6 Ingress for IPv4 Shoot Clusters
Per default, Gardener shoot clusters use only IPv4. Therefore, they also expose their services only via load balancers with IPv4 addresses. To allow external clients to also use IPv6 to access services in an IPv4 shoot cluster, the cluster needs to be configured to support dual-stack ingress.
It is possible to configure a shoot cluster to support dual-stack ingress, see Using IPv4/IPv6 (dual-stack) Ingress in an IPv4 single-stack cluster for more information.
The main benefit of this approach is that the existing cluster stays almost as is without major changes, keeping the operational simplicity. It works very well for services that only require incoming communication, e.g. pure web services.
The main drawback is that certain scenarios, especially related to IPv6 callbacks, are not possible. This means that services, which actively call to their clients via web hooks, will not be able to do so over IPv6. Hence, those services will not be able to allow full-usage via IPv6.
IPv6-only Shoot Clusters
Motivation
IPv6-only shoot clusters are the best option to verify that services are fully IPv6-compatible. While Dual-Stack Shoot Clusters may fall back on using IPv4 transparently, IPv6-only shoot clusters enforce the usage of IPv6 inside the cluster. Therefore, it is recommended to check with IPv6-only shoot clusters if a workload is fully IPv6-compatible.
In addition to being a good testbed for IPv6 compatibility, IPv6-only shoot clusters may also be a desirable eventual target in the IPv6 migration as they allow to support both IPv4 and IPv6 clients while having a single-stack with the cluster.
Creating an IPv6-only Shoot Cluster
To create an IPv6-only shoot cluster, the following needs to be specified in the Shoot resource (see also here):
kind: Shoot
apiVersion: core.gardener.cloud/v1beta1
metadata:
...
spec:
...
networking:
type: ...
ipFamilies:
- IPv6
...
provider:
type: aws
infrastructureConfig:
apiVersion: aws.provider.extensions.gardener.cloud/v1alpha1
kind: InfrastructureConfig
networks:
vpc:
cidr: 192.168.0.0/16
zones:
- name: ...
public: 192.168.32.0/20
internal: 192.168.48.0/20
Warning
Please note that
nodes,podsandservicesshould not be specified in.spec.networkingresource.
In contrast to that, it is still required to specify IPv4 ranges for the VPC and the public/internal subnets. This is mainly due to the fact that public/internal load balancers still require IPv4 addresses as there are no pure IPv6-only load balancers as of now. The ranges can be sized according to the expected amount of load balancers per zone/type.
The IPv6 address ranges are provided by AWS. It is ensured that the IPv6 ranges are globally unique und internet routable.
Load Balancer Configuration
The AWS Load Balancer Controller is automatically deployed when using an IPv6-only shoot cluster. When creating a load balancer, the corresponding annotations need to be configured, see AWS Load Balancer Documentation - Network Load Balancer for details.
The AWS Load Balancer Controller allows dual-stack ingress so that an IPv6-only shoot cluster can serve IPv4 and IPv6 clients. You can find an example here.
Warning
When accessing Network Load Balancers (NLB) from within the same IPv6-only cluster, it is crucial to add the annotation
service.beta.kubernetes.io/aws-load-balancer-target-group-attributes: preserve_client_ip.enabled=false. Without this annotation, if a request is routed by the NLB to the same target instance from which it originated, the client IP and destination IP will be identical. This situation, known as the hair-pinning effect, will prevent the request from being processed. (This also happens for internal load balancers in IPv4 clusters, but is mitigated by the NAT gateway for external IPv4 load balancers.)
Connectivity to IPv4-only Services
The IPv6-only shoot cluster can connect to IPv4-only services via DNS64/NAT64. The cluster is configured to use the DNS64/NAT64 service of the underlying cloud provider. This allows the cluster to resolve IPv4-only DNS names and to connect to IPv4-only services.
Please note that traffic going through NAT64 incurs the same cost as ordinary NAT traffic in an IPv4-only cluster. Therefore, it might be beneficial to prefer IPv6 for services, which provide IPv4 and IPv6.
Dual-Stack Shoot Clusters
Motivation
Dual-stack shoot clusters support IPv4 and IPv6 out-of-the-box. They can be the intermediate step on the way towards IPv6 for any existing (IPv4-only) clusters.
Creating a Dual-Stack Shoot Cluster
To create a dual-stack shoot cluster, the following needs to be specified in the Shoot resource:
kind: Shoot
apiVersion: core.gardener.cloud/v1beta1
metadata:
...
spec:
...
networking:
type: ...
pods: 192.168.128.0/17
nodes: 192.168.0.0/18
services: 192.168.64.0/18
ipFamilies:
- IPv4
- IPv6
...
provider:
type: aws
infrastructureConfig:
apiVersion: aws.provider.extensions.gardener.cloud/v1alpha1
kind: InfrastructureConfig
networks:
vpc:
cidr: 192.168.0.0/18
zones:
- name: ...
workers: 192.168.0.0/19
public: 192.168.32.0/20
internal: 192.168.48.0/20
Please note that the only change compared to an IPv4-only shoot cluster is the addition of IPv6 to the .spec.networking.ipFamilies field.
The order of the IP families defines the preference of the IP family.
In this case, IPv4 is preferred over IPv6, e.g. services specifying no IP family will get only an IPv4 address.
Bring your own VPC
To create an IPv6 shoot cluster or a dual-stack shoot within your own Virtual Private Cloud (VPC), it is necessary to have an Amazon-provided IPv6 CIDR block added to the VPC. This block can be assigned during the initial setup of the VPC, as illustrated in the accompanying screenshot.
 An egress-only internet gateway is required for outbound internet traffic (IPv6) from the instances within your VPC. Please create one egress-only internet gateway and attach it to the VPC. Please also make sure that the VPC has an attached internet gateway and the following attributes set:
 enableDnsHostnames and enableDnsSupport as described under usage.
Migration of IPv4-only Shoot Clusters to Dual-Stack
To migrate an IPv4-only shoot cluster to Dual-Stack simply change the .spec.networking.ipFamilies field in the Shoot resource from IPv4 to IPv4, IPv6 as shown below.
kind: Shoot
apiVersion: core.gardener.cloud/v1beta1
metadata:
...
spec:
...
networking:
type: ...
ipFamilies:
- IPv4
- IPv6
...
You can find more information about the process and the steps required here.
Warning
Please note that the dual-stack migration requires the IPv4-only cluster to run in native routing mode, i.e. pod overlay network needs to be disabled. The default quota of routes per route table in AWS is 50. This restricts the cluster size to about 50 nodes. Therefore, please adapt (if necessary) the routes per route table limit in the Amazon Virtual Private Cloud quotas accordingly before switching to native routing. The maximum setting is currently 1000.
Load Balancer Configuration
The AWS Load Balancer Controller is automatically deployed when using a dual-stack shoot cluster. When creating a load balancer, the corresponding annotations need to be configured, see AWS Load Balancer Documentation - Network Load Balancer for details.
Warning
Please note that load balancer services without any special annotations will default to IPv4-only regardless how
.spec.ipFamiliesis set.
The AWS Load Balancer Controller allows dual-stack ingress so that a dual-stack shoot cluster can serve IPv4 and IPv6 clients. You can find an example here.
Warning
When accessing external Network Load Balancers (NLB) from within the same cluster via IPv6 or internal NLBs via IPv4, it is crucial to add the annotation
service.beta.kubernetes.io/aws-load-balancer-target-group-attributes: preserve_client_ip.enabled=false. Without this annotation, if a request is routed by the NLB to the same target instance from which it originated, the client IP and destination IP will be identical. This situation, known as the hair-pinning effect, will prevent the request from being processed.
2.3.3 - Manage Certificates with Gardener
Manage certificates with Gardener for public domain
Introduction
Dealing with applications on Kubernetes which offer a secure service endpoints (e.g. HTTPS) also require you to enable a secured communication via SSL/TLS. With the certificate extension enabled, Gardener can manage commonly trusted X.509 certificate for your application endpoint. From initially requesting certificate, it also handeles their renewal in time using the free Let’s Encrypt API.
There are two senarios with which you can use the certificate extension
- You want to use a certificate for a subdomain the shoot’s default DNS (see
.spec.dns.domainof your shoot resource, e.g.short.ingress.shoot.project.default-domain.gardener.cloud). If this is your case, please see Manage certificates with Gardener for default domain - You want to use a certificate for a custom domain. If this is your case, please keep reading this article.
Prerequisites
Before you start this guide there are a few requirements you need to fulfill:
- You have an existing shoot cluster
- Your custom domain is under a public top level domain (e.g.
.com) - Your custom zone is resolvable with a public resolver via the internet (e.g.
8.8.8.8) - You have a custom DNS provider configured and working (see “DNS Providers”)
As part of the Let’s Encrypt ACME challenge validation process, Gardener sets a DNS TXT entry and Let’s Encrypt checks if it can both resolve and authenticate it. Therefore, it’s important that your DNS-entries are publicly resolvable. You can check this by querying e.g. Googles public DNS server and if it returns an entry your DNS is publicly visible:
# returns the A record for cert-example.example.com using Googles DNS server (8.8.8.8)
dig cert-example.example.com @8.8.8.8 A
DNS provider
In order to issue certificates for a custom domain you need to specify a DNS provider which is permitted to create DNS records for subdomains of your requested domain in the certificate. For example, if you request a certificate for host.example.com your DNS provider must be capable of managing subdomains of host.example.com.
DNS providers are normally specified in the shoot manifest. To learn more on how to configure one, please see the DNS provider documentation.
Issue a certificate
Every X.509 certificate is represented by a Kubernetes custom resource certificate.cert.gardener.cloud in your cluster. A Certificate resource may be used to initiate a new certificate request as well as to manage its lifecycle. Gardener’s certificate service regularly checks the expiration timestamp of Certificates, triggers a renewal process if necessary and replaces the existing X.509 certificate with a new one.
Your application should be able to reload replaced certificates in a timely manner to avoid service disruptions.
Certificates can be requested via 3 resources type
- Ingress
- Service (type LoadBalancer)
- Gateways (both Istio gateways and from the Gateway API)
- Certificate (Gardener CRD)
If either of the first 2 are used, a corresponding Certificate resource will be created automatically.
Using an Ingress Resource
apiVersion: networking.k8s.io/v1
kind: Ingress
metadata:
name: amazing-ingress
annotations:
cert.gardener.cloud/purpose: managed
# Optional but recommended, this is going to create the DNS entry at the same time
dns.gardener.cloud/class: garden
dns.gardener.cloud/ttl: "600"
#cert.gardener.cloud/commonname: "*.example.com" # optional, if not specified the first name from spec.tls[].hosts is used as common name
#cert.gardener.cloud/dnsnames: "" # optional, if not specified the names from spec.tls[].hosts are used
#cert.gardener.cloud/follow-cname: "true" # optional, same as spec.followCNAME in certificates
#cert.gardener.cloud/secret-labels: "key1=value1,key2=value2" # optional labels for the certificate secret
#cert.gardener.cloud/issuer: custom-issuer # optional to specify custom issuer (use namespace/name for shoot issuers)
#cert.gardener.cloud/preferred-chain: "chain name" # optional to specify preferred-chain (value is the Subject Common Name of the root issuer)
#cert.gardener.cloud/private-key-algorithm: ECDSA # optional to specify algorithm for private key, allowed values are 'RSA' or 'ECDSA'
#cert.gardener.cloud/private-key-size: "384" # optional to specify size of private key, allowed values for RSA are "2048", "3072", "4096" and for ECDSA "256" and "384"
spec:
tls:
- hosts:
# Must not exceed 64 characters.
- amazing.example.com
# Certificate and private key reside in this secret.
secretName: tls-secret
rules:
- host: amazing.example.com
http:
paths:
- pathType: Prefix
path: "/"
backend:
service:
name: amazing-svc
port:
number: 8080
Replace the hosts and rules[].host value again with your own domain and adjust the remaining Ingress attributes in accordance with your deployment (e.g. the above is for an istio Ingress controller and forwards traffic to a service1 on port 80).
Using a Service of type LoadBalancer
apiVersion: v1
kind: Service
metadata:
annotations:
cert.gardener.cloud/secretname: tls-secret
dns.gardener.cloud/dnsnames: example.example.com
dns.gardener.cloud/class: garden
# Optional
dns.gardener.cloud/ttl: "600"
cert.gardener.cloud/commonname: "*.example.example.com"
cert.gardener.cloud/dnsnames: ""
#cert.gardener.cloud/follow-cname: "true" # optional, same as spec.followCNAME in certificates
#cert.gardener.cloud/secret-labels: "key1=value1,key2=value2" # optional labels for the certificate secret
#cert.gardener.cloud/issuer: custom-issuer # optional to specify custom issuer (use namespace/name for shoot issuers)
#cert.gardener.cloud/preferred-chain: "chain name" # optional to specify preferred-chain (value is the Subject Common Name of the root issuer)
#cert.gardener.cloud/private-key-algorithm: ECDSA # optional to specify algorithm for private key, allowed values are 'RSA' or 'ECDSA'
#cert.gardener.cloud/private-key-size: "384" # optional to specify size of private key, allowed values for RSA are "2048", "3072", "4096" and for ECDSA "256" and "384"
name: test-service
namespace: default
spec:
ports:
- name: http
port: 80
protocol: TCP
targetPort: 8080
type: LoadBalancer
Using a Gateway resource
Please see Istio Gateways or Gateway API for details.
Using the custom Certificate resource
apiVersion: cert.gardener.cloud/v1alpha1
kind: Certificate
metadata:
name: cert-example
namespace: default
spec:
commonName: amazing.example.com
secretRef:
name: tls-secret
namespace: default
# Optionnal if using the default issuer
issuerRef:
name: garden
# If delegated domain for DNS01 challenge should be used. This has only an effect if a CNAME record is set for
# '_acme-challenge.amazing.example.com'.
# For example: If a CNAME record exists '_acme-challenge.amazing.example.com' => '_acme-challenge.writable.domain.com',
# the DNS challenge will be written to '_acme-challenge.writable.domain.com'.
#followCNAME: true
# optionally set labels for the secret
#secretLabels:
# key1: value1
# key2: value2
# Optionally specify the preferred certificate chain: if the CA offers multiple certificate chains, prefer the chain with an issuer matching this Subject Common Name. If no match, the default offered chain will be used.
#preferredChain: "ISRG Root X1"
# Optionally specify algorithm and key size for private key. Allowed algorithms: "RSA" (allowed sizes: 2048, 3072, 4096) and "ECDSA" (allowed sizes: 256, 384)
# If not specified, RSA with 2048 is used.
#privateKey:
# algorithm: ECDSA
# size: 384
Supported attributes
Here is a list of all supported annotations regarding the certificate extension:
| Path | Annotation | Value | Required | Description |
|---|---|---|---|---|
| N/A | cert.gardener.cloud/purpose: | managed | Yes when using annotations | Flag for Gardener that this specific Ingress or Service requires a certificate |
spec.commonName | cert.gardener.cloud/commonname: | E.g. “*.demo.example.com” or “special.example.com” | Certificate and Ingress : No Service: Yes, if DNS names unset | Specifies for which domain the certificate request will be created. If not specified, the names from spec.tls[].hosts are used. This entry must comply with the 64 character limit. |
spec.dnsNames | cert.gardener.cloud/dnsnames: | E.g. “special.example.com” | Certificate and Ingress : No Service: Yes, if common name unset | Additional domains the certificate should be valid for (Subject Alternative Name). If not specified, the names from spec.tls[].hosts are used. Entries in this list can be longer than 64 characters. |
spec.secretRef.name | cert.gardener.cloud/secretname: | any-name | Yes for certificate and Service | Specifies the secret which contains the certificate/key pair. If the secret is not available yet, it’ll be created automatically as soon as the certificate has been issued. |
spec.issuerRef.name | cert.gardener.cloud/issuer: | E.g. gardener | No | Specifies the issuer you want to use. Only necessary if you request certificates for custom domains. |
| N/A | cert.gardener.cloud/revoked: | true otherwise always false | No | Use only to revoke a certificate, see reference for more details |
spec.followCNAME | cert.gardener.cloud/follow-cname | E.g. true | No | Specifies that the usage of a delegated domain for DNS challenges is allowed. Details see Follow CNAME. |
spec.preferredChain | cert.gardener.cloud/preferred-chain | E.g. ISRG Root X1 | No | Specifies the Common Name of the issuer for selecting the certificate chain. Details see Preferred Chain. |
spec.secretLabels | cert.gardener.cloud/secret-labels | for annotation use e.g. key1=value1,key2=value2 | No | Specifies labels for the certificate secret. |
spec.privateKey.algorithm | cert.gardener.cloud/private-key-algorithm | RSA, ECDSA | No | Specifies algorithm for private key generation. The default value is depending on configuration of the extension (default of the default is RSA). You may request a new certificate without privateKey settings to find out the concrete defaults in your Gardener. |
spec.privateKey.size | cert.gardener.cloud/private-key-size | "256", "384", "2048", "3072", "4096" | No | Specifies size for private key generation. Allowed values for RSA are 2048, 3072, and 4096. For ECDSA allowed values are 256 and 384. The default values are depending on the configuration of the extension (defaults of the default values are 3072 for RSA and 384 for ECDSA respectively). |
Request a wildcard certificate
In order to avoid the creation of multiples certificates for every single endpoints, you may want to create a wildcard certificate for your shoot’s default cluster.
apiVersion: networking.k8s.io/v1
kind: Ingress
metadata:
name: amazing-ingress
annotations:
cert.gardener.cloud/purpose: managed
cert.gardener.cloud/commonName: "*.example.com"
spec:
tls:
- hosts:
- amazing.example.com
secretName: tls-secret
rules:
- host: amazing.example.com
http:
paths:
- pathType: Prefix
path: "/"
backend:
service:
name: amazing-svc
port:
number: 8080
Please note that this can also be achived by directly adding an annotation to a Service type LoadBalancer. You could also create a Certificate object with a wildcard domain.
Using a custom Issuer
Most Gardener deployment with the certification extension enabled have a preconfigured garden issuer. It is also usually configured to use Let’s Encrypt as the certificate provider.
If you need a custom issuer for a specific cluster, please see Using a custom Issuer
Quotas
For security reasons there may be a default quota on the certificate requests per day set globally in the controller registration of the shoot-cert-service.
The default quota only applies if there is no explicit quota defined for the issuer itself with the field
requestsPerDayQuota, e.g.:
kind: Shoot
...
spec:
extensions:
- type: shoot-cert-service
providerConfig:
apiVersion: service.cert.extensions.gardener.cloud/v1alpha1
kind: CertConfig
issuers:
- email: your-email@example.com
name: custom-issuer # issuer name must be specified in every custom issuer request, must not be "garden"
server: 'https://acme-v02.api.letsencrypt.org/directory'
requestsPerDayQuota: 10
DNS Propagation
As stated before, cert-manager uses the ACME challenge protocol to authenticate that you are the DNS owner for the domain’s certificate you are requesting.
This works by creating a DNS TXT record in your DNS provider under _acme-challenge.example.example.com containing a token to compare with. The TXT record is only applied during the domain validation.
Typically, the record is propagated within a few minutes. But if the record is not visible to the ACME server for any reasons, the certificate request is retried again after several minutes.
This means you may have to wait up to one hour after the propagation problem has been resolved before the certificate request is retried. Take a look in the events with kubectl describe ingress example for troubleshooting.
Character Restrictions
Due to restriction of the common name to 64 characters, you may to leave the common name unset in such cases.
For example, the following request is invalid:
apiVersion: cert.gardener.cloud/v1alpha1
kind: Certificate
metadata:
name: cert-invalid
namespace: default
spec:
commonName: morethan64characters.ingress.shoot.project.default-domain.gardener.cloud
But it is valid to request a certificate for this domain if you have left the common name unset:
apiVersion: cert.gardener.cloud/v1alpha1
kind: Certificate
metadata:
name: cert-example
namespace: default
spec:
dnsNames:
- morethan64characters.ingress.shoot.project.default-domain.gardener.cloud
References
2.3.4 - Manage Certificates with Gardener for Default Domain
Manage certificates with Gardener for default domain
Introduction
Dealing with applications on Kubernetes which offer a secure service endpoints (e.g. HTTPS) also require you to enable a secured communication via SSL/TLS. With the certificate extension enabled, Gardener can manage commonly trusted X.509 certificate for your application endpoint. From initially requesting certificate, it also handeles their renewal in time using the free Let’s Encrypt API.
There are two senarios with which you can use the certificate extension
- You want to use a certificate for a subdomain the shoot’s default DNS (see
.spec.dns.domainof your shoot resource, e.g.short.ingress.shoot.project.default-domain.gardener.cloud). If this is your case, please keep reading this article. - You want to use a certificate for a custom domain. If this is your case, please see Manage certificates with Gardener for public domain
Prerequisites
Before you start this guide there are a few requirements you need to fulfill:
- You have an existing shoot cluster
Since you are using the default DNS name, all DNS configuration should already be done and ready.
Issue a certificate
Every X.509 certificate is represented by a Kubernetes custom resource certificate.cert.gardener.cloud in your cluster. A Certificate resource may be used to initiate a new certificate request as well as to manage its lifecycle. Gardener’s certificate service regularly checks the expiration timestamp of Certificates, triggers a renewal process if necessary and replaces the existing X.509 certificate with a new one.
Your application should be able to reload replaced certificates in a timely manner to avoid service disruptions.
Certificates can be requested via 3 resources type
- Ingress
- Service (type LoadBalancer)
- certificate (Gardener CRD)
If either of the first 2 are used, a corresponding Certificate resource will automatically be created.
Using an ingress Resource
apiVersion: networking.k8s.io/v1
kind: Ingress
metadata:
name: amazing-ingress
annotations:
cert.gardener.cloud/purpose: managed
#cert.gardener.cloud/issuer: custom-issuer # optional to specify custom issuer (use namespace/name for shoot issuers)
#cert.gardener.cloud/follow-cname: "true" # optional, same as spec.followCNAME in certificates
#cert.gardener.cloud/secret-labels: "key1=value1,key2=value2" # optional labels for the certificate secret
#cert.gardener.cloud/preferred-chain: "chain name" # optional to specify preferred-chain (value is the Subject Common Name of the root issuer)
#cert.gardener.cloud/private-key-algorithm: ECDSA # optional to specify algorithm for private key, allowed values are 'RSA' or 'ECDSA'
#cert.gardener.cloud/private-key-size: "384" # optional to specify size of private key, allowed values for RSA are "2048", "3072", "4096" and for ECDSA "256" and "384"spec:
tls:
- hosts:
# Must not exceed 64 characters.
- short.ingress.shoot.project.default-domain.gardener.cloud
# Certificate and private key reside in this secret.
secretName: tls-secret
rules:
- host: short.ingress.shoot.project.default-domain.gardener.cloud
http:
paths:
- pathType: Prefix
path: "/"
backend:
service:
name: amazing-svc
port:
number: 8080
Using a service type LoadBalancer
apiVersion: v1
kind: Service
metadata:
annotations:
cert.gardener.cloud/purpose: managed
# Certificate and private key reside in this secret.
cert.gardener.cloud/secretname: tls-secret
# You may add more domains separated by commas (e.g. "service.shoot.project.default-domain.gardener.cloud, amazing.shoot.project.default-domain.gardener.cloud")
dns.gardener.cloud/dnsnames: "service.shoot.project.default-domain.gardener.cloud"
dns.gardener.cloud/ttl: "600"
#cert.gardener.cloud/issuer: custom-issuer # optional to specify custom issuer (use namespace/name for shoot issuers)
#cert.gardener.cloud/follow-cname: "true" # optional, same as spec.followCNAME in certificates
#cert.gardener.cloud/secret-labels: "key1=value1,key2=value2" # optional labels for the certificate secret
#cert.gardener.cloud/preferred-chain: "chain name" # optional to specify preferred-chain (value is the Subject Common Name of the root issuer)
#cert.gardener.cloud/private-key-algorithm: ECDSA # optional to specify algorithm for private key, allowed values are 'RSA' or 'ECDSA'
#cert.gardener.cloud/private-key-size: "384" # optional to specify size of private key, allowed values for RSA are "2048", "3072", "4096" and for ECDSA "256" and "384" name: test-service
namespace: default
spec:
ports:
- name: http
port: 80
protocol: TCP
targetPort: 8080
type: LoadBalancer
Using the custom Certificate resource
apiVersion: cert.gardener.cloud/v1alpha1
kind: Certificate
metadata:
name: cert-example
namespace: default
spec:
commonName: short.ingress.shoot.project.default-domain.gardener.cloud
secretRef:
name: tls-secret
namespace: default
# Optionnal if using the default issuer
issuerRef:
name: garden
If you’re interested in the current progress of your request, you’re advised to consult the description, more specifically the status attribute in case the issuance failed.
Request a wildcard certificate
In order to avoid the creation of multiples certificates for every single endpoints, you may want to create a wildcard certificate for your shoot’s default cluster.
apiVersion: networking.k8s.io/v1
kind: Ingress
metadata:
name: amazing-ingress
annotations:
cert.gardener.cloud/purpose: managed
cert.gardener.cloud/commonName: "*.ingress.shoot.project.default-domain.gardener.cloud"
spec:
tls:
- hosts:
- amazing.ingress.shoot.project.default-domain.gardener.cloud
secretName: tls-secret
rules:
- host: amazing.ingress.shoot.project.default-domain.gardener.cloud
http:
paths:
- pathType: Prefix
path: "/"
backend:
service:
name: amazing-svc
port:
number: 8080
Please note that this can also be achived by directly adding an annotation to a Service type LoadBalancer. You could also create a Certificate object with a wildcard domain.
More information
For more information and more examples about using the certificate extension, please see Manage certificates with Gardener for public domain
2.3.5 - Managing DNS with Gardener
Request DNS Names in Shoot Clusters
Introduction
Within a shoot cluster, it is possible to request DNS records via the following resource types:
It is necessary that the Gardener installation your shoot cluster runs in is equipped with a shoot-dns-service extension. This extension uses the seed’s dns management infrastructure to maintain DNS names for shoot clusters. Please ask your Gardener operator if the extension is available in your environment.
Shoot Feature Gate
In some Gardener setups the shoot-dns-service extension is not enabled globally and thus must be configured per shoot cluster. Please adapt the shoot specification by the configuration shown below to activate the extension individually.
kind: Shoot
...
spec:
extensions:
- type: shoot-dns-service
...
Before you start
You should :
- Have created a shoot cluster
- Have created and correctly configured a DNS Provider (Please consult this page for more information)
- Have a basic understanding of DNS (see link under References)
There are 2 types of DNS that you can use within Kubernetes :
- internal (usually managed by coreDNS)
- external (managed by a public DNS provider).
This page, and the extension, exclusively works for external DNS handling.
Gardener allows 2 way of managing your external DNS:
- Manually, which means you are in charge of creating / maintaining your Kubernetes related DNS entries
- Via the Gardener DNS extension
Gardener DNS extension
The managed external DNS records feature of the Gardener clusters makes all this easier. You do not need DNS service provider specific knowledge, and in fact you do not need to leave your cluster at all to achieve that. You simply annotate the Ingress / Service that needs its DNS records managed and it will be automatically created / managed by Gardener.
Managed external DNS records are supported with the following DNS provider types:
- aws-route53
- azure-dns
- azure-private-dns
- google-clouddns
- openstack-designate
- alicloud-dns
- cloudflare-dns
Request DNS records for Ingress resources
To request a DNS name for Ingress, Service or Gateway (Istio or Gateway API) objects in the shoot cluster it must be annotated with the DNS class garden and an annotation denoting the desired DNS names.
Example for an annotated Ingress resource:
apiVersion: networking.k8s.io/v1
kind: Ingress
metadata:
name: amazing-ingress
annotations:
# Let Gardener manage external DNS records for this Ingress.
dns.gardener.cloud/dnsnames: special.example.com # Use "*" to collects domains names from .spec.rules[].host
dns.gardener.cloud/ttl: "600"
dns.gardener.cloud/class: garden
# If you are delegating the certificate management to Gardener, uncomment the following line
#cert.gardener.cloud/purpose: managed
spec:
rules:
- host: special.example.com
http:
paths:
- pathType: Prefix
path: "/"
backend:
service:
name: amazing-svc
port:
number: 8080
# Uncomment the following part if you are delegating the certificate management to Gardener
#tls:
# - hosts:
# - special.example.com
# secretName: my-cert-secret-name
For an Ingress, the DNS names are already declared in the specification. Nevertheless the dnsnames annotation must be present. Here a subset of the DNS names of the ingress can be specified. If DNS names for all names are desired, the value all can be used.
Keep in mind that ingress resources are ignored unless an ingress controller is set up. Gardener does not provide an ingress controller by default. For more details, see Ingress Controllers and Service in the Kubernetes documentation.
Request DNS records for service type LoadBalancer
Example for an annotated Service (it must have the type LoadBalancer) resource:
apiVersion: v1
kind: Service
metadata:
name: amazing-svc
annotations:
# Let Gardener manage external DNS records for this Service.
dns.gardener.cloud/dnsnames: special.example.com
dns.gardener.cloud/ttl: "600"
dns.gardener.cloud/class: garden
spec:
selector:
app: amazing-app
ports:
- protocol: TCP
port: 80
targetPort: 8080
type: LoadBalancer
Request DNS records for Gateway resources
Please see Istio Gateways or Gateway API for details.
Creating a DNSEntry resource explicitly
It is also possible to create a DNS entry via the Kubernetes resource called DNSEntry:
apiVersion: dns.gardener.cloud/v1alpha1
kind: DNSEntry
metadata:
annotations:
# Let Gardener manage this DNS entry.
dns.gardener.cloud/class: garden
name: special-dnsentry
namespace: default
spec:
dnsName: special.example.com
ttl: 600
targets:
- 1.2.3.4
If one of the accepted DNS names is a direct subname of the shoot’s ingress domain, this is already handled by the standard wildcard entry for the ingress domain. Therefore this name should be excluded from the dnsnames list in the annotation. If only this DNS name is configured in the ingress, no explicit DNS entry is required, and the DNS annotations should be omitted at all.
You can check the status of the DNSEntry with
$ kubectl get dnsentry
NAME DNS TYPE PROVIDER STATUS AGE
mydnsentry special.example.com aws-route53 default/aws Ready 24s
As soon as the status of the entry is Ready, the provider has accepted the new DNS record. Depending on the provider and your DNS settings and cache, it may take up to 24 hours for the new entry to be propagated over all internet.
More examples can be found here
Request DNS records for Service/Ingress resources using a DNSAnnotation resource
In rare cases it may not be possible to add annotations to a Service or Ingress resource object.
E.g.: the helm chart used to deploy the resource may not be adaptable for some reasons or some automation is used, which always restores the original content of the resource object by dropping any additional annotations.
In these cases, it is recommended to use an additional DNSAnnotation resource in order to have more flexibility that DNSentry resources. The DNSAnnotation resource makes the DNS shoot service behave as if annotations have been added to the referenced resource.
For the Ingress example shown above, you can create a DNSAnnotation resource alternatively to provide the annotations.
apiVersion: dns.gardener.cloud/v1alpha1
kind: DNSAnnotation
metadata:
annotations:
dns.gardener.cloud/class: garden
name: test-ingress-annotation
namespace: default
spec:
resourceRef:
kind: Ingress
apiVersion: networking.k8s.io/v1
name: test-ingress
namespace: default
annotations:
dns.gardener.cloud/dnsnames: '*'
dns.gardener.cloud/class: garden
Note that the DNSAnnotation resource itself needs the dns.gardener.cloud/class=garden annotation. This also only works for annotations known to the DNS shoot service (see Accepted External DNS Records Annotations).
For more details, see also DNSAnnotation objects
Accepted External DNS Records Annotations
Here are all the accepted annotations related to the DNS extension:
| Annotation | Description |
|---|---|
| dns.gardener.cloud/dnsnames | Mandatory for service and ingress resources, accepts a comma-separated list of DNS names if multiple names are required. For ingress you can use the special value '*'. In this case, the DNS names are collected from .spec.rules[].host. |
| dns.gardener.cloud/class | Mandatory, in the context of the shoot-dns-service it must always be set to garden. |
| dns.gardener.cloud/ttl | Recommended, overrides the default Time-To-Live of the DNS record. |
| dns.gardener.cloud/cname-lookup-interval | Only relevant if multiple domain name targets are specified. It specifies the lookup interval for CNAMEs to map them to IP addresses (in seconds) |
| dns.gardener.cloud/realms | Internal, for restricting provider access for shoot DNS entries. Typcially not set by users of the shoot-dns-service. |
| dns.gardener.cloud/ip-stack | Only relevant for provider type aws-route53 if target is an AWS load balancer domain name. Can be set for service, ingress and DNSEntry resources. It specify which DNS records with alias targets are created instead of the usual CNAME records. If the annotation is not set (or has the value ipv4), only an A record is created. With value dual-stack, both A and AAAA records are created. With value ipv6 only an AAAA record is created. |
| dns.gardener.cloud/ignore | Optional, with the possible values: true, reconcile, or full. For values true and reconcile, the reconciliation is skipped. true is an alias for reconcile. For value full both reconciliation and deletion operations are skipped. |
| dns.gardener.cloud/target-hard-ignore | Optional, for a generated target DNSEntry to ignore it on reconciliation. It is not propagated from source objects to the target DNSEntry. Important: The entry is even ignored on deletion, so use with caution to avoid orphaned entries. |
| service.beta.kubernetes.io/aws-load-balancer-ip-address-type=dualstack | For services, behaves similar to dns.gardener.cloud/ip-stack=dual-stack. |
| loadbalancer.openstack.org/load-balancer-address | Internal, for services only: support for PROXY protocol on Openstack (which needs a hostname as ingress). Typcially not set by users of the shoot-dns-service. |
If one of the accepted DNS names is a direct subdomain of the shoot’s ingress domain, this is already handled by the standard wildcard entry for the ingress domain. Therefore, this name should be excluded from the dnsnames list in the annotation. If only this DNS name is configured in the ingress, no explicit DNS entry is required, and the DNS annotations should be omitted at all.
Troubleshooting
General DNS tools
To check the DNS resolution, use the nslookup or dig command.
$ nslookup special.your-domain.com
or with dig
$ dig +short special.example.com
Depending on your network settings, you may get a successful response faster using a public DNS server (e.g. 8.8.8.8, 8.8.4.4, or 1.1.1.1)
dig @8.8.8.8 +short special.example.com
DNS record events
The DNS controller publishes Kubernetes events for the resource which requested the DNS record (Ingress, Service, DNSEntry). These events reveal more information about the DNS requests being processed and are especially useful to check any kind of misconfiguration, e.g. requests for a domain you don’t own.
Events for a successfully created DNS record:
$ kubectl describe service my-service
Events:
Type Reason Age From Message
---- ------ ---- ---- -------
Normal dns-annotation 19s dns-controller-manager special.example.com: dns entry is pending
Normal dns-annotation 19s (x3 over 19s) dns-controller-manager special.example.com: dns entry pending: waiting for dns reconciliation
Normal dns-annotation 9s (x3 over 10s) dns-controller-manager special.example.com: dns entry active
Please note, events vanish after their retention period (usually 1h).
DNSEntry status
DNSEntry resources offer a .status sub-resource which can be used to check the current state of the object.
Status of a erroneous DNSEntry.
status:
message: No responsible provider found
observedGeneration: 3
provider: remote
state: Error
References
2.4 - Administer Client (Shoot) Clusters
2.4.1 - Scalability of Gardener Managed Kubernetes Clusters
Have you ever wondered how much more your Kubernetes cluster can scale before it breaks down?
Of course, the answer is heavily dependent on your workloads. But be assured, any cluster will break eventually. Therefore, the best mitigation is to plan for sharding early and run multiple clusters instead of trying to optimize everything hoping to survive with a single cluster. Still, it is helpful to know when the time has come to scale out. This document aims at giving you the basic knowledge to keep a Gardener-managed Kubernetes cluster up and running while it scales according to your needs.
Welcome to Planet Scale, Please Mind the Gap!
For a complex, distributed system like Kubernetes it is impossible to give absolute thresholds for its scalability. Instead, the limit of a cluster’s scalability is a combination of various, interconnected dimensions.
Let’s take a rather simple example of two dimensions - the number of Pods per Node and number of Nodes in a cluster. According to the scalability thresholds documentation, Kubernetes can scale up to 5000 Nodes and with default settings accommodate a maximum of 110 Pods on a single Node. Pushing only a single dimension towards its limit will likely harm the cluster. But if both are pushed simultaneously, any cluster will break way before reaching one dimension’s limit.
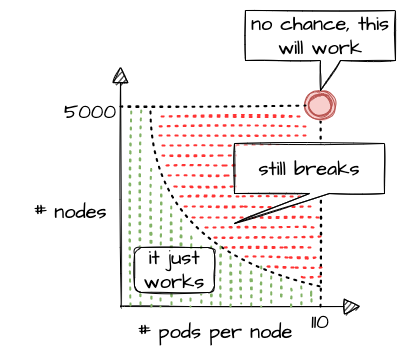
What sounds rather straightforward in theory can be a bit trickier in reality. While 110 Pods is the default limit, we successfully pushed beyond that and in certain cases run up to 200 Pods per Node without breaking the cluster. This is possible in an environment where one knows and controls all workloads and cluster configurations. It still requires careful testing, though, and comes at the cost of limiting the scalability of other dimensions, like the number of Nodes.
Of course, a Kubernetes cluster has a plethora of dimensions. Thus, when looking at a simple questions like “How many resources can I store in ETCD?”, the only meaningful answer must be: “it depends”
The following sections will help you to identify relevant dimensions and how they affect a Gardener-managed Kubernetes cluster’s scalability.
“Official” Kubernetes Thresholds and Scalability Considerations
To get started with the topic, please check the basic guidance provided by the Kubernetes community (specifically SIG Scalability):
Furthermore, the problem space has been discussed in a KubeCon talk, the slides for which can be found here. You should at least read the slides before continuing.
Essentially, it comes down to this:
If you promise to:
- correctly configure your cluster
- use extensibility features “reasonably”
- keep the load in the cluster within recommended limits
Then we promise that your cluster will function properly.
With that knowledge in mind, let’s look at Gardener and eventually pick up the question about the number of objects in ETCD raised above.
Gardener-Specific Considerations
The following considerations are based on experience with various large clusters that scaled in different dimensions. Just as explained above, pushing beyond even one of the limits is likely to cause issues at some point in time (but not guaranteed). Depending on the setup of your workloads however, it might work unexpectedly well. Nevertheless, we urge you take conscious decisions and rather think about sharding your workloads. Please keep in mind - your workload affects the overall stability and scalability of a cluster significantly.
ETCD
The following section is based on a setup where ETCD Pods run on a dedicated Node pool and each Node has 8 vCPU and 32GB memory at least.
ETCD has a practical space limit of 8 GB. It caps the number of objects one can technically have in a Kubernetes cluster.
Of course, the number is heavily influenced by each object’s size, especially when considering that secrets and configmaps may store up to 1MB of data. Another dimension is a cluster’s churn rate. Since ETCD stores a history of the keyspace, a higher churn rate reduces the number of objects. Gardener runs compaction every 30min and defragmentation once per day during a cluster’s maintenance window to ensure proper ETCD operations. However, it is still possible to overload ETCD. If the space limit is reached, ETCD will only accept READ or DELETE requests and manual interaction by a Gardener operator is needed to disarm the alarm, once you got below the threshold.
To avoid such a situation, you can monitor the current ETCD usage via the “ETCD” dashboard of the monitoring stack. It gives you the current DB size, as well as historical data for the past 2 weeks. While there are improvements planned to trigger compaction and defragmentation based on DB size, an ETCD should not grow up to this threshold. A typical, healthy DB size is less than 3 GB.
Furthermore, the dashboard has a panel called “Memory”, which indicates the memory usage of the etcd pod(s). Using more than 16GB memory is a clear red flag, and you should reduce the load on ETCD.
Another dimension you should be aware of is the object count in ETCD. You can check it via the “API Server” dashboard, which features a “ETCD Object Counts By Resource” panel. The overall number of objects (excluding events, as they are stored in a different etcd instance) should not exceed 100k for most use cases.
Kube API Server
The following section is based on a setup where kube-apiserver run as Pods and are scheduled to Nodes with at least 8 vCPU and 32GB memory.
Gardener can scale the Deployment of a kube-apiserver horizontally and vertically. Horizontal scaling is limited to a certain number of replicas and should not concern a stakeholder much. However, the CPU / memory consumption of an individual kube-apiserver pod poses a potential threat to the overall availability of your cluster. The vertical scaling of any kube-apiserver is limited by the amount of resources available on a single Node. Outgrowing the resources of a Node will cause a downtime and render the cluster unavailable.
In general, continuous CPU usage of up to 3 cores and 16 GB memory per kube-apiserver pod is considered to be safe. This gives some room to absorb spikes, for example when the caches are initialized. You can check the resource consumption by selecting kube-apiserver Pods in the “Kubernetes Pods” dashboard. If these boundaries are exceeded constantly, you need to investigate and derive measures to lower the load.
Further information is also recorded and made available through the monitoring stack. The dashboard “API Server Request Duration and Response Size” provides insights into the request processing time of kube-apiserver Pods. Related information like request rates, dropped requests or termination codes (e.g., 429 for too many requests) can be obtained from the dashboards “API Server” and “Kubernetes API Server Details”. They provide a good indicator for how well the system is dealing with its current load.
Reducing the load on the API servers can become a challenge. To get started, you may try to:
- Use immutable secrets and configmaps where possible to save watches. This pays off, especially when you have a high number of
Nodesor just lots of secrets in general. - Applications interacting with the K8s API: If you know an object by its name, use it. Using label selector queries is expensive, as the filtering happens only within the
kube-apiserverand notetcd, hence all resources must first pass completely frometcdtokube-apiserver. - Use (single object) caches within your controllers. Check the “Use cache for ShootStates in Gardenlet” issue for an example.
Nodes
When talking about the scalability of a Kubernetes cluster, Nodes are probably mentioned in the first place… well, obviously not in this guide. While vanilla Kubernetes lists 5000 Nodes as its upper limit, pushing that dimension is not feasible. Most clusters should run with fewer than 300 Nodes. But of course, the actual limit depends on the workloads deployed and can be lower or higher. As you scale your cluster, be extra careful and closely monitor ETCD and kube-apiserver.
The scalability of Nodes is subject to a range of limiting factors. Some of them can only be defined upon cluster creation and remain immutable during a cluster lifetime. So let’s discuss the most important dimensions.
CIDR:
Upon cluster creation, you have to specify or use the default values for several network segments. There are dedicated CIDRs for services, Pods, and Nodes. Each defines a range of IP addresses available for the individual resource type. Obviously, the maximum of possible Nodes is capped by the CIDR for Nodes.
However, there is a second limiting factor, which is the pod CIDR combined with the nodeCIDRMaskSize. This mask is used to divide the pod CIDR into smaller subnets, where each blocks gets assigned to a node. With a /16 pod network and a /24 nodeCIDRMaskSize, a cluster can scale up to 256 Nodes. Please check Shoot Networking for details.
Even though a /24 nodeCIDRMaskSize translates to a theoretical 256 pod IP addresses per Node, the maxPods setting should be less than 1/2 of this value. This gives the system some breathing room for churn and minimizes the risk for strange effects like mis-routed packages caused by immediate re-use of IPs.
Cloud provider capacity:
Most of the time, Nodes in Kubernetes translate to virtual machines on a hyperscaler. An attempt to add more Nodes to a cluster might fail due to capacity issues resulting in an error message like this:
Cloud provider message - machine codes error: code = [Internal] message = [InsufficientInstanceCapacity: We currently do not have sufficient <instance type> capacity in the Availability Zone you requested. Our system will be working on provisioning additional capacity.
In heavily utilized regions, individual clusters are competing for scarce resources. So before choosing a region / zone, try to ensure that the hyperscaler supports your anticipated growth. This might be done through quota requests or by contacting the respective support teams.
To mitigate such a situation, you may configure a worker pool with a different Node type and a corresponding priority expander as part of a shoot’s autoscaler section. Please consult the Autoscaler FAQ for more details.
Rolling of Node pools:
The overall number of Nodes is affecting the duration of a cluster’s maintenance. When upgrading a Node pool to a new OS image or Kubernetes version, all machines will be drained and deleted, and replaced with new ones. The more Nodes a cluster has, the longer this process will take, given that workloads are typically protected by PodDisruptionBudgets. Check Shoot Updates and Upgrades for details. Be sure to take this into consideration when planning maintenance.
Root disk:
You should be aware that the Node configuration impacts your workload’s performance too. Take the root disk of a Node, for example. While most hyperscalers offer the usage of HDD and SSD disks, it is strongly recommended to use SSD volumes as root disks. When there are lots of Pods on a Node or workloads making extensive use of emptyDir volumes, disk throttling becomes an issue. When a disk hits its IOPS limits, processes are stuck in IO-wait and slow down significantly. This can lead to a slow-down in the kubelet’s heartbeat mechanism and result in Nodes being replaced automatically, as they appear to be unhealthy. To analyze such a situation, you might have to run tools like iostat, sar or top directly on a Node.
Switching to an I/O optimized instance type (if offered for your infrastructure) can help to resolve issue. Please keep in mind that disks used via PersistentVolumeClaims have I/O limits as well. Sometimes these limits are related to the size and/or can be increased for individual disks.
Cloud Provider (Infrastructure) Limits
In addition to the already mentioned capacity restrictions, a cloud provider may impose other limitations to a Kubernetes cluster’s scalability. One category is the account quota defining the number of resources allowed globally or per region. Make sure to request appropriate values that suit your needs and contain a buffer, for example for having more Nodes during a rolling update.
Another dimension is the network throughput per VM or network interface. While you may be able to choose a network-optimized Node type for your workload to mitigate issues, you cannot influence the available bandwidth for control plane components. Therefore, please ensure that the traffic on the ETCD does not exceed 100MB/s. The ETCD dashboard provides data for monitoring this metric.
In some environments the upstream DNS might become an issue too and make your workloads subject to rate limiting. Given the heterogeneity of cloud providers incl. private data centers, it is not possible to give any thresholds. Still, the “CoreDNS” and “NodeLocalDNS” dashboards can help to derive a workload’s usage pattern. Check the DNS autoscaling and NodeLocalDNS documentations for available configuration options.
Webhooks
While webhooks provide powerful means to manage a cluster, they are equally powerful in breaking a cluster upon a malfunction or unavailability. Imagine using a policy enforcing system like Kyverno or Open Policy Agent Gatekeeper. As part of the stack, both will deploy webhooks which are invoked for almost everything that happens in a cluster. Now, if this webhook gets either overloaded or is simply not available, the cluster will stop functioning properly.
Hence, you have to ensure proper sizing, quick processing time, and availability of the webhook serving Pods when deploying webhooks. Please consult Dynamic Admission Control (Availability and Timeouts sections) for details. You should also be aware of the time added to any request that has to go through a webhook, as the kube-apiserver sends the request for mutation / validation to another pod and waits for the response. The more resources being subject to an external webhook, the more likely this will become a bottleneck when having a high churn rate on resources. Within the Gardener monitoring stack, you can check the extra time per webhook via the “API Server (Admission Details)” dashboard, which has a panel for “Duration per Webhook”.
In Gardener, any webhook timeout should be less than 15 seconds. Due to the separation of Kubernetes data-plane (shoot) and control-plane (seed) in Gardener, the extra hop from kube-apiserver (control-plane) to webhook (data-plane) is more expensive. Please check Shoot Status for more details.
Custom Resource Definitions
Using Custom Resource Definitions (CRD) to extend a cluster’s API is a common Kubernetes pattern and so is writing an operator to act upon custom resources. Writing an efficient controller reduces the load on the kube-apiserver and allows for better scaling. As a starting point, you might want to read Gardener’s Kubernetes Clients Guide.
Another problematic dimension is the usage of conversion webhooks when having resources stored in different versions. Not only do they add latency (see Webhooks) but can also block the kube-controllermanager’s garbage collection. If a conversion webhook is unavailable, the garbage collector fails to list all resources and does not perform any cleanup. In order to avoid such a situation, it is highly recommended to use conversion webhooks only when necessary and complete the migration to a new version as soon as possible.
Conclusion
As outlined by SIG Scalability, it is quite impossible to give limits or even recommendations fitting every individual use case. Instead, this guide outlines relevant dimensions and gives rather conservative recommendations based on usage patterns observed. By combining this information, it is possible to operate and scale a cluster in stable manner.
While going beyond is certainly possible for some dimensions, it significantly increases the risk of instability. Typically, limits on the control-plane are introduced by the availability of resources like CPU or memory on a single machine and can hardly be influenced by any user. Therefore, utilizing the existing resources efficiently is key. Other parameters are controlled by a user. In these cases, careful testing may reveal actual limits for a specific use case.
Please keep in mind that all aspects of a workload greatly influence the stability and scalability of a Kubernetes cluster.
2.4.2 - Authenticating with an Identity Provider
Prerequisites
Please read the following background material on OIDC tokens and Structured Authentication.
Overview
Kubernetes on its own doesn’t provide any user management. In other words, users aren’t managed through Kubernetes resources. Whenever you refer to a human user it’s sufficient to use a unique ID, for example, an email address. Nevertheless, Gardener project owners can use an identity provider to authenticate user access for shoot clusters in the following way:
- Configure an Identity Provider using OpenID Connect (OIDC).
- Configure a local kubectl oidc-login to enable
oidc-login. - Configure the shoot cluster to share details of the OIDC-compliant identity provider with the Kubernetes API Server.
- Authorize an authenticated user using role-based access control (RBAC).
- Verify the result
Note
Gardener allows administrators to modify aspects of the control plane setup. It gives administrators full control of how the control plane is parameterized. While this offers much flexibility, administrators need to ensure that they don’t configure a control plane that goes beyond the service level agreements of the responsible operators team.
Configure an Identity Provider
Create a tenant in an OIDC compatible Identity Provider. For simplicity, we use Auth0, which has a free plan.
In your tenant, create a client application to use authentication with
kubectl:
Provide a Name, choose Native as application type, and choose CREATE.

In the tab Settings, copy the following parameters to a local text file:
Domain
Corresponds to the issuer in OIDC. It must be an
https-secured endpoint (Auth0 requires a trailing/at the end). For more information, see Issuer Identifier.Client ID
Client Secret

Configure the client to have a callback url of
http://localhost:8000. This callback connects to your localkubectl oidc-loginplugin:
Save your changes.
Verify that
https://<Auth0 Domain>/.well-known/openid-configurationis reachable.Choose Users & Roles > Users > CREATE USERS to create a user with a user and password:

Note
Users must have a verified email address.
Configure a Local kubectl oidc-login
Install the
kubectlplugin oidc-login. We highly recommend the krew installation tool, which also makes other plugins easily available.kubectl krew install oidc-loginThe response looks like this:
Updated the local copy of plugin index. Installing plugin: oidc-login CAVEATS: \ | You need to setup the OIDC provider, Kubernetes API server, role binding and kubeconfig. | See https://github.com/int128/kubelogin for more. / Installed plugin: oidc-loginPrepare a
kubeconfigfor later use:cp ~/.kube/config ~/.kube/config-oidcModify the configuration of
~/.kube/config-oidcas follows:apiVersion: v1 kind: Config ... contexts: - context: cluster: shoot--project--mycluster user: my-oidc name: shoot--project--mycluster ... users: - name: my-oidc user: exec: apiVersion: client.authentication.k8s.io/v1beta1 command: kubectl args: - oidc-login - get-token - --oidc-issuer-url=https://<Issuer>/ - --oidc-client-id=<Client ID> - --oidc-client-secret=<Client Secret> - --oidc-extra-scope=email,offline_access,profile
To test our OIDC-based authentication, the context shoot--project--mycluster of ~/.kube/config-oidc is used in a later step. For now, continue to use the configuration ~/.kube/config with administration rights for your cluster.
Configure the Shoot Cluster
Create a AuthenticationConfiguration configmap in the project’s namespace.
For more options, check out Gardener Structured Authentication and Kubernetes Structured Authentication documentation.
apiVersion: v1
kind: ConfigMap
metadata:
name: authentication-config
namespace: garden-project
data:
config.yaml: |
apiVersion: apiserver.config.k8s.io/v1beta1
kind: AuthenticationConfiguration
jwt:
- issuer:
url: https://<Issuer>/
audiences:
- <Client ID>
claimMappings:
username:
claim: 'email'
prefix: 'unique-issuer-identifier:'
Modify the shoot cluster YAML as follows, using the client ID and the domain (as issuer) from the settings of the client application you created in Auth0:
kind: Shoot
apiVersion: garden.sapcloud.io/v1beta1
metadata:
name: mycluster
namespace: garden-project
...
spec:
kubernetes:
kubeAPIServer:
structuredAuthentication:
configMapName: authentication-config
This change of the Shoot manifest triggers a reconciliation. Once the reconciliation is finished, your OIDC configuration is applied. It doesn’t invalidate other certificate-based authentication methods. Wait for Gardener to reconcile the change. It can take up to 5 minutes.
Authorize an Authenticated User
In Auth0, you created a user with a verified email address, test@test.com in our example. For simplicity, we authorize a single user identified by this email address with the cluster role view:
Important
Do not forget to add the unique prefix to the name of the user.
apiVersion: rbac.authorization.k8s.io/v1
kind: ClusterRoleBinding
metadata:
name: viewer-test
roleRef:
apiGroup: rbac.authorization.k8s.io
kind: ClusterRole
name: view
subjects:
- apiGroup: rbac.authorization.k8s.io
kind: User
name: unique-issuer-identifier:test@test.com
As administrator, apply the cluster role binding in your shoot cluster.
Verify the Result
To step into the shoes of your user, use the prepared
kubeconfigfile~/.kube/config-oidc, and switch to the context that usesoidc-login:cd ~/.kube export KUBECONFIG=$(pwd)/config-oidc kubectl config use-context `shoot--project--mycluster`kubectldelegates the authentication to pluginoidc-loginthe first time the user useskubectlto contact the API server, for example:kubectl get allThe plugin opens a browser for an interactive authentication session with Auth0, and in parallel serves a local webserver for the configured callback.
Enter your login credentials.

You should get a successful response from the API server:
Opening in existing browser session. NAME TYPE CLUSTER-IP EXTERNAL-IP PORT(S) AGE service/kubernetes ClusterIP 100.64.0.1 <none> 443/TCP 86m
Note
After a successful login,
kubectluses a token for authentication so that you don’t have to provide user and password for every newkubectlcommand. How long the token is valid can be configured. If you want to log in again earlier, reset pluginoidc-login:
- Delete directory
~/.kube/cache/oidc-login.- Delete the browser cache.
To see if your user uses the cluster role
view, do some checks withkubectl auth can-i.The response for the following commands should be
no:kubectl auth can-i create clusterrolebindingskubectl auth can-i get secretskubectl auth can-i describe secretsThe response for the following commands should be
yes:kubectl auth can-i list podskubectl auth can-i get pods
If the last step is successful, you’ve configured your cluster to authenticate against an identity provider using OIDC.
Related Links
2.4.3 - Backup and Restore of Kubernetes Objects
TL;DR
Note
Details of the description might change in the near future since Heptio was taken over by VMWare which might result in different GitHub repositories or other changes. Please don’t hesitate to inform us in case you encounter any issues.
In general, Backup and Restore (BR) covers activities enabling an organization to bring a system back in a consistent state, e.g., after a disaster or to setup a new system. These activities vary in a very broad way depending on the applications and its persistency.
Kubernetes objects like Pods, Deployments, NetworkPolicies, etc. configure Kubernetes internal components and might as well include external components like load balancer and persistent volumes of the cloud provider. The BR of external components and their configurations might be difficult to handle in case manual configurations were needed to prepare these components.
To set the expectations right from the beginning, this tutorial covers the BR of Kubernetes deployments which might use persistent volumes. The BR of any manual configuration of external components, e.g., via the cloud providers console, is not covered here, as well as the BR of a whole Kubernetes system.
This tutorial puts the focus on the open source tool Velero (formerly Heptio Ark) and its functionality to explain the BR process.
Basically, Velero allows you to:
- backup and restore your Kubernetes cluster resources and persistent volumes (on-demand or scheduled)
- backup or restore all objects in your cluster, or filter resources by type, namespace, and/or label
- by default, all persistent volumes are backed up (configurable)
- replicate your production environment for development and testing environments
- define an expiration date per backup
- execute pre- and post-activities in a container of a pod when a backup is created (see Hooks)
- extend Velero by Plugins, e.g., for Object and Block store (see Plugins)
Velero consists of a server side component and a client tool. The server components consists of Custom Resource Definitions (CRD) and controllers to perform the activities. The client tool communicates with the K8s API server to, e.g., create objects like a Backup object.
The diagram below explains the backup process. When creating a backup, Velero client makes a call to the Kubernetes API server to create a Backup object (1). The BackupController notices the new Backup object, validates the object (2) and begins the backup process (3). Based on the filter settings provided by the Velero client it collects the resources in question (3). The BackupController creates a tar ball with the Kubernetes objects and stores it in the backup location, e.g., AWS S3 (4) as well as snapshots of persistent volumes (5).
The size of the backup tar ball corresponds to the number of objects in etcd. The gzipped archive contains the Json representations of the objects.

Note
As of the writing of this tutorial, Velero or any other BR tool for Shoot clusters is not provided by Gardener.
Getting Started
At first, clone the Velero GitHub repository and get the Velero client from the releases or build it from source via make all in the main directory of the cloned GitHub repository.
To use an AWS S3 bucket as storage for the backup files and the persistent volumes, you need to:
- create a S3 bucket as the backup target
- create an AWS IAM user for Velero
- configure the Velero server
- create a secret for your AWS credentials
For details about this setup, check the Set Permissions for Velero documentation. Moreover, it is possible to use other supported storage providers.
Note
Per default, Velero is installed in the namespace
velero. To change the namespace, check the documentation.
Velero offers a wide range of filter possibilities for Kubernetes resources, e.g filter by namespaces, labels or resource types. The filter settings can be combined and used as include or exclude, which gives a great flexibility for selecting resources.
Note
Carefully set labels and/or use namespaces for your deployments to make the selection of the resources to be backed up easier. The best practice would be to check in advance which resources are selected with the defined filter.
Exemplary Use Cases
Below are some use cases which could give you an idea on how to use Velero. You can also check Velero’s documentation for other introductory examples.
Helm Based Deployments
To be able to use Helm charts in your Kubernetes cluster, you need to install the Helm client helm and the server component tiller. Per default the server component is installed in the namespace kube-system. Even if it is possible to select single deployments via the filter settings of Velero, you should consider to install tiller in a separate namespace via helm init --tiller-namespace <your namespace>. This approach applies as well for all Helm charts to be deployed - consider separate namespaces for your deployments as well by using the parameter --namespace.
To backup a Helm based deployment, you need to backup both Tiller and the deployment. Only then the deployments could be managed via Helm. As mentioned above, the selection of resources would be easier in case they are separated in namespaces.
Separate Backup Locations
In case you run all your Kubernetes clusters on a single cloud provider, there is probably no need to store the backups in a bucket of a different cloud provider. However, if you run Kubernetes clusters on different cloud provider, you might consider to use a bucket on just one cloud provider as the target for the backups, e.g., to benefit from a lower price tag for the storage.
Per default, Velero assumes that both the persistent volumes and the backup location are on the same cloud provider. During the setup of Velero, a secret is created using the credentials for a cloud provider user who has access to both objects (see the policies, e.g., for the AWS configuration).
Now, since the backup location is different from the volume location, you need to follow these steps (described here for AWS):
configure as documented the volume storage location in
examples/aws/06-volumesnapshotlocation.yamland provide the user credentials. In this case, the S3 related settings like the policies can be omittedcreate the bucket for the backup in the cloud provider in question and a user with the appropriate credentials and store them in a separate file similar to
credentials-arkcreate a secret which contains two credentials, one for the volumes and one for the backup target, e.g., by using the command
kubectl create secret generic cloud-credentials --namespace heptio-ark --from-file cloud=credentials-ark --from-file backup-target=backup-arkconfigure in the deployment manifest
examples/aws/10-deployment.yamlthe entries involumeMounts,envandvolumesaccordingly, e.g., for a cluster running on AWS and the backup target bucket on GCP a configuration could look similar to:Some links might get broken in the near future since Heptio was taken over by VMWare which might result in different GitHub repositories or other changes. Please don't hesitate to inform us in case you encounter any issues.Example Velero deployment
# Copyright 2017 the Heptio Ark contributors. # # Licensed under the Apache License, Version 2.0 (the "License"); # you may not use this file except in compliance with the License. # You may obtain a copy of the License at # # http://www.apache.org/licenses/LICENSE-2.0 # # Unless required by applicable law or agreed to in writing, software # distributed under the License is distributed on an "AS IS" BASIS, # WITHOUT WARRANTIES OR CONDITIONS OF ANY KIND, either express or implied. # See the License for the specific language governing permissions and # limitations under the License. --- apiVersion: apps/v1beta1 kind: Deployment metadata: namespace: velero name: velero spec: replicas: 1 template: metadata: labels: component: velero annotations: prometheus.io/scrape: "true" prometheus.io/port: "8085" prometheus.io/path: "/metrics" spec: restartPolicy: Always serviceAccountName: velero containers: - name: velero image: gcr.io/heptio-images/velero:latest command: - /velero args: - server volumeMounts: - name: cloud-credentials mountPath: /credentials - name: plugins mountPath: /plugins - name: scratch mountPath: /scratch env: - name: AWS_SHARED_CREDENTIALS_FILE value: /credentials/cloud - name: GOOGLE_APPLICATION_CREDENTIALS value: /credentials/backup-target - name: VELERO_SCRATCH_DIR value: /scratch volumes: - name: cloud-credentials secret: secretName: cloud-credentials - name: plugins emptyDir: {} - name: scratch emptyDir: {}finally, configure the backup storage location in
examples/aws/05-backupstoragelocation.yamlto use, in this case, a GCP bucket
Limitations
Below is a potentially incomplete list of limitations. You can also consult Velero’s documentation to get up to date information.
- Only full backups of selected resources are supported. Incremental backups are not (yet) supported. However, by using filters it is possible to restrict the backup to specific resources
- Inconsistencies might occur in case of changes during the creation of the backup
- Application specific actions are not considered by default. However, they might be handled by using Velero’s Hooks or Plugins
2.4.4 - Create / Delete a Shoot Cluster
Create a Shoot Cluster
As you have already prepared an example Shoot manifest in the steps described in the development documentation, please open another Terminal pane/window with the KUBECONFIG environment variable pointing to the Garden development cluster and send the manifest to the Kubernetes API server:
kubectl apply -f your-shoot-aws.yaml
You should see that Gardener has immediately picked up your manifest and has started to deploy the Shoot cluster.
In order to investigate what is happening in the Seed cluster, please download its proper Kubeconfig yourself (see next paragraph). The namespace of the Shoot cluster in the Seed cluster will look like that: shoot-johndoe-johndoe-1, whereas the first johndoe is your namespace in the Garden cluster (also called “project”) and the johndoe-1 suffix is the actual name of the Shoot cluster.
To connect to the newly created Shoot cluster, you must download its Kubeconfig as well. Please connect to the proper Seed cluster, navigate to the Shoot namespace, and download the Kubeconfig from the kubecfg secret in that namespace.
Delete a Shoot Cluster
In order to delete your cluster, you have to set an annotation confirming the deletion first, and trigger the deletion after that. You can use the prepared delete shoot script which takes the Shoot name as first parameter. The namespace can be specified by the second parameter, but it is optional. If you don’t state it, it defaults to your namespace (the username you are logged in with to your machine).
./hack/usage/delete shoot johndoe-1 johndoe
(the hack bash script can be found at GitHub)
Configure a Shoot Cluster Alert Receiver
The receiver of the Shoot alerts can be configured from the .spec.monitoring.alerting.emailReceivers section in the Shoot specification. The value of the field has to be a list of valid mail addresses.
The alerting for the Shoot clusters is handled by the Prometheus Alertmanager. The Alertmanager will be deployed next to the control plane when the Shoot resource specifies .spec.monitoring.alerting.emailReceivers and if a SMTP secret exists.
If the field gets removed then the Alertmanager will be also removed during the next reconcilation of the cluster. The opposite is also valid if the field is added to an existing cluster.
2.4.5 - Create a Shoot Cluster Into an Existing AWS VPC
Overview
Gardener can create a new VPC, or use an existing one for your shoot cluster. Depending on your needs, you may want to create shoot(s) into an already created VPC. The tutorial describes how to create a shoot cluster into an existing AWS VPC. The steps are identical for Alicloud, Azure, and GCP. Please note that the existing VPC must be in the same region like the shoot cluster that you want to deploy into the VPC.
TL;DR
If .spec.provider.infrastructureConfig.networks.vpc.cidr is specified, Gardener will create a new VPC with the given CIDR block and respectively will delete it on shoot deletion.
If .spec.provider.infrastructureConfig.networks.vpc.id is specified, Gardener will use the existing VPC and respectively won’t delete it on shoot deletion.
Note
It’s not recommended to create a shoot cluster into a VPC that is managed by Gardener (that is created for another shoot cluster). In this case the deletion of the initial shoot cluster will fail to delete the VPC because there will be resources attached to it.
Gardener won’t delete any manually created (unmanaged) resources in your cloud provider account.
1. Configure the AWS CLI
The aws configure command is a convenient way to setup your AWS CLI. It will prompt you for your credentials and settings which will be used in the following AWS CLI invocations:
aws configure
AWS Access Key ID [None]: <ACCESS_KEY_ID>
AWS Secret Access Key [None]: <SECRET_ACCESS_KEY>
Default region name [None]: <DEFAULT_REGION>
Default output format [None]: <DEFAULT_OUTPUT_FORMAT>
2. Create a VPC
Create the VPC by running the following command:
aws ec2 create-vpc --cidr-block <cidr-block>
{
"Vpc": {
"VpcId": "vpc-ff7bbf86",
"InstanceTenancy": "default",
"Tags": [],
"CidrBlockAssociations": [
{
"AssociationId": "vpc-cidr-assoc-6e42b505",
"CidrBlock": "10.0.0.0/16",
"CidrBlockState": {
"State": "associated"
}
}
],
"Ipv6CidrBlockAssociationSet": [],
"State": "pending",
"DhcpOptionsId": "dopt-38f7a057",
"CidrBlock": "10.0.0.0/16",
"IsDefault": false
}
}
Gardener requires the VPC to have enabled DNS support, i.e the attributes enableDnsSupport and enableDnsHostnames must be set to true. enableDnsSupport attribute is enabled by default, enableDnsHostnames - not. Set the enableDnsHostnames attribute to true:
aws ec2 modify-vpc-attribute --vpc-id vpc-ff7bbf86 --enable-dns-hostnames
3. Create an Internet Gateway
Gardener also requires that an internet gateway is attached to the VPC. You can create one by using:
aws ec2 create-internet-gateway
{
"InternetGateway": {
"Tags": [],
"InternetGatewayId": "igw-c0a643a9",
"Attachments": []
}
}
and attach it to the VPC using:
aws ec2 attach-internet-gateway --internet-gateway-id igw-c0a643a9 --vpc-id vpc-ff7bbf86
4. Create the Shoot
Prepare your shoot manifest (you could check the example manifests). Please make sure that you choose the region in which you had created the VPC earlier (step 2). Also, put your VPC ID in the .spec.provider.infrastructureConfig.networks.vpc.id field:
spec:
region: <aws-region-of-vpc>
provider:
type: aws
infrastructureConfig:
apiVersion: aws.provider.extensions.gardener.cloud/v1alpha1
kind: InfrastructureConfig
networks:
vpc:
id: vpc-ff7bbf86
# ...
Apply your shoot manifest:
kubectl apply -f your-shoot-aws.yaml
Ensure that the shoot cluster is properly created:
kubectl get shoot $SHOOT_NAME -n $SHOOT_NAMESPACE
NAME CLOUDPROFILE VERSION SEED DOMAIN OPERATION PROGRESS APISERVER CONTROL NODES SYSTEM AGE
<SHOOT_NAME> aws 1.15.0 aws <SHOOT_DOMAIN> Succeeded 100 True True True True 20m
2.4.6 - Fix Problematic Conversion Webhooks
Reasoning
Custom Resource Definition (CRD) is what you use to define a Custom Resource. This is a powerful way to extend Kubernetes capabilities beyond the default installation, adding any kind of API objects useful for your application.
The CustomResourceDefinition API provides a workflow for introducing and upgrading to new versions of a CustomResourceDefinition. In a scenario where a CRD adds support for a new version and switches its spec.versions.storage field to it (i.e., from v1beta1 to v1), existing objects are not migrated in etcd. For more information, see Versions in CustomResourceDefinitions.
This creates a mismatch between the requested and stored version for all clients (kubectl, KCM, etc.). When the CRD also declares the usage of a conversion webhook, it gets called whenever a client requests information about a resource that still exists in the old version. If the CRD is created by the end-user, the webhook runs on the shoot side, whereas controllers / kapi-servers run separated, as part of the control-plane. For the webhook to be reachable, a working VPN connection seed -> shoot is essential. In scenarios where the VPN connection is broken, the kube-controller-manager eventually stops its garbage collection, as that requires it to list v1.PartialObjectMetadata for everything to build a dependency graph. Without the kube-controller-manager’s garbage collector, managed resources get stuck during update/rollout.
Breaking Situations
When a user upgrades to failureTolerance: node|zone, that will cause the VPN deployments to be replaced by statefulsets. However, as the VPN connection is broken upon teardown of the deployment, garbage collection will fail, leading to a situation that is stuck until an operator manually tackles it.
Such a situation can be avoided if the end-user has correctly configured CRDs containing conversion webhooks.
Checking Problematic CRDs
In order to make sure there are no version problematic CRDs, please run the script below in your shoot. It will return the name of the CRDs in case they have one of the 2 problems:
- the returned version of the CR is different than what is maintained in the
status.storedVersionsfield of the CRD. - the
status.storedVersionsfield of the CRD has more than 1 version defined.
#!/bin/bash
set -e -o pipefail
echo "Checking all CRDs in the cluster..."
for p in $(kubectl get crd | awk 'NR>1' | awk '{print $1}'); do
strategy=$(kubectl get crd "$p" -o json | jq -r .spec.conversion.strategy)
if [ "$strategy" == "Webhook" ]; then
crd_name=$(kubectl get crd "$p" -o json | jq -r .metadata.name)
number_of_stored_versions=$(kubectl get crd "$crd_name" -o json | jq '.status.storedVersions | length')
if [[ "$number_of_stored_versions" == 1 ]]; then
returned_cr_version=$(kubectl get "$crd_name" -A -o json | jq -r '.items[] | .apiVersion' | sed 's:.*/::')
if [ -z "$returned_cr_version" ]; then
continue
else
variable=$(echo "$returned_cr_version" | xargs -n1 | sort -u | xargs)
present_version=$(kubectl get crd "$crd_name" -o json | jq -cr '.status.storedVersions |.[]')
if [[ $variable != "$present_version" ]]; then
echo "ERROR: Stored version differs from the version that CRs are being returned. $crd_name with conversion webhook needs to be fixed"
fi
fi
fi
if [[ "$number_of_stored_versions" -gt 1 ]]; then
returned_cr_version=$(kubectl get "$crd_name" -A -o json | jq -r '.items[] | .apiVersion' | sed 's:.*/::')
if [ -z "$returned_cr_version" ]; then
continue
else
echo "ERROR: Too many stored versions defined. $crd_name with conversion webhook needs to be fixed"
fi
fi
fi
done
echo "Problematic CRDs are reported above."
Resolve CRDs
Below we give the steps needed to be taken in order to fix the CRDs reported by the script above.
Inspect all your CRDs that have conversion webhooks in place. If you have more than 1 version defined in its spec.status.storedVersions field, then initiate migration as described in Option 2 in the Upgrade existing objects to a new stored version guide.
For convenience, we have provided the necessary steps below.
Note
Please test the following steps on a non-productive landscape to make sure that the new CR version doesn’t break any of your existing workloads.
Please check/set the old CR version to
storage:falseand set the new CR version tostorage:true.For the sake of an example, let’s consider the two versions
v1beta1(old) andv1(new).Before:
spec: versions: - name: v1beta1 ...... storage: true - name: v1 ...... storage: falseAfter:
spec: versions: - name: v1beta1 ...... storage: false - name: v1 ...... storage: trueConvert
custom-resourcesto the newest version.kubectl get <custom-resource-name> -A -ojson | k apply -f -Patch the CRD to keep only the latest version under storedVersions.
kubectl patch customresourcedefinitions <crd-name> --subresource='status' --type='merge' -p '{"status":{"storedVersions":["your-latest-cr-version"]}}'
2.4.7 - GPU Enabled Cluster
Disclaimer
Be aware, that the following sections might be opinionated. Kubernetes, and the GPU support in particular, are rapidly evolving, which means that this guide is likely to be outdated sometime soon. For this reason, contributions are highly appreciated to update this guide.
Create a Cluster
First thing first, let’s create a Kubernetes (K8s) cluster with GPU accelerated nodes. In this example we will use an AWS p2.xlarge EC2 instance because it’s the cheapest available option at the moment. Use such cheap instances for learning to limit your resource costs. This costs around 1€/hour per GPU
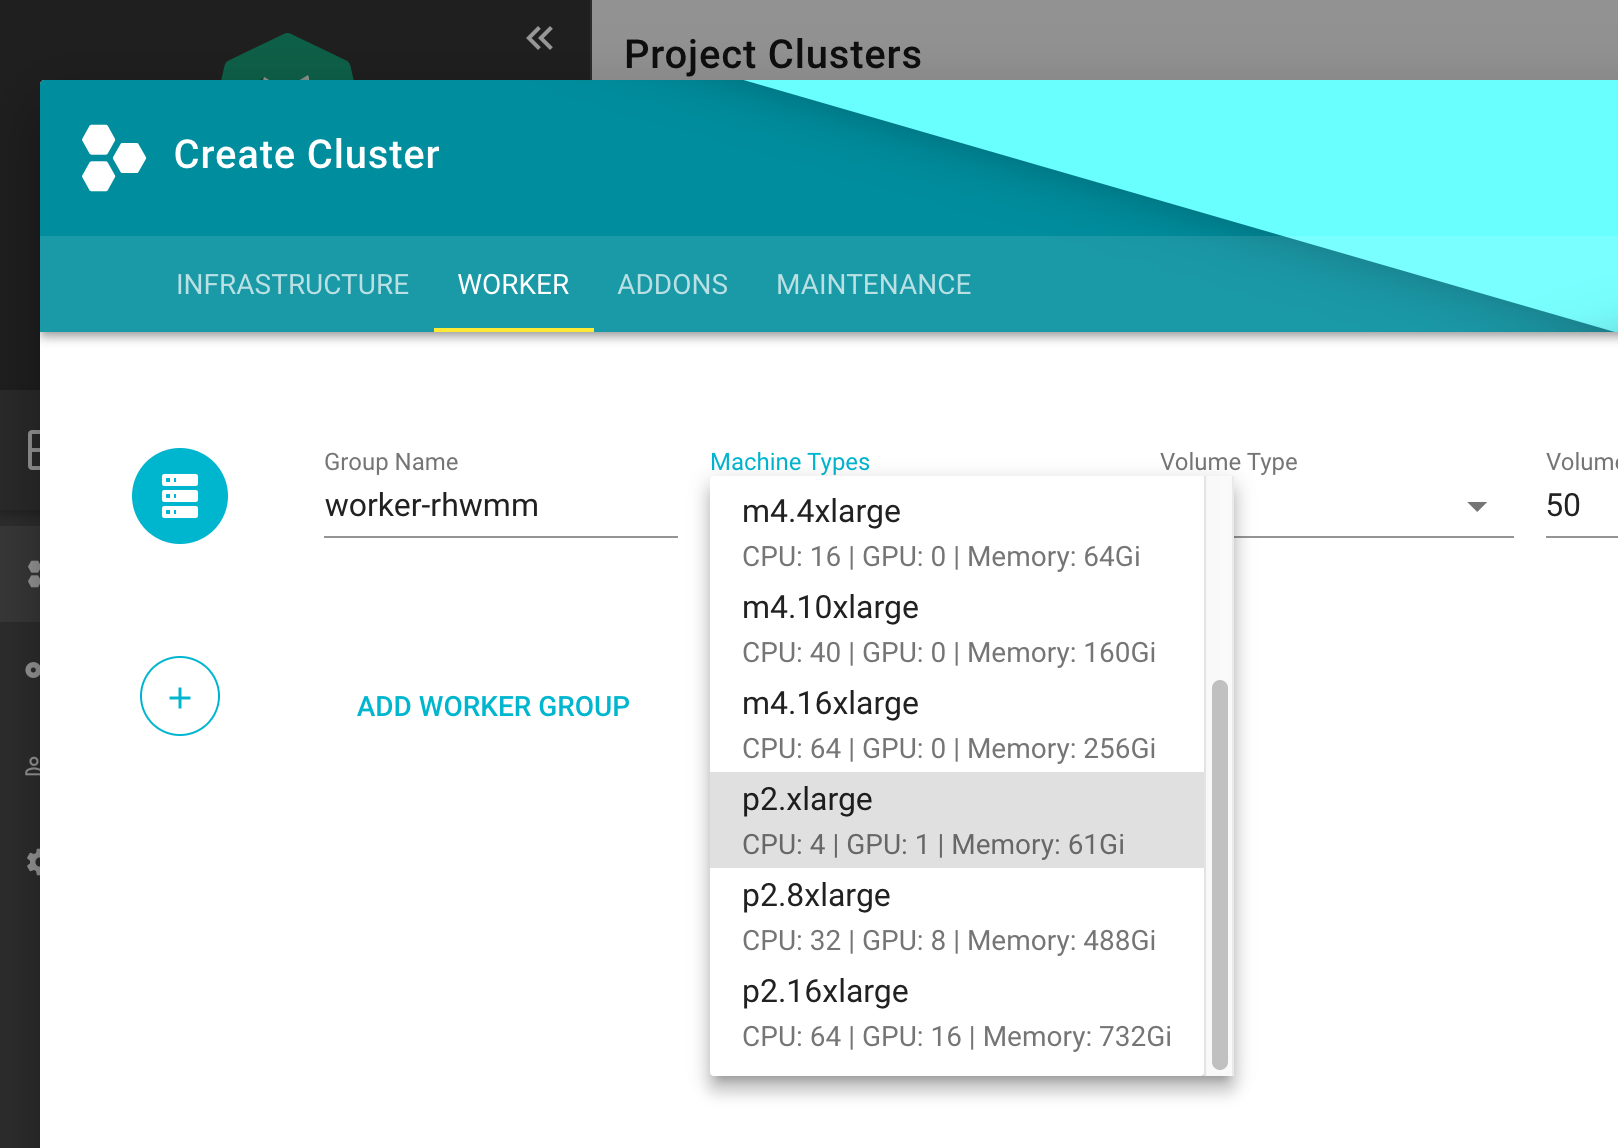
Install NVidia Driver as Daemonset
apiVersion: apps/v1
kind: DaemonSet
metadata:
name: nvidia-driver-installer
namespace: kube-system
labels:
k8s-app: nvidia-driver-installer
spec:
selector:
matchLabels:
name: nvidia-driver-installer
k8s-app: nvidia-driver-installer
template:
metadata:
labels:
name: nvidia-driver-installer
k8s-app: nvidia-driver-installer
spec:
hostPID: true
initContainers:
- image: squat/modulus:4a1799e7aa0143bcbb70d354bab3e419b1f54972
name: modulus
args:
- compile
- nvidia
- "410.104"
securityContext:
privileged: true
env:
- name: MODULUS_CHROOT
value: "true"
- name: MODULUS_INSTALL
value: "true"
- name: MODULUS_INSTALL_DIR
value: /opt/drivers
- name: MODULUS_CACHE_DIR
value: /opt/modulus/cache
- name: MODULUS_LD_ROOT
value: /root
- name: IGNORE_MISSING_MODULE_SYMVERS
value: "1"
volumeMounts:
- name: etc-coreos
mountPath: /etc/coreos
readOnly: true
- name: usr-share-coreos
mountPath: /usr/share/coreos
readOnly: true
- name: ld-root
mountPath: /root
- name: module-cache
mountPath: /opt/modulus/cache
- name: module-install-dir-base
mountPath: /opt/drivers
- name: dev
mountPath: /dev
containers:
- image: "gcr.io/google-containers/pause:3.1"
name: pause
tolerations:
- key: "nvidia.com/gpu"
effect: "NoSchedule"
operator: "Exists"
volumes:
- name: etc-coreos
hostPath:
path: /etc/coreos
- name: usr-share-coreos
hostPath:
path: /usr/share/coreos
- name: ld-root
hostPath:
path: /
- name: module-cache
hostPath:
path: /opt/modulus/cache
- name: dev
hostPath:
path: /dev
- name: module-install-dir-base
hostPath:
path: /opt/drivers
Install Device Plugin
apiVersion: apps/v1
kind: DaemonSet
metadata:
name: nvidia-gpu-device-plugin
namespace: kube-system
labels:
k8s-app: nvidia-gpu-device-plugin
#addonmanager.kubernetes.io/mode: Reconcile
spec:
selector:
matchLabels:
k8s-app: nvidia-gpu-device-plugin
template:
metadata:
labels:
k8s-app: nvidia-gpu-device-plugin
annotations:
scheduler.alpha.kubernetes.io/critical-pod: ''
spec:
priorityClassName: system-node-critical
volumes:
- name: device-plugin
hostPath:
path: /var/lib/kubelet/device-plugins
- name: dev
hostPath:
path: /dev
containers:
- image: "k8s.gcr.io/nvidia-gpu-device-plugin@sha256:08509a36233c5096bb273a492251a9a5ca28558ab36d74007ca2a9d3f0b61e1d"
command: ["/usr/bin/nvidia-gpu-device-plugin", "-logtostderr", "-host-path=/opt/drivers/nvidia"]
name: nvidia-gpu-device-plugin
resources:
requests:
cpu: 50m
memory: 10Mi
limits:
cpu: 50m
memory: 10Mi
securityContext:
privileged: true
volumeMounts:
- name: device-plugin
mountPath: /device-plugin
- name: dev
mountPath: /dev
updateStrategy:
type: RollingUpdate
Test
To run an example training on a GPU node, first start a base image with Tensorflow with GPU support & Keras:
apiVersion: apps/v1
kind: Deployment
metadata:
name: deeplearning-workbench
namespace: default
spec:
replicas: 1
selector:
matchLabels:
app: deeplearning-workbench
template:
metadata:
labels:
app: deeplearning-workbench
spec:
containers:
- name: deeplearning-workbench
image: afritzler/deeplearning-workbench
resources:
limits:
nvidia.com/gpu: 1
tolerations:
- key: "nvidia.com/gpu"
effect: "NoSchedule"
operator: "Exists"
Note
The
tolerationssection above is not required if you deploy theExtendedResourceTolerationadmission controller to your cluster. You can do this in thekubernetessection of your Gardener clustershoot.yamlas follows:
kubernetes:
kubeAPIServer:
admissionPlugins:
- name: ExtendedResourceToleration
Now exec into the container and start an example Keras training:
kubectl exec -it deeplearning-workbench-8676458f5d-p4d2v -- /bin/bash
cd /keras/example
python imdb_cnn.py
Related Links
- Andreas Fritzler from the Gardener Core team for the R&D, who has provided this setup.
- Build and install NVIDIA driver on CoreOS
2.4.8 - Shoot Cluster Maintenance
Overview
Day two operations for shoot clusters are related to:
- The Kubernetes version of the control plane and the worker nodes
- The operating system version of the worker nodes
Note
When referring to an update of the “operating system version” in this document, the update of the machine image of the shoot cluster’s worker nodes is meant. For example, Amazon Machine Images (AMI) for AWS.
The following table summarizes what options Gardener offers to maintain these versions:
| Auto-Update | Forceful Updates | Manual Updates | |
|---|---|---|---|
| Kubernetes version | Patches only | Patches and consecutive minor updates only | yes |
| Operating system version | yes | yes | yes |
Allowed Target Versions in the CloudProfile
Administrators maintain the allowed target versions that you can update to in the CloudProfile for each IaaS-Provider. Users with access to a Gardener project can check supported target versions with:
kubectl get cloudprofile [IAAS-SPECIFIC-PROFILE] -o yaml
| Path | Description | More Information |
|---|---|---|
spec.kubernetes.versions | The supported Kubernetes version major.minor.patch. | Patch releases |
spec.machineImages | The supported operating system versions for worker nodes |
Both the Kubernetes version and the operating system version follow semantic versioning that allows Gardener to handle updates automatically.
For more information, see Semantic Versioning.
Impact of Version Classifications on Updates
Gardener allows to classify versions in the CloudProfile as preview, supported, deprecated, or expired. During maintenance operations, preview versions are excluded from updates, because they’re often recently released versions that haven’t yet undergone thorough testing and may contain bugs or security issues.
For more information, see Version Classifications.
Let Gardener Manage Your Updates
The Maintenance Window
Gardener can manage updates for you automatically. It offers users to specify a maintenance window during which updates are scheduled:
- The time interval of the maintenance window can’t be less than 30 minutes or more than 6 hours.
- If there’s no maintenance window specified during the creation of a shoot cluster, Gardener chooses a maintenance window randomly to spread the load.
You can either specify the maintenance window in the shoot cluster specification (.spec.maintenance.timeWindow) or the start time of the maintenance window using the Gardener dashboard (CLUSTERS > [YOUR-CLUSTER] > OVERVIEW > Lifecycle > Maintenance).
Auto-Update and Forceful Updates
To trigger updates during the maintenance window automatically, Gardener offers the following methods:
Auto-update:
Gardener starts an update during the next maintenance window whenever there’s a version available in theCloudProfilethat is higher than the one of your shoot cluster specification, and that isn’t classified aspreviewversion. For Kubernetes versions, auto-update only updates to higher patch levels.You can either activate auto-update on the Gardener dashboard (CLUSTERS > [YOUR-CLUSTER] > OVERVIEW > Lifecycle > Maintenance) or in the shoot cluster specification:
.spec.maintenance.autoUpdate.kubernetesVersion: true.spec.maintenance.autoUpdate.machineImageVersion: true
Forceful updates:
In the maintenance window, Gardener compares the current version given in the shoot cluster specification with the version list in theCloudProfile. If the version has an expiration date and if the date is before the start of the maintenance window, Gardener starts an update to the highest version available in theCloudProfilethat isn’t classified aspreviewversion. The highest version inCloudProfilecan’t have an expiration date. For Kubernetes versions, Gardener only updates to higher patch levels or consecutive minor versions.
If you don’t want to wait for the next maintenance window, you can annotate the shoot cluster specification with shoot.gardener.cloud/operation: maintain. Gardener then checks immediately if there’s an auto-update or a forceful update needed.
Note
Forceful version updates are executed even if the auto-update for the Kubernetes version(or the auto-update for the machine image version) is deactivated (set to
false).
With expiration dates, administrators can give shoot cluster owners more time for testing before the actual version update happens, which allows for smoother transitions to new versions.
Kubernetes Update Paths
The bigger the delta of the Kubernetes source version and the Kubernetes target version, the better it must be planned and executed by operators. Gardener only provides automatic support for updates that can be applied safely to the cluster workload:
| Update Type | Example | Update Method |
|---|---|---|
| Patches | 1.10.12 to 1.10.13 | auto-update or Forceful update |
| Update to consecutive minor version | 1.10.12 to 1.11.10 | Forceful update |
| Other | 1.10.12 to 1.12.0 | Manual update |
Gardener doesn’t support automatic updates of nonconsecutive minor versions, because Kubernetes doesn’t guarantee updateability in this case. However, multiple minor version updates are possible if not only the minor source version is expired, but also the minor target version is expired. Gardener then updates the Kubernetes version first to the expired target version, and waits for the next maintenance window to update this version to the next minor target version.
Warning
The administrator who maintains the
CloudProfilehas to ensure that the list of Kubernetes versions consists of consecutive minor versions, for example, from1.10.xto1.11.y. If the minor version increases in bigger steps, for example, from1.10.xto1.12.y, then the shoot cluster updates will fail during the maintenance window.
Manual Updates
To update the Kubernetes version or the node operating system manually, change the .spec.kubernetes.version field or the .spec.provider.workers.machine.image.version field correspondingly.
Manual updates are required if you would like to do a minor update of the Kubernetes version. Gardener doesn’t do such updates automatically, as they can have breaking changes that could impact the cluster workload.
Manual updates are either executed immediately (default) or can be confined to the maintenance time window.
Choosing the latter option causes changes to the cluster (for example, node pool rolling-updates) and the subsequent reconciliation to only predictably happen during a defined time window (available since Gardener version 1.4).
For more information, see Confine Specification Changes/Update Roll Out.
Warning
Before applying such an update on minor or major releases, operators should check for all the breaking changes introduced in the target Kubernetes release changelog.
Examples
In the examples for the CloudProfile and the shoot cluster specification, only the fields relevant for the example are shown.
Auto-Update of Kubernetes Version
Let’s assume that the Kubernetes versions 1.10.5 and 1.11.0 were added in the following CloudProfile:
spec:
kubernetes:
versions:
- version: 1.11.0
- version: 1.10.5
- version: 1.10.0
Before this change, the shoot cluster specification looked like this:
spec:
kubernetes:
version: 1.10.0
maintenance:
timeWindow:
begin: 220000+0000
end: 230000+0000
autoUpdate:
kubernetesVersion: true
As a consequence, the shoot cluster is updated to Kubernetes version 1.10.5 between 22:00-23:00 UTC. Your shoot cluster isn’t updated automatically to 1.11.0, even though it’s the highest Kubernetes version in the CloudProfile, because Gardener only does automatic updates of the Kubernetes patch level.
Forceful Update Due to Expired Kubernetes Version
Let’s assume the following CloudProfile exists on the cluster:
spec:
kubernetes:
versions:
- version: 1.12.8
- version: 1.11.10
- version: 1.10.13
- version: 1.10.12
expirationDate: "2019-04-13T08:00:00Z"
Let’s assume the shoot cluster has the following specification:
spec:
kubernetes:
version: 1.10.12
maintenance:
timeWindow:
begin: 220000+0100
end: 230000+0100
autoUpdate:
kubernetesVersion: false
The shoot cluster specification refers to a Kubernetes version that has an expirationDate. In the maintenance window on 2019-04-12, the Kubernetes version stays the same as it’s still not expired. But in the maintenance window on 2019-04-14, the Kubernetes version of the shoot cluster is updated to 1.10.13 (independently of the value of .spec.maintenance.autoUpdate.kubernetesVersion).
Forceful Update to New Minor Kubernetes Version
Let’s assume the following CloudProfile exists on the cluster:
spec:
kubernetes:
versions:
- version: 1.12.8
- version: 1.11.10
- version: 1.11.09
- version: 1.10.12
expirationDate: "2019-04-13T08:00:00Z"
Let’s assume the shoot cluster has the following specification:
spec:
kubernetes:
version: 1.10.12
maintenance:
timeWindow:
begin: 220000+0100
end: 230000+0100
autoUpdate:
kubernetesVersion: false
The shoot cluster specification refers a Kubernetes version that has an expirationDate. In the maintenance window on 2019-04-14, the Kubernetes version of the shoot cluster is updated to 1.11.10, which is the highest patch version of minor target version 1.11 that follows the source version 1.10.
Automatic Update from Expired Machine Image Version
Let’s assume the following CloudProfile exists on the cluster:
spec:
machineImages:
- name: coreos
versions:
- version: 2191.5.0
- version: 2191.4.1
- version: 2135.6.0
expirationDate: "2019-04-13T08:00:00Z"
Let’s assume the shoot cluster has the following specification:
spec:
provider:
type: aws
workers:
- name: name
maximum: 1
minimum: 1
maxSurge: 1
maxUnavailable: 0
image:
name: coreos
version: 2135.6.0
type: m5.large
volume:
type: gp2
size: 20Gi
maintenance:
timeWindow:
begin: 220000+0100
end: 230000+0100
autoUpdate:
machineImageVersion: false
The shoot cluster specification refers a machine image version that has an expirationDate. In the maintenance window on 2019-04-12, the machine image version stays the same as it’s still not expired. But in the maintenance window on 2019-04-14, the machine image version of the shoot cluster is updated to 2191.5.0 (independently of the value of .spec.maintenance.autoUpdate.machineImageVersion) as version 2135.6.0 is expired.
2.4.9 - Tailscale
Access the Kubernetes apiserver from your tailnet
Overview
If you would like to strengthen the security of your Kubernetes cluster even further, this guide post explains how this can be achieved.
The most common way to secure a Kubernetes cluster which was created with Gardener is to apply the ACLs described in the Gardener ACL Extension repository or to use ExposureClass, which exposes the Kubernetes apiserver in a corporate network not exposed to the public internet.
However, those solutions are not without their drawbacks. Managing the ACL extension becomes fairly difficult with the growing number of participants, especially in a dynamic environment and work from home scenarios, and using ExposureClass requires you to first have a corporate network suitable for this purpose.
But there is a solution which bridges the gap between these two approaches by the use of a mesh VPN based on WireGuard.
Tailscale
Tailscale is a mesh VPN network which uses Wireguard under the hood, but automates the key exchange procedure. Please consult the official tailscale documentation for a detailed explanation.
Target Architecture

Installation
In order to be able to access the Kubernetes apiserver only from a tailscale VPN, you need this steps:
- Create a tailscale account and ensure MagicDNS is enabled.
- Create an OAuth ClientID and Secret OAuth ClientID and Secret. Don’t forget to create the required tags.
- Install the tailscale operator tailscale operator.
If all went well after the operator installation, you should be able to see the tailscale operator by running tailscale status:
# tailscale status
...
100.83.240.121 tailscale-operator tagged-devices linux -
...
Expose the Kubernetes apiserver
Now you are ready to expose the Kubernetes apiserver in the tailnet by annotating the service which was created by Gardener:
kubectl annotate -n default kubernetes tailscale.com/expose=true tailscale.com/hostname=kubernetes
It is required to kubernetes as the hostname, because this is part of the certificate common name of the Kubernetes apiserver.
After annotating the service, it will be exposed in the tailnet and can be shown by running tailscale status:
# tailscale status
...
100.83.240.121 tailscale-operator tagged-devices linux -
100.96.191.87 kubernetes tagged-devices linux idle, tx 19548 rx 71656
...
Modify the kubeconfig
In order to access the cluster via the VPN, you must modify the kubeconfig to point to the Kubernetes service exposed in the tailnet, by changing the server entry to https://kubernetes.
---
apiVersion: v1
clusters:
- cluster:
certificate-authority-data: <base64 encoded secret>
server: https://kubernetes
name: my-cluster
...
Enable ACLs to Block All IPs
Now you are ready to use your cluster from every device which is part of your tailnet. Therefore you can now block all access to the Kubernetes apiserver with the ACL extension.
Caveats
Multiple Kubernetes Clusters
You can actually not join multiple Kubernetes Clusters to join your tailnet because the kubernetes service in every cluster would overlap.
Headscale
It is possible to host a tailscale coordination by your own if you do not want to rely on the service tailscale.com offers. The headscale project is a open source implementation of this.
This works for basic tailscale VPN setups, but not for the tailscale operator described here, because headscale does not implement all required API endpoints for the tailscale operator.
The details can be found in this Github Issue.
2.5 - Monitor and Troubleshoot
2.5.1 - Analyzing Node Removal and Failures
Overview
Sometimes operators want to find out why a certain node got removed. This guide helps to identify possible causes. There are a few potential reasons why nodes can be removed:
- broken node: a node becomes unhealthy and machine-controller-manager terminates it in an attempt to replace the unhealthy node with a new one
- scale-down: cluster-autoscaler sees that a node is under-utilized and therefore scales down a worker pool
- node rolling: configuration changes to a worker pool (or cluster) require all nodes of one or all worker pools to be rolled and thus all nodes to be replaced. Some possible changes are:
- the K8s/OS version
- changing machine types
Helpful information can be obtained by using the logging stack. See Logging Stack for how to utilize the logging information in Gardener.
Find Out Whether the Node Was unhealthy
Check the Node Events
A good first indication on what happened to a node can be obtained from the node’s events. Events are scraped and ingested into the logging system, so they can be found in the explore tab of Grafana (make sure to select loki as datasource) with a query like {job="event-logging"} | unpack | object="Node/<node-name>" or find any event mentioning the node in question via a broader query like {job="event-logging"}|="<node-name>".
A potential result might reveal:
{"_entry":"Node ip-10-55-138-185.eu-central-1.compute.internal status is now: NodeNotReady","count":1,"firstTimestamp":"2023-04-05T12:02:08Z","lastTimestamp":"2023-04-05T12:02:08Z","namespace":"default","object":"Node/ip-10-55-138-185.eu-central-1.compute.internal","origin":"shoot","reason":"NodeNotReady","source":"node-controller","type":"Normal"}
Check machine-controller-manager Logs
If a node was getting unhealthy, the last conditions can be found in the logs of the machine-controller-manager by using a query like {pod_name=~"machine-controller-manager.*"}|="<node-name>".
Caveat: every node resource is backed by a corresponding machine resource managed by machine-controller-manager. Usually two corresponding node and machine resources have the same name with the exception of AWS. Here you first need to find with the above query the corresponding machine name, typically via a log like this
2023-04-05 12:02:08 {"log":"Conditions of Machine \"shoot--demo--cluster-pool-z1-6dffc-jh4z4\" with providerID \"aws:///eu-central-1/i-0a6ad1ca4c2e615dc\" and backing node \"ip-10-55-138-185.eu-central-1.compute.internal\" are changing","pid":"1","severity":"INFO","source":"machine_util.go:629"}
This reveals that node ip-10-55-138-185.eu-central-1.compute.internal is backed by machine shoot--demo--cluster-pool-z1-6dffc-jh4z4. On infrastructures other than AWS you can omit this step.
With the machine name at hand, now search for log entries with {pod_name=~"machine-controller-manager.*"}|="<machine-name>".
In case the node had failing conditions, you’d find logs like this:
2023-04-05 12:02:08 {"log":"Machine shoot--demo--cluster-pool-z1-6dffc-jh4z4 is unhealthy - changing MachineState to Unknown. Node conditions: [{Type:ClusterNetworkProblem Status:False LastHeartbeatTime:2023-04-05 11:58:39 +0000 UTC LastTransitionTime:2023-03-23 11:59:29 +0000 UTC Reason:NoNetworkProblems Message:no cluster network problems} ... {Type:Ready Status:Unknown LastHeartbeatTime:2023-04-05 11:55:27 +0000 UTC LastTransitionTime:2023-04-05 12:02:07 +0000 UTC Reason:NodeStatusUnknown Message:Kubelet stopped posting node status.}]","pid":"1","severity":"WARN","source":"machine_util.go:637"}
In the example above, the reason for an unhealthy node was that kubelet failed to renew its heartbeat. Typical reasons would be either a broken VM (that couldn’t execute kubelet anymore) or a broken network. Note that some VM terminations performed by the infrastructure provider are actually expected (e.g., scheduled events on AWS).
In both cases, the infrastructure provider might be able to provide more information on particular VM or network failures.
Whatever the failure condition might have been, if a node gets unhealthy, it will be terminated by machine-controller-manager after the machineHealthTimeout has elapsed (this parameter can be configured in your shoot spec).
Check the Node Logs
For each node the kernel and kubelet logs, as well as a few others, are scraped and can be queried with this query {nodename="<node-name>"}
This might reveal OS specific issues or, in the absence of any logs (e.g., after the node went unhealthy), might indicate a network disruption or sudden VM termination. Note that some VM terminations performed by the infrastructure provider are actually expected (e.g., scheduled events on AWS).
Infrastructure providers might be able to provide more information on particular VM failures in such cases.
Check the Network Problem Detector Dashboard
If your Gardener installation utilizes gardener-extension-shoot-networking-problemdetector, you can check the dashboard named “Network Problem Detector” in Grafana for hints on network issues on the node of interest.
Scale-Down
In general, scale-downs are managed by the cluster-autoscaler, its logs can be found with the query {container_name="cluster-autoscaler"}.
Attempts to remove a node can be found with the query {container_name="cluster-autoscaler"}|="Scale-down: removing empty node"
If a scale-down has caused disruptions in your workload, consider protecting your workload by adding PodDisruptionBudgets (see the autoscaler FAQ for more options).
Node Rolling
Node rolling can be caused by, e.g.:
- change of the K8s minor version of the cluster or a worker pool
- change of the OS version of the cluster or a worker pool
- change of the disk size/type or machine size/type of a worker pool
- change of node labels
Changes like the above are done by altering the shoot specification and thus are recorded in the external auditlog system that is configured for the garden cluster.
2.5.2 - Get a Shell to a Gardener Shoot Worker Node
Overview
To troubleshoot certain problems in a Kubernetes cluster, operators need access to the host of the Kubernetes node. This can be required if a node misbehaves or fails to join the cluster in the first place.
With access to the host, it is for instance possible to check the kubelet logs and interact with common tools such as systemctl and journalctl.
The first section of this guide explores options to get a shell to the node of a Gardener Kubernetes cluster. The options described in the second section do not rely on Kubernetes capabilities to get shell access to a node and thus can also be used if an instance failed to join the cluster.
This guide only covers how to get access to the host, but does not cover troubleshooting methods.
- Overview
- Get a Shell to an Operational Cluster Node
- SSH Access to a Node That Failed to Join the Cluster
- Cleanup
Get a Shell to an Operational Cluster Node
The following describes four different approaches to get a shell to an operational Shoot worker node. As a prerequisite to troubleshooting a Kubernetes node, the node must have joined the cluster successfully and be able to run a pod. All of the described approaches involve scheduling a pod with root permissions and mounting the root filesystem.
Gardener Dashboard
Prerequisite: the terminal feature is configured for the Gardener dashboard.
- Navigate to the cluster overview page and find the
Terminalin theAccesstile.

Select the target Cluster (Garden, Seed / Control Plane, Shoot cluster) depending on the requirements and access rights (only certain users have access to the Seed Control Plane).
- To open the terminal configuration, interact with the top right-hand corner of the screen.
- Set the Terminal Runtime to “Privileged”. Also, specify the target node from the drop-down menu.
Result
The Dashboard then schedules a pod and opens a shell session to the node.
To get access to the common binaries installed on the host, prefix the command with chroot /hostroot. Note that the path depends on where the root path is mounted in the container. In the default image used by the Dashboard, it is under /hostroot.

Gardener Ops Toolbelt
Prerequisite: kubectl is available.
The Gardener ops-toolbelt can be used as a convenient way to deploy a root pod to a node. The pod uses an image that is bundled with a bunch of useful troubleshooting tools. This is also the same image that is used by default when using the Gardener Dashboard terminal feature as described in the previous section.
The easiest way to use the Gardener ops-toolbelt is to execute the ops-pod script in the hacks folder. To get root shell access to a node, execute the aforementioned script by supplying the target node name as an argument:
<path-to-ops-toolbelt-repo>/hacks/ops-pod <target-node>
Custom Root Pod
Alternatively, a pod can be assigned to a target node and a shell can be opened via standard Kubernetes means. To enable root access to the node, the pod specification requires proper securityContext and volume properties.
For instance, you can use the following pod manifest, after changing
apiVersion: v1
kind: Pod
metadata:
name: privileged-pod
namespace: default
spec:
nodeSelector:
kubernetes.io/hostname: <target-node-name>
containers:
- name: busybox
image: busybox
stdin: true
securityContext:
privileged: true
volumeMounts:
- name: host-root-volume
mountPath: /host
readOnly: true
volumes:
- name: host-root-volume
hostPath:
path: /
hostNetwork: true
hostPID: true
restartPolicy: Never
SSH Access to a Node That Failed to Join the Cluster
This section explores two options that can be used to get SSH access to a node that failed to join the cluster. As it is not possible to schedule a pod on the node, the Kubernetes-based methods explored so far cannot be used in this scenario.
Additionally, Gardener typically provisions worker instances in a private subnet of the VPC, hence - there is no public IP address that could be used for direct SSH access.
For this scenario, cloud providers typically have extensive documentation (e.g., AWS & GCP and in some cases tooling support). However, these approaches are mostly cloud provider specific, require interaction via their CLI and API or sometimes the installation of a cloud provider specific agent on the node.
Alternatively, gardenctl can be used providing a cloud provider agnostic and out-of-the-box support to get ssh access to an instance in a private subnet. Currently gardenctl supports AWS, GCP, Openstack, Azure and Alibaba Cloud.
Identifying the Problematic Instance
First, the problematic instance has to be identified. In Gardener, worker pools can be created in different cloud provider regions, zones, and accounts.
The instance would typically show up as successfully started / running in the cloud provider dashboard or API and it is not immediately obvious which one has a problem. Instead, we can use the Gardener API / CRDs to obtain the faulty instance identifier in a cloud-agnostic way.
Gardener uses the Machine Controller Manager to create the Shoot worker nodes. For each worker node, the Machine Controller Manager creates a Machine CRD in the Shoot namespace in the respective Seed cluster. Usually the problematic instance can be identified, as the respective Machine CRD has status pending.
The instance / node name can be obtained from the Machine .status field:
kubectl get machine <machine-name> -o json | jq -r .status.node
This is all the information needed to go ahead and use gardenctl ssh to get a shell to the node. In addition, the used cloud provider, the specific identifier of the instance, and the instance region can be identified from the Machine CRD.
Get the identifier of the instance via:
kubectl get machine <machine-name> -o json | jq -r .spec.providerID // e.g aws:///eu-north-1/i-069733c435bdb4640
The identifier shows that the instance belongs to the cloud provider aws with the ec2 instance-id i-069733c435bdb4640 in region eu-north-1.
To get more information about the instance, check out the MachineClass (e.g., AWSMachineClass) that is associated with each Machine CRD in the Shoot namespace of the Seed cluster.
The AWSMachineClass contains the machine image (ami), machine-type, iam information, network-interfaces, subnets, security groups and attached volumes.
Of course, the information can also be used to get the instance with the cloud provider CLI / API.
gardenctl ssh
Using the node name of the problematic instance, we can use the gardenctl ssh command to get SSH access to the cloud provider instance via an automatically set up bastion host. gardenctl takes care of spinning up the bastion instance, setting up the SSH keys, ports and security groups and opens a root shell on the target instance. After the SSH session has ended, gardenctl deletes the created cloud provider resources.
Use the following commands:
- First, target a Garden cluster containing all the Shoot definitions.
gardenctl target garden <target-garden>
- Target an available Shoot by name. This sets up the context, configures the
kubeconfigfile of the Shoot cluster and downloads the cloud provider credentials. Subsequent commands will execute in this context.
gardenctl target shoot <target-shoot>
- This uses the cloud provider credentials to spin up the bastion and to open a shell on the target instance.
gardenctl ssh <target-node>
SSH with a Manually Created Bastion on AWS
In case you are not using gardenctl or want to control the bastion instance yourself, you can also manually set it up.
The steps described here are generally the same as those used by gardenctl internally.
Despite some cloud provider specifics, they can be generalized to the following list:
- Open port 22 on the target instance.
- Create an instance / VM in a public subnet (the bastion instance needs to have a public IP address).
- Set-up security groups and roles, and open port 22 for the bastion instance.
The following diagram shows an overview of how the SSH access to the target instance works:
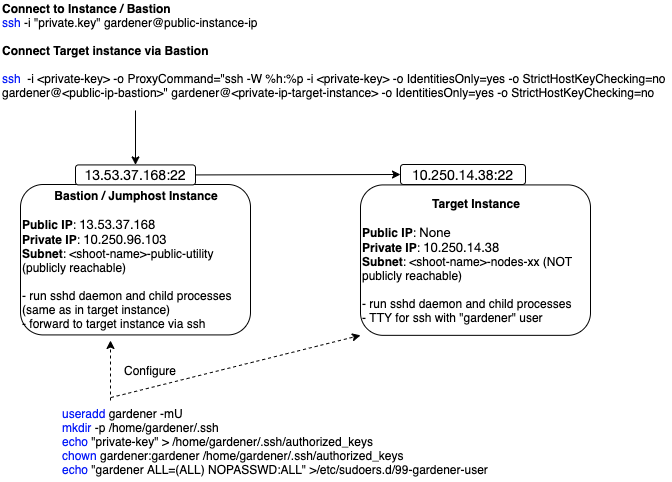
This guide demonstrates the setup of a bastion on AWS.
Prerequisites:
The
AWS CLIis set up.Obtain target
instance-id(see Identifying the Problematic Instance).Obtain the VPC ID the Shoot resources are created in. This can be found in the
InfrastructureCRD in theShootnamespace in theSeed.Make sure that port 22 on the target instance is open (default for Gardener deployed instances).
- Extract security group via:
aws ec2 describe-instances --instance-ids <instance-id>- Check for rule that allows inbound connections on port 22:
aws ec2 describe-security-groups --group-ids=<security-group-id>- If not available, create the rule with the following comamnd:
aws ec2 authorize-security-group-ingress --group-id <security-group-id> --protocol tcp --port 22 --cidr 0.0.0.0/0
Create the Bastion Security Group
- The common name of the security group is
<shoot-name>-bsg. Create the security group:
aws ec2 create-security-group --group-name <bastion-security-group-name> --description ssh-access --vpc-id <VPC-ID>
- Optionally, create identifying tags for the security group:
aws ec2 create-tags --resources <bastion-security-group-id> --tags Key=component,Value=<tag>
- Create a permission in the bastion security group that allows ssh access on port 22:
aws ec2 authorize-security-group-ingress --group-id <bastion-security-group-id> --protocol tcp --port 22 --cidr 0.0.0.0/0
- Create an IAM role for the bastion instance with the name
<shoot-name>-bastions:
aws iam create-role --role-name <shoot-name>-bastions
The content should be:
{
"Version": "2012-10-17",
"Statement": [
{
"Effect": "Allow",
"Action": [
"ec2:DescribeRegions"
],
"Resource": [
"*"
]
}
]
}
- Create the instance profile and name it
<shoot-name>-bastions:
aws iam create-instance-profile --instance-profile-name <name>
- Add the created role to the instance profile:
aws iam add-role-to-instance-profile --instance-profile-name <instance-profile-name> --role-name <role-name>
Create the Bastion Instance
Next, in order to be able to ssh into the bastion instance, the instance has to be set up with a user with a public ssh key.
Create a user gardener that has the same Gardener-generated public ssh key as the target instance.
- First, we need to get the public part of the
Shootssh-key. The ssh-key is stored in a secret in the the project namespace in the Garden cluster. The name is:<shoot-name>-ssh-publickey. Get the key via:
kubectl get secret aws-gvisor.ssh-keypair -o json | jq -r .data.\"id_rsa.pub\"
- A script handed over as
user-datato the bastionec2instance, can be used to create thegardeneruser and add the ssh-key. For your convenience, you can use the following script to generate theuser-data.
#!/bin/bash -eu
saveUserDataFile () {
ssh_key=$1
cat > gardener-bastion-userdata.sh <<EOF
#!/bin/bash -eu
id gardener || useradd gardener -mU
mkdir -p /home/gardener/.ssh
echo "$ssh_key" > /home/gardener/.ssh/authorized_keys
chown gardener:gardener /home/gardener/.ssh/authorized_keys
echo "gardener ALL=(ALL) NOPASSWD:ALL" >/etc/sudoers.d/99-gardener-user
EOF
}
if [ -p /dev/stdin ]; then
read -r input
cat | saveUserDataFile "$input"
else
pbpaste | saveUserDataFile "$input"
fi
- Use the script by handing-over the public ssh-key of the
Shootcluster:
kubectl get secret aws-gvisor.ssh-keypair -o json | jq -r .data.\"id_rsa.pub\" | ./generate-userdata.sh
This generates a file called gardener-bastion-userdata.sh in the same directory containing the user-data.
- The following information is needed to create the bastion instance:
bastion-IAM-instance-profile-name
- Use the created instance profile with the name <shoot-name>-bastions
image-id
- It is possible to use the same image-id as the one used for the target instance (or any other image). Has cloud provider specific format (AWS: ami).
ssh-public-key-name
- This is the ssh key pair already created in the Shoot's cloud provider account by Gardener during the `Infrastructure` CRD reconciliation.
- The name is usually: `<shoot-name>-ssh-publickey`
subnet-id
- Choose a subnet that is attached to an Internet Gateway and NAT Gateway (bastion instance must have a public IP).
- The Gardener created public subnet with the name <shoot-name>-public-utility-<xy> can be used.
Please check the created subnets with the cloud provider.
bastion-security-group-id
- Use the id of the created bastion security group.
file-path-to-userdata
- Use the filepath to the user-data file generated in the previous step.
bastion-instance-name- Optionaly, you can tag the instance.
- Usually
<shoot-name>-bastions
- Create the bastion instance via:
ec2 run-instances --iam-instance-profile Name=<bastion-IAM-instance-profile-name> --image-id <image-id> --count 1 --instance-type t3.nano --key-name <ssh-public-key-name> --security-group-ids <bastion-security-group-id> --subnet-id <subnet-id> --associate-public-ip-address --user-data <file-path-to-userdata> --tag-specifications ResourceType=instance,Tags=[{Key=Name,Value=<bastion-instance-name>},{Key=component,Value=<mytag>}] ResourceType=volume,Tags=[{Key=component,Value=<mytag>}]"
Capture the instance-id from the response and wait until the ec2 instance is running and has a public IP address.
Connecting to the Target Instance
- Save the private key of the ssh-key-pair in a temporary local file for later use:
umask 077
kubectl get secret <shoot-name>.ssh-keypair -o json | jq -r .data.\"id_rsa\" | base64 -d > id_rsa.key
- Use the private ssh key to ssh into the bastion instance:
ssh -i <path-to-private-key> gardener@<public-bastion-instance-ip>
- If that works, connect from your local terminal to the target instance via the bastion:
ssh -i <path-to-private-key> -o ProxyCommand="ssh -W %h:%p -i <private-key> -o IdentitiesOnly=yes -o StrictHostKeyChecking=no gardener@<public-ip-bastion>" gardener@<private-ip-target-instance> -o IdentitiesOnly=yes -o StrictHostKeyChecking=no
Cleanup
Do not forget to cleanup the created resources. Otherwise Gardener will eventually fail to delete the Shoot.
2.5.3 - How to Debug a Pod
Introduction
Kubernetes offers powerful options to get more details about startup or runtime failures of pods as e.g. described in Application Introspection and Debugging or Debug Pods and Replication Controllers.
In order to identify pods with potential issues, you could, e.g., run kubectl get pods --all-namespaces | grep -iv Running to filter out the pods which are not in the state Running. One of frequent error state is CrashLoopBackOff, which tells that a pod crashes right after the start. Kubernetes then tries to restart the pod again, but often the pod startup fails again.
Here is a short list of possible reasons which might lead to a pod crash:
- Error during image pull caused by e.g. wrong/missing secrets or wrong/missing image
- The app runs in an error state caused e.g. by missing environmental variables (ConfigMaps) or secrets
- Liveness probe failed
- Too high resource consumption (memory and/or CPU) or too strict quota settings
- Persistent volumes can’t be created/mounted
- The container image is not updated
Basically, the commands kubectl logs ... and kubectl describe ... with different parameters are used to get more detailed information. By calling e.g. kubectl logs --help you can get more detailed information about the command and its parameters.
In the next sections you’ll find some basic approaches to get some ideas what went wrong.
Remarks:
- Even if the pods seem to be running, as the status
Runningindicates, a high counter of theRestartsshows potential problems - You can get a good overview of the troubleshooting process with the interactive tutorial Troubleshooting with Kubectl available which explains basic debugging activities
- The examples below are deployed into the namespace
default. In case you want to change it, use the optional parameter--namespace <your-namespace>to select the target namespace. The examples require a Kubernetes release ≥ 1.8.
Prerequisites
Your deployment was successful (no logical/syntactical errors in the manifest files), but the pod(s) aren’t running.
Error Caused by Wrong Image Name
Start by running kubectl describe pod <your-pod> <your-namespace> to get detailed information about the pod startup.
In the Events section, you should get an error message like Failed to pull image ... and Reason: Failed. The pod is in state ImagePullBackOff.
The example below is based on a demo in the Kubernetes documentation. In all examples, the default namespace is used.
First, perform a cleanup with:
kubectl delete pod termination-demo
Next, create a resource based on the yaml content below:
apiVersion: v1
kind: Pod
metadata:
name: termination-demo
spec:
containers:
- name: termination-demo-container
image: debiann
command: ["/bin/sh"]
args: ["-c", "sleep 10 && echo Sleep expired > /dev/termination-log"]
kubectl describe pod termination-demo lists in the Event section the content
Events:
FirstSeen LastSeen Count From SubObjectPath Type Reason Message
--------- -------- ----- ---- ------------- -------- ------ -------
2m 2m 1 default-scheduler Normal Scheduled Successfully assigned termination-demo to ip-10-250-17-112.eu-west-1.compute.internal
2m 2m 1 kubelet, ip-10-250-17-112.eu-west-1.compute.internal Normal SuccessfulMountVolume MountVolume.SetUp succeeded for volume "default-token-sgccm"
2m 1m 4 kubelet, ip-10-250-17-112.eu-west-1.compute.internal spec.containers{termination-demo-container} Normal Pulling pulling image "debiann"
2m 1m 4 kubelet, ip-10-250-17-112.eu-west-1.compute.internal spec.containers{termination-demo-container} Warning Failed Failed to pull image "debiann": rpc error: code = Unknown desc = Error: image library/debiann:latest not found
2m 54s 10 kubelet, ip-10-250-17-112.eu-west-1.compute.internal Warning FailedSync Error syncing pod
2m 54s 6 kubelet, ip-10-250-17-112.eu-west-1.compute.internal spec.containers{termination-demo-container} Normal BackOff Back-off pulling image "debiann"
The error message with Reason: Failed tells you that there is an error during pulling the image. A closer look at the image name indicates a misspelling.
The App Runs in an Error State Caused, e.g., by Missing Environmental Variables (ConfigMaps) or Secrets
This example illustrates the behavior in the case when the app expects environment variables but the corresponding Kubernetes artifacts are missing.
First, perform a cleanup with:
kubectl delete deployment termination-demo
kubectl delete configmaps app-env
Next, deploy the following manifest:
apiVersion: apps/v1beta2
kind: Deployment
metadata:
name: termination-demo
labels:
app: termination-demo
spec:
replicas: 1
selector:
matchLabels:
app: termination-demo
template:
metadata:
labels:
app: termination-demo
spec:
containers:
- name: termination-demo-container
image: debian
command: ["/bin/sh"]
args: ["-c", "sed \"s/foo/bar/\" < $MYFILE"]
Now, the command kubectl get pods lists the pod termination-demo-xxx in the state Error or CrashLoopBackOff. The command kubectl describe pod termination-demo-xxx tells you that there is no error during startup but gives no clue about what caused the crash.
Events:
FirstSeen LastSeen Count From SubObjectPath Type Reason Message
--------- -------- ----- ---- ------------- -------- ------ -------
19m 19m 1 default-scheduler Normal Scheduled Successfully assigned termination-demo-5fb484867d-xz2x9 to ip-10-250-17-112.eu-west-1.compute.internal
19m 19m 1 kubelet, ip-10-250-17-112.eu-west-1.compute.internal Normal SuccessfulMountVolume MountVolume.SetUp succeeded for volume "default-token-sgccm"
19m 19m 4 kubelet, ip-10-250-17-112.eu-west-1.compute.internal spec.containers{termination-demo-container} Normal Pulling pulling image "debian"
19m 19m 4 kubelet, ip-10-250-17-112.eu-west-1.compute.internal spec.containers{termination-demo-container} Normal Pulled Successfully pulled image "debian"
19m 19m 4 kubelet, ip-10-250-17-112.eu-west-1.compute.internal spec.containers{termination-demo-container} Normal Created Created container
19m 19m 4 kubelet, ip-10-250-17-112.eu-west-1.compute.internal spec.containers{termination-demo-container} Normal Started Started container
19m 14m 24 kubelet, ip-10-250-17-112.eu-west-1.compute.internal spec.containers{termination-demo-container} Warning BackOff Back-off restarting failed container
19m 4m 69 kubelet, ip-10-250-17-112.eu-west-1.compute.internal Warning FailedSync Error syncing pod
The command kubectl get logs termination-demo-xxx gives access to the output, the application writes on stderr and stdout. In this case, you should get an output similar to:
/bin/sh: 1: cannot open : No such file
So you need to have a closer look at the application. In this case, the environmental variable MYFILE is missing. To fix this
issue, you could e.g. add a ConfigMap to your deployment as is shown in the manifest listed below:
apiVersion: v1
kind: ConfigMap
metadata:
name: app-env
data:
MYFILE: "/etc/profile"
---
apiVersion: apps/v1beta2
kind: Deployment
metadata:
name: termination-demo
labels:
app: termination-demo
spec:
replicas: 1
selector:
matchLabels:
app: termination-demo
template:
metadata:
labels:
app: termination-demo
spec:
containers:
- name: termination-demo-container
image: debian
command: ["/bin/sh"]
args: ["-c", "sed \"s/foo/bar/\" < $MYFILE"]
envFrom:
- configMapRef:
name: app-env
Note that once you fix the error and re-run the scenario, you might still see the pod in a CrashLoopBackOff status.
It is because the container finishes the command sed ... and runs to completion. In order to keep the container in a Running status, a long running task is required, e.g.:
apiVersion: v1
kind: ConfigMap
metadata:
name: app-env
data:
MYFILE: "/etc/profile"
SLEEP: "5"
---
apiVersion: apps/v1beta2
kind: Deployment
metadata:
name: termination-demo
labels:
app: termination-demo
spec:
replicas: 1
selector:
matchLabels:
app: termination-demo
template:
metadata:
labels:
app: termination-demo
spec:
containers:
- name: termination-demo-container
image: debian
command: ["/bin/sh"]
# args: ["-c", "sed \"s/foo/bar/\" < $MYFILE"]
args: ["-c", "while true; do sleep $SLEEP; echo sleeping; done;"]
envFrom:
- configMapRef:
name: app-env
Too High Resource Consumption (Memory and/or CPU) or Too Strict Quota Settings
You can optionally specify the amount of memory and/or CPU your container gets during runtime. In case these settings are missing, the default requests settings are taken: CPU: 0m (in Milli CPU) and RAM: 0Gi, which indicate no other limits other than the ones of the node(s) itself. For more details, e.g. about how to configure limits, see Configure Default Memory Requests and Limits for a Namespace.
In case your application needs more resources, Kubernetes distinguishes between requests and limit settings: requests specify the guaranteed amount of resource, whereas limit tells Kubernetes the maximum amount of resource the container might need. Mathematically, both settings could be described by the relation 0 <= requests <= limit. For both settings you need to consider the total amount of resources your nodes provide. For a detailed description of the concept, see Resource Quality of Service in Kubernetes.
Use kubectl describe nodes to get a first overview of the resource consumption in your cluster. Of special interest are the figures indicating the amount of CPU and Memory Requests at the bottom of the output.
The next example demonstrates what happens in case the CPU request is too high in order to be managed by your cluster.
First, perform a cleanup with:
kubectl delete deployment termination-demo
kubectl delete configmaps app-env
Next, adapt the cpu below in the yaml below to be slightly higher than the remaining CPU resources in your cluster and deploy this manifest. In this example, 600m (milli CPUs) are requested in a Kubernetes system with a single 2 core worker node which results in an error message.
apiVersion: apps/v1beta2
kind: Deployment
metadata:
name: termination-demo
labels:
app: termination-demo
spec:
replicas: 1
selector:
matchLabels:
app: termination-demo
template:
metadata:
labels:
app: termination-demo
spec:
containers:
- name: termination-demo-container
image: debian
command: ["/bin/sh"]
args: ["-c", "sleep 10 && echo Sleep expired > /dev/termination-log"]
resources:
requests:
cpu: "600m"
The command kubectl get pods lists the pod termination-demo-xxx in the state Pending. More details on why this happens could be found by using the command kubectl describe pod termination-demo-xxx:
$ kubectl describe po termination-demo-fdb7bb7d9-mzvfw
Name: termination-demo-fdb7bb7d9-mzvfw
Namespace: default
...
Containers:
termination-demo-container:
Image: debian
Port: <none>
Host Port: <none>
Command:
/bin/sh
Args:
-c
sleep 10 && echo Sleep expired > /dev/termination-log
Requests:
cpu: 6
Environment: <none>
Mounts:
/var/run/secrets/kubernetes.io/serviceaccount from default-token-t549m (ro)
Conditions:
Type Status
PodScheduled False
Events:
Type Reason Age From Message
---- ------ ---- ---- -------
Warning FailedScheduling 9s (x7 over 40s) default-scheduler 0/2 nodes are available: 2 Insufficient cpu.
You can find more details in:
Remarks:
- This example works similarly when specifying a too high request for memory
- In case you configured an autoscaler range when creating your Kubernetes cluster, another worker node will be spinned up automatically if you didn’t reach the maximum number of worker nodes
- In case your app is running out of memory (the memory settings are too small), you will typically find an
OOMKilled(Out Of Memory) message in theEventssection of thekubectl describe pod ...output
The Container Image Is Not Updated
You applied a fix in your app, created a new container image and pushed it into your container repository. After redeploying your Kubernetes manifests, you expected to get the updated app, but the same bug is still in the new deployment present.
This behavior is related to how Kubernetes decides whether to pull a new docker image or to use the cached one.
In case you didn’t change the image tag, the default image policy IfNotPresent tells Kubernetes to use the cached image (see Images).
As a best practice, you should not use the tag latest and change the image tag in case you changed anything in your image (see Configuration Best Practices).
For more information, see Container Image Not Updating.
Related Links
- Application Introspection and Debugging
- Debug Pods and Replication Controllers
- Logging Architecture
- Configure Default Memory Requests and Limits for a Namespace
- Managing Compute Resources for Containters
- Resource Quality of Service in Kubernetes
- Interactive Tutorial Troubleshooting with Kubectl
- Images
- Kubernetes Best Practices
2.5.4 - tail -f /var/log/my-application.log
Problem
One thing that always bothered me was that I couldn’t get logs of several pods at once with kubectl. A simple tail -f <path-to-logfile> isn’t possible at all. Certainly, you can use kubectl logs -f <pod-id>, but it doesn’t help if you want to monitor more than one pod at a time.
This is something you really need a lot, at least if you run several instances of a pod behind a deployment. This is even more so if you don’t have a Kibana or a similar setup.
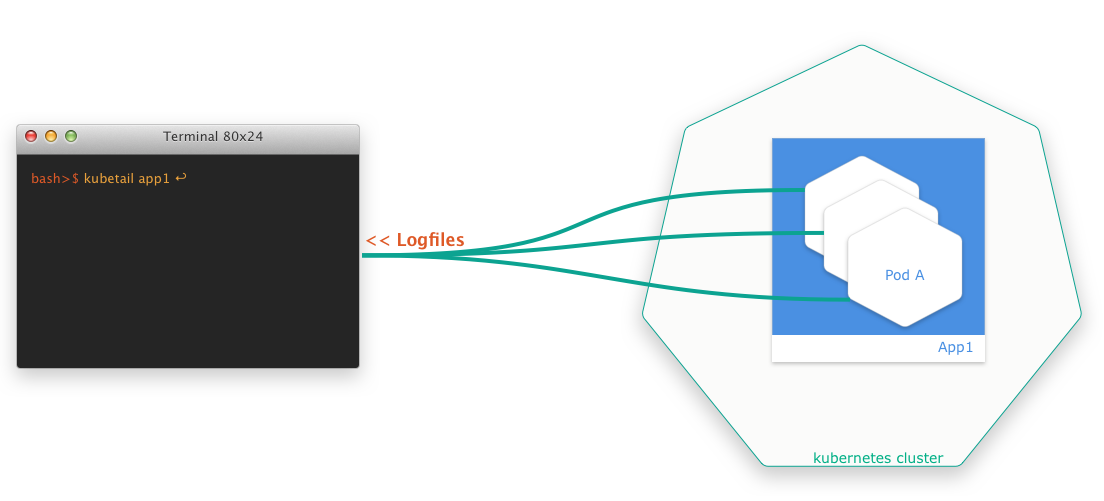
Solution
Luckily, there are smart developers out there who always come up with solutions. The finding of the week is a small bash script that allows you to aggregate log files of several pods at the same time in a simple way. The script is called kubetail and is available at GitHub.
2.6 - Applications
2.6.1 - Shoot Pod Autoscaling Best Practices
Introduction
There are two types of pod autoscaling in Kubernetes: Horizontal Pod Autoscaling (HPA) and Vertical Pod Autoscaling (VPA). HPA (implemented as part of the kube-controller-manager) scales the number of pod replicas, while VPA (implemented as independent community project) adjusts the CPU and memory requests for the pods. Both types of autoscaling aim to optimize resource usage/costs and maintain the performance and (high) availability of applications running on Kubernetes.
Horizontal Pod Autoscaling (HPA)
Horizontal Pod Autoscaling involves increasing or decreasing the number of pod replicas in a deployment, replica set, stateful set, or anything really with a scale subresource that manages pods. HPA adjusts the number of replicas based on specified metrics, such as CPU or memory average utilization (usage divided by requests; most common) or average value (usage; less common). When the demand on your application increases, HPA automatically scales out the number of pods to meet the demand. Conversely, when the demand decreases, it scales in the number of pods to reduce resource usage.
HPA targets (mostly stateless) applications where adding more instances of the application can linearly increase the ability to handle additional load. It is very useful for applications that experience variable traffic patterns, as it allows for real-time scaling without the need for manual intervention.
Note
HPA continuously monitors the metrics of the targeted pods and adjusts the number of replicas based on the observed metrics. It operates solely on the current metrics when it calculates the averages across all pods, meaning it reacts to the immediate resource usage without considering past trends or patterns. Also, all pods are treated equally based on the average metrics. This could potentially lead to situations where some pods are under high load while others are underutilized. Therefore, particular care must be applied to (fair) load-balancing (connection vs. request vs. actual resource load balancing are crucial).
A Few Words on the Cluster-Proportional (Horizontal) Autoscaler (CPA) and the Cluster-Proportional Vertical Autoscaler (CPVA)
Besides HPA and VPA, CPA and CPVA are further options for scaling horizontally or vertically (neither is deployed by Gardener and must be deployed by the user). Unlike HPA and VPA, CPA and CPVA do not monitor the actual pod metrics, but scale solely on the number of nodes or CPU cores in the cluster. While this approach may be helpful and sufficient in a few rare cases, it is often a risky and crude scaling scheme that we do not recommend. More often than not, cluster-proportional scaling results in either under- or over-reserving your resources.
Vertical Pod Autoscaling (VPA)
Vertical Pod Autoscaling, on the other hand, focuses on adjusting the CPU and memory resources allocated to the pods themselves. Instead of changing the number of replicas, VPA tweaks the resource requests (and limits, but only proportionally, if configured) for the pods in a deployment, replica set, stateful set, daemon set, or anything really with a scale subresource that manages pods. This means that each pod can be given more, or fewer resources as needed.
VPA is very useful for optimizing the resource requests of pods that have dynamic resource needs over time. It does so by mutating pod requests (unfortunately, not in-place). Therefore, in order to apply new recommendations, pods that are “out of bounds” (i.e. below a configured/computed lower or above a configured/computed upper recommendation percentile) will be evicted proactively, but also pods that are “within bounds” may be evicted after a grace period. The corresponding higher-level replication controller will then recreate a new pod that VPA will then mutate to set the currently recommended requests (and proportional limits, if configured).
Note
VPA continuously monitors all targeted pods and calculates recommendations based on their usage (one recommendation for the entire target). This calculation is influenced by configurable percentiles, with a greater emphasis on recent usage data and a gradual decrease (=decay) in the relevance of older data. However, this means, that VPA doesn’t take into account individual needs of single pods - eventually, all pods will receive the same recommendation, which may lead to considerable resource waste. Ideally, VPA would update pods in-place depending on their individual needs, but that’s (individual recommendations) not in its design, even if in-place updates get implemented, which may be years away for VPA based on current activity on the component.
Selecting the Appropriate Autoscaler
Before deciding on an autoscaling strategy, it’s important to understand the characteristics of your application:
- Interruptibility: Most importantly, if the clients of your workload are too sensitive to disruptions/cannot cope well with terminating pods, then maybe neither HPA nor VPA is an option (both, HPA and VPA cause pods and connections to be terminated, though VPA even more frequently). Clients must retry on disruptions, which is a reasonable ask in a highly dynamic (and self-healing) environment such as Kubernetes, but this is often not respected (or expected) by your clients (they may not know or care you run the workload in a Kubernetes cluster and have different expectations to the stability of the workload unless you communicated those through SLIs/SLOs/SLAs).
- Statelessness: Is your application stateless or stateful? Stateless applications are typically better candidates for HPA as they can be easily scaled out by adding more replicas without worrying about maintaining state.
- Traffic Patterns: Does your application experience variable traffic? If so, HPA can help manage these fluctuations by adjusting the number of replicas to handle the load.
- Resource Usage: Does your application’s resource usage change over time? VPA can adjust the CPU and memory reservations dynamically, which is beneficial for applications with non-uniform resource requirements.
- Scalability: Can your application handle increased load by scaling vertically (more resources per pod) or does it require horizontal scaling (more pod instances)?
HPA is the right choice if:
- Your application is stateless and can handle increased load by adding more instances.
- You experience short-term fluctuations in traffic that require quick scaling responses.
- You want to maintain a specific performance metric, such as requests per second per pod.
VPA is the right choice if:
- Your application’s resource requirements change over time, and you want to optimize resource usage without manual intervention.
- You want to avoid the complexity of managing resource requests for each pod, especially when they run code where it’s impossible for you to suggest static requests.
In essence:
- For applications that can handle increased load by simply adding more replicas, HPA should be used to handle short-term fluctuations in load by scaling the number of replicas.
- For applications that require more resources per pod to handle additional work, VPA should be used to adjust the resource allocation for longer-term trends in resource usage.
Consequently, if both cases apply (VPA often applies), HPA and VPA can also be combined. However, combining both, especially on the same metrics (CPU and memory), requires understanding and care to avoid conflicts and ensure that the autoscaling actions do not interfere with and rather complement each other. For more details, see Combining HPA and VPA.
Horizontal Pod Autoscaler (HPA)
HPA operates by monitoring resource metrics for all pods in a target. It computes the desired number of replicas from the current average metrics and the desired user-defined metrics as follows:
desiredReplicas = ceil[currentReplicas * (currentMetricValue / desiredMetricValue)]
HPA checks the metrics at regular intervals, which can be configured by the user. Several types of metrics are supported (classical resource metrics like CPU and memory, but also custom and external metrics like requests per second or queue length can be configured, if available). If a scaling event is necessary, HPA adjusts the replica count for the targeted resource.
Defining an HPA Resource
To configure HPA, you need to create an HPA resource in your cluster. This resource specifies the target to scale, the metrics to be used for scaling decisions, and the desired thresholds. Here’s an example of an HPA configuration:
apiVersion: autoscaling/v2
kind: HorizontalPodAutoscaler
metadata:
name: foo-hpa
spec:
scaleTargetRef:
apiVersion: apps/v1
kind: Deployment
name: foo-deployment
minReplicas: 1
maxReplicas: 10
metrics:
- type: Resource
resource:
name: cpu
target:
type: AverageValue
averageValue: 2
- type: Resource
resource:
name: memory
target:
type: AverageValue
averageValue: 8G
behavior:
scaleUp:
stabilizationWindowSeconds: 30
policies:
- type: Percent
value: 100
periodSeconds: 60
scaleDown:
stabilizationWindowSeconds: 1800
policies:
- type: Pods
value: 1
periodSeconds: 300
In this example, HPA is configured to scale foo-deployment based on pod average CPU and memory usage. It will maintain an average CPU and memory usage (not utilization, which is usage divided by requests!) across all replicas of 2 CPUs and 8G or lower with as few replicas as possible. The number of replicas will be scaled between a minimum of 1 and a maximum of 10 based on this target.
Since a while, you can also configure the autoscaling based on the resource usage of individual containers, not only on the resource usage of the entire pod. All you need to do is to switch the type from Resource to ContainerResource and specify the container name.
In the official documentation ([1] and [2]) you will find examples with average utilization (averageUtilization), not average usage (averageValue), but this is not particularly helpful, especially if you plan to combine HPA together with VPA on the same metrics (generally discouraged in the documentation). If you want to safely combine both on the same metrics, you should scale on average usage (averageValue) as shown above. For more details, see Combining HPA and VPA.
Finally, the behavior section influences how fast you scale up and down. Most of the time (depends on your workload), you like to scale out faster than you scale in. In this example, the configuration will trigger a scale-out only after observing the need to scale out for 30s (stabilizationWindowSeconds) and will then only scale out at most 100% (value + type) of the current number of replicas every 60s (periodSeconds). The configuration will trigger a scale-in only after observing the need to scale in for 1800s (stabilizationWindowSeconds) and will then only scale in at most 1 pod (value + type) every 300s (periodSeconds). As you can see, scale-out happens quicker than scale-in in this example.
HPA (actually KCM) Options
HPA is a function of the kube-controller-manager (KCM).
You can read up the full KCM options online and set most of them conveniently in your Gardener shoot cluster spec:
downscaleStabilization(default 5m): HPA will scale out whenever the formula (in accordance with the behavior section, if present in the HPA resource) yields a higher replica count, but it won’t scale in just as eagerly. This option lets you define a trailing time window that HPA must check and only if the recommended replica count is consistently lower throughout the entire time window, HPA will scale in (in accordance with the behavior section, if present in the HPA resource). If at any point in time in that trailing time window the recommended replica count isn’t lower, scale-in won’t happen. This setting is just a default, if nothing is defined in the behavior section of an HPA resource. The default for the upscale stabilization is 0s and it cannot be set via a KCM option (downscale stabilization was historically more important than upscale stabilization and when later the behavior sections were added to the HPA resources, upscale stabilization remained missing from the KCM options).tolerance(default +/-10%): HPA will not scale out or in if the desired replica count is (mathematically as a float) near the actual replica count (see source code for details), which is a form of hysteresis to avoid replica flapping around a threshold.
There are a few more configurable options of lesser interest:
syncPeriod(default 15s): How often HPA retrieves the pods and metrics respectively how often it recomputes and sets the desired replica count.cpuInitializationPeriod(default 30s) andinitialReadinessDelay(default 5m): Both settings only affect whether or not CPU metrics are considered for scaling decisions. They can be easily misinterpreted as the official docs are somewhat hard to read (see source code for details, which is more readable, if you ignore the comments). Normally, you have little reason to modify them, but here is what they do:cpuInitializationPeriod: Defines a grace period after a pod starts during which HPA won’t consider CPU metrics of the pod for scaling if the pod is either not ready or it is ready, but a given CPU metric is older than the last state transition (to ready). This is to ignore CPU metrics that predate the current readiness while still in initialization to not make scaling decisions based on potentially misleading data. If the pod is ready and a CPU metric was collected after it became ready, it is considered also within this grace period.initialReadinessDelay: Defines another grace period after a pod starts during which HPA won’t consider CPU metrics of the pod for scaling if the pod is not ready and it became not ready within this grace period (the docs/comments want to check whether the pod was ever ready, but the code only checks whether the pod condition last transition time to not ready happened within that grace period which it could have from being ready or simply unknown before). This is to ignore not (ever have been) ready pods while still in initialization to not make scaling decisions based on potentially misleading data. If the pod is ready, it is considered also within this grace period.
So, regardless of the values of these settings, if a pod is reporting ready and it has a CPU metric from the time after it became ready, that pod and its metric will be considered. This holds true even if the pod becomes ready very early into its initialization. These settings cannot be used to “black-out” pods for a certain duration before being considered for scaling decisions. Instead, if it is your goal to ignore a potentially resource-intensive initialization phase that could wrongly lead to further scale-out, you would need to configure your pods to not report as ready until that resource-intensive initialization phase is over.
Considerations When Using HPA
- Selection of metrics: Besides CPU and memory, HPA can also target custom or external metrics. Pick those (in addition or exclusively), if you guarantee certain SLOs in your SLAs.
- Targeting usage or utilization: HPA supports usage (absolute) and utilization (relative). Utilization is often preferred in simple examples, but usage is more precise and versatile.
- Compatibility with VPA: Care must be taken when using HPA in conjunction with VPA, as they can potentially interfere with each other’s scaling decisions.
Vertical Pod Autoscaler (VPA)
VPA operates by monitoring resource metrics for all pods in a target. It computes a resource requests recommendation from the historic and current resource metrics. VPA checks the metrics at regular intervals, which can be configured by the user. Only CPU and memory are supported. If VPA detects that a pod’s resource allocation is too high or too low, it may evict pods (if within the permitted disruption budget), which will trigger the creation of a new pod by the corresponding higher-level replication controller, which will then be mutated by VPA to match resource requests recommendation. This happens in three different components that work together:
- VPA Recommender: The Recommender observes the historic and current resource metrics of pods and generates recommendations based on this data.
- VPA Updater: The Updater component checks the recommendations from the Recommender and decides whether any pod’s resource requests need to be updated. If an update is needed, the Updater will evict the pod.
- VPA Admission Controller: When a pod is (re-)created, the Admission Controller modifies the pod’s resource requests based on the recommendations from the Recommender. This ensures that the pod starts with the optimal amount of resources.
Since VPA doesn’t support in-place updates, pods will be evicted. You will want to control voluntary evictions by means of Pod Disruption Budgets (PDBs). Please make yourself familiar with those and use them.
Note
PDBs will not always work as expected and can also get in your way, e.g. if the PDB is violated or would be violated, it may possibly block evictions that would actually help your workload, e.g. to get a pod out of an
OOMKilledCrashLoopBackoff(if the PDB is or would be violated, not even unhealthy pods would be evicted as they could theoretically become healthy again, which VPA doesn’t know). In order to overcome this issue, it is now possible (alpha since Kubernetesv1.26in combination with the feature gatePDBUnhealthyPodEvictionPolicyon the API server, beta and enabled by default since Kubernetesv1.27) to configure the so-called unhealthy pod eviction policy. The default is stillIfHealthyBudgetas a change in default would have changed the behavior (as described above), but you can now also setAlwaysAllowat the PDB (spec.unhealthyPodEvictionPolicy). For more information, please check out this discussion, the PR and this document and balance the pros and cons for yourself. In short, the newAlwaysAllowoption is probably the better choice in most of the cases whileIfHealthyBudgetis useful only if you have frequent temporary transitions or for special cases where you have already implemented controllers that depend on the old behavior.
Defining a VPA Resource
To configure VPA, you need to create a VPA resource in your cluster. This resource specifies the target to scale, the metrics to be used for scaling decisions, and the policies for resource updates. Here’s an example of an VPA configuration:
apiVersion: autoscaling.k8s.io/v1
kind: VerticalPodAutoscaler
metadata:
name: foo-vpa
spec:
targetRef:
apiVersion: "apps/v1"
kind: Deployment
name: foo-deployment
updatePolicy:
updateMode: "Auto"
resourcePolicy:
containerPolicies:
- containerName: foo-container
controlledValues: RequestsOnly
minAllowed:
cpu: 50m
memory: 200M
maxAllowed:
cpu: 4
memory: 16G
In this example, VPA is configured to scale foo-deployment requests (RequestsOnly) from 50m cores (minAllowed) up to 4 cores (maxAllowed) and 200M memory (minAllowed) up to 16G memory (maxAllowed) automatically (updateMode). VPA doesn’t support in-place updates, so in updateMode Auto it will evict pods under certain conditions and then mutate the requests (and possibly limits if you omit controlledValues or set it to RequestsAndLimits, which is the default) of upcoming new pods.
Multiple update modes exist. They influence eviction and mutation. The most important ones are:
Off: In this mode, recommendations are computed, but never applied. This mode is useful, if you want to learn more about your workload or if you have a custom controller that depends on VPA’s recommendations but shall act instead of VPA.Initial: In this mode, recommendations are computed and applied, but pods are never proactively evicted to enforce new recommendations over time. This mode is useful, if you want to control pod evictions yourself (similar to theStatefulSetupdateStrategyOnDelete) or your workload is sensitive to evictions, e.g. some brownfield singleton application or a daemon set pod that is critical for the node.Auto(default): In this mode, recommendations are computed, applied, and pods are even proactively evicted to enforce new recommendations over time. This applies recommendations continuously without you having to worry too much.
As mentioned, controlledValues influences whether only requests or requests and limits are scaled:
RequestsOnly: Updates only requests and doesn’t change limits. Useful if you have defined absolute limits (unrelated to the requests).RequestsAndLimits(default): Updates requests and proportionally scales limits along with the requests. Useful if you have defined relative limits (related to the requests). In this case, the gap between requests and limits should be either zero for QoSGuaranteedor small for QoSBurstableto avoid useless (way beyond the threshold of unhealthy behavior) or absurd (larger than node capacity) values.
VPA doesn’t offer many more settings that can be tuned per VPA resource than you see above (different than HPA’s behavior section). However, there is one more that isn’t shown above, which allows to scale only up or only down (evictionRequirements[].changeRequirement), in case you need that, e.g. to provide resources when needed, but avoid disruptions otherwise.
VPA Options
VPA is an independent community project that consists of a recommender (computing target recommendations and bounds), an updater (evicting pods that are out of recommendation bounds), and an admission controller (mutating webhook applying the target recommendation to newly created pods). As such, they have independent options.
VPA Recommender Options
You can read up the full VPA recommender options online and set some of them conveniently in your Gardener shoot cluster spec:
recommendationMarginFraction(default 15%): Safety margin that will be added to the recommended requests.targetCPUPercentile(default 90%): CPU usage percentile that will be targeted with the CPU recommendation (i.e. recommendation will “fit” e.g. 90% of the observed CPU usages). This setting is relevant for balancing your requests reservations vs. your costs. If you want to reduce costs, you can reduce this value (higher risk because of potential under-reservation, but lower costs), because CPU is compressible, but then VPA may lack the necessary signals for scale-up as throttling on an otherwise fully utilized node will go unnoticed by VPA. If you want to err on the safe side, you can increase this value, but you will then target more and more a worst case scenario, quickly (maybe even exponentially) increasing the costs.targetMemoryPercentile(default 90%): Memory usage percentile that will be targeted with the memory recommendation (i.e. recommendation will “fit” e.g. 90% of the observed memory usages). This setting is relevant for balancing your requests reservations vs. your costs. If you want to reduce costs, you can reduce this value (higher risk because of potential under-reservation, but lower costs), because OOMs will trigger bump-ups, but those will disrupt the workload. If you want to err on the safe side, you can increase this value, but you will then target more and more a worst case scenario, quickly (maybe even exponentially) increasing the costs.
There are a few more configurable options of lesser interest:
recommenderInterval(default 1m): How often VPA retrieves the pods and metrics respectively how often it recomputes the recommendations and bounds.
There are many more options that you can only configure if you deploy your own VPA and which we will not discuss here, but you can check them out here.
Note
Due to an implementation detail (smallest bucket size), VPA cannot create recommendations below 10m cores and 10M memory even if
minAllowedis lower.
VPA Updater Options
You can read up the full VPA updater options online and set some of them conveniently in your Gardener shoot cluster spec:
evictAfterOOMThreshold(default 10m): Pods where at least one container OOMs within this time period since its start will be actively evicted, which will implicitly apply the new target recommendation that will have been bumped up afterOOMKill. Please note, the kubelet may evict pods even before an OOM, but only ifkube-reservedis underrun, i.e. node-level resources are running low. In these cases, eviction will happen first by pod priority and second by how much the usage overruns the requests.evictionTolerance(default 50%): Defines a threshold below which no further eligible pod will be evited anymore, i.e. limits how many eligible pods may be in eviction in parallel (but at least 1). The threshold is computed as follows:running - evicted > replicas - tolerance. Example: 10 replicas, 9 running, 8 eligible for eviction, 20% tolerance with 10 replicas which amounts to 2 pods, and no pod evicted in this round yet, then9 - 0 > 10 - 2is true and a pod would be evicted, but the next one would be in violation as9 - 1 = 10 - 2and no further pod would be evicted anymore in this round.evictionRateBurst(default 1): Defines how many eligible pods may be evicted in one go.evictionRateLimit(default disabled): Defines how many eligible pods may be evicted per second (a value of 0 or -1 disables the rate limiting).
In general, avoid modifying these eviction settings unless you have good reasons and try to rely on Pod Disruption Budgets (PDBs) instead. However, PDBs are not available for daemon sets.
There are a few more configurable options of lesser interest:
updaterInterval(default 1m): How often VPA evicts the pods.
There are many more options that you can only configure if you deploy your own VPA and which we will not discuss here, but you can check them out here.
Considerations When Using VPA
- Initial Resource Estimates: VPA requires historical resource usage data to base its recommendations on. Until they kick in, your initial resource requests apply and should be sensible.
- Pod Disruption: When VPA adjusts the resources for a pod, it may need to “recreate” the pod, which can cause temporary disruptions. This should be taken into account.
- Compatibility with HPA: Care must be taken when using VPA in conjunction with HPA, as they can potentially interfere with each other’s scaling decisions.
Combining HPA and VPA
HPA and VPA serve different purposes and operate on different axes of scaling. HPA increases or decreases the number of pod replicas based on metrics like CPU or memory usage, effectively scaling the application out or in. VPA, on the other hand, adjusts the CPU and memory reservations of individual pods, scaling the application up or down.
When used together, these autoscalers can provide both horizontal and vertical scaling. However, they can also conflict with each other if used on the same metrics (e.g. both on CPU or both on memory). In particular, if VPA adjusts the requests, the utilization, i.e. the ratio between usage and requests, will approach 100% (for various reasons not exactly right, but for this consideration, close enough), which may trigger HPA to scale out, if it’s configured to scale on utilization below 100% (often seen in simple examples), which will spread the load across more pods, which may trigger VPA again to adjust the requests to match the new pod usages.
This is a feedback loop and it stems from HPA’s method of calculating the desired number of replicas, which is:
desiredReplicas = ceil[currentReplicas * (currentMetricValue / desiredMetricValue)]
If desiredMetricValue is utilization and VPA adjusts the requests, which changes the utilization, this may inadvertently trigger HPA and create said feedback loop. On the other hand, if desiredMetricValue is usage and VPA adjusts the requests now, this will have no impact on HPA anymore (HPA will always influence VPA, but we can control whether VPA influences HPA).
Therefore, to safely combine HPA and VPA, consider the following strategies:
- Configure HPA and VPA on different metrics: One way to avoid conflicts is to use HPA and VPA based on different metrics. For instance, you could configure HPA to scale based on requests per seconds (or another representative custom/external metric) and VPA to adjust CPU and memory requests. This way, each autoscaler operates independently based on its specific metric(s).
- Configure HPA to scale on usage, not utilization, when used with VPA: Another way to avoid conflicts is to use HPA not on average utilization (
averageUtilization), but instead on average usage (averageValue) as replicas driver, which is an absolute metric (requests don’t affect usage). This way, you can combine both autoscalers even on the same metrics.
Pod Autoscaling and Cluster Autoscaler
Autoscaling within Kubernetes can be implemented at different levels: pod autoscaling (HPA and VPA) and cluster autoscaling (CA). While pod autoscaling adjusts the number of pod replicas or their resource reservations, cluster autoscaling focuses on the number of nodes in the cluster, so that your pods can be hosted. If your workload isn’t static and especially if you make use of pod autoscaling, it only works if you have sufficient node capacity available. The most effective way to do that, without running a worst-case number of nodes, is to configure burstable worker pools in your shoot spec, i.e. define a true minimum node count and a worst-case maximum node count and leave the node autoscaling to Gardener that internally uses the Cluster Autoscaler to provision and deprovision nodes as needed.
Cluster Autoscaler automatically adjusts the number of nodes by adding or removing nodes based on the demands of the workloads and the available resources. It interacts with the cloud provider’s APIs to provision or deprovision nodes as needed. Cluster Autoscaler monitors the utilization of nodes and the scheduling of pods. If it detects that pods cannot be scheduled due to a lack of resources, it will trigger the addition of new nodes to the cluster. Conversely, if nodes are underutilized for some time and their pods can be placed on other nodes, it will remove those nodes to reduce costs and improve resource efficiency.
Best Practices:
- Resource Buffering: Maintain a buffer of resources to accommodate temporary spikes in demand without waiting for node provisioning. This can be done by deploying pods with low priority that can be preempted when real workloads require resources. This helps in faster pod scheduling and avoids delays in scaling out or up.
- Pod Disruption Budgets (PDBs): Use PDBs to ensure that during scale-down events, the availability of applications is maintained as the Cluster Autoscaler will not voluntarily evict a pod if a PDB would be violated.
Interesting CA Options
CA can be configured in your Gardener shoot cluster spec globally and also in parts per worker pool:
- Can only be configured globally:
expander(default least-waste): Defines the “expander” algorithm to use during scale-up, see FAQ.scaleDownDelayAfterAdd(default 1h): Defines how long after scaling up a node, a node may be scaled down.scaleDownDelayAfterFailure(default 3m): Defines how long after scaling down a node failed, scaling down will be resumed.scaleDownDelayAfterDelete(default 0s): Defines how long after scaling down a node, another node may be scaled down.
- Can be configured globally and also overwritten individually per worker pool:
scaleDownUtilizationThreshold(default 50%): Defines the threshold below which a node becomes eligible for scaling down.scaleDownUnneededTime(default 30m): Defines the trailing time window the node must be consistently below a certain utilization threshold before it can finally be scaled down.
There are many more options that you can only configure if you deploy your own CA and which we will not discuss here, but you can check them out here.
Importance of Monitoring
Monitoring is a critical component of autoscaling for several reasons:
- Performance Insights: It provides insights into how well your autoscaling strategy is meeting the performance requirements of your applications.
- Resource Utilization: It helps you understand resource utilization patterns, enabling you to optimize resource allocation and reduce waste.
- Cost Management: It allows you to track the cost implications of scaling actions, helping you to maintain control over your cloud spending.
- Troubleshooting: It enables you to quickly identify and address issues with autoscaling, such as unexpected scaling behavior or resource bottlenecks.
To effectively monitor autoscaling, you should leverage the following tools and metrics:
- Kubernetes Metrics Server: Collects resource metrics from kubelets and provides them to HPA and VPA for autoscaling decisions (automatically provided by Gardener).
- Prometheus: An open-source monitoring system that can collect and store custom metrics, providing a rich dataset for autoscaling decisions.
- Grafana/Plutono: A visualization tool that integrates with Prometheus to create dashboards for monitoring autoscaling metrics and events.
- Cloud Provider Tools: Most cloud providers offer native monitoring solutions that can be used to track the performance and costs associated with autoscaling.
Key metrics to monitor include:
- CPU and Memory Utilization: Track the resource utilization of your pods and nodes to understand how they correlate with scaling events.
- Pod Count: Monitor the number of pod replicas over time to see how HPA is responding to changes in load.
- Scaling Events: Keep an eye on scaling events triggered by HPA and VPA to ensure they align with expected behavior.
- Application Performance Metrics: Track application-specific metrics such as response times, error rates, and throughput.
Based on the insights gained from monitoring, you may need to adjust your autoscaling configurations:
- Refine Thresholds: If you notice frequent scaling actions or periods of underutilization or overutilization, adjust the thresholds used by HPA and VPA to better match the workload patterns.
- Update Policies: Modify VPA update policies if you observe that the current settings are causing too much or too little pod disruption.
- Custom Metrics: If using custom metrics, ensure they accurately reflect the load on your application and adjust them if they do not.
- Scaling Limits: Review and adjust the minimum and maximum scaling limits to prevent over-scaling or under-scaling based on the capacity of your cluster and the criticality of your applications.
Quality of Service (QoS)
A few words on the quality of service for pods. Basically, there are 3 classes of QoS and they influence the eviction of pods when kube-reserved is underrun, i.e. node-level resources are running low:
BestEffort, i.e. pods where no container has CPU or memory requests or limits: Avoid them unless you have really good reasons. The kube-scheduler will place them just anywhere according to its policy, e.g.balancedorbin-packing, but whatever resources these pods consume, may bring other pods into trouble or even the kubelet and the container runtime itself, if it happens very suddenly.Burstable, i.e. pods where at least one container has CPU or memory requests and at least one has no limits or limits that don’t match the requests: Prefer them unless you have really good reasons for the other QoS classes. Always specify proper requests or use VPA to recommend those. This helps the kube-scheduler to make the right scheduling decisions. Not having limits will additionally provide upward resource flexibility, if the node is not under pressure.Guaranteed, i.e. pods where all containers have CPU and memory requests and equal limits: Avoid them unless you really know the limits or throttling/killing is intended. While “Guaranteed” sounds like something “positive” in the English language, this class comes with the downside, that pods will be actively CPU-throttled and will actively go OOM, even if the node is not under pressure and has excess capacity left. Worse, if containers in the pod are under VPA, their CPU requests/limits will often not be scaled up as CPU throttling will go unnoticed by VPA.
Summary
- As a rule of thumb, always set CPU and memory requests (or let VPA do that) and always avoid CPU and memory limits.
- CPU limits aren’t helpful on an under-utilized node (=may result in needless outages) and even suppress the signals for VPA to act. On a nearly or fully utilized node, CPU limits are practically irrelevant as only the requests matter, which are translated into CPU shares that provide a fair use of the CPU anyway (see CFS).
Therefore, if you do not know the healthy range, do not set CPU limits. If you as author of the source code know its healthy range, set them to the upper threshold of that healthy range (everything above, from your knowledge of that code, is definitely an unbound busy loop or similar, which is the main reason for CPU limits, besides batch jobs where throttling is acceptable or even desired). - Memory limits may be more useful, but suffer a similar, though not as negative downside. As with CPU limits, memory limits aren’t helpful on an under-utilized node (=may result in needless outages), but different than CPU limits, they result in an OOM, which triggers VPA to provide more memory suddenly (modifies the currently computed recommendations by a configurable factor, defaulting to +20%, see docs).
Therefore, if you do not know the healthy range, do not set memory limits. If you as author of the source code know its healthy range, set them to the upper threshold of that healthy range (everything above, from your knowledge of that code, is definitely an unbound memory leak or similar, which is the main reason for memory limits)
- CPU limits aren’t helpful on an under-utilized node (=may result in needless outages) and even suppress the signals for VPA to act. On a nearly or fully utilized node, CPU limits are practically irrelevant as only the requests matter, which are translated into CPU shares that provide a fair use of the CPU anyway (see CFS).
- Horizontal Pod Autoscaling (HPA): Use for pods that support horizontal scaling. Prefer scaling on usage, not utilization, as this is more predictable (not dependent on a second variable, namely the current requests) and conflict-free with vertical pod autoscaling (VPA).
- As a rule of thumb, set the initial replicas to the 5th percentile of the actually observed replica count in production. Since HPA reacts fast, this is not as critical, but may help reduce initial load on the control plane early after deployment. However, be cautious when you update the higher-level resource not to inadvertently reset the current HPA-controlled replica count (very easy to make mistake that can lead to catastrophic loss of pods). HPA modifies the replica count directly in the spec and you do not want to overwrite that. Even if it reacts fast, it is not instant (not via a mutating webhook as VPA operates) and the damage may already be done.
- As for minimum and maximum, let your high availability requirements determine the minimum and your theoretical maximum load determine the maximum, flanked with alerts to detect erroneous run-away out-scaling or the actual nearing of your practical maximum load, so that you can intervene.
- Vertical Pod Autoscaling (VPA): Use for containers that have a significant usage (e.g. any container above 50m CPU or 100M memory) and a significant usage spread over time (by more than 2x), i.e. ignore small (e.g. side-cars) or static (e.g. Java statically allocated heap) containers, but otherwise use it to provide the resources needed on the one hand and keep the costs in check on the other hand.
- As a rule of thumb, set the initial requests to the 5th percentile of the actually observed CPU resp. memory usage in production. Since VPA may need some time at first to respond and evict pods, this is especially critical early after deployment. The lower bound, below which pods will be immediately evicted, converges much faster than the upper bound, above which pods will be immediately evicted, but it isn’t instant, e.g. after 5 minutes the lower bound is just at 60% of the computed lower bound; after 12 hours the upper bound is still at 300% of the computed upper bound (see code). Unlike with HPA, you don’t need to be as cautious when updating the higher-level resource in the case of VPA. As long as VPA’s mutating webhook (VPA Admission Controller) is operational (which also the VPA Updater checks before evicting pods), it’s generally safe to update the higher-level resource. However, if it’s not up and running, any new pods that are spawned (e.g. as a consequence of a rolling update of the higher-level resource or for any other reason) will not be mutated. Instead, they will receive whatever requests are currently configured at the higher-level resource, which can lead to catastrophic resource under-reservation. Gardener deploys the VPA Admission Controller in HA - if unhealthy, it is reported under the
ControlPlaneHealthyshoot status condition. - As a rule of thumb, for a container under VPA always specify initial resource requests for the resources which are controlled by VPA (the
controlledResourcesfield; by default both cpu and memory are controlled). vpa-updater evicts immediately if a container does not specify initial resource requests for a resource controlled by VPA (see code). - As a rule of thumb, for a container under VPA do not set initial requests less than VPA’s
minAllowedor vpa-recommender’s Pod minimum recommendation (10mand10Mi). In Gardener, vpa-recommender is configured to run with--pod-recommendation-min-cpu-millicores=10and--pod-recommendation-min-memory-mb=10(see code). These values are synced with the smallest histogram bucket sizes -10mand10M(see VPA Recommender Options). Note that the--pod-recommendation-min-memory-mbflag is in mebibytes, not megabytes (see code). If a Pod has a container under VPA with resource requests less than the VPA’sminAllowedor10mand10Mi, the Pod will be evicted immediately. The reason is that the VPA’s lower bound recommendation is set tominAllowedor10mand10Mi. vpa-updater evicts immediately if the container’s resource requests are “out of bounds” (in this particular case - less than the lower bound). - If you have defined absolute limits (unrelated to the requests), configure VPA to only scale the requests or else it will proportionally scale the limits as well, which can easily become useless (way beyond the threshold of unhealthy behavior) or absurd (larger than node capacity):
If you have defined relative limits (related to the requests), the default policy to scale the limits proportionally with the requests is fine, but the gap between requests and limits must be zero for QoSspec: resourcePolicy: containerPolicies: - controlledValues: RequestsOnly ...Guaranteedand should best be small for QoSBurstableto avoid useless or absurd limits either, e.g. prefer limits being 5 to at most 20% larger than requests as opposed to being 100% larger or more. - As a rule of thumb, set
minAllowedto the highest observed VPA recommendation (usually during the initialization phase or during any periodical activity) for an otherwise practically idle container, so that you avoid needless trashing (e.g. resource usage calms down over time and recommendations drop consecutively until eviction, which will then lead again to initialization or later periodical activity and higher recommendations and new evictions).
⚠️ You may want to provide higherminAllowedvalues, if you observe that up-scaling takes too long for CPU or memory for a too large percentile of your workload. This will get you out of the danger zone of too few resources for too many pods at the expense of providing too many resources for a few pods. Memory may react faster than CPU, because CPU throttling is not visible and memory gets aided by OOM bump-up incidents, but still, if you observe that up-scaling takes too long, you may want to increaseminAllowedaccordingly. - As a rule of thumb, set
maxAllowedto your theoretical maximum load, flanked with alerts to detect erroneous run-away usage or the actual nearing of your practical maximum load, so that you can intervene. However, VPA can easily recommend requests larger than what is allocatable on a node, so you must either ensure large enough nodes (Gardener can scale up from zero, in case you like to define a low-priority worker pool with more resources for very large pods) and/or cap VPA’s target recommendations usingmaxAllowedat the node allocatable remainder (after daemon set pods) of the largest eligible machine type (may result in under-provisioning resources for a pod). Use your monitoring and check maximum pod usage to decide about the maximum machine type.
Recommendations in a Box
| Container | When to use | Value |
|---|---|---|
| Requests | - Set them (recommended) unless: - Do not set requests for QoS BestEffort; useful only if pod can be evicted as often as needed and pod can pick up where it left off without any penalty | Set requests to 95th percentile (w/o VPA) of the actually observed CPU resp. memory usage in production resp. 5th percentile (w/ VPA) (see below) |
| Limits | - Avoid them (recommended) unless: - Set limits for QoS Guaranteed; useful only if pod has strictly static resource requirements- Set CPU limits if you want to throttle CPU usage for containers that can be throttled w/o any other disadvantage than processing time (never do that when time-critical operations like leases are involved) - Set limits if you know the healthy range and want to shield against unbound busy loops, unbound memory leaks, or similar | If you really can (otherwise not), set limits to healthy theoretical max load |
| Scaler | When to use | Initial | Minimum | Maximum |
|---|---|---|---|---|
| HPA | Use for pods that support horizontal scaling | Set initial replicas to 5th percentile of the actually observed replica count in production (prefer scaling on usage, not utilization) and make sure to never overwrite it later when controlled by HPA | Set minReplicas to 0 (requires feature gate and custom/external metrics), to 1 (regular HPA minimum), or whatever the high availability requirements of the workload demand | Set maxReplicas to healthy theoretical max load |
| VPA | Use for containers that have a significant usage (>50m/100M) and a significant usage spread over time (>2x) | Set initial requests to 5th percentile of the actually observed CPU resp. memory usage in production | Set minAllowed to highest observed VPA recommendation (includes start-up phase) for an otherwise practically idle container (avoids pod trashing when pod gets evicted after idling) | Set maxAllowed to fresh node allocatable remainder after daemonset pods (avoids pending pods when requests exceed fresh node allocatable remainder) or, if you really can (otherwise not), to healthy theoretical max load (less disruptive than limits as no throttling or OOM happens on under-utilized nodes) |
| CA | Use for dynamic workloads, definitely if you use HPA and/or VPA | N/A | Set minimum to 0 or number of nodes required right after cluster creation or wake-up | Set maximum to healthy theoretical max load |
Note
Theoretical max load may be very difficult to ascertain, especially with modern software that consists of building blocks you do not own or know in detail. If you have comprehensive monitoring in place, you may be tempted to pick the observed maximum and add a safety margin or even factor on top (2x, 4x, or any other number), but this is not to be confused with “theoretical max load” (solely depending on the code, not observations from the outside). At any point in time, your numbers may change, e.g. because you updated a software component or your usage increased. If you decide to use numbers that are set based only on observations, make sure to flank those numbers with monitoring alerts, so that you have sufficient time to investigate, revise, and readjust if necessary.
Conclusion
Pod autoscaling is a dynamic and complex aspect of Kubernetes, but it is also one of the most powerful tools at your disposal for maintaining efficient, reliable, and cost-effective applications. By carefully selecting the appropriate autoscaler, setting well-considered thresholds, and continuously monitoring and adjusting your strategies, you can ensure that your Kubernetes deployments are well-equipped to handle your resource demands while not over-paying for the provided resources at the same time.
As Kubernetes continues to evolve (e.g. in-place updates) and as new patterns and practices emerge, the approaches to autoscaling may also change. However, the principles discussed above will remain foundational to creating scalable and resilient Kubernetes workloads. Whether you’re a developer or operations engineer, a solid understanding of pod autoscaling will be instrumental in the successful deployment and management of containerized applications.
2.6.2 - Specifying a Disruption Budget for Kubernetes Controllers
Introduction of Disruptions
We need to understand that some kind of voluntary disruptions can happen to pods. For example, they can be caused by cluster administrators who want to perform automated cluster actions, like upgrading and autoscaling clusters. Typical application owner actions include:
- deleting the deployment or other controller that manages the pod
- updating a deployment’s pod template causing a restart
- directly deleting a pod (e.g., by accident)
Setup Pod Disruption Budgets
Kubernetes offers a feature called PodDisruptionBudget (PDB) for each application. A PDB limits the number of pods of a replicated application that are down simultaneously from voluntary disruptions.
The most common use case is when you want to protect an application specified by one of the built-in Kubernetes controllers:
- Deployment
- ReplicationController
- ReplicaSet
- StatefulSet
A PodDisruptionBudget has three fields:
- A label selector
.spec.selectorto specify the set of pods to which it applies. .spec.minAvailablewhich is a description of the number of pods from that set that must still be available after the eviction, even in the absence of the evicted pod. minAvailable can be either an absolute number or a percentage..spec.maxUnavailablewhich is a description of the number of pods from that set that can be unavailable after the eviction. It can be either an absolute number or a percentage.
Cluster Upgrade or Node Deletion Failed due to PDB Violation
Misconfiguration of the PDB could block the cluster upgrade or node deletion processes. There are two main cases that can cause a misconfiguration.
Case 1: The replica of Kubernetes controllers is 1
Only 1 replica is running: there is no
replicaCountsetup orreplicaCountfor the Kubernetes controllers is set to 1PDB configuration
spec: minAvailable: 1To fix this PDB misconfiguration, you need to change the value of
replicaCountfor the Kubernetes controllers to a number greater than 1
Case 2: HPA configuration violates PDB
In Kubernetes, a HorizontalPodAutoscaler automatically updates a workload resource (such as a Deployment or StatefulSet), with the aim of automatically scaling the workload to match demand. The HorizontalPodAutoscaler manages the replicas field of the Kubernetes controllers.
There is no
replicaCountsetup orreplicaCountfor the Kubernetes controllers is set to 1PDB configuration
spec: minAvailable: 1HPA configuration
spec: minReplicas: 1To fix this PDB misconfiguration, you need to change the value of HPA
minReplicasto be greater than 1
Related Links
2.6.3 - Access a Port of a Pod Locally
Question
You have deployed an application with a web UI or an internal endpoint in your Kubernetes (K8s) cluster. How to access this endpoint without an external load balancer (e.g., Ingress)?
This tutorial presents two options:
- Using Kubernetes port forward
- Using Kubernetes apiserver proxy
Please note that the options described here are mostly for quick testing or troubleshooting your application. For enabling access to your application for productive environment, please refer to the official Kubernetes documentation.
Solution 1: Using Kubernetes Port Forward
You could use the port forwarding functionality of kubectl to access the pods from your local host without involving a service.
To access any pod follow these steps:
- Run
kubectl get pods - Note down the name of the pod in question as
<your-pod-name> - Run
kubectl port-forward <your-pod-name> <local-port>:<your-app-port> - Run a web browser or curl locally and enter the URL:
http(s)://localhost:<local-port>
In addition, kubectl port-forward allows using a resource name, such as a deployment name or service name, to select a matching pod to port forward.
More details can be found in the Kubernetes documentation.
The main drawback of this approach is that the pod’s name changes as soon as it is restarted. Moreover, you need to have a web browser on your client and you need to make sure that the local port is not already used by an application running on your system. Finally, sometimes the port forwarding is canceled due to nonobvious reasons. This leads to a kind of shaky approach. A more stable possibility is based on accessing the app via the kube-proxy, which accesses the corresponding service.

Solution 2: Using the apiserver Proxy of Your Kubernetes Cluster
There are several different proxies in Kubernetes. In this tutorial we will be using apiserver proxy to enable the access to the services in your cluster without Ingress. Unlike the first solution, here a service is required.
Use the following format to compose a URL for accessing your service through an existing proxy on the Kubernetes cluster:
https://<your-cluster-master>/api/v1/namespace/<your-namespace>/services/<your-service>:<your-service-port>/proxy/<service-endpoint>
Example:
| your-main-cluster | your-namespace | your-service | your-service-port | your-service-endpoint | url to access service |
|---|---|---|---|---|---|
| api.testclstr.cpet.k8s.sapcloud.io | default | nginx-svc | 80 | / | http://api.testclstr.cpet.k8s.sapcloud.io/api/v1/namespaces/default/services/nginx-svc:80/proxy/ |
| api.testclstr.cpet.k8s.sapcloud.io | default | docker-nodejs-svc | 4500 | /cpu?baseNumber=4 | https://api.testclstr.cpet.k8s.sapcloud.io/api/v1/namespaces/default/services/docker-nodejs-svc:4500/proxy/cpu?baseNumber=4 |
For more details on the format, please refer to the official Kubernetes documentation.
Note
There are applications which do not support relative URLs yet, e.g. Prometheus (as of November, 2022). This typically leads to missing JavaScript objects, which could be investigated with your browser’s development tools. If such an issue occurs, please use the
port-forwardapproach described above.
2.6.4 - Auditing Kubernetes for Secure Setup

Increasing the Security of All Gardener Stakeholders
In summer 2018, the Gardener project team asked Kinvolk to execute several penetration tests in its role as third-party contractor. The goal of this ongoing work was to increase the security of all Gardener stakeholders in the open source community. Following the Gardener architecture, the control plane of a Gardener managed shoot cluster resides in the corresponding seed cluster. This is a Control-Plane-as-a-Service with a network air gap.
Along the way we found various kinds of security issues, for example, due to misconfiguration or missing isolation, as well as two special problems with upstream Kubernetes and its Control-Plane-as-a-Service architecture.
Major Findings
From this experience, we’d like to share a few examples of security issues that could happen on a Kubernetes installation and how to fix them.
Alban Crequy (Kinvolk) and Dirk Marwinski (SAP SE) gave a presentation entitled Hardening Multi-Cloud Kubernetes Clusters as a Service at KubeCon 2018 in Shanghai presenting some of the findings.
Here is a summary of the findings:
Privilege escalation due to insecure configuration of the Kubernetes API server
- Root cause: Same certificate authority (CA) is used for both the API server and the proxy that allows accessing the API server.
- Risk: Users can get access to the API server.
- Recommendation: Always use different CAs.
Exploration of the control plane network with malicious HTTP-redirects
- Root cause: See detailed description below.
- Risk: Provoked error message contains full HTTP payload from an existing endpoint which can be exploited. The contents of the payload depends on your setup, but can potentially be user data, configuration data, and credentials.
- Recommendation:
- Use the latest version of Gardener
- Ensure the seed cluster’s container network supports network policies. Clusters that have been created with Kubify are not protected as Flannel is used there which doesn’t support network policies.
- Recommendation:
Reading private AWS metadata via Grafana
- Root cause: It is possible to configuring a new custom data source in Grafana, we could send HTTP requests to target the control
- Risk: Users can get the “user-data” for the seed cluster from the metadata service and retrieve a kubeconfig for that Kubernetes cluster
- Recommendation: Lockdown Grafana features to only what’s necessary in this setup, block all unnecessary outgoing traffic, move Grafana to a different network, lockdown unauthenticated endpoints
Scenario 1: Privilege Escalation with Insecure API Server
In most configurations, different components connect directly to the Kubernetes API server, often using a kubeconfig with a client
certificate. The API server is started with the flag:
/hyperkube apiserver --client-ca-file=/srv/kubernetes/ca/ca.crt ...
The API server will check whether the client certificate presented by kubectl, kubelet, scheduler or another component is really signed by the configured certificate authority for clients.
 The API server can have many clients of various kinds
However, it is possible to configure the API server differently for use with an intermediate authenticating proxy. The proxy will authenticate the client with its own custom method and then issue HTTP requests to the API server with additional HTTP headers specifying the user name and group name. The API server should only accept HTTP requests with HTTP headers from a legitimate proxy. To allow the API server to check incoming requests, you need pass on a list of certificate authorities (CAs) to it. Requests coming from a proxy are only accepted if they use a client certificate that is signed by one of the CAs of that list.
--requestheader-client-ca-file=/srv/kubernetes/ca/ca-proxy.crt
--requestheader-username-headers=X-Remote-User
--requestheader-group-headers=X-Remote-Group
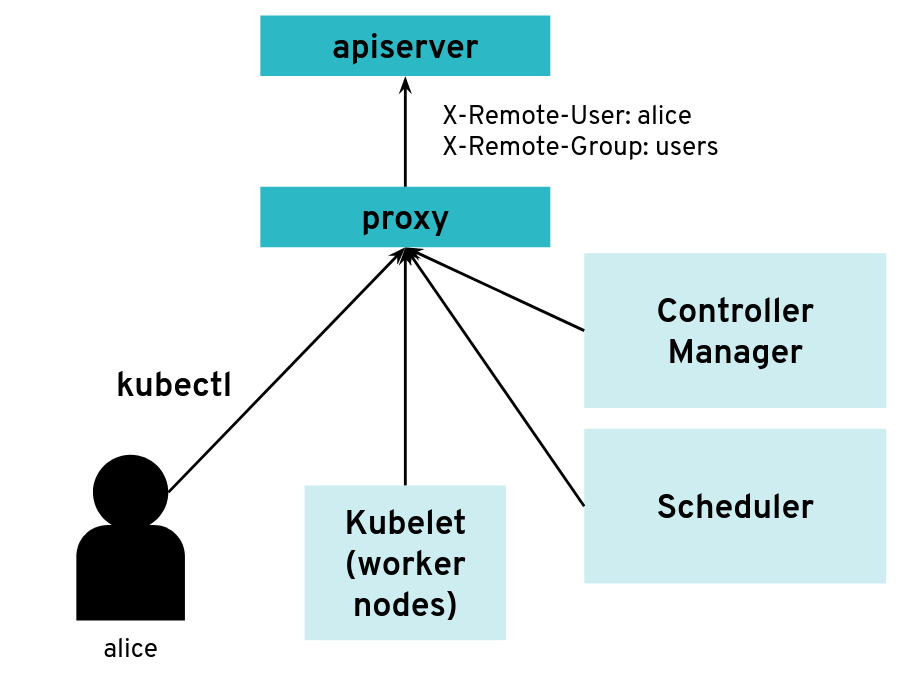 API server clients can reach the API server through an authenticating proxy
So far, so good. But what happens if the malicious user “Mallory” tries to connect directly to the API server and reuses the HTTP headers to pretend to be someone else?
 What happens when a client bypasses the proxy, connecting directly to the API server?
With a correct configuration, Mallory’s kubeconfig will have a certificate signed by the API server certificate authority but not signed by the proxy certificate authority. So the API server will not accept the extra HTTP header “X-Remote-Group: system:masters”.
You only run into an issue when the same certificate authority is used for both the API server and the proxy. Then, any Kubernetes client certificate can be used to take the role of different user or group as the API server will accept the user header and group header.
The kubectl tool does not normally add those HTTP headers but it’s pretty easy to generate the corresponding HTTP requests manually.
We worked on improving the Kubernetes documentation to make clearer that this configuration should be avoided.
Scenario 2: Exploration of the Control Plane Network with Malicious HTTP-Redirects
The API server is a central component of Kubernetes and many components initiate connections to it, including the kubelet running on worker nodes. Most of the requests from those clients will end up updating Kubernetes objects (pods, services, deployments, and so on) in the etcd database but the API server usually does not need to initiate TCP connections itself.
 The API server is mostly a component that receives requests
However, there are exceptions. Some kubectl commands will trigger the API server to open a new connection to the kubelet. kubectl exec is one of those commands. In order to get the standard I/Os from the pod, the API server will start an HTTP connection to the kubelet on the worker node where the pod is running. Depending on the container runtime used, it can be done in different ways, but one way to do it is for the kubelet to reply with a HTTP-302 redirection to the Container Runtime Interface (CRI). Basically, the kubelet is telling the API server to get the streams from CRI itself directly instead of forwarding. The redirection from the kubelet will only change the port and path from the URL; the IP address will not be changed because the kubelet and the CRI component run on the same worker node.
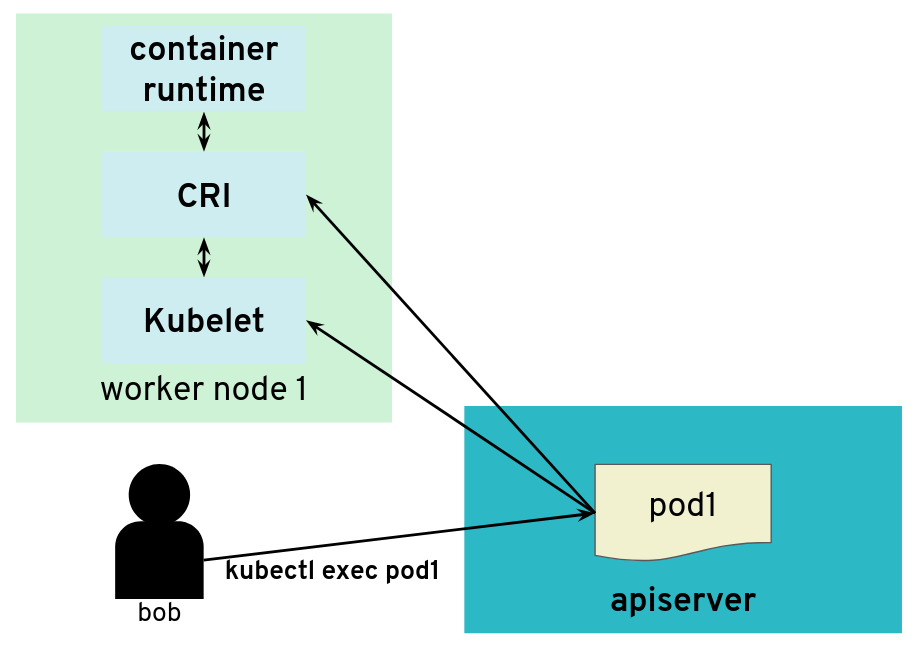 But the API server also initiates some connections, for example, to worker nodes
It’s often quite easy for users of a Kubernetes cluster to get access to worker nodes and tamper with the kubelet. They could be given explicit SSH access or they could be given a kubeconfig with enough privileges to create privileged pods or even just pods with “host” volumes.
In contrast, users (even those with “system:masters” permissions or “root” rights) are often not given access to the control plane. On setups like, for example, GKE or Gardener, the control plane is running on separate nodes, with a different administrative access. It could be hosted on a different cloud provider account. So users are not free to explore the internal networking the control plane.
What would happen if a user was tampering with the kubelet to make it maliciously redirect kubectl exec requests to a different random endpoint? Most likely the given endpoint would not speak to the streaming server protocol, so there would be an error. However, the full HTTP payload from the endpoint is included in the error message printed by kubectl exec.
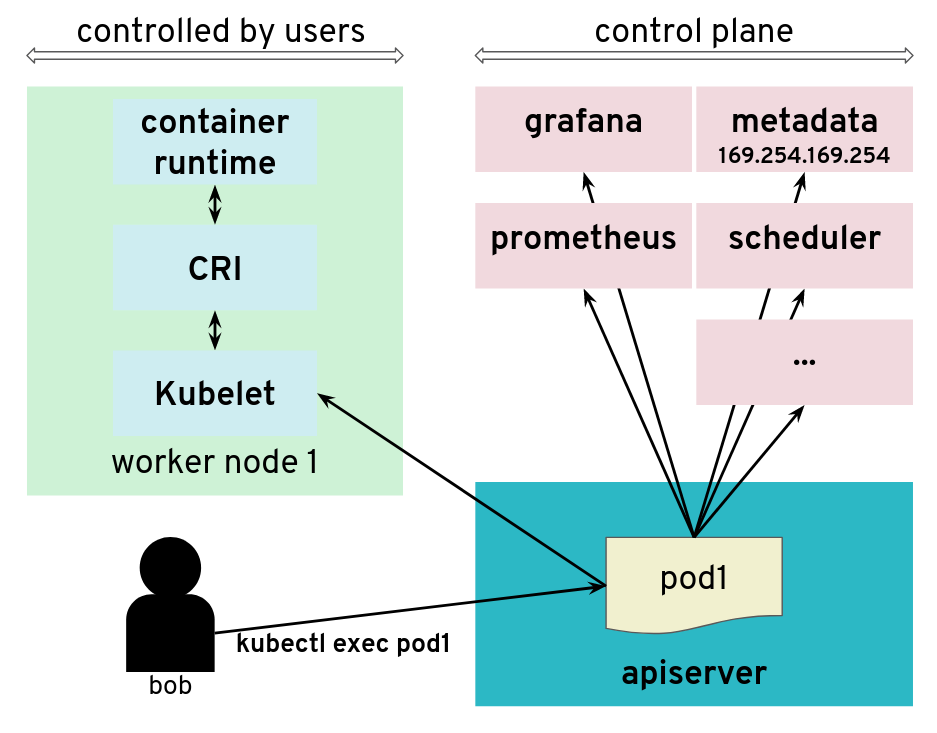 The API server is tricked to connect to other components
The impact of this issue depends on the specific setup. But in many configurations, we could find a metadata service (such as the AWS metadata service) containing user data, configurations and credentials. The setup we explored had a different AWS account and a different EC2 instance profile for the worker nodes and the control plane. This issue allowed users to get access to the AWS metadata service in the context of the control plane, which they should not have access to.
We have reported this issue to the Kubernetes Security mailing list and the public pull request that addresses the issue has been merged PR#66516. It provides a way to enforce HTTP redirect validation (disabled by default).
But there are several other ways that users could trigger the API server to generate HTTP requests and get the reply payload back, so it is advised to isolate the API server and other components from the network as additional precautious measures. Depending on where the API server runs, it could be with Kubernetes Network Policies, EC2 Security Groups or just iptables directly. Following the defense in depth principle, it is a good idea to apply the API server HTTP redirect validation when it is available as well as firewall rules.
In Gardener, this has been fixed with Kubernetes network policies along with changes to ensure the API server does not need to contact the metadata service. You can see more details in the announcements on the Gardener mailing list. This is tracked in CVE-2018-2475.
To be protected from this issue, stakeholders should:
- Use the latest version of Gardener
- Ensure the seed cluster’s container network supports network policies. Clusters that have been created with Kubify are not protected as Flannel is used there which doesn’t support network policies.
Scenario 3: Reading Private AWS Metadata via Grafana
For our tests, we had access to a Kubernetes setup where users are not only given access to the API server in the control plane, but also to a Grafana instance that is used to gather data from their Kubernetes clusters via Prometheus. The control plane is managed and users don’t have access to the nodes that it runs. They can only access the API server and Grafana via a load balancer. The internal network of the control plane is therefore hidden to users.
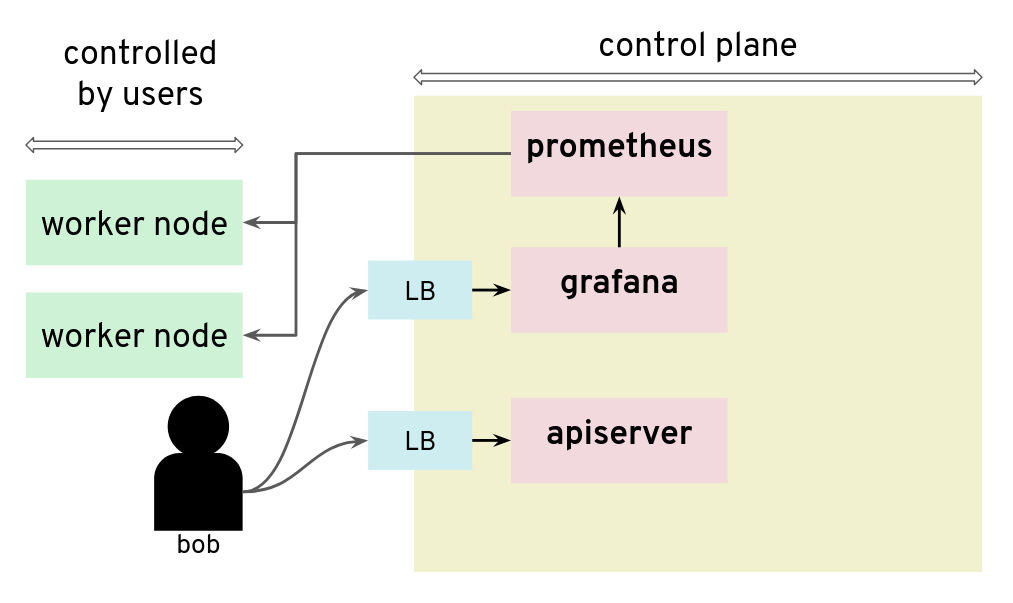 Prometheus and Grafana can be used to monitor worker nodes
Unfortunately, that setup was not protecting the control plane network from nosy users. By configuring a new custom data source in Grafana, we could send HTTP requests to target the control plane network, for example the AWS metadata service. The reply payload is not displayed on the Grafana Web UI but it is possible to access it from the debugging console of the Chrome browser.
 Credentials can be retrieved from the debugging console of Chrome
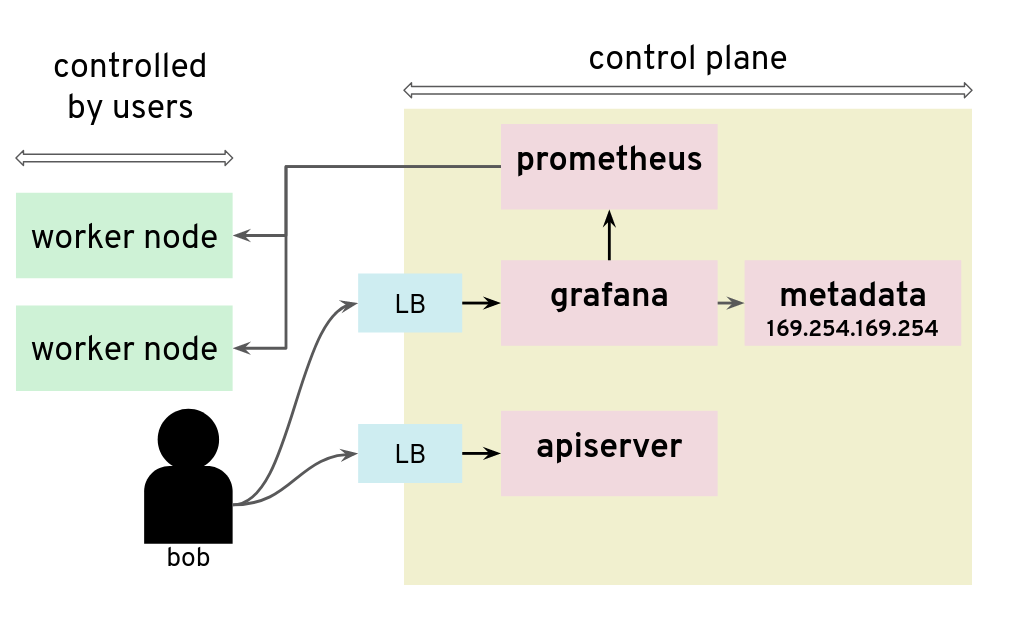 Adding a Grafana data source is a way to issue HTTP requests to arbitrary targets
In that installation, users could get the “user-data” for the seed cluster from the metadata service and retrieve a kubeconfig for that Kubernetes cluster.
There are many possible measures to avoid this situation: lockdown Grafana features to only what’s necessary in this setup, block all unnecessary outgoing traffic, move Grafana to a different network, or lockdown unauthenticated endpoints, among others.
Conclusion
The three scenarios above show pitfalls with a Kubernetes setup. A lot of them were specific to the Kubernetes installation: different cloud providers or different configurations will show different weaknesses. Users should no longer be given access to Grafana.
2.6.5 - Container Image Not Pulled
Problem
Two of the most common causes of this problems are specifying the wrong container image or trying to use private images without providing registry credentials.
Note
There is no observable difference in pod status between a missing image and incorrect registry permissions. In either case, Kubernetes will report an
ErrImagePullstatus for the pods. For this reason, this article deals with both scenarios.
Example
Let’s see an example. We’ll create a pod named fail, referencing a non-existent Docker image:
kubectl run -i --tty fail --image=tutum/curl:1.123456
The command doesn’t return and you can terminate the process with Ctrl+C.
Error Analysis
We can then inspect our pods and see that we have one pod with a status of ErrImagePull or ImagePullBackOff.
$ (minikube) kubectl get pods
NAME READY STATUS RESTARTS AGE
client-5b65b6c866-cs4ch 1/1 Running 1 1m
fail-6667d7685d-7v6w8 0/1 ErrImagePull 0 <invalid>
vuejs-578574b75f-5x98z 1/1 Running 0 1d
$ (minikube)
For some additional information, we can describe the failing pod.
kubectl describe pod fail-6667d7685d-7v6w8
As you can see in the events section, your image can’t be pulled:
Name: fail-6667d7685d-7v6w8
Namespace: default
Node: minikube/192.168.64.10
Start Time: Wed, 22 Nov 2017 10:01:59 +0100
Labels: pod-template-hash=2223832418
run=fail
Annotations: kubernetes.io/created-by={"kind":"SerializedReference","apiVersion":"v1","reference":{"kind":"ReplicaSet","namespace":"default","name":"fail-6667d7685d","uid":"cc4ccb3f-cf63-11e7-afca-4a7a1fa05b3f","a...
.
.
.
.
Events:
FirstSeen LastSeen Count From SubObjectPath Type Reason Message
--------- -------- ----- ---- ------------- -------- ------ -------
1m 1m 1 default-scheduler Normal Scheduled Successfully assigned fail-6667d7685d-7v6w8 to minikube
1m 1m 1 kubelet, minikube Normal SuccessfulMountVolume MountVolume.SetUp succeeded for volume "default-token-9fr6r"
1m 6s 4 kubelet, minikube spec.containers{fail} Normal Pulling pulling image "tutum/curl:1.123456"
1m 5s 4 kubelet, minikube spec.containers{fail} Warning Failed Failed to pull image "tutum/curl:1.123456": rpc error: code = Unknown desc = Error response from daemon: manifest for tutum/curl:1.123456 not found
1m <invalid> 10 kubelet, minikube Warning FailedSync Error syncing pod
1m <invalid> 6 kubelet, minikube spec.containers{fail} Normal BackOff Back-off pulling image "tutum/curl:1.123456"
Why couldn’t Kubernetes pull the image? There are three primary candidates besides network connectivity issues:
- The image tag is incorrect
- The image doesn’t exist
- Kubernetes doesn’t have permissions to pull that image
If you don’t notice a typo in your image tag, then it’s time to test using your local machine. I usually start by
running docker pull on my local development machine with the exact same image tag. In this case, I would
run docker pull tutum/curl:1.123456.
If this succeeds, then it probably means that Kubernetes doesn’t have the correct permissions to pull that image.
Add the docker registry user/pwd to your cluster:
kubectl create secret docker-registry dockersecret --docker-server=https://index.docker.io/v1/ --docker-username=<username> --docker-password=<password> --docker-email=<email>
If the exact image tag fails, then I will test without an explicit image tag:
docker pull tutum/curl
This command will attempt to pull the latest tag. If this succeeds, then that means the originally specified tag doesn’t exist. Go to the Docker registry and check which tags are available for this image.
If docker pull tutum/curl (without an exact tag) fails, then we have a bigger problem - that image does not exist at all in our image registry.
2.6.6 - Container Image Not Updating
Introduction
A container image should use a fixed tag or the SHA of the image. It should not use the tags latest, head, canary, or other tags that are designed to be floating.
Problem
If you have encountered this issue, you have probably done something along the lines of:
- Deploy anything using an image tag (e.g.,
cp-enablement/awesomeapp:1.0) - Fix a bug in awesomeapp
- Build a new image and push it with the same tag (
cp-enablement/awesomeapp:1.0) - Update the deployment
- Realize that the bug is still present
- Repeat steps 3-5 without any improvement
The problem relates to how Kubernetes decides whether to do a docker pull when starting a container.
Since we tagged our image as :1.0, the default pull policy is IfNotPresent. The Kubelet already has a local
copy of cp-enablement/awesomeapp:1.0, so it doesn’t attempt to do a docker pull. When the new Pods come up,
they’re still using the old broken Docker image.
There are a couple of ways to resolve this, with the recommended one being to use unique tags.
Solution
In order to fix the problem, you can use the following bash script that runs anytime the deployment is updated to create a new tag and push it to the registry.
#!/usr/bin/env bash
# Set the docker image name and the corresponding repository
# Ensure that you change them in the deployment.yml as well.
# You must be logged in with docker login.
#
# CHANGE THIS TO YOUR Docker.io SETTINGS
#
PROJECT=awesomeapp
REPOSITORY=cp-enablement
# causes the shell to exit if any subcommand or pipeline returns a non-zero status.
#
set -e
# set debug mode
#
set -x
# build my nodeJS app
#
npm run build
# get the latest version ID from the Docker.io registry and increment them
#
VERSION=$(curl https://registry.hub.docker.com/v1/repositories/$REPOSITORY/$PROJECT/tags | sed -e 's/[][]//g' -e 's/"//g' -e 's/ //g' | tr '}' '\n' | awk -F: '{print $3}' | grep v| tail -n 1)
VERSION=${VERSION:1}
((VERSION++))
VERSION="v$VERSION"
# build the new docker image
#
echo '>>> Building new image'
echo '>>> Push new image'
docker push $REPOSITORY/$PROJECT:$VERSION
2.6.7 - Custom Seccomp Profile
Overview
Seccomp (secure computing mode) is a security facility in the Linux kernel for restricting the set of system calls applications can make.
Starting from Kubernetes v1.3.0, the Seccomp feature is in Alpha. To configure it on a Pod, the following annotations can be used:
seccomp.security.alpha.kubernetes.io/pod: <seccomp-profile>where<seccomp-profile>is the seccomp profile to apply to all containers in aPod.container.seccomp.security.alpha.kubernetes.io/<container-name>: <seccomp-profile>where<seccomp-profile>is the seccomp profile to apply to<container-name>in aPod.
More details can be found in the PodSecurityPolicy documentation.
Installation of a Custom Profile
By default, kubelet loads custom Seccomp profiles from /var/lib/kubelet/seccomp/. There are two ways in which Seccomp profiles can be added to a Node:
- to be baked in the machine image
- to be added at runtime
This guide focuses on creating those profiles via a DaemonSet.
Create a file called seccomp-profile.yaml with the following content:
apiVersion: v1
kind: ConfigMap
metadata:
name: seccomp-profile
namespace: kube-system
data:
my-profile.json: |
{
"defaultAction": "SCMP_ACT_ALLOW",
"syscalls": [
{
"name": "chmod",
"action": "SCMP_ACT_ERRNO"
}
]
}
Note
The policy above is a very simple one and not suitable for complex applications. The default docker profile can be used a reference. Feel free to modify it to your needs.
Apply the ConfigMap in your cluster:
$ kubectl apply -f seccomp-profile.yaml
configmap/seccomp-profile created
The next steps is to create the DaemonSet Seccomp installer. It’s going to copy the policy from above in /var/lib/kubelet/seccomp/my-profile.json.
Create a file called seccomp-installer.yaml with the following content:
apiVersion: apps/v1
kind: DaemonSet
metadata:
name: seccomp
namespace: kube-system
labels:
security: seccomp
spec:
selector:
matchLabels:
security: seccomp
template:
metadata:
labels:
security: seccomp
spec:
initContainers:
- name: installer
image: alpine:3.10.0
command: ["/bin/sh", "-c", "cp -r -L /seccomp/*.json /host/seccomp/"]
volumeMounts:
- name: profiles
mountPath: /seccomp
- name: hostseccomp
mountPath: /host/seccomp
readOnly: false
containers:
- name: pause
image: k8s.gcr.io/pause:3.1
terminationGracePeriodSeconds: 5
volumes:
- name: hostseccomp
hostPath:
path: /var/lib/kubelet/seccomp
- name: profiles
configMap:
name: seccomp-profile
Create the installer and wait until it’s ready on all Nodes:
$ kubectl apply -f seccomp-installer.yaml
daemonset.apps/seccomp-installer created
$ kubectl -n kube-system get pods -l security=seccomp
NAME READY STATUS RESTARTS AGE
seccomp-installer-wjbxq 1/1 Running 0 21s
Create a Pod Using a Custom Seccomp Profile
Finally, we want to create a profile which uses our new Seccomp profile my-profile.json.
Create a file called my-seccomp-pod.yaml with the following content:
apiVersion: v1
kind: Pod
metadata:
name: seccomp-app
namespace: default
annotations:
seccomp.security.alpha.kubernetes.io/pod: "localhost/my-profile.json"
# you can specify seccomp profile per container. If you add another profile you can configure
# it for a specific container - 'pause' in this case.
# container.seccomp.security.alpha.kubernetes.io/pause: "localhost/some-other-profile.json"
spec:
containers:
- name: pause
image: k8s.gcr.io/pause:3.1
Create the Pod and see that it’s running:
$ kubectl apply -f my-seccomp-pod.yaml
pod/seccomp-app created
$ kubectl get pod seccomp-app
NAME READY STATUS RESTARTS AGE
seccomp-app 1/1 Running 0 42s
Throubleshooting
If an invalid or a non-existing profile is used, then the Pod will be stuck in ContainerCreating phase:
broken-seccomp-pod.yaml:
apiVersion: v1
kind: Pod
metadata:
name: broken-seccomp
namespace: default
annotations:
seccomp.security.alpha.kubernetes.io/pod: "localhost/not-existing-profile.json"
spec:
containers:
- name: pause
image: k8s.gcr.io/pause:3.1
$ kubectl apply -f broken-seccomp-pod.yaml
pod/broken-seccomp created
$ kubectl get pod broken-seccomp
NAME READY STATUS RESTARTS AGE
broken-seccomp 1/1 ContainerCreating 0 2m
$ kubectl describe pod broken-seccomp
Name: broken-seccomp
Namespace: default
....
Events:
Type Reason Age From Message
---- ------ ---- ---- -------
Normal Scheduled 18s default-scheduler Successfully assigned kube-system/broken-seccomp to docker-desktop
Warning FailedCreatePodSandBox 4s (x2 over 18s) kubelet, docker-desktop Failed create pod sandbox: rpc error: code = Unknown desc = failed to make sandbox docker config for pod "broken-seccomp": failed to generate sandbox security options
for sandbox "broken-seccomp": failed to generate seccomp security options for container: cannot load seccomp profile "/var/lib/kubelet/seccomp/not-existing-profile.json": open /var/lib/kubelet/seccomp/not-existing-profile.json: no such file or directory
Related Links
2.6.8 - Dockerfile Pitfalls
Using the latest Tag for an Image
Many Dockerfiles use the FROM package:latest pattern at the top of their Dockerfiles to pull the latest image from a Docker registry.
Bad Dockerfile
FROM alpine
While simple, using the latest tag for an image means that your build can suddenly break if that image gets updated. This can lead to problems where everything builds fine locally (because your local cache thinks it is the latest), while a build server may fail, because some pipelines make a clean pull on every build. Additionally, troubleshooting can prove to be difficult, since the maintainer of the Dockerfile didn’t actually make any changes.
Good Dockerfile
A digest takes the place of the tag when pulling an image. This will ensure that your Dockerfile remains immutable.
FROM alpine@sha256:7043076348bf5040220df6ad703798fd8593a0918d06d3ce30c6c93be117e430
Running apt/apk/yum update
Running apt-get install is one of those things virtually every Debian-based Dockerfile will have to do in order to satiate some external package requirements your code needs to run. However, using apt-get as an example, this comes with its own problems.
apt-get upgrade
This will update all your packages to their latests versions, which can be bad because it prevents your Dockerfile from creating consistent, immutable builds.
apt-get update (in a different line than the one running your apt-get install command)
Running apt-get update as a single line entry will get cached by the build and won’t actually run every time you need to run apt-get install. Instead, make sure you run apt-get update in the same line with all the packages to ensure that all are updated correctly.
Avoid Big Container Images
Building a small container image will reduce the time needed to start or restart pods. An image based on the popular Alpine Linux project is much smaller than most distribution based images (~5MB). For most popular languages and products, there is usually an official Alpine Linux image, e.g., golang, nodejs, and postgres.
$ docker images
REPOSITORY TAG IMAGE ID CREATED SIZE
postgres 9.6.9-alpine 6583932564f8 13 days ago 39.26 MB
postgres 9.6 d92dad241eff 13 days ago 235.4 MB
postgres 10.4-alpine 93797b0f31f4 13 days ago 39.56 MB
In addition, for compiled languages such as Go or C++ that do not require build time tooling during runtime, it is recommended to avoid build time tooling in the final images. With Docker’s support for multi-stages builds, this can be easily achieved with minimal effort. Such an example can be found at Multi-stage builds.
Google’s distroless image is also a good base image.
2.6.9 - Dynamic Volume Provisioning
Overview
The example shows how to run a Postgres database on Kubernetes and how to dynamically provision and mount the storage volumes needed by the database
Run Postgres Database
Define the following Kubernetes resources in a yaml file:
- PersistentVolumeClaim (PVC)
- Deployment
PersistentVolumeClaim
apiVersion: v1
kind: PersistentVolumeClaim
metadata:
name: postgresdb-pvc
spec:
accessModes:
- ReadWriteOnce
resources:
requests:
storage: 9Gi
storageClassName: 'default'
This defines a PVC using the storage class default. Storage classes abstract from the underlying storage provider as well as other parameters, like disk-type (e.g., solid-state vs standard disks).
The default storage class has the annotation {“storageclass.kubernetes.io/is-default-class”:“true”}.
$ kubectl describe sc default
Name: default
IsDefaultClass: Yes
Annotations: kubectl.kubernetes.io/last-applied-configuration={"apiVersion":"storage.k8s.io/v1beta1","kind":"StorageClass","metadata":{"annotations":{"storageclass.kubernetes.io/is-default-class":"true"},"labels":{"addonmanager.kubernetes.io/mode":"Exists"},"name":"default","namespace":""},"parameters":{"type":"gp2"},"provisioner":"kubernetes.io/aws-ebs"}
,storageclass.kubernetes.io/is-default-class=true
Provisioner: kubernetes.io/aws-ebs
Parameters: type=gp2
AllowVolumeExpansion: <unset>
MountOptions: <none>
ReclaimPolicy: Delete
VolumeBindingMode: Immediate
Events: <none>
A Persistent Volume is automatically created when it is dynamically provisioned. In the following example, the PVC is defined as “postgresdb-pvc”, and a corresponding PV “pvc-06c81c30-72ea-11e8-ada2-aa3b2329c8bb” is created and associated with the PVC automatically.
$ kubectl create -f .\postgres_deployment.yaml
persistentvolumeclaim "postgresdb-pvc" created
$ kubectl get pv
NAME CAPACITY ACCESS MODES RECLAIM POLICY STATUS CLAIM STORAGECLASS REASON AGE
pvc-06c81c30-72ea-11e8-ada2-aa3b2329c8bb 9Gi RWO Delete Bound default/postgresdb-pvc default 3s
$ kubectl get pvc
NAME STATUS VOLUME CAPACITY ACCESS MODES STORAGECLASS AGE
postgresdb-pvc Bound pvc-06c81c30-72ea-11e8-ada2-aa3b2329c8bb 9Gi RWO default 8s
Notice that the RECLAIM POLICY is Delete (default value), which is one of the two reclaim policies, the other one is Retain. (A third policy Recycle has been deprecated). In the case of Delete, the PV is deleted automatically when the PVC is removed, and the data on the PVC will also be lost.
On the other hand, a PV with Retain policy will not be deleted when the PVC is removed, and moved to Release status, so that data can be recovered by Administrators later.
You can use the kubectl patch command to change the reclaim policy as described in Change the Reclaim Policy of a PersistentVolume
or use kubectl edit pv <pv-name> to edit it online as shown below:
$ kubectl get pv
NAME CAPACITY ACCESS MODES RECLAIM POLICY STATUS CLAIM STORAGECLASS REASON AGE
pvc-06c81c30-72ea-11e8-ada2-aa3b2329c8bb 9Gi RWO Delete Bound default/postgresdb-pvc default 44m
# change the reclaim policy from "Delete" to "Retain"
$ kubectl edit pv pvc-06c81c30-72ea-11e8-ada2-aa3b2329c8bb
persistentvolume "pvc-06c81c30-72ea-11e8-ada2-aa3b2329c8bb" edited
# check the reclaim policy afterwards
$ kubectl get pv
NAME CAPACITY ACCESS MODES RECLAIM POLICY STATUS CLAIM STORAGECLASS REASON AGE
pvc-06c81c30-72ea-11e8-ada2-aa3b2329c8bb 9Gi RWO Retain Bound default/postgresdb-pvc default 45m
Deployment
Once a PVC is created, you can use it in your container via volumes.persistentVolumeClaim.claimName. In the below example, the PVC postgresdb-pvc is mounted as readable and writable, and in volumeMounts two paths in the container are mounted to subfolders in the volume.
apiVersion: apps/v1
kind: Deployment
metadata:
name: postgres
namespace: default
labels:
app: postgres
annotations:
deployment.kubernetes.io/revision: "1"
spec:
replicas: 1
strategy:
type: RollingUpdate
rollingUpdate:
maxUnavailable: 1
maxSurge: 1
selector:
matchLabels:
app: postgres
template:
metadata:
name: postgres
labels:
app: postgres
spec:
containers:
- name: postgres
image: "cpettech.docker.repositories.sap.ondemand.com/jtrack_postgres:howto"
env:
- name: POSTGRES_USER
value: postgres
- name: POSTGRES_PASSWORD
value: p5FVqfuJFrM42cVX9muQXxrC3r8S9yn0zqWnFR6xCoPqxqVQ
- name: POSTGRES_INITDB_XLOGDIR
value: "/var/log/postgresql/logs"
ports:
- containerPort: 5432
volumeMounts:
- mountPath: /var/lib/postgresql/data
name: postgre-db
subPath: data # https://github.com/kubernetes/website/pull/2292. Solve the issue of crashing initdb due to non-empty directory (i.e. lost+found)
- mountPath: /var/log/postgresql/logs
name: postgre-db
subPath: logs
volumes:
- name: postgre-db
persistentVolumeClaim:
claimName: postgresdb-pvc
readOnly: false
imagePullSecrets:
- name: cpettechregistry
To check the mount points in the container:
$ kubectl get po
NAME READY STATUS RESTARTS AGE
postgres-7f485fd768-c5jf9 1/1 Running 0 32m
$ kubectl exec -it postgres-7f485fd768-c5jf9 bash
root@postgres-7f485fd768-c5jf9:/# ls /var/lib/postgresql/data/
base pg_clog pg_dynshmem pg_ident.conf pg_multixact pg_replslot pg_snapshots pg_stat_tmp pg_tblspc PG_VERSION postgresql.auto.conf postmaster.opts
global pg_commit_ts pg_hba.conf pg_logical pg_notify pg_serial pg_stat pg_subtrans pg_twophase pg_xlog postgresql.conf postmaster.pid
root@postgres-7f485fd768-c5jf9:/# ls /var/log/postgresql/logs/
000000010000000000000001 archive_status
Deleting a PersistentVolumeClaim
In case of a Delete policy, deleting a PVC will also delete its associated PV. If Retain is the reclaim policy, the PV will change status from Bound to Released when the PVC is deleted.
# Check pvc and pv before deletion
$ kubectl get pvc
NAME STATUS VOLUME CAPACITY ACCESS MODES STORAGECLASS AGE
postgresdb-pvc Bound pvc-06c81c30-72ea-11e8-ada2-aa3b2329c8bb 9Gi RWO default 50m
$ kubectl get pv
NAME CAPACITY ACCESS MODES RECLAIM POLICY STATUS CLAIM STORAGECLASS REASON AGE
pvc-06c81c30-72ea-11e8-ada2-aa3b2329c8bb 9Gi RWO Retain Bound default/postgresdb-pvc default 50m
# delete pvc
$ kubectl delete pvc postgresdb-pvc
persistentvolumeclaim "postgresdb-pvc" deleted
# pv changed to status "Released"
$ kubectl get pv
NAME CAPACITY ACCESS MODES RECLAIM POLICY STATUS CLAIM STORAGECLASS REASON AGE
pvc-06c81c30-72ea-11e8-ada2-aa3b2329c8bb 9Gi RWO Retain Released default/postgresdb-pvc default 51m
2.6.10 - Install Knative in Gardener Clusters
Overview
This guide walks you through the installation of the latest version of Knative using pre-built images on a Gardener created cluster environment. To set up your own Gardener, see the documentation or have a look at the landscape-setup-template project. To learn more about this open source project, read the blog on kubernetes.io.
Prerequisites
Knative requires a Kubernetes cluster v1.15 or newer.
Steps
Install and Configure kubectl
If you already have
kubectlCLI, runkubectl version --shortto check the version. You need v1.10 or newer. If yourkubectlis older, follow the next step to install a newer version.
Access Gardener
Create a project in the Gardener dashboard. This will essentially create a Kubernetes namespace with the name
garden-<my-project>.Configure access to your Gardener project using a kubeconfig.
If you are not the Gardener Administrator already, you can create a technical user in the Gardener dashboard. Go to the “Members” section and add a service account. You can then download the kubeconfig for your project. You can skip this step if you create your cluster using the user interface; it is only needed for programmatic access, make sure you set
export KUBECONFIG=garden-my-project.yamlin your shell.
Creating a Kubernetes Cluster
You can create your cluster using kubectl CLI by providing a cluster specification yaml file. You can find an example for GCP in the gardener/gardener repository. Make sure the namespace matches that of your project. Then just apply the prepared so-called “shoot” cluster CRD with kubectl:
kubectl apply --filename my-cluster.yaml
The easier alternative is to create the cluster following the cluster creation wizard in the Gardener dashboard:

Configure kubectl for Your Cluster
You can now download the kubeconfig for your freshly created cluster in the Gardener dashboard or via the CLI as follows:
kubectl --namespace shoot--my-project--my-cluster get secret kubecfg --output jsonpath={.data.kubeconfig} | base64 --decode > my-cluster.yaml
This kubeconfig file has full administrators access to you cluster. For the rest of this guide, be sure you have export KUBECONFIG=my-cluster.yaml set.
Installing Istio
Knative depends on Istio. If your cloud platform offers a managed Istio installation, we recommend installing Istio that way, unless you need the ability to customize your installation.
Otherwise, see the Installing Istio for Knative guide to install Istio.
You must install Istio on your Kubernetes cluster before continuing with these instructions to install Knative.
Installing cluster-local-gateway for Serving Cluster-Internal Traffic
If you installed Istio, you can install a cluster-local-gateway within your Knative cluster so that you can serve cluster-internal traffic. If you want to configure your revisions to use routes that are visible only within your cluster, install and use the cluster-local-gateway.
Installing Knative
The following commands install all available Knative components as well as the standard set of observability plugins. Knative’s installation guide - Installing Knative.
If you are upgrading from Knative 0.3.x: Update your domain and static IP address to be associated with the LoadBalancer
istio-ingressgatewayinstead ofknative-ingressgateway. Then run the following to clean up leftover resources:kubectl delete svc knative-ingressgateway -n istio-system kubectl delete deploy knative-ingressgateway -n istio-systemIf you have the Knative Eventing Sources component installed, you will also need to delete the following resource before upgrading:
kubectl delete statefulset/controller-manager -n knative-sourcesWhile the deletion of this resource during the upgrade process will not prevent modifications to Eventing Source resources, those changes will not be completed until the upgrade process finishes.
To install Knative, first install the CRDs by running the
kubectl applycommand once with the-l knative.dev/crd-install=trueflag. This prevents race conditions during the install, which cause intermittent errors:kubectl apply --selector knative.dev/crd-install=true \ --filename https://github.com/knative/serving/releases/download/v0.12.1/serving.yaml \ --filename https://github.com/knative/eventing/releases/download/v0.12.1/eventing.yaml \ --filename https://github.com/knative/serving/releases/download/v0.12.1/monitoring.yamlTo complete the installation of Knative and its dependencies, run the
kubectl applycommand again, this time without the--selectorflag:kubectl apply --filename https://github.com/knative/serving/releases/download/v0.12.1/serving.yaml \ --filename https://github.com/knative/eventing/releases/download/v0.12.1/eventing.yaml \ --filename https://github.com/knative/serving/releases/download/v0.12.1/monitoring.yamlMonitor the Knative components until all of the components show a
STATUSofRunning:kubectl get pods --namespace knative-serving kubectl get pods --namespace knative-eventing kubectl get pods --namespace knative-monitoring
Set Your Custom Domain
- Fetch the external IP or CNAME of the knative-ingressgateway:
kubectl --namespace istio-system get service knative-ingressgateway
NAME TYPE CLUSTER-IP EXTERNAL-IP PORT(S) AGE
knative-ingressgateway LoadBalancer 100.70.219.81 35.233.41.212 80:32380/TCP,443:32390/TCP,32400:32400/TCP 4d
- Create a wildcard DNS entry in your custom domain to point to the above IP or CNAME:
*.knative.<my domain> == A 35.233.41.212
# or CNAME if you are on AWS
*.knative.<my domain> == CNAME a317a278525d111e89f272a164fd35fb-1510370581.eu-central-1.elb.amazonaws.com
- Adapt your Knative config-domain (set your domain in the data field):
kubectl --namespace knative-serving get configmaps config-domain --output yaml
apiVersion: v1
data:
knative.<my domain>: ""
kind: ConfigMap
name: config-domain
namespace: knative-serving
What’s Next
Now that your cluster has Knative installed, you can see what Knative has to offer.
Deploy your first app with the Getting Started with Knative App Deployment guide.
Get started with Knative Eventing by walking through one of the Eventing Samples.
Install Cert-Manager if you want to use the automatic TLS cert provisioning feature.
Cleaning Up
Use the Gardener dashboard to delete your cluster, or execute the following with kubectl pointing to your garden-my-project.yaml kubeconfig:
kubectl --kubeconfig garden-my-project.yaml --namespace garden--my-project annotate shoot my-cluster confirmation.gardener.cloud/deletion=true
kubectl --kubeconfig garden-my-project.yaml --namespace garden--my-project delete shoot my-cluster
2.6.11 - Integrity and Immutability
Introduction
When transferring data among networked systems, trust is a central concern. In particular, when communicating over an untrusted medium such as the internet, it is critical to ensure the integrity and immutability of all the data a system operates on. Especially if you use Docker Engine to push and pull images (data) to a public registry.
This immutability offers you a guarantee that any and all containers that you instantiate will be absolutely identical at inception. Surprise surprise, deterministic operations.
A Lesson in Deterministic Ops
Docker Tags are about as reliable and disposable as this guy down here.

Seems simple enough. You have probably already deployed hundreds of YAML’s or started endless counts of Docker containers.
docker run --name mynginx1 -P -d nginx:1.13.9
or
apiVersion: apps/v1
kind: Deployment
metadata:
name: rss-site
spec:
replicas: 1
selector:
matchLabels:
app: web
template:
metadata:
labels:
app: web
spec:
containers:
- name: front-end
image: nginx:1.13.9
ports:
- containerPort: 80
But Tags are mutable and humans are prone to error. Not a good combination. Here, we’ll dig into why the use of tags can be dangerous and how to deploy your containers across a pipeline and across environments with determinism in mind.
Let’s say that you want to ensure that whether it’s today or 5 years from now, that specific deployment uses the very same image that you have defined. Any updates or newer versions of an image should be executed as a new deployment. The solution: digest
A digest takes the place of the tag when pulling an image. For example, to pull the above image by digest, run the following command:
docker run --name mynginx1 -P -d nginx@sha256:4771d09578c7c6a65299e110b3ee1c0a2592f5ea2618d23e4ffe7a4cab1ce5de
You can now make sure that the same image is always loaded at every deployment. It doesn’t matter if the TAG of the image has been changed or not. This solves the problem of repeatability.
Content Trust
However, there’s an additionally hidden danger. It is possible for an attacker to replace a server image with another one infected with malware.

Docker Content trust gives you the ability to verify both the integrity and the publisher of all the data received from a registry over any channel.
Prior to version 1.8, Docker didn’t have a way to verify the authenticity of a server image. But in v1.8, a new feature called Docker Content Trust was introduced to automatically sign and verify the signature of a publisher.
So, as soon as a server image is downloaded, it is cross-checked with the signature of the publisher to see if someone tampered with it in any way. This solves the problem of trust.
In addition, you should scan all images for known vulnerabilities.
2.6.12 - Kubernetes Antipatterns

This HowTo covers common Kubernetes antipatterns that we have seen over the past months.
Running as Root User
Whenever possible, do not run containers as root user. One could be tempted to say that Kubernetes pods and nodes are well separated. Host and containers running on it share the same kernel. If a container is compromised, the root user in the container has full control over the underlying node.
Watch the very good presentation by Liz Rice at the KubeCon 2018
Use RUN groupadd -r anygroup && useradd -r -g anygroup myuser to create a group and add a user to it. Use the USER command to switch to this user. Note that you may also consider to provide an explicit UID/GID if required.
For example:
ARG GF_UID="500"
ARG GF_GID="500"
# add group & user
RUN groupadd -r -g $GF_GID appgroup && \
useradd appuser -r -u $GF_UID -g appgroup
USER appuser
Store Data or Logs in Containers
Containers are ideal for stateless applications and should be transient. This means that no data or logs should be stored in the container, as they are lost when the container is closed. Use persistence volumes instead to persist data outside of containers. Using an ELK stack is another good option for storing and processing logs.
Using Pod IP Addresses
Each pod is assigned an IP address. It is necessary for pods to communicate with each other to build an application, e.g. an application must communicate with a database. Existing pods are terminated and new pods are constantly started. If you would rely on the IP address of a pod or container, you would need to update the application configuration constantly. This makes the application fragile.
Create services instead. They provide a logical name that can be assigned independently of the varying number and IP addresses of containers. Services are the basic concept for load balancing within Kubernetes.
More Than One Process in a Container
A docker file provides a CMD and ENTRYPOINT to start the image. CMD is often used around a script that makes a configuration and then starts the container. Do not try to start multiple processes with this script. It is important to consider the separation of concerns when creating docker images. Running multiple processes in a single pod makes managing your containers, collecting logs and updating each process more difficult.
You can split the image into multiple containers and manage them independently - even in one pod. Bear in mind that Kubernetes only monitors the process with PID=1. If more than one process is started within a container, then these no longer fall under the control of Kubernetes.
Creating Images in a Running Container
A new image can be created with the docker commit command. This is useful if changes have been made to the container and you want to persist them for later error analysis. However, images created like this are not reproducible and completely worthless for a CI/CD environment. Furthermore, another developer cannot recognize which components the image contains. Instead, always make changes to the docker file, close existing containers and start a new container with the updated image.
Saving Passwords in a docker Image 💀
Do not save passwords in a Docker file! They are in plain text and are checked into a repository. That makes them completely vulnerable even if you are using a private repository like the Artifactory.
Always use Secrets or ConfigMaps to provision passwords or inject them by mounting a persistent volume.
Using the ’latest’ Tag
Starting an image with tomcat is tempting. If no tags are specified, a container is started with the tomcat:latest image. This image may no longer be up to date and refer to an older version instead. Running a production application requires complete control of the environment with exact versions of the image.
Make sure you always use a tag or even better the sha256 hash of the image, e.g., tomcat@sha256:c34ce3c1fcc0c7431e1392cc3abd0dfe2192ffea1898d5250f199d3ac8d8720f.
Why Use the sha256 Hash?
Tags are not immutable and can be overwritten by a developer at any time. In this case you don’t have complete control over your image - which is bad.
Different Images per Environment
Don’t create different images for development, testing, staging and production environments. The image should be the source of truth and should only be created once and pushed to the repository. This image:tag should be used for different environments in the future.
Depend on Start Order of Pods
Applications often depend on containers being started in a certain order. For example, a database container must be up and running before an application can connect to it. The application should be resilient to such changes, as the db pod can be unreachable or restarted at any time. The application container should be able to handle such situations without terminating or crashing.
Additional Anti-Patterns and Patterns
In the community, vast experience has been collected to improve the stability and usability of Docker and Kubernetes.
Refer to Kubernetes Production Patterns for more information.
2.6.13 - Namespace Isolation
Overview
You can configure a NetworkPolicy to deny all the traffic from other namespaces while allowing all the traffic coming from the same namespace the pod was deployed into.
There are many reasons why you may chose to employ Kubernetes network policies:
- Isolate multi-tenant deployments
- Regulatory compliance
- Ensure containers assigned to different environments (e.g. dev/staging/prod) cannot interfere with each other
Kubernetes network policies are application centric compared to infrastructure/network centric standard firewalls. There are no explicit CIDRs or IP addresses used for matching source or destination IP’s. Network policies build up on labels and selectors which are key concepts of Kubernetes that are used to organize (for example, all DB tier pods of an app) and select subsets of objects.
Example
We create two nginx HTTP-Servers in two namespaces and block all traffic between the two namespaces. E.g. you are unable to get content from namespace1 if you are sitting in namespace2.
Setup the Namespaces
# create two namespaces for test purpose
kubectl create ns customer1
kubectl create ns customer2
# create a standard HTTP web server
kubectl run nginx --image=nginx --replicas=1 --port=80 -n=customer1
kubectl run nginx --image=nginx --replicas=1 --port=80 -n=customer2
# expose the port 80 for external access
kubectl expose deployment nginx --port=80 --type=NodePort -n=customer1
kubectl expose deployment nginx --port=80 --type=NodePort -n=customer2
Test Without NP
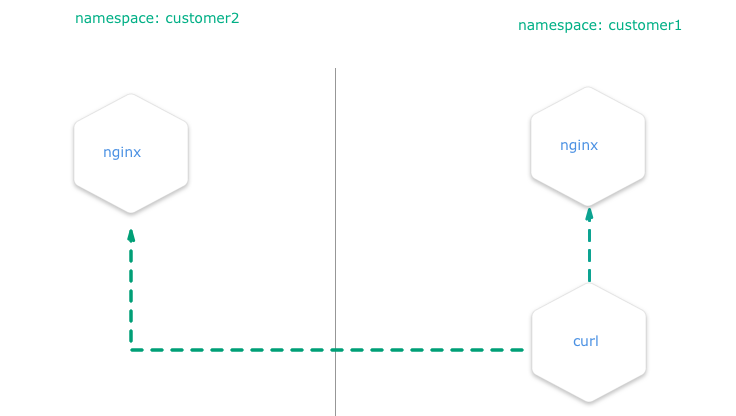
Create a pod with curl preinstalled inside the namespace customer1:
# create a "bash" pod in one namespace
kubectl run -i --tty client --image=tutum/curl -n=customer1
Try to curl the exposed nginx server to get the default index.html page. Execute this in the bash prompt of the pod created above.
# get the index.html from the nginx of the namespace "customer1" => success
curl http://nginx.customer1
# get the index.html from the nginx of the namespace "customer2" => success
curl http://nginx.customer2
Both calls are done in a pod within the namespace customer1 and both nginx servers are always reachable, no matter in what namespace.
Test with NP
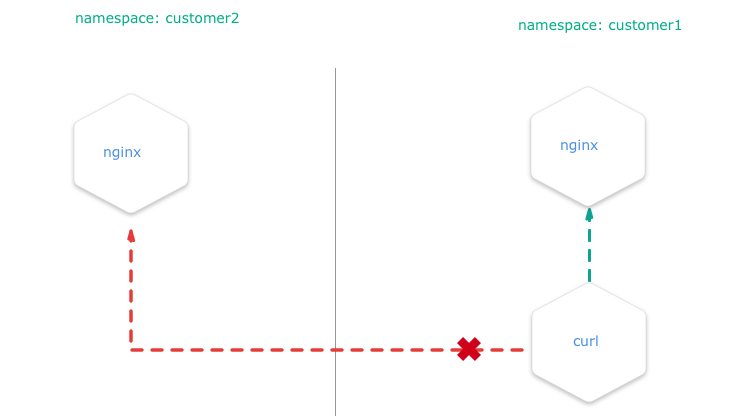
Install the NetworkPolicy from your shell:
apiVersion: networking.k8s.io/v1
kind: NetworkPolicy
metadata:
name: deny-from-other-namespaces
spec:
podSelector:
matchLabels:
ingress:
- from:
- podSelector: {}
- it applies the policy to ALL pods in the named namespace as the
spec.podSelector.matchLabelsis empty and therefore selects all pods. - it allows traffic from ALL pods in the named namespace, as
spec.ingress.from.podSelectoris empty and therefore selects all pods.
kubectl apply -f ./network-policy.yaml -n=customer1
kubectl apply -f ./network-policy.yaml -n=customer2
After this, curl http://nginx.customer2 shouldn’t work anymore if you are a service inside the namespace customer1 and vice versa.
Note
This policy, once applied, will also disable all external traffic to these pods. For example, you can create a service of type
LoadBalancerin namespacecustomer1that match the nginx pod. When you request the service by its<EXTERNAL_IP>:<PORT>, then the network policy that will deny the ingress traffic from the service and the request will time out.
Related Links
You can get more information on how to configure the NetworkPolicies at:
2.6.14 - Orchestration of Container Startup
Disclaimer
If an application depends on other services deployed separately, do not rely on a certain start sequence of containers. Instead, ensure that the application can cope with unavailability of the services it depends on.
Introduction
Kubernetes offers a feature called InitContainers to perform some tasks during a pod’s initialization.
In this tutorial, we demonstrate how to use InitContainers in order to orchestrate a starting sequence of multiple containers. The tutorial uses the example app url-shortener, which consists of two components:
- postgresql database
- webapp which depends on the postgresql database and provides two endpoints: create a short url from a given location and redirect from a given short URL to the corresponding target location
This app represents the minimal example where an application relies on another service or database. In this example, if the application starts before the database is ready, the application will fail as shown below:
$ kubectl logs webapp-958cf5567-h247n
time="2018-06-12T11:02:42Z" level=info msg="Connecting to Postgres database using: host=`postgres:5432` dbname=`url_shortener_db` username=`user`\n"
time="2018-06-12T11:02:42Z" level=fatal msg="failed to start: failed to open connection to database: dial tcp: lookup postgres on 100.64.0.10:53: no such host\n"
$ kubectl get po -w
NAME READY STATUS RESTARTS AGE
webapp-958cf5567-h247n 0/1 Pending 0 0s
webapp-958cf5567-h247n 0/1 Pending 0 0s
webapp-958cf5567-h247n 0/1 ContainerCreating 0 0s
webapp-958cf5567-h247n 0/1 ContainerCreating 0 1s
webapp-958cf5567-h247n 0/1 Error 0 2s
webapp-958cf5567-h247n 0/1 Error 1 3s
webapp-958cf5567-h247n 0/1 CrashLoopBackOff 1 4s
webapp-958cf5567-h247n 0/1 Error 2 18s
webapp-958cf5567-h247n 0/1 CrashLoopBackOff 2 29s
webapp-958cf5567-h247n 0/1 Error 3 43s
webapp-958cf5567-h247n 0/1 CrashLoopBackOff 3 56s
If the restartPolicy is set to Always (default) in the yaml file, the application will continue to restart the pod with an exponential back-off delay in case of failure.
Using InitContaniner
To avoid such a situation, InitContainers can be defined, which are executed prior to the application container. If one of the InitContainers fails, the application container won’t be triggered.
apiVersion: apps/v1
kind: Deployment
metadata:
name: webapp
spec:
selector:
matchLabels:
app: webapp
template:
metadata:
labels:
app: webapp
spec:
initContainers: # check if DB is ready, and only continue when true
- name: check-db-ready
image: postgres:9.6.5
command: ['sh', '-c', 'until pg_isready -h postgres -p 5432; do echo waiting for database; sleep 2; done;']
containers:
- image: xcoulon/go-url-shortener:0.1.0
name: go-url-shortener
env:
- name: POSTGRES_HOST
value: postgres
- name: POSTGRES_PORT
value: "5432"
- name: POSTGRES_DATABASE
value: url_shortener_db
- name: POSTGRES_USER
value: user
- name: POSTGRES_PASSWORD
value: mysecretpassword
ports:
- containerPort: 8080
In the above example, the InitContainers use the docker image postgres:9.6.5, which is different from the application container.
This also brings the advantage of not having to include unnecessary tools (e.g., pg_isready) in the application container.
With introduction of InitContainers, in case the database is not available yet, the pod startup will look like similarly to:
$ kubectl get po -w
NAME READY STATUS RESTARTS AGE
nginx-deployment-5cc79d6bfd-t9n8h 1/1 Running 0 5d
privileged-pod 1/1 Running 0 4d
webapp-fdcb49cbc-4gs4n 0/1 Pending 0 0s
webapp-fdcb49cbc-4gs4n 0/1 Pending 0 0s
webapp-fdcb49cbc-4gs4n 0/1 Init:0/1 0 0s
webapp-fdcb49cbc-4gs4n 0/1 Init:0/1 0 1s
$ kubectl logs webapp-fdcb49cbc-4gs4n
Error from server (BadRequest): container "go-url-shortener" in pod "webapp-fdcb49cbc-4gs4n" is waiting to start: PodInitializing
2.6.15 - Out-Dated HTML and JS Files Delivered
Problem
After updating your HTML and JavaScript sources in your web application, the Kubernetes cluster delivers outdated versions - why?
Overview
By default, Kubernetes service pods are not accessible from the external network, but only from other pods within the same Kubernetes cluster.
The Gardener cluster has a built-in configuration for HTTP load balancing called Ingress, defining rules for external connectivity to Kubernetes services. Users who want external access to their Kubernetes services create an ingress resource that defines rules, including the URI path, backing service name, and other information. The Ingress controller can then automatically program a frontend load balancer to enable Ingress configuration.

Example Ingress Configuration
apiVersion: networking.k8s.io/v1beta1
kind: Ingress
metadata:
name: vuejs-ingress
spec:
rules:
- host: test.ingress.<GARDENER-CLUSTER>.<GARDENER-PROJECT>.shoot.canary.k8s-hana.ondemand.com
http:
paths:
- backend:
serviceName: vuejs-svc
servicePort: 8080
where:
- <GARDENER-CLUSTER>: The cluster name in the Gardener
- <GARDENER-PROJECT>: You project name in the Gardener
Diagnosing the Problem
The ingress controller we are using is NGINX. NGINX is a software load balancer, web server, and content cache built on top of open source NGINX.
NGINX caches the content as specified in the HTTP header. If the HTTP header is missing, it is assumed that the cache is forever and NGINX never updates the content in the stupidest case.
Solution
In general, you can avoid this pitfall with one of the solutions below:
- Use a cache buster + HTTP-Cache-Control (prefered)
- Use HTTP-Cache-Control with a lower retention period
- Disable the caching in the ingress (just for dev purposes)
Learning how to set the HTTP header or setup a cache buster is left to you, as an exercise for your web framework (e.g., Express/NodeJS, SpringBoot, …)
Here is an example on how to disable the cache control for your ingress, done with an annotation in your ingress YAML (during development).
---
apiVersion: networking.k8s.io/v1beta1
kind: Ingress
metadata:
annotations:
ingress.kubernetes.io/cache-enable: "false"
name: vuejs-ingress
spec:
rules:
- host: test.ingress.<GARDENER-CLUSTER>.<GARDENER-PROJECT>.shoot.canary.k8s-hana.ondemand.com
http:
paths:
- backend:
serviceName: vuejs-svc
servicePort: 8080
2.6.16 - Remove Committed Secrets in Github 💀
Overview
If you commit sensitive data, such as a kubeconfig.yaml or SSH key into a Git repository, you can remove it from
the history. To entirely remove unwanted files from a repository’s history you can use the git filter-branch command.
The git filter-branch command rewrites your repository’s history, which changes the SHAs for existing commits that you alter and any dependent commits. Changed commit SHAs may affect open pull requests in your repository. Merging or closing all open pull requests before removing files from your repository is recommended.
Warning
If someone has already checked out the repository, then of course they have the secret on their computer. So ALWAYS revoke the OAuthToken/Password or whatever it was immediately.
Purging a File from Your Repository’s History
Warning
If you run
git filter-branchafter stashing changes, you won’t be able to retrieve your changes with other stash commands. Before runninggit filter-branch, we recommend unstashing any changes you’ve made. To unstash the last set of changes you’ve stashed, rungit stash show -p | git apply -R. For more information, see Git Tools - Stashing and Cleaning.
To illustrate how git filter-branch works, we’ll show you how to remove your file with sensitive data from the history of your repository and add it to .gitignore to ensure that it is not accidentally re-committed.
1. Navigate into the repository’s working directory:
cd YOUR-REPOSITORY
2. Run the following command, replacing PATH-TO-YOUR-FILE-WITH-SENSITIVE-DATA with the path to the file you want to remove, not just its filename.
These arguments will:
- Force Git to process, but not check out, the entire history of every branch and tag
- Remove the specified file, as well as any empty commits generated as a result
- Overwrite your existing tags
git filter-branch --force --index-filter \
'git rm --cached --ignore-unmatch PATH-TO-YOUR-FILE-WITH-SENSITIVE-DATA' \
--prune-empty --tag-name-filter cat -- --all
3. Add your file with sensitive data to .gitignore to ensure that you don’t accidentally commit it again:
echo "YOUR-FILE-WITH-SENSITIVE-DATA" >> .gitignore
Double-check that you’ve removed everything you wanted to from your repository’s history, and that all of your branches are checked out. Once you’re happy with the state of your repository, continue to the next step.
4. Force-push your local changes to overwrite your GitHub repository, as well as all the branches you’ve pushed up:
git push origin --force --all
4. In order to remove the sensitive file from your tagged releases, you’ll also need to force-push against your Git tags:
git push origin --force --tags
Warning
Tell your collaborators to rebase, not merge, any branches they created off of your old (tainted) repository history. One merge commit could reintroduce some or all of the tainted history that you just went to the trouble of purging.
Related Links
2.6.17 - Using Prometheus and Grafana to Monitor K8s
Disclaimer
This post is meant to give a basic end-to-end description for deploying and using Prometheus and Grafana. Both applications offer a wide range of flexibility, which needs to be considered in case you have specific requirements. Such advanced details are not in the scope of this topic.
Introduction
Prometheus is an open-source systems monitoring and alerting toolkit for recording numeric time series. It fits both machine-centric monitoring as well as monitoring of highly dynamic service-oriented architectures. In a world of microservices, its support for multi-dimensional data collection and querying is a particular strength.
Prometheus is the second hosted project to graduate within CNCF.
The following characteristics make Prometheus a good match for monitoring Kubernetes clusters:
Pull-based Monitoring Prometheus is a pull-based monitoring system, which means that the Prometheus server dynamically discovers and pulls metrics from your services running in Kubernetes.
Labels Prometheus and Kubernetes share the same label (key-value) concept that can be used to select objects in the system.
Labels are used to identify time series and sets of label matchers can be used in the query language (PromQL) to select the time series to be aggregated.Exporters
There are many exporters available, which enable integration of databases or even other monitoring systems not already providing a way to export metrics to Prometheus. One prominent exporter is the so called node-exporter, which allows to monitor hardware and OS related metrics of Unix systems.Powerful Query Language The Prometheus query language PromQL lets the user select and aggregate time series data in real time. Results can either be shown as a graph, viewed as tabular data in the Prometheus expression browser, or consumed by external systems via the HTTP API.
Find query examples on Prometheus Query Examples.
One very popular open-source visualization tool not only for Prometheus is Grafana. Grafana is a metric analytics and visualization suite. It is popular for visualizing time series data for infrastructure and application analytics but many use it in other domains including industrial sensors, home automation, weather, and process control. For more information, see the Grafana Documentation.
Grafana accesses data via Data Sources. The continuously growing list of supported backends includes Prometheus.
Dashboards are created by combining panels, e.g., Graph and Dashlist.
In this example, we describe an End-To-End scenario including the deployment of Prometheus and a basic monitoring configuration as the one provided for Kubernetes clusters created by Gardener.
If you miss elements on the Prometheus web page when accessing it via its service URL https://<your K8s FQN>/api/v1/namespaces/<your-prometheus-namespace>/services/prometheus-prometheus-server:80/proxy, this is probably caused by a Prometheus issue - #1583. To workaround this issue, set up a port forward kubectl port-forward -n <your-prometheus-namespace> <prometheus-pod> 9090:9090 on your client and access the Prometheus UI from there with your locally installed web browser. This issue is not relevant in case you use the service type LoadBalancer.
Preparation
The deployment of Prometheus and Grafana is based on Helm charts.
Make sure to implement the Helm settings before deploying the Helm charts.
The Kubernetes clusters provided by Gardener use role based access control (RBAC). To authorize the Prometheus node-exporter to access hardware and OS relevant metrics of your cluster’s worker nodes, specific artifacts need to be deployed.
Bind the Prometheus service account to the garden.sapcloud.io:monitoring:prometheus cluster role by running the command
kubectl apply -f crbinding.yaml.
Content of crbinding.yaml
apiVersion: rbac.authorization.k8s.io/v1beta1
kind: ClusterRoleBinding
metadata:
name: <your-prometheus-name>-server
roleRef:
apiGroup: rbac.authorization.k8s.io
kind: ClusterRole
name: garden.sapcloud.io:monitoring:prometheus
subjects:
- kind: ServiceAccount
name: <your-prometheus-name>-server
namespace: <your-prometheus-namespace>
Deployment of Prometheus and Grafana
Only minor changes are needed to deploy Prometheus and Grafana based on Helm charts.
Copy the following configuration into a file called values.yaml and deploy Prometheus:
helm install <your-prometheus-name> --namespace <your-prometheus-namespace> stable/prometheus -f values.yaml
Typically, Prometheus and Grafana are deployed into the same namespace. There is no technical reason behind this, so feel free to choose different namespaces.
Content of values.yaml for Prometheus:
rbac:
create: false # Already created in Preparation step
nodeExporter:
enabled: false # The node-exporter is already deployed by default
server:
global:
scrape_interval: 30s
scrape_timeout: 30s
serverFiles:
prometheus.yml:
rule_files:
- /etc/config/rules
- /etc/config/alerts
scrape_configs:
- job_name: 'kube-kubelet'
honor_labels: false
scheme: https
tls_config:
# This is needed because the kubelets' certificates are not generated
# for a specific pod IP
insecure_skip_verify: true
bearer_token_file: /var/run/secrets/kubernetes.io/serviceaccount/token
kubernetes_sd_configs:
- role: node
relabel_configs:
- target_label: __metrics_path__
replacement: /metrics
- source_labels: [__meta_kubernetes_node_address_InternalIP]
target_label: instance
- action: labelmap
regex: __meta_kubernetes_node_label_(.+)
- job_name: 'kube-kubelet-cadvisor'
honor_labels: false
scheme: https
tls_config:
# This is needed because the kubelets' certificates are not generated
# for a specific pod IP
insecure_skip_verify: true
bearer_token_file: /var/run/secrets/kubernetes.io/serviceaccount/token
kubernetes_sd_configs:
- role: node
relabel_configs:
- target_label: __metrics_path__
replacement: /metrics/cadvisor
- source_labels: [__meta_kubernetes_node_address_InternalIP]
target_label: instance
- action: labelmap
regex: __meta_kubernetes_node_label_(.+)
# Example scrape config for probing services via the Blackbox Exporter.
#
# Relabelling allows to configure the actual service scrape endpoint using the following annotations:
#
# * `prometheus.io/probe`: Only probe services that have a value of `true`
- job_name: 'kubernetes-services'
metrics_path: /probe
params:
module: [http_2xx]
kubernetes_sd_configs:
- role: service
relabel_configs:
- source_labels: [__meta_kubernetes_service_annotation_prometheus_io_probe]
action: keep
regex: true
- source_labels: [__address__]
target_label: __param_target
- target_label: __address__
replacement: blackbox
- source_labels: [__param_target]
target_label: instance
- action: labelmap
regex: __meta_kubernetes_service_label_(.+)
- source_labels: [__meta_kubernetes_namespace]
target_label: kubernetes_namespace
- source_labels: [__meta_kubernetes_service_name]
target_label: kubernetes_name
# Example scrape config for pods
#
# Relabelling allows to configure the actual service scrape endpoint using the following annotations:
#
# * `prometheus.io/scrape`: Only scrape pods that have a value of `true`
# * `prometheus.io/path`: If the metrics path is not `/metrics` override this.
# * `prometheus.io/port`: Scrape the pod on the indicated port instead of the default of `9102`.
- job_name: 'kubernetes-pods'
kubernetes_sd_configs:
- role: pod
relabel_configs:
- source_labels: [__meta_kubernetes_pod_annotation_prometheus_io_scrape]
action: keep
regex: true
- source_labels: [__meta_kubernetes_pod_annotation_prometheus_io_path]
action: replace
target_label: __metrics_path__
regex: (.+)
- source_labels: [__address__, __meta_kubernetes_pod_annotation_prometheus_io_port]
action: replace
regex: (.+):(?:\d+);(\d+)
replacement: ${1}:${2}
target_label: __address__
- action: labelmap
regex: __meta_kubernetes_pod_label_(.+)
- source_labels: [__meta_kubernetes_namespace]
action: replace
target_label: kubernetes_namespace
- source_labels: [__meta_kubernetes_pod_name]
action: replace
target_label: kubernetes_pod_name
# Scrape config for service endpoints.
#
# The relabeling allows the actual service scrape endpoint to be configured
# via the following annotations:
#
# * `prometheus.io/scrape`: Only scrape services that have a value of `true`
# * `prometheus.io/scheme`: If the metrics endpoint is secured then you will need
# to set this to `https` & most likely set the `tls_config` of the scrape config.
# * `prometheus.io/path`: If the metrics path is not `/metrics` override this.
# * `prometheus.io/port`: If the metrics are exposed on a different port to the
# service then set this appropriately.
- job_name: 'kubernetes-service-endpoints'
kubernetes_sd_configs:
- role: endpoints
relabel_configs:
- source_labels: [__meta_kubernetes_service_annotation_prometheus_io_scrape]
action: keep
regex: true
- source_labels: [__meta_kubernetes_service_annotation_prometheus_io_scheme]
action: replace
target_label: __scheme__
regex: (https?)
- source_labels: [__meta_kubernetes_service_annotation_prometheus_io_path]
action: replace
target_label: __metrics_path__
regex: (.+)
- source_labels: [__address__, __meta_kubernetes_service_annotation_prometheus_io_port]
action: replace
target_label: __address__
regex: (.+)(?::\d+);(\d+)
replacement: $1:$2
- action: labelmap
regex: __meta_kubernetes_service_label_(.+)
- source_labels: [__meta_kubernetes_namespace]
action: replace
target_label: kubernetes_namespace
- source_labels: [__meta_kubernetes_service_name]
action: replace
target_label: kubernetes_name # Add your additional configuration here...
Next, deploy Grafana. Since the deployment in this post is based on the Helm default values, the settings below are set explicitly in case the default changed.
Deploy Grafana via helm install grafana --namespace <your-prometheus-namespace> stable/grafana -f values.yaml. Here, the same namespace is chosen for Prometheus and for Grafana.
Content of values.yaml for Grafana:
server:
ingress:
enabled: false
service:
type: ClusterIP
Check the running state of the pods on the Kubernetes Dashboard or by running kubectl get pods -n <your-prometheus-namespace>. In case of errors, check the log files of the pod(s) in question.
The text output of Helm after the deployment of Prometheus and Grafana contains very useful information, e.g., the user and password of the Grafana Admin user. The credentials are stored as secrets in the namespace <your-prometheus-namespace> and could be decoded via kubectl get secret --namespace <my-grafana-namespace> grafana -o jsonpath="{.data.admin-password}" | base64 --decode ; echo.
Basic Functional Tests
To access the web UI of both applications, use port forwarding of port 9090.
Setup port forwarding for port 9090:
kubectl port-forward -n <your-prometheus-namespace> <your-prometheus-server-pod> 9090:9090
Open http://localhost:9090 in your web browser. Select Graph from the top tab and enter the following expressing to show the overall CPU usage for a server (see Prometheus Query Examples):
100 * (1 - avg by(instance)(irate(node_cpu{mode='idle'}[5m])))
This should show some data in a graph.
To show the same data in Grafana setup port forwarding for port 3000 for the Grafana pod and open the Grafana Web UI by opening http://localhost:3000 in a browser. Enter the credentials of the admin user.
Next, you need to enter the server name of your Prometheus deployment. This name is shown directly after the installation via helm.
Run
helm status <your-prometheus-name>
to find this name. Below, this server name is referenced by <your-prometheus-server-name>.
First, you need to add your Prometheus server as data source:
- Navigate to Dashboards → Data Sources
- Choose Add data source
- Enter:
Name:<your-prometheus-datasource-name>
Type: Prometheus
URL:http://<your-prometheus-server-name>
Access:proxy - Choose Save & Test
In case of failure, check the Prometheus URL in the Kubernetes Dashboard.
To add a Graph follow these steps:
- In the left corner, select Dashboards → New to create a new dashboard
- Select Graph to create a new graph
- Next, select the Panel Title → Edit
- Select your Prometheus Data Source in the drop down list
- Enter the expression
100 * (1 - avg by(instance)(irate(node_cpu{mode='idle'}[5m])))in the entry field A - Select the floppy disk symbol (Save) on top
Now you should have a very basic Prometheus and Grafana setup for your Kubernetes cluster.
As a next step you can implement monitoring for your applications by implementing the Prometheus client API.
Related Links
3 - Security and Compliance
3.1 - Kubernetes Cluster Hardening Procedure
Overview
The Gardener team takes security seriously, which is why we mandate the Security Technical Implementation Guide (STIG) for Kubernetes as published by the Defense Information Systems Agency (DISA) here. We offer Gardener adopters the opportunity to show compliance with DISA Kubernetes STIG via the compliance checker tool diki. The latest release in machine readable format can be found in the STIGs Document Library by searching for Kubernetes.
Kubernetes Clusters Security Requirements
DISA Kubernetes STIG version 1 release 11 contains 91 rules overall. Only the following rules, however, apply to you. Some of them are secure-by-default, so your responsibility is to make sure that they are not changed. For your convenience, the requirements are grouped logically and per role:
Rules Relevant for Cluster Admins
Control Plane Configuration
| ID | Description | Secure By Default | Comments |
|---|---|---|---|
| 242390 | Kubernetes API server must have anonymous authentication disabled | ✅ | Disabled unless you enable it via enableAnnonymousAuthentication |
| 245543 | Kubernetes API Server must disable token authentication to protect information in transit | ✅ | Disabled unless you enable it via enableStaticTokenKubeconfig |
| 242400 | Kubernetes API server must have Alpha APIs disabled | ✅ | Disabled unless you enable it via featureGates |
| 242436 | Kubernetes API server must have the ValidatingAdmissionWebhook enabled | ✅ | Enabled unless you disable it explicitly via admissionPlugins |
| 242393 | Kubernetes Worker Nodes must not have sshd service running | ❌ | Active to allow debugging of network issues, but it is possible to deactivate via the sshAccess setting |
| 242394 | Kubernetes Worker Nodes must not have the sshd service enabled | ❌ | Enabled to allow debugging of network issues, but it is possible to deactivate via the sshAccess setting |
| 242434 | Kubernetes Kubelet must enable kernel protection | ✅ | Enabled for Kubernetes v1.26 or later unless disabled explicitly via protectKernalDefaults |
| 245541 | Kubernetes Kubelet must not disable timeouts | ✅ | Enabled for Kubernetes v1.26 or later unless disabled explicitly via streamingConnectionIdleTimeout |
Audit Configuration
| ID | Description | Secure By Default | Comments |
|---|---|---|---|
| 242402 | The Kubernetes API Server must have an audit log path set | ❌ | It is the user’s responsibility to configure an audit extension that meets the requirements of their organization. Depending on the audit extension implementation the audit logs do not always need to be written on the filesystem, i.e. when --audit-webhook-config-file is set and logs are sent to an audit backend. |
| 242403 | Kubernetes API Server must generate audit records that identify what type of event has occurred, identify the source of the event, contain the event results, identify any users, and identify any containers associated with the event | ❌ | Users should set an audit policy that meets the requirements of their organization. Please consult the Shoot Audit Policy documentation. |
| 242461 | Kubernetes API Server audit logs must be enabled | ❌ | Users should set an audit policy that meets the requirements of their organization. Please consult the Shoot Audit Policy documentation. |
| 242462 | The Kubernetes API Server must be set to audit log max size | ❌ | It is the user’s responsibility to configure an audit extension that meets the requirements of their organization. Depending on the audit extension implementation the audit logs do not always need to be written on the filesystem, i.e. when --audit-webhook-config-file is set and logs are sent to an audit backend. |
| 242463 | The Kubernetes API Server must be set to audit log maximum backup | ❌ | It is the user’s responsibility to configure an audit extension that meets the requirements of their organization. Depending on the audit extension implementation the audit logs do not always need to be written on the filesystem, i.e. when --audit-webhook-config-file is set and logs are sent to an audit backend. |
| 242464 | The Kubernetes API Server audit log retention must be set | ❌ | It is the user’s responsibility to configure an audit extension that meets the requirements of their organization. Depending on the audit extension implementation the audit logs do not always need to be written on the filesystem, i.e. when --audit-webhook-config-file is set and logs are sent to an audit backend. |
| 242465 | The Kubernetes API Server audit log path must be set | ❌ | It is the user’s responsibility to configure an audit extension that meets the requirements of their organization. Depending on the audit extension implementation the audit logs do not always need to be written on the filesystem, i.e. when --audit-webhook-config-file is set and logs are sent to an audit backend. |
End User Workload
| ID | Description | Secure By Default | Comments |
|---|---|---|---|
| 242395 | Kubernetes dashboard must not be enabled | ✅ | Not installed unless you install it via kubernetesDashboard. |
| 242414 | Kubernetes cluster must use non-privileged host ports for user pods | ❌ | Do not use any ports below 1024 for your own workload. |
| 242415 | Secrets in Kubernetes must not be stored as environment variables | ❌ | Always mount secrets as volumes and never as environment variables. |
| 242383 | User-managed resources must be created in dedicated namespaces | ❌ | Create and use your own/dedicated namespaces and never place anything into the default, kube-system, kube-public, or kube-node-lease namespace. The default namespace is never to be used while the other above listed namespaces are only to be used by the Kubernetes provider (here Gardener). |
| 242417 | Kubernetes must separate user functionality | ❌ | While 242383 is about all resources, this rule is specifically about pods. Create and use your own/dedicated namespaces and never place pods into the default, kube-system, kube-public, or kube-node-lease namespace. The default namespace is never to be used while the other above listed namespaces are only to be used by the Kubernetes provider (here Gardener). |
| 242437 | Kubernetes must have a pod security policy set | ✅ | Set, but Gardener can only set default pod security policies (PSP) and does so only until v1.24 as with v1.25 PSPs were removed (deprecated since v1.21) and replaced with Pod Security Standards (see this blog for more information). Whatever the technology, you are responsible to configure custom-tailured appropriate PSPs respectively use them or PSSs, depending on your own workload and security needs (only you know what a pod should be allowed to do). |
| 242442 | Kubernetes must remove old components after updated versions have been installed | ❌ | While Gardener manages all its components in its system namespaces (automated), you are naturally responsible for your own workload. |
| 254800 | Kubernetes must have a Pod Security Admission control file configured | ❌ | Gardener ensures that the pod security configuration allows system components to be deployed in the kube-system namespace but does not set configurations that can affect user namespaces. It is recommended that users enforce a minimum of baseline pod security level for their workload via PodSecurity admission plugin. |
Rules Relevant for Service Providers
| ID | Description |
|---|---|
| 242376 | The Kubernetes Controller Manager must use TLS 1.2, at a minimum, to protect the confidentiality of sensitive data during electronic dissemination. |
| 242377 | The Kubernetes Scheduler must use TLS 1.2, at a minimum, to protect the confidentiality of sensitive data during electronic dissemination. |
| 242378 | The Kubernetes API Server must use TLS 1.2, at a minimum, to protect the confidentiality of sensitive data during electronic dissemination. |
| 242379 | The Kubernetes etcd must use TLS to protect the confidentiality of sensitive data during electronic dissemination. |
| 242380 | The Kubernetes etcd must use TLS to protect the confidentiality of sensitive data during electronic dissemination. |
| 242381 | The Kubernetes Controller Manager must create unique service accounts for each work payload. |
| 242382 | The Kubernetes API Server must enable Node,RBAC as the authorization mode. |
| 242384 | The Kubernetes Scheduler must have secure binding. |
| 242385 | The Kubernetes Controller Manager must have secure binding. |
| 242386 | The Kubernetes API server must have the insecure port flag disabled. |
| 242387 | The Kubernetes Kubelet must have the “readOnlyPort” flag disabled. |
| 242388 | The Kubernetes API server must have the insecure bind address not set. |
| 242389 | The Kubernetes API server must have the secure port set. |
| 242391 | The Kubernetes Kubelet must have anonymous authentication disabled. |
| 242392 | The Kubernetes kubelet must enable explicit authorization. |
| 242396 | Kubernetes Kubectl cp command must give expected access and results. |
| 242397 | The Kubernetes kubelet staticPodPath must not enable static pods. |
| 242398 | Kubernetes DynamicAuditing must not be enabled. |
| 242399 | Kubernetes DynamicKubeletConfig must not be enabled. |
| 242404 | Kubernetes Kubelet must deny hostname override. |
| 242405 | The Kubernetes manifests must be owned by root. |
| 242406 | The Kubernetes KubeletConfiguration file must be owned by root. |
| 242407 | The Kubernetes KubeletConfiguration files must have file permissions set to 644 or more restrictive. |
| 242408 | The Kubernetes manifest files must have least privileges. |
| 242409 | Kubernetes Controller Manager must disable profiling. |
| 242410 | The Kubernetes API Server must enforce ports, protocols, and services (PPS) that adhere to the Ports, Protocols, and Services Management Category Assurance List (PPSM CAL). |
| 242411 | The Kubernetes Scheduler must enforce ports, protocols, and services (PPS) that adhere to the Ports, Protocols, and Services Management Category Assurance List (PPSM CAL). |
| 242412 | The Kubernetes Controllers must enforce ports, protocols, and services (PPS) that adhere to the Ports, Protocols, and Services Management Category Assurance List (PPSM CAL). |
| 242413 | The Kubernetes etcd must enforce ports, protocols, and services (PPS) that adhere to the Ports, Protocols, and Services Management Category Assurance List (PPSM CAL). |
| 242418 | The Kubernetes API server must use approved cipher suites. |
| 242419 | Kubernetes API Server must have the SSL Certificate Authority set. |
| 242420 | Kubernetes Kubelet must have the SSL Certificate Authority set. |
| 242421 | Kubernetes Controller Manager must have the SSL Certificate Authority set. |
| 242422 | Kubernetes API Server must have a certificate for communication. |
| 242423 | Kubernetes etcd must enable client authentication to secure service. |
| 242424 | Kubernetes Kubelet must enable tlsPrivateKeyFile for client authentication to secure service. |
| 242425 | Kubernetes Kubelet must enable tlsCertFile for client authentication to secure service. |
| 242426 | Kubernetes etcd must enable client authentication to secure service. |
| 242427 | Kubernetes etcd must have a key file for secure communication. |
| 242428 | Kubernetes etcd must have a certificate for communication. |
| 242429 | Kubernetes etcd must have the SSL Certificate Authority set. |
| 242430 | Kubernetes etcd must have a certificate for communication. |
| 242431 | Kubernetes etcd must have a key file for secure communication. |
| 242432 | Kubernetes etcd must have peer-cert-file set for secure communication. |
| 242433 | Kubernetes etcd must have a peer-key-file set for secure communication. |
| 242438 | Kubernetes API Server must configure timeouts to limit attack surface. |
| 242443 | Kubernetes must contain the latest updates as authorized by IAVMs, CTOs, DTMs, and STIGs. |
| 242444 | The Kubernetes component manifests must be owned by root. |
| 242445 | The Kubernetes component etcd must be owned by etcd. |
| 242446 | The Kubernetes conf files must be owned by root. |
| 242447 | The Kubernetes Kube Proxy must have file permissions set to 644 or more restrictive. |
| 242448 | The Kubernetes Kube Proxy must be owned by root. |
| 242449 | The Kubernetes Kubelet certificate authority file must have file permissions set to 644 or more restrictive. |
| 242450 | The Kubernetes Kubelet certificate authority must be owned by root. |
| 242451 | The Kubernetes component PKI must be owned by root. |
| 242452 | The Kubernetes kubelet KubeConfig must have file permissions set to 644 or more restrictive. |
| 242453 | The Kubernetes kubelet KubeConfig file must be owned by root. |
| 242454 | The Kubernetes kubeadm.conf must be owned by root. |
| 242455 | The Kubernetes kubeadm.conf must have file permissions set to 644 or more restrictive. |
| 242456 | The Kubernetes kubelet config must have file permissions set to 644 or more restrictive. |
| 242457 | The Kubernetes kubelet config must be owned by root. |
| 242459 | The Kubernetes etcd must have file permissions set to 644 or more restrictive. |
| 242460 | The Kubernetes admin.conf must have file permissions set to 644 or more restrictive. |
| 242466 | The Kubernetes PKI CRT must have file permissions set to 644 or more restrictive. |
| 242467 | The Kubernetes PKI keys must have file permissions set to 600 or more restrictive. |
| 245542 | Kubernetes API Server must disable basic authentication to protect information in transit. |
| 245544 | Kubernetes endpoints must use approved organizational certificate and key pair to protect information in transit. |
| 254801 | Kubernetes must enable PodSecurity admission controller on static pods and Kubelets. |
3.2 - Run DISA K8s STIGs Ruleset
Show DISA K8s STIG Compliance for a Gardener Shoot Cluster
Introduction
This part covers the topic of showing compliance with the DISA K8s STIG for a Gardener shoot cluster. The guide features two providers - managedk8s and garden, both of which implement rules from the DISA K8s STIG ruleset.
The managedk8s provider assumes that the user running the ruleset does not have access to the environment (the seed in this particular case), in which the control plane components reside.
The garden provider is used for accessing theGarden cluster, in which the Shoot resource can be found.
Important
Since the two providers that we are going to use in this guide do not leverage access to the Shoot cluster controlplane, they only implement checks that concern configurations that cluster owners can change/modify by themselves. Compliance for configurations that cannot be influenced by cluster owners shall be ensured by the team that operates the concrete Gardener installation.
Prerequisites
Make sure you have diki installed and have a running Gardener shoot cluster.
We will be using the sample DISA K8s STIG for Shoots configuration file for this run.
Configuration
Configure the managedk8s provider
Set the following arguments:
providers[id=="managedk8s"].args.kubeconfigPathpointing to a shoot admin kubeconfig.- (optional)
providers[id=="managedk8s"].metadata.shootNameshould be set to the name of the shoot cluster. Themetadatafield contains custom metadata from the user that will be present in the generated report.
- id: managedk8s
name: "Managed Kubernetes"
metadata: # custom user metadata
# shootName: <shoot-name>
# foo: bar
args:
kubeconfigPath: <shoot-kubeconfig-path> # path to shoot admin kubeconfig
In case you need instructions on how to generate such a kubeconfig, please read Accessing Shoot Clusters.
Configure the garden provider
Set the following arguments:
providers[id=="garden"].args.kubeconfigPathpointing to the Garden cluster kubeconfig.providers[id=="garden"].rulesets.args.projectNamespaceshould be set to the namespace in which the shoot cluster is created.providers[id=="garden"].rulesets.args.shootNameshould be set to the name of the shoot cluster.
- id: garden
name: "Garden"
metadata: # custom user metadata
# foo: bar
args:
kubeconfigPath: <garden-kubeconfig-path> # path to garden cluster kubeconfig
rulesets:
- id: security-hardened-shoot-cluster
name: Security Hardened Shoot Cluster
version: v0.2.1
args:
projectNamespace: garden-<project-name> # name of project namespace containing the shoot resource to be tested
shootName: <shoot-name> # name of shoot resource to be tested
Additional configurations
Additional metadata such as the shoot’s name can also be included in the providers[id=="managedk8s|garden"].metadata section. The metadata section can be used to add additional context to different diki runs.
The provided configuration contain the recommended rule options for running the both providers, but you can modify rule options parameters according to requirements. All available options can be found in:
Running the DISA K8s STIGs Ruleset
To run diki against a Gardener shoot cluster, run the following command:
diki run \
--config=./example/guides/disa-k8s-stig-shoot.yaml \
--all \
--output=disa-k8s-stigs-report.json
Generating a Report
We can use the file generated in the previous step to create an html report by using the following command:
diki report generate \
--output=disa-k8s-stigs-report.html \
disa-k8s-stigs-report.json
3.3 - Gardener Compliance Report
Overview
Gardener aims to comply with public security standards and guidelines, such as the Security Technical Implementation Guide (STIG) for Kubernetes from Defense Information Systems Agency (DISA). The DISA Kubernetes STIG is a set of rules that provide recommendations for secure deployment and operation of Kubernetes. It covers various aspects of Kubernetes security, including the configurations of the Kubernetes API server and other components, cluster management, certificate management, handling of updates and patches.
While Gardener aims to follow this guideline, we also recognize that not all of the rules may be directly applicable or optimal for Gardener specific environment. Therefore, some of the requirements are adjusted. Rules that are not applicable to Gardener are skipped given an appropriate justification.
For every release, we check that Gardener is able of creating security hardened shoot clusters, reconfirming that the configurations which are not secure by default (as per Gardener Kubernetes Cluster Hardening Procedure) are still possible and work as expected.
In order to automate and ease this process, Gardener uses a tool called diki.
Security Hardened Shoot Configurations
The following security hardened shoot configurations were used in order to generate the compliance report.
AWS
kind: Shoot
apiVersion: core.gardener.cloud/v1beta1
metadata:
name: aws
spec:
cloudProfileName: aws
kubernetes:
kubeAPIServer:
admissionPlugins:
- name: PodSecurity
config:
apiVersion: pod-security.admission.config.k8s.io/v1beta1
kind: PodSecurityConfiguration
defaults:
enforce: baseline
audit: baseline
warn: baseline
disabled: false
auditConfig:
auditPolicy:
configMapRef:
name: audit-policy
version: "1.31"
enableStaticTokenKubeconfig: false
networking:
type: calico
pods: 100.64.0.0/12
nodes: 10.180.0.0/16
services: 100.104.0.0/13
ipFamilies:
- IPv4
provider:
type: aws
controlPlaneConfig:
apiVersion: aws.provider.extensions.gardener.cloud/v1alpha1
kind: ControlPlaneConfig
infrastructureConfig:
apiVersion: aws.provider.extensions.gardener.cloud/v1alpha1
kind: InfrastructureConfig
networks:
vpc:
cidr: 10.180.0.0/16
zones:
- internal: 10.180.48.0/20
name: eu-west-1c
public: 10.180.32.0/20
workers: 10.180.0.0/19
workers:
- cri:
name: containerd
name: worker-kkfk1
machine:
type: m5.large
image:
name: gardenlinux
architecture: amd64
maximum: 2
minimum: 2
maxSurge: 1
maxUnavailable: 0
volume:
type: gp3
size: 50Gi
zones:
- eu-west-1c
workersSettings:
sshAccess:
enabled: false
purpose: evaluation
region: eu-west-1
secretBindingName: secretBindingName
Azure
kind: Shoot
apiVersion: core.gardener.cloud/v1beta1
metadata:
name: azure
spec:
cloudProfileName: az
kubernetes:
kubeAPIServer:
admissionPlugins:
- name: PodSecurity
config:
apiVersion: pod-security.admission.config.k8s.io/v1beta1
kind: PodSecurityConfiguration
defaults:
enforce: baseline
audit: baseline
warn: baseline
disabled: false
auditConfig:
auditPolicy:
configMapRef:
name: audit-policy
version: "1.31"
enableStaticTokenKubeconfig: false
networking:
type: calico
pods: 100.64.0.0/12
nodes: 10.180.0.0/16
services: 100.104.0.0/13
ipFamilies:
- IPv4
provider:
type: azure
controlPlaneConfig:
apiVersion: azure.provider.extensions.gardener.cloud/v1alpha1
kind: ControlPlaneConfig
infrastructureConfig:
apiVersion: azure.provider.extensions.gardener.cloud/v1alpha1
kind: InfrastructureConfig
networks:
vnet:
cidr: 10.180.0.0/16
workers: 10.180.0.0/16
zoned: true
workers:
- cri:
name: containerd
name: worker-g7p4p
machine:
type: Standard_A4_v2
image:
name: gardenlinux
architecture: amd64
maximum: 2
minimum: 2
maxSurge: 1
maxUnavailable: 0
volume:
type: StandardSSD_LRS
size: 50Gi
zones:
- '3'
workersSettings:
sshAccess:
enabled: false
purpose: evaluation
region: westeurope
secretBindingName: secretBindingName
GCP
kind: Shoot
apiVersion: core.gardener.cloud/v1beta1
metadata:
name: gcp
spec:
cloudProfileName: gcp
kubernetes:
kubeAPIServer:
admissionPlugins:
- name: PodSecurity
config:
apiVersion: pod-security.admission.config.k8s.io/v1beta1
kind: PodSecurityConfiguration
defaults:
enforce: baseline
audit: baseline
warn: baseline
disabled: false
auditConfig:
auditPolicy:
configMapRef:
name: audit-policy
version: "1.31"
enableStaticTokenKubeconfig: false
networking:
type: calico
pods: 100.64.0.0/12
nodes: 10.180.0.0/16
services: 100.104.0.0/13
ipFamilies:
- IPv4
provider:
type: gcp
controlPlaneConfig:
apiVersion: gcp.provider.extensions.gardener.cloud/v1alpha1
kind: ControlPlaneConfig
zone: europe-west1-b
infrastructureConfig:
apiVersion: gcp.provider.extensions.gardener.cloud/v1alpha1
kind: InfrastructureConfig
networks:
workers: 10.180.0.0/16
workers:
- cri:
name: containerd
name: worker-bex82
machine:
type: n1-standard-2
image:
name: gardenlinux
architecture: amd64
maximum: 2
minimum: 2
maxSurge: 1
maxUnavailable: 0
volume:
type: pd-balanced
size: 50Gi
zones:
- europe-west1-b
workersSettings:
sshAccess:
enabled: false
purpose: evaluation
region: europe-west1
secretBindingName: secretBindingName
OpenStack
kind: Shoot
apiVersion: core.gardener.cloud/v1beta1
metadata:
name: openstack
spec:
cloudProfileName: converged-cloud-cp
kubernetes:
kubeAPIServer:
admissionPlugins:
- name: PodSecurity
config:
apiVersion: pod-security.admission.config.k8s.io/v1beta1
kind: PodSecurityConfiguration
defaults:
enforce: baseline
audit: baseline
warn: baseline
disabled: false
auditConfig:
auditPolicy:
configMapRef:
name: audit-policy
version: "1.31"
enableStaticTokenKubeconfig: false
networking:
type: calico
pods: 100.64.0.0/12
nodes: 10.180.0.0/16
services: 100.104.0.0/13
ipFamilies:
- IPv4
provider:
type: openstack
controlPlaneConfig:
apiVersion: openstack.provider.extensions.gardener.cloud/v1alpha1
kind: ControlPlaneConfig
loadBalancerProvider: f5
infrastructureConfig:
apiVersion: openstack.provider.extensions.gardener.cloud/v1alpha1
kind: InfrastructureConfig
networks:
workers: 10.180.0.0/16
floatingPoolName: FloatingIP-external-cp
workers:
- cri:
name: containerd
name: worker-dqty2
machine:
type: g_c2_m4
image:
name: gardenlinux
architecture: amd64
maximum: 2
minimum: 2
maxSurge: 1
maxUnavailable: 0
zones:
- eu-de-1b
workersSettings:
sshAccess:
enabled: false
purpose: evaluation
region: eu-de-1
secretBindingName: secretBindingName
Diki Configuration
The following diki configuration was used in order to test each of the shoot clusters described above. Mind that the rules regarding audit logging are skipped because organizations have different requirements and Gardener can integrate with different audit logging solutions.
Configuration
metadata: ...
providers:
- id: gardener
name: Gardener
metadata: ...
args: ...
rulesets:
- id: disa-kubernetes-stig
name: DISA Kubernetes Security Technical Implementation Guide
version: v2r1
args:
maxRetries: 5
ruleOptions:
- ruleID: "242402"
skip:
enabled: true
justification: Gardener can integrate with different audit logging solutions
- ruleID: "242403"
skip:
enabled: true
justification: Gardener can integrate with different audit logging solutions
- ruleID: "242414"
args:
acceptedPods:
- podMatchLabels:
k8s-app: node-local-dns
namespaceMatchLabels:
kubernetes.io/metadata.name: kube-system
justification: "node local dns requires port 53 in order to operate properly"
ports:
- 53
- ruleID: "242445"
args:
expectedFileOwner:
users: ["0", "65532"]
groups: ["0", "65532"]
- ruleID: "242446"
args:
expectedFileOwner:
users: ["0", "65532"]
groups: ["0", "65532"]
- ruleID: "242451"
args:
expectedFileOwner:
users: ["0", "65532"]
groups: ["0", "65532"]
- ruleID: "242462"
skip:
enabled: true
justification: Gardener can integrate with different audit logging solutions
- ruleID: "242463"
skip:
enabled: true
justification: Gardener can integrate with different audit logging solutions
- ruleID: "242464"
skip:
enabled: true
justification: Gardener can integrate with different audit logging solutions
- ruleID: "245543"
args:
acceptedTokens:
- user: "health-check"
uid: "health-check"
- ruleID: "254800"
args:
minPodSecurityStandardsProfile: "baseline"
output:
minStatus: Passed
Security Compliance Report for Hardened Shoot Clusters
The report can be reviewed directly or downloaded by clicking here. <!doctype html>
Compliance Run (03-03-2025)
Glossary
- 🟢 Passed: Rule check has been fulfilled.
- 🔵 Skipped: Rule check has been considered irrelevant for the specific scenario and will not be run.
- 🔵 Accepted: Rule check may or may not have been run, but it was decided by the user that the check is not a finding.
- 🟠 Warning: Rule check has encountered an ambiguous condition or configuration preventing the ability to determine if the check is fulfilled or not.
- 🔴 Failed: Rule check has been unfulfilled, can be considered a finding.
- 🔴 Errored: Rule check has errored during runtime. It cannot be determined whether the check is fulfilled or not.
- 🟠 Not Implemented: Rule check has not been implemented yet.
Evaluated targets
- aws (gardenVirtualCloudProvider: gcp, gardenerVersion: v1.113.0, projectName: diki-comp, seedCloudProvider: aws, seedKubernetesVersion: v1.31.4, shootCloudProvider: aws, shootKubernetesVersion: v1.31.4, time: 03-03-2025 01:21:50)
- azure (gardenVirtualCloudProvider: gcp, gardenerVersion: v1.113.0, projectName: diki-comp, seedCloudProvider: azure, seedKubernetesVersion: v1.31.4, shootCloudProvider: azure, shootKubernetesVersion: v1.31.4, time: 03-03-2025 01:23:43)
- gcp (gardenVirtualCloudProvider: gcp, gardenerVersion: v1.113.0, projectName: diki-comp, seedCloudProvider: gcp, seedKubernetesVersion: v1.31.4, shootCloudProvider: gcp, shootKubernetesVersion: v1.31.4, time: 03-03-2025 01:25:27)
- openstack (gardenVirtualCloudProvider: gcp, gardenerVersion: v1.113.0, projectName: diki-comp, seedCloudProvider: openstack, seedKubernetesVersion: v1.31.4, shootCloudProvider: openstack, shootKubernetesVersion: v1.31.4, time: 03-03-2025 01:27:12)
- v2r1 DISA Kubernetes Security Technical Implementation Guide (61x Passed 🟢, 24x Skipped 🔵, 7x Accepted 🔵, 1x Failed 🔴)
-
🟢 Passed
-
242376 (Medium) - The Kubernetes Controller Manager must use TLS 1.2, at a minimum, to protect the confidentiality of sensitive data during electronic dissemination.
-
Option tls-min-version has not been set.
- aws
- kind: deployment name: kube-controller-manager namespace: shoot--diki-comp--aws
- azure
- kind: deployment name: kube-controller-manager namespace: shoot--diki-comp--azure
- gcp
- kind: deployment name: kube-controller-manager namespace: shoot--diki-comp--gcp
- openstack
- kind: deployment name: kube-controller-manager namespace: shoot--diki-comp--openstack
- aws
-
Option tls-min-version has not been set.
-
242377 (Medium) - Kubernetes Scheduler must use TLS 1.2, at a minimum, to protect the confidentiality of sensitive data during electronic dissemination.
-
Option tls-min-version has not been set.
- aws
- cluster: seed kind: deployment name: kube-scheduler namespace: shoot--diki-comp--aws
- azure
- cluster: seed kind: deployment name: kube-scheduler namespace: shoot--diki-comp--azure
- gcp
- cluster: seed kind: deployment name: kube-scheduler namespace: shoot--diki-comp--gcp
- openstack
- cluster: seed kind: deployment name: kube-scheduler namespace: shoot--diki-comp--openstack
- aws
-
Option tls-min-version has not been set.
-
242378 (Medium) - The Kubernetes API Server must use TLS 1.2, at a minimum, to protect the confidentiality of sensitive data during electronic dissemination.
-
Option tls-min-version has not been set.
- aws
- kind: deployment name: kube-apiserver namespace: shoot--diki-comp--aws
- azure
- kind: deployment name: kube-apiserver namespace: shoot--diki-comp--azure
- gcp
- kind: deployment name: kube-apiserver namespace: shoot--diki-comp--gcp
- openstack
- kind: deployment name: kube-apiserver namespace: shoot--diki-comp--openstack
- aws
-
Option tls-min-version has not been set.
-
242379 (Medium) - The Kubernetes etcd must use TLS to protect the confidentiality of sensitive data during electronic dissemination.
-
Option client-transport-security.auto-tls set to allowed value.
- aws
- kind: statefulSet name: etcd-main namespace: shoot--diki-comp--aws
- kind: statefulSet name: etcd-events namespace: shoot--diki-comp--aws
- azure
- kind: statefulSet name: etcd-main namespace: shoot--diki-comp--azure
- kind: statefulSet name: etcd-events namespace: shoot--diki-comp--azure
- gcp
- kind: statefulSet name: etcd-main namespace: shoot--diki-comp--gcp
- kind: statefulSet name: etcd-events namespace: shoot--diki-comp--gcp
- openstack
- kind: statefulSet name: etcd-main namespace: shoot--diki-comp--openstack
- kind: statefulSet name: etcd-events namespace: shoot--diki-comp--openstack
- aws
-
Option client-transport-security.auto-tls set to allowed value.
-
242381 (High) - The Kubernetes Controller Manager must create unique service accounts for each work payload.
-
Option use-service-account-credentials set to allowed value.
- aws
- kind: deployment name: kube-controller-manager namespace: shoot--diki-comp--aws
- azure
- kind: deployment name: kube-controller-manager namespace: shoot--diki-comp--azure
- gcp
- kind: deployment name: kube-controller-manager namespace: shoot--diki-comp--gcp
- openstack
- kind: deployment name: kube-controller-manager namespace: shoot--diki-comp--openstack
- aws
-
Option use-service-account-credentials set to allowed value.
-
242382 (Medium) - The Kubernetes API Server must enable Node,RBAC as the authorization mode.
-
AuthorizationConfiguration has expected start mode types set.
- aws
- kind: AuthorizationConfiguration
- azure
- kind: AuthorizationConfiguration
- gcp
- kind: AuthorizationConfiguration
- openstack
- kind: AuthorizationConfiguration
- aws
-
AuthorizationConfiguration has expected start mode types set.
-
242383 (Medium) - Kubernetes must separate user functionality.
-
System resource in system namespaces.
- aws
- kind: Service name: kubernetes namespace: default
- azure
- kind: Service name: kubernetes namespace: default
- gcp
- kind: Service name: kubernetes namespace: default
- openstack
- kind: Service name: kubernetes namespace: default
- aws
-
System resource in system namespaces.
-
242386 (High) - The Kubernetes API server must have the insecure port flag disabled.
-
Option insecure-port not set.
- aws
- kind: deployment name: kube-apiserver namespace: shoot--diki-comp--aws
- azure
- kind: deployment name: kube-apiserver namespace: shoot--diki-comp--azure
- gcp
- kind: deployment name: kube-apiserver namespace: shoot--diki-comp--gcp
- openstack
- kind: deployment name: kube-apiserver namespace: shoot--diki-comp--openstack
- aws
-
Option insecure-port not set.
-
242387 (High) - The Kubernetes Kubelet must have the "readOnlyPort" flag disabled.
-
Option readOnlyPort not set.
- aws
- kind: node name: ip-IP-Address.eu-west-1.compute.internal
- kind: node name: ip-IP-Address.eu-west-1.compute.internal
- azure
- kind: node name: shoot--diki-comp--azure-worker-g7p4p-z3-7ccb8-2wxkr
- kind: node name: shoot--diki-comp--azure-worker-g7p4p-z3-7ccb8-8mwhx
- gcp
- kind: node name: shoot--diki-comp--gcp-worker-bex82-z1-d8757-66str
- kind: node name: shoot--diki-comp--gcp-worker-bex82-z1-d8757-nl4s4
- openstack
- kind: node name: shoot--diki-comp--openstack-worker-dqty2-z1-6c54d-j8jtj
- kind: node name: shoot--diki-comp--openstack-worker-dqty2-z1-6c54d-x7lx7
- aws
-
Option readOnlyPort not set.
-
242388 (High) - The Kubernetes API server must have the insecure bind address not set.
-
Option insecure-bind-address not set.
- aws
- kind: deployment name: kube-apiserver namespace: shoot--diki-comp--aws
- azure
- kind: deployment name: kube-apiserver namespace: shoot--diki-comp--azure
- gcp
- kind: deployment name: kube-apiserver namespace: shoot--diki-comp--gcp
- openstack
- kind: deployment name: kube-apiserver namespace: shoot--diki-comp--openstack
- aws
-
Option insecure-bind-address not set.
-
242389 (Medium) - The Kubernetes API server must have the secure port set.
-
Option secure-port set to allowed value.
- aws
- kind: deployment name: kube-apiserver namespace: shoot--diki-comp--aws
- azure
- kind: deployment name: kube-apiserver namespace: shoot--diki-comp--azure
- gcp
- kind: deployment name: kube-apiserver namespace: shoot--diki-comp--gcp
- openstack
- kind: deployment name: kube-apiserver namespace: shoot--diki-comp--openstack
- aws
-
Option secure-port set to allowed value.
-
242390 (High) - The Kubernetes API server must have anonymous authentication disabled.
-
Option anonymous-auth set to allowed value.
- aws
- kind: deployment name: kube-apiserver namespace: shoot--diki-comp--aws
- azure
- kind: deployment name: kube-apiserver namespace: shoot--diki-comp--azure
- gcp
- kind: deployment name: kube-apiserver namespace: shoot--diki-comp--gcp
- openstack
- kind: deployment name: kube-apiserver namespace: shoot--diki-comp--openstack
- aws
-
Option anonymous-auth set to allowed value.
-
242391 (High) - The Kubernetes Kubelet must have anonymous authentication disabled.
-
Option authentication.anonymous.enabled set to allowed value.
- aws
- kind: node name: ip-IP-Address.eu-west-1.compute.internal
- kind: node name: ip-IP-Address.eu-west-1.compute.internal
- azure
- kind: node name: shoot--diki-comp--azure-worker-g7p4p-z3-7ccb8-2wxkr
- kind: node name: shoot--diki-comp--azure-worker-g7p4p-z3-7ccb8-8mwhx
- gcp
- kind: node name: shoot--diki-comp--gcp-worker-bex82-z1-d8757-66str
- kind: node name: shoot--diki-comp--gcp-worker-bex82-z1-d8757-nl4s4
- openstack
- kind: node name: shoot--diki-comp--openstack-worker-dqty2-z1-6c54d-j8jtj
- kind: node name: shoot--diki-comp--openstack-worker-dqty2-z1-6c54d-x7lx7
- aws
-
Option authentication.anonymous.enabled set to allowed value.
-
242392 (High) - The Kubernetes kubelet must enable explicit authorization.
-
Option authorization.mode set to allowed value.
- aws
- kind: node name: ip-IP-Address.eu-west-1.compute.internal
- kind: node name: ip-IP-Address.eu-west-1.compute.internal
- azure
- kind: node name: shoot--diki-comp--azure-worker-g7p4p-z3-7ccb8-2wxkr
- kind: node name: shoot--diki-comp--azure-worker-g7p4p-z3-7ccb8-8mwhx
- gcp
- kind: node name: shoot--diki-comp--gcp-worker-bex82-z1-d8757-66str
- kind: node name: shoot--diki-comp--gcp-worker-bex82-z1-d8757-nl4s4
- openstack
- kind: node name: shoot--diki-comp--openstack-worker-dqty2-z1-6c54d-j8jtj
- kind: node name: shoot--diki-comp--openstack-worker-dqty2-z1-6c54d-x7lx7
- aws
-
Option authorization.mode set to allowed value.
-
242393 (Medium) - Kubernetes Worker Nodes must not have sshd service running.
-
SSH daemon service not installed
- aws
- kind: node name: ip-IP-Address.eu-west-1.compute.internal
- azure
- kind: node name: shoot--diki-comp--azure-worker-g7p4p-z3-7ccb8-2wxkr
- gcp
- kind: node name: shoot--diki-comp--gcp-worker-bex82-z1-d8757-66str
- openstack
- kind: node name: shoot--diki-comp--openstack-worker-dqty2-z1-6c54d-j8jtj
- aws
-
SSH daemon service not installed
-
242394 (Medium) - Kubernetes Worker Nodes must not have the sshd service enabled.
-
SSH daemon disabled (or could not be probed)
- aws
- kind: node name: ip-IP-Address.eu-west-1.compute.internal
- azure
- kind: node name: shoot--diki-comp--azure-worker-g7p4p-z3-7ccb8-2wxkr
- gcp
- kind: node name: shoot--diki-comp--gcp-worker-bex82-z1-d8757-66str
- openstack
- kind: node name: shoot--diki-comp--openstack-worker-dqty2-z1-6c54d-j8jtj
- aws
-
SSH daemon disabled (or could not be probed)
-
242395 (Medium) - Kubernetes dashboard must not be enabled.
-
Kubernetes dashboard not installed
- aws
- azure
- gcp
- openstack
- aws
-
Kubernetes dashboard not installed
-
242397 (High) - The Kubernetes kubelet staticPodPath must not enable static pods.
-
Option staticPodPath not set.
- aws
- kind: node name: ip-IP-Address.eu-west-1.compute.internal
- kind: node name: ip-IP-Address.eu-west-1.compute.internal
- azure
- kind: node name: shoot--diki-comp--azure-worker-g7p4p-z3-7ccb8-2wxkr
- kind: node name: shoot--diki-comp--azure-worker-g7p4p-z3-7ccb8-8mwhx
- gcp
- kind: node name: shoot--diki-comp--gcp-worker-bex82-z1-d8757-66str
- kind: node name: shoot--diki-comp--gcp-worker-bex82-z1-d8757-nl4s4
- openstack
- kind: node name: shoot--diki-comp--openstack-worker-dqty2-z1-6c54d-j8jtj
- kind: node name: shoot--diki-comp--openstack-worker-dqty2-z1-6c54d-x7lx7
- aws
-
Option staticPodPath not set.
-
242400 (Medium) - The Kubernetes API server must have Alpha APIs disabled.
-
Option featureGates.AllAlpha not set.
- aws
- cluster: seed kind: deployment name: kube-apiserver namespace: shoot--diki-comp--aws
- cluster: seed kind: deployment name: kube-controller-manager namespace: shoot--diki-comp--aws
- cluster: seed kind: deployment name: kube-scheduler namespace: shoot--diki-comp--aws
- cluster: shoot kind: node name: ip-IP-Address.eu-west-1.compute.internal
- cluster: shoot kind: node name: ip-IP-Address.eu-west-1.compute.internal
- cluster: shoot kind: pod name: kube-proxy-worker-kkfk1-v1.31.4-hkmbk namespace: kube-system
- azure
- cluster: seed kind: deployment name: kube-apiserver namespace: shoot--diki-comp--azure
- cluster: seed kind: deployment name: kube-controller-manager namespace: shoot--diki-comp--azure
- cluster: seed kind: deployment name: kube-scheduler namespace: shoot--diki-comp--azure
- cluster: shoot kind: node name: shoot--diki-comp--azure-worker-g7p4p-z3-7ccb8-2wxkr
- cluster: shoot kind: node name: shoot--diki-comp--azure-worker-g7p4p-z3-7ccb8-8mwhx
- cluster: shoot kind: pod name: kube-proxy-worker-g7p4p-v1.31.4-r8rjr namespace: kube-system
- gcp
- cluster: seed kind: deployment name: kube-apiserver namespace: shoot--diki-comp--gcp
- cluster: seed kind: deployment name: kube-controller-manager namespace: shoot--diki-comp--gcp
- cluster: seed kind: deployment name: kube-scheduler namespace: shoot--diki-comp--gcp
- cluster: shoot kind: node name: shoot--diki-comp--gcp-worker-bex82-z1-d8757-66str
- cluster: shoot kind: node name: shoot--diki-comp--gcp-worker-bex82-z1-d8757-nl4s4
- cluster: shoot kind: pod name: kube-proxy-worker-bex82-v1.31.4-kbb2d namespace: kube-system
- openstack
- cluster: seed kind: deployment name: kube-apiserver namespace: shoot--diki-comp--openstack
- cluster: seed kind: deployment name: kube-controller-manager namespace: shoot--diki-comp--openstack
- cluster: seed kind: deployment name: kube-scheduler namespace: shoot--diki-comp--openstack
- cluster: shoot kind: node name: shoot--diki-comp--openstack-worker-dqty2-z1-6c54d-j8jtj
- cluster: shoot kind: node name: shoot--diki-comp--openstack-worker-dqty2-z1-6c54d-x7lx7
- cluster: shoot kind: pod name: kube-proxy-worker-dqty2-v1.31.4-tpl27 namespace: kube-system
- aws
-
Option featureGates.AllAlpha not set.
-
242404 (Medium) - Kubernetes Kubelet must deny hostname override.
-
Flag hostname-override not set.
- aws
- kind: node name: ip-IP-Address.eu-west-1.compute.internal
- azure
- kind: node name: shoot--diki-comp--azure-worker-g7p4p-z3-7ccb8-2wxkr
- gcp
- kind: node name: shoot--diki-comp--gcp-worker-bex82-z1-d8757-66str
- openstack
- kind: node name: shoot--diki-comp--openstack-worker-dqty2-z1-6c54d-j8jtj
- aws
-
Flag hostname-override not set.
-
242406 (Medium) - The Kubernetes kubelet configuration file must be owned by root.
-
File has expected owners
- aws
- details: fileName: /etc/systemd/system/kubelet.service, ownerUser: 0, ownerGroup: 0 kind: node name: ip-IP-Address.eu-west-1.compute.internal
- azure
- details: fileName: /etc/systemd/system/kubelet.service, ownerUser: 0, ownerGroup: 0 kind: node name: shoot--diki-comp--azure-worker-g7p4p-z3-7ccb8-2wxkr
- gcp
- details: fileName: /etc/systemd/system/kubelet.service, ownerUser: 0, ownerGroup: 0 kind: node name: shoot--diki-comp--gcp-worker-bex82-z1-d8757-66str
- openstack
- details: fileName: /etc/systemd/system/kubelet.service, ownerUser: 0, ownerGroup: 0 kind: node name: shoot--diki-comp--openstack-worker-dqty2-z1-6c54d-j8jtj
- aws
-
File has expected owners
-
242407 (Medium) - The Kubernetes kubelet configuration files must have file permissions set to 644 or more restrictive.
-
File has expected permissions
- aws
- details: fileName: /etc/systemd/system/kubelet.service, permissions: 600 kind: node name: ip-IP-Address.eu-west-1.compute.internal
- azure
- details: fileName: /etc/systemd/system/kubelet.service, permissions: 600 kind: node name: shoot--diki-comp--azure-worker-g7p4p-z3-7ccb8-2wxkr
- gcp
- details: fileName: /etc/systemd/system/kubelet.service, permissions: 600 kind: node name: shoot--diki-comp--gcp-worker-bex82-z1-d8757-66str
- openstack
- details: fileName: /etc/systemd/system/kubelet.service, permissions: 600 kind: node name: shoot--diki-comp--openstack-worker-dqty2-z1-6c54d-j8jtj
- aws
-
File has expected permissions
-
242409 (Medium) - Kubernetes Controller Manager must disable profiling.
-
Option profiling set to allowed value.
- aws
- kind: deployment name: kube-controller-manager namespace: shoot--diki-comp--aws
- azure
- kind: deployment name: kube-controller-manager namespace: shoot--diki-comp--azure
- gcp
- kind: deployment name: kube-controller-manager namespace: shoot--diki-comp--gcp
- openstack
- kind: deployment name: kube-controller-manager namespace: shoot--diki-comp--openstack
- aws
-
Option profiling set to allowed value.
-
242414 (Medium) - The Kubernetes cluster must use non-privileged host ports for user pods.
-
Container does not use hostPort < 1024.
- aws
- cluster: seed kind: pod name: aws-custom-route-controller-7ff4fc4484-qv57g namespace: shoot--diki-comp--aws
- cluster: seed kind: pod name: blackbox-exporter-9689c845f-9df2r namespace: shoot--diki-comp--aws
- cluster: seed kind: pod name: blackbox-exporter-9689c845f-m54ws namespace: shoot--diki-comp--aws
- cluster: seed kind: pod name: cert-controller-manager-69bb8446bd-dml56 namespace: shoot--diki-comp--aws
- cluster: seed kind: pod name: cloud-controller-manager-84878d787c-s2rmt namespace: shoot--diki-comp--aws
- cluster: seed kind: pod name: csi-driver-controller-dfc558d68-lwwh5 namespace: shoot--diki-comp--aws
- cluster: seed kind: pod name: csi-driver-controller-dfc558d68-lwwh5 namespace: shoot--diki-comp--aws
- cluster: seed kind: pod name: csi-driver-controller-dfc558d68-lwwh5 namespace: shoot--diki-comp--aws
- cluster: seed kind: pod name: csi-driver-controller-dfc558d68-lwwh5 namespace: shoot--diki-comp--aws
- cluster: seed kind: pod name: csi-driver-controller-dfc558d68-lwwh5 namespace: shoot--diki-comp--aws
- cluster: seed kind: pod name: csi-driver-controller-dfc558d68-lwwh5 namespace: shoot--diki-comp--aws
- cluster: seed kind: pod name: csi-driver-controller-dfc558d68-lwwh5 namespace: shoot--diki-comp--aws
- cluster: seed kind: pod name: csi-snapshot-controller-b956d9c46-c4rkx namespace: shoot--diki-comp--aws
- cluster: seed kind: pod name: csi-snapshot-validation-7788f5f8f4-sfkbh namespace: shoot--diki-comp--aws
- cluster: seed kind: pod name: csi-snapshot-validation-7788f5f8f4-zpwlk namespace: shoot--diki-comp--aws
- cluster: seed kind: pod name: etcd-events-0 namespace: shoot--diki-comp--aws
- cluster: seed kind: pod name: etcd-events-0 namespace: shoot--diki-comp--aws
- cluster: seed kind: pod name: etcd-main-0 namespace: shoot--diki-comp--aws
- cluster: seed kind: pod name: etcd-main-0 namespace: shoot--diki-comp--aws
- cluster: seed kind: pod name: event-logger-777d6dc9b8-ctw2m namespace: shoot--diki-comp--aws
- cluster: seed kind: pod name: extension-shoot-lakom-service-59977dbc9-cdhjv namespace: shoot--diki-comp--aws
- cluster: seed kind: pod name: extension-shoot-lakom-service-59977dbc9-fh89r namespace: shoot--diki-comp--aws
- cluster: seed kind: pod name: gardener-resource-manager-69cc9894f8-jnh7b namespace: shoot--diki-comp--aws
- cluster: seed kind: pod name: gardener-resource-manager-69cc9894f8-nkb25 namespace: shoot--diki-comp--aws
- cluster: seed kind: pod name: kube-apiserver-7c5459cc5b-jkvn9 namespace: shoot--diki-comp--aws
- cluster: seed kind: pod name: kube-apiserver-7c5459cc5b-kz2dz namespace: shoot--diki-comp--aws
- cluster: seed kind: pod name: kube-controller-manager-c8b755f65-p4v5d namespace: shoot--diki-comp--aws
- cluster: seed kind: pod name: kube-scheduler-678cb86cc-zm2cn namespace: shoot--diki-comp--aws
- cluster: seed kind: pod name: kube-state-metrics-77546995b-rk69t namespace: shoot--diki-comp--aws
- cluster: seed kind: pod name: machine-controller-manager-59764d7c75-4dr9j namespace: shoot--diki-comp--aws
- cluster: seed kind: pod name: machine-controller-manager-59764d7c75-4dr9j namespace: shoot--diki-comp--aws
- cluster: seed kind: pod name: network-problem-detector-controller-5c744b5c9d-97kpz namespace: shoot--diki-comp--aws
- cluster: seed kind: pod name: plutono-67955bdb48-948jl namespace: shoot--diki-comp--aws
- cluster: seed kind: pod name: plutono-67955bdb48-948jl namespace: shoot--diki-comp--aws
- cluster: seed kind: pod name: plutono-67955bdb48-948jl namespace: shoot--diki-comp--aws
- cluster: seed kind: pod name: plutono-67955bdb48-948jl namespace: shoot--diki-comp--aws
- cluster: seed kind: pod name: prometheus-shoot-0 namespace: shoot--diki-comp--aws
- cluster: seed kind: pod name: prometheus-shoot-0 namespace: shoot--diki-comp--aws
- cluster: seed kind: pod name: prometheus-shoot-0 namespace: shoot--diki-comp--aws
- cluster: seed kind: pod name: prometheus-shoot-0 namespace: shoot--diki-comp--aws
- cluster: seed kind: pod name: shoot-dns-service-8644c5f898-x9562 namespace: shoot--diki-comp--aws
- cluster: seed kind: pod name: vali-0 namespace: shoot--diki-comp--aws
- cluster: seed kind: pod name: vali-0 namespace: shoot--diki-comp--aws
- cluster: seed kind: pod name: vali-0 namespace: shoot--diki-comp--aws
- cluster: seed kind: pod name: vali-0 namespace: shoot--diki-comp--aws
- cluster: seed kind: pod name: vpa-admission-controller-6d65958cbc-8m4ld namespace: shoot--diki-comp--aws
- cluster: seed kind: pod name: vpa-admission-controller-6d65958cbc-rvtlt namespace: shoot--diki-comp--aws
- cluster: seed kind: pod name: vpa-recommender-7d8c68d577-bvdvs namespace: shoot--diki-comp--aws
- cluster: seed kind: pod name: vpa-updater-66dc94789-pcdfh namespace: shoot--diki-comp--aws
- cluster: seed kind: pod name: vpn-seed-server-5f5cc9c687-s6fqv namespace: shoot--diki-comp--aws
- cluster: seed kind: pod name: vpn-seed-server-5f5cc9c687-s6fqv namespace: shoot--diki-comp--aws
- cluster: shoot kind: pod name: apiserver-proxy-vx2f2 namespace: kube-system
- cluster: shoot kind: pod name: apiserver-proxy-vx2f2 namespace: kube-system
- cluster: shoot kind: pod name: apiserver-proxy-xhcc8 namespace: kube-system
- cluster: shoot kind: pod name: apiserver-proxy-xhcc8 namespace: kube-system
- cluster: shoot kind: pod name: blackbox-exporter-6cb7b4b76c-9fnsl namespace: kube-system
- cluster: shoot kind: pod name: blackbox-exporter-6cb7b4b76c-tdqhz namespace: kube-system
- cluster: shoot kind: pod name: calico-node-pcfkz namespace: kube-system
- cluster: shoot kind: pod name: calico-node-pcfkz namespace: kube-system
- cluster: shoot kind: pod name: calico-node-qtt99 namespace: kube-system
- cluster: shoot kind: pod name: calico-node-qtt99 namespace: kube-system
- cluster: shoot kind: pod name: calico-node-vertical-autoscaler-66fbc8cdf9-sdcrg namespace: kube-system
- cluster: shoot kind: pod name: calico-typha-deploy-6959bc47cf-9p7ch namespace: kube-system
- cluster: shoot kind: pod name: calico-typha-deploy-6959bc47cf-lw7d7 namespace: kube-system
- cluster: shoot kind: pod name: calico-typha-horizontal-autoscaler-7d8cf6f7b4-d5x8l namespace: kube-system
- cluster: shoot kind: pod name: calico-typha-vertical-autoscaler-757978cc5-5btm4 namespace: kube-system
- cluster: shoot kind: pod name: coredns-5474587df-5cwh6 namespace: kube-system
- cluster: shoot kind: pod name: coredns-5474587df-ztxck namespace: kube-system
- cluster: shoot kind: pod name: csi-driver-node-54lnt namespace: kube-system
- cluster: shoot kind: pod name: csi-driver-node-54lnt namespace: kube-system
- cluster: shoot kind: pod name: csi-driver-node-54lnt namespace: kube-system
- cluster: shoot kind: pod name: csi-driver-node-p7v8p namespace: kube-system
- cluster: shoot kind: pod name: csi-driver-node-p7v8p namespace: kube-system
- cluster: shoot kind: pod name: csi-driver-node-p7v8p namespace: kube-system
- cluster: shoot kind: pod name: diki-242452-pud4u4zryg namespace: kube-system
- cluster: shoot kind: pod name: egress-filter-applier-c59zt namespace: kube-system
- cluster: shoot kind: pod name: egress-filter-applier-q5j8f namespace: kube-system
- cluster: shoot kind: pod name: kube-proxy-worker-kkfk1-v1.31.4-hkmbk namespace: kube-system
- cluster: shoot kind: pod name: kube-proxy-worker-kkfk1-v1.31.4-hkmbk namespace: kube-system
- cluster: shoot kind: pod name: kube-proxy-worker-kkfk1-v1.31.4-n2kgl namespace: kube-system
- cluster: shoot kind: pod name: kube-proxy-worker-kkfk1-v1.31.4-n2kgl namespace: kube-system
- cluster: shoot kind: pod name: metrics-server-c57587bbf-qqjfw namespace: kube-system
- cluster: shoot kind: pod name: metrics-server-c57587bbf-xnztf namespace: kube-system
- cluster: shoot kind: pod name: network-problem-detector-host-cpllg namespace: kube-system
- cluster: shoot kind: pod name: network-problem-detector-host-tzzf4 namespace: kube-system
- cluster: shoot kind: pod name: network-problem-detector-pod-d5p9q namespace: kube-system
- cluster: shoot kind: pod name: network-problem-detector-pod-jbnxw namespace: kube-system
- cluster: shoot kind: pod name: node-exporter-g4cm7 namespace: kube-system
- cluster: shoot kind: pod name: node-exporter-lp96f namespace: kube-system
- cluster: shoot kind: pod name: node-problem-detector-8699c namespace: kube-system
- cluster: shoot kind: pod name: node-problem-detector-plwx6 namespace: kube-system
- cluster: shoot kind: pod name: vpn-shoot-767fd85bcd-znxkl namespace: kube-system
- azure
- cluster: seed kind: pod name: blackbox-exporter-7bbbdbf85f-j4k9w namespace: shoot--diki-comp--azure
- cluster: seed kind: pod name: blackbox-exporter-7bbbdbf85f-lljfd namespace: shoot--diki-comp--azure
- cluster: seed kind: pod name: cert-controller-manager-7d455c88b9-h6bwz namespace: shoot--diki-comp--azure
- cluster: seed kind: pod name: cloud-controller-manager-6b8ccc589c-4q5ws namespace: shoot--diki-comp--azure
- cluster: seed kind: pod name: csi-driver-controller-disk-f96f8845f-7gxlg namespace: shoot--diki-comp--azure
- cluster: seed kind: pod name: csi-driver-controller-disk-f96f8845f-7gxlg namespace: shoot--diki-comp--azure
- cluster: seed kind: pod name: csi-driver-controller-disk-f96f8845f-7gxlg namespace: shoot--diki-comp--azure
- cluster: seed kind: pod name: csi-driver-controller-disk-f96f8845f-7gxlg namespace: shoot--diki-comp--azure
- cluster: seed kind: pod name: csi-driver-controller-disk-f96f8845f-7gxlg namespace: shoot--diki-comp--azure
- cluster: seed kind: pod name: csi-driver-controller-disk-f96f8845f-7gxlg namespace: shoot--diki-comp--azure
- cluster: seed kind: pod name: csi-driver-controller-file-6f4894f8db-q6p4w namespace: shoot--diki-comp--azure
- cluster: seed kind: pod name: csi-driver-controller-file-6f4894f8db-q6p4w namespace: shoot--diki-comp--azure
- cluster: seed kind: pod name: csi-driver-controller-file-6f4894f8db-q6p4w namespace: shoot--diki-comp--azure
- cluster: seed kind: pod name: csi-driver-controller-file-6f4894f8db-q6p4w namespace: shoot--diki-comp--azure
- cluster: seed kind: pod name: csi-driver-controller-file-6f4894f8db-q6p4w namespace: shoot--diki-comp--azure
- cluster: seed kind: pod name: csi-driver-controller-file-6f4894f8db-q6p4w namespace: shoot--diki-comp--azure
- cluster: seed kind: pod name: csi-snapshot-controller-b6cf5d7c8-5cwxj namespace: shoot--diki-comp--azure
- cluster: seed kind: pod name: etcd-events-0 namespace: shoot--diki-comp--azure
- cluster: seed kind: pod name: etcd-events-0 namespace: shoot--diki-comp--azure
- cluster: seed kind: pod name: etcd-main-0 namespace: shoot--diki-comp--azure
- cluster: seed kind: pod name: etcd-main-0 namespace: shoot--diki-comp--azure
- cluster: seed kind: pod name: event-logger-5b675bd46f-b6tk6 namespace: shoot--diki-comp--azure
- cluster: seed kind: pod name: extension-shoot-lakom-service-5fc9cb4b98-7dpdq namespace: shoot--diki-comp--azure
- cluster: seed kind: pod name: extension-shoot-lakom-service-5fc9cb4b98-99ptw namespace: shoot--diki-comp--azure
- cluster: seed kind: pod name: gardener-resource-manager-668c56d4cb-cnvhp namespace: shoot--diki-comp--azure
- cluster: seed kind: pod name: gardener-resource-manager-668c56d4cb-s8hbt namespace: shoot--diki-comp--azure
- cluster: seed kind: pod name: kube-apiserver-78d668b498-8xmjt namespace: shoot--diki-comp--azure
- cluster: seed kind: pod name: kube-apiserver-78d668b498-g4nbj namespace: shoot--diki-comp--azure
- cluster: seed kind: pod name: kube-controller-manager-9b68d9877-7d97p namespace: shoot--diki-comp--azure
- cluster: seed kind: pod name: kube-scheduler-79b6c874b4-q7l8z namespace: shoot--diki-comp--azure
- cluster: seed kind: pod name: kube-state-metrics-696c7f9988-s76vt namespace: shoot--diki-comp--azure
- cluster: seed kind: pod name: machine-controller-manager-5858dd8f98-2ffrn namespace: shoot--diki-comp--azure
- cluster: seed kind: pod name: machine-controller-manager-5858dd8f98-2ffrn namespace: shoot--diki-comp--azure
- cluster: seed kind: pod name: network-problem-detector-controller-58d8898bc-942ss namespace: shoot--diki-comp--azure
- cluster: seed kind: pod name: plutono-8cbb4fc48-kbsnv namespace: shoot--diki-comp--azure
- cluster: seed kind: pod name: plutono-8cbb4fc48-kbsnv namespace: shoot--diki-comp--azure
- cluster: seed kind: pod name: plutono-8cbb4fc48-kbsnv namespace: shoot--diki-comp--azure
- cluster: seed kind: pod name: plutono-8cbb4fc48-kbsnv namespace: shoot--diki-comp--azure
- cluster: seed kind: pod name: prometheus-shoot-0 namespace: shoot--diki-comp--azure
- cluster: seed kind: pod name: prometheus-shoot-0 namespace: shoot--diki-comp--azure
- cluster: seed kind: pod name: prometheus-shoot-0 namespace: shoot--diki-comp--azure
- cluster: seed kind: pod name: prometheus-shoot-0 namespace: shoot--diki-comp--azure
- cluster: seed kind: pod name: remedy-controller-azure-6bc55767c7-ftbcp namespace: shoot--diki-comp--azure
- cluster: seed kind: pod name: shoot-dns-service-678487b956-97xj4 namespace: shoot--diki-comp--azure
- cluster: seed kind: pod name: vali-0 namespace: shoot--diki-comp--azure
- cluster: seed kind: pod name: vali-0 namespace: shoot--diki-comp--azure
- cluster: seed kind: pod name: vali-0 namespace: shoot--diki-comp--azure
- cluster: seed kind: pod name: vali-0 namespace: shoot--diki-comp--azure
- cluster: seed kind: pod name: vpa-admission-controller-569c498d7b-7q4tx namespace: shoot--diki-comp--azure
- cluster: seed kind: pod name: vpa-admission-controller-569c498d7b-qlrs4 namespace: shoot--diki-comp--azure
- cluster: seed kind: pod name: vpa-recommender-846d654554-2drz8 namespace: shoot--diki-comp--azure
- cluster: seed kind: pod name: vpa-updater-566f48ffdb-6s8tf namespace: shoot--diki-comp--azure
- cluster: seed kind: pod name: vpn-seed-server-858fb7754d-gsrmq namespace: shoot--diki-comp--azure
- cluster: seed kind: pod name: vpn-seed-server-858fb7754d-gsrmq namespace: shoot--diki-comp--azure
- cluster: shoot kind: pod name: apiserver-proxy-n867f namespace: kube-system
- cluster: shoot kind: pod name: apiserver-proxy-n867f namespace: kube-system
- cluster: shoot kind: pod name: apiserver-proxy-vgjf5 namespace: kube-system
- cluster: shoot kind: pod name: apiserver-proxy-vgjf5 namespace: kube-system
- cluster: shoot kind: pod name: blackbox-exporter-6cb7b4b76c-22l8z namespace: kube-system
- cluster: shoot kind: pod name: blackbox-exporter-6cb7b4b76c-zml66 namespace: kube-system
- cluster: shoot kind: pod name: calico-node-grwcc namespace: kube-system
- cluster: shoot kind: pod name: calico-node-vertical-autoscaler-66fbc8cdf9-pzs6z namespace: kube-system
- cluster: shoot kind: pod name: calico-node-x7kcf namespace: kube-system
- cluster: shoot kind: pod name: calico-typha-deploy-6959bc47cf-nmnvp namespace: kube-system
- cluster: shoot kind: pod name: calico-typha-deploy-6959bc47cf-q4fk4 namespace: kube-system
- cluster: shoot kind: pod name: calico-typha-horizontal-autoscaler-7d8cf6f7b4-jsc5w namespace: kube-system
- cluster: shoot kind: pod name: calico-typha-vertical-autoscaler-757978cc5-hwb57 namespace: kube-system
- cluster: shoot kind: pod name: cloud-node-manager-5cl6f namespace: kube-system
- cluster: shoot kind: pod name: cloud-node-manager-tt2p6 namespace: kube-system
- cluster: shoot kind: pod name: coredns-696f69cb6c-9b8zt namespace: kube-system
- cluster: shoot kind: pod name: coredns-696f69cb6c-kk7lz namespace: kube-system
- cluster: shoot kind: pod name: csi-driver-node-disk-j7kk6 namespace: kube-system
- cluster: shoot kind: pod name: csi-driver-node-disk-j7kk6 namespace: kube-system
- cluster: shoot kind: pod name: csi-driver-node-disk-j7kk6 namespace: kube-system
- cluster: shoot kind: pod name: csi-driver-node-disk-kcqsm namespace: kube-system
- cluster: shoot kind: pod name: csi-driver-node-disk-kcqsm namespace: kube-system
- cluster: shoot kind: pod name: csi-driver-node-disk-kcqsm namespace: kube-system
- cluster: shoot kind: pod name: csi-driver-node-file-rfl7m namespace: kube-system
- cluster: shoot kind: pod name: csi-driver-node-file-rfl7m namespace: kube-system
- cluster: shoot kind: pod name: csi-driver-node-file-rfl7m namespace: kube-system
- cluster: shoot kind: pod name: csi-driver-node-file-rmq5z namespace: kube-system
- cluster: shoot kind: pod name: csi-driver-node-file-rmq5z namespace: kube-system
- cluster: shoot kind: pod name: csi-driver-node-file-rmq5z namespace: kube-system
- cluster: shoot kind: pod name: egress-filter-applier-22rv7 namespace: kube-system
- cluster: shoot kind: pod name: egress-filter-applier-hwmmx namespace: kube-system
- cluster: shoot kind: pod name: kube-proxy-worker-g7p4p-v1.31.4-ncssj namespace: kube-system
- cluster: shoot kind: pod name: kube-proxy-worker-g7p4p-v1.31.4-ncssj namespace: kube-system
- cluster: shoot kind: pod name: kube-proxy-worker-g7p4p-v1.31.4-r8rjr namespace: kube-system
- cluster: shoot kind: pod name: kube-proxy-worker-g7p4p-v1.31.4-r8rjr namespace: kube-system
- cluster: shoot kind: pod name: metrics-server-85c898cb58-22fjd namespace: kube-system
- cluster: shoot kind: pod name: metrics-server-85c898cb58-28w8v namespace: kube-system
- cluster: shoot kind: pod name: network-problem-detector-host-cfxbx namespace: kube-system
- cluster: shoot kind: pod name: network-problem-detector-host-sg989 namespace: kube-system
- cluster: shoot kind: pod name: network-problem-detector-pod-mcz27 namespace: kube-system
- cluster: shoot kind: pod name: network-problem-detector-pod-x8866 namespace: kube-system
- cluster: shoot kind: pod name: node-exporter-qqjnh namespace: kube-system
- cluster: shoot kind: pod name: node-exporter-r7fkg namespace: kube-system
- cluster: shoot kind: pod name: node-problem-detector-5n2x6 namespace: kube-system
- cluster: shoot kind: pod name: node-problem-detector-w4r4t namespace: kube-system
- cluster: shoot kind: pod name: vpn-shoot-dddcfbd9c-hzxzl namespace: kube-system
- gcp
- cluster: seed kind: pod name: blackbox-exporter-5787b8dcf7-gbftg namespace: shoot--diki-comp--gcp
- cluster: seed kind: pod name: blackbox-exporter-5787b8dcf7-mb8gx namespace: shoot--diki-comp--gcp
- cluster: seed kind: pod name: cert-controller-manager-8577478fbb-jzwtz namespace: shoot--diki-comp--gcp
- cluster: seed kind: pod name: cloud-controller-manager-75b656c795-r2f28 namespace: shoot--diki-comp--gcp
- cluster: seed kind: pod name: csi-driver-controller-9f54d87d4-tq92g namespace: shoot--diki-comp--gcp
- cluster: seed kind: pod name: csi-driver-controller-9f54d87d4-tq92g namespace: shoot--diki-comp--gcp
- cluster: seed kind: pod name: csi-driver-controller-9f54d87d4-tq92g namespace: shoot--diki-comp--gcp
- cluster: seed kind: pod name: csi-driver-controller-9f54d87d4-tq92g namespace: shoot--diki-comp--gcp
- cluster: seed kind: pod name: csi-driver-controller-9f54d87d4-tq92g namespace: shoot--diki-comp--gcp
- cluster: seed kind: pod name: csi-driver-controller-9f54d87d4-tq92g namespace: shoot--diki-comp--gcp
- cluster: seed kind: pod name: csi-snapshot-controller-7f896fb559-2c9ps namespace: shoot--diki-comp--gcp
- cluster: seed kind: pod name: csi-snapshot-validation-5c8bf6f599-4vhm7 namespace: shoot--diki-comp--gcp
- cluster: seed kind: pod name: csi-snapshot-validation-5c8bf6f599-9m5d4 namespace: shoot--diki-comp--gcp
- cluster: seed kind: pod name: etcd-events-0 namespace: shoot--diki-comp--gcp
- cluster: seed kind: pod name: etcd-events-0 namespace: shoot--diki-comp--gcp
- cluster: seed kind: pod name: etcd-main-0 namespace: shoot--diki-comp--gcp
- cluster: seed kind: pod name: etcd-main-0 namespace: shoot--diki-comp--gcp
- cluster: seed kind: pod name: event-logger-8c7d7bf97-hlh8w namespace: shoot--diki-comp--gcp
- cluster: seed kind: pod name: extension-shoot-lakom-service-fdcfbd686-l8d6r namespace: shoot--diki-comp--gcp
- cluster: seed kind: pod name: extension-shoot-lakom-service-fdcfbd686-wqtxv namespace: shoot--diki-comp--gcp
- cluster: seed kind: pod name: gardener-resource-manager-5f87b9f6b-kww5m namespace: shoot--diki-comp--gcp
- cluster: seed kind: pod name: gardener-resource-manager-5f87b9f6b-sh7vc namespace: shoot--diki-comp--gcp
- cluster: seed kind: pod name: kube-apiserver-857b9bd577-9k45w namespace: shoot--diki-comp--gcp
- cluster: seed kind: pod name: kube-apiserver-857b9bd577-knjdp namespace: shoot--diki-comp--gcp
- cluster: seed kind: pod name: kube-controller-manager-d546c97bb-k5rsh namespace: shoot--diki-comp--gcp
- cluster: seed kind: pod name: kube-scheduler-65fbc646c-ck6kp namespace: shoot--diki-comp--gcp
- cluster: seed kind: pod name: kube-state-metrics-d87d8b4f-htgkt namespace: shoot--diki-comp--gcp
- cluster: seed kind: pod name: machine-controller-manager-8594568fcd-r78cf namespace: shoot--diki-comp--gcp
- cluster: seed kind: pod name: machine-controller-manager-8594568fcd-r78cf namespace: shoot--diki-comp--gcp
- cluster: seed kind: pod name: network-problem-detector-controller-cbbb474fb-5jh9j namespace: shoot--diki-comp--gcp
- cluster: seed kind: pod name: plutono-85bbd7ddbc-2kzlv namespace: shoot--diki-comp--gcp
- cluster: seed kind: pod name: plutono-85bbd7ddbc-2kzlv namespace: shoot--diki-comp--gcp
- cluster: seed kind: pod name: plutono-85bbd7ddbc-2kzlv namespace: shoot--diki-comp--gcp
- cluster: seed kind: pod name: plutono-85bbd7ddbc-2kzlv namespace: shoot--diki-comp--gcp
- cluster: seed kind: pod name: prometheus-shoot-0 namespace: shoot--diki-comp--gcp
- cluster: seed kind: pod name: prometheus-shoot-0 namespace: shoot--diki-comp--gcp
- cluster: seed kind: pod name: prometheus-shoot-0 namespace: shoot--diki-comp--gcp
- cluster: seed kind: pod name: prometheus-shoot-0 namespace: shoot--diki-comp--gcp
- cluster: seed kind: pod name: shoot-dns-service-65bc698487-7pdmm namespace: shoot--diki-comp--gcp
- cluster: seed kind: pod name: vali-0 namespace: shoot--diki-comp--gcp
- cluster: seed kind: pod name: vali-0 namespace: shoot--diki-comp--gcp
- cluster: seed kind: pod name: vali-0 namespace: shoot--diki-comp--gcp
- cluster: seed kind: pod name: vali-0 namespace: shoot--diki-comp--gcp
- cluster: seed kind: pod name: vpa-admission-controller-755d64fd45-ghlhr namespace: shoot--diki-comp--gcp
- cluster: seed kind: pod name: vpa-admission-controller-755d64fd45-hp27b namespace: shoot--diki-comp--gcp
- cluster: seed kind: pod name: vpa-recommender-5f67c44999-kzjsn namespace: shoot--diki-comp--gcp
- cluster: seed kind: pod name: vpa-updater-5df7f89ff-xk2bz namespace: shoot--diki-comp--gcp
- cluster: seed kind: pod name: vpn-seed-server-6f5655998-kmqzq namespace: shoot--diki-comp--gcp
- cluster: seed kind: pod name: vpn-seed-server-6f5655998-kmqzq namespace: shoot--diki-comp--gcp
- cluster: shoot kind: pod name: apiserver-proxy-bx978 namespace: kube-system
- cluster: shoot kind: pod name: apiserver-proxy-bx978 namespace: kube-system
- cluster: shoot kind: pod name: apiserver-proxy-r9tdg namespace: kube-system
- cluster: shoot kind: pod name: apiserver-proxy-r9tdg namespace: kube-system
- cluster: shoot kind: pod name: blackbox-exporter-6cb7b4b76c-bdhqb namespace: kube-system
- cluster: shoot kind: pod name: blackbox-exporter-6cb7b4b76c-fvbxj namespace: kube-system
- cluster: shoot kind: pod name: calico-node-vertical-autoscaler-66fbc8cdf9-n95k5 namespace: kube-system
- cluster: shoot kind: pod name: calico-node-zl5pz namespace: kube-system
- cluster: shoot kind: pod name: calico-node-ztwrg namespace: kube-system
- cluster: shoot kind: pod name: calico-typha-deploy-6959bc47cf-2l4cw namespace: kube-system
- cluster: shoot kind: pod name: calico-typha-deploy-6959bc47cf-q5rtd namespace: kube-system
- cluster: shoot kind: pod name: calico-typha-horizontal-autoscaler-7d8cf6f7b4-fwc5h namespace: kube-system
- cluster: shoot kind: pod name: calico-typha-vertical-autoscaler-757978cc5-vwmzw namespace: kube-system
- cluster: shoot kind: pod name: coredns-65bdc57f48-b26c5 namespace: kube-system
- cluster: shoot kind: pod name: coredns-65bdc57f48-tq2b5 namespace: kube-system
- cluster: shoot kind: pod name: csi-driver-node-6lmpl namespace: kube-system
- cluster: shoot kind: pod name: csi-driver-node-6lmpl namespace: kube-system
- cluster: shoot kind: pod name: csi-driver-node-6lmpl namespace: kube-system
- cluster: shoot kind: pod name: csi-driver-node-srz2q namespace: kube-system
- cluster: shoot kind: pod name: csi-driver-node-srz2q namespace: kube-system
- cluster: shoot kind: pod name: csi-driver-node-srz2q namespace: kube-system
- cluster: shoot kind: pod name: diki-242394-ug7v34g0by namespace: kube-system
- cluster: shoot kind: pod name: egress-filter-applier-6cqn6 namespace: kube-system
- cluster: shoot kind: pod name: egress-filter-applier-jschk namespace: kube-system
- cluster: shoot kind: pod name: kube-proxy-worker-bex82-v1.31.4-kbb2d namespace: kube-system
- cluster: shoot kind: pod name: kube-proxy-worker-bex82-v1.31.4-kbb2d namespace: kube-system
- cluster: shoot kind: pod name: kube-proxy-worker-bex82-v1.31.4-nt98w namespace: kube-system
- cluster: shoot kind: pod name: kube-proxy-worker-bex82-v1.31.4-nt98w namespace: kube-system
- cluster: shoot kind: pod name: metrics-server-944fcbdc8-fp5jr namespace: kube-system
- cluster: shoot kind: pod name: metrics-server-944fcbdc8-n7hxj namespace: kube-system
- cluster: shoot kind: pod name: network-problem-detector-host-2nxh4 namespace: kube-system
- cluster: shoot kind: pod name: network-problem-detector-host-xbq6b namespace: kube-system
- cluster: shoot kind: pod name: network-problem-detector-pod-drdls namespace: kube-system
- cluster: shoot kind: pod name: network-problem-detector-pod-qdrkq namespace: kube-system
- cluster: shoot kind: pod name: node-exporter-4q9wx namespace: kube-system
- cluster: shoot kind: pod name: node-exporter-c5zhw namespace: kube-system
- cluster: shoot kind: pod name: node-problem-detector-h8g4k namespace: kube-system
- cluster: shoot kind: pod name: node-problem-detector-k9hz9 namespace: kube-system
- cluster: shoot kind: pod name: vpn-shoot-66b756699d-82sjr namespace: kube-system
- openstack
- cluster: seed kind: pod name: blackbox-exporter-796cfcbd7b-5xhnd namespace: shoot--diki-comp--openstack
- cluster: seed kind: pod name: blackbox-exporter-796cfcbd7b-x872d namespace: shoot--diki-comp--openstack
- cluster: seed kind: pod name: cert-controller-manager-768f7754d7-5vfn6 namespace: shoot--diki-comp--openstack
- cluster: seed kind: pod name: cloud-controller-manager-775878f68d-266rq namespace: shoot--diki-comp--openstack
- cluster: seed kind: pod name: csi-driver-controller-64f6c45c55-j8z7c namespace: shoot--diki-comp--openstack
- cluster: seed kind: pod name: csi-driver-controller-64f6c45c55-j8z7c namespace: shoot--diki-comp--openstack
- cluster: seed kind: pod name: csi-driver-controller-64f6c45c55-j8z7c namespace: shoot--diki-comp--openstack
- cluster: seed kind: pod name: csi-driver-controller-64f6c45c55-j8z7c namespace: shoot--diki-comp--openstack
- cluster: seed kind: pod name: csi-driver-controller-64f6c45c55-j8z7c namespace: shoot--diki-comp--openstack
- cluster: seed kind: pod name: csi-driver-controller-64f6c45c55-j8z7c namespace: shoot--diki-comp--openstack
- cluster: seed kind: pod name: csi-snapshot-controller-5697d75668-lnp8v namespace: shoot--diki-comp--openstack
- cluster: seed kind: pod name: csi-snapshot-validation-695ddb7d8f-s5s6r namespace: shoot--diki-comp--openstack
- cluster: seed kind: pod name: csi-snapshot-validation-695ddb7d8f-wpqd4 namespace: shoot--diki-comp--openstack
- cluster: seed kind: pod name: etcd-events-0 namespace: shoot--diki-comp--openstack
- cluster: seed kind: pod name: etcd-events-0 namespace: shoot--diki-comp--openstack
- cluster: seed kind: pod name: etcd-main-0 namespace: shoot--diki-comp--openstack
- cluster: seed kind: pod name: etcd-main-0 namespace: shoot--diki-comp--openstack
- cluster: seed kind: pod name: event-logger-7c4585694-pzqsn namespace: shoot--diki-comp--openstack
- cluster: seed kind: pod name: extension-shoot-lakom-service-57c6965d79-9sqs8 namespace: shoot--diki-comp--openstack
- cluster: seed kind: pod name: extension-shoot-lakom-service-57c6965d79-x5877 namespace: shoot--diki-comp--openstack
- cluster: seed kind: pod name: gardener-resource-manager-7498f9645d-9cctf namespace: shoot--diki-comp--openstack
- cluster: seed kind: pod name: gardener-resource-manager-7498f9645d-vxb6k namespace: shoot--diki-comp--openstack
- cluster: seed kind: pod name: kube-apiserver-5d6dcc9bd5-fvxd7 namespace: shoot--diki-comp--openstack
- cluster: seed kind: pod name: kube-apiserver-5d6dcc9bd5-jsqrl namespace: shoot--diki-comp--openstack
- cluster: seed kind: pod name: kube-controller-manager-6f87877757-4grgt namespace: shoot--diki-comp--openstack
- cluster: seed kind: pod name: kube-scheduler-68854c4574-mbcz2 namespace: shoot--diki-comp--openstack
- cluster: seed kind: pod name: kube-state-metrics-fb5bddd9f-phl5z namespace: shoot--diki-comp--openstack
- cluster: seed kind: pod name: machine-controller-manager-d4b9f98c8-2pz7r namespace: shoot--diki-comp--openstack
- cluster: seed kind: pod name: machine-controller-manager-d4b9f98c8-2pz7r namespace: shoot--diki-comp--openstack
- cluster: seed kind: pod name: network-problem-detector-controller-54c89cd46f-r82lt namespace: shoot--diki-comp--openstack
- cluster: seed kind: pod name: plutono-76985fdb86-hn9hx namespace: shoot--diki-comp--openstack
- cluster: seed kind: pod name: plutono-76985fdb86-hn9hx namespace: shoot--diki-comp--openstack
- cluster: seed kind: pod name: plutono-76985fdb86-hn9hx namespace: shoot--diki-comp--openstack
- cluster: seed kind: pod name: plutono-76985fdb86-hn9hx namespace: shoot--diki-comp--openstack
- cluster: seed kind: pod name: prometheus-shoot-0 namespace: shoot--diki-comp--openstack
- cluster: seed kind: pod name: prometheus-shoot-0 namespace: shoot--diki-comp--openstack
- cluster: seed kind: pod name: prometheus-shoot-0 namespace: shoot--diki-comp--openstack
- cluster: seed kind: pod name: prometheus-shoot-0 namespace: shoot--diki-comp--openstack
- cluster: seed kind: pod name: shoot-dns-service-c9f5c8d89-27psp namespace: shoot--diki-comp--openstack
- cluster: seed kind: pod name: vali-0 namespace: shoot--diki-comp--openstack
- cluster: seed kind: pod name: vali-0 namespace: shoot--diki-comp--openstack
- cluster: seed kind: pod name: vali-0 namespace: shoot--diki-comp--openstack
- cluster: seed kind: pod name: vali-0 namespace: shoot--diki-comp--openstack
- cluster: seed kind: pod name: vpa-admission-controller-9cd65b667-dfglc namespace: shoot--diki-comp--openstack
- cluster: seed kind: pod name: vpa-admission-controller-9cd65b667-j5ncm namespace: shoot--diki-comp--openstack
- cluster: seed kind: pod name: vpa-recommender-74d78b8fd6-9h8sw namespace: shoot--diki-comp--openstack
- cluster: seed kind: pod name: vpa-updater-5dcf7dbf74-ftrl2 namespace: shoot--diki-comp--openstack
- cluster: seed kind: pod name: vpn-seed-server-77d6864c94-46wzx namespace: shoot--diki-comp--openstack
- cluster: seed kind: pod name: vpn-seed-server-77d6864c94-46wzx namespace: shoot--diki-comp--openstack
- cluster: shoot kind: pod name: apiserver-proxy-cxrkt namespace: kube-system
- cluster: shoot kind: pod name: apiserver-proxy-cxrkt namespace: kube-system
- cluster: shoot kind: pod name: apiserver-proxy-ql792 namespace: kube-system
- cluster: shoot kind: pod name: apiserver-proxy-ql792 namespace: kube-system
- cluster: shoot kind: pod name: blackbox-exporter-6cb7b4b76c-7l9sk namespace: kube-system
- cluster: shoot kind: pod name: blackbox-exporter-6cb7b4b76c-cqtvr namespace: kube-system
- cluster: shoot kind: pod name: calico-kube-controllers-5757b9f7fd-lfpk9 namespace: kube-system
- cluster: shoot kind: pod name: calico-node-95h7z namespace: kube-system
- cluster: shoot kind: pod name: calico-node-95h7z namespace: kube-system
- cluster: shoot kind: pod name: calico-node-fnzkc namespace: kube-system
- cluster: shoot kind: pod name: calico-node-fnzkc namespace: kube-system
- cluster: shoot kind: pod name: calico-node-vertical-autoscaler-66fbc8cdf9-fd557 namespace: kube-system
- cluster: shoot kind: pod name: calico-typha-deploy-6959bc47cf-9xhk8 namespace: kube-system
- cluster: shoot kind: pod name: calico-typha-deploy-6959bc47cf-rktmq namespace: kube-system
- cluster: shoot kind: pod name: calico-typha-horizontal-autoscaler-7d8cf6f7b4-zcxqr namespace: kube-system
- cluster: shoot kind: pod name: calico-typha-vertical-autoscaler-757978cc5-s4z6h namespace: kube-system
- cluster: shoot kind: pod name: coredns-7779b6b486-46b9q namespace: kube-system
- cluster: shoot kind: pod name: coredns-7779b6b486-9fvwj namespace: kube-system
- cluster: shoot kind: pod name: csi-driver-node-66tql namespace: kube-system
- cluster: shoot kind: pod name: csi-driver-node-66tql namespace: kube-system
- cluster: shoot kind: pod name: csi-driver-node-66tql namespace: kube-system
- cluster: shoot kind: pod name: csi-driver-node-7bsvw namespace: kube-system
- cluster: shoot kind: pod name: csi-driver-node-7bsvw namespace: kube-system
- cluster: shoot kind: pod name: csi-driver-node-7bsvw namespace: kube-system
- cluster: shoot kind: pod name: egress-filter-applier-pwvjp namespace: kube-system
- cluster: shoot kind: pod name: egress-filter-applier-tzmbv namespace: kube-system
- cluster: shoot kind: pod name: kube-proxy-worker-dqty2-v1.31.4-jjnqj namespace: kube-system
- cluster: shoot kind: pod name: kube-proxy-worker-dqty2-v1.31.4-jjnqj namespace: kube-system
- cluster: shoot kind: pod name: kube-proxy-worker-dqty2-v1.31.4-tpl27 namespace: kube-system
- cluster: shoot kind: pod name: kube-proxy-worker-dqty2-v1.31.4-tpl27 namespace: kube-system
- cluster: shoot kind: pod name: metrics-server-7ccb5488f7-6cf26 namespace: kube-system
- cluster: shoot kind: pod name: metrics-server-7ccb5488f7-wmqrp namespace: kube-system
- cluster: shoot kind: pod name: network-problem-detector-host-8swgm namespace: kube-system
- cluster: shoot kind: pod name: network-problem-detector-host-khwzh namespace: kube-system
- cluster: shoot kind: pod name: network-problem-detector-pod-f7m96 namespace: kube-system
- cluster: shoot kind: pod name: network-problem-detector-pod-w77jp namespace: kube-system
- cluster: shoot kind: pod name: node-exporter-5tjpp namespace: kube-system
- cluster: shoot kind: pod name: node-exporter-v9hjf namespace: kube-system
- cluster: shoot kind: pod name: node-problem-detector-kdf5d namespace: kube-system
- cluster: shoot kind: pod name: node-problem-detector-mngdd namespace: kube-system
- cluster: shoot kind: pod name: vpn-shoot-587d6569f5-9z27v namespace: kube-system
- aws
-
Container does not use hostPort < 1024.
-
242415 (High) - Secrets in Kubernetes must not be stored as environment variables.
-
Pod does not use environment to inject secret.
- aws
- cluster: seed kind: pod name: aws-custom-route-controller-7ff4fc4484-qv57g namespace: shoot--diki-comp--aws
- cluster: seed kind: pod name: blackbox-exporter-9689c845f-9df2r namespace: shoot--diki-comp--aws
- cluster: seed kind: pod name: blackbox-exporter-9689c845f-m54ws namespace: shoot--diki-comp--aws
- cluster: seed kind: pod name: cert-controller-manager-69bb8446bd-dml56 namespace: shoot--diki-comp--aws
- cluster: seed kind: pod name: cloud-controller-manager-84878d787c-s2rmt namespace: shoot--diki-comp--aws
- cluster: seed kind: pod name: csi-driver-controller-dfc558d68-lwwh5 namespace: shoot--diki-comp--aws
- cluster: seed kind: pod name: csi-snapshot-controller-b956d9c46-c4rkx namespace: shoot--diki-comp--aws
- cluster: seed kind: pod name: csi-snapshot-validation-7788f5f8f4-sfkbh namespace: shoot--diki-comp--aws
- cluster: seed kind: pod name: csi-snapshot-validation-7788f5f8f4-zpwlk namespace: shoot--diki-comp--aws
- cluster: seed kind: pod name: etcd-events-0 namespace: shoot--diki-comp--aws
- cluster: seed kind: pod name: etcd-main-0 namespace: shoot--diki-comp--aws
- cluster: seed kind: pod name: event-logger-777d6dc9b8-ctw2m namespace: shoot--diki-comp--aws
- cluster: seed kind: pod name: extension-shoot-lakom-service-59977dbc9-cdhjv namespace: shoot--diki-comp--aws
- cluster: seed kind: pod name: extension-shoot-lakom-service-59977dbc9-fh89r namespace: shoot--diki-comp--aws
- cluster: seed kind: pod name: gardener-resource-manager-69cc9894f8-jnh7b namespace: shoot--diki-comp--aws
- cluster: seed kind: pod name: gardener-resource-manager-69cc9894f8-nkb25 namespace: shoot--diki-comp--aws
- cluster: seed kind: pod name: kube-apiserver-7c5459cc5b-jkvn9 namespace: shoot--diki-comp--aws
- cluster: seed kind: pod name: kube-apiserver-7c5459cc5b-kz2dz namespace: shoot--diki-comp--aws
- cluster: seed kind: pod name: kube-controller-manager-c8b755f65-p4v5d namespace: shoot--diki-comp--aws
- cluster: seed kind: pod name: kube-scheduler-678cb86cc-zm2cn namespace: shoot--diki-comp--aws
- cluster: seed kind: pod name: kube-state-metrics-77546995b-rk69t namespace: shoot--diki-comp--aws
- cluster: seed kind: pod name: machine-controller-manager-59764d7c75-4dr9j namespace: shoot--diki-comp--aws
- cluster: seed kind: pod name: network-problem-detector-controller-5c744b5c9d-97kpz namespace: shoot--diki-comp--aws
- cluster: seed kind: pod name: plutono-67955bdb48-948jl namespace: shoot--diki-comp--aws
- cluster: seed kind: pod name: prometheus-shoot-0 namespace: shoot--diki-comp--aws
- cluster: seed kind: pod name: shoot-dns-service-8644c5f898-x9562 namespace: shoot--diki-comp--aws
- cluster: seed kind: pod name: vali-0 namespace: shoot--diki-comp--aws
- cluster: seed kind: pod name: vpa-admission-controller-6d65958cbc-8m4ld namespace: shoot--diki-comp--aws
- cluster: seed kind: pod name: vpa-admission-controller-6d65958cbc-rvtlt namespace: shoot--diki-comp--aws
- cluster: seed kind: pod name: vpa-recommender-7d8c68d577-872bw namespace: shoot--diki-comp--aws
- cluster: seed kind: pod name: vpa-updater-66dc94789-pcdfh namespace: shoot--diki-comp--aws
- cluster: seed kind: pod name: vpn-seed-server-5f5cc9c687-s6fqv namespace: shoot--diki-comp--aws
- cluster: shoot kind: pod name: apiserver-proxy-vx2f2 namespace: kube-system
- cluster: shoot kind: pod name: apiserver-proxy-xhcc8 namespace: kube-system
- cluster: shoot kind: pod name: blackbox-exporter-6cb7b4b76c-9fnsl namespace: kube-system
- cluster: shoot kind: pod name: blackbox-exporter-6cb7b4b76c-tdqhz namespace: kube-system
- cluster: shoot kind: pod name: calico-node-pcfkz namespace: kube-system
- cluster: shoot kind: pod name: calico-node-qtt99 namespace: kube-system
- cluster: shoot kind: pod name: calico-node-vertical-autoscaler-66fbc8cdf9-sdcrg namespace: kube-system
- cluster: shoot kind: pod name: calico-typha-deploy-6959bc47cf-9p7ch namespace: kube-system
- cluster: shoot kind: pod name: calico-typha-deploy-6959bc47cf-lw7d7 namespace: kube-system
- cluster: shoot kind: pod name: calico-typha-horizontal-autoscaler-7d8cf6f7b4-d5x8l namespace: kube-system
- cluster: shoot kind: pod name: calico-typha-vertical-autoscaler-757978cc5-5btm4 namespace: kube-system
- cluster: shoot kind: pod name: coredns-5474587df-5cwh6 namespace: kube-system
- cluster: shoot kind: pod name: coredns-5474587df-ztxck namespace: kube-system
- cluster: shoot kind: pod name: csi-driver-node-54lnt namespace: kube-system
- cluster: shoot kind: pod name: csi-driver-node-p7v8p namespace: kube-system
- cluster: shoot kind: pod name: egress-filter-applier-c59zt namespace: kube-system
- cluster: shoot kind: pod name: egress-filter-applier-q5j8f namespace: kube-system
- cluster: shoot kind: pod name: kube-proxy-worker-kkfk1-v1.31.4-hkmbk namespace: kube-system
- cluster: shoot kind: pod name: kube-proxy-worker-kkfk1-v1.31.4-n2kgl namespace: kube-system
- cluster: shoot kind: pod name: metrics-server-c57587bbf-qqjfw namespace: kube-system
- cluster: shoot kind: pod name: metrics-server-c57587bbf-xnztf namespace: kube-system
- cluster: shoot kind: pod name: network-problem-detector-host-cpllg namespace: kube-system
- cluster: shoot kind: pod name: network-problem-detector-host-tzzf4 namespace: kube-system
- cluster: shoot kind: pod name: network-problem-detector-pod-d5p9q namespace: kube-system
- cluster: shoot kind: pod name: network-problem-detector-pod-jbnxw namespace: kube-system
- cluster: shoot kind: pod name: node-exporter-g4cm7 namespace: kube-system
- cluster: shoot kind: pod name: node-exporter-lp96f namespace: kube-system
- cluster: shoot kind: pod name: node-local-dns-7hq55 namespace: kube-system
- cluster: shoot kind: pod name: node-local-dns-bg64b namespace: kube-system
- cluster: shoot kind: pod name: node-problem-detector-8699c namespace: kube-system
- cluster: shoot kind: pod name: node-problem-detector-plwx6 namespace: kube-system
- cluster: shoot kind: pod name: vpn-shoot-767fd85bcd-znxkl namespace: kube-system
- azure
- cluster: seed kind: pod name: blackbox-exporter-7bbbdbf85f-j4k9w namespace: shoot--diki-comp--azure
- cluster: seed kind: pod name: blackbox-exporter-7bbbdbf85f-lljfd namespace: shoot--diki-comp--azure
- cluster: seed kind: pod name: cert-controller-manager-7d455c88b9-h6bwz namespace: shoot--diki-comp--azure
- cluster: seed kind: pod name: cloud-controller-manager-6b8ccc589c-4q5ws namespace: shoot--diki-comp--azure
- cluster: seed kind: pod name: csi-driver-controller-disk-f96f8845f-7gxlg namespace: shoot--diki-comp--azure
- cluster: seed kind: pod name: csi-driver-controller-file-6f4894f8db-q6p4w namespace: shoot--diki-comp--azure
- cluster: seed kind: pod name: csi-snapshot-controller-b6cf5d7c8-5cwxj namespace: shoot--diki-comp--azure
- cluster: seed kind: pod name: etcd-events-0 namespace: shoot--diki-comp--azure
- cluster: seed kind: pod name: etcd-main-0 namespace: shoot--diki-comp--azure
- cluster: seed kind: pod name: event-logger-5b675bd46f-b6tk6 namespace: shoot--diki-comp--azure
- cluster: seed kind: pod name: extension-shoot-lakom-service-5fc9cb4b98-7dpdq namespace: shoot--diki-comp--azure
- cluster: seed kind: pod name: extension-shoot-lakom-service-5fc9cb4b98-99ptw namespace: shoot--diki-comp--azure
- cluster: seed kind: pod name: gardener-resource-manager-668c56d4cb-cnvhp namespace: shoot--diki-comp--azure
- cluster: seed kind: pod name: gardener-resource-manager-668c56d4cb-s8hbt namespace: shoot--diki-comp--azure
- cluster: seed kind: pod name: kube-apiserver-78d668b498-8xmjt namespace: shoot--diki-comp--azure
- cluster: seed kind: pod name: kube-apiserver-78d668b498-g4nbj namespace: shoot--diki-comp--azure
- cluster: seed kind: pod name: kube-controller-manager-9b68d9877-7d97p namespace: shoot--diki-comp--azure
- cluster: seed kind: pod name: kube-scheduler-79b6c874b4-q7l8z namespace: shoot--diki-comp--azure
- cluster: seed kind: pod name: kube-state-metrics-696c7f9988-s76vt namespace: shoot--diki-comp--azure
- cluster: seed kind: pod name: machine-controller-manager-5858dd8f98-2ffrn namespace: shoot--diki-comp--azure
- cluster: seed kind: pod name: network-problem-detector-controller-58d8898bc-942ss namespace: shoot--diki-comp--azure
- cluster: seed kind: pod name: plutono-8cbb4fc48-kbsnv namespace: shoot--diki-comp--azure
- cluster: seed kind: pod name: prometheus-shoot-0 namespace: shoot--diki-comp--azure
- cluster: seed kind: pod name: remedy-controller-azure-6bc55767c7-ftbcp namespace: shoot--diki-comp--azure
- cluster: seed kind: pod name: shoot-dns-service-678487b956-97xj4 namespace: shoot--diki-comp--azure
- cluster: seed kind: pod name: vali-0 namespace: shoot--diki-comp--azure
- cluster: seed kind: pod name: vpa-admission-controller-569c498d7b-7q4tx namespace: shoot--diki-comp--azure
- cluster: seed kind: pod name: vpa-admission-controller-569c498d7b-qlrs4 namespace: shoot--diki-comp--azure
- cluster: seed kind: pod name: vpa-recommender-846d654554-2drz8 namespace: shoot--diki-comp--azure
- cluster: seed kind: pod name: vpa-updater-566f48ffdb-6s8tf namespace: shoot--diki-comp--azure
- cluster: seed kind: pod name: vpn-seed-server-858fb7754d-gsrmq namespace: shoot--diki-comp--azure
- cluster: shoot kind: pod name: apiserver-proxy-n867f namespace: kube-system
- cluster: shoot kind: pod name: apiserver-proxy-vgjf5 namespace: kube-system
- cluster: shoot kind: pod name: blackbox-exporter-6cb7b4b76c-22l8z namespace: kube-system
- cluster: shoot kind: pod name: blackbox-exporter-6cb7b4b76c-zml66 namespace: kube-system
- cluster: shoot kind: pod name: calico-node-grwcc namespace: kube-system
- cluster: shoot kind: pod name: calico-node-vertical-autoscaler-66fbc8cdf9-pzs6z namespace: kube-system
- cluster: shoot kind: pod name: calico-node-x7kcf namespace: kube-system
- cluster: shoot kind: pod name: calico-typha-deploy-6959bc47cf-nmnvp namespace: kube-system
- cluster: shoot kind: pod name: calico-typha-deploy-6959bc47cf-q4fk4 namespace: kube-system
- cluster: shoot kind: pod name: calico-typha-horizontal-autoscaler-7d8cf6f7b4-jsc5w namespace: kube-system
- cluster: shoot kind: pod name: calico-typha-vertical-autoscaler-757978cc5-hwb57 namespace: kube-system
- cluster: shoot kind: pod name: cloud-node-manager-5cl6f namespace: kube-system
- cluster: shoot kind: pod name: cloud-node-manager-tt2p6 namespace: kube-system
- cluster: shoot kind: pod name: coredns-696f69cb6c-9b8zt namespace: kube-system
- cluster: shoot kind: pod name: coredns-696f69cb6c-kk7lz namespace: kube-system
- cluster: shoot kind: pod name: csi-driver-node-disk-j7kk6 namespace: kube-system
- cluster: shoot kind: pod name: csi-driver-node-disk-kcqsm namespace: kube-system
- cluster: shoot kind: pod name: csi-driver-node-file-rfl7m namespace: kube-system
- cluster: shoot kind: pod name: csi-driver-node-file-rmq5z namespace: kube-system
- cluster: shoot kind: pod name: diki-242400-l5l43zx449 namespace: kube-system
- cluster: shoot kind: pod name: egress-filter-applier-22rv7 namespace: kube-system
- cluster: shoot kind: pod name: egress-filter-applier-hwmmx namespace: kube-system
- cluster: shoot kind: pod name: kube-proxy-worker-g7p4p-v1.31.4-ncssj namespace: kube-system
- cluster: shoot kind: pod name: kube-proxy-worker-g7p4p-v1.31.4-r8rjr namespace: kube-system
- cluster: shoot kind: pod name: metrics-server-85c898cb58-22fjd namespace: kube-system
- cluster: shoot kind: pod name: metrics-server-85c898cb58-28w8v namespace: kube-system
- cluster: shoot kind: pod name: network-problem-detector-host-cfxbx namespace: kube-system
- cluster: shoot kind: pod name: network-problem-detector-host-sg989 namespace: kube-system
- cluster: shoot kind: pod name: network-problem-detector-pod-mcz27 namespace: kube-system
- cluster: shoot kind: pod name: network-problem-detector-pod-x8866 namespace: kube-system
- cluster: shoot kind: pod name: node-exporter-qqjnh namespace: kube-system
- cluster: shoot kind: pod name: node-exporter-r7fkg namespace: kube-system
- cluster: shoot kind: pod name: node-local-dns-t252j namespace: kube-system
- cluster: shoot kind: pod name: node-local-dns-v42pz namespace: kube-system
- cluster: shoot kind: pod name: node-problem-detector-5n2x6 namespace: kube-system
- cluster: shoot kind: pod name: node-problem-detector-w4r4t namespace: kube-system
- cluster: shoot kind: pod name: vpn-shoot-dddcfbd9c-hzxzl namespace: kube-system
- gcp
- cluster: seed kind: pod name: blackbox-exporter-5787b8dcf7-gbftg namespace: shoot--diki-comp--gcp
- cluster: seed kind: pod name: blackbox-exporter-5787b8dcf7-mb8gx namespace: shoot--diki-comp--gcp
- cluster: seed kind: pod name: cert-controller-manager-8577478fbb-jzwtz namespace: shoot--diki-comp--gcp
- cluster: seed kind: pod name: cloud-controller-manager-75b656c795-r2f28 namespace: shoot--diki-comp--gcp
- cluster: seed kind: pod name: csi-driver-controller-9f54d87d4-tq92g namespace: shoot--diki-comp--gcp
- cluster: seed kind: pod name: csi-snapshot-controller-7f896fb559-2c9ps namespace: shoot--diki-comp--gcp
- cluster: seed kind: pod name: csi-snapshot-validation-5c8bf6f599-4vhm7 namespace: shoot--diki-comp--gcp
- cluster: seed kind: pod name: csi-snapshot-validation-5c8bf6f599-9m5d4 namespace: shoot--diki-comp--gcp
- cluster: seed kind: pod name: etcd-events-0 namespace: shoot--diki-comp--gcp
- cluster: seed kind: pod name: etcd-main-0 namespace: shoot--diki-comp--gcp
- cluster: seed kind: pod name: event-logger-8c7d7bf97-hlh8w namespace: shoot--diki-comp--gcp
- cluster: seed kind: pod name: extension-shoot-lakom-service-fdcfbd686-l8d6r namespace: shoot--diki-comp--gcp
- cluster: seed kind: pod name: extension-shoot-lakom-service-fdcfbd686-wqtxv namespace: shoot--diki-comp--gcp
- cluster: seed kind: pod name: gardener-resource-manager-5f87b9f6b-kww5m namespace: shoot--diki-comp--gcp
- cluster: seed kind: pod name: gardener-resource-manager-5f87b9f6b-sh7vc namespace: shoot--diki-comp--gcp
- cluster: seed kind: pod name: kube-apiserver-857b9bd577-9k45w namespace: shoot--diki-comp--gcp
- cluster: seed kind: pod name: kube-apiserver-857b9bd577-knjdp namespace: shoot--diki-comp--gcp
- cluster: seed kind: pod name: kube-controller-manager-d546c97bb-k5rsh namespace: shoot--diki-comp--gcp
- cluster: seed kind: pod name: kube-scheduler-65fbc646c-ck6kp namespace: shoot--diki-comp--gcp
- cluster: seed kind: pod name: kube-state-metrics-d87d8b4f-htgkt namespace: shoot--diki-comp--gcp
- cluster: seed kind: pod name: machine-controller-manager-8594568fcd-r78cf namespace: shoot--diki-comp--gcp
- cluster: seed kind: pod name: network-problem-detector-controller-cbbb474fb-5jh9j namespace: shoot--diki-comp--gcp
- cluster: seed kind: pod name: plutono-85bbd7ddbc-2kzlv namespace: shoot--diki-comp--gcp
- cluster: seed kind: pod name: prometheus-shoot-0 namespace: shoot--diki-comp--gcp
- cluster: seed kind: pod name: shoot-dns-service-65bc698487-7pdmm namespace: shoot--diki-comp--gcp
- cluster: seed kind: pod name: vali-0 namespace: shoot--diki-comp--gcp
- cluster: seed kind: pod name: vpa-admission-controller-755d64fd45-ghlhr namespace: shoot--diki-comp--gcp
- cluster: seed kind: pod name: vpa-admission-controller-755d64fd45-hp27b namespace: shoot--diki-comp--gcp
- cluster: seed kind: pod name: vpa-recommender-5f67c44999-kzjsn namespace: shoot--diki-comp--gcp
- cluster: seed kind: pod name: vpa-updater-5df7f89ff-xk2bz namespace: shoot--diki-comp--gcp
- cluster: seed kind: pod name: vpn-seed-server-6f5655998-kmqzq namespace: shoot--diki-comp--gcp
- cluster: shoot kind: pod name: apiserver-proxy-bx978 namespace: kube-system
- cluster: shoot kind: pod name: apiserver-proxy-r9tdg namespace: kube-system
- cluster: shoot kind: pod name: blackbox-exporter-6cb7b4b76c-bdhqb namespace: kube-system
- cluster: shoot kind: pod name: blackbox-exporter-6cb7b4b76c-fvbxj namespace: kube-system
- cluster: shoot kind: pod name: calico-node-vertical-autoscaler-66fbc8cdf9-n95k5 namespace: kube-system
- cluster: shoot kind: pod name: calico-node-zl5pz namespace: kube-system
- cluster: shoot kind: pod name: calico-node-ztwrg namespace: kube-system
- cluster: shoot kind: pod name: calico-typha-deploy-6959bc47cf-2l4cw namespace: kube-system
- cluster: shoot kind: pod name: calico-typha-deploy-6959bc47cf-q5rtd namespace: kube-system
- cluster: shoot kind: pod name: calico-typha-horizontal-autoscaler-7d8cf6f7b4-fwc5h namespace: kube-system
- cluster: shoot kind: pod name: calico-typha-vertical-autoscaler-757978cc5-vwmzw namespace: kube-system
- cluster: shoot kind: pod name: coredns-65bdc57f48-b26c5 namespace: kube-system
- cluster: shoot kind: pod name: coredns-65bdc57f48-tq2b5 namespace: kube-system
- cluster: shoot kind: pod name: csi-driver-node-6lmpl namespace: kube-system
- cluster: shoot kind: pod name: csi-driver-node-srz2q namespace: kube-system
- cluster: shoot kind: pod name: egress-filter-applier-6cqn6 namespace: kube-system
- cluster: shoot kind: pod name: egress-filter-applier-jschk namespace: kube-system
- cluster: shoot kind: pod name: kube-proxy-worker-bex82-v1.31.4-kbb2d namespace: kube-system
- cluster: shoot kind: pod name: kube-proxy-worker-bex82-v1.31.4-nt98w namespace: kube-system
- cluster: shoot kind: pod name: metrics-server-944fcbdc8-fp5jr namespace: kube-system
- cluster: shoot kind: pod name: metrics-server-944fcbdc8-n7hxj namespace: kube-system
- cluster: shoot kind: pod name: network-problem-detector-host-2nxh4 namespace: kube-system
- cluster: shoot kind: pod name: network-problem-detector-host-xbq6b namespace: kube-system
- cluster: shoot kind: pod name: network-problem-detector-pod-drdls namespace: kube-system
- cluster: shoot kind: pod name: network-problem-detector-pod-qdrkq namespace: kube-system
- cluster: shoot kind: pod name: node-exporter-4q9wx namespace: kube-system
- cluster: shoot kind: pod name: node-exporter-c5zhw namespace: kube-system
- cluster: shoot kind: pod name: node-local-dns-4hxs6 namespace: kube-system
- cluster: shoot kind: pod name: node-local-dns-f7kfv namespace: kube-system
- cluster: shoot kind: pod name: node-problem-detector-h8g4k namespace: kube-system
- cluster: shoot kind: pod name: node-problem-detector-k9hz9 namespace: kube-system
- cluster: shoot kind: pod name: vpn-shoot-66b756699d-82sjr namespace: kube-system
- openstack
- cluster: seed kind: pod name: blackbox-exporter-796cfcbd7b-5xhnd namespace: shoot--diki-comp--openstack
- cluster: seed kind: pod name: blackbox-exporter-796cfcbd7b-x872d namespace: shoot--diki-comp--openstack
- cluster: seed kind: pod name: cert-controller-manager-768f7754d7-5vfn6 namespace: shoot--diki-comp--openstack
- cluster: seed kind: pod name: cloud-controller-manager-775878f68d-266rq namespace: shoot--diki-comp--openstack
- cluster: seed kind: pod name: csi-driver-controller-64f6c45c55-j8z7c namespace: shoot--diki-comp--openstack
- cluster: seed kind: pod name: csi-snapshot-controller-5697d75668-lnp8v namespace: shoot--diki-comp--openstack
- cluster: seed kind: pod name: csi-snapshot-validation-695ddb7d8f-s5s6r namespace: shoot--diki-comp--openstack
- cluster: seed kind: pod name: csi-snapshot-validation-695ddb7d8f-wpqd4 namespace: shoot--diki-comp--openstack
- cluster: seed kind: pod name: etcd-events-0 namespace: shoot--diki-comp--openstack
- cluster: seed kind: pod name: etcd-main-0 namespace: shoot--diki-comp--openstack
- cluster: seed kind: pod name: event-logger-7c4585694-pzqsn namespace: shoot--diki-comp--openstack
- cluster: seed kind: pod name: extension-shoot-lakom-service-57c6965d79-9sqs8 namespace: shoot--diki-comp--openstack
- cluster: seed kind: pod name: extension-shoot-lakom-service-57c6965d79-x5877 namespace: shoot--diki-comp--openstack
- cluster: seed kind: pod name: gardener-resource-manager-7498f9645d-9cctf namespace: shoot--diki-comp--openstack
- cluster: seed kind: pod name: gardener-resource-manager-7498f9645d-vxb6k namespace: shoot--diki-comp--openstack
- cluster: seed kind: pod name: kube-apiserver-5d6dcc9bd5-fvxd7 namespace: shoot--diki-comp--openstack
- cluster: seed kind: pod name: kube-apiserver-5d6dcc9bd5-jsqrl namespace: shoot--diki-comp--openstack
- cluster: seed kind: pod name: kube-controller-manager-6f87877757-4grgt namespace: shoot--diki-comp--openstack
- cluster: seed kind: pod name: kube-scheduler-68854c4574-mbcz2 namespace: shoot--diki-comp--openstack
- cluster: seed kind: pod name: kube-state-metrics-fb5bddd9f-phl5z namespace: shoot--diki-comp--openstack
- cluster: seed kind: pod name: machine-controller-manager-d4b9f98c8-2pz7r namespace: shoot--diki-comp--openstack
- cluster: seed kind: pod name: network-problem-detector-controller-54c89cd46f-r82lt namespace: shoot--diki-comp--openstack
- cluster: seed kind: pod name: plutono-76985fdb86-hn9hx namespace: shoot--diki-comp--openstack
- cluster: seed kind: pod name: prometheus-shoot-0 namespace: shoot--diki-comp--openstack
- cluster: seed kind: pod name: shoot-dns-service-c9f5c8d89-27psp namespace: shoot--diki-comp--openstack
- cluster: seed kind: pod name: vali-0 namespace: shoot--diki-comp--openstack
- cluster: seed kind: pod name: vpa-admission-controller-9cd65b667-dfglc namespace: shoot--diki-comp--openstack
- cluster: seed kind: pod name: vpa-admission-controller-9cd65b667-j5ncm namespace: shoot--diki-comp--openstack
- cluster: seed kind: pod name: vpa-recommender-74d78b8fd6-9h8sw namespace: shoot--diki-comp--openstack
- cluster: seed kind: pod name: vpa-updater-5dcf7dbf74-ftrl2 namespace: shoot--diki-comp--openstack
- cluster: seed kind: pod name: vpn-seed-server-77d6864c94-46wzx namespace: shoot--diki-comp--openstack
- cluster: shoot kind: pod name: apiserver-proxy-cxrkt namespace: kube-system
- cluster: shoot kind: pod name: apiserver-proxy-ql792 namespace: kube-system
- cluster: shoot kind: pod name: blackbox-exporter-6cb7b4b76c-7l9sk namespace: kube-system
- cluster: shoot kind: pod name: blackbox-exporter-6cb7b4b76c-cqtvr namespace: kube-system
- cluster: shoot kind: pod name: calico-kube-controllers-5757b9f7fd-lfpk9 namespace: kube-system
- cluster: shoot kind: pod name: calico-node-95h7z namespace: kube-system
- cluster: shoot kind: pod name: calico-node-fnzkc namespace: kube-system
- cluster: shoot kind: pod name: calico-node-vertical-autoscaler-66fbc8cdf9-fd557 namespace: kube-system
- cluster: shoot kind: pod name: calico-typha-deploy-6959bc47cf-9xhk8 namespace: kube-system
- cluster: shoot kind: pod name: calico-typha-deploy-6959bc47cf-rktmq namespace: kube-system
- cluster: shoot kind: pod name: calico-typha-horizontal-autoscaler-7d8cf6f7b4-zcxqr namespace: kube-system
- cluster: shoot kind: pod name: calico-typha-vertical-autoscaler-757978cc5-s4z6h namespace: kube-system
- cluster: shoot kind: pod name: coredns-7779b6b486-46b9q namespace: kube-system
- cluster: shoot kind: pod name: coredns-7779b6b486-9fvwj namespace: kube-system
- cluster: shoot kind: pod name: csi-driver-node-66tql namespace: kube-system
- cluster: shoot kind: pod name: csi-driver-node-7bsvw namespace: kube-system
- cluster: shoot kind: pod name: diki-242393-wcceob1mzp namespace: kube-system
- cluster: shoot kind: pod name: diki-242453-mt4hvqywz1 namespace: kube-system
- cluster: shoot kind: pod name: egress-filter-applier-pwvjp namespace: kube-system
- cluster: shoot kind: pod name: egress-filter-applier-tzmbv namespace: kube-system
- cluster: shoot kind: pod name: kube-proxy-worker-dqty2-v1.31.4-jjnqj namespace: kube-system
- cluster: shoot kind: pod name: kube-proxy-worker-dqty2-v1.31.4-tpl27 namespace: kube-system
- cluster: shoot kind: pod name: metrics-server-7ccb5488f7-6cf26 namespace: kube-system
- cluster: shoot kind: pod name: metrics-server-7ccb5488f7-wmqrp namespace: kube-system
- cluster: shoot kind: pod name: network-problem-detector-host-8swgm namespace: kube-system
- cluster: shoot kind: pod name: network-problem-detector-host-khwzh namespace: kube-system
- cluster: shoot kind: pod name: network-problem-detector-pod-f7m96 namespace: kube-system
- cluster: shoot kind: pod name: network-problem-detector-pod-w77jp namespace: kube-system
- cluster: shoot kind: pod name: node-exporter-5tjpp namespace: kube-system
- cluster: shoot kind: pod name: node-exporter-v9hjf namespace: kube-system
- cluster: shoot kind: pod name: node-local-dns-28vpp namespace: kube-system
- cluster: shoot kind: pod name: node-local-dns-b4bn9 namespace: kube-system
- cluster: shoot kind: pod name: node-problem-detector-kdf5d namespace: kube-system
- cluster: shoot kind: pod name: node-problem-detector-mngdd namespace: kube-system
- cluster: shoot kind: pod name: vpn-shoot-587d6569f5-9z27v namespace: kube-system
- aws
-
Pod does not use environment to inject secret.
-
242417 (Medium) - Kubernetes must separate user functionality.
-
Gardener managed pods are not user pods
- aws
- kind: pod name: apiserver-proxy-vx2f2 namespace: kube-system
- kind: pod name: apiserver-proxy-xhcc8 namespace: kube-system
- kind: pod name: blackbox-exporter-6cb7b4b76c-9fnsl namespace: kube-system
- kind: pod name: blackbox-exporter-6cb7b4b76c-tdqhz namespace: kube-system
- kind: pod name: calico-node-pcfkz namespace: kube-system
- kind: pod name: calico-node-qtt99 namespace: kube-system
- kind: pod name: calico-node-vertical-autoscaler-66fbc8cdf9-sdcrg namespace: kube-system
- kind: pod name: calico-typha-deploy-6959bc47cf-9p7ch namespace: kube-system
- kind: pod name: calico-typha-deploy-6959bc47cf-lw7d7 namespace: kube-system
- kind: pod name: calico-typha-horizontal-autoscaler-7d8cf6f7b4-d5x8l namespace: kube-system
- kind: pod name: calico-typha-vertical-autoscaler-757978cc5-5btm4 namespace: kube-system
- kind: pod name: coredns-5474587df-5cwh6 namespace: kube-system
- kind: pod name: coredns-5474587df-ztxck namespace: kube-system
- kind: pod name: csi-driver-node-54lnt namespace: kube-system
- kind: pod name: csi-driver-node-p7v8p namespace: kube-system
- kind: pod name: egress-filter-applier-c59zt namespace: kube-system
- kind: pod name: egress-filter-applier-q5j8f namespace: kube-system
- kind: pod name: kube-proxy-worker-kkfk1-v1.31.4-hkmbk namespace: kube-system
- kind: pod name: kube-proxy-worker-kkfk1-v1.31.4-n2kgl namespace: kube-system
- kind: pod name: metrics-server-c57587bbf-qqjfw namespace: kube-system
- kind: pod name: metrics-server-c57587bbf-xnztf namespace: kube-system
- kind: pod name: network-problem-detector-host-cpllg namespace: kube-system
- kind: pod name: network-problem-detector-host-tzzf4 namespace: kube-system
- kind: pod name: network-problem-detector-pod-d5p9q namespace: kube-system
- kind: pod name: network-problem-detector-pod-jbnxw namespace: kube-system
- kind: pod name: node-exporter-g4cm7 namespace: kube-system
- kind: pod name: node-exporter-lp96f namespace: kube-system
- kind: pod name: node-local-dns-7hq55 namespace: kube-system
- kind: pod name: node-local-dns-bg64b namespace: kube-system
- kind: pod name: node-problem-detector-8699c namespace: kube-system
- kind: pod name: node-problem-detector-plwx6 namespace: kube-system
- kind: pod name: vpn-shoot-767fd85bcd-znxkl namespace: kube-system
- azure
- kind: pod name: apiserver-proxy-n867f namespace: kube-system
- kind: pod name: apiserver-proxy-vgjf5 namespace: kube-system
- kind: pod name: blackbox-exporter-6cb7b4b76c-22l8z namespace: kube-system
- kind: pod name: blackbox-exporter-6cb7b4b76c-dnzp8 namespace: kube-system
- kind: pod name: blackbox-exporter-6cb7b4b76c-zml66 namespace: kube-system
- kind: pod name: calico-node-grwcc namespace: kube-system
- kind: pod name: calico-node-vertical-autoscaler-66fbc8cdf9-pzs6z namespace: kube-system
- kind: pod name: calico-node-x7kcf namespace: kube-system
- kind: pod name: calico-typha-deploy-6959bc47cf-nmnvp namespace: kube-system
- kind: pod name: calico-typha-deploy-6959bc47cf-q4fk4 namespace: kube-system
- kind: pod name: calico-typha-horizontal-autoscaler-7d8cf6f7b4-jsc5w namespace: kube-system
- kind: pod name: calico-typha-vertical-autoscaler-757978cc5-hwb57 namespace: kube-system
- kind: pod name: cloud-node-manager-5cl6f namespace: kube-system
- kind: pod name: cloud-node-manager-tt2p6 namespace: kube-system
- kind: pod name: coredns-696f69cb6c-9b8zt namespace: kube-system
- kind: pod name: coredns-696f69cb6c-kk7lz namespace: kube-system
- kind: pod name: csi-driver-node-disk-j7kk6 namespace: kube-system
- kind: pod name: csi-driver-node-disk-kcqsm namespace: kube-system
- kind: pod name: csi-driver-node-file-rfl7m namespace: kube-system
- kind: pod name: csi-driver-node-file-rmq5z namespace: kube-system
- kind: pod name: egress-filter-applier-22rv7 namespace: kube-system
- kind: pod name: egress-filter-applier-hwmmx namespace: kube-system
- kind: pod name: kube-proxy-worker-g7p4p-v1.31.4-ncssj namespace: kube-system
- kind: pod name: kube-proxy-worker-g7p4p-v1.31.4-r8rjr namespace: kube-system
- kind: pod name: metrics-server-85c898cb58-22fjd namespace: kube-system
- kind: pod name: metrics-server-85c898cb58-28w8v namespace: kube-system
- kind: pod name: network-problem-detector-host-cfxbx namespace: kube-system
- kind: pod name: network-problem-detector-host-sg989 namespace: kube-system
- kind: pod name: network-problem-detector-pod-mcz27 namespace: kube-system
- kind: pod name: network-problem-detector-pod-x8866 namespace: kube-system
- kind: pod name: node-exporter-qqjnh namespace: kube-system
- kind: pod name: node-exporter-r7fkg namespace: kube-system
- kind: pod name: node-local-dns-t252j namespace: kube-system
- kind: pod name: node-local-dns-v42pz namespace: kube-system
- kind: pod name: node-problem-detector-5n2x6 namespace: kube-system
- kind: pod name: node-problem-detector-w4r4t namespace: kube-system
- kind: pod name: vpn-shoot-dddcfbd9c-hzxzl namespace: kube-system
- gcp
- kind: pod name: apiserver-proxy-bx978 namespace: kube-system
- kind: pod name: apiserver-proxy-r9tdg namespace: kube-system
- kind: pod name: blackbox-exporter-6cb7b4b76c-bdhqb namespace: kube-system
- kind: pod name: blackbox-exporter-6cb7b4b76c-fvbxj namespace: kube-system
- kind: pod name: calico-node-vertical-autoscaler-66fbc8cdf9-n95k5 namespace: kube-system
- kind: pod name: calico-node-zl5pz namespace: kube-system
- kind: pod name: calico-node-ztwrg namespace: kube-system
- kind: pod name: calico-typha-deploy-6959bc47cf-2l4cw namespace: kube-system
- kind: pod name: calico-typha-deploy-6959bc47cf-q5rtd namespace: kube-system
- kind: pod name: calico-typha-horizontal-autoscaler-7d8cf6f7b4-fwc5h namespace: kube-system
- kind: pod name: calico-typha-vertical-autoscaler-757978cc5-vwmzw namespace: kube-system
- kind: pod name: coredns-65bdc57f48-b26c5 namespace: kube-system
- kind: pod name: coredns-65bdc57f48-tq2b5 namespace: kube-system
- kind: pod name: csi-driver-node-6lmpl namespace: kube-system
- kind: pod name: csi-driver-node-srz2q namespace: kube-system
- kind: pod name: egress-filter-applier-6cqn6 namespace: kube-system
- kind: pod name: egress-filter-applier-jschk namespace: kube-system
- kind: pod name: kube-proxy-worker-bex82-v1.31.4-kbb2d namespace: kube-system
- kind: pod name: kube-proxy-worker-bex82-v1.31.4-nt98w namespace: kube-system
- kind: pod name: metrics-server-944fcbdc8-fp5jr namespace: kube-system
- kind: pod name: metrics-server-944fcbdc8-n7hxj namespace: kube-system
- kind: pod name: network-problem-detector-host-2nxh4 namespace: kube-system
- kind: pod name: network-problem-detector-host-xbq6b namespace: kube-system
- kind: pod name: network-problem-detector-pod-drdls namespace: kube-system
- kind: pod name: network-problem-detector-pod-qdrkq namespace: kube-system
- kind: pod name: node-exporter-4q9wx namespace: kube-system
- kind: pod name: node-exporter-c5zhw namespace: kube-system
- kind: pod name: node-local-dns-4hxs6 namespace: kube-system
- kind: pod name: node-local-dns-f7kfv namespace: kube-system
- kind: pod name: node-problem-detector-h8g4k namespace: kube-system
- kind: pod name: node-problem-detector-k9hz9 namespace: kube-system
- kind: pod name: vpn-shoot-66b756699d-82sjr namespace: kube-system
- openstack
- kind: pod name: apiserver-proxy-cxrkt namespace: kube-system
- kind: pod name: apiserver-proxy-ql792 namespace: kube-system
- kind: pod name: blackbox-exporter-6cb7b4b76c-7l9sk namespace: kube-system
- kind: pod name: blackbox-exporter-6cb7b4b76c-cqtvr namespace: kube-system
- kind: pod name: calico-kube-controllers-5757b9f7fd-lfpk9 namespace: kube-system
- kind: pod name: calico-node-95h7z namespace: kube-system
- kind: pod name: calico-node-fnzkc namespace: kube-system
- kind: pod name: calico-node-vertical-autoscaler-66fbc8cdf9-fd557 namespace: kube-system
- kind: pod name: calico-typha-deploy-6959bc47cf-9xhk8 namespace: kube-system
- kind: pod name: calico-typha-deploy-6959bc47cf-rktmq namespace: kube-system
- kind: pod name: calico-typha-horizontal-autoscaler-7d8cf6f7b4-zcxqr namespace: kube-system
- kind: pod name: calico-typha-vertical-autoscaler-757978cc5-s4z6h namespace: kube-system
- kind: pod name: coredns-7779b6b486-46b9q namespace: kube-system
- kind: pod name: coredns-7779b6b486-9fvwj namespace: kube-system
- kind: pod name: csi-driver-node-66tql namespace: kube-system
- kind: pod name: csi-driver-node-7bsvw namespace: kube-system
- kind: pod name: egress-filter-applier-pwvjp namespace: kube-system
- kind: pod name: egress-filter-applier-tzmbv namespace: kube-system
- kind: pod name: kube-proxy-worker-dqty2-v1.31.4-jjnqj namespace: kube-system
- kind: pod name: kube-proxy-worker-dqty2-v1.31.4-tpl27 namespace: kube-system
- kind: pod name: metrics-server-7ccb5488f7-6cf26 namespace: kube-system
- kind: pod name: metrics-server-7ccb5488f7-wmqrp namespace: kube-system
- kind: pod name: network-problem-detector-host-8swgm namespace: kube-system
- kind: pod name: network-problem-detector-host-khwzh namespace: kube-system
- kind: pod name: network-problem-detector-pod-f7m96 namespace: kube-system
- kind: pod name: network-problem-detector-pod-w77jp namespace: kube-system
- kind: pod name: node-exporter-5tjpp namespace: kube-system
- kind: pod name: node-exporter-v9hjf namespace: kube-system
- kind: pod name: node-local-dns-28vpp namespace: kube-system
- kind: pod name: node-local-dns-b4bn9 namespace: kube-system
- kind: pod name: node-problem-detector-kdf5d namespace: kube-system
- kind: pod name: node-problem-detector-mngdd namespace: kube-system
- kind: pod name: vpn-shoot-587d6569f5-9z27v namespace: kube-system
- aws
-
Gardener managed pods are not user pods
-
242418 (Medium) - The Kubernetes API server must use approved cipher suites.
-
Option tls-cipher-suites set to allowed values.
- aws
- kind: deployment name: kube-apiserver namespace: shoot--diki-comp--aws
- azure
- kind: deployment name: kube-apiserver namespace: shoot--diki-comp--azure
- gcp
- kind: deployment name: kube-apiserver namespace: shoot--diki-comp--gcp
- openstack
- kind: deployment name: kube-apiserver namespace: shoot--diki-comp--openstack
- aws
-
Option tls-cipher-suites set to allowed values.
-
242419 (Medium) - Kubernetes API Server must have the SSL Certificate Authority set.
-
Option client-ca-file set.
- aws
- kind: deployment name: kube-apiserver namespace: shoot--diki-comp--aws
- azure
- kind: deployment name: kube-apiserver namespace: shoot--diki-comp--azure
- gcp
- kind: deployment name: kube-apiserver namespace: shoot--diki-comp--gcp
- openstack
- kind: deployment name: kube-apiserver namespace: shoot--diki-comp--openstack
- aws
-
Option client-ca-file set.
-
242420 (Medium) - Kubernetes Kubelet must have the SSL Certificate Authority set.
-
Option authentication.x509.clientCAFile set.
- aws
- kind: node name: ip-IP-Address.eu-west-1.compute.internal
- kind: node name: ip-IP-Address.eu-west-1.compute.internal
- azure
- kind: node name: shoot--diki-comp--azure-worker-g7p4p-z3-7ccb8-2wxkr
- kind: node name: shoot--diki-comp--azure-worker-g7p4p-z3-7ccb8-8mwhx
- gcp
- kind: node name: shoot--diki-comp--gcp-worker-bex82-z1-d8757-66str
- kind: node name: shoot--diki-comp--gcp-worker-bex82-z1-d8757-nl4s4
- openstack
- kind: node name: shoot--diki-comp--openstack-worker-dqty2-z1-6c54d-j8jtj
- kind: node name: shoot--diki-comp--openstack-worker-dqty2-z1-6c54d-x7lx7
- aws
-
Option authentication.x509.clientCAFile set.
-
242421 (Medium) - Kubernetes Controller Manager must have the SSL Certificate Authority set.
-
Option root-ca-file set.
- aws
- kind: deployment name: kube-controller-manager namespace: shoot--diki-comp--aws
- azure
- kind: deployment name: kube-controller-manager namespace: shoot--diki-comp--azure
- gcp
- kind: deployment name: kube-controller-manager namespace: shoot--diki-comp--gcp
- openstack
- kind: deployment name: kube-controller-manager namespace: shoot--diki-comp--openstack
- aws
-
Option root-ca-file set.
-
242422 (Medium) - Kubernetes API Server must have a certificate for communication.
-
Option tls-cert-file set.
- aws
- kind: deployment name: kube-apiserver namespace: shoot--diki-comp--aws
- azure
- kind: deployment name: kube-apiserver namespace: shoot--diki-comp--azure
- gcp
- kind: deployment name: kube-apiserver namespace: shoot--diki-comp--gcp
- openstack
- kind: deployment name: kube-apiserver namespace: shoot--diki-comp--openstack
- aws
-
Option tls-private-key-file set.
- aws
- kind: deployment name: kube-apiserver namespace: shoot--diki-comp--aws
- azure
- kind: deployment name: kube-apiserver namespace: shoot--diki-comp--azure
- gcp
- kind: deployment name: kube-apiserver namespace: shoot--diki-comp--gcp
- openstack
- kind: deployment name: kube-apiserver namespace: shoot--diki-comp--openstack
- aws
-
Option tls-cert-file set.
-
242423 (Medium) - Kubernetes etcd must enable client authentication to secure service.
-
Option client-transport-security.client-cert-auth set to allowed value.
- aws
- kind: statefulSet name: etcd-main namespace: shoot--diki-comp--aws
- kind: statefulSet name: etcd-events namespace: shoot--diki-comp--aws
- azure
- kind: statefulSet name: etcd-main namespace: shoot--diki-comp--azure
- kind: statefulSet name: etcd-events namespace: shoot--diki-comp--azure
- gcp
- kind: statefulSet name: etcd-main namespace: shoot--diki-comp--gcp
- kind: statefulSet name: etcd-events namespace: shoot--diki-comp--gcp
- openstack
- kind: statefulSet name: etcd-main namespace: shoot--diki-comp--openstack
- kind: statefulSet name: etcd-events namespace: shoot--diki-comp--openstack
- aws
-
Option client-transport-security.client-cert-auth set to allowed value.
-
242424 (Medium) - Kubernetes Kubelet must enable tlsPrivateKeyFile for client authentication to secure service.
-
Kubelet rotates server certificates automatically itself.
- aws
- kind: node name: ip-IP-Address.eu-west-1.compute.internal
- kind: node name: ip-IP-Address.eu-west-1.compute.internal
- azure
- kind: node name: shoot--diki-comp--azure-worker-g7p4p-z3-7ccb8-2wxkr
- kind: node name: shoot--diki-comp--azure-worker-g7p4p-z3-7ccb8-8mwhx
- gcp
- kind: node name: shoot--diki-comp--gcp-worker-bex82-z1-d8757-66str
- kind: node name: shoot--diki-comp--gcp-worker-bex82-z1-d8757-nl4s4
- openstack
- kind: node name: shoot--diki-comp--openstack-worker-dqty2-z1-6c54d-j8jtj
- kind: node name: shoot--diki-comp--openstack-worker-dqty2-z1-6c54d-x7lx7
- aws
-
Kubelet rotates server certificates automatically itself.
-
242425 (Medium) - Kubernetes Kubelet must enable tlsCertFile for client authentication to secure service.
-
Kubelet rotates server certificates automatically itself.
- aws
- kind: node name: ip-IP-Address.eu-west-1.compute.internal
- kind: node name: ip-IP-Address.eu-west-1.compute.internal
- azure
- kind: node name: shoot--diki-comp--azure-worker-g7p4p-z3-7ccb8-2wxkr
- kind: node name: shoot--diki-comp--azure-worker-g7p4p-z3-7ccb8-8mwhx
- gcp
- kind: node name: shoot--diki-comp--gcp-worker-bex82-z1-d8757-66str
- kind: node name: shoot--diki-comp--gcp-worker-bex82-z1-d8757-nl4s4
- openstack
- kind: node name: shoot--diki-comp--openstack-worker-dqty2-z1-6c54d-j8jtj
- kind: node name: shoot--diki-comp--openstack-worker-dqty2-z1-6c54d-x7lx7
- aws
-
Kubelet rotates server certificates automatically itself.
-
242427 (Medium) - Kubernetes etcd must have a key file for secure communication.
-
Option client-transport-security.key-file set to allowed value.
- aws
- kind: statefulSet name: etcd-main namespace: shoot--diki-comp--aws
- kind: statefulSet name: etcd-events namespace: shoot--diki-comp--aws
- azure
- kind: statefulSet name: etcd-main namespace: shoot--diki-comp--azure
- kind: statefulSet name: etcd-events namespace: shoot--diki-comp--azure
- gcp
- kind: statefulSet name: etcd-main namespace: shoot--diki-comp--gcp
- kind: statefulSet name: etcd-events namespace: shoot--diki-comp--gcp
- openstack
- kind: statefulSet name: etcd-main namespace: shoot--diki-comp--openstack
- kind: statefulSet name: etcd-events namespace: shoot--diki-comp--openstack
- aws
-
Option client-transport-security.key-file set to allowed value.
-
242428 (Medium) - Kubernetes etcd must have a certificate for communication.
-
Option client-transport-security.cert-file set to allowed value.
- aws
- kind: statefulSet name: etcd-main namespace: shoot--diki-comp--aws
- kind: statefulSet name: etcd-events namespace: shoot--diki-comp--aws
- azure
- kind: statefulSet name: etcd-main namespace: shoot--diki-comp--azure
- kind: statefulSet name: etcd-events namespace: shoot--diki-comp--azure
- gcp
- kind: statefulSet name: etcd-main namespace: shoot--diki-comp--gcp
- kind: statefulSet name: etcd-events namespace: shoot--diki-comp--gcp
- openstack
- kind: statefulSet name: etcd-main namespace: shoot--diki-comp--openstack
- kind: statefulSet name: etcd-events namespace: shoot--diki-comp--openstack
- aws
-
Option client-transport-security.cert-file set to allowed value.
-
242429 (Medium) - Kubernetes etcd must have the SSL Certificate Authority set.
-
Option etcd-cafile set.
- aws
- kind: deployment name: kube-apiserver namespace: shoot--diki-comp--aws
- azure
- kind: deployment name: kube-apiserver namespace: shoot--diki-comp--azure
- gcp
- kind: deployment name: kube-apiserver namespace: shoot--diki-comp--gcp
- openstack
- kind: deployment name: kube-apiserver namespace: shoot--diki-comp--openstack
- aws
-
Option etcd-cafile set.
-
242430 (Medium) - Kubernetes etcd must have a certificate for communication.
-
Option etcd-certfile set.
- aws
- kind: deployment name: kube-apiserver namespace: shoot--diki-comp--aws
- azure
- kind: deployment name: kube-apiserver namespace: shoot--diki-comp--azure
- gcp
- kind: deployment name: kube-apiserver namespace: shoot--diki-comp--gcp
- openstack
- kind: deployment name: kube-apiserver namespace: shoot--diki-comp--openstack
- aws
-
Option etcd-certfile set.
-
242431 (Medium) - Kubernetes etcd must have a key file for secure communication.
-
Option etcd-keyfile set.
- aws
- kind: deployment name: kube-apiserver namespace: shoot--diki-comp--aws
- azure
- kind: deployment name: kube-apiserver namespace: shoot--diki-comp--azure
- gcp
- kind: deployment name: kube-apiserver namespace: shoot--diki-comp--gcp
- openstack
- kind: deployment name: kube-apiserver namespace: shoot--diki-comp--openstack
- aws
-
Option etcd-keyfile set.
-
242434 (High) - Kubernetes Kubelet must enable kernel protection.
-
Option protectKernelDefaults set to allowed value.
- aws
- kind: node name: ip-IP-Address.eu-west-1.compute.internal
- kind: node name: ip-IP-Address.eu-west-1.compute.internal
- azure
- kind: node name: shoot--diki-comp--azure-worker-g7p4p-z3-7ccb8-2wxkr
- kind: node name: shoot--diki-comp--azure-worker-g7p4p-z3-7ccb8-8mwhx
- gcp
- kind: node name: shoot--diki-comp--gcp-worker-bex82-z1-d8757-66str
- kind: node name: shoot--diki-comp--gcp-worker-bex82-z1-d8757-nl4s4
- openstack
- kind: node name: shoot--diki-comp--openstack-worker-dqty2-z1-6c54d-j8jtj
- kind: node name: shoot--diki-comp--openstack-worker-dqty2-z1-6c54d-x7lx7
- aws
-
Option protectKernelDefaults set to allowed value.
-
242436 (High) - The Kubernetes API server must have the ValidatingAdmissionWebhook enabled.
-
Option enable-admission-plugins set to allowed value.
- aws
- kind: deployment name: kube-apiserver namespace: shoot--diki-comp--aws
- azure
- kind: deployment name: kube-apiserver namespace: shoot--diki-comp--azure
- gcp
- kind: deployment name: kube-apiserver namespace: shoot--diki-comp--gcp
- openstack
- kind: deployment name: kube-apiserver namespace: shoot--diki-comp--openstack
- aws
-
Option enable-admission-plugins set to allowed value.
-
242438 (Medium) - Kubernetes API Server must configure timeouts to limit attack surface.
-
Option request-timeout has not been set.
- aws
- details: defaults to 1m0s kind: deployment name: kube-apiserver namespace: shoot--diki-comp--aws
- azure
- details: defaults to 1m0s kind: deployment name: kube-apiserver namespace: shoot--diki-comp--azure
- gcp
- details: defaults to 1m0s kind: deployment name: kube-apiserver namespace: shoot--diki-comp--gcp
- openstack
- details: defaults to 1m0s kind: deployment name: kube-apiserver namespace: shoot--diki-comp--openstack
- aws
-
Option request-timeout has not been set.
-
242442 (Medium) - Kubernetes must remove old components after updated versions have been installed.
-
All found images use current versions.
- aws
- azure
- gcp
- openstack
- aws
-
All found images use current versions.
-
242445 (Medium) - The Kubernetes component etcd must be owned by etcd.
-
File has expected owners
- aws
- containerName: etcd details: fileName: /var/lib/kubelet/pods/d46d0708-802d-43a7-bdf8-646912b7cb62/volumes/kubernetes.io~csi/pv-shoot--garden--aws-ha-eu1-5fd75c6b-82f4-4e32-97b1-ed522efea2b6/mount/new.etcd/member/wal/0.tmp, ownerUser: 65532, ownerGroup: 65532 kind: pod name: etcd-main-0 namespace: shoot--diki-comp--aws
- containerName: etcd details: fileName: /var/lib/kubelet/pods/d46d0708-802d-43a7-bdf8-646912b7cb62/volumes/kubernetes.io~csi/pv-shoot--garden--aws-ha-eu1-5fd75c6b-82f4-4e32-97b1-ed522efea2b6/mount/new.etcd/member/wal/0000000000000000-0000000000000000.wal, ownerUser: 65532, ownerGroup: 65532 kind: pod name: etcd-main-0 namespace: shoot--diki-comp--aws
- containerName: etcd details: fileName: /var/lib/kubelet/pods/d46d0708-802d-43a7-bdf8-646912b7cb62/volumes/kubernetes.io~csi/pv-shoot--garden--aws-ha-eu1-5fd75c6b-82f4-4e32-97b1-ed522efea2b6/mount/new.etcd/member/snap/db, ownerUser: 65532, ownerGroup: 65532 kind: pod name: etcd-main-0 namespace: shoot--diki-comp--aws
- containerName: etcd details: fileName: /var/lib/kubelet/pods/d46d0708-802d-43a7-bdf8-646912b7cb62/volumes/kubernetes.io~csi/pv-shoot--garden--aws-ha-eu1-5fd75c6b-82f4-4e32-97b1-ed522efea2b6/mount/safe_guard, ownerUser: 65532, ownerGroup: 65532 kind: pod name: etcd-main-0 namespace: shoot--diki-comp--aws
- containerName: etcd details: fileName: /var/lib/kubelet/pods/d46d0708-802d-43a7-bdf8-646912b7cb62/volumes/kubernetes.io~secret/etcd-ca/..2025_03_03_01_02_01.732820315/bundle.crt, ownerUser: 0, ownerGroup: 65532 kind: pod name: etcd-main-0 namespace: shoot--diki-comp--aws
- containerName: etcd details: fileName: /var/lib/kubelet/pods/d46d0708-802d-43a7-bdf8-646912b7cb62/volumes/kubernetes.io~secret/etcd-server-tls/..2025_03_03_01_02_01.2596588739/tls.crt, ownerUser: 0, ownerGroup: 65532 kind: pod name: etcd-main-0 namespace: shoot--diki-comp--aws
- containerName: etcd details: fileName: /var/lib/kubelet/pods/d46d0708-802d-43a7-bdf8-646912b7cb62/volumes/kubernetes.io~secret/etcd-server-tls/..2025_03_03_01_02_01.2596588739/tls.key, ownerUser: 0, ownerGroup: 65532 kind: pod name: etcd-main-0 namespace: shoot--diki-comp--aws
- containerName: etcd details: fileName: /var/lib/kubelet/pods/d46d0708-802d-43a7-bdf8-646912b7cb62/volumes/kubernetes.io~secret/etcd-client-tls/..2025_03_03_01_02_01.1252005562/tls.key, ownerUser: 0, ownerGroup: 65532 kind: pod name: etcd-main-0 namespace: shoot--diki-comp--aws
- containerName: etcd details: fileName: /var/lib/kubelet/pods/d46d0708-802d-43a7-bdf8-646912b7cb62/volumes/kubernetes.io~secret/etcd-client-tls/..2025_03_03_01_02_01.1252005562/tls.crt, ownerUser: 0, ownerGroup: 65532 kind: pod name: etcd-main-0 namespace: shoot--diki-comp--aws
- containerName: etcd details: fileName: /var/lib/kubelet/pods/d46d0708-802d-43a7-bdf8-646912b7cb62/volumes/kubernetes.io~secret/backup-restore-ca/..2025_03_03_01_02_01.3362730748/bundle.crt, ownerUser: 0, ownerGroup: 65532 kind: pod name: etcd-main-0 namespace: shoot--diki-comp--aws
- containerName: etcd details: fileName: /var/lib/kubelet/pods/d46d0708-802d-43a7-bdf8-646912b7cb62/volumes/kubernetes.io~projected/kube-api-access-gardener/..2025_03_03_01_02_01.1092768610/token, ownerUser: 65532, ownerGroup: 65532 kind: pod name: etcd-main-0 namespace: shoot--diki-comp--aws
- containerName: etcd details: fileName: /var/lib/kubelet/pods/d46d0708-802d-43a7-bdf8-646912b7cb62/volumes/kubernetes.io~projected/kube-api-access-gardener/..2025_03_03_01_02_01.1092768610/ca.crt, ownerUser: 0, ownerGroup: 65532 kind: pod name: etcd-main-0 namespace: shoot--diki-comp--aws
- containerName: etcd details: fileName: /var/lib/kubelet/pods/d46d0708-802d-43a7-bdf8-646912b7cb62/volumes/kubernetes.io~projected/kube-api-access-gardener/..2025_03_03_01_02_01.1092768610/namespace, ownerUser: 0, ownerGroup: 65532 kind: pod name: etcd-main-0 namespace: shoot--diki-comp--aws
- containerName: backup-restore details: fileName: /var/lib/kubelet/pods/d46d0708-802d-43a7-bdf8-646912b7cb62/volumes/kubernetes.io~secret/etcd-backup-secret/..2025_03_03_01_02_01.4053552407/accessKeyID, ownerUser: 0, ownerGroup: 65532 kind: pod name: etcd-main-0 namespace: shoot--diki-comp--aws
- containerName: backup-restore details: fileName: /var/lib/kubelet/pods/d46d0708-802d-43a7-bdf8-646912b7cb62/volumes/kubernetes.io~secret/etcd-backup-secret/..2025_03_03_01_02_01.4053552407/bucketName, ownerUser: 0, ownerGroup: 65532 kind: pod name: etcd-main-0 namespace: shoot--diki-comp--aws
- containerName: backup-restore details: fileName: /var/lib/kubelet/pods/d46d0708-802d-43a7-bdf8-646912b7cb62/volumes/kubernetes.io~secret/etcd-backup-secret/..2025_03_03_01_02_01.4053552407/region, ownerUser: 0, ownerGroup: 65532 kind: pod name: etcd-main-0 namespace: shoot--diki-comp--aws
- containerName: backup-restore details: fileName: /var/lib/kubelet/pods/d46d0708-802d-43a7-bdf8-646912b7cb62/volumes/kubernetes.io~secret/etcd-backup-secret/..2025_03_03_01_02_01.4053552407/secretAccessKey, ownerUser: 0, ownerGroup: 65532 kind: pod name: etcd-main-0 namespace: shoot--diki-comp--aws
- containerName: backup-restore details: fileName: /var/lib/kubelet/pods/d46d0708-802d-43a7-bdf8-646912b7cb62/volumes/kubernetes.io~csi/pv-shoot--garden--aws-ha-eu1-5fd75c6b-82f4-4e32-97b1-ed522efea2b6/mount/new.etcd/member/wal/0.tmp, ownerUser: 65532, ownerGroup: 65532 kind: pod name: etcd-main-0 namespace: shoot--diki-comp--aws
- containerName: backup-restore details: fileName: /var/lib/kubelet/pods/d46d0708-802d-43a7-bdf8-646912b7cb62/volumes/kubernetes.io~csi/pv-shoot--garden--aws-ha-eu1-5fd75c6b-82f4-4e32-97b1-ed522efea2b6/mount/new.etcd/member/wal/0000000000000000-0000000000000000.wal, ownerUser: 65532, ownerGroup: 65532 kind: pod name: etcd-main-0 namespace: shoot--diki-comp--aws
- containerName: backup-restore details: fileName: /var/lib/kubelet/pods/d46d0708-802d-43a7-bdf8-646912b7cb62/volumes/kubernetes.io~csi/pv-shoot--garden--aws-ha-eu1-5fd75c6b-82f4-4e32-97b1-ed522efea2b6/mount/new.etcd/member/snap/db, ownerUser: 65532, ownerGroup: 65532 kind: pod name: etcd-main-0 namespace: shoot--diki-comp--aws
- containerName: backup-restore details: fileName: /var/lib/kubelet/pods/d46d0708-802d-43a7-bdf8-646912b7cb62/volumes/kubernetes.io~csi/pv-shoot--garden--aws-ha-eu1-5fd75c6b-82f4-4e32-97b1-ed522efea2b6/mount/safe_guard, ownerUser: 65532, ownerGroup: 65532 kind: pod name: etcd-main-0 namespace: shoot--diki-comp--aws
- containerName: backup-restore details: fileName: /var/lib/kubelet/pods/d46d0708-802d-43a7-bdf8-646912b7cb62/volumes/kubernetes.io~configmap/etcd-config-file/..2025_03_03_01_02_01.108378467/etcd.conf.yaml, ownerUser: 0, ownerGroup: 65532 kind: pod name: etcd-main-0 namespace: shoot--diki-comp--aws
- containerName: backup-restore details: fileName: /var/lib/kubelet/pods/d46d0708-802d-43a7-bdf8-646912b7cb62/volumes/kubernetes.io~secret/backup-restore-server-tls/..2025_03_03_01_02_01.3321577487/tls.key, ownerUser: 0, ownerGroup: 65532 kind: pod name: etcd-main-0 namespace: shoot--diki-comp--aws
- containerName: backup-restore details: fileName: /var/lib/kubelet/pods/d46d0708-802d-43a7-bdf8-646912b7cb62/volumes/kubernetes.io~secret/backup-restore-server-tls/..2025_03_03_01_02_01.3321577487/tls.crt, ownerUser: 0, ownerGroup: 65532 kind: pod name: etcd-main-0 namespace: shoot--diki-comp--aws
- containerName: backup-restore details: fileName: /var/lib/kubelet/pods/d46d0708-802d-43a7-bdf8-646912b7cb62/volumes/kubernetes.io~secret/etcd-ca/..2025_03_03_01_02_01.732820315/bundle.crt, ownerUser: 0, ownerGroup: 65532 kind: pod name: etcd-main-0 namespace: shoot--diki-comp--aws
- containerName: backup-restore details: fileName: /var/lib/kubelet/pods/d46d0708-802d-43a7-bdf8-646912b7cb62/volumes/kubernetes.io~secret/etcd-client-tls/..2025_03_03_01_02_01.1252005562/tls.key, ownerUser: 0, ownerGroup: 65532 kind: pod name: etcd-main-0 namespace: shoot--diki-comp--aws
- containerName: backup-restore details: fileName: /var/lib/kubelet/pods/d46d0708-802d-43a7-bdf8-646912b7cb62/volumes/kubernetes.io~secret/etcd-client-tls/..2025_03_03_01_02_01.1252005562/tls.crt, ownerUser: 0, ownerGroup: 65532 kind: pod name: etcd-main-0 namespace: shoot--diki-comp--aws
- containerName: backup-restore details: fileName: /var/lib/kubelet/pods/d46d0708-802d-43a7-bdf8-646912b7cb62/volumes/kubernetes.io~projected/kube-api-access-gardener/..2025_03_03_01_02_01.1092768610/token, ownerUser: 65532, ownerGroup: 65532 kind: pod name: etcd-main-0 namespace: shoot--diki-comp--aws
- containerName: backup-restore details: fileName: /var/lib/kubelet/pods/d46d0708-802d-43a7-bdf8-646912b7cb62/volumes/kubernetes.io~projected/kube-api-access-gardener/..2025_03_03_01_02_01.1092768610/ca.crt, ownerUser: 0, ownerGroup: 65532 kind: pod name: etcd-main-0 namespace: shoot--diki-comp--aws
- containerName: backup-restore details: fileName: /var/lib/kubelet/pods/d46d0708-802d-43a7-bdf8-646912b7cb62/volumes/kubernetes.io~projected/kube-api-access-gardener/..2025_03_03_01_02_01.1092768610/namespace, ownerUser: 0, ownerGroup: 65532 kind: pod name: etcd-main-0 namespace: shoot--diki-comp--aws
- containerName: etcd details: fileName: /var/lib/kubelet/pods/43f307d7-051f-446e-a314-0e435190ca59/volumes/kubernetes.io~csi/pv-shoot--garden--aws-ha-eu1-1f0559c1-d2d6-4fbc-a896-f9f3b569ecc0/mount/new.etcd/member/snap/db, ownerUser: 65532, ownerGroup: 65532 kind: pod name: etcd-events-0 namespace: shoot--diki-comp--aws
- containerName: etcd details: fileName: /var/lib/kubelet/pods/43f307d7-051f-446e-a314-0e435190ca59/volumes/kubernetes.io~csi/pv-shoot--garden--aws-ha-eu1-1f0559c1-d2d6-4fbc-a896-f9f3b569ecc0/mount/new.etcd/member/wal/0000000000000000-0000000000000000.wal, ownerUser: 65532, ownerGroup: 65532 kind: pod name: etcd-events-0 namespace: shoot--diki-comp--aws
- containerName: etcd details: fileName: /var/lib/kubelet/pods/43f307d7-051f-446e-a314-0e435190ca59/volumes/kubernetes.io~csi/pv-shoot--garden--aws-ha-eu1-1f0559c1-d2d6-4fbc-a896-f9f3b569ecc0/mount/new.etcd/member/wal/0.tmp, ownerUser: 65532, ownerGroup: 65532 kind: pod name: etcd-events-0 namespace: shoot--diki-comp--aws
- containerName: etcd details: fileName: /var/lib/kubelet/pods/43f307d7-051f-446e-a314-0e435190ca59/volumes/kubernetes.io~csi/pv-shoot--garden--aws-ha-eu1-1f0559c1-d2d6-4fbc-a896-f9f3b569ecc0/mount/safe_guard, ownerUser: 65532, ownerGroup: 65532 kind: pod name: etcd-events-0 namespace: shoot--diki-comp--aws
- containerName: etcd details: fileName: /var/lib/kubelet/pods/43f307d7-051f-446e-a314-0e435190ca59/volumes/kubernetes.io~secret/etcd-ca/..2025_03_03_01_02_01.4042300612/bundle.crt, ownerUser: 0, ownerGroup: 65532 kind: pod name: etcd-events-0 namespace: shoot--diki-comp--aws
- containerName: etcd details: fileName: /var/lib/kubelet/pods/43f307d7-051f-446e-a314-0e435190ca59/volumes/kubernetes.io~secret/etcd-server-tls/..2025_03_03_01_02_01.2269653654/tls.crt, ownerUser: 0, ownerGroup: 65532 kind: pod name: etcd-events-0 namespace: shoot--diki-comp--aws
- containerName: etcd details: fileName: /var/lib/kubelet/pods/43f307d7-051f-446e-a314-0e435190ca59/volumes/kubernetes.io~secret/etcd-server-tls/..2025_03_03_01_02_01.2269653654/tls.key, ownerUser: 0, ownerGroup: 65532 kind: pod name: etcd-events-0 namespace: shoot--diki-comp--aws
- containerName: etcd details: fileName: /var/lib/kubelet/pods/43f307d7-051f-446e-a314-0e435190ca59/volumes/kubernetes.io~secret/etcd-client-tls/..2025_03_03_01_02_01.911620075/tls.crt, ownerUser: 0, ownerGroup: 65532 kind: pod name: etcd-events-0 namespace: shoot--diki-comp--aws
- containerName: etcd details: fileName: /var/lib/kubelet/pods/43f307d7-051f-446e-a314-0e435190ca59/volumes/kubernetes.io~secret/etcd-client-tls/..2025_03_03_01_02_01.911620075/tls.key, ownerUser: 0, ownerGroup: 65532 kind: pod name: etcd-events-0 namespace: shoot--diki-comp--aws
- containerName: etcd details: fileName: /var/lib/kubelet/pods/43f307d7-051f-446e-a314-0e435190ca59/volumes/kubernetes.io~secret/backup-restore-ca/..2025_03_03_01_02_01.402852323/bundle.crt, ownerUser: 0, ownerGroup: 65532 kind: pod name: etcd-events-0 namespace: shoot--diki-comp--aws
- containerName: etcd details: fileName: /var/lib/kubelet/pods/43f307d7-051f-446e-a314-0e435190ca59/volumes/kubernetes.io~projected/kube-api-access-gardener/..2025_03_03_01_02_01.2294882418/token, ownerUser: 65532, ownerGroup: 65532 kind: pod name: etcd-events-0 namespace: shoot--diki-comp--aws
- containerName: etcd details: fileName: /var/lib/kubelet/pods/43f307d7-051f-446e-a314-0e435190ca59/volumes/kubernetes.io~projected/kube-api-access-gardener/..2025_03_03_01_02_01.2294882418/ca.crt, ownerUser: 0, ownerGroup: 65532 kind: pod name: etcd-events-0 namespace: shoot--diki-comp--aws
- containerName: etcd details: fileName: /var/lib/kubelet/pods/43f307d7-051f-446e-a314-0e435190ca59/volumes/kubernetes.io~projected/kube-api-access-gardener/..2025_03_03_01_02_01.2294882418/namespace, ownerUser: 0, ownerGroup: 65532 kind: pod name: etcd-events-0 namespace: shoot--diki-comp--aws
- containerName: backup-restore details: fileName: /var/lib/kubelet/pods/43f307d7-051f-446e-a314-0e435190ca59/volumes/kubernetes.io~csi/pv-shoot--garden--aws-ha-eu1-1f0559c1-d2d6-4fbc-a896-f9f3b569ecc0/mount/new.etcd/member/snap/db, ownerUser: 65532, ownerGroup: 65532 kind: pod name: etcd-events-0 namespace: shoot--diki-comp--aws
- containerName: backup-restore details: fileName: /var/lib/kubelet/pods/43f307d7-051f-446e-a314-0e435190ca59/volumes/kubernetes.io~csi/pv-shoot--garden--aws-ha-eu1-1f0559c1-d2d6-4fbc-a896-f9f3b569ecc0/mount/new.etcd/member/wal/0000000000000000-0000000000000000.wal, ownerUser: 65532, ownerGroup: 65532 kind: pod name: etcd-events-0 namespace: shoot--diki-comp--aws
- containerName: backup-restore details: fileName: /var/lib/kubelet/pods/43f307d7-051f-446e-a314-0e435190ca59/volumes/kubernetes.io~csi/pv-shoot--garden--aws-ha-eu1-1f0559c1-d2d6-4fbc-a896-f9f3b569ecc0/mount/new.etcd/member/wal/0.tmp, ownerUser: 65532, ownerGroup: 65532 kind: pod name: etcd-events-0 namespace: shoot--diki-comp--aws
- containerName: backup-restore details: fileName: /var/lib/kubelet/pods/43f307d7-051f-446e-a314-0e435190ca59/volumes/kubernetes.io~csi/pv-shoot--garden--aws-ha-eu1-1f0559c1-d2d6-4fbc-a896-f9f3b569ecc0/mount/safe_guard, ownerUser: 65532, ownerGroup: 65532 kind: pod name: etcd-events-0 namespace: shoot--diki-comp--aws
- containerName: backup-restore details: fileName: /var/lib/kubelet/pods/43f307d7-051f-446e-a314-0e435190ca59/volumes/kubernetes.io~configmap/etcd-config-file/..2025_03_03_01_02_01.1094665409/etcd.conf.yaml, ownerUser: 0, ownerGroup: 65532 kind: pod name: etcd-events-0 namespace: shoot--diki-comp--aws
- containerName: backup-restore details: fileName: /var/lib/kubelet/pods/43f307d7-051f-446e-a314-0e435190ca59/volumes/kubernetes.io~secret/backup-restore-server-tls/..2025_03_03_01_02_01.3619666546/tls.crt, ownerUser: 0, ownerGroup: 65532 kind: pod name: etcd-events-0 namespace: shoot--diki-comp--aws
- containerName: backup-restore details: fileName: /var/lib/kubelet/pods/43f307d7-051f-446e-a314-0e435190ca59/volumes/kubernetes.io~secret/backup-restore-server-tls/..2025_03_03_01_02_01.3619666546/tls.key, ownerUser: 0, ownerGroup: 65532 kind: pod name: etcd-events-0 namespace: shoot--diki-comp--aws
- containerName: backup-restore details: fileName: /var/lib/kubelet/pods/43f307d7-051f-446e-a314-0e435190ca59/volumes/kubernetes.io~secret/etcd-ca/..2025_03_03_01_02_01.4042300612/bundle.crt, ownerUser: 0, ownerGroup: 65532 kind: pod name: etcd-events-0 namespace: shoot--diki-comp--aws
- containerName: backup-restore details: fileName: /var/lib/kubelet/pods/43f307d7-051f-446e-a314-0e435190ca59/volumes/kubernetes.io~secret/etcd-client-tls/..2025_03_03_01_02_01.911620075/tls.crt, ownerUser: 0, ownerGroup: 65532 kind: pod name: etcd-events-0 namespace: shoot--diki-comp--aws
- containerName: backup-restore details: fileName: /var/lib/kubelet/pods/43f307d7-051f-446e-a314-0e435190ca59/volumes/kubernetes.io~secret/etcd-client-tls/..2025_03_03_01_02_01.911620075/tls.key, ownerUser: 0, ownerGroup: 65532 kind: pod name: etcd-events-0 namespace: shoot--diki-comp--aws
- containerName: backup-restore details: fileName: /var/lib/kubelet/pods/43f307d7-051f-446e-a314-0e435190ca59/volumes/kubernetes.io~projected/kube-api-access-gardener/..2025_03_03_01_02_01.2294882418/token, ownerUser: 65532, ownerGroup: 65532 kind: pod name: etcd-events-0 namespace: shoot--diki-comp--aws
- containerName: backup-restore details: fileName: /var/lib/kubelet/pods/43f307d7-051f-446e-a314-0e435190ca59/volumes/kubernetes.io~projected/kube-api-access-gardener/..2025_03_03_01_02_01.2294882418/ca.crt, ownerUser: 0, ownerGroup: 65532 kind: pod name: etcd-events-0 namespace: shoot--diki-comp--aws
- containerName: backup-restore details: fileName: /var/lib/kubelet/pods/43f307d7-051f-446e-a314-0e435190ca59/volumes/kubernetes.io~projected/kube-api-access-gardener/..2025_03_03_01_02_01.2294882418/namespace, ownerUser: 0, ownerGroup: 65532 kind: pod name: etcd-events-0 namespace: shoot--diki-comp--aws
- azure
- containerName: etcd details: fileName: /var/lib/kubelet/pods/153ccd2e-435b-4b34-8337-7b33a279136f/volumes/kubernetes.io~csi/pv-shoot--garden--az-ha-eu1-81b2d8c1-722b-460c-92ce-9906a186289f/mount/safe_guard, ownerUser: 65532, ownerGroup: 65532 kind: pod name: etcd-main-0 namespace: shoot--diki-comp--azure
- containerName: etcd details: fileName: /var/lib/kubelet/pods/153ccd2e-435b-4b34-8337-7b33a279136f/volumes/kubernetes.io~csi/pv-shoot--garden--az-ha-eu1-81b2d8c1-722b-460c-92ce-9906a186289f/mount/new.etcd/member/snap/db, ownerUser: 65532, ownerGroup: 65532 kind: pod name: etcd-main-0 namespace: shoot--diki-comp--azure
- containerName: etcd details: fileName: /var/lib/kubelet/pods/153ccd2e-435b-4b34-8337-7b33a279136f/volumes/kubernetes.io~csi/pv-shoot--garden--az-ha-eu1-81b2d8c1-722b-460c-92ce-9906a186289f/mount/new.etcd/member/wal/0000000000000000-0000000000000000.wal, ownerUser: 65532, ownerGroup: 65532 kind: pod name: etcd-main-0 namespace: shoot--diki-comp--azure
- containerName: etcd details: fileName: /var/lib/kubelet/pods/153ccd2e-435b-4b34-8337-7b33a279136f/volumes/kubernetes.io~csi/pv-shoot--garden--az-ha-eu1-81b2d8c1-722b-460c-92ce-9906a186289f/mount/new.etcd/member/wal/0.tmp, ownerUser: 65532, ownerGroup: 65532 kind: pod name: etcd-main-0 namespace: shoot--diki-comp--azure
- containerName: etcd details: fileName: /var/lib/kubelet/pods/153ccd2e-435b-4b34-8337-7b33a279136f/volumes/kubernetes.io~secret/etcd-ca/..2025_03_03_01_02_09.1747192981/bundle.crt, ownerUser: 0, ownerGroup: 65532 kind: pod name: etcd-main-0 namespace: shoot--diki-comp--azure
- containerName: etcd details: fileName: /var/lib/kubelet/pods/153ccd2e-435b-4b34-8337-7b33a279136f/volumes/kubernetes.io~secret/etcd-server-tls/..2025_03_03_01_02_09.2561838193/tls.key, ownerUser: 0, ownerGroup: 65532 kind: pod name: etcd-main-0 namespace: shoot--diki-comp--azure
- containerName: etcd details: fileName: /var/lib/kubelet/pods/153ccd2e-435b-4b34-8337-7b33a279136f/volumes/kubernetes.io~secret/etcd-server-tls/..2025_03_03_01_02_09.2561838193/tls.crt, ownerUser: 0, ownerGroup: 65532 kind: pod name: etcd-main-0 namespace: shoot--diki-comp--azure
- containerName: etcd details: fileName: /var/lib/kubelet/pods/153ccd2e-435b-4b34-8337-7b33a279136f/volumes/kubernetes.io~secret/etcd-client-tls/..2025_03_03_01_02_09.1461912590/tls.crt, ownerUser: 0, ownerGroup: 65532 kind: pod name: etcd-main-0 namespace: shoot--diki-comp--azure
- containerName: etcd details: fileName: /var/lib/kubelet/pods/153ccd2e-435b-4b34-8337-7b33a279136f/volumes/kubernetes.io~secret/etcd-client-tls/..2025_03_03_01_02_09.1461912590/tls.key, ownerUser: 0, ownerGroup: 65532 kind: pod name: etcd-main-0 namespace: shoot--diki-comp--azure
- containerName: etcd details: fileName: /var/lib/kubelet/pods/153ccd2e-435b-4b34-8337-7b33a279136f/volumes/kubernetes.io~secret/backup-restore-ca/..2025_03_03_01_02_09.1112355822/bundle.crt, ownerUser: 0, ownerGroup: 65532 kind: pod name: etcd-main-0 namespace: shoot--diki-comp--azure
- containerName: etcd details: fileName: /var/lib/kubelet/pods/153ccd2e-435b-4b34-8337-7b33a279136f/volumes/kubernetes.io~projected/kube-api-access-gardener/..2025_03_03_01_02_09.3605391883/token, ownerUser: 65532, ownerGroup: 65532 kind: pod name: etcd-main-0 namespace: shoot--diki-comp--azure
- containerName: etcd details: fileName: /var/lib/kubelet/pods/153ccd2e-435b-4b34-8337-7b33a279136f/volumes/kubernetes.io~projected/kube-api-access-gardener/..2025_03_03_01_02_09.3605391883/ca.crt, ownerUser: 0, ownerGroup: 65532 kind: pod name: etcd-main-0 namespace: shoot--diki-comp--azure
- containerName: etcd details: fileName: /var/lib/kubelet/pods/153ccd2e-435b-4b34-8337-7b33a279136f/volumes/kubernetes.io~projected/kube-api-access-gardener/..2025_03_03_01_02_09.3605391883/namespace, ownerUser: 0, ownerGroup: 65532 kind: pod name: etcd-main-0 namespace: shoot--diki-comp--azure
- containerName: backup-restore details: fileName: /var/lib/kubelet/pods/153ccd2e-435b-4b34-8337-7b33a279136f/volumes/kubernetes.io~secret/etcd-backup-secret/..2025_03_03_01_02_09.2736915275/storageKey, ownerUser: 0, ownerGroup: 65532 kind: pod name: etcd-main-0 namespace: shoot--diki-comp--azure
- containerName: backup-restore details: fileName: /var/lib/kubelet/pods/153ccd2e-435b-4b34-8337-7b33a279136f/volumes/kubernetes.io~secret/etcd-backup-secret/..2025_03_03_01_02_09.2736915275/bucketName, ownerUser: 0, ownerGroup: 65532 kind: pod name: etcd-main-0 namespace: shoot--diki-comp--azure
- containerName: backup-restore details: fileName: /var/lib/kubelet/pods/153ccd2e-435b-4b34-8337-7b33a279136f/volumes/kubernetes.io~secret/etcd-backup-secret/..2025_03_03_01_02_09.2736915275/storageAccount, ownerUser: 0, ownerGroup: 65532 kind: pod name: etcd-main-0 namespace: shoot--diki-comp--azure
- containerName: backup-restore details: fileName: /var/lib/kubelet/pods/153ccd2e-435b-4b34-8337-7b33a279136f/volumes/kubernetes.io~csi/pv-shoot--garden--az-ha-eu1-81b2d8c1-722b-460c-92ce-9906a186289f/mount/safe_guard, ownerUser: 65532, ownerGroup: 65532 kind: pod name: etcd-main-0 namespace: shoot--diki-comp--azure
- containerName: backup-restore details: fileName: /var/lib/kubelet/pods/153ccd2e-435b-4b34-8337-7b33a279136f/volumes/kubernetes.io~csi/pv-shoot--garden--az-ha-eu1-81b2d8c1-722b-460c-92ce-9906a186289f/mount/new.etcd/member/snap/db, ownerUser: 65532, ownerGroup: 65532 kind: pod name: etcd-main-0 namespace: shoot--diki-comp--azure
- containerName: backup-restore details: fileName: /var/lib/kubelet/pods/153ccd2e-435b-4b34-8337-7b33a279136f/volumes/kubernetes.io~csi/pv-shoot--garden--az-ha-eu1-81b2d8c1-722b-460c-92ce-9906a186289f/mount/new.etcd/member/wal/0000000000000000-0000000000000000.wal, ownerUser: 65532, ownerGroup: 65532 kind: pod name: etcd-main-0 namespace: shoot--diki-comp--azure
- containerName: backup-restore details: fileName: /var/lib/kubelet/pods/153ccd2e-435b-4b34-8337-7b33a279136f/volumes/kubernetes.io~csi/pv-shoot--garden--az-ha-eu1-81b2d8c1-722b-460c-92ce-9906a186289f/mount/new.etcd/member/wal/0.tmp, ownerUser: 65532, ownerGroup: 65532 kind: pod name: etcd-main-0 namespace: shoot--diki-comp--azure
- containerName: backup-restore details: fileName: /var/lib/kubelet/pods/153ccd2e-435b-4b34-8337-7b33a279136f/volumes/kubernetes.io~configmap/etcd-config-file/..2025_03_03_01_02_09.1473205331/etcd.conf.yaml, ownerUser: 0, ownerGroup: 65532 kind: pod name: etcd-main-0 namespace: shoot--diki-comp--azure
- containerName: backup-restore details: fileName: /var/lib/kubelet/pods/153ccd2e-435b-4b34-8337-7b33a279136f/volumes/kubernetes.io~secret/backup-restore-server-tls/..2025_03_03_01_02_09.980570931/tls.crt, ownerUser: 0, ownerGroup: 65532 kind: pod name: etcd-main-0 namespace: shoot--diki-comp--azure
- containerName: backup-restore details: fileName: /var/lib/kubelet/pods/153ccd2e-435b-4b34-8337-7b33a279136f/volumes/kubernetes.io~secret/backup-restore-server-tls/..2025_03_03_01_02_09.980570931/tls.key, ownerUser: 0, ownerGroup: 65532 kind: pod name: etcd-main-0 namespace: shoot--diki-comp--azure
- containerName: backup-restore details: fileName: /var/lib/kubelet/pods/153ccd2e-435b-4b34-8337-7b33a279136f/volumes/kubernetes.io~secret/etcd-ca/..2025_03_03_01_02_09.1747192981/bundle.crt, ownerUser: 0, ownerGroup: 65532 kind: pod name: etcd-main-0 namespace: shoot--diki-comp--azure
- containerName: backup-restore details: fileName: /var/lib/kubelet/pods/153ccd2e-435b-4b34-8337-7b33a279136f/volumes/kubernetes.io~secret/etcd-client-tls/..2025_03_03_01_02_09.1461912590/tls.crt, ownerUser: 0, ownerGroup: 65532 kind: pod name: etcd-main-0 namespace: shoot--diki-comp--azure
- containerName: backup-restore details: fileName: /var/lib/kubelet/pods/153ccd2e-435b-4b34-8337-7b33a279136f/volumes/kubernetes.io~secret/etcd-client-tls/..2025_03_03_01_02_09.1461912590/tls.key, ownerUser: 0, ownerGroup: 65532 kind: pod name: etcd-main-0 namespace: shoot--diki-comp--azure
- containerName: backup-restore details: fileName: /var/lib/kubelet/pods/153ccd2e-435b-4b34-8337-7b33a279136f/volumes/kubernetes.io~projected/kube-api-access-gardener/..2025_03_03_01_02_09.3605391883/token, ownerUser: 65532, ownerGroup: 65532 kind: pod name: etcd-main-0 namespace: shoot--diki-comp--azure
- containerName: backup-restore details: fileName: /var/lib/kubelet/pods/153ccd2e-435b-4b34-8337-7b33a279136f/volumes/kubernetes.io~projected/kube-api-access-gardener/..2025_03_03_01_02_09.3605391883/ca.crt, ownerUser: 0, ownerGroup: 65532 kind: pod name: etcd-main-0 namespace: shoot--diki-comp--azure
- containerName: backup-restore details: fileName: /var/lib/kubelet/pods/153ccd2e-435b-4b34-8337-7b33a279136f/volumes/kubernetes.io~projected/kube-api-access-gardener/..2025_03_03_01_02_09.3605391883/namespace, ownerUser: 0, ownerGroup: 65532 kind: pod name: etcd-main-0 namespace: shoot--diki-comp--azure
- containerName: etcd details: fileName: /var/lib/kubelet/pods/e40a1350-0fce-48ce-bed8-75ba8d51e7a0/volumes/kubernetes.io~csi/pv-shoot--garden--az-ha-eu1-33b95d75-a9cf-4e74-8dda-794e03889079/mount/new.etcd/member/wal/0000000000000000-0000000000000000.wal, ownerUser: 65532, ownerGroup: 65532 kind: pod name: etcd-events-0 namespace: shoot--diki-comp--azure
- containerName: etcd details: fileName: /var/lib/kubelet/pods/e40a1350-0fce-48ce-bed8-75ba8d51e7a0/volumes/kubernetes.io~csi/pv-shoot--garden--az-ha-eu1-33b95d75-a9cf-4e74-8dda-794e03889079/mount/new.etcd/member/wal/0.tmp, ownerUser: 65532, ownerGroup: 65532 kind: pod name: etcd-events-0 namespace: shoot--diki-comp--azure
- containerName: etcd details: fileName: /var/lib/kubelet/pods/e40a1350-0fce-48ce-bed8-75ba8d51e7a0/volumes/kubernetes.io~csi/pv-shoot--garden--az-ha-eu1-33b95d75-a9cf-4e74-8dda-794e03889079/mount/new.etcd/member/snap/db, ownerUser: 65532, ownerGroup: 65532 kind: pod name: etcd-events-0 namespace: shoot--diki-comp--azure
- containerName: etcd details: fileName: /var/lib/kubelet/pods/e40a1350-0fce-48ce-bed8-75ba8d51e7a0/volumes/kubernetes.io~csi/pv-shoot--garden--az-ha-eu1-33b95d75-a9cf-4e74-8dda-794e03889079/mount/safe_guard, ownerUser: 65532, ownerGroup: 65532 kind: pod name: etcd-events-0 namespace: shoot--diki-comp--azure
- containerName: etcd details: fileName: /var/lib/kubelet/pods/e40a1350-0fce-48ce-bed8-75ba8d51e7a0/volumes/kubernetes.io~secret/etcd-ca/..2025_03_03_01_02_09.386575845/bundle.crt, ownerUser: 0, ownerGroup: 65532 kind: pod name: etcd-events-0 namespace: shoot--diki-comp--azure
- containerName: etcd details: fileName: /var/lib/kubelet/pods/e40a1350-0fce-48ce-bed8-75ba8d51e7a0/volumes/kubernetes.io~secret/etcd-server-tls/..2025_03_03_01_02_09.729094142/tls.key, ownerUser: 0, ownerGroup: 65532 kind: pod name: etcd-events-0 namespace: shoot--diki-comp--azure
- containerName: etcd details: fileName: /var/lib/kubelet/pods/e40a1350-0fce-48ce-bed8-75ba8d51e7a0/volumes/kubernetes.io~secret/etcd-server-tls/..2025_03_03_01_02_09.729094142/tls.crt, ownerUser: 0, ownerGroup: 65532 kind: pod name: etcd-events-0 namespace: shoot--diki-comp--azure
- containerName: etcd details: fileName: /var/lib/kubelet/pods/e40a1350-0fce-48ce-bed8-75ba8d51e7a0/volumes/kubernetes.io~secret/etcd-client-tls/..2025_03_03_01_02_09.2268049037/tls.crt, ownerUser: 0, ownerGroup: 65532 kind: pod name: etcd-events-0 namespace: shoot--diki-comp--azure
- containerName: etcd details: fileName: /var/lib/kubelet/pods/e40a1350-0fce-48ce-bed8-75ba8d51e7a0/volumes/kubernetes.io~secret/etcd-client-tls/..2025_03_03_01_02_09.2268049037/tls.key, ownerUser: 0, ownerGroup: 65532 kind: pod name: etcd-events-0 namespace: shoot--diki-comp--azure
- containerName: etcd details: fileName: /var/lib/kubelet/pods/e40a1350-0fce-48ce-bed8-75ba8d51e7a0/volumes/kubernetes.io~secret/backup-restore-ca/..2025_03_03_01_02_09.4148787187/bundle.crt, ownerUser: 0, ownerGroup: 65532 kind: pod name: etcd-events-0 namespace: shoot--diki-comp--azure
- containerName: etcd details: fileName: /var/lib/kubelet/pods/e40a1350-0fce-48ce-bed8-75ba8d51e7a0/volumes/kubernetes.io~projected/kube-api-access-gardener/..2025_03_03_01_02_09.745783697/token, ownerUser: 65532, ownerGroup: 65532 kind: pod name: etcd-events-0 namespace: shoot--diki-comp--azure
- containerName: etcd details: fileName: /var/lib/kubelet/pods/e40a1350-0fce-48ce-bed8-75ba8d51e7a0/volumes/kubernetes.io~projected/kube-api-access-gardener/..2025_03_03_01_02_09.745783697/ca.crt, ownerUser: 0, ownerGroup: 65532 kind: pod name: etcd-events-0 namespace: shoot--diki-comp--azure
- containerName: etcd details: fileName: /var/lib/kubelet/pods/e40a1350-0fce-48ce-bed8-75ba8d51e7a0/volumes/kubernetes.io~projected/kube-api-access-gardener/..2025_03_03_01_02_09.745783697/namespace, ownerUser: 0, ownerGroup: 65532 kind: pod name: etcd-events-0 namespace: shoot--diki-comp--azure
- containerName: backup-restore details: fileName: /var/lib/kubelet/pods/e40a1350-0fce-48ce-bed8-75ba8d51e7a0/volumes/kubernetes.io~csi/pv-shoot--garden--az-ha-eu1-33b95d75-a9cf-4e74-8dda-794e03889079/mount/new.etcd/member/wal/0000000000000000-0000000000000000.wal, ownerUser: 65532, ownerGroup: 65532 kind: pod name: etcd-events-0 namespace: shoot--diki-comp--azure
- containerName: backup-restore details: fileName: /var/lib/kubelet/pods/e40a1350-0fce-48ce-bed8-75ba8d51e7a0/volumes/kubernetes.io~csi/pv-shoot--garden--az-ha-eu1-33b95d75-a9cf-4e74-8dda-794e03889079/mount/new.etcd/member/wal/0.tmp, ownerUser: 65532, ownerGroup: 65532 kind: pod name: etcd-events-0 namespace: shoot--diki-comp--azure
- containerName: backup-restore details: fileName: /var/lib/kubelet/pods/e40a1350-0fce-48ce-bed8-75ba8d51e7a0/volumes/kubernetes.io~csi/pv-shoot--garden--az-ha-eu1-33b95d75-a9cf-4e74-8dda-794e03889079/mount/new.etcd/member/snap/db, ownerUser: 65532, ownerGroup: 65532 kind: pod name: etcd-events-0 namespace: shoot--diki-comp--azure
- containerName: backup-restore details: fileName: /var/lib/kubelet/pods/e40a1350-0fce-48ce-bed8-75ba8d51e7a0/volumes/kubernetes.io~csi/pv-shoot--garden--az-ha-eu1-33b95d75-a9cf-4e74-8dda-794e03889079/mount/safe_guard, ownerUser: 65532, ownerGroup: 65532 kind: pod name: etcd-events-0 namespace: shoot--diki-comp--azure
- containerName: backup-restore details: fileName: /var/lib/kubelet/pods/e40a1350-0fce-48ce-bed8-75ba8d51e7a0/volumes/kubernetes.io~configmap/etcd-config-file/..2025_03_03_01_02_09.3979181729/etcd.conf.yaml, ownerUser: 0, ownerGroup: 65532 kind: pod name: etcd-events-0 namespace: shoot--diki-comp--azure
- containerName: backup-restore details: fileName: /var/lib/kubelet/pods/e40a1350-0fce-48ce-bed8-75ba8d51e7a0/volumes/kubernetes.io~secret/backup-restore-server-tls/..2025_03_03_01_02_09.2392161902/tls.crt, ownerUser: 0, ownerGroup: 65532 kind: pod name: etcd-events-0 namespace: shoot--diki-comp--azure
- containerName: backup-restore details: fileName: /var/lib/kubelet/pods/e40a1350-0fce-48ce-bed8-75ba8d51e7a0/volumes/kubernetes.io~secret/backup-restore-server-tls/..2025_03_03_01_02_09.2392161902/tls.key, ownerUser: 0, ownerGroup: 65532 kind: pod name: etcd-events-0 namespace: shoot--diki-comp--azure
- containerName: backup-restore details: fileName: /var/lib/kubelet/pods/e40a1350-0fce-48ce-bed8-75ba8d51e7a0/volumes/kubernetes.io~secret/etcd-ca/..2025_03_03_01_02_09.386575845/bundle.crt, ownerUser: 0, ownerGroup: 65532 kind: pod name: etcd-events-0 namespace: shoot--diki-comp--azure
- containerName: backup-restore details: fileName: /var/lib/kubelet/pods/e40a1350-0fce-48ce-bed8-75ba8d51e7a0/volumes/kubernetes.io~secret/etcd-client-tls/..2025_03_03_01_02_09.2268049037/tls.crt, ownerUser: 0, ownerGroup: 65532 kind: pod name: etcd-events-0 namespace: shoot--diki-comp--azure
- containerName: backup-restore details: fileName: /var/lib/kubelet/pods/e40a1350-0fce-48ce-bed8-75ba8d51e7a0/volumes/kubernetes.io~secret/etcd-client-tls/..2025_03_03_01_02_09.2268049037/tls.key, ownerUser: 0, ownerGroup: 65532 kind: pod name: etcd-events-0 namespace: shoot--diki-comp--azure
- containerName: backup-restore details: fileName: /var/lib/kubelet/pods/e40a1350-0fce-48ce-bed8-75ba8d51e7a0/volumes/kubernetes.io~projected/kube-api-access-gardener/..2025_03_03_01_02_09.745783697/token, ownerUser: 65532, ownerGroup: 65532 kind: pod name: etcd-events-0 namespace: shoot--diki-comp--azure
- containerName: backup-restore details: fileName: /var/lib/kubelet/pods/e40a1350-0fce-48ce-bed8-75ba8d51e7a0/volumes/kubernetes.io~projected/kube-api-access-gardener/..2025_03_03_01_02_09.745783697/ca.crt, ownerUser: 0, ownerGroup: 65532 kind: pod name: etcd-events-0 namespace: shoot--diki-comp--azure
- containerName: backup-restore details: fileName: /var/lib/kubelet/pods/e40a1350-0fce-48ce-bed8-75ba8d51e7a0/volumes/kubernetes.io~projected/kube-api-access-gardener/..2025_03_03_01_02_09.745783697/namespace, ownerUser: 0, ownerGroup: 65532 kind: pod name: etcd-events-0 namespace: shoot--diki-comp--azure
- gcp
- containerName: backup-restore details: fileName: /var/lib/kubelet/pods/9e7e0135-30fe-4ef6-a174-df3a12ff2ca4/volumes/kubernetes.io~secret/etcd-backup-secret/..2025_03_03_01_02_10.2542207060/bucketName, ownerUser: 0, ownerGroup: 65532 kind: pod name: etcd-main-0 namespace: shoot--diki-comp--gcp
- containerName: backup-restore details: fileName: /var/lib/kubelet/pods/9e7e0135-30fe-4ef6-a174-df3a12ff2ca4/volumes/kubernetes.io~secret/etcd-backup-secret/..2025_03_03_01_02_10.2542207060/serviceaccount.json, ownerUser: 0, ownerGroup: 65532 kind: pod name: etcd-main-0 namespace: shoot--diki-comp--gcp
- containerName: backup-restore details: fileName: /var/lib/kubelet/pods/9e7e0135-30fe-4ef6-a174-df3a12ff2ca4/volumes/kubernetes.io~csi/pv--d18c09ba-ce50-475d-88d3-cad4eb603f5c/mount/safe_guard, ownerUser: 65532, ownerGroup: 65532 kind: pod name: etcd-main-0 namespace: shoot--diki-comp--gcp
- containerName: backup-restore details: fileName: /var/lib/kubelet/pods/9e7e0135-30fe-4ef6-a174-df3a12ff2ca4/volumes/kubernetes.io~csi/pv--d18c09ba-ce50-475d-88d3-cad4eb603f5c/mount/new.etcd/member/wal/0.tmp, ownerUser: 65532, ownerGroup: 65532 kind: pod name: etcd-main-0 namespace: shoot--diki-comp--gcp
- containerName: backup-restore details: fileName: /var/lib/kubelet/pods/9e7e0135-30fe-4ef6-a174-df3a12ff2ca4/volumes/kubernetes.io~csi/pv--d18c09ba-ce50-475d-88d3-cad4eb603f5c/mount/new.etcd/member/wal/0000000000000000-0000000000000000.wal, ownerUser: 65532, ownerGroup: 65532 kind: pod name: etcd-main-0 namespace: shoot--diki-comp--gcp
- containerName: backup-restore details: fileName: /var/lib/kubelet/pods/9e7e0135-30fe-4ef6-a174-df3a12ff2ca4/volumes/kubernetes.io~csi/pv--d18c09ba-ce50-475d-88d3-cad4eb603f5c/mount/new.etcd/member/snap/db, ownerUser: 65532, ownerGroup: 65532 kind: pod name: etcd-main-0 namespace: shoot--diki-comp--gcp
- containerName: backup-restore details: fileName: /var/lib/kubelet/pods/9e7e0135-30fe-4ef6-a174-df3a12ff2ca4/volumes/kubernetes.io~configmap/etcd-config-file/..2025_03_03_01_02_10.4061322218/etcd.conf.yaml, ownerUser: 0, ownerGroup: 65532 kind: pod name: etcd-main-0 namespace: shoot--diki-comp--gcp
- containerName: backup-restore details: fileName: /var/lib/kubelet/pods/9e7e0135-30fe-4ef6-a174-df3a12ff2ca4/volumes/kubernetes.io~secret/backup-restore-server-tls/..2025_03_03_01_02_10.2704526131/tls.crt, ownerUser: 0, ownerGroup: 65532 kind: pod name: etcd-main-0 namespace: shoot--diki-comp--gcp
- containerName: backup-restore details: fileName: /var/lib/kubelet/pods/9e7e0135-30fe-4ef6-a174-df3a12ff2ca4/volumes/kubernetes.io~secret/backup-restore-server-tls/..2025_03_03_01_02_10.2704526131/tls.key, ownerUser: 0, ownerGroup: 65532 kind: pod name: etcd-main-0 namespace: shoot--diki-comp--gcp
- containerName: backup-restore details: fileName: /var/lib/kubelet/pods/9e7e0135-30fe-4ef6-a174-df3a12ff2ca4/volumes/kubernetes.io~secret/etcd-ca/..2025_03_03_01_02_10.3050428415/bundle.crt, ownerUser: 0, ownerGroup: 65532 kind: pod name: etcd-main-0 namespace: shoot--diki-comp--gcp
- containerName: backup-restore details: fileName: /var/lib/kubelet/pods/9e7e0135-30fe-4ef6-a174-df3a12ff2ca4/volumes/kubernetes.io~secret/etcd-client-tls/..2025_03_03_01_02_10.3223316245/tls.key, ownerUser: 0, ownerGroup: 65532 kind: pod name: etcd-main-0 namespace: shoot--diki-comp--gcp
- containerName: backup-restore details: fileName: /var/lib/kubelet/pods/9e7e0135-30fe-4ef6-a174-df3a12ff2ca4/volumes/kubernetes.io~secret/etcd-client-tls/..2025_03_03_01_02_10.3223316245/tls.crt, ownerUser: 0, ownerGroup: 65532 kind: pod name: etcd-main-0 namespace: shoot--diki-comp--gcp
- containerName: backup-restore details: fileName: /var/lib/kubelet/pods/9e7e0135-30fe-4ef6-a174-df3a12ff2ca4/volumes/kubernetes.io~projected/kube-api-access-gardener/..2025_03_03_01_02_10.1269252471/ca.crt, ownerUser: 0, ownerGroup: 65532 kind: pod name: etcd-main-0 namespace: shoot--diki-comp--gcp
- containerName: backup-restore details: fileName: /var/lib/kubelet/pods/9e7e0135-30fe-4ef6-a174-df3a12ff2ca4/volumes/kubernetes.io~projected/kube-api-access-gardener/..2025_03_03_01_02_10.1269252471/namespace, ownerUser: 0, ownerGroup: 65532 kind: pod name: etcd-main-0 namespace: shoot--diki-comp--gcp
- containerName: backup-restore details: fileName: /var/lib/kubelet/pods/9e7e0135-30fe-4ef6-a174-df3a12ff2ca4/volumes/kubernetes.io~projected/kube-api-access-gardener/..2025_03_03_01_02_10.1269252471/token, ownerUser: 65532, ownerGroup: 65532 kind: pod name: etcd-main-0 namespace: shoot--diki-comp--gcp
- containerName: etcd details: fileName: /var/lib/kubelet/pods/9e7e0135-30fe-4ef6-a174-df3a12ff2ca4/volumes/kubernetes.io~csi/pv--d18c09ba-ce50-475d-88d3-cad4eb603f5c/mount/safe_guard, ownerUser: 65532, ownerGroup: 65532 kind: pod name: etcd-main-0 namespace: shoot--diki-comp--gcp
- containerName: etcd details: fileName: /var/lib/kubelet/pods/9e7e0135-30fe-4ef6-a174-df3a12ff2ca4/volumes/kubernetes.io~csi/pv--d18c09ba-ce50-475d-88d3-cad4eb603f5c/mount/new.etcd/member/wal/0.tmp, ownerUser: 65532, ownerGroup: 65532 kind: pod name: etcd-main-0 namespace: shoot--diki-comp--gcp
- containerName: etcd details: fileName: /var/lib/kubelet/pods/9e7e0135-30fe-4ef6-a174-df3a12ff2ca4/volumes/kubernetes.io~csi/pv--d18c09ba-ce50-475d-88d3-cad4eb603f5c/mount/new.etcd/member/wal/0000000000000000-0000000000000000.wal, ownerUser: 65532, ownerGroup: 65532 kind: pod name: etcd-main-0 namespace: shoot--diki-comp--gcp
- containerName: etcd details: fileName: /var/lib/kubelet/pods/9e7e0135-30fe-4ef6-a174-df3a12ff2ca4/volumes/kubernetes.io~csi/pv--d18c09ba-ce50-475d-88d3-cad4eb603f5c/mount/new.etcd/member/snap/db, ownerUser: 65532, ownerGroup: 65532 kind: pod name: etcd-main-0 namespace: shoot--diki-comp--gcp
- containerName: etcd details: fileName: /var/lib/kubelet/pods/9e7e0135-30fe-4ef6-a174-df3a12ff2ca4/volumes/kubernetes.io~secret/etcd-ca/..2025_03_03_01_02_10.3050428415/bundle.crt, ownerUser: 0, ownerGroup: 65532 kind: pod name: etcd-main-0 namespace: shoot--diki-comp--gcp
- containerName: etcd details: fileName: /var/lib/kubelet/pods/9e7e0135-30fe-4ef6-a174-df3a12ff2ca4/volumes/kubernetes.io~secret/etcd-server-tls/..2025_03_03_01_02_10.3265591842/tls.key, ownerUser: 0, ownerGroup: 65532 kind: pod name: etcd-main-0 namespace: shoot--diki-comp--gcp
- containerName: etcd details: fileName: /var/lib/kubelet/pods/9e7e0135-30fe-4ef6-a174-df3a12ff2ca4/volumes/kubernetes.io~secret/etcd-server-tls/..2025_03_03_01_02_10.3265591842/tls.crt, ownerUser: 0, ownerGroup: 65532 kind: pod name: etcd-main-0 namespace: shoot--diki-comp--gcp
- containerName: etcd details: fileName: /var/lib/kubelet/pods/9e7e0135-30fe-4ef6-a174-df3a12ff2ca4/volumes/kubernetes.io~secret/etcd-client-tls/..2025_03_03_01_02_10.3223316245/tls.key, ownerUser: 0, ownerGroup: 65532 kind: pod name: etcd-main-0 namespace: shoot--diki-comp--gcp
- containerName: etcd details: fileName: /var/lib/kubelet/pods/9e7e0135-30fe-4ef6-a174-df3a12ff2ca4/volumes/kubernetes.io~secret/etcd-client-tls/..2025_03_03_01_02_10.3223316245/tls.crt, ownerUser: 0, ownerGroup: 65532 kind: pod name: etcd-main-0 namespace: shoot--diki-comp--gcp
- containerName: etcd details: fileName: /var/lib/kubelet/pods/9e7e0135-30fe-4ef6-a174-df3a12ff2ca4/volumes/kubernetes.io~secret/backup-restore-ca/..2025_03_03_01_02_10.3857247242/bundle.crt, ownerUser: 0, ownerGroup: 65532 kind: pod name: etcd-main-0 namespace: shoot--diki-comp--gcp
- containerName: etcd details: fileName: /var/lib/kubelet/pods/9e7e0135-30fe-4ef6-a174-df3a12ff2ca4/volumes/kubernetes.io~projected/kube-api-access-gardener/..2025_03_03_01_02_10.1269252471/ca.crt, ownerUser: 0, ownerGroup: 65532 kind: pod name: etcd-main-0 namespace: shoot--diki-comp--gcp
- containerName: etcd details: fileName: /var/lib/kubelet/pods/9e7e0135-30fe-4ef6-a174-df3a12ff2ca4/volumes/kubernetes.io~projected/kube-api-access-gardener/..2025_03_03_01_02_10.1269252471/namespace, ownerUser: 0, ownerGroup: 65532 kind: pod name: etcd-main-0 namespace: shoot--diki-comp--gcp
- containerName: etcd details: fileName: /var/lib/kubelet/pods/9e7e0135-30fe-4ef6-a174-df3a12ff2ca4/volumes/kubernetes.io~projected/kube-api-access-gardener/..2025_03_03_01_02_10.1269252471/token, ownerUser: 65532, ownerGroup: 65532 kind: pod name: etcd-main-0 namespace: shoot--diki-comp--gcp
- containerName: backup-restore details: fileName: /var/lib/kubelet/pods/4df10450-500f-42ec-bcfd-2416afeb4c18/volumes/kubernetes.io~csi/pv--07f5ab52-a744-4aed-a9b6-de384c841487/mount/new.etcd/member/snap/db, ownerUser: 65532, ownerGroup: 65532 kind: pod name: etcd-events-0 namespace: shoot--diki-comp--gcp
- containerName: backup-restore details: fileName: /var/lib/kubelet/pods/4df10450-500f-42ec-bcfd-2416afeb4c18/volumes/kubernetes.io~csi/pv--07f5ab52-a744-4aed-a9b6-de384c841487/mount/new.etcd/member/wal/0.tmp, ownerUser: 65532, ownerGroup: 65532 kind: pod name: etcd-events-0 namespace: shoot--diki-comp--gcp
- containerName: backup-restore details: fileName: /var/lib/kubelet/pods/4df10450-500f-42ec-bcfd-2416afeb4c18/volumes/kubernetes.io~csi/pv--07f5ab52-a744-4aed-a9b6-de384c841487/mount/new.etcd/member/wal/0000000000000000-0000000000000000.wal, ownerUser: 65532, ownerGroup: 65532 kind: pod name: etcd-events-0 namespace: shoot--diki-comp--gcp
- containerName: backup-restore details: fileName: /var/lib/kubelet/pods/4df10450-500f-42ec-bcfd-2416afeb4c18/volumes/kubernetes.io~csi/pv--07f5ab52-a744-4aed-a9b6-de384c841487/mount/safe_guard, ownerUser: 65532, ownerGroup: 65532 kind: pod name: etcd-events-0 namespace: shoot--diki-comp--gcp
- containerName: backup-restore details: fileName: /var/lib/kubelet/pods/4df10450-500f-42ec-bcfd-2416afeb4c18/volumes/kubernetes.io~configmap/etcd-config-file/..2025_03_03_01_02_10.3425273932/etcd.conf.yaml, ownerUser: 0, ownerGroup: 65532 kind: pod name: etcd-events-0 namespace: shoot--diki-comp--gcp
- containerName: backup-restore details: fileName: /var/lib/kubelet/pods/4df10450-500f-42ec-bcfd-2416afeb4c18/volumes/kubernetes.io~secret/backup-restore-server-tls/..2025_03_03_01_02_10.2781398980/tls.crt, ownerUser: 0, ownerGroup: 65532 kind: pod name: etcd-events-0 namespace: shoot--diki-comp--gcp
- containerName: backup-restore details: fileName: /var/lib/kubelet/pods/4df10450-500f-42ec-bcfd-2416afeb4c18/volumes/kubernetes.io~secret/backup-restore-server-tls/..2025_03_03_01_02_10.2781398980/tls.key, ownerUser: 0, ownerGroup: 65532 kind: pod name: etcd-events-0 namespace: shoot--diki-comp--gcp
- containerName: backup-restore details: fileName: /var/lib/kubelet/pods/4df10450-500f-42ec-bcfd-2416afeb4c18/volumes/kubernetes.io~secret/etcd-ca/..2025_03_03_01_02_10.307199430/bundle.crt, ownerUser: 0, ownerGroup: 65532 kind: pod name: etcd-events-0 namespace: shoot--diki-comp--gcp
- containerName: backup-restore details: fileName: /var/lib/kubelet/pods/4df10450-500f-42ec-bcfd-2416afeb4c18/volumes/kubernetes.io~secret/etcd-client-tls/..2025_03_03_01_02_10.4134020076/tls.key, ownerUser: 0, ownerGroup: 65532 kind: pod name: etcd-events-0 namespace: shoot--diki-comp--gcp
- containerName: backup-restore details: fileName: /var/lib/kubelet/pods/4df10450-500f-42ec-bcfd-2416afeb4c18/volumes/kubernetes.io~secret/etcd-client-tls/..2025_03_03_01_02_10.4134020076/tls.crt, ownerUser: 0, ownerGroup: 65532 kind: pod name: etcd-events-0 namespace: shoot--diki-comp--gcp
- containerName: backup-restore details: fileName: /var/lib/kubelet/pods/4df10450-500f-42ec-bcfd-2416afeb4c18/volumes/kubernetes.io~projected/kube-api-access-gardener/..2025_03_03_01_02_10.2368081495/token, ownerUser: 65532, ownerGroup: 65532 kind: pod name: etcd-events-0 namespace: shoot--diki-comp--gcp
- containerName: backup-restore details: fileName: /var/lib/kubelet/pods/4df10450-500f-42ec-bcfd-2416afeb4c18/volumes/kubernetes.io~projected/kube-api-access-gardener/..2025_03_03_01_02_10.2368081495/ca.crt, ownerUser: 0, ownerGroup: 65532 kind: pod name: etcd-events-0 namespace: shoot--diki-comp--gcp
- containerName: backup-restore details: fileName: /var/lib/kubelet/pods/4df10450-500f-42ec-bcfd-2416afeb4c18/volumes/kubernetes.io~projected/kube-api-access-gardener/..2025_03_03_01_02_10.2368081495/namespace, ownerUser: 0, ownerGroup: 65532 kind: pod name: etcd-events-0 namespace: shoot--diki-comp--gcp
- containerName: etcd details: fileName: /var/lib/kubelet/pods/4df10450-500f-42ec-bcfd-2416afeb4c18/volumes/kubernetes.io~csi/pv--07f5ab52-a744-4aed-a9b6-de384c841487/mount/new.etcd/member/snap/db, ownerUser: 65532, ownerGroup: 65532 kind: pod name: etcd-events-0 namespace: shoot--diki-comp--gcp
- containerName: etcd details: fileName: /var/lib/kubelet/pods/4df10450-500f-42ec-bcfd-2416afeb4c18/volumes/kubernetes.io~csi/pv--07f5ab52-a744-4aed-a9b6-de384c841487/mount/new.etcd/member/wal/0.tmp, ownerUser: 65532, ownerGroup: 65532 kind: pod name: etcd-events-0 namespace: shoot--diki-comp--gcp
- containerName: etcd details: fileName: /var/lib/kubelet/pods/4df10450-500f-42ec-bcfd-2416afeb4c18/volumes/kubernetes.io~csi/pv--07f5ab52-a744-4aed-a9b6-de384c841487/mount/new.etcd/member/wal/0000000000000000-0000000000000000.wal, ownerUser: 65532, ownerGroup: 65532 kind: pod name: etcd-events-0 namespace: shoot--diki-comp--gcp
- containerName: etcd details: fileName: /var/lib/kubelet/pods/4df10450-500f-42ec-bcfd-2416afeb4c18/volumes/kubernetes.io~csi/pv--07f5ab52-a744-4aed-a9b6-de384c841487/mount/safe_guard, ownerUser: 65532, ownerGroup: 65532 kind: pod name: etcd-events-0 namespace: shoot--diki-comp--gcp
- containerName: etcd details: fileName: /var/lib/kubelet/pods/4df10450-500f-42ec-bcfd-2416afeb4c18/volumes/kubernetes.io~secret/etcd-ca/..2025_03_03_01_02_10.307199430/bundle.crt, ownerUser: 0, ownerGroup: 65532 kind: pod name: etcd-events-0 namespace: shoot--diki-comp--gcp
- containerName: etcd details: fileName: /var/lib/kubelet/pods/4df10450-500f-42ec-bcfd-2416afeb4c18/volumes/kubernetes.io~secret/etcd-server-tls/..2025_03_03_01_02_10.1725835043/tls.key, ownerUser: 0, ownerGroup: 65532 kind: pod name: etcd-events-0 namespace: shoot--diki-comp--gcp
- containerName: etcd details: fileName: /var/lib/kubelet/pods/4df10450-500f-42ec-bcfd-2416afeb4c18/volumes/kubernetes.io~secret/etcd-server-tls/..2025_03_03_01_02_10.1725835043/tls.crt, ownerUser: 0, ownerGroup: 65532 kind: pod name: etcd-events-0 namespace: shoot--diki-comp--gcp
- containerName: etcd details: fileName: /var/lib/kubelet/pods/4df10450-500f-42ec-bcfd-2416afeb4c18/volumes/kubernetes.io~secret/etcd-client-tls/..2025_03_03_01_02_10.4134020076/tls.key, ownerUser: 0, ownerGroup: 65532 kind: pod name: etcd-events-0 namespace: shoot--diki-comp--gcp
- containerName: etcd details: fileName: /var/lib/kubelet/pods/4df10450-500f-42ec-bcfd-2416afeb4c18/volumes/kubernetes.io~secret/etcd-client-tls/..2025_03_03_01_02_10.4134020076/tls.crt, ownerUser: 0, ownerGroup: 65532 kind: pod name: etcd-events-0 namespace: shoot--diki-comp--gcp
- containerName: etcd details: fileName: /var/lib/kubelet/pods/4df10450-500f-42ec-bcfd-2416afeb4c18/volumes/kubernetes.io~secret/backup-restore-ca/..2025_03_03_01_02_10.1333348608/bundle.crt, ownerUser: 0, ownerGroup: 65532 kind: pod name: etcd-events-0 namespace: shoot--diki-comp--gcp
- containerName: etcd details: fileName: /var/lib/kubelet/pods/4df10450-500f-42ec-bcfd-2416afeb4c18/volumes/kubernetes.io~projected/kube-api-access-gardener/..2025_03_03_01_02_10.2368081495/token, ownerUser: 65532, ownerGroup: 65532 kind: pod name: etcd-events-0 namespace: shoot--diki-comp--gcp
- containerName: etcd details: fileName: /var/lib/kubelet/pods/4df10450-500f-42ec-bcfd-2416afeb4c18/volumes/kubernetes.io~projected/kube-api-access-gardener/..2025_03_03_01_02_10.2368081495/ca.crt, ownerUser: 0, ownerGroup: 65532 kind: pod name: etcd-events-0 namespace: shoot--diki-comp--gcp
- containerName: etcd details: fileName: /var/lib/kubelet/pods/4df10450-500f-42ec-bcfd-2416afeb4c18/volumes/kubernetes.io~projected/kube-api-access-gardener/..2025_03_03_01_02_10.2368081495/namespace, ownerUser: 0, ownerGroup: 65532 kind: pod name: etcd-events-0 namespace: shoot--diki-comp--gcp
- openstack
- containerName: etcd details: fileName: /var/lib/kubelet/pods/7a54bb1c-3f4b-4dc7-95f5-377c788ad051/volumes/kubernetes.io~csi/pv-shoot--garden--cc-ha-eu1-8f4bdf35-bd60-4e8c-b357-63a805f65254/mount/safe_guard, ownerUser: 65532, ownerGroup: 65532 kind: pod name: etcd-events-0 namespace: shoot--diki-comp--openstack
- containerName: etcd details: fileName: /var/lib/kubelet/pods/7a54bb1c-3f4b-4dc7-95f5-377c788ad051/volumes/kubernetes.io~csi/pv-shoot--garden--cc-ha-eu1-8f4bdf35-bd60-4e8c-b357-63a805f65254/mount/new.etcd/member/snap/db, ownerUser: 65532, ownerGroup: 65532 kind: pod name: etcd-events-0 namespace: shoot--diki-comp--openstack
- containerName: etcd details: fileName: /var/lib/kubelet/pods/7a54bb1c-3f4b-4dc7-95f5-377c788ad051/volumes/kubernetes.io~csi/pv-shoot--garden--cc-ha-eu1-8f4bdf35-bd60-4e8c-b357-63a805f65254/mount/new.etcd/member/wal/0.tmp, ownerUser: 65532, ownerGroup: 65532 kind: pod name: etcd-events-0 namespace: shoot--diki-comp--openstack
- containerName: etcd details: fileName: /var/lib/kubelet/pods/7a54bb1c-3f4b-4dc7-95f5-377c788ad051/volumes/kubernetes.io~csi/pv-shoot--garden--cc-ha-eu1-8f4bdf35-bd60-4e8c-b357-63a805f65254/mount/new.etcd/member/wal/0000000000000000-0000000000000000.wal, ownerUser: 65532, ownerGroup: 65532 kind: pod name: etcd-events-0 namespace: shoot--diki-comp--openstack
- containerName: etcd details: fileName: /var/lib/kubelet/pods/7a54bb1c-3f4b-4dc7-95f5-377c788ad051/volumes/kubernetes.io~secret/etcd-ca/..2025_03_03_01_02_05.439102016/bundle.crt, ownerUser: 0, ownerGroup: 65532 kind: pod name: etcd-events-0 namespace: shoot--diki-comp--openstack
- containerName: etcd details: fileName: /var/lib/kubelet/pods/7a54bb1c-3f4b-4dc7-95f5-377c788ad051/volumes/kubernetes.io~secret/etcd-server-tls/..2025_03_03_01_02_05.3893612686/tls.crt, ownerUser: 0, ownerGroup: 65532 kind: pod name: etcd-events-0 namespace: shoot--diki-comp--openstack
- containerName: etcd details: fileName: /var/lib/kubelet/pods/7a54bb1c-3f4b-4dc7-95f5-377c788ad051/volumes/kubernetes.io~secret/etcd-server-tls/..2025_03_03_01_02_05.3893612686/tls.key, ownerUser: 0, ownerGroup: 65532 kind: pod name: etcd-events-0 namespace: shoot--diki-comp--openstack
- containerName: etcd details: fileName: /var/lib/kubelet/pods/7a54bb1c-3f4b-4dc7-95f5-377c788ad051/volumes/kubernetes.io~secret/etcd-client-tls/..2025_03_03_01_02_05.1189205670/tls.crt, ownerUser: 0, ownerGroup: 65532 kind: pod name: etcd-events-0 namespace: shoot--diki-comp--openstack
- containerName: etcd details: fileName: /var/lib/kubelet/pods/7a54bb1c-3f4b-4dc7-95f5-377c788ad051/volumes/kubernetes.io~secret/etcd-client-tls/..2025_03_03_01_02_05.1189205670/tls.key, ownerUser: 0, ownerGroup: 65532 kind: pod name: etcd-events-0 namespace: shoot--diki-comp--openstack
- containerName: etcd details: fileName: /var/lib/kubelet/pods/7a54bb1c-3f4b-4dc7-95f5-377c788ad051/volumes/kubernetes.io~secret/backup-restore-ca/..2025_03_03_01_02_05.913416246/bundle.crt, ownerUser: 0, ownerGroup: 65532 kind: pod name: etcd-events-0 namespace: shoot--diki-comp--openstack
- containerName: etcd details: fileName: /var/lib/kubelet/pods/7a54bb1c-3f4b-4dc7-95f5-377c788ad051/volumes/kubernetes.io~projected/kube-api-access-gardener/..2025_03_03_01_02_05.3448401570/token, ownerUser: 65532, ownerGroup: 65532 kind: pod name: etcd-events-0 namespace: shoot--diki-comp--openstack
- containerName: etcd details: fileName: /var/lib/kubelet/pods/7a54bb1c-3f4b-4dc7-95f5-377c788ad051/volumes/kubernetes.io~projected/kube-api-access-gardener/..2025_03_03_01_02_05.3448401570/ca.crt, ownerUser: 0, ownerGroup: 65532 kind: pod name: etcd-events-0 namespace: shoot--diki-comp--openstack
- containerName: etcd details: fileName: /var/lib/kubelet/pods/7a54bb1c-3f4b-4dc7-95f5-377c788ad051/volumes/kubernetes.io~projected/kube-api-access-gardener/..2025_03_03_01_02_05.3448401570/namespace, ownerUser: 0, ownerGroup: 65532 kind: pod name: etcd-events-0 namespace: shoot--diki-comp--openstack
- containerName: backup-restore details: fileName: /var/lib/kubelet/pods/7a54bb1c-3f4b-4dc7-95f5-377c788ad051/volumes/kubernetes.io~csi/pv-shoot--garden--cc-ha-eu1-8f4bdf35-bd60-4e8c-b357-63a805f65254/mount/safe_guard, ownerUser: 65532, ownerGroup: 65532 kind: pod name: etcd-events-0 namespace: shoot--diki-comp--openstack
- containerName: backup-restore details: fileName: /var/lib/kubelet/pods/7a54bb1c-3f4b-4dc7-95f5-377c788ad051/volumes/kubernetes.io~csi/pv-shoot--garden--cc-ha-eu1-8f4bdf35-bd60-4e8c-b357-63a805f65254/mount/new.etcd/member/snap/db, ownerUser: 65532, ownerGroup: 65532 kind: pod name: etcd-events-0 namespace: shoot--diki-comp--openstack
- containerName: backup-restore details: fileName: /var/lib/kubelet/pods/7a54bb1c-3f4b-4dc7-95f5-377c788ad051/volumes/kubernetes.io~csi/pv-shoot--garden--cc-ha-eu1-8f4bdf35-bd60-4e8c-b357-63a805f65254/mount/new.etcd/member/wal/0.tmp, ownerUser: 65532, ownerGroup: 65532 kind: pod name: etcd-events-0 namespace: shoot--diki-comp--openstack
- containerName: backup-restore details: fileName: /var/lib/kubelet/pods/7a54bb1c-3f4b-4dc7-95f5-377c788ad051/volumes/kubernetes.io~csi/pv-shoot--garden--cc-ha-eu1-8f4bdf35-bd60-4e8c-b357-63a805f65254/mount/new.etcd/member/wal/0000000000000000-0000000000000000.wal, ownerUser: 65532, ownerGroup: 65532 kind: pod name: etcd-events-0 namespace: shoot--diki-comp--openstack
- containerName: backup-restore details: fileName: /var/lib/kubelet/pods/7a54bb1c-3f4b-4dc7-95f5-377c788ad051/volumes/kubernetes.io~configmap/etcd-config-file/..2025_03_03_01_02_05.4090004166/etcd.conf.yaml, ownerUser: 0, ownerGroup: 65532 kind: pod name: etcd-events-0 namespace: shoot--diki-comp--openstack
- containerName: backup-restore details: fileName: /var/lib/kubelet/pods/7a54bb1c-3f4b-4dc7-95f5-377c788ad051/volumes/kubernetes.io~secret/backup-restore-server-tls/..2025_03_03_01_02_05.4287174027/tls.crt, ownerUser: 0, ownerGroup: 65532 kind: pod name: etcd-events-0 namespace: shoot--diki-comp--openstack
- containerName: backup-restore details: fileName: /var/lib/kubelet/pods/7a54bb1c-3f4b-4dc7-95f5-377c788ad051/volumes/kubernetes.io~secret/backup-restore-server-tls/..2025_03_03_01_02_05.4287174027/tls.key, ownerUser: 0, ownerGroup: 65532 kind: pod name: etcd-events-0 namespace: shoot--diki-comp--openstack
- containerName: backup-restore details: fileName: /var/lib/kubelet/pods/7a54bb1c-3f4b-4dc7-95f5-377c788ad051/volumes/kubernetes.io~secret/etcd-ca/..2025_03_03_01_02_05.439102016/bundle.crt, ownerUser: 0, ownerGroup: 65532 kind: pod name: etcd-events-0 namespace: shoot--diki-comp--openstack
- containerName: backup-restore details: fileName: /var/lib/kubelet/pods/7a54bb1c-3f4b-4dc7-95f5-377c788ad051/volumes/kubernetes.io~secret/etcd-client-tls/..2025_03_03_01_02_05.1189205670/tls.crt, ownerUser: 0, ownerGroup: 65532 kind: pod name: etcd-events-0 namespace: shoot--diki-comp--openstack
- containerName: backup-restore details: fileName: /var/lib/kubelet/pods/7a54bb1c-3f4b-4dc7-95f5-377c788ad051/volumes/kubernetes.io~secret/etcd-client-tls/..2025_03_03_01_02_05.1189205670/tls.key, ownerUser: 0, ownerGroup: 65532 kind: pod name: etcd-events-0 namespace: shoot--diki-comp--openstack
- containerName: backup-restore details: fileName: /var/lib/kubelet/pods/7a54bb1c-3f4b-4dc7-95f5-377c788ad051/volumes/kubernetes.io~projected/kube-api-access-gardener/..2025_03_03_01_02_05.3448401570/token, ownerUser: 65532, ownerGroup: 65532 kind: pod name: etcd-events-0 namespace: shoot--diki-comp--openstack
- containerName: backup-restore details: fileName: /var/lib/kubelet/pods/7a54bb1c-3f4b-4dc7-95f5-377c788ad051/volumes/kubernetes.io~projected/kube-api-access-gardener/..2025_03_03_01_02_05.3448401570/ca.crt, ownerUser: 0, ownerGroup: 65532 kind: pod name: etcd-events-0 namespace: shoot--diki-comp--openstack
- containerName: backup-restore details: fileName: /var/lib/kubelet/pods/7a54bb1c-3f4b-4dc7-95f5-377c788ad051/volumes/kubernetes.io~projected/kube-api-access-gardener/..2025_03_03_01_02_05.3448401570/namespace, ownerUser: 0, ownerGroup: 65532 kind: pod name: etcd-events-0 namespace: shoot--diki-comp--openstack
- containerName: etcd details: fileName: /var/lib/kubelet/pods/576670d6-2e92-4999-a5db-46d1e5b110fc/volumes/kubernetes.io~csi/pv-shoot--garden--cc-ha-eu1-d359d687-b56a-4021-9607-7dec21e0a35d/mount/new.etcd/member/wal/0.tmp, ownerUser: 65532, ownerGroup: 65532 kind: pod name: etcd-main-0 namespace: shoot--diki-comp--openstack
- containerName: etcd details: fileName: /var/lib/kubelet/pods/576670d6-2e92-4999-a5db-46d1e5b110fc/volumes/kubernetes.io~csi/pv-shoot--garden--cc-ha-eu1-d359d687-b56a-4021-9607-7dec21e0a35d/mount/new.etcd/member/wal/0000000000000000-0000000000000000.wal, ownerUser: 65532, ownerGroup: 65532 kind: pod name: etcd-main-0 namespace: shoot--diki-comp--openstack
- containerName: etcd details: fileName: /var/lib/kubelet/pods/576670d6-2e92-4999-a5db-46d1e5b110fc/volumes/kubernetes.io~csi/pv-shoot--garden--cc-ha-eu1-d359d687-b56a-4021-9607-7dec21e0a35d/mount/new.etcd/member/snap/db, ownerUser: 65532, ownerGroup: 65532 kind: pod name: etcd-main-0 namespace: shoot--diki-comp--openstack
- containerName: etcd details: fileName: /var/lib/kubelet/pods/576670d6-2e92-4999-a5db-46d1e5b110fc/volumes/kubernetes.io~csi/pv-shoot--garden--cc-ha-eu1-d359d687-b56a-4021-9607-7dec21e0a35d/mount/safe_guard, ownerUser: 65532, ownerGroup: 65532 kind: pod name: etcd-main-0 namespace: shoot--diki-comp--openstack
- containerName: etcd details: fileName: /var/lib/kubelet/pods/576670d6-2e92-4999-a5db-46d1e5b110fc/volumes/kubernetes.io~secret/etcd-ca/..2025_03_03_01_02_06.696245391/bundle.crt, ownerUser: 0, ownerGroup: 65532 kind: pod name: etcd-main-0 namespace: shoot--diki-comp--openstack
- containerName: etcd details: fileName: /var/lib/kubelet/pods/576670d6-2e92-4999-a5db-46d1e5b110fc/volumes/kubernetes.io~secret/etcd-server-tls/..2025_03_03_01_02_06.2589642709/tls.key, ownerUser: 0, ownerGroup: 65532 kind: pod name: etcd-main-0 namespace: shoot--diki-comp--openstack
- containerName: etcd details: fileName: /var/lib/kubelet/pods/576670d6-2e92-4999-a5db-46d1e5b110fc/volumes/kubernetes.io~secret/etcd-server-tls/..2025_03_03_01_02_06.2589642709/tls.crt, ownerUser: 0, ownerGroup: 65532 kind: pod name: etcd-main-0 namespace: shoot--diki-comp--openstack
- containerName: etcd details: fileName: /var/lib/kubelet/pods/576670d6-2e92-4999-a5db-46d1e5b110fc/volumes/kubernetes.io~secret/etcd-client-tls/..2025_03_03_01_02_06.989578068/tls.key, ownerUser: 0, ownerGroup: 65532 kind: pod name: etcd-main-0 namespace: shoot--diki-comp--openstack
- containerName: etcd details: fileName: /var/lib/kubelet/pods/576670d6-2e92-4999-a5db-46d1e5b110fc/volumes/kubernetes.io~secret/etcd-client-tls/..2025_03_03_01_02_06.989578068/tls.crt, ownerUser: 0, ownerGroup: 65532 kind: pod name: etcd-main-0 namespace: shoot--diki-comp--openstack
- containerName: etcd details: fileName: /var/lib/kubelet/pods/576670d6-2e92-4999-a5db-46d1e5b110fc/volumes/kubernetes.io~secret/backup-restore-ca/..2025_03_03_01_02_06.2507918529/bundle.crt, ownerUser: 0, ownerGroup: 65532 kind: pod name: etcd-main-0 namespace: shoot--diki-comp--openstack
- containerName: etcd details: fileName: /var/lib/kubelet/pods/576670d6-2e92-4999-a5db-46d1e5b110fc/volumes/kubernetes.io~projected/kube-api-access-gardener/..2025_03_03_01_02_06.3524888998/token, ownerUser: 65532, ownerGroup: 65532 kind: pod name: etcd-main-0 namespace: shoot--diki-comp--openstack
- containerName: etcd details: fileName: /var/lib/kubelet/pods/576670d6-2e92-4999-a5db-46d1e5b110fc/volumes/kubernetes.io~projected/kube-api-access-gardener/..2025_03_03_01_02_06.3524888998/ca.crt, ownerUser: 0, ownerGroup: 65532 kind: pod name: etcd-main-0 namespace: shoot--diki-comp--openstack
- containerName: etcd details: fileName: /var/lib/kubelet/pods/576670d6-2e92-4999-a5db-46d1e5b110fc/volumes/kubernetes.io~projected/kube-api-access-gardener/..2025_03_03_01_02_06.3524888998/namespace, ownerUser: 0, ownerGroup: 65532 kind: pod name: etcd-main-0 namespace: shoot--diki-comp--openstack
- containerName: backup-restore details: fileName: /var/lib/kubelet/pods/576670d6-2e92-4999-a5db-46d1e5b110fc/volumes/kubernetes.io~secret/etcd-backup-secret/..2025_03_03_01_02_06.4250764035/applicationCredentialName, ownerUser: 0, ownerGroup: 65532 kind: pod name: etcd-main-0 namespace: shoot--diki-comp--openstack
- containerName: backup-restore details: fileName: /var/lib/kubelet/pods/576670d6-2e92-4999-a5db-46d1e5b110fc/volumes/kubernetes.io~secret/etcd-backup-secret/..2025_03_03_01_02_06.4250764035/applicationCredentialSecret, ownerUser: 0, ownerGroup: 65532 kind: pod name: etcd-main-0 namespace: shoot--diki-comp--openstack
- containerName: backup-restore details: fileName: /var/lib/kubelet/pods/576670d6-2e92-4999-a5db-46d1e5b110fc/volumes/kubernetes.io~secret/etcd-backup-secret/..2025_03_03_01_02_06.4250764035/authURL, ownerUser: 0, ownerGroup: 65532 kind: pod name: etcd-main-0 namespace: shoot--diki-comp--openstack
- containerName: backup-restore details: fileName: /var/lib/kubelet/pods/576670d6-2e92-4999-a5db-46d1e5b110fc/volumes/kubernetes.io~secret/etcd-backup-secret/..2025_03_03_01_02_06.4250764035/bucketName, ownerUser: 0, ownerGroup: 65532 kind: pod name: etcd-main-0 namespace: shoot--diki-comp--openstack
- containerName: backup-restore details: fileName: /var/lib/kubelet/pods/576670d6-2e92-4999-a5db-46d1e5b110fc/volumes/kubernetes.io~secret/etcd-backup-secret/..2025_03_03_01_02_06.4250764035/domainName, ownerUser: 0, ownerGroup: 65532 kind: pod name: etcd-main-0 namespace: shoot--diki-comp--openstack
- containerName: backup-restore details: fileName: /var/lib/kubelet/pods/576670d6-2e92-4999-a5db-46d1e5b110fc/volumes/kubernetes.io~secret/etcd-backup-secret/..2025_03_03_01_02_06.4250764035/region, ownerUser: 0, ownerGroup: 65532 kind: pod name: etcd-main-0 namespace: shoot--diki-comp--openstack
- containerName: backup-restore details: fileName: /var/lib/kubelet/pods/576670d6-2e92-4999-a5db-46d1e5b110fc/volumes/kubernetes.io~secret/etcd-backup-secret/..2025_03_03_01_02_06.4250764035/tenantName, ownerUser: 0, ownerGroup: 65532 kind: pod name: etcd-main-0 namespace: shoot--diki-comp--openstack
- containerName: backup-restore details: fileName: /var/lib/kubelet/pods/576670d6-2e92-4999-a5db-46d1e5b110fc/volumes/kubernetes.io~secret/etcd-backup-secret/..2025_03_03_01_02_06.4250764035/applicationCredentialID, ownerUser: 0, ownerGroup: 65532 kind: pod name: etcd-main-0 namespace: shoot--diki-comp--openstack
- containerName: backup-restore details: fileName: /var/lib/kubelet/pods/576670d6-2e92-4999-a5db-46d1e5b110fc/volumes/kubernetes.io~csi/pv-shoot--garden--cc-ha-eu1-d359d687-b56a-4021-9607-7dec21e0a35d/mount/new.etcd/member/wal/0.tmp, ownerUser: 65532, ownerGroup: 65532 kind: pod name: etcd-main-0 namespace: shoot--diki-comp--openstack
- containerName: backup-restore details: fileName: /var/lib/kubelet/pods/576670d6-2e92-4999-a5db-46d1e5b110fc/volumes/kubernetes.io~csi/pv-shoot--garden--cc-ha-eu1-d359d687-b56a-4021-9607-7dec21e0a35d/mount/new.etcd/member/wal/0000000000000000-0000000000000000.wal, ownerUser: 65532, ownerGroup: 65532 kind: pod name: etcd-main-0 namespace: shoot--diki-comp--openstack
- containerName: backup-restore details: fileName: /var/lib/kubelet/pods/576670d6-2e92-4999-a5db-46d1e5b110fc/volumes/kubernetes.io~csi/pv-shoot--garden--cc-ha-eu1-d359d687-b56a-4021-9607-7dec21e0a35d/mount/new.etcd/member/snap/db, ownerUser: 65532, ownerGroup: 65532 kind: pod name: etcd-main-0 namespace: shoot--diki-comp--openstack
- containerName: backup-restore details: fileName: /var/lib/kubelet/pods/576670d6-2e92-4999-a5db-46d1e5b110fc/volumes/kubernetes.io~csi/pv-shoot--garden--cc-ha-eu1-d359d687-b56a-4021-9607-7dec21e0a35d/mount/safe_guard, ownerUser: 65532, ownerGroup: 65532 kind: pod name: etcd-main-0 namespace: shoot--diki-comp--openstack
- containerName: backup-restore details: fileName: /var/lib/kubelet/pods/576670d6-2e92-4999-a5db-46d1e5b110fc/volumes/kubernetes.io~configmap/etcd-config-file/..2025_03_03_01_02_06.3871353697/etcd.conf.yaml, ownerUser: 0, ownerGroup: 65532 kind: pod name: etcd-main-0 namespace: shoot--diki-comp--openstack
- containerName: backup-restore details: fileName: /var/lib/kubelet/pods/576670d6-2e92-4999-a5db-46d1e5b110fc/volumes/kubernetes.io~secret/backup-restore-server-tls/..2025_03_03_01_02_06.2509886571/tls.crt, ownerUser: 0, ownerGroup: 65532 kind: pod name: etcd-main-0 namespace: shoot--diki-comp--openstack
- containerName: backup-restore details: fileName: /var/lib/kubelet/pods/576670d6-2e92-4999-a5db-46d1e5b110fc/volumes/kubernetes.io~secret/backup-restore-server-tls/..2025_03_03_01_02_06.2509886571/tls.key, ownerUser: 0, ownerGroup: 65532 kind: pod name: etcd-main-0 namespace: shoot--diki-comp--openstack
- containerName: backup-restore details: fileName: /var/lib/kubelet/pods/576670d6-2e92-4999-a5db-46d1e5b110fc/volumes/kubernetes.io~secret/etcd-ca/..2025_03_03_01_02_06.696245391/bundle.crt, ownerUser: 0, ownerGroup: 65532 kind: pod name: etcd-main-0 namespace: shoot--diki-comp--openstack
- containerName: backup-restore details: fileName: /var/lib/kubelet/pods/576670d6-2e92-4999-a5db-46d1e5b110fc/volumes/kubernetes.io~secret/etcd-client-tls/..2025_03_03_01_02_06.989578068/tls.key, ownerUser: 0, ownerGroup: 65532 kind: pod name: etcd-main-0 namespace: shoot--diki-comp--openstack
- containerName: backup-restore details: fileName: /var/lib/kubelet/pods/576670d6-2e92-4999-a5db-46d1e5b110fc/volumes/kubernetes.io~secret/etcd-client-tls/..2025_03_03_01_02_06.989578068/tls.crt, ownerUser: 0, ownerGroup: 65532 kind: pod name: etcd-main-0 namespace: shoot--diki-comp--openstack
- containerName: backup-restore details: fileName: /var/lib/kubelet/pods/576670d6-2e92-4999-a5db-46d1e5b110fc/volumes/kubernetes.io~projected/kube-api-access-gardener/..2025_03_03_01_02_06.3524888998/token, ownerUser: 65532, ownerGroup: 65532 kind: pod name: etcd-main-0 namespace: shoot--diki-comp--openstack
- containerName: backup-restore details: fileName: /var/lib/kubelet/pods/576670d6-2e92-4999-a5db-46d1e5b110fc/volumes/kubernetes.io~projected/kube-api-access-gardener/..2025_03_03_01_02_06.3524888998/ca.crt, ownerUser: 0, ownerGroup: 65532 kind: pod name: etcd-main-0 namespace: shoot--diki-comp--openstack
- containerName: backup-restore details: fileName: /var/lib/kubelet/pods/576670d6-2e92-4999-a5db-46d1e5b110fc/volumes/kubernetes.io~projected/kube-api-access-gardener/..2025_03_03_01_02_06.3524888998/namespace, ownerUser: 0, ownerGroup: 65532 kind: pod name: etcd-main-0 namespace: shoot--diki-comp--openstack
- aws
-
File has expected owners
-
242446 (Medium) - The Kubernetes conf files must be owned by root.
-
File has expected owners
- aws
- containerName: kube-controller-manager details: fileName: /var/lib/kubelet/pods/18ff08d4-cfa9-4958-8aca-ee41d678f1d3/volumes/kubernetes.io~secret/ca/..2025_03_03_01_12_51.2065093033/bundle.crt, ownerUser: 0, ownerGroup: 65532 kind: pod name: kube-controller-manager-c8b755f65-p4v5d namespace: shoot--diki-comp--aws
- containerName: kube-controller-manager details: fileName: /var/lib/kubelet/pods/18ff08d4-cfa9-4958-8aca-ee41d678f1d3/volumes/kubernetes.io~secret/ca-client/..2025_03_03_01_12_51.3807269484/ca.crt, ownerUser: 0, ownerGroup: 65532 kind: pod name: kube-controller-manager-c8b755f65-p4v5d namespace: shoot--diki-comp--aws
- containerName: kube-controller-manager details: fileName: /var/lib/kubelet/pods/18ff08d4-cfa9-4958-8aca-ee41d678f1d3/volumes/kubernetes.io~secret/ca-client/..2025_03_03_01_12_51.3807269484/ca.key, ownerUser: 0, ownerGroup: 65532 kind: pod name: kube-controller-manager-c8b755f65-p4v5d namespace: shoot--diki-comp--aws
- containerName: kube-controller-manager details: fileName: /var/lib/kubelet/pods/18ff08d4-cfa9-4958-8aca-ee41d678f1d3/volumes/kubernetes.io~secret/service-account-key/..2025_03_03_01_12_51.3826556335/id_rsa, ownerUser: 0, ownerGroup: 65532 kind: pod name: kube-controller-manager-c8b755f65-p4v5d namespace: shoot--diki-comp--aws
- containerName: kube-controller-manager details: fileName: /var/lib/kubelet/pods/18ff08d4-cfa9-4958-8aca-ee41d678f1d3/volumes/kubernetes.io~secret/server/..2025_03_03_01_12_51.4117152144/tls.key, ownerUser: 0, ownerGroup: 65532 kind: pod name: kube-controller-manager-c8b755f65-p4v5d namespace: shoot--diki-comp--aws
- containerName: kube-controller-manager details: fileName: /var/lib/kubelet/pods/18ff08d4-cfa9-4958-8aca-ee41d678f1d3/volumes/kubernetes.io~secret/server/..2025_03_03_01_12_51.4117152144/tls.crt, ownerUser: 0, ownerGroup: 65532 kind: pod name: kube-controller-manager-c8b755f65-p4v5d namespace: shoot--diki-comp--aws
- containerName: kube-controller-manager details: fileName: /var/lib/kubelet/pods/18ff08d4-cfa9-4958-8aca-ee41d678f1d3/volumes/kubernetes.io~secret/ca-kubelet/..2025_03_03_01_12_51.1942131254/ca.key, ownerUser: 0, ownerGroup: 65532 kind: pod name: kube-controller-manager-c8b755f65-p4v5d namespace: shoot--diki-comp--aws
- containerName: kube-controller-manager details: fileName: /var/lib/kubelet/pods/18ff08d4-cfa9-4958-8aca-ee41d678f1d3/volumes/kubernetes.io~secret/ca-kubelet/..2025_03_03_01_12_51.1942131254/ca.crt, ownerUser: 0, ownerGroup: 65532 kind: pod name: kube-controller-manager-c8b755f65-p4v5d namespace: shoot--diki-comp--aws
- containerName: kube-controller-manager details: fileName: /var/lib/kubelet/pods/18ff08d4-cfa9-4958-8aca-ee41d678f1d3/volumes/kubernetes.io~projected/kubeconfig/..2025_03_03_01_12_51.2019118523/kubeconfig, ownerUser: 0, ownerGroup: 65532 kind: pod name: kube-controller-manager-c8b755f65-p4v5d namespace: shoot--diki-comp--aws
- containerName: kube-controller-manager details: fileName: /var/lib/kubelet/pods/18ff08d4-cfa9-4958-8aca-ee41d678f1d3/volumes/kubernetes.io~projected/kubeconfig/..2025_03_03_01_12_51.2019118523/token, ownerUser: 0, ownerGroup: 65532 kind: pod name: kube-controller-manager-c8b755f65-p4v5d namespace: shoot--diki-comp--aws
- containerName: kube-scheduler details: fileName: /var/lib/kubelet/pods/ba7e893a-c91e-4051-9cc0-aefe8c1fe492/volumes/kubernetes.io~projected/client-ca/..2025_03_03_01_13_50.3972196173/bundle.crt, ownerUser: 0, ownerGroup: 65532 kind: pod name: kube-scheduler-678cb86cc-zm2cn namespace: shoot--diki-comp--aws
- containerName: kube-scheduler details: fileName: /var/lib/kubelet/pods/ba7e893a-c91e-4051-9cc0-aefe8c1fe492/volumes/kubernetes.io~secret/kube-scheduler-server/..2025_03_03_01_13_50.72514188/tls.crt, ownerUser: 0, ownerGroup: 65532 kind: pod name: kube-scheduler-678cb86cc-zm2cn namespace: shoot--diki-comp--aws
- containerName: kube-scheduler details: fileName: /var/lib/kubelet/pods/ba7e893a-c91e-4051-9cc0-aefe8c1fe492/volumes/kubernetes.io~secret/kube-scheduler-server/..2025_03_03_01_13_50.72514188/tls.key, ownerUser: 0, ownerGroup: 65532 kind: pod name: kube-scheduler-678cb86cc-zm2cn namespace: shoot--diki-comp--aws
- containerName: kube-scheduler details: fileName: /var/lib/kubelet/pods/ba7e893a-c91e-4051-9cc0-aefe8c1fe492/volumes/kubernetes.io~configmap/kube-scheduler-config/..2025_03_03_01_13_50.3890899486/config.yaml, ownerUser: 0, ownerGroup: 65532 kind: pod name: kube-scheduler-678cb86cc-zm2cn namespace: shoot--diki-comp--aws
- containerName: kube-scheduler details: fileName: /var/lib/kubelet/pods/ba7e893a-c91e-4051-9cc0-aefe8c1fe492/volumes/kubernetes.io~projected/kubeconfig/..2025_03_03_01_13_50.680304539/kubeconfig, ownerUser: 0, ownerGroup: 65532 kind: pod name: kube-scheduler-678cb86cc-zm2cn namespace: shoot--diki-comp--aws
- containerName: kube-scheduler details: fileName: /var/lib/kubelet/pods/ba7e893a-c91e-4051-9cc0-aefe8c1fe492/volumes/kubernetes.io~projected/kubeconfig/..2025_03_03_01_13_50.680304539/token, ownerUser: 0, ownerGroup: 65532 kind: pod name: kube-scheduler-678cb86cc-zm2cn namespace: shoot--diki-comp--aws
- containerName: kube-apiserver details: fileName: /var/lib/kubelet/pods/8453cbe8-7815-4009-a228-90aa1f22bdd9/volumes/kubernetes.io~secret/ca/..2025_03_03_01_12_52.2699305413/bundle.crt, ownerUser: 0, ownerGroup: 65532 kind: pod name: kube-apiserver-7c5459cc5b-kz2dz namespace: shoot--diki-comp--aws
- containerName: kube-apiserver details: fileName: /var/lib/kubelet/pods/8453cbe8-7815-4009-a228-90aa1f22bdd9/volumes/kubernetes.io~secret/ca-client/..2025_03_03_01_12_52.4078078265/bundle.crt, ownerUser: 0, ownerGroup: 65532 kind: pod name: kube-apiserver-7c5459cc5b-kz2dz namespace: shoot--diki-comp--aws
- containerName: kube-apiserver details: fileName: /var/lib/kubelet/pods/8453cbe8-7815-4009-a228-90aa1f22bdd9/volumes/kubernetes.io~secret/ca-front-proxy/..2025_03_03_01_12_52.689706272/bundle.crt, ownerUser: 0, ownerGroup: 65532 kind: pod name: kube-apiserver-7c5459cc5b-kz2dz namespace: shoot--diki-comp--aws
- containerName: kube-apiserver details: fileName: /var/lib/kubelet/pods/8453cbe8-7815-4009-a228-90aa1f22bdd9/volumes/kubernetes.io~secret/service-account-key/..2025_03_03_01_12_52.1369411553/id_rsa, ownerUser: 0, ownerGroup: 65532 kind: pod name: kube-apiserver-7c5459cc5b-kz2dz namespace: shoot--diki-comp--aws
- containerName: kube-apiserver details: fileName: /var/lib/kubelet/pods/8453cbe8-7815-4009-a228-90aa1f22bdd9/volumes/kubernetes.io~secret/service-account-key-bundle/..2025_03_03_01_12_52.1447808254/bundle.key, ownerUser: 0, ownerGroup: 65532 kind: pod name: kube-apiserver-7c5459cc5b-kz2dz namespace: shoot--diki-comp--aws
- containerName: kube-apiserver details: fileName: /var/lib/kubelet/pods/8453cbe8-7815-4009-a228-90aa1f22bdd9/volumes/kubernetes.io~secret/static-token/..2025_03_03_01_12_52.832936945/static_tokens.csv, ownerUser: 0, ownerGroup: 65532 kind: pod name: kube-apiserver-7c5459cc5b-kz2dz namespace: shoot--diki-comp--aws
- containerName: kube-apiserver details: fileName: /var/lib/kubelet/pods/8453cbe8-7815-4009-a228-90aa1f22bdd9/volumes/kubernetes.io~secret/kube-aggregator/..2025_03_03_01_12_52.3118211134/tls.key, ownerUser: 0, ownerGroup: 65532 kind: pod name: kube-apiserver-7c5459cc5b-kz2dz namespace: shoot--diki-comp--aws
- containerName: kube-apiserver details: fileName: /var/lib/kubelet/pods/8453cbe8-7815-4009-a228-90aa1f22bdd9/volumes/kubernetes.io~secret/kube-aggregator/..2025_03_03_01_12_52.3118211134/tls.crt, ownerUser: 0, ownerGroup: 65532 kind: pod name: kube-apiserver-7c5459cc5b-kz2dz namespace: shoot--diki-comp--aws
- containerName: kube-apiserver details: fileName: /var/lib/kubelet/pods/8453cbe8-7815-4009-a228-90aa1f22bdd9/volumes/kubernetes.io~secret/server/..2025_03_03_01_12_52.3201692229/tls.crt, ownerUser: 0, ownerGroup: 65532 kind: pod name: kube-apiserver-7c5459cc5b-kz2dz namespace: shoot--diki-comp--aws
- containerName: kube-apiserver details: fileName: /var/lib/kubelet/pods/8453cbe8-7815-4009-a228-90aa1f22bdd9/volumes/kubernetes.io~secret/server/..2025_03_03_01_12_52.3201692229/tls.key, ownerUser: 0, ownerGroup: 65532 kind: pod name: kube-apiserver-7c5459cc5b-kz2dz namespace: shoot--diki-comp--aws
- containerName: kube-apiserver details: fileName: /var/lib/kubelet/pods/8453cbe8-7815-4009-a228-90aa1f22bdd9/volumes/kubernetes.io~configmap/audit-policy-config/..2025_03_03_01_12_52.486086435/audit-policy.yaml, ownerUser: 0, ownerGroup: 65532 kind: pod name: kube-apiserver-7c5459cc5b-kz2dz namespace: shoot--diki-comp--aws
- containerName: kube-apiserver details: fileName: /var/lib/kubelet/pods/8453cbe8-7815-4009-a228-90aa1f22bdd9/volumes/kubernetes.io~configmap/admission-config/..2025_03_03_01_12_52.357858322/podsecurity.yaml, ownerUser: 0, ownerGroup: 65532 kind: pod name: kube-apiserver-7c5459cc5b-kz2dz namespace: shoot--diki-comp--aws
- containerName: kube-apiserver details: fileName: /var/lib/kubelet/pods/8453cbe8-7815-4009-a228-90aa1f22bdd9/volumes/kubernetes.io~configmap/admission-config/..2025_03_03_01_12_52.357858322/admission-configuration.yaml, ownerUser: 0, ownerGroup: 65532 kind: pod name: kube-apiserver-7c5459cc5b-kz2dz namespace: shoot--diki-comp--aws
- containerName: kube-apiserver details: fileName: /var/lib/kubelet/pods/8453cbe8-7815-4009-a228-90aa1f22bdd9/volumes/kubernetes.io~secret/etcd-encryption-secret/..2025_03_03_01_12_52.1226153874/encryption-configuration.yaml, ownerUser: 0, ownerGroup: 65532 kind: pod name: kube-apiserver-7c5459cc5b-kz2dz namespace: shoot--diki-comp--aws
- containerName: kube-apiserver details: fileName: /var/lib/kubelet/pods/8453cbe8-7815-4009-a228-90aa1f22bdd9/volumes/kubernetes.io~secret/ca-vpn/..2025_03_03_01_12_52.1763016478/bundle.crt, ownerUser: 0, ownerGroup: 65532 kind: pod name: kube-apiserver-7c5459cc5b-kz2dz namespace: shoot--diki-comp--aws
- containerName: kube-apiserver details: fileName: /var/lib/kubelet/pods/8453cbe8-7815-4009-a228-90aa1f22bdd9/volumes/kubernetes.io~configmap/egress-selection-config/..2025_03_03_01_12_52.2580397749/egress-selector-configuration.yaml, ownerUser: 0, ownerGroup: 65532 kind: pod name: kube-apiserver-7c5459cc5b-kz2dz namespace: shoot--diki-comp--aws
- containerName: kube-apiserver details: fileName: /var/lib/kubelet/pods/8453cbe8-7815-4009-a228-90aa1f22bdd9/volumes/kubernetes.io~secret/ca-kubelet/..2025_03_03_01_12_52.1090624067/bundle.crt, ownerUser: 0, ownerGroup: 65532 kind: pod name: kube-apiserver-7c5459cc5b-kz2dz namespace: shoot--diki-comp--aws
- containerName: kube-apiserver details: fileName: /var/lib/kubelet/pods/8453cbe8-7815-4009-a228-90aa1f22bdd9/volumes/kubernetes.io~secret/kubelet-client/..2025_03_03_01_12_52.3153250716/tls.crt, ownerUser: 0, ownerGroup: 65532 kind: pod name: kube-apiserver-7c5459cc5b-kz2dz namespace: shoot--diki-comp--aws
- containerName: kube-apiserver details: fileName: /var/lib/kubelet/pods/8453cbe8-7815-4009-a228-90aa1f22bdd9/volumes/kubernetes.io~secret/kubelet-client/..2025_03_03_01_12_52.3153250716/tls.key, ownerUser: 0, ownerGroup: 65532 kind: pod name: kube-apiserver-7c5459cc5b-kz2dz namespace: shoot--diki-comp--aws
- containerName: kube-apiserver details: fileName: /var/lib/kubelet/pods/8453cbe8-7815-4009-a228-90aa1f22bdd9/volumes/kubernetes.io~secret/ca-etcd/..2025_03_03_01_12_52.3384748314/bundle.crt, ownerUser: 0, ownerGroup: 65532 kind: pod name: kube-apiserver-7c5459cc5b-kz2dz namespace: shoot--diki-comp--aws
- containerName: kube-apiserver details: fileName: /var/lib/kubelet/pods/8453cbe8-7815-4009-a228-90aa1f22bdd9/volumes/kubernetes.io~secret/etcd-client/..2025_03_03_01_12_52.3609175546/tls.crt, ownerUser: 0, ownerGroup: 65532 kind: pod name: kube-apiserver-7c5459cc5b-kz2dz namespace: shoot--diki-comp--aws
- containerName: kube-apiserver details: fileName: /var/lib/kubelet/pods/8453cbe8-7815-4009-a228-90aa1f22bdd9/volumes/kubernetes.io~secret/etcd-client/..2025_03_03_01_12_52.3609175546/tls.key, ownerUser: 0, ownerGroup: 65532 kind: pod name: kube-apiserver-7c5459cc5b-kz2dz namespace: shoot--diki-comp--aws
- containerName: kube-apiserver details: fileName: /var/lib/kubelet/pods/8453cbe8-7815-4009-a228-90aa1f22bdd9/volumes/kubernetes.io~secret/tls-sni-0/..2025_03_03_01_12_52.3930137623/ca.crt, ownerUser: 0, ownerGroup: 65532 kind: pod name: kube-apiserver-7c5459cc5b-kz2dz namespace: shoot--diki-comp--aws
- containerName: kube-apiserver details: fileName: /var/lib/kubelet/pods/8453cbe8-7815-4009-a228-90aa1f22bdd9/volumes/kubernetes.io~secret/tls-sni-0/..2025_03_03_01_12_52.3930137623/tls.crt, ownerUser: 0, ownerGroup: 65532 kind: pod name: kube-apiserver-7c5459cc5b-kz2dz namespace: shoot--diki-comp--aws
- containerName: kube-apiserver details: fileName: /var/lib/kubelet/pods/8453cbe8-7815-4009-a228-90aa1f22bdd9/volumes/kubernetes.io~secret/tls-sni-0/..2025_03_03_01_12_52.3930137623/tls.key, ownerUser: 0, ownerGroup: 65532 kind: pod name: kube-apiserver-7c5459cc5b-kz2dz namespace: shoot--diki-comp--aws
- containerName: kube-apiserver details: fileName: /var/lib/kubelet/pods/8453cbe8-7815-4009-a228-90aa1f22bdd9/volumes/kubernetes.io~configmap/authorization-config/..2025_03_03_01_12_52.3590438838/config.yaml, ownerUser: 0, ownerGroup: 65532 kind: pod name: kube-apiserver-7c5459cc5b-kz2dz namespace: shoot--diki-comp--aws
- containerName: kube-apiserver details: fileName: /var/lib/kubelet/pods/8453cbe8-7815-4009-a228-90aa1f22bdd9/volumes/kubernetes.io~secret/authorization-kubeconfigs/..2025_03_03_01_12_52.1573721038/node-agent-authorizer-kubeconfig.yaml, ownerUser: 0, ownerGroup: 65532 kind: pod name: kube-apiserver-7c5459cc5b-kz2dz namespace: shoot--diki-comp--aws
- containerName: kube-apiserver details: fileName: /var/lib/kubelet/pods/8453cbe8-7815-4009-a228-90aa1f22bdd9/volumes/kubernetes.io~secret/http-proxy/..2025_03_03_01_12_52.1526321829/tls.crt, ownerUser: 0, ownerGroup: 65532 kind: pod name: kube-apiserver-7c5459cc5b-kz2dz namespace: shoot--diki-comp--aws
- containerName: kube-apiserver details: fileName: /var/lib/kubelet/pods/8453cbe8-7815-4009-a228-90aa1f22bdd9/volumes/kubernetes.io~secret/http-proxy/..2025_03_03_01_12_52.1526321829/tls.key, ownerUser: 0, ownerGroup: 65532 kind: pod name: kube-apiserver-7c5459cc5b-kz2dz namespace: shoot--diki-comp--aws
- azure
- containerName: kube-controller-manager details: fileName: /var/lib/kubelet/pods/5ce475eb-2980-488b-a80e-b6056cb46e48/volumes/kubernetes.io~secret/ca/..2025_03_03_01_14_45.1500377092/bundle.crt, ownerUser: 0, ownerGroup: 65532 kind: pod name: kube-controller-manager-9b68d9877-7d97p namespace: shoot--diki-comp--azure
- containerName: kube-controller-manager details: fileName: /var/lib/kubelet/pods/5ce475eb-2980-488b-a80e-b6056cb46e48/volumes/kubernetes.io~secret/ca-client/..2025_03_03_01_14_45.741295729/ca.key, ownerUser: 0, ownerGroup: 65532 kind: pod name: kube-controller-manager-9b68d9877-7d97p namespace: shoot--diki-comp--azure
- containerName: kube-controller-manager details: fileName: /var/lib/kubelet/pods/5ce475eb-2980-488b-a80e-b6056cb46e48/volumes/kubernetes.io~secret/ca-client/..2025_03_03_01_14_45.741295729/ca.crt, ownerUser: 0, ownerGroup: 65532 kind: pod name: kube-controller-manager-9b68d9877-7d97p namespace: shoot--diki-comp--azure
- containerName: kube-controller-manager details: fileName: /var/lib/kubelet/pods/5ce475eb-2980-488b-a80e-b6056cb46e48/volumes/kubernetes.io~secret/service-account-key/..2025_03_03_01_14_45.1357350738/id_rsa, ownerUser: 0, ownerGroup: 65532 kind: pod name: kube-controller-manager-9b68d9877-7d97p namespace: shoot--diki-comp--azure
- containerName: kube-controller-manager details: fileName: /var/lib/kubelet/pods/5ce475eb-2980-488b-a80e-b6056cb46e48/volumes/kubernetes.io~secret/server/..2025_03_03_01_14_45.592586788/tls.crt, ownerUser: 0, ownerGroup: 65532 kind: pod name: kube-controller-manager-9b68d9877-7d97p namespace: shoot--diki-comp--azure
- containerName: kube-controller-manager details: fileName: /var/lib/kubelet/pods/5ce475eb-2980-488b-a80e-b6056cb46e48/volumes/kubernetes.io~secret/server/..2025_03_03_01_14_45.592586788/tls.key, ownerUser: 0, ownerGroup: 65532 kind: pod name: kube-controller-manager-9b68d9877-7d97p namespace: shoot--diki-comp--azure
- containerName: kube-controller-manager details: fileName: /var/lib/kubelet/pods/5ce475eb-2980-488b-a80e-b6056cb46e48/volumes/kubernetes.io~secret/ca-kubelet/..2025_03_03_01_14_45.264971959/ca.crt, ownerUser: 0, ownerGroup: 65532 kind: pod name: kube-controller-manager-9b68d9877-7d97p namespace: shoot--diki-comp--azure
- containerName: kube-controller-manager details: fileName: /var/lib/kubelet/pods/5ce475eb-2980-488b-a80e-b6056cb46e48/volumes/kubernetes.io~secret/ca-kubelet/..2025_03_03_01_14_45.264971959/ca.key, ownerUser: 0, ownerGroup: 65532 kind: pod name: kube-controller-manager-9b68d9877-7d97p namespace: shoot--diki-comp--azure
- containerName: kube-controller-manager details: fileName: /var/lib/kubelet/pods/5ce475eb-2980-488b-a80e-b6056cb46e48/volumes/kubernetes.io~projected/kubeconfig/..2025_03_03_01_14_45.737211032/kubeconfig, ownerUser: 0, ownerGroup: 65532 kind: pod name: kube-controller-manager-9b68d9877-7d97p namespace: shoot--diki-comp--azure
- containerName: kube-controller-manager details: fileName: /var/lib/kubelet/pods/5ce475eb-2980-488b-a80e-b6056cb46e48/volumes/kubernetes.io~projected/kubeconfig/..2025_03_03_01_14_45.737211032/token, ownerUser: 0, ownerGroup: 65532 kind: pod name: kube-controller-manager-9b68d9877-7d97p namespace: shoot--diki-comp--azure
- containerName: kube-scheduler details: fileName: /var/lib/kubelet/pods/e13bc0c7-ae81-4b12-a8f0-7939662b6273/volumes/kubernetes.io~projected/client-ca/..2025_03_03_01_10_45.274742397/bundle.crt, ownerUser: 0, ownerGroup: 65532 kind: pod name: kube-scheduler-79b6c874b4-q7l8z namespace: shoot--diki-comp--azure
- containerName: kube-scheduler details: fileName: /var/lib/kubelet/pods/e13bc0c7-ae81-4b12-a8f0-7939662b6273/volumes/kubernetes.io~secret/kube-scheduler-server/..2025_03_03_01_10_45.3845255199/tls.key, ownerUser: 0, ownerGroup: 65532 kind: pod name: kube-scheduler-79b6c874b4-q7l8z namespace: shoot--diki-comp--azure
- containerName: kube-scheduler details: fileName: /var/lib/kubelet/pods/e13bc0c7-ae81-4b12-a8f0-7939662b6273/volumes/kubernetes.io~secret/kube-scheduler-server/..2025_03_03_01_10_45.3845255199/tls.crt, ownerUser: 0, ownerGroup: 65532 kind: pod name: kube-scheduler-79b6c874b4-q7l8z namespace: shoot--diki-comp--azure
- containerName: kube-scheduler details: fileName: /var/lib/kubelet/pods/e13bc0c7-ae81-4b12-a8f0-7939662b6273/volumes/kubernetes.io~configmap/kube-scheduler-config/..2025_03_03_01_10_45.864706336/config.yaml, ownerUser: 0, ownerGroup: 65532 kind: pod name: kube-scheduler-79b6c874b4-q7l8z namespace: shoot--diki-comp--azure
- containerName: kube-scheduler details: fileName: /var/lib/kubelet/pods/e13bc0c7-ae81-4b12-a8f0-7939662b6273/volumes/kubernetes.io~projected/kubeconfig/..2025_03_03_01_10_45.121736196/kubeconfig, ownerUser: 0, ownerGroup: 65532 kind: pod name: kube-scheduler-79b6c874b4-q7l8z namespace: shoot--diki-comp--azure
- containerName: kube-scheduler details: fileName: /var/lib/kubelet/pods/e13bc0c7-ae81-4b12-a8f0-7939662b6273/volumes/kubernetes.io~projected/kubeconfig/..2025_03_03_01_10_45.121736196/token, ownerUser: 0, ownerGroup: 65532 kind: pod name: kube-scheduler-79b6c874b4-q7l8z namespace: shoot--diki-comp--azure
- containerName: kube-apiserver details: fileName: /var/lib/kubelet/pods/56fb368e-1dfa-4d5c-86bc-d3233d8c5ff7/volumes/kubernetes.io~secret/ca/..2025_03_03_01_15_45.490470259/bundle.crt, ownerUser: 0, ownerGroup: 65532 kind: pod name: kube-apiserver-78d668b498-8xmjt namespace: shoot--diki-comp--azure
- containerName: kube-apiserver details: fileName: /var/lib/kubelet/pods/56fb368e-1dfa-4d5c-86bc-d3233d8c5ff7/volumes/kubernetes.io~secret/ca-client/..2025_03_03_01_15_45.439326823/bundle.crt, ownerUser: 0, ownerGroup: 65532 kind: pod name: kube-apiserver-78d668b498-8xmjt namespace: shoot--diki-comp--azure
- containerName: kube-apiserver details: fileName: /var/lib/kubelet/pods/56fb368e-1dfa-4d5c-86bc-d3233d8c5ff7/volumes/kubernetes.io~secret/ca-front-proxy/..2025_03_03_01_15_45.1918001777/bundle.crt, ownerUser: 0, ownerGroup: 65532 kind: pod name: kube-apiserver-78d668b498-8xmjt namespace: shoot--diki-comp--azure
- containerName: kube-apiserver details: fileName: /var/lib/kubelet/pods/56fb368e-1dfa-4d5c-86bc-d3233d8c5ff7/volumes/kubernetes.io~secret/service-account-key/..2025_03_03_01_15_45.3156265392/id_rsa, ownerUser: 0, ownerGroup: 65532 kind: pod name: kube-apiserver-78d668b498-8xmjt namespace: shoot--diki-comp--azure
- containerName: kube-apiserver details: fileName: /var/lib/kubelet/pods/56fb368e-1dfa-4d5c-86bc-d3233d8c5ff7/volumes/kubernetes.io~secret/service-account-key-bundle/..2025_03_03_01_15_45.731119053/bundle.key, ownerUser: 0, ownerGroup: 65532 kind: pod name: kube-apiserver-78d668b498-8xmjt namespace: shoot--diki-comp--azure
- containerName: kube-apiserver details: fileName: /var/lib/kubelet/pods/56fb368e-1dfa-4d5c-86bc-d3233d8c5ff7/volumes/kubernetes.io~secret/static-token/..2025_03_03_01_15_45.686938039/static_tokens.csv, ownerUser: 0, ownerGroup: 65532 kind: pod name: kube-apiserver-78d668b498-8xmjt namespace: shoot--diki-comp--azure
- containerName: kube-apiserver details: fileName: /var/lib/kubelet/pods/56fb368e-1dfa-4d5c-86bc-d3233d8c5ff7/volumes/kubernetes.io~secret/kube-aggregator/..2025_03_03_01_15_45.4210460930/tls.crt, ownerUser: 0, ownerGroup: 65532 kind: pod name: kube-apiserver-78d668b498-8xmjt namespace: shoot--diki-comp--azure
- containerName: kube-apiserver details: fileName: /var/lib/kubelet/pods/56fb368e-1dfa-4d5c-86bc-d3233d8c5ff7/volumes/kubernetes.io~secret/kube-aggregator/..2025_03_03_01_15_45.4210460930/tls.key, ownerUser: 0, ownerGroup: 65532 kind: pod name: kube-apiserver-78d668b498-8xmjt namespace: shoot--diki-comp--azure
- containerName: kube-apiserver details: fileName: /var/lib/kubelet/pods/56fb368e-1dfa-4d5c-86bc-d3233d8c5ff7/volumes/kubernetes.io~secret/server/..2025_03_03_01_15_45.940486963/tls.crt, ownerUser: 0, ownerGroup: 65532 kind: pod name: kube-apiserver-78d668b498-8xmjt namespace: shoot--diki-comp--azure
- containerName: kube-apiserver details: fileName: /var/lib/kubelet/pods/56fb368e-1dfa-4d5c-86bc-d3233d8c5ff7/volumes/kubernetes.io~secret/server/..2025_03_03_01_15_45.940486963/tls.key, ownerUser: 0, ownerGroup: 65532 kind: pod name: kube-apiserver-78d668b498-8xmjt namespace: shoot--diki-comp--azure
- containerName: kube-apiserver details: fileName: /var/lib/kubelet/pods/56fb368e-1dfa-4d5c-86bc-d3233d8c5ff7/volumes/kubernetes.io~configmap/audit-policy-config/..2025_03_03_01_15_45.1971687659/audit-policy.yaml, ownerUser: 0, ownerGroup: 65532 kind: pod name: kube-apiserver-78d668b498-8xmjt namespace: shoot--diki-comp--azure
- containerName: kube-apiserver details: fileName: /var/lib/kubelet/pods/56fb368e-1dfa-4d5c-86bc-d3233d8c5ff7/volumes/kubernetes.io~configmap/admission-config/..2025_03_03_01_15_45.355533268/podsecurity.yaml, ownerUser: 0, ownerGroup: 65532 kind: pod name: kube-apiserver-78d668b498-8xmjt namespace: shoot--diki-comp--azure
- containerName: kube-apiserver details: fileName: /var/lib/kubelet/pods/56fb368e-1dfa-4d5c-86bc-d3233d8c5ff7/volumes/kubernetes.io~configmap/admission-config/..2025_03_03_01_15_45.355533268/admission-configuration.yaml, ownerUser: 0, ownerGroup: 65532 kind: pod name: kube-apiserver-78d668b498-8xmjt namespace: shoot--diki-comp--azure
- containerName: kube-apiserver details: fileName: /var/lib/kubelet/pods/56fb368e-1dfa-4d5c-86bc-d3233d8c5ff7/volumes/kubernetes.io~secret/etcd-encryption-secret/..2025_03_03_01_15_45.1979425120/encryption-configuration.yaml, ownerUser: 0, ownerGroup: 65532 kind: pod name: kube-apiserver-78d668b498-8xmjt namespace: shoot--diki-comp--azure
- containerName: kube-apiserver details: fileName: /var/lib/kubelet/pods/56fb368e-1dfa-4d5c-86bc-d3233d8c5ff7/volumes/kubernetes.io~secret/ca-vpn/..2025_03_03_01_15_45.2369293391/bundle.crt, ownerUser: 0, ownerGroup: 65532 kind: pod name: kube-apiserver-78d668b498-8xmjt namespace: shoot--diki-comp--azure
- containerName: kube-apiserver details: fileName: /var/lib/kubelet/pods/56fb368e-1dfa-4d5c-86bc-d3233d8c5ff7/volumes/kubernetes.io~configmap/egress-selection-config/..2025_03_03_01_15_45.587715866/egress-selector-configuration.yaml, ownerUser: 0, ownerGroup: 65532 kind: pod name: kube-apiserver-78d668b498-8xmjt namespace: shoot--diki-comp--azure
- containerName: kube-apiserver details: fileName: /var/lib/kubelet/pods/56fb368e-1dfa-4d5c-86bc-d3233d8c5ff7/volumes/kubernetes.io~secret/ca-kubelet/..2025_03_03_01_15_45.3923805873/bundle.crt, ownerUser: 0, ownerGroup: 65532 kind: pod name: kube-apiserver-78d668b498-8xmjt namespace: shoot--diki-comp--azure
- containerName: kube-apiserver details: fileName: /var/lib/kubelet/pods/56fb368e-1dfa-4d5c-86bc-d3233d8c5ff7/volumes/kubernetes.io~secret/kubelet-client/..2025_03_03_01_15_45.4026042906/tls.crt, ownerUser: 0, ownerGroup: 65532 kind: pod name: kube-apiserver-78d668b498-8xmjt namespace: shoot--diki-comp--azure
- containerName: kube-apiserver details: fileName: /var/lib/kubelet/pods/56fb368e-1dfa-4d5c-86bc-d3233d8c5ff7/volumes/kubernetes.io~secret/kubelet-client/..2025_03_03_01_15_45.4026042906/tls.key, ownerUser: 0, ownerGroup: 65532 kind: pod name: kube-apiserver-78d668b498-8xmjt namespace: shoot--diki-comp--azure
- containerName: kube-apiserver details: fileName: /var/lib/kubelet/pods/56fb368e-1dfa-4d5c-86bc-d3233d8c5ff7/volumes/kubernetes.io~secret/ca-etcd/..2025_03_03_01_15_45.3336896937/bundle.crt, ownerUser: 0, ownerGroup: 65532 kind: pod name: kube-apiserver-78d668b498-8xmjt namespace: shoot--diki-comp--azure
- containerName: kube-apiserver details: fileName: /var/lib/kubelet/pods/56fb368e-1dfa-4d5c-86bc-d3233d8c5ff7/volumes/kubernetes.io~secret/etcd-client/..2025_03_03_01_15_45.330086599/tls.key, ownerUser: 0, ownerGroup: 65532 kind: pod name: kube-apiserver-78d668b498-8xmjt namespace: shoot--diki-comp--azure
- containerName: kube-apiserver details: fileName: /var/lib/kubelet/pods/56fb368e-1dfa-4d5c-86bc-d3233d8c5ff7/volumes/kubernetes.io~secret/etcd-client/..2025_03_03_01_15_45.330086599/tls.crt, ownerUser: 0, ownerGroup: 65532 kind: pod name: kube-apiserver-78d668b498-8xmjt namespace: shoot--diki-comp--azure
- containerName: kube-apiserver details: fileName: /var/lib/kubelet/pods/56fb368e-1dfa-4d5c-86bc-d3233d8c5ff7/volumes/kubernetes.io~secret/tls-sni-0/..2025_03_03_01_15_45.2219346093/tls.crt, ownerUser: 0, ownerGroup: 65532 kind: pod name: kube-apiserver-78d668b498-8xmjt namespace: shoot--diki-comp--azure
- containerName: kube-apiserver details: fileName: /var/lib/kubelet/pods/56fb368e-1dfa-4d5c-86bc-d3233d8c5ff7/volumes/kubernetes.io~secret/tls-sni-0/..2025_03_03_01_15_45.2219346093/tls.key, ownerUser: 0, ownerGroup: 65532 kind: pod name: kube-apiserver-78d668b498-8xmjt namespace: shoot--diki-comp--azure
- containerName: kube-apiserver details: fileName: /var/lib/kubelet/pods/56fb368e-1dfa-4d5c-86bc-d3233d8c5ff7/volumes/kubernetes.io~secret/tls-sni-0/..2025_03_03_01_15_45.2219346093/ca.crt, ownerUser: 0, ownerGroup: 65532 kind: pod name: kube-apiserver-78d668b498-8xmjt namespace: shoot--diki-comp--azure
- containerName: kube-apiserver details: fileName: /var/lib/kubelet/pods/56fb368e-1dfa-4d5c-86bc-d3233d8c5ff7/volumes/kubernetes.io~configmap/authorization-config/..2025_03_03_01_15_45.289722142/config.yaml, ownerUser: 0, ownerGroup: 65532 kind: pod name: kube-apiserver-78d668b498-8xmjt namespace: shoot--diki-comp--azure
- containerName: kube-apiserver details: fileName: /var/lib/kubelet/pods/56fb368e-1dfa-4d5c-86bc-d3233d8c5ff7/volumes/kubernetes.io~secret/authorization-kubeconfigs/..2025_03_03_01_15_45.3971532155/node-agent-authorizer-kubeconfig.yaml, ownerUser: 0, ownerGroup: 65532 kind: pod name: kube-apiserver-78d668b498-8xmjt namespace: shoot--diki-comp--azure
- containerName: kube-apiserver details: fileName: /var/lib/kubelet/pods/56fb368e-1dfa-4d5c-86bc-d3233d8c5ff7/volumes/kubernetes.io~secret/http-proxy/..2025_03_03_01_15_45.1994303313/tls.key, ownerUser: 0, ownerGroup: 65532 kind: pod name: kube-apiserver-78d668b498-8xmjt namespace: shoot--diki-comp--azure
- containerName: kube-apiserver details: fileName: /var/lib/kubelet/pods/56fb368e-1dfa-4d5c-86bc-d3233d8c5ff7/volumes/kubernetes.io~secret/http-proxy/..2025_03_03_01_15_45.1994303313/tls.crt, ownerUser: 0, ownerGroup: 65532 kind: pod name: kube-apiserver-78d668b498-8xmjt namespace: shoot--diki-comp--azure
- gcp
- containerName: kube-apiserver details: fileName: /var/lib/kubelet/pods/608b7ac2-2a64-4600-bffc-9ed14a956ed8/volumes/kubernetes.io~secret/ca/..2025_03_03_01_12_36.1174479734/bundle.crt, ownerUser: 0, ownerGroup: 65532 kind: pod name: kube-apiserver-857b9bd577-9k45w namespace: shoot--diki-comp--gcp
- containerName: kube-apiserver details: fileName: /var/lib/kubelet/pods/608b7ac2-2a64-4600-bffc-9ed14a956ed8/volumes/kubernetes.io~secret/ca-client/..2025_03_03_01_12_36.1728520434/bundle.crt, ownerUser: 0, ownerGroup: 65532 kind: pod name: kube-apiserver-857b9bd577-9k45w namespace: shoot--diki-comp--gcp
- containerName: kube-apiserver details: fileName: /var/lib/kubelet/pods/608b7ac2-2a64-4600-bffc-9ed14a956ed8/volumes/kubernetes.io~secret/ca-front-proxy/..2025_03_03_01_12_36.3572642423/bundle.crt, ownerUser: 0, ownerGroup: 65532 kind: pod name: kube-apiserver-857b9bd577-9k45w namespace: shoot--diki-comp--gcp
- containerName: kube-apiserver details: fileName: /var/lib/kubelet/pods/608b7ac2-2a64-4600-bffc-9ed14a956ed8/volumes/kubernetes.io~secret/service-account-key/..2025_03_03_01_12_36.1776806755/id_rsa, ownerUser: 0, ownerGroup: 65532 kind: pod name: kube-apiserver-857b9bd577-9k45w namespace: shoot--diki-comp--gcp
- containerName: kube-apiserver details: fileName: /var/lib/kubelet/pods/608b7ac2-2a64-4600-bffc-9ed14a956ed8/volumes/kubernetes.io~secret/service-account-key-bundle/..2025_03_03_01_12_36.2525007222/bundle.key, ownerUser: 0, ownerGroup: 65532 kind: pod name: kube-apiserver-857b9bd577-9k45w namespace: shoot--diki-comp--gcp
- containerName: kube-apiserver details: fileName: /var/lib/kubelet/pods/608b7ac2-2a64-4600-bffc-9ed14a956ed8/volumes/kubernetes.io~secret/static-token/..2025_03_03_01_12_36.773770721/static_tokens.csv, ownerUser: 0, ownerGroup: 65532 kind: pod name: kube-apiserver-857b9bd577-9k45w namespace: shoot--diki-comp--gcp
- containerName: kube-apiserver details: fileName: /var/lib/kubelet/pods/608b7ac2-2a64-4600-bffc-9ed14a956ed8/volumes/kubernetes.io~secret/kube-aggregator/..2025_03_03_01_12_36.3477424634/tls.crt, ownerUser: 0, ownerGroup: 65532 kind: pod name: kube-apiserver-857b9bd577-9k45w namespace: shoot--diki-comp--gcp
- containerName: kube-apiserver details: fileName: /var/lib/kubelet/pods/608b7ac2-2a64-4600-bffc-9ed14a956ed8/volumes/kubernetes.io~secret/kube-aggregator/..2025_03_03_01_12_36.3477424634/tls.key, ownerUser: 0, ownerGroup: 65532 kind: pod name: kube-apiserver-857b9bd577-9k45w namespace: shoot--diki-comp--gcp
- containerName: kube-apiserver details: fileName: /var/lib/kubelet/pods/608b7ac2-2a64-4600-bffc-9ed14a956ed8/volumes/kubernetes.io~secret/server/..2025_03_03_01_12_36.2325140443/tls.crt, ownerUser: 0, ownerGroup: 65532 kind: pod name: kube-apiserver-857b9bd577-9k45w namespace: shoot--diki-comp--gcp
- containerName: kube-apiserver details: fileName: /var/lib/kubelet/pods/608b7ac2-2a64-4600-bffc-9ed14a956ed8/volumes/kubernetes.io~secret/server/..2025_03_03_01_12_36.2325140443/tls.key, ownerUser: 0, ownerGroup: 65532 kind: pod name: kube-apiserver-857b9bd577-9k45w namespace: shoot--diki-comp--gcp
- containerName: kube-apiserver details: fileName: /var/lib/kubelet/pods/608b7ac2-2a64-4600-bffc-9ed14a956ed8/volumes/kubernetes.io~configmap/audit-policy-config/..2025_03_03_01_12_36.1416965152/audit-policy.yaml, ownerUser: 0, ownerGroup: 65532 kind: pod name: kube-apiserver-857b9bd577-9k45w namespace: shoot--diki-comp--gcp
- containerName: kube-apiserver details: fileName: /var/lib/kubelet/pods/608b7ac2-2a64-4600-bffc-9ed14a956ed8/volumes/kubernetes.io~configmap/admission-config/..2025_03_03_01_12_36.631428973/podsecurity.yaml, ownerUser: 0, ownerGroup: 65532 kind: pod name: kube-apiserver-857b9bd577-9k45w namespace: shoot--diki-comp--gcp
- containerName: kube-apiserver details: fileName: /var/lib/kubelet/pods/608b7ac2-2a64-4600-bffc-9ed14a956ed8/volumes/kubernetes.io~configmap/admission-config/..2025_03_03_01_12_36.631428973/admission-configuration.yaml, ownerUser: 0, ownerGroup: 65532 kind: pod name: kube-apiserver-857b9bd577-9k45w namespace: shoot--diki-comp--gcp
- containerName: kube-apiserver details: fileName: /var/lib/kubelet/pods/608b7ac2-2a64-4600-bffc-9ed14a956ed8/volumes/kubernetes.io~secret/etcd-encryption-secret/..2025_03_03_01_12_36.2591932554/encryption-configuration.yaml, ownerUser: 0, ownerGroup: 65532 kind: pod name: kube-apiserver-857b9bd577-9k45w namespace: shoot--diki-comp--gcp
- containerName: kube-apiserver details: fileName: /var/lib/kubelet/pods/608b7ac2-2a64-4600-bffc-9ed14a956ed8/volumes/kubernetes.io~secret/ca-vpn/..2025_03_03_01_12_36.2145202368/bundle.crt, ownerUser: 0, ownerGroup: 65532 kind: pod name: kube-apiserver-857b9bd577-9k45w namespace: shoot--diki-comp--gcp
- containerName: kube-apiserver details: fileName: /var/lib/kubelet/pods/608b7ac2-2a64-4600-bffc-9ed14a956ed8/volumes/kubernetes.io~configmap/egress-selection-config/..2025_03_03_01_12_36.3766393744/egress-selector-configuration.yaml, ownerUser: 0, ownerGroup: 65532 kind: pod name: kube-apiserver-857b9bd577-9k45w namespace: shoot--diki-comp--gcp
- containerName: kube-apiserver details: fileName: /var/lib/kubelet/pods/608b7ac2-2a64-4600-bffc-9ed14a956ed8/volumes/kubernetes.io~secret/ca-kubelet/..2025_03_03_01_12_36.282363630/bundle.crt, ownerUser: 0, ownerGroup: 65532 kind: pod name: kube-apiserver-857b9bd577-9k45w namespace: shoot--diki-comp--gcp
- containerName: kube-apiserver details: fileName: /var/lib/kubelet/pods/608b7ac2-2a64-4600-bffc-9ed14a956ed8/volumes/kubernetes.io~secret/kubelet-client/..2025_03_03_01_12_36.2748958189/tls.key, ownerUser: 0, ownerGroup: 65532 kind: pod name: kube-apiserver-857b9bd577-9k45w namespace: shoot--diki-comp--gcp
- containerName: kube-apiserver details: fileName: /var/lib/kubelet/pods/608b7ac2-2a64-4600-bffc-9ed14a956ed8/volumes/kubernetes.io~secret/kubelet-client/..2025_03_03_01_12_36.2748958189/tls.crt, ownerUser: 0, ownerGroup: 65532 kind: pod name: kube-apiserver-857b9bd577-9k45w namespace: shoot--diki-comp--gcp
- containerName: kube-apiserver details: fileName: /var/lib/kubelet/pods/608b7ac2-2a64-4600-bffc-9ed14a956ed8/volumes/kubernetes.io~secret/ca-etcd/..2025_03_03_01_12_36.3945965329/bundle.crt, ownerUser: 0, ownerGroup: 65532 kind: pod name: kube-apiserver-857b9bd577-9k45w namespace: shoot--diki-comp--gcp
- containerName: kube-apiserver details: fileName: /var/lib/kubelet/pods/608b7ac2-2a64-4600-bffc-9ed14a956ed8/volumes/kubernetes.io~secret/etcd-client/..2025_03_03_01_12_36.1279523670/tls.key, ownerUser: 0, ownerGroup: 65532 kind: pod name: kube-apiserver-857b9bd577-9k45w namespace: shoot--diki-comp--gcp
- containerName: kube-apiserver details: fileName: /var/lib/kubelet/pods/608b7ac2-2a64-4600-bffc-9ed14a956ed8/volumes/kubernetes.io~secret/etcd-client/..2025_03_03_01_12_36.1279523670/tls.crt, ownerUser: 0, ownerGroup: 65532 kind: pod name: kube-apiserver-857b9bd577-9k45w namespace: shoot--diki-comp--gcp
- containerName: kube-apiserver details: fileName: /var/lib/kubelet/pods/608b7ac2-2a64-4600-bffc-9ed14a956ed8/volumes/kubernetes.io~secret/tls-sni-0/..2025_03_03_01_12_36.278921696/tls.crt, ownerUser: 0, ownerGroup: 65532 kind: pod name: kube-apiserver-857b9bd577-9k45w namespace: shoot--diki-comp--gcp
- containerName: kube-apiserver details: fileName: /var/lib/kubelet/pods/608b7ac2-2a64-4600-bffc-9ed14a956ed8/volumes/kubernetes.io~secret/tls-sni-0/..2025_03_03_01_12_36.278921696/tls.key, ownerUser: 0, ownerGroup: 65532 kind: pod name: kube-apiserver-857b9bd577-9k45w namespace: shoot--diki-comp--gcp
- containerName: kube-apiserver details: fileName: /var/lib/kubelet/pods/608b7ac2-2a64-4600-bffc-9ed14a956ed8/volumes/kubernetes.io~secret/tls-sni-0/..2025_03_03_01_12_36.278921696/ca.crt, ownerUser: 0, ownerGroup: 65532 kind: pod name: kube-apiserver-857b9bd577-9k45w namespace: shoot--diki-comp--gcp
- containerName: kube-apiserver details: fileName: /var/lib/kubelet/pods/608b7ac2-2a64-4600-bffc-9ed14a956ed8/volumes/kubernetes.io~configmap/authorization-config/..2025_03_03_01_12_36.2067107765/config.yaml, ownerUser: 0, ownerGroup: 65532 kind: pod name: kube-apiserver-857b9bd577-9k45w namespace: shoot--diki-comp--gcp
- containerName: kube-apiserver details: fileName: /var/lib/kubelet/pods/608b7ac2-2a64-4600-bffc-9ed14a956ed8/volumes/kubernetes.io~secret/authorization-kubeconfigs/..2025_03_03_01_12_36.399083477/node-agent-authorizer-kubeconfig.yaml, ownerUser: 0, ownerGroup: 65532 kind: pod name: kube-apiserver-857b9bd577-9k45w namespace: shoot--diki-comp--gcp
- containerName: kube-apiserver details: fileName: /var/lib/kubelet/pods/608b7ac2-2a64-4600-bffc-9ed14a956ed8/volumes/kubernetes.io~secret/http-proxy/..2025_03_03_01_12_36.3122740563/tls.crt, ownerUser: 0, ownerGroup: 65532 kind: pod name: kube-apiserver-857b9bd577-9k45w namespace: shoot--diki-comp--gcp
- containerName: kube-apiserver details: fileName: /var/lib/kubelet/pods/608b7ac2-2a64-4600-bffc-9ed14a956ed8/volumes/kubernetes.io~secret/http-proxy/..2025_03_03_01_12_36.3122740563/tls.key, ownerUser: 0, ownerGroup: 65532 kind: pod name: kube-apiserver-857b9bd577-9k45w namespace: shoot--diki-comp--gcp
- containerName: kube-scheduler details: fileName: /var/lib/kubelet/pods/ecad819a-dc71-4e4e-a17e-11b91bd08505/volumes/kubernetes.io~projected/client-ca/..2025_03_03_01_09_35.3955725141/bundle.crt, ownerUser: 0, ownerGroup: 65532 kind: pod name: kube-scheduler-65fbc646c-ck6kp namespace: shoot--diki-comp--gcp
- containerName: kube-scheduler details: fileName: /var/lib/kubelet/pods/ecad819a-dc71-4e4e-a17e-11b91bd08505/volumes/kubernetes.io~secret/kube-scheduler-server/..2025_03_03_01_09_35.344821711/tls.crt, ownerUser: 0, ownerGroup: 65532 kind: pod name: kube-scheduler-65fbc646c-ck6kp namespace: shoot--diki-comp--gcp
- containerName: kube-scheduler details: fileName: /var/lib/kubelet/pods/ecad819a-dc71-4e4e-a17e-11b91bd08505/volumes/kubernetes.io~secret/kube-scheduler-server/..2025_03_03_01_09_35.344821711/tls.key, ownerUser: 0, ownerGroup: 65532 kind: pod name: kube-scheduler-65fbc646c-ck6kp namespace: shoot--diki-comp--gcp
- containerName: kube-scheduler details: fileName: /var/lib/kubelet/pods/ecad819a-dc71-4e4e-a17e-11b91bd08505/volumes/kubernetes.io~configmap/kube-scheduler-config/..2025_03_03_01_09_35.1550550768/config.yaml, ownerUser: 0, ownerGroup: 65532 kind: pod name: kube-scheduler-65fbc646c-ck6kp namespace: shoot--diki-comp--gcp
- containerName: kube-scheduler details: fileName: /var/lib/kubelet/pods/ecad819a-dc71-4e4e-a17e-11b91bd08505/volumes/kubernetes.io~projected/kubeconfig/..2025_03_03_01_09_35.2841337904/kubeconfig, ownerUser: 0, ownerGroup: 65532 kind: pod name: kube-scheduler-65fbc646c-ck6kp namespace: shoot--diki-comp--gcp
- containerName: kube-scheduler details: fileName: /var/lib/kubelet/pods/ecad819a-dc71-4e4e-a17e-11b91bd08505/volumes/kubernetes.io~projected/kubeconfig/..2025_03_03_01_09_35.2841337904/token, ownerUser: 0, ownerGroup: 65532 kind: pod name: kube-scheduler-65fbc646c-ck6kp namespace: shoot--diki-comp--gcp
- containerName: kube-controller-manager details: fileName: /var/lib/kubelet/pods/90f34bcf-ceda-4e65-8112-679308dd007f/volumes/kubernetes.io~secret/ca/..2025_03_03_01_16_36.2922815650/bundle.crt, ownerUser: 0, ownerGroup: 65532 kind: pod name: kube-controller-manager-d546c97bb-k5rsh namespace: shoot--diki-comp--gcp
- containerName: kube-controller-manager details: fileName: /var/lib/kubelet/pods/90f34bcf-ceda-4e65-8112-679308dd007f/volumes/kubernetes.io~secret/ca-client/..2025_03_03_01_16_36.3990387563/ca.crt, ownerUser: 0, ownerGroup: 65532 kind: pod name: kube-controller-manager-d546c97bb-k5rsh namespace: shoot--diki-comp--gcp
- containerName: kube-controller-manager details: fileName: /var/lib/kubelet/pods/90f34bcf-ceda-4e65-8112-679308dd007f/volumes/kubernetes.io~secret/ca-client/..2025_03_03_01_16_36.3990387563/ca.key, ownerUser: 0, ownerGroup: 65532 kind: pod name: kube-controller-manager-d546c97bb-k5rsh namespace: shoot--diki-comp--gcp
- containerName: kube-controller-manager details: fileName: /var/lib/kubelet/pods/90f34bcf-ceda-4e65-8112-679308dd007f/volumes/kubernetes.io~secret/service-account-key/..2025_03_03_01_16_36.1502439632/id_rsa, ownerUser: 0, ownerGroup: 65532 kind: pod name: kube-controller-manager-d546c97bb-k5rsh namespace: shoot--diki-comp--gcp
- containerName: kube-controller-manager details: fileName: /var/lib/kubelet/pods/90f34bcf-ceda-4e65-8112-679308dd007f/volumes/kubernetes.io~secret/server/..2025_03_03_01_16_36.256775248/tls.key, ownerUser: 0, ownerGroup: 65532 kind: pod name: kube-controller-manager-d546c97bb-k5rsh namespace: shoot--diki-comp--gcp
- containerName: kube-controller-manager details: fileName: /var/lib/kubelet/pods/90f34bcf-ceda-4e65-8112-679308dd007f/volumes/kubernetes.io~secret/server/..2025_03_03_01_16_36.256775248/tls.crt, ownerUser: 0, ownerGroup: 65532 kind: pod name: kube-controller-manager-d546c97bb-k5rsh namespace: shoot--diki-comp--gcp
- containerName: kube-controller-manager details: fileName: /var/lib/kubelet/pods/90f34bcf-ceda-4e65-8112-679308dd007f/volumes/kubernetes.io~secret/ca-kubelet/..2025_03_03_01_16_36.2964178139/ca.crt, ownerUser: 0, ownerGroup: 65532 kind: pod name: kube-controller-manager-d546c97bb-k5rsh namespace: shoot--diki-comp--gcp
- containerName: kube-controller-manager details: fileName: /var/lib/kubelet/pods/90f34bcf-ceda-4e65-8112-679308dd007f/volumes/kubernetes.io~secret/ca-kubelet/..2025_03_03_01_16_36.2964178139/ca.key, ownerUser: 0, ownerGroup: 65532 kind: pod name: kube-controller-manager-d546c97bb-k5rsh namespace: shoot--diki-comp--gcp
- containerName: kube-controller-manager details: fileName: /var/lib/kubelet/pods/90f34bcf-ceda-4e65-8112-679308dd007f/volumes/kubernetes.io~projected/kubeconfig/..2025_03_03_01_16_36.3218948895/kubeconfig, ownerUser: 0, ownerGroup: 65532 kind: pod name: kube-controller-manager-d546c97bb-k5rsh namespace: shoot--diki-comp--gcp
- containerName: kube-controller-manager details: fileName: /var/lib/kubelet/pods/90f34bcf-ceda-4e65-8112-679308dd007f/volumes/kubernetes.io~projected/kubeconfig/..2025_03_03_01_16_36.3218948895/token, ownerUser: 0, ownerGroup: 65532 kind: pod name: kube-controller-manager-d546c97bb-k5rsh namespace: shoot--diki-comp--gcp
- openstack
- containerName: kube-controller-manager details: fileName: /var/lib/kubelet/pods/c96aace0-5680-4b81-9225-cb3db3aed8bf/volumes/kubernetes.io~secret/ca/..2025_03_03_01_10_31.235358473/bundle.crt, ownerUser: 0, ownerGroup: 65532 kind: pod name: kube-controller-manager-6f87877757-4grgt namespace: shoot--diki-comp--openstack
- containerName: kube-controller-manager details: fileName: /var/lib/kubelet/pods/c96aace0-5680-4b81-9225-cb3db3aed8bf/volumes/kubernetes.io~secret/ca-client/..2025_03_03_01_10_31.3584083571/ca.crt, ownerUser: 0, ownerGroup: 65532 kind: pod name: kube-controller-manager-6f87877757-4grgt namespace: shoot--diki-comp--openstack
- containerName: kube-controller-manager details: fileName: /var/lib/kubelet/pods/c96aace0-5680-4b81-9225-cb3db3aed8bf/volumes/kubernetes.io~secret/ca-client/..2025_03_03_01_10_31.3584083571/ca.key, ownerUser: 0, ownerGroup: 65532 kind: pod name: kube-controller-manager-6f87877757-4grgt namespace: shoot--diki-comp--openstack
- containerName: kube-controller-manager details: fileName: /var/lib/kubelet/pods/c96aace0-5680-4b81-9225-cb3db3aed8bf/volumes/kubernetes.io~secret/service-account-key/..2025_03_03_01_10_31.493633103/id_rsa, ownerUser: 0, ownerGroup: 65532 kind: pod name: kube-controller-manager-6f87877757-4grgt namespace: shoot--diki-comp--openstack
- containerName: kube-controller-manager details: fileName: /var/lib/kubelet/pods/c96aace0-5680-4b81-9225-cb3db3aed8bf/volumes/kubernetes.io~secret/server/..2025_03_03_01_10_31.104263364/tls.crt, ownerUser: 0, ownerGroup: 65532 kind: pod name: kube-controller-manager-6f87877757-4grgt namespace: shoot--diki-comp--openstack
- containerName: kube-controller-manager details: fileName: /var/lib/kubelet/pods/c96aace0-5680-4b81-9225-cb3db3aed8bf/volumes/kubernetes.io~secret/server/..2025_03_03_01_10_31.104263364/tls.key, ownerUser: 0, ownerGroup: 65532 kind: pod name: kube-controller-manager-6f87877757-4grgt namespace: shoot--diki-comp--openstack
- containerName: kube-controller-manager details: fileName: /var/lib/kubelet/pods/c96aace0-5680-4b81-9225-cb3db3aed8bf/volumes/kubernetes.io~secret/ca-kubelet/..2025_03_03_01_10_31.1741570139/ca.crt, ownerUser: 0, ownerGroup: 65532 kind: pod name: kube-controller-manager-6f87877757-4grgt namespace: shoot--diki-comp--openstack
- containerName: kube-controller-manager details: fileName: /var/lib/kubelet/pods/c96aace0-5680-4b81-9225-cb3db3aed8bf/volumes/kubernetes.io~secret/ca-kubelet/..2025_03_03_01_10_31.1741570139/ca.key, ownerUser: 0, ownerGroup: 65532 kind: pod name: kube-controller-manager-6f87877757-4grgt namespace: shoot--diki-comp--openstack
- containerName: kube-controller-manager details: fileName: /var/lib/kubelet/pods/c96aace0-5680-4b81-9225-cb3db3aed8bf/volumes/kubernetes.io~projected/kubeconfig/..2025_03_03_01_10_31.1519645152/kubeconfig, ownerUser: 0, ownerGroup: 65532 kind: pod name: kube-controller-manager-6f87877757-4grgt namespace: shoot--diki-comp--openstack
- containerName: kube-controller-manager details: fileName: /var/lib/kubelet/pods/c96aace0-5680-4b81-9225-cb3db3aed8bf/volumes/kubernetes.io~projected/kubeconfig/..2025_03_03_01_10_31.1519645152/token, ownerUser: 0, ownerGroup: 65532 kind: pod name: kube-controller-manager-6f87877757-4grgt namespace: shoot--diki-comp--openstack
- containerName: kube-scheduler details: fileName: /var/lib/kubelet/pods/c079eae7-e4b5-4e7a-adfb-051573ecabea/volumes/kubernetes.io~projected/client-ca/..2025_03_03_01_12_28.1885206071/bundle.crt, ownerUser: 0, ownerGroup: 65532 kind: pod name: kube-scheduler-68854c4574-mbcz2 namespace: shoot--diki-comp--openstack
- containerName: kube-scheduler details: fileName: /var/lib/kubelet/pods/c079eae7-e4b5-4e7a-adfb-051573ecabea/volumes/kubernetes.io~secret/kube-scheduler-server/..2025_03_03_01_12_28.484866836/tls.crt, ownerUser: 0, ownerGroup: 65532 kind: pod name: kube-scheduler-68854c4574-mbcz2 namespace: shoot--diki-comp--openstack
- containerName: kube-scheduler details: fileName: /var/lib/kubelet/pods/c079eae7-e4b5-4e7a-adfb-051573ecabea/volumes/kubernetes.io~secret/kube-scheduler-server/..2025_03_03_01_12_28.484866836/tls.key, ownerUser: 0, ownerGroup: 65532 kind: pod name: kube-scheduler-68854c4574-mbcz2 namespace: shoot--diki-comp--openstack
- containerName: kube-scheduler details: fileName: /var/lib/kubelet/pods/c079eae7-e4b5-4e7a-adfb-051573ecabea/volumes/kubernetes.io~configmap/kube-scheduler-config/..2025_03_03_01_12_28.3053481480/config.yaml, ownerUser: 0, ownerGroup: 65532 kind: pod name: kube-scheduler-68854c4574-mbcz2 namespace: shoot--diki-comp--openstack
- containerName: kube-scheduler details: fileName: /var/lib/kubelet/pods/c079eae7-e4b5-4e7a-adfb-051573ecabea/volumes/kubernetes.io~projected/kubeconfig/..2025_03_03_01_12_28.705390985/kubeconfig, ownerUser: 0, ownerGroup: 65532 kind: pod name: kube-scheduler-68854c4574-mbcz2 namespace: shoot--diki-comp--openstack
- containerName: kube-scheduler details: fileName: /var/lib/kubelet/pods/c079eae7-e4b5-4e7a-adfb-051573ecabea/volumes/kubernetes.io~projected/kubeconfig/..2025_03_03_01_12_28.705390985/token, ownerUser: 0, ownerGroup: 65532 kind: pod name: kube-scheduler-68854c4574-mbcz2 namespace: shoot--diki-comp--openstack
- containerName: kube-apiserver details: fileName: /var/lib/kubelet/pods/adef142b-7c5d-4d1e-b0c2-9c575b9bbdea/volumes/kubernetes.io~secret/ca/..2025_03_03_01_14_29.407171975/bundle.crt, ownerUser: 0, ownerGroup: 65532 kind: pod name: kube-apiserver-5d6dcc9bd5-jsqrl namespace: shoot--diki-comp--openstack
- containerName: kube-apiserver details: fileName: /var/lib/kubelet/pods/adef142b-7c5d-4d1e-b0c2-9c575b9bbdea/volumes/kubernetes.io~secret/ca-client/..2025_03_03_01_14_29.2499436981/bundle.crt, ownerUser: 0, ownerGroup: 65532 kind: pod name: kube-apiserver-5d6dcc9bd5-jsqrl namespace: shoot--diki-comp--openstack
- containerName: kube-apiserver details: fileName: /var/lib/kubelet/pods/adef142b-7c5d-4d1e-b0c2-9c575b9bbdea/volumes/kubernetes.io~secret/ca-front-proxy/..2025_03_03_01_14_29.2116021732/bundle.crt, ownerUser: 0, ownerGroup: 65532 kind: pod name: kube-apiserver-5d6dcc9bd5-jsqrl namespace: shoot--diki-comp--openstack
- containerName: kube-apiserver details: fileName: /var/lib/kubelet/pods/adef142b-7c5d-4d1e-b0c2-9c575b9bbdea/volumes/kubernetes.io~secret/service-account-key/..2025_03_03_01_14_29.3091365546/id_rsa, ownerUser: 0, ownerGroup: 65532 kind: pod name: kube-apiserver-5d6dcc9bd5-jsqrl namespace: shoot--diki-comp--openstack
- containerName: kube-apiserver details: fileName: /var/lib/kubelet/pods/adef142b-7c5d-4d1e-b0c2-9c575b9bbdea/volumes/kubernetes.io~secret/service-account-key-bundle/..2025_03_03_01_14_29.3490774438/bundle.key, ownerUser: 0, ownerGroup: 65532 kind: pod name: kube-apiserver-5d6dcc9bd5-jsqrl namespace: shoot--diki-comp--openstack
- containerName: kube-apiserver details: fileName: /var/lib/kubelet/pods/adef142b-7c5d-4d1e-b0c2-9c575b9bbdea/volumes/kubernetes.io~secret/static-token/..2025_03_03_01_14_29.1078480729/static_tokens.csv, ownerUser: 0, ownerGroup: 65532 kind: pod name: kube-apiserver-5d6dcc9bd5-jsqrl namespace: shoot--diki-comp--openstack
- containerName: kube-apiserver details: fileName: /var/lib/kubelet/pods/adef142b-7c5d-4d1e-b0c2-9c575b9bbdea/volumes/kubernetes.io~secret/kube-aggregator/..2025_03_03_01_14_29.3516547635/tls.key, ownerUser: 0, ownerGroup: 65532 kind: pod name: kube-apiserver-5d6dcc9bd5-jsqrl namespace: shoot--diki-comp--openstack
- containerName: kube-apiserver details: fileName: /var/lib/kubelet/pods/adef142b-7c5d-4d1e-b0c2-9c575b9bbdea/volumes/kubernetes.io~secret/kube-aggregator/..2025_03_03_01_14_29.3516547635/tls.crt, ownerUser: 0, ownerGroup: 65532 kind: pod name: kube-apiserver-5d6dcc9bd5-jsqrl namespace: shoot--diki-comp--openstack
- containerName: kube-apiserver details: fileName: /var/lib/kubelet/pods/adef142b-7c5d-4d1e-b0c2-9c575b9bbdea/volumes/kubernetes.io~secret/server/..2025_03_03_01_14_29.1544469879/tls.key, ownerUser: 0, ownerGroup: 65532 kind: pod name: kube-apiserver-5d6dcc9bd5-jsqrl namespace: shoot--diki-comp--openstack
- containerName: kube-apiserver details: fileName: /var/lib/kubelet/pods/adef142b-7c5d-4d1e-b0c2-9c575b9bbdea/volumes/kubernetes.io~secret/server/..2025_03_03_01_14_29.1544469879/tls.crt, ownerUser: 0, ownerGroup: 65532 kind: pod name: kube-apiserver-5d6dcc9bd5-jsqrl namespace: shoot--diki-comp--openstack
- containerName: kube-apiserver details: fileName: /var/lib/kubelet/pods/adef142b-7c5d-4d1e-b0c2-9c575b9bbdea/volumes/kubernetes.io~configmap/audit-policy-config/..2025_03_03_01_14_29.1344451113/audit-policy.yaml, ownerUser: 0, ownerGroup: 65532 kind: pod name: kube-apiserver-5d6dcc9bd5-jsqrl namespace: shoot--diki-comp--openstack
- containerName: kube-apiserver details: fileName: /var/lib/kubelet/pods/adef142b-7c5d-4d1e-b0c2-9c575b9bbdea/volumes/kubernetes.io~configmap/admission-config/..2025_03_03_01_14_29.1664806219/podsecurity.yaml, ownerUser: 0, ownerGroup: 65532 kind: pod name: kube-apiserver-5d6dcc9bd5-jsqrl namespace: shoot--diki-comp--openstack
- containerName: kube-apiserver details: fileName: /var/lib/kubelet/pods/adef142b-7c5d-4d1e-b0c2-9c575b9bbdea/volumes/kubernetes.io~configmap/admission-config/..2025_03_03_01_14_29.1664806219/admission-configuration.yaml, ownerUser: 0, ownerGroup: 65532 kind: pod name: kube-apiserver-5d6dcc9bd5-jsqrl namespace: shoot--diki-comp--openstack
- containerName: kube-apiserver details: fileName: /var/lib/kubelet/pods/adef142b-7c5d-4d1e-b0c2-9c575b9bbdea/volumes/kubernetes.io~secret/etcd-encryption-secret/..2025_03_03_01_14_29.50359616/encryption-configuration.yaml, ownerUser: 0, ownerGroup: 65532 kind: pod name: kube-apiserver-5d6dcc9bd5-jsqrl namespace: shoot--diki-comp--openstack
- containerName: kube-apiserver details: fileName: /var/lib/kubelet/pods/adef142b-7c5d-4d1e-b0c2-9c575b9bbdea/volumes/kubernetes.io~secret/ca-vpn/..2025_03_03_01_14_29.4102013387/bundle.crt, ownerUser: 0, ownerGroup: 65532 kind: pod name: kube-apiserver-5d6dcc9bd5-jsqrl namespace: shoot--diki-comp--openstack
- containerName: kube-apiserver details: fileName: /var/lib/kubelet/pods/adef142b-7c5d-4d1e-b0c2-9c575b9bbdea/volumes/kubernetes.io~configmap/egress-selection-config/..2025_03_03_01_14_29.528667485/egress-selector-configuration.yaml, ownerUser: 0, ownerGroup: 65532 kind: pod name: kube-apiserver-5d6dcc9bd5-jsqrl namespace: shoot--diki-comp--openstack
- containerName: kube-apiserver details: fileName: /var/lib/kubelet/pods/adef142b-7c5d-4d1e-b0c2-9c575b9bbdea/volumes/kubernetes.io~secret/ca-kubelet/..2025_03_03_01_14_29.1069799842/bundle.crt, ownerUser: 0, ownerGroup: 65532 kind: pod name: kube-apiserver-5d6dcc9bd5-jsqrl namespace: shoot--diki-comp--openstack
- containerName: kube-apiserver details: fileName: /var/lib/kubelet/pods/adef142b-7c5d-4d1e-b0c2-9c575b9bbdea/volumes/kubernetes.io~secret/kubelet-client/..2025_03_03_01_14_29.798787007/tls.crt, ownerUser: 0, ownerGroup: 65532 kind: pod name: kube-apiserver-5d6dcc9bd5-jsqrl namespace: shoot--diki-comp--openstack
- containerName: kube-apiserver details: fileName: /var/lib/kubelet/pods/adef142b-7c5d-4d1e-b0c2-9c575b9bbdea/volumes/kubernetes.io~secret/kubelet-client/..2025_03_03_01_14_29.798787007/tls.key, ownerUser: 0, ownerGroup: 65532 kind: pod name: kube-apiserver-5d6dcc9bd5-jsqrl namespace: shoot--diki-comp--openstack
- containerName: kube-apiserver details: fileName: /var/lib/kubelet/pods/adef142b-7c5d-4d1e-b0c2-9c575b9bbdea/volumes/kubernetes.io~secret/ca-etcd/..2025_03_03_01_14_29.3554070821/bundle.crt, ownerUser: 0, ownerGroup: 65532 kind: pod name: kube-apiserver-5d6dcc9bd5-jsqrl namespace: shoot--diki-comp--openstack
- containerName: kube-apiserver details: fileName: /var/lib/kubelet/pods/adef142b-7c5d-4d1e-b0c2-9c575b9bbdea/volumes/kubernetes.io~secret/etcd-client/..2025_03_03_01_14_29.3024572020/tls.key, ownerUser: 0, ownerGroup: 65532 kind: pod name: kube-apiserver-5d6dcc9bd5-jsqrl namespace: shoot--diki-comp--openstack
- containerName: kube-apiserver details: fileName: /var/lib/kubelet/pods/adef142b-7c5d-4d1e-b0c2-9c575b9bbdea/volumes/kubernetes.io~secret/etcd-client/..2025_03_03_01_14_29.3024572020/tls.crt, ownerUser: 0, ownerGroup: 65532 kind: pod name: kube-apiserver-5d6dcc9bd5-jsqrl namespace: shoot--diki-comp--openstack
- containerName: kube-apiserver details: fileName: /var/lib/kubelet/pods/adef142b-7c5d-4d1e-b0c2-9c575b9bbdea/volumes/kubernetes.io~secret/tls-sni-0/..2025_03_03_01_14_29.4247416010/ca.crt, ownerUser: 0, ownerGroup: 65532 kind: pod name: kube-apiserver-5d6dcc9bd5-jsqrl namespace: shoot--diki-comp--openstack
- containerName: kube-apiserver details: fileName: /var/lib/kubelet/pods/adef142b-7c5d-4d1e-b0c2-9c575b9bbdea/volumes/kubernetes.io~secret/tls-sni-0/..2025_03_03_01_14_29.4247416010/tls.crt, ownerUser: 0, ownerGroup: 65532 kind: pod name: kube-apiserver-5d6dcc9bd5-jsqrl namespace: shoot--diki-comp--openstack
- containerName: kube-apiserver details: fileName: /var/lib/kubelet/pods/adef142b-7c5d-4d1e-b0c2-9c575b9bbdea/volumes/kubernetes.io~secret/tls-sni-0/..2025_03_03_01_14_29.4247416010/tls.key, ownerUser: 0, ownerGroup: 65532 kind: pod name: kube-apiserver-5d6dcc9bd5-jsqrl namespace: shoot--diki-comp--openstack
- containerName: kube-apiserver details: fileName: /var/lib/kubelet/pods/adef142b-7c5d-4d1e-b0c2-9c575b9bbdea/volumes/kubernetes.io~configmap/authorization-config/..2025_03_03_01_14_29.1394916609/config.yaml, ownerUser: 0, ownerGroup: 65532 kind: pod name: kube-apiserver-5d6dcc9bd5-jsqrl namespace: shoot--diki-comp--openstack
- containerName: kube-apiserver details: fileName: /var/lib/kubelet/pods/adef142b-7c5d-4d1e-b0c2-9c575b9bbdea/volumes/kubernetes.io~secret/authorization-kubeconfigs/..2025_03_03_01_14_29.4088325230/node-agent-authorizer-kubeconfig.yaml, ownerUser: 0, ownerGroup: 65532 kind: pod name: kube-apiserver-5d6dcc9bd5-jsqrl namespace: shoot--diki-comp--openstack
- containerName: kube-apiserver details: fileName: /var/lib/kubelet/pods/adef142b-7c5d-4d1e-b0c2-9c575b9bbdea/volumes/kubernetes.io~secret/http-proxy/..2025_03_03_01_14_29.2845433525/tls.crt, ownerUser: 0, ownerGroup: 65532 kind: pod name: kube-apiserver-5d6dcc9bd5-jsqrl namespace: shoot--diki-comp--openstack
- containerName: kube-apiserver details: fileName: /var/lib/kubelet/pods/adef142b-7c5d-4d1e-b0c2-9c575b9bbdea/volumes/kubernetes.io~secret/http-proxy/..2025_03_03_01_14_29.2845433525/tls.key, ownerUser: 0, ownerGroup: 65532 kind: pod name: kube-apiserver-5d6dcc9bd5-jsqrl namespace: shoot--diki-comp--openstack
- aws
-
File has expected owners
-
242447 (Medium) - The Kubernetes Kube Proxy kubeconfig must have file permissions set to 644 or more restrictive.
-
File has expected permissions
- aws
- details: fileName: /var/lib/kubelet/pods/67fdc3bf-da6b-4131-84b0-3facad7ed698/volumes/kubernetes.io~configmap/kube-proxy-config/config.yaml, permissions: 644 kind: pod name: kube-proxy-worker-kkfk1-v1.31.4-hkmbk namespace: kube-system
- details: fileName: /var/lib/kubelet/pods/67fdc3bf-da6b-4131-84b0-3facad7ed698/volumes/kubernetes.io~secret/kubeconfig/kubeconfig, permissions: 644 kind: pod name: kube-proxy-worker-kkfk1-v1.31.4-hkmbk namespace: kube-system
- azure
- details: fileName: /var/lib/kubelet/pods/cba5277c-2ea9-4ff9-aa0f-720ebc55a428/volumes/kubernetes.io~configmap/kube-proxy-config/config.yaml, permissions: 644 kind: pod name: kube-proxy-worker-g7p4p-v1.31.4-r8rjr namespace: kube-system
- details: fileName: /var/lib/kubelet/pods/cba5277c-2ea9-4ff9-aa0f-720ebc55a428/volumes/kubernetes.io~secret/kubeconfig/kubeconfig, permissions: 644 kind: pod name: kube-proxy-worker-g7p4p-v1.31.4-r8rjr namespace: kube-system
- gcp
- details: fileName: /var/lib/kubelet/pods/3653b577-e930-4df8-b0b6-c1dee555c93f/volumes/kubernetes.io~configmap/kube-proxy-config/config.yaml, permissions: 644 kind: pod name: kube-proxy-worker-bex82-v1.31.4-nt98w namespace: kube-system
- details: fileName: /var/lib/kubelet/pods/3653b577-e930-4df8-b0b6-c1dee555c93f/volumes/kubernetes.io~secret/kubeconfig/kubeconfig, permissions: 644 kind: pod name: kube-proxy-worker-bex82-v1.31.4-nt98w namespace: kube-system
- openstack
- details: fileName: /var/lib/kubelet/pods/9618e3a0-8bdf-4e84-ae68-88437c5e8fee/volumes/kubernetes.io~configmap/kube-proxy-config/config.yaml, permissions: 644 kind: pod name: kube-proxy-worker-dqty2-v1.31.4-tpl27 namespace: kube-system
- details: fileName: /var/lib/kubelet/pods/9618e3a0-8bdf-4e84-ae68-88437c5e8fee/volumes/kubernetes.io~secret/kubeconfig/kubeconfig, permissions: 644 kind: pod name: kube-proxy-worker-dqty2-v1.31.4-tpl27 namespace: kube-system
- aws
-
File has expected permissions
-
242448 (Medium) - The Kubernetes Kube Proxy kubeconfig must be owned by root.
-
File has expected owners
- aws
- details: fileName: /var/lib/kubelet/pods/67fdc3bf-da6b-4131-84b0-3facad7ed698/volumes/kubernetes.io~configmap/kube-proxy-config/config.yaml, ownerUser: 0, ownerGroup: 0 kind: pod name: kube-proxy-worker-kkfk1-v1.31.4-hkmbk namespace: kube-system
- details: fileName: /var/lib/kubelet/pods/67fdc3bf-da6b-4131-84b0-3facad7ed698/volumes/kubernetes.io~secret/kubeconfig/kubeconfig, ownerUser: 0, ownerGroup: 0 kind: pod name: kube-proxy-worker-kkfk1-v1.31.4-hkmbk namespace: kube-system
- azure
- details: fileName: /var/lib/kubelet/pods/cba5277c-2ea9-4ff9-aa0f-720ebc55a428/volumes/kubernetes.io~configmap/kube-proxy-config/config.yaml, ownerUser: 0, ownerGroup: 0 kind: pod name: kube-proxy-worker-g7p4p-v1.31.4-r8rjr namespace: kube-system
- details: fileName: /var/lib/kubelet/pods/cba5277c-2ea9-4ff9-aa0f-720ebc55a428/volumes/kubernetes.io~secret/kubeconfig/kubeconfig, ownerUser: 0, ownerGroup: 0 kind: pod name: kube-proxy-worker-g7p4p-v1.31.4-r8rjr namespace: kube-system
- gcp
- details: fileName: /var/lib/kubelet/pods/3653b577-e930-4df8-b0b6-c1dee555c93f/volumes/kubernetes.io~configmap/kube-proxy-config/config.yaml, ownerUser: 0, ownerGroup: 0 kind: pod name: kube-proxy-worker-bex82-v1.31.4-nt98w namespace: kube-system
- details: fileName: /var/lib/kubelet/pods/3653b577-e930-4df8-b0b6-c1dee555c93f/volumes/kubernetes.io~secret/kubeconfig/kubeconfig, ownerUser: 0, ownerGroup: 0 kind: pod name: kube-proxy-worker-bex82-v1.31.4-nt98w namespace: kube-system
- openstack
- details: fileName: /var/lib/kubelet/pods/9618e3a0-8bdf-4e84-ae68-88437c5e8fee/volumes/kubernetes.io~configmap/kube-proxy-config/config.yaml, ownerUser: 0, ownerGroup: 0 kind: pod name: kube-proxy-worker-dqty2-v1.31.4-tpl27 namespace: kube-system
- details: fileName: /var/lib/kubelet/pods/9618e3a0-8bdf-4e84-ae68-88437c5e8fee/volumes/kubernetes.io~secret/kubeconfig/kubeconfig, ownerUser: 0, ownerGroup: 0 kind: pod name: kube-proxy-worker-dqty2-v1.31.4-tpl27 namespace: kube-system
- aws
-
File has expected owners
-
242449 (Medium) - The Kubernetes Kubelet certificate authority file must have file permissions set to 644 or more restrictive.
-
File has expected permissions
- aws
- details: fileName: /var/lib/kubelet/ca.crt, permissions: 644 kind: node name: ip-IP-Address.eu-west-1.compute.internal
- azure
- details: fileName: /var/lib/kubelet/ca.crt, permissions: 644 kind: node name: shoot--diki-comp--azure-worker-g7p4p-z3-7ccb8-2wxkr
- gcp
- details: fileName: /var/lib/kubelet/ca.crt, permissions: 644 kind: node name: shoot--diki-comp--gcp-worker-bex82-z1-d8757-66str
- openstack
- details: fileName: /var/lib/kubelet/ca.crt, permissions: 644 kind: node name: shoot--diki-comp--openstack-worker-dqty2-z1-6c54d-j8jtj
- aws
-
File has expected permissions
-
242450 (Medium) - The Kubernetes Kubelet certificate authority must be owned by root.
-
File has expected owners
- aws
- details: fileName: /var/lib/kubelet/ca.crt, ownerUser: 0, ownerGroup: 0 kind: node name: ip-IP-Address.eu-west-1.compute.internal
- azure
- details: fileName: /var/lib/kubelet/ca.crt, ownerUser: 0, ownerGroup: 0 kind: node name: shoot--diki-comp--azure-worker-g7p4p-z3-7ccb8-2wxkr
- gcp
- details: fileName: /var/lib/kubelet/ca.crt, ownerUser: 0, ownerGroup: 0 kind: node name: shoot--diki-comp--gcp-worker-bex82-z1-d8757-66str
- openstack
- details: fileName: /var/lib/kubelet/ca.crt, ownerUser: 0, ownerGroup: 0 kind: node name: shoot--diki-comp--openstack-worker-dqty2-z1-6c54d-j8jtj
- aws
-
File has expected owners
-
242451 (Medium) - The Kubernetes component PKI must be owned by root.
-
File has expected owners
- aws
- cluster: seed containerName: etcd details: fileName: /var/lib/kubelet/pods/d46d0708-802d-43a7-bdf8-646912b7cb62/volumes/kubernetes.io~secret/etcd-ca/..2025_03_03_01_02_01.732820315/bundle.crt, ownerUser: 0, ownerGroup: 65532 kind: pod name: etcd-main-0 namespace: shoot--diki-comp--aws
- cluster: seed containerName: etcd details: fileName: /var/lib/kubelet/pods/d46d0708-802d-43a7-bdf8-646912b7cb62/volumes/kubernetes.io~secret/etcd-server-tls/..2025_03_03_01_02_01.2596588739/tls.crt, ownerUser: 0, ownerGroup: 65532 kind: pod name: etcd-main-0 namespace: shoot--diki-comp--aws
- cluster: seed containerName: etcd details: fileName: /var/lib/kubelet/pods/d46d0708-802d-43a7-bdf8-646912b7cb62/volumes/kubernetes.io~secret/etcd-server-tls/..2025_03_03_01_02_01.2596588739/tls.key, ownerUser: 0, ownerGroup: 65532 kind: pod name: etcd-main-0 namespace: shoot--diki-comp--aws
- cluster: seed containerName: etcd details: fileName: /var/lib/kubelet/pods/d46d0708-802d-43a7-bdf8-646912b7cb62/volumes/kubernetes.io~secret/etcd-client-tls/..2025_03_03_01_02_01.1252005562/tls.key, ownerUser: 0, ownerGroup: 65532 kind: pod name: etcd-main-0 namespace: shoot--diki-comp--aws
- cluster: seed containerName: etcd details: fileName: /var/lib/kubelet/pods/d46d0708-802d-43a7-bdf8-646912b7cb62/volumes/kubernetes.io~secret/etcd-client-tls/..2025_03_03_01_02_01.1252005562/tls.crt, ownerUser: 0, ownerGroup: 65532 kind: pod name: etcd-main-0 namespace: shoot--diki-comp--aws
- cluster: seed containerName: etcd details: fileName: /var/lib/kubelet/pods/d46d0708-802d-43a7-bdf8-646912b7cb62/volumes/kubernetes.io~secret/backup-restore-ca/..2025_03_03_01_02_01.3362730748/bundle.crt, ownerUser: 0, ownerGroup: 65532 kind: pod name: etcd-main-0 namespace: shoot--diki-comp--aws
- cluster: seed containerName: etcd details: fileName: /var/lib/kubelet/pods/d46d0708-802d-43a7-bdf8-646912b7cb62/volumes/kubernetes.io~projected/kube-api-access-gardener/..2025_03_03_01_02_01.1092768610/ca.crt, ownerUser: 0, ownerGroup: 65532 kind: pod name: etcd-main-0 namespace: shoot--diki-comp--aws
- cluster: seed containerName: etcd details: fileName: /var/lib/kubelet/pods/d46d0708-802d-43a7-bdf8-646912b7cb62/volumes/kubernetes.io~secret/etcd-server-tls/..2025_03_03_01_02_01.2596588739, ownerUser: 0, ownerGroup: 65532 kind: pod name: etcd-main-0 namespace: shoot--diki-comp--aws
- cluster: seed containerName: etcd details: fileName: /var/lib/kubelet/pods/d46d0708-802d-43a7-bdf8-646912b7cb62/volumes/kubernetes.io~secret/etcd-client-tls/..2025_03_03_01_02_01.1252005562, ownerUser: 0, ownerGroup: 65532 kind: pod name: etcd-main-0 namespace: shoot--diki-comp--aws
- cluster: seed containerName: etcd details: fileName: /var/lib/kubelet/pods/d46d0708-802d-43a7-bdf8-646912b7cb62/volumes/kubernetes.io~secret/backup-restore-ca/..2025_03_03_01_02_01.3362730748, ownerUser: 0, ownerGroup: 65532 kind: pod name: etcd-main-0 namespace: shoot--diki-comp--aws
- cluster: seed containerName: etcd details: fileName: /var/lib/kubelet/pods/d46d0708-802d-43a7-bdf8-646912b7cb62/volumes/kubernetes.io~projected/kube-api-access-gardener/..2025_03_03_01_02_01.1092768610, ownerUser: 0, ownerGroup: 65532 kind: pod name: etcd-main-0 namespace: shoot--diki-comp--aws
- cluster: seed containerName: etcd details: fileName: /var/lib/kubelet/pods/d46d0708-802d-43a7-bdf8-646912b7cb62/volumes/kubernetes.io~secret/etcd-ca/..2025_03_03_01_02_01.732820315, ownerUser: 0, ownerGroup: 65532 kind: pod name: etcd-main-0 namespace: shoot--diki-comp--aws
- cluster: seed containerName: backup-restore details: fileName: /var/lib/kubelet/pods/d46d0708-802d-43a7-bdf8-646912b7cb62/volumes/kubernetes.io~secret/backup-restore-server-tls/..2025_03_03_01_02_01.3321577487/tls.key, ownerUser: 0, ownerGroup: 65532 kind: pod name: etcd-main-0 namespace: shoot--diki-comp--aws
- cluster: seed containerName: backup-restore details: fileName: /var/lib/kubelet/pods/d46d0708-802d-43a7-bdf8-646912b7cb62/volumes/kubernetes.io~secret/backup-restore-server-tls/..2025_03_03_01_02_01.3321577487/tls.crt, ownerUser: 0, ownerGroup: 65532 kind: pod name: etcd-main-0 namespace: shoot--diki-comp--aws
- cluster: seed containerName: backup-restore details: fileName: /var/lib/kubelet/pods/d46d0708-802d-43a7-bdf8-646912b7cb62/volumes/kubernetes.io~secret/etcd-ca/..2025_03_03_01_02_01.732820315/bundle.crt, ownerUser: 0, ownerGroup: 65532 kind: pod name: etcd-main-0 namespace: shoot--diki-comp--aws
- cluster: seed containerName: backup-restore details: fileName: /var/lib/kubelet/pods/d46d0708-802d-43a7-bdf8-646912b7cb62/volumes/kubernetes.io~secret/etcd-client-tls/..2025_03_03_01_02_01.1252005562/tls.key, ownerUser: 0, ownerGroup: 65532 kind: pod name: etcd-main-0 namespace: shoot--diki-comp--aws
- cluster: seed containerName: backup-restore details: fileName: /var/lib/kubelet/pods/d46d0708-802d-43a7-bdf8-646912b7cb62/volumes/kubernetes.io~secret/etcd-client-tls/..2025_03_03_01_02_01.1252005562/tls.crt, ownerUser: 0, ownerGroup: 65532 kind: pod name: etcd-main-0 namespace: shoot--diki-comp--aws
- cluster: seed containerName: backup-restore details: fileName: /var/lib/kubelet/pods/d46d0708-802d-43a7-bdf8-646912b7cb62/volumes/kubernetes.io~projected/kube-api-access-gardener/..2025_03_03_01_02_01.1092768610/ca.crt, ownerUser: 0, ownerGroup: 65532 kind: pod name: etcd-main-0 namespace: shoot--diki-comp--aws
- cluster: seed containerName: backup-restore details: fileName: /var/lib/kubelet/pods/d46d0708-802d-43a7-bdf8-646912b7cb62/volumes/kubernetes.io~secret/etcd-ca/..2025_03_03_01_02_01.732820315, ownerUser: 0, ownerGroup: 65532 kind: pod name: etcd-main-0 namespace: shoot--diki-comp--aws
- cluster: seed containerName: backup-restore details: fileName: /var/lib/kubelet/pods/d46d0708-802d-43a7-bdf8-646912b7cb62/volumes/kubernetes.io~secret/etcd-client-tls/..2025_03_03_01_02_01.1252005562, ownerUser: 0, ownerGroup: 65532 kind: pod name: etcd-main-0 namespace: shoot--diki-comp--aws
- cluster: seed containerName: backup-restore details: fileName: /var/lib/kubelet/pods/d46d0708-802d-43a7-bdf8-646912b7cb62/volumes/kubernetes.io~projected/kube-api-access-gardener/..2025_03_03_01_02_01.1092768610, ownerUser: 0, ownerGroup: 65532 kind: pod name: etcd-main-0 namespace: shoot--diki-comp--aws
- cluster: seed containerName: backup-restore details: fileName: /var/lib/kubelet/pods/d46d0708-802d-43a7-bdf8-646912b7cb62/volumes/kubernetes.io~secret/backup-restore-server-tls/..2025_03_03_01_02_01.3321577487, ownerUser: 0, ownerGroup: 65532 kind: pod name: etcd-main-0 namespace: shoot--diki-comp--aws
- cluster: seed containerName: backup-restore details: fileName: /var/lib/kubelet/pods/43f307d7-051f-446e-a314-0e435190ca59/volumes/kubernetes.io~secret/backup-restore-server-tls/..2025_03_03_01_02_01.3619666546/tls.crt, ownerUser: 0, ownerGroup: 65532 kind: pod name: etcd-events-0 namespace: shoot--diki-comp--aws
- cluster: seed containerName: backup-restore details: fileName: /var/lib/kubelet/pods/43f307d7-051f-446e-a314-0e435190ca59/volumes/kubernetes.io~secret/backup-restore-server-tls/..2025_03_03_01_02_01.3619666546/tls.key, ownerUser: 0, ownerGroup: 65532 kind: pod name: etcd-events-0 namespace: shoot--diki-comp--aws
- cluster: seed containerName: backup-restore details: fileName: /var/lib/kubelet/pods/43f307d7-051f-446e-a314-0e435190ca59/volumes/kubernetes.io~secret/etcd-ca/..2025_03_03_01_02_01.4042300612/bundle.crt, ownerUser: 0, ownerGroup: 65532 kind: pod name: etcd-events-0 namespace: shoot--diki-comp--aws
- cluster: seed containerName: backup-restore details: fileName: /var/lib/kubelet/pods/43f307d7-051f-446e-a314-0e435190ca59/volumes/kubernetes.io~secret/etcd-client-tls/..2025_03_03_01_02_01.911620075/tls.crt, ownerUser: 0, ownerGroup: 65532 kind: pod name: etcd-events-0 namespace: shoot--diki-comp--aws
- cluster: seed containerName: backup-restore details: fileName: /var/lib/kubelet/pods/43f307d7-051f-446e-a314-0e435190ca59/volumes/kubernetes.io~secret/etcd-client-tls/..2025_03_03_01_02_01.911620075/tls.key, ownerUser: 0, ownerGroup: 65532 kind: pod name: etcd-events-0 namespace: shoot--diki-comp--aws
- cluster: seed containerName: backup-restore details: fileName: /var/lib/kubelet/pods/43f307d7-051f-446e-a314-0e435190ca59/volumes/kubernetes.io~projected/kube-api-access-gardener/..2025_03_03_01_02_01.2294882418/ca.crt, ownerUser: 0, ownerGroup: 65532 kind: pod name: etcd-events-0 namespace: shoot--diki-comp--aws
- cluster: seed containerName: backup-restore details: fileName: /var/lib/kubelet/pods/43f307d7-051f-446e-a314-0e435190ca59/volumes/kubernetes.io~secret/etcd-client-tls/..2025_03_03_01_02_01.911620075, ownerUser: 0, ownerGroup: 65532 kind: pod name: etcd-events-0 namespace: shoot--diki-comp--aws
- cluster: seed containerName: backup-restore details: fileName: /var/lib/kubelet/pods/43f307d7-051f-446e-a314-0e435190ca59/volumes/kubernetes.io~projected/kube-api-access-gardener/..2025_03_03_01_02_01.2294882418, ownerUser: 0, ownerGroup: 65532 kind: pod name: etcd-events-0 namespace: shoot--diki-comp--aws
- cluster: seed containerName: backup-restore details: fileName: /var/lib/kubelet/pods/43f307d7-051f-446e-a314-0e435190ca59/volumes/kubernetes.io~secret/backup-restore-server-tls/..2025_03_03_01_02_01.3619666546, ownerUser: 0, ownerGroup: 65532 kind: pod name: etcd-events-0 namespace: shoot--diki-comp--aws
- cluster: seed containerName: backup-restore details: fileName: /var/lib/kubelet/pods/43f307d7-051f-446e-a314-0e435190ca59/volumes/kubernetes.io~secret/etcd-ca/..2025_03_03_01_02_01.4042300612, ownerUser: 0, ownerGroup: 65532 kind: pod name: etcd-events-0 namespace: shoot--diki-comp--aws
- cluster: seed containerName: etcd details: fileName: /var/lib/kubelet/pods/43f307d7-051f-446e-a314-0e435190ca59/volumes/kubernetes.io~secret/etcd-ca/..2025_03_03_01_02_01.4042300612/bundle.crt, ownerUser: 0, ownerGroup: 65532 kind: pod name: etcd-events-0 namespace: shoot--diki-comp--aws
- cluster: seed containerName: etcd details: fileName: /var/lib/kubelet/pods/43f307d7-051f-446e-a314-0e435190ca59/volumes/kubernetes.io~secret/etcd-server-tls/..2025_03_03_01_02_01.2269653654/tls.crt, ownerUser: 0, ownerGroup: 65532 kind: pod name: etcd-events-0 namespace: shoot--diki-comp--aws
- cluster: seed containerName: etcd details: fileName: /var/lib/kubelet/pods/43f307d7-051f-446e-a314-0e435190ca59/volumes/kubernetes.io~secret/etcd-server-tls/..2025_03_03_01_02_01.2269653654/tls.key, ownerUser: 0, ownerGroup: 65532 kind: pod name: etcd-events-0 namespace: shoot--diki-comp--aws
- cluster: seed containerName: etcd details: fileName: /var/lib/kubelet/pods/43f307d7-051f-446e-a314-0e435190ca59/volumes/kubernetes.io~secret/etcd-client-tls/..2025_03_03_01_02_01.911620075/tls.crt, ownerUser: 0, ownerGroup: 65532 kind: pod name: etcd-events-0 namespace: shoot--diki-comp--aws
- cluster: seed containerName: etcd details: fileName: /var/lib/kubelet/pods/43f307d7-051f-446e-a314-0e435190ca59/volumes/kubernetes.io~secret/etcd-client-tls/..2025_03_03_01_02_01.911620075/tls.key, ownerUser: 0, ownerGroup: 65532 kind: pod name: etcd-events-0 namespace: shoot--diki-comp--aws
- cluster: seed containerName: etcd details: fileName: /var/lib/kubelet/pods/43f307d7-051f-446e-a314-0e435190ca59/volumes/kubernetes.io~secret/backup-restore-ca/..2025_03_03_01_02_01.402852323/bundle.crt, ownerUser: 0, ownerGroup: 65532 kind: pod name: etcd-events-0 namespace: shoot--diki-comp--aws
- cluster: seed containerName: etcd details: fileName: /var/lib/kubelet/pods/43f307d7-051f-446e-a314-0e435190ca59/volumes/kubernetes.io~projected/kube-api-access-gardener/..2025_03_03_01_02_01.2294882418/ca.crt, ownerUser: 0, ownerGroup: 65532 kind: pod name: etcd-events-0 namespace: shoot--diki-comp--aws
- cluster: seed containerName: etcd details: fileName: /var/lib/kubelet/pods/43f307d7-051f-446e-a314-0e435190ca59/volumes/kubernetes.io~secret/etcd-ca/..2025_03_03_01_02_01.4042300612, ownerUser: 0, ownerGroup: 65532 kind: pod name: etcd-events-0 namespace: shoot--diki-comp--aws
- cluster: seed containerName: etcd details: fileName: /var/lib/kubelet/pods/43f307d7-051f-446e-a314-0e435190ca59/volumes/kubernetes.io~secret/etcd-server-tls/..2025_03_03_01_02_01.2269653654, ownerUser: 0, ownerGroup: 65532 kind: pod name: etcd-events-0 namespace: shoot--diki-comp--aws
- cluster: seed containerName: etcd details: fileName: /var/lib/kubelet/pods/43f307d7-051f-446e-a314-0e435190ca59/volumes/kubernetes.io~secret/etcd-client-tls/..2025_03_03_01_02_01.911620075, ownerUser: 0, ownerGroup: 65532 kind: pod name: etcd-events-0 namespace: shoot--diki-comp--aws
- cluster: seed containerName: etcd details: fileName: /var/lib/kubelet/pods/43f307d7-051f-446e-a314-0e435190ca59/volumes/kubernetes.io~secret/backup-restore-ca/..2025_03_03_01_02_01.402852323, ownerUser: 0, ownerGroup: 65532 kind: pod name: etcd-events-0 namespace: shoot--diki-comp--aws
- cluster: seed containerName: etcd details: fileName: /var/lib/kubelet/pods/43f307d7-051f-446e-a314-0e435190ca59/volumes/kubernetes.io~projected/kube-api-access-gardener/..2025_03_03_01_02_01.2294882418, ownerUser: 0, ownerGroup: 65532 kind: pod name: etcd-events-0 namespace: shoot--diki-comp--aws
- cluster: seed containerName: kube-apiserver details: fileName: /var/lib/kubelet/pods/8453cbe8-7815-4009-a228-90aa1f22bdd9/volumes/kubernetes.io~secret/ca/..2025_03_03_01_12_52.2699305413/bundle.crt, ownerUser: 0, ownerGroup: 65532 kind: pod name: kube-apiserver-7c5459cc5b-kz2dz namespace: shoot--diki-comp--aws
- cluster: seed containerName: kube-apiserver details: fileName: /var/lib/kubelet/pods/8453cbe8-7815-4009-a228-90aa1f22bdd9/volumes/kubernetes.io~secret/ca-client/..2025_03_03_01_12_52.4078078265/bundle.crt, ownerUser: 0, ownerGroup: 65532 kind: pod name: kube-apiserver-7c5459cc5b-kz2dz namespace: shoot--diki-comp--aws
- cluster: seed containerName: kube-apiserver details: fileName: /var/lib/kubelet/pods/8453cbe8-7815-4009-a228-90aa1f22bdd9/volumes/kubernetes.io~secret/ca-front-proxy/..2025_03_03_01_12_52.689706272/bundle.crt, ownerUser: 0, ownerGroup: 65532 kind: pod name: kube-apiserver-7c5459cc5b-kz2dz namespace: shoot--diki-comp--aws
- cluster: seed containerName: kube-apiserver details: fileName: /var/lib/kubelet/pods/8453cbe8-7815-4009-a228-90aa1f22bdd9/volumes/kubernetes.io~secret/service-account-key-bundle/..2025_03_03_01_12_52.1447808254/bundle.key, ownerUser: 0, ownerGroup: 65532 kind: pod name: kube-apiserver-7c5459cc5b-kz2dz namespace: shoot--diki-comp--aws
- cluster: seed containerName: kube-apiserver details: fileName: /var/lib/kubelet/pods/8453cbe8-7815-4009-a228-90aa1f22bdd9/volumes/kubernetes.io~secret/kube-aggregator/..2025_03_03_01_12_52.3118211134/tls.key, ownerUser: 0, ownerGroup: 65532 kind: pod name: kube-apiserver-7c5459cc5b-kz2dz namespace: shoot--diki-comp--aws
- cluster: seed containerName: kube-apiserver details: fileName: /var/lib/kubelet/pods/8453cbe8-7815-4009-a228-90aa1f22bdd9/volumes/kubernetes.io~secret/kube-aggregator/..2025_03_03_01_12_52.3118211134/tls.crt, ownerUser: 0, ownerGroup: 65532 kind: pod name: kube-apiserver-7c5459cc5b-kz2dz namespace: shoot--diki-comp--aws
- cluster: seed containerName: kube-apiserver details: fileName: /var/lib/kubelet/pods/8453cbe8-7815-4009-a228-90aa1f22bdd9/volumes/kubernetes.io~secret/server/..2025_03_03_01_12_52.3201692229/tls.crt, ownerUser: 0, ownerGroup: 65532 kind: pod name: kube-apiserver-7c5459cc5b-kz2dz namespace: shoot--diki-comp--aws
- cluster: seed containerName: kube-apiserver details: fileName: /var/lib/kubelet/pods/8453cbe8-7815-4009-a228-90aa1f22bdd9/volumes/kubernetes.io~secret/server/..2025_03_03_01_12_52.3201692229/tls.key, ownerUser: 0, ownerGroup: 65532 kind: pod name: kube-apiserver-7c5459cc5b-kz2dz namespace: shoot--diki-comp--aws
- cluster: seed containerName: kube-apiserver details: fileName: /var/lib/kubelet/pods/8453cbe8-7815-4009-a228-90aa1f22bdd9/volumes/kubernetes.io~secret/ca-vpn/..2025_03_03_01_12_52.1763016478/bundle.crt, ownerUser: 0, ownerGroup: 65532 kind: pod name: kube-apiserver-7c5459cc5b-kz2dz namespace: shoot--diki-comp--aws
- cluster: seed containerName: kube-apiserver details: fileName: /var/lib/kubelet/pods/8453cbe8-7815-4009-a228-90aa1f22bdd9/volumes/kubernetes.io~secret/ca-kubelet/..2025_03_03_01_12_52.1090624067/bundle.crt, ownerUser: 0, ownerGroup: 65532 kind: pod name: kube-apiserver-7c5459cc5b-kz2dz namespace: shoot--diki-comp--aws
- cluster: seed containerName: kube-apiserver details: fileName: /var/lib/kubelet/pods/8453cbe8-7815-4009-a228-90aa1f22bdd9/volumes/kubernetes.io~secret/kubelet-client/..2025_03_03_01_12_52.3153250716/tls.crt, ownerUser: 0, ownerGroup: 65532 kind: pod name: kube-apiserver-7c5459cc5b-kz2dz namespace: shoot--diki-comp--aws
- cluster: seed containerName: kube-apiserver details: fileName: /var/lib/kubelet/pods/8453cbe8-7815-4009-a228-90aa1f22bdd9/volumes/kubernetes.io~secret/kubelet-client/..2025_03_03_01_12_52.3153250716/tls.key, ownerUser: 0, ownerGroup: 65532 kind: pod name: kube-apiserver-7c5459cc5b-kz2dz namespace: shoot--diki-comp--aws
- cluster: seed containerName: kube-apiserver details: fileName: /var/lib/kubelet/pods/8453cbe8-7815-4009-a228-90aa1f22bdd9/volumes/kubernetes.io~secret/ca-etcd/..2025_03_03_01_12_52.3384748314/bundle.crt, ownerUser: 0, ownerGroup: 65532 kind: pod name: kube-apiserver-7c5459cc5b-kz2dz namespace: shoot--diki-comp--aws
- cluster: seed containerName: kube-apiserver details: fileName: /var/lib/kubelet/pods/8453cbe8-7815-4009-a228-90aa1f22bdd9/volumes/kubernetes.io~secret/etcd-client/..2025_03_03_01_12_52.3609175546/tls.crt, ownerUser: 0, ownerGroup: 65532 kind: pod name: kube-apiserver-7c5459cc5b-kz2dz namespace: shoot--diki-comp--aws
- cluster: seed containerName: kube-apiserver details: fileName: /var/lib/kubelet/pods/8453cbe8-7815-4009-a228-90aa1f22bdd9/volumes/kubernetes.io~secret/etcd-client/..2025_03_03_01_12_52.3609175546/tls.key, ownerUser: 0, ownerGroup: 65532 kind: pod name: kube-apiserver-7c5459cc5b-kz2dz namespace: shoot--diki-comp--aws
- cluster: seed containerName: kube-apiserver details: fileName: /var/lib/kubelet/pods/8453cbe8-7815-4009-a228-90aa1f22bdd9/volumes/kubernetes.io~secret/tls-sni-0/..2025_03_03_01_12_52.3930137623/ca.crt, ownerUser: 0, ownerGroup: 65532 kind: pod name: kube-apiserver-7c5459cc5b-kz2dz namespace: shoot--diki-comp--aws
- cluster: seed containerName: kube-apiserver details: fileName: /var/lib/kubelet/pods/8453cbe8-7815-4009-a228-90aa1f22bdd9/volumes/kubernetes.io~secret/tls-sni-0/..2025_03_03_01_12_52.3930137623/tls.crt, ownerUser: 0, ownerGroup: 65532 kind: pod name: kube-apiserver-7c5459cc5b-kz2dz namespace: shoot--diki-comp--aws
- cluster: seed containerName: kube-apiserver details: fileName: /var/lib/kubelet/pods/8453cbe8-7815-4009-a228-90aa1f22bdd9/volumes/kubernetes.io~secret/tls-sni-0/..2025_03_03_01_12_52.3930137623/tls.key, ownerUser: 0, ownerGroup: 65532 kind: pod name: kube-apiserver-7c5459cc5b-kz2dz namespace: shoot--diki-comp--aws
- cluster: seed containerName: kube-apiserver details: fileName: /var/lib/kubelet/pods/8453cbe8-7815-4009-a228-90aa1f22bdd9/volumes/kubernetes.io~secret/http-proxy/..2025_03_03_01_12_52.1526321829/tls.crt, ownerUser: 0, ownerGroup: 65532 kind: pod name: kube-apiserver-7c5459cc5b-kz2dz namespace: shoot--diki-comp--aws
- cluster: seed containerName: kube-apiserver details: fileName: /var/lib/kubelet/pods/8453cbe8-7815-4009-a228-90aa1f22bdd9/volumes/kubernetes.io~secret/http-proxy/..2025_03_03_01_12_52.1526321829/tls.key, ownerUser: 0, ownerGroup: 65532 kind: pod name: kube-apiserver-7c5459cc5b-kz2dz namespace: shoot--diki-comp--aws
- cluster: seed containerName: kube-apiserver details: fileName: /var/lib/kubelet/pods/8453cbe8-7815-4009-a228-90aa1f22bdd9/volumes/kubernetes.io~secret/ca/..2025_03_03_01_12_52.2699305413, ownerUser: 0, ownerGroup: 65532 kind: pod name: kube-apiserver-7c5459cc5b-kz2dz namespace: shoot--diki-comp--aws
- cluster: seed containerName: kube-apiserver details: fileName: /var/lib/kubelet/pods/8453cbe8-7815-4009-a228-90aa1f22bdd9/volumes/kubernetes.io~secret/ca-client/..2025_03_03_01_12_52.4078078265, ownerUser: 0, ownerGroup: 65532 kind: pod name: kube-apiserver-7c5459cc5b-kz2dz namespace: shoot--diki-comp--aws
- cluster: seed containerName: kube-apiserver details: fileName: /var/lib/kubelet/pods/8453cbe8-7815-4009-a228-90aa1f22bdd9/volumes/kubernetes.io~secret/ca-front-proxy/..2025_03_03_01_12_52.689706272, ownerUser: 0, ownerGroup: 65532 kind: pod name: kube-apiserver-7c5459cc5b-kz2dz namespace: shoot--diki-comp--aws
- cluster: seed containerName: kube-apiserver details: fileName: /var/lib/kubelet/pods/8453cbe8-7815-4009-a228-90aa1f22bdd9/volumes/kubernetes.io~secret/service-account-key-bundle/..2025_03_03_01_12_52.1447808254, ownerUser: 0, ownerGroup: 65532 kind: pod name: kube-apiserver-7c5459cc5b-kz2dz namespace: shoot--diki-comp--aws
- cluster: seed containerName: kube-apiserver details: fileName: /var/lib/kubelet/pods/8453cbe8-7815-4009-a228-90aa1f22bdd9/volumes/kubernetes.io~secret/server/..2025_03_03_01_12_52.3201692229, ownerUser: 0, ownerGroup: 65532 kind: pod name: kube-apiserver-7c5459cc5b-kz2dz namespace: shoot--diki-comp--aws
- cluster: seed containerName: kube-apiserver details: fileName: /var/lib/kubelet/pods/8453cbe8-7815-4009-a228-90aa1f22bdd9/volumes/kubernetes.io~secret/ca-vpn/..2025_03_03_01_12_52.1763016478, ownerUser: 0, ownerGroup: 65532 kind: pod name: kube-apiserver-7c5459cc5b-kz2dz namespace: shoot--diki-comp--aws
- cluster: seed containerName: kube-apiserver details: fileName: /var/lib/kubelet/pods/8453cbe8-7815-4009-a228-90aa1f22bdd9/volumes/kubernetes.io~secret/ca-kubelet/..2025_03_03_01_12_52.1090624067, ownerUser: 0, ownerGroup: 65532 kind: pod name: kube-apiserver-7c5459cc5b-kz2dz namespace: shoot--diki-comp--aws
- cluster: seed containerName: kube-apiserver details: fileName: /var/lib/kubelet/pods/8453cbe8-7815-4009-a228-90aa1f22bdd9/volumes/kubernetes.io~secret/kubelet-client/..2025_03_03_01_12_52.3153250716, ownerUser: 0, ownerGroup: 65532 kind: pod name: kube-apiserver-7c5459cc5b-kz2dz namespace: shoot--diki-comp--aws
- cluster: seed containerName: kube-apiserver details: fileName: /var/lib/kubelet/pods/8453cbe8-7815-4009-a228-90aa1f22bdd9/volumes/kubernetes.io~secret/kube-aggregator/..2025_03_03_01_12_52.3118211134, ownerUser: 0, ownerGroup: 65532 kind: pod name: kube-apiserver-7c5459cc5b-kz2dz namespace: shoot--diki-comp--aws
- cluster: seed containerName: kube-apiserver details: fileName: /var/lib/kubelet/pods/8453cbe8-7815-4009-a228-90aa1f22bdd9/volumes/kubernetes.io~secret/ca-etcd/..2025_03_03_01_12_52.3384748314, ownerUser: 0, ownerGroup: 65532 kind: pod name: kube-apiserver-7c5459cc5b-kz2dz namespace: shoot--diki-comp--aws
- cluster: seed containerName: kube-apiserver details: fileName: /var/lib/kubelet/pods/8453cbe8-7815-4009-a228-90aa1f22bdd9/volumes/kubernetes.io~secret/etcd-client/..2025_03_03_01_12_52.3609175546, ownerUser: 0, ownerGroup: 65532 kind: pod name: kube-apiserver-7c5459cc5b-kz2dz namespace: shoot--diki-comp--aws
- cluster: seed containerName: kube-apiserver details: fileName: /var/lib/kubelet/pods/8453cbe8-7815-4009-a228-90aa1f22bdd9/volumes/kubernetes.io~secret/tls-sni-0/..2025_03_03_01_12_52.3930137623, ownerUser: 0, ownerGroup: 65532 kind: pod name: kube-apiserver-7c5459cc5b-kz2dz namespace: shoot--diki-comp--aws
- cluster: seed containerName: kube-apiserver details: fileName: /var/lib/kubelet/pods/8453cbe8-7815-4009-a228-90aa1f22bdd9/volumes/kubernetes.io~secret/http-proxy/..2025_03_03_01_12_52.1526321829, ownerUser: 0, ownerGroup: 65532 kind: pod name: kube-apiserver-7c5459cc5b-kz2dz namespace: shoot--diki-comp--aws
- cluster: seed containerName: kube-controller-manager details: fileName: /var/lib/kubelet/pods/18ff08d4-cfa9-4958-8aca-ee41d678f1d3/volumes/kubernetes.io~secret/ca/..2025_03_03_01_12_51.2065093033/bundle.crt, ownerUser: 0, ownerGroup: 65532 kind: pod name: kube-controller-manager-c8b755f65-p4v5d namespace: shoot--diki-comp--aws
- cluster: seed containerName: kube-controller-manager details: fileName: /var/lib/kubelet/pods/18ff08d4-cfa9-4958-8aca-ee41d678f1d3/volumes/kubernetes.io~secret/ca-client/..2025_03_03_01_12_51.3807269484/ca.crt, ownerUser: 0, ownerGroup: 65532 kind: pod name: kube-controller-manager-c8b755f65-p4v5d namespace: shoot--diki-comp--aws
- cluster: seed containerName: kube-controller-manager details: fileName: /var/lib/kubelet/pods/18ff08d4-cfa9-4958-8aca-ee41d678f1d3/volumes/kubernetes.io~secret/ca-client/..2025_03_03_01_12_51.3807269484/ca.key, ownerUser: 0, ownerGroup: 65532 kind: pod name: kube-controller-manager-c8b755f65-p4v5d namespace: shoot--diki-comp--aws
- cluster: seed containerName: kube-controller-manager details: fileName: /var/lib/kubelet/pods/18ff08d4-cfa9-4958-8aca-ee41d678f1d3/volumes/kubernetes.io~secret/server/..2025_03_03_01_12_51.4117152144/tls.key, ownerUser: 0, ownerGroup: 65532 kind: pod name: kube-controller-manager-c8b755f65-p4v5d namespace: shoot--diki-comp--aws
- cluster: seed containerName: kube-controller-manager details: fileName: /var/lib/kubelet/pods/18ff08d4-cfa9-4958-8aca-ee41d678f1d3/volumes/kubernetes.io~secret/server/..2025_03_03_01_12_51.4117152144/tls.crt, ownerUser: 0, ownerGroup: 65532 kind: pod name: kube-controller-manager-c8b755f65-p4v5d namespace: shoot--diki-comp--aws
- cluster: seed containerName: kube-controller-manager details: fileName: /var/lib/kubelet/pods/18ff08d4-cfa9-4958-8aca-ee41d678f1d3/volumes/kubernetes.io~secret/ca-kubelet/..2025_03_03_01_12_51.1942131254/ca.key, ownerUser: 0, ownerGroup: 65532 kind: pod name: kube-controller-manager-c8b755f65-p4v5d namespace: shoot--diki-comp--aws
- cluster: seed containerName: kube-controller-manager details: fileName: /var/lib/kubelet/pods/18ff08d4-cfa9-4958-8aca-ee41d678f1d3/volumes/kubernetes.io~secret/ca-kubelet/..2025_03_03_01_12_51.1942131254/ca.crt, ownerUser: 0, ownerGroup: 65532 kind: pod name: kube-controller-manager-c8b755f65-p4v5d namespace: shoot--diki-comp--aws
- cluster: seed containerName: kube-controller-manager details: fileName: /var/lib/kubelet/pods/18ff08d4-cfa9-4958-8aca-ee41d678f1d3/volumes/kubernetes.io~secret/server/..2025_03_03_01_12_51.4117152144, ownerUser: 0, ownerGroup: 65532 kind: pod name: kube-controller-manager-c8b755f65-p4v5d namespace: shoot--diki-comp--aws
- cluster: seed containerName: kube-controller-manager details: fileName: /var/lib/kubelet/pods/18ff08d4-cfa9-4958-8aca-ee41d678f1d3/volumes/kubernetes.io~secret/ca-kubelet/..2025_03_03_01_12_51.1942131254, ownerUser: 0, ownerGroup: 65532 kind: pod name: kube-controller-manager-c8b755f65-p4v5d namespace: shoot--diki-comp--aws
- cluster: seed containerName: kube-controller-manager details: fileName: /var/lib/kubelet/pods/18ff08d4-cfa9-4958-8aca-ee41d678f1d3/volumes/kubernetes.io~secret/ca/..2025_03_03_01_12_51.2065093033, ownerUser: 0, ownerGroup: 65532 kind: pod name: kube-controller-manager-c8b755f65-p4v5d namespace: shoot--diki-comp--aws
- cluster: seed containerName: kube-controller-manager details: fileName: /var/lib/kubelet/pods/18ff08d4-cfa9-4958-8aca-ee41d678f1d3/volumes/kubernetes.io~secret/ca-client/..2025_03_03_01_12_51.3807269484, ownerUser: 0, ownerGroup: 65532 kind: pod name: kube-controller-manager-c8b755f65-p4v5d namespace: shoot--diki-comp--aws
- cluster: seed containerName: kube-scheduler details: fileName: /var/lib/kubelet/pods/ba7e893a-c91e-4051-9cc0-aefe8c1fe492/volumes/kubernetes.io~projected/client-ca/..2025_03_03_01_13_50.3972196173/bundle.crt, ownerUser: 0, ownerGroup: 65532 kind: pod name: kube-scheduler-678cb86cc-zm2cn namespace: shoot--diki-comp--aws
- cluster: seed containerName: kube-scheduler details: fileName: /var/lib/kubelet/pods/ba7e893a-c91e-4051-9cc0-aefe8c1fe492/volumes/kubernetes.io~secret/kube-scheduler-server/..2025_03_03_01_13_50.72514188/tls.crt, ownerUser: 0, ownerGroup: 65532 kind: pod name: kube-scheduler-678cb86cc-zm2cn namespace: shoot--diki-comp--aws
- cluster: seed containerName: kube-scheduler details: fileName: /var/lib/kubelet/pods/ba7e893a-c91e-4051-9cc0-aefe8c1fe492/volumes/kubernetes.io~secret/kube-scheduler-server/..2025_03_03_01_13_50.72514188/tls.key, ownerUser: 0, ownerGroup: 65532 kind: pod name: kube-scheduler-678cb86cc-zm2cn namespace: shoot--diki-comp--aws
- cluster: seed containerName: kube-scheduler details: fileName: /var/lib/kubelet/pods/ba7e893a-c91e-4051-9cc0-aefe8c1fe492/volumes/kubernetes.io~projected/client-ca/..2025_03_03_01_13_50.3972196173, ownerUser: 0, ownerGroup: 65532 kind: pod name: kube-scheduler-678cb86cc-zm2cn namespace: shoot--diki-comp--aws
- cluster: seed containerName: kube-scheduler details: fileName: /var/lib/kubelet/pods/ba7e893a-c91e-4051-9cc0-aefe8c1fe492/volumes/kubernetes.io~secret/kube-scheduler-server/..2025_03_03_01_13_50.72514188, ownerUser: 0, ownerGroup: 65532 kind: pod name: kube-scheduler-678cb86cc-zm2cn namespace: shoot--diki-comp--aws
- cluster: shoot details: fileName: /var/lib/kubelet/pki/kubelet-client-2025-03-03-01-09-12.pem, ownerUser: 0, ownerGroup: 0 kind: node name: ip-IP-Address.eu-west-1.compute.internal
- cluster: shoot details: fileName: /var/lib/kubelet/pki/kubelet-server-2025-03-03-01-09-55.pem, ownerUser: 0, ownerGroup: 0 kind: node name: ip-IP-Address.eu-west-1.compute.internal
- cluster: shoot details: fileName: /var/lib/kubelet/pki, ownerUser: 0, ownerGroup: 0 kind: node name: ip-IP-Address.eu-west-1.compute.internal
- cluster: shoot containerName: kube-proxy details: fileName: /var/lib/kubelet/pods/67fdc3bf-da6b-4131-84b0-3facad7ed698/volumes/kubernetes.io~projected/kube-api-access-gardener/..2025_03_03_01_15_17.1796558607/ca.crt, ownerUser: 0, ownerGroup: 0 kind: pod name: kube-proxy-worker-kkfk1-v1.31.4-hkmbk namespace: kube-system
- cluster: shoot containerName: kube-proxy details: fileName: /var/lib/kubelet/pods/67fdc3bf-da6b-4131-84b0-3facad7ed698/volumes/kubernetes.io~projected/kube-api-access-gardener/..2025_03_03_01_15_17.1796558607, ownerUser: 0, ownerGroup: 0 kind: pod name: kube-proxy-worker-kkfk1-v1.31.4-hkmbk namespace: kube-system
- cluster: shoot containerName: conntrack-fix details: fileName: /var/lib/kubelet/pods/67fdc3bf-da6b-4131-84b0-3facad7ed698/volumes/kubernetes.io~projected/kube-api-access-gardener/..2025_03_03_01_15_17.1796558607/ca.crt, ownerUser: 0, ownerGroup: 0 kind: pod name: kube-proxy-worker-kkfk1-v1.31.4-hkmbk namespace: kube-system
- cluster: shoot containerName: conntrack-fix details: fileName: /var/lib/kubelet/pods/67fdc3bf-da6b-4131-84b0-3facad7ed698/volumes/kubernetes.io~projected/kube-api-access-gardener/..2025_03_03_01_15_17.1796558607, ownerUser: 0, ownerGroup: 0 kind: pod name: kube-proxy-worker-kkfk1-v1.31.4-hkmbk namespace: kube-system
- azure
- cluster: seed containerName: etcd details: fileName: /var/lib/kubelet/pods/e40a1350-0fce-48ce-bed8-75ba8d51e7a0/volumes/kubernetes.io~secret/etcd-ca/..2025_03_03_01_02_09.386575845/bundle.crt, ownerUser: 0, ownerGroup: 65532 kind: pod name: etcd-events-0 namespace: shoot--diki-comp--azure
- cluster: seed containerName: etcd details: fileName: /var/lib/kubelet/pods/e40a1350-0fce-48ce-bed8-75ba8d51e7a0/volumes/kubernetes.io~secret/etcd-server-tls/..2025_03_03_01_02_09.729094142/tls.key, ownerUser: 0, ownerGroup: 65532 kind: pod name: etcd-events-0 namespace: shoot--diki-comp--azure
- cluster: seed containerName: etcd details: fileName: /var/lib/kubelet/pods/e40a1350-0fce-48ce-bed8-75ba8d51e7a0/volumes/kubernetes.io~secret/etcd-server-tls/..2025_03_03_01_02_09.729094142/tls.crt, ownerUser: 0, ownerGroup: 65532 kind: pod name: etcd-events-0 namespace: shoot--diki-comp--azure
- cluster: seed containerName: etcd details: fileName: /var/lib/kubelet/pods/e40a1350-0fce-48ce-bed8-75ba8d51e7a0/volumes/kubernetes.io~secret/etcd-client-tls/..2025_03_03_01_02_09.2268049037/tls.crt, ownerUser: 0, ownerGroup: 65532 kind: pod name: etcd-events-0 namespace: shoot--diki-comp--azure
- cluster: seed containerName: etcd details: fileName: /var/lib/kubelet/pods/e40a1350-0fce-48ce-bed8-75ba8d51e7a0/volumes/kubernetes.io~secret/etcd-client-tls/..2025_03_03_01_02_09.2268049037/tls.key, ownerUser: 0, ownerGroup: 65532 kind: pod name: etcd-events-0 namespace: shoot--diki-comp--azure
- cluster: seed containerName: etcd details: fileName: /var/lib/kubelet/pods/e40a1350-0fce-48ce-bed8-75ba8d51e7a0/volumes/kubernetes.io~secret/backup-restore-ca/..2025_03_03_01_02_09.4148787187/bundle.crt, ownerUser: 0, ownerGroup: 65532 kind: pod name: etcd-events-0 namespace: shoot--diki-comp--azure
- cluster: seed containerName: etcd details: fileName: /var/lib/kubelet/pods/e40a1350-0fce-48ce-bed8-75ba8d51e7a0/volumes/kubernetes.io~projected/kube-api-access-gardener/..2025_03_03_01_02_09.745783697/ca.crt, ownerUser: 0, ownerGroup: 65532 kind: pod name: etcd-events-0 namespace: shoot--diki-comp--azure
- cluster: seed containerName: etcd details: fileName: /var/lib/kubelet/pods/e40a1350-0fce-48ce-bed8-75ba8d51e7a0/volumes/kubernetes.io~secret/etcd-ca/..2025_03_03_01_02_09.386575845, ownerUser: 0, ownerGroup: 65532 kind: pod name: etcd-events-0 namespace: shoot--diki-comp--azure
- cluster: seed containerName: etcd details: fileName: /var/lib/kubelet/pods/e40a1350-0fce-48ce-bed8-75ba8d51e7a0/volumes/kubernetes.io~secret/etcd-server-tls/..2025_03_03_01_02_09.729094142, ownerUser: 0, ownerGroup: 65532 kind: pod name: etcd-events-0 namespace: shoot--diki-comp--azure
- cluster: seed containerName: etcd details: fileName: /var/lib/kubelet/pods/e40a1350-0fce-48ce-bed8-75ba8d51e7a0/volumes/kubernetes.io~secret/etcd-client-tls/..2025_03_03_01_02_09.2268049037, ownerUser: 0, ownerGroup: 65532 kind: pod name: etcd-events-0 namespace: shoot--diki-comp--azure
- cluster: seed containerName: etcd details: fileName: /var/lib/kubelet/pods/e40a1350-0fce-48ce-bed8-75ba8d51e7a0/volumes/kubernetes.io~secret/backup-restore-ca/..2025_03_03_01_02_09.4148787187, ownerUser: 0, ownerGroup: 65532 kind: pod name: etcd-events-0 namespace: shoot--diki-comp--azure
- cluster: seed containerName: etcd details: fileName: /var/lib/kubelet/pods/e40a1350-0fce-48ce-bed8-75ba8d51e7a0/volumes/kubernetes.io~projected/kube-api-access-gardener/..2025_03_03_01_02_09.745783697, ownerUser: 0, ownerGroup: 65532 kind: pod name: etcd-events-0 namespace: shoot--diki-comp--azure
- cluster: seed containerName: backup-restore details: fileName: /var/lib/kubelet/pods/e40a1350-0fce-48ce-bed8-75ba8d51e7a0/volumes/kubernetes.io~secret/backup-restore-server-tls/..2025_03_03_01_02_09.2392161902/tls.crt, ownerUser: 0, ownerGroup: 65532 kind: pod name: etcd-events-0 namespace: shoot--diki-comp--azure
- cluster: seed containerName: backup-restore details: fileName: /var/lib/kubelet/pods/e40a1350-0fce-48ce-bed8-75ba8d51e7a0/volumes/kubernetes.io~secret/backup-restore-server-tls/..2025_03_03_01_02_09.2392161902/tls.key, ownerUser: 0, ownerGroup: 65532 kind: pod name: etcd-events-0 namespace: shoot--diki-comp--azure
- cluster: seed containerName: backup-restore details: fileName: /var/lib/kubelet/pods/e40a1350-0fce-48ce-bed8-75ba8d51e7a0/volumes/kubernetes.io~secret/etcd-ca/..2025_03_03_01_02_09.386575845/bundle.crt, ownerUser: 0, ownerGroup: 65532 kind: pod name: etcd-events-0 namespace: shoot--diki-comp--azure
- cluster: seed containerName: backup-restore details: fileName: /var/lib/kubelet/pods/e40a1350-0fce-48ce-bed8-75ba8d51e7a0/volumes/kubernetes.io~secret/etcd-client-tls/..2025_03_03_01_02_09.2268049037/tls.crt, ownerUser: 0, ownerGroup: 65532 kind: pod name: etcd-events-0 namespace: shoot--diki-comp--azure
- cluster: seed containerName: backup-restore details: fileName: /var/lib/kubelet/pods/e40a1350-0fce-48ce-bed8-75ba8d51e7a0/volumes/kubernetes.io~secret/etcd-client-tls/..2025_03_03_01_02_09.2268049037/tls.key, ownerUser: 0, ownerGroup: 65532 kind: pod name: etcd-events-0 namespace: shoot--diki-comp--azure
- cluster: seed containerName: backup-restore details: fileName: /var/lib/kubelet/pods/e40a1350-0fce-48ce-bed8-75ba8d51e7a0/volumes/kubernetes.io~projected/kube-api-access-gardener/..2025_03_03_01_02_09.745783697/ca.crt, ownerUser: 0, ownerGroup: 65532 kind: pod name: etcd-events-0 namespace: shoot--diki-comp--azure
- cluster: seed containerName: backup-restore details: fileName: /var/lib/kubelet/pods/e40a1350-0fce-48ce-bed8-75ba8d51e7a0/volumes/kubernetes.io~secret/backup-restore-server-tls/..2025_03_03_01_02_09.2392161902, ownerUser: 0, ownerGroup: 65532 kind: pod name: etcd-events-0 namespace: shoot--diki-comp--azure
- cluster: seed containerName: backup-restore details: fileName: /var/lib/kubelet/pods/e40a1350-0fce-48ce-bed8-75ba8d51e7a0/volumes/kubernetes.io~secret/etcd-ca/..2025_03_03_01_02_09.386575845, ownerUser: 0, ownerGroup: 65532 kind: pod name: etcd-events-0 namespace: shoot--diki-comp--azure
- cluster: seed containerName: backup-restore details: fileName: /var/lib/kubelet/pods/e40a1350-0fce-48ce-bed8-75ba8d51e7a0/volumes/kubernetes.io~secret/etcd-client-tls/..2025_03_03_01_02_09.2268049037, ownerUser: 0, ownerGroup: 65532 kind: pod name: etcd-events-0 namespace: shoot--diki-comp--azure
- cluster: seed containerName: backup-restore details: fileName: /var/lib/kubelet/pods/e40a1350-0fce-48ce-bed8-75ba8d51e7a0/volumes/kubernetes.io~projected/kube-api-access-gardener/..2025_03_03_01_02_09.745783697, ownerUser: 0, ownerGroup: 65532 kind: pod name: etcd-events-0 namespace: shoot--diki-comp--azure
- cluster: seed containerName: kube-controller-manager details: fileName: /var/lib/kubelet/pods/5ce475eb-2980-488b-a80e-b6056cb46e48/volumes/kubernetes.io~secret/ca/..2025_03_03_01_14_45.1500377092/bundle.crt, ownerUser: 0, ownerGroup: 65532 kind: pod name: kube-controller-manager-9b68d9877-7d97p namespace: shoot--diki-comp--azure
- cluster: seed containerName: kube-controller-manager details: fileName: /var/lib/kubelet/pods/5ce475eb-2980-488b-a80e-b6056cb46e48/volumes/kubernetes.io~secret/ca-client/..2025_03_03_01_14_45.741295729/ca.key, ownerUser: 0, ownerGroup: 65532 kind: pod name: kube-controller-manager-9b68d9877-7d97p namespace: shoot--diki-comp--azure
- cluster: seed containerName: kube-controller-manager details: fileName: /var/lib/kubelet/pods/5ce475eb-2980-488b-a80e-b6056cb46e48/volumes/kubernetes.io~secret/ca-client/..2025_03_03_01_14_45.741295729/ca.crt, ownerUser: 0, ownerGroup: 65532 kind: pod name: kube-controller-manager-9b68d9877-7d97p namespace: shoot--diki-comp--azure
- cluster: seed containerName: kube-controller-manager details: fileName: /var/lib/kubelet/pods/5ce475eb-2980-488b-a80e-b6056cb46e48/volumes/kubernetes.io~secret/server/..2025_03_03_01_14_45.592586788/tls.crt, ownerUser: 0, ownerGroup: 65532 kind: pod name: kube-controller-manager-9b68d9877-7d97p namespace: shoot--diki-comp--azure
- cluster: seed containerName: kube-controller-manager details: fileName: /var/lib/kubelet/pods/5ce475eb-2980-488b-a80e-b6056cb46e48/volumes/kubernetes.io~secret/server/..2025_03_03_01_14_45.592586788/tls.key, ownerUser: 0, ownerGroup: 65532 kind: pod name: kube-controller-manager-9b68d9877-7d97p namespace: shoot--diki-comp--azure
- cluster: seed containerName: kube-controller-manager details: fileName: /var/lib/kubelet/pods/5ce475eb-2980-488b-a80e-b6056cb46e48/volumes/kubernetes.io~secret/ca-kubelet/..2025_03_03_01_14_45.264971959/ca.crt, ownerUser: 0, ownerGroup: 65532 kind: pod name: kube-controller-manager-9b68d9877-7d97p namespace: shoot--diki-comp--azure
- cluster: seed containerName: kube-controller-manager details: fileName: /var/lib/kubelet/pods/5ce475eb-2980-488b-a80e-b6056cb46e48/volumes/kubernetes.io~secret/ca-kubelet/..2025_03_03_01_14_45.264971959/ca.key, ownerUser: 0, ownerGroup: 65532 kind: pod name: kube-controller-manager-9b68d9877-7d97p namespace: shoot--diki-comp--azure
- cluster: seed containerName: kube-controller-manager details: fileName: /var/lib/kubelet/pods/5ce475eb-2980-488b-a80e-b6056cb46e48/volumes/kubernetes.io~secret/ca-client/..2025_03_03_01_14_45.741295729, ownerUser: 0, ownerGroup: 65532 kind: pod name: kube-controller-manager-9b68d9877-7d97p namespace: shoot--diki-comp--azure
- cluster: seed containerName: kube-controller-manager details: fileName: /var/lib/kubelet/pods/5ce475eb-2980-488b-a80e-b6056cb46e48/volumes/kubernetes.io~secret/server/..2025_03_03_01_14_45.592586788, ownerUser: 0, ownerGroup: 65532 kind: pod name: kube-controller-manager-9b68d9877-7d97p namespace: shoot--diki-comp--azure
- cluster: seed containerName: kube-controller-manager details: fileName: /var/lib/kubelet/pods/5ce475eb-2980-488b-a80e-b6056cb46e48/volumes/kubernetes.io~secret/ca-kubelet/..2025_03_03_01_14_45.264971959, ownerUser: 0, ownerGroup: 65532 kind: pod name: kube-controller-manager-9b68d9877-7d97p namespace: shoot--diki-comp--azure
- cluster: seed containerName: kube-controller-manager details: fileName: /var/lib/kubelet/pods/5ce475eb-2980-488b-a80e-b6056cb46e48/volumes/kubernetes.io~secret/ca/..2025_03_03_01_14_45.1500377092, ownerUser: 0, ownerGroup: 65532 kind: pod name: kube-controller-manager-9b68d9877-7d97p namespace: shoot--diki-comp--azure
- cluster: seed containerName: kube-scheduler details: fileName: /var/lib/kubelet/pods/e13bc0c7-ae81-4b12-a8f0-7939662b6273/volumes/kubernetes.io~projected/client-ca/..2025_03_03_01_10_45.274742397/bundle.crt, ownerUser: 0, ownerGroup: 65532 kind: pod name: kube-scheduler-79b6c874b4-q7l8z namespace: shoot--diki-comp--azure
- cluster: seed containerName: kube-scheduler details: fileName: /var/lib/kubelet/pods/e13bc0c7-ae81-4b12-a8f0-7939662b6273/volumes/kubernetes.io~secret/kube-scheduler-server/..2025_03_03_01_10_45.3845255199/tls.key, ownerUser: 0, ownerGroup: 65532 kind: pod name: kube-scheduler-79b6c874b4-q7l8z namespace: shoot--diki-comp--azure
- cluster: seed containerName: kube-scheduler details: fileName: /var/lib/kubelet/pods/e13bc0c7-ae81-4b12-a8f0-7939662b6273/volumes/kubernetes.io~secret/kube-scheduler-server/..2025_03_03_01_10_45.3845255199/tls.crt, ownerUser: 0, ownerGroup: 65532 kind: pod name: kube-scheduler-79b6c874b4-q7l8z namespace: shoot--diki-comp--azure
- cluster: seed containerName: kube-scheduler details: fileName: /var/lib/kubelet/pods/e13bc0c7-ae81-4b12-a8f0-7939662b6273/volumes/kubernetes.io~projected/client-ca/..2025_03_03_01_10_45.274742397, ownerUser: 0, ownerGroup: 65532 kind: pod name: kube-scheduler-79b6c874b4-q7l8z namespace: shoot--diki-comp--azure
- cluster: seed containerName: kube-scheduler details: fileName: /var/lib/kubelet/pods/e13bc0c7-ae81-4b12-a8f0-7939662b6273/volumes/kubernetes.io~secret/kube-scheduler-server/..2025_03_03_01_10_45.3845255199, ownerUser: 0, ownerGroup: 65532 kind: pod name: kube-scheduler-79b6c874b4-q7l8z namespace: shoot--diki-comp--azure
- cluster: seed containerName: etcd details: fileName: /var/lib/kubelet/pods/153ccd2e-435b-4b34-8337-7b33a279136f/volumes/kubernetes.io~secret/etcd-ca/..2025_03_03_01_02_09.1747192981/bundle.crt, ownerUser: 0, ownerGroup: 65532 kind: pod name: etcd-main-0 namespace: shoot--diki-comp--azure
- cluster: seed containerName: etcd details: fileName: /var/lib/kubelet/pods/153ccd2e-435b-4b34-8337-7b33a279136f/volumes/kubernetes.io~secret/etcd-server-tls/..2025_03_03_01_02_09.2561838193/tls.key, ownerUser: 0, ownerGroup: 65532 kind: pod name: etcd-main-0 namespace: shoot--diki-comp--azure
- cluster: seed containerName: etcd details: fileName: /var/lib/kubelet/pods/153ccd2e-435b-4b34-8337-7b33a279136f/volumes/kubernetes.io~secret/etcd-server-tls/..2025_03_03_01_02_09.2561838193/tls.crt, ownerUser: 0, ownerGroup: 65532 kind: pod name: etcd-main-0 namespace: shoot--diki-comp--azure
- cluster: seed containerName: etcd details: fileName: /var/lib/kubelet/pods/153ccd2e-435b-4b34-8337-7b33a279136f/volumes/kubernetes.io~secret/etcd-client-tls/..2025_03_03_01_02_09.1461912590/tls.crt, ownerUser: 0, ownerGroup: 65532 kind: pod name: etcd-main-0 namespace: shoot--diki-comp--azure
- cluster: seed containerName: etcd details: fileName: /var/lib/kubelet/pods/153ccd2e-435b-4b34-8337-7b33a279136f/volumes/kubernetes.io~secret/etcd-client-tls/..2025_03_03_01_02_09.1461912590/tls.key, ownerUser: 0, ownerGroup: 65532 kind: pod name: etcd-main-0 namespace: shoot--diki-comp--azure
- cluster: seed containerName: etcd details: fileName: /var/lib/kubelet/pods/153ccd2e-435b-4b34-8337-7b33a279136f/volumes/kubernetes.io~secret/backup-restore-ca/..2025_03_03_01_02_09.1112355822/bundle.crt, ownerUser: 0, ownerGroup: 65532 kind: pod name: etcd-main-0 namespace: shoot--diki-comp--azure
- cluster: seed containerName: etcd details: fileName: /var/lib/kubelet/pods/153ccd2e-435b-4b34-8337-7b33a279136f/volumes/kubernetes.io~projected/kube-api-access-gardener/..2025_03_03_01_02_09.3605391883/ca.crt, ownerUser: 0, ownerGroup: 65532 kind: pod name: etcd-main-0 namespace: shoot--diki-comp--azure
- cluster: seed containerName: etcd details: fileName: /var/lib/kubelet/pods/153ccd2e-435b-4b34-8337-7b33a279136f/volumes/kubernetes.io~secret/etcd-ca/..2025_03_03_01_02_09.1747192981, ownerUser: 0, ownerGroup: 65532 kind: pod name: etcd-main-0 namespace: shoot--diki-comp--azure
- cluster: seed containerName: etcd details: fileName: /var/lib/kubelet/pods/153ccd2e-435b-4b34-8337-7b33a279136f/volumes/kubernetes.io~secret/etcd-server-tls/..2025_03_03_01_02_09.2561838193, ownerUser: 0, ownerGroup: 65532 kind: pod name: etcd-main-0 namespace: shoot--diki-comp--azure
- cluster: seed containerName: etcd details: fileName: /var/lib/kubelet/pods/153ccd2e-435b-4b34-8337-7b33a279136f/volumes/kubernetes.io~secret/etcd-client-tls/..2025_03_03_01_02_09.1461912590, ownerUser: 0, ownerGroup: 65532 kind: pod name: etcd-main-0 namespace: shoot--diki-comp--azure
- cluster: seed containerName: etcd details: fileName: /var/lib/kubelet/pods/153ccd2e-435b-4b34-8337-7b33a279136f/volumes/kubernetes.io~secret/backup-restore-ca/..2025_03_03_01_02_09.1112355822, ownerUser: 0, ownerGroup: 65532 kind: pod name: etcd-main-0 namespace: shoot--diki-comp--azure
- cluster: seed containerName: etcd details: fileName: /var/lib/kubelet/pods/153ccd2e-435b-4b34-8337-7b33a279136f/volumes/kubernetes.io~projected/kube-api-access-gardener/..2025_03_03_01_02_09.3605391883, ownerUser: 0, ownerGroup: 65532 kind: pod name: etcd-main-0 namespace: shoot--diki-comp--azure
- cluster: seed containerName: backup-restore details: fileName: /var/lib/kubelet/pods/153ccd2e-435b-4b34-8337-7b33a279136f/volumes/kubernetes.io~secret/backup-restore-server-tls/..2025_03_03_01_02_09.980570931/tls.crt, ownerUser: 0, ownerGroup: 65532 kind: pod name: etcd-main-0 namespace: shoot--diki-comp--azure
- cluster: seed containerName: backup-restore details: fileName: /var/lib/kubelet/pods/153ccd2e-435b-4b34-8337-7b33a279136f/volumes/kubernetes.io~secret/backup-restore-server-tls/..2025_03_03_01_02_09.980570931/tls.key, ownerUser: 0, ownerGroup: 65532 kind: pod name: etcd-main-0 namespace: shoot--diki-comp--azure
- cluster: seed containerName: backup-restore details: fileName: /var/lib/kubelet/pods/153ccd2e-435b-4b34-8337-7b33a279136f/volumes/kubernetes.io~secret/etcd-ca/..2025_03_03_01_02_09.1747192981/bundle.crt, ownerUser: 0, ownerGroup: 65532 kind: pod name: etcd-main-0 namespace: shoot--diki-comp--azure
- cluster: seed containerName: backup-restore details: fileName: /var/lib/kubelet/pods/153ccd2e-435b-4b34-8337-7b33a279136f/volumes/kubernetes.io~secret/etcd-client-tls/..2025_03_03_01_02_09.1461912590/tls.crt, ownerUser: 0, ownerGroup: 65532 kind: pod name: etcd-main-0 namespace: shoot--diki-comp--azure
- cluster: seed containerName: backup-restore details: fileName: /var/lib/kubelet/pods/153ccd2e-435b-4b34-8337-7b33a279136f/volumes/kubernetes.io~secret/etcd-client-tls/..2025_03_03_01_02_09.1461912590/tls.key, ownerUser: 0, ownerGroup: 65532 kind: pod name: etcd-main-0 namespace: shoot--diki-comp--azure
- cluster: seed containerName: backup-restore details: fileName: /var/lib/kubelet/pods/153ccd2e-435b-4b34-8337-7b33a279136f/volumes/kubernetes.io~projected/kube-api-access-gardener/..2025_03_03_01_02_09.3605391883/ca.crt, ownerUser: 0, ownerGroup: 65532 kind: pod name: etcd-main-0 namespace: shoot--diki-comp--azure
- cluster: seed containerName: backup-restore details: fileName: /var/lib/kubelet/pods/153ccd2e-435b-4b34-8337-7b33a279136f/volumes/kubernetes.io~secret/backup-restore-server-tls/..2025_03_03_01_02_09.980570931, ownerUser: 0, ownerGroup: 65532 kind: pod name: etcd-main-0 namespace: shoot--diki-comp--azure
- cluster: seed containerName: backup-restore details: fileName: /var/lib/kubelet/pods/153ccd2e-435b-4b34-8337-7b33a279136f/volumes/kubernetes.io~secret/etcd-ca/..2025_03_03_01_02_09.1747192981, ownerUser: 0, ownerGroup: 65532 kind: pod name: etcd-main-0 namespace: shoot--diki-comp--azure
- cluster: seed containerName: backup-restore details: fileName: /var/lib/kubelet/pods/153ccd2e-435b-4b34-8337-7b33a279136f/volumes/kubernetes.io~secret/etcd-client-tls/..2025_03_03_01_02_09.1461912590, ownerUser: 0, ownerGroup: 65532 kind: pod name: etcd-main-0 namespace: shoot--diki-comp--azure
- cluster: seed containerName: backup-restore details: fileName: /var/lib/kubelet/pods/153ccd2e-435b-4b34-8337-7b33a279136f/volumes/kubernetes.io~projected/kube-api-access-gardener/..2025_03_03_01_02_09.3605391883, ownerUser: 0, ownerGroup: 65532 kind: pod name: etcd-main-0 namespace: shoot--diki-comp--azure
- cluster: seed containerName: kube-apiserver details: fileName: /var/lib/kubelet/pods/56fb368e-1dfa-4d5c-86bc-d3233d8c5ff7/volumes/kubernetes.io~secret/ca/..2025_03_03_01_15_45.490470259/bundle.crt, ownerUser: 0, ownerGroup: 65532 kind: pod name: kube-apiserver-78d668b498-8xmjt namespace: shoot--diki-comp--azure
- cluster: seed containerName: kube-apiserver details: fileName: /var/lib/kubelet/pods/56fb368e-1dfa-4d5c-86bc-d3233d8c5ff7/volumes/kubernetes.io~secret/ca-client/..2025_03_03_01_15_45.439326823/bundle.crt, ownerUser: 0, ownerGroup: 65532 kind: pod name: kube-apiserver-78d668b498-8xmjt namespace: shoot--diki-comp--azure
- cluster: seed containerName: kube-apiserver details: fileName: /var/lib/kubelet/pods/56fb368e-1dfa-4d5c-86bc-d3233d8c5ff7/volumes/kubernetes.io~secret/ca-front-proxy/..2025_03_03_01_15_45.1918001777/bundle.crt, ownerUser: 0, ownerGroup: 65532 kind: pod name: kube-apiserver-78d668b498-8xmjt namespace: shoot--diki-comp--azure
- cluster: seed containerName: kube-apiserver details: fileName: /var/lib/kubelet/pods/56fb368e-1dfa-4d5c-86bc-d3233d8c5ff7/volumes/kubernetes.io~secret/service-account-key-bundle/..2025_03_03_01_15_45.731119053/bundle.key, ownerUser: 0, ownerGroup: 65532 kind: pod name: kube-apiserver-78d668b498-8xmjt namespace: shoot--diki-comp--azure
- cluster: seed containerName: kube-apiserver details: fileName: /var/lib/kubelet/pods/56fb368e-1dfa-4d5c-86bc-d3233d8c5ff7/volumes/kubernetes.io~secret/kube-aggregator/..2025_03_03_01_15_45.4210460930/tls.crt, ownerUser: 0, ownerGroup: 65532 kind: pod name: kube-apiserver-78d668b498-8xmjt namespace: shoot--diki-comp--azure
- cluster: seed containerName: kube-apiserver details: fileName: /var/lib/kubelet/pods/56fb368e-1dfa-4d5c-86bc-d3233d8c5ff7/volumes/kubernetes.io~secret/kube-aggregator/..2025_03_03_01_15_45.4210460930/tls.key, ownerUser: 0, ownerGroup: 65532 kind: pod name: kube-apiserver-78d668b498-8xmjt namespace: shoot--diki-comp--azure
- cluster: seed containerName: kube-apiserver details: fileName: /var/lib/kubelet/pods/56fb368e-1dfa-4d5c-86bc-d3233d8c5ff7/volumes/kubernetes.io~secret/server/..2025_03_03_01_15_45.940486963/tls.crt, ownerUser: 0, ownerGroup: 65532 kind: pod name: kube-apiserver-78d668b498-8xmjt namespace: shoot--diki-comp--azure
- cluster: seed containerName: kube-apiserver details: fileName: /var/lib/kubelet/pods/56fb368e-1dfa-4d5c-86bc-d3233d8c5ff7/volumes/kubernetes.io~secret/server/..2025_03_03_01_15_45.940486963/tls.key, ownerUser: 0, ownerGroup: 65532 kind: pod name: kube-apiserver-78d668b498-8xmjt namespace: shoot--diki-comp--azure
- cluster: seed containerName: kube-apiserver details: fileName: /var/lib/kubelet/pods/56fb368e-1dfa-4d5c-86bc-d3233d8c5ff7/volumes/kubernetes.io~secret/ca-vpn/..2025_03_03_01_15_45.2369293391/bundle.crt, ownerUser: 0, ownerGroup: 65532 kind: pod name: kube-apiserver-78d668b498-8xmjt namespace: shoot--diki-comp--azure
- cluster: seed containerName: kube-apiserver details: fileName: /var/lib/kubelet/pods/56fb368e-1dfa-4d5c-86bc-d3233d8c5ff7/volumes/kubernetes.io~secret/ca-kubelet/..2025_03_03_01_15_45.3923805873/bundle.crt, ownerUser: 0, ownerGroup: 65532 kind: pod name: kube-apiserver-78d668b498-8xmjt namespace: shoot--diki-comp--azure
- cluster: seed containerName: kube-apiserver details: fileName: /var/lib/kubelet/pods/56fb368e-1dfa-4d5c-86bc-d3233d8c5ff7/volumes/kubernetes.io~secret/kubelet-client/..2025_03_03_01_15_45.4026042906/tls.crt, ownerUser: 0, ownerGroup: 65532 kind: pod name: kube-apiserver-78d668b498-8xmjt namespace: shoot--diki-comp--azure
- cluster: seed containerName: kube-apiserver details: fileName: /var/lib/kubelet/pods/56fb368e-1dfa-4d5c-86bc-d3233d8c5ff7/volumes/kubernetes.io~secret/kubelet-client/..2025_03_03_01_15_45.4026042906/tls.key, ownerUser: 0, ownerGroup: 65532 kind: pod name: kube-apiserver-78d668b498-8xmjt namespace: shoot--diki-comp--azure
- cluster: seed containerName: kube-apiserver details: fileName: /var/lib/kubelet/pods/56fb368e-1dfa-4d5c-86bc-d3233d8c5ff7/volumes/kubernetes.io~secret/ca-etcd/..2025_03_03_01_15_45.3336896937/bundle.crt, ownerUser: 0, ownerGroup: 65532 kind: pod name: kube-apiserver-78d668b498-8xmjt namespace: shoot--diki-comp--azure
- cluster: seed containerName: kube-apiserver details: fileName: /var/lib/kubelet/pods/56fb368e-1dfa-4d5c-86bc-d3233d8c5ff7/volumes/kubernetes.io~secret/etcd-client/..2025_03_03_01_15_45.330086599/tls.key, ownerUser: 0, ownerGroup: 65532 kind: pod name: kube-apiserver-78d668b498-8xmjt namespace: shoot--diki-comp--azure
- cluster: seed containerName: kube-apiserver details: fileName: /var/lib/kubelet/pods/56fb368e-1dfa-4d5c-86bc-d3233d8c5ff7/volumes/kubernetes.io~secret/etcd-client/..2025_03_03_01_15_45.330086599/tls.crt, ownerUser: 0, ownerGroup: 65532 kind: pod name: kube-apiserver-78d668b498-8xmjt namespace: shoot--diki-comp--azure
- cluster: seed containerName: kube-apiserver details: fileName: /var/lib/kubelet/pods/56fb368e-1dfa-4d5c-86bc-d3233d8c5ff7/volumes/kubernetes.io~secret/tls-sni-0/..2025_03_03_01_15_45.2219346093/tls.crt, ownerUser: 0, ownerGroup: 65532 kind: pod name: kube-apiserver-78d668b498-8xmjt namespace: shoot--diki-comp--azure
- cluster: seed containerName: kube-apiserver details: fileName: /var/lib/kubelet/pods/56fb368e-1dfa-4d5c-86bc-d3233d8c5ff7/volumes/kubernetes.io~secret/tls-sni-0/..2025_03_03_01_15_45.2219346093/tls.key, ownerUser: 0, ownerGroup: 65532 kind: pod name: kube-apiserver-78d668b498-8xmjt namespace: shoot--diki-comp--azure
- cluster: seed containerName: kube-apiserver details: fileName: /var/lib/kubelet/pods/56fb368e-1dfa-4d5c-86bc-d3233d8c5ff7/volumes/kubernetes.io~secret/tls-sni-0/..2025_03_03_01_15_45.2219346093/ca.crt, ownerUser: 0, ownerGroup: 65532 kind: pod name: kube-apiserver-78d668b498-8xmjt namespace: shoot--diki-comp--azure
- cluster: seed containerName: kube-apiserver details: fileName: /var/lib/kubelet/pods/56fb368e-1dfa-4d5c-86bc-d3233d8c5ff7/volumes/kubernetes.io~secret/http-proxy/..2025_03_03_01_15_45.1994303313/tls.key, ownerUser: 0, ownerGroup: 65532 kind: pod name: kube-apiserver-78d668b498-8xmjt namespace: shoot--diki-comp--azure
- cluster: seed containerName: kube-apiserver details: fileName: /var/lib/kubelet/pods/56fb368e-1dfa-4d5c-86bc-d3233d8c5ff7/volumes/kubernetes.io~secret/http-proxy/..2025_03_03_01_15_45.1994303313/tls.crt, ownerUser: 0, ownerGroup: 65532 kind: pod name: kube-apiserver-78d668b498-8xmjt namespace: shoot--diki-comp--azure
- cluster: seed containerName: kube-apiserver details: fileName: /var/lib/kubelet/pods/56fb368e-1dfa-4d5c-86bc-d3233d8c5ff7/volumes/kubernetes.io~secret/ca-front-proxy/..2025_03_03_01_15_45.1918001777, ownerUser: 0, ownerGroup: 65532 kind: pod name: kube-apiserver-78d668b498-8xmjt namespace: shoot--diki-comp--azure
- cluster: seed containerName: kube-apiserver details: fileName: /var/lib/kubelet/pods/56fb368e-1dfa-4d5c-86bc-d3233d8c5ff7/volumes/kubernetes.io~secret/service-account-key-bundle/..2025_03_03_01_15_45.731119053, ownerUser: 0, ownerGroup: 65532 kind: pod name: kube-apiserver-78d668b498-8xmjt namespace: shoot--diki-comp--azure
- cluster: seed containerName: kube-apiserver details: fileName: /var/lib/kubelet/pods/56fb368e-1dfa-4d5c-86bc-d3233d8c5ff7/volumes/kubernetes.io~secret/kube-aggregator/..2025_03_03_01_15_45.4210460930, ownerUser: 0, ownerGroup: 65532 kind: pod name: kube-apiserver-78d668b498-8xmjt namespace: shoot--diki-comp--azure
- cluster: seed containerName: kube-apiserver details: fileName: /var/lib/kubelet/pods/56fb368e-1dfa-4d5c-86bc-d3233d8c5ff7/volumes/kubernetes.io~secret/ca-kubelet/..2025_03_03_01_15_45.3923805873, ownerUser: 0, ownerGroup: 65532 kind: pod name: kube-apiserver-78d668b498-8xmjt namespace: shoot--diki-comp--azure
- cluster: seed containerName: kube-apiserver details: fileName: /var/lib/kubelet/pods/56fb368e-1dfa-4d5c-86bc-d3233d8c5ff7/volumes/kubernetes.io~secret/kubelet-client/..2025_03_03_01_15_45.4026042906, ownerUser: 0, ownerGroup: 65532 kind: pod name: kube-apiserver-78d668b498-8xmjt namespace: shoot--diki-comp--azure
- cluster: seed containerName: kube-apiserver details: fileName: /var/lib/kubelet/pods/56fb368e-1dfa-4d5c-86bc-d3233d8c5ff7/volumes/kubernetes.io~secret/etcd-client/..2025_03_03_01_15_45.330086599, ownerUser: 0, ownerGroup: 65532 kind: pod name: kube-apiserver-78d668b498-8xmjt namespace: shoot--diki-comp--azure
- cluster: seed containerName: kube-apiserver details: fileName: /var/lib/kubelet/pods/56fb368e-1dfa-4d5c-86bc-d3233d8c5ff7/volumes/kubernetes.io~secret/http-proxy/..2025_03_03_01_15_45.1994303313, ownerUser: 0, ownerGroup: 65532 kind: pod name: kube-apiserver-78d668b498-8xmjt namespace: shoot--diki-comp--azure
- cluster: seed containerName: kube-apiserver details: fileName: /var/lib/kubelet/pods/56fb368e-1dfa-4d5c-86bc-d3233d8c5ff7/volumes/kubernetes.io~secret/ca/..2025_03_03_01_15_45.490470259, ownerUser: 0, ownerGroup: 65532 kind: pod name: kube-apiserver-78d668b498-8xmjt namespace: shoot--diki-comp--azure
- cluster: seed containerName: kube-apiserver details: fileName: /var/lib/kubelet/pods/56fb368e-1dfa-4d5c-86bc-d3233d8c5ff7/volumes/kubernetes.io~secret/ca-client/..2025_03_03_01_15_45.439326823, ownerUser: 0, ownerGroup: 65532 kind: pod name: kube-apiserver-78d668b498-8xmjt namespace: shoot--diki-comp--azure
- cluster: seed containerName: kube-apiserver details: fileName: /var/lib/kubelet/pods/56fb368e-1dfa-4d5c-86bc-d3233d8c5ff7/volumes/kubernetes.io~secret/server/..2025_03_03_01_15_45.940486963, ownerUser: 0, ownerGroup: 65532 kind: pod name: kube-apiserver-78d668b498-8xmjt namespace: shoot--diki-comp--azure
- cluster: seed containerName: kube-apiserver details: fileName: /var/lib/kubelet/pods/56fb368e-1dfa-4d5c-86bc-d3233d8c5ff7/volumes/kubernetes.io~secret/ca-vpn/..2025_03_03_01_15_45.2369293391, ownerUser: 0, ownerGroup: 65532 kind: pod name: kube-apiserver-78d668b498-8xmjt namespace: shoot--diki-comp--azure
- cluster: seed containerName: kube-apiserver details: fileName: /var/lib/kubelet/pods/56fb368e-1dfa-4d5c-86bc-d3233d8c5ff7/volumes/kubernetes.io~secret/ca-etcd/..2025_03_03_01_15_45.3336896937, ownerUser: 0, ownerGroup: 65532 kind: pod name: kube-apiserver-78d668b498-8xmjt namespace: shoot--diki-comp--azure
- cluster: seed containerName: kube-apiserver details: fileName: /var/lib/kubelet/pods/56fb368e-1dfa-4d5c-86bc-d3233d8c5ff7/volumes/kubernetes.io~secret/tls-sni-0/..2025_03_03_01_15_45.2219346093, ownerUser: 0, ownerGroup: 65532 kind: pod name: kube-apiserver-78d668b498-8xmjt namespace: shoot--diki-comp--azure
- cluster: shoot details: fileName: /var/lib/kubelet/pki/kubelet-client-2025-03-03-01-09-13.pem, ownerUser: 0, ownerGroup: 0 kind: node name: shoot--diki-comp--azure-worker-g7p4p-z3-7ccb8-2wxkr
- cluster: shoot details: fileName: /var/lib/kubelet/pki/kubelet-server-2025-03-03-01-10-06.pem, ownerUser: 0, ownerGroup: 0 kind: node name: shoot--diki-comp--azure-worker-g7p4p-z3-7ccb8-2wxkr
- cluster: shoot details: fileName: /var/lib/kubelet/pki, ownerUser: 0, ownerGroup: 0 kind: node name: shoot--diki-comp--azure-worker-g7p4p-z3-7ccb8-2wxkr
- cluster: shoot containerName: kube-proxy details: fileName: /var/lib/kubelet/pods/cba5277c-2ea9-4ff9-aa0f-720ebc55a428/volumes/kubernetes.io~projected/kube-api-access-gardener/..2025_03_03_01_09_16.4128433039/ca.crt, ownerUser: 0, ownerGroup: 0 kind: pod name: kube-proxy-worker-g7p4p-v1.31.4-r8rjr namespace: kube-system
- cluster: shoot containerName: kube-proxy details: fileName: /var/lib/kubelet/pods/cba5277c-2ea9-4ff9-aa0f-720ebc55a428/volumes/kubernetes.io~projected/kube-api-access-gardener/..2025_03_03_01_09_16.4128433039, ownerUser: 0, ownerGroup: 0 kind: pod name: kube-proxy-worker-g7p4p-v1.31.4-r8rjr namespace: kube-system
- cluster: shoot containerName: conntrack-fix details: fileName: /var/lib/kubelet/pods/cba5277c-2ea9-4ff9-aa0f-720ebc55a428/volumes/kubernetes.io~projected/kube-api-access-gardener/..2025_03_03_01_09_16.4128433039/ca.crt, ownerUser: 0, ownerGroup: 0 kind: pod name: kube-proxy-worker-g7p4p-v1.31.4-r8rjr namespace: kube-system
- cluster: shoot containerName: conntrack-fix details: fileName: /var/lib/kubelet/pods/cba5277c-2ea9-4ff9-aa0f-720ebc55a428/volumes/kubernetes.io~projected/kube-api-access-gardener/..2025_03_03_01_09_16.4128433039, ownerUser: 0, ownerGroup: 0 kind: pod name: kube-proxy-worker-g7p4p-v1.31.4-r8rjr namespace: kube-system
- gcp
- cluster: seed containerName: etcd details: fileName: /var/lib/kubelet/pods/4df10450-500f-42ec-bcfd-2416afeb4c18/volumes/kubernetes.io~secret/etcd-ca/..2025_03_03_01_02_10.307199430/bundle.crt, ownerUser: 0, ownerGroup: 65532 kind: pod name: etcd-events-0 namespace: shoot--diki-comp--gcp
- cluster: seed containerName: etcd details: fileName: /var/lib/kubelet/pods/4df10450-500f-42ec-bcfd-2416afeb4c18/volumes/kubernetes.io~secret/etcd-server-tls/..2025_03_03_01_02_10.1725835043/tls.key, ownerUser: 0, ownerGroup: 65532 kind: pod name: etcd-events-0 namespace: shoot--diki-comp--gcp
- cluster: seed containerName: etcd details: fileName: /var/lib/kubelet/pods/4df10450-500f-42ec-bcfd-2416afeb4c18/volumes/kubernetes.io~secret/etcd-server-tls/..2025_03_03_01_02_10.1725835043/tls.crt, ownerUser: 0, ownerGroup: 65532 kind: pod name: etcd-events-0 namespace: shoot--diki-comp--gcp
- cluster: seed containerName: etcd details: fileName: /var/lib/kubelet/pods/4df10450-500f-42ec-bcfd-2416afeb4c18/volumes/kubernetes.io~secret/etcd-client-tls/..2025_03_03_01_02_10.4134020076/tls.key, ownerUser: 0, ownerGroup: 65532 kind: pod name: etcd-events-0 namespace: shoot--diki-comp--gcp
- cluster: seed containerName: etcd details: fileName: /var/lib/kubelet/pods/4df10450-500f-42ec-bcfd-2416afeb4c18/volumes/kubernetes.io~secret/etcd-client-tls/..2025_03_03_01_02_10.4134020076/tls.crt, ownerUser: 0, ownerGroup: 65532 kind: pod name: etcd-events-0 namespace: shoot--diki-comp--gcp
- cluster: seed containerName: etcd details: fileName: /var/lib/kubelet/pods/4df10450-500f-42ec-bcfd-2416afeb4c18/volumes/kubernetes.io~secret/backup-restore-ca/..2025_03_03_01_02_10.1333348608/bundle.crt, ownerUser: 0, ownerGroup: 65532 kind: pod name: etcd-events-0 namespace: shoot--diki-comp--gcp
- cluster: seed containerName: etcd details: fileName: /var/lib/kubelet/pods/4df10450-500f-42ec-bcfd-2416afeb4c18/volumes/kubernetes.io~projected/kube-api-access-gardener/..2025_03_03_01_02_10.2368081495/ca.crt, ownerUser: 0, ownerGroup: 65532 kind: pod name: etcd-events-0 namespace: shoot--diki-comp--gcp
- cluster: seed containerName: etcd details: fileName: /var/lib/kubelet/pods/4df10450-500f-42ec-bcfd-2416afeb4c18/volumes/kubernetes.io~secret/etcd-ca/..2025_03_03_01_02_10.307199430, ownerUser: 0, ownerGroup: 65532 kind: pod name: etcd-events-0 namespace: shoot--diki-comp--gcp
- cluster: seed containerName: etcd details: fileName: /var/lib/kubelet/pods/4df10450-500f-42ec-bcfd-2416afeb4c18/volumes/kubernetes.io~secret/etcd-server-tls/..2025_03_03_01_02_10.1725835043, ownerUser: 0, ownerGroup: 65532 kind: pod name: etcd-events-0 namespace: shoot--diki-comp--gcp
- cluster: seed containerName: etcd details: fileName: /var/lib/kubelet/pods/4df10450-500f-42ec-bcfd-2416afeb4c18/volumes/kubernetes.io~secret/etcd-client-tls/..2025_03_03_01_02_10.4134020076, ownerUser: 0, ownerGroup: 65532 kind: pod name: etcd-events-0 namespace: shoot--diki-comp--gcp
- cluster: seed containerName: etcd details: fileName: /var/lib/kubelet/pods/4df10450-500f-42ec-bcfd-2416afeb4c18/volumes/kubernetes.io~secret/backup-restore-ca/..2025_03_03_01_02_10.1333348608, ownerUser: 0, ownerGroup: 65532 kind: pod name: etcd-events-0 namespace: shoot--diki-comp--gcp
- cluster: seed containerName: etcd details: fileName: /var/lib/kubelet/pods/4df10450-500f-42ec-bcfd-2416afeb4c18/volumes/kubernetes.io~projected/kube-api-access-gardener/..2025_03_03_01_02_10.2368081495, ownerUser: 0, ownerGroup: 65532 kind: pod name: etcd-events-0 namespace: shoot--diki-comp--gcp
- cluster: seed containerName: backup-restore details: fileName: /var/lib/kubelet/pods/4df10450-500f-42ec-bcfd-2416afeb4c18/volumes/kubernetes.io~secret/backup-restore-server-tls/..2025_03_03_01_02_10.2781398980/tls.crt, ownerUser: 0, ownerGroup: 65532 kind: pod name: etcd-events-0 namespace: shoot--diki-comp--gcp
- cluster: seed containerName: backup-restore details: fileName: /var/lib/kubelet/pods/4df10450-500f-42ec-bcfd-2416afeb4c18/volumes/kubernetes.io~secret/backup-restore-server-tls/..2025_03_03_01_02_10.2781398980/tls.key, ownerUser: 0, ownerGroup: 65532 kind: pod name: etcd-events-0 namespace: shoot--diki-comp--gcp
- cluster: seed containerName: backup-restore details: fileName: /var/lib/kubelet/pods/4df10450-500f-42ec-bcfd-2416afeb4c18/volumes/kubernetes.io~secret/etcd-ca/..2025_03_03_01_02_10.307199430/bundle.crt, ownerUser: 0, ownerGroup: 65532 kind: pod name: etcd-events-0 namespace: shoot--diki-comp--gcp
- cluster: seed containerName: backup-restore details: fileName: /var/lib/kubelet/pods/4df10450-500f-42ec-bcfd-2416afeb4c18/volumes/kubernetes.io~secret/etcd-client-tls/..2025_03_03_01_02_10.4134020076/tls.key, ownerUser: 0, ownerGroup: 65532 kind: pod name: etcd-events-0 namespace: shoot--diki-comp--gcp
- cluster: seed containerName: backup-restore details: fileName: /var/lib/kubelet/pods/4df10450-500f-42ec-bcfd-2416afeb4c18/volumes/kubernetes.io~secret/etcd-client-tls/..2025_03_03_01_02_10.4134020076/tls.crt, ownerUser: 0, ownerGroup: 65532 kind: pod name: etcd-events-0 namespace: shoot--diki-comp--gcp
- cluster: seed containerName: backup-restore details: fileName: /var/lib/kubelet/pods/4df10450-500f-42ec-bcfd-2416afeb4c18/volumes/kubernetes.io~projected/kube-api-access-gardener/..2025_03_03_01_02_10.2368081495/ca.crt, ownerUser: 0, ownerGroup: 65532 kind: pod name: etcd-events-0 namespace: shoot--diki-comp--gcp
- cluster: seed containerName: backup-restore details: fileName: /var/lib/kubelet/pods/4df10450-500f-42ec-bcfd-2416afeb4c18/volumes/kubernetes.io~secret/backup-restore-server-tls/..2025_03_03_01_02_10.2781398980, ownerUser: 0, ownerGroup: 65532 kind: pod name: etcd-events-0 namespace: shoot--diki-comp--gcp
- cluster: seed containerName: backup-restore details: fileName: /var/lib/kubelet/pods/4df10450-500f-42ec-bcfd-2416afeb4c18/volumes/kubernetes.io~secret/etcd-ca/..2025_03_03_01_02_10.307199430, ownerUser: 0, ownerGroup: 65532 kind: pod name: etcd-events-0 namespace: shoot--diki-comp--gcp
- cluster: seed containerName: backup-restore details: fileName: /var/lib/kubelet/pods/4df10450-500f-42ec-bcfd-2416afeb4c18/volumes/kubernetes.io~secret/etcd-client-tls/..2025_03_03_01_02_10.4134020076, ownerUser: 0, ownerGroup: 65532 kind: pod name: etcd-events-0 namespace: shoot--diki-comp--gcp
- cluster: seed containerName: backup-restore details: fileName: /var/lib/kubelet/pods/4df10450-500f-42ec-bcfd-2416afeb4c18/volumes/kubernetes.io~projected/kube-api-access-gardener/..2025_03_03_01_02_10.2368081495, ownerUser: 0, ownerGroup: 65532 kind: pod name: etcd-events-0 namespace: shoot--diki-comp--gcp
- cluster: seed containerName: kube-controller-manager details: fileName: /var/lib/kubelet/pods/90f34bcf-ceda-4e65-8112-679308dd007f/volumes/kubernetes.io~secret/ca/..2025_03_03_01_16_36.2922815650/bundle.crt, ownerUser: 0, ownerGroup: 65532 kind: pod name: kube-controller-manager-d546c97bb-k5rsh namespace: shoot--diki-comp--gcp
- cluster: seed containerName: kube-controller-manager details: fileName: /var/lib/kubelet/pods/90f34bcf-ceda-4e65-8112-679308dd007f/volumes/kubernetes.io~secret/ca-client/..2025_03_03_01_16_36.3990387563/ca.crt, ownerUser: 0, ownerGroup: 65532 kind: pod name: kube-controller-manager-d546c97bb-k5rsh namespace: shoot--diki-comp--gcp
- cluster: seed containerName: kube-controller-manager details: fileName: /var/lib/kubelet/pods/90f34bcf-ceda-4e65-8112-679308dd007f/volumes/kubernetes.io~secret/ca-client/..2025_03_03_01_16_36.3990387563/ca.key, ownerUser: 0, ownerGroup: 65532 kind: pod name: kube-controller-manager-d546c97bb-k5rsh namespace: shoot--diki-comp--gcp
- cluster: seed containerName: kube-controller-manager details: fileName: /var/lib/kubelet/pods/90f34bcf-ceda-4e65-8112-679308dd007f/volumes/kubernetes.io~secret/server/..2025_03_03_01_16_36.256775248/tls.key, ownerUser: 0, ownerGroup: 65532 kind: pod name: kube-controller-manager-d546c97bb-k5rsh namespace: shoot--diki-comp--gcp
- cluster: seed containerName: kube-controller-manager details: fileName: /var/lib/kubelet/pods/90f34bcf-ceda-4e65-8112-679308dd007f/volumes/kubernetes.io~secret/server/..2025_03_03_01_16_36.256775248/tls.crt, ownerUser: 0, ownerGroup: 65532 kind: pod name: kube-controller-manager-d546c97bb-k5rsh namespace: shoot--diki-comp--gcp
- cluster: seed containerName: kube-controller-manager details: fileName: /var/lib/kubelet/pods/90f34bcf-ceda-4e65-8112-679308dd007f/volumes/kubernetes.io~secret/ca-kubelet/..2025_03_03_01_16_36.2964178139/ca.crt, ownerUser: 0, ownerGroup: 65532 kind: pod name: kube-controller-manager-d546c97bb-k5rsh namespace: shoot--diki-comp--gcp
- cluster: seed containerName: kube-controller-manager details: fileName: /var/lib/kubelet/pods/90f34bcf-ceda-4e65-8112-679308dd007f/volumes/kubernetes.io~secret/ca-kubelet/..2025_03_03_01_16_36.2964178139/ca.key, ownerUser: 0, ownerGroup: 65532 kind: pod name: kube-controller-manager-d546c97bb-k5rsh namespace: shoot--diki-comp--gcp
- cluster: seed containerName: kube-controller-manager details: fileName: /var/lib/kubelet/pods/90f34bcf-ceda-4e65-8112-679308dd007f/volumes/kubernetes.io~secret/ca-kubelet/..2025_03_03_01_16_36.2964178139, ownerUser: 0, ownerGroup: 65532 kind: pod name: kube-controller-manager-d546c97bb-k5rsh namespace: shoot--diki-comp--gcp
- cluster: seed containerName: kube-controller-manager details: fileName: /var/lib/kubelet/pods/90f34bcf-ceda-4e65-8112-679308dd007f/volumes/kubernetes.io~secret/ca/..2025_03_03_01_16_36.2922815650, ownerUser: 0, ownerGroup: 65532 kind: pod name: kube-controller-manager-d546c97bb-k5rsh namespace: shoot--diki-comp--gcp
- cluster: seed containerName: kube-controller-manager details: fileName: /var/lib/kubelet/pods/90f34bcf-ceda-4e65-8112-679308dd007f/volumes/kubernetes.io~secret/ca-client/..2025_03_03_01_16_36.3990387563, ownerUser: 0, ownerGroup: 65532 kind: pod name: kube-controller-manager-d546c97bb-k5rsh namespace: shoot--diki-comp--gcp
- cluster: seed containerName: kube-controller-manager details: fileName: /var/lib/kubelet/pods/90f34bcf-ceda-4e65-8112-679308dd007f/volumes/kubernetes.io~secret/server/..2025_03_03_01_16_36.256775248, ownerUser: 0, ownerGroup: 65532 kind: pod name: kube-controller-manager-d546c97bb-k5rsh namespace: shoot--diki-comp--gcp
- cluster: seed containerName: kube-apiserver details: fileName: /var/lib/kubelet/pods/608b7ac2-2a64-4600-bffc-9ed14a956ed8/volumes/kubernetes.io~secret/ca/..2025_03_03_01_12_36.1174479734/bundle.crt, ownerUser: 0, ownerGroup: 65532 kind: pod name: kube-apiserver-857b9bd577-9k45w namespace: shoot--diki-comp--gcp
- cluster: seed containerName: kube-apiserver details: fileName: /var/lib/kubelet/pods/608b7ac2-2a64-4600-bffc-9ed14a956ed8/volumes/kubernetes.io~secret/ca-client/..2025_03_03_01_12_36.1728520434/bundle.crt, ownerUser: 0, ownerGroup: 65532 kind: pod name: kube-apiserver-857b9bd577-9k45w namespace: shoot--diki-comp--gcp
- cluster: seed containerName: kube-apiserver details: fileName: /var/lib/kubelet/pods/608b7ac2-2a64-4600-bffc-9ed14a956ed8/volumes/kubernetes.io~secret/ca-front-proxy/..2025_03_03_01_12_36.3572642423/bundle.crt, ownerUser: 0, ownerGroup: 65532 kind: pod name: kube-apiserver-857b9bd577-9k45w namespace: shoot--diki-comp--gcp
- cluster: seed containerName: kube-apiserver details: fileName: /var/lib/kubelet/pods/608b7ac2-2a64-4600-bffc-9ed14a956ed8/volumes/kubernetes.io~secret/service-account-key-bundle/..2025_03_03_01_12_36.2525007222/bundle.key, ownerUser: 0, ownerGroup: 65532 kind: pod name: kube-apiserver-857b9bd577-9k45w namespace: shoot--diki-comp--gcp
- cluster: seed containerName: kube-apiserver details: fileName: /var/lib/kubelet/pods/608b7ac2-2a64-4600-bffc-9ed14a956ed8/volumes/kubernetes.io~secret/kube-aggregator/..2025_03_03_01_12_36.3477424634/tls.crt, ownerUser: 0, ownerGroup: 65532 kind: pod name: kube-apiserver-857b9bd577-9k45w namespace: shoot--diki-comp--gcp
- cluster: seed containerName: kube-apiserver details: fileName: /var/lib/kubelet/pods/608b7ac2-2a64-4600-bffc-9ed14a956ed8/volumes/kubernetes.io~secret/kube-aggregator/..2025_03_03_01_12_36.3477424634/tls.key, ownerUser: 0, ownerGroup: 65532 kind: pod name: kube-apiserver-857b9bd577-9k45w namespace: shoot--diki-comp--gcp
- cluster: seed containerName: kube-apiserver details: fileName: /var/lib/kubelet/pods/608b7ac2-2a64-4600-bffc-9ed14a956ed8/volumes/kubernetes.io~secret/server/..2025_03_03_01_12_36.2325140443/tls.crt, ownerUser: 0, ownerGroup: 65532 kind: pod name: kube-apiserver-857b9bd577-9k45w namespace: shoot--diki-comp--gcp
- cluster: seed containerName: kube-apiserver details: fileName: /var/lib/kubelet/pods/608b7ac2-2a64-4600-bffc-9ed14a956ed8/volumes/kubernetes.io~secret/server/..2025_03_03_01_12_36.2325140443/tls.key, ownerUser: 0, ownerGroup: 65532 kind: pod name: kube-apiserver-857b9bd577-9k45w namespace: shoot--diki-comp--gcp
- cluster: seed containerName: kube-apiserver details: fileName: /var/lib/kubelet/pods/608b7ac2-2a64-4600-bffc-9ed14a956ed8/volumes/kubernetes.io~secret/ca-vpn/..2025_03_03_01_12_36.2145202368/bundle.crt, ownerUser: 0, ownerGroup: 65532 kind: pod name: kube-apiserver-857b9bd577-9k45w namespace: shoot--diki-comp--gcp
- cluster: seed containerName: kube-apiserver details: fileName: /var/lib/kubelet/pods/608b7ac2-2a64-4600-bffc-9ed14a956ed8/volumes/kubernetes.io~secret/ca-kubelet/..2025_03_03_01_12_36.282363630/bundle.crt, ownerUser: 0, ownerGroup: 65532 kind: pod name: kube-apiserver-857b9bd577-9k45w namespace: shoot--diki-comp--gcp
- cluster: seed containerName: kube-apiserver details: fileName: /var/lib/kubelet/pods/608b7ac2-2a64-4600-bffc-9ed14a956ed8/volumes/kubernetes.io~secret/kubelet-client/..2025_03_03_01_12_36.2748958189/tls.key, ownerUser: 0, ownerGroup: 65532 kind: pod name: kube-apiserver-857b9bd577-9k45w namespace: shoot--diki-comp--gcp
- cluster: seed containerName: kube-apiserver details: fileName: /var/lib/kubelet/pods/608b7ac2-2a64-4600-bffc-9ed14a956ed8/volumes/kubernetes.io~secret/kubelet-client/..2025_03_03_01_12_36.2748958189/tls.crt, ownerUser: 0, ownerGroup: 65532 kind: pod name: kube-apiserver-857b9bd577-9k45w namespace: shoot--diki-comp--gcp
- cluster: seed containerName: kube-apiserver details: fileName: /var/lib/kubelet/pods/608b7ac2-2a64-4600-bffc-9ed14a956ed8/volumes/kubernetes.io~secret/ca-etcd/..2025_03_03_01_12_36.3945965329/bundle.crt, ownerUser: 0, ownerGroup: 65532 kind: pod name: kube-apiserver-857b9bd577-9k45w namespace: shoot--diki-comp--gcp
- cluster: seed containerName: kube-apiserver details: fileName: /var/lib/kubelet/pods/608b7ac2-2a64-4600-bffc-9ed14a956ed8/volumes/kubernetes.io~secret/etcd-client/..2025_03_03_01_12_36.1279523670/tls.key, ownerUser: 0, ownerGroup: 65532 kind: pod name: kube-apiserver-857b9bd577-9k45w namespace: shoot--diki-comp--gcp
- cluster: seed containerName: kube-apiserver details: fileName: /var/lib/kubelet/pods/608b7ac2-2a64-4600-bffc-9ed14a956ed8/volumes/kubernetes.io~secret/etcd-client/..2025_03_03_01_12_36.1279523670/tls.crt, ownerUser: 0, ownerGroup: 65532 kind: pod name: kube-apiserver-857b9bd577-9k45w namespace: shoot--diki-comp--gcp
- cluster: seed containerName: kube-apiserver details: fileName: /var/lib/kubelet/pods/608b7ac2-2a64-4600-bffc-9ed14a956ed8/volumes/kubernetes.io~secret/tls-sni-0/..2025_03_03_01_12_36.278921696/tls.crt, ownerUser: 0, ownerGroup: 65532 kind: pod name: kube-apiserver-857b9bd577-9k45w namespace: shoot--diki-comp--gcp
- cluster: seed containerName: kube-apiserver details: fileName: /var/lib/kubelet/pods/608b7ac2-2a64-4600-bffc-9ed14a956ed8/volumes/kubernetes.io~secret/tls-sni-0/..2025_03_03_01_12_36.278921696/tls.key, ownerUser: 0, ownerGroup: 65532 kind: pod name: kube-apiserver-857b9bd577-9k45w namespace: shoot--diki-comp--gcp
- cluster: seed containerName: kube-apiserver details: fileName: /var/lib/kubelet/pods/608b7ac2-2a64-4600-bffc-9ed14a956ed8/volumes/kubernetes.io~secret/tls-sni-0/..2025_03_03_01_12_36.278921696/ca.crt, ownerUser: 0, ownerGroup: 65532 kind: pod name: kube-apiserver-857b9bd577-9k45w namespace: shoot--diki-comp--gcp
- cluster: seed containerName: kube-apiserver details: fileName: /var/lib/kubelet/pods/608b7ac2-2a64-4600-bffc-9ed14a956ed8/volumes/kubernetes.io~secret/http-proxy/..2025_03_03_01_12_36.3122740563/tls.crt, ownerUser: 0, ownerGroup: 65532 kind: pod name: kube-apiserver-857b9bd577-9k45w namespace: shoot--diki-comp--gcp
- cluster: seed containerName: kube-apiserver details: fileName: /var/lib/kubelet/pods/608b7ac2-2a64-4600-bffc-9ed14a956ed8/volumes/kubernetes.io~secret/http-proxy/..2025_03_03_01_12_36.3122740563/tls.key, ownerUser: 0, ownerGroup: 65532 kind: pod name: kube-apiserver-857b9bd577-9k45w namespace: shoot--diki-comp--gcp
- cluster: seed containerName: kube-apiserver details: fileName: /var/lib/kubelet/pods/608b7ac2-2a64-4600-bffc-9ed14a956ed8/volumes/kubernetes.io~secret/ca-vpn/..2025_03_03_01_12_36.2145202368, ownerUser: 0, ownerGroup: 65532 kind: pod name: kube-apiserver-857b9bd577-9k45w namespace: shoot--diki-comp--gcp
- cluster: seed containerName: kube-apiserver details: fileName: /var/lib/kubelet/pods/608b7ac2-2a64-4600-bffc-9ed14a956ed8/volumes/kubernetes.io~secret/ca-kubelet/..2025_03_03_01_12_36.282363630, ownerUser: 0, ownerGroup: 65532 kind: pod name: kube-apiserver-857b9bd577-9k45w namespace: shoot--diki-comp--gcp
- cluster: seed containerName: kube-apiserver details: fileName: /var/lib/kubelet/pods/608b7ac2-2a64-4600-bffc-9ed14a956ed8/volumes/kubernetes.io~secret/ca/..2025_03_03_01_12_36.1174479734, ownerUser: 0, ownerGroup: 65532 kind: pod name: kube-apiserver-857b9bd577-9k45w namespace: shoot--diki-comp--gcp
- cluster: seed containerName: kube-apiserver details: fileName: /var/lib/kubelet/pods/608b7ac2-2a64-4600-bffc-9ed14a956ed8/volumes/kubernetes.io~secret/ca-client/..2025_03_03_01_12_36.1728520434, ownerUser: 0, ownerGroup: 65532 kind: pod name: kube-apiserver-857b9bd577-9k45w namespace: shoot--diki-comp--gcp
- cluster: seed containerName: kube-apiserver details: fileName: /var/lib/kubelet/pods/608b7ac2-2a64-4600-bffc-9ed14a956ed8/volumes/kubernetes.io~secret/ca-front-proxy/..2025_03_03_01_12_36.3572642423, ownerUser: 0, ownerGroup: 65532 kind: pod name: kube-apiserver-857b9bd577-9k45w namespace: shoot--diki-comp--gcp
- cluster: seed containerName: kube-apiserver details: fileName: /var/lib/kubelet/pods/608b7ac2-2a64-4600-bffc-9ed14a956ed8/volumes/kubernetes.io~secret/service-account-key-bundle/..2025_03_03_01_12_36.2525007222, ownerUser: 0, ownerGroup: 65532 kind: pod name: kube-apiserver-857b9bd577-9k45w namespace: shoot--diki-comp--gcp
- cluster: seed containerName: kube-apiserver details: fileName: /var/lib/kubelet/pods/608b7ac2-2a64-4600-bffc-9ed14a956ed8/volumes/kubernetes.io~secret/kube-aggregator/..2025_03_03_01_12_36.3477424634, ownerUser: 0, ownerGroup: 65532 kind: pod name: kube-apiserver-857b9bd577-9k45w namespace: shoot--diki-comp--gcp
- cluster: seed containerName: kube-apiserver details: fileName: /var/lib/kubelet/pods/608b7ac2-2a64-4600-bffc-9ed14a956ed8/volumes/kubernetes.io~secret/server/..2025_03_03_01_12_36.2325140443, ownerUser: 0, ownerGroup: 65532 kind: pod name: kube-apiserver-857b9bd577-9k45w namespace: shoot--diki-comp--gcp
- cluster: seed containerName: kube-apiserver details: fileName: /var/lib/kubelet/pods/608b7ac2-2a64-4600-bffc-9ed14a956ed8/volumes/kubernetes.io~secret/kubelet-client/..2025_03_03_01_12_36.2748958189, ownerUser: 0, ownerGroup: 65532 kind: pod name: kube-apiserver-857b9bd577-9k45w namespace: shoot--diki-comp--gcp
- cluster: seed containerName: kube-apiserver details: fileName: /var/lib/kubelet/pods/608b7ac2-2a64-4600-bffc-9ed14a956ed8/volumes/kubernetes.io~secret/etcd-client/..2025_03_03_01_12_36.1279523670, ownerUser: 0, ownerGroup: 65532 kind: pod name: kube-apiserver-857b9bd577-9k45w namespace: shoot--diki-comp--gcp
- cluster: seed containerName: kube-apiserver details: fileName: /var/lib/kubelet/pods/608b7ac2-2a64-4600-bffc-9ed14a956ed8/volumes/kubernetes.io~secret/http-proxy/..2025_03_03_01_12_36.3122740563, ownerUser: 0, ownerGroup: 65532 kind: pod name: kube-apiserver-857b9bd577-9k45w namespace: shoot--diki-comp--gcp
- cluster: seed containerName: kube-apiserver details: fileName: /var/lib/kubelet/pods/608b7ac2-2a64-4600-bffc-9ed14a956ed8/volumes/kubernetes.io~secret/ca-etcd/..2025_03_03_01_12_36.3945965329, ownerUser: 0, ownerGroup: 65532 kind: pod name: kube-apiserver-857b9bd577-9k45w namespace: shoot--diki-comp--gcp
- cluster: seed containerName: kube-apiserver details: fileName: /var/lib/kubelet/pods/608b7ac2-2a64-4600-bffc-9ed14a956ed8/volumes/kubernetes.io~secret/tls-sni-0/..2025_03_03_01_12_36.278921696, ownerUser: 0, ownerGroup: 65532 kind: pod name: kube-apiserver-857b9bd577-9k45w namespace: shoot--diki-comp--gcp
- cluster: seed containerName: kube-scheduler details: fileName: /var/lib/kubelet/pods/ecad819a-dc71-4e4e-a17e-11b91bd08505/volumes/kubernetes.io~projected/client-ca/..2025_03_03_01_09_35.3955725141/bundle.crt, ownerUser: 0, ownerGroup: 65532 kind: pod name: kube-scheduler-65fbc646c-ck6kp namespace: shoot--diki-comp--gcp
- cluster: seed containerName: kube-scheduler details: fileName: /var/lib/kubelet/pods/ecad819a-dc71-4e4e-a17e-11b91bd08505/volumes/kubernetes.io~secret/kube-scheduler-server/..2025_03_03_01_09_35.344821711/tls.crt, ownerUser: 0, ownerGroup: 65532 kind: pod name: kube-scheduler-65fbc646c-ck6kp namespace: shoot--diki-comp--gcp
- cluster: seed containerName: kube-scheduler details: fileName: /var/lib/kubelet/pods/ecad819a-dc71-4e4e-a17e-11b91bd08505/volumes/kubernetes.io~secret/kube-scheduler-server/..2025_03_03_01_09_35.344821711/tls.key, ownerUser: 0, ownerGroup: 65532 kind: pod name: kube-scheduler-65fbc646c-ck6kp namespace: shoot--diki-comp--gcp
- cluster: seed containerName: kube-scheduler details: fileName: /var/lib/kubelet/pods/ecad819a-dc71-4e4e-a17e-11b91bd08505/volumes/kubernetes.io~projected/client-ca/..2025_03_03_01_09_35.3955725141, ownerUser: 0, ownerGroup: 65532 kind: pod name: kube-scheduler-65fbc646c-ck6kp namespace: shoot--diki-comp--gcp
- cluster: seed containerName: kube-scheduler details: fileName: /var/lib/kubelet/pods/ecad819a-dc71-4e4e-a17e-11b91bd08505/volumes/kubernetes.io~secret/kube-scheduler-server/..2025_03_03_01_09_35.344821711, ownerUser: 0, ownerGroup: 65532 kind: pod name: kube-scheduler-65fbc646c-ck6kp namespace: shoot--diki-comp--gcp
- cluster: seed containerName: etcd details: fileName: /var/lib/kubelet/pods/9e7e0135-30fe-4ef6-a174-df3a12ff2ca4/volumes/kubernetes.io~secret/etcd-ca/..2025_03_03_01_02_10.3050428415/bundle.crt, ownerUser: 0, ownerGroup: 65532 kind: pod name: etcd-main-0 namespace: shoot--diki-comp--gcp
- cluster: seed containerName: etcd details: fileName: /var/lib/kubelet/pods/9e7e0135-30fe-4ef6-a174-df3a12ff2ca4/volumes/kubernetes.io~secret/etcd-server-tls/..2025_03_03_01_02_10.3265591842/tls.key, ownerUser: 0, ownerGroup: 65532 kind: pod name: etcd-main-0 namespace: shoot--diki-comp--gcp
- cluster: seed containerName: etcd details: fileName: /var/lib/kubelet/pods/9e7e0135-30fe-4ef6-a174-df3a12ff2ca4/volumes/kubernetes.io~secret/etcd-server-tls/..2025_03_03_01_02_10.3265591842/tls.crt, ownerUser: 0, ownerGroup: 65532 kind: pod name: etcd-main-0 namespace: shoot--diki-comp--gcp
- cluster: seed containerName: etcd details: fileName: /var/lib/kubelet/pods/9e7e0135-30fe-4ef6-a174-df3a12ff2ca4/volumes/kubernetes.io~secret/etcd-client-tls/..2025_03_03_01_02_10.3223316245/tls.key, ownerUser: 0, ownerGroup: 65532 kind: pod name: etcd-main-0 namespace: shoot--diki-comp--gcp
- cluster: seed containerName: etcd details: fileName: /var/lib/kubelet/pods/9e7e0135-30fe-4ef6-a174-df3a12ff2ca4/volumes/kubernetes.io~secret/etcd-client-tls/..2025_03_03_01_02_10.3223316245/tls.crt, ownerUser: 0, ownerGroup: 65532 kind: pod name: etcd-main-0 namespace: shoot--diki-comp--gcp
- cluster: seed containerName: etcd details: fileName: /var/lib/kubelet/pods/9e7e0135-30fe-4ef6-a174-df3a12ff2ca4/volumes/kubernetes.io~secret/backup-restore-ca/..2025_03_03_01_02_10.3857247242/bundle.crt, ownerUser: 0, ownerGroup: 65532 kind: pod name: etcd-main-0 namespace: shoot--diki-comp--gcp
- cluster: seed containerName: etcd details: fileName: /var/lib/kubelet/pods/9e7e0135-30fe-4ef6-a174-df3a12ff2ca4/volumes/kubernetes.io~projected/kube-api-access-gardener/..2025_03_03_01_02_10.1269252471/ca.crt, ownerUser: 0, ownerGroup: 65532 kind: pod name: etcd-main-0 namespace: shoot--diki-comp--gcp
- cluster: seed containerName: etcd details: fileName: /var/lib/kubelet/pods/9e7e0135-30fe-4ef6-a174-df3a12ff2ca4/volumes/kubernetes.io~secret/etcd-ca/..2025_03_03_01_02_10.3050428415, ownerUser: 0, ownerGroup: 65532 kind: pod name: etcd-main-0 namespace: shoot--diki-comp--gcp
- cluster: seed containerName: etcd details: fileName: /var/lib/kubelet/pods/9e7e0135-30fe-4ef6-a174-df3a12ff2ca4/volumes/kubernetes.io~secret/etcd-server-tls/..2025_03_03_01_02_10.3265591842, ownerUser: 0, ownerGroup: 65532 kind: pod name: etcd-main-0 namespace: shoot--diki-comp--gcp
- cluster: seed containerName: etcd details: fileName: /var/lib/kubelet/pods/9e7e0135-30fe-4ef6-a174-df3a12ff2ca4/volumes/kubernetes.io~secret/etcd-client-tls/..2025_03_03_01_02_10.3223316245, ownerUser: 0, ownerGroup: 65532 kind: pod name: etcd-main-0 namespace: shoot--diki-comp--gcp
- cluster: seed containerName: etcd details: fileName: /var/lib/kubelet/pods/9e7e0135-30fe-4ef6-a174-df3a12ff2ca4/volumes/kubernetes.io~secret/backup-restore-ca/..2025_03_03_01_02_10.3857247242, ownerUser: 0, ownerGroup: 65532 kind: pod name: etcd-main-0 namespace: shoot--diki-comp--gcp
- cluster: seed containerName: etcd details: fileName: /var/lib/kubelet/pods/9e7e0135-30fe-4ef6-a174-df3a12ff2ca4/volumes/kubernetes.io~projected/kube-api-access-gardener/..2025_03_03_01_02_10.1269252471, ownerUser: 0, ownerGroup: 65532 kind: pod name: etcd-main-0 namespace: shoot--diki-comp--gcp
- cluster: seed containerName: backup-restore details: fileName: /var/lib/kubelet/pods/9e7e0135-30fe-4ef6-a174-df3a12ff2ca4/volumes/kubernetes.io~secret/backup-restore-server-tls/..2025_03_03_01_02_10.2704526131/tls.crt, ownerUser: 0, ownerGroup: 65532 kind: pod name: etcd-main-0 namespace: shoot--diki-comp--gcp
- cluster: seed containerName: backup-restore details: fileName: /var/lib/kubelet/pods/9e7e0135-30fe-4ef6-a174-df3a12ff2ca4/volumes/kubernetes.io~secret/backup-restore-server-tls/..2025_03_03_01_02_10.2704526131/tls.key, ownerUser: 0, ownerGroup: 65532 kind: pod name: etcd-main-0 namespace: shoot--diki-comp--gcp
- cluster: seed containerName: backup-restore details: fileName: /var/lib/kubelet/pods/9e7e0135-30fe-4ef6-a174-df3a12ff2ca4/volumes/kubernetes.io~secret/etcd-ca/..2025_03_03_01_02_10.3050428415/bundle.crt, ownerUser: 0, ownerGroup: 65532 kind: pod name: etcd-main-0 namespace: shoot--diki-comp--gcp
- cluster: seed containerName: backup-restore details: fileName: /var/lib/kubelet/pods/9e7e0135-30fe-4ef6-a174-df3a12ff2ca4/volumes/kubernetes.io~secret/etcd-client-tls/..2025_03_03_01_02_10.3223316245/tls.key, ownerUser: 0, ownerGroup: 65532 kind: pod name: etcd-main-0 namespace: shoot--diki-comp--gcp
- cluster: seed containerName: backup-restore details: fileName: /var/lib/kubelet/pods/9e7e0135-30fe-4ef6-a174-df3a12ff2ca4/volumes/kubernetes.io~secret/etcd-client-tls/..2025_03_03_01_02_10.3223316245/tls.crt, ownerUser: 0, ownerGroup: 65532 kind: pod name: etcd-main-0 namespace: shoot--diki-comp--gcp
- cluster: seed containerName: backup-restore details: fileName: /var/lib/kubelet/pods/9e7e0135-30fe-4ef6-a174-df3a12ff2ca4/volumes/kubernetes.io~projected/kube-api-access-gardener/..2025_03_03_01_02_10.1269252471/ca.crt, ownerUser: 0, ownerGroup: 65532 kind: pod name: etcd-main-0 namespace: shoot--diki-comp--gcp
- cluster: seed containerName: backup-restore details: fileName: /var/lib/kubelet/pods/9e7e0135-30fe-4ef6-a174-df3a12ff2ca4/volumes/kubernetes.io~secret/backup-restore-server-tls/..2025_03_03_01_02_10.2704526131, ownerUser: 0, ownerGroup: 65532 kind: pod name: etcd-main-0 namespace: shoot--diki-comp--gcp
- cluster: seed containerName: backup-restore details: fileName: /var/lib/kubelet/pods/9e7e0135-30fe-4ef6-a174-df3a12ff2ca4/volumes/kubernetes.io~secret/etcd-ca/..2025_03_03_01_02_10.3050428415, ownerUser: 0, ownerGroup: 65532 kind: pod name: etcd-main-0 namespace: shoot--diki-comp--gcp
- cluster: seed containerName: backup-restore details: fileName: /var/lib/kubelet/pods/9e7e0135-30fe-4ef6-a174-df3a12ff2ca4/volumes/kubernetes.io~secret/etcd-client-tls/..2025_03_03_01_02_10.3223316245, ownerUser: 0, ownerGroup: 65532 kind: pod name: etcd-main-0 namespace: shoot--diki-comp--gcp
- cluster: seed containerName: backup-restore details: fileName: /var/lib/kubelet/pods/9e7e0135-30fe-4ef6-a174-df3a12ff2ca4/volumes/kubernetes.io~projected/kube-api-access-gardener/..2025_03_03_01_02_10.1269252471, ownerUser: 0, ownerGroup: 65532 kind: pod name: etcd-main-0 namespace: shoot--diki-comp--gcp
- cluster: shoot details: fileName: /var/lib/kubelet/pki/kubelet-server-2025-03-03-01-08-29.pem, ownerUser: 0, ownerGroup: 0 kind: node name: shoot--diki-comp--gcp-worker-bex82-z1-d8757-66str
- cluster: shoot details: fileName: /var/lib/kubelet/pki/kubelet-client-2025-03-03-01-07-27.pem, ownerUser: 0, ownerGroup: 0 kind: node name: shoot--diki-comp--gcp-worker-bex82-z1-d8757-66str
- cluster: shoot details: fileName: /var/lib/kubelet/pki, ownerUser: 0, ownerGroup: 0 kind: node name: shoot--diki-comp--gcp-worker-bex82-z1-d8757-66str
- cluster: shoot containerName: kube-proxy details: fileName: /var/lib/kubelet/pods/3653b577-e930-4df8-b0b6-c1dee555c93f/volumes/kubernetes.io~projected/kube-api-access-gardener/..2025_03_03_01_07_28.1688515968/ca.crt, ownerUser: 0, ownerGroup: 0 kind: pod name: kube-proxy-worker-bex82-v1.31.4-nt98w namespace: kube-system
- cluster: shoot containerName: kube-proxy details: fileName: /var/lib/kubelet/pods/3653b577-e930-4df8-b0b6-c1dee555c93f/volumes/kubernetes.io~projected/kube-api-access-gardener/..2025_03_03_01_07_28.1688515968, ownerUser: 0, ownerGroup: 0 kind: pod name: kube-proxy-worker-bex82-v1.31.4-nt98w namespace: kube-system
- cluster: shoot containerName: conntrack-fix details: fileName: /var/lib/kubelet/pods/3653b577-e930-4df8-b0b6-c1dee555c93f/volumes/kubernetes.io~projected/kube-api-access-gardener/..2025_03_03_01_07_28.1688515968/ca.crt, ownerUser: 0, ownerGroup: 0 kind: pod name: kube-proxy-worker-bex82-v1.31.4-nt98w namespace: kube-system
- cluster: shoot containerName: conntrack-fix details: fileName: /var/lib/kubelet/pods/3653b577-e930-4df8-b0b6-c1dee555c93f/volumes/kubernetes.io~projected/kube-api-access-gardener/..2025_03_03_01_07_28.1688515968, ownerUser: 0, ownerGroup: 0 kind: pod name: kube-proxy-worker-bex82-v1.31.4-nt98w namespace: kube-system
- openstack
- cluster: seed containerName: backup-restore details: fileName: /var/lib/kubelet/pods/7a54bb1c-3f4b-4dc7-95f5-377c788ad051/volumes/kubernetes.io~secret/backup-restore-server-tls/..2025_03_03_01_02_05.4287174027/tls.crt, ownerUser: 0, ownerGroup: 65532 kind: pod name: etcd-events-0 namespace: shoot--diki-comp--openstack
- cluster: seed containerName: backup-restore details: fileName: /var/lib/kubelet/pods/7a54bb1c-3f4b-4dc7-95f5-377c788ad051/volumes/kubernetes.io~secret/backup-restore-server-tls/..2025_03_03_01_02_05.4287174027/tls.key, ownerUser: 0, ownerGroup: 65532 kind: pod name: etcd-events-0 namespace: shoot--diki-comp--openstack
- cluster: seed containerName: backup-restore details: fileName: /var/lib/kubelet/pods/7a54bb1c-3f4b-4dc7-95f5-377c788ad051/volumes/kubernetes.io~secret/etcd-ca/..2025_03_03_01_02_05.439102016/bundle.crt, ownerUser: 0, ownerGroup: 65532 kind: pod name: etcd-events-0 namespace: shoot--diki-comp--openstack
- cluster: seed containerName: backup-restore details: fileName: /var/lib/kubelet/pods/7a54bb1c-3f4b-4dc7-95f5-377c788ad051/volumes/kubernetes.io~secret/etcd-client-tls/..2025_03_03_01_02_05.1189205670/tls.crt, ownerUser: 0, ownerGroup: 65532 kind: pod name: etcd-events-0 namespace: shoot--diki-comp--openstack
- cluster: seed containerName: backup-restore details: fileName: /var/lib/kubelet/pods/7a54bb1c-3f4b-4dc7-95f5-377c788ad051/volumes/kubernetes.io~secret/etcd-client-tls/..2025_03_03_01_02_05.1189205670/tls.key, ownerUser: 0, ownerGroup: 65532 kind: pod name: etcd-events-0 namespace: shoot--diki-comp--openstack
- cluster: seed containerName: backup-restore details: fileName: /var/lib/kubelet/pods/7a54bb1c-3f4b-4dc7-95f5-377c788ad051/volumes/kubernetes.io~projected/kube-api-access-gardener/..2025_03_03_01_02_05.3448401570/ca.crt, ownerUser: 0, ownerGroup: 65532 kind: pod name: etcd-events-0 namespace: shoot--diki-comp--openstack
- cluster: seed containerName: backup-restore details: fileName: /var/lib/kubelet/pods/7a54bb1c-3f4b-4dc7-95f5-377c788ad051/volumes/kubernetes.io~secret/backup-restore-server-tls/..2025_03_03_01_02_05.4287174027, ownerUser: 0, ownerGroup: 65532 kind: pod name: etcd-events-0 namespace: shoot--diki-comp--openstack
- cluster: seed containerName: backup-restore details: fileName: /var/lib/kubelet/pods/7a54bb1c-3f4b-4dc7-95f5-377c788ad051/volumes/kubernetes.io~secret/etcd-ca/..2025_03_03_01_02_05.439102016, ownerUser: 0, ownerGroup: 65532 kind: pod name: etcd-events-0 namespace: shoot--diki-comp--openstack
- cluster: seed containerName: backup-restore details: fileName: /var/lib/kubelet/pods/7a54bb1c-3f4b-4dc7-95f5-377c788ad051/volumes/kubernetes.io~secret/etcd-client-tls/..2025_03_03_01_02_05.1189205670, ownerUser: 0, ownerGroup: 65532 kind: pod name: etcd-events-0 namespace: shoot--diki-comp--openstack
- cluster: seed containerName: backup-restore details: fileName: /var/lib/kubelet/pods/7a54bb1c-3f4b-4dc7-95f5-377c788ad051/volumes/kubernetes.io~projected/kube-api-access-gardener/..2025_03_03_01_02_05.3448401570, ownerUser: 0, ownerGroup: 65532 kind: pod name: etcd-events-0 namespace: shoot--diki-comp--openstack
- cluster: seed containerName: etcd details: fileName: /var/lib/kubelet/pods/7a54bb1c-3f4b-4dc7-95f5-377c788ad051/volumes/kubernetes.io~secret/etcd-ca/..2025_03_03_01_02_05.439102016/bundle.crt, ownerUser: 0, ownerGroup: 65532 kind: pod name: etcd-events-0 namespace: shoot--diki-comp--openstack
- cluster: seed containerName: etcd details: fileName: /var/lib/kubelet/pods/7a54bb1c-3f4b-4dc7-95f5-377c788ad051/volumes/kubernetes.io~secret/etcd-server-tls/..2025_03_03_01_02_05.3893612686/tls.crt, ownerUser: 0, ownerGroup: 65532 kind: pod name: etcd-events-0 namespace: shoot--diki-comp--openstack
- cluster: seed containerName: etcd details: fileName: /var/lib/kubelet/pods/7a54bb1c-3f4b-4dc7-95f5-377c788ad051/volumes/kubernetes.io~secret/etcd-server-tls/..2025_03_03_01_02_05.3893612686/tls.key, ownerUser: 0, ownerGroup: 65532 kind: pod name: etcd-events-0 namespace: shoot--diki-comp--openstack
- cluster: seed containerName: etcd details: fileName: /var/lib/kubelet/pods/7a54bb1c-3f4b-4dc7-95f5-377c788ad051/volumes/kubernetes.io~secret/etcd-client-tls/..2025_03_03_01_02_05.1189205670/tls.crt, ownerUser: 0, ownerGroup: 65532 kind: pod name: etcd-events-0 namespace: shoot--diki-comp--openstack
- cluster: seed containerName: etcd details: fileName: /var/lib/kubelet/pods/7a54bb1c-3f4b-4dc7-95f5-377c788ad051/volumes/kubernetes.io~secret/etcd-client-tls/..2025_03_03_01_02_05.1189205670/tls.key, ownerUser: 0, ownerGroup: 65532 kind: pod name: etcd-events-0 namespace: shoot--diki-comp--openstack
- cluster: seed containerName: etcd details: fileName: /var/lib/kubelet/pods/7a54bb1c-3f4b-4dc7-95f5-377c788ad051/volumes/kubernetes.io~secret/backup-restore-ca/..2025_03_03_01_02_05.913416246/bundle.crt, ownerUser: 0, ownerGroup: 65532 kind: pod name: etcd-events-0 namespace: shoot--diki-comp--openstack
- cluster: seed containerName: etcd details: fileName: /var/lib/kubelet/pods/7a54bb1c-3f4b-4dc7-95f5-377c788ad051/volumes/kubernetes.io~projected/kube-api-access-gardener/..2025_03_03_01_02_05.3448401570/ca.crt, ownerUser: 0, ownerGroup: 65532 kind: pod name: etcd-events-0 namespace: shoot--diki-comp--openstack
- cluster: seed containerName: etcd details: fileName: /var/lib/kubelet/pods/7a54bb1c-3f4b-4dc7-95f5-377c788ad051/volumes/kubernetes.io~secret/etcd-ca/..2025_03_03_01_02_05.439102016, ownerUser: 0, ownerGroup: 65532 kind: pod name: etcd-events-0 namespace: shoot--diki-comp--openstack
- cluster: seed containerName: etcd details: fileName: /var/lib/kubelet/pods/7a54bb1c-3f4b-4dc7-95f5-377c788ad051/volumes/kubernetes.io~secret/etcd-server-tls/..2025_03_03_01_02_05.3893612686, ownerUser: 0, ownerGroup: 65532 kind: pod name: etcd-events-0 namespace: shoot--diki-comp--openstack
- cluster: seed containerName: etcd details: fileName: /var/lib/kubelet/pods/7a54bb1c-3f4b-4dc7-95f5-377c788ad051/volumes/kubernetes.io~secret/etcd-client-tls/..2025_03_03_01_02_05.1189205670, ownerUser: 0, ownerGroup: 65532 kind: pod name: etcd-events-0 namespace: shoot--diki-comp--openstack
- cluster: seed containerName: etcd details: fileName: /var/lib/kubelet/pods/7a54bb1c-3f4b-4dc7-95f5-377c788ad051/volumes/kubernetes.io~secret/backup-restore-ca/..2025_03_03_01_02_05.913416246, ownerUser: 0, ownerGroup: 65532 kind: pod name: etcd-events-0 namespace: shoot--diki-comp--openstack
- cluster: seed containerName: etcd details: fileName: /var/lib/kubelet/pods/7a54bb1c-3f4b-4dc7-95f5-377c788ad051/volumes/kubernetes.io~projected/kube-api-access-gardener/..2025_03_03_01_02_05.3448401570, ownerUser: 0, ownerGroup: 65532 kind: pod name: etcd-events-0 namespace: shoot--diki-comp--openstack
- cluster: seed containerName: kube-apiserver details: fileName: /var/lib/kubelet/pods/adef142b-7c5d-4d1e-b0c2-9c575b9bbdea/volumes/kubernetes.io~secret/ca/..2025_03_03_01_14_29.407171975/bundle.crt, ownerUser: 0, ownerGroup: 65532 kind: pod name: kube-apiserver-5d6dcc9bd5-jsqrl namespace: shoot--diki-comp--openstack
- cluster: seed containerName: kube-apiserver details: fileName: /var/lib/kubelet/pods/adef142b-7c5d-4d1e-b0c2-9c575b9bbdea/volumes/kubernetes.io~secret/ca-client/..2025_03_03_01_14_29.2499436981/bundle.crt, ownerUser: 0, ownerGroup: 65532 kind: pod name: kube-apiserver-5d6dcc9bd5-jsqrl namespace: shoot--diki-comp--openstack
- cluster: seed containerName: kube-apiserver details: fileName: /var/lib/kubelet/pods/adef142b-7c5d-4d1e-b0c2-9c575b9bbdea/volumes/kubernetes.io~secret/ca-front-proxy/..2025_03_03_01_14_29.2116021732/bundle.crt, ownerUser: 0, ownerGroup: 65532 kind: pod name: kube-apiserver-5d6dcc9bd5-jsqrl namespace: shoot--diki-comp--openstack
- cluster: seed containerName: kube-apiserver details: fileName: /var/lib/kubelet/pods/adef142b-7c5d-4d1e-b0c2-9c575b9bbdea/volumes/kubernetes.io~secret/service-account-key-bundle/..2025_03_03_01_14_29.3490774438/bundle.key, ownerUser: 0, ownerGroup: 65532 kind: pod name: kube-apiserver-5d6dcc9bd5-jsqrl namespace: shoot--diki-comp--openstack
- cluster: seed containerName: kube-apiserver details: fileName: /var/lib/kubelet/pods/adef142b-7c5d-4d1e-b0c2-9c575b9bbdea/volumes/kubernetes.io~secret/kube-aggregator/..2025_03_03_01_14_29.3516547635/tls.key, ownerUser: 0, ownerGroup: 65532 kind: pod name: kube-apiserver-5d6dcc9bd5-jsqrl namespace: shoot--diki-comp--openstack
- cluster: seed containerName: kube-apiserver details: fileName: /var/lib/kubelet/pods/adef142b-7c5d-4d1e-b0c2-9c575b9bbdea/volumes/kubernetes.io~secret/kube-aggregator/..2025_03_03_01_14_29.3516547635/tls.crt, ownerUser: 0, ownerGroup: 65532 kind: pod name: kube-apiserver-5d6dcc9bd5-jsqrl namespace: shoot--diki-comp--openstack
- cluster: seed containerName: kube-apiserver details: fileName: /var/lib/kubelet/pods/adef142b-7c5d-4d1e-b0c2-9c575b9bbdea/volumes/kubernetes.io~secret/server/..2025_03_03_01_14_29.1544469879/tls.key, ownerUser: 0, ownerGroup: 65532 kind: pod name: kube-apiserver-5d6dcc9bd5-jsqrl namespace: shoot--diki-comp--openstack
- cluster: seed containerName: kube-apiserver details: fileName: /var/lib/kubelet/pods/adef142b-7c5d-4d1e-b0c2-9c575b9bbdea/volumes/kubernetes.io~secret/server/..2025_03_03_01_14_29.1544469879/tls.crt, ownerUser: 0, ownerGroup: 65532 kind: pod name: kube-apiserver-5d6dcc9bd5-jsqrl namespace: shoot--diki-comp--openstack
- cluster: seed containerName: kube-apiserver details: fileName: /var/lib/kubelet/pods/adef142b-7c5d-4d1e-b0c2-9c575b9bbdea/volumes/kubernetes.io~secret/ca-vpn/..2025_03_03_01_14_29.4102013387/bundle.crt, ownerUser: 0, ownerGroup: 65532 kind: pod name: kube-apiserver-5d6dcc9bd5-jsqrl namespace: shoot--diki-comp--openstack
- cluster: seed containerName: kube-apiserver details: fileName: /var/lib/kubelet/pods/adef142b-7c5d-4d1e-b0c2-9c575b9bbdea/volumes/kubernetes.io~secret/ca-kubelet/..2025_03_03_01_14_29.1069799842/bundle.crt, ownerUser: 0, ownerGroup: 65532 kind: pod name: kube-apiserver-5d6dcc9bd5-jsqrl namespace: shoot--diki-comp--openstack
- cluster: seed containerName: kube-apiserver details: fileName: /var/lib/kubelet/pods/adef142b-7c5d-4d1e-b0c2-9c575b9bbdea/volumes/kubernetes.io~secret/kubelet-client/..2025_03_03_01_14_29.798787007/tls.crt, ownerUser: 0, ownerGroup: 65532 kind: pod name: kube-apiserver-5d6dcc9bd5-jsqrl namespace: shoot--diki-comp--openstack
- cluster: seed containerName: kube-apiserver details: fileName: /var/lib/kubelet/pods/adef142b-7c5d-4d1e-b0c2-9c575b9bbdea/volumes/kubernetes.io~secret/kubelet-client/..2025_03_03_01_14_29.798787007/tls.key, ownerUser: 0, ownerGroup: 65532 kind: pod name: kube-apiserver-5d6dcc9bd5-jsqrl namespace: shoot--diki-comp--openstack
- cluster: seed containerName: kube-apiserver details: fileName: /var/lib/kubelet/pods/adef142b-7c5d-4d1e-b0c2-9c575b9bbdea/volumes/kubernetes.io~secret/ca-etcd/..2025_03_03_01_14_29.3554070821/bundle.crt, ownerUser: 0, ownerGroup: 65532 kind: pod name: kube-apiserver-5d6dcc9bd5-jsqrl namespace: shoot--diki-comp--openstack
- cluster: seed containerName: kube-apiserver details: fileName: /var/lib/kubelet/pods/adef142b-7c5d-4d1e-b0c2-9c575b9bbdea/volumes/kubernetes.io~secret/etcd-client/..2025_03_03_01_14_29.3024572020/tls.key, ownerUser: 0, ownerGroup: 65532 kind: pod name: kube-apiserver-5d6dcc9bd5-jsqrl namespace: shoot--diki-comp--openstack
- cluster: seed containerName: kube-apiserver details: fileName: /var/lib/kubelet/pods/adef142b-7c5d-4d1e-b0c2-9c575b9bbdea/volumes/kubernetes.io~secret/etcd-client/..2025_03_03_01_14_29.3024572020/tls.crt, ownerUser: 0, ownerGroup: 65532 kind: pod name: kube-apiserver-5d6dcc9bd5-jsqrl namespace: shoot--diki-comp--openstack
- cluster: seed containerName: kube-apiserver details: fileName: /var/lib/kubelet/pods/adef142b-7c5d-4d1e-b0c2-9c575b9bbdea/volumes/kubernetes.io~secret/tls-sni-0/..2025_03_03_01_14_29.4247416010/ca.crt, ownerUser: 0, ownerGroup: 65532 kind: pod name: kube-apiserver-5d6dcc9bd5-jsqrl namespace: shoot--diki-comp--openstack
- cluster: seed containerName: kube-apiserver details: fileName: /var/lib/kubelet/pods/adef142b-7c5d-4d1e-b0c2-9c575b9bbdea/volumes/kubernetes.io~secret/tls-sni-0/..2025_03_03_01_14_29.4247416010/tls.crt, ownerUser: 0, ownerGroup: 65532 kind: pod name: kube-apiserver-5d6dcc9bd5-jsqrl namespace: shoot--diki-comp--openstack
- cluster: seed containerName: kube-apiserver details: fileName: /var/lib/kubelet/pods/adef142b-7c5d-4d1e-b0c2-9c575b9bbdea/volumes/kubernetes.io~secret/tls-sni-0/..2025_03_03_01_14_29.4247416010/tls.key, ownerUser: 0, ownerGroup: 65532 kind: pod name: kube-apiserver-5d6dcc9bd5-jsqrl namespace: shoot--diki-comp--openstack
- cluster: seed containerName: kube-apiserver details: fileName: /var/lib/kubelet/pods/adef142b-7c5d-4d1e-b0c2-9c575b9bbdea/volumes/kubernetes.io~secret/http-proxy/..2025_03_03_01_14_29.2845433525/tls.crt, ownerUser: 0, ownerGroup: 65532 kind: pod name: kube-apiserver-5d6dcc9bd5-jsqrl namespace: shoot--diki-comp--openstack
- cluster: seed containerName: kube-apiserver details: fileName: /var/lib/kubelet/pods/adef142b-7c5d-4d1e-b0c2-9c575b9bbdea/volumes/kubernetes.io~secret/http-proxy/..2025_03_03_01_14_29.2845433525/tls.key, ownerUser: 0, ownerGroup: 65532 kind: pod name: kube-apiserver-5d6dcc9bd5-jsqrl namespace: shoot--diki-comp--openstack
- cluster: seed containerName: kube-apiserver details: fileName: /var/lib/kubelet/pods/adef142b-7c5d-4d1e-b0c2-9c575b9bbdea/volumes/kubernetes.io~secret/ca-vpn/..2025_03_03_01_14_29.4102013387, ownerUser: 0, ownerGroup: 65532 kind: pod name: kube-apiserver-5d6dcc9bd5-jsqrl namespace: shoot--diki-comp--openstack
- cluster: seed containerName: kube-apiserver details: fileName: /var/lib/kubelet/pods/adef142b-7c5d-4d1e-b0c2-9c575b9bbdea/volumes/kubernetes.io~secret/ca-etcd/..2025_03_03_01_14_29.3554070821, ownerUser: 0, ownerGroup: 65532 kind: pod name: kube-apiserver-5d6dcc9bd5-jsqrl namespace: shoot--diki-comp--openstack
- cluster: seed containerName: kube-apiserver details: fileName: /var/lib/kubelet/pods/adef142b-7c5d-4d1e-b0c2-9c575b9bbdea/volumes/kubernetes.io~secret/tls-sni-0/..2025_03_03_01_14_29.4247416010, ownerUser: 0, ownerGroup: 65532 kind: pod name: kube-apiserver-5d6dcc9bd5-jsqrl namespace: shoot--diki-comp--openstack
- cluster: seed containerName: kube-apiserver details: fileName: /var/lib/kubelet/pods/adef142b-7c5d-4d1e-b0c2-9c575b9bbdea/volumes/kubernetes.io~secret/ca/..2025_03_03_01_14_29.407171975, ownerUser: 0, ownerGroup: 65532 kind: pod name: kube-apiserver-5d6dcc9bd5-jsqrl namespace: shoot--diki-comp--openstack
- cluster: seed containerName: kube-apiserver details: fileName: /var/lib/kubelet/pods/adef142b-7c5d-4d1e-b0c2-9c575b9bbdea/volumes/kubernetes.io~secret/ca-front-proxy/..2025_03_03_01_14_29.2116021732, ownerUser: 0, ownerGroup: 65532 kind: pod name: kube-apiserver-5d6dcc9bd5-jsqrl namespace: shoot--diki-comp--openstack
- cluster: seed containerName: kube-apiserver details: fileName: /var/lib/kubelet/pods/adef142b-7c5d-4d1e-b0c2-9c575b9bbdea/volumes/kubernetes.io~secret/kube-aggregator/..2025_03_03_01_14_29.3516547635, ownerUser: 0, ownerGroup: 65532 kind: pod name: kube-apiserver-5d6dcc9bd5-jsqrl namespace: shoot--diki-comp--openstack
- cluster: seed containerName: kube-apiserver details: fileName: /var/lib/kubelet/pods/adef142b-7c5d-4d1e-b0c2-9c575b9bbdea/volumes/kubernetes.io~secret/ca-kubelet/..2025_03_03_01_14_29.1069799842, ownerUser: 0, ownerGroup: 65532 kind: pod name: kube-apiserver-5d6dcc9bd5-jsqrl namespace: shoot--diki-comp--openstack
- cluster: seed containerName: kube-apiserver details: fileName: /var/lib/kubelet/pods/adef142b-7c5d-4d1e-b0c2-9c575b9bbdea/volumes/kubernetes.io~secret/kubelet-client/..2025_03_03_01_14_29.798787007, ownerUser: 0, ownerGroup: 65532 kind: pod name: kube-apiserver-5d6dcc9bd5-jsqrl namespace: shoot--diki-comp--openstack
- cluster: seed containerName: kube-apiserver details: fileName: /var/lib/kubelet/pods/adef142b-7c5d-4d1e-b0c2-9c575b9bbdea/volumes/kubernetes.io~secret/etcd-client/..2025_03_03_01_14_29.3024572020, ownerUser: 0, ownerGroup: 65532 kind: pod name: kube-apiserver-5d6dcc9bd5-jsqrl namespace: shoot--diki-comp--openstack
- cluster: seed containerName: kube-apiserver details: fileName: /var/lib/kubelet/pods/adef142b-7c5d-4d1e-b0c2-9c575b9bbdea/volumes/kubernetes.io~secret/http-proxy/..2025_03_03_01_14_29.2845433525, ownerUser: 0, ownerGroup: 65532 kind: pod name: kube-apiserver-5d6dcc9bd5-jsqrl namespace: shoot--diki-comp--openstack
- cluster: seed containerName: kube-apiserver details: fileName: /var/lib/kubelet/pods/adef142b-7c5d-4d1e-b0c2-9c575b9bbdea/volumes/kubernetes.io~secret/ca-client/..2025_03_03_01_14_29.2499436981, ownerUser: 0, ownerGroup: 65532 kind: pod name: kube-apiserver-5d6dcc9bd5-jsqrl namespace: shoot--diki-comp--openstack
- cluster: seed containerName: kube-apiserver details: fileName: /var/lib/kubelet/pods/adef142b-7c5d-4d1e-b0c2-9c575b9bbdea/volumes/kubernetes.io~secret/service-account-key-bundle/..2025_03_03_01_14_29.3490774438, ownerUser: 0, ownerGroup: 65532 kind: pod name: kube-apiserver-5d6dcc9bd5-jsqrl namespace: shoot--diki-comp--openstack
- cluster: seed containerName: kube-apiserver details: fileName: /var/lib/kubelet/pods/adef142b-7c5d-4d1e-b0c2-9c575b9bbdea/volumes/kubernetes.io~secret/server/..2025_03_03_01_14_29.1544469879, ownerUser: 0, ownerGroup: 65532 kind: pod name: kube-apiserver-5d6dcc9bd5-jsqrl namespace: shoot--diki-comp--openstack
- cluster: seed containerName: kube-controller-manager details: fileName: /var/lib/kubelet/pods/c96aace0-5680-4b81-9225-cb3db3aed8bf/volumes/kubernetes.io~secret/ca/..2025_03_03_01_10_31.235358473/bundle.crt, ownerUser: 0, ownerGroup: 65532 kind: pod name: kube-controller-manager-6f87877757-4grgt namespace: shoot--diki-comp--openstack
- cluster: seed containerName: kube-controller-manager details: fileName: /var/lib/kubelet/pods/c96aace0-5680-4b81-9225-cb3db3aed8bf/volumes/kubernetes.io~secret/ca-client/..2025_03_03_01_10_31.3584083571/ca.crt, ownerUser: 0, ownerGroup: 65532 kind: pod name: kube-controller-manager-6f87877757-4grgt namespace: shoot--diki-comp--openstack
- cluster: seed containerName: kube-controller-manager details: fileName: /var/lib/kubelet/pods/c96aace0-5680-4b81-9225-cb3db3aed8bf/volumes/kubernetes.io~secret/ca-client/..2025_03_03_01_10_31.3584083571/ca.key, ownerUser: 0, ownerGroup: 65532 kind: pod name: kube-controller-manager-6f87877757-4grgt namespace: shoot--diki-comp--openstack
- cluster: seed containerName: kube-controller-manager details: fileName: /var/lib/kubelet/pods/c96aace0-5680-4b81-9225-cb3db3aed8bf/volumes/kubernetes.io~secret/server/..2025_03_03_01_10_31.104263364/tls.crt, ownerUser: 0, ownerGroup: 65532 kind: pod name: kube-controller-manager-6f87877757-4grgt namespace: shoot--diki-comp--openstack
- cluster: seed containerName: kube-controller-manager details: fileName: /var/lib/kubelet/pods/c96aace0-5680-4b81-9225-cb3db3aed8bf/volumes/kubernetes.io~secret/server/..2025_03_03_01_10_31.104263364/tls.key, ownerUser: 0, ownerGroup: 65532 kind: pod name: kube-controller-manager-6f87877757-4grgt namespace: shoot--diki-comp--openstack
- cluster: seed containerName: kube-controller-manager details: fileName: /var/lib/kubelet/pods/c96aace0-5680-4b81-9225-cb3db3aed8bf/volumes/kubernetes.io~secret/ca-kubelet/..2025_03_03_01_10_31.1741570139/ca.crt, ownerUser: 0, ownerGroup: 65532 kind: pod name: kube-controller-manager-6f87877757-4grgt namespace: shoot--diki-comp--openstack
- cluster: seed containerName: kube-controller-manager details: fileName: /var/lib/kubelet/pods/c96aace0-5680-4b81-9225-cb3db3aed8bf/volumes/kubernetes.io~secret/ca-kubelet/..2025_03_03_01_10_31.1741570139/ca.key, ownerUser: 0, ownerGroup: 65532 kind: pod name: kube-controller-manager-6f87877757-4grgt namespace: shoot--diki-comp--openstack
- cluster: seed containerName: kube-controller-manager details: fileName: /var/lib/kubelet/pods/c96aace0-5680-4b81-9225-cb3db3aed8bf/volumes/kubernetes.io~secret/ca/..2025_03_03_01_10_31.235358473, ownerUser: 0, ownerGroup: 65532 kind: pod name: kube-controller-manager-6f87877757-4grgt namespace: shoot--diki-comp--openstack
- cluster: seed containerName: kube-controller-manager details: fileName: /var/lib/kubelet/pods/c96aace0-5680-4b81-9225-cb3db3aed8bf/volumes/kubernetes.io~secret/ca-client/..2025_03_03_01_10_31.3584083571, ownerUser: 0, ownerGroup: 65532 kind: pod name: kube-controller-manager-6f87877757-4grgt namespace: shoot--diki-comp--openstack
- cluster: seed containerName: kube-controller-manager details: fileName: /var/lib/kubelet/pods/c96aace0-5680-4b81-9225-cb3db3aed8bf/volumes/kubernetes.io~secret/server/..2025_03_03_01_10_31.104263364, ownerUser: 0, ownerGroup: 65532 kind: pod name: kube-controller-manager-6f87877757-4grgt namespace: shoot--diki-comp--openstack
- cluster: seed containerName: kube-controller-manager details: fileName: /var/lib/kubelet/pods/c96aace0-5680-4b81-9225-cb3db3aed8bf/volumes/kubernetes.io~secret/ca-kubelet/..2025_03_03_01_10_31.1741570139, ownerUser: 0, ownerGroup: 65532 kind: pod name: kube-controller-manager-6f87877757-4grgt namespace: shoot--diki-comp--openstack
- cluster: seed containerName: kube-scheduler details: fileName: /var/lib/kubelet/pods/c079eae7-e4b5-4e7a-adfb-051573ecabea/volumes/kubernetes.io~projected/client-ca/..2025_03_03_01_12_28.1885206071/bundle.crt, ownerUser: 0, ownerGroup: 65532 kind: pod name: kube-scheduler-68854c4574-mbcz2 namespace: shoot--diki-comp--openstack
- cluster: seed containerName: kube-scheduler details: fileName: /var/lib/kubelet/pods/c079eae7-e4b5-4e7a-adfb-051573ecabea/volumes/kubernetes.io~secret/kube-scheduler-server/..2025_03_03_01_12_28.484866836/tls.crt, ownerUser: 0, ownerGroup: 65532 kind: pod name: kube-scheduler-68854c4574-mbcz2 namespace: shoot--diki-comp--openstack
- cluster: seed containerName: kube-scheduler details: fileName: /var/lib/kubelet/pods/c079eae7-e4b5-4e7a-adfb-051573ecabea/volumes/kubernetes.io~secret/kube-scheduler-server/..2025_03_03_01_12_28.484866836/tls.key, ownerUser: 0, ownerGroup: 65532 kind: pod name: kube-scheduler-68854c4574-mbcz2 namespace: shoot--diki-comp--openstack
- cluster: seed containerName: kube-scheduler details: fileName: /var/lib/kubelet/pods/c079eae7-e4b5-4e7a-adfb-051573ecabea/volumes/kubernetes.io~projected/client-ca/..2025_03_03_01_12_28.1885206071, ownerUser: 0, ownerGroup: 65532 kind: pod name: kube-scheduler-68854c4574-mbcz2 namespace: shoot--diki-comp--openstack
- cluster: seed containerName: kube-scheduler details: fileName: /var/lib/kubelet/pods/c079eae7-e4b5-4e7a-adfb-051573ecabea/volumes/kubernetes.io~secret/kube-scheduler-server/..2025_03_03_01_12_28.484866836, ownerUser: 0, ownerGroup: 65532 kind: pod name: kube-scheduler-68854c4574-mbcz2 namespace: shoot--diki-comp--openstack
- cluster: seed containerName: etcd details: fileName: /var/lib/kubelet/pods/576670d6-2e92-4999-a5db-46d1e5b110fc/volumes/kubernetes.io~secret/etcd-ca/..2025_03_03_01_02_06.696245391/bundle.crt, ownerUser: 0, ownerGroup: 65532 kind: pod name: etcd-main-0 namespace: shoot--diki-comp--openstack
- cluster: seed containerName: etcd details: fileName: /var/lib/kubelet/pods/576670d6-2e92-4999-a5db-46d1e5b110fc/volumes/kubernetes.io~secret/etcd-server-tls/..2025_03_03_01_02_06.2589642709/tls.key, ownerUser: 0, ownerGroup: 65532 kind: pod name: etcd-main-0 namespace: shoot--diki-comp--openstack
- cluster: seed containerName: etcd details: fileName: /var/lib/kubelet/pods/576670d6-2e92-4999-a5db-46d1e5b110fc/volumes/kubernetes.io~secret/etcd-server-tls/..2025_03_03_01_02_06.2589642709/tls.crt, ownerUser: 0, ownerGroup: 65532 kind: pod name: etcd-main-0 namespace: shoot--diki-comp--openstack
- cluster: seed containerName: etcd details: fileName: /var/lib/kubelet/pods/576670d6-2e92-4999-a5db-46d1e5b110fc/volumes/kubernetes.io~secret/etcd-client-tls/..2025_03_03_01_02_06.989578068/tls.key, ownerUser: 0, ownerGroup: 65532 kind: pod name: etcd-main-0 namespace: shoot--diki-comp--openstack
- cluster: seed containerName: etcd details: fileName: /var/lib/kubelet/pods/576670d6-2e92-4999-a5db-46d1e5b110fc/volumes/kubernetes.io~secret/etcd-client-tls/..2025_03_03_01_02_06.989578068/tls.crt, ownerUser: 0, ownerGroup: 65532 kind: pod name: etcd-main-0 namespace: shoot--diki-comp--openstack
- cluster: seed containerName: etcd details: fileName: /var/lib/kubelet/pods/576670d6-2e92-4999-a5db-46d1e5b110fc/volumes/kubernetes.io~secret/backup-restore-ca/..2025_03_03_01_02_06.2507918529/bundle.crt, ownerUser: 0, ownerGroup: 65532 kind: pod name: etcd-main-0 namespace: shoot--diki-comp--openstack
- cluster: seed containerName: etcd details: fileName: /var/lib/kubelet/pods/576670d6-2e92-4999-a5db-46d1e5b110fc/volumes/kubernetes.io~projected/kube-api-access-gardener/..2025_03_03_01_02_06.3524888998/ca.crt, ownerUser: 0, ownerGroup: 65532 kind: pod name: etcd-main-0 namespace: shoot--diki-comp--openstack
- cluster: seed containerName: etcd details: fileName: /var/lib/kubelet/pods/576670d6-2e92-4999-a5db-46d1e5b110fc/volumes/kubernetes.io~projected/kube-api-access-gardener/..2025_03_03_01_02_06.3524888998, ownerUser: 0, ownerGroup: 65532 kind: pod name: etcd-main-0 namespace: shoot--diki-comp--openstack
- cluster: seed containerName: etcd details: fileName: /var/lib/kubelet/pods/576670d6-2e92-4999-a5db-46d1e5b110fc/volumes/kubernetes.io~secret/etcd-ca/..2025_03_03_01_02_06.696245391, ownerUser: 0, ownerGroup: 65532 kind: pod name: etcd-main-0 namespace: shoot--diki-comp--openstack
- cluster: seed containerName: etcd details: fileName: /var/lib/kubelet/pods/576670d6-2e92-4999-a5db-46d1e5b110fc/volumes/kubernetes.io~secret/etcd-server-tls/..2025_03_03_01_02_06.2589642709, ownerUser: 0, ownerGroup: 65532 kind: pod name: etcd-main-0 namespace: shoot--diki-comp--openstack
- cluster: seed containerName: etcd details: fileName: /var/lib/kubelet/pods/576670d6-2e92-4999-a5db-46d1e5b110fc/volumes/kubernetes.io~secret/etcd-client-tls/..2025_03_03_01_02_06.989578068, ownerUser: 0, ownerGroup: 65532 kind: pod name: etcd-main-0 namespace: shoot--diki-comp--openstack
- cluster: seed containerName: etcd details: fileName: /var/lib/kubelet/pods/576670d6-2e92-4999-a5db-46d1e5b110fc/volumes/kubernetes.io~secret/backup-restore-ca/..2025_03_03_01_02_06.2507918529, ownerUser: 0, ownerGroup: 65532 kind: pod name: etcd-main-0 namespace: shoot--diki-comp--openstack
- cluster: seed containerName: backup-restore details: fileName: /var/lib/kubelet/pods/576670d6-2e92-4999-a5db-46d1e5b110fc/volumes/kubernetes.io~secret/backup-restore-server-tls/..2025_03_03_01_02_06.2509886571/tls.crt, ownerUser: 0, ownerGroup: 65532 kind: pod name: etcd-main-0 namespace: shoot--diki-comp--openstack
- cluster: seed containerName: backup-restore details: fileName: /var/lib/kubelet/pods/576670d6-2e92-4999-a5db-46d1e5b110fc/volumes/kubernetes.io~secret/backup-restore-server-tls/..2025_03_03_01_02_06.2509886571/tls.key, ownerUser: 0, ownerGroup: 65532 kind: pod name: etcd-main-0 namespace: shoot--diki-comp--openstack
- cluster: seed containerName: backup-restore details: fileName: /var/lib/kubelet/pods/576670d6-2e92-4999-a5db-46d1e5b110fc/volumes/kubernetes.io~secret/etcd-ca/..2025_03_03_01_02_06.696245391/bundle.crt, ownerUser: 0, ownerGroup: 65532 kind: pod name: etcd-main-0 namespace: shoot--diki-comp--openstack
- cluster: seed containerName: backup-restore details: fileName: /var/lib/kubelet/pods/576670d6-2e92-4999-a5db-46d1e5b110fc/volumes/kubernetes.io~secret/etcd-client-tls/..2025_03_03_01_02_06.989578068/tls.key, ownerUser: 0, ownerGroup: 65532 kind: pod name: etcd-main-0 namespace: shoot--diki-comp--openstack
- cluster: seed containerName: backup-restore details: fileName: /var/lib/kubelet/pods/576670d6-2e92-4999-a5db-46d1e5b110fc/volumes/kubernetes.io~secret/etcd-client-tls/..2025_03_03_01_02_06.989578068/tls.crt, ownerUser: 0, ownerGroup: 65532 kind: pod name: etcd-main-0 namespace: shoot--diki-comp--openstack
- cluster: seed containerName: backup-restore details: fileName: /var/lib/kubelet/pods/576670d6-2e92-4999-a5db-46d1e5b110fc/volumes/kubernetes.io~projected/kube-api-access-gardener/..2025_03_03_01_02_06.3524888998/ca.crt, ownerUser: 0, ownerGroup: 65532 kind: pod name: etcd-main-0 namespace: shoot--diki-comp--openstack
- cluster: seed containerName: backup-restore details: fileName: /var/lib/kubelet/pods/576670d6-2e92-4999-a5db-46d1e5b110fc/volumes/kubernetes.io~secret/backup-restore-server-tls/..2025_03_03_01_02_06.2509886571, ownerUser: 0, ownerGroup: 65532 kind: pod name: etcd-main-0 namespace: shoot--diki-comp--openstack
- cluster: seed containerName: backup-restore details: fileName: /var/lib/kubelet/pods/576670d6-2e92-4999-a5db-46d1e5b110fc/volumes/kubernetes.io~secret/etcd-ca/..2025_03_03_01_02_06.696245391, ownerUser: 0, ownerGroup: 65532 kind: pod name: etcd-main-0 namespace: shoot--diki-comp--openstack
- cluster: seed containerName: backup-restore details: fileName: /var/lib/kubelet/pods/576670d6-2e92-4999-a5db-46d1e5b110fc/volumes/kubernetes.io~secret/etcd-client-tls/..2025_03_03_01_02_06.989578068, ownerUser: 0, ownerGroup: 65532 kind: pod name: etcd-main-0 namespace: shoot--diki-comp--openstack
- cluster: seed containerName: backup-restore details: fileName: /var/lib/kubelet/pods/576670d6-2e92-4999-a5db-46d1e5b110fc/volumes/kubernetes.io~projected/kube-api-access-gardener/..2025_03_03_01_02_06.3524888998, ownerUser: 0, ownerGroup: 65532 kind: pod name: etcd-main-0 namespace: shoot--diki-comp--openstack
- cluster: shoot details: fileName: /var/lib/kubelet/pki/kubelet-client-2025-03-03-01-09-31.pem, ownerUser: 0, ownerGroup: 0 kind: node name: shoot--diki-comp--openstack-worker-dqty2-z1-6c54d-j8jtj
- cluster: shoot details: fileName: /var/lib/kubelet/pki/kubelet-server-2025-03-03-01-09-40.pem, ownerUser: 0, ownerGroup: 0 kind: node name: shoot--diki-comp--openstack-worker-dqty2-z1-6c54d-j8jtj
- cluster: shoot details: fileName: /var/lib/kubelet/pki, ownerUser: 0, ownerGroup: 0 kind: node name: shoot--diki-comp--openstack-worker-dqty2-z1-6c54d-j8jtj
- cluster: shoot containerName: kube-proxy details: fileName: /var/lib/kubelet/pods/9618e3a0-8bdf-4e84-ae68-88437c5e8fee/volumes/kubernetes.io~projected/kube-api-access-gardener/..2025_03_03_01_09_32.791759420/ca.crt, ownerUser: 0, ownerGroup: 0 kind: pod name: kube-proxy-worker-dqty2-v1.31.4-tpl27 namespace: kube-system
- cluster: shoot containerName: kube-proxy details: fileName: /var/lib/kubelet/pods/9618e3a0-8bdf-4e84-ae68-88437c5e8fee/volumes/kubernetes.io~projected/kube-api-access-gardener/..2025_03_03_01_09_32.791759420, ownerUser: 0, ownerGroup: 0 kind: pod name: kube-proxy-worker-dqty2-v1.31.4-tpl27 namespace: kube-system
- cluster: shoot containerName: conntrack-fix details: fileName: /var/lib/kubelet/pods/9618e3a0-8bdf-4e84-ae68-88437c5e8fee/volumes/kubernetes.io~projected/kube-api-access-gardener/..2025_03_03_01_09_32.791759420/ca.crt, ownerUser: 0, ownerGroup: 0 kind: pod name: kube-proxy-worker-dqty2-v1.31.4-tpl27 namespace: kube-system
- cluster: shoot containerName: conntrack-fix details: fileName: /var/lib/kubelet/pods/9618e3a0-8bdf-4e84-ae68-88437c5e8fee/volumes/kubernetes.io~projected/kube-api-access-gardener/..2025_03_03_01_09_32.791759420, ownerUser: 0, ownerGroup: 0 kind: pod name: kube-proxy-worker-dqty2-v1.31.4-tpl27 namespace: kube-system
- aws
-
File has expected owners
-
242452 (Medium) - The Kubernetes kubelet KubeConfig must have file permissions set to 644 or more restrictive.
-
File has expected permissions
- aws
- details: fileName: /var/lib/kubelet/kubeconfig-real, permissions: 600 kind: node name: ip-IP-Address.eu-west-1.compute.internal
- details: fileName: /var/lib/kubelet/config/kubelet, permissions: 600 kind: node name: ip-IP-Address.eu-west-1.compute.internal
- azure
- details: fileName: /var/lib/kubelet/kubeconfig-real, permissions: 600 kind: node name: shoot--diki-comp--azure-worker-g7p4p-z3-7ccb8-2wxkr
- details: fileName: /var/lib/kubelet/config/kubelet, permissions: 600 kind: node name: shoot--diki-comp--azure-worker-g7p4p-z3-7ccb8-2wxkr
- gcp
- details: fileName: /var/lib/kubelet/kubeconfig-real, permissions: 600 kind: node name: shoot--diki-comp--gcp-worker-bex82-z1-d8757-66str
- details: fileName: /var/lib/kubelet/config/kubelet, permissions: 600 kind: node name: shoot--diki-comp--gcp-worker-bex82-z1-d8757-66str
- openstack
- details: fileName: /var/lib/kubelet/kubeconfig-real, permissions: 600 kind: node name: shoot--diki-comp--openstack-worker-dqty2-z1-6c54d-j8jtj
- details: fileName: /var/lib/kubelet/config/kubelet, permissions: 600 kind: node name: shoot--diki-comp--openstack-worker-dqty2-z1-6c54d-j8jtj
- aws
-
File has expected permissions
-
242453 (Medium) - The Kubernetes kubelet KubeConfig file must be owned by root.
-
File has expected owners
- aws
- details: fileName: /var/lib/kubelet/kubeconfig-real, ownerUser: 0, ownerGroup: 0 kind: node name: ip-IP-Address.eu-west-1.compute.internal
- details: fileName: /var/lib/kubelet/config/kubelet, ownerUser: 0, ownerGroup: 0 kind: node name: ip-IP-Address.eu-west-1.compute.internal
- azure
- details: fileName: /var/lib/kubelet/kubeconfig-real, ownerUser: 0, ownerGroup: 0 kind: node name: shoot--diki-comp--azure-worker-g7p4p-z3-7ccb8-2wxkr
- details: fileName: /var/lib/kubelet/config/kubelet, ownerUser: 0, ownerGroup: 0 kind: node name: shoot--diki-comp--azure-worker-g7p4p-z3-7ccb8-2wxkr
- gcp
- details: fileName: /var/lib/kubelet/kubeconfig-real, ownerUser: 0, ownerGroup: 0 kind: node name: shoot--diki-comp--gcp-worker-bex82-z1-d8757-66str
- details: fileName: /var/lib/kubelet/config/kubelet, ownerUser: 0, ownerGroup: 0 kind: node name: shoot--diki-comp--gcp-worker-bex82-z1-d8757-66str
- openstack
- details: fileName: /var/lib/kubelet/kubeconfig-real, ownerUser: 0, ownerGroup: 0 kind: node name: shoot--diki-comp--openstack-worker-dqty2-z1-6c54d-j8jtj
- details: fileName: /var/lib/kubelet/config/kubelet, ownerUser: 0, ownerGroup: 0 kind: node name: shoot--diki-comp--openstack-worker-dqty2-z1-6c54d-j8jtj
- aws
-
File has expected owners
-
242459 (Medium) - The Kubernetes etcd must have file permissions set to 644 or more restrictive.
-
File has expected permissions
- aws
- containerName: etcd details: fileName: /var/lib/kubelet/pods/d46d0708-802d-43a7-bdf8-646912b7cb62/volumes/kubernetes.io~csi/pv-shoot--garden--aws-ha-eu1-5fd75c6b-82f4-4e32-97b1-ed522efea2b6/mount/new.etcd/member/wal/0.tmp, permissions: 600 kind: pod name: etcd-main-0 namespace: shoot--diki-comp--aws
- containerName: etcd details: fileName: /var/lib/kubelet/pods/d46d0708-802d-43a7-bdf8-646912b7cb62/volumes/kubernetes.io~csi/pv-shoot--garden--aws-ha-eu1-5fd75c6b-82f4-4e32-97b1-ed522efea2b6/mount/new.etcd/member/wal/0000000000000000-0000000000000000.wal, permissions: 600 kind: pod name: etcd-main-0 namespace: shoot--diki-comp--aws
- containerName: etcd details: fileName: /var/lib/kubelet/pods/d46d0708-802d-43a7-bdf8-646912b7cb62/volumes/kubernetes.io~csi/pv-shoot--garden--aws-ha-eu1-5fd75c6b-82f4-4e32-97b1-ed522efea2b6/mount/new.etcd/member/snap/db, permissions: 600 kind: pod name: etcd-main-0 namespace: shoot--diki-comp--aws
- containerName: etcd details: fileName: /var/lib/kubelet/pods/d46d0708-802d-43a7-bdf8-646912b7cb62/volumes/kubernetes.io~csi/pv-shoot--garden--aws-ha-eu1-5fd75c6b-82f4-4e32-97b1-ed522efea2b6/mount/safe_guard, permissions: 600 kind: pod name: etcd-main-0 namespace: shoot--diki-comp--aws
- containerName: etcd details: fileName: /var/lib/kubelet/pods/d46d0708-802d-43a7-bdf8-646912b7cb62/volumes/kubernetes.io~secret/etcd-ca/..2025_03_03_01_02_01.732820315/bundle.crt, permissions: 640 kind: pod name: etcd-main-0 namespace: shoot--diki-comp--aws
- containerName: etcd details: fileName: /var/lib/kubelet/pods/d46d0708-802d-43a7-bdf8-646912b7cb62/volumes/kubernetes.io~secret/etcd-server-tls/..2025_03_03_01_02_01.2596588739/tls.crt, permissions: 640 kind: pod name: etcd-main-0 namespace: shoot--diki-comp--aws
- containerName: etcd details: fileName: /var/lib/kubelet/pods/d46d0708-802d-43a7-bdf8-646912b7cb62/volumes/kubernetes.io~secret/etcd-server-tls/..2025_03_03_01_02_01.2596588739/tls.key, permissions: 640 kind: pod name: etcd-main-0 namespace: shoot--diki-comp--aws
- containerName: etcd details: fileName: /var/lib/kubelet/pods/d46d0708-802d-43a7-bdf8-646912b7cb62/volumes/kubernetes.io~secret/etcd-client-tls/..2025_03_03_01_02_01.1252005562/tls.key, permissions: 640 kind: pod name: etcd-main-0 namespace: shoot--diki-comp--aws
- containerName: etcd details: fileName: /var/lib/kubelet/pods/d46d0708-802d-43a7-bdf8-646912b7cb62/volumes/kubernetes.io~secret/etcd-client-tls/..2025_03_03_01_02_01.1252005562/tls.crt, permissions: 640 kind: pod name: etcd-main-0 namespace: shoot--diki-comp--aws
- containerName: etcd details: fileName: /var/lib/kubelet/pods/d46d0708-802d-43a7-bdf8-646912b7cb62/volumes/kubernetes.io~secret/backup-restore-ca/..2025_03_03_01_02_01.3362730748/bundle.crt, permissions: 640 kind: pod name: etcd-main-0 namespace: shoot--diki-comp--aws
- containerName: etcd details: fileName: /var/lib/kubelet/pods/d46d0708-802d-43a7-bdf8-646912b7cb62/volumes/kubernetes.io~projected/kube-api-access-gardener/..2025_03_03_01_02_01.1092768610/token, permissions: 640 kind: pod name: etcd-main-0 namespace: shoot--diki-comp--aws
- containerName: backup-restore details: fileName: /var/lib/kubelet/pods/d46d0708-802d-43a7-bdf8-646912b7cb62/volumes/kubernetes.io~secret/etcd-backup-secret/..2025_03_03_01_02_01.4053552407/accessKeyID, permissions: 640 kind: pod name: etcd-main-0 namespace: shoot--diki-comp--aws
- containerName: backup-restore details: fileName: /var/lib/kubelet/pods/d46d0708-802d-43a7-bdf8-646912b7cb62/volumes/kubernetes.io~secret/etcd-backup-secret/..2025_03_03_01_02_01.4053552407/bucketName, permissions: 640 kind: pod name: etcd-main-0 namespace: shoot--diki-comp--aws
- containerName: backup-restore details: fileName: /var/lib/kubelet/pods/d46d0708-802d-43a7-bdf8-646912b7cb62/volumes/kubernetes.io~secret/etcd-backup-secret/..2025_03_03_01_02_01.4053552407/region, permissions: 640 kind: pod name: etcd-main-0 namespace: shoot--diki-comp--aws
- containerName: backup-restore details: fileName: /var/lib/kubelet/pods/d46d0708-802d-43a7-bdf8-646912b7cb62/volumes/kubernetes.io~secret/etcd-backup-secret/..2025_03_03_01_02_01.4053552407/secretAccessKey, permissions: 640 kind: pod name: etcd-main-0 namespace: shoot--diki-comp--aws
- containerName: backup-restore details: fileName: /var/lib/kubelet/pods/d46d0708-802d-43a7-bdf8-646912b7cb62/volumes/kubernetes.io~csi/pv-shoot--garden--aws-ha-eu1-5fd75c6b-82f4-4e32-97b1-ed522efea2b6/mount/new.etcd/member/wal/0.tmp, permissions: 600 kind: pod name: etcd-main-0 namespace: shoot--diki-comp--aws
- containerName: backup-restore details: fileName: /var/lib/kubelet/pods/d46d0708-802d-43a7-bdf8-646912b7cb62/volumes/kubernetes.io~csi/pv-shoot--garden--aws-ha-eu1-5fd75c6b-82f4-4e32-97b1-ed522efea2b6/mount/new.etcd/member/wal/0000000000000000-0000000000000000.wal, permissions: 600 kind: pod name: etcd-main-0 namespace: shoot--diki-comp--aws
- containerName: backup-restore details: fileName: /var/lib/kubelet/pods/d46d0708-802d-43a7-bdf8-646912b7cb62/volumes/kubernetes.io~csi/pv-shoot--garden--aws-ha-eu1-5fd75c6b-82f4-4e32-97b1-ed522efea2b6/mount/new.etcd/member/snap/db, permissions: 600 kind: pod name: etcd-main-0 namespace: shoot--diki-comp--aws
- containerName: backup-restore details: fileName: /var/lib/kubelet/pods/d46d0708-802d-43a7-bdf8-646912b7cb62/volumes/kubernetes.io~csi/pv-shoot--garden--aws-ha-eu1-5fd75c6b-82f4-4e32-97b1-ed522efea2b6/mount/safe_guard, permissions: 600 kind: pod name: etcd-main-0 namespace: shoot--diki-comp--aws
- containerName: backup-restore details: fileName: /var/lib/kubelet/pods/d46d0708-802d-43a7-bdf8-646912b7cb62/volumes/kubernetes.io~configmap/etcd-config-file/..2025_03_03_01_02_01.108378467/etcd.conf.yaml, permissions: 640 kind: pod name: etcd-main-0 namespace: shoot--diki-comp--aws
- containerName: backup-restore details: fileName: /var/lib/kubelet/pods/d46d0708-802d-43a7-bdf8-646912b7cb62/volumes/kubernetes.io~secret/backup-restore-server-tls/..2025_03_03_01_02_01.3321577487/tls.key, permissions: 640 kind: pod name: etcd-main-0 namespace: shoot--diki-comp--aws
- containerName: backup-restore details: fileName: /var/lib/kubelet/pods/d46d0708-802d-43a7-bdf8-646912b7cb62/volumes/kubernetes.io~secret/backup-restore-server-tls/..2025_03_03_01_02_01.3321577487/tls.crt, permissions: 640 kind: pod name: etcd-main-0 namespace: shoot--diki-comp--aws
- containerName: backup-restore details: fileName: /var/lib/kubelet/pods/d46d0708-802d-43a7-bdf8-646912b7cb62/volumes/kubernetes.io~secret/etcd-ca/..2025_03_03_01_02_01.732820315/bundle.crt, permissions: 640 kind: pod name: etcd-main-0 namespace: shoot--diki-comp--aws
- containerName: backup-restore details: fileName: /var/lib/kubelet/pods/d46d0708-802d-43a7-bdf8-646912b7cb62/volumes/kubernetes.io~secret/etcd-client-tls/..2025_03_03_01_02_01.1252005562/tls.key, permissions: 640 kind: pod name: etcd-main-0 namespace: shoot--diki-comp--aws
- containerName: backup-restore details: fileName: /var/lib/kubelet/pods/d46d0708-802d-43a7-bdf8-646912b7cb62/volumes/kubernetes.io~secret/etcd-client-tls/..2025_03_03_01_02_01.1252005562/tls.crt, permissions: 640 kind: pod name: etcd-main-0 namespace: shoot--diki-comp--aws
- containerName: backup-restore details: fileName: /var/lib/kubelet/pods/d46d0708-802d-43a7-bdf8-646912b7cb62/volumes/kubernetes.io~projected/kube-api-access-gardener/..2025_03_03_01_02_01.1092768610/token, permissions: 640 kind: pod name: etcd-main-0 namespace: shoot--diki-comp--aws
- containerName: etcd details: fileName: /var/lib/kubelet/pods/43f307d7-051f-446e-a314-0e435190ca59/volumes/kubernetes.io~csi/pv-shoot--garden--aws-ha-eu1-1f0559c1-d2d6-4fbc-a896-f9f3b569ecc0/mount/new.etcd/member/snap/db, permissions: 600 kind: pod name: etcd-events-0 namespace: shoot--diki-comp--aws
- containerName: etcd details: fileName: /var/lib/kubelet/pods/43f307d7-051f-446e-a314-0e435190ca59/volumes/kubernetes.io~csi/pv-shoot--garden--aws-ha-eu1-1f0559c1-d2d6-4fbc-a896-f9f3b569ecc0/mount/new.etcd/member/wal/0000000000000000-0000000000000000.wal, permissions: 600 kind: pod name: etcd-events-0 namespace: shoot--diki-comp--aws
- containerName: etcd details: fileName: /var/lib/kubelet/pods/43f307d7-051f-446e-a314-0e435190ca59/volumes/kubernetes.io~csi/pv-shoot--garden--aws-ha-eu1-1f0559c1-d2d6-4fbc-a896-f9f3b569ecc0/mount/new.etcd/member/wal/0.tmp, permissions: 600 kind: pod name: etcd-events-0 namespace: shoot--diki-comp--aws
- containerName: etcd details: fileName: /var/lib/kubelet/pods/43f307d7-051f-446e-a314-0e435190ca59/volumes/kubernetes.io~csi/pv-shoot--garden--aws-ha-eu1-1f0559c1-d2d6-4fbc-a896-f9f3b569ecc0/mount/safe_guard, permissions: 600 kind: pod name: etcd-events-0 namespace: shoot--diki-comp--aws
- containerName: etcd details: fileName: /var/lib/kubelet/pods/43f307d7-051f-446e-a314-0e435190ca59/volumes/kubernetes.io~secret/etcd-ca/..2025_03_03_01_02_01.4042300612/bundle.crt, permissions: 640 kind: pod name: etcd-events-0 namespace: shoot--diki-comp--aws
- containerName: etcd details: fileName: /var/lib/kubelet/pods/43f307d7-051f-446e-a314-0e435190ca59/volumes/kubernetes.io~secret/etcd-server-tls/..2025_03_03_01_02_01.2269653654/tls.crt, permissions: 640 kind: pod name: etcd-events-0 namespace: shoot--diki-comp--aws
- containerName: etcd details: fileName: /var/lib/kubelet/pods/43f307d7-051f-446e-a314-0e435190ca59/volumes/kubernetes.io~secret/etcd-server-tls/..2025_03_03_01_02_01.2269653654/tls.key, permissions: 640 kind: pod name: etcd-events-0 namespace: shoot--diki-comp--aws
- containerName: etcd details: fileName: /var/lib/kubelet/pods/43f307d7-051f-446e-a314-0e435190ca59/volumes/kubernetes.io~secret/etcd-client-tls/..2025_03_03_01_02_01.911620075/tls.crt, permissions: 640 kind: pod name: etcd-events-0 namespace: shoot--diki-comp--aws
- containerName: etcd details: fileName: /var/lib/kubelet/pods/43f307d7-051f-446e-a314-0e435190ca59/volumes/kubernetes.io~secret/etcd-client-tls/..2025_03_03_01_02_01.911620075/tls.key, permissions: 640 kind: pod name: etcd-events-0 namespace: shoot--diki-comp--aws
- containerName: etcd details: fileName: /var/lib/kubelet/pods/43f307d7-051f-446e-a314-0e435190ca59/volumes/kubernetes.io~secret/backup-restore-ca/..2025_03_03_01_02_01.402852323/bundle.crt, permissions: 640 kind: pod name: etcd-events-0 namespace: shoot--diki-comp--aws
- containerName: etcd details: fileName: /var/lib/kubelet/pods/43f307d7-051f-446e-a314-0e435190ca59/volumes/kubernetes.io~projected/kube-api-access-gardener/..2025_03_03_01_02_01.2294882418/token, permissions: 640 kind: pod name: etcd-events-0 namespace: shoot--diki-comp--aws
- containerName: backup-restore details: fileName: /var/lib/kubelet/pods/43f307d7-051f-446e-a314-0e435190ca59/volumes/kubernetes.io~csi/pv-shoot--garden--aws-ha-eu1-1f0559c1-d2d6-4fbc-a896-f9f3b569ecc0/mount/new.etcd/member/snap/db, permissions: 600 kind: pod name: etcd-events-0 namespace: shoot--diki-comp--aws
- containerName: backup-restore details: fileName: /var/lib/kubelet/pods/43f307d7-051f-446e-a314-0e435190ca59/volumes/kubernetes.io~csi/pv-shoot--garden--aws-ha-eu1-1f0559c1-d2d6-4fbc-a896-f9f3b569ecc0/mount/new.etcd/member/wal/0000000000000000-0000000000000000.wal, permissions: 600 kind: pod name: etcd-events-0 namespace: shoot--diki-comp--aws
- containerName: backup-restore details: fileName: /var/lib/kubelet/pods/43f307d7-051f-446e-a314-0e435190ca59/volumes/kubernetes.io~csi/pv-shoot--garden--aws-ha-eu1-1f0559c1-d2d6-4fbc-a896-f9f3b569ecc0/mount/new.etcd/member/wal/0.tmp, permissions: 600 kind: pod name: etcd-events-0 namespace: shoot--diki-comp--aws
- containerName: backup-restore details: fileName: /var/lib/kubelet/pods/43f307d7-051f-446e-a314-0e435190ca59/volumes/kubernetes.io~csi/pv-shoot--garden--aws-ha-eu1-1f0559c1-d2d6-4fbc-a896-f9f3b569ecc0/mount/safe_guard, permissions: 600 kind: pod name: etcd-events-0 namespace: shoot--diki-comp--aws
- containerName: backup-restore details: fileName: /var/lib/kubelet/pods/43f307d7-051f-446e-a314-0e435190ca59/volumes/kubernetes.io~configmap/etcd-config-file/..2025_03_03_01_02_01.1094665409/etcd.conf.yaml, permissions: 640 kind: pod name: etcd-events-0 namespace: shoot--diki-comp--aws
- containerName: backup-restore details: fileName: /var/lib/kubelet/pods/43f307d7-051f-446e-a314-0e435190ca59/volumes/kubernetes.io~secret/backup-restore-server-tls/..2025_03_03_01_02_01.3619666546/tls.crt, permissions: 640 kind: pod name: etcd-events-0 namespace: shoot--diki-comp--aws
- containerName: backup-restore details: fileName: /var/lib/kubelet/pods/43f307d7-051f-446e-a314-0e435190ca59/volumes/kubernetes.io~secret/backup-restore-server-tls/..2025_03_03_01_02_01.3619666546/tls.key, permissions: 640 kind: pod name: etcd-events-0 namespace: shoot--diki-comp--aws
- containerName: backup-restore details: fileName: /var/lib/kubelet/pods/43f307d7-051f-446e-a314-0e435190ca59/volumes/kubernetes.io~secret/etcd-ca/..2025_03_03_01_02_01.4042300612/bundle.crt, permissions: 640 kind: pod name: etcd-events-0 namespace: shoot--diki-comp--aws
- containerName: backup-restore details: fileName: /var/lib/kubelet/pods/43f307d7-051f-446e-a314-0e435190ca59/volumes/kubernetes.io~secret/etcd-client-tls/..2025_03_03_01_02_01.911620075/tls.crt, permissions: 640 kind: pod name: etcd-events-0 namespace: shoot--diki-comp--aws
- containerName: backup-restore details: fileName: /var/lib/kubelet/pods/43f307d7-051f-446e-a314-0e435190ca59/volumes/kubernetes.io~secret/etcd-client-tls/..2025_03_03_01_02_01.911620075/tls.key, permissions: 640 kind: pod name: etcd-events-0 namespace: shoot--diki-comp--aws
- containerName: backup-restore details: fileName: /var/lib/kubelet/pods/43f307d7-051f-446e-a314-0e435190ca59/volumes/kubernetes.io~projected/kube-api-access-gardener/..2025_03_03_01_02_01.2294882418/token, permissions: 640 kind: pod name: etcd-events-0 namespace: shoot--diki-comp--aws
- azure
- containerName: etcd details: fileName: /var/lib/kubelet/pods/153ccd2e-435b-4b34-8337-7b33a279136f/volumes/kubernetes.io~csi/pv-shoot--garden--az-ha-eu1-81b2d8c1-722b-460c-92ce-9906a186289f/mount/safe_guard, permissions: 600 kind: pod name: etcd-main-0 namespace: shoot--diki-comp--azure
- containerName: etcd details: fileName: /var/lib/kubelet/pods/153ccd2e-435b-4b34-8337-7b33a279136f/volumes/kubernetes.io~csi/pv-shoot--garden--az-ha-eu1-81b2d8c1-722b-460c-92ce-9906a186289f/mount/new.etcd/member/snap/db, permissions: 600 kind: pod name: etcd-main-0 namespace: shoot--diki-comp--azure
- containerName: etcd details: fileName: /var/lib/kubelet/pods/153ccd2e-435b-4b34-8337-7b33a279136f/volumes/kubernetes.io~csi/pv-shoot--garden--az-ha-eu1-81b2d8c1-722b-460c-92ce-9906a186289f/mount/new.etcd/member/wal/0000000000000000-0000000000000000.wal, permissions: 600 kind: pod name: etcd-main-0 namespace: shoot--diki-comp--azure
- containerName: etcd details: fileName: /var/lib/kubelet/pods/153ccd2e-435b-4b34-8337-7b33a279136f/volumes/kubernetes.io~csi/pv-shoot--garden--az-ha-eu1-81b2d8c1-722b-460c-92ce-9906a186289f/mount/new.etcd/member/wal/0.tmp, permissions: 600 kind: pod name: etcd-main-0 namespace: shoot--diki-comp--azure
- containerName: etcd details: fileName: /var/lib/kubelet/pods/153ccd2e-435b-4b34-8337-7b33a279136f/volumes/kubernetes.io~secret/etcd-ca/..2025_03_03_01_02_09.1747192981/bundle.crt, permissions: 640 kind: pod name: etcd-main-0 namespace: shoot--diki-comp--azure
- containerName: etcd details: fileName: /var/lib/kubelet/pods/153ccd2e-435b-4b34-8337-7b33a279136f/volumes/kubernetes.io~secret/etcd-server-tls/..2025_03_03_01_02_09.2561838193/tls.key, permissions: 640 kind: pod name: etcd-main-0 namespace: shoot--diki-comp--azure
- containerName: etcd details: fileName: /var/lib/kubelet/pods/153ccd2e-435b-4b34-8337-7b33a279136f/volumes/kubernetes.io~secret/etcd-server-tls/..2025_03_03_01_02_09.2561838193/tls.crt, permissions: 640 kind: pod name: etcd-main-0 namespace: shoot--diki-comp--azure
- containerName: etcd details: fileName: /var/lib/kubelet/pods/153ccd2e-435b-4b34-8337-7b33a279136f/volumes/kubernetes.io~secret/etcd-client-tls/..2025_03_03_01_02_09.1461912590/tls.crt, permissions: 640 kind: pod name: etcd-main-0 namespace: shoot--diki-comp--azure
- containerName: etcd details: fileName: /var/lib/kubelet/pods/153ccd2e-435b-4b34-8337-7b33a279136f/volumes/kubernetes.io~secret/etcd-client-tls/..2025_03_03_01_02_09.1461912590/tls.key, permissions: 640 kind: pod name: etcd-main-0 namespace: shoot--diki-comp--azure
- containerName: etcd details: fileName: /var/lib/kubelet/pods/153ccd2e-435b-4b34-8337-7b33a279136f/volumes/kubernetes.io~secret/backup-restore-ca/..2025_03_03_01_02_09.1112355822/bundle.crt, permissions: 640 kind: pod name: etcd-main-0 namespace: shoot--diki-comp--azure
- containerName: etcd details: fileName: /var/lib/kubelet/pods/153ccd2e-435b-4b34-8337-7b33a279136f/volumes/kubernetes.io~projected/kube-api-access-gardener/..2025_03_03_01_02_09.3605391883/token, permissions: 640 kind: pod name: etcd-main-0 namespace: shoot--diki-comp--azure
- containerName: backup-restore details: fileName: /var/lib/kubelet/pods/153ccd2e-435b-4b34-8337-7b33a279136f/volumes/kubernetes.io~secret/etcd-backup-secret/..2025_03_03_01_02_09.2736915275/storageKey, permissions: 640 kind: pod name: etcd-main-0 namespace: shoot--diki-comp--azure
- containerName: backup-restore details: fileName: /var/lib/kubelet/pods/153ccd2e-435b-4b34-8337-7b33a279136f/volumes/kubernetes.io~secret/etcd-backup-secret/..2025_03_03_01_02_09.2736915275/bucketName, permissions: 640 kind: pod name: etcd-main-0 namespace: shoot--diki-comp--azure
- containerName: backup-restore details: fileName: /var/lib/kubelet/pods/153ccd2e-435b-4b34-8337-7b33a279136f/volumes/kubernetes.io~secret/etcd-backup-secret/..2025_03_03_01_02_09.2736915275/storageAccount, permissions: 640 kind: pod name: etcd-main-0 namespace: shoot--diki-comp--azure
- containerName: backup-restore details: fileName: /var/lib/kubelet/pods/153ccd2e-435b-4b34-8337-7b33a279136f/volumes/kubernetes.io~csi/pv-shoot--garden--az-ha-eu1-81b2d8c1-722b-460c-92ce-9906a186289f/mount/safe_guard, permissions: 600 kind: pod name: etcd-main-0 namespace: shoot--diki-comp--azure
- containerName: backup-restore details: fileName: /var/lib/kubelet/pods/153ccd2e-435b-4b34-8337-7b33a279136f/volumes/kubernetes.io~csi/pv-shoot--garden--az-ha-eu1-81b2d8c1-722b-460c-92ce-9906a186289f/mount/new.etcd/member/snap/db, permissions: 600 kind: pod name: etcd-main-0 namespace: shoot--diki-comp--azure
- containerName: backup-restore details: fileName: /var/lib/kubelet/pods/153ccd2e-435b-4b34-8337-7b33a279136f/volumes/kubernetes.io~csi/pv-shoot--garden--az-ha-eu1-81b2d8c1-722b-460c-92ce-9906a186289f/mount/new.etcd/member/wal/0000000000000000-0000000000000000.wal, permissions: 600 kind: pod name: etcd-main-0 namespace: shoot--diki-comp--azure
- containerName: backup-restore details: fileName: /var/lib/kubelet/pods/153ccd2e-435b-4b34-8337-7b33a279136f/volumes/kubernetes.io~csi/pv-shoot--garden--az-ha-eu1-81b2d8c1-722b-460c-92ce-9906a186289f/mount/new.etcd/member/wal/0.tmp, permissions: 600 kind: pod name: etcd-main-0 namespace: shoot--diki-comp--azure
- containerName: backup-restore details: fileName: /var/lib/kubelet/pods/153ccd2e-435b-4b34-8337-7b33a279136f/volumes/kubernetes.io~configmap/etcd-config-file/..2025_03_03_01_02_09.1473205331/etcd.conf.yaml, permissions: 640 kind: pod name: etcd-main-0 namespace: shoot--diki-comp--azure
- containerName: backup-restore details: fileName: /var/lib/kubelet/pods/153ccd2e-435b-4b34-8337-7b33a279136f/volumes/kubernetes.io~secret/backup-restore-server-tls/..2025_03_03_01_02_09.980570931/tls.crt, permissions: 640 kind: pod name: etcd-main-0 namespace: shoot--diki-comp--azure
- containerName: backup-restore details: fileName: /var/lib/kubelet/pods/153ccd2e-435b-4b34-8337-7b33a279136f/volumes/kubernetes.io~secret/backup-restore-server-tls/..2025_03_03_01_02_09.980570931/tls.key, permissions: 640 kind: pod name: etcd-main-0 namespace: shoot--diki-comp--azure
- containerName: backup-restore details: fileName: /var/lib/kubelet/pods/153ccd2e-435b-4b34-8337-7b33a279136f/volumes/kubernetes.io~secret/etcd-ca/..2025_03_03_01_02_09.1747192981/bundle.crt, permissions: 640 kind: pod name: etcd-main-0 namespace: shoot--diki-comp--azure
- containerName: backup-restore details: fileName: /var/lib/kubelet/pods/153ccd2e-435b-4b34-8337-7b33a279136f/volumes/kubernetes.io~secret/etcd-client-tls/..2025_03_03_01_02_09.1461912590/tls.crt, permissions: 640 kind: pod name: etcd-main-0 namespace: shoot--diki-comp--azure
- containerName: backup-restore details: fileName: /var/lib/kubelet/pods/153ccd2e-435b-4b34-8337-7b33a279136f/volumes/kubernetes.io~secret/etcd-client-tls/..2025_03_03_01_02_09.1461912590/tls.key, permissions: 640 kind: pod name: etcd-main-0 namespace: shoot--diki-comp--azure
- containerName: backup-restore details: fileName: /var/lib/kubelet/pods/153ccd2e-435b-4b34-8337-7b33a279136f/volumes/kubernetes.io~projected/kube-api-access-gardener/..2025_03_03_01_02_09.3605391883/token, permissions: 640 kind: pod name: etcd-main-0 namespace: shoot--diki-comp--azure
- containerName: etcd details: fileName: /var/lib/kubelet/pods/e40a1350-0fce-48ce-bed8-75ba8d51e7a0/volumes/kubernetes.io~csi/pv-shoot--garden--az-ha-eu1-33b95d75-a9cf-4e74-8dda-794e03889079/mount/new.etcd/member/wal/0000000000000000-0000000000000000.wal, permissions: 600 kind: pod name: etcd-events-0 namespace: shoot--diki-comp--azure
- containerName: etcd details: fileName: /var/lib/kubelet/pods/e40a1350-0fce-48ce-bed8-75ba8d51e7a0/volumes/kubernetes.io~csi/pv-shoot--garden--az-ha-eu1-33b95d75-a9cf-4e74-8dda-794e03889079/mount/new.etcd/member/wal/0.tmp, permissions: 600 kind: pod name: etcd-events-0 namespace: shoot--diki-comp--azure
- containerName: etcd details: fileName: /var/lib/kubelet/pods/e40a1350-0fce-48ce-bed8-75ba8d51e7a0/volumes/kubernetes.io~csi/pv-shoot--garden--az-ha-eu1-33b95d75-a9cf-4e74-8dda-794e03889079/mount/new.etcd/member/snap/db, permissions: 600 kind: pod name: etcd-events-0 namespace: shoot--diki-comp--azure
- containerName: etcd details: fileName: /var/lib/kubelet/pods/e40a1350-0fce-48ce-bed8-75ba8d51e7a0/volumes/kubernetes.io~csi/pv-shoot--garden--az-ha-eu1-33b95d75-a9cf-4e74-8dda-794e03889079/mount/safe_guard, permissions: 600 kind: pod name: etcd-events-0 namespace: shoot--diki-comp--azure
- containerName: etcd details: fileName: /var/lib/kubelet/pods/e40a1350-0fce-48ce-bed8-75ba8d51e7a0/volumes/kubernetes.io~secret/etcd-ca/..2025_03_03_01_02_09.386575845/bundle.crt, permissions: 640 kind: pod name: etcd-events-0 namespace: shoot--diki-comp--azure
- containerName: etcd details: fileName: /var/lib/kubelet/pods/e40a1350-0fce-48ce-bed8-75ba8d51e7a0/volumes/kubernetes.io~secret/etcd-server-tls/..2025_03_03_01_02_09.729094142/tls.key, permissions: 640 kind: pod name: etcd-events-0 namespace: shoot--diki-comp--azure
- containerName: etcd details: fileName: /var/lib/kubelet/pods/e40a1350-0fce-48ce-bed8-75ba8d51e7a0/volumes/kubernetes.io~secret/etcd-server-tls/..2025_03_03_01_02_09.729094142/tls.crt, permissions: 640 kind: pod name: etcd-events-0 namespace: shoot--diki-comp--azure
- containerName: etcd details: fileName: /var/lib/kubelet/pods/e40a1350-0fce-48ce-bed8-75ba8d51e7a0/volumes/kubernetes.io~secret/etcd-client-tls/..2025_03_03_01_02_09.2268049037/tls.crt, permissions: 640 kind: pod name: etcd-events-0 namespace: shoot--diki-comp--azure
- containerName: etcd details: fileName: /var/lib/kubelet/pods/e40a1350-0fce-48ce-bed8-75ba8d51e7a0/volumes/kubernetes.io~secret/etcd-client-tls/..2025_03_03_01_02_09.2268049037/tls.key, permissions: 640 kind: pod name: etcd-events-0 namespace: shoot--diki-comp--azure
- containerName: etcd details: fileName: /var/lib/kubelet/pods/e40a1350-0fce-48ce-bed8-75ba8d51e7a0/volumes/kubernetes.io~secret/backup-restore-ca/..2025_03_03_01_02_09.4148787187/bundle.crt, permissions: 640 kind: pod name: etcd-events-0 namespace: shoot--diki-comp--azure
- containerName: etcd details: fileName: /var/lib/kubelet/pods/e40a1350-0fce-48ce-bed8-75ba8d51e7a0/volumes/kubernetes.io~projected/kube-api-access-gardener/..2025_03_03_01_02_09.745783697/token, permissions: 640 kind: pod name: etcd-events-0 namespace: shoot--diki-comp--azure
- containerName: backup-restore details: fileName: /var/lib/kubelet/pods/e40a1350-0fce-48ce-bed8-75ba8d51e7a0/volumes/kubernetes.io~csi/pv-shoot--garden--az-ha-eu1-33b95d75-a9cf-4e74-8dda-794e03889079/mount/new.etcd/member/wal/0000000000000000-0000000000000000.wal, permissions: 600 kind: pod name: etcd-events-0 namespace: shoot--diki-comp--azure
- containerName: backup-restore details: fileName: /var/lib/kubelet/pods/e40a1350-0fce-48ce-bed8-75ba8d51e7a0/volumes/kubernetes.io~csi/pv-shoot--garden--az-ha-eu1-33b95d75-a9cf-4e74-8dda-794e03889079/mount/new.etcd/member/wal/0.tmp, permissions: 600 kind: pod name: etcd-events-0 namespace: shoot--diki-comp--azure
- containerName: backup-restore details: fileName: /var/lib/kubelet/pods/e40a1350-0fce-48ce-bed8-75ba8d51e7a0/volumes/kubernetes.io~csi/pv-shoot--garden--az-ha-eu1-33b95d75-a9cf-4e74-8dda-794e03889079/mount/new.etcd/member/snap/db, permissions: 600 kind: pod name: etcd-events-0 namespace: shoot--diki-comp--azure
- containerName: backup-restore details: fileName: /var/lib/kubelet/pods/e40a1350-0fce-48ce-bed8-75ba8d51e7a0/volumes/kubernetes.io~csi/pv-shoot--garden--az-ha-eu1-33b95d75-a9cf-4e74-8dda-794e03889079/mount/safe_guard, permissions: 600 kind: pod name: etcd-events-0 namespace: shoot--diki-comp--azure
- containerName: backup-restore details: fileName: /var/lib/kubelet/pods/e40a1350-0fce-48ce-bed8-75ba8d51e7a0/volumes/kubernetes.io~configmap/etcd-config-file/..2025_03_03_01_02_09.3979181729/etcd.conf.yaml, permissions: 640 kind: pod name: etcd-events-0 namespace: shoot--diki-comp--azure
- containerName: backup-restore details: fileName: /var/lib/kubelet/pods/e40a1350-0fce-48ce-bed8-75ba8d51e7a0/volumes/kubernetes.io~secret/backup-restore-server-tls/..2025_03_03_01_02_09.2392161902/tls.crt, permissions: 640 kind: pod name: etcd-events-0 namespace: shoot--diki-comp--azure
- containerName: backup-restore details: fileName: /var/lib/kubelet/pods/e40a1350-0fce-48ce-bed8-75ba8d51e7a0/volumes/kubernetes.io~secret/backup-restore-server-tls/..2025_03_03_01_02_09.2392161902/tls.key, permissions: 640 kind: pod name: etcd-events-0 namespace: shoot--diki-comp--azure
- containerName: backup-restore details: fileName: /var/lib/kubelet/pods/e40a1350-0fce-48ce-bed8-75ba8d51e7a0/volumes/kubernetes.io~secret/etcd-ca/..2025_03_03_01_02_09.386575845/bundle.crt, permissions: 640 kind: pod name: etcd-events-0 namespace: shoot--diki-comp--azure
- containerName: backup-restore details: fileName: /var/lib/kubelet/pods/e40a1350-0fce-48ce-bed8-75ba8d51e7a0/volumes/kubernetes.io~secret/etcd-client-tls/..2025_03_03_01_02_09.2268049037/tls.crt, permissions: 640 kind: pod name: etcd-events-0 namespace: shoot--diki-comp--azure
- containerName: backup-restore details: fileName: /var/lib/kubelet/pods/e40a1350-0fce-48ce-bed8-75ba8d51e7a0/volumes/kubernetes.io~secret/etcd-client-tls/..2025_03_03_01_02_09.2268049037/tls.key, permissions: 640 kind: pod name: etcd-events-0 namespace: shoot--diki-comp--azure
- containerName: backup-restore details: fileName: /var/lib/kubelet/pods/e40a1350-0fce-48ce-bed8-75ba8d51e7a0/volumes/kubernetes.io~projected/kube-api-access-gardener/..2025_03_03_01_02_09.745783697/token, permissions: 640 kind: pod name: etcd-events-0 namespace: shoot--diki-comp--azure
- gcp
- containerName: etcd details: fileName: /var/lib/kubelet/pods/9e7e0135-30fe-4ef6-a174-df3a12ff2ca4/volumes/kubernetes.io~csi/pv--d18c09ba-ce50-475d-88d3-cad4eb603f5c/mount/safe_guard, permissions: 600 kind: pod name: etcd-main-0 namespace: shoot--diki-comp--gcp
- containerName: etcd details: fileName: /var/lib/kubelet/pods/9e7e0135-30fe-4ef6-a174-df3a12ff2ca4/volumes/kubernetes.io~csi/pv--d18c09ba-ce50-475d-88d3-cad4eb603f5c/mount/new.etcd/member/wal/0.tmp, permissions: 600 kind: pod name: etcd-main-0 namespace: shoot--diki-comp--gcp
- containerName: etcd details: fileName: /var/lib/kubelet/pods/9e7e0135-30fe-4ef6-a174-df3a12ff2ca4/volumes/kubernetes.io~csi/pv--d18c09ba-ce50-475d-88d3-cad4eb603f5c/mount/new.etcd/member/wal/0000000000000000-0000000000000000.wal, permissions: 600 kind: pod name: etcd-main-0 namespace: shoot--diki-comp--gcp
- containerName: etcd details: fileName: /var/lib/kubelet/pods/9e7e0135-30fe-4ef6-a174-df3a12ff2ca4/volumes/kubernetes.io~csi/pv--d18c09ba-ce50-475d-88d3-cad4eb603f5c/mount/new.etcd/member/snap/db, permissions: 600 kind: pod name: etcd-main-0 namespace: shoot--diki-comp--gcp
- containerName: etcd details: fileName: /var/lib/kubelet/pods/9e7e0135-30fe-4ef6-a174-df3a12ff2ca4/volumes/kubernetes.io~secret/etcd-ca/..2025_03_03_01_02_10.3050428415/bundle.crt, permissions: 640 kind: pod name: etcd-main-0 namespace: shoot--diki-comp--gcp
- containerName: etcd details: fileName: /var/lib/kubelet/pods/9e7e0135-30fe-4ef6-a174-df3a12ff2ca4/volumes/kubernetes.io~secret/etcd-server-tls/..2025_03_03_01_02_10.3265591842/tls.key, permissions: 640 kind: pod name: etcd-main-0 namespace: shoot--diki-comp--gcp
- containerName: etcd details: fileName: /var/lib/kubelet/pods/9e7e0135-30fe-4ef6-a174-df3a12ff2ca4/volumes/kubernetes.io~secret/etcd-server-tls/..2025_03_03_01_02_10.3265591842/tls.crt, permissions: 640 kind: pod name: etcd-main-0 namespace: shoot--diki-comp--gcp
- containerName: etcd details: fileName: /var/lib/kubelet/pods/9e7e0135-30fe-4ef6-a174-df3a12ff2ca4/volumes/kubernetes.io~secret/etcd-client-tls/..2025_03_03_01_02_10.3223316245/tls.key, permissions: 640 kind: pod name: etcd-main-0 namespace: shoot--diki-comp--gcp
- containerName: etcd details: fileName: /var/lib/kubelet/pods/9e7e0135-30fe-4ef6-a174-df3a12ff2ca4/volumes/kubernetes.io~secret/etcd-client-tls/..2025_03_03_01_02_10.3223316245/tls.crt, permissions: 640 kind: pod name: etcd-main-0 namespace: shoot--diki-comp--gcp
- containerName: etcd details: fileName: /var/lib/kubelet/pods/9e7e0135-30fe-4ef6-a174-df3a12ff2ca4/volumes/kubernetes.io~secret/backup-restore-ca/..2025_03_03_01_02_10.3857247242/bundle.crt, permissions: 640 kind: pod name: etcd-main-0 namespace: shoot--diki-comp--gcp
- containerName: etcd details: fileName: /var/lib/kubelet/pods/9e7e0135-30fe-4ef6-a174-df3a12ff2ca4/volumes/kubernetes.io~projected/kube-api-access-gardener/..2025_03_03_01_02_10.1269252471/token, permissions: 640 kind: pod name: etcd-main-0 namespace: shoot--diki-comp--gcp
- containerName: backup-restore details: fileName: /var/lib/kubelet/pods/9e7e0135-30fe-4ef6-a174-df3a12ff2ca4/volumes/kubernetes.io~secret/etcd-backup-secret/..2025_03_03_01_02_10.2542207060/bucketName, permissions: 640 kind: pod name: etcd-main-0 namespace: shoot--diki-comp--gcp
- containerName: backup-restore details: fileName: /var/lib/kubelet/pods/9e7e0135-30fe-4ef6-a174-df3a12ff2ca4/volumes/kubernetes.io~secret/etcd-backup-secret/..2025_03_03_01_02_10.2542207060/serviceaccount.json, permissions: 640 kind: pod name: etcd-main-0 namespace: shoot--diki-comp--gcp
- containerName: backup-restore details: fileName: /var/lib/kubelet/pods/9e7e0135-30fe-4ef6-a174-df3a12ff2ca4/volumes/kubernetes.io~csi/pv--d18c09ba-ce50-475d-88d3-cad4eb603f5c/mount/safe_guard, permissions: 600 kind: pod name: etcd-main-0 namespace: shoot--diki-comp--gcp
- containerName: backup-restore details: fileName: /var/lib/kubelet/pods/9e7e0135-30fe-4ef6-a174-df3a12ff2ca4/volumes/kubernetes.io~csi/pv--d18c09ba-ce50-475d-88d3-cad4eb603f5c/mount/new.etcd/member/wal/0.tmp, permissions: 600 kind: pod name: etcd-main-0 namespace: shoot--diki-comp--gcp
- containerName: backup-restore details: fileName: /var/lib/kubelet/pods/9e7e0135-30fe-4ef6-a174-df3a12ff2ca4/volumes/kubernetes.io~csi/pv--d18c09ba-ce50-475d-88d3-cad4eb603f5c/mount/new.etcd/member/wal/0000000000000000-0000000000000000.wal, permissions: 600 kind: pod name: etcd-main-0 namespace: shoot--diki-comp--gcp
- containerName: backup-restore details: fileName: /var/lib/kubelet/pods/9e7e0135-30fe-4ef6-a174-df3a12ff2ca4/volumes/kubernetes.io~csi/pv--d18c09ba-ce50-475d-88d3-cad4eb603f5c/mount/new.etcd/member/snap/db, permissions: 600 kind: pod name: etcd-main-0 namespace: shoot--diki-comp--gcp
- containerName: backup-restore details: fileName: /var/lib/kubelet/pods/9e7e0135-30fe-4ef6-a174-df3a12ff2ca4/volumes/kubernetes.io~configmap/etcd-config-file/..2025_03_03_01_02_10.4061322218/etcd.conf.yaml, permissions: 640 kind: pod name: etcd-main-0 namespace: shoot--diki-comp--gcp
- containerName: backup-restore details: fileName: /var/lib/kubelet/pods/9e7e0135-30fe-4ef6-a174-df3a12ff2ca4/volumes/kubernetes.io~secret/backup-restore-server-tls/..2025_03_03_01_02_10.2704526131/tls.crt, permissions: 640 kind: pod name: etcd-main-0 namespace: shoot--diki-comp--gcp
- containerName: backup-restore details: fileName: /var/lib/kubelet/pods/9e7e0135-30fe-4ef6-a174-df3a12ff2ca4/volumes/kubernetes.io~secret/backup-restore-server-tls/..2025_03_03_01_02_10.2704526131/tls.key, permissions: 640 kind: pod name: etcd-main-0 namespace: shoot--diki-comp--gcp
- containerName: backup-restore details: fileName: /var/lib/kubelet/pods/9e7e0135-30fe-4ef6-a174-df3a12ff2ca4/volumes/kubernetes.io~secret/etcd-ca/..2025_03_03_01_02_10.3050428415/bundle.crt, permissions: 640 kind: pod name: etcd-main-0 namespace: shoot--diki-comp--gcp
- containerName: backup-restore details: fileName: /var/lib/kubelet/pods/9e7e0135-30fe-4ef6-a174-df3a12ff2ca4/volumes/kubernetes.io~secret/etcd-client-tls/..2025_03_03_01_02_10.3223316245/tls.key, permissions: 640 kind: pod name: etcd-main-0 namespace: shoot--diki-comp--gcp
- containerName: backup-restore details: fileName: /var/lib/kubelet/pods/9e7e0135-30fe-4ef6-a174-df3a12ff2ca4/volumes/kubernetes.io~secret/etcd-client-tls/..2025_03_03_01_02_10.3223316245/tls.crt, permissions: 640 kind: pod name: etcd-main-0 namespace: shoot--diki-comp--gcp
- containerName: backup-restore details: fileName: /var/lib/kubelet/pods/9e7e0135-30fe-4ef6-a174-df3a12ff2ca4/volumes/kubernetes.io~projected/kube-api-access-gardener/..2025_03_03_01_02_10.1269252471/token, permissions: 640 kind: pod name: etcd-main-0 namespace: shoot--diki-comp--gcp
- containerName: etcd details: fileName: /var/lib/kubelet/pods/4df10450-500f-42ec-bcfd-2416afeb4c18/volumes/kubernetes.io~csi/pv--07f5ab52-a744-4aed-a9b6-de384c841487/mount/new.etcd/member/snap/db, permissions: 600 kind: pod name: etcd-events-0 namespace: shoot--diki-comp--gcp
- containerName: etcd details: fileName: /var/lib/kubelet/pods/4df10450-500f-42ec-bcfd-2416afeb4c18/volumes/kubernetes.io~csi/pv--07f5ab52-a744-4aed-a9b6-de384c841487/mount/new.etcd/member/wal/0.tmp, permissions: 600 kind: pod name: etcd-events-0 namespace: shoot--diki-comp--gcp
- containerName: etcd details: fileName: /var/lib/kubelet/pods/4df10450-500f-42ec-bcfd-2416afeb4c18/volumes/kubernetes.io~csi/pv--07f5ab52-a744-4aed-a9b6-de384c841487/mount/new.etcd/member/wal/0000000000000000-0000000000000000.wal, permissions: 600 kind: pod name: etcd-events-0 namespace: shoot--diki-comp--gcp
- containerName: etcd details: fileName: /var/lib/kubelet/pods/4df10450-500f-42ec-bcfd-2416afeb4c18/volumes/kubernetes.io~csi/pv--07f5ab52-a744-4aed-a9b6-de384c841487/mount/safe_guard, permissions: 600 kind: pod name: etcd-events-0 namespace: shoot--diki-comp--gcp
- containerName: etcd details: fileName: /var/lib/kubelet/pods/4df10450-500f-42ec-bcfd-2416afeb4c18/volumes/kubernetes.io~secret/etcd-ca/..2025_03_03_01_02_10.307199430/bundle.crt, permissions: 640 kind: pod name: etcd-events-0 namespace: shoot--diki-comp--gcp
- containerName: etcd details: fileName: /var/lib/kubelet/pods/4df10450-500f-42ec-bcfd-2416afeb4c18/volumes/kubernetes.io~secret/etcd-server-tls/..2025_03_03_01_02_10.1725835043/tls.key, permissions: 640 kind: pod name: etcd-events-0 namespace: shoot--diki-comp--gcp
- containerName: etcd details: fileName: /var/lib/kubelet/pods/4df10450-500f-42ec-bcfd-2416afeb4c18/volumes/kubernetes.io~secret/etcd-server-tls/..2025_03_03_01_02_10.1725835043/tls.crt, permissions: 640 kind: pod name: etcd-events-0 namespace: shoot--diki-comp--gcp
- containerName: etcd details: fileName: /var/lib/kubelet/pods/4df10450-500f-42ec-bcfd-2416afeb4c18/volumes/kubernetes.io~secret/etcd-client-tls/..2025_03_03_01_02_10.4134020076/tls.key, permissions: 640 kind: pod name: etcd-events-0 namespace: shoot--diki-comp--gcp
- containerName: etcd details: fileName: /var/lib/kubelet/pods/4df10450-500f-42ec-bcfd-2416afeb4c18/volumes/kubernetes.io~secret/etcd-client-tls/..2025_03_03_01_02_10.4134020076/tls.crt, permissions: 640 kind: pod name: etcd-events-0 namespace: shoot--diki-comp--gcp
- containerName: etcd details: fileName: /var/lib/kubelet/pods/4df10450-500f-42ec-bcfd-2416afeb4c18/volumes/kubernetes.io~secret/backup-restore-ca/..2025_03_03_01_02_10.1333348608/bundle.crt, permissions: 640 kind: pod name: etcd-events-0 namespace: shoot--diki-comp--gcp
- containerName: etcd details: fileName: /var/lib/kubelet/pods/4df10450-500f-42ec-bcfd-2416afeb4c18/volumes/kubernetes.io~projected/kube-api-access-gardener/..2025_03_03_01_02_10.2368081495/token, permissions: 640 kind: pod name: etcd-events-0 namespace: shoot--diki-comp--gcp
- containerName: backup-restore details: fileName: /var/lib/kubelet/pods/4df10450-500f-42ec-bcfd-2416afeb4c18/volumes/kubernetes.io~csi/pv--07f5ab52-a744-4aed-a9b6-de384c841487/mount/new.etcd/member/snap/db, permissions: 600 kind: pod name: etcd-events-0 namespace: shoot--diki-comp--gcp
- containerName: backup-restore details: fileName: /var/lib/kubelet/pods/4df10450-500f-42ec-bcfd-2416afeb4c18/volumes/kubernetes.io~csi/pv--07f5ab52-a744-4aed-a9b6-de384c841487/mount/new.etcd/member/wal/0.tmp, permissions: 600 kind: pod name: etcd-events-0 namespace: shoot--diki-comp--gcp
- containerName: backup-restore details: fileName: /var/lib/kubelet/pods/4df10450-500f-42ec-bcfd-2416afeb4c18/volumes/kubernetes.io~csi/pv--07f5ab52-a744-4aed-a9b6-de384c841487/mount/new.etcd/member/wal/0000000000000000-0000000000000000.wal, permissions: 600 kind: pod name: etcd-events-0 namespace: shoot--diki-comp--gcp
- containerName: backup-restore details: fileName: /var/lib/kubelet/pods/4df10450-500f-42ec-bcfd-2416afeb4c18/volumes/kubernetes.io~csi/pv--07f5ab52-a744-4aed-a9b6-de384c841487/mount/safe_guard, permissions: 600 kind: pod name: etcd-events-0 namespace: shoot--diki-comp--gcp
- containerName: backup-restore details: fileName: /var/lib/kubelet/pods/4df10450-500f-42ec-bcfd-2416afeb4c18/volumes/kubernetes.io~configmap/etcd-config-file/..2025_03_03_01_02_10.3425273932/etcd.conf.yaml, permissions: 640 kind: pod name: etcd-events-0 namespace: shoot--diki-comp--gcp
- containerName: backup-restore details: fileName: /var/lib/kubelet/pods/4df10450-500f-42ec-bcfd-2416afeb4c18/volumes/kubernetes.io~secret/backup-restore-server-tls/..2025_03_03_01_02_10.2781398980/tls.crt, permissions: 640 kind: pod name: etcd-events-0 namespace: shoot--diki-comp--gcp
- containerName: backup-restore details: fileName: /var/lib/kubelet/pods/4df10450-500f-42ec-bcfd-2416afeb4c18/volumes/kubernetes.io~secret/backup-restore-server-tls/..2025_03_03_01_02_10.2781398980/tls.key, permissions: 640 kind: pod name: etcd-events-0 namespace: shoot--diki-comp--gcp
- containerName: backup-restore details: fileName: /var/lib/kubelet/pods/4df10450-500f-42ec-bcfd-2416afeb4c18/volumes/kubernetes.io~secret/etcd-ca/..2025_03_03_01_02_10.307199430/bundle.crt, permissions: 640 kind: pod name: etcd-events-0 namespace: shoot--diki-comp--gcp
- containerName: backup-restore details: fileName: /var/lib/kubelet/pods/4df10450-500f-42ec-bcfd-2416afeb4c18/volumes/kubernetes.io~secret/etcd-client-tls/..2025_03_03_01_02_10.4134020076/tls.key, permissions: 640 kind: pod name: etcd-events-0 namespace: shoot--diki-comp--gcp
- containerName: backup-restore details: fileName: /var/lib/kubelet/pods/4df10450-500f-42ec-bcfd-2416afeb4c18/volumes/kubernetes.io~secret/etcd-client-tls/..2025_03_03_01_02_10.4134020076/tls.crt, permissions: 640 kind: pod name: etcd-events-0 namespace: shoot--diki-comp--gcp
- containerName: backup-restore details: fileName: /var/lib/kubelet/pods/4df10450-500f-42ec-bcfd-2416afeb4c18/volumes/kubernetes.io~projected/kube-api-access-gardener/..2025_03_03_01_02_10.2368081495/token, permissions: 640 kind: pod name: etcd-events-0 namespace: shoot--diki-comp--gcp
- openstack
- containerName: etcd details: fileName: /var/lib/kubelet/pods/576670d6-2e92-4999-a5db-46d1e5b110fc/volumes/kubernetes.io~csi/pv-shoot--garden--cc-ha-eu1-d359d687-b56a-4021-9607-7dec21e0a35d/mount/new.etcd/member/wal/0.tmp, permissions: 600 kind: pod name: etcd-main-0 namespace: shoot--diki-comp--openstack
- containerName: etcd details: fileName: /var/lib/kubelet/pods/576670d6-2e92-4999-a5db-46d1e5b110fc/volumes/kubernetes.io~csi/pv-shoot--garden--cc-ha-eu1-d359d687-b56a-4021-9607-7dec21e0a35d/mount/new.etcd/member/wal/0000000000000000-0000000000000000.wal, permissions: 600 kind: pod name: etcd-main-0 namespace: shoot--diki-comp--openstack
- containerName: etcd details: fileName: /var/lib/kubelet/pods/576670d6-2e92-4999-a5db-46d1e5b110fc/volumes/kubernetes.io~csi/pv-shoot--garden--cc-ha-eu1-d359d687-b56a-4021-9607-7dec21e0a35d/mount/new.etcd/member/snap/db, permissions: 600 kind: pod name: etcd-main-0 namespace: shoot--diki-comp--openstack
- containerName: etcd details: fileName: /var/lib/kubelet/pods/576670d6-2e92-4999-a5db-46d1e5b110fc/volumes/kubernetes.io~csi/pv-shoot--garden--cc-ha-eu1-d359d687-b56a-4021-9607-7dec21e0a35d/mount/safe_guard, permissions: 600 kind: pod name: etcd-main-0 namespace: shoot--diki-comp--openstack
- containerName: etcd details: fileName: /var/lib/kubelet/pods/576670d6-2e92-4999-a5db-46d1e5b110fc/volumes/kubernetes.io~secret/etcd-ca/..2025_03_03_01_02_06.696245391/bundle.crt, permissions: 640 kind: pod name: etcd-main-0 namespace: shoot--diki-comp--openstack
- containerName: etcd details: fileName: /var/lib/kubelet/pods/576670d6-2e92-4999-a5db-46d1e5b110fc/volumes/kubernetes.io~secret/etcd-server-tls/..2025_03_03_01_02_06.2589642709/tls.key, permissions: 640 kind: pod name: etcd-main-0 namespace: shoot--diki-comp--openstack
- containerName: etcd details: fileName: /var/lib/kubelet/pods/576670d6-2e92-4999-a5db-46d1e5b110fc/volumes/kubernetes.io~secret/etcd-server-tls/..2025_03_03_01_02_06.2589642709/tls.crt, permissions: 640 kind: pod name: etcd-main-0 namespace: shoot--diki-comp--openstack
- containerName: etcd details: fileName: /var/lib/kubelet/pods/576670d6-2e92-4999-a5db-46d1e5b110fc/volumes/kubernetes.io~secret/etcd-client-tls/..2025_03_03_01_02_06.989578068/tls.key, permissions: 640 kind: pod name: etcd-main-0 namespace: shoot--diki-comp--openstack
- containerName: etcd details: fileName: /var/lib/kubelet/pods/576670d6-2e92-4999-a5db-46d1e5b110fc/volumes/kubernetes.io~secret/etcd-client-tls/..2025_03_03_01_02_06.989578068/tls.crt, permissions: 640 kind: pod name: etcd-main-0 namespace: shoot--diki-comp--openstack
- containerName: etcd details: fileName: /var/lib/kubelet/pods/576670d6-2e92-4999-a5db-46d1e5b110fc/volumes/kubernetes.io~secret/backup-restore-ca/..2025_03_03_01_02_06.2507918529/bundle.crt, permissions: 640 kind: pod name: etcd-main-0 namespace: shoot--diki-comp--openstack
- containerName: etcd details: fileName: /var/lib/kubelet/pods/576670d6-2e92-4999-a5db-46d1e5b110fc/volumes/kubernetes.io~projected/kube-api-access-gardener/..2025_03_03_01_02_06.3524888998/token, permissions: 640 kind: pod name: etcd-main-0 namespace: shoot--diki-comp--openstack
- containerName: backup-restore details: fileName: /var/lib/kubelet/pods/576670d6-2e92-4999-a5db-46d1e5b110fc/volumes/kubernetes.io~secret/etcd-backup-secret/..2025_03_03_01_02_06.4250764035/applicationCredentialName, permissions: 640 kind: pod name: etcd-main-0 namespace: shoot--diki-comp--openstack
- containerName: backup-restore details: fileName: /var/lib/kubelet/pods/576670d6-2e92-4999-a5db-46d1e5b110fc/volumes/kubernetes.io~secret/etcd-backup-secret/..2025_03_03_01_02_06.4250764035/applicationCredentialSecret, permissions: 640 kind: pod name: etcd-main-0 namespace: shoot--diki-comp--openstack
- containerName: backup-restore details: fileName: /var/lib/kubelet/pods/576670d6-2e92-4999-a5db-46d1e5b110fc/volumes/kubernetes.io~secret/etcd-backup-secret/..2025_03_03_01_02_06.4250764035/authURL, permissions: 640 kind: pod name: etcd-main-0 namespace: shoot--diki-comp--openstack
- containerName: backup-restore details: fileName: /var/lib/kubelet/pods/576670d6-2e92-4999-a5db-46d1e5b110fc/volumes/kubernetes.io~secret/etcd-backup-secret/..2025_03_03_01_02_06.4250764035/bucketName, permissions: 640 kind: pod name: etcd-main-0 namespace: shoot--diki-comp--openstack
- containerName: backup-restore details: fileName: /var/lib/kubelet/pods/576670d6-2e92-4999-a5db-46d1e5b110fc/volumes/kubernetes.io~secret/etcd-backup-secret/..2025_03_03_01_02_06.4250764035/domainName, permissions: 640 kind: pod name: etcd-main-0 namespace: shoot--diki-comp--openstack
- containerName: backup-restore details: fileName: /var/lib/kubelet/pods/576670d6-2e92-4999-a5db-46d1e5b110fc/volumes/kubernetes.io~secret/etcd-backup-secret/..2025_03_03_01_02_06.4250764035/region, permissions: 640 kind: pod name: etcd-main-0 namespace: shoot--diki-comp--openstack
- containerName: backup-restore details: fileName: /var/lib/kubelet/pods/576670d6-2e92-4999-a5db-46d1e5b110fc/volumes/kubernetes.io~secret/etcd-backup-secret/..2025_03_03_01_02_06.4250764035/tenantName, permissions: 640 kind: pod name: etcd-main-0 namespace: shoot--diki-comp--openstack
- containerName: backup-restore details: fileName: /var/lib/kubelet/pods/576670d6-2e92-4999-a5db-46d1e5b110fc/volumes/kubernetes.io~secret/etcd-backup-secret/..2025_03_03_01_02_06.4250764035/applicationCredentialID, permissions: 640 kind: pod name: etcd-main-0 namespace: shoot--diki-comp--openstack
- containerName: backup-restore details: fileName: /var/lib/kubelet/pods/576670d6-2e92-4999-a5db-46d1e5b110fc/volumes/kubernetes.io~csi/pv-shoot--garden--cc-ha-eu1-d359d687-b56a-4021-9607-7dec21e0a35d/mount/new.etcd/member/wal/0.tmp, permissions: 600 kind: pod name: etcd-main-0 namespace: shoot--diki-comp--openstack
- containerName: backup-restore details: fileName: /var/lib/kubelet/pods/576670d6-2e92-4999-a5db-46d1e5b110fc/volumes/kubernetes.io~csi/pv-shoot--garden--cc-ha-eu1-d359d687-b56a-4021-9607-7dec21e0a35d/mount/new.etcd/member/wal/0000000000000000-0000000000000000.wal, permissions: 600 kind: pod name: etcd-main-0 namespace: shoot--diki-comp--openstack
- containerName: backup-restore details: fileName: /var/lib/kubelet/pods/576670d6-2e92-4999-a5db-46d1e5b110fc/volumes/kubernetes.io~csi/pv-shoot--garden--cc-ha-eu1-d359d687-b56a-4021-9607-7dec21e0a35d/mount/new.etcd/member/snap/db, permissions: 600 kind: pod name: etcd-main-0 namespace: shoot--diki-comp--openstack
- containerName: backup-restore details: fileName: /var/lib/kubelet/pods/576670d6-2e92-4999-a5db-46d1e5b110fc/volumes/kubernetes.io~csi/pv-shoot--garden--cc-ha-eu1-d359d687-b56a-4021-9607-7dec21e0a35d/mount/safe_guard, permissions: 600 kind: pod name: etcd-main-0 namespace: shoot--diki-comp--openstack
- containerName: backup-restore details: fileName: /var/lib/kubelet/pods/576670d6-2e92-4999-a5db-46d1e5b110fc/volumes/kubernetes.io~configmap/etcd-config-file/..2025_03_03_01_02_06.3871353697/etcd.conf.yaml, permissions: 640 kind: pod name: etcd-main-0 namespace: shoot--diki-comp--openstack
- containerName: backup-restore details: fileName: /var/lib/kubelet/pods/576670d6-2e92-4999-a5db-46d1e5b110fc/volumes/kubernetes.io~secret/backup-restore-server-tls/..2025_03_03_01_02_06.2509886571/tls.crt, permissions: 640 kind: pod name: etcd-main-0 namespace: shoot--diki-comp--openstack
- containerName: backup-restore details: fileName: /var/lib/kubelet/pods/576670d6-2e92-4999-a5db-46d1e5b110fc/volumes/kubernetes.io~secret/backup-restore-server-tls/..2025_03_03_01_02_06.2509886571/tls.key, permissions: 640 kind: pod name: etcd-main-0 namespace: shoot--diki-comp--openstack
- containerName: backup-restore details: fileName: /var/lib/kubelet/pods/576670d6-2e92-4999-a5db-46d1e5b110fc/volumes/kubernetes.io~secret/etcd-ca/..2025_03_03_01_02_06.696245391/bundle.crt, permissions: 640 kind: pod name: etcd-main-0 namespace: shoot--diki-comp--openstack
- containerName: backup-restore details: fileName: /var/lib/kubelet/pods/576670d6-2e92-4999-a5db-46d1e5b110fc/volumes/kubernetes.io~secret/etcd-client-tls/..2025_03_03_01_02_06.989578068/tls.key, permissions: 640 kind: pod name: etcd-main-0 namespace: shoot--diki-comp--openstack
- containerName: backup-restore details: fileName: /var/lib/kubelet/pods/576670d6-2e92-4999-a5db-46d1e5b110fc/volumes/kubernetes.io~secret/etcd-client-tls/..2025_03_03_01_02_06.989578068/tls.crt, permissions: 640 kind: pod name: etcd-main-0 namespace: shoot--diki-comp--openstack
- containerName: backup-restore details: fileName: /var/lib/kubelet/pods/576670d6-2e92-4999-a5db-46d1e5b110fc/volumes/kubernetes.io~projected/kube-api-access-gardener/..2025_03_03_01_02_06.3524888998/token, permissions: 640 kind: pod name: etcd-main-0 namespace: shoot--diki-comp--openstack
- containerName: backup-restore details: fileName: /var/lib/kubelet/pods/7a54bb1c-3f4b-4dc7-95f5-377c788ad051/volumes/kubernetes.io~csi/pv-shoot--garden--cc-ha-eu1-8f4bdf35-bd60-4e8c-b357-63a805f65254/mount/safe_guard, permissions: 600 kind: pod name: etcd-events-0 namespace: shoot--diki-comp--openstack
- containerName: backup-restore details: fileName: /var/lib/kubelet/pods/7a54bb1c-3f4b-4dc7-95f5-377c788ad051/volumes/kubernetes.io~csi/pv-shoot--garden--cc-ha-eu1-8f4bdf35-bd60-4e8c-b357-63a805f65254/mount/new.etcd/member/snap/db, permissions: 600 kind: pod name: etcd-events-0 namespace: shoot--diki-comp--openstack
- containerName: backup-restore details: fileName: /var/lib/kubelet/pods/7a54bb1c-3f4b-4dc7-95f5-377c788ad051/volumes/kubernetes.io~csi/pv-shoot--garden--cc-ha-eu1-8f4bdf35-bd60-4e8c-b357-63a805f65254/mount/new.etcd/member/wal/0.tmp, permissions: 600 kind: pod name: etcd-events-0 namespace: shoot--diki-comp--openstack
- containerName: backup-restore details: fileName: /var/lib/kubelet/pods/7a54bb1c-3f4b-4dc7-95f5-377c788ad051/volumes/kubernetes.io~csi/pv-shoot--garden--cc-ha-eu1-8f4bdf35-bd60-4e8c-b357-63a805f65254/mount/new.etcd/member/wal/0000000000000000-0000000000000000.wal, permissions: 600 kind: pod name: etcd-events-0 namespace: shoot--diki-comp--openstack
- containerName: backup-restore details: fileName: /var/lib/kubelet/pods/7a54bb1c-3f4b-4dc7-95f5-377c788ad051/volumes/kubernetes.io~configmap/etcd-config-file/..2025_03_03_01_02_05.4090004166/etcd.conf.yaml, permissions: 640 kind: pod name: etcd-events-0 namespace: shoot--diki-comp--openstack
- containerName: backup-restore details: fileName: /var/lib/kubelet/pods/7a54bb1c-3f4b-4dc7-95f5-377c788ad051/volumes/kubernetes.io~secret/backup-restore-server-tls/..2025_03_03_01_02_05.4287174027/tls.crt, permissions: 640 kind: pod name: etcd-events-0 namespace: shoot--diki-comp--openstack
- containerName: backup-restore details: fileName: /var/lib/kubelet/pods/7a54bb1c-3f4b-4dc7-95f5-377c788ad051/volumes/kubernetes.io~secret/backup-restore-server-tls/..2025_03_03_01_02_05.4287174027/tls.key, permissions: 640 kind: pod name: etcd-events-0 namespace: shoot--diki-comp--openstack
- containerName: backup-restore details: fileName: /var/lib/kubelet/pods/7a54bb1c-3f4b-4dc7-95f5-377c788ad051/volumes/kubernetes.io~secret/etcd-ca/..2025_03_03_01_02_05.439102016/bundle.crt, permissions: 640 kind: pod name: etcd-events-0 namespace: shoot--diki-comp--openstack
- containerName: backup-restore details: fileName: /var/lib/kubelet/pods/7a54bb1c-3f4b-4dc7-95f5-377c788ad051/volumes/kubernetes.io~secret/etcd-client-tls/..2025_03_03_01_02_05.1189205670/tls.crt, permissions: 640 kind: pod name: etcd-events-0 namespace: shoot--diki-comp--openstack
- containerName: backup-restore details: fileName: /var/lib/kubelet/pods/7a54bb1c-3f4b-4dc7-95f5-377c788ad051/volumes/kubernetes.io~secret/etcd-client-tls/..2025_03_03_01_02_05.1189205670/tls.key, permissions: 640 kind: pod name: etcd-events-0 namespace: shoot--diki-comp--openstack
- containerName: backup-restore details: fileName: /var/lib/kubelet/pods/7a54bb1c-3f4b-4dc7-95f5-377c788ad051/volumes/kubernetes.io~projected/kube-api-access-gardener/..2025_03_03_01_02_05.3448401570/token, permissions: 640 kind: pod name: etcd-events-0 namespace: shoot--diki-comp--openstack
- containerName: etcd details: fileName: /var/lib/kubelet/pods/7a54bb1c-3f4b-4dc7-95f5-377c788ad051/volumes/kubernetes.io~csi/pv-shoot--garden--cc-ha-eu1-8f4bdf35-bd60-4e8c-b357-63a805f65254/mount/safe_guard, permissions: 600 kind: pod name: etcd-events-0 namespace: shoot--diki-comp--openstack
- containerName: etcd details: fileName: /var/lib/kubelet/pods/7a54bb1c-3f4b-4dc7-95f5-377c788ad051/volumes/kubernetes.io~csi/pv-shoot--garden--cc-ha-eu1-8f4bdf35-bd60-4e8c-b357-63a805f65254/mount/new.etcd/member/snap/db, permissions: 600 kind: pod name: etcd-events-0 namespace: shoot--diki-comp--openstack
- containerName: etcd details: fileName: /var/lib/kubelet/pods/7a54bb1c-3f4b-4dc7-95f5-377c788ad051/volumes/kubernetes.io~csi/pv-shoot--garden--cc-ha-eu1-8f4bdf35-bd60-4e8c-b357-63a805f65254/mount/new.etcd/member/wal/0.tmp, permissions: 600 kind: pod name: etcd-events-0 namespace: shoot--diki-comp--openstack
- containerName: etcd details: fileName: /var/lib/kubelet/pods/7a54bb1c-3f4b-4dc7-95f5-377c788ad051/volumes/kubernetes.io~csi/pv-shoot--garden--cc-ha-eu1-8f4bdf35-bd60-4e8c-b357-63a805f65254/mount/new.etcd/member/wal/0000000000000000-0000000000000000.wal, permissions: 600 kind: pod name: etcd-events-0 namespace: shoot--diki-comp--openstack
- containerName: etcd details: fileName: /var/lib/kubelet/pods/7a54bb1c-3f4b-4dc7-95f5-377c788ad051/volumes/kubernetes.io~secret/etcd-ca/..2025_03_03_01_02_05.439102016/bundle.crt, permissions: 640 kind: pod name: etcd-events-0 namespace: shoot--diki-comp--openstack
- containerName: etcd details: fileName: /var/lib/kubelet/pods/7a54bb1c-3f4b-4dc7-95f5-377c788ad051/volumes/kubernetes.io~secret/etcd-server-tls/..2025_03_03_01_02_05.3893612686/tls.crt, permissions: 640 kind: pod name: etcd-events-0 namespace: shoot--diki-comp--openstack
- containerName: etcd details: fileName: /var/lib/kubelet/pods/7a54bb1c-3f4b-4dc7-95f5-377c788ad051/volumes/kubernetes.io~secret/etcd-server-tls/..2025_03_03_01_02_05.3893612686/tls.key, permissions: 640 kind: pod name: etcd-events-0 namespace: shoot--diki-comp--openstack
- containerName: etcd details: fileName: /var/lib/kubelet/pods/7a54bb1c-3f4b-4dc7-95f5-377c788ad051/volumes/kubernetes.io~secret/etcd-client-tls/..2025_03_03_01_02_05.1189205670/tls.crt, permissions: 640 kind: pod name: etcd-events-0 namespace: shoot--diki-comp--openstack
- containerName: etcd details: fileName: /var/lib/kubelet/pods/7a54bb1c-3f4b-4dc7-95f5-377c788ad051/volumes/kubernetes.io~secret/etcd-client-tls/..2025_03_03_01_02_05.1189205670/tls.key, permissions: 640 kind: pod name: etcd-events-0 namespace: shoot--diki-comp--openstack
- containerName: etcd details: fileName: /var/lib/kubelet/pods/7a54bb1c-3f4b-4dc7-95f5-377c788ad051/volumes/kubernetes.io~secret/backup-restore-ca/..2025_03_03_01_02_05.913416246/bundle.crt, permissions: 640 kind: pod name: etcd-events-0 namespace: shoot--diki-comp--openstack
- containerName: etcd details: fileName: /var/lib/kubelet/pods/7a54bb1c-3f4b-4dc7-95f5-377c788ad051/volumes/kubernetes.io~projected/kube-api-access-gardener/..2025_03_03_01_02_05.3448401570/token, permissions: 640 kind: pod name: etcd-events-0 namespace: shoot--diki-comp--openstack
- aws
-
File has expected permissions
-
242460 (Medium) - The Kubernetes admin.conf must have file permissions set to 644 or more restrictive.
-
File has expected permissions
- aws
- containerName: kube-controller-manager details: fileName: /var/lib/kubelet/pods/18ff08d4-cfa9-4958-8aca-ee41d678f1d3/volumes/kubernetes.io~secret/ca/..2025_03_03_01_12_51.2065093033/bundle.crt, permissions: 644 kind: pod name: kube-controller-manager-c8b755f65-p4v5d namespace: shoot--diki-comp--aws
- containerName: kube-controller-manager details: fileName: /var/lib/kubelet/pods/18ff08d4-cfa9-4958-8aca-ee41d678f1d3/volumes/kubernetes.io~secret/ca-client/..2025_03_03_01_12_51.3807269484/ca.crt, permissions: 640 kind: pod name: kube-controller-manager-c8b755f65-p4v5d namespace: shoot--diki-comp--aws
- containerName: kube-controller-manager details: fileName: /var/lib/kubelet/pods/18ff08d4-cfa9-4958-8aca-ee41d678f1d3/volumes/kubernetes.io~secret/ca-client/..2025_03_03_01_12_51.3807269484/ca.key, permissions: 640 kind: pod name: kube-controller-manager-c8b755f65-p4v5d namespace: shoot--diki-comp--aws
- containerName: kube-controller-manager details: fileName: /var/lib/kubelet/pods/18ff08d4-cfa9-4958-8aca-ee41d678f1d3/volumes/kubernetes.io~secret/service-account-key/..2025_03_03_01_12_51.3826556335/id_rsa, permissions: 640 kind: pod name: kube-controller-manager-c8b755f65-p4v5d namespace: shoot--diki-comp--aws
- containerName: kube-controller-manager details: fileName: /var/lib/kubelet/pods/18ff08d4-cfa9-4958-8aca-ee41d678f1d3/volumes/kubernetes.io~secret/server/..2025_03_03_01_12_51.4117152144/tls.key, permissions: 640 kind: pod name: kube-controller-manager-c8b755f65-p4v5d namespace: shoot--diki-comp--aws
- containerName: kube-controller-manager details: fileName: /var/lib/kubelet/pods/18ff08d4-cfa9-4958-8aca-ee41d678f1d3/volumes/kubernetes.io~secret/server/..2025_03_03_01_12_51.4117152144/tls.crt, permissions: 640 kind: pod name: kube-controller-manager-c8b755f65-p4v5d namespace: shoot--diki-comp--aws
- containerName: kube-controller-manager details: fileName: /var/lib/kubelet/pods/18ff08d4-cfa9-4958-8aca-ee41d678f1d3/volumes/kubernetes.io~secret/ca-kubelet/..2025_03_03_01_12_51.1942131254/ca.key, permissions: 640 kind: pod name: kube-controller-manager-c8b755f65-p4v5d namespace: shoot--diki-comp--aws
- containerName: kube-controller-manager details: fileName: /var/lib/kubelet/pods/18ff08d4-cfa9-4958-8aca-ee41d678f1d3/volumes/kubernetes.io~secret/ca-kubelet/..2025_03_03_01_12_51.1942131254/ca.crt, permissions: 640 kind: pod name: kube-controller-manager-c8b755f65-p4v5d namespace: shoot--diki-comp--aws
- containerName: kube-controller-manager details: fileName: /var/lib/kubelet/pods/18ff08d4-cfa9-4958-8aca-ee41d678f1d3/volumes/kubernetes.io~projected/kubeconfig/..2025_03_03_01_12_51.2019118523/kubeconfig, permissions: 644 kind: pod name: kube-controller-manager-c8b755f65-p4v5d namespace: shoot--diki-comp--aws
- containerName: kube-controller-manager details: fileName: /var/lib/kubelet/pods/18ff08d4-cfa9-4958-8aca-ee41d678f1d3/volumes/kubernetes.io~projected/kubeconfig/..2025_03_03_01_12_51.2019118523/token, permissions: 644 kind: pod name: kube-controller-manager-c8b755f65-p4v5d namespace: shoot--diki-comp--aws
- containerName: kube-scheduler details: fileName: /var/lib/kubelet/pods/ba7e893a-c91e-4051-9cc0-aefe8c1fe492/volumes/kubernetes.io~projected/client-ca/..2025_03_03_01_13_50.3972196173/bundle.crt, permissions: 644 kind: pod name: kube-scheduler-678cb86cc-zm2cn namespace: shoot--diki-comp--aws
- containerName: kube-scheduler details: fileName: /var/lib/kubelet/pods/ba7e893a-c91e-4051-9cc0-aefe8c1fe492/volumes/kubernetes.io~secret/kube-scheduler-server/..2025_03_03_01_13_50.72514188/tls.crt, permissions: 640 kind: pod name: kube-scheduler-678cb86cc-zm2cn namespace: shoot--diki-comp--aws
- containerName: kube-scheduler details: fileName: /var/lib/kubelet/pods/ba7e893a-c91e-4051-9cc0-aefe8c1fe492/volumes/kubernetes.io~secret/kube-scheduler-server/..2025_03_03_01_13_50.72514188/tls.key, permissions: 640 kind: pod name: kube-scheduler-678cb86cc-zm2cn namespace: shoot--diki-comp--aws
- containerName: kube-scheduler details: fileName: /var/lib/kubelet/pods/ba7e893a-c91e-4051-9cc0-aefe8c1fe492/volumes/kubernetes.io~configmap/kube-scheduler-config/..2025_03_03_01_13_50.3890899486/config.yaml, permissions: 644 kind: pod name: kube-scheduler-678cb86cc-zm2cn namespace: shoot--diki-comp--aws
- containerName: kube-scheduler details: fileName: /var/lib/kubelet/pods/ba7e893a-c91e-4051-9cc0-aefe8c1fe492/volumes/kubernetes.io~projected/kubeconfig/..2025_03_03_01_13_50.680304539/kubeconfig, permissions: 644 kind: pod name: kube-scheduler-678cb86cc-zm2cn namespace: shoot--diki-comp--aws
- containerName: kube-scheduler details: fileName: /var/lib/kubelet/pods/ba7e893a-c91e-4051-9cc0-aefe8c1fe492/volumes/kubernetes.io~projected/kubeconfig/..2025_03_03_01_13_50.680304539/token, permissions: 644 kind: pod name: kube-scheduler-678cb86cc-zm2cn namespace: shoot--diki-comp--aws
- containerName: kube-apiserver details: fileName: /var/lib/kubelet/pods/8453cbe8-7815-4009-a228-90aa1f22bdd9/volumes/kubernetes.io~secret/ca/..2025_03_03_01_12_52.2699305413/bundle.crt, permissions: 644 kind: pod name: kube-apiserver-7c5459cc5b-kz2dz namespace: shoot--diki-comp--aws
- containerName: kube-apiserver details: fileName: /var/lib/kubelet/pods/8453cbe8-7815-4009-a228-90aa1f22bdd9/volumes/kubernetes.io~secret/ca-client/..2025_03_03_01_12_52.4078078265/bundle.crt, permissions: 644 kind: pod name: kube-apiserver-7c5459cc5b-kz2dz namespace: shoot--diki-comp--aws
- containerName: kube-apiserver details: fileName: /var/lib/kubelet/pods/8453cbe8-7815-4009-a228-90aa1f22bdd9/volumes/kubernetes.io~secret/ca-front-proxy/..2025_03_03_01_12_52.689706272/bundle.crt, permissions: 644 kind: pod name: kube-apiserver-7c5459cc5b-kz2dz namespace: shoot--diki-comp--aws
- containerName: kube-apiserver details: fileName: /var/lib/kubelet/pods/8453cbe8-7815-4009-a228-90aa1f22bdd9/volumes/kubernetes.io~secret/service-account-key/..2025_03_03_01_12_52.1369411553/id_rsa, permissions: 640 kind: pod name: kube-apiserver-7c5459cc5b-kz2dz namespace: shoot--diki-comp--aws
- containerName: kube-apiserver details: fileName: /var/lib/kubelet/pods/8453cbe8-7815-4009-a228-90aa1f22bdd9/volumes/kubernetes.io~secret/service-account-key-bundle/..2025_03_03_01_12_52.1447808254/bundle.key, permissions: 640 kind: pod name: kube-apiserver-7c5459cc5b-kz2dz namespace: shoot--diki-comp--aws
- containerName: kube-apiserver details: fileName: /var/lib/kubelet/pods/8453cbe8-7815-4009-a228-90aa1f22bdd9/volumes/kubernetes.io~secret/static-token/..2025_03_03_01_12_52.832936945/static_tokens.csv, permissions: 644 kind: pod name: kube-apiserver-7c5459cc5b-kz2dz namespace: shoot--diki-comp--aws
- containerName: kube-apiserver details: fileName: /var/lib/kubelet/pods/8453cbe8-7815-4009-a228-90aa1f22bdd9/volumes/kubernetes.io~secret/kube-aggregator/..2025_03_03_01_12_52.3118211134/tls.key, permissions: 640 kind: pod name: kube-apiserver-7c5459cc5b-kz2dz namespace: shoot--diki-comp--aws
- containerName: kube-apiserver details: fileName: /var/lib/kubelet/pods/8453cbe8-7815-4009-a228-90aa1f22bdd9/volumes/kubernetes.io~secret/kube-aggregator/..2025_03_03_01_12_52.3118211134/tls.crt, permissions: 640 kind: pod name: kube-apiserver-7c5459cc5b-kz2dz namespace: shoot--diki-comp--aws
- containerName: kube-apiserver details: fileName: /var/lib/kubelet/pods/8453cbe8-7815-4009-a228-90aa1f22bdd9/volumes/kubernetes.io~secret/server/..2025_03_03_01_12_52.3201692229/tls.crt, permissions: 640 kind: pod name: kube-apiserver-7c5459cc5b-kz2dz namespace: shoot--diki-comp--aws
- containerName: kube-apiserver details: fileName: /var/lib/kubelet/pods/8453cbe8-7815-4009-a228-90aa1f22bdd9/volumes/kubernetes.io~secret/server/..2025_03_03_01_12_52.3201692229/tls.key, permissions: 640 kind: pod name: kube-apiserver-7c5459cc5b-kz2dz namespace: shoot--diki-comp--aws
- containerName: kube-apiserver details: fileName: /var/lib/kubelet/pods/8453cbe8-7815-4009-a228-90aa1f22bdd9/volumes/kubernetes.io~configmap/audit-policy-config/..2025_03_03_01_12_52.486086435/audit-policy.yaml, permissions: 644 kind: pod name: kube-apiserver-7c5459cc5b-kz2dz namespace: shoot--diki-comp--aws
- containerName: kube-apiserver details: fileName: /var/lib/kubelet/pods/8453cbe8-7815-4009-a228-90aa1f22bdd9/volumes/kubernetes.io~configmap/admission-config/..2025_03_03_01_12_52.357858322/podsecurity.yaml, permissions: 644 kind: pod name: kube-apiserver-7c5459cc5b-kz2dz namespace: shoot--diki-comp--aws
- containerName: kube-apiserver details: fileName: /var/lib/kubelet/pods/8453cbe8-7815-4009-a228-90aa1f22bdd9/volumes/kubernetes.io~configmap/admission-config/..2025_03_03_01_12_52.357858322/admission-configuration.yaml, permissions: 644 kind: pod name: kube-apiserver-7c5459cc5b-kz2dz namespace: shoot--diki-comp--aws
- containerName: kube-apiserver details: fileName: /var/lib/kubelet/pods/8453cbe8-7815-4009-a228-90aa1f22bdd9/volumes/kubernetes.io~secret/etcd-encryption-secret/..2025_03_03_01_12_52.1226153874/encryption-configuration.yaml, permissions: 640 kind: pod name: kube-apiserver-7c5459cc5b-kz2dz namespace: shoot--diki-comp--aws
- containerName: kube-apiserver details: fileName: /var/lib/kubelet/pods/8453cbe8-7815-4009-a228-90aa1f22bdd9/volumes/kubernetes.io~secret/ca-vpn/..2025_03_03_01_12_52.1763016478/bundle.crt, permissions: 644 kind: pod name: kube-apiserver-7c5459cc5b-kz2dz namespace: shoot--diki-comp--aws
- containerName: kube-apiserver details: fileName: /var/lib/kubelet/pods/8453cbe8-7815-4009-a228-90aa1f22bdd9/volumes/kubernetes.io~configmap/egress-selection-config/..2025_03_03_01_12_52.2580397749/egress-selector-configuration.yaml, permissions: 644 kind: pod name: kube-apiserver-7c5459cc5b-kz2dz namespace: shoot--diki-comp--aws
- containerName: kube-apiserver details: fileName: /var/lib/kubelet/pods/8453cbe8-7815-4009-a228-90aa1f22bdd9/volumes/kubernetes.io~secret/ca-kubelet/..2025_03_03_01_12_52.1090624067/bundle.crt, permissions: 644 kind: pod name: kube-apiserver-7c5459cc5b-kz2dz namespace: shoot--diki-comp--aws
- containerName: kube-apiserver details: fileName: /var/lib/kubelet/pods/8453cbe8-7815-4009-a228-90aa1f22bdd9/volumes/kubernetes.io~secret/kubelet-client/..2025_03_03_01_12_52.3153250716/tls.crt, permissions: 640 kind: pod name: kube-apiserver-7c5459cc5b-kz2dz namespace: shoot--diki-comp--aws
- containerName: kube-apiserver details: fileName: /var/lib/kubelet/pods/8453cbe8-7815-4009-a228-90aa1f22bdd9/volumes/kubernetes.io~secret/kubelet-client/..2025_03_03_01_12_52.3153250716/tls.key, permissions: 640 kind: pod name: kube-apiserver-7c5459cc5b-kz2dz namespace: shoot--diki-comp--aws
- containerName: kube-apiserver details: fileName: /var/lib/kubelet/pods/8453cbe8-7815-4009-a228-90aa1f22bdd9/volumes/kubernetes.io~secret/ca-etcd/..2025_03_03_01_12_52.3384748314/bundle.crt, permissions: 644 kind: pod name: kube-apiserver-7c5459cc5b-kz2dz namespace: shoot--diki-comp--aws
- containerName: kube-apiserver details: fileName: /var/lib/kubelet/pods/8453cbe8-7815-4009-a228-90aa1f22bdd9/volumes/kubernetes.io~secret/etcd-client/..2025_03_03_01_12_52.3609175546/tls.crt, permissions: 640 kind: pod name: kube-apiserver-7c5459cc5b-kz2dz namespace: shoot--diki-comp--aws
- containerName: kube-apiserver details: fileName: /var/lib/kubelet/pods/8453cbe8-7815-4009-a228-90aa1f22bdd9/volumes/kubernetes.io~secret/etcd-client/..2025_03_03_01_12_52.3609175546/tls.key, permissions: 640 kind: pod name: kube-apiserver-7c5459cc5b-kz2dz namespace: shoot--diki-comp--aws
- containerName: kube-apiserver details: fileName: /var/lib/kubelet/pods/8453cbe8-7815-4009-a228-90aa1f22bdd9/volumes/kubernetes.io~secret/tls-sni-0/..2025_03_03_01_12_52.3930137623/ca.crt, permissions: 640 kind: pod name: kube-apiserver-7c5459cc5b-kz2dz namespace: shoot--diki-comp--aws
- containerName: kube-apiserver details: fileName: /var/lib/kubelet/pods/8453cbe8-7815-4009-a228-90aa1f22bdd9/volumes/kubernetes.io~secret/tls-sni-0/..2025_03_03_01_12_52.3930137623/tls.crt, permissions: 640 kind: pod name: kube-apiserver-7c5459cc5b-kz2dz namespace: shoot--diki-comp--aws
- containerName: kube-apiserver details: fileName: /var/lib/kubelet/pods/8453cbe8-7815-4009-a228-90aa1f22bdd9/volumes/kubernetes.io~secret/tls-sni-0/..2025_03_03_01_12_52.3930137623/tls.key, permissions: 640 kind: pod name: kube-apiserver-7c5459cc5b-kz2dz namespace: shoot--diki-comp--aws
- containerName: kube-apiserver details: fileName: /var/lib/kubelet/pods/8453cbe8-7815-4009-a228-90aa1f22bdd9/volumes/kubernetes.io~configmap/authorization-config/..2025_03_03_01_12_52.3590438838/config.yaml, permissions: 644 kind: pod name: kube-apiserver-7c5459cc5b-kz2dz namespace: shoot--diki-comp--aws
- containerName: kube-apiserver details: fileName: /var/lib/kubelet/pods/8453cbe8-7815-4009-a228-90aa1f22bdd9/volumes/kubernetes.io~secret/authorization-kubeconfigs/..2025_03_03_01_12_52.1573721038/node-agent-authorizer-kubeconfig.yaml, permissions: 644 kind: pod name: kube-apiserver-7c5459cc5b-kz2dz namespace: shoot--diki-comp--aws
- containerName: kube-apiserver details: fileName: /var/lib/kubelet/pods/8453cbe8-7815-4009-a228-90aa1f22bdd9/volumes/kubernetes.io~secret/http-proxy/..2025_03_03_01_12_52.1526321829/tls.crt, permissions: 640 kind: pod name: kube-apiserver-7c5459cc5b-kz2dz namespace: shoot--diki-comp--aws
- containerName: kube-apiserver details: fileName: /var/lib/kubelet/pods/8453cbe8-7815-4009-a228-90aa1f22bdd9/volumes/kubernetes.io~secret/http-proxy/..2025_03_03_01_12_52.1526321829/tls.key, permissions: 640 kind: pod name: kube-apiserver-7c5459cc5b-kz2dz namespace: shoot--diki-comp--aws
- azure
- containerName: kube-apiserver details: fileName: /var/lib/kubelet/pods/56fb368e-1dfa-4d5c-86bc-d3233d8c5ff7/volumes/kubernetes.io~secret/ca/..2025_03_03_01_15_45.490470259/bundle.crt, permissions: 644 kind: pod name: kube-apiserver-78d668b498-8xmjt namespace: shoot--diki-comp--azure
- containerName: kube-apiserver details: fileName: /var/lib/kubelet/pods/56fb368e-1dfa-4d5c-86bc-d3233d8c5ff7/volumes/kubernetes.io~secret/ca-client/..2025_03_03_01_15_45.439326823/bundle.crt, permissions: 644 kind: pod name: kube-apiserver-78d668b498-8xmjt namespace: shoot--diki-comp--azure
- containerName: kube-apiserver details: fileName: /var/lib/kubelet/pods/56fb368e-1dfa-4d5c-86bc-d3233d8c5ff7/volumes/kubernetes.io~secret/ca-front-proxy/..2025_03_03_01_15_45.1918001777/bundle.crt, permissions: 644 kind: pod name: kube-apiserver-78d668b498-8xmjt namespace: shoot--diki-comp--azure
- containerName: kube-apiserver details: fileName: /var/lib/kubelet/pods/56fb368e-1dfa-4d5c-86bc-d3233d8c5ff7/volumes/kubernetes.io~secret/service-account-key/..2025_03_03_01_15_45.3156265392/id_rsa, permissions: 640 kind: pod name: kube-apiserver-78d668b498-8xmjt namespace: shoot--diki-comp--azure
- containerName: kube-apiserver details: fileName: /var/lib/kubelet/pods/56fb368e-1dfa-4d5c-86bc-d3233d8c5ff7/volumes/kubernetes.io~secret/service-account-key-bundle/..2025_03_03_01_15_45.731119053/bundle.key, permissions: 640 kind: pod name: kube-apiserver-78d668b498-8xmjt namespace: shoot--diki-comp--azure
- containerName: kube-apiserver details: fileName: /var/lib/kubelet/pods/56fb368e-1dfa-4d5c-86bc-d3233d8c5ff7/volumes/kubernetes.io~secret/static-token/..2025_03_03_01_15_45.686938039/static_tokens.csv, permissions: 644 kind: pod name: kube-apiserver-78d668b498-8xmjt namespace: shoot--diki-comp--azure
- containerName: kube-apiserver details: fileName: /var/lib/kubelet/pods/56fb368e-1dfa-4d5c-86bc-d3233d8c5ff7/volumes/kubernetes.io~secret/kube-aggregator/..2025_03_03_01_15_45.4210460930/tls.crt, permissions: 640 kind: pod name: kube-apiserver-78d668b498-8xmjt namespace: shoot--diki-comp--azure
- containerName: kube-apiserver details: fileName: /var/lib/kubelet/pods/56fb368e-1dfa-4d5c-86bc-d3233d8c5ff7/volumes/kubernetes.io~secret/kube-aggregator/..2025_03_03_01_15_45.4210460930/tls.key, permissions: 640 kind: pod name: kube-apiserver-78d668b498-8xmjt namespace: shoot--diki-comp--azure
- containerName: kube-apiserver details: fileName: /var/lib/kubelet/pods/56fb368e-1dfa-4d5c-86bc-d3233d8c5ff7/volumes/kubernetes.io~secret/server/..2025_03_03_01_15_45.940486963/tls.crt, permissions: 640 kind: pod name: kube-apiserver-78d668b498-8xmjt namespace: shoot--diki-comp--azure
- containerName: kube-apiserver details: fileName: /var/lib/kubelet/pods/56fb368e-1dfa-4d5c-86bc-d3233d8c5ff7/volumes/kubernetes.io~secret/server/..2025_03_03_01_15_45.940486963/tls.key, permissions: 640 kind: pod name: kube-apiserver-78d668b498-8xmjt namespace: shoot--diki-comp--azure
- containerName: kube-apiserver details: fileName: /var/lib/kubelet/pods/56fb368e-1dfa-4d5c-86bc-d3233d8c5ff7/volumes/kubernetes.io~configmap/audit-policy-config/..2025_03_03_01_15_45.1971687659/audit-policy.yaml, permissions: 644 kind: pod name: kube-apiserver-78d668b498-8xmjt namespace: shoot--diki-comp--azure
- containerName: kube-apiserver details: fileName: /var/lib/kubelet/pods/56fb368e-1dfa-4d5c-86bc-d3233d8c5ff7/volumes/kubernetes.io~configmap/admission-config/..2025_03_03_01_15_45.355533268/podsecurity.yaml, permissions: 644 kind: pod name: kube-apiserver-78d668b498-8xmjt namespace: shoot--diki-comp--azure
- containerName: kube-apiserver details: fileName: /var/lib/kubelet/pods/56fb368e-1dfa-4d5c-86bc-d3233d8c5ff7/volumes/kubernetes.io~configmap/admission-config/..2025_03_03_01_15_45.355533268/admission-configuration.yaml, permissions: 644 kind: pod name: kube-apiserver-78d668b498-8xmjt namespace: shoot--diki-comp--azure
- containerName: kube-apiserver details: fileName: /var/lib/kubelet/pods/56fb368e-1dfa-4d5c-86bc-d3233d8c5ff7/volumes/kubernetes.io~secret/etcd-encryption-secret/..2025_03_03_01_15_45.1979425120/encryption-configuration.yaml, permissions: 640 kind: pod name: kube-apiserver-78d668b498-8xmjt namespace: shoot--diki-comp--azure
- containerName: kube-apiserver details: fileName: /var/lib/kubelet/pods/56fb368e-1dfa-4d5c-86bc-d3233d8c5ff7/volumes/kubernetes.io~secret/ca-vpn/..2025_03_03_01_15_45.2369293391/bundle.crt, permissions: 644 kind: pod name: kube-apiserver-78d668b498-8xmjt namespace: shoot--diki-comp--azure
- containerName: kube-apiserver details: fileName: /var/lib/kubelet/pods/56fb368e-1dfa-4d5c-86bc-d3233d8c5ff7/volumes/kubernetes.io~configmap/egress-selection-config/..2025_03_03_01_15_45.587715866/egress-selector-configuration.yaml, permissions: 644 kind: pod name: kube-apiserver-78d668b498-8xmjt namespace: shoot--diki-comp--azure
- containerName: kube-apiserver details: fileName: /var/lib/kubelet/pods/56fb368e-1dfa-4d5c-86bc-d3233d8c5ff7/volumes/kubernetes.io~secret/ca-kubelet/..2025_03_03_01_15_45.3923805873/bundle.crt, permissions: 644 kind: pod name: kube-apiserver-78d668b498-8xmjt namespace: shoot--diki-comp--azure
- containerName: kube-apiserver details: fileName: /var/lib/kubelet/pods/56fb368e-1dfa-4d5c-86bc-d3233d8c5ff7/volumes/kubernetes.io~secret/kubelet-client/..2025_03_03_01_15_45.4026042906/tls.crt, permissions: 640 kind: pod name: kube-apiserver-78d668b498-8xmjt namespace: shoot--diki-comp--azure
- containerName: kube-apiserver details: fileName: /var/lib/kubelet/pods/56fb368e-1dfa-4d5c-86bc-d3233d8c5ff7/volumes/kubernetes.io~secret/kubelet-client/..2025_03_03_01_15_45.4026042906/tls.key, permissions: 640 kind: pod name: kube-apiserver-78d668b498-8xmjt namespace: shoot--diki-comp--azure
- containerName: kube-apiserver details: fileName: /var/lib/kubelet/pods/56fb368e-1dfa-4d5c-86bc-d3233d8c5ff7/volumes/kubernetes.io~secret/ca-etcd/..2025_03_03_01_15_45.3336896937/bundle.crt, permissions: 644 kind: pod name: kube-apiserver-78d668b498-8xmjt namespace: shoot--diki-comp--azure
- containerName: kube-apiserver details: fileName: /var/lib/kubelet/pods/56fb368e-1dfa-4d5c-86bc-d3233d8c5ff7/volumes/kubernetes.io~secret/etcd-client/..2025_03_03_01_15_45.330086599/tls.key, permissions: 640 kind: pod name: kube-apiserver-78d668b498-8xmjt namespace: shoot--diki-comp--azure
- containerName: kube-apiserver details: fileName: /var/lib/kubelet/pods/56fb368e-1dfa-4d5c-86bc-d3233d8c5ff7/volumes/kubernetes.io~secret/etcd-client/..2025_03_03_01_15_45.330086599/tls.crt, permissions: 640 kind: pod name: kube-apiserver-78d668b498-8xmjt namespace: shoot--diki-comp--azure
- containerName: kube-apiserver details: fileName: /var/lib/kubelet/pods/56fb368e-1dfa-4d5c-86bc-d3233d8c5ff7/volumes/kubernetes.io~secret/tls-sni-0/..2025_03_03_01_15_45.2219346093/tls.crt, permissions: 640 kind: pod name: kube-apiserver-78d668b498-8xmjt namespace: shoot--diki-comp--azure
- containerName: kube-apiserver details: fileName: /var/lib/kubelet/pods/56fb368e-1dfa-4d5c-86bc-d3233d8c5ff7/volumes/kubernetes.io~secret/tls-sni-0/..2025_03_03_01_15_45.2219346093/tls.key, permissions: 640 kind: pod name: kube-apiserver-78d668b498-8xmjt namespace: shoot--diki-comp--azure
- containerName: kube-apiserver details: fileName: /var/lib/kubelet/pods/56fb368e-1dfa-4d5c-86bc-d3233d8c5ff7/volumes/kubernetes.io~secret/tls-sni-0/..2025_03_03_01_15_45.2219346093/ca.crt, permissions: 640 kind: pod name: kube-apiserver-78d668b498-8xmjt namespace: shoot--diki-comp--azure
- containerName: kube-apiserver details: fileName: /var/lib/kubelet/pods/56fb368e-1dfa-4d5c-86bc-d3233d8c5ff7/volumes/kubernetes.io~configmap/authorization-config/..2025_03_03_01_15_45.289722142/config.yaml, permissions: 644 kind: pod name: kube-apiserver-78d668b498-8xmjt namespace: shoot--diki-comp--azure
- containerName: kube-apiserver details: fileName: /var/lib/kubelet/pods/56fb368e-1dfa-4d5c-86bc-d3233d8c5ff7/volumes/kubernetes.io~secret/authorization-kubeconfigs/..2025_03_03_01_15_45.3971532155/node-agent-authorizer-kubeconfig.yaml, permissions: 644 kind: pod name: kube-apiserver-78d668b498-8xmjt namespace: shoot--diki-comp--azure
- containerName: kube-apiserver details: fileName: /var/lib/kubelet/pods/56fb368e-1dfa-4d5c-86bc-d3233d8c5ff7/volumes/kubernetes.io~secret/http-proxy/..2025_03_03_01_15_45.1994303313/tls.key, permissions: 640 kind: pod name: kube-apiserver-78d668b498-8xmjt namespace: shoot--diki-comp--azure
- containerName: kube-apiserver details: fileName: /var/lib/kubelet/pods/56fb368e-1dfa-4d5c-86bc-d3233d8c5ff7/volumes/kubernetes.io~secret/http-proxy/..2025_03_03_01_15_45.1994303313/tls.crt, permissions: 640 kind: pod name: kube-apiserver-78d668b498-8xmjt namespace: shoot--diki-comp--azure
- containerName: kube-controller-manager details: fileName: /var/lib/kubelet/pods/5ce475eb-2980-488b-a80e-b6056cb46e48/volumes/kubernetes.io~secret/ca/..2025_03_03_01_14_45.1500377092/bundle.crt, permissions: 644 kind: pod name: kube-controller-manager-9b68d9877-7d97p namespace: shoot--diki-comp--azure
- containerName: kube-controller-manager details: fileName: /var/lib/kubelet/pods/5ce475eb-2980-488b-a80e-b6056cb46e48/volumes/kubernetes.io~secret/ca-client/..2025_03_03_01_14_45.741295729/ca.key, permissions: 640 kind: pod name: kube-controller-manager-9b68d9877-7d97p namespace: shoot--diki-comp--azure
- containerName: kube-controller-manager details: fileName: /var/lib/kubelet/pods/5ce475eb-2980-488b-a80e-b6056cb46e48/volumes/kubernetes.io~secret/ca-client/..2025_03_03_01_14_45.741295729/ca.crt, permissions: 640 kind: pod name: kube-controller-manager-9b68d9877-7d97p namespace: shoot--diki-comp--azure
- containerName: kube-controller-manager details: fileName: /var/lib/kubelet/pods/5ce475eb-2980-488b-a80e-b6056cb46e48/volumes/kubernetes.io~secret/service-account-key/..2025_03_03_01_14_45.1357350738/id_rsa, permissions: 640 kind: pod name: kube-controller-manager-9b68d9877-7d97p namespace: shoot--diki-comp--azure
- containerName: kube-controller-manager details: fileName: /var/lib/kubelet/pods/5ce475eb-2980-488b-a80e-b6056cb46e48/volumes/kubernetes.io~secret/server/..2025_03_03_01_14_45.592586788/tls.crt, permissions: 640 kind: pod name: kube-controller-manager-9b68d9877-7d97p namespace: shoot--diki-comp--azure
- containerName: kube-controller-manager details: fileName: /var/lib/kubelet/pods/5ce475eb-2980-488b-a80e-b6056cb46e48/volumes/kubernetes.io~secret/server/..2025_03_03_01_14_45.592586788/tls.key, permissions: 640 kind: pod name: kube-controller-manager-9b68d9877-7d97p namespace: shoot--diki-comp--azure
- containerName: kube-controller-manager details: fileName: /var/lib/kubelet/pods/5ce475eb-2980-488b-a80e-b6056cb46e48/volumes/kubernetes.io~secret/ca-kubelet/..2025_03_03_01_14_45.264971959/ca.crt, permissions: 640 kind: pod name: kube-controller-manager-9b68d9877-7d97p namespace: shoot--diki-comp--azure
- containerName: kube-controller-manager details: fileName: /var/lib/kubelet/pods/5ce475eb-2980-488b-a80e-b6056cb46e48/volumes/kubernetes.io~secret/ca-kubelet/..2025_03_03_01_14_45.264971959/ca.key, permissions: 640 kind: pod name: kube-controller-manager-9b68d9877-7d97p namespace: shoot--diki-comp--azure
- containerName: kube-controller-manager details: fileName: /var/lib/kubelet/pods/5ce475eb-2980-488b-a80e-b6056cb46e48/volumes/kubernetes.io~projected/kubeconfig/..2025_03_03_01_14_45.737211032/kubeconfig, permissions: 644 kind: pod name: kube-controller-manager-9b68d9877-7d97p namespace: shoot--diki-comp--azure
- containerName: kube-controller-manager details: fileName: /var/lib/kubelet/pods/5ce475eb-2980-488b-a80e-b6056cb46e48/volumes/kubernetes.io~projected/kubeconfig/..2025_03_03_01_14_45.737211032/token, permissions: 644 kind: pod name: kube-controller-manager-9b68d9877-7d97p namespace: shoot--diki-comp--azure
- containerName: kube-scheduler details: fileName: /var/lib/kubelet/pods/e13bc0c7-ae81-4b12-a8f0-7939662b6273/volumes/kubernetes.io~projected/client-ca/..2025_03_03_01_10_45.274742397/bundle.crt, permissions: 644 kind: pod name: kube-scheduler-79b6c874b4-q7l8z namespace: shoot--diki-comp--azure
- containerName: kube-scheduler details: fileName: /var/lib/kubelet/pods/e13bc0c7-ae81-4b12-a8f0-7939662b6273/volumes/kubernetes.io~secret/kube-scheduler-server/..2025_03_03_01_10_45.3845255199/tls.key, permissions: 640 kind: pod name: kube-scheduler-79b6c874b4-q7l8z namespace: shoot--diki-comp--azure
- containerName: kube-scheduler details: fileName: /var/lib/kubelet/pods/e13bc0c7-ae81-4b12-a8f0-7939662b6273/volumes/kubernetes.io~secret/kube-scheduler-server/..2025_03_03_01_10_45.3845255199/tls.crt, permissions: 640 kind: pod name: kube-scheduler-79b6c874b4-q7l8z namespace: shoot--diki-comp--azure
- containerName: kube-scheduler details: fileName: /var/lib/kubelet/pods/e13bc0c7-ae81-4b12-a8f0-7939662b6273/volumes/kubernetes.io~configmap/kube-scheduler-config/..2025_03_03_01_10_45.864706336/config.yaml, permissions: 644 kind: pod name: kube-scheduler-79b6c874b4-q7l8z namespace: shoot--diki-comp--azure
- containerName: kube-scheduler details: fileName: /var/lib/kubelet/pods/e13bc0c7-ae81-4b12-a8f0-7939662b6273/volumes/kubernetes.io~projected/kubeconfig/..2025_03_03_01_10_45.121736196/kubeconfig, permissions: 644 kind: pod name: kube-scheduler-79b6c874b4-q7l8z namespace: shoot--diki-comp--azure
- containerName: kube-scheduler details: fileName: /var/lib/kubelet/pods/e13bc0c7-ae81-4b12-a8f0-7939662b6273/volumes/kubernetes.io~projected/kubeconfig/..2025_03_03_01_10_45.121736196/token, permissions: 644 kind: pod name: kube-scheduler-79b6c874b4-q7l8z namespace: shoot--diki-comp--azure
- gcp
- containerName: kube-controller-manager details: fileName: /var/lib/kubelet/pods/90f34bcf-ceda-4e65-8112-679308dd007f/volumes/kubernetes.io~secret/ca/..2025_03_03_01_16_36.2922815650/bundle.crt, permissions: 644 kind: pod name: kube-controller-manager-d546c97bb-k5rsh namespace: shoot--diki-comp--gcp
- containerName: kube-controller-manager details: fileName: /var/lib/kubelet/pods/90f34bcf-ceda-4e65-8112-679308dd007f/volumes/kubernetes.io~secret/ca-client/..2025_03_03_01_16_36.3990387563/ca.crt, permissions: 640 kind: pod name: kube-controller-manager-d546c97bb-k5rsh namespace: shoot--diki-comp--gcp
- containerName: kube-controller-manager details: fileName: /var/lib/kubelet/pods/90f34bcf-ceda-4e65-8112-679308dd007f/volumes/kubernetes.io~secret/ca-client/..2025_03_03_01_16_36.3990387563/ca.key, permissions: 640 kind: pod name: kube-controller-manager-d546c97bb-k5rsh namespace: shoot--diki-comp--gcp
- containerName: kube-controller-manager details: fileName: /var/lib/kubelet/pods/90f34bcf-ceda-4e65-8112-679308dd007f/volumes/kubernetes.io~secret/service-account-key/..2025_03_03_01_16_36.1502439632/id_rsa, permissions: 640 kind: pod name: kube-controller-manager-d546c97bb-k5rsh namespace: shoot--diki-comp--gcp
- containerName: kube-controller-manager details: fileName: /var/lib/kubelet/pods/90f34bcf-ceda-4e65-8112-679308dd007f/volumes/kubernetes.io~secret/server/..2025_03_03_01_16_36.256775248/tls.key, permissions: 640 kind: pod name: kube-controller-manager-d546c97bb-k5rsh namespace: shoot--diki-comp--gcp
- containerName: kube-controller-manager details: fileName: /var/lib/kubelet/pods/90f34bcf-ceda-4e65-8112-679308dd007f/volumes/kubernetes.io~secret/server/..2025_03_03_01_16_36.256775248/tls.crt, permissions: 640 kind: pod name: kube-controller-manager-d546c97bb-k5rsh namespace: shoot--diki-comp--gcp
- containerName: kube-controller-manager details: fileName: /var/lib/kubelet/pods/90f34bcf-ceda-4e65-8112-679308dd007f/volumes/kubernetes.io~secret/ca-kubelet/..2025_03_03_01_16_36.2964178139/ca.crt, permissions: 640 kind: pod name: kube-controller-manager-d546c97bb-k5rsh namespace: shoot--diki-comp--gcp
- containerName: kube-controller-manager details: fileName: /var/lib/kubelet/pods/90f34bcf-ceda-4e65-8112-679308dd007f/volumes/kubernetes.io~secret/ca-kubelet/..2025_03_03_01_16_36.2964178139/ca.key, permissions: 640 kind: pod name: kube-controller-manager-d546c97bb-k5rsh namespace: shoot--diki-comp--gcp
- containerName: kube-controller-manager details: fileName: /var/lib/kubelet/pods/90f34bcf-ceda-4e65-8112-679308dd007f/volumes/kubernetes.io~projected/kubeconfig/..2025_03_03_01_16_36.3218948895/kubeconfig, permissions: 644 kind: pod name: kube-controller-manager-d546c97bb-k5rsh namespace: shoot--diki-comp--gcp
- containerName: kube-controller-manager details: fileName: /var/lib/kubelet/pods/90f34bcf-ceda-4e65-8112-679308dd007f/volumes/kubernetes.io~projected/kubeconfig/..2025_03_03_01_16_36.3218948895/token, permissions: 644 kind: pod name: kube-controller-manager-d546c97bb-k5rsh namespace: shoot--diki-comp--gcp
- containerName: kube-apiserver details: fileName: /var/lib/kubelet/pods/608b7ac2-2a64-4600-bffc-9ed14a956ed8/volumes/kubernetes.io~secret/ca/..2025_03_03_01_12_36.1174479734/bundle.crt, permissions: 644 kind: pod name: kube-apiserver-857b9bd577-9k45w namespace: shoot--diki-comp--gcp
- containerName: kube-apiserver details: fileName: /var/lib/kubelet/pods/608b7ac2-2a64-4600-bffc-9ed14a956ed8/volumes/kubernetes.io~secret/ca-client/..2025_03_03_01_12_36.1728520434/bundle.crt, permissions: 644 kind: pod name: kube-apiserver-857b9bd577-9k45w namespace: shoot--diki-comp--gcp
- containerName: kube-apiserver details: fileName: /var/lib/kubelet/pods/608b7ac2-2a64-4600-bffc-9ed14a956ed8/volumes/kubernetes.io~secret/ca-front-proxy/..2025_03_03_01_12_36.3572642423/bundle.crt, permissions: 644 kind: pod name: kube-apiserver-857b9bd577-9k45w namespace: shoot--diki-comp--gcp
- containerName: kube-apiserver details: fileName: /var/lib/kubelet/pods/608b7ac2-2a64-4600-bffc-9ed14a956ed8/volumes/kubernetes.io~secret/service-account-key/..2025_03_03_01_12_36.1776806755/id_rsa, permissions: 640 kind: pod name: kube-apiserver-857b9bd577-9k45w namespace: shoot--diki-comp--gcp
- containerName: kube-apiserver details: fileName: /var/lib/kubelet/pods/608b7ac2-2a64-4600-bffc-9ed14a956ed8/volumes/kubernetes.io~secret/service-account-key-bundle/..2025_03_03_01_12_36.2525007222/bundle.key, permissions: 640 kind: pod name: kube-apiserver-857b9bd577-9k45w namespace: shoot--diki-comp--gcp
- containerName: kube-apiserver details: fileName: /var/lib/kubelet/pods/608b7ac2-2a64-4600-bffc-9ed14a956ed8/volumes/kubernetes.io~secret/static-token/..2025_03_03_01_12_36.773770721/static_tokens.csv, permissions: 644 kind: pod name: kube-apiserver-857b9bd577-9k45w namespace: shoot--diki-comp--gcp
- containerName: kube-apiserver details: fileName: /var/lib/kubelet/pods/608b7ac2-2a64-4600-bffc-9ed14a956ed8/volumes/kubernetes.io~secret/kube-aggregator/..2025_03_03_01_12_36.3477424634/tls.crt, permissions: 640 kind: pod name: kube-apiserver-857b9bd577-9k45w namespace: shoot--diki-comp--gcp
- containerName: kube-apiserver details: fileName: /var/lib/kubelet/pods/608b7ac2-2a64-4600-bffc-9ed14a956ed8/volumes/kubernetes.io~secret/kube-aggregator/..2025_03_03_01_12_36.3477424634/tls.key, permissions: 640 kind: pod name: kube-apiserver-857b9bd577-9k45w namespace: shoot--diki-comp--gcp
- containerName: kube-apiserver details: fileName: /var/lib/kubelet/pods/608b7ac2-2a64-4600-bffc-9ed14a956ed8/volumes/kubernetes.io~secret/server/..2025_03_03_01_12_36.2325140443/tls.crt, permissions: 640 kind: pod name: kube-apiserver-857b9bd577-9k45w namespace: shoot--diki-comp--gcp
- containerName: kube-apiserver details: fileName: /var/lib/kubelet/pods/608b7ac2-2a64-4600-bffc-9ed14a956ed8/volumes/kubernetes.io~secret/server/..2025_03_03_01_12_36.2325140443/tls.key, permissions: 640 kind: pod name: kube-apiserver-857b9bd577-9k45w namespace: shoot--diki-comp--gcp
- containerName: kube-apiserver details: fileName: /var/lib/kubelet/pods/608b7ac2-2a64-4600-bffc-9ed14a956ed8/volumes/kubernetes.io~configmap/audit-policy-config/..2025_03_03_01_12_36.1416965152/audit-policy.yaml, permissions: 644 kind: pod name: kube-apiserver-857b9bd577-9k45w namespace: shoot--diki-comp--gcp
- containerName: kube-apiserver details: fileName: /var/lib/kubelet/pods/608b7ac2-2a64-4600-bffc-9ed14a956ed8/volumes/kubernetes.io~configmap/admission-config/..2025_03_03_01_12_36.631428973/podsecurity.yaml, permissions: 644 kind: pod name: kube-apiserver-857b9bd577-9k45w namespace: shoot--diki-comp--gcp
- containerName: kube-apiserver details: fileName: /var/lib/kubelet/pods/608b7ac2-2a64-4600-bffc-9ed14a956ed8/volumes/kubernetes.io~configmap/admission-config/..2025_03_03_01_12_36.631428973/admission-configuration.yaml, permissions: 644 kind: pod name: kube-apiserver-857b9bd577-9k45w namespace: shoot--diki-comp--gcp
- containerName: kube-apiserver details: fileName: /var/lib/kubelet/pods/608b7ac2-2a64-4600-bffc-9ed14a956ed8/volumes/kubernetes.io~secret/etcd-encryption-secret/..2025_03_03_01_12_36.2591932554/encryption-configuration.yaml, permissions: 640 kind: pod name: kube-apiserver-857b9bd577-9k45w namespace: shoot--diki-comp--gcp
- containerName: kube-apiserver details: fileName: /var/lib/kubelet/pods/608b7ac2-2a64-4600-bffc-9ed14a956ed8/volumes/kubernetes.io~secret/ca-vpn/..2025_03_03_01_12_36.2145202368/bundle.crt, permissions: 644 kind: pod name: kube-apiserver-857b9bd577-9k45w namespace: shoot--diki-comp--gcp
- containerName: kube-apiserver details: fileName: /var/lib/kubelet/pods/608b7ac2-2a64-4600-bffc-9ed14a956ed8/volumes/kubernetes.io~configmap/egress-selection-config/..2025_03_03_01_12_36.3766393744/egress-selector-configuration.yaml, permissions: 644 kind: pod name: kube-apiserver-857b9bd577-9k45w namespace: shoot--diki-comp--gcp
- containerName: kube-apiserver details: fileName: /var/lib/kubelet/pods/608b7ac2-2a64-4600-bffc-9ed14a956ed8/volumes/kubernetes.io~secret/ca-kubelet/..2025_03_03_01_12_36.282363630/bundle.crt, permissions: 644 kind: pod name: kube-apiserver-857b9bd577-9k45w namespace: shoot--diki-comp--gcp
- containerName: kube-apiserver details: fileName: /var/lib/kubelet/pods/608b7ac2-2a64-4600-bffc-9ed14a956ed8/volumes/kubernetes.io~secret/kubelet-client/..2025_03_03_01_12_36.2748958189/tls.key, permissions: 640 kind: pod name: kube-apiserver-857b9bd577-9k45w namespace: shoot--diki-comp--gcp
- containerName: kube-apiserver details: fileName: /var/lib/kubelet/pods/608b7ac2-2a64-4600-bffc-9ed14a956ed8/volumes/kubernetes.io~secret/kubelet-client/..2025_03_03_01_12_36.2748958189/tls.crt, permissions: 640 kind: pod name: kube-apiserver-857b9bd577-9k45w namespace: shoot--diki-comp--gcp
- containerName: kube-apiserver details: fileName: /var/lib/kubelet/pods/608b7ac2-2a64-4600-bffc-9ed14a956ed8/volumes/kubernetes.io~secret/ca-etcd/..2025_03_03_01_12_36.3945965329/bundle.crt, permissions: 644 kind: pod name: kube-apiserver-857b9bd577-9k45w namespace: shoot--diki-comp--gcp
- containerName: kube-apiserver details: fileName: /var/lib/kubelet/pods/608b7ac2-2a64-4600-bffc-9ed14a956ed8/volumes/kubernetes.io~secret/etcd-client/..2025_03_03_01_12_36.1279523670/tls.key, permissions: 640 kind: pod name: kube-apiserver-857b9bd577-9k45w namespace: shoot--diki-comp--gcp
- containerName: kube-apiserver details: fileName: /var/lib/kubelet/pods/608b7ac2-2a64-4600-bffc-9ed14a956ed8/volumes/kubernetes.io~secret/etcd-client/..2025_03_03_01_12_36.1279523670/tls.crt, permissions: 640 kind: pod name: kube-apiserver-857b9bd577-9k45w namespace: shoot--diki-comp--gcp
- containerName: kube-apiserver details: fileName: /var/lib/kubelet/pods/608b7ac2-2a64-4600-bffc-9ed14a956ed8/volumes/kubernetes.io~secret/tls-sni-0/..2025_03_03_01_12_36.278921696/tls.crt, permissions: 640 kind: pod name: kube-apiserver-857b9bd577-9k45w namespace: shoot--diki-comp--gcp
- containerName: kube-apiserver details: fileName: /var/lib/kubelet/pods/608b7ac2-2a64-4600-bffc-9ed14a956ed8/volumes/kubernetes.io~secret/tls-sni-0/..2025_03_03_01_12_36.278921696/tls.key, permissions: 640 kind: pod name: kube-apiserver-857b9bd577-9k45w namespace: shoot--diki-comp--gcp
- containerName: kube-apiserver details: fileName: /var/lib/kubelet/pods/608b7ac2-2a64-4600-bffc-9ed14a956ed8/volumes/kubernetes.io~secret/tls-sni-0/..2025_03_03_01_12_36.278921696/ca.crt, permissions: 640 kind: pod name: kube-apiserver-857b9bd577-9k45w namespace: shoot--diki-comp--gcp
- containerName: kube-apiserver details: fileName: /var/lib/kubelet/pods/608b7ac2-2a64-4600-bffc-9ed14a956ed8/volumes/kubernetes.io~configmap/authorization-config/..2025_03_03_01_12_36.2067107765/config.yaml, permissions: 644 kind: pod name: kube-apiserver-857b9bd577-9k45w namespace: shoot--diki-comp--gcp
- containerName: kube-apiserver details: fileName: /var/lib/kubelet/pods/608b7ac2-2a64-4600-bffc-9ed14a956ed8/volumes/kubernetes.io~secret/authorization-kubeconfigs/..2025_03_03_01_12_36.399083477/node-agent-authorizer-kubeconfig.yaml, permissions: 644 kind: pod name: kube-apiserver-857b9bd577-9k45w namespace: shoot--diki-comp--gcp
- containerName: kube-apiserver details: fileName: /var/lib/kubelet/pods/608b7ac2-2a64-4600-bffc-9ed14a956ed8/volumes/kubernetes.io~secret/http-proxy/..2025_03_03_01_12_36.3122740563/tls.crt, permissions: 640 kind: pod name: kube-apiserver-857b9bd577-9k45w namespace: shoot--diki-comp--gcp
- containerName: kube-apiserver details: fileName: /var/lib/kubelet/pods/608b7ac2-2a64-4600-bffc-9ed14a956ed8/volumes/kubernetes.io~secret/http-proxy/..2025_03_03_01_12_36.3122740563/tls.key, permissions: 640 kind: pod name: kube-apiserver-857b9bd577-9k45w namespace: shoot--diki-comp--gcp
- containerName: kube-scheduler details: fileName: /var/lib/kubelet/pods/ecad819a-dc71-4e4e-a17e-11b91bd08505/volumes/kubernetes.io~projected/client-ca/..2025_03_03_01_09_35.3955725141/bundle.crt, permissions: 644 kind: pod name: kube-scheduler-65fbc646c-ck6kp namespace: shoot--diki-comp--gcp
- containerName: kube-scheduler details: fileName: /var/lib/kubelet/pods/ecad819a-dc71-4e4e-a17e-11b91bd08505/volumes/kubernetes.io~secret/kube-scheduler-server/..2025_03_03_01_09_35.344821711/tls.crt, permissions: 640 kind: pod name: kube-scheduler-65fbc646c-ck6kp namespace: shoot--diki-comp--gcp
- containerName: kube-scheduler details: fileName: /var/lib/kubelet/pods/ecad819a-dc71-4e4e-a17e-11b91bd08505/volumes/kubernetes.io~secret/kube-scheduler-server/..2025_03_03_01_09_35.344821711/tls.key, permissions: 640 kind: pod name: kube-scheduler-65fbc646c-ck6kp namespace: shoot--diki-comp--gcp
- containerName: kube-scheduler details: fileName: /var/lib/kubelet/pods/ecad819a-dc71-4e4e-a17e-11b91bd08505/volumes/kubernetes.io~configmap/kube-scheduler-config/..2025_03_03_01_09_35.1550550768/config.yaml, permissions: 644 kind: pod name: kube-scheduler-65fbc646c-ck6kp namespace: shoot--diki-comp--gcp
- containerName: kube-scheduler details: fileName: /var/lib/kubelet/pods/ecad819a-dc71-4e4e-a17e-11b91bd08505/volumes/kubernetes.io~projected/kubeconfig/..2025_03_03_01_09_35.2841337904/kubeconfig, permissions: 644 kind: pod name: kube-scheduler-65fbc646c-ck6kp namespace: shoot--diki-comp--gcp
- containerName: kube-scheduler details: fileName: /var/lib/kubelet/pods/ecad819a-dc71-4e4e-a17e-11b91bd08505/volumes/kubernetes.io~projected/kubeconfig/..2025_03_03_01_09_35.2841337904/token, permissions: 644 kind: pod name: kube-scheduler-65fbc646c-ck6kp namespace: shoot--diki-comp--gcp
- openstack
- containerName: kube-controller-manager details: fileName: /var/lib/kubelet/pods/c96aace0-5680-4b81-9225-cb3db3aed8bf/volumes/kubernetes.io~secret/ca/..2025_03_03_01_10_31.235358473/bundle.crt, permissions: 644 kind: pod name: kube-controller-manager-6f87877757-4grgt namespace: shoot--diki-comp--openstack
- containerName: kube-controller-manager details: fileName: /var/lib/kubelet/pods/c96aace0-5680-4b81-9225-cb3db3aed8bf/volumes/kubernetes.io~secret/ca-client/..2025_03_03_01_10_31.3584083571/ca.crt, permissions: 640 kind: pod name: kube-controller-manager-6f87877757-4grgt namespace: shoot--diki-comp--openstack
- containerName: kube-controller-manager details: fileName: /var/lib/kubelet/pods/c96aace0-5680-4b81-9225-cb3db3aed8bf/volumes/kubernetes.io~secret/ca-client/..2025_03_03_01_10_31.3584083571/ca.key, permissions: 640 kind: pod name: kube-controller-manager-6f87877757-4grgt namespace: shoot--diki-comp--openstack
- containerName: kube-controller-manager details: fileName: /var/lib/kubelet/pods/c96aace0-5680-4b81-9225-cb3db3aed8bf/volumes/kubernetes.io~secret/service-account-key/..2025_03_03_01_10_31.493633103/id_rsa, permissions: 640 kind: pod name: kube-controller-manager-6f87877757-4grgt namespace: shoot--diki-comp--openstack
- containerName: kube-controller-manager details: fileName: /var/lib/kubelet/pods/c96aace0-5680-4b81-9225-cb3db3aed8bf/volumes/kubernetes.io~secret/server/..2025_03_03_01_10_31.104263364/tls.crt, permissions: 640 kind: pod name: kube-controller-manager-6f87877757-4grgt namespace: shoot--diki-comp--openstack
- containerName: kube-controller-manager details: fileName: /var/lib/kubelet/pods/c96aace0-5680-4b81-9225-cb3db3aed8bf/volumes/kubernetes.io~secret/server/..2025_03_03_01_10_31.104263364/tls.key, permissions: 640 kind: pod name: kube-controller-manager-6f87877757-4grgt namespace: shoot--diki-comp--openstack
- containerName: kube-controller-manager details: fileName: /var/lib/kubelet/pods/c96aace0-5680-4b81-9225-cb3db3aed8bf/volumes/kubernetes.io~secret/ca-kubelet/..2025_03_03_01_10_31.1741570139/ca.crt, permissions: 640 kind: pod name: kube-controller-manager-6f87877757-4grgt namespace: shoot--diki-comp--openstack
- containerName: kube-controller-manager details: fileName: /var/lib/kubelet/pods/c96aace0-5680-4b81-9225-cb3db3aed8bf/volumes/kubernetes.io~secret/ca-kubelet/..2025_03_03_01_10_31.1741570139/ca.key, permissions: 640 kind: pod name: kube-controller-manager-6f87877757-4grgt namespace: shoot--diki-comp--openstack
- containerName: kube-controller-manager details: fileName: /var/lib/kubelet/pods/c96aace0-5680-4b81-9225-cb3db3aed8bf/volumes/kubernetes.io~projected/kubeconfig/..2025_03_03_01_10_31.1519645152/kubeconfig, permissions: 644 kind: pod name: kube-controller-manager-6f87877757-4grgt namespace: shoot--diki-comp--openstack
- containerName: kube-controller-manager details: fileName: /var/lib/kubelet/pods/c96aace0-5680-4b81-9225-cb3db3aed8bf/volumes/kubernetes.io~projected/kubeconfig/..2025_03_03_01_10_31.1519645152/token, permissions: 644 kind: pod name: kube-controller-manager-6f87877757-4grgt namespace: shoot--diki-comp--openstack
- containerName: kube-scheduler details: fileName: /var/lib/kubelet/pods/c079eae7-e4b5-4e7a-adfb-051573ecabea/volumes/kubernetes.io~projected/client-ca/..2025_03_03_01_12_28.1885206071/bundle.crt, permissions: 644 kind: pod name: kube-scheduler-68854c4574-mbcz2 namespace: shoot--diki-comp--openstack
- containerName: kube-scheduler details: fileName: /var/lib/kubelet/pods/c079eae7-e4b5-4e7a-adfb-051573ecabea/volumes/kubernetes.io~secret/kube-scheduler-server/..2025_03_03_01_12_28.484866836/tls.crt, permissions: 640 kind: pod name: kube-scheduler-68854c4574-mbcz2 namespace: shoot--diki-comp--openstack
- containerName: kube-scheduler details: fileName: /var/lib/kubelet/pods/c079eae7-e4b5-4e7a-adfb-051573ecabea/volumes/kubernetes.io~secret/kube-scheduler-server/..2025_03_03_01_12_28.484866836/tls.key, permissions: 640 kind: pod name: kube-scheduler-68854c4574-mbcz2 namespace: shoot--diki-comp--openstack
- containerName: kube-scheduler details: fileName: /var/lib/kubelet/pods/c079eae7-e4b5-4e7a-adfb-051573ecabea/volumes/kubernetes.io~configmap/kube-scheduler-config/..2025_03_03_01_12_28.3053481480/config.yaml, permissions: 644 kind: pod name: kube-scheduler-68854c4574-mbcz2 namespace: shoot--diki-comp--openstack
- containerName: kube-scheduler details: fileName: /var/lib/kubelet/pods/c079eae7-e4b5-4e7a-adfb-051573ecabea/volumes/kubernetes.io~projected/kubeconfig/..2025_03_03_01_12_28.705390985/kubeconfig, permissions: 644 kind: pod name: kube-scheduler-68854c4574-mbcz2 namespace: shoot--diki-comp--openstack
- containerName: kube-scheduler details: fileName: /var/lib/kubelet/pods/c079eae7-e4b5-4e7a-adfb-051573ecabea/volumes/kubernetes.io~projected/kubeconfig/..2025_03_03_01_12_28.705390985/token, permissions: 644 kind: pod name: kube-scheduler-68854c4574-mbcz2 namespace: shoot--diki-comp--openstack
- containerName: kube-apiserver details: fileName: /var/lib/kubelet/pods/adef142b-7c5d-4d1e-b0c2-9c575b9bbdea/volumes/kubernetes.io~secret/ca/..2025_03_03_01_14_29.407171975/bundle.crt, permissions: 644 kind: pod name: kube-apiserver-5d6dcc9bd5-jsqrl namespace: shoot--diki-comp--openstack
- containerName: kube-apiserver details: fileName: /var/lib/kubelet/pods/adef142b-7c5d-4d1e-b0c2-9c575b9bbdea/volumes/kubernetes.io~secret/ca-client/..2025_03_03_01_14_29.2499436981/bundle.crt, permissions: 644 kind: pod name: kube-apiserver-5d6dcc9bd5-jsqrl namespace: shoot--diki-comp--openstack
- containerName: kube-apiserver details: fileName: /var/lib/kubelet/pods/adef142b-7c5d-4d1e-b0c2-9c575b9bbdea/volumes/kubernetes.io~secret/ca-front-proxy/..2025_03_03_01_14_29.2116021732/bundle.crt, permissions: 644 kind: pod name: kube-apiserver-5d6dcc9bd5-jsqrl namespace: shoot--diki-comp--openstack
- containerName: kube-apiserver details: fileName: /var/lib/kubelet/pods/adef142b-7c5d-4d1e-b0c2-9c575b9bbdea/volumes/kubernetes.io~secret/service-account-key/..2025_03_03_01_14_29.3091365546/id_rsa, permissions: 640 kind: pod name: kube-apiserver-5d6dcc9bd5-jsqrl namespace: shoot--diki-comp--openstack
- containerName: kube-apiserver details: fileName: /var/lib/kubelet/pods/adef142b-7c5d-4d1e-b0c2-9c575b9bbdea/volumes/kubernetes.io~secret/service-account-key-bundle/..2025_03_03_01_14_29.3490774438/bundle.key, permissions: 640 kind: pod name: kube-apiserver-5d6dcc9bd5-jsqrl namespace: shoot--diki-comp--openstack
- containerName: kube-apiserver details: fileName: /var/lib/kubelet/pods/adef142b-7c5d-4d1e-b0c2-9c575b9bbdea/volumes/kubernetes.io~secret/static-token/..2025_03_03_01_14_29.1078480729/static_tokens.csv, permissions: 644 kind: pod name: kube-apiserver-5d6dcc9bd5-jsqrl namespace: shoot--diki-comp--openstack
- containerName: kube-apiserver details: fileName: /var/lib/kubelet/pods/adef142b-7c5d-4d1e-b0c2-9c575b9bbdea/volumes/kubernetes.io~secret/kube-aggregator/..2025_03_03_01_14_29.3516547635/tls.key, permissions: 640 kind: pod name: kube-apiserver-5d6dcc9bd5-jsqrl namespace: shoot--diki-comp--openstack
- containerName: kube-apiserver details: fileName: /var/lib/kubelet/pods/adef142b-7c5d-4d1e-b0c2-9c575b9bbdea/volumes/kubernetes.io~secret/kube-aggregator/..2025_03_03_01_14_29.3516547635/tls.crt, permissions: 640 kind: pod name: kube-apiserver-5d6dcc9bd5-jsqrl namespace: shoot--diki-comp--openstack
- containerName: kube-apiserver details: fileName: /var/lib/kubelet/pods/adef142b-7c5d-4d1e-b0c2-9c575b9bbdea/volumes/kubernetes.io~secret/server/..2025_03_03_01_14_29.1544469879/tls.key, permissions: 640 kind: pod name: kube-apiserver-5d6dcc9bd5-jsqrl namespace: shoot--diki-comp--openstack
- containerName: kube-apiserver details: fileName: /var/lib/kubelet/pods/adef142b-7c5d-4d1e-b0c2-9c575b9bbdea/volumes/kubernetes.io~secret/server/..2025_03_03_01_14_29.1544469879/tls.crt, permissions: 640 kind: pod name: kube-apiserver-5d6dcc9bd5-jsqrl namespace: shoot--diki-comp--openstack
- containerName: kube-apiserver details: fileName: /var/lib/kubelet/pods/adef142b-7c5d-4d1e-b0c2-9c575b9bbdea/volumes/kubernetes.io~configmap/audit-policy-config/..2025_03_03_01_14_29.1344451113/audit-policy.yaml, permissions: 644 kind: pod name: kube-apiserver-5d6dcc9bd5-jsqrl namespace: shoot--diki-comp--openstack
- containerName: kube-apiserver details: fileName: /var/lib/kubelet/pods/adef142b-7c5d-4d1e-b0c2-9c575b9bbdea/volumes/kubernetes.io~configmap/admission-config/..2025_03_03_01_14_29.1664806219/podsecurity.yaml, permissions: 644 kind: pod name: kube-apiserver-5d6dcc9bd5-jsqrl namespace: shoot--diki-comp--openstack
- containerName: kube-apiserver details: fileName: /var/lib/kubelet/pods/adef142b-7c5d-4d1e-b0c2-9c575b9bbdea/volumes/kubernetes.io~configmap/admission-config/..2025_03_03_01_14_29.1664806219/admission-configuration.yaml, permissions: 644 kind: pod name: kube-apiserver-5d6dcc9bd5-jsqrl namespace: shoot--diki-comp--openstack
- containerName: kube-apiserver details: fileName: /var/lib/kubelet/pods/adef142b-7c5d-4d1e-b0c2-9c575b9bbdea/volumes/kubernetes.io~secret/etcd-encryption-secret/..2025_03_03_01_14_29.50359616/encryption-configuration.yaml, permissions: 640 kind: pod name: kube-apiserver-5d6dcc9bd5-jsqrl namespace: shoot--diki-comp--openstack
- containerName: kube-apiserver details: fileName: /var/lib/kubelet/pods/adef142b-7c5d-4d1e-b0c2-9c575b9bbdea/volumes/kubernetes.io~secret/ca-vpn/..2025_03_03_01_14_29.4102013387/bundle.crt, permissions: 644 kind: pod name: kube-apiserver-5d6dcc9bd5-jsqrl namespace: shoot--diki-comp--openstack
- containerName: kube-apiserver details: fileName: /var/lib/kubelet/pods/adef142b-7c5d-4d1e-b0c2-9c575b9bbdea/volumes/kubernetes.io~configmap/egress-selection-config/..2025_03_03_01_14_29.528667485/egress-selector-configuration.yaml, permissions: 644 kind: pod name: kube-apiserver-5d6dcc9bd5-jsqrl namespace: shoot--diki-comp--openstack
- containerName: kube-apiserver details: fileName: /var/lib/kubelet/pods/adef142b-7c5d-4d1e-b0c2-9c575b9bbdea/volumes/kubernetes.io~secret/ca-kubelet/..2025_03_03_01_14_29.1069799842/bundle.crt, permissions: 644 kind: pod name: kube-apiserver-5d6dcc9bd5-jsqrl namespace: shoot--diki-comp--openstack
- containerName: kube-apiserver details: fileName: /var/lib/kubelet/pods/adef142b-7c5d-4d1e-b0c2-9c575b9bbdea/volumes/kubernetes.io~secret/kubelet-client/..2025_03_03_01_14_29.798787007/tls.crt, permissions: 640 kind: pod name: kube-apiserver-5d6dcc9bd5-jsqrl namespace: shoot--diki-comp--openstack
- containerName: kube-apiserver details: fileName: /var/lib/kubelet/pods/adef142b-7c5d-4d1e-b0c2-9c575b9bbdea/volumes/kubernetes.io~secret/kubelet-client/..2025_03_03_01_14_29.798787007/tls.key, permissions: 640 kind: pod name: kube-apiserver-5d6dcc9bd5-jsqrl namespace: shoot--diki-comp--openstack
- containerName: kube-apiserver details: fileName: /var/lib/kubelet/pods/adef142b-7c5d-4d1e-b0c2-9c575b9bbdea/volumes/kubernetes.io~secret/ca-etcd/..2025_03_03_01_14_29.3554070821/bundle.crt, permissions: 644 kind: pod name: kube-apiserver-5d6dcc9bd5-jsqrl namespace: shoot--diki-comp--openstack
- containerName: kube-apiserver details: fileName: /var/lib/kubelet/pods/adef142b-7c5d-4d1e-b0c2-9c575b9bbdea/volumes/kubernetes.io~secret/etcd-client/..2025_03_03_01_14_29.3024572020/tls.key, permissions: 640 kind: pod name: kube-apiserver-5d6dcc9bd5-jsqrl namespace: shoot--diki-comp--openstack
- containerName: kube-apiserver details: fileName: /var/lib/kubelet/pods/adef142b-7c5d-4d1e-b0c2-9c575b9bbdea/volumes/kubernetes.io~secret/etcd-client/..2025_03_03_01_14_29.3024572020/tls.crt, permissions: 640 kind: pod name: kube-apiserver-5d6dcc9bd5-jsqrl namespace: shoot--diki-comp--openstack
- containerName: kube-apiserver details: fileName: /var/lib/kubelet/pods/adef142b-7c5d-4d1e-b0c2-9c575b9bbdea/volumes/kubernetes.io~secret/tls-sni-0/..2025_03_03_01_14_29.4247416010/ca.crt, permissions: 640 kind: pod name: kube-apiserver-5d6dcc9bd5-jsqrl namespace: shoot--diki-comp--openstack
- containerName: kube-apiserver details: fileName: /var/lib/kubelet/pods/adef142b-7c5d-4d1e-b0c2-9c575b9bbdea/volumes/kubernetes.io~secret/tls-sni-0/..2025_03_03_01_14_29.4247416010/tls.crt, permissions: 640 kind: pod name: kube-apiserver-5d6dcc9bd5-jsqrl namespace: shoot--diki-comp--openstack
- containerName: kube-apiserver details: fileName: /var/lib/kubelet/pods/adef142b-7c5d-4d1e-b0c2-9c575b9bbdea/volumes/kubernetes.io~secret/tls-sni-0/..2025_03_03_01_14_29.4247416010/tls.key, permissions: 640 kind: pod name: kube-apiserver-5d6dcc9bd5-jsqrl namespace: shoot--diki-comp--openstack
- containerName: kube-apiserver details: fileName: /var/lib/kubelet/pods/adef142b-7c5d-4d1e-b0c2-9c575b9bbdea/volumes/kubernetes.io~configmap/authorization-config/..2025_03_03_01_14_29.1394916609/config.yaml, permissions: 644 kind: pod name: kube-apiserver-5d6dcc9bd5-jsqrl namespace: shoot--diki-comp--openstack
- containerName: kube-apiserver details: fileName: /var/lib/kubelet/pods/adef142b-7c5d-4d1e-b0c2-9c575b9bbdea/volumes/kubernetes.io~secret/authorization-kubeconfigs/..2025_03_03_01_14_29.4088325230/node-agent-authorizer-kubeconfig.yaml, permissions: 644 kind: pod name: kube-apiserver-5d6dcc9bd5-jsqrl namespace: shoot--diki-comp--openstack
- containerName: kube-apiserver details: fileName: /var/lib/kubelet/pods/adef142b-7c5d-4d1e-b0c2-9c575b9bbdea/volumes/kubernetes.io~secret/http-proxy/..2025_03_03_01_14_29.2845433525/tls.crt, permissions: 640 kind: pod name: kube-apiserver-5d6dcc9bd5-jsqrl namespace: shoot--diki-comp--openstack
- containerName: kube-apiserver details: fileName: /var/lib/kubelet/pods/adef142b-7c5d-4d1e-b0c2-9c575b9bbdea/volumes/kubernetes.io~secret/http-proxy/..2025_03_03_01_14_29.2845433525/tls.key, permissions: 640 kind: pod name: kube-apiserver-5d6dcc9bd5-jsqrl namespace: shoot--diki-comp--openstack
- aws
-
File has expected permissions
-
242461 (Medium) - The Kubernetes API Server audit logs must be enabled.
-
Option audit-policy-file set.
- aws
- kind: deployment name: kube-apiserver namespace: shoot--diki-comp--aws
- azure
- kind: deployment name: kube-apiserver namespace: shoot--diki-comp--azure
- gcp
- kind: deployment name: kube-apiserver namespace: shoot--diki-comp--gcp
- openstack
- kind: deployment name: kube-apiserver namespace: shoot--diki-comp--openstack
- aws
-
Option audit-policy-file set.
-
242466 (Medium) - The Kubernetes PKI CRT must have file permissions set to 644 or more restrictive.
-
File has expected permissions
- aws
- cluster: seed containerName: backup-restore details: fileName: /var/lib/kubelet/pods/d46d0708-802d-43a7-bdf8-646912b7cb62/volumes/kubernetes.io~secret/backup-restore-server-tls/..2025_03_03_01_02_01.3321577487/tls.crt, permissions: 640 kind: pod name: etcd-main-0 namespace: shoot--diki-comp--aws
- cluster: seed containerName: backup-restore details: fileName: /var/lib/kubelet/pods/d46d0708-802d-43a7-bdf8-646912b7cb62/volumes/kubernetes.io~secret/etcd-ca/..2025_03_03_01_02_01.732820315/bundle.crt, permissions: 640 kind: pod name: etcd-main-0 namespace: shoot--diki-comp--aws
- cluster: seed containerName: backup-restore details: fileName: /var/lib/kubelet/pods/d46d0708-802d-43a7-bdf8-646912b7cb62/volumes/kubernetes.io~secret/etcd-client-tls/..2025_03_03_01_02_01.1252005562/tls.crt, permissions: 640 kind: pod name: etcd-main-0 namespace: shoot--diki-comp--aws
- cluster: seed containerName: backup-restore details: fileName: /var/lib/kubelet/pods/d46d0708-802d-43a7-bdf8-646912b7cb62/volumes/kubernetes.io~projected/kube-api-access-gardener/..2025_03_03_01_02_01.1092768610/ca.crt, permissions: 644 kind: pod name: etcd-main-0 namespace: shoot--diki-comp--aws
- cluster: seed containerName: etcd details: fileName: /var/lib/kubelet/pods/d46d0708-802d-43a7-bdf8-646912b7cb62/volumes/kubernetes.io~secret/etcd-ca/..2025_03_03_01_02_01.732820315/bundle.crt, permissions: 640 kind: pod name: etcd-main-0 namespace: shoot--diki-comp--aws
- cluster: seed containerName: etcd details: fileName: /var/lib/kubelet/pods/d46d0708-802d-43a7-bdf8-646912b7cb62/volumes/kubernetes.io~secret/etcd-server-tls/..2025_03_03_01_02_01.2596588739/tls.crt, permissions: 640 kind: pod name: etcd-main-0 namespace: shoot--diki-comp--aws
- cluster: seed containerName: etcd details: fileName: /var/lib/kubelet/pods/d46d0708-802d-43a7-bdf8-646912b7cb62/volumes/kubernetes.io~secret/etcd-client-tls/..2025_03_03_01_02_01.1252005562/tls.crt, permissions: 640 kind: pod name: etcd-main-0 namespace: shoot--diki-comp--aws
- cluster: seed containerName: etcd details: fileName: /var/lib/kubelet/pods/d46d0708-802d-43a7-bdf8-646912b7cb62/volumes/kubernetes.io~secret/backup-restore-ca/..2025_03_03_01_02_01.3362730748/bundle.crt, permissions: 640 kind: pod name: etcd-main-0 namespace: shoot--diki-comp--aws
- cluster: seed containerName: etcd details: fileName: /var/lib/kubelet/pods/d46d0708-802d-43a7-bdf8-646912b7cb62/volumes/kubernetes.io~projected/kube-api-access-gardener/..2025_03_03_01_02_01.1092768610/ca.crt, permissions: 644 kind: pod name: etcd-main-0 namespace: shoot--diki-comp--aws
- cluster: seed containerName: etcd details: fileName: /var/lib/kubelet/pods/43f307d7-051f-446e-a314-0e435190ca59/volumes/kubernetes.io~secret/etcd-ca/..2025_03_03_01_02_01.4042300612/bundle.crt, permissions: 640 kind: pod name: etcd-events-0 namespace: shoot--diki-comp--aws
- cluster: seed containerName: etcd details: fileName: /var/lib/kubelet/pods/43f307d7-051f-446e-a314-0e435190ca59/volumes/kubernetes.io~secret/etcd-server-tls/..2025_03_03_01_02_01.2269653654/tls.crt, permissions: 640 kind: pod name: etcd-events-0 namespace: shoot--diki-comp--aws
- cluster: seed containerName: etcd details: fileName: /var/lib/kubelet/pods/43f307d7-051f-446e-a314-0e435190ca59/volumes/kubernetes.io~secret/etcd-client-tls/..2025_03_03_01_02_01.911620075/tls.crt, permissions: 640 kind: pod name: etcd-events-0 namespace: shoot--diki-comp--aws
- cluster: seed containerName: etcd details: fileName: /var/lib/kubelet/pods/43f307d7-051f-446e-a314-0e435190ca59/volumes/kubernetes.io~secret/backup-restore-ca/..2025_03_03_01_02_01.402852323/bundle.crt, permissions: 640 kind: pod name: etcd-events-0 namespace: shoot--diki-comp--aws
- cluster: seed containerName: etcd details: fileName: /var/lib/kubelet/pods/43f307d7-051f-446e-a314-0e435190ca59/volumes/kubernetes.io~projected/kube-api-access-gardener/..2025_03_03_01_02_01.2294882418/ca.crt, permissions: 644 kind: pod name: etcd-events-0 namespace: shoot--diki-comp--aws
- cluster: seed containerName: backup-restore details: fileName: /var/lib/kubelet/pods/43f307d7-051f-446e-a314-0e435190ca59/volumes/kubernetes.io~secret/backup-restore-server-tls/..2025_03_03_01_02_01.3619666546/tls.crt, permissions: 640 kind: pod name: etcd-events-0 namespace: shoot--diki-comp--aws
- cluster: seed containerName: backup-restore details: fileName: /var/lib/kubelet/pods/43f307d7-051f-446e-a314-0e435190ca59/volumes/kubernetes.io~secret/etcd-ca/..2025_03_03_01_02_01.4042300612/bundle.crt, permissions: 640 kind: pod name: etcd-events-0 namespace: shoot--diki-comp--aws
- cluster: seed containerName: backup-restore details: fileName: /var/lib/kubelet/pods/43f307d7-051f-446e-a314-0e435190ca59/volumes/kubernetes.io~secret/etcd-client-tls/..2025_03_03_01_02_01.911620075/tls.crt, permissions: 640 kind: pod name: etcd-events-0 namespace: shoot--diki-comp--aws
- cluster: seed containerName: backup-restore details: fileName: /var/lib/kubelet/pods/43f307d7-051f-446e-a314-0e435190ca59/volumes/kubernetes.io~projected/kube-api-access-gardener/..2025_03_03_01_02_01.2294882418/ca.crt, permissions: 644 kind: pod name: etcd-events-0 namespace: shoot--diki-comp--aws
- cluster: seed containerName: kube-apiserver details: fileName: /var/lib/kubelet/pods/8453cbe8-7815-4009-a228-90aa1f22bdd9/volumes/kubernetes.io~secret/ca/..2025_03_03_01_12_52.2699305413/bundle.crt, permissions: 644 kind: pod name: kube-apiserver-7c5459cc5b-kz2dz namespace: shoot--diki-comp--aws
- cluster: seed containerName: kube-apiserver details: fileName: /var/lib/kubelet/pods/8453cbe8-7815-4009-a228-90aa1f22bdd9/volumes/kubernetes.io~secret/ca-client/..2025_03_03_01_12_52.4078078265/bundle.crt, permissions: 644 kind: pod name: kube-apiserver-7c5459cc5b-kz2dz namespace: shoot--diki-comp--aws
- cluster: seed containerName: kube-apiserver details: fileName: /var/lib/kubelet/pods/8453cbe8-7815-4009-a228-90aa1f22bdd9/volumes/kubernetes.io~secret/ca-front-proxy/..2025_03_03_01_12_52.689706272/bundle.crt, permissions: 644 kind: pod name: kube-apiserver-7c5459cc5b-kz2dz namespace: shoot--diki-comp--aws
- cluster: seed containerName: kube-apiserver details: fileName: /var/lib/kubelet/pods/8453cbe8-7815-4009-a228-90aa1f22bdd9/volumes/kubernetes.io~secret/kube-aggregator/..2025_03_03_01_12_52.3118211134/tls.crt, permissions: 640 kind: pod name: kube-apiserver-7c5459cc5b-kz2dz namespace: shoot--diki-comp--aws
- cluster: seed containerName: kube-apiserver details: fileName: /var/lib/kubelet/pods/8453cbe8-7815-4009-a228-90aa1f22bdd9/volumes/kubernetes.io~secret/server/..2025_03_03_01_12_52.3201692229/tls.crt, permissions: 640 kind: pod name: kube-apiserver-7c5459cc5b-kz2dz namespace: shoot--diki-comp--aws
- cluster: seed containerName: kube-apiserver details: fileName: /var/lib/kubelet/pods/8453cbe8-7815-4009-a228-90aa1f22bdd9/volumes/kubernetes.io~secret/ca-vpn/..2025_03_03_01_12_52.1763016478/bundle.crt, permissions: 644 kind: pod name: kube-apiserver-7c5459cc5b-kz2dz namespace: shoot--diki-comp--aws
- cluster: seed containerName: kube-apiserver details: fileName: /var/lib/kubelet/pods/8453cbe8-7815-4009-a228-90aa1f22bdd9/volumes/kubernetes.io~secret/ca-kubelet/..2025_03_03_01_12_52.1090624067/bundle.crt, permissions: 644 kind: pod name: kube-apiserver-7c5459cc5b-kz2dz namespace: shoot--diki-comp--aws
- cluster: seed containerName: kube-apiserver details: fileName: /var/lib/kubelet/pods/8453cbe8-7815-4009-a228-90aa1f22bdd9/volumes/kubernetes.io~secret/kubelet-client/..2025_03_03_01_12_52.3153250716/tls.crt, permissions: 640 kind: pod name: kube-apiserver-7c5459cc5b-kz2dz namespace: shoot--diki-comp--aws
- cluster: seed containerName: kube-apiserver details: fileName: /var/lib/kubelet/pods/8453cbe8-7815-4009-a228-90aa1f22bdd9/volumes/kubernetes.io~secret/ca-etcd/..2025_03_03_01_12_52.3384748314/bundle.crt, permissions: 644 kind: pod name: kube-apiserver-7c5459cc5b-kz2dz namespace: shoot--diki-comp--aws
- cluster: seed containerName: kube-apiserver details: fileName: /var/lib/kubelet/pods/8453cbe8-7815-4009-a228-90aa1f22bdd9/volumes/kubernetes.io~secret/etcd-client/..2025_03_03_01_12_52.3609175546/tls.crt, permissions: 640 kind: pod name: kube-apiserver-7c5459cc5b-kz2dz namespace: shoot--diki-comp--aws
- cluster: seed containerName: kube-apiserver details: fileName: /var/lib/kubelet/pods/8453cbe8-7815-4009-a228-90aa1f22bdd9/volumes/kubernetes.io~secret/tls-sni-0/..2025_03_03_01_12_52.3930137623/ca.crt, permissions: 640 kind: pod name: kube-apiserver-7c5459cc5b-kz2dz namespace: shoot--diki-comp--aws
- cluster: seed containerName: kube-apiserver details: fileName: /var/lib/kubelet/pods/8453cbe8-7815-4009-a228-90aa1f22bdd9/volumes/kubernetes.io~secret/tls-sni-0/..2025_03_03_01_12_52.3930137623/tls.crt, permissions: 640 kind: pod name: kube-apiserver-7c5459cc5b-kz2dz namespace: shoot--diki-comp--aws
- cluster: seed containerName: kube-apiserver details: fileName: /var/lib/kubelet/pods/8453cbe8-7815-4009-a228-90aa1f22bdd9/volumes/kubernetes.io~secret/http-proxy/..2025_03_03_01_12_52.1526321829/tls.crt, permissions: 640 kind: pod name: kube-apiserver-7c5459cc5b-kz2dz namespace: shoot--diki-comp--aws
- cluster: seed containerName: kube-controller-manager details: fileName: /var/lib/kubelet/pods/18ff08d4-cfa9-4958-8aca-ee41d678f1d3/volumes/kubernetes.io~secret/ca/..2025_03_03_01_12_51.2065093033/bundle.crt, permissions: 644 kind: pod name: kube-controller-manager-c8b755f65-p4v5d namespace: shoot--diki-comp--aws
- cluster: seed containerName: kube-controller-manager details: fileName: /var/lib/kubelet/pods/18ff08d4-cfa9-4958-8aca-ee41d678f1d3/volumes/kubernetes.io~secret/ca-client/..2025_03_03_01_12_51.3807269484/ca.crt, permissions: 640 kind: pod name: kube-controller-manager-c8b755f65-p4v5d namespace: shoot--diki-comp--aws
- cluster: seed containerName: kube-controller-manager details: fileName: /var/lib/kubelet/pods/18ff08d4-cfa9-4958-8aca-ee41d678f1d3/volumes/kubernetes.io~secret/server/..2025_03_03_01_12_51.4117152144/tls.crt, permissions: 640 kind: pod name: kube-controller-manager-c8b755f65-p4v5d namespace: shoot--diki-comp--aws
- cluster: seed containerName: kube-controller-manager details: fileName: /var/lib/kubelet/pods/18ff08d4-cfa9-4958-8aca-ee41d678f1d3/volumes/kubernetes.io~secret/ca-kubelet/..2025_03_03_01_12_51.1942131254/ca.crt, permissions: 640 kind: pod name: kube-controller-manager-c8b755f65-p4v5d namespace: shoot--diki-comp--aws
- cluster: seed containerName: kube-scheduler details: fileName: /var/lib/kubelet/pods/ba7e893a-c91e-4051-9cc0-aefe8c1fe492/volumes/kubernetes.io~projected/client-ca/..2025_03_03_01_13_50.3972196173/bundle.crt, permissions: 644 kind: pod name: kube-scheduler-678cb86cc-zm2cn namespace: shoot--diki-comp--aws
- cluster: seed containerName: kube-scheduler details: fileName: /var/lib/kubelet/pods/ba7e893a-c91e-4051-9cc0-aefe8c1fe492/volumes/kubernetes.io~secret/kube-scheduler-server/..2025_03_03_01_13_50.72514188/tls.crt, permissions: 640 kind: pod name: kube-scheduler-678cb86cc-zm2cn namespace: shoot--diki-comp--aws
- cluster: shoot details: fileName: /var/lib/kubelet/pki/kubelet-client-2025-03-03-01-09-12.pem, permissions: 600 kind: node name: ip-IP-Address.eu-west-1.compute.internal
- cluster: shoot details: fileName: /var/lib/kubelet/pki/kubelet-server-2025-03-03-01-09-55.pem, permissions: 600 kind: node name: ip-IP-Address.eu-west-1.compute.internal
- cluster: shoot containerName: kube-proxy details: fileName: /var/lib/kubelet/pods/67fdc3bf-da6b-4131-84b0-3facad7ed698/volumes/kubernetes.io~projected/kube-api-access-gardener/..2025_03_03_01_15_17.1796558607/ca.crt, permissions: 644 kind: pod name: kube-proxy-worker-kkfk1-v1.31.4-hkmbk namespace: kube-system
- cluster: shoot containerName: conntrack-fix details: fileName: /var/lib/kubelet/pods/67fdc3bf-da6b-4131-84b0-3facad7ed698/volumes/kubernetes.io~projected/kube-api-access-gardener/..2025_03_03_01_15_17.1796558607/ca.crt, permissions: 644 kind: pod name: kube-proxy-worker-kkfk1-v1.31.4-hkmbk namespace: kube-system
- azure
- cluster: seed containerName: kube-apiserver details: fileName: /var/lib/kubelet/pods/56fb368e-1dfa-4d5c-86bc-d3233d8c5ff7/volumes/kubernetes.io~secret/ca/..2025_03_03_01_15_45.490470259/bundle.crt, permissions: 644 kind: pod name: kube-apiserver-78d668b498-8xmjt namespace: shoot--diki-comp--azure
- cluster: seed containerName: kube-apiserver details: fileName: /var/lib/kubelet/pods/56fb368e-1dfa-4d5c-86bc-d3233d8c5ff7/volumes/kubernetes.io~secret/ca-client/..2025_03_03_01_15_45.439326823/bundle.crt, permissions: 644 kind: pod name: kube-apiserver-78d668b498-8xmjt namespace: shoot--diki-comp--azure
- cluster: seed containerName: kube-apiserver details: fileName: /var/lib/kubelet/pods/56fb368e-1dfa-4d5c-86bc-d3233d8c5ff7/volumes/kubernetes.io~secret/ca-front-proxy/..2025_03_03_01_15_45.1918001777/bundle.crt, permissions: 644 kind: pod name: kube-apiserver-78d668b498-8xmjt namespace: shoot--diki-comp--azure
- cluster: seed containerName: kube-apiserver details: fileName: /var/lib/kubelet/pods/56fb368e-1dfa-4d5c-86bc-d3233d8c5ff7/volumes/kubernetes.io~secret/kube-aggregator/..2025_03_03_01_15_45.4210460930/tls.crt, permissions: 640 kind: pod name: kube-apiserver-78d668b498-8xmjt namespace: shoot--diki-comp--azure
- cluster: seed containerName: kube-apiserver details: fileName: /var/lib/kubelet/pods/56fb368e-1dfa-4d5c-86bc-d3233d8c5ff7/volumes/kubernetes.io~secret/server/..2025_03_03_01_15_45.940486963/tls.crt, permissions: 640 kind: pod name: kube-apiserver-78d668b498-8xmjt namespace: shoot--diki-comp--azure
- cluster: seed containerName: kube-apiserver details: fileName: /var/lib/kubelet/pods/56fb368e-1dfa-4d5c-86bc-d3233d8c5ff7/volumes/kubernetes.io~secret/ca-vpn/..2025_03_03_01_15_45.2369293391/bundle.crt, permissions: 644 kind: pod name: kube-apiserver-78d668b498-8xmjt namespace: shoot--diki-comp--azure
- cluster: seed containerName: kube-apiserver details: fileName: /var/lib/kubelet/pods/56fb368e-1dfa-4d5c-86bc-d3233d8c5ff7/volumes/kubernetes.io~secret/ca-kubelet/..2025_03_03_01_15_45.3923805873/bundle.crt, permissions: 644 kind: pod name: kube-apiserver-78d668b498-8xmjt namespace: shoot--diki-comp--azure
- cluster: seed containerName: kube-apiserver details: fileName: /var/lib/kubelet/pods/56fb368e-1dfa-4d5c-86bc-d3233d8c5ff7/volumes/kubernetes.io~secret/kubelet-client/..2025_03_03_01_15_45.4026042906/tls.crt, permissions: 640 kind: pod name: kube-apiserver-78d668b498-8xmjt namespace: shoot--diki-comp--azure
- cluster: seed containerName: kube-apiserver details: fileName: /var/lib/kubelet/pods/56fb368e-1dfa-4d5c-86bc-d3233d8c5ff7/volumes/kubernetes.io~secret/ca-etcd/..2025_03_03_01_15_45.3336896937/bundle.crt, permissions: 644 kind: pod name: kube-apiserver-78d668b498-8xmjt namespace: shoot--diki-comp--azure
- cluster: seed containerName: kube-apiserver details: fileName: /var/lib/kubelet/pods/56fb368e-1dfa-4d5c-86bc-d3233d8c5ff7/volumes/kubernetes.io~secret/etcd-client/..2025_03_03_01_15_45.330086599/tls.crt, permissions: 640 kind: pod name: kube-apiserver-78d668b498-8xmjt namespace: shoot--diki-comp--azure
- cluster: seed containerName: kube-apiserver details: fileName: /var/lib/kubelet/pods/56fb368e-1dfa-4d5c-86bc-d3233d8c5ff7/volumes/kubernetes.io~secret/tls-sni-0/..2025_03_03_01_15_45.2219346093/tls.crt, permissions: 640 kind: pod name: kube-apiserver-78d668b498-8xmjt namespace: shoot--diki-comp--azure
- cluster: seed containerName: kube-apiserver details: fileName: /var/lib/kubelet/pods/56fb368e-1dfa-4d5c-86bc-d3233d8c5ff7/volumes/kubernetes.io~secret/tls-sni-0/..2025_03_03_01_15_45.2219346093/ca.crt, permissions: 640 kind: pod name: kube-apiserver-78d668b498-8xmjt namespace: shoot--diki-comp--azure
- cluster: seed containerName: kube-apiserver details: fileName: /var/lib/kubelet/pods/56fb368e-1dfa-4d5c-86bc-d3233d8c5ff7/volumes/kubernetes.io~secret/http-proxy/..2025_03_03_01_15_45.1994303313/tls.crt, permissions: 640 kind: pod name: kube-apiserver-78d668b498-8xmjt namespace: shoot--diki-comp--azure
- cluster: seed containerName: etcd details: fileName: /var/lib/kubelet/pods/153ccd2e-435b-4b34-8337-7b33a279136f/volumes/kubernetes.io~secret/etcd-ca/..2025_03_03_01_02_09.1747192981/bundle.crt, permissions: 640 kind: pod name: etcd-main-0 namespace: shoot--diki-comp--azure
- cluster: seed containerName: etcd details: fileName: /var/lib/kubelet/pods/153ccd2e-435b-4b34-8337-7b33a279136f/volumes/kubernetes.io~secret/etcd-server-tls/..2025_03_03_01_02_09.2561838193/tls.crt, permissions: 640 kind: pod name: etcd-main-0 namespace: shoot--diki-comp--azure
- cluster: seed containerName: etcd details: fileName: /var/lib/kubelet/pods/153ccd2e-435b-4b34-8337-7b33a279136f/volumes/kubernetes.io~secret/etcd-client-tls/..2025_03_03_01_02_09.1461912590/tls.crt, permissions: 640 kind: pod name: etcd-main-0 namespace: shoot--diki-comp--azure
- cluster: seed containerName: etcd details: fileName: /var/lib/kubelet/pods/153ccd2e-435b-4b34-8337-7b33a279136f/volumes/kubernetes.io~secret/backup-restore-ca/..2025_03_03_01_02_09.1112355822/bundle.crt, permissions: 640 kind: pod name: etcd-main-0 namespace: shoot--diki-comp--azure
- cluster: seed containerName: etcd details: fileName: /var/lib/kubelet/pods/153ccd2e-435b-4b34-8337-7b33a279136f/volumes/kubernetes.io~projected/kube-api-access-gardener/..2025_03_03_01_02_09.3605391883/ca.crt, permissions: 644 kind: pod name: etcd-main-0 namespace: shoot--diki-comp--azure
- cluster: seed containerName: backup-restore details: fileName: /var/lib/kubelet/pods/153ccd2e-435b-4b34-8337-7b33a279136f/volumes/kubernetes.io~secret/backup-restore-server-tls/..2025_03_03_01_02_09.980570931/tls.crt, permissions: 640 kind: pod name: etcd-main-0 namespace: shoot--diki-comp--azure
- cluster: seed containerName: backup-restore details: fileName: /var/lib/kubelet/pods/153ccd2e-435b-4b34-8337-7b33a279136f/volumes/kubernetes.io~secret/etcd-ca/..2025_03_03_01_02_09.1747192981/bundle.crt, permissions: 640 kind: pod name: etcd-main-0 namespace: shoot--diki-comp--azure
- cluster: seed containerName: backup-restore details: fileName: /var/lib/kubelet/pods/153ccd2e-435b-4b34-8337-7b33a279136f/volumes/kubernetes.io~secret/etcd-client-tls/..2025_03_03_01_02_09.1461912590/tls.crt, permissions: 640 kind: pod name: etcd-main-0 namespace: shoot--diki-comp--azure
- cluster: seed containerName: backup-restore details: fileName: /var/lib/kubelet/pods/153ccd2e-435b-4b34-8337-7b33a279136f/volumes/kubernetes.io~projected/kube-api-access-gardener/..2025_03_03_01_02_09.3605391883/ca.crt, permissions: 644 kind: pod name: etcd-main-0 namespace: shoot--diki-comp--azure
- cluster: seed containerName: etcd details: fileName: /var/lib/kubelet/pods/e40a1350-0fce-48ce-bed8-75ba8d51e7a0/volumes/kubernetes.io~secret/etcd-ca/..2025_03_03_01_02_09.386575845/bundle.crt, permissions: 640 kind: pod name: etcd-events-0 namespace: shoot--diki-comp--azure
- cluster: seed containerName: etcd details: fileName: /var/lib/kubelet/pods/e40a1350-0fce-48ce-bed8-75ba8d51e7a0/volumes/kubernetes.io~secret/etcd-server-tls/..2025_03_03_01_02_09.729094142/tls.crt, permissions: 640 kind: pod name: etcd-events-0 namespace: shoot--diki-comp--azure
- cluster: seed containerName: etcd details: fileName: /var/lib/kubelet/pods/e40a1350-0fce-48ce-bed8-75ba8d51e7a0/volumes/kubernetes.io~secret/etcd-client-tls/..2025_03_03_01_02_09.2268049037/tls.crt, permissions: 640 kind: pod name: etcd-events-0 namespace: shoot--diki-comp--azure
- cluster: seed containerName: etcd details: fileName: /var/lib/kubelet/pods/e40a1350-0fce-48ce-bed8-75ba8d51e7a0/volumes/kubernetes.io~secret/backup-restore-ca/..2025_03_03_01_02_09.4148787187/bundle.crt, permissions: 640 kind: pod name: etcd-events-0 namespace: shoot--diki-comp--azure
- cluster: seed containerName: etcd details: fileName: /var/lib/kubelet/pods/e40a1350-0fce-48ce-bed8-75ba8d51e7a0/volumes/kubernetes.io~projected/kube-api-access-gardener/..2025_03_03_01_02_09.745783697/ca.crt, permissions: 644 kind: pod name: etcd-events-0 namespace: shoot--diki-comp--azure
- cluster: seed containerName: backup-restore details: fileName: /var/lib/kubelet/pods/e40a1350-0fce-48ce-bed8-75ba8d51e7a0/volumes/kubernetes.io~secret/backup-restore-server-tls/..2025_03_03_01_02_09.2392161902/tls.crt, permissions: 640 kind: pod name: etcd-events-0 namespace: shoot--diki-comp--azure
- cluster: seed containerName: backup-restore details: fileName: /var/lib/kubelet/pods/e40a1350-0fce-48ce-bed8-75ba8d51e7a0/volumes/kubernetes.io~secret/etcd-ca/..2025_03_03_01_02_09.386575845/bundle.crt, permissions: 640 kind: pod name: etcd-events-0 namespace: shoot--diki-comp--azure
- cluster: seed containerName: backup-restore details: fileName: /var/lib/kubelet/pods/e40a1350-0fce-48ce-bed8-75ba8d51e7a0/volumes/kubernetes.io~secret/etcd-client-tls/..2025_03_03_01_02_09.2268049037/tls.crt, permissions: 640 kind: pod name: etcd-events-0 namespace: shoot--diki-comp--azure
- cluster: seed containerName: backup-restore details: fileName: /var/lib/kubelet/pods/e40a1350-0fce-48ce-bed8-75ba8d51e7a0/volumes/kubernetes.io~projected/kube-api-access-gardener/..2025_03_03_01_02_09.745783697/ca.crt, permissions: 644 kind: pod name: etcd-events-0 namespace: shoot--diki-comp--azure
- cluster: seed containerName: kube-controller-manager details: fileName: /var/lib/kubelet/pods/5ce475eb-2980-488b-a80e-b6056cb46e48/volumes/kubernetes.io~secret/ca/..2025_03_03_01_14_45.1500377092/bundle.crt, permissions: 644 kind: pod name: kube-controller-manager-9b68d9877-7d97p namespace: shoot--diki-comp--azure
- cluster: seed containerName: kube-controller-manager details: fileName: /var/lib/kubelet/pods/5ce475eb-2980-488b-a80e-b6056cb46e48/volumes/kubernetes.io~secret/ca-client/..2025_03_03_01_14_45.741295729/ca.crt, permissions: 640 kind: pod name: kube-controller-manager-9b68d9877-7d97p namespace: shoot--diki-comp--azure
- cluster: seed containerName: kube-controller-manager details: fileName: /var/lib/kubelet/pods/5ce475eb-2980-488b-a80e-b6056cb46e48/volumes/kubernetes.io~secret/server/..2025_03_03_01_14_45.592586788/tls.crt, permissions: 640 kind: pod name: kube-controller-manager-9b68d9877-7d97p namespace: shoot--diki-comp--azure
- cluster: seed containerName: kube-controller-manager details: fileName: /var/lib/kubelet/pods/5ce475eb-2980-488b-a80e-b6056cb46e48/volumes/kubernetes.io~secret/ca-kubelet/..2025_03_03_01_14_45.264971959/ca.crt, permissions: 640 kind: pod name: kube-controller-manager-9b68d9877-7d97p namespace: shoot--diki-comp--azure
- cluster: seed containerName: kube-scheduler details: fileName: /var/lib/kubelet/pods/e13bc0c7-ae81-4b12-a8f0-7939662b6273/volumes/kubernetes.io~projected/client-ca/..2025_03_03_01_10_45.274742397/bundle.crt, permissions: 644 kind: pod name: kube-scheduler-79b6c874b4-q7l8z namespace: shoot--diki-comp--azure
- cluster: seed containerName: kube-scheduler details: fileName: /var/lib/kubelet/pods/e13bc0c7-ae81-4b12-a8f0-7939662b6273/volumes/kubernetes.io~secret/kube-scheduler-server/..2025_03_03_01_10_45.3845255199/tls.crt, permissions: 640 kind: pod name: kube-scheduler-79b6c874b4-q7l8z namespace: shoot--diki-comp--azure
- cluster: shoot details: fileName: /var/lib/kubelet/pki/kubelet-client-2025-03-03-01-09-13.pem, permissions: 600 kind: node name: shoot--diki-comp--azure-worker-g7p4p-z3-7ccb8-2wxkr
- cluster: shoot details: fileName: /var/lib/kubelet/pki/kubelet-server-2025-03-03-01-10-06.pem, permissions: 600 kind: node name: shoot--diki-comp--azure-worker-g7p4p-z3-7ccb8-2wxkr
- cluster: shoot containerName: kube-proxy details: fileName: /var/lib/kubelet/pods/cba5277c-2ea9-4ff9-aa0f-720ebc55a428/volumes/kubernetes.io~projected/kube-api-access-gardener/..2025_03_03_01_09_16.4128433039/ca.crt, permissions: 644 kind: pod name: kube-proxy-worker-g7p4p-v1.31.4-r8rjr namespace: kube-system
- cluster: shoot containerName: conntrack-fix details: fileName: /var/lib/kubelet/pods/cba5277c-2ea9-4ff9-aa0f-720ebc55a428/volumes/kubernetes.io~projected/kube-api-access-gardener/..2025_03_03_01_09_16.4128433039/ca.crt, permissions: 644 kind: pod name: kube-proxy-worker-g7p4p-v1.31.4-r8rjr namespace: kube-system
- gcp
- cluster: seed containerName: etcd details: fileName: /var/lib/kubelet/pods/9e7e0135-30fe-4ef6-a174-df3a12ff2ca4/volumes/kubernetes.io~secret/etcd-ca/..2025_03_03_01_02_10.3050428415/bundle.crt, permissions: 640 kind: pod name: etcd-main-0 namespace: shoot--diki-comp--gcp
- cluster: seed containerName: etcd details: fileName: /var/lib/kubelet/pods/9e7e0135-30fe-4ef6-a174-df3a12ff2ca4/volumes/kubernetes.io~secret/etcd-server-tls/..2025_03_03_01_02_10.3265591842/tls.crt, permissions: 640 kind: pod name: etcd-main-0 namespace: shoot--diki-comp--gcp
- cluster: seed containerName: etcd details: fileName: /var/lib/kubelet/pods/9e7e0135-30fe-4ef6-a174-df3a12ff2ca4/volumes/kubernetes.io~secret/etcd-client-tls/..2025_03_03_01_02_10.3223316245/tls.crt, permissions: 640 kind: pod name: etcd-main-0 namespace: shoot--diki-comp--gcp
- cluster: seed containerName: etcd details: fileName: /var/lib/kubelet/pods/9e7e0135-30fe-4ef6-a174-df3a12ff2ca4/volumes/kubernetes.io~secret/backup-restore-ca/..2025_03_03_01_02_10.3857247242/bundle.crt, permissions: 640 kind: pod name: etcd-main-0 namespace: shoot--diki-comp--gcp
- cluster: seed containerName: etcd details: fileName: /var/lib/kubelet/pods/9e7e0135-30fe-4ef6-a174-df3a12ff2ca4/volumes/kubernetes.io~projected/kube-api-access-gardener/..2025_03_03_01_02_10.1269252471/ca.crt, permissions: 644 kind: pod name: etcd-main-0 namespace: shoot--diki-comp--gcp
- cluster: seed containerName: backup-restore details: fileName: /var/lib/kubelet/pods/9e7e0135-30fe-4ef6-a174-df3a12ff2ca4/volumes/kubernetes.io~secret/backup-restore-server-tls/..2025_03_03_01_02_10.2704526131/tls.crt, permissions: 640 kind: pod name: etcd-main-0 namespace: shoot--diki-comp--gcp
- cluster: seed containerName: backup-restore details: fileName: /var/lib/kubelet/pods/9e7e0135-30fe-4ef6-a174-df3a12ff2ca4/volumes/kubernetes.io~secret/etcd-ca/..2025_03_03_01_02_10.3050428415/bundle.crt, permissions: 640 kind: pod name: etcd-main-0 namespace: shoot--diki-comp--gcp
- cluster: seed containerName: backup-restore details: fileName: /var/lib/kubelet/pods/9e7e0135-30fe-4ef6-a174-df3a12ff2ca4/volumes/kubernetes.io~secret/etcd-client-tls/..2025_03_03_01_02_10.3223316245/tls.crt, permissions: 640 kind: pod name: etcd-main-0 namespace: shoot--diki-comp--gcp
- cluster: seed containerName: backup-restore details: fileName: /var/lib/kubelet/pods/9e7e0135-30fe-4ef6-a174-df3a12ff2ca4/volumes/kubernetes.io~projected/kube-api-access-gardener/..2025_03_03_01_02_10.1269252471/ca.crt, permissions: 644 kind: pod name: etcd-main-0 namespace: shoot--diki-comp--gcp
- cluster: seed containerName: etcd details: fileName: /var/lib/kubelet/pods/4df10450-500f-42ec-bcfd-2416afeb4c18/volumes/kubernetes.io~secret/etcd-ca/..2025_03_03_01_02_10.307199430/bundle.crt, permissions: 640 kind: pod name: etcd-events-0 namespace: shoot--diki-comp--gcp
- cluster: seed containerName: etcd details: fileName: /var/lib/kubelet/pods/4df10450-500f-42ec-bcfd-2416afeb4c18/volumes/kubernetes.io~secret/etcd-server-tls/..2025_03_03_01_02_10.1725835043/tls.crt, permissions: 640 kind: pod name: etcd-events-0 namespace: shoot--diki-comp--gcp
- cluster: seed containerName: etcd details: fileName: /var/lib/kubelet/pods/4df10450-500f-42ec-bcfd-2416afeb4c18/volumes/kubernetes.io~secret/etcd-client-tls/..2025_03_03_01_02_10.4134020076/tls.crt, permissions: 640 kind: pod name: etcd-events-0 namespace: shoot--diki-comp--gcp
- cluster: seed containerName: etcd details: fileName: /var/lib/kubelet/pods/4df10450-500f-42ec-bcfd-2416afeb4c18/volumes/kubernetes.io~secret/backup-restore-ca/..2025_03_03_01_02_10.1333348608/bundle.crt, permissions: 640 kind: pod name: etcd-events-0 namespace: shoot--diki-comp--gcp
- cluster: seed containerName: etcd details: fileName: /var/lib/kubelet/pods/4df10450-500f-42ec-bcfd-2416afeb4c18/volumes/kubernetes.io~projected/kube-api-access-gardener/..2025_03_03_01_02_10.2368081495/ca.crt, permissions: 644 kind: pod name: etcd-events-0 namespace: shoot--diki-comp--gcp
- cluster: seed containerName: backup-restore details: fileName: /var/lib/kubelet/pods/4df10450-500f-42ec-bcfd-2416afeb4c18/volumes/kubernetes.io~secret/backup-restore-server-tls/..2025_03_03_01_02_10.2781398980/tls.crt, permissions: 640 kind: pod name: etcd-events-0 namespace: shoot--diki-comp--gcp
- cluster: seed containerName: backup-restore details: fileName: /var/lib/kubelet/pods/4df10450-500f-42ec-bcfd-2416afeb4c18/volumes/kubernetes.io~secret/etcd-ca/..2025_03_03_01_02_10.307199430/bundle.crt, permissions: 640 kind: pod name: etcd-events-0 namespace: shoot--diki-comp--gcp
- cluster: seed containerName: backup-restore details: fileName: /var/lib/kubelet/pods/4df10450-500f-42ec-bcfd-2416afeb4c18/volumes/kubernetes.io~secret/etcd-client-tls/..2025_03_03_01_02_10.4134020076/tls.crt, permissions: 640 kind: pod name: etcd-events-0 namespace: shoot--diki-comp--gcp
- cluster: seed containerName: backup-restore details: fileName: /var/lib/kubelet/pods/4df10450-500f-42ec-bcfd-2416afeb4c18/volumes/kubernetes.io~projected/kube-api-access-gardener/..2025_03_03_01_02_10.2368081495/ca.crt, permissions: 644 kind: pod name: etcd-events-0 namespace: shoot--diki-comp--gcp
- cluster: seed containerName: kube-controller-manager details: fileName: /var/lib/kubelet/pods/90f34bcf-ceda-4e65-8112-679308dd007f/volumes/kubernetes.io~secret/ca/..2025_03_03_01_16_36.2922815650/bundle.crt, permissions: 644 kind: pod name: kube-controller-manager-d546c97bb-k5rsh namespace: shoot--diki-comp--gcp
- cluster: seed containerName: kube-controller-manager details: fileName: /var/lib/kubelet/pods/90f34bcf-ceda-4e65-8112-679308dd007f/volumes/kubernetes.io~secret/ca-client/..2025_03_03_01_16_36.3990387563/ca.crt, permissions: 640 kind: pod name: kube-controller-manager-d546c97bb-k5rsh namespace: shoot--diki-comp--gcp
- cluster: seed containerName: kube-controller-manager details: fileName: /var/lib/kubelet/pods/90f34bcf-ceda-4e65-8112-679308dd007f/volumes/kubernetes.io~secret/server/..2025_03_03_01_16_36.256775248/tls.crt, permissions: 640 kind: pod name: kube-controller-manager-d546c97bb-k5rsh namespace: shoot--diki-comp--gcp
- cluster: seed containerName: kube-controller-manager details: fileName: /var/lib/kubelet/pods/90f34bcf-ceda-4e65-8112-679308dd007f/volumes/kubernetes.io~secret/ca-kubelet/..2025_03_03_01_16_36.2964178139/ca.crt, permissions: 640 kind: pod name: kube-controller-manager-d546c97bb-k5rsh namespace: shoot--diki-comp--gcp
- cluster: seed containerName: kube-apiserver details: fileName: /var/lib/kubelet/pods/608b7ac2-2a64-4600-bffc-9ed14a956ed8/volumes/kubernetes.io~secret/ca/..2025_03_03_01_12_36.1174479734/bundle.crt, permissions: 644 kind: pod name: kube-apiserver-857b9bd577-9k45w namespace: shoot--diki-comp--gcp
- cluster: seed containerName: kube-apiserver details: fileName: /var/lib/kubelet/pods/608b7ac2-2a64-4600-bffc-9ed14a956ed8/volumes/kubernetes.io~secret/ca-client/..2025_03_03_01_12_36.1728520434/bundle.crt, permissions: 644 kind: pod name: kube-apiserver-857b9bd577-9k45w namespace: shoot--diki-comp--gcp
- cluster: seed containerName: kube-apiserver details: fileName: /var/lib/kubelet/pods/608b7ac2-2a64-4600-bffc-9ed14a956ed8/volumes/kubernetes.io~secret/ca-front-proxy/..2025_03_03_01_12_36.3572642423/bundle.crt, permissions: 644 kind: pod name: kube-apiserver-857b9bd577-9k45w namespace: shoot--diki-comp--gcp
- cluster: seed containerName: kube-apiserver details: fileName: /var/lib/kubelet/pods/608b7ac2-2a64-4600-bffc-9ed14a956ed8/volumes/kubernetes.io~secret/kube-aggregator/..2025_03_03_01_12_36.3477424634/tls.crt, permissions: 640 kind: pod name: kube-apiserver-857b9bd577-9k45w namespace: shoot--diki-comp--gcp
- cluster: seed containerName: kube-apiserver details: fileName: /var/lib/kubelet/pods/608b7ac2-2a64-4600-bffc-9ed14a956ed8/volumes/kubernetes.io~secret/server/..2025_03_03_01_12_36.2325140443/tls.crt, permissions: 640 kind: pod name: kube-apiserver-857b9bd577-9k45w namespace: shoot--diki-comp--gcp
- cluster: seed containerName: kube-apiserver details: fileName: /var/lib/kubelet/pods/608b7ac2-2a64-4600-bffc-9ed14a956ed8/volumes/kubernetes.io~secret/ca-vpn/..2025_03_03_01_12_36.2145202368/bundle.crt, permissions: 644 kind: pod name: kube-apiserver-857b9bd577-9k45w namespace: shoot--diki-comp--gcp
- cluster: seed containerName: kube-apiserver details: fileName: /var/lib/kubelet/pods/608b7ac2-2a64-4600-bffc-9ed14a956ed8/volumes/kubernetes.io~secret/ca-kubelet/..2025_03_03_01_12_36.282363630/bundle.crt, permissions: 644 kind: pod name: kube-apiserver-857b9bd577-9k45w namespace: shoot--diki-comp--gcp
- cluster: seed containerName: kube-apiserver details: fileName: /var/lib/kubelet/pods/608b7ac2-2a64-4600-bffc-9ed14a956ed8/volumes/kubernetes.io~secret/kubelet-client/..2025_03_03_01_12_36.2748958189/tls.crt, permissions: 640 kind: pod name: kube-apiserver-857b9bd577-9k45w namespace: shoot--diki-comp--gcp
- cluster: seed containerName: kube-apiserver details: fileName: /var/lib/kubelet/pods/608b7ac2-2a64-4600-bffc-9ed14a956ed8/volumes/kubernetes.io~secret/ca-etcd/..2025_03_03_01_12_36.3945965329/bundle.crt, permissions: 644 kind: pod name: kube-apiserver-857b9bd577-9k45w namespace: shoot--diki-comp--gcp
- cluster: seed containerName: kube-apiserver details: fileName: /var/lib/kubelet/pods/608b7ac2-2a64-4600-bffc-9ed14a956ed8/volumes/kubernetes.io~secret/etcd-client/..2025_03_03_01_12_36.1279523670/tls.crt, permissions: 640 kind: pod name: kube-apiserver-857b9bd577-9k45w namespace: shoot--diki-comp--gcp
- cluster: seed containerName: kube-apiserver details: fileName: /var/lib/kubelet/pods/608b7ac2-2a64-4600-bffc-9ed14a956ed8/volumes/kubernetes.io~secret/tls-sni-0/..2025_03_03_01_12_36.278921696/tls.crt, permissions: 640 kind: pod name: kube-apiserver-857b9bd577-9k45w namespace: shoot--diki-comp--gcp
- cluster: seed containerName: kube-apiserver details: fileName: /var/lib/kubelet/pods/608b7ac2-2a64-4600-bffc-9ed14a956ed8/volumes/kubernetes.io~secret/tls-sni-0/..2025_03_03_01_12_36.278921696/ca.crt, permissions: 640 kind: pod name: kube-apiserver-857b9bd577-9k45w namespace: shoot--diki-comp--gcp
- cluster: seed containerName: kube-apiserver details: fileName: /var/lib/kubelet/pods/608b7ac2-2a64-4600-bffc-9ed14a956ed8/volumes/kubernetes.io~secret/http-proxy/..2025_03_03_01_12_36.3122740563/tls.crt, permissions: 640 kind: pod name: kube-apiserver-857b9bd577-9k45w namespace: shoot--diki-comp--gcp
- cluster: seed containerName: kube-scheduler details: fileName: /var/lib/kubelet/pods/ecad819a-dc71-4e4e-a17e-11b91bd08505/volumes/kubernetes.io~projected/client-ca/..2025_03_03_01_09_35.3955725141/bundle.crt, permissions: 644 kind: pod name: kube-scheduler-65fbc646c-ck6kp namespace: shoot--diki-comp--gcp
- cluster: seed containerName: kube-scheduler details: fileName: /var/lib/kubelet/pods/ecad819a-dc71-4e4e-a17e-11b91bd08505/volumes/kubernetes.io~secret/kube-scheduler-server/..2025_03_03_01_09_35.344821711/tls.crt, permissions: 640 kind: pod name: kube-scheduler-65fbc646c-ck6kp namespace: shoot--diki-comp--gcp
- cluster: shoot details: fileName: /var/lib/kubelet/pki/kubelet-server-2025-03-03-01-08-29.pem, permissions: 600 kind: node name: shoot--diki-comp--gcp-worker-bex82-z1-d8757-66str
- cluster: shoot details: fileName: /var/lib/kubelet/pki/kubelet-client-2025-03-03-01-07-27.pem, permissions: 600 kind: node name: shoot--diki-comp--gcp-worker-bex82-z1-d8757-66str
- cluster: shoot containerName: kube-proxy details: fileName: /var/lib/kubelet/pods/3653b577-e930-4df8-b0b6-c1dee555c93f/volumes/kubernetes.io~projected/kube-api-access-gardener/..2025_03_03_01_07_28.1688515968/ca.crt, permissions: 644 kind: pod name: kube-proxy-worker-bex82-v1.31.4-nt98w namespace: kube-system
- cluster: shoot containerName: conntrack-fix details: fileName: /var/lib/kubelet/pods/3653b577-e930-4df8-b0b6-c1dee555c93f/volumes/kubernetes.io~projected/kube-api-access-gardener/..2025_03_03_01_07_28.1688515968/ca.crt, permissions: 644 kind: pod name: kube-proxy-worker-bex82-v1.31.4-nt98w namespace: kube-system
- openstack
- cluster: seed containerName: etcd details: fileName: /var/lib/kubelet/pods/7a54bb1c-3f4b-4dc7-95f5-377c788ad051/volumes/kubernetes.io~secret/etcd-ca/..2025_03_03_01_02_05.439102016/bundle.crt, permissions: 640 kind: pod name: etcd-events-0 namespace: shoot--diki-comp--openstack
- cluster: seed containerName: etcd details: fileName: /var/lib/kubelet/pods/7a54bb1c-3f4b-4dc7-95f5-377c788ad051/volumes/kubernetes.io~secret/etcd-server-tls/..2025_03_03_01_02_05.3893612686/tls.crt, permissions: 640 kind: pod name: etcd-events-0 namespace: shoot--diki-comp--openstack
- cluster: seed containerName: etcd details: fileName: /var/lib/kubelet/pods/7a54bb1c-3f4b-4dc7-95f5-377c788ad051/volumes/kubernetes.io~secret/etcd-client-tls/..2025_03_03_01_02_05.1189205670/tls.crt, permissions: 640 kind: pod name: etcd-events-0 namespace: shoot--diki-comp--openstack
- cluster: seed containerName: etcd details: fileName: /var/lib/kubelet/pods/7a54bb1c-3f4b-4dc7-95f5-377c788ad051/volumes/kubernetes.io~secret/backup-restore-ca/..2025_03_03_01_02_05.913416246/bundle.crt, permissions: 640 kind: pod name: etcd-events-0 namespace: shoot--diki-comp--openstack
- cluster: seed containerName: etcd details: fileName: /var/lib/kubelet/pods/7a54bb1c-3f4b-4dc7-95f5-377c788ad051/volumes/kubernetes.io~projected/kube-api-access-gardener/..2025_03_03_01_02_05.3448401570/ca.crt, permissions: 644 kind: pod name: etcd-events-0 namespace: shoot--diki-comp--openstack
- cluster: seed containerName: backup-restore details: fileName: /var/lib/kubelet/pods/7a54bb1c-3f4b-4dc7-95f5-377c788ad051/volumes/kubernetes.io~secret/backup-restore-server-tls/..2025_03_03_01_02_05.4287174027/tls.crt, permissions: 640 kind: pod name: etcd-events-0 namespace: shoot--diki-comp--openstack
- cluster: seed containerName: backup-restore details: fileName: /var/lib/kubelet/pods/7a54bb1c-3f4b-4dc7-95f5-377c788ad051/volumes/kubernetes.io~secret/etcd-ca/..2025_03_03_01_02_05.439102016/bundle.crt, permissions: 640 kind: pod name: etcd-events-0 namespace: shoot--diki-comp--openstack
- cluster: seed containerName: backup-restore details: fileName: /var/lib/kubelet/pods/7a54bb1c-3f4b-4dc7-95f5-377c788ad051/volumes/kubernetes.io~secret/etcd-client-tls/..2025_03_03_01_02_05.1189205670/tls.crt, permissions: 640 kind: pod name: etcd-events-0 namespace: shoot--diki-comp--openstack
- cluster: seed containerName: backup-restore details: fileName: /var/lib/kubelet/pods/7a54bb1c-3f4b-4dc7-95f5-377c788ad051/volumes/kubernetes.io~projected/kube-api-access-gardener/..2025_03_03_01_02_05.3448401570/ca.crt, permissions: 644 kind: pod name: etcd-events-0 namespace: shoot--diki-comp--openstack
- cluster: seed containerName: kube-apiserver details: fileName: /var/lib/kubelet/pods/adef142b-7c5d-4d1e-b0c2-9c575b9bbdea/volumes/kubernetes.io~secret/ca/..2025_03_03_01_14_29.407171975/bundle.crt, permissions: 644 kind: pod name: kube-apiserver-5d6dcc9bd5-jsqrl namespace: shoot--diki-comp--openstack
- cluster: seed containerName: kube-apiserver details: fileName: /var/lib/kubelet/pods/adef142b-7c5d-4d1e-b0c2-9c575b9bbdea/volumes/kubernetes.io~secret/ca-client/..2025_03_03_01_14_29.2499436981/bundle.crt, permissions: 644 kind: pod name: kube-apiserver-5d6dcc9bd5-jsqrl namespace: shoot--diki-comp--openstack
- cluster: seed containerName: kube-apiserver details: fileName: /var/lib/kubelet/pods/adef142b-7c5d-4d1e-b0c2-9c575b9bbdea/volumes/kubernetes.io~secret/ca-front-proxy/..2025_03_03_01_14_29.2116021732/bundle.crt, permissions: 644 kind: pod name: kube-apiserver-5d6dcc9bd5-jsqrl namespace: shoot--diki-comp--openstack
- cluster: seed containerName: kube-apiserver details: fileName: /var/lib/kubelet/pods/adef142b-7c5d-4d1e-b0c2-9c575b9bbdea/volumes/kubernetes.io~secret/kube-aggregator/..2025_03_03_01_14_29.3516547635/tls.crt, permissions: 640 kind: pod name: kube-apiserver-5d6dcc9bd5-jsqrl namespace: shoot--diki-comp--openstack
- cluster: seed containerName: kube-apiserver details: fileName: /var/lib/kubelet/pods/adef142b-7c5d-4d1e-b0c2-9c575b9bbdea/volumes/kubernetes.io~secret/server/..2025_03_03_01_14_29.1544469879/tls.crt, permissions: 640 kind: pod name: kube-apiserver-5d6dcc9bd5-jsqrl namespace: shoot--diki-comp--openstack
- cluster: seed containerName: kube-apiserver details: fileName: /var/lib/kubelet/pods/adef142b-7c5d-4d1e-b0c2-9c575b9bbdea/volumes/kubernetes.io~secret/ca-vpn/..2025_03_03_01_14_29.4102013387/bundle.crt, permissions: 644 kind: pod name: kube-apiserver-5d6dcc9bd5-jsqrl namespace: shoot--diki-comp--openstack
- cluster: seed containerName: kube-apiserver details: fileName: /var/lib/kubelet/pods/adef142b-7c5d-4d1e-b0c2-9c575b9bbdea/volumes/kubernetes.io~secret/ca-kubelet/..2025_03_03_01_14_29.1069799842/bundle.crt, permissions: 644 kind: pod name: kube-apiserver-5d6dcc9bd5-jsqrl namespace: shoot--diki-comp--openstack
- cluster: seed containerName: kube-apiserver details: fileName: /var/lib/kubelet/pods/adef142b-7c5d-4d1e-b0c2-9c575b9bbdea/volumes/kubernetes.io~secret/kubelet-client/..2025_03_03_01_14_29.798787007/tls.crt, permissions: 640 kind: pod name: kube-apiserver-5d6dcc9bd5-jsqrl namespace: shoot--diki-comp--openstack
- cluster: seed containerName: kube-apiserver details: fileName: /var/lib/kubelet/pods/adef142b-7c5d-4d1e-b0c2-9c575b9bbdea/volumes/kubernetes.io~secret/ca-etcd/..2025_03_03_01_14_29.3554070821/bundle.crt, permissions: 644 kind: pod name: kube-apiserver-5d6dcc9bd5-jsqrl namespace: shoot--diki-comp--openstack
- cluster: seed containerName: kube-apiserver details: fileName: /var/lib/kubelet/pods/adef142b-7c5d-4d1e-b0c2-9c575b9bbdea/volumes/kubernetes.io~secret/etcd-client/..2025_03_03_01_14_29.3024572020/tls.crt, permissions: 640 kind: pod name: kube-apiserver-5d6dcc9bd5-jsqrl namespace: shoot--diki-comp--openstack
- cluster: seed containerName: kube-apiserver details: fileName: /var/lib/kubelet/pods/adef142b-7c5d-4d1e-b0c2-9c575b9bbdea/volumes/kubernetes.io~secret/tls-sni-0/..2025_03_03_01_14_29.4247416010/ca.crt, permissions: 640 kind: pod name: kube-apiserver-5d6dcc9bd5-jsqrl namespace: shoot--diki-comp--openstack
- cluster: seed containerName: kube-apiserver details: fileName: /var/lib/kubelet/pods/adef142b-7c5d-4d1e-b0c2-9c575b9bbdea/volumes/kubernetes.io~secret/tls-sni-0/..2025_03_03_01_14_29.4247416010/tls.crt, permissions: 640 kind: pod name: kube-apiserver-5d6dcc9bd5-jsqrl namespace: shoot--diki-comp--openstack
- cluster: seed containerName: kube-apiserver details: fileName: /var/lib/kubelet/pods/adef142b-7c5d-4d1e-b0c2-9c575b9bbdea/volumes/kubernetes.io~secret/http-proxy/..2025_03_03_01_14_29.2845433525/tls.crt, permissions: 640 kind: pod name: kube-apiserver-5d6dcc9bd5-jsqrl namespace: shoot--diki-comp--openstack
- cluster: seed containerName: kube-controller-manager details: fileName: /var/lib/kubelet/pods/c96aace0-5680-4b81-9225-cb3db3aed8bf/volumes/kubernetes.io~secret/ca/..2025_03_03_01_10_31.235358473/bundle.crt, permissions: 644 kind: pod name: kube-controller-manager-6f87877757-4grgt namespace: shoot--diki-comp--openstack
- cluster: seed containerName: kube-controller-manager details: fileName: /var/lib/kubelet/pods/c96aace0-5680-4b81-9225-cb3db3aed8bf/volumes/kubernetes.io~secret/ca-client/..2025_03_03_01_10_31.3584083571/ca.crt, permissions: 640 kind: pod name: kube-controller-manager-6f87877757-4grgt namespace: shoot--diki-comp--openstack
- cluster: seed containerName: kube-controller-manager details: fileName: /var/lib/kubelet/pods/c96aace0-5680-4b81-9225-cb3db3aed8bf/volumes/kubernetes.io~secret/server/..2025_03_03_01_10_31.104263364/tls.crt, permissions: 640 kind: pod name: kube-controller-manager-6f87877757-4grgt namespace: shoot--diki-comp--openstack
- cluster: seed containerName: kube-controller-manager details: fileName: /var/lib/kubelet/pods/c96aace0-5680-4b81-9225-cb3db3aed8bf/volumes/kubernetes.io~secret/ca-kubelet/..2025_03_03_01_10_31.1741570139/ca.crt, permissions: 640 kind: pod name: kube-controller-manager-6f87877757-4grgt namespace: shoot--diki-comp--openstack
- cluster: seed containerName: kube-scheduler details: fileName: /var/lib/kubelet/pods/c079eae7-e4b5-4e7a-adfb-051573ecabea/volumes/kubernetes.io~projected/client-ca/..2025_03_03_01_12_28.1885206071/bundle.crt, permissions: 644 kind: pod name: kube-scheduler-68854c4574-mbcz2 namespace: shoot--diki-comp--openstack
- cluster: seed containerName: kube-scheduler details: fileName: /var/lib/kubelet/pods/c079eae7-e4b5-4e7a-adfb-051573ecabea/volumes/kubernetes.io~secret/kube-scheduler-server/..2025_03_03_01_12_28.484866836/tls.crt, permissions: 640 kind: pod name: kube-scheduler-68854c4574-mbcz2 namespace: shoot--diki-comp--openstack
- cluster: seed containerName: etcd details: fileName: /var/lib/kubelet/pods/576670d6-2e92-4999-a5db-46d1e5b110fc/volumes/kubernetes.io~secret/etcd-ca/..2025_03_03_01_02_06.696245391/bundle.crt, permissions: 640 kind: pod name: etcd-main-0 namespace: shoot--diki-comp--openstack
- cluster: seed containerName: etcd details: fileName: /var/lib/kubelet/pods/576670d6-2e92-4999-a5db-46d1e5b110fc/volumes/kubernetes.io~secret/etcd-server-tls/..2025_03_03_01_02_06.2589642709/tls.crt, permissions: 640 kind: pod name: etcd-main-0 namespace: shoot--diki-comp--openstack
- cluster: seed containerName: etcd details: fileName: /var/lib/kubelet/pods/576670d6-2e92-4999-a5db-46d1e5b110fc/volumes/kubernetes.io~secret/etcd-client-tls/..2025_03_03_01_02_06.989578068/tls.crt, permissions: 640 kind: pod name: etcd-main-0 namespace: shoot--diki-comp--openstack
- cluster: seed containerName: etcd details: fileName: /var/lib/kubelet/pods/576670d6-2e92-4999-a5db-46d1e5b110fc/volumes/kubernetes.io~secret/backup-restore-ca/..2025_03_03_01_02_06.2507918529/bundle.crt, permissions: 640 kind: pod name: etcd-main-0 namespace: shoot--diki-comp--openstack
- cluster: seed containerName: etcd details: fileName: /var/lib/kubelet/pods/576670d6-2e92-4999-a5db-46d1e5b110fc/volumes/kubernetes.io~projected/kube-api-access-gardener/..2025_03_03_01_02_06.3524888998/ca.crt, permissions: 644 kind: pod name: etcd-main-0 namespace: shoot--diki-comp--openstack
- cluster: seed containerName: backup-restore details: fileName: /var/lib/kubelet/pods/576670d6-2e92-4999-a5db-46d1e5b110fc/volumes/kubernetes.io~secret/backup-restore-server-tls/..2025_03_03_01_02_06.2509886571/tls.crt, permissions: 640 kind: pod name: etcd-main-0 namespace: shoot--diki-comp--openstack
- cluster: seed containerName: backup-restore details: fileName: /var/lib/kubelet/pods/576670d6-2e92-4999-a5db-46d1e5b110fc/volumes/kubernetes.io~secret/etcd-ca/..2025_03_03_01_02_06.696245391/bundle.crt, permissions: 640 kind: pod name: etcd-main-0 namespace: shoot--diki-comp--openstack
- cluster: seed containerName: backup-restore details: fileName: /var/lib/kubelet/pods/576670d6-2e92-4999-a5db-46d1e5b110fc/volumes/kubernetes.io~secret/etcd-client-tls/..2025_03_03_01_02_06.989578068/tls.crt, permissions: 640 kind: pod name: etcd-main-0 namespace: shoot--diki-comp--openstack
- cluster: seed containerName: backup-restore details: fileName: /var/lib/kubelet/pods/576670d6-2e92-4999-a5db-46d1e5b110fc/volumes/kubernetes.io~projected/kube-api-access-gardener/..2025_03_03_01_02_06.3524888998/ca.crt, permissions: 644 kind: pod name: etcd-main-0 namespace: shoot--diki-comp--openstack
- cluster: shoot details: fileName: /var/lib/kubelet/pki/kubelet-client-2025-03-03-01-09-31.pem, permissions: 600 kind: node name: shoot--diki-comp--openstack-worker-dqty2-z1-6c54d-j8jtj
- cluster: shoot details: fileName: /var/lib/kubelet/pki/kubelet-server-2025-03-03-01-09-40.pem, permissions: 600 kind: node name: shoot--diki-comp--openstack-worker-dqty2-z1-6c54d-j8jtj
- cluster: shoot containerName: kube-proxy details: fileName: /var/lib/kubelet/pods/9618e3a0-8bdf-4e84-ae68-88437c5e8fee/volumes/kubernetes.io~projected/kube-api-access-gardener/..2025_03_03_01_09_32.791759420/ca.crt, permissions: 644 kind: pod name: kube-proxy-worker-dqty2-v1.31.4-tpl27 namespace: kube-system
- cluster: shoot containerName: conntrack-fix details: fileName: /var/lib/kubelet/pods/9618e3a0-8bdf-4e84-ae68-88437c5e8fee/volumes/kubernetes.io~projected/kube-api-access-gardener/..2025_03_03_01_09_32.791759420/ca.crt, permissions: 644 kind: pod name: kube-proxy-worker-dqty2-v1.31.4-tpl27 namespace: kube-system
- aws
-
File has expected permissions
-
242467 (Medium) - The Kubernetes PKI keys must have file permissions set to 600 or more restrictive.
-
File has expected permissions
- aws
- cluster: seed containerName: etcd details: fileName: /var/lib/kubelet/pods/43f307d7-051f-446e-a314-0e435190ca59/volumes/kubernetes.io~secret/etcd-server-tls/..2025_03_03_01_02_01.2269653654/tls.key, permissions: 640 kind: pod name: etcd-events-0 namespace: shoot--diki-comp--aws
- cluster: seed containerName: etcd details: fileName: /var/lib/kubelet/pods/43f307d7-051f-446e-a314-0e435190ca59/volumes/kubernetes.io~secret/etcd-client-tls/..2025_03_03_01_02_01.911620075/tls.key, permissions: 640 kind: pod name: etcd-events-0 namespace: shoot--diki-comp--aws
- cluster: seed containerName: backup-restore details: fileName: /var/lib/kubelet/pods/43f307d7-051f-446e-a314-0e435190ca59/volumes/kubernetes.io~secret/backup-restore-server-tls/..2025_03_03_01_02_01.3619666546/tls.key, permissions: 640 kind: pod name: etcd-events-0 namespace: shoot--diki-comp--aws
- cluster: seed containerName: backup-restore details: fileName: /var/lib/kubelet/pods/43f307d7-051f-446e-a314-0e435190ca59/volumes/kubernetes.io~secret/etcd-client-tls/..2025_03_03_01_02_01.911620075/tls.key, permissions: 640 kind: pod name: etcd-events-0 namespace: shoot--diki-comp--aws
- cluster: seed containerName: kube-apiserver details: fileName: /var/lib/kubelet/pods/8453cbe8-7815-4009-a228-90aa1f22bdd9/volumes/kubernetes.io~secret/service-account-key-bundle/..2025_03_03_01_12_52.1447808254/bundle.key, permissions: 640 kind: pod name: kube-apiserver-7c5459cc5b-kz2dz namespace: shoot--diki-comp--aws
- cluster: seed containerName: kube-apiserver details: fileName: /var/lib/kubelet/pods/8453cbe8-7815-4009-a228-90aa1f22bdd9/volumes/kubernetes.io~secret/kube-aggregator/..2025_03_03_01_12_52.3118211134/tls.key, permissions: 640 kind: pod name: kube-apiserver-7c5459cc5b-kz2dz namespace: shoot--diki-comp--aws
- cluster: seed containerName: kube-apiserver details: fileName: /var/lib/kubelet/pods/8453cbe8-7815-4009-a228-90aa1f22bdd9/volumes/kubernetes.io~secret/server/..2025_03_03_01_12_52.3201692229/tls.key, permissions: 640 kind: pod name: kube-apiserver-7c5459cc5b-kz2dz namespace: shoot--diki-comp--aws
- cluster: seed containerName: kube-apiserver details: fileName: /var/lib/kubelet/pods/8453cbe8-7815-4009-a228-90aa1f22bdd9/volumes/kubernetes.io~secret/kubelet-client/..2025_03_03_01_12_52.3153250716/tls.key, permissions: 640 kind: pod name: kube-apiserver-7c5459cc5b-kz2dz namespace: shoot--diki-comp--aws
- cluster: seed containerName: kube-apiserver details: fileName: /var/lib/kubelet/pods/8453cbe8-7815-4009-a228-90aa1f22bdd9/volumes/kubernetes.io~secret/etcd-client/..2025_03_03_01_12_52.3609175546/tls.key, permissions: 640 kind: pod name: kube-apiserver-7c5459cc5b-kz2dz namespace: shoot--diki-comp--aws
- cluster: seed containerName: kube-apiserver details: fileName: /var/lib/kubelet/pods/8453cbe8-7815-4009-a228-90aa1f22bdd9/volumes/kubernetes.io~secret/tls-sni-0/..2025_03_03_01_12_52.3930137623/tls.key, permissions: 640 kind: pod name: kube-apiserver-7c5459cc5b-kz2dz namespace: shoot--diki-comp--aws
- cluster: seed containerName: kube-apiserver details: fileName: /var/lib/kubelet/pods/8453cbe8-7815-4009-a228-90aa1f22bdd9/volumes/kubernetes.io~secret/http-proxy/..2025_03_03_01_12_52.1526321829/tls.key, permissions: 640 kind: pod name: kube-apiserver-7c5459cc5b-kz2dz namespace: shoot--diki-comp--aws
- cluster: seed containerName: kube-controller-manager details: fileName: /var/lib/kubelet/pods/18ff08d4-cfa9-4958-8aca-ee41d678f1d3/volumes/kubernetes.io~secret/ca-client/..2025_03_03_01_12_51.3807269484/ca.key, permissions: 640 kind: pod name: kube-controller-manager-c8b755f65-p4v5d namespace: shoot--diki-comp--aws
- cluster: seed containerName: kube-controller-manager details: fileName: /var/lib/kubelet/pods/18ff08d4-cfa9-4958-8aca-ee41d678f1d3/volumes/kubernetes.io~secret/server/..2025_03_03_01_12_51.4117152144/tls.key, permissions: 640 kind: pod name: kube-controller-manager-c8b755f65-p4v5d namespace: shoot--diki-comp--aws
- cluster: seed containerName: kube-controller-manager details: fileName: /var/lib/kubelet/pods/18ff08d4-cfa9-4958-8aca-ee41d678f1d3/volumes/kubernetes.io~secret/ca-kubelet/..2025_03_03_01_12_51.1942131254/ca.key, permissions: 640 kind: pod name: kube-controller-manager-c8b755f65-p4v5d namespace: shoot--diki-comp--aws
- cluster: seed containerName: kube-scheduler details: fileName: /var/lib/kubelet/pods/ba7e893a-c91e-4051-9cc0-aefe8c1fe492/volumes/kubernetes.io~secret/kube-scheduler-server/..2025_03_03_01_13_50.72514188/tls.key, permissions: 640 kind: pod name: kube-scheduler-678cb86cc-zm2cn namespace: shoot--diki-comp--aws
- cluster: seed containerName: backup-restore details: fileName: /var/lib/kubelet/pods/d46d0708-802d-43a7-bdf8-646912b7cb62/volumes/kubernetes.io~secret/backup-restore-server-tls/..2025_03_03_01_02_01.3321577487/tls.key, permissions: 640 kind: pod name: etcd-main-0 namespace: shoot--diki-comp--aws
- cluster: seed containerName: backup-restore details: fileName: /var/lib/kubelet/pods/d46d0708-802d-43a7-bdf8-646912b7cb62/volumes/kubernetes.io~secret/etcd-client-tls/..2025_03_03_01_02_01.1252005562/tls.key, permissions: 640 kind: pod name: etcd-main-0 namespace: shoot--diki-comp--aws
- cluster: seed containerName: etcd details: fileName: /var/lib/kubelet/pods/d46d0708-802d-43a7-bdf8-646912b7cb62/volumes/kubernetes.io~secret/etcd-server-tls/..2025_03_03_01_02_01.2596588739/tls.key, permissions: 640 kind: pod name: etcd-main-0 namespace: shoot--diki-comp--aws
- cluster: seed containerName: etcd details: fileName: /var/lib/kubelet/pods/d46d0708-802d-43a7-bdf8-646912b7cb62/volumes/kubernetes.io~secret/etcd-client-tls/..2025_03_03_01_02_01.1252005562/tls.key, permissions: 640 kind: pod name: etcd-main-0 namespace: shoot--diki-comp--aws
- cluster: shoot details: fileName: /var/lib/kubelet/pki/kubelet-client-2025-03-03-01-09-12.pem, permissions: 600 kind: node name: ip-IP-Address.eu-west-1.compute.internal
- cluster: shoot details: fileName: /var/lib/kubelet/pki/kubelet-server-2025-03-03-01-09-55.pem, permissions: 600 kind: node name: ip-IP-Address.eu-west-1.compute.internal
- azure
- cluster: seed containerName: etcd details: fileName: /var/lib/kubelet/pods/153ccd2e-435b-4b34-8337-7b33a279136f/volumes/kubernetes.io~secret/etcd-server-tls/..2025_03_03_01_02_09.2561838193/tls.key, permissions: 640 kind: pod name: etcd-main-0 namespace: shoot--diki-comp--azure
- cluster: seed containerName: etcd details: fileName: /var/lib/kubelet/pods/153ccd2e-435b-4b34-8337-7b33a279136f/volumes/kubernetes.io~secret/etcd-client-tls/..2025_03_03_01_02_09.1461912590/tls.key, permissions: 640 kind: pod name: etcd-main-0 namespace: shoot--diki-comp--azure
- cluster: seed containerName: backup-restore details: fileName: /var/lib/kubelet/pods/153ccd2e-435b-4b34-8337-7b33a279136f/volumes/kubernetes.io~secret/backup-restore-server-tls/..2025_03_03_01_02_09.980570931/tls.key, permissions: 640 kind: pod name: etcd-main-0 namespace: shoot--diki-comp--azure
- cluster: seed containerName: backup-restore details: fileName: /var/lib/kubelet/pods/153ccd2e-435b-4b34-8337-7b33a279136f/volumes/kubernetes.io~secret/etcd-client-tls/..2025_03_03_01_02_09.1461912590/tls.key, permissions: 640 kind: pod name: etcd-main-0 namespace: shoot--diki-comp--azure
- cluster: seed containerName: etcd details: fileName: /var/lib/kubelet/pods/e40a1350-0fce-48ce-bed8-75ba8d51e7a0/volumes/kubernetes.io~secret/etcd-server-tls/..2025_03_03_01_02_09.729094142/tls.key, permissions: 640 kind: pod name: etcd-events-0 namespace: shoot--diki-comp--azure
- cluster: seed containerName: etcd details: fileName: /var/lib/kubelet/pods/e40a1350-0fce-48ce-bed8-75ba8d51e7a0/volumes/kubernetes.io~secret/etcd-client-tls/..2025_03_03_01_02_09.2268049037/tls.key, permissions: 640 kind: pod name: etcd-events-0 namespace: shoot--diki-comp--azure
- cluster: seed containerName: backup-restore details: fileName: /var/lib/kubelet/pods/e40a1350-0fce-48ce-bed8-75ba8d51e7a0/volumes/kubernetes.io~secret/backup-restore-server-tls/..2025_03_03_01_02_09.2392161902/tls.key, permissions: 640 kind: pod name: etcd-events-0 namespace: shoot--diki-comp--azure
- cluster: seed containerName: backup-restore details: fileName: /var/lib/kubelet/pods/e40a1350-0fce-48ce-bed8-75ba8d51e7a0/volumes/kubernetes.io~secret/etcd-client-tls/..2025_03_03_01_02_09.2268049037/tls.key, permissions: 640 kind: pod name: etcd-events-0 namespace: shoot--diki-comp--azure
- cluster: seed containerName: kube-controller-manager details: fileName: /var/lib/kubelet/pods/5ce475eb-2980-488b-a80e-b6056cb46e48/volumes/kubernetes.io~secret/ca-client/..2025_03_03_01_14_45.741295729/ca.key, permissions: 640 kind: pod name: kube-controller-manager-9b68d9877-7d97p namespace: shoot--diki-comp--azure
- cluster: seed containerName: kube-controller-manager details: fileName: /var/lib/kubelet/pods/5ce475eb-2980-488b-a80e-b6056cb46e48/volumes/kubernetes.io~secret/server/..2025_03_03_01_14_45.592586788/tls.key, permissions: 640 kind: pod name: kube-controller-manager-9b68d9877-7d97p namespace: shoot--diki-comp--azure
- cluster: seed containerName: kube-controller-manager details: fileName: /var/lib/kubelet/pods/5ce475eb-2980-488b-a80e-b6056cb46e48/volumes/kubernetes.io~secret/ca-kubelet/..2025_03_03_01_14_45.264971959/ca.key, permissions: 640 kind: pod name: kube-controller-manager-9b68d9877-7d97p namespace: shoot--diki-comp--azure
- cluster: seed containerName: kube-scheduler details: fileName: /var/lib/kubelet/pods/e13bc0c7-ae81-4b12-a8f0-7939662b6273/volumes/kubernetes.io~secret/kube-scheduler-server/..2025_03_03_01_10_45.3845255199/tls.key, permissions: 640 kind: pod name: kube-scheduler-79b6c874b4-q7l8z namespace: shoot--diki-comp--azure
- cluster: seed containerName: kube-apiserver details: fileName: /var/lib/kubelet/pods/56fb368e-1dfa-4d5c-86bc-d3233d8c5ff7/volumes/kubernetes.io~secret/service-account-key-bundle/..2025_03_03_01_15_45.731119053/bundle.key, permissions: 640 kind: pod name: kube-apiserver-78d668b498-8xmjt namespace: shoot--diki-comp--azure
- cluster: seed containerName: kube-apiserver details: fileName: /var/lib/kubelet/pods/56fb368e-1dfa-4d5c-86bc-d3233d8c5ff7/volumes/kubernetes.io~secret/kube-aggregator/..2025_03_03_01_15_45.4210460930/tls.key, permissions: 640 kind: pod name: kube-apiserver-78d668b498-8xmjt namespace: shoot--diki-comp--azure
- cluster: seed containerName: kube-apiserver details: fileName: /var/lib/kubelet/pods/56fb368e-1dfa-4d5c-86bc-d3233d8c5ff7/volumes/kubernetes.io~secret/server/..2025_03_03_01_15_45.940486963/tls.key, permissions: 640 kind: pod name: kube-apiserver-78d668b498-8xmjt namespace: shoot--diki-comp--azure
- cluster: seed containerName: kube-apiserver details: fileName: /var/lib/kubelet/pods/56fb368e-1dfa-4d5c-86bc-d3233d8c5ff7/volumes/kubernetes.io~secret/kubelet-client/..2025_03_03_01_15_45.4026042906/tls.key, permissions: 640 kind: pod name: kube-apiserver-78d668b498-8xmjt namespace: shoot--diki-comp--azure
- cluster: seed containerName: kube-apiserver details: fileName: /var/lib/kubelet/pods/56fb368e-1dfa-4d5c-86bc-d3233d8c5ff7/volumes/kubernetes.io~secret/etcd-client/..2025_03_03_01_15_45.330086599/tls.key, permissions: 640 kind: pod name: kube-apiserver-78d668b498-8xmjt namespace: shoot--diki-comp--azure
- cluster: seed containerName: kube-apiserver details: fileName: /var/lib/kubelet/pods/56fb368e-1dfa-4d5c-86bc-d3233d8c5ff7/volumes/kubernetes.io~secret/tls-sni-0/..2025_03_03_01_15_45.2219346093/tls.key, permissions: 640 kind: pod name: kube-apiserver-78d668b498-8xmjt namespace: shoot--diki-comp--azure
- cluster: seed containerName: kube-apiserver details: fileName: /var/lib/kubelet/pods/56fb368e-1dfa-4d5c-86bc-d3233d8c5ff7/volumes/kubernetes.io~secret/http-proxy/..2025_03_03_01_15_45.1994303313/tls.key, permissions: 640 kind: pod name: kube-apiserver-78d668b498-8xmjt namespace: shoot--diki-comp--azure
- cluster: shoot details: fileName: /var/lib/kubelet/pki/kubelet-client-2025-03-03-01-09-13.pem, permissions: 600 kind: node name: shoot--diki-comp--azure-worker-g7p4p-z3-7ccb8-2wxkr
- cluster: shoot details: fileName: /var/lib/kubelet/pki/kubelet-server-2025-03-03-01-10-06.pem, permissions: 600 kind: node name: shoot--diki-comp--azure-worker-g7p4p-z3-7ccb8-2wxkr
- gcp
- cluster: seed containerName: etcd details: fileName: /var/lib/kubelet/pods/4df10450-500f-42ec-bcfd-2416afeb4c18/volumes/kubernetes.io~secret/etcd-server-tls/..2025_03_03_01_02_10.1725835043/tls.key, permissions: 640 kind: pod name: etcd-events-0 namespace: shoot--diki-comp--gcp
- cluster: seed containerName: etcd details: fileName: /var/lib/kubelet/pods/4df10450-500f-42ec-bcfd-2416afeb4c18/volumes/kubernetes.io~secret/etcd-client-tls/..2025_03_03_01_02_10.4134020076/tls.key, permissions: 640 kind: pod name: etcd-events-0 namespace: shoot--diki-comp--gcp
- cluster: seed containerName: backup-restore details: fileName: /var/lib/kubelet/pods/4df10450-500f-42ec-bcfd-2416afeb4c18/volumes/kubernetes.io~secret/backup-restore-server-tls/..2025_03_03_01_02_10.2781398980/tls.key, permissions: 640 kind: pod name: etcd-events-0 namespace: shoot--diki-comp--gcp
- cluster: seed containerName: backup-restore details: fileName: /var/lib/kubelet/pods/4df10450-500f-42ec-bcfd-2416afeb4c18/volumes/kubernetes.io~secret/etcd-client-tls/..2025_03_03_01_02_10.4134020076/tls.key, permissions: 640 kind: pod name: etcd-events-0 namespace: shoot--diki-comp--gcp
- cluster: seed containerName: kube-controller-manager details: fileName: /var/lib/kubelet/pods/90f34bcf-ceda-4e65-8112-679308dd007f/volumes/kubernetes.io~secret/ca-client/..2025_03_03_01_16_36.3990387563/ca.key, permissions: 640 kind: pod name: kube-controller-manager-d546c97bb-k5rsh namespace: shoot--diki-comp--gcp
- cluster: seed containerName: kube-controller-manager details: fileName: /var/lib/kubelet/pods/90f34bcf-ceda-4e65-8112-679308dd007f/volumes/kubernetes.io~secret/server/..2025_03_03_01_16_36.256775248/tls.key, permissions: 640 kind: pod name: kube-controller-manager-d546c97bb-k5rsh namespace: shoot--diki-comp--gcp
- cluster: seed containerName: kube-controller-manager details: fileName: /var/lib/kubelet/pods/90f34bcf-ceda-4e65-8112-679308dd007f/volumes/kubernetes.io~secret/ca-kubelet/..2025_03_03_01_16_36.2964178139/ca.key, permissions: 640 kind: pod name: kube-controller-manager-d546c97bb-k5rsh namespace: shoot--diki-comp--gcp
- cluster: seed containerName: kube-apiserver details: fileName: /var/lib/kubelet/pods/608b7ac2-2a64-4600-bffc-9ed14a956ed8/volumes/kubernetes.io~secret/service-account-key-bundle/..2025_03_03_01_12_36.2525007222/bundle.key, permissions: 640 kind: pod name: kube-apiserver-857b9bd577-9k45w namespace: shoot--diki-comp--gcp
- cluster: seed containerName: kube-apiserver details: fileName: /var/lib/kubelet/pods/608b7ac2-2a64-4600-bffc-9ed14a956ed8/volumes/kubernetes.io~secret/kube-aggregator/..2025_03_03_01_12_36.3477424634/tls.key, permissions: 640 kind: pod name: kube-apiserver-857b9bd577-9k45w namespace: shoot--diki-comp--gcp
- cluster: seed containerName: kube-apiserver details: fileName: /var/lib/kubelet/pods/608b7ac2-2a64-4600-bffc-9ed14a956ed8/volumes/kubernetes.io~secret/server/..2025_03_03_01_12_36.2325140443/tls.key, permissions: 640 kind: pod name: kube-apiserver-857b9bd577-9k45w namespace: shoot--diki-comp--gcp
- cluster: seed containerName: kube-apiserver details: fileName: /var/lib/kubelet/pods/608b7ac2-2a64-4600-bffc-9ed14a956ed8/volumes/kubernetes.io~secret/kubelet-client/..2025_03_03_01_12_36.2748958189/tls.key, permissions: 640 kind: pod name: kube-apiserver-857b9bd577-9k45w namespace: shoot--diki-comp--gcp
- cluster: seed containerName: kube-apiserver details: fileName: /var/lib/kubelet/pods/608b7ac2-2a64-4600-bffc-9ed14a956ed8/volumes/kubernetes.io~secret/etcd-client/..2025_03_03_01_12_36.1279523670/tls.key, permissions: 640 kind: pod name: kube-apiserver-857b9bd577-9k45w namespace: shoot--diki-comp--gcp
- cluster: seed containerName: kube-apiserver details: fileName: /var/lib/kubelet/pods/608b7ac2-2a64-4600-bffc-9ed14a956ed8/volumes/kubernetes.io~secret/tls-sni-0/..2025_03_03_01_12_36.278921696/tls.key, permissions: 640 kind: pod name: kube-apiserver-857b9bd577-9k45w namespace: shoot--diki-comp--gcp
- cluster: seed containerName: kube-apiserver details: fileName: /var/lib/kubelet/pods/608b7ac2-2a64-4600-bffc-9ed14a956ed8/volumes/kubernetes.io~secret/http-proxy/..2025_03_03_01_12_36.3122740563/tls.key, permissions: 640 kind: pod name: kube-apiserver-857b9bd577-9k45w namespace: shoot--diki-comp--gcp
- cluster: seed containerName: kube-scheduler details: fileName: /var/lib/kubelet/pods/ecad819a-dc71-4e4e-a17e-11b91bd08505/volumes/kubernetes.io~secret/kube-scheduler-server/..2025_03_03_01_09_35.344821711/tls.key, permissions: 640 kind: pod name: kube-scheduler-65fbc646c-ck6kp namespace: shoot--diki-comp--gcp
- cluster: seed containerName: backup-restore details: fileName: /var/lib/kubelet/pods/9e7e0135-30fe-4ef6-a174-df3a12ff2ca4/volumes/kubernetes.io~secret/backup-restore-server-tls/..2025_03_03_01_02_10.2704526131/tls.key, permissions: 640 kind: pod name: etcd-main-0 namespace: shoot--diki-comp--gcp
- cluster: seed containerName: backup-restore details: fileName: /var/lib/kubelet/pods/9e7e0135-30fe-4ef6-a174-df3a12ff2ca4/volumes/kubernetes.io~secret/etcd-client-tls/..2025_03_03_01_02_10.3223316245/tls.key, permissions: 640 kind: pod name: etcd-main-0 namespace: shoot--diki-comp--gcp
- cluster: seed containerName: etcd details: fileName: /var/lib/kubelet/pods/9e7e0135-30fe-4ef6-a174-df3a12ff2ca4/volumes/kubernetes.io~secret/etcd-server-tls/..2025_03_03_01_02_10.3265591842/tls.key, permissions: 640 kind: pod name: etcd-main-0 namespace: shoot--diki-comp--gcp
- cluster: seed containerName: etcd details: fileName: /var/lib/kubelet/pods/9e7e0135-30fe-4ef6-a174-df3a12ff2ca4/volumes/kubernetes.io~secret/etcd-client-tls/..2025_03_03_01_02_10.3223316245/tls.key, permissions: 640 kind: pod name: etcd-main-0 namespace: shoot--diki-comp--gcp
- cluster: shoot details: fileName: /var/lib/kubelet/pki/kubelet-server-2025-03-03-01-08-29.pem, permissions: 600 kind: node name: shoot--diki-comp--gcp-worker-bex82-z1-d8757-66str
- cluster: shoot details: fileName: /var/lib/kubelet/pki/kubelet-client-2025-03-03-01-07-27.pem, permissions: 600 kind: node name: shoot--diki-comp--gcp-worker-bex82-z1-d8757-66str
- openstack
- cluster: seed containerName: kube-controller-manager details: fileName: /var/lib/kubelet/pods/c96aace0-5680-4b81-9225-cb3db3aed8bf/volumes/kubernetes.io~secret/ca-client/..2025_03_03_01_10_31.3584083571/ca.key, permissions: 640 kind: pod name: kube-controller-manager-6f87877757-4grgt namespace: shoot--diki-comp--openstack
- cluster: seed containerName: kube-controller-manager details: fileName: /var/lib/kubelet/pods/c96aace0-5680-4b81-9225-cb3db3aed8bf/volumes/kubernetes.io~secret/server/..2025_03_03_01_10_31.104263364/tls.key, permissions: 640 kind: pod name: kube-controller-manager-6f87877757-4grgt namespace: shoot--diki-comp--openstack
- cluster: seed containerName: kube-controller-manager details: fileName: /var/lib/kubelet/pods/c96aace0-5680-4b81-9225-cb3db3aed8bf/volumes/kubernetes.io~secret/ca-kubelet/..2025_03_03_01_10_31.1741570139/ca.key, permissions: 640 kind: pod name: kube-controller-manager-6f87877757-4grgt namespace: shoot--diki-comp--openstack
- cluster: seed containerName: kube-scheduler details: fileName: /var/lib/kubelet/pods/c079eae7-e4b5-4e7a-adfb-051573ecabea/volumes/kubernetes.io~secret/kube-scheduler-server/..2025_03_03_01_12_28.484866836/tls.key, permissions: 640 kind: pod name: kube-scheduler-68854c4574-mbcz2 namespace: shoot--diki-comp--openstack
- cluster: seed containerName: etcd details: fileName: /var/lib/kubelet/pods/576670d6-2e92-4999-a5db-46d1e5b110fc/volumes/kubernetes.io~secret/etcd-server-tls/..2025_03_03_01_02_06.2589642709/tls.key, permissions: 640 kind: pod name: etcd-main-0 namespace: shoot--diki-comp--openstack
- cluster: seed containerName: etcd details: fileName: /var/lib/kubelet/pods/576670d6-2e92-4999-a5db-46d1e5b110fc/volumes/kubernetes.io~secret/etcd-client-tls/..2025_03_03_01_02_06.989578068/tls.key, permissions: 640 kind: pod name: etcd-main-0 namespace: shoot--diki-comp--openstack
- cluster: seed containerName: backup-restore details: fileName: /var/lib/kubelet/pods/576670d6-2e92-4999-a5db-46d1e5b110fc/volumes/kubernetes.io~secret/backup-restore-server-tls/..2025_03_03_01_02_06.2509886571/tls.key, permissions: 640 kind: pod name: etcd-main-0 namespace: shoot--diki-comp--openstack
- cluster: seed containerName: backup-restore details: fileName: /var/lib/kubelet/pods/576670d6-2e92-4999-a5db-46d1e5b110fc/volumes/kubernetes.io~secret/etcd-client-tls/..2025_03_03_01_02_06.989578068/tls.key, permissions: 640 kind: pod name: etcd-main-0 namespace: shoot--diki-comp--openstack
- cluster: seed containerName: etcd details: fileName: /var/lib/kubelet/pods/7a54bb1c-3f4b-4dc7-95f5-377c788ad051/volumes/kubernetes.io~secret/etcd-server-tls/..2025_03_03_01_02_05.3893612686/tls.key, permissions: 640 kind: pod name: etcd-events-0 namespace: shoot--diki-comp--openstack
- cluster: seed containerName: etcd details: fileName: /var/lib/kubelet/pods/7a54bb1c-3f4b-4dc7-95f5-377c788ad051/volumes/kubernetes.io~secret/etcd-client-tls/..2025_03_03_01_02_05.1189205670/tls.key, permissions: 640 kind: pod name: etcd-events-0 namespace: shoot--diki-comp--openstack
- cluster: seed containerName: backup-restore details: fileName: /var/lib/kubelet/pods/7a54bb1c-3f4b-4dc7-95f5-377c788ad051/volumes/kubernetes.io~secret/backup-restore-server-tls/..2025_03_03_01_02_05.4287174027/tls.key, permissions: 640 kind: pod name: etcd-events-0 namespace: shoot--diki-comp--openstack
- cluster: seed containerName: backup-restore details: fileName: /var/lib/kubelet/pods/7a54bb1c-3f4b-4dc7-95f5-377c788ad051/volumes/kubernetes.io~secret/etcd-client-tls/..2025_03_03_01_02_05.1189205670/tls.key, permissions: 640 kind: pod name: etcd-events-0 namespace: shoot--diki-comp--openstack
- cluster: seed containerName: kube-apiserver details: fileName: /var/lib/kubelet/pods/adef142b-7c5d-4d1e-b0c2-9c575b9bbdea/volumes/kubernetes.io~secret/service-account-key-bundle/..2025_03_03_01_14_29.3490774438/bundle.key, permissions: 640 kind: pod name: kube-apiserver-5d6dcc9bd5-jsqrl namespace: shoot--diki-comp--openstack
- cluster: seed containerName: kube-apiserver details: fileName: /var/lib/kubelet/pods/adef142b-7c5d-4d1e-b0c2-9c575b9bbdea/volumes/kubernetes.io~secret/kube-aggregator/..2025_03_03_01_14_29.3516547635/tls.key, permissions: 640 kind: pod name: kube-apiserver-5d6dcc9bd5-jsqrl namespace: shoot--diki-comp--openstack
- cluster: seed containerName: kube-apiserver details: fileName: /var/lib/kubelet/pods/adef142b-7c5d-4d1e-b0c2-9c575b9bbdea/volumes/kubernetes.io~secret/server/..2025_03_03_01_14_29.1544469879/tls.key, permissions: 640 kind: pod name: kube-apiserver-5d6dcc9bd5-jsqrl namespace: shoot--diki-comp--openstack
- cluster: seed containerName: kube-apiserver details: fileName: /var/lib/kubelet/pods/adef142b-7c5d-4d1e-b0c2-9c575b9bbdea/volumes/kubernetes.io~secret/kubelet-client/..2025_03_03_01_14_29.798787007/tls.key, permissions: 640 kind: pod name: kube-apiserver-5d6dcc9bd5-jsqrl namespace: shoot--diki-comp--openstack
- cluster: seed containerName: kube-apiserver details: fileName: /var/lib/kubelet/pods/adef142b-7c5d-4d1e-b0c2-9c575b9bbdea/volumes/kubernetes.io~secret/etcd-client/..2025_03_03_01_14_29.3024572020/tls.key, permissions: 640 kind: pod name: kube-apiserver-5d6dcc9bd5-jsqrl namespace: shoot--diki-comp--openstack
- cluster: seed containerName: kube-apiserver details: fileName: /var/lib/kubelet/pods/adef142b-7c5d-4d1e-b0c2-9c575b9bbdea/volumes/kubernetes.io~secret/tls-sni-0/..2025_03_03_01_14_29.4247416010/tls.key, permissions: 640 kind: pod name: kube-apiserver-5d6dcc9bd5-jsqrl namespace: shoot--diki-comp--openstack
- cluster: seed containerName: kube-apiserver details: fileName: /var/lib/kubelet/pods/adef142b-7c5d-4d1e-b0c2-9c575b9bbdea/volumes/kubernetes.io~secret/http-proxy/..2025_03_03_01_14_29.2845433525/tls.key, permissions: 640 kind: pod name: kube-apiserver-5d6dcc9bd5-jsqrl namespace: shoot--diki-comp--openstack
- cluster: shoot details: fileName: /var/lib/kubelet/pki/kubelet-client-2025-03-03-01-09-31.pem, permissions: 600 kind: node name: shoot--diki-comp--openstack-worker-dqty2-z1-6c54d-j8jtj
- cluster: shoot details: fileName: /var/lib/kubelet/pki/kubelet-server-2025-03-03-01-09-40.pem, permissions: 600 kind: node name: shoot--diki-comp--openstack-worker-dqty2-z1-6c54d-j8jtj
- aws
-
File has expected permissions
-
245541 (Medium) - Kubernetes Kubelet must not disable timeouts.
-
Option streamingConnectionIdleTimeout set to allowed value.
- aws
- kind: node name: ip-IP-Address.eu-west-1.compute.internal
- kind: node name: ip-IP-Address.eu-west-1.compute.internal
- azure
- kind: node name: shoot--diki-comp--azure-worker-g7p4p-z3-7ccb8-2wxkr
- kind: node name: shoot--diki-comp--azure-worker-g7p4p-z3-7ccb8-8mwhx
- gcp
- kind: node name: shoot--diki-comp--gcp-worker-bex82-z1-d8757-66str
- kind: node name: shoot--diki-comp--gcp-worker-bex82-z1-d8757-nl4s4
- openstack
- kind: node name: shoot--diki-comp--openstack-worker-dqty2-z1-6c54d-j8jtj
- kind: node name: shoot--diki-comp--openstack-worker-dqty2-z1-6c54d-x7lx7
- aws
-
Option streamingConnectionIdleTimeout set to allowed value.
-
245542 (High) - Kubernetes API Server must disable basic authentication to protect information in transit.
-
Option basic-auth-file has not been set.
- aws
- kind: deployment name: kube-apiserver namespace: shoot--diki-comp--aws
- azure
- kind: deployment name: kube-apiserver namespace: shoot--diki-comp--azure
- gcp
- kind: deployment name: kube-apiserver namespace: shoot--diki-comp--gcp
- openstack
- kind: deployment name: kube-apiserver namespace: shoot--diki-comp--openstack
- aws
-
Option basic-auth-file has not been set.
-
245544 (High) - Kubernetes endpoints must use approved organizational certificate and key pair to protect information in transit.
-
Option kubelet-client-certificate set.
- aws
- kind: deployment name: kube-apiserver namespace: shoot--diki-comp--aws
- azure
- kind: deployment name: kube-apiserver namespace: shoot--diki-comp--azure
- gcp
- kind: deployment name: kube-apiserver namespace: shoot--diki-comp--gcp
- openstack
- kind: deployment name: kube-apiserver namespace: shoot--diki-comp--openstack
- aws
-
Option kubelet-client-key set.
- aws
- kind: deployment name: kube-apiserver namespace: shoot--diki-comp--aws
- azure
- kind: deployment name: kube-apiserver namespace: shoot--diki-comp--azure
- gcp
- kind: deployment name: kube-apiserver namespace: shoot--diki-comp--gcp
- openstack
- kind: deployment name: kube-apiserver namespace: shoot--diki-comp--openstack
- aws
-
Option kubelet-client-certificate set.
-
254800 (High) - Kubernetes must have a Pod Security Admission control file configured.
-
PodSecurity is properly configured
- aws
- kind: PodSecurityConfiguration
- azure
- kind: PodSecurityConfiguration
- gcp
- kind: PodSecurityConfiguration
- openstack
- kind: PodSecurityConfiguration
- aws
-
PodSecurity is properly configured
-
242376 (Medium) - The Kubernetes Controller Manager must use TLS 1.2, at a minimum, to protect the confidentiality of sensitive data during electronic dissemination.
-
🔵 Skipped
-
242380 (Medium) - The Kubernetes etcd must use TLS to protect the confidentiality of sensitive data during electronic dissemination.
-
ETCD runs as a single instance, peer communication options are not used.
- aws
- kind: statefulSet name: etcd-main namespace: shoot--diki-comp--aws
- kind: statefulSet name: etcd-events namespace: shoot--diki-comp--aws
- azure
- kind: statefulSet name: etcd-main namespace: shoot--diki-comp--azure
- kind: statefulSet name: etcd-events namespace: shoot--diki-comp--azure
- gcp
- kind: statefulSet name: etcd-main namespace: shoot--diki-comp--gcp
- kind: statefulSet name: etcd-events namespace: shoot--diki-comp--gcp
- openstack
- kind: statefulSet name: etcd-main namespace: shoot--diki-comp--openstack
- kind: statefulSet name: etcd-events namespace: shoot--diki-comp--openstack
- aws
-
ETCD runs as a single instance, peer communication options are not used.
-
242384 (Medium) - The Kubernetes Scheduler must have secure binding.
-
The Kubernetes Scheduler runs in a container which already has limited access to network interfaces. In addition ingress traffic to the Kubernetes Scheduler is restricted via network policies, making an unintended exposure less likely.
- aws
- azure
- gcp
- openstack
- aws
-
The Kubernetes Scheduler runs in a container which already has limited access to network interfaces. In addition ingress traffic to the Kubernetes Scheduler is restricted via network policies, making an unintended exposure less likely.
-
242385 (Medium) - The Kubernetes Controller Manager must have secure binding.
-
The Kubernetes Controller Manager runs in a container which already has limited access to network interfaces. In addition ingress traffic to the Kubernetes Controller Manager is restricted via network policies, making an unintended exposure less likely.
- aws
- azure
- gcp
- openstack
- aws
-
The Kubernetes Controller Manager runs in a container which already has limited access to network interfaces. In addition ingress traffic to the Kubernetes Controller Manager is restricted via network policies, making an unintended exposure less likely.
-
242396 (Medium) - Kubernetes Kubectl cp command must give expected access and results.
-
"kubectl" is not installed into control plane pods or worker nodes and Gardener does not offer Kubernetes v1.12 or older.
- aws
- azure
- gcp
- openstack
- aws
-
"kubectl" is not installed into control plane pods or worker nodes and Gardener does not offer Kubernetes v1.12 or older.
-
242398 (Medium) - Kubernetes DynamicAuditing must not be enabled.
-
Option feature-gates.DynamicAuditing removed in Kubernetes v1.19.
- aws
- azure
- gcp
- openstack
- aws
-
Option feature-gates.DynamicAuditing removed in Kubernetes v1.19.
-
242399 (Medium) - Kubernetes DynamicKubeletConfig must not be enabled.
-
Option featureGates.DynamicKubeletConfig removed in Kubernetes v1.26.
- aws
- details: Used Kubernetes version 1.31.4.
- azure
- details: Used Kubernetes version 1.31.4.
- gcp
- details: Used Kubernetes version 1.31.4.
- openstack
- details: Used Kubernetes version 1.31.4.
- aws
-
Option featureGates.DynamicKubeletConfig removed in Kubernetes v1.26.
-
242405 (Medium) - Kubernetes manifests must be owned by root.
-
Gardener does not deploy any control plane component as systemd processes or static pod.
- aws
- azure
- gcp
- openstack
- aws
-
Gardener does not deploy any control plane component as systemd processes or static pod.
-
242408 (Medium) - The Kubernetes manifest files must have least privileges.
-
Gardener does not deploy any control plane component as systemd processes or static pod.
- aws
- azure
- gcp
- openstack
- aws
-
Gardener does not deploy any control plane component as systemd processes or static pod.
-
242410 (Medium) - The Kubernetes API Server must enforce ports, protocols, and services (PPS) that adhere to the Ports, Protocols, and Services Management Category Assurance List (PPSM CAL).
-
Cannot be tested and should be enforced organizationally. Gardener uses a minimum of known and automatically opened/used/created ports/protocols/services (PPSM stands for Ports, Protocols, Service Management).
- aws
- azure
- gcp
- openstack
- aws
-
Cannot be tested and should be enforced organizationally. Gardener uses a minimum of known and automatically opened/used/created ports/protocols/services (PPSM stands for Ports, Protocols, Service Management).
-
242411 (Medium) - The Kubernetes Scheduler must enforce ports, protocols, and services (PPS) that adhere to the Ports, Protocols, and Services Management Category Assurance List (PPSM CAL).
-
Cannot be tested and should be enforced organizationally. Gardener uses a minimum of known and automatically opened/used/created ports/protocols/services (PPSM stands for Ports, Protocols, Service Management).
- aws
- azure
- gcp
- openstack
- aws
-
Cannot be tested and should be enforced organizationally. Gardener uses a minimum of known and automatically opened/used/created ports/protocols/services (PPSM stands for Ports, Protocols, Service Management).
-
242412 (Medium) - The Kubernetes Controllers must enforce ports, protocols, and services (PPS) that adhere to the Ports, Protocols, and Services Management Category Assurance List (PPSM CAL).
-
Cannot be tested and should be enforced organizationally. Gardener uses a minimum of known and automatically opened/used/created ports/protocols/services (PPSM stands for Ports, Protocols, Service Management).
- aws
- azure
- gcp
- openstack
- aws
-
Cannot be tested and should be enforced organizationally. Gardener uses a minimum of known and automatically opened/used/created ports/protocols/services (PPSM stands for Ports, Protocols, Service Management).
-
242413 (Medium) - The Kubernetes etcd must enforce ports, protocols, and services (PPS) that adhere to the Ports, Protocols, and Services Management Category Assurance List (PPSM CAL).
-
Cannot be tested and should be enforced organizationally. Gardener uses a minimum of known and automatically opened/used/created ports/protocols/services (PPSM stands for Ports, Protocols, Service Management).
- aws
- azure
- gcp
- openstack
- aws
-
Cannot be tested and should be enforced organizationally. Gardener uses a minimum of known and automatically opened/used/created ports/protocols/services (PPSM stands for Ports, Protocols, Service Management).
-
242426 (Medium) - Kubernetes etcd must enable client authentication to secure service.
-
ETCD runs as a single instance, peer communication options are not used.
- aws
- kind: statefulSet name: etcd-main namespace: shoot--diki-comp--aws
- kind: statefulSet name: etcd-events namespace: shoot--diki-comp--aws
- azure
- kind: statefulSet name: etcd-main namespace: shoot--diki-comp--azure
- kind: statefulSet name: etcd-events namespace: shoot--diki-comp--azure
- gcp
- kind: statefulSet name: etcd-main namespace: shoot--diki-comp--gcp
- kind: statefulSet name: etcd-events namespace: shoot--diki-comp--gcp
- openstack
- kind: statefulSet name: etcd-main namespace: shoot--diki-comp--openstack
- kind: statefulSet name: etcd-events namespace: shoot--diki-comp--openstack
- aws
-
ETCD runs as a single instance, peer communication options are not used.
-
242432 (Medium) - Kubernetes etcd must have peer-cert-file set for secure communication.
-
ETCD runs as a single instance, peer communication options are not used.
- aws
- kind: statefulSet name: etcd-main namespace: shoot--diki-comp--aws
- kind: statefulSet name: etcd-events namespace: shoot--diki-comp--aws
- azure
- kind: statefulSet name: etcd-main namespace: shoot--diki-comp--azure
- kind: statefulSet name: etcd-events namespace: shoot--diki-comp--azure
- gcp
- kind: statefulSet name: etcd-main namespace: shoot--diki-comp--gcp
- kind: statefulSet name: etcd-events namespace: shoot--diki-comp--gcp
- openstack
- kind: statefulSet name: etcd-main namespace: shoot--diki-comp--openstack
- kind: statefulSet name: etcd-events namespace: shoot--diki-comp--openstack
- aws
-
ETCD runs as a single instance, peer communication options are not used.
-
242433 (Medium) - Kubernetes etcd must have a peer-key-file set for secure communication.
-
ETCD runs as a single instance, peer communication options are not used.
- aws
- kind: statefulSet name: etcd-main namespace: shoot--diki-comp--aws
- kind: statefulSet name: etcd-events namespace: shoot--diki-comp--aws
- azure
- kind: statefulSet name: etcd-main namespace: shoot--diki-comp--azure
- kind: statefulSet name: etcd-events namespace: shoot--diki-comp--azure
- gcp
- kind: statefulSet name: etcd-main namespace: shoot--diki-comp--gcp
- kind: statefulSet name: etcd-events namespace: shoot--diki-comp--gcp
- openstack
- kind: statefulSet name: etcd-main namespace: shoot--diki-comp--openstack
- kind: statefulSet name: etcd-events namespace: shoot--diki-comp--openstack
- aws
-
ETCD runs as a single instance, peer communication options are not used.
-
242437 (High) - Kubernetes must have a pod security policy set.
-
PSPs are removed in K8s version 1.25.
- aws
- azure
- gcp
- openstack
- aws
-
PSPs are removed in K8s version 1.25.
-
242443 (Medium) - Kubernetes must contain the latest updates as authorized by IAVMs, CTOs, DTMs, and STIGs.
-
Scanning/patching security vulnerabilities should be enforced organizationally. Security vulnerability scanning should be automated and maintainers should be informed automatically.
- aws
- azure
- gcp
- openstack
- aws
-
Scanning/patching security vulnerabilities should be enforced organizationally. Security vulnerability scanning should be automated and maintainers should be informed automatically.
-
242444 (Medium) - Kubernetes component manifests must be owned by root.
-
Rule is duplicate of "242405"
- aws
- azure
- gcp
- openstack
- aws
-
Rule is duplicate of "242405"
-
242454 (Medium) - Kubernetes kubeadm.conf must be owned by root.
-
Gardener does not use "kubeadm" and also does not store any "main config" anywhere in seed or shoot (flow/component logic built-in/in-code).
- aws
- azure
- gcp
- openstack
- aws
-
Gardener does not use "kubeadm" and also does not store any "main config" anywhere in seed or shoot (flow/component logic built-in/in-code).
-
242455 (Medium) - Kubernetes kubeadm.conf must have file permissions set to 644 or more restrictive.
-
Gardener does not use "kubeadm" and also does not store any "main config" anywhere in seed or shoot (flow/component logic built-in/in-code).
- aws
- azure
- gcp
- openstack
- aws
-
Gardener does not use "kubeadm" and also does not store any "main config" anywhere in seed or shoot (flow/component logic built-in/in-code).
-
242456 (Medium) - Kubernetes kubelet config must have file permissions set to 644 or more restrictive.
-
Rule is duplicate of "242452".
- aws
- azure
- gcp
- openstack
- aws
-
Rule is duplicate of "242452".
-
242457 (Medium) - Kubernetes kubelet config must be owned by root.
-
Rule is duplicate of "242453".
- aws
- azure
- gcp
- openstack
- aws
-
Rule is duplicate of "242453".
-
242465 (Medium) - Kubernetes API Server audit log path must be set.
-
Rule is duplicate of "242402"
- aws
- azure
- gcp
- openstack
- aws
-
Rule is duplicate of "242402"
-
254801 (High) - Kubernetes must enable PodSecurity admission controller on static pods and Kubelets.
-
Option featureGates.PodSecurity was made GA in v1.25 and removed in v1.28.
- aws
- azure
- gcp
- openstack
- aws
-
Option featureGates.PodSecurity was made GA in v1.25 and removed in v1.28.
-
242380 (Medium) - The Kubernetes etcd must use TLS to protect the confidentiality of sensitive data during electronic dissemination.
-
🔵 Accepted
-
242402 (Medium) - The Kubernetes API Server must have an audit log path set.
-
Gardener can integrate with different audit logging solutions
- aws
- azure
- gcp
- openstack
- aws
-
Gardener can integrate with different audit logging solutions
-
242403 (Medium) - The Kubernetes API Server must generate audit records that identify what type of event has occurred, identify the source of the event, contain the event results, identify any users, and identify any containers associated with the event.
-
Gardener can integrate with different audit logging solutions
- aws
- azure
- gcp
- openstack
- aws
-
Gardener can integrate with different audit logging solutions
-
242414 (Medium) - The Kubernetes cluster must use non-privileged host ports for user pods.
-
node local dns requires port 53 in order to operate properly
- aws
- cluster: shoot details: containerName: node-cache, port: 53 kind: pod name: node-local-dns-7hq55 namespace: kube-system
- cluster: shoot details: containerName: node-cache, port: 53 kind: pod name: node-local-dns-7hq55 namespace: kube-system
- cluster: shoot details: containerName: node-cache, port: 53 kind: pod name: node-local-dns-bg64b namespace: kube-system
- cluster: shoot details: containerName: node-cache, port: 53 kind: pod name: node-local-dns-bg64b namespace: kube-system
- azure
- cluster: shoot details: containerName: node-cache, port: 53 kind: pod name: node-local-dns-t252j namespace: kube-system
- cluster: shoot details: containerName: node-cache, port: 53 kind: pod name: node-local-dns-t252j namespace: kube-system
- cluster: shoot details: containerName: node-cache, port: 53 kind: pod name: node-local-dns-v42pz namespace: kube-system
- cluster: shoot details: containerName: node-cache, port: 53 kind: pod name: node-local-dns-v42pz namespace: kube-system
- gcp
- cluster: shoot details: containerName: node-cache, port: 53 kind: pod name: node-local-dns-4hxs6 namespace: kube-system
- cluster: shoot details: containerName: node-cache, port: 53 kind: pod name: node-local-dns-4hxs6 namespace: kube-system
- cluster: shoot details: containerName: node-cache, port: 53 kind: pod name: node-local-dns-f7kfv namespace: kube-system
- cluster: shoot details: containerName: node-cache, port: 53 kind: pod name: node-local-dns-f7kfv namespace: kube-system
- openstack
- cluster: shoot details: containerName: node-cache, port: 53 kind: pod name: node-local-dns-28vpp namespace: kube-system
- cluster: shoot details: containerName: node-cache, port: 53 kind: pod name: node-local-dns-28vpp namespace: kube-system
- cluster: shoot details: containerName: node-cache, port: 53 kind: pod name: node-local-dns-b4bn9 namespace: kube-system
- cluster: shoot details: containerName: node-cache, port: 53 kind: pod name: node-local-dns-b4bn9 namespace: kube-system
- aws
-
node local dns requires port 53 in order to operate properly
-
242462 (Medium) - The Kubernetes API Server must be set to audit log max size.
-
Gardener can integrate with different audit logging solutions
- aws
- azure
- gcp
- openstack
- aws
-
Gardener can integrate with different audit logging solutions
-
242463 (Medium) - The Kubernetes API Server must be set to audit log maximum backup.
-
Gardener can integrate with different audit logging solutions
- aws
- azure
- gcp
- openstack
- aws
-
Gardener can integrate with different audit logging solutions
-
242464 (Medium) - The Kubernetes API Server audit log retention must be set.
-
Gardener can integrate with different audit logging solutions
- aws
- azure
- gcp
- openstack
- aws
-
Gardener can integrate with different audit logging solutions
-
245543 (High) - Kubernetes API Server must disable token authentication to protect information in transit.
-
All defined tokens are accepted.
- aws
- kind: deployment name: kube-apiserver namespace: shoot--diki-comp--aws
- azure
- kind: deployment name: kube-apiserver namespace: shoot--diki-comp--azure
- gcp
- kind: deployment name: kube-apiserver namespace: shoot--diki-comp--gcp
- openstack
- kind: deployment name: kube-apiserver namespace: shoot--diki-comp--openstack
- aws
-
All defined tokens are accepted.
-
242402 (Medium) - The Kubernetes API Server must have an audit log path set.
-
🔴 Failed
-
242459 (Medium) - The Kubernetes etcd must have file permissions set to 644 or more restrictive.
-
File has too wide permissions
- aws
- containerName: etcd details: fileName: /var/lib/kubelet/pods/d46d0708-802d-43a7-bdf8-646912b7cb62/volumes/kubernetes.io~projected/kube-api-access-gardener/..2025_03_03_01_02_01.1092768610/ca.crt, permissions: 644, expectedPermissionsMax: 640 kind: pod name: etcd-main-0 namespace: shoot--diki-comp--aws
- containerName: etcd details: fileName: /var/lib/kubelet/pods/d46d0708-802d-43a7-bdf8-646912b7cb62/volumes/kubernetes.io~projected/kube-api-access-gardener/..2025_03_03_01_02_01.1092768610/namespace, permissions: 644, expectedPermissionsMax: 640 kind: pod name: etcd-main-0 namespace: shoot--diki-comp--aws
- containerName: backup-restore details: fileName: /var/lib/kubelet/pods/d46d0708-802d-43a7-bdf8-646912b7cb62/volumes/kubernetes.io~projected/kube-api-access-gardener/..2025_03_03_01_02_01.1092768610/ca.crt, permissions: 644, expectedPermissionsMax: 640 kind: pod name: etcd-main-0 namespace: shoot--diki-comp--aws
- containerName: backup-restore details: fileName: /var/lib/kubelet/pods/d46d0708-802d-43a7-bdf8-646912b7cb62/volumes/kubernetes.io~projected/kube-api-access-gardener/..2025_03_03_01_02_01.1092768610/namespace, permissions: 644, expectedPermissionsMax: 640 kind: pod name: etcd-main-0 namespace: shoot--diki-comp--aws
- containerName: etcd details: fileName: /var/lib/kubelet/pods/43f307d7-051f-446e-a314-0e435190ca59/volumes/kubernetes.io~projected/kube-api-access-gardener/..2025_03_03_01_02_01.2294882418/ca.crt, permissions: 644, expectedPermissionsMax: 640 kind: pod name: etcd-events-0 namespace: shoot--diki-comp--aws
- containerName: etcd details: fileName: /var/lib/kubelet/pods/43f307d7-051f-446e-a314-0e435190ca59/volumes/kubernetes.io~projected/kube-api-access-gardener/..2025_03_03_01_02_01.2294882418/namespace, permissions: 644, expectedPermissionsMax: 640 kind: pod name: etcd-events-0 namespace: shoot--diki-comp--aws
- containerName: backup-restore details: fileName: /var/lib/kubelet/pods/43f307d7-051f-446e-a314-0e435190ca59/volumes/kubernetes.io~projected/kube-api-access-gardener/..2025_03_03_01_02_01.2294882418/ca.crt, permissions: 644, expectedPermissionsMax: 640 kind: pod name: etcd-events-0 namespace: shoot--diki-comp--aws
- containerName: backup-restore details: fileName: /var/lib/kubelet/pods/43f307d7-051f-446e-a314-0e435190ca59/volumes/kubernetes.io~projected/kube-api-access-gardener/..2025_03_03_01_02_01.2294882418/namespace, permissions: 644, expectedPermissionsMax: 640 kind: pod name: etcd-events-0 namespace: shoot--diki-comp--aws
- azure
- containerName: etcd details: fileName: /var/lib/kubelet/pods/153ccd2e-435b-4b34-8337-7b33a279136f/volumes/kubernetes.io~projected/kube-api-access-gardener/..2025_03_03_01_02_09.3605391883/ca.crt, permissions: 644, expectedPermissionsMax: 640 kind: pod name: etcd-main-0 namespace: shoot--diki-comp--azure
- containerName: etcd details: fileName: /var/lib/kubelet/pods/153ccd2e-435b-4b34-8337-7b33a279136f/volumes/kubernetes.io~projected/kube-api-access-gardener/..2025_03_03_01_02_09.3605391883/namespace, permissions: 644, expectedPermissionsMax: 640 kind: pod name: etcd-main-0 namespace: shoot--diki-comp--azure
- containerName: backup-restore details: fileName: /var/lib/kubelet/pods/153ccd2e-435b-4b34-8337-7b33a279136f/volumes/kubernetes.io~projected/kube-api-access-gardener/..2025_03_03_01_02_09.3605391883/ca.crt, permissions: 644, expectedPermissionsMax: 640 kind: pod name: etcd-main-0 namespace: shoot--diki-comp--azure
- containerName: backup-restore details: fileName: /var/lib/kubelet/pods/153ccd2e-435b-4b34-8337-7b33a279136f/volumes/kubernetes.io~projected/kube-api-access-gardener/..2025_03_03_01_02_09.3605391883/namespace, permissions: 644, expectedPermissionsMax: 640 kind: pod name: etcd-main-0 namespace: shoot--diki-comp--azure
- containerName: etcd details: fileName: /var/lib/kubelet/pods/e40a1350-0fce-48ce-bed8-75ba8d51e7a0/volumes/kubernetes.io~projected/kube-api-access-gardener/..2025_03_03_01_02_09.745783697/ca.crt, permissions: 644, expectedPermissionsMax: 640 kind: pod name: etcd-events-0 namespace: shoot--diki-comp--azure
- containerName: etcd details: fileName: /var/lib/kubelet/pods/e40a1350-0fce-48ce-bed8-75ba8d51e7a0/volumes/kubernetes.io~projected/kube-api-access-gardener/..2025_03_03_01_02_09.745783697/namespace, permissions: 644, expectedPermissionsMax: 640 kind: pod name: etcd-events-0 namespace: shoot--diki-comp--azure
- containerName: backup-restore details: fileName: /var/lib/kubelet/pods/e40a1350-0fce-48ce-bed8-75ba8d51e7a0/volumes/kubernetes.io~projected/kube-api-access-gardener/..2025_03_03_01_02_09.745783697/ca.crt, permissions: 644, expectedPermissionsMax: 640 kind: pod name: etcd-events-0 namespace: shoot--diki-comp--azure
- containerName: backup-restore details: fileName: /var/lib/kubelet/pods/e40a1350-0fce-48ce-bed8-75ba8d51e7a0/volumes/kubernetes.io~projected/kube-api-access-gardener/..2025_03_03_01_02_09.745783697/namespace, permissions: 644, expectedPermissionsMax: 640 kind: pod name: etcd-events-0 namespace: shoot--diki-comp--azure
- gcp
- containerName: etcd details: fileName: /var/lib/kubelet/pods/9e7e0135-30fe-4ef6-a174-df3a12ff2ca4/volumes/kubernetes.io~projected/kube-api-access-gardener/..2025_03_03_01_02_10.1269252471/ca.crt, permissions: 644, expectedPermissionsMax: 640 kind: pod name: etcd-main-0 namespace: shoot--diki-comp--gcp
- containerName: etcd details: fileName: /var/lib/kubelet/pods/9e7e0135-30fe-4ef6-a174-df3a12ff2ca4/volumes/kubernetes.io~projected/kube-api-access-gardener/..2025_03_03_01_02_10.1269252471/namespace, permissions: 644, expectedPermissionsMax: 640 kind: pod name: etcd-main-0 namespace: shoot--diki-comp--gcp
- containerName: backup-restore details: fileName: /var/lib/kubelet/pods/9e7e0135-30fe-4ef6-a174-df3a12ff2ca4/volumes/kubernetes.io~projected/kube-api-access-gardener/..2025_03_03_01_02_10.1269252471/ca.crt, permissions: 644, expectedPermissionsMax: 640 kind: pod name: etcd-main-0 namespace: shoot--diki-comp--gcp
- containerName: backup-restore details: fileName: /var/lib/kubelet/pods/9e7e0135-30fe-4ef6-a174-df3a12ff2ca4/volumes/kubernetes.io~projected/kube-api-access-gardener/..2025_03_03_01_02_10.1269252471/namespace, permissions: 644, expectedPermissionsMax: 640 kind: pod name: etcd-main-0 namespace: shoot--diki-comp--gcp
- containerName: etcd details: fileName: /var/lib/kubelet/pods/4df10450-500f-42ec-bcfd-2416afeb4c18/volumes/kubernetes.io~projected/kube-api-access-gardener/..2025_03_03_01_02_10.2368081495/ca.crt, permissions: 644, expectedPermissionsMax: 640 kind: pod name: etcd-events-0 namespace: shoot--diki-comp--gcp
- containerName: etcd details: fileName: /var/lib/kubelet/pods/4df10450-500f-42ec-bcfd-2416afeb4c18/volumes/kubernetes.io~projected/kube-api-access-gardener/..2025_03_03_01_02_10.2368081495/namespace, permissions: 644, expectedPermissionsMax: 640 kind: pod name: etcd-events-0 namespace: shoot--diki-comp--gcp
- containerName: backup-restore details: fileName: /var/lib/kubelet/pods/4df10450-500f-42ec-bcfd-2416afeb4c18/volumes/kubernetes.io~projected/kube-api-access-gardener/..2025_03_03_01_02_10.2368081495/ca.crt, permissions: 644, expectedPermissionsMax: 640 kind: pod name: etcd-events-0 namespace: shoot--diki-comp--gcp
- containerName: backup-restore details: fileName: /var/lib/kubelet/pods/4df10450-500f-42ec-bcfd-2416afeb4c18/volumes/kubernetes.io~projected/kube-api-access-gardener/..2025_03_03_01_02_10.2368081495/namespace, permissions: 644, expectedPermissionsMax: 640 kind: pod name: etcd-events-0 namespace: shoot--diki-comp--gcp
- openstack
- containerName: etcd details: fileName: /var/lib/kubelet/pods/576670d6-2e92-4999-a5db-46d1e5b110fc/volumes/kubernetes.io~projected/kube-api-access-gardener/..2025_03_03_01_02_06.3524888998/ca.crt, permissions: 644, expectedPermissionsMax: 640 kind: pod name: etcd-main-0 namespace: shoot--diki-comp--openstack
- containerName: etcd details: fileName: /var/lib/kubelet/pods/576670d6-2e92-4999-a5db-46d1e5b110fc/volumes/kubernetes.io~projected/kube-api-access-gardener/..2025_03_03_01_02_06.3524888998/namespace, permissions: 644, expectedPermissionsMax: 640 kind: pod name: etcd-main-0 namespace: shoot--diki-comp--openstack
- containerName: backup-restore details: fileName: /var/lib/kubelet/pods/576670d6-2e92-4999-a5db-46d1e5b110fc/volumes/kubernetes.io~projected/kube-api-access-gardener/..2025_03_03_01_02_06.3524888998/ca.crt, permissions: 644, expectedPermissionsMax: 640 kind: pod name: etcd-main-0 namespace: shoot--diki-comp--openstack
- containerName: backup-restore details: fileName: /var/lib/kubelet/pods/576670d6-2e92-4999-a5db-46d1e5b110fc/volumes/kubernetes.io~projected/kube-api-access-gardener/..2025_03_03_01_02_06.3524888998/namespace, permissions: 644, expectedPermissionsMax: 640 kind: pod name: etcd-main-0 namespace: shoot--diki-comp--openstack
- containerName: backup-restore details: fileName: /var/lib/kubelet/pods/7a54bb1c-3f4b-4dc7-95f5-377c788ad051/volumes/kubernetes.io~projected/kube-api-access-gardener/..2025_03_03_01_02_05.3448401570/ca.crt, permissions: 644, expectedPermissionsMax: 640 kind: pod name: etcd-events-0 namespace: shoot--diki-comp--openstack
- containerName: backup-restore details: fileName: /var/lib/kubelet/pods/7a54bb1c-3f4b-4dc7-95f5-377c788ad051/volumes/kubernetes.io~projected/kube-api-access-gardener/..2025_03_03_01_02_05.3448401570/namespace, permissions: 644, expectedPermissionsMax: 640 kind: pod name: etcd-events-0 namespace: shoot--diki-comp--openstack
- containerName: etcd details: fileName: /var/lib/kubelet/pods/7a54bb1c-3f4b-4dc7-95f5-377c788ad051/volumes/kubernetes.io~projected/kube-api-access-gardener/..2025_03_03_01_02_05.3448401570/ca.crt, permissions: 644, expectedPermissionsMax: 640 kind: pod name: etcd-events-0 namespace: shoot--diki-comp--openstack
- containerName: etcd details: fileName: /var/lib/kubelet/pods/7a54bb1c-3f4b-4dc7-95f5-377c788ad051/volumes/kubernetes.io~projected/kube-api-access-gardener/..2025_03_03_01_02_05.3448401570/namespace, permissions: 644, expectedPermissionsMax: 640 kind: pod name: etcd-events-0 namespace: shoot--diki-comp--openstack
- aws
-
File has too wide permissions
-
242459 (Medium) - The Kubernetes etcd must have file permissions set to 644 or more restrictive.
-
🟢 Passed
3.4 - Credential Rotation
Keys
There are plenty of keys in Gardener. The ETCD needs one to store resources like secrets encrypted at rest. Gardener generates certificate authorities (CAs) to ensure secured communication between the various components and actors and service account tokens are signed with a dedicated key. There is also an SSH key pair to allow debugging of nodes and the observability stack has its own passwords too.
All of these keys share a common property: they are managed by Gardener. Rotating them, however, is potentially very disruptive. Hence, Gardener does not do it automatically, but offers you means to perform these tasks easily. For a single cluster, you may conveniently use the dashboard.
Where possible, the rotation happens in two phases - Preparing and Completing.
Prepare Rotation of All Credentials
The Preparing phase introduces new keys while the old ones are still valid. Users can safely exchange keys / CA bundles wherever they are used. It is possible to start the preparation by annotating the shoot resource accordingly:
kubectl -n <shoot-namespace> annotate shoot <shoot-name> gardener.cloud/operation=rotate-credentials-start
Complete Rotation of All Credentials
Afterward, the Completing phase will invalidate the old keys / CA bundles. Annotate the shoot resource accordingly:
kubectl -n <shoot-namespace> annotate shoot <shoot-name> gardener.cloud/operation=rotate-credentials-complete
Rotation Phases
At the beginning, only the old set of credentials exists. By triggering the rotation, new credentials are created in the Preparing phase and both sets are valid. Now, all clients have to update and start using the new credentials. Only afterward it is safe to trigger the Completing phase, which invalidates the old credentials.
The shoot’s status will always show the current status / phase of the rotation.
For more information, see Credentials Rotation for Shoot Clusters.
User-Provided Credentials
You grant Gardener permissions to create resources by handing over cloud provider keys. These keys are stored in a secret and referenced to a shoot via a SecretBinding. Gardener uses the keys to create the network for the cluster resources, routes, VMs, disks, and IP addresses.
When you rotate credentials, the new keys have to be stored in the same secret and the shoot needs to reconcile successfully to ensure the replication to every controller. Afterward, the old keys can be deleted safely from Gardener’s perspective.
While the reconciliation can be triggered manually, there is no need for it (if you’re not in a hurry). Each shoot reconciles once within 24h and the new keys will be picked up during the next maintenance window.
Note
It is not possible to move a shoot to a different infrastructure account (at all!).
3.5 - Regional Restrictions
Shared Responsibility Model
Gardener, like most cloud providers’ Kubernetes offerings, is dedicated for a global setup. And just like how most cloud providers offer means to fulfil regional restrictions, Gardener also has some means built in for this purpose. Similarly, Gardener also follows a shared responsibility model where users are obliged to use the provided Gardener means in a way which results in compliance with regional restrictions.
Regions
Gardener users need to understand that Gardener is a generic tool and has no built-in knowledge about regions as geographical or political conglomerates. For Gardener, regions are only strings. To create regional restrictions is an obligation of all Gardener users who orchestrate existing Gardener functionality to reach evidence which can be audited later on.
Support for Regional Restrictions
Gardener offers functionality to support the most important kind of regional restrictions in its global setup:
- No Restriction: All seeds in all regions can be allowed to host the control plane of all shoots.
- Restriction by Dedication: Shoots running in a region can be configured so that only dedicated seeds in dedicated regions are allowed to host the shoot’s control plane. This can be achieved by adding labels to a seed and subsequently restricting shoot control plane placement to appropriately labeled seeds by using the field
spec.seedSelector(example). - Restriction by Tainting: Some seeds running in some dedicated regions are not allowed to host the control plane of any shoots unless explicitly allowed. This can be achieved by tainting seeds appropriately (example) which in turn requires explicit tolerations if a shoot’s control plane should be placed on such tainted seeds (example).
4 - Gardener
Documentation Index
Overview
- General Architecture
- Gardener landing page
gardener.cloud - “Gardener, the Kubernetes Botanist” blog on kubernetes.io
- “Gardener Project Update” blog on kubernetes.io
Concepts
Usage
Gardener
Project
Shoot
- Accessing Shoot Clusters
- Hibernate a Cluster
- Shoot Info
ConfigMap - Shoot Kubernetes Minor Version Upgrades
- Shoot Cluster Limits
- Shoot Maintenance
- Shoot Cluster Purposes
- Shoot Scheduling Profiles
- Shoot Status
- Supported CPU Architectures for Shoot Worker Nodes
- Workerless
Shoots - Shoot Workers Settings
- Access Restrictions
- Workload Identity
Shoot Operations
- Shoot Credentials Rotation
- Trigger shoot operations
- Shoot Updates and Upgrades
- Shoot Kubernetes and Operating System Versioning
- Supported Kubernetes versions
- Controlling the Kubernetes versions for specific worker pools
- Migration from SecretBinding to CredentialsBinding
High Availability
Security
- Default Seccomp Profile
- ETCD Encryption Config
- OpenIDConnect presets
- Admission Configuration for the
PodSecurityAdmission Plugin - Audit a Kubernetes cluster
- Shoot
ServiceAccountConfigurations
Networking
- Custom
CoreDNSconfiguration - DNS Search Path Optimization
- ExposureClasses
NodeLocalDNSfeature- Shoot
KUBERNETES_SERVICE_HOSTEnvironment Variable Injection - Shoot Networking
- Dual-Stack Network Migration
Autoscaling
Observability
Advanced
containerdRegistry Configuration- Endpoints and Ports of a Shoot Control-Plane
- (Custom) CSI components
- Custom
containerdconfiguration - Readiness of Shoot Worker Nodes
- Cleanup of Shoot clusters in deletion
- Tolerations
- Immutable Backup Buckets
API Reference
authentication.gardener.cloudAPI Groupcore.gardener.cloudAPI Groupextensions.gardener.cloudAPI Groupoperations.gardener.cloudAPI Groupresources.gardener.cloudAPI Groupsecurity.gardener.cloudAPI Groupseedmanagement.gardener.cloudAPI Groupsettings.gardener.cloudAPI Group
CLI Reference
Gardener Enhancement Proposals
- GEP: Gardener Enhancement Proposal Description
- GEP: Template
- GEP-1: Gardener extensibility and extraction of cloud-specific/OS-specific knowledge
- GEP-2:
BackupInfrastructureCRD and Controller Redesign - GEP-3: Network extensibility
- GEP-4: New
core.gardener.cloud/v1beta1APIs required to extract cloud-specific/OS-specific knowledge out of Gardener core - GEP-5: Gardener Versioning Policy
- GEP-6: Integrating etcd-druid with Gardener
- GEP-7: Shoot Control Plane Migration
- GEP-8: SNI Passthrough proxy for kube-apiservers
- GEP-9: Gardener integration test framework
- GEP-10: Support additional container runtimes
- GEP-11: Utilize API Server Network Proxy to Invert Seed-to-Shoot Connectivity
- GEP-12: OIDC Webhook Authenticator
- GEP-13: Automated Seed Management
- GEP-14: Reversed Cluster VPN
- GEP-15: Manage Bastions and SSH Key Pair Rotation
- GEP-16: Dynamic kubeconfig generation for Shoot clusters
- GEP-17: Shoot Control Plane Migration “Bad Case” Scenario
- GEP-18: Automated Shoot CA Rotation
- GEP-19: Observability Stack - Migrating to the prometheus-operator and fluent-bit operator
- GEP-20: Highly Available Shoot Control Planes
- GEP-21: IPv6 Single-Stack Support in Local Gardener
- GEP-22: Improved Usage of the
ShootStateAPI - GEP-23: Autoscaling Shoot kube-apiserver via Independently Driven HPA and VPA
- GEP-24: Shoot OIDC Issuer
- GEP-25: Namespaced Cloud Profiles
- GEP-26: Workload Identity - Trust Based Authentication
- GEP-27: Add Optional Bastion Section To CloudProfile
- GEP-28: Autonomous Shoot Clusters
- GEP-30: Rework API Server Proxy to Drop Proxy Protocol
- GEP-31: In-Place Node Updates of Shoot Clusters
- GEP-32: Cloud Profile Version Classification Lifecycles
- GEP-33: Machine Image Capabilities
Development
- Getting started locally (using the local provider)
- Setting up a development environment (using a cloud provider)
- Testing (Unit, Integration, E2E Tests)
- Test Machinery Tests
- Dependency Management
- Kubernetes Clients in Gardener
- Logging Guidelines in Gardener Components
- Changing the API
- Secrets Management for Seed and Shoot Clusters
- IPv6 in Gardener Clusters
- Releases, Features, Hotfixes
- Reversed Cluster VPN
- Adding New Cloud Providers
- Adding Support For A New Kubernetes Version
- Extending the Monitoring Stack
- Logging Stack
- How to create log parser for container into fluent-bit
PriorityClassesin Gardener Clusters- High Availability Of Deployed Components
- Checklist For Adding New Components
- Defaulting Strategy and Developer Guideline
- Autoscaling Specifics for Components
Extensions
- Extensibility overview
- Extension registration
Clusterresource- Extension points
- General conventions
- Trigger for reconcile operations
- Deploy resources into the shoot cluster
- Shoot resource customization webhooks
- Logging and monitoring for extensions
- Contributing to shoot health status conditions
- CA Rotation in Extensions
- Blob storage providers
- DNS providers
- IaaS/Cloud providers
- Network plugin providers
- Operating systems
- Container runtimes
- Generic (non-essential) extensions
- Extension Admission
- Heartbeat controller
- Provider Local
- Access to the Garden Cluster
- Control plane migration
- Force Deletion
- Extending project roles
- Referenced resources
Deployment
- Getting started locally
- Getting started locally with extensions
- Getting started locally with Autonomous Shoot Clusters
- Setup Gardener on a Kubernetes cluster
- Version Skew Policy
- Deploying Gardenlets
- Overwrite image vector
- Migration from Gardener
v0tov1 - Feature Gates in Gardener
- Configuring the Logging stack
- SecretBinding Provider Controller
Operations
- Gardener configuration and usage
- Control Plane Migration
- Istio
- Kube API server load balancing
ManagedSeeds: Register Shoot as SeedNetworkPolicys In Garden, Seed, Shoot Clusters- Seed Bootstrapping
- Seed Settings
- Topology-Aware Traffic Routing
- Trusted TLS certificate for shoot control planes
- Trusted TLS certificate for garden runtime cluster
Monitoring
4.1 - Advanced
4.1.1 - Cleanup of Shoot Clusters in Deletion
Cleanup of Shoot Clusters in Deletion
When a shoot cluster is deleted then Gardener tries to gracefully remove most of the Kubernetes resources inside the cluster. This is to prevent that any infrastructure or other artifacts remain after the shoot deletion.
The cleanup is performed in four steps. Some resources are deleted with a grace period, and all resources are forcefully deleted (by removing blocking finalizers) after some time to not block the cluster deletion entirely.
Cleanup steps:
- All
ValidatingWebhookConfigurations andMutatingWebhookConfigurations are deleted with a5mgrace period. Forceful finalization happens after5m. - All
APIServices andCustomResourceDefinitions are deleted with a5mgrace period. Forceful finalization happens after1h. - All
CronJobs,DaemonSets,Deployments,Ingresss,Jobs,Pods,ReplicaSets,ReplicationControllers,Services,StatefulSets,PersistentVolumeClaims are deleted with a5mgrace period. Forceful finalization happens after5m.If the
Shootis annotated withshoot.gardener.cloud/skip-cleanup=true, then onlyServices andPersistentVolumeClaims are considered. - All
VolumeSnapshots andVolumeSnapshotContents are deleted with a5mgrace period. Forceful finalization happens after1h.
It is possible to override the finalization grace periods via annotations on the Shoot:
shoot.gardener.cloud/cleanup-webhooks-finalize-grace-period-seconds(for the resources handled in step 1)shoot.gardener.cloud/cleanup-extended-apis-finalize-grace-period-seconds(for the resources handled in step 2)shoot.gardener.cloud/cleanup-kubernetes-resources-finalize-grace-period-seconds(for the resources handled in step 3)
⚠️ If "0" is provided, then all resources are finalized immediately without waiting for any graceful deletion.
Please be aware that this might lead to orphaned infrastructure artifacts.
4.1.2 - containerd Registry Configuration
containerd Registry Configuration
containerd supports configuring registries and mirrors. Using this native containerd feature, Shoot owners can configure containerd to use public or private mirrors for a given upstream registry. More details about the registry configuration can be found in the corresponding upstream documentation.
containerd Registry Configuration Patterns
At the time of writing this document, containerd support two patterns for configuring registries/mirrors.
Note: Trying to use both of the patterns at the same time is not supported by containerd. Only one of the configuration patterns has to be followed strictly.
Old and Deprecated Pattern
The old and deprecated pattern is specifying registry.mirrors and registry.configs in the containerd’s config.toml file. See the upstream documentation.
Example of the old and deprecated pattern:
version = 2
[plugins."io.containerd.grpc.v1.cri".registry]
[plugins."io.containerd.grpc.v1.cri".registry.mirrors]
[plugins."io.containerd.grpc.v1.cri".registry.mirrors."docker.io"]
endpoint = ["https://public-mirror.example.com"]
In the above example, containerd is configured to first try to pull docker.io images from a configured endpoint (https://public-mirror.example.com). If the image is not available in https://public-mirror.example.com, then containerd will fall back to the upstream registry (docker.io) and will pull the image from there.
Hosts Directory Pattern
The hosts directory pattern is the new and recommended pattern for configuring registries. It is available starting containerd@v1.5.0. See the upstream documentation.
The above example in the hosts directory pattern looks as follows.
The /etc/containerd/config.toml file has the following section:
version = 2
[plugins."io.containerd.grpc.v1.cri".registry]
config_path = "/etc/containerd/certs.d"
The following hosts directory structure has to be created:
$ tree /etc/containerd/certs.d
/etc/containerd/certs.d
└── docker.io
└── hosts.toml
Finally, for the docker.io upstream registry, we configure a hosts.toml file as follows:
server = "https://registry-1.docker.io"
[host."http://public-mirror.example.com"]
capabilities = ["pull", "resolve"]
Configuring containerd Registries for a Shoot
Gardener supports configuring containerd registries on a Shoot using the new hosts directory pattern. For each Shoot Node, Gardener creates the /etc/containerd/certs.d directory and adds the following section to the containerd’s /etc/containerd/config.toml file:
[plugins."io.containerd.grpc.v1.cri".registry] # gardener-managed
config_path = "/etc/containerd/certs.d"
This allows Shoot owners to use the hosts directory pattern to configure registries for containerd. To do this, the Shoot owners need to create a directory under /etc/containerd/certs.d that is named with the upstream registry host name. In the newly created directory, a hosts.toml file needs to be created. For more details, see the hosts directory pattern section and the upstream documentation.
The registry-cache Extension
There is a Gardener-native extension named registry-cache that supports:
- Configuring containerd registry mirrors based on the above-described contract. The feature is added in registry-cache@v0.6.0.
- Running pull through cache(s) in the Shoot.
For more details, see the registry-cache documentation.
4.1.3 - Control Plane Endpoints And Ports
Endpoints and Ports of a Shoot Control-Plane
With the reversed VPN tunnel, there are no endpoints with open ports in the shoot cluster required by Gardener. In order to allow communication to the shoots control-plane in the seed cluster, there are endpoints shared by multiple shoots of a seed cluster. Depending on the configured zones or exposure classes, there are different endpoints in a seed cluster. The IP address(es) can be determined by a DNS query for the API Server URL. The main entry-point into the seed cluster is the load balancer of the Istio ingress-gateway service. Depending on the infrastructure provider, there can be one IP address per zone.
The load balancer of the Istio ingress-gateway service exposes the following TCP ports:
- 443 for requests to the shoot API Server. The request is dispatched according to the set TLS SNI extension.
- 8443 for requests to the shoot API Server via
api-server-proxy, dispatched based on the proxy protocol target, which is the IP address ofkubernetes.default.svc.cluster.localin the shoot. - 8132 to establish the reversed VPN connection. It’s dispatched according to an HTTP header value.
kube-apiserver via SNI
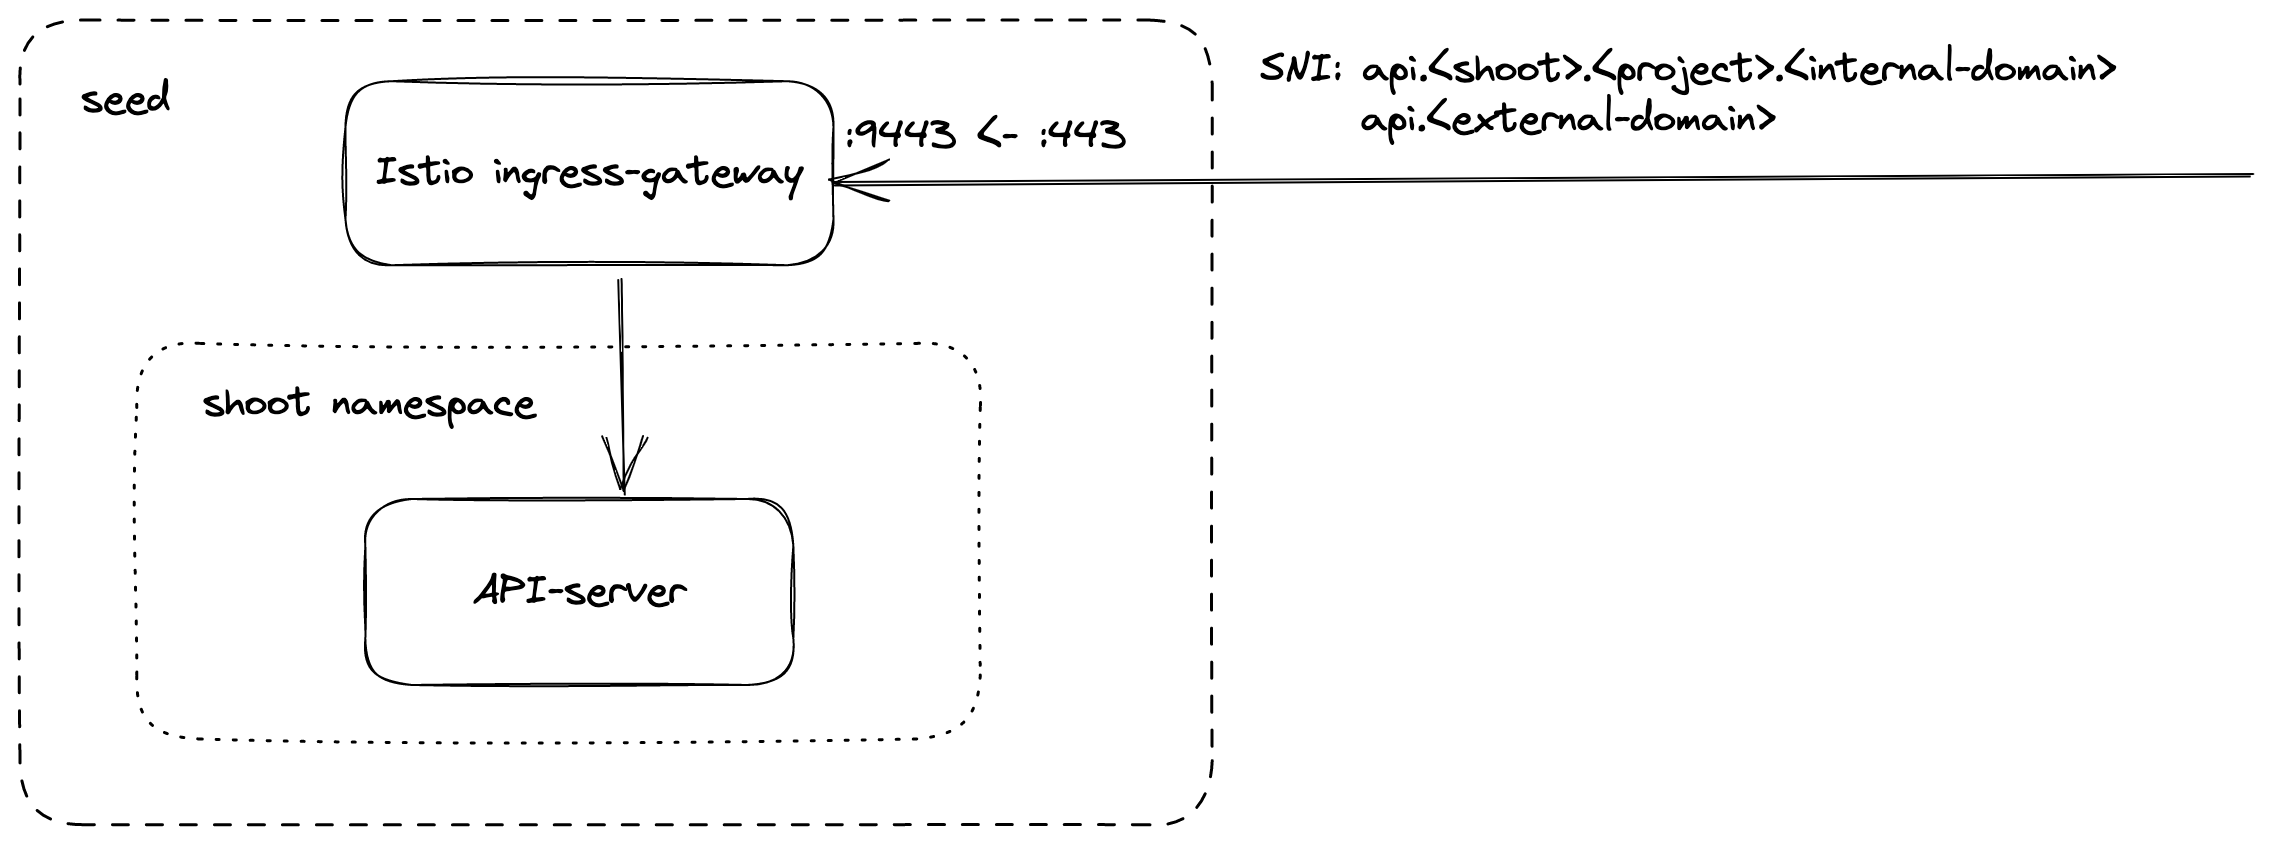
DNS entries for api.<external-domain> and api.<shoot>.<project>.<internal-domain> point to the load balancer of an Istio ingress-gateway service.
The Kubernetes client sets the server name to api.<external-domain> or api.<shoot>.<project>.<internal-domain>.
Based on SNI, the connection is forwarded to the respective API Server at TCP layer. There is no TLS termination at the Istio ingress-gateway.
TLS termination happens on the shoots API Server. Traffic is end-to-end encrypted between the client and the API Server. The certificate authority and authentication are defined in the corresponding kubeconfig.
Details can be found in GEP-08.
kube-apiserver via apiserver-proxy
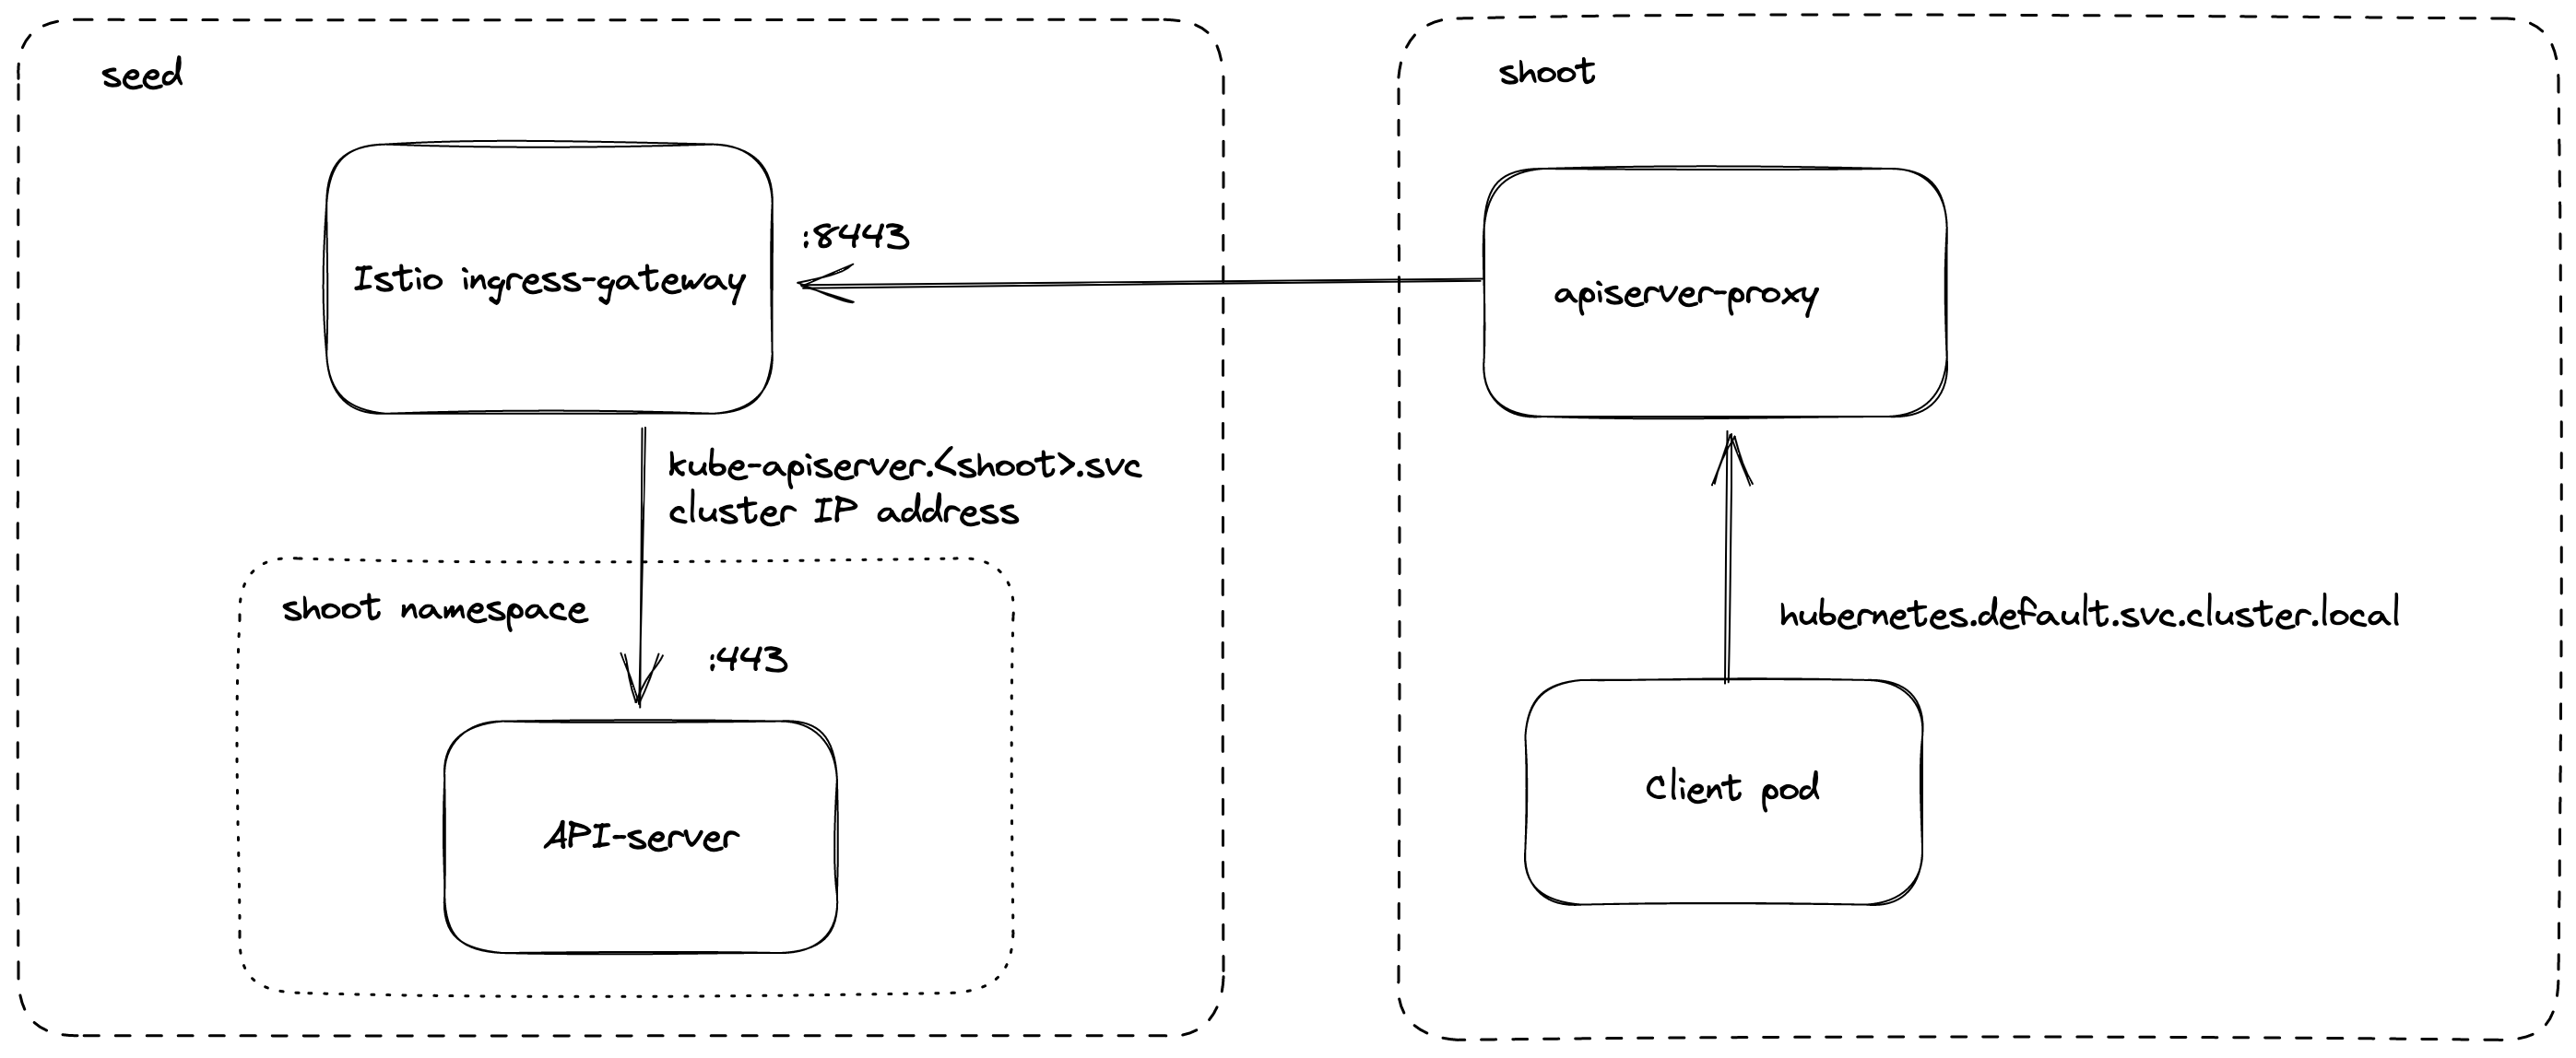
Inside the shoot cluster, the API Server can also be reached by the cluster internal name kubernetes.default.svc.cluster.local.
The pods apiserver-proxy are deployed in the host network as daemonset and intercept connections to the Kubernetes service IP address.
The destination address is changed to the cluster IP address of the service kube-apiserver.<shoot-namespace>.svc.cluster.local in the seed cluster.
The connections are forwarded via the HaProxy Proxy Protocol to the Istio ingress-gateway in the seed cluster.
The Istio ingress-gateway forwards the connection to the respective shoot API Server by it’s cluster IP address.
As TLS termination happens at the API Server, the traffic is end-to-end encrypted the same way as with SNI.
Details can be found in GEP-11.
Reversed VPN Tunnel
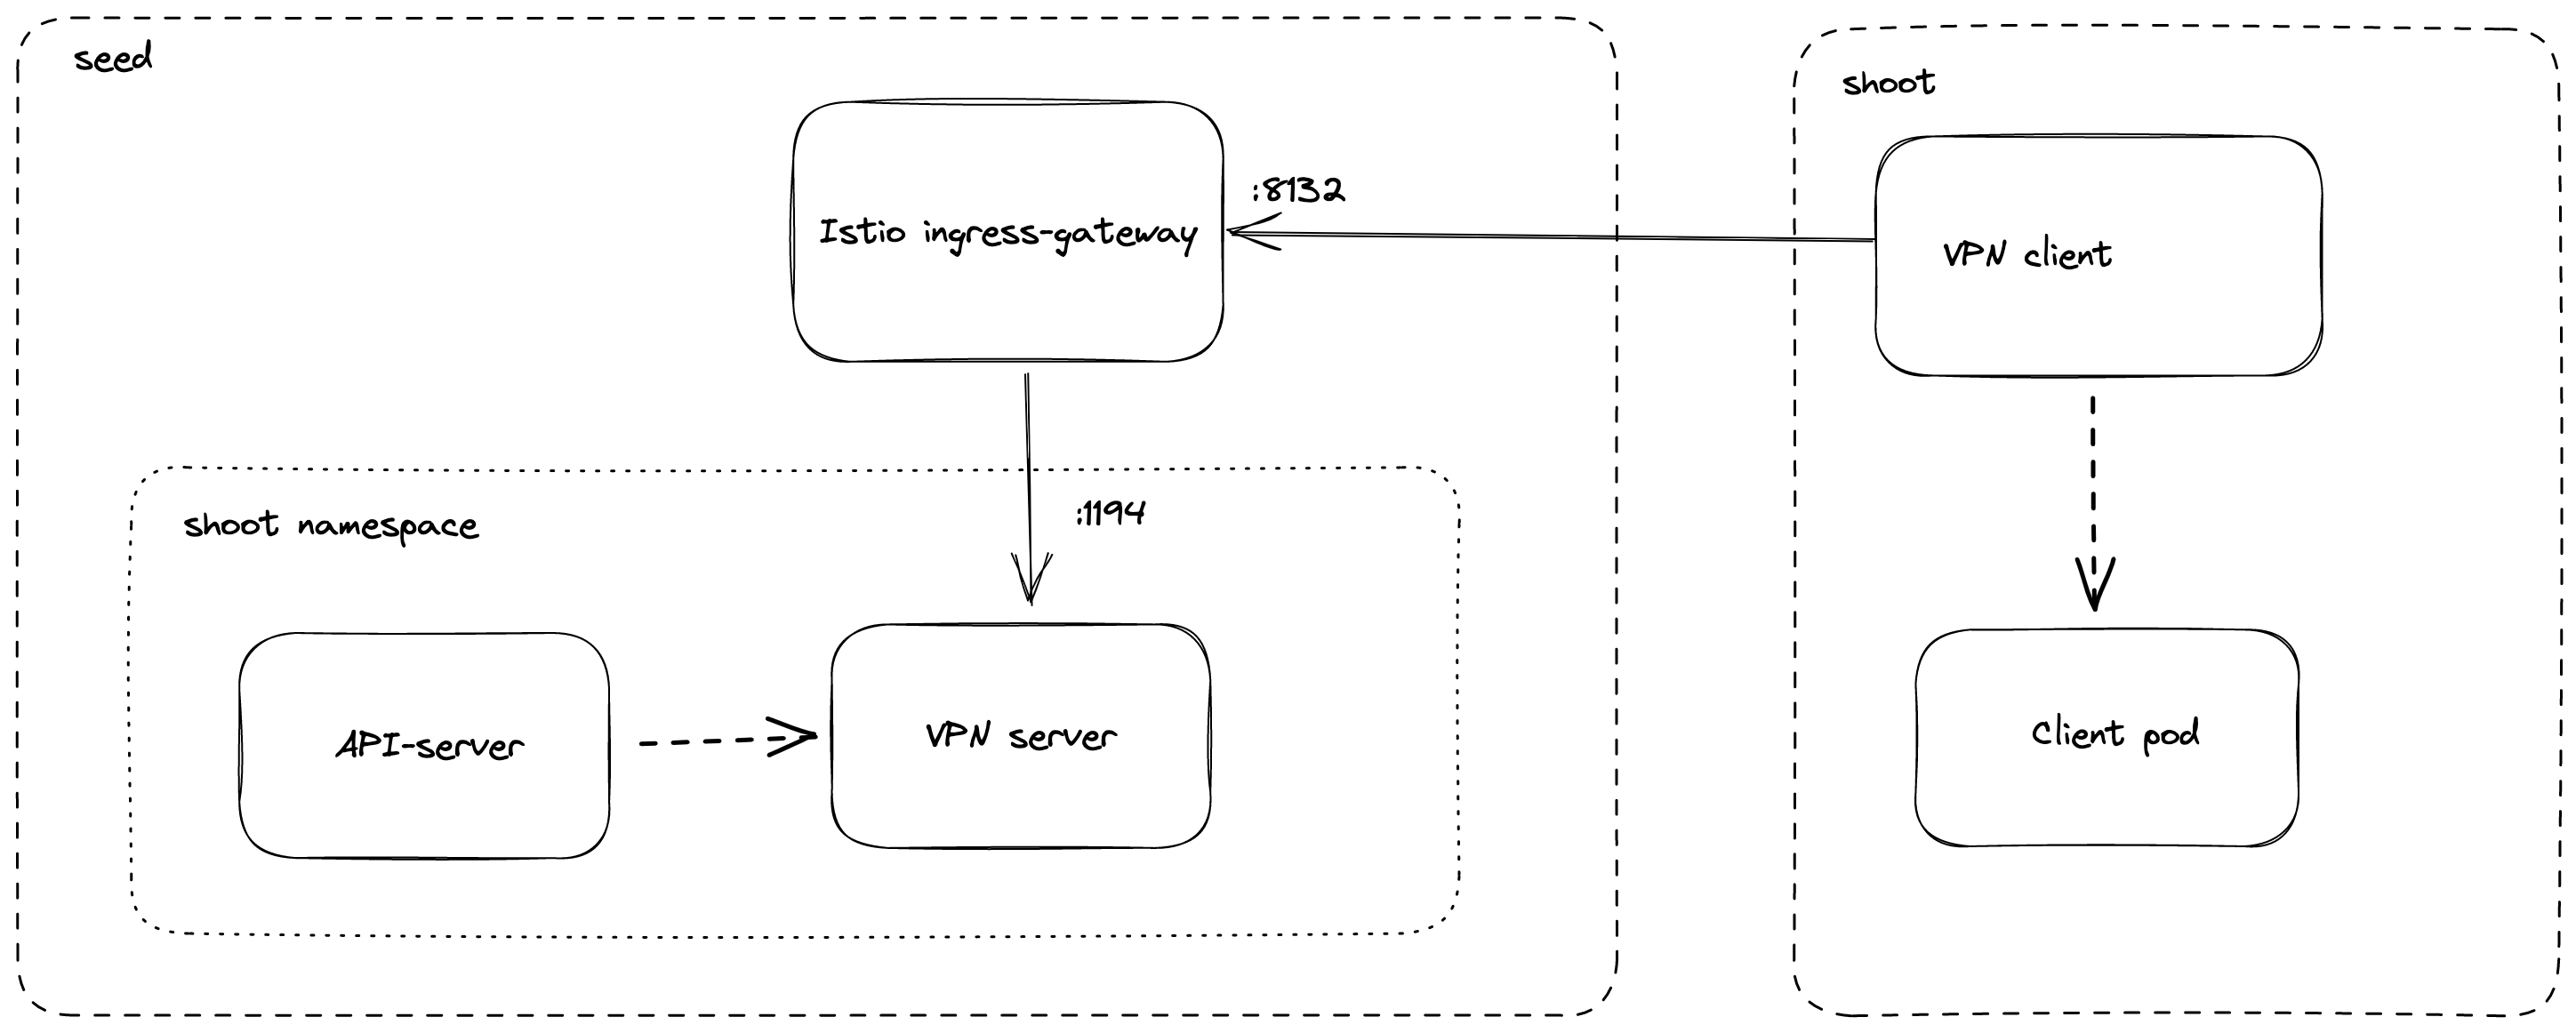
As the API Server has to be able to connect to endpoints in the shoot cluster, a VPN connection is established. This VPN connection is initiated from a VPN client in the shoot cluster. The VPN client connects to the Istio ingress-gateway and is forwarded to the VPN server in the control-plane namespace of the shoot. Once the VPN tunnel between the VPN client in the shoot and the VPN server in the seed cluster is established, the API Server can connect to nodes, services and pods in the shoot cluster.
More details can be found in the usage document and GEP-14.
4.1.4 - Custom containerd Configuration
Custom containerd Configuration
In case a Shoot cluster uses containerd, it is possible to make the containerd process load custom configuration files.
Gardener initializes containerd with the following statement:
imports = ["/etc/containerd/conf.d/*.toml"]
This means that all *.toml files in the /etc/containerd/conf.d directory will be imported and merged with the default configuration.
To prevent unintended configuration overwrites, please be aware that containerd merges config sections, not individual keys (see here and here).
Please consult the upstream containerd documentation for more information.
⚠️ Note that this only applies to nodes which were newly created after
gardener/gardener@v1.51was deployed. Existing nodes are not affected.
4.1.5 - Immutable Backup Buckets
Immutable Backup Buckets
Overview
Immutable backup buckets ensure that etcd backups cannot be modified or deleted before the configured retention period expires, by leveraging immutability features provided by supported cloud providers.
This capability is critical for:
- Security: Protecting against accidental or malicious deletion of backups.
- Compliance: Meeting regulatory requirements for data retention.
- Operational integrity: Ensuring recoverable state of your Kubernetes clusters.
Note
For background, see Gardener Issue #10866.
Core Concepts
When immutability is enabled via a supported Gardener provider extension:
The provider extension will:
- ✅ Create the backup bucket with the desired immutability policy (if it does not already exist).
- 🔄 Reconcile the policy on existing buckets to match the current configuration.
- 🚫 Prevent changes that would weaken the policy (reduce retention period or disable immutability).
- 🕑 Manage deletion lifecycle: If retention lock prevents immediate deletion of objects, a deletion policy will apply when allowed.
Important
Once a bucket’s immutability is locked at the cloud provider level, it cannot be removed or shortened—even by administrators or operators.
Provider Support
Warning
Not all Gardener provider extensions currently support immutable buckets. Support and configuration options vary between providers.
Please check your cloud provider’s extension documentation (see References) for up-to-date support and syntax.
How It Works: Admission Webhook Enforcement
To ensure backup integrity, an admission webhook enforces:
- 🔒 Immutability lock: Once the policy is locked, it cannot be disabled.
- 📅 Retention period: Once the policy is locked, the retention period cannot be shortened.
This protects clusters from accidental misconfiguration or policy drift.
How to Enable Immutable Backup Buckets
To enable immutable backup buckets:
1️⃣ Set the immutability options in .spec.backup.providerConfig of your Seed resource.
2️⃣ The Gardenlet and the provider extension will collaborate to provision and manage the bucket.
Example Configuration
Below is a generic example; adjust according to your cloud provider’s API:
apiVersion: core.gardener.cloud/v1beta1
kind: Seed
metadata:
name: example-seed
spec:
backup:
provider: <provider-name>
providerConfig:
apiVersion: <provider-extension-api-version>
kind: BackupBucketConfig
immutability:
retentionPeriod: 96h # Required: Retention duration (e.g., 96h)
retentionType: bucket # Bucket-level or object-level (provider-specific)
locked: false # Whether to lock policy on creation (recommended: true for production)
Note
See your provider’s documentation for specific fields and behavior:
Advanced: Ignoring Snapshots During Restoration
When using immutable backup buckets, you may encounter situations where certain snapshots cannot be deleted due to immutability constraints. In such cases, you can configure the etcd-backup-restore tool to ignore problematic snapshots during restoration. This allows you to proceed with restoring the etcd cluster without being blocked by snapshots that cannot be deleted.
Warning
Ignoring snapshots should be used with caution. It is recommended to only ignore snapshots that you are certain are not needed for recovery, as this may lead to data loss if critical snapshots are skipped.
👉 See: Ignoring Snapshots During Restoration.
References
4.1.6 - Necessary Labeling for Custom CSI Components
Necessary Labeling for Custom CSI Components
Some provider extensions for Gardener are using CSI components to manage persistent volumes in the shoot clusters. Additionally, most of the provider extensions are deploying controllers for taking volume snapshots (CSI snapshotter).
End-users can deploy their own CSI components and controllers into shoot clusters.
In such situations, there are multiple controllers acting on the VolumeSnapshot custom resources (each responsible for those instances associated with their respective driver provisioner types).
However, this might lead to operational conflicts that cannot be overcome by Gardener alone. Concretely, Gardener cannot know which custom CSI components were installed by end-users which can lead to issues, especially during shoot cluster deletion. You can add a label to your custom CSI components indicating that Gardener should not try to remove them during shoot cluster deletion. This means you have to take care of the lifecycle for these components yourself!
Recommendations
Custom CSI components are typically regular Deployments running in the shoot clusters.
Please label them with the shoot.gardener.cloud/no-cleanup=true label.
Background Information
When a shoot cluster is deleted, Gardener deletes most Kubernetes resources (Deployments, DaemonSets, StatefulSets, etc.). Gardener will also try to delete CSI components if they are not marked with the above mentioned label.
This can result in VolumeSnapshot resources still having finalizers that will never be cleaned up.
Consequently, manual intervention is required to clean them up before the cluster deletion can continue.
4.1.7 - Readiness of Shoot Worker Nodes
Readiness of Shoot Worker Nodes
Background
When registering new Nodes, kubelet adds the node.kubernetes.io/not-ready taint to prevent scheduling workload Pods to the Node until the Ready condition gets True.
However, the kubelet does not consider the readiness of node-critical Pods.
Hence, the Ready condition might get True and the node.kubernetes.io/not-ready taint might get removed, for example, before the CNI daemon Pod (e.g., calico-node) has successfully placed the CNI binaries on the machine.
This problem has been discussed extensively in kubernetes, e.g., in kubernetes/kubernetes#75890.
However, several proposals have been rejected because the problem can be solved by using the --register-with-taints kubelet flag and dedicated controllers (ref).
Implementation in Gardener
Gardener makes sure that workload Pods are only scheduled to Nodes where all node-critical components required for running workload Pods are ready.
For this, Gardener follows the proposed solution by the Kubernetes community and registers new Node objects with the node.gardener.cloud/critical-components-not-ready taint (effect NoSchedule).
gardener-resource-manager’s Node controller reacts on newly created Node objects that have this taint.
The controller removes the taint once all node-critical Pods are ready (determined by checking the Pods’ Ready conditions).
The Node controller considers all DaemonSets and Pods as node-critical which run in the kube-system namespace and are labeled with node.gardener.cloud/critical-component=true.
If there are DaemonSets that contain the node.gardener.cloud/critical-component=true label in their metadata and in their Pod template, the Node controller waits for corresponding daemon Pods to be scheduled and to get ready before removing the taint.
Additionally, the Node controller checks for the readiness of csi-driver-node components if a respective Pod indicates that it uses such a driver.
This is achieved through a well-defined annotation prefix (node.gardener.cloud/wait-for-csi-node-).
For example, the csi-driver-node Pod for Openstack Cinder is annotated with node.gardener.cloud/wait-for-csi-node-cinder=cinder.csi.openstack.org.
A key prefix is used instead of a “regular” annotation to allow for multiple CSI drivers being registered by one csi-driver-node Pod.
The annotation key’s suffix can be chosen arbitrarily (in this case cinder) and the annotation value needs to match the actual driver name as specified in the CSINode object.
The Node controller will verify that the used driver is properly registered in this object before removing the node.gardener.cloud/critical-components-not-ready taint.
Note that the csi-driver-node Pod still needs to be labelled and tolerate the taint as described above to be considered in this additional check.
Marking Node-Critical Components
To make use of this feature, node-critical DaemonSets and Pods need to:
- Tolerate the
node.gardener.cloud/critical-components-not-readyNoScheduletaint. - Be labelled with
node.gardener.cloud/critical-component=true. - Be placed in the
kube-systemnamespace.
csi-driver-node Pods additionally need to:
- Be annotated with
node.gardener.cloud/wait-for-csi-node-<name>=<full-driver-name>. It’s required that these Pods fulfill the above criteria (label and toleration) as well.
Gardener already marks components like kube-proxy, apiserver-proxy and node-local-dns as node-critical.
Provider extensions mark components like csi-driver-node as node-critical and add the wait-for-csi-node annotation.
Network extensions mark components responsible for setting up CNI on worker Nodes (e.g., calico-node) as node-critical.
If shoot owners manage any additional node-critical components, they can make use of this feature as well.
4.1.8 - Taints and Tolerations for Seeds and Shoots
Taints and Tolerations for Seeds and Shoots
Similar to taints and tolerations for Nodes and Pods in Kubernetes, the Seed resource supports specifying taints (.spec.taints, see this example) while the Shoot resource supports specifying tolerations (.spec.tolerations, see this example).
The feature is used to control scheduling to seeds as well as decisions whether a shoot can use a certain seed.
Compared to Kubernetes, Gardener’s taints and tolerations are very much down-stripped right now and have some behavioral differences. Please read the following explanations carefully if you plan to use them.
Scheduling
When scheduling a new shoot, the gardener-scheduler will filter all seed candidates whose taints are not tolerated by the shoot.
As Gardener’s taints/tolerations don’t support effects yet, you can compare this behaviour with using a NoSchedule effect taint in Kubernetes.
Be reminded that taints/tolerations are no means to define any affinity or selection for seeds - please use .spec.seedSelector in the Shoot to state such desires.
⚠️ Please note that - unlike how it’s implemented in Kubernetes - a certain seed cluster may only be used when the shoot tolerates all the seed’s taints.
This means that specifying .spec.seedName for a seed whose taints are not tolerated will make the gardener-apiserver reject the request.
Consequently, the taints/tolerations feature can be used as means to restrict usage of certain seeds.
Toleration Defaults and Whitelist
The Project resource features a .spec.tolerations object that may carry defaults and a whitelist (see this example).
The corresponding ShootTolerationRestriction admission plugin (cf. Kubernetes’ PodTolerationRestriction admission plugin) is responsible for evaluating these settings during creation/update of Shoots.
Whitelist
If a shoot gets created or updated with tolerations, then it is validated that only those tolerations may be used that were added to either a) the Project’s .spec.tolerations.whitelist, or b) to the global whitelist in the ShootTolerationRestriction’s admission config (see this example).
⚠️ Please note that the tolerations whitelist of Projects can only be changed if the user trying to change it is bound to the modify-spec-tolerations-whitelist custom RBAC role, e.g., via the following ClusterRole:
apiVersion: rbac.authorization.k8s.io/v1
kind: ClusterRole
metadata:
name: full-project-modification-access
rules:
- apiGroups:
- core.gardener.cloud
resources:
- projects
verbs:
- create
- patch
- update
- modify-spec-tolerations-whitelist
- delete
Defaults
If a shoot gets created, then the default tolerations specified in both the Project’s .spec.tolerations.defaults and the global default list in the ShootTolerationRestriction admission plugin’s configuration will be added to the .spec.tolerations of the Shoot (unless it already specifies a certain key).
4.2.1 - Authentication
Packages:
authentication.gardener.cloud/v1alpha1
Package v1alpha1 is a version of the API. “authentication.gardener.cloud/v1alpha1” API is already used for CRD registration and must not be served by the API server.
Resource Types:AdminKubeconfigRequest
AdminKubeconfigRequest can be used to request a kubeconfig with admin credentials for a Shoot cluster.
| Field | Description | ||
|---|---|---|---|
metadataKubernetes meta/v1.ObjectMeta | Standard object metadata. Refer to the Kubernetes API documentation for the fields of themetadata field. | ||
specAdminKubeconfigRequestSpec | Spec is the specification of the AdminKubeconfigRequest.
| ||
statusAdminKubeconfigRequestStatus | Status is the status of the AdminKubeconfigRequest. |
AdminKubeconfigRequestSpec
(Appears on: AdminKubeconfigRequest)
AdminKubeconfigRequestSpec contains the expiration time of the kubeconfig.
| Field | Description |
|---|---|
expirationSecondsint64 | (Optional) ExpirationSeconds is the requested validity duration of the credential. The credential issuer may return a credential with a different validity duration so a client needs to check the ‘expirationTimestamp’ field in a response. Defaults to 1 hour. |
AdminKubeconfigRequestStatus
(Appears on: AdminKubeconfigRequest)
AdminKubeconfigRequestStatus is the status of the AdminKubeconfigRequest containing the kubeconfig and expiration of the credential.
| Field | Description |
|---|---|
kubeconfig[]byte | Kubeconfig contains the kubeconfig with cluster-admin privileges for the shoot cluster. |
expirationTimestampKubernetes meta/v1.Time | ExpirationTimestamp is the expiration timestamp of the returned credential. |
ViewerKubeconfigRequest
ViewerKubeconfigRequest can be used to request a kubeconfig with viewer credentials (excluding Secrets) for a Shoot cluster.
| Field | Description | ||
|---|---|---|---|
metadataKubernetes meta/v1.ObjectMeta | Standard object metadata. Refer to the Kubernetes API documentation for the fields of themetadata field. | ||
specViewerKubeconfigRequestSpec | Spec is the specification of the ViewerKubeconfigRequest.
| ||
statusViewerKubeconfigRequestStatus | Status is the status of the ViewerKubeconfigRequest. |
ViewerKubeconfigRequestSpec
(Appears on: ViewerKubeconfigRequest)
ViewerKubeconfigRequestSpec contains the expiration time of the kubeconfig.
| Field | Description |
|---|---|
expirationSecondsint64 | (Optional) ExpirationSeconds is the requested validity duration of the credential. The credential issuer may return a credential with a different validity duration so a client needs to check the ‘expirationTimestamp’ field in a response. Defaults to 1 hour. |
ViewerKubeconfigRequestStatus
(Appears on: ViewerKubeconfigRequest)
ViewerKubeconfigRequestStatus is the status of the ViewerKubeconfigRequest containing the kubeconfig and expiration of the credential.
| Field | Description |
|---|---|
kubeconfig[]byte | Kubeconfig contains the kubeconfig with viewer privileges (excluding Secrets) for the shoot cluster. |
expirationTimestampKubernetes meta/v1.Time | ExpirationTimestamp is the expiration timestamp of the returned credential. |
Generated with gen-crd-api-reference-docs
4.2.2 - Core
Packages:
core.gardener.cloud/v1beta1
Package v1beta1 is a version of the API.
Resource Types:- BackupBucket
- BackupEntry
- CloudProfile
- ControllerDeployment
- ControllerInstallation
- ControllerRegistration
- ExposureClass
- InternalSecret
- NamespacedCloudProfile
- Project
- Quota
- SecretBinding
- Seed
- Shoot
- ShootState
BackupBucket
BackupBucket holds details about backup bucket
| Field | Description | ||||||||||
|---|---|---|---|---|---|---|---|---|---|---|---|
apiVersionstring | core.gardener.cloud/v1beta1 | ||||||||||
kindstring | BackupBucket | ||||||||||
metadataKubernetes meta/v1.ObjectMeta | Standard object metadata. Refer to the Kubernetes API documentation for the fields of themetadata field. | ||||||||||
specBackupBucketSpec | Specification of the Backup Bucket.
| ||||||||||
statusBackupBucketStatus | Most recently observed status of the Backup Bucket. |
BackupEntry
BackupEntry holds details about shoot backup.
| Field | Description | ||||
|---|---|---|---|---|---|
apiVersionstring | core.gardener.cloud/v1beta1 | ||||
kindstring | BackupEntry | ||||
metadataKubernetes meta/v1.ObjectMeta | Standard object metadata. Refer to the Kubernetes API documentation for the fields of themetadata field. | ||||
specBackupEntrySpec | (Optional) Spec contains the specification of the Backup Entry.
| ||||
statusBackupEntryStatus | (Optional) Status contains the most recently observed status of the Backup Entry. |
CloudProfile
CloudProfile represents certain properties about a provider environment.
| Field | Description | ||||||||||||||||||||||||
|---|---|---|---|---|---|---|---|---|---|---|---|---|---|---|---|---|---|---|---|---|---|---|---|---|---|
apiVersionstring | core.gardener.cloud/v1beta1 | ||||||||||||||||||||||||
kindstring | CloudProfile | ||||||||||||||||||||||||
metadataKubernetes meta/v1.ObjectMeta | (Optional) Standard object metadata. Refer to the Kubernetes API documentation for the fields of themetadata field. | ||||||||||||||||||||||||
specCloudProfileSpec | (Optional) Spec defines the provider environment properties.
|
ControllerDeployment
ControllerDeployment contains information about how this controller is deployed.
| Field | Description |
|---|---|
apiVersionstring | core.gardener.cloud/v1beta1 |
kindstring | ControllerDeployment |
metadataKubernetes meta/v1.ObjectMeta | Standard object metadata. Refer to the Kubernetes API documentation for the fields of themetadata field. |
typestring | Type is the deployment type. |
providerConfigk8s.io/apimachinery/pkg/runtime.RawExtension | ProviderConfig contains type-specific configuration. It contains assets that deploy the controller. |
injectGardenKubeconfigbool | (Optional) InjectGardenKubeconfig controls whether a kubeconfig to the garden cluster should be injected into workload resources. |
ControllerInstallation
ControllerInstallation represents an installation request for an external controller.
| Field | Description | ||||||
|---|---|---|---|---|---|---|---|
apiVersionstring | core.gardener.cloud/v1beta1 | ||||||
kindstring | ControllerInstallation | ||||||
metadataKubernetes meta/v1.ObjectMeta | Standard object metadata. Refer to the Kubernetes API documentation for the fields of themetadata field. | ||||||
specControllerInstallationSpec | Spec contains the specification of this installation. If the object’s deletion timestamp is set, this field is immutable.
| ||||||
statusControllerInstallationStatus | Status contains the status of this installation. |
ControllerRegistration
ControllerRegistration represents a registration of an external controller.
| Field | Description | ||||
|---|---|---|---|---|---|
apiVersionstring | core.gardener.cloud/v1beta1 | ||||
kindstring | ControllerRegistration | ||||
metadataKubernetes meta/v1.ObjectMeta | Standard object metadata. Refer to the Kubernetes API documentation for the fields of themetadata field. | ||||
specControllerRegistrationSpec | Spec contains the specification of this registration. If the object’s deletion timestamp is set, this field is immutable.
|
ExposureClass
ExposureClass represents a control plane endpoint exposure strategy.
| Field | Description |
|---|---|
apiVersionstring | core.gardener.cloud/v1beta1 |
kindstring | ExposureClass |
metadataKubernetes meta/v1.ObjectMeta | (Optional) Standard object metadata. Refer to the Kubernetes API documentation for the fields of themetadata field. |
handlerstring | Handler is the name of the handler which applies the control plane endpoint exposure strategy. This field is immutable. |
schedulingExposureClassScheduling | (Optional) Scheduling holds information how to select applicable Seed’s for ExposureClass usage. This field is immutable. |
InternalSecret
InternalSecret holds secret data of a certain type. The total bytes of the values in the Data field must be less than MaxSecretSize bytes.
| Field | Description |
|---|---|
apiVersionstring | core.gardener.cloud/v1beta1 |
kindstring | InternalSecret |
metadataKubernetes meta/v1.ObjectMeta | (Optional) Standard object’s metadata. More info: https://git.k8s.io/community/contributors/devel/sig-architecture/api-conventions.md#metadata Refer to the Kubernetes API documentation for the fields of themetadata field. |
immutablebool | (Optional) Immutable, if set to true, ensures that data stored in the Secret cannot be updated (only object metadata can be modified). If not set to true, the field can be modified at any time. Defaulted to nil. |
datamap[string][]byte | (Optional) Data contains the secret data. Each key must consist of alphanumeric characters, ‘-’, ‘_’ or ‘.’. The serialized form of the secret data is a base64 encoded string, representing the arbitrary (possibly non-string) data value here. Described in https://tools.ietf.org/html/rfc4648#section-4 |
stringDatamap[string]string | (Optional) stringData allows specifying non-binary secret data in string form. It is provided as a write-only input field for convenience. All keys and values are merged into the data field on write, overwriting any existing values. The stringData field is never output when reading from the API. |
typeKubernetes core/v1.SecretType | (Optional) Used to facilitate programmatic handling of secret data. More info: https://kubernetes.io/docs/concepts/configuration/secret/#secret-types |
NamespacedCloudProfile
NamespacedCloudProfile represents certain properties about a provider environment.
| Field | Description | ||||||||||||||||
|---|---|---|---|---|---|---|---|---|---|---|---|---|---|---|---|---|---|
apiVersionstring | core.gardener.cloud/v1beta1 | ||||||||||||||||
kindstring | NamespacedCloudProfile | ||||||||||||||||
metadataKubernetes meta/v1.ObjectMeta | Standard object metadata. Refer to the Kubernetes API documentation for the fields of themetadata field. | ||||||||||||||||
specNamespacedCloudProfileSpec | Spec defines the provider environment properties.
| ||||||||||||||||
statusNamespacedCloudProfileStatus | Most recently observed status of the NamespacedCloudProfile. |
Project
Project holds certain properties about a Gardener project.
| Field | Description | ||||||||||||||||
|---|---|---|---|---|---|---|---|---|---|---|---|---|---|---|---|---|---|
apiVersionstring | core.gardener.cloud/v1beta1 | ||||||||||||||||
kindstring | Project | ||||||||||||||||
metadataKubernetes meta/v1.ObjectMeta | (Optional) Standard object metadata. Refer to the Kubernetes API documentation for the fields of themetadata field. | ||||||||||||||||
specProjectSpec | (Optional) Spec defines the project properties.
| ||||||||||||||||
statusProjectStatus | (Optional) Most recently observed status of the Project. |
Quota
Quota represents a quota on resources consumed by shoot clusters either per project or per provider secret.
| Field | Description | ||||||
|---|---|---|---|---|---|---|---|
apiVersionstring | core.gardener.cloud/v1beta1 | ||||||
kindstring | Quota | ||||||
metadataKubernetes meta/v1.ObjectMeta | (Optional) Standard object metadata. Refer to the Kubernetes API documentation for the fields of themetadata field. | ||||||
specQuotaSpec | (Optional) Spec defines the Quota constraints.
|
SecretBinding
SecretBinding represents a binding to a secret in the same or another namespace.
| Field | Description |
|---|---|
apiVersionstring | core.gardener.cloud/v1beta1 |
kindstring | SecretBinding |
metadataKubernetes meta/v1.ObjectMeta | (Optional) Standard object metadata. Refer to the Kubernetes API documentation for the fields of themetadata field. |
secretRefKubernetes core/v1.SecretReference | SecretRef is a reference to a secret object in the same or another namespace. This field is immutable. |
quotas[]Kubernetes core/v1.ObjectReference | (Optional) Quotas is a list of references to Quota objects in the same or another namespace. This field is immutable. |
providerSecretBindingProvider | (Optional) Provider defines the provider type of the SecretBinding. This field is immutable. |
Seed
Seed represents an installation request for an external controller.
| Field | Description | ||||||||||||||||||||||
|---|---|---|---|---|---|---|---|---|---|---|---|---|---|---|---|---|---|---|---|---|---|---|---|
apiVersionstring | core.gardener.cloud/v1beta1 | ||||||||||||||||||||||
kindstring | Seed | ||||||||||||||||||||||
metadataKubernetes meta/v1.ObjectMeta | Standard object metadata. Refer to the Kubernetes API documentation for the fields of themetadata field. | ||||||||||||||||||||||
specSeedSpec | Spec contains the specification of this installation.
| ||||||||||||||||||||||
statusSeedStatus | Status contains the status of this installation. |
Shoot
Shoot represents a Shoot cluster created and managed by Gardener.
| Field | Description | ||||||||||||||||||||||||||||||||||||||||||||||||
|---|---|---|---|---|---|---|---|---|---|---|---|---|---|---|---|---|---|---|---|---|---|---|---|---|---|---|---|---|---|---|---|---|---|---|---|---|---|---|---|---|---|---|---|---|---|---|---|---|---|
apiVersionstring | core.gardener.cloud/v1beta1 | ||||||||||||||||||||||||||||||||||||||||||||||||
kindstring | Shoot | ||||||||||||||||||||||||||||||||||||||||||||||||
metadataKubernetes meta/v1.ObjectMeta | (Optional) Standard object metadata. Refer to the Kubernetes API documentation for the fields of themetadata field. | ||||||||||||||||||||||||||||||||||||||||||||||||
specShootSpec | (Optional) Specification of the Shoot cluster. If the object’s deletion timestamp is set, this field is immutable.
| ||||||||||||||||||||||||||||||||||||||||||||||||
statusShootStatus | (Optional) Most recently observed status of the Shoot cluster. |
ShootState
ShootState contains a snapshot of the Shoot’s state required to migrate the Shoot’s control plane to a new Seed.
| Field | Description | ||||||
|---|---|---|---|---|---|---|---|
apiVersionstring | core.gardener.cloud/v1beta1 | ||||||
kindstring | ShootState | ||||||
metadataKubernetes meta/v1.ObjectMeta | (Optional) Standard object metadata. Refer to the Kubernetes API documentation for the fields of themetadata field. | ||||||
specShootStateSpec | (Optional) Specification of the ShootState.
|
APIServerLogging
(Appears on: KubeAPIServerConfig)
APIServerLogging contains configuration for the logs level and http access logs
| Field | Description |
|---|---|
verbosityint32 | (Optional) Verbosity is the kube-apiserver log verbosity level Defaults to 2. |
httpAccessVerbosityint32 | (Optional) HTTPAccessVerbosity is the kube-apiserver access logs level |
APIServerRequests
(Appears on: KubeAPIServerConfig)
APIServerRequests contains configuration for request-specific settings for the kube-apiserver.
| Field | Description |
|---|---|
maxNonMutatingInflightint32 | (Optional) MaxNonMutatingInflight is the maximum number of non-mutating requests in flight at a given time. When the server exceeds this, it rejects requests. |
maxMutatingInflightint32 | (Optional) MaxMutatingInflight is the maximum number of mutating requests in flight at a given time. When the server exceeds this, it rejects requests. |
AccessRestriction
(Appears on: AccessRestrictionWithOptions, Region, SeedSpec)
AccessRestriction describes an access restriction for a Kubernetes cluster (e.g., EU access-only).
| Field | Description |
|---|---|
namestring | Name is the name of the restriction. |
AccessRestrictionWithOptions
(Appears on: ShootSpec)
AccessRestrictionWithOptions describes an access restriction for a Kubernetes cluster (e.g., EU access-only) and allows to specify additional options.
| Field | Description |
|---|---|
AccessRestrictionAccessRestriction | (Members of |
optionsmap[string]string | (Optional) Options is a map of additional options for the access restriction. |
Addon
(Appears on: KubernetesDashboard, NginxIngress)
Addon allows enabling or disabling a specific addon and is used to derive from.
| Field | Description |
|---|---|
enabledbool | Enabled indicates whether the addon is enabled or not. |
Addons
(Appears on: ShootSpec)
Addons is a collection of configuration for specific addons which are managed by the Gardener.
| Field | Description |
|---|---|
kubernetesDashboardKubernetesDashboard | (Optional) KubernetesDashboard holds configuration settings for the kubernetes dashboard addon. |
nginxIngressNginxIngress | (Optional) NginxIngress holds configuration settings for the nginx-ingress addon. |
AdmissionPlugin
(Appears on: KubeAPIServerConfig)
AdmissionPlugin contains information about a specific admission plugin and its corresponding configuration.
| Field | Description |
|---|---|
namestring | Name is the name of the plugin. |
configk8s.io/apimachinery/pkg/runtime.RawExtension | (Optional) Config is the configuration of the plugin. |
disabledbool | (Optional) Disabled specifies whether this plugin should be disabled. |
kubeconfigSecretNamestring | (Optional) KubeconfigSecretName specifies the name of a secret containing the kubeconfig for this admission plugin. |
Alerting
(Appears on: Monitoring)
Alerting contains information about how alerting will be done (i.e. who will receive alerts and how).
| Field | Description |
|---|---|
emailReceivers[]string | (Optional) MonitoringEmailReceivers is a list of recipients for alerts |
AuditConfig
(Appears on: KubeAPIServerConfig)
AuditConfig contains settings for audit of the api server
| Field | Description |
|---|---|
auditPolicyAuditPolicy | (Optional) AuditPolicy contains configuration settings for audit policy of the kube-apiserver. |
AuditPolicy
(Appears on: AuditConfig)
AuditPolicy contains audit policy for kube-apiserver
| Field | Description |
|---|---|
configMapRefKubernetes core/v1.ObjectReference | (Optional) ConfigMapRef is a reference to a ConfigMap object in the same namespace, which contains the audit policy for the kube-apiserver. |
AuthorizerKubeconfigReference
(Appears on: StructuredAuthorization)
AuthorizerKubeconfigReference is a reference for a kubeconfig for a authorization webhook.
| Field | Description |
|---|---|
authorizerNamestring | AuthorizerName is the name of a webhook authorizer. |
secretNamestring | SecretName is the name of a secret containing the kubeconfig. |
AvailabilityZone
(Appears on: Region)
AvailabilityZone is an availability zone.
| Field | Description |
|---|---|
namestring | Name is an availability zone name. |
unavailableMachineTypes[]string | (Optional) UnavailableMachineTypes is a list of machine type names that are not availability in this zone. |
unavailableVolumeTypes[]string | (Optional) UnavailableVolumeTypes is a list of volume type names that are not availability in this zone. |
Backup
(Appears on: SeedSpec, WorkerControlPlane)
Backup contains the object store configuration for backups for shoot (currently only etcd).
| Field | Description |
|---|---|
providerstring | Provider is a provider name. This field is immutable. |
providerConfigk8s.io/apimachinery/pkg/runtime.RawExtension | (Optional) ProviderConfig is the configuration passed to BackupBucket resource. |
regionstring | (Optional) Region is a region name. This field is immutable. |
credentialsRefKubernetes core/v1.ObjectReference | (Optional) CredentialsRef is reference to a resource holding the credentials used for authentication with the object store service where the backups are stored. Supported referenced resources are v1.Secrets and security.gardener.cloud/v1alpha1.WorkloadIdentity |
BackupBucketProvider
(Appears on: BackupBucketSpec)
BackupBucketProvider holds the details of cloud provider of the object store.
| Field | Description |
|---|---|
typestring | Type is the type of provider. |
regionstring | Region is the region of the bucket. |
BackupBucketSpec
(Appears on: BackupBucket)
BackupBucketSpec is the specification of a Backup Bucket.
| Field | Description |
|---|---|
providerBackupBucketProvider | Provider holds the details of cloud provider of the object store. This field is immutable. |
providerConfigk8s.io/apimachinery/pkg/runtime.RawExtension | (Optional) ProviderConfig is the configuration passed to BackupBucket resource. |
secretRefKubernetes core/v1.SecretReference | SecretRef is a reference to a secret that contains the credentials to access object store.
Deprecated: This field will be removed after v1.123.0 has been released. Use |
seedNamestring | (Optional) SeedName holds the name of the seed allocated to BackupBucket for running controller. This field is immutable. |
credentialsRefKubernetes core/v1.ObjectReference | (Optional) CredentialsRef is reference to a resource holding the credentials used for authentication with the object store service where the backups are stored. Supported referenced resources are v1.Secrets and security.gardener.cloud/v1alpha1.WorkloadIdentity |
BackupBucketStatus
(Appears on: BackupBucket)
BackupBucketStatus holds the most recently observed status of the Backup Bucket.
| Field | Description |
|---|---|
providerStatusk8s.io/apimachinery/pkg/runtime.RawExtension | (Optional) ProviderStatus is the configuration passed to BackupBucket resource. |
lastOperationLastOperation | (Optional) LastOperation holds information about the last operation on the BackupBucket. |
lastErrorLastError | (Optional) LastError holds information about the last occurred error during an operation. |
observedGenerationint64 | (Optional) ObservedGeneration is the most recent generation observed for this BackupBucket. It corresponds to the BackupBucket’s generation, which is updated on mutation by the API Server. |
generatedSecretRefKubernetes core/v1.SecretReference | (Optional) GeneratedSecretRef is reference to the secret generated by backup bucket, which will have object store specific credentials. |
BackupEntrySpec
(Appears on: BackupEntry)
BackupEntrySpec is the specification of a Backup Entry.
| Field | Description |
|---|---|
bucketNamestring | BucketName is the name of backup bucket for this Backup Entry. |
seedNamestring | (Optional) SeedName holds the name of the seed to which this BackupEntry is scheduled |
BackupEntryStatus
(Appears on: BackupEntry)
BackupEntryStatus holds the most recently observed status of the Backup Entry.
| Field | Description |
|---|---|
lastOperationLastOperation | (Optional) LastOperation holds information about the last operation on the BackupEntry. |
lastErrorLastError | (Optional) LastError holds information about the last occurred error during an operation. |
observedGenerationint64 | (Optional) ObservedGeneration is the most recent generation observed for this BackupEntry. It corresponds to the BackupEntry’s generation, which is updated on mutation by the API Server. |
seedNamestring | (Optional) SeedName is the name of the seed to which this BackupEntry is currently scheduled. This field is populated at the beginning of a create/reconcile operation. It is used when moving the BackupEntry between seeds. |
migrationStartTimeKubernetes meta/v1.Time | (Optional) MigrationStartTime is the time when a migration to a different seed was initiated. |
Bastion
(Appears on: CloudProfileSpec)
Bastion contains the bastions creation info
| Field | Description |
|---|---|
machineImageBastionMachineImage | (Optional) MachineImage contains the bastions machine image properties |
machineTypeBastionMachineType | (Optional) MachineType contains the bastions machine type properties |
BastionMachineImage
(Appears on: Bastion)
BastionMachineImage contains the bastions machine image properties
| Field | Description |
|---|---|
namestring | Name of the machine image |
versionstring | (Optional) Version of the machine image |
BastionMachineType
(Appears on: Bastion)
BastionMachineType contains the bastions machine type properties
| Field | Description |
|---|---|
namestring | Name of the machine type |
CARotation
(Appears on: ShootCredentialsRotation)
CARotation contains information about the certificate authority credential rotation.
| Field | Description |
|---|---|
phaseCredentialsRotationPhase | Phase describes the phase of the certificate authority credential rotation. |
lastCompletionTimeKubernetes meta/v1.Time | (Optional) LastCompletionTime is the most recent time when the certificate authority credential rotation was successfully completed. |
lastInitiationTimeKubernetes meta/v1.Time | (Optional) LastInitiationTime is the most recent time when the certificate authority credential rotation was initiated. |
lastInitiationFinishedTimeKubernetes meta/v1.Time | (Optional) LastInitiationFinishedTime is the recent time when the certificate authority credential rotation initiation was completed. |
lastCompletionTriggeredTimeKubernetes meta/v1.Time | (Optional) LastCompletionTriggeredTime is the recent time when the certificate authority credential rotation completion was triggered. |
pendingWorkersRollouts[]PendingWorkersRollout | (Optional) PendingWorkersRollouts contains the name of a worker pool and the initiation time of their last rollout due to credentials rotation. |
CRI
(Appears on: MachineImageVersion, Worker)
CRI contains information about the Container Runtimes.
| Field | Description |
|---|---|
nameCRIName | The name of the CRI library. Supported values are |
containerRuntimes[]ContainerRuntime | (Optional) ContainerRuntimes is the list of the required container runtimes supported for a worker pool. |
CRIName
(string alias)
(Appears on: CRI)
CRIName is a type alias for the CRI name string.
Capabilities
(map[string]github.com/gardener/gardener/pkg/apis/core/v1beta1.CapabilityValues alias)
(Appears on: CapabilitySet, MachineType)
Capabilities of a machine type or machine image.
CapabilityDefinition
(Appears on: CloudProfileSpec)
CapabilityDefinition contains the Name and Values of a capability.
| Field | Description |
|---|---|
namestring | |
valuesCapabilityValues |
CapabilitySet
(Appears on: MachineImageVersion)
CapabilitySet is a wrapper for Capabilities. This is a workaround as the Protobuf generator can’t handle a slice of maps.
| Field | Description |
|---|---|
-Capabilities |
CapabilityValues
([]string alias)
(Appears on: CapabilityDefinition)
CapabilityValues contains capability values. This is a workaround as the Protobuf generator can’t handle a map with slice values.
CloudProfileReference
(Appears on: NamespacedCloudProfileSpec, ShootSpec)
CloudProfileReference holds the information about a CloudProfile or a NamespacedCloudProfile.
| Field | Description |
|---|---|
kindstring | Kind contains a CloudProfile kind. |
namestring | Name contains the name of the referenced CloudProfile. |
CloudProfileSpec
(Appears on: CloudProfile, NamespacedCloudProfileStatus)
CloudProfileSpec is the specification of a CloudProfile. It must contain exactly one of its defined keys.
| Field | Description |
|---|---|
caBundlestring | (Optional) CABundle is a certificate bundle which will be installed onto every host machine of shoot cluster targeting this profile. |
kubernetesKubernetesSettings | Kubernetes contains constraints regarding allowed values of the ‘kubernetes’ block in the Shoot specification. |
machineImages[]MachineImage | MachineImages contains constraints regarding allowed values for machine images in the Shoot specification. |
machineTypes[]MachineType | MachineTypes contains constraints regarding allowed values for machine types in the ‘workers’ block in the Shoot specification. |
providerConfigk8s.io/apimachinery/pkg/runtime.RawExtension | (Optional) ProviderConfig contains provider-specific configuration for the profile. |
regions[]Region | Regions contains constraints regarding allowed values for regions and zones. |
seedSelectorSeedSelector | (Optional) SeedSelector contains an optional list of labels on |
typestring | Type is the name of the provider. |
volumeTypes[]VolumeType | (Optional) VolumeTypes contains constraints regarding allowed values for volume types in the ‘workers’ block in the Shoot specification. |
bastionBastion | (Optional) Bastion contains the machine and image properties |
limitsLimits | (Optional) Limits configures operational limits for Shoot clusters using this CloudProfile. See https://github.com/gardener/gardener/blob/master/docs/usage/shoot/shoot_limits.md. |
capabilities[]CapabilityDefinition | (Optional) Capabilities contains the definition of all possible capabilities in the CloudProfile. Only capabilities and values defined here can be used to describe MachineImages and MachineTypes. The order of values for a given capability is relevant. The most important value is listed first. During maintenance upgrades, the image that matches most capabilities will be selected. |
ClusterAutoscaler
(Appears on: Kubernetes)
ClusterAutoscaler contains the configuration flags for the Kubernetes cluster autoscaler.
| Field | Description |
|---|---|
scaleDownDelayAfterAddKubernetes meta/v1.Duration | (Optional) ScaleDownDelayAfterAdd defines how long after scale up that scale down evaluation resumes (default: 1 hour). |
scaleDownDelayAfterDeleteKubernetes meta/v1.Duration | (Optional) ScaleDownDelayAfterDelete how long after node deletion that scale down evaluation resumes, defaults to scanInterval (default: 0 secs). |
scaleDownDelayAfterFailureKubernetes meta/v1.Duration | (Optional) ScaleDownDelayAfterFailure how long after scale down failure that scale down evaluation resumes (default: 3 mins). |
scaleDownUnneededTimeKubernetes meta/v1.Duration | (Optional) ScaleDownUnneededTime defines how long a node should be unneeded before it is eligible for scale down (default: 30 mins). |
scaleDownUtilizationThresholdfloat64 | (Optional) ScaleDownUtilizationThreshold defines the threshold in fraction (0.0 - 1.0) under which a node is being removed (default: 0.5). |
scanIntervalKubernetes meta/v1.Duration | (Optional) ScanInterval how often cluster is reevaluated for scale up or down (default: 10 secs). |
expanderExpanderMode | (Optional) Expander defines the algorithm to use during scale up (default: least-waste). See: https://github.com/gardener/autoscaler/blob/machine-controller-manager-provider/cluster-autoscaler/FAQ.md#what-are-expanders. |
maxNodeProvisionTimeKubernetes meta/v1.Duration | (Optional) MaxNodeProvisionTime defines how long CA waits for node to be provisioned (default: 20 mins). |
maxGracefulTerminationSecondsint32 | (Optional) MaxGracefulTerminationSeconds is the number of seconds CA waits for pod termination when trying to scale down a node (default: 600). |
ignoreTaints[]string | (Optional) IgnoreTaints specifies a list of taint keys to ignore in node templates when considering to scale a node group. Deprecated: Ignore taints are deprecated as of K8S 1.29 and treated as startup taints |
newPodScaleUpDelayKubernetes meta/v1.Duration | (Optional) NewPodScaleUpDelay specifies how long CA should ignore newly created pods before they have to be considered for scale-up (default: 0s). |
maxEmptyBulkDeleteint32 | (Optional) MaxEmptyBulkDelete specifies the maximum number of empty nodes that can be deleted at the same time (default: MaxScaleDownParallelism when that is set). Deprecated: This field is deprecated. Setting this field will be forbidden starting from Kubernetes 1.33 and will be removed once gardener drops support for kubernetes v1.32. This cluster-autoscaler field is deprecated upstream, use –max-scale-down-parallelism instead. TODO(Kostov6): Drop this field after support for Kubernetes 1.32 is dropped. |
ignoreDaemonsetsUtilizationbool | (Optional) IgnoreDaemonsetsUtilization allows CA to ignore DaemonSet pods when calculating resource utilization for scaling down (default: false). |
verbosityint32 | (Optional) Verbosity allows CA to modify its log level (default: 2). |
startupTaints[]string | (Optional) StartupTaints specifies a list of taint keys to ignore in node templates when considering to scale a node group. Cluster Autoscaler treats nodes tainted with startup taints as unready, but taken into account during scale up logic, assuming they will become ready shortly. |
statusTaints[]string | (Optional) StatusTaints specifies a list of taint keys to ignore in node templates when considering to scale a node group. Cluster Autoscaler internally treats nodes tainted with status taints as ready, but filtered out during scale up logic. |
maxScaleDownParallelismint32 | (Optional) MaxScaleDownParallelism specifies the maximum number of nodes (both empty and needing drain) that can be deleted in parallel. Default: 10 or MaxEmptyBulkDelete when that is set |
maxDrainParallelismint32 | (Optional) MaxDrainParallelism specifies the maximum number of nodes needing drain, that can be drained and deleted in parallel. Default: 1 |
ClusterAutoscalerOptions
(Appears on: Worker)
ClusterAutoscalerOptions contains the cluster autoscaler configurations for a worker pool.
| Field | Description |
|---|---|
scaleDownUtilizationThresholdfloat64 | (Optional) ScaleDownUtilizationThreshold defines the threshold in fraction (0.0 - 1.0) under which a node is being removed. |
scaleDownGpuUtilizationThresholdfloat64 | (Optional) ScaleDownGpuUtilizationThreshold defines the threshold in fraction (0.0 - 1.0) of gpu resources under which a node is being removed. |
scaleDownUnneededTimeKubernetes meta/v1.Duration | (Optional) ScaleDownUnneededTime defines how long a node should be unneeded before it is eligible for scale down. |
scaleDownUnreadyTimeKubernetes meta/v1.Duration | (Optional) ScaleDownUnreadyTime defines how long an unready node should be unneeded before it is eligible for scale down. |
maxNodeProvisionTimeKubernetes meta/v1.Duration | (Optional) MaxNodeProvisionTime defines how long CA waits for node to be provisioned. |
ClusterType
(string alias)
(Appears on: ControllerResource)
ClusterType defines the type of cluster.
Condition
(Appears on: ControllerInstallationStatus, SeedStatus, ShootStatus)
Condition holds the information about the state of a resource.
| Field | Description |
|---|---|
typeConditionType | Type of the condition. |
statusConditionStatus | Status of the condition, one of True, False, Unknown. |
lastTransitionTimeKubernetes meta/v1.Time | Last time the condition transitioned from one status to another. |
lastUpdateTimeKubernetes meta/v1.Time | Last time the condition was updated. |
reasonstring | The reason for the condition’s last transition. |
messagestring | A human readable message indicating details about the transition. |
codes[]ErrorCode | (Optional) Well-defined error codes in case the condition reports a problem. |
ConditionStatus
(string alias)
(Appears on: Condition)
ConditionStatus is the status of a condition.
ConditionType
(string alias)
(Appears on: Condition)
ConditionType is a string alias.
ContainerRuntime
(Appears on: CRI)
ContainerRuntime contains information about worker’s available container runtime
| Field | Description |
|---|---|
typestring | Type is the type of the Container Runtime. |
providerConfigk8s.io/apimachinery/pkg/runtime.RawExtension | (Optional) ProviderConfig is the configuration passed to container runtime resource. |
ControlPlane
(Appears on: ShootSpec)
ControlPlane holds information about the general settings for the control plane of a shoot.
| Field | Description |
|---|---|
highAvailabilityHighAvailability | (Optional) HighAvailability holds the configuration settings for high availability of the control plane of a shoot. |
ControlPlaneAutoscaling
(Appears on: ETCDConfig, KubeAPIServerConfig)
ControlPlaneAutoscaling contains auto-scaling configuration options for control-plane components.
| Field | Description |
|---|---|
minAllowedKubernetes core/v1.ResourceList | MinAllowed configures the minimum allowed resource requests for vertical pod autoscaling.. Configuration of minAllowed resources is an advanced feature that can help clusters to overcome scale-up delays. Default values are not applied to this field. |
ControllerDeploymentPolicy
(string alias)
(Appears on: ControllerRegistrationDeployment)
ControllerDeploymentPolicy is a string alias.
ControllerInstallationSpec
(Appears on: ControllerInstallation)
ControllerInstallationSpec is the specification of a ControllerInstallation.
| Field | Description |
|---|---|
registrationRefKubernetes core/v1.ObjectReference | RegistrationRef is used to reference a ControllerRegistration resource. The name field of the RegistrationRef is immutable. |
seedRefKubernetes core/v1.ObjectReference | SeedRef is used to reference a Seed resource. The name field of the SeedRef is immutable. |
deploymentRefKubernetes core/v1.ObjectReference | (Optional) DeploymentRef is used to reference a ControllerDeployment resource. |
ControllerInstallationStatus
(Appears on: ControllerInstallation)
ControllerInstallationStatus is the status of a ControllerInstallation.
| Field | Description |
|---|---|
conditions[]Condition | (Optional) Conditions represents the latest available observations of a ControllerInstallations’s current state. |
providerStatusk8s.io/apimachinery/pkg/runtime.RawExtension | (Optional) ProviderStatus contains type-specific status. |
ControllerRegistrationDeployment
(Appears on: ControllerRegistrationSpec)
ControllerRegistrationDeployment contains information for how this controller is deployed.
| Field | Description |
|---|---|
policyControllerDeploymentPolicy | (Optional) Policy controls how the controller is deployed. It defaults to ‘OnDemand’. |
seedSelectorKubernetes meta/v1.LabelSelector | (Optional) SeedSelector contains an optional label selector for seeds. Only if the labels match then this controller will be considered for a deployment. An empty list means that all seeds are selected. |
deploymentRefs[]DeploymentRef | (Optional) DeploymentRefs holds references to |
ControllerRegistrationSpec
(Appears on: ControllerRegistration)
ControllerRegistrationSpec is the specification of a ControllerRegistration.
| Field | Description |
|---|---|
resources[]ControllerResource | (Optional) Resources is a list of combinations of kinds (DNSProvider, Infrastructure, Generic, …) and their actual types (aws-route53, gcp, auditlog, …). |
deploymentControllerRegistrationDeployment | (Optional) Deployment contains information for how this controller is deployed. |
ControllerResource
(Appears on: ControllerRegistrationSpec)
ControllerResource is a combination of a kind (DNSProvider, Infrastructure, Generic, …) and the actual type for this kind (aws-route53, gcp, auditlog, …).
| Field | Description |
|---|---|
kindstring | Kind is the resource kind, for example “OperatingSystemConfig”. |
typestring | Type is the resource type, for example “coreos” or “ubuntu”. |
reconcileTimeoutKubernetes meta/v1.Duration | (Optional) ReconcileTimeout defines how long Gardener should wait for the resource reconciliation. This field is defaulted to 3m0s when kind is “Extension”. |
primarybool | (Optional) Primary determines if the controller backed by this ControllerRegistration is responsible for the extension resource’s lifecycle. This field defaults to true. There must be exactly one primary controller for this kind/type combination. This field is immutable. |
lifecycleControllerResourceLifecycle | (Optional) Lifecycle defines a strategy that determines when different operations on a ControllerResource should be performed. This field is defaulted in the following way when kind is “Extension”. Reconcile: “AfterKubeAPIServer” Delete: “BeforeKubeAPIServer” Migrate: “BeforeKubeAPIServer” |
workerlessSupportedbool | (Optional) WorkerlessSupported specifies whether this ControllerResource supports Workerless Shoot clusters. This field is only relevant when kind is “Extension”. |
autoEnable[]ClusterType | (Optional) AutoEnable determines if this resource is automatically enabled for shoot or seed clusters, or both. This field can only be set for resources of kind “Extension”. |
clusterCompatibility[]ClusterType | (Optional) ClusterCompatibility defines the compatibility of this resource with different cluster types. If compatibility is not specified, it will be defaulted to ‘shoot’. This field can only be set for resources of kind “Extension”. |
ControllerResourceLifecycle
(Appears on: ControllerResource)
ControllerResourceLifecycle defines the lifecycle of a controller resource.
| Field | Description |
|---|---|
reconcileControllerResourceLifecycleStrategy | (Optional) Reconcile defines the strategy during reconciliation. |
deleteControllerResourceLifecycleStrategy | (Optional) Delete defines the strategy during deletion. |
migrateControllerResourceLifecycleStrategy | (Optional) Migrate defines the strategy during migration. |
ControllerResourceLifecycleStrategy
(string alias)
(Appears on: ControllerResourceLifecycle)
ControllerResourceLifecycleStrategy is a string alias.
CoreDNS
(Appears on: SystemComponents)
CoreDNS contains the settings of the Core DNS components running in the data plane of the Shoot cluster.
| Field | Description |
|---|---|
autoscalingCoreDNSAutoscaling | (Optional) Autoscaling contains the settings related to autoscaling of the Core DNS components running in the data plane of the Shoot cluster. |
rewritingCoreDNSRewriting | (Optional) Rewriting contains the setting related to rewriting of requests, which are obviously incorrect due to the unnecessary application of the search path. |
CoreDNSAutoscaling
(Appears on: CoreDNS)
CoreDNSAutoscaling contains the settings related to autoscaling of the Core DNS components running in the data plane of the Shoot cluster.
| Field | Description |
|---|---|
modeCoreDNSAutoscalingMode | The mode of the autoscaling to be used for the Core DNS components running in the data plane of the Shoot cluster.
Supported values are |
CoreDNSAutoscalingMode
(string alias)
(Appears on: CoreDNSAutoscaling)
CoreDNSAutoscalingMode is a type alias for the Core DNS autoscaling mode string.
CoreDNSRewriting
(Appears on: CoreDNS)
CoreDNSRewriting contains the setting related to rewriting requests, which are obviously incorrect due to the unnecessary application of the search path.
| Field | Description |
|---|---|
commonSuffixes[]string | (Optional) CommonSuffixes are expected to be the suffix of a fully qualified domain name. Each suffix should contain at least one or two dots (‘.’) to prevent accidental clashes. |
CredentialsRotationPhase
(string alias)
(Appears on: CARotation, ETCDEncryptionKeyRotation, ServiceAccountKeyRotation)
CredentialsRotationPhase is a string alias.
DNS
(Appears on: ShootSpec)
DNS holds information about the provider, the hosted zone id and the domain.
| Field | Description |
|---|---|
domainstring | (Optional) Domain is the external available domain of the Shoot cluster. This domain will be written into the kubeconfig that is handed out to end-users. This field is immutable. |
providers[]DNSProvider | (Optional) Providers is a list of DNS providers that shall be enabled for this shoot cluster. Only relevant if not a default domain is used. Deprecated: Configuring multiple DNS providers is deprecated and will be forbidden in a future release. Please use the DNS extension provider config (e.g. shoot-dns-service) for additional providers. |
DNSIncludeExclude
(Appears on: DNSProvider)
DNSIncludeExclude contains information about which domains shall be included/excluded.
| Field | Description |
|---|---|
include[]string | (Optional) Include is a list of domains that shall be included. |
exclude[]string | (Optional) Exclude is a list of domains that shall be excluded. |
DNSProvider
(Appears on: DNS)
DNSProvider contains information about a DNS provider.
| Field | Description |
|---|---|
domainsDNSIncludeExclude | (Optional) Domains contains information about which domains shall be included/excluded for this provider. Deprecated: This field is deprecated and will be removed in a future release. Please use the DNS extension provider config (e.g. shoot-dns-service) for additional configuration. |
primarybool | (Optional) Primary indicates that this DNSProvider is used for shoot related domains. Deprecated: This field is deprecated and will be removed in a future release. Please use the DNS extension provider config (e.g. shoot-dns-service) for additional and non-primary providers. |
secretNamestring | (Optional) SecretName is a name of a secret containing credentials for the stated domain and the provider. When not specified, the Gardener will use the cloud provider credentials referenced by the Shoot and try to find respective credentials there (primary provider only). Specifying this field may override this behavior, i.e. forcing the Gardener to only look into the given secret. |
typestring | (Optional) Type is the DNS provider type. |
zonesDNSIncludeExclude | (Optional) Zones contains information about which hosted zones shall be included/excluded for this provider. Deprecated: This field is deprecated and will be removed in a future release. Please use the DNS extension provider config (e.g. shoot-dns-service) for additional configuration. |
DataVolume
(Appears on: Worker)
DataVolume contains information about a data volume.
| Field | Description |
|---|---|
namestring | Name of the volume to make it referenceable. |
typestring | (Optional) Type is the type of the volume. |
sizestring | VolumeSize is the size of the volume. |
encryptedbool | (Optional) Encrypted determines if the volume should be encrypted. |
DeploymentRef
(Appears on: ControllerRegistrationDeployment)
DeploymentRef contains information about ControllerDeployment references.
| Field | Description |
|---|---|
namestring | Name is the name of the |
DualApprovalForDeletion
(Appears on: ProjectSpec)
DualApprovalForDeletion contains configuration for the dual approval concept for resource deletion.
| Field | Description |
|---|---|
resourcestring | Resource is the name of the resource this applies to. |
selectorKubernetes meta/v1.LabelSelector | Selector is the label selector for the resources. |
includeServiceAccountsbool | (Optional) IncludeServiceAccounts specifies whether the concept also applies when deletion is triggered by ServiceAccounts. Defaults to true. |
ETCD
(Appears on: Kubernetes)
ETCD contains configuration for etcds of the shoot cluster.
| Field | Description |
|---|---|
mainETCDConfig | (Optional) Main contains configuration for the main etcd. |
eventsETCDConfig | (Optional) Events contains configuration for the events etcd. |
ETCDConfig
(Appears on: ETCD)
ETCDConfig contains etcd configuration.
| Field | Description |
|---|---|
autoscalingControlPlaneAutoscaling | (Optional) Autoscaling contains auto-scaling configuration options for etcd. |
ETCDEncryptionKeyRotation
(Appears on: ShootCredentialsRotation)
ETCDEncryptionKeyRotation contains information about the ETCD encryption key credential rotation.
| Field | Description |
|---|---|
phaseCredentialsRotationPhase | Phase describes the phase of the ETCD encryption key credential rotation. |
lastCompletionTimeKubernetes meta/v1.Time | (Optional) LastCompletionTime is the most recent time when the ETCD encryption key credential rotation was successfully completed. |
lastInitiationTimeKubernetes meta/v1.Time | (Optional) LastInitiationTime is the most recent time when the ETCD encryption key credential rotation was initiated. |
lastInitiationFinishedTimeKubernetes meta/v1.Time | (Optional) LastInitiationFinishedTime is the recent time when the ETCD encryption key credential rotation initiation was completed. |
lastCompletionTriggeredTimeKubernetes meta/v1.Time | (Optional) LastCompletionTriggeredTime is the recent time when the ETCD encryption key credential rotation completion was triggered. |
EncryptionConfig
(Appears on: KubeAPIServerConfig)
EncryptionConfig contains customizable encryption configuration of the API server.
| Field | Description |
|---|---|
resources[]string | Resources contains the list of resources that shall be encrypted in addition to secrets. Each item is a Kubernetes resource name in plural (resource or resource.group) that should be encrypted. Wildcards are not supported for now. See https://github.com/gardener/gardener/blob/master/docs/usage/security/etcd_encryption_config.md for more details. |
ErrorCode
(string alias)
(Appears on: Condition, LastError)
ErrorCode is a string alias.
ExpanderMode
(string alias)
(Appears on: ClusterAutoscaler)
ExpanderMode is type used for Expander values
ExpirableVersion
(Appears on: KubernetesSettings, MachineImageVersion)
ExpirableVersion contains a version and an expiration date.
| Field | Description |
|---|---|
versionstring | Version is the version identifier. |
expirationDateKubernetes meta/v1.Time | (Optional) ExpirationDate defines the time at which this version expires. |
classificationVersionClassification | (Optional) Classification defines the state of a version (preview, supported, deprecated). To get the currently valid classification, use CurrentLifecycleClassification(). |
ExposureClassScheduling
(Appears on: ExposureClass)
ExposureClassScheduling holds information to select applicable Seed’s for ExposureClass usage.
| Field | Description |
|---|---|
seedSelectorSeedSelector | (Optional) SeedSelector is an optional label selector for Seed’s which are suitable to use the ExposureClass. |
tolerations[]Toleration | (Optional) Tolerations contains the tolerations for taints on Seed clusters. |
Extension
(Appears on: SeedSpec, ShootSpec)
Extension contains type and provider information for extensions.
| Field | Description |
|---|---|
typestring | Type is the type of the extension resource. |
providerConfigk8s.io/apimachinery/pkg/runtime.RawExtension | (Optional) ProviderConfig is the configuration passed to extension resource. |
disabledbool | (Optional) Disabled allows to disable extensions that were marked as ‘automatically enabled’ by Gardener administrators. |
ExtensionResourceState
(Appears on: ShootStateSpec)
ExtensionResourceState contains the kind of the extension custom resource and its last observed state in the Shoot’s namespace on the Seed cluster.
| Field | Description |
|---|---|
kindstring | Kind (type) of the extension custom resource |
namestring | (Optional) Name of the extension custom resource |
purposestring | (Optional) Purpose of the extension custom resource |
statek8s.io/apimachinery/pkg/runtime.RawExtension | (Optional) State of the extension resource |
resources[]NamedResourceReference | (Optional) Resources holds a list of named resource references that can be referred to in the state by their names. |
FailureTolerance
(Appears on: HighAvailability)
FailureTolerance describes information about failure tolerance level of a highly available resource.
| Field | Description |
|---|---|
typeFailureToleranceType | Type specifies the type of failure that the highly available resource can tolerate |
FailureToleranceType
(string alias)
(Appears on: FailureTolerance)
FailureToleranceType specifies the type of failure that a highly available shoot control plane that can tolerate.
Gardener
(Appears on: SeedStatus, ShootStatus)
Gardener holds the information about the Gardener version that operated a resource.
| Field | Description |
|---|---|
idstring | ID is the container id of the Gardener which last acted on a resource. |
namestring | Name is the hostname (pod name) of the Gardener which last acted on a resource. |
versionstring | Version is the version of the Gardener which last acted on a resource. |
GardenerResourceData
(Appears on: ShootStateSpec)
GardenerResourceData holds the data which is used to generate resources, deployed in the Shoot’s control plane.
| Field | Description |
|---|---|
namestring | Name of the object required to generate resources |
typestring | Type of the object |
datak8s.io/apimachinery/pkg/runtime.RawExtension | Data contains the payload required to generate resources |
labelsmap[string]string | (Optional) Labels are labels of the object |
HelmControllerDeployment
HelmControllerDeployment configures how an extension controller is deployed using helm. This is the legacy structure that used to be defined in gardenlet’s ControllerInstallation controller for ControllerDeployment’s with type=helm. While this is not a proper API type, we need to define the structure in the API package so that we can convert it to the internal API version in the new representation.
| Field | Description |
|---|---|
chart[]byte | Chart is a Helm chart tarball. |
valuesKubernetes apiextensions/v1.JSON | Values is a map of values for the given chart. |
ociRepositoryOCIRepository | (Optional) OCIRepository defines where to pull the chart. |
Hibernation
(Appears on: ShootSpec)
Hibernation contains information whether the Shoot is suspended or not.
| Field | Description |
|---|---|
enabledbool | (Optional) Enabled specifies whether the Shoot needs to be hibernated or not. If it is true, the Shoot’s desired state is to be hibernated. If it is false or nil, the Shoot’s desired state is to be awakened. |
schedules[]HibernationSchedule | (Optional) Schedules determine the hibernation schedules. |
HibernationSchedule
(Appears on: Hibernation)
HibernationSchedule determines the hibernation schedule of a Shoot. A Shoot will be regularly hibernated at each start time and will be woken up at each end time. Start or End can be omitted, though at least one of each has to be specified.
| Field | Description |
|---|---|
startstring | (Optional) Start is a Cron spec at which time a Shoot will be hibernated. |
endstring | (Optional) End is a Cron spec at which time a Shoot will be woken up. |
locationstring | (Optional) Location is the time location in which both start and shall be evaluated. |
HighAvailability
(Appears on: ControlPlane)
HighAvailability specifies the configuration settings for high availability for a resource. Typical usages could be to configure HA for shoot control plane or for seed system components.
| Field | Description |
|---|---|
failureToleranceFailureTolerance | FailureTolerance holds information about failure tolerance level of a highly available resource. |
HorizontalPodAutoscalerConfig
(Appears on: KubeControllerManagerConfig)
HorizontalPodAutoscalerConfig contains horizontal pod autoscaler configuration settings for the kube-controller-manager. Note: Descriptions were taken from the Kubernetes documentation.
| Field | Description |
|---|---|
cpuInitializationPeriodKubernetes meta/v1.Duration | (Optional) The period after which a ready pod transition is considered to be the first. |
downscaleStabilizationKubernetes meta/v1.Duration | (Optional) The configurable window at which the controller will choose the highest recommendation for autoscaling. |
initialReadinessDelayKubernetes meta/v1.Duration | (Optional) The configurable period at which the horizontal pod autoscaler considers a Pod “not yet ready” given that it’s unready and it has transitioned to unready during that time. |
syncPeriodKubernetes meta/v1.Duration | (Optional) The period for syncing the number of pods in horizontal pod autoscaler. |
tolerancefloat64 | (Optional) The minimum change (from 1.0) in the desired-to-actual metrics ratio for the horizontal pod autoscaler to consider scaling. |
IPFamily
(string alias)
(Appears on: Networking, SeedNetworks)
IPFamily is a type for specifying an IP protocol version to use in Gardener clusters.
InPlaceUpdates
(Appears on: MachineImageVersion)
InPlaceUpdates contains the configuration for in-place updates for a machine image version.
| Field | Description |
|---|---|
supportedbool | Supported indicates whether in-place updates are supported for this machine image version. |
minVersionForUpdatestring | (Optional) MinVersionForInPlaceUpdate specifies the minimum supported version from which an in-place update to this machine image version can be performed. |
InPlaceUpdatesStatus
(Appears on: ShootStatus)
InPlaceUpdatesStatus contains information about in-place updates for the Shoot workers.
| Field | Description |
|---|---|
pendingWorkerUpdatesPendingWorkerUpdates | (Optional) PendingWorkerUpdates contains information about worker pools pending in-place updates. |
Ingress
(Appears on: SeedSpec)
Ingress configures the Ingress specific settings of the cluster
| Field | Description |
|---|---|
domainstring | Domain specifies the IngressDomain of the cluster pointing to the ingress controller endpoint. It will be used to construct ingress URLs for system applications running in Shoot/Garden clusters. Once set this field is immutable. |
controllerIngressController | Controller configures a Gardener managed Ingress Controller listening on the ingressDomain |
IngressController
(Appears on: Ingress)
IngressController enables a Gardener managed Ingress Controller listening on the ingressDomain
| Field | Description |
|---|---|
kindstring | Kind defines which kind of IngressController to use. At the moment only |
providerConfigk8s.io/apimachinery/pkg/runtime.RawExtension | (Optional) ProviderConfig specifies infrastructure specific configuration for the ingressController |
KubeAPIServerConfig
(Appears on: Kubernetes)
KubeAPIServerConfig contains configuration settings for the kube-apiserver.
| Field | Description |
|---|---|
KubernetesConfigKubernetesConfig | (Members of |
admissionPlugins[]AdmissionPlugin | (Optional) AdmissionPlugins contains the list of user-defined admission plugins (additional to those managed by Gardener), and, if desired, the corresponding configuration. |
apiAudiences[]string | (Optional) APIAudiences are the identifiers of the API. The service account token authenticator will validate that tokens used against the API are bound to at least one of these audiences. Defaults to [“kubernetes”]. |
auditConfigAuditConfig | (Optional) AuditConfig contains configuration settings for the audit of the kube-apiserver. |
oidcConfigOIDCConfig | (Optional) OIDCConfig contains configuration settings for the OIDC provider. Deprecated: This field is deprecated and will be forbidden starting from Kubernetes 1.32. Please configure and use structured authentication instead of oidc flags. For more information check https://github.com/gardener/gardener/issues/9858 TODO(AleksandarSavchev): Drop this field after support for Kubernetes 1.31 is dropped. |
runtimeConfigmap[string]bool | (Optional) RuntimeConfig contains information about enabled or disabled APIs. |
serviceAccountConfigServiceAccountConfig | (Optional) ServiceAccountConfig contains configuration settings for the service account handling of the kube-apiserver. |
watchCacheSizesWatchCacheSizes | (Optional) WatchCacheSizes contains configuration of the API server’s watch cache sizes.
Configuring these flags might be useful for large-scale Shoot clusters with a lot of parallel update requests
and a lot of watching controllers (e.g. large ManagedSeed clusters). When the API server’s watch cache’s
capacity is too small to cope with the amount of update requests and watchers for a particular resource, it
might happen that controller watches are permanently stopped with |
requestsAPIServerRequests | (Optional) Requests contains configuration for request-specific settings for the kube-apiserver. |
enableAnonymousAuthenticationbool | (Optional) EnableAnonymousAuthentication defines whether anonymous requests to the secure port
of the API server should be allowed (flag Deprecated: This field is deprecated and will be removed in a future release. Please use anonymous authentication configuration instead. For more information see: https://kubernetes.io/docs/reference/access-authn-authz/authentication/#anonymous-authenticator-configuration TODO(marc1404): Forbid this field when the feature gate AnonymousAuthConfigurableEndpoints has graduated. |
eventTTLKubernetes meta/v1.Duration | (Optional) EventTTL controls the amount of time to retain events. Defaults to 1h. |
loggingAPIServerLogging | (Optional) Logging contains configuration for the log level and HTTP access logs. |
defaultNotReadyTolerationSecondsint64 | (Optional) DefaultNotReadyTolerationSeconds indicates the tolerationSeconds of the toleration for notReady:NoExecute
that is added by default to every pod that does not already have such a toleration (flag |
defaultUnreachableTolerationSecondsint64 | (Optional) DefaultUnreachableTolerationSeconds indicates the tolerationSeconds of the toleration for unreachable:NoExecute
that is added by default to every pod that does not already have such a toleration (flag |
encryptionConfigEncryptionConfig | (Optional) EncryptionConfig contains customizable encryption configuration of the Kube API server. |
structuredAuthenticationStructuredAuthentication | (Optional) StructuredAuthentication contains configuration settings for structured authentication for the kube-apiserver. This field is only available for Kubernetes v1.30 or later. |
structuredAuthorizationStructuredAuthorization | (Optional) StructuredAuthorization contains configuration settings for structured authorization for the kube-apiserver. This field is only available for Kubernetes v1.30 or later. |
autoscalingControlPlaneAutoscaling | (Optional) Autoscaling contains auto-scaling configuration options for the kube-apiserver. |
KubeControllerManagerConfig
(Appears on: Kubernetes)
KubeControllerManagerConfig contains configuration settings for the kube-controller-manager.
| Field | Description |
|---|---|
KubernetesConfigKubernetesConfig | (Members of |
horizontalPodAutoscalerHorizontalPodAutoscalerConfig | (Optional) HorizontalPodAutoscalerConfig contains horizontal pod autoscaler configuration settings for the kube-controller-manager. |
nodeCIDRMaskSizeint32 | (Optional) NodeCIDRMaskSize defines the mask size for node cidr in cluster (default is 24). This field is immutable. |
podEvictionTimeoutKubernetes meta/v1.Duration | (Optional) PodEvictionTimeout defines the grace period for deleting pods on failed nodes. Defaults to 2m. Deprecated: The corresponding kube-controller-manager flag |
nodeMonitorGracePeriodKubernetes meta/v1.Duration | (Optional) NodeMonitorGracePeriod defines the grace period before an unresponsive node is marked unhealthy. |
KubeProxyConfig
(Appears on: Kubernetes)
KubeProxyConfig contains configuration settings for the kube-proxy.
| Field | Description |
|---|---|
KubernetesConfigKubernetesConfig | (Members of |
modeProxyMode | (Optional) Mode specifies which proxy mode to use. defaults to IPTables. |
enabledbool | (Optional) Enabled indicates whether kube-proxy should be deployed or not. Depending on the networking extensions switching kube-proxy off might be rejected. Consulting the respective documentation of the used networking extension is recommended before using this field. defaults to true if not specified. |
KubeSchedulerConfig
(Appears on: Kubernetes)
KubeSchedulerConfig contains configuration settings for the kube-scheduler.
| Field | Description |
|---|---|
KubernetesConfigKubernetesConfig | (Members of |
kubeMaxPDVolsstring | (Optional) KubeMaxPDVols allows to configure the |
profileSchedulingProfile | (Optional) Profile configures the scheduling profile for the cluster. If not specified, the used profile is “balanced” (provides the default kube-scheduler behavior). |
KubeletConfig
(Appears on: Kubernetes, WorkerKubernetes)
KubeletConfig contains configuration settings for the kubelet.
| Field | Description |
|---|---|
KubernetesConfigKubernetesConfig | (Members of |
cpuCFSQuotabool | (Optional) CPUCFSQuota allows you to disable/enable CPU throttling for Pods. |
cpuManagerPolicystring | (Optional) CPUManagerPolicy allows to set alternative CPU management policies (default: none). |
evictionHardKubeletConfigEviction | (Optional) EvictionHard describes a set of eviction thresholds (e.g. memory.available<1Gi) that if met would trigger a Pod eviction. Default: memory.available: “100Mi/1Gi/5%” nodefs.available: “5%” nodefs.inodesFree: “5%” imagefs.available: “5%” imagefs.inodesFree: “5%” |
evictionMaxPodGracePeriodint32 | (Optional) EvictionMaxPodGracePeriod describes the maximum allowed grace period (in seconds) to use when terminating pods in response to a soft eviction threshold being met. Default: 90 |
evictionMinimumReclaimKubeletConfigEvictionMinimumReclaim | (Optional) EvictionMinimumReclaim configures the amount of resources below the configured eviction threshold that the kubelet attempts to reclaim whenever the kubelet observes resource pressure. Default: 0 for each resource |
evictionPressureTransitionPeriodKubernetes meta/v1.Duration | (Optional) EvictionPressureTransitionPeriod is the duration for which the kubelet has to wait before transitioning out of an eviction pressure condition. Default: 4m0s |
evictionSoftKubeletConfigEviction | (Optional) EvictionSoft describes a set of eviction thresholds (e.g. memory.available<1.5Gi) that if met over a corresponding grace period would trigger a Pod eviction. Default: memory.available: “200Mi/1.5Gi/10%” nodefs.available: “10%” nodefs.inodesFree: “10%” imagefs.available: “10%” imagefs.inodesFree: “10%” |
evictionSoftGracePeriodKubeletConfigEvictionSoftGracePeriod | (Optional) EvictionSoftGracePeriod describes a set of eviction grace periods (e.g. memory.available=1m30s) that correspond to how long a soft eviction threshold must hold before triggering a Pod eviction. Default: memory.available: 1m30s nodefs.available: 1m30s nodefs.inodesFree: 1m30s imagefs.available: 1m30s imagefs.inodesFree: 1m30s |
maxPodsint32 | (Optional) MaxPods is the maximum number of Pods that are allowed by the Kubelet. Default: 110 |
podPidsLimitint64 | (Optional) PodPIDsLimit is the maximum number of process IDs per pod allowed by the kubelet. |
failSwapOnbool | (Optional) FailSwapOn makes the Kubelet fail to start if swap is enabled on the node. (default true). |
kubeReservedKubeletConfigReserved | (Optional) KubeReserved is the configuration for resources reserved for kubernetes node components (mainly kubelet and container runtime). When updating these values, be aware that cgroup resizes may not succeed on active worker nodes. Look for the NodeAllocatableEnforced event to determine if the configuration was applied. Default: cpu=80m,memory=1Gi,pid=20k |
systemReservedKubeletConfigReserved | (Optional) SystemReserved is the configuration for resources reserved for system processes not managed by kubernetes (e.g. journald). When updating these values, be aware that cgroup resizes may not succeed on active worker nodes. Look for the NodeAllocatableEnforced event to determine if the configuration was applied. Deprecated: Separately configuring resource reservations for system processes is deprecated in Gardener and will be forbidden starting from Kubernetes 1.31. Please merge existing resource reservations into the kubeReserved field. TODO(MichaelEischer): Drop this field after support for Kubernetes 1.30 is dropped. |
imageGCHighThresholdPercentint32 | (Optional) ImageGCHighThresholdPercent describes the percent of the disk usage which triggers image garbage collection. Default: 50 |
imageGCLowThresholdPercentint32 | (Optional) ImageGCLowThresholdPercent describes the percent of the disk to which garbage collection attempts to free. Default: 40 |
serializeImagePullsbool | (Optional) SerializeImagePulls describes whether the images are pulled one at a time. Default: true |
registryPullQPSint32 | (Optional) RegistryPullQPS is the limit of registry pulls per second. The value must not be a negative number. Setting it to 0 means no limit. Default: 5 |
registryBurstint32 | (Optional) RegistryBurst is the maximum size of bursty pulls, temporarily allows pulls to burst to this number, while still not exceeding registryPullQPS. The value must not be a negative number. Only used if registryPullQPS is greater than 0. Default: 10 |
seccompDefaultbool | (Optional) SeccompDefault enables the use of |
containerLogMaxSizek8s.io/apimachinery/pkg/api/resource.Quantity | (Optional) A quantity defines the maximum size of the container log file before it is rotated. For example: “5Mi” or “256Ki”. Default: 100Mi |
containerLogMaxFilesint32 | (Optional) Maximum number of container log files that can be present for a container. |
protectKernelDefaultsbool | (Optional) ProtectKernelDefaults ensures that the kernel tunables are equal to the kubelet defaults. Defaults to true. |
streamingConnectionIdleTimeoutKubernetes meta/v1.Duration | (Optional) StreamingConnectionIdleTimeout is the maximum time a streaming connection can be idle before the connection is automatically closed. This field cannot be set lower than “30s” or greater than “4h”. Default: “5m”. |
memorySwapMemorySwapConfiguration | (Optional) MemorySwap configures swap memory available to container workloads. |
maxParallelImagePullsint32 | (Optional) MaxParallelImagePulls describes the maximum number of image pulls in parallel. The value must be a positive number. This field cannot be set if SerializeImagePulls (pull one image at a time) is set to true. Setting it to nil means no limit. Default: nil |
imageMinimumGCAgeKubernetes meta/v1.Duration | (Optional) ImageMinimumGCAge is the minimum age of an unused image before it can be garbage collected. Default: 2m0s |
imageMaximumGCAgeKubernetes meta/v1.Duration | (Optional) ImageMaximumGCAge is the maximum age of an unused image before it can be garbage collected. Default: 0s |
KubeletConfigEviction
(Appears on: KubeletConfig)
KubeletConfigEviction contains kubelet eviction thresholds supporting either a resource.Quantity or a percentage based value.
| Field | Description |
|---|---|
memoryAvailablestring | (Optional) MemoryAvailable is the threshold for the free memory on the host server. |
imageFSAvailablestring | (Optional) ImageFSAvailable is the threshold for the free disk space in the imagefs filesystem (docker images and container writable layers). |
imageFSInodesFreestring | (Optional) ImageFSInodesFree is the threshold for the available inodes in the imagefs filesystem. |
nodeFSAvailablestring | (Optional) NodeFSAvailable is the threshold for the free disk space in the nodefs filesystem (docker volumes, logs, etc). |
nodeFSInodesFreestring | (Optional) NodeFSInodesFree is the threshold for the available inodes in the nodefs filesystem. |
KubeletConfigEvictionMinimumReclaim
(Appears on: KubeletConfig)
KubeletConfigEvictionMinimumReclaim contains configuration for the kubelet eviction minimum reclaim.
| Field | Description |
|---|---|
memoryAvailablek8s.io/apimachinery/pkg/api/resource.Quantity | (Optional) MemoryAvailable is the threshold for the memory reclaim on the host server. |
imageFSAvailablek8s.io/apimachinery/pkg/api/resource.Quantity | (Optional) ImageFSAvailable is the threshold for the disk space reclaim in the imagefs filesystem (docker images and container writable layers). |
imageFSInodesFreek8s.io/apimachinery/pkg/api/resource.Quantity | (Optional) ImageFSInodesFree is the threshold for the inodes reclaim in the imagefs filesystem. |
nodeFSAvailablek8s.io/apimachinery/pkg/api/resource.Quantity | (Optional) NodeFSAvailable is the threshold for the disk space reclaim in the nodefs filesystem (docker volumes, logs, etc). |
nodeFSInodesFreek8s.io/apimachinery/pkg/api/resource.Quantity | (Optional) NodeFSInodesFree is the threshold for the inodes reclaim in the nodefs filesystem. |
KubeletConfigEvictionSoftGracePeriod
(Appears on: KubeletConfig)
KubeletConfigEvictionSoftGracePeriod contains grace periods for kubelet eviction thresholds.
| Field | Description |
|---|---|
memoryAvailableKubernetes meta/v1.Duration | (Optional) MemoryAvailable is the grace period for the MemoryAvailable eviction threshold. |
imageFSAvailableKubernetes meta/v1.Duration | (Optional) ImageFSAvailable is the grace period for the ImageFSAvailable eviction threshold. |
imageFSInodesFreeKubernetes meta/v1.Duration | (Optional) ImageFSInodesFree is the grace period for the ImageFSInodesFree eviction threshold. |
nodeFSAvailableKubernetes meta/v1.Duration | (Optional) NodeFSAvailable is the grace period for the NodeFSAvailable eviction threshold. |
nodeFSInodesFreeKubernetes meta/v1.Duration | (Optional) NodeFSInodesFree is the grace period for the NodeFSInodesFree eviction threshold. |
KubeletConfigReserved
(Appears on: KubeletConfig)
KubeletConfigReserved contains reserved resources for daemons
| Field | Description |
|---|---|
cpuk8s.io/apimachinery/pkg/api/resource.Quantity | (Optional) CPU is the reserved cpu. |
memoryk8s.io/apimachinery/pkg/api/resource.Quantity | (Optional) Memory is the reserved memory. |
ephemeralStoragek8s.io/apimachinery/pkg/api/resource.Quantity | (Optional) EphemeralStorage is the reserved ephemeral-storage. |
pidk8s.io/apimachinery/pkg/api/resource.Quantity | (Optional) PID is the reserved process-ids. |
Kubernetes
(Appears on: ShootSpec)
Kubernetes contains the version and configuration variables for the Shoot control plane.
| Field | Description |
|---|---|
clusterAutoscalerClusterAutoscaler | (Optional) ClusterAutoscaler contains the configuration flags for the Kubernetes cluster autoscaler. |
kubeAPIServerKubeAPIServerConfig | (Optional) KubeAPIServer contains configuration settings for the kube-apiserver. |
kubeControllerManagerKubeControllerManagerConfig | (Optional) KubeControllerManager contains configuration settings for the kube-controller-manager. |
kubeSchedulerKubeSchedulerConfig | (Optional) KubeScheduler contains configuration settings for the kube-scheduler. |
kubeProxyKubeProxyConfig | (Optional) KubeProxy contains configuration settings for the kube-proxy. |
kubeletKubeletConfig | (Optional) Kubelet contains configuration settings for the kubelet. |
versionstring | (Optional) Version is the semantic Kubernetes version to use for the Shoot cluster.
Defaults to the highest supported minor and patch version given in the referenced cloud profile.
The version can be omitted completely or partially specified, e.g. |
verticalPodAutoscalerVerticalPodAutoscaler | (Optional) VerticalPodAutoscaler contains the configuration flags for the Kubernetes vertical pod autoscaler. |
etcdETCD | (Optional) ETCD contains configuration for etcds of the shoot cluster. |
KubernetesConfig
(Appears on: KubeAPIServerConfig, KubeControllerManagerConfig, KubeProxyConfig, KubeSchedulerConfig, KubeletConfig)
KubernetesConfig contains common configuration fields for the control plane components.
| Field | Description |
|---|---|
featureGatesmap[string]bool | (Optional) FeatureGates contains information about enabled feature gates. |
KubernetesDashboard
(Appears on: Addons)
KubernetesDashboard describes configuration values for the kubernetes-dashboard addon.
| Field | Description |
|---|---|
AddonAddon | (Members of |
authenticationModestring | (Optional) AuthenticationMode defines the authentication mode for the kubernetes-dashboard. |
KubernetesSettings
(Appears on: CloudProfileSpec, NamespacedCloudProfileSpec)
KubernetesSettings contains constraints regarding allowed values of the ‘kubernetes’ block in the Shoot specification.
| Field | Description |
|---|---|
versions[]ExpirableVersion | (Optional) Versions is the list of allowed Kubernetes versions with optional expiration dates for Shoot clusters. |
LastError
(Appears on: BackupBucketStatus, BackupEntryStatus, ShootStatus)
LastError indicates the last occurred error for an operation on a resource.
| Field | Description |
|---|---|
descriptionstring | A human readable message indicating details about the last error. |
taskIDstring | (Optional) ID of the task which caused this last error |
codes[]ErrorCode | (Optional) Well-defined error codes of the last error(s). |
lastUpdateTimeKubernetes meta/v1.Time | (Optional) Last time the error was reported |
LastMaintenance
(Appears on: ShootStatus)
LastMaintenance holds information about a maintenance operation on the Shoot.
| Field | Description |
|---|---|
descriptionstring | A human-readable message containing details about the operations performed in the last maintenance. |
triggeredTimeKubernetes meta/v1.Time | TriggeredTime is the time when maintenance was triggered. |
stateLastOperationState | Status of the last maintenance operation, one of Processing, Succeeded, Error. |
failureReasonstring | (Optional) FailureReason holds the information about the last maintenance operation failure reason. |
LastOperation
(Appears on: BackupBucketStatus, BackupEntryStatus, SeedStatus, ShootStatus)
LastOperation indicates the type and the state of the last operation, along with a description message and a progress indicator.
| Field | Description |
|---|---|
descriptionstring | A human readable message indicating details about the last operation. |
lastUpdateTimeKubernetes meta/v1.Time | Last time the operation state transitioned from one to another. |
progressint32 | The progress in percentage (0-100) of the last operation. |
stateLastOperationState | Status of the last operation, one of Aborted, Processing, Succeeded, Error, Failed. |
typeLastOperationType | Type of the last operation, one of Create, Reconcile, Delete, Migrate, Restore. |
LastOperationState
(string alias)
(Appears on: LastMaintenance, LastOperation)
LastOperationState is a string alias.
LastOperationType
(string alias)
(Appears on: LastOperation)
LastOperationType is a string alias.
Limits
(Appears on: CloudProfileSpec, NamespacedCloudProfileSpec)
Limits configures operational limits for Shoot clusters using this CloudProfile. See https://github.com/gardener/gardener/blob/master/docs/usage/shoot/shoot_limits.md.
| Field | Description |
|---|---|
maxNodesTotalint32 | (Optional) MaxNodesTotal configures the maximum node count a Shoot cluster can have during runtime. |
LoadBalancerServicesProxyProtocol
(Appears on: SeedSettingLoadBalancerServices, SeedSettingLoadBalancerServicesZones)
LoadBalancerServicesProxyProtocol controls whether ProxyProtocol is (optionally) allowed for the load balancer services.
| Field | Description |
|---|---|
allowedbool | Allowed controls whether the ProxyProtocol is optionally allowed for the load balancer services. This should only be enabled if the load balancer services are already using ProxyProtocol or will be reconfigured to use it soon. Until the load balancers are configured with ProxyProtocol, enabling this setting may allow clients to spoof their source IP addresses. The option allows a migration from non-ProxyProtocol to ProxyProtocol without downtime (depending on the infrastructure). Defaults to false. |
Machine
(Appears on: Worker)
Machine contains information about the machine type and image.
| Field | Description |
|---|---|
typestring | Type is the machine type of the worker group. |
imageShootMachineImage | (Optional) Image holds information about the machine image to use for all nodes of this pool. It will default to the latest version of the first image stated in the referenced CloudProfile if no value has been provided. |
architecturestring | (Optional) Architecture is CPU architecture of machines in this worker pool. |
MachineControllerManagerSettings
(Appears on: Worker)
MachineControllerManagerSettings contains configurations for different worker-pools. Eg. MachineDrainTimeout, MachineHealthTimeout.
| Field | Description |
|---|---|
machineDrainTimeoutKubernetes meta/v1.Duration | (Optional) MachineDrainTimeout is the period after which machine is forcefully deleted. |
machineHealthTimeoutKubernetes meta/v1.Duration | (Optional) MachineHealthTimeout is the period after which machine is declared failed. |
machineCreationTimeoutKubernetes meta/v1.Duration | (Optional) MachineCreationTimeout is the period after which creation of the machine is declared failed. |
maxEvictRetriesint32 | (Optional) MaxEvictRetries are the number of eviction retries on a pod after which drain is declared failed, and forceful deletion is triggered. |
nodeConditions[]string | (Optional) NodeConditions are the set of conditions if set to true for the period of MachineHealthTimeout, machine will be declared failed. |
inPlaceUpdateTimeoutKubernetes meta/v1.Duration | (Optional) MachineInPlaceUpdateTimeout is the timeout after which in-place update is declared failed. |
disableHealthTimeoutbool | (Optional) DisableHealthTimeout if set to true, health timeout will be ignored. Leading to machine never being declared failed. This is intended to be used only for in-place updates. |
MachineImage
(Appears on: CloudProfileSpec, NamespacedCloudProfileSpec)
MachineImage defines the name and multiple versions of the machine image in any environment.
| Field | Description |
|---|---|
namestring | Name is the name of the image. |
versions[]MachineImageVersion | Versions contains versions, expiration dates and container runtimes of the machine image |
updateStrategyMachineImageUpdateStrategy | (Optional) UpdateStrategy is the update strategy to use for the machine image. Possible values are: - patch: update to the latest patch version of the current minor version. - minor: update to the latest minor and patch version. - major: always update to the overall latest version (default). |
MachineImageUpdateStrategy
(string alias)
(Appears on: MachineImage)
MachineImageUpdateStrategy is the update strategy to use for a machine image
MachineImageVersion
(Appears on: MachineImage)
MachineImageVersion is an expirable version with list of supported container runtimes and interfaces
| Field | Description |
|---|---|
ExpirableVersionExpirableVersion | (Members of |
cri[]CRI | (Optional) CRI list of supported container runtime and interfaces supported by this version |
architectures[]string | (Optional) Architectures is the list of CPU architectures of the machine image in this version. |
kubeletVersionConstraintstring | (Optional) KubeletVersionConstraint is a constraint describing the supported kubelet versions by the machine image in this version. If the field is not specified, it is assumed that the machine image in this version supports all kubelet versions. Examples: - ‘>= 1.26’ - supports only kubelet versions greater than or equal to 1.26 - ‘< 1.26’ - supports only kubelet versions less than 1.26 |
inPlaceUpdatesInPlaceUpdates | (Optional) InPlaceUpdates contains the configuration for in-place updates for this machine image version. |
capabilitySets[]CapabilitySet | (Optional) CapabilitySets is an array of capability sets. Each entry represents a combination of capabilities that is provided by the machine image version. |
MachineType
(Appears on: CloudProfileSpec, NamespacedCloudProfileSpec)
MachineType contains certain properties of a machine type.
| Field | Description |
|---|---|
cpuk8s.io/apimachinery/pkg/api/resource.Quantity | CPU is the number of CPUs for this machine type. |
gpuk8s.io/apimachinery/pkg/api/resource.Quantity | GPU is the number of GPUs for this machine type. |
memoryk8s.io/apimachinery/pkg/api/resource.Quantity | Memory is the amount of memory for this machine type. |
namestring | Name is the name of the machine type. |
storageMachineTypeStorage | (Optional) Storage is the amount of storage associated with the root volume of this machine type. |
usablebool | (Optional) Usable defines if the machine type can be used for shoot clusters. |
architecturestring | (Optional) Architecture is the CPU architecture of this machine type. |
capabilitiesCapabilities | (Optional) Capabilities contains the machine type capabilities. |
MachineTypeStorage
(Appears on: MachineType)
MachineTypeStorage is the amount of storage associated with the root volume of this machine type.
| Field | Description |
|---|---|
classstring | Class is the class of the storage type. |
sizek8s.io/apimachinery/pkg/api/resource.Quantity | (Optional) StorageSize is the storage size. |
typestring | Type is the type of the storage. |
minSizek8s.io/apimachinery/pkg/api/resource.Quantity | (Optional) MinSize is the minimal supported storage size.
This overrides any other common minimum size configuration from |
MachineUpdateStrategy
(string alias)
(Appears on: Worker)
MachineUpdateStrategy specifies the machine update strategy for the worker pool.
Maintenance
(Appears on: ShootSpec)
Maintenance contains information about the time window for maintenance operations and which operations should be performed.
| Field | Description |
|---|---|
autoUpdateMaintenanceAutoUpdate | (Optional) AutoUpdate contains information about which constraints should be automatically updated. |
timeWindowMaintenanceTimeWindow | (Optional) TimeWindow contains information about the time window for maintenance operations. |
confineSpecUpdateRolloutbool | (Optional) ConfineSpecUpdateRollout prevents that changes/updates to the shoot specification will be rolled out immediately. Instead, they are rolled out during the shoot’s maintenance time window. There is one exception that will trigger an immediate roll out which is changes to the Spec.Hibernation.Enabled field. |
MaintenanceAutoUpdate
(Appears on: Maintenance)
MaintenanceAutoUpdate contains information about which constraints should be automatically updated.
| Field | Description |
|---|---|
kubernetesVersionbool | KubernetesVersion indicates whether the patch Kubernetes version may be automatically updated (default: true). |
machineImageVersionbool | (Optional) MachineImageVersion indicates whether the machine image version may be automatically updated (default: true). |
MaintenanceTimeWindow
(Appears on: Maintenance)
MaintenanceTimeWindow contains information about the time window for maintenance operations.
| Field | Description |
|---|---|
beginstring | Begin is the beginning of the time window in the format HHMMSS+ZONE, e.g. “220000+0100”. If not present, a random value will be computed. |
endstring | End is the end of the time window in the format HHMMSS+ZONE, e.g. “220000+0100”. If not present, the value will be computed based on the “Begin” value. |
MemorySwapConfiguration
(Appears on: KubeletConfig)
MemorySwapConfiguration contains kubelet swap configuration For more information, please see KEP: 2400-node-swap
| Field | Description |
|---|---|
swapBehaviorSwapBehavior | (Optional) SwapBehavior configures swap memory available to container workloads. May be one of {“LimitedSwap”, “UnlimitedSwap”} defaults to: LimitedSwap |
Monitoring
(Appears on: ShootSpec)
Monitoring contains information about the monitoring configuration for the shoot.
| Field | Description |
|---|---|
alertingAlerting | (Optional) Alerting contains information about the alerting configuration for the shoot cluster. |
NamedResourceReference
(Appears on: ExtensionResourceState, SeedSpec, ShootSpec)
NamedResourceReference is a named reference to a resource.
| Field | Description |
|---|---|
namestring | Name of the resource reference. |
resourceRefKubernetes autoscaling/v1.CrossVersionObjectReference | ResourceRef is a reference to a resource. |
NamespacedCloudProfileSpec
(Appears on: NamespacedCloudProfile)
NamespacedCloudProfileSpec is the specification of a NamespacedCloudProfile.
| Field | Description |
|---|---|
caBundlestring | (Optional) CABundle is a certificate bundle which will be installed onto every host machine of shoot cluster targeting this profile. |
kubernetesKubernetesSettings | (Optional) Kubernetes contains constraints regarding allowed values of the ‘kubernetes’ block in the Shoot specification. |
machineImages[]MachineImage | (Optional) MachineImages contains constraints regarding allowed values for machine images in the Shoot specification. |
machineTypes[]MachineType | (Optional) MachineTypes contains constraints regarding allowed values for machine types in the ‘workers’ block in the Shoot specification. |
volumeTypes[]VolumeType | (Optional) VolumeTypes contains constraints regarding allowed values for volume types in the ‘workers’ block in the Shoot specification. |
parentCloudProfileReference | Parent contains a reference to a CloudProfile it inherits from. |
providerConfigk8s.io/apimachinery/pkg/runtime.RawExtension | (Optional) ProviderConfig contains provider-specific configuration for the profile. |
limitsLimits | (Optional) Limits configures operational limits for Shoot clusters using this NamespacedCloudProfile. Any limits specified here override those set in the parent CloudProfile. See https://github.com/gardener/gardener/blob/master/docs/usage/shoot/shoot_limits.md. |
NamespacedCloudProfileStatus
(Appears on: NamespacedCloudProfile)
NamespacedCloudProfileStatus holds the most recently observed status of the NamespacedCloudProfile.
| Field | Description |
|---|---|
cloudProfileSpecCloudProfileSpec | CloudProfile is the most recently generated CloudProfile of the NamespacedCloudProfile. |
observedGenerationint64 | (Optional) ObservedGeneration is the most recent generation observed for this NamespacedCloudProfile. |
Networking
(Appears on: ShootSpec)
Networking defines networking parameters for the shoot cluster.
| Field | Description |
|---|---|
typestring | (Optional) Type identifies the type of the networking plugin. This field is immutable. |
providerConfigk8s.io/apimachinery/pkg/runtime.RawExtension | (Optional) ProviderConfig is the configuration passed to network resource. |
podsstring | (Optional) Pods is the CIDR of the pod network. This field is immutable. |
nodesstring | (Optional) Nodes is the CIDR of the entire node network. This field is mutable. |
servicesstring | (Optional) Services is the CIDR of the service network. This field is immutable. |
ipFamilies[]IPFamily | (Optional) IPFamilies specifies the IP protocol versions to use for shoot networking. This field is immutable. See https://github.com/gardener/gardener/blob/master/docs/development/ipv6.md. Defaults to [“IPv4”]. |
NetworkingStatus
(Appears on: ShootStatus)
NetworkingStatus contains information about cluster networking such as CIDRs.
| Field | Description |
|---|---|
pods[]string | (Optional) Pods are the CIDRs of the pod network. |
nodes[]string | (Optional) Nodes are the CIDRs of the node network. |
services[]string | (Optional) Services are the CIDRs of the service network. |
egressCIDRs[]string | (Optional) EgressCIDRs is a list of CIDRs used by the shoot as the source IP for egress traffic as reported by the used Infrastructure extension controller. For certain environments the egress IPs may not be stable in which case the extension controller may opt to not populate this field. |
NginxIngress
(Appears on: Addons)
NginxIngress describes configuration values for the nginx-ingress addon.
| Field | Description |
|---|---|
AddonAddon | (Members of |
loadBalancerSourceRanges[]string | (Optional) LoadBalancerSourceRanges is list of allowed IP sources for NginxIngress |
configmap[string]string | (Optional) Config contains custom configuration for the nginx-ingress-controller configuration. See https://github.com/kubernetes/ingress-nginx/blob/master/docs/user-guide/nginx-configuration/configmap.md#configuration-options |
externalTrafficPolicyKubernetes core/v1.ServiceExternalTrafficPolicy | (Optional) ExternalTrafficPolicy controls the |
NodeLocalDNS
(Appears on: SystemComponents)
NodeLocalDNS contains the settings of the node local DNS components running in the data plane of the Shoot cluster.
| Field | Description |
|---|---|
enabledbool | Enabled indicates whether node local DNS is enabled or not. |
forceTCPToClusterDNSbool | (Optional) ForceTCPToClusterDNS indicates whether the connection from the node local DNS to the cluster DNS (Core DNS) will be forced to TCP or not. Default, if unspecified, is to enforce TCP. |
forceTCPToUpstreamDNSbool | (Optional) ForceTCPToUpstreamDNS indicates whether the connection from the node local DNS to the upstream DNS (infrastructure DNS) will be forced to TCP or not. Default, if unspecified, is to enforce TCP. |
disableForwardToUpstreamDNSbool | (Optional) DisableForwardToUpstreamDNS indicates whether requests from node local DNS to upstream DNS should be disabled. Default, if unspecified, is to forward requests for external domains to upstream DNS |
OCIRepository
(Appears on: HelmControllerDeployment)
OCIRepository configures where to pull an OCI Artifact, that could contain for example a Helm Chart.
| Field | Description |
|---|---|
refstring | (Optional) Ref is the full artifact Ref and takes precedence over all other fields. |
repositorystring | (Optional) Repository is a reference to an OCI artifact repository. |
tagstring | (Optional) Tag is the image tag to pull. |
digeststring | (Optional) Digest of the image to pull, takes precedence over tag. |
pullSecretRefKubernetes core/v1.LocalObjectReference | (Optional) PullSecretRef is a reference to a secret containing the pull secret.
The secret must be of type |
OIDCConfig
(Appears on: KubeAPIServerConfig)
OIDCConfig contains configuration settings for the OIDC provider. Note: Descriptions were taken from the Kubernetes documentation.
| Field | Description |
|---|---|
caBundlestring | (Optional) If set, the OpenID server’s certificate will be verified by one of the authorities in the oidc-ca-file, otherwise the host’s root CA set will be used. |
clientAuthenticationOpenIDConnectClientAuthentication | (Optional) ClientAuthentication can optionally contain client configuration used for kubeconfig generation. Deprecated: This field has no implemented use and will be forbidden starting from Kubernetes 1.31. It’s use was planned for genereting OIDC kubeconfig https://github.com/gardener/gardener/issues/1433 TODO(AleksandarSavchev): Drop this field after support for Kubernetes 1.30 is dropped. |
clientIDstring | (Optional) The client ID for the OpenID Connect client, must be set. |
groupsClaimstring | (Optional) If provided, the name of a custom OpenID Connect claim for specifying user groups. The claim value is expected to be a string or array of strings. This flag is experimental, please see the authentication documentation for further details. |
groupsPrefixstring | (Optional) If provided, all groups will be prefixed with this value to prevent conflicts with other authentication strategies. |
issuerURLstring | (Optional) The URL of the OpenID issuer, only HTTPS scheme will be accepted. Used to verify the OIDC JSON Web Token (JWT). |
requiredClaimsmap[string]string | (Optional) key=value pairs that describes a required claim in the ID Token. If set, the claim is verified to be present in the ID Token with a matching value. |
signingAlgs[]string | (Optional) List of allowed JOSE asymmetric signing algorithms. JWTs with a ‘alg’ header value not in this list will be rejected. Values are defined by RFC 7518 https://tools.ietf.org/html/rfc7518#section-3.1 |
usernameClaimstring | (Optional) The OpenID claim to use as the user name. Note that claims other than the default (‘sub’) is not guaranteed to be unique and immutable. This flag is experimental, please see the authentication documentation for further details. (default “sub”) |
usernamePrefixstring | (Optional) If provided, all usernames will be prefixed with this value. If not provided, username claims other than ‘email’ are prefixed by the issuer URL to avoid clashes. To skip any prefixing, provide the value ‘-’. |
ObservabilityRotation
(Appears on: ShootCredentialsRotation)
ObservabilityRotation contains information about the observability credential rotation.
| Field | Description |
|---|---|
lastInitiationTimeKubernetes meta/v1.Time | (Optional) LastInitiationTime is the most recent time when the observability credential rotation was initiated. |
lastCompletionTimeKubernetes meta/v1.Time | (Optional) LastCompletionTime is the most recent time when the observability credential rotation was successfully completed. |
OpenIDConnectClientAuthentication
(Appears on: OIDCConfig)
OpenIDConnectClientAuthentication contains configuration for OIDC clients.
| Field | Description |
|---|---|
extraConfigmap[string]string | (Optional) Extra configuration added to kubeconfig’s auth-provider. Must not be any of idp-issuer-url, client-id, client-secret, idp-certificate-authority, idp-certificate-authority-data, id-token or refresh-token |
secretstring | (Optional) The client Secret for the OpenID Connect client. |
PendingWorkerUpdates
(Appears on: InPlaceUpdatesStatus)
PendingWorkerUpdates contains information about worker pools pending in-place update.
| Field | Description |
|---|---|
autoInPlaceUpdate[]string | (Optional) AutoInPlaceUpdate contains the names of the pending worker pools with strategy AutoInPlaceUpdate. |
manualInPlaceUpdate[]string | (Optional) ManualInPlaceUpdate contains the names of the pending worker pools with strategy ManualInPlaceUpdate. |
PendingWorkersRollout
(Appears on: CARotation, ServiceAccountKeyRotation)
PendingWorkersRollout contains the name of a worker pool and the initiation time of their last rollout due to credentials rotation.
| Field | Description |
|---|---|
namestring | Name is the name of a worker pool. |
lastInitiationTimeKubernetes meta/v1.Time | (Optional) LastInitiationTime is the most recent time when the credential rotation was initiated. |
ProjectMember
(Appears on: ProjectSpec)
ProjectMember is a member of a project.
| Field | Description |
|---|---|
SubjectKubernetes rbac/v1.Subject | (Members of Subject is representing a user name, an email address, or any other identifier of a user, group, or service account that has a certain role. |
rolestring | Role represents the role of this member.
IMPORTANT: Be aware that this field will be removed in the |
roles[]string | (Optional) Roles represents the list of roles of this member. |
ProjectPhase
(string alias)
(Appears on: ProjectStatus)
ProjectPhase is a label for the condition of a project at the current time.
ProjectSpec
(Appears on: Project)
ProjectSpec is the specification of a Project.
| Field | Description |
|---|---|
createdByKubernetes rbac/v1.Subject | (Optional) CreatedBy is a subject representing a user name, an email address, or any other identifier of a user who created the project. This field is immutable. |
descriptionstring | (Optional) Description is a human-readable description of what the project is used for. |
ownerKubernetes rbac/v1.Subject | (Optional) Owner is a subject representing a user name, an email address, or any other identifier of a user owning
the project.
IMPORTANT: Be aware that this field will be removed in the |
purposestring | (Optional) Purpose is a human-readable explanation of the project’s purpose. |
members[]ProjectMember | (Optional) Members is a list of subjects representing a user name, an email address, or any other identifier of a user, group, or service account that has a certain role. |
namespacestring | (Optional) Namespace is the name of the namespace that has been created for the Project object.
A nil value means that Gardener will determine the name of the namespace.
If set, its value must be prefixed with |
tolerationsProjectTolerations | (Optional) Tolerations contains the tolerations for taints on seed clusters. |
dualApprovalForDeletion[]DualApprovalForDeletion | (Optional) DualApprovalForDeletion contains configuration for the dual approval concept for resource deletion. |
ProjectStatus
(Appears on: Project)
ProjectStatus holds the most recently observed status of the project.
| Field | Description |
|---|---|
observedGenerationint64 | (Optional) ObservedGeneration is the most recent generation observed for this project. |
phaseProjectPhase | Phase is the current phase of the project. |
staleSinceTimestampKubernetes meta/v1.Time | (Optional) StaleSinceTimestamp contains the timestamp when the project was first discovered to be stale/unused. |
staleAutoDeleteTimestampKubernetes meta/v1.Time | (Optional) StaleAutoDeleteTimestamp contains the timestamp when the project will be garbage-collected/automatically deleted because it’s stale/unused. |
lastActivityTimestampKubernetes meta/v1.Time | (Optional) LastActivityTimestamp contains the timestamp from the last activity performed in this project. |
ProjectTolerations
(Appears on: ProjectSpec)
ProjectTolerations contains the tolerations for taints on seed clusters.
| Field | Description |
|---|---|
defaults[]Toleration | (Optional) Defaults contains a list of tolerations that are added to the shoots in this project by default. |
whitelist[]Toleration | (Optional) Whitelist contains a list of tolerations that are allowed to be added to the shoots in this project. Please note
that this list may only be added by users having the |
Provider
(Appears on: ShootSpec)
Provider contains provider-specific information that are handed-over to the provider-specific extension controller.
| Field | Description |
|---|---|
typestring | Type is the type of the provider. This field is immutable. |
controlPlaneConfigk8s.io/apimachinery/pkg/runtime.RawExtension | (Optional) ControlPlaneConfig contains the provider-specific control plane config blob. Please look up the concrete definition in the documentation of your provider extension. |
infrastructureConfigk8s.io/apimachinery/pkg/runtime.RawExtension | (Optional) InfrastructureConfig contains the provider-specific infrastructure config blob. Please look up the concrete definition in the documentation of your provider extension. |
workers[]Worker | (Optional) Workers is a list of worker groups. |
workersSettingsWorkersSettings | (Optional) WorkersSettings contains settings for all workers. |
ProxyMode
(string alias)
(Appears on: KubeProxyConfig)
ProxyMode available in Linux platform: ‘userspace’ (older, going to be EOL), ‘iptables’ (newer, faster), ‘ipvs’ (newest, better in performance and scalability). As of now only ‘iptables’ and ‘ipvs’ is supported by Gardener. In Linux platform, if the iptables proxy is selected, regardless of how, but the system’s kernel or iptables versions are insufficient, this always falls back to the userspace proxy. IPVS mode will be enabled when proxy mode is set to ‘ipvs’, and the fall back path is firstly iptables and then userspace.
QuotaSpec
(Appears on: Quota)
QuotaSpec is the specification of a Quota.
| Field | Description |
|---|---|
clusterLifetimeDaysint32 | (Optional) ClusterLifetimeDays is the lifetime of a Shoot cluster in days before it will be terminated automatically. |
metricsKubernetes core/v1.ResourceList | Metrics is a list of resources which will be put under constraints. |
scopeKubernetes core/v1.ObjectReference | Scope is the scope of the Quota object, either ‘project’, ‘secret’ or ‘workloadidentity’. This field is immutable. |
Region
(Appears on: CloudProfileSpec)
Region contains certain properties of a region.
| Field | Description |
|---|---|
namestring | Name is a region name. |
zones[]AvailabilityZone | (Optional) Zones is a list of availability zones in this region. |
labelsmap[string]string | (Optional) Labels is an optional set of key-value pairs that contain certain administrator-controlled labels for this region. It can be used by Gardener administrators/operators to provide additional information about a region, e.g. wrt quality, reliability, etc. |
accessRestrictions[]AccessRestriction | (Optional) AccessRestrictions describe a list of access restrictions that can be used for Shoots using this region. |
ResourceData
(Appears on: ShootStateSpec)
ResourceData holds the data of a resource referred to by an extension controller state.
| Field | Description |
|---|---|
CrossVersionObjectReferenceKubernetes autoscaling/v1.CrossVersionObjectReference | (Members of |
datak8s.io/apimachinery/pkg/runtime.RawExtension | Data of the resource |
ResourceWatchCacheSize
(Appears on: WatchCacheSizes)
ResourceWatchCacheSize contains configuration of the API server’s watch cache size for one specific resource.
| Field | Description |
|---|---|
apiGroupstring | (Optional) APIGroup is the API group of the resource for which the watch cache size should be configured.
An unset value is used to specify the legacy core API (e.g. for |
resourcestring | Resource is the name of the resource for which the watch cache size should be configured
(in lowercase plural form, e.g. |
sizeint32 | CacheSize specifies the watch cache size that should be configured for the specified resource. |
SSHAccess
(Appears on: WorkersSettings)
SSHAccess contains settings regarding ssh access to the worker nodes.
| Field | Description |
|---|---|
enabledbool | Enabled indicates whether the SSH access to the worker nodes is ensured to be enabled or disabled in systemd. Defaults to true. |
SchedulingProfile
(string alias)
(Appears on: KubeSchedulerConfig)
SchedulingProfile is a string alias used for scheduling profile values.
SecretBindingProvider
(Appears on: SecretBinding)
SecretBindingProvider defines the provider type of the SecretBinding.
| Field | Description |
|---|---|
typestring | Type is the type of the provider. For backwards compatibility, the field can contain multiple providers separated by a comma. However the usage of single SecretBinding (hence Secret) for different cloud providers is strongly discouraged. |
SeedDNS
(Appears on: SeedSpec)
SeedDNS contains DNS-relevant information about this seed cluster.
| Field | Description |
|---|---|
providerSeedDNSProvider | (Optional) Provider configures a DNSProvider |
SeedDNSProvider
(Appears on: SeedDNS)
SeedDNSProvider configures a DNSProvider for Seeds
| Field | Description |
|---|---|
typestring | Type describes the type of the dns-provider, for example |
secretRefKubernetes core/v1.SecretReference | SecretRef is a reference to a Secret object containing cloud provider credentials used for registering external domains. |
SeedNetworks
(Appears on: SeedSpec)
SeedNetworks contains CIDRs for the pod, service and node networks of a Kubernetes cluster.
| Field | Description |
|---|---|
nodesstring | (Optional) Nodes is the CIDR of the node network. This field is immutable. |
podsstring | Pods is the CIDR of the pod network. This field is immutable. |
servicesstring | Services is the CIDR of the service network. This field is immutable. |
shootDefaultsShootNetworks | (Optional) ShootDefaults contains the default networks CIDRs for shoots. |
blockCIDRs[]string | (Optional) BlockCIDRs is a list of network addresses that should be blocked for shoot control plane components running in the seed cluster. |
ipFamilies[]IPFamily | (Optional) IPFamilies specifies the IP protocol versions to use for seed networking. This field is immutable. See https://github.com/gardener/gardener/blob/master/docs/development/ipv6.md. Defaults to [“IPv4”]. |
SeedProvider
(Appears on: SeedSpec)
SeedProvider defines the provider-specific information of this Seed cluster.
| Field | Description |
|---|---|
typestring | Type is the name of the provider. |
providerConfigk8s.io/apimachinery/pkg/runtime.RawExtension | (Optional) ProviderConfig is the configuration passed to Seed resource. |
regionstring | Region is a name of a region. |
zones[]string | (Optional) Zones is the list of availability zones the seed cluster is deployed to. |
SeedSelector
(Appears on: CloudProfileSpec, ExposureClassScheduling, ShootSpec)
SeedSelector contains constraints for selecting seed to be usable for shoots using a profile
| Field | Description |
|---|---|
LabelSelectorKubernetes meta/v1.LabelSelector | (Members of LabelSelector is optional and can be used to select seeds by their label settings |
providerTypes[]string | (Optional) Providers is optional and can be used by restricting seeds by their provider type. ‘*’ can be used to enable seeds regardless of their provider type. |
SeedSettingDependencyWatchdog
(Appears on: SeedSettings)
SeedSettingDependencyWatchdog controls the dependency-watchdog settings for the seed.
| Field | Description |
|---|---|
weederSeedSettingDependencyWatchdogWeeder | (Optional) Weeder controls the weeder settings for the dependency-watchdog for the seed. |
proberSeedSettingDependencyWatchdogProber | (Optional) Prober controls the prober settings for the dependency-watchdog for the seed. |
SeedSettingDependencyWatchdogProber
(Appears on: SeedSettingDependencyWatchdog)
SeedSettingDependencyWatchdogProber controls the prober settings for the dependency-watchdog for the seed.
| Field | Description |
|---|---|
enabledbool | Enabled controls whether the probe controller(prober) of the dependency-watchdog should be enabled. This controller scales down the kube-controller-manager, machine-controller-manager and cluster-autoscaler of shoot clusters in case their respective kube-apiserver is not reachable via its external ingress in order to avoid melt-down situations. |
SeedSettingDependencyWatchdogWeeder
(Appears on: SeedSettingDependencyWatchdog)
SeedSettingDependencyWatchdogWeeder controls the weeder settings for the dependency-watchdog for the seed.
| Field | Description |
|---|---|
enabledbool | Enabled controls whether the endpoint controller(weeder) of the dependency-watchdog should be enabled. This controller helps to alleviate the delay where control plane components remain unavailable by finding the respective pods in CrashLoopBackoff status and restarting them once their dependants become ready and available again. |
SeedSettingExcessCapacityReservation
(Appears on: SeedSettings)
SeedSettingExcessCapacityReservation controls the excess capacity reservation for shoot control planes in the seed.
| Field | Description |
|---|---|
enabledbool | (Optional) Enabled controls whether the default excess capacity reservation should be enabled. When not specified, the functionality is enabled. |
configs[]SeedSettingExcessCapacityReservationConfig | (Optional) Configs configures excess capacity reservation deployments for shoot control planes in the seed. |
SeedSettingExcessCapacityReservationConfig
(Appears on: SeedSettingExcessCapacityReservation)
SeedSettingExcessCapacityReservationConfig configures excess capacity reservation deployments for shoot control planes in the seed.
| Field | Description |
|---|---|
resourcesKubernetes core/v1.ResourceList | Resources specify the resource requests and limits of the excess-capacity-reservation pod. |
nodeSelectormap[string]string | (Optional) NodeSelector specifies the node where the excess-capacity-reservation pod should run. |
tolerations[]Kubernetes core/v1.Toleration | (Optional) Tolerations specify the tolerations for the the excess-capacity-reservation pod. |
SeedSettingLoadBalancerServices
(Appears on: SeedSettings)
SeedSettingLoadBalancerServices controls certain settings for services of type load balancer that are created in the seed.
| Field | Description |
|---|---|
annotationsmap[string]string | (Optional) Annotations is a map of annotations that will be injected/merged into every load balancer service object. |
externalTrafficPolicyKubernetes core/v1.ServiceExternalTrafficPolicy | (Optional) ExternalTrafficPolicy describes how nodes distribute service traffic they receive on one of the service’s “externally-facing” addresses. Defaults to “Cluster”. |
zones[]SeedSettingLoadBalancerServicesZones | (Optional) Zones controls settings, which are specific to the single-zone load balancers in a multi-zonal setup. Can be empty for single-zone seeds. Each specified zone has to relate to one of the zones in seed.spec.provider.zones. |
proxyProtocolLoadBalancerServicesProxyProtocol | (Optional) ProxyProtocol controls whether ProxyProtocol is (optionally) allowed for the load balancer services. Defaults to nil, which is equivalent to not allowing ProxyProtocol. |
SeedSettingLoadBalancerServicesZones
(Appears on: SeedSettingLoadBalancerServices)
SeedSettingLoadBalancerServicesZones controls settings, which are specific to the single-zone load balancers in a multi-zonal setup.
| Field | Description |
|---|---|
namestring | Name is the name of the zone as specified in seed.spec.provider.zones. |
annotationsmap[string]string | (Optional) Annotations is a map of annotations that will be injected/merged into the zone-specific load balancer service object. |
externalTrafficPolicyKubernetes core/v1.ServiceExternalTrafficPolicy | (Optional) ExternalTrafficPolicy describes how nodes distribute service traffic they receive on one of the service’s “externally-facing” addresses. Defaults to “Cluster”. |
proxyProtocolLoadBalancerServicesProxyProtocol | (Optional) ProxyProtocol controls whether ProxyProtocol is (optionally) allowed for the load balancer services. Defaults to nil, which is equivalent to not allowing ProxyProtocol. |
SeedSettingScheduling
(Appears on: SeedSettings)
SeedSettingScheduling controls settings for scheduling decisions for the seed.
| Field | Description |
|---|---|
visiblebool | Visible controls whether the gardener-scheduler shall consider this seed when scheduling shoots. Invisible seeds are not considered by the scheduler. |
SeedSettingTopologyAwareRouting
(Appears on: SeedSettings)
SeedSettingTopologyAwareRouting controls certain settings for topology-aware traffic routing in the seed. See https://github.com/gardener/gardener/blob/master/docs/operations/topology_aware_routing.md.
| Field | Description |
|---|---|
enabledbool | Enabled controls whether certain Services deployed in the seed cluster should be topology-aware. These Services are etcd-main-client, etcd-events-client, kube-apiserver, gardener-resource-manager and vpa-webhook. |
SeedSettingVerticalPodAutoscaler
(Appears on: SeedSettings)
SeedSettingVerticalPodAutoscaler controls certain settings for the vertical pod autoscaler components deployed in the seed.
| Field | Description |
|---|---|
enabledbool | Enabled controls whether the VPA components shall be deployed into the garden namespace in the seed cluster. It is enabled by default because Gardener heavily relies on a VPA being deployed. You should only disable this if your seed cluster already has another, manually/custom managed VPA deployment. |
SeedSettings
(Appears on: SeedSpec)
SeedSettings contains certain settings for this seed cluster.
| Field | Description |
|---|---|
excessCapacityReservationSeedSettingExcessCapacityReservation | (Optional) ExcessCapacityReservation controls the excess capacity reservation for shoot control planes in the seed. |
schedulingSeedSettingScheduling | (Optional) Scheduling controls settings for scheduling decisions for the seed. |
loadBalancerServicesSeedSettingLoadBalancerServices | (Optional) LoadBalancerServices controls certain settings for services of type load balancer that are created in the seed. |
verticalPodAutoscalerSeedSettingVerticalPodAutoscaler | (Optional) VerticalPodAutoscaler controls certain settings for the vertical pod autoscaler components deployed in the seed. |
dependencyWatchdogSeedSettingDependencyWatchdog | (Optional) DependencyWatchdog controls certain settings for the dependency-watchdog components deployed in the seed. |
topologyAwareRoutingSeedSettingTopologyAwareRouting | (Optional) TopologyAwareRouting controls certain settings for topology-aware traffic routing in the seed. See https://github.com/gardener/gardener/blob/master/docs/operations/topology_aware_routing.md. |
SeedSpec
(Appears on: Seed, SeedTemplate)
SeedSpec is the specification of a Seed.
| Field | Description |
|---|---|
backupBackup | (Optional) Backup holds the object store configuration for the backups of shoot (currently only etcd). If it is not specified, then there won’t be any backups taken for shoots associated with this seed. If backup field is present in seed, then backups of the etcd from shoot control plane will be stored under the configured object store. |
dnsSeedDNS | DNS contains DNS-relevant information about this seed cluster. |
networksSeedNetworks | Networks defines the pod, service and worker network of the Seed cluster. |
providerSeedProvider | Provider defines the provider type and region for this Seed cluster. |
taints[]SeedTaint | (Optional) Taints describes taints on the seed. |
volumeSeedVolume | (Optional) Volume contains settings for persistentvolumes created in the seed cluster. |
settingsSeedSettings | (Optional) Settings contains certain settings for this seed cluster. |
ingressIngress | (Optional) Ingress configures Ingress specific settings of the Seed cluster. This field is immutable. |
accessRestrictions[]AccessRestriction | (Optional) AccessRestrictions describe a list of access restrictions for this seed cluster. |
extensions[]Extension | (Optional) Extensions contain type and provider information for Seed extensions. |
resources[]NamedResourceReference | (Optional) Resources holds a list of named resource references that can be referred to in extension configs by their names. |
SeedStatus
(Appears on: Seed)
SeedStatus is the status of a Seed.
| Field | Description |
|---|---|
gardenerGardener | (Optional) Gardener holds information about the Gardener which last acted on the Shoot. |
kubernetesVersionstring | (Optional) KubernetesVersion is the Kubernetes version of the seed cluster. |
conditions[]Condition | (Optional) Conditions represents the latest available observations of a Seed’s current state. |
observedGenerationint64 | (Optional) ObservedGeneration is the most recent generation observed for this Seed. It corresponds to the Seed’s generation, which is updated on mutation by the API Server. |
clusterIdentitystring | (Optional) ClusterIdentity is the identity of the Seed cluster. This field is immutable. |
capacityKubernetes core/v1.ResourceList | (Optional) Capacity represents the total resources of a seed. |
allocatableKubernetes core/v1.ResourceList | (Optional) Allocatable represents the resources of a seed that are available for scheduling. Defaults to Capacity. |
clientCertificateExpirationTimestampKubernetes meta/v1.Time | (Optional) ClientCertificateExpirationTimestamp is the timestamp at which gardenlet’s client certificate expires. |
lastOperationLastOperation | (Optional) LastOperation holds information about the last operation on the Seed. |
SeedTaint
(Appears on: SeedSpec)
SeedTaint describes a taint on a seed.
| Field | Description |
|---|---|
keystring | Key is the taint key to be applied to a seed. |
valuestring | (Optional) Value is the taint value corresponding to the taint key. |
SeedTemplate
SeedTemplate is a template for creating a Seed object.
| Field | Description | ||||||||||||||||||||||
|---|---|---|---|---|---|---|---|---|---|---|---|---|---|---|---|---|---|---|---|---|---|---|---|
metadataKubernetes meta/v1.ObjectMeta | (Optional) Standard object metadata. Refer to the Kubernetes API documentation for the fields of themetadata field. | ||||||||||||||||||||||
specSeedSpec | (Optional) Specification of the desired behavior of the Seed.
|
SeedVolume
(Appears on: SeedSpec)
SeedVolume contains settings for persistentvolumes created in the seed cluster.
| Field | Description |
|---|---|
minimumSizek8s.io/apimachinery/pkg/api/resource.Quantity | (Optional) MinimumSize defines the minimum size that should be used for PVCs in the seed. |
providers[]SeedVolumeProvider | (Optional) Providers is a list of storage class provisioner types for the seed. |
SeedVolumeProvider
(Appears on: SeedVolume)
SeedVolumeProvider is a storage class provisioner type.
| Field | Description |
|---|---|
purposestring | Purpose is the purpose of this provider. |
namestring | Name is the name of the storage class provisioner type. |
ServiceAccountConfig
(Appears on: KubeAPIServerConfig)
ServiceAccountConfig is the kube-apiserver configuration for service accounts.
| Field | Description |
|---|---|
issuerstring | (Optional) Issuer is the identifier of the service account token issuer. The issuer will assert this identifier in “iss” claim of issued tokens. This value is used to generate new service account tokens. This value is a string or URI. Defaults to URI of the API server. |
extendTokenExpirationbool | (Optional) ExtendTokenExpiration turns on projected service account expiration extension during token generation, which helps safe transition from legacy token to bound service account token feature. If this flag is enabled, admission injected tokens would be extended up to 1 year to prevent unexpected failure during transition, ignoring value of service-account-max-token-expiration. |
maxTokenExpirationKubernetes meta/v1.Duration | (Optional) MaxTokenExpiration is the maximum validity duration of a token created by the service account token issuer. If an otherwise valid TokenRequest with a validity duration larger than this value is requested, a token will be issued with a validity duration of this value. This field must be within [30d,90d]. |
acceptedIssuers[]string | (Optional) AcceptedIssuers is an additional set of issuers that are used to determine which service account tokens are accepted. These values are not used to generate new service account tokens. Only useful when service account tokens are also issued by another external system or a change of the current issuer that is used for generating tokens is being performed. |
ServiceAccountKeyRotation
(Appears on: ShootCredentialsRotation)
ServiceAccountKeyRotation contains information about the service account key credential rotation.
| Field | Description |
|---|---|
phaseCredentialsRotationPhase | Phase describes the phase of the service account key credential rotation. |
lastCompletionTimeKubernetes meta/v1.Time | (Optional) LastCompletionTime is the most recent time when the service account key credential rotation was successfully completed. |
lastInitiationTimeKubernetes meta/v1.Time | (Optional) LastInitiationTime is the most recent time when the service account key credential rotation was initiated. |
lastInitiationFinishedTimeKubernetes meta/v1.Time | (Optional) LastInitiationFinishedTime is the recent time when the service account key credential rotation initiation was completed. |
lastCompletionTriggeredTimeKubernetes meta/v1.Time | (Optional) LastCompletionTriggeredTime is the recent time when the service account key credential rotation completion was triggered. |
pendingWorkersRollouts[]PendingWorkersRollout | (Optional) PendingWorkersRollouts contains the name of a worker pool and the initiation time of their last rollout due to credentials rotation. |
ShootAdvertisedAddress
(Appears on: ShootStatus)
ShootAdvertisedAddress contains information for the shoot’s Kube API server.
| Field | Description |
|---|---|
namestring | Name of the advertised address. e.g. external |
urlstring | The URL of the API Server. e.g. https://api.foo.bar or https://1.2.3.4 |
ShootCredentials
(Appears on: ShootStatus)
ShootCredentials contains information about the shoot credentials.
| Field | Description |
|---|---|
rotationShootCredentialsRotation | (Optional) Rotation contains information about the credential rotations. |
ShootCredentialsRotation
(Appears on: ShootCredentials)
ShootCredentialsRotation contains information about the rotation of credentials.
| Field | Description |
|---|---|
certificateAuthoritiesCARotation | (Optional) CertificateAuthorities contains information about the certificate authority credential rotation. |
kubeconfigShootKubeconfigRotation | (Optional) Kubeconfig contains information about the kubeconfig credential rotation. Deprecated: This field is deprecated and will be removed in gardener v1.120 |
sshKeypairShootSSHKeypairRotation | (Optional) SSHKeypair contains information about the ssh-keypair credential rotation. |
observabilityObservabilityRotation | (Optional) Observability contains information about the observability credential rotation. |
serviceAccountKeyServiceAccountKeyRotation | (Optional) ServiceAccountKey contains information about the service account key credential rotation. |
etcdEncryptionKeyETCDEncryptionKeyRotation | (Optional) ETCDEncryptionKey contains information about the ETCD encryption key credential rotation. |
ShootKubeconfigRotation
(Appears on: ShootCredentialsRotation)
ShootKubeconfigRotation contains information about the kubeconfig credential rotation.
| Field | Description |
|---|---|
lastInitiationTimeKubernetes meta/v1.Time | (Optional) LastInitiationTime is the most recent time when the kubeconfig credential rotation was initiated. |
lastCompletionTimeKubernetes meta/v1.Time | (Optional) LastCompletionTime is the most recent time when the kubeconfig credential rotation was successfully completed. |
ShootMachineImage
(Appears on: Machine)
ShootMachineImage defines the name and the version of the shoot’s machine image in any environment. Has to be defined in the respective CloudProfile.
| Field | Description |
|---|---|
namestring | Name is the name of the image. |
providerConfigk8s.io/apimachinery/pkg/runtime.RawExtension | (Optional) ProviderConfig is the shoot’s individual configuration passed to an extension resource. |
versionstring | (Optional) Version is the version of the shoot’s image. If version is not provided, it will be defaulted to the latest version from the CloudProfile. |
ShootNetworks
(Appears on: SeedNetworks)
ShootNetworks contains the default networks CIDRs for shoots.
| Field | Description |
|---|---|
podsstring | (Optional) Pods is the CIDR of the pod network. |
servicesstring | (Optional) Services is the CIDR of the service network. |
ShootPurpose
(string alias)
(Appears on: ShootSpec)
ShootPurpose is a type alias for string.
ShootSSHKeypairRotation
(Appears on: ShootCredentialsRotation)
ShootSSHKeypairRotation contains information about the ssh-keypair credential rotation.
| Field | Description |
|---|---|
lastInitiationTimeKubernetes meta/v1.Time | (Optional) LastInitiationTime is the most recent time when the ssh-keypair credential rotation was initiated. |
lastCompletionTimeKubernetes meta/v1.Time | (Optional) LastCompletionTime is the most recent time when the ssh-keypair credential rotation was successfully completed. |
ShootSpec
(Appears on: Shoot, ShootTemplate)
ShootSpec is the specification of a Shoot.
| Field | Description |
|---|---|
addonsAddons | (Optional) Addons contains information about enabled/disabled addons and their configuration. |
cloudProfileNamestring | (Optional) CloudProfileName is a name of a CloudProfile object.
Deprecated: This field will be removed in a future version of Gardener. Use |
dnsDNS | (Optional) DNS contains information about the DNS settings of the Shoot. |
extensions[]Extension | (Optional) Extensions contain type and provider information for Shoot extensions. |
hibernationHibernation | (Optional) Hibernation contains information whether the Shoot is suspended or not. |
kubernetesKubernetes | Kubernetes contains the version and configuration settings of the control plane components. |
networkingNetworking | (Optional) Networking contains information about cluster networking such as CNI Plugin type, CIDRs, …etc. |
maintenanceMaintenance | (Optional) Maintenance contains information about the time window for maintenance operations and which operations should be performed. |
monitoringMonitoring | (Optional) Monitoring contains information about custom monitoring configurations for the shoot. |
providerProvider | Provider contains all provider-specific and provider-relevant information. |
purposeShootPurpose | (Optional) Purpose is the purpose class for this cluster. |
regionstring | Region is a name of a region. This field is immutable. |
secretBindingNamestring | (Optional) SecretBindingName is the name of a SecretBinding that has a reference to the provider secret. The credentials inside the provider secret will be used to create the shoot in the respective account. The field is mutually exclusive with CredentialsBindingName. This field is immutable. |
seedNamestring | (Optional) SeedName is the name of the seed cluster that runs the control plane of the Shoot. |
seedSelectorSeedSelector | (Optional) SeedSelector is an optional selector which must match a seed’s labels for the shoot to be scheduled on that seed. |
resources[]NamedResourceReference | (Optional) Resources holds a list of named resource references that can be referred to in extension configs by their names. |
tolerations[]Toleration | (Optional) Tolerations contains the tolerations for taints on seed clusters. |
exposureClassNamestring | (Optional) ExposureClassName is the optional name of an exposure class to apply a control plane endpoint exposure strategy. This field is immutable. |
systemComponentsSystemComponents | (Optional) SystemComponents contains the settings of system components in the control or data plane of the Shoot cluster. |
controlPlaneControlPlane | (Optional) ControlPlane contains general settings for the control plane of the shoot. |
schedulerNamestring | (Optional) SchedulerName is the name of the responsible scheduler which schedules the shoot. If not specified, the default scheduler takes over. This field is immutable. |
cloudProfileCloudProfileReference | (Optional) CloudProfile contains a reference to a CloudProfile or a NamespacedCloudProfile. |
credentialsBindingNamestring | (Optional) CredentialsBindingName is the name of a CredentialsBinding that has a reference to the provider credentials. The credentials will be used to create the shoot in the respective account. The field is mutually exclusive with SecretBindingName. |
accessRestrictions[]AccessRestrictionWithOptions | (Optional) AccessRestrictions describe a list of access restrictions for this shoot cluster. |
ShootStateSpec
(Appears on: ShootState)
ShootStateSpec is the specification of the ShootState.
| Field | Description |
|---|---|
gardener[]GardenerResourceData | (Optional) Gardener holds the data required to generate resources deployed by the gardenlet |
extensions[]ExtensionResourceState | (Optional) Extensions holds the state of custom resources reconciled by extension controllers in the seed |
resources[]ResourceData | (Optional) Resources holds the data of resources referred to by extension controller states |
ShootStatus
(Appears on: Shoot)
ShootStatus holds the most recently observed status of the Shoot cluster.
| Field | Description |
|---|---|
conditions[]Condition | (Optional) Conditions represents the latest available observations of a Shoots’s current state. |
constraints[]Condition | (Optional) Constraints represents conditions of a Shoot’s current state that constraint some operations on it. |
gardenerGardener | Gardener holds information about the Gardener which last acted on the Shoot. |
hibernatedbool | IsHibernated indicates whether the Shoot is currently hibernated. |
lastOperationLastOperation | (Optional) LastOperation holds information about the last operation on the Shoot. |
lastErrors[]LastError | (Optional) LastErrors holds information about the last occurred error(s) during an operation. |
observedGenerationint64 | (Optional) ObservedGeneration is the most recent generation observed for this Shoot. It corresponds to the Shoot’s generation, which is updated on mutation by the API Server. |
retryCycleStartTimeKubernetes meta/v1.Time | (Optional) RetryCycleStartTime is the start time of the last retry cycle (used to determine how often an operation must be retried until we give up). |
seedNamestring | (Optional) SeedName is the name of the seed cluster that runs the control plane of the Shoot. This value is only written after a successful create/reconcile operation. It will be used when control planes are moved between Seeds. |
technicalIDstring | TechnicalID is a unique technical ID for this Shoot. It is used for the infrastructure resources, and basically everything that is related to this particular Shoot. For regular shoot clusters, this is also the name of the namespace in the seed cluster running the shoot’s control plane. This field is immutable. |
uidk8s.io/apimachinery/pkg/types.UID | UID is a unique identifier for the Shoot cluster to avoid portability between Kubernetes clusters. It is used to compute unique hashes. This field is immutable. |
clusterIdentitystring | (Optional) ClusterIdentity is the identity of the Shoot cluster. This field is immutable. |
advertisedAddresses[]ShootAdvertisedAddress | (Optional) List of addresses that are relevant to the shoot. These include the Kube API server address and also the service account issuer. |
migrationStartTimeKubernetes meta/v1.Time | (Optional) MigrationStartTime is the time when a migration to a different seed was initiated. |
credentialsShootCredentials | (Optional) Credentials contains information about the shoot credentials. |
lastHibernationTriggerTimeKubernetes meta/v1.Time | (Optional) LastHibernationTriggerTime indicates the last time when the hibernation controller managed to change the hibernation settings of the cluster |
lastMaintenanceLastMaintenance | (Optional) LastMaintenance holds information about the last maintenance operations on the Shoot. |
encryptedResources[]string | (Optional) EncryptedResources is the list of resources in the Shoot which are currently encrypted. Secrets are encrypted by default and are not part of the list. See https://github.com/gardener/gardener/blob/master/docs/usage/security/etcd_encryption_config.md for more details. |
networkingNetworkingStatus | (Optional) Networking contains information about cluster networking such as CIDRs. |
inPlaceUpdatesInPlaceUpdatesStatus | (Optional) InPlaceUpdates contains information about in-place updates for the Shoot workers. |
ShootTemplate
ShootTemplate is a template for creating a Shoot object.
| Field | Description | ||||||||||||||||||||||||||||||||||||||||||||||||
|---|---|---|---|---|---|---|---|---|---|---|---|---|---|---|---|---|---|---|---|---|---|---|---|---|---|---|---|---|---|---|---|---|---|---|---|---|---|---|---|---|---|---|---|---|---|---|---|---|---|
metadataKubernetes meta/v1.ObjectMeta | (Optional) Standard object metadata. Refer to the Kubernetes API documentation for the fields of themetadata field. | ||||||||||||||||||||||||||||||||||||||||||||||||
specShootSpec | (Optional) Specification of the desired behavior of the Shoot.
|
StructuredAuthentication
(Appears on: KubeAPIServerConfig)
StructuredAuthentication contains authentication config for kube-apiserver.
| Field | Description |
|---|---|
configMapNamestring | ConfigMapName is the name of the ConfigMap in the project namespace which contains AuthenticationConfiguration for the kube-apiserver. |
StructuredAuthorization
(Appears on: KubeAPIServerConfig)
StructuredAuthorization contains authorization config for kube-apiserver.
| Field | Description |
|---|---|
configMapNamestring | ConfigMapName is the name of the ConfigMap in the project namespace which contains AuthorizationConfiguration for the kube-apiserver. |
kubeconfigs[]AuthorizerKubeconfigReference | Kubeconfigs is a list of references for kubeconfigs for the authorization webhooks. |
SwapBehavior
(string alias)
(Appears on: MemorySwapConfiguration)
SwapBehavior configures swap memory available to container workloads
SystemComponents
(Appears on: ShootSpec)
SystemComponents contains the settings of system components in the control or data plane of the Shoot cluster.
| Field | Description |
|---|---|
coreDNSCoreDNS | (Optional) CoreDNS contains the settings of the Core DNS components running in the data plane of the Shoot cluster. |
nodeLocalDNSNodeLocalDNS | (Optional) NodeLocalDNS contains the settings of the node local DNS components running in the data plane of the Shoot cluster. |
Toleration
(Appears on: ExposureClassScheduling, ProjectTolerations, ShootSpec)
Toleration is a toleration for a seed taint.
| Field | Description |
|---|---|
keystring | Key is the toleration key to be applied to a project or shoot. |
valuestring | (Optional) Value is the toleration value corresponding to the toleration key. |
VersionClassification
(string alias)
(Appears on: ExpirableVersion)
VersionClassification is the logical state of a version.
VerticalPodAutoscaler
(Appears on: Kubernetes)
VerticalPodAutoscaler contains the configuration flags for the Kubernetes vertical pod autoscaler.
| Field | Description |
|---|---|
enabledbool | Enabled specifies whether the Kubernetes VPA shall be enabled for the shoot cluster. |
evictAfterOOMThresholdKubernetes meta/v1.Duration | (Optional) EvictAfterOOMThreshold defines the threshold that will lead to pod eviction in case it OOMed in less than the given threshold since its start and if it has only one container (default: 10m0s). |
evictionRateBurstint32 | (Optional) EvictionRateBurst defines the burst of pods that can be evicted (default: 1) |
evictionRateLimitfloat64 | (Optional) EvictionRateLimit defines the number of pods that can be evicted per second. A rate limit set to 0 or -1 will disable the rate limiter (default: -1). |
evictionTolerancefloat64 | (Optional) EvictionTolerance defines the fraction of replica count that can be evicted for update in case more than one pod can be evicted (default: 0.5). |
recommendationMarginFractionfloat64 | (Optional) RecommendationMarginFraction is the fraction of usage added as the safety margin to the recommended request (default: 0.15). |
updaterIntervalKubernetes meta/v1.Duration | (Optional) UpdaterInterval is the interval how often the updater should run (default: 1m0s). |
recommenderIntervalKubernetes meta/v1.Duration | (Optional) RecommenderInterval is the interval how often metrics should be fetched (default: 1m0s). |
targetCPUPercentilefloat64 | (Optional) TargetCPUPercentile is the usage percentile that will be used as a base for CPU target recommendation. Doesn’t affect CPU lower bound, CPU upper bound nor memory recommendations. (default: 0.9) |
recommendationLowerBoundCPUPercentilefloat64 | (Optional) RecommendationLowerBoundCPUPercentile is the usage percentile that will be used for the lower bound on CPU recommendation. (default: 0.5) |
recommendationUpperBoundCPUPercentilefloat64 | (Optional) RecommendationUpperBoundCPUPercentile is the usage percentile that will be used for the upper bound on CPU recommendation. (default: 0.95) |
targetMemoryPercentilefloat64 | (Optional) TargetMemoryPercentile is the usage percentile that will be used as a base for memory target recommendation. Doesn’t affect memory lower bound nor memory upper bound. (default: 0.9) |
recommendationLowerBoundMemoryPercentilefloat64 | (Optional) RecommendationLowerBoundMemoryPercentile is the usage percentile that will be used for the lower bound on memory recommendation. (default: 0.5) |
recommendationUpperBoundMemoryPercentilefloat64 | (Optional) RecommendationUpperBoundMemoryPercentile is the usage percentile that will be used for the upper bound on memory recommendation. (default: 0.95) |
cpuHistogramDecayHalfLifeKubernetes meta/v1.Duration | (Optional) CPUHistogramDecayHalfLife is the amount of time it takes a historical CPU usage sample to lose half of its weight. (default: 24h) |
memoryHistogramDecayHalfLifeKubernetes meta/v1.Duration | (Optional) MemoryHistogramDecayHalfLife is the amount of time it takes a historical memory usage sample to lose half of its weight. (default: 24h) |
memoryAggregationIntervalKubernetes meta/v1.Duration | (Optional) MemoryAggregationInterval is the length of a single interval, for which the peak memory usage is computed. (default: 24h) |
memoryAggregationIntervalCountint64 | (Optional) MemoryAggregationIntervalCount is the number of consecutive memory-aggregation-intervals which make up the
MemoryAggregationWindowLength which in turn is the period for memory usage aggregation by VPA. In other words,
|
Volume
(Appears on: Worker)
Volume contains information about the volume type, size, and encryption.
| Field | Description |
|---|---|
namestring | (Optional) Name of the volume to make it referenceable. |
typestring | (Optional) Type is the type of the volume. |
sizestring | VolumeSize is the size of the volume. |
encryptedbool | (Optional) Encrypted determines if the volume should be encrypted. |
VolumeType
(Appears on: CloudProfileSpec, NamespacedCloudProfileSpec)
VolumeType contains certain properties of a volume type.
| Field | Description |
|---|---|
classstring | Class is the class of the volume type. |
namestring | Name is the name of the volume type. |
usablebool | (Optional) Usable defines if the volume type can be used for shoot clusters. |
minSizek8s.io/apimachinery/pkg/api/resource.Quantity | (Optional) MinSize is the minimal supported storage size. |
WatchCacheSizes
(Appears on: KubeAPIServerConfig)
WatchCacheSizes contains configuration of the API server’s watch cache sizes.
| Field | Description |
|---|---|
defaultint32 | (Optional) Default configures the default watch cache size of the kube-apiserver
(flag |
resources[]ResourceWatchCacheSize | (Optional) Resources configures the watch cache size of the kube-apiserver per resource
(flag |
Worker
(Appears on: Provider)
Worker is the base definition of a worker group.
| Field | Description |
|---|---|
annotationsmap[string]string | (Optional) Annotations is a map of key/value pairs for annotations for all the |
caBundlestring | (Optional) CABundle is a certificate bundle which will be installed onto every machine of this worker pool. |
criCRI | (Optional) CRI contains configurations of CRI support of every machine in the worker pool.
Defaults to a CRI with name |
kubernetesWorkerKubernetes | (Optional) Kubernetes contains configuration for Kubernetes components related to this worker pool. |
labelsmap[string]string | (Optional) Labels is a map of key/value pairs for labels for all the |
namestring | Name is the name of the worker group. |
machineMachine | Machine contains information about the machine type and image. |
maximumint32 | Maximum is the maximum number of machines to create. This value is divided by the number of configured zones for a fair distribution. |
minimumint32 | Minimum is the minimum number of machines to create. This value is divided by the number of configured zones for a fair distribution. |
maxSurgek8s.io/apimachinery/pkg/util/intstr.IntOrString | (Optional) MaxSurge is maximum number of machines that are created during an update. This value is divided by the number of configured zones for a fair distribution. Defaults to 0 in case of an in-place update. Defaults to 1 in case of a rolling update. |
maxUnavailablek8s.io/apimachinery/pkg/util/intstr.IntOrString | (Optional) MaxUnavailable is the maximum number of machines that can be unavailable during an update. This value is divided by the number of configured zones for a fair distribution. Defaults to 1 in case of an in-place update. Defaults to 0 in case of a rolling update. |
providerConfigk8s.io/apimachinery/pkg/runtime.RawExtension | (Optional) ProviderConfig is the provider-specific configuration for this worker pool. |
taints[]Kubernetes core/v1.Taint | (Optional) Taints is a list of taints for all the |
volumeVolume | (Optional) Volume contains information about the volume type and size. |
dataVolumes[]DataVolume | (Optional) DataVolumes contains a list of additional worker volumes. |
kubeletDataVolumeNamestring | (Optional) KubeletDataVolumeName contains the name of a dataVolume that should be used for storing kubelet state. |
zones[]string | (Optional) Zones is a list of availability zones that are used to evenly distribute this worker pool. Optional as not every provider may support availability zones. |
systemComponentsWorkerSystemComponents | (Optional) SystemComponents contains configuration for system components related to this worker pool |
machineControllerManagerMachineControllerManagerSettings | (Optional) MachineControllerManagerSettings contains configurations for different worker-pools. Eg. MachineDrainTimeout, MachineHealthTimeout. |
sysctlsmap[string]string | (Optional) Sysctls is a map of kernel settings to apply on all machines in this worker pool. |
clusterAutoscalerClusterAutoscalerOptions | (Optional) ClusterAutoscaler contains the cluster autoscaler configurations for the worker pool. |
priorityint32 | (Optional) Priority (or weight) is the importance by which this worker group will be scaled by cluster autoscaling. |
updateStrategyMachineUpdateStrategy | (Optional) UpdateStrategy specifies the machine update strategy for the worker pool. |
controlPlaneWorkerControlPlane | (Optional) ControlPlane specifies that the shoot cluster control plane components should be running in this worker pool. This is only relevant for autonomous shoot clusters. |
WorkerControlPlane
(Appears on: Worker)
WorkerControlPlane specifies that the shoot cluster control plane components should be running in this worker pool.
| Field | Description |
|---|---|
backupBackup | (Optional) Backup holds the object store configuration for the backups of shoot (currently only etcd). If it is not specified, then there won’t be any backups taken. |
WorkerKubernetes
(Appears on: Worker)
WorkerKubernetes contains configuration for Kubernetes components related to this worker pool.
| Field | Description |
|---|---|
kubeletKubeletConfig | (Optional) Kubelet contains configuration settings for all kubelets of this worker pool.
If set, all |
versionstring | (Optional) Version is the semantic Kubernetes version to use for the Kubelet in this Worker Group. If not specified the kubelet version is derived from the global shoot cluster kubernetes version. version must be equal or lower than the version of the shoot kubernetes version. Only one minor version difference to other worker groups and global kubernetes version is allowed. |
WorkerSystemComponents
(Appears on: Worker)
WorkerSystemComponents contains configuration for system components related to this worker pool
| Field | Description |
|---|---|
allowbool | Allow determines whether the pool should be allowed to host system components or not (defaults to true) |
WorkersSettings
(Appears on: Provider)
WorkersSettings contains settings for all workers.
| Field | Description |
|---|---|
sshAccessSSHAccess | (Optional) SSHAccess contains settings regarding ssh access to the worker nodes. |
Generated with gen-crd-api-reference-docs
4.2.3 - Core V1
Packages:
core.gardener.cloud/v1
Package v1 is a version of the API.
Resource Types:ControllerDeployment
ControllerDeployment contains information about how this controller is deployed.
| Field | Description |
|---|---|
apiVersionstring | core.gardener.cloud/v1 |
kindstring | ControllerDeployment |
metadataKubernetes meta/v1.ObjectMeta | Standard object metadata. Refer to the Kubernetes API documentation for the fields of themetadata field. |
helmHelmControllerDeployment | (Optional) Helm configures that an extension controller is deployed using helm. |
injectGardenKubeconfigbool | (Optional) InjectGardenKubeconfig controls whether a kubeconfig to the garden cluster should be injected into workload resources. |
HelmControllerDeployment
(Appears on: ControllerDeployment)
HelmControllerDeployment configures how an extension controller is deployed using helm.
| Field | Description |
|---|---|
rawChart[]byte | (Optional) RawChart is the base64-encoded, gzip’ed, tar’ed extension controller chart. |
valuesKubernetes apiextensions/v1.JSON | (Optional) Values are the chart values. |
ociRepositoryOCIRepository | (Optional) OCIRepository defines where to pull the chart. |
OCIRepository
(Appears on: HelmControllerDeployment)
OCIRepository configures where to pull an OCI Artifact, that could contain for example a Helm Chart.
| Field | Description |
|---|---|
refstring | (Optional) Ref is the full artifact Ref and takes precedence over all other fields. |
repositorystring | (Optional) Repository is a reference to an OCI artifact repository. |
tagstring | (Optional) Tag is the image tag to pull. |
digeststring | (Optional) Digest of the image to pull, takes precedence over tag.
The value should be in the format ‘sha256: |
pullSecretRefKubernetes core/v1.LocalObjectReference | (Optional) PullSecretRef is a reference to a secret containing the pull secret.
The secret must be of type |
Generated with gen-crd-api-reference-docs
4.2.4 - Extensions
Packages:
extensions.gardener.cloud/v1alpha1
Package v1alpha1 is the v1alpha1 version of the API.
Resource Types:- BackupBucket
- BackupEntry
- Bastion
- Cluster
- ContainerRuntime
- ControlPlane
- DNSRecord
- Extension
- Infrastructure
- Network
- OperatingSystemConfig
- Worker
BackupBucket
BackupBucket is a specification for backup bucket.
| Field | Description | ||||||
|---|---|---|---|---|---|---|---|
apiVersionstring | extensions.gardener.cloud/v1alpha1 | ||||||
kindstring | BackupBucket | ||||||
metadataKubernetes meta/v1.ObjectMeta | (Optional)
Refer to the Kubernetes API documentation for the fields of the
metadata field. | ||||||
specBackupBucketSpec | Specification of the BackupBucket. If the object’s deletion timestamp is set, this field is immutable.
| ||||||
statusBackupBucketStatus | (Optional) |
BackupEntry
BackupEntry is a specification for backup Entry.
| Field | Description | ||||||||||
|---|---|---|---|---|---|---|---|---|---|---|---|
apiVersionstring | extensions.gardener.cloud/v1alpha1 | ||||||||||
kindstring | BackupEntry | ||||||||||
metadataKubernetes meta/v1.ObjectMeta | (Optional)
Refer to the Kubernetes API documentation for the fields of the
metadata field. | ||||||||||
specBackupEntrySpec | Specification of the BackupEntry. If the object’s deletion timestamp is set, this field is immutable.
| ||||||||||
statusBackupEntryStatus | (Optional) |
Bastion
Bastion is a bastion or jump host that is dynamically created to provide SSH access to shoot nodes.
| Field | Description | ||||||
|---|---|---|---|---|---|---|---|
apiVersionstring | extensions.gardener.cloud/v1alpha1 | ||||||
kindstring | Bastion | ||||||
metadataKubernetes meta/v1.ObjectMeta | (Optional)
Refer to the Kubernetes API documentation for the fields of the
metadata field. | ||||||
specBastionSpec | Spec is the specification of this Bastion. If the object’s deletion timestamp is set, this field is immutable.
| ||||||
statusBastionStatus | (Optional) Status is the bastion’s status. |
Cluster
Cluster is a specification for a Cluster resource.
| Field | Description | ||||||
|---|---|---|---|---|---|---|---|
apiVersionstring | extensions.gardener.cloud/v1alpha1 | ||||||
kindstring | Cluster | ||||||
metadataKubernetes meta/v1.ObjectMeta | Refer to the Kubernetes API documentation for the fields of the
metadata field. | ||||||
specClusterSpec |
|
ContainerRuntime
ContainerRuntime is a specification for a container runtime resource.
| Field | Description | ||||||
|---|---|---|---|---|---|---|---|
apiVersionstring | extensions.gardener.cloud/v1alpha1 | ||||||
kindstring | ContainerRuntime | ||||||
metadataKubernetes meta/v1.ObjectMeta | (Optional)
Refer to the Kubernetes API documentation for the fields of the
metadata field. | ||||||
specContainerRuntimeSpec | Specification of the ContainerRuntime. If the object’s deletion timestamp is set, this field is immutable.
| ||||||
statusContainerRuntimeStatus | (Optional) |
ControlPlane
ControlPlane is a specification for a ControlPlane resource.
| Field | Description | ||||||||
|---|---|---|---|---|---|---|---|---|---|
apiVersionstring | extensions.gardener.cloud/v1alpha1 | ||||||||
kindstring | ControlPlane | ||||||||
metadataKubernetes meta/v1.ObjectMeta | Refer to the Kubernetes API documentation for the fields of the
metadata field. | ||||||||
specControlPlaneSpec | Specification of the ControlPlane. If the object’s deletion timestamp is set, this field is immutable.
| ||||||||
statusControlPlaneStatus | (Optional) |
DNSRecord
DNSRecord is a specification for a DNSRecord resource.
| Field | Description | ||||||||||||||||
|---|---|---|---|---|---|---|---|---|---|---|---|---|---|---|---|---|---|
apiVersionstring | extensions.gardener.cloud/v1alpha1 | ||||||||||||||||
kindstring | DNSRecord | ||||||||||||||||
metadataKubernetes meta/v1.ObjectMeta | Refer to the Kubernetes API documentation for the fields of the
metadata field. | ||||||||||||||||
specDNSRecordSpec | Specification of the DNSRecord. If the object’s deletion timestamp is set, this field is immutable.
| ||||||||||||||||
statusDNSRecordStatus | (Optional) |
Extension
Extension is a specification for a Extension resource.
| Field | Description | ||
|---|---|---|---|
apiVersionstring | extensions.gardener.cloud/v1alpha1 | ||
kindstring | Extension | ||
metadataKubernetes meta/v1.ObjectMeta | (Optional)
Refer to the Kubernetes API documentation for the fields of the
metadata field. | ||
specExtensionSpec | Specification of the Extension. If the object’s deletion timestamp is set, this field is immutable.
| ||
statusExtensionStatus | (Optional) |
Infrastructure
Infrastructure is a specification for cloud provider infrastructure.
| Field | Description | ||||||||
|---|---|---|---|---|---|---|---|---|---|
apiVersionstring | extensions.gardener.cloud/v1alpha1 | ||||||||
kindstring | Infrastructure | ||||||||
metadataKubernetes meta/v1.ObjectMeta | (Optional)
Refer to the Kubernetes API documentation for the fields of the
metadata field. | ||||||||
specInfrastructureSpec | Specification of the Infrastructure. If the object’s deletion timestamp is set, this field is immutable.
| ||||||||
statusInfrastructureStatus | (Optional) |
Network
Network is the specification for cluster networking.
| Field | Description | ||||||||
|---|---|---|---|---|---|---|---|---|---|
apiVersionstring | extensions.gardener.cloud/v1alpha1 | ||||||||
kindstring | Network | ||||||||
metadataKubernetes meta/v1.ObjectMeta | (Optional)
Refer to the Kubernetes API documentation for the fields of the
metadata field. | ||||||||
specNetworkSpec | Specification of the Network. If the object’s deletion timestamp is set, this field is immutable.
| ||||||||
statusNetworkStatus | (Optional) |
OperatingSystemConfig
OperatingSystemConfig is a specification for a OperatingSystemConfig resource
| Field | Description | ||||||||||||
|---|---|---|---|---|---|---|---|---|---|---|---|---|---|
apiVersionstring | extensions.gardener.cloud/v1alpha1 | ||||||||||||
kindstring | OperatingSystemConfig | ||||||||||||
metadataKubernetes meta/v1.ObjectMeta | (Optional)
Refer to the Kubernetes API documentation for the fields of the
metadata field. | ||||||||||||
specOperatingSystemConfigSpec | Specification of the OperatingSystemConfig. If the object’s deletion timestamp is set, this field is immutable.
| ||||||||||||
statusOperatingSystemConfigStatus | (Optional) |
Worker
Worker is a specification for a Worker resource.
| Field | Description | ||||||||||||
|---|---|---|---|---|---|---|---|---|---|---|---|---|---|
apiVersionstring | extensions.gardener.cloud/v1alpha1 | ||||||||||||
kindstring | Worker | ||||||||||||
metadataKubernetes meta/v1.ObjectMeta | (Optional)
Refer to the Kubernetes API documentation for the fields of the
metadata field. | ||||||||||||
specWorkerSpec | Specification of the Worker. If the object’s deletion timestamp is set, this field is immutable.
| ||||||||||||
statusWorkerStatus | (Optional) |
BackupBucketSpec
(Appears on: BackupBucket)
BackupBucketSpec is the spec for an BackupBucket resource.
| Field | Description |
|---|---|
DefaultSpecDefaultSpec | (Members of DefaultSpec is a structure containing common fields used by all extension resources. |
regionstring | Region is the region of this bucket. This field is immutable. |
secretRefKubernetes core/v1.SecretReference | SecretRef is a reference to a secret that contains the credentials to access object store. |
BackupBucketStatus
(Appears on: BackupBucket)
BackupBucketStatus is the status for an BackupBucket resource.
| Field | Description |
|---|---|
DefaultStatusDefaultStatus | (Members of DefaultStatus is a structure containing common fields used by all extension resources. |
generatedSecretRefKubernetes core/v1.SecretReference | (Optional) GeneratedSecretRef is reference to the secret generated by backup bucket, which will have object store specific credentials. |
BackupEntrySpec
(Appears on: BackupEntry)
BackupEntrySpec is the spec for an BackupEntry resource.
| Field | Description |
|---|---|
DefaultSpecDefaultSpec | (Members of DefaultSpec is a structure containing common fields used by all extension resources. |
backupBucketProviderStatusk8s.io/apimachinery/pkg/runtime.RawExtension | (Optional) BackupBucketProviderStatus contains the provider status that has
been generated by the controller responsible for the |
regionstring | Region is the region of this Entry. This field is immutable. |
bucketNamestring | BucketName is the name of backup bucket for this Backup Entry. |
secretRefKubernetes core/v1.SecretReference | SecretRef is a reference to a secret that contains the credentials to access object store. |
BackupEntryStatus
(Appears on: BackupEntry)
BackupEntryStatus is the status for an BackupEntry resource.
| Field | Description |
|---|---|
DefaultStatusDefaultStatus | (Members of DefaultStatus is a structure containing common fields used by all extension resources. |
BastionIngressPolicy
(Appears on: BastionSpec)
BastionIngressPolicy represents an ingress policy for SSH bastion hosts.
| Field | Description |
|---|---|
ipBlockKubernetes networking/v1.IPBlock | IPBlock defines an IP block that is allowed to access the bastion. |
BastionSpec
(Appears on: Bastion)
BastionSpec contains the specification for an SSH bastion host.
| Field | Description |
|---|---|
DefaultSpecDefaultSpec | (Members of DefaultSpec is a structure containing common fields used by all extension resources. |
userData[]byte | UserData is the base64-encoded user data for the bastion instance. This should contain code to provision the SSH key on the bastion instance. This field is immutable. |
ingress[]BastionIngressPolicy | Ingress controls from where the created bastion host should be reachable. |
BastionStatus
(Appears on: Bastion)
BastionStatus holds the most recently observed status of the Bastion.
| Field | Description |
|---|---|
DefaultStatusDefaultStatus | (Members of DefaultStatus is a structure containing common fields used by all extension resources. |
ingressKubernetes core/v1.LoadBalancerIngress | (Optional) Ingress is the external IP and/or hostname of the bastion host. |
CARotation
(Appears on: CredentialsRotation)
CARotation contains information about the certificate authority credential rotation.
| Field | Description |
|---|---|
lastInitiationTimeKubernetes meta/v1.Time | (Optional) LastInitiationTime is the most recent time when the certificate authority credential rotation was initiated. |
CRIConfig
(Appears on: OperatingSystemConfigSpec)
CRIConfig contains configurations of the CRI library.
| Field | Description |
|---|---|
nameCRIName | Name is a mandatory string containing the name of the CRI library. Supported values are |
cgroupDriverCgroupDriverName | (Optional) CgroupDriver configures the CRI’s cgroup driver. Supported values are |
containerdContainerdConfig | (Optional) ContainerdConfig is the containerd configuration. Only to be set for OperatingSystemConfigs with purpose ‘reconcile’. |
CRIName
(string alias)
(Appears on: CRIConfig)
CRIName is a type alias for the CRI name string.
CgroupDriverName
(string alias)
(Appears on: CRIConfig)
CgroupDriverName is a string denoting the CRI cgroup driver.
CloudConfig
(Appears on: OperatingSystemConfigStatus)
CloudConfig contains the generated output for the given operating system config spec. It contains a reference to a secret as the result may contain confidential data.
| Field | Description |
|---|---|
secretRefKubernetes core/v1.SecretReference | SecretRef is a reference to a secret that contains the actual result of the generated cloud config. |
ClusterAutoscalerOptions
(Appears on: WorkerPool)
ClusterAutoscalerOptions contains the cluster autoscaler configurations for a worker pool.
| Field | Description |
|---|---|
scaleDownUtilizationThresholdstring | (Optional) ScaleDownUtilizationThreshold defines the threshold in fraction (0.0 - 1.0) under which a node is being removed. |
scaleDownGpuUtilizationThresholdstring | (Optional) ScaleDownGpuUtilizationThreshold defines the threshold in fraction (0.0 - 1.0) of gpu resources under which a node is being removed. |
scaleDownUnneededTimeKubernetes meta/v1.Duration | (Optional) ScaleDownUnneededTime defines how long a node should be unneeded before it is eligible for scale down. |
scaleDownUnreadyTimeKubernetes meta/v1.Duration | (Optional) ScaleDownUnreadyTime defines how long an unready node should be unneeded before it is eligible for scale down. |
maxNodeProvisionTimeKubernetes meta/v1.Duration | (Optional) MaxNodeProvisionTime defines how long cluster autoscaler should wait for a node to be provisioned. |
ClusterSpec
(Appears on: Cluster)
ClusterSpec is the spec for a Cluster resource.
| Field | Description |
|---|---|
cloudProfilek8s.io/apimachinery/pkg/runtime.RawExtension | CloudProfile is a raw extension field that contains the cloudprofile resource referenced by the shoot that has to be reconciled. |
seedk8s.io/apimachinery/pkg/runtime.RawExtension | Seed is a raw extension field that contains the seed resource referenced by the shoot that has to be reconciled. |
shootk8s.io/apimachinery/pkg/runtime.RawExtension | Shoot is a raw extension field that contains the shoot resource that has to be reconciled. |
ContainerRuntimeSpec
(Appears on: ContainerRuntime)
ContainerRuntimeSpec is the spec for a ContainerRuntime resource.
| Field | Description |
|---|---|
DefaultSpecDefaultSpec | (Members of DefaultSpec is a structure containing common fields used by all extension resources. |
binaryPathstring | BinaryPath is the Worker’s machine path where container runtime extensions should copy the binaries to. |
workerPoolContainerRuntimeWorkerPool | WorkerPool identifies the worker pool of the Shoot. For each worker pool and type, Gardener deploys a ContainerRuntime CRD. |
ContainerRuntimeStatus
(Appears on: ContainerRuntime)
ContainerRuntimeStatus is the status for a ContainerRuntime resource.
| Field | Description |
|---|---|
DefaultStatusDefaultStatus | (Members of DefaultStatus is a structure containing common fields used by all extension resources. |
ContainerRuntimeWorkerPool
(Appears on: ContainerRuntimeSpec)
ContainerRuntimeWorkerPool identifies a Shoot worker pool by its name and selector.
| Field | Description |
|---|---|
namestring | Name specifies the name of the worker pool the container runtime should be available for. This field is immutable. |
selectorKubernetes meta/v1.LabelSelector | Selector is the label selector used by the extension to match the nodes belonging to the worker pool. |
ContainerdConfig
(Appears on: CRIConfig)
ContainerdConfig contains configuration options for containerd.
| Field | Description |
|---|---|
registries[]RegistryConfig | (Optional) Registries configures the registry hosts for containerd. |
sandboxImagestring | SandboxImage configures the sandbox image for containerd. |
plugins[]PluginConfig | (Optional) Plugins configures the plugins section in containerd’s config.toml. |
ControlPlaneSpec
(Appears on: ControlPlane)
ControlPlaneSpec is the spec of a ControlPlane resource.
| Field | Description |
|---|---|
DefaultSpecDefaultSpec | (Members of DefaultSpec is a structure containing common fields used by all extension resources. |
infrastructureProviderStatusk8s.io/apimachinery/pkg/runtime.RawExtension | (Optional) InfrastructureProviderStatus contains the provider status that has
been generated by the controller responsible for the |
regionstring | Region is the region of this control plane. This field is immutable. |
secretRefKubernetes core/v1.SecretReference | SecretRef is a reference to a secret that contains the cloud provider specific credentials. |
ControlPlaneStatus
(Appears on: ControlPlane)
ControlPlaneStatus is the status of a ControlPlane resource.
| Field | Description |
|---|---|
DefaultStatusDefaultStatus | (Members of DefaultStatus is a structure containing common fields used by all extension resources. |
CredentialsRotation
(Appears on: InPlaceUpdates)
CredentialsRotation is a structure containing information about the last initiation time of the certificate authority and service account key rotation.
| Field | Description |
|---|---|
certificateAuthoritiesCARotation | (Optional) CertificateAuthorities contains information about the certificate authority credential rotation. |
serviceAccountKeyServiceAccountKeyRotation | (Optional) ServiceAccountKey contains information about the service account key credential rotation. |
DNSRecordSpec
(Appears on: DNSRecord)
DNSRecordSpec is the spec of a DNSRecord resource.
| Field | Description |
|---|---|
DefaultSpecDefaultSpec | (Members of DefaultSpec is a structure containing common fields used by all extension resources. |
secretRefKubernetes core/v1.SecretReference | SecretRef is a reference to a secret that contains the cloud provider specific credentials. |
regionstring | (Optional) Region is the region of this DNS record. If not specified, the region specified in SecretRef will be used. If that is also not specified, the extension controller will use its default region. |
zonestring | (Optional) Zone is the DNS hosted zone of this DNS record. If not specified, it will be determined automatically by getting all hosted zones of the account and searching for the longest zone name that is a suffix of Name. |
namestring | Name is the fully qualified domain name, e.g. “api. |
recordTypeDNSRecordType | RecordType is the DNS record type. Only A, CNAME, and TXT records are currently supported. This field is immutable. |
values[]string | Values is a list of IP addresses for A records, a single hostname for CNAME records, or a list of texts for TXT records. |
ttlint64 | (Optional) TTL is the time to live in seconds. Defaults to 120. |
DNSRecordStatus
(Appears on: DNSRecord)
DNSRecordStatus is the status of a DNSRecord resource.
| Field | Description |
|---|---|
DefaultStatusDefaultStatus | (Members of DefaultStatus is a structure containing common fields used by all extension resources. |
zonestring | (Optional) Zone is the DNS hosted zone of this DNS record. |
DNSRecordType
(string alias)
(Appears on: DNSRecordSpec)
DNSRecordType is a string alias.
DataVolume
(Appears on: WorkerPool)
DataVolume contains information about a data volume.
| Field | Description |
|---|---|
namestring | Name of the volume to make it referenceable. |
typestring | (Optional) Type is the type of the volume. |
sizestring | Size is the of the root volume. |
encryptedbool | (Optional) Encrypted determines if the volume should be encrypted. |
DefaultSpec
(Appears on: BackupBucketSpec, BackupEntrySpec, BastionSpec, ContainerRuntimeSpec, ControlPlaneSpec, DNSRecordSpec, ExtensionSpec, InfrastructureSpec, NetworkSpec, OperatingSystemConfigSpec, WorkerSpec)
DefaultSpec contains common status fields for every extension resource.
| Field | Description |
|---|---|
typestring | Type contains the instance of the resource’s kind. |
classExtensionClass | (Optional) Class holds the extension class used to control the responsibility for multiple provider extensions. |
providerConfigk8s.io/apimachinery/pkg/runtime.RawExtension | (Optional) ProviderConfig is the provider specific configuration. |
DefaultStatus
(Appears on: BackupBucketStatus, BackupEntryStatus, BastionStatus, ContainerRuntimeStatus, ControlPlaneStatus, DNSRecordStatus, ExtensionStatus, InfrastructureStatus, NetworkStatus, OperatingSystemConfigStatus, WorkerStatus)
DefaultStatus contains common status fields for every extension resource.
| Field | Description |
|---|---|
providerStatusk8s.io/apimachinery/pkg/runtime.RawExtension | (Optional) ProviderStatus contains provider-specific status. |
conditions[]github.com/gardener/gardener/pkg/apis/core/v1beta1.Condition | (Optional) Conditions represents the latest available observations of a Seed’s current state. |
lastErrorgithub.com/gardener/gardener/pkg/apis/core/v1beta1.LastError | (Optional) LastError holds information about the last occurred error during an operation. |
lastOperationgithub.com/gardener/gardener/pkg/apis/core/v1beta1.LastOperation | (Optional) LastOperation holds information about the last operation on the resource. |
observedGenerationint64 | ObservedGeneration is the most recent generation observed for this resource. |
statek8s.io/apimachinery/pkg/runtime.RawExtension | (Optional) State can be filled by the operating controller with what ever data it needs. |
resources[]github.com/gardener/gardener/pkg/apis/core/v1beta1.NamedResourceReference | (Optional) Resources holds a list of named resource references that can be referred to in the state by their names. |
DropIn
(Appears on: Unit)
DropIn is a drop-in configuration for a systemd unit.
| Field | Description |
|---|---|
namestring | Name is the name of the drop-in. |
contentstring | Content is the content of the drop-in. |
ExtensionClass
(string alias)
(Appears on: DefaultSpec)
ExtensionClass is a string alias for an extension class.
ExtensionSpec
(Appears on: Extension)
ExtensionSpec is the spec for a Extension resource.
| Field | Description |
|---|---|
DefaultSpecDefaultSpec | (Members of DefaultSpec is a structure containing common fields used by all extension resources. |
ExtensionStatus
(Appears on: Extension)
ExtensionStatus is the status for a Extension resource.
| Field | Description |
|---|---|
DefaultStatusDefaultStatus | (Members of DefaultStatus is a structure containing common fields used by all extension resources. |
File
(Appears on: OperatingSystemConfigSpec, OperatingSystemConfigStatus)
File is a file that should get written to the host’s file system. The content can either be inlined or referenced from a secret in the same namespace.
| Field | Description |
|---|---|
pathstring | Path is the path of the file system where the file should get written to. |
permissionsuint32 | (Optional) Permissions describes with which permissions the file should get written to the file system. If no permissions are set, the operating system’s defaults are used. |
contentFileContent | Content describe the file’s content. |
FileCodecID
(string alias)
FileCodecID is the id of a FileCodec for cloud-init scripts.
FileContent
(Appears on: File)
FileContent can either reference a secret or contain inline configuration.
| Field | Description |
|---|---|
secretRefFileContentSecretRef | (Optional) SecretRef is a struct that contains information about the referenced secret. |
inlineFileContentInline | (Optional) Inline is a struct that contains information about the inlined data. |
transmitUnencodedbool | (Optional) TransmitUnencoded set to true will ensure that the os-extension does not encode the file content when sent to the node. This for example can be used to manipulate the clear-text content before it reaches the node. |
imageRefFileContentImageRef | (Optional) ImageRef describes a container image which contains a file. |
FileContentImageRef
(Appears on: FileContent)
FileContentImageRef describes a container image which contains a file
| Field | Description |
|---|---|
imagestring | Image contains the container image repository with tag. |
filePathInImagestring | FilePathInImage contains the path in the image to the file that should be extracted. |
FileContentInline
(Appears on: FileContent)
FileContentInline contains keys for inlining a file content’s data and encoding.
| Field | Description |
|---|---|
encodingstring | Encoding is the file’s encoding (e.g. base64). |
datastring | Data is the file’s data. |
FileContentSecretRef
(Appears on: FileContent)
FileContentSecretRef contains keys for referencing a file content’s data from a secret in the same namespace.
| Field | Description |
|---|---|
namestring | Name is the name of the secret. |
dataKeystring | DataKey is the key in the secret’s |
IPFamily
(string alias)
(Appears on: NetworkSpec, NetworkStatus)
IPFamily is a type for specifying an IP protocol version to use in Gardener clusters.
InPlaceUpdates
(Appears on: OperatingSystemConfigSpec)
InPlaceUpdates is a structure containing configuration for in-place updates.
| Field | Description |
|---|---|
operatingSystemVersionstring | OperatingSystemVersion is the version of the operating system. |
kubeletstring | KubeletVersion is the version of the kubelet. |
credentialsRotationCredentialsRotation | (Optional) CredentialsRotation is a structure containing information about the last initiation time of the certificate authority and service account key rotation. |
InPlaceUpdatesStatus
(Appears on: OperatingSystemConfigStatus)
InPlaceUpdatesStatus is a structure containing configuration for in-place updates.
| Field | Description |
|---|---|
osUpdateOSUpdate | (Optional) OSUpdate defines the configuration for the operating system update. |
InPlaceUpdatesWorkerStatus
(Appears on: WorkerStatus)
InPlaceUpdatesWorkerStatus contains the configuration for in-place updates.
| Field | Description |
|---|---|
workerPoolToHashMapmap[string]string | (Optional) WorkerPoolToHashMap is a map of worker pool names to their corresponding hash. |
InfrastructureSpec
(Appears on: Infrastructure)
InfrastructureSpec is the spec for an Infrastructure resource.
| Field | Description |
|---|---|
DefaultSpecDefaultSpec | (Members of DefaultSpec is a structure containing common fields used by all extension resources. |
regionstring | Region is the region of this infrastructure. This field is immutable. |
secretRefKubernetes core/v1.SecretReference | SecretRef is a reference to a secret that contains the cloud provider credentials. |
sshPublicKey[]byte | (Optional) SSHPublicKey is the public SSH key that should be used with this infrastructure. |
InfrastructureStatus
(Appears on: Infrastructure)
InfrastructureStatus is the status for an Infrastructure resource.
| Field | Description |
|---|---|
DefaultStatusDefaultStatus | (Members of DefaultStatus is a structure containing common fields used by all extension resources. |
nodesCIDRstring | (Optional) NodesCIDR is the CIDR of the node network that was optionally created by the acting extension controller. This might be needed in environments in which the CIDR for the network for the shoot worker node cannot be statically defined in the Shoot resource but must be computed dynamically. |
egressCIDRs[]string | (Optional) EgressCIDRs is a list of CIDRs used by the shoot as the source IP for egress traffic. For certain environments the egress IPs may not be stable in which case the extension controller may opt to not populate this field. |
networkingInfrastructureStatusNetworking | (Optional) Networking contains information about cluster networking such as CIDRs. |
InfrastructureStatusNetworking
(Appears on: InfrastructureStatus)
InfrastructureStatusNetworking is a structure containing information about the node, service and pod network ranges.
| Field | Description |
|---|---|
pods[]string | (Optional) Pods are the CIDRs of the pod network. |
nodes[]string | (Optional) Nodes are the CIDRs of the node network. |
services[]string | (Optional) Services are the CIDRs of the service network. |
MachineDeployment
(Appears on: WorkerStatus)
MachineDeployment is a created machine deployment.
| Field | Description |
|---|---|
namestring | Name is the name of the |
minimumint32 | Minimum is the minimum number for this machine deployment. |
maximumint32 | Maximum is the maximum number for this machine deployment. |
priorityint32 | (Optional) Priority (or weight) is the importance by which this machine deployment will be scaled by cluster autoscaling. |
MachineImage
(Appears on: WorkerPool)
MachineImage contains logical information about the name and the version of the machie image that should be used. The logical information must be mapped to the provider-specific information (e.g., AMIs, …) by the provider itself.
| Field | Description |
|---|---|
namestring | Name is the logical name of the machine image. |
versionstring | Version is the version of the machine image. |
NetworkSpec
(Appears on: Network)
NetworkSpec is the spec for an Network resource.
| Field | Description |
|---|---|
DefaultSpecDefaultSpec | (Members of DefaultSpec is a structure containing common fields used by all extension resources. |
podCIDRstring | PodCIDR defines the CIDR that will be used for pods. This field is immutable. |
serviceCIDRstring | ServiceCIDR defines the CIDR that will be used for services. This field is immutable. |
ipFamilies[]IPFamily | (Optional) IPFamilies specifies the IP protocol versions to use for shoot networking. See https://github.com/gardener/gardener/blob/master/docs/development/ipv6.md |
NetworkStatus
(Appears on: Network)
NetworkStatus is the status for an Network resource.
| Field | Description |
|---|---|
DefaultStatusDefaultStatus | (Members of DefaultStatus is a structure containing common fields used by all extension resources. |
ipFamilies[]IPFamily | (Optional) IPFamilies specifies the IP protocol versions that actually are used for shoot networking. During dual-stack migration, this field may differ from the spec. |
NodeTemplate
(Appears on: WorkerPool)
NodeTemplate contains information about the expected node properties.
| Field | Description |
|---|---|
capacityKubernetes core/v1.ResourceList | Capacity represents the expected Node capacity. |
virtualCapacityKubernetes core/v1.ResourceList | (Optional) VirtualCapacity represents the expected Node ‘virtual’ capacity ie comprising virtual extended resources. |
OSUpdate
(Appears on: InPlaceUpdatesStatus)
OSUpdate contains the configuration for the operating system update.
| Field | Description |
|---|---|
commandstring | Command defines the command responsible for performing machine image updates. |
args[]string | (Optional) Args provides a mechanism to pass additional arguments or flags to the Command. |
Object
Object is an extension object resource.
OperatingSystemConfigPurpose
(string alias)
(Appears on: OperatingSystemConfigSpec)
OperatingSystemConfigPurpose is a string alias.
OperatingSystemConfigSpec
(Appears on: OperatingSystemConfig)
OperatingSystemConfigSpec is the spec for a OperatingSystemConfig resource.
| Field | Description |
|---|---|
DefaultSpecDefaultSpec | (Members of DefaultSpec is a structure containing common fields used by all extension resources. |
criConfigCRIConfig | (Optional) CRI config is a structure contains configurations of the CRI library |
purposeOperatingSystemConfigPurpose | Purpose describes how the result of this OperatingSystemConfig is used by Gardener. Either it
gets sent to the |
units[]Unit | (Optional) Units is a list of unit for the operating system configuration (usually, a systemd unit). |
files[]File | (Optional) Files is a list of files that should get written to the host’s file system. |
inPlaceUpdatesInPlaceUpdates | (Optional) InPlaceUpdates contains the configuration for in-place updates. |
OperatingSystemConfigStatus
(Appears on: OperatingSystemConfig)
OperatingSystemConfigStatus is the status for a OperatingSystemConfig resource.
| Field | Description |
|---|---|
DefaultStatusDefaultStatus | (Members of DefaultStatus is a structure containing common fields used by all extension resources. |
extensionUnits[]Unit | (Optional) ExtensionUnits is a list of additional systemd units provided by the extension. |
extensionFiles[]File | (Optional) ExtensionFiles is a list of additional files provided by the extension. |
cloudConfigCloudConfig | (Optional) CloudConfig is a structure for containing the generated output for the given operating system config spec. It contains a reference to a secret as the result may contain confidential data. After Gardener v1.112, this will be only set for OperatingSystemConfigs with purpose ‘provision’. |
inPlaceUpdatesInPlaceUpdatesStatus | (Optional) InPlaceUpdates contains the configuration for in-place updates. |
PluginConfig
(Appears on: ContainerdConfig)
PluginConfig contains configuration values for the containerd plugins section.
| Field | Description |
|---|---|
opPluginPathOperation | (Optional) Op is the operation for the given path. Possible values are ‘add’ and ‘remove’, defaults to ‘add’. |
path[]string | Path is a list of elements that construct the path in the plugins section. |
valuesk8s.io/apiextensions-apiserver/pkg/apis/apiextensions/v1.JSON | (Optional) Values are the values configured at the given path. If defined, it is expected as json format: - A given json object will be put to the given path. - If not configured, only the table entry to be created. |
PluginPathOperation
(string alias)
(Appears on: PluginConfig)
PluginPathOperation is a type alias for operations at containerd’s plugin configuration.
RegistryCapability
(string alias)
(Appears on: RegistryHost)
RegistryCapability specifies an action a client can perform against a registry.
RegistryConfig
(Appears on: ContainerdConfig)
RegistryConfig contains registry configuration options.
| Field | Description |
|---|---|
upstreamstring | Upstream is the upstream name of the registry. |
serverstring | (Optional) Server is the URL to registry server of this upstream.
It corresponds to the server field in the |
hosts[]RegistryHost | Hosts are the registry hosts.
It corresponds to the host fields in the |
readinessProbebool | (Optional) ReadinessProbe determines if host registry endpoints should be probed before they are added to the containerd config. |
RegistryHost
(Appears on: RegistryConfig)
RegistryHost contains configuration values for a registry host.
| Field | Description |
|---|---|
urlstring | URL is the endpoint address of the registry mirror. |
capabilities[]RegistryCapability | Capabilities determine what operations a host is capable of performing. Defaults to - pull - resolve |
caCerts[]string | CACerts are paths to public key certificates used for TLS. |
ServiceAccountKeyRotation
(Appears on: CredentialsRotation)
ServiceAccountKeyRotation contains information about the service account key credential rotation.
| Field | Description |
|---|---|
lastInitiationTimeKubernetes meta/v1.Time | (Optional) LastInitiationTime is the most recent time when the service account key credential rotation was initiated. |
Spec
Spec is the spec section of an Object.
Status
Status is the status of an Object.
Unit
(Appears on: OperatingSystemConfigSpec, OperatingSystemConfigStatus)
Unit is a unit for the operating system configuration (usually, a systemd unit).
| Field | Description |
|---|---|
namestring | Name is the name of a unit. |
commandUnitCommand | (Optional) Command is the unit’s command. |
enablebool | (Optional) Enable describes whether the unit is enabled or not. |
contentstring | (Optional) Content is the unit’s content. |
dropIns[]DropIn | (Optional) DropIns is a list of drop-ins for this unit. |
filePaths[]string | FilePaths is a list of files the unit depends on. If any file changes a restart of the dependent unit will be triggered. For each FilePath there must exist a File with matching Path in OperatingSystemConfig.Spec.Files. |
UnitCommand
(string alias)
(Appears on: Unit)
UnitCommand is a string alias.
Volume
(Appears on: WorkerPool)
Volume contains information about the root disks that should be used for worker pools.
| Field | Description |
|---|---|
namestring | (Optional) Name of the volume to make it referenceable. |
typestring | (Optional) Type is the type of the volume. |
sizestring | Size is the of the root volume. |
encryptedbool | (Optional) Encrypted determines if the volume should be encrypted. |
WorkerPool
(Appears on: WorkerSpec)
WorkerPool is the definition of a specific worker pool.
| Field | Description |
|---|---|
machineTypestring | MachineType contains information about the machine type that should be used for this worker pool. |
maximumint32 | Maximum is the maximum size of the worker pool. |
maxSurgek8s.io/apimachinery/pkg/util/intstr.IntOrString | MaxSurge is maximum number of VMs that are created during an update. |
maxUnavailablek8s.io/apimachinery/pkg/util/intstr.IntOrString | MaxUnavailable is the maximum number of VMs that can be unavailable during an update. |
annotationsmap[string]string | (Optional) Annotations is a map of key/value pairs for annotations for all the |
labelsmap[string]string | (Optional) Labels is a map of key/value pairs for labels for all the |
taints[]Kubernetes core/v1.Taint | (Optional) Taints is a list of taints for all the |
machineImageMachineImage | MachineImage contains logical information about the name and the version of the machie image that should be used. The logical information must be mapped to the provider-specific information (e.g., AMIs, …) by the provider itself. |
minimumint32 | Minimum is the minimum size of the worker pool. |
namestring | Name is the name of this worker pool. |
nodeAgentSecretNamestring | (Optional) NodeAgentSecretName is uniquely identifying selected aspects of the OperatingSystemConfig. If it changes, then the worker pool must be rolled. |
providerConfigk8s.io/apimachinery/pkg/runtime.RawExtension | (Optional) ProviderConfig is a provider specific configuration for the worker pool. |
userDataSecretRefKubernetes core/v1.SecretKeySelector | UserDataSecretRef references a Secret and a data key containing the data that is sent to the provider’s APIs when a new machine/VM that is part of this worker pool shall be spawned. |
volumeVolume | (Optional) Volume contains information about the root disks that should be used for this worker pool. |
dataVolumes[]DataVolume | (Optional) DataVolumes contains a list of additional worker volumes. |
kubeletDataVolumeNamestring | (Optional) KubeletDataVolumeName contains the name of a dataVolume that should be used for storing kubelet state. |
zones[]string | (Optional) Zones contains information about availability zones for this worker pool. |
machineControllerManagergithub.com/gardener/gardener/pkg/apis/core/v1beta1.MachineControllerManagerSettings | (Optional) MachineControllerManagerSettings contains configurations for different worker-pools. Eg. MachineDrainTimeout, MachineHealthTimeout. |
kubernetesVersionstring | (Optional) KubernetesVersion is the kubernetes version in this worker pool |
kubeletConfiggithub.com/gardener/gardener/pkg/apis/core/v1beta1.KubeletConfig | (Optional) KubeletConfig contains the kubelet configuration for the worker pool. |
nodeTemplateNodeTemplate | (Optional) NodeTemplate contains resource information of the machine which is used by Cluster Autoscaler to generate nodeTemplate during scaling a nodeGroup |
architecturestring | (Optional) Architecture is the CPU architecture of the worker pool machines and machine image. |
clusterAutoscalerClusterAutoscalerOptions | (Optional) ClusterAutoscaler contains the cluster autoscaler configurations for the worker pool. |
priorityint32 | (Optional) Priority (or weight) is the importance by which this worker pool will be scaled by cluster autoscaling. |
updateStrategygithub.com/gardener/gardener/pkg/apis/core/v1beta1.MachineUpdateStrategy | (Optional) UpdateStrategy specifies the machine update strategy for the worker pool. |
WorkerSpec
(Appears on: Worker)
WorkerSpec is the spec for a Worker resource.
| Field | Description |
|---|---|
DefaultSpecDefaultSpec | (Members of DefaultSpec is a structure containing common fields used by all extension resources. |
infrastructureProviderStatusk8s.io/apimachinery/pkg/runtime.RawExtension | (Optional) InfrastructureProviderStatus is a raw extension field that contains the provider status that has
been generated by the controller responsible for the |
regionstring | Region is the name of the region where the worker pool should be deployed to. This field is immutable. |
secretRefKubernetes core/v1.SecretReference | SecretRef is a reference to a secret that contains the cloud provider specific credentials. |
sshPublicKey[]byte | (Optional) SSHPublicKey is the public SSH key that should be used with these workers. |
pools[]WorkerPool | Pools is a list of worker pools. |
WorkerStatus
(Appears on: Worker)
WorkerStatus is the status for a Worker resource.
| Field | Description |
|---|---|
DefaultStatusDefaultStatus | (Members of DefaultStatus is a structure containing common fields used by all extension resources. |
machineDeployments[]MachineDeployment | MachineDeployments is a list of created machine deployments. It will be used to e.g. configure the cluster-autoscaler properly. |
machineDeploymentsLastUpdateTimeKubernetes meta/v1.Time | (Optional) MachineDeploymentsLastUpdateTime is the timestamp when the status.MachineDeployments slice was last updated. |
inPlaceUpdatesInPlaceUpdatesWorkerStatus | (Optional) InPlaceUpdates contains the status for in-place updates. |
Generated with gen-crd-api-reference-docs
4.2.5 - Operations
Packages:
operations.gardener.cloud/v1alpha1
Package v1alpha1 is a version of the API.
Resource Types:Bastion
Bastion holds details about an SSH bastion for a shoot cluster.
| Field | Description | ||||||||||
|---|---|---|---|---|---|---|---|---|---|---|---|
apiVersionstring | operations.gardener.cloud/v1alpha1 | ||||||||||
kindstring | Bastion | ||||||||||
metadataKubernetes meta/v1.ObjectMeta | Standard object metadata. Refer to the Kubernetes API documentation for the fields of themetadata field. | ||||||||||
specBastionSpec | Specification of the Bastion.
| ||||||||||
statusBastionStatus | (Optional) Most recently observed status of the Bastion. |
BastionIngressPolicy
(Appears on: BastionSpec)
BastionIngressPolicy represents an ingress policy for SSH bastion hosts.
| Field | Description |
|---|---|
ipBlockKubernetes networking/v1.IPBlock | IPBlock defines an IP block that is allowed to access the bastion. |
BastionSpec
(Appears on: Bastion)
BastionSpec is the specification of a Bastion.
| Field | Description |
|---|---|
shootRefKubernetes core/v1.LocalObjectReference | ShootRef defines the target shoot for a Bastion. The name field of the ShootRef is immutable. |
seedNamestring | (Optional) SeedName is the name of the seed to which this Bastion is currently scheduled. This field is populated at the beginning of a create/reconcile operation. |
providerTypestring | (Optional) ProviderType is cloud provider used by the referenced Shoot. |
sshPublicKeystring | SSHPublicKey is the user’s public key. This field is immutable. |
ingress[]BastionIngressPolicy | Ingress controls from where the created bastion host should be reachable. |
BastionStatus
(Appears on: Bastion)
BastionStatus holds the most recently observed status of the Bastion.
| Field | Description |
|---|---|
ingressKubernetes core/v1.LoadBalancerIngress | (Optional) Ingress holds the public IP and/or hostname of the bastion instance. |
conditions[]github.com/gardener/gardener/pkg/apis/core/v1beta1.Condition | (Optional) Conditions represents the latest available observations of a Bastion’s current state. |
lastHeartbeatTimestampKubernetes meta/v1.Time | (Optional) LastHeartbeatTimestamp is the time when the bastion was last marked as not to be deleted. When this is set, the ExpirationTimestamp is advanced as well. |
expirationTimestampKubernetes meta/v1.Time | (Optional) ExpirationTimestamp is the time after which a Bastion is supposed to be garbage collected. |
observedGenerationint64 | (Optional) ObservedGeneration is the most recent generation observed for this Bastion. It corresponds to the Bastion’s generation, which is updated on mutation by the API Server. |
Generated with gen-crd-api-reference-docs
4.2.6 - Operator
Packages:
operator.gardener.cloud/v1alpha1
Package v1alpha1 contains the configuration of the Gardener Operator.
Resource Types:AdmissionDeploymentSpec
(Appears on: Deployment)
AdmissionDeploymentSpec contains the deployment specification for the admission controller of an extension.
| Field | Description |
|---|---|
runtimeClusterDeploymentSpec | (Optional) RuntimeCluster is the deployment configuration for the admission in the runtime cluster. The runtime deployment is responsible for creating the admission controller in the runtime cluster. |
virtualClusterDeploymentSpec | (Optional) VirtualCluster is the deployment configuration for the admission deployment in the garden cluster. The garden deployment installs necessary resources in the virtual garden cluster e.g. RBAC that are necessary for the admission controller. |
valuesk8s.io/apiextensions-apiserver/pkg/apis/apiextensions/v1.JSON | (Optional) Values are the deployment values. The values will be applied to both admission deployments. |
AuditWebhook
(Appears on: GardenerAPIServerConfig, KubeAPIServerConfig)
AuditWebhook contains settings related to an audit webhook configuration.
| Field | Description |
|---|---|
batchMaxSizeint32 | (Optional) BatchMaxSize is the maximum size of a batch. |
kubeconfigSecretNamestring | KubeconfigSecretName specifies the name of a secret containing the kubeconfig for this webhook. |
versionstring | (Optional) Version is the API version to send and expect from the webhook. |
Authentication
(Appears on: KubeAPIServerConfig)
Authentication contains settings related to authentication.
| Field | Description |
|---|---|
webhookAuthenticationWebhook | (Optional) Webhook contains settings related to an authentication webhook configuration. |
AuthenticationWebhook
(Appears on: Authentication)
AuthenticationWebhook contains settings related to an authentication webhook configuration.
| Field | Description |
|---|---|
cacheTTLKubernetes meta/v1.Duration | (Optional) CacheTTL is the duration to cache responses from the webhook authenticator. |
kubeconfigSecretNamestring | KubeconfigSecretName specifies the name of a secret containing the kubeconfig for this webhook. |
versionstring | (Optional) Version is the API version to send and expect from the webhook. |
Backup
(Appears on: ETCDMain)
Backup contains the object store configuration for backups for the virtual garden etcd.
| Field | Description |
|---|---|
providerstring | Provider is a provider name. This field is immutable. |
bucketNamestring | (Optional) BucketName is the name of the backup bucket. If not provided, gardener-operator attempts to manage a new bucket. In this case, the cloud provider credentials provided in the SecretRef must have enough privileges for creating and deleting buckets. |
providerConfigk8s.io/apimachinery/pkg/runtime.RawExtension | (Optional) ProviderConfig is the provider-specific configuration passed to BackupBucket resource. |
regionstring | (Optional) Region is a region name. If undefined, the provider region is used. This field is immutable. |
secretRefKubernetes core/v1.LocalObjectReference | SecretRef is a reference to a Secret object containing the cloud provider credentials for the object store where backups should be stored. It should have enough privileges to manipulate the objects as well as buckets. |
ControlPlane
(Appears on: VirtualCluster)
ControlPlane holds information about the general settings for the control plane of the virtual garden cluster.
| Field | Description |
|---|---|
highAvailabilityHighAvailability | (Optional) HighAvailability holds the configuration settings for high availability settings. |
Credentials
(Appears on: GardenStatus)
Credentials contains information about the virtual garden cluster credentials.
| Field | Description |
|---|---|
rotationCredentialsRotation | (Optional) Rotation contains information about the credential rotations. |
CredentialsRotation
(Appears on: Credentials)
CredentialsRotation contains information about the rotation of credentials.
| Field | Description |
|---|---|
certificateAuthoritiesgithub.com/gardener/gardener/pkg/apis/core/v1beta1.CARotation | (Optional) CertificateAuthorities contains information about the certificate authority credential rotation. |
serviceAccountKeygithub.com/gardener/gardener/pkg/apis/core/v1beta1.ServiceAccountKeyRotation | (Optional) ServiceAccountKey contains information about the service account key credential rotation. |
etcdEncryptionKeygithub.com/gardener/gardener/pkg/apis/core/v1beta1.ETCDEncryptionKeyRotation | (Optional) ETCDEncryptionKey contains information about the ETCD encryption key credential rotation. |
observabilitygithub.com/gardener/gardener/pkg/apis/core/v1beta1.ObservabilityRotation | (Optional) Observability contains information about the observability credential rotation. |
workloadIdentityKeyWorkloadIdentityKeyRotation | (Optional) WorkloadIdentityKey contains information about the workload identity key credential rotation. |
DNS
(Appears on: VirtualCluster)
DNS holds information about DNS settings.
| Field | Description |
|---|---|
domains[]DNSDomain | Domains are the external domains of the virtual garden cluster. The first given domain in this list is immutable. |
DNSDomain
DNSDomain defines a DNS domain with optional provider.
| Field | Description |
|---|---|
namestring | Name is the domain name. |
providerstring | (Optional) Provider is the name of the DNS provider as declared in the ‘.spec.dns.providers’ section.
It is only optional, if the |
DNSManagement
(Appears on: GardenSpec)
DNSManagement contains specifications of DNS providers.
| Field | Description |
|---|---|
providers[]DNSProvider | Providers is a list of DNS providers. |
DNSProvider
(Appears on: DNSManagement)
DNSProvider contains the configuration for a DNS provider.
| Field | Description |
|---|---|
namestring | Name is the name of the DNS provider. |
typestring | Type is the type of the DNS provider. |
providerConfigk8s.io/apimachinery/pkg/runtime.RawExtension | (Optional) Config is the provider-specific configuration passed to DNSRecord resources. |
secretRefKubernetes core/v1.LocalObjectReference | SecretRef is a reference to a Secret object containing the DNS provider credentials. |
DashboardGitHub
(Appears on: GardenerDashboardConfig)
DashboardGitHub contains configuration for the GitHub ticketing feature.
| Field | Description |
|---|---|
apiURLstring | APIURL is the URL to the GitHub API. |
organisationstring | Organisation is the name of the GitHub organisation. |
repositorystring | Repository is the name of the GitHub repository. |
secretRefKubernetes core/v1.LocalObjectReference | SecretRef is the reference to a secret in the garden namespace containing the GitHub credentials. |
pollIntervalKubernetes meta/v1.Duration | (Optional) PollInterval is the interval of how often the GitHub API is polled for issue updates. This field is used as a
fallback mechanism to ensure state synchronization, even when there is a GitHub webhook configuration. If a
webhook event is missed or not successfully delivered, the polling will help catch up on any missed updates.
If this field is not provided and there is no ‘webhookSecret’ key in the referenced secret, it will be
implicitly defaulted to |
DashboardIngress
(Appears on: GardenerDashboardConfig)
DashboardIngress contains configuration for the dashboard ingress resource.
| Field | Description |
|---|---|
enabledbool | (Optional) Enabled controls whether the Dashboard Ingress resource will be deployed to the cluster. |
DashboardOIDC
(Appears on: GardenerDashboardConfig)
DashboardOIDC contains configuration for the OIDC settings.
| Field | Description |
|---|---|
clientIDPublicstring | (Optional) ClientIDPublic is the public client ID. Falls back to the API server’s OIDC client ID configuration if not set here. |
issuerURLstring | (Optional) The URL of the OpenID issuer, only HTTPS scheme will be accepted. Used to verify the OIDC JSON Web Token (JWT). Falls back to the API server’s OIDC issuer URL configuration if not set here. |
sessionLifetimeKubernetes meta/v1.Duration | (Optional) SessionLifetime is the maximum duration of a session. |
additionalScopes[]string | (Optional) AdditionalScopes is the list of additional OIDC scopes. |
secretRefKubernetes core/v1.LocalObjectReference | SecretRef is the reference to a secret in the garden namespace containing the OIDC client ID and secret for the dashboard. |
certificateAuthoritySecretRefKubernetes core/v1.LocalObjectReference | (Optional) CertificateAuthoritySecretRef is the reference to a secret in the garden namespace containing a custom CA certificate under the “ca.crt” key |
DashboardTerminal
(Appears on: GardenerDashboardConfig)
DashboardTerminal contains configuration for the terminal settings.
| Field | Description |
|---|---|
containerDashboardTerminalContainer | Container contains configuration for the dashboard terminal container. |
allowedHosts[]string | (Optional) AllowedHosts should consist of permitted hostnames (without the scheme) for terminal connections. It is important to consider that the usage of wildcards follows the rules defined by the content security policy. ‘.seed.local.gardener.cloud’, or ‘.other-seeds.local.gardener.cloud’. For more information, see https://github.com/gardener/dashboard/blob/master/docs/operations/webterminals.md#allowlist-for-hosts. |
DashboardTerminalContainer
(Appears on: DashboardTerminal)
DashboardTerminalContainer contains configuration for the dashboard terminal container.
| Field | Description |
|---|---|
imagestring | Image is the container image for the dashboard terminal container. |
descriptionstring | (Optional) Description is a description for the dashboard terminal container with hints for the user. |
Deployment
(Appears on: ExtensionSpec)
Deployment specifies how an extension can be installed for a Gardener landscape. It includes the specification for installing an extension and/or an admission controller.
| Field | Description |
|---|---|
extensionExtensionDeploymentSpec | (Optional) ExtensionDeployment contains the deployment configuration an extension. |
admissionAdmissionDeploymentSpec | (Optional) AdmissionDeployment contains the deployment configuration for an admission controller. |
DeploymentSpec
(Appears on: AdmissionDeploymentSpec, ExtensionDeploymentSpec)
DeploymentSpec is the specification for the deployment of a component.
| Field | Description |
|---|---|
helmExtensionHelm | Helm contains the specification for a Helm deployment. |
ETCD
(Appears on: VirtualCluster)
ETCD contains configuration for the etcds of the virtual garden cluster.
| Field | Description |
|---|---|
mainETCDMain | (Optional) Main contains configuration for the main etcd. |
eventsETCDEvents | (Optional) Events contains configuration for the events etcd. |
ETCDEvents
(Appears on: ETCD)
ETCDEvents contains configuration for the events etcd.
| Field | Description |
|---|---|
autoscalinggithub.com/gardener/gardener/pkg/apis/core/v1beta1.ControlPlaneAutoscaling | (Optional) Autoscaling contains auto-scaling configuration options for etcd. |
storageStorage | (Optional) Storage contains storage configuration. |
ETCDMain
(Appears on: ETCD)
ETCDMain contains configuration for the main etcd.
| Field | Description |
|---|---|
autoscalinggithub.com/gardener/gardener/pkg/apis/core/v1beta1.ControlPlaneAutoscaling | (Optional) Autoscaling contains auto-scaling configuration options for etcd. |
backupBackup | (Optional) Backup contains the object store configuration for backups for the virtual garden etcd. |
storageStorage | (Optional) Storage contains storage configuration. |
Extension
Extension describes a Gardener extension.
| Field | Description | ||||
|---|---|---|---|---|---|
metadataKubernetes meta/v1.ObjectMeta | Standard object metadata. Refer to the Kubernetes API documentation for the fields of themetadata field. | ||||
specExtensionSpec | Spec contains the specification of this extension.
| ||||
statusExtensionStatus | Status contains the status of this extension. |
ExtensionDeploymentSpec
(Appears on: Deployment)
ExtensionDeploymentSpec specifies how to install the extension in a gardener landscape. The installation is split into two parts: - installing the extension in the virtual garden cluster by creating the ControllerRegistration and ControllerDeployment - installing the extension in the runtime cluster (if necessary).
| Field | Description |
|---|---|
DeploymentSpecDeploymentSpec | (Members of DeploymentSpec is the deployment configuration for the extension. |
valuesk8s.io/apiextensions-apiserver/pkg/apis/apiextensions/v1.JSON | (Optional) Values are the deployment values used in the creation of the ControllerDeployment in the virtual garden cluster. |
runtimeClusterValuesk8s.io/apiextensions-apiserver/pkg/apis/apiextensions/v1.JSON | (Optional) RuntimeClusterValues are the deployment values for the extension deployment running in the runtime garden cluster. |
policygithub.com/gardener/gardener/pkg/apis/core/v1beta1.ControllerDeploymentPolicy | (Optional) Policy controls how the controller is deployed. It defaults to ‘OnDemand’. |
seedSelectorKubernetes meta/v1.LabelSelector | (Optional) SeedSelector contains an optional label selector for seeds. Only if the labels match then this controller will be considered for a deployment. An empty list means that all seeds are selected. |
injectGardenKubeconfigbool | (Optional) InjectGardenKubeconfig controls whether a kubeconfig to the garden cluster should be injected into workload resources. |
ExtensionHelm
(Appears on: DeploymentSpec)
ExtensionHelm is the configuration for a helm deployment.
| Field | Description |
|---|---|
ociRepositorygithub.com/gardener/gardener/pkg/apis/core/v1.OCIRepository | (Optional) OCIRepository defines where to pull the chart from. |
ExtensionSpec
(Appears on: Extension)
ExtensionSpec contains the specification of a Gardener extension.
| Field | Description |
|---|---|
resources[]github.com/gardener/gardener/pkg/apis/core/v1beta1.ControllerResource | (Optional) Resources is a list of combinations of kinds (DNSRecord, Backupbucket, …) and their actual types (aws-route53, gcp). |
deploymentDeployment | (Optional) Deployment contains deployment configuration for an extension and it’s admission controller. |
ExtensionStatus
(Appears on: Extension)
ExtensionStatus is the status of a Gardener extension.
| Field | Description |
|---|---|
observedGenerationint64 | (Optional) ObservedGeneration is the most recent generation observed for this resource. |
conditions[]github.com/gardener/gardener/pkg/apis/core/v1beta1.Condition | (Optional) Conditions represents the latest available observations of an Extension’s current state. |
providerStatusk8s.io/apimachinery/pkg/runtime.RawExtension | (Optional) ProviderStatus contains type-specific status. |
Garden
Garden describes a list of gardens.
| Field | Description | ||||||||
|---|---|---|---|---|---|---|---|---|---|
metadataKubernetes meta/v1.ObjectMeta | Standard object metadata. Refer to the Kubernetes API documentation for the fields of themetadata field. | ||||||||
specGardenSpec | Spec contains the specification of this garden.
| ||||||||
statusGardenStatus | Status contains the status of this garden. |
GardenExtension
(Appears on: GardenSpec)
GardenExtension contains type and provider information for Garden extensions.
| Field | Description |
|---|---|
typestring | Type is the type of the extension resource. |
providerConfigk8s.io/apimachinery/pkg/runtime.RawExtension | (Optional) ProviderConfig is the configuration passed to extension resource. |
GardenSpec
(Appears on: Garden)
GardenSpec contains the specification of a garden environment.
| Field | Description |
|---|---|
dnsDNSManagement | (Optional) DNS contains specifications of DNS providers. |
extensions[]GardenExtension | (Optional) Extensions contain type and provider information for Garden extensions. |
runtimeClusterRuntimeCluster | RuntimeCluster contains configuration for the runtime cluster. |
virtualClusterVirtualCluster | VirtualCluster contains configuration for the virtual cluster. |
GardenStatus
(Appears on: Garden)
GardenStatus is the status of a garden environment.
| Field | Description |
|---|---|
gardenergithub.com/gardener/gardener/pkg/apis/core/v1beta1.Gardener | (Optional) Gardener holds information about the Gardener which last acted on the Garden. |
conditions[]github.com/gardener/gardener/pkg/apis/core/v1beta1.Condition | Conditions is a list of conditions. |
lastOperationgithub.com/gardener/gardener/pkg/apis/core/v1beta1.LastOperation | (Optional) LastOperation holds information about the last operation on the Garden. |
observedGenerationint64 | ObservedGeneration is the most recent generation observed for this resource. |
credentialsCredentials | (Optional) Credentials contains information about the virtual garden cluster credentials. |
encryptedResources[]string | (Optional) EncryptedResources is the list of resources which are currently encrypted in the virtual garden by the virtual kube-apiserver. Resources which are encrypted by default will not appear here. See https://github.com/gardener/gardener/blob/master/docs/concepts/operator.md#etcd-encryption-config for more details. |
Gardener
(Appears on: VirtualCluster)
Gardener contains the configuration settings for the Gardener components.
| Field | Description |
|---|---|
clusterIdentitystring | ClusterIdentity is the identity of the garden cluster. This field is immutable. |
gardenerAPIServerGardenerAPIServerConfig | (Optional) APIServer contains configuration settings for the gardener-apiserver. |
gardenerAdmissionControllerGardenerAdmissionControllerConfig | (Optional) AdmissionController contains configuration settings for the gardener-admission-controller. |
gardenerControllerManagerGardenerControllerManagerConfig | (Optional) ControllerManager contains configuration settings for the gardener-controller-manager. |
gardenerSchedulerGardenerSchedulerConfig | (Optional) Scheduler contains configuration settings for the gardener-scheduler. |
gardenerDashboardGardenerDashboardConfig | (Optional) Dashboard contains configuration settings for the gardener-dashboard. |
gardenerDiscoveryServerGardenerDiscoveryServerConfig | (Optional) DiscoveryServer contains configuration settings for the gardener-discovery-server. |
GardenerAPIServerConfig
(Appears on: Gardener)
GardenerAPIServerConfig contains configuration settings for the gardener-apiserver.
| Field | Description |
|---|---|
KubernetesConfiggithub.com/gardener/gardener/pkg/apis/core/v1beta1.KubernetesConfig | (Members of |
admissionPlugins[]github.com/gardener/gardener/pkg/apis/core/v1beta1.AdmissionPlugin | (Optional) AdmissionPlugins contains the list of user-defined admission plugins (additional to those managed by Gardener), and, if desired, the corresponding configuration. |
auditConfiggithub.com/gardener/gardener/pkg/apis/core/v1beta1.AuditConfig | (Optional) AuditConfig contains configuration settings for the audit of the kube-apiserver. |
auditWebhookAuditWebhook | (Optional) AuditWebhook contains settings related to an audit webhook configuration. |
logginggithub.com/gardener/gardener/pkg/apis/core/v1beta1.APIServerLogging | (Optional) Logging contains configuration for the log level and HTTP access logs. |
requestsgithub.com/gardener/gardener/pkg/apis/core/v1beta1.APIServerRequests | (Optional) Requests contains configuration for request-specific settings for the kube-apiserver. |
watchCacheSizesgithub.com/gardener/gardener/pkg/apis/core/v1beta1.WatchCacheSizes | (Optional) WatchCacheSizes contains configuration of the API server’s watch cache sizes.
Configuring these flags might be useful for large-scale Garden clusters with a lot of parallel update requests
and a lot of watching controllers (e.g. large ManagedSeed clusters). When the API server’s watch cache’s
capacity is too small to cope with the amount of update requests and watchers for a particular resource, it
might happen that controller watches are permanently stopped with |
encryptionConfiggithub.com/gardener/gardener/pkg/apis/core/v1beta1.EncryptionConfig | (Optional) EncryptionConfig contains customizable encryption configuration of the Gardener API server. |
goAwayChancefloat64 | (Optional) GoAwayChance can be used to prevent HTTP/2 clients from getting stuck on a single apiserver, randomly close a connection (GOAWAY). The client’s other in-flight requests won’t be affected, and the client will reconnect, likely landing on a different apiserver after going through the load balancer again. This field sets the fraction of requests that will be sent a GOAWAY. Min is 0 (off), Max is 0.02 (1⁄50 requests); 0.001 (1⁄1000) is a recommended starting point. |
shootAdminKubeconfigMaxExpirationKubernetes meta/v1.Duration | (Optional) ShootAdminKubeconfigMaxExpiration is the maximum validity duration of a credential requested to a Shoot by an AdminKubeconfigRequest. If an otherwise valid AdminKubeconfigRequest with a validity duration larger than this value is requested, a credential will be issued with a validity duration of this value. |
GardenerAdmissionControllerConfig
(Appears on: Gardener)
GardenerAdmissionControllerConfig contains configuration settings for the gardener-admission-controller.
| Field | Description |
|---|---|
logLevelstring | (Optional) LogLevel is the configured log level for the gardener-admission-controller. Must be one of [info,debug,error]. Defaults to info. |
resourceAdmissionConfigurationResourceAdmissionConfiguration | (Optional) ResourceAdmissionConfiguration is the configuration for resource size restrictions for arbitrary Group-Version-Kinds. |
GardenerControllerManagerConfig
(Appears on: Gardener)
GardenerControllerManagerConfig contains configuration settings for the gardener-controller-manager.
| Field | Description |
|---|---|
KubernetesConfiggithub.com/gardener/gardener/pkg/apis/core/v1beta1.KubernetesConfig | (Members of |
defaultProjectQuotas[]ProjectQuotaConfiguration | (Optional) DefaultProjectQuotas is the default configuration matching projects are set up with if a quota is not already specified. |
logLevelstring | (Optional) LogLevel is the configured log level for the gardener-controller-manager. Must be one of [info,debug,error]. Defaults to info. |
GardenerDashboardConfig
(Appears on: Gardener)
GardenerDashboardConfig contains configuration settings for the gardener-dashboard.
| Field | Description |
|---|---|
enableTokenLoginbool | (Optional) EnableTokenLogin specifies whether it is possible to log into the dashboard with a JWT token. If disabled, OIDC must be configured. |
frontendConfigMapRefKubernetes core/v1.LocalObjectReference | (Optional) FrontendConfigMapRef is the reference to a ConfigMap in the garden namespace containing the frontend configuration. |
assetsConfigMapRefKubernetes core/v1.LocalObjectReference | (Optional) AssetsConfigMapRef is the reference to a ConfigMap in the garden namespace containing the assets (logos/icons). |
gitHubDashboardGitHub | (Optional) GitHub contains configuration for the GitHub ticketing feature. |
logLevelstring | (Optional) LogLevel is the configured log level. Must be one of [trace,debug,info,warn,error]. Defaults to info. |
oidcConfigDashboardOIDC | (Optional) OIDCConfig contains configuration for the OIDC provider. This field must be provided when EnableTokenLogin is false. |
terminalDashboardTerminal | (Optional) Terminal contains configuration for the terminal settings. |
ingressDashboardIngress | (Optional) Ingress contains configuration for the ingress settings. |
GardenerDiscoveryServerConfig
(Appears on: Gardener)
GardenerDiscoveryServerConfig contains configuration settings for the gardener-discovery-server.
GardenerSchedulerConfig
(Appears on: Gardener)
GardenerSchedulerConfig contains configuration settings for the gardener-scheduler.
| Field | Description |
|---|---|
KubernetesConfiggithub.com/gardener/gardener/pkg/apis/core/v1beta1.KubernetesConfig | (Members of |
logLevelstring | (Optional) LogLevel is the configured log level for the gardener-scheduler. Must be one of [info,debug,error]. Defaults to info. |
GroupResource
(Appears on: KubeAPIServerConfig)
GroupResource contains a list of resources which should be stored in etcd-events instead of etcd-main.
| Field | Description |
|---|---|
groupstring | Group is the API group name. |
resourcestring | Resource is the resource name. |
HighAvailability
(Appears on: ControlPlane)
HighAvailability specifies the configuration settings for high availability for a resource.
Ingress
(Appears on: RuntimeCluster)
Ingress configures the Ingress specific settings of the runtime cluster.
| Field | Description |
|---|---|
domains[]DNSDomain | Domains specify the ingress domains of the cluster pointing to the ingress controller endpoint. They will be used to construct ingress URLs for system applications running in runtime cluster. |
controllergithub.com/gardener/gardener/pkg/apis/core/v1beta1.IngressController | Controller configures a Gardener managed Ingress Controller listening on the ingressDomain. |
KubeAPIServerConfig
(Appears on: Kubernetes)
KubeAPIServerConfig contains configuration settings for the kube-apiserver.
| Field | Description |
|---|---|
KubeAPIServerConfiggithub.com/gardener/gardener/pkg/apis/core/v1beta1.KubeAPIServerConfig | (Members of KubeAPIServerConfig contains all configuration values not specific to the virtual garden cluster. |
auditWebhookAuditWebhook | (Optional) AuditWebhook contains settings related to an audit webhook configuration. |
authenticationAuthentication | (Optional) Authentication contains settings related to authentication. |
resourcesToStoreInETCDEvents[]GroupResource | (Optional) ResourcesToStoreInETCDEvents contains a list of resources which should be stored in etcd-events instead of etcd-main. The ‘events’ resource is always stored in etcd-events. Note that adding or removing resources from this list will not migrate them automatically from the etcd-main to etcd-events or vice versa. |
sniSNI | (Optional) SNI contains configuration options for the TLS SNI settings. |
KubeControllerManagerConfig
(Appears on: Kubernetes)
KubeControllerManagerConfig contains configuration settings for the kube-controller-manager.
| Field | Description |
|---|---|
KubeControllerManagerConfiggithub.com/gardener/gardener/pkg/apis/core/v1beta1.KubeControllerManagerConfig | (Members of KubeControllerManagerConfig contains all configuration values not specific to the virtual garden cluster. |
certificateSigningDurationKubernetes meta/v1.Duration | (Optional) CertificateSigningDuration is the maximum length of duration signed certificates will be given. Individual CSRs
may request shorter certs by setting |
Kubernetes
(Appears on: VirtualCluster)
Kubernetes contains the version and configuration options for the Kubernetes components of the virtual garden cluster.
| Field | Description |
|---|---|
kubeAPIServerKubeAPIServerConfig | (Optional) KubeAPIServer contains configuration settings for the kube-apiserver. |
kubeControllerManagerKubeControllerManagerConfig | (Optional) KubeControllerManager contains configuration settings for the kube-controller-manager. |
versionstring | Version is the semantic Kubernetes version to use for the virtual garden cluster. |
Maintenance
(Appears on: VirtualCluster)
Maintenance contains information about the time window for maintenance operations.
| Field | Description |
|---|---|
timeWindowgithub.com/gardener/gardener/pkg/apis/core/v1beta1.MaintenanceTimeWindow | TimeWindow contains information about the time window for maintenance operations. |
Networking
(Appears on: VirtualCluster)
Networking defines networking parameters for the virtual garden cluster.
| Field | Description |
|---|---|
services[]string | Services are the CIDRs of the service network. Elements can be appended to this list, but not removed. |
ProjectQuotaConfiguration
(Appears on: GardenerControllerManagerConfig)
ProjectQuotaConfiguration defines quota configurations.
| Field | Description |
|---|---|
configKubernetes core/v1.ResourceQuota | Config is the corev1.ResourceQuota specification used for the project set-up. |
projectSelectorKubernetes meta/v1.LabelSelector | (Optional) ProjectSelector is an optional setting to select the projects considered for quotas. Defaults to empty LabelSelector, which matches all projects. |
Provider
(Appears on: RuntimeCluster)
Provider defines the provider-specific information for this cluster.
| Field | Description |
|---|---|
regionstring | (Optional) Region is the region the cluster is deployed to. |
zones[]string | (Optional) Zones is the list of availability zones the cluster is deployed to. |
ResourceAdmissionConfiguration
(Appears on: GardenerAdmissionControllerConfig)
ResourceAdmissionConfiguration contains settings about arbitrary kinds and the size each resource should have at most.
| Field | Description |
|---|---|
limits[]ResourceLimit | Limits contains configuration for resources which are subjected to size limitations. |
unrestrictedSubjects[]Kubernetes rbac/v1.Subject | (Optional) UnrestrictedSubjects contains references to users, groups, or service accounts which aren’t subjected to any resource size limit. |
operationModeResourceAdmissionWebhookMode | (Optional) OperationMode specifies the mode the webhooks operates in. Allowed values are “block” and “log”. Defaults to “block”. |
ResourceAdmissionWebhookMode
(string alias)
(Appears on: ResourceAdmissionConfiguration)
ResourceAdmissionWebhookMode is an alias type for the resource admission webhook mode.
ResourceLimit
(Appears on: ResourceAdmissionConfiguration)
ResourceLimit contains settings about a kind and the size each resource should have at most.
| Field | Description |
|---|---|
apiGroups[]string | (Optional) APIGroups is the name of the APIGroup that contains the limited resource. WildcardAll represents all groups. |
apiVersions[]string | (Optional) APIVersions is the version of the resource. WildcardAll represents all versions. |
resources[]string | Resources is the name of the resource this rule applies to. WildcardAll represents all resources. |
sizek8s.io/apimachinery/pkg/api/resource.Quantity | Size specifies the imposed limit. |
RuntimeCluster
(Appears on: GardenSpec)
RuntimeCluster contains configuration for the runtime cluster.
| Field | Description |
|---|---|
ingressIngress | Ingress configures Ingress specific settings for the Garden cluster. |
networkingRuntimeNetworking | Networking defines the networking configuration of the runtime cluster. |
providerProvider | Provider defines the provider-specific information for this cluster. |
settingsSettings | (Optional) Settings contains certain settings for this cluster. |
volumeVolume | (Optional) Volume contains settings for persistent volumes created in the runtime cluster. |
RuntimeNetworking
(Appears on: RuntimeCluster)
RuntimeNetworking defines the networking configuration of the runtime cluster.
| Field | Description |
|---|---|
nodes[]string | (Optional) Nodes are the CIDRs of the node network. Elements can be appended to this list, but not removed. |
pods[]string | Pods are the CIDRs of the pod network. Elements can be appended to this list, but not removed. |
services[]string | Services are the CIDRs of the service network. Elements can be appended to this list, but not removed. |
blockCIDRs[]string | (Optional) BlockCIDRs is a list of network addresses that should be blocked. |
SNI
(Appears on: KubeAPIServerConfig)
SNI contains configuration options for the TLS SNI settings.
| Field | Description |
|---|---|
secretNamestring | (Optional) SecretName is the name of a secret containing the TLS certificate and private key. If not configured, Gardener falls back to a secret labelled with ‘gardener.cloud/role=garden-cert’. |
domainPatterns[]string | (Optional) DomainPatterns is a list of fully qualified domain names, possibly with prefixed wildcard segments. The domain patterns also allow IP addresses, but IPs should only be used if the apiserver has visibility to the IP address requested by a client. If no domain patterns are provided, the names of the certificate are extracted. Non-wildcard matches trump over wildcard matches, explicit domain patterns trump over extracted names. |
SettingLoadBalancerServices
(Appears on: Settings)
SettingLoadBalancerServices controls certain settings for services of type load balancer that are created in the runtime cluster.
| Field | Description |
|---|---|
annotationsmap[string]string | (Optional) Annotations is a map of annotations that will be injected/merged into every load balancer service object. |
SettingTopologyAwareRouting
(Appears on: Settings)
SettingTopologyAwareRouting controls certain settings for topology-aware traffic routing in the cluster. See https://github.com/gardener/gardener/blob/master/docs/operations/topology_aware_routing.md.
| Field | Description |
|---|---|
enabledbool | Enabled controls whether certain Services deployed in the cluster should be topology-aware. These Services are virtual-garden-etcd-main-client, virtual-garden-etcd-events-client and virtual-garden-kube-apiserver. Additionally, other components that are deployed to the runtime cluster via other means can read this field and according to its value enable/disable topology-aware routing for their Services. |
SettingVerticalPodAutoscaler
(Appears on: Settings)
SettingVerticalPodAutoscaler controls certain settings for the vertical pod autoscaler components deployed in the seed.
| Field | Description |
|---|---|
enabledbool | (Optional) Enabled controls whether the VPA components shall be deployed into this cluster. It is true by default because the operator (and Gardener) heavily rely on a VPA being deployed. You should only disable this if your runtime cluster already has another, manually/custom managed VPA deployment. If this is not the case, but you still disable it, then reconciliation will fail. |
Settings
(Appears on: RuntimeCluster)
Settings contains certain settings for this cluster.
| Field | Description |
|---|---|
loadBalancerServicesSettingLoadBalancerServices | (Optional) LoadBalancerServices controls certain settings for services of type load balancer that are created in the runtime cluster. |
verticalPodAutoscalerSettingVerticalPodAutoscaler | (Optional) VerticalPodAutoscaler controls certain settings for the vertical pod autoscaler components deployed in the cluster. |
topologyAwareRoutingSettingTopologyAwareRouting | (Optional) TopologyAwareRouting controls certain settings for topology-aware traffic routing in the cluster. See https://github.com/gardener/gardener/blob/master/docs/operations/topology_aware_routing.md. |
Storage
(Appears on: ETCDEvents, ETCDMain)
Storage contains storage configuration.
| Field | Description |
|---|---|
capacityk8s.io/apimachinery/pkg/api/resource.Quantity | (Optional) Capacity is the storage capacity for the volumes. |
classNamestring | (Optional) ClassName is the name of a storage class. |
VirtualCluster
(Appears on: GardenSpec)
VirtualCluster contains configuration for the virtual cluster.
| Field | Description |
|---|---|
controlPlaneControlPlane | (Optional) ControlPlane holds information about the general settings for the control plane of the virtual cluster. |
dnsDNS | DNS holds information about DNS settings. |
etcdETCD | (Optional) ETCD contains configuration for the etcds of the virtual garden cluster. |
gardenerGardener | Gardener contains the configuration options for the Gardener control plane components. |
kubernetesKubernetes | Kubernetes contains the version and configuration options for the Kubernetes components of the virtual garden cluster. |
maintenanceMaintenance | Maintenance contains information about the time window for maintenance operations. |
networkingNetworking | Networking contains information about cluster networking such as CIDRs, etc. |
Volume
(Appears on: RuntimeCluster)
Volume contains settings for persistent volumes created in the runtime cluster.
| Field | Description |
|---|---|
minimumSizek8s.io/apimachinery/pkg/api/resource.Quantity | (Optional) MinimumSize defines the minimum size that should be used for PVCs in the runtime cluster. |
WorkloadIdentityKeyRotation
(Appears on: CredentialsRotation)
WorkloadIdentityKeyRotation contains information about the workload identity key credential rotation.
| Field | Description |
|---|---|
phasegithub.com/gardener/gardener/pkg/apis/core/v1beta1.CredentialsRotationPhase | Phase describes the phase of the workload identity key credential rotation. |
lastCompletionTimeKubernetes meta/v1.Time | (Optional) LastCompletionTime is the most recent time when the workload identity key credential rotation was successfully completed. |
lastInitiationTimeKubernetes meta/v1.Time | (Optional) LastInitiationTime is the most recent time when the workload identity key credential rotation was initiated. |
lastInitiationFinishedTimeKubernetes meta/v1.Time | (Optional) LastInitiationFinishedTime is the recent time when the workload identity key credential rotation initiation was completed. |
lastCompletionTriggeredTimeKubernetes meta/v1.Time | (Optional) LastCompletionTriggeredTime is the recent time when the workload identity key credential rotation completion was triggered. |
Generated with gen-crd-api-reference-docs
4.2.7 - Provider Local
Packages:
local.provider.extensions.gardener.cloud/v1alpha1
Package v1alpha1 contains the local provider API resources.
Resource Types:CloudProfileConfig
CloudProfileConfig contains provider-specific configuration that is embedded into Gardener’s CloudProfile
resource.
| Field | Description |
|---|---|
apiVersionstring | local.provider.extensions.gardener.cloud/v1alpha1 |
kindstring | CloudProfileConfig |
machineImages[]MachineImages | MachineImages is the list of machine images that are understood by the controller. It maps logical names and versions to provider-specific identifiers. |
WorkerStatus
WorkerStatus contains information about created worker resources.
| Field | Description |
|---|---|
apiVersionstring | local.provider.extensions.gardener.cloud/v1alpha1 |
kindstring | WorkerStatus |
machineImages[]MachineImage | (Optional) MachineImages is a list of machine images that have been used in this worker. Usually, the extension controller
gets the mapping from name/version to the provider-specific machine image data from the CloudProfile. However, if
a version that is still in use gets removed from this componentconfig it cannot reconcile anymore existing |
MachineImage
(Appears on: WorkerStatus)
MachineImage is a mapping from logical names and versions to provider-specific machine image data.
| Field | Description |
|---|---|
namestring | Name is the logical name of the machine image. |
versionstring | Version is the logical version of the machine image. |
imagestring | Image is the image for the machine image. |
MachineImageVersion
(Appears on: MachineImages)
MachineImageVersion contains a version and a provider-specific identifier.
| Field | Description |
|---|---|
versionstring | Version is the version of the image. |
imagestring | Image is the image for the machine image. |
MachineImages
(Appears on: CloudProfileConfig)
MachineImages is a mapping from logical names and versions to provider-specific identifiers.
| Field | Description |
|---|---|
namestring | Name is the logical name of the machine image. |
versions[]MachineImageVersion | Versions contains versions and a provider-specific identifier. |
Generated with gen-crd-api-reference-docs
4.2.8 - Resources
Packages:
resources.gardener.cloud/v1alpha1
Package v1alpha1 contains the configuration of the Gardener Resource Manager.
Resource Types:ManagedResource
ManagedResource describes a list of managed resources.
| Field | Description | ||||||||||||||||
|---|---|---|---|---|---|---|---|---|---|---|---|---|---|---|---|---|---|
metadataKubernetes meta/v1.ObjectMeta | Standard object metadata. Refer to the Kubernetes API documentation for the fields of themetadata field. | ||||||||||||||||
specManagedResourceSpec | Spec contains the specification of this managed resource.
| ||||||||||||||||
statusManagedResourceStatus | Status contains the status of this managed resource. |
ManagedResourceSpec
(Appears on: ManagedResource)
ManagedResourceSpec contains the specification of this managed resource.
| Field | Description |
|---|---|
classstring | (Optional) Class holds the resource class used to control the responsibility for multiple resource manager instances |
secretRefs[]Kubernetes core/v1.LocalObjectReference | SecretRefs is a list of secret references. |
injectLabelsmap[string]string | (Optional) InjectLabels injects the provided labels into every resource that is part of the referenced secrets. |
forceOverwriteLabelsbool | (Optional) ForceOverwriteLabels specifies that all existing labels should be overwritten. Defaults to false. |
forceOverwriteAnnotationsbool | (Optional) ForceOverwriteAnnotations specifies that all existing annotations should be overwritten. Defaults to false. |
keepObjectsbool | (Optional) KeepObjects specifies whether the objects should be kept although the managed resource has already been deleted. Defaults to false. |
equivalences[][]k8s.io/apimachinery/pkg/apis/meta/v1.GroupKind | (Optional) Equivalences specifies possible group/kind equivalences for objects. |
deletePersistentVolumeClaimsbool | (Optional) DeletePersistentVolumeClaims specifies if PersistentVolumeClaims created by StatefulSets, which are managed by this resource, should also be deleted when the corresponding StatefulSet is deleted (defaults to false). |
ManagedResourceStatus
(Appears on: ManagedResource)
ManagedResourceStatus is the status of a managed resource.
| Field | Description |
|---|---|
conditions[]github.com/gardener/gardener/pkg/apis/core/v1beta1.Condition | |
observedGenerationint64 | ObservedGeneration is the most recent generation observed for this resource. |
resources[]ObjectReference | (Optional) Resources is a list of objects that have been created. |
secretsDataChecksumstring | (Optional) SecretsDataChecksum is the checksum of referenced secrets data. |
ObjectReference
(Appears on: ManagedResourceStatus)
ObjectReference is a reference to another object.
| Field | Description |
|---|---|
ObjectReferenceKubernetes core/v1.ObjectReference | (Members of |
labelsmap[string]string | Labels is a map of labels that were used during last update of the resource. |
annotationsmap[string]string | Annotations is a map of annotations that were used during last update of the resource. |
Generated with gen-crd-api-reference-docs
4.2.9 - Security
Packages:
security.gardener.cloud/v1alpha1
Package v1alpha1 is a version of the API.
Resource Types:CredentialsBinding
CredentialsBinding represents a binding to credentials in the same or another namespace.
| Field | Description |
|---|---|
apiVersionstring | security.gardener.cloud/v1alpha1 |
kindstring | CredentialsBinding |
metadataKubernetes meta/v1.ObjectMeta | (Optional) Standard object metadata. Refer to the Kubernetes API documentation for the fields of themetadata field. |
providerCredentialsBindingProvider | Provider defines the provider type of the CredentialsBinding. This field is immutable. |
credentialsRefKubernetes core/v1.ObjectReference | CredentialsRef is a reference to a resource holding the credentials. Accepted resources are core/v1.Secret and security.gardener.cloud/v1alpha1.WorkloadIdentity This field is immutable. |
quotas[]Kubernetes core/v1.ObjectReference | (Optional) Quotas is a list of references to Quota objects in the same or another namespace. This field is immutable. |
WorkloadIdentity
WorkloadIdentity is resource that allows workloads to be presented before external systems by giving them identities managed by the Gardener API server. The identity of such workload is represented by JSON Web Token issued by the Gardener API server. Workload identities are designed to be used by components running in the Gardener environment, seed or runtime cluster, that make use of identity federation inspired by the OIDC protocol.
| Field | Description | ||||
|---|---|---|---|---|---|
apiVersionstring | security.gardener.cloud/v1alpha1 | ||||
kindstring | WorkloadIdentity | ||||
metadataKubernetes meta/v1.ObjectMeta | (Optional) Standard object metadata. Refer to the Kubernetes API documentation for the fields of themetadata field. | ||||
specWorkloadIdentitySpec | Spec configures the JSON Web Token issued by the Gardener API server.
| ||||
statusWorkloadIdentityStatus | Status contain the latest observed status of the WorkloadIdentity. |
ContextObject
(Appears on: TokenRequestSpec)
ContextObject identifies the object the token is requested for.
| Field | Description |
|---|---|
kindstring | Kind of the object the token is requested for. Valid kinds are ‘Shoot’, ‘Seed’, etc. |
apiVersionstring | API version of the object the token is requested for. |
namestring | Name of the object the token is requested for. |
namespacestring | (Optional) Namespace of the object the token is requested for. |
uidk8s.io/apimachinery/pkg/types.UID | UID of the object the token is requested for. |
CredentialsBindingProvider
(Appears on: CredentialsBinding)
CredentialsBindingProvider defines the provider type of the CredentialsBinding.
| Field | Description |
|---|---|
typestring | Type is the type of the provider. |
TargetSystem
(Appears on: WorkloadIdentitySpec)
TargetSystem represents specific configurations for the system that will accept the JWTs.
| Field | Description |
|---|---|
typestring | Type is the type of the target system. |
providerConfigk8s.io/apimachinery/pkg/runtime.RawExtension | (Optional) ProviderConfig is the configuration passed to extension resource. |
TokenRequest
TokenRequest is a resource that is used to request WorkloadIdentity tokens.
| Field | Description | ||||
|---|---|---|---|---|---|
metadataKubernetes meta/v1.ObjectMeta | Standard object metadata. Refer to the Kubernetes API documentation for the fields of themetadata field. | ||||
specTokenRequestSpec | Spec holds configuration settings for the requested token.
| ||||
statusTokenRequestStatus | Status bears the issued token with additional information back to the client. |
TokenRequestSpec
(Appears on: TokenRequest)
TokenRequestSpec holds configuration settings for the requested token.
| Field | Description |
|---|---|
contextObjectContextObject | (Optional) ContextObject identifies the object the token is requested for. |
expirationSecondsint64 | (Optional) ExpirationSeconds specifies for how long the requested token should be valid. |
TokenRequestStatus
(Appears on: TokenRequest)
TokenRequestStatus bears the issued token with additional information back to the client.
| Field | Description |
|---|---|
tokenstring | Token is the issued token. |
expirationTimestampKubernetes meta/v1.Time | ExpirationTimestamp is the time of expiration of the returned token. |
WorkloadIdentitySpec
(Appears on: WorkloadIdentity)
WorkloadIdentitySpec configures the JSON Web Token issued by the Gardener API server.
| Field | Description |
|---|---|
audiences[]string | Audiences specify the list of recipients that the JWT is intended for. The values of this field will be set in the ‘aud’ claim. |
targetSystemTargetSystem | TargetSystem represents specific configurations for the system that will accept the JWTs. |
WorkloadIdentityStatus
(Appears on: WorkloadIdentity)
WorkloadIdentityStatus contain the latest observed status of the WorkloadIdentity.
| Field | Description |
|---|---|
substring | Sub contains the computed value of the subject that is going to be set in JWTs ‘sub’ claim. |
Generated with gen-crd-api-reference-docs
4.2.10 - Seedmanagement
Packages:
seedmanagement.gardener.cloud/v1alpha1
Package v1alpha1 is a version of the API.
Resource Types:Gardenlet
Gardenlet represents a Gardenlet configuration for an unmanaged seed.
| Field | Description | ||||||
|---|---|---|---|---|---|---|---|
apiVersionstring | seedmanagement.gardener.cloud/v1alpha1 | ||||||
kindstring | Gardenlet | ||||||
metadataKubernetes meta/v1.ObjectMeta | (Optional) Standard object metadata. Refer to the Kubernetes API documentation for the fields of themetadata field. | ||||||
specGardenletSpec | (Optional) Specification of the Gardenlet.
| ||||||
statusGardenletStatus | (Optional) Most recently observed status of the Gardenlet. |
ManagedSeed
ManagedSeed represents a Shoot that is registered as Seed.
| Field | Description | ||||
|---|---|---|---|---|---|
apiVersionstring | seedmanagement.gardener.cloud/v1alpha1 | ||||
kindstring | ManagedSeed | ||||
metadataKubernetes meta/v1.ObjectMeta | (Optional) Standard object metadata. Refer to the Kubernetes API documentation for the fields of themetadata field. | ||||
specManagedSeedSpec | (Optional) Specification of the ManagedSeed.
| ||||
statusManagedSeedStatus | (Optional) Most recently observed status of the ManagedSeed. |
ManagedSeedSet
ManagedSeedSet represents a set of identical ManagedSeeds.
| Field | Description | ||||||||||||
|---|---|---|---|---|---|---|---|---|---|---|---|---|---|
apiVersionstring | seedmanagement.gardener.cloud/v1alpha1 | ||||||||||||
kindstring | ManagedSeedSet | ||||||||||||
metadataKubernetes meta/v1.ObjectMeta | (Optional) Standard object metadata. Refer to the Kubernetes API documentation for the fields of themetadata field. | ||||||||||||
specManagedSeedSetSpec | (Optional) Spec defines the desired identities of ManagedSeeds and Shoots in this set.
| ||||||||||||
statusManagedSeedSetStatus | (Optional) Status is the current status of ManagedSeeds and Shoots in this ManagedSeedSet. |
Bootstrap
(string alias)
(Appears on: GardenletConfig)
Bootstrap describes a mechanism for bootstrapping gardenlet connection to the Garden cluster.
GardenletConfig
(Appears on: ManagedSeedSpec)
GardenletConfig specifies gardenlet deployment parameters and the GardenletConfiguration used to configure gardenlet.
| Field | Description |
|---|---|
deploymentGardenletDeployment | (Optional) Deployment specifies certain gardenlet deployment parameters, such as the number of replicas, the image, etc. |
configk8s.io/apimachinery/pkg/runtime.RawExtension | (Optional) Config is the GardenletConfiguration used to configure gardenlet. |
bootstrapBootstrap | (Optional) Bootstrap is the mechanism that should be used for bootstrapping gardenlet connection to the Garden cluster. One of ServiceAccount, BootstrapToken, None. If set to ServiceAccount or BootstrapToken, a service account or a bootstrap token will be created in the garden cluster and used to compute the bootstrap kubeconfig. If set to None, the gardenClientConnection.kubeconfig field will be used to connect to the Garden cluster. Defaults to BootstrapToken. This field is immutable. |
mergeWithParentbool | (Optional) MergeWithParent specifies whether the GardenletConfiguration of the parent gardenlet should be merged with the specified GardenletConfiguration. Defaults to true. This field is immutable. |
GardenletDeployment
(Appears on: GardenletConfig, GardenletSelfDeployment)
GardenletDeployment specifies certain gardenlet deployment parameters, such as the number of replicas, the image, etc.
| Field | Description |
|---|---|
replicaCountint32 | (Optional) ReplicaCount is the number of gardenlet replicas. Defaults to 2. |
revisionHistoryLimitint32 | (Optional) RevisionHistoryLimit is the number of old gardenlet ReplicaSets to retain to allow rollback. Defaults to 2. |
serviceAccountNamestring | (Optional) ServiceAccountName is the name of the ServiceAccount to use to run gardenlet pods. |
imageImage | (Optional) Image is the gardenlet container image. |
resourcesKubernetes core/v1.ResourceRequirements | (Optional) Resources are the compute resources required by the gardenlet container. |
podLabelsmap[string]string | (Optional) PodLabels are the labels on gardenlet pods. |
podAnnotationsmap[string]string | (Optional) PodAnnotations are the annotations on gardenlet pods. |
additionalVolumes[]Kubernetes core/v1.Volume | (Optional) AdditionalVolumes is the list of additional volumes that should be mounted by gardenlet containers. |
additionalVolumeMounts[]Kubernetes core/v1.VolumeMount | (Optional) AdditionalVolumeMounts is the list of additional pod volumes to mount into the gardenlet container’s filesystem. |
env[]Kubernetes core/v1.EnvVar | (Optional) Env is the list of environment variables to set in the gardenlet container. |
GardenletHelm
(Appears on: GardenletSelfDeployment)
GardenletHelm is the Helm deployment configuration for gardenlet.
| Field | Description |
|---|---|
ociRepositorygithub.com/gardener/gardener/pkg/apis/core/v1.OCIRepository | OCIRepository defines where to pull the chart. |
GardenletSelfDeployment
(Appears on: GardenletSpec)
GardenletSelfDeployment specifies certain gardenlet deployment parameters, such as the number of replicas, the image, etc.
| Field | Description |
|---|---|
GardenletDeploymentGardenletDeployment | (Members of GardenletDeployment specifies common gardenlet deployment parameters. |
helmGardenletHelm | Helm is the Helm deployment configuration. |
imageVectorOverwritestring | (Optional) ImageVectorOverwrite is the image vector overwrite for the components deployed by this gardenlet. |
componentImageVectorOverwritestring | (Optional) ComponentImageVectorOverwrite is the component image vector overwrite for the components deployed by this gardenlet. |
GardenletSpec
(Appears on: Gardenlet)
GardenletSpec specifies gardenlet deployment parameters and the configuration used to configure gardenlet.
| Field | Description |
|---|---|
deploymentGardenletSelfDeployment | Deployment specifies certain gardenlet deployment parameters, such as the number of replicas, the image, etc. |
configk8s.io/apimachinery/pkg/runtime.RawExtension | (Optional) Config is the GardenletConfiguration used to configure gardenlet. |
kubeconfigSecretRefKubernetes core/v1.LocalObjectReference | (Optional) KubeconfigSecretRef is a reference to a secret containing a kubeconfig for the cluster to which gardenlet should be deployed. This is only used by gardener-operator for a very first gardenlet deployment. After that, gardenlet will continuously upgrade itself. If this field is empty, gardener-operator deploys it into its own runtime cluster. |
GardenletStatus
(Appears on: Gardenlet)
GardenletStatus is the status of a Gardenlet.
| Field | Description |
|---|---|
conditions[]github.com/gardener/gardener/pkg/apis/core/v1beta1.Condition | (Optional) Conditions represents the latest available observations of a Gardenlet’s current state. |
observedGenerationint64 | (Optional) ObservedGeneration is the most recent generation observed for this Gardenlet. It corresponds to the Gardenlet’s generation, which is updated on mutation by the API Server. |
Image
(Appears on: GardenletDeployment)
Image specifies container image parameters.
| Field | Description |
|---|---|
repositorystring | (Optional) Repository is the image repository. |
tagstring | (Optional) Tag is the image tag. |
pullPolicyKubernetes core/v1.PullPolicy | (Optional) PullPolicy is the image pull policy. One of Always, Never, IfNotPresent. Defaults to Always if latest tag is specified, or IfNotPresent otherwise. |
ManagedSeedSetSpec
(Appears on: ManagedSeedSet)
ManagedSeedSetSpec is the specification of a ManagedSeedSet.
| Field | Description |
|---|---|
replicasint32 | (Optional) Replicas is the desired number of replicas of the given Template. Defaults to 1. |
selectorKubernetes meta/v1.LabelSelector | Selector is a label query over ManagedSeeds and Shoots that should match the replica count. It must match the ManagedSeeds and Shoots template’s labels. This field is immutable. |
templateManagedSeedTemplate | Template describes the ManagedSeed that will be created if insufficient replicas are detected. Each ManagedSeed created / updated by the ManagedSeedSet will fulfill this template. |
shootTemplategithub.com/gardener/gardener/pkg/apis/core/v1beta1.ShootTemplate | ShootTemplate describes the Shoot that will be created if insufficient replicas are detected for hosting the corresponding ManagedSeed. Each Shoot created / updated by the ManagedSeedSet will fulfill this template. |
updateStrategyUpdateStrategy | (Optional) UpdateStrategy specifies the UpdateStrategy that will be employed to update ManagedSeeds / Shoots in the ManagedSeedSet when a revision is made to Template / ShootTemplate. |
revisionHistoryLimitint32 | (Optional) RevisionHistoryLimit is the maximum number of revisions that will be maintained in the ManagedSeedSet’s revision history. Defaults to 10. This field is immutable. |
ManagedSeedSetStatus
(Appears on: ManagedSeedSet)
ManagedSeedSetStatus represents the current state of a ManagedSeedSet.
| Field | Description |
|---|---|
observedGenerationint64 | ObservedGeneration is the most recent generation observed for this ManagedSeedSet. It corresponds to the ManagedSeedSet’s generation, which is updated on mutation by the API Server. |
replicasint32 | Replicas is the number of replicas (ManagedSeeds and their corresponding Shoots) created by the ManagedSeedSet controller. |
readyReplicasint32 | ReadyReplicas is the number of ManagedSeeds created by the ManagedSeedSet controller that have a Ready Condition. |
nextReplicaNumberint32 | NextReplicaNumber is the ordinal number that will be assigned to the next replica of the ManagedSeedSet. |
currentReplicasint32 | CurrentReplicas is the number of ManagedSeeds created by the ManagedSeedSet controller from the ManagedSeedSet version indicated by CurrentRevision. |
updatedReplicasint32 | UpdatedReplicas is the number of ManagedSeeds created by the ManagedSeedSet controller from the ManagedSeedSet version indicated by UpdateRevision. |
currentRevisionstring | CurrentRevision, if not empty, indicates the version of the ManagedSeedSet used to generate ManagedSeeds with smaller ordinal numbers during updates. |
updateRevisionstring | UpdateRevision, if not empty, indicates the version of the ManagedSeedSet used to generate ManagedSeeds with larger ordinal numbers during updates |
collisionCountint32 | (Optional) CollisionCount is the count of hash collisions for the ManagedSeedSet. The ManagedSeedSet controller uses this field as a collision avoidance mechanism when it needs to create the name for the newest ControllerRevision. |
conditions[]github.com/gardener/gardener/pkg/apis/core/v1beta1.Condition | (Optional) Conditions represents the latest available observations of a ManagedSeedSet’s current state. |
pendingReplicaPendingReplica | (Optional) PendingReplica, if not empty, indicates the replica that is currently pending creation, update, or deletion. This replica is in a state that requires the controller to wait for it to change before advancing to the next replica. |
ManagedSeedSpec
(Appears on: ManagedSeed, ManagedSeedTemplate)
ManagedSeedSpec is the specification of a ManagedSeed.
| Field | Description |
|---|---|
shootShoot | (Optional) Shoot references a Shoot that should be registered as Seed. This field is immutable. |
gardenletGardenletConfig | Gardenlet specifies that the ManagedSeed controller should deploy a gardenlet into the cluster with the given deployment parameters and GardenletConfiguration. |
ManagedSeedStatus
(Appears on: ManagedSeed)
ManagedSeedStatus is the status of a ManagedSeed.
| Field | Description |
|---|---|
conditions[]github.com/gardener/gardener/pkg/apis/core/v1beta1.Condition | (Optional) Conditions represents the latest available observations of a ManagedSeed’s current state. |
observedGenerationint64 | ObservedGeneration is the most recent generation observed for this ManagedSeed. It corresponds to the ManagedSeed’s generation, which is updated on mutation by the API Server. |
ManagedSeedTemplate
(Appears on: ManagedSeedSetSpec)
ManagedSeedTemplate is a template for creating a ManagedSeed object.
| Field | Description | ||||
|---|---|---|---|---|---|
metadataKubernetes meta/v1.ObjectMeta | (Optional) Standard object metadata. Refer to the Kubernetes API documentation for the fields of themetadata field. | ||||
specManagedSeedSpec | (Optional) Specification of the desired behavior of the ManagedSeed.
|
PendingReplica
(Appears on: ManagedSeedSetStatus)
PendingReplica contains information about a replica that is currently pending creation, update, or deletion.
| Field | Description |
|---|---|
namestring | Name is the replica name. |
reasonPendingReplicaReason | Reason is the reason for the replica to be pending. |
sinceKubernetes meta/v1.Time | Since is the moment in time since the replica is pending with the specified reason. |
retriesint32 | (Optional) Retries is the number of times the shoot operation (reconcile or delete) has been retried after having failed. Only applicable if Reason is ShootReconciling or ShootDeleting. |
PendingReplicaReason
(string alias)
(Appears on: PendingReplica)
PendingReplicaReason is a string enumeration type that enumerates all possible reasons for a replica to be pending.
RollingUpdateStrategy
(Appears on: UpdateStrategy)
RollingUpdateStrategy is used to communicate parameters for RollingUpdateStrategyType.
| Field | Description |
|---|---|
partitionint32 | (Optional) Partition indicates the ordinal at which the ManagedSeedSet should be partitioned. Defaults to 0. |
Shoot
(Appears on: ManagedSeedSpec)
Shoot identifies the Shoot that should be registered as Seed.
| Field | Description |
|---|---|
namestring | Name is the name of the Shoot that will be registered as Seed. |
UpdateStrategy
(Appears on: ManagedSeedSetSpec)
UpdateStrategy specifies the strategy that the ManagedSeedSet controller will use to perform updates. It includes any additional parameters necessary to perform the update for the indicated strategy.
| Field | Description |
|---|---|
typeUpdateStrategyType | (Optional) Type indicates the type of the UpdateStrategy. Defaults to RollingUpdate. |
rollingUpdateRollingUpdateStrategy | (Optional) RollingUpdate is used to communicate parameters when Type is RollingUpdateStrategyType. |
UpdateStrategyType
(string alias)
(Appears on: UpdateStrategy)
UpdateStrategyType is a string enumeration type that enumerates all possible update strategies for the ManagedSeedSet controller.
Generated with gen-crd-api-reference-docs
4.2.11 - Settings
Packages:
settings.gardener.cloud/v1alpha1
Package v1alpha1 is a version of the API.
Resource Types:ClusterOpenIDConnectPreset
ClusterOpenIDConnectPreset is a OpenID Connect configuration that is applied to a Shoot objects cluster-wide.
| Field | Description | ||||
|---|---|---|---|---|---|
apiVersionstring | settings.gardener.cloud/v1alpha1 | ||||
kindstring | ClusterOpenIDConnectPreset | ||||
metadataKubernetes meta/v1.ObjectMeta | Standard object metadata. Refer to the Kubernetes API documentation for the fields of themetadata field. | ||||
specClusterOpenIDConnectPresetSpec | Spec is the specification of this OpenIDConnect preset.
|
OpenIDConnectPreset
OpenIDConnectPreset is a OpenID Connect configuration that is applied to a Shoot in a namespace.
| Field | Description | ||||||||
|---|---|---|---|---|---|---|---|---|---|
apiVersionstring | settings.gardener.cloud/v1alpha1 | ||||||||
kindstring | OpenIDConnectPreset | ||||||||
metadataKubernetes meta/v1.ObjectMeta | Standard object metadata. Refer to the Kubernetes API documentation for the fields of themetadata field. | ||||||||
specOpenIDConnectPresetSpec | Spec is the specification of this OpenIDConnect preset.
|
ClusterOpenIDConnectPresetSpec
(Appears on: ClusterOpenIDConnectPreset)
ClusterOpenIDConnectPresetSpec contains the OpenIDConnect specification and project selector matching Shoots in Projects.
| Field | Description |
|---|---|
OpenIDConnectPresetSpecOpenIDConnectPresetSpec | (Members of |
projectSelectorKubernetes meta/v1.LabelSelector | (Optional) Project decides whether to apply the configuration if the Shoot is in a specific Project matching the label selector. Use the selector only if the OIDC Preset is opt-in, because end users may skip the admission by setting the labels. Defaults to the empty LabelSelector, which matches everything. |
KubeAPIServerOpenIDConnect
(Appears on: OpenIDConnectPresetSpec)
KubeAPIServerOpenIDConnect contains configuration settings for the OIDC provider. Note: Descriptions were taken from the Kubernetes documentation.
| Field | Description |
|---|---|
caBundlestring | (Optional) If set, the OpenID server’s certificate will be verified by one of the authorities in the oidc-ca-file, otherwise the host’s root CA set will be used. |
clientIDstring | The client ID for the OpenID Connect client. Required. |
groupsClaimstring | (Optional) If provided, the name of a custom OpenID Connect claim for specifying user groups. The claim value is expected to be a string or array of strings. This field is experimental, please see the authentication documentation for further details. |
groupsPrefixstring | (Optional) If provided, all groups will be prefixed with this value to prevent conflicts with other authentication strategies. |
issuerURLstring | The URL of the OpenID issuer, only HTTPS scheme will be accepted. If set, it will be used to verify the OIDC JSON Web Token (JWT). Required. |
requiredClaimsmap[string]string | (Optional) key=value pairs that describes a required claim in the ID Token. If set, the claim is verified to be present in the ID Token with a matching value. |
signingAlgs[]string | (Optional) List of allowed JOSE asymmetric signing algorithms. JWTs with a ‘alg’ header value not in this list will be rejected. Values are defined by RFC 7518 https://tools.ietf.org/html/rfc7518#section-3.1 Defaults to [RS256] |
usernameClaimstring | (Optional) The OpenID claim to use as the user name. Note that claims other than the default (‘sub’) is not guaranteed to be unique and immutable. This field is experimental, please see the authentication documentation for further details. Defaults to “sub”. |
usernamePrefixstring | (Optional) If provided, all usernames will be prefixed with this value. If not provided, username claims other than ‘email’ are prefixed by the issuer URL to avoid clashes. To skip any prefixing, provide the value ‘-’. |
OpenIDConnectClientAuthentication
(Appears on: OpenIDConnectPresetSpec)
OpenIDConnectClientAuthentication contains configuration for OIDC clients.
| Field | Description |
|---|---|
secretstring | (Optional) The client Secret for the OpenID Connect client. |
extraConfigmap[string]string | (Optional) Extra configuration added to kubeconfig’s auth-provider. Must not be any of idp-issuer-url, client-id, client-secret, idp-certificate-authority, idp-certificate-authority-data, id-token or refresh-token |
OpenIDConnectPresetSpec
(Appears on: OpenIDConnectPreset, ClusterOpenIDConnectPresetSpec)
OpenIDConnectPresetSpec contains the Shoot selector for which a specific OpenID Connect configuration is applied.
| Field | Description |
|---|---|
serverKubeAPIServerOpenIDConnect | Server contains the kube-apiserver’s OpenID Connect configuration. This configuration is not overwriting any existing OpenID Connect configuration already set on the Shoot object. |
clientOpenIDConnectClientAuthentication | (Optional) Client contains the configuration used for client OIDC authentication of Shoot clusters. This configuration is not overwriting any existing OpenID Connect client authentication already set on the Shoot object. Deprecated: The OpenID Connect configuration this field specifies is not used and will be forbidden starting from Kubernetes 1.31. It’s use was planned for genereting OIDC kubeconfig https://github.com/gardener/gardener/issues/1433 TODO(AleksandarSavchev): Drop this field after support for Kubernetes 1.30 is dropped. |
shootSelectorKubernetes meta/v1.LabelSelector | (Optional) ShootSelector decides whether to apply the configuration if the Shoot has matching labels. Use the selector only if the OIDC Preset is opt-in, because end users may skip the admission by setting the labels. Default to the empty LabelSelector, which matches everything. |
weightint32 | Weight associated with matching the corresponding preset, in the range 1-100. Required. |
Generated with gen-crd-api-reference-docs
4.3 - Autoscaling
4.3.1 - DNS Autoscaling
DNS Autoscaling
This is a short guide describing different options how to automatically scale CoreDNS in the shoot cluster.
Background
Currently, Gardener uses CoreDNS as DNS server. Per default, it is installed as a deployment into the shoot cluster that is auto-scaled horizontally to cover for QPS-intensive applications. However, doing so does not seem to be enough to completely circumvent DNS bottlenecks such as:
- Cloud provider limits for DNS lookups.
- Unreliable UDP connections that forces a period of timeout in case packets are dropped.
- Unnecessary node hopping since CoreDNS is not deployed on all nodes, and as a result DNS queries end-up traversing multiple nodes before reaching the destination server.
- Inefficient load-balancing of services (e.g., round-robin might not be enough when using IPTables mode).
- Overload of the CoreDNS replicas as the maximum amount of replicas is fixed.
- and more …
As an alternative with extended configuration options, Gardener provides cluster-proportional autoscaling of CoreDNS. This guide focuses on the configuration of cluster-proportional autoscaling of CoreDNS and its advantages/disadvantages compared to the horizontal autoscaling. Please note that there is also the option to use a node-local DNS cache, which helps mitigate potential DNS bottlenecks (see Trade-offs in conjunction with NodeLocalDNS for considerations regarding using NodeLocalDNS together with one of the CoreDNS autoscaling approaches).
Configuring Cluster-Proportional DNS Autoscaling
All that needs to be done to enable the usage of cluster-proportional autoscaling of CoreDNS is to set the corresponding option (spec.systemComponents.coreDNS.autoscaling.mode) in the Shoot resource to cluster-proportional:
...
spec:
...
systemComponents:
coreDNS:
autoscaling:
mode: cluster-proportional
...
To switch back to horizontal DNS autoscaling, you can set the spec.systemComponents.coreDNS.autoscaling.mode to horizontal (or remove the coreDNS section).
Once the cluster-proportional autoscaling of CoreDNS has been enabled and the Shoot cluster has been reconciled afterwards, a ConfigMap called coredns-autoscaler will be created in the kube-system namespace with the default settings. The content will be similar to the following:
linear: '{"coresPerReplica":256,"min":2,"nodesPerReplica":16}'
It is possible to adapt the ConfigMap according to your needs in case the defaults do not work as desired. The number of CoreDNS replicas is calculated according to the following formula:
replicas = max( ceil( cores × 1 / coresPerReplica ) , ceil( nodes × 1 / nodesPerReplica ) )
Depending on your needs, you can adjust coresPerReplica or nodesPerReplica, but it is also possible to override min if required.
Trade-Offs of Horizontal and Cluster-Proportional DNS Autoscaling
The horizontal autoscaling of CoreDNS as implemented by Gardener is fully managed, i.e., you do not need to perform any configuration changes. It scales according to the CPU usage of CoreDNS replicas, meaning that it will create new replicas if the existing ones are under heavy load. This approach scales between 2 and 5 instances, which is sufficient for most workloads. In case this is not enough, the cluster-proportional autoscaling approach can be used instead, with its more flexible configuration options.
The cluster-proportional autoscaling of CoreDNS as implemented by Gardener is fully managed, but allows more configuration options to adjust the default settings to your individual needs. It scales according to the cluster size, i.e., if your cluster grows in terms of cores/nodes so will the amount of CoreDNS replicas. However, it does not take the actual workload, e.g., CPU consumption, into account.
Experience shows that the horizontal autoscaling of CoreDNS works for a variety of workloads. It does reach its limits if a cluster has a high amount of DNS requests, though. The cluster-proportional autoscaling approach allows to fine-tune the amount of CoreDNS replicas. It helps to scale in clusters of changing size. However, please keep in mind that you need to cater for the maximum amount of DNS requests as the replicas will not be adapted according to the workload, but only according to the cluster size (cores/nodes).
Trade-Offs in Conjunction with NodeLocalDNS
Using a node-local DNS cache can mitigate a lot of the potential DNS related problems. It works fine with a DNS workload that can be handle through the cache and reduces the inter-node DNS communication. As node-local DNS cache reduces the amount of traffic being sent to the cluster’s CoreDNS replicas, it usually works fine with horizontally scaled CoreDNS. Nevertheless, it also works with CoreDNS scaled in a cluster-proportional approach. In this mode, though, it might make sense to adapt the default settings as the CoreDNS workload is likely significantly reduced.
Overall, you can view the DNS options on a scale. Horizontally scaled DNS provides a small amount of DNS servers. Especially for bigger clusters, a cluster-proportional approach will yield more CoreDNS instances and hence may yield a more balanced DNS solution. By adapting the settings you can further increase the amount of CoreDNS replicas. On the other end of the spectrum, a node-local DNS cache provides DNS on every node and allows to reduce the amount of (backend) CoreDNS instances regardless if they are horizontally or cluster-proportionally scaled.
4.3.2 - Shoot Autoscaling
Auto-Scaling in Shoot Clusters
There are three auto-scaling scenarios of relevance in Kubernetes clusters in general and Gardener shoot clusters in particular:
- Horizontal node auto-scaling, i.e., dynamically adding and removing worker nodes.
- Horizontal pod auto-scaling, i.e., dynamically adding and removing pod replicas.
- Vertical pod auto-scaling, i.e., dynamically raising or shrinking the resource requests/limits of pods.
This document provides an overview of these scenarios and how the respective auto-scaling components can be enabled and configured. For more details, please see our pod auto-scaling best practices.
Horizontal Node Auto-Scaling
Every shoot cluster that has at least one worker pool with minimum < maximum nodes configuration will get a cluster-autoscaler deployment.
Gardener is leveraging the upstream community Kubernetes cluster-autoscaler component.
We have forked it to gardener/autoscaler so that it supports the way how Gardener manages the worker nodes (leveraging gardener/machine-controller-manager).
However, we have not touched the logic how it performs auto-scaling decisions.
Consequently, please refer to the official documentation for this component.
The Shoot API allows to configure a few flags of the cluster-autoscaler:
There are general options for cluster-autoscaler, and these values will be used for all worker groups except for those overwriting them. Additionally, there are some cluster-autoscaler flags to be set per worker pool. They override any general value such as those specified in the general flags above.
Only some
cluster-autoscalerflags can be configured per worker pool, and is limited by NodeGroupAutoscalingOptions of the upstream community Kubernetes repository. This list can be found here.
Horizontal Pod Auto-Scaling
This functionality (HPA) is a standard functionality of any Kubernetes cluster (implemented as part of the kube-controller-manager that all Kubernetes clusters have). It is always enabled.
The Shoot API allows to configure most of the flags of the horizontal-pod-autoscaler.
Vertical Pod Auto-Scaling
This form of auto-scaling (VPA) is enabled by default, but it can be switched off in the Shoot by setting .spec.kubernetes.verticalPodAutoscaler.enabled=false in case you deploy your own VPA into your cluster (having more than one VPA on the same set of pods will lead to issues, eventually).
Gardener is leveraging the upstream community Kubernetes vertical-pod-autoscaler.
If enabled, Gardener will deploy it as part of the control plane into the seed cluster.
It will also be used for the vertical autoscaling of Gardener’s system components deployed into the kube-system namespace of shoot clusters, for example, kube-proxy or metrics-server.
You might want to refer to the official documentation for this component to get more information how to use it.
The Shoot API allows to configure a few flags of the vertical-pod-autoscaler.
⚠️ Please note that if you disable VPA, the related CustomResourceDefinitions (ours and yours) will remain in your shoot cluster (whether someone acts on them or not).
You can delete these CustomResourceDefinitions yourself using kubectl delete crd if you want to get rid of them (in case you statically size all resources, which we do not recommend).
Pod Auto-Scaling Best Practices
Please continue reading our pod auto-scaling best practices for more details and recommendations.
4.3.3 - Shoot Pod Autoscaling Best Practices
Introduction
There are two types of pod autoscaling in Kubernetes: Horizontal Pod Autoscaling (HPA) and Vertical Pod Autoscaling (VPA). HPA (implemented as part of the kube-controller-manager) scales the number of pod replicas, while VPA (implemented as independent community project) adjusts the CPU and memory requests for the pods. Both types of autoscaling aim to optimize resource usage/costs and maintain the performance and (high) availability of applications running on Kubernetes.
Horizontal Pod Autoscaling (HPA)
Horizontal Pod Autoscaling involves increasing or decreasing the number of pod replicas in a deployment, replica set, stateful set, or anything really with a scale subresource that manages pods. HPA adjusts the number of replicas based on specified metrics, such as CPU or memory average utilization (usage divided by requests; most common) or average value (usage; less common). When the demand on your application increases, HPA automatically scales out the number of pods to meet the demand. Conversely, when the demand decreases, it scales in the number of pods to reduce resource usage.
HPA targets (mostly stateless) applications where adding more instances of the application can linearly increase the ability to handle additional load. It is very useful for applications that experience variable traffic patterns, as it allows for real-time scaling without the need for manual intervention.
Note
HPA continuously monitors the metrics of the targeted pods and adjusts the number of replicas based on the observed metrics. It operates solely on the current metrics when it calculates the averages across all pods, meaning it reacts to the immediate resource usage without considering past trends or patterns. Also, all pods are treated equally based on the average metrics. This could potentially lead to situations where some pods are under high load while others are underutilized. Therefore, particular care must be applied to (fair) load-balancing (connection vs. request vs. actual resource load balancing are crucial).
A Few Words on the Cluster-Proportional (Horizontal) Autoscaler (CPA) and the Cluster-Proportional Vertical Autoscaler (CPVA)
Besides HPA and VPA, CPA and CPVA are further options for scaling horizontally or vertically (neither is deployed by Gardener and must be deployed by the user). Unlike HPA and VPA, CPA and CPVA do not monitor the actual pod metrics, but scale solely on the number of nodes or CPU cores in the cluster. While this approach may be helpful and sufficient in a few rare cases, it is often a risky and crude scaling scheme that we do not recommend. More often than not, cluster-proportional scaling results in either under- or over-reserving your resources.
Vertical Pod Autoscaling (VPA)
Vertical Pod Autoscaling, on the other hand, focuses on adjusting the CPU and memory resources allocated to the pods themselves. Instead of changing the number of replicas, VPA tweaks the resource requests (and limits, but only proportionally, if configured) for the pods in a deployment, replica set, stateful set, daemon set, or anything really with a scale subresource that manages pods. This means that each pod can be given more, or fewer resources as needed.
VPA is very useful for optimizing the resource requests of pods that have dynamic resource needs over time. It does so by mutating pod requests (unfortunately, not in-place). Therefore, in order to apply new recommendations, pods that are “out of bounds” (i.e. below a configured/computed lower or above a configured/computed upper recommendation percentile) will be evicted proactively, but also pods that are “within bounds” may be evicted after a grace period. The corresponding higher-level replication controller will then recreate a new pod that VPA will then mutate to set the currently recommended requests (and proportional limits, if configured).
Note
VPA continuously monitors all targeted pods and calculates recommendations based on their usage (one recommendation for the entire target). This calculation is influenced by configurable percentiles, with a greater emphasis on recent usage data and a gradual decrease (=decay) in the relevance of older data. However, this means, that VPA doesn’t take into account individual needs of single pods - eventually, all pods will receive the same recommendation, which may lead to considerable resource waste. Ideally, VPA would update pods in-place depending on their individual needs, but that’s (individual recommendations) not in its design, even if in-place updates get implemented, which may be years away for VPA based on current activity on the component.
Selecting the Appropriate Autoscaler
Before deciding on an autoscaling strategy, it’s important to understand the characteristics of your application:
- Interruptibility: Most importantly, if the clients of your workload are too sensitive to disruptions/cannot cope well with terminating pods, then maybe neither HPA nor VPA is an option (both, HPA and VPA cause pods and connections to be terminated, though VPA even more frequently). Clients must retry on disruptions, which is a reasonable ask in a highly dynamic (and self-healing) environment such as Kubernetes, but this is often not respected (or expected) by your clients (they may not know or care you run the workload in a Kubernetes cluster and have different expectations to the stability of the workload unless you communicated those through SLIs/SLOs/SLAs).
- Statelessness: Is your application stateless or stateful? Stateless applications are typically better candidates for HPA as they can be easily scaled out by adding more replicas without worrying about maintaining state.
- Traffic Patterns: Does your application experience variable traffic? If so, HPA can help manage these fluctuations by adjusting the number of replicas to handle the load.
- Resource Usage: Does your application’s resource usage change over time? VPA can adjust the CPU and memory reservations dynamically, which is beneficial for applications with non-uniform resource requirements.
- Scalability: Can your application handle increased load by scaling vertically (more resources per pod) or does it require horizontal scaling (more pod instances)?
HPA is the right choice if:
- Your application is stateless and can handle increased load by adding more instances.
- You experience short-term fluctuations in traffic that require quick scaling responses.
- You want to maintain a specific performance metric, such as requests per second per pod.
VPA is the right choice if:
- Your application’s resource requirements change over time, and you want to optimize resource usage without manual intervention.
- You want to avoid the complexity of managing resource requests for each pod, especially when they run code where it’s impossible for you to suggest static requests.
In essence:
- For applications that can handle increased load by simply adding more replicas, HPA should be used to handle short-term fluctuations in load by scaling the number of replicas.
- For applications that require more resources per pod to handle additional work, VPA should be used to adjust the resource allocation for longer-term trends in resource usage.
Consequently, if both cases apply (VPA often applies), HPA and VPA can also be combined. However, combining both, especially on the same metrics (CPU and memory), requires understanding and care to avoid conflicts and ensure that the autoscaling actions do not interfere with and rather complement each other. For more details, see Combining HPA and VPA.
Horizontal Pod Autoscaler (HPA)
HPA operates by monitoring resource metrics for all pods in a target. It computes the desired number of replicas from the current average metrics and the desired user-defined metrics as follows:
desiredReplicas = ceil[currentReplicas * (currentMetricValue / desiredMetricValue)]
HPA checks the metrics at regular intervals, which can be configured by the user. Several types of metrics are supported (classical resource metrics like CPU and memory, but also custom and external metrics like requests per second or queue length can be configured, if available). If a scaling event is necessary, HPA adjusts the replica count for the targeted resource.
Defining an HPA Resource
To configure HPA, you need to create an HPA resource in your cluster. This resource specifies the target to scale, the metrics to be used for scaling decisions, and the desired thresholds. Here’s an example of an HPA configuration:
apiVersion: autoscaling/v2
kind: HorizontalPodAutoscaler
metadata:
name: foo-hpa
spec:
scaleTargetRef:
apiVersion: apps/v1
kind: Deployment
name: foo-deployment
minReplicas: 1
maxReplicas: 10
metrics:
- type: Resource
resource:
name: cpu
target:
type: AverageValue
averageValue: 2
- type: Resource
resource:
name: memory
target:
type: AverageValue
averageValue: 8G
behavior:
scaleUp:
stabilizationWindowSeconds: 30
policies:
- type: Percent
value: 100
periodSeconds: 60
scaleDown:
stabilizationWindowSeconds: 1800
policies:
- type: Pods
value: 1
periodSeconds: 300
In this example, HPA is configured to scale foo-deployment based on pod average CPU and memory usage. It will maintain an average CPU and memory usage (not utilization, which is usage divided by requests!) across all replicas of 2 CPUs and 8G or lower with as few replicas as possible. The number of replicas will be scaled between a minimum of 1 and a maximum of 10 based on this target.
Since a while, you can also configure the autoscaling based on the resource usage of individual containers, not only on the resource usage of the entire pod. All you need to do is to switch the type from Resource to ContainerResource and specify the container name.
In the official documentation ([1] and [2]) you will find examples with average utilization (averageUtilization), not average usage (averageValue), but this is not particularly helpful, especially if you plan to combine HPA together with VPA on the same metrics (generally discouraged in the documentation). If you want to safely combine both on the same metrics, you should scale on average usage (averageValue) as shown above. For more details, see Combining HPA and VPA.
Finally, the behavior section influences how fast you scale up and down. Most of the time (depends on your workload), you like to scale out faster than you scale in. In this example, the configuration will trigger a scale-out only after observing the need to scale out for 30s (stabilizationWindowSeconds) and will then only scale out at most 100% (value + type) of the current number of replicas every 60s (periodSeconds). The configuration will trigger a scale-in only after observing the need to scale in for 1800s (stabilizationWindowSeconds) and will then only scale in at most 1 pod (value + type) every 300s (periodSeconds). As you can see, scale-out happens quicker than scale-in in this example.
HPA (actually KCM) Options
HPA is a function of the kube-controller-manager (KCM).
You can read up the full KCM options online and set most of them conveniently in your Gardener shoot cluster spec:
downscaleStabilization(default 5m): HPA will scale out whenever the formula (in accordance with the behavior section, if present in the HPA resource) yields a higher replica count, but it won’t scale in just as eagerly. This option lets you define a trailing time window that HPA must check and only if the recommended replica count is consistently lower throughout the entire time window, HPA will scale in (in accordance with the behavior section, if present in the HPA resource). If at any point in time in that trailing time window the recommended replica count isn’t lower, scale-in won’t happen. This setting is just a default, if nothing is defined in the behavior section of an HPA resource. The default for the upscale stabilization is 0s and it cannot be set via a KCM option (downscale stabilization was historically more important than upscale stabilization and when later the behavior sections were added to the HPA resources, upscale stabilization remained missing from the KCM options).tolerance(default +/-10%): HPA will not scale out or in if the desired replica count is (mathematically as a float) near the actual replica count (see source code for details), which is a form of hysteresis to avoid replica flapping around a threshold.
There are a few more configurable options of lesser interest:
syncPeriod(default 15s): How often HPA retrieves the pods and metrics respectively how often it recomputes and sets the desired replica count.cpuInitializationPeriod(default 30s) andinitialReadinessDelay(default 5m): Both settings only affect whether or not CPU metrics are considered for scaling decisions. They can be easily misinterpreted as the official docs are somewhat hard to read (see source code for details, which is more readable, if you ignore the comments). Normally, you have little reason to modify them, but here is what they do:cpuInitializationPeriod: Defines a grace period after a pod starts during which HPA won’t consider CPU metrics of the pod for scaling if the pod is either not ready or it is ready, but a given CPU metric is older than the last state transition (to ready). This is to ignore CPU metrics that predate the current readiness while still in initialization to not make scaling decisions based on potentially misleading data. If the pod is ready and a CPU metric was collected after it became ready, it is considered also within this grace period.initialReadinessDelay: Defines another grace period after a pod starts during which HPA won’t consider CPU metrics of the pod for scaling if the pod is not ready and it became not ready within this grace period (the docs/comments want to check whether the pod was ever ready, but the code only checks whether the pod condition last transition time to not ready happened within that grace period which it could have from being ready or simply unknown before). This is to ignore not (ever have been) ready pods while still in initialization to not make scaling decisions based on potentially misleading data. If the pod is ready, it is considered also within this grace period.
So, regardless of the values of these settings, if a pod is reporting ready and it has a CPU metric from the time after it became ready, that pod and its metric will be considered. This holds true even if the pod becomes ready very early into its initialization. These settings cannot be used to “black-out” pods for a certain duration before being considered for scaling decisions. Instead, if it is your goal to ignore a potentially resource-intensive initialization phase that could wrongly lead to further scale-out, you would need to configure your pods to not report as ready until that resource-intensive initialization phase is over.
Considerations When Using HPA
- Selection of metrics: Besides CPU and memory, HPA can also target custom or external metrics. Pick those (in addition or exclusively), if you guarantee certain SLOs in your SLAs.
- Targeting usage or utilization: HPA supports usage (absolute) and utilization (relative). Utilization is often preferred in simple examples, but usage is more precise and versatile.
- Compatibility with VPA: Care must be taken when using HPA in conjunction with VPA, as they can potentially interfere with each other’s scaling decisions.
Vertical Pod Autoscaler (VPA)
VPA operates by monitoring resource metrics for all pods in a target. It computes a resource requests recommendation from the historic and current resource metrics. VPA checks the metrics at regular intervals, which can be configured by the user. Only CPU and memory are supported. If VPA detects that a pod’s resource allocation is too high or too low, it may evict pods (if within the permitted disruption budget), which will trigger the creation of a new pod by the corresponding higher-level replication controller, which will then be mutated by VPA to match resource requests recommendation. This happens in three different components that work together:
- VPA Recommender: The Recommender observes the historic and current resource metrics of pods and generates recommendations based on this data.
- VPA Updater: The Updater component checks the recommendations from the Recommender and decides whether any pod’s resource requests need to be updated. If an update is needed, the Updater will evict the pod.
- VPA Admission Controller: When a pod is (re-)created, the Admission Controller modifies the pod’s resource requests based on the recommendations from the Recommender. This ensures that the pod starts with the optimal amount of resources.
Since VPA doesn’t support in-place updates, pods will be evicted. You will want to control voluntary evictions by means of Pod Disruption Budgets (PDBs). Please make yourself familiar with those and use them.
Note
PDBs will not always work as expected and can also get in your way, e.g. if the PDB is violated or would be violated, it may possibly block evictions that would actually help your workload, e.g. to get a pod out of an
OOMKilledCrashLoopBackoff(if the PDB is or would be violated, not even unhealthy pods would be evicted as they could theoretically become healthy again, which VPA doesn’t know). In order to overcome this issue, it is now possible (alpha since Kubernetesv1.26in combination with the feature gatePDBUnhealthyPodEvictionPolicyon the API server, beta and enabled by default since Kubernetesv1.27) to configure the so-called unhealthy pod eviction policy. The default is stillIfHealthyBudgetas a change in default would have changed the behavior (as described above), but you can now also setAlwaysAllowat the PDB (spec.unhealthyPodEvictionPolicy). For more information, please check out this discussion, the PR and this document and balance the pros and cons for yourself. In short, the newAlwaysAllowoption is probably the better choice in most of the cases whileIfHealthyBudgetis useful only if you have frequent temporary transitions or for special cases where you have already implemented controllers that depend on the old behavior.
Defining a VPA Resource
To configure VPA, you need to create a VPA resource in your cluster. This resource specifies the target to scale, the metrics to be used for scaling decisions, and the policies for resource updates. Here’s an example of an VPA configuration:
apiVersion: autoscaling.k8s.io/v1
kind: VerticalPodAutoscaler
metadata:
name: foo-vpa
spec:
targetRef:
apiVersion: "apps/v1"
kind: Deployment
name: foo-deployment
updatePolicy:
updateMode: "Auto"
resourcePolicy:
containerPolicies:
- containerName: foo-container
controlledValues: RequestsOnly
minAllowed:
cpu: 50m
memory: 200M
maxAllowed:
cpu: 4
memory: 16G
In this example, VPA is configured to scale foo-deployment requests (RequestsOnly) from 50m cores (minAllowed) up to 4 cores (maxAllowed) and 200M memory (minAllowed) up to 16G memory (maxAllowed) automatically (updateMode). VPA doesn’t support in-place updates, so in updateMode Auto it will evict pods under certain conditions and then mutate the requests (and possibly limits if you omit controlledValues or set it to RequestsAndLimits, which is the default) of upcoming new pods.
Multiple update modes exist. They influence eviction and mutation. The most important ones are:
Off: In this mode, recommendations are computed, but never applied. This mode is useful, if you want to learn more about your workload or if you have a custom controller that depends on VPA’s recommendations but shall act instead of VPA.Initial: In this mode, recommendations are computed and applied, but pods are never proactively evicted to enforce new recommendations over time. This mode is useful, if you want to control pod evictions yourself (similar to theStatefulSetupdateStrategyOnDelete) or your workload is sensitive to evictions, e.g. some brownfield singleton application or a daemon set pod that is critical for the node.Auto(default): In this mode, recommendations are computed, applied, and pods are even proactively evicted to enforce new recommendations over time. This applies recommendations continuously without you having to worry too much.
As mentioned, controlledValues influences whether only requests or requests and limits are scaled:
RequestsOnly: Updates only requests and doesn’t change limits. Useful if you have defined absolute limits (unrelated to the requests).RequestsAndLimits(default): Updates requests and proportionally scales limits along with the requests. Useful if you have defined relative limits (related to the requests). In this case, the gap between requests and limits should be either zero for QoSGuaranteedor small for QoSBurstableto avoid useless (way beyond the threshold of unhealthy behavior) or absurd (larger than node capacity) values.
VPA doesn’t offer many more settings that can be tuned per VPA resource than you see above (different than HPA’s behavior section). However, there is one more that isn’t shown above, which allows to scale only up or only down (evictionRequirements[].changeRequirement), in case you need that, e.g. to provide resources when needed, but avoid disruptions otherwise.
VPA Options
VPA is an independent community project that consists of a recommender (computing target recommendations and bounds), an updater (evicting pods that are out of recommendation bounds), and an admission controller (mutating webhook applying the target recommendation to newly created pods). As such, they have independent options.
VPA Recommender Options
You can read up the full VPA recommender options online and set some of them conveniently in your Gardener shoot cluster spec:
recommendationMarginFraction(default 15%): Safety margin that will be added to the recommended requests.targetCPUPercentile(default 90%): CPU usage percentile that will be targeted with the CPU recommendation (i.e. recommendation will “fit” e.g. 90% of the observed CPU usages). This setting is relevant for balancing your requests reservations vs. your costs. If you want to reduce costs, you can reduce this value (higher risk because of potential under-reservation, but lower costs), because CPU is compressible, but then VPA may lack the necessary signals for scale-up as throttling on an otherwise fully utilized node will go unnoticed by VPA. If you want to err on the safe side, you can increase this value, but you will then target more and more a worst case scenario, quickly (maybe even exponentially) increasing the costs.targetMemoryPercentile(default 90%): Memory usage percentile that will be targeted with the memory recommendation (i.e. recommendation will “fit” e.g. 90% of the observed memory usages). This setting is relevant for balancing your requests reservations vs. your costs. If you want to reduce costs, you can reduce this value (higher risk because of potential under-reservation, but lower costs), because OOMs will trigger bump-ups, but those will disrupt the workload. If you want to err on the safe side, you can increase this value, but you will then target more and more a worst case scenario, quickly (maybe even exponentially) increasing the costs.
There are a few more configurable options of lesser interest:
recommenderInterval(default 1m): How often VPA retrieves the pods and metrics respectively how often it recomputes the recommendations and bounds.
There are many more options that you can only configure if you deploy your own VPA and which we will not discuss here, but you can check them out here.
Note
Due to an implementation detail (smallest bucket size), VPA cannot create recommendations below 10m cores and 10M memory even if
minAllowedis lower.
VPA Updater Options
You can read up the full VPA updater options online and set some of them conveniently in your Gardener shoot cluster spec:
evictAfterOOMThreshold(default 10m): Pods where at least one container OOMs within this time period since its start will be actively evicted, which will implicitly apply the new target recommendation that will have been bumped up afterOOMKill. Please note, the kubelet may evict pods even before an OOM, but only ifkube-reservedis underrun, i.e. node-level resources are running low. In these cases, eviction will happen first by pod priority and second by how much the usage overruns the requests.evictionTolerance(default 50%): Defines a threshold below which no further eligible pod will be evited anymore, i.e. limits how many eligible pods may be in eviction in parallel (but at least 1). The threshold is computed as follows:running - evicted > replicas - tolerance. Example: 10 replicas, 9 running, 8 eligible for eviction, 20% tolerance with 10 replicas which amounts to 2 pods, and no pod evicted in this round yet, then9 - 0 > 10 - 2is true and a pod would be evicted, but the next one would be in violation as9 - 1 = 10 - 2and no further pod would be evicted anymore in this round.evictionRateBurst(default 1): Defines how many eligible pods may be evicted in one go.evictionRateLimit(default disabled): Defines how many eligible pods may be evicted per second (a value of 0 or -1 disables the rate limiting).
In general, avoid modifying these eviction settings unless you have good reasons and try to rely on Pod Disruption Budgets (PDBs) instead. However, PDBs are not available for daemon sets.
There are a few more configurable options of lesser interest:
updaterInterval(default 1m): How often VPA evicts the pods.
There are many more options that you can only configure if you deploy your own VPA and which we will not discuss here, but you can check them out here.
Considerations When Using VPA
- Initial Resource Estimates: VPA requires historical resource usage data to base its recommendations on. Until they kick in, your initial resource requests apply and should be sensible.
- Pod Disruption: When VPA adjusts the resources for a pod, it may need to “recreate” the pod, which can cause temporary disruptions. This should be taken into account.
- Compatibility with HPA: Care must be taken when using VPA in conjunction with HPA, as they can potentially interfere with each other’s scaling decisions.
Combining HPA and VPA
HPA and VPA serve different purposes and operate on different axes of scaling. HPA increases or decreases the number of pod replicas based on metrics like CPU or memory usage, effectively scaling the application out or in. VPA, on the other hand, adjusts the CPU and memory reservations of individual pods, scaling the application up or down.
When used together, these autoscalers can provide both horizontal and vertical scaling. However, they can also conflict with each other if used on the same metrics (e.g. both on CPU or both on memory). In particular, if VPA adjusts the requests, the utilization, i.e. the ratio between usage and requests, will approach 100% (for various reasons not exactly right, but for this consideration, close enough), which may trigger HPA to scale out, if it’s configured to scale on utilization below 100% (often seen in simple examples), which will spread the load across more pods, which may trigger VPA again to adjust the requests to match the new pod usages.
This is a feedback loop and it stems from HPA’s method of calculating the desired number of replicas, which is:
desiredReplicas = ceil[currentReplicas * (currentMetricValue / desiredMetricValue)]
If desiredMetricValue is utilization and VPA adjusts the requests, which changes the utilization, this may inadvertently trigger HPA and create said feedback loop. On the other hand, if desiredMetricValue is usage and VPA adjusts the requests now, this will have no impact on HPA anymore (HPA will always influence VPA, but we can control whether VPA influences HPA).
Therefore, to safely combine HPA and VPA, consider the following strategies:
- Configure HPA and VPA on different metrics: One way to avoid conflicts is to use HPA and VPA based on different metrics. For instance, you could configure HPA to scale based on requests per seconds (or another representative custom/external metric) and VPA to adjust CPU and memory requests. This way, each autoscaler operates independently based on its specific metric(s).
- Configure HPA to scale on usage, not utilization, when used with VPA: Another way to avoid conflicts is to use HPA not on average utilization (
averageUtilization), but instead on average usage (averageValue) as replicas driver, which is an absolute metric (requests don’t affect usage). This way, you can combine both autoscalers even on the same metrics.
Pod Autoscaling and Cluster Autoscaler
Autoscaling within Kubernetes can be implemented at different levels: pod autoscaling (HPA and VPA) and cluster autoscaling (CA). While pod autoscaling adjusts the number of pod replicas or their resource reservations, cluster autoscaling focuses on the number of nodes in the cluster, so that your pods can be hosted. If your workload isn’t static and especially if you make use of pod autoscaling, it only works if you have sufficient node capacity available. The most effective way to do that, without running a worst-case number of nodes, is to configure burstable worker pools in your shoot spec, i.e. define a true minimum node count and a worst-case maximum node count and leave the node autoscaling to Gardener that internally uses the Cluster Autoscaler to provision and deprovision nodes as needed.
Cluster Autoscaler automatically adjusts the number of nodes by adding or removing nodes based on the demands of the workloads and the available resources. It interacts with the cloud provider’s APIs to provision or deprovision nodes as needed. Cluster Autoscaler monitors the utilization of nodes and the scheduling of pods. If it detects that pods cannot be scheduled due to a lack of resources, it will trigger the addition of new nodes to the cluster. Conversely, if nodes are underutilized for some time and their pods can be placed on other nodes, it will remove those nodes to reduce costs and improve resource efficiency.
Best Practices:
- Resource Buffering: Maintain a buffer of resources to accommodate temporary spikes in demand without waiting for node provisioning. This can be done by deploying pods with low priority that can be preempted when real workloads require resources. This helps in faster pod scheduling and avoids delays in scaling out or up.
- Pod Disruption Budgets (PDBs): Use PDBs to ensure that during scale-down events, the availability of applications is maintained as the Cluster Autoscaler will not voluntarily evict a pod if a PDB would be violated.
Interesting CA Options
CA can be configured in your Gardener shoot cluster spec globally and also in parts per worker pool:
- Can only be configured globally:
expander(default least-waste): Defines the “expander” algorithm to use during scale-up, see FAQ.scaleDownDelayAfterAdd(default 1h): Defines how long after scaling up a node, a node may be scaled down.scaleDownDelayAfterFailure(default 3m): Defines how long after scaling down a node failed, scaling down will be resumed.scaleDownDelayAfterDelete(default 0s): Defines how long after scaling down a node, another node may be scaled down.
- Can be configured globally and also overwritten individually per worker pool:
scaleDownUtilizationThreshold(default 50%): Defines the threshold below which a node becomes eligible for scaling down.scaleDownUnneededTime(default 30m): Defines the trailing time window the node must be consistently below a certain utilization threshold before it can finally be scaled down.
There are many more options that you can only configure if you deploy your own CA and which we will not discuss here, but you can check them out here.
Importance of Monitoring
Monitoring is a critical component of autoscaling for several reasons:
- Performance Insights: It provides insights into how well your autoscaling strategy is meeting the performance requirements of your applications.
- Resource Utilization: It helps you understand resource utilization patterns, enabling you to optimize resource allocation and reduce waste.
- Cost Management: It allows you to track the cost implications of scaling actions, helping you to maintain control over your cloud spending.
- Troubleshooting: It enables you to quickly identify and address issues with autoscaling, such as unexpected scaling behavior or resource bottlenecks.
To effectively monitor autoscaling, you should leverage the following tools and metrics:
- Kubernetes Metrics Server: Collects resource metrics from kubelets and provides them to HPA and VPA for autoscaling decisions (automatically provided by Gardener).
- Prometheus: An open-source monitoring system that can collect and store custom metrics, providing a rich dataset for autoscaling decisions.
- Grafana/Plutono: A visualization tool that integrates with Prometheus to create dashboards for monitoring autoscaling metrics and events.
- Cloud Provider Tools: Most cloud providers offer native monitoring solutions that can be used to track the performance and costs associated with autoscaling.
Key metrics to monitor include:
- CPU and Memory Utilization: Track the resource utilization of your pods and nodes to understand how they correlate with scaling events.
- Pod Count: Monitor the number of pod replicas over time to see how HPA is responding to changes in load.
- Scaling Events: Keep an eye on scaling events triggered by HPA and VPA to ensure they align with expected behavior.
- Application Performance Metrics: Track application-specific metrics such as response times, error rates, and throughput.
Based on the insights gained from monitoring, you may need to adjust your autoscaling configurations:
- Refine Thresholds: If you notice frequent scaling actions or periods of underutilization or overutilization, adjust the thresholds used by HPA and VPA to better match the workload patterns.
- Update Policies: Modify VPA update policies if you observe that the current settings are causing too much or too little pod disruption.
- Custom Metrics: If using custom metrics, ensure they accurately reflect the load on your application and adjust them if they do not.
- Scaling Limits: Review and adjust the minimum and maximum scaling limits to prevent over-scaling or under-scaling based on the capacity of your cluster and the criticality of your applications.
Quality of Service (QoS)
A few words on the quality of service for pods. Basically, there are 3 classes of QoS and they influence the eviction of pods when kube-reserved is underrun, i.e. node-level resources are running low:
BestEffort, i.e. pods where no container has CPU or memory requests or limits: Avoid them unless you have really good reasons. The kube-scheduler will place them just anywhere according to its policy, e.g.balancedorbin-packing, but whatever resources these pods consume, may bring other pods into trouble or even the kubelet and the container runtime itself, if it happens very suddenly.Burstable, i.e. pods where at least one container has CPU or memory requests and at least one has no limits or limits that don’t match the requests: Prefer them unless you have really good reasons for the other QoS classes. Always specify proper requests or use VPA to recommend those. This helps the kube-scheduler to make the right scheduling decisions. Not having limits will additionally provide upward resource flexibility, if the node is not under pressure.Guaranteed, i.e. pods where all containers have CPU and memory requests and equal limits: Avoid them unless you really know the limits or throttling/killing is intended. While “Guaranteed” sounds like something “positive” in the English language, this class comes with the downside, that pods will be actively CPU-throttled and will actively go OOM, even if the node is not under pressure and has excess capacity left. Worse, if containers in the pod are under VPA, their CPU requests/limits will often not be scaled up as CPU throttling will go unnoticed by VPA.
Summary
- As a rule of thumb, always set CPU and memory requests (or let VPA do that) and always avoid CPU and memory limits.
- CPU limits aren’t helpful on an under-utilized node (=may result in needless outages) and even suppress the signals for VPA to act. On a nearly or fully utilized node, CPU limits are practically irrelevant as only the requests matter, which are translated into CPU shares that provide a fair use of the CPU anyway (see CFS).
Therefore, if you do not know the healthy range, do not set CPU limits. If you as author of the source code know its healthy range, set them to the upper threshold of that healthy range (everything above, from your knowledge of that code, is definitely an unbound busy loop or similar, which is the main reason for CPU limits, besides batch jobs where throttling is acceptable or even desired). - Memory limits may be more useful, but suffer a similar, though not as negative downside. As with CPU limits, memory limits aren’t helpful on an under-utilized node (=may result in needless outages), but different than CPU limits, they result in an OOM, which triggers VPA to provide more memory suddenly (modifies the currently computed recommendations by a configurable factor, defaulting to +20%, see docs).
Therefore, if you do not know the healthy range, do not set memory limits. If you as author of the source code know its healthy range, set them to the upper threshold of that healthy range (everything above, from your knowledge of that code, is definitely an unbound memory leak or similar, which is the main reason for memory limits)
- CPU limits aren’t helpful on an under-utilized node (=may result in needless outages) and even suppress the signals for VPA to act. On a nearly or fully utilized node, CPU limits are practically irrelevant as only the requests matter, which are translated into CPU shares that provide a fair use of the CPU anyway (see CFS).
- Horizontal Pod Autoscaling (HPA): Use for pods that support horizontal scaling. Prefer scaling on usage, not utilization, as this is more predictable (not dependent on a second variable, namely the current requests) and conflict-free with vertical pod autoscaling (VPA).
- As a rule of thumb, set the initial replicas to the 5th percentile of the actually observed replica count in production. Since HPA reacts fast, this is not as critical, but may help reduce initial load on the control plane early after deployment. However, be cautious when you update the higher-level resource not to inadvertently reset the current HPA-controlled replica count (very easy to make mistake that can lead to catastrophic loss of pods). HPA modifies the replica count directly in the spec and you do not want to overwrite that. Even if it reacts fast, it is not instant (not via a mutating webhook as VPA operates) and the damage may already be done.
- As for minimum and maximum, let your high availability requirements determine the minimum and your theoretical maximum load determine the maximum, flanked with alerts to detect erroneous run-away out-scaling or the actual nearing of your practical maximum load, so that you can intervene.
- Vertical Pod Autoscaling (VPA): Use for containers that have a significant usage (e.g. any container above 50m CPU or 100M memory) and a significant usage spread over time (by more than 2x), i.e. ignore small (e.g. side-cars) or static (e.g. Java statically allocated heap) containers, but otherwise use it to provide the resources needed on the one hand and keep the costs in check on the other hand.
- As a rule of thumb, set the initial requests to the 5th percentile of the actually observed CPU resp. memory usage in production. Since VPA may need some time at first to respond and evict pods, this is especially critical early after deployment. The lower bound, below which pods will be immediately evicted, converges much faster than the upper bound, above which pods will be immediately evicted, but it isn’t instant, e.g. after 5 minutes the lower bound is just at 60% of the computed lower bound; after 12 hours the upper bound is still at 300% of the computed upper bound (see code). Unlike with HPA, you don’t need to be as cautious when updating the higher-level resource in the case of VPA. As long as VPA’s mutating webhook (VPA Admission Controller) is operational (which also the VPA Updater checks before evicting pods), it’s generally safe to update the higher-level resource. However, if it’s not up and running, any new pods that are spawned (e.g. as a consequence of a rolling update of the higher-level resource or for any other reason) will not be mutated. Instead, they will receive whatever requests are currently configured at the higher-level resource, which can lead to catastrophic resource under-reservation. Gardener deploys the VPA Admission Controller in HA - if unhealthy, it is reported under the
ControlPlaneHealthyshoot status condition. - As a rule of thumb, for a container under VPA always specify initial resource requests for the resources which are controlled by VPA (the
controlledResourcesfield; by default both cpu and memory are controlled). vpa-updater evicts immediately if a container does not specify initial resource requests for a resource controlled by VPA (see code). - As a rule of thumb, for a container under VPA do not set initial requests less than VPA’s
minAllowedor vpa-recommender’s Pod minimum recommendation (10mand10Mi). In Gardener, vpa-recommender is configured to run with--pod-recommendation-min-cpu-millicores=10and--pod-recommendation-min-memory-mb=10(see code). These values are synced with the smallest histogram bucket sizes -10mand10M(see VPA Recommender Options). Note that the--pod-recommendation-min-memory-mbflag is in mebibytes, not megabytes (see code). If a Pod has a container under VPA with resource requests less than the VPA’sminAllowedor10mand10Mi, the Pod will be evicted immediately. The reason is that the VPA’s lower bound recommendation is set tominAllowedor10mand10Mi. vpa-updater evicts immediately if the container’s resource requests are “out of bounds” (in this particular case - less than the lower bound). - If you have defined absolute limits (unrelated to the requests), configure VPA to only scale the requests or else it will proportionally scale the limits as well, which can easily become useless (way beyond the threshold of unhealthy behavior) or absurd (larger than node capacity):
If you have defined relative limits (related to the requests), the default policy to scale the limits proportionally with the requests is fine, but the gap between requests and limits must be zero for QoSspec: resourcePolicy: containerPolicies: - controlledValues: RequestsOnly ...Guaranteedand should best be small for QoSBurstableto avoid useless or absurd limits either, e.g. prefer limits being 5 to at most 20% larger than requests as opposed to being 100% larger or more. - As a rule of thumb, set
minAllowedto the highest observed VPA recommendation (usually during the initialization phase or during any periodical activity) for an otherwise practically idle container, so that you avoid needless trashing (e.g. resource usage calms down over time and recommendations drop consecutively until eviction, which will then lead again to initialization or later periodical activity and higher recommendations and new evictions).
⚠️ You may want to provide higherminAllowedvalues, if you observe that up-scaling takes too long for CPU or memory for a too large percentile of your workload. This will get you out of the danger zone of too few resources for too many pods at the expense of providing too many resources for a few pods. Memory may react faster than CPU, because CPU throttling is not visible and memory gets aided by OOM bump-up incidents, but still, if you observe that up-scaling takes too long, you may want to increaseminAllowedaccordingly. - As a rule of thumb, set
maxAllowedto your theoretical maximum load, flanked with alerts to detect erroneous run-away usage or the actual nearing of your practical maximum load, so that you can intervene. However, VPA can easily recommend requests larger than what is allocatable on a node, so you must either ensure large enough nodes (Gardener can scale up from zero, in case you like to define a low-priority worker pool with more resources for very large pods) and/or cap VPA’s target recommendations usingmaxAllowedat the node allocatable remainder (after daemon set pods) of the largest eligible machine type (may result in under-provisioning resources for a pod). Use your monitoring and check maximum pod usage to decide about the maximum machine type.
Recommendations in a Box
| Container | When to use | Value |
|---|---|---|
| Requests | - Set them (recommended) unless: - Do not set requests for QoS BestEffort; useful only if pod can be evicted as often as needed and pod can pick up where it left off without any penalty | Set requests to 95th percentile (w/o VPA) of the actually observed CPU resp. memory usage in production resp. 5th percentile (w/ VPA) (see below) |
| Limits | - Avoid them (recommended) unless: - Set limits for QoS Guaranteed; useful only if pod has strictly static resource requirements- Set CPU limits if you want to throttle CPU usage for containers that can be throttled w/o any other disadvantage than processing time (never do that when time-critical operations like leases are involved) - Set limits if you know the healthy range and want to shield against unbound busy loops, unbound memory leaks, or similar | If you really can (otherwise not), set limits to healthy theoretical max load |
| Scaler | When to use | Initial | Minimum | Maximum |
|---|---|---|---|---|
| HPA | Use for pods that support horizontal scaling | Set initial replicas to 5th percentile of the actually observed replica count in production (prefer scaling on usage, not utilization) and make sure to never overwrite it later when controlled by HPA | Set minReplicas to 0 (requires feature gate and custom/external metrics), to 1 (regular HPA minimum), or whatever the high availability requirements of the workload demand | Set maxReplicas to healthy theoretical max load |
| VPA | Use for containers that have a significant usage (>50m/100M) and a significant usage spread over time (>2x) | Set initial requests to 5th percentile of the actually observed CPU resp. memory usage in production | Set minAllowed to highest observed VPA recommendation (includes start-up phase) for an otherwise practically idle container (avoids pod trashing when pod gets evicted after idling) | Set maxAllowed to fresh node allocatable remainder after daemonset pods (avoids pending pods when requests exceed fresh node allocatable remainder) or, if you really can (otherwise not), to healthy theoretical max load (less disruptive than limits as no throttling or OOM happens on under-utilized nodes) |
| CA | Use for dynamic workloads, definitely if you use HPA and/or VPA | N/A | Set minimum to 0 or number of nodes required right after cluster creation or wake-up | Set maximum to healthy theoretical max load |
Note
Theoretical max load may be very difficult to ascertain, especially with modern software that consists of building blocks you do not own or know in detail. If you have comprehensive monitoring in place, you may be tempted to pick the observed maximum and add a safety margin or even factor on top (2x, 4x, or any other number), but this is not to be confused with “theoretical max load” (solely depending on the code, not observations from the outside). At any point in time, your numbers may change, e.g. because you updated a software component or your usage increased. If you decide to use numbers that are set based only on observations, make sure to flank those numbers with monitoring alerts, so that you have sufficient time to investigate, revise, and readjust if necessary.
Conclusion
Pod autoscaling is a dynamic and complex aspect of Kubernetes, but it is also one of the most powerful tools at your disposal for maintaining efficient, reliable, and cost-effective applications. By carefully selecting the appropriate autoscaler, setting well-considered thresholds, and continuously monitoring and adjusting your strategies, you can ensure that your Kubernetes deployments are well-equipped to handle your resource demands while not over-paying for the provided resources at the same time.
As Kubernetes continues to evolve (e.g. in-place updates) and as new patterns and practices emerge, the approaches to autoscaling may also change. However, the principles discussed above will remain foundational to creating scalable and resilient Kubernetes workloads. Whether you’re a developer or operations engineer, a solid understanding of pod autoscaling will be instrumental in the successful deployment and management of containerized applications.
4.4 - Concepts
4.4.1 - APIServer Admission Plugins
Overview
Similar to the kube-apiserver, the gardener-apiserver comes with a few in-tree managed admission plugins. If you want to get an overview of the what and why of admission plugins then this document might be a good start.
This document lists all existing admission plugins with a short explanation of what it is responsible for.
BackupBucketValidator
(enabled by default)
This admission controller reacts on CREATE and UPDATE operations for BackupBucketss.
When the backup bucket is using WorkloadIdentity as backup credentials, the plugin ensures the backup bucket and the workload identity have the same provider type, i.e. backupBucket.spec.provider.type and workloadIdentity.spec.targetSystem.type have the same value.
ClusterOpenIDConnectPreset, OpenIDConnectPreset
(both enabled by default)
These admission controllers react on CREATE operations for Shoots.
If the Shoot does not specify any OIDC configuration (.spec.kubernetes.kubeAPIServer.oidcConfig=nil), then it tries to find a matching ClusterOpenIDConnectPreset or OpenIDConnectPreset, respectively.
If there are multiple matches, then the one with the highest weight “wins”.
In this case, the admission controller will default the OIDC configuration in the Shoot.
ControllerRegistrationResources
(enabled by default)
This admission controller reacts on CREATE and UPDATE operations for ControllerRegistrations.
It validates that there exists only one ControllerRegistration in the system that is primarily responsible for a given kind/type resource combination.
This prevents misconfiguration by the Gardener administrator/operator.
CustomVerbAuthorizer
(enabled by default)
This admission controller reacts on CREATE and UPDATE operations for Projects and NamespacedCloudProfiles.
For Projects it validates whether the user is bound to an RBAC role with the modify-spec-tolerations-whitelist verb in case the user tries to change the .spec.tolerations.whitelist field of the respective Project resource.
Usually, regular project members are not bound to this custom verb, allowing the Gardener administrator to manage certain toleration whitelists on Project basis.
For NamespacedCloudProfiles, the modification of specific fields also require the user to be bound to an RBAC role with custom verbs.
Please see this document for more information.
DeletionConfirmation
(enabled by default)
This admission controller reacts on DELETE operations for Projects, Shoots, and ShootStates.
It validates that the respective resource is annotated with a deletion confirmation annotation, namely confirmation.gardener.cloud/deletion=true.
Only if this annotation is present it allows the DELETE operation to pass.
This prevents users from accidental/undesired deletions.
In addition, it applies the “four-eyes principle for deletion” concept if the Project is configured accordingly.
Find all information about it in this document.
Furthermore, this admission controller reacts on CREATE or UPDATE operations for Shoots.
It makes sure that the deletion.gardener.cloud/confirmed-by annotation is properly maintained in case the Shoot deletion is confirmed with above mentioned annotation.
ExposureClass
(enabled by default)
This admission controller reacts on Create operations for Shoots.
It mutates Shoot resources which have an ExposureClass referenced by merging both their shootSelectors and/or tolerations into the Shoot resource.
ExtensionValidator
(enabled by default)
This admission controller reacts on CREATE and UPDATE operations for BackupEntrys, BackupBuckets, Seeds, and Shoots.
For all the various extension types in the specifications of these objects, it validates whether there exists a ControllerRegistration in the system that is primarily responsible for the stated extension type(s).
This prevents misconfigurations that would otherwise allow users to create such resources with extension types that don’t exist in the cluster, effectively leading to failing reconciliation loops.
ExtensionLabels
(enabled by default)
This admission controller reacts on CREATE and UPDATE operations for BackupBuckets, BackupEntrys, CloudProfiles, NamespacedCloudProfiles, Seeds, SecretBindings, CredentialsBindings, WorkloadIdentitys and Shoots. For all the various extension types in the specifications of these objects, it adds a corresponding label in the resource. This would allow extension admission webhooks to filter out the resources they are responsible for and ignore all others. This label is of the form <extension-type>.extensions.gardener.cloud/<extension-name> : "true". For example, an extension label for provider extension type aws, looks like provider.extensions.gardener.cloud/aws : "true".
FinalizerRemoval
(enabled by default)
This admission controller reacts on UPDATE operations for CredentialsBindings, SecretBindings, Shoots.
It ensures that the finalizers of these resources are not removed by users, as long as the affected resource is still in use.
For CredentialsBindings and SecretBindings this means, that the gardener finalizer can only be removed if the binding is not referenced by any Shoot.
In case of Shoots, the gardener finalizer can only be removed if the last operation of the Shoot indicates a successful deletion.
ProjectValidator
(enabled by default)
This admission controller reacts on CREATE and UPDATE operations for Projects.
It prevents creating Projects with a non-empty .spec.namespace if the value in .spec.namespace does not start with garden-.
In addition, the project specification is initialized during creation:
.spec.createdByis set to the user creating the project..spec.ownerdefaults to the value of.spec.createdByif it is not specified.
During subsequent updates, it ensures that the project owner is included in the .spec.members list.
ResourceQuota
(enabled by default)
This admission controller enables object count ResourceQuotas for Gardener resources, e.g. Shoots, SecretBindings, Projects, etc.
⚠️ In addition to this admission plugin, the ResourceQuota controller must be enabled for the Kube-Controller-Manager of your Garden cluster.
ResourceReferenceManager
(enabled by default)
This admission controller reacts on CREATE and UPDATE operations for CloudProfiles, Projects, SecretBindings, Seeds, and Shoots.
Generally, it checks whether referred resources stated in the specifications of these objects exist in the system (e.g., if a referenced Secret exists).
However, it also has some special behaviours for certain resources:
CloudProfiles: It rejects removing Kubernetes or machine image versions if there is at least oneShootthat refers to them.
SeedValidator
(enabled by default)
This admission controller reacts on CREATE, UPDATE, and DELETE operations for Seeds.
Rejects the deletion if Shoot(s) reference the seed cluster.
While the seed is still used by Shoot(s), the plugin disallows removal of entries from the seed.spec.provider.zones field.
When the seed is using WorkloadIdentity as backup credentials, the plugin ensures the seed backup and the workload identity have the same provider type, i.e. seed.spec.backup.provider and workloadIdentity.spec.targetSystem.type have the same value.
SeedMutator
(enabled by default)
This admission controller reacts on CREATE and UPDATE operations for Seeds.
It maintains the name.seed.gardener.cloud/<name> labels for it.
More specifically, it adds that the name.seed.gardener.cloud/<name>=true label where <name> is
- the name of the
Seedresource (aSeednamedfoowill get labelname.seed.gardener.cloud/foo=true). - the name of the parent
Seedresource in case it is aManagedSeed(aSeednamedfoothat is created by aManagedSeedwhich references aShootrunning aSeedcalledbarwill get labelname.seed.gardener.cloud/bar=true).
ShootDNS
(enabled by default)
This admission controller reacts on CREATE and UPDATE operations for Shoots.
It tries to assign a default domain to the Shoot.
It also validates the DNS configuration (.spec.dns) for shoots.
ShootNodeLocalDNSEnabledByDefault
(disabled by default)
This admission controller reacts on CREATE operations for Shoots.
If enabled, it will enable node local dns within the shoot cluster (for more information, see NodeLocalDNS Configuration) by setting spec.systemComponents.nodeLocalDNS.enabled=true for newly created Shoots.
Already existing Shoots and new Shoots that explicitly disable node local dns (spec.systemComponents.nodeLocalDNS.enabled=false)
will not be affected by this admission plugin.
ShootQuotaValidator
(enabled by default)
This admission controller reacts on CREATE and UPDATE operations for Shoots.
It validates the resource consumption declared in the specification against applicable Quota resources.
Only if the applicable Quota resources admit the configured resources in the Shoot then it allows the request.
Applicable Quotas are referred in the SecretBinding that is used by the Shoot.
ShootResourceReservation
(enabled by default)
This admission controller reacts on CREATE and UPDATE operations for Shoots.
It injects the Kubernetes.Kubelet.KubeReserved setting for kubelet either as global setting for a shoot or on a per worker pool basis.
If the admission configuration (see this example) for the ShootResourceReservation plugin contains useGKEFormula: false (the default), then it sets a static default resource reservation for the shoot.
If useGKEFormula: true is set, then the plugin injects resource reservations based on the machine type similar to GKE’s formula for resource reservation into each worker pool.
Already existing resource reservations are not modified; this also means that resource reservations are not automatically updated if the machine type for a worker pool is changed.
If a shoot contains global resource reservations, then no per worker pool resource reservations are injected.
By default, useGKEFormula: true applies to all Shoots.
Operators can provide an optional label selector via the selector field to limit which Shoots get worker specific resource reservations injected.
ShootVPAEnabledByDefault
(disabled by default)
This admission controller reacts on CREATE operations for Shoots.
If enabled, it will enable the managed VerticalPodAutoscaler components (for more information, see Vertical Pod Auto-Scaling)
by setting spec.kubernetes.verticalPodAutoscaler.enabled=true for newly created Shoots.
Already existing Shoots and new Shoots that explicitly disable VPA (spec.kubernetes.verticalPodAutoscaler.enabled=false)
will not be affected by this admission plugin.
ShootTolerationRestriction
(enabled by default)
This admission controller reacts on CREATE and UPDATE operations for Shoots.
It validates the .spec.tolerations used in Shoots against the whitelist of its Project, or against the whitelist configured in the admission controller’s configuration, respectively.
Additionally, it defaults the .spec.tolerations in Shoots with those configured in its Project, and those configured in the admission controller’s configuration, respectively.
ShootValidator
(enabled by default)
This admission controller reacts on CREATE, UPDATE and DELETE operations for Shoots.
It validates certain configurations in the specification against the referred CloudProfile (e.g., machine images, machine types, used Kubernetes version, …).
Generally, it performs validations that cannot be handled by the static API validation due to their dynamic nature (e.g., when something needs to be checked against referred resources).
Additionally, it takes over certain defaulting tasks (e.g., default machine image for worker pools, default Kubernetes version) and setting the gardener.cloud/created-by=<username> annotation for newly created Shoot resources.
ShootManagedSeed
(enabled by default)
This admission controller reacts on UPDATE and DELETE operations for Shoots.
It validates certain configuration values in the specification that are specific to ManagedSeeds (e.g. the nginx-addon of the Shoot has to be disabled, the Shoot VPA has to be enabled).
It rejects the deletion if the Shoot is referred to by a ManagedSeed.
ManagedSeedValidator
(enabled by default)
This admission controller reacts on CREATE and UPDATE operations for ManagedSeedss.
It validates certain configuration values in the specification against the referred Shoot, for example Seed provider, network ranges, DNS domain, etc.
Similar to ShootValidator, it performs validations that cannot be handled by the static API validation due to their dynamic nature.
Additionally, it performs certain defaulting tasks, making sure that configuration values that are not specified are defaulted to the values of the referred Shoot, for example Seed provider, network ranges, DNS domain, etc.
ManagedSeedShoot
(enabled by default)
This admission controller reacts on DELETE operations for ManagedSeeds.
It rejects the deletion if there are Shoots that are scheduled onto the Seed that is registered by the ManagedSeed.
ShootDNSRewriting
(disabled by default)
This admission controller reacts on CREATE operations for Shoots.
If enabled, it adds a set of common suffixes configured in its admission plugin configuration to the Shoot (spec.systemComponents.coreDNS.rewriting.commonSuffixes) (for more information, see DNS Search Path Optimization).
Already existing Shoots will not be affected by this admission plugin.
NamespacedCloudProfileValidator
(enabled by default)
This admission controller reacts on CREATE and UPDATE operations for NamespacedCloudProfiles.
It primarily validates if the referenced parent CloudProfile exists in the system. In addition, the admission controller ensures that the NamespacedCloudProfile only configures new machine types, and does not overwrite those from the parent CloudProfile.
4.4.2 - Architecture
Official Definition - What is Kubernetes?
“Kubernetes is an open-source system for automating deployment, scaling, and management of containerized applications.”
Introduction - Basic Principle
The foundation of the Gardener (providing Kubernetes Clusters as a Service) is Kubernetes itself, because Kubernetes is the go-to solution to manage software in the Cloud, even when it’s Kubernetes itself (see also OpenStack which is provisioned more and more on top of Kubernetes as well).
While self-hosting, meaning to run Kubernetes components inside Kubernetes, is a popular topic in the community, we apply a special pattern catering to the needs of our cloud platform to provision hundreds or even thousands of clusters. We take a so-called “seed” cluster and seed the control plane (such as the API server, scheduler, controllers, etcd persistence and others) of an end-user cluster, which we call “shoot” cluster, as pods into the “seed” cluster. That means that one “seed” cluster, of which we will have one per IaaS and region, hosts the control planes of multiple “shoot” clusters. That allows us to avoid dedicated hardware/virtual machines for the “shoot” cluster control planes. We simply put the control plane into pods/containers and since the “seed” cluster watches them, they can be deployed with a replica count of 1 and only need to be scaled out when the control plane gets under pressure, but no longer for HA reasons. At the same time, the deployments get simpler (standard Kubernetes deployment) and easier to update (standard Kubernetes rolling update). The actual “shoot” cluster consists only of the worker nodes (no control plane) and therefore the users may get full administrative access to their clusters.
Setting The Scene - Components and Procedure
We provide a central operator UI, which we call the “Gardener Dashboard”. It talks to a dedicated cluster, which we call the “Garden” cluster, and uses custom resources managed by an aggregated API server (one of the general extension concepts of Kubernetes) to represent “shoot” clusters. In this “Garden” cluster runs the “Gardener”, which is basically a Kubernetes controller that watches the custom resources and acts upon them, i.e. creates, updates/modifies, or deletes “shoot” clusters. The creation follows basically these steps:
- Create a namespace in the “seed” cluster for the “shoot” cluster, which will host the “shoot” cluster control plane.
- Generate secrets and credentials, which the worker nodes will need to talk to the control plane.
- Create the infrastructure (using Terraform), which basically consists out of the network setup.
- Deploy the “shoot” cluster control plane into the “shoot” namespace in the “seed” cluster, containing the “machine-controller-manager” pod.
- Create machine CRDs in the “seed” cluster, describing the configuration and the number of worker machines for the “shoot” (the machine-controller-manager watches the CRDs and creates virtual machines out of it).
- Wait for the “shoot” cluster API server to become responsive (pods will be scheduled, persistent volumes and load balancers are created by Kubernetes via the respective cloud provider).
- Finally, we deploy
kube-systemdaemons likekube-proxyand further add-ons like thedashboardinto the “shoot” cluster and the cluster becomes active.
Overview Architecture Diagram
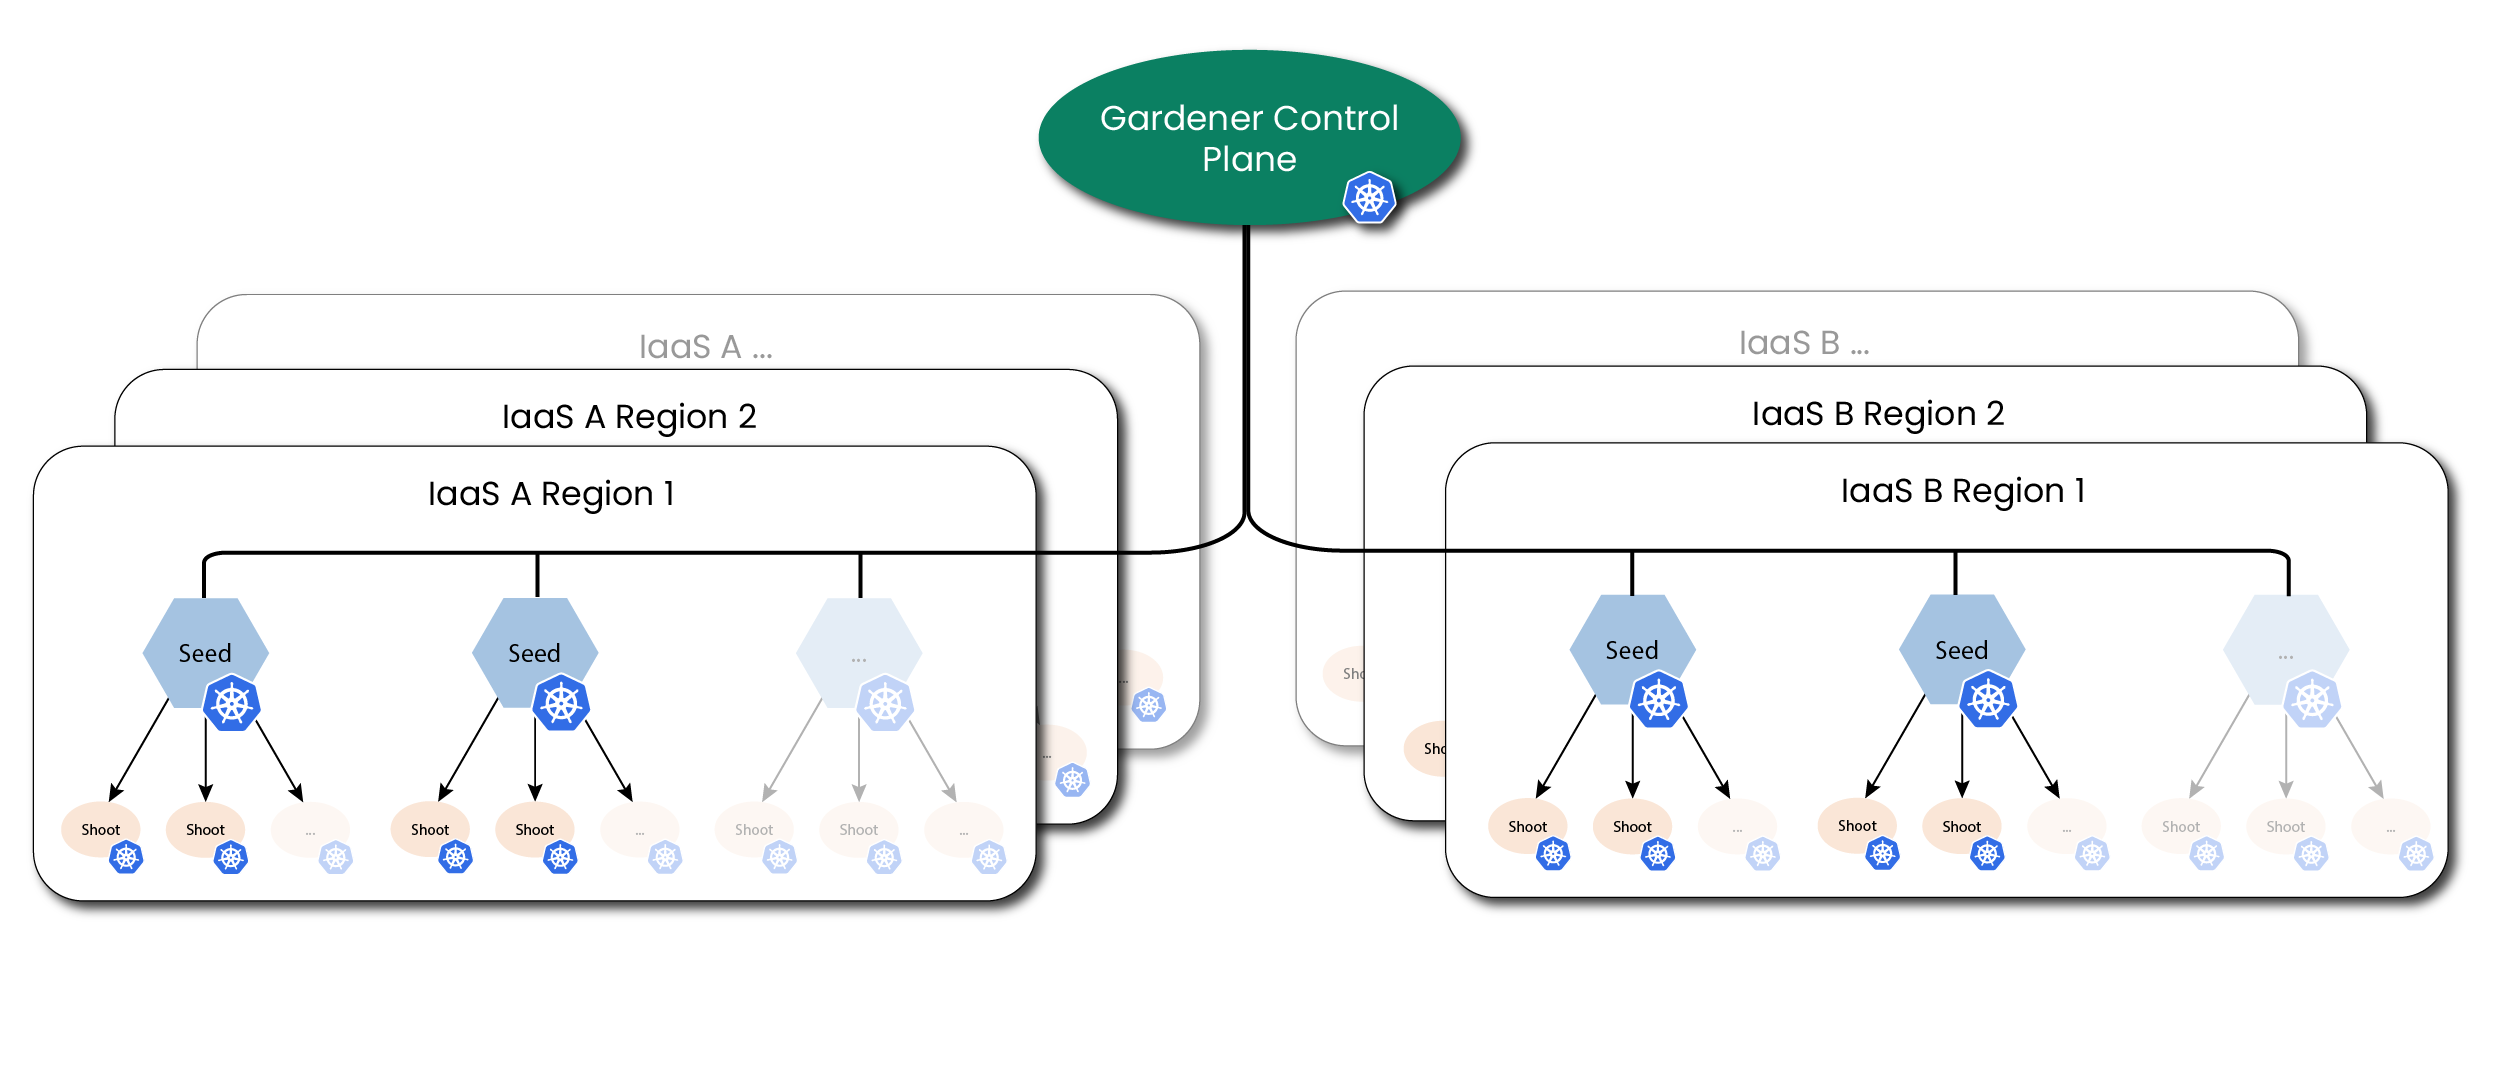
Detailed Architecture Diagram
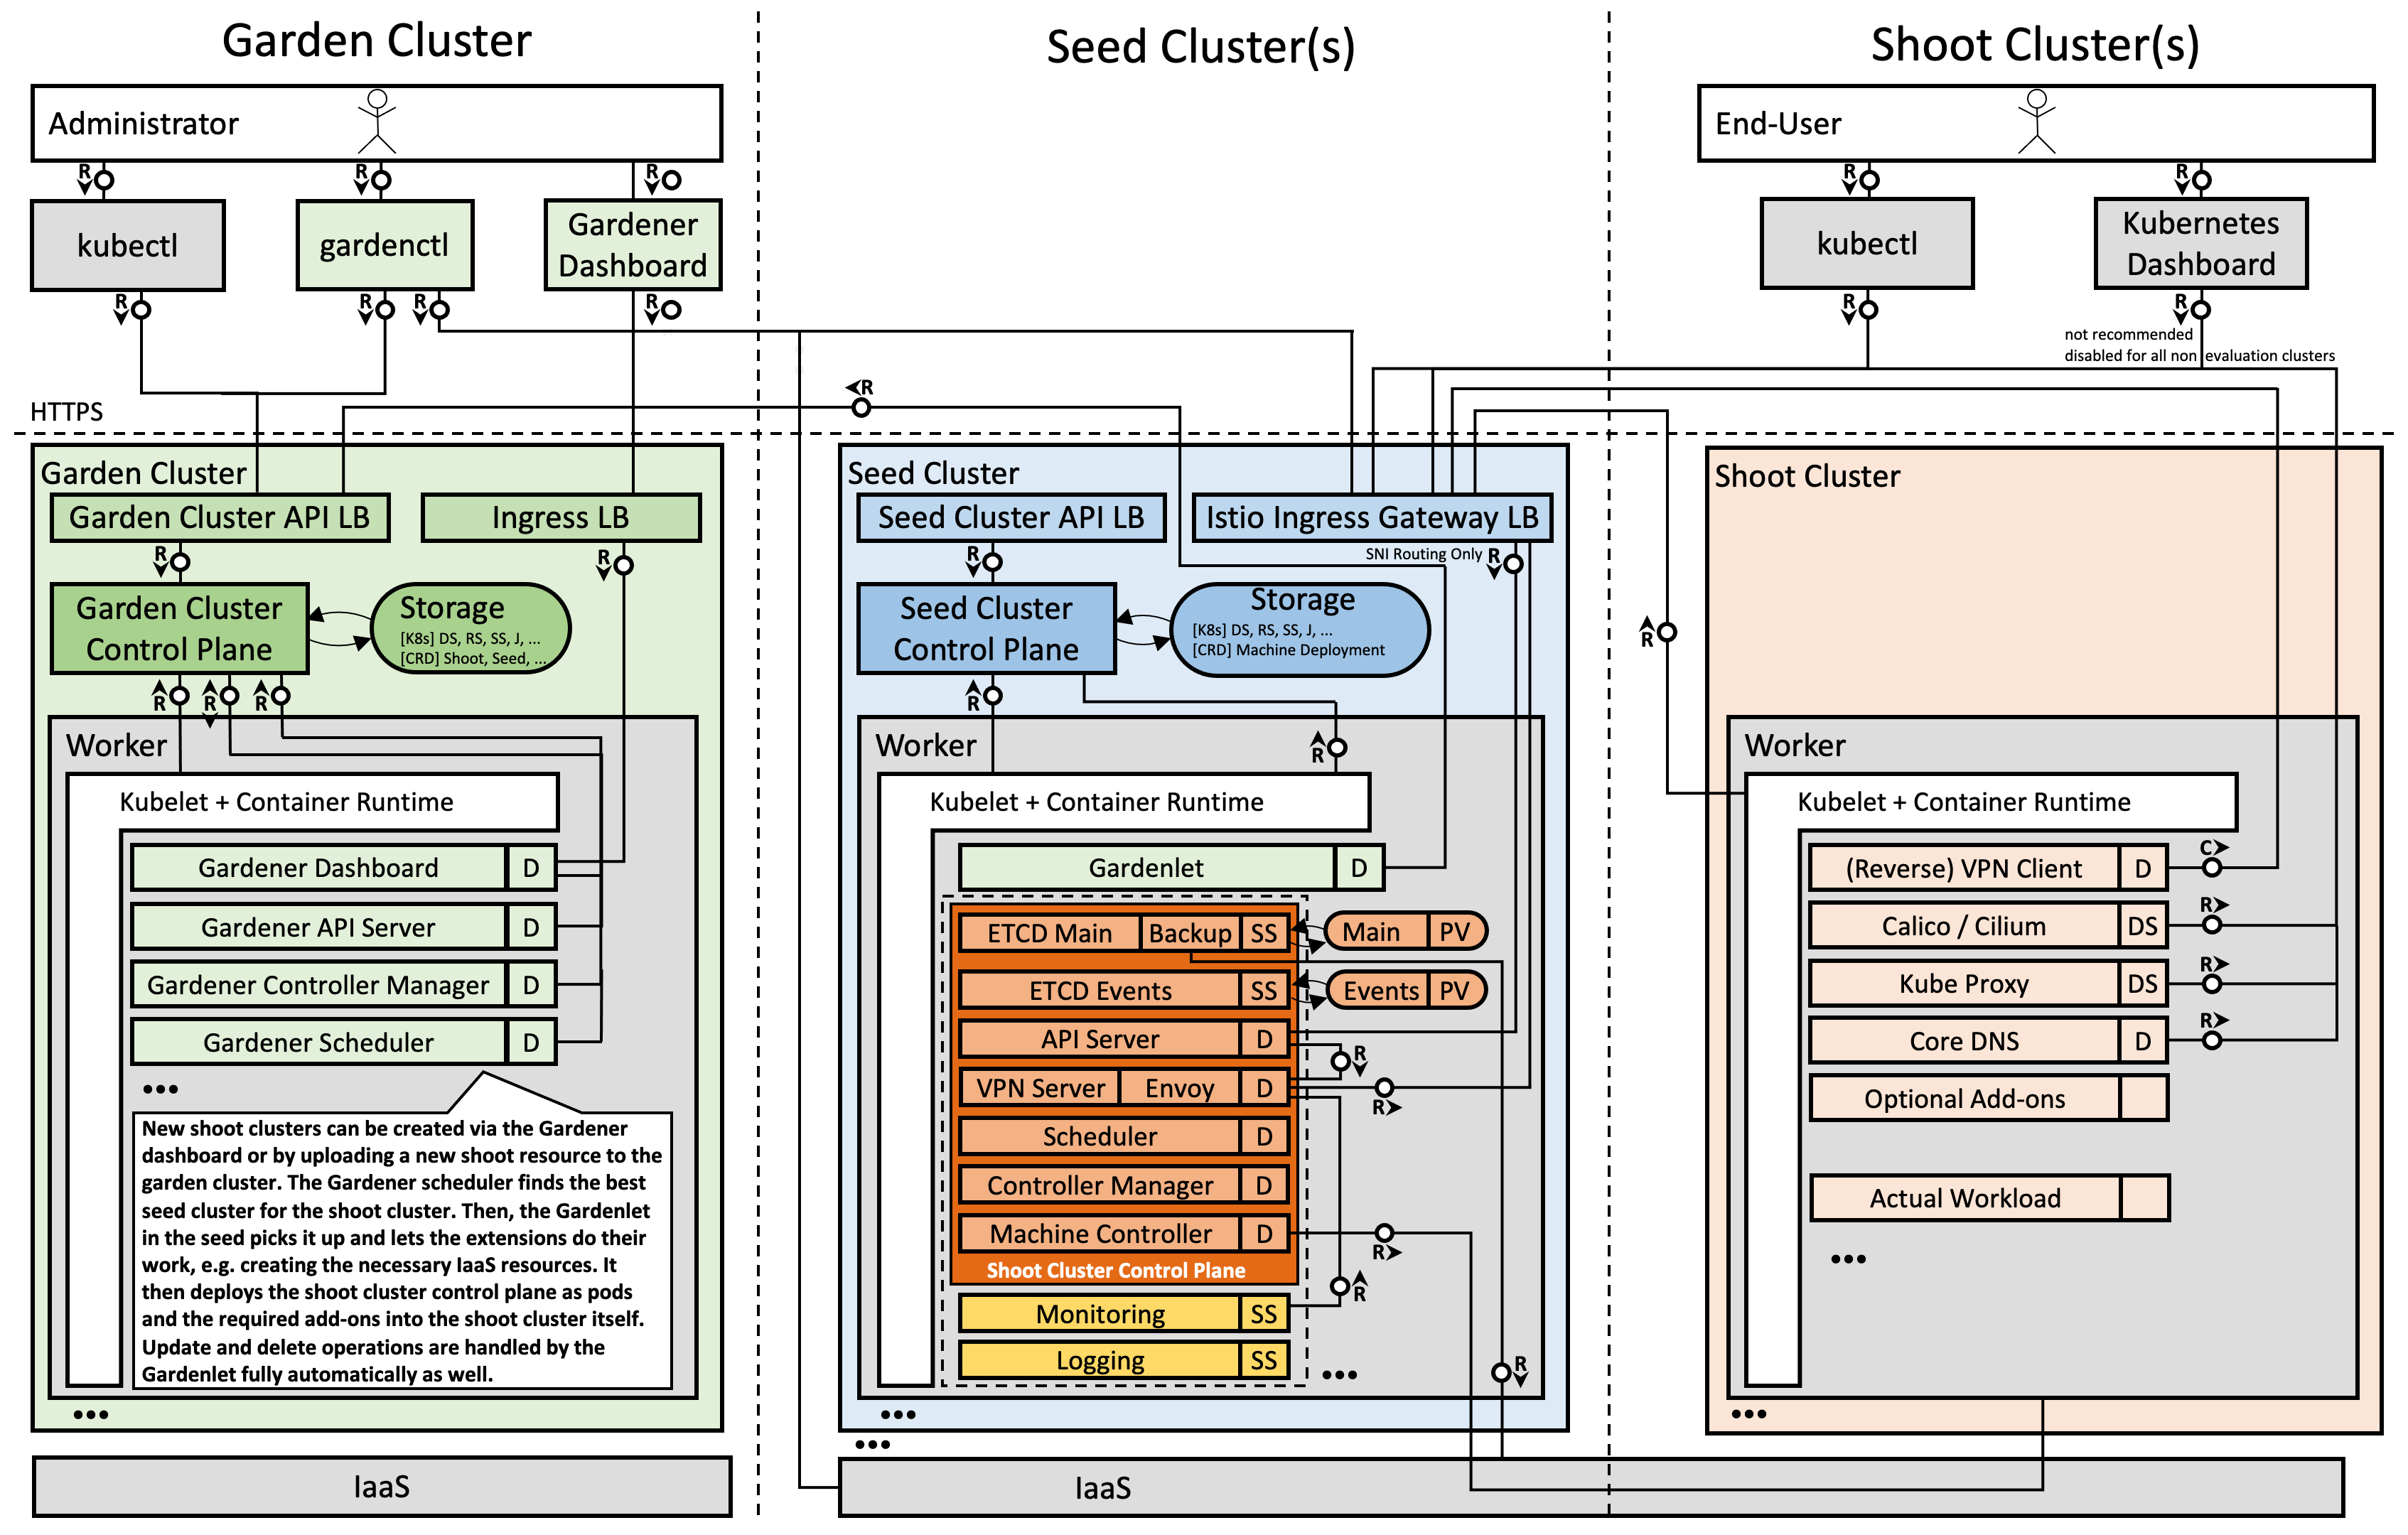
Note: The kubelet, as well as the pods inside the “shoot” cluster, talks through the front-door (load balancer IP; public Internet) to its “shoot” cluster API server running in the “seed” cluster. The reverse communication from the API server to the pod, service, and node networks happens through a VPN connection that we deploy into the “seed” and “shoot” clusters.
4.4.3 - Backup and Restore
Overview
Kubernetes uses etcd as the key-value store for its resource definitions. Gardener supports the backup and restore of etcd. It is the responsibility of the shoot owners to backup the workload data.
Gardener uses an etcd-backup-restore component to backup the etcd backing the Shoot cluster regularly and restore it in case of disaster. It is deployed as sidecar via etcd-druid. This doc mainly focuses on the backup and restore configuration used by Gardener when deploying these components. For more details on the design and internal implementation details, please refer to GEP-06 and the documentation on individual repositories.
Bucket Provisioning
Refer to the backup bucket extension document to find out details about configuring the backup bucket.
Backup Policy
etcd-backup-restore supports full snapshot and delta snapshots over full snapshot. In Gardener, this configuration is currently hard-coded to the following parameters:
- Full Snapshot schedule:
- Daily,
24hrinterval. - For each Shoot, the schedule time in a day is randomized based on the configured Shoot maintenance window.
- Daily,
- Delta Snapshot schedule:
- At
5mininterval. - If aggregated events size since last snapshot goes beyond
100Mib.
- At
- Backup History / Garbage backup deletion policy:
- Gardener configures backup restore to have
Exponentialgarbage collection policy. - As per policy, the following backups are retained:
- All full backups and delta backups for the previous hour.
- Latest full snapshot of each previous hour for the day.
- Latest full snapshot of each previous day for 7 days.
- Latest full snapshot of the previous 4 weeks.
- Garbage Collection is configured at
12hrinterval.
- Gardener configures backup restore to have
- Listing:
- Gardener doesn’t have any API to list out the backups.
- To find the backups list, an admin can checkout the
BackupEntryresource associated with the Shoot which holds the bucket and prefix details on the object store.
Restoration
The restoration process of etcd is automated through the etcd-backup-restore component from the latest snapshot. Gardener doesn’t support Point-In-Time-Recovery (PITR) of etcd. In case of an etcd disaster, the etcd is recovered from the latest backup automatically. For further details, please refer the Restoration topic. Post restoration of etcd, the Shoot reconciliation loop brings the cluster back to its previous state.
Again, the Shoot owner is responsible for maintaining the backup/restore of his workload. Gardener only takes care of the cluster’s etcd.
4.4.4 - Cluster API
Relation Between Gardener API and Cluster API (SIG Cluster Lifecycle)
The Cluster API (CAPI) and Gardener approach Kubernetes cluster management with different, albeit related, philosophies. In essence, Cluster API primarily harmonizes how to get to clusters, while Gardener goes a significant step further by also harmonizing the clusters themselves.
Gardener already provides a declarative, Kubernetes-native API to manage the full lifecycle of conformant Kubernetes clusters. This is a key distinction, as many other managed Kubernetes services are often exposed via proprietary REST APIs or imperative CLIs, whereas Gardener’s API is Kubernetes. Gardener is inherently multi-cloud and, by design, unifies far more aspects of a cluster’s make-up and operational behavior than Cluster API currently aims to.
Gardener’s Homogeneity vs. CAPI’s Provider Model
The Cluster API delegates the specifics of cluster creation and management to providers for infrastructures (e.g., AWS, Azure, GCP) and control planes, each with their own Custom Resource Definitions (CRDs). This means that different Cluster API providers can result in vastly different Kubernetes clusters in terms of their configuration (see, e.g., AKS vs GKE), available Kubernetes versions, operating systems, control plane setup, included add-ons, and operational behavior.
In stark contrast, Gardener provides homogeneous clusters. Regardless of the underlying infrastructure (AWS, Azure, GCP, OpenStack, etc.), you get clusters with the exact same Kubernetes version, operating system choices, control plane configuration (API server, kubelet, etc.), core add-ons (overlay network, DNS, metrics, logging, etc.), and consistent behavior for updates, auto-scaling, self-healing, credential rotation, you name it. This deep harmonization is a core design goal of Gardener, aimed at simplifying operations for teams developing and shipping software on Kubernetes across diverse environments. Gardener’s extensive coverage in the official Kubernetes conformance test grid underscores this commitment.
Historical Context and Evolution
Gardener has actively followed and contributed to Cluster API. Notably, Gardener heavily influenced the Machine API concepts within Cluster API through its Machine Controller Manager and was the first to adopt it. A joint KubeCon talk between SIG Cluster Lifecycle and Gardener further details this collaboration.
Cluster API has evolved significantly, especially from v1alpha1 to v1alpha2, which put a strong emphasis on a machine-based paradigm (The Cluster API Book - Updating a v1alpha1 provider to a v1alpha2 infrastructure provider). This “demoted” v1alpha1 providers to mere infrastructure providers, creating an “impedance mismatch” for fully managed services like GKE (which runs on Borg), Gardener (which uses a “kubeception” model — running control planes as pods in a seed cluster, a.k.a. “hosted control planes”) and others, making direct adoption difficult.
Challenges of Integrating Fully Managed Services with Cluster API
Despite the recent improvements, integrating fully managed Kubernetes services with Cluster API presents inherent challenges:
Opinionated Structure: Cluster API’s
Cluster/ControlPlane/MachineDeployment/MachinePoolstructure is opinionated and doesn’t always align naturally with how fully managed services architect their offerings. In particular, the separation betweenControlPlaneandInfraClusterobjects can be difficult to map cleanly. Fully managed services often abstract away the details of how control planes are provisioned and operated, making the distinction between these two components less meaningful or even redundant in those contexts.Provider-Specific CRDs: While CAPI provides a common
Clusterresource, the crucialControlPlaneand infrastructure-specific resources (e.g.,AWSManagedControlPlane,GCPManagedCluster,AzureManagedControlPlane) are entirely different for each provider. This means you cannot simply swapprovider: foowithprovider: barin a CAPI manifest and expect it to work. Users still need to understand the unique CRDs and capabilities of each CAPI provider.Limited Unification: CAPI unifies the act of requesting a cluster, but not the resulting cluster’s features, available Kubernetes versions, release cycles, supported operating systems, specific add-ons, or nuanced operational behaviors like credential rotation procedures and their side effects.
Experimental or Limited Support: For some managed services, CAPI provider support is still experimental or limited. For example:
- The CAPI provider for AKS notes that the
AzureManagedClusterTemplateis “basically a no-op,” with most configuration inAzureManagedControlPlaneTemplate(CAPZ Docs). - The CAPI provider for GKE states: “Provisioning managed clusters (GKE) is an experimental feature…” and is disabled by default (CAPG Docs).
- The CAPI provider for AKS notes that the
Platform Governance and Lifecycle Management: While Cluster API standardizes the request for a cluster, it doesn’t inherently provide the comprehensive governance and lifecycle management features that platform operators require, especially in enterprise settings. A platform solution needs to go beyond provisioning and offer robust mechanisms for:
- Defining and Enforcing Policies: Platform administrators need to control which Kubernetes versions, machine images, operating systems, and add-on versions are available to end-users. This includes classifying them (e.g., “preview,” “supported,” “deprecated”) and setting clear expiration dates.
- Communicating Lifecycle Changes: End-users must be informed about upcoming deprecations or required upgrades to plan their own application maintenance and avoid disruptions.
- Automated Maintenance and Compliance: The platform should facilitate or even automate updates and compliance checks based on these defined policies.
Gardener is designed with these enterprise platform needs at its core. It provides a rich API and control plane that allows administrators to manage the entire lifecycle of these components. For instance, Gardener enables platform teams to:
- Clearly mark Kubernetes versions or machine images as “supported,” “preview,” or “deprecated,” complete with expiration dates.
- Offer end-users the ability to opt-into automated maintenance schedules or provide them with the necessary information to build their own automated update logic for their workloads before underlying components are deprecated.
This level of granular control, policy enforcement, and lifecycle communication is crucial for maintaining stability, security, and operational efficiency across a large number of clusters. For organizations adopting Cluster API directly, implementing such a comprehensive governance layer becomes an additional, significant development and operational burden that they must address on top of CAPI’s provisioning capabilities.
Gardener’s Perspective on a Cluster API Provider
Given that Gardener already offers a robust, Kubernetes-native API for homogenous multi-cloud cluster management, a Cluster API provider for Gardener could still act as a bridge for users transitioning from CAPI to Gardener, enabling them to gradually adopt Gardener’s capabilities while maintaining compatibility with existing CAPI workflows.
- For users exclusively using Gardener: Wrapping Gardener’s comprehensive API within CAPI’s structure offers limited additional value other than maintaining compatibility with existing CAPI workflows, as Gardener’s native API is already declarative and Kubernetes-centric, meaning any tool or language binding that can handle Kubernetes CRDs will work with Gardener.
- For users managing diverse clusters (e.g., ACK, AKS, EKS, GKE, Gardener,
kubeadm) via CAPI: Cluster API offers a unified interface for initiating cluster provisioning across diverse managed services, but it does not harmonize the differences in provider-specific CRDs, capabilities, or operational behaviors. This can limit its ability to leverage the unique strengths of each service. However, we understand that a CAPI provider for Gardener could open doors for users familiar with CAPI’s workflows. It would allow them to explore Gardener’s enterprise-grade, homogeneous cluster management while maintaining compatibility with existing CAPI workflows, fostering a smoother transition to Gardener.
The mapping from the Gardener API to a potential Cluster API provider for Gardener would be mostly syntactic. However, the fundamental value proposition of Gardener — providing homogeneous Kubernetes clusters across all supported infrastructures — extends beyond what Cluster API currently aims to achieve.
We follow Cluster API’s development with great interest and remain active members of the community.
4.4.5 - etcd
etcd - Key-Value Store for Kubernetes
etcd is a strongly consistent key-value store and the most prevalent choice for the Kubernetes
persistence layer. All API cluster objects like Pods, Deployments, Secrets, etc., are stored in etcd, which
makes it an essential part of a Kubernetes control plane.
Garden or Shoot Cluster Persistence
Each garden or shoot cluster gets its very own persistence for the control plane.
It runs in the shoot namespace on the respective seed cluster (or in the garden namespace in the garden cluster, respectively).
Concretely, there are two etcd instances per shoot cluster, which the kube-apiserver is configured to use in the following way:
etcd-main
A store that contains all “cluster critical” or “long-term” objects. These object kinds are typically considered for a backup to prevent any data loss.
etcd-events
A store that contains all Event objects (events.k8s.io) of a cluster.
Events usually have a short retention period and occur frequently, but are not essential for a disaster recovery.
The setup above prevents both, the critical etcd-main is not flooded by Kubernetes Events, as well as backup space is not occupied by non-critical data.
This separation saves time and resources.
etcd Operator
Configuring, maintaining, and health-checking etcd is outsourced to a dedicated operator called etcd Druid.
When a gardenlet reconciles a Shoot resource or a gardener-operator reconciles a Garden resource, they manage an Etcd resource in the seed or garden cluster, containing necessary information (backup information, defragmentation schedule, resources, etc.).
etcd-druid needs to manage the lifecycle of the desired etcd instance (today main or events).
Likewise, when the Shoot or Garden is deleted, gardenlet or gardener-operator deletes the Etcd resources and etcd Druid takes care of cleaning up all related objects, e.g. the backing StatefulSets.
Backup
If Seeds specify backups for etcd (example), then Gardener and the respective provider extensions are responsible for creating a bucket on the cloud provider’s side (modelled through a BackupBucket resource).
The bucket stores backups of Shoots scheduled on that Seed.
Furthermore, Gardener creates a BackupEntry, which subdivides the bucket and thus makes it possible to store backups of multiple shoot clusters.
How long backups are stored in the bucket after a shoot has been deleted depends on the configured retention period in the Seed resource.
Please see this example configuration for more information.
For Gardens specifying backups for etcd (example), the bucket must be pre-created externally and provided via the Garden specification.
Both etcd instances are configured to run with a special backup-restore sidecar. It takes care about regularly backing up etcd data and restoring it in case of data loss (in the main etcd only). The sidecar also performs defragmentation and other house-keeping tasks. More information can be found in the component’s GitHub repository.
Housekeeping
etcd maintenance tasks must be performed from time to time in order to re-gain database storage and to ensure the system’s reliability. The backup-restore sidecar takes care about this job as well.
For both Shoots and Gardens, a random time within the shoot’s maintenance time is chosen for scheduling these tasks.
4.4.6 - gardenadm
Caution
This tool is currently under development and considered highly experimental. Do not use it in production environments. Read more about it in GEP-28.

Overview
gardenadm is a command line tool for bootstrapping Kubernetes clusters called “Autonomous Shoot Clusters”.
In contrast to usual Gardener-managed clusters (called Shoot Clusters), the Kubernetes control plane components run as static pods on a dedicated control plane worker pool in the cluster itself (instead of running them as pods on another Kubernetes cluster (called Seed Cluster)).
Autonomous shoot clusters can be bootstrapped without an existing Gardener installation.
Hence, they can host a Gardener installation itself and/or serve as the initial seed cluster of a Gardener installation.
Furthermore, autonomous shoot clusters can only be created by the gardenadm tool and not via an API of an existing Gardener system.
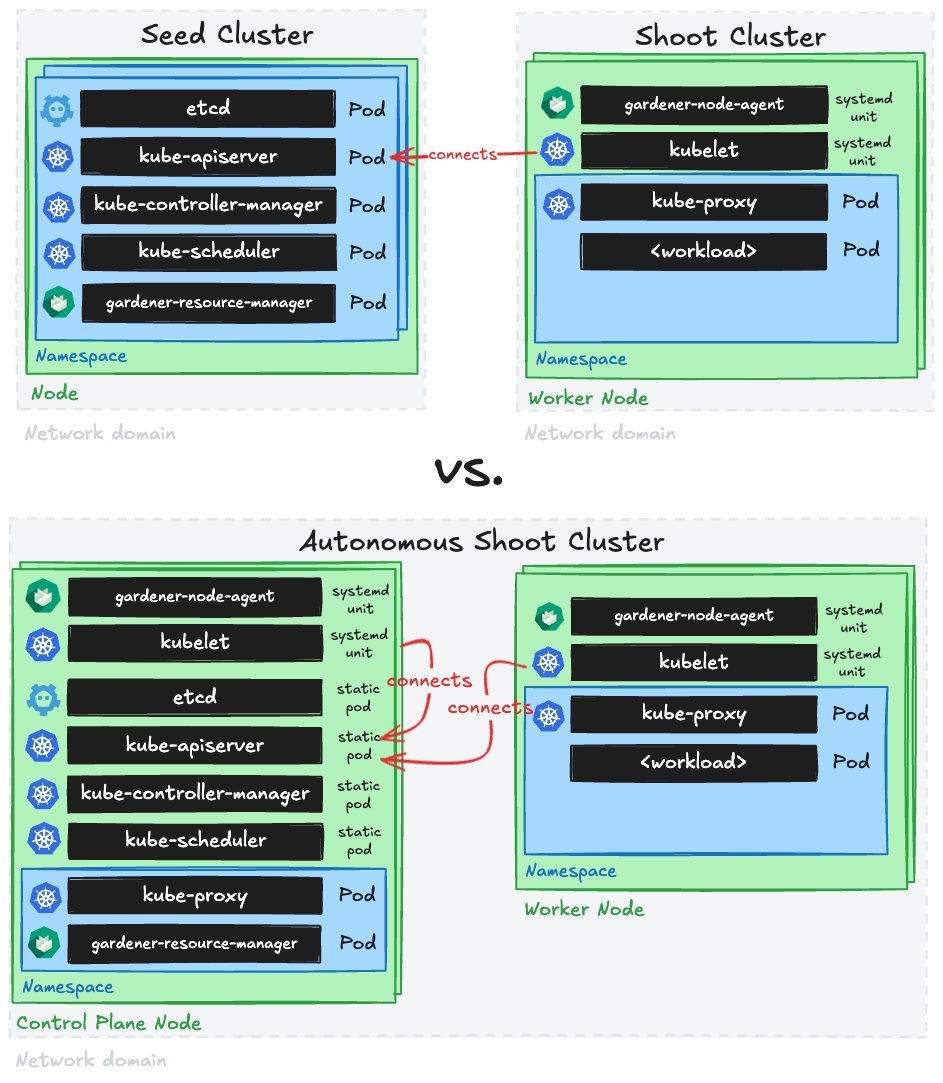
Such autonomous shoot clusters are meant to operate autonomously, but not to exist completely independently of Gardener.
Hence, after their initial creation, they are connected to an existing Gardener system such that the established cluster management functionality via the Shoot API can be applied.
I.e., day-2 operations for autonomous shoot clusters are only supported after connecting them to a Gardener system.
This Gardener system could also run in an autonomous shoot cluster itself (in this case, you would first need to deploy it before being able to connect the autonomous shoot cluster to it).
Furthermore, autonomous shoot clusters are not considered a replacement or alternative for regular shoot clusters. They should be only used for special use-cases or requirements as creating them is more complex and as their costs will most likely be higher (since control plane nodes are typically not fully utilized in such architecture). In this light, a high cluster creation/deletion churn rate is neither expected nor in scope.
Getting Started Locally
This document walks you through deploying Autonomous Shoot Clusters using gardenadm on your local machine.
This setup can be used for trying out and developing gardenadm locally without additional infrastructure.
The setup is also used for running e2e tests for gardenadm in CI.
Scenarios
We distinguish between two different scenarios for bootstrapping autonomous shoot clusters:
- High Touch, meaning that there is no programmable infrastructure available. We consider this the “bare metal” or “edge” use-case, where at first machines must be (often manually) prepared by human operators. In this case, network setup (e.g., VPCs, subnets, route tables, etc.) and machine management are out of scope.
- Medium Touch, meaning that there is programmable infrastructure available where we can leverage provider extensions and
machine-controller-managerin order to manage the network setup and the machines.
The general procedure of bootstrapping an autonomous shoot cluster is similar in both scenarios.
4.4.7 - Gardener Admission Controller
Overview
While the Gardener API server works with admission plugins to validate and mutate resources belonging to Gardener related API groups, e.g. core.gardener.cloud, the same is needed for resources belonging to non-Gardener API groups as well, e.g. secrets in the core API group.
Therefore, the Gardener Admission Controller runs a http(s) server with the following handlers which serve as validating/mutating endpoints for admission webhooks.
It is also used to serve http(s) handlers for authorization webhooks.
Admission Webhook Handlers
This section describes the admission webhook handlers that are currently served.
Authentication Configuration Validator
In Shoots, it is possible to reference structured authentication configurations.
This validation handler validates that such configurations are valid.
Authorization Configuration Validator
In Shoots, it is possible to reference structured authorization configurations.
This validation handler validates that such configurations are valid.
Admission Plugin Secret Validator
In Shoots, AdmissionPlugin can have reference to other files. This validation handler validates the referred admission plugin secret and ensures that the secret always contains the required data kubeconfig.
Kubeconfig Secret Validator
Malicious Kubeconfigs applied by end users may cause a leakage of sensitive data.
This handler checks if the incoming request contains a Kubernetes secret with a .data.kubeconfig field and denies the request if the Kubeconfig structure violates Gardener’s security standards.
Namespace Validator
Namespaces are the backing entities of Gardener projects in which shoot cluster objects reside.
This validation handler protects active namespaces against premature deletion requests.
Therefore, it denies deletion requests if a namespace still contains shoot clusters or if it belongs to a non-deleting Gardener project (without .metadata.deletionTimestamp).
Resource Size Validator
Since users directly apply Kubernetes native objects to the Garden cluster, it also involves the risk of being vulnerable to DoS attacks because these resources are continuously watched and read by controllers. One example is the creation of shoot resources with large annotation values (up to 256 kB per value), which can cause severe out-of-memory issues for the gardenlet component. Vertical autoscaling can help to mitigate such situations, but we cannot expect to scale infinitely, and thus need means to block the attack itself.
The Resource Size Validator checks arbitrary incoming admission requests against a configured maximum size for the resource’s group-version-kind combination. It denies the request if the object exceeds the quota.
Note
The contents of
statussubresources andmetadata.managedFieldsare not taken into account for the resource size calculation.
Example for Gardener Admission Controller configuration:
server:
resourceAdmissionConfiguration:
limits:
- apiGroups: ["core.gardener.cloud"]
apiVersions: ["*"]
resources: ["shoots"]
size: 100k
- apiGroups: [""]
apiVersions: ["v1"]
resources: ["secrets"]
size: 100k
unrestrictedSubjects:
- kind: Group
name: gardener.cloud:system:seeds
apiGroup: rbac.authorization.k8s.io
# - kind: User
# name: admin
# apiGroup: rbac.authorization.k8s.io
# - kind: ServiceAccount
# name: "*"
# namespace: garden
# apiGroup: ""
operationMode: block #log
With the configuration above, the Resource Size Validator denies requests for shoots with Gardener’s core API group which exceed a size of 100 kB. The same is done for Kubernetes secrets.
As this feature is meant to protect the system from malicious requests sent by users, it is recommended to exclude trusted groups, users or service accounts from the size restriction via resourceAdmissionConfiguration.unrestrictedSubjects.
For example, the backing user for the gardenlet should always be capable of changing the shoot resource instead of being blocked due to size restrictions.
This is because the gardenlet itself occasionally changes the shoot specification, labels or annotations, and might violate the quota if the existing resource is already close to the quota boundary.
Also, operators are supposed to be trusted users and subjecting them to a size limitation can inhibit important operational tasks.
Wildcard ("*") in subject name is supported.
Size limitations depend on the individual Gardener setup and choosing the wrong values can affect the availability of your Gardener service.
resourceAdmissionConfiguration.operationMode allows to control if a violating request is actually denied (default) or only logged.
It’s recommended to start with log, check the logs for exceeding requests, adjust the limits if necessary and finally switch to block.
SeedRestriction
Please refer to Scoped API Access for Gardenlets for more information.
UpdateRestriction
Gardener stores public data regarding shoot clusters, i.e. certificate authority bundles, OIDC discovery documents, etc.
This information can be used by third parties so that they establish trust to specific authorities, making the integrity of the stored data extremely important in a way that any unwanted modifications can be considered a security risk.
This handler protects secrets and configmaps against tampering.
It denies CREATE, UPDATE and DELETE requests if the resource is labeled with gardener.cloud/update-restriction=true and the request is not made by a gardenlet.
In addition, the following service accounts are allowed to perform certain operations:
system:serviceaccount:kube-system:generic-garbage-collectoris allowed toDELETErestricted resources.system:serviceaccount:kube-system:gardener-internalis allowed toUPDATErestricted resources.
Authorization Webhook Handlers
This section describes the authorization webhook handlers that are currently served.
SeedAuthorization
Please refer to Scoped API Access for Gardenlets for more information.
4.4.8 - Gardener API Server
Overview
The Gardener API server is a Kubernetes-native extension based on its aggregation layer.
It is registered via an APIService object and designed to run inside a Kubernetes cluster whose API it wants to extend.
After registration, it exposes the following resources:
CloudProfiles
CloudProfiles are resources that describe a specific environment of an underlying infrastructure provider, e.g. AWS, Azure, etc.
Each shoot has to reference a CloudProfile to declare the environment it should be created in.
In a CloudProfile, the gardener operator specifies certain constraints like available machine types, regions, which Kubernetes versions they want to offer, etc.
End-users can read CloudProfiles to see these values, but only operators can change the content or create/delete them.
When a shoot is created or updated, then an admission plugin checks that only allowed values are used via the referenced CloudProfile.
Additionally, a CloudProfile may contain a providerConfig, which is a special configuration dedicated for the infrastructure provider.
Gardener does not evaluate or understand this config, but extension controllers might need it for declaration of provider-specific constraints, or global settings.
Please see this example manifest and consult the documentation of your provider extension controller to get information about its providerConfig.
NamespacedCloudProfiles
In addition to CloudProfiles, NamespacedCloudProfiles exist to enable project-level customizations of CloudProfiles.
Project administrators can create and manage cloud profiles with overrides or extensions specific to their project.
Please see this example manifest and this usage documentation for further information.
InternalSecrets
End-users can read and/or write Secrets in their project namespaces in the garden cluster. This prevents Gardener components from storing such “Gardener-internal” secrets in the respective project namespace.
InternalSecrets are resources that contain shoot or project-related secrets that are “Gardener-internal”, i.e., secrets used and managed by the system that end-users don’t have access to.
InternalSecrets are defined like plain Kubernetes Secrets, behave exactly like them, and can be used in the same manners. The only difference is, that the InternalSecret resource is a dedicated API resource (exposed by gardener-apiserver).
This allows separating access to “normal” secrets and internal secrets by the usual RBAC means.
Gardener uses an InternalSecret per Shoot for syncing the client CA to the project namespace in the garden cluster (named <shoot-name>.ca-client). The shoots/adminkubeconfig subresource signs short-lived client certificates by retrieving the CA from the InternalSecret.
Operators should configure gardener-apiserver to encrypt the internalsecrets.core.gardener.cloud resource in etcd.
Please see this example manifest.
Seeds
Seeds are resources that represent seed clusters.
Gardener does not care about how a seed cluster got created - the only requirement is that it is of at least Kubernetes v1.27 and passes the Kubernetes conformance tests.
The Gardener operator has to either deploy the gardenlet into the cluster they want to use as seed (recommended, then the gardenlet will create the Seed object itself after bootstrapping) or provide the kubeconfig to the cluster inside a secret (that is referenced by the Seed resource) and create the Seed resource themselves.
Please see this, this, and optionally this example manifests.
Shoot Quotas
To allow end-users not having their dedicated infrastructure account to try out Gardener, the operator can register an account owned by them that they allow to be used for trial clusters. Trial clusters can be put under quota so that they don’t consume too many resources (resulting in costs) and that one user cannot consume all resources on their own. These clusters are automatically terminated after a specified time, but end-users may extend the lifetime manually if needed.
Please see this example manifest.
Projects
The first thing before creating a shoot cluster is to create a Project.
A project is used to group multiple shoot clusters together.
End-users can invite colleagues to the project to enable collaboration, and they can either make them admin or viewer.
After an end-user has created a project, they will get a dedicated namespace in the garden cluster for all their shoots.
Please see this example manifest.
SecretBindings
Now that the end-user has a namespace the next step is registering their infrastructure provider account.
Please see this example manifest and consult the documentation of the extension controller for the respective infrastructure provider to get information about which keys are required in this secret.
After the secret has been created, the end-user has to create a special SecretBinding resource that binds this secret.
Later, when creating shoot clusters, they will reference such binding.
Please see this example manifest.
Shoots
Shoot cluster contain various settings that influence how end-user Kubernetes clusters will look like in the end. As Gardener heavily relies on extension controllers for operating system configuration, networking, and infrastructure specifics, the end-user has the possibility (and responsibility) to provide these provider-specific configurations as well. Such configurations are not evaluated by Gardener (because it doesn’t know/understand them), but they are only transported to the respective extension controller.
⚠️ This means that any configuration issues/mistake on the end-user side that relates to a provider-specific flag or setting cannot be caught during the update request itself but only later during the reconciliation (unless a validator webhook has been registered in the garden cluster by an operator).
Please see this example manifest and consult the documentation of the provider extension controller to get information about its spec.provider.controlPlaneConfig, .spec.provider.infrastructureConfig, and .spec.provider.workers[].providerConfig.
(Cluster)OpenIDConnectPresets
Please see this separate documentation file.
Overview Data Model

4.4.9 - Gardener Controller Manager
Overview
The gardener-controller-manager (often referred to as “GCM”) is a component that runs next to the Gardener API server, similar to the Kubernetes Controller Manager.
It runs several controllers that do not require talking to any seed or shoot cluster.
Also, as of today, it exposes an HTTP server that is serving several health check endpoints and metrics.
This document explains the various functionalities of the gardener-controller-manager and their purpose.
Controllers
Bastion Controller
Bastion resources have a limited lifetime which can be extended up to a certain amount by performing a heartbeat on them.
The Bastion controller is responsible for deleting expired or rotten Bastions.
- “expired” means a
Bastionhas exceeded itsstatus.expirationTimestamp. - “rotten” means a
Bastionis older than the configuredmaxLifetime.
The maxLifetime defaults to 24 hours and is an option in the BastionControllerConfiguration which is part of gardener-controller-managers ControllerManagerControllerConfiguration, see the example config file for details.
The controller also deletes Bastions in case the referenced Shoot:
- no longer exists
- is marked for deletion (i.e., have a non-
nil.metadata.deletionTimestamp) - was migrated to another seed (i.e.,
Shoot.spec.seedNameis different thanBastion.spec.seedName).
The deletion of Bastions triggers the gardenlet to perform the necessary cleanups in the Seed cluster, so some time can pass between deletion and the Bastion actually disappearing.
Clients like gardenctl are advised to not re-use Bastions whose deletion timestamp has been set already.
Refer to GEP-15 for more information on the lifecycle of
Bastion resources.
CertificateSigningRequest Controller
After the gardenlet gets deployed on the Seed cluster, it needs to establish itself as a trusted party to communicate with the Gardener API server. It runs through a bootstrap flow similar to the kubelet bootstrap process.
On startup, the gardenlet uses a kubeconfig with a bootstrap token which authenticates it as being part of the system:bootstrappers group. This kubeconfig is used to create a CertificateSigningRequest (CSR) against the Gardener API server.
The controller in gardener-controller-manager checks whether the CertificateSigningRequest has the expected organization, common name and usages which the gardenlet would request.
It only auto-approves the CSR if the client making the request is allowed to “create” the
certificatesigningrequests/seedclient subresource. Clients with the system:bootstrappers group are bound to the gardener.cloud:system:seed-bootstrapper ClusterRole, hence, they have such privileges. As the bootstrap kubeconfig for the gardenlet contains a bootstrap token which is authenticated as being part of the systems:bootstrappers group, its created CSR gets auto-approved.
CloudProfile Controller
CloudProfiles are essential when it comes to reconciling Shoots since they contain constraints (like valid machine types, Kubernetes versions, or machine images) and sometimes also some global configuration for the respective environment (typically via provider-specific configuration in .spec.providerConfig).
Consequently, to ensure that CloudProfiles in-use are always present in the system until the last referring Shoot or NamespacedCloudProfile gets deleted, the controller adds a finalizer which is only released when there is no Shoot or NamespacedCloudProfile referencing the CloudProfile anymore.
NamespacedCloudProfile Controller
NamespacedCloudProfiles provide a project-scoped extension to CloudProfiles, allowing for adjustments of a parent CloudProfile (e.g. by overriding expiration dates of Kubernetes versions or machine images). This allows for modifications without global project visibility. Like CloudProfiles do in their spec, NamespacedCloudProfiles also expose the resulting Shoot constraints as a CloudProfileSpec in their status.
The controller ensures that NamespacedCloudProfiles in-use remain present in the system until the last referring Shoot is deleted by adding a finalizer that is only released when there is no Shoot referencing the NamespacedCloudProfile anymore.
ControllerDeployment Controller
Extensions are registered in the garden cluster via ControllerRegistration and deployment of respective extensions are specified via ControllerDeployment. For more info refer to Registering Extension Controllers.
This controller ensures that ControllerDeployment in-use always exists until the last ControllerRegistration referencing them gets deleted. The controller adds a finalizer which is only released when there is no ControllerRegistration referencing the ControllerDeployment anymore.
ControllerRegistration Controller
The ControllerRegistration controller makes sure that the required Gardener Extensions specified by the ControllerRegistration resources are present in the seed clusters.
It also takes care of the creation and deletion of ControllerInstallation objects for a given seed cluster.
The controller has three reconciliation loops.
“Main” Reconciler
This reconciliation loop watches the Seed objects and determines which ControllerRegistrations are required for them and reconciles the corresponding ControllerInstallation resources to reach the determined state.
To begin with, it computes the kind/type combinations of extensions required for the seed.
For this, the controller examines a live list of ControllerRegistrations, ControllerInstallations, BackupBuckets, BackupEntrys, Shoots, and Secrets from the garden cluster.
For example, it examines the shoots running on the seed and deducts the kind/type, like Infrastructure/gcp.
The seed (seed.spec.provider.type) and DNS (seed.spec.dns.provider.type) provider types are considered when calculating the list of required ControllerRegistrations, as well.
It also decides whether they should always be deployed based on the .spec.deployment.policy.
For the configuration options, please see this section.
Based on these required combinations, each of them are mapped to ControllerRegistration objects and then to their corresponding ControllerInstallation objects (if existing).
The controller then creates or updates the required ControllerInstallation objects for the given seed.
It also deletes every existing ControllerInstallation whose referenced ControllerRegistration is not part of the required list.
For example, if the shoots in the seed are no longer using the DNS provider aws-route53, then the controller proceeds to delete the respective ControllerInstallation object.
"ControllerRegistration Finalizer" Reconciler
This reconciliation loop watches the ControllerRegistration resource and adds finalizers to it when they are created.
In case a deletion request comes in for the resource, i.e., if a .metadata.deletionTimestamp is set, it actively scans for a ControllerInstallation resource using this ControllerRegistration, and decides whether the deletion can be allowed.
In case no related ControllerInstallation is present, it removes the finalizer and marks it for deletion.
"Seed Finalizer" Reconciler
This loop also watches the Seed object and adds finalizers to it at creation.
If a .metadata.deletionTimestamp is set for the seed, then the controller checks for existing ControllerInstallation objects which reference this seed.
If no such objects exist, then it removes the finalizer and allows the deletion.
“Extension ClusterRole” Reconciler
This reconciler watches two resources in the garden cluster:
ClusterRoles labelled withauthorization.gardener.cloud/custom-extensions-permissions=trueServiceAccounts in seed namespaces matching the selector provided via theauthorization.gardener.cloud/extensions-serviceaccount-selectorannotation of suchClusterRoles.
Its core task is to maintain a ClusterRoleBinding resource referencing the respective ClusterRole.
This gets bound to all ServiceAccounts in seed namespaces whose labels match the selector provided via the authorization.gardener.cloud/extensions-serviceaccount-selector annotation of such ClusterRoles.
You can read more about the purpose of this reconciler in this document.
CredentialsBinding Controller
CredentialsBindings reference Secrets, WorkloadIdentitys and Quotas and are themselves referenced by Shoots.
The controller adds finalizers to the referenced objects to ensure they don’t get deleted while still being referenced.
Similarly, to ensure that CredentialsBindings in-use are always present in the system until the last referring Shoot gets deleted, the controller adds a finalizer which is only released when there is no Shoot referencing the CredentialsBinding anymore.
Referenced Secrets and WorkloadIdentitys will also be labeled with provider.shoot.gardener.cloud/<type>=true, where <type> is the value of the .provider.type of the CredentialsBinding.
Also, all referenced Secrets and WorkloadIdentitys, as well as Quotas, will be labeled with reference.gardener.cloud/credentialsbinding=true to allow for easily filtering for objects referenced by CredentialsBindings.
Event Controller
With the Gardener Event Controller, you can prolong the lifespan of events related to Shoot clusters. This is an optional controller which will become active once you provide the below mentioned configuration.
All events in K8s are deleted after a configurable time-to-live (controlled via a kube-apiserver argument called --event-ttl (defaulting to 1 hour)).
The need to prolong the time-to-live for Shoot cluster events frequently arises when debugging customer issues on live systems.
This controller leaves events involving Shoots untouched, while deleting all other events after a configured time.
In order to activate it, provide the following configuration:
concurrentSyncs: The amount of goroutines scheduled for reconciling events.ttlNonShootEvents: When an event reaches this time-to-live it gets deleted unless it is a Shoot-related event (defaults to1h, equivalent to theevent-ttldefault).
⚠️ In addition, you should also configure the
--event-ttlfor the kube-apiserver to define an upper-limit of how long Shoot-related events should be stored. The--event-ttlshould be larger than thettlNonShootEventsor this controller will have no effect.
ExposureClass Controller
ExposureClass abstracts the ability to expose a Shoot clusters control plane in certain network environments (e.g. corporate networks, DMZ, internet) on all Seeds or a subset of the Seeds. For more information, see ExposureClasses.
Consequently, to ensure that ExposureClasses in-use are always present in the system until the last referring Shoot gets deleted, the controller adds a finalizer which is only released when there is no Shoot referencing the ExposureClass anymore.
ManagedSeedSet Controller
ManagedSeedSet objects maintain a stable set of replicas of ManagedSeeds, i.e. they guarantee the availability of a specified number of identical ManagedSeeds on an equal number of identical Shoots.
The ManagedSeedSet controller creates and deletes ManagedSeeds and Shoots in response to changes to the replicas and selector fields. For more information, refer to the ManagedSeedSet proposal document.
- The reconciler first gets all the replicas of the given
ManagedSeedSetin theManagedSeedSet’s namespace and with the matching selector. Each replica is a struct that contains aManagedSeed, its correspondingSeedandShootobjects. - Then the pending replica is retrieved, if it exists.
- Next it determines the ready, postponed, and deletable replicas.
- A replica is considered
readywhen aSeedowned by aManagedSeedhas been registered either directly or by deployinggardenletinto aShoot, theSeedisReadyand theShoot’s status isHealthy. - If a replica is not ready and it is not pending, i.e. it is not specified in the
ManagedSeed’sstatus.pendingReplicafield, then it is added to thepostponedreplicas. - A replica is deletable if it has no scheduled
Shoots and the replica’sShootandManagedSeeddo not have theseedmanagement.gardener.cloud/protect-from-deletionannotation.
- A replica is considered
- Finally, it checks the actual and target replica counts. If the actual count is less than the target count, the controller scales up the replicas by creating new replicas to match the desired target count. If the actual count is more than the target, the controller deletes replicas to match the desired count. Before scale-out or scale-in, the controller first reconciles the pending replica (there can always only be one) and makes sure the replica is ready before moving on to the next one.
Scale-out(actual count < target count)- During the scale-out phase, the controller first creates the
Shootobject from theManagedSeedSet’sspec.shootTemplatefield and adds the replica to thestatus.pendingReplicaof theManagedSeedSet. - For the subsequent reconciliation steps, the controller makes sure that the pending replica is ready before proceeding to the next replica. Once the
Shootis created successfully, theManagedSeedobject is created from theManagedSeedSet’sspec.template. TheManagedSeedobject is reconciled by theManagedSeedcontroller and aSeedobject is created for the replica. Once the replica’sSeedbecomes ready and theShootbecomes healthy, the replica also becomes ready.
- During the scale-out phase, the controller first creates the
Scale-in(actual count > target count)- During the scale-in phase, the controller first determines the replica that can be deleted. From the deletable replicas, it chooses the one with the lowest priority and deletes it. Priority is determined in the following order:
- First, compare replica statuses. Replicas with “less advanced” status are considered lower priority. For example, a replica with
StatusShootReconcilingstatus has a lower value than a replica withStatusShootReconciledstatus. Hence, in this case, a replica with aStatusShootReconcilingstatus will have lower priority and will be considered for deletion. - Then, the replicas are compared with the readiness of their
Seeds. Replicas with non-readySeeds are considered lower priority. - Then, the replicas are compared with the health statuses of their
Shoots. Replicas with “worse” statuses are considered lower priority. - Finally, the replica ordinals are compared. Replicas with lower ordinals are considered lower priority.
- First, compare replica statuses. Replicas with “less advanced” status are considered lower priority. For example, a replica with
- During the scale-in phase, the controller first determines the replica that can be deleted. From the deletable replicas, it chooses the one with the lowest priority and deletes it. Priority is determined in the following order:
Quota Controller
Quota object limits the resources consumed by shoot clusters either per provider secret or per project/namespace.
Consequently, to ensure that Quotas in-use are always present in the system until the last SecretBinding or CredentialsBinding that references them gets deleted, the controller adds a finalizer which is only released when there is no SecretBinding or CredentialsBinding referencing the Quota anymore.
Project Controller
There are multiple controllers responsible for different aspects of Project objects.
Please also refer to the Project documentation.
“Main” Reconciler
This reconciler manages a dedicated Namespace for each Project.
The namespace name can either be specified explicitly in .spec.namespace (must be prefixed with garden-) or it will be determined by the controller.
If .spec.namespace is set, it tries to create it. If it already exists, it tries to adopt it.
This will only succeed if the Namespace was previously labeled with gardener.cloud/role=project and project.gardener.cloud/name=<project-name>.
This is to prevent end-users from being able to adopt arbitrary namespaces and escalate their privileges, e.g. the kube-system namespace.
After the namespace was created/adopted, the controller creates several ClusterRoles and ClusterRoleBindings that allow the project members to access related resources based on their roles.
These RBAC resources are prefixed with gardener.cloud:system:project{-member,-viewer}:<project-name>.
Gardener administrators and extension developers can define their own roles. For more information, see Extending Project Roles for more information.
In addition, operators can configure the Project controller to maintain a default ResourceQuota for project namespaces.
Quotas can especially limit the creation of user facing resources, e.g. Shoots, SecretBindings, CredentialsBinding, Secrets and thus protect the garden cluster from massive resource exhaustion but also enable operators to align quotas with respective enterprise policies.
⚠️ Gardener itself is not exempted from configured quotas. For example, Gardener creates
Secretsfor every shoot cluster in the project namespace and at the same time increases the available quota count. Please mind this additional resource consumption.
The controller configuration provides a template section controllers.project.quotas where such a ResourceQuota (see the example below) can be deposited.
controllers:
project:
quotas:
- config:
apiVersion: v1
kind: ResourceQuota
spec:
hard:
count/shoots.core.gardener.cloud: "100"
count/secretbindings.core.gardener.cloud: "10"
count/credentialsbindings.security.gardener.cloud: "10"
count/secrets: "800"
projectSelector: {}
The Project controller takes the specified config and creates a ResourceQuota with the name gardener in the project namespace.
If a ResourceQuota resource with the name gardener already exists, the controller will only update fields in spec.hard which are unavailable at that time.
This is done to configure a default Quota in all projects but to allow manual quota increases as the projects’ demands increase.
spec.hard fields in the ResourceQuota object that are not present in the configuration are removed from the object.
Labels and annotations on the ResourceQuota config get merged with the respective fields on existing ResourceQuotas.
An optional projectSelector narrows down the amount of projects that are equipped with the given config.
If multiple configs match for a project, then only the first match in the list is applied to the project namespace.
The .status.phase of the Project resources is set to Ready or Failed by the reconciler to indicate whether the reconciliation loop was performed successfully.
Also, it generates Events to provide further information about its operations.
When a Project is marked for deletion, the controller ensures that there are no Shoots left in the project namespace.
Once all Shoots are gone, the Namespace and Project are released.
“Stale Projects” Reconciler
As Gardener is a large-scale Kubernetes as a Service, it is designed for being used by a large amount of end-users.
Over time, it is likely to happen that some of the hundreds or thousands of Project resources are no longer actively used.
Gardener offers the “stale projects” reconciler which will take care of identifying such stale projects, marking them with a “warning”, and eventually deleting them after a certain time period. This reconciler is enabled by default and works as follows:
- Projects are considered as “stale”/not actively used when all of the following conditions apply: The namespace associated with the
Projectdoes not have any…Shootresources.BackupEntryresources.Secretresources that are referenced by aSecretBindingor aCredentialsBindingthat is in use by aShoot(not necessarily in the same namespace).WorkloadIdentityresources that are referenced by aCredentialsBindingthat is in use by aShoot(not necessarily in the same namespace).Quotaresources that are referenced by aSecretBindingor aCredentialsBindingthat is in use by aShoot(not necessarily in the same namespace).- The time period when the project was used for the last time (
status.lastActivityTimestamp) is longer than the configuredminimumLifetimeDays
If a project is considered “stale”, then its .status.staleSinceTimestamp will be set to the time when it was first detected to be stale.
If it gets actively used again, this timestamp will be removed.
After some time, the .status.staleAutoDeleteTimestamp will be set to a timestamp after which Gardener will auto-delete the Project resource if it still is not actively used.
The component configuration of the gardener-controller-manager offers to configure the following options:
minimumLifetimeDays: Don’t consider newly createdProjects as “stale” too early to give people/end-users some time to onboard and get familiar with the system. The “stale project” reconciler won’t set any timestamp forProjects younger thanminimumLifetimeDays. When you change this value, then projects marked as “stale” may be no longer marked as “stale” in case they are young enough, or vice versa.staleGracePeriodDays: Don’t compute auto-delete timestamps for staleProjects that are unused for less thanstaleGracePeriodDays. This is to not unnecessarily make people/end-users nervous “just because” they haven’t actively used theirProjectfor a given amount of time. When you change this value, then already assigned auto-delete timestamps may be removed if the new grace period is not yet exceeded.staleExpirationTimeDays: Expiration time after which staleProjects are finally auto-deleted (after.status.staleSinceTimestamp). If this value is changed and an auto-delete timestamp got already assigned to the projects, then the new value will only take effect if it’s increased. Hence, decreasing thestaleExpirationTimeDayswill not decrease already assigned auto-delete timestamps.
Gardener administrators/operators can exclude specific
Projects from the stale check by annotating the relatedNamespaceresource withproject.gardener.cloud/skip-stale-check=true.
“Activity” Reconciler
Since the other two reconcilers are unable to actively monitor the relevant objects that are used in a Project (Shoot, Secret, etc.), there could be a situation where the user creates and deletes objects in a short period of time. In that case, the Stale Project Reconciler could not see that there was any activity on that project and it will still mark it as a Stale, even though it is actively used.
The Project Activity Reconciler is implemented to take care of such cases. An event handler will notify the reconciler for any activity and then it will update the status.lastActivityTimestamp. This update will also trigger the Stale Project Reconciler.
SecretBinding Controller
SecretBindings reference Secrets and Quotas and are themselves referenced by Shoots.
The controller adds finalizers to the referenced objects to ensure they don’t get deleted while still being referenced.
Similarly, to ensure that SecretBindings in-use are always present in the system until the last referring Shoot gets deleted, the controller adds a finalizer which is only released when there is no Shoot referencing the SecretBinding anymore.
Referenced Secrets will also be labeled with provider.shoot.gardener.cloud/<type>=true, where <type> is the value of the .provider.type of the SecretBinding.
Also, all referenced Secrets, as well as Quotas, will be labeled with reference.gardener.cloud/secretbinding=true to allow for easily filtering for objects referenced by SecretBindings.
Seed Controller
The Seed controller in the gardener-controller-manager reconciles Seed objects with the help of the following reconcilers.
“Main” Reconciler
This reconciliation loop takes care of seed related operations in the garden cluster. When a new Seed object is created,
the reconciler creates a new Namespace in the garden cluster seed-<seed-name>. Namespaces dedicated to single
seed clusters allow us to segregate access permissions i.e., a gardenlet must not have permissions to access objects in
all Namespaces in the garden cluster.
There are objects in a Garden environment which are created once by the operator e.g., default domain secret,
alerting credentials, and are required for operations happening in the gardenlet. Therefore, we not only need a seed specific
Namespace but also a copy of these “shared” objects.
The “main” reconciler takes care about this replication:
| Kind | Namespace | Label Selector |
|---|---|---|
| Secret | garden | gardener.cloud/role |
“Backup Buckets Check” Reconciler
Every time a BackupBucket object is created or updated, the referenced Seed object is enqueued for reconciliation.
It’s the reconciler’s task to check the status subresource of all existing BackupBuckets that reference this Seed.
If at least one BackupBucket has .status.lastError != nil, the BackupBucketsReady condition on the Seed will be set to False, and consequently the Seed is considered as NotReady.
If the SeedBackupBucketsCheckControllerConfiguration (which is part of gardener-controller-managers component configuration) contains a conditionThreshold for the BackupBucketsReady, the condition will instead first be set to Progressing and eventually to False once the conditionThreshold expires. See the example config file for details.
Once the BackupBucket is healthy again, the seed will be re-queued and the condition will turn true.
“Extensions Check” Reconciler
This reconciler reconciles Seed objects and checks whether all ControllerInstallations referencing them are in a healthy state.
Concretely, all three conditions Valid, Installed, and Healthy must have status True and the Progressing condition must have status False.
Based on this check, it maintains the ExtensionsReady condition in the respective Seed’s .status.conditions list.
“Lifecycle” Reconciler
The “Lifecycle” reconciler processes Seed objects which are enqueued every 10 seconds in order to check if the responsible
gardenlet is still responding and operable. Therefore, it checks renewals via Lease objects of the seed in the garden cluster
which are renewed regularly by the gardenlet.
In case a Lease is not renewed for the configured amount in config.controllers.seed.monitorPeriod.duration:
- The reconciler assumes that the
gardenletstopped operating and updates theGardenletReadycondition toUnknown. - Additionally, the conditions and constraints of all
Shootresources scheduled on the affected seed are set toUnknownas well, because a strikinggardenletwon’t be able to maintain these conditions any more. - If the gardenlet’s client certificate has expired (identified based on the
.status.clientCertificateExpirationTimestampfield in theSeedresource) and if it is managed by aManagedSeed, then this will be triggered for a reconciliation. This will trigger the bootstrapping process again and allows gardenlets to obtain a fresh client certificate.
“Reference” Reconciler
Seed objects may specify references to other objects in the garden namespace in the garden cluster which are required for certain features.
For example, operators can configure additional data for extensions via .spec.resources[].
Such objects need a special protection against deletion requests as long as they are still being referenced by one or multiple seeds.
Therefore, this reconciler checks Seeds for referenced objects and adds the finalizer gardener.cloud/reference-protection to their .metadata.finalizers list.
The reconciled Seed also gets this finalizer to enable a proper garbage collection in case the gardener-controller-manager is offline at the moment of an incoming deletion request.
When an object is not actively referenced anymore because the Seed specification has changed or all related seeds were deleted (are in deletion), the controller will remove the added finalizer again so that the object can safely be deleted or garbage collected.
This reconciler inspects the following references:
Secrets andConfigMaps from.spec.resources[]
The checks naturally grow with the number of references that are added to the Seed specification.
Shoot Controller
“Conditions” Reconciler
In case the reconciled Shoot is registered via a ManagedSeed as a seed cluster, this reconciler merges the conditions in the respective Seed’s .status.conditions into the .status.conditions of the Shoot.
This is to provide a holistic view on the status of the registered seed cluster by just looking at the Shoot resource.
“Hibernation” Reconciler
This reconciler is responsible for hibernating or awakening shoot clusters based on the schedules defined in their .spec.hibernation.schedules.
It ignores failed Shoots and those marked for deletion.
“Maintenance” Reconciler
This reconciler is responsible for maintaining shoot clusters based on the time window defined in their .spec.maintenance.timeWindow.
It might auto-update the Kubernetes version or the operating system versions specified in the worker pools (.spec.provider.workers).
It could also add some operation or task annotations. For more information, see Shoot Maintenance.
“Quota” Reconciler
This reconciler might auto-delete shoot clusters in case their referenced SecretBinding or CredentialsBinding is itself referencing a Quota with .spec.clusterLifetimeDays != nil.
If the shoot cluster is older than the configured lifetime, then it gets deleted.
It maintains the expiration time of the Shoot in the value of the shoot.gardener.cloud/expiration-timestamp annotation.
This annotation might be overridden, however only by at most twice the value of the .spec.clusterLifetimeDays.
“Reference” Reconciler
Shoot objects may specify references to other objects in the garden cluster which are required for certain features.
For example, users can configure various DNS providers via .spec.dns.providers and usually need to refer to a corresponding Secret with valid DNS provider credentials inside.
Such objects need a special protection against deletion requests as long as they are still being referenced by one or multiple shoots.
Therefore, this reconciler checks Shoots for referenced objects and adds the finalizer gardener.cloud/reference-protection to their .metadata.finalizers list.
The reconciled Shoot also gets this finalizer to enable a proper garbage collection in case the gardener-controller-manager is offline at the moment of an incoming deletion request.
When an object is not actively referenced anymore because the Shoot specification has changed or all related shoots were deleted (are in deletion), the controller will remove the added finalizer again so that the object can safely be deleted or garbage collected.
This reconciler inspects the following references:
- Admission plugin kubeconfig
Secrets (.spec.kubernetes.kubeAPIServer.admissionPlugins[].kubeconfigSecretName) - Audit policy
ConfigMaps (.spec.kubernetes.kubeAPIServer.auditConfig.auditPolicy.configMapRef) - DNS provider
Secrets (.spec.dns.providers[].secretName) - Structured authentication
ConfigMaps (.spec.kubernetes.kubeAPIServer.structuredAuthentication.configMapName) - Structured authorization
ConfigMaps (.spec.kubernetes.kubeAPIServer.structuredAuthorization.configMapName) - Structured authorization kubeconfig
Secrets (.spec.kubernetes.kubeAPIServer.structuredAuthorization.kubeconfigs[].secretName) Secrets andConfigMaps from.spec.resources[]
The checks naturally grow with the number of references that are added to the Shoot specification.
“Retry” Reconciler
This reconciler is responsible for retrying certain failed Shoots.
Currently, the reconciler retries only failed Shoots with an error code ERR_INFRA_RATE_LIMITS_EXCEEDED. See Shoot Status for more details.
“Status Label” Reconciler
This reconciler is responsible for maintaining the shoot.gardener.cloud/status label on Shoots. See Shoot Status for more details.
“Migration” Reconciler
This reconciler is triggered for Shoots currently in migration (i.e., .spec.seedName != .status.seedName).
It maintains the ReadyForMigration constraint in the .status.constraints[] list.
A Shoot is considered ready for migration if the destination Seed is up-to-date and healthy.
The main purpose of this constraint is to allow the gardenlet running in the source seed cluster to check if it can start with the migration flow without that it needs to directly read the destination Seed resource (for which it won’t have permissions).
“ShootState Finalizer” Reconciler
This reconciler is responsible for managing a finalizer (core.gardener.cloud/shootstate) on a ShootState. The finalizer ensures the ShootState will exist during migration of Shoot’s control plane to another Seed.
The ShootState has to be present until the Migrate and Restore operations finish successfully. Otherwise, in corner cases of prior deletion, subsequent Restore operations of the Shoot will fail due to the missing ShootState resource.
4.4.10 - Gardener Node Agent
Overview
The goal of the gardener-node-agent is to bootstrap a machine into a worker node and maintain node-specific components, which run on the node and are unmanaged by Kubernetes (e.g. the kubelet service, systemd units, …).
It effectively is a Kubernetes controller deployed onto the worker node.
Architecture and Basic Design

This figure visualizes the overall architecture of the gardener-node-agent. On the left side, it starts with an OperatingSystemConfig resource (OSC) with a corresponding worker pool specific cloud-config-<worker-pool> secret being passed by reference through the userdata to a machine by the machine-controller-manager (MCM).
On the right side, the cloud-config secret will be extracted and used by the gardener-node-agent after being installed. Details on this can be found in the next section.
Finally, the gardener-node-agent runs a systemd service watching on secret resources located in the kube-system namespace like our cloud-config secret that contains the OperatingSystemConfig. When gardener-node-agent applies the OSC, it installs the kubelet + configuration on the worker node.
Installation and Bootstrapping
This section describes how the gardener-node-agent is initially installed onto the worker node.
In the beginning, there is a very small bash script called gardener-node-init.sh, which will be copied to /var/lib/gardener-node-agent/init.sh on the node with cloud-init data.
This script’s sole purpose is downloading and starting the gardener-node-agent.
The binary artifact is extracted from an OCI artifact and lives at /opt/bin/gardener-node-agent.
Along with the init script, a configuration for the gardener-node-agent is carried over to the worker node at /var/lib/gardener-node-agent/config.yaml.
This configuration contains things like the shoot’s kube-apiserver endpoint, the according certificates to communicate with it, and controller configuration.
In a bootstrapping phase, the gardener-node-agent sets itself up as a systemd service.
It also executes tasks that need to be executed before any other components are installed, e.g. formatting the data device for the kubelet.
Controllers
This section describes the controllers in more details.
Lease Controller
This controller creates a Lease for gardener-node-agent in kube-system namespace of the shoot cluster.
Each instance of gardener-node-agent creates its own Lease when its corresponding Node was created.
It renews the Lease resource every 10 seconds. This indicates a heartbeat to the external world.
Node Controller
This controller watches the Node object for the machine it runs on.
The correct Node is identified based on the hostname of the machine (Nodes have the kubernetes.io/hostname label).
Whenever the worker.gardener.cloud/restart-systemd-services annotation changes, the controller performs the desired changes by restarting the specified systemd unit files.
See also this document for more information.
After restarting all units, the annotation is removed.
ℹ️ When the
gardener-node-agentsystemd service itself is requested to be restarted, the annotation is removed first to ensure it does not restart itself indefinitely.
Operating System Config Controller
This controller contains the main logic of gardener-node-agent.
It watches Secrets whose data map contains the OperatingSystemConfig which consists of all systemd units and files that are relevant for the node configuration.
Amongst others, a prominent example is the configuration file for kubelet and its unit file for the kubelet.service.
It also watches Nodes and requeues the corresponding Secret when the reason of the node condition InPlaceUpdate changes to ReadyForUpdate.
The controller decodes the configuration and computes the files and units that have changed since its last reconciliation. It writes or update the files and units to the file system, removes no longer needed files and units, reloads the systemd daemon, and starts or stops the units accordingly.
After successful reconciliation, it persists the just applied OperatingSystemConfig into a file on the host.
This file will be used for future reconciliations to compute file/unit changes.
The controller also maintains two annotations on the Node:
worker.gardener.cloud/kubernetes-version, describing the version of the installedkubelet.checksum/cloud-config-data, describing the checksum of the appliedOperatingSystemConfig(used in future reconciliations to determine whether it needs to reconcile, and to report that this node is up-to-date).
Token Controller
This controller watches the access token Secrets in the kube-system namespace configured via the gardener-node-agent’s component configuration (.controllers.token.syncConfigs[] field).
Whenever the .data.token field changes, it writes the new content to a file on the configured path on the host file system.
This mechanism is used to download its own access token for the shoot cluster, but also the access tokens of other systemd components (e.g., valitail).
Since the underlying client is based on k8s.io/client-go and the kubeconfig points to this token file, it is dynamically reloaded without the necessity of explicit configuration or code changes.
This procedure ensures that the most up-to-date tokens are always present on the host and used by the gardener-node-agent and the other systemd components.
The controller is also triggered via a source channel, which is done by the Operating System Config controller during an in-place service account key rotation.
Reasoning
The gardener-node-agent is a replacement for what was called the cloud-config-downloader and the cloud-config-executor, both written in bash. The gardener-node-agent implements this functionality as a regular controller and feels more uniform in terms of maintenance.
With the new architecture we gain a lot, let’s describe the most important gains here.
Developer Productivity
Since the Gardener community develops in Go day by day, writing business logic in bash is difficult, hard to maintain, almost impossible to test. Getting rid of almost all bash scripts which are currently in use for this very important part of the cluster creation process will enhance the speed of adding new features and removing bugs.
Speed
Until now, the cloud-config-downloader runs in a loop every 60s to check if something changed on the shoot which requires modifications on the worker node. This produces a lot of unneeded traffic on the API server and wastes time, it will sometimes take up to 60s until a desired modification is started on the worker node.
By writing a “real” Kubernetes controller, we can watch for the Node, the OSC in the Secret, and the shoot-access token in the secret. If any of these object changed, and only then, the required action will take effect immediately.
This will speed up operations and will reduce the load on the API server of the shoot especially for large clusters.
Scalability
The cloud-config-downloader adds a random wait time before restarting the kubelet in case the kubelet was updated or a configuration change was made to it. This is required to reduce the load on the API server and the traffic on the internet uplink. It also reduces the overall downtime of the services in the cluster because every kubelet restart transforms a node for several seconds into NotReady state which potentially interrupts service availability.
Decision was made to keep the existing jitter mechanism which calculates the kubelet-download-and-restart-delay-seconds on the controller itself.
Correctness
The configuration of the cloud-config-downloader is actually done by placing a file for every configuration item on the disk on the worker node. This was done because parsing the content of a single file and using this as a value in bash reduces to something like VALUE=$(cat /the/path/to/the/file). Simple, but it lacks validation, type safety and whatnot.
With the gardener-node-agent we introduce a new API which is then stored in the gardener-node-agent secret and stored on disk in a single YAML file for comparison with the previous known state. This brings all benefits of type safe configuration.
Because actual and previous configuration are compared, removed files and units are also removed and stopped on the worker if removed from the OSC.
Availability
Previously, the cloud-config-downloader simply restarted the systemd units on every change to the OSC, regardless which of the services changed. The gardener-node-agent first checks which systemd unit was changed, and will only restart these. This will prevent unneeded kubelet restarts.
4.4.11 - Gardener Operator
Overview
The gardener-operator is responsible for the garden cluster environment.
Without this component, users must deploy ETCD, the Gardener control plane, etc., manually and with separate mechanisms (not maintained in this repository).
This is quite unfortunate since this requires separate tooling, processes, etc.
A lot of production- and enterprise-grade features were built into Gardener for managing the seed and shoot clusters, so it makes sense to re-use them as much as possible also for the garden cluster.
Deployment
There is a Helm chart which can be used to deploy the gardener-operator.
Once deployed and ready, you can create a Garden resource.
Note that there can only be one Garden resource per system at a time.
ℹ️ Similar to seed clusters, garden runtime clusters require a VPA, see this section. By default,
gardener-operatordeploys the VPA components. However, when there already is a VPA available, then set.spec.runtimeCluster.settings.verticalPodAutoscaler.enabled=falsein theGardenresource.
Garden Resources
Please find an exemplary Garden resource here.
Configuration For Runtime Cluster
Settings
The Garden resource offers a few settings that are used to control the behaviour of gardener-operator in the runtime cluster.
This section provides an overview over the available settings in .spec.runtimeCluster.settings:
Load Balancer Services
gardener-operator deploys Istio and relevant resources to the runtime cluster in order to expose the virtual-garden-kube-apiserver service (similar to how the kube-apiservers of shoot clusters are exposed).
In most cases, the cloud-controller-manager (responsible for managing these load balancers on the respective underlying infrastructure) supports certain customization and settings via annotations.
This document provides a good overview and many examples.
By setting the .spec.runtimeCluster.settings.loadBalancerServices.annotations field the Gardener administrator can specify a list of annotations which will be injected into the Services of type LoadBalancer.
Vertical Pod Autoscaler
gardener-operator heavily relies on the Kubernetes vertical-pod-autoscaler component.
By default, the Garden controller deploys the VPA components into the garden namespace of the respective runtime cluster.
In case you want to manage the VPA deployment on your own or have a custom one, then you might want to disable the automatic deployment of gardener-operator.
Otherwise, you might end up with two VPAs which will cause erratic behaviour.
By setting the .spec.runtimeCluster.settings.verticalPodAutoscaler.enabled=false you can disable the automatic deployment.
⚠️ In any case, there must be a VPA available for your runtime cluster. Using a runtime cluster without VPA is not supported.
Topology-Aware Traffic Routing
Refer to the Topology-Aware Traffic Routing documentation as this document contains the documentation for the topology-aware routing setting for the garden runtime cluster.
Volumes
It is possible to define the minimum size for PersistentVolumeClaims in the runtime cluster created by gardener-operator via the .spec.runtimeCluster.volume.minimumSize field.
This can be relevant in case the runtime cluster runs on an infrastructure that does only support disks of at least a certain size.
Configuration For Virtual Cluster
ETCD Encryption Config
The spec.virtualCluster.kubernetes.kubeAPIServer.encryptionConfig field in the Garden API allows operators to customize encryption configurations for the kube-apiserver of the virtual cluster. It provides options to specify additional resources for encryption. Similarly spec.virtualCluster.gardener.gardenerAPIServer.encryptionConfig field allows operators to customize encryption configurations for the gardener-apiserver.
- The resources field can be used to specify resources that should be encrypted in addition to secrets. Secrets are always encrypted for the
kube-apiserver. For thegardener-apiserver, the following resources are always encrypted:controllerdeployments.core.gardener.cloudcontrollerregistrations.core.gardener.cloudinternalsecrets.core.gardener.cloudshootstates.core.gardener.cloud
- Adding an item to any of the lists will cause patch requests for all the resources of that kind to encrypt them in the etcd. See Encrypting Confidential Data at Rest for more details.
- Removing an item from any of these lists will cause patch requests for all the resources of that type to decrypt and rewrite the resource as plain text. See Decrypt Confidential Data that is Already Encrypted at Rest for more details.
Extension Resource
A Gardener installation relies on extensions to provide support for new cloud providers or to add new capabilities. You can find out more about Gardener extensions and how they can be used here.
The Extension resource is intended to automate the installation and management of extensions in a Gardener landscape.
It contains configuration for the following scenarios:
- The deployment of the extension chart in the garden runtime cluster.
- The deployment of
ControllerRegistrationandControllerDeploymentresources in the (virtual) garden cluster. - The deployment of extension admissions charts in runtime and virtual clusters.
With regard to the Garden reconciliation process, there are specific types of extensions that are of key interest, namely the BackupBucket, DNSRecord, and Extension types.
The BackupBucket extension is utilized to manage the backup bucket dedicated to the garden’s main etcd.
The DNSRecord extension type is essential to manage the API server and ingress DNS records.
Lastly, the Extension type plays a crucial role in managing generic Gardener extensions which deploy various components within the runtime cluster. These extensions can be activated and configured in the .spec.extensions field of the Garden resource. These extensions can supplement functionality and provide new capabilities.
Please find an exemplary Extension resource here.
Extension Deployment
The .spec.deployment specifies how an extension can be installed for a Gardener landscape and consists of the following parts:
.spec.deployment.extensioncontains the deployment specification of an extension..spec.deployment.admissioncontains the deployment specification of an extension admission.
Each one is described in more details below.
Configuration for Extension Deployment
.spec.deployment.extension contains configuration for the registration of an extension in the garden cluster.
gardener-operator follows the same principles described by this document:
.spec.deployment.extension.helmand.spec.deployment.extension.valuesare used when creating theControllerDeploymentin the garden cluster..spec.deployment.extension.policyand.spec.deployment.extension.seedSelectordefine the extension’s installation policy as per theControllerDeployment'srespective fields
Runtime
Extensions can manage resources required by the Garden resource (e.g. BackupBucket, DNSRecord, Extension) in the runtime cluster.
Since the environment in the runtime cluster may differ from that of a Seed, the extension is installed in the runtime cluster with a distinct set of Helm chart values specified in .spec.deployment.extension.runtimeValues.
If no runtimeValues are provided, the extension deployment for the runtime garden is considered superfluous and the deployment is uninstalled.
The configuration allows for precise control over various extension parameters, such as requested resources, priority classes, and more.
Besides the values configured in .spec.deployment.extension.runtimeValues, a runtime deployment flag and a priority class are merged into the values:
gardener:
runtimeCluster:
enabled: true # indicates the extension is enabled for the Garden cluster, e.g. for handling `BackupBucket`, `DNSRecord` and `Extension` objects.
priorityClassName: gardener-garden-system-200
As soon as a Garden object is created and runtimeValues are configured, the extension is deployed in the runtime cluster.
Extension Registration
When the virtual garden cluster is available, the Extension controller manages ControllerRegistration/ControllerDeployment resources
to register extensions for shoots. The fields of .spec.deployment.extension include their configuration options.
Configuration for Admission Deployment
The .spec.deployment.admission defines how an extension admission may be deployed by the gardener-operator.
This deployment is optional and may be omitted.
Typically, the admission are split in two parts:
Runtime
The runtime part contains deployment relevant manifests, required to run the admission service in the runtime cluster.
The following values are passed to the chart during reconciliation:
gardener:
runtimeCluster:
priorityClassName: <Class to be used for extension admission>
Virtual
The virtual part includes the webhook registration (MutatingWebhookConfiguration/Validatingwebhookconfiguration) and RBAC configuration.
The following values are passed to the chart during reconciliation:
gardener:
virtualCluster:
serviceAccount:
name: <Name of the service account used to connect to the garden cluster>
namespace: <Namespace of the service account>
Extension admissions often need to retrieve additional context from the garden cluster in order to process validating or mutating requests.
For example, the corresponding CloudProfile might be needed to perform a provider specific shoot validation.
Therefore, Gardener automatically injects a kubeconfig into the admission deployment to interact with the (virtual) garden cluster (see this document for more information).
Configuration for Extension Resources
The .spec.resources field refers to the extension resources as defined by Gardener in the extensions.gardener.cloud/v1alpha1 API.
These include both well-known types such as Infrastructure, Worker etc. and generic resources.
The field will be used to populate the respective field in the resulting ControllerRegistration in the garden cluster.
Controllers
The gardener-operator controllers are now described in more detail.
Garden Controller
The Garden controller in the operator reconciles Garden objects with the help of the following reconcilers.
Main Reconciler
The reconciler first generates a general CA certificate which is valid for ~30d and auto-rotated when 80% of its lifetime is reached.
Afterwards, it brings up the so-called “garden system components”.
The gardener-resource-manager is deployed first since its ManagedResource controller will be used to bring up the remainders.
Other system components are:
- runtime garden system resources (
PriorityClasses for the workload resources) - virtual garden system resources (RBAC rules)
- Vertical Pod Autoscaler (if enabled via
.spec.runtimeCluster.settings.verticalPodAutoscaler.enabled=truein theGarden) - ETCD Druid
- Istio
As soon as all system components are up, the reconciler deploys the virtual garden cluster.
It comprises out of two ETCDs (one “main” etcd, one “events” etcd) which are managed by ETCD Druid via druid.gardener.cloud/v1alpha1.Etcd custom resources.
The whole management works similar to how it works for Shoots, so you can take a look at this document for more information in general.
The virtual garden control plane components are:
virtual-garden-etcd-mainvirtual-garden-etcd-eventsvirtual-garden-kube-apiservervirtual-garden-kube-controller-managervirtual-garden-gardener-resource-manager
If the .spec.virtualCluster.controlPlane.highAvailability={} is set then these components will be deployed in a “highly available” mode.
For ETCD, this means that there will be 3 replicas each.
This works similar like for Shoots (see this document) except for the fact that there is no failure tolerance type configurability.
The gardener-resource-manager’s HighAvailabilityConfig webhook makes sure that all pods with multiple replicas are spread on nodes, and if there are at least two zones in .spec.runtimeCluster.provider.zones then they also get spread across availability zones.
If once set, removing
.spec.virtualCluster.controlPlane.highAvailabilityagain is not supported.
The virtual-garden-kube-apiserver Deployment is exposed via Istio, similar to how the kube-apiservers of shoot clusters are exposed.
Similar to the Shoot API, the version of the virtual garden cluster is controlled via .spec.virtualCluster.kubernetes.version.
Likewise, specific configuration for the control plane components can be provided in the same section, e.g. via .spec.virtualCluster.kubernetes.kubeAPIServer for the kube-apiserver or .spec.virtualCluster.kubernetes.kubeControllerManager for the kube-controller-manager.
The kube-controller-manager only runs a few controllers that are necessary in the scenario of the virtual garden.
Most prominently, the serviceaccount-token controller is unconditionally disabled.
Hence, the usage of static ServiceAccount secrets is not supported generally.
Instead, the TokenRequest API should be used.
Third-party components that need to communicate with the virtual cluster can leverage the gardener-resource-manager’s TokenRequestor controller and the generic kubeconfig, just like it works for Shoots.
Please note, that this functionality is restricted to the garden namespace. The current Secret name of the generic kubeconfig can be found in the annotations (key: generic-token-kubeconfig.secret.gardener.cloud/name) of the Garden resource.
For the virtual cluster, it is essential to provide at least one DNS domain via .spec.virtualCluster.dns.domains.
The respective DNS records are not managed by gardener-operator and should be created manually.
They should point to the load balancer IP of the istio-ingressgateway Service in namespace virtual-garden-istio-ingress.
The DNS records must be prefixed with both gardener. and api. for all domains in .spec.virtualCluster.dns.domains.
The first DNS domain in this list is used for the server in the kubeconfig, and for configuring the --external-hostname flag of the API server.
Apart from the control plane components of the virtual cluster, the reconcile also deploys the control plane components of Gardener.
gardener-apiserver reuses the same ETCDs like the virtual-garden-kube-apiserver, so all data related to the “the garden cluster” is stored together and “isolated” from ETCD data related to the runtime cluster.
This drastically simplifies backup and restore capabilities (e.g., moving the virtual garden cluster from one runtime cluster to another).
The Gardener control plane components are:
gardener-apiservergardener-admission-controllergardener-controller-managergardener-scheduler
Besides those, the gardener-operator is able to deploy the following optional components:
- Gardener Dashboard (and the controller for web terminals) when
.spec.virtualCluster.gardener.gardenerDashboard(or.spec.virtualCluster.gardener.gardenerDashboard.terminal, respectively) is set. You can read more about it and its configuration in this section. - Gardener Discovery Server when
.spec.virtualCluster.gardener.gardenerDiscoveryServeris set. The service account issuer of shoots will be calculated in the formathttps://discovery.<.spec.runtimeCluster.ingress.domains[0]>/projects/<project-name>/shoots/<shoot-uid>/issuer. This configuration applies for all seeds registered with the Garden cluster. Once set it should not be modified.
The reconciler also manages a few observability-related components:
fluent-operatorfluent-bitgardener-metrics-exporterkube-state-metricsplutonovaliprometheus-operatoropentelemetry-operatoralertmanager-garden(read more here)prometheus-garden(read more here)prometheus-longterm(read more here)blackbox-exporterperses-operator
It is also mandatory to provide an IPv4 CIDR for the service network of the virtual cluster via .spec.virtualCluster.networking.services.
This range is used by the API server to compute the cluster IPs of Services.
The controller maintains the .status.lastOperation which indicates the status of an operation.
Gardener Dashboard
.spec.virtualCluster.gardener.gardenerDashboard serves a few configuration options for the dashboard.
This section highlights the most prominent fields:
oidcConfig: The general OIDC configuration is part of.spec.virtualCluster.kubernetes.kubeAPIServer.oidcConfig(deprecated). Since Kubernetes 1.30 the general OIDC configuration happens via the Structured Authentication feature.spec.virtualCluster.kubernetes.kubeAPIServer.structuredAuthentication. This section allows you to define a few specific settings for the dashboard.clientIDPublicis the public ID of the OIDC client.issuerURLis the URL of the JWT issuer.sessionLifetimeis the duration after which a session is terminated (i.e., after which a user is automatically logged out).additionalScopesallows to extend the list of scopes of the JWT token that are to be recognized.certificateAuthoritySecretRefallows you to specify a secret containing a custom CA certificate for communicating with the OIDC issuer.
You must reference aSecretin thegardennamespace containing the client and, if applicable, the client secret for the dashboard:If using a public client, a client secret is not required. The dashboard can function as a public OIDC client, allowing for improved flexibility in environments where secret storage is not feasible.apiVersion: v1 kind: Secret metadata: name: gardener-dashboard-oidc namespace: garden type: Opaque stringData: client_id: <client_id> client_secret: <optional>enableTokenLogin: This is enabled by default and allows logging into the dashboard with a JWT token. You can disable it in case you want to only allow OIDC-based login. However, at least one of the both login methods must be enabled.frontendConfigMapRef: Reference aConfigMapin thegardennamespace containing the frontend configuration in the data with keyfrontend-config.yaml, for examplePlease take a look at this file to get an idea of which values are configurable. This configuration can also include branding, themes, and colors. Read more about it here. Assets (logos/icons) are configured in a separateapiVersion: v1 kind: ConfigMap metadata: name: gardener-dashboard-frontend namespace: garden data: frontend-config.yaml: | helpMenuItems: - title: Homepage icon: mdi-file-document url: https://gardener.cloudConfigMap, see below.assetsConfigMapRef: Reference aConfigMapin thegardennamespace containing the assets, for exampleNote that the assets must be provided base64-encoded, henceapiVersion: v1 kind: ConfigMap metadata: name: gardener-dashboard-assets namespace: garden binaryData: favicon-16x16.png: base64(favicon-16x16.png) favicon-32x32.png: base64(favicon-32x32.png) favicon-96x96.png: base64(favicon-96x96.png) favicon.ico: base64(favicon.ico) logo.svg: base64(logo.svg)binaryData(instead ofdata) must be used. Please take a look at this file to get more information.gitHub: You can connect a GitHub repository that can be used to create issues for shoot clusters in the cluster details page. You have to reference aSecretin thegardennamespace that contains the GitHub credentials, for example:Note that you can also set up a GitHub webhook to the dashboard such that it receives updates when somebody changes the GitHub issue. TheapiVersion: v1 kind: Secret metadata: name: gardener-dashboard-github namespace: garden type: Opaque stringData: # This is for GitHub token authentication: authentication.token: <secret> # Alternatively, this is for GitHub app authentication: authentication.appId: <secret> authentication.clientId: <secret> authentication.clientSecret: <secret> authentication.installationId: <secret> authentication.privateKey: <secret> # This is the webhook secret, see explanation below webhookSecret: <secret>webhookSecretfield is the secret that you enter in GitHub in the webhook configuration. The dashboard uses it to verify that received traffic is indeed originated from GitHub. If you don’t want to set up such webhook, or if the dashboard is not reachable by the GitHub webhook (e.g., in restricted environments) you can also configuregitHub.pollInterval. It is the interval of how often the GitHub API is polled for issue updates. This field is used as a fallback mechanism to ensure state synchronization, even when there is a GitHub webhook configuration. If a webhook event is missed or not successfully delivered, the polling will help catch up on any missed updates. If this field is not provided and there is nowebhookSecretkey in the referenced secret, it will be implicitly defaulted to15m. The dashboard will use this to regularly poll the GitHub API for updates on issues.terminal: This enables the web terminal feature, read more about it here. When set, theterminal-controller-managerwill be deployed to the runtime cluster. TheallowedHostsfield is explained here. Thecontainersection allows you to specify a container image and a description that should be used for the web terminals.ingress: This allows you to customize theIngressresource of the dashboard. Theenabledfield allows you to control whether to deploy theIngressresource to the cluster.
Observability
Garden Prometheus
gardener-operator deploys a Prometheus instance in the garden namespace (called “Garden Prometheus”) which fetches metrics and data from garden system components, cAdvisors, the virtual cluster control plane, and the Seeds’ aggregate Prometheus instances.
Its purpose is to provide an entrypoint for operators when debugging issues with components running in the garden cluster.
It also serves as the top-level aggregator of metering across a Gardener landscape.
To extend the configuration of the Garden Prometheus, you can create the prometheus-operator’s custom resources and label them with prometheus=garden, for example:
apiVersion: monitoring.coreos.com/v1
kind: ServiceMonitor
metadata:
labels:
prometheus: garden
name: garden-my-component
namespace: garden
spec:
selector:
matchLabels:
app: my-component
endpoints:
- metricRelabelings:
- action: keep
regex: ^(metric1|metric2|...)$
sourceLabels:
- __name__
port: metrics
Long-Term Prometheus
gardener-operator deploys another Prometheus instance in the garden namespace (called “Long-Term Prometheus”) which federates metrics from Garden Prometheus.
Its purpose is to store those with a longer retention than Garden Prometheus would. It is not possible to define different retention periods for different metrics in Prometheus, hence, using another Prometheus instance is the only option.
This Long-term Prometheus also has an additional Cortex sidecar container for caching some queries to achieve faster processing times.
To extend the configuration of the Long-term Prometheus, you can create the prometheus-operator’s custom resources and label them with prometheus=longterm, for example:
apiVersion: monitoring.coreos.com/v1
kind: ServiceMonitor
metadata:
labels:
prometheus: longterm
name: longterm-my-component
namespace: garden
spec:
selector:
matchLabels:
app: my-component
endpoints:
- metricRelabelings:
- action: keep
regex: ^(metric1|metric2|...)$
sourceLabels:
- __name__
port: metrics
Alertmanager
By default, the alertmanager-garden deployed by gardener-operator does not come with any configuration.
It is the responsibility of the human operators to design and provide it.
This can be done by creating monitoring.coreos.com/v1alpha1.AlertmanagerConfig resources labeled with alertmanager=garden (read more about them here), for example:
apiVersion: monitoring.coreos.com/v1alpha1
kind: AlertmanagerConfig
metadata:
name: config
namespace: garden
labels:
alertmanager: garden
spec:
route:
receiver: dev-null
groupBy:
- alertname
- landscape
routes:
- continue: true
groupWait: 3m
groupInterval: 5m
repeatInterval: 12h
routes:
- receiver: ops
matchers:
- name: severity
value: warning
matchType: =
- name: topology
value: garden
matchType: =
receivers:
- name: dev-null
- name: ops
slackConfigs:
- apiURL: https://<slack-api-url>
channel: <channel-name>
username: Gardener-Alertmanager
iconEmoji: ":alert:"
title: "[{{ .Status | toUpper }}] Gardener Alert(s)"
text: "{{ range .Alerts }}*{{ .Annotations.summary }} ({{ .Status }})*\n{{ .Annotations.description }}\n\n{{ end }}"
sendResolved: true
Plutono
A Plutono instance is deployed by gardener-operator into the garden namespace for visualizing monitoring metrics and logs via dashboards.
In order to provide custom dashboards, create a ConfigMap in the garden namespace labelled with dashboard.monitoring.gardener.cloud/garden=true that contains the respective JSON documents, for example:
apiVersion: v1
kind: ConfigMap
metadata:
labels:
dashboard.monitoring.gardener.cloud/garden: "true"
name: my-custom-dashboard
namespace: garden
data:
my-custom-dashboard.json: <dashboard-JSON-document>
Care Reconciler
This reconciler performs four “care” actions related to Gardens.
It maintains the following conditions:
VirtualGardenAPIServerAvailable: The/healthzendpoint of the garden’svirtual-garden-kube-apiserveris called and considered healthy when it responds with200 OK.RuntimeComponentsHealthy: The conditions of theManagedResources applied to the runtime cluster are checked (e.g.,ResourcesApplied).VirtualComponentsHealthy: The virtual components are considered healthy when the respectiveDeployments (for examplevirtual-garden-kube-apiserver,virtual-garden-kube-controller-manager), andEtcds (for examplevirtual-garden-etcd-main) exist and are healthy. Additionally, the conditions of theManagedResources applied to the virtual cluster are checked (e.g.,ResourcesApplied).ObservabilityComponentsHealthy: This condition is considered healthy when the respectiveDeployments (for exampleplutono) andStatefulSets (for exampleprometheus,vali) exist and are healthy.
If all checks for a certain condition are succeeded, then its status will be set to True.
Otherwise, it will be set to False or Progressing.
If at least one check fails and there is threshold configuration for the conditions (in .controllers.gardenCare.conditionThresholds), then the status will be set:
- to
Progressingif it wasTruebefore. - to
Progressingif it wasProgressingbefore and thelastUpdateTimeof the condition does not exceed the configured threshold duration yet. - to
Falseif it wasProgressingbefore and thelastUpdateTimeof the condition exceeds the configured threshold duration.
The condition thresholds can be used to prevent reporting issues too early just because there is a rollout or a short disruption.
Only if the unhealthiness persists for at least the configured threshold duration, then the issues will be reported (by setting the status to False).
In order to compute the condition statuses, this reconciler considers ManagedResources (in the garden and istio-system namespace) and their status, see this document for more information.
The following table explains which ManagedResources are considered for which condition type:
| Condition Type | ManagedResources are considered when |
|---|---|
RuntimeComponentsHealthy | .spec.class=seed and care.gardener.cloud/condition-type label either unset, or set to RuntimeComponentsHealthy |
VirtualComponentsHealthy | .spec.class unset or care.gardener.cloud/condition-type label set to VirtualComponentsHealthy |
ObservabilityComponentsHealthy | care.gardener.cloud/condition-type label set to ObservabilityComponentsHealthy |
Reference Reconciler
Garden objects may specify references to other objects in the Garden cluster which are required for certain features.
For example, operators can configure a secret for ETCD backup via .spec.virtualCluster.etcd.main.backup.secretRef.name or an audit policy ConfigMap via .spec.virtualCluster.kubernetes.kubeAPIServer.auditConfig.auditPolicy.configMapRef.name.
Such objects need a special protection against deletion requests as long as they are still being referenced by the Garden.
Therefore, this reconciler checks Gardens for referenced objects and adds the finalizer gardener.cloud/reference-protection to their .metadata.finalizers list.
The reconciled Garden also gets this finalizer to enable a proper garbage collection in case the gardener-operator is offline at the moment of an incoming deletion request.
When an object is not actively referenced anymore because the Garden specification has changed is in deletion, the controller will remove the added finalizer again so that the object can safely be deleted or garbage collected.
This reconciler inspects the following references:
- Admission plugin kubeconfig
Secrets (.spec.virtualCluster.kubernetes.kubeAPIServer.admissionPlugins[].kubeconfigSecretNameand.spec.virtualCluster.gardener.gardenerAPIServer.admissionPlugins[].kubeconfigSecretName) - Audit policy
ConfigMaps (.spec.virtualCluster.kubernetes.kubeAPIServer.auditConfig.auditPolicy.configMapRef.nameand.spec.virtualCluster.gardener.gardenerAPIServer.auditConfig.auditPolicy.configMapRef.name) - Audit webhook kubeconfig
Secrets (.spec.virtualCluster.kubernetes.kubeAPIServer.auditWebhook.kubeconfigSecretNameand.spec.virtualCluster.gardener.gardenerAPIServer.auditWebhook.kubeconfigSecretName) - Authentication webhook kubeconfig
Secrets (.spec.virtualCluster.kubernetes.kubeAPIServer.authentication.webhook.kubeconfigSecretName) - DNS
Secrets (.spec.dns.providers[].secretRef) - ETCD backup
Secrets (.spec.virtualCluster.etcd.main.backup.secretRef) - Structured authentication
ConfigMaps (.spec.virtualCluster.kubernetes.kubeAPIServer.structuredAuthentication.configMapName) - Structured authorization
ConfigMaps (.spec.virtualCluster.kubernetes.kubeAPIServer.structuredAuthorization.configMapName) - Structured authorization kubeconfig
Secrets (.spec.virtualCluster.kubernetes.kubeAPIServer.structuredAuthorization.kubeconfigs[].secretName) - SNI
Secrets (.spec.virtualCluster.kubernetes.kubeAPIServer.sni.secretName)
The checks naturally grow with the number of references that are added to the Garden specification.
Controller Registrar Controller
Some controllers may only be instantiated or added later, because they need the Garden resource to be available (e.g. network configuration) or even the entire virtual garden cluster to run:
NetworkPolicycontrollerVPA EvictionRequirementscontrollerRequired RuntimereconcilerRequired VirtualreconcilerAccesscontrollerVirtual-Cluster-RegistrarcontrollerGardenletcontroller
Note
Some of the listed controllers are part of
gardenlet, as well. If the garden cluster is a seed cluster at the same time,gardenletwill skip running theNetworkPolicyandVPA EvictionRequirementscontrollers to avoid interferences.
Extension Controller
Gardener relies on extensions to provide various capabilities, such as supporting cloud providers. This controller automates the management of extensions by managing all necessary resources in the runtime and virtual garden clusters.
Extension Care Reconciler
This reconciler performs three “care” actions related to Extensionss.
It maintains the following conditions:
ControllerInstallationsHealthy: The conditions of theControllerInstallations which belong to this extension are checked (e.g.,Healthy).RuntimeHealthy: The conditions of theManagedResources applied to the runtime cluster are checked (e.g.,ResourcesApplied).AdmissionHealthy: The conditions of theManagedResources applied to the runtime and the virtual cluster are checked (e.g.,ResourcesApplied).
If all checks for a certain condition are succeeded, then its status will be set to True.
Otherwise, it will be set to False or Progressing.
If at least one check fails and there is threshold configuration for the conditions (in .controllers.extensionCare.conditionThresholds), then the status will be set:
- to
Progressingif it wasTruebefore. - to
Progressingif it wasProgressingbefore and thelastUpdateTimeof the condition does not exceed the configured threshold duration yet. - to
Falseif it wasProgressingbefore and thelastUpdateTimeof the condition exceeds the configured threshold duration.
The condition thresholds can be used to prevent reporting issues too early just because there is a rollout or a short disruption.
Only if the unhealthiness persists for at least the configured threshold duration, then the issues will be reported (by setting the status to False).
Main Reconciler
Currently, this logic handles the following scenarios:
- Extension deployment in the runtime cluster, based on the
RequiredRuntimecondition. - Extension admission deployment for the virtual garden cluster.
ControllerDeploymentandControllerRegistrationreconciliation in the virtual garden cluster.
Required Runtime Reconciler
This reconciler reacts on Garden and Extension events.
It is checked if the extension deployment is required in the garden runtime cluster based on the existing Garden specification.
The result is then put into the RequiredRuntime condition and added to the Extension status.
Required Virtual Reconciler
This reconciler reacts on events from ControllerInstallation and Extension resources.
It updates the RequiredVirtual condition of Extension objects, based on the existence of related ControllerInstallations and whether they are marked as required.
Access Controller
This controller performs actions related to the garden access secret (gardener or gardener-internal) for the virtual garden cluster.
It extracts the included Kubeconfig, and prepares a dedicated REST config, where the inline bearer token is replaced by a bearer token file.
Any subsequent reconciliation run, mostly triggered by a token replacement, causes the content of the bearer token file to be updated with the token found in the access secret.
At the end, the prepared REST config is passed to the Virtual-Cluster-Registrar controller.
Together with the adjusted config and the token file, related controllers can continuously run their operations, even after credentials rotation.
Virtual-Cluster-Registrar Controller
The Virtual-Cluster-Registrar controller watches for events on a dedicated channel that is shared with the Access controller.
Once a REST config is sent to the channel, the reconciliation loop picks up the request, creates a Cluster object and stores in memory.
This Cluster object points to the virtual garden cluster and is used to register further controllers, e.g. Gardenlet controller.
Gardenlet Controller
The Gardenlet controller reconciles a seedmanagement.gardener.cloud/v1alpha1.Gardenlet resource in case there is no Seed yet with the same name.
This is used to allow easy deployments of gardenlets into unmanaged seed clusters.
For a general overview, see this document.
On Gardenlet reconciliation, the controller deploys the gardenlet to the cluster (either its own, or the one provided via the .spec.kubeconfigSecretRef) after downloading the Helm chart specified in .spec.deployment.helm.ociRepository and rendering it with the provided values/configuration.
On Gardenlet deletion, nothing happens: gardenlets must always be deleted manually (by deleting the Seed and, once gone, then the gardenlet Deployment).
Note
This controller only takes care of the very first
gardenletdeployment (since it only reacts when there is noSeedresource yet). After thegardenletis running, it uses the self-upgrade mechanism by watching theseedmanagement.gardener.cloud/v1alpha1.Gardenlet(see this for more details.)After a successful
Gardenreconciliation,gardener-operatoralso updates the.spec.deployment.helm.ociRepository.refto its own version in allGardenletresources labeled withoperator.gardener.cloud/auto-update-gardenlet-helm-chart-ref=true.gardenlets then updates themselves.⚠️ If you prefer to manage the
Gardenletresources via GitOps, Flux, or similar tools, then you should better manage the.spec.deployment.helm.ociRepository.reffield yourself and not label the resources as mentioned above (to preventgardener-operatorfrom interfering with your desired state). Make sure to apply yourGardenletresources (potentially containing a new version) after theGardenresource was successfully reconciled (i.e., after Gardener control plane was successfully rolled out, see this for more information.)
Webhooks
As of today, the gardener-operator only has one webhook handler which is now described in more detail.
Validation
The validation webhook consists of the following handlers.
Garden
This webhook handler validates CREATE/UPDATE/DELETE operations on Garden resources.
Simple validation is performed via standard CRD validation.
However, more advanced validation is hard to express via these means and is performed by this webhook handler.
Furthermore, for deletion requests, it is validated that the Garden is annotated with a deletion confirmation annotation, namely confirmation.gardener.cloud/deletion=true.
Only if this annotation is present it allows the DELETE operation to pass.
This prevents users from accidental/undesired deletions.
Another validation is to check that there is only one Garden resource at a time.
It prevents creating a second Garden when there is already one in the system.
Extension
This webhook handler validates UPDATE and DELETE operations on Extension resources.
In an UPDATE request, the configured .spec.resources are validated to ensure the primary field remains immutable.
DELETE requests for Extension resources are denied if they are reported as required (also see required-runtime and required-virtual).
These deletions often happen accidentally, and this handler safeguards the system from such actions.
Defaulting
This webhook handler mutates Garden resources on CREATE/UPDATE/DELETE operations.
Extension resources are mutated in the scope of CREATE/UPDATE requests.
Simple defaulting is performed via standard CRD defaulting.
However, more advanced defaulting is hard to express via these means and is performed by this webhook handler.
Using Garden Runtime Cluster As Seed Cluster
In production scenarios, you probably wouldn’t use the Kubernetes cluster running gardener-operator and the Gardener control plane (called “runtime cluster”) as seed cluster at the same time.
However, such setup is technically possible and might simplify certain situations (e.g., development, evaluation, …).
If the runtime cluster is a seed cluster at the same time, gardenlet’s Seed controller will not manage the components which were already deployed (and reconciled) by gardener-operator.
As of today, this applies to:
gardener-resource-managervpa-{admission-controller,recommender,updater}etcd-druidistiocontrol-planenginx-ingress-controller
Those components are so-called “seed system components”. In addition, there are a few observability components:
fluent-operatorfluent-bitvaliplutonokube-state-metricsprometheus-operatorperses-operatoropentelemetry-operator
As all of these components are managed by gardener-operator in this scenario, the gardenlet just skips them.
ℹ️ There is no need to configure anything - the
gardenletwill automatically detect when its seed cluster is the garden runtime cluster at the same time.
⚠️ Note that such setup requires that you upgrade the versions of gardener-operator and gardenlet in lock-step.
Otherwise, you might experience unexpected behaviour or issues with your seed or shoot clusters.
Credentials Rotation
The credentials rotation works in the same way as it does for Shoot resources, i.e. there are gardener.cloud/operation annotation values for starting or completing the rotation procedures.
For certificate authorities, gardener-operator generates one which is automatically rotated roughly each month (ca-garden-runtime) and several CAs which are NOT automatically rotated but only on demand.
🚨 Hence, it is the responsibility of the (human) operator to regularly perform the credentials rotation.
Please refer to this document for more details. As of today, gardener-operator only creates the following types of credentials (i.e., some sections of the document don’t apply for Gardens and can be ignored):
- certificate authorities (and related server and client certificates)
- ETCD encryption key
- observability password for Plutono
ServiceAccounttoken signing keyWorkloadIdentitytoken signing key
⚠️ Rotation of static ServiceAccount secrets is not supported since the kube-controller-manager does not enable the serviceaccount-token controller.
When the ServiceAccount token signing key rotation is in Preparing phase, then gardener-operator annotates all Seeds with gardener.cloud/operation=renew-garden-access-secrets.
This causes gardenlet to populate new ServiceAccount tokens for the garden cluster to all extensions, which are now signed with the new signing key.
Read more about it here.
Similarly, when the CA certificate rotation is in Preparing phase, then gardener-operator annotates all Seeds with gardener.cloud/operation=renew-kubeconfig.
This causes gardenlet to request a new client certificate for its garden cluster kubeconfig, which is now signed with the new client CA, and which also contains the new CA bundle for the server certificate verification.
Read more about it here.
Also, when the WorkloadIdentity token signing key rotation is in Preparing phase, then gardener-operator annotates all Seeds with gardener.cloud/operation=renew-workload-identity-tokens.
This causes gardenlet to renew all workload identity tokens in the seed cluster with new tokens now signed with the new signing key.
Migrating an Existing Gardener Landscape to gardener-operator
Since gardener-operator was only developed in 2023, six years after the Gardener project initiation, most users probably already have an existing Gardener landscape.
The most prominent installation procedure is garden-setup, however experience shows that most community members have developed their own tooling for managing the garden cluster and the Gardener control plane components.
Consequently, providing a general migration guide is not possible since the detailed steps vary heavily based on how the components were set up previously. As a result, this section can only highlight the most important caveats and things to know, while the concrete migration steps must be figured out individually based on the existing installation.
Please test your migration procedure thoroughly. Note that in some cases it can be easier to set up a fresh landscape with
gardener-operator, restore the ETCD data, switch the DNS records, and issue new credentials for all clients.
Please make sure that you configure all your desired fields in the Garden resource.
ETCD
gardener-operator leverages etcd-druid for managing the virtual-garden-etcd-main and virtual-garden-etcd-events, similar to how shoot cluster control planes are handled.
The PersistentVolumeClaim names differ slightly - for virtual-garden-etcd-events it’s virtual-garden-etcd-events-virtual-garden-etcd-events-0, while for virtual-garden-etcd-main it’s main-virtual-garden-etcd-virtual-garden-etcd-main-0.
The easiest approach for the migration is to make your existing ETCD volumes follow the same naming scheme.
Alternatively, backup your data, let gardener-operator take over ETCD, and then restore your data to the new volume.
The backup bucket must be created separately, and its name as well as the respective credentials must be provided via the Garden resource in .spec.virtualCluster.etcd.main.backup.
virtual-garden-kube-apiserver Deployment
gardener-operator deploys a virtual-garden-kube-apiserver into the runtime cluster.
This virtual-garden-kube-apiserver spans a new cluster, called the virtual cluster.
There are a few certificates and other credentials that should not change during the migration.
You have to prepare the environment accordingly by leveraging the secret’s manager capabilities.
- The existing Cluster CA
Secretshould be labeled withsecrets-manager-use-data-for-name=ca. - The existing Client CA
Secretshould be labeled withsecrets-manager-use-data-for-name=ca-client. - The existing Front Proxy CA
Secretshould be labeled withsecrets-manager-use-data-for-name=ca-front-proxy. - The existing Service Account Signing Key
Secretshould be labeled withsecrets-manager-use-data-for-name=service-account-key. - The existing ETCD Encryption Key
Secretshould be labeled withsecrets-manager-use-data-for-name=kube-apiserver-etcd-encryption-key.
virtual-garden-kube-apiserver Exposure
The virtual-garden-kube-apiserver is exposed via a dedicated istio-ingressgateway deployed to namespace virtual-garden-istio-ingress.
The virtual-garden-kube-apiserver Service in the garden namespace is only of type ClusterIP.
Consequently, DNS records for this API server must target the load balancer IP of the istio-ingressgateway.
Virtual Garden Kubeconfig
gardener-operator does not generate any static token or likewise for access to the virtual cluster.
Ideally, human users access it via OIDC only.
Alternatively, you can create an auto-rotated token that you can use for automation like CI/CD pipelines:
apiVersion: v1
kind: Secret
type: Opaque
metadata:
name: shoot-access-virtual-garden
namespace: garden
labels:
resources.gardener.cloud/purpose: token-requestor
resources.gardener.cloud/class: shoot
annotations:
serviceaccount.resources.gardener.cloud/name: virtual-garden-user
serviceaccount.resources.gardener.cloud/namespace: kube-system
serviceaccount.resources.gardener.cloud/token-expiration-duration: 3h
---
apiVersion: v1
kind: Secret
metadata:
name: managedresource-virtual-garden-access
namespace: garden
type: Opaque
stringData:
clusterrolebinding____gardener.cloud.virtual-garden-access.yaml: |
apiVersion: rbac.authorization.k8s.io/v1
kind: ClusterRoleBinding
metadata:
name: gardener.cloud.sap:virtual-garden
roleRef:
apiGroup: rbac.authorization.k8s.io
kind: ClusterRole
name: cluster-admin
subjects:
- kind: ServiceAccount
name: virtual-garden-user
namespace: kube-system
---
apiVersion: resources.gardener.cloud/v1alpha1
kind: ManagedResource
metadata:
name: virtual-garden-access
namespace: garden
spec:
secretRefs:
- name: managedresource-virtual-garden-access
The shoot-access-virtual-garden Secret will get a .data.token field which can be used to authenticate against the virtual garden cluster.
See also this document for more information about the TokenRequestor.
gardener-apiserver
Similar to the virtual-garden-kube-apiserver, the gardener-apiserver also uses a few certificates and other credentials that should not change during the migration.
Again, you have to prepare the environment accordingly by leveraging the secret’s manager capabilities.
- The existing ETCD Encryption Key
Secretshould be labeled withsecrets-manager-use-data-for-name=gardener-apiserver-etcd-encryption-key.
Also note that gardener-operator manages the Service and Endpoints resources for the gardener-apiserver in the virtual cluster within the kube-system namespace (garden-setup uses the garden namespace).
Local Development
The easiest setup is using a local KinD cluster and the Skaffold based approach to deploy and develop the gardener-operator.
Setting Up the KinD Cluster (runtime cluster)
make kind-multi-zone-up
This command sets up a new KinD cluster named gardener-local and stores the kubeconfig in the ./example/gardener-local/kind/multi-zone/kubeconfig file.
It might be helpful to copy this file to
$HOME/.kube/config, since you will need to target this KinD cluster multiple times. Alternatively, make sure to set yourKUBECONFIGenvironment variable to./example/gardener-local/kind/multi-zone/kubeconfigfor all future steps viaexport KUBECONFIG=$PWD/example/gardener-local/kind/multi-zone/kubeconfig.
All the following steps assume that you are using this kubeconfig.
Setting Up Gardener Operator
make operator-up
This will first build the base images (which might take a bit if you do it for the first time). Afterwards, the Gardener Operator resources will be deployed into the cluster.
Developing Gardener Operator (Optional)
make operator-dev
This is similar to make operator-up but additionally starts a skaffold dev loop.
After the initial deployment, skaffold starts watching source files.
Once it has detected changes, press any key to trigger a new build and deployment of the changed components.
Debugging Gardener Operator (Optional)
make operator-debug
This is similar to make gardener-debug but for Gardener Operator component. Please check Debugging Gardener for details.
Creating a Garden
In order to create a garden, just run:
kubectl apply -f example/operator/20-garden.yaml
You can wait for the Garden to be ready by running:
./hack/usage/wait-for.sh garden local VirtualGardenAPIServerAvailable VirtualComponentsHealthy
Alternatively, you can run kubectl get garden and wait for the RECONCILED status to reach True:
NAME LAST OPERATION RUNTIME VIRTUAL API SERVER OBSERVABILITY AGE
local Processing False False False False 1s
(Optional): Instead of creating above Garden resource manually, you could execute the e2e tests by running:
make test-e2e-local-operator
Accessing the Virtual Garden Cluster
⚠️ Please note that in this setup, the virtual garden cluster is not accessible by default when you download the kubeconfig and try to communicate with it.
The reason is that your host most probably cannot resolve the DNS name of the cluster.
Hence, if you want to access the virtual garden cluster, you have to run the following command which will extend your /etc/hosts file with the required information to make the DNS names resolvable:
cat <<EOF | sudo tee -a /etc/hosts
# Manually created to access local Gardener virtual garden cluster.
# TODO: Remove this again when the virtual garden cluster access is no longer required.
172.18.255.3 api.virtual-garden.local.gardener.cloud
EOF
To access the virtual garden, you can generate a kubeconfig by running
hack/usage/generate-virtual-garden-admin-kubeconf.sh > /tmp/virtual-garden-kubeconfig
kubectl --kubeconfig /tmp/virtual-garden-kubeconfig get namespaces
Creating Seeds and Shoots
You can also create Seeds and Shoots from your local development setup. Please see here for details.
Deleting the Garden
./hack/usage/delete garden local
Tear Down the Gardener Operator Environment
make operator-down
make kind-multi-zone-down
4.4.12 - Gardener Resource Manager
Overview
Initially, the gardener-resource-manager was a project similar to the kube-addon-manager.
It manages Kubernetes resources in a target cluster which means that it creates, updates, and deletes them.
Also, it makes sure that manual modifications to these resources are reconciled back to the desired state.
In the Gardener project we were using the kube-addon-manager since more than two years.
While we have progressed with our extensibility story (moving cloud providers out-of-tree), we had decided that the kube-addon-manager is no longer suitable for this use-case.
The problem with it is that it needs to have its managed resources on its file system.
This requires storing the resources in ConfigMaps or Secrets and mounting them to the kube-addon-manager pod during deployment time.
The gardener-resource-manager uses CustomResourceDefinitions which allows to dynamically add, change, and remove resources with immediate action and without the need to reconfigure the volume mounts/restarting the pod.
Meanwhile, the gardener-resource-manager has evolved to a more generic component comprising several controllers and webhook handlers.
It is deployed by gardenlet once per seed (in the garden namespace) and once per shoot (in the respective shoot namespaces in the seed).
Component Configuration
Similar to other Gardener components, the gardener-resource-manager uses a so-called component configuration file.
It allows specifying certain central settings like log level and formatting, client connection configuration, server ports and bind addresses, etc.
In addition, controllers and webhooks can be configured and sometimes even disabled.
Note that the very basic ManagedResource and health controllers cannot be disabled.
You can find an example configuration file here.
Controllers
ManagedResource Controller
This controller watches custom objects called ManagedResources in the resources.gardener.cloud/v1alpha1 API group.
These objects contain references to secrets, which itself contain the resources to be managed.
The reason why a Secret is used to store the resources is that they could contain confidential information like credentials.
---
apiVersion: v1
kind: Secret
metadata:
name: managedresource-example1
namespace: default
type: Opaque
data:
objects.yaml: YXBpVmVyc2lvbjogdjEKa2luZDogQ29uZmlnTWFwCm1ldGFkYXRhOgogIG5hbWU6IHRlc3QtMTIzNAogIG5hbWVzcGFjZTogZGVmYXVsdAotLS0KYXBpVmVyc2lvbjogdjEKa2luZDogQ29uZmlnTWFwCm1ldGFkYXRhOgogIG5hbWU6IHRlc3QtNTY3OAogIG5hbWVzcGFjZTogZGVmYXVsdAo=
# apiVersion: v1
# kind: ConfigMap
# metadata:
# name: test-1234
# namespace: default
# ---
# apiVersion: v1
# kind: ConfigMap
# metadata:
# name: test-5678
# namespace: default
---
apiVersion: resources.gardener.cloud/v1alpha1
kind: ManagedResource
metadata:
name: example
namespace: default
spec:
secretRefs:
- name: managedresource-example1
In the above example, the controller creates two ConfigMaps in the default namespace.
When a user is manually modifying them, they will be reconciled back to the desired state stored in the managedresource-example secret.
It is also possible to inject labels into all the resources:
---
apiVersion: v1
kind: Secret
metadata:
name: managedresource-example2
namespace: default
type: Opaque
data:
other-objects.yaml: YXBpVmVyc2lvbjogYXBwcy92MSAjIGZvciB2ZXJzaW9ucyBiZWZvcmUgMS45LjAgdXNlIGFwcHMvdjFiZXRhMgpraW5kOiBEZXBsb3ltZW50Cm1ldGFkYXRhOgogIG5hbWU6IG5naW54LWRlcGxveW1lbnQKc3BlYzoKICBzZWxlY3RvcjoKICAgIG1hdGNoTGFiZWxzOgogICAgICBhcHA6IG5naW54CiAgcmVwbGljYXM6IDIgIyB0ZWxscyBkZXBsb3ltZW50IHRvIHJ1biAyIHBvZHMgbWF0Y2hpbmcgdGhlIHRlbXBsYXRlCiAgdGVtcGxhdGU6CiAgICBtZXRhZGF0YToKICAgICAgbGFiZWxzOgogICAgICAgIGFwcDogbmdpbngKICAgIHNwZWM6CiAgICAgIGNvbnRhaW5lcnM6CiAgICAgIC0gbmFtZTogbmdpbngKICAgICAgICBpbWFnZTogbmdpbng6MS43LjkKICAgICAgICBwb3J0czoKICAgICAgICAtIGNvbnRhaW5lclBvcnQ6IDgwCg==
# apiVersion: apps/v1
# kind: Deployment
# metadata:
# name: nginx-deployment
# spec:
# selector:
# matchLabels:
# app: nginx
# replicas: 2 # tells deployment to run 2 pods matching the template
# template:
# metadata:
# labels:
# app: nginx
# spec:
# containers:
# - name: nginx
# image: nginx:1.7.9
# ports:
# - containerPort: 80
---
apiVersion: resources.gardener.cloud/v1alpha1
kind: ManagedResource
metadata:
name: example
namespace: default
spec:
secretRefs:
- name: managedresource-example2
injectLabels:
foo: bar
In this example, the label foo=bar will be injected into the Deployment, as well as into all created ReplicaSets and Pods.
Preventing Reconciliations
If a ManagedResource is annotated with resources.gardener.cloud/ignore=true, then it will be skipped entirely by the controller (no reconciliations or deletions of managed resources at all).
However, when the ManagedResource itself is deleted (for example when a shoot is deleted), then the annotation is not respected and all resources will be deleted as usual.
This feature can be helpful to temporarily patch/change resources managed as part of such ManagedResource.
Condition checks will be skipped for such ManagedResources.
Modes
The gardener-resource-manager can manage a resource in the following supported modes:
Ignore- The corresponding resource is removed from the
ManagedResourcestatus (.status.resources). No action is performed on the cluster. - The resource is no longer “managed” (updated or deleted).
- The primary use case is a migration of a resource from one
ManagedResourceto another one.
- The corresponding resource is removed from the
The mode for a resource can be specified with the resources.gardener.cloud/mode annotation. The annotation should be specified in the encoded resource manifest in the Secret that is referenced by the ManagedResource.
Resource Class and Reconciliation Scope
By default, the gardener-resource-manager controller watches for ManagedResources in all namespaces.
The .sourceClientConnection.namespace field in the component configuration restricts the watch to ManagedResources in a single namespace only.
Note that this setting also affects all other controllers and webhooks since it’s a central configuration.
A ManagedResource has an optional .spec.class field that allows it to indicate that it belongs to a given class of resources.
The .controllers.resourceClass field in the component configuration restricts the watch to ManagedResources with the given .spec.class.
A default class is assumed if no class is specified.
For instance, the gardener-resource-manager which is deployed in the Shoot’s control plane namespace in the Seed does not specify a .spec.class and watches only for resources in the control plane namespace by specifying it in the .sourceClientConnection.namespace field.
If the .spec.class changes this means that the resources have to be handled by a different Gardener Resource Manager. That is achieved by:
- Cleaning all referenced resources by the Gardener Resource Manager that was responsible for the old class in its target cluster.
- Creating all referenced resources by the Gardener Resource Manager that is responsible for the new class in its target cluster.
Conditions
A ManagedResource has a ManagedResourceStatus, which has an array of Conditions. Conditions currently include:
| Condition | Description |
|---|---|
ResourcesApplied | True if all resources are applied to the target cluster |
ResourcesHealthy | True if all resources are present and healthy |
ResourcesProgressing | False if all resources have been fully rolled out |
ResourcesApplied may be False when:
- the resource
apiVersionis not known to the target cluster - the resource spec is invalid (for example the label value does not match the required regex for it)
- …
ResourcesHealthy may be False when:
- the resource is not found
- the resource is a Deployment and the Deployment does not have the minimum availability.
- …
ResourcesProgressing may be True when:
- a
Deployment,StatefulSetorDaemonSethas not been fully rolled out yet, i.e. not all replicas have been updated with the latest changes tospec.template. - there are still old
Pods belonging to an olderReplicaSetof aDeploymentwhich are not terminated yet.
Each Kubernetes resources has different notion for being healthy. For example, a Deployment is considered healthy if the controller observed its current revision and if the number of updated replicas is equal to the number of replicas.
The following status.conditions section describes a healthy ManagedResource:
conditions:
- lastTransitionTime: "2022-05-03T10:55:39Z"
lastUpdateTime: "2022-05-03T10:55:39Z"
message: All resources are healthy.
reason: ResourcesHealthy
status: "True"
type: ResourcesHealthy
- lastTransitionTime: "2022-05-03T10:55:36Z"
lastUpdateTime: "2022-05-03T10:55:36Z"
message: All resources have been fully rolled out.
reason: ResourcesRolledOut
status: "False"
type: ResourcesProgressing
- lastTransitionTime: "2022-05-03T10:55:18Z"
lastUpdateTime: "2022-05-03T10:55:18Z"
message: All resources are applied.
reason: ApplySucceeded
status: "True"
type: ResourcesApplied
Ignoring Updates
In some cases, it is not desirable to update or re-apply some of the cluster components (for example, if customization is required or needs to be applied by the end-user). For these resources, the annotation “resources.gardener.cloud/ignore” needs to be set to “true” or a truthy value (Truthy values are “1”, “t”, “T”, “true”, “TRUE”, “True”) in the corresponding managed resource secrets. This can be done from the components that create the managed resource secrets, for example Gardener extensions or Gardener. Once this is done, the resource will be initially created and later ignored during reconciliation.
Finalizing Deletion of Resources After Grace Period
When a ManagedResource is deleted, the controller deletes all managed resources from the target cluster.
In case the resources still have entries in their .metadata.finalizers[] list, they will remain stuck in the system until another entity removes the finalizers.
If you want the controller to forcefully finalize the deletion after some grace period (i.e., setting .metadata.finalizers=null), you can annotate the managed resources with resources.gardener.cloud/finalize-deletion-after=<duration>, e.g., resources.gardener.cloud/finalize-deletion-after=1h.
Preserving replicas or resources in Workload Resources
The objects which are part of the ManagedResource can be annotated with:
resources.gardener.cloud/preserve-replicas=truein case the.spec.replicasfield of workload resources likeDeployments,StatefulSets, etc., shall be preserved during updates.resources.gardener.cloud/preserve-resources=truein case the.spec.containers[*].resourcesfields of all containers of workload resources likeDeployments,StatefulSets, etc., shall be preserved during updates.
This can be useful if there are non-standard horizontal/vertical auto-scaling mechanisms in place. Standard mechanisms like
HorizontalPodAutoscalerorVerticalPodAutoscalerwill be auto-recognized bygardener-resource-manager, i.e., in such cases the annotations are not needed.
Origin
All the objects managed by the resource manager get a dedicated annotation
resources.gardener.cloud/origin describing the ManagedResource object that describes
this object. The default format is <namespace>/<objectname>.
In multi-cluster scenarios (the ManagedResource objects are maintained in a
cluster different from the one the described objects are managed), it might
be useful to include the cluster identity, as well.
This can be enforced by setting the .controllers.clusterID field in the component configuration.
Here, several possibilities are supported:
- given a direct value: use this as id for the source cluster.
<cluster>: read the cluster identity from acluster-identityconfig map in thekube-systemnamespace (attributecluster-identity). This is automatically maintained in all clusters managed or involved in a gardener landscape.<default>: try to read the cluster identity from the config map. If not found, no identity is used.- empty string: no cluster identity is used (completely cluster local scenarios).
By default, cluster id is not used. If cluster id is specified, the format is <cluster id>:<namespace>/<objectname>.
In addition to the origin annotation, all objects managed by the resource manager get a dedicated label resources.gardener.cloud/managed-by. This label can be used to describe these objects with a selector. By default it is set to “gardener”, but this can be overwritten by setting the .conrollers.managedResources.managedByLabelValue field in the component configuration.
Compression
The number and size of manifests for a ManagedResource can accumulate to a considerable amount which leads to increased Secret data.
A decent compression algorithm helps to reduce the footprint of such Secrets and the load they put on etcd, the kube-apiserver, and client caches.
We found Brotli to be a suitable candidate for most use cases (see comparison table here).
When the gardener-resource-manager detects a data key with the known suffix .br, it automatically un-compresses the data first before processing the contained manifest.
To decompress a ManagedResource Secret use:
kubectl -n <namespace> get secret <managed-resource-secret> -o jsonpath='{.data.data\.yaml\.br}' | base64 -d | brotli -d
On macOS, the brotli binary can be installed via homebrew using the brotli formula.
health Controller
This controller processes ManagedResources that were reconciled by the main ManagedResource Controller at least once.
Its main job is to perform checks for maintaining the well known conditions ResourcesHealthy and ResourcesProgressing.
Progressing Checks
In Kubernetes, applied changes must usually be rolled out first, e.g. when changing the base image in a Deployment.
Progressing checks detect ongoing roll-outs and report them in the ResourcesProgressing condition of the corresponding ManagedResource.
The following object kinds are considered for progressing checks:
DaemonSetDeploymentStatefulSetPrometheusAlertmanagerCertificateIssuer
Health Checks
gardener-resource-manager can evaluate the health of specific resources, often by consulting their conditions.
Health check results are regularly updated in the ResourcesHealthy condition of the corresponding ManagedResource.
The following object kinds are considered for health checks:
CustomResourceDefinitionDaemonSetDeploymentJobPodReplicaSetReplicationControllerServiceStatefulSetVerticalPodAutoscalerPrometheusAlertmanagerCertificateIssuer
Skipping Health Check
If a resource owned by a ManagedResource is annotated with resources.gardener.cloud/skip-health-check=true, then the resource will be skipped during health checks by the health controller. The ManagedResource conditions will not reflect the health condition of this resource anymore. The ResourcesProgressing condition will also be set to False.
Garbage Collector For Immutable ConfigMaps/Secrets
In Kubernetes, workload resources (e.g., Pods) can mount ConfigMaps or Secrets or reference them via environment variables in containers.
Typically, when the content of such a ConfigMap/Secret gets changed, then the respective workload is usually not dynamically reloading the configuration, i.e., a restart is required.
The most commonly used approach is probably having the so-called checksum annotations in the pod template, which makes Kubernetes recreate the pod if the checksum changes.
However, it has the downside that old, still running versions of the workload might not be able to properly work with the already updated content in the ConfigMap/Secret, potentially causing application outages.
In order to protect users from such outages (and also to improve the performance of the cluster), the Kubernetes community provides the “immutable ConfigMaps/Secrets feature”.
Enabling immutability requires ConfigMaps/Secrets to have unique names.
Having unique names requires the client to delete ConfigMaps/Secrets no longer in use.
In order to provide a similarly lightweight experience for clients (compared to the well-established checksum annotation approach), the gardener-resource-manager features an optional garbage collector controller (disabled by default).
The purpose of this controller is cleaning up such immutable ConfigMaps/Secrets if they are no longer in use.
How Does the Garbage Collector Work?
The following algorithm is implemented in the GC controller:
- List all
ConfigMaps andSecrets labeled withresources.gardener.cloud/garbage-collectable-reference=true. - List all
Deployments,StatefulSets,DaemonSets,Jobs,CronJobs,Pods,ManagedResources and for each of them:- iterate over the
.metadata.annotationsand for each of them:- If the annotation key follows the
reference.resources.gardener.cloud/{configmap,secret}-<hash>scheme and the value equals<name>, then consider it as “in-use”.
- If the annotation key follows the
- iterate over the
- Delete all
ConfigMaps andSecrets not considered as “in-use”.
Consequently, clients need to:
Create immutable
ConfigMaps/Secrets with unique names (e.g., a checksum suffix based on the.data).Label such
ConfigMaps/Secrets withresources.gardener.cloud/garbage-collectable-reference=true.Annotate their workload resources with
reference.resources.gardener.cloud/{configmap,secret}-<hash>=<name>for allConfigMaps/Secrets used by the containers of the respectivePods.⚠️ Add such annotations to
.metadata.annotations, as well as to all templates of other resources (e.g.,.spec.template.metadata.annotationsinDeployments or.spec.jobTemplate.metadata.annotationsand.spec.jobTemplate.spec.template.metadata.annotationsforCronJobs. This ensures that the GC controller does not unintentionally considerConfigMaps/Secrets as “not in use” just because there isn’t aPodreferencing them anymore (e.g., they could still be used by aDeploymentscaled down to0).
ℹ️ For the last step, there is a helper function InjectAnnotations in the pkg/controller/garbagecollector/references, which you can use for your convenience.
Example:
---
apiVersion: v1
kind: ConfigMap
metadata:
name: test-1234
namespace: default
labels:
resources.gardener.cloud/garbage-collectable-reference: "true"
---
apiVersion: v1
kind: ConfigMap
metadata:
name: test-5678
namespace: default
labels:
resources.gardener.cloud/garbage-collectable-reference: "true"
---
apiVersion: v1
kind: Pod
metadata:
name: example
namespace: default
annotations:
reference.resources.gardener.cloud/configmap-82a3537f: test-5678
spec:
containers:
- name: nginx
image: nginx:1.14.2
terminationGracePeriodSeconds: 2
The GC controller would delete the ConfigMap/test-1234 because it is considered as not “in-use”.
ℹ️ If the GC controller is activated then the ManagedResource controller will no longer delete ConfigMaps/Secrets having the above label.
How to Activate the Garbage Collector?
The GC controller can be activated by setting the .controllers.garbageCollector.enabled field to true in the component configuration.
TokenRequestor Controller
This controller provides the service to create and auto-renew tokens via the TokenRequest API.
It provides a functionality similar to the kubelet’s Service Account Token Volume Projection. It was created to handle the special case of issuing tokens to pods that run in a different cluster than the API server they communicate with (hence, using the native token volume projection feature is not possible).
The controller differentiates between source cluster and target cluster.
The source cluster hosts the gardener-resource-manager pod. Secrets in this cluster are watched and modified by the controller.
The target cluster can be configured to point to another cluster. The existence of ServiceAccounts are ensured and token requests are issued against the target.
When the gardener-resource-manager is deployed next to the Shoot’s controlplane in the Seed, the source cluster is the Seed while the target cluster points to the Shoot.
Reconciliation Loop
This controller reconciles Secrets in all namespaces in the source cluster with the label: resources.gardener.cloud/purpose=token-requestor.
See this YAML file for an example of the secret.
The controller ensures a ServiceAccount exists in the target cluster as specified in the annotations of the Secret in the source cluster:
serviceaccount.resources.gardener.cloud/name: <sa-name>
serviceaccount.resources.gardener.cloud/namespace: <sa-namespace>
You can optionally annotate the Secret with serviceaccount.resources.gardener.cloud/labels, e.g. serviceaccount.resources.gardener.cloud/labels={"some":"labels","foo":"bar"}.
This will make the ServiceAccount getting labelled accordingly.
The requested tokens will act with the privileges which are assigned to this ServiceAccount.
The controller will then request a token via the TokenRequest API and populate it into the .data.token field to the Secret in the source cluster.
Alternatively, the client can provide a raw kubeconfig (in YAML or JSON format) via the Secret’s .data.kubeconfig field.
The controller will then populate the requested token in the kubeconfig for the user used in the .current-context.
For example, if .data.kubeconfig is
apiVersion: v1
clusters:
- cluster:
certificate-authority-data: AAAA
server: some-server-url
name: shoot--foo--bar
contexts:
- context:
cluster: shoot--foo--bar
user: shoot--foo--bar-token
name: shoot--foo--bar
current-context: shoot--foo--bar
kind: Config
preferences: {}
users:
- name: shoot--foo--bar-token
user:
token: ""
then the .users[0].user.token field of the kubeconfig will be updated accordingly.
The TokenRequestor can also optionally inject the current CA bundle if the secret is annotated with
serviceaccount.resources.gardener.cloud/inject-ca-bundle: "true"
If a kubeconfig is present in the secret, the CA bundle is set in the in the cluster.certificate-authority-data field of the cluster of the current context.
Otherwise, the bundle is stored in an additional secret key bundle.crt.
The controller also adds an annotation to the Secret to keep track when to renew the token before it expires.
By default, the tokens are issued to expire after 12 hours. The expiration time can be set with the following annotation:
serviceaccount.resources.gardener.cloud/token-expiration-duration: 6h
It automatically renews once 80% of the lifetime is reached, or after 24h.
Optionally, the controller can also populate the token into a Secret in the target cluster. This can be requested by annotating the Secret in the source cluster with:
token-requestor.resources.gardener.cloud/target-secret-name: "foo"
token-requestor.resources.gardener.cloud/target-secret-namespace: "bar"
Overall, the TokenRequestor controller provides credentials with limited lifetime (JWT tokens) used by Shoot control plane components running in the Seed to talk to the Shoot API Server. Please see the graphic below:
ℹ️ Generally, the controller can run with multiple instances in different components. For example,
gardener-resource-managermight run theTokenRequestorcontroller, butgardenletmight run it, too. In order to differentiate which instance of the controller is responsible for aSecret, it can be labeled withresources.gardener.cloud/class=<class>. The<class>must be configured in the respective controller, otherwise it will be responsible for allSecrets no matter whether they have the label or not.
CertificateSigningRequest Approver
Kubelet Server
Gardener configures the kubelets such that they request two certificates via the CertificateSigningRequest API:
- client certificate for communicating with the
kube-apiserver - server certificate for serving its HTTPS server
For client certificates, the kubernetes.io/kube-apiserver-client-kubelet signer is used (see Certificate Signing Requests for more details).
The kube-controller-manager’s csrapprover controller is responsible for auto-approving such CertificateSigningRequests so that the respective certificates can be issued.
For server certificates, the kubernetes.io/kubelet-serving signer is used.
Unfortunately, the kube-controller-manager is not able to auto-approve such CertificateSigningRequests (see kubernetes/kubernetes#73356 for details).
That’s the motivation for having this controller as part of gardener-resource-manager.
It watches CertificateSigningRequests with the kubernetes.io/kubelet-serving signer and auto-approves them when all the following conditions are met:
- The
.spec.usernameis prefixed withsystem:node:. - There must be at least one DNS name or IP address as part of the certificate SANs.
- The common name in the CSR must match the
.spec.username. - The organization in the CSR must only contain
system:nodes. - There must be a
Nodeobject with the same name in the shoot cluster. - There must be exactly one
Machinefor the node in the seed cluster. - The DNS names part of the SANs must be equal to all
.status.addresses[]of typeHostnamein theNode. - The IP addresses part of the SANs must be equal to all
.status.addresses[]of typeInternalIPin theNode.
If any one of these requirements is violated, the CertificateSigningRequest will be denied.
Otherwise, once approved, the kube-controller-manager’s csrsigner controller will issue the requested certificate.
Gardener Node Agent
There is a second use case for CSR Approver, because Gardener Node Agent is able to use client certificates for communication with kube-apiserver.
These certificates are requested via the CertificateSigningRequest API. They are using the kubernetes.io/kube-apiserver-client signer.
Three use cases are covered:
- Bootstrap a new
node. - Renew certificates.
- Migrate nodes using
gardener-node-agentservice account.
There is no auto-approve for these CertificateSigningRequests either.
As there are more users of kubernetes.io/kube-apiserver-client signer this controller handles only CertificateSigningRequests when the common name in the CSR is prefixed with gardener.cloud:node-agent:machine:.
The prefix is followed by the username which must be equal to the machine.Name.
It auto-approves them when the following conditions are met.
Bootstrapping:
- The
.spec.usernameis prefixed withsystem:node:. - A
Machinefor common name patterngardener.cloud:node-agent:machine:<machine-name>in the CSR exists. - The
Machinedoes not have alabelwith keynode.
Certificate renewal:
- The
.spec.usernameis prefixed withgardener.cloud:node-agent:machine:. - A
Machinefor common name patterngardener.cloud:node-agent:machine:<machine-name>in the CSR exists. - The common name in the CSR must match the
.spec.username.
Migration:
- The
.spec.usernameis equal tosystem:serviceaccount:kube-system:gardener-node-agent. - A
Machinefor common name patterngardener.cloud:node-agent:machine:<machine-name>in the CSR exists. - The
Machinehas alabelwith keynode.
If the common name in the CSR is not prefixed with gardener.cloud:node-agent:machine:, the CertificateSigningRequest will be ignored.
If any one of these requirements is violated, the CertificateSigningRequest will be denied.
Otherwise, once approved, the kube-controller-manager’s csrsigner controller will issue the requested certificate.
NetworkPolicy Controller
This controller reconciles Services with a non-empty .spec.podSelector.
It creates two NetworkPolicys for each port in the .spec.ports[] list.
For example:
apiVersion: v1
kind: Service
metadata:
name: gardener-resource-manager
namespace: a
spec:
selector:
app: gardener-resource-manager
ports:
- name: server
port: 443
protocol: TCP
targetPort: 10250
leads to
apiVersion: networking.k8s.io/v1
kind: NetworkPolicy
metadata:
annotations:
gardener.cloud/description: Allows ingress TCP traffic to port 10250 for pods
selected by the a/gardener-resource-manager service selector from pods running
in namespace a labeled with map[networking.resources.gardener.cloud/to-gardener-resource-manager-tcp-10250:allowed].
name: ingress-to-gardener-resource-manager-tcp-10250
namespace: a
spec:
ingress:
- from:
- podSelector:
matchLabels:
networking.resources.gardener.cloud/to-gardener-resource-manager-tcp-10250: allowed
ports:
- port: 10250
protocol: TCP
podSelector:
matchLabels:
app: gardener-resource-manager
policyTypes:
- Ingress
---
apiVersion: networking.k8s.io/v1
kind: NetworkPolicy
metadata:
annotations:
gardener.cloud/description: Allows egress TCP traffic to port 10250 from pods
running in namespace a labeled with map[networking.resources.gardener.cloud/to-gardener-resource-manager-tcp-10250:allowed]
to pods selected by the a/gardener-resource-manager service selector.
name: egress-to-gardener-resource-manager-tcp-10250
namespace: a
spec:
egress:
- to:
- podSelector:
matchLabels:
app: gardener-resource-manager
ports:
- port: 10250
protocol: TCP
podSelector:
matchLabels:
networking.resources.gardener.cloud/to-gardener-resource-manager-tcp-10250: allowed
policyTypes:
- Egress
A component that initiates the connection to gardener-resource-manager’s tcp/10250 port can now be labeled with networking.resources.gardener.cloud/to-gardener-resource-manager-tcp-10250=allowed.
That’s all this component needs to do - it does not need to create any NetworkPolicys itself.
Cross-Namespace Communication
Apart from this “simple” case where both communicating components run in the same namespace a, there is also the cross-namespace communication case.
With above example, let’s say there are components running in another namespace b, and they would like to initiate the communication with gardener-resource-manager in a.
To cover this scenario, the Service can be annotated with networking.resources.gardener.cloud/namespace-selectors='[{"matchLabels":{"kubernetes.io/metadata.name":"b"}}]'.
Note that you can specify multiple namespace selectors in this annotation which are OR-ed.
This will make the controller create additional NetworkPolicys as follows:
apiVersion: networking.k8s.io/v1
kind: NetworkPolicy
metadata:
annotations:
gardener.cloud/description: Allows ingress TCP traffic to port 10250 for pods selected
by the a/gardener-resource-manager service selector from pods running in namespace b
labeled with map[networking.resources.gardener.cloud/to-a-gardener-resource-manager-tcp-10250:allowed].
name: ingress-to-gardener-resource-manager-tcp-10250-from-b
namespace: a
spec:
ingress:
- from:
- namespaceSelector:
matchLabels:
kubernetes.io/metadata.name: b
podSelector:
matchLabels:
networking.resources.gardener.cloud/to-a-gardener-resource-manager-tcp-10250: allowed
ports:
- port: 10250
protocol: TCP
podSelector:
matchLabels:
app: gardener-resource-manager
policyTypes:
- Ingress
---
apiVersion: networking.k8s.io/v1
kind: NetworkPolicy
metadata:
annotations:
gardener.cloud/description: Allows egress TCP traffic to port 10250 from pods running in
namespace b labeled with map[networking.resources.gardener.cloud/to-a-gardener-resource-manager-tcp-10250:allowed]
to pods selected by the a/gardener-resource-manager service selector.
name: egress-to-a-gardener-resource-manager-tcp-10250
namespace: b
spec:
egress:
- to:
- namespaceSelector:
matchLabels:
kubernetes.io/metadata.name: a
podSelector:
matchLabels:
app: gardener-resource-manager
ports:
- port: 10250
protocol: TCP
podSelector:
matchLabels:
networking.resources.gardener.cloud/to-a-gardener-resource-manager-tcp-10250: allowed
policyTypes:
- Egress
The components in namespace b now need to be labeled with networking.resources.gardener.cloud/to-a-gardener-resource-manager-tcp-10250=allowed, but that’s already it.
Obviously, this approach also works for namespace selectors different from
kubernetes.io/metadata.nameto cover scenarios where the namespace name is not known upfront or where multiple namespaces with a similar label are relevant. The controller creates two dedicated policies for each namespace matching the selectors.
Service Targets In Multiple Namespaces
Finally, let’s say there is a Service called example which exists in different namespaces whose names are not static (e.g., foo-1, foo-2), and a component in namespace bar wants to initiate connections with all of them.
The example Services in these namespaces can now be annotated with networking.resources.gardener.cloud/namespace-selectors='[{"matchLabels":{"kubernetes.io/metadata.name":"bar"}}]'.
As a consequence, the component in namespace bar now needs to be labeled with networking.resources.gardener.cloud/to-foo-1-example-tcp-8080=allowed, networking.resources.gardener.cloud/to-foo-2-example-tcp-8080=allowed, etc.
This approach does not work in practice, however, since the namespace names are neither static nor known upfront.
To overcome this, it is possible to specify an alias for the concrete namespace in the pod label selector via the networking.resources.gardener.cloud/pod-label-selector-namespace-alias annotation.
In above case, the example Service in the foo-* namespaces could be annotated with networking.resources.gardener.cloud/pod-label-selector-namespace-alias=all-foos.
This would modify the label selector in all NetworkPolicys related to cross-namespace communication, i.e. instead of networking.resources.gardener.cloud/to-foo-{1,2,...}-example-tcp-8080=allowed, networking.resources.gardener.cloud/to-all-foos-example-tcp-8080=allowed would be used.
Now the component in namespace bar only needs this single label and is able to talk to all such Services in the different namespaces.
Real-world examples for this scenario are the
kube-apiserverService(which exists in all shoot namespaces), or theistio-ingressgatewayService(which exists in allistio-ingress*namespaces). In both cases, the names of the namespaces are not statically known and depend on user input.
Overwriting The Pod Selector Label
For a component which initiates the connection to many other components, it’s sometimes impractical to specify all the respective labels in its pod template.
For example, let’s say a component foo talks to bar{0..9} on ports tcp/808{0..9}.
foo would need to have the ten networking.resources.gardener.cloud/to-bar{0..9}-tcp-808{0..9}=allowed labels.
As an alternative and to simplify this, it is also possible to annotate the targeted Services with networking.resources.gardener.cloud/from-<some-alias>-allowed-ports.
For our example, <some-alias> could be all-bars.
As a result, component foo just needs to have the label networking.resources.gardener.cloud/to-all-bars=allowed instead of all the other ten explicit labels.
⚠️ Note that this also requires to specify the list of allowed container ports as annotation value since the pod selector label will no longer be specific for a dedicated service/port.
For our example, the Service for barX with X in {0..9} needs to be annotated with networking.resources.gardener.cloud/from-all-bars-allowed-ports=[{"port":808X,"protocol":"TCP"}] in addition.
Real-world examples for this scenario are the
Prometheisin seed clusters which initiate the communication to a lot of components in order to scrape their metrics. Another example is thekube-apiserverwhich initiates the communication to webhook servers (potentially of extension components that are not known by Gardener itself).
Ingress From Everywhere
All above scenarios are about components initiating connections to some targets. However, some components also receive incoming traffic from sources outside the cluster. This traffic requires adequate ingress policies so that it can be allowed.
To cover this scenario, the Service can be annotated with networking.resources.gardener.cloud/from-world-to-ports=[{"port":"10250","protocol":"TCP"}].
As a result, the controller creates the following NetworkPolicy:
apiVersion: networking.k8s.io/v1
kind: NetworkPolicy
metadata:
name: ingress-to-gardener-resource-manager-from-world
namespace: a
spec:
ingress:
- ports:
- port: 10250
protocol: TCP
podSelector:
matchLabels:
app: gardener-resource-manager
policyTypes:
- Ingress
The respective pods don’t need any additional labels.
If the annotation’s value is empty ([]) then all ports are allowed.
Services Exposed via Ingress Resources
The controller can optionally be configured to watch Ingress resources by specifying the pod and namespace selectors for the Ingress controller.
If this information is provided, it automatically creates NetworkPolicy resources allowing the respective ingress/egress traffic for the backends exposed by the Ingresses.
This way, neither custom NetworkPolicys nor custom labels must be provided.
The needed configuration is part of the component configuration:
controllers:
networkPolicy:
enabled: true
concurrentSyncs: 5
# namespaceSelectors:
# - matchLabels:
# kubernetes.io/metadata.name: default
ingressControllerSelector:
namespace: default
podSelector:
matchLabels:
foo: bar
As an example, let’s assume that above gardener-resource-manager Service was exposed via the following Ingress resource:
apiVersion: networking.k8s.io/v1
kind: Ingress
metadata:
name: gardener-resource-manager
namespace: a
spec:
rules:
- host: grm.foo.example.com
http:
paths:
- backend:
service:
name: gardener-resource-manager
port:
number: 443
path: /
pathType: Prefix
As a result, the controller would automatically create the following NetworkPolicys:
apiVersion: networking.k8s.io/v1
kind: NetworkPolicy
metadata:
annotations:
gardener.cloud/description: Allows ingress TCP traffic to port 10250 for pods
selected by the a/gardener-resource-manager service selector from ingress controller
pods running in the default namespace labeled with map[foo:bar].
name: ingress-to-gardener-resource-manager-tcp-10250-from-ingress-controller
namespace: a
spec:
ingress:
- from:
- podSelector:
matchLabels:
foo: bar
namespaceSelector:
matchLabels:
kubernetes.io/metadata.name: default
ports:
- port: 10250
protocol: TCP
podSelector:
matchLabels:
app: gardener-resource-manager
policyTypes:
- Ingress
---
apiVersion: networking.k8s.io/v1
kind: NetworkPolicy
metadata:
annotations:
gardener.cloud/description: Allows egress TCP traffic to port 10250 from pods
running in the default namespace labeled with map[foo:bar] to pods selected by
the a/gardener-resource-manager service selector.
name: egress-to-a-gardener-resource-manager-tcp-10250-from-ingress-controller
namespace: default
spec:
egress:
- to:
- podSelector:
matchLabels:
app: gardener-resource-manager
namespaceSelector:
matchLabels:
kubernetes.io/metadata.name: a
ports:
- port: 10250
protocol: TCP
podSelector:
matchLabels:
foo: bar
policyTypes:
- Egress
ℹ️ Note that
Ingressresources reference the service port whileNetworkPolicys reference the target port/container port. The controller automatically translates this when reconciling theNetworkPolicyresources.
Node Controller
Critical Components Controller
Gardenlet configures kubelet of shoot worker nodes to register the Node object with the node.gardener.cloud/critical-components-not-ready taint (effect NoSchedule).
This controller watches newly created Node objects in the shoot cluster and removes the taint once all node-critical components are scheduled and ready.
If the controller finds node-critical components that are not scheduled or not ready yet, it checks the Node again after the duration configured in ResourceManagerConfiguration.controllers.node.backoff
Please refer to the feature documentation or proposal issue for more details.
Node Agent Reconciliation Delay Controller
This controller computes a reconciliation delay per node by using a simple linear mapping approach based on the index of the nodes in the list of all nodes in the shoot cluster.
This approach ensures that the delays of all instances of gardener-node-agent are distributed evenly.
The minimum and maximum delays can be configured, but they are defaulted to 0s and 5m, respectively.
This approach works well as long as the number of nodes in the cluster is not higher than the configured maximum delay in seconds.
In this case, the delay is still computed linearly, however, the more nodes exist in the cluster, the closer the delay times become (which might be of limited use then).
Consider increasing the maximum delay by annotating the Shoot with shoot.gardener.cloud/cloud-config-execution-max-delay-seconds=<value>.
The highest possible value is 1800.
The controller adds the node-agent.gardener.cloud/reconciliation-delay annotation to nodes whose value is read by the node-agents.
Webhooks
Mutating Webhooks
High Availability Config
This webhook is used to conveniently apply the configuration to make components deployed to seed or shoot clusters highly available. The details and scenarios are described in High Availability Of Deployed Components.
The webhook reacts on creation/update of Deployments, StatefulSets and HorizontalPodAutoscalers in namespaces labeled with high-availability-config.resources.gardener.cloud/consider=true.
The webhook performs the following actions:
The
.spec.replicas(orspec.minReplicasrespectively) field is mutated based on thehigh-availability-config.resources.gardener.cloud/typelabel of the resource and thehigh-availability-config.resources.gardener.cloud/failure-tolerance-typeannotation of the namespace:Failure Tolerance Type ➡️
/
⬇️ Component Type️ ️unset empty non-empty controller212server222- The replica count values can be overwritten by the
high-availability-config.resources.gardener.cloud/replicasannotation. - It does NOT mutate the replicas when:
- the replicas are already set to
0(hibernation case), or - when the resource is scaled horizontally by
HorizontalPodAutoscaler, and the current replica count is higher than what was computed above.
- the replicas are already set to
- The replica count values can be overwritten by the
When the
high-availability-config.resources.gardener.cloud/zonesannotation is NOT empty and either thehigh-availability-config.resources.gardener.cloud/failure-tolerance-typeannotation is set or thehigh-availability-config.resources.gardener.cloud/zone-pinningannotation is set totrue, then it adds a node affinity to the pod template spec:spec: affinity: nodeAffinity: requiredDuringSchedulingIgnoredDuringExecution: nodeSelectorTerms: - matchExpressions: - key: topology.kubernetes.io/zone operator: In values: - <zone1> # - ...This ensures that all pods are pinned to only nodes in exactly those concrete zones.
Topology Spread Constraints are added to the pod template spec when the
.spec.replicasare greater than1. When thehigh-availability-config.resources.gardener.cloud/zonesannotation …… contains only one zone, then the following is added:
spec: topologySpreadConstraints: - topologyKey: kubernetes.io/hostname minDomains: 3 # lower value of max replicas or 3 maxSkew: 1 whenUnsatisfiable: ScheduleAnyway # or DoNotSchedule matchLabelKeys: - pod-template-hash labelSelector: ...This ensures that the (multiple) pods are scheduled across nodes.
minDomainsis set when failure tolerance is configured or annotationhigh-availability-config.resources.gardener.cloud/host-spread="true"is given.… contains at least two zones, then the following is added:
spec: topologySpreadConstraints: - topologyKey: kubernetes.io/hostname maxSkew: 1 whenUnsatisfiable: ScheduleAnyway # or DoNotSchedule matchLabelKeys: - pod-template-hash labelSelector: ... - topologyKey: topology.kubernetes.io/zone minDomains: 2 # lower value of max replicas or number of zones maxSkew: 1 whenUnsatisfiable: DoNotSchedule matchLabelKeys: - pod-template-hash labelSelector: ...This enforces that the (multiple) pods are scheduled across zones. The
minDomainscalculation is based on whatever value is lower - (maximum) replicas or number of zones. This is the number of minimum domains required to schedule pods in a highly available manner.
Independent on the number of zones, when one of the following conditions is true, then the field
whenUnsatisfiableis set toDoNotSchedulefor the constraint withtopologyKey=kubernetes.io/hostname(which enforces the node-spread):- The
high-availability-config.resources.gardener.cloud/host-spreadannotation is set totrue. - The
high-availability-config.resources.gardener.cloud/failure-tolerance-typeannotation is set and NOT empty.
Adds default tolerations for taint-based evictions:
Tolerations for taints
node.kubernetes.io/not-readyandnode.kubernetes.io/unreachableare added to the handledDeploymentandStatefulSetif theirpodTemplates do not already specify them. TheTolerationSecondsare taken from the respective configuration section of the webhook’s configuration (see example)).We consider fine-tuned values for those tolerations a matter of high-availability because they often help to reduce recovery times in case of node or zone outages, also see High-Availability Best Practices. In addition, this webhook handling helps to set defaults for many but not all workload components in a cluster. For instance, Gardener can use this webhook to set defaults for nearly every component in seed clusters but only for the system components in shoot clusters. Any customer workload remains unchanged.
Kubernetes Service Host Injection
By default, when Pods are created, Kubernetes implicitly injects the KUBERNETES_SERVICE_HOST environment variable into all containers.
The value of this variable points it to the default Kubernetes service (i.e., kubernetes.default.svc.cluster.local).
This allows pods to conveniently talk to the API server of their cluster.
In shoot clusters, this network path involves the apiserver-proxy DaemonSet which eventually forwards the traffic to the API server.
Hence, it results in additional network hop.
The purpose of this webhook is to explicitly inject the KUBERNETES_SERVICE_HOST environment variable into all containers and setting its value to the FQDN of the API server.
This way, the additional network hop is avoided.
Auto-Mounting Projected ServiceAccount Tokens
When this webhook is activated, then it automatically injects projected ServiceAccount token volumes into Pods and all its containers if all of the following preconditions are fulfilled:
- The
Podis NOT labeled withprojected-token-mount.resources.gardener.cloud/skip=true. - The
Pod’s.spec.serviceAccountNamefield is NOT empty and NOT set todefault. - The
ServiceAccountspecified in thePod’s.spec.serviceAccountNamesets.automountServiceAccountToken=false. - The
Pod’s.spec.volumes[]DO NOT already contain a volume with a name prefixed withkube-api-access-.
The projected volume will look as follows:
spec:
volumes:
- name: kube-api-access-gardener
projected:
defaultMode: 420
sources:
- serviceAccountToken:
expirationSeconds: 43200
path: token
- configMap:
items:
- key: ca.crt
path: ca.crt
name: kube-root-ca.crt
- downwardAPI:
items:
- fieldRef:
apiVersion: v1
fieldPath: metadata.namespace
path: namespace
The
expirationSecondsare defaulted to12hand can be overwritten with the.webhooks.projectedTokenMount.expirationSecondsfield in the component configuration, or with theprojected-token-mount.resources.gardener.cloud/expiration-secondsannotation on aPodresource.
The volume will be mounted into all containers specified in the Pod to the path /var/run/secrets/kubernetes.io/serviceaccount.
This is the default location where client libraries expect to find the tokens and mimics the upstream ServiceAccount admission plugin. See Managing Service Accounts for more information.
Overall, this webhook is used to inject projected service account tokens into pods running in the Shoot and the Seed cluster. Hence, it is served from the Seed GRM and each Shoot GRM. Please find an overview below for pods deployed in the Shoot cluster:
Pod Topology Spread Constraints
When this webhook is enabled, then it mimics the topologyKey feature for Topology Spread Constraints (TSC) on the label pod-template-hash.
Concretely, when a pod is labelled with pod-template-hash, the handler of this webhook extends any topology spread constraint in the pod:
metadata:
labels:
pod-template-hash: 123abc
spec:
topologySpreadConstraints:
- maxSkew: 1
topologyKey: topology.kubernetes.io/zone
whenUnsatisfiable: DoNotSchedule
labelSelector:
matchLabels:
pod-template-hash: 123abc # added by webhook
The procedure circumvents a known limitation with TSCs which leads to imbalanced deployments after rolling updates.
Gardener enables this webhook to schedule pods of deployments across nodes and zones. This webhook is enabled only when the MatchLabelKeysInPodTopologySpread feature gate (beta since v1.27) is explicitly disabled in the kube-apiserver and kube-scheduler.
Please note that the gardener-resource-manager itself as well as pods labelled with topology-spread-constraints.resources.gardener.cloud/skip are excluded from any mutations.
System Components Webhook
If enabled, this webhook handles scheduling concerns for system components Pods (except those managed by DaemonSets).
The following tasks are performed by this webhook:
- Add
pod.spec.nodeSelectoras given in the webhook configuration. - Add
pod.spec.tolerationsas given in the webhook configuration. - Add
pod.spec.tolerationsfor any existing nodes matching the node selector given in the webhook configuration. Known taints and tolerations used for taint based evictions are disregarded.
Gardener enables this webhook for kube-system and kubernetes-dashboard namespaces in shoot clusters, selecting Pods being labelled with resources.gardener.cloud/managed-by: gardener.
It adds a configuration, so that Pods will get the worker.gardener.cloud/system-components: true node selector (step 1) as well as tolerate any custom taint (step 2) that is added to system component worker nodes (shoot.spec.provider.workers[].systemComponents.allow: true).
In addition, the webhook merges these tolerations with the ones required for at that time available system component Nodes in the cluster (step 3).
Both is required to ensure system component Pods can be scheduled or executed during an active shoot reconciliation that is happening due to any modifications to shoot.spec.provider.workers[].taints, e.g. Pods must be scheduled while there are still Nodes not having the updated taint configuration.
You can opt-out of this behaviour for
Pods by labeling them withsystem-components-config.resources.gardener.cloud/skip=true.
EndpointSlice Hints
This webhook mutates EndpointSlices. For each endpoint in the EndpointSlice, it sets the endpoint’s hints to the endpoint’s zone.
apiVersion: discovery.k8s.io/v1
kind: EndpointSlice
metadata:
name: example-hints
endpoints:
- addresses:
- "10.1.2.3"
conditions:
ready: true
hostname: pod-1
zone: zone-a
hints:
forZones:
- name: "zone-a" # added by webhook
- addresses:
- "10.1.2.4"
conditions:
ready: true
hostname: pod-2
zone: zone-b
hints:
forZones:
- name: "zone-b" # added by webhook
The webhook aims to circumvent issues with the Kubernetes TopologyAwareHints feature that currently does not allow to achieve a deterministic topology-aware traffic routing. For more details, see the following issue kubernetes/kubernetes#113731 that describes drawbacks of the TopologyAwareHints feature for our use case.
If the above-mentioned issue gets resolved and there is a native support for deterministic topology-aware traffic routing in Kubernetes, then this webhook can be dropped in favor of the native Kubernetes feature.
The EndpointSlice Hints webhook is disabled when the runtime Kubernetes version is >= 1.32. Instead, the
ServiceTrafficDistributionfeature is used. See more details in Topology-Aware Traffic Routing.
Pod Kube API Server Load Balancing
This webhook is used in the context of L7 load balancing for kube-apiservers. It facilitates access of control plane components to the kube-apiserver via istio ingress gateway which is the Gardener l7 load balancer.
For those control plane pods which use the generic token kubeconfig the webhook adds these items:
- It adds a network policy label to allow the pods to access the internal istio ingress gateway service which is responsible for “its” kube-apiserver.
- It adds a host alias which resolves the cluster externally resolvable kube-apiserver host to the internal istio ingress gateway service cluster IP address.
apiVersion: v1
kind: Pod
metadata:
labels:
networking.resources.gardener.cloud/to-istio-ingress-istio-ingressgateway-internal-tcp-9443: allowed # added by webhook
spec:
hostAliases:
- hostnames: # added by webhook
- api.local.local.internal.local.gardener.cloud # added by webhook
ip: 10.2.15.178 # added by webhook
For mutating pods, the webhook needs to know the namespace of the istio ingress gateway responsible for the kube-apiserver and its host names.
These values are stored in istio-internal-load-balancing configmap in the same namespace as the pod being mutated.
Validating Webhooks
Unconfirmed Deletion Prevention For Custom Resources And Definitions
As part of Gardener’s extensibility concepts, a lot of CustomResourceDefinitions are deployed to the seed clusters that serve as extension points for provider-specific controllers.
For example, the Infrastructure CRD triggers the provider extension to prepare the IaaS infrastructure of the underlying cloud provider for a to-be-created shoot cluster.
Consequently, these extension CRDs have a lot of power and control large portions of the end-user’s shoot cluster.
Accidental or undesired deletions of those resource can cause tremendous and hard-to-recover-from outages and should be prevented.
When this webhook is activated, it reacts for CustomResourceDefinitions and most of the custom resources in the extensions.gardener.cloud/v1alpha1 API group.
It also reacts for the druid.gardener.cloud/v1alpha1.Etcd resources.
The webhook prevents DELETE requests for those CustomResourceDefinitions labeled with gardener.cloud/deletion-protected=true, and for all mentioned custom resources if they were not previously annotated with the confirmation.gardener.cloud/deletion=true.
This prevents that undesired kubectl delete <...> requests are accepted.
Extension Resource Validation
When this webhook is activated, it reacts for most of the custom resources in the extensions.gardener.cloud/v1alpha1 API group.
It also reacts for the druid.gardener.cloud/v1alpha1.Etcd resources.
The webhook validates the resources specifications for CREATE and UPDATE requests.
Authorization Webhooks
node-agent-authorizer webhook
gardener-resource-manager serves an authorization webhook for shoot kube-apiservers which authorizes requests made by the gardener-node-agent.
It works similar to SeedAuthorizer. However, the logic used to make decisions is much simpler so it does not implement a decision graph.
In many cases, the objects gardener-node-agent is allowed to access depend on the Node it is running on.
The username of the gardener-node-agent used for authorization requests is derived from the name of the Machine resource responsible for the node that the gardener-node-agent is running on. It follows the pattern gardener.cloud:node-agent:machine:<machine-name>.
The name of the Node which runs on a Machine is read from node label of the Machine.
All gardener-node-agent users are assigned to gardener.cloud:node-agents group.
Today, the following rules are implemented:
| Resource | Verbs | Description |
|---|---|---|
CertificateSigningRequests | get , create | Allow create requests for all CertificateSigningRequests s. Allow get requests for CertificateSigningRequests s created by the same user. |
Events | create , patch | Allow to create and patch all Event s. |
Leases | get , list , watch , create , update | Allow get , list , watch , create , update requests for Leases with the name gardener-node-agent-<node-name> in kube-system namespace. |
Nodes | get , list , watch , patch , update | Allow get , watch , patch , update requests for the Node where gardener-node-agent is running. Allow list requests for all nodes. |
Secrets | get , list , watch | Allow get , list , watch request to gardener-valitail secret and the gardener-node-agent-secret of the worker group of the Node where gardener-node-agent is running. |
Pods | get , list , watch , delete | Allow list and watch permissions on Pods . For Shoot clusters running Kubernetes v1.31 or later, where the AuthorizeWithSelectors feature gate is enabled (it’s beta and enabled by default in v1.32+), allow list and watch only if the request contains a field selector spec.nodeName=<node-on-which-gardener-node-agent-is-running> . Allow get and delete requests if the .spec.nodeName of the Pod matches the Node on which gardener-node-agent is running. |
4.4.13 - Gardener Scheduler
Overview
The Gardener Scheduler is in essence a controller that watches newly created shoots and assigns a seed cluster to them. Conceptually, the task of the Gardener Scheduler is very similar to the task of the Kubernetes Scheduler: finding a seed for a shoot instead of a node for a pod.
Either the scheduling strategy or the shoot cluster purpose hereby determines how the scheduler is operating. The following sections explain the configuration and flow in greater detail.
Why Is the Gardener Scheduler Needed?
1. Decoupling
Previously, an admission plugin in the Gardener API server conducted the scheduling decisions. This implies changes to the API server whenever adjustments of the scheduling are needed. Decoupling the API server and the scheduler comes with greater flexibility to develop these components independently.
2. Extensibility
It should be possible to easily extend and tweak the scheduler in the future. Possibly, similar to the Kubernetes scheduler, hooks could be provided which influence the scheduling decisions. It should be also possible to completely replace the standard Gardener Scheduler with a custom implementation.
Algorithm Overview
The following sequence describes the steps involved to determine a seed candidate:
- Determine usable seeds with “usable” defined as follows:
- no
.metadata.deletionTimestamp .spec.settings.scheduling.visibleistrue.status.lastOperationis notnil- conditions
GardenletReady,BackupBucketsReady(if available) aretrue
- no
- Filter seeds:
- matching
.spec.seedSelectorinCloudProfileused by theShoot - matching
.spec.seedSelectorinShoot - having no network intersection with the
Shoot’s networks (due to the VPN connectivity between seeds and shoots their networks must be disjoint) - whose taints (
.spec.taints) are tolerated by theShoot(.spec.tolerations) - whose access restrictions (
.spec.accessRestrictions) are supporting those configured in theShoot(.spec.accessRestrictions) - whose capacity for shoots would not be exceeded if the shoot is scheduled onto the seed, see Ensuring seeds capacity for shoots is not exceeded
- which have at least three zones in
.spec.provider.zonesif shoot requests a high available control plane with failure tolerance typezone.
- matching
- Apply active strategy e.g., Minimal Distance strategy
- Choose least utilized seed, i.e., the one with the least number of shoot control planes, will be the winner and written to the
.spec.seedNamefield of theShoot.
In order to put the scheduling decision into effect, the scheduler sends an update request for the Shoot resource to
the API server. After validation, the gardener-apiserver updates the Shoot to have the spec.seedName field set.
Subsequently, the gardenlet picks up and starts to create the cluster on the specified seed.
Configuration
The Gardener Scheduler configuration has to be supplied on startup. It is a mandatory and also the only available flag. This yaml file holds an example scheduler configuration.
Most of the configuration options are the same as in the Gardener Controller Manager (leader election, client connection, …). However, the Gardener Scheduler on the other hand does not need a TLS configuration, because there are currently no webhooks configurable.
Strategies
The scheduling strategy is defined in the candidateDeterminationStrategy of the scheduler’s configuration and can have the possible values SameRegion and MinimalDistance.
The SameRegion strategy is the default strategy.
Same Region strategy
The Gardener Scheduler reads the spec.provider.type and .spec.region fields from the Shoot resource.
It tries to find a seed that has the identical .spec.provider.type and .spec.provider.region fields set.
If it cannot find a suitable seed, it adds an event to the shoot stating that it is unschedulable.
Minimal Distance strategy
The Gardener Scheduler tries to find a valid seed with minimal distance to the shoot’s intended region.
Distances are configured via ConfigMap(s), usually per cloud provider in a Gardener landscape.
The configuration is structured like this:
- It refers to one or multiple
CloudProfiles via annotationscheduling.gardener.cloud/cloudprofiles. - It contains the declaration as
region-configvia labelscheduling.gardener.cloud/purpose. - If a
CloudProfileis referred by multipleConfigMaps, only the first one is considered. - The
datafields configure actual distances, where key relates to theShootregion and value contains distances toSeedregions.
apiVersion: v1
kind: ConfigMap
metadata:
name: <name>
namespace: garden
annotations:
scheduling.gardener.cloud/cloudprofiles: cloudprofile-name-1{,optional-cloudprofile-name-2,...}
labels:
scheduling.gardener.cloud/purpose: region-config
data:
region-1: |
region-2: 10
region-3: 20
...
region-2: |
region-1: 10
region-3: 10
...
Gardener provider extensions for public cloud providers usually have an example weight
ConfigMapin their repositories. We suggest to check them out before defining your own data.
If a valid seed candidate cannot be found after consulting the distance configuration, the scheduler will fall back to
the Levenshtein distance to find the closest region. Therefore, the region name
is split into a base name and an orientation. Possible orientations are north, south, east, west and central.
The distance then is twice the Levenshtein distance of the region’s base name plus a correction value based on the
orientation and the provider.
If the orientations of shoot and seed candidate match, the correction value is 0, if they differ it is 2 and if either the seed’s or the shoot’s region does not have an orientation it is 1. If the provider differs, the correction value is additionally incremented by 2.
Because of this, a matching region with a matching provider is always preferred.
Special handling based on shoot cluster purpose
Every shoot cluster can have a purpose that describes what the cluster is used for, and also influences how the cluster is setup (see Shoot Cluster Purpose for more information).
In case the shoot has the testing purpose, then the scheduler only reads the .spec.provider.type from the Shoot resource and tries to find a Seed that has the identical .spec.provider.type.
The region does not matter, i.e., testing shoots may also be scheduled on a seed in a complete different region if it is better for balancing the whole Gardener system.
shoots/binding Subresource
The shoots/binding subresource is used to bind a Shoot to a Seed. On creation of a shoot cluster/s, the scheduler updates the binding automatically if an appropriate seed cluster is available.
Only an operator with the necessary RBAC can update this binding manually. This can be done by changing the .spec.seedName of the shoot. However, if a different seed is already assigned to the shoot, this will trigger a control-plane migration. For required steps, please see Triggering the Migration.
spec.schedulerName Field in the Shoot Specification
Similar to the spec.schedulerName field in Pods, the Shoot specification has an optional .spec.schedulerName field. If this field is set on creation, only the scheduler which relates to the configured name is responsible for scheduling the shoot.
The default-scheduler name is reserved for the default scheduler of Gardener.
Affected Shoots will remain in Pending state if the mentioned scheduler is not present in the landscape.
spec.seedName Field in the Shoot Specification
Similar to the .spec.nodeName field in Pods, the Shoot specification has an optional .spec.seedName field. If this field is set on creation, the shoot will be scheduled to this seed. However, this field can only be set by users having RBAC for the shoots/binding subresource. If this field is not set, the scheduler will assign a suitable seed automatically and populate this field with the seed name.
seedSelector Field in the Shoot Specification
Similar to the .spec.nodeSelector field in Pods, the Shoot specification has an optional .spec.seedSelector field.
It allows the user to provide a label selector that must match the labels of the Seeds in order to be scheduled to one of them.
The labels on the Seeds are usually controlled by Gardener administrators/operators - end users cannot add arbitrary labels themselves.
If provided, the Gardener Scheduler will only consider as “suitable” those seeds whose labels match those provided in the .spec.seedSelector of the Shoot.
By default, only seeds with the same provider as the shoot are selected. By adding a providerTypes field to the seedSelector,
a dedicated set of possible providers (* means all provider types) can be selected.
Ensuring a Seed’s Capacity for Shoots Is Not Exceeded
Seeds have a practical limit of how many shoots they can accommodate. Exceeding this limit is undesirable, as the system performance will be noticeably impacted. Therefore, the scheduler ensures that a seed’s capacity for shoots is not exceeded by taking into account a maximum number of shoots that can be scheduled onto a seed.
This mechanism works as follows:
- The
gardenletis configured with certain resources and their total capacity (and, for certain resources, the amount reserved for Gardener), see /example/20-componentconfig-gardenlet.yaml. Currently, the only such resource is the maximum number of shoots that can be scheduled onto a seed. - The
gardenletseed controller updates thecapacityandallocatablefields in the Seed status with the capacity of each resource and how much of it is actually available to be consumed by shoots. Theallocatablevalue of a resource is equal tocapacityminusreserved. - When scheduling shoots, the scheduler filters out all candidate seeds whose allocatable capacity for shoots would be exceeded if the shoot is scheduled onto the seed.
Failure to Determine a Suitable Seed
In case the scheduler fails to find a suitable seed, the operation is being retried with exponential backoff.
The reason for the failure will be reported in the Shoot’s .status.lastOperation field as well as a Kubernetes event (which can be retrieved via kubectl -n <namespace> describe shoot <shoot-name>).
Current Limitation / Future Plans
- Azure unfortunately has a geographically non-hierarchical naming pattern and does not start with the continent. This is the reason why we will exchange the implementation of the
MinimalDistancestrategy with a more suitable one in the future.
4.4.14 - gardenlet
Overview
Gardener is implemented using the operator pattern: It uses custom controllers that act on our own custom resources, and apply Kubernetes principles to manage clusters instead of containers. Following this analogy, you can recognize components of the Gardener architecture as well-known Kubernetes components, for example, shoot clusters can be compared with pods, and seed clusters can be seen as worker nodes.
The following Gardener components play a similar role as the corresponding components in the Kubernetes architecture:
| Gardener Component | Kubernetes Component |
|---|---|
gardener-apiserver | kube-apiserver |
gardener-controller-manager | kube-controller-manager |
gardener-scheduler | kube-scheduler |
gardenlet | kubelet |
Similar to how the kube-scheduler of Kubernetes finds an appropriate node
for newly created pods, the gardener-scheduler of Gardener finds an appropriate seed cluster
to host the control plane for newly ordered clusters.
By providing multiple seed clusters for a region or provider, and distributing the workload,
Gardener also reduces the blast radius of potential issues.
Kubernetes runs a primary “agent” on every node, the kubelet, which is responsible for managing pods and containers on its particular node. Decentralizing the responsibility to the kubelet has the advantage that the overall system is scalable. Gardener achieves the same for cluster management by using a gardenlet as a primary “agent” on every seed cluster, and is only responsible for shoot clusters located in its particular seed cluster:
The gardener-controller-manager has controllers to manage resources of the Gardener API. However, instead of letting the gardener-controller-manager talk directly to seed clusters or shoot clusters, the responsibility isn’t only delegated to the gardenlet, but also managed using a reversed control flow: It’s up to the gardenlet to contact the Gardener API server, for example, to share a status for its managed seed clusters.
Reversing the control flow allows placing seed clusters or shoot clusters behind firewalls without the necessity of direct access via VPN tunnels anymore.
TLS Bootstrapping
Kubernetes doesn’t manage worker nodes itself, and it’s also not responsible for the lifecycle of the kubelet running on the workers. Similarly, Gardener doesn’t manage seed clusters itself, so it is also not responsible for the lifecycle of the gardenlet running on the seeds. As a consequence, both the gardenlet and the kubelet need to prepare a trusted connection to the Gardener API server and the Kubernetes API server correspondingly.
To prepare a trusted connection between the gardenlet and the Gardener API server, the gardenlet initializes a bootstrapping process after you deployed it into your seed clusters:
The gardenlet starts up with a bootstrap
kubeconfighaving a bootstrap token that allows to createCertificateSigningRequest(CSR) resources.After the CSR is signed, the gardenlet downloads the created client certificate, creates a new
kubeconfigwith it, and stores it inside aSecretin the seed cluster.The gardenlet deletes the bootstrap
kubeconfigsecret, and starts up with its newkubeconfig.The gardenlet starts normal operation.
The gardener-controller-manager runs a control loop
that automatically signs CSRs created by gardenlets.
The gardenlet bootstrapping process is based on the kubelet bootstrapping process. More information: Kubelet’s TLS bootstrapping.
If you don’t want to run this bootstrap process, you can create
a kubeconfig pointing to the garden cluster for the gardenlet yourself,
and use the field gardenClientConnection.kubeconfig in the
gardenlet configuration to share it with the gardenlet.
gardenlet Certificate Rotation
The certificate used to authenticate the gardenlet against the API server
has a certain validity based on the configuration of the garden cluster
(--cluster-signing-duration flag of the kube-controller-manager (default 1y)).
You can also configure the validity for the client certificate by specifying
.gardenClientConnection.kubeconfigValidity.validityin the gardenlet’s component configuration. Note that changing this value will only take effect when the kubeconfig is rotated again (it is not picked up immediately). The minimum validity is10m(that’s what is enforced by theCertificateSigningRequestAPI in Kubernetes which is used by the gardenlet).
By default, after about 70-90% of the validity has expired, the gardenlet tries to automatically replace the current certificate with a new one (certificate rotation).
You can change these boundaries by specifying
.gardenClientConnection.kubeconfigValidity.autoRotationJitterPercentage{Min,Max}in the gardenlet’s component configuration.
To use a certificate rotation, you need to specify the secret to store
the kubeconfig with the rotated certificate in the field
.gardenClientConnection.kubeconfigSecret of the
gardenlet component configuration.
Rotate Certificates Using Bootstrap kubeconfig
If the gardenlet created the certificate during the initial TLS Bootstrapping
using the Bootstrap kubeconfig, certificates can be rotated automatically.
The same control loop in the gardener-controller-manager that signs
the CSRs during the initial TLS Bootstrapping also automatically signs
the CSR during a certificate rotation.
ℹ️ You can trigger an immediate renewal by annotating the Secret in the seed
cluster stated in the .gardenClientConnection.kubeconfigSecret field with
gardener.cloud/operation=renew. Within 10s, gardenlet detects this and terminates
itself to request new credentials. After it has booted up again, gardenlet will issue a
new certificate independent of the remaining validity of the existing one.
ℹ️ Alternatively, annotate the respective Seed with gardener.cloud/operation=renew-kubeconfig.
This will make gardenlet annotate its own kubeconfig secret with gardener.cloud/operation=renew
and triggers the process described in the previous paragraph.
Rotate Certificates Using Custom kubeconfig
When trying to rotate a custom certificate that wasn’t created by gardenlet
as part of the TLS Bootstrap, the x509 certificate’s Subject field
needs to conform to the following:
- the Common Name (CN) is prefixed with
gardener.cloud:system:seed: - the Organization (O) equals
gardener.cloud:system:seeds
Otherwise, the gardener-controller-manager doesn’t automatically
sign the CSR.
In this case, an external component or user needs to approve the CSR manually,
for example, using the command kubectl certificate approve seed-csr-<...>).
If that doesn’t happen within 15 minutes,
the gardenlet repeats the process and creates another CSR.
Configuring the Seed to Work with gardenlet
The gardenlet works with a single seed, which must be configured in the
GardenletConfiguration under .seedConfig. This must be a copy of the
Seed resource, for example:
apiVersion: gardenlet.config.gardener.cloud/v1alpha1
kind: GardenletConfiguration
seedConfig:
metadata:
name: my-seed
spec:
provider:
type: aws
# ...
settings:
scheduling:
visible: true
(see this yaml file for a more complete example)
On startup, gardenlet registers a Seed resource using the given template
in the seedConfig if it’s not present already.
Component Configuration
In the component configuration for the gardenlet, it’s possible to define:
- settings for the Kubernetes clients interacting with the various clusters
- settings for the controllers inside the gardenlet
- settings for leader election and log levels, feature gates, and seed selection or seed configuration.
More information: Example gardenlet Component Configuration.
Heartbeats
Similar to how Kubernetes uses Lease objects for node heart beats
(see KEP),
the gardenlet is using Lease objects for heart beats of the seed cluster.
Every two seconds, the gardenlet checks that the seed cluster’s /healthz
endpoint returns HTTP status code 200.
If that is the case, the gardenlet renews the lease in the Garden cluster in the gardener-system-seed-lease namespace and updates
the GardenletReady condition in the status.conditions field of the Seed resource. For more information, see this section.
Similar to the node-lifecycle-controller inside the kube-controller-manager,
the gardener-controller-manager features a seed-lifecycle-controller that sets
the GardenletReady condition to Unknown in case the gardenlet fails to renew the lease.
As a consequence, the gardener-scheduler doesn’t consider this seed cluster for newly created shoot clusters anymore.
/healthz Endpoint
The gardenlet includes an HTTP server that serves a /healthz endpoint.
It’s used as a liveness probe in the Deployment of the gardenlet.
If the gardenlet fails to renew its lease,
then the endpoint returns 500 Internal Server Error, otherwise it returns 200 OK.
Please note that the /healthz only indicates whether the gardenlet
could successfully probe the Seed’s API server and renew the lease with
the Garden cluster.
It does not show that the Gardener extension API server (with the Gardener resource groups)
is available.
However, the gardenlet is designed to withstand such connection outages and
retries until the connection is reestablished.
Controllers
The gardenlet consists out of several controllers which are now described in more detail.
BackupBucket Controller
The BackupBucket controller reconciles those core.gardener.cloud/v1beta1.BackupBucket resources whose .spec.seedName value is equal to the name of the Seed the respective gardenlet is responsible for.
A core.gardener.cloud/v1beta1.BackupBucket resource is created by the Seed controller if .spec.backup is defined in the Seed.
The controller adds finalizers to the BackupBucket and the secret mentioned in the .spec.secretRef of the BackupBucket. The controller also copies this secret to the seed cluster. Additionally, it creates an extensions.gardener.cloud/v1alpha1.BackupBucket resource (non-namespaced) in the seed cluster and waits until the responsible extension controller reconciles it (see Contract: BackupBucket Resource for more details).
The status from the reconciliation is reported in the .status.lastOperation field. Once the extension resource is ready and the .status.generatedSecretRef is set by the extension controller, the gardenlet copies the referenced secret to the garden namespace in the garden cluster. An owner reference to the core.gardener.cloud/v1beta1.BackupBucket is added to this secret.
If the core.gardener.cloud/v1beta1.BackupBucket is deleted, the controller deletes the generated secret in the garden cluster and the extensions.gardener.cloud/v1alpha1.BackupBucket resource in the seed cluster and it waits for the respective extension controller to remove its finalizers from the extensions.gardener.cloud/v1alpha1.BackupBucket. Then it deletes the secret in the seed cluster and finally removes the finalizers from the core.gardener.cloud/v1beta1.BackupBucket and the referred secret.
BackupEntry Controller
The BackupEntry controller reconciles those core.gardener.cloud/v1beta1.BackupEntry resources whose .spec.seedName value is equal to the name of a Seed the respective gardenlet is responsible for.
Those resources are created by the Shoot controller (only if backup is enabled for the respective Seed) and there is exactly one BackupEntry per Shoot.
The controller creates an extensions.gardener.cloud/v1alpha1.BackupEntry resource (non-namespaced) in the seed cluster and waits until the responsible extension controller reconciled it (see Contract: BackupEntry Resource for more details).
The status is populated in the .status.lastOperation field.
The core.gardener.cloud/v1beta1.BackupEntry resource has an owner reference pointing to the corresponding Shoot.
Hence, if the Shoot is deleted, the BackupEntry resource also gets deleted.
In this case, the controller deletes the extensions.gardener.cloud/v1alpha1.BackupEntry resource in the seed cluster and waits until the responsible extension controller has deleted it.
Afterwards, the finalizer of the core.gardener.cloud/v1beta1.BackupEntry resource is released so that it finally disappears from the system.
If the spec.seedName and .status.seedName of the core.gardener.cloud/v1beta1.BackupEntry are different, the controller will migrate it by annotating the extensions.gardener.cloud/v1alpha1.BackupEntry in the Source Seed with gardener.cloud/operation: migrate, waiting for it to be migrated successfully and eventually deleting it from the Source Seed cluster. Afterwards, the controller will recreate the extensions.gardener.cloud/v1alpha1.BackupEntry in the Destination Seed, annotate it with gardener.cloud/operation: restore and wait for the restore operation to finish. For more details about control plane migration, please read Shoot Control Plane Migration.
Keep Backup for Deleted Shoots
In some scenarios it might be beneficial to not immediately delete the BackupEntrys (and with them, the etcd backup) for deleted Shoots.
In this case you can configure the .controllers.backupEntry.deletionGracePeriodHours field in the component configuration of the gardenlet.
For example, if you set it to 48, then the BackupEntrys for deleted Shoots will only be deleted 48 hours after the Shoot was deleted.
Additionally, you can limit the shoot purposes for which this applies by setting .controllers.backupEntry.deletionGracePeriodShootPurposes[].
For example, if you set it to [production] then only the BackupEntrys for Shoots with .spec.purpose=production will be deleted after the configured grace period. All others will be deleted immediately after the Shoot deletion.
In case a BackupEntry is scheduled for future deletion but you want to delete it immediately, add the annotation backupentry.core.gardener.cloud/force-deletion=true.
Bastion Controller
The Bastion controller reconciles those operations.gardener.cloud/v1alpha1.Bastion resources whose .spec.seedName value is equal to the name of a Seed the respective gardenlet is responsible for.
The controller creates an extensions.gardener.cloud/v1alpha1.Bastion resource in the seed cluster in the shoot namespace with the same name as operations.gardener.cloud/v1alpha1.Bastion. Then it waits until the responsible extension controller has reconciled it (see Contract: Bastion Resource for more details). The status is populated in the .status.conditions and .status.ingress fields.
During the deletion of operations.gardener.cloud/v1alpha1.Bastion resources, the controller first sets the Ready condition to False and then deletes the extensions.gardener.cloud/v1alpha1.Bastion resource in the seed cluster.
Once this resource is gone, the finalizer of the operations.gardener.cloud/v1alpha1.Bastion resource is released, so it finally disappears from the system.
ControllerInstallation Controller
The ControllerInstallation controller in the gardenlet reconciles ControllerInstallation objects with the help of the following reconcilers.
“Main” Reconciler
This reconciler is responsible for ControllerInstallations referencing a ControllerDeployment whose type=helm.
For each ControllerInstallation, it creates a namespace on the seed cluster named extension-<controller-installation-name>.
Then, it creates a generic garden kubeconfig and garden access secret for the extension for accessing the garden cluster.
After that, it unpacks the Helm chart tarball in the ControllerDeployments .providerConfig.chart field and deploys the rendered resources to the seed cluster.
The Helm chart values in .providerConfig.values will be used and extended with some information about the Gardener environment and the seed cluster:
gardener:
version: <gardenlet-version>
garden:
clusterIdentity: <identity-of-garden-cluster>
genericKubeconfigSecretName: <secret-name>
gardenlet:
featureGates:
Foo: true
Bar: false
# ...
seed:
name: <seed-name>
clusterIdentity: <identity-of-seed-cluster>
annotations: <seed-annotations>
labels: <seed-labels>
spec: <seed-specification>
As of today, there are a few more fields in .gardener.seed, but it is recommended to use the .gardener.seed.spec if the Helm chart needs more information about the seed configuration.
The rendered chart will be deployed via a ManagedResource created in the garden namespace of the seed cluster.
It is labeled with controllerinstallation-name=<name> so that one can easily find the owning ControllerInstallation for an existing ManagedResource.
The reconciler maintains the Installed condition of the ControllerInstallation and sets it to False if the rendering or deployment fails.
“Care” Reconciler
This reconciler reconciles ControllerInstallation objects and checks whether they are in a healthy state.
It checks the .status.conditions of the backing ManagedResource created in the garden namespace of the seed cluster.
- If the
ResourcesAppliedcondition of theManagedResourceisTrue, then theInstalledcondition of theControllerInstallationwill be set toTrue. - If the
ResourcesHealthycondition of theManagedResourceisTrue, then theHealthycondition of theControllerInstallationwill be set toTrue. - If the
ResourcesProgressingcondition of theManagedResourceisTrue, then theProgressingcondition of theControllerInstallationwill be set toTrue.
A ControllerInstallation is considered “healthy” if Applied=Healthy=True and Progressing=False.
“Required” Reconciler
This reconciler watches all resources in the extensions.gardener.cloud API group in the seed cluster.
It is responsible for maintaining the Required condition on ControllerInstallations.
Concretely, when there is at least one extension resource in the seed cluster a ControllerInstallation is responsible for, then the status of the Required condition will be True.
If there are no extension resources anymore, its status will be False.
This condition is taken into account by the ControllerRegistration controller part of gardener-controller-manager when it computes which extensions have to be deployed to which seed cluster. See Gardener Controller Manager for more details.
Gardenlet Controller
The Gardenlet controller reconciles a Gardenlet resource with the same name as the Seed the gardenlet is responsible for.
This is used to implement self-upgrades of gardenlet based on information pulled from the garden cluster.
For a general overview, see this document.
On Gardenlet reconciliation, the controller deploys the gardenlet within its own cluster which after downloading the Helm chart specified in .spec.deployment.helm.ociRepository and rendering it with the provided values/configuration.
On Gardenlet deletion, nothing happens: The gardenlet does not terminate itself - deleting a Gardenlet object effectively means that self-upgrades are stopped.
ManagedSeed Controller
The ManagedSeed controller in the gardenlet reconciles ManagedSeeds that refers to Shoot scheduled on Seed the gardenlet is responsible for.
Additionally, the controller monitors Seeds, which are owned by ManagedSeeds for which the gardenlet is responsible.
On ManagedSeed reconciliation, the controller first waits for the referenced Shoot to undergo a reconciliation process.
Once the Shoot is successfully reconciled, the controller sets the ShootReconciled status of the ManagedSeed to true.
Then, it creates garden namespace within the target shoot cluster.
The controller also manages secrets related to Seeds, such as the backup and kubeconfig secrets.
It ensures that these secrets are created and updated according to the ManagedSeed spec.
Finally, it deploys the gardenlet within the specified shoot cluster which registers the Seed cluster.
On ManagedSeed deletion, the controller first deletes the corresponding Seed that was originally created by the controller.
Subsequently, it deletes the gardenlet instance within the shoot cluster.
The controller also ensures the deletion of related Seed secrets.
Finally, the dedicated garden namespace within the shoot cluster is deleted.
NetworkPolicy Controller
The NetworkPolicy controller reconciles NetworkPolicys in all relevant namespaces in the seed cluster and provides so-called “general” policies for access to the runtime cluster’s API server, DNS, public networks, etc.
The controller resolves the IP address of the Kubernetes service in the default namespace and creates an egress NetworkPolicys for it.
For more details about NetworkPolicys in Gardener, please see NetworkPolicys In Garden, Seed, Shoot Clusters.
Seed Controller
The Seed controller in the gardenlet reconciles Seed objects with the help of the following reconcilers.
“Main Reconciler”
This reconciler is responsible for managing the seed’s system components.
Those comprise CA certificates, the various CustomResourceDefinitions, the logging and monitoring stacks, and few central components like gardener-resource-manager, etcd-druid, istio, etc.
The reconciler also deploys a BackupBucket resource in the garden cluster in case the Seed's .spec.backup is set.
It also checks whether the seed cluster’s Kubernetes version is at least the minimum supported version and errors in case this constraint is not met.
This reconciler maintains the .status.lastOperation field, i.e. it sets it:
- to
state=Progressingbefore it executes its reconciliation flow. - to
state=Errorin case an error occurs. - to
state=Succeededin case the reconciliation succeeded.
“Care” Reconciler
This reconciler checks whether the seed system components (deployed by the “main” reconciler) are healthy.
It checks the .status.conditions of the backing ManagedResource created in the garden namespace of the seed cluster.
A ManagedResource is considered “healthy” if the conditions ResourcesApplied=ResourcesHealthy=True and ResourcesProgressing=False.
If all ManagedResources are healthy, then the SeedSystemComponentsHealthy condition of the Seed will be set to True.
Otherwise, it will be set to False.
If at least one ManagedResource is unhealthy and there is threshold configuration for the conditions (in .controllers.seedCare.conditionThresholds), then the status of the SeedSystemComponentsHealthy condition will be set:
- to
Progressingif it wasTruebefore. - to
Progressingif it wasProgressingbefore and thelastUpdateTimeof the condition does not exceed the configured threshold duration yet. - to
Falseif it wasProgressingbefore and thelastUpdateTimeof the condition exceeds the configured threshold duration.
The condition thresholds can be used to prevent reporting issues too early just because there is a rollout or a short disruption.
Only if the unhealthiness persists for at least the configured threshold duration, then the issues will be reported (by setting the status to False).
In order to compute the condition statuses, this reconciler considers ManagedResources (in the garden and istio-system namespace) and their status, see this document for more information.
The following table explains which ManagedResources are considered for which condition type:
| Condition Type | ManagedResources are considered when |
|---|---|
SeedSystemComponentsHealthy | .spec.class is set |
“Lease” Reconciler
This reconciler checks whether the connection to the seed cluster’s /healthz endpoint works.
If this succeeds, then it renews a Lease resource in the garden cluster’s gardener-system-seed-lease namespace.
This indicates a heartbeat to the external world, and internally the gardenlet sets its health status to true.
In addition, the GardenletReady condition in the status of the Seed is set to True.
The whole process is similar to what the kubelet does to report heartbeats for its Node resource and its KubeletReady condition. For more information, see this section.
If the connection to the /healthz endpoint or the update of the Lease fails, then the internal health status of gardenlet is set to false.
Also, this internal health status is set to false automatically after some time, in case the controller gets stuck for whatever reason.
This internal health status is available via the gardenlet’s /healthz endpoint and is used for the livenessProbe in the gardenlet pod.
Shoot Controller
The Shoot controller in the gardenlet reconciles Shoot objects with the help of the following reconcilers.
“Main” Reconciler
This reconciler is responsible for managing all shoot cluster components and implements the core logic for creating, updating, hibernating, deleting, and migrating shoot clusters.
It is also responsible for syncing the Cluster cluster to the seed cluster before and after each successful shoot reconciliation.
The main reconciliation logic is performed in 3 different task flows dedicated to specific operation types:
reconcile(operations: create, reconcile, restore): this is the main flow responsible for creation and regular reconciliation of shoots. Hibernating a shoot also triggers this flow. It is also used for restoration of the shoot control plane on the new seed (second half of a Control Plane Migration)migrate: this flow is triggered whenspec.seedNamespecifies a different seed thanstatus.seedName. It performs the first half of the Control Plane Migration, i.e., a backup (migrateoperation) of all control plane components followed by a “shallow delete”.delete: this flow is triggered when the shoot’sdeletionTimestampis set, i.e., when it is deleted.
The gardenlet takes special care to prevent unnecessary shoot reconciliations. This is important for several reasons, e.g., to not overload the seed API servers and to not exhaust infrastructure rate limits too fast. The gardenlet performs shoot reconciliations according to the following rules:
- If
status.observedGenerationis less thanmetadata.generation: this is the case, e.g., when the spec was changed, a manual reconciliation operation was triggered, or the shoot was deleted. - If the last operation was not successful.
- If the shoot is in a failed state, the gardenlet does not perform any reconciliation on the shoot (unless the retry operation was triggered). However, it syncs the
Clusterresource to the seed in order to inform the extension controllers about the failed state. - Regular reconciliations are performed with every
GardenletConfiguration.controllers.shoot.syncPeriod(defaults to1h). - Shoot reconciliations are not performed if the assigned seed cluster is not healthy or has not been reconciled by the current gardenlet version yet (determined by the
Seed.status.gardenersection). This is done to make sure that shoots are reconciled with fully rolled out seed system components after a Gardener upgrade. Otherwise, the gardenlet might perform operations of the new version that doesn’t match the old version of the deployed seed system components, which might lead to unspecified behavior.
There are a few special cases that overwrite or confine how often and under which circumstances periodic shoot reconciliations are performed:
- In case the gardenlet config allows it (
controllers.shoot.respectSyncPeriodOverwrite, disabled by default), the sync period for a shoot can be increased individually by setting theshoot.gardener.cloud/sync-periodannotation. This is always allowed for shoots in thegardennamespace. Shoots are not reconciled with a higher frequency than specified inGardenletConfiguration.controllers.shoot.syncPeriod. - In case the gardenlet config allows it (
controllers.shoot.respectSyncPeriodOverwrite, disabled by default), shoots can be marked as “ignored” by setting theshoot.gardener.cloud/ignoreannotation. In this case, the gardenlet does not perform any reconciliation for the shoot. - In case
GardenletConfiguration.controllers.shoot.reconcileInMaintenanceOnlyis enabled (disabled by default), the gardenlet performs regular shoot reconciliations only once in the respective maintenance time window (GardenletConfiguration.controllers.shoot.syncPeriodis ignored). The gardenlet randomly distributes shoot reconciliations over the maintenance time window to avoid high bursts of reconciliations (see Shoot Maintenance). - In case
Shoot.spec.maintenance.confineSpecUpdateRolloutis enabled (disabled by default), changes to the shoot specification are not rolled out immediately but only during the respective maintenance time window (see Shoot Maintenance).
“Care” Reconciler
This reconciler performs three “care” actions related to Shoots.
Conditions
It maintains the following conditions:
APIServerAvailable: The/healthzendpoint of the shoot’skube-apiserveris called and considered healthy when it responds with200 OK.ControlPlaneHealthy: The control plane is considered healthy when the respectiveDeployments (for examplekube-apiserver,kube-controller-manager), andEtcds (for exampleetcd-main) exist and are healthy.ObservabilityComponentsHealthy: This condition is considered healthy when the respectiveDeployments (for exampleplutono) andStatefulSets (for exampleprometheus,vali) exist and are healthy.EveryNodeReady: The conditions of the worker nodes are checked (e.g.,Ready,MemoryPressure). Also, it’s checked whether the Kubernetes version of the installedkubeletmatches the desired version specified in theShootresource.SystemComponentsHealthy: The conditions of theManagedResources are checked (e.g.,ResourcesApplied). Also, it is verified whether the VPN tunnel connection is established (which is required for thekube-apiserverto communicate with the worker nodes).
Sometimes, ManagedResources can have both Healthy and Progressing conditions set to True (e.g., when a DaemonSet rolls out one-by-one on a large cluster with many nodes) while this is not reflected in the Shoot status. In order to catch issues where the rollout gets stuck, one can set .controllers.shootCare.managedResourceProgressingThreshold in the gardenlet’s component configuration. If the Progressing condition is still True for more than the configured duration, the SystemComponentsHealthy condition in the Shoot is set to False, eventually.
Each condition can optionally also have error codes in order to indicate which type of issue was detected (see Shoot Status for more details).
Apart from the above, extension controllers can also contribute to the status or error codes of these conditions (see Contributing to Shoot Health Status Conditions for more details).
If all checks for a certain conditions are succeeded, then its status will be set to True.
Otherwise, it will be set to False.
If at least one check fails and there is threshold configuration for the conditions (in .controllers.seedCare.conditionThresholds), then the status will be set:
- to
Progressingif it wasTruebefore. - to
Progressingif it wasProgressingbefore and thelastUpdateTimeof the condition does not exceed the configured threshold duration yet. - to
Falseif it wasProgressingbefore and thelastUpdateTimeof the condition exceeds the configured threshold duration.
The condition thresholds can be used to prevent reporting issues too early just because there is a rollout or a short disruption.
Only if the unhealthiness persists for at least the configured threshold duration, then the issues will be reported (by setting the status to False).
Besides directly checking the status of Deployments, Etcds, StatefulSets in the shoot namespace, this reconciler also considers ManagedResources (in the shoot namespace) and their status in order to compute the condition statuses, see this document for more information.
The following table explains which ManagedResources are considered for which condition type:
| Condition Type | ManagedResources are considered when |
|---|---|
ControlPlaneHealthy | .spec.class=seed and care.gardener.cloud/condition-type label either unset, or set to ControlPlaneHealthy |
ObservabilityComponentsHealthy | care.gardener.cloud/condition-type label set to ObservabilityComponentsHealthy |
SystemComponentsHealthy | .spec.class unset or care.gardener.cloud/condition-type label set to SystemComponentsHealthy |
Constraints And Automatic Webhook Remediation
Please see Shoot Status for more details.
Garbage Collection
Stale pods in the shoot namespace in the seed cluster and in the kube-system namespace in the shoot cluster are deleted.
A pod is considered stale when:
- it was terminated with reason
Evicted. - it was terminated with reason starting with
OutOf(e.g.,OutOfCpu). - it was terminated with reason
NodeAffinity. - it is stuck in termination (i.e., if its
deletionTimestampis more than5mago).
“State” Reconciler
This reconciler periodically (default: every 6h) performs backups of the state of Shoot clusters and persists them into ShootState resources into the same namespace as the Shoots in the garden cluster.
It is only started in case the gardenlet is responsible for an unmanaged Seed, i.e. a Seed which is not backed by a seedmanagement.gardener.cloud/v1alpha1.ManagedSeed object.
Alternatively, it can be disabled by setting the concurrentSyncs=0 for the controller in the gardenlet’s component configuration.
Please refer to GEP-22: Improved Usage of the ShootState API for all information.
“Status” Reconciler
This reconciler watches for the extensionsv1alpha1.Worker resource in the control plane namespace of the Shoot and if its status.inPlaceUpdates.workerPoolToHashMap has changed, it requeues the corresponding Shoot. A worker pool is removed from status.inPlaceUpdates.pendingWorkersRollouts.manualInPlaceUpdate field in the Shoot if the hash of the worker pool in the Shoot spec and the Worker status field matches. This indicates that all the nodes of that worker pool are successfully updated and are no longer pending manual in-place updates.
TokenRequestor Controller For ServiceAccounts
The gardenlet uses an instance of the TokenRequestor controller which initially was developed in the context of the gardener-resource-manager, please read this document for further information.
gardenlet uses it for requesting tokens for components running in the seed cluster that need to communicate with the garden cluster.
The mechanism works the same way as for shoot control plane components running in the seed which need to communicate with the shoot cluster.
However, gardenlet’s instance of the TokenRequestor controller is restricted to Secrets labeled with resources.gardener.cloud/class=garden.
Furthermore, it doesn’t respect the serviceaccount.resources.gardener.cloud/namespace annotation. Instead, it always uses the seed’s namespace in the garden cluster for managing ServiceAccounts and their tokens.
TokenRequestor Controller For WorkloadIdentitys
The TokenRequestorWorkloadIdentity controller in the gardenlet reconciles Secrets labeled with security.gardener.cloud/purpose=workload-identity-token-requestor.
When it encounters such Secret, it associates the Secret with a specific WorkloadIdentity using the annotations workloadidentity.security.gardener.cloud/name and workloadidentity.security.gardener.cloud/namespace.
Any workload creating such Secrets is responsible to label and annotate the Secrets accordingly.
After the association is made, the gardenlet requests a token for the specific WorkloadIdentity from the Gardener API Server and writes it back in the Secret’s data against the token key.
The gardenlet is responsible to keep this token valid by refreshing it periodically.
The token is then used by components running in the seed cluster in order to present the said WorkloadIdentity before external systems, e.g. by calling cloud provider APIs.
Please refer to GEP-26: Workload Identity - Trust Based Authentication for more details.
VPAEvictionRequirements Controller
The VPAEvictionRequirements controller in the gardenlet reconciles VerticalPodAutoscaler objects labeled with autoscaling.gardener.cloud/eviction-requirements: managed-by-controller. It manages the EvictionRequirements on a VPA object, which are used to restrict when and how a Pod can be evicted to apply a new resource recommendation.
Specifically, the following actions will be taken for the respective label and annotation configuration:
- If the VPA has the annotation
eviction-requirements.autoscaling.gardener.cloud/downscale-restriction: never, anEvictionRequirementis added to the VPA object that allows evictions for upscaling only - If the VPA has the annotation
eviction-requirements.autoscaling.gardener.cloud/downscale-restriction: in-maintenance-window-only, the sameEvictionRequirementis added to the VPA object when the Shoot is currently outside of its maintenance window. When the Shoot is inside its maintenance window, theEvictionRequirementis removed. Information about the Shoot maintenance window times are stored in the annotationshoot.gardener.cloud/maintenance-windowon the VPA
Managed Seeds
Gardener users can use shoot clusters as seed clusters, so-called “managed seeds” (aka “shooted seeds”),
by creating ManagedSeed resources.
By default, the gardenlet that manages this shoot cluster then automatically
creates a clone of itself with the same version and the same configuration
that it currently has.
Then it deploys the gardenlet clone into the managed seed cluster.
For more information, see ManagedSeeds: Register Shoot as Seed.
Migrating from Previous Gardener Versions
If your Gardener version doesn’t support gardenlets yet, no special migration is required, but the following prerequisites must be met:
- Your Gardener version is at least 0.31 before upgrading to v1.
- You have to make sure that your garden cluster is exposed in a way that it’s reachable from all your seed clusters.
With previous Gardener versions, you had deployed the Gardener Helm chart
(incorporating the API server, controller-manager, and scheduler).
With v1, this stays the same, but you now have to deploy the gardenlet Helm chart as well
into all of your seeds (if they aren’t managed, as mentioned earlier).
See Deploy a gardenlet for all instructions.
Related Links
4.5 - Extensions
Extensibility Overview
Initially, everything was developed in-tree in the Gardener project. All cloud providers and the configuration for all the supported operating systems were released together with the Gardener core itself. But as the project grew, it got more and more difficult to add new providers and maintain the existing code base. As a consequence and in order to become agile and flexible again, we proposed GEP-1 (Gardener Enhancement Proposal) and later gardener/gardener#9635 as an enhancement. The document describes an out-of-tree extension architecture that keeps the Gardener core logic independent of provider-specific knowledge (similar to what Kubernetes has achieved with out-of-tree cloud providers or with CSI volume plugins).
Basic Concepts
Gardener components run in the garden and seed clusters, implementing the core logic for garden, seed, and shoot cluster reconciliation and deletion. Extensions are Kubernetes controllers themselves (like Gardener) and run in the garden runtime and seed clusters. As usual, we try to use Kubernetes wherever applicable. We rely on Kubernetes extension concepts in order to enable extensibility for Gardener.
Building Blocks
Extensions consist of the following building blocks:
- A Helm chart as the vehicle to generally deploy extension controllers to a Kubernetes clusters
- Extension controllers that reconcile objects of the API group
extensions.gardener.cloud. These controllers take over outsourced tasks, like creating the shoot infrastructure or deploying components to the control-plane. Optionally, extensions can bring their own webhooks to mutate resources deployed by Gardener. - Optionally, a Helm chart with an admission component inside. The admission controller runs in the garden runtime cluster and validates extension specific settings of the
Shoot(given inproviderConfigfields). See admission for more details.
Registration
Before an extension can be used, it needs to be made known to the system. The gardener-operator automates much of the registration process, making Extension resources (group operator.gardener.cloud) the preferred method for registering extensions. For more information, see the Registration documentation.
Practically, many extensions provide basic example manifests to start with the registration in their example directory (example1, example2).
Kinds and Types
Extensions are defined by their Kinds (defined by Gardener - see resources) and Types.
For example, the following is an extension resource of Kind Infrastructure and Type local, which means we need a Gardener extension local that reconciles Infrastructure resources.
apiVersion: extensions.gardener.cloud/v1alpha1
kind: Infrastructure
metadata:
name: infrastructure
namespace: shoot--core--aws-01
spec:
type: local
Classes
A Gardener landscape consists of various cluster types which extension controllers may consider during reconciliation.
The .spec.class field identifies the different deployment cases.
Garden
Extension controllers serve the garden (run in garden runtime), e.g., installing certificates for API and ingress endpoints.
In the course of the Garden reconciliation, the gardener-operator creates BackupBucket, DNSRecord and Extension resources (group extensions.gardener.cloud) which triggers the responsible extension controllers to reconcile them.
Seed
Extension controllers serve the seed (run in seed), e.g., requesting a wildcard certificate for the seed’s ingress domain.
In the course of the Seed reconciliation, the gardenlet creates DNSRecord and Extension resources (group extensions.gardener.cloud) which triggers the responsible extension controllers to reconcile them.
Shoot
Extension controllers serve the shoot (run in seed), e.g., deploying a certificate controller into the control-plane namespace.
In the course of the Shoot reconciliation, the gardenlet creates various extension resources (group extensions.gardener.cloud) which triggers the responsible extension controllers to reconcile them.
gardenlet Reconciliation Walkthrough
Resources of group extensions.gardener.cloud are always created by Gardener itself, either in the garden runtime or in the seed cluster.
To get a better understanding of how the concept works, we will walk through the reconciliation process of a Shoot resource in the seed cluster.
During the shoot reconciliation process, Gardener will write CRDs into the seed cluster that are watched and managed by the extension controllers. They will reconcile (based on the
.spec) and report whether everything went well or errors occurred in the CRD’s.statusfield.Gardener keeps deploying the provider-independent control plane components (etcd, kube-apiserver, etc.). However, some of these components might still need little customization by providers, e.g., additional configuration, flags, etc. In this case, the extension controllers register webhooks in order to manipulate the manifests.
Example 1:
Gardener creates a new AWS shoot cluster and requires the preparation of infrastructure in order to proceed (networks, security groups, etc.). It writes the following CRD into the seed cluster:
apiVersion: extensions.gardener.cloud/v1alpha1
kind: Infrastructure
metadata:
name: infrastructure
namespace: shoot--core--aws-01
spec:
type: aws
providerConfig:
apiVersion: aws.provider.extensions.gardener.cloud/v1alpha1
kind: InfrastructureConfig
networks:
vpc:
cidr: 10.250.0.0/16
internal:
- 10.250.112.0/22
public:
- 10.250.96.0/22
workers:
- 10.250.0.0/19
zones:
- eu-west-1a
dns:
apiserver: api.aws-01.core.example.com
region: eu-west-1
secretRef:
name: my-aws-credentials
sshPublicKey: |
base64(key)
Please note that the .spec.providerConfig is a raw blob and not evaluated or known in any way by Gardener.
Instead, it was specified by the user (in the Shoot resource) and just “forwarded” to the extension controller.
Only the AWS controller understands this configuration and will now start provisioning/reconciling the infrastructure.
It reports in the .status field the result:
status:
observedGeneration: ...
state: ...
lastError: ..
lastOperation: ...
providerStatus:
apiVersion: aws.provider.extensions.gardener.cloud/v1alpha1
kind: InfrastructureStatus
vpc:
id: vpc-1234
subnets:
- id: subnet-acbd1234
name: workers
zone: eu-west-1
securityGroups:
- id: sg-xyz12345
name: workers
iam:
nodesRoleARN: <some-arn>
instanceProfileName: foo
ec2:
keyName: bar
Gardener waits until the .status.lastOperation / .status.lastError indicates that the operation reached a final state and either continuous with the next step, or stops and reports the potential error.
The extension-specific output in .status.providerStatus is - similar to .spec.providerConfig - not evaluated, and simply forwarded to CRDs in subsequent steps.
Example 2:
Gardener deploys the control plane components into the seed cluster, e.g., the kube-controller-manager deployment with the following flags:
apiVersion: apps/v1
kind: Deployment
...
spec:
template:
spec:
containers:
- command:
- /usr/local/bin/kube-controller-manager
- --allocate-node-cidrs=true
- --attach-detach-reconcile-sync-period=1m0s
- --controllers=*,bootstrapsigner,tokencleaner
- --cluster-cidr=100.96.0.0/11
- --cluster-name=shoot--core--aws-01
- --cluster-signing-cert-file=/srv/kubernetes/ca/ca.crt
- --cluster-signing-key-file=/srv/kubernetes/ca/ca.key
- --concurrent-deployment-syncs=10
- --concurrent-replicaset-syncs=10
...
The AWS controller requires some additional flags in order to make the cluster functional.
It needs to provide a Kubernetes cloud-config and also some cloud-specific flags.
Consequently, it registers a MutatingWebhookConfiguration on Deployments and adds these flags to the container:
- --cloud-provider=external
- --external-cloud-volume-plugin=aws
- --cloud-config=/etc/kubernetes/cloudprovider/cloudprovider.conf
Of course, it would have needed to create a ConfigMap containing the cloud config and to add the proper volume and volumeMounts to the manifest as well.
(Please note for this special example: The Kubernetes community is also working on making the kube-controller-manager provider-independent.
However, there will most probably be still components other than the kube-controller-manager which need to be adapted by extensions.)
If you are interested in writing an extension, or generally in digging deeper to find out the nitty-gritty details of the extension concepts, please read GEP-1. We are truly looking forward to your feedback!
Known Extensions
We track all extensions of Gardener in the known Gardener Extensions List repo.
4.5.1 - Access to the Garden Cluster for Extensions
Access to the Garden Cluster for Extensions
Gardener offers different means to provide or equip registered extensions with a kubeconfig which may be used to connect to the garden cluster.
Admission Controllers
For extensions with an admission controller deployment, gardener-operator injects a token-based kubeconfig as a volume and volume mount.
The token is valid for 12h, automatically renewed, and associated with a dedicated ServiceAccount in the garden cluster.
The path to this kubeconfig is revealed under the GARDEN_KUBECONFIG environment variable, also added to the pod spec(s).
Extensions on Seed Clusters
Extensions that are installed on seed clusters via a ControllerInstallation can request gardenlet to inject a kubeconfig and a token for the garden cluster.
In order to do so, injectGardenKubeconfig must be set to true in the referenced ControllerDeployment.
If it should still be disabled for an individual workload resource (Deployment, StatefulSet, etc.), they must be labeled with extensions.gardener.cloud/inject-garden-kubeconfig=false.
When enabled, extensions can then simply read the kubeconfig file specified by the GARDEN_KUBECONFIG environment variable to create a garden cluster client.
With this, they use a short-lived token (valid for 12h) associated with a dedicated ServiceAccount in the seed-<seed-name> namespace to securely access the garden cluster.
The used ServiceAccounts are granted permissions in the garden cluster similar to gardenlet clients.
Background
Historically, gardenlet has been the only component running in the seed cluster that has access to both the seed cluster and the garden cluster.
Accordingly, extensions running on the seed cluster didn’t have access to the garden cluster.
Starting from Gardener v1.74.0, there is a new mechanism for components running on seed clusters to get access to the garden cluster.
For this, gardenlet runs an instance of the TokenRequestor for requesting tokens that can be used to communicate with the garden cluster.
Using Gardenlet-Managed Garden Access
By default, extensions are equipped with secure access to the garden cluster using a dedicated ServiceAccount without requiring any additional action.
They can simply read the file specified by the GARDEN_KUBECONFIG and construct a garden client with it.
When installing a ControllerInstallation, gardenlet creates two secrets in the installation’s namespace: a generic garden kubeconfig (generic-garden-kubeconfig-<hash>) and a garden access secret (garden-access-extension).
Note that the ServiceAccount created based on this access secret will be created in the respective seed-* namespace in the garden cluster and labelled with controllerregistration.core.gardener.cloud/name=<name>.
Additionally, gardenlet injects volume, volumeMounts, and two environment variables into all (init) containers in all objects in the apps and batch API groups:
GARDEN_KUBECONFIG: points to the path where the generic garden kubeconfig is mounted.SEED_NAME: set to the name of theSeedwhere the extension is installed. This is useful for restricting watches in the garden cluster to relevant objects.
If an object already contains the GARDEN_KUBECONFIG environment variable, it is not overwritten and injection of volume and volumeMounts is skipped.
For example, a Deployment deployed via a ControllerInstallation will be mutated as follows:
apiVersion: apps/v1
kind: Deployment
metadata:
name: gardener-extension-provider-local
annotations:
reference.resources.gardener.cloud/secret-795f7ca6: garden-access-extension
reference.resources.gardener.cloud/secret-d5f5a834: generic-garden-kubeconfig-81fb3a88
spec:
template:
metadata:
annotations:
reference.resources.gardener.cloud/secret-795f7ca6: garden-access-extension
reference.resources.gardener.cloud/secret-d5f5a834: generic-garden-kubeconfig-81fb3a88
spec:
containers:
- name: gardener-extension-provider-local
env:
- name: GARDEN_KUBECONFIG
value: /var/run/secrets/gardener.cloud/garden/generic-kubeconfig/kubeconfig
- name: SEED_NAME
value: local
volumeMounts:
- mountPath: /var/run/secrets/gardener.cloud/garden/generic-kubeconfig
name: garden-kubeconfig
readOnly: true
volumes:
- name: garden-kubeconfig
projected:
defaultMode: 420
sources:
- secret:
items:
- key: kubeconfig
path: kubeconfig
name: generic-garden-kubeconfig-81fb3a88
optional: false
- secret:
items:
- key: token
path: token
name: garden-access-extension
optional: false
The generic garden kubeconfig will look like this:
apiVersion: v1
kind: Config
clusters:
- cluster:
certificate-authority-data: LS0t...
server: https://garden.local.gardener.cloud:6443
name: garden
contexts:
- context:
cluster: garden
user: extension
name: garden
current-context: garden
users:
- name: extension
user:
tokenFile: /var/run/secrets/gardener.cloud/garden/generic-kubeconfig/token
Manually Requesting a Token for the Garden Cluster
Seed components that need to communicate with the garden cluster can request a token in the garden cluster by creating a garden access secret.
This secret has to be labelled with resources.gardener.cloud/purpose=token-requestor and resources.gardener.cloud/class=garden, e.g.:
apiVersion: v1
kind: Secret
metadata:
name: garden-access-example
namespace: example
labels:
resources.gardener.cloud/purpose: token-requestor
resources.gardener.cloud/class: garden
annotations:
serviceaccount.resources.gardener.cloud/name: example
type: Opaque
This will instruct gardenlet to create a new ServiceAccount named example in its own seed-<seed-name> namespace in the garden cluster, request a token for it, and populate the token in the secret’s data under the token key.
Permissions in the Garden Cluster
Both the SeedAuthorizer and the SeedRestriction plugin handle extensions clients and generally grant the same permissions in the garden cluster to them as to gardenlet clients.
With this, extensions are restricted to work with objects in the garden cluster that are related to seed they are running one just like gardenlet.
Note that if the plugins are not enabled, extension clients are only granted read access to global resources like CloudProfiles (this is granted to all authenticated users).
There are a few exceptions to the granted permissions as documented here.
Additional Permissions
If an extension needs access to additional resources in the garden cluster (e.g., extension-specific custom resources), permissions need to be granted via the usual RBAC means.
Let’s consider the following example: An extension requires the privileges to create authorization.k8s.io/v1.SubjectAccessReviews (which is not covered by the “default” permissions mentioned above).
This requires a human Gardener operator to create a ClusterRole in the garden cluster with the needed rules:
apiVersion: rbac.authorization.k8s.io/v1
kind: ClusterRole
metadata:
name: extension-create-subjectaccessreviews
annotations:
authorization.gardener.cloud/extensions-serviceaccount-selector: '{"matchLabels":{"controllerregistration.core.gardener.cloud/name":"<extension-name>"}}'
labels:
authorization.gardener.cloud/custom-extensions-permissions: "true"
rules:
- apiGroups:
- authorization.k8s.io
resources:
- subjectaccessreviews
verbs:
- create
Note the label authorization.gardener.cloud/extensions-serviceaccount-selector which contains a label selector for ServiceAccounts.
There is a controller part of gardener-controller-manager which takes care of maintaining the respective ClusterRoleBinding resources.
It binds all ServiceAccounts in the seed namespaces in the garden cluster (i.e., all extension clients) whose labels match.
You can read more about this controller here.
Custom Permissions
If an extension wants to create a dedicated ServiceAccount for accessing the garden cluster without automatically inheriting all permissions of the gardenlet, it first needs to create a garden access secret in its extension namespace in the seed cluster:
apiVersion: v1
kind: Secret
metadata:
name: my-custom-component
namespace: <extension-namespace>
labels:
resources.gardener.cloud/purpose: token-requestor
resources.gardener.cloud/class: garden
annotations:
serviceaccount.resources.gardener.cloud/name: my-custom-component-extension-foo
serviceaccount.resources.gardener.cloud/labels: '{"foo":"bar}'
type: Opaque
❗️️Do not prefix the service account name with extension- to prevent inheriting the gardenlet permissions! It is still recommended to add the extension name (e.g., as a suffix) for easier identification where this ServiceAccount comes from.
Next, you can follow the same approach described above.
However, the authorization.gardener.cloud/extensions-serviceaccount-selector annotation should not contain controllerregistration.core.gardener.cloud/name=<extension-name> but rather custom labels, e.g. foo=bar.
This way, the created ServiceAccount will only get the permissions of above ClusterRole and nothing else.
Renewing All Garden Access Secrets
Operators can trigger an automatic renewal of all garden access secrets in a given Seed and their requested ServiceAccount tokens, e.g., when rotating the garden cluster’s ServiceAccount signing key.
For this, the Seed has to be annotated with gardener.cloud/operation=renew-garden-access-secrets.
4.5.2 - CA Rotation
CA Rotation in Extensions
GEP-18 proposes adding support for automated rotation of Shoot cluster certificate authorities (CAs). This document outlines all the requirements that Gardener extensions need to fulfill in order to support the CA rotation feature.
Requirements for Shoot Cluster CA Rotation
- Extensions must not rely on static CA
Secretnames managed by the gardenlet, because their names are changing during CA rotation. - Extensions cannot issue or use client certificates for authenticating against shoot API servers. Instead, they should use short-lived auto-rotated
ServiceAccounttokens via gardener-resource-manager’sTokenRequestor. Also see Conventions andTokenRequestordocuments. - Extensions need to generate dedicated CAs for signing server certificates (e.g.
cloud-controller-manager). There should be one CA per controller and purpose in order to bind the lifecycle to the reconciliation cycle of the respective object for which it is created. - CAs managed by extensions should be rotated in lock-step with the shoot cluster CA.
When the user triggers a rotation, the gardenlet writes phase and initiation time to
Shoot.status.credentials.rotation.certificateAuthorities.{phase,lastInitiationTime}. See GEP-18 for a detailed description on what needs to happen in each phase. Extensions can retrieve this information fromCluster.shoot.status.
Utilities for Secrets Management
In order to fulfill the requirements listed above, extension controllers can reuse the SecretsManager that the gardenlet uses to manage all shoot cluster CAs, certificates, and other secrets as well.
It implements the core logic for managing secrets that need to be rotated, auto-renewed, etc.
Additionally, there are utilities for reusing SecretsManager in extension controllers.
They already implement the above requirements based on the Cluster resource and allow focusing on the extension controllers’ business logic.
For example, a simple SecretsManager usage in an extension controller could look like this:
const (
// identity for SecretsManager instance in ControlPlane controller
identity = "provider-foo-controlplane"
// secret config name of the dedicated CA
caControlPlaneName = "ca-provider-foo-controlplane"
)
func Reconcile() {
var (
cluster *extensionscontroller.Cluster
client client.Client
// define wanted secrets with options
secretConfigs = []extensionssecretsmanager.SecretConfigWithOptions{
{
// dedicated CA for ControlPlane controller
Config: &secretutils.CertificateSecretConfig{
Name: caControlPlaneName,
CommonName: "ca-provider-foo-controlplane",
CertType: secretutils.CACert,
},
// persist CA so that it gets restored on control plane migration
Options: []secretsmanager.GenerateOption{secretsmanager.Persist()},
},
{
// server cert for control plane component
Config: &secretutils.CertificateSecretConfig{
Name: "cloud-controller-manager",
CommonName: "cloud-controller-manager",
DNSNames: kutil.DNSNamesForService("cloud-controller-manager", namespace),
CertType: secretutils.ServerCert,
},
// sign with our dedicated CA
Options: []secretsmanager.GenerateOption{secretsmanager.SignedByCA(caControlPlaneName)},
},
}
)
// initialize SecretsManager based on Cluster object
sm, err := extensionssecretsmanager.SecretsManagerForCluster(ctx, logger.WithName("secretsmanager"), clock.RealClock{}, client, cluster, identity, secretConfigs)
// generate all wanted secrets (first CAs, then the rest)
secrets, err := extensionssecretsmanager.GenerateAllSecrets(ctx, sm, secretConfigs)
// cleanup any secrets that are not needed any more (e.g. after rotation)
err = sm.Cleanup(ctx)
}
Please pay attention to the following points:
- There should be one
SecretsManageridentity per controller in order to prevent conflicts between different instances. E.g., there should be different identities forInfrastructrue,Worker,ControlPlanecontroller, etc. - All other points in Reusing the SecretsManager in Other Components.
4.5.3 - Cluster
Cluster Resource
As part of the extensibility epic, a lot of responsibility that was previously taken over by Gardener directly has now been shifted to extension controllers running in the seed clusters. These extensions often serve a well-defined purpose (e.g., the management of DNS records, infrastructure). We have introduced a couple of extension CRDs in the seeds whose specification is written by Gardener, and which are acted up by the extensions.
However, the extensions sometimes require more information that is not directly part of the specification.
One example of that is the GCP infrastructure controller which needs to know the shoot’s pod and service network.
Another example is the Azure infrastructure controller which requires some information out of the CloudProfile resource.
The problem is that Gardener does not know which extension requires which information so that it can write it into their specific CRDs.
In order to deal with this problem we have introduced the Cluster extension resource.
This CRD is written into the seeds, however, it does not contain a status, so it is not expected that something acts upon it.
Instead, you can treat it like a ConfigMap which contains data that might be interesting for you.
In the context of Gardener, seeds and shoots, and extensibility the Cluster resource contains the CloudProfile, Seed, and Shoot manifest.
Extension controllers can take whatever information they want out of it that might help completing their individual tasks.
---
apiVersion: extensions.gardener.cloud/v1alpha1
kind: Cluster
metadata:
name: shoot--foo--bar
spec:
cloudProfile:
apiVersion: core.gardener.cloud/v1beta1
kind: CloudProfile
...
seed:
apiVersion: core.gardener.cloud/v1beta1
kind: Seed
...
shoot:
apiVersion: core.gardener.cloud/v1beta1
kind: Shoot
...
The resource is written by Gardener before it starts the reconciliation flow of the shoot.
⚠️ All Gardener components use the core.gardener.cloud/v1beta1 version, i.e., the Cluster resource will contain the objects in this version.
Important Information that Should Be Taken into Account
There are some fields in the Shoot specification that might be interesting to take into account.
.spec.hibernation.enabled={true,false}: Extension controllers might want to behave differently if the shoot is hibernated or not (probably they might want to scale down their control plane components, for example)..status.lastOperation.state=Failed: If Gardener sets the shoot’s last operation state toFailed, it means that Gardener won’t automatically retry to finish the reconciliation/deletion flow because an error occurred that could not be resolved within the last24h(default). In this case, end-users are expected to manually re-trigger the reconciliation flow in case they want Gardener to try again. Extension controllers are expected to follow the same principle. This means they have to read the shoot state out of theClusterresource.
Extension Resources Not Associated with a Shoot
In some cases, Gardener may create extension resources that are not associated with a shoot, but are needed to support some functionality internal to Gardener. Such resources will be created in the garden namespace of a seed cluster.
For example, if the managed ingress controller is active on the seed, Gardener will create a DNSRecord resource(s) in the garden namespace of the seed cluster for the ingress DNS record.
Extension controllers that may be expected to reconcile extension resources in the garden namespace should make sure that they can tolerate the absence of a cluster resource. This means that they should not attempt to read the cluster resource in such cases, or if they do they should ignore the “not found” error.
References and Additional Resources
4.5.4 - ControlPlane Webhooks
ControlPlane Customization Webhooks
Gardener creates the Shoot controlplane in several steps of the Shoot flow. At different point of this flow, it:
- Deploys standard controlplane components such as kube-apiserver, kube-controller-manager, and kube-scheduler by creating the corresponding deployments, services, and other resources in the Shoot namespace.
- Initiates the deployment of custom controlplane components by ControlPlane controllers by creating a
ControlPlaneresource in the Shoot namespace.
In order to apply any provider-specific changes to the configuration provided by Gardener for the standard controlplane components, cloud extension providers can install mutating admission webhooks for the resources created by Gardener in the Shoot namespace.
What needs to be implemented to support a new cloud provider?
In order to support a new cloud provider, you should install “controlplane” mutating webhooks for any of the following resources:
- Deployment with name
kube-apiserver,kube-controller-manager, orkube-scheduler - Service with name
kube-apiserver OperatingSystemConfigwith any name, and purposereconcile
See Contract Specification for more details on the contract that Gardener and webhooks should adhere to regarding the content of the above resources.
You can install 2 different kinds of controlplane webhooks:
Shoot, orcontrolplanewebhooks apply changes needed by the Shoot cloud provider, for example the--cloud-providercommand line flag ofkube-apiserverandkube-controller-manager. Such webhooks should only operate on Shoot namespaces labeled withshoot.gardener.cloud/provider=<provider>.Seed, orseedproviderwebhooks apply changes needed by the Seed cloud provider, for example adapting the storage class and capacity onEtcdobjects. Such webhooks should only operate on Shoot namespaces labeled withseed.gardener.cloud/provider=<provider>.
The labels shoot.gardener.cloud/provider and seed.gardener.cloud/provider are added by Gardener when it creates the Shoot namespace.
The resources mutated by the “controlplane” mutating webhooks are labeled with provider.extensions.gardener.cloud/mutated-by-controlplane-webhook: true by gardenlet. The provider extensions can add an object selector to their “controlplane” mutating webhooks to not intercept requests for unrelated objects.
Contract Specification
This section specifies the contract that Gardener and webhooks should adhere to in order to ensure smooth interoperability. Note that this contract can’t be specified formally and is therefore easy to violate, especially by Gardener. The Gardener team will nevertheless do its best to adhere to this contract in the future and to ensure via additional measures (tests, validations) that it’s not unintentionally broken. If it needs to be changed intentionally, this can only happen after proper communication has taken place to ensure that the affected provider webhooks could be adapted to work with the new version of the contract.
Note: The contract described below may not necessarily be what Gardener does currently (as of May 2019). Rather, it reflects the target state after changes for Gardener extensibility have been introduced.
kube-apiserver
To deploy kube-apiserver, Gardener shall create a deployment and a service both named kube-apiserver in the Shoot namespace. They can be mutated by webhooks to apply any provider-specific changes to the standard configuration provided by Gardener.
The pod template of the kube-apiserver deployment shall contain a container named kube-apiserver.
The command field of the kube-apiserver container shall contain the kube-apiserver command line. It shall contain a number of provider-independent flags that should be ignored by webhooks, such as:
- admission plugins (
--enable-admission-plugins,--disable-admission-plugins) - secure communications (
--etcd-cafile,--etcd-certfile,--etcd-keyfile, …) - audit log (
--audit-log-*) - ports (
--secure-port)
The kube-apiserver command line shall not contain any provider-specific flags, such as:
--cloud-provider--cloud-config
These flags can be added by webhooks if needed.
The kube-apiserver command line may contain a number of additional provider-independent flags. In general, webhooks should ignore these unless they are known to interfere with the desired kube-apiserver behavior for the specific provider. Among the flags to be considered are:
--endpoint-reconciler-type--advertise-address--feature-gates
Gardener uses SNI to expose the apiserver. In this case, Gardener expects that the --endpoint-reconciler-type and --advertise-address flags of the kube-apiserver’s Deployment are not modified.
The --enable-admission-plugins flag may contain admission plugins that are not compatible with CSI plugins such as PersistentVolumeLabel. Webhooks should therefore ensure that such admission plugins are either explicitly enabled (if CSI plugins are not used) or disabled (otherwise).
The env field of the kube-apiserver container shall not contain any provider-specific environment variables (so it will be empty). If any provider-specific environment variables are needed, they should be added by webhooks.
The volumes field of the pod template of the kube-apiserver deployment, and respectively the volumeMounts field of the kube-apiserver container shall not contain any provider-specific Secret or ConfigMap resources. If such resources should be mounted as volumes, this should be done by webhooks.
The kube-apiserver Service will be of type ClusterIP. In this case, Gardener expects that for this Service no mutations happen.
kube-controller-manager
To deploy kube-controller-manager, Gardener shall create a deployment named kube-controller-manager in the Shoot namespace. It can be mutated by webhooks to apply any provider-specific changes to the standard configuration provided by Gardener.
The pod template of the kube-controller-manager deployment shall contain a container named kube-controller-manager.
The command field of the kube-controller-manager container shall contain the kube-controller-manager command line. It shall contain a number of provider-independent flags that should be ignored by webhooks, such as:
--kubeconfig,--authentication-kubeconfig,--authorization-kubeconfig--leader-elect- secure communications (
--tls-cert-file,--tls-private-key-file, …) - cluster CIDR and identity (
--cluster-cidr,--cluster-name) - sync settings (
--concurrent-deployment-syncs,--concurrent-replicaset-syncs) - horizontal pod autoscaler (
--horizontal-pod-autoscaler-*) - ports (
--port,--secure-port)
The kube-controller-manager command line shall not contain any provider-specific flags, such as:
--cloud-provider--cloud-config--configure-cloud-routes--external-cloud-volume-plugin
These flags can be added by webhooks if needed.
The kube-controller-manager command line may contain a number of additional provider-independent flags. In general, webhooks should ignore these unless they are known to interfere with the desired kube-controller-manager behavior for the specific provider. Among the flags to be considered are:
--feature-gates
The env field of the kube-controller-manager container shall not contain any provider-specific environment variables (so it will be empty). If any provider-specific environment variables are needed, they should be added by webhooks.
The volumes field of the pod template of the kube-controller-manager deployment, and respectively the volumeMounts field of the kube-controller-manager container shall not contain any provider-specific Secret or ConfigMap resources. If such resources should be mounted as volumes, this should be done by webhooks.
kube-scheduler
To deploy kube-scheduler, Gardener shall create a deployment named kube-scheduler in the Shoot namespace. It can be mutated by webhooks to apply any provider-specific changes to the standard configuration provided by Gardener.
The pod template of the kube-scheduler deployment shall contain a container named kube-scheduler.
The command field of the kube-scheduler container shall contain the kube-scheduler command line. It shall contain a number of provider-independent flags that should be ignored by webhooks, such as:
--config--authentication-kubeconfig,--authorization-kubeconfig- secure communications (
--tls-cert-file,--tls-private-key-file, …) - ports (
--port,--secure-port)
The kube-scheduler command line may contain additional provider-independent flags. In general, webhooks should ignore these unless they are known to interfere with the desired kube-controller-manager behavior for the specific provider. Among the flags to be considered are:
--feature-gates
The kube-scheduler command line can’t contain provider-specific flags, and it makes no sense to specify provider-specific environment variables or mount provider-specific Secret or ConfigMap resources as volumes.
etcd-main and etcd-events
To deploy etcd, Gardener shall create 2 Etcd named etcd-main and etcd-events in the Shoot namespace. They can be mutated by webhooks to apply any provider-specific changes to the standard configuration provided by Gardener.
Gardener shall configure the Etcd resource completely to set up an etcd cluster which uses the default storage class of the seed cluster.
cloud-controller-manager
Gardener shall not deploy a cloud-controller-manager. If it is needed, it should be added by a ControlPlane controller
CSI Controllers
Gardener shall not deploy a CSI controller. If it is needed, it should be added by a ControlPlane controller
kubelet
To specify the kubelet configuration, Gardener shall create a OperatingSystemConfig resource with any name and purpose reconcile in the Shoot namespace. It can therefore also be mutated by webhooks to apply any provider-specific changes to the standard configuration provided by Gardener. Gardener may write multiple such resources with different type to the same Shoot namespaces if multiple OSs are used.
The OSC resource shall contain a unit named kubelet.service, containing the corresponding systemd unit configuration file. The [Service] section of this file shall contain a single ExecStart option having the kubelet command line as its value.
The OSC resource shall contain a file with path /var/lib/kubelet/config/kubelet, which contains a KubeletConfiguration resource in YAML format. Most of the flags that can be specified in the kubelet command line can alternatively be specified as options in this configuration as well.
The kubelet command line shall contain a number of provider-independent flags that should be ignored by webhooks, such as:
--config--bootstrap-kubeconfig,--kubeconfig--network-plugin(and, if it equalscni, also--cni-bin-dirand--cni-conf-dir)--node-labels
The kubelet command line shall not contain any provider-specific flags, such as:
--cloud-provider--cloud-config--provider-id
These flags can be added by webhooks if needed.
The kubelet command line / configuration may contain a number of additional provider-independent flags / options. In general, webhooks should ignore these unless they are known to interfere with the desired kubelet behavior for the specific provider. Among the flags / options to be considered are:
--enable-controller-attach-detach(enableControllerAttachDetach) - should be set totrueif CSI plugins are used, but in general can also be ignored since its default value is alsotrue, and this should work both with and without CSI plugins.--feature-gates(featureGates) - should contain a list of specific feature gates if CSI plugins are used. If CSI plugins are not used, the corresponding feature gates can be ignored since enabling them should not harm in any way.
4.5.5 - Conventions
General Conventions
All the extensions that are registered to Gardener are deployed to the garden runtime and seed clusters on which they are required (also see extension registration documentation).
Some of these extensions might need to create global resources in the seed (e.g., ClusterRoles), i.e., it’s important to have a naming scheme to avoid conflicts as it cannot be checked or validated upfront that two extensions don’t use the same names.
Consequently, this page should help answering some general questions that might come up when it comes to developing an extension.
Extension Classes
Each extension resource has a .spec.class field that is used to distinguish between different instances of the same extension type.
For extensions configured in Shoots the class is named shoot (or unspecified for backwards compatibility), for Seeds the class is named seed.
Extension controllers ought to use the class field for event filtering (see HasClass Predicate) and during reconciliation.
PriorityClasses
Extensions are not supposed to create and use self-defined PriorityClasses.
Instead, they can and should rely on well-known PriorityClasses managed by gardenlet.
High Availability of Deployed Components
Extensions might deploy components via Deployments, StatefulSets, etc., as part of the shoot control plane, or the seed or shoot system components.
In case a seed or shoot cluster is highly available, there are various failure tolerance types. For more information, see Highly Available Shoot Control Plane.
Accordingly, the replicas, topologySpreadConstraints or affinity settings of the deployed components might need to be adapted.
Instead of doing this one-by-one for each and every component, extensions can rely on a mutating webhook provided by Gardener. Please refer to High Availability of Deployed Components for details.
To reduce costs and to improve the network traffic latency in multi-zone clusters, extensions can make a Service topology-aware. Please refer to this document for details.
Is there a naming scheme for (global) resources?
As there is no formal process to validate non-existence of conflicts between two extensions, please follow these naming schemes when creating resources (especially, when creating global resources, but it’s in general a good idea for most created resources):
The resource name should be prefixed with extensions.gardener.cloud:<extension-type>-<extension-name>:<resource-name>, for example:
extensions.gardener.cloud:provider-aws:some-controller-managerextensions.gardener.cloud:extension-certificate-service:cert-broker
How to create resources in the shoot cluster?
Some extensions might not only create resources in the seed cluster itself but also in the shoot cluster. Usually, every extension comes with a ServiceAccount and the required RBAC permissions when it gets installed to the seed.
However, there are no credentials for the shoot for every extension.
Extensions are supposed to use ManagedResources to manage resources in shoot clusters.
gardenlet deploys gardener-resource-manager instances into all shoot control planes, that will reconcile ManagedResources without a specified class (spec.class=null) in shoot clusters. Mind that Gardener acts on ManagedResources with the origin=gardener label. In order to prevent unwanted behavior, extensions should omit the origin label or provide their own unique value for it when creating such resources.
If you need to deploy a non-DaemonSet resource, Gardener automatically ensures that it only runs on nodes that are allowed to host system components and extensions. For more information, see System Components Webhook.
How to create kubeconfigs for the shoot cluster?
Historically, Gardener extensions used to generate kubeconfigs with client certificates for components they deploy into the shoot control plane.
For this, they reused the shoot cluster CA secret (ca) to issue new client certificates.
With gardener/gardener#4661 we moved away from using client certificates in favor of short-lived, auto-rotated ServiceAccount tokens. These tokens are managed by gardener-resource-manager’s TokenRequestor.
Extensions are supposed to reuse this mechanism for requesting tokens and a generic-token-kubeconfig for authenticating against shoot clusters.
With GEP-18 (Shoot cluster CA rotation), a dedicated CA will be used for signing client certificates (gardener/gardener#5779) which will be rotated when triggered by the shoot owner.
With this, extensions cannot reuse the ca secret anymore to issue client certificates.
Hence, extensions must switch to short-lived ServiceAccount tokens in order to support the CA rotation feature.
The generic-token-kubeconfig secret contains the CA bundle for establishing trust to shoot API servers. However, as the secret is immutable, its name changes with the rotation of the cluster CA.
Extensions need to look up the generic-token-kubeconfig.secret.gardener.cloud/name annotation on the respective Cluster object in order to determine which secret contains the current CA bundle.
The helper function extensionscontroller.GenericTokenKubeconfigSecretNameFromCluster can be used for this task.
You can take a look at CA Rotation in Extensions for more details on the CA rotation feature in regard to extensions.
How to create certificates for the shoot cluster?
Gardener creates several certificate authorities (CA) that are used to create server certificates for various components. For example, the shoot’s etcd has its own CA, the kube-aggregator has its own CA as well, and both are different to the actual cluster’s CA.
With GEP-18 (Shoot cluster CA rotation), extensions are required to do the same and generate dedicated CAs for their components (e.g. for signing a server certificate for cloud-controller-manager). They must not depend on the CA secrets managed by gardenlet.
Please see CA Rotation in Extensions for the exact requirements that extensions need to fulfill in order to support the CA rotation feature.
How to enforce a Pod Security Standard for extension namespaces?
The pod-security.kubernetes.io/enforce namespace label enforces the Pod Security Standards.
You can set the pod-security.kubernetes.io/enforce label for extension namespace by adding the security.gardener.cloud/pod-security-enforce annotation to your ControllerRegistration. The value of the annotation would be the value set for the pod-security.kubernetes.io/enforce label. It is advised to set the annotation with the most restrictive pod security standard that your extension pods comply with.
If you are using the ./hack/generate-controller-registration.sh script to generate your ControllerRegistration you can use the -e, –pod-security-enforce option to set the security.gardener.cloud/pod-security-enforce annotation. If the option is not set, it defaults to baseline.
4.5.6 - Force Deletion
Force Deletion
From v1.81, Gardener supports Shoot Force Deletion. All extension controllers should also properly support it. This document outlines some important points that extension maintainers should keep in mind to support force deletion in their extensions.
Overall Principles
The following principles should always be upheld:
- All resources pertaining to the extension and managed by it should be appropriately handled and cleaned up by the extension when force deletion is initiated.
Implementation Details
ForceDelete Actuator Methods
Most extension controller implementations follow a common pattern where a generic Reconciler implementation delegates to an Actuator interface that contains the methods Reconcile, Delete, Migrate and Restore provided by the extension. A new method, ForceDelete has been added to all such Actuator interfaces; see the infrastructure Actuator interface as an example. The generic reconcilers call this method if the Shoot has annotation confirmation.gardener.cloud/force-deletion=true. Thus, it should be implemented by the extension controller to forcefully delete resources if not possible to delete them gracefully. If graceful deletion is possible, then in the ForceDelete, they can simply call the Delete method.
Extension Controllers Based on Generic Actuators
In practice, the implementation of many extension controllers (for example, the controlplane and worker controllers in most provider extensions) are based on a generic Actuator implementation that only delegates to extension methods for behavior that is truly provider-specific. In all such cases, the ForceDelete method has already been implemented with a method that should suit most of the extensions. If it doesn’t suit your extension, then the ForceDelete method needs to be overridden; see the Azure controlplane controller as an example.
Extension Controllers Not Based on Generic Actuators
The implementation of some extension controllers (for example, the infrastructure controllers in all provider extensions) are not based on a generic Actuator implementation. Such extension controllers must always provide a proper implementation of the ForceDelete method according to the above guidelines; see the AWS infrastructure controller as an example. In practice, this might result in code duplication between the different extensions, since the ForceDelete code is usually not OS-specific.
Some General Implementation Examples
- If the extension deploys only resources in the shoot cluster not backed by infrastructure in third-party systems, then performing the regular deletion code (
actuator.Delete) will suffice in the majority of cases. (e.g - https://github.com/gardener/gardener-extension-shoot-networking-filter/blob/1d95a483d803874e8aa3b1de89431e221a7d574e/pkg/controller/lifecycle/actuator.go#L175-L178) - If the extension deploys resources which are backed by infrastructure in third-party systems:
- If the resource is in the Seed cluster, the extension should remove the finalizers and delete the resource. This is needed especially if the resource is a custom resource since
gardenletwill not be aware of this resource and cannot take action. - If the resource is in the Shoot and if it’s deployed by a
ManagedResource, thengardenletwill take care to forcefully delete it in a later step of force-deletion. If the resource is not deployed via aManagedResource, then it wouldn’t block the deletion flow anyway since it is in the Shoot cluster. In both cases, the extension controller can ignore the resource and returnnil.
- If the resource is in the Seed cluster, the extension should remove the finalizers and delete the resource. This is needed especially if the resource is a custom resource since
4.5.7 - Healthcheck Library
Health Check Library
Goal
Typically, an extension reconciles a specific resource (Custom Resource Definitions (CRDs)) and creates / modifies resources in the cluster (via helm, managed resources, kubectl, …). We call these API Objects ‘dependent objects’ - as they are bound to the lifecycle of the extension.
The goal of this library is to enable extensions to setup health checks for their ‘dependent objects’ with minimal effort.
Usage
The library provides a generic controller with the ability to register any resource that satisfies the extension object interface.
An example is the Worker CRD.
Health check functions for commonly used dependent objects can be reused and registered with the controller, such as:
- Deployment
- DaemonSet
- StatefulSet
- ManagedResource (Gardener specific)
See the below example taken from the provider-aws.
health.DefaultRegisterExtensionForHealthCheck(
aws.Type,
extensionsv1alpha1.SchemeGroupVersion.WithKind(extensionsv1alpha1.WorkerResource),
func() runtime.Object { return &extensionsv1alpha1.Worker{} },
mgr, // controller runtime manager
opts, // options for the health check controller
nil, // custom predicates
map[extensionshealthcheckcontroller.HealthCheck]string{
general.CheckManagedResource(genericactuator.McmShootResourceName): string(gardencorev1beta1.ShootSystemComponentsHealthy),
general.CheckSeedDeployment(aws.MachineControllerManagerName): string(gardencorev1beta1.ShootEveryNodeReady),
worker.SufficientNodesAvailable(): string(gardencorev1beta1.ShootEveryNodeReady),
})
This creates a health check controller that reconciles the extensions.gardener.cloud/v1alpha1.Worker resource with the spec.type ‘aws’.
Three health check functions are registered that are executed during reconciliation.
Each health check is mapped to a single HealthConditionType that results in conditions with the same condition.type (see below).
To contribute to the Shoot’s health, the following conditions can be used: SystemComponentsHealthy, EveryNodeReady, ControlPlaneHealthy, ObservabilityComponentsHealthy. In case of workerless Shoot the EveryNodeReady condition is not present, so it can’t be used.
The Gardener/Gardenlet checks each extension for conditions matching these types.
However, extensions are free to choose any HealthConditionType.
For more information, see Contributing to Shoot Health Status Conditions.
A health check has to satisfy the below interface. You can find implementation examples in the healtcheck folder.
type HealthCheck interface {
// Check is the function that executes the actual health check
Check(context.Context, types.NamespacedName) (*SingleCheckResult, error)
// InjectSeedClient injects the seed client
InjectSeedClient(client.Client)
// InjectShootClient injects the shoot client
InjectShootClient(client.Client)
// SetLoggerSuffix injects the logger
SetLoggerSuffix(string, string)
// DeepCopy clones the healthCheck
DeepCopy() HealthCheck
}
The health check controller regularly (default: 30s) reconciles the extension resource and executes the registered health checks for the dependent objects.
As a result, the controller writes condition(s) to the status of the extension containing the health check result.
In our example, two checks are mapped to ShootEveryNodeReady and one to ShootSystemComponentsHealthy, leading to conditions with two distinct HealthConditionTypes (condition.type):
status:
conditions:
- lastTransitionTime: "20XX-10-28T08:17:21Z"
lastUpdateTime: "20XX-11-28T08:17:21Z"
message: (1/1) Health checks successful
reason: HealthCheckSuccessful
status: "True"
type: SystemComponentsHealthy
- lastTransitionTime: "20XX-10-28T08:17:21Z"
lastUpdateTime: "20XX-11-28T08:17:21Z"
message: (2/2) Health checks successful
reason: HealthCheckSuccessful
status: "True"
type: EveryNodeReady
Please note that there are four statuses: True, False, Unknown, and Progressing.
Trueshould be used for successful health checks.Falseshould be used for unsuccessful/failing health checks.Unknownshould be used when there was an error trying to determine the health status.Progressingshould be used to indicate that the health status did not succeed but for expected reasons (e.g., a cluster scale up/down could make the standard health check fail because something is wrong with theMachines, however, it’s actually an expected situation and known to be completed within a few minutes.)
Health checks that report Progressing should also provide a timeout, after which this “progressing situation” is expected to be completed.
The health check library will automatically transition the status to False if the timeout was exceeded.
Additional Considerations
It is up to the extension to decide how to conduct health checks, though it is recommended to make use of the build-in health check functionality of managedresources for trivial checks.
By deploying the depending resources via managed resources, the gardener resource manager conducts basic checks for different API objects out-of-the-box (e.g Deployments, DaemonSets, …) - and writes health conditions.
By default, Gardener performs health checks for all the ManagedResources created in the shoot namespaces.
Their status will be aggregated to the Shoot conditions according to the following rules:
- Health checks of
ManagedResourcewith.spec.class=nilare aggregated to theSystemComponentsHealthycondition - Health checks of
ManagedResourcewith.spec.class!=nilare aggregated to theControlPlaneHealthycondition unless theManagedResourceis labeled withcare.gardener.cloud/condition-type=<other-condition-type>. In such case, it is aggregated to the<other-condition-type>.
More sophisticated health checks should be implemented by the extension controller itself (implementing the HealthCheck interface).
4.5.8 - Heartbeat
Heartbeat Controller
The heartbeat controller renews a dedicated Lease object named gardener-extension-heartbeat at regular 30 second intervals by default. This Lease is used for heartbeats similar to how gardenlet uses Lease objects for seed heartbeats (see gardenlet heartbeats).
The gardener-extension-heartbeat Lease can be checked by other controllers to verify that the corresponding extension controller is still running. Currently, gardenlet checks this Lease when performing shoot health checks and expects to find the Lease inside the namespace where the extension controller is deployed by the corresponding ControllerInstallation. For each extension resource deployed in the Shoot control plane, gardenlet finds the corresponding gardener-extension-heartbeat Lease resource and checks whether the Lease’s .spec.renewTime is older than the allowed threshold for stale extension health checks - in this case, gardenlet considers the health check report for an extension resource as “outdated” and reflects this in the Shoot status.
4.5.9 - Logging And Monitoring
Logging and Monitoring for Extensions
Gardener provides an integrated logging and monitoring stack for alerting, monitoring, and troubleshooting of its managed components by operators or end users. For further information how to make use of it in these roles, refer to the corresponding guides for exploring logs and for monitoring with Plutono.
The components that constitute the logging and monitoring stack are managed by Gardener. By default, it deploys Prometheus and Alertmanager (managed via prometheus-operator, and Plutono into the garden namespace of all seed clusters. If the logging is enabled in the gardenlet configuration (logging.enabled), it will deploy fluent-operator and Vali in the garden namespace too.
Each shoot namespace hosts managed logging and monitoring components. As part of the shoot reconciliation flow, Gardener deploys a shoot-specific Prometheus, blackbox-exporter, Plutono, and, if configured, an Alertmanager into the shoot namespace, next to the other control plane components. If the logging is enabled in the gardenlet configuration (logging.enabled) and the shoot purpose is not testing, it deploys a shoot-specific Vali in the shoot namespace too.
The logging and monitoring stack is extensible by configuration. Gardener extensions can take advantage of that and contribute monitoring configurations encoded in ConfigMaps for their own, specific dashboards, alerts and other supported assets and integrate with it. As with other Gardener resources, they will be continuously reconciled. The extensions can also deploy directly fluent-operator custom resources which will be created in the seed cluster and plugged into the fluent-bit instance.
This guide is about the roles and extensibility options of the logging and monitoring stack components, and how to integrate extensions with:
Monitoring
Seed Cluster
Cache Prometheus
The central Prometheus instance in the garden namespace (called “cache Prometheus”) fetches metrics and data from all seed cluster nodes and all seed cluster pods.
It uses the federation concept to allow the shoot-specific instances to scrape only the metrics for the pods of the control plane they are responsible for.
This mechanism allows to scrape the metrics for the nodes/pods once for the whole cluster, and to have them distributed afterwards.
For more details, continue reading here.
Typically, this is not necessary, but in case an extension wants to extend the configuration for this cache Prometheus, they can create the prometheus-operator’s custom resources and label them with prometheus=cache, for example:
apiVersion: monitoring.coreos.com/v1
kind: ServiceMonitor
metadata:
labels:
prometheus: cache
name: cache-my-component
namespace: garden
spec:
selector:
matchLabels:
app: my-component
endpoints:
- metricRelabelings:
- action: keep
regex: ^(metric1|metric2|...)$
sourceLabels:
- __name__
port: metrics
Seed Prometheus
Another Prometheus instance in the garden namespace (called “seed Prometheus”) fetches metrics and data from seed system components, kubelets, cAdvisors, and extensions.
If you want your extension pods to be scraped then they must be annotated with prometheus.io/scrape=true and prometheus.io/port=<metrics-port>.
For more details, continue reading here.
Typically, this is not necessary, but in case an extension wants to extend the configuration for this seed Prometheus, they can create the prometheus-operator’s custom resources and label them with prometheus=seed, for example:
apiVersion: monitoring.coreos.com/v1
kind: ServiceMonitor
metadata:
labels:
prometheus: seed
name: seed-my-component
namespace: garden
spec:
selector:
matchLabels:
app: my-component
endpoints:
- metricRelabelings:
- action: keep
regex: ^(metric1|metric2|...)$
sourceLabels:
- __name__
port: metrics
Aggregate Prometheus
Another Prometheus instance in the garden namespace (called “aggregate Prometheus”) stores pre-aggregated data from the cache Prometheus and shoot Prometheus.
An ingress exposes this Prometheus instance allowing it to be scraped from another cluster.
For more details, continue reading here.
Typically, this is not necessary, but in case an extension wants to extend the configuration for this aggregate Prometheus, they can create the prometheus-operator’s custom resources and label them with prometheus=aggregate, for example:
apiVersion: monitoring.coreos.com/v1
kind: ServiceMonitor
metadata:
labels:
prometheus: aggregate
name: aggregate-my-component
namespace: garden
spec:
selector:
matchLabels:
app: my-component
endpoints:
- metricRelabelings:
- action: keep
regex: ^(metric1|metric2|...)$
sourceLabels:
- __name__
port: metrics
Plutono
A Plutono instance is deployed by gardenlet into the seed cluster’s garden namespace for visualizing monitoring metrics and logs via dashboards.
In order to provide custom dashboards, create a ConfigMap in the garden namespace labelled with dashboard.monitoring.gardener.cloud/seed=true that contains the respective JSON documents, for example:
apiVersion: v1
kind: ConfigMap
metadata:
labels:
dashboard.monitoring.gardener.cloud/seed: "true"
name: extension-foo-my-custom-dashboard
namespace: garden
data:
my-custom-dashboard.json: <dashboard-JSON-document>
Shoot Cluster
Shoot Prometheus
The shoot-specific metrics are then made available to operators and users in the shoot Plutono, using the shoot Prometheus as data source.
Extension controllers might deploy components as part of their reconciliation next to the shoot’s control plane. Examples for this would be a cloud-controller-manager or CSI controller deployments. Extensions that want to have their managed control plane components integrated with monitoring can contribute their per-shoot configuration for scraping Prometheus metrics, Alertmanager alerts or Plutono dashboards.
Extensions Monitoring Integration
In case an extension wants to extend the configuration for the shoot Prometheus, they can create the prometheus-operator’s custom resources and label them with prometheus=shoot.
ServiceMonitor
When the component runs in the seed cluster (e.g., as part of the shoot control plane), ServiceMonitor resources should be used:
apiVersion: monitoring.coreos.com/v1
kind: ServiceMonitor
metadata:
labels:
prometheus: shoot
name: shoot-my-controlplane-component
namespace: shoot--foo--bar
spec:
selector:
matchLabels:
app: my-component
endpoints:
- metricRelabelings:
- action: keep
regex: ^(metric1|metric2|...)$
sourceLabels:
- __name__
port: metrics
In case HTTPS scheme is used, the CA certificate should be provided like this:
spec:
scheme: HTTPS
tlsConfig:
ca:
secret:
name: <name-of-ca-bundle-secret>
key: bundle.crt
In case the component requires credentials when contacting its metrics endpoint, provide them like this:
spec:
authorization:
credentials:
name: <name-of-secret-containing-credentials>
key: <data-keyin-secret>
If the component delegates authorization to the kube-apiserver of the shoot cluster, you can use the shoot-access-prometheus-shoot secret:
spec:
authorization:
credentials:
name: shoot-access-prometheus-shoot
key: token
# in case the component's server certificate is signed by the cluster CA:
scheme: HTTPS
tlsConfig:
ca:
secret:
name: <name-of-ca-bundle-secret>
key: bundle.crt
ScrapeConfigs
If the component runs in the shoot cluster itself, metrics are scraped via the kube-apiserver proxy.
In this case, Prometheus needs to authenticate itself with the API server.
This can be done like this:
apiVersion: monitoring.coreos.com/v1alpha1
kind: ScrapeConfig
metadata:
labels:
prometheus: shoot
name: shoot-my-cluster-component
namespace: shoot--foo--bar
spec:
authorization:
credentials:
name: shoot-access-prometheus-shoot
key: token
scheme: HTTPS
tlsConfig:
ca:
secret:
name: <name-of-ca-bundle-secret>
key: bundle.crt
kubernetesSDConfigs:
- apiServer: https://kube-apiserver
authorization:
credentials:
name: shoot-access-prometheus-shoot
key: token
followRedirects: true
namespaces:
names:
- kube-system
role: endpoints
tlsConfig:
ca:
secret:
name: <name-of-ca-bundle-secret>
key: bundle.crt
cert: {}
metricRelabelings:
- sourceLabels:
- __name__
action: keep
regex: ^(metric1|metric2)$
- sourceLabels:
- namespace
action: keep
regex: kube-system
relabelings:
- action: replace
replacement: my-cluster-component
targetLabel: job
- sourceLabels: [__meta_kubernetes_service_name, __meta_kubernetes_pod_container_port_name]
separator: ;
regex: my-component-service;metrics
replacement: $1
action: keep
- sourceLabels: [__meta_kubernetes_endpoint_node_name]
separator: ;
regex: (.*)
targetLabel: node
replacement: $1
action: replace
- sourceLabels: [__meta_kubernetes_pod_name]
separator: ;
regex: (.*)
targetLabel: pod
replacement: $1
action: replace
- targetLabel: __address__
replacement: kube-apiserver:443
- sourceLabels: [__meta_kubernetes_pod_name, __meta_kubernetes_pod_container_port_number]
separator: ;
regex: (.+);(.+)
targetLabel: __metrics_path__
replacement: /api/v1/namespaces/kube-system/pods/${1}:${2}/proxy/metrics
action: replace
Tip
Developers can make use of the
pkg/component/observability/monitoring/prometheus/shoot.ClusterComponentScrapeConfigSpecfunction in order to generate aScrapeConfiglike above.
PrometheusRule
Similar to ServiceMonitors, PrometheusRules can be created with the prometheus=shoot label:
apiVersion: monitoring.coreos.com/v1
kind: PrometheusRule
metadata:
labels:
prometheus: shoot
name: shoot-my-component
namespace: shoot--foo--bar
spec:
groups:
- name: my.rules
rules:
# ...
Plutono Dashboards
A Plutono instance is deployed by gardenlet into the shoot cluster’s namespace for visualizing monitoring metrics and logs via dashboards.
In order to provide custom dashboards, create a ConfigMap in the shoot cluster’s namespace labelled with dashboard.monitoring.gardener.cloud/shoot=true that contains the respective JSON documents, for example:
apiVersion: v1
kind: ConfigMap
metadata:
labels:
dashboard.monitoring.gardener.cloud/shoot: "true"
name: extension-foo-my-custom-dashboard
namespace: shoot--project--name
data:
my-custom-dashboard.json: <dashboard-JSON-document>
Logging
In Kubernetes clusters, container logs are non-persistent and do not survive stopped and destroyed containers. Gardener addresses this problem for the components hosted in a seed cluster by introducing its own managed logging solution. It is integrated with the Gardener monitoring stack to have all troubleshooting context in one place.

Gardener logging consists of components in three roles - log collectors and forwarders, log persistency and exploration/consumption interfaces. All of them live in the seed clusters in multiple instances:
- Logs are persisted by Vali instances deployed as StatefulSets - one per shoot namespace, if the logging is enabled in the
gardenletconfiguration (logging.enabled) and the shoot purpose is nottesting, and one in thegardennamespace. The shoot instances store logs from the control plane components hosted there. ThegardenVali instance is responsible for logs from the rest of the seed namespaces -kube-system,garden,extension-*, and others. - Fluent-bit DaemonSets deployed by the fluent-operator on each seed node collect logs from it. A custom plugin takes care to distribute the collected log messages to the Vali instances that they are intended for. This allows to fetch the logs once for the whole cluster, and to distribute them afterwards.
- Plutono is the UI component used to explore monitoring and log data together for easier troubleshooting and in context. Plutono instances are configured to use the corresponding Vali instances, sharing the same namespace as data providers. There is one Plutono Deployment in the
gardennamespace and one Deployment per shoot namespace (exposed to the end users and to the operators).
Logs can be produced from various sources, such as containers or systemd, and in different formats. The fluent-bit design supports configurable data pipeline to address that problem. Gardener provides such configuration for logs produced by all its core managed components as ClusterFilters and ClusterParsers . Extensions can contribute their own, specific configurations as fluent-operator custom resources too. See for example the logging configuration for the Gardener AWS provider extension.
Fluent-bit Log Parsers and Filters
To integrate with Gardener logging, extensions can and should specify how fluent-bit will handle the logs produced by the managed components that they contribute to Gardener. Normally, that would require to configure a parser for the specific logging format, if none of the available is applicable, and a filter defining how to apply it. For a complete reference for the configuration options, refer to fluent-bit’s documentation.
To contribute its own configuration to the fluent-bit agents data pipelines, an extension must deploy a fluent-operator custom resource labeled with fluentbit.gardener/type: seed in the seed cluster.
Note: Take care to provide the correct data pipeline elements in the corresponding fields and not to mix them.
Example: Logging configuration for provider-specific cloud-controller-manager deployed into shoot namespaces that reuses the kube-apiserver-parser defined in logging.go to parse the component logs:
apiVersion: fluentbit.fluent.io/v1alpha2
kind: ClusterFilter
metadata:
labels:
fluentbit.gardener/type: "seed"
name: cloud-controller-manager-aws-cloud-controller-manager
spec:
filters:
- parser:
keyName: log
parser: kube-apiserver-parser
reserveData: true
match: kubernetes.*cloud-controller-manager*aws-cloud-controller-manager*
Further details how to define parsers and use them with examples can be found in the following guide.
Plutono
The two types of Plutono instances found in a seed cluster are configured to expose logs of different origin in their dashboards:
- Garden Plutono dashboards expose logs from non-shoot namespaces of the seed clusters
- Shoot Plutono dashboards expose logs from the shoot cluster namespace where they belong
- Kube Apiserver
- Kube Controller Manager
- Kube Scheduler
- Cluster Autoscaler
- VPA components
- Kubernetes Pods
If the type of logs exposed in the Plutono instances needs to be changed, it is necessary to update the corresponding instance dashboard configurations.
Tips
- Be careful to create
ClusterFiltersandClusterParserswith unique names because they are not namespaced. We usepod_namefor filters with one container andpod_name--container_namefor pods with multiple containers. - Be careful to match exactly the log names that you need for a particular parser in your filters configuration. The regular expression you will supply will match names in the form
kubernetes.pod_name.<metadata>.container_name. If there are extensions with the same container and pod names, they will all match the same parser in a filter. That may be a desired effect, if they all share the same log format. But it will be a problem if they don’t. To solve it, either the pod or container names must be unique, and the regular expression in the filter has to match that unique pattern. A recommended approach is to prefix containers with the extension name and tune the regular expression to match it. For example, usingmyextension-containeras container name and a regular expressionkubernetes.mypod.*myextension-containerwill guarantee match of the right log name. Make sure that the regular expression does not match more than you expect. For example,kubernetes.systemd.*systemd.*will match bothsystemd-serviceandsystemd-monitor-service. You will want to be as specific as possible. - It’s a good idea to put the logging configuration into the Helm chart that also deploys the extension controller, while the monitoring configuration can be part of the Helm chart/deployment routine that deploys the component managed by the controller.
- For monitoring to work in the Gardener context, scrape targets need to be labelled appropriately, see
NetworkPolicys In Garden, Seed, Shoot Clusters for details.
References and Additional Resources
4.5.10 - Managedresources
Deploy Resources to the Shoot Cluster
We have introduced a component called gardener-resource-manager that is deployed as part of every shoot control plane in the seed.
One of its tasks is to manage CRDs, so called ManagedResources.
Managed resources contain Kubernetes resources that shall be created, reconciled, updated, and deleted by the gardener-resource-manager.
Extension controllers may create these ManagedResources in the shoot namespace if they need to create any resource in the shoot cluster itself, for example RBAC roles (or anything else).
Where can I find more examples and more information how to use ManagedResources?
Please take a look at the respective documentation.
4.5.11 - Migration
Control Plane Migration
Control Plane Migration is a new Gardener feature that has been recently implemented as proposed in GEP-7 Shoot Control Plane Migration. It should be properly supported by all extensions controllers. This document outlines some important points that extension maintainers should keep in mind to properly support migration in their extensions.
Overall Principles
The following principles should always be upheld:
- All states maintained by the extension that is external from the seed cluster, for example infrastructure resources in a cloud provider, DNS entries, etc., should be kept during the migration. No such state should be deleted and then recreated, as this might cause disruption in the availability of the shoot cluster.
- All Kubernetes resources maintained by the extension in the shoot cluster itself should also be kept during the migration. No such resources should be deleted and then recreated.
Migrate and Restore Operations
Two new operations have been introduced in Gardener. They can be specified as values of the gardener.cloud/operation annotation on an extension resource to indicate that an operation different from a normal reconcile should be performed by the corresponding extension controller:
- The
migrateoperation is used to ask the extension controller in the source seed to stop reconciling extension resources (in case they are requeued due to errors) and perform cleanup activities, if such are required. These cleanup activities might involve removing finalizers on resources in the shoot namespace that have been previously created by the extension controller and deleting them without actually deleting any resources external to the seed cluster. This is also the last opportunity for extensions to persist their state into the.status.statefield of the reconciled extension resource before its restored in the new destination seed cluster. - The
restoreoperation is used to ask the extension controller in the destination seed to restore any state saved in the extension resourcestatus, before performing the actual reconciliation.
Unlike the reconcile operation, extension controllers must remove the gardener.cloud/operation annotation at the end of a successful reconciliation when the current operation is migrate or restore, not at the beginning of a reconciliation.
Cleaning-Up Source Seed Resources
All resources in the source seed that have been created by an extension controller, for example secrets, config maps, managed resources, etc., should be properly cleaned up by the extension controller when the current operation is migrate. As mentioned above, such resources should be deleted without actually deleting any resources external to the seed cluster.
There is one exception to this: Secrets labeled with persist=true created via the secrets manager. They should be kept (i.e., the Cleanup function of secrets manager should not be called) and will be garbage collected automatically at the end of the migrate operation. This ensures that they can be properly persisted in the ShootState resource and get restored on the new destination seed cluster.
For many custom resources, for example MCM resources, the above requirement means in practice that any finalizers should be removed before deleting the resource, in addition to ensuring that the resource deletion is not reconciled by its respective controller if there is no finalizer. For managed resources, the above requirement means in practice that the spec.keepObjects field should be set to true before deleting the extension resource.
Here it is assumed that any resources that contain state needed by the extension controller can be safely deleted, since any such state has been saved as described in Saving and Restoring Extension States at the end of the last successful reconciliation.
Saving and Restoring Extension States
Some extension controllers create and maintain their own state when reconciling extension resources. For example, most infrastructure controllers use Terraform and maintain the terraform state in a special config map in the shoot namespace. This state must be properly migrated to the new seed cluster during control plane migration, so that subsequent reconciliations in the new seed could find and use it appropriately.
All extension controllers that require such state migration must save their state in the status.state field of their extension resource at the end of a successful reconciliation. They must also restore their state from that same field upon reconciling an extension resource when the current operation is restore, as specified by the gardener.cloud/operation annotation, before performing the actual reconciliation.
As an example, an infrastructure controller that uses Terraform must save the terraform state in the status.state field of the Infrastructure resource. An Infrastructure resource with a properly saved state might look as follows:
apiVersion: extensions.gardener.cloud/v1alpha1
kind: Infrastructure
metadata:
name: infrastructure
namespace: shoot--foo--bar
spec:
type: azure
region: eu-west-1
secretRef:
name: cloudprovider
namespace: shoot--foo--bar
providerConfig:
apiVersion: azure.provider.extensions.gardener.cloud/v1alpha1
kind: InfrastructureConfig
resourceGroup:
name: mygroup
...
status:
state: |
{
"version": 3,
"terraform_version": "0.11.14",
"serial": 2,
"lineage": "3a1e2faa-e7b6-f5f0-5043-368dd8ea6c10",
...
}
Extension controllers that do not use a saved state and therefore do not require state migration could leave the status.state field as nil at the end of a successful reconciliation, and just perform a normal reconciliation when the current operation is restore.
In addition, extension controllers that use referenced resources (usually secrets) must also make sure that these resources are added to the status.resources field of their extension resource at the end of a successful reconciliation, so they could be properly migrated by Gardener to the destination seed.
Implementation Details
Migrate and Restore Actuator Methods
Most extension controller implementations follow a common pattern where a generic Reconciler implementation delegates to an Actuator interface that contains the methods Reconcile and Delete, provided by the extension.
Two methods Migrate and Restore are available in all such Actuator interfaces, see the infrastructure Actuator interface as an example.
These methods are called by the generic reconcilers for the migrate and restore operations respectively, and should be implemented by the extension according to the above guidelines.
Extension Controllers Based on Generic Actuators
In practice, the implementation of many extension controllers (for example, the ControlPlane and Worker controllers in most provider extensions) are based on a generic Actuator implementation that only delegates to extension methods for behavior that is truly provider specific.
In all such cases, the Migrate and Restore methods have already been implemented properly in the generic actuators and there is nothing more to do in the extension itself.
In some rare cases, extension controllers based on a generic actuator might still introduce a custom Actuator implementation to override some of the generic actuator methods in order to enhance or change their behavior in a certain way.
In such cases, the Migrate and Restore methods might need to be overridden as well, see the Azure controlplane controller as an example.
Worker State
Note that the machine state is handled specially by gardenlet (i.e., all relevant objects in the machine.sapcloud.io/v1alpha1 API are directly persisted by gardenlet and NOT by the generic actuators).
In the past, they were persisted to the Worker’s .status.state field by the so-called “worker state reconciler”, however, this reconciler was dropped and changed as part of GEP-22.
Nowadays, gardenlet directly writes the state to the ShootState resource during the Migrate phase of a Shoot (without the detour of the Worker’s .status.state field).
On restoration, unlike for other extension kinds, gardenlet no longer populates the machine state into the Worker’s .status.state field.
Instead, the extension controller should read the machine state directly from the ShootState in the garden cluster (see this document for information how to access the garden cluster) and use it to subsequently restore the relevant machine.sapcloud.io/v1alpha1 resources.
This flow is implemented in the generic Worker actuator.
As a result, Extension controllers using this generic actuator do not need to implement any custom logic.
Extension Controllers Not Based on Generic Actuators
The implementation of some extension controllers (for example, the infrastructure controllers in all provider extensions) are not based on a generic Actuator implementation.
Such extension controllers must always provide a proper implementation of the Migrate and Restore methods according to the above guidelines, see the AWS infrastructure controller as an example.
In practice, this might result in code duplication between the different extensions, since the Migrate and Restore code is usually not provider or OS-specific.
If you do not use the generic
Workeractuator, see this section for information how to handle the machine state related to theWorkerresource.
4.5.12 - Project Roles
Extending Project Roles
The Project resource allows to specify a list of roles for every member (.spec.members[*].roles).
There are a few standard roles defined by Gardener itself.
Please consult Projects for further information.
However, extension controllers running in the garden cluster may also create CustomResourceDefinitions that project members might be able to CRUD.
For this purpose, Gardener also allows to specify extension roles.
An extension role is prefixed with extension:, e.g.
apiVersion: core.gardener.cloud/v1beta1
kind: Project
metadata:
name: dev
spec:
members:
- apiGroup: rbac.authorization.k8s.io
kind: User
name: alice.doe@example.com
role: admin
roles:
- owner
- extension:foo
The project controller will, for every extension role, create a ClusterRole with name gardener.cloud:extension:project:<projectName>:<roleName>, i.e., for the above example: gardener.cloud:extension:project:dev:foo.
This ClusterRole aggregates other ClusterRoles that are labeled with rbac.gardener.cloud/aggregate-to-extension-role=foo which might be created by extension controllers.
An extension that might want to contribute to the core admin or viewer roles can use the labels rbac.gardener.cloud/aggregate-to-project-member=true or rbac.gardener.cloud/aggregate-to-project-viewer=true, respectively.
Please note that the names of the extension roles are restricted to 20 characters!
Moreover, the project controller will also create a corresponding RoleBinding with the same name in the project namespace.
It will automatically assign all members that are assigned to this extension role.
4.5.13 - Provider Local
Local Provider Extension
The “local provider” extension is used to allow the usage of seed and shoot clusters which run entirely locally without any real infrastructure or cloud provider involved. It implements Gardener’s extension contract (GEP-1) and thus comprises several controllers and webhooks acting on resources in seed and shoot clusters.
The code is maintained in pkg/provider-local.
Motivation
The motivation for maintaining such extension is the following:
- 🛡 Output Qualification: Run fast and cost-efficient end-to-end tests, locally and in CI systems (increased confidence ⛑ before merging pull requests)
- ⚙️ Development Experience: Develop Gardener entirely on a local machine without any external resources involved (improved costs 💰 and productivity 🚀)
- 🤝 Open Source: Quick and easy setup for a first evaluation of Gardener and a good basis for first contributions
Current Limitations
The following enlists the current limitations of the implementation. Please note that all of them are not technical limitations/blockers, but simply advanced scenarios that we haven’t had invested yet into.
No load balancers for Shoot clusters.
We have not yet developed a
cloud-controller-managerwhich could reconcile load balancerServices in the shoot cluster.In case a seed cluster with multiple availability zones, i.e. multiple entries in
.spec.provider.zones, is used in conjunction with a single-zone shoot control plane, i.e. a shoot cluster without.spec.controlPlane.highAvailabilityor with.spec.controlPlane.highAvailability.failureTolerance.typeset tonode, the local address of the API server endpoint needs to be determined manually or via the in-clustercoredns.As the different istio ingress gateway loadbalancers have individual external IP addresses, single-zone shoot control planes can end up in a random availability zone. Having the local host use the
corednsin the cluster as name resolver would form a name resolution cycle. The tests mitigate the issue by adapting the DNS configuration inside the affected test.
ManagedSeeds
It is possible to deploy ManagedSeeds with provider-local by first creating a Shoot in the garden namespace and then creating a referencing ManagedSeed object.
Please note that this is only supported by the
Skaffold-based setup.
The corresponding e2e test can be run via:
./hack/test-e2e-local.sh --label-filter "ManagedSeed"
Implementation Details
The images locally built by Skaffold for the Gardener components which are deployed to this shoot cluster are managed by a container registry in the registry namespace in the kind cluster.
provider-local configures this registry as mirror for the shoot by mutating the OperatingSystemConfig and using the default contract for extending the containerd configuration.
In order to bootstrap a seed cluster, the gardenlet deploys PersistentVolumeClaims and Services of type LoadBalancer.
While storage is supported in shoot clusters by using the local-path-provisioner, load balancers are not supported yet.
However, provider-local runs a Service controller which specifically reconciles the seed-related Services of type LoadBalancer.
This way, they get an IP and gardenlet can finish its bootstrapping process.
Note that these IPs are not reachable, however for the sake of developing ManagedSeeds this is sufficient for now.
Also, please note that the provider-local extension only gets deployed because of the Always deployment policy in its corresponding ControllerRegistration and because the DNS provider type of the seed is set to local.
Implementation Details
This section contains information about how the respective controllers and webhooks in provider-local are implemented and what their purpose is.
Bootstrapping
The Helm chart of the provider-local extension defined in its Extension contains a special deployment for a CoreDNS instance in a gardener-extension-provider-local-coredns namespace in the seed cluster.
This CoreDNS instance is responsible for enabling the components running in the shoot clusters to be able to resolve the DNS names when they communicate with their kube-apiservers.
It contains a static configuration to resolve the DNS names based on local.gardener.cloud to istio-ingressgateway.istio-ingress.svc.
Controllers
There are controllers for all resources in the extensions.gardener.cloud/v1alpha1 API group except for BackupBucket and BackupEntrys.
ControlPlane
This controller is deploying the local-path-provisioner as well as a related StorageClass in order to support PersistentVolumeClaims in the local shoot cluster.
Additionally, it creates a few (currently unused) dummy secrets (CA, server and client certificate, basic auth credentials) for the sake of testing the secrets manager integration in the extensions library.
DNSRecord
The controller adapts the cluster internal DNS configuration by extending the coredns configuration for every observed DNSRecord. It will add two corresponding entries in the custom DNS configuration per shoot cluster:
data:
api.local.local.external.local.gardener.cloud.override: |
rewrite stop name regex api.local.local.external.local.gardener.cloud istio-ingressgateway.istio-ingress.svc.cluster.local answer auto
api.local.local.internal.local.gardener.cloud.override: |
rewrite stop name regex api.local.local.internal.local.gardener.cloud istio-ingressgateway.istio-ingress.svc.cluster.local answer auto
Infrastructure
This controller generates a NetworkPolicy which allows the control plane pods (like kube-apiserver) to communicate with the worker machine pods (see Worker section).
It also deploys a NetworkPolicy which allows the bastion pods to communicate with the worker machine pods (see Bastion section).
Network
This controller is not implemented anymore. In the initial version of provider-local, there was a Network controller deploying kindnetd (see release v1.44.1).
However, we decided to drop it because this setup prevented us from using NetworkPolicys (kindnetd does not ship a NetworkPolicy controller).
In addition, we had issues with shoot clusters having more than one node (hence, we couldn’t support rolling updates, see PR #5666).
OperatingSystemConfig
This controller renders a simple cloud-init template which can later be executed by the shoot worker nodes.
The shoot worker nodes are Pods with a container based on the kindest/node image. This is maintained in the gardener/machine-controller-manager-provider-local repository and has a special run-userdata systemd service which executes the cloud-init generated earlier by the OperatingSystemConfig controller.
Worker
This controller leverages the standard generic Worker actuator in order to deploy the machine-controller-manager as well as the machine-controller-manager-provider-local.
Additionally, it generates the MachineClasses and the MachineDeployments based on the specification of the Worker resources.
Bastion
This controller implements the Bastion.extensions.gardener.cloud resource by deploying a pod with the local machine image along with a LoadBalancer service.
Note that this controller does not respect the Bastion.spec.ingress configuration as there is no way to perform client IP restrictions in the local setup.
Ingress
The gardenlet creates a wildcard DNS record for the Seed’s ingress domain pointing to the nginx-ingress-controller’s LoadBalancer.
This domain is commonly used by all Ingress objects created in the Seed for Seed and Shoot components.
As provider-local implements the DNSRecord extension API (see the DNSRecordsection), this controller reconciles all Ingresss and creates DNSRecords of type local for each host included in spec.rules.
This only happens for shoot namespaces (gardener.cloud/role=shoot label) to make Ingress domains resolvable on the machine pods.
Service
This controller reconciles Services of type LoadBalancer in the local Seed cluster.
Since the local Kubernetes clusters used as Seed clusters typically don’t support such services, this controller sets the .status.ingress.loadBalancer.ip[0] to the IP of the host.
It makes important LoadBalancer Services (e.g. istio-ingress/istio-ingressgateway and shoot--*--*/bastion-*) available to the host by setting spec.ports[].nodePort to well-known ports that are mapped to hostPorts in the kind cluster configuration.
istio-ingress/istio-ingressgateway is set to be exposed on nodePort 30433 by this controller.
The bastion services are exposed on nodePort 30022.
In case the seed has multiple availability zones (.spec.provider.zones) and it uses SNI, the different zone-specific istio-ingressgateway loadbalancers are exposed via different IP addresses. Per default, IP addresses 172.18.255.10, 172.18.255.11, and 172.18.255.12 are used for the zones 0, 1, and 2 respectively.
ETCD Backups
This controller reconciles the BackupBucket and BackupEntry of the shoot allowing the etcd-backup-restore to create and copy backups using the local provider functionality. The backups are stored on the host file system. This is achieved by mounting that directory to the etcd-backup-restore container.
Extension Seed
This controller reconciles Extensions of type local-ext-seed. It creates a single serviceaccount named local-ext-seed in the shoot’s namespace in the seed. The extension is reconciled before the kube-apiserver. More on extension lifecycle strategies can be read in Registering Extension Controllers.
Extension Shoot
This controller reconciles Extensions of type local-ext-shoot. It creates a single serviceaccount named local-ext-shoot in the kube-system namespace of the shoot. The extension is reconciled after the kube-apiserver. More on extension lifecycle strategies can be read Registering Extension Controllers.
Extension Shoot After Worker
This controller reconciles Extensions of type local-ext-shoot-after-worker. It creates a deployment named local-ext-shoot-after-worker in the kube-system namespace of the shoot. The extension is reconciled after the workers and waits until the deployment is ready. More on extension lifecycle strategies can be read Registering Extension Controllers.
Health Checks
The health check controller leverages the health check library in order to:
- check the health of the
ManagedResource/extension-controlplane-shoot-webhooksand populate theSystemComponentsHealthycondition in theControlPlaneresource. - check the health of the
ManagedResource/extension-networking-localand populate theSystemComponentsHealthycondition in theNetworkresource. - check the health of the
ManagedResource/extension-worker-mcm-shootand populate theSystemComponentsHealthycondition in theWorkerresource. - check the health of the
Deployment/machine-controller-managerand populate theControlPlaneHealthycondition in theWorkerresource. - check the health of the
Nodes and populate theEveryNodeReadycondition in theWorkerresource.
Webhooks
Control Plane
This webhook reacts on the OperatingSystemConfig containing the configuration of the kubelet and sets the failSwapOn to false (independent of what is configured in the Shoot spec) (ref).
DNS Config
This webhook reacts on events for the dependency-watchdog-probe Deployment, the blackbox-exporter Deployment, as well as on events for Pods created when the machine-controller-manager reconciles Machines.
All these pods need to be able to resolve the DNS names for shoot clusters.
It sets the .spec.dnsPolicy=None and .spec.dnsConfig.nameServers to the cluster IP of the coredns Service created in the gardener-extension-provider-local-coredns namespaces so that these pods can resolve the DNS records for shoot clusters (see the Bootstrapping section for more details).
Machine Controller Manager
This webhook mutates the global ClusterRole related to machine-controller-manager and injects permissions for Service resources.
The machine-controller-manager-provider-local deploys Pods for each Machine (while real infrastructure provider obviously deploy VMs, so no Kubernetes resources directly).
It also deploys a Service for these machine pods, and in order to do so, the ClusterRole must allow the needed permissions for Service resources.
Node
This webhook reacts on updates to nodes/status in both seed and shoot clusters and sets the .status.{allocatable,capacity}.cpu="100" and .status.{allocatable,capacity}.memory="100Gi" fields.
Background: Typically, the .status.{capacity,allocatable} values are determined by the resources configured for the Docker daemon (see for example the docker Quick Start Guide for Mac).
Since many of the Pods deployed by Gardener have quite high .spec.resources.requests, the Nodes easily get filled up and only a few Pods can be scheduled (even if they barely consume any of their reserved resources).
In order to improve the user experience, on startup/leader election the provider-local extension submits an empty patch which triggers the “node webhook” (see the below section) for the seed cluster.
The webhook will increase the capacity of the Nodes to allow all Pods to be scheduled.
For the shoot clusters, this empty patch trigger is not needed since the MutatingWebhookConfiguration is reconciled by the ControlPlane controller and exists before the Node object gets registered.
Shoot
This webhook reacts on the ConfigMap used by the kube-proxy and sets the maxPerCore field to 0 since other values don’t work well in conjunction with the kindest/node image which is used as base for the shoot worker machine pods (ref).
DNS Configuration for Multi-Zonal Seeds
In case a seed cluster has multiple availability zones as specified in .spec.provider.zones, multiple istio ingress gateways are deployed, one per availability zone in addition to the default deployment. The result is that single-zone shoot control planes, i.e. shoot clusters with .spec.controlPlane.highAvailability set or with .spec.controlPlane.highAvailability.failureTolerance.type set to node, may be exposed via any of the zone-specific istio ingress gateways. Previously, the endpoints were statically mapped via /etc/hosts. Unfortunately, this is no longer possible due to the aforementioned dynamic in the endpoint selection.
For multi-zonal seed clusters, there is an additional configuration following coredns’s view plugin mapping the external IP addresses of the zone-specific loadbalancers to the corresponding internal istio ingress gateway domain names. This configuration is only in place for requests from outside of the seed cluster. Those requests are currently being identified by the protocol. UDP requests are interpreted as originating from within the seed cluster while TCP requests are assumed to come from outside the cluster via the docker hostport mapping.
The corresponding test sets the DNS configuration accordingly so that the name resolution during the test use coredns in the cluster.
machine-controller-manager-provider-local
Out of tree (controller-based) implementation for local as a new provider.
The local out-of-tree provider implements the interface defined at MCM OOT driver.
Fundamental Design Principles
Following are the basic principles kept in mind while developing the external plugin.
- Communication between this Machine Controller (MC) and Machine Controller Manager (MCM) is achieved using the Kubernetes native declarative approach.
- Machine Controller (MC) behaves as the controller used to interact with the
localprovider and manage the VMs corresponding to the machine objects. - Machine Controller Manager (MCM) deals with higher level objects such as machine-set and machine-deployment objects.
Future Work
Future work could mostly focus on resolving the above listed limitations, i.e.:
- Implement a
cloud-controller-managerand deploy it via theControlPlanecontroller. - Properly implement
.spec.machineTypesin theCloudProfiles (i.e., configure.spec.resourcesproperly for the created shoot worker machine pods).
4.5.14 - Reconcile Trigger
Reconcile Trigger
Gardener dictates the time of reconciliation for resources of the API group extensions.gardener.cloud.
It does that by annotating the respected resource with gardener.cloud/operation=reconcile.
Extension controllers shall react to this annotation and start reconciling the resource.
They have to remove this annotation as soon as they begin with their reconcile operation and maintain the status of the extension resource accordingly.
The reason for this behaviour is that it is possible to configure Gardener to reconcile only in the shoots’ maintenance time windows. In order to avoid that, extension controllers reconcile outside of the shoot’s maintenance time window we have introduced this contract. This way extension controllers don’t need to care about when the shoot maintenance time window happens. Gardener keeps control and decides when the shoot shall be reconciled/updated.
Our extension controller library provides all the required utilities to conveniently implement this behaviour.
4.5.15 - Referenced Resources
Referenced Resources
Shoots and Seeds can include a list of resources (usually secrets) that can be referenced by name in the extension providerConfig and other Shoot sections, for example:
kind: Shoot
apiVersion: core.gardener.cloud/v1beta1
metadata:
name: crazy-botany
namespace: garden-dev
...
spec:
...
extensions:
- type: foobar
providerConfig:
apiVersion: foobar.extensions.gardener.cloud/v1alpha1
kind: FooBarConfig
foo: bar
secretRef: foobar-secret
resources:
- name: foobar-secret
resourceRef:
apiVersion: v1
kind: Secret
name: my-foobar-secret
Gardener expects these referenced resources to be located in the project namespace (e.g., garden-dev) for Shoots and in the garden namespace for Seeds.
Seed resources are copied to the garden namespace in the seed cluster, while Shoot resources are copied to the control-plane namespace in the shoot cluster.
To avoid conflicts with other resources in the shoot, all resources in the seed are prefixed with a static value.
Extension controllers can resolve the references to these resources by accessing the Shoot via the Cluster resource. To properly read a referenced resources, extension controllers should use the utility function GetObjectByReference from the extensions/pkg/controller package, for example:
...
ref = &autoscalingv1.CrossVersionObjectReference{
APIVersion: "v1",
Kind: "Secret",
Name: "foo",
}
secret := &corev1.Secret{}
if err := controller.GetObjectByReference(ctx, client, ref, "shoot--test--foo", secret); err != nil {
return err
}
// Use secret
...
4.5.16 - Registering Extension Controllers
Registering Extension Controllers
Before Gardener can manage shoot clusters, it needs to know which required and optional extensions are available in the landscape. The following sections explain the general registration process for extensions.
Extensions
The registration starts by creating Extension resources in the garden runtime cluster.
They represent the single source for all deployment aspects an extension may offer (garden, seed, shoot, admission).
The gardener-operator takes these resources to deploy the extension controllers to the garden runtime cluster, as well as creating corresponding ControllerRegistration and ControllerDeployment resources in the virtual garden cluster.
Please see the following example of an Extension resource which mainly configures:
- The resource kinds and types the extension is responsible for
- A Reference the OCI Helm chart(s) for the extension admission and optional values
- A Reference the OCI Helm chart for the extension controller
- Optional values for the extension in the garden runtime cluster
- Optional values for the deployment in the seed clusters
apiVersion: operator.gardener.cloud/v1alpha1
kind: Extension
metadata:
name: provider-local
spec:
resources:
- kind: BackupBucket
type: local
- kind: BackupEntry
type: local
- kind: DNSRecord
type: local
- kind: Infrastructure
type: local
- kind: ControlPlane
type: local
- kind: Worker
type: local
deployment:
admission:
runtimeCluster:
helm:
ociRepository:
ref: registry.example.com/gardener/extensions/local/admission-runtime:v1.0.0
virtualCluster:
helm:
ociRepository:
ref: registry.example.com/gardener/extensions/local/adission-application:v1.0.0
values: {}
extension:
helm:
ociRepository:
ref: registry.example.com/gardener/extensions/local/extension:v1.0.0
values:
controllers:
dnsrecord:
concurrentSyncs: 20
runtimeClusterValues:
controllers:
dnsrecord:
concurrentSyncs: 1
Operators may use Extensions to observe their status conditions, regularly updated by gardener-operator.
They provide more information about whether an extension is currently in use and if their installation was successful.
status:
conditions:
- lastTransitionTime: "2025-03-12T13:46:51Z"
lastUpdateTime: "2025-03-12T13:46:51Z"
message: Extension required for kinds [DNSRecord]
reason: ExtensionRequired
status: "True"
type: RequiredRuntime
- lastTransitionTime: "2025-01-20T10:39:47Z"
lastUpdateTime: "2025-01-20T10:39:47Z"
message: Extension has required ControllerInstallations for seed clusters
reason: RequiredControllerInstallation
status: "True"
type: RequiredVirtual
- lastTransitionTime: "2025-04-03T06:42:37Z"
lastUpdateTime: "2025-04-03T06:42:37Z"
message: Extension has been reconciled successfully
reason: ReconcileSuccessful
status: "True"
type: Installed
ControllerRegistrations
In the virtual garden cluster, the native extension registration resource kinds are ControllerRegistration and ControllerDeployment.
These resources are usually created by the gardener-operator based on Extensions in the runtime cluster.
They provide the gardenlets in the seed clusters with information about which extensions are available and how to deploy them.
Note
Before gardener/gardener#9635, the only option to register extensions was via
ControllerRegistration/ControllerDeploymentresources. In the meantime, they became an implementation detail of the extension registration and should be treated as a gardener internal object. While it’s still possible to create them manually (withoutExtensions), operators should only consider this option for advanced use cases.
Once created, gardener evaluates the registrations and deployments and creates ControllerInstallation resources which describe the request “please install this controller X to this seed Y”.
The specification mainly describes which of Gardener’s extension CRDs are managed, for example:
apiVersion: core.gardener.cloud/v1
kind: ControllerDeployment
metadata:
name: provider-local
helm:
ociRepository:
ref: registry.example.com/gardener/extensions/local/extension:v1.0.0
values:
controllers:
dnsrecord:
concurrentSyncs: 20
---
apiVersion: core.gardener.cloud/v1beta1
kind: ControllerRegistration
metadata:
name: provider-local
spec:
deployment:
deploymentRefs:
- name: provider-local
resources:
- kind: BackupBucket
type: local
- kind: BackupEntry
type: local
- kind: DNSRecord
type: local
- kind: Infrastructure
type: local
- kind: ControlPlane
type: local
- kind: Worker
type: local
This information tells Gardener that there is an extension controller that can handle BackupBucket, BackupEntry, DNSRecord, Infrastructure, ControlPlane and Worker resources of type local.
A reference to the shown ControllerDeployment specifies how the deployment of the extension controller is accomplished.
Deploying Extension Controllers
In the garden runtime cluster gardener-operator deploys the extension controllers directly, as soon as it is considered as required.
Deployments in the seed clusters are represented by another resource called ControllerInstallation.
apiVersion: core.gardener.cloud/v1beta1
kind: ControllerInstallation
metadata:
name: provider-local
spec:
deploymentRef:
name: provider-local
registrationRef:
name: provider-local
seedRef:
name: local-1
This resource expresses that Gardener requires the provider-local extension controller to run on the local-1 seed cluster.
gardener-controller-manager automatically determines which extension controller is required on which seed cluster and will only create ControllerInstallation objects for those.
Also, it will automatically delete ControllerInstallations referencing extension controllers that are no longer required on a seed (e.g., because all shoots on it have been deleted).
There are additional configuration options, please see the Deployment Configuration Options section.
After gardener-controller-manager has written the ControllerInstallation resource, gardenlet picks it up and installs the controller on the respective Seed using the referenced ControllerDeployment.
Helm Charts
Extensions and ControllerDeployments both need to specify a reference to an OCI Helm chart that contains the extension controller.
Those charts are usually provided by the extension and allow their deployment to the garden runtime or seed clusters.
Note
Due to legacy reasons, a
ControllerDeploymentcan work with arawChartinstead of an OCI image reference. If your extension does not yet offer an OCI image, you may consider using this option as a temporary workaround. Please note, thatrawChartis not supported inExtensions and thus cannot be used for a deployment in the garden runtime cluster.
helm:
ociRepository:
# full ref with either tag or digest, or both
ref: registry.example.com/foo:1.0.0@sha256:abc
---
helm:
ociRepository:
# repository and tag
repository: registry.example.com
tag: 1.0.0
---
helm:
ociRepository:
# repository and digest
repository: registry.example.com
digest: sha256:abc
---
helm:
ociRepository:
# when specifying both tag and digest, the tag is ignored.
repository: registry.example.com
tag: 1.0.0
digest: sha256:abc
If needed, a pull secret can be referenced in the ControllerDeployment.helm.ociRepository.pullSecretRef field.
helm:
ociRepository:
repository: registry.example.com
tag: 1.0.0
pullSecretRef:
name: my-pull-secret
The pull secret must be available in the garden namespace of the cluster where the ControllerDeployment is created and must contain the data key .dockerconfigjson with the base64-encoded Docker configuration JSON.
---
apiVersion: v1
kind: Secret
metadata:
name: my-pull-secret
namespace: garden
labels:
gardener.cloud/role: helm-pull-secret
type: kubernetes.io/dockerconfigjson
data:
.dockerconfigjson: <base64-encoded-docker-config-json>
The downloaded chart is cached in memory. It is recommended to always specify a digest, because if it is not specified, the manifest is fetched in every reconciliation to compare the digest with the local cache.
Helm Values
No matter where the chart originates from, gardener-operator and gardenlet deploy it with the provided Helm values.
The chart and the values can be updated at any time - Gardener will recognize it and re-trigger the deployment process.
In order to allow extension controller deployments to get information about the garden and the seed cluster, additional properties are mixed into the values (root level) of every deployed Helm chart:
Additional properties for garden deployment
gardener: runtimeCluster: enabled: true priorityClassName: <priority-class-name-for-extension>Additional properties for seed deployment
gardener: version: <gardener-version> garden: clusterIdentity: <uuid-of-gardener-installation> genericKubeconfigSecretName: <generic-garden-kubeconfig-secret-name> seed: name: <seed-name> clusterIdentity: <seed-cluster-identity> annotations: <seed-annotations> labels: <seed-labels> provider: <seed-provider-type> region: <seed-region> volumeProvider: <seed-first-volume-provider> volumeProviders: <seed-volume-providers> ingressDomain: <seed-ingress-domain> protected: <seed-protected-taint> visible: <seed-visible-setting> taints: <seed-taints> networks: <seed-networks> blockCIDRs: <seed-networks-blockCIDRs> spec: <seed-spec> gardenlet: featureGates: <gardenlet-feature-gates>If the extension is deployed in an autonomous shoot cluster, then the
.gardener.autonomousShootClusterfield is additionally propagated and set totrue.
Extension controller deployments can use this information in their Helm chart in case they require knowledge about the garden and the seed environment. The list might be extended in the future.
Deployment Configuration Options
The .spec.extension structure allows to configure a deployment policy.
There are the following policies:
OnDemand(default): Gardener will demand the deployment and deletion of the extension controller to/from seed clusters dynamically. It will automatically determine (based on other resources likeShoots) whether it is required and decide accordingly.Always: Gardener will demand the deployment of the extension controller to seed clusters independent of whether it is actually required or not. This might be helpful if you want to add a new component/controller to all seed clusters by default. Another use-case is to minimize the durations until extension controllers get deployed and ready in case you have highly fluctuating seed clusters.AlwaysExceptNoShoots: Similar toAlways, but if the seed does not have any shoots, then the extension controller is not being deployed. It will be deleted from a seed after the last shoot has been removed from it.
Also, the .spec.extension.seedSelector allows to specify a label selector for seed clusters.
Only if it matches the labels of a seed, then it will be deployed to it.
Please note that a seed selector can only be specified for secondary controllers (primary=false for all .spec.resources[]).
Extension Resource Configurations
The extensibility contract allows the following configuration options per registered extension resource (see resources below):
apiVersion: operator.gardener.cloud/v1alpha1
kind: Extension
metadata:
name: extension-foo
spec:
resources:
- kind: Extension
type: foo
primary: true
autoEnable:
- shoot
clusterCompatibility:
- seed
- shoot
reconcileTimeout: 30s
lifecycle:
reconcile: AfterKubeAPIServer
delete: BeforeKubeAPIServer
migrate: BeforeKubeAPIServer
The autoEnable=[shoot] option specifies that the Extension/foo object shall be created by default for all shoots (unless they opted out by setting .spec.extensions[].enabled=false in the Shoot spec).
The autoEnable=[seed,shoot] option specifies that the Extension/foo can be enabled in seed and shoot clusters.
The reconcileTimeout tells Gardener how long it should wait during its reconciliation flow for the Extension/foo’s reconciliation to finish.
primary specifies whether the extension controller is the main one responsible for the lifecycle of the Extension resource.
Setting primary to false would allow to register additional, secondary controllers that may also watch/react on the Extension/foo resources, however, only the primary controller may change/update the main status of the extension object.
Particularly, only the primary controller may set .status.lastOperation, .status.lastError, .status.observedGeneration, and .status.state.
Secondary controllers may contribute to the .status.conditions[] if they like, of course.
Secondary controllers might be helpful in scenarios where additional tasks need to be completed which are not part of the reconciliation logic of the primary controller but separated out into a dedicated extension.
⚠️ There must be exactly one primary controller for every registered kind/type combination.
Also, please note that the primary field cannot be changed after creation of the Extension.
Extension Lifecycle
The lifecycle field tells Gardener when to perform a certain action on the Extension (extensions.gardener.cloud/v1alpha1) resource during the reconciliation flows. If omitted, then the default behaviour will be applied. Please find more information on the defaults in the explanation below. Possible values for each control flow are AfterKubeAPIServer, BeforeKubeAPIServer, and AfterWorker. Let’s take the following configuration and explain it.
...
lifecycle:
reconcile: AfterKubeAPIServer
delete: BeforeKubeAPIServer
migrate: BeforeKubeAPIServer
reconcile: AfterKubeAPIServermeans that the extension resource will be reconciled after the successful reconciliation of thekube-apiserverduring shoot reconciliation. This is also the default behaviour if this value is not specified. During shoot hibernation, the opposite rule is applied, meaning that in this case the reconciliation of the extension will happen before thekube-apiserveris scaled to 0 replicas. On the other hand, if the extension needs to be reconciled before thekube-apiserverand scaled down after it, then the valueBeforeKubeAPIServershould be used.delete: BeforeKubeAPIServermeans that the extension resource will be deleted before thekube-apiserveris destroyed during shoot deletion. This is the default behaviour if this value is not specified.migrate: BeforeKubeAPIServermeans that the extension resource will be migrated before thekube-apiserveris destroyed in the source cluster during control plane migration. This is the default behaviour if this value is not specified. The restoration of the control plane follows the reconciliation control flow.
Due to technical reasons, exceptions apply for different reconcile flows, for example:
- The garden reconciliation doesn’t distinguish between
AfterKubeAPIServerandAfterWorker. - The seed reconciliation completely ignores the
lifecyclefield. - The lifecycle value
AfterWorkeris only available duringreconcile. When specified, the extension resource will be reconciled after the workers are deployed. This is useful for extensions that want to deploy a workload in the shoot control plane and want to wait for the workload to run and get ready on a node. During shoot creation the extension will start its reconciliation before the first workers have joined the cluster, they will become available at some later point.
4.5.17 - Resource Admission in the Garden Cluster
Resource Admission in the Garden Cluster
The Shoot resource itself can contain some extension-specific data blobs (see providerConfig):
apiVersion: core.gardener.cloud/v1beta1
kind: Shoot
metadata:
name: johndoe-aws
namespace: garden-dev
spec:
...
region: eu-west-1
provider:
type: aws
providerConfig:
apiVersion: aws.cloud.gardener.cloud/v1alpha1
kind: InfrastructureConfig
networks:
vpc: # specify either 'id' or 'cidr'
# id: vpc-123456
cidr: 10.250.0.0/16
internal:
- 10.250.112.0/22
public:
- 10.250.96.0/22
workers:
- 10.250.0.0/19
zones:
- eu-west-1a
...
In the above example, Gardener itself does not understand the AWS-specific provider configuration for the infrastructure. However, if this part of the Shoot resource should be validated, then you should run an AWS-specific component in the garden cluster that registers a webhook. The same is true for values defaulting via MutatingWebhookConfiguration. Similarly to how Gardener is deployed to the garden cluster, these components must be deployed and managed by the Gardener administrator.
Examples of extensions performing validation:
- provider extensions would validate
spec.provider.infrastructureConfigandspec.provider.controlPlaneConfigin theShootresource andspec.providerConfigin theCloudProfileresource. - networking extensions would validate
spec.networking.providerConfigin theShootresource.
As a best practice, the validation should be performed only if there is a change in the spec of the resource. Please find an exemplary implementation in the gardener/gardener-extension-provider-aws repository.
extensions.gardener.cloud Labeling
When an admission relevant resource (e.g., BackupEntrys, BackupBuckets, CloudProfiles, Seeds, SecretBindings, and Shoots) is newly created or updated in the garden cluster, Gardener adds an extension label to it. This label is of the form <extension-type>.extensions.gardener.cloud/<extension-name> : "true". For example, an extension label for a provider extension type aws looks like provider.extensions.gardener.cloud/aws : "true". The extensions should add object selectors in their admission webhooks for these labels to filter out the objects they are responsible for. Please see the types_constants.go file for the full list of extension labels.
4.5.18 - Resources
4.5.18.1 - BackupBucket
Contract: BackupBucket Resource
The Gardener project features a sub-project called etcd-backup-restore to take periodic backups of etcd backing Shoot clusters. It demands the bucket (or its equivalent in different object store providers) to be created and configured externally with appropriate credentials. The BackupBucket resource takes this responsibility in Gardener.
Before introducing the BackupBucket extension resource, Gardener was using Terraform in order to create and manage these provider-specific resources (e.g., see AWS Backup).
Now, Gardener commissions an external, provider-specific controller to take over this task. You can also refer to backupInfra proposal documentation to get an idea about how the transition was done and understand the resource in a broader scope.
What Is the Scope of a Bucket?
A bucket will be provisioned per Seed. So, a backup of every Shoot created on that Seed will be stored under a different shoot specific prefix under the bucket.
For the backup of the Shoot rescheduled on different Seed, it will continue to use the same bucket.
What Is the Lifespan of a BackupBucket?
The bucket associated with BackupBucket will be created at the creation of the Seed. And as per current implementation, it will also be deleted on deletion of the Seed, if there isn’t any BackupEntry resource associated with it.
In the future, we plan to introduce a schedule for BackupBucket - the deletion logic for the BackupBucket resource, which will reschedule it on different available Seeds on deletion or failure of a health check for the currently associated seed. In that case, the BackupBucket will be deleted only if there isn’t any schedulable Seed available and there isn’t any associated BackupEntry resource.
What Needs to Be Implemented to Support a New Infrastructure Provider?
As part of the seed flow, Gardener will create a special CRD in the seed cluster that needs to be reconciled by an extension controller, for example:
---
apiVersion: extensions.gardener.cloud/v1alpha1
kind: BackupBucket
metadata:
name: foo
spec:
type: azure
providerConfig:
<some-optional-provider-specific-backupbucket-configuration>
region: eu-west-1
secretRef:
name: backupprovider
namespace: shoot--foo--bar
The .spec.secretRef contains a reference to the provider secret pointing to the account that shall be used to create the needed resources. This provider secret will be configured by the Gardener operator in the Seed resource and propagated over there by the seed controller.
After your controller has created the required bucket, if required, it generates the secret to access the objects in the bucket and put a reference to it in status.generatedSecretRef.
The secret should be created in the namespace specified in the backupbucket.extensions.gardener.cloud/generated-secret-namespace annotation.
In case the annotation is not present, the garden namespace should be used.
This secret is supposed to be used by Gardener, or eventually a BackupEntry resource and etcd-backup-restore component, for backing up the etcd.
In order to support a new infrastructure provider, you need to write a controller that watches all BackupBuckets with .spec.type=<my-provider-name>. You can take a look at the below referenced example implementation for the Azure provider.
References and Additional Resources
4.5.18.2 - BackupEntry
Contract: BackupEntry Resource
The Gardener project features a sub-project called etcd-backup-restore to take periodic backups of etcd backing Shoot clusters. It demands the bucket (or its equivalent in different object store providers) access credentials to be created and configured externally with appropriate credentials. The BackupEntry resource takes this responsibility in Gardener to provide this information by creating a secret specific to the component.
That being said, the core motivation for introducing this resource was to support retention of backups post deletion of Shoot. The etcd-backup-restore components take responsibility of garbage collecting old backups out of the defined period. Once a shoot is deleted, we need to persist the backups for few days. Hence, Gardener uses the BackupEntry resource for this housekeeping work post deletion of a Shoot. The BackupEntry resource is responsible for shoot specific prefix under referred bucket.
Before introducing the BackupEntry extension resource, Gardener was using Terraform in order to create and manage these provider-specific resources (e.g., see AWS Backup).
Now, Gardener commissions an external, provider-specific controller to take over this task. You can also refer to backupInfra proposal documentation to get idea about how the transition was done and understand the resource in broader scope.
What Is the Lifespan of a BackupEntry?
The bucket associated with BackupEntry will be created by using a BackupBucket resource. The BackupEntry resource will be created as a part of the Shoot creation. But resources might continue to exist post deletion of a Shoot (see gardenlet for more details).
What Needs to be Implemented to Support a New Infrastructure Provider?
As part of the shoot flow, Gardener will create a special CRD in the seed cluster that needs to be reconciled by an extension controller, for example:
---
apiVersion: extensions.gardener.cloud/v1alpha1
kind: BackupEntry
metadata:
name: shoot--foo--bar
spec:
type: azure
providerConfig:
<some-optional-provider-specific-backup-bucket-configuration>
backupBucketProviderStatus:
<some-optional-provider-specific-backup-bucket-status>
region: eu-west-1
bucketName: foo
secretRef:
name: backupprovider
namespace: shoot--foo--bar
The .spec.secretRef contains a reference to the provider secret pointing to the account that shall be used to create the needed resources. This provider secret will be propagated from the BackupBucket resource by the shoot controller.
Your controller is supposed to create the etcd-backup secret in the control plane namespace of a shoot. This secret is supposed to be used by Gardener or eventually by the etcd-backup-restore component to backup the etcd. The controller implementation should clean up the objects created under the shoot specific prefix in the bucket equivalent to the name of the BackupEntry resource.
In order to support a new infrastructure provider, you need to write a controller that watches all the BackupBuckets with .spec.type=<my-provider-name>. You can take a look at the below referenced example implementation for the Azure provider.
References and Additional Resources
4.5.18.3 - Bastion
Contract: Bastion Resource
The Gardener project allows users to connect to Shoot worker nodes via SSH. As nodes are usually firewalled and not directly accessible from the public internet, GEP-15 introduced the concept of “Bastions”. A bastion is a dedicated server that only serves to allow SSH ingress to the worker nodes.
Bastion resources contain the user’s public SSH key and IP address, in order to provision the server accordingly: The public key is put onto the Bastion and SSH ingress is only authorized for the given IP address (in fact, it’s not a single IP address, but a set of IP ranges, however for most purposes a single IP is be used).
What Is the Lifespan of a Bastion?
Once a Bastion has been created in the garden, it will be replicated to the appropriate seed cluster, where a controller then reconciles a server and firewall rules etc., on the cloud provider used by the target Shoot. When the Bastion is ready (i.e. has a public IP), that IP is stored in the Bastion’s status and from there it is picked up by the garden cluster and gardenctl eventually.
To make multiple SSH sessions possible, the existence of the Bastion is not directly tied to the execution of gardenctl: users can exit out of gardenctl and use ssh manually to connect to the bastion and worker nodes.
However, Bastions have an expiry date, after which they will be garbage collected.
When SSH access is set to false for the Shoot in the workers settings (see Shoot Worker Nodes Settings), Bastion resources are deleted during Shoot reconciliation and new Bastions are prevented from being created.
What Needs to Be Implemented to Support a New Infrastructure Provider?
As part of the shoot flow, Gardener will create a special CRD in the seed cluster that needs to be reconciled by an extension controller, for example:
---
apiVersion: extensions.gardener.cloud/v1alpha1
kind: Bastion
metadata:
name: mybastion
namespace: shoot--foo--bar
spec:
type: aws
# userData is base64-encoded cloud provider user data; this contains the
# user's SSH key
userData: IyEvYmluL2Jhc2ggL....Nlcgo=
ingress:
- ipBlock:
cidr: 192.88.99.0/32 # this is most likely the user's IP address
Your controller is supposed to create a new instance at the given cloud provider, firewall it to only allow SSH (TCP port 22) from the given IP blocks, and then configure the firewall for the worker nodes to allow SSH from the bastion instance. When a Bastion is deleted, all these changes need to be reverted.
Implementation Details
ConfigValidator Interface
For bastion controllers, the generic Reconciler also delegates to a ConfigValidator interface that contains a single Validate method. This method is called by the generic Reconciler at the beginning of every reconciliation, and can be implemented by the extension to validate the .spec.providerConfig part of the Bastion resource with the respective cloud provider, typically the existence and validity of cloud provider resources such as VPCs, images, etc.
The Validate method returns a list of errors. If this list is non-empty, the generic Reconciler will fail with an error. This error will have the error code ERR_CONFIGURATION_PROBLEM, unless there is at least one error in the list that has its ErrorType field set to field.ErrorTypeInternal.
References and Additional Resources
4.5.18.4 - ContainerRuntime
Contract: ContainerRuntime Resource
At the lowest layers of a Kubernetes node is the software that, among other things, starts and stops containers. It is called “Container Runtime”. The most widely known container runtime is Docker, but it is not alone in this space. In fact, the container runtime space has been rapidly evolving.
Kubernetes supports different container runtimes using Container Runtime Interface (CRI) – a plugin interface which enables kubelet to use a wide variety of container runtimes.
Gardener supports creation of Worker machines using CRI. For more information, see CRI Support.
Motivation
Prior to the Container Runtime Extensibility concept, Gardener used Docker as the only
container runtime to use in shoot worker machines. Because of the wide variety of different container runtimes
offering multiple important features (for example, enhanced security concepts), it is important to enable end users to use other container runtimes as well.
The ContainerRuntime Extension Resource
Here is what a typical ContainerRuntime resource would look like:
---
apiVersion: extensions.gardener.cloud/v1alpha1
kind: ContainerRuntime
metadata:
name: my-container-runtime
spec:
binaryPath: /var/bin/containerruntimes
type: gvisor
workerPool:
name: worker-ubuntu
selector:
matchLabels:
worker.gardener.cloud/pool: worker-ubuntu
Gardener deploys one ContainerRuntime resource per worker pool per CRI.
To exemplify this, consider a Shoot having two worker pools (worker-one, worker-two) using containerd as the CRI as well as gvisor and kata as enabled container runtimes.
Gardener would deploy four ContainerRuntime resources. For worker-one: one ContainerRuntime for type gvisor and one for type kata. The same resource are being deployed for worker-two.
Supporting a New Container Runtime Provider
To add support for another container runtime (e.g., gvisor, kata-containers), a container runtime extension controller needs to be implemented. It should support Gardener’s supported CRI plugins.
The container runtime extension should install the necessary resources into the shoot cluster (e.g., RuntimeClasses), and it should copy the runtime binaries to the relevant worker machines in path: spec.binaryPath.
Gardener labels the shoot nodes according to the CRI configured: worker.gardener.cloud/cri-name=<value> (e.g., worker.gardener.cloud/cri-name=containerd) and multiple labels for each of the container runtimes configured for the shoot Worker machine:
containerruntime.worker.gardener.cloud/<container-runtime-type-value>=true (e.g., containerruntime.worker.gardener.cloud/gvisor=true).
The way to install the binaries is by creating a daemon set which copies the binaries from an image in a docker registry to the relevant labeled Worker’s nodes (avoid downloading binaries from the internet to also cater with isolated environments).
For additional reference, please have a look at the runtime-gvsior provider extension, which provides more information on how to configure the necessary charts, as well as the actuators required to reconcile container runtime inside the Shoot cluster to the desired state.
4.5.18.5 - ControlPlane
Contract: ControlPlane Resource
Most Kubernetes clusters require a cloud-controller-manager or CSI drivers in order to work properly.
Before introducing the ControlPlane extension resource Gardener was having several different Helm charts for the cloud-controller-manager deployments for the various providers.
Now, Gardener commissions an external, provider-specific controller to take over this task.
Which control plane resources are required?
As mentioned in the controlplane customization webhooks document, Gardener shall not deploy any cloud-controller-manager or any other provider-specific component.
Instead, it creates a ControlPlane CRD that should be picked up by provider extensions.
Its purpose is to trigger the deployment of such provider-specific components in the shoot namespace in the seed cluster.
What needs to be implemented to support a new infrastructure provider?
As part of the shoot flow Gardener will create a special CRD in the seed cluster that needs to be reconciled by an extension controller, for example:
---
apiVersion: extensions.gardener.cloud/v1alpha1
kind: ControlPlane
metadata:
name: control-plane
namespace: shoot--foo--bar
spec:
type: openstack
region: europe-west1
secretRef:
name: cloudprovider
namespace: shoot--foo--bar
providerConfig:
apiVersion: openstack.provider.extensions.gardener.cloud/v1alpha1
kind: ControlPlaneConfig
loadBalancerProvider: provider
zone: eu-1a
cloudControllerManager:
featureGates:
CustomResourceValidation: true
infrastructureProviderStatus:
apiVersion: openstack.provider.extensions.gardener.cloud/v1alpha1
kind: InfrastructureStatus
networks:
floatingPool:
id: vpc-1234
subnets:
- purpose: nodes
id: subnetid
The .spec.secretRef contains a reference to the provider secret pointing to the account that shall be used for the shoot cluster.
However, the most important section is the .spec.providerConfig and the .spec.infrastructureProviderStatus.
The first one contains an embedded declaration of the provider specific configuration for the control plane (that cannot be known by Gardener itself).
You are responsible for designing how this configuration looks like.
Gardener does not evaluate it but just copies this part from what has been provided by the end-user in the Shoot resource.
The second one contains the output of the Infrastructure resource (that might be relevant for the CCM config).
In order to support a new control plane provider, you need to write a controller that watches all ControlPlanes with .spec.type=<my-provider-name>.
You can take a look at the below referenced example implementation for the Alicloud provider.
The control plane controller as part of the ControlPlane reconciliation often deploys resources (e.g. pods/deployments) into the Shoot namespace in the Seed as part of its ControlPlane reconciliation loop.
Because the namespace contains network policies that per default deny all ingress and egress traffic,
the pods may need to have proper labels matching to the selectors of the network policies in order to allow the required network traffic.
Otherwise, they won’t be allowed to talk to certain other components (e.g., the kube-apiserver of the shoot).
For more information, see NetworkPolicys In Garden, Seed, Shoot Clusters.
Non-Provider Specific Information Required for Infrastructure Creation
Most providers might require further information that is not provider specific but already part of the shoot resource.
One example for this is the GCP control plane controller, which needs the Kubernetes version of the shoot cluster (because it already uses the in-tree Kubernetes cloud-controller-manager).
As Gardener cannot know which information is required by providers, it simply mirrors the Shoot, Seed, and CloudProfile resources into the seed.
They are part of the Cluster extension resource and can be used to extract information that is not part of the Infrastructure resource itself.
References and Additional Resources
4.5.18.6 - DNS Record
Contract: DNSRecord Resources
Every shoot cluster requires external DNS records that are publicly resolvable. The management of these DNS records requires provider-specific knowledge which is to be developed outside the Gardener’s core repository.
Currently, Gardener uses DNSProvider and DNSEntry resources. However, this introduces undesired coupling of Gardener to a controller that does not adhere to the Gardener extension contracts. Because of this, we plan to stop using DNSProvider and DNSEntry resources for Gardener DNS records in the future and use the DNSRecord resources described here instead.
What does Gardener create DNS records for?
Internal Domain Name
Every shoot cluster’s kube-apiserver running in the seed is exposed via a load balancer that has a public endpoint (IP or hostname). This endpoint is used by end-users and also by system components (that are running in another network, e.g., the kubelet or kube-proxy) to talk to the cluster. In order to be robust against changes of this endpoint (e.g., caused due to re-creation of the load balancer or move of the DNS record to another seed cluster), Gardener creates a so-called internal domain name for every shoot cluster. The internal domain name is a publicly resolvable DNS record that points to the load balancer of the kube-apiserver. Gardener uses this domain name in the kubeconfigs of all system components, instead of using directly the load balancer endpoint. This way Gardener does not need to recreate all kubeconfigs if the endpoint changes - it just needs to update the DNS record.
External Domain Name
The internal domain name is not configurable by end-users directly but configured by the Gardener administrator. However, end-users usually prefer to have another DNS name, maybe even using their own domain sometimes, to access their Kubernetes clusters. Gardener supports that by creating another DNS record, named external domain name, that actually points to the internal domain name. The kubeconfig handed out to end-users does contain this external domain name, i.e., users can access their clusters with the DNS name they like to.
As not every end-user has an own domain, it is possible for Gardener administrators to configure so-called default domains.
If configured, shoots that do not specify a domain explicitly get an external domain name based on a default domain (unless explicitly stated that this shoot should not get an external domain name (.spec.dns.provider=unmanaged)).
Ingress Domain Name (Deprecated)
Gardener allows to deploy a nginx-ingress-controller into a shoot cluster (deprecated).
This controller is exposed via a public load balancer (again, either IP or hostname).
Gardener creates a wildcard DNS record pointing to this load balancer.
Ingress resources can later use this wildcard DNS record to expose underlying applications.
Seed Ingress
If .spec.ingress is configured in the Seed, Gardener deploys the ingress controller mentioned in .spec.ingress.controller.kind to the seed cluster. Currently, the only supported kind is “nginx”. If the ingress field is set, then .spec.dns.provider must also be set. Gardener creates a wildcard DNS record pointing to the load balancer of the ingress controller. The Ingress resources of components like Plutono and Prometheus in the garden namespace and the shoot namespaces use this wildcard DNS record to expose their underlying applications.
What needs to be implemented to support a new DNS provider?
As part of the shoot flow, Gardener will create a number of DNSRecord resources in the seed cluster (one for each of the DNS records mentioned above) that need to be reconciled by an extension controller.
These resources contain the following information:
- The DNS provider type (e.g.,
aws-route53,google-clouddns, …) - A reference to a
Secretobject that contains the provider-specific credentials used to communicate with the provider’s API. - The fully qualified domain name (FQDN) of the DNS record, e.g. “api.<shoot domain>”.
- The DNS record type, one of
A,AAAA,CNAME, orTXT. - The DNS record values, that is a list of IP addresses for A records, a single hostname for CNAME records, or a list of texts for TXT records.
Optionally, the DNSRecord resource may contain also the following information:
- The region of the DNS record. If not specified, the region specified in the referenced
Secretshall be used. If that is also not specified, the extension controller shall use a certain default region. - The DNS hosted zone of the DNS record. If not specified, it shall be determined automatically by the extension controller by getting all hosted zones of the account and searching for the longest zone name that is a suffix of the fully qualified domain name (FQDN) mentioned above.
- The TTL of the DNS record in seconds. If not specified, it shall be set by the extension controller to 120.
Example DNSRecord:
---
apiVersion: v1
kind: Secret
metadata:
name: dnsrecord-bar-external
namespace: shoot--foo--bar
type: Opaque
data:
# aws-route53 specific credentials here
---
apiVersion: extensions.gardener.cloud/v1alpha1
kind: DNSRecord
metadata:
name: dnsrecord-external
namespace: default
spec:
type: aws-route53
secretRef:
name: dnsrecord-bar-external
namespace: shoot--foo--bar
# region: eu-west-1
# zone: ZFOO
name: api.bar.foo.my-fancy-domain.com
recordType: A
values:
- 1.2.3.4
# ttl: 600
In order to support a new DNS record provider, you need to write a controller that watches all DNSRecords with .spec.type=<my-provider-name>.
You can take a look at the below referenced example implementation for the AWS route53 provider.
Key Names in Secrets Containing Provider-Specific Credentials
For compatibility with existing setups, extension controllers shall support two different namings of keys in secrets containing provider-specific credentials:
- The naming used by the external-dns-management DNS controller. For example, on AWS the key names are
AWS_ACCESS_KEY_ID,AWS_SECRET_ACCESS_KEY, andAWS_REGION. - The naming used by other provider-specific extension controllers, e.g., for infrastructure. For example, on AWS the key names are
accessKeyId,secretAccessKey, andregion.
Avoiding Reading the DNS Hosted Zones
If the DNS hosted zone is not specified in the DNSRecord resource, during the first reconciliation the extension controller shall determine the correct DNS hosted zone for the specified FQDN and write it to the status of the resource:
---
apiVersion: extensions.gardener.cloud/v1alpha1
kind: DNSRecord
metadata:
name: dnsrecord-external
namespace: shoot--foo--bar
spec:
...
status:
lastOperation: ...
zone: ZFOO
On subsequent reconciliations, the extension controller shall use the zone from the status and avoid reading the DNS hosted zones from the provider.
If the DNSRecord resource specifies a zone in .spec.zone and the extension controller has written a value to .status.zone, the first one shall be considered with higher priority by the extension controller.
Non-Provider Specific Information Required for DNS Record Creation
Some providers might require further information that is not provider specific but already part of the shoot resource.
As Gardener cannot know which information is required by providers, it simply mirrors the Shoot, Seed, and CloudProfile resources into the seed.
They are part of the Cluster extension resource and can be used to extract information that is not part of the DNSRecord resource itself.
Using DNSRecord Resources
gardenlet manages DNSRecord resources for all three DNS records mentioned above (internal, external, and ingress).
In order to successfully reconcile a shoot with the feature gate enabled, extension controllers for DNSRecord resources for types used in the default, internal, and custom domain secrets should be registered via ControllerRegistration resources.
Note: For compatibility reasons, the
spec.dns.providerssection is still used to specify additional providers. Only the one marked asprimary: truewill be used forDNSRecord. All others are considered by theshoot-dns-serviceextension only (if deployed).
Support for DNSRecord Resources in the Provider Extensions
The following table contains information about the provider extension version that adds support for DNSRecord resources:
| Extension | Version |
|---|---|
| provider-alicloud | v1.26.0 |
| provider-aws | v1.27.0 |
| provider-azure | v1.21.0 |
| provider-gcp | v1.18.0 |
| provider-openstack | v1.21.0 |
| provider-vsphere | N/A |
| provider-equinix-metal | N/A |
| provider-kubevirt | N/A |
| provider-openshift | N/A |
Support for DNSRecord IPv6 recordType: AAAA in the Provider Extensions
The following table contains information about the provider extension version that adds support for DNSRecord IPv6 recordType: AAAA:
| Extension | Version |
|---|---|
| provider-alicloud | N/A |
| provider-aws | N/A |
| provider-azure | N/A |
| provider-gcp | N/A |
| provider-openstack | N/A |
| provider-vsphere | N/A |
| provider-equinix-metal | N/A |
| provider-kubevirt | N/A |
| provider-openshift | N/A |
| provider-local | v1.63.0 |
References and Additional Resources
4.5.18.7 - Extension
Contract: Extension Resource
Gardener defines common procedures which must be passed to create a functioning shoot cluster. Well known steps are represented by special resources like Infrastructure, OperatingSystemConfig or DNS. These resources are typically reconciled by dedicated controllers setting up the infrastructure on the hyperscaler or managing DNS entries, etc.
But, some requirements don’t match with those special resources or don’t depend on being proceeded at a specific step in the creation / deletion flow of the shoot. They require a more generic hook. Therefore, Gardener offers the Extension resource.
What is required to register and support an Extension type?
Gardener creates one Extension resource per registered extension type in ControllerRegistration per shoot.
apiVersion: core.gardener.cloud/v1beta1
kind: ControllerRegistration
metadata:
name: extension-example
spec:
resources:
- kind: Extension
type: example
autoEnable:
- shoot
workerlessSupported: true
If spec.resources[].autoEnable is set to shoot, then the Extension resources of the given type is created for every shoot cluster. Set to none (default), the Extension resource is only created if configured in the Shoot manifest. In case of workerless Shoot, an automatically enabled Extension resource is created only if spec.resources[].workerlessSupported is also set to true. If an extension configured in the spec of a workerless Shoot is not supported yet, the admission request will be rejected.
Another valid value is seed, which means the extension is automatically enabled for all seeds.
The Extension resources are created in the shoot namespace of the seed cluster.
---
apiVersion: extensions.gardener.cloud/v1alpha1
kind: Extension
metadata:
name: example
namespace: shoot--foo--bar
spec:
type: example
providerConfig: {}
Your controller needs to reconcile extensions.extensions.gardener.cloud. Since there can exist multiple Extension resources per shoot, each one holds a spec.type field to let controllers check their responsibility (similar to all other extension resources of Gardener).
ProviderConfig
It is possible to provide data in the Shoot resource which is copied to spec.providerConfig of the Extension resource.
---
apiVersion: core.gardener.cloud/v1beta1
kind: Shoot
metadata:
name: bar
namespace: garden-foo
spec:
extensions:
- type: example
providerConfig:
foo: bar
...
results in
---
apiVersion: extensions.gardener.cloud/v1alpha1
kind: Extension
metadata:
name: example
namespace: shoot--foo--bar
spec:
type: example
providerConfig:
foo: bar
Shoot Reconciliation Flow and Extension Status
Gardener creates Extension resources as part of the Shoot reconciliation. Moreover, it is guaranteed that the Cluster resource exists before the Extension resource is created. Extensions can be reconciled at different stages during Shoot reconciliation depending on the defined extension lifecycle strategy in the respective ControllerRegistration resource. Please consult the Extension Lifecycle section for more information.
For an Extension controller it is crucial to maintain the Extension’s status correctly. At the end Gardener checks the status of each Extension and only reports a successful shoot reconciliation if the state of the last operation is Succeeded.
apiVersion: extensions.gardener.cloud/v1alpha1
kind: Extension
metadata:
generation: 1
name: example
namespace: shoot--foo--bar
spec:
type: example
status:
lastOperation:
state: Succeeded
observedGeneration: 1
4.5.18.8 - Infrastructure
Contract: Infrastructure Resource
Every Kubernetes cluster requires some low-level infrastructure to be setup in order to work properly.
Examples for that are networks, routing entries, security groups, IAM roles, etc.
Before introducing the Infrastructure extension resource Gardener was using Terraform in order to create and manage these provider-specific resources (e.g., see here).
Now, Gardener commissions an external, provider-specific controller to take over this task.
Which infrastructure resources are required?
Unfortunately, there is no general answer to this question as it is highly provider specific. Consider the above mentioned resources, i.e., VPC, subnets, route tables, security groups, IAM roles, SSH key pairs. Most of the resources are required in order to create VMs (the shoot cluster worker nodes), load balancers, and volumes.
What needs to be implemented to support a new infrastructure provider?
As part of the shoot flow Gardener will create a special CRD in the seed cluster that needs to be reconciled by an extension controller, for example:
---
apiVersion: extensions.gardener.cloud/v1alpha1
kind: Infrastructure
metadata:
name: infrastructure
namespace: shoot--foo--bar
spec:
type: azure
region: eu-west-1
secretRef:
name: cloudprovider
namespace: shoot--foo--bar
providerConfig:
apiVersion: azure.provider.extensions.gardener.cloud/v1alpha1
kind: InfrastructureConfig
resourceGroup:
name: mygroup
networks:
vnet: # specify either 'name' or 'cidr'
# name: my-vnet
cidr: 10.250.0.0/16
workers: 10.250.0.0/19
The .spec.secretRef contains a reference to the provider secret pointing to the account that shall be used to create the needed resources.
However, the most important section is the .spec.providerConfig.
It contains an embedded declaration of the provider specific configuration for the infrastructure (that cannot be known by Gardener itself).
You are responsible for designing how this configuration looks like.
Gardener does not evaluate it but just copies this part from what has been provided by the end-user in the Shoot resource.
After your controller has created the required resources in your provider’s infrastructure it needs to generate an output that can be used by other controllers in subsequent steps.
An example for that is the Worker extension resource controller.
It is responsible for creating virtual machines (shoot worker nodes) in this prepared infrastructure.
Everything that it needs to know in order to do that (e.g. the network IDs, security group names, etc. (again: provider-specific)) needs to be provided as output in the Infrastructure resource:
---
apiVersion: extensions.gardener.cloud/v1alpha1
kind: Infrastructure
metadata:
name: infrastructure
namespace: shoot--foo--bar
spec:
...
status:
lastOperation: ...
providerStatus:
apiVersion: azure.provider.extensions.gardener.cloud/v1alpha1
kind: InfrastructureStatus
resourceGroup:
name: mygroup
networks:
vnet:
name: my-vnet
subnets:
- purpose: nodes
name: my-subnet
availabilitySets:
- purpose: nodes
id: av-set-id
name: av-set-name
routeTables:
- purpose: nodes
name: route-table-name
securityGroups:
- purpose: nodes
name: sec-group-name
In order to support a new infrastructure provider you need to write a controller that watches all Infrastructures with .spec.type=<my-provider-name>.
You can take a look at the below referenced example implementation for the Azure provider.
Dynamic nodes network for shoot clusters
Some environments do not allow end-users to statically define a CIDR for the network that shall be used for the shoot worker nodes.
In these cases it is possible for the extension controllers to dynamically provision a network for the nodes (as part of their reconciliation loops), and to provide the CIDR in the status of the Infrastructure resource:
---
apiVersion: extensions.gardener.cloud/v1alpha1
kind: Infrastructure
metadata:
name: infrastructure
namespace: shoot--foo--bar
spec:
...
status:
lastOperation: ...
providerStatus: ...
nodesCIDR: 10.250.0.0/16
Gardener will pick this nodesCIDR and use it to configure the VPN components to establish network connectivity between the control plane and the worker nodes.
If the Shoot resource already specifies a nodes CIDR in .spec.networking.nodes and the extension controller provides also a value in .status.nodesCIDR in the Infrastructure resource then the latter one will always be considered with higher priority by Gardener.
Non-provider specific information required for infrastructure creation
Some providers might require further information that is not provider specific but already part of the shoot resource.
One example for this is the GCP infrastructure controller which needs the pod and the service network of the cluster in order to prepare and configure the infrastructure correctly.
As Gardener cannot know which information is required by providers it simply mirrors the Shoot, Seed, and CloudProfile resources into the seed.
They are part of the Cluster extension resource and can be used to extract information that is not part of the Infrastructure resource itself.
Implementation details
Actuator interface
Most existing infrastructure controller implementations follow a common pattern where a generic Reconciler delegates to an Actuator interface that contains the methods Reconcile, Delete, Migrate, and Restore. These methods are called by the generic Reconciler for the respective operations, and should be implemented by the extension according to the contract described here and the migration guidelines.
ConfigValidator interface
For infrastructure controllers, the generic Reconciler also delegates to a ConfigValidator interface that contains a single Validate method. This method is called by the generic Reconciler at the beginning of every reconciliation, and can be implemented by the extension to validate the .spec.providerConfig part of the Infrastructure resource with the respective cloud provider, typically the existence and validity of cloud provider resources such as AWS VPCs or GCP Cloud NAT IPs.
The Validate method returns a list of errors. If this list is non-empty, the generic Reconciler will fail with an error. This error will have the error code ERR_CONFIGURATION_PROBLEM, unless there is at least one error in the list that has its ErrorType field set to field.ErrorTypeInternal.
References and additional resources
4.5.18.9 - Network
Contract: Network Resource
Gardener is an open-source project that provides a nested user model. Basically, there are two types of services provided by Gardener to its users:
- Managed: end-users only request a Kubernetes cluster (Clusters-as-a-Service)
- Hosted: operators utilize Gardener to provide their own managed version of Kubernetes (Cluster-Provisioner-as-a-service)
Whether a user is an operator or an end-user, it makes sense to provide choice. For example, for an end-user it might make sense to choose a network-plugin that would support enforcing network policies (some plugins does not come with network-policy support by default). For operators however, choice only matters for delegation purposes, i.e., when providing an own managed-service, it becomes important to also provide choice over which network-plugins to use.
Furthermore, Gardener provisions clusters on different cloud-providers with different networking requirements. For example, Azure does not support Calico overlay networking with IP in IP [1], this leads to the introduction of manual exceptions in static add-on charts which is error prone and can lead to failures during upgrades.
Finally, every provider is different, and thus the network always needs to adapt to the infrastructure needs to provide better performance. Consistency does not necessarily lie in the implementation but in the interface.
Motivation
Prior to the Network Extensibility concept, Gardener followed a mono network-plugin support model (i.e., Calico). Although this seemed to be the easier approach, it did not completely reflect the real use-case.
The goal of the Gardener Network Extensions is to support different network plugins, therefore, the specification for the network resource won’t be fixed and will be customized based on the underlying network plugin.
To do so, a ProviderConfig field in the spec will be provided where each plugin will define. Below is an example for how to deploy Calico as the cluster network plugin.
The Network Extensions Resource
Here is what a typical Network resource would look-like:
---
apiVersion: extensions.gardener.cloud/v1alpha1
kind: Network
metadata:
name: my-network
spec:
ipFamilies:
- IPv4
podCIDR: 100.244.0.0/16
serviceCIDR: 100.32.0.0/13
type: calico
providerConfig:
apiVersion: calico.networking.extensions.gardener.cloud/v1alpha1
kind: NetworkConfig
backend: bird
ipam:
cidr: usePodCIDR
type: host-local
status:
ipFamilies:
- IPv4
The spec of above resources is divided into two parts (more information can be found at Using the Networking Calico Extension):
- global configuration (e.g., podCIDR, serviceCIDR, and type)
- provider specific config (e.g., for calico we can choose to configure a
birdbackend)
Note: Certain cloud-provider extensions might have webhooks that would modify the network-resource to fit into their network specific context. As previously mentioned, Azure does not support IPIP, as a result, the Azure provider extension implements a webhook to mutate the backend and set it to
Noneinstead ofbird.
Supporting a New Network Extension Provider
To add support for another networking provider (e.g., weave, Cilium, Flannel) a network extension controller needs to be implemented which would optionally have its own custom configuration specified in the spec.providerConfig in the Network resource. For example, if support for a network plugin named gardenet is required, the following Network resource would be created:
---
apiVersion: extensions.gardener.cloud/v1alpha1
kind: Network
metadata:
name: my-network
spec:
ipFamilies:
- IPv4
podCIDR: 100.244.0.0/16
serviceCIDR: 100.32.0.0/13
type: gardenet
providerConfig:
apiVersion: gardenet.networking.extensions.gardener.cloud/v1alpha1
kind: NetworkConfig
gardenetCustomConfigField: <value>
ipam:
cidr: usePodCIDR
type: host-local
Once applied, the presumably implemented Gardenet extension controller would pick the configuration up, parse the providerConfig, and create the necessary resources in the shoot.
For additional reference, please have a look at the networking-calico provider extension, which provides more information on how to configure the necessary charts, as well as the actuators required to reconcile networking inside the Shoot cluster to the desired state.
Supporting kube-proxy-less Service Routing
Some networking extensions support service routing without the kube-proxy component. This is why Gardener supports disabling of kube-proxy for service routing by setting .spec.kubernetes.kubeproxy.enabled to false in the Shoot specification. The implicit contract of the flag is:
If kube-proxy is disabled, then the networking extension is responsible for the service routing.
The networking extensions need to handle this twofold:
- During the reconciliation of the networking resources, the extension needs to check whether
kube-proxytakes care of the service routing or the networking extension itself should handle it. In case the networking extension should be responsible according to.spec.kubernetes.kubeproxy.enabled(but is unable to perform the service routing), it should raise an error during the reconciliation. If the networking extension should handle the service routing, it may reconfigure itself accordingly. - (Optional) In case the networking extension does not support taking over the service routing (in some scenarios), it is recommended to also provide a validating admission webhook to reject corresponding changes early on. The validation may take the current operating mode of the networking extension into consideration.
Supporting Migration of ipFamilies
To enable the migration from a shoot cluster with single-stack networking to a cluster with dual-stack networking, the status field of the Network resource includes the ipFamilies field.
This field reflects the currently deployed configuration and is used to verify whether the migration process has been completed successfully. To support the migration from single-stack to dual-stack networking, a network extension provider must ensure that this field is properly maintained and updated during the migration process.
Related Links
4.5.18.10 - OperatingSystemConfig
Contract: OperatingSystemConfig Resource
Gardener uses the machine API and leverages the functionalities of the machine-controller-manager (MCM) in order to manage the worker nodes of a shoot cluster. The machine-controller-manager itself simply takes a reference to an OS-image and (optionally) some user-data (a script or configuration that is executed when a VM is bootstrapped), and forwards both to the provider’s API when creating VMs. MCM does not have any restrictions regarding supported operating systems as it does not modify or influence the machine’s configuration in any way - it just creates/deletes machines with the provided metadata.
Consequently, Gardener needs to provide this information when interacting with the machine-controller-manager. This means that basically every operating system is possible to be used, as long as there is some implementation that generates the OS-specific configuration in order to provision/bootstrap the machines.
⚠️ Currently, there are a few requirements of pre-installed components that must be present in all OS images:
- containerd
- ctr (client CLI)
containerdmust listen on its default socket path:unix:///run/containerd/containerd.sockcontainerdmust be configured to work with the default configuration file in:/etc/containerd/config.toml(eventually created by Gardener).
- systemd
The reasons for that will become evident later.
What does the user-data bootstrapping the machines contain?
Gardener installs a few components onto every worker machine in order to allow it to join the shoot cluster.
There is the kubelet process and also configuration for log rotation, CA certificates, etc.
You can find the complete configuration at the components folder. We are calling this the “original” user-data.
How does Gardener bootstrap the machines?
gardenlet makes use of gardener-node-agent to perform the bootstrapping and reconciliation of systemd units and files on the machine.
Please refer to this document for a first overview.
Usually, you would submit all the components you want to install onto the machine as part of the user-data during creation time.
However, some providers do have a size limitation (around ~16KB) for that user-data.
That’s why we do not send the “original” user-data to the machine-controller-manager (who then forwards it to the provider’s API).
Instead, we only send a small “init” script that bootstrap the gardener-node-agent.
It fetches the “original” content from a Secret and applies it on the machine directly.
This way we can extend the “original” user-data without any size restrictions (except for the 1 MB limit for Secrets).
The high-level flow is as follows:
- For every worker pool
Xin theShootspecification, Gardener creates aSecretnamedcloud-config-<X>in thekube-systemnamespace of the shoot cluster. The secret contains the “original”OperatingSystemConfig(i.e., systemd units and files forkubelet). - Gardener generates a kubeconfig with minimal permissions just allowing reading these secrets. It is used by the
gardener-node-agentlater. - Gardener provides the
gardener-node-init.shbash script and the machine image stated in theShootspecification to the machine-controller-manager. - Based on this information, the machine-controller-manager creates the VM.
- After the VM has been provisioned, the
gardener-node-init.shscript starts, fetches thegardener-node-agentbinary, and starts it. - The
gardener-node-agentwill read thegardener-node-agent-<X>Secretfor its worker pool (containing the “original”OperatingSystemConfig), and reconciles it.
The gardener-node-agent can update itself in case of newer Gardener versions, and it performs a continuous reconciliation of the systemd units and files in the provided OperatingSystemConfig (just like any other Kubernetes controller).
What needs to be implemented to support a new operating system?
As part of the Shoot reconciliation flow, gardenlet will create a special CRD in the seed cluster that needs to be reconciled by an extension controller, for example:
---
apiVersion: extensions.gardener.cloud/v1alpha1
kind: OperatingSystemConfig
metadata:
name: pool-01-original
namespace: default
spec:
type: <my-operating-system>
purpose: reconcile
units:
- name: containerd.service
dropIns:
- name: 10-containerd-opts.conf
content: |
[Service]
Environment="SOME_OPTS=--foo=bar"
files:
- path: /var/lib/kubelet/ca.crt
permissions: 0644
encoding: b64
content:
secretRef:
name: default-token-5dtjz
dataKey: token
- path: /etc/sysctl.d/99-k8s-general.conf
permissions: 0644
content:
inline:
data: |
# A higher vm.max_map_count is great for elasticsearch, mongo, or other mmap users
# See https://github.com/kubernetes/kops/issues/1340
vm.max_map_count = 135217728
In order to support a new operating system, you need to write a controller that watches all OperatingSystemConfigs with .spec.type=<my-operating-system>.
For those it shall generate a configuration blob that fits to your operating system.
OperatingSystemConfigs can have two purposes: either provision or reconcile.
provision Purpose
The provision purpose is used by gardenlet for the user-data that it later passes to the machine-controller-manager (and then to the provider’s API) when creating new VMs.
It contains the gardener-node-init.sh script and systemd unit.
The OS controller has to translate the .spec.units and .spec.files into configuration that fits to the operating system.
For example, a Flatcar controller might generate a CoreOS cloud-config or Ignition, SLES might generate cloud-init, and others might simply generate a bash script translating the .spec.units into systemd units, and .spec.files into real files on the disk.
⚠️ Please avoid mixing in additional systemd units or files - this step should just translate what
gardenletput into.spec.unitsand.spec.files.
After generation, extension controllers are asked to store their OS config inside a Secret (as it might contain confidential data) in the same namespace.
The secret’s .data could look like this:
apiVersion: v1
kind: Secret
metadata:
name: osc-result-pool-01-original
namespace: default
ownerReferences:
- apiVersion: extensions.gardener.cloud/v1alpha1
blockOwnerDeletion: true
controller: true
kind: OperatingSystemConfig
name: pool-01-original
uid: 99c0c5ca-19b9-11e9-9ebd-d67077b40f82
data:
cloud_config: base64(generated-user-data)
Finally, the secret’s metadata must be provided in the OperatingSystemConfig’s .status field:
...
status:
cloudConfig:
secretRef:
name: osc-result-pool-01-original
namespace: default
lastOperation:
description: Successfully generated cloud config
lastUpdateTime: "2019-01-23T07:45:23Z"
progress: 100
state: Succeeded
type: Reconcile
observedGeneration: 5
reconcile Purpose
The reconcile purpose contains the “original” OperatingSystemConfig (which is later stored in Secrets in the shoot’s kube-system namespace (see step 1)). This is downloaded and applies late (see step 5).
The OS controller does not need to translate anything here, but it has the option to provide additional systemd units or files via the .status field:
status:
extensionUnits:
- name: my-custom-service.service
command: start
enable: true
content: |
[Unit]
// some systemd unit content
extensionFiles:
- path: /etc/some/file
permissions: 0644
content:
inline:
data: some-file-content
lastOperation:
description: Successfully generated cloud config
lastUpdateTime: "2019-01-23T07:45:23Z"
progress: 100
state: Succeeded
type: Reconcile
observedGeneration: 5
The gardener-node-agent will merge .spec.units and .status.extensionUnits as well as .spec.files and .status.extensionFiles when applying.
You can find an example implementation here.
As described above, the “original” user-data must be re-applicable to allow in-place updates.
The way how this is done is specific to the generated operating system config (e.g., for CoreOS cloud-init the command is /usr/bin/coreos-cloudinit --from-file=<path>, whereas SLES would run cloud-init --file <path> single -n write_files --frequency=once).
Consequently, besides the generated OS config, the extension controller must also provide a command for re-application an updated version of the user-data.
As visible in the mentioned examples, the command requires a path to the user-data file.
As soon as Gardener detects that the user data has changed it will reload the systemd daemon and restart all the units provided in the .status.units[] list (see the below example). The same logic applies during the very first application of the whole configuration.
After generation, extension controllers are asked to store their OS config inside a Secret (as it might contain confidential data) in the same namespace.
The secret’s .data could look like this:
apiVersion: v1
kind: Secret
metadata:
name: osc-result-pool-01-original
namespace: default
ownerReferences:
- apiVersion: extensions.gardener.cloud/v1alpha1
blockOwnerDeletion: true
controller: true
kind: OperatingSystemConfig
name: pool-01-original
uid: 99c0c5ca-19b9-11e9-9ebd-d67077b40f82
data:
cloud_config: base64(generated-user-data)
Finally, the secret’s metadata, the OS-specific command to re-apply the configuration, and the list of systemd units that shall be considered to be restarted if an updated version of the user-data is re-applied must be provided in the OperatingSystemConfig’s .status field:
...
status:
cloudConfig:
secretRef:
name: osc-result-pool-01-original
namespace: default
lastOperation:
description: Successfully generated cloud config
lastUpdateTime: "2019-01-23T07:45:23Z"
progress: 100
state: Succeeded
type: Reconcile
observedGeneration: 5
Once the .status indicates that the extension controller finished reconciling Gardener will continue with the next step of the shoot reconciliation flow.
Bootstrap Tokens
gardenlet adds a file with the content <<BOOTSTRAP_TOKEN>> to the OperatingSystemConfig with purpose provision and sets transmitUnencoded=true.
This instructs the responsible OS extension to pass this file (with its content in clear-text) to the corresponding Worker resource.
machine-controller-manager makes sure that:
- a bootstrap token gets created per machine
- the
<<BOOTSTRAP_TOKEN>>string in the user data of the machine gets replaced by the generated token
After the machine has been bootstrapped, the token secret in the shoot cluster gets deleted again.
The token is used to bootstrap Gardener Node Agent and kubelet.
In-Place OS Updates
Gardener enables in-place OS updates for worker nodes, allowing OS updates without replacing the node. This feature executes a predefined command on the node to perform the update.
For an OS to support in-place updates, it must meet the following prerequisites:
- The machine image or operating system must support in-place updates with a tool or utility to initiate the process.
- The update mechanism should ensure reliability by:
- Booting into the updated version if successful.
- Reverting to the previous version in case of failure.
- The update tool may also provide configuration options, including:
- Retry Configuration: The ability to define the number of retries for the update.
- Registry Configuration: The option to specify the registry from which the OS image is pulled.
An OS supporting in-place updates must define the update configuration in .status.inPlaceUpdates as follows:
status:
inPlaceUpdates:
osUpdate:
command: /update-me
args:
- foo
- bar
command: Specifies the path to the OS update utility or script to be executed on the node.args: Provides optional flags or arguments to customize the update behavior.
CRI Support
Gardener supports specifying a Container Runtime Interface (CRI) configuration in the OperatingSystemConfig resource. If the .spec.cri section exists, then the name property is mandatory. The only supported value for cri.name at the moment is: containerd.
For example:
apiVersion: extensions.gardener.cloud/v1alpha1
kind: OperatingSystemConfig
metadata:
name: pool-01-original
namespace: default
spec:
type: <my-operating-system>
purpose: reconcile
cri:
name: containerd
# cgroupDriver: cgroupfs # or systemd
containerd:
sandboxImage: registry.k8s.io/pause
# registries:
# - upstream: docker.io
# server: https://registry-1.docker.io
# hosts:
# - url: http://<service-ip>:<port>]
# plugins:
# - op: add # add (default) or remove
# path: [io.containerd.grpc.v1.cri, containerd]
# values: '{"default_runtime_name": "runc"}'
...
To support containerd, an OS extension must satisfy the following criteria:
- The operating system must have built-in containerd and ctr (client CLI).
containerdmust listen on its default socket path:unix:///run/containerd/containerd.sockcontainerdmust be configured to work with the default configuration file in:/etc/containerd/config.toml(Created by Gardener).
For a convenient handling, gardener-node-agent can manage various aspects of containerd’s config, e.g. the registry configuration, if given in the OperatingSystemConfig.
Any Gardener extension which needs to modify the config, should check the functionality exposed through this API first.
If applicable, adjustments can be implemented through mutating webhooks, acting on the created or updated OperatingSystemConfig resource.
If CRI configurations are not supported, it is recommended to create a validating webhook running in the garden cluster that prevents specifying the .spec.providers.workers[].cri section in the Shoot objects.
cgroup driver
For Shoot clusters using Kubernetes < 1.31, Gardener is setting the kubelet’s cgroup driver to cgroupfs and containerd’s cgroup driver is unmanaged. For Shoot clusters using Kubernetes 1.31+, Gardener is setting both kubelet’s and containerd’s cgroup driver to systemd.
The systemd cgroup driver is a requirement for operating systems using cgroup v2. It’s important to ensure that both kubelet and the container runtime (containerd) are using the same cgroup driver to avoid potential issues.
OS extensions might also overwrite the cgroup driver for containerd and kubelet.
References and Additional Resources
4.5.18.11 - Worker
Contract: Worker Resource
While the control plane of a shoot cluster is living in the seed and deployed as native Kubernetes workload, the worker nodes of the shoot clusters are normal virtual machines (VMs) in the end-users infrastructure account.
The Gardener project features a sub-project called machine-controller-manager.
This controller is extending the Kubernetes API using custom resource definitions to represent actual VMs as Machine objects inside a Kubernetes system.
This approach unlocks the possibility to manage virtual machines in the Kubernetes style and benefit from all its design principles.
What is the machine-controller-manager doing exactly?
Generally, there are provider-specific MachineClass objects (AWSMachineClass, AzureMachineClass, etc.; similar to StorageClass), and MachineDeployment, MachineSet, and Machine objects (similar to Deployment, ReplicaSet, and Pod).
A machine class describes where and how to create virtual machines (in which networks, region, availability zone, SSH key, user-data for bootstrapping, etc.), while a Machine results in an actual virtual machine.
You can read up more information in the machine-controller-manager’s repository.
The gardenlet deploys the machine-controller-manager, hence, provider extensions only have to inject their specific out-of-tree machine-controller-manager sidecar container into the Deployment.
What needs to be implemented to support a new worker provider?
As part of the shoot flow Gardener will create a special CRD in the seed cluster that needs to be reconciled by an extension controller, for example:
---
apiVersion: extensions.gardener.cloud/v1alpha1
kind: Worker
metadata:
name: bar
namespace: shoot--foo--bar
spec:
type: azure
region: eu-west-1
secretRef:
name: cloudprovider
namespace: shoot--foo--bar
infrastructureProviderStatus:
apiVersion: aws.provider.extensions.gardener.cloud/v1alpha1
kind: InfrastructureStatus
ec2:
keyName: shoot--foo--bar-ssh-publickey
iam:
instanceProfiles:
- name: shoot--foo--bar-nodes
purpose: nodes
roles:
- arn: arn:aws:iam::0123456789:role/shoot--foo--bar-nodes
purpose: nodes
vpc:
id: vpc-0123456789
securityGroups:
- id: sg-1234567890
purpose: nodes
subnets:
- id: subnet-01234
purpose: nodes
zone: eu-west-1b
- id: subnet-56789
purpose: public
zone: eu-west-1b
- id: subnet-0123a
purpose: nodes
zone: eu-west-1c
- id: subnet-5678a
purpose: public
zone: eu-west-1c
pools:
- name: cpu-worker
minimum: 3
maximum: 5
maxSurge: 1
maxUnavailable: 0
machineType: m4.large
machineImage:
name: coreos
version: 1967.5.0
nodeAgentSecretName: gardener-node-agent-local-ee46034b8269353b
nodeTemplate:
capacity:
cpu: 2
gpu: 0
memory: 8Gi
virtualCapacity:
subdomain.domain.com/resource-name: 1234567
labels:
node.kubernetes.io/role: node
worker.gardener.cloud/cri-name: containerd
worker.gardener.cloud/pool: cpu-worker
worker.gardener.cloud/system-components: "true"
userDataSecretRef:
name: user-data-secret
key: cloud_config
volume:
size: 20Gi
type: gp2
zones:
- eu-west-1b
- eu-west-1c
machineControllerManager:
drainTimeout: 10m
healthTimeout: 10m
creationTimeout: 10m
maxEvictRetries: 30
nodeConditions:
- ReadonlyFilesystem
- DiskPressure
- KernelDeadlock
clusterAutoscaler:
scaleDownUtilizationThreshold: 0.5
scaleDownGpuUtilizationThreshold: 0.5
scaleDownUnneededTime: 30m
scaleDownUnreadyTime: 1h
maxNodeProvisionTime: 15m
The .spec.secretRef contains a reference to the provider secret pointing to the account that shall be used to create the needed virtual machines.
Also, as you can see, Gardener copies the output of the infrastructure creation (.spec.infrastructureProviderStatus, see Infrastructure resource), into the .spec.
In the .spec.pools[] field, the desired worker pools are listed.
In the above example, one pool with machine type m4.large and min=3, max=5 machines shall be spread over two availability zones (eu-west-1b, eu-west-1c).
This information together with the infrastructure status must be used to determine the proper configuration for the machine classes.
The spec.pools[].labels map contains all labels that should be added to all nodes of the corresponding worker pool.
Gardener configures kubelet’s --node-labels flag to contain all labels that are mentioned here and allowed by the NodeRestriction admission plugin.
This makes sure that kubelet adds all user-specified and gardener-managed labels to the new Node object when registering a new machine with the API server.
Nevertheless, this is only effective when bootstrapping new nodes.
The provider extension (respectively, machine-controller-manager) is still responsible for updating the labels of existing Nodes when the worker specification changes.
The spec.pools[].nodeTemplate.capacity field contains the resource information of the machine like cpu, gpu, and memory. This info is used by Cluster Autoscaler to generate nodeTemplate during scaling the nodeGroup from zero.
The spec.pools[].nodeTemplate.virtualCapacity field contains the virtual resource information associated with the machine and used to specify extended resources that are virtual in nature (for specifying real, provisionable resources, nodeTemplate.capacity should be used). This will be applied to the machine class nodeTemplate without triggering a rollout of the cluster and will be used by Cluster Autoscaler for scaling the nodeGroup.
The spec.pools[].machineControllerManager field allows to configure the settings for machine-controller-manager component. Providers must populate these settings on worker-pool to the related fields in MachineDeployment.
The spec.pools[].clusterAutoscaler field contains cluster-autoscaler settings that are to be applied only to specific worker group. cluster-autoscaler expects to find these settings as annotations on the MachineDeployment, and so providers must pass these values to the corresponding MachineDeployment via annotations. The keys for these annotations can be found here and the values for the corresponding annotations should be the same as what is passed into the field. Providers can use the helper function extensionsv1alpha1helper.GetMachineDeploymentClusterAutoscalerAnnotations that returns the annotation map to be used.
The controller must only inject its provider-specific sidecar container into the machine-controller-manager Deployment managed by gardenlet.
After that, it must compute the desired machine classes and the desired machine deployments. Typically, one class maps to one deployment, and one class/deployment is created per availability zone. Following this convention, the created resource would look like this:
apiVersion: v1
kind: Secret
metadata:
name: shoot--foo--bar-cpu-worker-z1-3db65
namespace: shoot--foo--bar
labels:
gardener.cloud/purpose: machineclass
type: Opaque
data:
providerAccessKeyId: eW91ci1hd3MtYWNjZXNzLWtleS1pZAo=
providerSecretAccessKey: eW91ci1hd3Mtc2VjcmV0LWFjY2Vzcy1rZXkK
userData: c29tZSBkYXRhIHRvIGJvb3RzdHJhcCB0aGUgVk0K
---
apiVersion: machine.sapcloud.io/v1alpha1
kind: AWSMachineClass
metadata:
name: shoot--foo--bar-cpu-worker-z1-3db65
namespace: shoot--foo--bar
spec:
ami: ami-0123456789 # Your controller must map the stated version to the provider specific machine image information, in the AWS case the AMI.
blockDevices:
- ebs:
volumeSize: 20
volumeType: gp2
iam:
name: shoot--foo--bar-nodes
keyName: shoot--foo--bar-ssh-publickey
machineType: m4.large
networkInterfaces:
- securityGroupIDs:
- sg-1234567890
subnetID: subnet-01234
region: eu-west-1
secretRef:
name: shoot--foo--bar-cpu-worker-z1-3db65
namespace: shoot--foo--bar
tags:
kubernetes.io/cluster/shoot--foo--bar: "1"
kubernetes.io/role/node: "1"
---
apiVersion: machine.sapcloud.io/v1alpha1
kind: MachineDeployment
metadata:
name: shoot--foo--bar-cpu-worker-z1
namespace: shoot--foo--bar
spec:
replicas: 2
selector:
matchLabels:
name: shoot--foo--bar-cpu-worker-z1
strategy:
type: RollingUpdate
rollingUpdate:
maxSurge: 1
maxUnavailable: 0
template:
metadata:
labels:
name: shoot--foo--bar-cpu-worker-z1
spec:
class:
kind: AWSMachineClass
name: shoot--foo--bar-cpu-worker-z1-3db65
for the first availability zone eu-west-1b, and
apiVersion: v1
kind: Secret
metadata:
name: shoot--foo--bar-cpu-worker-z2-5z6as
namespace: shoot--foo--bar
labels:
gardener.cloud/purpose: machineclass
type: Opaque
data:
providerAccessKeyId: eW91ci1hd3MtYWNjZXNzLWtleS1pZAo=
providerSecretAccessKey: eW91ci1hd3Mtc2VjcmV0LWFjY2Vzcy1rZXkK
userData: c29tZSBkYXRhIHRvIGJvb3RzdHJhcCB0aGUgVk0K
---
apiVersion: machine.sapcloud.io/v1alpha1
kind: AWSMachineClass
metadata:
name: shoot--foo--bar-cpu-worker-z2-5z6as
namespace: shoot--foo--bar
spec:
ami: ami-0123456789 # Your controller must map the stated version to the provider specific machine image information, in the AWS case the AMI.
blockDevices:
- ebs:
volumeSize: 20
volumeType: gp2
iam:
name: shoot--foo--bar-nodes
keyName: shoot--foo--bar-ssh-publickey
machineType: m4.large
networkInterfaces:
- securityGroupIDs:
- sg-1234567890
subnetID: subnet-0123a
region: eu-west-1
secretRef:
name: shoot--foo--bar-cpu-worker-z2-5z6as
namespace: shoot--foo--bar
tags:
kubernetes.io/cluster/shoot--foo--bar: "1"
kubernetes.io/role/node: "1"
---
apiVersion: machine.sapcloud.io/v1alpha1
kind: MachineDeployment
metadata:
name: shoot--foo--bar-cpu-worker-z1
namespace: shoot--foo--bar
spec:
replicas: 1
selector:
matchLabels:
name: shoot--foo--bar-cpu-worker-z1
strategy:
type: RollingUpdate
rollingUpdate:
maxSurge: 1
maxUnavailable: 0
template:
metadata:
labels:
name: shoot--foo--bar-cpu-worker-z1
spec:
class:
kind: AWSMachineClass
name: shoot--foo--bar-cpu-worker-z2-5z6as
for the second availability zone eu-west-1c.
Another convention is the 5-letter hash at the end of the machine class names.
Most controllers compute a checksum out of the specification of the machine class.
Any change to the value of the nodeAgentSecretName field must result in a change of the machine class name.
The checksum in the machine class name helps to trigger a rolling update of the worker nodes if, for example, the machine image version changes.
In this case, a new checksum will be generated which results in the creation of a new machine class.
The MachineDeployment’s machine class reference (.spec.template.spec.class.name) is updated, which triggers the rolling update process in the machine-controller-manager.
However, all of this is only a convention that eases writing the controller, but you can do it completely differently if you desire - as long as you make sure that the described behaviours are implemented correctly.
After the machine classes and machine deployments have been created, the machine-controller-manager will start talking to the provider’s IaaS API and create the virtual machines.
Gardener makes sure that the content of the Secret referenced in the userDataSecretRef field that is used to bootstrap the machines contains the required configuration for installation of the kubelet and registering the VM as worker node in the shoot cluster.
The Worker extension controller shall wait until all the created MachineDeployments indicate healthiness/readiness before it ends the control loop.
Does Gardener need some information that must be returned back?
Another important benefit of the machine-controller-manager’s design principles (extending the Kubernetes API using CRDs) is that the cluster-autoscaler can be used without any provider-specific implementation. We have forked the upstream Kubernetes community’s cluster-autoscaler and extended it so that it understands the machine API. Definitely, we will merge it back into the community’s versions once it has been adapted properly.
Our cluster-autoscaler only needs to know the minimum and maximum number of replicas per MachineDeployment and is ready to act. Without knowing that, it needs to talk to the provider APIs (it just modifies the .spec.replicas field in the MachineDeployment object).
Gardener deploys this autoscaler if there is at least one worker pool that specifies max>min.
In order to know how it needs to configure it, the provider-specific Worker extension controller must expose which MachineDeployments it has created and how the min/max numbers should look like.
Consequently, your controller should write this information into the Worker resource’s .status.machineDeployments field. It should also update the .status.machineDeploymentsLastUpdateTime field along with .status.machineDeployments, so that gardener is able to deploy Cluster-Autoscaler right after the status is updated with the latest MachineDeployments and does not wait for the reconciliation to be completed:
---
apiVersion: extensions.gardener.cloud/v1alpha1
kind: Worker
metadata:
name: worker
namespace: shoot--foo--bar
spec:
...
status:
lastOperation: ...
machineDeployments:
- name: shoot--foo--bar-cpu-worker-z1
minimum: 2
maximum: 3
- name: shoot--foo--bar-cpu-worker-z2
minimum: 1
maximum: 2
machineDeploymentsLastUpdateTime: "2023-05-01T12:44:27Z"
In order to support a new worker provider, you need to write a controller that watches all Workers with .spec.type=<my-provider-name>.
You can take a look at the below referenced example implementation for the AWS provider.
That sounds like a lot that needs to be done, can you help me?
All of the described behaviour is mostly the same for every provider.
The only difference is maybe the version/configuration of the provider-specific machine-controller-manager sidecar container, and the machine class specification itself.
You can take a look at our extension library, especially the worker controller part where you will find a lot of utilities that you can use.
Note that there are also utility functions for getting the default sidecar container specification or corresponding VPA container policy in the machinecontrollermanager package called ProviderSidecarContainer and ProviderSidecarVPAContainerPolicy.
Also, using the library you only need to implement your provider specifics - all the things that can be handled generically can be taken for free and do not need to be re-implemented.
Take a look at the AWS worker controller for finding an example.
Non-provider specific information required for worker creation
All the providers require further information that is not provider specific but already part of the shoot resource.
One example for such information is whether the shoot is hibernated or not.
In this case, all the virtual machines should be deleted/terminated, and after that the machine controller-manager should be scaled down.
You can take a look at the AWS worker controller to see how it reads this information and how it is used.
As Gardener cannot know which information is required by providers, it simply mirrors the Shoot, Seed, and CloudProfile resources into the seed.
They are part of the Cluster extension resource and can be used to extract information that is not part of the Worker resource itself.
References and Additional Resources
4.5.19 - Shoot Health Status Conditions
Contributing to Shoot Health Status Conditions
Gardener checks regularly (every minute by default) the health status of all shoot clusters. It categorizes its checks into five different types:
APIServerAvailable: This type indicates whether the shoot’s kube-apiserver is available or not.ControlPlaneHealthy: This type indicates whether the core components of the Shoot controlplane (ETCD, KAPI, KCM..) are healthy.EveryNodeReady: This type indicates whether allNodes and allMachineobjects report healthiness.ObservabilityComponentsHealthy: This type indicates whether the observability components of the Shoot control plane (Prometheus, Vali, Plutono..) are healthy.SystemComponentsHealthy: This type indicates whether all system components deployed to thekube-systemnamespace in the shoot do exist and are running fine.
In case of workerless Shoot, EveryNodeReady condition is not present in the Shoot’s conditions since there are no nodes in the cluster.
Every Shoot resource has a status.conditions[] list that contains the mentioned types, together with a status (True/False) and a descriptive message/explanation of the status.
Most extension controllers are deploying components and resources as part of their reconciliation flows into the seed or shoot cluster.
A prominent example for this is the ControlPlane controller that usually deploys a cloud-controller-manager or CSI controllers as part of the shoot control plane.
Now that the extensions deploy resources into the cluster, especially resources that are essential for the functionality of the cluster, they might want to contribute to Gardener’s checks mentioned above.
What can extensions do to contribute to Gardener’s health checks?
Every extension resource in Gardener’s extensions.gardener.cloud/v1alpha1 API group also has a status.conditions[] list (like the Shoot).
Extension controllers can write conditions to the resource they are acting on and use a type that also exists in the shoot’s conditions.
One exception is that APIServerAvailable can’t be used, as Gardener clearly can identify the status of this condition and it doesn’t make sense for extensions to try to contribute/modify it.
As an example for the ControlPlane controller, let’s take a look at the following resource:
apiVersion: extensions.gardener.cloud/v1alpha1
kind: ControlPlane
metadata:
name: control-plane
namespace: shoot--foo--bar
spec:
...
status:
conditions:
- type: ControlPlaneHealthy
status: "False"
reason: DeploymentUnhealthy
message: 'Deployment cloud-controller-manager is unhealthy: condition "Available" has
invalid status False (expected True) due to MinimumReplicasUnavailable: Deployment
does not have minimum availability.'
lastUpdateTime: "2014-05-25T12:44:27Z"
- type: ConfigComputedSuccessfully
status: "True"
reason: ConfigCreated
message: The cloud-provider-config has been successfully computed.
lastUpdateTime: "2014-05-25T12:43:27Z"
The extension controller has declared in its extension resource that one of the deployments it is responsible for is unhealthy. Also, it has written a second condition using a type that is unknown by Gardener.
Gardener will pick the list of conditions and recognize that there is one with a type ControlPlaneHealthy.
It will merge it with its own ControlPlaneHealthy condition and report it back to the Shoot’s status:
apiVersion: core.gardener.cloud/v1beta1
kind: Shoot
metadata:
labels:
shoot.gardener.cloud/status: unhealthy
name: some-shoot
namespace: garden-core
spec:
status:
conditions:
- type: APIServerAvailable
status: "True"
reason: HealthzRequestSucceeded
message: API server /healthz endpoint responded with success status code. [response_time:31ms]
lastUpdateTime: "2014-05-23T08:26:52Z"
lastTransitionTime: "2014-05-25T12:45:13Z"
- type: ControlPlaneHealthy
status: "False"
reason: ControlPlaneUnhealthyReport
message: 'Deployment cloud-controller-manager is unhealthy: condition "Available" has
invalid status False (expected True) due to MinimumReplicasUnavailable: Deployment
does not have minimum availability.'
lastUpdateTime: "2014-05-25T12:45:13Z"
lastTransitionTime: "2014-05-25T12:45:13Z"
...
Hence, the only duty extensions have is to maintain the health status of their components in the extension resource they are managing. This can be accomplished using the health check library for extensions.
Error Codes
The Gardener API includes some well-defined error codes, e.g., ERR_INFRA_UNAUTHORIZED, ERR_INFRA_DEPENDENCIES, etc.
Extension may set these error codes in the .status.conditions[].codes[] list in case it makes sense.
Gardener will pick them up and will similarly merge them into the .status.conditions[].codes[] list in the Shoot:
status:
conditions:
- type: ControlPlaneHealthy
status: "False"
reason: DeploymentUnhealthy
message: 'Deployment cloud-controller-manager is unhealthy: condition "Available" has
invalid status False (expected True) due to MinimumReplicasUnavailable: Deployment
does not have minimum availability.'
lastUpdateTime: "2014-05-25T12:44:27Z"
codes:
- ERR_INFRA_UNAUTHORIZED
4.5.20 - Shoot Maintenance
Shoot Maintenance
There is a general document about shoot maintenance that you might want to read. Here, we describe how you can influence certain operations that happen during a shoot maintenance.
Restart Control Plane Controllers
As outlined in the above linked document, Gardener offers to restart certain control plane controllers running in the seed during a shoot maintenance.
Extension controllers can extend the amount of pods being affected by these restarts.
If your Gardener extension manages pods of a shoot’s control plane (shoot namespace in seed) and it could potentially profit from a regular restart, please consider labeling it with maintenance.gardener.cloud/restart=true.
4.5.21 - Shoot Webhooks
Shoot Resource Customization Webhooks
Gardener deploys several components/resources into the shoot cluster.
Some of these resources are essential (like the kube-proxy), others are optional addons (like the kubernetes-dashboard or the nginx-ingress-controller).
In either case, some provider extensions might need to mutate these resources and inject provider-specific bits into it.
What’s the approach to implement such mutations?
Similar to how control plane components in the seed are modified, we are using MutatingWebhookConfigurations to achieve the same for resources in the shoot.
Both the provider extension and the kube-apiserver of the shoot cluster are running in the same seed.
Consequently, the kube-apiserver can talk cluster-internally to the provider extension webhook, which makes such operations even faster.
How is the MutatingWebhookConfiguration object created in the shoot?
The preferred approach is to use a ManagedResource (see also Deploy Resources to the Shoot Cluster) in the seed cluster.
This way the gardener-resource-manager ensures that end-users cannot delete/modify the webhook configuration.
The provider extension doesn’t need to care about the same.
What else is needed?
The shoot’s kube-apiserver must be allowed to talk to the provider extension.
To achieve this, you need to make sure that the relevant NetworkPolicy get created for allowing the network traffic.
Please refer to this guide for more information.
Autonomous Shoot Clusters
If running in an autonomous shoot cluster, the shoot webhooks should be merged into the seed webhooks.
You can do so by setting the mergeShootWebhooksIntoSeedWebhooks to true in the extensions/pkg/webhook/cmd.AddToManager function.
Take a look at this document in order to determine whether the extension runs in an autonomous shoot cluster.
4.6 - High Availability
4.6.1 - Implementing High Availability and Tolerating Zone Outages
Implementing High Availability and Tolerating Zone Outages
Developing highly available workload that can tolerate a zone outage is no trivial task. You will find here various recommendations to get closer to that goal. While many recommendations are general enough, the examples are specific in how to achieve this in a Gardener-managed cluster and where/how to tweak the different control plane components. If you do not use Gardener, it may be still a worthwhile read.
First however, what is a zone outage? It sounds like a clear-cut “thing”, but it isn’t. There are many things that can go haywire. Here are some examples:
- Elevated cloud provider API error rates for individual or multiple services
- Network bandwidth reduced or latency increased, usually also effecting storage sub systems as they are network attached
- No networking at all, no DNS, machines shutting down or restarting, …
- Functional issues, of either the entire service (e.g. all block device operations) or only parts of it (e.g. LB listener registration)
- All services down, temporarily or permanently (the proverbial burning down data center 🔥)
This and everything in between make it hard to prepare for such events, but you can still do a lot. The most important recommendation is to not target specific issues exclusively - tomorrow another service will fail in an unanticipated way. Also, focus more on meaningful availability than on internal signals (useful, but not as relevant as the former). Always prefer automation over manual intervention (e.g. leader election is a pretty robust mechanism, auto-scaling may be required as well, etc.).
Also remember that HA is costly - you need to balance it against the cost of an outage as silly as this may sound, e.g. running all this excess capacity “just in case” vs. “going down” vs. a risk-based approach in between where you have means that will kick in, but they are not guaranteed to work (e.g. if the cloud provider is out of resource capacity). Maybe some of your components must run at the highest possible availability level, but others not - that’s a decision only you can make.
Control Plane
The Kubernetes cluster control plane is managed by Gardener (as pods in separate infrastructure clusters to which you have no direct access) and can be set up with no failure tolerance (control plane pods will be recreated best-effort when resources are available) or one of the failure tolerance types node or zone.
Strictly speaking, static workload does not depend on the (high) availability of the control plane, but static workload doesn’t rhyme with Cloud and Kubernetes and also means, that when you possibly need it the most, e.g. during a zone outage, critical self-healing or auto-scaling functionality won’t be available to you and your workload, if your control plane is down as well. That’s why, even though the resource consumption is significantly higher, we generally recommend to use the failure tolerance type zone for the control planes of productive clusters, at least in all regions that have 3+ zones. Regions that have only 1 or 2 zones don’t support the failure tolerance type zone and then your second best option is the failure tolerance type node, which means a zone outage can still take down your control plane, but individual node outages won’t.
In the shoot resource it’s merely only this what you need to add:
apiVersion: core.gardener.cloud/v1beta1
kind: Shoot
spec:
controlPlane:
highAvailability:
failureTolerance:
type: zone # valid values are `node` and `zone` (only available if your control plane resides in a region with 3+ zones)
This setting will scale out all control plane components for a Gardener cluster as necessary, so that no single zone outage can take down the control plane for longer than just a few seconds for the fail-over to take place (e.g. lease expiration and new leader election or readiness probe failure and endpoint removal). Components run highly available in either active-active (servers) or active-passive (controllers) mode at all times, the persistence (ETCD), which is consensus-based, will tolerate the loss of one zone and still maintain quorum and therefore remain operational. These are all patterns that we will revisit down below also for your own workload.
Worker Pools
Now that you have configured your Kubernetes cluster control plane in HA, i.e. spread it across multiple zones, you need to do the same for your own workload, but in order to do so, you need to spread your nodes across multiple zones first.
apiVersion: core.gardener.cloud/v1beta1
kind: Shoot
spec:
provider:
workers:
- name: ...
minimum: 6
maximum: 60
zones:
- ...
Prefer regions with at least 2, better 3+ zones and list the zones in the zones section for each of your worker pools. Whether you need 2 or 3 zones at a minimum depends on your fail-over concept:
- Consensus-based software components (like ETCD) depend on maintaining a quorum of
(n/2)+1, so you need at least 3 zones to tolerate the outage of 1 zone. - Primary/Secondary-based software components need just 2 zones to tolerate the outage of 1 zone.
- Then there are software components that can scale out horizontally. They are probably fine with 2 zones, but you also need to think about the load-shift and that the remaining zone must then pick up the work of the unhealthy zone. With 2 zones, the remaining zone must cope with an increase of 100% load. With 3 zones, the remaining zones must only cope with an increase of 50% load (per zone).
In general, the question is also whether you have the fail-over capacity already up and running or not. If not, i.e. you depend on re-scheduling to a healthy zone or auto-scaling, be aware that during a zone outage, you will see a resource crunch in the healthy zones. If you have no automation, i.e. only human operators (a.k.a. “red button approach”), you probably will not get the machines you need and even with automation, it may be tricky. But holding the capacity available at all times is costly. In the end, that’s a decision only you can make. If you made that decision, please adapt the minimum, maximum, maxSurge and maxUnavailable settings for your worker pools accordingly (visit this section for more information).
Also, consider fall-back worker pools (with different/alternative machine types) and cluster autoscaler expanders using a priority-based strategy.
Gardener-managed clusters deploy the cluster autoscaler or CA for short and you can tweak the general CA knobs for Gardener-managed clusters like this:
apiVersion: core.gardener.cloud/v1beta1
kind: Shoot
spec:
kubernetes:
clusterAutoscaler:
expander: "least-waste"
scanInterval: 10s
scaleDownDelayAfterAdd: 60m
scaleDownDelayAfterDelete: 0s
scaleDownDelayAfterFailure: 3m
scaleDownUnneededTime: 30m
scaleDownUtilizationThreshold: 0.5
In addition to that, it is also possible to configure the cluster-autoscaler priority expander by adding priorities to the worker groups like this:
apiVersion: core.gardener.cloud/v1beta1
kind: Shoot
spec:
provider:
workers:
- name: worker1
priority: 40 # priority of this worker group
machine:
type: local
- name: worker2
machine:
type: local
When at least one worker group has a priority defined, the respective ConfigMap will be generated and deployed, which the cluster-autoscaler uses.
When only a part of the worker groups have priorities configured, those who do not have these configured, will be defaulted to 0.
If you want to be ready for a sudden spike or have some buffer in general, over-provision nodes by means of “placeholder” pods with low priority and appropriate resource requests. This way, they will demand nodes to be provisioned for them, but if any pod comes up with a regular/higher priority, the low priority pods will be evicted to make space for the more important ones. Strictly speaking, this is not related to HA, but it may be important to keep this in mind as you generally want critical components to be rescheduled as fast as possible and if there is no node available, it may take 3 minutes or longer to do so (depending on the cloud provider). Besides, not only zones can fail, but also individual nodes.
Replicas (Horizontal Scaling)
Now let’s talk about your workload. In most cases, this will mean to run multiple replicas. If you cannot do that (a.k.a. you have a singleton), that’s a bad situation to be in. Maybe you can run a spare (secondary) as backup? If you cannot, you depend on quick detection and rescheduling of your singleton (more on that below).
Obviously, things get messier with persistence. If you have persistence, you should ideally replicate your data, i.e. let your spare (secondary) “follow” your main (primary). If your software doesn’t support that, you have to deploy other means, e.g. volume snapshotting or side-backups (specific to the software you deploy; keep the backups regional, so that you can switch to another zone at all times). If you have to do those, your HA scenario becomes more a DR scenario and terms like RPO and RTO become relevant to you:
- Recovery Point Objective (RPO): Potential data loss, i.e. how much data will you lose at most (time between backups)
- Recovery Time Objective (RTO): Time until recovery, i.e. how long does it take you to be operational again (time to restore)
Also, keep in mind that your persistent volumes are usually zonal, i.e. once you have a volume in one zone, it’s bound to that zone and you cannot get up your pod in another zone w/o first recreating the volume yourself (Kubernetes won’t help you here directly).
Anyway, best avoid that, if you can (from technical and cost perspective). The best solution (and also the most costly one) is to run multiple replicas in multiple zones and keep your data replicated at all times, so that your RPO is always 0 (best). That’s what we do for Gardener-managed cluster HA control planes (ETCD) as any data loss may be disastrous and lead to orphaned resources (in addition, we deploy side cars that do side-backups for disaster recovery, with full and incremental snapshots with an RPO of 5m).
So, how to run with multiple replicas? That’s the easiest part in Kubernetes and the two most important resources, Deployments and StatefulSet, support that out of the box:
apiVersion: apps/v1
kind: Deployment | StatefulSet
spec:
replicas: ...
The problem comes with the number of replicas. It’s easy only if the number is static, e.g. 2 for active-active/passive or 3 for consensus-based software components, but what with software components that can scale out horizontally? Here you usually do not set the number of replicas statically, but make use of the horizontal pod autoscaler or HPA for short (built-in; part of the kube-controller-manager). There are also other options like the cluster proportional autoscaler, but while the former works based on metrics, the latter is more a guesstimate approach that derives the number of replicas from the number of nodes/cores in a cluster. Sometimes useful, but often blind to the actual demand.
So, HPA it is then for most of the cases. However, what is the resource (e.g. CPU or memory) that drives the number of desired replicas? Again, this is up to you, but not always are CPU or memory the best choices. In some cases, custom metrics may be more appropriate, e.g. requests per second (it was also for us).
You will have to create specific HorizontalPodAutoscaler resources for your scale target and can tweak the general HPA knobs for Gardener-managed clusters like this:
apiVersion: core.gardener.cloud/v1beta1
kind: Shoot
spec:
kubernetes:
kubeControllerManager:
horizontalPodAutoscaler:
syncPeriod: 15s
tolerance: 0.1
downscaleStabilization: 5m0s
initialReadinessDelay: 30s
cpuInitializationPeriod: 5m0s
Resources (Vertical Scaling)
While it is important to set a sufficient number of replicas, it is also important to give the pods sufficient resources (CPU and memory). This is especially true when you think about HA. When a zone goes down, you might need to get up replacement pods, if you don’t have them running already to take over the load from the impacted zone. Likewise, e.g. with active-active software components, you can expect the remaining pods to receive more load. If you cannot scale them out horizontally to serve the load, you will probably need to scale them out (or rather up) vertically. This is done by the vertical pod autoscaler or VPA for short (not built-in; part of the kubernetes/autoscaler repository).
A few caveats though:
- You cannot use HPA and VPA on the same metrics as they would influence each other, which would lead to pod trashing (more replicas require fewer resources; fewer resources require more replicas)
- Scaling horizontally doesn’t cause downtimes (at least not when out-scaling and only one replica is affected when in-scaling), but scaling vertically does (if the pod runs OOM anyway, but also when new recommendations are applied, resource requests for existing pods may be changed, which causes the pods to be rescheduled). Although the discussion is going on for a very long time now, that is still not supported in-place yet (see KEP 1287, implementation in Kubernetes, implementation in VPA).
VPA is a useful tool and Gardener-managed clusters deploy a VPA by default for you (HPA is supported anyway as it’s built into the kube-controller-manager). You will have to create specific VerticalPodAutoscaler resources for your scale target and can tweak the general VPA knobs for Gardener-managed clusters like this:
apiVersion: core.gardener.cloud/v1beta1
kind: Shoot
spec:
kubernetes:
verticalPodAutoscaler:
enabled: true
evictAfterOOMThreshold: 10m0s
evictionRateBurst: 1
evictionRateLimit: -1
evictionTolerance: 0.5
recommendationMarginFraction: 0.15
updaterInterval: 1m0s
recommenderInterval: 1m0s
While horizontal pod autoscaling is relatively straight-forward, it takes a long time to master vertical pod autoscaling. We saw performance issues, hard-coded behavior (on OOM, memory is bumped by +20% and it may take a few iterations to reach a good level), unintended pod disruptions by applying new resource requests (after 12h all targeted pods will receive new requests even though individually they would be fine without, which also drives active-passive resource consumption up), difficulties to deal with spiky workload in general (due to the algorithmic approach it takes), recommended requests may exceed node capacity, limit scaling is proportional and therefore often questionable, and more. VPA is a double-edged sword: useful and necessary, but not easy to handle.
For the Gardener-managed components, we mostly removed limits. Why?
- CPU limits have almost always only downsides. They cause needless CPU throttling, which is not even easily visible. CPU requests turn into
cpu shares, so if the node has capacity, the pod may consume the freely available CPU, but not if you have set limits, which curtail the pod by means ofcpu quota. There are only certain scenarios in which they may make sense, e.g. if you set requests=limits and thereby define a pod withguaranteedQoS, which influences yourcgroupplacement. However, that is difficult to do for the components you implement yourself and practically impossible for the components you just consume, because what’s the correct value for requests/limits and will it hold true also if the load increases and what happens if a zone goes down or with the next update/version of this component? If anything, CPU limits caused outages, not helped prevent them. - As for memory limits, they are slightly more useful, because CPU is compressible and memory is not, so if one pod runs berserk, it may take others down (with CPU,
cpu sharesmake it as fair as possible), depending on which OOM killer strikes (a complicated topic by itself). You don’t want the operating system OOM killer to strike as the result is unpredictable. Better, it’s the cgroup OOM killer or even thekubelet’s eviction, if the consumption is slow enough as it takes priorities into consideration even. If your component is critical and a singleton (e.g. node daemon set pods), you are better off also without memory limits, because letting the pod go OOM because of artificial/wrong memory limits can mean that the node becomes unusable. Hence, such components also better run only with no or a very high memory limit, so that you can catch the occasional memory leak (bug) eventually, but under normal operation, if you cannot decide about a true upper limit, rather not have limits and cause endless outages through them or when you need the pods the most (during a zone outage) where all your assumptions went out of the window.
The downside of having poor or no limits and poor and no requests is that nodes may “die” more often. Contrary to the expectation, even for managed services, the managed service is not responsible or cannot guarantee the health of a node under all circumstances, since the end user defines what is run on the nodes (shared responsibility). If the workload exhausts any resource, it will be the end of the node, e.g. by compressing the CPU too much (so that the kubelet fails to do its work), exhausting the main memory too fast, disk space, file handles, or any other resource.
The kubelet allows for explicit reservation of resources for operating system daemons (system-reserved) and Kubernetes daemons (kube-reserved) that are subtracted from the actual node resources and become the allocatable node resources for your workload/pods. All managed services configure these settings “by rule of thumb” (a balancing act), but cannot guarantee that the values won’t waste resources or always will be sufficient. You will have to fine-tune them eventually and adapt them to your needs. In addition, you can configure soft and hard eviction thresholds to give the kubelet some headroom to evict “greedy” pods in a controlled way. These settings can be configured for Gardener-managed clusters like this:
apiVersion: core.gardener.cloud/v1beta1
kind: Shoot
spec:
kubernetes:
kubelet:
kubeReserved: # explicit resource reservation for Kubernetes daemons
cpu: 100m
memory: 1Gi
ephemeralStorage: 1Gi
pid: 1000
evictionSoft: # soft, i.e. graceful eviction (used if the node is about to run out of resources, avoiding hard evictions)
memoryAvailable: 200Mi
imageFSAvailable: 10%
imageFSInodesFree: 10%
nodeFSAvailable: 10%
nodeFSInodesFree: 10%
evictionSoftGracePeriod: # caps pod's `terminationGracePeriodSeconds` value during soft evictions (specific grace periods)
memoryAvailable: 1m30s
imageFSAvailable: 1m30s
imageFSInodesFree: 1m30s
nodeFSAvailable: 1m30s
nodeFSInodesFree: 1m30s
evictionHard: # hard, i.e. immediate eviction (used if the node is out of resources, avoiding the OS generally run out of resources fail processes indiscriminately)
memoryAvailable: 100Mi
imageFSAvailable: 5%
imageFSInodesFree: 5%
nodeFSAvailable: 5%
nodeFSInodesFree: 5%
evictionMinimumReclaim: # additional resources to reclaim after hitting the hard eviction thresholds to not hit the same thresholds soon after again
memoryAvailable: 0Mi
imageFSAvailable: 0Mi
imageFSInodesFree: 0Mi
nodeFSAvailable: 0Mi
nodeFSInodesFree: 0Mi
evictionMaxPodGracePeriod: 90 # caps pod's `terminationGracePeriodSeconds` value during soft evictions (general grace periods)
evictionPressureTransitionPeriod: 5m0s # stabilization time window to avoid flapping of node eviction state
You can tweak these settings also individually per worker pool (spec.provider.workers.kubernetes.kubelet...), which makes sense especially with different machine types (and also workload that you may want to schedule there).
Physical memory is not compressible, but you can overcome this issue to some degree (alpha since Kubernetes v1.22 in combination with the feature gate NodeSwap on the kubelet) with swap memory. You can read more in this introductory blog and the docs. If you chose to use it (still only alpha at the time of this writing) you may want to consider also the risks associated with swap memory:
- Reduced performance predictability
- Reduced performance up to page trashing
- Reduced security as secrets, normally held only in memory, could be swapped out to disk
That said, the various options mentioned above are only remotely related to HA and will not be further explored throughout this document, but just to remind you: if a zone goes down, load patterns will shift, existing pods will probably receive more load and will require more resources (especially because it is often practically impossible to set “proper” resource requests, which drive node allocation - limits are always ignored by the scheduler) or more pods will/must be placed on the existing and/or new nodes and then these settings, which are generally critical (especially if you switch on bin-packing for Gardener-managed clusters as a cost saving measure), will become even more critical during a zone outage.
Probes
Before we go down the rabbit hole even further and talk about how to spread your replicas, we need to talk about probes first, as they will become relevant later. Kubernetes supports three kinds of probes: startup, liveness, and readiness probes. If you are a visual thinker, also check out this slide deck by Tim Hockin (Kubernetes networking SIG chair).
Basically, the startupProbe and the livenessProbe help you restart the container, if it’s unhealthy for whatever reason, by letting the kubelet that orchestrates your containers on a node know, that it’s unhealthy. The former is a special case of the latter and only applied at the startup of your container, if you need to handle the startup phase differently (e.g. with very slow starting containers) from the rest of the lifetime of the container.
Now, the readinessProbe helps you manage the ready status of your container and thereby pod (any container that is not ready turns the pod not ready). This again has impact on endpoints and pod disruption budgets:
- If the pod is not ready, the endpoint will be removed and the pod will not receive traffic anymore
- If the pod is not ready, the pod counts into the pod disruption budget and if the budget is exceeded, no further voluntary pod disruptions will be permitted for the remaining ready pods (e.g. no eviction, no voluntary horizontal or vertical scaling, if the pod runs on a node that is about to be drained or in draining, draining will be paused until the max drain timeout passes)
As you can see, all of these probes are (also) related to HA (mostly the readinessProbe, but depending on your workload, you can also leverage livenessProbe and startupProbe into your HA strategy). If Kubernetes doesn’t know about the individual status of your container/pod, it won’t do anything for you (right away). That said, later/indirectly something might/will happen via the node status that can also be ready or not ready, which influences the pods and load balancer listener registration (a not ready node will not receive cluster traffic anymore), but this process is worker pool global and reacts delayed and also doesn’t discriminate between the containers/pods on a node.
In addition, Kubernetes also offers pod readiness gates to amend your pod readiness with additional custom conditions (normally, only the sum of the container readiness matters, but pod readiness gates additionally count into the overall pod readiness). This may be useful if you want to block (by means of pod disruption budgets that we will talk about next) the roll-out of your workload/nodes in case some (possibly external) condition fails.
Pod Disruption Budgets
One of the most important resources that help you on your way to HA are pod disruption budgets or PDB for short. They tell Kubernetes how to deal with voluntary pod disruptions, e.g. during the deployment of your workload, when the nodes are rolled, or just in general when a pod shall be evicted/terminated. Basically, if the budget is reached, they block all voluntary pod disruptions (at least for a while until possibly other timeouts act or things happen that leave Kubernetes no choice anymore, e.g. the node is forcefully terminated). You should always define them for your workload.
Very important to note is that they are based on the readinessProbe, i.e. even if all of your replicas are lively, but not enough of them are ready, this blocks voluntary pod disruptions, so they are very critical and useful. Here an example (you can specify either minAvailable or maxUnavailable in absolute numbers or as percentage):
apiVersion: policy/v1
kind: PodDisruptionBudget
spec:
maxUnavailable: 1
selector:
matchLabels:
...
And please do not specify a PDB of maxUnavailable being 0 or similar. That’s pointless, even detrimental, as it blocks then even useful operations, forces always the hard timeouts that are less graceful and it doesn’t make sense in the context of HA. You cannot “force” HA by preventing voluntary pod disruptions, you must work with the pod disruptions in a resilient way. Besides, PDBs are really only about voluntary pod disruptions - something bad can happen to a node/pod at any time and PDBs won’t make this reality go away for you.
PDBs will not always work as expected and can also get in your way, e.g. if the PDB is violated or would be violated, it may possibly block whatever you are trying to do to salvage the situation, e.g. drain a node or deploy a patch version (if the PDB is or would be violated, not even unhealthy pods would be evicted as they could theoretically become healthy again, which Kubernetes doesn’t know). In order to overcome this issue, it is now possible (alpha since Kubernetes v1.26 in combination with the feature gate PDBUnhealthyPodEvictionPolicy on the API server, beta and enabled by default since Kubernetes v1.27) to configure the so-called unhealthy pod eviction policy. The default is still IfHealthyBudget as a change in default would have changed the behavior (as described above), but you can now also set AlwaysAllow at the PDB (spec.unhealthyPodEvictionPolicy). For more information, please check out this discussion, the PR and this document and balance the pros and cons for yourself. In short, the new AlwaysAllow option is probably the better choice in most of the cases while IfHealthyBudget is useful only if you have frequent temporary transitions or for special cases where you have already implemented controllers that depend on the old behavior.
Pod Topology Spread Constraints
Pod topology spread constraints or PTSC for short (no official abbreviation exists, but we will use this in the following) are enormously helpful to distribute your replicas across multiple zones, nodes, or any other user-defined topology domain. They complement and improve on pod (anti-)affinities that still exist and can be used in combination.
PTSCs are an improvement, because they allow for maxSkew and minDomains. You can steer the “level of tolerated imbalance” with maxSkew, e.g. you probably want that to be at least 1, so that you can perform a rolling update, but this all depends on your deployment (maxUnavailable and maxSurge), etc. Stateful sets are a bit different (maxUnavailable) as they are bound to volumes and depend on them, so there usually cannot be 2 pods requiring the same volume. minDomains is a hint to tell the scheduler how far to spread, e.g. if all nodes in one zone disappeared because of a zone outage, it may “appear” as if there are only 2 zones in a 3 zones cluster and the scheduling decisions may end up wrong, so a minDomains of 3 will tell the scheduler to spread to 3 zones before adding another replica in one zone. Be careful with this setting as it also means, if one zone is down the “spread” is already at least 1, if pods run in the other zones. This is useful where you have exactly as many replicas as you have zones and you do not want any imbalance. Imbalance is critical as if you end up with one, nobody is going to do the (active) re-balancing for you (unless you deploy and configure additional non-standard components such as the descheduler). So, for instance, if you have something like a DBMS that you want to spread across 2 zones (active-passive) or 3 zones (consensus-based), you better specify minDomains of 2 respectively 3 to force your replicas into at least that many zones before adding more replicas to another zone (if supported).
Anyway, PTSCs are critical to have, but not perfect, so we saw (unsurprisingly, because that’s how the scheduler works), that the scheduler may block the deployment of new pods because it takes the decision pod-by-pod (see for instance #109364).
Pod Affinities and Anti-Affinities
As said, you can combine PTSCs with pod affinities and/or anti-affinities. Especially inter-pod (anti-)affinities may be helpful to place pods apart, e.g. because they are fall-backs for each other or you do not want multiple potentially resource-hungry “best-effort” or “burstable” pods side-by-side (noisy neighbor problem), or together, e.g. because they form a unit and you want to reduce the failure domain, reduce the network latency, and reduce the costs.
Topology Aware Hints
While topology aware hints are not directly related to HA, they are very relevant in the HA context. Spreading your workload across multiple zones may increase network latency and cost significantly, if the traffic is not shaped. Topology aware hints (beta since Kubernetes v1.23, replacing the now deprecated topology aware traffic routing with topology keys) help to route the traffic within the originating zone, if possible. Basically, they tell kube-proxy how to setup your routing information, so that clients can talk to endpoints that are located within the same zone.
Be aware however, that there are some limitations. Those are called safeguards and if they strike, the hints are off and traffic is routed again randomly. Especially controversial is the balancing limitation as there is the assumption, that the load that hits an endpoint is determined by the allocatable CPUs in that topology zone, but that’s not always, if even often, the case (see for instance #113731 and #110714). So, this limitation hits far too often and your hints are off, but then again, it’s about network latency and cost optimization first, so it’s better than nothing.
Networking
We have talked about networking only to some small degree so far (readiness probes, pod disruption budgets, topology aware hints). The most important component is probably your ingress load balancer - everything else is managed by Kubernetes. AWS, Azure, GCP, and also OpenStack offer multi-zonal load balancers, so make use of them. In Azure and GCP, LBs are regional whereas in AWS and OpenStack, they need to be bound to a zone, which the cloud-controller-manager does by observing the zone labels at the nodes (please note that this behavior is not always working as expected, see #570 where the AWS cloud-controller-manager is not readjusting to newly observed zones).
Please be reminded that even if you use a service mesh like Istio, the off-the-shelf installation/configuration usually never comes with productive settings (to simplify first-time installation and improve first-time user experience) and you will have to fine-tune your installation/configuration, much like the rest of your workload.
Relevant Cluster Settings
Following now a summary/list of the more relevant settings you may like to tune for Gardener-managed clusters:
apiVersion: core.gardener.cloud/v1beta1
kind: Shoot
spec:
controlPlane:
highAvailability:
failureTolerance:
type: zone # valid values are `node` and `zone` (only available if your control plane resides in a region with 3+ zones)
kubernetes:
kubeAPIServer:
defaultNotReadyTolerationSeconds: 300
defaultUnreachableTolerationSeconds: 300
kubelet:
...
kubeScheduler:
featureGates:
MinDomainsInPodTopologySpread: true
kubeControllerManager:
nodeMonitorGracePeriod: 40s
horizontalPodAutoscaler:
syncPeriod: 15s
tolerance: 0.1
downscaleStabilization: 5m0s
initialReadinessDelay: 30s
cpuInitializationPeriod: 5m0s
verticalPodAutoscaler:
enabled: true
evictAfterOOMThreshold: 10m0s
evictionRateBurst: 1
evictionRateLimit: -1
evictionTolerance: 0.5
recommendationMarginFraction: 0.15
updaterInterval: 1m0s
recommenderInterval: 1m0s
clusterAutoscaler:
expander: "least-waste"
scanInterval: 10s
scaleDownDelayAfterAdd: 60m
scaleDownDelayAfterDelete: 0s
scaleDownDelayAfterFailure: 3m
scaleDownUnneededTime: 30m
scaleDownUtilizationThreshold: 0.5
provider:
workers:
- name: ...
minimum: 6
maximum: 60
maxSurge: 3
maxUnavailable: 0
zones:
- ... # list of zones you want your worker pool nodes to be spread across, see above
kubernetes:
kubelet:
... # similar to `kubelet` above (cluster-wide settings), but here per worker pool (pool-specific settings), see above
machineControllerManager: # optional, it allows to configure the machine-controller settings.
machineCreationTimeout: 20m
machineHealthTimeout: 10m
machineDrainTimeout: 60h
systemComponents:
coreDNS:
autoscaling:
mode: horizontal # valid values are `horizontal` (driven by CPU load) and `cluster-proportional` (driven by number of nodes/cores)
On spec.controlPlane.highAvailability.failureTolerance.type
If set, determines the degree of failure tolerance for your control plane. zone is preferred, but only available if your control plane resides in a region with 3+ zones. See above and the docs.
On spec.kubernetes.kubeAPIServer.defaultUnreachableTolerationSeconds and defaultNotReadyTolerationSeconds
This is a very interesting API server setting that lets Kubernetes decide how fast to evict pods from nodes whose status condition of type Ready is either Unknown (node status unknown, a.k.a unreachable) or False (kubelet not ready) (see node status conditions; please note that kubectl shows both values as NotReady which is a somewhat “simplified” visualization).
You can also override the cluster-wide API server settings individually per pod:
spec:
tolerations:
- key: "node.kubernetes.io/unreachable"
operator: "Exists"
effect: "NoExecute"
tolerationSeconds: 0
- key: "node.kubernetes.io/not-ready"
operator: "Exists"
effect: "NoExecute"
tolerationSeconds: 0
This will evict pods on unreachable or not-ready nodes immediately, but be cautious: 0 is very aggressive and may lead to unnecessary disruptions. Again, you must decide for your own workload and balance out the pros and cons (e.g. long startup time).
Please note, these settings replace spec.kubernetes.kubeControllerManager.podEvictionTimeout that was deprecated with Kubernetes v1.26 (and acted as an upper bound).
On spec.kubernetes.kubeScheduler.featureGates.MinDomainsInPodTopologySpread
Required to be enabled for minDomains to work with PTSCs (beta since Kubernetes v1.25, but off by default). See above and the docs. This tells the scheduler, how many topology domains to expect (=zones in the context of this document).
On spec.kubernetes.kubeControllerManager.nodeMonitorGracePeriod
This is another very interesting kube-controller-manager setting that can help you speed up or slow down how fast a node shall be considered Unknown (node status unknown, a.k.a unreachable) when the kubelet is not updating its status anymore (see node status conditions), which effects eviction (see spec.kubernetes.kubeAPIServer.defaultUnreachableTolerationSeconds and defaultNotReadyTolerationSeconds above). The shorter the time window, the faster Kubernetes will act, but the higher the chance of flapping behavior and pod trashing, so you may want to balance that out according to your needs, otherwise stick to the default which is a reasonable compromise.
On spec.kubernetes.kubeControllerManager.horizontalPodAutoscaler...
This configures horizontal pod autoscaling in Gardener-managed clusters. See above and the docs for the detailed fields.
On spec.kubernetes.verticalPodAutoscaler...
This configures vertical pod autoscaling in Gardener-managed clusters. See above and the docs for the detailed fields.
On spec.kubernetes.clusterAutoscaler...
This configures node auto-scaling in Gardener-managed clusters. See above and the docs for the detailed fields, especially about expanders, which may become life-saving in case of a zone outage when a resource crunch is setting in and everybody rushes to get machines in the healthy zones.
In case of a zone outage, it is critical to understand how the cluster autoscaler will put a worker pool in one zone into “back-off” and what the consequences for your workload will be. Unfortunately, the official cluster autoscaler documentation does not explain these details, but you can find hints in the source code:
If a node fails to come up, the node group (worker pool in that zone) will go into “back-off”, at first 5m, then exponentially longer until the maximum of 30m is reached. The “back-off” is reset after 3 hours. This in turn means, that nodes must be first considered Unknown, which happens when spec.kubernetes.kubeControllerManager.nodeMonitorGracePeriod lapses (e.g. at the beginning of a zone outage). Then they must either remain in this state until spec.provider.workers.machineControllerManager.machineHealthTimeout lapses for them to be recreated, which will fail in the unhealthy zone, or spec.kubernetes.kubeAPIServer.defaultUnreachableTolerationSeconds lapses for the pods to be evicted (usually faster than node replacements, depending on your configuration), which will trigger the cluster autoscaler to create more capacity, but very likely in the same zone as it tries to balance its node groups at first, which will fail in the unhealthy zone. It will be considered failed only when maxNodeProvisionTime lapses (usually close to spec.provider.workers.machineControllerManager.machineCreationTimeout) and only then put the node group into “back-off” and not retry for 5m (at first and then exponentially longer). Only then you can expect new node capacity to be brought up somewhere else.
During the time of ongoing node provisioning (before a node group goes into “back-off”), the cluster autoscaler may have “virtually scheduled” pending pods onto those new upcoming nodes and will not reevaluate these pods anymore unless the node provisioning fails (which will fail during a zone outage, but the cluster autoscaler cannot know that and will therefore reevaluate its decision only after it has given up on the new nodes).
It’s critical to keep that in mind and accommodate for it. If you have already capacity up and running, the reaction time is usually much faster with leases (whatever you set) or endpoints (spec.kubernetes.kubeControllerManager.nodeMonitorGracePeriod), but if you depend on new/fresh capacity, the above should inform you how long you will have to wait for it and for how long pods might be pending (because capacity is generally missing and pending pods may have been “virtually scheduled” to new nodes that won’t come up until the node group goes eventually into “back-off” and nodes in the healthy zones come up).
On spec.provider.workers.minimum, maximum, maxSurge, maxUnavailable, zones, and machineControllerManager
Each worker pool in Gardener may be configured differently. Among many other settings like machine type, root disk, Kubernetes version, kubelet settings, and many more you can also specify the lower and upper bound for the number of machines (minimum and maximum), how many machines may be added additionally during a rolling update (maxSurge) and how many machines may be in termination/recreation during a rolling update (maxUnavailable), and of course across how many zones the nodes shall be spread (zones).
Gardener divides minimum, maximum, maxSurge, maxUnavailable values by the number of zones specified for this worker pool. This fact must be considered when you plan the sizing of your worker pools.
Example:
provider:
workers:
- name: ...
minimum: 6
maximum: 60
maxSurge: 3
maxUnavailable: 0
zones: ["a", "b", "c"]
- The resulting
MachineDeployments per zone will getminimum: 2,maximum: 20,maxSurge: 1,maxUnavailable: 0. - If another zone is added all values will be divided by
4, resulting in:- Less workers per zone.
- ⚠️ One
MachineDeploymentwithmaxSurge: 0, i.e. there will be a replacement of nodes without rolling updates.
Interesting is also the configuration for Gardener’s machine-controller-manager or MCM for short that provisions, monitors, terminates, replaces, or updates machines that back your nodes:
- The shorter
machineCreationTimeoutis, the faster MCM will retry to create a machine/node, if the process is stuck on cloud provider side. It is set to useful/practical timeouts for the different cloud providers and you probably don’t want to change those (in the context of HA at least). Please align with the cluster autoscaler’smaxNodeProvisionTime. - The shorter
machineHealthTimeoutis, the faster MCM will replace machines/nodes in case the kubelet isn’t reporting back, which translates toUnknown, or reports back withNotReady, or the node-problem-detector that Gardener deploys for you reports a non-recoverable issue/condition (e.g. read-only file system). If it is too short however, you risk node and pod trashing, so be careful. - The shorter
machineDrainTimeoutis, the faster you can get rid of machines/nodes that MCM decided to remove, but this puts a cap on the grace periods and PDBs. They are respected up until the drain timeout lapses - then the machine/node will be forcefully terminated, whether or not the pods are still in termination or not even terminated because of PDBs. Those PDBs will then be violated, so be careful here as well. Please align with the cluster autoscaler’smaxGracefulTerminationSeconds.
Especially the last two settings may help you recover faster from cloud provider issues.
On spec.systemComponents.coreDNS.autoscaling
DNS is critical, in general and also within a Kubernetes cluster. Gardener-managed clusters deploy CoreDNS, a graduated CNCF project. Gardener supports 2 auto-scaling modes for it, horizontal (using HPA based on CPU) and cluster-proportional (using cluster proportional autoscaler that scales the number of pods based on the number of nodes/cores, not to be confused with the cluster autoscaler that scales nodes based on their utilization). Check out the docs, especially the trade-offs why you would chose one over the other (cluster-proportional gives you more configuration options, if CPU-based horizontal scaling is insufficient to your needs). Consider also Gardener’s feature node-local DNS to decouple you further from the DNS pods and stabilize DNS. Again, that’s not strictly related to HA, but may become important during a zone outage, when load patterns shift and pods start to initialize/resolve DNS records more frequently in bulk.
More Caveats
Unfortunately, there are a few more things of note when it comes to HA in a Kubernetes cluster that may be “surprising” and hard to mitigate:
- If the
kubeletrestarts, it will report all pods asNotReadyon startup until it reruns its probes (#100277), which leads to temporary endpoint and load balancer target removal (#102367). This topic is somewhat controversial. Gardener uses rolling updates and a jitter to spread necessarykubeletrestarts as good as possible. - If a
kube-proxypod on a node turnsNotReady, all load balancer traffic to all pods (on this node) under services withexternalTrafficPolicylocalwill cease as the load balancer will then take this node out of serving. This topic is somewhat controversial as well. So, please remember thatexternalTrafficPolicylocalnot only has the disadvantage of imbalanced traffic spreading, but also a dependency to the kube-proxy pod that may and will be unavailable during updates. Gardener uses rolling updates to spread necessarykube-proxyupdates as good as possible.
These are just a few additional considerations. They may or may not affect you, but other intricacies may. It’s a reminder to be watchful as Kubernetes may have one or two relevant quirks that you need to consider (and will probably only find out over time and with extensive testing).
Meaningful Availability
Finally, let’s go back to where we started. We recommended to measure meaningful availability. For instance, in Gardener, we do not trust only internal signals, but track also whether Gardener or the control planes that it manages are externally available through the external DNS records and load balancers, SNI-routing Istio gateways, etc. (the same path all users must take). It’s a huge difference whether the API server’s internal readiness probe passes or the user can actually reach the API server and it does what it’s supposed to do. Most likely, you will be in a similar spot and can do the same.
What you do with these signals is another matter. Maybe there are some actionable metrics and you can trigger some active fail-over, maybe you can only use it to improve your HA setup altogether. In our case, we also use it to deploy mitigations, e.g. via our dependency-watchdog that watches, for instance, Gardener-managed API servers and shuts down components like the controller managers to avert cascading knock-off effects (e.g. melt-down if the kubelets cannot reach the API server, but the controller managers can and start taking down nodes and pods).
Either way, understanding how users perceive your service is key to the improvement process as a whole. Even if you are not struck by a zone outage, the measures above and tracking the meaningful availability will help you improve your service.
Thank you for your interest.
4.6.2 - Shoot High Availability
node and zone. Possible mitigations for zone or node outagesHighly Available Shoot Control Plane
Shoot resource offers a way to request for a highly available control plane.
Failure Tolerance Types
A highly available shoot control plane can be setup with either a failure tolerance of zone or node.
Node Failure Tolerance
The failure tolerance of a node will have the following characteristics:
- Control plane components will be spread across different nodes within a single availability zone. There will not be more than one replica per node for each control plane component which has more than one replica.
Worker poolshould have a minimum of 3 nodes.- A multi-node etcd (quorum size of 3) will be provisioned, offering zero-downtime capabilities with each member in a different node within a single availability zone.
Zone Failure Tolerance
The failure tolerance of a zone will have the following characteristics:
- Control plane components will be spread across different availability zones. There will be at least one replica per zone for each control plane component which has more than one replica.
- Gardener scheduler will automatically select a
seedwhich has a minimum of 3 zones to host the shoot control plane. - A multi-node etcd (quorum size of 3) will be provisioned, offering zero-downtime capabilities with each member in a different zone.
Shoot Spec
To request for a highly available shoot control plane Gardener provides the following configuration in the shoot spec:
apiVersion: core.gardener.cloud/v1beta1
kind: Shoot
spec:
controlPlane:
highAvailability:
failureTolerance:
type: <node | zone>
Allowed Transitions
If you already have a shoot cluster with non-HA control plane, then the following upgrades are possible:
- Upgrade of non-HA shoot control plane to HA shoot control plane with
nodefailure tolerance. - Upgrade of non-HA shoot control plane to HA shoot control plane with
zonefailure tolerance. However, it is essential that theseedwhich is currently hosting the shoot control plane should bemulti-zonal. If it is not, then the request to upgrade will be rejected.
Note: There will be a small downtime during the upgrade, especially for etcd, which will transition from a single node etcd cluster to a multi-node etcd cluster.
Disallowed Transitions
If you already have a shoot cluster with HA control plane, then the following transitions are not possible:
- Upgrade of HA shoot control plane from
nodefailure tolerance tozonefailure tolerance is currently not supported, mainly because already existing volumes are bound to the zone they were created in originally. - Downgrade of HA shoot control plane with
zonefailure tolerance tonodefailure tolerance is currently not supported, mainly because of the same reason as above, that already existing volumes are bound to the respective zones they were created in originally. - Downgrade of HA shoot control plane with either
nodeorzonefailure tolerance, to a non-HA shoot control plane is currently not supported, mainly because etcd-druid does not currently support scaling down of a multi-node etcd cluster to a single-node etcd cluster.
Zone Outage Situation
Implementing highly available software that can tolerate even a zone outage unscathed is no trivial task. You may find our HA Best Practices helpful to get closer to that goal. In this document, we collected many options and settings for you that also Gardener internally uses to provide a highly available service.
During a zone outage, you may be forced to change your cluster setup on short notice in order to compensate for failures and shortages resulting from the outage.
For instance, if the shoot cluster has worker nodes across three zones where one zone goes down, the computing power from these nodes is also gone during that time.
Changing the worker pool (shoot.spec.provider.workers[]) and infrastructure (shoot.spec.provider.infrastructureConfig) configuration can eliminate this disbalance, having enough machines in healthy availability zones that can cope with the requests of your applications.
Gardener relies on a sophisticated reconciliation flow with several dependencies for which various flow steps wait for the readiness of prior ones.
During a zone outage, this can block the entire flow, e.g., because all three etcd replicas can never be ready when a zone is down, and required changes mentioned above can never be accomplished.
For this, a special one-off annotation shoot.gardener.cloud/skip-readiness helps to skip any readiness checks in the flow.
The
shoot.gardener.cloud/skip-readinessannotation serves as a last resort if reconciliation is stuck because of important changes during an AZ outage. Use it with caution, only in exceptional cases and after a case-by-case evaluation with your Gardener landscape administrator. If used together with other operations like Kubernetes version upgrades or credential rotation, the annotation may lead to a severe outage of your shoot control plane.
4.7 - Deployment
4.7.1 - Authentication Gardener Control Plane
Authentication of Gardener Control Plane Components Against the Garden Cluster
Note: This document refers to Gardener’s API server, admission controller, controller manager and scheduler components. Any reference to the term Gardener control plane component can be replaced with any of the mentioned above.
There are several authentication possibilities depending on whether or not the concept of Virtual Garden is used.
Virtual Garden is not used, i.e., the runtime Garden cluster is also the target Garden cluster.
Automounted Service Account Token
The easiest way to deploy a Gardener control plane component is to not provide a kubeconfig at all. This way in-cluster configuration and an automounted service account token will be used. The drawback of this approach is that the automounted token will not be automatically rotated.
Service Account Token Volume Projection
Another solution is to use Service Account Token Volume Projection combined with a kubeconfig referencing a token file (see the example below).
apiVersion: v1
kind: Config
clusters:
- cluster:
certificate-authority-data: <CA-DATA>
server: https://default.kubernetes.svc.cluster.local
name: garden
contexts:
- context:
cluster: garden
user: garden
name: garden
current-context: garden
users:
- name: garden
user:
tokenFile: /var/run/secrets/projected/serviceaccount/token
This will allow for automatic rotation of the service account token by the kubelet. The configuration can be achieved by setting both .Values.global.<GardenerControlPlaneComponent>.serviceAccountTokenVolumeProjection.enabled: true and .Values.global.<GardenerControlPlaneComponent>.kubeconfig in the respective chart’s values.yaml file.
Virtual Garden is used, i.e., the runtime Garden cluster is different from the target Garden cluster.
Service Account
The easiest way to setup the authentication is to create a service account and the respective roles will be bound to this service account in the target cluster. Then use the generated service account token and craft a kubeconfig, which will be used by the workload in the runtime cluster. This approach does not provide a solution for the rotation of the service account token. However, this setup can be achieved by setting .Values.global.deployment.virtualGarden.enabled: true and following these steps:
- Deploy the
applicationpart of the charts in thetargetcluster. - Get the service account token and craft the
kubeconfig. - Set the crafted
kubeconfigand deploy theruntimepart of the charts in theruntimecluster.
Client Certificate
Another solution is to bind the roles in the target cluster to a User subject instead of a service account and use a client certificate for authentication. This approach does not provide a solution for the client certificate rotation. However, this setup can be achieved by setting both .Values.global.deployment.virtualGarden.enabled: true and .Values.global.deployment.virtualGarden.<GardenerControlPlaneComponent>.user.name, then following these steps:
- Generate a client certificate for the
targetcluster for the respective user. - Deploy the
applicationpart of the charts in thetargetcluster. - Craft a
kubeconfigusing the already generated client certificate. - Set the crafted
kubeconfigand deploy theruntimepart of the charts in theruntimecluster.
Projected Service Account Token
This approach requires an already deployed and configured oidc-webhook-authenticator for the target cluster. Also, the runtime cluster should be registered as a trusted identity provider in the target cluster. Then, projected service accounts tokens from the runtime cluster can be used to authenticate against the target cluster. The needed steps are as follows:
- Deploy OWA and establish the needed trust.
- Set
.Values.global.deployment.virtualGarden.enabled: trueand.Values.global.deployment.virtualGarden.<GardenerControlPlaneComponent>.user.name.Note: username value will depend on the trust configuration, e.g.,
<prefix>:system:serviceaccount:<namespace>:<serviceaccount> - Set
.Values.global.<GardenerControlPlaneComponent>.serviceAccountTokenVolumeProjection.enabled: trueand.Values.global.<GardenerControlPlaneComponent>.serviceAccountTokenVolumeProjection.audience.Note: audience value will depend on the trust configuration, e.g.,
<client-id-from-trust-config>. - Craft a kubeconfig (see the example below).
- Deploy the
applicationpart of the charts in thetargetcluster. - Deploy the
runtimepart of the charts in theruntimecluster.
apiVersion: v1
kind: Config
clusters:
- cluster:
certificate-authority-data: <CA-DATA>
server: https://virtual-garden.api
name: virtual-garden
contexts:
- context:
cluster: virtual-garden
user: virtual-garden
name: virtual-garden
current-context: virtual-garden
users:
- name: virtual-garden
user:
tokenFile: /var/run/secrets/projected/serviceaccount/token
4.7.2 - Configuring Logging
Configuring the Logging Stack via gardenlet Configurations
Enable the Logging
In order to install the Gardener logging stack, the logging.enabled configuration option has to be enabled in the Gardenlet configuration:
logging:
enabled: true
From now on, each Seed is going to have a logging stack which will collect logs from all pods and some systemd services. Logs related to Shoots with testing purpose are dropped in the fluent-bit output plugin. Shoots with a purpose different than testing have the same type of log aggregator (but different instance) as the Seed. The logs can be viewed in the Plutono in the garden namespace for the Seed components and in the respective shoot control plane namespaces.
Enable Logs from the Shoot’s Node systemd Services
The logs from the systemd services on each node can be retrieved by enabling the logging.shootNodeLogging option in the gardenlet configuration:
logging:
enabled: true
shootNodeLogging:
shootPurposes:
- "evaluation"
- "deployment"
Under the shootPurpose section, just list all the shoot purposes for which the Shoot node logging feature will be enabled. Specifying the testing purpose has no effect because this purpose prevents the logging stack installation.
Logs can be viewed in the operator Plutono!
The dedicated labels are unit, syslog_identifier, and nodename in the Explore menu.
Configuring Central Vali Storage Capacity
By default, the central Vali has 100Gi of storage capacity.
To overwrite the current central Vali storage capacity, the logging.vali.garden.storage setting in the gardenlet’s component configuration should be altered.
If you need to increase it, you can do so without losing the current data by specifying a higher capacity. By doing so, the Vali’s PersistentVolume capacity will be increased instead of deleting the current PV.
However, if you specify less capacity, then the PersistentVolume will be deleted and with it the logs, too.
logging:
enabled: true
vali:
garden:
storage: "200Gi"
4.7.3 - Deploy Gardenlet
Deploying Gardenlets
Gardenlets act as decentralized agents to manage the shoot clusters of a seed cluster.
Procedure
After you have deployed the Gardener control plane, you need one or more seed clusters in order to be able to create shoot clusters.
You can either register an existing cluster as “seed” (this could also be the cluster in which the control plane runs), or you can create new clusters (typically shoots, i.e., this approach registers at least one first initial seed) and then register them as “seeds”.
The following sections describe the scenarios.
Register A First Seed Cluster
If you have not registered a seed cluster yet (thus, you need to deploy a first, so-called “unmanaged seed”), your approach depends on how you deployed the Gardener control plane.
Gardener Control Plane Deployed Via gardener/controlplane Helm chart
You can follow Deploy a gardenlet Manually.
Gardener Control Plane Deployed Via gardener-operator
- If you want to register the same cluster in which
gardener-operatorruns, or if you want to register another cluster that is reachable (network-wise) forgardener-operator, you can follow Deploy gardenlet viagardener-operator. - If you want to register a cluster that is not reachable (network-wise) (e.g., because it runs behind a firewall), you can follow Deploy a gardenlet Manually.
Register Further Seed Clusters
If you already have a seed cluster, and you want to deploy further seed clusters (so-called “managed seeds”), you can follow Deploy a gardenlet Automatically.
4.7.4 - Deploy Gardenlet Automatically
Deploy a gardenlet Automatically
The gardenlet can automatically deploy itself into shoot clusters, and register them as seed clusters. These clusters are called “managed seeds” (aka “shooted seeds”). This procedure is the preferred way to add additional seed clusters, because shoot clusters already come with production-grade qualities that are also demanded for seed clusters.
Prerequisites
The only prerequisite is to register an initial cluster as a seed cluster that already has a deployed gardenlet (for available options see Deploying Gardenlets).
Tip
The initial seed cluster can be the garden cluster itself, but for better separation of concerns, it is recommended to only register other clusters as seeds.
Auto-Deployment of Gardenlets into Shoot Clusters
For a better scalability of your Gardener landscape (e.g., when the total number of Shoots grows), you usually need more seed clusters that you can create, as follows:
- Use the initial seed cluster (“unmanaged seed”) to create shoot clusters that you later register as seed clusters.
- The gardenlet deployed in the initial cluster can deploy itself into the shoot clusters (which eventually makes them getting registered as seeds) if
ManagedSeedresources are created.
The advantage of this approach is that there’s only one initial gardenlet installation required. Every other managed seed cluster gets an automatically deployed gardenlet.
Related Links
4.7.5 - Deploy Gardenlet Manually
Deploy a gardenlet Manually
Manually deploying a gardenlet is usually only required if the Kubernetes cluster to be registered as a seed cluster is managed via third-party tooling (i.e., the Kubernetes cluster is not a shoot cluster, so Deploy a gardenlet Automatically cannot be used).
In this case, gardenlet needs to be deployed manually, meaning that its Helm chart must be installed.
Tip
Once you’ve deployed a gardenlet manually, you can deploy new gardenlets automatically. The manually deployed gardenlet is then used as a template for the new gardenlets. For more information, see Deploy a gardenlet Automatically.
Prerequisites
Kubernetes Cluster that Should Be Registered as a Seed Cluster
Verify that the cluster has a supported Kubernetes version.
Determine the nodes, pods, and services CIDR of the cluster. You need to configure this information in the
Seedconfiguration. Gardener uses this information to check that the shoot cluster isn’t created with overlapping CIDR ranges.Every seed cluster needs an Ingress controller which distributes external requests to internal components like Plutono and Prometheus. For this, configure the following lines in your Seed resource:
spec: dns: provider: type: aws-route53 secretRef: name: ingress-secret namespace: garden ingress: domain: ingress.my-seed.example.com controller: kind: nginx providerConfig: <some-optional-provider-specific-config-for-the-ingressController>
Procedure Overview
Create a Bootstrap Token Secret in the kube-system Namespace of the Garden Cluster
The gardenlet needs to talk to the Gardener API server residing in the garden cluster.
Use gardenlet’s ability to request a signed certificate for the garden cluster by leveraging Kubernetes Certificate Signing Requests. The gardenlet performs a TLS bootstrapping process that is similar to the Kubelet TLS Bootstrapping. Make sure that the API server of the garden cluster has bootstrap token authentication enabled.
The client credentials required for the gardenlet’s TLS bootstrapping process need to be either token or certificate (OIDC isn’t supported) and have permissions to create a Certificate Signing Request (CSR).
It’s recommended to use bootstrap tokens due to their desirable security properties (such as a limited token lifetime).
Therefore, first create a bootstrap token secret for the garden cluster:
apiVersion: v1
kind: Secret
metadata:
# Name MUST be of form "bootstrap-token-<token id>"
name: bootstrap-token-07401b
namespace: kube-system
# Type MUST be 'bootstrap.kubernetes.io/token'
type: bootstrap.kubernetes.io/token
stringData:
# Human readable description. Optional.
description: "Token to be used by the gardenlet for Seed `sweet-seed`."
# Token ID and secret. Required.
token-id: 07401b # 6 characters
token-secret: f395accd246ae52d # 16 characters
# Expiration. Optional.
# expiration: 2017-03-10T03:22:11Z
# Allowed usages.
usage-bootstrap-authentication: "true"
usage-bootstrap-signing: "true"
When you later prepare the gardenlet Helm chart, a kubeconfig based on this token is shared with the gardenlet upon deployment.
Prepare the gardenlet Helm Chart
This section only describes the minimal configuration, using the global configuration values of the gardenlet Helm chart. For an overview over all values, see the configuration values. We refer to the global configuration values as gardenlet configuration in the following procedure.
Create a gardenlet configuration
gardenlet-values.yamlbased on this template.Create a bootstrap
kubeconfigbased on the bootstrap token created in the garden cluster.Replace the
<bootstrap-token>withtoken-id.token-secret(from our previous example:07401b.f395accd246ae52d) from the bootstrap token secret.apiVersion: v1 kind: Config current-context: gardenlet-bootstrap@default clusters: - cluster: certificate-authority-data: <ca-of-garden-cluster> server: https://<endpoint-of-garden-cluster> name: default contexts: - context: cluster: default user: gardenlet-bootstrap name: gardenlet-bootstrap@default users: - name: gardenlet-bootstrap user: token: <bootstrap-token>In the
gardenClientConnection.bootstrapKubeconfigsection of your gardenlet configuration, provide the bootstrapkubeconfigtogether with a name and namespace to the gardenlet Helm chart.gardenClientConnection: bootstrapKubeconfig: name: gardenlet-kubeconfig-bootstrap namespace: garden kubeconfig: | <bootstrap-kubeconfig> # will be base64 encoded by helmThe bootstrap
kubeconfigis stored in the specified secret.In the
gardenClientConnection.kubeconfigSecretsection of your gardenlet configuration, define a name and a namespace where the gardenlet stores the realkubeconfigthat it creates during the bootstrap process. If the secret doesn’t exist, the gardenlet creates it for you.gardenClientConnection: kubeconfigSecret: name: gardenlet-kubeconfig namespace: garden
Updating the Garden Cluster CA
The kubeconfig created by the gardenlet in step 4 will not be recreated as long as it exists, even if a new bootstrap kubeconfig is provided.
To enable rotation of the garden cluster CA certificate, a new bundle can be provided via the gardenClientConnection.gardenClusterCACert field.
If the provided bundle differs from the one currently in the gardenlet’s kubeconfig secret then it will be updated.
To remove the CA completely (e.g. when switching to a publicly trusted endpoint), this field can be set to either none or null.
Prepare Seed Specification
When gardenlet starts, it tries to register a Seed resource in the garden cluster based on the specification provided in seedConfig in its configuration.
This procedure doesn’t describe all the possible configurations for the
Seedresource. For more information, see:
Supply the
Seedresource in theseedConfigsection of your gardenlet configurationgardenlet-values.yaml.Add the
seedConfigto your gardenlet configurationgardenlet-values.yaml. The fieldseedConfig.spec.provider.typespecifies the infrastructure provider type (for example,aws) of the seed cluster. For all supported infrastructure providers, see Known Extension Implementations.# ... seedConfig: metadata: name: sweet-seed labels: environment: evaluation annotations: custom.gardener.cloud/option: special spec: dns: provider: type: <provider> secretRef: name: ingress-secret namespace: garden ingress: # see prerequisites domain: ingress.dev.my-seed.example.com controller: kind: nginx networks: # see prerequisites nodes: 10.240.0.0/16 pods: 100.244.0.0/16 services: 100.32.0.0/13 shootDefaults: # optional: non-overlapping default CIDRs for shoot clusters of that Seed pods: 100.96.0.0/11 services: 100.64.0.0/13 provider: region: eu-west-1 type: <provider>
Apart from the seed’s name, seedConfig.metadata can optionally contain labels and annotations.
gardenlet will set the labels of the registered Seed object to the labels given in the seedConfig plus gardener.cloud/role=seed.
Any custom labels on the Seed object will be removed on the next restart of gardenlet.
If a label is removed from the seedConfig it is removed from the Seed object as well.
In contrast to labels, annotations in the seedConfig are added to existing annotations on the Seed object.
Thus, custom annotations that are added to the Seed object during runtime are not removed by gardenlet on restarts.
Furthermore, if an annotation is removed from the seedConfig, gardenlet does not remove it from the Seed object.
Optional: Enable HA Mode
You may consider running gardenlet with multiple replicas, especially if the seed cluster is configured to host HA shoot control planes.
Therefore, the following Helm chart values define the degree of high availability you want to achieve for the gardenlet deployment.
replicaCount: 2 # or more if a higher failure tolerance is required.
failureToleranceType: zone # One of `zone` or `node` - defines how replicas are spread.
Optional: Enable Backup and Restore
The seed cluster can be set up with backup and restore for the main etcds of shoot clusters.
Gardener uses etcd-backup-restore that integrates with different storage providers to store the shoot cluster’s main etcd backups.
Make sure to obtain client credentials that have sufficient permissions with the chosen storage provider.
Create a secret in the garden cluster with client credentials for the storage provider. The format of the secret is cloud provider specific and can be found in the repository of the respective Gardener extension. For example, the secret for AWS S3 can be found in the AWS provider extension (30-etcd-backup-secret.yaml).
apiVersion: v1
kind: Secret
metadata:
name: sweet-seed-backup
namespace: garden
type: Opaque
data:
# client credentials format is provider specific
Configure the Seed resource in the seedConfig section of your gardenlet configuration to use backup and restore:
# ...
seedConfig:
metadata:
name: sweet-seed
spec:
backup:
provider: <provider>
credentialsRef:
apiVersion: v1
kind: Secret
name: sweet-seed-backup
namespace: garden
Optional: Enable Self-Upgrades
In order to take off the continuous task of deploying gardenlet’s Helm chart in case you want to upgrade its version, it supports self-upgrades.
The way this works is that it pulls information (its configuration and deployment values) from a seedmanagement.gardener.cloud/v1alpha1.Gardenlet resource in the garden cluster.
This resource must be in the garden namespace and must have the same name as the Seed the gardenlet is responsible for.
For more information, see this section.
In order to make gardenlet automatically create a corresponding seedmanagement.gardener.cloud/v1alpha1.Gardenlet resource, you must provide
selfUpgrade:
deployment:
helm:
ociRepository:
ref: <url-to-oci-repository-containing-gardenlet-helm-chart>
in your gardenlet-values.yaml file.
Please replace the ref placeholder with the URL to the OCI repository containing the gardenlet Helm chart you are installing.
Note
If you don’t configure this
selfUpgradesection in the initial deployment, you can also do it later, or you directly create the correspondingseedmanagement.gardener.cloud/v1alpha1.Gardenletresource in the garden cluster.
Deploy the gardenlet
The gardenlet-values.yaml looks something like this (with backup for shoot clusters enabled):
# <default config>
# ...
config:
gardenClientConnection:
# ...
bootstrapKubeconfig:
name: gardenlet-bootstrap-kubeconfig
namespace: garden
kubeconfig: |
apiVersion: v1
clusters:
- cluster:
certificate-authority-data: <dummy>
server: <my-garden-cluster-endpoint>
name: my-kubernetes-cluster
# ...
kubeconfigSecret:
name: gardenlet-kubeconfig
namespace: garden
# ...
# <default config>
# ...
seedConfig:
metadata:
name: sweet-seed
spec:
dns:
provider:
type: <provider>
secretRef:
name: ingress-secret
namespace: garden
ingress: # see prerequisites
domain: ingress.dev.my-seed.example.com
controller:
kind: nginx
networks:
nodes: 10.240.0.0/16
pods: 100.244.0.0/16
services: 100.32.0.0/13
shootDefaults:
pods: 100.96.0.0/11
services: 100.64.0.0/13
provider:
region: eu-west-1
type: <provider>
backup:
provider: <provider>
credentialsRef:
apiVersion: v1
kind: Secret
name: sweet-seed-backup
namespace: garden
Deploy the gardenlet Helm chart to the Kubernetes cluster:
helm install gardenlet charts/gardener/gardenlet \
--namespace garden \
-f gardenlet-values.yaml \
--wait
This Helm chart creates:
- A service account
gardenletthat the gardenlet can use to talk to the Seed API server. - RBAC roles for the service account (full admin rights at the moment).
- The secret (
garden/gardenlet-bootstrap-kubeconfig) containing the bootstrapkubeconfig. - The gardenlet deployment in the
gardennamespace.
Check that the gardenlet Is Successfully Deployed
Check that the gardenlets certificate bootstrap was successful.
Check if the secret
gardenlet-kubeconfigin the namespacegardenin the seed cluster is created and contains akubeconfigwith a valid certificate.Get the
kubeconfigfrom the created secret.$ kubectl -n garden get secret gardenlet-kubeconfig -o json | jq -r .data.kubeconfig | base64 -dTest against the garden cluster and verify it’s working.
Extract the
client-certificate-datafrom the usergardenlet.View the certificate:
$ openssl x509 -in ./gardenlet-cert -noout -text
Check that the bootstrap secret
gardenlet-bootstrap-kubeconfighas been deleted from the seed cluster in namespacegarden.Check that the seed cluster is registered and
READYin the garden cluster.Check that the seed cluster
sweet-seedexists and all conditions indicate that it’s available. If so, the Gardenlet is sending regular heartbeats and the seed bootstrapping was successful.Check that the conditions on the
Seedresource look similar to the following:$ kubectl get seed sweet-seed -o json | jq .status.conditions [ { "lastTransitionTime": "2020-07-17T09:17:29Z", "lastUpdateTime": "2020-07-17T09:17:29Z", "message": "Gardenlet is posting ready status.", "reason": "GardenletReady", "status": "True", "type": "GardenletReady" }, { "lastTransitionTime": "2020-07-17T09:17:49Z", "lastUpdateTime": "2020-07-17T09:53:17Z", "message": "Backup Buckets are available.", "reason": "BackupBucketsAvailable", "status": "True", "type": "BackupBucketsReady" } ]
Self Upgrades
In order to keep your gardenlets in such “unmanaged seeds” up-to-date (i.e., in seeds which are no shoot clusters), its Helm chart must be regularly deployed. This requires network connectivity to such clusters which can be challenging if they reside behind a firewall or in restricted environments. It is much simpler if gardenlet could keep itself up-to-date, based on configuration read from the garden cluster. This approach greatly reduces operational complexity.
gardenlet runs a controller which watches for seedmanagement.gardener.cloud/v1alpha1.Gardenlet resources in the garden cluster in the garden namespace having the same name as the Seed the gardenlet is responsible for.
Such resources contain its component configuration and deployment values.
Most notably, a URL to an OCI repository containing gardenlet’s Helm chart is included.
An example Gardenlet resource looks like this:
apiVersion: seedmanagement.gardener.cloud/v1alpha1
kind: Gardenlet
metadata:
name: local
namespace: garden
spec:
deployment:
replicaCount: 1
revisionHistoryLimit: 2
helm:
ociRepository:
ref: <url-to-gardenlet-chart-repository>:v1.97.0
config:
apiVersion: gardenlet.config.gardener.cloud/v1alpha1
kind: GardenletConfiguration
gardenClientConnection:
kubeconfigSecret:
name: gardenlet-kubeconfig
namespace: garden
controllers:
shoot:
reconcileInMaintenanceOnly: true
respectSyncPeriodOverwrite: true
shootState:
concurrentSyncs: 0
featureGates:
DefaultSeccompProfile: true
logging:
enabled: true
vali:
enabled: true
shootNodeLogging:
shootPurposes:
- infrastructure
- production
- development
- evaluation
seedConfig:
apiVersion: core.gardener.cloud/v1beta1
kind: Seed
metadata:
labels:
base: kind
spec:
backup:
provider: local
region: local
credentialsRef:
apiVersion: v1
kind: Secret
name: backup-local
namespace: garden
dns:
provider:
secretRef:
name: internal-domain-internal-local-gardener-cloud
namespace: garden
type: local
ingress:
controller:
kind: nginx
domain: ingress.local.seed.local.gardener.cloud
networks:
nodes: 172.18.0.0/16
pods: 10.1.0.0/16
services: 10.2.0.0/16
shootDefaults:
pods: 10.3.0.0/16
services: 10.4.0.0/16
provider:
region: local
type: local
zones:
- "0"
settings:
excessCapacityReservation:
enabled: false
scheduling:
visible: true
verticalPodAutoscaler:
enabled: true
On reconciliation, gardenlet downloads the Helm chart, renders it with the provided values, and then applies it to its own cluster. Hence, in order to keep a gardenlet up-to-date, it is enough to update the tag/digest of the OCI repository ref for the Helm chart:
spec:
deployment:
helm:
ociRepository:
ref: <url-to-gardenlet-chart-repository>:v1.97.0
This way, network connectivity to the cluster in which gardenlet runs is not required at all (at least for deployment purposes).
When you delete this resource, nothing happens: gardenlet remains running with the configuration as before.
However, self-upgrades are obviously not possible anymore.
In order to upgrade it, you have to either recreate the Gardenlet object, or redeploy the Helm chart.
Related Links
4.7.6 - Deploy Gardenlet Via Operator
Deploy a gardenlet Via gardener-operator
The gardenlet can automatically be deployed by gardener-operator into existing Kubernetes clusters in order to register them as seeds.
Prerequisites
Using this method only works when gardener-operator is managing the garden cluster.
If you have used the gardener/controlplane Helm chart for the deployment of the Gardener control plane, please refer to this document.
Tip
The initial seed cluster can be the garden cluster itself, but for better separation of concerns, it is recommended to only register other clusters as seeds.
Deployment of gardenlets
Using this method, gardener-operator is only taking care of the very first deployment of gardenlet.
Once running, the gardenlet leverages the self-upgrade strategy in order to keep itself up-to-date.
Concretely, gardener-operator only acts when there is no respective Seed resource yet.
In order to request a gardenlet deployment, create following resource in the (virtual) garden cluster:
apiVersion: seedmanagement.gardener.cloud/v1alpha1
kind: Gardenlet
metadata:
name: local
namespace: garden
spec:
deployment:
replicaCount: 1
revisionHistoryLimit: 2
helm:
ociRepository:
ref: <url-to-gardenlet-chart-repository>:v1.97.0
config:
apiVersion: gardenlet.config.gardener.cloud/v1alpha1
kind: GardenletConfiguration
controllers:
shoot:
reconcileInMaintenanceOnly: true
respectSyncPeriodOverwrite: true
shootState:
concurrentSyncs: 0
logging:
enabled: true
vali:
enabled: true
shootNodeLogging:
shootPurposes:
- infrastructure
- production
- development
- evaluation
seedConfig:
apiVersion: core.gardener.cloud/v1beta1
kind: Seed
metadata:
labels:
base: kind
spec:
backup:
provider: local
region: local
credentialsRef:
apiVersion: v1
kind: Secret
name: backup-local
namespace: garden
dns:
provider:
secretRef:
name: internal-domain-internal-local-gardener-cloud
namespace: garden
type: local
ingress:
controller:
kind: nginx
domain: ingress.local.seed.local.gardener.cloud
networks:
nodes: 172.18.0.0/16
pods: 10.1.0.0/16
services: 10.2.0.0/16
shootDefaults:
pods: 10.3.0.0/16
services: 10.4.0.0/16
provider:
region: local
type: local
zones:
- "0"
settings:
excessCapacityReservation:
enabled: false
scheduling:
visible: true
verticalPodAutoscaler:
enabled: true
This causes gardener-operator to deploy gardenlet to the same cluster where it is running.
Once it comes up, gardenlet will create a Seed resource with the same name and uses the Gardenlet resource for self-upgrades (see this document).
Remote Clusters
If you want gardener-operator to deploy gardenlet into some other cluster, create a kubeconfig Secret and reference it in the Gardenlet resource:
apiVersion: v1
kind: Secret
metadata:
name: remote-cluster-kubeconfig
namespace: garden
type: Opaque
data:
kubeconfig: base64(kubeconfig-to-remote-cluster)
---
apiVersion: seedmanagement.gardener.cloud/v1alpha1
kind: Gardenlet
metadata:
name: local
namespace: garden
spec:
kubeconfigSecretRef:
name: remote-cluster-kubeconfig
# ...
Important
After successful deployment of gardenlet,
gardener-operatorwill delete theremote-cluster-kubeconfigSecretand set.spec.kubeconfigSecretReftonil. This is because the kubeconfig will never ever be needed anymore (gardener-operatoris only responsible for initial deployment, and gardenlet updates itself with an in-cluster kubeconfig). In case your landscape is managed via a GitOps approach, you might want to reflect this change in your repository.
Forceful Re-Deployment
In certain scenarios, it might be necessary to forcefully re-deploy the gardenlet.
For example, in case the gardenlet client certificate has been expired or is “lost”, or the gardenlet Deployment has been “accidentally” (😉) deleted from the seed cluster.
You can trigger the forceful re-deployment by annotating the Gardenlet with
gardener.cloud/operation=force-redeploy
Tip
Do not forget to create the kubeconfig
Secretand re-add the.spec.kubeconfigSecretRefto theGardenletspecification if this is a remote cluster.
gardener-operator will remove the operation annotation after it’s done.
Just like after the initial deployment, it’ll also delete the kubeconfig Secret and set .spec.kubeconfigSecretRef to nil, see above.
Configuring the connection to garden cluster
The garden cluster connection of your seeds are configured automatically by gardener-operator.
You could also specify the gardenClusterAddress and gardenClusterCACert in the Gardenlet resource manually, but this is not recommended.
If GardenClusterAddress is unset gardener-operator will determine the address automatically based on the Garden resource.
It is set to "api." + garden.spec.virtualCluster.dns.domains[0] which should cover most use cases since this is the immutable address of the garden cluster.
If the runtime cluster is used as a seed cluster and IstioTLSTermination feature is not active, gardenlet overwrites the address with the internal service address of the garden cluster at runtime.
This happens for this single seed cluster only, so any managed seed running on this seed cluster will still use the default address of the garden cluster.
gardenClusterCACert is deprecated and should not be set. In this case, gardenlet will update the garden cluster CA certificate automatically from the garden cluster.
If a seed managed by a Gardenlet resource loses permanent access to the garden cluster for some reason, you can re-establish the connection by using the Forceful Re-Deployment feature.
4.7.7 - Feature Gates
Feature Gates in Gardener
This page contains an overview of the various feature gates an administrator can specify on different Gardener components.
Overview
Feature gates are a set of key=value pairs that describe Gardener features. You can turn these features on or off using the component configuration file for a specific component.
Each Gardener component lets you enable or disable a set of feature gates that are relevant to that component. For example, this is the configuration of the gardenlet component.
The following tables are a summary of the feature gates that you can set on different Gardener components.
- The “Since” column contains the Gardener release when a feature is introduced or its release stage is changed.
- The “Until” column, if not empty, contains the last Gardener release in which you can still use a feature gate.
- If a feature is in the Alpha or Beta state, you can find the feature listed in the Alpha/Beta feature gate table.
- If a feature is stable you can find all stages for that feature listed in the Graduated/Deprecated feature gate table.
- The Graduated/Deprecated feature gate table also lists deprecated and withdrawn features.
Feature Gates for Alpha or Beta Features
| Feature | Default | Stage | Since | Until |
|---|---|---|---|---|
| DefaultSeccompProfile | false | Alpha | 1.54 | |
| UseNamespacedCloudProfile | false | Alpha | 1.92 | 1.111 |
| UseNamespacedCloudProfile | true | Beta | 1.112 | |
| ShootCredentialsBinding | false | Alpha | 1.98 | 1.106 |
| ShootCredentialsBinding | true | Beta | 1.107 | |
| NewWorkerPoolHash | false | Alpha | 1.98 | |
| CredentialsRotationWithoutWorkersRollout | false | Alpha | 1.112 | 1.120 |
| CredentialsRotationWithoutWorkersRollout | true | Beta | 1.121 | |
| InPlaceNodeUpdates | false | Alpha | 1.113 | |
| IstioTLSTermination | false | Alpha | 1.114 | |
| CloudProfileCapabilities | false | Alpha | 1.117 | |
| DoNotCopyBackupCredentials | false | Alpha | 1.121 | 1.122 |
| DoNotCopyBackupCredentials | true | Beta | 1.123 |
Feature Gates for Graduated or Deprecated Features
| Feature | Default | Stage | Since | Until |
|---|---|---|---|---|
| NodeLocalDNS | false | Alpha | 1.7 | 1.25 |
| NodeLocalDNS | Removed | 1.26 | ||
| KonnectivityTunnel | false | Alpha | 1.6 | 1.26 |
| KonnectivityTunnel | Removed | 1.27 | ||
| MountHostCADirectories | false | Alpha | 1.11 | 1.25 |
| MountHostCADirectories | true | Beta | 1.26 | 1.27 |
| MountHostCADirectories | true | GA | 1.27 | 1.29 |
| MountHostCADirectories | Removed | 1.30 | ||
| DisallowKubeconfigRotationForShootInDeletion | false | Alpha | 1.28 | 1.31 |
| DisallowKubeconfigRotationForShootInDeletion | true | Beta | 1.32 | 1.35 |
| DisallowKubeconfigRotationForShootInDeletion | true | GA | 1.36 | 1.37 |
| DisallowKubeconfigRotationForShootInDeletion | Removed | 1.38 | ||
| Logging | false | Alpha | 0.13 | 1.40 |
| Logging | Removed | 1.41 | ||
| AdminKubeconfigRequest | false | Alpha | 1.24 | 1.38 |
| AdminKubeconfigRequest | true | Beta | 1.39 | 1.41 |
| AdminKubeconfigRequest | true | GA | 1.42 | 1.49 |
| AdminKubeconfigRequest | Removed | 1.50 | ||
| UseDNSRecords | false | Alpha | 1.27 | 1.38 |
| UseDNSRecords | true | Beta | 1.39 | 1.43 |
| UseDNSRecords | true | GA | 1.44 | 1.49 |
| UseDNSRecords | Removed | 1.50 | ||
| CachedRuntimeClients | false | Alpha | 1.7 | 1.33 |
| CachedRuntimeClients | true | Beta | 1.34 | 1.44 |
| CachedRuntimeClients | true | GA | 1.45 | 1.49 |
| CachedRuntimeClients | Removed | 1.50 | ||
| DenyInvalidExtensionResources | false | Alpha | 1.31 | 1.41 |
| DenyInvalidExtensionResources | true | Beta | 1.42 | 1.44 |
| DenyInvalidExtensionResources | true | GA | 1.45 | 1.49 |
| DenyInvalidExtensionResources | Removed | 1.50 | ||
| RotateSSHKeypairOnMaintenance | false | Alpha | 1.28 | 1.44 |
| RotateSSHKeypairOnMaintenance | true | Beta | 1.45 | 1.47 |
| RotateSSHKeypairOnMaintenance (deprecated) | false | Beta | 1.48 | 1.50 |
| RotateSSHKeypairOnMaintenance (deprecated) | Removed | 1.51 | ||
| ShootForceDeletion | false | Alpha | 1.81 | 1.90 |
| ShootForceDeletion | true | Beta | 1.91 | 1.110 |
| ShootForceDeletion | true | GA | 1.111 | 1.119 |
| ShootForceDeletion | Removed | 1.120 | ||
| ShootMaxTokenExpirationOverwrite | false | Alpha | 1.43 | 1.44 |
| ShootMaxTokenExpirationOverwrite | true | Beta | 1.45 | 1.47 |
| ShootMaxTokenExpirationOverwrite | true | GA | 1.48 | 1.50 |
| ShootMaxTokenExpirationOverwrite | Removed | 1.51 | ||
| ShootMaxTokenExpirationValidation | false | Alpha | 1.43 | 1.45 |
| ShootMaxTokenExpirationValidation | true | Beta | 1.46 | 1.47 |
| ShootMaxTokenExpirationValidation | true | GA | 1.48 | 1.50 |
| ShootMaxTokenExpirationValidation | Removed | 1.51 | ||
| WorkerPoolKubernetesVersion | false | Alpha | 1.35 | 1.45 |
| WorkerPoolKubernetesVersion | true | Beta | 1.46 | 1.49 |
| WorkerPoolKubernetesVersion | true | GA | 1.50 | 1.51 |
| WorkerPoolKubernetesVersion | Removed | 1.52 | ||
| DisableDNSProviderManagement | false | Alpha | 1.41 | 1.49 |
| DisableDNSProviderManagement | true | Beta | 1.50 | 1.51 |
| DisableDNSProviderManagement | true | GA | 1.52 | 1.59 |
| DisableDNSProviderManagement | Removed | 1.60 | ||
| SecretBindingProviderValidation | false | Alpha | 1.38 | 1.50 |
| SecretBindingProviderValidation | true | Beta | 1.51 | 1.52 |
| SecretBindingProviderValidation | true | GA | 1.53 | 1.54 |
| SecretBindingProviderValidation | Removed | 1.55 | ||
| SeedKubeScheduler | false | Alpha | 1.15 | 1.54 |
| SeedKubeScheduler | false | Deprecated | 1.55 | 1.60 |
| SeedKubeScheduler | Removed | 1.61 | ||
| ShootCARotation | false | Alpha | 1.42 | 1.50 |
| ShootCARotation | true | Beta | 1.51 | 1.56 |
| ShootCARotation | true | GA | 1.57 | 1.59 |
| ShootCARotation | Removed | 1.60 | ||
| ShootSARotation | false | Alpha | 1.48 | 1.50 |
| ShootSARotation | true | Beta | 1.51 | 1.56 |
| ShootSARotation | true | GA | 1.57 | 1.59 |
| ShootSARotation | Removed | 1.60 | ||
| ReversedVPN | false | Alpha | 1.22 | 1.41 |
| ReversedVPN | true | Beta | 1.42 | 1.62 |
| ReversedVPN | true | GA | 1.63 | 1.69 |
| ReversedVPN | Removed | 1.70 | ||
| ForceRestore | Removed | 1.66 | ||
| SeedChange | false | Alpha | 1.12 | 1.52 |
| SeedChange | true | Beta | 1.53 | 1.68 |
| SeedChange | true | GA | 1.69 | 1.72 |
| SeedChange | Removed | 1.73 | ||
| CopyEtcdBackupsDuringControlPlaneMigration | false | Alpha | 1.37 | 1.52 |
| CopyEtcdBackupsDuringControlPlaneMigration | true | Beta | 1.53 | 1.68 |
| CopyEtcdBackupsDuringControlPlaneMigration | true | GA | 1.69 | 1.72 |
| CopyEtcdBackupsDuringControlPlaneMigration | Removed | 1.73 | ||
| ManagedIstio | false | Alpha | 1.5 | 1.18 |
| ManagedIstio | true | Beta | 1.19 | 1.47 |
| ManagedIstio | true | Deprecated | 1.48 | 1.69 |
| ManagedIstio | Removed | 1.70 | ||
| APIServerSNI | false | Alpha | 1.7 | 1.18 |
| APIServerSNI | true | Beta | 1.19 | 1.47 |
| APIServerSNI | true | Deprecated | 1.48 | 1.72 |
| APIServerSNI | Removed | 1.73 | ||
| HAControlPlanes | false | Alpha | 1.49 | 1.70 |
| HAControlPlanes | true | Beta | 1.71 | 1.72 |
| HAControlPlanes | true | GA | 1.73 | 1.73 |
| HAControlPlanes | Removed | 1.74 | ||
| FullNetworkPoliciesInRuntimeCluster | false | Alpha | 1.66 | 1.70 |
| FullNetworkPoliciesInRuntimeCluster | true | Beta | 1.71 | 1.72 |
| FullNetworkPoliciesInRuntimeCluster | true | GA | 1.73 | 1.73 |
| FullNetworkPoliciesInRuntimeCluster | Removed | 1.74 | ||
| DisableScalingClassesForShoots | false | Alpha | 1.73 | 1.78 |
| DisableScalingClassesForShoots | true | Beta | 1.79 | 1.80 |
| DisableScalingClassesForShoots | true | GA | 1.81 | 1.81 |
| DisableScalingClassesForShoots | Removed | 1.82 | ||
| ContainerdRegistryHostsDir | false | Alpha | 1.77 | 1.85 |
| ContainerdRegistryHostsDir | true | Beta | 1.86 | 1.86 |
| ContainerdRegistryHostsDir | true | GA | 1.87 | 1.87 |
| ContainerdRegistryHostsDir | Removed | 1.88 | ||
| WorkerlessShoots | false | Alpha | 1.70 | 1.78 |
| WorkerlessShoots | true | Beta | 1.79 | 1.85 |
| WorkerlessShoots | true | GA | 1.86 | 1.87 |
| WorkerlessShoots | Removed | 1.88 | ||
| MachineControllerManagerDeployment | false | Alpha | 1.73 | 1.80 |
| MachineControllerManagerDeployment | true | Beta | 1.81 | 1.81 |
| MachineControllerManagerDeployment | true | GA | 1.82 | 1.91 |
| MachineControllerManagerDeployment | Removed | 1.92 | ||
| APIServerFastRollout | true | Beta | 1.82 | 1.89 |
| APIServerFastRollout | true | GA | 1.90 | 1.91 |
| APIServerFastRollout | Removed | 1.92 | ||
| UseGardenerNodeAgent | false | Alpha | 1.82 | 1.88 |
| UseGardenerNodeAgent | true | Beta | 1.89 | 1.89 |
| UseGardenerNodeAgent | true | GA | 1.90 | 1.91 |
| UseGardenerNodeAgent | Removed | 1.92 | ||
| CoreDNSQueryRewriting | false | Alpha | 1.55 | 1.95 |
| CoreDNSQueryRewriting | true | Beta | 1.96 | 1.96 |
| CoreDNSQueryRewriting | true | GA | 1.97 | 1.100 |
| CoreDNSQueryRewriting | Removed | 1.101 | ||
| MutableShootSpecNetworkingNodes | false | Alpha | 1.64 | 1.95 |
| MutableShootSpecNetworkingNodes | true | Beta | 1.96 | 1.96 |
| MutableShootSpecNetworkingNodes | true | GA | 1.97 | 1.100 |
| MutableShootSpecNetworkingNodes | Removed | 1.101 | ||
| VPAForETCD | false | Alpha | 1.94 | 1.96 |
| VPAForETCD | true | Beta | 1.97 | 1.104 |
| VPAForETCD | true | GA | 1.105 | 1.108 |
| VPAForETCD | Removed | 1.109 | ||
| VPAAndHPAForAPIServer | false | Alpha | 1.95 | 1.100 |
| VPAAndHPAForAPIServer | true | Beta | 1.101 | 1.104 |
| VPAAndHPAForAPIServer | true | GA | 1.105 | 1.108 |
| VPAAndHPAForAPIServer | Removed | 1.109 | ||
| HVPA | false | Alpha | 0.31 | 1.105 |
| HVPA | false | Deprecated | 1.106 | 1.108 |
| HVPA | Removed | 1.109 | ||
| HVPAForShootedSeed | false | Alpha | 0.32 | 1.105 |
| HVPAForShootedSeed | false | Deprecated | 1.106 | 1.108 |
| HVPAForShootedSeed | Removed | 1.109 | ||
| IPv6SingleStack | false | Alpha | 1.63 | 1.106 |
| IPv6SingleStack | Removed | 1.107 | ||
| ShootManagedIssuer | false | Alpha | 1.93 | 1.110 |
| ShootManagedIssuer | Removed | 1.111 | ||
| NewVPN | false | Alpha | 1.104 | 1.114 |
| NewVPN | true | Beta | 1.115 | 1.115 |
| NewVPN | true | GA | 1.116 | |
| RemoveAPIServerProxyLegacyPort | false | Alpha | 1.113 | 1.118 |
| RemoveAPIServerProxyLegacyPort | true | Beta | 1.119 | 1.121 |
| RemoveAPIServerProxyLegacyPort | true | GA | 1.122 | 1.122 |
| RemoveAPIServerProxyLegacyPort | Removed | 1.123 | ||
| NodeAgentAuthorizer | false | Alpha | 1.109 | 1.115 |
| NodeAgentAuthorizer | true | Beta | 1.116 | 1.122 |
| NodeAgentAuthorizer | true | GA | 1.123 |
Using a Feature
A feature can be in Alpha, Beta or GA stage. An Alpha feature means:
- Disabled by default.
- Might be buggy. Enabling the feature may expose bugs.
- Support for feature may be dropped at any time without notice.
- The API may change in incompatible ways in a later software release without notice.
- Recommended for use only in short-lived testing clusters, due to increased risk of bugs and lack of long-term support.
A Beta feature means:
- Enabled by default.
- The feature is well tested. Enabling the feature is considered safe.
- Support for the overall feature will not be dropped, though details may change.
- The schema and/or semantics of objects may change in incompatible ways in a subsequent beta or stable release. When this happens, we will provide instructions for migrating to the next version. This may require deleting, editing, and re-creating API objects. The editing process may require some thought. This may require downtime for applications that rely on the feature.
- Recommended for only non-critical uses because of potential for incompatible changes in subsequent releases.
Please do try Beta features and give feedback on them! After they exit beta, it may not be practical for us to make more changes.
A General Availability (GA) feature is also referred to as a stable feature. It means:
- The feature is always enabled; you cannot disable it.
- The corresponding feature gate is no longer needed.
- Stable versions of features will appear in released software for many subsequent versions.
List of Feature Gates
Note: All feature gates that are relevant for
gardenlet, are also relevant forgardenadm.
| Feature | Relevant Components | Description |
|---|---|---|
| DefaultSeccompProfile | gardenlet, gardener-operator | Enables the defaulting of the seccomp profile for Gardener managed workload in the garden or seed to RuntimeDefault. |
| UseNamespacedCloudProfile | gardener-apiserver | Enables usage of NamespacedCloudProfiles in Shoots. |
| ShootManagedIssuer | gardenlet | Enables the shoot managed issuer functionality described in GEP 24. |
| ShootCredentialsBinding | gardener-apiserver | Enables usage of CredentialsBindingName in Shoots. |
| NewWorkerPoolHash | gardenlet | Enables usage of the new worker pool hash calculation. The new calculation supports rolling worker pools if kubeReserved, systemReserved, evictionHard or cpuManagerPolicy in the kubelet configuration are changed. All provider extensions must be upgraded to support this feature first. Existing worker pools are not immediately migrated to the new hash variant, since this would trigger the replacement of all nodes. The migration happens when a rolling update is triggered according to the old or new hash version calculation. |
| NewVPN | gardenlet | Enables usage of the new implementation of the VPN (go rewrite) using an IPv6 transfer network. |
| NodeAgentAuthorizer | gardenlet, gardener-node-agent | Enables authorization of gardener-node-agent to kube-apiserver of shoot clusters using an authorization webhook. It restricts the permissions of each gardener-node-agent instance to the objects belonging to its own node only. |
| CredentialsRotationWithoutWorkersRollout | gardener-apiserver | CredentialsRotationWithoutWorkersRollout enables starting the credentials rotation without immediately causing a rolling update of all worker nodes. Instead, the rolling update can be triggered manually by the user at a later point in time of their convenience. This should only be enabled when all deployed provider extensions vendor at least gardener/gardener@v1.111+. |
| InPlaceNodeUpdates | gardener-apiserver | Enables setting the update strategy of worker pools to AutoInPlaceUpdate or ManualInPlaceUpdate in the Shoot API. |
| IstioTLSTermination | gardenlet, gardener-operator | Enables TLS termination for the Istio Ingress Gateway instead of TLS termination at the kube-apiserver. It allows load-balancing of requests to the kube-apiserver on request level instead of connection level. |
| CloudProfileCapabilities | gardener-apiserver | Enables the usage of capabilities in the CloudProfile. Capabilities are used to create a relation between machineTypes and machineImages. It allows to validate worker groups of a shoot ensuring the selected image and machine combination will boot up successfully. Capabilities are also used to determine valid upgrade paths during automated maintenance operation. |
| DoNotCopyBackupCredentials | gardenlet | Disables the copying of Shoot infrastructure credentials as backup credentials when the Shoot is used as a ManagedSeed. Operators are responsible for providing the credentials for backup explicitly. Credentials that were already copied will be labeled with secret.backup.gardener.cloud/status=previously-managed and would have to be cleaned up by operators. |
4.7.8 - Getting Started Locally
Deploying Gardener Locally
This document will walk you through deploying Gardener on your local machine. If you encounter difficulties, please open an issue so that we can make this process easier.
Overview
Gardener runs in any Kubernetes cluster. In this guide, we will start a KinD cluster which is used as both garden and seed cluster (please refer to the architecture overview) for simplicity.
Based on Skaffold, the container images for all required components will be built and deployed into the cluster (via their Helm charts).
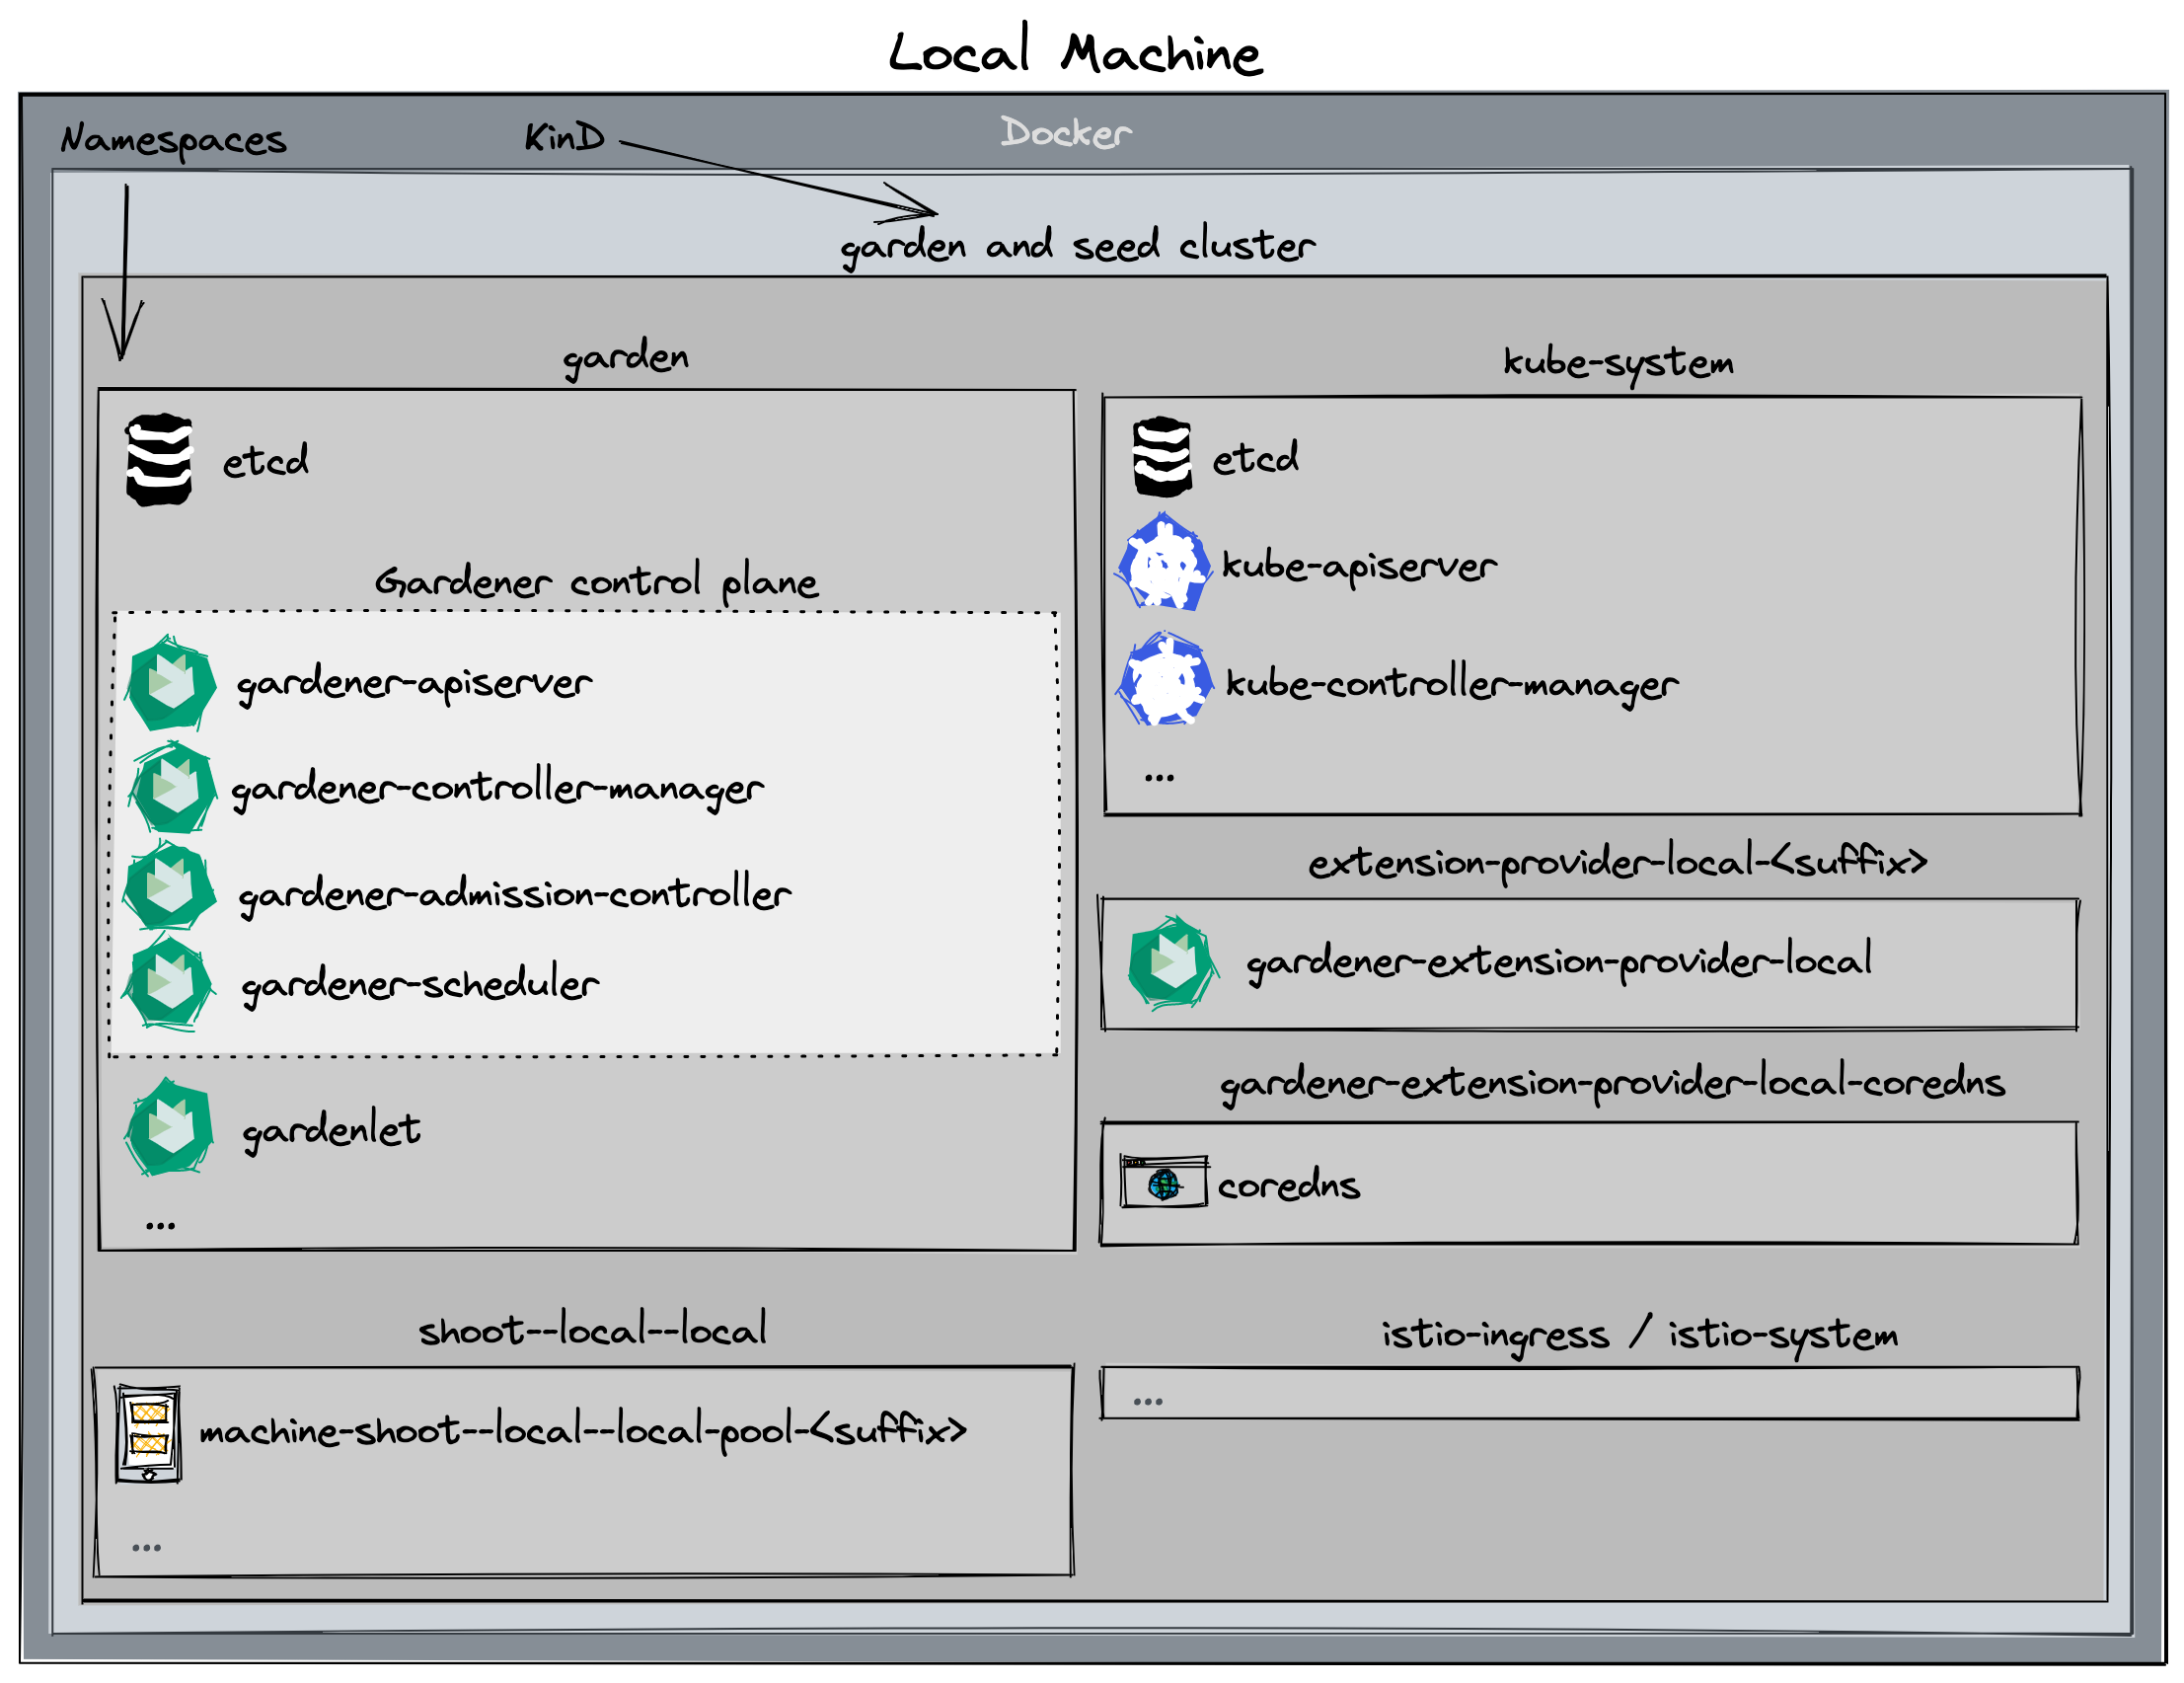
Alternatives
When deploying Gardener on your local machine you might face several limitations:
- Your machine doesn’t have enough compute resources (see prerequisites) for hosting a second seed cluster or multiple shoot clusters.
- Testing Gardener’s IPv6 features requires a Linux machine and native IPv6 connectivity to the internet, but you’re on macOS or don’t have IPv6 connectivity in your office environment or via your home ISP.
In these cases, you might want to check out one of the following options that run the setup described in this guide elsewhere for circumventing these limitations:
- remote local setup: deploy on a remote pod for more compute resources
- dev box on Google Cloud: deploy on a Google Cloud machine for more compute resource and/or simple IPv4/IPv6 dual-stack networking
Prerequisites
- Make sure that you have followed the Local Setup guide up until the Get the sources step.
- Make sure your Docker daemon is up-to-date, up and running and has enough resources (at least
8CPUs and8Gimemory; see here how to configure the resources for Docker for Mac).Please note that 8 CPU / 8Gi memory might not be enough for more than two
Shootclusters, i.e., you might need to increase these values if you want to run additionalShoots. If you plan on following the optional steps to create a second seed cluster, the required resources will be more - at least10CPUs and18Gimemory. Additionally, please configure at least120Giof disk size for the Docker daemon. Tip: You can clean up unused data withdocker system dfanddocker system prune -a.
Setting Up the KinD Cluster (Garden and Seed)
make kind-up
If you want to setup an IPv6 KinD cluster, use
make kind-up IPFAMILY=ipv6instead.
This command sets up a new KinD cluster named gardener-local and stores the kubeconfig in the ./example/gardener-local/kind/local/kubeconfig file.
It might be helpful to copy this file to
$HOME/.kube/config, since you will need to target this KinD cluster multiple times. Alternatively, make sure to set yourKUBECONFIGenvironment variable to./example/gardener-local/kind/local/kubeconfigfor all future steps viaexport KUBECONFIG=$PWD/example/gardener-local/kind/local/kubeconfig.
All following steps assume that you are using this kubeconfig.
Additionally, this command also deploys a local container registry to the cluster, as well as a few registry mirrors, that are set up as a pull-through cache for all upstream registries Gardener uses by default. This is done to speed up image pulls across local clusters.
You will need to add
127.0.0.1 garden.local.gardener.cloudto your /etc/hosts.
The local registry can now be accessed either via localhost:5001 or garden.local.gardener.cloud:5001 for pushing and pulling.
The storage directories of the registries are mounted to the host machine under dev/local-registry.
With this, mirrored images don’t have to be pulled again after recreating the cluster.
The command also deploys a default calico installation as the cluster’s CNI implementation with NetworkPolicy support (the default kindnet CNI doesn’t provide NetworkPolicy support).
Furthermore, it deploys the metrics-server in order to support HPA and VPA on the seed cluster.
Setting Up IPv6 Single-Stack Networking (optional)
First, ensure that your /etc/hosts file contains an entry resolving garden.local.gardener.cloud to the IPv6 loopback address:
::1 garden.local.gardener.cloud
Typically, only ip6-localhost is mapped to ::1 on linux machines.
However, we need garden.local.gardener.cloud to resolve to both 127.0.0.1 and ::1 so that we can talk to our registry via a single address (garden.local.gardener.cloud:5001).
Next, we need to configure NAT for outgoing traffic from the kind network to the internet.
After executing make kind-up IPFAMILY=ipv6, execute the following command to set up the corresponding iptables rules:
ip6tables -t nat -A POSTROUTING -o $(ip route show default | awk '{print $5}') -s fd00:10::/64 -j MASQUERADE
Setting Up Gardener
make gardener-up
If you want to setup an IPv6 ready Gardener, use
make gardener-up IPFAMILY=ipv6instead.
This will first build the base images (which might take a bit if you do it for the first time). Afterwards, the Gardener resources will be deployed into the cluster.
Developing Gardener
make gardener-dev
This is similar to make gardener-up but additionally starts a skaffold dev loop.
After the initial deployment, skaffold starts watching source files.
Once it has detected changes, press any key to trigger a new build and deployment of the changed components.
Tip: you can set the SKAFFOLD_MODULE environment variable to select specific modules of the skaffold configuration (see skaffold.yaml) that skaffold should watch, build, and deploy.
This significantly reduces turnaround times during development.
For example, if you want to develop changes to gardenlet:
# initial deployment of all components
make gardener-up
# start iterating on gardenlet without deploying other components
make gardener-dev SKAFFOLD_MODULE=gardenlet
Debugging Gardener
make gardener-debug
This is using skaffold debugging features. In the Gardener case, Go debugging using Delve is the most relevant use case. Please see the skaffold debugging documentation how to set up your IDE accordingly or check the examples below (GoLand, VS Code).
SKAFFOLD_MODULE environment variable is working the same way as described for Developing Gardener. However, skaffold is not watching for changes when debugging,
because it would like to avoid interrupting your debugging session.
For example, if you want to debug gardenlet:
# initial deployment of all components
make gardener-up
# start debugging gardenlet without deploying other components
make gardener-debug SKAFFOLD_MODULE=gardenlet
In debugging flow, skaffold builds your container images, reconfigures your pods and creates port forwardings for the Delve debugging ports to your localhost.
The default port is 56268. If you debug multiple pods at the same time, the port of the second pod will be forwarded to 56269 and so on.
Please check your console output for the concrete port-forwarding on your machine.
Note: Resuming or stopping only a single goroutine (Go Issue 25578, 31132) is currently not supported, so the action will cause all the goroutines to get activated or paused. (vscode-go wiki)
This means that when a goroutine of gardenlet (or any other gardener-core component you try to debug) is paused on a breakpoint, all the other goroutines are paused. Hence, when the whole gardenlet process is paused, it can not renew its lease and can not respond to the liveness and readiness probes. Skaffold automatically increases timeoutSeconds of liveness and readiness probes to 600. Anyway, we were facing problems when debugging that pods have been killed after a while.
Thus, leader election, health and readiness checks for gardener-admission-controller, gardener-apiserver, gardener-controller-manager, gardener-scheduler,gardenlet and operator are disabled when debugging.
If you have similar problems with other components which are not deployed by skaffold, you could temporarily turn off the leader election and disable liveness and readiness probes there too.
Debugging in GoLand
- Edit your Run/Debug Configurations.
- Add a new Go Remote configuration.
- Set the port to
56268(or any increment of it when debugging multiple components). - Recommended: Change the behavior of On disconnect to Leave it running.
Debugging in VS Code
- Create or edit your
.vscode/launch.jsonconfiguration. - Add the following configuration:
{
"name": "go remote",
"type": "go",
"request": "attach",
"mode": "remote",
"port": 56268, // or any increment of it when debugging multiple components
"host": "127.0.0.1"
}
Since the ko builder is used in Skaffold to build the images, it’s not necessary to specify the cwd and remotePath options as they match the workspace folder (ref).
Creating a Shoot Cluster
You can wait for the Seed to be ready by running:
./hack/usage/wait-for.sh seed local GardenletReady SeedSystemComponentsHealthy ExtensionsReady
Alternatively, you can run kubectl get seed local and wait for the STATUS to indicate readiness:
NAME STATUS PROVIDER REGION AGE VERSION K8S VERSION
local Ready local local 4m42s vX.Y.Z-dev v1.28.1
In order to create a first shoot cluster, just run:
kubectl apply -f example/provider-local/shoot.yaml
You can wait for the Shoot to be ready by running:
NAMESPACE=garden-local ./hack/usage/wait-for.sh shoot local APIServerAvailable ControlPlaneHealthy ObservabilityComponentsHealthy EveryNodeReady SystemComponentsHealthy
Alternatively, you can run kubectl -n garden-local get shoot local and wait for the LAST OPERATION to reach 100%:
NAME CLOUDPROFILE PROVIDER REGION K8S VERSION HIBERNATION LAST OPERATION STATUS AGE
local local local local 1.28.1 Awake Create Processing (43%) healthy 94s
If you don’t need any worker pools, you can create a workerless Shoot by running:
kubectl apply -f example/provider-local/shoot-workerless.yaml
(Optional): You could also execute a simple e2e test (creating and deleting a shoot) by running:
make test-e2e-local-simple KUBECONFIG="$PWD/example/gardener-local/kind/local/kubeconfig"
Accessing the Shoot Cluster
⚠️ Please note that in this setup, shoot clusters are not accessible by default when you download the kubeconfig and try to communicate with them.
The reason is that your host most probably cannot resolve the DNS names of the clusters since provider-local extension runs inside the KinD cluster (for more details, see DNSRecord).
Hence, if you want to access the shoot cluster, you have to run the following command which will extend your /etc/hosts file with the required information to make the DNS names resolvable:
cat <<EOF | sudo tee -a /etc/hosts
# Begin of Gardener local setup section
# Shoot API server domains
172.18.255.1 api.local.local.external.local.gardener.cloud
172.18.255.1 api.local.local.internal.local.gardener.cloud
# Ingress
172.18.255.1 p-seed.ingress.local.seed.local.gardener.cloud
172.18.255.1 g-seed.ingress.local.seed.local.gardener.cloud
172.18.255.1 gu-local--local.ingress.local.seed.local.gardener.cloud
172.18.255.1 p-local--local.ingress.local.seed.local.gardener.cloud
172.18.255.1 v-local--local.ingress.local.seed.local.gardener.cloud
# E2E tests
172.18.255.1 api.e2e-managedseed.garden.external.local.gardener.cloud
172.18.255.1 api.e2e-managedseed.garden.internal.local.gardener.cloud
172.18.255.1 api.e2e-hib.local.external.local.gardener.cloud
172.18.255.1 api.e2e-hib.local.internal.local.gardener.cloud
172.18.255.1 api.e2e-hib-wl.local.external.local.gardener.cloud
172.18.255.1 api.e2e-hib-wl.local.internal.local.gardener.cloud
172.18.255.1 api.e2e-unpriv.local.external.local.gardener.cloud
172.18.255.1 api.e2e-unpriv.local.internal.local.gardener.cloud
172.18.255.1 api.e2e-wake-up.local.external.local.gardener.cloud
172.18.255.1 api.e2e-wake-up.local.internal.local.gardener.cloud
172.18.255.1 api.e2e-wake-up-wl.local.external.local.gardener.cloud
172.18.255.1 api.e2e-wake-up-wl.local.internal.local.gardener.cloud
172.18.255.1 api.e2e-wake-up-ncp.local.external.local.gardener.cloud
172.18.255.1 api.e2e-wake-up-ncp.local.internal.local.gardener.cloud
172.18.255.1 api.e2e-migrate.local.external.local.gardener.cloud
172.18.255.1 api.e2e-migrate.local.internal.local.gardener.cloud
172.18.255.1 api.e2e-migrate-wl.local.external.local.gardener.cloud
172.18.255.1 api.e2e-migrate-wl.local.internal.local.gardener.cloud
172.18.255.1 api.e2e-mgr-hib.local.external.local.gardener.cloud
172.18.255.1 api.e2e-mgr-hib.local.internal.local.gardener.cloud
172.18.255.1 api.e2e-rotate.local.external.local.gardener.cloud
172.18.255.1 api.e2e-rotate.local.internal.local.gardener.cloud
172.18.255.1 api.e2e-rotate-wl.local.external.local.gardener.cloud
172.18.255.1 api.e2e-rotate-wl.local.internal.local.gardener.cloud
172.18.255.1 api.e2e-rot-noroll.local.external.local.gardener.cloud
172.18.255.1 api.e2e-rot-noroll.local.internal.local.gardener.cloud
172.18.255.1 api.e2e-rot-ip.local.external.local.gardener.cloud
172.18.255.1 api.e2e-rot-ip.local.internal.local.gardener.cloud
172.18.255.1 api.e2e-rot-nr-ip.local.external.local.gardener.cloud
172.18.255.1 api.e2e-rot-nr-ip.local.internal.local.gardener.cloud
172.18.255.1 api.e2e-default.local.external.local.gardener.cloud
172.18.255.1 api.e2e-default.local.internal.local.gardener.cloud
172.18.255.1 api.e2e-default-wl.local.external.local.gardener.cloud
172.18.255.1 api.e2e-default-wl.local.internal.local.gardener.cloud
172.18.255.1 api.e2e-default-ip.local.external.local.gardener.cloud
172.18.255.1 api.e2e-default-ip.local.internal.local.gardener.cloud
172.18.255.1 api.e2e-force-delete.local.external.local.gardener.cloud
172.18.255.1 api.e2e-force-delete.local.internal.local.gardener.cloud
172.18.255.1 api.e2e-fd-hib.local.external.local.gardener.cloud
172.18.255.1 api.e2e-fd-hib.local.internal.local.gardener.cloud
172.18.255.1 api.e2e-upd-node.local.external.local.gardener.cloud
172.18.255.1 api.e2e-upd-node.local.internal.local.gardener.cloud
172.18.255.1 api.e2e-upd-node-wl.local.external.local.gardener.cloud
172.18.255.1 api.e2e-upd-node-wl.local.internal.local.gardener.cloud
172.18.255.1 api.e2e-upgrade.local.external.local.gardener.cloud
172.18.255.1 api.e2e-upgrade.local.internal.local.gardener.cloud
172.18.255.1 api.e2e-upgrade-wl.local.external.local.gardener.cloud
172.18.255.1 api.e2e-upgrade-wl.local.internal.local.gardener.cloud
172.18.255.1 api.e2e-upg-hib.local.external.local.gardener.cloud
172.18.255.1 api.e2e-upg-hib.local.internal.local.gardener.cloud
172.18.255.1 api.e2e-upg-hib-wl.local.external.local.gardener.cloud
172.18.255.1 api.e2e-upg-hib-wl.local.internal.local.gardener.cloud
172.18.255.1 api.e2e-auth-one.local.external.local.gardener.cloud
172.18.255.1 api.e2e-auth-one.local.internal.local.gardener.cloud
172.18.255.1 api.e2e-auth-two.local.external.local.gardener.cloud
172.18.255.1 api.e2e-auth-two.local.internal.local.gardener.cloud
172.18.255.1 api.e2e-layer4-lb.local.internal.local.gardener.cloud
172.18.255.1 api.e2e-layer4-lb.local.external.local.gardener.cloud
172.18.255.1 gu-local--e2e-rotate.ingress.local.seed.local.gardener.cloud
172.18.255.1 gu-local--e2e-rotate-wl.ingress.local.seed.local.gardener.cloud
172.18.255.1 gu-local--e2e-rot-noroll.ingress.local.seed.local.gardener.cloud
172.18.255.1 gu-local--e2e-rot-ip.ingress.local.seed.local.gardener.cloud
172.18.255.1 gu-local--e2e-rot-nr-ip.ingress.local.seed.local.gardener.cloud
# End of Gardener local setup section
EOF
To access the Shoot, you can acquire a kubeconfig by using the shoots/adminkubeconfig subresource.
For convenience a helper script is provided in the hack directory. By default the script will generate a kubeconfig for a Shoot named “local” in the garden-local namespace valid for one hour.
./hack/usage/generate-admin-kubeconf.sh > admin-kubeconf.yaml
If you want to change the default namespace or shoot name, you can do so by passing different values as arguments.
./hack/usage/generate-admin-kubeconf.sh --namespace <namespace> --shoot-name <shootname> > admin-kubeconf.yaml
To access an Ingress resource from the Seed, use the Ingress host with port 8448 (https://<ingress-host>:8448, for example https://gu-local--local.ingress.local.seed.local.gardener.cloud:8448).
(Optional): Setting Up a Second Seed Cluster
There are cases where you would want to create a second seed cluster in your local setup. For example, if you want to test the control plane migration feature. The following steps describe how to do that.
Start by setting up the second KinD cluster:
make kind2-up
This command sets up a new KinD cluster named gardener-local2 and stores its kubeconfig in the ./example/gardener-local/kind/local2/kubeconfig file.
It adds another IP address (172.18.255.2) to your loopback device which is necessary for you to reach the new cluster locally.
In order to deploy required resources in the KinD cluster that you just created, run:
make gardenlet-kind2-up
The following steps assume that you are using the kubeconfig that points to the gardener-local cluster (first KinD cluster): export KUBECONFIG=$PWD/example/gardener-local/kind/local/kubeconfig.
You can wait for the local2 Seed to be ready by running:
./hack/usage/wait-for.sh seed local2 GardenletReady SeedSystemComponentsHealthy ExtensionsReady
Alternatively, you can run kubectl get seed local2 and wait for the STATUS to indicate readiness:
NAME STATUS PROVIDER REGION AGE VERSION K8S VERSION
local2 Ready local local 4m42s vX.Y.Z-dev v1.25.1
If you want to perform control plane migration, you can follow the steps outlined in Control Plane Migration to migrate the shoot cluster to the second seed you just created.
Deleting the Shoot Cluster
./hack/usage/delete shoot local garden-local
(Optional): Tear Down the Second Seed Cluster
make kind2-down
On macOS, if you want to remove the additional IP address on your loopback device run the following script:
sudo ip addr del 172.18.255.2 dev lo0
Tear Down the Gardener Environment
make kind-down
Alternative Way to Set Up Garden and Seed Leveraging gardener-operator
Instead of starting Garden and Seed via make kind-up gardener-up, you can also use gardener-operator to create your local dev landscape.
In this setup, the virtual garden cluster has its own load balancer, so you have to create an own DNS entry in your /etc/hosts:
cat <<EOF | sudo tee -a /etc/hosts
# Begin of Gardener Operator local setup section
172.18.255.3 api.virtual-garden.local.gardener.cloud
172.18.255.3 plutono-garden.ingress.runtime-garden.local.gardener.cloud
# End of Gardener Operator local setup section
EOF
You can bring up gardener-operator with this command:
make kind-multi-zone-up operator-up
Afterwards, you can create your local Garden and install gardenlet into the KinD cluster with this command:
make operator-seed-up
You find the kubeconfig for the KinD cluster at ./example/gardener-local/kind/multi-zone/kubeconfig.
The one for the virtual garden is accessible at ./dev-setup/kubeconfigs/virtual-garden/kubeconfig.
Important
When you create non-HA shoot clusters (i.e.,
Shoots with.spec.controlPlane.highAvailability.failureTolerance != zone), then they are not exposed via172.18.255.1(ref). Instead, you need to find out under which Istio instance they got exposed, and put the corresponding IP address into your/etc/hostsfile:# replace <shoot-namespace> with your shoot namespace (e.g., `shoot--foo--bar`): kubectl -n "$(kubectl -n <shoot-namespace> get gateway kube-apiserver -o jsonpath={.spec.selector.istio} | sed 's/.*--/istio-ingress--/')" get svc istio-ingressgateway -o jsonpath={.status.loadBalancer.ingress..ip}When the shoot cluster is HA (i.e.,
.spec.controlPlane.highAvailability.failureTolerance == zone), then you can access it via172.18.255.1.
Similar as in the section Developing Gardener it’s possible to run a Skaffold development loop as well using:
make operator-seed-dev
ℹ️ Please note that in this setup Skaffold is only watching for changes in the following components:
gardenletgardenlet/chartgardener-resource-managergardener-node-agent
Finally, please use this command to tear down your environment:
make kind-multi-zone-down
This setup supports creating shoots and managed seeds the same way as explained in the previous chapters. However, the development loop has limitations and the debugging setup is not working yet.
Remote Local Setup
Just like Prow is executing the KinD-based e2e tests in a K8s pod, it is possible to interactively run this KinD based Gardener development environment, aka “local setup”, in a “remote” K8s pod.
k apply -f docs/deployment/content/remote-local-setup.yaml
k exec -it remote-local-setup-0 -- sh
tmux a
Caveats
Please refer to the TMUX documentation for working effectively inside the remote-local-setup pod.
To access Plutono, Prometheus or other components in a browser, two port forwards are needed:
The port forward from the laptop to the pod:
k port-forward remote-local-setup-0 3000
The port forward in the remote-local-setup pod to the respective component:
k port-forward -n shoot--local--local deployment/plutono 3000
Related Links
4.7.9 - Getting Started Locally With Extensions
Deploying Gardener Locally and Enabling Provider-Extensions
This document will walk you through deploying Gardener on your local machine and bootstrapping your own seed clusters on an existing Kubernetes cluster. It is supposed to run your local Gardener developments on a real infrastructure. For running Gardener only entirely local, please check the getting started locally documentation. If you encounter difficulties, please open an issue so that we can make this process easier.
Overview
Gardener runs in any Kubernetes cluster. In this guide, we will start a KinD cluster which is used as garden cluster. Any Kubernetes cluster could be used as seed clusters in order to support provider extensions (please refer to the architecture overview). This guide is tested for using Kubernetes clusters provided by Gardener, AWS, Azure, and GCP as seed so far.
Based on Skaffold, the container images for all required components will be built and deployed into the clusters (via their Helm charts).
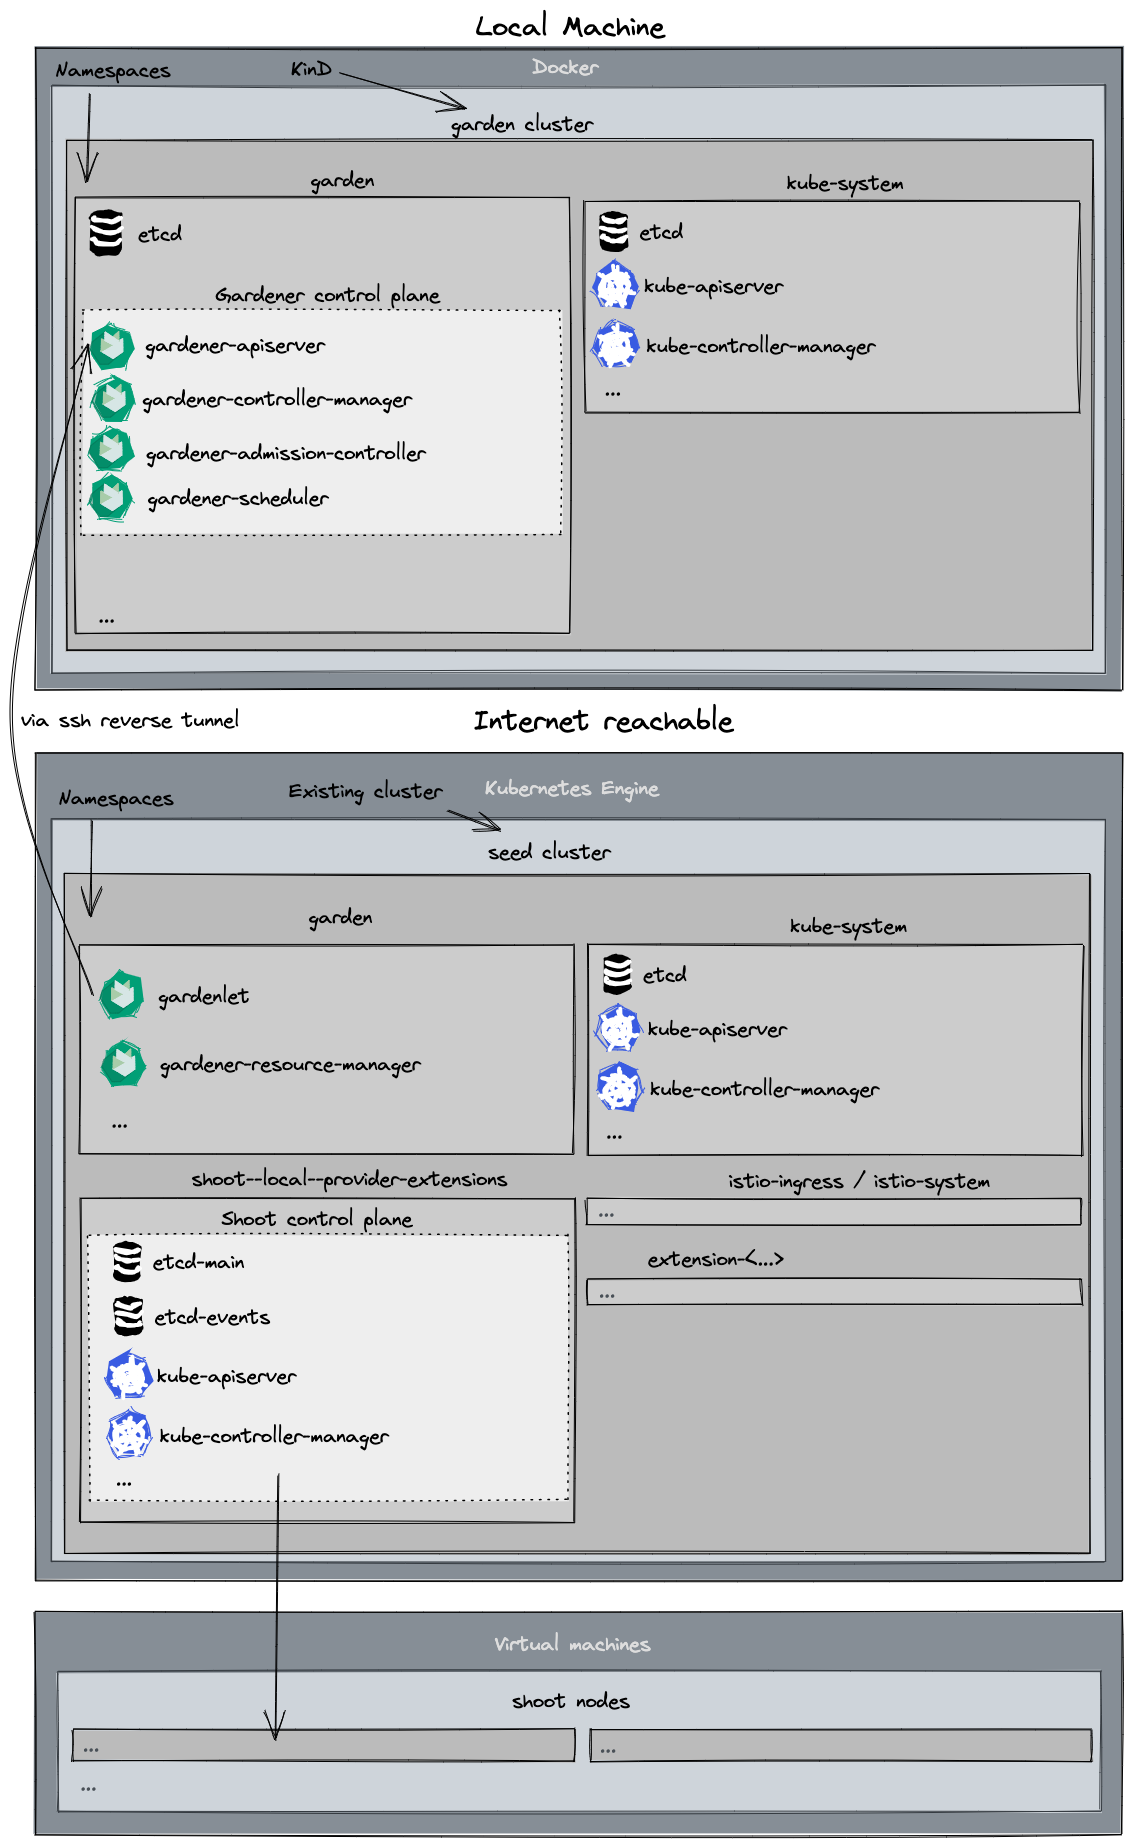
Prerequisites
- Make sure that you have followed the Local Setup guide up until the Get the sources step.
- Make sure your Docker daemon is up-to-date, up and running and has enough resources (at least
8CPUs and8Gimemory; see the Docker documentation for how to configure the resources for Docker for Mac).Additionally, please configure at least
120Giof disk size for the Docker daemon. Tip: You can clean up unused data withdocker system dfanddocker system prune -a. - Make sure that you have access to a Kubernetes cluster you can use as a seed cluster in this setup.
- The seed cluster requires at least 16 CPUs in total to run one shoot cluster
- You could use any Kubernetes cluster for your seed cluster. However, using a Gardener shoot cluster for your seed simplifies some configuration steps.
- When bootstrapping
gardenletto the cluster, your new seed will have the same provider type as the shoot cluster you use - an AWS shoot will become an AWS seed, a GCP shoot will become a GCP seed, etc. (only relevant when using a Gardener shoot as seed).
Provide Infrastructure Credentials and Configuration
As this setup is running on a real infrastructure, you have to provide credentials for DNS, the infrastructure, and the kubeconfig for the Kubernetes cluster you want to use as seed.
There are
.gitignoreentries for all files and directories which include credentials. Nevertheless, please double check and make sure that credentials are not committed to the version control system.
DNS
Gardener control plane requires DNS for default and internal domains. Thus, you have to configure a valid DNS provider for your setup.
Please maintain your DNS provider configuration and credentials at ./example/provider-extensions/garden/controlplane/domain-secrets.yaml.
You can find a template for the file at ./example/provider-extensions/garden/controlplane/domain-secrets.yaml.tmpl.
Infrastructure
Infrastructure secrets and the corresponding secret bindings should be maintained at:
./example/provider-extensions/garden/project/credentials/infrastructure-secrets.yaml./example/provider-extensions/garden/project/credentials/secretbindings.yaml
There are templates with .tmpl suffixes for the files in the same folder.
Projects
The projects and the namespaces associated with them should be maintained at ./example/provider-extensions/garden/project/project.yaml.
You can find a template for the file at ./example/provider-extensions/garden/project/project.yaml.tmpl.
Seed Cluster Preparation
The kubeconfig of your Kubernetes cluster you would like to use as seed should be placed at ./example/provider-extensions/seed/kubeconfig.
Additionally, please maintain the configuration of your seed in ./example/provider-extensions/gardenlet/values.yaml. It is automatically copied from values.yaml.tmpl in the same directory when you run make gardener-extensions-up for the first time. It also includes explanations of the properties you should set.
Using a Gardener Shoot cluster as seed simplifies the process, because some configuration options can be taken from shoot-info and creating DNS entries and TLS certificates is automated.
However, you can use different Kubernetes clusters for your seed too and configure these things manually. Please configure the options of ./example/provider-extensions/gardenlet/values.yaml upfront. For configuring DNS and TLS certificates, make gardener-extensions-up, which is explained later, will pause and tell you what to do.
External Controllers
You might plan to deploy and register external controllers for networking, operating system, providers, etc. Please put ControllerDeployments and ControllerRegistrations into the ./example/provider-extensions/garden/controllerregistrations directory. The whole content of this folder will be applied to your KinD cluster.
CloudProfiles
There are no demo CloudProfiles yet. Thus, please copy CloudProfiles from another landscape to the ./example/provider-extensions/garden/cloudprofiles directory or create your own CloudProfiles based on the gardener examples. Please check the GitHub repository of your desired provider-extension. Most of them include example CloudProfiles. All files you place in this folder will be applied to your KinD cluster.
Setting Up the KinD Cluster
make kind-extensions-up
This command sets up a new KinD cluster named gardener-extensions and stores the kubeconfig in the ./example/gardener-local/kind/extensions/kubeconfig file.
It might be helpful to copy this file to
$HOME/.kube/config, since you will need to target this KinD cluster multiple times. Alternatively, make sure to set yourKUBECONFIGenvironment variable to./example/gardener-local/kind/extensions/kubeconfigfor all future steps viaexport KUBECONFIG=$PWD/example/gardener-local/kind/extensions/kubeconfig.
All of the following steps assume that you are using this kubeconfig.
Additionally, this command deploys a local container registry to the cluster as well as a few registry mirrors that are set up as a pull-through cache for all upstream registries Gardener uses by default. This is done to speed up image pulls across local clusters.
You will need to add
127.0.0.1 garden.local.gardener.cloudto your /etc/hosts.
The local registry can now be accessed either via localhost:5001 or garden.local.gardener.cloud:5001 for pushing and pulling.
The storage directories of the registries are mounted to your machine under dev/local-registry.
With this, mirrored images don’t have to be pulled again after recreating the cluster.
The command also deploys a default calico installation as the cluster’s CNI implementation with NetworkPolicy support (the default kindnet CNI doesn’t provide NetworkPolicy support).
Furthermore, it deploys the metrics-server in order to support HPA and VPA on the seed cluster.
Setting Up Gardener (Garden on KinD, Seed on Gardener Cluster)
make gardener-extensions-up
This will first prepare the basic configuration of your KinD and Gardener clusters.
Afterwards, the images for the Garden cluster are built and deployed into the KinD cluster.
Finally, the images for the Seed cluster are built, pushed to a container registry on the Seed, and the gardenlet is started.
If support for workload identity is required you can invoke the top command with DEV_SETUP_WITH_WORKLOAD_IDENTITY_SUPPORT variable set to true.
This will cause the Gardener Discovery Server to be deployed and exposed through the seed cluster.
External systems can be then configured to trust the workload identity issuer of the local Garden cluster.
DEV_SETUP_WITH_WORKLOAD_IDENTITY_SUPPORT=true make gardener-extensions-up
Important
The Gardener Discovery Server is started with a token which is valid for 48 hours. Rerun
DEV_SETUP_WITH_WORKLOAD_IDENTITY_SUPPORT=true make gardener-extensions-upin order to renew the token.When working with multiple seed clusters you need to only pass
DEV_SETUP_WITH_WORKLOAD_IDENTITY_SUPPORT=truefor the one seed cluster that will be used to expose the workload identity documents. A single Garden cluster needs only one Gardener Discovery Server.
To setup workload identity with your provider please refer to the provider extension specific docs:
Adding Additional Seeds
Additional seed(s) can be added by running
make gardener-extensions-up SEED_NAME=<seed-name>
The seed cluster preparations are similar to the first seed:
The kubeconfig of your Kubernetes cluster you would like to use as seed should be placed at ./example/provider-extensions/seed/kubeconfig-<seed-name>.
Additionally, please maintain the configuration of your seed in ./example/provider-extensions/gardenlet/values-<seed-name>.yaml. It is automatically copied from values.yaml.tmpl in the same directory when you run make gardener-extensions-up SEED_NAME=<seed-name> for the first time. It also includes explanations of the properties you should set.
Removing a Seed
If you have multiple seeds and want to remove one, just use
make gardener-extensions-down SEED_NAME=<seed-name>
If it is not the last seed, this command will only remove the seed, but leave the local Gardener cluster and the other seeds untouched. To remove all seeds and to cleanup the local Gardener cluster, you have to run the command for each seed.
Tip
If using development setup that supports workload identity pass
DEV_SETUP_WITH_WORKLOAD_IDENTITY_SUPPORT=truewhen removing the seed that was used to host the Gardener Discovery Server.DEV_SETUP_WITH_WORKLOAD_IDENTITY_SUPPORT=true make gardener-extensions-down SEED_NAME=<seed-name>
Rotate credentials of container image registry in a Seed
There is a container image registry in each Seed cluster where Gardener images required for the Seed and the Shoot nodes are pushed to. This registry is password protected.
The password is generated when the Seed is deployed via make gardener-extensions-up. Afterward, it is not rotated automatically.
Otherwise, this could break the update of gardener-node-agent, because it might not be able to pull its own new image anymore
This is no general issue of gardener-node-agent, but a limitation provider-extensions setup. Gardener does not support protected container images out of the box. The function was added for this scenario only.
However, if you want to rotate the credentials for any reason, there are two options for it.
- run
make gardener-extensions-up(to ensure that your images are up-to-date) reconcileall shoots on the seed where you want to rotate the registry password- run
kubectl delete secrets -n registry registry-passwordon your seed cluster - run
make gardener-extensions-up reconcilethe shoots again
or
reconcileall shoots on the seed where you want to rotate the registry password- run
kubectl delete secrets -n registry registry-passwordon your seed cluster - run
./example/provider-extensions/registry-seed/deploy-registry.sh <path to seed kubeconfig> <seed registry hostname> reconcilethe shoots again
Pause and Unpause the KinD Cluster
The KinD cluster can be paused by stopping and keeping its docker container. This can be done by running:
make kind-extensions-down
When you run make kind-extensions-up again, you will start the docker container with your previous Gardener configuration again.
This provides the option to switch off your local KinD cluster fast without leaving orphaned infrastructure elements behind.
Creating a Shoot Cluster
You can wait for the Seed to be ready by running:
kubectl wait --for=condition=gardenletready seed provider-extensions --timeout=5m
make kind-extensions-up already includes such a check. However, it might be useful when you wake up your Seed from hibernation or unpause you KinD cluster.
Alternatively, you can run kubectl get seed provider-extensions and wait for the STATUS to indicate readiness:
NAME STATUS PROVIDER REGION AGE VERSION K8S VERSION
provider-extensions Ready gcp europe-west1 111m v1.61.0-dev v1.24.7
In order to create a first shoot cluster, please create your own Shoot definition and apply it to your KinD cluster. gardener-scheduler includes candidateDeterminationStrategy: MinimalDistance configuration so you are able to run schedule Shoots of different providers on your Seed.
You can wait for your Shoots to be ready by running kubectl -n garden-local get shoots and wait for the LAST OPERATION to reach 100%. The output depends on your Shoot definition. This is an example output:
NAME CLOUDPROFILE PROVIDER REGION K8S VERSION HIBERNATION LAST OPERATION STATUS AGE
aws aws aws eu-west-1 1.24.3 Awake Create Processing (43%) healthy 84s
aws-arm64 aws aws eu-west-1 1.24.3 Awake Create Processing (43%) healthy 65s
azure az azure westeurope 1.24.2 Awake Create Processing (43%) healthy 57s
gcp gcp gcp europe-west1 1.24.3 Awake Create Processing (43%) healthy 94s
Accessing the Shoot Cluster
Your shoot clusters will have a public DNS entries for their API servers, so that they could be reached via the Internet via kubectl after you have created their kubeconfig.
We encourage you to use the adminkubeconfig subresource for accessing your shoot cluster. You can find an example how to use it in Accessing Shoot Clusters.
Deleting the Shoot Clusters
Before tearing down your environment, you have to delete your shoot clusters. This is highly recommended because otherwise you would leave orphaned items on your infrastructure accounts.
./hack/usage/delete shoot <your-shoot> garden-local
Tear Down the Gardener Environment
Before you delete your local KinD cluster, you should shut down your Shoots and Seed in a clean way to avoid orphaned infrastructure elements in your projects.
Please ensure that your KinD and Seed clusters are online (not paused or hibernated) and run:
make gardener-extensions-down
This will delete all Shoots first (this could take a couple of minutes), then uninstall gardenlet from the Seed and the gardener components from the KinD. Finally, the additional components like container registry, etc., are deleted from both clusters.
When this is done, you can securely delete your local KinD cluster by running:
make kind-extensions-clean
4.7.10 - Getting Started Locally With Gardenadm
Deploying Autonomous Shoot Clusters Locally
Caution
The
gardenadmtool is currently under development and considered highly experimental. Do not use it in production environments. Read more about it in GEP-28.
This document walks you through deploying Autonomous Shoot Clusters using gardenadm on your local machine.
This setup can be used for trying out and developing gardenadm locally without additional infrastructure.
The setup is also used for running e2e tests for gardenadm in CI (Prow).
If you encounter difficulties, please open an issue so that we can make this process easier.
Overview
gardenadm is a command line tool for bootstrapping Kubernetes clusters called “Autonomous Shoot Clusters”. Read the gardenadm documentation for more details on its concepts.
In this guide, we will start a KinD cluster which hosts pods serving as machines for the autonomous shoot cluster – just as for shoot clusters of provider-local.
The setup supports both the high-touch and medium-touch scenario of gardenadm.
Based on Skaffold, the container images for all required components will be built and deployed into the cluster.
This also includes the gardenadm CLI, which is installed on the machine pods by pulling the container image and extracting the binary.
Prerequisites
- Make sure that you have followed the Local Setup guide up until the Get the sources step.
- Make sure your Docker daemon is up-to-date, up and running and has enough resources (at least
8CPUs and8Gimemory; see here how to configure the resources for Docker for Mac).Additionally, please configure at least
120Giof disk size for the Docker daemon.
Tip
You can clean up unused data with
docker system dfanddocker system prune -a.
Setting Up the KinD Cluster
make kind-up
Please see this documentation section for more details.
All following steps assume that you are using the kubeconfig for this KinD cluster:
export KUBECONFIG=$PWD/example/gardener-local/kind/local/kubeconfig
High-Touch Scenario
Use the following command to prepare the gardenadm high-touch scenario:
make gardenadm-up
This will first build the needed images, deploy 2 machine pods using the gardener-extension-provider-local-node image, install the gardenadm binary on both of them, and copy the needed manifests to the /gardenadm/resources directory.
Afterward, you can use kubectl exec to execute gardenadm commands on the machines.
Let’s start with exec’ing into the machine-0 pod:
$ kubectl -n gardenadm-high-touch exec -it machine-0 -- bash
root@machine-0:/# gardenadm -h
gardenadm bootstraps and manages autonomous shoot clusters in the Gardener project.
...
root@machine-0:/# cat /gardenadm/resources/manifests.yaml
apiVersion: core.gardener.cloud/v1beta1
kind: CloudProfile
metadata:
name: local
...
Bootstrapping a Single-Node Control Plane
Use gardenadm init to bootstrap the first control plane node using the provided manifests:
root@machine-0:/# gardenadm init -d /gardenadm/resources
...
Your Shoot cluster control-plane has initialized successfully!
...
Connecting to the Autonomous Shoot Cluster
The machine pod’s shell environment is configured for easily connecting to the autonomous shoot cluster.
Just execute kubectl within a bash shell in the machine pod:
$ kubectl -n gardenadm-high-touch exec -it machine-0 -- bash
root@machine-0:/# kubectl get node
NAME STATUS ROLES AGE VERSION
machine-0 Ready <none> 4m11s v1.32.0
You can also copy the kubeconfig to your local machine and use a port-forward to connect to the cluster’s API server:
$ kubectl -n gardenadm-high-touch exec -it machine-0 -- cat /etc/kubernetes/admin.conf | sed 's/api.root.garden.internal.gardenadm.local/localhost:6443/' > /tmp/shoot--garden--root.conf
$ kubectl -n gardenadm-high-touch port-forward pod/machine-0 6443:443
# in a new terminal
$ export KUBECONFIG=/tmp/shoot--garden--root.conf
$ kubectl get no
NAME STATUS ROLES AGE VERSION
machine-0 Ready <none> 10m v1.32.0
Joining a Worker Node
If you would like to join a worker node to the cluster, generate a bootstrap token and the corresponding gardenadm join command on machine-0 (the control plane node).
Then exec into the machine-1 pod to run the command:
root@machine-0:/# gardenadm token create --print-join-command
# now copy the output, terminate the exec session and start a new one for machine-1
$ kubectl -n gardenadm-high-touch exec -it machine-1 -- bash
# paste the copied 'gardenadm join' command here and execute it
root@machine-1:/# gardenadm join ...
...
Your node has successfully been instructed to join the cluster as a worker!
...
Using the kubeconfig as described in this section, you should now be able to see the new node in the cluster:
$ kubectl get no
NAME STATUS ROLES AGE VERSION
machine-0 Ready <none> 10m v1.32.0
machine-1 Ready <none> 37s v1.32.0
Medium-Touch Scenario
Use the following command to prepare the gardenadm medium-touch scenario:
make gardenadm-medium-touch-up
This will first build the needed images and then render the needed manifests for gardenadm bootstrap to the ./dev-setup/gardenadm/resources/generated/medium-touch directory.
Afterward, you can use go run to execute gardenadm commands on your machine:
$ export IMAGEVECTOR_OVERWRITE=$PWD/dev-setup/gardenadm/resources/generated/.imagevector-overwrite.yaml
$ go run ./cmd/gardenadm bootstrap -d ./dev-setup/gardenadm/resources/generated/medium-touch
...
Command is work in progress
Connecting the Autonomous Shoot Cluster to Gardener
After you have successfully bootstrapped an autonomous shoot cluster (either via the high touch or the medium touch scenario), you can connect it to an existing Gardener system. For this, you need to have a Gardener running locally in your KinD cluster. In order to deploy it, you can run
make gardenadm-up SCENARIO=connect
This will deploy gardener-operator and create a Garden resource (which will then be reconciled and results in a full Gardener deployment).
Find all information about it here.
Note, that in this setup, no Seed will be registered in the Gardener - it’s just a plain garden cluster without the ability to create regular shoot clusters.
Once above command is finished, you can connect the autonomous shoot cluster to this Gardener instance:
$ kubectl -n gardenadm-high-touch exec -it machine-0 -- bash
root@machine-0:/# gardenadm connect
2025-07-03T12:21:49.586Z INFO Command is work in progress
Running E2E Tests for gardenadm
Based on the described setup, you can execute the e2e test suite for gardenadm:
make gardenadm-up SCENARIO=high-touch
make gardenadm-up SCENARIO=medium-touch
make test-e2e-local-gardenadm
You can also selectively run the e2e tests for one of the scenarios:
make gardenadm-up SCENARIO=high-touch
./hack/test-e2e-local.sh gardenadm --label-filter="high-touch" ./test/e2e/gardenadm/...
Tear Down the KinD Cluster
make kind-down
4.7.11 - Image Vector
Image Vector
The Gardener components are deploying several different container images into the garden, seed, and the shoot clusters. The image repositories and tags are defined in a central image vector file. Obviously, the image versions defined there must fit together with the deployment manifests (e.g., some command-line flags do only exist in certain versions).
Example
images:
- name: pause-container
sourceRepository: github.com/kubernetes/kubernetes/blob/master/build/pause/Dockerfile
repository: registry.k8s.io/pause
tag: "3.4"
targetVersion: "1.20.x"
architectures:
- amd64
- arm64
- name: pause-container
sourceRepository: github.com/kubernetes/kubernetes/blob/master/build/pause/Dockerfile
ref: registry.k8s.io/pause:3.5
targetVersion: ">= 1.21"
architectures:
- amd64
- arm64
That means that Gardener will use the pause-container with tag 3.4 for all clusters with Kubernetes version 1.20.x, and the image with ref registry.k8s.io/pause:3.5 for all clusters with Kubernetes >= 1.21.
Note
As you can see, it is possible to provide the full image reference via the
reffield. Another option is to use therepositoryandtagfields.tagmay also be a digest only (starting withsha256:...), or it can contain both tag and digest (v1.2.3@sha256:...).
Architectures
images:
- name: pause-container
sourceRepository: github.com/kubernetes/kubernetes/blob/master/build/pause/Dockerfile
repository: registry.k8s.io/pause
tag: "3.5"
architectures:
- amd64
- name: pause-container
sourceRepository: github.com/kubernetes/kubernetes/blob/master/build/pause/Dockerfile
ref: registry.k8s.io/pause:3.5
architectures:
- arm64
- name: pause-container
sourceRepository: github.com/kubernetes/kubernetes/blob/master/build/pause/Dockerfile
ref: registry.k8s.io/pause:3.5
architectures:
- amd64
- arm64
architectures is an optional field of image. It is a list of strings specifying CPU architecture of machines on which this image can be used. The valid options for the architectures field are as follows:
amd64: This specifies that the image can run only on machines having CPU architectureamd64.arm64: This specifies that the image can run only on machines having CPU architecturearm64.
If an image doesn’t specify any architectures, then by default it is considered to support both amd64 and arm64 architectures.
Overwriting Image Vector
In some environments it is not possible to use these “pre-defined” images that come with a Gardener release.
A prominent example for that is Alicloud in China, which does not allow access to Google’s GCR.
In these cases, you might want to overwrite certain images, e.g., point the pause-container to a different registry.
⚠️ If you specify an image that does not fit to the resource manifest, then the reconciliations might fail.
In order to overwrite the images, you must provide a similar file to the Gardener component:
images:
- name: pause-container
sourceRepository: github.com/kubernetes/kubernetes/blob/master/build/pause/Dockerfile
repository: my-custom-image-registry/pause
tag: "3.4"
version: "1.20.x"
- name: pause-container
sourceRepository: github.com/kubernetes/kubernetes/blob/master/build/pause/Dockerfile
ref: my-custom-image-registry/pause:3.5
version: ">= 1.21"
Important
When the overwriting file contains
reffor an image but the source file doesn’t, then this invalidates bothrepositoryandtagof the source. When it containsrepositoryfor an image but the source file usesref, then this invalidatesrefof the source.
For gardenlet, you can create a ConfigMap containing the above content and mount it as a volume into the gardenlet pod.
Next, specify the environment variable IMAGEVECTOR_OVERWRITE, whose value must be the path to the file you just mounted.
The approach works similarly for gardener-operator.
apiVersion: v1
kind: ConfigMap
metadata:
name: gardenlet-images-overwrite
namespace: garden
data:
images_overwrite.yaml: |
images:
- ...
---
apiVersion: apps/v1
kind: Deployment
metadata:
name: gardenlet
namespace: garden
spec:
template:
spec:
containers:
- name: gardenlet
env:
- name: IMAGEVECTOR_OVERWRITE
value: /imagevector-overwrite/images_overwrite.yaml
volumeMounts:
- name: gardenlet-images-overwrite
mountPath: /imagevector-overwrite
volumes:
- name: gardenlet-images-overwrite
configMap:
name: gardenlet-images-overwrite
Image Vectors for Dependent Components
Gardener is deploying a lot of different components that might deploy other images themselves. These components might use an image vector as well. Operators might want to customize the image locations for these transitive images as well, hence, they might need to specify an image vector overwrite for the components directly deployed by Gardener.
It is possible to specify the IMAGEVECTOR_OVERWRITE_COMPONENTS environment variable to Gardener that points to a file with the following content:
components:
- name: etcd-druid
imageVectorOverwrite: |
images:
- name: etcd
tag: v1.2.3
repository: etcd/etcd
Gardener will, if supported by the directly deployed component (etcd-druid in this example), inject the given imageVectorOverwrite into the Deployment manifest.
The respective component is responsible for using the overwritten images instead of its defaults.
Helm Chart Image Vector
Some Gardener components might also deploy packaged Helm charts which are pulled from an OCI repository.
The concepts are the very same as for the container images.
The only difference is that the environment variable for overwriting this chart image vector is called IMAGEVECTOR_OVERWRITE_CHARTS.
4.7.12 - Migration V0 To V1
Migration from Gardener v0 to v1
Please refer to the document for older Gardener versions.
4.7.13 - Scoped API Access for gardenlets and Extensions
Scoped API Access for gardenlets and Extensions
By default, gardenlets have administrative access in the garden cluster.
They are able to execute any API request on any object independent of whether the object is related to the seed cluster the gardenlet is responsible for.
As RBAC is not powerful enough for fine-grained checks and for the sake of security, Gardener provides two optional but recommended configurations for your environments that scope the API access for gardenlets.
Similar to the Node authorization mode in Kubernetes, Gardener features a SeedAuthorizer plugin.
It is a special-purpose authorization plugin that specifically authorizes API requests made by the gardenlets.
Likewise, similar to the NodeRestriction admission plugin in Kubernetes, Gardener features a SeedRestriction plugin.
It is a special-purpose admission plugin that specifically limits the Kubernetes objects gardenlets can modify.
📚 You might be interested to look into the design proposal for scoped Kubelet API access from the Kubernetes community.
It can be translated to Gardener and Gardenlets with their Seed and Shoot resources.
Historically, gardenlet has been the only component running in the seed cluster that has access to both the seed cluster and the garden cluster.
Starting from Gardener v1.74.0, extensions running on seed clusters can also get access to the garden cluster using a token for a dedicated ServiceAccount.
Extensions using this mechanism only get permission to read global resources like CloudProfiles (this is granted to all authenticated users) unless the plugins described in this document are enabled.
Generally, the plugins handle extension clients exactly like gardenlet clients with some minor exceptions.
Extension clients in the sense of the plugins are clients authenticated as a ServiceAccount with the extension- name prefix in a seed- namespace of the garden cluster.
Other ServiceAccounts are not considered as seed clients, not handled by the plugins, and only get the described read access to global resources.
Flow Diagram
The following diagram shows how the two plugins are included in the request flow of a gardenlet.
When they are not enabled, then the kube-apiserver is internally authorizing the request via RBAC before forwarding the request directly to the gardener-apiserver, i.e., the gardener-admission-controller would not be consulted (this is not entirely correct because it also serves other admission webhook handlers, but for simplicity reasons this document focuses on the API access scope only).
When enabling the plugins, there is one additional step for each before the gardener-apiserver responds to the request.

Please note that the example shows a request to an object (Shoot) residing in one of the API groups served by gardener-apiserver.
However, the gardenlet is also interacting with objects in API groups served by the kube-apiserver (e.g., Secret,ConfigMap).
In this case, the consultation of the SeedRestriction admission plugin is performed by the kube-apiserver itself before it forwards the request to the gardener-apiserver.
Implemented Rules
Today, the following rules are implemented:
| Resource | Verbs | Path(s) | Description |
|---|---|---|---|
BackupBucket | get, list, watch, create, update, patch, delete | BackupBucket -> Seed | Allow get, list, watch requests for all BackupBuckets. Allow only create, update, patch, delete requests for BackupBuckets assigned to the gardenlet’s Seed. |
BackupEntry | get, list, watch, create, update, patch | BackupEntry -> Seed | Allow get, list, watch requests for all BackupEntrys. Allow only create, update, patch requests for BackupEntrys assigned to the gardenlet’s Seed and referencing BackupBuckets assigned to the gardenlet’s Seed. |
Bastion | get, list, watch, create, update, patch | Bastion -> Seed | Allow get, list, watch requests for all Bastions. Allow only create, update, patch requests for Bastions assigned to the gardenlet’s Seed. |
CertificateSigningRequest | get, create | CertificateSigningRequest -> Seed | Allow only get, create requests for CertificateSigningRequests related to the gardenlet’s Seed. |
CloudProfile | get | CloudProfile -> Shoot -> Seed | Allow only get requests for CloudProfiles referenced by Shoots that are assigned to the gardenlet’s Seed. |
ClusterRoleBinding | create, get, update, patch, delete | ClusterRoleBinding -> ManagedSeed -> Shoot -> Seed | Allow create, get, update, patch requests for ManagedSeeds in the bootstrapping phase assigned to the gardenlet’s Seeds. Allow delete requests from gardenlets bootstrapped via ManagedSeeds. |
ConfigMap | get | ConfigMap -> Seed, ConfigMap -> Shoot -> Seed | Allow only get requests for ConfigMaps referenced by Seeds, or Shoots that are assigned to the gardenlet’s Seed. Allow reading the kube-system/cluster-identity ConfigMap. |
ControllerRegistration | get, list, watch | ControllerRegistration -> ControllerInstallation -> Seed | Allow get, list, watch requests for all ControllerRegistrations. |
ControllerDeployment | get | ControllerDeployment -> ControllerInstallation -> Seed | Allow get requests for ControllerDeploymentss referenced by ControllerInstallations assigned to the gardenlet’s Seed. |
ControllerInstallation | get, list, watch, update, patch | ControllerInstallation -> Seed | Allow get, list, watch requests for all ControllerInstallations. Allow only update, patch requests for ControllerInstallations assigned to the gardenlet’s Seed. |
CredentialsBinding | get | CredentialsBinding -> Shoot -> Seed | Allow only get requests for CredentialsBindings referenced by Shoots that are assigned to the gardenlet’s Seed. |
Event | create, patch | none | Allow to create or patch all kinds of Events. |
ExposureClass | get | ExposureClass -> Shoot -> Seed | Allow get requests for ExposureClasses referenced by Shoots that are assigned to the gardenlet’s Seed. Deny get requests to other ExposureClasses. |
Gardenlet | get, list, watch, update, patch, create | Gardenlet -> Seed | Allow get, list, watch requests for all Gardenlets. Allow only create, update, and patch requests for Gardenlets belonging to the gardenlet’s Seed. |
Lease | create, get, watch, update | Lease -> Seed | Allow create, get, update, and delete requests for Leases of the gardenlet’s Seed. |
ManagedSeed | get, list, watch, update, patch | ManagedSeed -> Shoot -> Seed | Allow get, list, watch requests for all ManagedSeeds. Allow only update, patch requests for ManagedSeeds referencing a Shoot assigned to the gardenlet’s Seed. |
Namespace | get | Namespace -> Shoot -> Seed | Allow get requests for Namespaces of Shoots that are assigned to the gardenlet’s Seed. Always allow get requests for the garden Namespace. |
NamespacedCloudProfile | get | NamespacedCloudProfile -> Shoot -> Seed | Allow only get requests for NamespacedCloudProfiles referenced by Shoots that are assigned to the gardenlet’s Seed. |
Project | get | Project -> Namespace -> Shoot -> Seed | Allow get requests for Projects referenced by the Namespace of Shoots that are assigned to the gardenlet’s Seed. |
SecretBinding | get | SecretBinding -> Shoot -> Seed | Allow only get requests for SecretBindings referenced by Shoots that are assigned to the gardenlet’s Seed. |
Secret | create, get, update, patch, delete(, list, watch) | Secret -> Seed, Secret -> Shoot -> Seed, Secret -> SecretBinding -> Shoot -> Seed, Secret -> CredentialsBinding -> Shoot -> Seed, BackupBucket -> Seed | Allow get, list, watch requests for all Secrets in the seed-<name> namespace. Allow only create, get, update, patch, delete requests for the Secrets related to resources assigned to the gardenlet’s Seeds. |
Seed | get, list, watch, create, update, patch, delete | Seed | Allow get, list, watch requests for all Seeds. Allow only create, update, patch, delete requests for the gardenlet’s Seeds. [1] |
ServiceAccount | create, get, update, patch, delete | ServiceAccount -> ManagedSeed -> Shoot -> Seed, ServiceAccount -> Namespace -> Seed | Allow create, get, update, patch requests for ManagedSeeds in the bootstrapping phase assigned to the gardenlet’s Seeds. Allow delete requests from gardenlets bootstrapped via ManagedSeeds. Allow all verbs on ServiceAccounts in seed-specific namespace. |
Shoot | get, list, watch, update, patch | Shoot -> Seed | Allow get, list, watch requests for all Shoots. Allow only update, patch requests for Shoots assigned to the gardenlet’s Seed. |
ShootState | get, create, update, patch | ShootState -> Shoot -> Seed | Allow only get, create, update, patch requests for ShootStates belonging by Shoots that are assigned to the gardenlet’s Seed. |
WorkloadIdentity | get | WorkloadIdentity -> CredentialsBinding -> Shoot -> Seed | Allow only get requests for WorkloadIdentities referenced by CredentialsBindings referenced by Shoots that are assigned to the gardenlet’s Seed. |
[1] If you use
ManagedSeedresources then thegardenletreconciling them (“parentgardenlet”) may be allowed to submit certain requests for theSeedresources resulting out of suchManagedSeedreconciliations (even if the “parentgardenlet” is not responsible for them):
ℹ️ It is allowed to delete the Seed resources if the corresponding ManagedSeed objects already have a deletionTimestamp (this is secure as gardenlets themselves don’t have permissions for deleting ManagedSeeds).
Rule Exceptions for Extension Clients
Extension clients are allowed to perform the same operations as gardenlet clients with the following exceptions:
- Extension clients are granted the read-only subset of verbs for
CertificateSigningRequests,ClusterRoleBindings, andServiceAccounts(to prevent privilege escalation). - Extension clients are granted full access to
Leaseobjects but only in the seed-specific namespace.
When the need arises, more exceptions might be added to the access rules for resources that are already handled by the plugins.
E.g., if an extension needs to populate additional shoot-specific InternalSecrets, according handling can be introduced.
Permissions for resources that are not handled by the plugins can be granted using additional RBAC rules (independent of the plugins).
SeedAuthorizer Authorization Webhook Enablement
The SeedAuthorizer is implemented as a Kubernetes authorization webhook and part of the gardener-admission-controller component running in the garden cluster.
🎛 In order to activate it, you have to follow these steps:
Set the following flags for the
kube-apiserverof the garden cluster (i.e., thekube-apiserverwhose API is extended by Gardener):--authorization-mode=RBAC,Node,Webhook(please note thatWebhookshould appear afterRBACin the list [1];Nodemight not be needed if you use a virtual garden cluster)--authorization-webhook-config-file=<path-to-the-webhook-config-file>--authorization-webhook-cache-authorized-ttl=0--authorization-webhook-cache-unauthorized-ttl=0
The webhook config file (stored at
<path-to-the-webhook-config-file>) should look as follows:apiVersion: v1 kind: Config clusters: - name: garden cluster: certificate-authority-data: base64(CA-CERT-OF-GARDENER-ADMISSION-CONTROLLER) server: https://gardener-admission-controller.garden/webhooks/auth/seed users: - name: kube-apiserver user: {} contexts: - name: auth-webhook context: cluster: garden user: kube-apiserver current-context: auth-webhookWhen deploying the Gardener
controlplaneHelm chart, set.global.rbac.seedAuthorizer.enabled=true. This will ensure that the RBAC resources granting global access for allgardenlets will be deployed.Delete the existing RBAC resources granting global access for all
gardenlets by running:kubectl delete \ clusterrole.rbac.authorization.k8s.io/gardener.cloud:system:seeds \ clusterrolebinding.rbac.authorization.k8s.io/gardener.cloud:system:seeds \ --ignore-not-found
Please note that you should activate the SeedRestriction admission handler as well.
[1] The reason for the fact that
Webhookauthorization plugin should appear afterRBACis that thekube-apiserverwill be depending on thegardener-admission-controller(serving the webhook). However, thegardener-admission-controllercan only start whengardener-apiserverruns, butgardener-apiserveritself can only start whenkube-apiserverruns. IfWebhookis beforeRBAC, thengardener-apiservermight not be able to start, leading to a deadlock.
Authorizer Decisions
As mentioned earlier, it’s the authorizer’s job to evaluate API requests and return one of the following decisions:
DecisionAllow: The request is allowed, further configured authorizers won’t be consulted.DecisionDeny: The request is denied, further configured authorizers won’t be consulted.DecisionNoOpinion: A decision cannot be made, further configured authorizers will be consulted.
For backwards compatibility, no requests are denied at the moment, so that they are still deferred to a subsequent authorizer like RBAC. Though, this might change in the future.
First, the SeedAuthorizer extracts the Seed name from the API request.
This step considers the following two cases:
- If the authenticated user belongs to the
gardener.cloud:system:seedsgroup, it is considered a gardenlet client.- This requires a proper TLS certificate that the
gardenletuses to contact the API server and is automatically given if TLS bootstrapping is used. - The authorizer extracts the seed name from the username by stripping the
gardener.cloud:system:seed:prefix. - In cases where this information is missing e.g., when a custom Kubeconfig is used, the authorizer cannot make any decision. Thus, RBAC is still a considerable option to restrict the
gardenlet’s access permission if the above explained preconditions are not given.
- This requires a proper TLS certificate that the
- If the authenticated user belongs to the
system:serviceaccountsgroup, it is considered an extension client under the following conditions:- The
ServiceAccountmust be located in aseed-namespace. I.e., the user has to belong to a group with thesystem:serviceaccounts:seed-prefix. The seed name is extracted from this group by stripping the prefix. - The
ServiceAccountmust have theextension-prefix. I.e., the username must have thesystem:serviceaccount:seed-<seed-name>:extension-prefix.
- The
With the Seed name at hand, the authorizer checks for an existing path from the resource that a request is being made for to the Seed belonging to the gardenlet/extension.
Take a look at the Implementation Details section for more information.
Implementation Details
Internally, the SeedAuthorizer uses a directed, acyclic graph data structure in order to efficiently respond to authorization requests for gardenlets/extensions:
- A vertex in this graph represents a Kubernetes resource with its kind, namespace, and name (e.g.,
Shoot:garden-my-project/my-shoot). - An edge from vertex
uto vertexvin this graph exists when- (1)
vis referred byuandvis aSeed, or when - (2)
uis referred byv, or when - (3)
uis strictly associated withv.
- (1)
For example, a Shoot refers to a Seed, a CloudProfile, a SecretBinding, etc., so it has an outgoing edge to the Seed (1) and incoming edges from the CloudProfile and SecretBinding vertices (2).
However, there might also be a ShootState or a BackupEntry resource strictly associated with this Shoot, hence, it has incoming edges from these vertices (3).
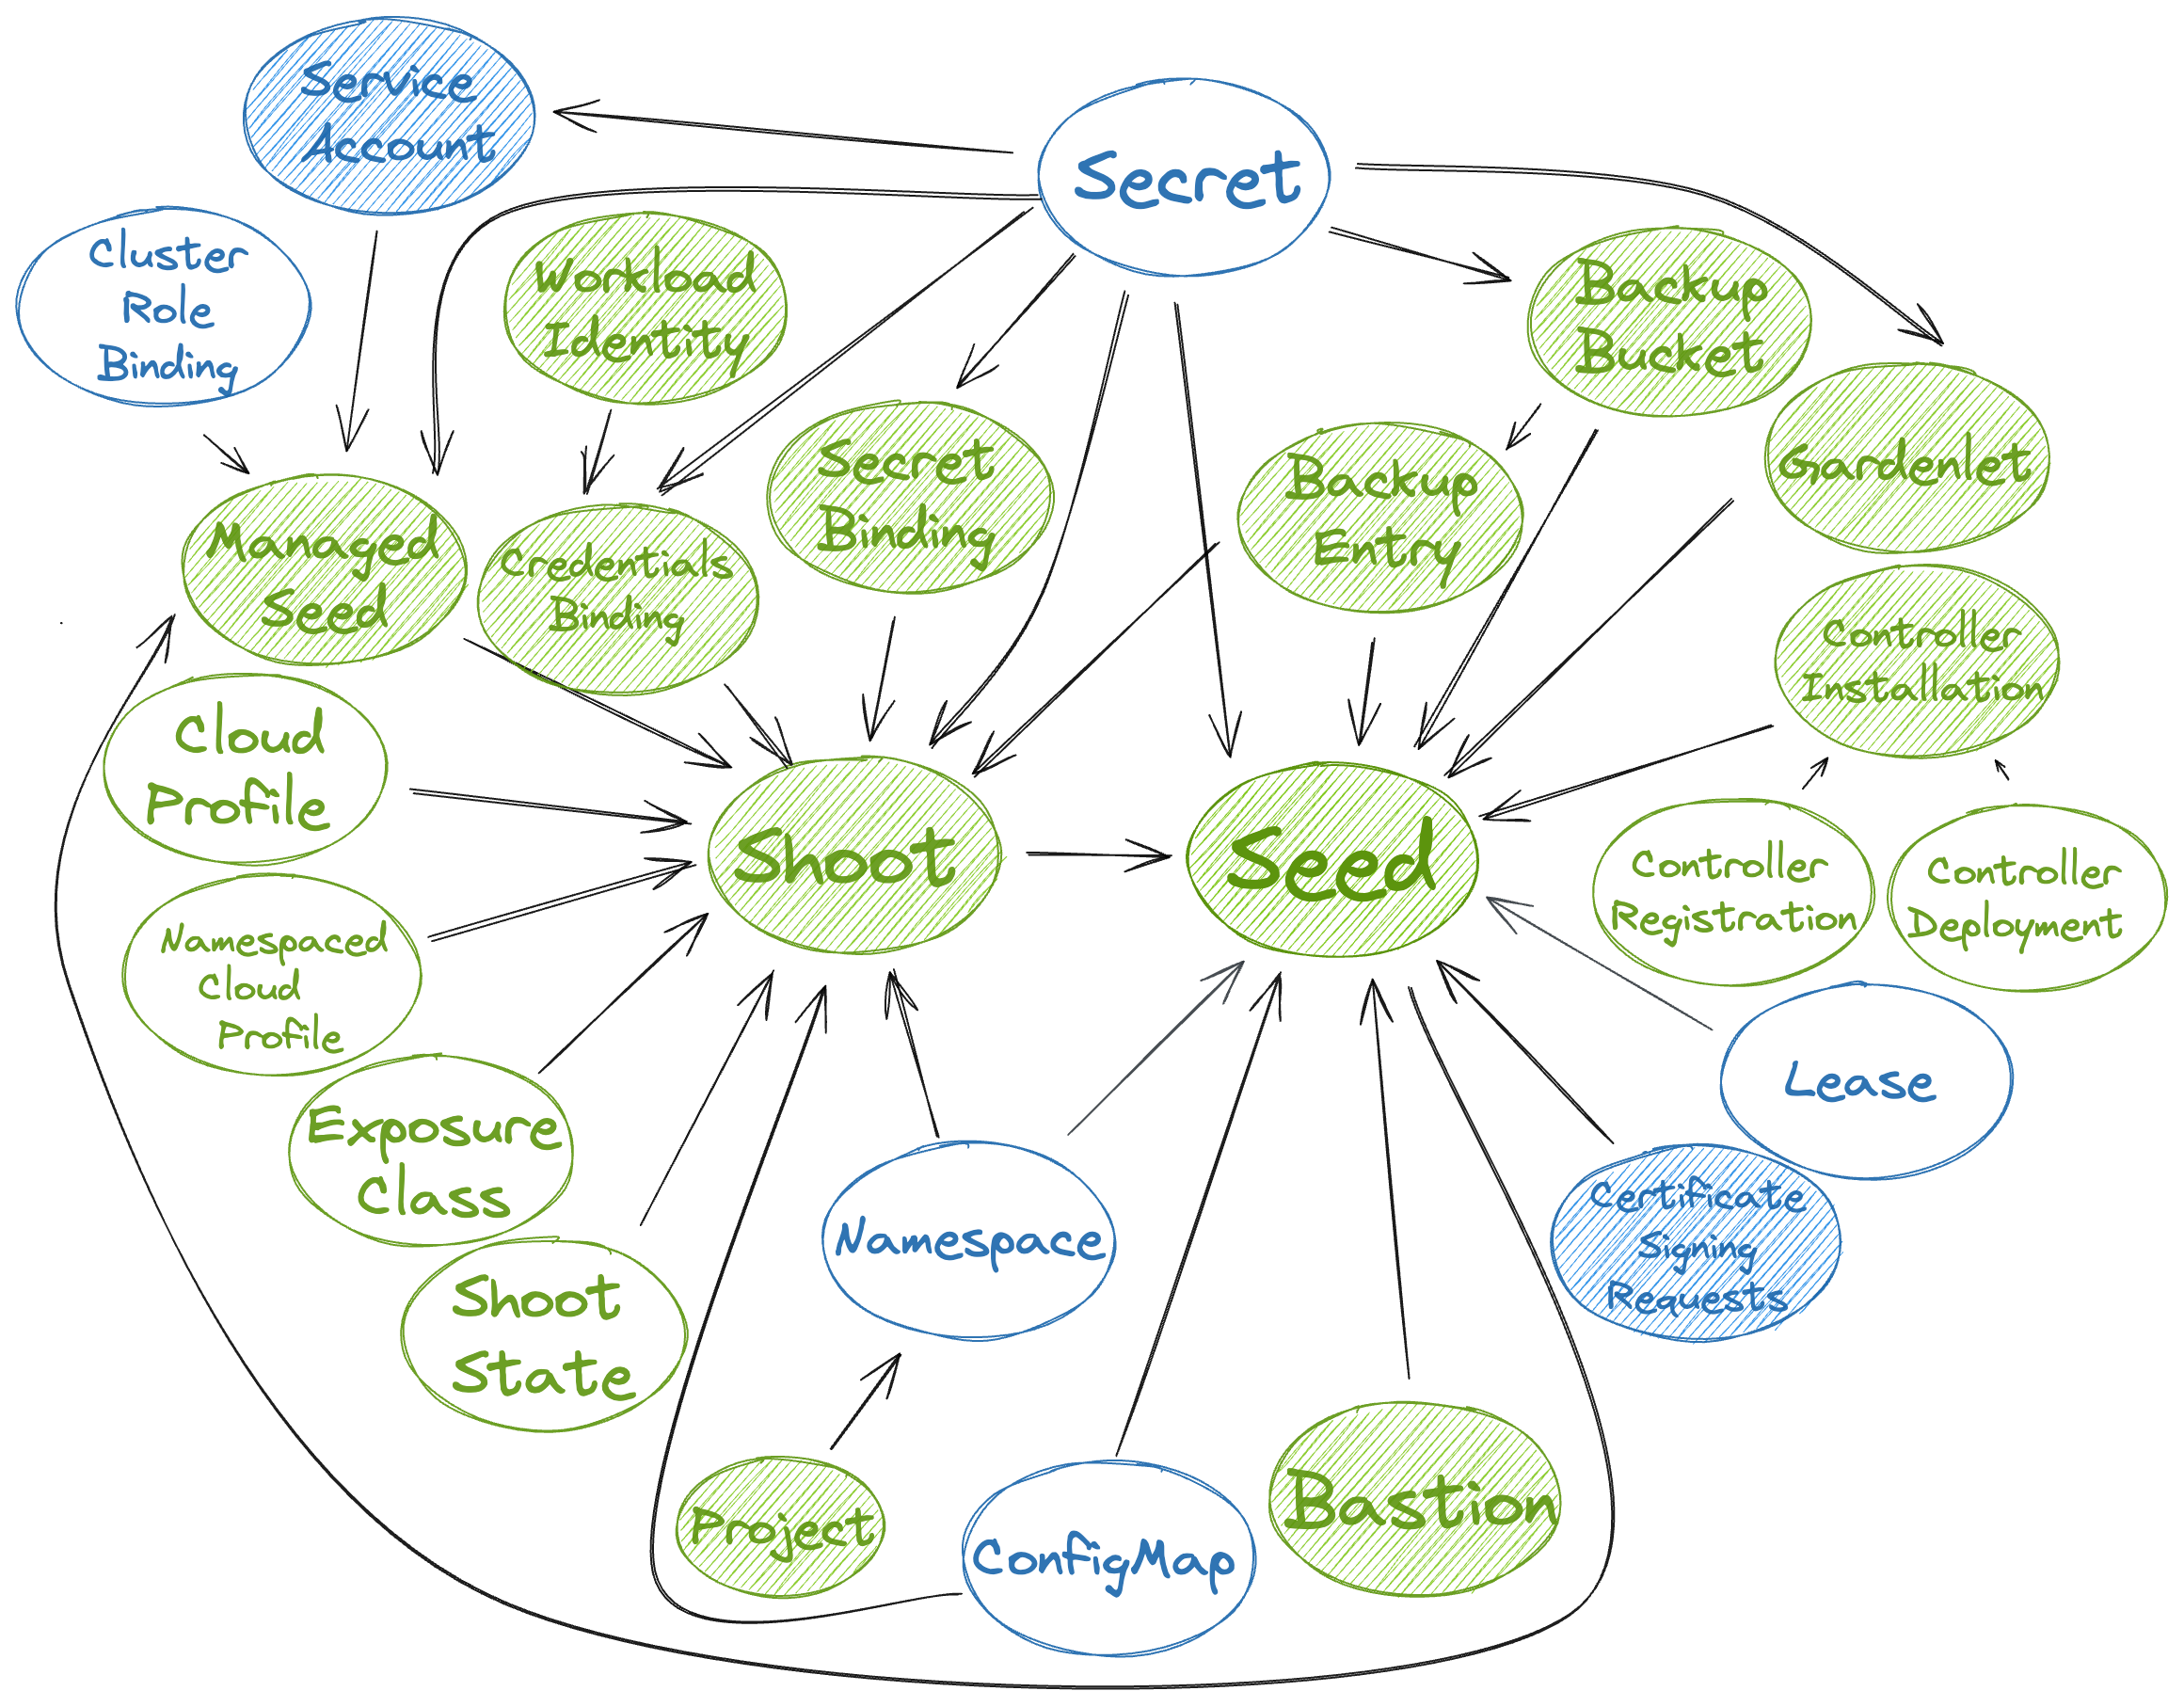
In the above picture, the resources that are actively watched are shaded. Gardener resources are green, while Kubernetes resources are blue. It shows the dependencies between the resources and how the graph is built based on the above rules.
ℹ️ The above picture shows all resources that may be accessed by gardenlets/extensions, except for the Quota resource which is only included for completeness.
Now, when a gardenlet/extension wants to access certain resources, then the SeedAuthorizer uses a Depth-First traversal starting from the vertex representing the resource in question, e.g., from a Project vertex.
If there is a path from the Project vertex to the vertex representing the Seed the gardenlet/extension is responsible for. then it allows the request.
Metrics
The SeedAuthorizer registers the following metrics related to the mentioned graph implementation:
| Metric | Description |
|---|---|
gardener_admission_controller_seed_authorizer_graph_update_duration_seconds | Histogram of duration of resource dependency graph updates in seed authorizer, i.e., how long does it take to update the graph’s vertices/edges when a resource is created, changed, or deleted. |
gardener_admission_controller_seed_authorizer_graph_path_check_duration_seconds | Histogram of duration of checks whether a path exists in the resource dependency graph in seed authorizer. |
Debug Handler
When the .server.enableDebugHandlers field in the gardener-admission-controller’s component configuration is set to true, then it serves a handler that can be used for debugging the resource dependency graph under /debug/resource-dependency-graph.
🚨 Only use this setting for development purposes, as it enables unauthenticated users to view all data if they have access to the gardener-admission-controller component.
The handler renders an HTML page displaying the current graph with a list of vertices and its associated incoming and outgoing edges to other vertices.
Depending on the size of the Gardener landscape (and consequently, the size of the graph), it might not be possible to render it in its entirety.
If there are more than 2000 vertices, then the default filtering will selected for kind=Seed to prevent overloading the output.
Example output:
-------------------------------------------------------------------------------
|
| # Seed:my-seed
| <- (11)
| BackupBucket:73972fe2-3d7e-4f61-a406-b8f9e670e6b7
| BackupEntry:garden-my-project/shoot--dev--my-shoot--4656a460-1a69-4f00-9372-7452cbd38ee3
| ControllerInstallation:dns-external-mxt8m
| ControllerInstallation:extension-shoot-cert-service-4qw5j
| ControllerInstallation:networking-calico-bgrb2
| ControllerInstallation:os-gardenlinux-qvb5z
| ControllerInstallation:provider-gcp-w4mvf
| Secret:garden/backup
| Shoot:garden-my-project/my-shoot
|
-------------------------------------------------------------------------------
|
| # Shoot:garden-my-project/my-shoot
| <- (5)
| CloudProfile:gcp
| Namespace:garden-my-project
| Secret:garden-my-project/my-dns-secret
| SecretBinding:garden-my-project/my-credentials
| ShootState:garden-my-project/my-shoot
| -> (1)
| Seed:my-seed
|
-------------------------------------------------------------------------------
|
| # ShootState:garden-my-project/my-shoot
| -> (1)
| Shoot:garden-my-project/my-shoot
|
-------------------------------------------------------------------------------
... (etc., similarly for the other resources)
There are anchor links to easily jump from one resource to another, and the page provides means for filtering the results based on the kind, namespace, and/or name.
Pitfalls
When there is a relevant update to an existing resource, i.e., when a reference to another resource is changed, then the corresponding vertex (along with all associated edges) is first deleted from the graph before it gets added again with the up-to-date edges.
However, this does only work for vertices belonging to resources that are only created in exactly one “watch handler”.
For example, the vertex for a SecretBinding can either be created in the SecretBinding handler itself or in the Shoot handler.
In such cases, deleting the vertex before (re-)computing the edges might lead to race conditions and potentially renders the graph invalid.
Consequently, instead of deleting the vertex, only the edges the respective handler is responsible for are deleted.
If the vertex ends up with no remaining edges, then it also gets deleted automatically.
Afterwards, the vertex can either be added again or the updated edges can be created.
SeedRestriction Admission Webhook Enablement
The SeedRestriction is implemented as Kubernetes admission webhook and part of the gardener-admission-controller component running in the garden cluster.
🎛 In order to activate it, you have to set .global.admission.seedRestriction.enabled=true when using the Gardener controlplane Helm chart.
This will add an additional webhook in the existing ValidatingWebhookConfiguration of the gardener-admission-controller which contains the configuration for the SeedRestriction handler.
Please note that it should only be activated when the SeedAuthorizer is active as well.
Admission Decisions
The admission’s purpose is to perform extended validation on requests which require the body of the object in question.
Additionally, it handles CREATE requests of gardenlets/extensions (the above discussed resource dependency graph cannot be used in such cases because there won’t be any vertex/edge for non-existing resources).
Gardenlets/extensions are restricted to only create new resources which are somehow related to the seed clusters they are responsible for.
4.7.14 - Secret Binding Provider Controller
SecretBinding Provider Controller
This page describes the process on how to enable the SecretBinding provider controller.
Overview
With Gardener v1.38.0, the SecretBinding resource now contains a new optional field .provider.type (details about the motivation can be found in https://github.com/gardener/gardener/issues/4888). To make the process of setting the new field automated and afterwards to enforce validation on the new field in backwards compatible manner, Gardener features the SecretBinding provider controller and a feature gate - SecretBindingProviderValidation.
Process
A Gardener landscape operator can follow the following steps:
Enable the SecretBinding provider controller of Gardener Controller Manager.
The SecretBinding provider controller is responsible for populating the
.provider.typefield of a SecretBinding based on its current usage by Shoot resources. For example, if a Shootcrazy-botanywith.provider.type=awsis using a SecretBindingmy-secret-binding, then the SecretBinding provider controller will take care to set the.provider.typefield of the SecretBinding to the same provider type (aws). To enable the SecretBinding provider controller, set thecontroller.secretBindingProvider.concurrentSyncsfield in the ControllerManagerConfiguration (e.g set it to5). Although that it is not recommended, the API allows Shoots from different provider types to reference the same SecretBinding (assuming that the backing Secret contains data for both of the provider types). To preserve the backwards compatibility for such SecretBindings, the provider controller will maintain the multiple provider types in the field (it will join them with the separator,- for exampleaws,gcp).Disable the SecretBinding provider controller and enable the
SecretBindingProviderValidationfeature gate of Gardener API server.The
SecretBindingProviderValidationfeature gate of Gardener API server enables a set of validations for the SecretBinding provider field. It forbids creating a Shoot that has a different provider type from the referenced SecretBinding’s one. It also enforces immutability on the field. After making sure that SecretBinding provider controller is enabled and it populated the.provider.typefield of a majority of the SecretBindings on a Gardener landscape (the SecretBindings that are unused will have their provider type unset), a Gardener landscape operator has to disable the SecretBinding provider controller and to enable theSecretBindingProviderValidationfeature gate of Gardener API server. To disable the SecretBinding provider controller, set thecontroller.secretBindingProvider.concurrentSyncsfield in the ControllerManagerConfiguration to0.
Implementation History
- Gardener v1.38: The SecretBinding resource has a new optional field
.provider.type. The SecretBinding provider controller is disabled by default. TheSecretBindingProviderValidationfeature gate of Gardener API server is disabled by default. - Gardener v1.42: The SecretBinding provider controller is enabled by default.
- Gardener v1.51: The
SecretBindingProviderValidationfeature gate of Gardener API server is enabled by default and the SecretBinding provider controller is disabled by default. - Gardener v1.53: The
SecretBindingProviderValidationfeature gate of Gardener API server is unconditionally enabled (can no longer be disabled). - Gardener v1.55: The
SecretBindingProviderValidationfeature gate of Gardener API server and the SecretBinding provider controller are removed.
4.7.15 - Setup Gardener
How to Set Up a Gardener Landscape
Important
DISCLAIMER This document outlines the building blocks used to set up a Gardener landscape. It is not meant as a comprehensive configuration guide but rather as a starting point. Setting up a landscape requires careful planning and consideration of dimensions like the number of providers, geographical distribution, and envisioned size.
To make it more tangible, some choices are made to provide examples - specifically this guide uses OpenStack as infrastructure provider, Garden Linux to run any worker nodes, and Calico as CNI. Providing working examples for all combinations of components is out of scope. For a detailed descriptions of components, please refer to the documentation and API reference.
Target Picture
A Gardener landscape consists of several building blocks. The basis is an existing Kubernetes cluster which is referred to as runtime cluster.
Within this cluster another Kubernetes cluster is hosted, which is referred to as virtual Garden cluster. It is nodeless, meaning it does not host any pods as workload. The virtual Garden cluster is the management plane for the Gardener landscape and contains resources like Shoots, Seeds and so on.
Any new Gardener landscape starts with the deployment of the Gardener Operator and the creation of a garden namespace on the designated runtime cluster.
With the operator in place, the Garden resource can be deployed. It is reconciled by the Gardener Operator, which will create the “virtual” Garden cluster with its etcd, kube-apiserver, gardener-apiserver, and so on.
The API server is exposed through an Istio Gateway and a DNS record pointing to the Gateway’s external IP address is created.
Once the Garden reports readiness, basic building blocks like CloudProfiles, ControllerDeployments, and ControllerRegistrations, as well as Secrets granting access to DNS management for the internal domain and external default domain, are deployed to the virtual Garden cluster.
To be able to host any Shoots, at least one Seed is required. The very first Seed is created via a Gardenlet resource (more precisely gardenlets.seedmanagement.gardener.cloud) deployed to the virtual Garden cluster. The actual gardenlet Pods run on the runtime cluster or another Kubernetes cluster not managed by Gardener. Typically, this is referred to as an unmanaged Seed and is considered part of the Gardener infrastructure.
In this setup, the very first Seed will be reserved for one or several “infrastructure” Shoots. Those will be turned into Seeds again through a ManagedSeed resource. These Gardener-managed Seeds will then host control planes of any users’ Shoot clusters.
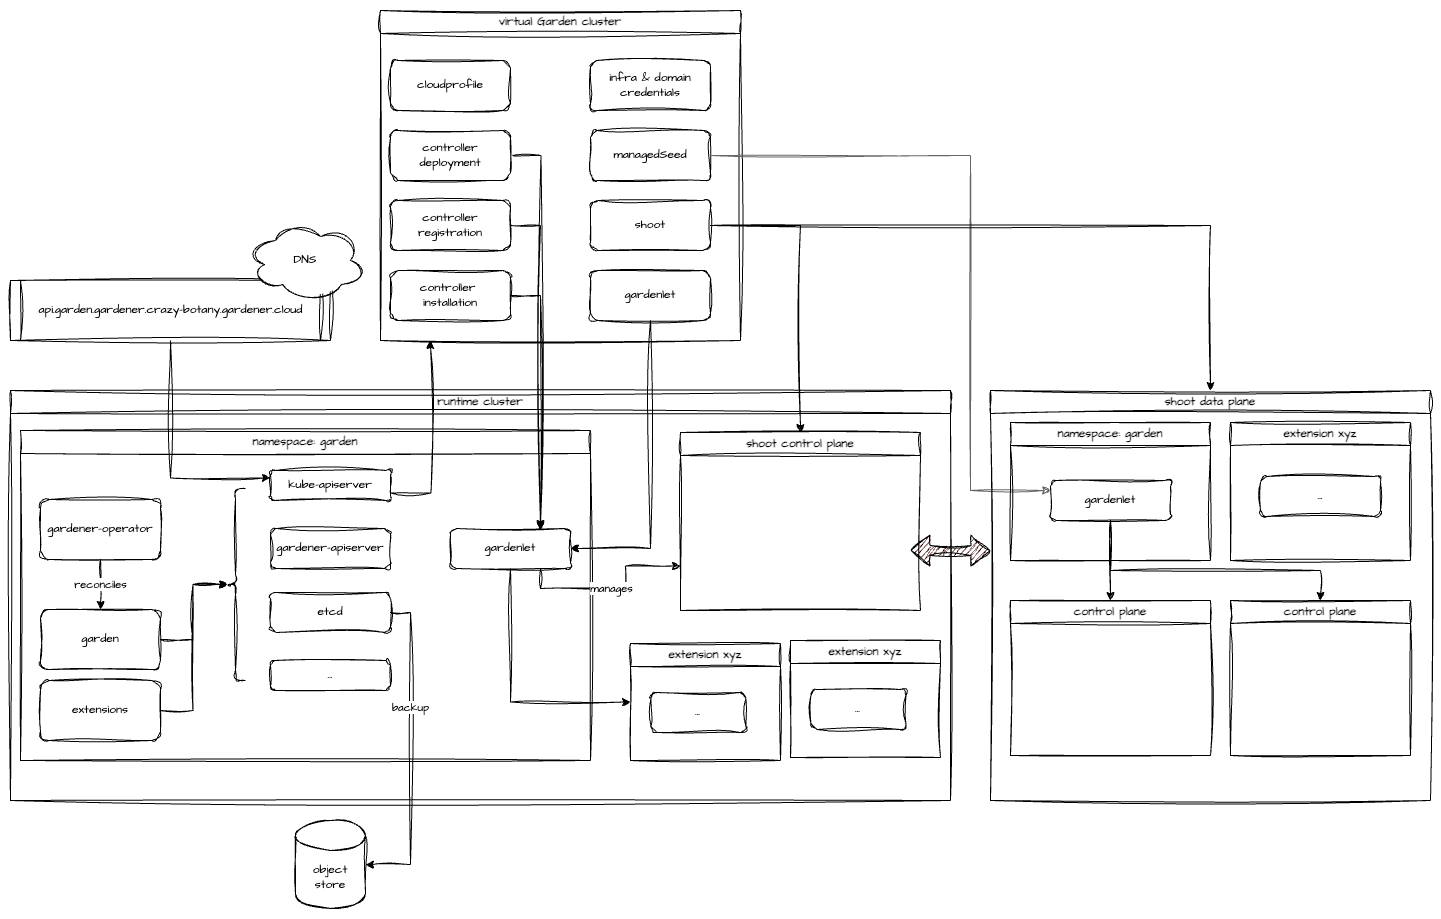
Reference documentation:
Prerequisites
Runtime Cluster
In order to install and run Gardener an already existing Kubernetes cluster is required. It serves as the root cluster hosting all the components required for the virtual Garden cluster - like a kube-apiserver and etcd but also admission webhooks or the gardener-controller-manager.
Reference documentation:
In this example, the runtime cluster is also used to host the very first gardenlet, which will register this cluster as a Seed as well. The gardenlet can be deployed to another Kubernetes cluster (recommended for productive setups). Here, using the runtime cluster keeps the amount of unmanaged clusters at a bare minimum.
DNS Zone
The virtual Garden API endpoint (kube-apiserver) is exposed through an Istio Gateway. This in turn is reachable via a LoadBalancer Service. The IP address is made discoverable through DNS. Hence, a zone where an A record can be created is required.
Additionally, Gardener advertises kube-apiservers of Shoots through two DNS records, which requires at least one DNS zone and credentials to interact with it through automation.
Assuming the base domain for a Gardener landscape is crazy-botany.gardener.cloud, the following example shows a possible way to structure DNS records:
| Component | General | Example |
|---|---|---|
| Gardener Base | gardener.<base-domain> | gardener.crazy-botany.gardener.cloud |
| Virtual Garden | api.garden.<base-domain> | api.garden.gardener.crazy-botany.gardener.cloud |
| Gardener Ingress | ingress.garden<gardener-base-domain> | ingress.garden.gardener.crazy-botany.gardener.cloud |
| Gardener Dashboard | dashboard.ingress.<gardener-base-domain> | dashboard.ingress.garden.crazy-botany.gardener.cloud |
| Gardener Discovery | discovery.ingress.<gardener-base-domain> | discovery.ingress.garden.crazy-botany.gardener.cloud |
| Shoot Internal | internal.<gardener-base-domain> | internal.gardener.crazy-botany.gardener.cloud |
| Shoot (default) External | shoot.<gardener-base-domain> | shoot.gardener.crazy-botany.gardener.cloud |
| Unmanaged Seed Ingress | ingress.soil.<gardener-base-domain> | ingress.soil.gardener.crazy-botany.gardener.cloud |
| Managed Seed | <seed-name>.seed.<gardener-base-domain> | cc-ha.seed.gardener.crazy-botany.gardener.cloud |
| Managed Seed Ingress | ingress.<seed-name>.seed.<gardener-base-domain> | ingress.cc-ha.seed.gardener.crazy-botany.gardener.cloud |
Reference documentation:
Backup Bucket
The virtual Garden cluster’s etcd is governed by etcd-druid. If configured, backups are created continuously and stored to a supported object store. This requires credentials to manage an object store on the chosen infrastructure.
It is recommended for any productive installation of Gardener.
Infrastructure
For each infrastructure supported by Gardener a so-called provider-extension exists. It implements the required interfaces. For this example, the OpenStack extension will be used.
Access to the respective infrastructure is required and needs to be handed over to Gardener in the provider-specific format (e.g., OpenStack application credentials).
Reference documentation:
Configure and deploy components
This section focuses on the individual building blocks of a Gardener landscape and their deployment / options.
Gardener Operator
The Gardener Operator is provided as a helm chart, which is also published as an OCI artifact and attached to each release of the gardener/gardener repository.
When setting up a new Gardener landscape, choose the latest version and either install the chart or render the templates e.g.:
helm template ./charts/gardener/operator --namespace garden --set replicaCount=2 --set image.tag=v1.111.0
Reference documentation:
Garden
The Gardener Operator reconciles the so-called Garden resource, which contains a detailed configuration of the Garden landscape to be created. Specify the domain name for the Garden’s API endpoint, CIDR blocks for the virtual cluster, high availability, and other options here.
To get familiar with the available options, check the Garden example.
While most operations are carried out in the realm of the runtime cluster, two external services are required. To automate both the creation of DNSRecords and a BackupBucket, a provider-extension needs to be deployed to the runtime cluster as well.
To facilitate the extension’s deployment, the API group operator.gardener.cloud/v1alpha1 contains an Extension resources, which is reconciled by the Gardener Operator. Such an Extension resource specifies how to install it into the runtime cluster, as well as the virtual Garden cluster. More details can be found in the Extensions section.
The below example shows how an Extension is used to deploy the provider-extension for OpenStack. Please note, it advertises to support resources of kind: BackupBucket and type: openstack as well as kind: DNSrecord and type: openstack-designate.
apiVersion: operator.gardener.cloud/v1alpha1
kind: Extension
metadata:
name: provider-openstack
spec:
deployment:
admission:
runtimeCluster:
helm:
ociRepository:
repository: europe-docker.pkg.dev/gardener-project/releases/charts/gardener/extensions/admission-openstack-runtime
tag: v1.44.1
values:
replicaCount: 3
virtualCluster:
helm:
ociRepository:
repository: europe-docker.pkg.dev/gardener-project/releases/charts/gardener/extensions/admission-openstack-application
tag: v1.44.1
extension:
helm:
ociRepository:
repository: europe-docker.pkg.dev/gardener-project/releases/charts/gardener/extensions/provider-openstack
tag: v1.44.1
runtimeClusterValues:
vpa:
enabled: true
resourcePolicy:
minAllowed:
memory: 128Mi
updatePolicy:
updateMode: Auto
values:
replicaCount: 3
resources:
requests:
cpu: 30m
memory: 256Mi
injectGardenKubeconfig: true
resources:
- kind: BackupBucket
type: openstack
- kind: BackupEntry
type: openstack
- kind: Bastion
type: openstack
- kind: ControlPlane
type: openstack
- kind: Infrastructure
type: openstack
- kind: Worker
type: openstack
- kind: DNSRecord
type: openstack-designate
If needed, a pull secret can be referenced for the Helm charts.
apiVersion: operator.gardener.cloud/v1alpha1
kind: Extension
metadata:
name: ...
spec:
deployment:
...
helm:
ociRepository:
repository: ...
tag: ...
pullSecretRef:
name: my-pull-secret
---
apiVersion: v1
kind: Secret
metadata:
name: my-pull-secret
namespace: garden
labels:
gardener.cloud/role: helm-pull-secret
type: kubernetes.io/dockerconfigjson
data:
.dockerconfigjson: <base64-encoded-docker-config-json>
To make use of the automated DNS management, the Garden resource has to contain a primary provider. Here is an example for an OpenStack-based setup, where the actual credentials are stored in the referenced Secret:
dns:
providers:
- name: primary
type: openstack-designate
secretRef:
name: dns-showroom-garden
Additionally, the BackupBucket and credentials to access it are configured alongside. The easiest way to get started is by using and customizing the example linked below.

Upon the first reconciliation of the Garden resource, a Kubernetes control plane will be bootstrapped in the garden namespace. etcd-main and etcd-events are managed by etcd-druid and use the BackupBucket created by the provider-extension.
To be able to serve any Gardener resource, the gardener-apiserver is deployed and registered through an APIService resource with the kube-apiserver of the virtual Garden cluster. Components like gardener-scheduler and gardener-controller-manager are deployed to act on Gardener’s resources.
Once the Garden resource reports readiness, the virtual Garden cluster can be targeted.
kubectl get garden crazy-botany
NAME K8S VERSION GARDENER VERSION LAST OPERATION RUNTIME VIRTUAL API SERVER OBSERVABILITY AGE
crazy-botany 1.31.1 v1.110.0 Succeeded True True True True 1d
In case the automatic DNS record creation is not supported, a record with the external address of the virtual-garden-istio-ingress (found in namespace istio-ingressgateway) service has to be created manually.
To obtain credentials and interact with the virtual Garden cluster, please follow this guide.
Reference documentation and examples:
Extensions
Gardener is provider-agnostic and relies on a growing set of extensions. An extension can provide support for an infrastructure (required) or add a desired feature to a Kubernetes cluster (often optional).
There are a few extensions considered essential to any Gardener installation:
- at least one infrastructure provider (commonly referred to as provider-extension)
- at least one operating system extension - Garden Linux is recommended
- at least one network plugin (CNI)
- Shoot services
An extension often consists of two components - a controller implementing the Gardener’s extension contract and an admission controller. The latter is deployed to the runtime cluster and prevents misconfiguration of Shoots.
Choices
For this example, the following choices are made:
Reference documentation:
How to install an extension
In order to make an extension known to a Gardener landscape, two resources have to be applied to the virtual Garden cluster - firstly, a ControllerDeployment and secondly, a matching ControllerRegistration. With both in place, Gardener-managed ControllerInstallations take care of the actual deployment of the extension to the target environment.
Check the extension registration documentation for more details.
Now, the classical way of installing ControllerDeployment and ControllerRegistration is to prepare the resources and apply them to the virtual Garden cluster. The ControllerDeployment references an OCI repository containing the extension’s helm chart.
For example, to deploy the provider OpenStack extension, the example file can be used.
To simplify this procedure, extensions can be registered through Extension resources in the runtime cluster. The Gardener Operator will take care of deploying the required resources to the virtual Garden cluster.
In addition, this approach allows the extensions and their admission controllers to be deployed to the runtime cluster as well. There, they can provide additional functionality like managing DNSRecords or BackupBuckets.
More details can be found in the Extension Resource documentation.

Cloud Profile
In order to host any Shoot cluster, at least one CloudProfile is required. The CloudProfile resource describes supported Kubernetes and OS versions, as well as infrastructure capabilities like regions and their availability zones.
Hence, the next step is to craft a CloudProfile for each infrastructure provider and combine it with the information where the operating system images can be found. The resulting CloudProfile resource has to be deployed to the virtual Garden cluster.
The following list provides the high-level steps to build a CloudProfile:
- add at least one supported minor version to
.spec.kubernetes.versions[]. - add at least one region including the availability zone to
.spec.regions[]. - add at least one operating system to
.spec.machineImages[]and define at least on supported version. - add one or several machine types to
.spec.machineTypes[]. - specify a
.spec.providerConfigaccording to the extension’s documentation. Typically, this includes a list ofMachineImages. Garden Linux, for example, publishes images and provides a list of location as part of the release notes. In case of private infrastructure, copying the images might be required.
Here is a simplified example manifest:
apiVersion: core.gardener.cloud/v1beta1
kind: CloudProfile
metadata:
name: openstack-example
spec:
caBundle: | # CA Bundle installed on all nodes of the shoot clusters using this CloudProfile
<redacted>
kubernetes:
versions:
- classification: preview
version: 1.31.3
- classification: supported
expirationDate: "2025-07-30T23:59:59Z"
version: 1.31.2
machineImages:
- name: gardenlinux
updateStrategy: minor
versions:
- architectures:
- amd64
- arm64
classification: supported
cri:
- containerRuntimes:
- type: gvisor
name: containerd
version: 1592.3.0
machineTypes:
- architecture: amd64
cpu: "2"
gpu: "0"
memory: 4Gi
name: small_machine
storage:
class: standard
size: 64Gi
type: default
usable: true
regions:
- name: my-region-1
zones:
- name: my-region-1a
- name: my-region-1b
providerConfig:
apiVersion: openstack.provider.extensions.gardener.cloud/v1alpha1
kind: CloudProfileConfig
machineImages:
- name: gardenlinux
versions:
- version: 1592.3.0
regions:
- id: abcd-1234 # The ID of the image in the given OpenStack installation for the specified region.
name: my-region-1
# ...
Reference documentation:
CloudProfilesCloudProfileexample- OpenStack
CloudProfileexample - Garden Linux release notes example
- Image vector
- Image vector container defaults
DNS setup for internal & external domains
Gardener maintains DNS records for a Shoot which requires a DNS zone and credentials to manage records in this zone. Provide the credentials alongside with information about the zone. The secrets are deployed to the virtual Garden cluster.
Reference documentation:
Gardenlet
Before the first Shoot can be created in a new Gardener landscape, at least one Seed is required. Typically, the very first Seed is created by deploying a properly configured gardenlet to an existing Kubernetes cluster. In this example, the gardenlet will be deployed to the runtime cluster - effectively turning it into a Seed as well.
Thus, the runtime cluster serves two purposes now - it hosts the virtual Garden cluster and control planes. It is possible, and strongly recommended for larger installations, to deploy a gardenlet to another Kubernetes cluster. This separates the virtual Garden cluster from the first Seed with the control planes hosted there.
A Seed requires a provider-extension matching the target infrastructure to manage DNSRecords for the Seed’s ingress domain and if configured, the BackupBucket. A Secret with the credentials to interact with the infrastructure needs to be created in the virtual Garden cluster and linked in the gardenlet’s configuration.
The easiest way to deploy a gardenlet is to create a Gardenlet resource in the virtual Garden cluster. Make sure to configure the CIDR blocks properly to avoid conflicts or overlaps with the runtime cluster.
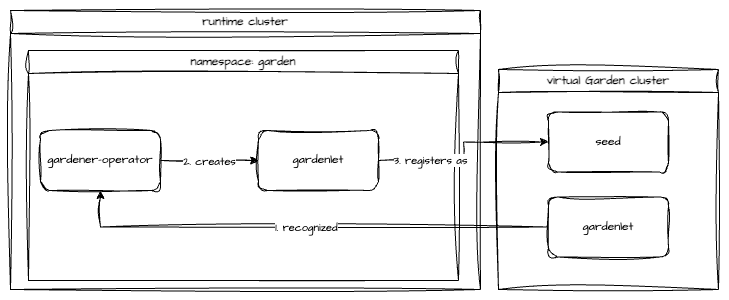
A common pattern is to protect this very first Seed, in a sense that no control planes of user Shoot clusters will be scheduled to it. Instead, this Seed should host control planes of Gardener-managed Seed clusters exclusively. These in turn host the control planes of user Shoots.
This pattern allows to scale out the capacity of a Gardener landscape, as creating new seeds is simple and fast. More details can be found in the Shoot & Managed Seed section.
To achieve this protection, the gardenlet resource should contain the following configuration:
spec:
config:
seedConfig:
spec:
taints:
- key: seed.gardener.cloud/protected
settings:
scheduling:
visible: false
Reference documentation:
Shoot & Managed Seed
With the very first Seed in place, the Gardener landscape can scale by the means of Gardener-managed infrastructure. To get started, a Shoot needs to be created in the virtual Garden cluster. This requires infrastructure credentials to be provided in the form of a Secret and CredentialsBinding. This Shoot should have a toleration for the above taint:
spec:
tolerations:
- key: seed.gardener.cloud/protected
Up next, a gardenlet has to be installed on to this Shoot and it needs to be registered as a Seed. The recommended way is to create a ManagedSeed resource in the virtual Garden. The configuration for the Seed needs to be crafted carefully to avoid overlapping CIDR ranges etc. Additionally, the virtual Garden’s API endpoint needs to be added. When deploying a gardenlet to the runtime cluster, cluster-internal communication through the Service’s cluster DNS record works well. Now with the new gardenlet running on a different Kubernetes cluster, the public endpoint is required in the gardenlet’s configuration within the ManagedSeed resource.
spec:
gardenlet:
config:
apiVersion: gardenlet.config.gardener.cloud/v1alpha1
kind: GardenletConfiguration
gardenClientConnection:
gardenClusterAddress: https://api.garden.crazy-botany.gardener.cloud
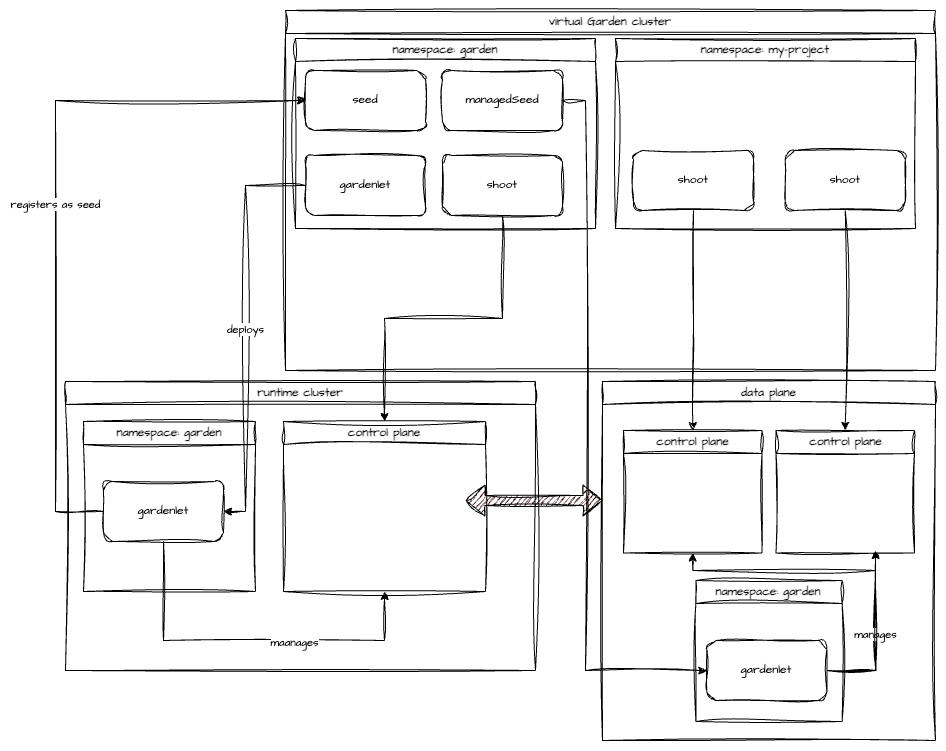
Reference documentation:
Conclusion
Setting up a new Gardener landscape is much easier today - thanks to the evolution of the Gardener Operator and Garden resource. Utilizing the Extension resource reduces manual efforts significantly.
A single Gardener landscape can support multiple infrastructures for Shoots. To onboard an infrastructure, the relevant extensions need to be deployed as well.
Due to the vast amount of configuration options it is highly recommended to spend some time to derive a meaningful setup initially.
In this example, the runtime cluster serves two purposes - it hosts the virtual Garden cluster and runs a gardenlet which registers the runtime cluster itself as a seed with the virtual Garden cluster. This first seed is reserved to host the control planes of “infrastructure” Shoots only. Those Shoots will be turned into seeds using the ManagedSeed resource and allow for proper scaling.
To get started with Gardener, visit our landing page and try the demo environment.
4.7.16 - Version Skew Policy
Version Skew Policy
This document describes the maximum version skew supported between various Gardener components.
Supported Gardener Versions
Gardener versions are expressed as x.y.z, where x is the major version, y is the minor version, and z is the patch version, following Semantic Versioning terminology.
The Gardener project maintains release branches for the three most recent minor releases.
Applicable fixes, including security fixes, may be backported to those three release branches, depending on severity and feasibility. Patch releases are cut from those branches at a regular cadence, plus additional urgent releases when required.
For more information, see the Releases document.
Supported Version Skew
Technically, we follow the same policy as the Kubernetes project.
However, given that our release cadence is much more frequent compared to Kubernetes (every 14d vs. every 120d), in many cases it might be possible to skip versions, though we do not test these upgrade paths.
Consequently, in general it might not work, and to be on the safe side, it is highly recommended to follow the described policy.
🚨 Note that downgrading Gardener versions is generally not tested during development and should be considered unsupported.
gardener-apiserver
In multi-instance setups of Gardener, the newest and oldest gardener-apiserver instances must be within one minor version.
Example:
- newest
gardener-apiserveris at 1.37 - other
gardener-apiserverinstances are supported at 1.37 and 1.36
gardener-controller-manager, gardener-scheduler, gardener-admission-controller
gardener-controller-manager, gardener-scheduler, and gardener-admission-controller must not be newer than the gardener-apiserver instances they communicate with.
They are expected to match the gardener-apiserver minor version, but may be up to one minor version older (to allow live upgrades).
Example:
gardener-apiserveris at 1.37gardener-controller-manager,gardener-scheduler, andgardener-admission-controllerare supported at 1.37 and 1.36
gardenlet
gardenletmust not be newer thangardener-apiservergardenletmay be up to two minor versions older thangardener-apiserver
Example:
gardener-apiserveris at 1.37gardenletis supported at 1.37, 1.36, and 1.35
gardener-operator
Since gardener-operator manages the Gardener control plane components (gardener-apiserver, gardener-controller-manager, gardener-scheduler, gardener-admission-controller), it follows the same policy as for gardener-apiserver.
It implements additional start-up checks to ensure adherence to this policy.
Concretely, gardener-operator will crash when
- its gets downgraded.
- its version gets upgraded and skips at least one minor version.
Supported Component Upgrade Order
The supported version skew between components has implications on the order in which components must be upgraded. This section describes the order in which components must be upgraded to transition an existing Gardener installation from version 1.37 to version 1.38.
gardener-apiserver
Prerequisites:
- In a single-instance setup, the existing
gardener-apiserverinstance is 1.37. - In a multi-instance setup, all
gardener-apiserverinstances are at 1.37 or 1.38 (this ensures maximum skew of 1 minor version between the oldest and newestgardener-apiserverinstance). - The
gardener-controller-manager,gardener-scheduler, andgardener-admission-controllerinstances that communicate with thisgardener-apiserverare at version 1.37 (this ensures they are not newer than the existing API server version and are within 1 minor version of the new API server version). gardenletinstances on all seeds are at version 1.37 or 1.36 (this ensures they are not newer than the existing API server version and are within 2 minor versions of the new API server version).
Actions:
- Upgrade
gardener-apiserverto 1.38.
gardener-controller-manager, gardener-scheduler, gardener-admission-controller
Prerequisites:
- The
gardener-apiserverinstances these components communicate with are at 1.38 (in multi-instance setups in which these components can communicate with anygardener-apiserverinstance in the cluster, allgardener-apiserverinstances must be upgraded before upgrading these components).
Actions:
- Upgrade
gardener-controller-manager,gardener-scheduler, andgardener-admission-controllerto 1.38
gardenlet
Prerequisites:
- The
gardener-apiserverinstances thegardenletcommunicates with are at 1.38.
Actions:
- Optionally upgrade
gardenletinstances to 1.38 (or they can be left at 1.37 or 1.36).
Warning
Running a landscape with
gardenletinstances that are persistently two minor versions behindgardener-apiservermeans they must be upgraded before the Gardener control plane can be upgraded.
gardener-operator
Prerequisites:
- All
gardener-operatorinstances are at 1.37.
Actions:
- Upgrade
gardener-operatorto 1.38.
Supported Gardener Extension Versions
Extensions are maintained and released separately and independently of the gardener/gardener repository.
Consequently, providing version constraints is not possible in this document.
Sometimes, the documentation of extensions contains compatibility information (e.g., “this extension version is only compatible with Gardener versions higher than 1.80”, see this example).
However, since all extensions typically make use of the extensions library (example), a general constraint is that no extension must depend on a version of the extensions library higher than the version of gardenlet.
Example 1:
gardener-apiserverand other Gardener control plane components are at 1.37.- All
gardenlets are at 1.37. - Only extensions are supported which depend on 1.37 or lower of the extensions library.
Example 2:
gardener-apiserverand other Gardener control plane components are at 1.37.- Some
gardenlets are at 1.37, others are at 1.36. - Only extensions are supported which depend on 1.36 or lower of the extensions library.
Supported Kubernetes Versions
Please refer to Supported Kubernetes Versions.
4.8 - Networking
4.8.1 - Custom DNS Configuration
Custom DNS Configuration
Gardener provides Kubernetes-Clusters-As-A-Service where all the system components (e.g., kube-proxy, networking, dns) are managed. As a result, Gardener needs to ensure and auto-correct additional configuration to those system components to avoid unnecessary down-time.
In some cases, auto-correcting system components can prevent users from deploying applications on top of the cluster that requires bits of customization, DNS configuration can be a good example.
To allow for customizations for DNS configuration (that could potentially lead to downtime) while having the option to “undo”, we utilize the import plugin from CoreDNS [1].
which enables in-line configuration changes.
How to use
To customize your CoreDNS cluster config, you can simply edit a ConfigMap named coredns-custom in the kube-system namespace.
By editing, this ConfigMap, you are modifying CoreDNS configuration, therefore care is advised.
For example, to apply new config to CoreDNS that would point all .global DNS requests to another DNS pod, simply edit the configuration as follows:
apiVersion: v1
kind: ConfigMap
metadata:
name: coredns-custom
namespace: kube-system
data:
istio.server: |
global:8053 {
errors
cache 30
forward . 1.2.3.4
}
corefile.override: |
# <some-plugin> <some-plugin-config>
debug
whoami
The port number 8053 in global:8053 is the specific port that CoreDNS is bound to and cannot be changed to any other port if it should act on ordinary name resolution requests from pods. Otherwise, CoreDNS will open a second port, but you are responsible to direct the traffic to this port. kube-dns service in kube-system namespace will direct name resolution requests within the cluster to port 8053 on the CoreDNS pods.
Moreover, additional network policies are needed to allow corresponding ingress traffic to CoreDNS pods.
In order for the destination DNS server to be reachable, it must listen on port 53 as it is required by network policies. Other ports are only possible if additional network policies allow corresponding egress traffic from CoreDNS pods.
It is important to have the ConfigMap keys ending with *.server (if you would like to add a new server) or *.override
if you want to customize the current server configuration (it is optional setting both).
Warning
Be careful when overriding plugins log, forward or cache.
- Increasing log level can lead to increased load/reduced throughput.
- Changing the forward target may lead to unexpected results.
- Playing with the cache settings can impact the timeframe how long it takes for changes to become visible.
*.override and *.server data points from coredns-custom ConfigMap are imported into Corefile as follows.
Please consult coredns plugin documentation for potential side-effects.
.:8053 {
health {
lameduck 15s
}
ready
[search-rewrites]
kubernetes[clusterDomain]in-addr.arpa ip6.arpa {
pods insecure
fallthrough in-addr.arpa ip6.arpa
ttl 30
}
prometheus :9153
loop
import custom/*.override
errors
log . {
class error
}
forward . /etc/resolv.conf
cache 30
reload
loadbalance round_robin
}
import custom/*.server
[Optional] Reload CoreDNS
As Gardener is configuring the reload plugin of CoreDNS a restart of the CoreDNS components is typically not necessary to propagate ConfigMap changes. However, if you don’t want to wait for the default (30s) to kick in, you can roll-out your CoreDNS deployment using:
kubectl -n kube-system rollout restart deploy coredns
This will reload the config into CoreDNS.
The approach we follow here was inspired by AKS’s approach [2].
Anti-Pattern
Applying a configuration that is in-compatible with the running version of CoreDNS is an anti-pattern (sometimes plugin configuration changes, simply applying a configuration can break DNS).
If incompatible changes are applied by mistake, simply delete the content of the ConfigMap and re-apply.
This should bring the cluster DNS back to functioning state.
Node Local DNS
Custom DNS configuration] may not work as expected in conjunction with NodeLocalDNS.
With NodeLocalDNS, ordinary DNS queries targeted at the upstream DNS servers, i.e. non-kubernetes domains,
will not end up at CoreDNS, but will instead be directly sent to the upstream DNS server. Therefore, configuration
applying to non-kubernetes entities, e.g. the istio.server block in the
custom DNS configuration example, may not have any effect with NodeLocalDNS enabled.
If this kind of custom configuration is required, forwarding to upstream DNS has to be disabled.
This can be done by setting the option (spec.systemComponents.nodeLocalDNS.disableForwardToUpstreamDNS) in the Shoot resource to true:
...
spec:
...
systemComponents:
nodeLocalDNS:
enabled: true
disableForwardToUpstreamDNS: true
...
References
[1] Import plugin [2] AKS Custom DNS
4.8.2 - DNS Search Path Optimization
DNS Search Path Optimization
DNS Search Path
Using fully qualified names has some downsides, e.g., it may become harder to move deployments from one landscape to the next. It is far easier and simple to rely on short/local names, which may have different meaning depending on the context they are used in.
The DNS search path allows for the usage of short/local names. It is an ordered list of DNS suffixes to append to short/local names to create a fully qualified name.
If a short/local name should be resolved, each entry is appended to it one by one to check whether it can be resolved. The process stops when either the name could be resolved or the DNS search path ends. As the last step after trying the search path, the short/local name is attempted to be resolved on it own.
DNS Option ndots
As explained in the section above, the DNS search path is used for short/local names to create fully
qualified names. The DNS option ndots specifies how many dots (.) a name needs to have to be considered fully qualified.
For names with less than ndots dots (.), the DNS search path will be applied.
DNS Search Path, ndots, and Kubernetes
Kubernetes tries to make it easy/convenient for developers to use name resolution. It provides several means to address a
service, most notably by its name directly, using the namespace as suffix, utilizing <namespace>.svc as suffix or as a
fully qualified name as <service>.<namespace>.svc.cluster.local (assuming cluster.local to be the cluster domain).
This is why the DNS search path is fairly long in Kubernetes, usually consisting of <namespace>.svc.cluster.local,
svc.cluster.local, cluster.local, and potentially some additional entries coming from the local network of the cluster.
For various reasons, the default ndots value in the context of Kubernetes is with 5, also fairly large. See
this comment for a more detailed description.
DNS Search Path/ndots Problem in Kubernetes
As the DNS search path is long and ndots is large, a lot of DNS queries might traverse the DNS search path. This results
in an explosion of DNS requests.
For example, consider the name resolution of the default kubernetes service kubernetes.default.svc.cluster.local. As this
name has only four dots, it is not considered a fully qualified name according to the default ndots=5 setting. Therefore,
the DNS search path is applied, resulting in the following queries being created
kubernetes.default.svc.cluster.local.some-namespace.svc.cluster.localkubernetes.default.svc.cluster.local.svc.cluster.localkubernetes.default.svc.cluster.local.cluster.localkubernetes.default.svc.cluster.local.network-domain- …
In IPv4/IPv6 dual stack systems, the amount of DNS requests may even double as each name is resolved for IPv4 and IPv6.
General Workarounds/Mitigations
Kubernetes provides the capability to set the DNS options for each pod (see Pod DNS config for details). However, this has to be applied for every pod (doing name resolution) to resolve the problem. A mutating webhook may be useful in this regard. Unfortunately, the DNS requirements may be different depending on the workload. Therefore, a general solution may difficult to impossible.
Another approach is to use always fully qualified names and append a dot (.) to the name to prevent the name resolution
system from using the DNS search path. This might be somewhat counterintuitive as most developers are not used to the
trailing dot (.). Furthermore, it makes moving to different landscapes more difficult/error-prone.
Gardener Specific Workarounds/Mitigations
Gardener allows users to customize their DNS configuration. CoreDNS allows several approaches to deal with the requests generated by the DNS search path. Caching is possible as well as query rewriting. There are also several other plugins available, which may mitigate the situation.
Gardener DNS Query Rewriting
As explained above, the application of the DNS search path may lead to the undesired
creation of DNS requests. Especially with the default setting of ndots=5, seemingly fully qualified names pointing to
services in the cluster may trigger the DNS search path application.
Gardener allows to automatically rewrite some obviously incorrect DNS names, which stem from an application of the DNS search
path to the most likely desired name. This will automatically rewrite requests like service.namespace.svc.cluster.local.svc.cluster.local to
service.namespace.svc.cluster.local.
In case the applications also target services for name resolution, which are outside of the cluster and have less than ndots dots,
it might be helpful to prevent search path application for them as well. One way to achieve it is by adding them to the
commonSuffixes:
...
spec:
...
systemComponents:
coreDNS:
rewriting:
commonSuffixes:
- gardener.cloud
- example.com
...
DNS requests containing a common suffix and ending in .svc.cluster.local are assumed to be incorrect application of the DNS
search path. Therefore, they are rewritten to everything ending in the common suffix. For example, www.gardener.cloud.svc.cluster.local
would be rewritten to www.gardener.cloud.
Please note that the common suffixes should be long enough and include enough dots (.) to prevent random overlap with
other DNS queries. For example, it would be a bad idea to simply put com on the list of common suffixes, as there may be
services/namespaces which have com as part of their name. The effect would be seemingly random DNS requests. Gardener
requires that common suffixes contain at least one dot (.) and adds a second dot at the beginning. For instance, a common
suffix of example.com in the configuration would match *.example.com.
Since some clients verify the host in the response of a DNS query, the host must also be rewritten.
For that reason, we can’t rewrite a query for service.dst-namespace.svc.cluster.local.src-namespace.svc.cluster.local or
www.example.com.src-namespace.svc.cluster.local, as for an answer rewrite src-namespace would not be known.
4.8.3 - Dual-stack network migration
Dual-Stack Network Migration
This document provides a guide for migrating IPv4-only or IPv6-only Gardener shoot clusters to dual-stack networking (IPv4 and IPv6).
Overview
Dual-stack networking allows clusters to operate with both IPv4 and IPv6 protocols. This configuration is controlled via the spec.networking.ipFamilies field, which accepts the following values:
[IPv4][IPv6][IPv4, IPv6][IPv6, IPv4]
Key Considerations
- Adding a new protocol is only allowed as the second element in the array, ensuring the primary protocol remains unchanged.
- Migration involves multiple reconciliation runs to ensure a smooth transition without disruptions.
Preconditions
Gardener supports multiple different network configurations, including running with pod overlay network or native routing. Currently, there is only native routing as supported operating mode for dual-stack networking in Gardener. This means that the pod overlay network needs to be disabled before starting the dual-stack migration. Otherwise, pod-to-pod cross-node communication may not work as expected after the migration.
At the moment, this only affects IPv4-only clusters, which should be migrated to dual-stack networking. IPv6-only clusters always use native routing.
You can check whether your cluster uses overlay network or native routing by looking for spec.networking.providerConfig.overlay.enabled in your cluster’s manifest. If it is set to true or not present, the cluster is using the pod overlay network. If it is set to false, the cluster is using native routing.
Please note that there are infrastructure-specific limitations with regards to cluster size due to one route being added per node. Therefore, please consult the documentation of your infrastructure if your cluster should grow beyond 50 nodes and adapt the route limit quotas accordingly before switching to native routing.
To disable the pod overlay network and thereby switch to native routing, adjust your cluster specification as follows:
spec:
...
networking:
providerConfig:
overlay:
enabled: false
...
Migration Process
The migration process should usually take place during the corresponding shoot maintenance time window. If you wish to run the migration process earlier, then you need to roll the nodes yourself and then trigger a reconcile so that the status of the DualStackNodesMigrationReady constraint is set to true. Once this is the case a new reconcile needs to be triggered to update the final components as described in step 5.
Step 1: Update Networking Configuration
Modify the spec.networking.ipFamilies field to include the desired dual-stack configuration. For example, change [IPv4] to [IPv4, IPv6].
Step 2: Infrastructure Reconciliation
Changing the ipFamilies field triggers an infrastructure reconciliation. This step applies necessary changes to the underlying infrastructure to support dual-stack networking.
Step 3: Control Plane Updates
Depending on the infrastructure, control plane components will be updated or reconfigured to support dual-stack networking.
Step 4: Node Rollout
Nodes must support the new network protocol. However, node rollout is a manual step and is not triggered automatically. It should be performed during a maintenance window to minimize disruptions. Over time, this step may occur automatically, for example, during Kubernetes minor version updates that involve node replacements.
Cluster owners can monitor the progress of this step by checking the DualStackNodesMigrationReady constraint in the shoot status. During shoot reconciliation, the system verifies if all nodes support dual-stack networking and updates the migration state accordingly.
Step 5: Final Reconciliation
Once all nodes are migrated, the remaining control plane components and the Container Network Interface (CNI) are configured for dual-stack networking. The migration constraint is removed at the end of this step.
Post-Migration Behavior
After completing the migration:
- The shoot cluster supports dual-stack networking.
- New pods will receive IP addresses from both address families.
- Existing pods will only receive a second IP address upon recreation.
- If full dual-stack networking is required all pods need to be rolled.
4.8.4 - ExposureClasses
ExposureClasses
The Gardener API server provides a cluster-scoped ExposureClass resource.
This resource is used to allow exposing the control plane of a Shoot cluster in various network environments like restricted corporate networks, DMZ, etc.
Background
The ExposureClass resource is based on the concept for the RuntimeClass resource in Kubernetes.
A RuntimeClass abstracts the installation of a certain container runtime (e.g., gVisor, Kata Containers) on all nodes or a subset of the nodes in a Kubernetes cluster.
See Runtime Class for more information.
In contrast, an ExposureClass abstracts the ability to expose a Shoot clusters control plane in certain network environments (e.g., corporate networks, DMZ, internet) on all Seeds or a subset of the Seeds.
Example: RuntimeClass and ExposureClass
apiVersion: node.k8s.io/v1
kind: RuntimeClass
metadata:
name: gvisor
handler: gvisorconfig
# scheduling:
# nodeSelector:
# env: prod
---
kind: ExposureClass
metadata:
name: internet
handler: internet-config
# scheduling:
# seedSelector:
# matchLabels:
# network/env: internet
Similar to RuntimeClasses, ExposureClasses also define a .handler field reflecting the name reference for the corresponding CRI configuration of the RuntimeClass and the control plane exposure configuration for the ExposureClass.
The CRI handler for RuntimeClasses is usually installed by an administrator (e.g., via a DaemonSet which installs the corresponding container runtime on the nodes).
The control plane exposure configuration for ExposureClasses will be also provided by an administrator.
This exposure configuration is part of the gardenlet configuration, as this component is responsible to configure the control plane accordingly.
See the gardenlet Configuration ExposureClass Handlers section for more information.
The RuntimeClass also supports the selection of a node subset (which have the respective controller runtime binaries installed) for pod scheduling via its .scheduling section.
The ExposureClass also supports the selection of a subset of available Seed clusters whose gardenlet is capable of applying the exposure configuration for the Shoot control plane accordingly via its .scheduling section.
Usage by a Shoot
A Shoot can reference an ExposureClass via the .spec.exposureClassName field.
⚠️ When creating a
Shootresource, the Gardener scheduler will try to assign theShootto aSeedwhich will host its control plane.
The scheduling behaviour can be influenced via the .spec.seedSelectors and/or .spec.tolerations fields in the Shoot.
ExposureClasses can also contain scheduling instructions.
If a Shoot is referencing an ExposureClass, then the scheduling instructions of both will be merged into the Shoot.
Those unions of scheduling instructions might lead to a selection of a Seed which is not able to deal with the handler of the ExposureClass and the Shoot creation might end up in an error.
In such case, the Shoot scheduling instructions should be revisited to check that they are not interfering with the ones from the ExposureClass.
If this is not feasible, then the combination with the ExposureClass might not be possible and you need to contact your Gardener administrator.
Example: Shoot and ExposureClass scheduling instructions merge flow
- Assuming there is the following
Shootwhich is referencing theExposureClassbelow:
apiVersion: core.gardener.cloud/v1beta1
kind: Shoot
metadata:
name: abc
namespace: garden-dev
spec:
exposureClassName: abc
seedSelectors:
matchLabels:
env: prod
---
apiVersion: core.gardener.cloud/v1beta1
kind: ExposureClass
metadata:
name: abc
handler: abc
scheduling:
seedSelector:
matchLabels:
network: internal
- Both
seedSelectorswould be merged into theShoot. The result would be the following:
apiVersion: core.gardener.cloud/v1beta1
kind: Shoot
metadata:
name: abc
namespace: garden-dev
spec:
exposureClassName: abc
seedSelectors:
matchLabels:
env: prod
network: internal
- Now the Gardener Scheduler would try to find a
Seedwith those labels.
- If there are no Seeds with matching labels for the seed selector, then the
Shootwill be unschedulable. - If there are Seeds with matching labels for the seed selector, then the Shoot will be assigned to the best candidate after the scheduling strategy is applied, see Gardener Scheduler.
- If the
Seedis not able to serve theExposureClasshandlerabc, then the Shoot will end up in error state. - If the
Seedis able to serve theExposureClasshandlerabc, then theShootwill be created.
- If the
gardenlet Configuration ExposureClass Handlers
The gardenlet is responsible to realize the control plane exposure strategy defined in the referenced ExposureClass of a Shoot.
Therefore, the GardenletConfiguration can contain an .exposureClassHandlers list with the respective configuration.
Example of the GardenletConfiguration:
exposureClassHandlers:
- name: internet-config
loadBalancerService:
annotations:
loadbalancer/network: internet
- name: internal-config
loadBalancerService:
annotations:
loadbalancer/network: internal
sni:
ingress:
namespace: ingress-internal
labels:
network: internal
Each gardenlet can define how the handler of a certain ExposureClass needs to be implemented for the Seed(s) where it is responsible for.
The .name is the name of the handler config and it must match to the .handler in the ExposureClass.
All control planes on a Seed are exposed via a load balancer, either a dedicated one or a central shared one.
The load balancer service needs to be configured in a way that it is reachable from the target network environment.
Therefore, the configuration of load balancer service need to be specified, which can be done via the .loadBalancerService section.
The common way to influence load balancer service behaviour is via annotations where the respective cloud-controller-manager will react on and configure the infrastructure load balancer accordingly.
The control planes on a Seed will be exposed via a central load balancer and with Envoy via TLS SNI passthrough proxy.
In this case, the gardenlet will install a dedicated ingress gateway (Envoy + load balancer + respective configuration) for each handler on the Seed.
The configuration of the ingress gateways can be controlled via the .sni section in the same way like for the default ingress gateways.
4.8.5 - KUBERNETES_SERVICE_HOST Environment Variable Injection
KUBERNETES_SERVICE_HOST Environment Variable Injection
In each Shoot cluster’s kube-system namespace a DaemonSet called apiserver-proxy is deployed. It routes traffic to the upstream Shoot Kube APIServer. See the APIServer SNI GEP for more details.
To skip this extra network hop, a mutating webhook called apiserver-proxy.networking.gardener.cloud is deployed next to the API server in the Seed. It adds a KUBERNETES_SERVICE_HOST environment variable to each container and init container that do not specify it. See the webhook repository for more information.
Opt-Out of Pod Injection
In some cases it’s desirable to opt-out of Pod injection:
- DNS is disabled on that individual Pod, but it still needs to talk to the kube-apiserver.
- Want to test the
kube-proxyandkubeletin-cluster discovery.
Opt-Out of Pod Injection for Specific Pods
To opt out of the injection, the Pod should be labeled with apiserver-proxy.networking.gardener.cloud/inject: disable, e.g.:
apiVersion: apps/v1
kind: Deployment
metadata:
name: nginx
labels:
app: nginx
spec:
replicas: 1
selector:
matchLabels:
app: nginx
template:
metadata:
labels:
app: nginx
apiserver-proxy.networking.gardener.cloud/inject: disable
spec:
containers:
- name: nginx
image: nginx:1.14.2
ports:
- containerPort: 80
Opt-Out of Pod Injection on Namespace Level
To opt out of the injection of all Pods in a namespace, you should label your namespace with apiserver-proxy.networking.gardener.cloud/inject: disable, e.g.:
apiVersion: v1
kind: Namespace
metadata:
labels:
apiserver-proxy.networking.gardener.cloud/inject: disable
name: my-namespace
or via kubectl for existing namespace:
kubectl label namespace my-namespace apiserver-proxy.networking.gardener.cloud/inject=disable
Note: Please be aware that it’s not possible to disable injection on a namespace level and enable it for individual pods in it.
Opt-Out of Pod Injection for the Entire Cluster
If the injection is causing problems for different workloads and ignoring individual pods or namespaces is not possible, then the feature could be disabled for the entire cluster with the alpha.featuregates.shoot.gardener.cloud/apiserver-sni-pod-injector annotation with value disable on the Shoot resource itself:
apiVersion: core.gardener.cloud/v1beta1
kind: Shoot
metadata:
annotations:
alpha.featuregates.shoot.gardener.cloud/apiserver-sni-pod-injector: 'disable'
name: my-cluster
or via kubectl for existing shoot cluster:
kubectl label shoot my-cluster alpha.featuregates.shoot.gardener.cloud/apiserver-sni-pod-injector=disable
Note: Please be aware that it’s not possible to disable injection on a cluster level and enable it for individual pods in it.
4.8.6 - NodeLocalDNS Configuration
NodeLocalDNS Configuration
This is a short guide describing how to enable DNS caching on the shoot cluster nodes.
Background
Currently in Gardener we are using CoreDNS as a deployment that is auto-scaled horizontally to cover for QPS-intensive applications. However, doing so does not seem to be enough to completely circumvent DNS bottlenecks such as:
- Cloud provider limits for DNS lookups.
- Unreliable UDP connections that forces a period of timeout in case packets are dropped.
- Unnecessary node hopping since CoreDNS is not deployed on all nodes, and as a result DNS queries end-up traversing multiple nodes before reaching the destination server.
- Inefficient load-balancing of services (e.g., round-robin might not be enough when using IPTables mode)
- and more …
To workaround the issues described above, node-local-dns was introduced. The architecture is described below. The idea is simple:
- For new queries, the connection is upgraded from UDP to TCP and forwarded towards the cluster IP for the original CoreDNS server.
- For previously resolved queries, an immediate response from the same node where the requester workload / pod resides is provided.
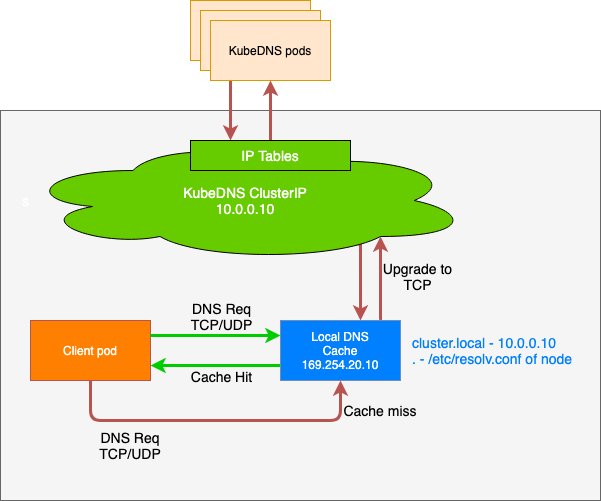
Configuring NodeLocalDNS
All that needs to be done to enable the usage of the node-local-dns feature is to set the corresponding option (spec.systemComponents.nodeLocalDNS.enabled) in the Shoot resource to true:
...
spec:
...
systemComponents:
nodeLocalDNS:
enabled: true
...
It is worth noting that:
- When migrating from IPVS to IPTables, existing pods will continue to leverage the node-local-dns cache.
- When migrating from IPtables to IPVS, only newer pods will be switched to the node-local-dns cache.
- During the reconfiguration of the node-local-dns there might be a short disruption in terms of domain name resolution depending on the setup. Usually, DNS requests are repeated for some time as UDP is an unreliable protocol, but that strictly depends on the application/way the domain name resolution happens. It is recommended to let the shoot be reconciled during the next maintenance period.
- Enabling or disabling node-local-dns triggers a rollout of all shoot worker nodes, see also this document.
For more information about node-local-dns, please refer to the KEP or to the usage documentation.
Known Issues
Custom DNS configuration may not work as expected in conjunction with NodeLocalDNS.
Please refer to Custom DNS Configuration.
4.8.7 - Shoot Networking Configurations
Shoot Networking Configurations
This document contains network related information for Shoot clusters.
Pod Network
A Pod network is imperative for any kind of cluster communication with Pods not started within the Node’s host network. More information about the Kubernetes network model can be found in the Cluster Networking topic.
Gardener allows users to configure the Pod network’s CIDR during Shoot creation:
apiVersion: core.gardener.cloud/v1beta1
kind: Shoot
spec:
networking:
type: <some-network-extension-name> # {calico,cilium}
pods: 100.96.0.0/16
nodes: ...
services: ...
⚠️ The
networking.podsIP configuration is immutable and cannot be changed afterwards. Please consider the following paragraph to choose a configuration which will meet your demands.
One of the network plugin’s (CNI) tasks is to assign IP addresses to Pods started in the Pod network. Different network plugins come with different IP address management (IPAM) features, so we can’t give any definite advice how IP ranges should be configured. Nevertheless, we want to outline the standard configuration.
Information in .spec.networking.pods matches the –cluster-cidr flag of the Kube-Controller-Manager of your Shoot cluster.
This IP range is divided into smaller subnets, also called podCIDRs (default mask /24) and assigned to Node objects .spec.podCIDR.
Pods get their IP address from this smaller node subnet in a default IPAM setup.
Thus, it must be guaranteed that enough of these subnets can be created for the maximum amount of nodes you expect in the cluster.
Example 1
Pod network: 100.96.0.0/16
nodeCIDRMaskSize: /24
-------------------------
Number of podCIDRs: 256 --> max. Node count
Number of IPs per podCIDRs: 256
With the configuration above a Shoot cluster can at most have 256 nodes which are ready to run workload in the Pod network.
Example 2
Pod network: 100.96.0.0/20
nodeCIDRMaskSize: /24
-------------------------
Number of podCIDRs: 16 --> max. Node count
Number of IPs per podCIDRs: 256
With the configuration above a Shoot cluster can at most have 16 nodes which are ready to run workload in the Pod network.
Beside the configuration in .spec.networking.pods, users can tune the nodeCIDRMaskSize used by Kube-Controller-Manager on shoot creation.
A smaller IP range per node means more podCIDRs and thus the ability to provision more nodes in the cluster, but less available IPs for Pods running on each of the nodes.
apiVersion: core.gardener.cloud/v1beta1
kind: Shoot
spec:
kubernetes:
kubeControllerManager:
nodeCIDRMaskSize: 24 # (default)
⚠️ The
nodeCIDRMaskSizeconfiguration is immutable and cannot be changed afterwards.
Example 3
Pod network: 100.96.0.0/20
nodeCIDRMaskSize: /25
-------------------------
Number of podCIDRs: 32 --> max. Node count
Number of IPs per podCIDRs: 128
With the configuration above, a Shoot cluster can at most have 32 nodes which are ready to run workload in the Pod network.
Reserved Networks
Some network ranges are reserved for specific use-cases in the communication between seeds and shoots.
| IPv | CIDR | Name | Purpose |
|---|---|---|---|
| IPv6 | fd8f:6d53:b97a:1::/96 | Default VPN Range | |
| IPv4 | 240.0.0.0/8 | Kube-ApiServer Mapping Range | Used for the kubernetes.default.svc.cluster.local service in a shoot |
| IPv4 | 241.0.0.0/8 | Seed Pod Mapping Range | Used for allowing overlapping IPv4 networks between shoot and seed. Requires non-HA control plane. Only used within the vpn pods |
| IPv4 | 242.0.0.0/8 | Shoot Node Mapping Range | Used for allowing overlapping IPv4 networks between shoot and seed. Requires non-HA control plane. Only used within the vpn pods |
| IPv4 | 243.0.0.0/8 | Shoot Service Mapping Range | Used for allowing overlapping IPv4 networks between shoot and seed. Requires non-HA control plane. Only used within the vpn pods |
| IPv4 | 244.0.0.0/8 | Shoot Pod Mapping Range | Used for allowing overlapping IPv4 networks between shoot and seed. Requires non-HA control plane. Only used within the vpn pods |
⚠️ Do not use any of the CIDR ranges mentioned above for any of the node, pod or service networks. Gardener will prevent their creation. Pre-existing shoots using reserved ranges will still work, though it is recommended to recreate them with compatible network ranges.
Overlapping IPv4 Networks between Seed and Shoot
By default, the seed and shoot clusters must have non-overlapping IPv4 network ranges and gardener will enforce disjunct ranges. However, under certain conditions it is possible to allow overlapping IPv4 network ranges:
- The shoot cluster must have a non-highly-available VPN, usually implicitly selected by having a non-highly-available control plane.
- The shoot cluster need be either single-stack IPv4 or dual-stack IPv4/IPv6.
- The shoot cluster networks don’t use the reserved ranges mentioned above.
Note: single-stack IPv6 shoots are usually not affected due to the vastly larger address space. However, Gardener still enforces the non-overlapping condition for IPv6 networks to avoid any potential issues.
If all conditions are met, the seed and shoot clusters can have overlapping (IPv4) network ranges. The potentially overlapping ranges are mapped to the reserved ranges mentioned above within the VPN network, i.e., double network address translation (NAT) is used .
4.9 - Monitoring
Monitoring
Roles of the different Prometheus instances
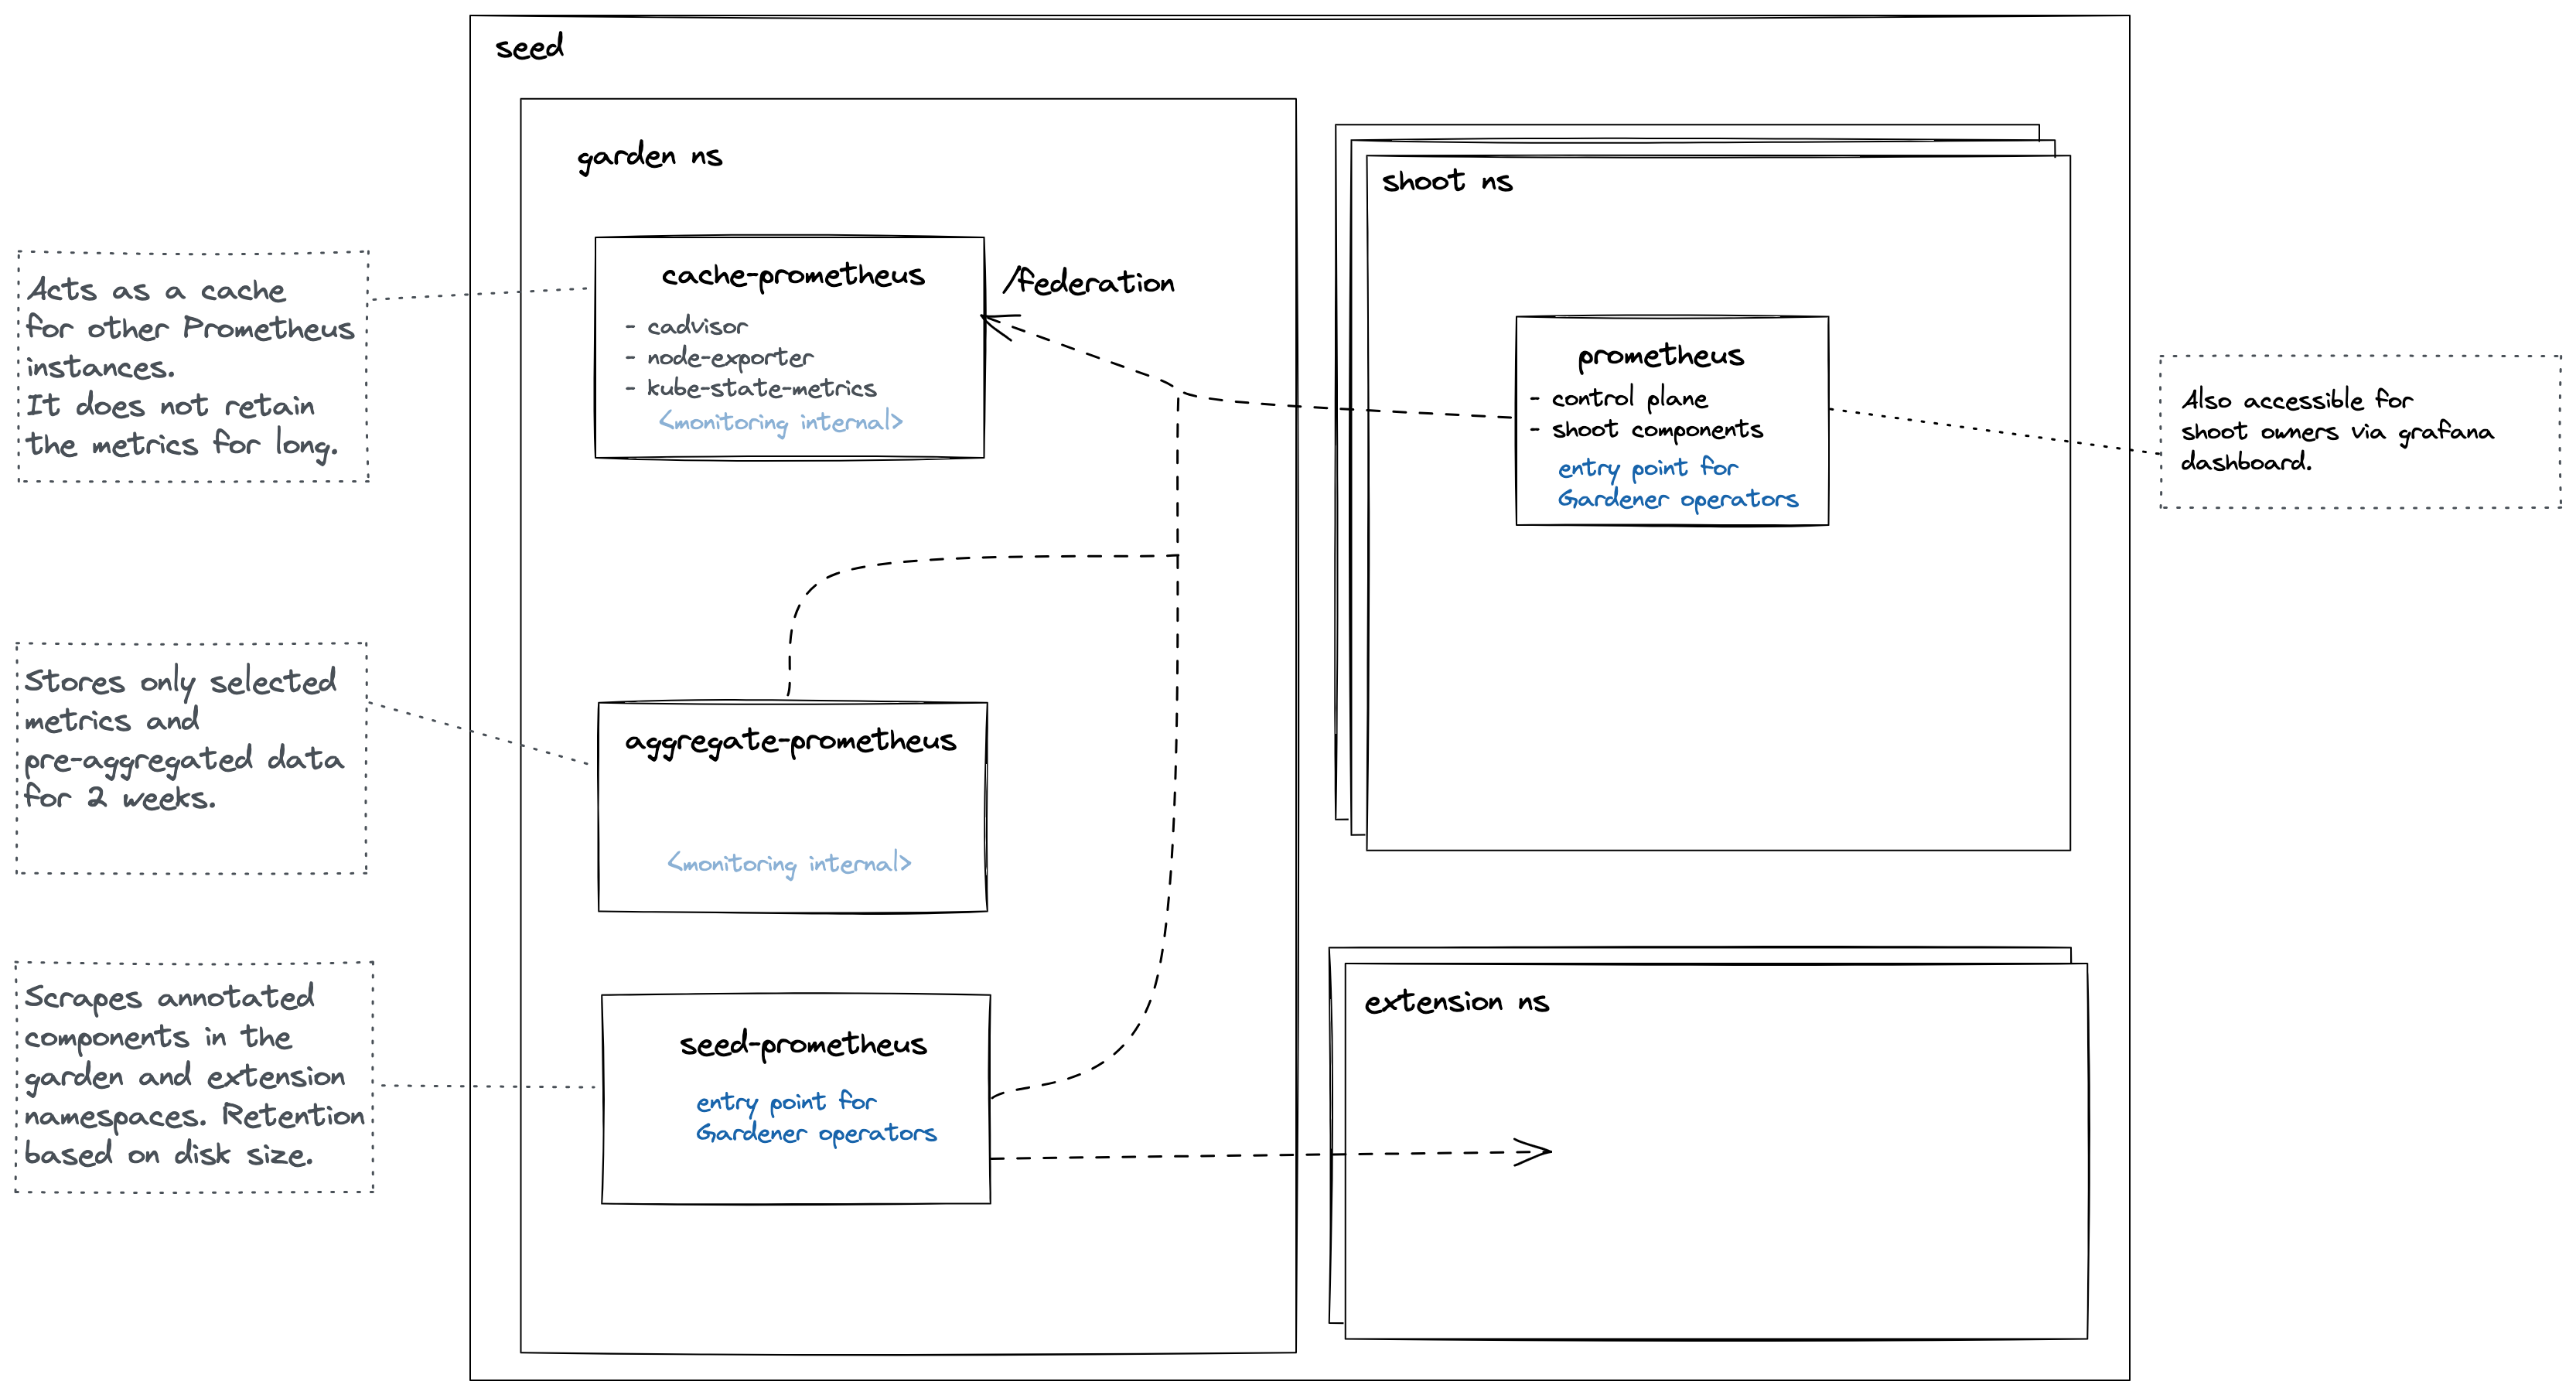
Cache Prometheus
Deployed in the garden namespace. Important scrape targets:
- cadvisor
- node-exporter
- kube-state-metrics
Purpose: Act as a reverse proxy that supports server-side filtering, which is not supported by Prometheus exporters but by federation. Metrics in this Prometheus are kept for a short amount of time (~1 day) since other Prometheus instances are expected to federate from it and move metrics over. For example, the shoot Prometheus queries this Prometheus to retrieve metrics corresponding to the shoot’s control plane. This way, we achieve isolation so that shoot owners are only able to query metrics for their shoots. Please note Prometheus does not support isolation features. Another example is if another Prometheus needs access to cadvisor metrics, which does not support server-side filtering, so it will query this Prometheus instead of the cadvisor. This strategy also reduces load on the kubelets and API Server.
Note some of these Prometheus’ metrics have high cardinality (e.g., metrics related to all shoots managed by the seed). Some of these are aggregated with recording rules. These pre-aggregated metrics are scraped by the aggregate Prometheus.
This Prometheus is not used for alerting.
Aggregate Prometheus
Deployed in the garden namespace. Important scrape targets:
- other Prometheus instances
- logging components
Purpose: Store pre-aggregated data from the cache Prometheus and shoot Prometheus. An ingress exposes this Prometheus allowing it to be scraped from another cluster. Such pre-aggregated data is also used for alerting.
Seed Prometheus
Deployed in the garden namespace. Important scrape targets:
- pods in extension namespaces annotated with:
prometheus.io/scrape=true
prometheus.io/port=<port>
prometheus.io/name=<name>
- cadvisor metrics from pods in the garden and extension namespaces
The job name label will be applied to all metrics from that service.
Purpose: Entrypoint for operators when debugging issues with extensions or other garden components.
This Prometheus is not used for alerting.
Shoot Prometheus
Deployed in the shoot control plane namespace. Important scrape targets:
- control plane components
- shoot nodes (node-exporter)
- blackbox-exporter used to measure connectivity
Purpose: Monitor all relevant components belonging to a shoot cluster managed by Gardener. Shoot owners can view the metrics in Plutono dashboards and receive alerts based on these metrics. For alerting internals refer to this document.
Federate from the Shoot Prometheus to an External Prometheus
Shoot owners that are interested in collecting metrics for their shoot’s control-planes can do so by federating from their shoot Prometheus instances. This allows shoot owners to selectively pull metrics from the shoot Prometheus into their own Prometheus instance. Collecting shoot’s control-plane metrics by directly scraping control-plane resources will not work because such resources are managed by Gardener and are either not accessible to shoot owners or are behind a load balancer.
Note Gardener is working on an OpenTelemetry-based approach for observability, but there is no official timeline for its release yet.
Step 1: Retrieve Prometheus Credentials and URL
Gardener provides access to the shoot control plane Prometheus instance through a monitoring secret stored in the virtual garden cluster. The necessary credentials can be found in the dashboard or by following these steps:
Target the shoot’s project using
gardenctl:gardenctl target --garden <garden-name> --project <project-name>Retrieve the shoot’s monitoring secret:
kubectl get secret <shoot-name>.monitoring -o yamlExtract the Prometheus URL from the secret’s annotations:
metadata.annotations.prometheus-urlExtract the credentials from the secret’s data fields:
echo "$(kubectl get secret <shoot-name>.monitoring -o jsonpath='{.data.username}' | base64 --decode)" echo "$(kubectl get secret <shoot-name>.monitoring -o jsonpath='{.data.password}' | base64 --decode)"
Step 2: Configure Federation in Your Prometheus
Once the Prometheus URL, username, and password are obtained, federation can be configured in the external Prometheus instance.
Edit the external Prometheus configuration to add a federation job:
scrape_configs: - job_name: 'gardener-federation' honor_labels: true metrics_path: '/federate' params: 'match[]': - '{job="kube-apiserver"}' scheme: https basic_auth: username: '<prometheus-username>' password: '<prometheus-password>' static_configs: - targets: - '<prometheus-url>'Replace
<prometheus-username>,<prometheus-password>, and<prometheus-url>with the values obtained earlier. In this example, the federation job is configured to federate metrics scraped by thekube-apiserverjob, butmatch[]entry should be adjusted to the specific use-case.Restart Prometheus to apply the configuration.
Collect all shoot Prometheus with remote write
An optional collection of all shoot Prometheus metrics to a central Prometheus (or cortex) instance is possible with the monitoring.shoot setting in GardenletConfiguration:
monitoring:
shoot:
remoteWrite:
url: https://remoteWriteUrl # remote write URL
keep:# metrics that should be forwarded to the external write endpoint. If empty all metrics get forwarded
- kube_pod_container_info
externalLabels: # add additional labels to metrics to identify it on the central instance
additional: label
If basic auth is needed it can be set via secret in garden namespace (Gardener API Server). Example secret
Disable Gardener Monitoring
If you wish to disable metric collection for every shoot and roll your own then you can simply set.
monitoring:
shoot:
enabled: false
4.9.1 - Alerting
Alerting
Gardener uses Prometheus to gather metrics from each component. A Prometheus is deployed in each shoot control plane (on the seed) which is responsible for gathering control plane and cluster metrics. Prometheus can be configured to fire alerts based on these metrics and send them to an Alertmanager. The Alertmanager is responsible for sending the alerts to users and operators. This document describes how to setup alerting for:
Alerting for Users
To receive email alerts as a user, set the following values in the shoot spec:
spec:
monitoring:
alerting:
emailReceivers:
- john.doe@example.com
emailReceivers is a list of emails that will receive alerts if something is wrong with the shoot cluster.
Alerting for Operators
Currently, Gardener supports two options for alerting:
Email Alerting
Gardener provides the option to deploy an Alertmanager into each seed. This Alertmanager is responsible for sending out alerts to operators for each shoot cluster in the seed. Only email alerts are supported by the Alertmanager managed by Gardener. This is configurable by setting the Gardener controller manager configuration values alerting. See Gardener Configuration and Usage on how to configure the Gardener’s SMTP secret. If the values are set, a secret with the label gardener.cloud/role: alerting will be created in the garden namespace of the garden cluster. This secret will be used by each Alertmanager in each seed.
External Alertmanager
The Alertmanager supports different kinds of alerting configurations. The Alertmanager provided by Gardener only supports email alerts. If email is not sufficient, then alerts can be sent to an external Alertmanager. Prometheus will send alerts to a URL and then alerts will be handled by the external Alertmanager. This external Alertmanager is operated and configured by the operator (i.e. Gardener does not configure or deploy this Alertmanager). To configure sending alerts to an external Alertmanager, create a secret in the virtual garden cluster in the garden namespace with the label: gardener.cloud/role: alerting. This secret needs to contain a URL to the external Alertmanager and information regarding authentication. Supported authentication types are:
- No Authentication (none)
- Basic Authentication (basic)
- Mutual TLS (certificate)
Remote Alertmanager Examples
Note: The
urlvalue cannot be prepended withhttporhttps.
# No Authentication
apiVersion: v1
kind: Secret
metadata:
labels:
gardener.cloud/role: alerting
name: alerting-auth
namespace: garden
data:
# No Authentication
auth_type: base64(none)
url: base64(external.alertmanager.foo)
# Basic Auth
auth_type: base64(basic)
url: base64(external.alertmanager.foo)
username: base64(admin)
password: base64(password)
# Mutual TLS
auth_type: base64(certificate)
url: base64(external.alertmanager.foo)
ca.crt: base64(ca)
tls.crt: base64(certificate)
tls.key: base64(key)
insecure_skip_verify: base64(false)
# Email Alerts (internal alertmanager)
auth_type: base64(smtp)
auth_identity: base64(internal.alertmanager.auth_identity)
auth_password: base64(internal.alertmanager.auth_password)
auth_username: base64(internal.alertmanager.auth_username)
from: base64(internal.alertmanager.from)
smarthost: base64(internal.alertmanager.smarthost)
to: base64(internal.alertmanager.to)
type: Opaque
Configuring Your External Alertmanager
Please refer to the Alertmanager documentation on how to configure an Alertmanager.
We recommend you use at least the following inhibition rules in your Alertmanager configuration to prevent excessive alerts:
inhibit_rules:
# Apply inhibition if the alert name is the same.
- source_match:
severity: critical
target_match:
severity: warning
equal: ['alertname', 'service', 'cluster']
# Stop all alerts for type=shoot if there are VPN problems.
- source_match:
service: vpn
target_match_re:
type: shoot
equal: ['type', 'cluster']
# Stop warning and critical alerts if there is a blocker
- source_match:
severity: blocker
target_match_re:
severity: ^(critical|warning)$
equal: ['cluster']
# If the API server is down inhibit no worker nodes alert. No worker nodes depends on kube-state-metrics which depends on the API server.
- source_match:
service: kube-apiserver
target_match_re:
service: nodes
equal: ['cluster']
# If API server is down inhibit kube-state-metrics alerts.
- source_match:
service: kube-apiserver
target_match_re:
severity: info
equal: ['cluster']
# No Worker nodes depends on kube-state-metrics. Inhibit no worker nodes if kube-state-metrics is down.
- source_match:
service: kube-state-metrics-shoot
target_match_re:
service: nodes
equal: ['cluster']
Below is a graph visualizing the inhibition rules:

4.9.2 - Connectivity
Connectivity
Shoot Connectivity
We measure the connectivity from the shoot to the API Server. This is done via the blackbox exporter which is deployed in the shoot’s kube-system namespace. Prometheus will scrape the blackbox exporter and then the exporter will try to access the API Server. Metrics are exposed if the connection was successful or not. This can be seen in the Kubernetes Control Plane Status dashboard under the API Server Connectivity panel. The shoot line represents the connectivity from the shoot.
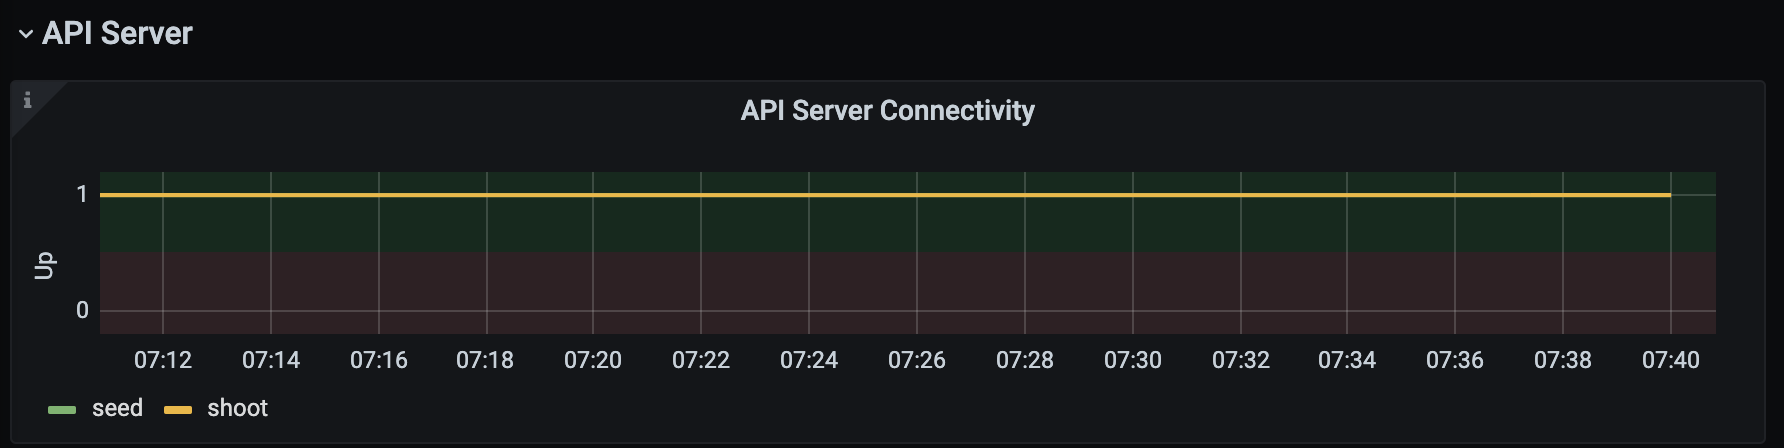
Seed Connectivity
In addition to the shoot connectivity, we also measure the seed connectivity. This means trying to reach the API Server from the seed via the external fully qualified domain name of the API server. The connectivity is also displayed in the above panel as the seed line. Both seed and shoot connectivity are shown below.
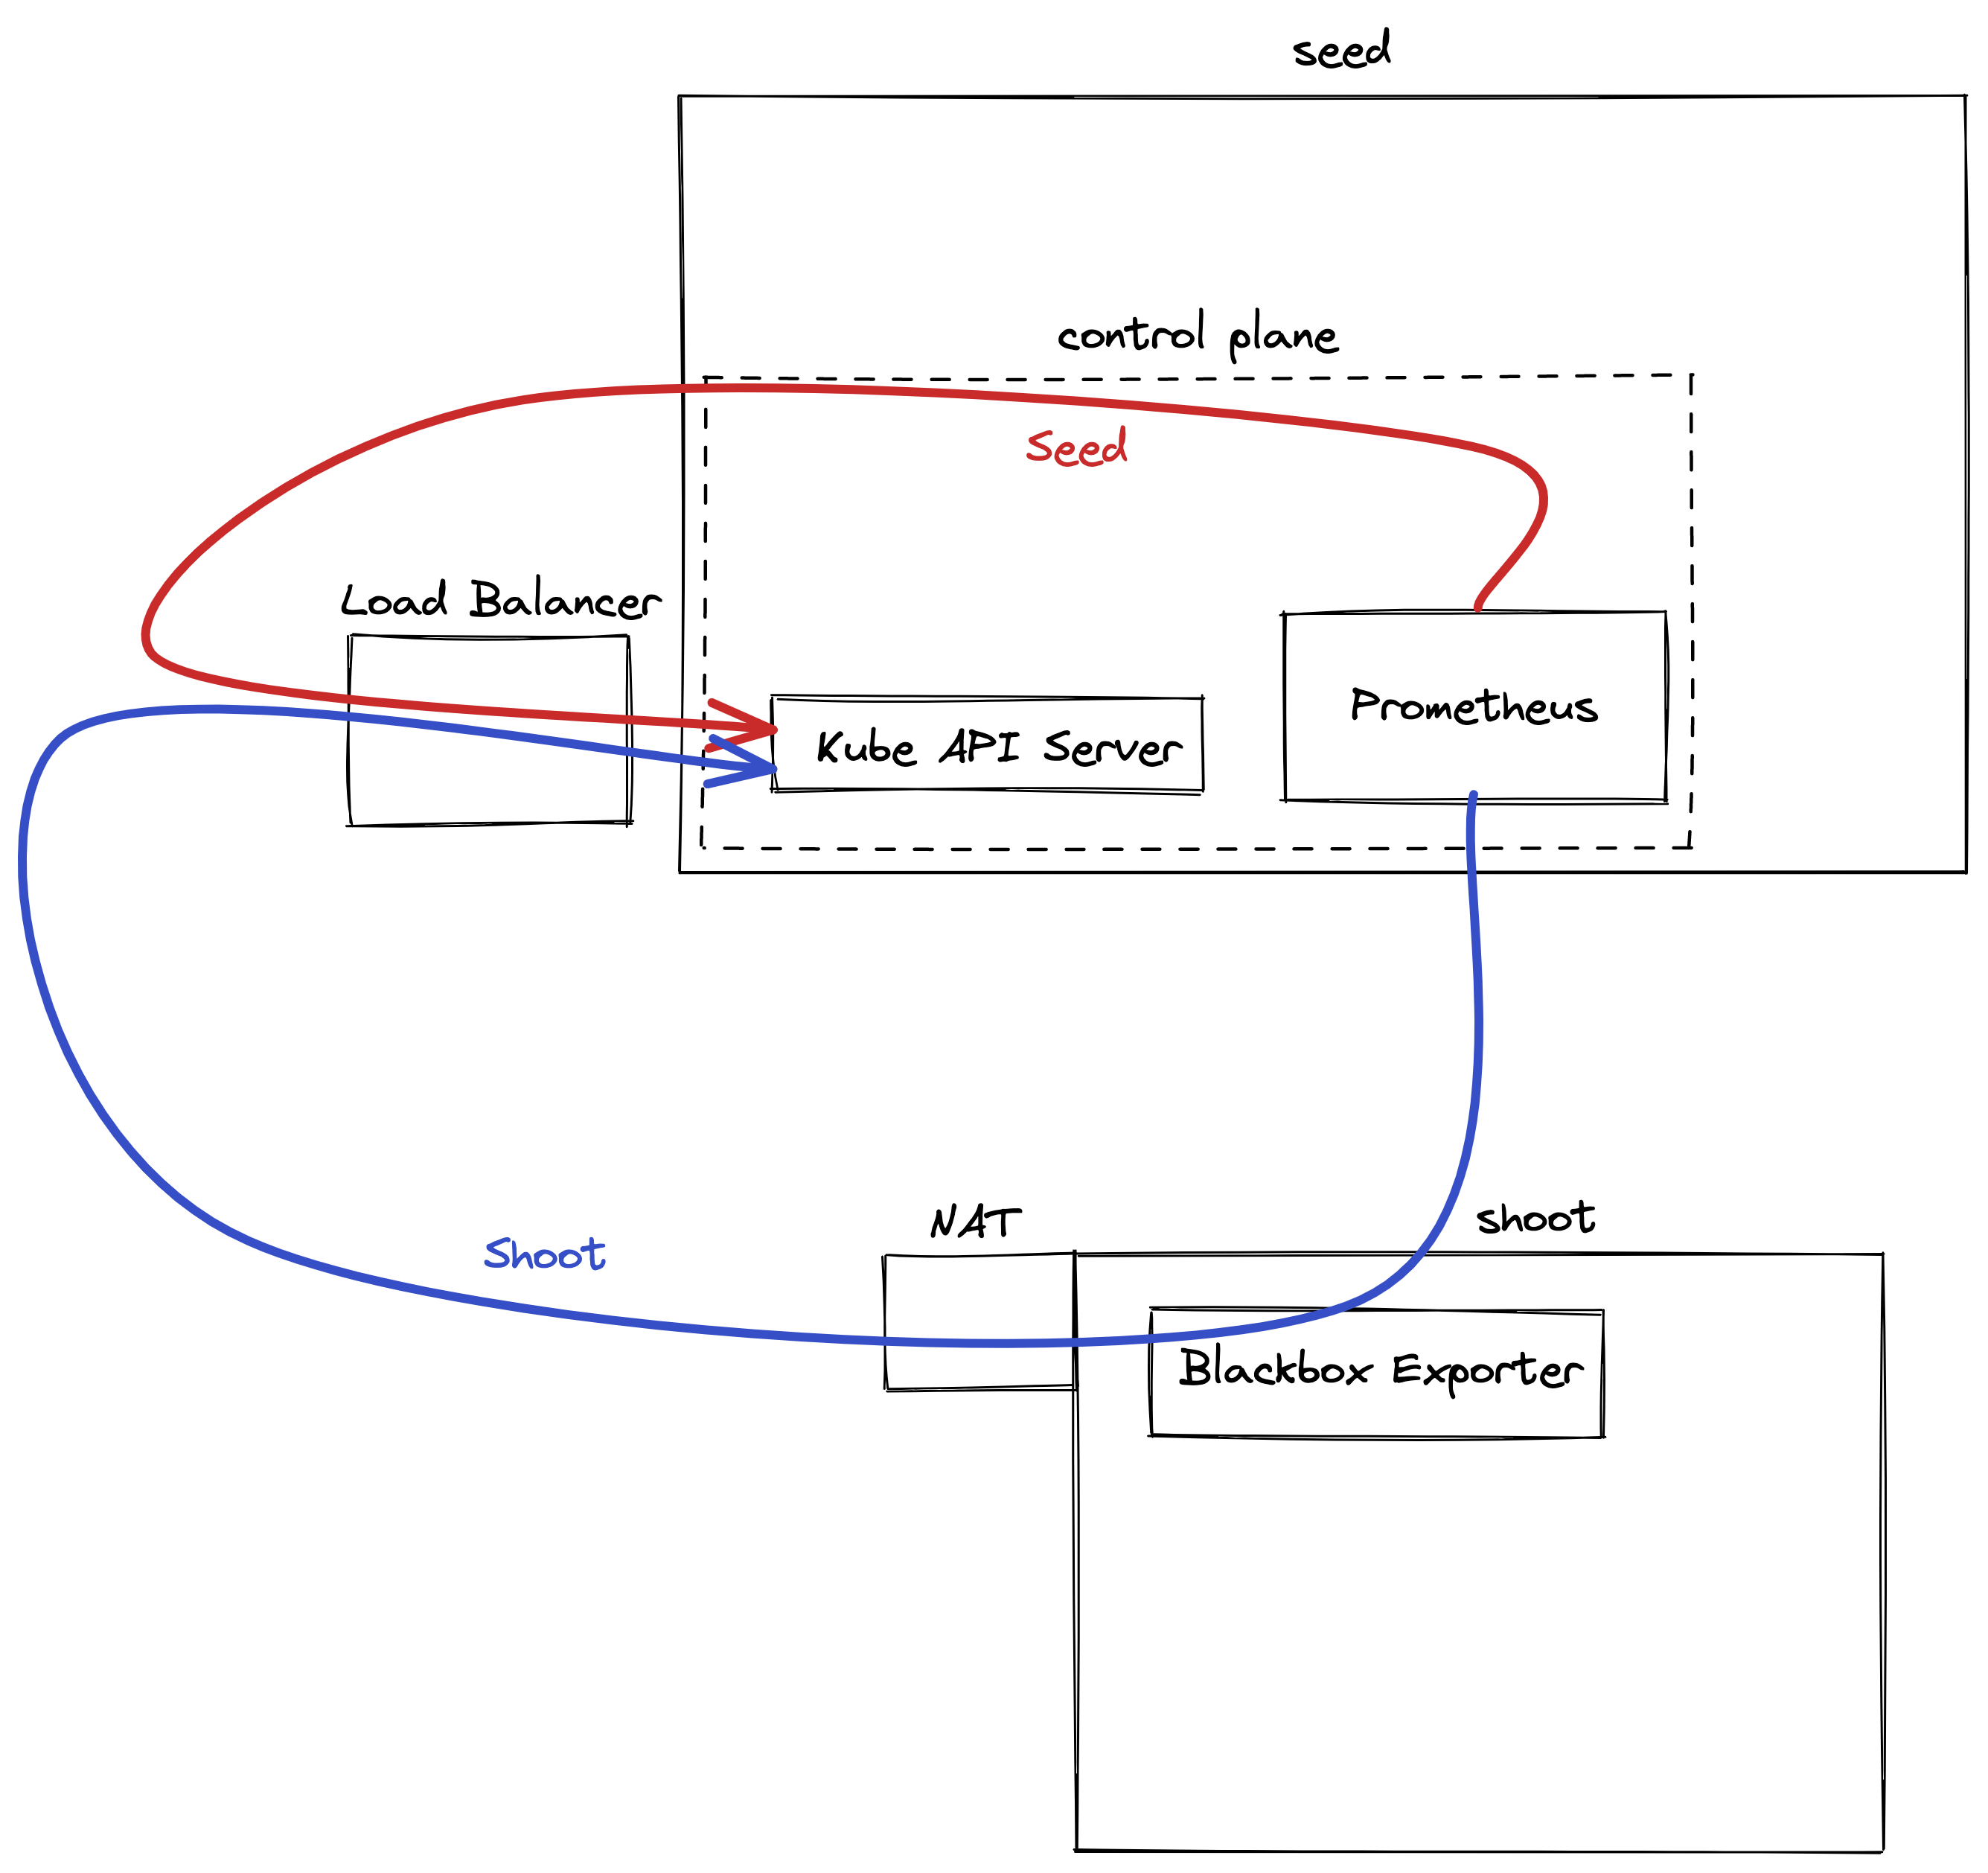
4.9.3 - Profiling
Profiling Gardener Components
Similar to Kubernetes, Gardener components support profiling using standard Go tools for analyzing CPU and memory usage by different code sections and more. This document shows how to enable and use profiling handlers with Gardener components.
Enabling profiling handlers and the ports on which they are exposed differs between components.
However, once the handlers are enabled, they provide profiles via the same HTTP endpoint paths, from which you can retrieve them via curl/wget or directly using go tool pprof.
(You might need to use kubectl port-forward in order to access HTTP endpoints of Gardener components running in clusters.)
For example (gardener-controller-manager):
$ curl http://localhost:2718/debug/pprof/heap > /tmp/heap-controller-manager
$ go tool pprof /tmp/heap-controller-manager
Type: inuse_space
Time: Sep 3, 2021 at 10:05am (CEST)
Entering interactive mode (type "help" for commands, "o" for options)
(pprof)
or
$ go tool pprof http://localhost:2718/debug/pprof/heap
Fetching profile over HTTP from http://localhost:2718/debug/pprof/heap
Saved profile in /Users/timebertt/pprof/pprof.alloc_objects.alloc_space.inuse_objects.inuse_space.008.pb.gz
Type: inuse_space
Time: Sep 3, 2021 at 10:05am (CEST)
Entering interactive mode (type "help" for commands, "o" for options)
(pprof)
gardener-apiserver
gardener-apiserver provides the same flags as kube-apiserver for enabling profiling handlers (enabled by default):
--contention-profiling Enable lock contention profiling, if profiling is enabled
--profiling Enable profiling via web interface host:port/debug/pprof/ (default true)
The handlers are served on the same port as the API endpoints (configured via --secure-port).
This means that you will also have to authenticate against the API server according to the configured authentication and authorization policy.
gardener-{admission-controller,controller-manager,scheduler,resource-manager}, gardenlet
gardener-controller-manager, gardener-admission-controller, gardener-scheduler, gardener-resource-manager and gardenlet also allow enabling profiling handlers via their respective component configs (currently disabled by default).
Here is an example for the gardener-admission-controller’s configuration and how to enable it (it looks similar for the other components):
apiVersion: admissioncontroller.config.gardener.cloud/v1alpha1
kind: AdmissionControllerConfiguration
# ...
server:
metrics:
port: 2723
debugging:
enableProfiling: true
enableContentionProfiling: true
However, the handlers are served on the same port as configured in server.metrics.port via HTTP.
For example (gardener-admission-controller):
$ curl http://localhost:2723/debug/pprof/heap > /tmp/heap
$ go tool pprof /tmp/heap
4.10 - Observability
4.10.1 - Logging
Logging Stack
Motivation
Kubernetes uses the underlying container runtime logging, which does not persist logs for stopped and destroyed containers. This makes it difficult to investigate issues in the very common case of not running containers. Gardener provides a solution to this problem for the managed cluster components by introducing its own logging stack.
Components
- A Fluent-bit daemonset which works like a log collector and custom Golang plugin which spreads log messages to their Vali instances.
- One Vali Statefulset in the
gardennamespace which contains logs for the seed cluster and one per shoot namespace which contains logs for shoot’s controlplane. - One Plutono Deployment in
gardennamespace and two Deployments per shoot namespace (one exposed to the end users and one for the operators). Plutono is the UI component used in the logging stack.
Container Logs Rotation and Retention in kubelet
It is possible to configure the containerLogMaxSize and containerLogMaxFiles fields in the Shoot specification. Both fields are optional and if nothing is specified, then the kubelet rotates on the size 100M. Those fields are part of provider’s workers definition. Here is an example:
spec:
provider:
workers:
- cri:
name: containerd
kubernetes:
kubelet:
# accepted values are of resource.Quantity
containerLogMaxSize: 150Mi
containerLogMaxFiles: 10
The values of the containerLogMaxSize and containerLogMaxFiles fields need to be considered with care since container log files claim disk space from the host. On the opposite side, log rotations on too small sizes may result in frequent rotations which can be missed by other components (log shippers) observing these rotations.
In the majority of the cases, the defaults should do just fine. Custom configuration might be of use under rare conditions.
Logs Retention in Vali
Logs in Vali are preserved for a maximum of 14 days. Note that the retention period is also restricted to the Vali’s persistent volume size and in some cases, it can be less than 14 days. The oldest logs are deleted when a configured threshold of free disk space is crossed.
Extension of the Logging Stack
The logging stack is extended to scrape logs from the systemd services of each shoots’ nodes and from all Gardener components in the shoot kube-system namespace. These logs are exposed only to the Gardener operators.
Also, in the shoot control plane an event-logger pod is deployed, which scrapes events from the shoot kube-system namespace and shoot control-plane namespace in the seed. The event-logger logs the events to the standard output. Then the fluent-bit gets these events as container logs and sends them to the Vali in the shoot control plane (similar to how it works for any other control plane component).
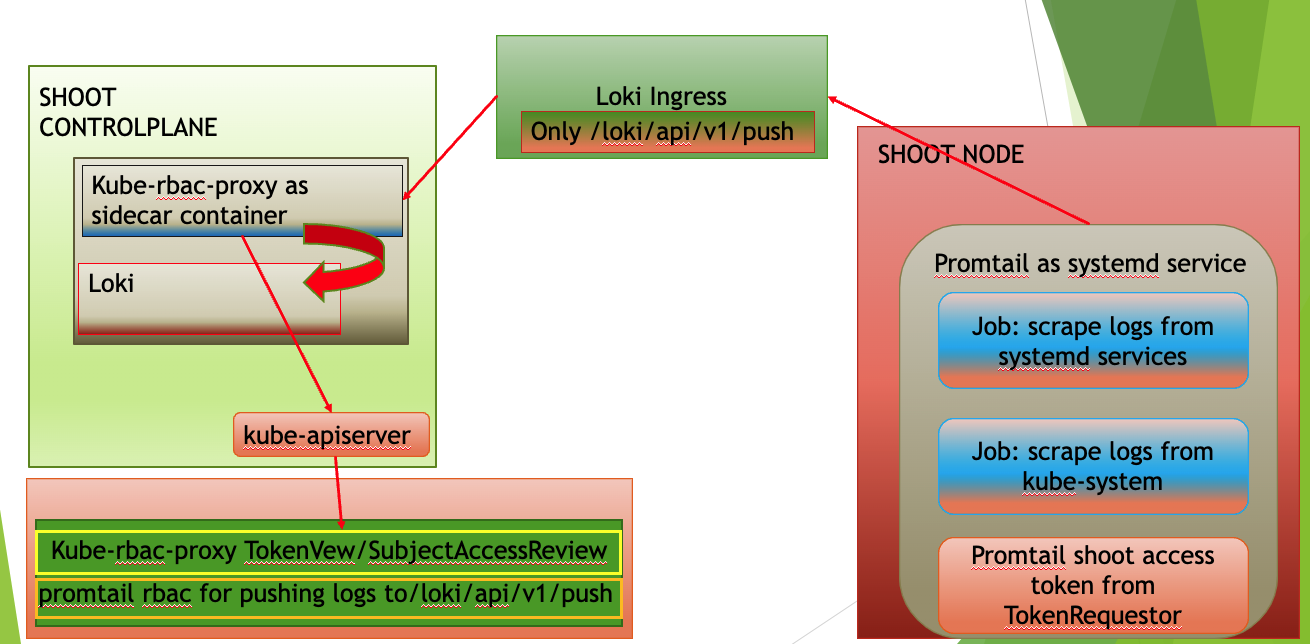
How to Access the Logs
The logs are accessible via Plutono. To access them:
Authenticate via basic auth to gain access to Plutono.
The secret containing the credentials is stored in the project namespace following the naming pattern<shoot-name>.monitoring. In this secret you can also find the Plutono URL in theplutono-urlannotation. For Gardener operators, the credentials are also stored in the control-plane (shoot--<project-name>--<shoot-name>) namespace in theobservability-ingress-users-<hash>secret in the seed.Plutono contains several dashboards that aim to facilitate the work of operators and users. From the
Exploretab, users and operators have unlimited abilities to extract and manipulate logs.
Note: Gardener Operators are people part of the Gardener team with operator permissions, not operators of the end-user cluster!
How to Use the Explore Tab
If you click on the Log browser > button, you will see all of the available labels.
Clicking on the label, you can see all of its available values for the given period of time you have specified.
If you are searching for logs for the past one hour, do not expect to see labels or values for which there were no logs for that period of time.
By clicking on a value, Plutono automatically eliminates all other labels and/or values with which no valid log stream can be made.
After choosing the right labels and their values, click on the Show logs button.
This will build Log query and execute it.
This approach is convenient when you don’t know the labels names or they values.
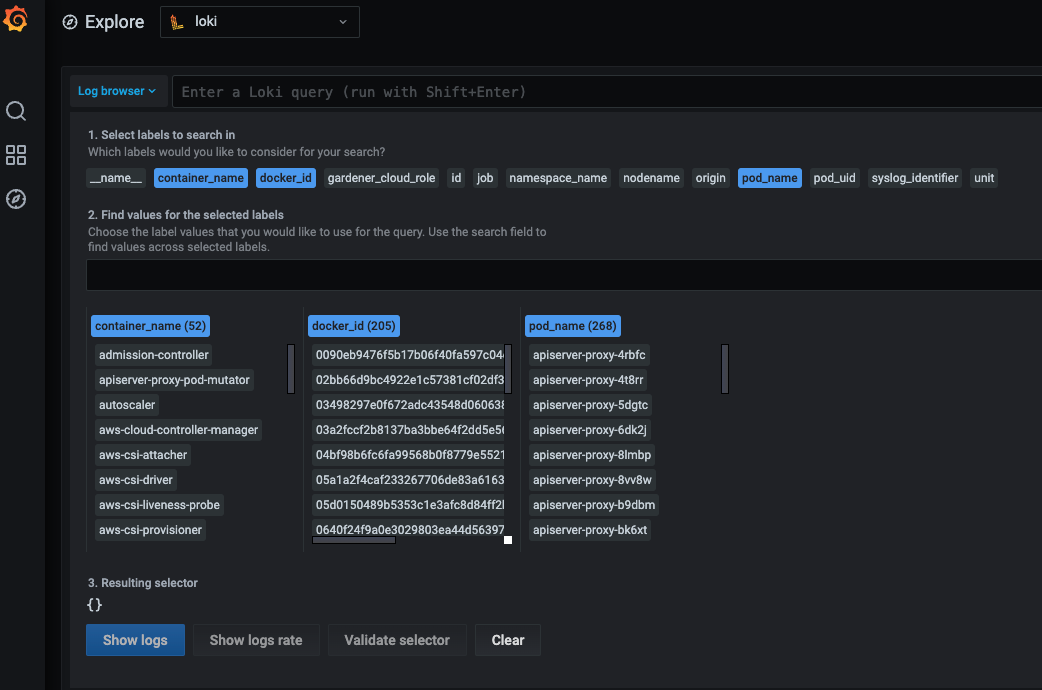
Once you feel comfortable, you can start to use the LogQL language to search for logs.
Next to the Log browser > button is the place where you can type log queries.
Examples:
If you want to get logs for
calico-node-<hash>pod in the clusterkube-system: The name of the node on whichcalico-nodewas running is known, but not the hash suffix of thecalico-nodepod. Also we want to search for errors in the logs.{pod_name=~"calico-node-.+", nodename="ip-10-222-31-182.eu-central-1.compute.internal"} |~ "error"Here, you will get as much help as possible from the Plutono by giving you suggestions and auto-completion.
If you want to get the logs from
kubeletsystemd service of a given node and search for a pod name in the logs:{unit="kubelet.service", nodename="ip-10-222-31-182.eu-central-1.compute.internal"} |~ "pod name"
Note: Under
unitlabel there is only thedocker,containerd,kubeletandkernellogs.
If you want to get the logs from
gardener-node-agentsystemd service of a given node and search for a string in the logs:{job="systemd-combine-journal",nodename="ip-10-222-31-182.eu-central-1.compute.internal"} | unpack | unit="gardener-node-agent.service"
Note:
{job="systemd-combine-journal",nodename="<node name>"}stream pack all logs from systemd services exceptdocker,containerd,kubelet, andkernel. To filter those log by unit, you have to unpack them first.
- Retrieving events:
If you want to get the events from the shoot
kube-systemnamespace generated bykubeletand related to thenode-problem-detector:{job="event-logging"} | unpack | origin_extracted="shoot",source="kubelet",object=~".*node-problem-detector.*"If you want to get the events generated by MCM in the shoot control plane in the seed:
{job="event-logging"} | unpack | origin_extracted="seed",source=~".*machine-controller-manager.*"Note: In order to group events by origin, one has to specify
origin_extractedbecause theoriginlabel is reserved for all of the logs from the seed and theevent-loggerresides in the seed, so all of its logs are coming as they are only from the seed. The actual origin is embedded in the unpacked event. When unpacked, the embeddedoriginbecomesorigin_extracted.
4.11 - Project
4.11.1 - NamespacedCloudProfiles
NamespacedCloudProfiles
NamespacedCloudProfiles are resources in Gardener that allow project-level customization of CloudProfiles.
They enable project administrators to create and manage cloud profiles specific to their projects and reduce the operational burden on central Gardener operators.
As opposed to CloudProfiles, NamespacedCloudProfiles are namespaced and thus limit configuration options for Shoots, such as special machine types, to the associated project only.
These profiles inherit from a parent CloudProfile and can override or extend certain fields while maintaining backward compatibility.
Project viewers have the permission to see NamespacedCloudProfiles associated with a particular project.
Project administrators can generally create, edit, or delete NamespacedCloudProfiles but with some exceptions (see the restrictions outlined below).
When creating or updating a Shoot, the cloud profile reference can be set to point to a NamespacedCloudProfile, allowing for more granular and project-specific configurations.
The modification of a Shoot’s cloud profile reference is restricted to switching within the same profile hierarchy, i.e. from a CloudProfile to a descendant NamespacedCloudProfile, from a NamespacedCloudProfile to its parent CloudProfile and between NamespacedCloudProfiles having the same CloudProfile parent.
Changing the reference from one CloudProfile or descendant NamespacedCloudProfile to another CloudProfile or descendant NamespacedCloudProfile is not allowed.
The usage of NamespacedCloudProfiles is currently subject to a beta feature gate and is enabled by default.
It requires the enabled provider extensions to support the feature as well.
The feature gate can be disabled by passing the --feature-gates=NamespacedCloudProfiles=false flag to the Gardener API server.
Please see this example manifest and GEP-25 for additional information.
Field Modification Restrictions
In order to make changes to specific fields in the NamespacedCloudProfile, a user must be granted custom RBAC verbs.
Modifications of these fields need to be performed with caution and might require additional validation steps or accompanying changes.
By default, only landscape operators have the permission to change these fields, as they are usually able to judge the implications.
Changing the following fields require the corresponding custom verbs:
- For changing the
.spec.kubernetesfield, the custom verbmodify-spec-kubernetesis required. - For changing the
.spec.machineImagesfield, the custom verbmodify-spec-machineimagesis required. - For changing the
.spec.providerConfigfield, the custom verbmodify-spec-providerconfigis required. - For raising limits in
.spec.limitsfield above values in the parent CloudProfile.spec.limits, the custom verbraise-spec-limitsis required.
The assignment of these custom verbs can be achieved by creating a ClusterRole and a RoleBinding like in the following example:
---
apiVersion: rbac.authorization.k8s.io/v1
kind: ClusterRole
metadata:
name: namespacedcloudprofile-kubernetes
rules:
- apiGroups: ["core.gardener.cloud"]
resources: ["namespacedcloudprofiles"]
verbs: ["modify-spec-kubernetes"]
---
apiVersion: rbac.authorization.k8s.io/v1
kind: RoleBinding
metadata:
name: edit-kubernetes
namespace: dev
roleRef:
apiGroup: rbac.authorization.k8s.io
kind: ClusterRole
name: namespacedcloudprofile-kubernetes
subjects:
- apiGroup: rbac.authorization.k8s.io
kind: User
name: alice.doe@example.com
4.11.2 - Projects
Projects
The Gardener API server supports a cluster-scoped Project resource which is used for data isolation between individual Gardener consumers. For example, each development team has its own project to manage its own shoot clusters.
Each Project is backed by a Kubernetes Namespace that contains the actual related Kubernetes resources, like Secrets or Shoots.
Example resource:
apiVersion: core.gardener.cloud/v1beta1
kind: Project
metadata:
name: dev
spec:
namespace: garden-dev
description: "This is my first project"
purpose: "Experimenting with Gardener"
owner:
apiGroup: rbac.authorization.k8s.io
kind: User
name: john.doe@example.com
members:
- apiGroup: rbac.authorization.k8s.io
kind: User
name: alice.doe@example.com
role: admin
# roles:
# - viewer
# - uam
# - serviceaccountmanager
# - extension:foo
- apiGroup: rbac.authorization.k8s.io
kind: User
name: bob.doe@example.com
role: viewer
# tolerations:
# defaults:
# - key: <some-key>
# whitelist:
# - key: <some-key>
The .spec.namespace field is optional and is initialized if unset.
The name of the resulting namespace will be determined based on the Project name and UID, e.g., garden-dev-5aef3.
It’s also possible to adopt existing namespaces by labeling them gardener.cloud/role=project and project.gardener.cloud/name=dev beforehand (otherwise, they cannot be adopted).
When deleting a Project resource, the corresponding namespace is also deleted.
To keep a namespace after project deletion, an administrator/operator (not Project members!) can annotate the project-namespace with namespace.gardener.cloud/keep-after-project-deletion.
The spec.description and .spec.purpose fields can be used to describe to fellow team members and Gardener operators what this project is used for.
Each project has one dedicated owner, configured in .spec.owner using the rbac.authorization.k8s.io/v1.Subject type.
The owner is the main contact person for Gardener operators.
Please note that the .spec.owner field is deprecated and will be removed in future API versions in favor of the owner role, see below.
The list of members (again a list in .spec.members[] using the rbac.authorization.k8s.io/v1.Subject type) contains all the people that are associated with the project in any way.
Each project member must have at least one role (currently described in .spec.members[].role, additional roles can be added to .spec.members[].roles[]). The following roles exist:
admin: This allows to fully manage resources inside the project (e.g., secrets, shoots, configmaps, and similar). Mind that theadminrole has read only access to service accounts.serviceaccountmanager: This allows to fully manage service accounts inside the project namespace and request tokens for them. The permissions of the created service accounts are instead managed by theadminrole. Please refer to Service Account Manager.uam: This allows to add/modify/remove human users or groups to/from the project member list.viewer: This allows to read all resources inside the project except secrets.owner: This combines theadmin,uam, andserviceaccountmanagerroles.- Extension roles (prefixed with
extension:): Please refer to Extending Project Roles.
The project controller inside the Gardener Controller Manager is managing RBAC resources that grant the described privileges to the respective members.
There are three central ClusterRoles gardener.cloud:system:project-member, gardener.cloud:system:project-viewer, and gardener.cloud:system:project-serviceaccountmanager that grant the permissions for namespaced resources (e.g., Secrets, Shoots, ServiceAccounts).
Via referring RoleBindings created in the respective namespace the project members get bound to these ClusterRoles and, thus, the needed permissions.
There are also project-specific ClusterRoles granting the permissions for cluster-scoped resources, e.g., the Namespace or Project itself.
For each role, the following ClusterRoles, ClusterRoleBindings, and RoleBindings are created:
| Role | ClusterRole | ClusterRoleBinding | RoleBinding |
|---|---|---|---|
admin | gardener.cloud:system:project-member:<projectName> | gardener.cloud:system:project-member:<projectName> | gardener.cloud:system:project-member |
serviceaccountmanager | gardener.cloud:system:project-serviceaccountmanager | ||
uam | gardener.cloud:system:project-uam:<projectName> | gardener.cloud:system:project-uam:<projectName> | |
viewer | gardener.cloud:system:project-viewer:<projectName> | gardener.cloud:system:project-viewer:<projectName> | gardener.cloud:system:project-viewer |
owner | gardener.cloud:system:project:<projectName> | gardener.cloud:system:project:<projectName> | |
extension:* | gardener.cloud:extension:project:<projectName>:<extensionRoleName> | gardener.cloud:extension:project:<projectName>:<extensionRoleName> |
User Access Management
For Projects created before Gardener v1.8, all admins were allowed to manage other members.
Beginning with v1.8, the new uam role is being introduced.
It is backed by the manage-members custom RBAC verb which allows to add/modify/remove human users or groups to/from the project member list.
Human users are subjects with kind=User and name!=system:serviceaccount:*, and groups are subjects with kind=Group.
The management of service account subjects (kind=ServiceAccount or name=system:serviceaccount:*) is not controlled via the uam custom verb but with the standard update/patch verbs for projects.
All newly created projects will only bind the owner to the uam role.
The owner can still grant the uam role to other members if desired.
For projects created before Gardener v1.8, the Gardener Controller Manager will migrate all projects to also assign the uam role to all admin members (to not break existing use-cases). The corresponding migration logic is present in Gardener Controller Manager from v1.8 to v1.13.
The project owner can gradually remove these roles if desired.
Stale Projects
When a project is not actively used for some period of time, it is marked as “stale”. This is done by a controller called “Stale Projects Reconciler”. Once the project is marked as stale, there is a time frame in which if not used it will be deleted by that controller.
Four-Eyes-Principle For Resource Deletion
In order to delete a Shoot, the deletion must be confirmed upfront with the confirmation.gardener.cloud/deletion=true annotation.
Without this annotation being set, gardener-apiserver denies any DELETE request.
Still, users sometimes accidentally shot themselves in the foot, meaning that they accidentally deleted a Shoot despite the confirmation requirement.
To prevent that (or make it harder, at least), the Project can be configured to apply the dual approval concept for Shoot deletion.
This means that the subject confirming the deletion must not be the same as the subject sending the DELETE request.
Example:
spec:
dualApprovalForDeletion:
- resource: shoots
selector:
matchLabels: {}
includeServiceAccounts: true
Note
As of today,
core.gardener.cloud/v1beta1.Shootis the only resource for which this concept is implemented.
As usual, .spec.dualApprovalForDeletion[].selector.matchLabels={} matches all resources, .spec.dualApprovalForDeletion[].selector.matchLabels=null matches none at all.
It can also be decided to specify an individual label selector if this concept shall only apply to a subset of the Shoots in the project (e.g., CI/development clusters shall be excluded).
The includeServiceAccounts (default: true) controls whether the concept also applies when the Shoot deletion confirmation and actual deletion is triggered via ServiceAccounts.
This is to prevent that CI jobs have to follow this concept as well, adding additional complexity/overhead.
Alternatively, you could also use two ServiceAccounts, one for confirming the deletion, and another one for actually sending the DELETE request, if desired.
Important
Project members can still change the labels of
Shoots (or the selector itself) to circumvent the dual approval concept. This concern is intentionally excluded/ignored for now since the principle is not a “security feature” but shall just help preventing accidental deletion.
4.11.3 - Service Account Manager
Service Account Manager
Overview
With Gardener v1.47, a new role called serviceaccountmanager was introduced. This role allows to fully manage ServiceAccount’s in the project namespace and request tokens for them. This is the preferred way of managing the access to a project namespace, as it aims to replace the usage of the default ServiceAccount secrets that will no longer be generated automatically.
Actions
Once assigned the serviceaccountmanager role, a user can create/update/delete ServiceAccounts in the project namespace.
Create a Service Account
In order to create a ServiceAccount named “robot-user”, run the following kubectl command:
kubectl -n project-abc create sa robot-user
Request a Token for a Service Account
A token for the “robot-user” ServiceAccount can be requested via the TokenRequest API in several ways:
kubectl -n project-abc create token robot-user --duration=3600s
- directly calling the Kubernetes HTTP API
curl -X POST https://api.gardener/api/v1/namespaces/project-abc/serviceaccounts/robot-user/token \
-H "Authorization: Bearer <auth-token>" \
-H "Content-Type: application/json" \
-d '{
"apiVersion": "authentication.k8s.io/v1",
"kind": "TokenRequest",
"spec": {
"expirationSeconds": 3600
}
}'
Mind that the returned token is not stored within the Kubernetes cluster, will be valid for 3600 seconds, and will be invalidated if the “robot-user” ServiceAccount is deleted. Although expirationSeconds can be modified depending on the needs, the returned token’s validity will not exceed the configured service-account-max-token-expiration duration for the garden cluster. It is advised that the actual expirationTimestamp is verified so that expectations are met. This can be done by asserting the expirationTimestamp in the TokenRequestStatus or the exp claim in the token itself.
Delete a Service Account
In order to delete the ServiceAccount named “robot-user”, run the following kubectl command:
kubectl -n project-abc delete sa robot-user
This will invalidate all existing tokens for the “robot-user” ServiceAccount.
4.12 - Security
4.12.1 - Admission Configuration for the `PodSecurity` Admission Plugin
PodSecurity plugin in .spec.kubernetes.kubeAPIServer.admissionPluginsAdmission Configuration for the PodSecurity Admission Plugin
If you wish to add your custom configuration for the PodSecurity plugin, you can do so in the Shoot spec under .spec.kubernetes.kubeAPIServer.admissionPlugins by adding:
admissionPlugins:
- name: PodSecurity
config:
apiVersion: pod-security.admission.config.k8s.io/v1
kind: PodSecurityConfiguration
# Defaults applied when a mode label is not set.
#
# Level label values must be one of:
# - "privileged" (default)
# - "baseline"
# - "restricted"
#
# Version label values must be one of:
# - "latest" (default)
# - specific version like "v1.25"
defaults:
enforce: "privileged"
enforce-version: "latest"
audit: "privileged"
audit-version: "latest"
warn: "privileged"
warn-version: "latest"
exemptions:
# Array of authenticated usernames to exempt.
usernames: []
# Array of runtime class names to exempt.
runtimeClasses: []
# Array of namespaces to exempt.
namespaces: []
For proper functioning of Gardener, kube-system namespace will also be automatically added to the exemptions.namespaces list.
4.12.2 - Audit a Kubernetes Cluster
ConfigMap and reference it in the shoot specAudit a Kubernetes Cluster
The shoot cluster is a Kubernetes cluster and its kube-apiserver handles the audit events. In order to define which audit events must be logged, a proper audit policy file must be passed to the Kubernetes API server. You could find more information about auditing a kubernetes cluster in the Auditing topic.
Default Audit Policy
By default, the Gardener will deploy the shoot cluster with audit policy defined in the kube-apiserver package.
Custom Audit Policy
If you need specific audit policy for your shoot cluster, then you could deploy the required audit policy in the garden cluster as ConfigMap resource and set up your shoot to refer this ConfigMap. Note that the policy must be stored under the key policy in the data section of the ConfigMap.
For example, deploy the auditpolicy ConfigMap in the same namespace as your Shoot resource:
kubectl apply -f example/95-configmap-custom-audit-policy.yaml
then set your shoot to refer that ConfigMap (only related fields are shown):
spec:
kubernetes:
kubeAPIServer:
auditConfig:
auditPolicy:
configMapRef:
name: auditpolicy
Gardener validate the Shoot resource to refer only existing ConfigMap containing valid audit policy, and rejects the Shoot on failure.
If you want to switch back to the default audit policy, you have to remove the section
auditPolicy:
configMapRef:
name: <configmap-name>
from the shoot spec.
Rolling Out Changes to the Audit Policy
Gardener is not automatically rolling out changes to the Audit Policy to minimize the amount of Shoot reconciliations in order to prevent cloud provider rate limits, etc. Gardener will pick up the changes on the next reconciliation of Shoots referencing the Audit Policy ConfigMap. If users want to immediately rollout Audit Policy changes, they can manually trigger a Shoot reconciliation as described in triggering an immediate reconciliation. This is similar to changes to the cloud provider secret referenced by Shoots.
4.12.3 - Default Seccomp Profile
RuntimeDefault as the default seccomp profile through spec.kubernetes.kubelet.seccompDefaultDefault Seccomp Profile and Configuration
This is a short guide describing how to enable the defaulting of seccomp profiles for Gardener managed workloads in the seed. Running pods in Unconfined (seccomp disabled) mode is undesirable since this is the least restrictive profile. Also, mind that any privileged container will always run as Unconfined. More information about seccomp can be found in this Kubernetes tutorial.
Setting the Seccomp Profile to RuntimeDefault for Seed Clusters
To address the above issue, Gardener provides a webhook that is capable of mutating pods in the seed clusters, explicitly providing them with a seccomp profile type of RuntimeDefault. This profile is defined by the container runtime and represents a set of default syscalls that are allowed or not.
spec:
securityContext:
seccompProfile:
type: RuntimeDefault
A Pod is mutated when all of the following preconditions are fulfilled:
- The
Podis created in a Gardener managed namespace. - The
Podis NOT labeled withseccompprofile.resources.gardener.cloud/skip. - The
Poddoes NOT explicitly specify.spec.securityContext.seccompProfile.type.
How to Configure
To enable this feature, the gardenlet DefaultSeccompProfile feature gate must be set to true.
featureGates:
DefaultSeccompProfile: true
Please refer to the examples in this yaml file for more information.
Once the feature gate is enabled, the webhook will be registered and configured for the seed cluster. Newly created pods will be mutated to have their seccomp profile set to RuntimeDefault.
Note: Please note that this feature is still in Alpha, so you might see instabilities every now and then.
Setting the Seccomp Profile to RuntimeDefault for Shoot Clusters
You can enable the use of RuntimeDefault as the default seccomp profile for all workloads. If enabled, the kubelet will use the RuntimeDefault seccomp profile by default, which is defined by the container runtime, instead of using the Unconfined mode. More information for this feature can be found in the Kubernetes documentation.
To use seccomp profile defaulting, you must run the kubelet with the SeccompDefault feature gate enabled (this is the default).
How to Configure
To enable this feature, the kubelet seccompDefault configuration parameter must be set to true in the shoot’s spec.
spec:
kubernetes:
version: 1.25.0
kubelet:
seccompDefault: true
Please refer to the examples in this yaml file for more information.
4.12.4 - ETCD Encryption Config
spec.kubernetes.kubeAPIServer.encryptionConfigETCD Encryption Config
The spec.kubernetes.kubeAPIServer.encryptionConfig field in the Shoot API allows users to customize encryption configurations for the API server. It provides options to specify additional resources for encryption beyond secrets.
Usage Guidelines
- The
resourcesfield can be used to specify resources that should be encrypted in addition to secrets. Secrets are always encrypted. - Each item is a Kubernetes resource name in plural (resource or resource.group). Wild cards are not supported.
- Adding an item to this list will cause patch requests for all the resources of that kind to encrypt them in the etcd. See Encrypting Confidential Data at Rest for more details.
- Removing an item from this list will cause patch requests for all the resources of that type to decrypt and rewrite the resource as plain text. See Decrypt Confidential Data that is Already Encrypted at Rest for more details.
Example Usage in a Shoot
spec:
kubernetes:
kubeAPIServer:
encryptionConfig:
resources:
- configmaps
- statefulsets.apps
- customresource.fancyoperator.io
4.12.5 - OpenIDConnect Presets
ClusterOpenIDConnectPreset and OpenIDConnectPreset
Warning
OpenID Connect is deprecated in favor of Structured Authentication configuration. Setting OpenID Connect configurations is forbidden for clusters with Kubernetes version
>= 1.32.
This page provides an overview of ClusterOpenIDConnectPresets and OpenIDConnectPresets, which are objects for injecting OpenIDConnect Configuration into Shoot at creation time. The injected information contains configuration for the Kube API Server and optionally configuration for kubeconfig generation using said configuration.
OpenIDConnectPreset
An OpenIDConnectPreset is an API resource for injecting additional runtime OIDC requirements into a Shoot at creation time. You use label selectors to specify the Shoot to which a given OpenIDConnectPreset applies.
Using a OpenIDConnectPresets allows project owners to not have to explicitly provide the same OIDC configuration for every Shoot in their Project.
For more information about the background, see the issue for OpenIDConnectPreset.
How OpenIDConnectPreset Works
Gardener provides an admission controller (OpenIDConnectPreset) which, when enabled, applies OpenIDConnectPresets to incoming Shoot creation requests. When a Shoot creation request occurs, the system does the following:
Retrieve all OpenIDConnectPreset available for use in the
Shootnamespace.Check if the shoot label selectors of any OpenIDConnectPreset matches the labels on the Shoot being created.
If multiple presets are matched then only one is chosen and results are sorted based on:
.spec.weightvalue.- lexicographically ordering their names (e.g.,
002preset>001preset)
If the
Shootalready has a.spec.kubernetes.kubeAPIServer.oidcConfig, then no mutation occurs.
Simple OpenIDConnectPreset Example
This is a simple example to show how a Shoot is modified by the OpenIDConnectPreset:
apiVersion: settings.gardener.cloud/v1alpha1
kind: OpenIDConnectPreset
metadata:
name: test-1
namespace: default
spec:
shootSelector:
matchLabels:
oidc: enabled
server:
clientID: test-1
issuerURL: https://foo.bar
# caBundle: |
# -----BEGIN CERTIFICATE-----
# Li4u
# -----END CERTIFICATE-----
groupsClaim: groups-claim
groupsPrefix: groups-prefix
usernameClaim: username-claim
usernamePrefix: username-prefix
signingAlgs:
- RS256
requiredClaims:
key: value
weight: 90
Create the OpenIDConnectPreset:
kubectl apply -f preset.yaml
Examine the created OpenIDConnectPreset:
kubectl get openidconnectpresets
NAME ISSUER SHOOT-SELECTOR AGE
test-1 https://foo.bar oidc=enabled 1s
Simple Shoot example:
This is a sample of a Shoot with some fields omitted:
apiVersion: core.gardener.cloud/v1beta1
kind: Shoot
metadata:
name: preset
namespace: default
labels:
oidc: enabled
spec:
kubernetes:
version: 1.20.2
Create the Shoot:
kubectl apply -f shoot.yaml
Examine the created Shoot:
kubectl get shoot preset -o yaml
apiVersion: core.gardener.cloud/v1beta1
kind: Shoot
metadata:
name: preset
namespace: default
labels:
oidc: enabled
spec:
kubernetes:
kubeAPIServer:
oidcConfig:
clientID: test-1
groupsClaim: groups-claim
groupsPrefix: groups-prefix
issuerURL: https://foo.bar
requiredClaims:
key: value
signingAlgs:
- RS256
usernameClaim: username-claim
usernamePrefix: username-prefix
version: 1.20.2
Disable OpenIDConnectPreset
The OpenIDConnectPreset admission control is enabled by default. To disable it, use the --disable-admission-plugins flag on the gardener-apiserver.
For example:
--disable-admission-plugins=OpenIDConnectPreset
ClusterOpenIDConnectPreset
A ClusterOpenIDConnectPreset is an API resource for injecting additional runtime OIDC requirements into a Shoot at creation time. In contrast to OpenIDConnect, it’s a cluster-scoped resource. You use label selectors to specify the Project and Shoot to which a given OpenIDCConnectPreset applies.
Using a OpenIDConnectPresets allows cluster owners to not have to explicitly provide the same OIDC configuration for every Shoot in specific Project.
For more information about the background, see the issue for ClusterOpenIDConnectPreset.
How ClusterOpenIDConnectPreset Works
Gardener provides an admission controller (ClusterOpenIDConnectPreset) which, when enabled, applies ClusterOpenIDConnectPresets to incoming Shoot creation requests. When a Shoot creation request occurs, the system does the following:
Retrieve all ClusterOpenIDConnectPresets available.
Check if the project label selector of any ClusterOpenIDConnectPreset matches the labels of the
Projectin which theShootis being created.Check if the shoot label selectors of any ClusterOpenIDConnectPreset matches the labels on the
Shootbeing created.If multiple presets are matched then only one is chosen and results are sorted based on:
.spec.weightvalue.- lexicographically ordering their names ( e.g.
002preset>001preset)
If the
Shootalready has a.spec.kubernetes.kubeAPIServer.oidcConfigthen no mutation occurs.
Note: Due to the previous requirement, if a
Shootis matched by bothOpenIDConnectPresetandClusterOpenIDConnectPreset, thenOpenIDConnectPresettakes precedence overClusterOpenIDConnectPreset.
Simple ClusterOpenIDConnectPreset Example
This is a simple example to show how a Shoot is modified by the ClusterOpenIDConnectPreset:
apiVersion: settings.gardener.cloud/v1alpha1
kind: ClusterOpenIDConnectPreset
metadata:
name: test
spec:
shootSelector:
matchLabels:
oidc: enabled
projectSelector: {} # selects all projects.
server:
clientID: cluster-preset
issuerURL: https://foo.bar
# caBundle: |
# -----BEGIN CERTIFICATE-----
# Li4u
# -----END CERTIFICATE-----
groupsClaim: groups-claim
groupsPrefix: groups-prefix
usernameClaim: username-claim
usernamePrefix: username-prefix
signingAlgs:
- RS256
requiredClaims:
key: value
weight: 90
Create the ClusterOpenIDConnectPreset:
kubectl apply -f preset.yaml
Examine the created ClusterOpenIDConnectPreset:
kubectl get clusteropenidconnectpresets
NAME ISSUER PROJECT-SELECTOR SHOOT-SELECTOR AGE
test https://foo.bar <none> oidc=enabled 1s
This is a sample of a Shoot, with some fields omitted:
kind: Shoot
apiVersion: core.gardener.cloud/v1beta1
metadata:
name: preset
namespace: default
labels:
oidc: enabled
spec:
kubernetes:
version: 1.20.2
Create the Shoot:
kubectl apply -f shoot.yaml
Examine the created Shoot:
kubectl get shoot preset -o yaml
apiVersion: core.gardener.cloud/v1beta1
kind: Shoot
metadata:
name: preset
namespace: default
labels:
oidc: enabled
spec:
kubernetes:
kubeAPIServer:
oidcConfig:
clientID: cluster-preset
groupsClaim: groups-claim
groupsPrefix: groups-prefix
issuerURL: https://foo.bar
requiredClaims:
key: value
signingAlgs:
- RS256
usernameClaim: username-claim
usernamePrefix: username-prefix
version: 1.20.2
Disable ClusterOpenIDConnectPreset
The ClusterOpenIDConnectPreset admission control is enabled by default. To disable it, use the --disable-admission-plugins flag on the gardener-apiserver.
For example:
--disable-admission-plugins=ClusterOpenIDConnectPreset
4.12.6 - Shoot Serviceaccounts
ServiceAccount Configurations for Shoot Clusters
The Shoot specification allows to configure some of the settings for the handling of ServiceAccounts:
apiVersion: core.gardener.cloud/v1beta1
kind: Shoot
spec:
kubernetes:
kubeAPIServer:
serviceAccountConfig:
issuer: foo
acceptedIssuers:
- foo1
- foo2
extendTokenExpiration: true
maxTokenExpiration: 45d
...
Issuer and Accepted Issuers
The .spec.kubernetes.kubeAPIServer.serviceAccountConfig.{issuer,acceptedIssuers} fields are translated to the --service-account-issuer flag for the kube-apiserver.
The issuer will assert its identifier in the iss claim of the issued tokens.
According to the upstream specification, values need to meet the following requirements:
This value is a string or URI. If this option is not a valid URI per the OpenID Discovery 1.0 spec, the ServiceAccountIssuerDiscovery feature will remain disabled, even if the feature gate is set to true. It is highly recommended that this value comply with the OpenID spec: https://openid.net/specs/openid-connect-discovery-1_0.html. In practice, this means that service-account-issuer must be an https URL. It is also highly recommended that this URL be capable of serving OpenID discovery documents at {service-account-issuer}/.well-known/openid-configuration.
By default, Gardener uses the internal cluster domain as issuer (e.g., https://api.foo.bar.example.com).
If you specify the issuer, then this default issuer will always be part of the list of accepted issuers (you don’t need to specify it yourself).
Caution
If you change from the default issuer to a custom
issuer, all previously issued tokens will still be valid/accepted. However, if you change from a customissuerAto anotherissuerB(custom or default), then you have to addAto theacceptedIssuersso that previously issued tokens are not invalidated. Otherwise, the control plane components as well as system components and your workload pods might fail. You can removeAfrom theacceptedIssuerswhen all currently active tokens have been issued solely byB. This can be ensured by using projected token volumes with a short validity, or by rolling out all pods. Additionally, allServiceAccounttoken secrets should be recreated. Apart from this, you should wait for at least12hto make sure the control plane and system components have received a new token from Gardener.
Token Expirations
The .spec.kubernetes.kubeAPIServer.serviceAccountConfig.extendTokenExpiration configures the --service-account-extend-token-expiration flag of the kube-apiserver.
It is enabled by default and has the following specification:
Turns on projected service account expiration extension during token generation, which helps safe transition from legacy token to bound service account token feature. If this flag is enabled, admission injected tokens would be extended up to 1 year to prevent unexpected failure during transition, ignoring value of service-account-max-token-expiration.
The .spec.kubernetes.kubeAPIServer.serviceAccountConfig.maxTokenExpiration configures the --service-account-max-token-expiration flag of the kube-apiserver.
It has the following specification:
The maximum validity duration of a token created by the service account token issuer. If an otherwise valid TokenRequest with a validity duration larger than this value is requested, a token will be issued with a validity duration of this value.
Note
The value for this field must be in the
[30d,90d]range. The background for this limitation is that all Gardener components rely on theTokenRequestAPI and the Kubernetes service account token projection feature with short-lived, auto-rotating tokens. Any values lower than30drisk impacting the SLO for shoot clusters, and any values above90dviolate security best practices with respect to maximum validity of credentials before they must be rotated. Given that the field just specifies the upper bound, end-users can still use lower values for their individual workload by specifying the.spec.volumes[].projected.sources[].serviceAccountToken.expirationSecondsin thePodSpecs.
Managed Service Account Issuer
Gardener also provides a way to manage the service account issuer of a shoot cluster as well as serving its OIDC discovery documents from a centrally managed server called Gardener Discovery Server.
This ability removes the need for changing the .spec.kubernetes.kubeAPIServer.serviceAccountConfig.issuer and exposing it separately.
Prerequisites
Note
The following prerequisites are responsibility of the Gardener Administrators and are not something that end users can configure by themselves. If uncertain that these requirements are met, please contact your Gardener Administrator.
Prerequisites:
- The Garden Cluster should have the Gardener Discovery Server deployed and configured. The easiest way to handle this is by using the gardener-operator.
Enablement
If the prerequisites are met then the feature can be enabled for a shoot cluster by annotating it with authentication.gardener.cloud/issuer=managed.
Mind that once enabled, this feature cannot be disabled.
Note
After annotating the shoot with
authentication.gardener.cloud/issuer=managedthe reconciliation will not be triggered immediately. One can wait for the shoot maintenance window or trigger reconciliation by annotating the shoot withgardener.cloud/operation=reconcile.
After the shoot is reconciled, you can retrieve the new shoot service account issuer value from the shoot’s status. A sample query that will retrieve the managed issuer looks like this:
kubectl -n my-project get shoot my-shoot -o jsonpath='{.status.advertisedAddresses[?(@.name=="service-account-issuer")].url}'
Once retrieved, the shoot’s OIDC discovery documents can be explored by querying the /.well-known/openid-configuration endpoint of the issuer.
Mind that this annotation is incompatible with the .spec.kubernetes.kubeAPIServer.serviceAccountConfig.issuer field, so if you want to enable it then the issuer field should not be set in the shoot specification.
Caution
If you change from the default issuer to a managed issuer, all previously issued tokens will still be valid/accepted. However, if you change from a custom
issuerAto a managed issuer, then you have to addAto the.spec.kubernetes.kubeAPIServer.serviceAccountConfig.acceptedIssuersso that previously issued tokens are not invalidated. Otherwise, the control plane components as well as system components and your workload pods might fail. You can removeAfrom theacceptedIssuerswhen all currently active tokens have been issued solely by the managed issuer. This can be ensured by using projected token volumes with a short validity, or by rolling out all pods. Additionally, allServiceAccounttoken secrets should be recreated. Apart from this, you should wait for at least12hto make sure the control plane and system components have received a new token from Gardener.
4.13 - Shoot
4.13.1 - Access Restrictions
Access Restrictions
Access restrictions can be configured in the CloudProfile, Seed, and Shoot APIs.
They can be used to implement access restrictions for seed and shoot clusters (e.g., if you want to ensure “EU access”-only or similar policies).
CloudProfile
The .spec.regions list contains all regions that can be selected by Shoots.
Operators can configure them with a list of access restrictions that apply for each region, for example:
spec:
regions:
- name: europe-central-1
accessRestrictions:
- name: eu-access-only
- name: us-west-1
This configuration means that Shoots selecting the europe-central-1 region can configure an eu-access-only access restriction.
Shoots running in other regions cannot configure this access restriction in their specification.
Seed
The Seed specification also allows to configure access restrictions that apply for this specific seed cluster, for example:
spec:
accessRestrictions:
- name: eu-access-only
This configuration means that this seed cluster can host shoot clusters that also have the eu-access-only access restriction.
In addition, this seed cluster can also host shoot clusters without any access restrictions at all.
Shoot
If the CloudProfile allows to configure access restrictions for the selected .spec.region in the Shoot (see above), then they can also be provided in the specification of the Shoot, for example:
spec:
region: europe-central-1
accessRestrictions:
- name: eu-access-only
# options:
# support.gardener.cloud/eu-access-for-cluster-addons: "false"
# support.gardener.cloud/eu-access-for-cluster-nodes: "true"
In addition, it is possible to specify arbitrary options (key-value pairs) for the access restriction.
These options are not interpreted by Gardener, but can be helpful when evaluated by other tools (e.g., gardenctl implements some of them).
Above configuration means that the Shoot shall only be accessible by operators in the EU.
When configured for
- a newly created
Shoot,gardener-schedulerwill automatically filter forSeeds also supporting this access restriction. All otherSeeds are not considered for scheduling. - an existing
Shoot,gardener-apiserverwill allow removing access restrictions, but adding them is only possible if the currently selectedSeedsupports them. If it does not support them, theShootmust first be migrated to another eligibleSeedbefore they can be added. - an existing
Shootthat is migrated,gardener-apiserverwill only allow the migration in case the targetedSeedalso supports the access restrictions configured on theShoot.
Important
There is no technical enforcement of these access restrictions - they are purely informational. Hence, it is the responsibility of the operator to ensure that they enforce the configured access restrictions.
4.13.2 - Accessing Shoot Clusters
Accessing Shoot Clusters
After creation of a shoot cluster, end-users require a kubeconfig to access it. There are several options available to get to such kubeconfig.
shoots/adminkubeconfig Subresource
The shoots/adminkubeconfig subresource allows users to dynamically generate temporary kubeconfigs that can be used to access shoot cluster with cluster-admin privileges. The credentials associated with this kubeconfig are client certificates which have a very short validity and must be renewed before they expire (by calling the subresource endpoint again).
The username associated with such kubeconfig will be the same which is used for authenticating to the Gardener API. Apart from this advantage, the created kubeconfig will not be persisted anywhere.
In order to request such a kubeconfig, you can run the following commands (targeting the garden cluster):
export NAMESPACE=garden-my-namespace
export SHOOT_NAME=my-shoot
export KUBECONFIG=<kubeconfig for garden cluster> # can be set using "gardenctl target --garden <landscape>"
kubectl create \
-f <(printf '{"spec":{"expirationSeconds":600}}') \
--raw /apis/core.gardener.cloud/v1beta1/namespaces/${NAMESPACE}/shoots/${SHOOT_NAME}/adminkubeconfig | \
jq -r ".status.kubeconfig" | \
base64 -d
You also can use controller-runtime client (>= v0.14.3) to create such a kubeconfig from your go code like so:
expiration := 10 * time.Minute
expirationSeconds := int64(expiration.Seconds())
adminKubeconfigRequest := &authenticationv1alpha1.AdminKubeconfigRequest{
Spec: authenticationv1alpha1.AdminKubeconfigRequestSpec{
ExpirationSeconds: &expirationSeconds,
},
}
err := client.SubResource("adminkubeconfig").Create(ctx, shoot, adminKubeconfigRequest)
if err != nil {
return err
}
config = adminKubeconfigRequest.Status.Kubeconfig
In Python, you can use the native kubernetes client to create such a kubeconfig like this:
# This script first loads an existing kubeconfig from your system, and then sends a request to the Gardener API to create a new kubeconfig for a shoot cluster.
# The received kubeconfig is then decoded and a new API client is created for interacting with the shoot cluster.
import base64
import json
from kubernetes import client, config
import yaml
# Set configuration options
shoot_name="my-shoot" # Name of the shoot
project_namespace="garden-my-namespace" # Namespace of the project
# Load kubeconfig from default ~/.kube/config
config.load_kube_config()
api = client.ApiClient()
# Create kubeconfig request
kubeconfig_request = {
'apiVersion': 'authentication.gardener.cloud/v1alpha1',
'kind': 'AdminKubeconfigRequest',
'spec': {
'expirationSeconds': 600
}
}
response = api.call_api(resource_path=f'/apis/core.gardener.cloud/v1beta1/namespaces/{project_namespace}/shoots/{shoot_name}/adminkubeconfig',
method='POST',
body=kubeconfig_request,
auth_settings=['BearerToken'],
_preload_content=False,
_return_http_data_only=True,
)
decoded_kubeconfig = base64.b64decode(json.loads(response.data)["status"]["kubeconfig"]).decode('utf-8')
print(decoded_kubeconfig)
# Create an API client to interact with the shoot cluster
shoot_api_client = config.new_client_from_config_dict(yaml.safe_load(decoded_kubeconfig))
v1 = client.CoreV1Api(shoot_api_client)
Note: The
gardenctl-v2tool simplifies targeting shoot clusters. It automatically downloads a kubeconfig that uses the gardenlogin kubectl auth plugin. This transparently manages authentication and certificate renewal without containing any credentials.
shoots/viewerkubeconfig Subresource
The shoots/viewerkubeconfig subresource works similar to the shoots/adminkubeconfig.
The difference is that it returns a kubeconfig with read-only access for all APIs except the core/v1.Secret API and the resources which are specified in the spec.kubernetes.kubeAPIServer.encryptionConfig field in the Shoot (see this document).
In order to request such a kubeconfig, you can run follow almost the same code as above - the only difference is that you need to use the viewerkubeconfig subresource.
For example, in bash this looks like this:
export NAMESPACE=garden-my-namespace
export SHOOT_NAME=my-shoot
kubectl create \
-f <(printf '{"spec":{"expirationSeconds":600}}') \
--raw /apis/core.gardener.cloud/v1beta1/namespaces/${NAMESPACE}/shoots/${SHOOT_NAME}/viewerkubeconfig | \
jq -r ".status.kubeconfig" | \
base64 -d
The examples for other programming languages are similar to the above and can be adapted accordingly.
Tip
If the Gardener operator has configured a “control plane wildcard certificate”, the issued kubeconfigs have a dedicated
Clusterentry containing an endpoint that is served with this wildcard certificate. This could be a generally trusted certificate, e.g. from Let’s Encrypt or a similar certificate authority, i.e., it does not require you to specify the certificate authority bundle.⚠️ This endpoint is specific to the seed cluster your
Shootis scheduled to, i.e., if the seed cluster changes (.spec.seedName, for example because of a control plane migration), the endpoint changes as well. Have this in mind in case you consider using it!
Structured Authentication
For shoots with Kubernetes version >= 1.30, which have StructuredAuthenticationConfiguration feature gate enabled (enabled by default), kube-apiserver of shoot clusters can be provided with Structured Authentication configuration via the Shoot spec:
apiVersion: core.gardener.cloud/v1beta1
kind: Shoot
...
spec:
kubernetes:
kubeAPIServer:
structuredAuthentication:
configMapName: name-of-configmap-containing-authentication-config
The configMapName references a user created ConfigMap in the project namespace containing the AuthenticationConfiguration in it’s config.yaml data field.
Here is an example of such ConfigMap:
apiVersion: v1
kind: ConfigMap
metadata:
name: name-of-configmap-containing-authentication-config
namespace: garden-my-project
data:
config.yaml: |
apiVersion: apiserver.config.k8s.io/v1beta1
kind: AuthenticationConfiguration
jwt:
- issuer:
url: https://issuer1.example.com
audiences:
- audience1
- audience2
audienceMatchPolicy: MatchAny
claimMappings:
username:
expression: 'claims.username'
groups:
expression: 'claims.groups'
uid:
expression: 'claims.uid'
claimValidationRules:
- expression: 'claims.hd == "example.com"'
message: "the hosted domain name must be example.com"
The user is responsible for the validity of the configured JWTAuthenticators.
Be aware that changing the configuration in the ConfigMap will be applied in the next Shoot reconciliation, but this is not automatically triggered.
If you want the changes to roll out immediately, trigger a reconciliation explicitly.
Migrating from OIDC to Structured Authentication Config
If you would like to migrate from OIDC to Structured Authentication Config and your Shoot spec has the spec.kubernetes.kubeAPIServer.oidcConfig field set, for example:
apiVersion: core.gardener.cloud/v1beta1
kind: Shoot
spec:
kubernetes:
kubeAPIServer:
oidcConfig:
clientID: <client-ID>
groupsClaim: groups
groupsPrefix: "<groups-prefix>"
issuerURL: <issuer-url>
usernameClaim: username
Or you have configured OIDC using a (Cluster)OpenIDConnectPreset resource, for example:
apiVersion: settings.gardener.cloud/v1alpha1
kind: (Cluster)OpenIDConnectPreset
spec:
server:
clientID: <client-ID>
groupsClaim: groups
groupsPrefix: "<groups-prefix>"
issuerURL: <issuer-url>
usernameClaim: username
Create a
ConfigMapin your project namespace containing an equivalentAuthenticationConfigurationto your current OIDC config. It should look similar to:apiVersion: v1 kind: ConfigMap metadata: name: structured-authentication-config data: config.yaml: | apiVersion: apiserver.config.k8s.io/v1beta1 kind: AuthenticationConfiguration jwt: - issuer: url: <issuer-url> audiences: - <client-ID> claimMappings: groups: claim: groups prefix: "<groups-prefix>" username: claim: username prefix: ""You can also follow the steps in the Kubernetes 1.30: Structured Authentication Configuration Moves to Beta blog post.
Remove the
spec.kubernetes.kubeAPIServer.oidcConfigfield from the Shoot spec (or the(Cluster)OpenIDConnectPresetresources if it does not target any other Shoot cluster) and replace it with a reference to the newly createdConfigMapinspec.kubernetes.kubeAPIServer.structuredAuthentication.configMapName:apiVersion: core.gardener.cloud/v1beta1 kind: Shoot spec: kubernetes: kubeAPIServer: structuredAuthentication: configMapName: structured-authentication-config
Structured Authorization
For shoots with Kubernetes version >= 1.30, which have StructuredAuthorizationConfiguration feature gate enabled (enabled by default), kube-apiserver of shoot clusters can be provided with Structured Authorization configuration via the Shoot spec:
apiVersion: core.gardener.cloud/v1beta1
kind: Shoot
...
spec:
kubernetes:
kubeAPIServer:
structuredAuthorization:
configMapName: name-of-configmap-containing-authorization-config
kubeconfigs:
- authorizerName: my-webhook
secretName: webhook-kubeconfig
The configMapName references a user created ConfigMap in the project namespace containing the AuthorizationConfiguration in it’s config.yaml data field.
Here is an example of such ConfigMap:
apiVersion: v1
kind: ConfigMap
metadata:
name: name-of-configmap-containing-authorization-config
namespace: garden-my-project
data:
config.yaml: |
apiVersion: apiserver.config.k8s.io/v1beta1
kind: AuthorizationConfiguration
authorizers:
- type: Webhook
name: my-webhook
webhook:
timeout: 3s
subjectAccessReviewVersion: v1
matchConditionSubjectAccessReviewVersion: v1
failurePolicy: Deny
matchConditions:
- expression: request.resourceAttributes.namespace == 'kube-system'
In addition, it is required to provide a Secret for each authorizer.
This Secret should contain a kubeconfig with the server address of the webhook server, and optionally credentials for authentication:
apiVersion: v1
kind: Secret
metadata:
name: webhook-kubeconfig
namespace: garden-my-project
data:
kubeconfig: <base64-encoded-kubeconfig-for-authz-webhook>
The user is responsible for the validity of the configured authorizers.
Be aware that changing the configuration in the ConfigMap will be applied in the next Shoot reconciliation, but this is not automatically triggered.
If you want the changes to roll out immediately, trigger a reconciliation explicitly.
Note
You can have one or more authorizers of type
Webhook(no other types are supported).You are not allowed to specify the
authorizers[].webhook.connectionInfofield. Instead, as mentioned above, provide a kubeconfig file containing the server address (and optionally, credentials that can be used bykube-apiserverin order to authenticate with the webhook server) by creating aSecretcontaining the kubeconfig (in the.data.kubeconfigkey). Reference thisSecretby adding it to.spec.kubernetes.kubeAPIServer.structuredAuthorization.kubeconfigs[](choose the properauthorizerName, see example above).
Be aware of the fact that all webhook authorizers are added only after the RBAC/Node authorizers.
Hence, if RBAC already allows a request, your webhook authorizer might not get called.
OpenID Connect
Warning
OpenID Connect is deprecated in favor of Structured Authentication configuration. Setting OpenID Connect configurations is forbidden for clusters with Kubernetes version
>= 1.32. The configuration and the related API resources(Cluster)OpenIDConnectPresetwill be removed when Gardener no longer supports clusters with Kubernetes version< 1.32.
The kube-apiserver of shoot clusters can be provided with OpenID Connect configuration via the Shoot spec:
apiVersion: core.gardener.cloud/v1beta1
kind: Shoot
...
spec:
kubernetes:
oidcConfig:
...
It is the end-user’s responsibility to incorporate the OpenID Connect configurations in the kubeconfig for accessing the cluster (i.e., Gardener will not automatically generate the kubeconfig based on these OIDC settings).
The recommended way is using the kubectl plugin called kubectl oidc-login for OIDC authentication.
If you want to use the same OIDC configuration for all your shoots by default, then you can use the ClusterOpenIDConnectPreset and OpenIDConnectPreset API resources. They allow defaulting the .spec.kubernetes.kubeAPIServer.oidcConfig fields for newly created Shoots such that you don’t have to repeat yourself every time (similar to PodPreset resources in Kubernetes).
ClusterOpenIDConnectPreset specified OIDC configuration applies to Projects and Shoots cluster-wide (hence, only available to Gardener operators), while OpenIDConnectPreset is Project-scoped.
Shoots have to “opt-in” for such defaulting by using the oidc=enable label.
For further information on (Cluster)OpenIDConnectPreset, refer to ClusterOpenIDConnectPreset and OpenIDConnectPreset.
For shoots with Kubernetes version >= 1.30, which have StructuredAuthenticationConfiguration feature gate enabled (enabled by default), it is advised to use Structured Authentication instead of configuring .spec.kubernetes.kubeAPIServer.oidcConfig and/or (Cluster)OpenIDConnectPreset.
If oidcConfig is configured, it is translated into an AuthenticationConfiguration file to use for Structured Authentication configuration.
4.13.3 - Shoot Cluster Limits
Shoot Cluster Limits
Gardener operators can configure limits for shoot clusters in the CloudProfile.spec.limits section, where they can also be looked up by shoot owners.
The limits are enforced on all shoot clusters using the respective CloudProfile.
If a certain limit is not configured, no limit is enforced.
The configured limits of a CloudProfile can be overridden by configuring limits in a NamespacedCloudProfile.
To increase a CloudProfile limit, a user must have permission by the appropriate custom verbs.
Setting a stricter limit is always allowed without requiring special permissions.
For more information, see the NamespacedCloudProfile documentation.
This document explains the limits that can be configured in the CloudProfile.
Maximum Node Count
The CloudProfile.spec.limits.maxNodesTotal configures the maximum supported node count of shoot clusters in a Gardener installation.
If this limit is set, Gardener ensures that
- the total minimum node count of all worker pools (i.e., the total initial node count) does not exceed the configured limit
- the maximum node count of an individual worker pool does not exceed the configured limit
- cluster-autoscaler does not provision more nodes than the configured limit (
--max-nodes-totalflag)
The maximum node count of a shoot cluster can be lower than the configured limit, if the cluster’s networking configurations don’t allow it (see this doc page).
Gardener operators must ensure that no existing shoot cluster exceeds the limit when adding it. Because Gardener API server itself cannot verify that all shoot clusters would comply with a given limit set in an API request, it does not allow decreasing the limit, which could be disruptive for existing shoots. Increasing and removing the limits is allowed.
Note that the node count limit during runtime is applied by the cluster-autoscaler only.
E.g., performing a rolling update can cause shoots to exceed maxNodesTotal by the total maxSurge of all worker pools.
Also, when a shoot owner adds another worker pool to a cluster that has already reached the maximum node count via cluster autoscaling, Gardener would initially deploy the new worker pool with the minimum number of nodes.
This would cause the shoot to temporarily exceed the configured limit until cluster-autoscaler scales the cluster down again.
In other words, CloudProfile.spec.limits.maxNodesTotal doesn’t enforce a hard limit, but rather ensures that shoot clusters stay within a reasonable size that the Gardener operator can and wants to support.
Shoot owners should keep the limit configured in the CloudProfile in mind when configuring the initial node count of new worker pools.
4.13.4 - Shoot Cluster Purposes
Shoot Cluster Purpose
The Shoot resource contains a .spec.purpose field indicating how the shoot is used, whose allowed values are as follows:
evaluation(default): Indicates that the shoot cluster is for evaluation scenarios.development: Indicates that the shoot cluster is for development scenarios.testing: Indicates that the shoot cluster is for testing scenarios.production: Indicates that the shoot cluster is for production scenarios.infrastructure: Indicates that the shoot cluster is for infrastructure scenarios (only allowed for shoots in thegardennamespace).
Behavioral Differences
The following enlists the differences in the way the shoot clusters are set up based on the selected purpose:
testingshoot clusters do not get a monitoring or a logging stack as part of their control planes.- for
productionandinfrastructureshoot clusters auto-scaling scale down of the main ETCD is disabled. - shoot addons like
nginxIngressandkubernetesDashboardcan only be enabled forevaluationshoot clusters.
There are also differences with respect to how testing shoots are scheduled after creation, please consult the Scheduler documentation.
Future Steps
We might introduce more behavioral difference depending on the shoot purpose in the future. As of today, there are no plans yet.
4.13.5 - Shoot cluster supported Kubernetes versions and specifics
Shoot Kubernetes Minor Version Upgrades
Breaking changes may be introduced with new Kubernetes versions. This documentation describes the Gardener specific differences and requirements for upgrading to a supported Kubernetes version. For Kubernetes specific upgrade notes the upstream Kubernetes release notes, changelogs and release blogs should be considered before upgrade.
Upgrading to Kubernetes v1.33
- A new
deny-allNetworkPolicyis deployed into thekube-systemnamespace of theShootcluster.Shootowners that run workloads in thekube-systemnamespace are required to explicitly allow their expectedIngressandEgresstraffic inkube-systemviaNetworkPolicies. - The
Shoot’s field.spec.kubernetes.kubeControllerManager.podEvictionTimeoutis forbidden.Shootowners should use the.spec.kubernetes.kubeAPIServer.defaultNotReadyTolerationSecondsand.spec.kubernetes.kubeAPIServer.defaultUnreachableTolerationSecondsfields. - The
Shoot’s field.spec.kubernetes.clusterAutoscaler.maxEmptyBulkDeleteis forbidden.Shootowners should use the.spec.kubernetes.clusterAutoscaler.maxScaleDownParallelismfield.
Upgrading to Kubernetes v1.32
Tip
It is recommended to migrate from OIDC to
StructuredAuthenticationbefore updating to Kubernetes v1.32 in order to avoid not being able to revert the change.
- The
Shoot’sspec.kubernetes.kubeAPIServer.oidcConfigfield is forbidden.Shootowners that have usedoidcConfigor a(Cluster)OpenIDConnectPresetresource are recommended to migrate toStructuredAuthentication. More information aboutStructuredAuthenticationcan be found in the Structured Authentication documentation.
Upgrading to Kubernetes v1.31
- The
Shoot’sspec.kubernetes.kubeAPIServer.oidcConfig.clientAuthenticationfield is forbidden. - The
Shoot’s.spec.kubernetes.kubelet.systemReservedand.spec.provider.workers[].kubernetes.kubelet.systemReservedfields are forbidden.Shootowners should use the.spec.kubernetes.kubelet.kubeReservedand.spec.provider.workers[].kubernetes.kubelet.kubeReservedfields.
Upgrading to Kubernetes v1.30
- The
kubeletUnlimitedSwapbehavior, configured in theShoot’s.spec.{kubernetes,provider.workers[]}.kubelet.memorySwap.swapBehaviorfields, can no longer be used.
4.13.6 - Shoot Hibernation
Shoot Hibernation
Clusters are only needed 24 hours a day if they run productive workload. So whenever you do development in a cluster, or just use it for tests or demo purposes, you can save a lot of money if you scale-down your Kubernetes resources whenever you don’t need them. However, scaling them down manually can become time-consuming the more resources you have.
Gardener offers a clever way to automatically scale-down all resources to zero: cluster hibernation. You can either hibernate a cluster by pushing a button, or by defining a hibernation schedule.
To save costs, it’s recommended to define a hibernation schedule before the creation of a cluster. You can hibernate your cluster or wake up your cluster manually even if there’s a schedule for its hibernation.
What Is Hibernation?
When a cluster is hibernated, Gardener scales down the worker nodes and the cluster’s control plane to free resources at the IaaS provider. This affects:
- Your workload, for example, pods, deployments, custom resources.
- The virtual machines running your workload.
- The resources of the control plane of your cluster.
What Isn’t Affected by the Hibernation?
To scale up everything where it was before hibernation, Gardener doesn’t delete state-related information, that is, information stored in persistent volumes. The cluster state as persistent in etcd is also preserved.
Hibernate Your Cluster Manually
The .spec.hibernation.enabled field specifies whether the cluster needs to be hibernated or not. If the field is set to true, the cluster’s desired state is to be hibernated. If it is set to false or not specified at all, the cluster’s desired state is to be awakened.
To hibernate your cluster, you can run the following kubectl command:
$ kubectl patch shoot -n $NAMESPACE $SHOOT_NAME -p '{"spec":{"hibernation":{"enabled": true}}}'
Wake Up Your Cluster Manually
To wake up your cluster, you can run the following kubectl command:
$ kubectl patch shoot -n $NAMESPACE $SHOOT_NAME -p '{"spec":{"hibernation":{"enabled": false}}}'
Create a Schedule to Hibernate Your Cluster
You can specify a hibernation schedule to automatically hibernate/wake up a cluster.
Let’s have a look into the following example:
hibernation:
enabled: false
schedules:
- start: "0 20 * * *" # Start hibernation every day at 8PM
end: "0 6 * * *" # Stop hibernation every day at 6AM
location: "America/Los_Angeles" # Specify a location for the cron to run in
The above section configures a hibernation schedule that hibernates the cluster every day at 08:00 PM and wakes it up at 06:00 AM. The start or end fields can be omitted, though at least one of them has to be specified. Hence, it is possible to configure a hibernation schedule that only hibernates or wakes up a cluster. The location field is the time location used to evaluate the cron expressions.
4.13.7 - Shoot Info Configmap
Shoot Info ConfigMap
Overview
The gardenlet maintains a ConfigMap inside the Shoot cluster that contains information about the cluster itself. The ConfigMap is named shoot-info and located in the kube-system namespace.
Fields
The following fields are provided:
apiVersion: v1
kind: ConfigMap
metadata:
name: shoot-info
namespace: kube-system
data:
domain: crazy-botany.core.my-custom-domain.com # .spec.dns.domain field from the Shoot resource
extensions: foobar,foobaz # List of extensions that are enabled
kubernetesVersion: 1.25.4 # .spec.kubernetes.version field from the Shoot resource
maintenanceBegin: 220000+0100 # .spec.maintenance.timeWindow.begin field from the Shoot resource
maintenanceEnd: 230000+0100 # .spec.maintenance.timeWindow.end field from the Shoot resource
nodeNetwork: 10.250.0.0/16 # .spec.networking.nodes field from the Shoot resource
podNetwork: 100.96.0.0/11 # .spec.networking.pods field from the Shoot resource
projectName: dev # .metadata.name of the Project
provider: <some-provider-name> # .spec.provider.type field from the Shoot resource
region: europe-central-1 # .spec.region field from the Shoot resource
serviceNetwork: 100.64.0.0/13 # .spec.networking.services field from the Shoot resource
shootName: crazy-botany # .metadata.name from the Shoot resource
4.13.8 - Shoot Maintenance
Shoot Maintenance
Shoots configure a maintenance time window in which Gardener performs certain operations that may restart the control plane, roll out the nodes, result in higher network traffic, etc. A summary of what was changed in the last maintenance time window in shoot specification is kept in the shoot status .status.lastMaintenance field.
This document outlines what happens during a shoot maintenance.
Time Window
Via the .spec.maintenance.timeWindow field in the shoot specification, end-users can configure the time window in which maintenance operations are executed.
Gardener runs one maintenance operation per day in this time window:
spec:
maintenance:
timeWindow:
begin: 220000+0100
end: 230000+0100
The offset (+0100) is considered with respect to UTC time.
The minimum time window is 30m and the maximum is 6h.
⚠️ Please note that there is no guarantee that a maintenance operation that, e.g., starts a node roll-out will finish within the time window. Especially for large clusters, it may take several hours until a graceful rolling update of the worker nodes succeeds (also depending on the workload and the configured pod disruption budgets/termination grace periods).
Internally, Gardener is subtracting 15m from the end of the time window to (best-effort) try to finish the maintenance until the end is reached, however, this might not work in all cases.
If you don’t specify a time window, then Gardener will randomly compute it. You can change it later, of course.
Automatic Version Updates
The .spec.maintenance.autoUpdate field in the shoot specification allows you to control how/whether automatic updates of Kubernetes patch and machine image versions are performed.
Machine image versions are updated per worker pool.
spec:
maintenance:
autoUpdate:
kubernetesVersion: true
machineImageVersion: true
During the daily maintenance, the Gardener Controller Manager updates the Shoot’s Kubernetes and machine image version if any of the following criteria applies:
- There is a higher version available and the Shoot opted-in for automatic version updates.
- The currently used version is
expired.
The target version for machine image upgrades is controlled by the updateStrategy field for the machine image in the CloudProfile. Allowed update strategies are patch, minor and major.
Gardener (gardener-controller-manager) populates the lastMaintenance field in the Shoot status with the maintenance results.
Last Maintenance:
Description: "All maintenance operations successful. Control Plane: Updated Kubernetes version from 1.26.4 to 1.27.1. Reason: Kubernetes version expired - force update required"
State: Succeeded
Triggered Time: 2023-07-28T09:07:27Z
Additionally, Gardener creates events with the type MachineImageVersionMaintenance or KubernetesVersionMaintenance on the Shoot describing the action performed during maintenance, including the reason why an update has been triggered.
LAST SEEN TYPE REASON OBJECT MESSAGE
30m Normal MachineImageVersionMaintenance shoot/local Worker pool "local": Updated image from 'gardenlinux' version 'xy' to version 'abc'. Reason: Automatic update of the machine image version is configured (image update strategy: major).
30m Normal KubernetesVersionMaintenance shoot/local Control Plane: Updated Kubernetes version from "1.26.4" to "1.27.1". Reason: Kubernetes version expired - force update required.
15m Normal KubernetesVersionMaintenance shoot/local Worker pool "local": Updated Kubernetes version '1.26.3' to version '1.27.1'. Reason: Kubernetes version expired - force update required.
If at least one maintenance operation fails, the lastMaintenance field in the Shoot status is set to Failed:
Last Maintenance:
Description: "(1/2) maintenance operations successful: Control Plane: Updated Kubernetes version from 1.26.4 to 1.27.1. Reason: Kubernetes version expired - force update required, Worker pool x: 'gardenlinux' machine image version maintenance failed. Reason for update: machine image version expired"
FailureReason: "Worker pool x: either the machine image 'gardenlinux' is reaching end of life and migration to another machine image is required or there is a misconfiguration in the CloudProfile."
State: Failed
Triggered Time: 2023-07-28T09:07:27Z
Please refer to the Shoot Kubernetes and Operating System Versioning in Gardener topic for more information about Kubernetes and machine image versions in Gardener.
Cluster Reconciliation
Gardener administrators/operators can configure the gardenlet in a way that it only reconciles shoot clusters during their maintenance time windows. This behaviour is not controllable by end-users but might make sense for large Gardener installations. Concretely, your shoot will be reconciled regularly during its maintenance time window. Outside of the maintenance time window it will only reconcile if you change the specification or if you explicitly trigger it, see also Trigger Shoot Operations.
Confine Specification Changes/Updates Roll Out
Via the .spec.maintenance.confineSpecUpdateRollout field you can control whether you want to make Gardener roll out changes/updates to your shoot specification only during the maintenance time window.
It is false by default, i.e., any change to your shoot specification triggers a reconciliation (even outside of the maintenance time window).
This is helpful if you want to update your shoot but don’t want the changes to be applied immediately. One example use-case would be a Kubernetes version upgrade that you want to roll out during the maintenance time window.
Any update to the specification will not increase the .metadata.generation of the Shoot, which is something you should be aware of.
Also, even if Gardener administrators/operators have not enabled the “reconciliation in maintenance time window only” configuration (as mentioned above), then your shoot will only reconcile in the maintenance time window.
The reason is that Gardener cannot differentiate between create/update/reconcile operations.
⚠️ If confineSpecUpdateRollout=true, please note that if you change the maintenance time window itself, then it will only be effective after the upcoming maintenance.
⚠️ As exceptions to the above rules, manually triggered reconciliations and changes to the .spec.hibernation.enabled field trigger immediate rollouts.
I.e., if you hibernate or wake-up your shoot, or you explicitly tell Gardener to reconcile your shoot, then Gardener gets active right away.
Shoot Operations
In case you would like to perform a shoot credential rotation or a reconcile operation during your maintenance time window, you can annotate the Shoot with
maintenance.gardener.cloud/operation=<operation>
This will execute the specified <operation> during the next maintenance reconciliation.
Note that Gardener will remove this annotation after it has been performed in the maintenance reconciliation.
⚠️ This is skipped when the
Shoot’s.status.lastOperation.state=Failed. Make sure to retry your shoot reconciliation beforehand.
Special Operations During Maintenance
The shoot maintenance controller triggers special operations that are performed as part of the shoot reconciliation.
Infrastructure and DNSRecord Reconciliation
The reconciliation of the Infrastructure and DNSRecord extension resources is only demanded during the shoot’s maintenance time window.
The rationale behind it is to prevent sending too many requests against the cloud provider APIs, especially on large landscapes or if a user has many shoot clusters in the same cloud provider account.
Restart Control Plane Controllers
Gardener operators can make Gardener restart/delete certain control plane pods during a shoot maintenance. This feature helps to automatically solve service denials of controllers due to stale caches, dead-locks or starving routines.
Please note that these are exceptional cases but they are observed from time to time.
Gardener, for example, takes this precautionary measure for kube-controller-manager pods.
See Shoot Maintenance to see how extension developers can extend this behaviour.
Restart Some Core Addons
Gardener operators can make Gardener restart some core addons (at the moment only CoreDNS) during a shoot maintenance.
CoreDNS benefits from this feature as it automatically solve problems with clients stuck to single replica of the deployment and thus overloading it. Please note that these are exceptional cases but they are observed from time to time.
4.13.9 - Shoot Scheduling Profiles
balanced and bin-packing scheduling profilesShoot Scheduling Profiles
This guide describes the available scheduling profiles and how they can be configured in the Shoot cluster. It also clarifies how a custom scheduling profile can be configured.
Scheduling Profiles
The scheduling process in the kube-scheduler happens in a series of stages. A scheduling profile allows configuring the different stages of the scheduling.
As of today, Gardener supports two predefined scheduling profiles:
balanced(default)Overview
The
balancedprofile attempts to spread Pods evenly across Nodes to obtain a more balanced resource usage. This profile provides the default kube-scheduler behavior.How it works?
The kube-scheduler is started without any profiles. In such case, by default, one profile with the scheduler name
default-scheduleris created. This profile includes the default plugins. If a Pod doesn’t specify the.spec.schedulerNamefield, kube-apiserver sets it todefault-scheduler. Then, the Pod gets scheduled by thedefault-scheduleraccordingly.bin-packingOverview
The
bin-packingprofile scores Nodes based on the allocation of resources. It prioritizes Nodes with the most allocated resources. By favoring the Nodes with the most allocation, some of the other Nodes become under-utilized over time (because new Pods keep being scheduled to the most allocated Nodes). Then, the cluster-autoscaler identifies such under-utilized Nodes and removes them from the cluster. In this way, this profile provides a greater overall resource utilization (compared to thebalancedprofile).Note: The decision of when to remove a Node is a trade-off between optimizing for utilization or the availability of resources. Removing under-utilized Nodes improves cluster utilization, but new workloads might have to wait for resources to be provisioned again before they can run.
How it works?
The kube-scheduler is configured with the following bin packing profile:
apiVersion: kubescheduler.config.k8s.io/v1beta3 kind: KubeSchedulerConfiguration profiles: - schedulerName: bin-packing-scheduler pluginConfig: - name: NodeResourcesFit args: scoringStrategy: type: MostAllocated plugins: score: disabled: - name: NodeResourcesBalancedAllocationTo impose the new profile, a
MutatingWebhookConfigurationis deployed in the Shoot cluster. TheMutatingWebhookConfigurationinterceptsCREATEoperations for Pods and sets the.spec.schedulerNamefield tobin-packing-scheduler. Then, the Pod gets scheduled by thebin-packing-scheduleraccordingly. Pods that specify a custom scheduler (i.e., having.spec.schedulerNamedifferent fromdefault-schedulerandbin-packing-scheduler) are not affected.
Configuring the Scheduling Profile
The scheduling profile can be configured via the .spec.kubernetes.kubeScheduler.profile field in the Shoot:
spec:
# ...
kubernetes:
kubeScheduler:
profile: "balanced" # or "bin-packing"
Custom Scheduling Profiles
The kube-scheduler’s component configs allows configuring custom scheduling profiles to match the cluster needs. As of today, Gardener supports only two predefined scheduling profiles. The profile configuration in the component config is quite expressive and it is not possible to easily define profiles that would match the needs of every cluster. Because of these reasons, there are no plans to add support for new predefined scheduling profiles. If a cluster owner wants to use a custom scheduling profile, then they have to deploy (and maintain) a dedicated kube-scheduler deployment in the cluster itself.
4.13.10 - Shoot Status
Shoot Status
This document provides an overview of the ShootStatus.
Conditions
The Shoot status consists of a set of conditions. A Condition has the following fields:
| Field name | Description |
|---|---|
type | Name of the condition. |
status | Indicates whether the condition is applicable, with possible values True, False, Unknown or Progressing. |
lastTransitionTime | Timestamp for when the condition last transitioned from one status to another. |
lastUpdateTime | Timestamp for when the condition was updated. Usually changes when reason or message in condition is updated. |
reason | Machine-readable, UpperCamelCase text indicating the reason for the condition’s last transition. |
message | Human-readable message indicating details about the last status transition. |
codes | Well-defined error codes in case the condition reports a problem. |
Currently, the available Shoot condition types are:
APIServerAvailableControlPlaneHealthyEveryNodeReadyObservabilityComponentsHealthySystemComponentsHealthy
The Shoot conditions are maintained by the shoot care reconciler of the gardenlet. Find more information in the gardelent documentation.
Sync Period
The condition checks are executed periodically at an interval which is configurable in the GardenletConfiguration (.controllers.shootCare.syncPeriod, defaults to 1m).
Condition Thresholds
The GardenletConfiguration also allows configuring condition thresholds (controllers.shootCare.conditionThresholds). A condition threshold is the amount of time to consider a condition as Processing on condition status changes.
Let’s check the following example to get a better understanding. Let’s say that the APIServerAvailable condition of our Shoot is with status True. If the next condition check fails (for example kube-apiserver becomes unreachable), then the condition first goes to Processing state. Only if this state remains for condition threshold amount of time, then the condition is finally updated to False.
Constraints
Constraints represent conditions of a Shoot’s current state that constraint some operations on it. The current constraints are:
HibernationPossible:
This constraint indicates whether a Shoot is allowed to be hibernated.
The rationale behind this constraint is that a Shoot can have ValidatingWebhookConfigurations or MutatingWebhookConfigurations acting on resources that are critical for waking up a cluster.
For example, if a webhook has rules for CREATE/UPDATE Pods or Nodes and failurePolicy=Fail, the webhook will block joining Nodes and creating critical system component Pods and thus block the entire wakeup operation, because the server backing the webhook is not running.
Even if the failurePolicy is set to Ignore, high timeouts (>15s) can lead to blocking requests of control plane components.
That’s because most control-plane API calls are made with a client-side timeout of 30s, so if a webhook has timeoutSeconds=30
the overall request might still fail as there is overhead in communication with the API server and potential other webhooks.
Generally, it’s best practice to specify low timeouts in WebhookConfigs.
As an effort to correct this common problem, the webhook remediator has been created. This is enabled by setting .controllers.shootCare.webhookRemediatorEnabled=true in the gardenlet’s configuration. This feature simply checks whether webhook configurations in shoot clusters match a set of rules described here. If at least one of the rules matches, it will change set status=False for the .status.constraints of type HibernationPossible and MaintenancePreconditionsSatisfied in the Shoot resource. In addition, the failurePolicy in the affected webhook configurations will be set from Fail to Ignore. Gardenlet will also add an annotation to make it visible to end-users that their webhook configurations were mutated and should be fixed/adapted according to the rules and best practices.
In most cases, you can avoid this by simply excluding the kube-system namespace from your webhook via the namespaceSelector:
apiVersion: admissionregistration.k8s.io/v1
kind: MutatingWebhookConfiguration
webhooks:
- name: my-webhook.example.com
namespaceSelector:
matchExpressions:
- key: gardener.cloud/purpose
operator: NotIn
values:
- kube-system
rules:
- operations: ["*"]
apiGroups: [""]
apiVersions: ["v1"]
resources: ["pods"]
scope: "Namespaced"
However, some other resources (some of them cluster-scoped) might still trigger the remediator, namely:
- endpoints
- nodes
- clusterroles
- clusterrolebindings
- customresourcedefinitions
- apiservices
- certificatesigningrequests
- priorityclasses
If one of the above resources triggers the remediator, the preferred solution is to remove that particular resource from your webhook’s rules. You can also use the objectSelector to reduce the scope of webhook’s rules. However, in special cases where a webhook is absolutely needed for the workload, it is possible to add the remediation.webhook.shoot.gardener.cloud/exclude=true label to your webhook so that the remediator ignores it. This label should not be used to silence an alert, but rather to confirm that a webhook won’t cause problems. Note that all of this is no perfect solution and just done on a best effort basis, and only the owner of the webhook can know whether it indeed is problematic and configured correctly.
In a special case, if a webhook has a rule for CREATE/UPDATE lease resources in kube-system namespace, its timeoutSeconds is updated to 3 seconds. This is required to ensure the proper functioning of the leader election of essential control plane controllers.
You can also find more help from the Kubernetes documentation
MaintenancePreconditionsSatisfied:
This constraint indicates whether all preconditions for a safe maintenance operation are satisfied (see Shoot Maintenance for more information about what happens during a shoot maintenance).
As of today, the same checks as in the HibernationPossible constraint are being performed (user-deployed webhooks that might interfere with potential rolling updates of shoot worker nodes).
There is no further action being performed on this constraint’s status (maintenance is still being performed).
It is meant to make the user aware of potential problems that might occur due to his configurations.
CACertificateValiditiesAcceptable:
This constraint indicates that there is at least one CA certificate which expires in less than 1y.
It will not be added to the .status.constraints if there is no such CA certificate.
However, if it’s visible, then a credentials rotation operation should be considered.
CRDsWithProblematicConversionWebhooks:
This constraint indicates that there is at least one CustomResourceDefinition in the cluster which has multiple stored versions and a conversion webhook configured. This could break the reconciliation flow of a Shoot cluster in some cases. See https://github.com/gardener/gardener/issues/7471 for more details.
It will not be added to the .status.constraints if there is no such CRD.
However, if it’s visible, then you should consider upgrading the existing objects to the current stored version. See Upgrade existing objects to a new stored version for detailed steps.
ManualInPlaceWorkersUpdated:
This constraint indicates that at least one worker pool with the update strategy ManualInPlaceUpdate is pending an update. Despite this, the Shoot reconciliation will still succeed.
The constraint is not added to .status.constraints if all such worker pools are already up-to-date.
Once the user manually labels all the relevant nodes with node.machine.sapcloud.io/selected-for-update and the update process completes, the constraint will be automatically removed.
Last Operation
The Shoot status holds information about the last operation that is performed on the Shoot. The last operation field reflects overall progress and the tasks that are currently being executed. Allowed operation types are Create, Reconcile, Delete, Migrate, and Restore. Allowed operation states are Processing, Succeeded, Error, Failed, Pending, and Aborted. An operation in Error state is an operation that will be retried for a configurable amount of time (controllers.shoot.retryDuration field in GardenletConfiguration, defaults to 12h). If the operation cannot complete successfully for the configured retry duration, it will be marked as Failed. An operation in Failed state is an operation that won’t be retried automatically (to retry such an operation, see Retry failed operation).
Last Errors
The Shoot status also contains information about the last occurred error(s) (if any) during an operation. A LastError consists of identifier of the task returned error, human-readable message of the error and error codes (if any) associated with the error.
Error Codes
Known error codes and their classification are:
| Error code | User error | Description |
|---|---|---|
ERR_INFRA_UNAUTHENTICATED | true | Indicates that the last error occurred due to the client request not being completed because it lacks valid authentication credentials for the requested resource. It is classified as a non-retryable error code. |
ERR_INFRA_UNAUTHORIZED | true | Indicates that the last error occurred due to the server understanding the request but refusing to authorize it. It is classified as a non-retryable error code. |
ERR_INFRA_QUOTA_EXCEEDED | true | Indicates that the last error occurred due to infrastructure quota limits. It is classified as a non-retryable error code. |
ERR_INFRA_RATE_LIMITS_EXCEEDED | false | Indicates that the last error occurred due to exceeded infrastructure request rate limits. |
ERR_INFRA_DEPENDENCIES | true | Indicates that the last error occurred due to dependent objects on the infrastructure level. It is classified as a non-retryable error code. |
ERR_RETRYABLE_INFRA_DEPENDENCIES | false | Indicates that the last error occurred due to dependent objects on the infrastructure level, but the operation should be retried. |
ERR_INFRA_RESOURCES_DEPLETED | true | Indicates that the last error occurred due to depleted resource in the infrastructure. |
ERR_CLEANUP_CLUSTER_RESOURCES | true | Indicates that the last error occurred due to resources in the cluster that are stuck in deletion. |
ERR_CONFIGURATION_PROBLEM | true | Indicates that the last error occurred due to a configuration problem. It is classified as a non-retryable error code. |
ERR_RETRYABLE_CONFIGURATION_PROBLEM | true | Indicates that the last error occurred due to a retryable configuration problem. “Retryable” means that the occurred error is likely to be resolved in a ungraceful manner after given period of time. |
ERR_PROBLEMATIC_WEBHOOK | true | Indicates that the last error occurred due to a webhook not following the Kubernetes best practices. |
Please note: Errors classified as User error: true do not require a Gardener operator to resolve but can be remediated by the user (e.g. by refreshing expired infrastructure credentials).
Even though ERR_INFRA_RATE_LIMITS_EXCEEDED and ERR_RETRYABLE_INFRA_DEPENDENCIES is mentioned as User error: false` operator can’t provide any resolution because it is related to cloud provider issue.
Status Label
Shoots will be automatically labeled with the shoot.gardener.cloud/status label.
Its value might either be healthy, progressing, unhealthy or unknown depending on the .status.conditions, .status.lastOperation, and status.lastErrors of the Shoot.
This can be used as an easy filter method to find shoots based on their “health” status.
4.13.11 - Shoot Supported Architectures
Supported CPU Architectures for Shoot Worker Nodes
Users can create shoot clusters with worker groups having virtual machines of different architectures. CPU architecture of each worker pool can be specified in the Shoot specification as follows:
Example Usage in a Shoot
spec:
provider:
workers:
- name: cpu-worker
machine:
architecture: <some-cpu-architecture> # optional
If no value is specified for the architecture field, it defaults to amd64. For a valid shoot object, a machine type should be present in the respective CloudProfile with the same CPU architecture as specified in the Shoot yaml. Also, a valid machine image should be present in the CloudProfile that supports the required architecture specified in the Shoot worker pool.
Example Usage in a CloudProfile
spec:
machineImages:
- name: test-image
versions:
- architectures: # optional
- <architecture-1>
- <architecture-2>
version: 1.2.3
machineTypes:
- architecture: <some-cpu-architecture>
cpu: "2"
gpu: "0"
memory: 8Gi
name: test-machine
Currently, Gardener supports two of the most widely used CPU architectures:
amd64arm64
4.13.12 - Shoot Worker Nodes Settings
Shoot Worker Nodes Settings
Users can configure settings affecting all worker nodes via .spec.provider.workersSettings in the Shoot resource.
SSH Access
SSHAccess indicates whether the sshd.service should be running on the worker nodes. This is ensured by a systemd service called sshd-ensurer.service which runs every 15 seconds on each worker node. When set to true, the systemd service ensures that the sshd.service is unmasked, enabled and running. If it is set to false, the systemd service ensures that sshd.service is disabled, masked and stopped. This also terminates all established SSH connections on the host. In addition, when this value is set to false, existing Bastion resources are deleted during Shoot reconciliation and new ones are prevented from being created, SSH keypairs are not created/rotated, SSH keypair secrets are deleted from the Garden cluster, and the gardener-user.service is not deployed to the worker nodes.
sshAccess.enabled is set to true by default.
Example Usage in a Shoot
spec:
provider:
workersSettings:
sshAccess:
enabled: false
4.13.13 - Shoot Workload Identity
Shoot Workload Identity
WorkloadIdentity is a resource that allows workloads to be presented before external systems by giving them identities managed by Gardener.
As WorkloadIdentitys do not directly contain credentials we gain the ability to create Shoots without the need of preliminary exchange of credentials.
For that to work users should establish trust to the Gardener Workload Identity Issuer in advance.
The issuer URL can be read from the Gardener Info ConfigMap.
Tip
Shoots that were previously usingSecrets as authentication method can also be migrated to useWorkloadIdentity. As thecredentialsReffield ofCredentialsBindingis immutable, one would have to create a newCredentialsBindingthat references aWorkloadIdentityand set the.spec.credentialsBindingNamefield of theShootto refer to the newly createdCredentialsBinding.
As of now WorkloadIdentity is supported for AWS, Azure and GCP. For detailed explanation on how to enable the feature, please consult the provider extension specific documentation:
4.13.14 - Workerless `Shoot`s
Workerless Shoots
Starting from v1.71, users can create a Shoot without any workers, known as a “workerless Shoot”. Previously, worker nodes had to always be included even if users only needed the Kubernetes control plane. With workerless Shoots, Gardener will not create any worker nodes or anything related to them.
Here’s an example manifest for a local workerless Shoot:
apiVersion: core.gardener.cloud/v1beta1
kind: Shoot
metadata:
name: local
namespace: garden-local
spec:
cloudProfile:
name: local
region: local
provider:
type: local
kubernetes:
version: 1.31.1
⚠️ It’s important to note that a workerless
Shootcannot be converted to aShootwith workers or vice versa.
As part of the control plane, the following components are deployed in the seed cluster for workerless Shoot:
- etcds
- kube-apiserver
- kube-controller-manager
- gardener-resource-manager
- logging and monitoring components
- extension components (if they support workerless
Shoots, see here)
4.14 - Shoot Operations
4.14.1 - Controlling the Kubernetes Versions for Specific Worker Pools
Controlling the Kubernetes Versions for Specific Worker Pools
Since Gardener v1.36, worker pools can have different Kubernetes versions specified than the control plane.
In earlier Gardener versions, all worker pools inherited the Kubernetes version of the control plane. Once the Kubernetes version of the control plane was modified, all worker pools have been updated as well (either by rolling the nodes in case of a minor version change, or in-place for patch version changes).
In order to gracefully perform Kubernetes upgrades (triggering a rolling update of the nodes) with workloads sensitive to restarts (e.g., those dealing with lots of data), it might be required to be able to gradually perform the upgrade process.
In such cases, the Kubernetes version for the worker pools can be pinned (.spec.provider.workers[].kubernetes.version) while the control plane Kubernetes version (.spec.kubernetes.version) is updated.
This results in the nodes being untouched while the control plane is upgraded.
Now a new worker pool (with the version equal to the control plane version) can be added.
Administrators can then reschedule their workloads to the new worker pool according to their upgrade requirements and processes.
Example Usage in a Shoot
spec:
kubernetes:
version: 1.27.4
provider:
workers:
- name: data1
kubernetes:
version: 1.26.8
- name: data2
- If
.kubernetes.versionis not specified in a worker pool, then the Kubernetes version of the kubelet is inherited from the control plane (.spec.kubernetes.version), i.e., in the above example, thedata2pool will use1.26.8. - If
.kubernetes.versionis specified in a worker pool, then it must meet the following constraints:- It must be at most two minor versions lower than the control plane version.
- If it was not specified before, then no downgrade is possible (you cannot set it to
1.26.8while.spec.kubernetes.versionis already1.27.4). The “two minor version skew” is only possible if the worker pool version is set to the control plane version and then the control plane was updated gradually by two minor versions. - If the version is removed from the worker pool, only one minor version difference is allowed to the control plane (you cannot upgrade a pool from version
1.25.0to1.27.0in one go).
Automatic updates of Kubernetes versions (see Shoot Maintenance) also apply to worker pool Kubernetes versions.
4.14.2 - SecretBinding to CredentialsBinding Migration
SecretBinding to CredentialsBinding Migration
With the introduction of the CredentialsBinding resource a new way of referencing credentials through the Shoot was created.
While SecretBindings can only reference Secrets, CredentialsBindings can also reference WorkloadIdentitys which provide an alternative authentication method.
WorkloadIdentitys do not directly contain credentials but are rather a representation of the workload that is going to access the user’s account.
As CredentialsBindings cover the functionality of SecretBindings, the latter are considered legacy and will be deprecated in the future.
This incurs the need for migration from SecretBinding to CredentialsBinding resources.
Note
Mind that the migration will be allowed only if the old
SecretBindingand the newCredentialsBindingrefer to the same exactSecret. One cannot do a direct migration to aCredentialsBindingthat reference aWorkloadIdentity. For information on how to useWorkloadIdentity, please refer to the following document.
Migration Path
A standard use of SecretBinding can look like the following example.
apiVersion: core.gardener.cloud/v1beta1
kind: SecretBinding
metadata:
name: infrastructure-credentials
namespace: garden-proj
provider:
type: foo-provider
secretRef:
name: infrastructure-credentials-secret
namespace: garden-proj
---
apiVersion: core.gardener.cloud/v1beta1
kind: Shoot
metadata:
name: bar
namespace: garden-proj
spec:
secretBindingName: infrastructure-credentials
...
In order to migrate to CredentialsBinding one should:
Create a
CredentialsBindingresource corresponding to the existingSecretBinding. The main difference is that we set thekindandapiVersionof the credentials that theCredentialsBindingis referencing.apiVersion: security.gardener.cloud/v1alpha1 kind: CredentialsBinding metadata: name: infrastructure-credentials namespace: garden-proj credentialsRef: apiVersion: v1 kind: Secret name: infrastructure-credentials-secret namespace: garden-proj provider: type: foo-providerReplace
secretBindingNamewithcredentialsBindingNamein theShootspec.apiVersion: core.gardener.cloud/v1beta1 kind: Shoot metadata: name: bar namespace: garden-proj spec: credentialsBindingName: infrastructure-credentials ...
4.14.3 - Shoot Credentials Rotation
Credentials Rotation for Shoot Clusters
There are a lot of different credentials for Shoots to make sure that the various components can communicate with each other and to make sure it is usable and operable.
This page explains how the varieties of credentials can be rotated so that the cluster can be considered secure.
User-Provided Credentials
Cloud Provider Keys
End-users must provide credentials such that Gardener and Kubernetes controllers can communicate with the respective cloud provider APIs in order to perform infrastructure operations. For example, Gardener uses them to set up and maintain the networks, security groups, subnets, etc., while the cloud-controller-manager uses them to reconcile load balancers and routes, and the CSI controller uses them to reconcile volumes and disks.
Depending on the cloud provider, the required data keys of the Secret differ.
Please consult the documentation of the respective provider extension documentation to get to know the concrete data keys (e.g., this document for AWS).
It is the responsibility of the end-user to regularly rotate those credentials. The following steps are required to perform the rotation:
- Update the data in the
Secretwith new credentials. - ⚠️ Wait until all
Shoots using theSecretare reconciled before you disable the old credentials in your cloud provider account! Otherwise, theShoots will no longer work as expected. Check out this document to learn how to trigger a reconciliation of yourShoots.- (Optional) If you want to verify that the new credentials are valid you can trigger immediate maintenance operation for the corresponding shoot cluster(s) and wait for to subsequent reconciliation(s) to complete successfully. The maintenance operation triggers infrastructure reconciliation during the subsequent shoot reconciliation which makes use of the new cloud provider credentials.
- After all
Shoots using theSecretwere reconciled, you can go ahead and deactivate the old credentials in your provider account.
Gardener-Provided Credentials
The below credentials are generated by Gardener when shoot clusters are being created. Those include:
- certificate authorities (and related server and client certificates)
- observability passwords for Plutono
- SSH key pair for worker nodes
- ETCD encryption key
ServiceAccounttoken signing key- …
🚨 There is no auto-rotation of those credentials, and it is the responsibility of the end-user to regularly rotate them.
While it is possible to rotate them one by one, there is also a convenient method to combine the rotation of all of those credentials. The rotation happens in two phases since it might be required to update some API clients (e.g., when CAs are rotated).
Prepare Rotation of All Credentials
In order to start the rotation (first phase), you have to annotate the shoot with the rotate-credentials-start operation:
kubectl -n <shoot-namespace> annotate shoot <shoot-name> gardener.cloud/operation=rotate-credentials-start
Tip
You can check the
.status.credentials.rotationfield in theShootto see when the rotation was last initiated and last completed.
Kindly consider the detailed descriptions below to learn how the rotation is performed and what your responsibilities are. Please note that all respective individual actions apply for this combined rotation as well (e.g., worker nodes are rolled out in the first phase).
Tip
If you don’t want the worker nodes to roll out immediately in this phase (and rather trigger it individually at a later time of your convenience), you can use the
rotate-credentials-start-without-workers-rolloutandrotate-rollout-workersoperations instead. Read up all about it here.
Complete Rotation of All Credentials
You can complete the rotation (second phase) by annotating the shoot with the rotate-credentials-complete operation:
kubectl -n <shoot-namespace> annotate shoot <shoot-name> gardener.cloud/operation=rotate-credentials-complete
Certificate Authorities
Gardener generates several certificate authorities (CAs) to ensure secured communication between the various components and actors.
Most of those CAs are used for internal communication (e.g., kube-apiserver talks to etcd, vpn-shoot talks to the vpn-seed-server, kubelet talks to kube-apiserver).
However, there is also the “cluster CA” which is part of all kubeconfigs and used to sign the server certificate exposed by the kube-apiserver.
Gardener populates a ConfigMap with the name <shoot-name>.ca-cluster in the project namespace in the garden cluster which contains the following data keys:
ca.crt: the CA bundle of the cluster
This bundle contains one or multiple CAs which are used for signing serving certificates of the Shoot’s API server.
Hence, the certificates contained in this ConfigMap can be used to verify the API server’s identity when communicating with its public endpoint (e.g., as certificate-authority-data in a kubeconfig).
This is the same certificate that is also contained in the kubeconfig’s certificate-authority-data field.
Shoots created with Gardener >= v1.45 have a dedicated client CA which verifies the legitimacy of client certificates. For olderShoots, the client CA is equal to the cluster CA. With the first CA rotation, such clusters will get a dedicated client CA as well.
All the certificates are valid for 10 years.
Since it requires adaptation for the consumers of the Shoot, there is no automatic rotation, and it is the responsibility of the end-user to regularly rotate the CA certificates.
The rotation happens in three stages (see also GEP-18 for the full details):
- In stage one, new CAs are created and added to the bundle (together with the old CAs). Client certificates are re-issued immediately.
- In stage two, end-users update all cluster API clients that communicate with the control plane.
- In stage three, the old CAs are dropped from the bundle and server certificate are re-issued.
Technically, the Preparing phase indicates stage one.
Once it is completed, the Prepared phase indicates readiness for stage two.
The Completing phase indicates stage three, and the Completed phase states that the rotation process has finished.
You can check the
.status.credentials.rotation.certificateAuthoritiesfield in theShootto see when the rotation was last initiated, last completed, and in which phase it currently is.
In order to start the rotation (stage one), you have to annotate the shoot with the rotate-ca-start operation:
kubectl -n <shoot-namespace> annotate shoot <shoot-name> gardener.cloud/operation=rotate-ca-start
This will trigger a Shoot reconciliation and performs stage one.
After it is completed, the .status.credentials.rotation.certificateAuthorities.phase is set to Prepared.
Now you must update all API clients outside the cluster (such as the kubeconfigs on developer machines) to use the newly issued CA bundle in the <shoot-name>.ca-cluster ConfigMap.
Please also note that client certificates must be re-issued now.
After updating all API clients, you can complete the rotation by annotating the shoot with the rotate-ca-complete operation:
kubectl -n <shoot-namespace> annotate shoot <shoot-name> gardener.cloud/operation=rotate-ca-complete
This will trigger another Shoot reconciliation and performs stage three.
After it is completed, the .status.credentials.rotation.certificateAuthorities.phase is set to Completed.
You could update your API clients again and drop the old CA from their bundle.
Note that the CA rotation also rotates all internal CAs and signed certificates. Hence, most of the components need to be restarted (including etcd and
kube-apiserver).⚠️ In stage one, all worker nodes of the
Shootwill be rolled out to ensure that thePods as well as thekubelets get the updated credentials as well.
Triggering Worker Node Rollout Individually
If you don’t want that all worker nodes of the Shoot get rolled out in phase one, you can start the rotation with rotate-ca-start-without-workers-rollout instead of rotate-ca-start.
This allows you to trigger the worker node rollout individually (per worker pool) whenever you are ready for it.
Using this annotation will trigger a Shoot reconciliation and performs stage one.
While it’s running, .status.credentials.rotation.certificateAuthorities.phase is set to PreparingWithoutWorkersRollout.
Once completed, the phase transitions to WaitingForWorkersRollout.
Now you can update all API clients outside the cluster (see above) and also trigger the rollout of your worker pools like this:
kubectl -n <shoot-namespace> annotate shoot <shoot-name> gardener.cloud/operation=rotate-rollout-workers=<pool1-name>[,<pool2-name>,...]
You can check which worker pools still need to be rolled by reading .status.credentials.rotation.certificateAuthorities.pendingWorkersRollouts[].name.
Once this list is empty, the phase transitions to Prepared.
Now you can just complete the rotation as usual (see above).
Worker Node with ManualInPlaceUpdate Update Strategy
In case of manual in-place update, shoot CA rotation phase will be at Preparing until all the worker pools are successfully in-place updated and there are no pending worker pools with strategy ManualInPlaceUpdate.
You can check which worker pools still need to be updated by reading .status.inPlaceUpdates.pendingWorkerUpdates.manualInPlaceUpdate.
Once this list is empty, the phase transitions to Prepared.
After this rotation will be completed as usual (see above).
Observability Password(s) For Plutono and Prometheus
For Shoots with .spec.purpose!=testing, Gardener deploys an observability stack with Prometheus for monitoring, Alertmanager for alerting (optional), Vali for logging, and Plutono for visualization.
The Plutono instance is exposed via Ingress and accessible for end-users via basic authentication credentials generated and managed by Gardener.
Those credentials are stored in a Secret with the name <shoot-name>.monitoring in the project namespace in the garden cluster and has multiple data keys:
username: the usernamepassword: the passwordauth: the username with SHA-1 representation of the password
It is the responsibility of the end-user to regularly rotate those credentials.
In order to rotate the password, annotate the Shoot with gardener.cloud/operation=rotate-observability-credentials.
This operation is not allowed for Shoots that are already marked for deletion.
kubectl -n <shoot-namespace> annotate shoot <shoot-name> gardener.cloud/operation=rotate-observability-credentials
You can check the
.status.credentials.rotation.observabilityfield in theShootto see when the rotation was last initiated and last completed.
SSH Key Pair for Worker Nodes
Gardener generates an SSH key pair whose public key is propagated to all worker nodes of the Shoot.
The private key can be used to establish an SSH connection to the workers for troubleshooting purposes.
It is recommended to use gardenctl-v2 and its gardenctl ssh command since it is required to first open up the security groups and create a bastion VM (no direct SSH access to the worker nodes is possible).
The private key is stored in a Secret with the name <shoot-name>.ssh-keypair in the project namespace in the garden cluster and has multiple data keys:
id_rsa: the private keyid_rsa.pub: the public key for SSH
In order to rotate the keys, annotate the Shoot with gardener.cloud/operation=rotate-ssh-keypair.
This will propagate a new key to all worker nodes while keeping the old key active and valid as well (it will only be invalidated/removed with the next rotation).
kubectl -n <shoot-namespace> annotate shoot <shoot-name> gardener.cloud/operation=rotate-ssh-keypair
You can check the
.status.credentials.rotation.sshKeypairfield in theShootto see when the rotation was last initiated or last completed.
The old key is stored in a Secret with the name <shoot-name>.ssh-keypair.old in the project namespace in the garden cluster and has the same data keys as the regular Secret.
ETCD Encryption Key
This key is used to encrypt the data of Secret resources inside etcd (see upstream Kubernetes documentation).
The encryption key has no expiration date. There is no automatic rotation, and it is the responsibility of the end-user to regularly rotate the encryption key.
The rotation happens in three stages:
- In stage one, a new encryption key is created and added to the bundle (together with the old encryption key).
- In stage two, all
Secrets in the cluster and resources configured in thespec.kubernetes.kubeAPIServer.encryptionConfigof the Shoot (see ETCD Encryption Config) are rewritten by thekube-apiserverso that they become encrypted with the new encryption key. - In stage three, the old encryption is dropped from the bundle.
Technically, the Preparing phase indicates the stages one and two.
Once it is completed, the Prepared phase indicates readiness for stage three.
The Completing phase indicates stage three, and the Completed phase states that the rotation process has finished.
You can check the
.status.credentials.rotation.etcdEncryptionKeyfield in theShootto see when the rotation was last initiated, last completed, and in which phase it currently is.
In order to start the rotation (stage one), you have to annotate the shoot with the rotate-etcd-encryption-key-start operation:
kubectl -n <shoot-namespace> annotate shoot <shoot-name> gardener.cloud/operation=rotate-etcd-encryption-key-start
This will trigger a Shoot reconciliation and performs the stages one and two.
After it is completed, the .status.credentials.rotation.etcdEncryptionKey.phase is set to Prepared.
Now you can complete the rotation by annotating the shoot with the rotate-etcd-encryption-key-complete operation:
kubectl -n <shoot-namespace> annotate shoot <shoot-name> gardener.cloud/operation=rotate-etcd-encryption-key-complete
This will trigger another Shoot reconciliation and performs stage three.
After it is completed, the .status.credentials.rotation.etcdEncryptionKey.phase is set to Completed.
ServiceAccount Token Signing Key
Gardener generates a key which is used to sign the tokens for ServiceAccounts.
Those tokens are typically used by workload Pods running inside the cluster in order to authenticate themselves with the kube-apiserver.
This also includes system components running in the kube-system namespace.
The token signing key has no expiration date.
Since it might require adaptation for the consumers of the Shoot, there is no automatic rotation, and it is the responsibility of the end-user to regularly rotate the signing key.
The rotation happens in three stages, similar to how the CA certificates are rotated:
- In stage one, a new signing key is created and added to the bundle (together with the old signing key).
- In stage two, end-users update all out-of-cluster API clients that communicate with the control plane via
ServiceAccounttokens. - In stage three, the old signing key is dropped from the bundle.
Technically, the Preparing phase indicates stage one.
Once it is completed, the Prepared phase indicates readiness for stage two.
The Completing phase indicates stage three, and the Completed phase states that the rotation process has finished.
You can check the
.status.credentials.rotation.serviceAccountKeyfield in theShootto see when the rotation was last initiated, last completed, and in which phase it currently is.
In order to start the rotation (stage one), you have to annotate the shoot with the rotate-serviceaccount-key-start operation:
kubectl -n <shoot-namespace> annotate shoot <shoot-name> gardener.cloud/operation=rotate-serviceaccount-key-start
This will trigger a Shoot reconciliation and performs stage one.
After it is completed, the .status.credentials.rotation.serviceAccountKey.phase is set to Prepared.
Now you must update all API clients outside the cluster using a ServiceAccount token (such as the kubeconfigs on developer machines) to use a token issued by the new signing key.
Gardener already generates new secrets for those ServiceAccounts in the cluster, whose static token was automatically created by Kubernetes (typically before v1.22 - ref)
However, if you need to create it manually, you can check out this document for instructions.
After updating all API clients, you can complete the rotation by annotating the shoot with the rotate-serviceaccount-key-complete operation:
kubectl -n <shoot-namespace> annotate shoot <shoot-name> gardener.cloud/operation=rotate-serviceaccount-key-complete
This will trigger another Shoot reconciliation and performs stage three.
After it is completed, the .status.credentials.rotation.serviceAccountKey.phase is set to Completed.
⚠️ In stage one, all worker nodes of the
Shootwill be rolled out to ensure that thePods use a new token.
Triggering Worker Node Rollout Individually
Similar to the rotation of the certificate authorities, you can control the worker node rollout individually.
Please read this section to get more information.
It works the same way for the ServiceAccount token signing key (using rotate-serviceaccount-key-start-without-workers-rollout).
Worker Node with ManualInPlaceUpdate Update Strategy
Similar to the rotation of the certificate authorities, in case of manual in-place update, ServiceAccount token signing key rotation phase will be at Preparing until all the worker pools are successfully in-place updated and there are no pending worker pools with strategy ManualInPlaceUpdate.
Please read this section for more information.
OpenVPN TLS Auth Keys
This key is used to ensure encrypted communication for the VPN connection between the control plane in the seed cluster and the shoot cluster. It is currently not rotated automatically and there is no way to trigger it manually.
4.14.4 - Shoot Kubernetes and Operating System Versioning in Gardener
Shoot Kubernetes and Operating System Versioning in Gardener
Motivation
On the one hand-side, Gardener is responsible for managing the Kubernetes and the Operating System (OS) versions of its Shoot clusters. On the other hand-side, Gardener needs to be configured and updated based on the availability and support of the Kubernetes and Operating System version it provides. For instance, the Kubernetes community releases minor versions roughly every three months and usually maintains three minor versions (the current and the last two) with bug fixes and security updates. Patch releases are done more frequently.
When using the term Machine image in the following, we refer to the OS version that comes with the machine image of the node/worker pool of a Gardener Shoot cluster.
As such, we are not referring to the CloudProvider specific machine image like the AMI for AWS.
For more information on how Gardener maps machine image versions to CloudProvider specific machine images, take a look at the individual gardener extension providers, such as the provider for AWS.
Gardener should be configured accordingly to reflect the “logical state” of a version. It should be possible to define the Kubernetes or Machine image versions that still receive bug fixes and security patches, and also vice-versa to define the version that are out-of-maintenance and are potentially vulnerable. Moreover, this allows Gardener to “understand” the current state of a version and act upon it (more information in the following sections).
Overview
As a Gardener operator:
- I can classify a version based on it’s logical state (
preview,supported,deprecated, andexpired; see Version Classification). - I can define which Machine image and Kubernetes versions are eligible for the auto update of clusters during the maintenance time.
- I can define a moment in time when Shoot clusters are forcefully migrated off a certain version (through an
expirationDate). - I can define an update path for machine images for auto and force updates; see Update path for machine image versions).
- I can disallow the creation of clusters having a certain version (think of severe security issues).
As an end-user/Shoot owner of Gardener:
- I can get information about which Kubernetes and Machine image versions exist and their classification.
- I can determine the time when my Shoot clusters Machine image and Kubernetes version will be forcefully updated to the next patch or minor version (in case the cluster is running a deprecated version with an expiration date).
- I can get this information via API from the
CloudProfile.
Version Classifications
Administrators can classify versions into four distinct “logical states”: preview, supported, deprecated, and expired.
The version classification serves as a “point-of-reference” for end-users and also has implications during shoot creation and the maintenance time.
If a version is unclassified, Gardener cannot make those decision based on the “logical state”.
Nevertheless, Gardener can operate without version classifications and can be added at any time to the Kubernetes and machine image versions in the CloudProfile.
As a best practice, versions usually start with the classification preview, then are promoted to supported, eventually deprecated and finally expired.
This information is programmatically available in the CloudProfiles of the Garden cluster.
preview: A
previewversion is a new version that has not yet undergone thorough testing, possibly a new release, and needs time to be validated. Due to its short early age, there is a higher probability of undiscovered issues and is therefore not yet recommended for production usage. A Shoot does not update (neitherauto-updateorforce-update) to apreviewversion during the maintenance time. Also,previewversions are not considered for the defaulting to the highest available version when deliberately omitting the patch version during Shoot creation. Typically, after a fresh release of a new Kubernetes (e.g., v1.25.0) or Machine image version (e.g., suse-chost 15.4.20220818), the operator tags it aspreviewuntil they have gained sufficient experience and regards this version to be reliable. After the operator has gained sufficient trust, the version can be manually promoted tosupported.supported: A
supportedversion is the recommended version for new and existing Shoot clusters. This is the version that new Shoot clusters should use and existing clusters should update to. Typically for Kubernetes versions, the latest Kubernetes patch versions of the actual (if not still inpreview) and the last 3 minor Kubernetes versions are maintained by the community. An operator could define these versions as beingsupported(e.g., v1.27.6, v1.26.10, and v1.25.12).deprecated: A
deprecatedversion is a version that approaches the end of its lifecycle and can contain issues which are probably resolved in a supported version. New Shoots should not use this version anymore. Existing Shoots will be updated to a newer version ifauto-updateis enabled (.spec.maintenance.autoUpdate.kubernetesVersionfor Kubernetes versionauto-update, or.spec.maintenance.autoUpdate.machineImageVersionfor machine image versionauto-update). Using automatic upgrades, however, does not guarantee that a Shoot runs a non-deprecated version, as the latest version (overall or of the minor version) can be deprecated as well. Deprecated versions should have an expiration date set for eventual expiration.expired: An
expiredversions has an expiration date (based on the Golang time package) in the past. New clusters with that version cannot be created and existing clusters are forcefully migrated to a higher version during the maintenance time.
Below is an example how the relevant section of the CloudProfile might look like:
apiVersion: core.gardener.cloud/v1beta1
kind: CloudProfile
metadata:
name: alicloud
spec:
kubernetes:
versions:
- classification: preview
version: 1.27.0
- classification: preview
version: 1.26.3
- classification: supported
version: 1.26.2
- classification: preview
version: 1.25.5
- classification: supported
version: 1.25.4
- classification: supported
version: 1.24.6
- classification: deprecated
expirationDate: "2022-11-30T23:59:59Z"
version: 1.24.5
Automatic Version Upgrades
There are two ways, the Kubernetes version of the control plane as well as the Kubernetes and machine image version of a worker pool can be upgraded: auto update and forceful update.
See Automatic Version Updates for how to enable auto updates for Kubernetes or machine image versions on the Shoot cluster.
If a Shoot is running a version after its expiration date has passed, it will be forcefully updated during its maintenance time. This happens even if the owner has opted out of automatic cluster updates!
When an auto update is triggered?:
- The
Shoothas auto-update enabled and the version is not the latest eligible version for the auto-update. Please note that this latest version that qualifies for an auto-update is not necessarily the overall latest version in the CloudProfile:- For Kubernetes version, the latest eligible version for auto-updates is the latest patch version of the current minor.
- For machine image version, the latest eligible version for auto-updates is controlled by the
updateStrategyfield of the machine image in the CloudProfile.
- The
Shoothas auto-update disabled and the version is either expired or does not exist.
The auto update can fail if the version is already on the latest eligible version for the auto-update. A failed auto update triggers a force update. The force and auto update path for Kubernetes and machine image versions differ slightly and are described in more detail below.
Update rules for both Kubernetes and machine image versions
- Both auto and force update first try to update to the latest patch version of the same minor.
- An auto update prefers supported versions over deprecated versions. If there is a lower supported version and a higher deprecated version, auto update will pick the supported version. If all qualifying versions are deprecated, update to the latest deprecated version.
- An auto update never updates to an expired version.
- A force update prefers to update to not-expired versions. If all qualifying versions are expired, update to the latest expired version. Please note that therefore multiple consecutive version upgrades are possible. In this case, the version is again upgraded in the next maintenance time.
Update path for machine image versions
Administrators can define three different update strategies (field updateStrategy) for machine images in the CloudProfile: patch, minor, major (default). This is to accommodate the different version schemes of Operating Systems (e.g. Gardenlinux only updates major and minor versions with occasional patches).
patch: update to the latest patch version of the current minor version. When using an expired version: force update to the latest patch of the current minor. If already on the latest patch version, then force update to the next higher (not necessarily +1) minor version.minor: update to the latest minor and patch version. When using an expired version: force update to the latest minor and patch of the current major. If already on the latest minor and patch of the current major, then update to the next higher (not necessarily +1) major version.major: always update to the overall latest version. This is the legacy behavior for automatic machine image version upgrades. Force updates are not possible and will fail if the latest version in the CloudProfile for that image is expired (EOL scenario).
Example configuration in the CloudProfile:
machineImages:
- name: gardenlinux
updateStrategy: minor
versions:
- version: 1096.1.0
- version: 934.8.0
- version: 934.7.0
- name: suse-chost
updateStrategy: patch
versions:
- version: 15.3.20220818
- version: 15.3.20221118
Please note that force updates for machine images can skip minor versions (strategy: patch) or major versions (strategy: minor) if the next minor/major version has no qualifying versions (only preview versions).
Update path for Kubernetes versions
For Kubernetes versions, the auto update picks the latest non-preview patch version of the current minor version.
If the cluster is already on the latest patch version and the latest patch version is also expired, it will continue with the latest patch version of the next consecutive minor (minor +1) Kubernetes version, so it will result in an update of a minor Kubernetes version!
Kubernetes “minor version jumps” are not allowed - meaning to skip the update to the consecutive minor version and directly update to any version after that.
For instance, the version 1.24.x can only update to a version 1.25.x, not to 1.26.x or any other version.
This is because Kubernetes does not guarantee upgradability in this case, leading to possibly broken Shoot clusters.
The administrator has to set up the CloudProfile in such a way that consecutive Kubernetes minor versions are available.
Otherwise, Shoot clusters will fail to upgrade during the maintenance time.
Consider the CloudProfile below with a Shoot using the Kubernetes version 1.24.12.
Even though the version is expired, due to missing 1.25.x versions, the Gardener Controller Manager cannot upgrade the Shoot’s Kubernetes version.
spec:
kubernetes:
versions:
- version: 1.26.10
- version: 1.26.9
- version: 1.24.12
expirationDate: "<expiration date in the past>"
The CloudProfile must specify versions 1.25.x of the consecutive minor version.
Configuring the CloudProfile in such a way, the Shoot’s Kubernetes version will be upgraded to version 1.25.10 in the next maintenance time.
spec:
kubernetes:
versions:
- version: 1.26.9
- version: 1.25.10
- version: 1.25.9
- version: 1.24.12
expirationDate: "<expiration date in the past>"
Version Requirements (Kubernetes and Machine Image)
The Gardener API server enforces the following requirements for versions:
- A version that is in use by a Shoot cannot be deleted from the
CloudProfile. - Creating a new version with expiration date in the past is not allowed.
- There can be only one
supportedversion per minor version. - The latest Kubernetes version cannot have an expiration date.
- NOTE: The latest version for a machine image can have an expiration date. [*]
[*] Useful for cases in which support for a given machine image needs to be deprecated and removed (for example, the machine image reaches end of life).
Related Documentation
You might want to read about the Shoot Updates and Upgrades procedures to get to know the effects of such operations.
4.14.5 - Shoot Updates and Upgrades
Shoot Updates and Upgrades
This document describes what happens during shoot updates (changes incorporated in a newly deployed Gardener version) and during shoot upgrades (changes for version controllable by end-users).
Updates
Updates to all aspects of the shoot cluster happen when the gardenlet reconciles the Shoot resource.
When are Reconciliations Triggered
Generally, when you change the specification of your Shoot the reconciliation will start immediately, potentially updating your cluster.
Please note that you can also confine the reconciliation triggered due to your specification updates to the cluster’s maintenance time window. Please find more information in Confine Specification Changes/Updates Roll Out.
You can also annotate your shoot with special operation annotations (for more information, see Trigger Shoot Operations), which will cause the reconciliation to start due to your actions.
There is also an automatic reconciliation by Gardener.
The period, i.e., how often it is performed, depends on the configuration of the Gardener administrators/operators.
In some Gardener installations the operators might enable “reconciliation in maintenance time window only” (for more information, see Cluster Reconciliation), which will result in at least one reconciliation during the time configured in the Shoot’s .spec.maintenance.timeWindow field.
Which Updates are Applied
As end-users can only control the Shoot resource’s specification but not the used Gardener version, they don’t have any influence on which of the updates are rolled out (other than those settings configurable in the Shoot).
A Gardener operator can deploy a new Gardener version at any point in time.
Any subsequent reconciliation of Shoots will update them by rolling out the changes incorporated in this new Gardener version.
Some examples for such shoot updates are:
- Add a new/remove an old component to/from the shoot’s control plane running in the seed, or to/from the shoot’s system components running on the worker nodes.
- Change the configuration of an existing control plane/system component.
- Restart of existing control plane/system components (this might result in a short unavailability of the Kubernetes API server, e.g., when etcd or a kube-apiserver itself is being restarted)
Behavioural Changes
Generally, some of such updates (e.g., configuration changes) could theoretically result in different behaviour of controllers. If such changes would be backwards-incompatible, then we usually follow one of those approaches (depends on the concrete change):
- Only apply the change for new clusters.
- Expose a new field in the
Shootresource that lets users control this changed behaviour to enable it at a convenient point in time. - Put the change behind an alpha feature gate (disabled by default) in the gardenlet (only controllable by Gardener operators), which will be promoted to beta (enabled by default) in subsequent releases (in this case, end-users have no influence on when the behaviour changes - Gardener operators should inform their end-users and provide clear timelines when they will enable the feature gate).
Upgrades
We consider shoot upgrades to change either the:
- Kubernetes version (
.spec.kubernetes.version) - Kubernetes version of the worker pool if specified (
.spec.provider.workers[].kubernetes.version) - Machine image version of at least one worker pool (
.spec.provider.workers[].machine.image.version)
Generally, an upgrade is also performed through a reconciliation of the Shoot resource, i.e., the same concepts as for shoot updates apply.
If an end-user triggers an upgrade (e.g., by changing the Kubernetes version) after a new Gardener version was deployed but before the shoot was reconciled again, then this upgrade might incorporate the changes delivered with this new Gardener version.
The UpdateStrategy field in the Shoot specification (.spec.provider.workers[].updateStrategy) gives users the flexibility to define how the machine-controller-manager handles worker pool updates during the upgrade process. Currently gardener support three update strategies:
AutoRollingUpdateAutoInPlaceUpdateManualInPlaceUpdate
⚠️ The above strategies generally require draining the node when changes are made to the
Shootspecification. The specific changes that trigger this behavior will be discussed in later sections. For all other spec changes like Kubernetes patch version update, the upgrade is executed without draining the node and the shoot worker nodes remain unchanged. In case of Kubernetes patch version, only thekubeletprocess is restarted with the updated Kubernetes version binary.
Rolling Updates
The upgrade is performed in a “rolling update” manner, during which nodes in the worker pool are replaced. Similar to how pods in Kubernetes are updated when backed by a Deployment.
Worker nodes are terminated one after another and replaced by new nodes.
The existing workload is gracefully drained and evicted from the old worker nodes to new worker nodes, respecting the configured PodDisruptionBudgets (see Specifying a Disruption Budget for your Application).
Automatic Rolling Updates
When the auto rolling update strategy is selected, the update process is fully orchestrated by the Gardener and the machine-controller-manager. The machine-controller-manager sequentially terminates the worker nodes and replaces them with new nodes.
ℹ️ This is the
defaultupdate strategy.
To create workers with AutoRollingUpdate, either omit the Shoot's .spec.provider.workers[].updateStrategy field (it will default to AutoRollingUpdate) or explicitly set the field to AutoRollingUpdate.
spec:
provider:
workers:
- name: cpu-worker
maxSurge: 0
maxUnavailable: 2
updateStrategy: AutoRollingUpdate
Customize Rolling Update Behaviour of Shoot Worker Nodes
The .spec.provider.workers[] list exposes two fields that you might configure based on your workload’s needs: maxSurge and maxUnavailable.
The same concepts like in Kubernetes apply.
Additionally, you might customize how the machine-controller-manager is behaving. You can configure the following fields in .spec.provider.worker[].machineControllerManager:
machineDrainTimeout: Timeout (in duration) used while draining of machine before deletion, beyond whichmachine-controller-managerforcefully deletes the machine (default:2h).machineHealthTimeout: Timeout (in duration) used while re-joining (in case of temporary health issues) of a machine before it is declared as failed (default:10m).machineCreationTimeout: Timeout (in duration) used while joining (during creation) of a machine before it is declared as failed (default:10m).maxEvictRetries: Maximum number of times evicts would be attempted on a pod before it is forcibly deleted during the draining of a machine (default:10).nodeConditions: List of case-sensitive node-conditions which will change a machine to aFailedstate after themachineHealthTimeoutduration. It may further be replaced with a new machine if the machine is backed by a machine-set object (defaults:KernelDeadlock,ReadonlyFilesystem,DiskPressure).
Rolling Update Triggers
A rolling update of the shoot worker nodes is triggered for some changes to your worker pool specification (.spec.provider.workers[], even if you don’t change the Kubernetes or machine image version).
The complete list of fields that trigger a rolling update:
.spec.kubernetes.version(except for patch version changes).spec.provider.workers[].machine.image.name.spec.provider.workers[].machine.image.version.spec.provider.workers[].machine.type.spec.provider.workers[].volume.type.spec.provider.workers[].volume.size.spec.provider.workers[].providerConfig(provider extension dependent with feature gateNewWorkerPoolHash).spec.provider.workers[].cri.name.spec.provider.workers[].kubernetes.version(except for patch version changes).spec.systemComponents.nodeLocalDNS.enabled.status.credentials.rotation.certificateAuthorities.lastInitiationTime(changed by Gardener when a shoot CA rotation is initiated) when worker pool is not part of.status.credentials.rotation.certificateAuthorities.pendingWorkersRollouts[].status.credentials.rotation.serviceAccountKey.lastInitiationTime(changed by Gardener when a shoot service account signing key rotation is initiated) when worker pool is not part of.status.credentials.rotation.serviceAccountKey.pendingWorkersRollouts[]
If feature gate NewWorkerPoolHash is enabled:
.spec.kubernetes.kubelet.kubeReserved(unless a worker pool-specific value is set).spec.kubernetes.kubelet.systemReserved(unless a worker pool-specific value is set).spec.kubernetes.kubelet.evictionHard(unless a worker pool-specific value is set).spec.kubernetes.kubelet.cpuManagerPolicy(unless a worker pool-specific value is set).spec.provider.workers[].kubernetes.kubelet.kubeReserved.spec.provider.workers[].kubernetes.kubelet.systemReserved.spec.provider.workers[].kubernetes.kubelet.evictionHard.spec.provider.workers[].kubernetes.kubelet.cpuManagerPolicy
Changes to kubeReserved or systemReserved do not trigger a node roll if their sum does not change.
Generally, the provider extension controllers might have additional constraints for changes leading to rolling updates, so please consult the respective documentation as well.
In particular, if the feature gate NewWorkerPoolHash is enabled and a worker pool uses the new hash, then the providerConfig as a whole is not included. Instead only fields selected by the provider extension are considered.
In-Place Updates
For scenarios where users want to retain the current nodes and avoid deletion during updates, Gardener provides the option of in-place updates. The upgrade is performed without replacing the underlying machines. Although there is an exception where new nodes are created with the updated configuration and old ones are terminated. One such exception is discussed in Automatic inplace update section.
The existing workload is gracefully drained and evicted from the worker nodes, respecting the configured PodDisruptionBudgets (see Specifying a Disruption Budget for your Application).
ℹ️ Currently,
in-placeupdates are controlled by theInPlaceNodeUpdatesfeature gate in thegardener-apiserver.
For in-place updates, the first requirement is that the operating system must support them. For a specific machine image version, the configuration for in-place updates must be defined in the CloudProfile under spec.machineImages[].versions[].inPlaceUpdates:
- The
inPlaceUpdates.supportedfield must be set totrue. - The
inPlaceUpdates.minVersionForUpdatefield specifies the minimum version from which an in-place update to the target machine image version can be performed.
machineImages:
- name: gardenlinux
versions:
- version: 1632.0.0
inPlaceUpdates:
supported: true
minVersionForUpdate: 1630.0.0
The inPlaceUpdates field in the Shoot status provides details about in-place updates for the Shoot workers. It includes the pendingWorkerUpdates field, which lists the worker pools that are awaiting in-place updates.
Customize In-Place Update Behaviour of Shoot Worker Nodes
In addition to customisable fields mentioned in section, you can configure the following fields in .spec.provider.worker[].machineControllerManager:
MachineInPlaceUpdateTimeout: Timeout (in duration) after which an in-place update is declared as failed.DisableHealthTimeout: A boolean value that, when set totrue, ignores the health timeout. As a result, machines are never marked as failed, and unhealthy machines are not deleted. The default value istruefor in-place updates.
In-Place Update Triggers
An in-place update of the shoot worker nodes is triggered for rolling update triggers listed under Rolling Update Triggers except for the following:
.spec.provider.workers[].machine.image.name.spec.provider.workers[].machine.type.spec.provider.workers[].volume.type.spec.provider.workers[].volume.size.spec.provider.workers[].cri.name.spec.systemComponents.nodeLocalDNS.enabled
There are validations which restricts changing the above mentioned exception fields when
in-placeupdates strategy is configured.
When a worker pool is undergoing an in-place update, applying subsequent updates to the same worker pool is restricted.
If an in-place update fails and nodes are left in a problematic state, user intervention is required to manually fix the nodes. In cases where a subsequent update is necessary to resolve the issue, users can update the worker pool after adding the force update annotation gardener.cloud/operation=force-in-place-update on the Shoot. Refer to Force-update a worker pool with InPlace update strategy for more details.
⚠️ Changing the update strategy from
AutoRollingUpdatetoAutoInPlaceUpdate/ManualInPlaceUpdate(and vice versa) is not allowed. However, switching betweenAutoInPlaceUpdateandManualInPlaceUpdateis permitted.
Automatic In-Place Updates
In case of AutoInPlaceUpdate update strategy, the update process is fully orchestrated by Gardener and the machine-controller-manager. No user intervention is required.
Set .spec.provider.workers[].updateStrategy field in the Shoot spec to AutoInPlaceUpdate.
spec:
provider:
workers:
- name: cpu-worker
maxSurge: 0
maxUnavailable: 2
updateStrategy: AutoInPlaceUpdate
During automatic in-place updates, if the maxSurge value is set to greater than 0, the machine-controller-manager creates new nodes equal to the maxSurge value. All old nodes, except for those equal to the maxSurge value, are updated in place, and the old nodes corresponding to the maxSurge value are terminated. If maxSurge is set to 0, no new nodes are created and all old nodes are updated in-place.
The inPlaceUpdates.pendingWorkerUpdates.autoInPlaceUpdate field in the Shoot status lists the names of worker pools that are pending updates with this strategy.
Manual In-Place Updates
The ManualInPlaceUpdate strategy allows users to control and orchestrate the update process manually.
Set .spec.provider.workers[].updateStrategy field in the Shoot spec to ManualInPlaceUpdate.
spec:
provider:
workers:
- name: cpu-worker
maxSurge: 0
maxUnavailable: 2
updateStrategy: ManualInPlaceUpdate
Once machine-controller-manager labels nodes with node.machine.sapcloud.io/candidate-for-update, user can select the candidate nodes for update by labeling them with node.machine.sapcloud.io/selected-for-update=true:
kubectl label node <node-name> node.machine.sapcloud.io/selected-for-update=true
The ManualInPlaceWorkersUpdated constraint in the shoot status indicates that at least one worker pool with the ManualInPlaceUpdate strategy is pending an update. Shoot reconciliation will still succeed even if there are worker pools pending updates.
The inPlaceUpdates.pendingWorkerUpdates.manualInPlaceUpdate field in the Shoot status lists the names of worker pools that are pending updates with this strategy.
Related Documentation
4.14.6 - Supported Kubernetes Versions
Supported Kubernetes Versions
Currently, Gardener supports the following Kubernetes versions:
Garden Clusters
The minimum version of a garden cluster that can be used to run Gardener is 1.27.x.
Seed Clusters
The minimum version of a seed cluster that can be connected to Gardener is 1.27.x.
Shoot Clusters
Gardener itself is capable of spinning up clusters with Kubernetes versions 1.27 up to 1.33.
However, the concrete versions that can be used for shoot clusters depend on the installed provider extension.
Consequently, please consult the documentation of your provider extension to see which Kubernetes versions are supported for shoot clusters.
👨🏼💻 Developers note: The Adding Support For a New Kubernetes Version topic explains what needs to be done in order to add support for a new Kubernetes version.
4.14.7 - Trigger Shoot Operations Through Annotations
Trigger Shoot Operations Through Annotations
You can trigger a few explicit operations by annotating the Shoot with an operation annotation.
This might allow you to induct certain behavior without the need to change the Shoot specification.
Some of the operations can also not be caused by changing something in the shoot specification because they can’t properly be reflected here.
Note that once the triggered operation is considered by the controllers, the annotation will be automatically removed and you have to add it each time you want to trigger the operation.
Please note: If .spec.maintenance.confineSpecUpdateRollout=true, then the only way to trigger a shoot reconciliation is by setting the reconcile operation, see below.
Immediate Reconciliation
Annotate the shoot with gardener.cloud/operation=reconcile to make the gardenlet start a reconciliation operation without changing the shoot spec and possibly without being in its maintenance time window:
kubectl -n garden-<project-name> annotate shoot <shoot-name> gardener.cloud/operation=reconcile
Immediate Maintenance
Annotate the shoot with gardener.cloud/operation=maintain to make the gardener-controller-manager start maintaining your shoot immediately (possibly without being in its maintenance time window).
If no reconciliation starts, then nothing needs to be maintained:
kubectl -n garden-<project-name> annotate shoot <shoot-name> gardener.cloud/operation=maintain
Retry Failed Reconciliation
Annotate the shoot with gardener.cloud/operation=retry to make the gardenlet start a new reconciliation loop on a failed shoot.
Failed shoots are only reconciled again if a new Gardener version is deployed, the shoot specification is changed or this annotation is set:
kubectl -n garden-<project-name> annotate shoot <shoot-name> gardener.cloud/operation=retry
Force-update a worker pool with InPlace update strategy
Annotate the shoot with gardener.cloud/operation=force-in-place-update to force an update for worker pools using the update strategy AutoInPlaceUpdate or ManualInPlaceUpdate. Without this annotation, any subsequent updates to the same worker pool are denied until the Shoot has been successfully reconciled following the current in-place update.
kubectl -n garden-<project-name> annotate shoot <shoot-name> gardener.cloud/operation=force-in-place-update
Credentials Rotation Operations
Please consult Credentials Rotation for Shoot Clusters for more information.
Restart systemd Services on Particular Worker Nodes
It is possible to make Gardener restart particular systemd services on your shoot worker nodes if needed.
The annotation is not set on the Shoot resource but directly on the Node object you want to target.
For example, the following will restart both the kubelet and the containerd services:
kubectl annotate node <node-name> worker.gardener.cloud/restart-systemd-services=kubelet,containerd
It may take up to a minute until the service is restarted.
The annotation will be removed from the Node object after all specified systemd services have been restarted.
It will also be removed even if the restart of one or more services failed.
ℹ️ In the example mentioned above, you could additionally verify when/whether the kubelet restarted by using
kubectl describe node <node-name>and looking for such aStarting kubeletevent.
Force Deletion
When a Shoot fails to be deleted normally, users can force-delete the Shoot if it meets the following conditions:
- Shoot has a deletion timestamp.
- Shoot status contains at least one of the following ErrorCodes:
ERR_CLEANUP_CLUSTER_RESOURCESERR_CONFIGURATION_PROBLEMERR_INFRA_DEPENDENCIESERR_INFRA_UNAUTHENTICATEDERR_INFRA_UNAUTHORIZED
If the above conditions are satisfied, you can annotate the Shoot with confirmation.gardener.cloud/force-deletion=true, and Gardener will cleanup the Shoot controlplane and the Shoot metadata.
⚠️ You MUST ensure that all the resources created in the IaaS account are cleaned up to prevent orphaned resources. Gardener will NOT delete any resources in the underlying infrastructure account. Hence, use this annotation at your own risk and only if you are fully aware of these consequences.
4.15 - Autoscaling Specifics for Components
Overview
This document describes the used autoscaling mechanism for several components.
Garden or Shoot Cluster etcd
The etcd is scaled by a native VPA resource.
Downscaling is handled more pessimistically to prevent many subsequent etcd restarts. Thus, for production and infrastructure Shoot clusters (or all Garden clusters), downscaling is deactivated for the main etcd. For all other Shoot clusters, lower advertised requests/limits are only applied during the Shoot’s maintenance time window.
Shoot Kubernetes API Server
The Shoot Kubernetes API server is scaled simultaneously by VPA and HPA on the same metric (CPU and memory usage).
The pod-trashing cycle between VPA and HPA scaling on the same metric is avoided by configuring the HPA to scale on average usage (not on average utilization).
This makes possible VPA to first scale vertically on CPU/memory usage.
Once all Pods’ average CPU/memory usage exceeds the HPA’s target average usage, HPA is scaling horizontally (by adding a new replica). HPA’s average target usage values are 6 CPU and 24G.
The initial API server resource requests are 250m and 500Mi.
The API server’s min replica count is 2, the max replica count - 6. The min replica count of 2 is imposed by the High Availability of Shoot Control Plane Components.
The gardenlet sets the initial API server resource requests only when the Deployment is not found. When the Deployment exists, it is not overwriting the kube-apiserver container resources.
Disabling Scale Down for Components in the Shoot Control Plane
Some Shoot clusters’ control plane components can be overloaded and can have very high resource usage. The existing autoscaling solution could be imperfect to cover these cases. Scale down actions for such overloaded components could be disruptive.
To prevent such disruptive scale-down actions it is possible to disable scale down of the etcd, Kubernetes API server and Kubernetes controller manager in the Shoot control plane by annotating the Shoot with alpha.control-plane.scaling.shoot.gardener.cloud/scale-down-disabled=true.
There is the following specific for when disabling scale-down for the Kubernetes API server component:
- If the HPA resource exists and HPA’s
spec.minReplicasis not nil then the min replica count ismax(spec.minReplicas, status.desiredReplicas). When scale-down is disabled, this allows operators to specify a custom value for HPAspec.minReplicasand this value not to be reverted by gardenlet. I.e, HPA does scale down to min replicas but not below min replicas. HPA’s max replica count is 6.
Note
The
alpha.control-plane.scaling.shoot.gardener.cloud/scale-down-disabledannotation is alpha and can be removed anytime without further notice. Only use it if you know what you do.
Virtual Kubernetes API Server and Gardener API Server
The virtual Kubernetes API server’s autoscaling is same as the Shoot Kubernetes API server’s with the following differences:
- The initial API server resource requests are
600mand512Mi. - The min replica count is 2 for a non-HA virtual cluster and 3 for an HA virtual cluster. The max replica count is 6.
The Gardener API server’s autoscaling is the same as the Shoot Kubernetes API server’s with the following differences:
- The initial API server resource requests are
600mand512Mi. - The replica count is 2 for a non-HA virtual cluster and 3 for an HA virtual cluster.
- Gardener API server is not scaled by HPA.
- Virtual Kubernetes API servers use one single HTTP2 connection to a Gardener API server. Thus, in case Gardener API server have more replicas its additional pods would not receive any requests.
Configure minAllowed Resources for Control Plane Components
It is possible to configure minimum allowed resources (minAllowed) for CPU/memory for ETCD instances and the Kubernetes API server.
This configuration is available for both Shoot clusters and the Garden cluster, see examples below:
Shootspec: kubernetes: etcd: main: autoscaling: minAllowed: cpu: "2" memory: 6Gi events: autoscaling: minAllowed: cpu: "1" memory: 3Gi kubeAPIServer: autoscaling: minAllowed: cpu: "1" memory: 3GiGardenspec: virtualCluster: etcd: main: autoscaling: minAllowed: cpu: "2" memory: 6Gi events: autoscaling: minAllowed: cpu: "1" memory: 3Gi kubernetes: kubeAPIServer: autoscaling: minAllowed: cpu: "1" memory: 3Gi
A primary use-case for configuring minAllowed resources arises from the need to alleviate delays during consecutive scale-up activities.
Typically, in longer-running clusters, resource usage patterns evolve gradually, and the control plane can scale vertically in an adequate manner.
However, in the case of newly spun-up clusters requiring immediate heavy usage, setting a minAllowed threshold for CPU and memory ensures that the control plane components are provisioned with sufficient resources to handle abrupt load increases without substantial delay.
Note
To use this feature effectively, users should thoroughly analyze their cluster usage patterns in advance to identify appropriate resource values.
4.16 - Changing the API
Changing the API
This document describes the steps that need to be performed when changing the API. It provides guidance for API changes to both (Gardener system in general or component configurations).
Generally, as Gardener is a Kubernetes-native extension, it follows the same API conventions and guidelines like Kubernetes itself. The Kubernetes API Conventions as well as Changing the API topics already provide a good overview and general explanation of the basic concepts behind it. We are following the same approaches.
Gardener API
The Gardener API is defined in the pkg/apis/{core,extensions,settings} directories and is the main point of interaction with the system.
It must be ensured that the API is always backwards-compatible.
Changing the API
Checklist when changing the API:
- Modify the field(s) in the respective Golang files of all external versions and the internal version.
- Make sure new fields are being added as “optional” fields, i.e., they are of pointer types, they have the
// +optionalcomment, and they have theomitemptyJSON tag. - Make sure that the existing field numbers in the protobuf tags are not changed.
- Do not copy protobuf tags from other fields but create them with
make generate WHAT="protobuf".
- Make sure new fields are being added as “optional” fields, i.e., they are of pointer types, they have the
- If necessary, implement/adapt the conversion logic defined in the versioned APIs (e.g.,
pkg/apis/core/v1beta1/conversions*.go). - If necessary, implement/adapt defaulting logic defined in the versioned APIs (e.g.,
pkg/apis/core/v1beta1/defaults*.go). - Run the code generation:
make generate - If necessary, implement/adapt validation logic defined in the internal API (e.g.,
pkg/apis/core/validation/validation*.go). - If necessary, adapt the exemplary YAML manifests of the Gardener resources defined in
example/*.yaml. - In most cases, it makes sense to add/adapt the documentation for administrators/operators and/or end-users in the
docsfolder to provide information on purpose and usage of the added/changed fields. - When opening the pull request, always add a release note so that end-users are becoming aware of the changes.
Removing a Field
If fields shall be removed permanently from the API, then a proper deprecation period must be adhered to so that end-users have enough time to adapt their clients.
Once the deprecation period is over, the field should be dropped from the API in a two-step process, i.e., in two release cycles. In the first step, all the usages in the code base should be dropped. In the second step, the field should be dropped from API. We need to follow this two-step process cause there can be the case where gardener-apiserver is upgraded to a new version in which the field has been removed but other controllers are still on the old version of Gardener. This can lead to nil pointer exceptions or other unexpected behaviour.
The steps for removing a field from the code base is:
The field in the external version(s) has to be commented out with appropriate doc string that the protobuf number of the corresponding field is reserved. Example:
- SeedTemplate *gardencorev1beta1.SeedTemplate `json:"seedTemplate,omitempty" protobuf:"bytes,2,opt,name=seedTemplate"` + // SeedTemplate is tombstoned to show why 2 is reserved protobuf tag. + // SeedTemplate *gardencorev1beta1.SeedTemplate `json:"seedTemplate,omitempty" protobuf:"bytes,2,opt,name=seedTemplate"`The reasoning behind this is to prevent the same protobuf number being used by a new field. Introducing a new field with the same protobuf number would be a breaking change for clients still using the old protobuf definitions that have the old field for the given protobuf number. The field in the internal version can be removed.
A unit test has to be added to make sure that a new field does not reuse the already reserved protobuf tag.
Example of field removal can be found in the Remove seedTemplate field from ManagedSeed API PR.
Component Configuration APIs
Most Gardener components have a component configuration that follows similar principles to the Gardener API.
Those component configurations are defined in pkg/{controllermanager,gardenlet,scheduler},pkg/apis/config.
Hence, the above checklist also applies for changes to those APIs.
However, since these APIs are only used internally and only during the deployment of Gardener, the guidelines with respect to changes and backwards-compatibility are slightly relaxed.
If necessary, it is allowed to remove fields without a proper deprecation period if the release note uses the breaking operator keywords.
In addition to the above checklist:
- If necessary, then adapt the Helm chart of Gardener defined in
charts/gardener. Adapt thevalues.yamlfile as well as the manifest templates.
4.17 - Component Checklist
Checklist For Adding New Components
Adding new components that run in the garden, seed, or shoot cluster is theoretically quite simple - we just need a Deployment (or other similar workload resource), the respective container image, and maybe a bit of configuration.
In practice, however, there are a couple of things to keep in mind in order to make the deployment production-ready.
This document provides a checklist for them that you can walk through.
General
Avoid usage of Helm charts (example)
Nowadays, we use Golang components instead of Helm charts for deploying components to a cluster. Please find a typical structure of such components in the provided metrics_server.go file (configuration values are typically managed in a
Valuesstructure). There are a few exceptions (e.g., Istio) still using charts, however the default should be using a Golang-based implementation. For the exceptional cases, use Golang’s embed package to embed the Helm chart directory (example 1, example 2).Choose the proper deployment way (example 1 (direct application w/ client), example 2 (using
ManagedResource), example 3 (mixed scenario))For historic reasons, resources related to shoot control plane components are applied directly with the client. All other resources (seed or shoot system components) are deployed via
gardener-resource-manager’s Resource controller (ManagedResources) since it performs health checks out-of-the-box and has a lot of other features (see its documentation for more information). Components that can run as both seed system component or shoot control plane component (e.g., VPA orkube-state-metrics) can make use of these utility functions.Use unique
ConfigMaps/Secrets (example 1, example 2)Unique
ConfigMaps/Secrets are immutable for modification and have a unique name. This has a couple of benefits, e.g. thekubeletdoesn’t watch these resources, and it is always clear which resource contains which data since it cannot be changed. As a consequence, unique/immutableConfigMaps/Secretare superior to checksum annotations on the pod templates. Stale/unusedConfigMaps/Secrets are garbage-collected bygardener-resource-manager’s GarbageCollector. There are utility functions (see examples above) for using uniqueConfigMaps/Secrets in Golang components. It is essential to inject the annotations into the workload resource to make the garbage-collection work.
Note that someConfigMaps/Secrets should not be unique (e.g., those containing monitoring or logging configuration). The reason is that the old revision stays in the cluster even if unused until the garbage-collector acts. During this time, they would be wrongly aggregated to the full configuration.Manage certificates/secrets via secrets manager (example)
You should use the secrets manager for the management of any kind of credentials. This makes sure that credentials rotation works out-of-the-box without you requiring to think about it. Generally, do not use client certificates (see the Security section).
Consider hibernation when calculating replica count (example)
Shoot clusters can be hibernated meaning that all control plane components in the shoot namespace in the seed cluster are scaled down to zero and all worker nodes are terminated. If your component runs in the seed cluster then you have to consider this case and provide the proper replica count. There is a utility function available (see example).
Ensure task dependencies are as precise as possible in shoot flows (example 1, example 2)
Only define the minimum of needed dependency tasks in the shoot reconciliation/deletion flows.
Handle shoot system components
Shoot system components deployed by
gardener-resource-managerare labelled withresource.gardener.cloud/managed-by: gardener. This makes Gardener adding required label selectors and tolerations so that non-DaemonSetmanagedPods will exclusively run on selected nodes (for more information, see System Components Webhook).DaemonSets on the other hand, should generally tolerate anyNoScheduleorNoExecutetaints so that they can run on anyNode, regardless of user added taints.
Images
Do not hard-code container image references (example 1, example 2, example 3)
We define all image references centrally in the
imagevector/containers.yamlfile. Hence, the image references must not be hard-coded in the pod template spec but read from this so-called image vector instead.Do not use container images from registries that don’t support IPv6 (example: image vector, prow configuration)
Registries such as ECR, GHCR (
ghcr.io), MCR (mcr.microsoft.com) don’t support pulling images over IPv6.Check if the upstream image is being also maintained in a registry that support IPv6 natively such as Artifact Registry, Quay (
quay.io). If there is such image, use the image from registry with IPv6 support.If the image is not available in a registry with IPv6 then copy the image to the gardener GCR. There is a prow job copying images that are needed in gardener components from a source registry to the gardener GCR under the prefix
europe-docker.pkg.dev/gardener-project/releases/3rd/(see the documentation or gardener/ci-infra#619).If you want to use a new image from a registry without IPv6 support or upgrade an already used image to a newer tag, please open a PR to the ci-infra repository that modifies the job’s list of images to copy:
images.yaml.Do not use container images from Docker Hub (example: image vector, prow configuration)
There is a strict rate-limit that applies to the Docker Hub registry. As described in 2., use another registry (if possible) or copy the image to the gardener GCR.
Do not use Shoot container images that are not multi-arch
Gardener supports Shoot clusters with both
amd64andarm64based worker Nodes.amd64container images cannot run onarm64worker Nodes and vice-versa.
Security
Use a dedicated
ServiceAccountand disable auto-mount (example)Components that need to talk to the API server of their runtime cluster must always use a dedicated
ServiceAccount(do not usedefault), withautomountServiceAccountTokenset tofalse. This makesgardener-resource-manager’sProjectedTokenMountwebhook inject a projected token automatically.Use shoot access tokens instead of a client certificates (example)
For components that need to talk to a target cluster different from their runtime cluster (e.g., running in seed cluster but talking to shoot) the
gardener-resource-manager’s TokenRequestor should be used to manage a so-called “shoot access token”.Define RBAC roles with minimal privileges (example)
The component’s
ServiceAccount(if it exists) should have as little privileges as possible. Consequently, please define proper RBAC roles for it. This might include a combination ofClusterRoles andRoles. Please do not provide elevated privileges due to laziness (e.g., because there is already aClusterRolethat can be extended vs. creating aRoleonly when access to a single namespace is needed). Please avoid using wildcards*where possible.Use
NetworkPolicys to restrict network trafficYou should restrict both ingress and egress traffic to/from your component as much as possible to ensure that it only gets access to/from other components if really needed. Gardener provides a few default policies for typical usage scenarios. For more information, see
NetworkPolicys In Garden, Seed, Shoot Clusters.Do not run containers in privileged mode (example, example 2)
Avoid running containers with
privileged=true. Instead, define the needed Linux capabilities.Do not allow privilege escalation for containers (example)
Explicitly set
securityContext.allowPrivilegeEscalation=false, in cases when possible. There is an issue in Kubernetes about this configuration beingtrueby default.Do not run containers as root (example)
Avoid running containers as root. Usually, components such as Kubernetes controllers and admission webhook servers don’t need root user capabilities to do their jobs.
The problem with running as root, starts with how the container is first built. Unless a non-privileged user is configured in the
Dockerfile, container build systems by default set up the container with the root user. Add a non-privileged user to yourDockerfileor use a base image with a non-root user (for example thenonrootimages from distroless such asgcr.io/distroless/static-debian12:nonroot).If the image is an upstream one, then consider configuring a securityContext for the container/Pod with a non-privileged user. For more information, see Configure a Security Context for a Pod or Container.
Choose the proper Seccomp profile (example 1, example 2)
For components deployed in the Seed cluster, the Seccomp profile will be defaulted to
RuntimeDefaultbygardener-resource-manager’s SeccompProfile webhook which works well for the majority of components. However, in some special cases you might need to overwrite it.The
gardener-resource-manager’s SeccompProfile webhook is not enabled for a Shoot cluster. For components deployed in the Shoot cluster, it is required [*] to explicitly specify the Seccomp profile.[*] It is required because if a component deployed in the Shoot cluster does not specify a Seccomp profile and cannot run with the
RuntimeDefaultSeccomp profile, then enabling the.spec.kubernetes.kubelet.seccompDefaultfield in the Shoot spec would break the corresponding component.
High Availability / Stability
Specify the component type label for high availability (example)
To support high-availability deployments,
gardener-resource-managers HighAvailabilityConfig webhook injects the proper specification like replica or topology spread constraints. You only need to specify the type label. For more information, see High Availability Of Deployed Components.Define a
PodDisruptionBudget(example)Closely related to high availability but also to stability in general: The definition of a
PodDisruptionBudgetwithmaxUnavailable=1should be provided by default.Choose the right
PriorityClass(example)Each cluster runs many components with different priorities. Gardener provides a set of default
PriorityClasses. For more information, see Priority Classes.Consider defining liveness and readiness probes (example)
To ensure smooth rolling update behaviour, consider the definition of liveness and/or readiness probes.
Mark node-critical components (example)
To ensure user workload pods are only scheduled to
Nodeswhere all node-critical components are ready, these components need to tolerate thenode.gardener.cloud/critical-components-not-readytaint (NoScheduleeffect). Also, suchDaemonSetsand the includedPodTemplatesneed to be labelled withnode.gardener.cloud/critical-component=true. For more information, see Readiness of Shoot Worker Nodes.Consider making a
Servicetopology-aware (example)To reduce costs and to improve the network traffic latency in multi-zone Seed clusters, consider making a
Servicetopology-aware, if applicable. In short, when aServiceis topology-aware, Kubernetes routes network traffic to theEndpoints (Pods) which are located in the same zone where the traffic originated from. In this way, the cross availability zone traffic is avoided. See Topology-Aware Traffic Routing.Enable leader election unconditionally for controllers (example 1, example 2, example 3)
Enable leader election unconditionally for controllers independently from the number of replicas or from the high availability configurations. Having leader election enabled even for a single replica Deployment prevents having two Pods active at the same time. Otherwise, there are some corner cases that can result in two active Pods - Deployment rolling update or kubelet stops running on a Node and is not able to terminate the old replica while kube-controller-manager creates a new replica to match the Deployment’s desired replicas count.
Do not set a
pod{Anti}Affinityfor spreading across nodes or zonesSpread across nodes and zones is handled by the HighAvailabilityConfig webhook. Specifying another
pod{Anti}Affinitymakes it harder to run the component locally or in smaller setups with only a single node.
Scalability
Provide resource requirements (example)
All components should define reasonable (initial) CPU and memory
requestsand avoid limits (especially CPU limits) unless you know the healthy range for your component (almost impossible with most components today), but no more than the node allocatable remainder (after daemonset pods) of the largest eligible machine type. Scheduling only takesrequestsinto account!Define a
VerticalPodAutoscaler(example)We typically (need to) perform vertical auto-scaling for containers that have a significant usage (>50m/100M) and a significant usage spread over time (>2x) by defining a
VerticalPodAutoscalerwithupdatePolicy.updateModeAuto,containerPolicies[].controlledValuesRequestsOnly, reasonableminAllowedconfiguration and nomaxAllowedconfiguration (will be taken care of in Gardener environments for you/capped at the largest eligible machine type).Define a
HorizontalPodAutoscalerif needed (example)If your component is capable of scaling horizontally, you should consider defining a
HorizontalPodAutoscaler.
Note
For more information and concrete configuration hints, please see our best practices guide for pod auto scaling and especially the summary and recommendations sections.
Observability / Operations Productivity
Provide monitoring scrape config and alerting rules (example 1, example 2)
Components should provide scrape configuration and alerting rules for Prometheus/Alertmanager if appropriate. This should be done inside a dedicated
monitoring.gofile. Extensions should follow the guidelines described in Extensions Monitoring Integration.Provide logging parsers and filters (example 1, example 2)
Components should provide parsers and filters for fluent-bit, if appropriate. This should be done inside a dedicated
logging.gofile. Extensions should follow the guidelines described in Fluent-bit log parsers and filters.Set the
revisionHistoryLimitto2forDeployments andDaemonSets (example)In order to allow easy inspection of two
ReplicaSets /ControllerRevisions to quickly find the changes that lead to a rolling update, the revision history limit should be set to2. This also helps to not flood the API server with too many revisions.Define health checks (example 1)
gardener-operators’s andgardenlet’s care controllers regularly check the health status of components relevant to the respective cluster (garden/seed/shoot). For shoot control plane components, you need to enhance the lists of components to make sure your component is checked, see example above. For components deployed viaManagedResource, please consult the respective care controller documentation for more information (garden, seed, shoot).Configure automatic restarts in shoot maintenance time window (example 1, example 2)
Gardener offers to restart components during the maintenance time window. For more information, see Restart Control Plane Controllers and Restart Some Core Addons. You can consider adding the needed label to your control plane component to get this automatic restart (probably not needed for most components).
4.18 - Configuration
Gardener Configuration and Usage
Gardener automates the full lifecycle of Kubernetes clusters as a service. Additionally, it has several extension points allowing external controllers to plug-in to the lifecycle. As a consequence, there are several configuration options for the various custom resources that are partially required.
This document describes the:
- Configuration and usage of Gardener as operator/administrator.
- Configuration and usage of Gardener as end-user/stakeholder/customer.
Configuration and Usage of Gardener as Operator/Administrator
When we use the terms “operator/administrator”, we refer to both the people deploying and operating Gardener. Gardener consists of the following components:
gardener-apiserver, a Kubernetes-native API extension that serves custom resources in the Kubernetes-style (likeSeeds andShoots), and a component that contains multiple admission plugins.gardener-admission-controller, an HTTP(S) server with several handlers to be used in a ValidatingWebhookConfiguration.gardener-controller-manager, a component consisting of multiple controllers that implement reconciliation and deletion flows for some of the custom resources (e.g., it contains the logic for maintainingShoots, reconcilingProjects).gardener-scheduler, a component that assigns newly createdShootclusters to appropriateSeedclusters.gardenlet, a component running in seed clusters and consisting out of multiple controllers that implement reconciliation and deletion flows for some of the custom resources (e.g., it contains the logic for reconciliation and deletion ofShoots).
Each of these components have various configuration options.
The gardener-apiserver uses the standard API server library maintained by the Kubernetes community, and as such it mainly supports command line flags.
Other components use so-called componentconfig files that describe their configuration in a Kubernetes-style versioned object.
Configuration File for Gardener Admission Controller
The Gardener admission controller only supports one command line flag, which should be a path to a valid admission-controller configuration file. Please take a look at this example configuration.
Configuration File for Gardener Controller Manager
The Gardener controller manager only supports one command line flag, which should be a path to a valid controller-manager configuration file. Please take a look at this example configuration.
Configuration File for Gardener Scheduler
The Gardener scheduler also only supports one command line flag, which should be a path to a valid scheduler configuration file. Please take a look at this example configuration. Information about the concepts of the Gardener scheduler can be found at Gardener Scheduler.
Configuration File for gardenlet
The gardenlet also only supports one command line flag, which should be a path to a valid gardenlet configuration file. Please take a look at this example configuration. Information about the concepts of the Gardenlet can be found at gardenlet.
System Configuration
After successful deployment of the four components, you need to setup the system.
Let’s first focus on some “static” configuration.
When the gardenlet starts, it scans the garden namespace of the garden cluster for Secrets that have influence on its reconciliation loops, mainly the Shoot reconciliation:
Internal domain secret - contains the DNS provider credentials (having appropriate privileges) which will be used to create/delete the so-called “internal” DNS records for the Shoot clusters, please see this yaml file for an example.
- This secret is used in order to establish a stable endpoint for shoot clusters, which is used internally by all control plane components.
- The DNS records are normal DNS records but called “internal” in our scenario because only the kubeconfigs for the control plane components use this endpoint when talking to the shoot clusters.
- It is forbidden to change the internal domain secret if there are existing shoot clusters.
Default domain secrets (optional) - contain the DNS provider credentials (having appropriate privileges) which will be used to create/delete DNS records for a default domain for shoots (e.g.,
example.com), please see this yaml file for an example.- Not every end-user/stakeholder/customer has its own domain, however, Gardener needs to create a DNS record for every shoot cluster.
- As landscape operator you might want to define a default domain owned and controlled by you that is used for all shoot clusters that don’t specify their own domain.
- If you have multiple default domain secrets defined you can add a priority as an annotation (
dns.gardener.cloud/domain-default-priority) to select which domain should be used for new shoots during creation. The domain with the highest priority is selected during shoot creation. If there is no annotation defined, the default priority is0, also all non integer values are considered as priority0.
Alerting secrets (optional) - contain the alerting configuration and credentials for the AlertManager to send email alerts. It is also possible to configure the monitoring stack to send alerts to an AlertManager not deployed by Gardener to handle alerting. Please see this yaml file for an example.
- If email alerting is configured:
- An AlertManager is deployed into each seed cluster that handles the alerting for all shoots on the seed cluster.
- Gardener will inject the SMTP credentials into the configuration of the AlertManager.
- The AlertManager will send emails to the configured email address in case any alerts are firing.
- If an external AlertManager is configured:
- Each shoot has a Prometheus responsible for monitoring components and sending out alerts. The alerts will be sent to a URL configured in the alerting secret.
- This external AlertManager is not managed by Gardener and can be configured however the operator sees fit.
- Supported authentication types are no authentication, basic, or mutual TLS.
- If email alerting is configured:
Global monitoring secrets (optional) - contains basic authentication credentials for the Prometheus aggregating metrics for all clusters.
- These secrets are synced to each seed cluster and used to gain access to the aggregate monitoring components.
Shoot Service Account Issuer secret (optional) - contains the configuration needed to centrally configure gardenlets in order to implement GEP-24. Please see the example configuration for more details.
- This secret contains the hostname which will be used to configure the shoot’s managed issuer, therefore the value of the hostname should not be changed once configured.
Caution
Gardener Operator manages this field automatically if Gardener Discovery Server is enabled and does not provide a way to change the default value of it as of now. It calculates it based on the first ingress domain for the runtime Garden cluster. The domain is prefixed with “discovery.” using the formula
discovery.{garden.spec.runtimeCluster.ingress.domains[0]}. If you are not yet using Gardener Operator it is EXTREMELY important to follow the same convention as Gardener Operator, so that during migration to Gardener Operator thehostnamecan stay the same and avoid disruptions for shoots that already have a managed service account issuer.
Apart from this “static” configuration there are several custom resources extending the Kubernetes API and used by Gardener. As an operator/administrator, you have to configure some of them to make the system work.
Configuration and Usage of Gardener as End-User/Stakeholder/Customer
As an end-user/stakeholder/customer, you are using a Gardener landscape that has been setup for you by another team.
You don’t need to care about how Gardener itself has to be configured or how it has to be deployed.
Take a look at Gardener API Server - the topic describes which resources are offered by Gardener.
You may want to have a more detailed look for Projects, SecretBindings, Shoots, and (Cluster)OpenIDConnectPresets.
4.19 - Control Plane Migration
Control Plane Migration
Prerequisites
The Seeds involved in the control plane migration must have backups enabled - their .spec.backup fields cannot be nil.
ShootState
ShootState is an API resource which stores non-reconstructible state and data required to completely recreate a Shoot’s control plane on a new Seed. The ShootState resource is created on Shoot creation in its Project namespace and the required state/data is persisted during Shoot creation or reconciliation.
Shoot Control Plane Migration
Triggering the migration is done by changing the Shoot’s .spec.seedName to a Seed that differs from the .status.seedName, we call this Seed a "Destination Seed". This action can only be performed by an operator (see Triggering the Migration). If the Destination Seed does not have a backup and restore configuration, the change to spec.seedName is rejected. Additionally, this Seed must not be set for deletion and must be healthy.
If the Shoot has different .spec.seedName and .status.seedName, a process is started to prepare the Control Plane for migration:
.status.lastOperationis changed toMigrate.- Kubernetes API Server is stopped and the extension resources are annotated with
gardener.cloud/operation=migrate. - Full snapshot of the ETCD is created and terminating of the Control Plane in the
Source Seedis initiated.
If the process is successful, we update the status of the Shoot by setting the .status.seedName to the null value. That way, a restoration is triggered in the Destination Seed and .status.lastOperation is changed to Restore. The control plane migration is completed when the Restore operation has completed successfully.
The etcd backups will be copied over to the BackupBucket of the Destination Seed during control plane migration and any future backups will be uploaded there.
Triggering the Migration
For control plane migration, operators with the necessary RBAC can use the shoots/binding subresource to change the .spec.seedName, with the following commands:
NAMESPACE=my-namespace
SHOOT_NAME=my-shoot
DEST_SEED_NAME=destination-seed
kubectl get --raw /apis/core.gardener.cloud/v1beta1/namespaces/${NAMESPACE}/shoots/${SHOOT_NAME} | jq -c '.spec.seedName = "'${DEST_SEED_NAME}'"' | kubectl replace --raw /apis/core.gardener.cloud/v1beta1/namespaces/${NAMESPACE}/shoots/${SHOOT_NAME}/binding -f - | jq -r '.spec.seedName'
Important
When migrating
Shoots to aDestination Seedwith different provider type from theSource Seed, make sure of the following:Pods running in the
Destination Seedmust have network connectivity to the backup storage provider of theSource Seedso that etcd backups can be copied successfully. Otherwise, theRestoreoperation will get stuck at theWaiting until etcd backups are copiedstep. However, if you do end up in this case, you can still finish the control plane migration by following the guide to manually copy etcd backups.The nodes of your
Shootcluster must have network connectivity to theShoot’skube-apiserverand thevpn-seed-serveronce they are migrated to theDestination Seed. Otherwise, theRestoreoperation will get stuck at theWaiting until the Kubernetes API server can connect to the Shoot workersstep. However, if you do end up in this case and cannot allow network traffic from the nodes to theShoot’s control plane, you can annotate theShootwith theshoot.gardener.cloud/skip-readinessannotation so that theRestoreoperation finishes, and then use theshoots/bindingsubresource to migrate the control plane back to theSource Seed.
Copying ETCD Backups Manually During the Restore Operation
Following is a workaround that can be used to copy etcd backups manually in situations where a Shoot’s control plane has been moved to a Destination Seed and the pods running in it lack network connectivity to the Source Seed’s storage provider:
- Follow the instructions in the
etcd-backup-restoregetting started documentation on how to run theetcdbrctlcommand locally or in a container. - Follow the instructions in the passing-credentials guide on how to set up the required credentials for the copy operation depending on the storage providers for which you want to perform it.
- Use the
etcdbrctl copycommand to copy the backups by following the instructions in theetcdbrctl copyguide - After you have successfully copied the etcd backups, wait for the
EtcdCopyBackupsTaskcustom resource to be created in theShoot’s control plane on theDestination Seed, if it does not already exist. Afterwards, mark it as successful by patching it using the following command:SHOOT_NAME=my-shoot PROJECT_NAME=my-project kubectl patch -n shoot--${PROJECT_NAME}--${SHOOT_NAME} etcdcopybackupstask ${SHOOT_NAME} --subresource status --type merge -p "{\"status\":{\"conditions\":[{\"type\":\"Succeeded\",\"status\":\"True\",\"reason\":\"manual copy successful\",\"message\":\"manual copy successful\",\"lastTransitionTime\":\"$(date -Iseconds)\",\"lastUpdateTime\":\"$(date -Iseconds)\"}]}}" - After the
main-etcdbecomesReady, and thesource-etcd-backupsecret is deleted from theShoot’s control plane, remove the finalizer on the sourceextensions.gardener.cloud/v1alpha1.BackupEntryin theDestination Seedso that it can be deleted successfully (the resource name uses the following format:source-shoot--<project-name>--<shoot-name>--<uid>). This is necessary as theDestination Seedwill not have network connectivity to theSource Seed’s storage provider and the deletion will fail. - Once the control plane migration has finished successfully, make sure to manually clean up the source backup directory in the
Source Seed’s storage provider.
4.20 - Defaulting
Defaulting Strategy and Developer Guidelines
This document walks you through:
- Conventions to be followed when writing defaulting functions
- How to write a test for a defaulting function
The document is aimed towards developers who want to contribute code and need to write defaulting code and unit tests covering the defaulting functions, as well as maintainers and reviewers who review code. It serves as a common guide that we commit to follow in our project to ensure consistency in our defaulting code, good coverage for high confidence, and good maintainability.
Writing defaulting code
- Every kubernetes type should have a dedicated
defaults_*.gofile. For instance, if you have aShoottype, there should be a correspondingdefaults_shoot.gofile containing all defaulting logic for that type. - If there is only one type under an api group then we can just have
types.goand a correspondingdefaults.go. For instance,resourcemanagerapi has only onetypes.go, hence in this case onlydefaults.gofile would suffice. - Aim to segregate each struct type into its own
SetDefaults_*function. These functions encapsulate the defaulting logic specific to the corresponding struct type, enhancing modularity and maintainability. For example,ServerConfigurationstruct inresourcemanagerapi has correspondingSetDefaults_ServerConfiguration()function.
⚠️ Ensure to run the make generate WHAT=codegen command when new SetDefaults_* function is added, which generates the zz_generated.defaults.go file containing the overall defaulting function.
Writing unit tests for defaulting code
Each test case should validate the overall defaulting function
SetObjectDefaults_*generated bydefaulter-genand not a specificSetDefaults_*. This way we also test if thezz_generated.defaults.gowas generated correctly. For example, thespec.machineImages[].updateStrategyfield in the CloudProfile is defaulted as follows: https://github.com/gardener/gardener/blob/ff5a5be6049777b0695659a50189e461e1b17796/pkg/apis/core/v1beta1/defaults_cloudprofile.go#L23-L29 The defaulting should be tested with the overall defaulting functionSetObjectDefaults_CloudProfile(and not withSetDefaults_MachineImage): https://github.com/gardener/gardener/blob/ff5a5be6049777b0695659a50189e461e1b17796/pkg/apis/core/v1beta1/defaults_cloudprofile_test.go#L40-L47Test each defaulting function carefully to ensure:
Proper defaulting behaviour when fields are empty or nil. Note that some fields may be optional and should not be defaulted.
Preservation of existing values, ensuring that defaulting does not accidentally overwrite them.
For example, when
spec.secretRef.namespacefield ofSecretBindingis nil, it should be defaulted to the namespace of SecretBinding object. Butspec.secretRef.namespacefield should not be overwritten by defaulting logic if it is already set. https://github.com/gardener/gardener/blob/ff5a5be6049777b0695659a50189e461e1b17796/pkg/apis/core/v1beta1/defaults_secretbinding_test.go#L26-L54
4.21 - Dependencies
Dependency Management
We are using go modules for dependency management.
In order to add a new package dependency to the project, you can perform go get <PACKAGE>@<VERSION> or edit the go.mod file and append the package along with the version you want to use.
Updating Dependencies
The Makefile contains a rule called tidy which performs go mod tidy:
go mod tidymakes surego.modmatches the source code in the module. It adds any missing modules necessary to build the current module’s packages and dependencies, and it removes unused modules that don’t provide any relevant packages.
make tidy
⚠️ Make sure that you test the code after you have updated the dependencies!
Exported Packages
This repository contains several packages that could be considered “exported packages”, in a sense that they are supposed to be reused in other Go projects. For example:
- Gardener’s API packages:
pkg/apis - Library for building Gardener extensions:
extensions - Gardener’s Test Framework:
test/framework
There are a few more folders in this repository (non-Go sources) that are reused across projects in the Gardener organization:
- GitHub templates:
.github - Concourse / cc-utils related helpers:
hack/.ci - Development, build and testing helpers:
hack
These packages feature a dummy doc.go file to allow other Go projects to pull them in as go mod dependencies.
These packages are explicitly not supposed to be used in other projects (consider them as “non-exported”):
- API validation packages:
pkg/apis/*/*/validation - Operation package (main Gardener business logic regarding
SeedandShootclusters):pkg/gardenlet/operation - Third party code:
third_party
Currently, we don’t have a mechanism yet for selectively syncing out these exported packages into dedicated repositories like kube’s staging mechanism (publishing-bot).
Import Restrictions
We want to make sure that other projects can depend on this repository’s “exported” packages without pulling in the entire repository (including “non-exported” packages) or a high number of other unwanted dependencies. Hence, we have to be careful when adding new imports or references between our packages.
ℹ️ General rule of thumb: the mentioned “exported” packages should be as self-contained as possible and depend on as few other packages in the repository and other projects as possible.
In order to support that rule and automatically check compliance with that goal, we leverage import-boss.
The tool checks all imports of the given packages (including transitive imports) against rules defined in .import-restrictions files in each directory.
An import is allowed if it matches at least one allowed prefix and does not match any forbidden prefixes.
Note:
''(the empty string) is a prefix of everything. For more details, see the import-boss topic.
import-boss is executed on every pull request and blocks the PR if it doesn’t comply with the defined import restrictions.
You can also run it locally using make check.
Import restrictions should be changed in the following situations:
- We spot a new pattern of imports across our packages that was not restricted before but makes it more difficult for other projects to depend on our “exported” packages. In that case, the imports should be further restricted to disallow such problematic imports, and the code/package structure should be reworked to comply with the newly given restrictions.
- We want to share code between packages, but existing import restrictions prevent us from doing so. In that case, please consider what additional dependencies it will pull in, when loosening existing restrictions. Also consider possible alternatives, like code restructurings or extracting shared code into dedicated packages for minimal impact on dependent projects.
4.22 - Gardener Info Configmap
Gardener Info ConfigMap
Overview
The Gardener Operator maintains a ConfigMap inside the Garden cluster that contains information about the Garden landscape.
The ConfigMap is named gardener-info and located in the gardener-system-public namespace. It is visible to all authenticated users.
Fields
The following fields are provided:
apiVersion: v1
kind: ConfigMap
metadata:
name: gardener-info
namespace: gardener-system-public
data:
gardenerAPIServer: | # key name of the gardener-apiserver section
version: v1.111.0 # version of the gardener-apiserver
workloadIdentityIssuerURL: https://issuer.gardener.cloud.local # the URL of the authority that issues workload identity tokens
4.23 - Getting Started Locally
Developing Gardener Locally
This document explains how to setup a kind based environment for developing Gardener locally.
For the best development experience you should especially check the Developing Gardener section.
In case you plan a debugging session please check the Debugging Gardener section.
4.24 - High Availability Of Components
High Availability of Deployed Components
gardenlets and extension controllers are deploying components via Deployments, StatefulSets, etc., as part of the shoot control plane, or the seed or shoot system components.
Some of the above component deployments must be further tuned to improve fault tolerance / resilience of the service. This document outlines what needs to be done to achieve this goal.
Please be forwarded to the Convenient Application Of These Rules section, if you want to take a shortcut to the list of actions that require developers’ attention.
Seed Clusters
The worker nodes of seed clusters can be deployed to one or multiple availability zones.
The Seed specification allows you to provide the information which zones are available:
spec:
provider:
region: europe-1
zones:
- europe-1a
- europe-1b
- europe-1c
Independent of the number of zones, seed system components like the gardenlet or the extension controllers themselves, or others like etcd-druid, dependency-watchdog, etc., should always be running with multiple replicas.
Concretely, all seed system components should respect the following conventions:
Replica Counts
Component Type < 3Zones>= 3ZonesComment Observability (Monitoring, Logging) 1 1 Downtimes accepted due to cost reasons Controllers 2 2 / (Webhook) Servers 2 2 / Apart from the above, there might be special cases where these rules do not apply, for example:
istio-ingressgatewayis scaled horizontally, hence the above numbers are the minimum values.nginx-ingress-controllerin the seed cluster is used to advertise all shoot observability endpoints, so due to performance reasons it runs with2replicas at all times. In the future, this component might disappear in favor of theistio-ingressgatewayanyways.
Topology Spread Constraints
When the component has
>= 2replicas …… then it should also have a
topologySpreadConstraint, ensuring the replicas are spread over the nodes:spec: topologySpreadConstraints: - topologyKey: kubernetes.io/hostname minDomains: 3 # lower value of max replicas or 3 maxSkew: 1 whenUnsatisfiable: ScheduleAnyway matchLabels: ...minDomainsis set when failure tolerance is configured or annotationhigh-availability-config.resources.gardener.cloud/host-spread="true"is given.… and the seed cluster has
>= 2zones, then the component should also have a secondtopologySpreadConstraint, ensuring the replicas are spread over the zones:spec: topologySpreadConstraints: - topologyKey: topology.kubernetes.io/zone minDomains: 2 # lower value of max replicas or number of zones maxSkew: 1 whenUnsatisfiable: DoNotSchedule matchLabels: ...
According to these conventions, even seed clusters with only one availability zone try to be highly available “as good as possible” by spreading the replicas across multiple nodes. Hence, while such seed clusters obviously cannot handle zone outages, they can at least handle node failures.
Shoot Clusters
The Shoot specification allows configuring “high availability” as well as the failure tolerance type for the control plane components, see Highly Available Shoot Control Plane for details.
Regarding the seed cluster selection, the only constraint is that shoot clusters with failure tolerance type zone are only allowed to run on seed clusters with at least three zones.
All other shoot clusters (non-HA or those with failure tolerance type node) can run on seed clusters with any number of zones.
Control Plane Components
All control plane components should respect the following conventions:
Replica Counts
Component Type w/o HA w/ HA ( node)w/ HA ( zone)Comment Observability (Monitoring, Logging) 1 1 1 Downtimes accepted due to cost reasons Controllers 1 2 2 / (Webhook) Servers 2 2 2 / Apart from the above, there might be special cases where these rules do not apply, for example:
etcdis a server, though the most critical component of a cluster requiring a quorum to survive failures. Hence, it should have3replicas even when the failure tolerance isnodeonly.kube-apiserveris scaled horizontally, hence the above numbers are the minimum values (even when the shoot cluster is not HA, there might be multiple replicas).
Topology Spread Constraints
When the component has
>= 2replicas …… then it should also have a
topologySpreadConstraintensuring the replicas are spread over the nodes:spec: topologySpreadConstraints: - maxSkew: 1 topologyKey: kubernetes.io/hostname whenUnsatisfiable: ScheduleAnyway matchLabels: ...Hence, the node spread is done on best-effort basis only.
However, if the shoot cluster has defined a failure tolerance type, the
whenUnsatisfiablefield should be set toDoNotSchedule.… and the failure tolerance type of the shoot cluster is
zone, then the component should also have a secondtopologySpreadConstraintensuring the replicas are spread over the zones:spec: topologySpreadConstraints: - maxSkew: 1 minDomains: 2 # lower value of max replicas or number of zones topologyKey: topology.kubernetes.io/zone whenUnsatisfiable: DoNotSchedule matchLabels: ...
Node Affinity
The
gardenletannotates the shoot namespace in the seed cluster with thehigh-availability-config.resources.gardener.cloud/zonesannotation.- If the shoot cluster is non-HA or has failure tolerance type
node, then the value will be always exactly one zone (e.g.,high-availability-config.resources.gardener.cloud/zones=europe-1b). - If the shoot cluster has failure tolerance type
zone, then the value will always contain exactly three zones (e.g.,high-availability-config.resources.gardener.cloud/zones=europe-1a,europe-1b,europe-1c).
For backwards-compatibility, this annotation might contain multiple zones for shoot clusters created before
gardener/gardener@v1.60and not having failure tolerance typezone. This is because their volumes might already exist in multiple zones, hence pinning them to only one zone would not work.Hence, in case this annotation is present, the components should have the following node affinity:
spec: affinity: nodeAffinity: requiredDuringSchedulingIgnoredDuringExecution: nodeSelectorTerms: - matchExpressions: - key: topology.kubernetes.io/zone operator: In values: - europe-1a # - ...This is to ensure all pods are running in the same (set of) availability zone(s) such that cross-zone network traffic is avoided as much as possible (such traffic is typically charged by the underlying infrastructure provider).
- If the shoot cluster is non-HA or has failure tolerance type
System Components
The availability of system components is independent of the control plane since they run on the shoot worker nodes while the control plane components run on the seed worker nodes (for more information, see the Kubernetes architecture overview).
Hence, it only depends on the number of availability zones configured in the shoot worker pools via .spec.provider.workers[].zones.
Concretely, the highest number of zones of a worker pool with systemComponents.allow=true is considered.
All system components should respect the following conventions:
Replica Counts
Component Type 1or2Zones>= 3ZonesControllers 2 2 (Webhook) Servers 2 2 Apart from the above, there might be special cases where these rules do not apply, for example:
corednsis scaled horizontally (today), hence the above numbers are the minimum values (possibly, scaling these components vertically may be more appropriate, but that’s unrelated to the HA subject matter).- Optional addons like
nginx-ingressorkubernetes-dashboardare only provided on best-effort basis for evaluation purposes, hence they run with1replica at all times.
Topology Spread Constraints
When the component has
>= 2replicas …… then it should also have a
topologySpreadConstraintensuring the replicas are spread over the nodes:spec: topologySpreadConstraints: - maxSkew: 1 topologyKey: kubernetes.io/hostname whenUnsatisfiable: ScheduleAnyway matchLabels: ...Hence, the node spread is done on best-effort basis only.
… and the cluster has
>= 2zones, then the component should also have a secondtopologySpreadConstraintensuring the replicas are spread over the zones:spec: topologySpreadConstraints: - maxSkew: 1 minDomains: 2 # lower value of max replicas or number of zones topologyKey: topology.kubernetes.io/zone whenUnsatisfiable: DoNotSchedule matchLabels: ...
Convenient Application of These Rules
According to above scenarios and conventions, the replicas, topologySpreadConstraints or affinity settings of the deployed components might need to be adapted.
In order to apply those conveniently and easily for developers, Gardener installs a mutating webhook into both seed and shoot clusters which reacts on Deployments and StatefulSets deployed to namespaces with the high-availability-config.resources.gardener.cloud/consider=true label set.
The following actions have to be taken by developers:
Check if
componentsare prepared to run concurrently with multiple replicas, e.g. controllers usually use leader election to achieve this.All components should be generally equipped with
PodDisruptionBudgets with.spec.maxUnavailable=1andunhealthyPodEvictionPolicy=AlwaysAllow:
spec:
maxUnavailable: 1
unhealthyPodEvictionPolicy: AlwaysAllow
selector:
matchLabels: ...
- Add the label
high-availability-config.resources.gardener.cloud/typetodeployments orstatefulsets, as well as optionally involvedhorizontalpodautoscalers where the following two values are possible:
controllerserver
Type server is also preferred if a component is a controller and (webhook) server at the same time.
You can read more about the webhook’s internals in High Availability Config.
gardenlet Internals
Make sure you have read the above document about the webhook internals before continuing reading this section.
Seed Controller
The gardenlet performs the following changes on all namespaces running seed system components:
- adds the label
high-availability-config.resources.gardener.cloud/consider=true. - adds the annotation
high-availability-config.resources.gardener.cloud/zones=<zones>, where<zones>is the list provided in.spec.provider.zones[]in theSeedspecification.
Note that neither the high-availability-config.resources.gardener.cloud/failure-tolerance-type, nor the high-availability-config.resources.gardener.cloud/zone-pinning annotations are set, hence the node affinity would never be touched by the webhook.
The only exception to this rule are the istio ingress gateway namespaces. This includes the default istio ingress gateway when SNI is enabled, as well as analogous namespaces for exposure classes and zone-specific istio ingress gateways. Those namespaces
will additionally be annotated with high-availability-config.resources.gardener.cloud/zone-pinning set to true, resulting in the node affinities and the topology spread constraints being set. The replicas are not touched, as the istio ingress gateways
are scaled by a horizontal autoscaler instance.
Shoot Controller
Control Plane
The gardenlet performs the following changes on the namespace running the shoot control plane components:
- adds the label
high-availability-config.resources.gardener.cloud/consider=true. This makes the webhook mutate the replica count and the topology spread constraints. - adds the annotation
high-availability-config.resources.gardener.cloud/failure-tolerance-typewith value equal to.spec.controlPlane.highAvailability.failureTolerance.type(or"", if.spec.controlPlane.highAvailability=nil). This makes the webhook mutate the node affinity according to the specified zone(s). - adds the annotation
high-availability-config.resources.gardener.cloud/zones=<zones>, where<zones>is a …- … random zone chosen from the
.spec.provider.zones[]list in theSeedspecification (always only one zone (even if there are multiple available in the seed cluster)) in case theShoothas no HA setting (i.e.,spec.controlPlane.highAvailability=nil) or when theShoothas HA setting with failure tolerance typenode. - … list of three randomly chosen zones from the
.spec.provider.zones[]list in theSeedspecification in case theShoothas HA setting with failure tolerance typezone.
- … random zone chosen from the
System Components
The gardenlet performs the following changes on all namespaces running shoot system components:
- adds the label
high-availability-config.resources.gardener.cloud/consider=true. This makes the webhook mutate the replica count and the topology spread constraints. - adds the annotation
high-availability-config.resources.gardener.cloud/zones=<zones>where<zones>is the merged list of zones provided in.zones[]withsystemComponents.allow=truefor all worker pools in.spec.provider.workers[]in theShootspecification.
Note that neither the high-availability-config.resources.gardener.cloud/failure-tolerance-type, nor the high-availability-config.resources.gardener.cloud/zone-pinning annotations are set, hence the node affinity would never be touched by the webhook.
4.25 - Ipv6
IPv6 in Gardener Clusters
🚧 IPv6 networking is currently under development.
IPv6 Single-Stack Networking
GEP-21 proposes IPv6 Single-Stack Support in the local Gardener environment. This documentation will be enhanced while implementing GEP-21, see gardener/gardener#7051.
For real infrastructure providers, please check the corresponding provider documentation for IPv6 support. Furthermore, please check the documentation of your preferred networking extension for IPv6 support.
Development/Testing Setup
Developing or testing IPv6-related features requires a Linux machine (docker only supports IPv6 on Linux) and native IPv6 connectivity to the internet. If you’re on a different OS or don’t have IPv6 connectivity in your office environment or via your home ISP, make sure to check out gardener-community/dev-box-gcp, which allows you to circumvent these limitations.
To get started with the IPv6 setup and create a local IPv6 single-stack shoot cluster, run the following commands:
make kind-up gardener-up IPFAMILY=ipv6
k apply -f example/provider-local/shoot-ipv6.yaml
Please also take a look at the guide on Deploying Gardener Locally for more details on setting up an IPv6 gardener for testing or development purposes.
Container Images
If you plan on using custom images, make sure your registry supports IPv6 access.
Check the component checklist for tips concerning container registries and how to handle their IPv6 support.
4.26 - Istio
Istio
Istio offers a service mesh implementation with focus on several important features - traffic, observability, security, and policy.
Prerequisites
- Third-party JWT is used, therefore each Seed cluster where this feature is enabled must have Service Account Token Volume Projection enabled.
- Kubernetes 1.16+
Differences with Istio’s Default Profile
The default profile which is recommended for production deployment, is not suitable for the Gardener use case, as it offers more functionality than desired. The current installation goes through heavy refactorings due to the IstioOperator and the mixture of Helm values + Kubernetes API specification makes configuring and fine-tuning it very hard. A more simplistic deployment is used by Gardener. The differences are the following:
- Telemetry is not deployed.
istiodis deployed.istio-ingress-gatewayis deployed in a separateistio-ingressnamespace.istio-egress-gatewayis not deployed.- None of the Istio addons are deployed.
- Mixer (deprecated) is not deployed.
- Mixer CDRs are not deployed.
- Kubernetes
Service, Istio’sVirtualServiceandServiceEntryare NOT advertised in the service mesh. This means that if aServiceneeds to be accessed directly from the Istio Ingress Gateway, it should havenetworking.istio.io/exportTo: "*"annotation.VirtualServiceandServiceEntrymust have.spec.exportTo: ["*"]set on them respectively. - Istio injector is not enabled.
- mTLS is enabled by default.
Handling Multiple Availability Zones with Istio
For various reasons, e.g., improved resiliency to certain failures, it may be beneficial to use multiple availability zones in a seed cluster. While availability zones have advantages in being able to cover some failure domains, they also come with some additional challenges. Most notably, the latency across availability zone boundaries is higher than within an availability zone. Furthermore, there might be additional cost implied by network traffic crossing an availability zone boundary. Therefore, it may be useful to try to keep traffic within an availability zone if possible. The istio deployment as part of Gardener has been adapted to allow this.
A seed cluster spanning multiple availability zones may be used for highly-available shoot control planes. Those control planes may use a single or multiple availability zones. In addition to that, ordinary non-highly-available shoot control planes may be scheduled to such a seed cluster as well. The result is that the seed cluster may have control planes spanning multiple availability zones and control planes that are pinned to exactly one availability zone. These two types need to be handled differently when trying to prevent unnecessary cross-zonal traffic.
The goal is achieved by using multiple istio ingress gateways. The default istio ingress gateway spans all availability zones. It is used for multi-zonal shoot control planes. For each availability zone, there is an additional istio ingress gateway, which is utilized only for single-zone shoot control planes pinned to this availability zone. This is illustrated in the following diagram.
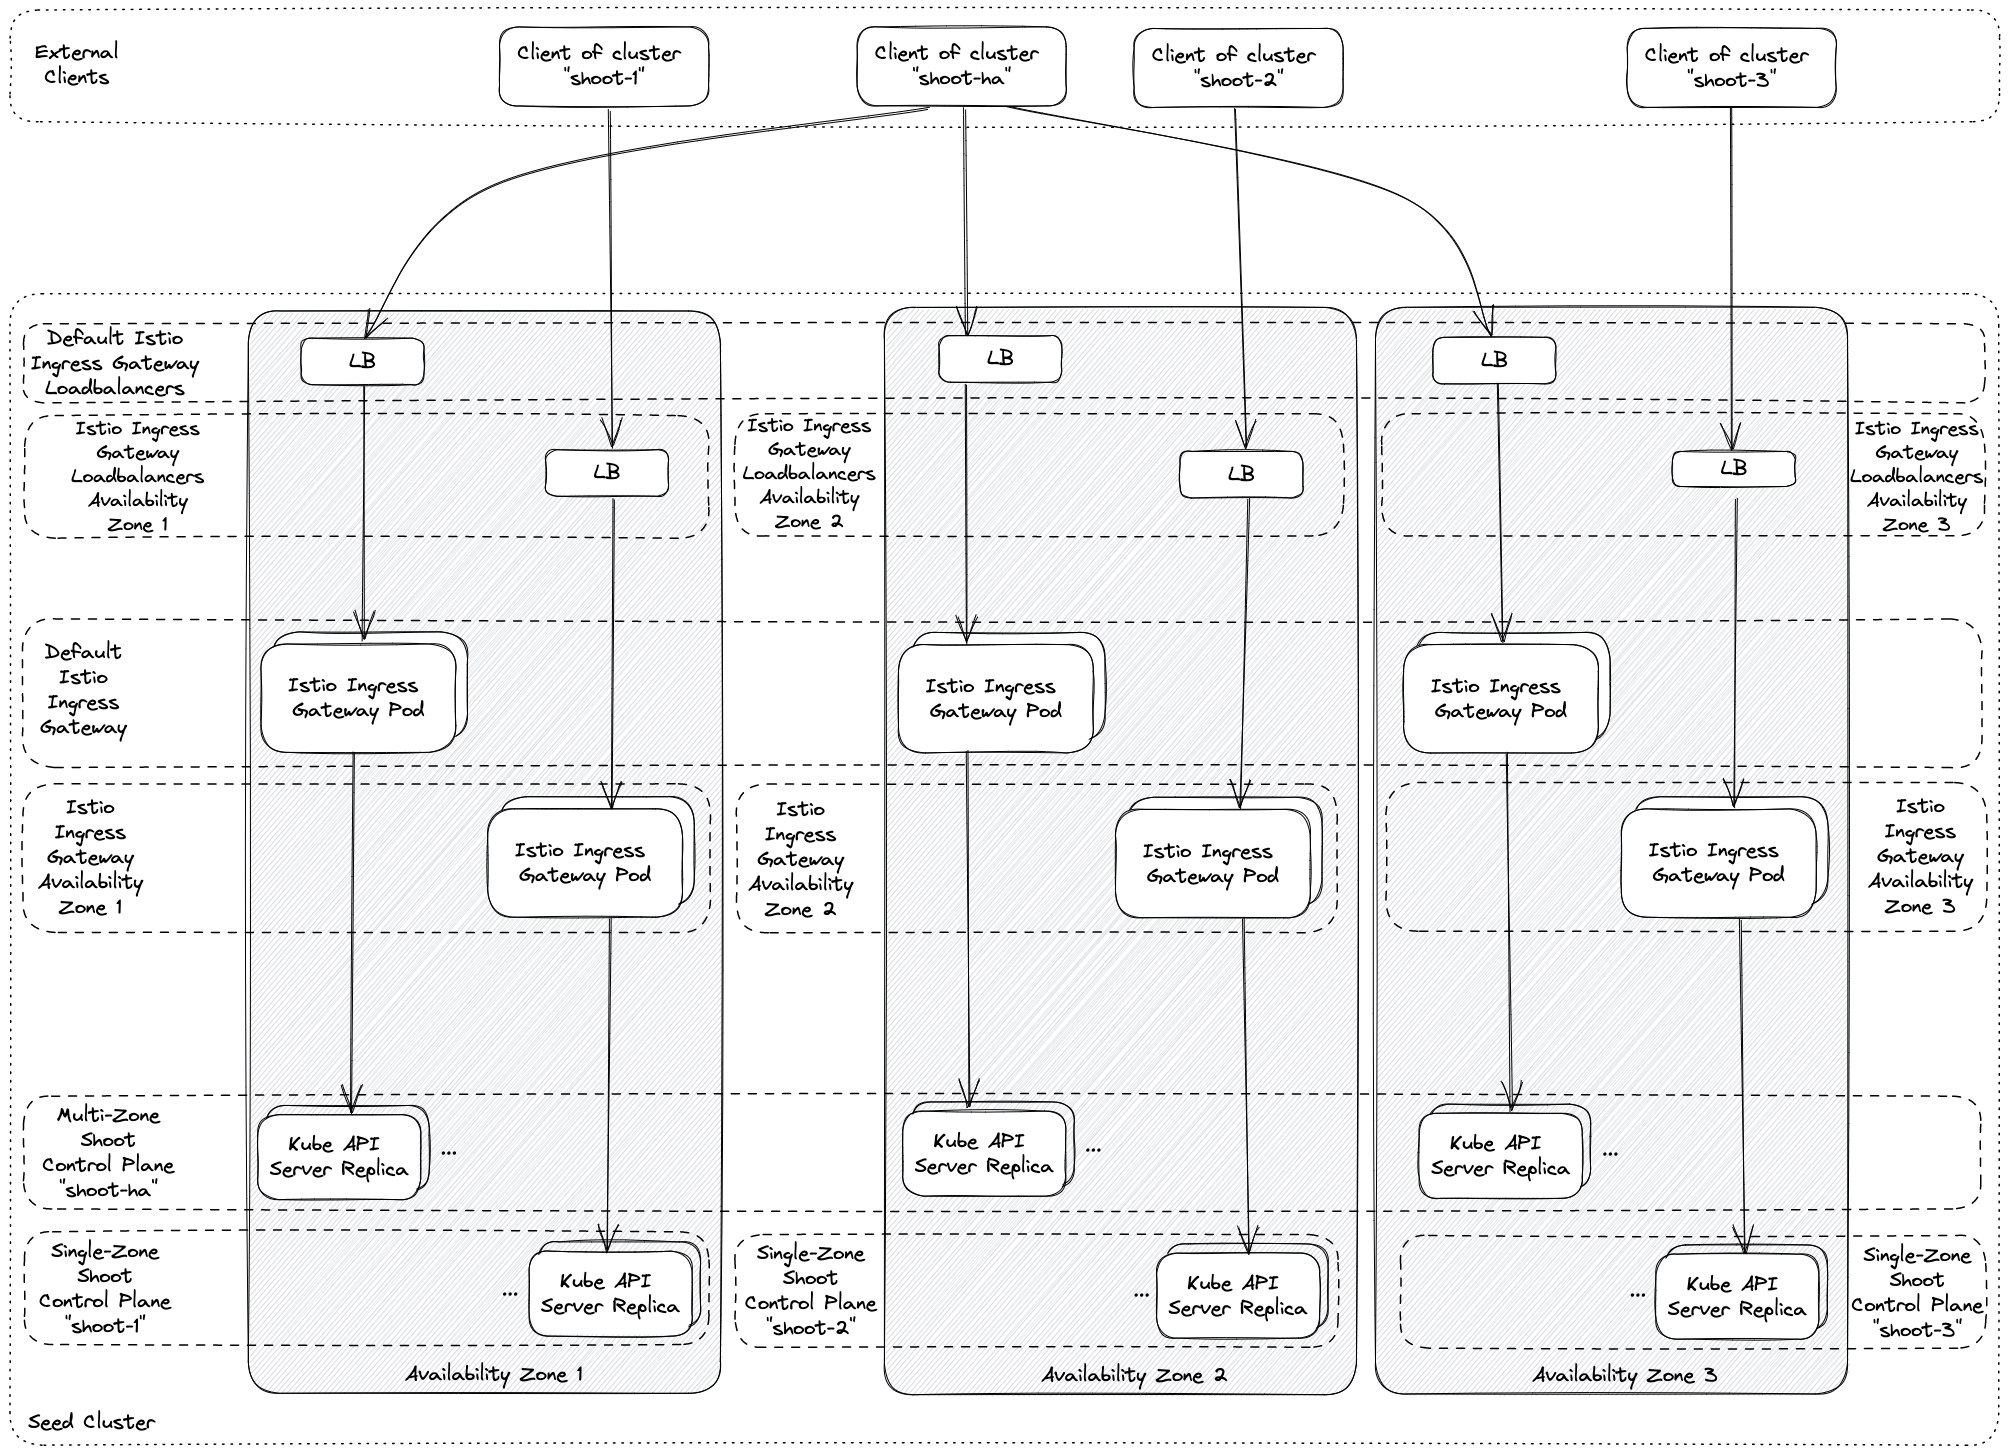
Please note that operators may need to perform additional tuning to prevent cross-zonal traffic completely. The loadbalancer settings in the seed specification offer various options, e.g., by setting the external traffic policy to local or using infrastructure specific loadbalancer annotations.
Furthermore, note that this approach is also taken in case ExposureClasses are used. For each exposure class, additional zonal istio ingress gateways may be deployed to cover for single-zone shoot control planes using the exposure class.
4.27 - Kube Apiserver Loadbalancing
Kube API server load balancing
Load balancing for shoot and garden Kube API servers leverages the Gardener Istio deployment.
In default mode Istio performs L4 load balancing. Istio distributes connections to Kube API servers preferably in the same zone (Topology-Aware Traffic Routing). Requests are not taken into account for a load balancing decisions. TLS is terminated by Kube API server instances.
There is a second mode which can be activated via IstioTLSTermination feature gate in gardenlet and gardener-operator.
This mode introduces L7 load balancing and distributes requests among the Kube API server instances.
It does not use Topology-Aware Traffic Routing since it contradicts the load balancing goal.
In this mode TLS is terminated in Istio. However, Istio creates a TLS connection to Kube API servers, too, so the
traffic within the cluster remains encrypted.
This document is focused on the second mode.
On seeds where the feature gate is activated L7 load balancing can still be deactivated for single shoots by annotating
them with shoot.gardener.cloud/disable-istio-tls-termination: "true".
How it works
L7 load balancing works for the externally resolvable Kube API server endpoints, for connections which use
apiserver-proxy like endpoint kubernetes.default.svc.cluster.local and for control plane components running in shoot
namespaces.
Clients might authenticate at Kube API server using client certificates, tokens or might connect unauthenticated. In the first case Istio ingress gateway must validate client certificates because it terminates the TLS connection. Thus, it is configured with an optional mutual TLS authentication. It is optional because in case of the authentication via token, the token is validated by Kube API server. Unauthenticated requests are handled by Kube API server too. For TLS termination and client certificate validation Kube API server certificate (including the private key) and the client CA bundle must be synchronized into the namespace where istio ingress gateway is running.
While token authentication and unauthenticated requests are still handled by Kube API server itself, it requires dedicated request headers if an authentication proxy is used. Based on these headers Kube API server identifies the user and group of a request. They are added with a lua script running in an envoy filter in istio ingress gateway. Kube API server trusts the headers set by the authentication proxy so it requires an mTLS connection to the proxy. Istio uses the front proxy CA (including private key) and the server CA bundle to establish the mTLS connection. These secrets again must be synchronized into the namespace where istio ingress gateway is running. There is an own istio destination rule for the mTLS connection.
The destination host of the istio virtual service has an istio destination rule which does not use mTLS so that Kube API server authenticates requests by itself. It is used for the token based authentication. The istio destination rule for the mTLS connection is set by the lua script mentioned above only. This is a safety net to prevent that requests can reach Kube API server via the trusted connection in case the lua scripts fails for some reason.
Cluster internal control plane components like kube-controller-manager, kube-scheduler and gardener-resource-manager
use L7 load balancing too. They connect to the Kube API server via a cluster IP service for istio ingress gateway.
The generic token kubeconfig uses the public Kube API server endpoint. In order to avoid external traffic, the control
plane components use host aliases in their pod specifications. For convenience, the host aliases are automatically added
by the pod-kube-apiserver-load-balancing webhook
in gardener-resource-manager. It also adds a label to create a network policy allowing egress traffic to the istio
ingress gateway pods.
This works for control plane components running in shoot namespaces and for the virtual garden control plane.
The flow for L7 load balancing is shown in the following illustration.
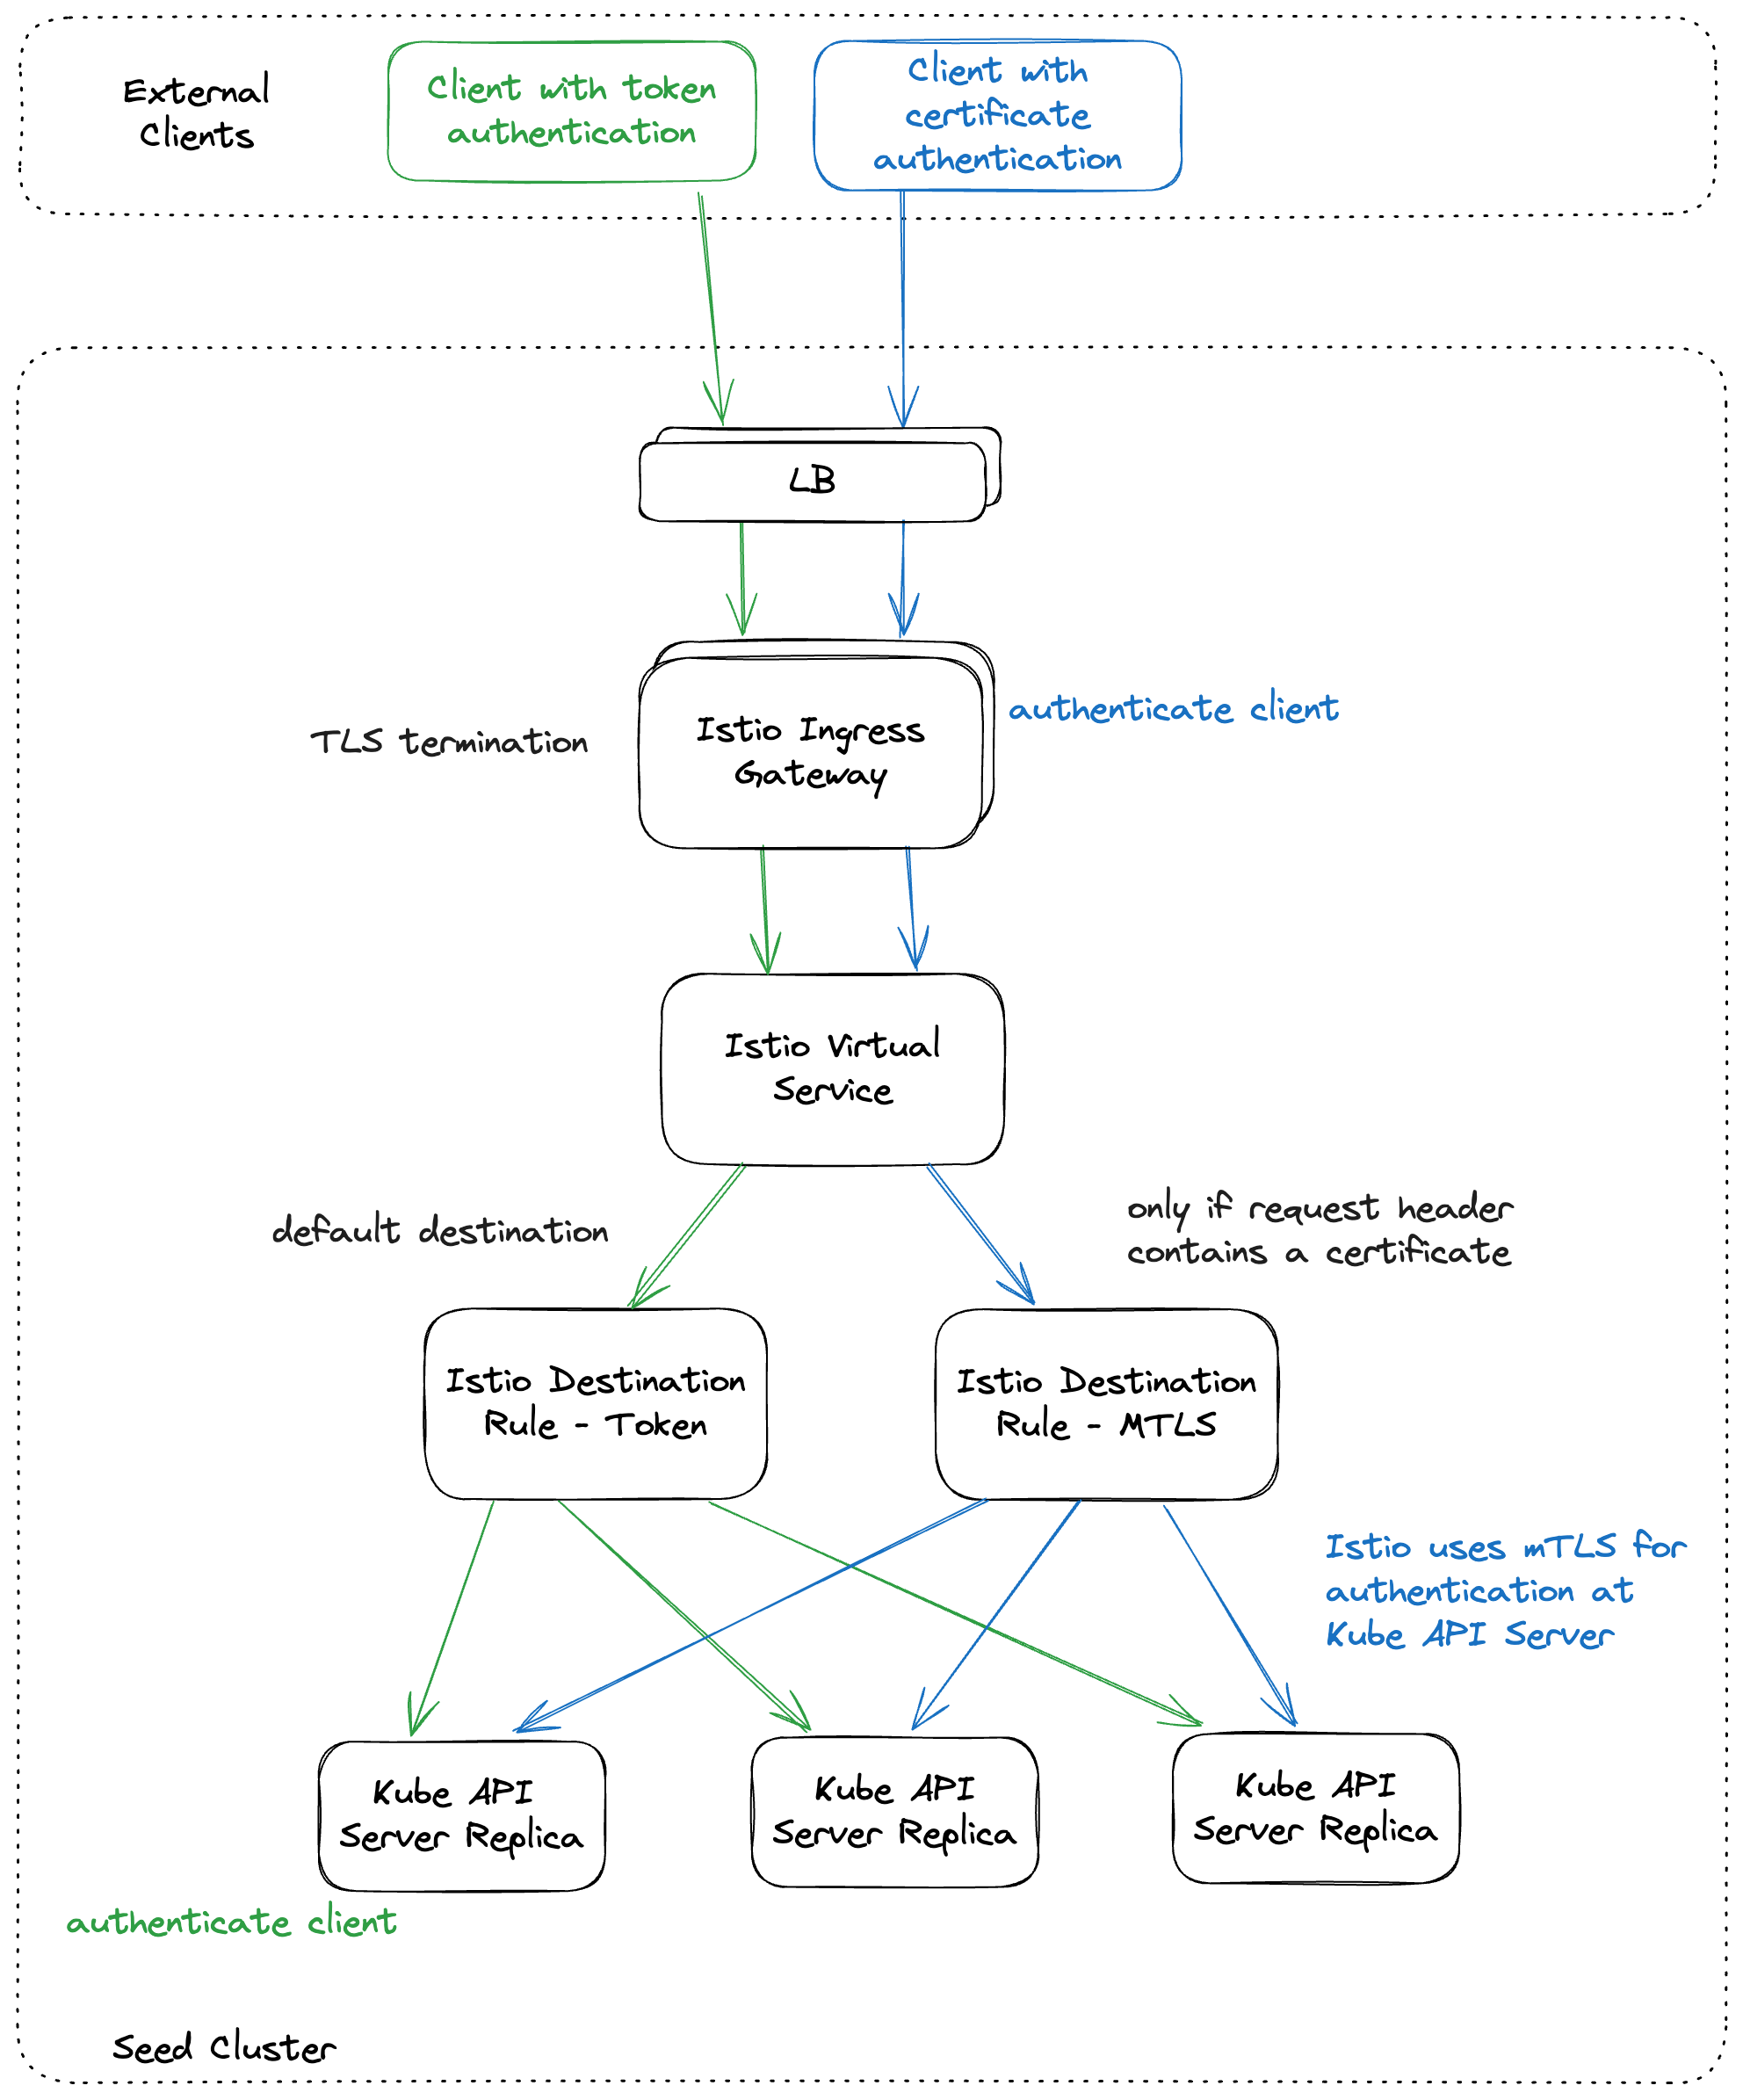
4.28 - Kubernetes Clients
Kubernetes Clients in Gardener
This document aims at providing a general developer guideline on different aspects of using Kubernetes clients in a large-scale distributed system and project like Gardener. The points included here are not meant to be consulted as absolute rules, but rather as general rules of thumb that allow developers to get a better feeling about certain gotchas and caveats. It should be updated with lessons learned from maintaining the project and running Gardener in production.
Prerequisites:
Please familiarize yourself with the following basic Kubernetes API concepts first, if you’re new to Kubernetes. A good understanding of these basics will help you better comprehend the following document.
- Kubernetes API Concepts (including terminology, watch basics, etc.)
- Extending the Kubernetes API (including Custom Resources and aggregation layer / extension API servers)
- Extend the Kubernetes API with CustomResourceDefinitions
- Working with Kubernetes Objects
- Sample Controller (the diagram helps to build an understanding of an controller’s basic structure)
Client Types: Client-Go, Generated, Controller-Runtime
For historical reasons, you will find different kinds of Kubernetes clients in Gardener:
Client-Go Clients
client-go is the default/official client for talking to the Kubernetes API in Golang.
It features the so called “client sets” for all built-in Kubernetes API groups and versions (e.g. v1 (aka core/v1), apps/v1).
client-go clients are generated from the built-in API types using client-gen and are composed of interfaces for every known API GroupVersionKind.
A typical client-go usage looks like this:
var (
ctx context.Context
c kubernetes.Interface // "k8s.io/client-go/kubernetes"
deployment *appsv1.Deployment // "k8s.io/api/apps/v1"
)
updatedDeployment, err := c.AppsV1().Deployments("default").Update(ctx, deployment, metav1.UpdateOptions{})
Important characteristics of client-go clients:
- clients are specific to a given API GroupVersionKind, i.e., clients are hard-coded to corresponding API-paths (don’t need to use the discovery API to map GVK to a REST endpoint path).
- client’s don’t modify the passed in-memory object (e.g.
deploymentin the above example). Instead, they return a new in-memory object. This means that controllers have to continue working with the new in-memory object or overwrite the shared object to not lose any state updates.
Generated Client Sets for Gardener APIs
Gardener’s APIs extend the Kubernetes API by registering an extension API server (in the garden cluster) and CustomResourceDefinitions (on Seed clusters), meaning that the Kubernetes API will expose additional REST endpoints to manage Gardener resources in addition to the built-in API resources.
In order to talk to these extended APIs in our controllers and components, client-gen is used to generate client-go-style clients to pkg/client/{core,extensions,seedmanagement,...}.
Usage of these clients is equivalent to client-go clients, and the same characteristics apply. For example:
var (
ctx context.Context
c gardencoreclientset.Interface // "github.com/gardener/gardener/pkg/client/core/clientset/versioned"
shoot *gardencorev1beta1.Shoot // "github.com/gardener/gardener/pkg/apis/core/v1beta1"
)
updatedShoot, err := c.CoreV1beta1().Shoots("garden-my-project").Update(ctx, shoot, metav1.UpdateOptions{})
Controller-Runtime Clients
controller-runtime is a Kubernetes community project (kubebuilder subproject) for building controllers and operators for custom resources. Therefore, it features a generic client that follows a different approach and does not rely on generated client sets. Instead, the client can be used for managing any Kubernetes resources (built-in or custom) homogeneously. For example:
var (
ctx context.Context
c client.Client // "sigs.k8s.io/controller-runtime/pkg/client"
deployment *appsv1.Deployment // "k8s.io/api/apps/v1"
shoot *gardencorev1beta1.Shoot // "github.com/gardener/gardener/pkg/apis/core/v1beta1"
)
err := c.Update(ctx, deployment)
// or
err = c.Update(ctx, shoot)
A brief introduction to controller-runtime and its basic constructs can be found at the official Go documentation.
Important characteristics of controller-runtime clients:
- The client functions take a generic
client.Objectorclient.ObjectListvalue. These interfaces are implemented by all Golang types, that represent Kubernetes API objects or lists respectively which can be interacted with via usual API requests. [1] - The client first consults a
runtime.Scheme(configured during client creation) for recognizing the object’sGroupVersionKind(this happens on the client-side only). Aruntime.Schemeis basically a registry for Golang API types, defaulting and conversion functions. Schemes are usually provided perGroupVersion(see this example forapps/v1) and can be combined to one single scheme for further usage (example). In controller-runtime clients, schemes are used only for mapping a typed API object to itsGroupVersionKind. - It then consults a
meta.RESTMapper(also configured during client creation) for mapping theGroupVersionKindto aRESTMapping, which contains theGroupVersionResourceandScope(namespaced or cluster-scoped). From these values, the client can unambiguously determine the REST endpoint path of the corresponding API resource. For instance:appsv1.DeploymentListis available at/apis/apps/v1/deploymentsor/apis/apps/v1/namespaces/<namespace>/deploymentsrespectively.- There are different
RESTMapperimplementations, but generally they are talking to the API server’s discovery API for retrievingRESTMappingsfor all API resources known to the API server (either built-in, registered via API extension orCustomResourceDefinitions). - The default implementation of a controller-runtime (which Gardener uses as well) is the dynamic
RESTMapper. It caches discovery results (i.e.RESTMappings) in-memory and only re-discovers resources from the API server when a client tries to use an unknownGroupVersionKind, i.e., when it encounters aNo{Kind,Resource}MatchError.
- There are different
- The client writes back results from the API server into the passed in-memory object.
- This means that controllers don’t have to worry about copying back the results and should just continue to work on the given in-memory object.
- This is a nice and flexible pattern, and helper functions should try to follow it wherever applicable. Meaning, if possible accept an object param, pass it down to clients and keep working on the same in-memory object instead of creating a new one in your helper function.
- The benefit is that you don’t lose updates to the API object and always have the last-known state in memory. Therefore, you don’t have to read it again, e.g., for getting the current
resourceVersionwhen working with optimistic locking, and thus minimize the chances for running into conflicts. - However, controllers must not use the same in-memory object concurrently in multiple goroutines. For example, decoding results from the API server in multiple goroutines into the same maps (e.g., labels, annotations) will cause panics because of “concurrent map writes”. Also, reading from an in-memory API object in one goroutine while decoding into it in another goroutine will yield non-atomic reads, meaning data might be corrupt and represent a non-valid/non-existing API object.
- Therefore, if you need to use the same in-memory object in multiple goroutines concurrently (e.g., shared state), remember to leverage proper synchronization techniques like channels, mutexes,
atomic.Valueand/or copy the object prior to use. The average controller however, will not need to share in-memory API objects between goroutines, and it’s typically an indicator that the controller’s design should be improved.
- The client decoder erases the object’s
TypeMeta(apiVersionandkindfields) after retrieval from the API server, see kubernetes/kubernetes#80609, kubernetes-sigs/controller-runtime#1517. Unstructured and metadata-only requests objects are an exception to this because the containedTypeMetais the only way to identify the object’s type. Because of this behavior,obj.GetObjectKind().GroupVersionKind()is likely to return an emptyGroupVersionKind. I.e., you must not rely onTypeMetabeing set orGetObjectKind()to return something usable. If you need to identify an object’sGroupVersionKind, use a scheme and itsObjectKindsfunction instead (or the helper functionapiutil.GVKForObject). This is not specific to controller-runtime clients and applies to client-go clients as well.
[1] Other lower level, config or internal API types (e.g., such as AdmissionReview) don’t implement client.Object. However, you also can’t interact with such objects via the Kubernetes API and thus also not via a client, so this can be disregarded at this point.
Metadata-Only Clients
Additionally, controller-runtime clients can be used to easily retrieve metadata-only objects or lists.
This is useful for efficiently checking if at least one object of a given kind exists, or retrieving metadata of an object, if one is not interested in the rest (e.g., spec/status).
The Accept header sent to the API server then contains application/json;as=PartialObjectMetadataList;g=meta.k8s.io;v=v1, which makes the API server only return metadata of the retrieved object(s).
This saves network traffic and CPU/memory load on the API server and client side.
If the client fully lists all objects of a given kind including their spec/status, the resulting list can be quite large and easily exceed the controllers available memory.
That’s why it’s important to carefully check if a full list is actually needed, or if metadata-only list can be used instead.
For example:
var (
ctx context.Context
c client.Client // "sigs.k8s.io/controller-runtime/pkg/client"
shootList = &metav1.PartialObjectMetadataList{} // "k8s.io/apimachinery/pkg/apis/meta/v1"
)
shootList.SetGroupVersionKind(gardencorev1beta1.SchemeGroupVersion.WithKind("ShootList"))
if err := c.List(ctx, shootList, client.InNamespace("garden-my-project"), client.Limit(1)); err != nil {
return err
}
if len(shootList.Items) > 0 {
// project has at least one shoot
} else {
// project doesn't have any shoots
}
Gardener’s Client Collection, ClientMaps
The Gardener codebase has a collection of clients (kubernetes.Interface), which can return all the above mentioned client types.
Additionally, it contains helpers for rendering and applying helm charts (ChartRender, ChartApplier) and retrieving the API server’s version (Version).
Client sets are managed by so called ClientMaps, which are a form of registry for all client set for a given type of cluster, i.e., Garden, Seed and Shoot.
ClientMaps manage the whole lifecycle of clients: they take care of creating them if they don’t exist already, running their caches, refreshing their cached server version and invalidating them when they are no longer needed.
var (
ctx context.Context
cm clientmap.ClientMap // "github.com/gardener/gardener/pkg/client/kubernetes/clientmap"
shoot *gardencorev1beta1.Shoot
)
cs, err := cm.GetClient(ctx, keys.ForShoot(shoot)) // kubernetes.Interface
if err != nil {
return err
}
c := cs.Client() // client.Client
The client collection mainly exist for historical reasons (there used to be a lot of code using the client-go style clients). However, Gardener is in the process of moving more towards controller-runtime and only using their clients, as they provide many benefits and are much easier to use. Also, gardener/gardener#4251 aims at refactoring our controller and admission components to native controller-runtime components.
⚠️ Please always prefer controller-runtime clients over other clients when writing new code or refactoring existing code.
Cache Types: Informers, Listers, Controller-Runtime Caches
Similar to the different types of client(set)s, there are also different kinds of Kubernetes client caches.
However, all of them are based on the same concept: Informers.
An Informer is a watch-based cache implementation, meaning it opens watch connections to the API server and continuously updates cached objects based on the received watch events (ADDED, MODIFIED, DELETED).
Informers offer to add indices to the cache for efficient object lookup (e.g., by name or labels) and to add EventHandlers for the watch events.
The latter is used by controllers to fill queues with objects that should be reconciled on watch events.
Informers are used in and created via several higher-level constructs:
SharedInformerFactories, Listers
The generated clients (built-in as well as extended) feature a SharedInformerFactory for every API group, which can be used to create and retrieve Informers for all GroupVersionKinds.
Similarly, it can be used to retrieve Listers that allow getting and listing objects from the Informer’s cache.
However, both of these constructs are only used for historical reasons, and we are in the process of migrating away from them in favor of cached controller-runtime clients (see gardener/gardener#2414, gardener/gardener#2822). Thus, they are described only briefly here.
Important characteristics of Listers:
- Objects read from Informers and Listers can always be slightly out-out-date (i.e., stale) because the client has to first observe changes to API objects via watch events (which can intermittently lag behind by a second or even more).
- Thus, don’t make any decisions based on data read from Listers if the consequences of deciding wrongfully based on stale state might be catastrophic (e.g. leaking infrastructure resources). In such cases, read directly from the API server via a client instead.
- Objects retrieved from Informers or Listers are pointers to the cached objects, so they must not be modified without copying them first, otherwise the objects in the cache are also modified.
Controller-Runtime Caches
controller-runtime features a cache implementation that can be used equivalently as their clients. In fact, it implements a subset of the client.Client interface containing the Get and List functions.
Under the hood, a cache.Cache dynamically creates Informers (i.e., opens watches) for every object GroupVersionKind that is being retrieved from it.
Note that the underlying Informers of a controller-runtime cache (cache.Cache) and the ones of a SharedInformerFactory (client-go) are not related in any way.
Both create Informers and watch objects on the API server individually.
This means that if you read the same object from different cache implementations, you may receive different versions of the object because the watch connections of the individual Informers are not synced.
⚠️ Because of this, controllers/reconcilers should get the object from the same cache in the reconcile loop, where the
EventHandlerwas also added to set up the controller. For example, if aSharedInformerFactoryis used for setting up the controller then read the object in the reconciler from theListerinstead of from a cached controller-runtime client.
By default, the client.Client created by a controller-runtime Manager is a DelegatingClient. It delegates Get and List calls to a Cache, and all other calls to a client that talks directly to the API server. Exceptions are requests with *unstructured.Unstructured objects and object kinds that were configured to be excluded from the cache in the DelegatingClient.
ℹ️
kubernetes.Interface.Client()returns aDelegatingClientthat uses the cache returned fromkubernetes.Interface.Cache()under the hood. This means that allClient()usages need to be ready for cached clients and should be able to cater with stale cache reads.
Important characteristics of cached controller-runtime clients:
- Like for Listers, objects read from a controller-runtime cache can always be slightly out of date. Hence, don’t base any important decisions on data read from the cache (see above).
- In contrast to Listers, controller-runtime caches fill the passed in-memory object with the state of the object in the cache (i.e., they perform something like a “deep copy into”). This means that objects read from a controller-runtime cache can safely be modified without unintended side effects.
- Reading from a controller-runtime cache or a cached controller-runtime client implicitly starts a watch for the given object kind under the hood. This has important consequences:
- Reading a given object kind from the cache for the first time can take up to a few seconds depending on size and amount of objects as well as API server latency. This is because the cache has to do a full list operation and wait for an initial watch sync before returning results.
- ⚠️ Controllers need appropriate RBAC permissions for the object kinds they retrieve via cached clients (i.e.,
listandwatch). - ⚠️ By default, watches started by a controller-runtime cache are cluster-scoped, meaning it watches and caches objects across all namespaces. Thus, be careful which objects to read from the cache as it might significantly increase the controller’s memory footprint.
- There is no interaction with the cache on writing calls (
Create,Update,PatchandDelete), see below.
Uncached objects, filtered caches, APIReaders:
In order to allow more granular control over which object kinds should be cached and which calls should bypass the cache, controller-runtime offers a few mechanisms to further tweak the client/cache behavior:
- When creating a
DelegatingClient, certain object kinds can be configured to always be read directly from the API instead of from the cache. Note that this does not prevent starting a new Informer when retrieving them directly from the cache. - Watches can be restricted to a given (set of) namespace(s) by setting
cache.Options.Namespaces. - Watches can be filtered (e.g., by label) per object kind by configuring
cache.Options.SelectorsByObjecton creation of the cache. - Retrieving metadata-only objects or lists from a cache results in a metadata-only watch/cache for that object kind.
- The
APIReadercan be used to always talk directly to the API server for a givenGetorListcall (use with care and only as a last resort!).
To Cache or Not to Cache
Although watch-based caches are an important factor for the immense scalability of Kubernetes, it definitely comes at a price (mainly in terms of memory consumption). Thus, developers need to be careful when introducing new API calls and caching new object kinds. Here are some general guidelines on choosing whether to read from a cache or not:
- Always try to use the cache wherever possible and make your controller able to tolerate stale reads.
- Leverage optimistic locking: use deterministic naming for objects you create (this is what the
Deploymentcontroller does [2]). - Leverage optimistic locking / concurrency control of the API server: send updates/patches with the last-known
resourceVersionfrom the cache (see below). This will make the request fail, if there were concurrent updates to the object (conflict error), which indicates that we have operated on stale data and might have made wrong decisions. In this case, let the controller handle the error with exponential backoff. This will make the controller eventually consistent. - Track the actions you took, e.g., when creating objects with
generateName(this is what theReplicaSetcontroller does [3]). The actions can be tracked in memory and repeated if the expected watch events don’t occur after a given amount of time. - Always try to write controllers with the assumption that data will only be eventually correct and can be slightly out of date (even if read directly from the API server!).
- If there is already some other code that needs a cache (e.g., a controller watch), reuse it instead of doing extra direct reads.
- Don’t read an object again if you just sent a write request. Write requests (
Create,Update,PatchandDelete) don’t interact with the cache. Hence, use the current state that the API server returned (filled into the passed in-memory object), which is basically a “free direct read” instead of reading the object again from a cache, because this will probably set back the object to an olderresourceVersion.
- Leverage optimistic locking: use deterministic naming for objects you create (this is what the
- If you are concerned about the impact of the resulting cache, try to minimize that by using filtered or metadata-only watches.
- If watching and caching an object type is not feasible, for example because there will be a lot of updates, and you are only interested in the object every ~5m, or because it will blow up the controllers memory footprint, fallback to a direct read. This can either be done by disabling caching the object type generally or doing a single request via an
APIReader. In any case, please bear in mind that every direct API call results in a quorum read from etcd, which can be costly in a heavily-utilized cluster and impose significant scalability limits. Thus, always try to minimize the impact of direct calls by filtering results by namespace or labels, limiting the number of results and/or using metadata-only calls.
[2] The Deployment controller uses the pattern <deployment-name>-<podtemplate-hash> for naming ReplicaSets. This means, the name of a ReplicaSet it tries to create/update/delete at any given time is deterministically calculated based on the Deployment object. By this, it is insusceptible to stale reads from its ReplicaSets cache.
[3] In simple terms, the ReplicaSet controller tracks its CREATE pod actions as follows: when creating new Pods, it increases a counter of expected ADDED watch events for the corresponding ReplicaSet. As soon as such events arrive, it decreases the counter accordingly. It only creates new Pods for a given ReplicaSet once all expected events occurred (counter is back to zero) or a timeout has occurred. This way, it prevents creating more Pods than desired because of stale cache reads and makes the controller eventually consistent.
Conflicts, Concurrency Control, and Optimistic Locking
Every Kubernetes API object contains the metadata.resourceVersion field, which identifies an object’s version in the backing data store, i.e., etcd. Every write to an object in etcd results in a newer resourceVersion.
This field is mainly used for concurrency control on the API server in an optimistic locking fashion, but also for efficient resumption of interrupted watch connections.
Optimistic locking in the Kubernetes API sense means that when a client wants to update an API object, then it includes the object’s resourceVersion in the request to indicate the object’s version the modifications are based on.
If the resourceVersion in etcd has not changed in the meantime, the update request is accepted by the API server and the updated object is written to etcd.
If the resourceVersion sent by the client does not match the one of the object stored in etcd, there were concurrent modifications to the object. Consequently, the request is rejected with a conflict error (status code 409, API reason Conflict), for example:
{
"kind": "Status",
"apiVersion": "v1",
"metadata": {},
"status": "Failure",
"message": "Operation cannot be fulfilled on configmaps \"foo\": the object has been modified; please apply your changes to the latest version and try again",
"reason": "Conflict",
"details": {
"name": "foo",
"kind": "configmaps"
},
"code": 409
}
This concurrency control is an important mechanism in Kubernetes as there are typically multiple clients acting on API objects at the same time (humans, different controllers, etc.). If a client receives a conflict error, it should read the object’s latest version from the API server, make the modifications based on the newest changes, and retry the update. The reasoning behind this is that a client might choose to make different decisions based on the concurrent changes made by other actors compared to the outdated version that it operated on.
Important points about concurrency control and conflicts:
- The
resourceVersionfield carries a string value and clients must not assume numeric values (the type and structure of versions depend on the backing data store). This means clients may compareresourceVersionvalues to detect whether objects were changed. But they must not compareresourceVersions to figure out which one is newer/older, i.e., no greater/less-than comparisons are allowed. - By default, update calls (e.g. via client-go and controller-runtime clients) use optimistic locking as the passed in-memory usually object contains the latest
resourceVersionknown to the controller, which is then also sent to the API server. - API servers can also choose to accept update calls without optimistic locking (i.e., without a
resourceVersionin the object’s metadata) for any given resource. However, sending update requests without optimistic locking is strongly discouraged, as doing so overwrites the entire object, discarding any concurrent changes made to it. - On the other side, patch requests can always be executed either with or without optimistic locking, by (not) including the
resourceVersionin the patched object’s metadata. Sending patch requests without optimistic locking might be safe and even desirable as a patch typically updates only a specific section of the object. However, there are also situations where patching without optimistic locking is not safe (see below).
Don’t Retry on Conflict
Similar to how a human would typically handle a conflict error, there are helper functions implementing RetryOnConflict-semantics, i.e., try an update call, then re-read the object if a conflict occurs, apply the modification again and retry the update.
However, controllers should generally not use RetryOnConflict-semantics. Instead, controllers should abort their current reconciliation run and let the queue handle the conflict error with exponential backoff.
The reasoning behind this is that a conflict error indicates that the controller has operated on stale data and might have made wrong decisions earlier on in the reconciliation.
When using a helper function that implements RetryOnConflict-semantics, the controller doesn’t check which fields were changed and doesn’t revise its previous decisions accordingly.
Instead, retrying on conflict basically just ignores any conflict error and blindly applies the modification.
To properly solve the conflict situation, controllers should immediately return with the error from the update call. This will cause retries with exponential backoff so that the cache has a chance to observe the latest changes to the object. In a later run, the controller will then make correct decisions based on the newest version of the object, not run into conflict errors, and will then be able to successfully reconcile the object. This way, the controller becomes eventually consistent.
The other way to solve the situation is to modify objects without optimistic locking in order to avoid running into a conflict in the first place (only if this is safe). This can be a preferable solution for controllers with long-running reconciliations (which is actually an anti-pattern but quite unavoidable in some of Gardener’s controllers). Aborting the entire reconciliation run is rather undesirable in such cases, as it will add a lot of unnecessary waiting time for end users and overhead in terms of compute and network usage.
However, in any case, retrying on conflict is probably not the right option to solve the situation (there are some correct use cases for it, though, they are very rare). Hence, don’t retry on conflict.
To Lock or Not to Lock
As explained before, conflicts are actually important and prevent clients from doing wrongful concurrent updates. This means that conflicts are not something we generally want to avoid or ignore. However, in many cases controllers are exclusive owners of the fields they want to update and thus it might be safe to run without optimistic locking.
For example, the gardenlet is the exclusive owner of the spec section of the Extension resources it creates on behalf of a Shoot (e.g., the Infrastructure resource for creating VPC). Meaning, it knows the exact desired state and no other actor is supposed to update the Infrastructure’s spec fields.
When the gardenlet now updates the Infrastructures spec section as part of the Shoot reconciliation, it can simply issue a PATCH request that only updates the spec and runs without optimistic locking.
If another controller concurrently updated the object in the meantime (e.g., the status section), the resourceVersion got changed, which would cause a conflict error if running with optimistic locking.
However, concurrent status updates would not change the gardenlet’s mind on the desired spec of the Infrastructure resource as it is determined only by looking at the Shoot’s specification.
If the spec section was changed concurrently, it’s still fine to overwrite it because the gardenlet should reconcile the spec back to its desired state.
Generally speaking, if a controller is the exclusive owner of a given set of fields and they are independent of concurrent changes to other fields in that object, it can patch these fields without optimistic locking. This might ignore concurrent changes to other fields or blindly overwrite changes to the same fields, but this is fine if the mentioned conditions apply. Obviously, this applies only to patch requests that modify only a specific set of fields but not to update requests that replace the entire object.
In such cases, it’s even desirable to run without optimistic locking as it will be more performant and save retries. If certain requests are made with high frequency and have a good chance of causing conflicts, retries because of optimistic locking can cause a lot of additional network traffic in a large-scale Gardener installation.
Updates, Patches, Server-Side Apply
There are different ways of modifying Kubernetes API objects. The following snippet demonstrates how to do a given modification with the most frequently used options using a controller-runtime client:
var (
ctx context.Context
c client.Client
shoot *gardencorev1beta1.Shoot
)
// update
shoot.Spec.Kubernetes.Version = "1.26"
err := c.Update(ctx, shoot)
// json merge patch
patch := client.MergeFrom(shoot.DeepCopy())
shoot.Spec.Kubernetes.Version = "1.26"
err = c.Patch(ctx, shoot, patch)
// strategic merge patch
patch = client.StrategicMergeFrom(shoot.DeepCopy())
shoot.Spec.Kubernetes.Version = "1.26"
err = c.Patch(ctx, shoot, patch)
Important characteristics of the shown request types:
- Update requests always send the entire object to the API server and update all fields accordingly. By default, optimistic locking is used (
resourceVersionis included). - Both patch types run without optimistic locking by default. However, it can be enabled explicitly if needed:
// json merge patch + optimistic locking patch := client.MergeFromWithOptions(shoot.DeepCopy(), client.MergeFromWithOptimisticLock{}) // ... // strategic merge patch + optimistic locking patch = client.StrategicMergeFrom(shoot.DeepCopy(), client.MergeFromWithOptimisticLock{}) // ... - Patch requests only contain the changes made to the in-memory object between the copy passed to
client.*MergeFromand the object passed toClient.Patch(). The diff is calculated on the client-side based on the in-memory objects only. This means that if in the meantime some fields were changed on the API server to a different value than the one on the client-side, the fields will not be changed back as long as they are not changed on the client-side as well (there will be no diff in memory). - Thus, if you want to ensure a given state using patch requests, always read the object first before patching it, as there will be no diff otherwise, meaning the patch will be empty. For more information, see gardener/gardener#4057 and the comments in gardener/gardener#4027.
- Also, always send updates and patch requests even if your controller hasn’t made any changes to the current state on the API server. I.e., don’t make any optimization for preventing empty patches or no-op updates. There might be mutating webhooks in the system that will modify the object and that rely on update/patch requests being sent (even if they are no-op). Gardener’s extension concept makes heavy use of mutating webhooks, so it’s important to keep this in mind.
- JSON merge patches always replace lists as a whole and don’t merge them. Keep this in mind when operating on lists with merge patch requests. If the controller is the exclusive owner of the entire list, it’s safe to run without optimistic locking. Though, if you want to prevent overwriting concurrent changes to the list or its items made by other actors (e.g., additions/removals to the
metadata.finalizerslist), enable optimistic locking. - Strategic merge patches are able to make more granular modifications to lists and their elements without replacing the entire list. It uses Golang struct tags of the API types to determine which and how lists should be merged. See Update API Objects in Place Using kubectl patch or the strategic merge patch documentation for more in-depth explanations and comparison with JSON merge patches.
With this, controllers might be able to issue patch requests for individual list items without optimistic locking, even if they are not exclusive owners of the entire list. Remember to check the
patchStrategyandpatchMergeKeystruct tags of the fields you want to modify before blindly adding patch requests without optimistic locking. - Strategic merge patches are only supported by built-in Kubernetes resources and custom resources served by Extension API servers. Strategic merge patches are not supported by custom resources defined by
CustomResourceDefinitions (see this comparison). In that case, fallback to JSON merge patches. - Server-side Apply is yet another mechanism to modify API objects, which is supported by all API resources (in newer Kubernetes versions). However, it has a few problems and more caveats preventing us from using it in Gardener at the time of writing. See gardener/gardener#4122 for more details.
Generally speaking, patches are often the better option compared to update requests because they can save network traffic, encoding/decoding effort, and avoid conflicts under the presented conditions. If choosing a patch type, consider which type is supported by the resource you’re modifying and what will happen in case of a conflict. Consider whether your modification is safe to run without optimistic locking. However, there is no simple rule of thumb on which patch type to choose.
On Helper Functions
Here is a note on some helper functions, that should be avoided and why:
controllerutil.CreateOrUpdate does a basic get, mutate and create or update call chain, which is often used in controllers. We should avoid using this helper function in Gardener, because it is likely to cause conflicts for cached clients and doesn’t send no-op requests if nothing was changed, which can cause problems because of the heavy use of webhooks in Gardener extensions (see above).
That’s why usage of this function was completely replaced in gardener/gardener#4227 and similar PRs.
controllerutil.CreateOrPatch is similar to CreateOrUpdate but does a patch request instead of an update request. It has the same drawback as CreateOrUpdate regarding no-op updates.
Also, controllers can’t use optimistic locking or strategic merge patches when using CreateOrPatch.
Another reason for avoiding use of this function is that it also implicitly patches the status section if it was changed, which is confusing for others reading the code. To accomplish this, the func does some back and forth conversion, comparison and checks, which are unnecessary in most of our cases and simply wasted CPU cycles and complexity we want to avoid.
There were some Try{Update,UpdateStatus,Patch,PatchStatus} helper functions in Gardener that were already removed by gardener/gardener#4378 but are still used in some extension code at the time of writing.
The reason for eliminating these functions is that they implement RetryOnConflict-semantics. Meaning, they first get the object, mutate it, then try to update and retry if a conflict error occurs.
As explained above, retrying on conflict is a controller anti-pattern and should be avoided in almost every situation.
The other problem with these functions is that they read the object first from the API server (always do a direct call), although in most cases we already have a recent version of the object at hand. So, using this function generally does unnecessary API calls and therefore causes unwanted compute and network load.
For the reasons explained above, there are similar helper functions that accomplish similar things but address the mentioned drawbacks: controllerutils.{GetAndCreateOrMergePatch,GetAndCreateOrStrategicMergePatch}.
These can be safely used as replacements for the aforementioned helper funcs.
If they are not fitting for your use case, for example because you need to use optimistic locking, just do the appropriate calls in the controller directly.
Related Links
- Kubernetes Client usage in Gardener (Community Meeting talk, 2020-06-26)
These resources are only partially related to the topics covered in this doc, but might still be interesting for developer seeking a deeper understanding of Kubernetes API machinery, architecture and foundational concepts.
4.29 - Local Setup
Overview
Conceptually, all Gardener components are designed to run as a Pod inside a Kubernetes cluster. The Gardener API server extends the Kubernetes API via the user-aggregated API server concepts. However, if you want to develop it, you may want to work locally with the Gardener without building a Docker image and deploying it to a cluster each and every time. That means that the Gardener runs outside a Kubernetes cluster which requires providing a Kubeconfig in your local filesystem and point the Gardener to it when starting it (see below).
Further details can be found in
This guide is split into two main parts:
- Preparing your setup by installing all dependencies and tools
- Getting the Gardener source code locally
Preparing the Setup
[macOS only] Installing homebrew
The copy-paste instructions in this guide are designed for macOS and use the package manager Homebrew.
On macOS run
/bin/bash -c "$(curl -fsSL https://raw.githubusercontent.com/Homebrew/install/HEAD/install.sh)"
[macOS only] Installing GNU bash
Built-in apple-darwin bash is missing some features that could cause shell scripts to fail locally.
brew install bash
Installing git
We use git as VCS which you need to install. On macOS run
brew install git
For other OS, please check the Git installation documentation.
Installing Go
Install the latest version of Go. On macOS run
brew install go
For other OS, please check Go installation documentation.
Installing kubectl
Install kubectl. Please make sure that the version of kubectl is at least v1.27.x. On macOS run
brew install kubernetes-cli
For other OS, please check the kubectl installation documentation.
Installing Docker
You need to have docker installed and running. On macOS run
brew install --cask docker
For other OS please check the docker installation documentation.
Installing iproute2
iproute2 provides a collection of utilities for network administration and configuration. On macOS run
brew install iproute2mac
Installing jq
jq is a lightweight and flexible command-line JSON processor. On macOS run
brew install jq
Installing yq
yq is a lightweight and portable command-line YAML processor. On macOS run
brew install yq
Installing GNU Parallel
GNU Parallel is a shell tool for executing jobs in parallel, used by the code generation scripts (make generate). On macOS run
brew install parallel
[macOS only] Install GNU Core Utilities
When running on macOS, install the GNU core utilities and friends:
brew install coreutils gnu-sed gnu-tar grep gzip
This will create symbolic links for the GNU utilities with g prefix on your PATH, e.g., gsed or gbase64.
To allow using them without the g prefix, add the gnubin directories to the beginning of your PATH environment variable (brew install and brew info will print out instructions for each formula):
export PATH=$(brew --prefix)/opt/coreutils/libexec/gnubin:$PATH
export PATH=$(brew --prefix)/opt/gnu-sed/libexec/gnubin:$PATH
export PATH=$(brew --prefix)/opt/gnu-tar/libexec/gnubin:$PATH
export PATH=$(brew --prefix)/opt/grep/libexec/gnubin:$PATH
export PATH=$(brew --prefix)/opt/gzip/bin:$PATH
[Windows Only] WSL2
Apart from Linux distributions and macOS, the local gardener setup can also run on the Windows Subsystem for Linux 2.
While WSL1, plain docker for Windows and various Linux distributions and local Kubernetes environments may be supported, this setup was verified with:
- WSL2
- Docker Desktop WSL2 Engine
- Ubuntu 18.04 LTS on WSL2
- Nodeless local garden (see below)
The Gardener repository and all the above-mentioned tools (git, golang, kubectl, …) should be installed in your WSL2 distro, according to the distribution-specific Linux installation instructions.
Get the Sources
Clone the repository from GitHub into your $GOPATH.
mkdir -p $(go env GOPATH)/src/github.com/gardener
cd $(go env GOPATH)/src/github.com/gardener
git clone git@github.com:gardener/gardener.git
cd gardener
Note: Gardener is using Go modules and cloning the repository into
$GOPATHis not a hard requirement. However it is still recommended to clone into$GOPATHbecausek8s.io/code-generatordoes not work yet outside of$GOPATH- kubernetes/kubernetes#86753.
Start the Gardener
Please see getting_started_locally.md how to build and deploy Gardener from your local sources.
4.30 - Log Parsers
How to Create Log Parser for Container into fluent-bit
If our log message is parsed correctly, it has to be showed in Plutono like this:
{"log":"OpenAPI AggregationController: Processing item v1beta1.metrics.k8s.io","pid":"1","severity":"INFO","source":"controller.go:107"}
Otherwise it will looks like this:
{
"log":"{
\"level\":\"info\",\"ts\":\"2020-06-01T11:23:26.679Z\",\"logger\":\"gardener-resource-manager.health-reconciler\",\"msg\":\"Finished ManagedResource health checks\",\"object\":\"garden/provider-aws-dsm9r\"
}\n"
}
}
Create a Custom Parser
First of all, we need to know how the log for the specific container looks like (for example, lets take a log from the
alertmanager:level=info ts=2019-01-28T12:33:49.362015626Z caller=main.go:175 build_context="(go=go1.11.2, user=root@4ecc17c53d26, date=20181109-15:40:48))We can see that this log contains 4 subfields(severity=info, timestamp=2019-01-28T12:33:49.362015626Z, source=main.go:175 and the actual message). So we have to write a regex which matches this log in 4 groups(We can use https://regex101.com/ like helping tool). So, for this purpose our regex looks like this:
^level=(?<severity>\w+)\s+ts=(?<time>\d{4}-\d{2}-\d{2}[Tt].*[zZ])\s+caller=(?<source>[^\s]*+)\s+(?<log>.*)
- Now we have to create correct time format for the timestamp (We can use this site for this purpose: http://ruby-doc.org/stdlib-2.4.1/libdoc/time/rdoc/Time.html#method-c-strptime). So our timestamp matches correctly the following format:
%Y-%m-%dT%H:%M:%S.%L
- It’s time to apply our new regex into fluent-bit configuration. To achieve that we can just deploy in the cluster where the
fluent-operatoris deployed the following custom resources:
apiVersion: fluentbit.fluent.io/v1alpha2
kind: ClusterFilter
metadata:
labels:
fluentbit.gardener/type: seed
name: << pod-name >>--(<< container-name >>)
spec:
filters:
- parser:
keyName: log
parser: << container-name >>-parser
reserveData: true
match: kubernetes.<< pod-name >>*<< container-name >>*
EXAMPLE
apiVersion: fluentbit.fluent.io/v1alpha2
kind: ClusterFilter
metadata:
labels:
fluentbit.gardener/type: seed
name: alertmanager
spec:
filters:
- parser:
keyName: log
parser: alertmanager-parser
reserveData: true
match: "kubernetes.alertmanager*alertmanager*"
- Now lets check if there already exists
ClusterParserwith such a regex and time format that we need. If it doesn’t, create one:
apiVersion: fluentbit.fluent.io/v1alpha2
kind: ClusterParser
metadata:
name: << container-name >>-parser
labels:
fluentbit.gardener/type: "seed"
spec:
regex:
timeKey: time
timeFormat: << time-format >>
regex: "<< regex >>"
EXAMPLE
apiVersion: fluentbit.fluent.io/v1alpha2
kind: ClusterParser
metadata:
name: alermanager-parser
labels:
fluentbit.gardener/type: "seed"
spec:
regex:
timeKey: time
timeFormat: "%Y-%m-%dT%H:%M:%S.%L"
regex: "^level=(?<severity>\\w+)\\s+ts=(?<time>\\d{4}-\\d{2}-\\d{2}[Tt].*[zZ])\\s+caller=(?<source>[^\\s]*+)\\s+(?<log>.*)"
Follow your development setup to validate that the parsers are working correctly.
4.31 - Logging Guidelines
Logging Guidelines in Gardener Components
This document aims at providing a general developer guideline on different aspects of logging practices and conventions used in the Gardener codebase. It contains mostly Gardener-specific points, and references other existing and commonly accepted logging guidelines for general advice. Developers and reviewers should consult this guide when writing, refactoring, and reviewing Gardener code. If parts are unclear or new learnings arise, this guide should be adapted accordingly.
Logging Libraries / Implementations
Historically, Gardener components have been using logrus.
There is a global logrus logger (logger.Logger) that is initialized by components on startup and used across the codebase.
In most places, it is used as a printf-style logger and only in some instances we make use of logrus’ structured logging functionality.
In the process of migrating our components to native controller-runtime components (see gardener/gardener#4251), we also want to make use of controller-runtime’s built-in mechanisms for streamlined logging. controller-runtime uses logr, a simple structured logging interface, for library-internal logging and logging in controllers.
logr itself is only an interface and doesn’t provide an implementation out of the box. Instead, it needs to be backed by a logging implementation like zapr. Code that uses the logr interface is thereby not tied to a specific logging implementation and makes the implementation easily exchangeable. controller-runtime already provides a set of helpers for constructing zapr loggers, i.e., logr loggers backed by zap, which is a popular logging library in the go community. Hence, we are migrating our component logging from logrus to logr (backed by zap) as part of gardener/gardener#4251.
⚠️
logger.Logger(logrus logger) is deprecated in Gardener and shall not be used in new code – use logr loggers when writing new code! (also see Migration from logrus to logr)ℹ️ Don’t use zap loggers directly, always use the logr interface in order to avoid tight coupling to a specific logging implementation.
gardener-apiserver differs from the other components as it is based on the apiserver library and therefore uses klog – just like kube-apiserver. As gardener-apiserver writes (almost) no logs in our coding (outside the apiserver library), there is currently no plan for switching the logging implementation. Hence, the following sections focus on logging in the controller and admission components only.
logcheck Tool
To ensure a smooth migration to logr and make logging in Gardener components more consistent, the logcheck tool was added.
It enforces (parts of) this guideline and detects programmer-level errors early on in order to prevent bugs.
Please check out the tool’s documentation for a detailed description.
Structured Logging
Similar to efforts in the Kubernetes project, we want to migrate our component logs to structured logging. As motivated above, we will use the logr interface instead of klog though.
You can read more about the motivation behind structured logging in logr’s background and FAQ (also see this blog post by Dave Cheney). Also, make sure to check out controller-runtime’s logging guideline with specifics for projects using the library. The following sections will focus on the most important takeaways from those guidelines and give general instructions on how to apply them to Gardener and its controller-runtime components.
Note: Some parts in this guideline differ slightly from controller-runtime’s document.
TL;DR of Structured Logging
❌ Stop using printf-style logging:
var logger *logrus.Logger
logger.Infof("Scaling deployment %s/%s to %d replicas", deployment.Namespace, deployment.Name, replicaCount)
✅ Instead, write static log messages and enrich them with additional structured information in form of key-value pairs:
var logger logr.Logger
logger.Info("Scaling deployment", "deployment", client.ObjectKeyFromObject(deployment), "replicas", replicaCount)
Log Configuration
Gardener components can be configured to either log in json (default) or text format:
json format is supposed to be used in production, while text format might be nicer for development.
# json
{"level":"info","ts":"2021-12-16T08:32:21.059+0100","msg":"Hello botanist","garden":"eden"}
# text
2021-12-16T08:32:21.059+0100 INFO Hello botanist {"garden": "eden"}
Components can be set to one of the following log levels (with increasing verbosity): error, info (default), debug.
Log Levels
logr uses V-levels (numbered log levels), higher V-level means higher verbosity.
V-levels are relative (in contrast to klog’s absolute V-levels), i.e., V(1) creates a logger, that is one level more verbose than its parent logger.
In Gardener components, the mentioned log levels in the component config (error, info, debug) map to the zap levels with the same names (see here).
Hence, our loggers follow the same mapping from numerical logr levels to named zap levels like described in zapr, i.e.:
- component config specifies
debug➡️ bothV(0)andV(1)are enabled - component config specifies
info➡️V(0)is enabled,V(1)will not be shown - component config specifies
error➡️ neitherV(0)norV(1)will be shown Error()logs will always be shown
This mapping applies to the components’ root loggers (the ones that are not “derived” from any other logger; constructed on component startup).
If you derive a new logger with e.g. V(1), the mapping will shift by one. For example, V(0) will then log at zap’s debug level.
There is no warning level (see Dave Cheney’s post).
If there is an error condition (e.g., unexpected error received from a called function), the error should either be handled or logged at error if it is neither handled nor returned.
If you have an error value at hand that doesn’t represent an actual error condition, but you still want to log it as an informational message, log it at info level with key err.
We might consider to make use of a broader range of log levels in the future when introducing more logs and common command line flags for our components (comparable to --v of Kubernetes components).
For now, we stick to the mentioned two log levels like controller-runtime: info (V(0)) and debug (V(1)).
Logging in Controllers
Named Loggers
Controllers should use named loggers that include their name, e.g.:
controllerLogger := rootLogger.WithName("controller").WithName("shoot")
controllerLogger.Info("Deploying kube-apiserver")
results in
2021-12-16T09:27:56.550+0100 INFO controller.shoot Deploying kube-apiserver
Logger names are hierarchical. You can make use of it, where controllers are composed of multiple “subcontrollers”, e.g., controller.shoot.hibernation or controller.shoot.maintenance.
Using the global logger logf.Log directly is discouraged and should be rather exceptional because it makes correlating logs with code harder.
Preferably, all parts of the code should use some named logger.
Reconciler Loggers
In your Reconcile function, retrieve a logger from the given context.Context.
It inherits from the controller’s logger (i.e., is already named) and is preconfigured with name and namespace values for the reconciliation request:
func (r *reconciler) Reconcile(ctx context.Context, request reconcile.Request) (reconcile.Result, error) {
log := logf.FromContext(ctx)
log.Info("Reconciling Shoot")
// ...
return reconcile.Result{}, nil
}
results in
2021-12-16T09:35:59.099+0100 INFO controller.shoot Reconciling Shoot {"name": "sunflower", "namespace": "garden-greenhouse"}
The logger is injected by controller-runtime’s Controller implementation. The logger returned by logf.FromContext is never nil. If the context doesn’t carry a logger, it falls back to the global logger (logf.Log), which might discard logs if not configured, but is also never nil.
⚠️ Make sure that you don’t overwrite the
nameornamespacevalue keys for such loggers, otherwise you will lose information about the reconciled object.
The controller implementation (controller-runtime) itself takes care of logging the error returned by reconcilers. Hence, don’t log an error that you are returning. Generally, functions should not return an error, if they already logged it, because that means the error is already handled and not an error anymore. See Dave Cheney’s post for more on this.
Messages
- Log messages should be static. Don’t put variable content in there, i.e., no
fmt.Sprintfor string concatenation (+). Use key-value pairs instead. - Log messages should be capitalized. Note: This contrasts with error messages, that should not be capitalized. However, both should not end with a punctuation mark.
Keys and Values
Use
WithValuesinstead of repeatedly adding key-value pairs for multiple log statements.WithValuescreates a new logger from the parent, that carries the given key-value pairs. E.g., use it when acting on one object in multiple steps and logging something for each step:log := parentLog.WithValues("infrastructure", client.ObjectKeyFromObject(infrastructure)) // ... log.Info("Creating Infrastructure") // ... log.Info("Waiting for Infrastructure to be reconciled") // ...
Note:
WithValuesbypasses controller-runtime’s special zap encoder that nicely encodesObjectKey/NamespacedNameandruntime.Objectvalues, see kubernetes-sigs/controller-runtime#1290. Thus, the end result might look different depending on the value and itsStringerimplementation.
Use lowerCamelCase for keys. Don’t put spaces in keys, as it will make log processing with simple tools like
jqharder.Keys should be constant, human-readable, consistent across the codebase and naturally match parts of the log message, see logr guideline.
When logging object keys (name and namespace), use the object’s type as the log key and a
client.ObjectKey/types.NamespacedNamevalue as value, e.g.:var deployment *appsv1.Deployment log.Info("Creating Deployment", "deployment", client.ObjectKeyFromObject(deployment))which results in
{"level":"info","ts":"2021-12-16T08:32:21.059+0100","msg":"Creating Deployment","deployment":{"name": "bar", "namespace": "foo"}}There are cases where you don’t have the full object key or the object itself at hand, e.g., if an object references another object (in the same namespace) by name (think
secretRefor similar). In such a cases, either construct the full object key including the implied namespace or log the object name under a key ending inName, e.g.:var ( // object to reconcile shoot *gardencorev1beta1.Shoot // retrieved via logf.FromContext, preconfigured by controller with namespace and name of reconciliation request log logr.Logger ) // option a: full object key, manually constructed log.Info("Shoot uses SecretBinding", "secretBinding", client.ObjectKey{Namespace: shoot.Namespace, Name: *shoot.Spec.SecretBindingName}) // option b: only name under respective *Name log key log.Info("Shoot uses SecretBinding", "secretBindingName", *shoot.Spec.SecretBindingName)Both options result in well-structured logs, that are easy to interpret and process:
{"level":"info","ts":"2022-01-18T18:00:56.672+0100","msg":"Shoot uses SecretBinding","name":"my-shoot","namespace":"garden-project","secretBinding":{"namespace":"garden-project","name":"aws"}} {"level":"info","ts":"2022-01-18T18:00:56.673+0100","msg":"Shoot uses SecretBinding","name":"my-shoot","namespace":"garden-project","secretBindingName":"aws"}When handling generic
client.Objectvalues (e.g. in helper funcs), useobjectas key.When adding timestamps to key-value pairs, use
time.Timevalues. By this, they will be encoded in the same format as the log entry’s timestamp.
Don’t usemetav1.Timevalues, as they will be encoded in a different format by theirStringerimplementation. Pass<someTimestamp>.Timeto loggers in case you have ametav1.Timevalue at hand.Same applies to durations. Use
time.Durationvalues instead of*metav1.Duration. Durations can be handled specially by zap just like timestamps.Event recorders not only create
Eventobjects but also log them. However, both Gardener’s manually instantiated event recorders and the ones that controller-runtime provides log todebuglevel and use generic formats, that are not very easy to interpret or process (no structured logs). Hence, don’t use event recorders as replacements for well-structured logs. If a controller records an event for a completed action or important information, it should probably log it as well, e.g.:log.Info("Creating ManagedSeed", "replica", r.GetObjectKey()) a.recorder.Eventf(managedSeedSet, corev1.EventTypeNormal, EventCreatingManagedSeed, "Creating ManagedSeed %s", r.GetFullName())
Logging in Test Code
If the tested production code requires a logger, you can pass
logr.Discard()orlogf.NullLogger{}in your test, which simply discards all logs.logf.Logis safe to use in tests and will not cause a nil pointer deref, even if it’s not initialized vialogf.SetLogger. It is initially set to aNullLoggerby default, which means all logs are discarded, unlesslogf.SetLoggeris called in the first 30 seconds of execution.Pass
zap.WriteTo(GinkgoWriter)in tests where you want to see the logs on test failure but not on success, for example:logf.SetLogger(logger.MustNewZapLogger(logger.DebugLevel, logger.FormatJSON, zap.WriteTo(GinkgoWriter))) log := logf.Log.WithName("test")
4.32 - Logging Stack
Logging Stack
This document contains logging stack related how-tos and configuration options for developers.
Expose Logs for Component to User Plutono
Exposing logs for a new component to the User’s Plutono is described in the How to Expose Logs to the Users section.
Configuration
Fluent-bit
The Fluent-bit configurations can be found on pkg/component/observability/logging/fluentoperator/customresources
There are six different specifications:
- FluentBit: Defines the fluent-bit DaemonSet specifications
- ClusterFluentBitConfig: Defines the labelselectors of the resources which fluent-bit will match
- ClusterInput: Defines the location of the input stream of the logs
- ClusterOutput: Defines the location of the output source (Vali for example)
- ClusterFilter: Defines filters which match specific keys
- ClusterParser: Defines parsers which are used by the filters
Vali
The Vali configurations can be found on charts/seed-bootstrap/charts/vali/templates/vali-configmap.yaml
The main specifications there are:
- Index configuration: Currently the following one is used:
schema_config:
configs:
- from: 2018-04-15
store: boltdb
object_store: filesystem
schema: v11
index:
prefix: index_
period: 24h
from: Is the date from which logs collection is started. Using a date in the past is okay.store: The DB used for storing the index.object_store: Where the data is stored.schema: Schema version which should be used (v11 is currently recommended).index.prefix: The prefix for the index.index.period: The period for updating the indices.
Adding a new index happens with new config block definition. The from field should start from the current day + previous index.period and should not overlap with the current index. The prefix also should be different.
schema_config:
configs:
- from: 2018-04-15
store: boltdb
object_store: filesystem
schema: v11
index:
prefix: index_
period: 24h
- from: 2020-06-18
store: boltdb
object_store: filesystem
schema: v11
index:
prefix: index_new_
period: 24h
- chunk_store_config Configuration
chunk_store_config:
max_look_back_period: 336h
chunk_store_config.max_look_back_period should be the same as the retention_period
- table_manager Configuration
table_manager:
retention_deletes_enabled: true
retention_period: 336h
table_manager.retention_period is the living time for each log message. Vali will keep messages for (table_manager.retention_period - index.period) time due to specification in the Vali implementation.
Plutono
This is the Vali configuration that Plutono uses:
- name: vali
type: vali
access: proxy
url: http://logging.{{ .Release.Namespace }}.svc:3100
jsonData:
maxLines: 5000
name: Is the name of the datasource.type: Is the type of the datasource.access: Should be set to proxy.url: Vali’s urlsvc: Vali’s portjsonData.maxLines: The limit of the log messages which Plutono will show to the users.
Decrease this value if the browser works slowly!
4.33 - Managed Seed
ManagedSeeds: Register Shoot as Seed
An existing shoot can be registered as a seed by creating a ManagedSeed resource. This resource contains:
- The name of the shoot that should be registered as seed.
- A
gardenletsection that contains:gardenletdeployment parameters, such as the number of replicas, the image, etc.- The
GardenletConfigurationresource that contains controllers configuration, feature gates, and aseedConfigsection that contains theSeedspec and parts of its metadata. - Additional configuration parameters, such as the garden connection bootstrap mechanism (see TLS Bootstrapping), and whether to merge the provided configuration with the configuration of the parent
gardenlet.
gardenlet is deployed to the shoot, and it registers a new seed upon startup based on the seedConfig section.
Note: Earlier Gardener allowed specifying a
seedTemplatedirectly in theManagedSeedresource. This feature is discontinued, any seed configuration must be via theGardenletConfiguration.
Note the following important aspects:
- Unlike the
Seedresource, theManagedSeedresource is namespaced. Currently, managed seeds are restricted to thegardennamespace. - The newly created
Seedresource always has the same name as theManagedSeedresource. Attempting to specify a different name in theseedConfigwill fail. - The
ManagedSeedresource must always refer to an existing shoot. Attempting to create aManagedSeedreferring to a non-existing shoot will fail. - A shoot that is being referred to by a
ManagedSeedcannot be deleted. Attempting to delete such a shoot will fail. - You can omit practically everything from the
gardenletsection, including all or most of theSeedspec fields. Proper defaults will be supplied in all cases, based either on the most common use cases or the information already available in theShootresource. - Also, if your seed is configured to host HA shoot control planes, then
gardenletwill be deployed with multiple replicas across nodes or availability zones by default. - Some
Seedspec fields, for example the provider type and region, networking CIDRs for pods, services, and nodes, etc., must be the same as the correspondingShootspec fields of the shoot that is being registered as seed. Attempting to use different values (except empty ones, so that they are supplied by the defaulting mechanism) will fail.
Deploying gardenlet to the Shoot
To register a shoot as a seed and deploy gardenlet to the shoot using a default configuration, create a ManagedSeed resource similar to the following:
apiVersion: seedmanagement.gardener.cloud/v1alpha1
kind: ManagedSeed
metadata:
name: my-managed-seed
namespace: garden
spec:
shoot:
name: crazy-botany
For an example that uses non-default configuration, see 55-managed-seed-gardenlet.yaml
Renewing the Gardenlet Kubeconfig Secret
In order to make the ManagedSeed controller renew the gardenlet’s kubeconfig secret, annotate the ManagedSeed with gardener.cloud/operation=renew-kubeconfig. This will trigger a reconciliation during which the kubeconfig secret is deleted and the bootstrapping is performed again (during which gardenlet obtains a new client certificate).
It is also possible to trigger the renewal on the secret directly, see Rotate Certificates Using Bootstrap kubeconfig.
Enforced Configuration Options
The following configuration options are enforced by Gardener API server for the ManagedSeed resources:
The vertical pod autoscaler should be enabled from the Shoot specification.
The vertical pod autoscaler is a prerequisite for a Seed cluster. It is possible to enable the VPA feature for a Seed (using the Seed spec) and for a Shoot (using the Shoot spec). In context of
ManagedSeeds, enabling the VPA in the Seed spec (instead of the Shoot spec) offers less flexibility and increases the network transfer and cost. Due to these reasons, the Gardener API server enforces the vertical pod autoscaler to be enabled from the Shoot specification.The nginx-ingress addon should not be enabled for a Shoot referred by a ManagedSeed.
An Ingress controller is also a prerequisite for a Seed cluster. For a Seed cluster, it is possible to enable Gardener managed Ingress controller or to deploy self-managed Ingress controller. There is also the nginx-ingress addon that can be enabled for a Shoot (using the Shoot spec). However, the Shoot nginx-ingress addon is in deprecated mode and it is not recommended for production clusters. Due to these reasons, the Gardener API server does not allow the Shoot nginx-ingress addon to be enabled for ManagedSeeds.
4.34 - Monitoring Stack
Extending the Monitoring Stack
This document provides instructions to extend the Shoot cluster monitoring stack by integrating new scrape targets, alerts and dashboards.
Please ensure that you have understood the basic principles of Prometheus and its ecosystem before you continue.
‼️ The purpose of the monitoring stack is to observe the behaviour of the control plane and the system components deployed by Gardener onto the worker nodes. Monitoring of custom workloads running in the cluster is out of scope.
Overview

Each Shoot cluster comes with its own monitoring stack. The following components are deployed into the seed and shoot:
- Seed
- Prometheus
- Plutono
- blackbox-exporter
- kube-state-metrics (Seed metrics)
- kube-state-metrics (Shoot metrics)
- Alertmanager (Optional)
- Shoot
In each Seed cluster there is a Prometheus in the garden namespace responsible for collecting metrics from the Seed kubelets and cAdvisors. These metrics are provided to each Shoot Prometheus via federation.
The alerts for all Shoot clusters hosted on a Seed are routed to a central Alertmanger running in the garden namespace of the Seed. The purpose of this central Alertmanager is to forward all important alerts to the operators of the Gardener setup.
The Alertmanager in the Shoot namespace on the Seed is only responsible for forwarding alerts from its Shoot cluster to a cluster owner/cluster alert receiver via email. The Alertmanager is optional and the conditions for a deployment are already described in Alerting.
The node-exporter’s textfile collector is enabled and configured to parse all *.prom files in the /var/lib/node-exporter/textfile-collector directory on each Shoot node. Scripts and programs which run on Shoot nodes and cannot expose an endpoint to be scraped by prometheus can use this directory to export metrics in files that match the glob *.prom using the text format.
Adding New Monitoring Targets
After exploring the metrics which your component provides or adding new metrics, you should be aware which metrics are required to write the needed alerts and dashboards.
Prometheus prefers a pull based metrics collection approach and therefore the targets to observe need to be defined upfront. The targets are defined in charts/seed-monitoring/charts/core/charts/prometheus/templates/config.yaml.
New scrape jobs can be added in the section scrape_configs. Detailed information how to configure scrape jobs and how to use the kubernetes service discovery are available in the Prometheus documentation.
The job_name of a scrape job should be the name of the component e.g. kube-apiserver or vpn. The collection interval should be the default of 30s. You do not need to specify this in the configuration.
Please do not ingest all metrics which are provided by a component. Rather, collect only those metrics which are needed to define the alerts and dashboards (i.e. whitelist). This can be achieved by adding the following metric_relabel_configs statement to your scrape jobs (replace exampleComponent with component name).
- job_name: example-component
...
metric_relabel_configs:
{{ include "prometheus.keep-metrics.metric-relabel-config" .Values.allowedMetrics.exampleComponent | indent 6 }}
The whitelist for the metrics of your job can be maintained in charts/seed-monitoring/charts/core/charts/prometheus/values.yaml in section allowedMetrics.exampleComponent (replace exampleComponent with component name). Check the following example:
allowedMetrics:
...
exampleComponent:
* metrics_name_1
* metrics_name_2
...
Adding Alerts
The alert definitions are located in charts/seed-monitoring/charts/core/charts/prometheus/rules. There are two approaches for adding new alerts.
- Adding additional alerts for a component which already has a set of alerts. In this case you have to extend the existing rule file for the component.
- Adding alerts for a new component. In this case a new rule file with name scheme
example-component.rules.yamlneeds to be added. - Add the new alert to
alertInhibitionGraph.dot, add any required inhibition flows and render the new graph. To render the graph, run:
dot -Tpng ./content/alertInhibitionGraph.dot -o ./content/alertInhibitionGraph.png
- Create a test for the new alert. See
Alert Tests.
Example alert:
groups:
* name: example.rules
rules:
* alert: ExampleAlert
expr: absent(up{job="exampleJob"} == 1)
for: 20m
labels:
service: example
severity: critical # How severe is the alert? (blocker|critical|info|warning)
type: shoot # For which topology is the alert relevant? (seed|shoot)
visibility: all # Who should receive the alerts? (all|operator|owner)
annotations:
description: A longer description of the example alert that should also explain the impact of the alert.
summary: Short summary of an example alert.
If the deployment of component is optional then the alert definitions needs to be added to charts/seed-monitoring/charts/core/charts/prometheus/optional-rules instead. Furthermore the alerts for component need to be activatable in charts/seed-monitoring/charts/core/charts/prometheus/values.yaml via rules.optional.example-component.enabled. The default should be true.
Basic instruction how to define alert rules can be found in the Prometheus documentation.
Routing Tree
The Alertmanager is grouping incoming alerts based on labels into buckets. Each bucket has its own configuration like alert receivers, initial delaying duration or resending frequency, etc. You can find more information about Alertmanager routing in the Prometheus/Alertmanager documentation. The routing trees for the Alertmanagers deployed by Gardener are depicted below.
Central Seed Alertmanager
∟ main route (all alerts for all shoots on the seed will enter)
∟ group by project and shoot name
∟ group by visibility "all" and "operator"
∟ group by severity "blocker", "critical", and "info" → route to Garden operators
∟ group by severity "warning" (dropped)
∟ group by visibility "owner" (dropped)
Shoot Alertmanager
∟ main route (only alerts for one Shoot will enter)
∟ group by visibility "all" and "owner"
∟ group by severity "blocker", "critical", and "info" → route to cluster alert receiver
∟ group by severity "warning" (dropped, will change soon → route to cluster alert receiver)
∟ group by visibility "operator" (dropped)
Alert Inhibition
All alerts related to components running on the Shoot workers are inhibited in case of an issue with the vpn connection, because those components can’t be scraped anymore and Prometheus will fire alerts in consequence. The components running on the workers are probably healthy and the alerts are presumably false positives. The inhibition flow is shown in the figure below. If you add a new alert, make sure to add it to the diagram.
Alert Attributes
Each alert rule definition has to contain the following annotations:
- summary: A short description of the issue.
- description: A detailed explanation of the issue with hints to the possible root causes and the impact assessment of the issue.
In addition, each alert must contain the following labels:
- type
shoot: Components running on the Shoot worker nodes in thekube-systemnamespace.seed: Components running on the Seed in the Shoot namespace as part of/next to the control plane.
- service
- Name of the component (in lowercase) e.g.
kube-apiserver,alertmanagerorvpn.
- Name of the component (in lowercase) e.g.
- severity
blocker: All issues which make the cluster entirely unusable, e.g.KubeAPIServerDownorKubeSchedulerDowncritical: All issues which affect single functionalities/components but do not affect the cluster in its core functionality e.g.VPNDownorKubeletDown.info: All issues that do not affect the cluster or its core functionality, but if this component is down we cannot determine if a blocker alert is firing. (i.e. A component with an info level severity is a dependency for a component with a blocker severity)warning: No current existing issue, rather a hint for situations which could lead to real issue in the close future e.g.HighLatencyApiServerToWorkersorApiServerResponseSlow.
Adding Plutono Dashboards
The dashboard definition files are located in charts/seed-monitoring/charts/plutono/dashboards. Every dashboard needs its own file.
If you are adding a new component dashboard please also update the overview dashboard by adding a chart for its current up/down status and with a drill down option to the component dashboard.
Dashboard Structure
The dashboards should be structured in the following way. The assignment of the component dashboards to the categories should be handled via dashboard tags.
- Kubernetes control plane components (Tag:
control-plane)- All components which are part of the Kubernetes control plane e. g. Kube API Server, Kube Controller Manager, Kube Scheduler and Cloud Controller Manager
- ETCD + Backup/Restore
- Kubernetes Addon Manager
- Node/Machine components (Tag:
node/machine)- All metrics which are related to the behaviour/control of the Kubernetes nodes and kubelets
- Machine-Controller-Manager + Cluster Autoscaler
- Networking components (Tag:
network)- CoreDNS, KubeProxy, Calico, VPN, Nginx Ingress
- Addon components (Tag:
addon)- Cert Broker
- Monitoring components (Tag:
monitoring) - Logging components (Tag:
logging)
Mandatory Charts for Component Dashboards
For each new component, its corresponding dashboard should contain the following charts in the first row, before adding custom charts for the component in the subsequent rows.
- Pod up/down status
up{job="example-component"} - Pod/containers cpu utilization
- Pod/containers memory consumption
- Pod/containers network i/o
That information is provided by the cAdvisor metrics. These metrics are already integrated. Please check the other dashboards for detailed information on how to query.
Chart Requirements
Each chart needs to contain:
- a meaningful name
- a detailed description (for non trivial charts)
- appropriate x/y axis descriptions
- appropriate scaling levels for the x/y axis
- proper units for the x/y axis
Dashboard Parameters
The following parameters should be added to all dashboards to ensure a homogeneous experience across all dashboards.
Dashboards have to:
- contain a title which refers to the component name(s)
- contain a timezone statement which should be the browser time
- contain tags which express where the component is running (
seedorshoot) and to which category the component belong (see dashboard structure) - contain a version statement with a value of 1
- be immutable
Example dashboard configuration:
{
"title": "example-component",
"timezone": "utc",
"tags": [
"seed",
"control-plane"
],
"version": 1,
"editable": "false"
}
Furthermore, all dashboards should contain the following time options:
{
"time": {
"from": "now-1h",
"to": "now"
},
"timepicker": {
"refresh_intervals": [
"30s",
"1m",
"5m"
],
"time_options": [
"5m",
"15m",
"1h",
"6h",
"12h",
"24h",
"2d",
"10d"
]
}
}
4.35 - Network Policies
NetworkPolicys In Garden, Seed, Shoot Clusters
This document describes which Kubernetes NetworkPolicys deployed by Gardener into the various clusters.
Garden Cluster
(via gardener-operator and gardener-resource-manager)
The gardener-operator runs a NetworkPolicy controller which is responsible for the following namespaces:
gardenistio-system*istio-ingress-*shoot-*extension-*(in case the garden cluster is a seed cluster at the same time)
It deploys the following so-called “general NetworkPolicys”:
| Name | Purpose |
|---|---|
deny-all | Denies all ingress and egress traffic for all pods in this namespace. Hence, all traffic must be explicitly allowed. |
allow-to-dns | Allows egress traffic from pods labeled with networking.gardener.cloud/to-dns=allowed to DNS pods running in the kube-system namespace. In practice, most of the pods performing network egress traffic need this label. |
allow-to-runtime-apiserver | Allows egress traffic from pods labeled with networking.gardener.cloud/to-runtime-apiserver=allowed to the API server of the runtime cluster. |
allow-to-blocked-cidrs | Allows egress traffic from pods labeled with networking.gardener.cloud/to-blocked-cidrs=allowed to explicitly blocked addresses configured by human operators (configured via .spec.networking.blockedCIDRs in the Seed). For instance, this can be used to block the cloud provider’s metadata service. |
allow-to-public-networks | Allows egress traffic from pods labeled with networking.gardener.cloud/to-public-networks=allowed to all public network IPs, except for private networks (RFC1918), carrier-grade NAT (RFC6598), and explicitly blocked addresses configured by human operators for all pods labeled with networking.gardener.cloud/to-public-networks=allowed. In practice, this blocks egress traffic to all networks in the cluster and only allows egress traffic to public IPv4 addresses. |
allow-to-private-networks | Allows egress traffic from pods labeled with networking.gardener.cloud/to-private-networks=allowed to the private networks (RFC1918) and carrier-grade NAT (RFC6598) except for cluster-specific networks (configured via .spec.networks in the Seed). |
Apart from those, the gardener-operator also enables the NetworkPolicy controller of gardener-resource-manager.
Please find more information in the linked document.
In summary, most of the pods that initiate connections with other pods will have labels with networking.resources.gardener.cloud/ prefixes.
This way, they leverage the automatically created NetworkPolicys by the controller.
As a result, in most cases no special/custom-crafted NetworkPolicys must be created anymore.
Logging & Monitoring
As part of the garden reconciliation flow, the gardener-operator deploys various Prometheus instances into the garden namespace.
Each pod that should be scraped for metrics by these instances must have a Service which is annotated with
annotations:
networking.resources.gardener.cloud/from-all-garden-scrape-targets-allowed-ports: '[{"port":<metrics-port-on-pod>,"protocol":"<protocol, typically TCP>"}]'
If the respective pod is not running in the garden namespace, the Service needs these annotations in addition:
annotations:
networking.resources.gardener.cloud/namespace-selectors: '[{"matchLabels":{"kubernetes.io/metadata.name":"garden"}}]'
networking.resources.gardener.cloud/pod-label-selector-namespace-alias: extensions
This automatically allows the needed network traffic from the respective Prometheus pods.
Seed Cluster
(via gardenlet and gardener-resource-manager)
In seed clusters it works the same way as in the garden cluster managed by gardener-operator.
When a seed cluster is the garden cluster at the same time, gardenlet does not enable the NetworkPolicy controller (since gardener-operator already runs it).
Otherwise, it uses the exact same controller and code like gardener-operator, resulting in the same behaviour in both garden and seed clusters.
Logging & Monitoring
Seed System Namespaces
As part of the seed reconciliation flow, the gardenlet deploys various Prometheus instances into the garden namespace.
See also this document for more information.
Each pod that should be scraped for metrics by these instances must have a Service which is annotated with
annotations:
networking.resources.gardener.cloud/from-all-seed-scrape-targets-allowed-ports: '[{"port":<metrics-port-on-pod>,"protocol":"<protocol, typically TCP>"}]'
If the respective pod is not running in the garden namespace, the Service needs these annotations in addition:
annotations:
networking.resources.gardener.cloud/namespace-selectors: '[{"matchLabels":{"kubernetes.io/metadata.name":"garden"}}]'
If the respective pod is running in an extension-* namespace, the Service needs this annotation in addition:
annotations:
networking.resources.gardener.cloud/pod-label-selector-namespace-alias: extensions
This automatically allows the needed network traffic from the respective Prometheus pods.
Shoot Namespaces
As part of the shoot reconciliation flow, the gardenlet deploys a shoot-specific Prometheus into the shoot namespace.
Each pod that should be scraped for metrics must have a Service which is annotated with
annotations:
networking.resources.gardener.cloud/from-all-scrape-targets-allowed-ports: '[{"port":<metrics-port-on-pod>,"protocol":"<protocol, typically TCP>"}]'
This automatically allows the network traffic from the Prometheus pod.
Webhook Servers
Components serving webhook handlers that must be reached by kube-apiservers of the virtual garden cluster or shoot clusters just need to annotate their Service as follows:
annotations:
networking.resources.gardener.cloud/from-all-webhook-targets-allowed-ports: '[{"port":<server-port-on-pod>,"protocol":"<protocol, typically TCP>"}]'
This automatically allows the network traffic from the API server pods.
In case the servers run in a different namespace than the kube-apiservers, the following annotations are needed:
annotations:
networking.resources.gardener.cloud/from-all-webhook-targets-allowed-ports: '[{"port":<server-port-on-pod>,"protocol":"<protocol, typically TCP>"}]'
networking.resources.gardener.cloud/pod-label-selector-namespace-alias: extensions
# for the virtual garden cluster:
networking.resources.gardener.cloud/namespace-selectors: '[{"matchLabels":{"kubernetes.io/metadata.name":"garden"}}]'
# for shoot clusters:
networking.resources.gardener.cloud/namespace-selectors: '[{"matchLabels":{"gardener.cloud/role":"shoot"}}]'
Additional Namespace Coverage in Garden/Seed Cluster
In some cases, garden or seed clusters might run components in dedicated namespaces which are not covered by the controller by default (see list above).
Still, it might(/should) be desired to also include such “custom namespaces” into the control of the NetworkPolicy controllers.
In order to do so, human operators can adapt the component configs of gardener-operator or gardenlet by providing label selectors for additional namespaces:
controllers:
networkPolicy:
additionalNamespaceSelectors:
- matchLabels:
foo: bar
Communication With kube-apiserver For Components In Custom Namespaces
Egress Traffic
Component running in such custom namespaces might need to initiate the communication with the kube-apiservers of the virtual garden cluster or a shoot cluster.
In order to achieve this, their custom namespace must be labeled with networking.gardener.cloud/access-target-apiserver=allowed.
This will make the NetworkPolicy controllers automatically provisioning the required policies into their namespace.
As a result, the respective component pods just need to be labeled with
networking.resources.gardener.cloud/to-garden-virtual-garden-kube-apiserver-tcp-443=allowed(virtual garden cluster)networking.resources.gardener.cloud/to-all-shoots-kube-apiserver-tcp-443=allowed(shoot clusters)
Ingress Traffic
Components running in such custom namespaces might serve webhook handlers that must be reached by the kube-apiservers of the virtual garden cluster or a shoot cluster.
In order to achieve this, their Service must be annotated.
Please refer to this section for more information.
Shoot Cluster
(via gardenlet)
For shoot clusters, the concepts mentioned above don’t apply and are not enabled.
Instead, gardenlet only deploys a few “custom” NetworkPolicys for the shoot system components running in the kube-system namespace.
All other namespaces in the shoot cluster do not contain network policies deployed by gardenlet.
As a best practice, every pod deployed into the kube-system namespace should use appropriate NetworkPolicy in order to only allow required network traffic.
Therefore, pods should have labels matching to the selectors of the available network policies.
gardenlet deploys the following NetworkPolicys:
NAME POD-SELECTOR
gardener.cloud--allow-dns k8s-app in (kube-dns)
gardener.cloud--allow-from-seed networking.gardener.cloud/from-seed=allowed
gardener.cloud--allow-to-dns networking.gardener.cloud/to-dns=allowed
gardener.cloud--allow-to-apiserver networking.gardener.cloud/to-apiserver=allowed
gardener.cloud--allow-to-from-nginx app=nginx-ingress
gardener.cloud--allow-to-kubelet networking.gardener.cloud/to-kubelet=allowed
gardener.cloud--allow-to-public-networks networking.gardener.cloud/to-public-networks=allowed
gardener.cloud--allow-vpn app=vpn-shoot
Note that a deny-all policy will not be created by gardenlet.
Shoot owners can create it manually if needed/desired.
Above listed NetworkPolicys ensure that the traffic for the shoot system components is allowed in case such deny-all policies is created.
Webhook Servers in Shoot Clusters
Shoot components serving webhook handlers must be reached by kube-apiservers of the shoot cluster.
However, the control plane components, e.g. kube-apiserver, run on the seed cluster decoupled by a VPN connection.
Therefore, shoot components serving webhook handlers need to allow the VPN endpoints in the shoot cluster as clients to allow kube-apiservers to call them.
For the kube-system namespace, the network policy gardener.cloud--allow-from-seed fulfils the purpose to allow pods to mark themselves as targets for such calls, allowing corresponding traffic to pass through.
For custom namespaces, operators can use the network policy gardener.cloud--allow-from-seed as a template.
Please note that the label selector may change over time, i.e. with Gardener version updates.
This is why a simpler variant with a reduced label selector like the example below is recommended:
apiVersion: networking.k8s.io/v1
kind: NetworkPolicy
metadata:
name: allow-from-seed
namespace: custom-namespace
spec:
ingress:
- from:
- namespaceSelector:
matchLabels:
gardener.cloud/purpose: kube-system
podSelector:
matchLabels:
app: vpn-shoot
Implications for Gardener Extensions
Gardener extensions sometimes need to deploy additional components into the shoot namespace in the seed cluster hosting the control plane.
For example, the gardener-extension-provider-aws deploys the cloud-controller-manager into the shoot namespace.
In most cases, such pods require network policy labels to allow the traffic they are initiating.
For components deployed in the kube-system namespace of the shoots (e.g., CNI plugins or CSI drivers, etc.), custom NetworkPolicys might be required to ensure the respective components can still communicate in case the user creates a deny-all policy.
4.36 - New Cloud Provider
Adding Cloud Providers
This document provides an overview of how to integrate a new cloud provider into Gardener. Each component that requires integration has a detailed description of how to integrate it and the steps required.
Cloud Components
Gardener is composed of 2 or more Kubernetes clusters:
- Shoot: These are the end-user clusters, the regular Kubernetes clusters you have seen. They provide places for your workloads to run.
- Seed: This is the “management” cluster. It manages the control planes of shoots by running them as native Kubernetes workloads.
These two clusters can run in the same cloud provider, but they do not need to. For example, you could run your Seed in AWS, while having one shoot in Azure, two in Google, two in Alicloud, and three in Equinix Metal.
The Seed cluster deploys and manages the Shoot clusters. Importantly, for this discussion, the etcd data store backing each Shoot runs as workloads inside the Seed. Thus, to use the above example, the clusters in Azure, Google, Alicloud and Equinix Metal will have their worker nodes and master nodes running in those clouds, but the etcd clusters backing them will run as separate deployments in the Seed Kubernetes cluster on AWS.
This distinction becomes important when preparing the integration to a new cloud provider.
Gardener Cloud Integration
Gardener and its related components integrate with cloud providers at the following key lifecycle elements:
- Create/destroy/get/list machines for the Shoot.
- Create/destroy/get/list infrastructure components for the Shoot, e.g. VPCs, subnets, routes, etc.
- Backup/restore etcd for the Seed via writing files to and reading them from object storage.
Thus, the integrations you need for your cloud provider depend on whether you want to deploy Shoot clusters to the provider, Seed or both.
- Shoot Only: machine lifecycle management, infrastructure
- Seed: etcd backup/restore
Gardener API
In addition to the requirements to integrate with the cloud provider, you also need to enable the core Gardener app to receive, validate, and process requests to use that cloud provider.
- Expose the cloud provider to the consumers of the Gardener API, so it can be told to use that cloud provider as an option.
- Validate that API as requests come in.
- Write cloud provider specific implementation (called “provider extension”).
Cloud Provider API Requirements
In order for a cloud provider to integrate with Gardener, the provider must have an API to perform machine lifecycle events, specifically:
- Create a machine
- Destroy a machine
- Get information about a machine and its state
- List machines
In addition, if the Seed is to run on the given provider, it also must have an API to save files to block storage and retrieve them, for etcd backup/restore.
The current integration with cloud providers is to add their API calls to Gardener and the Machine Controller Manager. As both Gardener and the Machine Controller Manager are written in go, the cloud provider should have a go SDK. However, if it has an API that is wrappable in go, e.g. a REST API, then you can use that to integrate.
The Gardener team is working on bringing cloud provider integrations out-of-tree, making them pluggable, which should simplify the process and make it possible to use other SDKs.
Summary
To add a new cloud provider, you need some or all of the following. Each repository contains instructions on how to extend it to a new cloud provider.
| Type | Purpose | Location | Documentation |
|---|---|---|---|
| Seed or Shoot | Machine Lifecycle | machine-controller-manager | MCM new cloud provider |
| Seed only | etcd backup/restore | etcd-backup-restore | In process |
| All | Extension implementation | gardener | Extension controller |
4.37 - New Kubernetes Version
Adding Support For a New Kubernetes Version
This document describes the steps needed to perform in order to confidently add support for a new Kubernetes minor version.
Kubernetes Release Responsible Plan
Tasks:
- Ensure Gardener and extensions are updated to support the new Kubernetes version (example)
- Bump Golang dependencies for
k8s.io/*andsigs.k8s.io/controller-runtime(example) [ref] - Prepare a short (~30-60 min) session for a special edition of Gardener’s Review Meeting on new key features and changes in the release
- Drop support for all but the greatest/latest 5 Kubernetes minor versions (the newly added plus four prior). Drop all lower/older versions and adapt accordingly (example)
| Version | Expected Release Date | Release Responsibles |
|---|---|---|
| v1.32 | December 11, 2024 | @marc1404, @LucaBernstein |
| v1.33 | April 23, 2025 | @Kostov6, @plkokanov |
| v1.34 | August ?, 2025 | @tobschli, @ScheererJ |
| v1.35 | December ?, 2025 | @timuthy, @rfranzke |
| v1.36 | April ?, 2026 | @oliver-goetz, @ary1992 |
| v1.37 | August ?, 2026 | @acumino, @shafeeqes |
| v1.38 | December ?, 2026 | @ialidzhikov, TBD |
Click to expand the archived release responsible associations!
| Version | Expected Release Date | Release Responsibles |
|---|---|---|
| v1.18 | March 25, 2020 | @rfranzke |
| v1.19 | August 20, 2020 | @rfranzke |
| v1.20 | December 08, 2020 | @rfranzke |
| v1.21 | April 08, 2021 | @rfranzke |
| v1.22 | August 04, 2021 | @timuthy |
| v1.23 | December 07, 2021 | @rfranzke, @BeckerMax |
| v1.24 | May 03, 2022 | @acumino |
| v1.25 | August 23, 2022 | @shafeeqes |
| v1.26 | December 09, 2022 | @ialidzhikov |
| v1.27 | April 11, 2023 | @ary1992 |
| v1.28 | August 15, 2023 | @oliver-goetz |
| v1.29 | December 13, 2023 | @acumino |
| v1.30 | April 17, 2024 | @shafeeqes |
| v1.31 | August 13, 2024 | @ialidzhikov |
Introduction
⚠️ Typically, once a minor Kubernetes version
vX.Yis supported by Gardener, then all patch versionsvX.Y.Zare also automatically supported without any required action. This is because patch versions do not introduce any new feature or API changes, so there is nothing that needs to be adapted ingardener/gardenercode.
The Kubernetes community release a new minor version roughly every 4 months. Please refer to the official documentation about their release cycles for any additional information.
Shortly before a new release, an “umbrella” issue should be opened which is used to collect the required adaptations and to track the work items.
For example, #5102 can be used as a template for the issue description.
As you can see, the task of supporting a new Kubernetes version also includes the provider extensions maintained in the gardener GitHub organization and is not restricted to gardener/gardener only.
Generally, the work items can be split into two groups: The first group contains tasks specific to the changes in the given Kubernetes release, the second group contains Kubernetes release-independent tasks.
ℹ️ Upgrading the
k8s.io/*andsigs.k8s.io/controller-runtimeGolang dependencies is typically tracked and worked on separately (see e.g. #4772 or #5282), however, it is in the responsibility of the Kubernetes Release Responsibles to make sure the libraries get updated (see the respective section below).
Preparation
Once a new Kubernetes version is released, two issues should be created and assigned according to the release responsible plan. Use the most recent previous issue as a template for the new issue:
- ☂️-Issue for “Support for Kubernetes v1.xx”
- Upgrade
k8s.io/*tov0.xx,sigs.k8s.io/controller-runtimetov0.xx
Deriving Release-Specific Tasks
Most new minor Kubernetes releases incorporate API changes, deprecations, or new features.
The community announces them via their change logs.
In order to derive the release-specific tasks, the respective change log for the new version vX.Y has to be read and understood (for example, the changelog for v1.24).
As already mentioned, typical changes to watch out for are:
- API version promotions or deprecations
- Feature gate promotions or deprecations
- CLI flag changes for Kubernetes components
- New default values in resources
- New available fields in resources
- New features potentially relevant for the Gardener system
- Changes of labels or annotations Gardener relies on
- …
Obviously, this requires a certain experience and understanding of the Gardener project so that all “relevant changes” can be identified.
While reading the change log, add the tasks (along with the respective PR in kubernetes/kubernetes to the umbrella issue).
ℹ️ Some of the changes might be specific to certain cloud providers. Pay attention to those as well and add related tasks to the issue.
List Of Release-Independent Tasks
The following paragraphs describe recurring tasks that need to be performed for each new release.
Make Sure a New hyperkube Image Is Released
The gardener/hyperkube repository is used to release container images consisting of the kubectl and kubelet binaries.
There is a CI/CD job that runs periodically and releases a new hyperkube image when there is a new Kubernetes release. Before proceeding with the next steps, make sure that a new hyperkube image is released for the corresponding new Kubernetes minor version. Make sure that container image is present in GCR.
Adapting Gardener
- Allow instantiation of a Kubernetes client for the new minor version and update the
README.md: - Maintain the Kubernetes feature gates used for validation of
Shootresources:- The feature gates are maintained in this file.
- To maintain this list for new Kubernetes versions follow this guide:
- Alpha & Beta Feature Gates:
- Open: https://kubernetes.io/docs/reference/command-line-tools-reference/feature-gates/#feature-gates-for-alpha-or-beta-features
- Search the page for the new Kubernetes version, e.g. “1.32”.
- Add new alpha feature gates that have been added “Since” the new Kubernetes version.
- Change the
Defaultfor Beta feature gates that have been promoted “Since” the new Kubernetes version.
- Graduated & Deprecated Feature Gates:
- Open: https://kubernetes.io/docs/reference/command-line-tools-reference/feature-gates/#feature-gates-for-graduated-or-deprecated-features
- Search the page for the new Kubernetes version, e.g. “1.32”.
- Change
LockedToDefaultInVersionfor GA and Deprecated feature gates that have been graduated/deprecated “Since” the new Kubernetes version.
- Removed Feature Gates:
- Open: https://kubernetes.io/docs/reference/command-line-tools-reference/feature-gates-removed/#feature-gates-that-are-removed
- Search the page for the current Kubernetes version, e.g. if the new version is “1.32”, search for “1.31”.
- Set
RemovedInVersionto the new Kubernetes version for feature gates that have been removed after the current Kubernetes version according to the “To” column.
- Alpha & Beta Feature Gates:
- See this example commit.
- Maintain the Kubernetes
kube-apiserveradmission plugins used for validation ofShootresources:- The admission plugins are maintained in this file.
- See this and this example commit.
- To maintain this list for new Kubernetes versions, run
hack/compare-k8s-admission-plugins.sh <old-version> <new-version>(e.g.hack/compare-k8s-admission-plugins.sh 1.26 1.27). - It will present 2 lists of admission plugins: those added and those removed in
<new-version>compared to<old-version>. - Add all added admission plugins to the
admissionPluginsVersionRangesmap with<new-version>asAddedInVersionand noRemovedInVersion. - For any removed admission plugins, add
<new-version>asRemovedInVersionto the already existing admission plugin in the map. - In local setup, create a shoot with all of the newly added admission plugins disabled. Make sure that the shoot creation and deletion will succeed. If it fails, that means some of the admission plugins are required. Flag any admission plugins that are required (plugins that must not be disabled in the
Shootspec) by setting theRequiredboolean variable to true for the admission plugin in the map. - Check the Kubernetes documentation for admission controllers if any newly added admission plugin is not recommended for production usage. Example:
The Kubernetes project recommends that you do not use the SecurityContextDeny admission controller. Note that this admission controller was removed in Kubernetes 1.30 in this PR and that’s why it is not mentioned in the latest Kubernetes documentation. Flag those admission plugins by setting theForbiddenboolean variable to true for the admission plugin in the map.
- Maintain the Kubernetes
kube-apiserverAPI groups used for validation ofShootresources:- The API groups are maintained in this file.
- See this example commit.
- To maintain this list for new Kubernetes versions, run
hack/compare-k8s-api-groups.sh <old-version> <new-version>(e.g.hack/compare-k8s-api-groups.sh 1.26 1.27). - It will present 2 lists of API GroupVersions and 2 lists of API GroupVersionResources: those added and those removed in
<new-version>compared to<old-version>. - Add all added group versions to the
apiGroupVersionRangesmap and group version resources to theapiGVRVersionRangesmap with<new-version>asAddedInVersionand noRemovedInVersion. - For any removed APIs, add
<new-version>asRemovedInVersionto the already existing API in the corresponding map. - In local setup, create a shoot and a workerless shoot with all of the newly added API groups disabled. Make sure that the shoot creation and deletion will succeed. If it fails, that means some of the API groups are required. Flag any APIs that are required (APIs that must not be disabled in the
Shootspec) by setting theRequiredboolean variable to true for the API in theapiGVRVersionRangesmap. If this API also should not be disabled for Workerless Shoots, then setRequiredForWorkerlessboolean variable also to true. If the API is required for both Shoot types, then both of these booleans need to be set to true. If the whole API Group is required, then mark it correspondingly in theapiGroupVersionRangesmap.
- Maintain the Kubernetes
kube-controller-managercontrollers for each API group used in deploying required KCM controllers based on active APIs:- The API groups are maintained in this file.
- See this example commit.
- To maintain this list for new Kubernetes versions, run
hack/compute-k8s-controllers.sh <old-version> <new-version>(e.g.hack/compute-k8s-controllers.sh 1.28 1.29). - If it complains that the path for the controller is not present in the map, check the release branch of the new Kubernetes version and find the correct path for the missing/wrong controller. You can do so by checking the file
cmd/kube-controller-manager/app/controllermanager.goand where the controller is initialized from. As of now, there is no straight-forward way to map each controller to its file. If this has improved, please enhance the script. - If the paths are correct, it will present 2 lists of controllers: those added and those removed for each API group in
<new-version>compared to<old-version>. - Add all added controllers to the
APIGroupControllerMapmap and under the corresponding API group with<new-version>asAddedInVersionand noRemovedInVersion. - For any removed controllers, add
<new-version>asRemovedInVersionto the already existing controller in the corresponding API group map. If you are unable to find the removed controller name, then check for its alias. Either in thestaging/src/k8s.io/cloud-provider/names/controller_names.gofile (example) or in thecmd/kube-controller-manager/app/*files (example for apps API group). This is because for kubernetes versions starting fromv1.28, we don’t maintain the aliases in the controller, but the controller names itself since some controllers can be initialized without aliases as well (example). The old alias should still be working since it should be backwards compatible as explained here. Once the support for kubernetes version <v1.28is dropped, we can drop the usages of these aliases and move completely to controller names. - Make sure that the API groups in this file are in sync with the groups in this file. Please note that, for example,
core/v1is replaced by the script asv1andapiserverinternalasinternal. This is because the API groups registered by the apiserver (example) and the file path imported by the controllers (example) might be slightly different in some cases.
- Maintain the names of controllers used for workerless Shoots, here after carefully evaluating whether they are needed if there are no workers. The Kubernetes documentation might not always explain what a specific controller does. In such cases, you may need to search the
kubernetes/kubernetesrepository for the controller’s name and find the pull request that introduced it. - Maintain copies of the
DaemonSetcontroller’s scheduling logic:gardener-resource-manager’sNodecontroller uses a copy of parts of theDaemonSetcontroller’s logic for determining whether a specificNodeshould run a daemon pod of a givenDaemonSet: see this file.- See this example commit.
- Check the referenced upstream files for changes to the
DaemonSetcontroller’s logic and adapt our copies accordingly. This might include introducing version-specific checks in our codebase to handle different shoot cluster versions.
- Handle breaking changes that require adjustments to update the Shoot to the new Kubernetes minor version:
- Removal of functionalities from the Shoot API is usually connected to a Kubernetes minor version upgrade. For more details, see the Deprecations and Backwards-Compatibility section. Check if there are breaking changes to the Shoot API that require the Shoot spec to be adapted in order to update to the new Kubernetes minor version.
- Maintain version specific defaulting logic in shoot admission plugin. Sometimes default values for shoots are intentionally changed with the introduction of a new Kubernetes version. The final Kubernetes version for a shoot is determined in the Shoot Validator Admission Plugin. Any defaulting logic that depends on the version should be placed in this admission plugin (example).
- Ensure that maintenance-controller is able to auto-update shoots to the new Kubernetes version. Changes to the shoot spec required for the Kubernetes update should be enforced in such cases (examples).
- Maintain the Shoot Kubernetes Minor Version Upgrades documentation file. Add breaking and/or behavioral changes related to Gardener, introduced with the new Kubernetes version.
- Add the new Kubernetes version to the CloudProfile in local setup.
- See this example commit.
- In the next Gardener release, file a PR that bumps the used Kubernetes version for local e2e test.
- This step must be performed in a PR that targets the next Gardener release because of the e2e upgrade tests. The e2e upgrade tests deploy the previous Gardener version where the new Kubernetes version is not present in the CloudProfile. If the e2e tests are adapted in the same PR that adds the support for the Kubernetes version, then the e2e upgrade tests for that PR will fail because the newly added Kubernetes version in missing in the local CloudProfile from the old release.
- See this example commit PR.
Filing the Pull Request
Work on all the tasks you have collected and validate them using the local provider. Execute the e2e tests and if everything looks good, then go ahead and file the PR (example PR). Generally, it is great if you add the PRs also to the umbrella issue so that they can be tracked more easily.
Adapting Provider Extensions
After the PR in gardener/gardener for the support of the new version has been merged, you can go ahead and work on the provider extensions.
Actually, you can already start even if the PR is not yet merged and use the branch of your fork.
- Update the
github.com/gardener/gardenerdependency in the extension and update theREADME.md. - Work on release-specific tasks related to this provider.
Maintaining the cloud-controller-manager Images
Provider extensions are using upstream cloud-controller-manager images.
Make sure to adopt the new cloud-controller-manager release for the new Kubernetes minor version (example PR).
Some of the cloud providers are not using upstream cloud-controller-manager images for some of the supported Kubernetes versions.
Instead, we build and maintain the images ourselves:
Use the instructions below in case you need to maintain a release branch for such cloud-controller-manager image:
Expand the instructions!
Until we switch to upstream images, you need to update the Kubernetes dependencies and release a new image. The required steps are as follows:
- Checkout the
legacy-cloud-providerbranch of the respective repository - Bump the versions in the
Dockerfile(example commit). - Update the
VERSIONtovX.Y.Z-devwhereZis the latest available Kubernetes patch version for thevX.Yminor version. - Update the
k8s.io/*dependencies in thego.modfile tovX.Y.Zand rungo mod tidy(example commit). - Checkout a new
release-vX.Ybranch and release it (example)
As you are already on it, it is great if you also bump the
k8s.io/*dependencies for the last three minor releases as well. In this case, you need to check out therelease-vX.{Y-{1,2,3}}branches and only perform the last three steps (example branch, example commit).
Now you need to update the new releases in the imagevector/images.yaml of the respective provider extension so that they are used (see this example commit for reference).
Maintaining Additional Images
Provider extensions might also deploy additional images other than cloud-controller-manager that are specific for a given Kubernetes minor version.
Make sure to use a new image for the following components:
The
ecr-credential-providerimage for the provider-aws extension.We are building the
ecr-credential-providerimage ourselves because the upstream community does not provide an OCI image for the corresponding component. For more details, see this upstream issue.Use the following steps to prepare a release of the
ecr-credential-providerimage for the new Kubernetes minor version:- Update the
VERSIONfile in the gardener/ecr-credential-provider repository (example PR). - Once the PR is merged, trigger a new release from the CI/CD.
- Update the
The
csi-driver-cinderandcsi-driver-manilaimages for the provider-openstack extension.The upstream community is providing
csi-driver-cinderandcsi-driver-manilareleases per Kubernetes minor version. Make sure to adopt the newcsi-driver-cinderandcsi-driver-manilareleases for the new Kubernetes minor version (example PR).
Filing the Pull Request
Again, work on all the tasks you have collected. This time, you cannot use the local provider for validation but should create real clusters on the various infrastructures. Typically, the following validations should be performed:
- Create new clusters with versions <
vX.Y - Create new clusters with version =
vX.Y - Upgrade old clusters from version
vX.{Y-1}to versionvX.Y - Delete clusters with versions <
vX.Y - Delete clusters with version =
vX.Y
If everything looks good, then go ahead and file the PR (example PR). Generally, it is again great if you add the PRs also to the umbrella issue so that they can be tracked more easily.
Bump Golang dependencies for k8s.io/* and sigs.k8s.io/controller-runtime
The versions of the upstream Go dependencies k8s.io/* and sigs.k8s.io/controller-runtime should be updated to the latest version that is compatible with the new Kubernetes version.
This is handled via a separate issue (example) and pull request (example).
- Bump the
k8s.io/*dependencies in thego.modfile to the latest version that is compatible with the new Kubernetes version. - Bump the
sigs.k8s.io/controller-runtimedependency in thego.modfile to the latest version that is compatible with the new Kubernetes version.
4.38 - Priority Classes
PriorityClasses in Gardener Clusters
Gardener makes use of PriorityClasses to improve the overall robustness of the system.
In order to benefit from the full potential of PriorityClasses, the gardenlet manages a set of well-known PriorityClasses with fine-granular priority values.
All components of the system should use these well-known PriorityClasses instead of creating and using separate ones with arbitrary values, which would compromise the overall goal of using PriorityClasses in the first place.
The gardenlet manages the well-known PriorityClasses listed in this document, so that third parties (e.g., Gardener extensions) can rely on them to be present when deploying components to Seed and Shoot clusters.
The listed well-known PriorityClasses follow this rough concept:
- Values are close to the maximum that can be declared by the user. This is important to ensure that Shoot system components have higher priority than the workload deployed by end-users.
- Values have a bit of headroom in between to ensure flexibility when the need for intermediate priority values arises.
- Values of
PriorityClasses created on Seed clusters are lower than the ones on Shoots to ensure that Shoot system components have higher priority than Seed components, if the Seed is backed by a Shoot (ManagedSeed), e.g.corednsshould have higher priority thangardenlet. - Names simply include the last digits of the value to minimize confusion caused by many (similar) names like
critical,importance-high, etc.
Garden Clusters
When using the gardener-operator for managing the garden runtime and virtual cluster, the following PriorityClasses are available:
PriorityClasses for Garden Control Plane Components
| Name | Priority | Associated Components (Examples) |
|---|---|---|
gardener-garden-system-critical | 999999550 | gardener-operator, gardener-resource-manager, istio |
gardener-garden-system-500 | 999999500 | virtual-garden-etcd-events, virtual-garden-etcd-main, virtual-garden-kube-apiserver, gardener-apiserver |
gardener-garden-system-400 | 999999400 | virtual-garden-gardener-resource-manager, gardener-admission-controller, Extension Admission Controllers |
gardener-garden-system-300 | 999999300 | virtual-garden-kube-controller-manager, vpa-admission-controller, etcd-druid, nginx-ingress-controller |
gardener-garden-system-200 | 999999200 | vpa-recommender, vpa-updater, gardener-scheduler, gardener-controller-manager, gardener-dashboard, terminal-controller-manager, gardener-discovery-server, Extension Controllers |
gardener-garden-system-100 | 999999100 | fluent-operator, fluent-bit, gardener-metrics-exporter, kube-state-metrics, plutono, vali, prometheus-operator, alertmanager-garden, prometheus-garden, blackbox-exporter, prometheus-longterm, perses-operator, opentelemetry-operator |
Seed Clusters
PriorityClasses for Seed System Components
| Name | Priority | Associated Components (Examples) |
|---|---|---|
gardener-system-critical | 999998950 | gardenlet, gardener-resource-manager, istio-ingressgateway, istiod |
gardener-system-900 | 999998900 | Extensions |
gardener-system-800 | 999998800 | dependency-watchdog-endpoint, dependency-watchdog-probe, etcd-druid, vpa-admission-controller |
gardener-system-700 | 999998700 | vpa-recommender, vpa-updater |
gardener-system-600 | 999998600 | alertmanager-seed, fluent-operator, fluent-bit, plutono, kube-state-metrics, nginx-ingress-controller, nginx-k8s-backend, prometheus-operator, prometheus-aggregate, prometheus-cache, prometheus-seed, vali, perses-operator, opentelemetry-operator |
gardener-reserve-excess-capacity | -5 | reserve-excess-capacity (ref) |
PriorityClasses for Shoot Control Plane Components
| Name | Priority | Associated Components (Examples) |
|---|---|---|
gardener-system-500 | 999998500 | etcd-events, etcd-main, kube-apiserver |
gardener-system-400 | 999998400 | gardener-resource-manager |
gardener-system-300 | 999998300 | cloud-controller-manager, cluster-autoscaler, csi-driver-controller, kube-controller-manager, kube-scheduler, machine-controller-manager, terraformer, vpn-seed-server |
gardener-system-200 | 999998200 | csi-snapshot-controller, csi-snapshot-validation, cert-controller-manager, shoot-dns-service, vpa-admission-controller, vpa-recommender, vpa-updater |
gardener-system-100 | 999998100 | alertmanager-shoot, plutono, kube-state-metrics, prometheus-shoot, blackbox-exporter, vali, event-logger |
Shoot Clusters
PriorityClasses for Shoot System Components
| Name | Priority | Associated Components (Examples) |
|---|---|---|
system-node-critical (created by Kubernetes) | 2000001000 | calico-node, kube-proxy, apiserver-proxy, csi-driver, egress-filter-applier |
system-cluster-critical (created by Kubernetes) | 2000000000 | calico-typha, calico-kube-controllers, coredns, vpn-shoot, registry-cache |
gardener-shoot-system-900 | 999999900 | node-problem-detector |
gardener-shoot-system-800 | 999999800 | calico-typha-horizontal-autoscaler, calico-typha-vertical-autoscaler |
gardener-shoot-system-700 | 999999700 | blackbox-exporter, node-exporter |
gardener-shoot-system-600 | 999999600 | addons-nginx-ingress-controller, addons-nginx-ingress-k8s-backend, kubernetes-dashboard, kubernetes-metrics-scraper |
4.39 - Process
Releases, Features, Hotfixes
This document describes how to contribute features or hotfixes, and how new Gardener releases are usually scheduled, validated, etc.
Releases
The @gardener-maintainers are trying to provide a new release roughly every other week (depending on their capacity and the stability/robustness of the master branch).
Hotfixes are usually maintained for the latest three minor releases, though, there are no fixed release dates.
Release Responsible Plan
| Version | Week No | Begin Validation Phase | Due Date | Release Responsible |
|---|---|---|---|---|
| v1.115 | Week 11-12 | March 10, 2025 | March 23, 2025 | @ialidzhikov |
| v1.116 | Week 13-14 | March 24, 2025 | April 6, 2025 | @Kostov6 |
| v1.117 | Week 15-16 | April 7, 2025 | April 20, 2025 | @marc1404 |
| v1.118 | Week 17-18 | April 21, 2025 | May 4, 2025 | @acumino |
| v1.119 | Week 19-20 | May 5, 2025 | May 18, 2025 | @LucaBernstein |
| v1.120 | Week 21-22 | May 19, 2025 | June 1, 2025 | @timuthy |
| v1.121 | Week 23-24 | June 2, 2025 | June 15, 2025 | @ary1992 |
| v1.122 | Week 25-26 | June 16, 2025 | June 29, 2025 | @ialidzhikov |
| v1.123 | Week 27-28 | June 30, 2025 | July 13, 2025 | @ScheererJ |
| v1.124 | Week 29-30 | July 14, 2025 | July 27, 2025 | @oliver-goetz |
| v1.125 | Week 31-32 | July 28, 2025 | August 10, 2025 | @tobschli |
| v1.126 | Week 33-34 | August 11, 2025 | August 24, 2025 | @plkokanov |
| v1.127 | Week 35-36 | August 25, 2025 | September 7, 2025 | @rfranzke |
| v1.128 | Week 37-38 | September 8, 2025 | September 21, 2025 | @shafeeqes |
| v1.129 | Week 39-40 | September 22, 2025 | October 5, 2025 | @Kostov6 |
| v1.130 | Week 41-42 | October 6, 2025 | October 19, 2025 | @vitanovs |
| v1.131 | Week 43-44 | October 20, 2025 | November 2, 2025 | @dimitar-kostadinov |
Apart from the release of the next version, the release responsible is also taking care of potential hotfix releases of the last three minor versions. The release responsible is the main contact person for coordinating new feature PRs for the next minor versions or cherry-pick PRs for the last three minor versions.
Click to expand the archived release responsible associations!
| Version | Week No | Begin Validation Phase | Due Date | Release Responsible |
|---|---|---|---|---|
| v1.17 | Week 07-08 | February 15, 2021 | February 28, 2021 | @rfranzke |
| v1.18 | Week 09-10 | March 1, 2021 | March 14, 2021 | @danielfoehrKn |
| v1.19 | Week 11-12 | March 15, 2021 | March 28, 2021 | @timebertt |
| v1.20 | Week 13-14 | March 29, 2021 | April 11, 2021 | @vpnachev |
| v1.21 | Week 15-16 | April 12, 2021 | April 25, 2021 | @timuthy |
| v1.22 | Week 17-18 | April 26, 2021 | May 9, 2021 | @BeckerMax |
| v1.23 | Week 19-20 | May 10, 2021 | May 23, 2021 | @ialidzhikov |
| v1.24 | Week 21-22 | May 24, 2021 | June 5, 2021 | @stoyanr |
| v1.25 | Week 23-24 | June 7, 2021 | June 20, 2021 | @rfranzke |
| v1.26 | Week 25-26 | June 21, 2021 | July 4, 2021 | @danielfoehrKn |
| v1.27 | Week 27-28 | July 5, 2021 | July 18, 2021 | @timebertt |
| v1.28 | Week 29-30 | July 19, 2021 | August 1, 2021 | @ialidzhikov |
| v1.29 | Week 31-32 | August 2, 2021 | August 15, 2021 | @timuthy |
| v1.30 | Week 33-34 | August 16, 2021 | August 29, 2021 | @BeckerMax |
| v1.31 | Week 35-36 | August 30, 2021 | September 12, 2021 | @stoyanr |
| v1.32 | Week 37-38 | September 13, 2021 | September 26, 2021 | @vpnachev |
| v1.33 | Week 39-40 | September 27, 2021 | October 10, 2021 | @voelzmo |
| v1.34 | Week 41-42 | October 11, 2021 | October 24, 2021 | @plkokanov |
| v1.35 | Week 43-44 | October 25, 2021 | November 7, 2021 | @kris94 |
| v1.36 | Week 45-46 | November 8, 2021 | November 21, 2021 | @timebertt |
| v1.37 | Week 47-48 | November 22, 2021 | December 5, 2021 | @danielfoehrKn |
| v1.38 | Week 49-50 | December 6, 2021 | December 19, 2021 | @rfranzke |
| v1.39 | Week 01-04 | January 3, 2022 | January 30, 2022 | @ialidzhikov, @timuthy |
| v1.40 | Week 05-06 | January 31, 2022 | February 13, 2022 | @BeckerMax |
| v1.41 | Week 07-08 | February 14, 2022 | February 27, 2022 | @plkokanov |
| v1.42 | Week 09-10 | February 28, 2022 | March 13, 2022 | @kris94 |
| v1.43 | Week 11-12 | March 14, 2022 | March 27, 2022 | @rfranzke |
| v1.44 | Week 13-14 | March 28, 2022 | April 10, 2022 | @timebertt |
| v1.45 | Week 15-16 | April 11, 2022 | April 24, 2022 | @acumino |
| v1.46 | Week 17-18 | April 25, 2022 | May 8, 2022 | @ialidzhikov |
| v1.47 | Week 19-20 | May 9, 2022 | May 22, 2022 | @shafeeqes |
| v1.48 | Week 21-22 | May 23, 2022 | June 5, 2022 | @ary1992 |
| v1.49 | Week 23-24 | June 6, 2022 | June 19, 2022 | @plkokanov |
| v1.50 | Week 25-26 | June 20, 2022 | July 3, 2022 | @rfranzke |
| v1.51 | Week 27-28 | July 4, 2022 | July 17, 2022 | @timebertt |
| v1.52 | Week 29-30 | July 18, 2022 | July 31, 2022 | @acumino |
| v1.53 | Week 31-32 | August 1, 2022 | August 14, 2022 | @kris94 |
| v1.54 | Week 33-34 | August 15, 2022 | August 28, 2022 | @ialidzhikov |
| v1.55 | Week 35-36 | August 29, 2022 | September 11, 2022 | @oliver-goetz |
| v1.56 | Week 37-38 | September 12, 2022 | September 25, 2022 | @shafeeqes |
| v1.57 | Week 39-40 | September 26, 2022 | October 9, 2022 | @ary1992 |
| v1.58 | Week 41-42 | October 10, 2022 | October 23, 2022 | @plkokanov |
| v1.59 | Week 43-44 | October 24, 2022 | November 6, 2022 | @rfranzke |
| v1.60 | Week 45-46 | November 7, 2022 | November 20, 2022 | @acumino |
| v1.61 | Week 47-48 | November 21, 2022 | December 4, 2022 | @ialidzhikov |
| v1.62 | Week 49-50 | December 5, 2022 | December 18, 2022 | @oliver-goetz |
| v1.63 | Week 01-04 | January 2, 2023 | January 29, 2023 | @shafeeqes |
| v1.64 | Week 05-06 | January 30, 2023 | February 12, 2023 | @ary1992 |
| v1.65 | Week 07-08 | February 13, 2023 | February 26, 2023 | @timuthy |
| v1.66 | Week 09-10 | February 27, 2023 | March 12, 2023 | @plkokanov |
| v1.67 | Week 11-12 | March 13, 2023 | March 26, 2023 | @rfranzke |
| v1.68 | Week 13-14 | March 27, 2023 | April 9, 2023 | @acumino |
| v1.69 | Week 15-16 | April 10, 2023 | April 23, 2023 | @oliver-goetz |
| v1.70 | Week 17-18 | April 24, 2023 | May 7, 2023 | @ialidzhikov |
| v1.71 | Week 19-20 | May 8, 2023 | May 21, 2023 | @shafeeqes |
| v1.72 | Week 21-22 | May 22, 2023 | June 4, 2023 | @ary1992 |
| v1.73 | Week 23-24 | June 5, 2023 | June 18, 2023 | @timuthy |
| v1.74 | Week 25-26 | June 19, 2023 | July 2, 2023 | @oliver-goetz |
| v1.75 | Week 27-28 | July 3, 2023 | July 16, 2023 | @rfranzke |
| v1.76 | Week 29-30 | July 17, 2023 | July 30, 2023 | @plkokanov |
| v1.77 | Week 31-32 | July 31, 2023 | August 13, 2023 | @ialidzhikov |
| v1.78 | Week 33-34 | August 14, 2023 | August 27, 2023 | @acumino |
| v1.79 | Week 35-36 | August 28, 2023 | September 10, 2023 | @shafeeqes |
| v1.80 | Week 37-38 | September 11, 2023 | September 24, 2023 | @ScheererJ |
| v1.81 | Week 39-40 | September 25, 2023 | October 8, 2023 | @ary1992 |
| v1.82 | Week 41-42 | October 9, 2023 | October 22, 2023 | @timuthy |
| v1.83 | Week 43-44 | October 23, 2023 | November 5, 2023 | @oliver-goetz |
| v1.84 | Week 45-46 | November 6, 2023 | November 19, 2023 | @rfranzke |
| v1.85 | Week 47-48 | November 20, 2023 | December 3, 2023 | @plkokanov |
| v1.86 | Week 49-50 | December 4, 2023 | December 17, 2023 | @ialidzhikov |
| v1.87 | Week 01-04 | January 1, 2024 | January 28, 2024 | @acumino |
| v1.88 | Week 05-06 | January 29, 2024 | February 11, 2024 | @timuthy |
| v1.89 | Week 07-08 | February 12, 2024 | February 25, 2024 | @ScheererJ |
| v1.90 | Week 09-10 | February 26, 2024 | March 10, 2024 | @ary1992 |
| v1.91 | Week 11-12 | March 11, 2024 | March 24, 2024 | @shafeeqes |
| v1.92 | Week 13-14 | March 25, 2024 | April 7, 2024 | @oliver-goetz |
| v1.93 | Week 15-16 | April 8, 2024 | April 21, 2024 | @rfranzke |
| v1.94 | Week 17-18 | April 22, 2024 | May 5, 2024 | @plkokanov |
| v1.95 | Week 19-20 | May 6, 2024 | May 19, 2024 | @ialidzhikov |
| v1.96 | Week 21-22 | May 20, 2024 | June 2, 2024 | @acumino |
| v1.97 | Week 23-24 | June 3, 2024 | June 16, 2024 | @timuthy |
| v1.98 | Week 25-26 | June 17, 2024 | June 30, 2024 | @ScheererJ |
| v1.99 | Week 27-28 | July 1, 2024 | July 14, 2024 | @ary1992 |
| v1.100 | Week 29-30 | July 15, 2024 | July 28, 2024 | @shafeeqes |
| v1.101 | Week 31-32 | July 29, 2024 | August 11, 2024 | @rfranzke |
| v1.102 | Week 33-34 | August 12, 2024 | August 25, 2024 | @plkokanov |
| v1.103 | Week 35-36 | August 26, 2024 | September 8, 2024 | @oliver-goetz |
| v1.104 | Week 37-38 | September 9, 2024 | September 22, 2024 | @ialidzhikov |
| v1.105 | Week 39-40 | September 23, 2024 | October 6, 2024 | @acumino |
| v1.106 | Week 41-42 | October 7, 2024 | October 20, 2024 | @timuthy |
| v1.107 | Week 43-44 | October 21, 2024 | November 3, 2024 | @LucaBernstein |
| v1.108 | Week 45-46 | November 4, 2024 | November 17, 2024 | @shafeeqes |
| v1.109 | Week 47-48 | November 18, 2024 | December 1, 2024 | @ary1992 |
| v1.110 | Week 49-50 | December 2, 2024 | December 15, 2024 | @ScheererJ |
| v1.111 | Week 01-04 | December 30, 2024 | January 26, 2025 | @oliver-goetz |
| v1.112 | Week 05-06 | January 27, 2025 | February 9, 2025 | @tobschli |
| v1.113 | Week 07-08 | February 10, 2025 | February 23, 2025 | @plkokanov |
| v1.114 | Week 09-10 | February 24, 2025 | March 9, 2025 | @rfranzke |
Click here to view the Kubernetes Release Responsible plan.
Release Validation
The release phase for a new minor version lasts two weeks. Typically, the first week is used for the validation of the release. This phase includes the following steps:
master(or latestrelease-*branch) is deployed to a development landscape that already hosts some existing seed and shoot clusters.- An extended test suite is triggered by the “release responsible” which:
- executes the Gardener integration tests for different Kubernetes versions, infrastructures, and
Shootsettings. - executes the Kubernetes conformance tests.
- executes further tests like Kubernetes/OS patch/minor version upgrades.
- executes the Gardener integration tests for different Kubernetes versions, infrastructures, and
- Additionally, every four hours (or on demand) more tests (e.g., including the Kubernetes e2e test suite) are executed for different infrastructures.
- The “release responsible” is verifying new features or other notable changes (derived of the draft release notes) in this development system.
Usually, the new release is triggered in the beginning of the second week if all tests are green, all checks were successful, and if all of the planned verifications were performed by the release responsible.
Contributing New Features or Fixes
Please refer to the Gardener contributor guide.
Besides a lot of general information, it also provides a checklist for newly created pull requests that may help you to prepare your changes for an efficient review process.
If you are contributing a fix or major improvement, please take care to open cherry-pick PRs to all affected and still supported versions once the change is approved and merged in the master branch.
⚠️ Please ensure that your modifications pass the verification checks (linting, formatting, static code checks, tests, etc.) by executing
make verify
before filing your pull request.
The guide applies for both changes to the master and to any release-* branch.
All changes must be submitted via a pull request and be reviewed and approved by at least one code owner.
TODO Statements
Sometimes, TODO statements are being introduced when one cannot follow up immediately with certain tasks or when temporary migration code is required. In order to properly follow-up with such TODOs and to prevent them from piling up without getting attention, the following rules should be followed:
- Each TODO statement should have an associated person and state when it can be removed.
Example:
// TODO(<github-username>): Remove this code after v1.75 has been released. - When the task depends on a certain implementation, a GitHub issue should be opened and referenced in the statement.
Example:The associated person should actively drive the implementation of the referenced issue (unless it cannot be done because of third-party dependencies or conditions) so that the TODO statement does not get stale.
// TODO(<github-username>): Remove this code after https://github.com/gardener/gardener/issues/<issue-number> has been implemented. - TODO statements without actionable tasks or those that are unlikely to ever be implemented (maybe because of very low priorities) should not be specified in the first place. If a TODO is specified, the associated person should make sure to actively follow-up.
Deprecations and Backwards-Compatibility
In case you have to remove functionality relevant to end-users (e.g., a field or default value in the Shoot API), please connect it with a Kubernetes minor version upgrade.
This way, end-users are forced to actively adapt their manifests when they perform their Kubernetes upgrades.
For example, the .spec.kubernetes.enableStaticTokenKubeconfig field in the Shoot API is no longer allowed to be set for Kubernetes versions >= 1.27.
In case you have to remove or change functionality which cannot be directly connected with a Kubernetes version upgrade, please consider introducing a feature gate.
This way, landscape operators can announce the planned changes to their users and communicate a timeline when they plan to activate the feature gate.
End-users can then prepare for it accordingly.
For example, the fact that changes to kubelet.kubeReserved in the Shoot API will lead to a rolling update of the worker nodes (previously, these changes were updated in-place) is controlled via the NewWorkerPoolHash feature gate.
In case you have to remove functionality relevant to Gardener extensions, please deprecate it first, and add a TODO statement to remove it only after at least 9 releases.
Do not forget to write a proper release note as part of your pull request.
This gives extension developers enough time (~18 weeks) to adapt to the changes (and to release a new version of their extension) before Gardener finally removes the functionality.
Examples are removing a field in the extensions.gardener.cloud/v1alpha1 API group, or removing a controller in the extensions library.
In case you have to run migration code (which is mostly internal), please add a TODO statement to remove it only after 3 releases.
This way, we can ensure that the Gardener version skew policy is not violated.
For example, the migration code for moving the Prometheus instances under management of prometheus-operator was running for three releases.
Tip
Please revisit the version skew policy.
Cherry Picks
This section explains how to initiate cherry picks on release branches within the gardener/gardener repository.
Prerequisites
Before you initiate a cherry pick, make sure that the following prerequisites are accomplished.
- A pull request merged against the
masterbranch. - The release branch exists (check in the branches section).
- Have the
gardener/gardenerrepository cloned as follows:- the
originremote should point to your fork (alternatively this can be overwritten by passingFORK_REMOTE=<fork-remote>). - the
upstreamremote should point to the Gardener GitHub org (alternatively this can be overwritten by passingUPSTREAM_REMOTE=<upstream-remote>).
- the
- Have
hubinstalled. On macOS,hubcan be installed via homebrew using the hub formula. For other OS, follow thehubinstallation instructions. - A GitHub token which has permissions to create a PR in an upstream branch.
Initiate a Cherry Pick
Run the [cherry pick script][cherry-pick-script].
This example applies a master branch PR #3632 to the remote branch
upstream/release-v3.14:GITHUB_USER=<your-user> hack/cherry-pick-pull.sh upstream/release-v3.14 3632Be aware the cherry pick script assumes you have a git remote called
upstreamthat points at the Gardener GitHub org.You will need to run the cherry pick script separately for each patch release you want to cherry pick to. Cherry picks should be applied to all active release branches where the fix is applicable.
When asked for your GitHub password, provide the created GitHub token rather than your actual GitHub password. Refer https://github.com/github/hub/issues/2655#issuecomment-735836048
4.40 - Reversed VPN Tunnel
Reversed VPN Tunnel Setup and Configuration
The Reversed VPN Tunnel is enabled by default. A highly available VPN connection is automatically deployed in all shoots that configure an HA control-plane.
Reversed VPN Tunnel
In the first VPN solution, connection establishment was initiated by a VPN client in the seed cluster. Due to several issues with this solution, the tunnel establishment direction has been reverted. The client is deployed in the shoot and initiates the connection from there. This way, there is no need to deploy a special purpose loadbalancer for the sake of addressing the data-plane, in addition to saving costs, this is considered the more secure alternative. For more information on how this is achieved, please have a look at the following GEP.
Connection establishment with a reversed tunnel:
APIServer --> Envoy-Proxy | VPN-Seed-Server <-- Istio/Envoy-Proxy <-- SNI API Server Endpoint <-- LB (one for all clusters of a seed) <--- internet <--- VPN-Shoot-Client --> Pods | Nodes | Services
High Availability for Reversed VPN Tunnel
Shoots which define spec.controlPlane.highAvailability.failureTolerance: {node, zone} get an HA control-plane, including a
highly available VPN connection by deploying redundant VPN servers and clients.
Please note that it is not possible to move an open connection to another VPN tunnel. Especially long-running
commands like kubectl exec -it ... or kubectl logs -f ... will still break if the routing path must be switched
because either VPN server or client are not reachable anymore. A new request should be possible within seconds.
HA Architecture for VPN
Establishing a connection from the VPN client on the shoot to the server in the control plane works nearly the same
way as in the non-HA case. The only difference is that the VPN client targets one of two VPN servers, represented by two services
vpn-seed-server-0 and vpn-seed-server-1 with endpoints in pods with the same name.
The VPN tunnel is used by a kube-apiserver to reach nodes, services, or pods in the shoot cluster.
In the non-HA case, a kube-apiserver uses an HTTP proxy running as a side-car in the VPN server to address
the shoot networks via the VPN tunnel and the vpn-shoot acts as a router.
In the HA case, the setup is more complicated. Instead of an HTTP proxy in the VPN server, the kube-apiserver has
additional side-cars, one side-car for each VPN client to connect to the corresponding VPN server.
On the shoot side, there are now two vpn-shoot pods, each with two VPN clients for each VPN server.
With this setup, there would be four possible routes, but only one can be used. Switching the route kills all
open connections. Therefore, another layer is introduced: link aggregation, also named bonding.
In Linux, you can create a network link by using several other links as slaves. Bonding here is used with
active-backup mode. This means the traffic only goes through the active sublink and is only changed if the active one
becomes unavailable. Switching happens in the bonding network driver without changing any routes. So with this layer,
vpn-seed-server pods can be rolled without disrupting open connections.
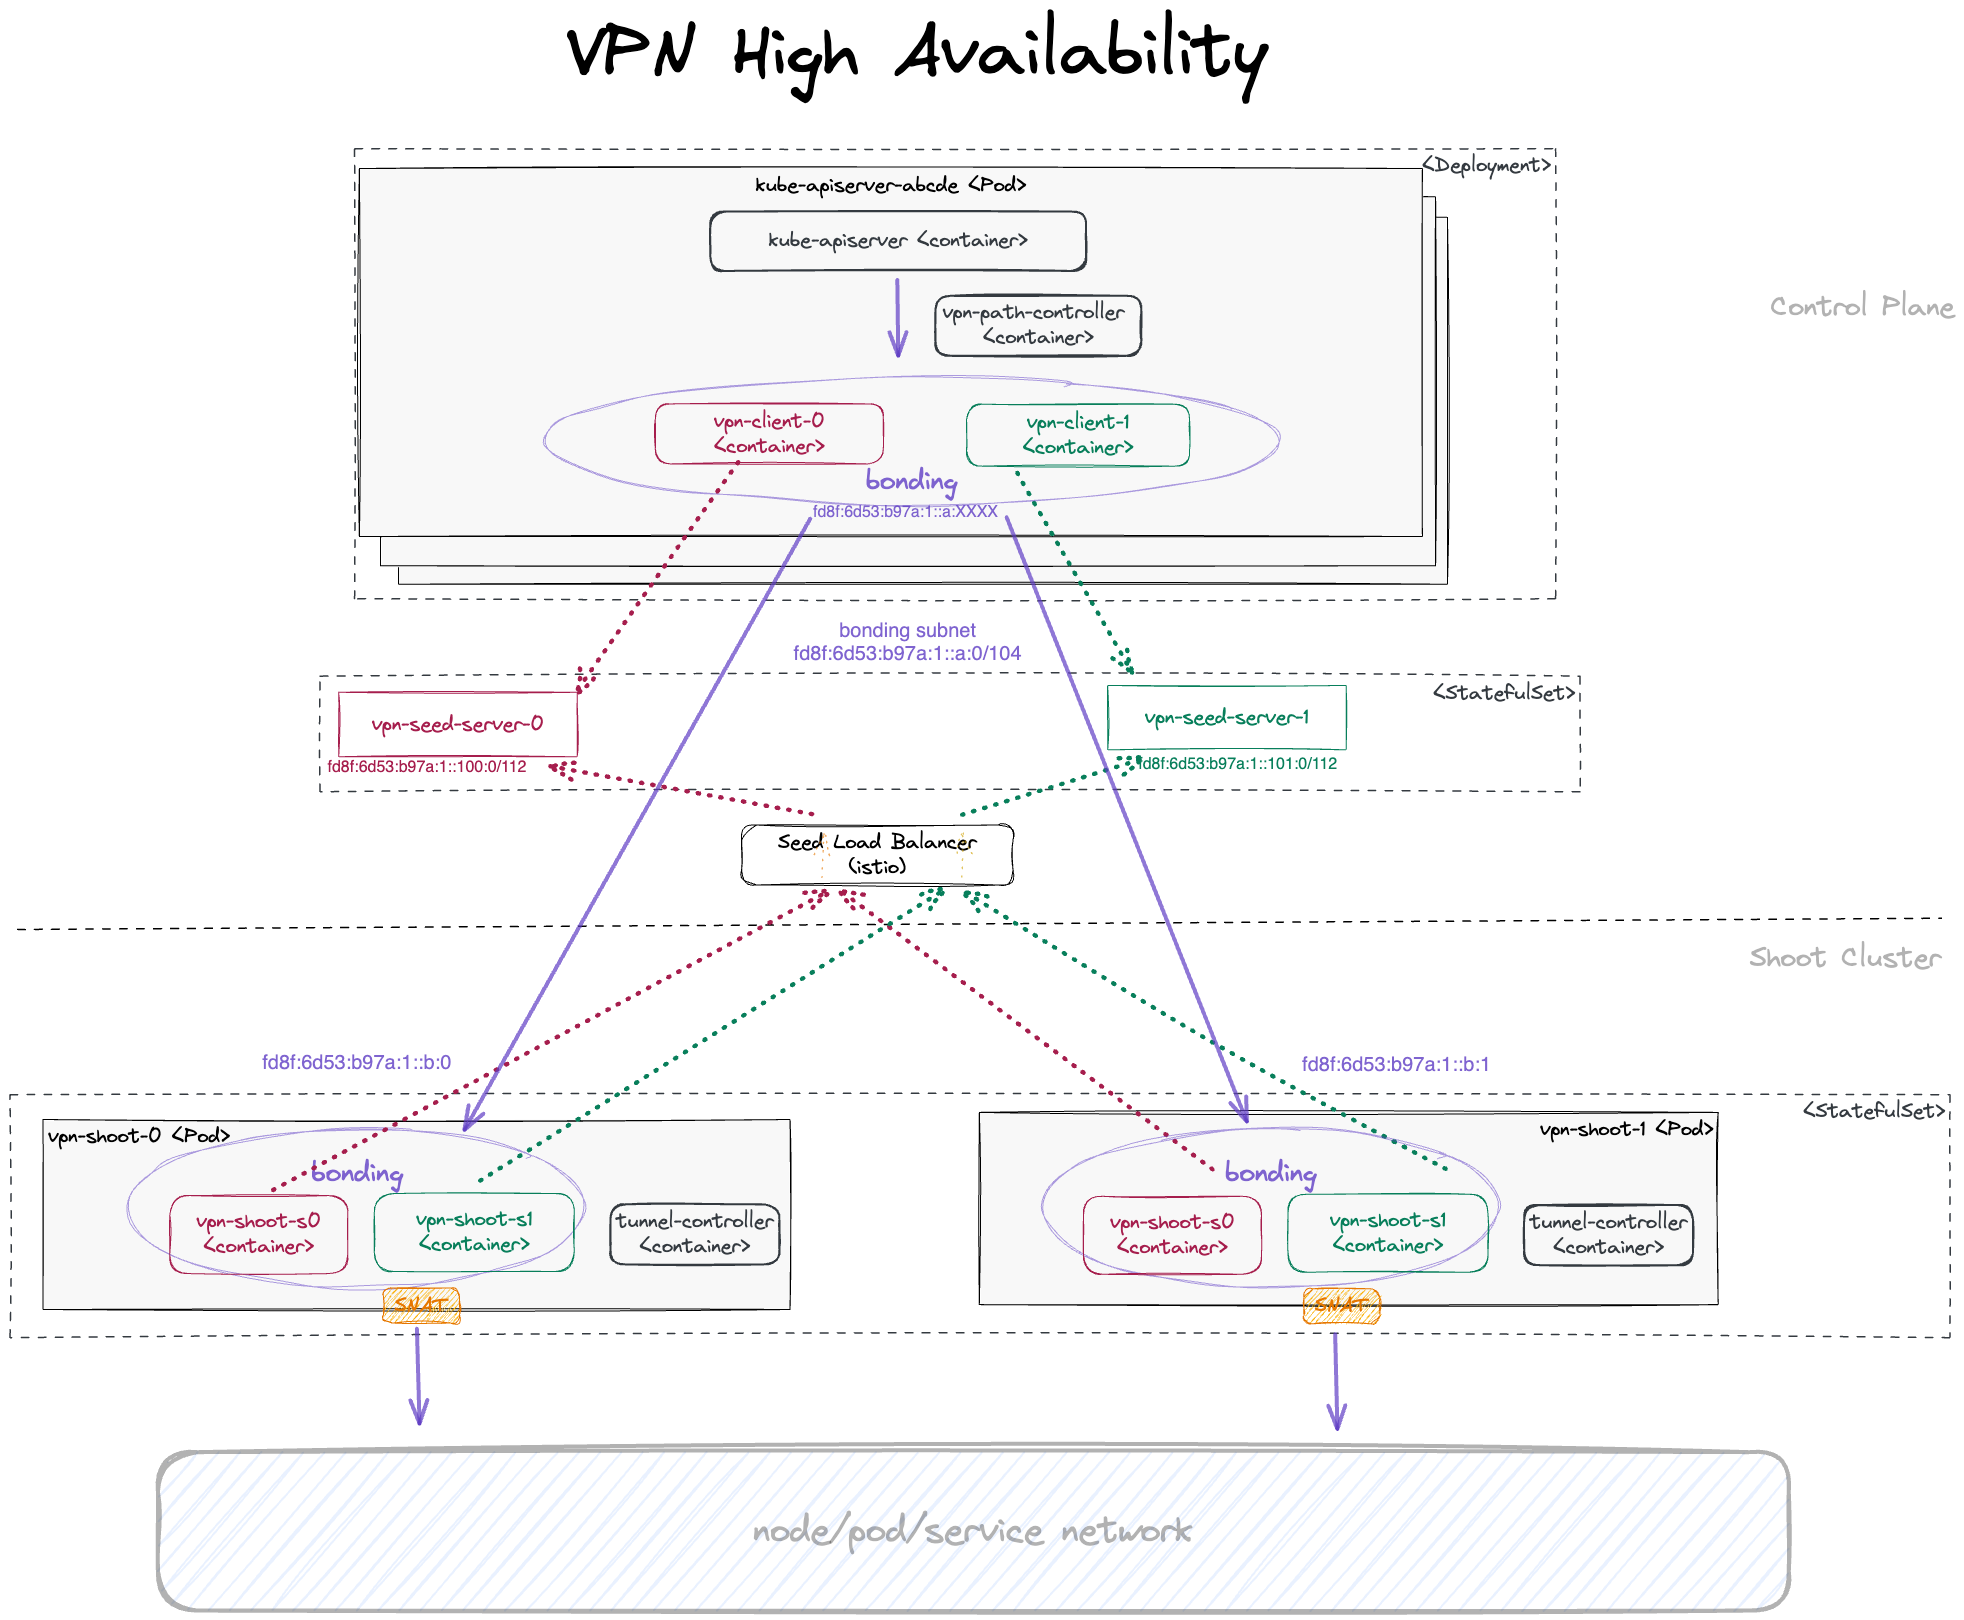
With bonding, there are 2 possible routing paths, ensuring that there is at least one routing path intact even if
one vpn-seed-server pod and one vpn-shoot pod are unavailable at the same time.
As multi-path routing is not available on the worker nodes, one routing path must be configured explicitly.
For this purpose, the path-controller app is running in another side-car of the kube-apiserver pod.
It pings all shoot-side VPN clients regularly every few seconds. If the active routing path is not responsive anymore,
the routing is switched to the other responsive routing path.
Using an IPv6 transport network for communication between the bonding devices of the VPN clients, additional
tunnel devices are needed on both ends to allow transport of both IPv4 and IPv6 packets.
For this purpose, ip6tnl type tunnel devices are in place (an IPv4/IPv6 over IPv6 tunnel interface).
The connection establishment with a reversed tunnel in HA case is:
APIServer[k] --> ip6tnl-device[j] --> bond-device --> tap-device[i] | VPN-Seed-Server[i] <-- Istio/Envoy-Proxy <-- SNI API Server Endpoint <-- LB (one for all clusters of a seed) <--- internet <--- VPN-Shoot-Client[j] --> tap-device[i] --> bond-device --> ip6tnl-device[k] --> Pods | Nodes | Services
Here, [k] is the index of the kube-apiserver instance, [j] of the VPN shoot instance, and [i] of VPN seed server.
For each kube-apiserver instance, an own ip6tnl tunnel device is needed on the shoot side.
Additionally, the back routes from the VPN shoot to any new kube-apiserver instance must be set dynamically.
Both tasks are managed by the tunnel-controller running in each VPN shoot client.
It listens for UDP6 packets sent periodically from the path-controller running in the kube-apiserver pods.
These UDP6 packets contain the IPv6 address of the bond device.
If the tunnel controller detects a new kube-apiserver this way, it creates a new tunnel device and route to it.

For general information about HA control-plane, see GEP-20.
4.41 - Secrets Management
Secrets Management for Seed and Shoot Cluster
The gardenlet needs to create quite some amount of credentials (certificates, private keys, passwords) for seed and shoot clusters in order to ensure secure deployments. Such credentials typically should be renewed automatically when their validity expires, rotated regularly, and they potentially need to be persisted such that they don’t get lost in case of a control plane migration or a lost seed cluster.
SecretsManager Introduction
These requirements can be covered by using the SecretsManager package maintained in pkg/utils/secrets/manager.
It is built on top of the ConfigInterface and DataInterface interfaces part of pkg/utils/secrets and provides the following functions:
Generate(context.Context, secrets.ConfigInterface, ...GenerateOption) (*corev1.Secret, error)This method either retrieves the current secret for the given configuration or it (re)generates it in case the configuration changed, the signing CA changed (for certificate secrets), or when proactive rotation was triggered. If the configuration describes a certificate authority secret then this method automatically generates a bundle secret containing the current and potentially the old certificate. Available
GenerateOptions:SignedByCA(string, ...SignedByCAOption): This is only valid for certificate secrets and automatically retrieves the correct certificate authority in order to sign the provided server or client certificate.- There are two
SignedByCAOptions:UseCurrentCA. This option will sign server certificates with the new/current CA in case of a CA rotation. For more information, please refer to the “Certificate Signing” section below.UseOldCA. This option will sign client certificates with the old CA in case of a CA rotation. For more information, please refer to the “Certificate Signing” section below.
- There are two
Persist(): This marks the secret such that it gets persisted in theShootStateresource in the garden cluster. Consequently, it should only be used for secrets related to a shoot cluster.Rotate(rotationStrategy): This specifies the strategy in case this secret is to be rotated or regenerated (eitherInPlacewhich immediately forgets about the old secret, orKeepOldwhich keeps the old secret in the system).IgnoreOldSecrets(): This specifies that old secrets should not be considered and loaded (contrary to the default behavior). It should be used when old secrets are no longer important and can be “forgotten” (e.g. in “phase 2” (t2) of the CA certificate rotation). Such old secrets will be deleted onCleanup().IgnoreOldSecretsAfter(time.Duration): This specifies that old secrets should not be considered and loaded once a given duration after rotation has passed. It can be used to clean up old secrets after automatic rotation (e.g. the Seed cluster CA is automatically rotated when its validity will soon end and the old CA will be cleaned up 24 hours after triggering the rotation).Validity(time.Duration): This specifies how long the secret should be valid. For certificate secret configurations, the manager will automatically deduce this information from the generated certificate.RenewAfterValidityPercentage(int): This specifies the percentage of validity for renewal. The secret will be renewed based on whichever comes first: The specified percentage of validity or 10 days before end of validity. If not specified, the default percentage is80.
Get(string, ...GetOption) (*corev1.Secret, bool)This method retrieves the current secret for the given name. In case the secret in question is a certificate authority secret then it retrieves the bundle secret by default. It is important that this method only knows about secrets for which there were prior
Generatecalls. AvailableGetOptions:Bundle(default): This retrieves the bundle secret.Current: This retrieves the current secret.Old: This retrieves the old secret.
Cleanup(context.Context) errorThis method deletes secrets which are no longer required. No longer required secrets are those still existing in the system which weren’t detected by prior
Generatecalls. Consequently, only callCleanupafter you have executedGeneratecalls for all desired secrets.
Some exemplary usages would look as follows:
secret, err := k.secretsManager.Generate(
ctx,
&secrets.CertificateSecretConfig{
Name: "my-server-secret",
CommonName: "server-abc",
DNSNames: []string{"first-name", "second-name"},
CertType: secrets.ServerCert,
SkipPublishingCACertificate: true,
},
secretsmanager.SignedByCA("my-ca"),
secretsmanager.Persist(),
secretsmanager.Rotate(secretsmanager.InPlace),
)
if err != nil {
return err
}
As explained above, the caller does not need to care about the renewal, rotation or the persistence of this secret - all of these concerns are handled by the secrets manager.
Automatic renewal of secrets happens when their validity approaches 80% or less than 10d are left until expiration.
In case a CA certificate is needed by some component, then it can be retrieved as follows:
caSecret, found := k.secretsManager.Get("my-ca")
if !found {
return fmt.Errorf("secret my-ca not found")
}
As explained above, this returns the bundle secret for the CA my-ca which might potentially contain both the current and the old CA (in case of rotation/regeneration).
Certificate Signing
Default Behaviour
By default, client certificates are signed by the current CA while server certificate are signed by the old CA (if it exists). This is to ensure a smooth exchange of certificate during a CA rotation (typically has two phases, ref GEP-18):
- Client certificates:
- In phase 1, clients get new certificates as soon as possible to ensure that all clients have been adapted before phase 2.
- In phase 2, the respective server drops accepting certificates signed by the old CA.
- Server certificates:
- In phase 1, servers still use their old/existing certificates to allow clients to update their CA bundle used for verification of the servers’ certificates.
- In phase 2, the old CA is dropped, hence servers need to get a certificate signed by the new/current CA. At this point in time, clients have already adapted their CA bundles.
Alternative: Sign Server Certificates with Current CA
In case you control all clients and update them at the same time as the server, it is possible to make the secrets manager generate even server certificates with the new/current CA. This can help to prevent certificate mismatches when the CA bundle is already exchanged while the server still serves with a certificate signed by a CA no longer part of the bundle.
Let’s consider the two following examples:
gardenletdeploys a webhook server (gardener-resource-manager) and a correspondingMutatingWebhookConfigurationat the same time. In this case, the server certificate should be generated with the new/current CA to avoid above mentioned certificate mismatches during a CA rotation.gardenletdeploys a server (etcd) in one step, and a client (kube-apiserver) in a subsequent step. In this case, the default behaviour should apply (server certificate should be signed by old/existing CA).
Alternative: Sign Client Certificate with Old CA
In the unusual case where the client is deployed before the server, it might be useful to always use the old CA for signing the client’s certificate. This can help to prevent certificate mismatches when the client already gets a new certificate while the server still only accepts certificates signed by the old CA.
Let’s consider the two following examples:
gardenletdeploys thekube-apiserverbefore thekubelet. However, thekube-apiserverhas a client certificate signed by theca-kubeletin order to communicate with it (e.g., when retrieving logs or forwarding ports). In this case, the client certificate should be generated with the old CA to avoid above mentioned certificate mismatches during a CA rotation.gardenletdeploys a server (etcd) in one step, and a client (kube-apiserver) in a subsequent step. In this case, the default behaviour should apply (client certificate should be signed by new/current CA).
Reusing the SecretsManager in Other Components
While the SecretsManager is primarily used by gardenlet, it can be reused by other components (e.g. extensions) as well for managing secrets that are specific to the component or extension. For example, provider extensions might use their own SecretsManager instance for managing the serving certificate of cloud-controller-manager.
External components that want to reuse the SecretsManager should consider the following aspects:
- On initialization of a
SecretsManager, pass anidentityspecific to the component and controller. For example, gardenlet’s shoot controller usesgardenletas theSecretsManager’s identity, theWorkercontroller inprovider-fooshould useprovider-foo-worker, and theControlPlanecontroller should useprovider-foo-controlplaneforControlPlaneobjects. The given identity is added as a value for themanager-identitylabel on managedSecrets. This label is used by theCleanupfunction to select only thoseSecrets that are actually managed by the particularSecretManagerinstance. This is done to prevent removing still neededSecrets that are managed by other instances. - Generate dedicated CAs for signing certificates instead of depending on CAs managed by gardenlet.
- Names of
Secrets managed by externalSecretsManagerinstances must not conflict withSecretnames from other instances (e.g. gardenlet). - For CAs that should be rotated in lock-step with the Shoot CAs managed by gardenlet, components need to pass information about the last rotation initiation time and the current rotation phase to the
SecretsManagerupon initialization. The relevant information can be retrieved from theClusterresource under.spec.shoot.status.credentials.rotation.certificateAuthorities. - Independent of the specific identity, secrets marked with the
Persistoption are automatically saved in theShootStateresource by the gardenlet and are also restored by the gardenlet on Control Plane Migration to the new Seed.
Migrating Existing Secrets To SecretsManager
If you already have existing secrets which were not created with SecretsManager, then you can (optionally) migrate them by labeling them with secrets-manager-use-data-for-name=<config-name>.
For example, if your SecretsManager generates a CertificateConfigSecret with name foo like this
secret, err := k.secretsManager.Generate(
ctx,
&secrets.CertificateSecretConfig{
Name: "foo",
// ...
},
)
and you already have an existing secret in your system whose data should be kept instead of regenerated, then labeling it with secrets-manager-use-data-for-name=foo will instruct SecretsManager accordingly.
⚠️ Caveat: You have to make sure that the existing data keys match with what SecretsManager uses:
| Secret Type | Data Keys |
|---|---|
| Basic Auth | username, password, auth |
| CA Certificate | ca.crt, ca.key |
| Non-CA Certificate | tls.crt, tls.key |
| Control Plane Secret | ca.crt, username, password, token, kubeconfig |
| ETCD Encryption Key | key, secret |
| Kubeconfig | kubeconfig |
| RSA Private Key | id_rsa, id_rsa.pub |
| Static Token | static_tokens.csv |
| VPN TLS Auth | vpn.tlsauth |
Implementation Details
The source of truth for the secrets manager is the list of Secrets in the Kubernetes cluster it acts upon (typically, the seed cluster).
The persisted secrets in the ShootState are only used if and only if the shoot is in the Restore phase - in this case all secrets are just synced to the seed cluster so that they can be picked up by the secrets manager.
In order to prevent kubelets from unneeded watches (thus, causing some significant traffic against the kube-apiserver), the Secrets are marked as immutable.
Consequently, they have a unique, deterministic name which is computed as follows:
- For CA secrets, the name is just exactly the name specified in the configuration (e.g.,
ca). This is for backwards-compatibility and will be dropped in a future release once all components depending on the static name have been adapted. - For all other secrets, the name specified in the configuration is used as prefix followed by an 8-digit hash. This hash is computed out of the checksum of the secret configuration and the checksum of the certificate of the signing CA (only for certificate configurations).
In all cases, the name of the secrets is suffixed with a 5-digit hash computed out of the time when the rotation for this secret was last started.
4.42 - Seed Bootstrapping
Seed Bootstrapping
Whenever the gardenlet is responsible for a new Seed resource its “seed controller” is being activated.
One part of this controller’s reconciliation logic is deploying certain components into the garden namespace of the seed cluster itself.
These components are required to spawn and manage control planes for shoot clusters later on.
This document is providing an overview which actions are performed during this bootstrapping phase, and it explains the rationale behind them.
Dependency Watchdog
The dependency watchdog (abbreviation: DWD) is a component developed separately in the gardener/dependency-watchdog GitHub repository. Gardener is using it for two purposes:
- Prevention of melt-down situations when the load balancer used to expose the kube-apiserver of shoot clusters goes down while the kube-apiserver itself is still up and running.
- Fast recovery times for crash-looping pods when depending pods are again available.
For the sake of separating these concerns, two instances of the DWD are deployed by the seed controller.
Prober
The dependency-watchdog-prober deployment is responsible for above-mentioned first point.
The kube-apiserver of shoot clusters is exposed via a load balancer, usually with an attached public IP, which serves as the main entry point when it comes to interaction with the shoot cluster (e.g., via kubectl).
While end-users are talking to their clusters via this load balancer, other control plane components like the kube-controller-manager or kube-scheduler run in the same namespace/same cluster, so they can communicate via the in-cluster Service directly instead of using the detour with the load balancer.
However, the worker nodes of shoot clusters run in isolated, distinct networks.
This means that the kubelets and kube-proxys also have to talk to the control plane via the load balancer.
The kube-controller-manager has a special control loop called nodelifecycle which will set the status of Nodes to NotReady in case the kubelet stops to regularly renew its lease/to send its heartbeat.
This will trigger other self-healing capabilities of Kubernetes, for example, the eviction of pods from such “unready” nodes to healthy nodes.
Similarly, the cloud-controller-manager has a control loop that will disconnect load balancers from “unready” nodes, i.e., such workload would no longer be accessible until moved to a healthy node.
Furthermore, the machine-controller-manager removes “unready” nodes after health-timeout (default 10min).
While these are awesome Kubernetes features on their own, they have a dangerous drawback when applied in the context of Gardener’s architecture:
When the kube-apiserver load balancer fails for whatever reason, then the kubelets can’t talk to the kube-apiserver to renew their lease anymore.
After a minute or so the kube-controller-manager will get the impression that all nodes have died and will mark them as NotReady.
This will trigger above mentioned eviction as well as detachment of load balancers.
As a result, the customer’s workload will go down and become unreachable.
This is exactly the situation that the DWD prevents:
It regularly tries to talk to the kube-apiservers of the shoot clusters, once by using their load balancer, and once by talking via the in-cluster Service.
If it detects that the kube-apiserver is reachable internally but not externally, it scales down machine-controller-manager, cluster-autoscaler (if enabled) and kube-controller-manager to 0.
This will prevent it from marking the shoot worker nodes as “unready”. This will also prevent the machine-controller-manager from deleting potentially healthy nodes.
As soon as the kube-apiserver is reachable externally again, kube-controller-manager, machine-controller-manager and cluster-autoscaler are restored to the state prior to scale-down.
Weeder
The dependency-watchdog-weeder deployment is responsible for above mentioned second point.
Kubernetes is restarting failing pods with an exponentially increasing backoff time. While this is a great strategy to prevent system overloads, it has the disadvantage that the delay between restarts is increasing up to multiple minutes very fast.
In the Gardener context, we are deploying many components that are depending on other components.
For example, the kube-apiserver is depending on a running etcd, or the kube-controller-manager and kube-scheduler are depending on a running kube-apiserver.
In case such a “higher-level” component fails for whatever reason, the dependent pods will fail and end-up in crash-loops.
As Kubernetes does not know anything about these hierarchies, it won’t recognize that such pods can be restarted faster as soon as their dependents are up and running again.
This is exactly the situation in which the DWD will become active:
If it detects that a certain Service is available again (e.g., after the etcd was temporarily down while being moved to another seed node), then DWD will restart all crash-looping dependant pods.
These dependant pods are detected via a pre-configured label selector.
As of today, the DWD is configured to restart a crash-looping kube-apiserver after etcd became available again, or any pod depending on the kube-apiserver that has a gardener.cloud/role=controlplane label (e.g., kube-controller-manager, kube-scheduler).
4.43 - Seed Settings
Settings for Seeds
The Seed resource offers a few settings that are used to control the behaviour of certain Gardener components.
This document provides an overview over the available settings:
Dependency Watchdog
Gardenlet can deploy two instances of the dependency-watchdog into the garden namespace of the seed cluster.
One instance only activates the weeder while the second instance only activates the prober.
Weeder
The weeder helps to alleviate the delay where control plane components remain unavailable by finding the respective pods in CrashLoopBackoff status and restarting them once their dependents become ready and available again.
For example, if etcd goes down then also kube-apiserver goes down (and into a CrashLoopBackoff state). If etcd comes up again then (without the endpoint controller) it might take some time until kube-apiserver gets restarted as well.
⚠️ .spec.settings.dependencyWatchdog.endpoint.enabled is deprecated and will be removed in a future version of Gardener. Use .spec.settings.dependencyWatchdog.weeder.enabled instead.
It can be enabled/disabled via the .spec.settings.dependencyWatchdog.endpoint.enabled field.
It defaults to true.
Prober
The probe controller scales down the kube-controller-manager of shoot clusters in case their respective kube-apiserver is not reachable via its external ingress.
This is in order to avoid melt-down situations, since the kube-controller-manager uses in-cluster communication when talking to the kube-apiserver, i.e., it wouldn’t be affected if the external access to the kube-apiserver is interrupted for whatever reason.
The kubelets on the shoot worker nodes, however, would indeed be affected since they typically run in different networks and use the external ingress when talking to the kube-apiserver.
Hence, without scaling down kube-controller-manager, the nodes might be marked as NotReady and eventually replaced (since the kubelets cannot report their status anymore).
To prevent such unnecessary turbulence, kube-controller-manager is being scaled down until the external ingress becomes available again. In addition, as a precautionary measure, machine-controller-manager is also scaled down, along with cluster-autoscaler which depends on machine-controller-manager.
⚠️ .spec.settings.dependencyWatchdog.probe.enabled is deprecated and will be removed in a future version of Gardener. Use .spec.settings.dependencyWatchdog.prober.enabled instead.
It can be enabled/disabled via the .spec.settings.dependencyWatchdog.probe.enabled field.
It defaults to true.
Reserve Excess Capacity
If the excess capacity reservation is enabled, then the gardenlet will deploy a special Deployment into the garden namespace of the seed cluster.
This Deployment’s pod template has only one container, the pause container, which simply runs in an infinite loop.
The priority of the deployment is very low, so any other pod will preempt these pause pods.
This is especially useful if new shoot control planes are created in the seed.
In case the seed cluster runs at its capacity, then there is no waiting time required during the scale-up.
Instead, the low-priority pause pods will be preempted and allow newly created shoot control plane pods to be scheduled fast.
In the meantime, the cluster-autoscaler will trigger the scale-up because the preempted pause pods want to run again.
However, this delay doesn’t affect the important shoot control plane pods, which will improve the user experience.
Use .spec.settings.excessCapacityReservation.configs to create excess capacity reservation deployments which allow to specify custom values for resources, nodeSelector and tolerations. Each config creates a deployment with a minimum number of 2 replicas and a maximum equal to the number of zones configured for this seed.
It defaults to a config reserving 2 CPUs and 6Gi of memory for each pod with no nodeSelector and no tolerations.
Excess capacity reservation is enabled when .spec.settings.excessCapacityReservation.enabled is true or not specified while configs are present. It can be disabled by setting the field to false.
Scheduling
By default, the Gardener Scheduler will consider all seed clusters when a new shoot cluster shall be created.
However, administrators/operators might want to exclude some of them from being considered by the scheduler.
Therefore, seed clusters can be marked as “invisible”.
In this case, the scheduler simply ignores them as if they wouldn’t exist.
Shoots can still use the invisible seed but only by explicitly specifying the name in their .spec.seedName field.
Seed clusters can be marked visible/invisible via the .spec.settings.scheduling.visible field.
It defaults to true.
ℹ️ In previous Gardener versions (< 1.5) these settings were controlled via taint keys (seed.gardener.cloud/{disable-capacity-reservation,invisible}).
The taint keys are no longer supported and removed in version 1.12.
The rationale behind it is the implementation of tolerations similar to Kubernetes tolerations.
More information about it can be found in #2193.
Load Balancer Services
Gardener creates certain Kubernetes Service objects of type LoadBalancer in the seed cluster.
Most prominently, they are used for exposing the shoot control planes, namely the kube-apiserver of the shoot clusters.
In most cases, the cloud-controller-manager (responsible for managing these load balancers on the respective underlying infrastructure) supports certain customization and settings via annotations.
This document provides a good overview and many examples.
By setting the .spec.settings.loadBalancerServices.annotations field the Gardener administrator can specify a list of annotations, which will be injected into the Services of type LoadBalancer.
External Traffic Policy
Setting the external traffic policy to Local can be beneficial as it
preserves the source IP address of client requests. In addition to that, it removes one hop in the data path and hence reduces request latency. On some cloud infrastructures, it can furthermore be
used in conjunction with Service annotations as described above to prevent cross-zonal traffic from the load balancer to the backend pod.
The default external traffic policy is Cluster, meaning that all traffic from the load balancer will be sent to any cluster node, which then itself will redirect the traffic to the actual receiving pod.
This approach adds a node to the data path, may cross the zone boundaries twice, and replaces the source IP with one of the cluster nodes.
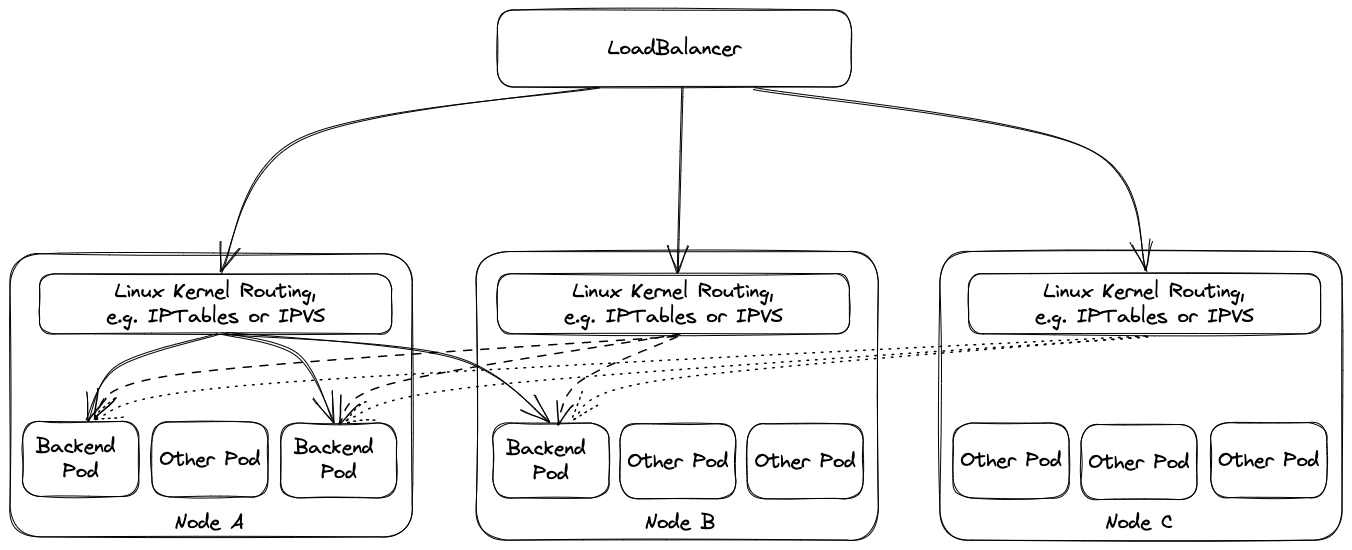
Using external traffic policy Local drops the additional node, i.e., only cluster nodes with corresponding backend pods will be in the list of backends of the load balancer. However, this has multiple implications.
The health check port in this scenario is exposed by kube-proxy , i.e., if kube-proxy is not working on a node a corresponding pod on the node will not receive traffic from
the load balancer as the load balancer will see a failing health check. (This is quite different from ordinary service routing where kube-proxy is only responsible for setup, but does not need to
run for its operation.) Furthermore, load balancing may become imbalanced if multiple pods run on the same node because load balancers will split the load equally among the nodes and not among the pods. This is mitigated by corresponding node anti affinities.
Operators need to take these implications into account when considering switching external traffic policy to Local.
Proxy Protocol
Traditionally, the client IP address can be used for security filtering measures, e.g. IP allow listing. However, for this to have any usefulness, the client IP address needs to be correctly transferred to the filtering entity.
Load balancers can either act transparently and simply pass the client IP on, or they terminate one connection and forward data on a new connection. The latter (intransparant) approach requires a separate way to propagate the client IP address. Common approaches are an HTTP header for TLS terminating load balancers or (HA) proxy protocol.
For level 3 load balancers, (HA) proxy protocol is the default way to preserve client IP addresses. As it prepends a small proxy protocol header before the actual workload data, the receiving server needs to be aware of it and handle it properly. This means that activating proxy protocol needs to happen on both load balancer and receiving server at/around the same time, as otherwise the receiving server will incorrectly interpret data as workload/proxy protocol header.
For disruption-free migration to proxy protocol, set .spec.settings.loadBalancerServices.proxyProtocol.allow to true. The migration path should be to enable the option and shortly thereafter also enable proxy protocol on the load balancer with infrastructure-specific means, e.g. a corresponding load balancer annotation.
When switching back from use of proxy protocol to no use of it, use the inverse order, i.e. disable proxy protocol first on the load balancer before disabling .spec.settings.loadBalancerServices.proxyProtocol.allow.
Zone-Specific Settings
In case a seed cluster is configured to use multiple zones via .spec.provider.zones, it may be necessary to configure the load balancers in individual zones in different way, e.g., by utilizing
different annotations. One reason may be to reduce cross-zonal traffic and have zone-specific load balancers in place. Zone-specific load balancers may then be bound to zone-specific subnets or
availability zones in the cloud infrastructure.
Besides the load balancer annotations, it is also possible to set proxy protocol termination and the external traffic policy for each zone-specific load balancer individually.
Vertical Pod Autoscaler
Gardener heavily relies on the Kubernetes vertical-pod-autoscaler component.
By default, the seed controller deploys the VPA components into the garden namespace of the respective seed clusters.
In case you want to manage the VPA deployment on your own or have a custom one, then you might want to disable the automatic deployment of Gardener.
Otherwise, you might end up with two VPAs, which will cause erratic behaviour.
By setting the .spec.settings.verticalPodAutoscaler.enabled=false, you can disable the automatic deployment.
⚠️ In any case, there must be a VPA available for your seed cluster. Using a seed without VPA is not supported.
VPA Pitfall: Excessive Resource Requests Making Pod Unschedulable
VPA is unaware of node capacity, and can increase the resource requests of a pod beyond the capacity of any single node.
Such pod is likely to become permanently unschedulable. That problem can be partly mitigated by using the
VerticalPodAutoscaler.Spec.ResourcePolicy.ContainerPolicies[].MaxAllowed field to constrain pod resource requests to
the level of nodes’ allocatable resources. The downside is that a pod constrained in such fashion would be using more
resources than it has requested, and can starve for resources and/or negatively impact neighbour pods with which it is
sharing a node.
As an alternative, in scenarios where MaxAllowed is not set, it is important to maintain a worker pool which can accommodate the highest level of resources that VPA would actually request for the pods it controls.
Finally, the optimal strategy typically is to both ensure large enough worker pools, and, as an insurance, use MaxAllowed aligned with the allocatable resources of the largest worker.
Topology-Aware Traffic Routing
Refer to the Topology-Aware Traffic Routing documentation as this document contains the documentation for the topology-aware routing Seed setting.
4.44 - Testing
Testing Strategy and Developer Guideline
This document walks you through:
- What kind of tests we have in Gardener
- How to run each of them
- What purpose each kind of test serves
- How to best write tests that are correct, stable, fast and maintainable
- How to debug tests that are not working as expected
The document is aimed towards developers that want to contribute code and need to write tests, as well as maintainers and reviewers that review test code. It serves as a common guide that we commit to follow in our project to ensure consistency in our tests, good coverage for high confidence, and good maintainability.
The guidelines are not meant to be absolute rules. Always apply common sense and adapt the guideline if it doesn’t make much sense for some cases. If in doubt, don’t hesitate to ask questions during a PR review (as an author, but also as a reviewer). Add new learnings as soon as we make them!
Generally speaking, tests are a strict requirement for contributing new code. If you touch code that is currently untested, you need to add tests for the new cases that you introduce as a minimum. Ideally though, you would add the missing test cases for the current code as well (boy scout rule – “always leave the campground cleaner than you found it”).
Writing Tests (Relevant for All Kinds)
- We follow BDD (behavior-driven development) testing principles and use Ginkgo, along with Gomega.
- Make sure to check out their extensive guides for more information and how to best leverage all of their features
- Use
Byto structure test cases with multiple steps, so that steps are easy to follow in the logs: example test - Call
defer GinkgoRecover()if making assertions in goroutines: doc, example test - Use
DeferCleanupinstead of cleaning up manually (or use custom coding from the test framework): example test, example testDeferCleanupmakes sure to run the cleanup code in the right point in time, e.g., aDeferCleanupadded inBeforeEachis executed withAfterEach.
- Test results should point to locations that cause the failures, so that the CI output isn’t too difficult to debug/fix.
- Consider using
ExpectWithOffsetif the test uses assertions made in a helper function, among other assertions defined directly in the test (e.g.expectSomethingWasCreated): example test - Make sure to add additional descriptions to Gomega matchers if necessary (e.g. in a loop): example test
- Consider using
- Introduce helper functions for assertions to make test more readable where applicable: example test
- Keep test code and output readable:
- Introduce custom matchers where applicable: example matcher
- Prevent gstruct matchers on larger object list: example test. The failure output is often truncated and unclear.
- Don’t rely on accurate timing of
time.Sleepand friends.- If doing so, CPU throttling in CI will make tests flaky, example flake
- Use fake clocks instead, example PR
- Use the same client schemes that are also used by production code to avoid subtle bugs/regressions: example PR, production schemes, usage in test
- Make sure that your test is actually asserting the right thing and it doesn’t pass if the exact bug is introduced that you want to prevent.
- Use specific error matchers instead of asserting any error has happened, make sure that the corresponding branch in the code is tested, e.g., preferover
Expect(err).To(MatchError("foo"))Expect(err).To(HaveOccurred()) - If you’re unsure about your test’s behavior, attaching the debugger can sometimes be helpful to make sure your test is correct.
- Use specific error matchers instead of asserting any error has happened, make sure that the corresponding branch in the code is tested, e.g., prefer
- About overwriting global variables:
- This is a common pattern (or hack?) in go for faking calls to external functions.
- However, this can lead to races, when the global variable is used from a goroutine (e.g., the function is called).
- Alternatively, set fields on structs (passed via parameter or set directly): this is not racy, as struct values are typically (and should be) only used for a single test case.
- An alternative to dealing with function variables and fields:
- Add an interface which your code depends on
- Write a fake and a real implementation (similar to
clock.Clock.Sleep) - The real implementation calls the actual function (
clock.RealClock.Sleepcallstime.Sleep) - The fake implementation does whatever you want it to do for your test (
clock.FakeClock.Sleepwaits until the test code advanced the time)
- Use constants in test code with care.
- Typically, you should not use constants from the same package as the tested code, instead use literals.
- If the constant value is changed, tests using the constant will still pass, although the “specification” is not fulfilled anymore.
- There are cases where it’s fine to use constants, but keep this caveat in mind when doing so.
- Creating sample data for tests can be a high effort.
- If valuable, add a package for generating common sample data, e.g. Shoot/Cluster objects.
- Make use of the
testdatadirectory for storing arbitrary sample data needed by tests (helm charts, YAML manifests, etc.), example PR- From https://pkg.go.dev/cmd/go/internal/test:
The go tool will ignore a directory named “testdata”, making it available to hold ancillary data needed by the tests.
- From https://pkg.go.dev/cmd/go/internal/test:
Unit Tests
Running Unit Tests
Run all unit tests:
make test
Run all unit tests with test coverage:
make test-cov
open test.coverage.html
make test-cov-clean
Run unit tests of specific packages:
# run with same settings like in CI (race detector, timeout, ...)
./hack/test.sh ./pkg/resourcemanager/controller/... ./pkg/utils/secrets/...
# freestyle
go test ./pkg/resourcemanager/controller/... ./pkg/utils/secrets/...
ginkgo run ./pkg/resourcemanager/controller/... ./pkg/utils/secrets/...
Debugging Unit Tests
Use ginkgo to focus on (a set of) test specs via code or via CLI flags. Remember to unfocus specs before contributing code, otherwise your PR tests will fail.
$ ginkgo run --focus "should delete the unused resources" ./pkg/resourcemanager/controller/garbagecollector
...
Will run 1 of 3 specs
SS•
Ran 1 of 3 Specs in 0.003 seconds
SUCCESS! -- 1 Passed | 0 Failed | 0 Pending | 2 Skipped
PASS
Use ginkgo to run tests until they fail:
$ ginkgo run --until-it-fails ./pkg/resourcemanager/controller/garbagecollector
...
Ran 3 of 3 Specs in 0.004 seconds
SUCCESS! -- 3 Passed | 0 Failed | 0 Pending | 0 Skipped
PASS
All tests passed...
Will keep running them until they fail.
This was attempt #58
No, seriously... you can probably stop now.
Use the stress tool for deflaking tests that fail sporadically in CI, e.g., due resource contention (CPU throttling):
# get the stress tool
go install golang.org/x/tools/cmd/stress@latest
# build a test binary
ginkgo build ./pkg/resourcemanager/controller/garbagecollector
# alternatively
go test -c ./pkg/resourcemanager/controller/garbagecollector
# run the test in parallel and report any failures
stress -p 16 ./pkg/resourcemanager/controller/garbagecollector/garbagecollector.test -ginkgo.focus "should delete the unused resources"
5s: 1077 runs so far, 0 failures
10s: 2160 runs so far, 0 failures
stress will output a path to a file containing the full failure message when a test run fails.
Purpose of Unit Tests
- Unit tests prove the correctness of a single unit according to the specification of its interface.
- Think: Is the unit that I introduced doing what it is supposed to do for all cases?
- Unit tests protect against regressions caused by adding new functionality to or refactoring of a single unit.
- Think: Is the unit that was introduced earlier (by someone else) and that I changed still doing what it was supposed to do for all cases?
- Example units: functions (conversion, defaulting, validation, helpers), structs (helpers, basic building blocks like the Secrets Manager), predicates, event handlers.
- For these purposes, unit tests need to cover all important cases of input for a single unit and cover edge cases / negative paths as well (e.g., errors).
- Because of the possible high dimensionality of test input, unit tests need to be fast to execute: individual test cases should not take more than a few seconds, test suites not more than 2 minutes.
- Fuzzing can be used as a technique in addition to usual test cases for covering edge cases.
- Test coverage can be used as a tool during test development for covering all cases of a unit.
- However, test coverage data can be a false safety net.
- Full line coverage doesn’t mean you have covered all cases of valid input.
- We don’t have strict requirements for test coverage, as it doesn’t necessarily yield the desired outcome.
- Unit tests should not test too large components, e.g. entire controller
Reconcilefunctions.- If a function/component does many steps, it’s probably better to split it up into multiple functions/components that can be unit tested individually
- There might be special cases for very small
Reconcilefunctions. - If there are a lot of edge cases, extract dedicated functions that cover them and use unit tests to test them.
- Usual-sized controllers should rather be tested in integration tests.
- Individual parts (e.g. helper functions) should still be tested in unit test for covering all cases, though.
- Unit tests are especially easy to run with a debugger and can help in understanding concrete behavior of components.
Writing Unit Tests
- For the sake of execution speed, fake expensive calls/operations, e.g. secret generation: example test
- Generally, prefer fakes over mocks, e.g., use controller-runtime fake client over mock clients.
- Mocks decrease maintainability because they expect the tested component to follow a certain way to reach the desired goal (e.g., call specific functions with particular arguments), example consequence
- Generally, fakes should be used in “result-oriented” test code (e.g., that a certain object was labelled, but the test doesn’t care if it was via patch or update as both a valid ways to reach the desired goal).
- Although rare, there are valid use cases for mocks, e.g. if the following aspects are important for correctness:
- Asserting that an exact function is called
- Asserting that functions are called in a specific order
- Asserting that exact parameters/values/… are passed
- Asserting that a certain function was not called
- Many of these can also be verified with fakes, although mocks might be simpler
- Only use mocks if the tested code directly calls the mock; never if the tested code only calls the mock indirectly (e.g., through a helper package/function).
- Keep in mind the maintenance implications of using mocks:
- Can you make a valid non-behavioral change in the code without breaking the test or dependent tests?
- It’s valid to mix fakes and mocks in the same test or between test cases.
- When using mocks, prefer
ReturnoverDoAndReturnwhenever possible, e.g., prefer:overc.EXPECT().Get(ctx, client.ObjectKey{Namespace: namespace, Name: name}, gomock.AssignableToTypeOf(&corev1.Secret{})).Return(apierrors.NewNotFound(corev1.Resource("secret"), name))c.EXPECT().Get(ctx, client.ObjectKey{Namespace: namespace, Name: name}, gomock.AssignableToTypeOf(&corev1.Secret{})).DoAndReturn( func(_ context.Context, _ client.ObjectKey, _obj_ *corev1.Secret, _ ...client.GetOption) error { return apierrors.NewNotFound(corev1.Resource("secret"), name) }, ) - When using mocks, prefer
SetArgsoverDoAndReturnwhenever possible, e.g., prefer:overc.EXPECT().Get(ctx, client.ObjectKey{Namespace: namespace, Name: name}, gomock.AssignableToTypeOf(&corev1.Secret{})).SetArg(2, *secret).Return(nil)c.EXPECT().Get(ctx, client.ObjectKey{Namespace: namespace, Name: name}, gomock.AssignableToTypeOf(&corev1.Secret{})).DoAndReturn( func(_ context.Context, _ client.ObjectKey, s *corev1.Secret, _ ...client.GetOption) error { *s = *secret return nil }, ) - Generally, use the go test package, i.e., declare
package <production_package>_test:- Helps in avoiding cyclic dependencies between production, test and helper packages
- Also forces you to distinguish between the public (exported) API surface of your code and internal state that might not be of interest to tests
- It might be valid to use the same package as the tested code if you want to test unexported functions.
- Alternatively, an
internalpackage can be used to host “internal” helpers: example package
- Alternatively, an
- Helpers can also be exported if no one is supposed to import the containing package (e.g. controller package).
Integration Tests (envtests)
Integration tests in Gardener use the sigs.k8s.io/controller-runtime/pkg/envtest package.
It sets up a temporary control plane (etcd + kube-apiserver) and runs the test against it.
The test suites start their individual envtest environment before running the tested controller/webhook and executing test cases.
Before exiting, the test suites tear down the temporary test environment.
Package github.com/gardener/gardener/test/envtest augments the controller-runtime’s envtest package by starting and registering gardener-apiserver.
This is used to test controllers that act on resources in the Gardener APIs (aggregated APIs).
Historically, test machinery tests have also been called “integration tests”. However, test machinery does not perform integration testing but rather executes a form of end-to-end tests against a real landscape. Hence, we tried to sharpen the terminology that we use to distinguish between “real” integration tests and test machinery tests but you might still find “integration tests” referring to test machinery tests in old issues or outdated documents.
Running Integration Tests
The test-integration make rule prepares the environment automatically by downloading the respective binaries (if not yet present) and setting the necessary environment variables.
make test-integration
If you want to run a specific set of integration tests, you can also execute them using ./hack/test-integration.sh directly instead of using the test-integration rule. Prior to execution, the PATH environment variable needs to be set to also included the tools binary directory. For example:
export PATH="$PWD/hack/tools/bin/$(go env GOOS)-$(go env GOARCH):$PATH"
source ./hack/test-integration.env
./hack/test-integration.sh ./test/integration/resourcemanager/tokenrequestor
The script takes care of preparing the environment for you.
If you want to execute the test suites directly via go test or ginkgo, you have to point the KUBEBUILDER_ASSETS environment variable to the path that contains the etcd and kube-apiserver binaries. Alternatively, you can install the binaries to /usr/local/kubebuilder/bin. Additionally, the environment variables from hack/test-integration.env should be sourced.
Debugging Integration Tests
You can configure envtest to use an existing cluster or control plane instead of starting a temporary control plane that is torn down immediately after executing the test.
This can be helpful for debugging integration tests because you can easily inspect what is going on in your test environment with kubectl.
While you can use an existing cluster (e.g., kind), some test suites expect that no controllers and no nodes are running in the test environment (as it is the case in envtest test environments).
Hence, using a full-blown cluster with controllers and nodes might sometimes be impractical, as you would need to stop cluster components for the tests to work.
You can use make start-envtest to start an envtest test environment that is managed separately from individual test suites.
This allows you to keep the test environment running for as long as you want, and to debug integration tests by executing multiple test runs in parallel or inspecting test runs using kubectl.
When you are finished, just hit CTRL-C for tearing down the test environment.
The kubeconfig for the test environment is placed in dev/envtest-kubeconfig.yaml.
make start-envtest brings up an envtest environment using the default configuration.
If your test suite requires a different control plane configuration (e.g., disabled admission plugins or enabled feature gates), feel free to locally modify the configuration in test/start-envtest while debugging.
Run an envtest suite (not using gardener-apiserver) against an existing test environment:
make start-envtest
# in another terminal session:
export KUBECONFIG=$PWD/dev/envtest-kubeconfig.yaml
export USE_EXISTING_CLUSTER=true
# run test with verbose output
./hack/test-integration.sh -v ./test/integration/resourcemanager/health -ginkgo.v
# in another terminal session:
export KUBECONFIG=$PWD/dev/envtest-kubeconfig.yaml
# watch test objects
k get managedresource -A -w
Run a gardenerenvtest suite (using gardener-apiserver) against an existing test environment:
# modify GardenerTestEnvironment{} in test/start-envtest to disable admission plugins and enable feature gates like in test suite...
make start-envtest ENVTEST_TYPE=gardener
# in another terminal session:
export KUBECONFIG=$PWD/dev/envtest-kubeconfig.yaml
export USE_EXISTING_GARDENER=true
# run test with verbose output
./hack/test-integration.sh -v ./test/integration/controllermanager/bastion -ginkgo.v
# in another terminal session:
export KUBECONFIG=$PWD/dev/envtest-kubeconfig.yaml
# watch test objects
k get bastion -A -w
Similar to debugging unit tests, the stress tool can help hunting flakes in integration tests.
Though, you might need to run less tests in parallel though (specified via -p) and have a bit more patience.
Generally, reproducing flakes in integration tests is easier when stress-testing against an existing test environment instead of starting temporary individual control planes per test run.
Stress-test an envtest suite (not using gardener-apiserver):
# build a test binary
ginkgo build ./test/integration/resourcemanager/health
# prepare a test environment to run the test against
make start-envtest
# in another terminal session:
export KUBECONFIG=$PWD/dev/envtest-kubeconfig.yaml
export USE_EXISTING_CLUSTER=true
# use same timeout settings like in CI
source ./hack/test-integration.env
# switch to test package directory like `go test`
cd ./test/integration/resourcemanager/health
# run the test in parallel and report any failures
stress -ignore "unable to grab random port" -p 16 ./health.test
...
Stress-test a gardenerenvtest suite (using gardener-apiserver):
# modify test/start-envtest to disable admission plugins and enable feature gates like in test suite...
# build a test binary
ginkgo build ./test/integration/controllermanager/bastion
# prepare a test environment including gardener-apiserver to run the test against
make start-envtest ENVTEST_TYPE=gardener
# in another terminal session:
export KUBECONFIG=$PWD/dev/envtest-kubeconfig.yaml
export USE_EXISTING_GARDENER=true
# use same timeout settings like in CI
source ./hack/test-integration.env
# switch to test package directory like `go test`
cd ./test/integration/controllermanager/bastion
# run the test in parallel and report any failures
stress -ignore "unable to grab random port" -p 16 ./bastion.test
...
Purpose of Integration Tests
- Integration tests prove that multiple units are correctly integrated into a fully-functional component of the system.
- Example components with multiple units:
- A controller with its reconciler, watches, predicates, event handlers, queues, etc.
- A webhook with its server, handler, decoder, and webhook configuration.
- Integration tests set up a full component (including used libraries) and run it against a test environment close to the actual setup.
- e.g., start controllers against a real Kubernetes control plane to catch bugs that can only happen when talking to a real API server.
- Integration tests are generally more expensive to run (e.g., in terms of execution time).
- Integration tests should not cover each and every detailed case.
- Rather than that, cover a good portion of the “usual” cases that components will face during normal operation (positive and negative test cases).
- Also, there is no need to cover all failure cases or all cases of predicates -> they should be covered in unit tests already.
- Generally, not supposed to “generate test coverage” but to provide confidence that components work well.
- As integration tests typically test only one component (or a cohesive set of components) isolated from others, they cannot catch bugs that occur when multiple controllers interact (could be discovered by e2e tests, though).
- Rule of thumb: a new integration tests should be added for each new controller (an integration test doesn’t replace unit tests though).
Writing Integration Tests
- Make sure to have a clean test environment on both test suite and test case level:
- Set up dedicated test environments (envtest instances) per test suite.
- Use dedicated namespaces per test suite:
- Use
GenerateNamewith a test-specific prefix: example test - Restrict the controller-runtime manager to the test namespace by setting
manager.Options.Namespace: example test - Alternatively, use a test-specific prefix with a random suffix determined upfront: example test
- This can be used to restrict webhooks to a dedicated test namespace: example test
- This allows running a test in parallel against the same existing cluster for deflaking and stress testing: example PR
- Use
- If the controller works on cluster-scoped resources:
- Label the resources with a label specific to the test run, e.g. the test namespace’s name: example test
- Restrict the manager’s cache for these objects with a corresponding label selector: example test
- Alternatively, use a checksum of a random UUID using
uuid.NewUUID()function: example test - This allows running a test in parallel against the same existing cluster for deflaking and stress testing, even if it works with cluster-scoped resources that are visible to all parallel test runs: example PR
- Use dedicated test resources for each test case:
- Use
GenerateName: example test - Alternatively, use a checksum of a random UUID using
uuid.NewUUID()function: example test - Logging the created object names is generally a good idea to support debugging failing or flaky tests: example test
- Always delete all resources after the test case (e.g., via
DeferCleanup) that were created for the test case - This avoids conflicts between test cases and cascading failures which distract from the actual root failures
- Use
- Don’t tolerate already existing resources (~dirty test environment), code smell: ignoring already exist errors
- Don’t use a cached client in test code (e.g., the one from a controller-runtime manager), always construct a dedicated test client (uncached): example test
- When creating/updating an object with
runtime.RawExtensionfield against a real cluster (not fake or mocked client), pass the field definition in theRawfield of theruntime.RawExtension. TheObjectfield ofruntime.RawExtensiondoesn’t have a protobuf tag, and theRawfield does, which allows it to be serialized. - Use asynchronous assertions:
EventuallyandConsistently.- Never
Expectanything to happen synchronously (immediately). - Don’t use retry or wait until functions -> use
Eventually,Consistentlyinstead: example test - This allows to override the interval/timeout values from outside instead of hard-coding this in the test (see
hack/test-integration.sh): example PR - Beware of the default
Eventually/Consistentlytimeouts / poll intervals: docs - Don’t set custom (high) timeouts and intervals in test code: example PR
- iInstead, shorten sync period of controllers, overwrite intervals of the tested code, or use fake clocks: example test
- Pass
g GomegatoEventually/Consistentlyand useg.Expectin it: docs, example test, example PR - Don’t forget to call
{Eventually,Consistently}.Should(), otherwise the assertions always silently succeeds without errors: onsi/gomega#561
- Never
- When using Gardener’s envtest (
envtest.GardenerTestEnvironment):- Disable gardener-apiserver’s admission plugins that are not relevant to the integration test itself by passing
--disable-admission-plugins: example test - This makes setup / teardown code simpler and ensures to only test code relevant to the tested component itself (but not the entire set of admission plugins)
- e.g., you can disable the
ShootValidatorplugin to createShootsthat reference non-existingSecretBindingsor disable theDeletionConfirmationplugin to delete Gardener resources without adding a deletion confirmation first.
- Disable gardener-apiserver’s admission plugins that are not relevant to the integration test itself by passing
- Use a custom rate limiter for controllers in integration tests: example test
- This can be used for limiting exponential backoff to shorten wait times.
- Otherwise, if using the default rate limiter, exponential backoff might exceed the timeout of
Eventuallycalls and cause flakes.
End-to-End (e2e) Tests (Using provider-local)
We run a suite of e2e tests on every pull request and periodically on the master branch.
It uses a KinD cluster and skaffold to bootstrap a full installation of Gardener based on the current revision, including provider-local.
This allows us to run e2e tests in an isolated test environment and fully locally without any infrastructure interaction.
The tests perform a set of operations on Shoot clusters, e.g. creating, deleting, hibernating and waking up.
These tests are executed in our prow instance at prow.gardener.cloud, see job definition and job history.
Running e2e Tests
You can also run these tests on your development machine, using the following commands:
make kind-up
export KUBECONFIG=$PWD/example/gardener-local/kind/local/kubeconfig
make gardener-up
make test-e2e-local # alternatively: make test-e2e-local-simple
If you want to run a specific set of e2e test cases, you can also execute them using ./hack/test-e2e-local.sh directly in combination with ginkgo label filters. For example:
./hack/test-e2e-local.sh --label-filter "Shoot && credentials-rotation" ./test/e2e/gardener/...
If you want to use an existing shoot instead of creating a new one for the test case and deleting it afterwards, you can specify the existing shoot via the following flags. This can be useful to speed up the development of e2e tests.
./hack/test-e2e-local.sh --label-filter "Shoot && credentials-rotation" ./test/e2e/gardener/... -- --project-namespace=garden-local --existing-shoot-name=local
For more information, see Developing Gardener Locally and Deploying Gardener Locally.
Debugging e2e Tests
When debugging e2e test failures in CI, logs of the cluster components can be very helpful.
Our e2e test jobs export logs of all containers running in the kind cluster to prow’s artifacts storage.
You can find them by clicking the Artifacts link in the top bar in prow’s job view and navigating to artifacts.
This directory will contain all cluster component logs grouped by node.
Pull all artifacts using gsutil for searching and filtering the logs locally (use the path displayed in the artifacts view):
gsutil cp -r gs://gardener-prow/pr-logs/pull/gardener_gardener/6136/pull-gardener-e2e-kind/1542030416616099840/artifacts/gardener-local-control-plane /tmp
Purpose of e2e Tests
- e2e tests provide a high level of confidence that our code runs as expected by users when deployed to production.
- They are supposed to catch bugs resulting from interaction between multiple components.
- Test cases should be as close as possible to real usage by end users:
- You should test “from the perspective of the user” (or operator).
- Example: I create a Shoot and expect to be able to connect to it via the provided kubeconfig.
- Accordingly, don’t assert details of the system.
- e.g., the user also wouldn’t expect that there is a kube-apiserver deployment in the seed, they rather expect that they can talk to it no matter how it is deployed
- Only assert details of the system if the tested feature is not fully visible to the end-user and there is no other way of ensuring that the feature works reliably
- e.g., the Shoot CA rotation is not fully visible to the user but is assertable by looking at the secrets in the Seed.
- Pro: can be executed by developers and users without any real infrastructure (provider-local).
- Con: they currently cannot be executed with real infrastructure (e.g., provider-aws), we will work on this as part of #6016.
- Keep in mind that the tested scenario is still artificial in a sense of using default configuration, only a few objects, only a few config/settings combinations are covered.
- We will never be able to cover the full “test matrix” and this should not be our goal.
- Bugs will still be released and will still happen in production; we can’t avoid it.
- Instead, we should add test cases for preventing bugs in features or settings that were frequently regressed: example PR
- Usually e2e tests cover the “straight-forward cases”.
- However, negative test cases can also be included, especially if they are important from the user’s perspective.
Writing e2e Tests
- Tests must always use the
Ordereddecorator - Separate individual steps from each other with
Itstatements- This makes debugging of the test and flake detection much easier
- Make sure to always utilize the
SpecContextwhen dealing with contexts inside ofItstatements, like here
- Use the
TestContextto store the current state of the test (Reference)- Do not share test contexts between test cases
- Whenever possible, use the type-specific test contexts like:
ShootContext,SeedContext - Common steps should be implemented in dedicated helper functions, which accept the
TestContextor its type-specific derivatives - Use
BeforeTestSetupto initialize theTestContextor its type-specific derivatives - Always wrap API calls and similar things in
Eventuallyblocks: example test- At this point, we are pretty much working with a distributed system and failures can happen anytime.
- Wrapping calls in
Eventuallymakes tests more stable and more realistic (usually, you wouldn’t call the system broken if a single API call fails because of a short connectivity issue).
- Most of the points from writing integration tests are relevant for e2e tests as well (especially the points about asynchronous assertions).
- In contrast to integration tests, in e2e tests, it might make sense to specify higher timeouts for
Eventuallycalls, e.g., when waiting for aShootto be reconciled.- Generally, try to use the default settings for
Eventuallyspecified via the environment variables. - Only set higher timeouts if waiting for long-running reconciliations to be finished.
- Generally, try to use the default settings for
Gardener Upgrade Tests (Using provider-local)
Gardener upgrade tests setup a kind cluster and deploy Gardener version vX.X.X before upgrading it to a given version vY.Y.Y.
This allows verifying whether the current (unreleased) revision/branch (or a specific release) is compatible with the latest (or a specific other) release. The GARDENER_PREVIOUS_RELEASE and GARDENER_NEXT_RELEASE environment variables are used to specify the respective versions.
This helps understanding what happens or how the system reacts when Gardener upgrades from versions vX.X.X to vY.Y.Y for existing shoots in different states (creation/hibernation/wakeup/deletion). Gardener upgrade tests also help qualifying releases for all flavors (non-HA or HA with failure tolerance node/zone).
Just like E2E tests, upgrade tests also use a KinD cluster and skaffold for bootstrapping a full Gardener installation based on the current revision/branch, including provider-local. This allows running e2e tests in an isolated test environment, fully locally without any infrastructure interaction. The tests perform a set of operations on Shoot clusters, e.g. create, delete, hibernate and wake up.
Below is a sequence describing how the tests are performed.
- Create a
kindcluster. - Install Gardener version
vX.X.X. - Run gardener pre-upgrade tests which are labeled with
pre-upgrade. - Upgrade Gardener version from
vX.X.XtovY.Y.Y. - Run gardener post-upgrade tests which are labeled with
post-upgrade - Tear down seed and kind cluster.
How to Run Upgrade Tests Between Two Gardener Releases
Sometimes, we need to verify/qualify two Gardener releases when we upgrade from one version to another.
This can performed by fetching the two Gardener versions from the GitHub Gardener release page and setting appropriate env variables GARDENER_PREVIOUS_RELEASE, GARDENER_NEXT_RELEASE.
GARDENER_PREVIOUS_RELEASE– This env variable refers to a source revision/branch (or a specific release) which has to be installed first and then upgraded to versionGARDENER_NEXT_RELEASE. By default, it fetches the latest release version from GitHub Gardener release page.
GARDENER_NEXT_RELEASE– This env variable refers to the target revision/branch (or a specific release) to be upgraded to after successful installation ofGARDENER_PREVIOUS_RELEASE. By default, it considers the local HEAD revision, builds code, and installs Gardener from the current revision where the Gardener upgrade tests triggered.
make ci-e2e-kind-upgrade GARDENER_PREVIOUS_RELEASE=v1.60.0 GARDENER_NEXT_RELEASE=v1.61.0make ci-e2e-kind-ha-multi-node-upgrade GARDENER_PREVIOUS_RELEASE=v1.60.0 GARDENER_NEXT_RELEASE=v1.61.0make ci-e2e-kind-ha-multi-zone-upgrade GARDENER_PREVIOUS_RELEASE=v1.60.0 GARDENER_NEXT_RELEASE=v1.61.0
Purpose of Upgrade Tests
- Tests will ensure that shoot clusters reconciled with the previous version of Gardener work as expected even with the next Gardener version.
- This will reproduce or catch actual issues faced by end users.
- One of the test cases ensures no downtime is faced by the end-users for shoots while upgrading Gardener if the shoot’s control-plane is configured as HA.
Writing Upgrade Tests
- Tests are divided into two parts and labeled with
pre-upgradeandpost-upgradelabels. - An example test case which ensures a shoot which was
hibernatedin a previous Gardener release shouldwakeupas expected in next release:- Creating a shoot and hibernating a shoot is pre-upgrade test case which should be labeled
pre-upgradelabel. - Then wakeup a shoot and delete a shoot is post-upgrade test case which should be labeled
post-upgradelabel.
- Creating a shoot and hibernating a shoot is pre-upgrade test case which should be labeled
Test Machinery Tests
Please see Test Machinery Tests.
Purpose of Test Machinery Tests
- Test machinery tests have to be executed against full-blown Gardener installations.
- They can provide a very high level of confidence that an installation is functional in its current state, this includes: all Gardener components, Extensions, the used Cloud Infrastructure, all relevant settings/configuration.
- This brings the following benefits:
- They test more realistic scenarios than e2e tests (real configuration, real infrastructure, etc.).
- Tests run “where the users are”.
- However, this also brings significant drawbacks:
- Tests are difficult to develop and maintain.
- Tests require a full Gardener installation and cannot be executed in CI (on PR-level or against master).
- Tests require real infrastructure (think cloud provider credentials, cost).
- Using
TestDefinitionsunder.test-defsrequires a full test machinery installation. - Accordingly, tests are heavyweight and expensive to run.
- Testing against real infrastructure can cause flakes sometimes (e.g., in outage situations).
- Failures are hard to debug, because clusters are deleted after the test (for obvious cost reasons).
- Bugs can only be caught, once it’s “too late”, i.e., when code is merged and deployed.
- Today, test machinery tests cover a bigger “test matrix” (e.g., Shoot creation across infrastructures, kubernetes versions, machine image versions).
- Test machinery also runs Kubernetes conformance tests.
- However, because of the listed drawbacks, we should rather focus on augmenting our e2e tests, as we can run them locally and in CI in order to catch bugs before they get merged.
- It’s still a good idea to add test machinery tests if a feature that is depending on some installation-specific configuration needs to be tested.
Writing Test Machinery Tests
- Generally speaking, most points from writing integration tests and writing e2e tests apply here as well.
- However, test machinery tests contain a lot of technical debt and existing code doesn’t follow these best practices.
- As test machinery tests are out of our general focus, we don’t intend on reworking the tests soon or providing more guidance on how to write new ones.
Manual Tests
- Manual tests can be useful when the cost of trying to automatically test certain functionality are too high.
- Useful for PR verification, if a reviewer wants to verify that all cases are properly tested by automated tests.
- Currently, it’s the simplest option for testing upgrade scenarios.
- e.g. migration coding is probably best tested manually, as it’s a high effort to write an automated test for little benefit
- Obviously, the need for manual tests should be kept at a bare minimum.
- Instead, we should add e2e tests wherever sensible/valuable.
- We want to implement some form of general upgrade tests as part of #6016.
4.45 - Testmachinery Tests
Test Machinery Tests
In order to automatically qualify Gardener releases, we execute a set of end-to-end tests using Test Machinery. This requires a full Gardener installation including infrastructure extensions, as well as a setup of Test Machinery itself. These tests operate on Shoot clusters across different Cloud Providers, using different supported Kubernetes versions and various configuration options (huge test matrix).
This manual gives an overview about test machinery tests in Gardener.
Structure
Gardener test machinery tests are split into two test suites that can be found under test/testmachinery/suites:
- The Gardener Test Suite contains all tests that only require a running gardener instance.
- The Shoot Test Suite contains all tests that require a predefined running shoot cluster.
The corresponding tests of a test suite are defined in the import statement of the suite definition (see shoot/run_suite_test.go)
and their source code can be found under test/testmachinery.
The test directory is structured as follows:
test
├── e2e # end-to-end tests (using provider-local)
│ ├── gardener
│ │ ├── seed
│ │ ├── shoot
| | └── ...
| └──operator
├── framework # helper code shared across integration, e2e and testmachinery tests
├── integration # integration tests (envtests)
│ ├── controllermanager
│ ├── envtest
│ ├── resourcemanager
│ ├── scheduler
│ └── ...
└── testmachinery # test machinery tests
├── gardener # actual test cases imported by suites/gardener
│ └── security
├── shoots # actual test cases imported by suites/shoot
│ ├── applications
│ ├── care
│ ├── logging
│ ├── operatingsystem
│ ├── operations
│ └── vpntunnel
├── suites # suites that run against a running garden or shoot cluster
│ ├── gardener
│ └── shoot
└── system # suites that are used for building a full test flow
├── complete_reconcile
├── managed_seed_creation
├── managed_seed_deletion
├── shoot_cp_migration
├── shoot_creation
├── shoot_deletion
├── shoot_hibernation
├── shoot_hibernation_wakeup
└── shoot_update
A suite can be executed by running the suite definition with ginkgo’s focus and skip flags
to control the execution of specific labeled test. See the example below:
go test -timeout=0 ./test/testmachinery/suites/shoot \
--v -ginkgo.v -ginkgo.show-node-events -ginkgo.no-color \
--report-file=/tmp/report.json \ # write elasticsearch formatted output to a file
--disable-dump=false \ # disables dumping of the current state if a test fails
-kubecfg=/path/to/gardener/kubeconfig \
-shoot-name=<shoot-name> \ # Name of the shoot to test
-project-namespace=<gardener project namespace> \ # Name of the gardener project the test shoot resides
-ginkgo.focus="\[RELEASE\]" \ # Run all tests that are tagged as release
-ginkgo.skip="\[SERIAL\]|\[DISRUPTIVE\]" # Exclude all tests that are tagged SERIAL or DISRUPTIVE
Add a New Test
To add a new test the framework requires the following steps (step 1. and 2. can be skipped if the test is added to an existing package):
- Create a new test file e.g.
test/testmachinery/shoot/security/my-sec-test.go - Import the test into the appropriate test suite (gardener or shoot):
import _ "github.com/gardener/gardener/test/testmachinery/shoot/security" - Define your test with the testframework. The framework will automatically add its initialization, cleanup and dump functions.
var _ = ginkgo.Describe("my suite", func(){
f := framework.NewShootFramework(nil)
f.Beta().CIt("my first test", func(ctx context.Context) {
f.ShootClient.Get(xx)
// testing ...
})
})
The newly created test can be tested by focusing the test with the default ginkgo focus f.Beta().FCIt("my first test", func(ctx context.Context)
and running the shoot test suite with:
go test -timeout=0 ./test/testmachinery/suites/shoot \
--v -ginkgo.v -ginkgo.show-node-events -ginkgo.no-color \
--report-file=/tmp/report.json \ # write elasticsearch formatted output to a file
--disable-dump=false \ # disables dumping of the current state if a test fails
-kubecfg=/path/to/gardener/kubeconfig \
-shoot-name=<shoot-name> \ # Name of the shoot to test
-project-namespace=<gardener project namespace> \
-fenced=<true|false> # Tested shoot is running in a fenced environment and cannot be reached by gardener
or for the gardener suite with:
go test -timeout=0 ./test/testmachinery/suites/gardener \
--v -ginkgo.v -ginkgo.show-node-events -ginkgo.no-color \
--report-file=/tmp/report.json \ # write elasticsearch formatted output to a file
--disable-dump=false \ # disables dumping of the current state if a test fails
-kubecfg=/path/to/gardener/kubeconfig \
-project-namespace=<gardener project namespace>
⚠️ Make sure that you do not commit any focused specs as this feature is only intended for local development! Ginkgo will fail the test suite if there are any focused specs.
Alternatively, a test can be triggered by specifying a ginkgo focus regex with the name of the test e.g.
go test -timeout=0 ./test/testmachinery/suites/gardener \
--v -ginkgo.v -ginkgo.show-node-events -ginkgo.no-color \
--report-file=/tmp/report.json \ # write elasticsearch formatted output to a file
-kubecfg=/path/to/gardener/kubeconfig \
-project-namespace=<gardener project namespace> \
-ginkgo.focus="my first test" # regex to match test cases
Test Labels
Every test should be labeled by using the predefined labels available with every framework to have consistent labeling across all test machinery tests.
The labels are applied to every new It()/CIt() definition by:
f := framework.NewCommonFramework()
f.Default().Serial().It("my test") => "[DEFAULT] [SERIAL] my test"
f := framework.NewShootFramework()
f.Default().Serial().It("my test") => "[DEFAULT] [SERIAL] [SHOOT] my test"
f := framework.NewGardenerFramework()
f.Default().Serial().It("my test") => "[DEFAULT] [GARDENER] [SERIAL] my test"
Labels:
- Beta: Newly created tests with no experience on stableness should be first labeled as beta tests. They should be watched (and probably improved) until stable enough to be promoted to Default.
- Default: Tests that were Beta before and proved to be stable are promoted to Default eventually. Default tests run more often, produce alerts and are considered during the release decision although they don’t necessarily block a release.
- Release: Test are release relevant. A failing Release test blocks the release pipeline. Therefore, these tests need to be stable. Only tests proven to be stable will eventually be promoted to Release.
Behavior Labels:
- Serial: The test should always be executed in serial with no other tests running, as it may impact other tests.
- Destructive: The test is destructive. Which means that is runs with no other tests and may break Gardener or the shoot. Only create such tests if really necessary, as the execution will be expensive (neither Gardener nor the shoot can be reused in this case for other tests).
Framework
The framework directory contains all the necessary functions / utilities for running test machinery tests. For example, there are methods for creation/deletion of shoots, waiting for shoot deletion/creation, downloading/installing/deploying helm charts, logging, etc.
The framework itself consists of 3 different frameworks that expect different prerequisites and offer context specific functionality.
- CommonFramework: The common framework is the base framework that handles logging and setup of commonly needed resources like helm.
It also contains common functions for interacting with Kubernetes clusters like
Waiting for resources to be readyorExec into a running pod. - GardenerFramework contains all functions of the common framework and expects a running Gardener instance with the provided Gardener kubeconfig and a project namespace.
It also contains functions to interact with gardener like
Waiting for a shoot to be reconciledorPatch a shootorGet a seed. - ShootFramework: contains all functions of the common and the gardener framework. It expects a running shoot cluster defined by the shoot’s name and namespace (project namespace). This framework contains functions to directly interact with the specific shoot.
The whole framework also includes commonly used checks, ginkgo wrapper, etc., as well as commonly used tests. Theses common application tests (like the guestbook test) can be used within multiple tests to have a default application (with ingress, deployment, stateful backend) to test external factors.
Config
Every framework commandline flag can also be defined by a configuration file (the value of the configuration file is only used if a flag is not specified by commandline).
The test suite searches for a configuration file (yaml is preferred) if the command line flag --config=/path/to/config/file is provided.
A framework can be defined in the configuration file by just using the flag name as root key e.g.
verbose: debug
kubecfg: /kubeconfig/path
project-namespace: garden-it
Report
The framework automatically writes the ginkgo default report to stdout and a specifically structured elastichsearch bulk report file to a specified location. The elastichsearch bulk report will write one json document per testcase and injects the metadata of the whole testsuite. An example document for one test case would look like the following document:
{
"suite": {
"name": "Shoot Test Suite",
"phase": "Succeeded",
"tests": 3,
"failures": 1,
"errors": 0,
"time": 87.427
},
"name": "Shoot application testing [DEFAULT] [RELEASE] [SHOOT] should download shoot kubeconfig successfully",
"shortName": "should download shoot kubeconfig successfully",
"labels": [
"DEFAULT",
"RELEASE",
"SHOOT"
],
"phase": "Succeeded",
"time": 0.724512057
}
Resources
The resources directory contains templates used by the tests.
resources
└── templates
├── guestbook-app.yaml.tpl
└── logger-app.yaml.tpl
System Tests
This directory contains the system tests that have a special meaning for the testmachinery with their own Test Definition. Currently, these system tests consist of:
- Shoot creation
- Shoot deletion
- Shoot Kubernetes update
- Gardener Full reconcile check
Shoot Creation Test
Create Shoot test is meant to test shoot creation.
Example Run
go test -timeout=0 ./test/testmachinery/system/shoot_creation \
--v -ginkgo.v -ginkgo.show-node-events \
-kubecfg=$HOME/.kube/config \
-shoot-name=$SHOOT_NAME \
-cloud-profile-name=$CLOUDPROFILE \
-seed=$SEED \
-secret-binding=$SECRET_BINDING \
-provider-type=$PROVIDER_TYPE \
-region=$REGION \
-k8s-version=$K8S_VERSION \
-project-namespace=$PROJECT_NAMESPACE \
-annotations=$SHOOT_ANNOTATIONS \
-infrastructure-provider-config-filepath=$INFRASTRUCTURE_PROVIDER_CONFIG_FILEPATH \
-controlplane-provider-config-filepath=$CONTROLPLANE_PROVIDER_CONFIG_FILEPATH \
-workers-config-filepath=$$WORKERS_CONFIG_FILEPATH \
-worker-zone=$ZONE \
-networking-pods=$NETWORKING_PODS \
-networking-services=$NETWORKING_SERVICES \
-networking-nodes=$NETWORKING_NODES \
-start-hibernated=$START_HIBERNATED
Shoot Deletion Test
Delete Shoot test is meant to test the deletion of a shoot.
Example Run
go test -timeout=0 -ginkgo.v -ginkgo.show-node-events \
./test/testmachinery/system/shoot_deletion \
-kubecfg=$HOME/.kube/config \
-shoot-name=$SHOOT_NAME \
-project-namespace=$PROJECT_NAMESPACE
Shoot Update Test
The Update Shoot test is meant to test the Kubernetes version update of a existing shoot. If no specific version is provided, the next patch version is automatically selected. If there is no available newer version, this test is a noop.
Example Run
go test -timeout=0 ./test/testmachinery/system/shoot_update \
--v -ginkgo.v -ginkgo.show-node-events \
-kubecfg=$HOME/.kube/config \
-shoot-name=$SHOOT_NAME \
-project-namespace=$PROJECT_NAMESPACE \
-version=$K8S_VERSION
Gardener Full Reconcile Test
The Gardener Full Reconcile test is meant to test if all shoots of a Gardener instance are successfully reconciled.
Example Run
go test -timeout=0 ./test/testmachinery/system/complete_reconcile \
--v -ginkgo.v -ginkgo.show-node-events \
-kubecfg=$HOME/.kube/config \
-project-namespace=$PROJECT_NAMESPACE \
-gardenerVersion=$GARDENER_VERSION # needed to validate the last acted gardener version of a shoot
Container Images
Test machinery tests usually deploy a workload to the Shoot cluster as part of the test execution. When introducing a new container image, consider the following:
- Make sure the container image is multi-arch.
- Tests are executed against
amd64andarm64based worker Nodes.
- Tests are executed against
- Do not use container images from Docker Hub.
- Docker Hub has rate limiting (see Download rate limit). For anonymous users, the rate limit is set to 100 pulls per 6 hours per IP address. In some fenced environments the network setup can be such that all egress connections are issued from single IP (or set of IPs). In such scenarios the allowed rate limit can be exhausted too fast. See https://github.com/gardener/gardener/issues/4160.
- Docker Hub registry doesn’t support pulling images over IPv6 (see Beta IPv6 Support on Docker Hub Registry).
- Avoid manually copying Docker Hub images to Gardener GCR (
europe-docker.pkg.dev/gardener-project/releases/3rd/). Use the existing prow job for this (see Copy Images). - If possible, use a Kubernetes e2e image (
registry.k8s.io/e2e-test-images/<image-name>).- In some cases, there is already a Kubernetes e2e image alternative of the Docker Hub image.
- For example, use
registry.k8s.io/e2e-test-images/busyboxinstead ofeurope-docker.pkg.dev/gardener-project/releases/3rd/busyboxordocker.io/busybox.
- For example, use
- Kubernetes has multiple test images - see https://github.com/kubernetes/kubernetes/tree/v1.27.0/test/images.
agnhostis the most widely used image in Kubernetes e2e tests. It contains multiple testing related binaries inside such aspause,logs-generator,serve-hostname,webhookand others. See all of them in the agnhost’s README.md. - The list of available Kubernetes e2e images and tags can be checked in this page.
- In some cases, there is already a Kubernetes e2e image alternative of the Docker Hub image.
4.46 - Topology Aware Routing
Topology-Aware Traffic Routing
Motivation
The enablement of highly available shoot control-planes requires multi-zone seed clusters. A garden runtime cluster can also be a multi-zone cluster. The topology-aware routing is introduced to reduce costs and to improve network performance by avoiding the cross availability zone traffic, if possible. The cross availability zone traffic is charged by the cloud providers and it comes with higher latency compared to the traffic within the same zone. The topology-aware routing feature enables topology-aware routing for Services deployed in a seed or garden runtime cluster. For the clients consuming these topology-aware services, kube-proxy favors the endpoints which are located in the same zone where the traffic originated from. In this way, the cross availability zone traffic is avoided.
How it works
The topology-aware routing feature relies on the Kubernetes features TopologyAwareHints or ServiceTrafficDistribution based on the runtime cluster’s Kubernetes versions.
For Kubernetes versions < 1.31, the TopologyAwareHints feature is being used on in combination with the EndpointSlice hints mutating webhook.
For Kubernetes versions >= 1.31, the ServiceTrafficDistribution feature is being used on. The EndpointSlice hints mutating webhook is enabled for Kubernetes 1.31 to allow graceful migration from TopologyAwareHints to ServiceTrafficDistribution.
How TopologyAwareHints works
The EndpointSlice hints mutating webhook and kube-proxy sections reveal the implementation details (and the drawbacks) of the TopologyAwareHints feature. For more details, see upstream documentation of the feature.
EndpointSlice Hints Mutating Webhook
The component that is responsible for providing hints in the EndpointSlices resources is the kube-controller-manager, in particular this is the EndpointSlice controller. However, there are several drawbacks with the TopologyAwareHints feature that don’t allow us to use it in its native way:
The algorithm in the EndpointSlice controller is based on a CPU-balance heuristic. From the TopologyAwareHints documentation:
The controller allocates a proportional amount of endpoints to each zone. This proportion is based on the allocatable CPU cores for nodes running in that zone. For example, if one zone had 2 CPU cores and another zone only had 1 CPU core, the controller would allocate twice as many endpoints to the zone with 2 CPU cores.
In case it is not possible to achieve a balanced distribution of the endpoints, as a safeguard mechanism the controller removes hints from the EndpointSlice resource. In our setup, the clients and the servers are well-known and usually the traffic a component receives does not depend on the zone’s allocatable CPU. Many components deployed by Gardener are scaled automatically by VPA. In case of an overload of a replica, the VPA should provide and apply enhanced CPU and memory resources. Additionally, Gardener uses the cluster-autoscaler to upscale/downscale Nodes dynamically. Hence, it is not possible to ensure a balanced allocatable CPU across the zones.
The TopologyAwareHints feature does not work at low-endpoint counts. It falls apart for a Service with less than 10 Endpoints.
Hints provided by the EndpointSlice controller are not deterministic. With cluster-autoscaler running and load increasing, hints can be removed in the next moment. There is no option to enforce the zone-level topology.
For more details, see the following issue kubernetes/kubernetes#113731.
To circumvent these issues with the EndpointSlice controller, a mutating webhook in the gardener-resource-manager assigns hints to EndpointSlice resources. For each endpoint in the EndpointSlice, it sets the endpoint’s hints to the endpoint’s zone. The webhook overwrites the hints provided by the EndpointSlice controller in kube-controller-manager. For more details, see the webhook’s documentation.
kube-proxy
By default, with kube-proxy running in iptables mode, traffic is distributed randomly across all endpoints, regardless of where it originates from. In a cluster with 3 zones, traffic is more likely to go to another zone than to stay in the current zone.
With the topology-aware routing feature, kube-proxy filters the endpoints it routes to based on the hints in the EndpointSlice resource. In most of the cases, kube-proxy will prefer the endpoint(s) in the same zone. For more details, see the Kubernetes documentation.
How ServiceTrafficDistribution works
We reported the drawbacks related to the TopologyAwareHints feature in kubernetes/kubernetes#113731. As result, the Kubernetes community implemented the ServiceTrafficDistribution feature.
The ServiceTrafficDistribution allows expressing preferences for how traffic should be routed to Service endpoints. For more details, see upstream documentation of the feature.
The PreferClose strategy allows traffic to be routed to Service endpoints in topology-aware and predictable manner.
It is simpler than service.kubernetes.io/topology-mode: auto - if there are Service endpoints which reside in the same zone as the client, traffic is routed to one of the endpoints within the same zone as the client. If the client’s zone does not have any available Service endpoints, traffic is routed to any available endpoint within the cluster.
How to make a Service topology-aware
How to make a Service topology-aware in Kubernetes < 1.31
In Kubernetes < 1.31, TopologyAwareHints and EndpointSlice Hints mutating webhook are being used to make a Service topology-aware. The following annotation and label have to be added to the Service:
apiVersion: v1
kind: Service
metadata:
annotations:
service.kubernetes.io/topology-mode: "auto"
labels:
endpoint-slice-hints.resources.gardener.cloud/consider: "true"
The service.kubernetes.io/topology-mode=auto annotation is needed for kube-proxy. One of the prerequisites on kube-proxy side for using topology-aware routing is the corresponding Service to be annotated with the service.kubernetes.io/topology-mode=auto. For more details, see the following kube-proxy function.
The endpoint-slice-hints.resources.gardener.cloud/consider=true label is needed for gardener-resource-manager to prevent the EndpointSlice hints mutating webhook from selecting all EndpointSlice resources but only the ones that are labeled with the consider label.
The Gardener extensions can use this approach to make a Service they deploy topology-aware.
How to make a Service topology-aware in Kubernetes 1.31
In Kubernetes 1.31, ServiceTrafficDistribution and EndpointSlice Hints mutating webhook are being used to make a Service topology-aware. The .spec.trafficDistribution field has to be set to PreferClose and the label endpoint-slice-hints.resources.gardener.cloud/consider=true needs to be added:
apiVersion: v1
kind: Service
metadata:
labels:
endpoint-slice-hints.resources.gardener.cloud/consider: "true"
spec:
trafficDistribution: PreferClose
How to make a Service topology-aware in Kubernetes >= 1.32
In Kubernetes >= 1.32, ServiceTrafficDistribution is being used to make a Service topology-aware. The .spec.trafficDistribution field has to be set to PreferClose:
apiVersion: v1
kind: Service
spec:
trafficDistribution: PreferClose
Prerequisites for making a Service topology-aware
- The Pods backing the Service should be spread on most of the available zones. This constraint should be ensured with appropriate scheduling constraints (topology spread constraints, (anti-)affinity). Enabling the feature for a Service with a single backing Pod or Pods all located in the same zone does not lead to a benefit.
- The component should be scaled up by
VerticalPodAutoscaler. In case of an overload (a large portion of the of the traffic is originating from a given zone), theVerticalPodAutoscalershould provide better resource recommendations for the overloaded backing Pods. - Consider the
TopologyAwareHintsconstraints.
Note: The topology-aware routing feature is considered as alpha feature. Use it only for evaluation purposes.
Topology-aware Services in the Seed cluster
etcd-main-client and etcd-events-client
The etcd-main-client and etcd-events-client Services are topology-aware. They are consumed by the kube-apiserver.
kube-apiserver
The kube-apiserver Service is topology-aware. It is consumed by the controllers running in the Shoot control plane.
Note: The
istio-ingressgatewaycomponent routes traffic in topology-aware manner - if possible, it routes traffic to the targetkube-apiserverPods in the same zone. If there is no healthykube-apiserverPod available in the same zone, the traffic is routed to any of the healthy Pods in the other zones. This behaviour is unconditionally enabled.
gardener-resource-manager
The gardener-resource-manager Service that is part of the Shoot control plane is topology-aware. The resource-manager serves webhooks and the Service is consumed by the kube-apiserver for the webhook communication.
vpa-webhook
The vpa-webhook Service that is part of the Shoot control plane is topology-aware. It is consumed by the kube-apiserver for the webhook communication.
Topology-aware Services in the garden runtime cluster
virtual-garden-etcd-main-client and virtual-garden-etcd-events-client
The virtual-garden-etcd-main-client and virtual-garden-etcd-events-client Services are topology-aware. virtual-garden-etcd-main-client is consumed by virtual-garden-kube-apiserver and gardener-apiserver, virtual-garden-etcd-events-client is consumed by virtual-garden-kube-apiserver.
virtual-garden-kube-apiserver
The virtual-garden-kube-apiserver Service is topology-aware. It is consumed by virtual-garden-kube-controller-manager, gardener-controller-manager, gardener-scheduler, gardener-admission-controller, extension admission components, gardener-dashboard and other components.
Note: Unlike the other Services, the
virtual-garden-kube-apiserverService is of type LoadBalancer. In-cluster components consuming thevirtual-garden-kube-apiserverService by its Service name will have benefit from the topology-aware routing. However, the TopologyAwareHints feature cannot help with external traffic routed to load balancer’s address - such traffic won’t be routed in a topology-aware manner and will be routed according to the cloud-provider specific implementation.
gardener-apiserver
The gardener-apiserver Service is topology-aware. It is consumed by virtual-garden-kube-apiserver. The aggregation layer in virtual-garden-kube-apiserver proxies requests sent for the Gardener API types to the gardener-apiserver.
gardener-admission-controller
The gardener-admission-controller Service is topology-aware. It is consumed by virtual-garden-kube-apiserver and gardener-apiserver for the webhook communication.
How to enable the topology-aware routing for a Seed cluster?
For a Seed cluster the topology-aware routing functionality can be enabled in the Seed specification:
apiVersion: core.gardener.cloud/v1beta1
kind: Seed
# ...
spec:
settings:
topologyAwareRouting:
enabled: true
The topology-aware routing setting can be only enabled for a Seed cluster with more than one zone.
gardenlet enables topology-aware Services only for Shoot control planes with failure tolerance type zone (.spec.controlPlane.highAvailability.failureTolerance.type=zone). Control plane Pods of non-HA Shoots and HA Shoots with failure tolerance type node are pinned to single zone. For more details, see High Availability Of Deployed Components.
How to enable the topology-aware routing for a garden runtime cluster?
For a garden runtime cluster the topology-aware routing functionality can be enabled in the Garden resource specification:
apiVersion: operator.gardener.cloud/v1alpha1
kind: Garden
# ...
spec:
runtimeCluster:
settings:
topologyAwareRouting:
enabled: true
The topology-aware routing setting can be only enabled for a garden runtime cluster with more than one zone.
4.47 - Trusted Tls For Control Planes
Trusted TLS Certificate for Shoot Control Planes
Shoot clusters are composed of several control plane components deployed by Gardener and its corresponding extensions.
Some components are exposed via Ingress resources, which make them addressable under the HTTPS protocol.
Examples:
- Alertmanager
- Plutono
- Prometheus
Gardener generates the backing TLS certificates, which are signed by the shoot cluster’s CA by default (self-signed).
Unlike with a self-contained Kubeconfig file, common internet browsers or operating systems don’t trust a shoot’s cluster CA and adding it as a trusted root is often undesired in enterprise environments.
Therefore, Gardener operators can predefine trusted wildcard certificates under which the mentioned endpoints will be served instead.
Register a trusted wildcard certificate
Since control plane components are published under the ingress domain (core.gardener.cloud/v1beta1.Seed.spec.ingress.domain) a wildcard certificate is required.
For example:
- Seed ingress domain:
dev.my-seed.example.com CNorSANfor a certificate:*.dev.my-seed.example.com
A wildcard certificate matches exactly one seed. It must be deployed as part of your landscape setup as a Kubernetes Secret inside the garden namespace of the corresponding seed cluster.
Please ensure that the secret has the gardener.cloud/role label shown below:
apiVersion: v1
data:
ca.crt: base64-encoded-ca.crt
tls.crt: base64-encoded-tls.crt
tls.key: base64-encoded-tls.key
kind: Secret
metadata:
labels:
gardener.cloud/role: controlplane-cert
name: seed-ingress-certificate
namespace: garden
type: Opaque
Gardener copies the secret during the reconciliation of shoot clusters to the shoot namespace in the seed. Afterwards, the Ingress resources in that namespace for the mentioned components will refer to the wildcard certificate.
Best Practice
While it is possible to create the wildcard certificates manually and deploy them to seed clusters, it is recommended to let certificate management components do this job. Often, a seed cluster is also a shoot cluster at the same time (ManagedSeed) and might already provide a certificate service extension. Otherwise, a Gardener operator may use solutions like Cert-Management or Cert-Manager.
4.48 - Trusted Tls For Garden Runtime
Trusted TLS Certificate for Garden Runtime Cluster
In Garden Runtime Cluster components are exposed via Ingress resources, which make them addressable under the HTTPS protocol.
Examples:
- Plutono
Gardener generates the backing TLS certificates, which are signed by the garden runtime cluster’s CA by default (self-signed).
Unlike with a self-contained Kubeconfig file, common internet browsers or operating systems don’t trust a garden runtime’s cluster CA and adding it as a trusted root is often undesired in enterprise environments.
Therefore, Gardener operators can predefine a trusted wildcard certificate under which the mentioned endpoints will be served instead.
Register a trusted wildcard certificate
Since Garden Runtime Cluster components are published under the ingress domain (operator.gardener.cloud/v1alpha1.Garden.spec.runtimeCluster.ingress.domains) a wildcard certificate is required.
For example:
- Garden Runtime cluster ingress domain:
dev.my-garden.example.com CNorSANfor a certificate:*.dev.my-garden.example.com
It must be deployed as part of your landscape setup as a Kubernetes Secret inside the garden namespace of the garden runtime cluster.
Please ensure that the secret has the gardener.cloud/role label shown below:
apiVersion: v1
data:
ca.crt: base64-encoded-ca.crt
tls.crt: base64-encoded-tls.crt
tls.key: base64-encoded-tls.key
kind: Secret
metadata:
labels:
gardener.cloud/role: garden-cert
name: garden-ingress-certificate
namespace: garden
type: Opaque
In addition to the configured ingress domains, this wildcard certificate is considered for SNI domains (operator.gardener.cloud/v1alpha1.Garden.spec.virtualCluster.kubernetes.kubeAPIServer.sni.domainPatterns) if secretName is unspecified.
Best Practice
While it is possible to create the wildcard certificate manually and deploy it to the cluster, it is recommended to let certificate management components (e.g. gardener/cert-management) do this job.
5 - List of Extensions
Gardener Extensions Library

Project Gardener implements the automated management and operation of Kubernetes clusters as a service. Its main principle is to leverage Kubernetes concepts for all of its tasks.
Recently, most of the vendor specific logic has been developed in-tree. However, the project has grown to a size where it is very hard to extend, maintain, and test. With GEP-1 we have proposed how the architecture can be changed in a way to support external controllers that contain their very own vendor specifics. This way, we can keep Gardener core clean and independent.
This directory contains utilities functions and common libraries meant to ease writing the actual extension controllers. Please consult https://github.com/gardener/gardener/tree/master/docs/extensions to get more information about the extension contracts.
Known Extension Implementations
Check out these repositories for implementations of the Gardener Extension contracts:
Infrastructure Provider
Primary DNS Provider
The primary DNS provider manages DNSRecord resources (mandatory for Gardener related DNS records)
Operating System
Container Runtime
Network Plugin
Generic Extensions
- Minimal Working Example
- Registry Cache
- Shoot Certificate Service
- Shoot DNS Service
- Shoot Falco Service
- Shoot Flux Service
- Shoot Lakom Service
- Shoot Networking Filter
- Shoot Networking Problem Detector
- Shoot OpenID Connect Service
- Shoot Rsyslog Relp
If you implemented a new extension, please feel free to add it to this list!
Feedback and Support
Feedback and contributions are always welcome. Please report bugs or suggestions as GitHub issues or reach out on Slack (join the workspace here).
Learn more!
Please find further resources about out project here:
5.1 - Infrastructure Extensions
5.1.1 - Provider Alicloud
Gardener Extension for Alicloud provider
Project Gardener implements the automated management and operation of Kubernetes clusters as a service. Its main principle is to leverage Kubernetes concepts for all of its tasks.
Recently, most of the vendor specific logic has been developed in-tree. However, the project has grown to a size where it is very hard to extend, maintain, and test. With GEP-1 we have proposed how the architecture can be changed in a way to support external controllers that contain their very own vendor specifics. This way, we can keep Gardener core clean and independent.
This controller implements Gardener’s extension contract for the Alicloud provider.
An example for a ControllerRegistration resource that can be used to register this controller to Gardener can be found here.
Please find more information regarding the extensibility concepts and a detailed proposal here.
Supported Kubernetes versions
This extension controller supports the following Kubernetes versions:
| Version | Support | Conformance test results |
|---|---|---|
| Kubernetes 1.33 | 1.33.0+ | N/A |
| Kubernetes 1.32 | 1.32.0+ | |
| Kubernetes 1.31 | 1.31.0+ | |
| Kubernetes 1.30 | 1.30.0+ | |
| Kubernetes 1.29 | 1.29.0+ | |
| Kubernetes 1.28 | 1.28.0+ | |
| Kubernetes 1.27 | 1.27.0+ |
Please take a look here to see which versions are supported by Gardener in general.
How to start using or developing this extension controller locally
You can run the controller locally on your machine by executing make start.
Static code checks and tests can be executed by running make verify. We are using Go modules for Golang package dependency management and Ginkgo/Gomega for testing.
Feedback and Support
Feedback and contributions are always welcome!
Please report bugs or suggestions as GitHub issues or reach out on Slack (join the workspace here).
Learn more!
Please find further resources about out project here:
- Our landing page gardener.cloud
- “Gardener, the Kubernetes Botanist” blog on kubernetes.io
- “Gardener Project Update” blog on kubernetes.io
- GEP-1 (Gardener Enhancement Proposal) on extensibility
- GEP-4 (New
core.gardener.cloud/v1beta1API) - Extensibility API documentation
- Gardener Extensions Golang library
- Gardener API Reference
5.1.1.1 - Tutorials
5.1.1.1.1 - Create a Kubernetes Cluster on Alibaba Cloud with Gardener
Overview
Gardener allows you to create a Kubernetes cluster on different infrastructure providers. This tutorial will guide you through the process of creating a cluster on Alibaba Cloud.
Prerequisites
- You have created an Alibaba Cloud account.
- You have access to the Gardener dashboard and have permissions to create projects.
Steps
Go to the Gardener dashboard and create a project.

To be able to add shoot clusters to this project, you must first create a technical user on Alibaba Cloud with sufficient permissions.
Choose Secrets, then the plus icon
 and select AliCloud.
To copy the policy for Alibaba Cloud from the Gardener dashboard, click on the help icon
 for Alibaba Cloud secrets, and choose copy
  .
.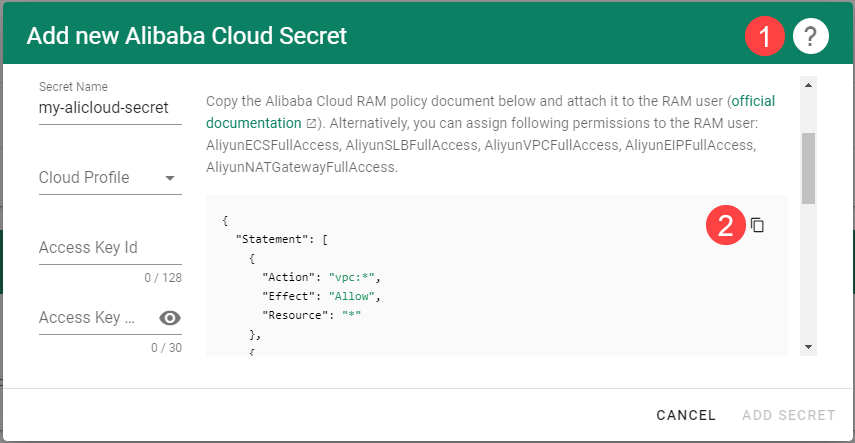
Create a custom policy in Alibaba Cloud:
Log on to your Alibaba account and choose RAM > Permissions > Policies.
Enter the name of your policy.
Select
Script.Paste the policy that you copied from the Gardener dashboard to this custom policy.
Choose OK.
In the Alibaba Cloud console, create a new technical user:
Choose RAM > Users.
Choose Create User.
Enter a logon and display name for your user.
Select Open API Access.
Choose OK.
After the user is created,
AccessKeyIdandAccessKeySecretare generated and displayed. Remember to save them. TheAccessKeyis used later to create secrets for Gardener.
Assign the policy you created to the technical user:
Choose RAM > Permissions > Grants.
Choose Grant Permission.

Select Alibaba Cloud Account.
Assign the policy you’ve created before to the technical user.
Create your secret.
- Type the name of your secret.
- Copy and paste the
Access Key IDandSecret Access Keyyou saved when you created the technical user on Alibaba Cloud. - Choose Add secret.
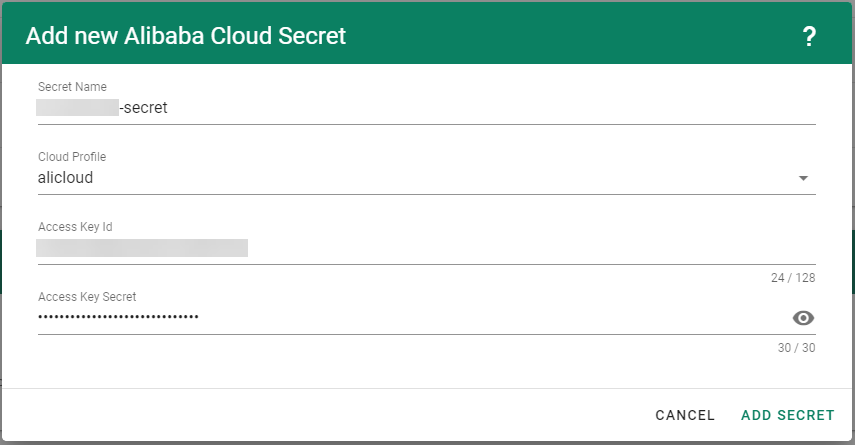
After completing these steps, you should see your newly created secret in the Infrastructure Secrets section.
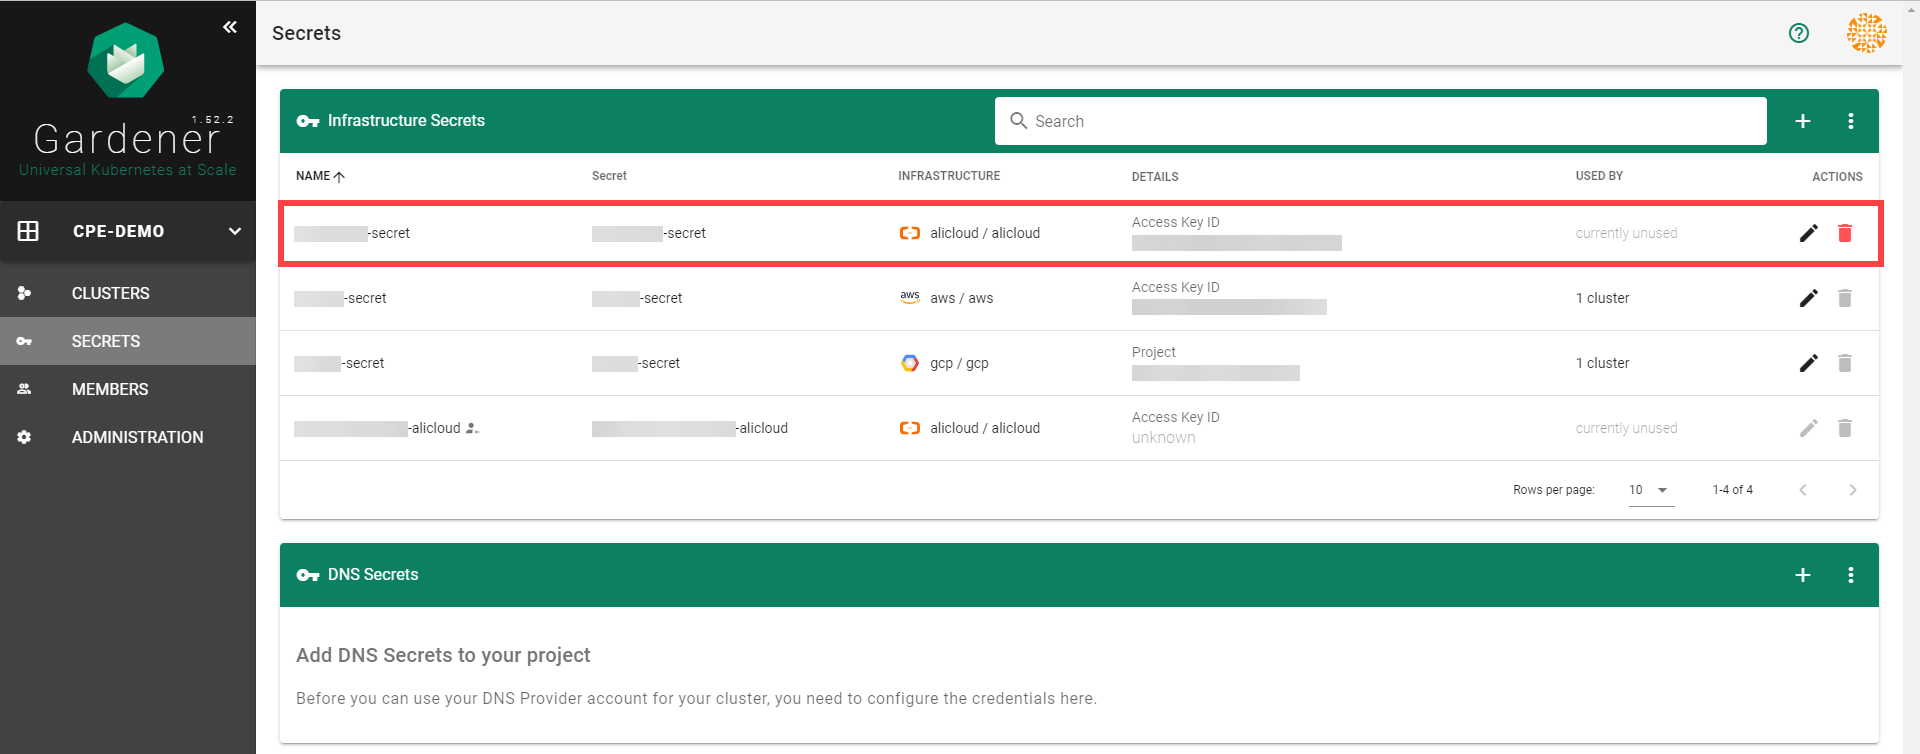
To create a new cluster, choose Clusters and then the plus sign in the upper right corner.

In the Create Cluster section:
Select AliCloud in the Infrastructure tab.
Type the name of your cluster in the Cluster Details tab.
Choose the secret you created before in the Infrastructure Details tab.
Choose Create.

Wait for your cluster to get created.
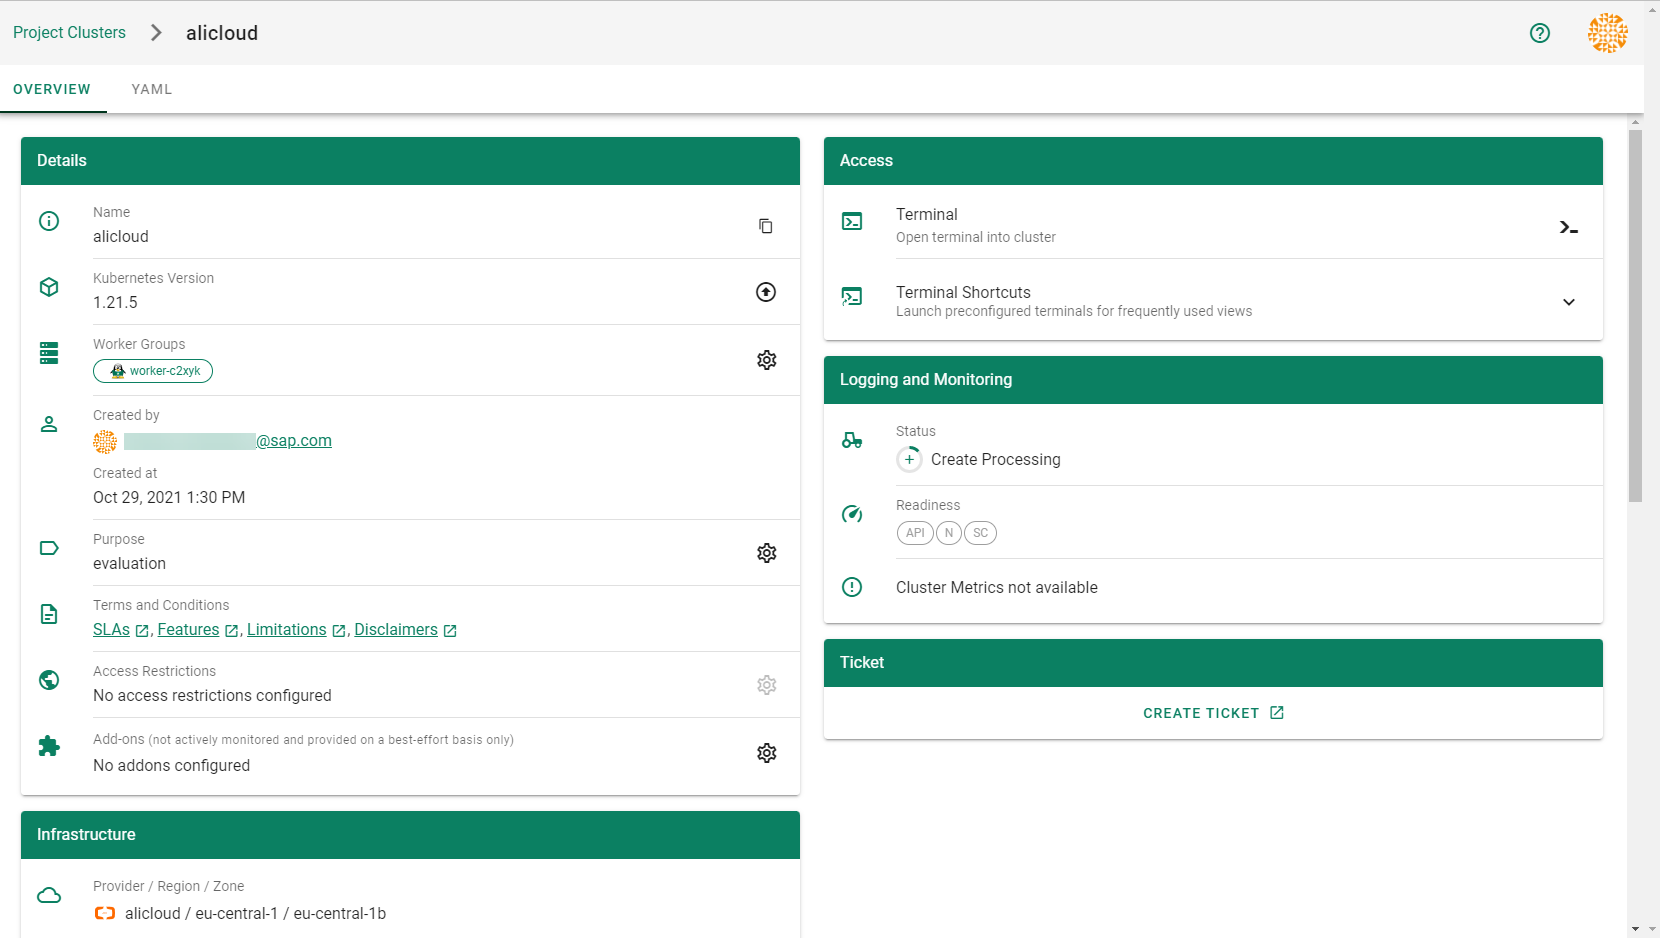
Result
After completing the steps in this tutorial, you will be able to see and download the kubeconfig of your cluster. With it you can create shoot clusters on Alibaba Cloud.

The size of persistent volumes in your shoot cluster must at least be 20 GiB large. If you choose smaller sizes in your Kubernetes PV definition, the allocation of cloud disk space on Alibaba Cloud fails.
5.1.1.2 - Deployment
Deployment of the AliCloud provider extension
Disclaimer: This document is NOT a step by step installation guide for the AliCloud provider extension and only contains some configuration specifics regarding the installation of different components via the helm charts residing in the AliCloud provider extension repository.
gardener-extension-admission-alicloud
Authentication against the Garden cluster
There are several authentication possibilities depending on whether or not the concept of Virtual Garden is used.
Virtual Garden is not used, i.e., the runtime Garden cluster is also the target Garden cluster.
Automounted Service Account Token
The easiest way to deploy the gardener-extension-admission-alicloud component will be to not provide kubeconfig at all. This way in-cluster configuration and an automounted service account token will be used. The drawback of this approach is that the automounted token will not be automatically rotated.
This will allow for automatic rotation of the service account token by the kubelet. The configuration can be achieved by setting both .Values.global.serviceAccountTokenVolumeProjection.enabled: true and .Values.global.kubeconfig in the respective chart’s values.yaml file.
Virtual Garden is used, i.e., the runtime Garden cluster is different from the target Garden cluster.
Service Account
The easiest way to setup the authentication will be to create a service account and the respective roles will be bound to this service account in the target cluster. Then use the generated service account token and craft a kubeconfig which will be used by the workload in the runtime cluster. This approach does not provide a solution for the rotation of the service account token. However, this setup can be achieved by setting .Values.global.virtualGarden.enabled: true and following these steps:
- Deploy the
applicationpart of the charts in thetargetcluster. - Get the service account token and craft the
kubeconfig. - Set the crafted
kubeconfigand deploy theruntimepart of the charts in theruntimecluster.
Client Certificate
Another solution will be to bind the roles in the target cluster to a User subject instead of a service account and use a client certificate for authentication. This approach does not provide a solution for the client certificate rotation. However, this setup can be achieved by setting both .Values.global.virtualGarden.enabled: true and .Values.global.virtualGarden.user.name, then following these steps:
- Generate a client certificate for the
targetcluster for the respective user. - Deploy the
applicationpart of the charts in thetargetcluster. - Craft a
kubeconfigusing the already generated client certificate. - Set the crafted
kubeconfigand deploy theruntimepart of the charts in theruntimecluster.
5.1.1.3 - Local Setup
admission-alicloud
admission-alicloud is an admission webhook server which is responsible for the validation of the cloud provider (Alicloud in this case) specific fields and resources. The Gardener API server is cloud provider agnostic and it wouldn’t be able to perform similar validation.
Follow the steps below to run the admission webhook server locally.
Start the Gardener API server.
For details, check the Gardener local setup.
Start the webhook server
Make sure that the
KUBECONFIGenvironment variable is pointing to the local garden cluster.make start-admissionSetup the
ValidatingWebhookConfiguration.hack/dev-setup-admission-alicloud.shwill configure the webhook Service which will allow the kube-apiserver of your local cluster to reach the webhook server. It will also apply theValidatingWebhookConfigurationmanifest../hack/dev-setup-admission-alicloud.sh
You are now ready to experiment with the admission-alicloud webhook server locally.
5.1.1.4 - Operations
Using the Alicloud provider extension with Gardener as operator
The core.gardener.cloud/v1beta1.CloudProfile resource declares a providerConfig field that is meant to contain provider-specific configuration.
The core.gardener.cloud/v1beta1.Seed resource is structured similarly.
Additionally, it allows configuring settings for the backups of the main etcds’ data of shoot clusters control planes running in this seed cluster.
This document explains the necessary configuration for this provider extension. In addition, this document also describes how to enable the use of customized machine images for Alicloud.
CloudProfile resource
This section describes, how the configuration for CloudProfile looks like for Alicloud by providing an example CloudProfile manifest with minimal configuration that can be used to allow the creation of Alicloud shoot clusters.
CloudProfileConfig
The cloud profile configuration contains information about the real machine image IDs in the Alicloud environment (AMIs).
You have to map every version that you specify in .spec.machineImages[].versions here such that the Alicloud extension knows the AMI for every version you want to offer.
An example CloudProfileConfig for the Alicloud extension looks as follows:
apiVersion: alicloud.provider.extensions.gardener.cloud/v1alpha1
kind: CloudProfileConfig
machineImages:
- name: coreos
versions:
- version: 2023.4.0
regions:
- name: eu-central-1
id: coreos_2023_4_0_64_30G_alibase_20190319.vhd
Example CloudProfile manifest
Please find below an example CloudProfile manifest:
apiVersion: core.gardener.cloud/v1beta1
kind: CloudProfile
metadata:
name: alicloud
spec:
type: alicloud
kubernetes:
versions:
- version: 1.32.0
- version: 1.31.1
expirationDate: "2026-03-31T23:59:59Z"
machineImages:
- name: coreos
versions:
- version: 2023.4.0
machineTypes:
- name: ecs.sn2ne.large
cpu: "2"
gpu: "0"
memory: 8Gi
volumeTypes:
- name: cloud_efficiency
class: standard
- name: cloud_essd
class: premium
regions:
- name: eu-central-1
zones:
- name: eu-central-1a
- name: eu-central-1b
providerConfig:
apiVersion: alicloud.provider.extensions.gardener.cloud/v1alpha1
kind: CloudProfileConfig
machineImages:
- name: coreos
versions:
- version: 2023.4.0
regions:
- name: eu-central-1
id: coreos_2023_4_0_64_30G_alibase_20190319.vhd
Enable customized machine images for the Alicloud extension
Customized machine images can be created for an Alicloud account and shared with other Alicloud accounts.
The same customized machine image has different image ID in different regions on Alicloud.
If you need to enable encrypted system disk, you must provide customized machine images.
Administrators/Operators need to explicitly declare them per imageID per region as below:
machineImages:
- name: customized_coreos
regions:
- imageID: <image_id_in_eu_central_1>
region: eu-central-1
- imageID: <image_id_in_cn_shanghai>
region: cn-shanghai
...
version: 2191.4.1
...
End-users have to have the permission to use the customized image from its creator Alicloud account. To enable end-users to use customized images, the images are shared from Alicloud account of Seed operator with end-users’ Alicloud accounts. Administrators/Operators need to explicitly provide Seed operator’s Alicloud account access credentials (base64 encoded) as below:
machineImageOwnerSecret:
name: machine-image-owner
accessKeyID: <base64_encoded_access_key_id>
accessKeySecret: <base64_encoded_access_key_secret>
As a result, a Secret named machine-image-owner by default will be created in namespace of Alicloud provider extension.
Operators should also maintain custom image IDs which are to be shared with end-users as below:
toBeSharedImageIDs:
- <image_id_1>
- <image_id_2>
- <image_id_3>
Example ControllerDeployment manifest for enabling customized machine images
apiVersion: core.gardener.cloud/v1beta1
kind: ControllerDeployment
metadata:
name: extension-provider-alicloud
spec:
type: helm
providerConfig:
chart: |
H4sIFAAAAAAA/yk...
values:
config:
machineImageOwnerSecret:
accessKeyID: <base64_encoded_access_key_id>
accessKeySecret: <base64_encoded_access_key_secret>
toBeSharedImageIDs:
- <image_id_1>
- <image_id_2>
...
machineImages:
- name: customized_coreos
regions:
- imageID: <image_id_in_eu_central_1>
region: eu-central-1
- imageID: <image_id_in_cn_shanghai>
region: cn-shanghai
...
version: 2191.4.1
...
csi:
enableADController: true
resources:
limits:
cpu: 500m
memory: 1Gi
requests:
memory: 128Mi
Seed resource
This provider extension does not support any provider configuration for the Seed’s .spec.provider.providerConfig field.
However, it supports to managing of backup infrastructure, i.e., you can specify a configuration for the .spec.backup field.
Backup configuration
A Seed of type alicloud can be configured to perform backups for the main etcds’ of the shoot clusters control planes using Alicloud Object Storage Service.
The location/region where the backups will be stored defaults to the region of the Seed (spec.provider.region).
Please find below an example Seed manifest (partly) that configures backups using Alicloud Object Storage Service.
---
apiVersion: core.gardener.cloud/v1beta1
kind: Seed
metadata:
name: my-seed
spec:
provider:
type: alicloud
region: cn-shanghai
backup:
provider: alicloud
credentialsRef:
apiVersion: v1
kind: Secret
name: backup-credentials
namespace: garden
...
An example of the referenced secret containing the credentials for the Alicloud Object Storage Service can be found in the example folder.
Permissions for Alicloud Object Storage Service
Please make sure the RAM user associated with the provided AccessKey pair has the following permission.
- AliyunOSSFullAccess
5.1.1.5 - Usage
Using the Alicloud provider extension with Gardener as end-user
The core.gardener.cloud/v1beta1.Shoot resource declares a few fields that are meant to contain provider-specific configuration.
This document describes the configurable options for Alicloud and provides an example Shoot manifest with minimal configuration that can be used to create an Alicloud cluster (modulo the landscape-specific information like cloud profile names, secret binding names, etc.).
Alicloud Provider Credentials
In order for Gardener to create a Kubernetes cluster using Alicloud infrastructure components, a Shoot has to provide credentials with sufficient permissions to the desired Alicloud project.
Every shoot cluster references a SecretBinding or a CredentialsBinding which itself references a Secret, and this Secret contains the provider credentials of the Alicloud project.
This Secret must look as follows:
apiVersion: v1
kind: Secret
metadata:
name: core-alicloud
namespace: garden-dev
type: Opaque
data:
accessKeyID: base64(access-key-id)
accessKeySecret: base64(access-key-secret)
The SecretBinding/CredentialsBinding is configurable in the Shoot cluster with the field secretBindingName/credentialsBindingName.
The required credentials for the Alicloud project are an AccessKey Pair associated with a Resource Access Management (RAM) User. A RAM user is a special account that can be used by services and applications to interact with Alicloud Cloud Platform APIs. Applications can use AccessKey pair to authorize themselves to a set of APIs and perform actions within the permissions granted to the RAM user.
Make sure to create a Resource Access Management User, and create an AccessKey Pair that shall be used for the Shoot cluster.
Permissions
Please make sure the provided credentials have the correct privileges. You can use the following Alicloud RAM policy document and attach it to the RAM user backed by the credentials you provided.
Click to expand the Alicloud RAM policy document!
{
"Statement": [
{
"Action": [
"vpc:*"
],
"Effect": "Allow",
"Resource": [
"*"
]
},
{
"Action": [
"ecs:*"
],
"Effect": "Allow",
"Resource": [
"*"
]
},
{
"Action": [
"slb:*"
],
"Effect": "Allow",
"Resource": [
"*"
]
},
{
"Action": [
"ram:GetRole",
"ram:CreateRole",
"ram:CreateServiceLinkedRole"
],
"Effect": "Allow",
"Resource": [
"*"
]
},
{
"Action": [
"ros:*"
],
"Effect": "Allow",
"Resource": [
"*"
]
}
],
"Version": "1"
}
InfrastructureConfig
The infrastructure configuration mainly describes how the network layout looks like in order to create the shoot worker nodes in a later step, thus, prepares everything relevant to create VMs, load balancers, volumes, etc.
An example InfrastructureConfig for the Alicloud extension looks as follows:
apiVersion: alicloud.provider.extensions.gardener.cloud/v1alpha1
kind: InfrastructureConfig
networks:
vpc: # specify either 'id' or 'cidr'
# id: my-vpc
cidr: 10.250.0.0/16
# gardenerManagedNATGateway: true
zones:
- name: eu-central-1a
workers: 10.250.1.0/24
# natGateway:
# eipAllocationID: eip-ufxsdg122elmszcg
The networks.vpc section describes whether you want to create the shoot cluster in an already existing VPC or whether to create a new one:
- If
networks.vpc.idis given then you have to specify the VPC ID of the existing VPC that was created by other means (manually, other tooling, …). - If
networks.vpc.cidris given then you have to specify the VPC CIDR of a new VPC that will be created during shoot creation. You can freely choose a private CIDR range. - Either
networks.vpc.idornetworks.vpc.cidrmust be present, but not both at the same time. - When
networks.vpc.idis present, in addition, you can also choose to setnetworks.vpc.gardenerManagedNATGateway. It is by defaultfalse. When it is set totrue, Gardener will create an Enhanced NATGateway in the VPC and associate it with a VSwitch created in the first zone in thenetworks.zones. - Please note that when
networks.vpc.idis present, andnetworks.vpc.gardenerManagedNATGatewayisfalseor not set, you have to manually create an Enhance NATGateway and associate it with a VSwitch that you manually created. In this case, make sure the worker CIDRs innetworks.zonesdo not overlap with the one you created. If a NATGateway is created manually and a shoot is created in the same VPC withnetworks.vpc.gardenerManagedNATGatewaysettrue, you need to manually adjust the route rule accordingly. You may refer to here.
The networks.zones section describes which subnets you want to create in availability zones.
For every zone, the Alicloud extension creates one subnet:
- The
workerssubnet is used for all shoot worker nodes, i.e., VMs which later run your applications.
For every subnet, you have to specify a CIDR range contained in the VPC CIDR specified above, or the VPC CIDR of your already existing VPC. You can freely choose these CIDR and it is your responsibility to properly design the network layout to suit your needs.
If you want to use multiple availability zones then add a second, third, … entry to the networks.zones[] list and properly specify the AZ name in networks.zones[].name.
Apart from the VPC and the subnets the Alicloud extension will also create a NAT gateway (only if a new VPC is created), a key pair, elastic IPs, VSwitches, a SNAT table entry, and security groups.
By default, the Alicloud extension will create a corresponding Elastic IP that it attaches to this NAT gateway and which is used for egress traffic.
The networks.zones[].natGateway.eipAllocationID field allows you to specify the Elastic IP Allocation ID of an existing Elastic IP allocation in case you want to bring your own.
If provided, no new Elastic IP will be created and, instead, the Elastic IP specified by you will be used.
⚠️ If you change this field for an already existing infrastructure then it will disrupt egress traffic while Alicloud applies this change, because the NAT gateway must be recreated with the new Elastic IP association. Also, please note that the existing Elastic IP will be permanently deleted if it was earlier created by the Alicloud extension.
ControlPlaneConfig
The control plane configuration mainly contains values for the Alicloud-specific control plane components.
Today, the Alicloud extension deploys the cloud-controller-manager and the CSI controllers.
An example ControlPlaneConfig for the Alicloud extension looks as follows:
apiVersion: alicloud.provider.extensions.gardener.cloud/v1alpha1
kind: ControlPlaneConfig
csi:
enableADController: true
# cloudControllerManager:
# featureGates:
# SomeKubernetesFeature: true
The csi.enableADController is used as the value of environment DISK_AD_CONTROLLER, which is used for AliCloud csi-disk-plugin. This field is optional. When a new shoot is creatd, this field is automatically set true. For an existing shoot created in previous versions, it remains unchanged. If there are persistent volumes created before year 2021, please be cautious to set this field true because they may fail to mount to nodes.
The cloudControllerManager.featureGates contains a map of explicitly enabled or disabled feature gates.
For production usage it’s not recommend to use this field at all as you can enable alpha features or disable beta/stable features, potentially impacting the cluster stability.
If you don’t want to configure anything for the cloudControllerManager simply omit the key in the YAML specification.
WorkerConfig
The Alicloud extension does not support a specific WorkerConfig. However, it supports additional data volumes (plus encryption) per machine.
By default (if not stated otherwise), all the disks are unencrypted.
For each data volume, you have to specify a name.
It also supports encrypted system disk.
However, only Customized image is currently supported to be used as a basic image for encrypted system disk.
Please be noted that the change of system disk encryption flag will cause reconciliation of a shoot, and it will result in nodes rolling update within the worker group.
The following YAML is a snippet of a Shoot resource:
spec:
provider:
workers:
- name: cpu-worker
...
volume:
type: cloud_efficiency
size: 20Gi
encrypted: true
dataVolumes:
- name: kubelet-dir
type: cloud_efficiency
size: 25Gi
encrypted: true
Example Shoot manifest (one availability zone)
Please find below an example Shoot manifest for one availability zone:
apiVersion: core.gardener.cloud/v1beta1
kind: Shoot
metadata:
name: johndoe-alicloud
namespace: garden-dev
spec:
cloudProfile:
name: alicloud
region: eu-central-1
secretBindingName: core-alicloud
provider:
type: alicloud
infrastructureConfig:
apiVersion: alicloud.provider.extensions.gardener.cloud/v1alpha1
kind: InfrastructureConfig
networks:
vpc:
cidr: 10.250.0.0/16
zones:
- name: eu-central-1a
workers: 10.250.0.0/19
controlPlaneConfig:
apiVersion: alicloud.provider.extensions.gardener.cloud/v1alpha1
kind: ControlPlaneConfig
workers:
- name: worker-xoluy
machine:
type: ecs.sn2ne.large
minimum: 2
maximum: 2
volume:
size: 50Gi
type: cloud_efficiency
zones:
- eu-central-1a
networking:
nodes: 10.250.0.0/16
type: calico
kubernetes:
version: 1.28.2
maintenance:
autoUpdate:
kubernetesVersion: true
machineImageVersion: true
addons:
kubernetesDashboard:
enabled: true
nginxIngress:
enabled: true
Example Shoot manifest (two availability zones)
Please find below an example Shoot manifest for two availability zones:
apiVersion: core.gardener.cloud/v1beta1
kind: Shoot
metadata:
name: johndoe-alicloud
namespace: garden-dev
spec:
cloudProfile:
name: alicloud
region: eu-central-1
secretBindingName: core-alicloud
provider:
type: alicloud
infrastructureConfig:
apiVersion: alicloud.provider.extensions.gardener.cloud/v1alpha1
kind: InfrastructureConfig
networks:
vpc:
cidr: 10.250.0.0/16
zones:
- name: eu-central-1a
workers: 10.250.0.0/26
- name: eu-central-1b
workers: 10.250.0.64/26
controlPlaneConfig:
apiVersion: alicloud.provider.extensions.gardener.cloud/v1alpha1
kind: ControlPlaneConfig
workers:
- name: worker-xoluy
machine:
type: ecs.sn2ne.large
minimum: 2
maximum: 4
volume:
size: 50Gi
type: cloud_efficiency
# NOTE: Below comment is for the case when encrypted field of an existing shoot is updated from false to true.
# It will cause affected nodes to be rolling updated. Users must trigger a MAINTAIN operation of the shoot.
# Otherwise, the shoot will fail to reconcile.
# You could do it either via Dashboard or annotating the shoot with gardener.cloud/operation=maintain
encrypted: true
zones:
- eu-central-1a
- eu-central-1b
networking:
nodes: 10.250.0.0/16
type: calico
kubernetes:
version: 1.28.2
maintenance:
autoUpdate:
kubernetesVersion: true
machineImageVersion: true
addons:
kubernetesDashboard:
enabled: true
nginxIngress:
enabled: true
Kubernetes Versions per Worker Pool
This extension supports gardener/gardener’s WorkerPoolKubernetesVersion feature gate, i.e., having worker pools with overridden Kubernetes versions since gardener-extension-provider-alicloud@v1.33.
Shoot CA Certificate and ServiceAccount Signing Key Rotation
This extension supports gardener/gardener’s ShootCARotation feature gate since gardener-extension-provider-alicloud@v1.36 and ShootSARotation feature gate since gardener-extension-provider-alicloud@v1.37.
5.1.2 - Provider AWS
Gardener Extension for AWS provider
Project Gardener implements the automated management and operation of Kubernetes clusters as a service. Its main principle is to leverage Kubernetes concepts for all of its tasks.
Recently, most of the vendor specific logic has been developed in-tree. However, the project has grown to a size where it is very hard to extend, maintain, and test. With GEP-1 we have proposed how the architecture can be changed in a way to support external controllers that contain their very own vendor specifics. This way, we can keep Gardener core clean and independent.
This controller implements Gardener’s extension contract for the AWS provider.
An example for a ControllerRegistration resource that can be used to register this controller to Gardener can be found here.
Please find more information regarding the extensibility concepts and a detailed proposal here.
Supported Kubernetes versions
This extension controller supports the following Kubernetes versions:
| Version | Support | Conformance test results |
|---|---|---|
| Kubernetes 1.33 | 1.33.0+ | N/A |
| Kubernetes 1.32 | 1.32.0+ | |
| Kubernetes 1.31 | 1.31.0+ | |
| Kubernetes 1.30 | 1.30.0+ | |
| Kubernetes 1.29 | 1.29.0+ | |
| Kubernetes 1.28 | 1.28.0+ | |
| Kubernetes 1.27 | 1.27.0+ |
Please take a look here to see which versions are supported by Gardener in general.
Compatibility
The following lists known compatibility issues of this extension controller with other Gardener components.
| AWS Extension | Gardener | Action | Notes |
|---|---|---|---|
<= v1.15.0 | >v1.10.0 | Please update the provider version to > v1.15.0 or disable the feature gate MountHostCADirectories in the Gardenlet. | Applies if feature flag MountHostCADirectories in the Gardenlet is enabled. Shoots with CSI enabled (Kubernetes version >= 1.18) miss a mount to the directory /etc/ssl in the Shoot API Server. This can lead to not trusting external Root CAs when the API Server makes requests via webhooks or OIDC. |
How to start using or developing this extension controller locally
You can run the controller locally on your machine by executing make start.
Static code checks and tests can be executed by running make verify. We are using Go modules for Golang package dependency management and Ginkgo/Gomega for testing.
Feedback and Support
Feedback and contributions are always welcome!
Please report bugs or suggestions as GitHub issues or reach out on Slack (join the workspace here).
Learn more!
Please find further resources about out project here:
- Our landing page gardener.cloud
- “Gardener, the Kubernetes Botanist” blog on kubernetes.io
- “Gardener Project Update” blog on kubernetes.io
- GEP-1 (Gardener Enhancement Proposal) on extensibility
- GEP-4 (New
core.gardener.cloud/v1beta1API) - Extensibility API documentation
- Gardener Extensions Golang library
- Gardener API Reference
5.1.2.1 - Tutorials
Overview
Gardener allows you to create a Kubernetes cluster on different infrastructure providers. This tutorial will guide you through the process of creating a cluster on AWS.
Prerequisites
- You have created an AWS account.
- You have access to the Gardener dashboard and have permissions to create projects.
Steps
Go to the Gardener dashboard and create a Project.
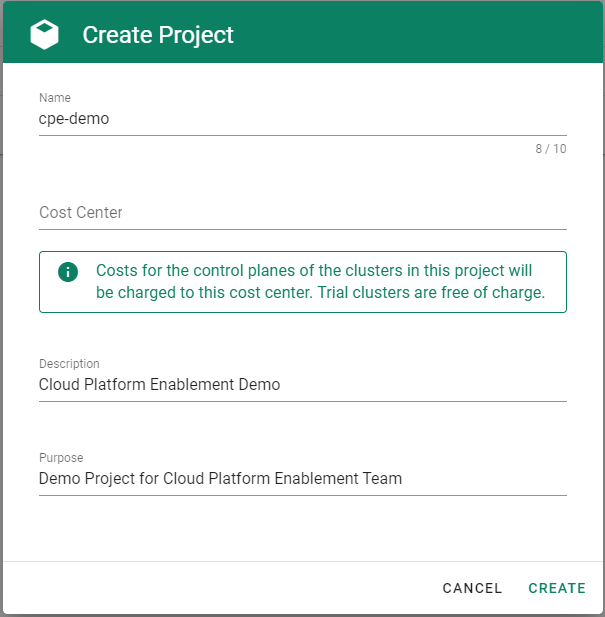
Choose Secrets, then the plus icon
 and select AWS.
To copy the policy for AWS from the Gardener dashboard, click on the help icon
 for AWS secrets, and choose copy
  .
.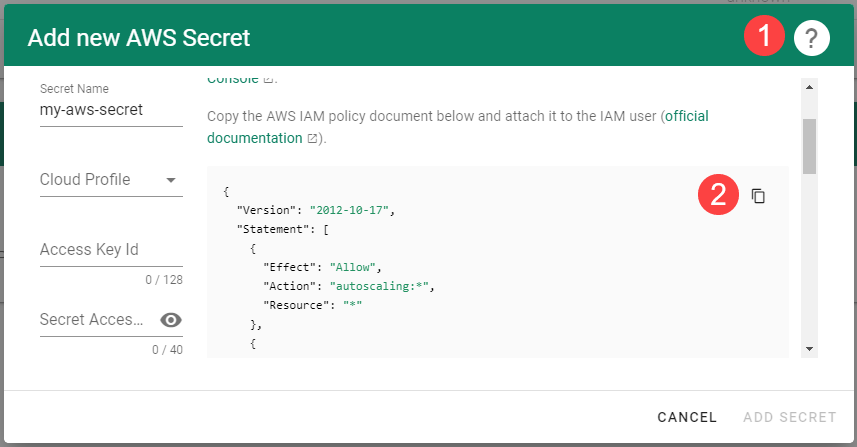
Create a new policy in AWS:
Choose Create policy.
Paste the policy that you copied from the Gardener dashboard to this custom policy.
Choose Next until you reach the Review section.
Fill in the name and description, then choose Create policy.

Create a new technical user in AWS:
Type in a username and select the access key credential type.
Choose Attach an existing policy.
Select GardenerAccess from the policy list.
Choose Next until you reach the Review section.
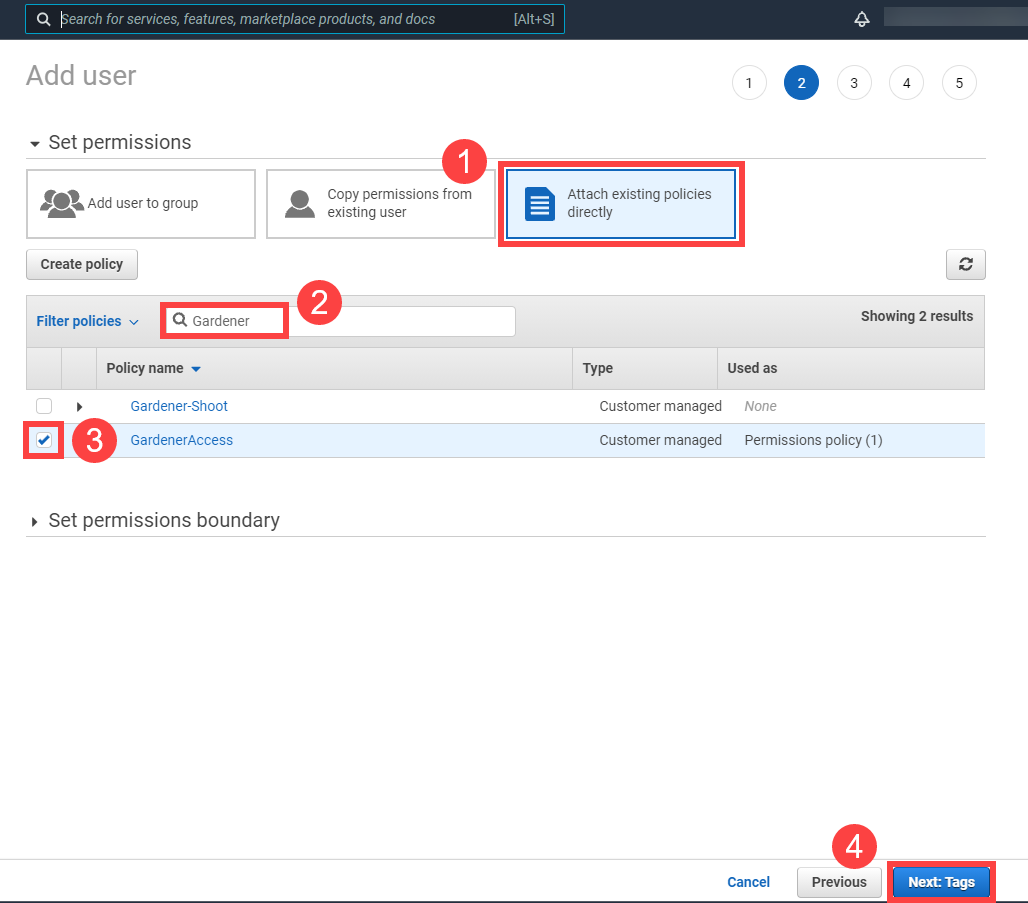
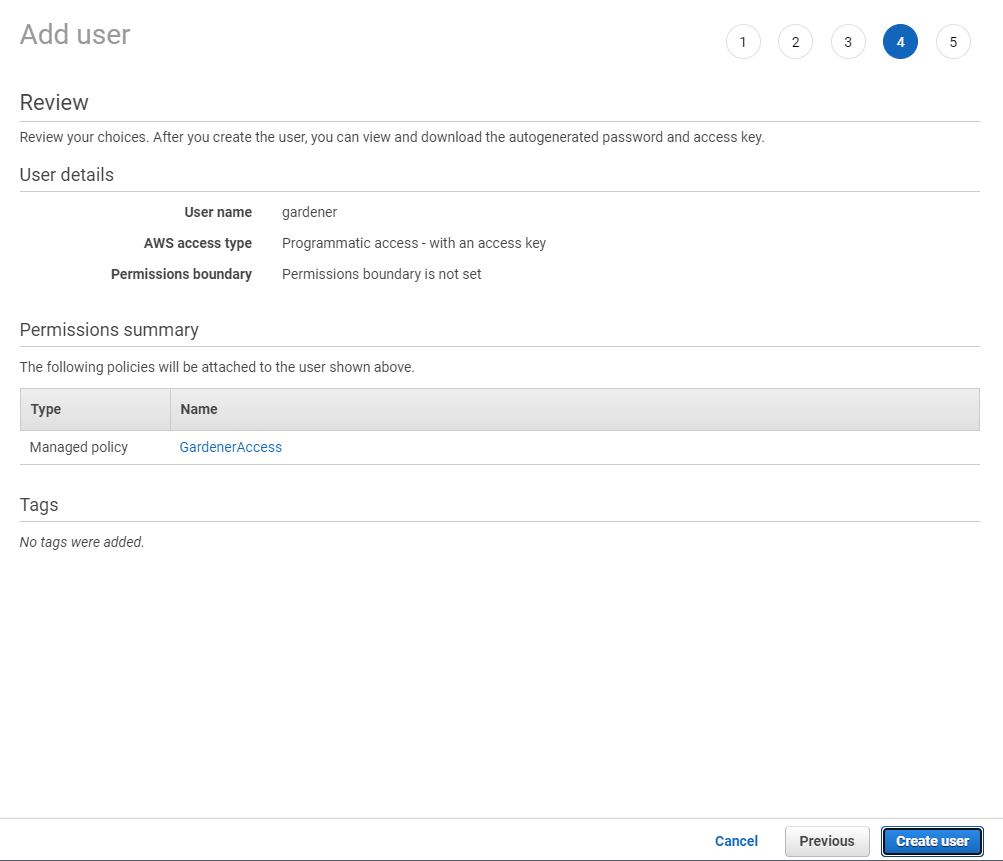
Note
After the user is created,
Access key IDandSecret access keyare generated and displayed. Remember to save them. TheAccess key IDis used later to create secrets for Gardener.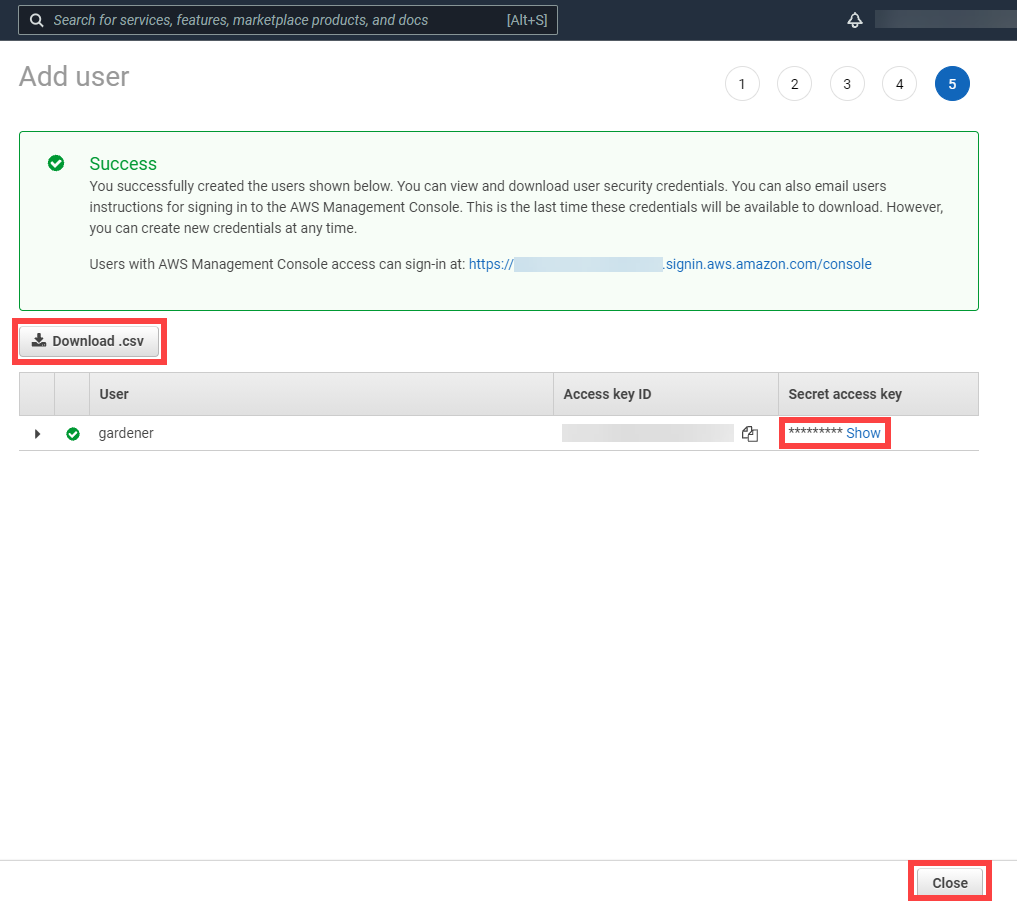
On the Gardener dashboard, choose Secrets and then the plus sign
. Select AWS from the drop down menu to add a new AWS secret.Create your secret.
- Type the name of your secret.
- Copy and paste the
Access Key IDandSecret Access Keyyou saved when you created the technical user on AWS. - Choose Add secret.

After completing these steps, you should see your newly created secret in the Infrastructure Secrets section.
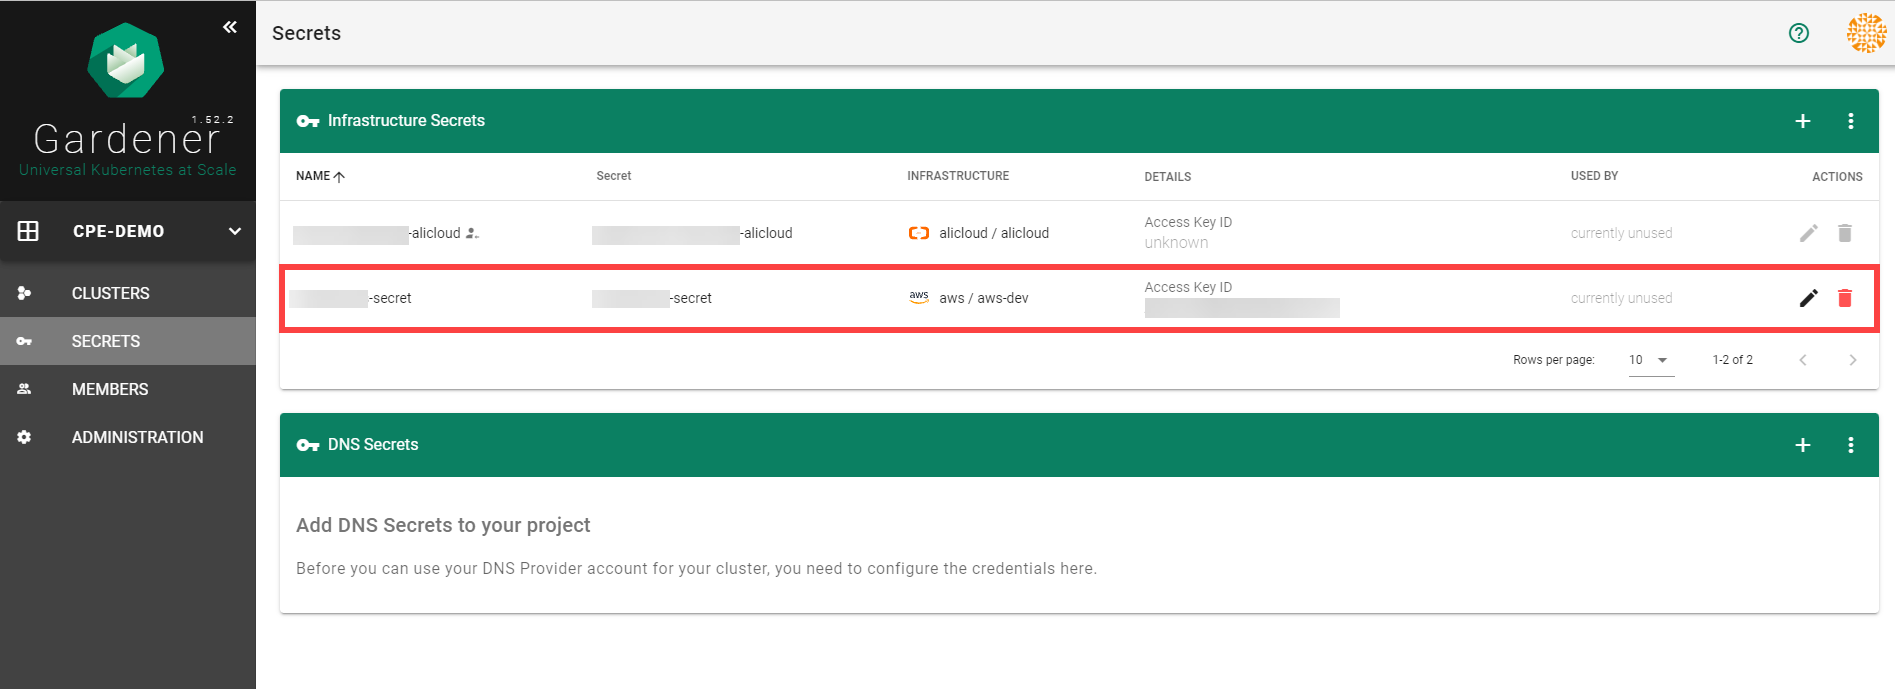
To create a new cluster, choose Clusters and then the plus sign in the upper right corner.

In the Create Cluster section:
- Select AWS in the Infrastructure tab.
- Type the name of your cluster in the Cluster Details tab.
- Choose the secret you created before in the Infrastructure Details tab.
- Choose Create.
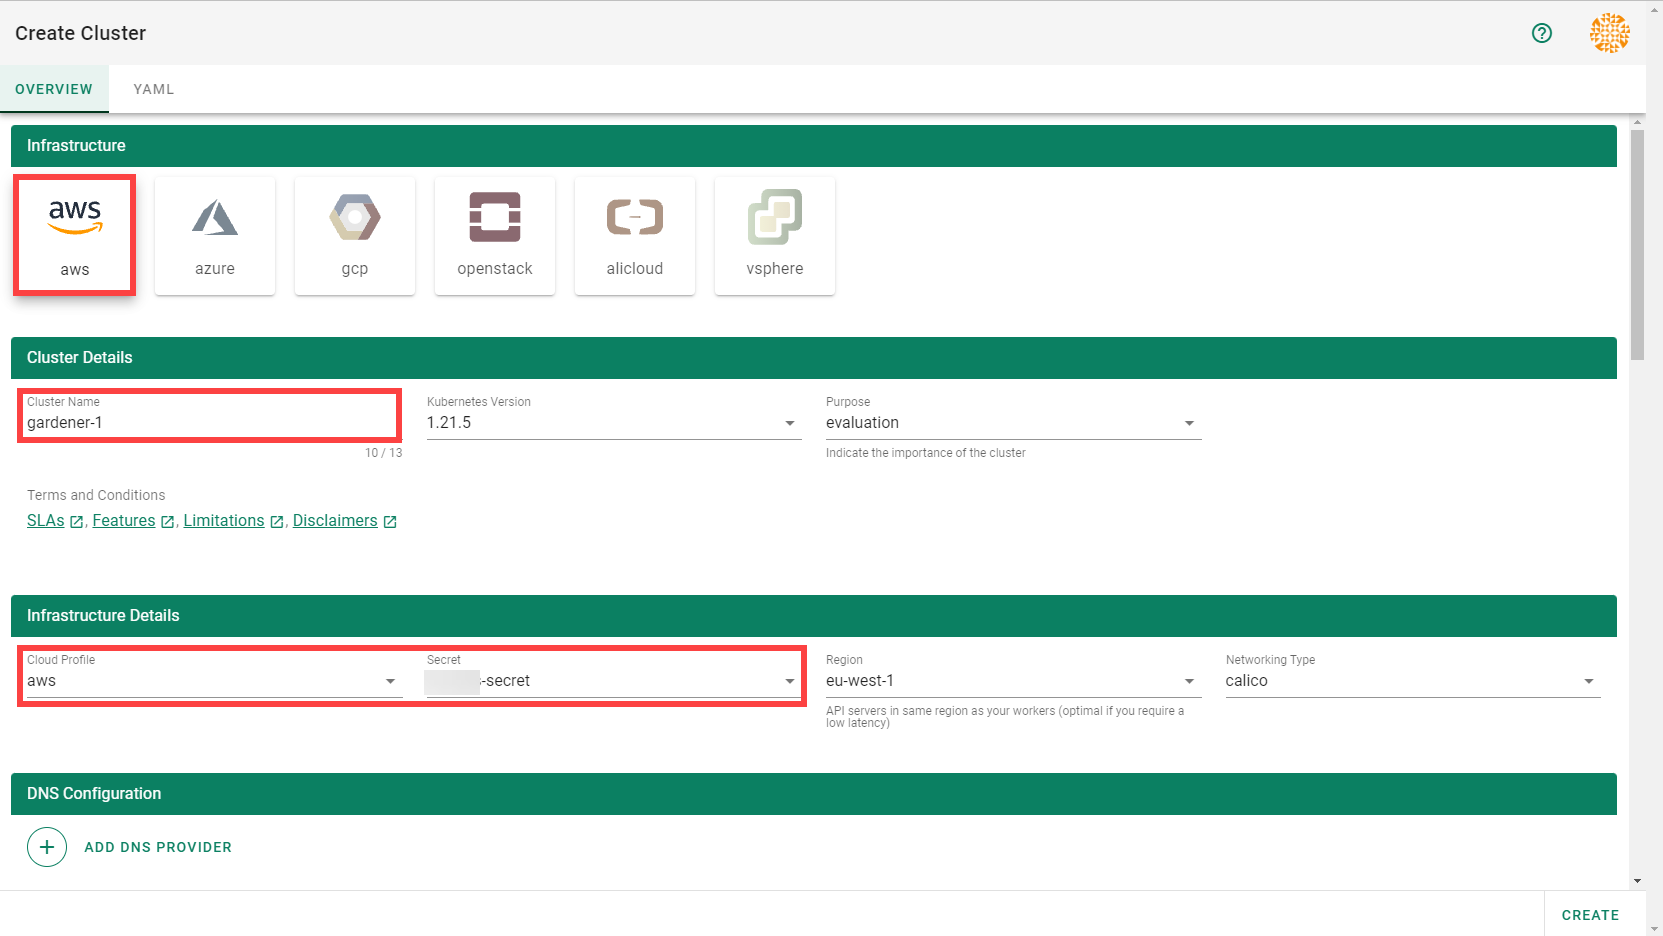
Wait for your cluster to get created.
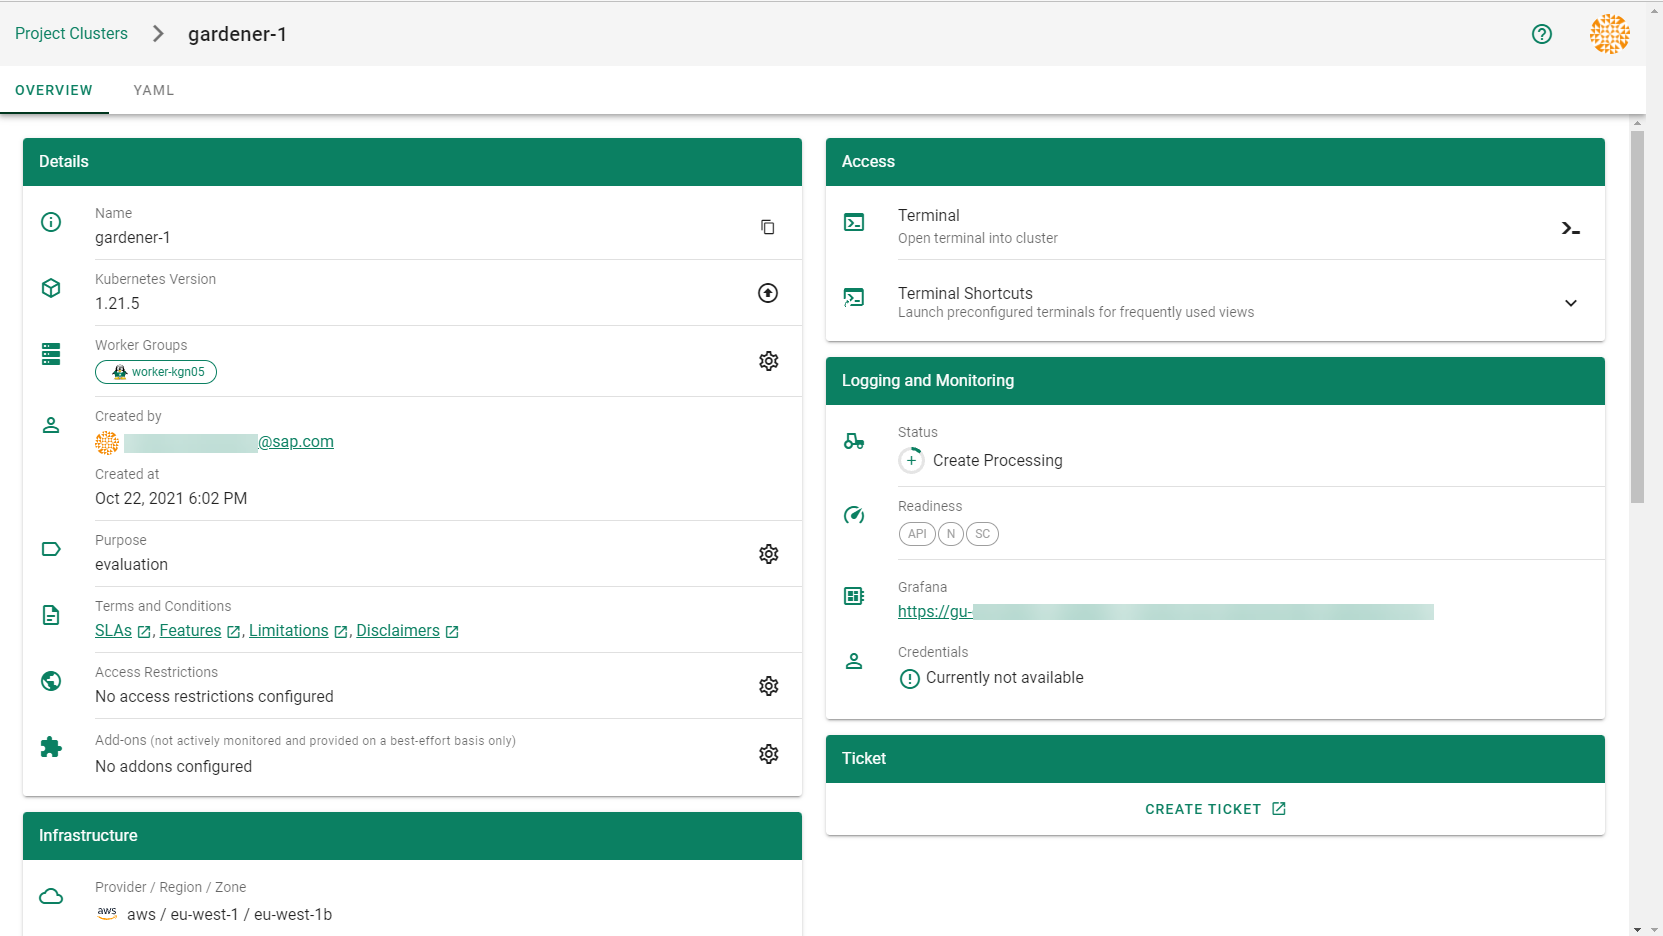
Result
After completing the steps in this tutorial, you will be able to see and download the kubeconfig of your cluster.
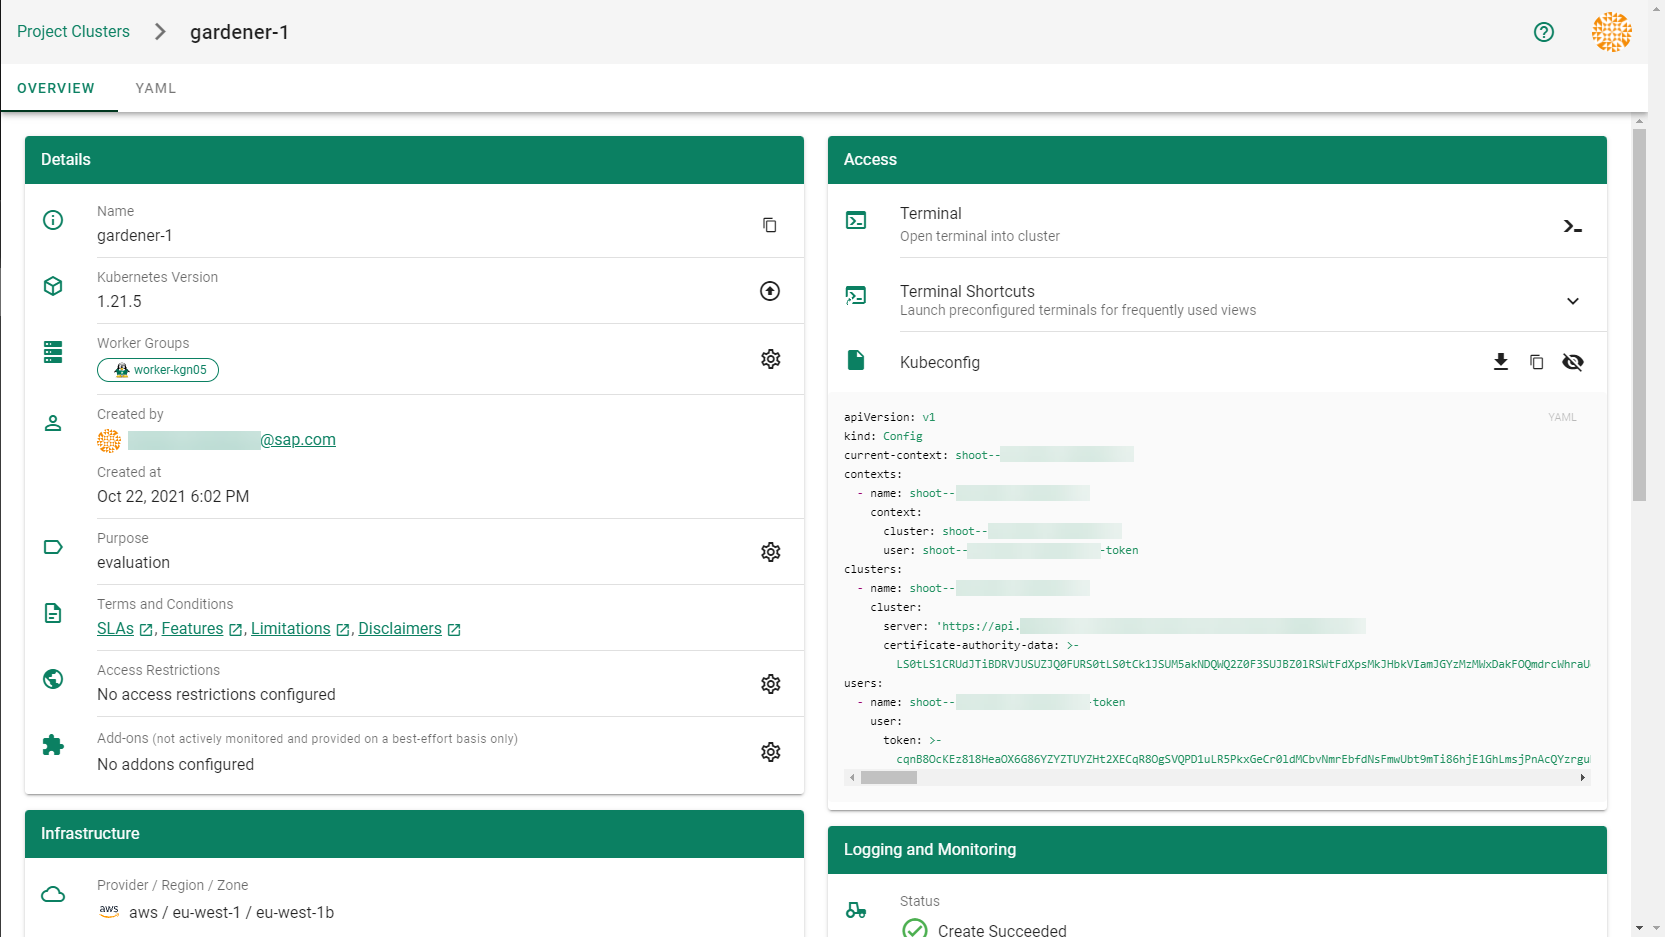
5.1.2.2 - Deployment
Deployment of the AWS provider extension
Disclaimer: This document is NOT a step by step installation guide for the AWS provider extension and only contains some configuration specifics regarding the installation of different components via the helm charts residing in the AWS provider extension repository.
gardener-extension-admission-aws
Authentication against the Garden cluster
There are several authentication possibilities depending on whether or not the concept of Virtual Garden is used.
Virtual Garden is not used, i.e., the runtime Garden cluster is also the target Garden cluster.
Automounted Service Account Token
The easiest way to deploy the gardener-extension-admission-aws component will be to not provide kubeconfig at all. This way in-cluster configuration and an automounted service account token will be used. The drawback of this approach is that the automounted token will not be automatically rotated.
Service Account Token Volume Projection
Another solution will be to use Service Account Token Volume Projection combined with a kubeconfig referencing a token file (see example below).
apiVersion: v1
kind: Config
clusters:
- cluster:
certificate-authority-data: <CA-DATA>
server: https://default.kubernetes.svc.cluster.local
name: garden
contexts:
- context:
cluster: garden
user: garden
name: garden
current-context: garden
users:
- name: garden
user:
tokenFile: /var/run/secrets/projected/serviceaccount/token
This will allow for automatic rotation of the service account token by the kubelet. The configuration can be achieved by setting both .Values.global.serviceAccountTokenVolumeProjection.enabled: true and .Values.global.kubeconfig in the respective chart’s values.yaml file.
Virtual Garden is used, i.e., the runtime Garden cluster is different from the target Garden cluster.
Service Account
The easiest way to setup the authentication will be to create a service account and the respective roles will be bound to this service account in the target cluster. Then use the generated service account token and craft a kubeconfig which will be used by the workload in the runtime cluster. This approach does not provide a solution for the rotation of the service account token. However, this setup can be achieved by setting .Values.global.virtualGarden.enabled: true and following these steps:
- Deploy the
applicationpart of the charts in thetargetcluster. - Get the service account token and craft the
kubeconfig. - Set the crafted
kubeconfigand deploy theruntimepart of the charts in theruntimecluster.
Client Certificate
Another solution will be to bind the roles in the target cluster to a User subject instead of a service account and use a client certificate for authentication. This approach does not provide a solution for the client certificate rotation. However, this setup can be achieved by setting both .Values.global.virtualGarden.enabled: true and .Values.global.virtualGarden.user.name, then following these steps:
- Generate a client certificate for the
targetcluster for the respective user. - Deploy the
applicationpart of the charts in thetargetcluster. - Craft a
kubeconfigusing the already generated client certificate. - Set the crafted
kubeconfigand deploy theruntimepart of the charts in theruntimecluster.
Projected Service Account Token
This approach requires an already deployed and configured oidc-webhook-authenticator for the target cluster. Also the runtime cluster should be registered as a trusted identity provider in the target cluster. Then projected service accounts tokens from the runtime cluster can be used to authenticate against the target cluster. The needed steps are as follows:
- Deploy OWA and establish the needed trust.
- Set
.Values.global.virtualGarden.enabled: trueand.Values.global.virtualGarden.user.name. Note: username value will depend on the trust configuration, e.g.,<prefix>:system:serviceaccount:<namespace>:<serviceaccount> - Set
.Values.global.serviceAccountTokenVolumeProjection.enabled: trueand.Values.global.serviceAccountTokenVolumeProjection.audience. Note: audience value will depend on the trust configuration, e.g.,<cliend-id-from-trust-config>. - Craft a kubeconfig (see example below).
- Deploy the
applicationpart of the charts in thetargetcluster. - Deploy the
runtimepart of the charts in theruntimecluster.
apiVersion: v1
kind: Config
clusters:
- cluster:
certificate-authority-data: <CA-DATA>
server: https://virtual-garden.api
name: virtual-garden
contexts:
- context:
cluster: virtual-garden
user: virtual-garden
name: virtual-garden
current-context: virtual-garden
users:
- name: virtual-garden
user:
tokenFile: /var/run/secrets/projected/serviceaccount/token
5.1.2.3 - Dual Stack Ingress
Using IPv4/IPv6 (dual-stack) Ingress in an IPv4 single-stack cluster
Motivation
IPv6 adoption is continuously growing, already overtaking IPv4 in certain regions, e.g. India, or scenarios, e.g. mobile. Even though most IPv6 installations deploy means to reach IPv4, it might still be beneficial to expose services natively via IPv4 and IPv6 instead of just relying on IPv4.
Disadvantages of full IPv4/IPv6 (dual-stack) Deployments
Enabling full IPv4/IPv6 (dual-stack) support in a kubernetes cluster is a major endeavor. It requires a lot of changes and restarts of all pods so that all pods get addresses for both IP families. A side-effect of dual-stack networking is that failures may be hidden as network traffic may take the other protocol to reach the target. For this reason and also due to reduced operational complexity, service teams might lean towards staying in a single-stack environment as much as possible. Luckily, this is possible with Gardener and IPv4/IPv6 (dual-stack) ingress on AWS.
Simplifying IPv4/IPv6 (dual-stack) Ingress with Protocol Translation on AWS
Fortunately, the network load balancer on AWS supports automatic protocol translation, i.e. it can expose both IPv4 and IPv6 endpoints while communicating with just one protocol to the backends. Under the hood, automatic protocol translation takes place. Client IP address preservation can be achieved by using proxy protocol.
This approach enables users to expose IPv4 workload to IPv6-only clients without having to change the workload/service. Without requiring invasive changes, it allows a fairly simple first step into the IPv6 world for services just requiring ingress (incoming) communication.
Necessary Shoot Cluster Configuration Changes for IPv4/IPv6 (dual-stack) Ingress
To be able to utilize IPv4/IPv6 (dual-stack) Ingress in an IPv4 shoot cluster, the cluster needs to meet two preconditions:
dualStack.enabledneeds to be set totrueto configure VPC/subnet for IPv6 and add a routing rule for IPv6. (This does not add IPv6 addresses to kubernetes nodes.)loadBalancerController.enabledneeds to be set totrueas well to use the load balancer controller, which supports dual-stack ingress.
apiVersion: core.gardener.cloud/v1beta1
kind: Shoot
...
spec:
provider:
type: aws
infrastructureConfig:
apiVersion: aws.provider.extensions.gardener.cloud/v1alpha1
kind: InfrastructureConfig
dualStack:
enabled: true
controlPlaneConfig:
apiVersion: aws.provider.extensions.gardener.cloud/v1alpha1
kind: ControlPlaneConfig
loadBalancerController:
enabled: true
...
When infrastructureConfig.networks.vpc.id is set to the ID of an existing VPC, please make sure that your VPC has an Amazon-provided IPv6 CIDR block added.
After adapting the shoot specification and reconciling the cluster, dual-stack load balancers can be created using kubernetes services objects.
Creating an IPv4/IPv6 (dual-stack) Ingress
With the preconditions set, creating an IPv4/IPv6 load balancer is as easy as annotating a service with the correct annotations:
apiVersion: v1
kind: Service
metadata:
annotations:
service.beta.kubernetes.io/aws-load-balancer-ip-address-type: dualstack
service.beta.kubernetes.io/aws-load-balancer-scheme: internet-facing
service.beta.kubernetes.io/aws-load-balancer-nlb-target-type: instance
service.beta.kubernetes.io/aws-load-balancer-type: external
name: ...
namespace: ...
spec:
...
type: LoadBalancer
In case the client IP address should be preserved, the following annotation can be used to enable proxy protocol. (The pod receiving the traffic needs to be configured for proxy protocol as well.)
service.beta.kubernetes.io/aws-load-balancer-proxy-protocol: "*"
Please note that changing an existing Service to dual-stack may cause the creation of a new load balancer without
deletion of the old AWS load balancer resource. While this helps in a seamless migration by not cutting existing
connections it may lead to wasted/forgotten resources. Therefore, the (manual) cleanup needs to be taken into account
when migrating an existing Service instance.
For more details see AWS Load Balancer Documentation - Network Load Balancer.
DNS Considerations to Prevent Downtime During a Dual-Stack Migration
In case the migration of an existing service is desired, please check if there are DNS entries directly linked to the corresponding load balancer. The migrated load balancer will have a new domain name immediately, which will not be ready in the beginning. Therefore, a direct migration of the domain name entries is not desired as it may cause a short downtime, i.e. domain name entries without backing IP addresses.
If there are DNS entries directly linked to the corresponding load balancer and they are managed by the
shoot-dns-service, you can identify this via
annotations with the prefix dns.gardener.cloud/. Those annotations can be linked to a Service, Ingress or
Gateway resources. Alternatively, they may also use DNSEntry or DNSAnnotation resources.
For a seamless migration without downtime use the following three step approach:
- Temporarily prevent direct DNS updates
- Migrate the load balancer and wait until it is operational
- Allow DNS updates again
To prevent direct updates of the DNS entries when the load balancer is migrated add the annotation
dns.gardener.cloud/ignore: 'true' to all affected resources next to the other dns.gardener.cloud/... annotations
before starting the migration. For example, in case of a Service ensure that the service looks like the following:
kind: Service
metadata:
annotations:
dns.gardener.cloud/ignore: 'true'
dns.gardener.cloud/class: garden
dns.gardener.cloud/dnsnames: '...'
...
Next, migrate the load balancer to be dual-stack enabled by adding/changing the corresponding annotations.
You have multiple options how to check that the load balancer has been provisioned successfully. It might be useful
to peek into status.loadBalancer.ingress of the corresponding Service to identify the load balancer:
- Check in the AWS console for the corresponding load balancer provisioning state
- Perform domain name lookups with
nslookup/digto check whether the name resolves to an IP address. - Call your workload via the new load balancer, e.g. using
curl --resolve <my-domain-name>:<port>:<IP-address> https://<my-domain-name>:<port>, which allows you to call your service with the “correct” domain name without using actual name resolution. - Wait a fixed period of time as load balancer creation is usually finished within 15 minutes
Once the load balancer has been provisioned, you can remove the annotation dns.gardener.cloud/ignore: 'true' again
from the affected resources. It may take some additional time until the domain name change finally propagates
(up to one hour).
5.1.2.4 - Ipv6
Support for IPv6
Overview
Gardener supports different levels of IPv6 support in shoot clusters. This document describes the differences between them and what to consider when using them.
In IPv6 Ingress for IPv4 Shoot Clusters, the focus is on how an existing IPv4-only shoot cluster can provide dual-stack services to clients. Section IPv6-only Shoot Clusters describes how to create a shoot cluster that only supports IPv6. Finally, Dual-Stack Shoot Clusters explains how to create a shoot cluster that supports both IPv4 and IPv6.
IPv6 Ingress for IPv4 Shoot Clusters
Per default, Gardener shoot clusters use only IPv4. Therefore, they also expose their services only via load balancers with IPv4 addresses. To allow external clients to also use IPv6 to access services in an IPv4 shoot cluster, the cluster needs to be configured to support dual-stack ingress.
It is possible to configure a shoot cluster to support dual-stack ingress, see Using IPv4/IPv6 (dual-stack) Ingress in an IPv4 single-stack cluster for more information.
The main benefit of this approach is that the existing cluster stays almost as is without major changes, keeping the operational simplicity. It works very well for services that only require incoming communication, e.g. pure web services.
The main drawback is that certain scenarios, especially related to IPv6 callbacks, are not possible. This means that services, which actively call to their clients via web hooks, will not be able to do so over IPv6. Hence, those services will not be able to allow full-usage via IPv6.
IPv6-only Shoot Clusters
Motivation
IPv6-only shoot clusters are the best option to verify that services are fully IPv6-compatible. While Dual-Stack Shoot Clusters may fall back on using IPv4 transparently, IPv6-only shoot clusters enforce the usage of IPv6 inside the cluster. Therefore, it is recommended to check with IPv6-only shoot clusters if a workload is fully IPv6-compatible.
In addition to being a good testbed for IPv6 compatibility, IPv6-only shoot clusters may also be a desirable eventual target in the IPv6 migration as they allow to support both IPv4 and IPv6 clients while having a single-stack with the cluster.
Creating an IPv6-only Shoot Cluster
To create an IPv6-only shoot cluster, the following needs to be specified in the Shoot resource (see also here):
kind: Shoot
apiVersion: core.gardener.cloud/v1beta1
metadata:
...
spec:
...
networking:
type: ...
ipFamilies:
- IPv6
...
provider:
type: aws
infrastructureConfig:
apiVersion: aws.provider.extensions.gardener.cloud/v1alpha1
kind: InfrastructureConfig
networks:
vpc:
cidr: 192.168.0.0/16
zones:
- name: ...
public: 192.168.32.0/20
internal: 192.168.48.0/20
Warning
Please note that
nodes,podsandservicesshould not be specified in.spec.networkingresource.
In contrast to that, it is still required to specify IPv4 ranges for the VPC and the public/internal subnets. This is mainly due to the fact that public/internal load balancers still require IPv4 addresses as there are no pure IPv6-only load balancers as of now. The ranges can be sized according to the expected amount of load balancers per zone/type.
The IPv6 address ranges are provided by AWS. It is ensured that the IPv6 ranges are globally unique und internet routable.
Load Balancer Configuration
The AWS Load Balancer Controller is automatically deployed when using an IPv6-only shoot cluster. When creating a load balancer, the corresponding annotations need to be configured, see AWS Load Balancer Documentation - Network Load Balancer for details.
The AWS Load Balancer Controller allows dual-stack ingress so that an IPv6-only shoot cluster can serve IPv4 and IPv6 clients. You can find an example here.
Warning
When accessing Network Load Balancers (NLB) from within the same IPv6-only cluster, it is crucial to add the annotation
service.beta.kubernetes.io/aws-load-balancer-target-group-attributes: preserve_client_ip.enabled=false. Without this annotation, if a request is routed by the NLB to the same target instance from which it originated, the client IP and destination IP will be identical. This situation, known as the hair-pinning effect, will prevent the request from being processed. (This also happens for internal load balancers in IPv4 clusters, but is mitigated by the NAT gateway for external IPv4 load balancers.)
Connectivity to IPv4-only Services
The IPv6-only shoot cluster can connect to IPv4-only services via DNS64/NAT64. The cluster is configured to use the DNS64/NAT64 service of the underlying cloud provider. This allows the cluster to resolve IPv4-only DNS names and to connect to IPv4-only services.
Please note that traffic going through NAT64 incurs the same cost as ordinary NAT traffic in an IPv4-only cluster. Therefore, it might be beneficial to prefer IPv6 for services, which provide IPv4 and IPv6.
Dual-Stack Shoot Clusters
Motivation
Dual-stack shoot clusters support IPv4 and IPv6 out-of-the-box. They can be the intermediate step on the way towards IPv6 for any existing (IPv4-only) clusters.
Creating a Dual-Stack Shoot Cluster
To create a dual-stack shoot cluster, the following needs to be specified in the Shoot resource:
kind: Shoot
apiVersion: core.gardener.cloud/v1beta1
metadata:
...
spec:
...
networking:
type: ...
pods: 192.168.128.0/17
nodes: 192.168.0.0/18
services: 192.168.64.0/18
ipFamilies:
- IPv4
- IPv6
...
provider:
type: aws
infrastructureConfig:
apiVersion: aws.provider.extensions.gardener.cloud/v1alpha1
kind: InfrastructureConfig
networks:
vpc:
cidr: 192.168.0.0/18
zones:
- name: ...
workers: 192.168.0.0/19
public: 192.168.32.0/20
internal: 192.168.48.0/20
Please note that the only change compared to an IPv4-only shoot cluster is the addition of IPv6 to the .spec.networking.ipFamilies field.
The order of the IP families defines the preference of the IP family.
In this case, IPv4 is preferred over IPv6, e.g. services specifying no IP family will get only an IPv4 address.
Bring your own VPC
To create an IPv6 shoot cluster or a dual-stack shoot within your own Virtual Private Cloud (VPC), it is necessary to have an Amazon-provided IPv6 CIDR block added to the VPC. This block can be assigned during the initial setup of the VPC, as illustrated in the accompanying screenshot.
An egress-only internet gateway is required for outbound internet traffic (IPv6) from the instances within your VPC. Please create one egress-only internet gateway and attach it to the VPC. Please also make sure that the VPC has an attached internet gateway and the following attributes set: enableDnsHostnames and enableDnsSupport as described under usage.
Migration of IPv4-only Shoot Clusters to Dual-Stack
To migrate an IPv4-only shoot cluster to Dual-Stack simply change the .spec.networking.ipFamilies field in the Shoot resource from IPv4 to IPv4, IPv6 as shown below.
kind: Shoot
apiVersion: core.gardener.cloud/v1beta1
metadata:
...
spec:
...
networking:
type: ...
ipFamilies:
- IPv4
- IPv6
...
You can find more information about the process and the steps required here.
Warning
Please note that the dual-stack migration requires the IPv4-only cluster to run in native routing mode, i.e. pod overlay network needs to be disabled. The default quota of routes per route table in AWS is 50. This restricts the cluster size to about 50 nodes. Therefore, please adapt (if necessary) the routes per route table limit in the Amazon Virtual Private Cloud quotas accordingly before switching to native routing. The maximum setting is currently 1000.
Load Balancer Configuration
The AWS Load Balancer Controller is automatically deployed when using a dual-stack shoot cluster. When creating a load balancer, the corresponding annotations need to be configured, see AWS Load Balancer Documentation - Network Load Balancer for details.
Warning
Please note that load balancer services without any special annotations will default to IPv4-only regardless how
.spec.ipFamiliesis set.
The AWS Load Balancer Controller allows dual-stack ingress so that a dual-stack shoot cluster can serve IPv4 and IPv6 clients. You can find an example here.
Warning
When accessing external Network Load Balancers (NLB) from within the same cluster via IPv6 or internal NLBs via IPv4, it is crucial to add the annotation
service.beta.kubernetes.io/aws-load-balancer-target-group-attributes: preserve_client_ip.enabled=false. Without this annotation, if a request is routed by the NLB to the same target instance from which it originated, the client IP and destination IP will be identical. This situation, known as the hair-pinning effect, will prevent the request from being processed.
5.1.2.5 - Local Setup
admission-aws
admission-aws is an admission webhook server which is responsible for the validation of the cloud provider (AWS in this case) specific fields and resources. The Gardener API server is cloud provider agnostic and it wouldn’t be able to perform similar validation.
Follow the steps below to run the admission webhook server locally.
Start the Gardener API server.
For details, check the Gardener local setup.
Start the webhook server
Make sure that the
KUBECONFIGenvironment variable is pointing to the local garden cluster.make start-admissionSetup the
ValidatingWebhookConfiguration.hack/dev-setup-admission-aws.shwill configure the webhook Service which will allow the kube-apiserver of your local cluster to reach the webhook server. It will also apply theValidatingWebhookConfigurationmanifest../hack/dev-setup-admission-aws.sh
You are now ready to experiment with the admission-aws webhook server locally.
5.1.2.6 - Operations
Using the AWS provider extension with Gardener as operator
The core.gardener.cloud/v1beta1.CloudProfile resource declares a providerConfig field that is meant to contain provider-specific configuration.
Similarly, the core.gardener.cloud/v1beta1.Seed resource is structured.
Additionally, it allows to configure settings for the backups of the main etcds’ data of shoot clusters control planes running in this seed cluster.
This document explains what is necessary to configure for this provider extension.
CloudProfile resource
In this section we are describing how the configuration for CloudProfiles looks like for AWS and provide an example CloudProfile manifest with minimal configuration that you can use to allow creating AWS shoot clusters.
CloudProfileConfig
The cloud profile configuration contains information about the real machine image IDs in the AWS environment (AMIs).
You have to map every version that you specify in .spec.machineImages[].versions here such that the AWS extension knows the AMI for every version you want to offer.
For each AMI an architecture field can be specified which specifies the CPU architecture of the machine on which given machine image can be used.
An example CloudProfileConfig for the AWS extension looks as follows:
apiVersion: aws.provider.extensions.gardener.cloud/v1alpha1
kind: CloudProfileConfig
machineImages:
- name: coreos
versions:
- version: 2135.6.0
regions:
- name: eu-central-1
ami: ami-034fd8c3f4026eb39
# architecture: amd64 # optional
Example CloudProfile manifest
Please find below an example CloudProfile manifest:
apiVersion: core.gardener.cloud/v1beta1
kind: CloudProfile
metadata:
name: aws
spec:
type: aws
kubernetes:
versions:
- version: 1.32.1
- version: 1.31.4
expirationDate: "2022-10-31T23:59:59Z"
machineImages:
- name: coreos
versions:
- version: 2135.6.0
machineTypes:
- name: m5.large
cpu: "2"
gpu: "0"
memory: 8Gi
usable: true
volumeTypes:
- name: gp2
class: standard
usable: true
- name: io1
class: premium
usable: true
regions:
- name: eu-central-1
zones:
- name: eu-central-1a
- name: eu-central-1b
- name: eu-central-1c
providerConfig:
apiVersion: aws.provider.extensions.gardener.cloud/v1alpha1
kind: CloudProfileConfig
machineImages:
- name: coreos
versions:
- version: 2135.6.0
regions:
- name: eu-central-1
ami: ami-034fd8c3f4026eb39
# architecture: amd64 # optional
Seed resource
This provider extension does not support any provider configuration for the Seed’s .spec.provider.providerConfig field.
However, it supports to manage backup infrastructure, i.e., you can specify configuration for the .spec.backup field.
Backup configuration
Please find below an example Seed manifest (partly) that configures backups.
As you can see, the location/region where the backups will be stored can be different to the region where the seed cluster is running.
apiVersion: v1
kind: Secret
metadata:
name: backup-credentials
namespace: garden
type: Opaque
data:
accessKeyID: base64(access-key-id)
secretAccessKey: base64(secret-access-key)
---
apiVersion: core.gardener.cloud/v1beta1
kind: Seed
metadata:
name: my-seed
spec:
provider:
type: aws
region: eu-west-1
backup:
provider: aws
region: eu-central-1
credentialsRef:
apiVersion: v1
kind: Secret
name: backup-credentials
namespace: garden
...
Please look up https://docs.aws.amazon.com/general/latest/gr/aws-sec-cred-types.html#access-keys-and-secret-access-keys as well.
Permissions for AWS IAM user
Please make sure that the provided credentials have the correct privileges. You can use the following AWS IAM policy document and attach it to the IAM user backed by the credentials you provided (please check the official AWS documentation as well):
Click to expand the AWS IAM policy document!
{
"Version": "2012-10-17",
"Statement": [
{
"Effect": "Allow",
"Action": "s3:*",
"Resource": "*"
}
]
}
Rolling Update Triggers
Changes to the Shoot worker-pools are applied in-place where possible.
In case this is not possible a rolling update of the workers will be performed to apply the new configuration, as outlined in the Gardener documentation.
The exact fields that trigger this behavior are defined in the Gardener doc, with a few additions:
.spec.provider.workers[].providerConfig.spec.provider.workers[].volume.encrypted.spec.provider.workers[].dataVolumes[].size(only the affected worker pool).spec.provider.workers[].dataVolumes[].type(only the affected worker pool).spec.provider.workers[].dataVolumes[].encrypted(only the affected worker pool)
For now, if the feature gate NewWorkerPoolHash is enabled, the same fields are used.
This behavior might change once MCM supports in-place volume updates.
If updateStrategy is set to inPlace and NewWorkerPoolHash is enabled,
all the fields mentioned above except of the providerConifg are used.
If in-place-updates are enabled for a worker-pool, then updates to the fields that trigger rolling updates will be disallowed.
5.1.2.7 - Usage
Using the AWS provider extension with Gardener as an end-user
The core.gardener.cloud/v1beta1.Shoot resource declares a few fields that are meant to contain provider-specific configuration.
In this document we are describing how this configuration looks like for AWS and provide an example Shoot manifest with minimal configuration that you can use to create an AWS cluster (modulo the landscape-specific information like cloud profile names, secret binding names, etc.).
Accessing AWS APIs
In order for Gardener to create a Kubernetes cluster using AWS infrastructure components, a Shoot has to provide an authentication mechanism giving sufficient permissions to the desired AWS account.
Every shoot cluster references a SecretBinding or a CredentialsBinding.
Important
While
SecretBindings can only referenceSecrets,CredentialsBindings can also referenceWorkloadIdentitys which provide an alternative authentication method.WorkloadIdentitys do not directly contain credentials but are rather a representation of the workload that is going to access the user’s account. If the user has configured OIDC Federation with Gardener’s Workload Identity Issuer then the AWS infrastructure components can access the user’s account without the need of preliminary exchange of credentials.
Important
The
SecretBinding/CredentialsBindingis configurable in the Shoot cluster with the fieldsecretBindingName/credentialsBindingName.SecretBindings are considered legacy and will be deprecated in the future. It is advised to useCredentialsBindings instead.
Provider Secret Data
Every shoot cluster references a SecretBinding or a CredentialsBinding which itself references a Secret, and this Secret contains the provider credentials of your AWS account.
This Secret must look as follows:
apiVersion: v1
kind: Secret
metadata:
name: core-aws
namespace: garden-dev
type: Opaque
data:
accessKeyID: base64(access-key-id)
secretAccessKey: base64(secret-access-key)
The AWS documentation explains the necessary steps to enable programmatic access, i.e. create access key ID and access key, for the user of your choice.
Warning
For security reasons, we recommend creating a dedicated user with programmatic access only. Please avoid re-using a IAM user which has access to the AWS console (human user).
Depending on your AWS API usage it can be problematic to reuse the same AWS Account for different Shoot clusters in the same region due to rate limits. Please consider spreading your Shoots over multiple AWS Accounts if you are hitting those limits.
AWS Workload Identity Federation
Users can choose to trust Gardener’s Workload Identity Issuer and eliminate the need for providing AWS Access Key credentials.
1. Configure OIDC Federation with Gardener’s Workload Identity Issuer.
Tip
You can retrieve Gardener’s Workload Identity Issuer URL directly from the Garden cluster by reading the contents of the Gardener Info ConfigMap.
kubectl -n gardener-system-public get configmap gardener-info -o yaml
Important
Use an audience that will uniquely identify the trust relationship between your AWS account and Gardener.
2. Create a policy listing the required permissions.
3. Create a role that trusts the external web identity.
In the Identity Provider dropdown menu choose the Gardener’s Workload Identity Provider.
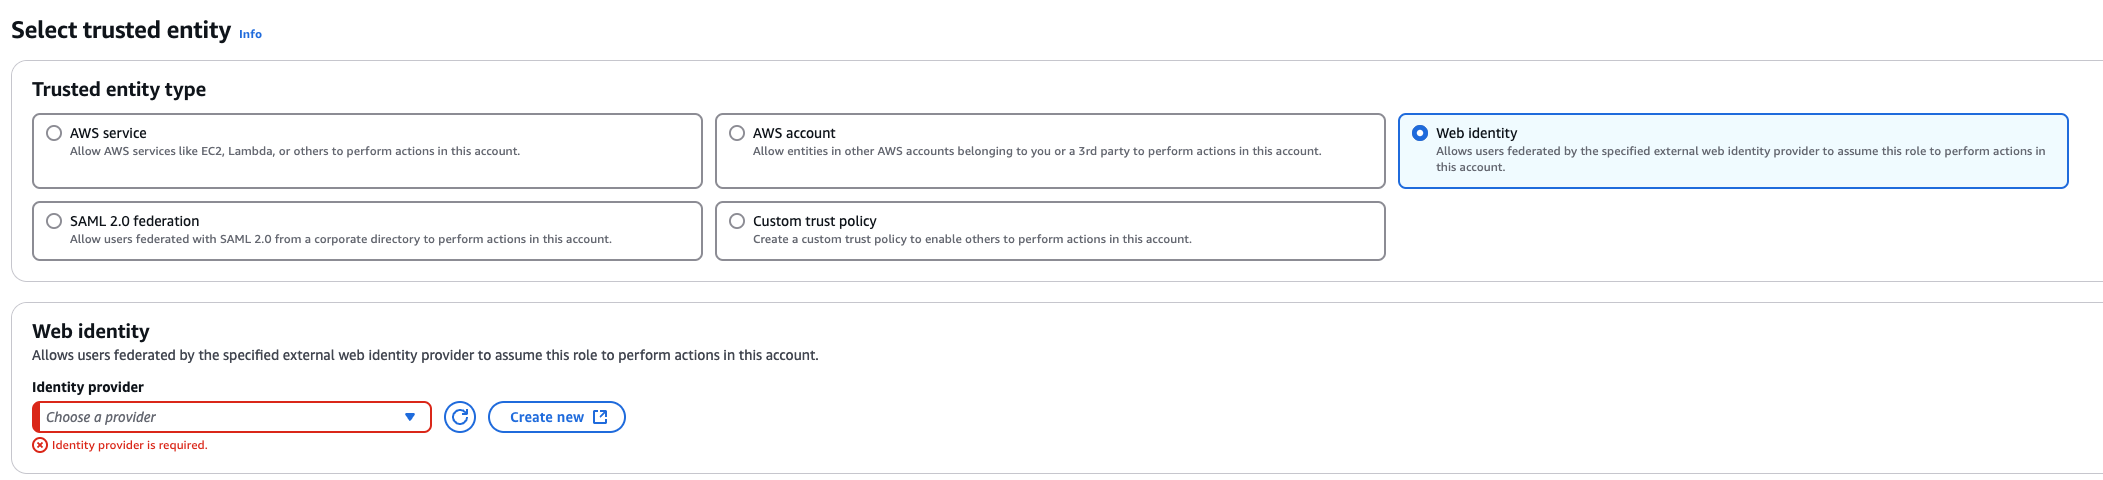
Add the newly created policy that will grant the required permissions.

4. Configure the trust relationship.
Caution
Remember to reduce the scope of the identities that can assume this role only to your own controlled identities! In the example shown below
WorkloadIdentitys that are created in thegarden-myprojnamespace and have the nameawswill be authenticated and granted permissions. Later on, the scope of the trust configuration can be reduced further by replacing the wildcard “*” with the actual id of theWorkloadIdentityand converting the “StringLike” condition to “StringEquals”. This is currently not possible since we do not have the id of theWorkloadIdentityyet.{ "Version": "2012-10-17", "Statement": [ { "Effect": "Allow", "Action": "sts:AssumeRoleWithWebIdentity", "Principal": { "Federated": "arn:aws:iam::123456789012:oidc-provider/example.local.gardener.cloud/garden/workload-identity/issuer" }, "Condition": { "StringEquals": { "example.local.gardener.cloud/garden/workload-identity/issuer:aud": [ "my-aws-account-gardener-workload-identity" ] }, "StringLike": { "example.local.gardener.cloud/garden/workload-identity/issuer:sub": "gardener.cloud:workloadidentity:garden-myproj:aws:*" } } } ] }
5. Create the WorkloadIdentity in the Garden cluster.
This step will require the ARN of the role that was created in the previous step. The identity will be used by infrastructure components to authenticate against AWS APIs. A sample of such resource is shown below:
apiVersion: security.gardener.cloud/v1alpha1
kind: WorkloadIdentity
metadata:
name: aws
namespace: garden-myproj
spec:
audiences:
- my-aws-account-gardener-workload-identity
targetSystem:
type: aws
providerConfig:
apiVersion: aws.provider.extensions.gardener.cloud/v1alpha1
kind: WorkloadIdentityConfig
roleARN: arn:aws:iam::123456789012:role/gardener-workload-identity
Tip
Once created you can extract the whole subject of the workload identity and edit the created Role’s trust relationship configuration to also include the workload identity’s id. Obtain the complete
subby running the following:SUBJECT=$(kubectl -n garden-myproj get workloadidentity aws -o=jsonpath='{.status.sub}') echo "$SUBJECT"
6. Create a CredentialsBinding referencing the AWS WorkloadIdentity and use it in your Shoot definitions.
apiVersion: security.gardener.cloud/v1alpha1
kind: CredentialsBinding
metadata:
name: aws
namespace: garden-myproj
credentialsRef:
apiVersion: security.gardener.cloud/v1alpha1
kind: WorkloadIdentity
name: aws
namespace: garden-myproj
provider:
type: aws
apiVersion: core.gardener.cloud/v1beta1
kind: Shoot
metadata:
name: aws
namespace: garden-myproj
spec:
credentialsBindingName: aws
...
Permissions
Please make sure that the provided credentials have the correct privileges. You can use the following AWS IAM policy document and attach it to the IAM user backed by the credentials you provided (please check the official AWS documentation as well):
Click to expand the AWS IAM policy document!
{
"Version": "2012-10-17",
"Statement": [
{
"Effect": "Allow",
"Action": "autoscaling:*",
"Resource": "*"
},
{
"Effect": "Allow",
"Action": "ec2:*",
"Resource": "*"
},
{
"Effect": "Allow",
"Action": "elasticloadbalancing:*",
"Resource": "*"
},
{
"Action": [
"iam:GetInstanceProfile",
"iam:GetPolicy",
"iam:GetPolicyVersion",
"iam:GetRole",
"iam:GetRolePolicy",
"iam:ListPolicyVersions",
"iam:ListRolePolicies",
"iam:ListAttachedRolePolicies",
"iam:ListInstanceProfilesForRole",
"iam:CreateInstanceProfile",
"iam:CreatePolicy",
"iam:CreatePolicyVersion",
"iam:CreateRole",
"iam:CreateServiceLinkedRole",
"iam:AddRoleToInstanceProfile",
"iam:AttachRolePolicy",
"iam:DetachRolePolicy",
"iam:RemoveRoleFromInstanceProfile",
"iam:DeletePolicy",
"iam:DeletePolicyVersion",
"iam:DeleteRole",
"iam:DeleteRolePolicy",
"iam:DeleteInstanceProfile",
"iam:PutRolePolicy",
"iam:PassRole",
"iam:UpdateAssumeRolePolicy"
],
"Effect": "Allow",
"Resource": "*"
},
// The following permission set is only needed, if AWS Load Balancer controller is enabled (see ControlPlaneConfig)
{
"Effect": "Allow",
"Action": [
"cognito-idp:DescribeUserPoolClient",
"acm:ListCertificates",
"acm:DescribeCertificate",
"iam:ListServerCertificates",
"iam:GetServerCertificate",
"waf-regional:GetWebACL",
"waf-regional:GetWebACLForResource",
"waf-regional:AssociateWebACL",
"waf-regional:DisassociateWebACL",
"wafv2:GetWebACL",
"wafv2:GetWebACLForResource",
"wafv2:AssociateWebACL",
"wafv2:DisassociateWebACL",
"shield:GetSubscriptionState",
"shield:DescribeProtection",
"shield:CreateProtection",
"shield:DeleteProtection"
],
"Resource": "*"
}
]
}
InfrastructureConfig
The infrastructure configuration mainly describes how the network layout looks like in order to create the shoot worker nodes in a later step, thus, prepares everything relevant to create VMs, load balancers, volumes, etc.
An example InfrastructureConfig for the AWS extension looks as follows:
apiVersion: aws.provider.extensions.gardener.cloud/v1alpha1
kind: InfrastructureConfig
enableECRAccess: true
dualStack:
enabled: false
networks:
vpc: # specify either 'id' or 'cidr'
# id: vpc-123456
cidr: 10.250.0.0/16
# gatewayEndpoints:
# - s3
zones:
- name: eu-west-1a
internal: 10.250.112.0/22
public: 10.250.96.0/22
workers: 10.250.0.0/19
# elasticIPAllocationID: eipalloc-123456
ignoreTags:
keys: # individual ignored tag keys
- SomeCustomKey
- AnotherCustomKey
keyPrefixes: # ignored tag key prefixes
- user.specific/prefix/
The enableECRAccess flag specifies whether the AWS IAM role policy attached to all worker nodes of the cluster shall contain permissions to access the Elastic Container Registry of the respective AWS account.
If the flag is not provided it is defaulted to true.
Please note that if the iamInstanceProfile is set for a worker pool in the WorkerConfig (see below) then enableECRAccess does not have any effect.
It only applies for those worker pools whose iamInstanceProfile is not set.
Click to expand the default AWS IAM policy document used for the instance profiles!
{
"Version": "2012-10-17",
"Statement": [
{
"Effect": "Allow",
"Action": [
"ec2:DescribeInstances"
],
"Resource": [
"*"
]
},
// Only if `.enableECRAccess` is `true`.
{
"Effect": "Allow",
"Action": [
"ecr:GetAuthorizationToken",
"ecr:BatchCheckLayerAvailability",
"ecr:GetDownloadUrlForLayer",
"ecr:GetRepositoryPolicy",
"ecr:DescribeRepositories",
"ecr:ListImages",
"ecr:BatchGetImage"
],
"Resource": [
"*"
]
}
]
}
The dualStack.enabled flag specifies whether dual-stack or IPv4-only should be supported by the infrastructure.
When the flag is set to true an Amazon provided IPv6 CIDR block will be attached to the VPC.
All subnets will receive a /64 block from it and a route entry is added to the main route table to route all IPv6 traffic over the IGW.
The networks.vpc section describes whether you want to create the shoot cluster in an already existing VPC or whether to create a new one:
- If
networks.vpc.idis given then you have to specify the VPC ID of the existing VPC that was created by other means (manually, other tooling, …). Please make sure that the VPC has attached an internet gateway - the AWS controller won’t create one automatically for existing VPCs. To make sure the nodes are able to join and operate in your cluster properly, please make sure that your VPC has enabled DNS Support, explicitly the attributesenableDnsHostnamesandenableDnsSupportmust be set totrue. - If
networks.vpc.cidris given then you have to specify the VPC CIDR of a new VPC that will be created during shoot creation. You can freely choose a private CIDR range. - Either
networks.vpc.idornetworks.vpc.cidrmust be present, but not both at the same time. networks.vpc.gatewayEndpointsis optional. If specified then each item is used as service name in a corresponding Gateway VPC Endpoint.
The networks.zones section contains configuration for resources you want to create or use in availability zones.
For every zone, the AWS extension creates three subnets:
- The
internalsubnet is used for internal AWS load balancers. - The
publicsubnet is used for public AWS load balancers. - The
workerssubnet is used for all shoot worker nodes, i.e., VMs which later run your applications.
For every subnet, you have to specify a CIDR range contained in the VPC CIDR specified above, or the VPC CIDR of your already existing VPC. You can freely choose these CIDRs and it is your responsibility to properly design the network layout to suit your needs.
Also, the AWS extension creates a dedicated NAT gateway for each zone.
By default, it also creates a corresponding Elastic IP that it attaches to this NAT gateway and which is used for egress traffic.
The elasticIPAllocationID field allows you to specify the ID of an existing Elastic IP allocation in case you want to bring your own.
If provided, no new Elastic IP will be created and, instead, the Elastic IP specified by you will be used.
Warning
If you change this field for an already existing infrastructure then it will disrupt egress traffic while AWS applies this change. The reason is that the NAT gateway must be recreated with the new Elastic IP association. Also, please note that the existing Elastic IP will be permanently deleted if it was earlier created by the AWS extension.
You can configure Gateway VPC Endpoints by adding items in the optional list networks.vpc.gatewayEndpoints. Each item in the list is used as a service name and a corresponding endpoint is created for it. All created endpoints point to the service within the cluster’s region. For example, consider this (partial) shoot config:
spec:
region: eu-central-1
provider:
type: aws
infrastructureConfig:
apiVersion: aws.provider.extensions.gardener.cloud/v1alpha1
kind: InfrastructureConfig
networks:
vpc:
gatewayEndpoints:
- s3
The service name of the S3 Gateway VPC Endpoint in this example is com.amazonaws.eu-central-1.s3.
If you want to use multiple availability zones then add a second, third, … entry to the networks.zones[] list and properly specify the AZ name in networks.zones[].name.
Apart from the VPC and the subnets the AWS extension will also create DHCP options and an internet gateway (only if a new VPC is created), routing tables, security groups, elastic IPs, NAT gateways, EC2 key pairs, IAM roles, and IAM instance profiles.
The ignoreTags section allows to configure which resource tags on AWS resources managed by Gardener should be ignored during
infrastructure reconciliation. By default, all tags that are added outside of Gardener’s
reconciliation will be removed during the next reconciliation. This field allows users and automation to add
custom tags on AWS resources created and managed by Gardener without loosing them on the next reconciliation.
Tags can be ignored either by specifying exact key values (ignoreTags.keys) or key prefixes (ignoreTags.keyPrefixes).
In both cases it is forbidden to ignore the Name tag or any tag starting with kubernetes.io or gardener.cloud.
Please note though, that the tags are only ignored on resources created on behalf of the Infrastructure CR (i.e. VPC,
subnets, security groups, keypair, etc.), while tags on machines, volumes, etc. are not in the scope of this controller.
ControlPlaneConfig
The control plane configuration mainly contains values for the AWS-specific control plane components.
Today, the only component deployed by the AWS extension is the cloud-controller-manager.
An example ControlPlaneConfig for the AWS extension looks as follows:
apiVersion: aws.provider.extensions.gardener.cloud/v1alpha1
kind: ControlPlaneConfig
cloudControllerManager:
# featureGates:
# SomeKubernetesFeature: true
useCustomRouteController: true
# loadBalancerController:
# enabled: true
# ingressClassName: alb
# ipamController:
# enabled: true
storage:
managedDefaultClass: false
The cloudControllerManager.featureGates contains a map of explicitly enabled or disabled feature gates.
For production usage it’s not recommend to use this field at all as you can enable alpha features or disable beta/stable features, potentially impacting the cluster stability.
If you don’t want to configure anything for the cloudControllerManager simply omit the key in the YAML specification.
The cloudControllerManager.useCustomRouteController controls if the custom routes controller should be enabled.
If enabled, it will add routes to the pod CIDRs for all nodes in the route tables for all zones.
The storage.managedDefaultClass controls if the default storage / volume snapshot classes are marked as default by Gardener. Set it to false to mark another storage / volume snapshot class as default without Gardener overwriting this change. If unset, this field defaults to true.
If the AWS Load Balancer Controller should be deployed, set loadBalancerController.enabled to true.
In this case, it is assumed that an IngressClass named alb is created by the user.
You can overwrite the name by setting loadBalancerController.ingressClassName.
Please note, that currently only the “instance” mode is supported.
Examples for Ingress and Service managed by the AWS Load Balancer Controller:
- Prerequisites
Make sure you have created an IngressClass. For more details about parameters, please see AWS Load Balancer Controller - IngressClass
apiVersion: networking.k8s.io/v1
kind: IngressClass
metadata:
name: alb # default name if not specified by `loadBalancerController.ingressClassName`
spec:
controller: ingress.k8s.aws/alb
- Ingress
apiVersion: networking.k8s.io/v1
kind: Ingress
metadata:
namespace: default
name: echoserver
annotations:
# complete set of annotations: https://kubernetes-sigs.github.io/aws-load-balancer-controller/latest/guide/ingress/annotations/
alb.ingress.kubernetes.io/scheme: internet-facing
alb.ingress.kubernetes.io/target-type: instance # target-type "ip" NOT supported in Gardener
spec:
ingressClassName: alb
rules:
- http:
paths:
- path: /
pathType: Prefix
backend:
service:
name: echoserver
port:
number: 80
For more details see AWS Load Balancer Documentation - Ingress Specification
- Service of Type
LoadBalancer
This can be used to create a Network Load Balancer (NLB).
apiVersion: v1
kind: Service
metadata:
annotations:
# complete set of annotations: https://kubernetes-sigs.github.io/aws-load-balancer-controller/latest/guide/service/annotations/
service.beta.kubernetes.io/aws-load-balancer-nlb-target-type: instance # target-type "ip" NOT supported in Gardener
service.beta.kubernetes.io/aws-load-balancer-scheme: internet-facing
name: ingress-nginx-controller
namespace: ingress-nginx
...
spec:
...
type: LoadBalancer
loadBalancerClass: service.k8s.aws/nlb # mandatory to be managed by AWS Load Balancer Controller (otherwise the Cloud Controller Manager will act on it)
For more details see AWS Load Balancer Documentation - Network Load Balancer
Warning
When using Network Load Balancers (NLB) as internal load balancers, it is crucial to add the annotation
service.beta.kubernetes.io/aws-load-balancer-target-group-attributes: preserve_client_ip.enabled=false. Without this annotation, if a request is routed by the NLB to the same target instance from which it originated, the client IP and destination IP will be identical. This situation, known as the hairpinning effect, will prevent the request from being processed.
WorkerConfig
The AWS extension supports encryption for volumes plus support for additional data volumes per machine.
For each data volume, you have to specify a name.
By default, (if not stated otherwise), all the disks (root & data volumes) are encrypted.
Please make sure that your instance-type supports encryption.
If your instance-type doesn’t support encryption, you will have to disable encryption (which is enabled by default) by setting volume.encrpyted to false (refer below shown YAML snippet).
The following YAML is a snippet of a Shoot resource:
spec:
provider:
workers:
- name: cpu-worker
...
volume:
type: gp2
size: 20Gi
encrypted: false
dataVolumes:
- name: kubelet-dir
type: gp2
size: 25Gi
encrypted: true
Note
The AWS extension does not support EBS volume (root & data volumes) encryption with customer managed CMK. Support for customer managed CMK is out of scope for now. Only AWS managed CMK is supported.
Additionally, it is possible to provide further AWS-specific values for configuring the worker pools. The additional configuration must be specified in the providerConfig field of the respective worker.
spec:
provider:
workers:
- name: cpu-worker
...
providerConfig:
# AWS worker config
The configuration will be evaluated when the provider-aws will reconcile the worker pools for the respective shoot.
An example WorkerConfig for the AWS extension looks as follows:
spec:
provider:
workers:
- name: cpu-worker
...
providerConfig:
apiVersion: aws.provider.extensions.gardener.cloud/v1alpha1
kind: WorkerConfig
volume:
iops: 10000
throughput: 200
dataVolumes:
- name: kubelet-dir
iops: 12345
throughput: 150
snapshotID: snap-1234
iamInstanceProfile: # (specify either ARN or name)
name: my-profile
instanceMetadataOptions:
httpTokens: required
httpPutResponseHopLimit: 2
# arn: my-instance-profile-arn
nodeTemplate: # (to be specified only if the node capacity would be different from cloudprofile info during runtime)
capacity:
cpu: 2 # inherited from pool's machine type if un-specified
gpu: 0 # inherited from pool's machine type if un-specified
memory: 50Gi # inherited from pool's machine type if un-specified
ephemeral-storage: 10Gi # override to specify explicit ephemeral-storage for scale fro zero
resource.com/dongle: 4 # Example of a custom, extended resource.
The .volume.iops is the number of I/O operations per second (IOPS) that the volume supports.
For io1 and gp3 volume type, this represents the number of IOPS that are provisioned for the volume.
For gp2 volume type, this represents the baseline performance of the volume and the rate at which the volume accumulates I/O credits for bursting. For more information about General Purpose SSD baseline performance, I/O credits, IOPS range and bursting, see Amazon EBS Volume Types (http://docs.aws.amazon.com/AWSEC2/latest/UserGuide/EBSVolumeTypes.html) in the Amazon Elastic Compute Cloud User Guide.
Constraint: IOPS should be a positive value. Validation of IOPS (i.e. whether it is allowed and is in the specified range for a particular volume type) is done on aws side.
The volume.throughput is the throughput that the volume supports, in MiB/s. As of 16th Aug 2022, this parameter is valid only for gp3 volume types and will return an error from the provider side if specified for other volume types. Its current range of throughput is from 125MiB/s to 1000 MiB/s. To know more about throughput and its range, see the official AWS documentation here.
The .dataVolumes can optionally contain configurations for the data volumes stated in the Shoot specification in the .spec.provider.workers[].dataVolumes list.
The .name must match to the name of the data volume in the shoot.
It is also possible to provide a snapshot ID. It allows to restore the data volume from an existing snapshot.
The iamInstanceProfile section allows to specify the IAM instance profile name xor ARN that should be used for this worker pool.
If not specified, a dedicated IAM instance profile created by the infrastructure controller is used (see above).
The instanceMetadataOptions controls access to the instance metadata service (IMDS) for members of the worker. You can do the following operations:
- access IMDSv1 (default)
- access IMDSv2 -
httpPutResponseHopLimit >= 2 - access IMDSv2 only (restrict access to IMDSv1) -
httpPutResponseHopLimit >=2,httpTokens = "required" - disable access to IMDS -
httpTokens = "required"
Note
The accessibility of IMDS discussed in the previous point is referenced from the point of view of containers NOT running in the host network. By default on host network IMDSv2 is already enabled (but not accessible from inside the pods). It is currently not possible to create a VM with complete restriction to the IMDS service. It is however possible to restrict access from inside the pods by setting
httpTokenstorequiredand not settinghttpPutResponseHopLimit(or setting it to 1).
You can find more information regarding the options in the AWS documentation.
cpuOptions grants more finegrained control over the worker’s CPU configuration. It has two attributes:
coreCount: Specify a custom amount of cores the instance should be configured with.threadsPerCore: How many threads should there be on each core. Set to1to disable multi-threading.
Note that if you decide to configure cpuOptions both these values need to be provided. For a list of valid combinations of these values refer to the AWS documentation.
Example Shoot manifest (one availability zone)
Please find below an example Shoot manifest for one availability zone:
apiVersion: core.gardener.cloud/v1beta1
kind: Shoot
metadata:
name: johndoe-aws
namespace: garden-dev
spec:
cloudProfile:
name: aws
region: eu-central-1
credentialsBindingName: core-aws
provider:
type: aws
infrastructureConfig:
apiVersion: aws.provider.extensions.gardener.cloud/v1alpha1
kind: InfrastructureConfig
networks:
vpc:
cidr: 10.250.0.0/16
zones:
- name: eu-central-1a
internal: 10.250.112.0/22
public: 10.250.96.0/22
workers: 10.250.0.0/19
controlPlaneConfig:
apiVersion: aws.provider.extensions.gardener.cloud/v1alpha1
kind: ControlPlaneConfig
workers:
- name: worker-xoluy
machine:
type: m5.large
minimum: 2
maximum: 2
volume:
size: 50Gi
type: gp2
# The following provider config is valid if the volume type is `io1`.
# providerConfig:
# apiVersion: aws.provider.extensions.gardener.cloud/v1alpha1
# kind: WorkerConfig
# volume:
# iops: 10000
zones:
- eu-central-1a
networking:
nodes: 10.250.0.0/16
type: calico
kubernetes:
version: 1.28.2
maintenance:
autoUpdate:
kubernetesVersion: true
machineImageVersion: true
addons:
kubernetesDashboard:
enabled: true
nginxIngress:
enabled: true
---
apiVersion: security.gardener.cloud/v1alpha1
kind: CredentialsBinding
metadata:
name: core-aws
namespace: garden-dev
credentialsRef:
apiVersion: v1
kind: Secret
name: core-aws
namespace: garden-dev
provider:
type: aws
---
apiVersion: v1
kind: Secret
metadata:
name: core-aws
namespace: garden-dev
type: Opaque
data:
accessKeyID: base64(access-key-id)
secretAccessKey: base64(secret-access-key)
Example Shoot manifest (three availability zones)
Please find below an example Shoot manifest for three availability zones:
apiVersion: core.gardener.cloud/v1beta1
kind: Shoot
metadata:
name: johndoe-aws
namespace: garden-dev
spec:
cloudProfile:
name: aws
region: eu-central-1
credentialsBindingName: core-aws
provider:
type: aws
infrastructureConfig:
apiVersion: aws.provider.extensions.gardener.cloud/v1alpha1
kind: InfrastructureConfig
networks:
vpc:
cidr: 10.250.0.0/16
zones:
- name: eu-central-1a
workers: 10.250.0.0/26
public: 10.250.96.0/26
internal: 10.250.112.0/26
- name: eu-central-1b
workers: 10.250.0.64/26
public: 10.250.96.64/26
internal: 10.250.112.64/26
- name: eu-central-1c
workers: 10.250.0.128/26
public: 10.250.96.128/26
internal: 10.250.112.128/26
controlPlaneConfig:
apiVersion: aws.provider.extensions.gardener.cloud/v1alpha1
kind: ControlPlaneConfig
workers:
- name: worker-xoluy
machine:
type: m5.large
minimum: 3
maximum: 9
volume:
size: 50Gi
type: gp2
zones:
- eu-central-1a
- eu-central-1b
- eu-central-1c
networking:
nodes: 10.250.0.0/16
type: calico
kubernetes:
version: 1.28.2
maintenance:
autoUpdate:
kubernetesVersion: true
machineImageVersion: true
addons:
kubernetesDashboard:
enabled: true
nginxIngress:
enabled: true
Example Shoot manifest (IPv6)
Please find below an example Shoot manifest for an IPv6 shoot cluster:
apiVersion: core.gardener.cloud/v1beta1
kind: Shoot
metadata:
name: johndoe-aws-ipv6
namespace: garden-dev
spec:
cloudProfile:
name: aws
region: eu-central-1
credentialsBindingName: core-aws
provider:
type: aws
infrastructureConfig:
apiVersion: aws.provider.extensions.gardener.cloud/v1alpha1
kind: InfrastructureConfig
networks:
vpc:
cidr: 10.250.0.0/16
zones:
- name: eu-central-1a
public: 10.250.96.0/22
internal: 10.250.112.0/22
controlPlaneConfig:
apiVersion: aws.provider.extensions.gardener.cloud/v1alpha1
kind: ControlPlaneConfig
workers:
- ...
networking:
ipFamilies:
- IPv6
type: calico
kubernetes:
version: 1.28.2
...
addons:
kubernetesDashboard:
enabled: true
nginxIngress:
enabled: false
CSI volume provisioners
Every AWS shoot cluster will be deployed with the AWS EBS CSI driver.
It is compatible with the legacy in-tree volume provisioner that was deprecated by the Kubernetes community and will be removed in future versions of Kubernetes.
End-users might want to update their custom StorageClasses to the new ebs.csi.aws.com provisioner.
Node-specific Volume Limits
The Kubernetes scheduler allows configurable limit for the number of volumes that can be attached to a node. See https://k8s.io/docs/concepts/storage/storage-limits/#custom-limits.
CSI drivers usually have a different procedure for configuring this custom limit.
By default, the EBS CSI driver parses the machine type name and then decides the volume limit.
However, this is only a rough approximation and not good enough in most cases.
Specifying the volume attach limit via command line flag (--volume-attach-limit) is currently the alternative until a more sophisticated solution presents itself (dynamically discovering the maximum number of attachable volume per EC2 machine type, see also https://github.com/kubernetes-sigs/aws-ebs-csi-driver/issues/347).
The AWS extension allows the --volume-attach-limit flag of the EBS CSI driver to be configurable via aws.provider.extensions.gardener.cloud/volume-attach-limit annotation on the Shoot resource.
ℹ️ Please note: If the annotation is added to an existing Shoot, then reconciliation needs to be triggered manually (see Immediate reconciliation), as adding an annotation to a resource is not a change that leads to an increase of .metadata.generation in general.
Other CSI options
The newer versions of EBS CSI driver are not readily compatible with the use of XFS volumes on nodes using a kernel version <= 5.4.
A workaround was added that enables the use of a “legacy XFS” mode that introduces a backwards compatible volume formating for the older kernels.
You can enable this option for your shoot by annotating it with aws.provider.extensions.gardener.cloud/legacy-xfs=true.
ℹ️ Please note: If the annotation is added to an existing Shoot, then reconciliation needs to be triggered manually (see Immediate reconciliation), as adding an annotation to a resource is not a change that leads to an increase of .metadata.generation in general.
Support for VolumeAttributesClasses (Beta in k8s 1.31)
To have the CSI-driver configured to support the necessary features for VolumeAttributesClasses on AWS for shoots with a k8s-version of at least 1.31, use the aws.provider.extensions.gardener.cloud/enable-volume-attributes-class annotation on the shoot. Keep in mind to also enable the required feature flags and runtime-config on the common kubernetes controllers (as outlined in the link above) in the shoot-spec.
For more information and examples, see this markdown in the aws-ebs-csi-driver repository. Please take special note of the considerations mentioned.
Kubernetes Versions per Worker Pool
This extension supports gardener/gardener’s WorkerPoolKubernetesVersion feature gate, i.e., having worker pools with overridden Kubernetes versions since gardener-extension-provider-aws@v1.34.
Shoot CA Certificate and ServiceAccount Signing Key Rotation
This extension supports gardener/gardener’s ShootCARotation and ShootSARotation feature gates since gardener-extension-provider-aws@v1.36.
Flow Infrastructure Reconciler
The extension offers two different reconciler implementations for the infrastructure resource:
- terraform-based
- native Go SDK based (dubbed the “flow”-based implementation)
The default implementation currently is the terraform reconciler which uses the https://github.com/gardener/terraformer as the backend for managing the shoot’s infrastructure.
The “flow” implementation is a newer implementation that is trying to solve issues we faced with managing terraform infrastructure on Kubernetes. The goal is to have more control over the reconciliation process and be able to perform fine-grained tuning over it. The implementation is completely backwards-compatible and offers a migration route from the legacy terraformer implementation.
For most users there will be no noticeable difference. However for certain use-cases, users may notice a slight deviation from the previous behavior. For example, with flow-based infrastructure users may be able to perform certain modifications to infrastructure resources without having them reconciled back by terraform. Operations that would degrade the shoot infrastructure are still expected to be reverted back.
For the time-being, to take advantage of the flow reconciler users have to “opt-in” by annotating the shoot manifest with: aws.provider.extensions.gardener.cloud/use-flow="true". For existing shoots with this annotation, the migration will take place on the next infrastructure reconciliation (on maintenance window or if other infrastructure changes are requested). The migration is not revertible.
BackupBucket
Gardener manages etcd's backups for Shoot clusters using provider specific storage solutions. On AWS, this storage is implemented through AWS S3, which store the backups/snapshots of the etcd's cluster data.
The BackupBucket resource abstracts the backup infrastructure, enabling Gardener and its extension controllers to manage it seamlessly. This abstraction allows Gardener to create, delete, and maintain backup buckets across various cloud providers in a standardized manner.
The BackupBucket resource includes a spec field, which defines the configuration details for the backup bucket. These details include:
- A
regionis reference to a region where the bucket should be created. - A
secretRefis reference to the secret containing credentials for accessing the cloud provider. - A
typefield defines the storage provider type like aws, azure etc. - A
providerConfigfield defines provider specific configurations.
BackupBucketConfig
The BackupBucketConfig describes the configuration that needs to be passed over for creation of the backup bucket infrastructure. Configuration for immutability feature a.k.a object lock in S3 that can be set on the bucket are specified in BackupBucketConfig.
Immutability feature (WORM, i.e. write-once-read-many model) ensures that once backups is written to the bucket, it will prevent locked object versions from being permanently deleted, hence it cannot be modified or deleted for a specified period. This feature is crucial for protecting backups from accidental or malicious deletion, ensuring data safety and availability for restoration.
Note
With enabling S3 object lock, S3 versioning will also get enabled.
The Gardener extension provider for AWS supports creating bucket (and enabling already existing buckets if immutability configured) to use object lock feature provided by storage provider AWS S3.
Here is an example configuration for BackupBucketConfig:
apiVersion: aws.provider.extensions.gardener.cloud/v1alpha1
kind: BackupBucketConfig
immutability:
retentionType: bucket
retentionPeriod: 24h
mode: compliance
retentionType: Specifies the type of retention policy. Currently, S3 supports object lock onbucketlevel as well as onobjectlevel. The allowed value isbucket, which applies the retention policy and retention period to the entire bucket. For more details, refer to the documentation. Objects in the bucket will inherit the retention period which is set on the bucket. Please refer here to see working of backups/snapshots with immutable feature.retentionPeriod: Defines the duration for which object version in the bucket will remain immutable. AWS S3 only supports immutability durations in days or years, therefore this field must be set as multiple of 24h.mode: Defines the mode for object locked enabled S3 bucket, S3 provides two retention modes that apply different levels of protection to objects:- Governance mode: Users with special permissions can overwrite, delete or alter object versions during retention period.
- Compliance mode: No users(including root user) can overwrite, delete or alter object versions during retention period.
To configure a BackupBucket with immutability feature, include the BackupBucketConfig in the .spec.providerConfig of the BackupBucket resource.
Here is an example of configuring a BackupBucket S3 object lock with retentionPeriod set to 24h i.e 1 Day and with mode Compliance.
apiVersion: extensions.gardener.cloud/v1alpha1
kind: BackupBucket
metadata:
name: my-backup-bucket
spec:
type: aws
region: eu-west-1
secretRef:
name: my-aws-secret
namespace: my-namespace
providerConfig:
apiVersion: aws.provider.extensions.gardener.cloud/v1alpha1
kind: BackupBucketConfig
immutability:
retentionType: bucket
retentionPeriod: 24h
mode: compliance
Note
Once S3 Object Lock is enabled, it cannot be disabled, nor can S3 versioning. However, you can remove the default retention settings by removing the
BackupBucketConfigfrom.spec.providerConfig.
5.1.3 - Provider Azure
Gardener Extension for Azure provider
Project Gardener implements the automated management and operation of Kubernetes clusters as a service. Its main principle is to leverage Kubernetes concepts for all of its tasks.
Recently, most of the vendor specific logic has been developed in-tree. However, the project has grown to a size where it is very hard to extend, maintain, and test. With GEP-1 we have proposed how the architecture can be changed in a way to support external controllers that contain their very own vendor specifics. This way, we can keep Gardener core clean and independent.
This controller implements Gardener’s extension contract for the Azure provider.
An example for a ControllerRegistration resource that can be used to register this controller to Gardener can be found here.
Please find more information regarding the extensibility concepts and a detailed proposal here.
Supported Kubernetes versions
This extension controller supports the following Kubernetes versions:
| Version | Support | Conformance test results |
|---|---|---|
| Kubernetes 1.33 | 1.33.0+ | N/A |
| Kubernetes 1.32 | 1.32.0+ | |
| Kubernetes 1.31 | 1.31.0+ | |
| Kubernetes 1.30 | 1.30.0+ | |
| Kubernetes 1.29 | 1.29.0+ | |
| Kubernetes 1.28 | 1.28.0+ | |
| Kubernetes 1.27 | 1.27.0+ |
Please take a look here to see which versions are supported by Gardener in general.
How to start using or developing this extension controller locally
You can run the controller locally on your machine by executing make start.
Static code checks and tests can be executed by running make verify. We are using Go modules for Golang package dependency management and Ginkgo/Gomega for testing.
Feedback and Support
Feedback and contributions are always welcome!
Please report bugs or suggestions as GitHub issues or reach out on Slack (join the workspace here).
Learn more!
Please find further resources about out project here:
- Our landing page gardener.cloud
- “Gardener, the Kubernetes Botanist” blog on kubernetes.io
- “Gardener Project Update” blog on kubernetes.io
- GEP-1 (Gardener Enhancement Proposal) on extensibility
- GEP-4 (New
core.gardener.cloud/v1beta1API) - Extensibility API documentation
- Gardener Extensions Golang library
- Gardener API Reference
5.1.3.1 - Tutorials
5.1.3.1.1 - Create a Kubernetes Cluster on Azure with Gardener
Overview
Gardener allows you to create a Kubernetes cluster on different infrastructure providers. This tutorial will guide you through the process of creating a cluster on Azure.
Prerequisites
- You have created an Azure account.
- You have access to the Gardener dashboard and have permissions to create projects.
- You have an Azure Service Principal assigned to your subscription.
Steps
Go to the Gardener dashboard and create a Project.

Get the properties of your Azure AD tenant, Subscription and Service Principal.
Before you can provision and access a Kubernetes cluster on Azure, you need to add the Azure service principal, AD tenant and subscription credentials in Gardener. Gardener needs the credentials to provision and operate the Azure infrastructure for your Kubernetes cluster.
Ensure that the Azure service principal has the actions defined within the Azure Permissions within your Subscription assigned. If no fine-grained permission/actions are required, then simply the built-in
Contributorrole can be assigned.Tenant ID
To find your
TenantID, follow this guide.SubscriptionID
To find your
SubscriptionID, search for and select Subscriptions.
After that, copy the
SubscriptionIDfrom your subscription of choice.
Service Principal (SPN)
A service principal consist of a
ClientID(also calledApplicationID) and a Client Secret. For more information, see Application and service principal objects in Azure Active Directory. You need to obtain the:Client ID
Access the Azure Portal and navigate to the Active Directory service. Within the service navigate to App registrations and select your service principal. Copy the
ClientIDyou see there.Client Secret
Secrets for the Azure Account/Service Principal can be generated/rotated via the Azure Portal. After copying your
ClientID, in the Detail view of your Service Principal navigate to Certificates & secrets. In the section, you can generate a new secret.
Choose Secrets, then the plus icon
 and select Azure.
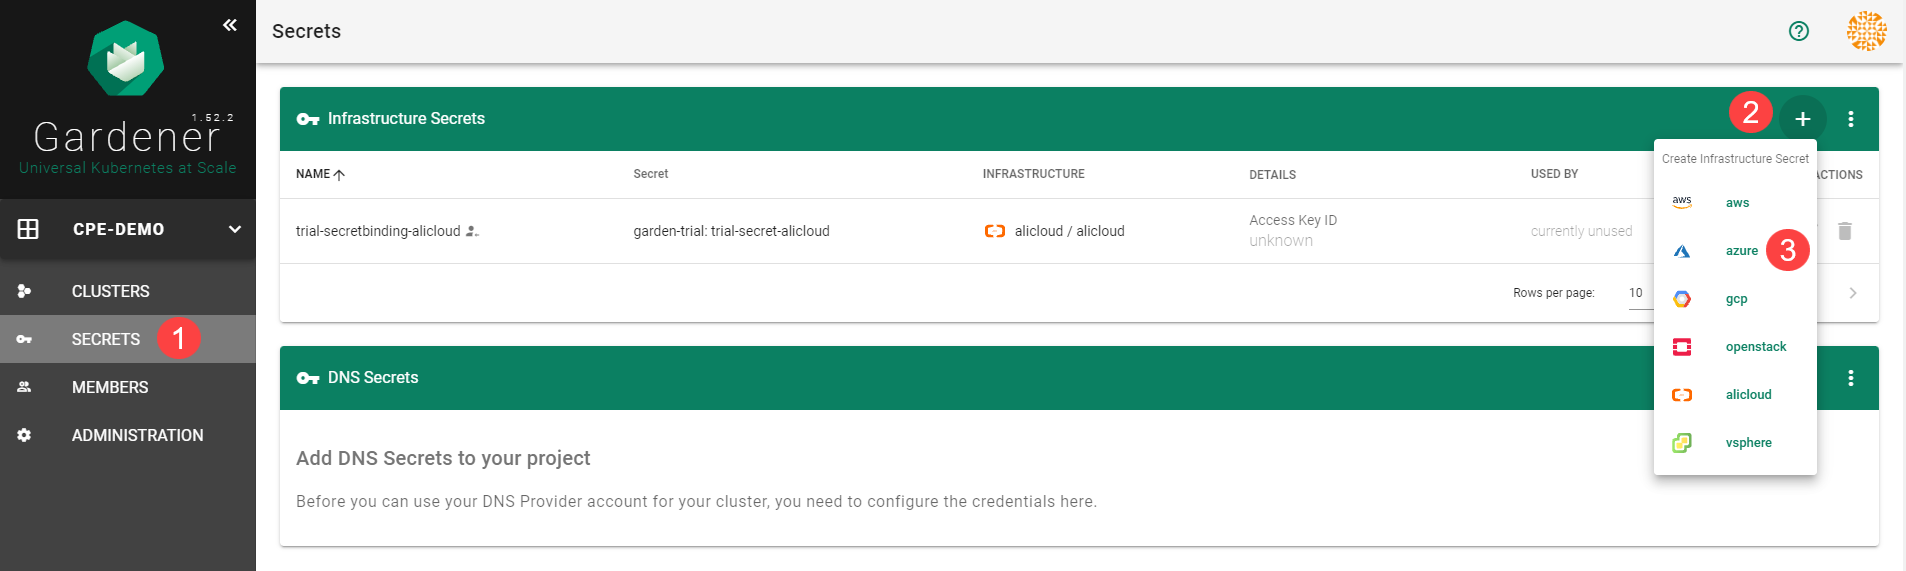
Create your secret.
- Type the name of your secret.
- Copy and paste the
TenantID,SubscriptionIDand the Service Principal credentials (ClientIDandClientSecret). - Choose Add secret.

After completing these steps, you should see your newly created secret in the Infrastructure Secrets section.
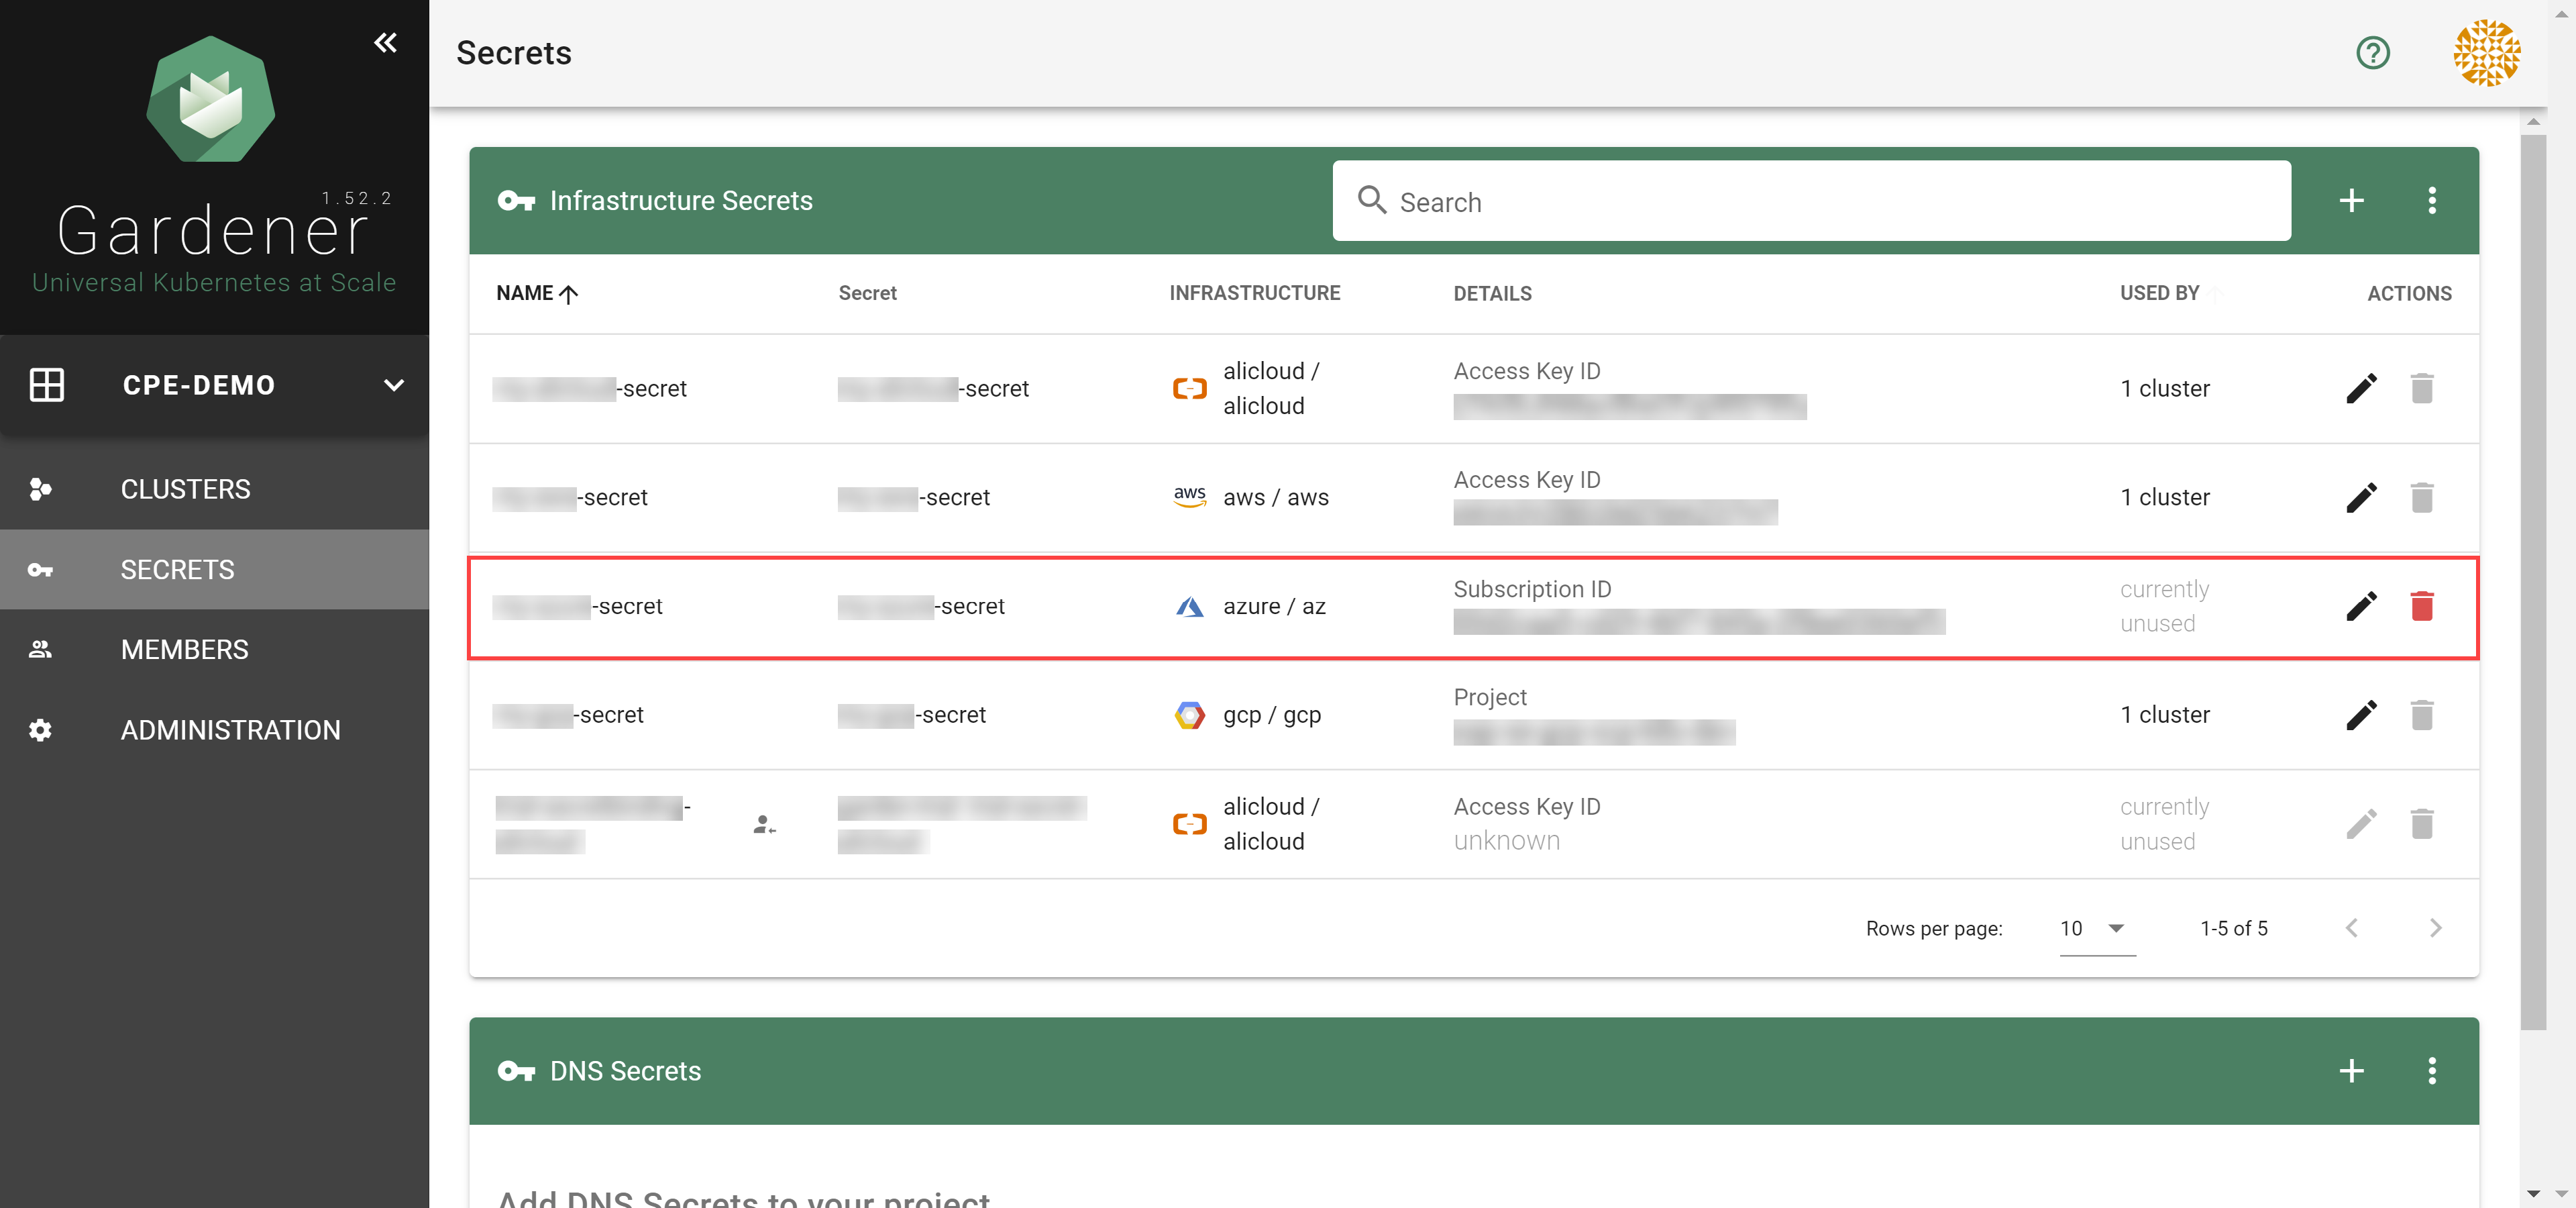
Register resource providers for your subscription.
- Go to your Azure dashboard
- Navigate to Subscriptions -> <your_subscription>
- Pick resource providers from the sidebar
- Register microsoft.Network
- Register microsoft.Compute
To create a new cluster, choose Clusters and then the plus sign in the upper right corner.

In the Create Cluster section:
- Select Azure in the Infrastructure tab.
- Type the name of your cluster in the Cluster Details tab.
- Choose the secret you created before in the Infrastructure Details tab.
- Choose Create.
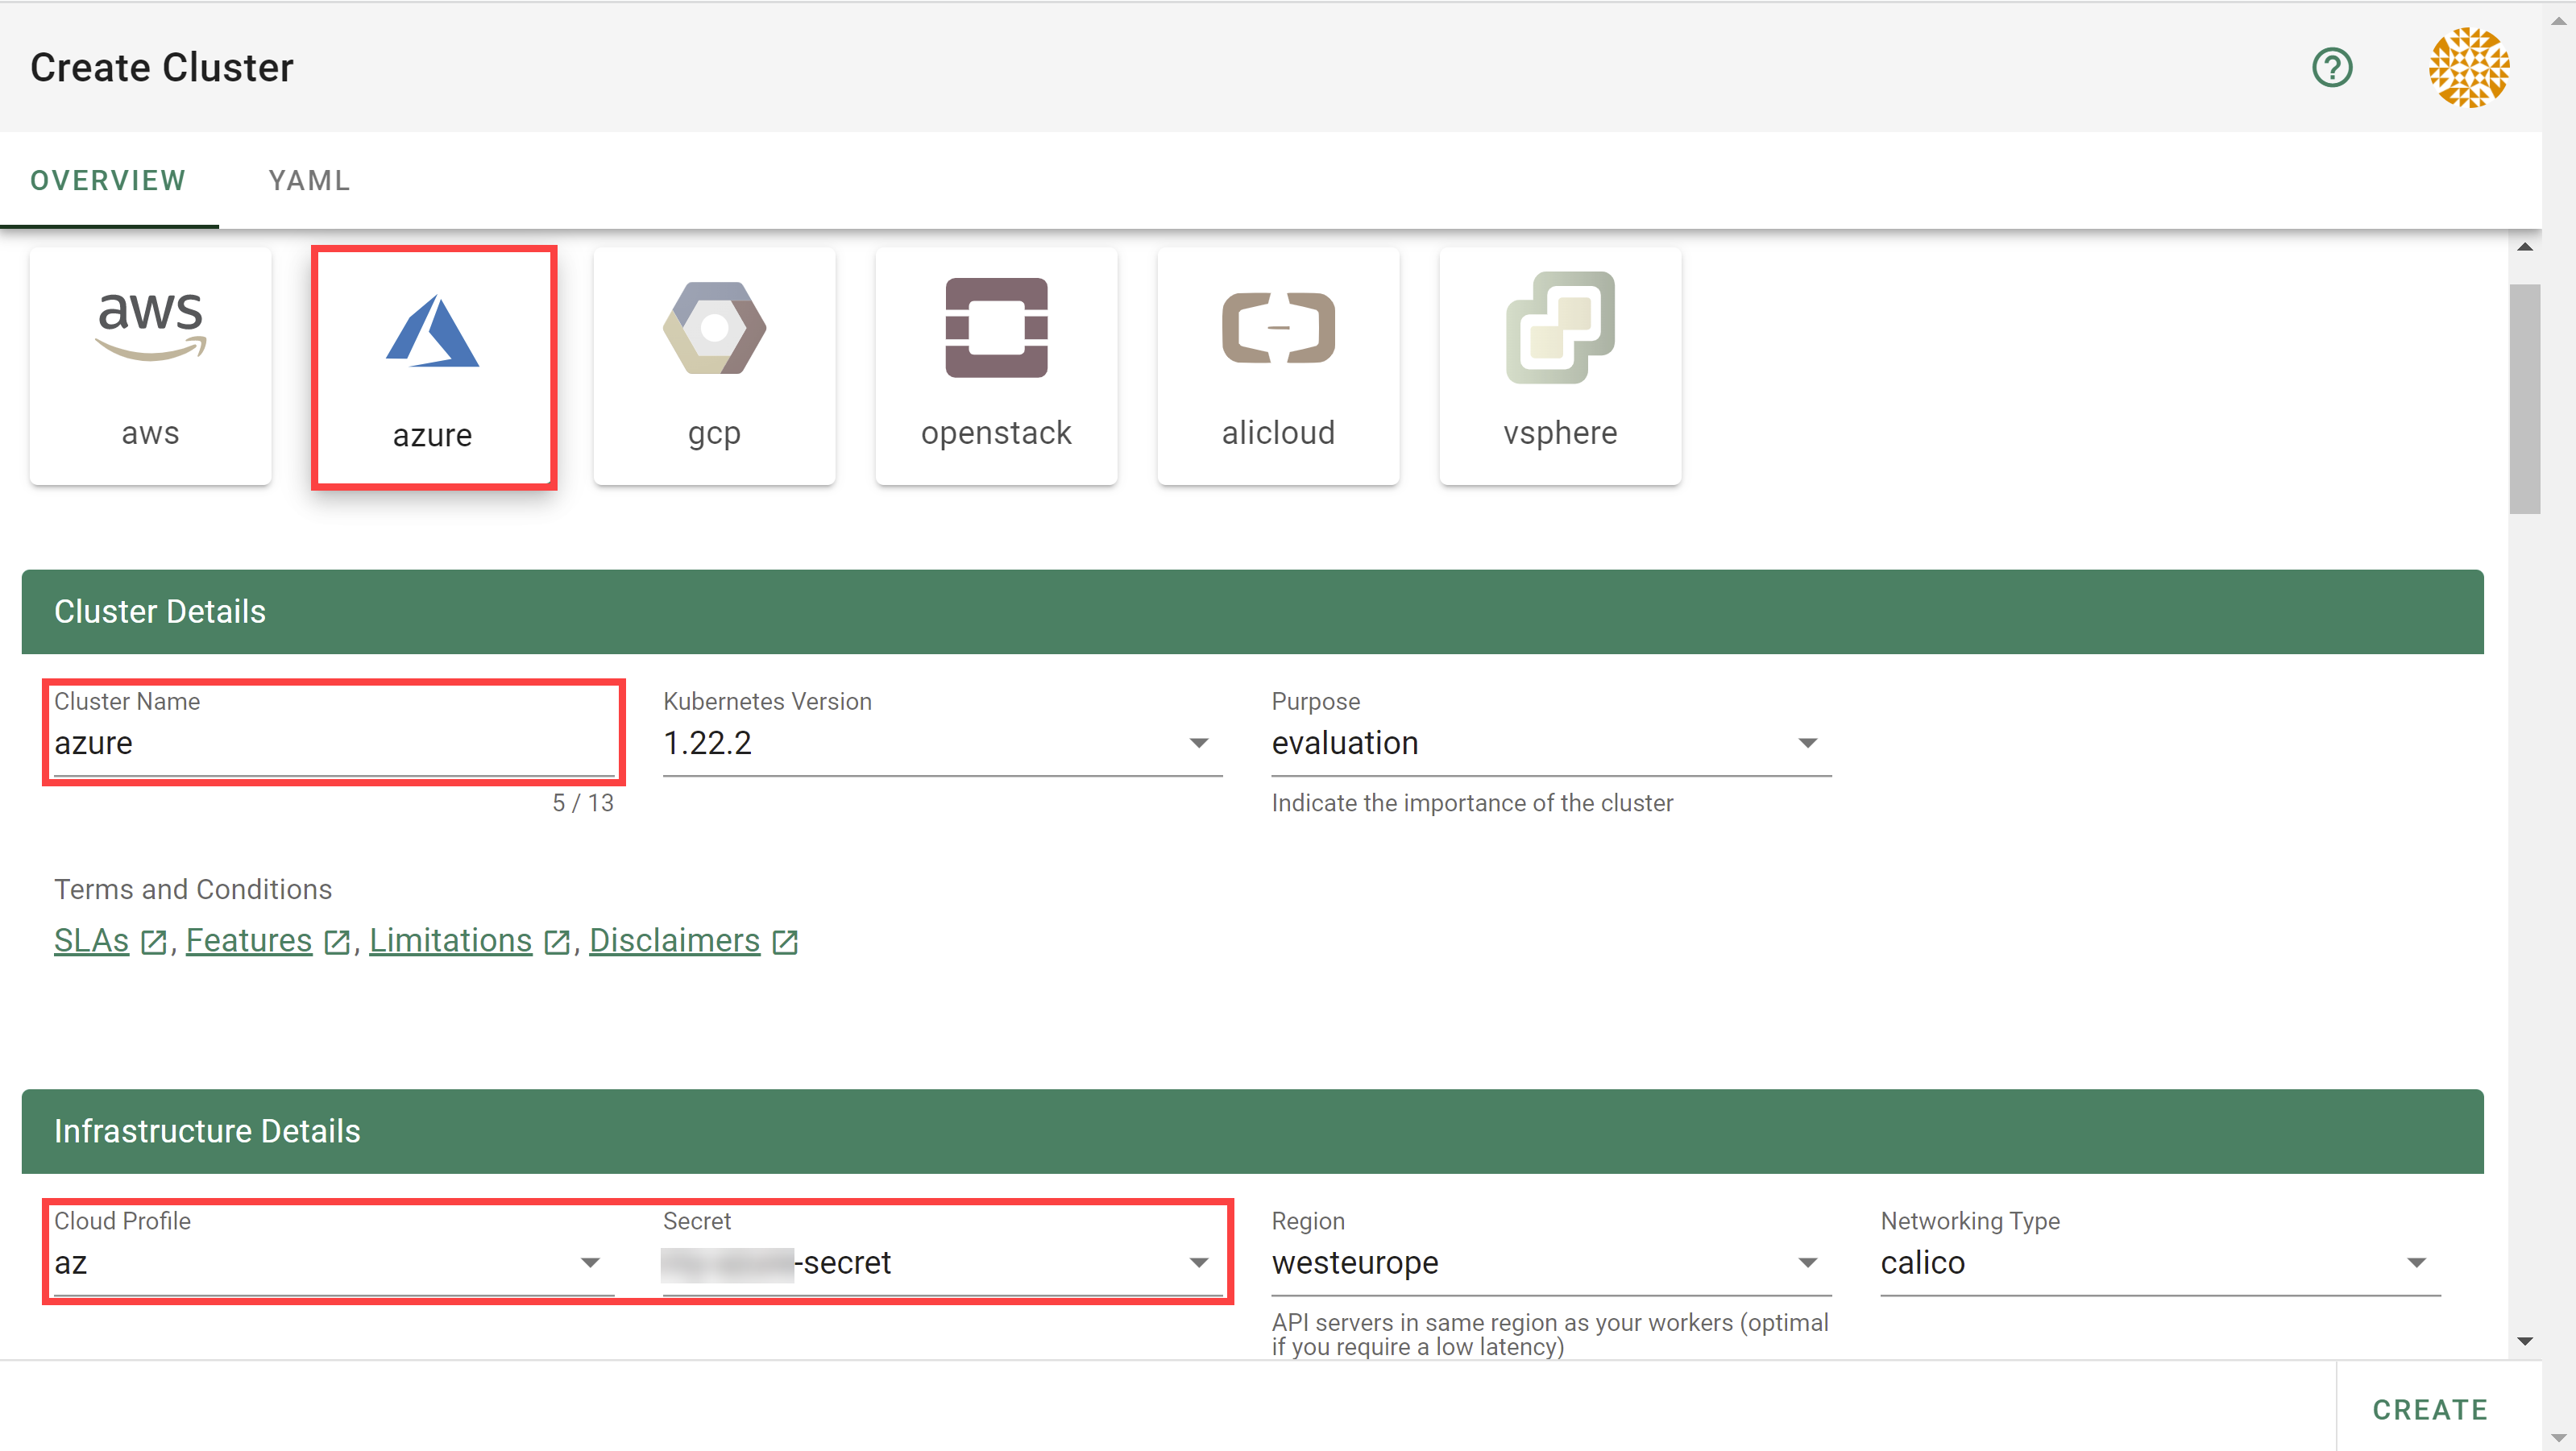
Wait for your cluster to get created.
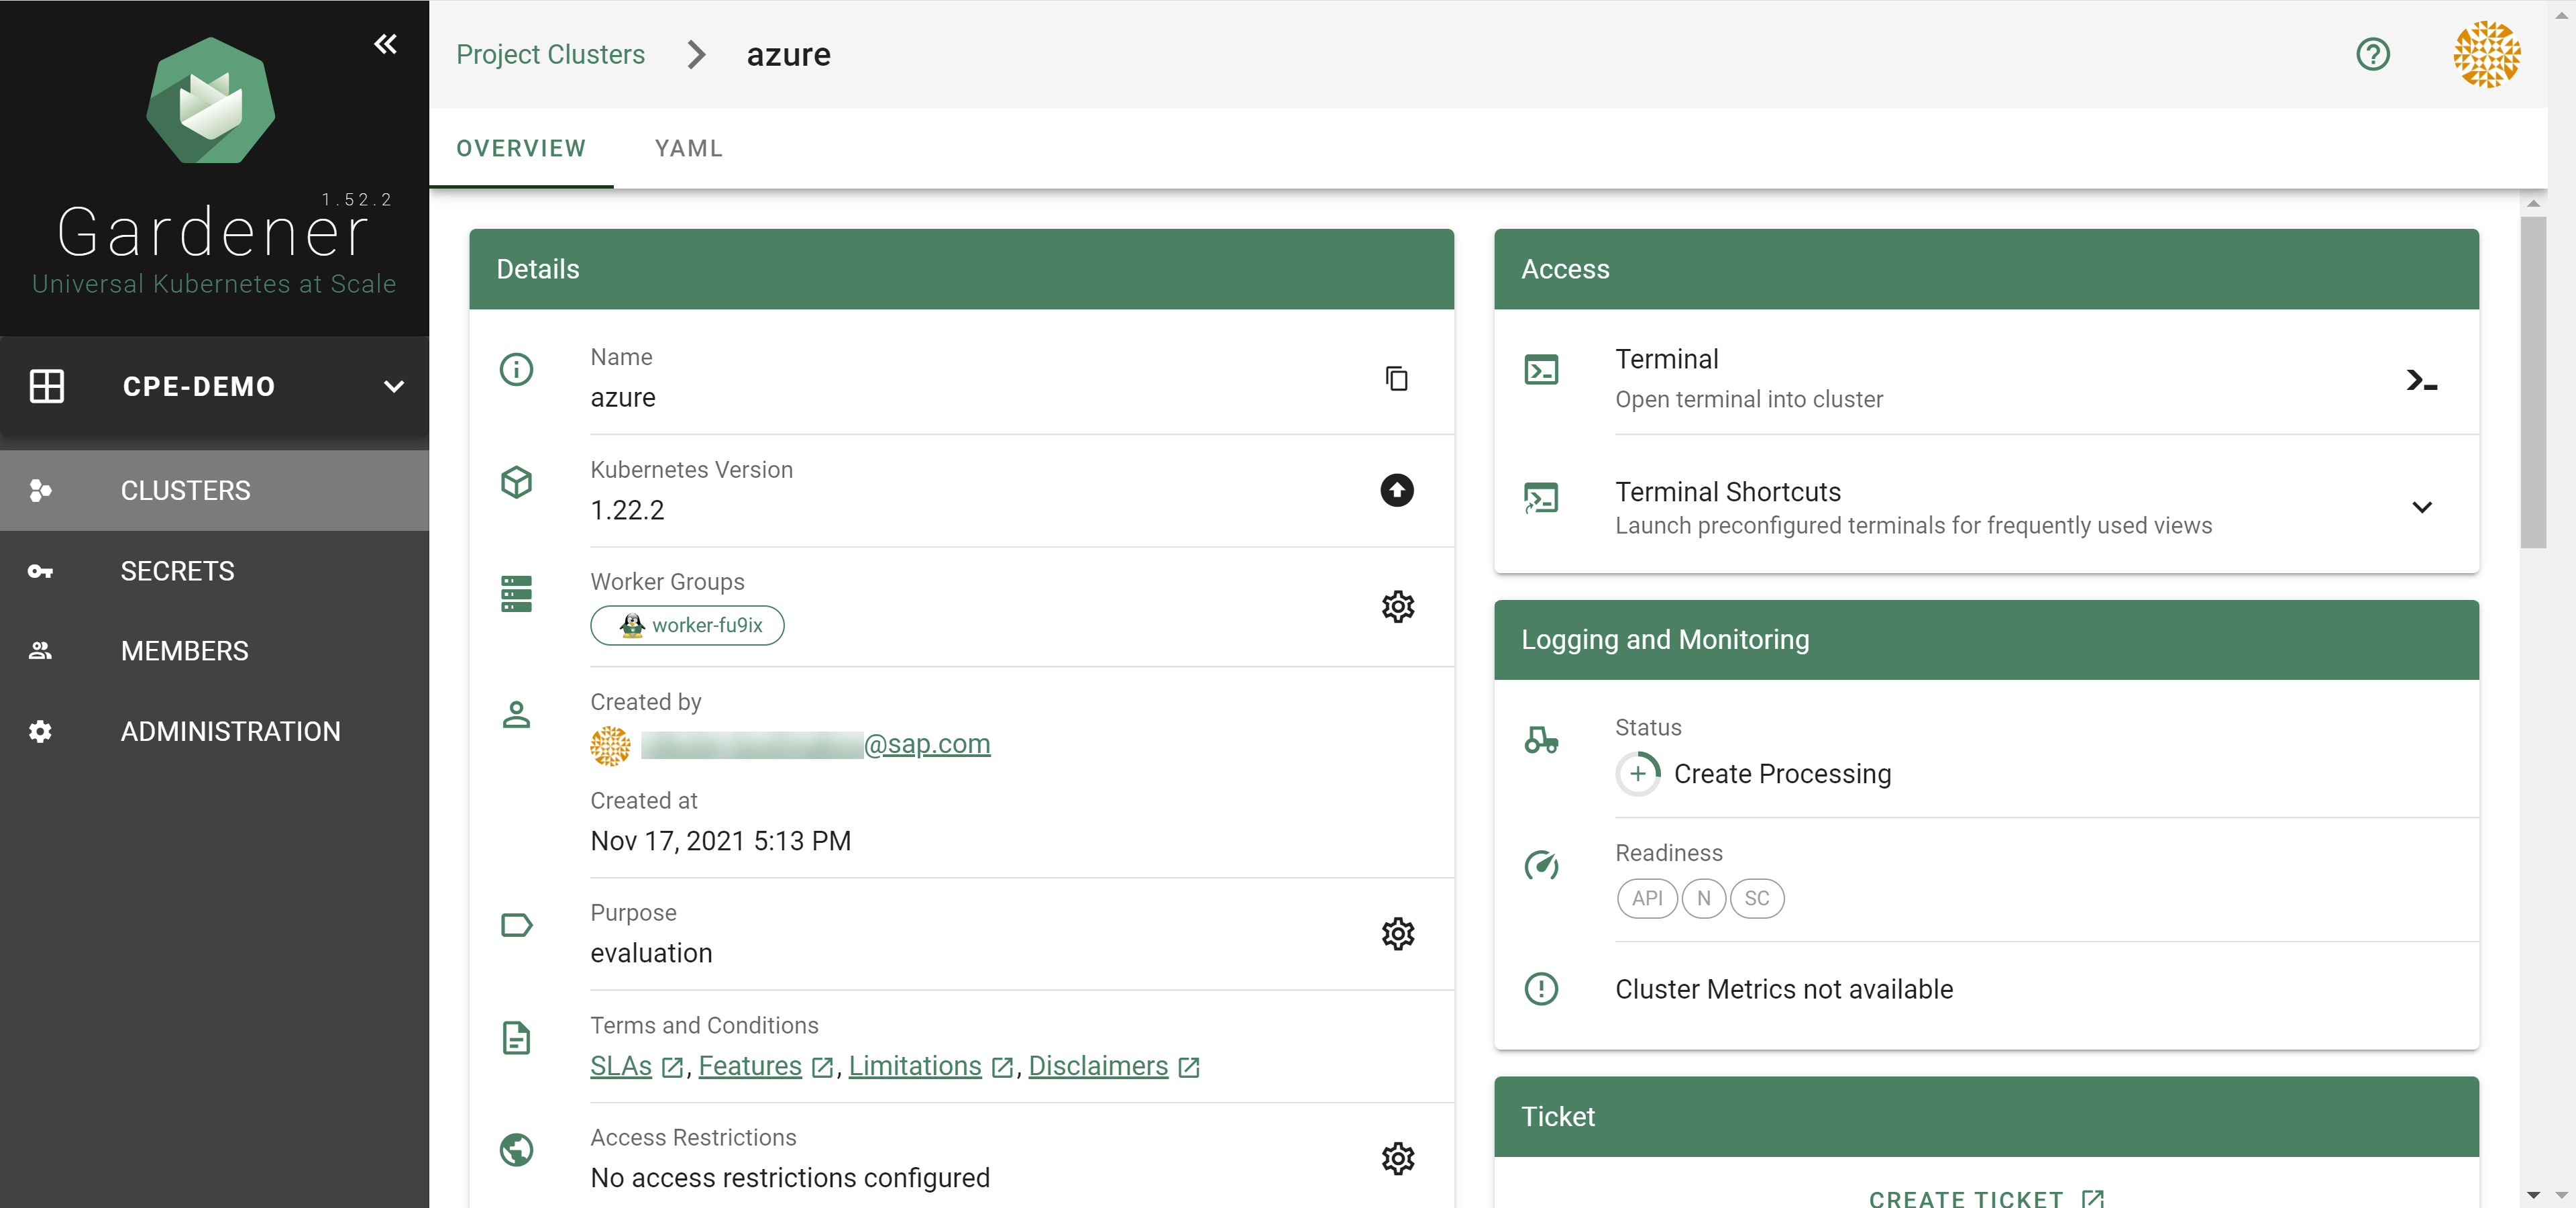
Result
After completing the steps in this tutorial, you will be able to see and download the kubeconfig of your cluster.
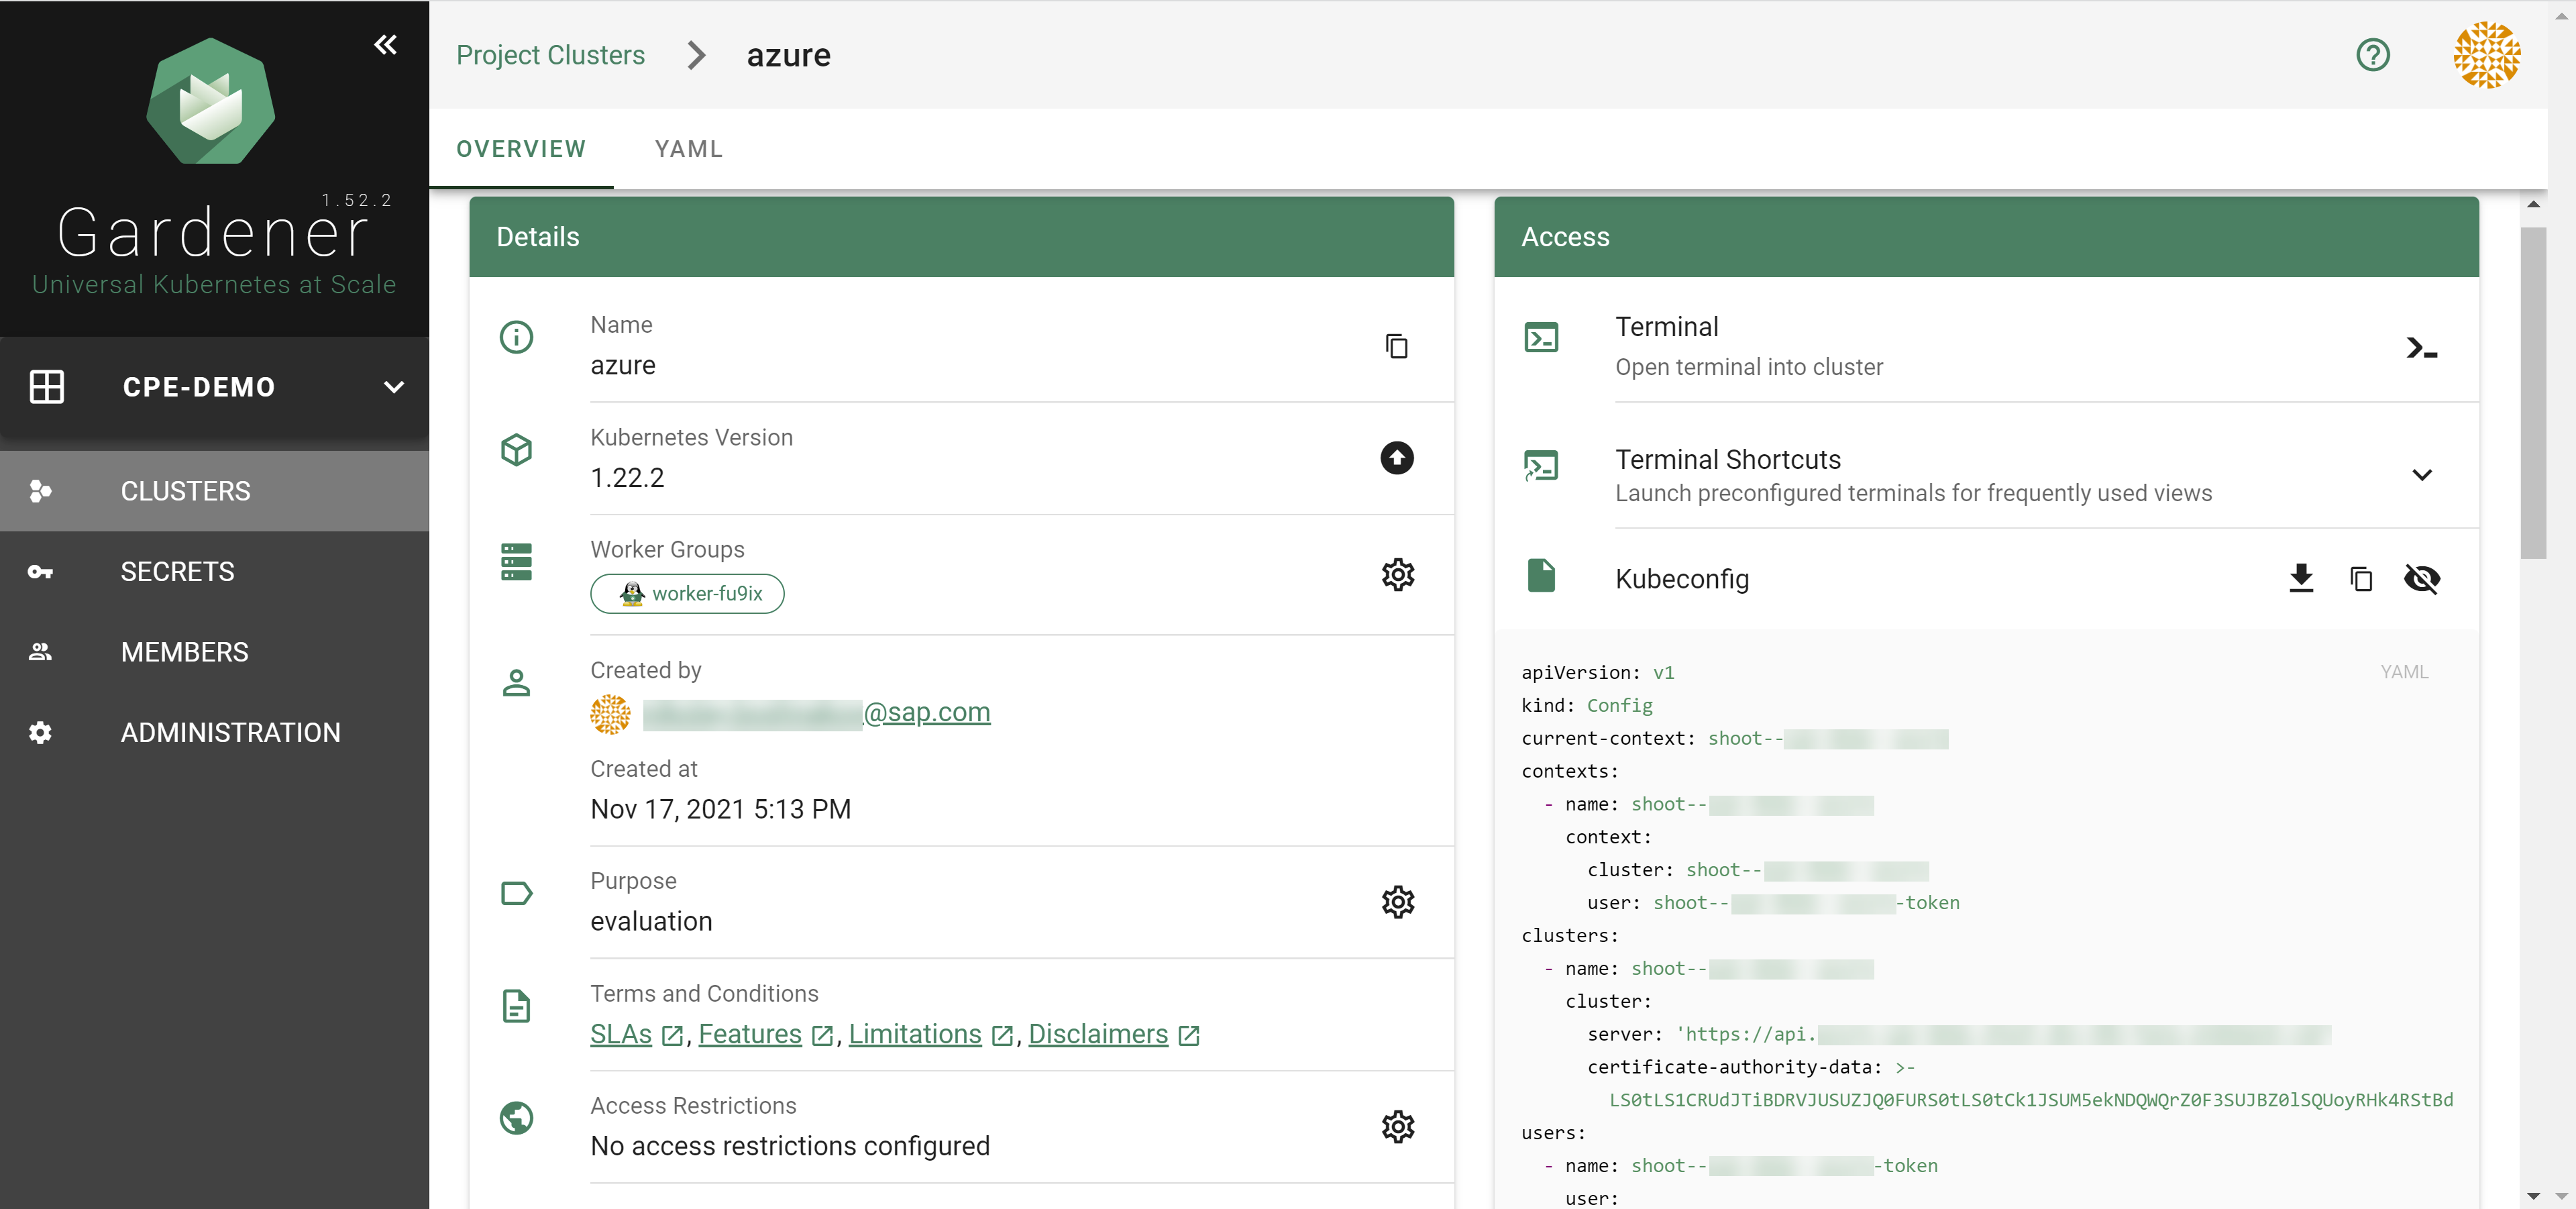
5.1.3.2 - Azure Permissions
Azure Permissions
The following document describes the required Azure actions manage a Shoot cluster on Azure split by the different Azure provider/services.
Be aware some actions are just required if particular deployment scenarios or features e.g. bring your own vNet, use Azure-file, let the Shoot act as Seed, immutable buckets, etc. should be used.
Microsoft.Compute
# Required if a non zonal cluster based on Availability Set should be used.
Microsoft.Compute/availabilitySets/delete
Microsoft.Compute/availabilitySets/read
Microsoft.Compute/availabilitySets/write
# Required to let Kubernetes manage Azure disks.
Microsoft.Compute/disks/delete
Microsoft.Compute/disks/read
Microsoft.Compute/disks/write
# Required for to fetch meta information about disk and virtual machines sizes.
Microsoft.Compute/locations/diskOperations/read
Microsoft.Compute/locations/operations/read
Microsoft.Compute/locations/vmSizes/read
# Required if csi snapshot capabilities should be used and/or the Shoot should act as a Seed.
Microsoft.Compute/snapshots/delete
Microsoft.Compute/snapshots/read
Microsoft.Compute/snapshots/write
# Required to let Gardener/Machine-Controller-Manager manage the cluster nodes/machines.
Microsoft.Compute/virtualMachines/delete
Microsoft.Compute/virtualMachines/read
Microsoft.Compute/virtualMachines/start/action
Microsoft.Compute/virtualMachines/write
# Required if a non zonal cluster based on VMSS Flex (VMO) should be used.
Microsoft.Compute/virtualMachineScaleSets/delete
Microsoft.Compute/virtualMachineScaleSets/read
Microsoft.Compute/virtualMachineScaleSets/write
Microsoft.ManagedIdentity
# Required if a user provided Azure managed identity should attached to the cluster nodes.
Microsoft.ManagedIdentity/userAssignedIdentities/assign/action
Microsoft.ManagedIdentity/userAssignedIdentities/read
Microsoft.MarketplaceOrdering
# Required if nodes/machines should be created with images hosted on the Azure Marketplace.
Microsoft.MarketplaceOrdering/offertypes/publishers/offers/plans/agreements/read
Microsoft.MarketplaceOrdering/offertypes/publishers/offers/plans/agreements/write
Microsoft.Network
# Required to let Kubernetes manage services of type 'LoadBalancer'.
Microsoft.Network/loadBalancers/backendAddressPools/join/action
Microsoft.Network/loadBalancers/delete
Microsoft.Network/loadBalancers/read
Microsoft.Network/loadBalancers/write
# Required in case the Shoot should use NatGateway(s).
Microsoft.Network/natGateways/delete
Microsoft.Network/natGateways/join/action
Microsoft.Network/natGateways/read
Microsoft.Network/natGateways/write
# Required to let Gardener/Machine-Controller-Manager manage the cluster nodes/machines.
Microsoft.Network/networkInterfaces/delete
Microsoft.Network/networkInterfaces/ipconfigurations/join/action
Microsoft.Network/networkInterfaces/ipconfigurations/read
Microsoft.Network/networkInterfaces/join/action
Microsoft.Network/networkInterfaces/read
Microsoft.Network/networkInterfaces/write
# Required to let Gardener maintain the basic infrastructure of the Shoot cluster and maintaing LoadBalancer services.
Microsoft.Network/networkSecurityGroups/delete
Microsoft.Network/networkSecurityGroups/join/action
Microsoft.Network/networkSecurityGroups/read
Microsoft.Network/networkSecurityGroups/write
# Required for managing LoadBalancers and NatGateways.
Microsoft.Network/publicIPAddresses/delete
Microsoft.Network/publicIPAddresses/join/action
Microsoft.Network/publicIPAddresses/read
Microsoft.Network/publicIPAddresses/write
# Required for managing the basic infrastructure of a cluster and maintaing LoadBalancer services.
Microsoft.Network/routeTables/delete
Microsoft.Network/routeTables/join/action
Microsoft.Network/routeTables/read
Microsoft.Network/routeTables/routes/delete
Microsoft.Network/routeTables/routes/read
Microsoft.Network/routeTables/routes/write
Microsoft.Network/routeTables/write
# Required to let Gardener maintain the basic infrastructure of the Shoot cluster.
# Only a subset is required for the bring your own vNet scenario.
Microsoft.Network/virtualNetworks/delete # not required for bring your own vnet
Microsoft.Network/virtualNetworks/read
Microsoft.Network/virtualNetworks/subnets/delete
Microsoft.Network/virtualNetworks/subnets/join/action
Microsoft.Network/virtualNetworks/subnets/read
Microsoft.Network/virtualNetworks/subnets/write
Microsoft.Network/virtualNetworks/write # not required for bring your own vnet
Microsoft.Resources
# Required to let Gardener maintain the basic infrastructure of the Shoot cluster.
Microsoft.Resources/subscriptions/resourceGroups/delete
Microsoft.Resources/subscriptions/resourceGroups/read
Microsoft.Resources/subscriptions/resourceGroups/write
Microsoft.Storage
# Required if Azure File should be used and/or if the Shoot should act as Seed.
Microsoft.Storage/operations/read
Microsoft.Storage/storageAccounts/blobServices/containers/delete
Microsoft.Storage/storageAccounts/blobServices/containers/read
Microsoft.Storage/storageAccounts/blobServices/containers/write
Microsoft.Storage/storageAccounts/blobServices/read
Microsoft.Storage/storageAccounts/delete
Microsoft.Storage/storageAccounts/listkeys/action
Microsoft.Storage/storageAccounts/read
Microsoft.Storage/storageAccounts/write
# Required if Shoot should act as Seed with immutable ABS containers.
Microsoft.Storage/storageAccounts/blobServices/containers/immutabilityPolicies/extend/action
Microsoft.Storage/storageAccounts/blobServices/containers/immutabilityPolicies/delete
Microsoft.Storage/storageAccounts/blobServices/containers/immutabilityPolicies/write
Microsoft.Storage/storageAccounts/blobServices/containers/immutabilityPolicies/lock/action
Microsoft.Storage/storageAccounts/blobServices/containers/immutabilityPolicies/read
Microsoft.Storage/storageAccounts/managementPolicies/delete
Microsoft.Storage/storageAccounts/managementPolicies/read
Microsoft.Storage/storageAccounts/managementPolicies/write
# Required to configure storage key rotation
Microsoft.Storage/storageAccounts/regeneratekey/action
5.1.3.3 - Deployment
Deployment of the Azure provider extension
Disclaimer: This document is NOT a step by step installation guide for the Azure provider extension and only contains some configuration specifics regarding the installation of different components via the helm charts residing in the Azure provider extension repository.
gardener-extension-admission-azure
Authentication against the Garden cluster
There are several authentication possibilities depending on whether or not the concept of Virtual Garden is used.
Virtual Garden is not used, i.e., the runtime Garden cluster is also the target Garden cluster.
Automounted Service Account Token
The easiest way to deploy the gardener-extension-admission-azure component will be to not provide kubeconfig at all. This way in-cluster configuration and an automounted service account token will be used. The drawback of this approach is that the automounted token will not be automatically rotated.
Virtual Garden is used, i.e., the runtime Garden cluster is different from the target Garden cluster.
Service Account
The easiest way to setup the authentication will be to create a service account and the respective roles will be bound to this service account in the target cluster. Then use the generated service account token and craft a kubeconfig which will be used by the workload in the runtime cluster. This approach does not provide a solution for the rotation of the service account token. However, this setup can be achieved by setting .Values.global.virtualGarden.enabled: true and following these steps:
- Deploy the
applicationpart of the charts in thetargetcluster. - Get the service account token and craft the
kubeconfig. - Set the crafted
kubeconfigand deploy theruntimepart of the charts in theruntimecluster.
Client Certificate
Another solution will be to bind the roles in the target cluster to a User subject instead of a service account and use a client certificate for authentication. This approach does not provide a solution for the client certificate rotation. However, this setup can be achieved by setting both .Values.global.virtualGarden.enabled: true and .Values.global.virtualGarden.user.name, then following these steps:
- Generate a client certificate for the
targetcluster for the respective user. - Deploy the
applicationpart of the charts in thetargetcluster. - Craft a
kubeconfigusing the already generated client certificate. - Set the crafted
kubeconfigand deploy theruntimepart of the charts in theruntimecluster.
5.1.3.4 - Local Setup
admission-azure
admission-azure is an admission webhook server which is responsible for the validation of the cloud provider (Azure in this case) specific fields and resources. The Gardener API server is cloud provider agnostic and it wouldn’t be able to perform similar validation.
Follow the steps below to run the admission webhook server locally.
Start the Gardener API server.
For details, check the Gardener local setup.
Start the webhook server
Make sure that the
KUBECONFIGenvironment variable is pointing to the local garden cluster.make start-admissionSetup the
ValidatingWebhookConfiguration.hack/dev-setup-admission-azure.shwill configure the webhook Service which will allow the kube-apiserver of your local cluster to reach the webhook server. It will also apply theValidatingWebhookConfigurationmanifest../hack/dev-setup-admission-azure.sh
You are now ready to experiment with the admission-azure webhook server locally.
5.1.3.5 - Operations
Using the Azure provider extension with Gardener as an operator
The core.gardener.cloud/v1beta1.CloudProfile resource declares a providerConfig field that is meant to contain provider-specific configuration.
The core.gardener.cloud/v1beta1.Seed resource is structured similarly.
Additionally, it allows configuring settings for the backups of the main etcds’ data of shoot clusters control planes running in this seed cluster.
This document explains the necessary configuration for the Azure provider extension.
CloudProfile resource
This section describes, how the configuration for CloudProfiles looks like for Azure by providing an example CloudProfile manifest with minimal configuration that can be used to allow the creation of Azure shoot clusters.
CloudProfileConfig
The cloud profile configuration contains information about the real machine image IDs in the Azure environment (image urn, id, communityGalleryImageID or sharedGalleryImageID).
You have to map every version that you specify in .spec.machineImages[].versions to an available VM image in your subscription.
The VM image can be either from the Azure Marketplace and will then get identified via a urn, it can be a custom VM image from a shared image gallery and is then identified sharedGalleryImageID, or it can be from a community image gallery and is then identified by its communityGalleryImageID. You can use id field also to specifiy the image location in the azure compute gallery (in which case it would have a different kind of path) but it is not recommended as it sometimes faces problems in cross subscription image sharing.
For each machine image version an architecture field can be specified which specifies the CPU architecture of the machine on which given machine image can be used.
An example CloudProfileConfig for the Azure extension looks as follows:
apiVersion: azure.provider.extensions.gardener.cloud/v1alpha1
kind: CloudProfileConfig
countUpdateDomains:
- region: westeurope
count: 5
countFaultDomains:
- region: westeurope
count: 3
machineTypes:
- name: Standard_D3_v2
acceleratedNetworking: true
- name: Standard_X
machineImages:
- name: coreos
versions:
- version: 2135.6.0
urn: "CoreOS:CoreOS:Stable:2135.6.0"
# architecture: amd64 # optional
acceleratedNetworking: true
- name: myimage
versions:
- version: 1.0.0
id: "/subscriptions/<subscription ID where the gallery is located>/resourceGroups/myGalleryRG/providers/Microsoft.Compute/galleries/myGallery/images/myImageDefinition/versions/1.0.0"
- name: GardenLinuxCommunityImage
versions:
- version: 1.0.0
communityGalleryImageID: "/CommunityGalleries/gardenlinux-567905d8-921f-4a85-b423-1fbf4e249d90/Images/gardenlinux/Versions/576.1.1"
- name: SharedGalleryImageName
versions:
- version: 1.0.0
sharedGalleryImageID: "/SharedGalleries/sharedGalleryName/Images/sharedGalleryImageName/Versions/sharedGalleryImageVersionName"
The cloud profile configuration contains information about the update via .countUpdateDomains[] and failure domain via .countFaultDomains[] counts in the Azure regions you want to offer.
The .machineTypes[] list contain provider specific information to the machine types e.g. if the machine type support Azure Accelerated Networking, see .machineTypes[].acceleratedNetworking.
Additionally, it contains the real machine image identifiers in the Azure environment. You can provide either URN for Azure Market Place images or id of Shared Image Gallery images.
When Shared Image Gallery is used, you have to ensure that the image is available in the desired regions and the end-user subscriptions have access to the image or to the whole gallery.
You have to map every version that you specify in .spec.machineImages[].versions here such that the Azure extension knows the machine image identifiers for every version you want to offer.
Furthermore, you can specify for each image version via .machineImages[].versions[].acceleratedNetworking if Azure Accelerated Networking is supported.
Example CloudProfile manifest
The possible values for .spec.volumeTypes[].name on Azure are Standard_LRS, StandardSSD_LRS and Premium_LRS. There is another volume type called UltraSSD_LRS but this type is not supported to use as os disk. If an end user select a volume type whose name is not equal to one of the valid values then the machine will be created with the default volume type which belong to the selected machine type. Therefore it is recommended to configure only the valid values for the .spec.volumeType[].name in the CloudProfile.
Please find below an example CloudProfile manifest:
apiVersion: core.gardener.cloud/v1beta1
kind: CloudProfile
metadata:
name: azure
spec:
type: azure
kubernetes:
versions:
- version: 1.28.2
- version: 1.23.8
expirationDate: "2022-10-31T23:59:59Z"
machineImages:
- name: coreos
versions:
- version: 2135.6.0
machineTypes:
- name: Standard_D3_v2
cpu: "4"
gpu: "0"
memory: 14Gi
- name: Standard_D4_v3
cpu: "4"
gpu: "0"
memory: 16Gi
volumeTypes:
- name: Standard_LRS
class: standard
usable: true
- name: StandardSSD_LRS
class: premium
usable: false
- name: Premium_LRS
class: premium
usable: false
regions:
- name: westeurope
providerConfig:
apiVersion: azure.provider.extensions.gardener.cloud/v1alpha1
kind: CloudProfileConfig
machineTypes:
- name: Standard_D3_v2
acceleratedNetworking: true
- name: Standard_D4_v3
countUpdateDomains:
- region: westeurope
count: 5
countFaultDomains:
- region: westeurope
count: 3
machineImages:
- name: coreos
versions:
- version: 2303.3.0
urn: CoreOS:CoreOS:Stable:2303.3.0
# architecture: amd64 # optional
acceleratedNetworking: true
- version: 2135.6.0
urn: "CoreOS:CoreOS:Stable:2135.6.0"
# architecture: amd64 # optional
Seed resource
This provider extension does not support any provider configuration for the Seed’s .spec.provider.providerConfig field.
However, it supports managing of backup infrastructure, i.e., you can specify a configuration for the .spec.backup field.
Backup configuration
A Seed of type azure can be configured to perform backups for the main etcds’ of the shoot clusters control planes using Azure Blob storage.
The location/region where the backups will be stored defaults to the region of the Seed (spec.provider.region), but can also be explicitly configured via the field spec.backup.region.
The region of the backup can be different from where the Seed cluster is running.
However, usually it makes sense to pick the same region for the backup bucket as used for the Seed cluster.
Please find below an example Seed manifest (partly) that configures backups using Azure Blob storage.
---
apiVersion: core.gardener.cloud/v1beta1
kind: Seed
metadata:
name: my-seed
spec:
provider:
type: azure
region: westeurope
backup:
provider: azure
region: westeurope # default region
credentialsRef:
apiVersion: v1
kind: Secret
name: backup-credentials
namespace: garden
...
The referenced secret has to contain the provider credentials of the Azure subscription. Please take a look here on how to create an Azure Application, Service Principle and how to obtain credentials. The example below demonstrates how the secret has to look like.
apiVersion: v1
kind: Secret
metadata:
name: core-azure
namespace: garden-dev
type: Opaque
data:
clientID: base64(client-id)
clientSecret: base64(client-secret)
subscriptionID: base64(subscription-id)
tenantID: base64(tenant-id)
Permissions for Azure Blob storage
Please make sure the Azure application has the following IAM roles.
Miscellaneous
Gardener managed Service Principals
The operators of the Gardener Azure extension can provide a list of managed service principals (technical users) that can be used for Azure Shoots. This eliminates the need for users to provide own service principals for their clusters.
The user would need to grant the managed service principal access to their subscription with proper permissions.
As service principals are managed in an Azure Active Directory for each supported Active Directory, an own service principal needs to be provided.
In case the user provides an own service principal in the Shoot secret, this one will be used instead of the managed one provided by the operator.
Each managed service principal will be maintained in a Secret like that:
apiVersion: v1
kind: Secret
metadata:
name: service-principal-my-tenant
namespace: extension-provider-azure
labels:
azure.provider.extensions.gardener.cloud/purpose: tenant-service-principal-secret
data:
tenantID: base64(my-tenant)
clientID: base64(my-service-princiapl-id)
clientSecret: base64(my-service-princiapl-secret)
type: Opaque
The user needs to provide in its Shoot secret a tenantID and subscriptionID.
The managed service principal will be assigned based on the tenantID.
In case there is a managed service principal secret with a matching tenantID, this one will be used for the Shoot.
If there is no matching managed service principal secret then the next Shoot operation will fail.
One of the benefits of having managed service principals is that the operator controls the lifecycle of the service principal and can rotate its secrets.
After the service principal secret has been rotated and the corresponding secret is updated, all Shoot clusters using it need to be reconciled or the last operation to be retried.
Rolling Update Triggers
Changes to the Shoot worker-pools are applied in-place where possible.
In case this is not possible a rolling update of the workers will be performed to apply the new configuration,
as outlined in the Gardener documentation.
The exact fields that trigger this behavior are defined in the Gardener doc,
with a few additions:
.spec.provider.workers[].providerConfig.spec.provider.infrastructureConfig.identity.spec.provider.infrastructureConfig.zoned.spec.provider.workers[].dataVolumes[].size(only the affected worker pool).spec.provider.workers[].dataVolumes[].type(only the affected worker pool)
Additionally, if the VMO name of a worker pool changes, the worker pool will be rolled.
This can occur if the countFaultDomains field in the cloud profile is modified.
For now, if the feature gate NewWorkerPoolHash is enabled, the exact same fields are used.
This behavior may change once MCM supports in-place updates, such as volume updates.
5.1.3.6 - Usage
Using the Azure provider extension with Gardener as end-user
The core.gardener.cloud/v1beta1.Shoot resource declares a few fields that are meant to contain provider-specific configuration.
This document describes the configurable options for Azure and provides an example Shoot manifest with minimal configuration that can be used to create an Azure cluster (modulo the landscape-specific information like cloud profile names, secret binding names, etc.).
Azure Provider Credentials
In order for Gardener to create a Kubernetes cluster using Azure infrastructure components, a Shoot has to provide credentials with sufficient permissions to the desired Azure subscription.
Every shoot cluster references a SecretBinding or a CredentialsBinding.
SecretBindings reference a Secret while CredentialsBindings can reference a Secret or a WorkloadIdentity.
A Secret would contain the provider credentials of the Azure subscription while a WorkloadIdentity would be used to represent an identity of Gardener managed workload.
Important
The
SecretBinding/CredentialsBindingis configurable in the Shoot cluster with the fieldsecretBindingName/credentialsBindingName.SecretBindings are considered legacy and will be deprecated in the future. It is advised to useCredentialsBindings instead.
Create an Azure Application and Service Principle and obtain its credentials.
Please ensure that the Azure application (spn) has the IAM actions defined here assigned. If no fine-grained permissions/actions required then simply assign the Contributor role.
The example below demonstrates how the secret containing the client credentials of the Azure Application has to look like:
apiVersion: v1
kind: Secret
metadata:
name: core-azure
namespace: garden-dev
type: Opaque
data:
clientID: base64(client-id)
clientSecret: base64(client-secret)
subscriptionID: base64(subscription-id)
tenantID: base64(tenant-id)
Warning
Depending on your API usage it can be problematic to reuse the same Service Principal for different Shoot clusters due to rate limits. Please consider spreading your Shoots over Service Principals from different Azure subscriptions if you are hitting those limits.
Managed Service Principals
The operators of the Gardener Azure extension can provide managed service principals. This eliminates the need for users to provide an own service principal for a Shoot.
To make use of a managed service principal, the Azure secret of a Shoot cluster must contain only a subscriptionID and a tenantID field, but no clientID and clientSecret.
Removing those fields from the secret of an existing Shoot will also let it adopt the managed service principal.
Based on the tenantID field, the Gardener extension will try to assign the managed service principal to the Shoot.
If no managed service principal can be assigned then the next operation on the Shoot will fail.
Warning
The managed service principal need to be assigned to the users Azure subscription with proper permissions before using it.
Azure Workload Identity Federation
Users can choose to trust Gardener’s Workload Identity Issuer and eliminate the need for providing Azure credentials.
As a first step a resource of type WorkloadIdentity should be created in the Garden cluster and configured with the required Azure information.
This identity will be used by infrastructure components to authenticate against Azure APIs.
A sample of such resource is shown below:
apiVersion: security.gardener.cloud/v1alpha1
kind: WorkloadIdentity
metadata:
name: azure
namespace: garden-myproj
spec:
audiences:
# This is the audience that you configure during the creation of a federated credential
- api://AzureADTokenExchange-my-application
targetSystem:
type: azure
providerConfig:
apiVersion: azure.provider.extensions.gardener.cloud/v1alpha1
kind: WorkloadIdentityConfig
clientID: 00000000-0000-0000-0000-000000000001 # This is the id of the application (client)
tenantID: 00000000-0000-0000-0000-000000000002 # This is the id of the directory (tenant)
subscriptionID: 00000000-0000-0000-0000-000000000003 # This is the id of the Azure subscription
Once created the WorkloadIdentity will get its own id which will be used to form the subject of the said WorkloadIdentity.
The subject can be obtained by running the following command:
kubectl -n garden-myproj get wi azure -o=jsonpath={.status.sub}
As a second step users should configure Workload Identity Federation so that their application trusts Gardener’s Workload Identity Issuer.
Tip
You can retrieve Gardener’s Workload Identity Issuer URL directly from the Garden cluster by reading the contents of the Gardener Info ConfigMap.
kubectl -n gardener-system-public get configmap -o yaml
In the shown example a WorkloadIdentity with name azure with id 00000000-0000-0000-0000-000000000000 from the garden-myproj namespace will be trusted by the Azure application.
Important
You should replace the subject indentifier in the example below with the subject that is populated in the status of the
WorkloadIdentity, obtained in a previous step.
Please ensure that the Azure application (spn) has the proper IAM actions assigned. If no fine-grained permissions/actions required then simply assign the Contributor role.
Once you have everything set you can create a CredentialsBinding that reference the WorkloadIdentity and configure your shoot to use it.
Please see the following examples:
apiVersion: security.gardener.cloud/v1alpha1
kind: CredentialsBinding
metadata:
name: azure
namespace: garden-myproj
credentialsRef:
apiVersion: security.gardener.cloud/v1alpha1
kind: WorkloadIdentity
name: azure
namespace: garden-myproj
provider:
type: azure
apiVersion: core.gardener.cloud/v1beta1
kind: Shoot
metadata:
name: azure
namespace: garden-myproj
spec:
credentialsBindingName: azure
...
InfrastructureConfig
The infrastructure configuration mainly describes how the network layout looks like in order to create the shoot worker nodes in a later step, thus, prepares everything relevant to create VMs, load balancers, volumes, etc.
An example InfrastructureConfig for the Azure extension looks as follows:
apiVersion: azure.provider.extensions.gardener.cloud/v1alpha1
kind: InfrastructureConfig
networks:
vnet: # specify either 'name' and 'resourceGroup' or 'cidr'
# name: my-vnet
# resourceGroup: my-vnet-resource-group
cidr: 10.250.0.0/16
# ddosProtectionPlanID: /subscriptions/test/resourceGroups/test/providers/Microsoft.Network/ddosProtectionPlans/test-ddos-protection-plan
workers: 10.250.0.0/19
# natGateway:
# enabled: false
# idleConnectionTimeoutMinutes: 4
# zone: 1
# ipAddresses:
# - name: my-public-ip-name
# resourceGroup: my-public-ip-resource-group
# zone: 1
# serviceEndpoints:
# - Microsoft.Test
# zones:
# - name: 1
# cidr: "10.250.0.0/24
# - name: 2
# cidr: "10.250.0.0/24"
# natGateway:
# enabled: false
zoned: false
# resourceGroup:
# name: mygroup
#identity:
# name: my-identity-name
# resourceGroup: my-identity-resource-group
# acrAccess: true
Currently, it’s not yet possible to deploy into existing resource groups.
The .resourceGroup.name field will allow specifying the name of an already existing resource group that the shoot cluster and all infrastructure resources will be deployed to.
Via the .zoned boolean you can tell whether you want to use Azure availability zones or not.
If you didn’t use zones in the past then an availability set was created and only basic load balancers were used.
Now VMSS-FLex (VMO) has become the default also for non-zonal clusters and only standard load balancers are used.
The networks.vnet section describes whether you want to create the shoot cluster in an already existing VNet or whether to create a new one:
- If
networks.vnet.nameandnetworks.vnet.resourceGroupare given then you have to specify the VNet name and VNet resource group name of the existing VNet that was created by other means (manually, other tooling, …). - If
networks.vnet.cidris given then you have to specify the VNet CIDR of a new VNet that will be created during shoot creation. You can freely choose a private CIDR range. - Either
networks.vnet.nameandneworks.vnet.resourceGroupornetworks.vnet.cidrmust be present, but not both at the same time. - The
networks.vnet.ddosProtectionPlanIDfield can be used to specify the id of a ddos protection plan which should be assigned to the VNet. This will only work for a VNet managed by Gardener. For externally managed VNets the ddos protection plan must be assigned by other means. - If a vnet name is given and cilium shoot clusters are created without a network overlay within one vnet make sure that the pod CIDR specified in
shoot.spec.networking.podsis not overlapping with any other pod CIDR used in that vnet. Overlapping pod CIDRs will lead to disfunctional shoot clusters. - It’s possible to place multiple shoot cluster into the same vnet
The networks.workers section describes the CIDR for a subnet that is used for all shoot worker nodes, i.e., VMs which later run your applications.
The specified CIDR range must be contained in the VNet CIDR specified above, or the VNet CIDR of your already existing VNet.
You can freely choose this CIDR and it is your responsibility to properly design the network layout to suit your needs.
In the networks.serviceEndpoints[] list you can specify the list of Azure service endpoints which shall be associated with the worker subnet. All available service endpoints and their technical names can be found in the (Azure Service Endpoint documentation](https://docs.microsoft.com/en-us/azure/virtual-network/virtual-network-service-endpoints-overview).
The networks.natGateway section contains configuration for the Azure NatGateway which can be attached to the worker subnet of a Shoot cluster. Here are some key information about the usage of the NatGateway for a Shoot cluster:
- NatGateway usage is optional and can be enabled or disabled via
.networks.natGateway.enabled. - If the NatGateway is not used then the egress connections initiated within the Shoot cluster will be nated via the LoadBalancer of the clusters (default Azure behaviour, see here).
- NatGateway is only available for zonal clusters
.zoned=true. - The NatGateway is currently not zone redundantly deployed. That mean the NatGateway of a Shoot cluster will always be in just one zone. This zone can be optionally selected via
.networks.natGateway.zone. - Caution: Modifying the
.networks.natGateway.zonesetting requires a recreation of the NatGateway and the managed public ip (automatically used if no own public ip is specified, see below). That mean you will most likely get a different public ip for egress connections. - It is possible to bring own zonal public ip(s) via
networks.natGateway.ipAddresses. Those public ip(s) need to be in the same zone as the NatGateway (seenetworks.natGateway.zone) and be of SKUstandard. For each public ip thename, theresourceGroupand thezoneneed to be specified. - The field
networks.natGateway.idleConnectionTimeoutMinutesallows the configuration of NAT Gateway’s idle connection timeout property. The idle timeout value can be adjusted from 4 minutes, up to 120 minutes. Omitting this property will set the idle timeout to its default value according to NAT Gateway’s documentation.
In the identity section you can specify an Azure user-assigned managed identity which should be attached to all cluster worker machines. With identity.name you can specify the name of the identity and with identity.resourceGroup you can specify the resource group which contains the identity resource on Azure. The identity need to be created by the user upfront (manually, other tooling, …). Gardener/Azure Extension will only use the referenced one and won’t create an identity. Furthermore the identity have to be in the same subscription as the Shoot cluster. Via the identity.acrAccess you can configure the worker machines to use the passed identity for pulling from an Azure Container Registry (ACR).
Caution: Adding, exchanging or removing the identity will require a rolling update of all worker machines in the Shoot cluster.
Apart from the VNet and the worker subnet the Azure extension will also create a dedicated resource group, route tables, security groups, and an availability set (if not using zoned clusters).
InfrastructureConfig with dedicated subnets per zone
Another deployment option for zonal clusters only, is to create and configure a separate subnet per availability zone. This network layout is recommended to users that require fine-grained control over their network setup. One prevalent usecase is to create a zone-redundant NAT Gateway deployment by taking advantage of the ability to deploy separate NAT Gateways for each subnet.
To use this configuration the following requirements must be met:
- the
zonedfield must be set totrue. - the
networks.vnetsection must not be empty and must contain a valid configuration. For existing clusters that were not using thenetworks.vnetsection, it is enough ifnetworks.vnet.cidrfield is set to the currentnetworks.workervalue.
For each of the target zones a subnet CIDR range must be specified. The specified CIDR range must be contained in the VNet CIDR specified above, or the VNet CIDR of your already existing VNet. In addition, the CIDR ranges must not overlap with the ranges of the other subnets.
ServiceEndpoints and NatGateways can be configured per subnet. Respectively, when networks.zones is specified, the fields networks.workers, networks.serviceEndpoints and networks.natGateway cannot be set. All the configuration for the subnets must be done inside the respective zone’s configuration.
Example:
apiVersion: azure.provider.extensions.gardener.cloud/v1alpha1
kind: InfrastructureConfig
networks:
zoned: true
vnet: # specify either 'name' and 'resourceGroup' or 'cidr'
cidr: 10.250.0.0/16
zones:
- name: 1
cidr: "10.250.0.0/24"
- name: 2
cidr: "10.250.0.0/24"
natGateway:
enabled: false
Migrating to zonal shoots with dedicated subnets per zone
For existing zonal clusters it is possible to migrate to a network layout with dedicated subnets per zone. The migration works by creating additional network resources as specified in the configuration and progressively roll part of your existing nodes to use the new resources. To achieve the controlled rollout of your nodes, parts of the existing infrastructure must be preserved which is why the following constraint is imposed:
One of your specified zones must have the exact same CIDR range as the current network.workers field. Here is an example of such migration:
infrastructureConfig:
apiVersion: azure.provider.extensions.gardener.cloud/v1alpha1
kind: InfrastructureConfig
networks:
vnet:
cidr: 10.250.0.0/16
workers: 10.250.0.0/19
zoned: true
to
infrastructureConfig:
apiVersion: azure.provider.extensions.gardener.cloud/v1alpha1
kind: InfrastructureConfig
networks:
vnet:
cidr: 10.250.0.0/16
zones:
- name: 3
cidr: 10.250.0.0/19 # note the preservation of the 'workers' CIDR
# optionally add other zones
# - name: 2
# cidr: 10.250.32.0/19
# natGateway:
# enabled: true
zoned: true
Another more advanced example with user-provided public IP addresses for the NAT Gateway and how it can be migrated:
infrastructureConfig:
apiVersion: azure.provider.extensions.gardener.cloud/v1alpha1
kind: InfrastructureConfig
networks:
vnet:
cidr: 10.250.0.0/16
workers: 10.250.0.0/19
natGateway:
enabled: true
zone: 1
ipAddresses:
- name: pip1
resourceGroup: group
zone: 1
- name: pip2
resourceGroup: group
zone: 1
zoned: true
to
infrastructureConfig:
apiVersion: azure.provider.extensions.gardener.cloud/v1alpha1
kind: InfrastructureConfig
zoned: true
networks:
vnet:
cidr: 10.250.0.0/16
zones:
- name: 1
cidr: 10.250.0.0/19 # note the preservation of the 'workers' CIDR
natGateway:
enabled: true
ipAddresses:
- name: pip1
resourceGroup: group
zone: 1
- name: pip2
resourceGroup: group
zone: 1
# optionally add other zones
# - name: 2
# cidr: 10.250.32.0/19
# natGateway:
# enabled: true
# ipAddresses:
# - name: pip3
# resourceGroup: group
You can apply such change to your shoot by issuing a kubectl patch command to replace your current .spec.provider.infrastructureConfig section:
$ cat new-infra.json
[
{
"op": "replace",
"path": "/spec/provider/infrastructureConfig",
"value": {
"apiVersion": "azure.provider.extensions.gardener.cloud/v1alpha1",
"kind": "InfrastructureConfig",
"networks": {
"vnet": {
"cidr": "<your-vnet-cidr>"
},
"zones": [
{
"name": 1,
"cidr": "10.250.0.0/24",
"natGateway": {
"enabled": true
}
},
{
"name": 1,
"cidr": "10.250.1.0/24",
"natGateway": {
"enabled": true
}
},
]
},
"zoned": true
}
}
]
kubectl patch --type="json" --patch-file new-infra.json shoot <my-shoot>
Warning
The migration to shoots with dedicated subnets per zone is a one-way process. Reverting the shoot to the previous configuration is not supported. During the migration a subset of the nodes will be rolled to the new subnets.
ControlPlaneConfig
The control plane configuration mainly contains values for the Azure-specific control plane components.
Today, the only component deployed by the Azure extension is the cloud-controller-manager.
An example ControlPlaneConfig for the Azure extension looks as follows:
apiVersion: azure.provider.extensions.gardener.cloud/v1alpha1
kind: ControlPlaneConfig
cloudControllerManager:
# featureGates:
# SomeKubernetesFeature: true
The cloudControllerManager.featureGates contains a map of explicitly enabled or disabled feature gates.
For production usage it’s not recommend to use this field at all as you can enable alpha features or disable beta/stable features, potentially impacting the cluster stability.
If you don’t want to configure anything for the cloudControllerManager simply omit the key in the YAML specification.
storage contains options for storage-related control plane component.
storage.managedDefaultStorageClass is enabled by default and will deploy a storageClass and mark it as a default (via the storageclass.kubernetes.io/is-default-class annotation)
storage.managedDefaultVolumeSnapshotClass is enabled by default and will deploy a volumeSnapshotClass and mark it as a default (via the snapshot.storage.kubernetes.io/is-default-classs annotation)
In case you want to manage your own default storageClass or volumeSnapshotClass you need to disable the respective options above, otherwise reconciliation of the controlplane may fail.
WorkerConfig
The Azure extension supports encryption for volumes plus support for additional data volumes per machine.
Please note that you cannot specify the encrypted flag for Azure disks as they are encrypted by default/out-of-the-box.
For each data volume, you have to specify a name.
The following YAML is a snippet of a Shoot resource:
spec:
provider:
workers:
- name: cpu-worker
...
volume:
type: Standard_LRS
size: 20Gi
dataVolumes:
- name: kubelet-dir
type: Standard_LRS
size: 25Gi
Additionally, it supports for other Azure-specific values and could be configured under .spec.provider.workers[].providerConfig
An example WorkerConfig for the Azure extension looks like:
apiVersion: azure.provider.extensions.gardener.cloud/v1alpha1
kind: WorkerConfig
nodeTemplate: # (to be specified only if the node capacity would be different from cloudprofile info during runtime)
capacity:
cpu: 2
gpu: 1
memory: 50Gi
diagnosticsProfile:
enabled: true
# storageURI: https://<storage-account-name>.blob.core.windows.net/
dataVolumes:
- name: test-image
imageRef:
communityGalleryImageID: /CommunityGalleries/gardenlinux-13e998fe-534d-4b0a-8a27-f16a73aef620/Images/gardenlinux/Versions/1443.10.0
# sharedGalleryImageID: /SharedGalleries/82fc46df-cc38-4306-9880-504e872cee18-VSMP_MEMORYONE_GALLERY/Images/vSMP_MemoryONE/Versions/1062800168.0.0
# id: /Subscriptions/2ebd38b6-270b-48a2-8e0b-2077106dc615/Providers/Microsoft.Compute/Locations/westeurope/Publishers/sap/ArtifactTypes/VMImage/Offers/gardenlinux/Skus/greatest/Versions/1443.10.0
# urn: sap:gardenlinux:greatest:1443.10.0
The .nodeTemplate is used to specify resource information of the machine during runtime. This then helps in Scale-from-Zero.
Some points to note for this field:
- Currently only cpu, gpu and memory are configurable.
- a change in the value lead to a rolling update of the machine in the worker pool
- all the resources needs to be specified
The .diagnosticsProfile is used to enable machine boot diagnostics (disabled per default).
A storage account is used for storing vm’s boot console output and screenshots.
If .diagnosticsProfile.StorageURI is not specified azure managed storage will be used (recommended way).
The .dataVolumes field is used to add provider specific configurations for dataVolumes.
.dataVolumes[].name must match with one of the names in workers.dataVolumes[].name.
To specify an image source for the dataVolume either use communityGalleryImageID, sharedGalleryImageID, id or urn as imageRef.
However, users have to make sure that the image really exists, there’s yet no check in place.
If the image does not exist the machine will get stuck in creation.
Example Shoot manifest (non-zoned)
Please find below an example Shoot manifest for a non-zoned cluster:
apiVersion: core.gardener.cloud/v1beta1
kind: Shoot
metadata:
name: johndoe-azure
namespace: garden-dev
spec:
cloudProfile:
name: azure
region: westeurope
credentialsBindingName: core-azure
provider:
type: azure
infrastructureConfig:
apiVersion: azure.provider.extensions.gardener.cloud/v1alpha1
kind: InfrastructureConfig
networks:
vnet:
cidr: 10.250.0.0/16
workers: 10.250.0.0/19
zoned: false
controlPlaneConfig:
apiVersion: azure.provider.extensions.gardener.cloud/v1alpha1
kind: ControlPlaneConfig
workers:
- name: worker-xoluy
machine:
type: Standard_D4_v3
minimum: 2
maximum: 2
volume:
size: 50Gi
type: Standard_LRS
# providerConfig:
# apiVersion: azure.provider.extensions.gardener.cloud/v1alpha1
# kind: WorkerConfig
# nodeTemplate: # (to be specified only if the node capacity would be different from cloudprofile info during runtime)
# capacity:
# cpu: 2
# gpu: 1
# memory: 50Gi
networking:
type: calico
pods: 100.96.0.0/11
nodes: 10.250.0.0/16
services: 100.64.0.0/13
kubernetes:
version: 1.28.2
maintenance:
autoUpdate:
kubernetesVersion: true
machineImageVersion: true
addons:
kubernetesDashboard:
enabled: true
nginxIngress:
enabled: true
Example Shoot manifest (zoned)
Please find below an example Shoot manifest for a zoned cluster:
apiVersion: core.gardener.cloud/v1beta1
kind: Shoot
metadata:
name: johndoe-azure
namespace: garden-dev
spec:
cloudProfile:
name: azure
region: westeurope
credentialsBindingName: core-azure
provider:
type: azure
infrastructureConfig:
apiVersion: azure.provider.extensions.gardener.cloud/v1alpha1
kind: InfrastructureConfig
networks:
vnet:
cidr: 10.250.0.0/16
workers: 10.250.0.0/19
zoned: true
controlPlaneConfig:
apiVersion: azure.provider.extensions.gardener.cloud/v1alpha1
kind: ControlPlaneConfig
workers:
- name: worker-xoluy
machine:
type: Standard_D4_v3
minimum: 2
maximum: 2
volume:
size: 50Gi
type: Standard_LRS
zones:
- "1"
- "2"
networking:
type: calico
pods: 100.96.0.0/11
nodes: 10.250.0.0/16
services: 100.64.0.0/13
kubernetes:
version: 1.28.2
maintenance:
autoUpdate:
kubernetesVersion: true
machineImageVersion: true
addons:
kubernetesDashboard:
enabled: true
nginxIngress:
enabled: true
Example Shoot manifest (zoned with NAT Gateways per zone)
Please find below an example Shoot manifest for a zoned cluster using NAT Gateways per zone:
apiVersion: core.gardener.cloud/v1beta1
kind: Shoot
metadata:
name: johndoe-azure
namespace: garden-dev
spec:
cloudProfile:
name: azure
region: westeurope
credentialsBindingName: core-azure
provider:
type: azure
infrastructureConfig:
apiVersion: azure.provider.extensions.gardener.cloud/v1alpha1
kind: InfrastructureConfig
networks:
vnet:
cidr: 10.250.0.0/16
zones:
- name: 1
cidr: 10.250.0.0/24
serviceEndpoints:
- Microsoft.Storage
- Microsoft.Sql
natGateway:
enabled: true
idleConnectionTimeoutMinutes: 4
- name: 2
cidr: 10.250.1.0/24
serviceEndpoints:
- Microsoft.Storage
- Microsoft.Sql
natGateway:
enabled: true
zoned: true
controlPlaneConfig:
apiVersion: azure.provider.extensions.gardener.cloud/v1alpha1
kind: ControlPlaneConfig
workers:
- name: worker-xoluy
machine:
type: Standard_D4_v3
minimum: 2
maximum: 2
volume:
size: 50Gi
type: Standard_LRS
zones:
- "1"
- "2"
networking:
type: calico
pods: 100.96.0.0/11
nodes: 10.250.0.0/16
services: 100.64.0.0/13
kubernetes:
version: 1.28.2
maintenance:
autoUpdate:
kubernetesVersion: true
machineImageVersion: true
addons:
kubernetesDashboard:
enabled: true
nginxIngress:
enabled: true
CSI volume provisioners
Every Azure shoot cluster will be deployed with the Azure Disk CSI driver and the Azure File CSI driver.
Kubernetes Versions per Worker Pool
This extension supports gardener/gardener’s WorkerPoolKubernetesVersion feature gate, i.e., having worker pools with overridden Kubernetes versions since gardener-extension-provider-azure@v1.25.
Shoot CA Certificate and ServiceAccount Signing Key Rotation
This extension supports gardener/gardener’s ShootCARotation and ShootSARotation feature gates since gardener-extension-provider-azure@v1.28.
Miscellaneous
Azure Accelerated Networking
All worker machines of the cluster will be automatically configured to use Azure Accelerated Networking if the prerequisites are fulfilled.
The prerequisites are that the cluster must be zoned, and the used machine type and operating system image version are compatible for Accelerated Networking.
Availability Set based shoot clusters will not be enabled for accelerated networking even if the machine type and operating system support it, this is necessary because all machines from the availability set must be scheduled on special hardware, more details can be found here.
Supported machine types are listed in the CloudProfile in .spec.providerConfig.machineTypes[].acceleratedNetworking and the supported operating system image versions are defined in .spec.providerConfig.machineImages[].versions[].acceleratedNetworking.
Support for other Azure instances
The provider extension can be configured to connect to Azure instances other than the public one by providing additional configuration in the CloudProfile:
spec:
…
providerConfig:
apiVersion: azure.provider.extensions.gardener.cloud/v1alpha1
kind: CloudProfileConfig
cloudConfiguration:
name: AzurePublic # AzurePublic | AzureGovernment | AzureChina
machineTypes:
…
…
…
If no configuration is specified the extension will default to the public instance.
Azure instances other than AzurePublic, AzureGovernment, or AzureChina are not supported at this time.
Disabling the automatic deployment of allow-{tcp,udp} loadbalancer services
Using the azure-cloud-controller-manager when a user first creates a loadbalancer service in the cluster, a new Load Balancer is created in Azure and all nodes of the cluster are registered as backend.
When a NAT Gateway is not used, then this Load Balancer is used as a NAT device for outbound traffic by using one of the registered FrontendIPs assigned to the k8s LB service.
In cases where a NATGateway is not used, provider-azure will deploy by default a set of 2 Load Balancer services in the kube-system.
These are responsible for allowing outbound traffic in all cases for UDP and TCP.
There is a way for users to disable the deployment of these additional LBs by using the azure.provider.extensions.gardener.cloud/skip-allow-egress="true" annotation on their shoot.
[!WARNING]
Disabling the system Load Balancers may affect the outbound of your shoot.
Before disabling them, users are highly advised to have created at least one Load Balancer for TCP and UDP or forward outbound traffic via a different route.
Support for VolumeAttributesClasses (Beta in k8s 1.31)
To have the CSI-driver configured to support the necessary features for VolumeAttributesClasses on Azure for shoots with a k8s-version greater than 1.31, use the azure.provider.extensions.gardener.cloud/enable-volume-attributes-class annotation on the shoot. Keep in mind to also enable the required feature flags and runtime-config on the common kubernetes controllers (as outlined in the link above) in the shoot-spec.
For more information and examples on how to configure the volume attributes class, see example provided in the the azuredisk-csi-driver repository.
Shoot clusters with VMSS Flexible Orchestration (VMSS Flex/VMO)
The machines of an Azure cluster can be created while being attached to an Azure Virtual Machine ScaleSet with flexible orchestration.
Azure VMSS Flex is the replacement of Azure AvailabilitySet for non-zoned Azure Shoot clusters as VMSS Flex come with less disadvantages like no blocking machine operations or compatibility with Standard SKU loadbalancer etc.
Now, Azure Shoot clusters are using VMSS Flex by default for non-zoned clusters. In the past you used to need to do the following:
- The
InfrastructureConfigof the Shoot configuration need to contain.zoned=false
Some key facts about VMSS Flex based clusters:
- Unlike regular non-zonal Azure Shoot clusters, which have a primary AvailabilitySet which is shared between all machines in all worker pools of a Shoot cluster, a VMSS Flex based cluster has an own VMSS for each workerpool
- In case the configuration of the VMSS will change (e.g. amount of fault domains in a region change; configured in the CloudProfile) all machines of the worker pool need to be rolled
- It is not possible to migrate an existing primary AvailabilitySet based Shoot cluster to VMSS Flex based Shoot cluster and vice versa
- VMSS Flex based clusters are using
StandardSKU LoadBalancers instead ofBasicSKU LoadBalancers for AvailabilitySet based Shoot clusters
Migrating AvailabilitySet shoots to VMSS Flex
Azure plans to deprecate Basic SKU public IP addresses.
See the official announcement.
This will create issues with existing legacy non-zonal clusters since their existing LoadBalancers are using Basic SKU and they can’t directly migrate to Standard SKU.
Provider-azure is offering a migration path from availability sets to VMSS Flex.
You have to annotate your shoot with the following annotation: migration.azure.provider.extensions.gardener.cloud/vmo='true' and trigger the shoot Maintenance.
The process for the migration closely traces the process outlined by Azure
This will allow you to preserve your public IPs during the migration.
During this process there will be downtime that users need to plan.
For the transition the Loadbalancer will have to be deleted and recreated.
Also all nodes will have to roll out to the VMSS flex workers.
The rollout is controlled by the worker’s MCM settings, but it is suggested that you speed up this process so that traffic to your cluster is restored as quickly as possible (for example by using higher maxUnavailable values)
BackupBucketConfig
Immutable Buckets
The extension provides a gated feature currently in alpha called enableImmutableBuckets.
To make use of this feature, and enable the extension to react to the configuration below, you will need to set config.featureGates.enableImmutableBuckets: true in your helm charts’ values.yaml. See values.yaml for an example.
Before enabling this feature, you will need to add additional permissions to your Azure credential. Please check the linked section in docs/usage/azure-permissions.md.
BackupBucketConfig describes the configuration that needs to be passed over for creation of the backup bucket infrastructure. Configuration like immutability (WORM, i.e. write-once-read-many) that can be set on the bucket are specified here. Objects in the bucket will inherit the immutability duration which is set on the bucket, and they can not be modified or deleted for that duration.
This extension supports creating (and migrating already existing buckets if enabled) to use container-level WORM policies.
Example:
apiVersion: azure.provider.extensions.gardener.cloud/v1alpha1
kind: BackupBucketConfig
immutability:
retentionType: "bucket"
retentionPeriod: 24h
locked: false
Options:
retentionType: Specifies the type of retention policy. The allowed value isbucket, which applies the retention policy to the entire bucket. See the documentation.retentionPeriod: Defines the duration for which objects in the bucket will remain immutable. Azure Blob Storage only supports immutability durations in days, therefore this field must be set as multiples of 24h.locked: A boolean indicating whether the retention policy is locked. Once locked, the policy cannot be removed or shortened, ensuring immutability. Learn more about locking policies here.
To configure a BackupBucket with immutability, include the BackupBucketConfig in the ProviderConfig of the BackupBucket resource. If the locked field is set to true, the retention policy will be locked, preventing further changes. However, the retention interval can be lengthened for a locked policy up to five times, but it can’t be shortened.
Here is an example of configuring a BackupBucket with immutability:
apiVersion: extensions.gardener.cloud/v1alpha1
kind: BackupBucket
metadata:
name: my-backup-bucket
spec:
region: westeurope
secretRef:
name: my-azure-secret
namespace: my-namespace
providerConfig:
apiVersion: azure.provider.extensions.gardener.cloud/v1alpha1
kind: BackupBucketConfig
immutability:
retentionType: "bucket"
retentionPeriod: 24h
locked: true
Storage Account Key Rotation
Here is an example of configuring a BackupBucket configured with key rotation:
apiVersion: extensions.gardener.cloud/v1alpha1
kind: BackupBucket
metadata:
name: my-backup-bucket
spec:
region: westeurope
secretRef:
name: my-azure-secret
namespace: my-namespace
providerConfig:
apiVersion: azure.provider.extensions.gardener.cloud/v1alpha1
kind: BackupBucketConfig
rotationConfig:
rotationPeriodDays: 2
expirationPeriodDays: 10
Storage account key rotation is only enabled when the rotationConfig is configured.
A storage account in Azure is always created with 2 different keys.
Every triggered rotation by the BackupBucket controller will rotate the key that is not currently in use, and update the BackupBucket referenced secret to the new key.
In addition operators can annotate a BackupBucket with azure.provider.extensions.gardener.cloud/rotate=true to trigger a key rotation on the next reconciliation, regardless of the key’s age.
Options:
rotationPeriodDays: Defines the period after its creation that anstorage account keyshould be rotated.expirationPeriodDays: When specified it will install an expiration policy for keys in the Azure storage account.
Warning
A full rotation (a rotation of both storage account keys) is completed after 2*
rotationPeriod. It is suggested that therotationPeriodis configured at least twice the maintenance interval of the shoots. This will ensure that at least one active key is currently used by the etcd-backup pods.
5.1.4 - Provider Equinix Metal
Gardener Extension for Equinix Metal provider
Project Gardener implements the automated management and operation of Kubernetes clusters as a service. Its main principle is to leverage Kubernetes concepts for all of its tasks.
Recently, most of the vendor specific logic has been developed in-tree. However, the project has grown to a size where it is very hard to extend, maintain, and test. With GEP-1 we have proposed how the architecture can be changed in a way to support external controllers that contain their very own vendor specifics. This way, we can keep Gardener core clean and independent.
This controller implements Gardener’s extension contract for the Equinix Metal provider.
An example for a ControllerRegistration resource that can be used to register this controller to Gardener can be found here.
Please find more information regarding the extensibility concepts and a detailed proposal here.
Supported Kubernetes versions
This extension controller supports the following Kubernetes versions:
| Version | Support | Conformance test results |
|---|---|---|
| Kubernetes 1.31 | untested | N/A |
| Kubernetes 1.30 | untested | N/A |
| Kubernetes 1.29 | untested | N/A |
| Kubernetes 1.28 | untested | N/A |
| Kubernetes 1.27 | untested | N/A |
Please take a look here to see which versions are supported by Gardener in general.
How to start using or developing this extension controller locally
You can run the controller locally on your machine by executing make start.
Static code checks and tests can be executed by running make verify. We are using Go modules for Golang package dependency management and Ginkgo/Gomega for testing.
Caveats
You can use all available disks on your Equinix instance, but only under certain conditions:
- You must use Flatcar
- You must have a homogenous worker pool (all workers use the same OS and container engine)
- You must set any value for
DataVolume
Feedback and Support
Feedback and contributions are always welcome!
Please report bugs or suggestions as GitHub issues or reach out on Slack (join the workspace here).
Learn more!
Please find further resources about out project here:
- Our landing page gardener.cloud
- “Gardener, the Kubernetes Botanist” blog on kubernetes.io
- “Gardener Project Update” blog on kubernetes.io
- GEP-1 (Gardener Enhancement Proposal) on extensibility
- GEP-4 (New
core.gardener.cloud/v1beta1API) - Extensibility API documentation
- Gardener Extensions Golang library
- Gardener API Reference
5.1.4.1 - Operations
Using the Equinix Metal provider extension with Gardener as operator
The core.gardener.cloud/v1beta1.CloudProfile resource declares a providerConfig field that is meant to contain provider-specific configuration.
In this document we are describing how this configuration looks like for Equinix Metal and provide an example CloudProfile manifest with minimal configuration that you can use to allow creating Equinix Metal shoot clusters.
Example CloudProfile manifest
Please find below an example CloudProfile manifest:
apiVersion: core.gardener.cloud/v1beta1
kind: CloudProfile
metadata:
name: equinix-metal
spec:
type: equinixmetal
kubernetes:
versions:
- version: 1.27.2
#expirationDate: "2023-03-15T23:59:59Z"
machineImages:
- name: flatcar
versions:
- version: 0.0.0-stable
machineTypes:
- name: t1.small
cpu: "4"
gpu: "0"
memory: 8Gi
usable: true
regions: # List of offered metros
- name: ny
zones: # List of offered facilities within the respective metro
- name: ewr1
- name: ny5
- name: ny7
providerConfig:
apiVersion: equinixmetal.provider.extensions.gardener.cloud/v1alpha1
kind: CloudProfileConfig
machineImages:
- name: flatcar
versions:
- version: 0.0.0-stable
id: flatcar_stable
- version: 3510.2.2
ipxeScriptUrl: https://stable.release.flatcar-linux.net/amd64-usr/3510.2.2/flatcar_production_packet.ipxe
CloudProfileConfig
The cloud profile configuration contains information about the real machine image IDs in the Equinix Metal environment (IDs).
You have to map every version that you specify in .spec.machineImages[].versions here such that the Equinix Metal extension knows the ID for every version you want to offer.
Equinix Metal supports two different options to specify the image:
- Supported Operating System: Images that are provided by Equinix Metal. They are referenced by their ID (
slug). See (Operating Systems Reference)[https://deploy.equinix.com/developers/docs/metal/operating-systems/supported/#operating-systems-reference] for all supported operating system and their ids. - Custom iPXE Boot: Equinix Metal supports passing custom iPXE scripts during provisioning, which allows you to install a custom operating system manually. This is useful if you want to have a custom image or want to pin to a specific version. See Custom iPXE Boot for details.
An example CloudProfileConfig for the Equinix Metal extension looks as follows:
apiVersion: equinixmetal.provider.extensions.gardener.cloud/v1alpha1
kind: CloudProfileConfig
machineImages:
- name: flatcar
versions:
- version: 0.0.0-stable
id: flatcar_stable
- version: 3510.2.2
ipxeScriptUrl: https://stable.release.flatcar-linux.net/amd64-usr/3510.2.2/flatcar_production_packet.ipxe
NOTE:
CloudProfileConfigis not a Custom Resource, so you cannot create it directly.
5.1.4.2 - Usage
Using the Equinix Metal provider extension with Gardener as end-user
The core.gardener.cloud/v1beta1.Shoot resource declares a few fields that are meant to contain provider-specific configuration.
In this document we are describing how this configuration looks like for Equinix Metal and provide an example Shoot manifest with minimal configuration that you can use to create an Equinix Metal cluster (modulo the landscape-specific information like cloud profile names, secret binding names, etc.).
Provider secret data
Every shoot cluster references a SecretBinding which itself references a Secret, and this Secret contains the provider credentials of your Equinix Metal project.
This Secret must look as follows:
apiVersion: v1
kind: Secret
metadata:
name: my-secret
namespace: garden-dev
type: Opaque
data:
apiToken: base64(api-token)
projectID: base64(project-id)
Please look up https://metal.equinix.com/developers/api/ as well.
With Secret created, create a SecretBinding resource referencing it. It may look like this:
apiVersion: core.gardener.cloud/v1beta1
kind: SecretBinding
metadata:
name: my-secret
namespace: garden-dev
secretRef:
name: my-secret
quotas: []
InfrastructureConfig
Currently, there is no infrastructure configuration possible for the Equinix Metal environment.
An example InfrastructureConfig for the Equinix Metal extension looks as follows:
apiVersion: equinixmetal.provider.extensions.gardener.cloud/v1alpha1
kind: InfrastructureConfig
The Equinix Metal extension will only create a key pair.
ControlPlaneConfig
The control plane configuration mainly contains values for the Equinix Metal-specific control plane components.
Today, the Equinix Metal extension deploys the cloud-controller-manager and the CSI controllers, however, it doesn’t offer any configuration options at the moment.
An example ControlPlaneConfig for the Equinix Metal extension looks as follows:
apiVersion: equinixmetal.provider.extensions.gardener.cloud/v1alpha1
kind: ControlPlaneConfig
WorkerConfig
The Equinix Metal extension supports specifying IDs for reserved devices that should be used for the machines of a specific worker pool.
An example WorkerConfig for the Equinix Metal extension looks as follows:
apiVersion: equinixmetal.provider.extensions.gardener.cloud/v1alpha1
kind: WorkerConfig
reservationIDs:
- my-reserved-device-1
- my-reserved-device-2
reservedDevicesOnly: false
The .reservationIDs[] list contains the list of IDs of the reserved devices.
The .reservedDevicesOnly field indicates whether only reserved devices from the provided list of reservation IDs should be used when new machines are created.
It always will attempt to create a device from one of the reservation IDs.
If none is available, the behaviour depends on the setting:
true: return an errorfalse: request a regular on-demand device
The default value is false.
Example Shoot manifest
Please find below an example Shoot manifest:
apiVersion: core.gardener.cloud/v1beta1
kind: Shoot
metadata:
name: my-shoot
namespace: garden-dev
spec:
cloudProfileName: equinix-metal
region: ny # Corresponds to a metro
secretBindingName: my-secret
provider:
type: equinixmetal
infrastructureConfig:
apiVersion: equinixmetal.provider.extensions.gardener.cloud/v1alpha1
kind: InfrastructureConfig
controlPlaneConfig:
apiVersion: equinixmetal.provider.extensions.gardener.cloud/v1alpha1
kind: ControlPlaneConfig
workers:
- name: worker-pool1
machine:
type: t1.small
minimum: 2
maximum: 2
volume:
size: 50Gi
type: storage_1
zones: # Optional list of facilities, all of which MUST be in the metro; if not provided, then random facilities within the metro will be chosen for each machine.
- ewr1
- ny5
- name: reserved-pool
machine:
type: t1.small
minimum: 1
maximum: 2
providerConfig:
apiVersion: equinixmetal.provider.extensions.gardener.cloud/v1alpha1
kind: WorkerConfig
reservationIDs:
- reserved-device1
- reserved-device2
reservedDevicesOnly: true
volume:
size: 50Gi
type: storage_1
networking:
type: calico
kubernetes:
version: 1.27.2
maintenance:
autoUpdate:
kubernetesVersion: true
machineImageVersion: true
addons:
kubernetesDashboard:
enabled: true
nginxIngress:
enabled: true
⚠️ Note that if you specify multiple facilities in the .spec.provider.workers[].zones[] list then new machines are randomly created in one of the provided facilities.
Particularly, it is not ensured that all facilities are used or that all machines are equally or unequally distributed.
Kubernetes Versions per Worker Pool
This extension supports gardener/gardener’s WorkerPoolKubernetesVersion feature gate, i.e., having worker pools with overridden Kubernetes versions since gardener-extension-provider-equinix-metal@v2.2.
Shoot CA Certificate and ServiceAccount Signing Key Rotation
This extension supports gardener/gardener’s ShootCARotation feature gate since gardener-extension-provider-equinix-metal@v2.3 and ShootSARotation feature gate since gardener-extension-provider-equinix-metal@v2.4.
5.1.5 - Provider GCP
Gardener Extension for GCP provider
Project Gardener implements the automated management and operation of Kubernetes clusters as a service. Its main principle is to leverage Kubernetes concepts for all of its tasks.
Recently, most of the vendor specific logic has been developed in-tree. However, the project has grown to a size where it is very hard to extend, maintain, and test. With GEP-1 we have proposed how the architecture can be changed in a way to support external controllers that contain their very own vendor specifics. This way, we can keep Gardener core clean and independent.
This controller implements Gardener’s extension contract for the GCP provider.
An example for a ControllerRegistration resource that can be used to register this controller to Gardener can be found here.
Please find more information regarding the extensibility concepts and a detailed proposal here.
Supported Kubernetes versions
This extension controller supports the following Kubernetes versions:
| Version | Support | Conformance test results |
|---|---|---|
| Kubernetes 1.33 | 1.33.0+ | N/A |
| Kubernetes 1.32 | 1.32.0+ | |
| Kubernetes 1.31 | 1.31.0+ | |
| Kubernetes 1.30 | 1.30.0+ | |
| Kubernetes 1.29 | 1.29.0+ | |
| Kubernetes 1.28 | 1.28.0+ | |
| Kubernetes 1.27 | 1.27.0+ |
Please take a look here to see which versions are supported by Gardener in general.
How to start using or developing this extension controller locally
You can run the controller locally on your machine by executing make start.
Static code checks and tests can be executed by running make verify. We are using Go modules for Golang package dependency management and Ginkgo/Gomega for testing.
Feedback and Support
Feedback and contributions are always welcome!
Please report bugs or suggestions as GitHub issues or reach out on Slack (join the workspace here).
Learn more!
Please find further resources about out project here:
- Our landing page gardener.cloud
- “Gardener, the Kubernetes Botanist” blog on kubernetes.io
- “Gardener Project Update” blog on kubernetes.io
- GEP-1 (Gardener Enhancement Proposal) on extensibility
- GEP-4 (New
core.gardener.cloud/v1beta1API) - Extensibility API documentation
- Gardener Extensions Golang library
- Gardener API Reference
5.1.5.1 - Tutorials
5.1.5.1.1 - Create a Кubernetes Cluster on GCP with Gardener
Overview
Gardener allows you to create a Kubernetes cluster on different infrastructure providers. This tutorial will guide you through the process of creating a cluster on GCP.
Prerequisites
- You have created a GCP account.
- You have access to the Gardener dashboard and have permissions to create projects.
Steps
Go to the Gardener dashboard and create a Project.

Check which roles are required by Gardener.
Choose Secrets, then the plus icon
 and select GCP.
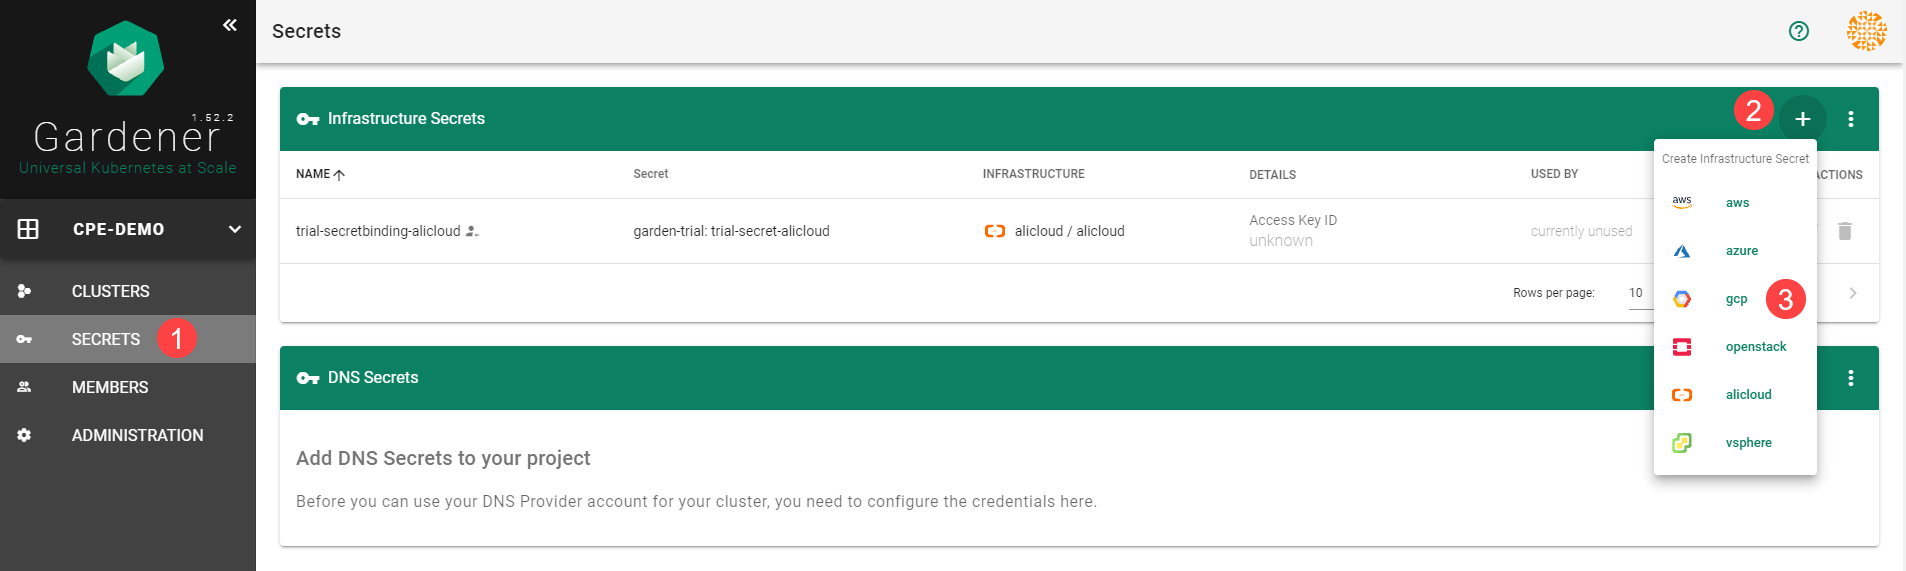
Click on the help button
 .
.
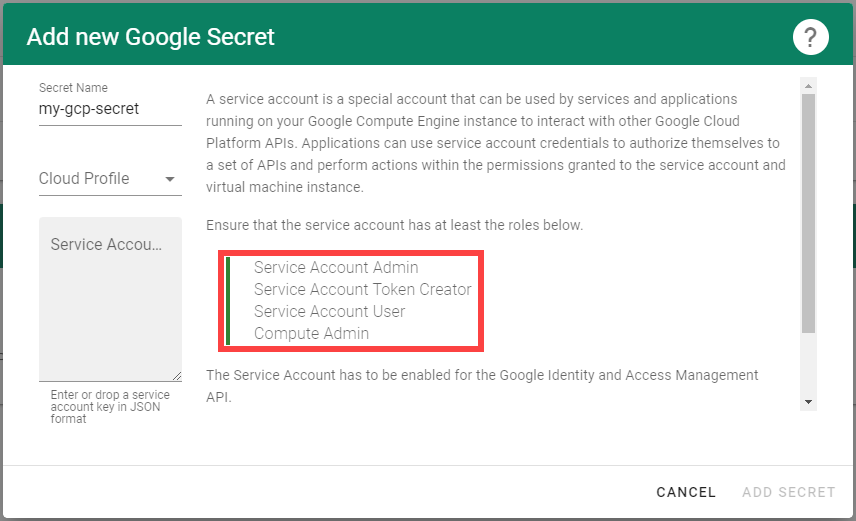
Create a service account with the correct roles in GCP:
Create a new service account in GCP.

Enter the name and description of your service account.
Assign the roles required by Gardener.
Choose Done.
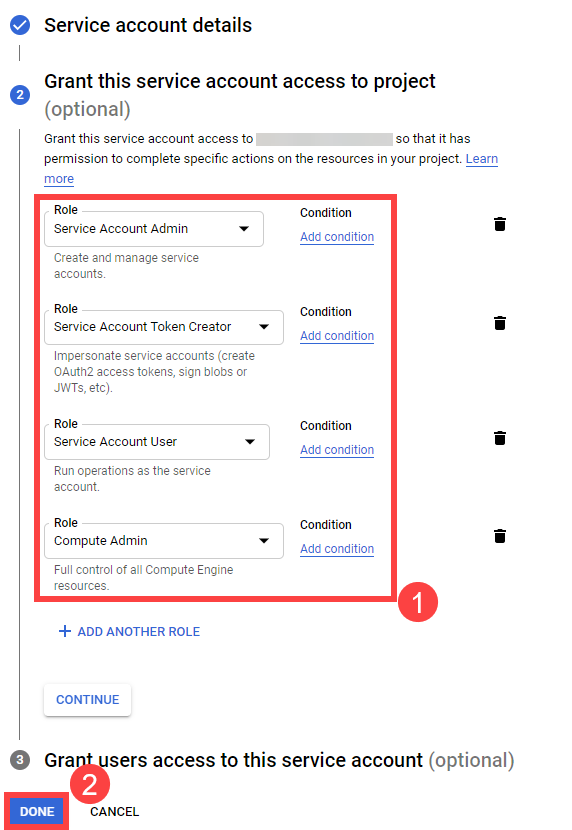
Create a key for your service:
Locate your service account, then choose Actions and Manage keys.
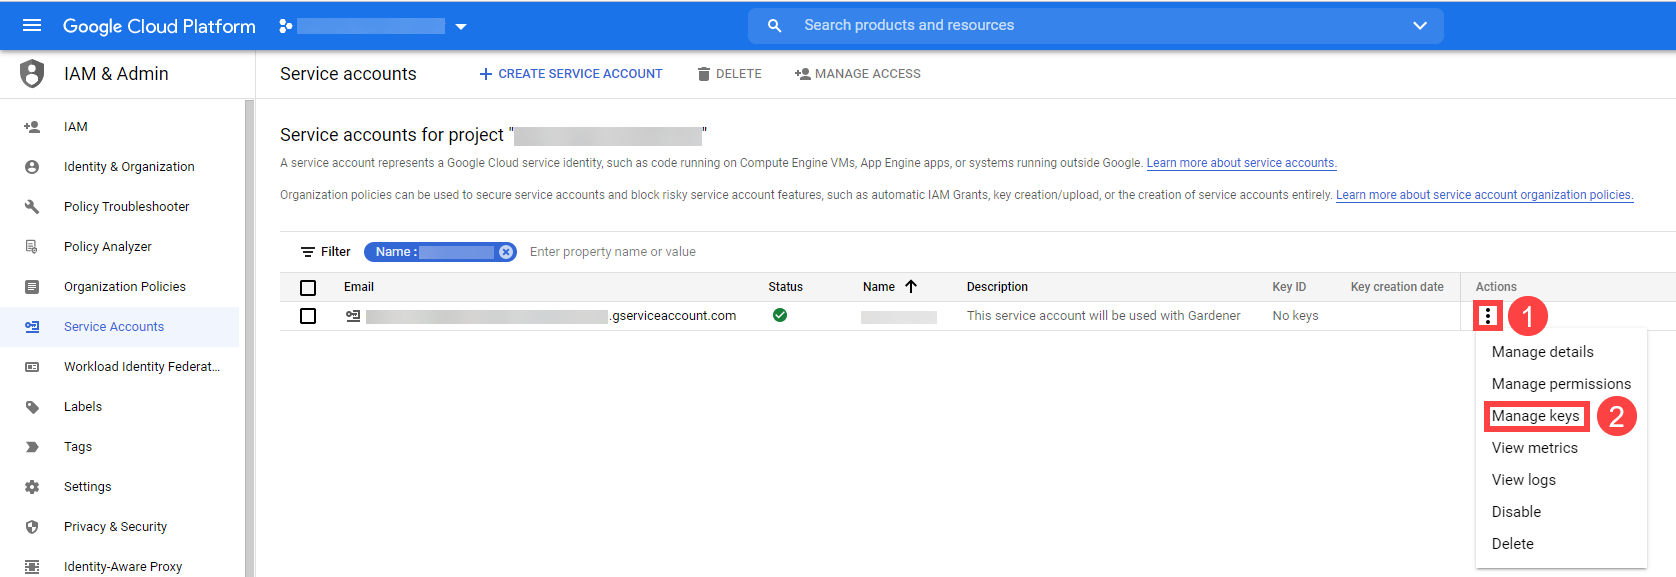
Choose Add Key, then Create new key.
Save the private key of the service account in JSON format.
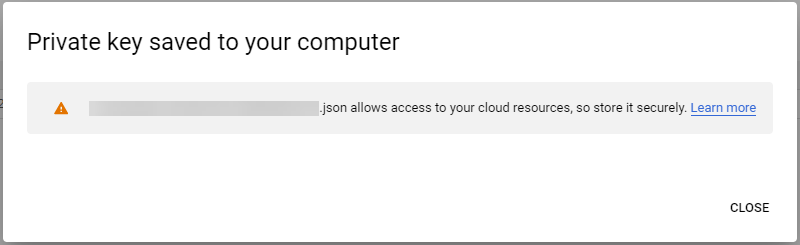
Tip
Save the key of the user, it’s used later to create secrets for Gardener.
Enable the Google Compute API by following these steps.
When you are finished, you should see the following page:
Enable the Google IAM API by following these steps.
When you are finished, you should see the following page:
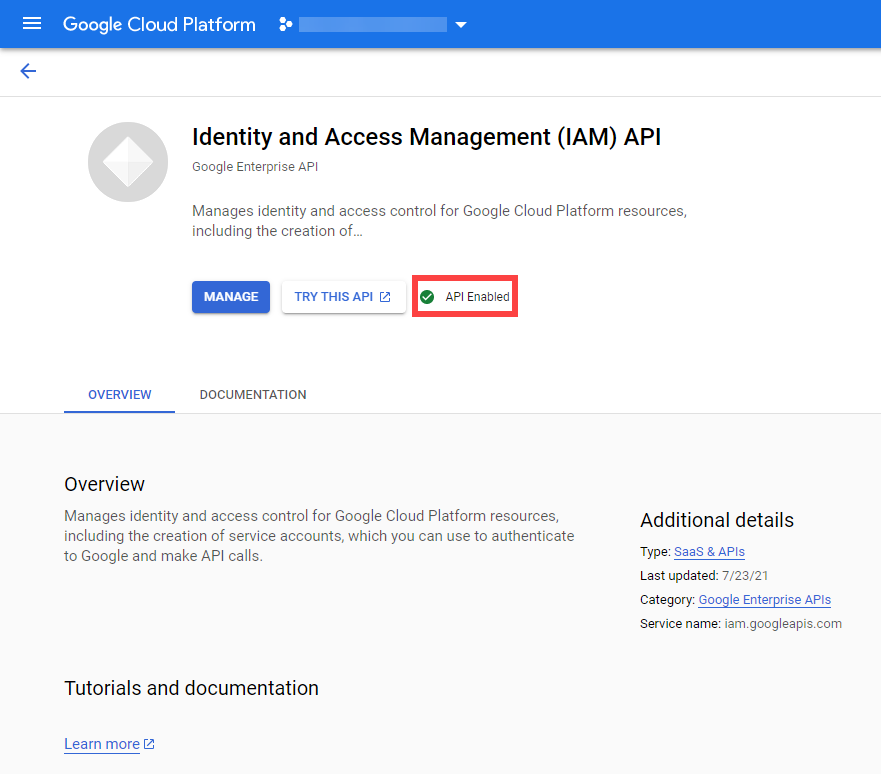
On the Gardener dashboard, choose Secrets and then the plus sign
. Select GCP from the drop down menu to add a new GCP secret.Create your secret.
- Type the name of your secret.
- Select your Cloud Profile.
- Copy and paste the contents of the .JSON file you saved when you created the secret key on GCP.
- Choose Add secret.
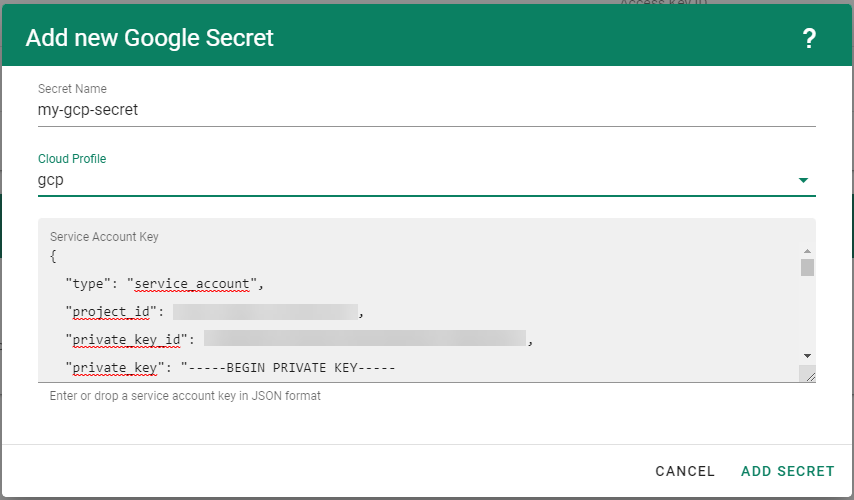
After completing these steps, you should see your newly created secret in the Infrastructure Secrets section.
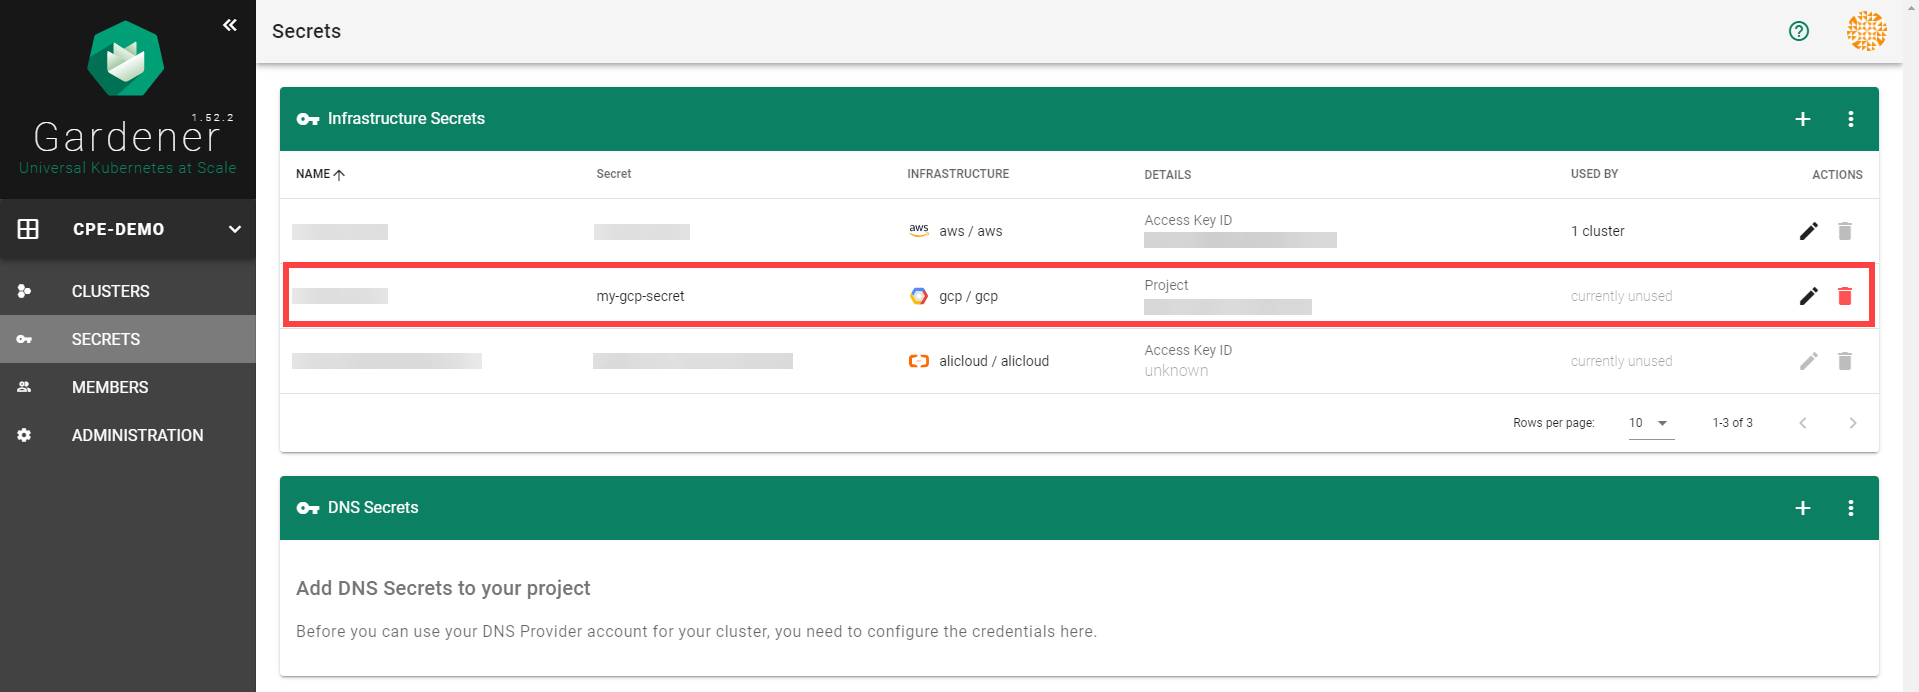
To create a new cluster, choose Clusters and then the plus sign in the upper right corner.

In the Create Cluster section:
- Select GCP in the Infrastructure tab.
- Type the name of your cluster in the Cluster Details tab.
- Choose the secret you created before in the Infrastructure Details tab.
- Choose Create.
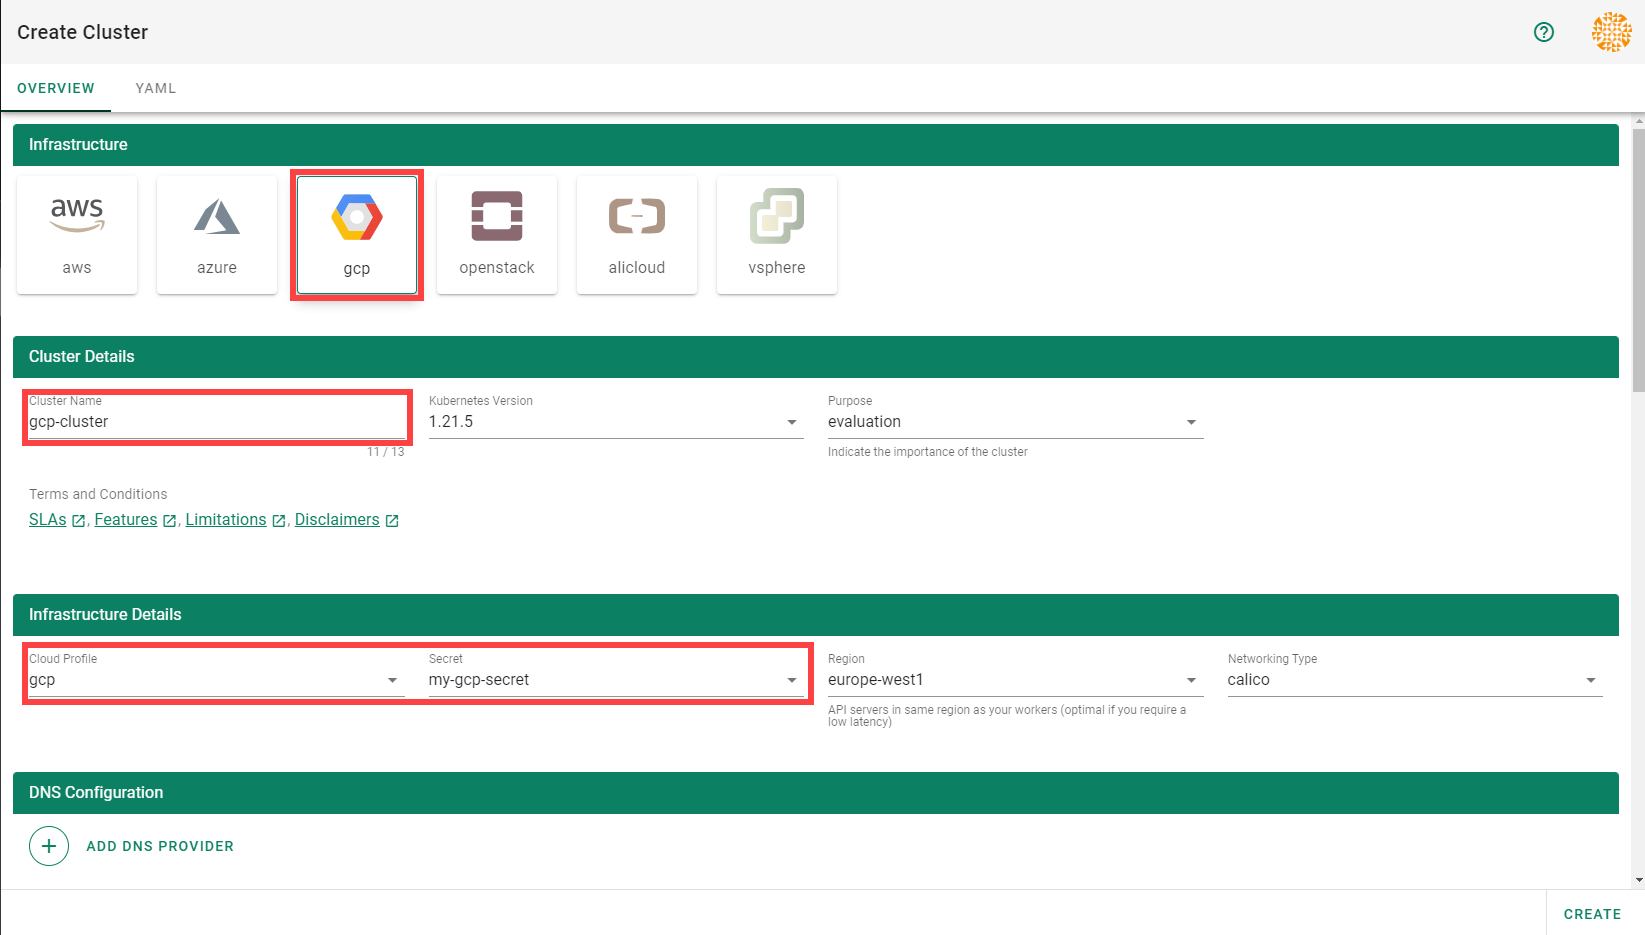
Wait for your cluster to get created.
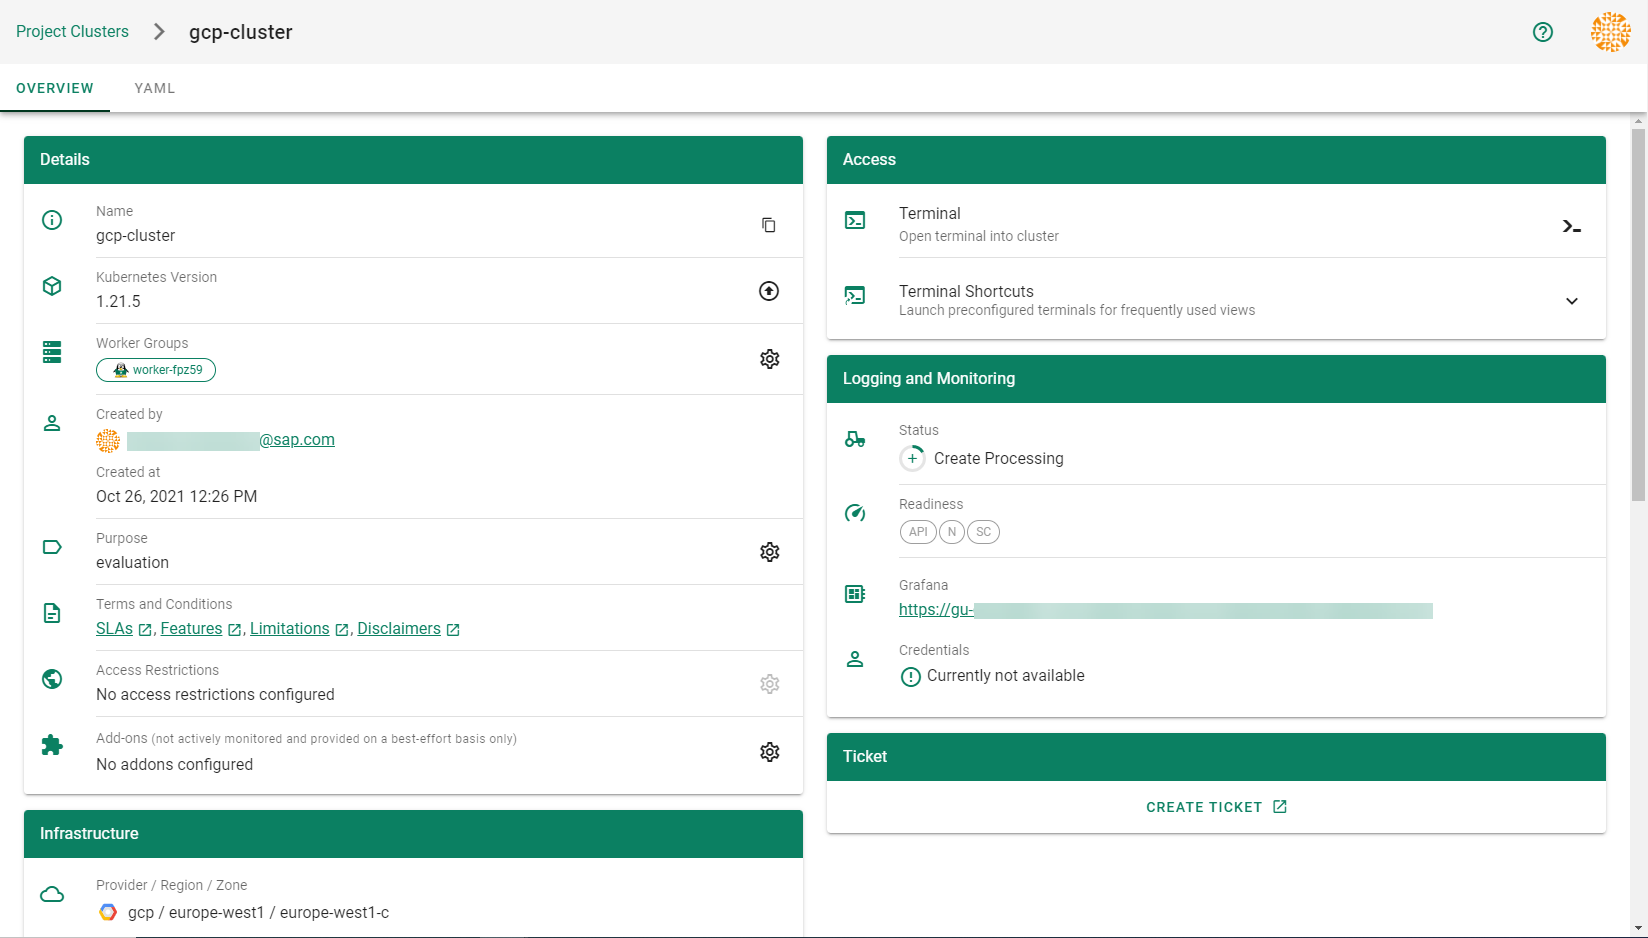
Result
After completing the steps in this tutorial, you will be able to see and download the kubeconfig of your cluster.
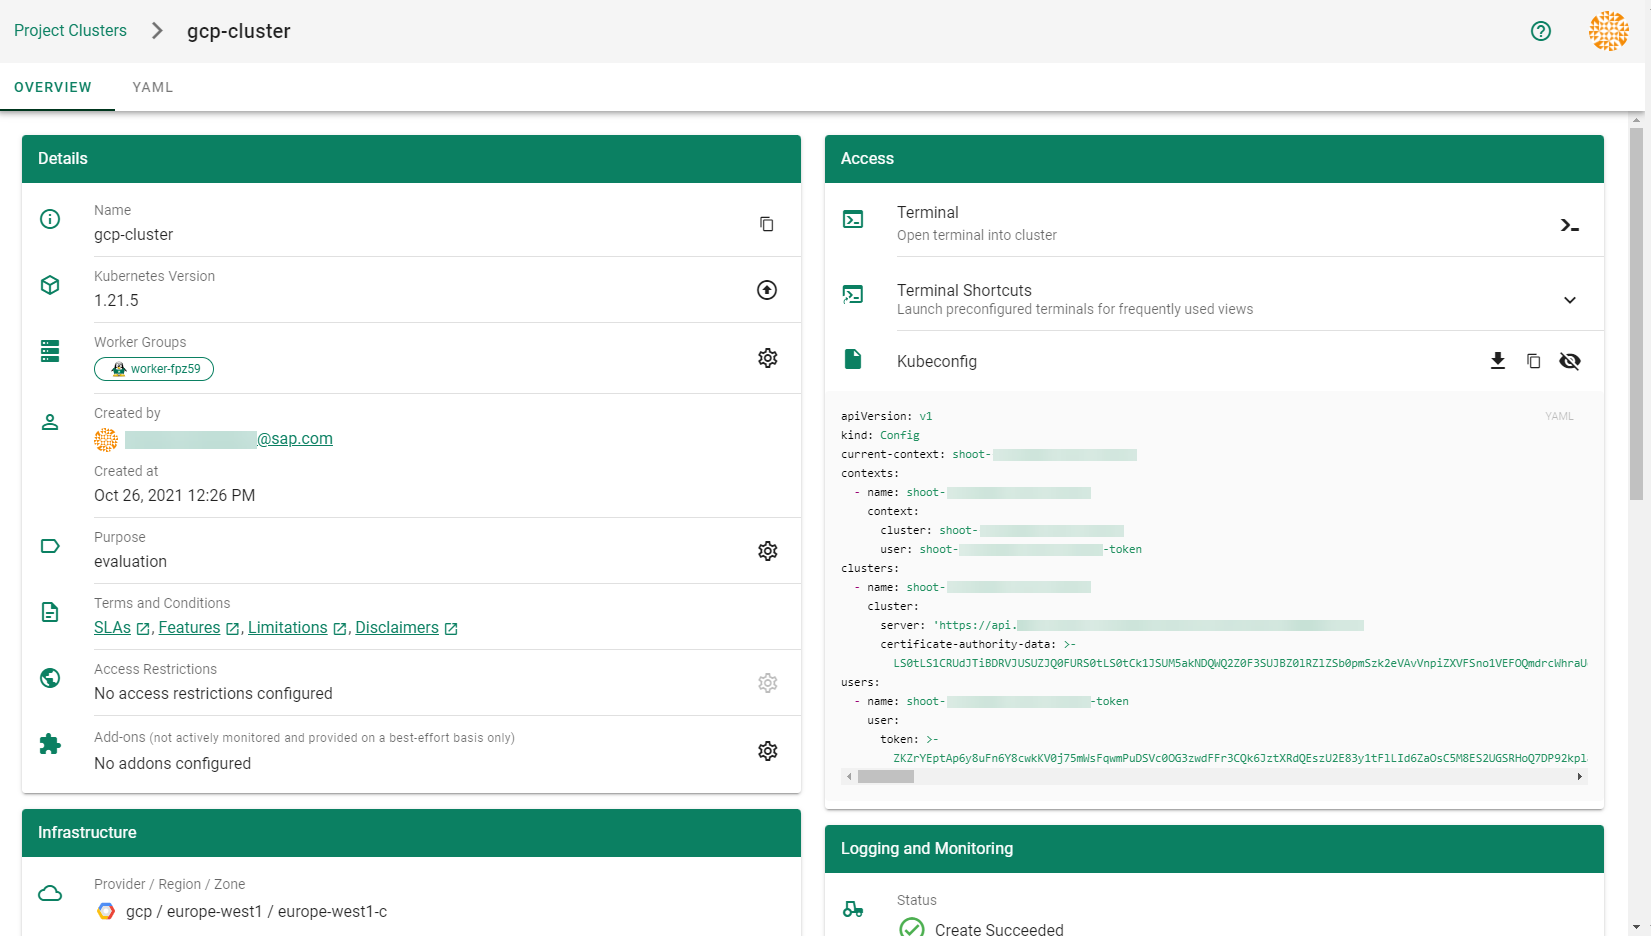
5.1.5.2 - Data Disk Restore From Image
Data Disk Restore From Image
Table of Contents
Summary
Currently, we have no support either in the shoot spec or in the MCM GCP Provider for restoring GCP Data Disks from images.
Motivation
The primary motivation is to support Integration of vSMP MemeoryOne in Azure. We implemented support for this in AWS via Support for data volume snapshot ID . In GCP we have the option to restore data disk from a custom image which is more convenient and flexible.
Goals
- Extend the GCP provider specific WorkerConfig section in the shoot YAML and support provider configuration for data-disks to support data-disk creation from an image name by supplying an image name.
Proposal
Shoot Specification
At this current time, there is no support for provider specific configuration of data disks in an GCP shoot spec. The below shows an example configuration at the time of this proposal:
providerConfig:
apiVersion: gcp.provider.extensions.gardener.cloud/v1alpha1
kind: WorkerConfig
volume:
interface: NVME
encryption: # optional, skipped detail here
serviceAccount:
email: foo@bar.com
scopes:
- https://www.googleapis.com/auth/cloud-platform
gpu:
acceleratorType: nvidia-tesla-t4
count: 1
We propose that the worker config section be enahnced to support data disk configuration
providerConfig:
apiVersion: gcp.provider.extensions.gardener.cloud/v1alpha1
kind: WorkerConfig
volume:
interface: NVME
encryption: # optional, skipped detail here
dataVolumes: # <-- NEW SUB_SECTION
- name: vsmp1
image: imgName
serviceAccount:
email: foo@bar.com
scopes:
- https://www.googleapis.com/auth/cloud-platform
gpu:
acceleratorType: nvidia-tesla-t4
count: 1
In the above imgName specified in providerConfig.dataVolumes.image represents the image name of a previously created image created by a tool or process.
See Google Cloud Create Image.
The MCM GCP Provider will ensure when a VM instance is instantiated, that the data
disk(s) for the VM are created with the source image set to the provided imgName.
The mechanics of this is left to MCM GCP provider. See image param to --create-disk flag in
Google Cloud Instance Creation
5.1.5.3 - Deployment
Deployment of the GCP provider extension
Disclaimer: This document is NOT a step-by-step installation guide for the GCP provider extension and only contains some configuration specifics regarding the installation of different components via the helm charts residing in the GCP provider extension repository.
gardener-extension-admission-gcp
Authentication against the Garden cluster
There are several authentication possibilities depending on whether or not the concept of Virtual Garden is used.
Virtual Garden is not used, i.e., the runtime Garden cluster is also the target Garden cluster.
Automounted Service Account Token
The easiest way to deploy the gardener-extension-admission-gcp component will be to not provide kubeconfig at all. This way in-cluster configuration and an automounted service account token will be used. The drawback of this approach is that the automounted token will not be automatically rotated.
Service Account Token Volume Projection
Another solution will be to use Service Account Token Volume Projection combined with a kubeconfig referencing a token file (see example below).
apiVersion: v1
kind: Config
clusters:
- cluster:
certificate-authority-data: <CA-DATA>
server: https://default.kubernetes.svc.cluster.local
name: garden
contexts:
- context:
cluster: garden
user: garden
name: garden
current-context: garden
users:
- name: garden
user:
tokenFile: /var/run/secrets/projected/serviceaccount/token
This will allow for automatic rotation of the service account token by the kubelet. The configuration can be achieved by setting both .Values.global.serviceAccountTokenVolumeProjection.enabled: true and .Values.global.kubeconfig in the respective chart’s values.yaml file.
Virtual Garden is used, i.e., the runtime Garden cluster is different from the target Garden cluster.
Service Account
The easiest way to setup the authentication will be to create a service account and the respective roles will be bound to this service account in the target cluster. Then use the generated service account token and craft a kubeconfig which will be used by the workload in the runtime cluster. This approach does not provide a solution for the rotation of the service account token. However, this setup can be achieved by setting .Values.global.virtualGarden.enabled: true and following these steps:
- Deploy the
applicationpart of the charts in thetargetcluster. - Get the service account token and craft the
kubeconfig. - Set the crafted
kubeconfigand deploy theruntimepart of the charts in theruntimecluster.
Client Certificate
Another solution will be to bind the roles in the target cluster to a User subject instead of a service account and use a client certificate for authentication. This approach does not provide a solution for the client certificate rotation. However, this setup can be achieved by setting both .Values.global.virtualGarden.enabled: true and .Values.global.virtualGarden.user.name, then following these steps:
- Generate a client certificate for the
targetcluster for the respective user. - Deploy the
applicationpart of the charts in thetargetcluster. - Craft a
kubeconfigusing the already generated client certificate. - Set the crafted
kubeconfigand deploy theruntimepart of the charts in theruntimecluster.
Projected Service Account Token
This approach requires an already deployed and configured oidc-webhook-authenticator for the target cluster. Also the runtime cluster should be registered as a trusted identity provider in the target cluster. Then projected service accounts tokens from the runtime cluster can be used to authenticate against the target cluster. The needed steps are as follows:
- Deploy OWA and establish the needed trust.
- Set
.Values.global.virtualGarden.enabled: trueand.Values.global.virtualGarden.user.name. Note: username value will depend on the trust configuration, e.g.,<prefix>:system:serviceaccount:<namespace>:<serviceaccount> - Set
.Values.global.serviceAccountTokenVolumeProjection.enabled: trueand.Values.global.serviceAccountTokenVolumeProjection.audience. Note: audience value will depend on the trust configuration, e.g.,<cliend-id-from-trust-config>. - Craft a kubeconfig (see example below).
- Deploy the
applicationpart of the charts in thetargetcluster. - Deploy the
runtimepart of the charts in theruntimecluster.
apiVersion: v1
kind: Config
clusters:
- cluster:
certificate-authority-data: <CA-DATA>
server: https://virtual-garden.api
name: virtual-garden
contexts:
- context:
cluster: virtual-garden
user: virtual-garden
name: virtual-garden
current-context: virtual-garden
users:
- name: virtual-garden
user:
tokenFile: /var/run/secrets/projected/serviceaccount/token
5.1.5.4 - Ipv6
Dual-Stack Support for Gardener GCP Extension
This document provides an overview of dual-stack support for the Gardener GCP extension. Furthermore it clarifies which components are utilized, how the infrastructure is setup and how a dual-stack cluster can be provisioned.
Overview
Gardener allows to create dual-stack clusters on GCP. In this mode, both IPv4 and IPv6 are supported within the cluster. This significantly expands the available address space, enables seamless communication across both IPv4 and IPv6 environments, and ensures compliance with modern networking standards.
Key Components for Dual-Stack Support
- Dual-Stack Subnets: Separate subnets are created for nodes and services, with explicit IPv4 and external IPv6 ranges.
- Ingress-GCE: Responsible for creating dual-stack (IPv4,IPv6) Load Balancers.
- Cloud Allocator: Manages the assignment of IPv4 and IPv6 ranges to nodes and pods.
Dual-Stack Subnets
When provisioning a dual-stack cluster, the GCP provider creates distinct subnets:
1. Node Subnet
- Primary IPv4 Range: Used for IPv4 nodes.
- Secondary IPv4 Range: Used for IPv4 pods.
- External IPv6 Range: Auto-assigned with a
/64prefix. Each VM gets an interface with a/96prefix. - Customization:
- IPv4 ranges (pods and nodes) can be defined in the shoot object.
- IPv6 ranges are automatically filled by the GCP provider.
2. Service Subnet
- This subnet is dedicated to IPv6 services. It is created due to GCP’s limitation of not supporting IPv6 range reservations.
3. Internal Subnet (optional)
- This subnet is dedicated for internal load balancer. Currently, only internal IPv4 loadbalancer are supported. They are provisioned by the Cloud Controller Manager (CCM).
Ingress-GCE
The ingress-gce is a mandatory component for dual-stack clusters. It is responsible for creating dual-stack (IPv4,IPv6) Load Balancers. This is necessary because the GCP Cloud Controller Manager does not support provisioning IPv6 Load Balancer.
Cloud Allocator
The Cloud Allocator is part of the GCP Cloud Controller Manager and plays a critical role in managing IPAM (IP Address Management) for dual-stack clusters.
Responsibilities
- Assigning PODCIDRs to Node Objects: Ensures that both IPv4 and IPv6 pod ranges are correctly assigned to the node objects.
- Leveraging Secondary IPv4 Range:
- Uses the secondary IPv4 range in the node subnet to allocate pod IP ranges.
- Assigns both IPv4 and IPv6 pod ranges in compliance with GCP’s networking model.
Operational Details
- The Cloud Allocator assigns a
/112pod cidr range/subrange from the/96cidr range assigned to each VM. - This ensures efficient utilization of IPv6 address space while maintaining compatibility with Kubernetes networking requirements.
Why Use a Secondary IPv4 Range for Pods?
The secondary IPv4 range is essential for:
- Enabling the Cloud Allocator to function correctly in assigning IP ranges.
- Supporting both IPv4 and IPv6 pods in dual-stack clusters.
- Aligning with GCP CCM’s requirement to separate pod IP ranges within the node subnet.
Creating a Dual-Stack Cluster
To create a dual-stack cluster, both IP families (IPv4,IPv6) need to be specified under spec.networking.ipFamilies. Below is an example of a dual-stack shoot cluster configuration:
apiVersion: core.gardener.cloud/v1beta1
kind: Shoot
metadata:
...
spec:
...
provider:
type: gcp
infrastructureConfig:
apiVersion: gcp.provider.extensions.gardener.cloud/v1alpha1
kind: InfrastructureConfig
networks:
workers: 10.250.0.0/16
...
networking:
type: ...
ipFamilies:
- IPv4
- IPv6
nodes: 10.250.0.0/16
...
Migration of IPv4-Only Shoot Clusters to Dual-Stack
To migrate an IPv4-only shoot cluster to Dual-Stack simply change the .spec.networking.ipFamilies field in the Shoot resource from IPv4 to IPv4, IPv6 as shown below.
kind: Shoot
apiVersion: core.gardener.cloud/v1beta1
metadata:
...
spec:
...
networking:
type: ...
ipFamilies:
- IPv4
- IPv6
...
You can find more information about the process and the steps required here.
Warning
Please note that the dual-stack migration requires the IPv4-only cluster to run in native routing mode, i.e. pod overlay network needs to be disabled. The default quota of static routes per VPC in GCP is 200. This restricts the cluster size. Therefore, please adapt (if necessary) the quota for the routes per VPC (
STATIC_ROUTES_PER_NETWORK) in the gcp cloud console accordingly before switching to native routing.
After triggering the migration a constraint of type DualStackNodesMigrationReady is added to the shoot status. It is in state False until all nodes have an IPv4 and IPv6 address assigned.
Changing the ipFamilies field triggers immediately an infrastructure reconciliation, where the infrastructure is reconfigured to additionally support IPv6. During this infrastructure migration process the subnets get an external IPv6 range and the node subnet gets a secondary IPv4 range. Pod specific cloud routes are deleted from the VPC route table and alias IP ranges for the pod routes are added to the NIC of Kubernetes nodes/instances.
With the next node roll-out which is a manual step and will not be triggered automatically, all nodes will get an IPv6 address and an IPv6 prefix for pods assigned. When all nodes have IPv4 and IPv6 pod ranges, the status of the DualStackNodesMigrationReady constraint will be changed to True.
Once all nodes are migrated, the remaining control plane components and the Container Network Interface (CNI) are configured for dual-stack networking and the migration constraint is removed at the end of this step.
Load Balancer Service Configuration
To create a dual-stack LoadBalancer the spec.ipFamilies and spec.ipFamilyPolicy field needs to be specified in the Kubernetes service.
An example configuration is shown below:
apiVersion: v1
kind: Service
metadata:
name: nginx
namespace: default
annotations:
cloud.google.com/l4-rbs: enabled
spec:
ipFamilies:
- IPv4
- IPv6
ipFamilyPolicy: PreferDualStack
ports:
- port: 12345
protocol: TCP
targetPort: 80
selector:
run: nginx
type: LoadBalancer
The required annotation cloud.google.com/l4-rbs: enabled for ingress-gce is added automatically via webhook for services of type: LoadBalancer.
Internal Load Balancer
- Internal IPv6 LoadBalancers are currently not supported.
- To create internal IPv4 LoadBalancers, you can set one of the the following annotations:
"networking.gke.io/load-balancer-type=Internal""cloud.google.com/load-balancer-type=internal"(deprecated). Internal load balancers are created by cloud-controller-manger and get an IPv4 address from the internal subnet.
5.1.5.5 - Local Setup
admission-gcp
admission-gcp is an admission webhook server which is responsible for the validation of the cloud provider (GCP in this case) specific fields and resources. The Gardener API server is cloud provider agnostic and it wouldn’t be able to perform similar validation.
Follow the steps below to run the admission webhook server locally.
Start the Gardener API server.
For details, check the Gardener local setup.
Start the webhook server
Make sure that the
KUBECONFIGenvironment variable is pointing to the local garden cluster.make start-admissionSetup the
ValidatingWebhookConfiguration.hack/dev-setup-admission-gcp.shwill configure the webhook Service which will allow the kube-apiserver of your local cluster to reach the webhook server. It will also apply theValidatingWebhookConfigurationmanifest../hack/dev-setup-admission-gcp.sh
You are now ready to experiment with the admission-gcp webhook server locally.
5.1.5.6 - Operations
Using the GCP provider extension with Gardener as operator
The core.gardener.cloud/v1beta1.CloudProfile resource declares a providerConfig field that is meant to contain provider-specific configuration.
The core.gardener.cloud/v1beta1.Seed resource is structured similarly.
Additionally, it allows configuring settings for the backups of the main etcds’ data of shoot clusters control planes running in this seed cluster.
This document explains the necessary configuration for this provider extension.
CloudProfile resource
This section describes, how the configuration for CloudProfiles looks like for GCP by providing an example CloudProfile manifest with minimal configuration that can be used to allow the creation of GCP shoot clusters.
CloudProfileConfig
The cloud profile configuration contains information about the real machine image IDs in the GCP environment (image URLs).
You have to map every version that you specify in .spec.machineImages[].versions here such that the GCP extension knows the image URL for every version you want to offer.
For each machine image version an architecture field can be specified which specifies the CPU architecture of the machine on which given machine image can be used.
An example CloudProfileConfig for the GCP extension looks as follows:
apiVersion: gcp.provider.extensions.gardener.cloud/v1alpha1
kind: CloudProfileConfig
machineImages:
- name: coreos
versions:
- version: 2135.6.0
image: projects/coreos-cloud/global/images/coreos-stable-2135-6-0-v20190801
# architecture: amd64 # optional
Example CloudProfile manifest
If you want to allow that shoots can create VMs with local SSDs volumes then you have to specify the type of the disk with SCRATCH in the .spec.volumeTypes[] list.
Please find below an example CloudProfile manifest:
apiVersion: core.gardener.cloud/v1beta1
kind: CloudProfile
metadata:
name: gcp
spec:
type: gcp
kubernetes:
versions:
- version: 1.32.0
- version: 1.31.2
expirationDate: "2026-03-31T23:59:59Z"
machineImages:
- name: coreos
versions:
- version: 2135.6.0
machineTypes:
- name: n1-standard-4
cpu: "4"
gpu: "0"
memory: 15Gi
volumeTypes:
- name: pd-standard
class: standard
- name: pd-ssd
class: premium
- name: SCRATCH
class: standard
regions:
- region: europe-west1
names:
- europe-west1-b
- europe-west1-c
- europe-west1-d
providerConfig:
apiVersion: gcp.provider.extensions.gardener.cloud/v1alpha1
kind: CloudProfileConfig
machineImages:
- name: coreos
versions:
- version: 2135.6.0
image: projects/coreos-cloud/global/images/coreos-stable-2135-6-0-v20190801
# architecture: amd64 # optional
Seed resource
This provider extension does not support any provider configuration for the Seed’s .spec.provider.providerConfig field.
However, it supports to managing of backup infrastructure, i.e., you can specify a configuration for the .spec.backup field.
Backup configuration
A Seed of type gcp can be configured to perform backups for the main etcds’ of the shoot clusters control planes using Google Cloud Storage buckets.
The location/region where the backups will be stored defaults to the region of the Seed (spec.provider.region), but can also be explicitly configured via the field spec.backup.region.
The region of the backup can be different from where the seed cluster is running.
However, usually it makes sense to pick the same region for the backup bucket as used for the Seed cluster.
Please find below an example Seed manifest (partly) that configures backups using Google Cloud Storage buckets.
---
apiVersion: core.gardener.cloud/v1beta1
kind: Seed
metadata:
name: my-seed
spec:
provider:
type: gcp
region: europe-west1
backup:
provider: gcp
region: europe-west1 # default region
credentialsRef:
apiVersion: v1
kind: Secret
name: backup-credentials
namespace: garden
...
An example of the referenced secret containing the credentials for the GCP Cloud storage can be found in the example folder.
Permissions for GCP Cloud Storage
Please make sure the service account associated with the provided credentials has the following IAM roles.
Rolling Update Triggers
Changes to the Shoot worker-pools are applied in-place where possible.
In case this is not possible a rolling update of the workers will be performed to apply the new configuration,
as outlined in the Gardener documentation.
The exact fields that trigger this behaviour depend on whether the feature gate NewWorkerPoolHash is enabled.
If it is not enabled, only the fields mentioned in the Gardener doc plus the providerConfig are used.
If the feature gate is enabled, it’s the same with a few additions:
.spec.provider.workers[].dataVolumes[].name.spec.provider.workers[].dataVolumes[].size.spec.provider.workers[].dataVolumes[].type
We exclude .spec.provider.workers[].dataVolumes[].encrypted from the hash calculation because GCP disks are encrypted by default,
and the field does not influence disk encryption behavior.
Everything related to disk encryption is handled by the providerConfig.
5.1.5.7 - Usage
Using the GCP provider extension with Gardener as end-user
The core.gardener.cloud/v1beta1.Shoot resource declares a few fields that are meant to contain provider-specific configuration.
This document describes the configurable options for GCP and provides an example Shoot manifest with minimal configuration that can be used to create a GCP cluster (modulo the landscape-specific information like cloud profile names, secret binding names, etc.).
Accessing GCP APIs
In order for Gardener to create a Kubernetes cluster using GCP infrastructure components, a Shoot has to provide an authentication mechanism giving sufficient permissions to the desired GCP project.
Every shoot cluster references a SecretBinding or a CredentialsBinding.
Important
While
SecretBindings can only referenceSecrets,CredentialsBindings can also referenceWorkloadIdentitys which provide an alternative authentication method.WorkloadIdentitys do not directly contain credentials but are rather a representation of the workload that is going to access the user’s account. If the user has configured Workload Identity Federation with Gardener’s Workload Identity Issuer then the GCP infrastructure components can access the user’s account without the need of preliminary exchange of credentials.
Important
The
SecretBinding/CredentialsBindingis configurable in the Shoot cluster with the fieldsecretBindingName/credentialsBindingName.SecretBindings are considered legacy and will be deprecated in the future. It is advised to useCredentialsBindings instead.
GCP Service Account Credentials
The required credentials for the GCP project are a Service Account Key to authenticate as a GCP Service Account. A service account is a special account that can be used by services and applications to interact with Google Cloud Platform APIs. Applications can use service account credentials to authorize themselves to a set of APIs and perform actions within the permissions granted to the service account.
Make sure to enable the Google Identity and Access Management (IAM) API. Create a Service Account that shall be used for the Shoot cluster. Grant at least the following IAM roles to the Service Account.
- Service Account Admin
- Service Account Token Creator
- Service Account User
- Compute Admin
Create a JSON Service Account key for the Service Account.
Provide it in the Secret (base64 encoded for field serviceaccount.json), that is being referenced by the SecretBinding in the Shoot cluster configuration.
This Secret must look as follows:
apiVersion: v1
kind: Secret
metadata:
name: core-gcp
namespace: garden-dev
type: Opaque
data:
serviceaccount.json: base64(serviceaccount-json)
Warning
Depending on your API usage it can be problematic to reuse the same Service Account Key for different Shoot clusters due to rate limits. Please consider spreading your Shoots over multiple Service Accounts on different GCP projects if you are hitting those limits, see https://cloud.google.com/compute/docs/api-rate-limits.
GCP Workload Identity Federation
Users can choose to trust Gardener’s Workload Identity Issuer and eliminate the need for providing GCP Service Account credentials.
As a first step users should configure Workload Identity Federation with Gardener’s Workload Identity Issuer.
Tip
You can retrieve Gardener’s Workload Identity Issuer URL directly from the Garden cluster by reading the contents of the Gardener Info ConfigMap.
kubectl -n gardener-system-public get configmap gardener-info -o yaml
In the example attribute mapping shown below all WorkloadIdentitys that are created in the garden-myproj namespace will be authenticated.
Now that the Workload Identity Federation is configured the user should download the credential configuration file.
Important
If required, users can use a stricter mapping to authenticate only certain
WorkloadIdentitys. Please, refer to the attribute mappings documentation for more information.
Users should now create a Service Account that is going to be impersonated by the federated identity. Make sure to enable the Google Identity and Access Management (IAM) API. Create a Service Account that shall be used for the Shoot cluster. Grant at least the following IAM roles to the Service Account.
- Service Account Token Creator
- Service Account User
- Compute Admin
As a next step a resource of type WorkloadIdentity should be created in the Garden cluster and configured with the information from the already downloaded credential configuration file.
This identity will be used to impersonate the Service Account in order to call GCP APIs.
Mind that the service_account_impersonation_url is probably not present in the downloaded credential configuration file.
You can use the example template or download a new credential configuration file once we grant the permission to the federated identity to impersonate the Service Account.
A sample of such resource is shown below:
apiVersion: security.gardener.cloud/v1alpha1
kind: WorkloadIdentity
metadata:
name: gcp
namespace: garden-myproj
spec:
audiences:
# This is the audience that you configure during workload identity pool creation
- https://iam.googleapis.com/projects/<project_number>/locations/global/workloadIdentityPools/<pool_name>/providers/<provider_name>
targetSystem:
type: gcp
providerConfig:
apiVersion: gcp.provider.extensions.gardener.cloud/v1alpha1
kind: WorkloadIdentityConfig
projectID: gcp-project-name # This is the name of the project which the workload identity will access
# Use the downloaded credential configuration file to set this field. The credential_source field is not important to Gardener and should be omitted.
credentialsConfig:
universe_domain: "googleapis.com"
type: "external_account"
audience: "//iam.googleapis.com/projects/<project_number>/locations/global/workloadIdentityPools/<pool_name>/providers/<provider_name>"
subject_token_type: "urn:ietf:params:oauth:token-type:jwt"
service_account_impersonation_url: "https://iamcredentials.googleapis.com/v1/projects/-/serviceAccounts/<service_account_email>:generateAccessToken"
token_url: "https://sts.googleapis.com/v1/token"
Now users should give permissions to the WorkloadIdentity to impersonate the Service Account.
In order to construct the principal that will be used for impersonation retrieve the subject of the created WorkloadIdentity.
SUBJECT=$(kubectl -n garden-myproj get workloadidentity gcp -o=jsonpath='{.status.sub}')
echo "principal://iam.googleapis.com/projects/<project_number>/locations/global/workloadIdentityPools/<pool_name>/subject/$SUBJECT"
The principal template is also shown in the Google Console Workload Identity Pool UI.
Users should give this principal the Role Workload Identity User so that it can impersonate the Service Account.
One can do this through the Service Account Permissions tab, through the Google Console Workload Identity Pool UI or by using the gcloud cli.
As a final step create a CredentialsBinding referencing the GCP WorkloadIdentity and use it in your Shoot definitions.
apiVersion: security.gardener.cloud/v1alpha1
kind: CredentialsBinding
metadata:
name: gcp
namespace: garden-myproj
credentialsRef:
apiVersion: security.gardener.cloud/v1alpha1
kind: WorkloadIdentity
name: gcp
namespace: garden-myproj
provider:
type: gcp
apiVersion: core.gardener.cloud/v1beta1
kind: Shoot
metadata:
name: gcp
namespace: garden-myproj
spec:
credentialsBindingName: gcp
...
Warning
One can omit the creation of Service Account and directly grant access to the federated identity’s principal, skipping the Service Account impersonation. This although recommended, will not always work because federated identities do not fall under the
allAuthenticatedUserscategory and cannot access machine images that are not made available toallUsers. This means that machine images should be made available toallUsersor permissions should be explicitly given to the federated identity in order for this to work.GCP imposes some restrictions on which images can be accessible to
allUsers. As of now, Gardenlinux images are not published in a way that they can be accessed byallUsers. See the following issue for more details https://github.com/gardenlinux/glci/issues/148.
InfrastructureConfig
The infrastructure configuration mainly describes how the network layout looks like in order to create the shoot worker nodes in a later step, thus, prepares everything relevant to create VMs, load balancers, volumes, etc.
An example InfrastructureConfig for the GCP extension looks as follows:
apiVersion: gcp.provider.extensions.gardener.cloud/v1alpha1
kind: InfrastructureConfig
networks:
# vpc:
# name: my-vpc
# cloudRouter:
# name: my-cloudrouter
workers: 10.250.0.0/16
# internal: 10.251.0.0/16
# cloudNAT:
# minPortsPerVM: 2048
# maxPortsPerVM: 65536
# endpointIndependentMapping:
# enabled: false
# enableDynamicPortAllocation: false
# natIPNames:
# - name: manualnat1
# - name: manualnat2
# udpIdleTimeoutSec: 30
# icmpIdleTimeoutSec: 30
# tcpEstablishedIdleTimeoutSec: 1200
# tcpTransitoryIdleTimeoutSec: 30
# tcpTimeWaitTimeoutSec: 120
# flowLogs:
# aggregationInterval: INTERVAL_5_SEC
# flowSampling: 0.2
# metadata: INCLUDE_ALL_METADATA
The networks.vpc section describes whether you want to create the shoot cluster in an already existing VPC or whether to create a new one:
If
networks.vpc.nameis given then you have to specify the VPC name of the existing VPC that was created by other means (manually, other tooling, …). If you want to get a fresh VPC for the shoot then just omit thenetworks.vpcfield.If a VPC name is not given then we will create the cloud router + NAT gateway to ensure that worker nodes don’t get external IPs.
If a VPC name is given then a cloud router name must also be given, failure to do so would result in validation errors and possibly clusters without egress connectivity.
If a VPC name is given and calico shoot clusters are created without a network overlay within one VPC make sure that the pod CIDR specified in
shoot.spec.networking.podsis not overlapping with any other pod CIDR used in that VPC. Overlapping pod CIDRs will lead to disfunctional shoot clusters.
The networks.workers section describes the CIDR for a subnet that is used for all shoot worker nodes, i.e., VMs which later run your applications.
The networks.internal section is optional and can describe a CIDR for a subnet that is used for internal load balancers,
The networks.cloudNAT.minPortsPerVM is optional and is used to define the minimum number of ports allocated to a VM for the CloudNAT
The networks.cloudNAT.natIPNames is optional and is used to specify the names of the manual ip addresses which should be used by the nat gateway
The networks.cloudNAT.endpointIndependentMapping is optional and is used to define the endpoint mapping behavior. You can enable it or disable it at any point by toggling networks.cloudNAT.endpointIndependentMapping.enabled. By default, it is disabled.
networks.cloudNAT.enableDynamicPortAllocation is optional (default: false) and allows one to enable dynamic port allocation (https://cloud.google.com/nat/docs/ports-and-addresses#dynamic-port). Note that enabling this puts additional restrictions on the permitted values for networks.cloudNAT.minPortsPerVM and networks.cloudNAT.minPortsPerVM, namely that they now both are required to be powers of two. Also, maxPortsPerVM may not be given if dynamic port allocation is disabled.
networks.cloudNAT.udpIdleTimeoutSec, networks.cloudNAT.icmpIdleTimeoutSec, networks.cloudNAT.tcpEstablishedIdleTimeoutSec, networks.cloudNAT.tcpTransitoryIdleTimeoutSec, and networks.cloudNAT.tcpTimeWaitTimeoutSec give more fine-granular control over various timeout-values. For more details see https://cloud.google.com/nat/docs/public-nat#specs-timeouts.
The specified CIDR ranges must be contained in the VPC CIDR specified above, or the VPC CIDR of your already existing VPC. You can freely choose these CIDRs and it is your responsibility to properly design the network layout to suit your needs.
The networks.flowLogs section describes the configuration for the VPC flow logs. In order to enable the VPC flow logs at least one of the following parameters needs to be specified in the flow log section:
networks.flowLogs.aggregationIntervalan optional parameter describing the aggregation interval for collecting flow logs. For more details, see aggregation_interval reference.networks.flowLogs.flowSamplingan optional parameter describing the sampling rate of VPC flow logs within the subnetwork where 1.0 means all collected logs are reported and 0.0 means no logs are reported. For more details, see flow_sampling reference.networks.flowLogs.metadataan optional parameter describing whether metadata fields should be added to the reported VPC flow logs. For more details, see metadata reference.
Apart from the VPC and the subnets the GCP extension will also create a dedicated service account for this shoot, and firewall rules.
ControlPlaneConfig
The control plane configuration mainly contains values for the GCP-specific control plane components.
Today, the only component deployed by the GCP extension is the cloud-controller-manager.
An example ControlPlaneConfig for the GCP extension looks as follows:
apiVersion: gcp.provider.extensions.gardener.cloud/v1alpha1
kind: ControlPlaneConfig
zone: europe-west1-b
cloudControllerManager:
# featureGates:
# SomeKubernetesFeature: true
storage:
managedDefaultStorageClass: true
managedDefaultVolumeSnapshotClass: true
# csiFilestore:
# enabled: true
The zone field tells the cloud-controller-manager in which zone it should mainly operate.
You can still create clusters in multiple availability zones, however, the cloud-controller-manager requires one “main” zone.
⚠️ You always have to specify this field!
The cloudControllerManager.featureGates contains a map of explicitly enabled or disabled feature gates.
For production usage it’s not recommend to use this field at all as you can enable alpha features or disable beta/stable features, potentially impacting the cluster stability.
If you don’t want to configure anything for the cloudControllerManager simply omit the key in the YAML specification.
The members of the storage allows to configure the provided storage classes further.
If storage.managedDefaultStorageClass is enabled (the default), the default StorageClass deployed will be marked as default (via storageclass.kubernetes.io/is-default-class annotation).
Similarly, if storage.managedDefaultVolumeSnapshotClass is enabled (the default), the default VolumeSnapshotClass deployed will be marked as default.
In case you want to set a different StorageClass or VolumeSnapshotClass as default you need to set the corresponding option to false as at most one class should be marked as default in each case and the ResourceManager will prevent any changes from the Gardener managed classes to take effect.
Furthermore, the storage.csiFilestore.enabled field can be set to true to
enable the GCP Filestore CSI driver.
Additionally, you have to make sure that your IAM user has the permission roles/file.editor and
that the filestore API is enabled in your GCP project.
WorkerConfig
The worker configuration contains:
Local SSD interface for the additional volumes attached to GCP worker machines.
If you attach the disk with
SCRATCHtype, either anNVMeinterface or aSCSIinterface must be specified. It is only meaningful to provide this volume interface if onlySCRATCHdata volumes are used.Volume Encryption config that specifies values for
kmsKeyNameandkmsKeyServiceAccountName.- The
kmsKeyNameis the key name of the cloud kms disk encryption key and must be specified if CMEK disk encryption is needed. - The
kmsKeyServiceAccountis the service account granted theroles/cloudkms.cryptoKeyEncrypterDecrypteron thekmsKeyNameIf empty, then the role should be given to the Compute Engine Service Agent Account. This CESA account usually has the name:service-PROJECT_NUMBER@compute-system.iam.gserviceaccount.com. See: https://cloud.google.com/iam/docs/service-agents#compute-engine-service-agent - Prior to use, the operator should add IAM policy binding using the gcloud CLI:
gcloud projects add-iam-policy-binding projectId --member serviceAccount:name@projectIdgserviceaccount.com --role roles/cloudkms.cryptoKeyEncrypterDecrypter - Setting
.spec.provider.workers[].(data)Volumes[].encryptedhas no impact because GCP disks are encrypted by default.
- The
Setting a volume image with
dataVolumes.sourceImage. However, this parameter should only be used with particular caution. For example Gardenlinux works with filesystem LABELs only and creating another disk form the very same image causes the LABELs to be duplicated. See: https://github.com/gardener/gardener-extension-provider-gcp/issues/323Some hyperdisks allow adjustment of their default values for
provisionedIopsandprovisionedThroughput. Keep in mind though that Hyperdisk Extreme and Hyperdisk Throughput volumes can’t be used as boot disks.Service Account with their specified scopes, authorized for this worker.
Service accounts created in advance that generate access tokens that can be accessed through the metadata server and used to authenticate applications on the instance.
Note: If you do not provide service accounts for your workers, the Compute Engine default service account will be used. For more details on the default account, see https://cloud.google.com/compute/docs/access/service-accounts#default_service_account. If the
DisableGardenerServiceAccountCreationfeature gate is disabled, Gardener will create a shared service accounts to use for all instances. This feature gate is currently in beta and it will no longer be possible to re-enable the service account creation via feature gate flag.GPU with its type and count per node. This will attach that GPU to all the machines in the worker grp
Note:
A rolling upgrade of the worker group would be triggered in case the
acceleratorTypeorcountis updated.Some machineTypes like a2 family come with already attached gpu of
a100type and pre-defined count. If your workerPool consists of such machineTypes, please specify exact GPU configuration for the machine type as specified in Google cloud documentation.acceleratorTypeto use for families with attached gpu are stated below:- a2 family ->
nvidia-tesla-a100 - g2 family ->
nvidia-l4
- a2 family ->
Sufficient quota of gpu is needed in the GCP project. This includes quota to support autoscaling if enabled.
GPU-attached machines can’t be live migrated during host maintenance events. Find out how to handle that in your application here
GPU count specified here is considered for forming node template during scale-from-zero in Cluster Autoscaler
The
.nodeTemplateis used to specify resource information of the machine during runtime. This then helps in Scale-from-Zero. Some points to note for this field:- Currently only cpu, gpu and memory are configurable.
- a change in the value lead to a rolling update of the machine in the workerpool
- all the resources needs to be specified
An example
WorkerConfigfor the GCP looks as follows:
apiVersion: gcp.provider.extensions.gardener.cloud/v1alpha1
kind: WorkerConfig
volume:
interface: NVME
encryption:
kmsKeyName: "projects/projectId/locations/<zoneName>/keyRings/<keyRingName>/cryptoKeys/alpha"
kmsKeyServiceAccount: "user@projectId.iam.gserviceaccount.com"
dataVolumes:
- name: test
sourceImage: projects/sap-se-gcp-gardenlinux/global/images/gardenlinux-gcp-gardener-prod-amd64-1443-3-c261f887
provisionedIops: 3000
provisionedThroughput: 140
serviceAccount:
email: foo@bar.com
scopes:
- https://www.googleapis.com/auth/cloud-platform
gpu:
acceleratorType: nvidia-tesla-t4
count: 1
nodeTemplate: # (to be specified only if the node capacity would be different from cloudprofile info during runtime)
capacity:
cpu: 2
gpu: 1
memory: 50Gi
Example Shoot manifest
Please find below an example Shoot manifest:
apiVersion: core.gardener.cloud/v1beta1
kind: Shoot
metadata:
name: johndoe-gcp
namespace: garden-dev
spec:
cloudProfile:
name: gcp
region: europe-west1
credentialsBindingName: core-gcp
provider:
type: gcp
infrastructureConfig:
apiVersion: gcp.provider.extensions.gardener.cloud/v1alpha1
kind: InfrastructureConfig
networks:
workers: 10.250.0.0/16
controlPlaneConfig:
apiVersion: gcp.provider.extensions.gardener.cloud/v1alpha1
kind: ControlPlaneConfig
zone: europe-west1-b
workers:
- name: worker-xoluy
machine:
type: n1-standard-4
minimum: 2
maximum: 2
volume:
size: 50Gi
type: pd-standard
zones:
- europe-west1-b
networking:
nodes: 10.250.0.0/16
type: calico
kubernetes:
version: 1.28.2
maintenance:
autoUpdate:
kubernetesVersion: true
machineImageVersion: true
addons:
kubernetesDashboard:
enabled: true
nginxIngress:
enabled: true
CSI volume provisioners
Every GCP shoot cluster will be deployed with the GCP PD CSI driver.
It is compatible with the legacy in-tree volume provisioner that was deprecated by the Kubernetes community and will be removed in future versions of Kubernetes.
End-users might want to update their custom StorageClasses to the new pd.csi.storage.gke.io provisioner.
Support for VolumeAttributesClasses (Beta in k8s 1.31)
To have the CSI-driver configured to support the necessary features for VolumeAttributesClasses on GCP for shoots with a k8s-version greater than 1.31, use the gcp.provider.extensions.gardener.cloud/enable-volume-attributes-class annotation on the shoot. Keep in mind to also enable the required feature flags and runtime-config on the common kubernetes controllers (as outlined in the link above) in the shoot-spec.
Kubernetes Versions per Worker Pool
This extension supports gardener/gardener’s WorkerPoolKubernetesVersion feature gate, i.e., having worker pools with overridden Kubernetes versions since gardener-extension-provider-gcp@v1.21.
Shoot CA Certificate and ServiceAccount Signing Key Rotation
This extension supports gardener/gardener’s ShootCARotation and ShootSARotation feature gates since gardener-extension-provider-gcp@v1.23.
BackupBucket
Gardener manages etcd backups for Shoot clusters using provider-specific backup storage solutions. On GCP, this storage is implemented through Google Cloud Storage (GCS) buckets, which store snapshots of the cluster’s etcd data.
The BackupBucket resource abstracts the backup infrastructure, enabling Gardener and its extension controllers to manage it seamlessly. This abstraction allows Gardener to create, delete, and maintain backup buckets across various cloud providers in a standardized manner.
The BackupBucket resource includes a spec field, which defines the configuration details for the backup bucket. These details include:
- The region where the bucket should be created.
- A reference to the secret containing credentials for accessing the cloud provider.
- A
ProviderConfigfield for provider-specific configurations.
BackupBucketConfig
The BackupBucketConfig represents the configuration for a backup bucket. It includes an optional immutability configuration that enforces retention policies on the backup bucket.
The Gardener extension provider for GCP supports creating and managing immutable backup buckets by leveraging the bucket lock feature. Immutability ensures that once data is written to the bucket, it cannot be modified or deleted for a specified period. This feature is crucial for protecting backups from accidental or malicious deletion, ensuring data safety and availability for restoration.
Here is an example configuration for BackupBucketConfig:
apiVersion: gcp.provider.extensions.gardener.cloud/v1alpha1
kind: BackupBucketConfig
immutability:
retentionType: bucket
retentionPeriod: "24h"
locked: false
retentionType: Specifies the type of retention policy. The allowed value isbucket, which applies the retention policy to the entire bucket. For more details, refer to the documentation.retentionPeriod: Defines the duration for which objects in the bucket will remain immutable. The value should follow GCP-supported formats, such as"24h"for 24 hours. Refer to retention period formats for more information. The minimum retention period is 24 hours.locked: A boolean indicating whether the retention policy is locked. Once locked, the policy cannot be removed or shortened, ensuring immutability. Learn more about locking policies here.
To configure a BackupBucket with immutability, include the BackupBucketConfig in the ProviderConfig of the BackupBucket resource. If the locked field is set to true, the retention policy will be locked, preventing the retention policy from being removed and the retention period from being reduced. However, it’s still possible to increase the retention period.
Here is an example of configuring a BackupBucket with immutability:
apiVersion: extensions.gardener.cloud/v1alpha1
kind: BackupBucket
metadata:
name: my-backup-bucket
spec:
provider:
region: europe-west1
secretRef:
name: my-gcp-secret
namespace: my-namespace
providerConfig:
apiVersion: gcp.provider.extensions.gardener.cloud/v1alpha1
kind: BackupBucketConfig
immutability:
retentionType: bucket
retentionPeriod: 24h
locked: true
5.1.6 - Provider Openstack
Gardener Extension for OpenStack provider
Project Gardener implements the automated management and operation of Kubernetes clusters as a service. Its main principle is to leverage Kubernetes concepts for all of its tasks.
Recently, most of the vendor specific logic has been developed in-tree. However, the project has grown to a size where it is very hard to extend, maintain, and test. With GEP-1 we have proposed how the architecture can be changed in a way to support external controllers that contain their very own vendor specifics. This way, we can keep Gardener core clean and independent.
This controller implements Gardener’s extension contract for the OpenStack provider.
An example for a ControllerRegistration resource that can be used to register this controller to Gardener can be found here.
Please find more information regarding the extensibility concepts and a detailed proposal here.
Supported Kubernetes versions
This extension controller supports the following Kubernetes versions:
| Version | Support | Conformance test results |
|---|---|---|
| Kubernetes 1.33 | 1.33.0+ | N/A |
| Kubernetes 1.32 | 1.32.0+ | |
| Kubernetes 1.31 | 1.31.0+ | |
| Kubernetes 1.30 | 1.30.0+ | |
| Kubernetes 1.29 | 1.29.0+ | |
| Kubernetes 1.28 | 1.28.0+ | |
| Kubernetes 1.27 | 1.27.0+ |
Please take a look here to see which versions are supported by Gardener in general.
Compatibility
The following lists known compatibility issues of this extension controller with other Gardener components.
| OpenStack Extension | Gardener | Action | Notes |
|---|---|---|---|
< v1.12.0 | > v1.10.0 | Please update the provider version to >= v1.12.0 or disable the feature gate MountHostCADirectories in the Gardenlet. | Applies if feature flag MountHostCADirectories in the Gardenlet is enabled. This is to prevent duplicate volume mounts to /usr/share/ca-certificates in the Shoot API Server. |
How to start using or developing this extension controller locally
You can run the controller locally on your machine by executing make start.
Static code checks and tests can be executed by running make verify. We are using Go modules for Golang package dependency management and Ginkgo/Gomega for testing.
Feedback and Support
Feedback and contributions are always welcome!
Please report bugs or suggestions as GitHub issues or reach out on Slack (join the workspace here).
Learn more!
Please find further resources about out project here:
- Our landing page gardener.cloud
- “Gardener, the Kubernetes Botanist” blog on kubernetes.io
- “Gardener Project Update” blog on kubernetes.io
- GEP-1 (Gardener Enhancement Proposal) on extensibility
- GEP-4 (New
core.gardener.cloud/v1beta1API) - Extensibility API documentation
- Gardener Extensions Golang library
- Gardener API Reference
5.1.6.1 - Deployment
Deployment of the OpenStack provider extension
Disclaimer: This document is NOT a step by step installation guide for the OpenStack provider extension and only contains some configuration specifics regarding the installation of different components via the helm charts residing in the OpenStack provider extension repository.
gardener-extension-admission-openstack
Authentication against the Garden cluster
There are several authentication possibilities depending on whether or not the concept of Virtual Garden is used.
Virtual Garden is not used, i.e., the runtime Garden cluster is also the target Garden cluster.
Automounted Service Account Token
The easiest way to deploy the gardener-extension-admission-openstack component will be to not provide kubeconfig at all. This way in-cluster configuration and an automounted service account token will be used. The drawback of this approach is that the automounted token will not be automatically rotated.
Service Account Token Volume Projection
Another solution will be to use Service Account Token Volume Projection combined with a kubeconfig referencing a token file (see example below).
apiVersion: v1
kind: Config
clusters:
- cluster:
certificate-authority-data: <CA-DATA>
server: https://default.kubernetes.svc.cluster.local
name: garden
contexts:
- context:
cluster: garden
user: garden
name: garden
current-context: garden
users:
- name: garden
user:
tokenFile: /var/run/secrets/projected/serviceaccount/token
This will allow for automatic rotation of the service account token by the kubelet. The configuration can be achieved by setting both .Values.global.serviceAccountTokenVolumeProjection.enabled: true and .Values.global.kubeconfig in the respective chart’s values.yaml file.
Virtual Garden is used, i.e., the runtime Garden cluster is different from the target Garden cluster.
Service Account
The easiest way to setup the authentication will be to create a service account and the respective roles will be bound to this service account in the target cluster. Then use the generated service account token and craft a kubeconfig which will be used by the workload in the runtime cluster. This approach does not provide a solution for the rotation of the service account token. However, this setup can be achieved by setting .Values.global.virtualGarden.enabled: true and following these steps:
- Deploy the
applicationpart of the charts in thetargetcluster. - Get the service account token and craft the
kubeconfig. - Set the crafted
kubeconfigand deploy theruntimepart of the charts in theruntimecluster.
Client Certificate
Another solution will be to bind the roles in the target cluster to a User subject instead of a service account and use a client certificate for authentication. This approach does not provide a solution for the client certificate rotation. However, this setup can be achieved by setting both .Values.global.virtualGarden.enabled: true and .Values.global.virtualGarden.user.name, then following these steps:
- Generate a client certificate for the
targetcluster for the respective user. - Deploy the
applicationpart of the charts in thetargetcluster. - Craft a
kubeconfigusing the already generated client certificate. - Set the crafted
kubeconfigand deploy theruntimepart of the charts in theruntimecluster.
Projected Service Account Token
This approach requires an already deployed and configured oidc-webhook-authenticator for the target cluster. Also the runtime cluster should be registered as a trusted identity provider in the target cluster. Then projected service accounts tokens from the runtime cluster can be used to authenticate against the target cluster. The needed steps are as follows:
- Deploy OWA and establish the needed trust.
- Set
.Values.global.virtualGarden.enabled: trueand.Values.global.virtualGarden.user.name. Note: username value will depend on the trust configuration, e.g.,<prefix>:system:serviceaccount:<namespace>:<serviceaccount> - Set
.Values.global.serviceAccountTokenVolumeProjection.enabled: trueand.Values.global.serviceAccountTokenVolumeProjection.audience. Note: audience value will depend on the trust configuration, e.g.,<cliend-id-from-trust-config>. - Craft a kubeconfig (see example below).
- Deploy the
applicationpart of the charts in thetargetcluster. - Deploy the
runtimepart of the charts in theruntimecluster.
apiVersion: v1
kind: Config
clusters:
- cluster:
certificate-authority-data: <CA-DATA>
server: https://virtual-garden.api
name: virtual-garden
contexts:
- context:
cluster: virtual-garden
user: virtual-garden
name: virtual-garden
current-context: virtual-garden
users:
- name: virtual-garden
user:
tokenFile: /var/run/secrets/projected/serviceaccount/token
5.1.6.2 - Local Setup
admission-openstack
admission-openstack is an admission webhook server which is responsible for the validation of the cloud provider (OpenStack in this case) specific fields and resources. The Gardener API server is cloud provider agnostic and it wouldn’t be able to perform similar validation.
Follow the steps below to run the admission webhook server locally.
Start the Gardener API server.
For details, check the Gardener local setup.
Start the webhook server
Make sure that the
KUBECONFIGenvironment variable is pointing to the local garden cluster.make start-admissionSetup the
ValidatingWebhookConfiguration.hack/dev-setup-admission-openstack.shwill configure the webhook Service which will allow the kube-apiserver of your local cluster to reach the webhook server. It will also apply theValidatingWebhookConfigurationmanifest../hack/dev-setup-admission-openstack.sh
You are now ready to experiment with the admission-openstack webhook server locally.
5.1.6.3 - Operations
Using the OpenStack provider extension with Gardener as operator
The core.gardener.cloud/v1beta1.CloudProfile resource declares a providerConfig field that is meant to contain provider-specific configuration.
In this document we are describing how this configuration looks like for OpenStack and provide an example CloudProfile manifest with minimal configuration that you can use to allow creating OpenStack shoot clusters.
CloudProfileConfig
The cloud profile configuration contains information about the real machine image IDs in the OpenStack environment (image names).
You have to map every version that you specify in .spec.machineImages[].versions here such that the OpenStack extension knows the image ID for every version you want to offer.
It also contains optional default values for DNS servers that shall be used for shoots.
In the dnsServers[] list you can specify IP addresses that are used as DNS configuration for created shoot subnets.
Also, you have to specify the keystone URL in the keystoneURL field to your environment.
Additionally, you can influence the HTTP request timeout when talking to the OpenStack API in the requestTimeout field.
This may help when you have for example a long list of load balancers in your environment.
In case your OpenStack system uses Octavia for network load balancing then you have to set the useOctavia field to true such that the cloud-controller-manager for OpenStack gets correctly configured (it defaults to false).
Some hypervisors (especially those which are VMware-based) don’t automatically send a new volume size to a Linux kernel when a volume is resized and in-use.
For those hypervisors you can enable the storage plugin interacting with Cinder to telling the SCSI block device to refresh its information to provide information about it’s updated size to the kernel. You might need to enable this behavior depending on the underlying hypervisor of your OpenStack installation. The rescanBlockStorageOnResize field controls this. Please note that it only applies for Kubernetes versions where CSI is used.
Some openstack configurations do not allow to attach more volumes than a specific amount to a single node.
To tell the k8s scheduler to not over schedule volumes on a node, you can set nodeVolumeAttachLimit which defaults to 256.
Some openstack configurations have different names for volume and compute availability zones, which might cause pods to go into pending state as there are no nodes available in the detected volume AZ. To ignore the volume AZ when scheduling pods, you can set ignoreVolumeAZ to true (it defaults to false).
See CSI Cinder driver.
The cloud profile config also contains constraints for floating pools and load balancer providers that can be used in shoots.
If your OpenStack system supports server groups, the serverGroupPolicies property will enable your end-users to create shoots with workers where the nodes are managed by Nova’s server groups.
Specifying serverGroupPolicies is optional and can be omitted. If enabled, the end-user can choose whether or not to use this feature for a shoot’s workers. Gardener will handle the creation of the server group and node assignment.
To enable this feature, an operator should:
- specify the allowed policy values (e.g.
affintity,anti-affinity) in this section. Only the policies in the allow-list will be available for end-users. - make sure that your OpenStack project has enough server group capacity. Otherwise, shoot creation will fail.
If your OpenStack system has multiple volume-types, the storageClasses property enables the creation of kubernetes storageClasses for shoots.
Set storageClasses[].parameters.type to map it with an openstack volume-type. Specifying storageClasses is optional and can be omitted.
An example CloudProfileConfig for the OpenStack extension looks as follows:
apiVersion: openstack.provider.extensions.gardener.cloud/v1alpha1
kind: CloudProfileConfig
machineImages:
- name: coreos
versions:
- version: 2135.6.0
# Fallback to image name if no region mapping is found
# Only works for amd64 and is strongly discouraged. Prefer image IDs!
image: coreos-2135.6.0
regions:
- name: europe
id: "1234-amd64"
architecture: amd64 # optional, defaults to amd64
- name: europe
id: "1234-arm64"
architecture: arm64
- name: asia
id: "5678-amd64"
architecture: amd64
# keystoneURL: https://url-to-keystone/v3/
# keystoneURLs:
# - region: europe
# url: https://europe.example.com/v3/
# - region: asia
# url: https://asia.example.com/v3/
# dnsServers:
# - 10.10.10.11
# - 10.10.10.12
# requestTimeout: 60s
# useOctavia: true
# useSNAT: true
# rescanBlockStorageOnResize: true
# ignoreVolumeAZ: true
# nodeVolumeAttachLimit: 30
# serverGroupPolicies:
# - soft-anti-affinity
# - anti-affinity
# resolvConfOptions:
# - rotate
# - timeout:1
# storageClasses:
# - name: example-sc
# default: false
# provisioner: cinder.csi.openstack.org
# volumeBindingMode: WaitForFirstConsumer
# parameters:
# type: storage_premium_perf0
constraints:
floatingPools:
- name: fp-pool-1
# region: europe
# loadBalancerClasses:
# - name: lb-class-1
# floatingSubnetID: "1234"
# floatingNetworkID: "4567"
# subnetID: "7890"
# - name: "fp-pool-*"
# region: europe
# loadBalancerClasses:
# - name: lb-class-1
# floatingSubnetID: "1234"
# floatingNetworkID: "4567"
# subnetID: "7890"
# - name: "fp-pool-eu-demo"
# region: europe
# domain: demo
# loadBalancerClasses:
# - name: lb-class-1
# floatingSubnetID: "1234"
# floatingNetworkID: "4567"
# subnetID: "7890"
# - name: "fp-pool-eu-dev"
# region: europe
# domain: dev
# nonConstraining: true
# loadBalancerClasses:
# - name: lb-class-1
# floatingSubnetID: "1234"
# floatingNetworkID: "4567"
# subnetID: "7890"
loadBalancerProviders:
- name: haproxy
# - name: f5
# region: asia
# - name: haproxy
# region: asia
Please note that it is possible to configure a region mapping for keystone URLs, floating pools, and load balancer providers.
Additionally, floating pools can be constrainted to a keystone domain by specifying the domain field.
Floating pool names may also contains simple wildcard expressions, like * or fp-pool-* or *-fp-pool. Please note that the * must be either single or at the beginning or at the end. Consequently, fp-*-pool is not possible/allowed.
The default behavior is that, if found, the regional (and/or domain restricted) entry is taken.
If no entry for the given region exists then the fallback value is the most matching entry (w.r.t. wildcard matching) in the list without a region field (or the keystoneURL value for the keystone URLs).
If an additional floating pool should be selectable for a region and/or domain, you can mark it as non constraining
with setting the optional field nonConstraining to true.
Multiple loadBalancerProviders can be specified in the CloudProfile. Each provider may specify a region constraint for where it can be used.
If at least one region specific entry exists in the CloudProfile, the shoot’s specified loadBalancerProvider must adhere to the list of the available providers of that region. Otherwise, one of the non-regional specific providers should be used.
Each entry in the loadBalancerProviders must be uniquely identified by its name and if applicable, its region.
The loadBalancerClasses field is an optional list of load balancer classes which can be when the corresponding floating pool network is choosen. The load balancer classes can be configured in the same way as in the ControlPlaneConfig in the Shoot resource, therefore see here for more details.
Some OpenStack environments don’t need these regional mappings, hence, the region and keystoneURLs fields are optional.
If your OpenStack environment only has regional values and it doesn’t make sense to provide a (non-regional) fallback then simply
omit keystoneURL and always specify region.
If Gardener creates and manages the router of a shoot cluster, it is additionally possible to specify that the enable_snat field is set to true via useSNAT: true in the CloudProfileConfig.
On some OpenStack enviroments, there may be the need to set options in the file /etc/resolv.conf on worker nodes.
If the field resolvConfOptions is set, a systemd service will be installed which copies /run/systemd/resolve/resolv.conf
on every change to /etc/resolv.conf and appends the given options.
Example CloudProfile manifest
Please find below an example CloudProfile manifest:
apiVersion: core.gardener.cloud/v1beta1
kind: CloudProfile
metadata:
name: openstack
spec:
type: openstack
kubernetes:
versions:
- version: 1.32.0
- version: 1.31.1
expirationDate: "2026-03-31T23:59:59Z"
machineImages:
- name: coreos
versions:
- version: 2135.6.0
architectures: # optional, defaults to [amd64]
- amd64
- arm64
machineTypes:
- name: medium_4_8
cpu: "4"
gpu: "0"
memory: 8Gi
architecture: amd64 # optional, defaults to amd64
storage:
class: standard
type: default
size: 40Gi
- name: medium_4_8_arm
cpu: "4"
gpu: "0"
memory: 8Gi
architecture: arm64
storage:
class: standard
type: default
size: 40Gi
regions:
- name: europe-1
zones:
- name: europe-1a
- name: europe-1b
- name: europe-1c
providerConfig:
apiVersion: openstack.provider.extensions.gardener.cloud/v1alpha1
kind: CloudProfileConfig
machineImages:
- name: coreos
versions:
- version: 2135.6.0
# Fallback to image name if no region mapping is found
# Only works for amd64 and is strongly discouraged. Prefer image IDs!
image: coreos-2135.6.0
regions:
- name: europe
id: "1234-amd64"
architecture: amd64 # optional, defaults to amd64
- name: europe
id: "1234-arm64"
architecture: arm64
- name: asia
id: "5678-amd64"
architecture: amd64
keystoneURL: https://url-to-keystone/v3/
constraints:
floatingPools:
- name: fp-pool-1
loadBalancerProviders:
- name: haproxy
Rolling Update Triggers
Changes to the Shoot worker-pools are applied in-place where possible.
In case this is not possible a rolling update of the workers will be performed to apply the new configuration,
as outlined in the Gardener documentation.
The exact fields that trigger this behavior are defined in the Gardener doc,
with a few additions:
.spec.provider.workers[].providerConfig.serverGroup(ID of the server group).spec.provider.workers[].providerConfig.MachineLabels[](ifMachineLabels.triggerRollingUpdateis set totrue)
The featuregate NewWorkerPoolHash has no impact on the hash calculation for now.
5.1.6.4 - Usage
Using the OpenStack provider extension with Gardener as end-user
The core.gardener.cloud/v1beta1.Shoot resource declares a few fields that are meant to contain provider-specific configuration.
In this document we are describing how this configuration looks like for OpenStack and provide an example Shoot manifest with minimal configuration that you can use to create an OpenStack cluster (modulo the landscape-specific information like cloud profile names, secret binding names, etc.).
Provider Secret Data
Every shoot cluster references a SecretBinding or a CredentialsBinding which itself references a Secret, and this Secret contains the provider credentials of your OpenStack tenant.
This Secret must look as follows:
apiVersion: v1
kind: Secret
metadata:
name: core-openstack
namespace: garden-dev
type: Opaque
data:
domainName: base64(domain-name)
tenantName: base64(tenant-name)
# either use username/password
username: base64(user-name)
password: base64(password)
# or application credentials
#applicationCredentialID: base64(app-credential-id)
#applicationCredentialName: base64(app-credential-name) # optional
#applicationCredentialSecret: base64(app-credential-secret)
Please look up https://docs.openstack.org/keystone/pike/admin/identity-concepts.html as well.
For authentication with username/password see Keystone username/password
Alternatively, for authentication with application credentials see Keystone Application Credentials.
⚠️ Depending on your API usage it can be problematic to reuse the same provider credentials for different Shoot clusters due to rate limits. Please consider spreading your Shoots over multiple credentials from different tenants if you are hitting those limits.
InfrastructureConfig
The infrastructure configuration mainly describes how the network layout looks like in order to create the shoot worker nodes in a later step, thus, prepares everything relevant to create VMs, load balancers, volumes, etc.
An example InfrastructureConfig for the OpenStack extension looks as follows:
apiVersion: openstack.provider.extensions.gardener.cloud/v1alpha1
kind: InfrastructureConfig
floatingPoolName: MY-FLOATING-POOL
# floatingPoolSubnetName: my-floating-pool-subnet-name
networks:
# id: 12345678-abcd-efef-08af-0123456789ab
# router:
# id: 1234
workers: 10.250.0.0/19
# shareNetwork:
# enabled: true
The floatingPoolName is the name of the floating pool you want to use for your shoot.
If you don’t know which floating pools are available look it up in the respective CloudProfile.
With floatingPoolSubnetName you can explicitly define to which subnet in the floating pool network (defined via floatingPoolName) the router should be attached to.
networks.id is an optional field. If it is given, you can specify the uuid of an existing private Neutron network (created manually, by other tooling, …) that should be reused. A new subnet for the Shoot will be created in it.
If a networks.id is given and calico shoot clusters are created without a network overlay within one network make sure that the pod CIDR specified in shoot.spec.networking.pods is not overlapping with any other pod CIDR used in that network.
Overlapping pod CIDRs will lead to disfunctional shoot clusters.
The networks.router section describes whether you want to create the shoot cluster in an already existing router or whether to create a new one:
If
networks.router.idis given then you have to specify the router id of the existing router that was created by other means (manually, other tooling, …). If you want to get a fresh router for the shoot then just omit thenetworks.routerfield.In any case, the shoot cluster will be created in a new subnet.
The networks.workers section describes the CIDR for a subnet that is used for all shoot worker nodes, i.e., VMs which later run your applications.
You can freely choose these CIDRs and it is your responsibility to properly design the network layout to suit your needs.
Apart from the router and the worker subnet the OpenStack extension will also create a network, router interfaces, security groups, and a key pair.
The optional networks.shareNetwork.enabled field controls the creation of a share network. This is only needed if shared
file system storage (like NFS) should be used. Note, that in this case, the ControlPlaneConfig needs additional configuration, too.
ControlPlaneConfig
The control plane configuration mainly contains values for the OpenStack-specific control plane components.
Today, the only component deployed by the OpenStack extension is the cloud-controller-manager.
An example ControlPlaneConfig for the OpenStack extension looks as follows:
apiVersion: openstack.provider.extensions.gardener.cloud/v1alpha1
kind: ControlPlaneConfig
loadBalancerProvider: haproxy
loadBalancerClasses:
- name: lbclass-1
purpose: default
floatingNetworkID: fips-1-id
floatingSubnetName: internet-*
- name: lbclass-2
floatingNetworkID: fips-1-id
floatingSubnetTags: internal,private
- name: lbclass-3
purpose: private
subnetID: internal-id
# cloudControllerManager:
# featureGates:
# SomeKubernetesFeature: true
# storage:
# csiManila:
# enabled: true
The loadBalancerProvider is the provider name you want to use for load balancers in your shoot.
If you don’t know which types are available look it up in the respective CloudProfile.
The loadBalancerClasses field contains an optional list of load balancer classes which will be available in the cluster. Each entry can have the following fields:
nameto select the load balancer class via the kubernetes service annotationsloadbalancer.openstack.org/class=namepurposewith valuesdefaultorprivate- The configuration of the
defaultload balancer class will be used as default for all other kubernetes loadbalancer services without a class annotation - The configuration of the
privateload balancer class will be also set to the global loadbalancer configuration of the cluster, but will be overridden by thedefaultpurpose
- The configuration of the
floatingNetworkIDcan be specified to receive an ip from an floating/external network, additionally the subnet in this network can be selected viafloatingSubnetNamecan be either a full subnet name or a regex/glob to match subnet namefloatingSubnetTagsa comma seperated list of subnet tagsfloatingSubnetIDthe id of a specific subnet
subnetIDcan be specified by to receive an ip from an internal subnet (will not have an effect in combination with floating/external network configuration)
The cloudControllerManager.featureGates contains a map of explicitly enabled or disabled feature gates.
For production usage it’s not recommended to use this field at all as you can enable alpha features or disable beta/stable features, potentially impacting the cluster stability.
If you don’t want to configure anything for the cloudControllerManager simply omit the key in the YAML specification.
The optional storage.csiManila.enabled field is used to enable the deployment of the CSI Manila driver to support NFS persistent volumes.
In this case, please ensure to set networks.shareNetwork.enabled=true in the InfrastructureConfig, too.
Additionally, if CSI Manila driver is enabled, for each availability zone a NFS StorageClass will be created on the shoot
named like csi-manila-nfs-<zone>.
WorkerConfig
Each worker group in a shoot may contain provider-specific configurations and options. These are contained in the providerConfig section of a worker group and can be configured using a WorkerConfig object.
An example of a WorkerConfig looks as follows:
apiVersion: openstack.provider.extensions.gardener.cloud/v1alpha1
kind: WorkerConfig
serverGroup:
policy: soft-anti-affinity
# nodeTemplate: # (to be specified only if the node capacity would be different from cloudprofile info during runtime)
# capacity:
# cpu: 2
# gpu: 0
# memory: 50Gi
# machineLabels:
# - name: my-label
# value: foo
# - name: my-rolling-label
# value: bar
# triggerRollingOnUpdate: true # means any change of the machine label value will trigger rolling of all machines of the worker pool
ServerGroups
When you specify the serverGroup section in your worker group configuration, a new server group will be created with the configured policy for each worker group that enabled this setting and all machines managed by this worker group will be assigned as members of the created server group.
For users to have access to the server group feature, it must be enabled on the CloudProfile by your operator.
Existing clusters can take advantage of this feature by updating the server group configuration of their respective worker groups. Worker groups that are already configured with server groups can update their setting to change the policy used, or remove it altogether at any time.
Users must be aware that any change to the server group settings will result in a rolling deployment of new nodes for the affected worker group.
Please note the following restrictions when deploying workers with server groups:
- The
serverGroupsection is optional, but if it is included in the worker configuration, it must contain a valid policy value. - The available
policyvalues that can be used, are defined in the provider specific section ofCloudProfileby your operator. - Certain policy values may induce further constraints. Using the
affinitypolicy is only allowed when the worker group utilizes a single zone.
MachineLabels
The machineLabels section in the worker group configuration allows to specify additional machine labels. These labels are added to the machine
instances only, but not to the node object. Additionally, they have an optional triggerRollingOnUpdate field. If it is set to true, changing the label value
will trigger a rolling of all machines of this worker pool.
Node Templates
Node templates allow users to override the capacity of the nodes as defined by the server flavor specified in the CloudProfile’s machineTypes. This is useful for certain dynamic scenarios as it allows users to customize cluster-autoscaler’s behavior for these workergroup with their provided values.
Example Shoot manifest (one availability zone)
Please find below an example Shoot manifest for one availability zone:
apiVersion: core.gardener.cloud/v1beta1
kind: Shoot
metadata:
name: johndoe-openstack
namespace: garden-dev
spec:
cloudProfile:
name: openstack
region: europe-1
secretBindingName: core-openstack
provider:
type: openstack
infrastructureConfig:
apiVersion: openstack.provider.extensions.gardener.cloud/v1alpha1
kind: InfrastructureConfig
floatingPoolName: MY-FLOATING-POOL
networks:
workers: 10.250.0.0/19
controlPlaneConfig:
apiVersion: openstack.provider.extensions.gardener.cloud/v1alpha1
kind: ControlPlaneConfig
loadBalancerProvider: haproxy
workers:
- name: worker-xoluy
machine:
type: medium_4_8
minimum: 2
maximum: 2
zones:
- europe-1a
networking:
nodes: 10.250.0.0/16
type: calico
kubernetes:
version: 1.28.2
maintenance:
autoUpdate:
kubernetesVersion: true
machineImageVersion: true
addons:
kubernetesDashboard:
enabled: true
nginxIngress:
enabled: true
CSI volume provisioners
Every OpenStack shoot cluster will be deployed with the OpenStack Cinder CSI driver.
It is compatible with the legacy in-tree volume provisioner that was deprecated by the Kubernetes community and will be removed in future versions of Kubernetes.
End-users might want to update their custom StorageClasses to the new cinder.csi.openstack.org provisioner.
Kubernetes Versions per Worker Pool
This extension supports gardener/gardener’s WorkerPoolKubernetesVersion feature gate, i.e., having worker pools with overridden Kubernetes versions since gardener-extension-provider-openstack@v1.23.
Shoot CA Certificate and ServiceAccount Signing Key Rotation
This extension supports gardener/gardener’s ShootCARotation and ShootSARotation feature gates since gardener-extension-provider-openstack@v1.26.
5.2 - Operating System Extensions
5.2.1 - CoreOS/FlatCar OS
Gardener Extension for CoreOS Container Linux
Project Gardener implements the automated management and operation of Kubernetes clusters as a service. Its main principle is to leverage Kubernetes concepts for all of its tasks.
Recently, most of the vendor specific logic has been developed in-tree. However, the project has grown to a size where it is very hard to extend, maintain, and test. With GEP-1 we have proposed how the architecture can be changed in a way to support external controllers that contain their very own vendor specifics. This way, we can keep Gardener core clean and independent.
This controller operates on the OperatingSystemConfig resource in the extensions.gardener.cloud/v1alpha1 API group. It supports CoreOS Container Linux and Flatcar Container Linux (“a friendly fork of CoreOS Container Linux”).
The controller manages those objects that are requesting CoreOS Container Linux configuration (.spec.type=coreos) or Flatcar Container Linux configuration (.spec.type=flatcar):
---
apiVersion: extensions.gardener.cloud/v1alpha1
kind: OperatingSystemConfig
metadata:
name: pool-01-original
namespace: default
spec:
type: coreos
units:
...
files:
...
Please find a concrete example in the example folder.
After reconciliation the resulting data will be stored in a secret within the same namespace (as the config itself might contain confidential data). The name of the secret will be written into the resource’s .status field:
...
status:
...
cloudConfig:
secretRef:
name: osc-result-pool-01-original
namespace: default
command: /usr/bin/coreos-cloudinit -from-file=<path>
units:
- docker-monitor.service
- kubelet-monitor.service
- kubelet.service
The secret has one data key cloud_config that stores the generation.
An example for a ControllerRegistration resource that can be used to register this controller to Gardener can be found here.
Please find more information regarding the extensibility concepts and a detailed proposal here.
How to start using or developing this extension controller locally
You can run the controller locally on your machine by executing make start. Please make sure to have the kubeconfig to the cluster you want to connect to ready in the ./dev/kubeconfig file.
Static code checks and tests can be executed by running make verify. We are using Go modules for Golang package dependency management and Ginkgo/Gomega for testing.
Feedback and Support
Feedback and contributions are always welcome!
Please report bugs or suggestions as GitHub issues or reach out on Slack (join the workspace here).
Learn more!
Please find further resources about out project here:
5.2.1.1 - Usage
Using the CoreOS extension with Gardener as end-user
The core.gardener.cloud/v1beta1.Shoot resource declares a few fields that must be considered when this OS extension is used.
In this document we describe how this configuration looks like and under which circumstances your attention may be required.
AWS VPC settings for CoreOS workers
Gardener allows you to create CoreOS based worker nodes by:
- Using a Gardener managed VPC
- Reusing a VPC that already exists (VPC
idspecified in InfrastructureConfig]
If the second option applies to your use-case please make sure that your VPC has enabled DNS Support. Otherwise CoreOS based nodes aren’t able to join or operate in your cluster properly.
DNS settings (required):
enableDnsHostnames: true (necessary for collecting node metrics)enableDnsSupport: true
5.2.2 - Garden Linux OS
Gardener Extension for Garden Linux OS
This controller operates on the OperatingSystemConfig resource in the extensions.gardener.cloud/v1alpha1 API group.
It manages those objects that are requesting…
Garden Linux OS configuration (
.spec.type=gardenlinux):--- apiVersion: extensions.gardener.cloud/v1alpha1 kind: OperatingSystemConfig metadata: name: pool-01-original namespace: default spec: type: gardenlinux units: ... files: ...Please find a concrete example in the
examplefolder.MemoryOne on Garden Linux configuration (
spec.type=memoryone-gardenlinux):--- apiVersion: extensions.gardener.cloud/v1alpha1 kind: OperatingSystemConfig metadata: name: pool-01-original namespace: default spec: type: memoryone-gardenlinux units: ... files: ... providerConfig: apiVersion: memoryone-gardenlinux.os.extensions.gardener.cloud/v1alpha1 kind: OperatingSystemConfiguration memoryTopology: "2" systemMemory: "6x"Please find a concrete example in the
examplefolder.
After reconciliation the resulting data will be stored in a secret within the same namespace (as the config itself might contain confidential data). The name of the secret will be written into the resource’s .status field:
...
status:
...
cloudConfig:
secretRef:
name: osc-result-pool-01-original
namespace: default
command: /usr/bin/env bash <path>
units:
- kubelet-monitor.service
- kubelet.service
The secret has one data key cloud_config that stores the generation.
An example for a ControllerRegistration resource that can be used to register this controller to Gardener can be found here.
Please find more information regarding the extensibility concepts and a detailed proposal here.
How to start using or developing this extension controller locally
You can run the controller locally on your machine by executing make start. Please make sure to have the kubeconfig to the cluster you want to connect to ready in the ./dev/kubeconfig file.
Static code checks and tests can be executed by running make verify. We are using Go modules for Golang package dependency management and Ginkgo/Gomega for testing.
Feedback and Support
Feedback and contributions are always welcome!
Please report bugs or suggestions as GitHub issues or reach out on Slack (join the workspace here).
Learn more!
Please find further resources about out project here:
5.2.3 - SUSE CHost OS
Gardener Extension for SUSE CHost
This controller operates on the OperatingSystemConfig resource in the extensions.gardener.cloud/v1alpha1 API group. It manages those objects that are requesting SUSE Container Host configuration, i.e. suse-chost type:
---
apiVersion: extensions.gardener.cloud/v1alpha1
kind: OperatingSystemConfig
metadata:
name: pool-01-original
namespace: default
spec:
type: suse-chost
units:
...
files:
...
Please find a concrete example in the example folder.
It is also capable of supporting the vSMP MemoryOne operating system with the memoryone-chost type. Please find more information here.
After reconciliation the resulting data will be stored in a secret within the same namespace (as the config itself might contain confidential data). The name of the secret will be written into the resource’s .status field:
...
status:
...
cloudConfig:
secretRef:
name: osc-result-pool-01-original
namespace: default
command: /usr/bin/env bash <path>
units:
- kubelet-monitor.service
- kubelet.service
The secret has one data key cloud_config that stores the generation.
An example for a ControllerRegistration resource that can be used to register this controller to Gardener can be found here.
Please find more information regarding the extensibility concepts and a detailed proposal here.
How to start using or developing this extension controller locally
You can run the controller locally on your machine by executing make start. Please make sure to have the kubeconfig to the cluster you want to connect to ready in the ./dev/kubeconfig file.
Static code checks and tests can be executed by running make verify. We are using Go modules for Golang package dependency management and Ginkgo/Gomega for testing.
Feedback and Support
Feedback and contributions are always welcome!
Please report bugs or suggestions as GitHub issues or reach out on Slack (join the workspace here).
Learn more!
Please find further resources about out project here:
5.2.3.1 - Usage
Using the SuSE CHost extension with Gardener as end-user
The core.gardener.cloud/v1beta1.Shoot resource declares a few fields that must be considered when this OS extension is used.
In this document we describe how this configuration looks like and under which circumstances your attention may be required.
AWS VPC settings for SuSE CHost workers
Gardener allows you to create SuSE CHost based worker nodes by:
- Using a Gardener managed VPC
- Reusing a VPC that already exists (VPC
idspecified in InfrastructureConfig]
If the second option applies to your use-case please make sure that your VPC has enabled DNS Support. Otherwise SuSE CHost based nodes aren’t able to join or operate in your cluster properly.
DNS settings (required):
enableDnsHostnames: trueenableDnsSupport: true
Support for vSMP MemoryOne
This extension controller is also capable of generating user-data for the vSMP MemoryOne operating system in conjunction with SuSE CHost.
It reacts on the memoryone-chost extension type.
Additionally, it allows certain customizations with the following configuration:
apiVersion: memoryone-chost.os.extensions.gardener.cloud/v1alpha1
kind: OperatingSystemConfiguration
memoryTopology: "3"
systemMemory: "7x"
- The
memoryTopologyfield controls themem_topologysetting. If it’s not provided then it will default to2. - The
systemMemoryfield controls thesystem_memorysetting. If it’s not provided then it defaults to6x.
Please note that it was only e2e-tested on AWS. Additionally, you need a snapshot ID of a SuSE CHost/CHost volume (see below how to create it).
An exemplary worker pool configuration inside a Shoot resource using for the vSMP MemoryOne operating system would look as follows:
apiVersion: core.gardener.cloud/v1beta1
kind: Shoot
metadata:
name: vsmp-memoryone
namespace: garden-foo
spec:
...
workers:
- name: cpu-worker3
minimum: 1
maximum: 1
maxSurge: 1
maxUnavailable: 0
machine:
image:
name: memoryone-chost
version: 9.5.195
providerConfig:
apiVersion: memoryone-chost.os.extensions.gardener.cloud/v1alpha1
kind: OperatingSystemConfiguration
memoryTopology: "2"
systemMemory: "6x"
type: c5d.metal
volume:
size: 20Gi
type: gp2
dataVolumes:
- name: chost
size: 50Gi
type: gp2
providerConfig:
apiVersion: aws.provider.extensions.gardener.cloud/v1alpha1
kind: WorkerConfig
dataVolumes:
- name: chost
snapshotID: snap-123456
zones:
- eu-central-1b
Please note that vSMP MemoryOne only works for EC2 bare-metal instance types such as M5d, R5, C5, C5d, etc. - please consult the EC2 instance types overview page and the documentation of vSMP MemoryOne to find out whether the instance type in question is eligible.
Generating an AWS snapshot ID for the CHost/CHost operating system
The following script will help to generate the snapshot ID on AWS.
It runs in the region that is selected in your $HOME/.aws/config file.
Consequently, if you want to generate the snapshot in multiple regions, you have to run in multiple times after configuring the respective region using aws configure.
ami="ami-1234" #Replace the ami with the intended one.
name=`aws ec2 describe-images --image-ids $ami --query="Images[].Name" --output=text`
cur=`aws ec2 describe-snapshots --filter="Name=description,Values=snap-$name" --query="Snapshots[].Description" --output=text`
if [ -n "$cur" ]; then
echo "AMI $name exists as snapshot $cur"
continue
fi
echo "AMI $name ... creating private snapshot"
inst=`aws ec2 run-instances --instance-type t3.nano --image-id $ami --query 'Instances[0].InstanceId' --output=text --subnet-id subnet-1234 --tag-specifications 'ResourceType=instance,Tags=[{Key=scalemp-test,Value=scalemp-test}]'` #Replace the subnet-id with the intended one.
aws ec2 wait instance-running --instance-ids $inst
vol=`aws ec2 describe-instances --instance-ids $inst --query "Reservations[].Instances[].BlockDeviceMappings[0].Ebs.VolumeId" --output=text`
snap=`aws ec2 create-snapshot --description "snap-$name" --volume-id $vol --query='SnapshotId' --tag-specifications "ResourceType=snapshot,Tags=[{Key=Name,Value=\"$name\"}]" --output=text`
aws ec2 wait snapshot-completed --snapshot-ids $snap
aws ec2 terminate-instances --instance-id $inst > /dev/null
echo $snap
5.2.4 - Ubuntu OS
Gardener Extension for Ubuntu OS
This controller operates on the OperatingSystemConfig resource in the extensions.gardener.cloud/v1alpha1 API group. It manages those objects that are requesting Ubuntu OS configuration (.spec.type=ubuntu). An experimental support for Ubuntu Pro is added (.spec.type=ubuntu-pro):
---
apiVersion: extensions.gardener.cloud/v1alpha1
kind: OperatingSystemConfig
metadata:
name: pool-01-original
namespace: default
spec:
type: ubuntu
units:
...
files:
...
Please find a concrete example in the example folder.
After reconciliation the resulting data will be stored in a secret within the same namespace (as the config itself might contain confidential data). The name of the secret will be written into the resource’s .status field:
...
status:
...
cloudConfig:
secretRef:
name: osc-result-pool-01-original
namespace: default
command: /usr/bin/env bash <path>
units:
- docker-monitor.service
- kubelet-monitor.service
- kubelet.service
The secret has one data key cloud_config that stores the generation.
An example for a ControllerRegistration resource that can be used to register this controller to Gardener can be found here.
Please find more information regarding the extensibility concepts and a detailed proposal here.
How to start using or developing this extension controller locally
You can run the controller locally on your machine by executing make start.
Static code checks and tests can be executed by running make verify. We are using Go modules for Golang package dependency management and Ginkgo/Gomega for testing.
Feedback and Support
Feedback and contributions are always welcome!
Please report bugs or suggestions as GitHub issues or reach out on Slack (join the workspace here).
Learn more!
Please find further resources about out project here:
5.2.4.1 - Usage
Using the Ubuntu extension with Gardener as end-user
The core.gardener.cloud/v1beta1.Shoot resource declares a few fields that must be considered when this OS extension is used.
In this document we describe how this configuration looks like and under which circumstances your attention may be required.
AWS VPC settings for Ubuntu workers
Gardener allows you to create Ubuntu based worker nodes by:
- Using a Gardener managed VPC
- Reusing a VPC that already exists (VPC
idspecified in InfrastructureConfig]
If the second option applies to your use-case please make sure that your VPC has enabled DNS Support. Otherwise Ubuntu based nodes aren’t able to join or operate in your cluster properly.
DNS settings (required):
enableDnsHostnames: trueenableDnsSupport: true
5.3 - Network Extensions
5.3.1 - Calico CNI
Gardener Extension for Calico Networking
This controller operates on the Network resource in the extensions.gardener.cloud/v1alpha1 API group. It manages those objects that are requesting Calico Networking configuration (.spec.type=calico):
---
apiVersion: extensions.gardener.cloud/v1alpha1
kind: Network
metadata:
name: calico-network
namespace: shoot--core--test-01
spec:
type: calico
clusterCIDR: 192.168.0.0/24
serviceCIDR: 10.96.0.0/24
providerConfig:
apiVersion: calico.networking.extensions.gardener.cloud/v1alpha1
kind: NetworkConfig
overlay:
enabled: false
Please find a concrete example in the example folder. All the Calico specific configuration
should be configured in the providerConfig section. If additional configuration is required, it should be added to
the networking-calico chart in controllers/networking-calico/charts/internal/calico/values.yaml and corresponding code
parts should be adapted (for example in controllers/networking-calico/pkg/charts/utils.go).
Once the network resource is applied, the networking-calico controller would then create all the necessary managed-resources which should be picked
up by the gardener-resource-manager which will then apply all the
network extensions resources to the shoot cluster.
Finally after successful reconciliation an output similar to the one below should be expected.
status:
lastOperation:
description: Successfully reconciled network
lastUpdateTime: "..."
progress: 100
state: Succeeded
type: Reconcile
observedGeneration: 1
providerStatus:
apiVersion: calico.networking.extensions.gardener.cloud/v1alpha1
kind: NetworkStatus
Compatibility
The following table lists known compatibility issues of this extension controller with other Gardener components.
| Calico Extension | Gardener | Action | Notes |
|---|---|---|---|
>= v1.30.0 | < v1.63.0 | Please first update Gardener components to >= v1.63.0. | Without the mentioned minimum Gardener version, Calico Pods are not only scheduled to dedicated system component nodes in the shoot cluster. |
How to start using or developing this extension controller locally
You can run the controller locally on your machine by executing make start. Please make sure to have the kubeconfig pointed to the cluster you want to connect to.
Static code checks and tests can be executed by running make verify. We are using Go modules for Golang package dependency management and Ginkgo/Gomega for testing.
Feedback and Support
Feedback and contributions are always welcome!
Please report bugs or suggestions as GitHub issues or reach out on Slack (join the workspace here).
Learn more!
Please find further resources about out project here:
5.3.1.1 - Deployment
Deployment of the networking Calico extension
Disclaimer: This document is NOT a step by step deployment guide for the networking Calico extension and only contains some configuration specifics regarding the deployment of different components via the helm charts residing in the networking Calico extension repository.
gardener-extension-admission-calico
Authentication against the Garden cluster
There are several authentication possibilities depending on whether or not the concept of Virtual Garden is used.
Virtual Garden is not used, i.e., the runtime Garden cluster is also the target Garden cluster.
Automounted Service Account Token
The easiest way to deploy the gardener-extension-admission-calico component will be to not provide kubeconfig at all. This way in-cluster configuration and an automounted service account token will be used. The drawback of this approach is that the automounted token will not be automatically rotated.
Service Account Token Volume Projection
Another solution will be to use Service Account Token Volume Projection combined with a kubeconfig referencing a token file (see example below).
apiVersion: v1
kind: Config
clusters:
- cluster:
certificate-authority-data: <CA-DATA>
server: https://default.kubernetes.svc.cluster.local
name: garden
contexts:
- context:
cluster: garden
user: garden
name: garden
current-context: garden
users:
- name: garden
user:
tokenFile: /var/run/secrets/projected/serviceaccount/token
This will allow for automatic rotation of the service account token by the kubelet. The configuration can be achieved by setting both .Values.global.serviceAccountTokenVolumeProjection.enabled: true and .Values.global.kubeconfig in the respective chart’s values.yaml file.
Virtual Garden is used, i.e., the runtime Garden cluster is different from the target Garden cluster.
Service Account
The easiest way to setup the authentication will be to create a service account and the respective roles will be bound to this service account in the target cluster. Then use the generated service account token and craft a kubeconfig which will be used by the workload in the runtime cluster. This approach does not provide a solution for the rotation of the service account token. However, this setup can be achieved by setting .Values.global.virtualGarden.enabled: true and following these steps:
- Deploy the
applicationpart of the charts in thetargetcluster. - Get the service account token and craft the
kubeconfig. - Set the crafted
kubeconfigand deploy theruntimepart of the charts in theruntimecluster.
Client Certificate
Another solution will be to bind the roles in the target cluster to a User subject instead of a service account and use a client certificate for authentication. This approach does not provide a solution for the client certificate rotation. However, this setup can be achieved by setting both .Values.global.virtualGarden.enabled: true and .Values.global.virtualGarden.user.name, then following these steps:
- Generate a client certificate for the
targetcluster for the respective user. - Deploy the
applicationpart of the charts in thetargetcluster. - Craft a
kubeconfigusing the already generated client certificate. - Set the crafted
kubeconfigand deploy theruntimepart of the charts in theruntimecluster.
Projected Service Account Token
This approach requires an already deployed and configured oidc-webhook-authenticator for the target cluster. Also the runtime cluster should be registered as a trusted identity provider in the target cluster. Then projected service accounts tokens from the runtime cluster can be used to authenticate against the target cluster. The needed steps are as follows:
- Deploy OWA and establish the needed trust.
- Set
.Values.global.virtualGarden.enabled: trueand.Values.global.virtualGarden.user.name. Note: username value will depend on the trust configuration, e.g.,<prefix>:system:serviceaccount:<namespace>:<serviceaccount> - Set
.Values.global.serviceAccountTokenVolumeProjection.enabled: trueand.Values.global.serviceAccountTokenVolumeProjection.audience. Note: audience value will depend on the trust configuration, e.g.,<cliend-id-from-trust-config>. - Craft a kubeconfig (see example below).
- Deploy the
applicationpart of the charts in thetargetcluster. - Deploy the
runtimepart of the charts in theruntimecluster.
apiVersion: v1
kind: Config
clusters:
- cluster:
certificate-authority-data: <CA-DATA>
server: https://virtual-garden.api
name: virtual-garden
contexts:
- context:
cluster: virtual-garden
user: virtual-garden
name: virtual-garden
current-context: virtual-garden
users:
- name: virtual-garden
user:
tokenFile: /var/run/secrets/projected/serviceaccount/token
5.3.1.2 - Operations
Using the Calico networking extension with Gardener as operator
This document explains configuration options supported by the networking-calico extension.
Run calico-node in non-privileged and non-root mode
Feature State: Alpha
Motivation
Running containers in privileged mode is not recommended as privileged containers run with all linux capabilities enabled and can access the host’s resources. Running containers in privileged mode opens number of security threats such as breakout to underlying host OS.
Support for non-privileged and non-root mode
The Calico project has a preliminary support for running the calico-node component in non-privileged mode (see this guide). Similar to Tigera Calico operator the networking-calico extension can also run calico-node in non-privileged and non-root mode. This feature is controller via feature gate named NonPrivilegedCalicoNode. The feature gates are configured in the ControllerConfiguration of networking-calico. The corresponding ControllerDeployment configuration that enables the NonPrivilegedCalicoNode would look like:
apiVersion: core.gardener.cloud/v1beta1
kind: ControllerDeployment
metadata:
name: networking-calico
type: helm
providerConfig:
values:
chart: <omitted>
config:
featureGates:
NonPrivilegedCalicoNode: false
Limitations
- The support for the non-privileged mode in the Calico project is not ready for productive usage. The upstream documentation states that in non-privileged mode the support for features added after Calico v3.21 is not guaranteed.
- Calico in non-privileged mode does not support eBPF dataplane. That’s why when eBPF dataplane is enabled, calico-node has to run in privileged mode (even when the
NonPrivilegedCalicoNodefeature gate is enabled). - (At the time of writing this guide) there is the following issue projectcalico/calico#5348 that is not addressed.
- (At the time of writing this guide) the upstream adoptions seems to be low. The Calico charts and manifest in projectcalico/calico run calico-node in privileged mode.
5.3.1.3 - Shoot Overlay Network
Enable / disable overlay network for shoots with Calico
Gardener can be used with or without the overlay network.
Starting versions:
The default configuration of shoot clusters is without overlay network.
Understanding overlay network
The Overlay networking permits the routing of packets between multiples pods located on multiple nodes, even if the pod and the node network are not the same.
This is done through the encapsulation of pod packets in the node network so that the routing can be done as usual. We use ipip encapsulation with calico as default in case the overlay network is enabled. This (simply put) sends an IP packet as workload in another IP packet.

In order to simplify the troubleshooting of problems and reduce the latency of packets traveling between nodes, the overlay network is disabled by default as stated above for all new clusters.

This means that the routing is done directly through the VPC routing table. Basically, when a new node is created, it is assigned a slice (usually a /24) of the pod network. All future pods in that node are going to be in this slice. Then, the cloud-controller-manager updates the cloud provider router to add the new route (all packets within the network slice as destination should go to that node).
This has the advantage of:
- Doing less work for the node as encapsulation takes some CPU cycles.
- The maximum transmission unit (MTU) is slightly bigger resulting in slightly better performance, i.e. potentially more workload bytes per packet.
- More direct and simpler setup, which makes the problems much easier to troubleshoot.
In the case where multiple shoots are in the same VPC and the overlay network is disabled, if the pod’s network is not configured properly, there is a very strong chance that some pod IP address might overlap, which is going to cause all sorts of funny problems. So, if someone asks you how to avoid that, they need to make sure that the podCIDRs for each shoot do not overlap with each other.
Enabling the overlay network
In certain cases, the overlay network might be preferable if, for example, the customer wants to create multiple clusters in the same VPC without ensuring there’s no overlap between the pod networks.
To enable the overlay network, add the following to the shoot’s YAML:
apiVersion: core.gardener.cloud/v1beta1
kind: Shoot
metadata:
...
spec:
...
networking:
type: calico
providerConfig:
apiVersion: calico.networking.extensions.gardener.cloud/v1alpha1
kind: NetworkConfig
overlay:
enabled: true
...
Disabling the overlay network
Inversely, here is how to disable the overlay network:
apiVersion: core.gardener.cloud/v1beta1
kind: Shoot
metadata:
...
spec:
...
networking:
type: calico
providerConfig:
apiVersion: calico.networking.extensions.gardener.cloud/v1alpha1
kind: NetworkConfig
overlay:
enabled: false
...
Using VXLAN as overlay
To enable the overlay network with VXLAN, add the following to the shoot’s YAML:
apiVersion: core.gardener.cloud/v1beta1
kind: Shoot
metadata:
...
spec:
...
networking:
type: calico
providerConfig:
apiVersion: calico.networking.extensions.gardener.cloud/v1alpha1
kind: NetworkConfig
overlay:
enabled: true
vxlan:
enabled: true
...
How to know if a cluster is using overlay or not?
You can look at any of the old nodes. If there are tunl0 devices at least at some point in time the overlay network was used.
Another way is to look into the Network object in the shoot’s control plane namespace on the seed (see example above).
Do we have some documentation somewhere on how to do the migration?
No, not yet. The migration from no overlay to overlay is fairly simply by just setting the configuration as specified above. The other way is more complicated as the Network configuration needs to be changed AND the local routes need to be cleaned. Unfortunately, the change will be rolled out slowly (one calico-node at a time). Hence, it implies some network outages during the migration.
AWS implementation
On AWS, it is not possible to use the cloud-controller-manager for managing the routes as it does not support multiple route tables, which Gardener creates. Therefore, a custom controller is created to manage the routes.
5.3.1.4 - Usage
Using the Networking Calico extension with Gardener as end-user
The core.gardener.cloud/v1beta1.Shoot resource declares a networking field that is meant to contain network-specific configuration.
In this document we are describing how this configuration looks like for Calico and provide an example Shoot manifest with minimal configuration that you can use to create a cluster.
Calico Typha
Calico Typha is an optional component of Project Calico designed to offload the Kubernetes API server. The Typha daemon sits between the datastore (such as the Kubernetes API server which is the one used by Gardener managed Kubernetes) and many instances of Felix. Typha’s main purpose is to increase scale by reducing each node’s impact on the datastore. You can opt-out Typha via .spec.networking.providerConfig.typha.enabled=false of your Shoot manifest. By default the Typha is enabled.
EBPF Dataplane
Calico can be run in ebpf dataplane mode. This has several benefits, calico scales to higher troughput, uses less cpu per GBit and has native support for kubernetes services (without needing kube-proxy). To switch to a pure ebpf dataplane it is recommended to run without an overlay network. The following configuration can be used to run without an overlay and without kube-proxy.
An example ebpf dataplane NetworkingConfig manifest:
apiVersion: calico.networking.extensions.gardener.cloud/v1alpha1
kind: NetworkConfig
ebpfDataplane:
enabled: true
overlay:
enabled: false
To disable kube-proxy set the enabled field to false in the shoot manifest.
apiVersion: core.gardener.cloud/v1beta1
kind: Shoot
metadata:
name: ebpf-shoot
namespace: garden-dev
spec:
kubernetes:
kubeProxy:
enabled: false
Know limitations of the EBPF Dataplane
Please note that the default settings for calico’s ebpf dataplane may interfere with
accelerated networking in azure
rendering nodes with accelerated networking unusable in the network. The reason for this is that calico does not ignore
the accelerated networking interface enP... as it should, but applies its ebpf programs to it. A simple mitigation for
this is to adapt the FelixConfiguration default and ensure that the bpfDataIfacePattern does not include enP....
Per default bpfDataIfacePattern is not set. The default value for this option can be found
here.
For example, you could apply the following change:
$ kubectl edit felixconfiguration default
...
apiVersion: crd.projectcalico.org/v1
kind: FelixConfiguration
metadata:
...
name: default
...
spec:
bpfDataIfacePattern: ^((en|wl|ww|sl|ib)[opsx].*|(eth|wlan|wwan).*|tunl0$|vxlan.calico$|wireguard.cali$|wg-v6.cali$)
...
AutoScaling
Autoscaling defines how the calico components are automatically scaled. It allows to use either static resource assignment, vertical pod or cluster-proportional autoscaler (default: cluster-proportional).
The cluster-proportional autoscaling mode is preferable when conditions require minimal disturbances and vpa mode for improved cluster resource utilization. Static resource assignments causes no disruptions due to autoscaling, but has no dynamics to handle changing demands.
Please note VPA must be enabled on the shoot as a pre-requisite to enabling vpa mode.
An example NetworkingConfig manifest for vertical pod autoscaling:
apiVersion: calico.networking.extensions.gardener.cloud/v1alpha1
kind: NetworkConfig
autoScaling:
mode: "vpa"
An example NetworkingConfig manifest for static resource assignment:
apiVersion: calico.networking.extensions.gardener.cloud/v1alpha1
kind: NetworkConfig
autoScaling:
mode: "static"
resources:
node:
cpu: 100m
memory: 100Mi
typha:
cpu: 100m
memory: 100Mi
ℹ️ Please note that in static mode, you have the option to configure the resource requests for calico-node and calico-typha. If not specified, default settings will be used. If the resource requests are chosen too low, it might impact the stability/performance of the cluster. Specifying the resource requests for any other autoscaling mode has no effect.
Example NetworkingConfig manifest
An example NetworkingConfig for the Calico extension looks as follows:
apiVersion: calico.networking.extensions.gardener.cloud/v1alpha1
kind: NetworkConfig
ipam:
type: host-local
cidr: usePodCIDR
vethMTU: 1440
typha:
enabled: true
overlay:
enabled: true
autoScaling:
mode: "vpa"
Example Shoot manifest
Please find below an example Shoot manifest with calico networking configratations:
apiVersion: core.gardener.cloud/v1beta1
kind: Shoot
metadata:
name: johndoe-azure
namespace: garden-dev
spec:
cloudProfileName: azure
region: westeurope
secretBindingName: core-azure
provider:
type: azure
infrastructureConfig:
apiVersion: azure.provider.extensions.gardener.cloud/v1alpha1
kind: InfrastructureConfig
networks:
vnet:
cidr: 10.250.0.0/16
workers: 10.250.0.0/19
zoned: true
controlPlaneConfig:
apiVersion: azure.provider.extensions.gardener.cloud/v1alpha1
kind: ControlPlaneConfig
workers:
- name: worker-xoluy
machine:
type: Standard_D4_v3
minimum: 2
maximum: 2
volume:
size: 50Gi
type: Standard_LRS
zones:
- "1"
- "2"
networking:
type: calico
nodes: 10.250.0.0/16
providerConfig:
apiVersion: calico.networking.extensions.gardener.cloud/v1alpha1
kind: NetworkConfig
ipam:
type: host-local
vethMTU: 1440
overlay:
enabled: true
typha:
enabled: false
kubernetes:
version: 1.28.3
maintenance:
autoUpdate:
kubernetesVersion: true
machineImageVersion: true
addons:
kubernetesDashboard:
enabled: true
nginxIngress:
enabled: true
Known Limitations in conjunction with NodeLocalDNS
If NodeLocalDNS is active in a shoot cluster, which uses calico as CNI without overlay network, it may be impossible to block DNS traffic to the cluster DNS server via network policy. This is due to FELIX_CHAININSERTMODE being set to APPEND instead of INSERT in case SNAT is being applied to requests to the infrastructure DNS server. In this scenario the iptables rules of NodeLocalDNS already accept the traffic before the network policies are checked.
This only applies to traffic directed to NodeLocalDNS. If blocking of all DNS traffic is desired via network policy the pod dnsPolicy should be changed to Default so that the cluster DNS is not used. Alternatives are usage of overlay network or disabling of NodeLocalDNS.
5.3.2 - Cilium CNI
Gardener Extension for cilium Networking
This controller operates on the Network resource in the extensions.gardener.cloud/v1alpha1 API group. It manages those objects that are requesting cilium Networking configuration (.spec.type=cilium):
apiVersion: extensions.gardener.cloud/v1alpha1
kind: Network
metadata:
name: cilium-network
namespace: shoot--foo--bar
spec:
type: cilium
podCIDR: 10.244.0.0/16
serviceCIDR: 10.96.0.0/24
providerConfig:
apiVersion: cilium.networking.extensions.gardener.cloud/v1alpha1
kind: NetworkConfig
# hubble:
# enabled: true
# store: kubernetes
Please find a concrete example in the example folder. All the cilium specific configuration
should be configured in the providerConfig section. If additional configuration is required, it should be added to
the networking-cilium chart in controllers/networking-cilium/charts/internal/cilium/values.yaml and corresponding code
parts should be adapted (for example in controllers/networking-cilium/pkg/charts/utils.go).
Once the network resource is applied, the networking-cilium controller would then create all the necessary managed-resources which should be picked
up by the gardener-resource-manager which will then apply all the
network extensions resources to the shoot cluster.
Finally after successful reconciliation an output similar to the one below should be expected.
status:
lastOperation:
description: Successfully reconciled network
lastUpdateTime: "..."
progress: 100
state: Succeeded
type: Reconcile
observedGeneration: 1
How to start using or developing this extension controller locally
You can run the controller locally on your machine by executing make start. Please make sure to have the kubeconfig pointed to the cluster you want to connect to.
Static code checks and tests can be executed by running make verify. We are using Go modules for Golang package dependency management and Ginkgo/Gomega for testing.
Feedback and Support
Feedback and contributions are always welcome!
Please report bugs or suggestions as GitHub issues or reach out on Slack (join the workspace here).
Learn more!
Please find further resources about out project here:
5.3.2.1 - Usage
Using the Networking Cilium extension with Gardener as end-user
The core.gardener.cloud/v1beta1.Shoot resource declares a networking field that is meant to contain network-specific configuration.
In this document we are describing how this configuration looks like for Cilium and provide an example Shoot manifest with minimal configuration that you can use to create a cluster.
Cilium Hubble
Hubble is a fully distributed networking and security observability platform build on top of Cilium and BPF. It is optional and is deployed to the cluster when enabled in the NetworkConfig.
If the dashboard is not externally exposed
kubectl port-forward -n kube-system deployment/hubble-ui 8081
can be used to acess it locally.
Example NetworkingConfig manifest
An example NetworkingConfig for the Cilium extension looks as follows:
apiVersion: cilium.networking.extensions.gardener.cloud/v1alpha1
kind: NetworkConfig
hubble:
enabled: true
#debug: false
#tunnel: vxlan
#store: kubernetes
NetworkingConfig options
The hubble.enabled field describes whether hubble should be deployed into the cluster or not (default).
The debug field describes whether you want to run cilium in debug mode or not (default), change this value to true to use debug mode.
The tunnel field describes the encapsulation mode for communication between nodes. Possible values are vxlan (default), geneve or disabled.
The bpfSocketLBHostnsOnly.enabled field describes whether socket LB will be skipped for services when inside a pod namespace (default), in favor of service LB at the pod interface. Socket LB is still used when in the host namespace. This feature is required when using cilium with a service mesh like istio or linkerd.
Setting the field cni.exclusive to false might be useful when additional plugins, such as Istio or Linkerd, wish to chain after Cilium. This action disables the default behavior of Cilium, which is to overwrite changes to the CNI configuration file.
The egressGateway.enabled field describes whether egress gateways are enabled or not (default). To use this feature kube-proxy must be disabled. This can be done with the following configuration in the Shoot:
spec:
kubernetes:
kubeProxy:
enabled: false
The egress gateway feature is only supported in gardener with an overlay network (shoot.spec.networking.providerConfig.overlay.enabled: true) at the moment. This is due to the reason that bpf masquerading is required for the egress gateway feature. Once the overlay network is enabled bpf.masquerade is set to true in the cilium configmap.
The snatToUpstreamDNS.enabled field describes whether the traffic to the upstream dns server should be masqueraded or not (default). This is needed on some infrastructures where traffic to the dns server with the pod CIDR range is blocked.
Example Shoot manifest
Please find below an example Shoot manifest with cilium networking configuration:
apiVersion: core.gardener.cloud/v1beta1
kind: Shoot
metadata:
name: aws-cilium
namespace: garden-dev
spec:
networking:
type: cilium
providerConfig:
apiVersion: cilium.networking.extensions.gardener.cloud/v1alpha1
kind: NetworkConfig
hubble:
enabled: true
pods: 100.96.0.0/11
nodes: 10.250.0.0/16
services: 100.64.0.0/13
...
If you would like to see a provider specific shoot example, please check out the documentation of the well-known extensions. A list of them can be found here.
High Availabilty
The cilium-operator operates in high availability (HA) mode when the worker group in the shoot specification is configured with a minimum of at least two nodes as shown in the following example:
spec:
provider:
workers:
- ...
maximum: 5
minimum: 2
...
This setup prevents unnecessary node spin-ups and reduces the compute costs in single-node clusters.
5.4 - Container Runtime Extensions
5.4.1 - GVisor container runtime
Gardener Extension for the gVisor Container Runtime Sandbox
Project Gardener implements the automated management and operation of Kubernetes clusters as a service. Its main principle is to leverage Kubernetes concepts for all of its tasks.
Recently, most of the vendor specific logic has been developed in-tree. However, the project has grown to a size where it is very hard to extend, maintain, and test. With GEP-1 we have proposed how the architecture can be changed in a way to support external controllers that contain their very own vendor specifics. This way, we can keep Gardener core clean and independent.
How to use this Controller
This controller operates on the ContainerRuntime resource in the extensions.gardener.cloud/v1alpha1 API group.
It manages objects that are requesting (.spec.type=gvisor) to enable the gVisor container runtime sandbox for a worker pool of a shoot cluster.
The ContainerRuntime can be configured in the shoot manifest in .spec.povider.workers[].cri.containerRuntimes an example can be found here:
kind: Shoot
apiVersion: core.gardener.cloud/v1beta1
metadata:
name: gvisor-shoot
namespace: garden-local
spec:
...
provider:
workers:
- name: worker-xyz
...
cri:
name: containerd
containerRuntimes:
- type: gvisor
...
gVisor can be configured with additional configuration flags by adding them to the configFlags field in the providerConfig.
Right now the following flags are supported and all other flags are ignored:
debug: "true": This enables debug logs for runsc. The logs are written to/var/log/runsc/<containerd-id>/<command>-gvisor.logon the node.net-raw: "true": This is required for some applications that need to use raw sockets, such astraceroute, oristioinit conainers.nvproxy: "true": Run GPU enabled containers in your gVisor sandbox. This flag is required for the NVIDIA GPU device plugin to work with gVisor.
...
- type: gvisor
providerConfig:
apiVersion: gvisor.runtime.extensions.config.gardener.cloud/v1alpha1
kind: GVisorConfiguration
configFlags:
debug: "true"
net-raw: "true"
nvproxy: "true"
...
...
Based on the configuration in the shoot manifest the ContainerRuntime resource is created:
---
apiVersion: extensions.gardener.cloud/v1alpha1
kind: ContainerRuntime
metadata:
name: my-container-runtime
spec:
binaryPath: /var/bin/containerruntimes
type: gvisor
providerConfig:
apiVersion: gvisor.runtime.extensions.config.gardener.cloud/v1alpha1
configFlags:
net-raw: "true"
kind: GVisorConfiguration
workerPool:
name: worker-ubuntu
selector:
matchLabels:
worker.gardener.cloud/pool: worker-xyz
NVProxy Usage
gVisor can be used with NVIDIA GPUs. To enable this, the nvproxy config flag must be set in the gVisor providerConfig of the shoot:
...
- type: gvisor
providerConfig:
apiVersion: gvisor.runtime.extensions.config.gardener.cloud/v1alpha1
kind: GVisorConfiguration
configFlags:
nvproxy: "true"
...
...
Pre-requisites
- The required NVIDIA drivers must be installed on the nodes.
- In case of Gardenlinux, the gardenlinux-nvidia-installer can be used.
- ⚠ Please note that the gardenlinux-nvidia-installer version must match the gardenlinux version.
- The NVIDIA device plugin must be installed in the cluster.
Known limitations:
gVisor does not support all NVIDIA GPUs and drivers. Please refer to the gVisor documentation for detailed information.
Before using gVisor with NVIDIA GPUs, please check the supporded drivers by running the following command on your node with enabled gVisor:
$ /var/bin/containerruntimes/runsc nvproxy list-supported-drivers
535.183.01
535.183.06
535.216.01
535.230.02
550.54.14
550.54.15
550.90.07
550.90.12
550.127.05
560.35.03
565.57.01
570.86.15
How to start using or developing this extension controller locally
You can run the controller locally on your machine by executing make start. Please make sure to have the kubeconfig to the cluster you want to connect to ready in the ./dev/kubeconfig file.
Static code checks and tests can be executed by running make verify. We are using Go modules for Golang package dependency management and Ginkgo/Gomega for testing.
Feedback and Support
Feedback and contributions are always welcome!
Please report bugs or suggestions as GitHub issues or reach out on Slack (join the workspace here).
Learn more!
Please find further resources about out project here:
5.5 - Others
5.5.1 - Certificate Services
Gardener Extension for certificate services
Project Gardener implements the automated management and operation of Kubernetes clusters as a service. Its main principle is to leverage Kubernetes concepts for all of its tasks.
Recently, most of the vendor specific logic has been developed in-tree. However, the project has grown to a size where it is very hard to extend, maintain, and test. With GEP-1 we have proposed how the architecture can be changed in a way to support external controllers that contain their very own vendor specifics. This way, we can keep Gardener core clean and independent.
Configuration
Example configuration for this extension controller:
apiVersion: shoot-cert-service.extensions.config.gardener.cloud/v1alpha1
kind: Configuration
issuerName: gardener
restrictIssuer: true # restrict issuer to any sub-domain of shoot.spec.dns.domain (default)
acme:
email: john.doe@example.com
server: https://acme-v02.api.letsencrypt.org/directory
# privateKey: | # Optional key for Let's Encrypt account.
# -----BEGIN BEGIN RSA PRIVATE KEY-----
# ...
# -----END RSA PRIVATE KEY-----
Extension-Resources
Example extension resource:
apiVersion: extensions.gardener.cloud/v1alpha1
kind: Extension
metadata:
name: "extension-certificate-service"
namespace: shoot--project--abc
spec:
type: shoot-cert-service
When an extension resource is reconciled, the extension controller will create an instance of Cert-Management as well as an Issuer with the ACME information provided in the configuration above. These resources are placed inside the shoot namespace on the seed. Also, the controller takes care about generating necessary RBAC resources for the seed as well as for the shoot.
Please note, this extension controller relies on the Gardener-Resource-Manager to deploy k8s resources to seed and shoot clusters, i.e. it never deploys them directly.
How to start using or developing this extension controller locally
You can run the controller locally on your machine by executing make start. Please make sure to have the kubeconfig to the cluster you want to connect to ready in the ./dev/kubeconfig file.
Static code checks and tests can be executed by running make verify. We are using Go modules for Golang package dependency management and Ginkgo/Gomega for testing.
Feedback and Support
Feedback and contributions are always welcome!
Please report bugs or suggestions as GitHub issues or reach out on Slack (join the workspace here).
Learn more!
Please find further resources about out project here:
5.5.1.1 - Changing alerting settings
Changing alerting settings
Certificates are normally renewed automatically 30 days before they expire. As a second line of defense, there is an alerting in Prometheus activated if the certificate is a few days before expiration. By default, the alert is triggered 15 days before expiration.
You can configure the days in the providerConfig of the extension.
Setting it to 0 disables the alerting.
In this example, the days are changed to 3 days before expiration.
kind: Shoot
...
spec:
extensions:
- type: shoot-cert-service
providerConfig:
apiVersion: service.cert.extensions.gardener.cloud/v1alpha1
kind: CertConfig
alerting:
certExpirationAlertDays: 3
5.5.1.2 - Manage certificates with Gardener for default domain
Manage certificates with Gardener for default domain
Introduction
Dealing with applications on Kubernetes which offer a secure service endpoints (e.g. HTTPS) also require you to enable a secured communication via SSL/TLS. With the certificate extension enabled, Gardener can manage commonly trusted X.509 certificate for your application endpoint. From initially requesting certificate, it also handeles their renewal in time using the free Let’s Encrypt API.
There are two senarios with which you can use the certificate extension
- You want to use a certificate for a subdomain the shoot’s default DNS (see
.spec.dns.domainof your shoot resource, e.g.short.ingress.shoot.project.default-domain.gardener.cloud). If this is your case, please keep reading this article. - You want to use a certificate for a custom domain. If this is your case, please see Manage certificates with Gardener for public domain
Prerequisites
Before you start this guide there are a few requirements you need to fulfill:
- You have an existing shoot cluster
Since you are using the default DNS name, all DNS configuration should already be done and ready.
Issue a certificate
Every X.509 certificate is represented by a Kubernetes custom resource certificate.cert.gardener.cloud in your cluster. A Certificate resource may be used to initiate a new certificate request as well as to manage its lifecycle. Gardener’s certificate service regularly checks the expiration timestamp of Certificates, triggers a renewal process if necessary and replaces the existing X.509 certificate with a new one.
Your application should be able to reload replaced certificates in a timely manner to avoid service disruptions.
Certificates can be requested via 3 resources type
- Ingress
- Service (type LoadBalancer)
- certificate (Gardener CRD)
If either of the first 2 are used, a corresponding Certificate resource will automatically be created.
Using an ingress Resource
apiVersion: networking.k8s.io/v1
kind: Ingress
metadata:
name: amazing-ingress
annotations:
cert.gardener.cloud/purpose: managed
#cert.gardener.cloud/issuer: custom-issuer # optional to specify custom issuer (use namespace/name for shoot issuers)
#cert.gardener.cloud/follow-cname: "true" # optional, same as spec.followCNAME in certificates
#cert.gardener.cloud/secret-labels: "key1=value1,key2=value2" # optional labels for the certificate secret
#cert.gardener.cloud/preferred-chain: "chain name" # optional to specify preferred-chain (value is the Subject Common Name of the root issuer)
#cert.gardener.cloud/private-key-algorithm: ECDSA # optional to specify algorithm for private key, allowed values are 'RSA' or 'ECDSA'
#cert.gardener.cloud/private-key-size: "384" # optional to specify size of private key, allowed values for RSA are "2048", "3072", "4096" and for ECDSA "256" and "384"spec:
tls:
- hosts:
# Must not exceed 64 characters.
- short.ingress.shoot.project.default-domain.gardener.cloud
# Certificate and private key reside in this secret.
secretName: tls-secret
rules:
- host: short.ingress.shoot.project.default-domain.gardener.cloud
http:
paths:
- pathType: Prefix
path: "/"
backend:
service:
name: amazing-svc
port:
number: 8080
Using a service type LoadBalancer
apiVersion: v1
kind: Service
metadata:
annotations:
cert.gardener.cloud/purpose: managed
# Certificate and private key reside in this secret.
cert.gardener.cloud/secretname: tls-secret
# You may add more domains separated by commas (e.g. "service.shoot.project.default-domain.gardener.cloud, amazing.shoot.project.default-domain.gardener.cloud")
dns.gardener.cloud/dnsnames: "service.shoot.project.default-domain.gardener.cloud"
dns.gardener.cloud/ttl: "600"
#cert.gardener.cloud/issuer: custom-issuer # optional to specify custom issuer (use namespace/name for shoot issuers)
#cert.gardener.cloud/follow-cname: "true" # optional, same as spec.followCNAME in certificates
#cert.gardener.cloud/secret-labels: "key1=value1,key2=value2" # optional labels for the certificate secret
#cert.gardener.cloud/preferred-chain: "chain name" # optional to specify preferred-chain (value is the Subject Common Name of the root issuer)
#cert.gardener.cloud/private-key-algorithm: ECDSA # optional to specify algorithm for private key, allowed values are 'RSA' or 'ECDSA'
#cert.gardener.cloud/private-key-size: "384" # optional to specify size of private key, allowed values for RSA are "2048", "3072", "4096" and for ECDSA "256" and "384" name: test-service
namespace: default
spec:
ports:
- name: http
port: 80
protocol: TCP
targetPort: 8080
type: LoadBalancer
Using the custom Certificate resource
apiVersion: cert.gardener.cloud/v1alpha1
kind: Certificate
metadata:
name: cert-example
namespace: default
spec:
commonName: short.ingress.shoot.project.default-domain.gardener.cloud
secretRef:
name: tls-secret
namespace: default
# Optionnal if using the default issuer
issuerRef:
name: garden
If you’re interested in the current progress of your request, you’re advised to consult the description, more specifically the status attribute in case the issuance failed.
Request a wildcard certificate
In order to avoid the creation of multiples certificates for every single endpoints, you may want to create a wildcard certificate for your shoot’s default cluster.
apiVersion: networking.k8s.io/v1
kind: Ingress
metadata:
name: amazing-ingress
annotations:
cert.gardener.cloud/purpose: managed
cert.gardener.cloud/commonName: "*.ingress.shoot.project.default-domain.gardener.cloud"
spec:
tls:
- hosts:
- amazing.ingress.shoot.project.default-domain.gardener.cloud
secretName: tls-secret
rules:
- host: amazing.ingress.shoot.project.default-domain.gardener.cloud
http:
paths:
- pathType: Prefix
path: "/"
backend:
service:
name: amazing-svc
port:
number: 8080
Please note that this can also be achived by directly adding an annotation to a Service type LoadBalancer. You could also create a Certificate object with a wildcard domain.
More information
For more information and more examples about using the certificate extension, please see Manage certificates with Gardener for public domain
5.5.1.3 - Manage certificates with Gardener for public domain
Manage certificates with Gardener for public domain
Introduction
Dealing with applications on Kubernetes which offer a secure service endpoints (e.g. HTTPS) also require you to enable a secured communication via SSL/TLS. With the certificate extension enabled, Gardener can manage commonly trusted X.509 certificate for your application endpoint. From initially requesting certificate, it also handeles their renewal in time using the free Let’s Encrypt API.
There are two senarios with which you can use the certificate extension
- You want to use a certificate for a subdomain the shoot’s default DNS (see
.spec.dns.domainof your shoot resource, e.g.short.ingress.shoot.project.default-domain.gardener.cloud). If this is your case, please see Manage certificates with Gardener for default domain - You want to use a certificate for a custom domain. If this is your case, please keep reading this article.
Prerequisites
Before you start this guide there are a few requirements you need to fulfill:
- You have an existing shoot cluster
- Your custom domain is under a public top level domain (e.g.
.com) - Your custom zone is resolvable with a public resolver via the internet (e.g.
8.8.8.8) - You have a custom DNS provider configured and working (see “DNS Providers”)
As part of the Let’s Encrypt ACME challenge validation process, Gardener sets a DNS TXT entry and Let’s Encrypt checks if it can both resolve and authenticate it. Therefore, it’s important that your DNS-entries are publicly resolvable. You can check this by querying e.g. Googles public DNS server and if it returns an entry your DNS is publicly visible:
# returns the A record for cert-example.example.com using Googles DNS server (8.8.8.8)
dig cert-example.example.com @8.8.8.8 A
DNS provider
In order to issue certificates for a custom domain you need to specify a DNS provider which is permitted to create DNS records for subdomains of your requested domain in the certificate. For example, if you request a certificate for host.example.com your DNS provider must be capable of managing subdomains of host.example.com.
DNS providers are normally specified in the shoot manifest. To learn more on how to configure one, please see the DNS provider documentation.
Issue a certificate
Every X.509 certificate is represented by a Kubernetes custom resource certificate.cert.gardener.cloud in your cluster. A Certificate resource may be used to initiate a new certificate request as well as to manage its lifecycle. Gardener’s certificate service regularly checks the expiration timestamp of Certificates, triggers a renewal process if necessary and replaces the existing X.509 certificate with a new one.
Your application should be able to reload replaced certificates in a timely manner to avoid service disruptions.
Certificates can be requested via 3 resources type
- Ingress
- Service (type LoadBalancer)
- Gateways (both Istio gateways and from the Gateway API)
- Certificate (Gardener CRD)
If either of the first 2 are used, a corresponding Certificate resource will be created automatically.
Using an Ingress Resource
apiVersion: networking.k8s.io/v1
kind: Ingress
metadata:
name: amazing-ingress
annotations:
cert.gardener.cloud/purpose: managed
# Optional but recommended, this is going to create the DNS entry at the same time
dns.gardener.cloud/class: garden
dns.gardener.cloud/ttl: "600"
#cert.gardener.cloud/commonname: "*.example.com" # optional, if not specified the first name from spec.tls[].hosts is used as common name
#cert.gardener.cloud/dnsnames: "" # optional, if not specified the names from spec.tls[].hosts are used
#cert.gardener.cloud/follow-cname: "true" # optional, same as spec.followCNAME in certificates
#cert.gardener.cloud/secret-labels: "key1=value1,key2=value2" # optional labels for the certificate secret
#cert.gardener.cloud/issuer: custom-issuer # optional to specify custom issuer (use namespace/name for shoot issuers)
#cert.gardener.cloud/preferred-chain: "chain name" # optional to specify preferred-chain (value is the Subject Common Name of the root issuer)
#cert.gardener.cloud/private-key-algorithm: ECDSA # optional to specify algorithm for private key, allowed values are 'RSA' or 'ECDSA'
#cert.gardener.cloud/private-key-size: "384" # optional to specify size of private key, allowed values for RSA are "2048", "3072", "4096" and for ECDSA "256" and "384"
spec:
tls:
- hosts:
# Must not exceed 64 characters.
- amazing.example.com
# Certificate and private key reside in this secret.
secretName: tls-secret
rules:
- host: amazing.example.com
http:
paths:
- pathType: Prefix
path: "/"
backend:
service:
name: amazing-svc
port:
number: 8080
Replace the hosts and rules[].host value again with your own domain and adjust the remaining Ingress attributes in accordance with your deployment (e.g. the above is for an istio Ingress controller and forwards traffic to a service1 on port 80).
Using a Service of type LoadBalancer
apiVersion: v1
kind: Service
metadata:
annotations:
cert.gardener.cloud/secretname: tls-secret
dns.gardener.cloud/dnsnames: example.example.com
dns.gardener.cloud/class: garden
# Optional
dns.gardener.cloud/ttl: "600"
cert.gardener.cloud/commonname: "*.example.example.com"
cert.gardener.cloud/dnsnames: ""
#cert.gardener.cloud/follow-cname: "true" # optional, same as spec.followCNAME in certificates
#cert.gardener.cloud/secret-labels: "key1=value1,key2=value2" # optional labels for the certificate secret
#cert.gardener.cloud/issuer: custom-issuer # optional to specify custom issuer (use namespace/name for shoot issuers)
#cert.gardener.cloud/preferred-chain: "chain name" # optional to specify preferred-chain (value is the Subject Common Name of the root issuer)
#cert.gardener.cloud/private-key-algorithm: ECDSA # optional to specify algorithm for private key, allowed values are 'RSA' or 'ECDSA'
#cert.gardener.cloud/private-key-size: "384" # optional to specify size of private key, allowed values for RSA are "2048", "3072", "4096" and for ECDSA "256" and "384"
name: test-service
namespace: default
spec:
ports:
- name: http
port: 80
protocol: TCP
targetPort: 8080
type: LoadBalancer
Using a Gateway resource
Please see Istio Gateways or Gateway API for details.
Using the custom Certificate resource
apiVersion: cert.gardener.cloud/v1alpha1
kind: Certificate
metadata:
name: cert-example
namespace: default
spec:
commonName: amazing.example.com
secretRef:
name: tls-secret
namespace: default
# Optionnal if using the default issuer
issuerRef:
name: garden
# If delegated domain for DNS01 challenge should be used. This has only an effect if a CNAME record is set for
# '_acme-challenge.amazing.example.com'.
# For example: If a CNAME record exists '_acme-challenge.amazing.example.com' => '_acme-challenge.writable.domain.com',
# the DNS challenge will be written to '_acme-challenge.writable.domain.com'.
#followCNAME: true
# optionally set labels for the secret
#secretLabels:
# key1: value1
# key2: value2
# Optionally specify the preferred certificate chain: if the CA offers multiple certificate chains, prefer the chain with an issuer matching this Subject Common Name. If no match, the default offered chain will be used.
#preferredChain: "ISRG Root X1"
# Optionally specify algorithm and key size for private key. Allowed algorithms: "RSA" (allowed sizes: 2048, 3072, 4096) and "ECDSA" (allowed sizes: 256, 384)
# If not specified, RSA with 2048 is used.
#privateKey:
# algorithm: ECDSA
# size: 384
Supported attributes
Here is a list of all supported annotations regarding the certificate extension:
| Path | Annotation | Value | Required | Description |
|---|---|---|---|---|
| N/A | cert.gardener.cloud/purpose: | managed | Yes when using annotations | Flag for Gardener that this specific Ingress or Service requires a certificate |
spec.commonName | cert.gardener.cloud/commonname: | E.g. “*.demo.example.com” or “special.example.com” | Certificate and Ingress : No Service: Yes, if DNS names unset | Specifies for which domain the certificate request will be created. If not specified, the names from spec.tls[].hosts are used. This entry must comply with the 64 character limit. |
spec.dnsNames | cert.gardener.cloud/dnsnames: | E.g. “special.example.com” | Certificate and Ingress : No Service: Yes, if common name unset | Additional domains the certificate should be valid for (Subject Alternative Name). If not specified, the names from spec.tls[].hosts are used. Entries in this list can be longer than 64 characters. |
spec.secretRef.name | cert.gardener.cloud/secretname: | any-name | Yes for certificate and Service | Specifies the secret which contains the certificate/key pair. If the secret is not available yet, it’ll be created automatically as soon as the certificate has been issued. |
spec.issuerRef.name | cert.gardener.cloud/issuer: | E.g. gardener | No | Specifies the issuer you want to use. Only necessary if you request certificates for custom domains. |
| N/A | cert.gardener.cloud/revoked: | true otherwise always false | No | Use only to revoke a certificate, see reference for more details |
spec.followCNAME | cert.gardener.cloud/follow-cname | E.g. true | No | Specifies that the usage of a delegated domain for DNS challenges is allowed. Details see Follow CNAME. |
spec.preferredChain | cert.gardener.cloud/preferred-chain | E.g. ISRG Root X1 | No | Specifies the Common Name of the issuer for selecting the certificate chain. Details see Preferred Chain. |
spec.secretLabels | cert.gardener.cloud/secret-labels | for annotation use e.g. key1=value1,key2=value2 | No | Specifies labels for the certificate secret. |
spec.privateKey.algorithm | cert.gardener.cloud/private-key-algorithm | RSA, ECDSA | No | Specifies algorithm for private key generation. The default value is depending on configuration of the extension (default of the default is RSA). You may request a new certificate without privateKey settings to find out the concrete defaults in your Gardener. |
spec.privateKey.size | cert.gardener.cloud/private-key-size | "256", "384", "2048", "3072", "4096" | No | Specifies size for private key generation. Allowed values for RSA are 2048, 3072, and 4096. For ECDSA allowed values are 256 and 384. The default values are depending on the configuration of the extension (defaults of the default values are 3072 for RSA and 384 for ECDSA respectively). |
Request a wildcard certificate
In order to avoid the creation of multiples certificates for every single endpoints, you may want to create a wildcard certificate for your shoot’s default cluster.
apiVersion: networking.k8s.io/v1
kind: Ingress
metadata:
name: amazing-ingress
annotations:
cert.gardener.cloud/purpose: managed
cert.gardener.cloud/commonName: "*.example.com"
spec:
tls:
- hosts:
- amazing.example.com
secretName: tls-secret
rules:
- host: amazing.example.com
http:
paths:
- pathType: Prefix
path: "/"
backend:
service:
name: amazing-svc
port:
number: 8080
Please note that this can also be achived by directly adding an annotation to a Service type LoadBalancer. You could also create a Certificate object with a wildcard domain.
Using a custom Issuer
Most Gardener deployment with the certification extension enabled have a preconfigured garden issuer. It is also usually configured to use Let’s Encrypt as the certificate provider.
If you need a custom issuer for a specific cluster, please see Using a custom Issuer
Quotas
For security reasons there may be a default quota on the certificate requests per day set globally in the controller registration of the shoot-cert-service.
The default quota only applies if there is no explicit quota defined for the issuer itself with the field
requestsPerDayQuota, e.g.:
kind: Shoot
...
spec:
extensions:
- type: shoot-cert-service
providerConfig:
apiVersion: service.cert.extensions.gardener.cloud/v1alpha1
kind: CertConfig
issuers:
- email: your-email@example.com
name: custom-issuer # issuer name must be specified in every custom issuer request, must not be "garden"
server: 'https://acme-v02.api.letsencrypt.org/directory'
requestsPerDayQuota: 10
DNS Propagation
As stated before, cert-manager uses the ACME challenge protocol to authenticate that you are the DNS owner for the domain’s certificate you are requesting.
This works by creating a DNS TXT record in your DNS provider under _acme-challenge.example.example.com containing a token to compare with. The TXT record is only applied during the domain validation.
Typically, the record is propagated within a few minutes. But if the record is not visible to the ACME server for any reasons, the certificate request is retried again after several minutes.
This means you may have to wait up to one hour after the propagation problem has been resolved before the certificate request is retried. Take a look in the events with kubectl describe ingress example for troubleshooting.
Character Restrictions
Due to restriction of the common name to 64 characters, you may to leave the common name unset in such cases.
For example, the following request is invalid:
apiVersion: cert.gardener.cloud/v1alpha1
kind: Certificate
metadata:
name: cert-invalid
namespace: default
spec:
commonName: morethan64characters.ingress.shoot.project.default-domain.gardener.cloud
But it is valid to request a certificate for this domain if you have left the common name unset:
apiVersion: cert.gardener.cloud/v1alpha1
kind: Certificate
metadata:
name: cert-example
namespace: default
spec:
dnsNames:
- morethan64characters.ingress.shoot.project.default-domain.gardener.cloud
References
5.5.1.4 - Using a custom Issuer
Using a custom Issuer
Another possibility to request certificates for custom domains is a dedicated issuer.
Note: This is only needed if the default issuer provided by Gardener is restricted to shoot related domains or you are using domain names not visible to public DNS servers. Which means that your senario most likely doesn’t require your to add an issuer.
The custom issuers are specified normally in the shoot manifest. If the shootIssuers feature is enabled, it can alternatively be defined in the shoot cluster.
Custom issuer in the shoot manifest
kind: Shoot
...
spec:
extensions:
- type: shoot-cert-service
providerConfig:
apiVersion: service.cert.extensions.gardener.cloud/v1alpha1
kind: CertConfig
issuers:
- email: your-email@example.com
name: custom-issuer # issuer name must be specified in every custom issuer request, must not be "garden"
server: 'https://acme-v02.api.letsencrypt.org/directory'
privateKeySecretName: my-privatekey # referenced resource, the private key must be stored in the secret at `data.privateKey` (optionally, only needed as alternative to auto registration)
#precheckNameservers: # to provide special set of nameservers to be used for prechecking DNSChallenges for an issuer
#- dns1.private.company-net:53
#- dns2.private.company-net:53"
#shootIssuers:
# if true, allows to specify issuers in the shoot cluster
#enabled: true
resources:
- name: my-privatekey
resourceRef:
apiVersion: v1
kind: Secret
name: custom-issuer-privatekey # name of secret in Gardener project
If you are using an ACME provider for private domains, you may need to change the nameservers used for
checking the availability of the DNS challenge’s TXT record before the certificate is requested from the ACME provider.
By default, only public DNS servers may be used for this purpose.
At least one of the precheckNameservers must be able to resolve the private domain names.
Using the custom issuer
To use the custom issuer in a certificate, just specify its name in the spec.
apiVersion: cert.gardener.cloud/v1alpha1
kind: Certificate
spec:
...
issuerRef:
name: custom-issuer
...
For source resources like Ingress or Service use the cert.gardener.cloud/issuer annotation.
apiVersion: networking.k8s.io/v1
kind: Ingress
metadata:
name: amazing-ingress
annotations:
cert.gardener.cloud/purpose: managed
cert.gardener.cloud/issuer: custom-issuer
...
Custom issuer in the shoot cluster
Prerequiste: The shootIssuers feature has to be enabled.
It is either enabled globally in the ControllerDeployment or in the shoot manifest
with:
kind: Shoot
...
spec:
extensions:
- type: shoot-cert-service
providerConfig:
apiVersion: service.cert.extensions.gardener.cloud/v1alpha1
kind: CertConfig
shootIssuers:
enabled: true # if true, allows to specify issuers in the shoot cluster
...
Example for specifying an Issuer resource and its Secret directly in any
namespace of the shoot cluster:
apiVersion: cert.gardener.cloud/v1alpha1
kind: Issuer
metadata:
name: my-own-issuer
namespace: my-namespace
spec:
acme:
domains:
include:
- my.own.domain.com
email: some.user@my.own.domain.com
privateKeySecretRef:
name: my-own-issuer-secret
namespace: my-namespace
server: https://acme-v02.api.letsencrypt.org/directory
---
apiVersion: v1
kind: Secret
metadata:
name: my-own-issuer-secret
namespace: my-namespace
type: Opaque
data:
privateKey: ... # replace '...' with valus encoded as base64
Using the custom shoot issuer
To use the custom issuer in a certificate, just specify its name and namespace in the spec.
apiVersion: cert.gardener.cloud/v1alpha1
kind: Certificate
spec:
...
issuerRef:
name: my-own-issuer
namespace: my-namespace
...
For source resources like Ingress or Service use the cert.gardener.cloud/issuer annotation.
apiVersion: networking.k8s.io/v1
kind: Ingress
metadata:
name: amazing-ingress
annotations:
cert.gardener.cloud/purpose: managed
cert.gardener.cloud/issuer: my-namespace/my-own-issuer
...
5.5.1.5 - Deployment
Gardener Certificate Management
Introduction
Gardener comes with an extension that enables shoot owners to request X.509 compliant certificates for shoot domains.
Extension Installation
The shoot-cert-service extension can be deployed and configured via Gardener’s native resource ControllerRegistration.
Prerequisites
To let the shoot-cert-service operate properly, you need to have:
- a DNS service in your seed
- contact details and optionally a private key for a pre-existing Let’s Encrypt account
Operator Extension
Using an operator extension resource (extension.operator.gardener.cloud) is the recommended way to deploy the shoot-cert-service extension.
An example of an operator extension resource can be found at extension-shoot-cert-service.yaml.
The ControllerRegistration contains a reference to the Helm chart which eventually deploy the shoot-cert-service to seed clusters.
It offers some configuration options, mainly to set up a default issuer for shoot clusters.
With a default issuer, pre-existing Let’s Encrypt accounts can be used and shared with shoot clusters (See Integration Guide - One Account or Many?).
Tip
Please keep the Let’s Encrypt Rate Limits in mind when using this shared account model. Depending on the amount of shoots and domains it is recommended to use an account with increased rate limits.
apiVersion: operator.gardener.cloud/v1alpha1
kind: Extension
metadata:
annotations:
security.gardener.cloud/pod-security-enforce: baseline
name: extension-shoot-cert-service
spec:
deployment:
extension:
helm:
ociRepository:
ref: ... # OCI reference to the Helm chart
injectGardenKubeconfig: true
policy: Always
values:
certificateConfig:
defaultIssuer:
name: default-issuer
acme:
email: some.user@example.com
# optional private key for the Let's Encrypt account
#privateKey: |-
#-----BEGIN RSA PRIVATE KEY-----
#...
#-----END RSA PRIVATE KEY-----
server: https://acme-v02.api.letsencrypt.org/directory
# altenatively to `acme`, you can use a self-signed root or intermediate certificate for providing self-signed certificates
# ca:
# certificate: |
# -----BEGIN CERTIFICATE-----
# ...
# -----END CERTIFICATE-----
# certificateKey: |
# -----BEGIN PRIVATE KEY-----
# ...
# -----END PRIVATE KEY-----
# defaultRequestsPerDayQuota: 50
# precheckNameservers: 8.8.8.8,8.8.4.4
# caCertificates: | # optional custom CA certificates when using private ACME provider
# -----BEGIN CERTIFICATE-----
# ...
# -----END CERTIFICATE-----
# -----BEGIN CERTIFICATE-----
# ...
# -----END CERTIFICATE-----
shootIssuers:
enabled: false # if true, allows specifying issuers in the shoot clusters
deactivateAuthorizations: true # if true, enables flag --acme-deactivate-authorizations in cert-controller-manager
skipDNSChallengeValidation: false # if true, skips dns-challenges in cert-controller-manager
# The following values are only needed if the extension should be deployed on the runtime cluster.
runtimeClusterValues:
certificateConfig:
defaultIssuer:
# typically the same values as at .spec.deployment.values.certificateConfig.defaultIssuer
...
resources:
- autoEnable:
- shoot # if set, the extension is enabled for all shoots by default
clusterCompatibility:
- shoot
kind: Extension
type: shoot-cert-service
workerlessSupported: true
- clusterCompatibility:
- garden
- seed
kind: Extension
lifecycle:
delete: AfterKubeAPIServer
reconcile: BeforeKubeAPIServer
type: controlplane-cert-service
Providing Trusted TLS Certificate for Garden Runtime Cluster
The shoot-cert-service can provide the TLS secret labeled with gardener.cloud/role: garden-cert in the garden namespace to be used by the Gardener API server.
See Trusted TLS Certificate for Garden Runtime Cluster for more information.
For this purpose, the extension must be deployed on the runtime cluster. Several configuration steps are needed:
- Provide the
spec.runtimeClusterValuesvalues in theextension.operator.gardener.cloudresource in the operator extension. - Add the extension with type
controlplane-cert-serviceto theGardenresource on the Garden runtime cluster.apiVersion: operator.gardener.cloud/v1alpha1 kind: Garden metadata: name: ... spec: extensions: - type: controlplane-cert-service providerConfig: apiVersion: service.cert.extensions.gardener.cloud/v1alpha1 kind: CertConfig generateControlPlaneCertificate: true
If you only want to deploy the cert-controller-manager in the garden namespace, you can set generateControlPlaneCertificate to false.
If generateControlPlaneCertificate is set to true, the current values spec.virtualCluster.dns.domains and spec.runtimeCluster.ingress.domains from the Garden resource are read, and the certificate is created/updated in the garden namespace.
The certificate will be reconciled by the cert-controller-manager to provide the TLS secret with the label gardener.cloud/role: garden-cert in the garden namespace.
Additionally, the extension provides a webhook to mutate the virtual-garden-kube-apiserver deployment in the garden namespace.
It will manage the --tls-sni-cert-key command line arguments and patches the volume/volume mount with the TLS secret.
Only the secondary domain names will be used for the SNI certificate, as the self-signed certificate of the first domain name is provided by the Gardener operator.
Example for resulting domains of the certificate
If the Garden resource contains the following values:
apiVersion: operator.gardener.cloud/v1alpha1
kind: Garden
spec:
runtimeCluster:
ingress:
domains:
- name: "ingress.garden.example.com"
provider: gardener-dns
virtualCluster:
dns:
domains:
- name: "primary.garden.example.com"
provider: gardener-dns
- name: "secondary.foo.example.com"
provider: gardener-dns
then the Certificate will be created with these wildcard domain names:
*.primary.garden.example.com*.secondary.foo.example.com*.ingress.garden.example.com
Providing Trusted TLS Certificate for Shoot Control Planes
The shoot-cert-service can provide the TLS secret labeled with gardener.cloud/role: controlplane-cert in the garden namespace on the seeds.
See Trusted TLS Certificate for Shoot Control Planes for more information.
For this purpose, the extension must be enabled for the seed(s) by adding the controlplane-cert-service type to the Seed manifest:
apiVersion: core.gardener.cloud/v1beta1
kind: Seed
metadata:
name: ...
spec:
extensions:
- type: controlplane-cert-service
providerConfig:
apiVersion: service.cert.extensions.gardener.cloud/v1alpha1
kind: CertConfig
generateControlPlaneCertificate: true
The certificate will contain the wildcard domain name using the base domain name from the .spec.ingress.domain value of the Seed resource.
ControllerRegistration
Note
Using a
ControllerRegistration/ControllerDeploymentdirectly is not recommended if your Gardener landscape has a virtual Garden cluster. In this case, please use anextension.operator.gardener.cloudresource as described above. The Gardener operator will then take care of theControllerRegistrationandControllerDeploymentfor you.
An example of a ControllerRegistration for the shoot-cert-service can be found at controller-registration.yaml.
The ControllerRegistration contains a Helm chart which eventually deploy the shoot-cert-service to seed clusters. It offers some configuration options, mainly to set up a default issuer for shoot clusters. With a default issuer, pre-existing Let’s Encrypt accounts can be used and shared with shoot clusters (See “One Account or Many?” of the Integration Guide).
Please keep the Let’s Encrypt Rate Limits in mind when using this shared account model. Depending on the amount of shoots and domains it is recommended to use an account with increased rate limits.
apiVersion: core.gardener.cloud/v1beta1
kind: ControllerRegistration
...
values:
certificateConfig:
defaultIssuer:
acme:
email: foo@example.com
privateKey: |-
-----BEGIN RSA PRIVATE KEY-----
...
-----END RSA PRIVATE KEY-----
server: https://acme-v02.api.letsencrypt.org/directory
name: default-issuer
# restricted: true # restrict default issuer to any sub-domain of shoot.spec.dns.domain
# defaultRequestsPerDayQuota: 50
# precheckNameservers: 8.8.8.8,8.8.4.4
# caCertificates: | # optional custom CA certificates when using private ACME provider
# -----BEGIN CERTIFICATE-----
# ...
# -----END CERTIFICATE-----
#
# -----BEGIN CERTIFICATE-----
# ...
# -----END CERTIFICATE-----
shootIssuers:
enabled: false # if true, allows to specify issuers in the shoot clusters
Enablement
If the shoot-cert-service should be enabled for every shoot cluster in your Gardener managed environment, you need to auto enable it in the ControllerRegistration:
apiVersion: core.gardener.cloud/v1beta1
kind: ControllerRegistration
...
resources:
- kind: Extension
type: shoot-cert-service
autoEnable:
- shoot # if set, the extension is enabled for all shoots by default
clusterCompatibility:
- shoot
workerlessSupported: true
Alternatively, you’re given the option to only enable the service for certain shoots:
kind: Shoot
apiVersion: core.gardener.cloud/v1beta1
...
spec:
extensions:
- type: shoot-cert-service
...
5.5.1.6 - Gardener yourself a Shoot with Istio, custom Domains, and Certificates
As we ramp up more and more friends of Gardener, I thought it worthwhile to explore and write a tutorial about how to simply:
- create a Gardener managed Kubernetes Cluster (Shoot) via kubectl
- install Istio as a preferred, production ready Ingress/Service Mesh (instead of the Nginx Ingress addon)
- attach your own custom domain to be managed by Gardener
- combine everything with certificates from Let’s Encrypt
Here are some pre-pointers that you will need to go deeper:
Tip
If you try my instructions and fail, then read the alternative title of this tutorial as “Shoot yourself in the foot with Gardener, custom Domains, Istio and Certificates”.First Things First
Login to your Gardener landscape, setup a project with adequate infrastructure credentials and then navigate to your account. Note down the name of your secret. I chose the GCP infrastructure from the vast possible options that my Gardener provides me with, so i had named the secret as shoot-operator-gcp.
From the Access widget (leave the default settings) download your personalized kubeconfig into ~/.kube/kubeconfig-garden-myproject. Follow the instructions to setup kubelogin:
For convinience, let us set an alias command with
alias kgarden="kubectl --kubeconfig ~/.kube/kubeconfig-garden-myproject.yaml"
kgarden now gives you all botanical powers and connects you directly with your Gardener.
You should now be able to run kgarden get shoots, automatically get an oidc token, and list already running clusters/shoots.
Prepare your Custom Domain
I am going to use Cloud Flare as programmatic DNS of my custom domain mydomain.io. Please follow detailed instructions from Cloud Flare on how to delegate your domain (the free account does not support delegating subdomains). Alternatively, AWS Route53 (and most others) support delegating subdomains.
I needed to follow these instructions and created the following secret:
apiVersion: v1
kind: Secret
metadata:
name: cloudflare-mydomain-io
type: Opaque
data:
CLOUDFLARE_API_TOKEN: useYOURownDAMITzNDU2Nzg5MDEyMzQ1Njc4OQ==
Apply this secret into your project with kgarden create -f cloudflare-mydomain-io.yaml.
Our External DNS Manager also supports Amazon Route53, Google CloudDNS, AliCloud DNS, Azure DNS, or OpenStack Designate. Check it out.
Prepare Gardener Extensions
I now need to prepare the Gardener extensions shoot-dns-service and shoot-cert-service and set the parameters accordingly.
Note
Please note, that the availability of Gardener Extensions depends on how your administrator has configured the Gardener landscape. Please contact your Gardener administrator in case you experience any issues during activation.
The following snippet allows Gardener to manage my entire custom domain, whereas with the include: attribute I restrict all dynamic entries under the subdomain gsicdc.mydomain.io:
dns:
providers:
- domains:
include:
- gsicdc.mydomain.io
primary: false
secretName: cloudflare-mydomain-io
type: cloudflare-dns
extensions:
- type: shoot-dns-service
The next snipplet allows Gardener to manage certificates automatically from Let’s Encrypt on mydomain.io for me:
extensions:
- type: shoot-cert-service
providerConfig:
apiVersion: service.cert.extensions.gardener.cloud/v1alpha1
issuers:
- email: me@mail.com
name: mydomain
server: 'https://acme-v02.api.letsencrypt.org/directory'
- email: me@mail.com
name: mydomain-staging
server: 'https://acme-staging-v02.api.letsencrypt.org/directory'
Note
Adjust the snipplets with your parameters (don’t forget your email). And please use the mydomain-staging issuer while you are testing and learning. Otherwise, Let’s Encrypt will rate limit your frequent requests and you can wait a week until you can continue.
References for Let’s Encrypt:
Create the Gardener Shoot Cluster
Remember I chose to create the Shoot on GCP, so below is the simplest declarative shoot or cluster order document. Notice that I am referring to the infrastructure credentials with shoot-operator-gcp and I combined the above snippets into the yaml file:
apiVersion: core.gardener.cloud/v1beta1
kind: Shoot
metadata:
name: gsicdc
spec:
dns:
providers:
- domains:
include:
- gsicdc.mydomain.io
primary: false
secretName: cloudflare-mydomain-io
type: cloudflare-dns
extensions:
- type: shoot-dns-service
- type: shoot-cert-service
providerConfig:
apiVersion: service.cert.extensions.gardener.cloud/v1alpha1
issuers:
- email: me@mail.com
name: mydomain
server: 'https://acme-v02.api.letsencrypt.org/directory'
- email: me@mail.com
name: mydomain-staging
server: 'https://acme-staging-v02.api.letsencrypt.org/directory'
cloudProfileName: gcp
kubernetes:
version: 1.28.2
maintenance:
autoUpdate:
kubernetesVersion: true
machineImageVersion: true
networking:
nodes: 10.250.0.0/16
pods: 100.96.0.0/11
services: 100.64.0.0/13
type: calico
provider:
controlPlaneConfig:
apiVersion: gcp.provider.extensions.gardener.cloud/v1alpha1
kind: ControlPlaneConfig
zone: europe-west1-d
infrastructureConfig:
apiVersion: gcp.provider.extensions.gardener.cloud/v1alpha1
kind: InfrastructureConfig
networks:
workers: 10.250.0.0/16
type: gcp
workers:
- machine:
image:
name: gardenlinux
version: 576.9.0
type: n1-standard-2
maxSurge: 1
maxUnavailable: 0
maximum: 2
minimum: 1
name: my-workerpool
volume:
size: 50Gi
type: pd-standard
zones:
- europe-west1-d
purpose: testing
region: europe-west1
secretBindingName: shoot-operator-gcp
Create your cluster and wait for it to be ready (about 5 to 7min).
$ kgarden create -f gsicdc.yaml
shoot.core.gardener.cloud/gsicdc created
$ kgarden get shoot gsicdc --watch
NAME CLOUDPROFILE VERSION SEED DOMAIN HIBERNATION OPERATION PROGRESS APISERVER CONTROL NODES SYSTEM AGE
gsicdc gcp 1.28.2 gcp gsicdc.myproject.shoot.devgarden.cloud Awake Processing 38 Progressing Progressing Unknown Unknown 83s
...
gsicdc gcp 1.28.2 gcp gsicdc.myproject.shoot.devgarden.cloud Awake Succeeded 100 True True True False 6m7s
Get access to your freshly baked cluster and set your KUBECONFIG:
$ kgarden get secrets gsicdc.kubeconfig -o jsonpath={.data.kubeconfig} | base64 -d >kubeconfig-gsicdc.yaml
$ export KUBECONFIG=$(pwd)/kubeconfig-gsicdc.yaml
$ kubectl get all
NAME TYPE CLUSTER-IP EXTERNAL-IP PORT(S) AGE
service/kubernetes ClusterIP 100.64.0.1 <none> 443/TCP 89m
Install Istio
Please follow the Istio installation instructions and download istioctl. If you are on a Mac, I recommend:
brew install istioctl
I want to install Istio with a default profile and SDS enabled. Furthermore I pass the following annotations to the service object istio-ingressgateway in the istio-system namespace.
annotations:
cert.gardener.cloud/issuer: mydomain-staging
cert.gardener.cloud/secretname: wildcard-tls
dns.gardener.cloud/class: garden
dns.gardener.cloud/dnsnames: "*.gsicdc.mydomain.io"
dns.gardener.cloud/ttl: "120"
With these annotations three things now happen automatically:
- The External DNS Manager, provided to you as a service (
dns.gardener.cloud/class: garden), picks up the request and creates the wildcard DNS entry*.gsicdc.mydomain.iowith a time to live of 120sec at your DNS provider. My provider Cloud Flare is very very quick (as opposed to some other services). You should be able to verify the entry withdig lovemygardener.gsicdc.mydomain.iowithin seconds. - The Certificate Management picks up the request as well and initiates a DNS01 protocol exchange with Let’s Encrypt; using the staging environment referred to with the issuer behind
mydomain-staging. - After aproximately 70sec (give and take) you will receive the wildcard certificate in the
wildcard-tlssecret in the namespaceistio-system.
Note
Notice, that the namespace for the certificate secret is often the cause of many troubleshooting sessions: the secret must reside in the same namespace of the gateway.
Here is the istio-install script:
$ export domainname="*.gsicdc.mydomain.io"
$ export issuer="mydomain-staging"
$ cat <<EOF | istioctl install -y -f -
apiVersion: install.istio.io/v1alpha1
kind: IstioOperator
spec:
profile: default
components:
ingressGateways:
- name: istio-ingressgateway
enabled: true
k8s:
serviceAnnotations:
cert.gardener.cloud/issuer: "${issuer}"
cert.gardener.cloud/secretname: wildcard-tls
dns.gardener.cloud/class: garden
dns.gardener.cloud/dnsnames: "${domainname}"
dns.gardener.cloud/ttl: "120"
EOF
Verify that setup is working and that DNS and certificates have been created/delivered:
$ kubectl -n istio-system describe service istio-ingressgateway
<snip>
Events:
Type Reason Age From Message
---- ------ ---- ---- -------
Normal EnsuringLoadBalancer 58s service-controller Ensuring load balancer
Normal reconcile 58s cert-controller-manager created certificate object istio-system/istio-ingressgateway-service-pwqdm
Normal cert-annotation 58s cert-controller-manager wildcard-tls: cert request is pending
Normal cert-annotation 54s cert-controller-manager wildcard-tls: certificate pending: certificate requested, preparing/waiting for successful DNS01 challenge
Normal cert-annotation 28s cert-controller-manager wildcard-tls: certificate ready
Normal EnsuredLoadBalancer 26s service-controller Ensured load balancer
Normal reconcile 26s dns-controller-manager created dns entry object shoot--core--gsicdc/istio-ingressgateway-service-p9qqb
Normal dns-annotation 26s dns-controller-manager *.gsicdc.mydomain.io: dns entry is pending
Normal dns-annotation 21s (x3 over 21s) dns-controller-manager *.gsicdc.mydomain.io: dns entry active
$ dig lovemygardener.gsicdc.mydomain.io
; <<>> DiG 9.10.6 <<>> lovemygardener.gsicdc.mydomain.io
<snip>
;; ANSWER SECTION:
lovemygardener.gsicdc.mydomain.io. 120 IN A 35.195.120.62
<snip>
There you have it, the wildcard-tls certificate is ready and the *.gsicdc.mydomain.io dns entry is active. Traffic will be going your way.
Handy Tools to Install
Another set of fine tools to use are kapp (formerly known as k14s), k9s and HTTPie. While we are at it, let’s install them all. If you are on a Mac, I recommend:
brew tap vmware-tanzu/carvel
brew install ytt kbld kapp kwt imgpkg vendir
brew install derailed/k9s/k9s
brew install httpie
Ingress at Your Service
Note
Networking is a central part of Kubernetes, but it can be challenging to understand exactly how it is expected to work. You should learn about Kubernetes networking, and first try to debug problems yourself. With a solid managed cluster from Gardener, it is always PEBCAK!
Kubernetes Ingress is a subject that is evolving to much broader standard. Please watch Evolving the Kubernetes Ingress APIs to GA and Beyond for a good introduction. In this example, I did not want to use the Kubernetes Ingress compatibility option of Istio. Instead, I used VirtualService and Gateway from the Istio’s API group networking.istio.io/v1 directly, and enabled istio-injection generically for the namespace.
I use httpbin as service that I want to expose to the internet, or where my ingress should be routed to (depends on your point of view, I guess).
apiVersion: v1
kind: Namespace
metadata:
name: production
labels:
istio-injection: enabled
---
apiVersion: v1
kind: Service
metadata:
name: httpbin
namespace: production
labels:
app: httpbin
spec:
ports:
- name: http
port: 8000
targetPort: 80
selector:
app: httpbin
---
apiVersion: apps/v1
kind: Deployment
metadata:
name: httpbin
namespace: production
spec:
replicas: 1
selector:
matchLabels:
app: httpbin
template:
metadata:
labels:
app: httpbin
spec:
containers:
- image: docker.io/kennethreitz/httpbin
imagePullPolicy: IfNotPresent
name: httpbin
ports:
- containerPort: 80
---
apiVersion: networking.istio.io/v1
kind: Gateway
metadata:
name: httpbin-gw
namespace: production
spec:
selector:
istio: ingressgateway #! use istio default ingress gateway
servers:
- port:
number: 80
name: http
protocol: HTTP
tls:
httpsRedirect: true
hosts:
- "httpbin.gsicdc.mydomain.io"
- port:
number: 443
name: https
protocol: HTTPS
tls:
mode: SIMPLE
credentialName: wildcard-tls
hosts:
- "httpbin.gsicdc.mydomain.io"
---
apiVersion: networking.istio.io/v1
kind: VirtualService
metadata:
name: httpbin-vs
namespace: production
spec:
hosts:
- "httpbin.gsicdc.mydomain.io"
gateways:
- httpbin-gw
http:
- match:
- uri:
regex: /.*
route:
- destination:
port:
number: 8000
host: httpbin
---
Let us now deploy the whole package of Kubernetes primitives using kapp:
$ kapp deploy -a httpbin -f httpbin-kapp.yaml
Target cluster 'https://api.gsicdc.myproject.shoot.devgarden.cloud' (nodes: shoot--myproject--gsicdc-my-workerpool-z1-6586c8f6cb-x24kh)
Changes
Namespace Name Kind Conds. Age Op Wait to Rs Ri
(cluster) production Namespace - - create reconcile - -
production httpbin Deployment - - create reconcile - -
^ httpbin Service - - create reconcile - -
^ httpbin-gw Gateway - - create reconcile - -
^ httpbin-vs VirtualService - - create reconcile - -
Op: 5 create, 0 delete, 0 update, 0 noop
Wait to: 5 reconcile, 0 delete, 0 noop
Continue? [yN]: y
5:36:31PM: ---- applying 1 changes [0/5 done] ----
<snip>
5:37:00PM: ok: reconcile deployment/httpbin (apps/v1) namespace: production
5:37:00PM: ---- applying complete [5/5 done] ----
5:37:00PM: ---- waiting complete [5/5 done] ----
Succeeded
Let’s finally test the service (Of course you can use the browser as well):
$ http httpbin.gsicdc.mydomain.io
HTTP/1.1 301 Moved Permanently
content-length: 0
date: Wed, 13 May 2020 21:29:13 GMT
location: https://httpbin.gsicdc.mydomain.io/
server: istio-envoy
$ curl -k https://httpbin.gsicdc.mydomain.io/ip
{
"origin": "10.250.0.2"
}
Quod erat demonstrandum. The proof of exchanging the issuer is now left to the reader.
Tip
Remember that the certificate is actually not valid because it is issued from the Let’s encrypt staging environment. Thus, we needed “curl -k” or “http –verify no”.Hint: use the interactive k9s tool.
Cleanup
Remove the cloud native application:
$ kapp ls
Apps in namespace 'default'
Name Namespaces Lcs Lca
httpbin (cluster),production true 17m
$ kapp delete -a httpbin
...
Continue? [yN]: y
...
11:47:47PM: ---- waiting complete [8/8 done] ----
Succeeded
Remove Istio:
$ istioctl x uninstall --purge
clusterrole.rbac.authorization.k8s.io "prometheus-istio-system" deleted
clusterrolebinding.rbac.authorization.k8s.io "prometheus-istio-system" deleted
...
Delete your Shoot:
kgarden annotate shoot gsicdc confirmation.gardener.cloud/deletion=true --overwrite
kgarden delete shoot gsicdc --wait=false
5.5.1.7 - Gateway Api Gateways
Using annotated Gateway API Gateway and/or HTTPRoutes as Source
This tutorial describes how to use annotated Gateway API resources as source for Certificate.
Install Istio on your cluster
Follow the Istio Kubernetes Gateway API to install the Gateway API and to install Istio.
These are the typical commands for the Istio installation with the Kubernetes Gateway API:
export KUEBCONFIG=...
curl -L https://istio.io/downloadIstio | sh -
kubectl get crd gateways.gateway.networking.k8s.io &> /dev/null || \
{ kubectl kustomize "github.com/kubernetes-sigs/gateway-api/config/crd?ref=v1.0.0" | kubectl apply -f -; }
istioctl install --set profile=minimal -y
kubectl label namespace default istio-injection=enabled
Verify that Gateway Source works
Install a sample service
With automatic sidecar injection:
$ kubectl apply -f https://raw.githubusercontent.com/istio/istio/release-1.20/samples/httpbin/httpbin.yaml
Note: The sample service is not used in the following steps. It is deployed for illustration purposes only. To use it with certificates, you have to add an HTTPS port for it.
Using a Gateway as a source
Deploy the Gateway API configuration including a single exposed route (i.e., /get):
kubectl create namespace istio-ingress
kubectl apply -f - <<EOF
apiVersion: gateway.networking.k8s.io/v1beta1
kind: Gateway
metadata:
name: gateway
namespace: istio-ingress
annotations:
#cert.gardener.cloud/dnsnames: "*.example.com" # alternative if you want to control the dns names explicitly.
cert.gardener.cloud/purpose: managed
spec:
gatewayClassName: istio
listeners:
- name: default
hostname: "*.example.com" # this is used by cert-controller-manager to extract DNS names
port: 443
protocol: HTTPS
allowedRoutes:
namespaces:
from: All
tls: # important: tls section must be defined with exactly one certificateRefs item
certificateRefs:
- name: foo-example-com
---
apiVersion: gateway.networking.k8s.io/v1beta1
kind: HTTPRoute
metadata:
name: http
namespace: default
spec:
parentRefs:
- name: gateway
namespace: istio-ingress
hostnames: ["httpbin.example.com"] # this is used by cert-controller-manager to extract DNS names too
rules:
- matches:
- path:
type: PathPrefix
value: /get
backendRefs:
- name: httpbin
port: 8000
EOF
You should now see a created Certificate resource similar to:
$ kubectl -n istio-ingress get cert -oyaml
apiVersion: v1
items:
- apiVersion: cert.gardener.cloud/v1alpha1
kind: Certificate
metadata:
generateName: gateway-gateway-
name: gateway-gateway-kdw6h
namespace: istio-ingress
ownerReferences:
- apiVersion: gateway.networking.k8s.io/v1
blockOwnerDeletion: true
controller: true
kind: Gateway
name: gateway
spec:
commonName: '*.example.com'
secretName: foo-example-com
status:
...
kind: List
metadata:
resourceVersion: ""
Using a HTTPRoute as a source
If the Gateway resource is annotated with cert.gardener.cloud/purpose: managed,
hostnames from all referencing HTTPRoute resources are automatically extracted.
These resources don’t need an additional annotation.
Deploy the Gateway API configuration including a single exposed route (i.e., /get):
kubectl create namespace istio-ingress
kubectl apply -f - <<EOF
apiVersion: gateway.networking.k8s.io/v1beta1
kind: Gateway
metadata:
name: gateway
namespace: istio-ingress
annotations:
cert.gardener.cloud/purpose: managed
spec:
gatewayClassName: istio
listeners:
- name: default
hostname: null # not set
port: 443
protocol: HTTPS
allowedRoutes:
namespaces:
from: All
tls: # important: tls section must be defined with exactly one certificateRefs item
certificateRefs:
- name: foo-example-com
---
apiVersion: gateway.networking.k8s.io/v1beta1
kind: HTTPRoute
metadata:
name: http
namespace: default
spec:
parentRefs:
- name: gateway
namespace: istio-ingress
hostnames: ["httpbin.example.com"] # this is used by dns-controller-manager to extract DNS names too
rules:
- matches:
- path:
type: PathPrefix
value: /get
backendRefs:
- name: httpbin
port: 8000
EOF
This should show a similar Certificate resource as above.
5.5.1.8 - Istio Gateways
Using annotated Istio Gateway and/or Istio Virtual Service as Source
This tutorial describes how to use annotated Istio Gateway resources as source for Certificate resources.
Install Istio on your cluster
Follow the Istio Getting Started to download and install Istio.
These are the typical commands for the istio demo installation
export KUEBCONFIG=...
curl -L https://istio.io/downloadIstio | sh -
istioctl install --set profile=demo -y
kubectl label namespace default istio-injection=enabled
Note: If you are using a KinD cluster, the istio-ingressgateway service may be pending forever.
$ kubectl -n istio-system get svc istio-ingressgateway
NAME TYPE CLUSTER-IP EXTERNAL-IP PORT(S) AGE
istio-ingressgateway LoadBalancer 10.96.88.189 <pending> 15021:30590/TCP,80:30185/TCP,443:30075/TCP,31400:30129/TCP,15443:30956/TCP 13m
In this case, you may patch the status for demo purposes (of course it still would not accept connections)
kubectl -n istio-system patch svc istio-ingressgateway --type=merge --subresource status --patch '{"status":{"loadBalancer":{"ingress":[{"ip":"1.2.3.4"}]}}}'
Verify that Istio Gateway/VirtualService Source works
Install a sample service
With automatic sidecar injection:
$ kubectl apply -f https://raw.githubusercontent.com/istio/istio/release-1.20/samples/httpbin/httpbin.yaml
Using a Gateway as a source
Create an Istio Gateway:
$ cat <<EOF | kubectl apply -f -
apiVersion: networking.istio.io/v1
kind: Gateway
metadata:
name: httpbin-gateway
namespace: istio-system
annotations:
#cert.gardener.cloud/dnsnames: "*.example.com" # alternative if you want to control the dns names explicitly.
cert.gardener.cloud/purpose: managed
spec:
selector:
istio: ingressgateway # use Istio default gateway implementation
servers:
- port:
number: 443
name: http
protocol: HTTPS
hosts:
- "httpbin.example.com" # this is used by the dns-controller-manager to extract DNS names
tls:
credentialName: my-tls-secret
EOF
You should now see a created Certificate resource similar to:
$ kubectl -n istio-system get cert -oyaml
apiVersion: v1
items:
- apiVersion: cert.gardener.cloud/v1alpha1
kind: Certificate
metadata:
generateName: httpbin-gateway-gateway-
name: httpbin-gateway-gateway-hdbjb
namespace: istio-system
ownerReferences:
- apiVersion: networking.istio.io/v1
blockOwnerDeletion: true
controller: true
kind: Gateway
name: httpbin-gateway
spec:
commonName: httpbin.example.com
secretName: my-tls-secret
status:
...
kind: List
metadata:
resourceVersion: ""
Using a VirtualService as a source
If the Gateway resource is annotated with cert.gardener.cloud/purpose: managed,
hosts from all referencing VirtualServices resources are automatically extracted.
These resources don’t need an additional annotation.
Create an Istio Gateway:
$ cat <<EOF | kubectl apply -f -
apiVersion: networking.istio.io/v1
kind: Gateway
metadata:
name: httpbin-gateway
namespace: istio-system
annotations:
cert.gardener.cloud/purpose: managed
spec:
selector:
istio: ingressgateway # use Istio default gateway implementation
servers:
- port:
number: 443
name: https
protocol: HTTPS
hosts:
- "*"
tls:
credentialName: my-tls-secret
EOF
Configure routes for traffic entering via the Gateway:
$ cat <<EOF | kubectl apply -f -
apiVersion: networking.istio.io/v1
kind: VirtualService
metadata:
name: httpbin
namespace: default
spec:
hosts:
- "httpbin.example.com" # this is used by dns-controller-manager to extract DNS names
gateways:
- istio-system/httpbin-gateway
http:
- match:
- uri:
prefix: /status
- uri:
prefix: /delay
route:
- destination:
port:
number: 8000
host: httpbin
EOF
This should show a similar Certificate resource as above.
5.5.2 - Access Control List Extension
Gardener Access Control List Extension
An Access Control List (ACL) is a list of permissions attached to an object, specifying which users or system processes are granted or denied access to that object.
Gardener utilizes the ACL extension to control access to shoot clusters using an allow-list mechanism, allowing you to specify which IP addresses or CIDR blocks are allowed to access the Kubernetes API and other services in the shoot cluster.
This extension supports multiple ingress namespaces, enhancing its flexibility for various deployment scenarios. The extension leverages Istio’s envoy proxy to insert additional configuration that limits access to specific clusters, impacting different external traffic flows such as Kubernetes API listeners, service listeners, and VPN listeners.
The extension’s functionality and limitations are intricately managed to handle different access types effectively, ensuring robust security for Kubernetes API servers.
Note
The ACL extension is not part of Gardener and is maintained by STACKIT in their own GitHub organization.
You can find more information in the Gardener ACL Extension repository.
5.5.3 - DNS Services
Gardener Extension for DNS services
Project Gardener implements the automated management and operation of Kubernetes clusters as a service. Its main principle is to leverage Kubernetes concepts for all of its tasks.
Recently, most of the vendor specific logic has been developed in-tree. However, the project has grown to a size where it is very hard to extend, maintain, and test. With GEP-1 we have proposed how the architecture can be changed in a way to support external controllers that contain their very own vendor specifics. This way, we can keep Gardener core clean and independent.
Extension-Resources
Example extension resource:
apiVersion: extensions.gardener.cloud/v1alpha1
kind: Extension
metadata:
name: "extension-dns-service"
namespace: shoot--project--abc
spec:
type: shoot-dns-service
How to start using or developing this extension controller locally
You can run the controller locally on your machine by executing make start. Please make sure to have the kubeconfig to the cluster you want to connect to ready in the ./dev/kubeconfig file.
Static code checks and tests can be executed by running make verify. We are using Go modules for Golang package dependency management and Ginkgo/Gomega for testing.
Feedback and Support
Feedback and contributions are always welcome!
Please report bugs or suggestions as GitHub issues or reach out on Slack (join the workspace here).
Learn more!
Please find further resources about out project here:
5.5.3.1 - Deployment
Gardener DNS Management for Shoots
Introduction
Gardener allows Shoot clusters to request DNS names for Ingresses and Services out of the box.
To support this the gardener must be installed with the shoot-dns-service
extension.
This extension uses the seed’s dns management infrastructure to maintain DNS
names for shoot clusters. So, far only the external DNS domain of a shoot
(already used for the kubernetes api server and ingress DNS names) can be used
for managed DNS names.
Operator Extension
Using an operator extension resource (extension.operator.gardener.cloud) is the recommended way to deploy the shoot-dns-service extension.
An example of an operator extension resource can be found at extension-shoot-dns-service.yaml.
It is possible to decide whether the extension should be always available for all shoots or whether the extension must be separately enabled per shoot.
To enable the extension for all shoots, the autoEnable field must be set to [shoot] in the Extension resource.
apiVersion: operator.gardener.cloud/v1alpha1
kind: Extension
metadata:
annotations:
security.gardener.cloud/pod-security-enforce: baseline
name: extension-shoot-dns-service
spec:
deployment:
admission:
runtimeCluster:
helm:
ociRepository:
ref: ... # OCI reference to the Helm chart
virtualCluster:
helm:
ociRepository:
ref: ... # OCI reference to the Helm chart
extension:
helm:
ociRepository:
ref: ... # OCI reference to the Helm chart
resources:
- autoEnable:
- shoot # if set, the extension is enabled for all shoots by default
clusterCompatibility:
- shoot
kind: Extension
type: shoot-dns-service
workerlessSupported: true
Providing Base Domains usable for a Shoot
So, far only the external DNS domain of a shoot already used for the kubernetes api server and ingress DNS names can be used for managed DNS names. This is either the shoot domain as subdomain of the default domain configured for the gardener installation, or a dedicated domain with dedicated access credentials configured for a dedicated shoot via the shoot manifest.
Alternatively, you can specify DNSProviders and its credentials
Secret directly in the shoot, if this feature is enabled.
By default, DNSProvider replication is disabled, but it can be enabled globally in the ControllerDeployment
or for a shoot cluster in the shoot manifest (details see further below).
apiVersion: operator.gardener.cloud/v1alpha1
kind: Extension
metadata:
name: extension-shoot-dns-service
spec:
extension:
values:
dnsProviderReplication:
enabled: true
Shoot Feature Gate
If the shoot DNS feature is not globally enabled by default (depends on the extension registration on the garden cluster), it must be enabled per shoot.
To enable the feature for a shoot, the shoot manifest must explicitly add the
shoot-dns-service extension.
...
spec:
extensions:
- type: shoot-dns-service
...
Enable/disable DNS provider replication for a shoot
The DNSProvider` replication feature enablement can be overwritten in the shoot manifest, e.g.
Kind: Shoot
...
spec:
extensions:
- type: shoot-dns-service
providerConfig:
apiVersion: service.dns.extensions.gardener.cloud/v1alpha1
kind: DNSConfig
dnsProviderReplication:
enabled: true
...
5.5.3.2 - DNS Names
Request DNS Names in Shoot Clusters
Introduction
Within a shoot cluster, it is possible to request DNS records via the following resource types:
It is necessary that the Gardener installation your shoot cluster runs in is equipped with a shoot-dns-service extension. This extension uses the seed’s dns management infrastructure to maintain DNS names for shoot clusters. Please ask your Gardener operator if the extension is available in your environment.
Shoot Feature Gate
In some Gardener setups the shoot-dns-service extension is not enabled globally and thus must be configured per shoot cluster. Please adapt the shoot specification by the configuration shown below to activate the extension individually.
kind: Shoot
...
spec:
extensions:
- type: shoot-dns-service
...
Before you start
You should :
- Have created a shoot cluster
- Have created and correctly configured a DNS Provider (Please consult this page for more information)
- Have a basic understanding of DNS (see link under References)
There are 2 types of DNS that you can use within Kubernetes :
- internal (usually managed by coreDNS)
- external (managed by a public DNS provider).
This page, and the extension, exclusively works for external DNS handling.
Gardener allows 2 way of managing your external DNS:
- Manually, which means you are in charge of creating / maintaining your Kubernetes related DNS entries
- Via the Gardener DNS extension
Gardener DNS extension
The managed external DNS records feature of the Gardener clusters makes all this easier. You do not need DNS service provider specific knowledge, and in fact you do not need to leave your cluster at all to achieve that. You simply annotate the Ingress / Service that needs its DNS records managed and it will be automatically created / managed by Gardener.
Managed external DNS records are supported with the following DNS provider types:
- aws-route53
- azure-dns
- azure-private-dns
- google-clouddns
- openstack-designate
- alicloud-dns
- cloudflare-dns
Request DNS records for Ingress resources
To request a DNS name for Ingress, Service or Gateway (Istio or Gateway API) objects in the shoot cluster it must be annotated with the DNS class garden and an annotation denoting the desired DNS names.
Example for an annotated Ingress resource:
apiVersion: networking.k8s.io/v1
kind: Ingress
metadata:
name: amazing-ingress
annotations:
# Let Gardener manage external DNS records for this Ingress.
dns.gardener.cloud/dnsnames: special.example.com # Use "*" to collects domains names from .spec.rules[].host
dns.gardener.cloud/ttl: "600"
dns.gardener.cloud/class: garden
# If you are delegating the certificate management to Gardener, uncomment the following line
#cert.gardener.cloud/purpose: managed
spec:
rules:
- host: special.example.com
http:
paths:
- pathType: Prefix
path: "/"
backend:
service:
name: amazing-svc
port:
number: 8080
# Uncomment the following part if you are delegating the certificate management to Gardener
#tls:
# - hosts:
# - special.example.com
# secretName: my-cert-secret-name
For an Ingress, the DNS names are already declared in the specification. Nevertheless the dnsnames annotation must be present. Here a subset of the DNS names of the ingress can be specified. If DNS names for all names are desired, the value all can be used.
Keep in mind that ingress resources are ignored unless an ingress controller is set up. Gardener does not provide an ingress controller by default. For more details, see Ingress Controllers and Service in the Kubernetes documentation.
Request DNS records for service type LoadBalancer
Example for an annotated Service (it must have the type LoadBalancer) resource:
apiVersion: v1
kind: Service
metadata:
name: amazing-svc
annotations:
# Let Gardener manage external DNS records for this Service.
dns.gardener.cloud/dnsnames: special.example.com
dns.gardener.cloud/ttl: "600"
dns.gardener.cloud/class: garden
spec:
selector:
app: amazing-app
ports:
- protocol: TCP
port: 80
targetPort: 8080
type: LoadBalancer
Request DNS records for Gateway resources
Please see Istio Gateways or Gateway API for details.
Creating a DNSEntry resource explicitly
It is also possible to create a DNS entry via the Kubernetes resource called DNSEntry:
apiVersion: dns.gardener.cloud/v1alpha1
kind: DNSEntry
metadata:
annotations:
# Let Gardener manage this DNS entry.
dns.gardener.cloud/class: garden
name: special-dnsentry
namespace: default
spec:
dnsName: special.example.com
ttl: 600
targets:
- 1.2.3.4
If one of the accepted DNS names is a direct subname of the shoot’s ingress domain, this is already handled by the standard wildcard entry for the ingress domain. Therefore this name should be excluded from the dnsnames list in the annotation. If only this DNS name is configured in the ingress, no explicit DNS entry is required, and the DNS annotations should be omitted at all.
You can check the status of the DNSEntry with
$ kubectl get dnsentry
NAME DNS TYPE PROVIDER STATUS AGE
mydnsentry special.example.com aws-route53 default/aws Ready 24s
As soon as the status of the entry is Ready, the provider has accepted the new DNS record. Depending on the provider and your DNS settings and cache, it may take up to 24 hours for the new entry to be propagated over all internet.
More examples can be found here
Request DNS records for Service/Ingress resources using a DNSAnnotation resource
In rare cases it may not be possible to add annotations to a Service or Ingress resource object.
E.g.: the helm chart used to deploy the resource may not be adaptable for some reasons or some automation is used, which always restores the original content of the resource object by dropping any additional annotations.
In these cases, it is recommended to use an additional DNSAnnotation resource in order to have more flexibility that DNSentry resources. The DNSAnnotation resource makes the DNS shoot service behave as if annotations have been added to the referenced resource.
For the Ingress example shown above, you can create a DNSAnnotation resource alternatively to provide the annotations.
apiVersion: dns.gardener.cloud/v1alpha1
kind: DNSAnnotation
metadata:
annotations:
dns.gardener.cloud/class: garden
name: test-ingress-annotation
namespace: default
spec:
resourceRef:
kind: Ingress
apiVersion: networking.k8s.io/v1
name: test-ingress
namespace: default
annotations:
dns.gardener.cloud/dnsnames: '*'
dns.gardener.cloud/class: garden
Note that the DNSAnnotation resource itself needs the dns.gardener.cloud/class=garden annotation. This also only works for annotations known to the DNS shoot service (see Accepted External DNS Records Annotations).
For more details, see also DNSAnnotation objects
Accepted External DNS Records Annotations
Here are all the accepted annotations related to the DNS extension:
| Annotation | Description |
|---|---|
| dns.gardener.cloud/dnsnames | Mandatory for service and ingress resources, accepts a comma-separated list of DNS names if multiple names are required. For ingress you can use the special value '*'. In this case, the DNS names are collected from .spec.rules[].host. |
| dns.gardener.cloud/class | Mandatory, in the context of the shoot-dns-service it must always be set to garden. |
| dns.gardener.cloud/ttl | Recommended, overrides the default Time-To-Live of the DNS record. |
| dns.gardener.cloud/cname-lookup-interval | Only relevant if multiple domain name targets are specified. It specifies the lookup interval for CNAMEs to map them to IP addresses (in seconds) |
| dns.gardener.cloud/realms | Internal, for restricting provider access for shoot DNS entries. Typcially not set by users of the shoot-dns-service. |
| dns.gardener.cloud/ip-stack | Only relevant for provider type aws-route53 if target is an AWS load balancer domain name. Can be set for service, ingress and DNSEntry resources. It specify which DNS records with alias targets are created instead of the usual CNAME records. If the annotation is not set (or has the value ipv4), only an A record is created. With value dual-stack, both A and AAAA records are created. With value ipv6 only an AAAA record is created. |
| dns.gardener.cloud/ignore | Optional, with the possible values: true, reconcile, or full. For values true and reconcile, the reconciliation is skipped. true is an alias for reconcile. For value full both reconciliation and deletion operations are skipped. |
| dns.gardener.cloud/target-hard-ignore | Optional, for a generated target DNSEntry to ignore it on reconciliation. It is not propagated from source objects to the target DNSEntry. Important: The entry is even ignored on deletion, so use with caution to avoid orphaned entries. |
| service.beta.kubernetes.io/aws-load-balancer-ip-address-type=dualstack | For services, behaves similar to dns.gardener.cloud/ip-stack=dual-stack. |
| loadbalancer.openstack.org/load-balancer-address | Internal, for services only: support for PROXY protocol on Openstack (which needs a hostname as ingress). Typcially not set by users of the shoot-dns-service. |
If one of the accepted DNS names is a direct subdomain of the shoot’s ingress domain, this is already handled by the standard wildcard entry for the ingress domain. Therefore, this name should be excluded from the dnsnames list in the annotation. If only this DNS name is configured in the ingress, no explicit DNS entry is required, and the DNS annotations should be omitted at all.
Troubleshooting
General DNS tools
To check the DNS resolution, use the nslookup or dig command.
$ nslookup special.your-domain.com
or with dig
$ dig +short special.example.com
Depending on your network settings, you may get a successful response faster using a public DNS server (e.g. 8.8.8.8, 8.8.4.4, or 1.1.1.1)
dig @8.8.8.8 +short special.example.com
DNS record events
The DNS controller publishes Kubernetes events for the resource which requested the DNS record (Ingress, Service, DNSEntry). These events reveal more information about the DNS requests being processed and are especially useful to check any kind of misconfiguration, e.g. requests for a domain you don’t own.
Events for a successfully created DNS record:
$ kubectl describe service my-service
Events:
Type Reason Age From Message
---- ------ ---- ---- -------
Normal dns-annotation 19s dns-controller-manager special.example.com: dns entry is pending
Normal dns-annotation 19s (x3 over 19s) dns-controller-manager special.example.com: dns entry pending: waiting for dns reconciliation
Normal dns-annotation 9s (x3 over 10s) dns-controller-manager special.example.com: dns entry active
Please note, events vanish after their retention period (usually 1h).
DNSEntry status
DNSEntry resources offer a .status sub-resource which can be used to check the current state of the object.
Status of a erroneous DNSEntry.
status:
message: No responsible provider found
observedGeneration: 3
provider: remote
state: Error
References
5.5.3.3 - DNS Providers
DNS Providers
Introduction
Gardener can manage DNS records on your behalf, so that you can request them via different resource types (see here) within the shoot cluster. The domains for which you are permitted to request records, are however restricted and depend on the DNS provider configuration.
Shoot provider
By default, every shoot cluster is equipped with a default provider. It is the very same provider that manages the shoot cluster’s kube-apiserver public DNS record (DNS address in your Kubeconfig).
kind: Shoot
...
dns:
domain: shoot.project.default-domain.gardener.cloud
You are permitted to request any sub-domain of .dns.domain that is not already taken (e.g. api.shoot.project.default-domain.gardener.cloud, *.ingress.shoot.project.default-domain.gardener.cloud) with this provider.
Additional providers
If you need to request DNS records for domains not managed by the default provider, additional providers can
be configured in the shoot specification.
Alternatively, if it is enabled, it can be added as DNSProvider resources to the shoot cluster.
Additional providers in the shoot specification
To add a providers in the shoot spec, you need set them in the spec.dns.providers list.
For example:
kind: Shoot
...
spec:
dns:
domain: shoot.project.default-domain.gardener.cloud
providers:
- secretName: my-aws-account
type: aws-route53
- secretName: my-gcp-account
type: google-clouddns
Please consult the API-Reference to get a complete list of supported fields and configuration options.
Referenced secrets should exist in the project namespace in the Garden cluster and must comply with the provider specific credentials format. The External-DNS-Management project provides corresponding examples (20-secret-<provider-name>-credentials.yaml) for known providers.
Additional providers as resources in the shoot cluster
If it is not enabled globally, you have to enable the feature in the shoot manifest:
Kind: Shoot
...
spec:
extensions:
- type: shoot-dns-service
providerConfig:
apiVersion: service.dns.extensions.gardener.cloud/v1alpha1
kind: DNSConfig
dnsProviderReplication:
enabled: true
...
To add a provider directly in the shoot cluster, provide a DNSProvider in any namespace together
with Secret containing the credentials.
For example if the domain is hosted with AWS Route 53 (provider type aws-route53):
apiVersion: dns.gardener.cloud/v1alpha1
kind: DNSProvider
metadata:
annotations:
dns.gardener.cloud/class: garden
name: my-own-domain
namespace: my-namespace
spec:
type: aws-route53
secretRef:
name: my-own-domain-credentials
domains:
include:
- my.own.domain.com
---
apiVersion: v1
kind: Secret
metadata:
name: my-own-domain-credentials
namespace: my-namespace
type: Opaque
data:
# replace '...' with values encoded as base64
AWS_ACCESS_KEY_ID: ...
AWS_SECRET_ACCESS_KEY: ...
The External-DNS-Management project provides examples with more details for DNSProviders (30-provider-<provider-name>.yaml)
and credential Secrets (20-secret-<provider-name>.yaml) at https://github.com/gardener/external-dns-management//examples
for all supported provider types.
5.5.3.4 - Gateway Api Gateways
Using annotated Gateway API Gateway and/or HTTPRoutes as Source
This tutorial describes how to use annotated Gateway API resources as source for DNSEntries with the Gardener shoot-dns-service extension.
The dns-controller-manager supports the resources Gateway and HTTPRoute.
Install Istio on your cluster
Using a new or existing shoot cluster, follow the Istio Kubernetes Gateway API to install the Gateway API and to install Istio.
These are the typical commands for the Istio installation with the Kubernetes Gateway API:
export KUEBCONFIG=...
curl -L https://istio.io/downloadIstio | sh -
kubectl get crd gateways.gateway.networking.k8s.io &> /dev/null || \
{ kubectl kustomize "github.com/kubernetes-sigs/gateway-api/config/crd?ref=v1.0.0" | kubectl apply -f -; }
istioctl install --set profile=minimal -y
kubectl label namespace default istio-injection=enabled
Verify that Gateway Source works
Install a sample service
With automatic sidecar injection:
$ kubectl apply -f https://raw.githubusercontent.com/istio/istio/release-1.20/samples/httpbin/httpbin.yaml
Using a Gateway as a source
Deploy the Gateway API configuration including a single exposed route (i.e., /get):
kubectl create namespace istio-ingress
kubectl apply -f - <<EOF
apiVersion: gateway.networking.k8s.io/v1
kind: Gateway
metadata:
name: gateway
namespace: istio-ingress
annotations:
dns.gardener.cloud/dnsnames: "*.example.com"
dns.gardener.cloud/class: garden
spec:
gatewayClassName: istio
listeners:
- name: default
hostname: "*.example.com" # this is used by dns-controller-manager to extract DNS names
port: 80
protocol: HTTP
allowedRoutes:
namespaces:
from: All
---
apiVersion: gateway.networking.k8s.io/v1
kind: HTTPRoute
metadata:
name: http
namespace: default
spec:
parentRefs:
- name: gateway
namespace: istio-ingress
hostnames: ["httpbin.example.com"] # this is used by dns-controller-manager to extract DNS names too
rules:
- matches:
- path:
type: PathPrefix
value: /get
backendRefs:
- name: httpbin
port: 8000
EOF
You should now see events in the namespace of the gateway:
$ kubectl -n istio-system get events --sort-by={.metadata.creationTimestamp}
LAST SEEN TYPE REASON OBJECT MESSAGE
...
38s Normal dns-annotation service/gateway-istio httpbin.example.com: created dns entry object shoot--foo--bar/gateway-istio-service-zpf8n
38s Normal dns-annotation service/gateway-istio httpbin.example.com: dns entry pending: waiting for dns reconciliation
38s Normal dns-annotation service/gateway-istio httpbin.example.com: dns entry is pending
36s Normal dns-annotation service/gateway-istio httpbin.example.com: dns entry active
Using a HTTPRoute as a source
If the Gateway resource is annotated with dns.gardener.cloud/dnsnames: "*", hostnames from all referencing HTTPRoute resources
are automatically extracted. These resources don’t need an additional annotation.
Deploy the Gateway API configuration including a single exposed route (i.e., /get):
kubectl create namespace istio-ingress
kubectl apply -f - <<EOF
apiVersion: gateway.networking.k8s.io/v1
kind: Gateway
metadata:
name: gateway
namespace: istio-ingress
annotations:
dns.gardener.cloud/dnsnames: "*"
dns.gardener.cloud/class: garden
spec:
gatewayClassName: istio
listeners:
- name: default
hostname: null # not set
port: 80
protocol: HTTP
allowedRoutes:
namespaces:
from: All
---
apiVersion: gateway.networking.k8s.io/v1
kind: HTTPRoute
metadata:
name: http
namespace: default
spec:
parentRefs:
- name: gateway
namespace: istio-ingress
hostnames: ["httpbin.example.com"] # this is used by dns-controller-manager to extract DNS names too
rules:
- matches:
- path:
type: PathPrefix
value: /get
backendRefs:
- name: httpbin
port: 8000
EOF
This should show a similar events as above.
Access the sample service using curl
$ curl -I http://httpbin.example.com/get
HTTP/1.1 200 OK
server: istio-envoy
date: Tue, 13 Feb 2024 08:09:41 GMT
content-type: application/json
content-length: 701
access-control-allow-origin: *
access-control-allow-credentials: true
x-envoy-upstream-service-time: 19
Accessing any other URL that has not been explicitly exposed should return an HTTP 404 error:
$ curl -I http://httpbin.example.com/headers
HTTP/1.1 404 Not Found
date: Tue, 13 Feb 2024 08:09:41 GMT
server: istio-envoy
transfer-encoding: chunked
5.5.3.5 - Istio Gateways
Using annotated Istio Gateway and/or Istio Virtual Service as Source
This tutorial describes how to use annotated Istio Gateway resources as source for DNSEntries with the Gardener shoot-dns-service extension.
Install Istio on your cluster
Using a new or existing shoot cluster, follow the Istio Getting Started to download and install Istio.
These are the typical commands for the istio demo installation
export KUEBCONFIG=...
curl -L https://istio.io/downloadIstio | sh -
istioctl install --set profile=demo -y
kubectl label namespace default istio-injection=enabled
Verify that Istio Gateway/VirtualService Source works
Install a sample service
With automatic sidecar injection:
$ kubectl apply -f https://raw.githubusercontent.com/istio/istio/release-1.20/samples/httpbin/httpbin.yaml
Using a Gateway as a source
Create an Istio Gateway:
$ cat <<EOF | kubectl apply -f -
apiVersion: networking.istio.io/v1alpha3
kind: Gateway
metadata:
name: httpbin-gateway
namespace: istio-system
annotations:
dns.gardener.cloud/dnsnames: "*"
dns.gardener.cloud/class: garden
spec:
selector:
istio: ingressgateway # use Istio default gateway implementation
servers:
- port:
number: 80
name: http
protocol: HTTP
hosts:
- "httpbin.example.com" # this is used by the dns-controller-manager to extract DNS names
EOF
Configure routes for traffic entering via the Gateway:
$ cat <<EOF | kubectl apply -f -
apiVersion: networking.istio.io/v1alpha3
kind: VirtualService
metadata:
name: httpbin
namespace: default
spec:
hosts:
- "httpbin.example.com" # this is also used by the dns-controller-manager to extract DNS names
gateways:
- istio-system/httpbin-gateway
http:
- match:
- uri:
prefix: /status
- uri:
prefix: /delay
route:
- destination:
port:
number: 8000
host: httpbin
EOF
You should now see events in the namespace of the gateway:
$ kubectl -n istio-system get events --sort-by={.metadata.creationTimestamp}
LAST SEEN TYPE REASON OBJECT MESSAGE
...
38s Normal dns-annotation gateway/httpbin-gateway httpbin.example.com: created dns entry object shoot--foo--bar/httpbin-gateway-gateway-zpf8n
38s Normal dns-annotation gateway/httpbin-gateway httpbin.example.com: dns entry pending: waiting for dns reconciliation
38s Normal dns-annotation gateway/httpbin-gateway httpbin.example.com: dns entry is pending
36s Normal dns-annotation gateway/httpbin-gateway httpbin.example.com: dns entry active
Using a VirtualService as a source
If the Gateway resource is annotated with dns.gardener.cloud/dnsnames: "*", hosts from all referencing VirtualServices resources
are automatically extracted. These resources don’t need an additional annotation.
Create an Istio Gateway:
$ cat <<EOF | kubectl apply -f -
apiVersion: networking.istio.io/v1alpha3
kind: Gateway
metadata:
name: httpbin-gateway
namespace: istio-system
annotations:
dns.gardener.cloud/dnsnames: "*"
dns.gardener.cloud/class: garden
spec:
selector:
istio: ingressgateway # use Istio default gateway implementation
servers:
- port:
number: 80
name: http
protocol: HTTP
hosts:
- "*"
EOF
Configure routes for traffic entering via the Gateway:
$ cat <<EOF | kubectl apply -f -
apiVersion: networking.istio.io/v1alpha3
kind: VirtualService
metadata:
name: httpbin
namespace: default
spec:
hosts:
- "httpbin.example.com" # this is used by dns-controller-manager to extract DNS names
gateways:
- istio-system/httpbin-gateway
http:
- match:
- uri:
prefix: /status
- uri:
prefix: /delay
route:
- destination:
port:
number: 8000
host: httpbin
EOF
This should show a similar events as above.
To get the targets to the extracted DNS names, the shoot-dns-service controller is able to gather information from the kubernetes service of the Istio Ingress Gateway.
Note: It is also possible to set the targets my specifying an Ingress resource using the dns.gardener.cloud/ingress annotation on the Istio Ingress Gateway resource.
Note: It is also possible to set the targets manually by using the dns.gardener.cloud/targets annotation on the Istio Ingress Gateway resource.
Access the sample service using curl
$ curl -I http://httpbin.example.com/status/200
HTTP/1.1 200 OK
server: istio-envoy
date: Tue, 13 Feb 2024 07:49:37 GMT
content-type: text/html; charset=utf-8
access-control-allow-origin: *
access-control-allow-credentials: true
content-length: 0
x-envoy-upstream-service-time: 15
Accessing any other URL that has not been explicitly exposed should return an HTTP 404 error:
$ curl -I http://httpbin.example.com/headers
HTTP/1.1 404 Not Found
date: Tue, 13 Feb 2024 08:09:41 GMT
server: istio-envoy
transfer-encoding: chunked
5.5.4 - Egress Filtering
Gardener Extension for Networking Filter
Project Gardener implements the automated management and operation of Kubernetes clusters as a service. Its main principle is to leverage Kubernetes concepts for all of its tasks.
Recently, most of the vendor specific logic has been developed in-tree. However, the project has grown to a size where it is very hard to extend, maintain, and test. With GEP-1 we have proposed how the architecture can be changed in a way to support external controllers that contain their very own vendor specifics. This way, we can keep Gardener core clean and independent.
This controller implements Gardener’s extension contract for the shoot-networking-filter extension.
An example for a ControllerRegistration resource that can be used to register this controller to Gardener can be found here.
Please find more information regarding the extensibility concepts and a detailed proposal here.
Extension Resources
Example extension resource:
apiVersion: extensions.gardener.cloud/v1alpha1
kind: Extension
metadata:
name: extension-shoot-networking-filter
namespace: shoot--project--abc
spec:
providerConfig:
egressFilter:
blackholingEnabled: false
staticFilterList:
- network: 1.2.3.4/31
policy: BLOCK_ACCESS
workers:
blackholingEnabled: true
names:
- external-api
When an extension resource is reconciled, if the optional workers field is not used, the extension controller will create a daemonset egress-filter-applier on the shoot containing a Dockerfile container.
If the optional workers field is used, the extension controller will create one daemonset egress-filter-applier-<worker name> per each worker group on the shoot.
See the usage documentation for more details on how to configure the extension on a shoot cluster.
Please note, this extension controller relies on the Gardener-Resource-Manager to deploy k8s resources to seed and shoot clusters.
How to start using or developing this extension controller locally
You can run the controller locally on your machine by executing make start.
We are using Go modules for Golang package dependency management and Ginkgo/Gomega for testing.
Feedback and Support
Feedback and contributions are always welcome!
Please report bugs or suggestions as GitHub issues or reach out on Slack (join the workspace here).
Learn more!
Please find further resources about out project here:
5.5.4.1 - Deployment
Gardener Networking Policy Filter for Shoots
Introduction
Gardener allows shoot clusters to filter egress traffic on node level. To support this the Gardener must be installed with the shoot-networking-filter extension.
Configuration
To generally enable the networking filter for shoot objects the shoot-networking-filter extension must be registered by providing an appropriate extension registration in the garden cluster.
Here it is possible to decide whether the extension should be always available for all shoots or whether the extension must be separately enabled per shoot.
If the extension should be used for all shoots the globallyEnabled flag should be set to true.
apiVersion: core.gardener.cloud/v1beta1
kind: ControllerRegistration
...
spec:
resources:
- kind: Extension
type: shoot-networking-filter
globallyEnabled: true
ControllerRegistration
An example of a ControllerRegistration for the shoot-networking-filter can be found at controller-registration.yaml.
The ControllerRegistration contains a Helm chart which eventually deploys the shoot-networking-filter to seed clusters. It offers some configuration options, mainly to set up a static filter list or provide the configuration for downloading the filter list from a service endpoint.
apiVersion: core.gardener.cloud/v1beta1
kind: ControllerDeployment
...
values:
egressFilter:
blackholingEnabled: true
filterListProviderType: static
staticFilterList:
- network: 1.2.3.4/31
policy: BLOCK_ACCESS
- network: 5.6.7.8/32
policy: BLOCK_ACCESS
- network: ::2/128
policy: BLOCK_ACCESS
#filterListProviderType: download
#downloaderConfig:
# endpoint: https://my.filter.list.server/lists/policy
# oauth2Endpoint: https://my.auth.server/oauth2/token
# refreshPeriod: 1h
## if the downloader needs an OAuth2 access token, client credentials can be provided with oauth2Secret
#oauth2Secret:
# clientID: 1-2-3-4
# clientSecret: secret!!
## either clientSecret of client certificate is required
# client.crt.pem: |
# -----BEGIN CERTIFICATE-----
# ...
# -----END CERTIFICATE-----
# client.key.pem: |
# -----BEGIN PRIVATE KEY-----
# ...
# -----END PRIVATE KEY-----
Enablement for a Shoot
If the shoot networking filter is not globally enabled by default (depends on the extension registration on the garden cluster), it can be enabled per shoot. To enable the service for a shoot, the shoot manifest must explicitly add the shoot-networking-filter extension.
apiVersion: core.gardener.cloud/v1beta1
kind: Shoot
...
spec:
extensions:
- type: shoot-networking-filter
...
If the shoot networking filter is globally enabled by default, it can be disabled per shoot. To disable the service for a shoot, the shoot manifest must explicitly state it.
apiVersion: core.gardener.cloud/v1beta1
kind: Shoot
...
spec:
extensions:
- type: shoot-networking-filter
disabled: true
...
5.5.4.2 - Shoot Networking Filter
Register Shoot Networking Filter Extension in Shoot Clusters
Introduction
Within a shoot cluster, it is possible to enable the networking filter. It is necessary that the Gardener installation your shoot cluster runs in is equipped with a shoot-networking-filter extension. Please ask your Gardener operator if the extension is available in your environment.
Shoot Feature Gate
In most of the Gardener setups the shoot-networking-filter extension is not enabled globally and thus must be configured per shoot cluster. Please adapt the shoot specification by the configuration shown below to activate the extension individually.
kind: Shoot
...
spec:
extensions:
- type: shoot-networking-filter
...
Opt-out
If the shoot networking filter is globally enabled by default, it can be disabled per shoot. To disable the service for a shoot, the shoot manifest must explicitly state it.
apiVersion: core.gardener.cloud/v1beta1
kind: Shoot
...
spec:
extensions:
- type: shoot-networking-filter
disabled: true
...
Ingress Filtering
By default, the networking filter only filters egress traffic. However, if you enable blackholing, incoming traffic will also be blocked. You can enable blackholing on a per-shoot basis.
apiVersion: core.gardener.cloud/v1beta1
kind: Shoot
...
spec:
extensions:
- type: shoot-networking-filter
providerConfig:
egressFilter:
blackholingEnabled: true
...
Ingress traffic can only be blocked by blackhole routing, if the source IP address is preserved. On Azure, GCP and AliCloud this works by default.
The default on AWS is a classic load balancer that replaces the source IP by it’s own IP address. Here, a network load balancer has to be
configured adding the annotation service.beta.kubernetes.io/aws-load-balancer-type: "nlb" to the service.
On OpenStack, load balancers don’t preserve the source address.
When you disable blackholing in an existing shoot, the associated blackhole routes will be removed automatically.
Conversely, when you re-enable blackholing again, the iptables-based filter rules will be removed and replaced by blackhole routes.
Ingress Filtering per Worker Group
You can optionally enable or disable ingress filtering for specified worker groups.
For example, you may want to disable blackholing in general but enable it for a worker group hosting an external API.
You can do so by using an optional workers field:
apiVersion: core.gardener.cloud/v1beta1
kind: Shoot
...
spec:
extensions:
- type: shoot-networking-filter
providerConfig:
egressFilter:
blackholingEnabled: false
workers:
blackholingEnabled: true
names:
- external-api
...
Please note that only blackholing can be changed per worker group. You may not define different IPs to block or disable blocking altogether.
Custom IP
It is possible to add custom IP addresses to the network filter. This can be useful for testing purposes.
apiVersion: core.gardener.cloud/v1beta1
kind: Shoot
...
spec:
extensions:
- type: shoot-networking-filter
providerConfig:
egressFilter:
staticFilterList:
- network: 1.2.3.4/31
policy: BLOCK_ACCESS
- network: 5.6.7.8/32
policy: BLOCK_ACCESS
- network: ::2/128
policy: BLOCK_ACCESS
...
5.5.5 - Lakom Service
Gardener Extension for lakom services
Project Gardener implements the automated management and operation of Kubernetes clusters as a service. Its main principle is to leverage Kubernetes concepts for all of its tasks.
Recently, most of the vendor specific logic has been developed in-tree. However, the project has grown to a size where it is very hard to extend, maintain, and test. With GEP-1 we have proposed how the architecture can be changed in a way to support external controllers that contain their very own vendor specifics. This way, we can keep Gardener core clean and independent.
This controller implements Gardener’s extension contract for the shoot-lakom-service extension.
An example for a ControllerRegistration resource that can be used to register this controller to Gardener can be found here.
Please find more information regarding the extensibility concepts and a detailed proposal here.
Lakom Admission Controller
Lakom is kubernetes admission controller which purpose is to implement cosign image signature verification against public cosign key. It also takes care to resolve image tags to sha256 digests. It also caches all OCI artifacts to reduce the load toward the OCI registry.
Extension Resources
Example extension resource:
apiVersion: extensions.gardener.cloud/v1alpha1
kind: Extension
metadata:
name: extension-shoot-lakom-service
namespace: shoot--project--abc
spec:
type: shoot-lakom-service
When an extension resource is reconciled, the extension controller will create an instance of lakom admission controller. These resources are placed inside the shoot namespace on the seed. Also, the controller takes care about generating necessary RBAC resources for the seed as well as for the shoot.
Please note, this extension controller relies on the Gardener-Resource-Manager to deploy k8s resources to seed and shoot clusters.
How to start using or developing this extension controller locally
The Lakom admission controller can be configured with make dev-setup and started with make start-lakom.
You can run the lakom extension controller locally on your machine by executing make start.
If you’d like to develop Lakom using a local cluster such as KinD, make sure your KUBECONFIG environment variable is targeting the local Garden cluster.
Add 127.0.0.1 garden.local.gardener.cloud to your /etc/hosts. You can then run:
make extension-up
This will trigger a skaffold deployment that builds the images, pushes them to the registry and installs the helm charts from /charts.
We are using Go modules for Golang package dependency management and Ginkgo/Gomega for testing.
Feedback and Support
Feedback and contributions are always welcome!
Please report bugs or suggestions as GitHub issues or reach out on Slack (join the workspace here).
Learn more
Please find further resources about out project here:
5.5.5.1 - Deployment
Gardener Lakom Service for Shoots
Introduction
Gardener allows Shoot clusters to use Lakom admission controller for cosign image signing verification. To support this the Gardener must be installed with the shoot-lakom-service extension.
Configuration
To generally enable the Lakom service for shoot objects the shoot-lakom-service extension must be registered by providing an appropriate extension registration in the garden cluster.
Here it is possible to decide whether the extension should be always available for all shoots or whether the extension must be separately enabled per shoot.
If the extension should be used for all shoots the globallyEnabled flag should be set to true.
spec:
resources:
- kind: Extension
type: shoot-lakom-service
globallyEnabled: true
Shoot Feature Gate
If the shoot Lakom service is not globally enabled by default (depends on the extension registration on the garden cluster), it can be enabled per shoot. To enable the service for a shoot, the shoot manifest must explicitly add the shoot-lakom-service extension.
...
spec:
extensions:
- type: shoot-lakom-service
...
If the shoot Lakom service is globally enabled by default, it can be disabled per shoot. To disable the service for a shoot, the shoot manifest must explicitly state it.
...
spec:
extensions:
- type: shoot-lakom-service
disabled: true
...
5.5.5.2 - Lakom
Introduction
Lakom is kubernetes admission controller which purpose is to implement cosign image signature verification with public cosign key. It also takes care to resolve image tags to sha256 digests. A built-in cache mechanism can be enabled to reduce the load toward the OCI registry.
Flags
Lakom admission controller is configurable via command line flags. The trusted
cosign public keys and the associated algorithms associated with them are set
viq configuration file provided with the flag --lakom-config-path.
| Flag Name | Description | Default Value |
|---|---|---|
--bind-address | Address to bind to | “0.0.0.0” |
--cache-refresh-interval | Refresh interval for the cached objects | 30s |
--cache-ttl | TTL for the cached objects. Set to 0, if cache has to be disabled | 10m0s |
--contention-profiling | Enable lock contention profiling, if profiling is enabled | false |
--health-bind-address | Bind address for the health server | “:8081” |
-h, --help | help for lakom | |
--insecure-allow-insecure-registries | If set, communication via HTTP with registries will be allowed. | false |
--insecure-allow-untrusted-images | If set, the webhook will just return warning for the images without trusted signatures. | false |
--kubeconfig | Paths to a kubeconfig. Only required if out-of-cluster. | |
--lakom-config-path | Path to file with lakom configuration containing cosign public keys used to verify the image signatures | |
--metrics-bind-address | Bind address for the metrics server | “:8080” |
--port | Webhook server port | 9443 |
--profiling | Enable profiling via web interface host:port/debug/pprof/ | false |
--tls-cert-dir | Directory with server TLS certificate and key (must contain a tls.crt and tls.key file | |
--use-only-image-pull-secrets | If set, only the credentials from the image pull secrets of the pod are used to access the OCI registry. Otherwise, the node identity and docker config are also used. | false |
--version | prints version information and quits; –version=vX.Y.Z… sets the reported version |
Lakom Cosign Public Keys Configuration File
Lakom cosign public keys configuration file should be YAML or JSON formatted. It
can set multiple trusted keys, as each key must be given a name. The supported
types of public keys are RSA, ECDSA and Ed25519. The RSA keys can be
additionally configured with a signature verification algorithm specifying the
scheme and hash function used during signature verification. As of now ECDSA
and Ed25519 keys cannot be configured with specific algorithm.
publicKeys:
- name: example-public-key
algorithm: RSASSA-PSS-SHA256
key: |-
-----BEGIN PUBLIC KEY-----
MFwwDQYJKoZIhvcNAQEBBQADSwAwSAJBAPeQXbIWMMXYV+9+j9b4jXTflnpfwn4E
GMrmqYVhm0sclXb2FPP5aV/NFH6SZdHDZcT8LCNsNgxzxV4N+UE/JIsCAwEAAQ==
-----END PUBLIC KEY-----
Here:
nameis logical human friendly name of the key.algorithmis the algorithm that has to be used to verify the signature, see Supported RSA Signature Verification Algorithms for the list of supported algorithms.keyis the cryptographic public key that will be used for image signature validation.
Supported RSA Signature Verification Algorithms
RSASSA-PKCS1-v1_5-SHA256: usesRSASSA-PKCS1-v1_5scheme withSHA256hash funcRSASSA-PKCS1-v1_5-SHA384: usesRSASSA-PKCS1-v1_5scheme withSHA384hash funcRSASSA-PKCS1-v1_5-SHA512: usesRSASSA-PKCS1-v1_5scheme withSHA512hash funcRSASSA-PSS-SHA256: usesRSASSA-PSSscheme withSHA256hash funcRSASSA-PSS-SHA384: usesRSASSA-PSSscheme withSHA384hash funcRSASSA-PSS-SHA512: usesRSASSA-PSSscheme withSHA512hash func
Supported Resources for Verification
By default, Lakom validates only Pod resources in the clusters that it covers.
However, it also has the capabilities to validate the following Gardener specific resources:
controllerdeployments.core.gardener.cloud/v1gardenlets.seedmanagement.gardener.cloud/v1alpha1extensions.operator.gardener.cloud/v1alpha1
Important
When deploying Lakom via the helm chart in
/charts/lakom, theadmissionConfig.ruleskey can be fully customized to include any of the listed resources above. Make sure that they are registered with the same group & versions as the ones listed above. Any difference will cause Lakom to skip validation and approve the request, making it a security risk.
5.5.5.3 - Oci Registries
OCI Registries
This document aims to introduce the reader to the general architecture of OCI Registries, their history and jargon that might be encountered.
History of Container Registries
Most readers might be familiar with the container registry that was introduced by Docker. It aims to provide a way for developers to store and distribute container images that can be used for running applications in containers.
In the beginning, the registry was meant to only host images in a way that the different layers of the image could be downloaded in parallel, while being assembled on the client side.
In June 2015, multiple companies agreed to standardize the container image format, including its distribution and runtime. This was the birth of the Open Container Initiative (OCI).
Understanding OCI Registries
The most important document that pertains to OCI Registries in the case of Lakom is the OCI distribution spec. It outlines the way that artifacts shall be stored and fetched from a registry that adheres to the OCI standard.
OCI Registries are meant to store content. While in the beginning the main problem that they were trying to solve was image storage, during the evolution of the image registry concept, a decision was made to make it more general for storage of any form of objects, sometimes called artifacts.
An artifact is an abstract idea of multiple components that together describe how an object is built along with storing metadata about the object.
To implement this, every OCI registry has to expose an API for creating 3 types of objects:
- Blobs
- Manifests
- Tags
Blobs
A blob is just a set of bytes. Nothing more. The important part about blobs is that they are content addressable. Content Addressable Storage (CAS) is a method of storing data in such a way that the address of the data is derived from the data itself. This means that if you store the same blob twice, it will be stored only once, and the address of the blob will be the same. This is achieved by using the digest of the blob as the address.
This is the actual mechanism for allowing images to be optimal in terms of storage. Since most images begin by depending on the same base image, this means that it can be stored only once and referenced by multiple images.
Manifests
A manifest is just a JSON document. It is stored separately from the blobs. But similarly to the blobs, it is also content addressable. The manifest gets formatted to a canonical form and then hashed. The hash becomes the address of the manifest.
Where manifests become powerful is when they are used to reference to other manifests or blobs. These references are called OCI Content Descriptors. For example, the Image Manifest that most readers would be familiar with contains a list of layers that are used to build the image. Each layer is a reference to a blob.
An additional reference outside the layer references is used for storing additional configuration. More info can be found in the official OCI Image Manifest spec.
The term artifact is just a generalization over the Image Manifest idea.
The Image Manifest has a specific format that can be found in the aforementioned OCI Image Manifest spec.
The important field is the .config.mediaType field. Based on the official guidelines,
it can be used for defining types other than an image. More info can be found here.
Combining all of these ideas, we can see that artifacts can be represented by 1
specific object - a manifest. That manifest, based on the media type in the config, can be
interpreted by different programs for their specific use case. Eg. a Helm chart.
Helm charts specifically have a mediaType of application/vnd.cncf.helm.config.v1+json.
Layers, too, have a media type. The media type of a layer when the artifact
is a helm chart is one of:
- application/vnd.cncf.helm.config.v1+json
- application/vnd.cncf.helm.chart.content.v1.tar+gzip
- application/vnd.cncf.helm.chart.provenance.v1.prov
More info specifically on Helm charts as OCI Artifacts can be found here: Helm OCI MediaTypes.
Tags
While manifests and blobs being content addressable is nice, it becomes hard to address them in a human-readable format. Tags allow us to add a reference to a given manifest that differs from the digest of the object.
Normally, whenever we push an image to a registry, if we don’t give it an
explicit tag, the registry would most likely give it the tag latest. This,
actually is not mandatory based on the distribution spec. Manifests don’t
require that they have a tag.
Multiple tags can point to the same manifest.
Cosign
Cosign is generally a part of the bigger project called sigstore. Sigstore is an “open-source project for improving software supply chain security”. It aims for developers to have a hassle-free way to sign their artifacts while leveraging other components that add additional layers of security to the signature process. Eg. Rekor and Fulcio.
Cosign is a CLI tool aiming to tie all the components of sigstore together. In our specific case, we use it only as a format for creating signatures and then verifying them. In theory, we wouldn’t need to use Cosign for this, but it uses a popular format for the signatures and the libraries help us save work.
In the context of Lakom, what interests us is how Cosign signs OCI artifacts
and how it stores them.
The signing process in a nutshell is the following – Sign(sha256(SimpleSigningPayload(sha256(Image Manifest)))), where:
- Image Manifest is what it says. Just the manifest of the image (artifact).
- sha256 is the hashing algorithm used.
- SimpleSigningPayload is the interesting part here. Instead of just signing the
hash of the manifest itself, the hash itself is packed into a JSON doc that
is called the
SimpleSigningPayload. Example payload:
{
"critical": {
"identity": {
"docker-reference": "testing/manifest"
},
"image": {
"Docker-manifest-digest": "sha256:20be...fe55"
},
"type": "cosign container image signature"
},
"optional": {
"creator": "atomic",
"timestamp": 1458239713
}
}
We can see that the hash of the manifest is stored in the Docker-manifest-digest.
Now this object is the one that gets signed using our private key. The signed
version of this objest is the one that gets stored and gets used for
verification.
Storage of the signature is done via an image manifest that gets uploaded
in the same repo as the image, but tagged with sha256-<container-image-digest>.sig.
Thus, the signature discovery mechanism is to just fetch the image digest
that is tagged with the aforementioned tag.
More info on this whole process can be found here.
Lakom relies on the cosign libraries to automate this whole process. When validating an artifact, if we know its digest, we can fetch the signature and verify it. If the signature is valid, we can be sure that the artifact has not been tampered with.
5.5.5.4 - Shoot Extension
Introduction
This extension implements cosign image verification. It is strictly limited only to the kubernetes system components deployed by Gardener and other Gardener Extensions in the kube-system namespace of a shoot cluster.
Shoot Feature Gate
In most of the Gardener setups the shoot-lakom-service extension is enabled globally and thus can be configured per shoot cluster. Please adapt the shoot specification by the configuration shown below to disable the extension individually.
kind: Shoot
...
spec:
resources:
- name: lakom-ref
resourceRef:
apiVersion: v1
kind: Secret
name: lakom-secret
extensions:
- type: shoot-lakom-service
disabled: true
providerConfig:
apiVersion: lakom.extensions.gardener.cloud/v1alpha1
kind: LakomConfig
scope: KubeSystem
trustedKeysResourceName: lakom-ref
...
Scope
The scope field instruct lakom which pods to validate. The possible values are:
KubeSystemLakom will validate all pods in thekube-systemnamespace.KubeSystemManagedByGardenerLakom will validate all pods in thekube-systemnamespace that are annotated with “managed-by/gardener”. This is the default value.ClusterLakom will validate all pods in all namespaces.
TrustedKeysResourceName
Lakom, by default, tries to verify only workloads that belong to Gardener. Because of this, the only public keys that it uses to do its job are the ones for the Gardener workload.
If you’d like to use Lakom as a tool for verifying your own workload, you’ll need to add your own public keys to the ones that Lakom is already using. This can be achieved using Gardener referenced resources. More information about the keys and their format can be found here.
Simply:
- Create a secret in your project namespace that contains a field
keyswith your keys as a value. Example keys:
- name: example-client-key1
algorithm: RSASSA-PSS-SHA256
key: |-
-----BEGIN PUBLIC KEY-----
MFwwDQYJKoZIhvcNAQEBBQADSwAwSAJBAPeQXbIWMMXYV+9+j9b4jXTflnpfwn4E
GMrmqYVhm0sclXb2FPP5aV/NFH6SZdHDZcT8LCNsNgxzxV4N+UE/JIsCAwEAAQ==
-----END PUBLIC KEY-----
- name: example-client-key2
algorithm: RSASSA-PSS-SHA256
key: |-
-----BEGIN PUBLIC KEY-----
MFwwDQYJKoZIhvcNAQEBBQADSwAwSAJBAPeQXbIWMMXYV+9+j9b4jXTflnpfwn4E
GMrmqYVhm0sclXb2FPP5aV/NFH6SZdHDZcT8LCNsNgxzxV4N+UE/JIsCAwEAAQ==
-----END PUBLIC KEY-----
- Add a reference to your secret via the
resourcesfield in the shoot spec as shown above. - Add the name of your referenece in
trustedKeysResourceNamein the provider config as shown above.
Now, whenever Lakom tries to verify a Pod, it will make sure to use your public keys as well.
5.5.6 - Networking Problem Detector
Gardener Extension for Network Problem Detector
Project Gardener implements the automated management and operation of Kubernetes clusters as a service. Its main principle is to leverage Kubernetes concepts for all of its tasks.
Recently, most of the vendor specific logic has been developed in-tree. However, the project has grown to a size where it is very hard to extend, maintain, and test. With GEP-1 we have proposed how the architecture can be changed in a way to support external controllers that contain their very own vendor specifics. This way, we can keep Gardener core clean and independent.
This controller implements Gardener’s extension contract for the shoot-networking-problemdetector extension.
An example for a ControllerRegistration resource that can be used to register this controller to Gardener can be found here.
Please find more information regarding the extensibility concepts and a detailed proposal here.
Extension Resources
Currently there is nothing to specify in the extension spec.
Example extension resource:
apiVersion: extensions.gardener.cloud/v1alpha1
kind: Extension
metadata:
name: extension-shoot-networking-problemdetector
namespace: shoot--project--abc
spec:
When an extension resource is reconciled, the extension controller will create two daemonsets nwpd-agent-pod-net and nwpd-agent-node-net deploying
the “network problem detector agent”.
These daemon sets perform and collect various checks between all nodes of the Kubernetes cluster, to its Kube API server and/or external endpoints.
Checks are performed using TCP connections, PING (ICMP) or mDNS (UDP).
More details about the network problem detector agent can be found in its repository gardener/network-problem-detector.
Please note, this extension controller relies on the Gardener-Resource-Manager to deploy k8s resources to seed and shoot clusters.
How to start using or developing this extension controller locally
You can run the controller locally on your machine by executing make start.
We are using Go modules for Golang package dependency management and Ginkgo/Gomega for testing.
Feedback and Support
Feedback and contributions are always welcome!
Please report bugs or suggestions as GitHub issues or reach out on Slack (join the workspace here).
Learn more!
Please find further resources about out project here:
5.5.6.1 - Deployment
Gardener Networking Policy Filter for Shoots
Introduction
Gardener allows shoot clusters to add network problem observability using the network problem detector.
To support this the Gardener must be installed with the shoot-networking-problemdetector extension.
Configuration
To generally enable the networking problem detector for shoot objects the shoot-networking-problemdetector extension must be registered by providing an appropriate extension registration in the garden cluster.
Here it is possible to decide whether the extension should be always available for all shoots or whether the extension must be separately enabled per shoot.
If the extension should automatically be used for all shoots the autoEnable field should be set to [shoot].
apiVersion: core.gardener.cloud/v1beta1
kind: ControllerRegistration
...
spec:
resources:
- kind: Extension
type: shoot-networking-problemdetector
autoEnable: [shoot]
ControllerRegistration
An example of a ControllerRegistration for the shoot-networking-problemdetector can be found at controller-registration.yaml.
The ControllerRegistration contains a Helm chart which eventually deploys the shoot-networking-problemdetector to seed clusters. It offers some configuration options, mainly to set up a static filter list or provide the configuration for downloading the filter list from a service endpoint.
apiVersion: core.gardener.cloud/v1beta1
kind: ControllerDeployment
...
values:
#networkProblemDetector:
# defaultPeriod: 30s
Enablement for a Shoot
If the shoot network problem detector is not globally enabled by default (depends on the extension registration on the garden cluster), it can be enabled per shoot. To enable the service for a shoot, the shoot manifest must explicitly add the shoot-networking-problemdetector extension.
apiVersion: core.gardener.cloud/v1beta1
kind: Shoot
...
spec:
extensions:
- type: shoot-networking-problemdetector
...
If the shoot network problem detector is globally enabled by default, it can be disabled per shoot. To disable the service for a shoot, the shoot manifest must explicitly state it.
apiVersion: core.gardener.cloud/v1beta1
kind: Shoot
...
spec:
extensions:
- type: shoot-networking-problemdetector
disabled: true
...
5.5.6.2 - Shoot Networking Problemdetector
Register Shoot Networking Filter Extension in Shoot Clusters
Introduction
Within a shoot cluster, it is possible to enable the network problem detector. It is necessary that the Gardener installation your shoot cluster runs in is equipped with a shoot-networking-problemdetector extension. Please ask your Gardener operator if the extension is available in your environment.
Shoot Feature Gate
In most of the Gardener setups the shoot-networking-problemdetector extension is not enabled globally and thus must be configured per shoot cluster. Please adapt the shoot specification by the configuration shown below to activate the extension individually.
kind: Shoot
...
spec:
extensions:
- type: shoot-networking-problemdetector
...
Opt-out
If the shoot network problem detector is globally enabled by default, it can be disabled per shoot. To disable the service for a shoot, the shoot manifest must explicitly state it.
apiVersion: core.gardener.cloud/v1beta1
kind: Shoot
...
spec:
extensions:
- type: shoot-networking-problemdetector
disabled: true
...
5.5.7 - Node Audit Logging
Gardener Extension to configure rsyslog with relp module
Gardener extension controller which configures the rsyslog and auditd services installed on shoot nodes.
Usage
- Configuring the Rsyslog Relp Extension - learn what is the use-case for rsyslog-relp, how to enable it and configure it
Local Setup and Development
- Deploying the Rsyslog Relp Extension Locally - learn how to set up a local development environment
- Developer Docs for Gardener Shoot Rsyslog Relp Extension - learn about the inner workings
5.5.7.1 - Configuration
Configuring the Rsyslog Relp Extension
Introduction
As a cluster owner, you might need audit logs on a Shoot node level. With these audit logs you can track actions on your nodes like privilege escalation, file integrity, process executions, and who is the user that performed these actions. Such information is essential for the security of your Shoot cluster. Linux operating systems collect such logs via the auditd and journald daemons. However, these logs can be lost if they are only kept locally on the operating system. You need a reliable way to send them to a remote server where they can be stored for longer time periods and retrieved when necessary.
Rsyslog offers a solution for that. It gathers and processes logs from auditd and journald and then forwards them to a remote server. Moreover, rsyslog can make use of the RELP protocol so that logs are sent reliably and no messages are lost.
The shoot-rsyslog-relp extension is used to configure rsyslog on each Shoot node so that the following can take place:
Rsyslogreads logs from theauditdandjournaldsockets.- The logs are filtered based on the program name, syslog severity and content of the message.
- The logs are enriched with metadata containing the name of the Project in which the Shoot is created, the name of the Shoot, the UID of the Shoot, and the hostname of the node on which the log event occurred.
- The enriched logs are sent to the target remote server via the RELP protocol.
The following graph shows a rough outline of how that looks in a Shoot cluster:
Shoot Configuration
The extension is not globally enabled and must be configured per Shoot cluster. The Shoot specification has to be adapted to include the shoot-rsyslog-relp extension configuration, which specifies the target server to which logs are forwarded, its port, and some optional rsyslog settings described in the examples below.
Below is an example shoot-rsyslog-relp extension configuration as part of the Shoot spec:
kind: Shoot
metadata:
name: bar
namespace: garden-foo
...
spec:
extensions:
- type: shoot-rsyslog-relp
providerConfig:
apiVersion: rsyslog-relp.extensions.gardener.cloud/v1alpha1
kind: RsyslogRelpConfig
# Set the target server to which logs are sent. The server must support the RELP protocol.
target: some.rsyslog-relp.server
# Set the port of the target server.
port: 10250
# Define rules to select logs from which programs and with what syslog severity
# are forwarded to the target server.
loggingRules:
- severity: 4
programNames: ["kubelet", "audisp-syslog"]
# Set regular expression to match or exclude messages based on their content.
# messageContent:
# regex: "foo"
# exclude: "bar"
- severity: 1
programNames: ["audisp-syslog"]
# Define an interval of 90 seconds at which the current connection is broken and re-established.
# By default this value is 0 which means that the connection is never broken and re-established.
rebindInterval: 90
# Set the timeout for relp sessions to 90 seconds. If set too low, valid sessions may be considered
# dead and tried to recover.
timeout: 90
# Set how often an action is retried before it is considered to have failed.
# Failed actions discard log messages. Setting `-1` here means that messages are never discarded.
resumeRetryCount: -1
# Configures rsyslog to report continuation of action suspension, e.g. when the connection to the target
# server is broken.
reportSuspensionContinuation: true
# Add tls settings if tls should be used to encrypt the connection to the target server.
tls:
enabled: true
# Use `name` authentication mode for the tls connection.
authMode: name
# Only allow connections if the server's name is `some.rsyslog-relp.server`
permittedPeer:
- "some.rsyslog-relp.server"
# Reference to the resource which contains certificates used for the tls connection.
# It must be added to the `.spec.resources` field of the Shoot.
secretReferenceName: rsyslog-relp-tls
# Instruct librelp on the Shoot nodes to use the gnutls tls library.
tlsLib: gnutls
# Add auditConfig settings if you want to customize node level auditing.
auditConfig:
enabled: true
# Reference to the resource which contains the audit configuration.
# It must be added to the `.spec.resources` field of the Shoot.
configMapReferenceName: audit-config
resources:
# Add the rsyslog-relp-tls secret in the resources field of the Shoot spec.
- name: rsyslog-relp-tls
resourceRef:
apiVersion: v1
kind: Secret
name: rsyslog-relp-tls-v1
- name: audit-config
resourceRef:
apiVersion: v1
kind: ConfigMap
name: audit-config-v1
...
Choosing Which Log Messages to Send to the Target Server
The .loggingRules field defines rules about which logs should be sent to the target server. When a log is processed by rsyslog, it is compared against the list of rules in order. If the program name, the syslog severity of the log messages and the message content matches the rule, the message is forwarded to the target server. The following table describes the syslog severity and their corresponding codes:
Numerical Severity
Code
0 Emergency: system is unusable
1 Alert: action must be taken immediately
2 Critical: critical conditions
3 Error: error conditions
4 Warning: warning conditions
5 Notice: normal but significant condition
6 Informational: informational messages
7 Debug: debug-level messages
Below is an example with a .loggingRules section that will only forward logs from the kubelet program with syslog severity of 6 or lower that don’t contain “bar” and any other program with syslog severity of 2 or lower:
apiVersion: rsyslog-relp.extensions.gardener.cloud/v1alpha1
kind: RsyslogRelpConfig
target: localhost
port: 1520
loggingRules:
- severity: 6
programNames: ["kubelet"]
messageContent:
exclude: "bar"
- severity: 2
You can use a minimal shoot-rsyslog-relp extension configuration to forward all logs to the target server:
apiVersion: rsyslog-relp.extensions.gardener.cloud/v1alpha1
kind: RsyslogRelpConfig
target: some.rsyslog-relp.server
port: 10250
loggingRules:
- severity: 7
Securing the Communication to the Target Server with TLS
The communication to the target server is not encrypted by default. To enable encryption, set the .tls.enabled field in the shoot-rsyslog-relp extension configuration to true. In this case, an immutable secret which contains the TLS certificates used to establish the TLS connection to the server must be created in the same project namespace as your Shoot.
An example Secret is given below:
Note: The secret must be immutable
kind: Secret
apiVersion: v1
metadata:
name: rsyslog-relp-tls-v1
namespace: garden-foo
immutable: true
data:
ca: |
-----BEGIN BEGIN RSA PRIVATE KEY-----
...
-----END RSA PRIVATE KEY-----
crt: |
-----BEGIN BEGIN RSA PRIVATE KEY-----
...
-----END RSA PRIVATE KEY-----
key: |
-----BEGIN BEGIN RSA PRIVATE KEY-----
...
-----END RSA PRIVATE KEY-----
The Secret must be referenced in the Shoot’s .spec.resources field and the corresponding resource entry must be referenced in the .tls.secretReferenceName of the shoot-rsyslog-relp extension configuration:
kind: Shoot
metadata:
name: bar
namespace: garden-foo
...
spec:
extensions:
- type: shoot-rsyslog-relp
providerConfig:
apiVersion: rsyslog-relp.extensions.gardener.cloud/v1alpha1
kind: RsyslogRelpConfig
target: some.rsyslog-relp.server
port: 10250
loggingRules:
- severity: 7
tls:
enabled: true
secretReferenceName: rsyslog-relp-tls
resources:
- name: rsyslog-relp-tls
resourceRef:
apiVersion: v1
kind: Secret
name: rsyslog-relp-tls-v1
...
You can set a few additional parameters for the TLS connection: .tls.authMode, tls.permittedPeer, and tls.tlsLib. Refer to the rsyslog documentation for more information on these parameters:
Configuring the Audit Daemon on the Shoot Nodes
The shoot-rsyslog-relp extension also allows you to configure the Audit Daemon (auditd) on the Shoot nodes.
By default, the audit rules located under the /etc/audit/rules.d directory on your Shoot’s nodes will be moved to /etc/audit/rules.d.original and the following rules will be placed under the /etc/audit/rules.d directory: 00-base-config.rules, 10-privilege-escalation.rules, 11-privilege-special.rules, 12-system-integrity.rules. Next, augerules --load will be called and the audit daemon (auditd) restarted so that the new rules can take effect.
Alternatively, you can define your own auditd rules to be placed on your Shoot’s nodes by using the following configuration:
apiVersion: rsyslog-relp.extensions.gardener.cloud/v1alpha1
kind: Auditd
auditRules: |
## First rule - delete all existing rules
-D
## Now define some custom rules
-a exit,always -F arch=b64 -S setuid -S setreuid -S setgid -S setregid -F auid>0 -F auid!=-1 -F key=privilege_escalation
-a exit,always -F arch=b64 -S execve -S execveat -F euid=0 -F auid>0 -F auid!=-1 -F key=privilege_escalation
In this case the original rules are also backed up in the /etc/audit/rules.d.original directory.
To deploy this configuration, it must be embedded in an immutable ConfigMap.
Note
The data key storing this configuration must be named
auditd.
An example ConfigMap is given below:
apiVersion: v1
kind: ConfigMap
metadata:
name: audit-config-v1
namespace: garden-foo
immutable: true
data:
auditd: |
apiVersion: rsyslog-relp.extensions.gardener.cloud/v1alpha1
kind: Auditd
auditRules: |
## First rule - delete all existing rules
-D
## Now define some custom rules
-a exit,always -F arch=b64 -S setuid -S setreuid -S setgid -S setregid -F auid>0 -F auid!=-1 -F key=privilege_escalation
-a exit,always -F arch=b64 -S execve -S execveat -F euid=0 -F auid>0 -F auid!=-1 -F key=privilege_escalation
After creating such a ConfigMap, it must be included in the Shoot’s spec.resources array and then referenced from the providerConfig.auditConfig.configMapReferenceName field in the shoot-rsyslog-relp extension configuration.
An example configuration is given below:
kind: Shoot
metadata:
name: bar
namespace: garden-foo
...
spec:
extensions:
- type: shoot-rsyslog-relp
providerConfig:
apiVersion: rsyslog-relp.extensions.gardener.cloud/v1alpha1
kind: RsyslogRelpConfig
target: some.rsyslog-relp.server
port: 10250
loggingRules:
- severity: 7
auditConfig:
enabled: true
configMapReferenceName: audit-config
resources:
- name: audit-config
resourceRef:
apiVersion: v1
kind: ConfigMap
name: audit-config-v1
Finally, by setting providerConfig.auditConfig.enabled to false in the shoot-rsyslog-relp extension configuration, the original audit rules on your Shoot’s nodes will not be modified and auditd will not be restarted.
Examples on how the providerConfig.auditConfig.enabled field functions are given below:
- The following deploys the extension default audit rules as of today:
providerConfig: auditConfig: enabled: true - The following deploys only the rules specified in the referenced ConfigMap:
providerConfig: auditConfig: enabled: true configMapReferenceName: audit-config - Both of the following do not deploy any audit rules:
providerConfig: auditConfig: enabled: false configMapReferenceName: audit-configproviderConfig: auditConfig: enabled: false
5.5.7.2 - Deploying Rsyslog Relp Extension Remotely
Deploying Rsyslog Relp Extension Remotely
This document will walk you through running the Rsyslog Relp extension controller on a remote seed cluster and the rsyslog relp admission component in your local garden cluster for development purposes. This guide uses Gardener’s setup with provider extensions and builds on top of it.
If you encounter difficulties, please open an issue so that we can make this process easier.
Prerequisites
- Make sure that you have a running Gardener setup with provider extensions. The steps to complete this can be found in the Deploying Gardener Locally and Enabling Provider-Extensions guide.
- Make sure you are running Gardener version
>= 1.95.0or the latest version of the master branch.
Setting up the Rsyslog Relp Extension
Important: Make sure that your KUBECONFIG env variable is targeting the local Gardener cluster!
The location of the Gardener project from the Gardener setup is expected to be under the same root as this repository (e.g. ~/go/src/github.com/gardener/). If this is not the case, the location of Gardener project should be specified in GARDENER_REPO_ROOT environment variable:
export GARDENER_REPO_ROOT="<path_to_gardener_project>"
Then you can run:
make remote-extension-up
In case you have added additional Seeds you can specify the seed name:
make remote-extension-up SEED_NAME=<seed-name>
Creating a Shoot Cluster
Once the above step is completed, you can create a Shoot cluster. In order to create a Shoot cluster, please create your own Shoot definition depending on providers on your Seed cluster.
Configuring the Shoot Cluster and deploying the Rsyslog Relp Echo Server
To be able to properly test the rsyslog relp extension you need a running rsyslog relp echo server to which logs from the Shoot nodes can be sent. To deploy the server and configure the rsyslog relp extension on your Shoot cluster you can run:
make configure-shoot SHOOT_NAME=<shoot-name> SHOOT_NAMESPACE=<shoot-namespace>
This command will deploy an rsyslog relp echo server in your Shoot cluster in the rsyslog-relp-echo-server namespace.
It will also add configuration for the shoot-rsyslog-relp extension to your Shoot spec by patching it with ./example/extension/<shoot-name>--<shoot-namespace>--extension-config-patch.yaml. This file is automatically copied from extension-config-patch.yaml.tmpl in the same directory when you run make configure-shoot for the first time. The file also includes explanations of the properties you should set or change.
The command will also deploy the rsyslog-relp-tls secret in case you wish to enable tls.
Tearing Down the Development Environment
To tear down the development environment, delete the Shoot cluster or disable the shoot-rsyslog-relp extension in the Shoot’s specification. When the extension is not used by the Shoot anymore, you can run:
make remote-extension-down
The make target will delete the ControllerDeployment and ControllerRegistration of the extension, and the shoot-rsyslog-relp admission helm deployment.
5.5.7.3 - Getting Started
Deploying Rsyslog Relp Extension Locally
This document will walk you through running the Rsyslog Relp extension and a fake rsyslog relp service on your local machine for development purposes. This guide uses Gardener’s local development setup and builds on top of it.
If you encounter difficulties, please open an issue so that we can make this process easier.
Prerequisites
- Make sure that you have a running local Gardener setup. The steps to complete this can be found here.
- Make sure you are running Gardener version
>= 1.74.0or the latest version of the master branch.
Setting up the Rsyslog Relp Extension
Important: Make sure that your KUBECONFIG env variable is targeting the local Gardener cluster!
make extension-up
This will build the shoot-rsyslog-relp, shoot-rsyslog-relp-admission, and shoot-rsyslog-relp-echo-server images and deploy the needed resources and configurations in the garden cluster. The shoot-rsyslog-relp-echo-server will act as development replacement of a real rsyslog relp server.
Creating a Shoot Cluster
Once the above step is completed, we can deploy and configure a Shoot cluster with default rsyslog relp settings.
kubectl apply -f ./example/shoot.yaml
Once the Shoot’s namespace is created, we can create a networkpolicy that will allow egress traffic from the rsyslog on the Shoot’s nodes to the rsyslog-relp-echo-server that serves as a fake rsyslog target server.
kubectl apply -f ./example/local/allow-machine-to-rsyslog-relp-echo-server-netpol.yaml
Currently, the Shoot’s nodes run Ubuntu, which does not have the rsyslog-relp and auditd packages installed, so the configuration done by the extension has no effect.
Once the Shoot is created, we have to manually install the rsyslog-relp and auditd packages:
kubectl -n shoot--local--local exec -it $(kubectl -n shoot--local--local get po -l app=machine,machine-provider=local -o name) -- bash -c "
apt-get update && \
apt-get install -y rsyslog-relp auditd && \
systemctl enable rsyslog.service && \
systemctl start rsyslog.service"
Once that is done we can verify that log messages are forwarded to the rsyslog-relp-echo-server by checking its logs.
kubectl -n rsyslog-relp-echo-server logs deployment/rsyslog-relp-echo-server
Making Changes to the Rsyslog Relp Extension
Changes to the rsyslog relp extension can be applied to the local environment by repeatedly running the make recipe.
make extension-up
Tearing Down the Development Environment
To tear down the development environment, delete the Shoot cluster or disable the shoot-rsyslog-relp extension in the Shoot’s spec. When the extension is not used by the Shoot anymore, you can run:
make extension-down
This will delete the ControllerRegistration and ControllerDeployment of the extension, the shoot-rsyslog-relp-admission deployment, and the rsyslog-relp-echo-server deployment.
Maintaining the Publicly Available Image for the rsyslog-relp Echo Server
The testmachinery tests use an rsyslog-relp-echo-server image from a publicly available repository. The one which is currently used is eu.gcr.io/gardener-project/gardener/extensions/shoot-rsyslog-relp-echo-server:v0.1.0.
Sometimes it might be necessary to update the image and publish it, e.g. when updating the alpine base image version specified in the repository’s Dokerfile.
To do that:
Bump the version with which the image is built in the Makefile.
Build the
shoot-rsyslog-relp-echo-serverimage:make echo-server-docker-imageOnce the image is built, push it to
gcrwith:make push-echo-server-imageFinally, bump the version of the image used by the
testmachinerytests here.Create a PR with the changes.
5.5.7.4 - Monitoring
Monitoring
The shoot-rsyslog-relp extension exposes metrics for the rsyslog service running on a Shoot’s nodes so that they can be easily viewed by cluster owners and operators in the Shoot’s Prometheus and Plutono instances. The exposed monitoring data offers valuable insights into the operation of the rsyslog service and can be used to detect and debug ongoing issues. This guide describes the various metrics, alerts and logs available to cluster owners and operators.
Metrics
Metrics for the rsyslog service originate from its impstats module. These include the number of messages in the various queues, the number of ingested messages, the number of processed messages by configured actions, system resources used by the rsyslog service, and others. More information about them can be found in the impstats documentation and the statistics counter documentation. They are exposed via the node-exporter running on each Shoot node and are scraped by the Shoot’s Prometheus instance.
These metrics can also be viewed in a dedicated dashboard named Rsyslog Stats in the Shoot’s Plutono instance. You can select the node for which you wish the metrics to be displayed from the Node dropdown menu (by default metrics are summed over all nodes).
Following is a list of all exposed rsyslog metrics. The name and origin labels can be used to determine wether the metric is for: a queue, an action, plugins or system stats; the node label can be used to determine the node the metric originates from:
rsyslog_pstat_submitted
Number of messages that were submitted to the rsyslog service from its input. Currently rsyslog uses the /run/systemd/journal/syslog socket as input.
- Type: Counter
- Labels:
namenodeorigin
rsyslog_pstat_processed
Number of messages that are successfully processed by an action and sent to the target server.
- Type: Counter
- Labels:
namenodeorigin
rsyslog_pstat_failed
Number of messages that could not be processed by an action nor sent to the target server.
- Type: Counter
- Labels:
namenodeorigin
rsyslog_pstat_suspended
Total number of times an action suspended itself. Note that this counts the number of times the action transitioned from active to suspended state. The counter is no indication of how long the action was suspended or how often it was retried.
- Type: Counter
- Labels:
namenodeorigin
rsyslog_pstat_suspended_duration
The total number of seconds this action was disabled.
- Type: Counter
- Labels:
namenodeorigin
rsyslog_pstat_resumed
The total number of times this action resumed itself. A resumption occurs after the action has detected that a failure condition does no longer exist.
- Type: Counter
- Labels:
namenodeorigin
rsyslog_pstat_utime
User time used in microseconds.
- Type: Counter
- Labels:
namenodeorigin
rsyslog_pstat_stime
System time used in microsends.
- Type: Counter
- Labels:
namenodeorigin
rsyslog_pstat_maxrss
Maximum resident set size
- Type: Gauge
- Labels:
namenodeorigin
rsyslog_pstat_minflt
Total number of minor faults the task has made per second, those which have not required loading a memory page from disk.
- Type: Counter
- Labels:
namenodeorigin
rsyslog_pstat_majflt
Total number of major faults the task has made per second, those which have required loading a memory page from disk.
- Type: Counter
- Labels:
namenodeorigin
rsyslog_pstat_inblock
Filesystem input operations.
- Type: Counter
- Labels:
namenodeorigin
rsyslog_pstat_oublock
Filesystem output operations.
- Type: Counter
- Labels:
namenodeorigin
rsyslog_pstat_nvcsw
Voluntary context switches.
- Type: Counter
- Labels:
namenodeorigin
rsyslog_pstat_nivcsw
Involuntary context switches.
- Type: Counter
- Labels:
namenodeorigin
rsyslog_pstat_openfiles
Number of open files.
- Type: Counter
- Labels:
namenodeorigin
rsyslog_pstat_size
Messages currently in queue.
- Type: Gauge
- Labels:
namenodeorigin
rsyslog_pstat_enqueued
Total messages enqueued.
- Type: Counter
- Labels:
namenodeorigin
rsyslog_pstat_full
Times queue was full.
- Type: Counter
- Labels:
namenodeorigin
rsyslog_pstat_discarded_full
Messages discarded due to queue being full.
- Type: Counter
- Labels:
namenodeorigin
rsyslog_pstat_discarded_nf
Messages discarded when queue not full.
- Type: Counter
- Labels:
namenodeorigin
rsyslog_pstat_maxqsize
Maximum size queue has reached.
- Type: Gauge
- Labels:
namenodeorigin
rsyslog_augenrules_load_success
Shows whether the augenrules --load command was executed successfully or not on the node.
- Type: Gauge
- Labels:
node
Alerts
There are three alerts defined for the rsyslog service in the Shoot’s Prometheus instance:
RsyslogTooManyRelpActionFailures
This indicates that the cumulative failure rate in processing relp action messages is greater than 2%. In other words, it compares the rate of processed relp action messages to the rate of failed relp action messages and fires an alert when the following expression evaluates to true:
sum(rate(rsyslog_pstat_failed{origin="core.action",name="rsyslg-relp"}[5m])) / sum(rate(rsyslog_pstat_processed{origin="core.action",name="rsyslog-relp"}[5m])) > bool 0.02`
RsyslogRelpActionProcessingRateIsZero
This indicates that no messages are being sent to the upstream rsyslog target by the relp action. An alert is fired when the following expression evaluates to true:
rate(rsyslog_pstat_processed{origin="core.action",name="rsyslog-relp"}[5m]) == 0
RsyslogRelpAuditRulesNotLoadedSuccessfully
This indicates that augenrules --load was not executed successfully when called to load the configured audit rules. You should check if the auditd configuration you provided is valid. An alert is fired when the following expression evaluates to true:
absent(rsyslog_augenrules_load_success == 1)
Users can subscribe to these alerts by following the Gardener alerting guide.
Logging
There are two ways to view the logs of the rsyslog service running on the Shoot’s nodes - either using the Explore tab of the Shoot’s Plutono instance, or ssh-ing directly to a node.
To view logs in Plutono, navigate to the Explore tab and select vali from the Explore dropdown menu. Afterwards enter the following vali query:
{nodename="<name-of-node>"} |~ "\"unit\":\"rsyslog.service\""
Notice that you cannot use the unit label to filter for the rsyslog.service unit logs. Instead, you have to grep for the service as displayed in the example above.
To view logs when directly ssh-ing to a node in the Shoot cluster, use either of the following commands on the node:
systemctl status rsyslog
journalctl -u rsyslog
5.5.7.5 - Shoot Rsyslog Relp
Developer Docs for Gardener Shoot Rsyslog Relp Extension
This document outlines how Shoot reconciliation and deletion works for a Shoot with the shoot-rsyslog-relp extension enabled.
Shoot Reconciliation
This section outlines how the reconciliation works for a Shoot with the shoot-rsyslog-relp extension enabled.
Extension Enablement / Reconciliation
This section outlines how the extension enablement/reconciliation works, e.g., the extension has been added to the Shoot spec.
- As part of the Shoot reconciliation flow, the gardenlet deploys the Extension resource.
- The shoot-rsyslog-relp extension reconciles the Extension resource. pkg/controller/lifecycle/actuator.go contains the implementation of the extension.Actuator interface. The reconciliation of an Extension of type
shoot-rsyslog-relponly deploys the necessary monitoring configuration - theshoot-rsyslog-relp-dashboardsConfigMap which contains the definitions for: Plutono dashboard for the Rsyslog component, and theshoot-shoot-rsyslog-relpServiceMonitorandPrometheusRuleresources which contains the definitions for: scraping metrics by prometheus, alerting rules. - As part of the Shoot reconciliation flow, the gardenlet deploys the OperatingSystemConfig resource.
- The shoot-rsyslog-relp extension serves a webhook that mutates the OperatingSystemConfig resource for Shoots having the shoot-rsyslog-relp extension enabled (the corresponding namespace gets labeled by the gardenlet with
extensions.gardener.cloud/shoot-rsyslog-relp=true). pkg/webhook/operatingsystemconfig/ensurer.go contains implementation of the genericmutator.Ensurer interface.- The webhook renders the 60-audit.conf.tpl template script and appends it to the OperatingSystemConfig files. When rendering the template, the configuration of the shoot-rsyslog-relp extension is used to fill in the required template values. The file is installed as
/var/lib/rsyslog-relp-configurator/rsyslog.d/60-audit.confon the host OS. - The webhook appends the audit rules to the OperatingSystemConfig. The files are installed under
/var/lib/rsyslog-relp-configurator/rules.don the host OS. - If the user has specified alternative audit rules in a config map reference, the webhook fetches the referenced
ConfigMapfrom the Shoot’s control plane namespace and decodes the value of itsauditddata key into an object of typeAuditd. It then takes theauditRulesdefined in the object and places those under the/var/lib/rsyslog-relp-configurator/rules.ddirectory in a single file. - The webhook renders the configure-rsyslog.tpl.sh script and appends it to the OperatingSystemConfig files. This script is installed as
/var/lib/rsyslog-relp-configurator/configure-rsyslog.shon the host OS. It keeps the configuration of thersyslogsystemd service up-to-date by copying/var/lib/rsyslog-relp-configurator/rsyslog.d/60-audit.confto/etc/rsyslog.d/60-audit.conf, if/etc/rsyslog.d/60-audit.confdoes not exist or the files differ. The script also takes care of syncing the audit rules in/etc/audit/rules.dwith the ones installed in/var/lib/rsyslog-relp-configurator/rules.dand restarts the auditd systemd service if necessary. - The webhook renders the process-rsyslog-pstats.tpl.sh and appends it to the OperatingSystemConfig files. This script receives metrics from the
rsyslogprocess, transforms them, and writes them to/var/lib/node-exporter/textfile-collector/rsyslog_pstats.promso that they can be collected by thenode-exporter. - As part of the Shoot reconciliation, before the shoot-rsyslog-relp extension is deployed, the gardenlet copies all Secret and ConfigMap resources referenced in
.spec.resources[]to the Shoot’s control plane namespace on the Seed. When the.tls.enabledfield istruein the shoot-rsyslog-relp extension configuration, a value for.tls.secretReferenceNamemust also be specified so that it references a named resource reference in the Shoot’s.spec.resources[]array. The webhook appends the data of the referenced Secret in the Shoot’s control plane namespace to the OperatingSystemConfig files. - The webhook appends the
rsyslog-configurator.serviceunit to the OperatingSystemConfig units. The unit invokes theconfigure-rsyslog.shscript every 15 seconds.
- The webhook renders the 60-audit.conf.tpl template script and appends it to the OperatingSystemConfig files. When rendering the template, the configuration of the shoot-rsyslog-relp extension is used to fill in the required template values. The file is installed as
Extension Disablement
This section outlines how the extension disablement works, i.e., the extension has to be removed from the Shoot spec.
- As part of the Shoot reconciliation flow, the gardenlet destroys the Extension resource because it is no longer needed.
- As part of the deletion flow, the shoot-rsyslog-relp extension deploys the
rsyslog-relp-configuration-cleanerDaemonSet to the Shoot cluster to clean up the existing rsyslog configuration and revert the audit rules.
- As part of the deletion flow, the shoot-rsyslog-relp extension deploys the
Shoot Deletion
This section outlines how the deletion works for a Shoot with the shoot-rsyslog-relp extension enabled.
- As part of the Shoot deletion flow, the gardenlet destroys the Extension resource.
- In the Shoot deletion flow, the Extension resource is deleted after the Worker resource. Hence, there is no need to deploy the
rsyslog-relp-configuration-cleanerDaemonSet to the Shoot cluster to clean up the existing rsyslog configuration and revert the audit rules.
- In the Shoot deletion flow, the Extension resource is deleted after the Worker resource. Hence, there is no need to deploy the
5.5.8 - OpenID Connect Services
Gardener Extension for openid connect services
Project Gardener implements the automated management and operation of Kubernetes clusters as a service. Its main principle is to leverage Kubernetes concepts for all of its tasks.
Recently, most of the vendor specific logic has been developed in-tree. However, the project has grown to a size where it is very hard to extend, maintain, and test. With GEP-1 we have proposed how the architecture can be changed in a way to support external controllers that contain their very own vendor specifics. This way, we can keep Gardener core clean and independent.
This controller implements Gardener’s extension contract for the shoot-oidc-service extension.
An example for a ControllerRegistration resource that can be used to register this controller to Gardener can be found here.
Please find more information regarding the extensibility concepts and a detailed proposal here.
Compatibility
The following lists compatibility requirements of this extension controller with regards to other Gardener components.
| OIDC Extension | Gardener | Notes |
|---|---|---|
== v0.15.0 | >= 1.60.0 <= v1.64.0 | A typical side-effect when running Gardener < v1.63.0 is an unexpected scale-down of the OIDC webhook from 2 -> 1. |
== v0.16.0 | >= 1.65.0 |
Extension Resources
Example extension resource:
apiVersion: extensions.gardener.cloud/v1alpha1
kind: Extension
metadata:
name: extension-shoot-oidc-service
namespace: shoot--project--abc
spec:
type: shoot-oidc-service
When an extension resource is reconciled, the extension controller will create an instance of OIDC Webhook Authenticator. These resources are placed inside the shoot namespace on the seed. Also, the controller takes care about generating necessary RBAC resources for the seed as well as for the shoot.
Please note, this extension controller relies on the Gardener-Resource-Manager to deploy k8s resources to seed and shoot clusters.
How to start using or developing this extension controller locally
You can run the controller locally on your machine by executing make start.
We are using Go modules for Golang package dependency management and Ginkgo/Gomega for testing.
Feedback and Support
Feedback and contributions are always welcome!
Please report bugs or suggestions as GitHub issues or reach out on Slack (join the workspace here).
Learn more!
Please find further resources about out project here:
5.5.8.1 - Deployment
Gardener OIDC Service for Shoots
Introduction
Gardener allows Shoot clusters to dynamically register OpenID Connect providers. To support this the Gardener must be installed with the shoot-oidc-service extension.
Configuration
To generally enable the OIDC service for shoot objects the shoot-oidc-service extension must be registered by providing an appropriate extension registration in the garden cluster.
Here it is possible to decide whether the extension should be always available for all shoots or whether the extension must be separately enabled per shoot.
If the extension should be used for all shoots the globallyEnabled flag should be set to true.
spec:
resources:
- kind: Extension
type: shoot-oidc-service
globallyEnabled: true
Shoot Feature Gate
If the shoot OIDC service is not globally enabled by default (depends on the extension registration on the garden cluster), it can be enabled per shoot. To enable the service for a shoot, the shoot manifest must explicitly add the shoot-oidc-service extension.
...
spec:
extensions:
- type: shoot-oidc-service
...
If the shoot OIDC service is globally enabled by default, it can be disabled per shoot. To disable the service for a shoot, the shoot manifest must explicitly state it.
...
spec:
extensions:
- type: shoot-oidc-service
disabled: true
...
5.5.8.2 - Openidconnects
Register OpenID Connect provider in Shoot Clusters
Introduction
Within a shoot cluster, it is possible to dynamically register OpenID Connect providers. It is necessary that the Gardener installation your shoot cluster runs in is equipped with a shoot-oidc-service extension. Please ask your Gardener operator if the extension is available in your environment.
Important
Kubernetes v1.29 introduced support for Structured Authentication. Gardener allows the use of this feature for shoot clusters with Kubernetes version >= 1.30.
Structured Authentication should be preferred over the Gardener OIDC Extension in case:
- you do not need more than 64 authenticators (a limitation that is tracked in https://github.com/kubernetes/kubernetes/issues/122809)
- you do not need to register an issuer twice (anyways not recommended since it can lead to misconfiguration and user impersonation if done poorly)
- you need the ability to write custom expressions to map and validate claims
- you need support for multiple audiences per authenticator
- you need support for providers that don’t support OpenID connect discovery
See how to make use of Structured Authentication in Gardener.
Shoot Feature Gate
In most of the Gardener setups the shoot-oidc-service extension is not enabled globally and thus must be configured per shoot cluster. Please adapt the shoot specification by the configuration shown below to activate the extension individually.
kind: Shoot
...
spec:
extensions:
- type: shoot-oidc-service
...
OpenID Connect provider
In order to register an OpenID Connect provider an openidconnect resource should be deployed in the shoot cluster.
Caution
It is strongly recommended to NOT disable prefixing since it may result in unwanted impersonations. The rule of thumb is to always use meaningful and unique prefixes for both
usernameandgroups. A good way to ensure this is to use the name of theopenidconnectresource as shown in the example below.
Caution
It is strongly recommended to have unique issuer URLs across all
openidconnects and other places that might contain issuer URL configurations related to authentication (e.g. Structured Authentication even forbids that). Users handled by an issuer must be identified in a consistent, predictable and unique way!
apiVersion: authentication.gardener.cloud/v1alpha1
kind: OpenIDConnect
metadata:
name: abc
spec:
# issuerURL is the URL the provider signs ID Tokens as.
# This will be the "iss" field of all tokens produced by the provider and is used for configuration discovery.
issuerURL: https://abc-oidc-provider.example
# clientID is the audience for which the JWT must be issued for, the "aud" field.
clientID: my-shoot-cluster
# usernameClaim is the JWT field to use as the user's username.
usernameClaim: sub
# usernamePrefix, if specified, causes claims mapping to username to be prefix with the provided value.
# A value "oidc:" would result in usernames like "oidc:john".
# If not provided, the prefix defaults to "( .metadata.name )/". The value "-" can be used to disable all prefixing.
usernamePrefix: "abc:"
# groupsClaim, if specified, causes the OIDCAuthenticator to try to populate the user's groups with an ID Token field.
# If the groupsClaim field is present in an ID Token the value must be a string or list of strings.
# groupsClaim: groups
# groupsPrefix, if specified, causes claims mapping to group names to be prefixed with the value.
# A value "oidc:" would result in groups like "oidc:engineering" and "oidc:marketing".
# If not provided, the prefix defaults to "( .metadata.name )/".
# The value "-" can be used to disable all prefixing.
# groupsPrefix: "abc:"
# caBundle is a PEM encoded CA bundle which will be used to validate the OpenID server's certificate. If unspecified, system's trusted certificates are used.
# caBundle: <base64 encoded bundle>
# supportedSigningAlgs sets the accepted set of JOSE signing algorithms that can be used by the provider to sign tokens.
# The default value is RS256.
# supportedSigningAlgs:
# - RS256
# requiredClaims, if specified, causes the OIDCAuthenticator to verify that all the
# required claims key value pairs are present in the ID Token.
# requiredClaims:
# customclaim: requiredvalue
# maxTokenExpirationSeconds if specified, sets a limit in seconds to the maximum validity duration of a token.
# Tokens issued with validity greater that this value will not be verified.
# Setting this will require that the tokens have the "iat" and "exp" claims.
# maxTokenExpirationSeconds: 3600
# jwks if specified, provides an option to specify JWKS keys offline.
# jwks:
# keys is a base64 encoded JSON webkey Set. If specified, the OIDCAuthenticator skips the request to the issuer's jwks_uri endpoint to retrieve the keys.
# keys: <base64 encoded jwks>
5.5.9 - Registry Cache
Gardener Extension for Registry Cache
Gardener extension controller which deploys pull-through caches for container registries.
Usage
- Configuring the Registry Cache Extension - learn what is the use-case for a pull-through cache, how to enable it and configure it
- How to provide credentials for upstream repository?
- Registry Cache Observability - learn what metrics and alerts are exposed and how to view the registry cache logs
- Configuring the Registry Mirror Extension - learn what is the use-case for a registry mirror, how to enable and configure it
Local Setup and Development
- Deploying Registry Cache Extension Locally - learn how to set up a local development environment
- Deploying Registry Cache Extension in Gardener’s Local Setup with Provider Extensions - learn how to set up a development environment using own Seed clusters on an existing Kubernetes cluster
- Developer Docs for Gardener Extension Registry Cache - learn about the inner workings
5.5.9.1 - Configuring the Registry Cache Extension
Configuring the Registry Cache Extension
Introduction
Use Case
For a Shoot cluster, the containerd daemon of every Node goes to the internet and fetches an image that it doesn’t have locally in the Node’s image cache. New Nodes are often created due to events such as auto-scaling (scale up), rolling update, or replacement of unhealthy Node. Such a new Node would need to pull all of the images of the Pods running on it from the internet because the Node’s cache is initially empty. Pulling an image from a registry produces network traffic and registry costs. To avoid these network traffic and registry costs, you can use the registry-cache extension to run a registry as pull-through cache.
The following diagram shows a rough outline of how an image pull looks like for a Shoot cluster without registry cache:
Solution
The registry-cache extension deploys and manages a registry in the Shoot cluster that runs as pull-through cache. The used registry implementation is distribution/distribution.
How does it work?
When the extension is enabled, a registry cache for each configured upstream is deployed to the Shoot cluster. Along with this, the containerd daemon on the Shoot cluster Nodes gets configured to use as a mirror the Service IP address of the deployed registry cache. For example, if a registry cache for upstream docker.io is requested via the Shoot spec, then containerd gets configured to first pull the image from the deployed cache in the Shoot cluster. If this image pull operation fails, containerd falls back to the upstream itself (docker.io in that case).
The first time an image is requested from the pull-through cache, it pulls the image from the configured upstream registry and stores it locally, before handing it back to the client. On subsequent requests, the pull-through cache is able to serve the image from its own storage.
Note
The used registry implementation (distribution/distribution) supports mirroring of only one upstream registry.
The following diagram shows a rough outline of how an image pull looks like for a Shoot cluster with registry cache:
Shoot Configuration
The extension is not globally enabled and must be configured per Shoot cluster. The Shoot specification has to be adapted to include the registry-cache extension configuration.
Below is an example of registry-cache extension configuration as part of the Shoot spec:
apiVersion: core.gardener.cloud/v1beta1
kind: Shoot
metadata:
name: crazy-botany
namespace: garden-dev
spec:
extensions:
- type: registry-cache
providerConfig:
apiVersion: registry.extensions.gardener.cloud/v1alpha3
kind: RegistryConfig
caches:
- upstream: docker.io
volume:
size: 100Gi
# storageClassName: premium
- upstream: ghcr.io
- upstream: quay.io
garbageCollection:
ttl: 0s
secretReferenceName: quay-credentials
- upstream: my-registry.io:5000
remoteURL: http://my-registry.io:5000
# ...
resources:
- name: quay-credentials
resourceRef:
apiVersion: v1
kind: Secret
name: quay-credentials-v1
The providerConfig field is required.
The providerConfig.caches field contains information about the registry caches to deploy. It is a required field. At least one cache has to be specified.
The providerConfig.caches[].upstream field is the remote registry host to cache. It is a required field.
The value must be a valid DNS subdomain (RFC 1123) and optionally a port (i.e. <host>[:<port>]). It must not include a scheme.
The providerConfig.caches[].remoteURL optional field is the remote registry URL. If configured, it must include an https:// or http:// scheme.
If the field is not configured, the remote registry URL defaults to https://<upstream>. In case the upstream is docker.io, it defaults to https://registry-1.docker.io.
The providerConfig.caches[].volume field contains settings for the registry cache volume.
The registry-cache extension deploys a StatefulSet with a volume claim template. A PersistentVolumeClaim is created with the configured size and StorageClass name.
The providerConfig.caches[].volume.size field is the size of the registry cache volume. Defaults to 10Gi. The size must be a positive quantity (greater than 0).
This field is immutable. See Increase the cache disk size on how to resize the disk.
The extension defines alerts for the volume. More information about the registry cache alerts and how to enable notifications for them can be found in the alerts documentation.
The providerConfig.caches[].volume.storageClassName field is the name of the StorageClass used by the registry cache volume.
This field is immutable. If the field is not specified, then the default StorageClass will be used.
The providerConfig.caches[].garbageCollection.ttl field is the time to live of a blob in the cache. If the field is set to 0s, the garbage collection is disabled. Defaults to 168h (7 days). See the Garbage Collection section for more details.
The providerConfig.caches[].secretReferenceName is the name of the reference for the Secret containing the upstream registry credentials. To cache images from a private registry, credentials to the upstream registry should be supplied. For more details, see How to provide credentials for upstream registry.
Note
It is only possible to provide one set of credentials for one private upstream registry.
The providerConfig.caches[].proxy.httpProxy field represents the proxy server for HTTP connections which is used by the registry cache. It must include an https:// or http:// scheme.
The providerConfig.caches[].proxy.httpsProxy field represents the proxy server for HTTPS connections which is used by the registry cache. It must include an https:// or http:// scheme.
The providerConfig.caches[].http.tls field indicates whether TLS is enabled for the HTTP server of the registry cache. Defaults to true.
The providerConfig.caches[].highAvailability.enabled defines if the registry cache is scaled with the high availability feature. See the High Availability section for more details.
Garbage Collection
When the registry cache receives a request for an image that is not present in its local store, it fetches the image from the upstream, returns it to the client and stores the image in the local store. The registry cache runs a scheduler that deletes images when their time to live (ttl) expires. When adding an image to the local store, the registry cache also adds a time to live for the image. The ttl defaults to 168h (7 days) and is configurable. The garbage collection can be disabled by setting the ttl to 0s. Requesting an image from the registry cache does not extend the time to live of the image. Hence, an image is always garbage collected from the registry cache store when its ttl expires.
At the time of writing this document, there is no functionality for garbage collection based on disk size - e.g., garbage collecting images when a certain disk usage threshold is passed.
The garbage collection cannot be enabled once it is disabled. This constraint is added to mitigate distribution/distribution#4249.
Increase the Cache Disk Size
When there is no available disk space, the registry cache continues to respond to requests. However, it cannot store the remotely fetched images locally because it has no free disk space. In such case, it is simply acting as a proxy without being able to cache the images in its local store. The disk has to be resized to ensure that the registry cache continues to cache images.
There are two alternatives to enlarge the cache’s disk size:
[Alternative 1] Resize the PVC
To enlarge the PVC’s size, perform the following steps:
Make sure that the
KUBECONFIGenvironment variable is targeting the correct Shoot cluster.Find the PVC name to resize for the desired upstream. The below example fetches the PVC for the
docker.ioupstream:kubectl -n kube-system get pvc -l upstream-host=docker.ioPatch the PVC’s size to the desired size. The below example patches the size of a PVC to
10Gi:kubectl -n kube-system patch pvc $PVC_NAME --type merge -p '{"spec":{"resources":{"requests": {"storage": "10Gi"}}}}'Make sure that the PVC gets resized. Describe the PVC to check the resize operation result:
kubectl -n kube-system describe pvc -l upstream-host=docker.io
Drawback of this approach: The cache’s size in the Shoot spec (
providerConfig.caches[].size) diverges from the PVC’s size.
[Alternative 2] Remove and Readd the Cache
There is always the option to remove the cache from the Shoot spec and to readd it again with the updated size.
Drawback of this approach: The already cached images get lost and the cache starts with an empty disk.
High Availability
By default the registry cache runs with a single replica. This fact may lead to concerns for the high availability such as “What happens when the registry cache is down? Does containerd fail to pull the image?”. As outlined in the How does it work? section, containerd is configured to fall back to the upstream registry if it fails to pull the image from the registry cache. Hence, when the registry cache is unavailable, the containerd’s image pull operations are not affected because containerd falls back to image pull from the upstream registry.
In special cases where this is not enough it is possible to set providerConfig.caches[].highAvailability.enabled to true. This will add the label high-availability-config.resources.gardener.cloud/type=server to the StatefulSet and it will be scaled to 2 replicas. Appropriate Pod Topology Spread Constraints will be added to the registry cache Pods according to the Shoot cluster configuration. See also High Availability of Deployed Components. Pay attention that each registry cache replica uses its own volume, so each registry cache pulls the image from the upstream and stores it in its volume.
Possible Pitfalls
- The used registry implementation (the Distribution project) supports mirroring of only one upstream registry. The extension deploys a pull-through cache for each configured upstream.
us-docker.pkg.dev,europe-docker.pkg.dev, andasia-docker.pkg.devare different upstreams. Hence, configuringpkg.devas upstream won’t cache images fromus-docker.pkg.dev,europe-docker.pkg.dev, orasia-docker.pkg.dev.
Limitations
Images that are pulled before a registry cache Pod is running or before a registry cache Service is reachable from the corresponding Node won’t be cached - containerd will pull these images directly from the upstream.
The reasoning behind this limitation is that a registry cache Pod is running in the Shoot cluster. To have a registry cache’s Service cluster IP reachable from containerd running on the Node, the registry cache Pod has to be running and kube-proxy has to configure iptables/IPVS rules for the registry cache Service. If kube-proxy hasn’t configured iptables/IPVS rules for the registry cache Service, then the image pull times (and new Node bootstrap times) will be increased significantly. For more detailed explanations, see point 2. and gardener/gardener-extension-registry-cache#68.
That’s why the registry configuration on a Node is applied only after the registry cache Service is reachable from the Node. The
gardener-node-agent.servicesystemd unit sends requests to the registry cache’s Service. Once the registry cache responds withHTTP 200, the unit creates the needed registry configuration file (hosts.toml).As a result, for images from Shoot system components:
- On Shoot creation with the registry cache extension enabled, a registry cache is unable to cache all of the images from the Shoot system components. Usually, until the registry cache Pod is running, containerd pulls from upstream the images from Shoot system components (before the registry configuration gets applied).
- On new Node creation for existing Shoot with the registry cache extension enabled, a registry cache is unable to cache most of the images from Shoot system components. The reachability of the registry cache Service requires the Service network to be set up, i.e., the kube-proxy for that new Node to be running and to have set up iptables/IPVS configuration for the registry cache Service.
containerd requests will time out in 30s in case kube-proxy hasn’t configured iptables/IPVS rules for the registry cache Service - the image pull times will increase significantly.
containerd is configured to fall back to the upstream itself if a request against the cache fails. However, if the cluster IP of the registry cache Service does not exist or if kube-proxy hasn’t configured iptables/IPVS rules for the registry cache Service, then containerd requests against the registry cache time out in 30 seconds. This significantly increases the image pull times because containerd does multiple requests as part of the image pull (HEAD request to resolve the manifest by tag, GET request for the manifest by SHA, GET requests for blobs)
Example: If the Service of a registry cache is deleted, then a new Service will be created. containerd’s registry config will still contain the old Service’s cluster IP. containerd requests against the old Service’s cluster IP will time out and containerd will fall back to upstream.
- Image pull of
docker.io/library/alpine:3.13.2from the upstream takes ~2s while image pull of the same image with invalid registry cache cluster IP takes ~2m.2s. - Image pull of
eu.gcr.io/gardener-project/gardener/ops-toolbelt:0.18.0from the upstream takes ~10s while image pull of the same image with invalid registry cache cluster IP takes ~3m.10s.
- Image pull of
Amazon Elastic Container Registry is currently not supported. For details see distribution/distribution#4383.
5.5.9.2 - Configuring the Registry Mirror Extension
Configuring the Registry Mirror Extension
Introduction
Use Case
containerd allows registry mirrors to be configured. Use cases are:
- Usage of public mirror(s) - for example, circumvent issues with the upstream registry such as rate limiting, outages, and others.
- Usage of private mirror(s) - for example, reduce network costs by using a private mirror running in the same network.
Solution
The registry-mirror extension allows the registry mirror configuration to be configured via the Shoot spec directly.
How does it work?
When the extension is enabled, the containerd daemon on the Shoot cluster Nodes gets configured to use the requested mirrors as a mirror. For example, if for the upstream docker.io the mirror https://mirror.gcr.io is configured in the Shoot spec, then containerd gets configured to first pull the image from the mirror (https://mirror.gcr.io in that case). If this image pull operation fails, containerd falls back to the upstream itself (docker.io in that case).
The extension is based on the contract described in containerd Registry Configuration. The corresponding upstream documentation in containerd is Registry Configuration - Introduction.
Shoot Configuration
The Shoot specification has to be adapted to include the registry-mirror extension configuration.
Below is an example of registry-mirror extension configuration as part of the Shoot spec:
apiVersion: core.gardener.cloud/v1beta1
kind: Shoot
metadata:
name: crazy-botany
namespace: garden-dev
spec:
extensions:
- type: registry-mirror
providerConfig:
apiVersion: mirror.extensions.gardener.cloud/v1alpha1
kind: MirrorConfig
mirrors:
- upstream: docker.io
hosts:
- host: "https://mirror.gcr.io"
capabilities: ["pull"]
The providerConfig field is required.
The providerConfig.mirrors field contains information about the registry mirrors to configure. It is a required field. At least one mirror has to be specified.
The providerConfig.mirror[].upstream field is the remote registry host to mirror. It is a required field.
The value must be a valid DNS subdomain (RFC 1123) and optionally a port (i.e. <host>[:<port>]). It must not include a scheme.
The providerConfig.mirror[].hosts field represents the mirror hosts to be used for the upstream. At least one mirror host has to be specified.
The providerConfig.mirror[].hosts[].host field is the mirror host. It is a required field.
The value must include a scheme - http:// or https://.
The providerConfig.mirror[].hosts[].capabilities field represents the operations a host is capable of performing. This also represents the set of operations for which the mirror host may be trusted to perform. Defaults to ["pull"]. The supported values are pull and resolve.
See the capabilities field documentation for more information on which operations are considered trusted ones against public/private mirrors.
5.5.9.3 - Deploying Registry Cache Extension in Gardener's Local Setup with Provider Extensions
Deploying Registry Cache Extension in Gardener’s Local Setup with Provider Extensions
Prerequisites
- Make sure that you have a running local Gardener setup with enabled provider extensions. The steps to complete this can be found in the Deploying Gardener Locally and Enabling Provider-Extensions guide.
Setting up the Registry Cache Extension
Make sure that your KUBECONFIG environment variable is targeting the local Gardener cluster.
The location of the Gardener project from the Gardener setup step is expected to be under the same root (e.g. ~/go/src/github.com/gardener/). If this is not the case, the location of Gardener project should be specified in GARDENER_REPO_ROOT environment variable:
export GARDENER_REPO_ROOT="<path_to_gardener_project>"
Then you can run:
make remote-extension-up
In case you have added additional Seeds you can specify the seed name:
make remote-extension-up SEED_NAME=<seed-name>
The corresponding make target will build the extension image, push it into the Seed cluster image registry, and deploy the registry-cache ControllerDeployment and ControllerRegistration resources into the kind cluster. The container image in the ControllerDeployment will be the image that was build and pushed into the Seed cluster image registry.
The make target will then deploy the registry-cache admission component. It will build the admission image, push it into the kind cluster image registry, and finally install the admission component charts to the kind cluster.
Creating a Shoot Cluster
Once the above step is completed, you can create a Shoot cluster. In order to create a Shoot cluster, please create your own Shoot definition depending on providers on your Seed cluster.
Tearing Down the Development Environment
To tear down the development environment, delete the Shoot cluster or disable the registry-cache extension in the Shoot’s specification. When the extension is not used by the Shoot anymore, you can run:
make remote-extension-down
The make target will delete the ControllerDeployment and ControllerRegistration of the extension, and the registry-cache admission helm deployment.
5.5.9.4 - Deploying Registry Cache Extension Locally
Deploying Registry Cache Extension Locally
Prerequisites
- Make sure that you have a running local Gardener setup. The steps to complete this can be found in the Deploying Gardener Locally guide.
Setting up the Registry Cache Extension
Make sure that your KUBECONFIG environment variable is targeting the local Gardener cluster. When this is ensured, run:
make extension-up
The corresponding make target will build the extension image, load it into the kind cluster Nodes, and deploy the registry-cache ControllerDeployment and ControllerRegistration resources. The container image in the ControllerDeployment will be the image that was build and loaded into the kind cluster Nodes.
The make target will then deploy the registry-cache admission component. It will build the admission image, load it into the kind cluster Nodes, and finally install the admission component charts to the kind cluster.
Creating a Shoot Cluster
Once the above step is completed, you can create a Shoot cluster.
example/shoot-registry-cache.yaml contains a Shoot specification with the registry-cache extension:
kubectl create -f example/shoot-registry-cache.yaml
example/shoot-registry-mirror.yaml contains a Shoot specification with the registry-mirror extension:
kubectl create -f example/shoot-registry-mirror.yaml
Tearing Down the Development Environment
To tear down the development environment, delete the Shoot cluster or disable the registry-cache extension in the Shoot’s specification. When the extension is not used by the Shoot anymore, you can run:
make extension-down
The make target will delete the ControllerDeployment and ControllerRegistration of the extension, and the registry-cache admission helm deployment.
Alternative Setup Using the gardener-operator Local Setup
Alternatively, you can deploy the registry-cache extension in the gardener-operator local setup. To do this, make sure you are have a running local setup based on Alternative Way to Set Up Garden and Seed Leveraging gardener-operator. The KUBECONFIG environment variable should target the operator local KinD cluster (i.e. <path_to_gardener_project>/example/gardener-local/kind/operator/kubeconfig).
Creating the registry-cache Extension.operator.gardener.cloud resource:
make extension-operator-up
The corresponding make target will build the registry-cache admission and extension container images, OCI artifacts for the admission runtime and application charts, and the extension chart. Then, the container images and the OCI artifacts are pushed into the default skaffold registry (i.e. garden.local.gardener.cloud:5001). Next, the registry-cache Extension.operator.gardener.cloud resource is deployed into the KinD cluster. Based on this resource the gardener-operator will deploy the registry-cache admission component, as well as the registry-cache ControllerDeployment and ControllerRegistration resources.
Creating a Shoot Cluster
To create a Shoot cluster the KUBECONFIG environment variable should target virtual garden cluster (i.e. <path_to_gardener_project>/example/operator/virtual-garden/kubeconfig) and then execute:
kubectl create -f example/shoot-registry-cache.yaml
Delete the registry-cache Extension.operator.gardener.cloud resource
Make sure the environment variable KUBECONFIG points to the operator’s local KinD cluster and then run:
make extension-operator-down
The corresponding make target will delete the Extension.operator.gardener.cloud resource. Consequently, the gardener-operator will delete the registry-cache admission component and registry-cache ControllerDeployment and ControllerRegistration resources.
5.5.9.5 - Developer Docs for Gardener Extension Registry Cache
Developer Docs for Gardener Extension Registry Cache
This document outlines how Shoot reconciliation and deletion works for a Shoot with the registry-cache extension enabled.
Shoot Reconciliation
This section outlines how the reconciliation works for a Shoot with the registry-cache extension enabled.
Extension Enablement / Reconciliation
This section outlines how the extension enablement/reconciliation works, e.g., the extension has been added to the Shoot spec.
- As part of the Shoot reconciliation flow, the gardenlet deploys the Extension resource.
- The registry-cache extension reconciles the Extension resource. pkg/controller/cache/actuator.go contains the implementation of the extension.Actuator interface. The reconciliation of an Extension of type
registry-cacheconsists of the following steps:- The registry-cache extension deploys resources to the Shoot cluster via ManagedResource. For every configured upstream, it creates a StatefulSet (with PVC), Service, and other resources.
- It lists all Services from the
kube-systemnamespace that have theupstream-hostlabel. It will return an error (and retry in exponential backoff) until the Services count matches the configured registries count. - When there is a Service created for each configured upstream registry, the registry-cache extension populates the Extension resource status. In the Extension status, for each upstream, it maintains an endpoint (in the format
http://<cluster-ip>:5000) which can be used to access the registry cache from within the Shoot cluster.<cluster-ip>is the cluster IP of the registry cache Service. The cluster IP of a Service is assigned by the Kubernetes API server on Service creation.
- As part of the Shoot reconciliation flow, the gardenlet deploys the OperatingSystemConfig resource.
- The registry-cache extension serves a webhook that mutates the OperatingSystemConfig resource for Shoots having the registry-cache extension enabled (the corresponding namespace gets labeled by the gardenlet with
extensions.gardener.cloud/registry-cache=true). pkg/webhook/cache/ensurer.go contains an implementation of the genericmutator.Ensurer interface.- The webhook appends or updates
RegistryConfigentries in the OperatingSystemConfig CRI configuration that corresponds to configured registry caches in the Shoot. TheRegistryConfigreadiness probe is enabled so that gardener-node-agent creates ahosts.tomlcontainerd registry configuration file when allRegistryConfighosts are reachable.
- The webhook appends or updates
Extension Disablement
This section outlines how the extension disablement works, i.e., the extension has to be removed from the Shoot spec.
- As part of the Shoot reconciliation flow, the gardenlet destroys the Extension resource because it is no longer needed.
- The extension deletes the ManagedResource containing the registry cache resources.
- The OperatingSystemConfig resource will not be mutated and no
RegistryConfigentries will be added or updated. The gardener-node-agent detects thatRegistryConfigentries have been removed or changed and deletes or updates correspondinghosts.tomlconfiguration files under/etc/containerd/certs.dfolder.
Shoot Deletion
This section outlines how the deletion works for a Shoot with the registry-cache extension enabled.
- As part of the Shoot deletion flow, the gardenlet destroys the Extension resource.
- The extension deletes the ManagedResource containing the registry cache resources.
5.5.9.6 - How to provide credentials for upstream registry?
How to provide credentials for upstream registry?
In Kubernetes, to pull images from private container image registries you either have to specify an image pull Secret (see Pull an Image from a Private Registry) or you have to configure the kubelet to dynamically retrieve credentials using a credential provider plugin (see Configure a kubelet image credential provider). When pulling an image, the kubelet is providing the credentials to the CRI implementation. The CRI implementation uses the provided credentials against the upstream registry to pull the image.
The registry-cache extension is using the Distribution project as pull through cache implementation. The Distribution project does not use the provided credentials from the CRI implementation while fetching an image from the upstream. Hence, the above-described scenarios such as configuring image pull Secret for a Pod or configuring kubelet credential provider plugins don’t work out of the box with the pull through cache provided by the registry-cache extension. Instead, the Distribution project supports configuring only one set of credentials for a given pull through cache instance (for a given upstream).
This document describe how to supply credentials for the private upstream registry in order to pull private image with the registry cache.
How to configure the registry cache to use upstream registry credentials?
Create an immutable Secret with the upstream registry credentials in the Garden cluster:
kubectl create -f - <<EOF apiVersion: v1 kind: Secret metadata: name: ro-docker-secret-v1 namespace: garden-dev type: Opaque immutable: true data: username: $(echo -n $USERNAME | base64 -w0) password: $(echo -n $PASSWORD | base64 -w0) EOFFor Artifact Registry, the username is
_json_keyand the password is the service account key in JSON format. To base64 encode the service account key, copy it and run:echo -n $SERVICE_ACCOUNT_KEY_JSON | base64 -w0Add the newly created Secret as a reference to the Shoot spec, and then to the registry-cache extension configuration.
In the registry-cache configuration, set the
secretReferenceNamefield. It should point to a resource reference underspec.resources. The resource reference itself points to the Secret in project namespace.apiVersion: core.gardener.cloud/v1beta1 kind: Shoot # ... spec: extensions: - type: registry-cache providerConfig: apiVersion: registry.extensions.gardener.cloud/v1alpha3 kind: RegistryConfig caches: - upstream: docker.io secretReferenceName: docker-secret # ... resources: - name: docker-secret resourceRef: apiVersion: v1 kind: Secret name: ro-docker-secret-v1 # ...
Warning
Do not delete the referenced Secret when there is a Shoot still using it.
How to rotate the registry credentials?
To rotate registry credentials perform the following steps:
- Generate a new pair of credentials in the cloud provider account. Do not invalidate the old ones.
- Create a new Secret (e.g.,
ro-docker-secret-v2) with the newly generated credentials as described in step 1. in How to configure the registry cache to use upstream registry credentials?. - Update the Shoot spec with newly created Secret as described in step 2. in How to configure the registry cache to use upstream registry credentials?.
- The above step will trigger a Shoot reconciliation. Wait for it to complete.
- Make sure that the old Secret is no longer referenced by any Shoot cluster. Finally, delete the Secret containing the old credentials (e.g.,
ro-docker-secret-v1). - Delete the corresponding old credentials from the cloud provider account.
Possible Pitfalls
- The registry cache is not protected by any authentication/authorization mechanism. The cached images (incl. private images) can be fetched from the registry cache without authentication/authorization. Note that the registry cache itself is not exposed publicly.
- The registry cache provides the credentials for every request against the corresponding upstream. In some cases, misconfigured credentials can prevent the registry cache to pull even public images from the upstream (for example: invalid service account key for Artifact Registry). However, this behaviour is controlled by the server-side logic of the upstream registry.
- Do not remove the image pull Secrets when configuring credentials for the registry cache. When the registry-cache is not available, containerd falls back to the upstream registry. containerd still needs the image pull Secret to pull the image and in this way to have the fallback mechanism working.
5.5.9.7 - Observability
Registry Cache Observability
The registry-cache extension exposes metrics for the registry caches running in the Shoot cluster so that they can be easily viewed by cluster owners and operators in the Shoot’s Prometheus and Plutono instances. The exposed monitoring data provides an overview of the performance of the pull-through caches, including hit rate and network traffic data.
Metrics
A registry cache serves several metrics. The metrics are scraped by the Shoot’s Prometheus instance.
The Registry Caches dashboard in the Shoot’s Plutono instance contains several panels which are built using the registry cache metrics. From the Registry dropdown menu you can select the upstream for which you wish the metrics to be displayed (by default, metrics are summed for all upstream registries).
Following is a list of all exposed registry cache metrics. The upstream_host label can be used to determine the upstream host to which the metrics are related, while the type label can be used to determine weather the metric is for an image blob or an image manifest:
registry_proxy_requests_total
The number of total incoming request received.
- Type: Counter
- Labels:
upstream_hosttype
registry_proxy_hits_total
The number of total cache hits; i.e. the requested content exists in the registry cache’s image store and it is served from there (upstream is not contacted at all for serving the requested content).
- Type: Counter
- Labels:
upstream_hosttype
registry_proxy_misses_total
The number of total cache misses; i.e. the requested content does not exist in the registry cache’s image store and it is fetched from the upstream.
- Type: Counter
- Labels:
upstream_hosttype
registry_proxy_pulled_bytes_total
The size of total bytes that the registry cache has pulled from the upstream.
- Type: Counter
- Labels:
upstream_hosttype
registry_proxy_pushed_bytes_total
The size of total bytes pushed to the registry cache’s clients.
- Type: Counter
- Labels:
upstream_hosttype
Alerts
There are two alerts defined for the registry cache PersistentVolume in the Shoot’s Prometheus instance:
RegistryCachePersistentVolumeUsageCritical
This indicates that the registry cache PersistentVolume is almost full and less than 5% is free. When there is no available disk space, no new images will be cached. However, image pull operations are not affected. An alert is fired when the following expression evaluates to true:
100 * (
kubelet_volume_stats_available_bytes{persistentvolumeclaim=~"^cache-volume-registry-.+$"}
/
kubelet_volume_stats_capacity_bytes{persistentvolumeclaim=~"^cache-volume-registry-.+$"}
) < 5
RegistryCachePersistentVolumeFullInFourDays
This indicates that the registry cache PersistentVolume is expected to fill up within four days based on recent sampling. An alert is fired when the following expression evaluates to true:
100 * (
kubelet_volume_stats_available_bytes{persistentvolumeclaim=~"^cache-volume-registry-.+$"}
/
kubelet_volume_stats_capacity_bytes{persistentvolumeclaim=~"^cache-volume-registry-.+$"}
) < 15
and
predict_linear(kubelet_volume_stats_available_bytes{persistentvolumeclaim=~"^cache-volume-registry-.+$"}[30m], 4 * 24 * 3600) <= 0
Users can subscribe to these alerts by following the Gardener alerting guide.
Logging
To view the registry cache logs in Plutono, navigate to the Explore tab and select vali from the Explore dropdown menu. Afterwards enter the following vali query:
{container_name="registry-cache"}to view the logs for all registries.{pod_name=~"registry-<upstream_host>.+"}to view the logs for specific upstream registry.
6 - Other Components
6.1 - Dependency Watchdog
Dependency Watchdog


Overview
A watchdog which actively looks out for disruption and recovery of critical services. If there is a disruption then it will prevent cascading failure by conservatively scaling down dependent configured resources and if a critical service has just recovered then it will expedite the recovery of dependent services/pods.
Avoiding cascading failure is handled by Prober component and expediting recovery of dependent services/pods is handled by Weeder component. These are separately deployed as individual pods.
Current Limitation & Future Scope
Although in the current offering the Prober is tailored to handle one such use case of kube-apiserver connectivity, but the usage of prober can be extended to solve similar needs for other scenarios where the components involved might be different.
Start using or developing the Dependency Watchdog
See our documentation in the /docs repository, please find the index here.
Feedback and Support
We always look forward to active community engagement.
Please report bugs or suggestions on how we can enhance dependency-watchdog to address additional recovery scenarios on GitHub issues
6.1.1 - Concepts
6.1.1.1 - Prober
Prober
Overview
Prober starts asynchronous and periodic probes for every shoot cluster. The first probe is the api-server probe which checks the reachability of the API Server from the control plane. The second probe is the lease probe which is done after the api server probe is successful and checks if the number of expired node leases is below a certain threshold.
If the lease probe fails, it will scale down the dependent kubernetes resources. Once the connectivity to kube-apiserver is reestablished and the number of expired node leases are within the accepted threshold, the prober will then proactively scale up the dependent kubernetes resources it had scaled down earlier. The failure threshold fraction for lease probe
and dependent kubernetes resources are defined in configuration that is passed to the prober.
Origin
In a shoot cluster (a.k.a data plane) each node runs a kubelet which periodically renewes its lease. Leases serve as heartbeats informing Kube Controller Manager that the node is alive. The connectivity between the kubelet and the Kube ApiServer can break for different reasons and not recover in time.
As an example, consider a large shoot cluster with several hundred nodes. There is an issue with a NAT gateway on the shoot cluster which prevents the Kubelet from any node in the shoot cluster to reach its control plane Kube ApiServer. As a consequence, Kube Controller Manager transitioned the nodes of this shoot cluster to Unknown state.
Machine Controller Manager which also runs in the shoot control plane reacts to any changes to the Node status and then takes action to recover backing VMs/machine(s). It waits for a grace period and then it will begin to replace the unhealthy machine(s) with new ones.
This replacement of healthy machines due to a broken connectivity between the worker nodes and the control plane Kube ApiServer results in undesired downtimes for customer workloads that were running on these otherwise healthy nodes. It is therefore required that there be an actor which detects the connectivity loss between the the kubelet and shoot cluster’s Kube ApiServer and proactively scales down components in the shoot control namespace which could exacerbate the availability of nodes in the shoot cluster.
Dependency Watchdog Prober in Gardener
Prober is a central component which is deployed in the garden namespace in the seed cluster. Control plane components for a shoot are deployed in a dedicated shoot namespace for the shoot within the seed cluster.
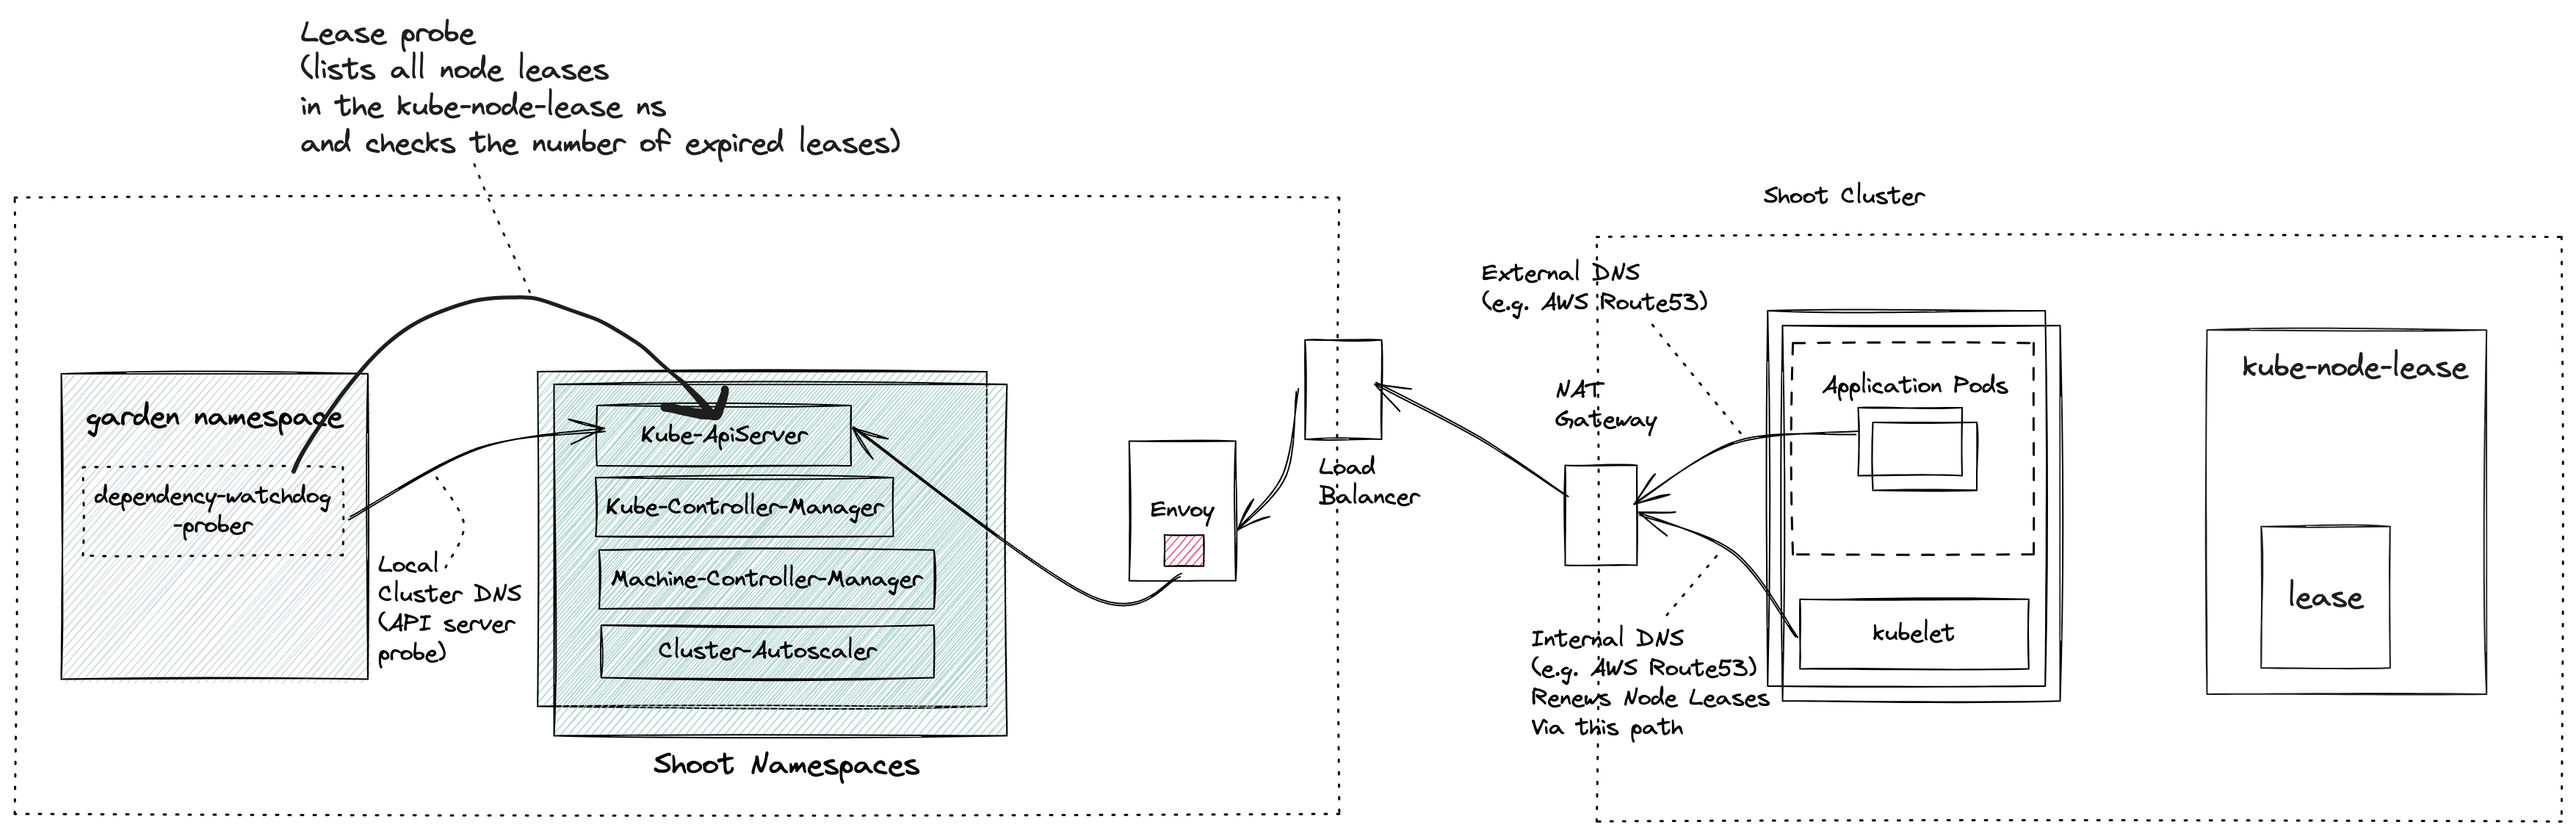
NOTE: If you are not familiar with what gardener components like seed, shoot then please see the appendix for links.
Prober periodically probes Kube ApiServer via two separate probes:
- API Server Probe: Local cluster DNS name which resolves to the ClusterIP of the Kube Apiserver
- Lease Probe: Checks for number of expired leases to be within the specified threshold. The threshold defines the limit after which DWD can say that the kubelets are not able to reach the API server.
Behind the scene
For all active shoot clusters (which have not been hibernated or deleted or moved to another seed via control-plane-migration), prober will schedule a probe to run periodically. During each run of a probe it will do the following:
- Checks if the Kube ApiServer is reachable via local cluster DNS. This should always succeed and will fail only when the Kube ApiServer has gone down. If the Kube ApiServer is down then there can be no further damage to the existing shoot cluster (barring new requests to the Kube Api Server).
- Only if the probe is able to reach the Kube ApiServer via local cluster DNS, will it attempt to check the number of expired node leases in the shoot. The node lease renewal is done by the Kubelet, and so we can say that the lease probe is checking if the kubelet is able to reach the API server. If the number of expired node leases reaches the threshold, then the probe fails.
- If and when a lease probe fails, then it will initiate a scale-down operation for dependent resources as defined in the prober configuration. While scaling down the resource prober will annotate the deployment of the resource with
dependency-watchdog.gardener.cloud/meltdown-protection-active. This annotation can be checked to ensure not to scale up these resources during a regular shoot maintenance or an out-of-band shoot reconciliation. - In subsequent runs it will keep performing the lease probe. If it is successful, then it will start the scale-up operation for dependent resources as defined in the configuration. It shall also remove the
dependency-watchdog.gardener.cloud/meltdown-protection-activefrom deployment metadata of all scaled up resources.
Manual Intervention/Override of DWD behavior: j In case where you don’t want DWD to act on a resource during a meltdown, you can annotate the said resource deployment with
"dependency-watchdog.gardener.cloud/ignore-scaling"annotation. This will ensure that prober will not act on such resource. When this ignore scaling annotation is put by an operator, thedependency-watchdog.gardener.cloud/meltdown-protection-activeannotation shall be removed to avoid any ambiguity.
Prober lifecycle
A reconciler is registered to listen to all events for Cluster resource.
When a Reconciler receives a request for a Cluster change, it will query the extension kube-api server to get the Cluster resource.
In the following cases it will either remove an existing probe for this cluster or skip creating a new probe:
- Cluster is marked for deletion.
- Hibernation has been enabled for the cluster.
- There is an ongoing seed migration for this cluster.
- If a new cluster is created with no workers.
- If an update is made to the cluster by removing all workers (in other words making it worker-less).
If none of the above conditions are true and there is no existing probe for this cluster then a new probe will be created, registered and started.
Probe failure identification
DWD probe can either be a success or it could return an error. If the API server probe fails, the lease probe is not done and the probes will be retried. If the error is a TooManyRequests error due to requests to the Kube-API-Server being throttled,
then the probes are retried after a backOff of backOffDurationForThrottledRequests.
If the lease probe fails, then the error could be due to failure in listing the leases. In this case, no scaling operations are performed. If the error in listing the leases is a TooManyRequests error due to requests to the Kube-API-Server being throttled,
then the probes are retried after a backOff of backOffDurationForThrottledRequests.
If there is no error in listing the leases, then the Lease probe fails if the number of expired leases reaches the threshold fraction specified in the configuration. A lease is considered expired in the following scenario:-
time.Now() >= lease.Spec.RenewTime + (p.config.KCMNodeMonitorGraceDuration.Duration * expiryBufferFraction)
Here, lease.Spec.RenewTime is the time when current holder of a lease has last updated the lease. config is the probe config generated from the configuration and
KCMNodeMonitorGraceDuration is amount of time which KCM allows a running Node to be unresponsive before marking it unhealthy (See ref)
. expiryBufferFraction is a hard coded value of 0.75. Using this fraction allows the prober to intervene before KCM marks a node as unknown, but at the same time allowing kubelet sufficient retries to renew the node lease (Kubelet renews the lease every 10s See ref).
Appendix
6.1.1.2 - Weeder
Weeder
Overview
Weeder watches for an update to service endpoints and on receiving such an event it will create a time-bound watch for all configured dependent pods that need to be actively recovered in case they have not yet recovered from CrashLoopBackoff state. In a nutshell it accelerates recovery of pods when an upstream service recovers.
An interference in automatic recovery for dependent pods is required because kubernetes pod restarts a container with an exponential backoff when the pod is in CrashLoopBackOff state. This backoff could become quite large if the service stays down for long. Presence of weeder would not let that happen as it’ll restart the pod.
Prerequisites
Before we understand how Weeder works, we need to be familiar with kubernetes services & endpoints.
NOTE: If a kubernetes service is created with selectors then kubernetes will create corresponding endpoint resource which will have the same name as that of the service. In weeder implementation service and endpoint name is used interchangeably.
Config
Weeder can be configured via command line arguments and a weeder configuration. See configure weeder.
Internals
Weeder keeps a watch on the events for the specified endpoints in the config. For every endpoints a list of podSelectors can be specified. It cretes a weeder object per endpoints resource when it receives a satisfactory Create or Update event. Then for every podSelector it creates a goroutine. This goroutine keeps a watch on the pods with labels as per the podSelector and kills any pod which turn into CrashLoopBackOff. Each weeder lives for watchDuration interval which has a default value of 5 mins if not explicitly set.
To understand the actions taken by the weeder lets use the following diagram as a reference.
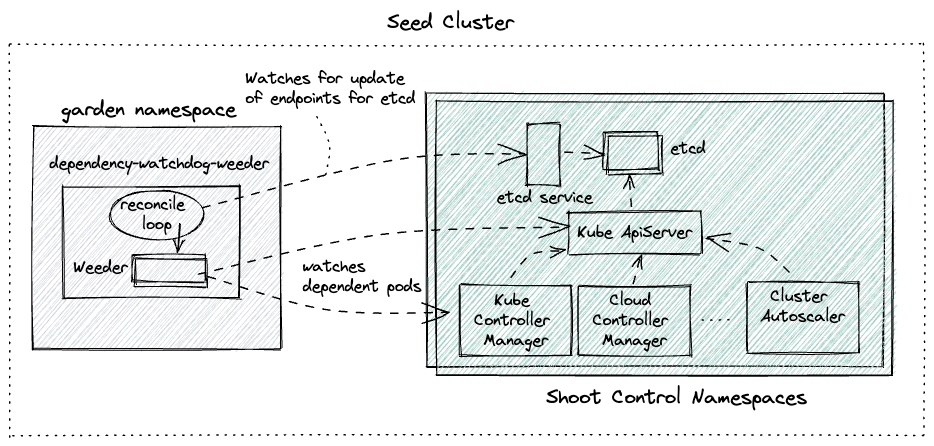 Let us also assume the following configuration for the weeder:
watchDuration: 2m0s
servicesAndDependantSelectors:
etcd-main-client: # name of the service/endpoint for etcd statefulset that weeder will receive events for.
podSelectors: # all pods matching the label selector are direct dependencies for etcd service
- matchExpressions:
- key: gardener.cloud/role
operator: In
values:
- controlplane
- key: role
operator: In
values:
- apiserver
kube-apiserver: # name of the service/endpoint for kube-api-server pods that weeder will receive events for.
podSelectors: # all pods matching the label selector are direct dependencies for kube-api-server service
- matchExpressions:
- key: gardener.cloud/role
operator: In
values:
- controlplane
- key: role
operator: NotIn
values:
- main
- apiserver
Only for the sake of demonstration lets pick the first service -> dependent pods tuple (etcd-main-client as the service endpoint).
- Assume that there are 3 replicas for etcd statefulset.
- Time here is just for showing the series of events
t=0-> all etcd pods go downt=10-> kube-api-server pods transition to CrashLoopBackOfft=100-> all etcd pods recover togethert=101-> Weeder seesUpdateevent foretcd-main-clientendpoints resourcet=102-> go routine created to keep watch on kube-api-server podst=103-> Since kube-api-server pods are still in CrashLoopBackOff, weeder deletes the pods to accelerate the recovery.t=104-> new kube-api-server pod created by replica-set controller in kube-controller-manager
Points to Note
- Weeder only respond on
Updateevents where anotReadyendpoints resource turn toReady. Thats why there was no weeder action at timet=10in the example above.notReady-> no backing pod is ReadyReady-> atleast one backing pod is Ready
- Weeder doesn’t respond on
Deleteevents - Weeder will always wait for the entire
watchDuration. If the dependent pods transition to CrashLoopBackOff after the watch duration or even after repeated deletion of these pods they do not recover then weeder will exit. Quality of service offered via a weeder is only Best-Effort.
6.1.2 - Deployment
6.1.2.1 - Configure
Configure Dependency Watchdog Components
Prober
Dependency watchdog prober command takes command-line-flags which are meant to fine-tune the prober. In addition a ConfigMap is also mounted to the container which provides tuning knobs for the all probes that the prober starts.
Command line arguments
Prober can be configured via the following flags:
| Flag Name | Type | Required | Default Value | Description |
|---|---|---|---|---|
| kube-api-burst | int | No | 10 | Burst to use while talking with kubernetes API server. The number must be >= 0. If it is 0 then a default value of 10 will be used |
| kube-api-qps | float | No | 5.0 | Maximum QPS (queries per second) allowed when talking with kubernetes API server. The number must be >= 0. If it is 0 then a default value of 5.0 will be used |
| concurrent-reconciles | int | No | 1 | Maximum number of concurrent reconciles |
| config-file | string | Yes | NA | Path of the config file containing the configuration to be used for all probes |
| metrics-bind-addr | string | No | “:9643” | The TCP address that the controller should bind to for serving prometheus metrics |
| health-bind-addr | string | No | “:9644” | The TCP address that the controller should bind to for serving health probes |
| enable-leader-election | bool | No | false | In case prober deployment has more than 1 replica for high availability, then it will be setup in a active-passive mode. Out of many replicas one will become the leader and the rest will be passive followers waiting to acquire leadership in case the leader dies. |
| leader-election-namespace | string | No | “garden” | Namespace in which leader election resource will be created. It should be the same namespace where DWD pods are deployed |
| leader-elect-lease-duration | time.Duration | No | 15s | The duration that non-leader candidates will wait after observing a leadership renewal until attempting to acquire leadership of a led but unrenewed leader slot. This is effectively the maximum duration that a leader can be stopped before it is replaced by another candidate. This is only applicable if leader election is enabled. |
| leader-elect-renew-deadline | time.Duration | No | 10s | The interval between attempts by the acting master to renew a leadership slot before it stops leading. This must be less than or equal to the lease duration. This is only applicable if leader election is enabled. |
| leader-elect-retry-period | time.Duration | No | 2s | The duration the clients should wait between attempting acquisition and renewal of a leadership. This is only applicable if leader election is enabled. |
You can view an example kubernetes prober deployment YAML to see how these command line args are configured.
Prober Configuration
A probe configuration is mounted as ConfigMap to the container. The path to the config file is configured via config-file command line argument as mentioned above. Prober will start one probe per Shoot control plane hosted within the Seed cluster. Each such probe will run asynchronously and will periodically connect to the Kube ApiServer of the Shoot. Configuration below will influence each such probe.
You can view an example YAML configuration provided as data in a ConfigMap here.
| Name | Type | Required | Default Value | Description |
|---|---|---|---|---|
| kubeConfigSecretName | string | Yes | NA | Name of the kubernetes Secret which has the encoded KubeConfig required to connect to the Shoot control plane Kube ApiServer via an internal domain. This typically uses the local cluster DNS. |
| probeInterval | metav1.Duration | No | 10s | Interval with which each probe will run. |
| initialDelay | metav1.Duration | No | 30s | Initial delay for the probe to become active. Only applicable when the probe is created for the first time. |
| probeTimeout | metav1.Duration | No | 30s | In each run of the probe it will attempt to connect to the Shoot Kube ApiServer. probeTimeout defines the timeout after which a single run of the probe will fail. |
| backoffJitterFactor | float64 | No | 0.2 | Jitter with which a probe is run. |
| dependentResourceInfos | []prober.DependentResourceInfo | Yes | NA | Detailed below. |
| kcmNodeMonitorGraceDuration | metav1.Duration | Yes | NA | It is the node-monitor-grace-period set in the kcm flags. Used to determine whether a node lease can be considered expired. |
| nodeLeaseFailureFraction | float64 | No | 0.6 | is used to determine the maximum number of leases that can be expired for a lease probe to succeed. |
DependentResourceInfo
If a lease probe fails, then it scales down the dependent resources defined by this property. Similarly, if the lease probe is now successful, then it scales up the dependent resources defined by this property.
Each dependent resource info has the following properties:
| Name | Type | Required | Default Value | Description |
|---|---|---|---|---|
| ref | autoscalingv1.CrossVersionObjectReference | Yes | NA | It is a collection of ApiVersion, Kind and Name for a kubernetes resource thus serving as an identifier. |
| optional | bool | Yes | NA | It is possible that a dependent resource is optional for a Shoot control plane. This property enables a probe to determine the correct behavior in case it is unable to find the resource identified via ref. |
| scaleUp | prober.ScaleInfo | No | Captures the configuration to scale up this resource. Detailed below. | |
| scaleDown | prober.ScaleInfo | No | Captures the configuration to scale down this resource. Detailed below. |
NOTE: Since each dependent resource is a target for scale up/down, therefore it is mandatory that the resource reference points a kubernetes resource which has a
scalesubresource.
ScaleInfo
How to scale a DependentResourceInfo is captured in ScaleInfo. It has the following properties:
| Name | Type | Required | Default Value | Description |
|---|---|---|---|---|
| level | int | Yes | NA | Detailed below. |
| initialDelay | metav1.Duration | No | 0s (No initial delay) | Once a decision is taken to scale a resource then via this property a delay can be induced before triggering the scale of the dependent resource. |
| timeout | metav1.Duration | No | 30s | Defines the timeout for the scale operation to finish for a dependent resource. |
Determining target replicas
Prober cannot assume any target replicas during a scale-up operation for the following reasons:
- Kubernetes resources could be set to provide highly availability and the number of replicas could wary from one shoot control plane to the other. In gardener the number of replicas of pods in shoot namespace are controlled by the shoot control plane configuration.
- If Horizontal Pod Autoscaler has been configured for a kubernetes dependent resource then it could potentially change the
spec.replicasfor a deployment/statefulset.
Given the above constraint lets look at how prober determines the target replicas during scale-down or scale-up operations.
Scale-Up: Primary responsibility of a probe while performing a scale-up is to restore the replicas of a kubernetes dependent resource prior to scale-down. In order to do that it updates the following for each dependent resource that requires a scale-up:spec.replicas: Checks ifdependency-watchdog.gardener.cloud/replicasis set. If it is, then it will take the value stored against this key as the target replicas. To be a valid value it should always be greater than 0.- If
dependency-watchdog.gardener.cloud/replicasannotation is not present then it falls back to the hard coded default value for scale-up which is set to 1. - Removes the annotation
dependency-watchdog.gardener.cloud/replicasif it exists.
Scale-Down: To scale down a dependent kubernetes resource it does the following:- Adds an annotation
dependency-watchdog.gardener.cloud/replicasand sets its value to the current value ofspec.replicas. - Updates
spec.replicasto 0.
- Adds an annotation
Level
Each dependent resource that should be scaled up or down is associated to a level. Levels are ordered and processed in ascending order (starting with 0 assigning it the highest priority). Consider the following configuration:
dependentResourceInfos:
- ref:
kind: "Deployment"
name: "kube-controller-manager"
apiVersion: "apps/v1"
scaleUp:
level: 1
scaleDown:
level: 0
- ref:
kind: "Deployment"
name: "machine-controller-manager"
apiVersion: "apps/v1"
scaleUp:
level: 1
scaleDown:
level: 1
- ref:
kind: "Deployment"
name: "cluster-autoscaler"
apiVersion: "apps/v1"
scaleUp:
level: 0
scaleDown:
level: 2
Let us order the dependent resources by their respective levels for both scale-up and scale-down. We get the following order:
Scale Up Operation
Order of scale up will be:
- cluster-autoscaler
- kube-controller-manager and machine-controller-manager will be scaled up concurrently after cluster-autoscaler has been scaled up.
Scale Down Operation
Order of scale down will be:
- kube-controller-manager
- machine-controller-manager after (1) has been scaled down.
- cluster-autoscaler after (2) has been scaled down.
Disable/Ignore Scaling
A probe can be configured to ignore scaling of configured dependent kubernetes resources.
To do that one must set dependency-watchdog.gardener.cloud/ignore-scaling annotation to true on the scalable resource for which scaling should be ignored.
Weeder
Dependency watchdog weeder command also (just like the prober command) takes command-line-flags which are meant to fine-tune the weeder. In addition a ConfigMap is also mounted to the container which helps in defining the dependency of pods on endpoints.
Command Line Arguments
Weeder can be configured with the same flags as that for prober described under command-line-arguments section You can find an example weeder deployment YAML to see how these command line args are configured.
Weeder Configuration
Weeder configuration is mounted as ConfigMap to the container. The path to the config file is configured via config-file command line argument as mentioned above. Weeder will start one go routine per podSelector per endpoint on an endpoint event as described in weeder internal concepts.
You can view the example YAML configuration provided as data in a ConfigMap here.
| Name | Type | Required | Default Value | Description |
|---|---|---|---|---|
| watchDuration | *metav1.Duration | No | 5m0s | The time duration for which watch is kept on dependent pods to see if anyone turns to CrashLoopBackoff |
| servicesAndDependantSelectors | map[string]DependantSelectors | Yes | NA | Endpoint name and its corresponding dependent pods. More info below. |
DependantSelectors
If the service recovers from downtime, then weeder starts to watch for CrashLoopBackOff pods. These pods are identified by info stored in this property.
| Name | Type | Required | Default Value | Description |
|---|---|---|---|---|
| podSelectors | []*metav1.LabelSelector | Yes | NA | This is a list of Label selector |
6.1.2.2 - Monitor
Monitoring
Work In Progress
We will be introducing metrics for Dependency-Watchdog-Prober and Dependency-Watchdog-Weeder. These metrics will be pushed to prometheus. Once that is completed we will provide details on all the metrics that will be supported here.
6.1.3 - Contribution
How to contribute?
Contributions are always welcome!
In order to contribute ensure that you have the development environment setup and you familiarize yourself with required steps to build, verify-quality and test.
Setting up development environment
Installing Go
Minimum Golang version required: 1.18.
On MacOS run:
brew install go
For other OS, follow the installation instructions.
Installing Git
Git is used as version control for dependency-watchdog. On MacOS run:
brew install git
If you do not have git installed already then please follow the installation instructions.
Installing Docker
In order to test dependency-watchdog containers you will need a local kubernetes setup. Easiest way is to first install Docker. This becomes a pre-requisite to setting up either a vanilla KIND/minikube cluster or a local Gardener cluster.
On MacOS run:
brew install -cash docker
For other OS, follow the installation instructions.
Installing Kubectl
To interact with the local Kubernetes cluster you will need kubectl. On MacOS run:
brew install kubernetes-cli
For other IS, follow the installation instructions.
Get the sources
Clone the repository from Github:
git clone https://github.com/gardener/dependency-watchdog.git
Using Makefile
For every change following make targets are recommended to run.
# build the code changes
> make build
# ensure that all required checks pass
> make verify # this will check formatting, linting and will run unit tests
# if you do not wish to run tests then you can use the following make target.
> make check
All tests should be run and the test coverage should ideally not reduce. Please ensure that you have read testing guidelines.
Before raising a pull request ensure that if you are introducing any new file then you must add licesence header to all new files. To add license header you can run this make target:
> make add-license-headers
# This will add license headers to any file which does not already have it.
NOTE: Also have a look at the Makefile as it has other targets that are not mentioned here.
Raising a Pull Request
To raise a pull request do the following:
- Create a fork of dependency-watchdog
- Add dependency-watchdog as upstream remote via
git remote add upstream https://github.com/gardener/dependency-watchdog
- It is recommended that you create a git branch and push all your changes for the pull-request.
- Ensure that while you work on your pull-request, you continue to rebase the changes from upstream to your branch. To do that execute the following command:
git pull --rebase upstream master
- We prefer clean commits. If you have multiple commits in the pull-request, then squash the commits to a single commit. You can do this via
interactive git rebasecommand. For example if your PR branch is ahead of remote origin HEAD by 5 commits then you can execute the following command and pick the first commit and squash the remaining commits.
git rebase -i HEAD~5 #actual number from the head will depend upon how many commits your branch is ahead of remote origin master
6.1.4 - Dwd Using Local Garden
Dependency Watchdog with Local Garden Cluster
Setting up Local Garden cluster
A convenient way to test local dependency-watchdog changes is to use a local garden cluster. To setup a local garden cluster you can follow the setup-guide.
Dependency Watchdog resources
As part of the local garden installation, a local seed will be available.
Dependency Watchdog resources created in the seed
Namespaced resources
In the garden namespace of the seed cluster, following resources will be created:
| Resource (GVK) | Name |
|---|---|
| {apiVersion: v1, Kind: ServiceAccount} | dependency-watchdog-prober |
| {apiVersion: v1, Kind: ServiceAccount} | dependency-watchdog-weeder |
| {apiVersion: apps/v1, Kind: Deployment} | dependency-watchdog-prober |
| {apiVersion: apps/v1, Kind: Deployment} | dependency-watchdog-weeder |
| {apiVersion: v1, Kind: ConfigMap} | dependency-watchdog-prober-* |
| {apiVersion: v1, Kind: ConfigMap} | dependency-watchdog-weeder-* |
| {apiVersion: rbac.authorization.k8s.io/v1, Kind: Role} | gardener.cloud:dependency-watchdog-prober:role |
| {apiVersion: rbac.authorization.k8s.io/v1, Kind: Role} | gardener.cloud:dependency-watchdog-weeder:role |
| {apiVersion: rbac.authorization.k8s.io/v1, Kind: RoleBinding} | gardener.cloud:dependency-watchdog-prober:role-binding |
| {apiVersion: rbac.authorization.k8s.io/v1, Kind: RoleBinding} | gardener.cloud:dependency-watchdog-weeder:role-binding |
| {apiVersion: resources.gardener.cloud/v1alpha1, Kind: ManagedResource} | dependency-watchdog-prober |
| {apiVersion: resources.gardener.cloud/v1alpha1, Kind: ManagedResource} | dependency-watchdog-weeder |
| {apiVersion: v1, Kind: Secret} | managedresource-dependency-watchdog-weeder |
| {apiVersion: v1, Kind: Secret} | managedresource-dependency-watchdog-prober |
Cluster resources
| Resource (GVK) | Name |
|---|---|
| {apiVersion: rbac.authorization.k8s.io/v1, Kind: ClusterRole} | gardener.cloud:dependency-watchdog-prober:cluster-role |
| {apiVersion: rbac.authorization.k8s.io/v1, Kind: ClusterRole} | gardener.cloud:dependency-watchdog-weeder:cluster-role |
| {apiVersion: rbac.authorization.k8s.io/v1, Kind: ClusterRoleBinding} | gardener.cloud:dependency-watchdog-prober:cluster-role-binding |
| {apiVersion: rbac.authorization.k8s.io/v1, Kind: ClusterRoleBinding} | gardener.cloud:dependency-watchdog-weeder:cluster-role-binding |
Dependency Watchdog resources created in Shoot control namespace
| Resource (GVK) | Name |
|---|---|
| {apiVersion: v1, Kind: Secret} | dependency-watchdog-prober |
| {apiVersion: resources.gardener.cloud/v1alpha1, Kind: ManagedResource} | shoot-core-dependency-watchdog |
Dependency Watchdog resources created in the kube-node-lease namespace of the shoot
| Resource (GVK) | Name |
|---|---|
| {apiVersion: rbac.authorization.k8s.io/v1, Kind: Role} | gardener.cloud:target:dependency-watchdog |
| {apiVersion: rbac.authorization.k8s.io/v1, Kind: RoleBinding} | gardener.cloud:target:dependency-watchdog |
These will be created by the GRM and will have a managed resource named shoot-core-dependency-watchdog in the shoot namespace in the seed.
Update Gardener with custom Dependency Watchdog Docker images
Build, Tag and Push docker images
To build dependency watchdog docker images run the following make target:
> make docker-build
Local gardener hosts a docker registry which can be access at localhost:5001. To enable local gardener to be able to access the custom docker images you need to tag and push these images to the embedded docker registry. To do that execute the following commands:
> docker images
# Get the IMAGE ID of the dependency watchdog images that were built using docker-build make target.
> docker tag <IMAGE-ID> localhost:5001/europe-docker.pkg.dev/gardener-project/public/gardener/dependency-watchdog-prober:<TAGNAME>
> docker push localhost:5001/europe-docker.pkg.dev/gardener-project/public/gardener/dependency-watchdog-prober:<TAGNAME>
Update ManagedResource
Garden resource manager will revert back any changes that are done to the kubernetes deployment for dependency watchdog. This is quite useful in live landscapes where only tested and qualified images are used for all gardener managed components. Any change therefore is automatically reverted.
However, during development and testing you will need to use custom docker images. To prevent garden resource manager from reverting the changes done to the kubernetes deployment for dependency watchdog components you must update the respective managed resources first.
# List the managed resources
> kubectl get mr -n garden | grep dependency
# Sample response
dependency-watchdog-weeder seed True True False 26h
dependency-watchdog-prober seed True True False 26h
# Lets assume that you are currently testing prober and would like to use a custom docker image
> kubectl edit mr dependency-watchdog-prober -n garden
# This will open the resource YAML for editing. Add the annotation resources.gardener.cloud/ignore=true
# Reference: https://github.com/gardener/gardener/blob/master/docs/concepts/resource-manager.md
# Save the YAML file.
When you are done with your testing then you can again edit the ManagedResource and remove the annotation. Garden resource manager will revert back to the image with which gardener was initially built and started.
Update Kubernetes Deployment
Find and update the kubernetes deployment for dependency watchdog.
> kubectl get deploy -n garden | grep dependency
# Sample response
dependency-watchdog-weeder 1/1 1 1 26h
dependency-watchdog-prober 1/1 1 1 26h
# Lets assume that you are currently testing prober and would like to use a custom docker image
> kubectl edit deploy dependency-watchdog-prober -n garden
# This will open the resource YAML for editing. Change the image or any other changes and save.
6.1.5 - Testing
Testing Strategy and Developer Guideline
Intent of this document is to introduce you (the developer) to the following:
- Category of tests that exists.
- Libraries that are used to write tests.
- Best practices to write tests that are correct, stable, fast and maintainable.
- How to run each category of tests.
For any new contributions tests are a strict requirement. Boy Scouts Rule is followed: If you touch a code for which either no tests exist or coverage is insufficient then it is expected that you will add relevant tests.
Tools Used for Writing Tests
These are the following tools that were used to write all the tests (unit + envtest + vanilla kind cluster tests), it is preferred not to introduce any additional tools / test frameworks for writing tests:
Gomega
We use gomega as our matcher or assertion library. Refer to Gomega’s official documentation for details regarding its installation and application in tests.
Testing Package from Standard Library
We use the Testing package provided by the standard library in golang for writing all our tests. Refer to its official documentation to learn how to write tests using Testing package. You can also refer to this example.
Writing Tests
Common for All Kinds
- For naming the individual tests (
TestXxxandtestXxxmethods) and helper methods, make sure that the name describes the implementation of the method. For eg:testScalingWhenMandatoryResourceNotFoundtests the behaviour of thescalerwhen a mandatory resource (KCM deployment) is not present. - Maintain proper logging in tests. Use
t.log()method to add appropriate messages wherever necessary to describe the flow of the test. See this for examples. - Make use of the
testdatadirectory for storing arbitrary sample data needed by tests (YAML manifests, etc.). See this package for examples.- From https://pkg.go.dev/cmd/go/internal/test:
The go tool will ignore a directory named “testdata”, making it available to hold ancillary data needed by the tests.
- From https://pkg.go.dev/cmd/go/internal/test:
Table-driven tests
We need a tabular structure in two cases:
- When we have multiple tests which require the same kind of setup:- In this case we have a
TestXxxSuitemethod which will do the setup and run all the tests. We have a slice ofteststruct which holds all the tests (typically atitleandrunmethod). We use aforloop to run all the tests one by one. See this for examples. - When we have the same code path and multiple possible values to check:- In this case we have the arguments and expectations in a struct. We iterate through the slice of all such structs, passing the arguments to appropriate methods and checking if the expectation is met. See this for examples.
Env Tests
Env tests in Dependency Watchdog use the sigs.k8s.io/controller-runtime/pkg/envtest package. It sets up a temporary control plane (etcd + kube-apiserver) and runs the test against it. The code to set up and teardown the environment can be checked out here.
These are the points to be followed while writing tests that use envtest setup:
All tests should be divided into two top level partitions:
- tests with common environment (
testXxxCommonEnvTests) - tests which need a dedicated environment for each one. (
testXxxDedicatedEnvTests)
They should be contained within the
TestXxxSuitemethod. See this for examples. If all tests are of one kind then this is not needed.- tests with common environment (
Create a method named
setUpXxxTestfor performing setup tasks before all/each test. It should either return a method or have a separate method to perform teardown tasks. See this for examples.The tests run by the suite can be table-driven as well.
Use the
envtestsetup when there is a need of an environment close to an actual setup. Eg: start controllers against a real Kubernetes control plane to catch bugs that can only happen when talking to a real API server.
NOTE: It is currently not possible to bring up more than one envtest environments. See issue#1363. We enforce running serial execution of test suites each of which uses a different envtest environments. See hack/test.sh.
Vanilla Kind Cluster Tests
There are some tests where we need a vanilla kind cluster setup, for eg:- The scaler.go code in the prober package uses the scale subresource to scale the deployments mentioned in the prober config. But the envtest setup does not support the scale subresource as of now. So we need this setup to test if the deployments are scaled as per the config or not.
You can check out the code for this setup here. You can add utility methods for different kubernetes and custom resources in there.
These are the points to be followed while writing tests that use Vanilla Kind Cluster setup:
- Use this setup only if there is a need of an actual Kubernetes cluster(api server + control plane + etcd) to write the tests. (Because this is slower than your normal
envTestsetup) - Create
setUpXxxTestsimilar to the one inenvTest. Follow the same structural pattern used inenvTestfor writing these tests. See this for examples.
Run Tests
To run unit tests, use the following Makefile target
make test
To run KIND cluster based tests, use the following Makefile target
make kind-tests # these tests will be slower as it brings up a vanilla KIND cluster
To view coverage after running the tests, run :
go tool cover -html=cover.out
Flaky tests
If you see that a test is flaky then you can use make stress target which internally uses stress tool
make stress test-package=<test-package> test-func=<test-func> tool-params="<tool-params>"
An example invocation:
make stress test-package=./internal/util test-func=TestRetryUntilPredicateWithBackgroundContext tool-params="-p 10"
The make target will do the following:
- It will create a test binary for the package specified via
test-packageat/tmp/pkg-stress.testdirectory. - It will run
stresstool passing thetool-paramsand targets the functiontest-func.
6.2 - etcd-druid
![]()
![]()

![]()
etcd-druid is an etcd operator which makes it easy to configure, provision, reconcile, monitor and delete etcd clusters. It enables management of etcd clusters through declarative Kubernetes API model.
In every etcd cluster managed by etcd-druid, each etcd member is a two container Pod which consists of:
- etcd-wrapper which manages the lifecycle (validation & initialization) of an etcd.
- etcd-backup-restore sidecar which currently provides the following capabilities (the list is not comprehensive):
- etcd DB validation.
- Scheduled etcd DB defragmentation.
- Backup - etcd DB snapshots are taken regularly and backed in an object store if one is configured.
- Restoration - In case of a DB corruption for a single-member cluster it helps in restoring from latest set of snapshots (full & delta).
- Member control operations.
etcd-druid additionally provides the following capabilities:
- Facilitates declarative scale-out of etcd clusters.
- Provides protection against accidental deletion/mutation of resources provisioned as part of an etcd cluster.
- Offers an asynchronous and threshold based capability to process backed up snapshots to:
- Potentially minimize the recovery time by leveraging restoration from backups followed by etcd’s compaction and defragmentation.
- Indirectly assert integrity of the backed up snaphots.
- Allows seamless copy of backups between any two object store buckets.
Start using or developing etcd-druid locally
If you are looking to try out druid then you can use a Kind cluster based setup.
https://github.com/user-attachments/assets/cfe0d891-f709-4d7f-b975-4300c6de67e4
For detailed documentation, see our docs.
Contributions
If you wish to contribute then please see our contributor guidelines.
Feedback and Support
We always look forward to active community engagement. Please report bugs or suggestions on how we can enhance etcd-druid on GitHub Issues.
License
Release under Apache-2.0 license.
6.2.1 - 01 Multi Node Etcd Clusters
DEP-01: Multi-node etcd cluster instances via etcd-druid
This document proposes an approach (along with some alternatives) to support provisioning and management of multi-node etcd cluster instances via etcd-druid and etcd-backup-restore.
Goal
- Enhance etcd-druid and etcd-backup-restore to support provisioning and management of multi-node etcd cluster instances within a single Kubernetes cluster.
- The etcd CRD interface should be simple to use. It should preferably work with just setting the
spec.replicasfield to the desired value and should not require any more configuration in the CRD than currently required for the single-node etcd instances. Thespec.replicasfield is part of thescalesub-resource implementation inEtcdCRD. - The single-node and multi-node scenarios must be automatically identified and managed by
etcd-druidandetcd-backup-restore. - The etcd clusters (single-node or multi-node) managed by
etcd-druidandetcd-backup-restoremust automatically recover from failures (even quorum loss) and disaster (e.g. etcd member persistence/data loss) as much as possible. - It must be possible to dynamically scale an etcd cluster horizontally (even between single-node and multi-node scenarios) by simply scaling the
Etcdscale sub-resource. - It must be possible to (optionally) schedule the individual members of an etcd clusters on different nodes or even infrastructure availability zones (within the hosting Kubernetes cluster).
Though this proposal tries to cover most aspects related to single-node and multi-node etcd clusters, there are some more points that are not goals for this document but are still in the scope of either etcd-druid/etcd-backup-restore and/or gardener. In such cases, a high-level description of how they can be addressed in the future are mentioned at the end of the document.
Background and Motivation
Single-node etcd cluster
At present, etcd-druid supports only single-node etcd cluster instances.
The advantages of this approach are given below.
- The problem domain is smaller. There are no leader election and quorum related issues to be handled. It is simpler to setup and manage a single-node etcd cluster.
- Single-node etcd clusters instances have less request latency than multi-node etcd clusters because there is no requirement to replicate the changes to the other members before committing the changes.
etcd-druidprovisions etcd cluster instances as pods (actually asstatefulsets) in a Kubernetes cluster and Kubernetes is quick (<20s) to restart container/pods if they go down.- Also,
etcd-druidis currently only used by gardener to provision etcd clusters to act as back-ends for Kubernetes control-planes and Kubernetes control-plane components (kube-apiserver,kubelet,kube-controller-manager,kube-scheduleretc.) can tolerate etcd going down and recover when it comes back up. - Single-node etcd clusters incur less cost (CPU, memory and storage)
- It is easy to cut-off client requests if backups fail by using
readinessProbeon theetcd-backup-restorehealthz endpoint to minimize the gap between the latest revision and the backup revision.
The disadvantages of using single-node etcd clusters are given below.
- The database verification step by
etcd-backup-restorecan introduce additional delays whenever etcd container/pod restarts (in total ~20-25s). This can be much longer if a database restoration is required. Especially, if there are incremental snapshots that need to be replayed (this can be mitigated by compacting the incremental snapshots in the background). - Kubernetes control-plane components can go into
CrashloopBackoffif etcd is down for some time. This is mitigated by the dependency-watchdog. But Kubernetes control-plane components require a lot of resources and create a lot of load on the etcd cluster and the apiserver when they come out ofCrashloopBackoff. Especially, in medium or large sized clusters (>20nodes). - Maintenance operations such as updates to etcd (and updates to
etcd-druidofetcd-backup-restore), rolling updates to the nodes of the underlying Kubernetes cluster and vertical scaling of etcd pods are disruptive because they cause etcd pods to be restarted. The vertical scaling of etcd pods is somewhat mitigated during scale down by doing it only during the target clusters’ maintenance window. But scale up is still disruptive. - We currently use some form of elastic storage (via
persistentvolumeclaims) for storing which have some upper-bounds on the I/O latency and throughput. This can be potentially be a problem for large clusters (>220nodes). Also, some cloud providers (e.g. Azure) take a long time to attach/detach volumes to and from machines which increases the down time to the Kubernetes components that depend on etcd. It is difficult to use ephemeral/local storage (to achieve better latency/throughput as well as to circumvent volume attachment/detachment) for single-node etcd cluster instances.
Multi-node etcd-cluster
The advantages of introducing support for multi-node etcd clusters via etcd-druid are below.
- Multi-node etcd cluster is highly-available. It can tolerate disruption to individual etcd pods as long as the quorum is not lost (i.e. more than half the etcd member pods are healthy and ready).
- Maintenance operations such as updates to etcd (and updates to
etcd-druidofetcd-backup-restore), rolling updates to the nodes of the underlying Kubernetes cluster and vertical scaling of etcd pods can be done non-disruptively by respectingpoddisruptionbudgetsfor the various multi-node etcd cluster instances hosted on that cluster. - Kubernetes control-plane components do not see any etcd cluster downtime unless quorum is lost (which is expected to be lot less frequent than current frequency of etcd container/pod restarts).
- We can consider using ephemeral/local storage for multi-node etcd cluster instances because individual member restarts can afford to take time to restore from backup before (re)joining the etcd cluster because the remaining members serve the requests in the meantime.
- High-availability across availability zones is also possible by specifying (anti)affinity for the etcd pods (possibly via
kupid).
Some disadvantages of using multi-node etcd clusters due to which it might still be desirable, in some cases, to continue to use single-node etcd cluster instances in the gardener context are given below.
- Multi-node etcd cluster instances are more complex to manage.
The problem domain is larger including the following.
- Leader election
- Quorum loss
- Managing rolling changes
- Backups to be taken from only the leading member.
- More complex to cut-off client requests if backups fail to minimize the gap between the latest revision and the backup revision is under control.
- Multi-node etcd cluster instances incur more cost (CPU, memory and storage).
Dynamic multi-node etcd cluster
Though it is not part of this proposal, it is conceivable to convert a single-node etcd cluster into a multi-node etcd cluster temporarily to perform some disruptive operation (etcd, etcd-backup-restore or etcd-druid updates, etcd cluster vertical scaling and perhaps even node rollout) and convert it back to a single-node etcd cluster once the disruptive operation has been completed. This will necessarily still involve a down-time because scaling from a single-node etcd cluster to a three-node etcd cluster will involve etcd pod restarts, it is still probable that it can be managed with a shorter down time than we see at present for single-node etcd clusters (on the other hand, converting a three-node etcd cluster to five node etcd cluster can be non-disruptive).
This is definitely not to argue in favour of such a dynamic approach in all cases (eventually, if/when dynamic multi-node etcd clusters are supported). On the contrary, it makes sense to make use of static (fixed in size) multi-node etcd clusters for production scenarios because of the high-availability.
Prior Art
ETCD Operator from CoreOS
This project is no longer actively developed or maintained. The project exists here for historical reference. If you are interested in the future of the project and taking over stewardship, please contact etcd-dev@googlegroups.com.
etcdadm from kubernetes-sigs
etcdadm is a command-line tool for operating an etcd cluster. It makes it easy to create a new cluster, add a member to, or remove a member from an existing cluster. Its user experience is inspired by kubeadm.
It is a tool more tailored for manual command-line based management of etcd clusters with no API’s. It also makes no assumptions about the underlying platform on which the etcd clusters are provisioned and hence, doesn’t leverage any capabilities of Kubernetes.
Etcd Cluster Operator from Improbable-Engineering
Etcd Cluster Operator is an Operator for automating the creation and management of etcd inside of Kubernetes. It provides a custom resource definition (CRD) based API to define etcd clusters with Kubernetes resources, and enable management with native Kubernetes tooling._
Out of all the alternatives listed here, this one seems to be the only possible viable alternative. Parts of its design/implementations are similar to some of the approaches mentioned in this proposal. However, we still don’t propose to use it as -
- The project is still in early phase and is not mature enough to be consumed as is in productive scenarios of ours.
- The resotration part is completely different which makes it difficult to adopt as-is and requries lot of re-work with the current restoration semantics with etcd-backup-restore making the usage counter-productive.
General Approach to ETCD Cluster Management
Bootstrapping
There are three ways to bootstrap an etcd cluster which are static, etcd discovery and DNS discovery. Out of these, the static way is the simplest (and probably faster to bootstrap the cluster) and has the least external dependencies. Hence, it is preferred in this proposal. But it requires that the initial (during bootstrapping) etcd cluster size (number of members) is already known before bootstrapping and that all of the members are already addressable (DNS,IP,TLS etc.). Such information needs to be passed to the individual members during startup using the following static configuration.
- ETCD_INITIAL_CLUSTER
- The list of peer URLs including all the members. This must be the same as the advertised peer URLs configuration. This can also be passed as
initial-clusterflag to etcd.
- The list of peer URLs including all the members. This must be the same as the advertised peer URLs configuration. This can also be passed as
- ETCD_INITIAL_CLUSTER_STATE
- This should be set to
newwhile bootstrapping an etcd cluster.
- This should be set to
- ETCD_INITIAL_CLUSTER_TOKEN
- This is a token to distinguish the etcd cluster from any other etcd cluster in the same network.
Assumptions
- ETCD_INITIAL_CLUSTER can use DNS instead of IP addresses. We need to verify this by deleting a pod (as against scaling down the statefulset) to ensure that the pod IP changes and see if the recreated pod (by the statefulset controller) re-joins the cluster automatically.
- DNS for the individual members is known or computable. This is true in the case of etcd-druid setting up an etcd cluster using a single statefulset. But it may not necessarily be true in other cases (multiple statefulset per etcd cluster or deployments instead of statefulsets or in the case of etcd cluster with members distributed across more than one Kubernetes cluster.
Adding a new member to an etcd cluster
A new member can be added to an existing etcd cluster instance using the following steps.
- If the latest backup snapshot exists, restore the member’s etcd data to the latest backup snapshot. This can reduce the load on the leader to bring the new member up to date when it joins the cluster.
- If the latest backup snapshot doesn’t exist or if the latest backup snapshot is not accessible (please see backup failure) and if the cluster itself is quorate, then the new member can be started with an empty data. But this will will be suboptimal because the new member will fetch all the data from the leading member to get up-to-date.
- The cluster is informed that a new member is being added using the
MemberAddAPI including information like the member name and its advertised peer URLs. - The new etcd member is then started with
ETCD_INITIAL_CLUSTER_STATE=existingapart from other required configuration.
This proposal recommends this approach.
Note
- If there are incremental snapshots (taken by
etcd-backup-restore), they cannot be applied because that requires the member to be started in isolation without joining the cluster which is not possible. This is acceptable if the amount of incremental snapshots are managed to be relatively small. This adds one more reason to increase the priority of the issue of incremental snapshot compaction. - There is a time window, between the
MemberAddcall and the new member joining the cluster and getting up to date, where the cluster is vulnerable to leader elections which could be disruptive.
Alternative
With v3.4, the new raft learner approach can be used to mitigate some of the possible disruptions mentioned above.
Then the steps will be as follows.
- If the latest backup snapshot exists, restore the member’s etcd data to the latest backup snapshot. This can reduce the load on the leader to bring the new member up to date when it joins the cluster.
- The cluster is informed that a new member is being added using the
MemberAddAsLearnerAPI including information like the member name and its advertised peer URLs. - The new etcd member is then started with
ETCD_INITIAL_CLUSTER_STATE=existingapart from other required configuration. - Once the new member (learner) is up to date, it can be promoted to a full voting member by using the
MemberPromoteAPI
This approach is new and involves more steps and is not recommended in this proposal. It can be considered in future enhancements.
Managing Failures
A multi-node etcd cluster may face failures of diffent kinds during its life-cycle. The actions that need to be taken to manage these failures depend on the failure mode.
Removing an existing member from an etcd cluster
If a member of an etcd cluster becomes unhealthy, it must be explicitly removed from the etcd cluster, as soon as possible.
This can be done by using the MemberRemove API.
This ensures that only healthy members participate as voting members.
A member of an etcd cluster may be removed not just for managing failures but also for other reasons such as -
- The etcd cluster is being scaled down. I.e. the cluster size is being reduced
- An existing member is being replaced by a new one for some reason (e.g. upgrades)
If the majority of the members of the etcd cluster are healthy and the member that is unhealthy/being removed happens to be the leader at that moment then the etcd cluster will automatically elect a new leader. But if only a minority of etcd clusters are healthy after removing the member then the the cluster will no longer be quorate and will stop accepting write requests. Such an etcd cluster needs to be recovered via some kind of disaster-recovery.
Restarting an existing member of an etcd cluster
If the existing member of an etcd cluster restarts and retains an uncorrupted data directory after the restart, then it can simply re-join the cluster as an existing member without any API calls or configuration changes. This is because the relevant metadata (including member ID and cluster ID) are maintained in the write ahead logs. However, if it doesn’t retain an uncorrupted data directory after the restart, then it must first be removed and added as a new member.
Recovering an etcd cluster from failure of majority of members
If a majority of members of an etcd cluster fail but if they retain their uncorrupted data directory then they can be simply restarted and they will re-form the existing etcd cluster when they come up. However, if they do not retain their uncorrupted data directory, then the etcd cluster must be recovered from latest snapshot in the backup. This is very similar to bootstrapping with the additional initial step of restoring the latest snapshot in each of the members. However, the same limitation about incremental snapshots, as in the case of adding a new member, applies here. But unlike in the case of adding a new member, not applying incremental snapshots is not acceptable in the case of etcd cluster recovery. Hence, if incremental snapshots are required to be applied, the etcd cluster must be recovered in the following steps.
- Restore a new single-member cluster using the latest snapshot.
- Apply incremental snapshots on the single-member cluster.
- Take a full snapshot which can now be used while adding the remaining members.
- Add new members using the latest snapshot created in the step above.
Kubernetes Context
- Users will provision an etcd cluster in a Kubernetes cluster by creating an etcd CRD resource instance.
- A multi-node etcd cluster is indicated if the
spec.replicasfield is set to any value greater than 1. The etcd-druid will add validation to ensure that thespec.replicasvalue is an odd number according to the requirements of etcd. - The etcd-druid controller will provision a statefulset with the etcd main container and the etcd-backup-restore sidecar container. It will pass on the
spec.replicasfield from the etcd resource to the statefulset. It will also supply the right pre-computed configuration to both the containers. - The statefulset controller will create the pods based on the pod template in the statefulset spec and these individual pods will be the members that form the etcd cluster.
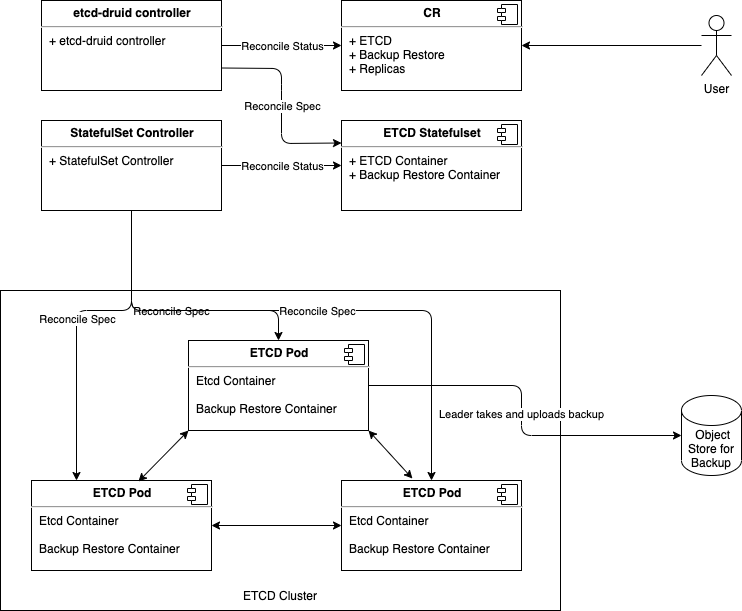
This approach makes it possible to satisfy the assumption that the DNS for the individual members of the etcd cluster must be known/computable.
This can be achieved by using a headless service (along with the statefulset) for each etcd cluster instance.
Then we can address individual pods/etcd members via the predictable DNS name of <statefulset_name>-{0|1|2|3|…|n}.<headless_service_name> from within the Kubernetes namespace (or from outside the Kubernetes namespace by appending .<namespace>.svc.<cluster_domain> suffix).
The etcd-druid controller can compute the above configurations automatically based on the spec.replicas in the etcd resource.
This proposal recommends this approach.
Alternative
One statefulset is used for each member (instead of one statefulset for all members). While this approach gives a flexibility to have different pod specifications for the individual members, it makes managing the individual members (e.g. rolling updates) more complicated. Hence, this approach is not recommended.
ETCD Configuration
As mentioned in the general approach section, there are differences in the configuration that needs to be passed to individual members of an etcd cluster in different scenarios such as bootstrapping, adding a new member, removing a member, restarting an existing member etc. Managing such differences in configuration for individual pods of a statefulset is tricky in the recommended approach of using a single statefulset to manage all the member pods of an etcd cluster. This is because statefulset uses the same pod template for all its pods.
The recommendation is for etcd-druid to provision the base configuration template in a ConfigMap which is passed to all the pods via the pod template in the StatefulSet.
The initialization flow of etcd-backup-restore (which is invoked every time the etcd container is (re)started) is then enhanced to generate the customized etcd configuration for the corresponding member pod (in a shared volume between etcd and the backup-restore containers) based on the supplied template configuration.
This will require that etcd-backup-restore will have to have a mechanism to detect which scenario listed above applies during any given member container/pod restart.
Alternative
As mentioned above, one statefulset is used for each member of the etcd cluster.
Then different configuration (generated directly by etcd-druid) can be passed in the pod templates of the different statefulsets.
Though this approach is advantageous in the context of managing the different configuration, it is not recommended in this proposal because it makes the rest of the management (e.g. rolling updates) more complicated.
Data Persistence
The type of persistence used to store etcd data (including the member ID and cluster ID) has an impact on the steps that are needed to be taken when the member pods or containers (minority of them or majority) need to be recovered.
Persistent
Like the single-node case, persistentvolumes can be used to persist ETCD data for all the member pods. The individual member pods then get their own persistentvolumes.
The advantage is that individual members retain their member ID across pod restarts and even pod deletion/recreation across Kubernetes nodes.
This means that member pods that crash (or are unhealthy) can be restarted automatically (by configuring livenessProbe) and they will re-join the etcd cluster using their existing member ID without any need for explicit etcd cluster management).
The disadvantages of this approach are as follows.
- The number of persistentvolumes increases linearly with the cluster size which is a cost-related concern.
- Network-mounted persistentvolumes might eventually become a performance bottleneck under heavy load for a latency-sensitive component like ETCD.
- Volume attach/detach issues when associated with etcd cluster instances cause downtimes to the target shoot clusters that are backed by those etcd cluster instances.
Ephemeral
The ephemeral volumes use-case is considered as an optimization and may be planned as a follow-up action.
Disk
Ephemeral persistence can be achieved in Kubernetes by using either emptyDir volumes or local persistentvolumes to persist ETCD data.
The advantages of this approach are as follows.
- Potentially faster disk I/O.
- The number of persistent volumes does not increase linearly with the cluster size (at least not technically).
- Issues related volume attachment/detachment can be avoided.
The main disadvantage of using ephemeral persistence is that the individual members may retain their identity and data across container restarts but not across pod deletion/recreation across Kubernetes nodes. If the data is lost then on restart of the member pod, the older member (represented by the container) has to be removed and a new member has to be added.
Using emptyDir ephemeral persistence has the disadvantage that the volume doesn’t have its own identity.
So, if the member pod is recreated but scheduled on the same node as before then it will not retain the identity as the persistence is lost.
But it has the advantage that scheduling of pods is unencumbered especially during pod recreation as they are free to be scheduled anywhere.
Using local persistentvolumes has the advantage that the volume has its own indentity and hence, a recreated member pod will retain its identity if scheduled on the same node.
But it has the disadvantage of tying down the member pod to a node which is a problem if the node becomes unhealthy requiring etcd druid to take additional actions (such as deleting the local persistent volume).
Based on these constraints, if ephemeral persistence is opted for, it is recommended to use emptyDir ephemeral persistence.
In-memory
In-memory ephemeral persistence can be achieved in Kubernetes by using emptyDir with medium: Memory.
In this case, a tmpfs (RAM-backed file-system) volume will be used.
In addition to the advantages of ephemeral persistence, this approach can achieve the fastest possible disk I/O.
Similarly, in addition to the disadvantages of ephemeral persistence, in-memory persistence has the following additional disadvantages.
- More memory required for the individual member pods.
- Individual members may not at all retain their data and identity across container restarts let alone across pod restarts/deletion/recreation across Kubernetes nodes. I.e. every time an etcd container restarts, the old member (represented by the container) will have to be removed and a new member has to be added.
How to detect if valid metadata exists in an etcd member
Since the likelyhood of a member not having valid metadata in the WAL files is much more likely in the ephemeral persistence scenario, one option is to pass the information that ephemeral persistence is being used to the etcd-backup-restore sidecar (say, via command-line flags or environment variables).
But in principle, it might be better to determine this from the WAL files directly so that the possibility of corrupted WAL files also gets handled correctly. To do this, the wal package has some functions that might be useful.
Recommendation
It might be possible that using the wal package for verifying if valid metadata exists might be performance intensive. So, the performance impact needs to be measured. If the performance impact is acceptable (both in terms of resource usage and time), it is recommended to use this way to verify if the member contains valid metadata. Otherwise, alternatives such as a simple check that WAL folder exists coupled with the static information about use of persistent or ephemeral storage might be considered.
How to detect if valid data exists in an etcd member
The initialization sequence in etcd-backup-restore already includes database verification.
This would suffice to determine if the member has valid data.
Recommendation
Though ephemeral persistence has performance and logistics advantages, it is recommended to start with persistent data for the member pods. In addition to the reasons and concerns listed above, there is also the additional concern that in case of backup failure, the risk of additional data loss is a bit higher if ephemeral persistence is used (simultaneous quoram loss is sufficient) when compared to persistent storage (simultaenous quorum loss with majority persistence loss is needed). The risk might still be acceptable but the idea is to gain experience about how frequently member containers/pods get restarted/recreated, how frequently leader election happens among members of an etcd cluster and how frequently etcd clusters lose quorum. Based on this experience, we can move towards using ephemeral (perhaps even in-memory) persistence for the member pods.
Separating peer and client traffic
The current single-node ETCD cluster implementation in etcd-druid and etcd-backup-restore uses a single service object to act as the entry point for the client traffic.
There is no separation or distinction between the client and peer traffic because there is not much benefit to be had by making that distinction.
In the multi-node ETCD cluster scenario, it makes sense to distinguish between and separate the peer and client traffic.
This can be done by using two services.
- peer
- To be used for peer communication. This could be a
headlessservice.
- To be used for peer communication. This could be a
- client
- To be used for client communication. This could be a normal
ClusterIPservice like it is in the single-node case.
- To be used for client communication. This could be a normal
The main advantage of this approach is that it makes it possible (if needed) to allow only peer to peer communication while blocking client communication. Such a thing might be required during some phases of some maintenance tasks (manual or automated).
Cutting off client requests
At present, in the single-node ETCD instances, etcd-druid configures the readinessProbe of the etcd main container to probe the healthz endpoint of the etcd-backup-restore sidecar which considers the status of the latest backup upload in addition to the regular checks about etcd and the side car being up and healthy. This has the effect of setting the etcd main container (and hence the etcd pod) as not ready if the latest backup upload failed. This results in the endpoints controller removing the pod IP address from the endpoints list for the service which eventually cuts off ingress traffic coming into the etcd pod via the etcd client service. The rationale for this is to fail early when the backup upload fails rather than continuing to serve requests while the gap between the last backup and the current data increases which might lead to unacceptably large amount of data loss if disaster strikes.
This approach will not work in the multi-node scenario because we need the individual member pods to be able to talk to each other to maintain the cluster quorum when backup upload fails but need to cut off only client ingress traffic.
It is recommended to separate the backup health condition tracking taking appropriate remedial actions.
With that, the backup health condition tracking is now separated to the BackupReady condition in the Etcd resource status and the cutting off of client traffic (which could now be done for more reasons than failed backups) can be achieved in a different way described below.
Manipulating Client Service podSelector
The client traffic can be cut off by updating (manually or automatically by some component) the podSelector of the client service to add an additional label (say, unhealthy or disabled) such that the podSelector no longer matches the member pods created by the statefulset.
This will result in the client ingress traffic being cut off.
The peer service is left unmodified so that peer communication is always possible.
Health Check
The etcd main container and the etcd-backup-restore sidecar containers will be configured with livenessProbe and readinessProbe which will indicate the health of the containers and effectively the corresponding ETCD cluster member pod.
Backup Failure
As described above using readinessProbe failures based on latest backup failure is not viable in the multi-node ETCD scenario.
Though cutting off traffic by manipulating client service podSelector is workable, it may not be desirable.
It is recommended that on backup failure, the leading etcd-backup-restore sidecar (the one that is responsible for taking backups at that point in time, as explained in the backup section below, updates the BackupReady condition in the Etcd status and raises a high priority alert to the landscape operators but does not cut off the client traffic.
The reasoning behind this decision to not cut off the client traffic on backup failure is to allow the Kubernetes cluster’s control plane (which relies on the ETCD cluster) to keep functioning as long as possible and to avoid bringing down the control-plane due to a missed backup.
The risk of this approach is that with a cascaded sequence of failures (on top of the backup failure), there is a chance of more data loss than the frequency of backup would otherwise indicate.
To be precise, the risk of such an additional data loss manifests only when backup failure as well as a special case of quorum loss (majority of the members are not ready) happen in such a way that the ETCD cluster needs to be re-bootstrapped from the backup. As described here, re-bootstrapping the ETCD cluster requires restoration from the latest backup only when a majority of members no longer have uncorrupted data persistence.
If persistent storage is used, this will happen only when backup failure as well as a majority of the disks/volumes backing the ETCD cluster members fail simultaneously. This would indeed be rare and might be an acceptable risk.
If ephemeral storage is used (especially, in-memory), the data loss will happen if a majority of the ETCD cluster members become NotReady (requiring a pod restart) at the same time as the backup failure.
This may not be as rare as majority members’ disk/volume failure.
The risk can be somewhat mitigated at least for planned maintenance operations by postponing potentially disruptive maintenance operations when BackupReady condition is false (vertical scaling, rolling updates, evictions due to node roll-outs).
But in practice (when ephemeral storage is used), the current proposal suggests restoring from the latest full backup even when a minority of ETCD members (even a single pod) restart both to speed up the process of the new member catching up to the latest revision but also to avoid load on the leading member which needs to supply the data to bring the new member up-to-date. But as described here, in case of a minority member failure while using ephemeral storage, it is possible to restart the new member with empty data and let it fetch all the data from the leading member (only if backup is not accessible). Though this is suboptimal, it is workable given the constraints and conditions. With this, the risk of additional data loss in the case of ephemeral storage is only if backup failure as well as quorum loss happens. While this is still less rare than the risk of additional data loss in case of persistent storage, the risk might be tolerable. Provided the risk of quorum loss is not too high. This needs to be monitored/evaluated before opting for ephemeral storage.
Given these constraints, it is better to dynamically avoid/postpone some potentially disruptive operations when BackupReady condition is false.
This has the effect of allowing n/2 members to be evicted when the backups are healthy and completely disabling evictions when backups are not healthy.
- Skip/postpone potentially disruptive maintenance operations (listed below) when the
BackupReadycondition isfalse. - Vertical scaling.
- Rolling updates, Basically, any updates to the
StatefulSetspec which includes vertical scaling. - Dynamically toggle the
minAvailablefield of thePodDisruptionBudgetbetweenn/2 + 1andn(wherenis the ETCD desired cluster size) whenever theBackupReadycondition toggles betweentrueandfalse.
This will mean that etcd-backup-restore becomes Kubernetes-aware. But there might be reasons for making etcd-backup-restore Kubernetes-aware anyway (e.g. to update the etcd resource status with latest full snapshot details).
This enhancement should keep etcd-backup-restore backward compatible.
I.e. it should be possible to use etcd-backup-restore Kubernetes-unaware as before this proposal.
This is possible either by auto-detecting the existence of kubeconfig or by an explicit command-line flag (such as --enable-client-service-updates which can be defaulted to false for backward compatibility).
Alternative
The alternative is for etcd-druid to implement the above functionality.
But etcd-druid is centrally deployed in the host Kubernetes cluster and cannot scale well horizontally.
So, it can potentially be a bottleneck if it is involved in regular health check mechanism for all the etcd clusters it manages.
Also, the recommended approach above is more robust because it can work even if etcd-druid is down when the backup upload of a particular etcd cluster fails.
Status
It is desirable (for the etcd-druid and landscape administrators/operators) to maintain/expose status of the etcd cluster instances in the status sub-resource of the Etcd CRD.
The proposed structure for maintaining the status is as shown in the example below.
apiVersion: druid.gardener.cloud/v1alpha1
kind: Etcd
metadata:
name: etcd-main
spec:
replicas: 3
...
...
status:
...
conditions:
- type: Ready # Condition type for the readiness of the ETCD cluster
status: "True" # Indicates of the ETCD Cluster is ready or not
lastHeartbeatTime: "2020-11-10T12:48:01Z"
lastTransitionTime: "2020-11-10T12:48:01Z"
reason: Quorate # Quorate|QuorumLost
- type: AllMembersReady # Condition type for the readiness of all the member of the ETCD cluster
status: "True" # Indicates if all the members of the ETCD Cluster are ready
lastHeartbeatTime: "2020-11-10T12:48:01Z"
lastTransitionTime: "2020-11-10T12:48:01Z"
reason: AllMembersReady # AllMembersReady|NotAllMembersReady
- type: BackupReady # Condition type for the readiness of the backup of the ETCD cluster
status: "True" # Indicates if the backup of the ETCD cluster is ready
lastHeartbeatTime: "2020-11-10T12:48:01Z"
lastTransitionTime: "2020-11-10T12:48:01Z"
reason: FullBackupSucceeded # FullBackupSucceeded|IncrementalBackupSucceeded|FullBackupFailed|IncrementalBackupFailed
...
clusterSize: 3
...
replicas: 3
...
members:
- name: etcd-main-0 # member pod name
id: 272e204152 # member Id
role: Leader # Member|Leader
status: Ready # Ready|NotReady|Unknown
lastTransitionTime: "2020-11-10T12:48:01Z"
reason: LeaseSucceeded # LeaseSucceeded|LeaseExpired|UnknownGracePeriodExceeded|PodNotRead
- name: etcd-main-1 # member pod name
id: 272e204153 # member Id
role: Member # Member|Leader
status: Ready # Ready|NotReady|Unknown
lastTransitionTime: "2020-11-10T12:48:01Z"
reason: LeaseSucceeded # LeaseSucceeded|LeaseExpired|UnknownGracePeriodExceeded|PodNotRead
This proposal recommends that etcd-druid (preferrably, the custodian controller in etcd-druid) maintains most of the information in the status of the Etcd resources described above.
One exception to this is the BackupReady condition which is recommended to be maintained by the leading etcd-backup-restore sidecar container.
This will mean that etcd-backup-restore becomes Kubernetes-aware. But there are other reasons for making etcd-backup-restore Kubernetes-aware anyway (e.g. to maintain health conditions).
This enhancement should keep etcd-backup-restore backward compatible.
But it should be possible to use etcd-backup-restore Kubernetes-unaware as before this proposal. This is possible either by auto-detecting the existence of kubeconfig or by an explicit command-line flag (such as --enable-etcd-status-updates which can be defaulted to false for backward compatibility).
Members
The members section of the status is intended to be maintained by etcd-druid (preferraby, the custodian controller of etcd-druid) based on the leases of the individual members.
Note
An earlier design in this proposal was for the individual etcd-backup-restore sidecars to update the corresponding status.members entries themselves. But this was redesigned to use member leases to avoid conflicts rising from frequent updates and the limitations in the support for Server-Side Apply in some versions of Kubernetes.
The spec.holderIdentity field in the leases is used to communicate the ETCD member id and role between the etcd-backup-restore sidecars and etcd-druid.
Member name as the key
In an ETCD cluster, the member id is the unique identifier for a member.
However, this proposal recommends using a single StatefulSet whose pods form the members of the ETCD cluster and Pods of a StatefulSet have uniquely indexed names as well as uniquely addressible DNS.
This proposal recommends that the name of the member (which is the same as the name of the member Pod) be used as the unique key to identify a member in the members array.
This can minimise the need to cleanup superfluous entries in the members array after the member pods are gone to some extent because the replacement pods for any member will share the same name and will overwrite the entry with a possibly new member id.
There is still the possibility of not only superfluous entries in the members array but also superfluous members in the ETCD cluster for which there is no corresponding pod in the StatefulSet anymore.
For example, if an ETCD cluster is scaled up from 3 to 5 and the new members were failing constantly due to insufficient resources and then if the ETCD client is scaled back down to 3 and failing member pods may not have the chance to clean up their member entries (from the members array as well as from the ETCD cluster) leading to superfluous members in the cluster that may have adverse effect on quorum of the cluster.
Hence, the superfluous entries in both members array as well as the ETCD cluster need to be cleaned up as appropriate.
Member Leases
One Kubernetes lease object per desired ETCD member is maintained by etcd-druid (preferrably, the custodian controller in etcd-druid).
The lease objects will be created in the same namespace as their owning Etcd object and will have the same name as the member to which they correspond (which, in turn would be the same as the pod name in which the member ETCD process runs).
The lease objects are created and deleted only by etcd-druid but are continually renewed within the leaseDurationSeconds by the individual etcd-backup-restore sidecars (corresponding to their members) if the the corresponding ETCD member is ready and is part of the ETCD cluster.
This will mean that etcd-backup-restore becomes Kubernetes-aware. But there are other reasons for making etcd-backup-restore Kubernetes-aware anyway (e.g. to maintain health conditions).
This enhancement should keep etcd-backup-restore backward compatible.
But it should be possible to use etcd-backup-restore Kubernetes-unaware as before this proposal. This is possible either by auto-detecting the existence of kubeconfig or by an explicit command-line flag (such as --enable-etcd-lease-renewal which can be defaulted to false for backward compatibility).
A member entry in the Etcd resource status would be marked as Ready (with reason: LeaseSucceeded) if the corresponding pod is ready and the corresponding lease has not yet expired.
The member entry would be marked as NotReady if the corresponding pod is not ready (with reason PodNotReady) or as Unknown if the corresponding lease has expired (with reason: LeaseExpired).
While renewing the lease, the etcd-backup-restore sidecars also maintain the ETCD member id and their role (Leader or Member) separated by : in the spec.holderIdentity field of the corresponding lease object since this information is only available to the ETCD member processes and the etcd-backup-restore sidecars (e.g. 272e204152:Leader or 272e204153:Member).
When the lease objects are created by etcd-druid, the spec.holderIdentity field would be empty.
The value in spec.holderIdentity in the leases is parsed and copied onto the id and role fields of the corresponding status.members by etcd-druid.
Conditions
The conditions section in the status describe the overall condition of the ETCD cluster.
The condition type Ready indicates if the ETCD cluster as a whole is ready to serve requests (i.e. the cluster is quorate) even though some minority of the members are not ready.
The condition type AllMembersReady indicates of all the members of the ETCD cluster are ready.
The distinction between these conditions could be significant for both external consumers of the status as well as etcd-druid itself.
Some maintenance operations might be safe to do (e.g. rolling updates) only when all members of the cluster are ready.
The condition type BackupReady indicates of the most recent backup upload (full or incremental) succeeded.
This information also might be significant because some maintenance operations might be safe to do (e.g. anything that involves re-bootstrapping the ETCD cluster) only when backup is ready.
The Ready and AllMembersReady conditions can be maintained by etcd-druid based on the status in the members section.
The BackupReady condition will be maintained by the leading etcd-backup-restore sidecar that is in charge of taking backups.
More condition types could be introduced in the future if specific purposes arise.
ClusterSize
The clusterSize field contains the current size of the ETCD cluster. It will be actively kept up-to-date by etcd-druid in all scenarios.
- Before bootstrapping the ETCD cluster (during cluster creation or later bootstrapping because of quorum failure),
etcd-druidwill clear thestatus.membersarray and setstatus.clusterSizeto be equal tospec.replicas. - While the ETCD cluster is quorate,
etcd-druidwill actively setstatus.clusterSizeto be equal to length of thestatus.memberswhenever the length of the array changes (say, due to scaling of the ETCD cluster).
Given that clusterSize reliably represents the size of the ETCD cluster, it can be used to calculate the Ready condition.
Alternative
The alternative is for etcd-druid to maintain the status in the Etcd status sub-resource.
But etcd-druid is centrally deployed in the host Kubernetes cluster and cannot scale well horizontally.
So, it can potentially be a bottleneck if it is involved in regular health check mechanism for all the etcd clusters it manages.
Also, the recommended approach above is more robust because it can work even if etcd-druid is down when the backup upload of a particular etcd cluster fails.
Decision table for etcd-druid based on the status
The following decision table describes the various criteria etcd-druid takes into consideration to determine the different etcd cluster management scenarios and the corresponding reconciliation actions it must take.
The general principle is to detect the scenario and take the minimum action to move the cluster along the path to good health.
The path from any one scenario to a state of good health will typically involve going through multiple reconciliation actions which probably take the cluster through many other cluster management scenarios.
Especially, it is proposed that individual members auto-heal where possible, even in the case of the failure of a majority of members of the etcd cluster and that etcd-druid takes action only if the auto-healing doesn’t happen for a configured period of time.
1. Pink of health
Observed state
- Cluster Size
- Desired:
n - Current:
n
- Desired:
StatefulSetreplicas- Desired:
n - Ready:
n
- Desired:
Etcdstatus- members
- Total:
n - Ready:
n - Members
NotReadyfor long enough to be evicted, i.e.lastTransitionTime > notReadyGracePeriod:0 - Members with readiness status
Unknownlong enough to be consideredNotReady, i.e.lastTransitionTime > unknownGracePeriod:0 - Members with expired
lease:0
- Total:
- conditions:
- Ready:
true - AllMembersReady:
true - BackupReady:
true
- Ready:
- members
Recommended Action
Nothing to do
2. Member status is out of sync with their leases
Observed state
- Cluster Size
- Desired:
n - Current:
n
- Desired:
StatefulSetreplicas- Desired:
n - Ready:
n
- Desired:
Etcdstatus- members
- Total:
n - Ready:
r - Members
NotReadyfor long enough to be evicted, i.e.lastTransitionTime > notReadyGracePeriod:0 - Members with readiness status
Unknownlong enough to be consideredNotReady, i.e.lastTransitionTime > unknownGracePeriod:0 - Members with expired
lease:l
- Total:
- conditions:
- Ready:
true - AllMembersReady:
true - BackupReady:
true
- Ready:
- members
Recommended Action
Mark the l members corresponding to the expired leases as Unknown with reason LeaseExpired and with id populated from spec.holderIdentity of the lease if they are not already updated so.
Mark the n - l members corresponding to the active leases as Ready with reason LeaseSucceeded and with id populated from spec.holderIdentity of the lease if they are not already updated so.
Please refer here for more details.
3. All members are Ready but AllMembersReady condition is stale
Observed state
- Cluster Size
- Desired: N/A
- Current: N/A
StatefulSetreplicas- Desired:
n - Ready: N/A
- Desired:
Etcdstatus- members
- Total:
n - Ready:
n - Members
NotReadyfor long enough to be evicted, i.e.lastTransitionTime > notReadyGracePeriod:0 - Members with readiness status
Unknownlong enough to be consideredNotReady, i.e.lastTransitionTime > unknownGracePeriod:0 - Members with expired
lease:0
- Total:
- conditions:
- Ready: N/A
- AllMembersReady: false
- BackupReady: N/A
- members
Recommended Action
Mark the status condition type AllMembersReady to true.
4. Not all members are Ready but AllMembersReady condition is stale
Observed state
Cluster Size
- Desired: N/A
- Current: N/A
StatefulSetreplicas- Desired:
n - Ready: N/A
- Desired:
Etcdstatus- members
- Total: N/A
- Ready:
rwhere0 <= r < n - Members
NotReadyfor long enough to be evicted, i.e.lastTransitionTime > notReadyGracePeriod:nrwhere0 < nr < n - Members with readiness status
Unknownlong enough to be consideredNotReady, i.e.lastTransitionTime > unknownGracePeriod:uwhere0 < u < n - Members with expired
lease:hwhere0 < h < n
- conditions:
- Ready: N/A
- AllMembersReady: true
- BackupReady: N/A
where
(nr + u + h) > 0orr < n- members
Recommended Action
Mark the status condition type AllMembersReady to false.
5. Majority members are Ready but Ready condition is stale
Observed state
Cluster Size
- Desired: N/A
- Current: N/A
StatefulSetreplicas- Desired:
n - Ready: N/A
- Desired:
Etcdstatus- members
- Total:
n - Ready:
rwherer > n/2 - Members
NotReadyfor long enough to be evicted, i.e.lastTransitionTime > notReadyGracePeriod:nrwhere0 < nr < n/2 - Members with readiness status
Unknownlong enough to be consideredNotReady, i.e.lastTransitionTime > unknownGracePeriod:uwhere0 < u < n/2 - Members with expired
lease: N/A
- Total:
- conditions:
- Ready:
false - AllMembersReady: N/A
- BackupReady: N/A
- Ready:
where
0 < (nr + u + h) < n/2- members
Recommended Action
Mark the status condition type Ready to true.
6. Majority members are NotReady but Ready condition is stale
Observed state
Cluster Size
- Desired: N/A
- Current: N/A
StatefulSetreplicas- Desired:
n - Ready: N/A
- Desired:
Etcdstatus- members
- Total:
n - Ready:
rwhere0 < r < n - Members
NotReadyfor long enough to be evicted, i.e.lastTransitionTime > notReadyGracePeriod:nrwhere0 < nr < n - Members with readiness status
Unknownlong enough to be consideredNotReady, i.e.lastTransitionTime > unknownGracePeriod:uwhere0 < u < n - Members with expired
lease: N/A
- Total:
- conditions:
- Ready:
true - AllMembersReady: N/A
- BackupReady: N/A
- Ready:
where
(nr + u + h) > n/2orr < n/2- members
Recommended Action
Mark the status condition type Ready to false.
7. Some members have been in Unknown status for a while
Observed state
- Cluster Size
- Desired: N/A
- Current:
n
StatefulSetreplicas- Desired: N/A
- Ready: N/A
Etcdstatus- members
- Total: N/A
- Ready: N/A
- Members
NotReadyfor long enough to be evicted, i.e.lastTransitionTime > notReadyGracePeriod: N/A - Members with readiness status
Unknownlong enough to be consideredNotReady, i.e.lastTransitionTime > unknownGracePeriod:uwhereu <= n - Members with expired
lease: N/A
- conditions:
- Ready: N/A
- AllMembersReady: N/A
- BackupReady: N/A
- members
Recommended Action
Mark the u members as NotReady in Etcd status with reason: UnknownGracePeriodExceeded.
8. Some member pods are not Ready but have not had the chance to update their status
Observed state
- Cluster Size
- Desired: N/A
- Current:
n
StatefulSetreplicas- Desired:
n - Ready:
swheres < n
- Desired:
Etcdstatus- members
- Total: N/A
- Ready: N/A
- Members
NotReadyfor long enough to be evicted, i.e.lastTransitionTime > notReadyGracePeriod: N/A - Members with readiness status
Unknownlong enough to be consideredNotReady, i.e.lastTransitionTime > unknownGracePeriod: N/A - Members with expired
lease: N/A
- conditions:
- Ready: N/A
- AllMembersReady: N/A
- BackupReady: N/A
- members
Recommended Action
Mark the n - s members (corresponding to the pods that are not Ready) as NotReady in Etcd status with reason: PodNotReady
9. Quorate cluster with a minority of members NotReady
Observed state
- Cluster Size
- Desired: N/A
- Current:
n
StatefulSetreplicas- Desired: N/A
- Ready: N/A
Etcdstatus- members
- Total:
n - Ready:
n - f - Members
NotReadyfor long enough to be evicted, i.e.lastTransitionTime > notReadyGracePeriod:fwheref < n/2 - Members with readiness status
Unknownlong enough to be consideredNotReady, i.e.lastTransitionTime > unknownGracePeriod:0 - Members with expired
lease: N/A
- Total:
- conditions:
- Ready: true
- AllMembersReady: false
- BackupReady: true
- members
Recommended Action
Delete the f NotReady member pods to force restart of the pods if they do not automatically restart via failed livenessProbe. The expectation is that they will either re-join the cluster as an existing member or remove themselves and join as new members on restart of the container or pod and renew their leases.
10. Quorum lost with a majority of members NotReady
Observed state
- Cluster Size
- Desired: N/A
- Current:
n
StatefulSetreplicas- Desired: N/A
- Ready: N/A
Etcdstatus- members
- Total:
n - Ready:
n - f - Members
NotReadyfor long enough to be evicted, i.e.lastTransitionTime > notReadyGracePeriod:fwheref >= n/2 - Members with readiness status
Unknownlong enough to be consideredNotReady, i.e.lastTransitionTime > unknownGracePeriod: N/A - Members with expired
lease: N/A
- Total:
- conditions:
- Ready: false
- AllMembersReady: false
- BackupReady: true
- members
Recommended Action
Scale down the StatefulSet to replicas: 0. Ensure that all member pods are deleted. Ensure that all the members are removed from Etcd status. Delete and recreate all the member leases. Recover the cluster from loss of quorum as discussed here.
11. Scale up of a healthy cluster
Observed state
- Cluster Size
- Desired:
d - Current:
nwhered > n
- Desired:
StatefulSetreplicas- Desired: N/A
- Ready:
n
Etcdstatus- members
- Total:
n - Ready:
n - Members
NotReadyfor long enough to be evicted, i.e.lastTransitionTime > notReadyGracePeriod: 0 - Members with readiness status
Unknownlong enough to be consideredNotReady, i.e.lastTransitionTime > unknownGracePeriod: 0 - Members with expired
lease: 0
- Total:
- conditions:
- Ready: true
- AllMembersReady: true
- BackupReady: true
- members
Recommended Action
Add d - n new members by scaling the StatefulSet to replicas: d. The rest of the StatefulSet spec need not be updated until the next cluster bootstrapping (alternatively, the rest of the StatefulSet spec can be updated pro-actively once the new members join the cluster. This will trigger a rolling update).
Also, create the additional member leases for the d - n new members.
12. Scale down of a healthy cluster
Observed state
- Cluster Size
- Desired:
d - Current:
nwhered < n
- Desired:
StatefulSetreplicas- Desired:
n - Ready:
n
- Desired:
Etcdstatus- members
- Total:
n - Ready:
n - Members
NotReadyfor long enough to be evicted, i.e.lastTransitionTime > notReadyGracePeriod: 0 - Members with readiness status
Unknownlong enough to be consideredNotReady, i.e.lastTransitionTime > unknownGracePeriod: 0 - Members with expired
lease: 0
- Total:
- conditions:
- Ready: true
- AllMembersReady: true
- BackupReady: true
- members
Recommended Action
Remove d - n existing members (numbered d, d + 1 … n) by scaling the StatefulSet to replicas: d. The StatefulSet spec need not be updated until the next cluster bootstrapping (alternatively, the StatefulSet spec can be updated pro-actively once the superfluous members exit the cluster. This will trigger a rolling update).
Also, delete the member leases for the d - n members being removed.
The superfluous entries in the members array will be cleaned up as explained here.
The superfluous members in the ETCD cluster will be cleaned up by the leading etcd-backup-restore sidecar.
13. Superfluous member entries in Etcd status
Observed state
- Cluster Size
- Desired: N/A
- Current:
n
StatefulSetreplicas- Desired: n
- Ready: n
Etcdstatus- members
- Total:
mwherem > n - Ready: N/A
- Members
NotReadyfor long enough to be evicted, i.e.lastTransitionTime > notReadyGracePeriod: N/A - Members with readiness status
Unknownlong enough to be consideredNotReady, i.e.lastTransitionTime > unknownGracePeriod: N/A - Members with expired
lease: N/A
- Total:
- conditions:
- Ready: N/A
- AllMembersReady: N/A
- BackupReady: N/A
- members
Recommended Action
Remove the superfluous m - n member entries from Etcd status (numbered n, n+1 … m).
Remove the superfluous m - n member leases if they exist.
The superfluous members in the ETCD cluster will be cleaned up by the leading etcd-backup-restore sidecar.
Decision table for etcd-backup-restore during initialization
As discussed above, the initialization sequence of etcd-backup-restore in a member pod needs to generate suitable etcd configuration for its etcd container.
It also might have to handle the etcd database verification and restoration functionality differently in different scenarios.
The initialization sequence itself is proposed to be as follows.
It is an enhancement of the existing initialization sequence.
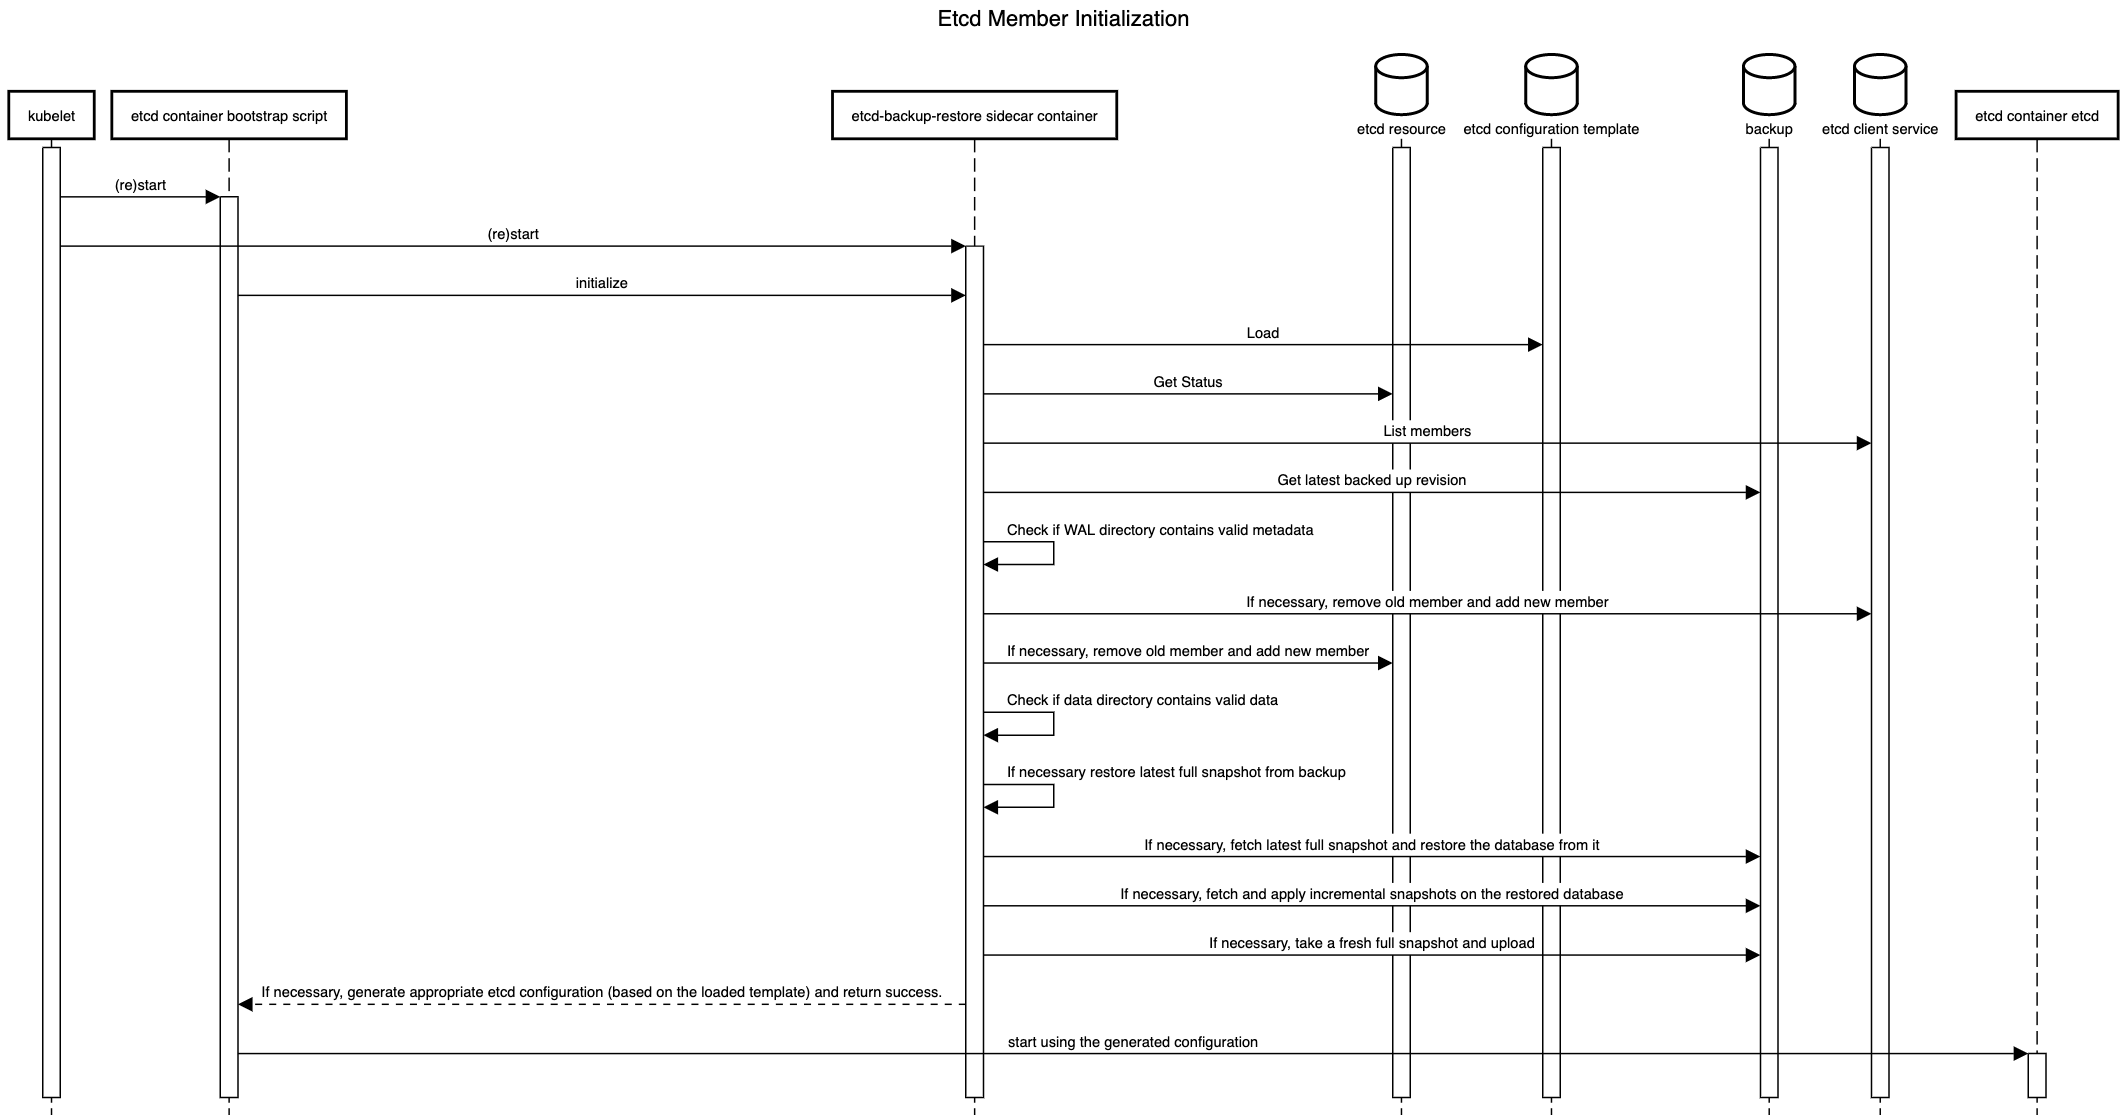
The details of the decisions to be taken during the initialization are given below.
1. First member during bootstrap of a fresh etcd cluster
Observed state
- Cluster Size:
n Etcdstatus members:- Total:
0 - Ready:
0 - Status contains own member:
false
- Total:
- Data persistence
- WAL directory has cluster/ member metadata:
false - Data directory is valid and up-to-date:
false
- WAL directory has cluster/ member metadata:
- Backup
- Backup exists:
false - Backup has incremental snapshots:
false
- Backup exists:
Recommended Action
Generate etcd configuration with n initial cluster peer URLs and initial cluster state new and return success.
2. Addition of a new following member during bootstrap of a fresh etcd cluster
Observed state
- Cluster Size:
n Etcdstatus members:- Total:
mwhere0 < m < n - Ready:
m - Status contains own member:
false
- Total:
- Data persistence
- WAL directory has cluster/ member metadata:
false - Data directory is valid and up-to-date:
false
- WAL directory has cluster/ member metadata:
- Backup
- Backup exists:
false - Backup has incremental snapshots:
false
- Backup exists:
Recommended Action
Generate etcd configuration with n initial cluster peer URLs and initial cluster state new and return success.
3. Restart of an existing member of a quorate cluster with valid metadata and data
Observed state
- Cluster Size:
n Etcdstatus members:- Total:
mwherem > n/2 - Ready:
rwherer > n/2 - Status contains own member:
true
- Total:
- Data persistence
- WAL directory has cluster/ member metadata:
true - Data directory is valid and up-to-date:
true
- WAL directory has cluster/ member metadata:
- Backup
- Backup exists: N/A
- Backup has incremental snapshots: N/A
Recommended Action
Re-use previously generated etcd configuration and return success.
4. Restart of an existing member of a quorate cluster with valid metadata but without valid data
Observed state
- Cluster Size:
n Etcdstatus members:- Total:
mwherem > n/2 - Ready:
rwherer > n/2 - Status contains own member:
true
- Total:
- Data persistence
- WAL directory has cluster/ member metadata:
true - Data directory is valid and up-to-date:
false
- WAL directory has cluster/ member metadata:
- Backup
- Backup exists: N/A
- Backup has incremental snapshots: N/A
Recommended Action
Remove self as a member (old member ID) from the etcd cluster as well as Etcd status. Add self as a new member of the etcd cluster as well as in the Etcd status. If backups do not exist, create an empty data and WAL directory. If backups exist, restore only the latest full snapshot (please see here for the reason for not restoring incremental snapshots). Generate etcd configuration with n initial cluster peer URLs and initial cluster state existing and return success.
5. Restart of an existing member of a quorate cluster without valid metadata
Observed state
- Cluster Size:
n Etcdstatus members:- Total:
mwherem > n/2 - Ready:
rwherer > n/2 - Status contains own member:
true
- Total:
- Data persistence
- WAL directory has cluster/ member metadata:
false - Data directory is valid and up-to-date: N/A
- WAL directory has cluster/ member metadata:
- Backup
- Backup exists: N/A
- Backup has incremental snapshots: N/A
Recommended Action
Remove self as a member (old member ID) from the etcd cluster as well as Etcd status. Add self as a new member of the etcd cluster as well as in the Etcd status. If backups do not exist, create an empty data and WAL directory. If backups exist, restore only the latest full snapshot (please see here for the reason for not restoring incremental snapshots). Generate etcd configuration with n initial cluster peer URLs and initial cluster state existing and return success.
6. Restart of an existing member of a non-quorate cluster with valid metadata and data
Observed state
- Cluster Size:
n Etcdstatus members:- Total:
mwherem < n/2 - Ready:
rwherer < n/2 - Status contains own member:
true
- Total:
- Data persistence
- WAL directory has cluster/ member metadata:
true - Data directory is valid and up-to-date:
true
- WAL directory has cluster/ member metadata:
- Backup
- Backup exists: N/A
- Backup has incremental snapshots: N/A
Recommended Action
Re-use previously generated etcd configuration and return success.
7. Restart of the first member of a non-quorate cluster without valid data
Observed state
- Cluster Size:
n Etcdstatus members:- Total:
0 - Ready:
0 - Status contains own member:
false
- Total:
- Data persistence
- WAL directory has cluster/ member metadata: N/A
- Data directory is valid and up-to-date:
false
- Backup
- Backup exists: N/A
- Backup has incremental snapshots: N/A
Recommended Action
If backups do not exist, create an empty data and WAL directory. If backups exist, restore the latest full snapshot. Start a single-node embedded etcd with initial cluster peer URLs containing only own peer URL and initial cluster state new. If incremental snapshots exist, apply them serially (honouring source transactions). Take and upload a full snapshot after incremental snapshots are applied successfully (please see here for more reasons why). Generate etcd configuration with n initial cluster peer URLs and initial cluster state new and return success.
8. Restart of a following member of a non-quorate cluster without valid data
Observed state
- Cluster Size:
n Etcdstatus members:- Total:
mwhere1 < m < n - Ready:
rwhere1 < r < n - Status contains own member:
false
- Total:
- Data persistence
- WAL directory has cluster/ member metadata: N/A
- Data directory is valid and up-to-date:
false
- Backup
- Backup exists: N/A
- Backup has incremental snapshots: N/A
Recommended Action
If backups do not exist, create an empty data and WAL directory. If backups exist, restore only the latest full snapshot (please see here for the reason for not restoring incremental snapshots). Generate etcd configuration with n initial cluster peer URLs and initial cluster state existing and return success.
Backup
Only one of the etcd-backup-restore sidecars among the members are required to take the backup for a given ETCD cluster. This can be called a backup leader. There are two possibilities to ensure this.
Leading ETCD main container’s sidecar is the backup leader
The backup-restore sidecar could poll the etcd cluster and/or its own etcd main container to see if it is the leading member in the etcd cluster. This information can be used by the backup-restore sidecars to decide that sidecar of the leading etcd main container is the backup leader (i.e. responsible to for taking/uploading backups regularly).
The advantages of this approach are as follows.
- The approach is operationally and conceptually simple. The leading etcd container and backup-restore sidecar are always located in the same pod.
- Network traffic between the backup container and the etcd cluster will always be local.
The disadvantage is that this approach may not age well in the future if we think about moving the backup-restore container as a separate pod rather than a sidecar container.
Independent leader election between backup-restore sidecars
We could use the etcd lease mechanism to perform leader election among the backup-restore sidecars. For example, using something like go.etcd.io/etcd/clientv3/concurrency.
The advantage and disadvantages are pretty much the opposite of the approach above. The advantage being that this approach may age well in the future if we think about moving the backup-restore container as a separate pod rather than a sidecar container.
The disadvantages are as follows.
- The approach is operationally and conceptually a bit complex. The leading etcd container and backup-restore sidecar might potentially belong to different pods.
- Network traffic between the backup container and the etcd cluster might potentially be across nodes.
History Compaction
This proposal recommends to configure automatic history compaction on the individual members.
Defragmentation
Defragmentation is already triggered periodically by etcd-backup-restore.
This proposal recommends to enhance this functionality to be performed only by the leading backup-restore container.
The defragmentation must be performed only when etcd cluster is in full health and must be done in a rolling manner for each members to avoid disruption.
The leading member should be defragmented last after all the rest of the members have been defragmented to minimise potential leadership changes caused by defragmentation.
If the etcd cluster is unhealthy when it is time to trigger scheduled defragmentation, the defragmentation must be postponed until the cluster becomes healthy. This check must be done before triggering defragmentation for each member.
Work-flows in etcd-backup-restore
There are different work-flows in etcd-backup-restore.
Some existing flows like initialization, scheduled backups and defragmentation have been enhanced or modified.
Some new work-flows like status updates have been introduced.
Some of these work-flows are sensitive to which etcd-backup-restore container is leading and some are not.
The life-cycle of these work-flows is shown below.
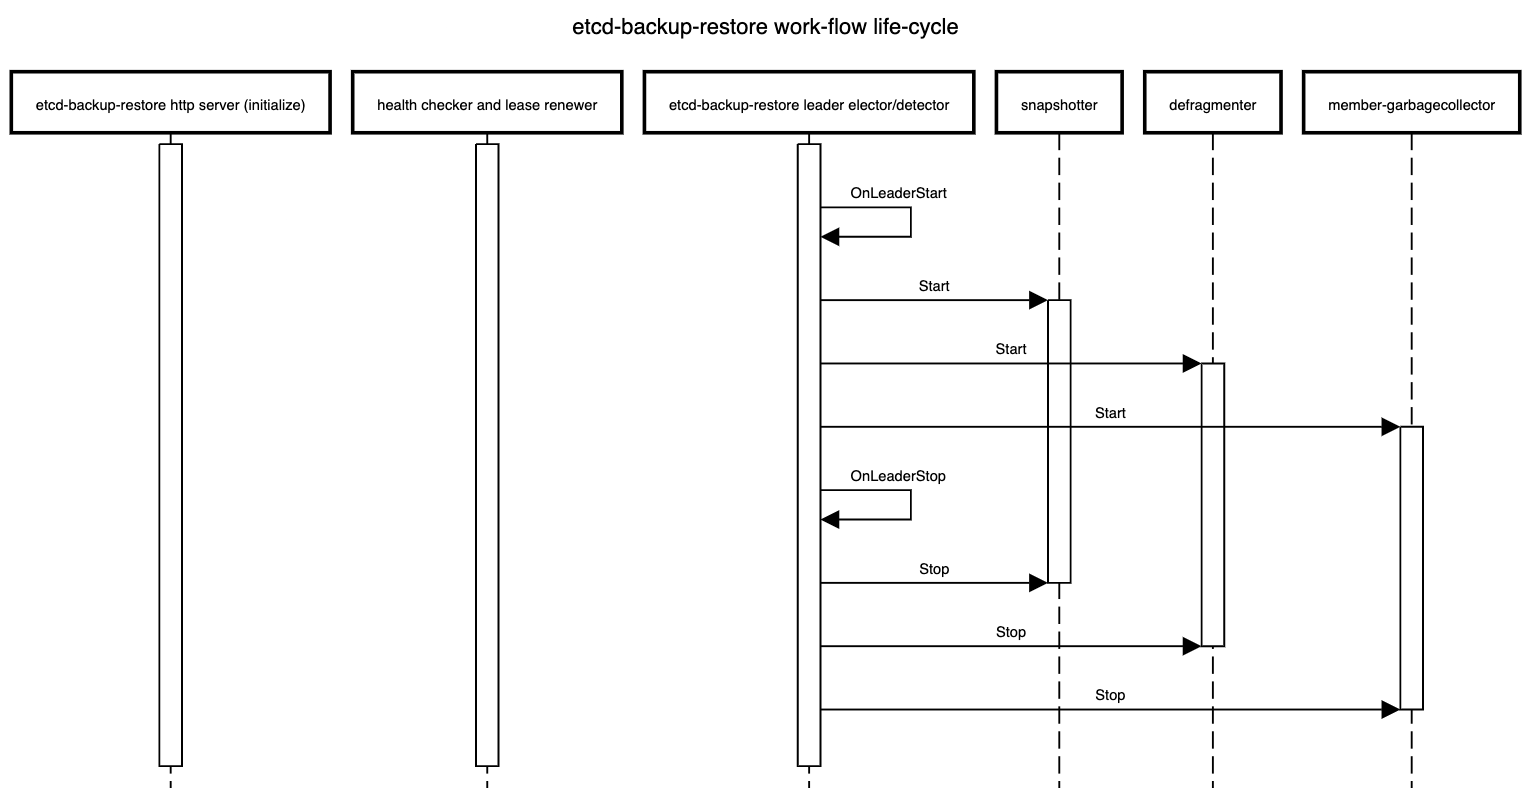
Work-flows independent of leader election in all members
- Serve the HTTP API that all members are expected to support currently but some HTTP API call which are used to take out-of-sync delta or full snapshot should delegate the incoming HTTP requests to the
leading-sidecarand one of the possible approach to achieve this is via an HTTP reverse proxy. - Check the health of the respective etcd member and renew the corresponding member
lease.
Work-flows only on the leading member
- Take backups (full and incremental) at configured regular intervals
- Defragment all the members sequentially at configured regular intervals
- Cleanup superflous members from the ETCD cluster for which there is no corresponding pod (the ordinal in the pod name is greater than the cluster size) at regular intervals (or whenever the
Etcdresource status changes by watching it)- The cleanup of superfluous entries in
status.membersarray is already covered here
- The cleanup of superfluous entries in
High Availability
Considering that high-availability is the primary reason for using a multi-node etcd cluster, it makes sense to distribute the individual member pods of the etcd cluster across different physical nodes. If the underlying Kubernetes cluster has nodes from multiple availability zones, it makes sense to also distribute the member pods across nodes from different availability zones.
One possibility to do this is via SelectorSpreadPriority of kube-scheduler but this is only best-effort and may not always be enforced strictly.
It is better to use pod anti-affinity to enforce such distribution of member pods.
Zonal Cluster - Single Availability Zone
A zonal cluster is configured to consist of nodes belonging to only a single availability zone in a region of the cloud provider. In such a case, we can at best distribute the member pods of a multi-node etcd cluster instance only across different nodes in the configured availability zone.
This can be done by specifying pod anti-affinity in the specification of the member pods using kubernetes.io/hostname as the topology key.
apiVersion: apps/v1
kind: StatefulSet
...
spec:
...
template:
...
spec:
...
affinity:
podAntiAffinity:
requiredDuringSchedulingIgnoredDuringExecution:
- labelSelector: {} # podSelector that matches the member pods of the given etcd cluster instance
topologyKey: "kubernetes.io/hostname"
...
...
...
The recommendation is to keep etcd-druid agnostic of such topics related scheduling and cluster-topology and to use kupid to orthogonally inject the desired pod anti-affinity.
Alternative
Another option is to build the functionality into etcd-druid to include the required pod anti-affinity when it provisions the StatefulSet that manages the member pods.
While this has the advantage of avoiding a dependency on an external component like kupid, the disadvantage is that we might need to address development or testing use-cases where it might be desirable to avoid distributing member pods and schedule them on as less number of nodes as possible.
Also, as mentioned below, kupid can be used to distribute member pods of an etcd cluster instance across nodes in a single availability zone as well as across nodes in multiple availability zones with very minor variation.
This keeps the solution uniform regardless of the topology of the underlying Kubernetes cluster.
Regional Cluster - Multiple Availability Zones
A regional cluster is configured to consist of nodes belonging to multiple availability zones (typically, three) in a region of the cloud provider. In such a case, we can distribute the member pods of a multi-node etcd cluster instance across nodes belonging to different availability zones.
This can be done by specifying pod anti-affinity in the specification of the member pods using topology.kubernetes.io/zone as the topology key.
In Kubernetes clusters using Kubernetes release older than 1.17, the older (and now deprecated) failure-domain.beta.kubernetes.io/zone might have to be used as the topology key.
apiVersion: apps/v1
kind: StatefulSet
...
spec:
...
template:
...
spec:
...
affinity:
podAntiAffinity:
requiredDuringSchedulingIgnoredDuringExecution:
- labelSelector: {} # podSelector that matches the member pods of the given etcd cluster instance
topologyKey: "topology.kubernetes.io/zone
...
...
...
The recommendation is to keep etcd-druid agnostic of such topics related scheduling and cluster-topology and to use kupid to orthogonally inject the desired pod anti-affinity.
Alternative
Another option is to build the functionality into etcd-druid to include the required pod anti-affinity when it provisions the StatefulSet that manages the member pods.
While this has the advantage of avoiding a dependency on an external component like kupid, the disadvantage is that such built-in support necessarily limits what kind of topologies of the underlying cluster will be supported.
Hence, it is better to keep etcd-druid altogether agnostic of issues related to scheduling and cluster-topology.
PodDisruptionBudget
This proposal recommends that etcd-druid should deploy PodDisruptionBudget (minAvailable set to floor(<cluster size>/2) + 1) for multi-node etcd clusters (if AllMembersReady condition is true) to ensure that any planned disruptive operation can try and honour the disruption budget to ensure high availability of the etcd cluster while making potentially disrupting maintenance operations.
Also, it is recommended to toggle the minAvailable field between floor(<cluster size>/2) and <number of members with status Ready true> whenever the AllMembersReady condition toggles between true and false.
This is to disable eviction of any member pods when not all members are Ready.
In case of a conflict, the recommendation is to use the highest of the applicable values for minAvailable.
Rolling updates to etcd members
Any changes to the Etcd resource spec that might result in a change to StatefulSet spec or otherwise result in a rolling update of member pods should be applied/propagated by etcd-druid only when the etcd cluster is fully healthy to reduce the risk of quorum loss during the updates.
This would include vertical autoscaling changes (via, HVPA).
If the cluster status unhealthy (i.e. if either AllMembersReady or BackupReady conditions are false), etcd-druid must restore it to full health before proceeding with such operations that lead to rolling updates.
This can be further optimized in the future to handle the cases where rolling updates can still be performed on an etcd cluster that is not fully healthy.
Follow Up
Ephemeral Volumes
See section Ephemeral Volumes.
Shoot Control-Plane Migration
This proposal adds support for multi-node etcd clusters but it should not have significant impact on shoot control-plane migration any more than what already present in the single-node etcd cluster scenario. But to be sure, this needs to be discussed further.
Performance impact of multi-node etcd clusters
Multi-node etcd clusters incur a cost on write performance as compared to single-node etcd clusters. This performance impact needs to be measured and documented. Here, we should compare different persistence option for the multi-nodeetcd clusters so that we have all the information necessary to take the decision balancing the high-availability, performance and costs.
Metrics, Dashboards and Alerts
There are already metrics exported by etcd and etcd-backup-restore which are visualized in monitoring dashboards and also used in triggering alerts.
These might have hidden assumptions about single-node etcd clusters.
These might need to be enhanced and potentially new metrics, dashboards and alerts configured to cover the multi-node etcd cluster scenario.
Especially, a high priority alert must be raised if BackupReady condition becomes false.
Costs
Multi-node etcd clusters will clearly involve higher cost (when compared with single-node etcd clusters) just going by the CPU and memory usage for the additional members. Also, the different options for persistence for etcd data for the members will have different cost implications. Such cost impact needs to be assessed and documented to help navigate the trade offs between high availability, performance and costs.
Future Work
Gardener Ring
Gardener Ring, requires provisioning and management of an etcd cluster with the members distributed across more than one Kubernetes cluster. This cannot be achieved by etcd-druid alone which has only the view of a single Kubernetes cluster. An additional component that has the view of all the Kubernetes clusters involved in setting up the gardener ring will be required to achieve this. However, etcd-druid can be used by such a higher-level component/controller (for example, by supplying the initial cluster configuration) such that individual etcd-druid instances in the individual Kubernetes clusters can manage the corresponding etcd cluster members.
Autonomous Shoot Clusters
Autonomous Shoot Clusters also will require a highly availble etcd cluster to back its control-plane and the multi-node support proposed here can be leveraged in that context. However, the current proposal will not meet all the needs of a autonomous shoot cluster. Some additional components will be required that have the overall view of the autonomous shoot cluster and they can use etcd-druid to manage the multi-node etcd cluster. But this scenario may be different from that of Gardener Ring in that the individual etcd members of the cluster may not be hosted on different Kubernetes clusters.
Optimization of recovery from non-quorate cluster with some member containing valid data
It might be possible to optimize the actions during the recovery of a non-quorate cluster where some of the members contain valid data and some other don’t. The optimization involves verifying the data of the valid members to determine the data of which member is the most recent (even considering the latest backup) so that the full snapshot can be taken from it before recovering the etcd cluster. Such an optimization can be attempted in the future.
Optimization of rolling updates to unhealthy etcd clusters
As mentioned above, optimizations to proceed with rolling updates to unhealthy etcd clusters (without first restoring the cluster to full health) can be pursued in future work.
6.2.2 - 02 Snapshot Compaction
DEP-02: Snapshot Compaction for Etcd
Current Problem
To ensure recoverability of Etcd, backups of the database are taken at regular interval. Backups are of two types: Full Snapshots and Incremental Snapshots.
Full Snapshots
Full snapshot is a snapshot of the complete database at given point in time.The size of the database keeps changing with time and typically the size is relatively large (measured in 100s of megabytes or even in gigabytes. For this reason, full snapshots are taken after some large intervals.
Incremental Snapshots
Incremental Snapshots are collection of events on Etcd database, obtained through running WATCH API Call on Etcd. After some short intervals, all the events that are accumulated through WATCH API Call are saved in a file and named as Incremental Snapshots at relatively short time intervals.
Recovery from the Snapshots
Recovery from Full Snapshots
As the full snapshots are snapshots of the complete database, the whole database can be recovered from a full snapshot in one go. Etcd provides API Call to restore the database from a full snapshot file.
Recovery from Incremental Snapshots
Delta snapshots are collection of retrospective Etcd events. So, to restore from Incremental snapshot file, the events from the file are needed to be applied sequentially on Etcd database through Etcd Put/Delete API calls. As it is heavily dependent on Etcd calls sequentially, restoring from Incremental Snapshot files can take long if there are numerous commands captured in Incremental Snapshot files.
Delta snapshots are applied on top of running Etcd database. So, if there is inconsistency between the state of database at the point of applying and the state of the database when the delta snapshot commands were captured, restoration will fail.
Currently, in Gardener setup, Etcd is restored from the last full snapshot and then the delta snapshots, which were captured after the last full snapshot.
The main problem with this is that the complete restoration time can be unacceptably large if the rate of change coming into the etcd database is quite high because there are large number of events in the delta snapshots to be applied sequentially. A secondary problem is that, though auto-compaction is enabled for etcd, it is not quick enough to compact all the changes from the incremental snapshots being re-applied during the relatively short period of time of restoration (as compared to the actual period of time when the incremental snapshots were accumulated). This may lead to the etcd pod (the backup-restore sidecar container, to be precise) to run out of memory and/or storage space even if it is sufficient for normal operations.
Solution
Compaction command
To help with the problem mentioned earlier, our proposal is to introduce compact subcommand with etcdbrctl. On execution of compact command, A separate embedded Etcd process will be started where the Etcd data will be restored from the snapstore (exactly as in the restoration scenario today). Then the new Etcd database will be compacted and defragmented using Etcd API calls. The compaction will strip off the Etcd database of old revisions as per the Etcd auto-compaction configuration. The defragmentation will free up the unused fragment memory space released after compaction. Then a full snapshot of the compacted database will be saved in snapstore which then can be used as the base snapshot during any subsequent restoration (or backup compaction).
How the solution works
The newly introduced compact command does not disturb the running Etcd while compacting the backup snapshots. The command is designed to run potentially separately (from the main Etcd process/container/pod). Etcd Druid can be configured to run the newly introduced compact command as a separate job (scheduled periodically) based on total number of Etcd events accumulated after the most recent full snapshot.
Etcd-druid flags:
Etcd-druid introduces the following flags to configure the compaction job:
--enable-backup-compaction(defaultfalse): Set this flag totrueto enable the automatic compaction of etcd backups when the threshold value denoted by CLI flag--etcd-events-thresholdis exceeded.--compaction-workers(default3): Number of worker threads of the CompactionJob controller. The controller creates a backup compaction job if a certain etcd event threshold is reached. If compaction is enabled, the value for this flag must be greater than zero.--etcd-events-threshold(default1000000): Total number of etcd events that can be allowed before a backup compaction job is triggered.--active-deadline-duration(default3h): Duration after which a running backup compaction job will be terminated.--metrics-scrape-wait-duration(default0s): Duration to wait for after compaction job is completed, to allow Prometheus metrics to be scraped.
Points to take care while saving the compacted snapshot:
As compacted snapshot and the existing periodic full snapshots are taken by different processes running in different pods but accessing same store to save the snapshots, some problems may arise:
- When uploading the compacted snapshot to the snapstore, there is the problem of how does the restorer know when to start using the newly compacted snapshot. This communication needs to be atomic.
- With a regular schedule for compaction that happens potentially separately from the main etcd pod, is there a need for regular scheduled full snapshots anymore?
- We are planning to introduce new directory structure, under v2 prefix, for saving the snapshots (compacted and full), as mentioned in details below. But for backward compatibility, we also need to consider the older directory, which is currently under v1 prefix, during accessing snapshots.
How to swap full snapshot with compacted snapshot atomically
Currently, full snapshots and the subsequent delta snapshots are grouped under same prefix path in the snapstore. When a full snapshot is created, it is placed under a prefix/directory with the name comprising of timestamp. Then subsequent delta snapshots are also pushed into the same directory. Thus each prefix/directory contains a single full snapshot and the subsequent delta snapshots. So far, it is the job of ETCDBR to start main Etcd process and snapshotter process which takes full snapshot and delta snapshot periodically. But as per our proposal, compaction will be running as parallel process to main Etcd process and snapshotter process. So we can’t reliably co-ordinate between the processes to achieve switching to the compacted snapshot as the base snapshot atomically.
Current Directory Structure
- Backup-192345
- Full-Snapshot-0-1-192345
- Incremental-Snapshot-1-100-192355
- Incremental-Snapshot-100-200-192365
- Incremental-Snapshot-200-300-192375
- Backup-192789
- Full-Snapshot-0-300-192789
- Incremental-Snapshot-300-400-192799
- Incremental-Snapshot-400-500-192809
- Incremental-Snapshot-500-600-192819
To solve the problem, proposal is:
- ETCDBR will take the first full snapshot after it starts main Etcd Process and snapshotter process. After taking the first full snapshot, snapshotter will continue taking full snapshots. On the other hand, ETCDBR compactor command will be run as periodic job in a separate pod and use the existing full or compacted snapshots to produce further compacted snapshots. Full snapshots and compacted snapshots will be named after same fashion. So, there is no need of any mechanism to choose which snapshots(among full and compacted snapshot) to consider as base snapshots.
- Flatten the directory structure of backup folder. Save all the full snapshots, delta snapshots and compacted snapshots under same directory/prefix. Restorer will restore from full/compacted snapshots and delta snapshots sorted based on the revision numbers in name (or timestamp if the revision numbers are equal).
Proposed Directory Structure
Backup :
- Full-Snapshot-0-1-192355 (Taken by snapshotter)
- Incremental-Snapshot-revision-1-100-192365
- Incremental-Snapshot-revision-100-200-192375
- Full-Snapshot-revision-0-200-192379 (Taken by snapshotter)
- Incremental-Snapshot-revision-200-300-192385
- Full-Snapshot-revision-0-300-192386 (Taken by compaction job)
- Incremental-Snapshot-revision-300-400-192396
- Incremental-Snapshot-revision-400-500-192406
- Incremental-Snapshot-revision-500-600-192416
- Full-Snapshot-revision-0-600-192419 (Taken by snapshotter)
- Full-Snapshot-revision-0-600-192420 (Taken by compaction job)
What happens to the delta snapshots that were compacted?
The proposed compaction sub-command in etcdbrctl (and hence, the CronJob provisioned by etcd-druid that will schedule it at a regular interval) would only upload the compacted full snapshot.
It will not delete the snapshots (delta or full snapshots) that were compacted.
These snapshots which were superseded by a freshly uploaded compacted snapshot would follow the same life-cycle as other older snapshots.
I.e. they will be garbage collected according to the configured backup snapshot retention policy.
For example, if an exponential retention policy is configured and if compaction is done every 30m then there might be at most 48 additional (compacted) full snapshots (24h * 2) in the backup for the latest day. As time rolls forward to the next day, these additional compacted snapshots (along with the delta snapshots that were compacted into them) will get garbage collected retaining only one full snapshot for the day before according to the retention policy.
Future work
In the future, we have plan to stop the snapshotter just after taking the first full snapshot. Then, the compaction job will be solely responsible for taking subsequent full snapshots. The directory structure would be looking like following:
Backup :
- Full-Snapshot-0-1-192355 (Taken by snapshotter)
- Incremental-Snapshot-revision-1-100-192365
- Incremental-Snapshot-revision-100-200-192375
- Incremental-Snapshot-revision-200-300-192385
- Full-Snapshot-revision-0-300-192386 (Taken by compaction job)
- Incremental-Snapshot-revision-300-400-192396
- Incremental-Snapshot-revision-400-500-192406
- Incremental-Snapshot-revision-500-600-192416
- Full-Snapshot-revision-0-600-192420 (Taken by compaction job)
Backward Compatibility
- Restoration : The changes to handle the newly proposed backup directory structure must be backward compatible with older structures at least for restoration because we need have to restore from backups in the older structure. This includes the support for restoring from a backup without a metadata file if that is used in the actual implementation.
- Backup : For new snapshots (even on a backup containing the older structure), the new structure may be used. The new structure must be setup automatically including creating the base full snapshot.
- Garbage collection : The existing functionality of garbage collection of snapshots (full and incremental) according to the backup retention policy must be compatible with both old and new backup folder structure. I.e. the snapshots in the older backup structure must be retained in their own structure and the snapshots in the proposed backup structure should be retained in the proposed structure. Once all the snapshots in the older backup structure go out of the retention policy and are garbage collected, we can think of removing the support for older backup folder structure.
Note: Compactor will run parallel to current snapshotter process and work only if there is any full snapshot already present in the store. By current design, a full snapshot will be taken if there is already no full snapshot or the existing full snapshot is older than 24 hours. It is not limitation but a design choice. As per proposed design, the backup storage will contain both periodic full snapshots as well as periodic compacted snapshot. Restorer will pickup the base snapshot whichever is latest one.
6.2.3 - 03 Scaling Up An Etcd Cluster
DEP-03: Scaling-up a single-node to multi-node etcd cluster deployed by etcd-druid
To mark a cluster for scale-up from single node to multi-node etcd, just patch the etcd custom resource’s .spec.replicas from 1 to 3 (for example).
Challenges for scale-up
- Etcd cluster with single replica don’t have any peers, so no peer communication is required hence peer URL may or may not be TLS enabled. However, while scaling up from single node etcd to multi-node etcd, there will be a requirement to have peer communication between members of the etcd cluster. Peer communication is required for various reasons, for instance for members to sync up cluster state, data, and to perform leader election or any cluster wide operation like removal or addition of a member etc. Hence in a multi-node etcd cluster we need to have TLS enable peer URL for peer communication.
- Providing the correct configuration to start new etcd members as it is different from boostrapping a cluster since these new etcd members will join an existing cluster.
Approach
We first went through the etcd doc of update-advertise-peer-urls to find out information regarding peer URL updation. Interestingly, etcd doc has mentioned the following:
To update the advertise peer URLs of a member, first update it explicitly via member command and then restart the member.
But we can’t assume peer URL is not TLS enabled for single-node cluster as it depends on end-user. A user may or may not enable the TLS for peer URL for a single node etcd cluster. So, How do we detect whether peer URL was enabled or not when cluster is marked for scale-up?
Detecting if peerURL TLS is enabled or not
For this we use an annotation in member lease object member.etcd.gardener.cloud/tls-enabled set by backup-restore sidecar of etcd. As etcd configuration is provided by backup-restore, so it can find out whether TLS is enabled or not and accordingly set this annotation member.etcd.gardener.cloud/tls-enabled to either true or false in member lease object.
And with the help of this annotation and config-map values etcd-druid is able to detect whether there is a change in a peer URL or not.
Etcd-Druid helps in scaling up etcd cluster
Now, it is detected whether peer URL was TLS enabled or not for single node etcd cluster. Etcd-druid can now use this information to take action:
- If peer URL was already TLS enabled then no action is required from etcd-druid side. Etcd-druid can proceed with scaling up the cluster.
- If peer URL was not TLS enabled then etcd-druid has to intervene and make sure peer URL should be TLS enabled first for the single node before marking the cluster for scale-up.
Action taken by etcd-druid to enable the peerURL TLS
- Etcd-druid will update the
{etcd.Name}-configconfig-map with new config like initial-cluster,initial-advertise-peer-urls etc. Backup-restore will detect this change and update the member lease annotation tomember.etcd.gardener.cloud/tls-enabled: "true". - In case the peer URL TLS has been changed to
enabled: Etcd-druid will add tasks to the deployment flow:- Check if peer TLS has been enabled for existing StatefulSet pods, by checking the member leases for the annotation
member.etcd.gardener.cloud/tls-enabled. - If peer TLS enablement is pending for any of the members, then check and patch the StatefulSet with the peer TLS volume mounts, if not already patched. This will cause a rolling update of the existing StatefulSet pods, which allows etcd-backup-restore to update the member peer URL in the etcd cluster.
- Requeue this reconciliation flow until peer TLS has been enabled for all the existing etcd members.
- Check if peer TLS has been enabled for existing StatefulSet pods, by checking the member leases for the annotation
After PeerURL is TLS enabled
After peer URL TLS enablement for single node etcd cluster, now etcd-druid adds a scale-up annotation: gardener.cloud/scaled-to-multi-node to the etcd statefulset and etcd-druid will patch the statefulsets .spec.replicas to 3(for example). The statefulset controller will then bring up new pods(etcd with backup-restore as a sidecar). Now etcd’s sidecar i.e backup-restore will check whether this member is already a part of a cluster or not and incase it is unable to check (may be due to some network issues) then backup-restore checks presence of this annotation: gardener.cloud/scaled-to-multi-node in etcd statefulset to detect scale-up. If it finds out it is the scale-up case then backup-restore adds new etcd member as a learner first and then starts the etcd learner by providing the correct configuration. Once learner gets in sync with the etcd cluster leader, it will get promoted to a voting member.
Providing the correct etcd config
As backup-restore detects that it’s a scale-up scenario, backup-restore sets initial-cluster-state to existing as this member will join an existing cluster and it calculates the rest of the config from the updated config-map provided by etcd-druid.

Future improvements:
The need of restarting etcd pods twice will change in the future. please refer: https://github.com/gardener/etcd-backup-restore/issues/538
6.2.4 - Add New Etcd Cluster Component
Add A New Etcd Cluster Component
etcd-druid defines an Operator which is responsible for creation, deletion and update of a resource that is created for an Etcd cluster. If you want to introduce a new resource for an Etcd cluster then you must do the following:
Add a dedicated
packagefor the resource under component.Implement
Operatorinterface.Define a new Kind for this resource in the operator Registry.
Every resource a.k.a
Componentneeds to have the following set of default labels:app.kubernetes.io/name- value of this label is the name of this component. Helper functions are defined here to create the name of each component using the parentEtcdresource. Please define a new helper function to generate the name of your resource using the parentEtcdresource.app.kubernetes.io/component- value of this label is the type of the component. All component type label values are defined here where you can add an entry for your component.- In addition to the above component specific labels, each resource/component should have default labels defined on the
Etcdresource. You can use GetDefaultLabels function.
These labels are also part of recommended labels by kubernetes. NOTE: Constants for the label keys are already defined here.
Ensure that there is no
waitintroduced in anyOperatormethod implementation in your component. In case there are multiple steps to be executed in a sequence then re-queue the event with a special error code in case there is an error or if the pre-conditions check to execute the next step are not yet satisfied.All errors should be wrapped with a custom DruidError.
6.2.5 - API Reference
Packages:
druid.gardener.cloud/v1alpha1
Package v1alpha1 is the v1alpha1 version of the etcd-druid API.
Resource Types:BackupSpec
(Appears on: EtcdSpec)
BackupSpec defines parameters associated with the full and delta snapshots of etcd.
| Field | Description |
|---|---|
portint32 | (Optional) Port define the port on which etcd-backup-restore server will be exposed. |
tlsTLSConfig | (Optional) |
imagestring | (Optional) Image defines the etcd container image and tag |
storeStoreSpec | (Optional) Store defines the specification of object store provider for storing backups. |
resourcesKubernetes core/v1.ResourceRequirements | (Optional) Resources defines compute Resources required by backup-restore container. More info: https://kubernetes.io/docs/concepts/configuration/manage-compute-resources-container/ |
compactionResourcesKubernetes core/v1.ResourceRequirements | (Optional) CompactionResources defines compute Resources required by compaction job. More info: https://kubernetes.io/docs/concepts/configuration/manage-compute-resources-container/ |
fullSnapshotSchedulestring | (Optional) FullSnapshotSchedule defines the cron standard schedule for full snapshots. |
garbageCollectionPolicyGarbageCollectionPolicy | (Optional) GarbageCollectionPolicy defines the policy for garbage collecting old backups |
garbageCollectionPeriodKubernetes meta/v1.Duration | (Optional) GarbageCollectionPeriod defines the period for garbage collecting old backups |
deltaSnapshotPeriodKubernetes meta/v1.Duration | (Optional) DeltaSnapshotPeriod defines the period after which delta snapshots will be taken |
deltaSnapshotMemoryLimitk8s.io/apimachinery/pkg/api/resource.Quantity | (Optional) DeltaSnapshotMemoryLimit defines the memory limit after which delta snapshots will be taken |
compressionCompressionSpec | (Optional) SnapshotCompression defines the specification for compression of Snapshots. |
enableProfilingbool | (Optional) EnableProfiling defines if profiling should be enabled for the etcd-backup-restore-sidecar |
etcdSnapshotTimeoutKubernetes meta/v1.Duration | (Optional) EtcdSnapshotTimeout defines the timeout duration for etcd FullSnapshot operation |
leaderElectionLeaderElectionSpec | (Optional) LeaderElection defines parameters related to the LeaderElection configuration. |
ClientService
(Appears on: EtcdConfig)
ClientService defines the parameters of the client service that a user can specify
| Field | Description |
|---|---|
annotationsmap[string]string | (Optional) Annotations specify the annotations that should be added to the client service |
labelsmap[string]string | (Optional) Labels specify the labels that should be added to the client service |
CompactionMode
(string alias)
(Appears on: SharedConfig)
CompactionMode defines the auto-compaction-mode: ‘periodic’ or ‘revision’. ‘periodic’ for duration based retention and ‘revision’ for revision number based retention.
CompressionPolicy
(string alias)
(Appears on: CompressionSpec)
CompressionPolicy defines the type of policy for compression of snapshots.
CompressionSpec
(Appears on: BackupSpec)
CompressionSpec defines parameters related to compression of Snapshots(full as well as delta).
| Field | Description |
|---|---|
enabledbool | (Optional) |
policyCompressionPolicy | (Optional) |
Condition
(Appears on: EtcdCopyBackupsTaskStatus, EtcdStatus)
Condition holds the information about the state of a resource.
| Field | Description |
|---|---|
typeConditionType | Type of the Etcd condition. |
statusConditionStatus | Status of the condition, one of True, False, Unknown. |
lastTransitionTimeKubernetes meta/v1.Time | Last time the condition transitioned from one status to another. |
lastUpdateTimeKubernetes meta/v1.Time | Last time the condition was updated. |
reasonstring | The reason for the condition’s last transition. |
messagestring | A human-readable message indicating details about the transition. |
ConditionStatus
(string alias)
(Appears on: Condition)
ConditionStatus is the status of a condition.
ConditionType
(string alias)
(Appears on: Condition)
ConditionType is the type of condition.
CrossVersionObjectReference
(Appears on: EtcdStatus)
CrossVersionObjectReference contains enough information to let you identify the referred resource.
| Field | Description |
|---|---|
kindstring | Kind of the referent |
namestring | Name of the referent |
apiVersionstring | (Optional) API version of the referent |
Etcd
Etcd is the Schema for the etcds API
| Field | Description | ||||||||||||||||||||||||
|---|---|---|---|---|---|---|---|---|---|---|---|---|---|---|---|---|---|---|---|---|---|---|---|---|---|
metadataKubernetes meta/v1.ObjectMeta | Refer to the Kubernetes API documentation for the fields of the
metadata field. | ||||||||||||||||||||||||
specEtcdSpec |
| ||||||||||||||||||||||||
statusEtcdStatus |
EtcdConfig
(Appears on: EtcdSpec)
EtcdConfig defines parameters associated etcd deployed
| Field | Description |
|---|---|
quotak8s.io/apimachinery/pkg/api/resource.Quantity | (Optional) Quota defines the etcd DB quota. |
defragmentationSchedulestring | (Optional) DefragmentationSchedule defines the cron standard schedule for defragmentation of etcd. |
serverPortint32 | (Optional) |
clientPortint32 | (Optional) |
imagestring | (Optional) Image defines the etcd container image and tag |
authSecretRefKubernetes core/v1.SecretReference | (Optional) |
metricsMetricsLevel | (Optional) Metrics defines the level of detail for exported metrics of etcd, specify ‘extensive’ to include histogram metrics. |
resourcesKubernetes core/v1.ResourceRequirements | (Optional) Resources defines the compute Resources required by etcd container. More info: https://kubernetes.io/docs/concepts/configuration/manage-compute-resources-container/ |
clientUrlTlsTLSConfig | (Optional) ClientUrlTLS contains the ca, server TLS and client TLS secrets for client communication to ETCD cluster |
peerUrlTlsTLSConfig | (Optional) PeerUrlTLS contains the ca and server TLS secrets for peer communication within ETCD cluster Currently, PeerUrlTLS does not require client TLS secrets for gardener implementation of ETCD cluster. |
etcdDefragTimeoutKubernetes meta/v1.Duration | (Optional) EtcdDefragTimeout defines the timeout duration for etcd defrag call |
heartbeatDurationKubernetes meta/v1.Duration | (Optional) HeartbeatDuration defines the duration for members to send heartbeats. The default value is 10s. |
clientServiceClientService | (Optional) ClientService defines the parameters of the client service that a user can specify |
EtcdCopyBackupsTask
EtcdCopyBackupsTask is a task for copying etcd backups from a source to a target store.
| Field | Description | ||||||||||
|---|---|---|---|---|---|---|---|---|---|---|---|
metadataKubernetes meta/v1.ObjectMeta | Refer to the Kubernetes API documentation for the fields of the
metadata field. | ||||||||||
specEtcdCopyBackupsTaskSpec |
| ||||||||||
statusEtcdCopyBackupsTaskStatus |
EtcdCopyBackupsTaskSpec
(Appears on: EtcdCopyBackupsTask)
EtcdCopyBackupsTaskSpec defines the parameters for the copy backups task.
| Field | Description |
|---|---|
sourceStoreStoreSpec | SourceStore defines the specification of the source object store provider for storing backups. |
targetStoreStoreSpec | TargetStore defines the specification of the target object store provider for storing backups. |
maxBackupAgeuint32 | (Optional) MaxBackupAge is the maximum age in days that a backup must have in order to be copied. By default all backups will be copied. |
maxBackupsuint32 | (Optional) MaxBackups is the maximum number of backups that will be copied starting with the most recent ones. |
waitForFinalSnapshotWaitForFinalSnapshotSpec | (Optional) WaitForFinalSnapshot defines the parameters for waiting for a final full snapshot before copying backups. |
EtcdCopyBackupsTaskStatus
(Appears on: EtcdCopyBackupsTask)
EtcdCopyBackupsTaskStatus defines the observed state of the copy backups task.
| Field | Description |
|---|---|
conditions[]Condition | (Optional) Conditions represents the latest available observations of an object’s current state. |
observedGenerationint64 | (Optional) ObservedGeneration is the most recent generation observed for this resource. |
lastErrorstring | (Optional) LastError represents the last occurred error. |
EtcdMemberConditionStatus
(string alias)
(Appears on: EtcdMemberStatus)
EtcdMemberConditionStatus is the status of an etcd cluster member.
EtcdMemberStatus
(Appears on: EtcdStatus)
EtcdMemberStatus holds information about a etcd cluster membership.
| Field | Description |
|---|---|
namestring | Name is the name of the etcd member. It is the name of the backing |
idstring | (Optional) ID is the ID of the etcd member. |
roleEtcdRole | (Optional) Role is the role in the etcd cluster, either |
statusEtcdMemberConditionStatus | Status of the condition, one of True, False, Unknown. |
reasonstring | The reason for the condition’s last transition. |
lastTransitionTimeKubernetes meta/v1.Time | LastTransitionTime is the last time the condition’s status changed. |
EtcdRole
(string alias)
(Appears on: EtcdMemberStatus)
EtcdRole is the role of an etcd cluster member.
EtcdSpec
(Appears on: Etcd)
EtcdSpec defines the desired state of Etcd
| Field | Description |
|---|---|
selectorKubernetes meta/v1.LabelSelector | selector is a label query over pods that should match the replica count. It must match the pod template’s labels. More info: https://kubernetes.io/docs/concepts/overview/working-with-objects/labels/#label-selectors |
labelsmap[string]string | |
annotationsmap[string]string | (Optional) |
etcdEtcdConfig | |
backupBackupSpec | |
sharedConfigSharedConfig | (Optional) |
schedulingConstraintsSchedulingConstraints | (Optional) |
replicasint32 | |
priorityClassNamestring | (Optional) PriorityClassName is the name of a priority class that shall be used for the etcd pods. |
storageClassstring | (Optional) StorageClass defines the name of the StorageClass required by the claim. More info: https://kubernetes.io/docs/concepts/storage/persistent-volumes#class-1 |
storageCapacityk8s.io/apimachinery/pkg/api/resource.Quantity | (Optional) StorageCapacity defines the size of persistent volume. |
volumeClaimTemplatestring | (Optional) VolumeClaimTemplate defines the volume claim template to be created |
EtcdStatus
(Appears on: Etcd)
EtcdStatus defines the observed state of Etcd.
| Field | Description |
|---|---|
observedGenerationint64 | (Optional) ObservedGeneration is the most recent generation observed for this resource. |
etcdCrossVersionObjectReference | (Optional) |
conditions[]Condition | (Optional) Conditions represents the latest available observations of an etcd’s current state. |
serviceNamestring | (Optional) ServiceName is the name of the etcd service. |
lastErrorstring | (Optional) LastError represents the last occurred error. |
clusterSizeint32 | (Optional) Cluster size is the size of the etcd cluster. |
currentReplicasint32 | (Optional) CurrentReplicas is the current replica count for the etcd cluster. |
replicasint32 | (Optional) Replicas is the replica count of the etcd resource. |
readyReplicasint32 | (Optional) ReadyReplicas is the count of replicas being ready in the etcd cluster. |
readybool | (Optional) Ready is |
updatedReplicasint32 | (Optional) UpdatedReplicas is the count of updated replicas in the etcd cluster. |
labelSelectorKubernetes meta/v1.LabelSelector | (Optional) LabelSelector is a label query over pods that should match the replica count. It must match the pod template’s labels. |
members[]EtcdMemberStatus | (Optional) Members represents the members of the etcd cluster |
peerUrlTLSEnabledbool | (Optional) PeerUrlTLSEnabled captures the state of peer url TLS being enabled for the etcd member(s) |
GarbageCollectionPolicy
(string alias)
(Appears on: BackupSpec)
GarbageCollectionPolicy defines the type of policy for snapshot garbage collection.
LeaderElectionSpec
(Appears on: BackupSpec)
LeaderElectionSpec defines parameters related to the LeaderElection configuration.
| Field | Description |
|---|---|
reelectionPeriodKubernetes meta/v1.Duration | (Optional) ReelectionPeriod defines the Period after which leadership status of corresponding etcd is checked. |
etcdConnectionTimeoutKubernetes meta/v1.Duration | (Optional) EtcdConnectionTimeout defines the timeout duration for etcd client connection during leader election. |
MetricsLevel
(string alias)
(Appears on: EtcdConfig)
MetricsLevel defines the level ‘basic’ or ‘extensive’.
SchedulingConstraints
(Appears on: EtcdSpec)
SchedulingConstraints defines the different scheduling constraints that must be applied to the pod spec in the etcd statefulset. Currently supported constraints are Affinity and TopologySpreadConstraints.
| Field | Description |
|---|---|
affinityKubernetes core/v1.Affinity | (Optional) Affinity defines the various affinity and anti-affinity rules for a pod that are honoured by the kube-scheduler. |
topologySpreadConstraints[]Kubernetes core/v1.TopologySpreadConstraint | (Optional) TopologySpreadConstraints describes how a group of pods ought to spread across topology domains, that are honoured by the kube-scheduler. |
SecretReference
(Appears on: TLSConfig)
SecretReference defines a reference to a secret.
| Field | Description |
|---|---|
SecretReferenceKubernetes core/v1.SecretReference | (Members of |
dataKeystring | (Optional) DataKey is the name of the key in the data map containing the credentials. |
SharedConfig
(Appears on: EtcdSpec)
SharedConfig defines parameters shared and used by Etcd as well as backup-restore sidecar.
| Field | Description |
|---|---|
autoCompactionModeCompactionMode | (Optional) AutoCompactionMode defines the auto-compaction-mode:‘periodic’ mode or ‘revision’ mode for etcd and embedded-Etcd of backup-restore sidecar. |
autoCompactionRetentionstring | (Optional) AutoCompactionRetention defines the auto-compaction-retention length for etcd as well as for embedded-Etcd of backup-restore sidecar. |
StorageProvider
(string alias)
(Appears on: StoreSpec)
StorageProvider defines the type of object store provider for storing backups.
StoreSpec
(Appears on: BackupSpec, EtcdCopyBackupsTaskSpec)
StoreSpec defines parameters related to ObjectStore persisting backups
| Field | Description |
|---|---|
containerstring | (Optional) Container is the name of the container the backup is stored at. |
prefixstring | Prefix is the prefix used for the store. |
providerStorageProvider | (Optional) Provider is the name of the backup provider. |
secretRefKubernetes core/v1.SecretReference | (Optional) SecretRef is the reference to the secret which used to connect to the backup store. |
TLSConfig
(Appears on: BackupSpec, EtcdConfig)
TLSConfig hold the TLS configuration details.
| Field | Description |
|---|---|
tlsCASecretRefSecretReference | |
serverTLSSecretRefKubernetes core/v1.SecretReference | |
clientTLSSecretRefKubernetes core/v1.SecretReference | (Optional) |
WaitForFinalSnapshotSpec
(Appears on: EtcdCopyBackupsTaskSpec)
WaitForFinalSnapshotSpec defines the parameters for waiting for a final full snapshot before copying backups.
| Field | Description |
|---|---|
enabledbool | Enabled specifies whether to wait for a final full snapshot before copying backups. |
timeoutKubernetes meta/v1.Duration | (Optional) Timeout is the timeout for waiting for a final full snapshot. When this timeout expires, the copying of backups will be performed anyway. No timeout or 0 means wait forever. |
Generated with gen-crd-api-reference-docs
6.2.6 - Changing Api
Change the API
This guide provides detailed information on what needs to be done when the API needs to be changed.
etcd-druid API follows the same API conventions and guidelines which Kubernetes defines and adopts. The Kubernetes API Conventions as well as Changing the API topics already provide a good overview and general explanation of the basic concepts behind it. We adhere to the principles laid down by Kubernetes.
Etcd Druid API
The etcd-druid API is defined here.
!!! info
The current version of the API is v1alpha1. We are currently working on migration to v1beta1 API.
Changing the API
If there is a need to make changes to the API, then one should do the following:
- If new fields are added then ensure that these are added as
optionalfields. They should have the+optionalcomment and anomitemptyJSON tag should be added against the field. - Ensure that all new fields or changing the existing fields are well documented with doc-strings.
- Care should be taken that incompatible API changes should not be made in the same version of the API. If there is a real necessity to introduce a backward incompatible change then a newer version of the API should be created and an API conversion webhook should be put in place to support more than one version of the API.
- After the changes to the API are finalized, run
make generateto ensure that the changes are also reflected in the CRD. - If necessary, implement or adapt the validation for the API.
- If necessary, adapt the examples YAML manifests.
- When opening a pull-request, always add a release note informing the end-users of the changes that are coming in.
Removing a Field
If field(s) needs to be removed permanently from the API, then one should ensure the following:
- Field should not be directly removed, instead first a deprecation notice should be put which should follow a well-defined deprecation period. Ensure that the release note in the pull-request is properly categorized so that this is easily visible to the end-users and clearly mentiones which field(s) have been deprecated. Clearly suggest a way in which clients need to adapt.
- To allow sufficient time to the end-users to adapt to the API changes, deprecated field(s) should only be removed once the deprecation period is over. It is generally recommended that this be done in 2 stages:
- First stage: Remove the code that refers to the deprecated fields. This ensures that the code no longer has dependency on the deprecated field(s).
- Second Stage: Remove the field from the API.
6.2.7 - Configure Etcd Druid
etcd-druid CLI Flags
etcd-druid process can be started with the following command line flags.
Command line flags
!!! note “Deprecation Notice”
All existing command line flags have been marked as deprecated. To configure etcd-druid the recommended way is to define a single --config CLI flag which points to a configuration YAML file containing etcd-druid OperatorConfiguration. For backward compatibility both new --config CLI flag and now deprecated existing CLI flags are supported.
Operator Configuration
The recommended way to configure etcd-druid is via OperatorConfiguration.
| Flag | Description | Default |
|---|---|---|
| config | Path to the mounted operator configuration. | NA |
You can see the default values for OperatorConfiguration at api/config/v1alpha1/defaults.go.
!!! note
It is required to define the --config CLI flag and point to the configuration YAML file path.
If you are deploying etcd-druid in a kubernetes cluster, then it is assumed that you have done the following:
- Created a
ConfigMapwhich contains the serialized operator configuration. - Mount the
ConfigMapto etcd-druidDeployment.
Leader election (Deprecated)
If you wish to setup etcd-druid in high-availability mode then leader election needs to be enabled to ensure that at a time only one replica services the incoming events and does the reconciliation.
| Flag | Description | Default |
|---|---|---|
| enable-leader-election | Leader election provides the capability to select one replica as a leader where active reconciliation will happen. The other replicas will keep waiting for leadership change and not do active reconciliations. | false |
| leader-election-id | Name of the k8s lease object that leader election will use for holding the leader lock. By default etcd-druid will use lease resource lock for leader election which is also a natural usecase for leases and is also recommended by k8s. | “druid-leader-election” |
| leader-election-resource-lock | Deprecated: This flag will be removed in later version of druid. By default lease.coordination.k8s.io resources will be used for leader election resource locking for the controller manager. | “leases” |
Metrics (Deprecated)
etcd-druid exposes a /metrics endpoint which can be scrapped by tools like Prometheus. If the default metrics endpoint configuration is not suitable then consumers can change it via the following options.
| Flag | Description | Default |
|---|---|---|
| metrics-bind-address | The IP address that the metrics endpoint binds to | "" |
| metrics-port | The port used for the metrics endpoint | 8080 |
| metrics-addr | Duration to wait for after compaction job is completed, to allow Prometheus metrics to be scraped. Deprecated: Please use --metrics-bind-address and --metrics-port instead | “:8080” |
Metrics bind-address is computed by joining the host and port. By default its value is computed as :8080.
!!! tip
Ensure that the metrics-port is also reflected in the etcd-druid deployment specification.
Webhook Server (Deprecated)
etcd-druid provides the following CLI flags to configure webhook server. These CLI flags are used to construct a new webhook.Server by configuring Options.
| Flag | Description | Default |
|---|---|---|
| webhook-server-bind-address | It is the address that the webhook server will listen on. | "" |
| webhook-server-port | Port is the port number that the webhook server will serve. | 9443 |
| webhook-server-tls-server-cert-dir | The path to a directory containing the server’s TLS certificate and key (the files must be named tls.crt and tls.key respectively). | /etc/webhook-server-tls |
Etcd-Components Webhook (Deprecated)
etcd-druid provisions and manages several Kubernetes resources which we call Etcdcluster components. To ensure that there is no accidental changes done to these managed resources, a webhook is put in place to check manual changes done to any managed etcd-cluster Kubernetes resource. It rejects most of these changes except a few. The details on how to enable the etcd-components webhook, which resources are protected and in which scenarios is the change allowed is documented here.
Following CLI flags are provided to configure the etcd-components webhook:
| Flag | Description | Default |
|---|---|---|
| enable-etcd-components-webhook | Enable EtcdComponents Webhook to prevent unintended changes to resources managed by etcd-druid. | false |
| reconciler-service-account | The fully qualified name of the service account used by etcd-druid for reconciling etcd resources. If unspecified, the default service account mounted for etcd-druid will be used | etcd-druid-service-account |
| etcd-components-exempt-service-accounts | In case there is a need to allow changes to Etcd resources from external controllers like vertical-pod-autoscaler then one must list the ServiceAaccount that is used by each such controller. | "" |
Reconcilers (Deprecated)
Following set of flags configures the reconcilers running within etcd-druid. To know more about different reconcilers read this document.
Etcd Reconciler (Deprecated)
| Flag | Description | Default |
|---|---|---|
| etcd-workers | Number of workers spawned for concurrent reconciles of Etcd resources. | 3 |
| enable-etcd-spec-auto-reconcile | If true then automatically reconciles Etcd Spec. If false, waits for explicit annotation gardener.cloud/operation: reconcile to be placed on the Etcd resource to trigger reconcile. | false |
| disable-etcd-serviceaccount-automount | For each Etcd cluster a ServiceAccount is created which is used by the StatefulSet pods and tied to Role via RoleBinding. If false then pods running as this ServiceAccount will have the API token automatically mounted. You can consider disabling it if you wish to use Projected Volumes allowing one to set an expirationSeconds on the mounted token for better security. To use projected volumes ensure that you have set relevant kube-apiserver flags.Note: With Kubernetes version >=1.24 projected service account token is the default. This means that we no longer need this flag. Issue #872 has been raised to address this. | false |
| etcd-status-sync-period | Etcd.Status is periodically updated. This interval defines the status sync frequency. | 15s |
| etcd-member-notready-threshold | Threshold after which an etcd member is considered not ready if the status was unknown before. This is currently used to update EtcdMemberConditionStatus. | 5m |
| etcd-member-unknown-threshold | Threshold after which an etcd member is considered unknown. This is currently used to update EtcdMemberConditionStatus. | 1m |
Compaction Reconciler (Deprecated)
| Flag | Description | Default |
|---|---|---|
| enable-backup-compaction | Enable automatic compaction of etcd backups | false |
| compaction-workers | Number of workers that can be spawned for concurrent reconciles for compaction Jobs. The controller creates a backup compaction job if a certain etcd event threshold is reached. If compaction is enabled, the value for this flag must be greater than zero. | 3 |
| etcd-events-threshold | Defines the threshold in terms of total number of etcd events before a backup compaction job is triggered. | 1000000 |
| active-deadline-duration | Duration after which a running backup compaction job will be terminated. | 3h |
| metrics-scrape-wait-duration | Duration to wait for after compaction job is completed, to allow Prometheus metrics to be scraped. | 0s |
Etcd Copy-Backup Task & Secret Reconcilers (Deprecated)
| Flag | Description | Default |
|---|---|---|
| etcd-copy-backups-task-workers | Number of workers spawned for concurrent reconciles for EtcdCopyBackupTask resources. | 3 |
| secret-workers | Number of workers spawned for concurrent reconciles for secrets. | 10 |
Miscellaneous (Deprecated)
| Flag | Description | Default |
|---|---|---|
| feature-gates | A set of key=value pairs that describe feature gates for alpha/experimental features. Please check feature-gates for more information. | "" |
| disable-lease-cache | Disable cache for lease.coordination.k8s.io resources. | false |
6.2.8 - Contribution
Contributors Guide
etcd-druid is an actively maintained project which has organically evolved to be a mature and stable etcd operator. We welcome active participation from the community and to this end this guide serves as a good starting point.
Code of Conduct
All maintainers and contributors must abide by Contributor Covenant. Real progress can only happen in a collaborative environment which fosters mutual respect, openeness and disruptive innovation.
Developer Certificate of Origin
Due to legal reasons, contributors will be asked to accept a Developer Certificate of Origin (DCO) before they submit the first pull request to the IronCore project, this happens in an automated fashion during the submission process. We use the standard DCO text of the Linux Foundation.
License
Your contributions to etcd-druid must be licensed properly:
- Code contributions must be licensed under the Apache 2.0 License.
- Documentation contributions must be licensed under the Creative Commons Attribution 4.0 International License.
Contributing
etcd-druid use Github to manage reviews of pull requests.
- If you are looking to make your first contribution, follow Steps to Contribute.
- If you have a trivial fix or improvement, go ahead and create an issue first followed by a pull request.
- If you plan to do something more involved, first discuss your ideas by creating an issue. This will avoid unnecessary work and surely give you and us a good deal of inspiration.
Steps to Contribute
- If you wish to contribute and have not done that in the past, then first try and filter the list of issues with label
exp/beginner. Once you find the issue that interests you, add a comment stating that you would like to work on it. This is to prevent duplicated efforts from contributors on the same issue. - If you have questions about one of the issues please comment on them and one of the maintainers will clarify it.
We kindly ask you to follow the Pull Request Checklist to ensure reviews can happen accordingly.
Issues and Planning
We use GitHub issues to track bugs and enhancement requests. Please provide as much context as possible when you open an issue. The information you provide must be comprehensive enough to understand, reproduce the behavior and find related reports of that issue for the assignee. Therefore, contributors may use but aren’t restricted to the issue template provided by the etcd-druid maintainers.
6.2.9 - Controllers
Controllers
etcd-druid is an operator to manage etcd clusters, and follows the Operator pattern for Kubernetes.
It makes use of the Kubebuilder framework which makes it quite easy to define Custom Resources (CRs) such as Etcds and EtcdCopyBackupTasks through Custom Resource Definitions (CRDs), and define controllers for these CRDs.
etcd-druid uses Kubebuilder to define the Etcd CR and its corresponding controllers.
All controllers that are a part of etcd-druid reside in package internal/controller, as sub-packages.
Etcd-druid currently consists of the following controllers, each having its own responsibility:
- etcd : responsible for the reconciliation of the
EtcdCR spec, which allows users to run etcd clusters within the specified Kubernetes cluster, and also responsible for periodically updating theEtcdCR status with the up-to-date state of the managed etcd cluster. - compaction : responsible for snapshot compaction.
- etcdcopybackupstask : responsible for the reconciliation of the
EtcdCopyBackupsTaskCR, which helps perform the job of copying snapshot backups from one object store to another. - secret : responsible in making sure
Secrets being referenced byEtcdresources are not deleted while in use.
Package Structure
The typical package structure for the controllers that are part of etcd-druid is shown with the compaction controller:
internal/controller/compaction
├── config.go
├── reconciler.go
└── register.go
config.go: contains all the logic for the configuration of the controller, including feature gate activations, CLI flag parsing and validations.register.go: contains the logic for registering the controller with the etcd-druid controller manager.reconciler.go: contains the controller reconciliation logic.
Each controller package also contains auxiliary files which are relevant to that specific controller.
Controller Manager
A manager is first created for all controllers that are a part of etcd-druid.
The controller manager is responsible for all the controllers that are associated with CRDs.
Once the manager is Start()ed, all the controllers that are registered with it are started.
Each controller is built using a controller builder, configured with details such as the type of object being reconciled, owned objects whose owner object is reconciled, event filters (predicates), etc. Predicates are filters which allow controllers to filter which type of events the controller should respond to and which ones to ignore.
The logic relevant to the controller manager like the creation of the controller manager and registering each of the controllers with the manager, is contained in internal/manager/manager.go.
Etcd Controller
The etcd controller is responsible for the reconciliation of the Etcd resource spec and status. It handles the provisioning and management of the etcd cluster. Different components that are required for the functioning of the cluster like Leases, ConfigMaps, and the Statefulset for the etcd cluster are all deployed and managed by the etcd controller.
Additionally, etcd controller also periodically updates the Etcd resource status with the latest available information from the etcd cluster, as well as results and errors from the recent-most reconciliation of the Etcd resource spec.
The etcd controller is essential to the functioning of the etcd cluster and etcd-druid, thus the minimum number of worker threads is 1 (default being 3), controlled by the CLI flag --etcd-workers.
Etcd Spec Reconciliation
While building the controller, an event filter is set such that the behavior of the controller, specifically for Etcd update operations, depends on the gardener.cloud/operation: reconcile annotation. This is controlled by the --enable-etcd-spec-auto-reconcile CLI flag, which, if set to false, tells the controller to perform reconciliation only when this annotation is present. If the flag is set to true, the controller will reconcile the etcd cluster anytime the Etcd spec, and thus generation, changes, and the next queued event for it is triggered.
!!! note
Creation and deletion of Etcd resources are not affected by the above flag or annotation.
The reason this filter is present is that any disruption in the Etcd resource due to reconciliation (due to changes in the Etcd spec, for example) while workloads are being run would cause unwanted downtimes to the etcd cluster. Hence, any user who wishes to avoid such disruptions, can choose to set the --enable-etcd-spec-auto-reconcile CLI flag to false. An example of this is Gardener’s gardenlet, which reconciles the Etcd resource only during a shoot cluster’s maintenance window.
The controller adds a finalizer to the Etcd resource in order to ensure that it does not get deleted until all dependent resources managed by etcd-druid, aka managed components, are properly cleaned up. Only the etcd controller can delete a resource once it adds finalizers to it. This ensures that the proper deletion flow steps are followed while deleting the resource. During deletion flow, managed components are deleted in parallel.
Etcd Status Updates
The Etcd resource status is updated periodically by etcd controller, the interval for which is determined by the CLI flag --etcd-status-sync-period.
Status fields of the Etcd resource such as LastOperation, LastErrors and ObservedGeneration, are updated to reflect the result of the recent reconciliation of the Etcd resource spec.
LastOperationholds information about the last operation performed on the etcd cluster, indicated by fieldsType,State,DescriptionandLastUpdateTime. Additionally, a fieldRunIDindicates the unique ID assigned to the specific reconciliation run, to allow for better debugging of issues.LastErrorsis a slice of errors encountered by the last reconciliation run. Each error consists of fieldsCodeto indicate the custom etcd-druid error code for the error, a human-readableDescription, and theObservedAttime when the error was seen.ObservedGenerationindicates the latestgenerationof theEtcdresource that etcd-druid has “observed” and consequently reconciled. It helps identify whether a change in theEtcdresource spec was acted upon by druid or not.
Status fields of the Etcd resource which correspond to the StatefulSet like CurrentReplicas, ReadyReplicas and Replicas are updated to reflect those of the StatefulSet by the controller.
Status fields related to the etcd cluster itself, such as Members, PeerUrlTLSEnabled and Ready are updated as follows:
- Cluster Membership: The controller updates the information about etcd cluster membership like
Role,Status,Reason,LastTransitionTimeand identifying information like theNameandID. For theStatusfield, the member is checked for the Ready condition, where the member can be inReady,NotReadyandUnknownstatuses.
Etcd resource conditions are indicated by status field Conditions. The condition checks that are currently performed are:
AllMembersReady: indicates readiness of all members of the etcd cluster.Ready: indicates overall readiness of the etcd cluster in serving traffic.BackupReady: indicates health of the etcd backups, i.e., whether etcd backups are being taken regularly as per schedule. This condition is applicable only when backups are enabled for the etcd cluster.DataVolumesReady: indicates health of the persistent volumes containing the etcd data.
Compaction Controller
The compaction controller deploys the snapshot compaction job whenever required. To understand the rationale behind this controller, please read snapshot-compaction.md.
The controller watches the number of events accumulated as part of delta snapshots in the etcd cluster’s backups, and triggers a snapshot compaction when the number of delta events crosses the set threshold, which is configurable through the --etcd-events-threshold CLI flag (1M events by default).
The controller watches for changes in snapshot Leases associated with Etcd resources.
It checks the full and delta snapshot Leases and calculates the difference in events between the latest delta snapshot and the previous full snapshot, and initiates the compaction job if the event threshold is crossed.
The number of worker threads for the compaction controller needs to be greater than or equal to 0 (default 3), controlled by the CLI flag --compaction-workers.
This is unlike other controllers which need at least one worker thread for the proper functioning of etcd-druid as snapshot compaction is not a core functionality for the etcd clusters to be deployed.
The compaction controller should be explicitly enabled by the user, through the --enable-backup-compaction CLI flag.
EtcdCopyBackupsTask Controller
The etcdcopybackupstask controller is responsible for deploying the etcdbrctl copy command as a job.
This controller reacts to create/update events arising from EtcdCopyBackupsTask resources, and deploys the EtcdCopyBackupsTask job with source and target backup storage providers as arguments, which are derived from source and target bucket secrets referenced by the EtcdCopyBackupsTask resource.
The number of worker threads for the etcdcopybackupstask controller needs to be greater than or equal to 0 (default being 3), controlled by the CLI flag --etcd-copy-backups-task-workers.
This is unlike other controllers who need at least one worker thread for the proper functioning of etcd-druid as EtcdCopyBackupsTask is not a core functionality for the etcd clusters to be deployed.
Secret Controller
The secret controller’s primary responsibility is to add a finalizer on Secrets referenced by the Etcd resource.
The secret controller is registered for Secrets, and the controller keeps a watch on the Etcd CR.
This finalizer is added to ensure that Secrets which are referenced by the Etcd CR aren’t deleted while still being used by the Etcd resource.
Events arising from the Etcd resource are mapped to a list of Secrets such as backup and TLS secrets that are referenced by the Etcd resource, and are enqueued into the request queue, which the reconciler then acts on.
The number of worker threads for the secret controller must be at least 1 (default being 10) for this core controller, controlled by the CLI flag --secret-workers, since the referenced TLS and infrastructure access secrets are essential to the proper functioning of the etcd cluster.
6.2.10 - DEP Title
DEP-NN: Your short, descriptive title
Summary
Motivation
Goals
Non-Goals
Proposal
Alternatives
6.2.11 - Dependency Management
Dependency Management
We use Go Modules for dependency management. In order to add a new package dependency to the project, you can perform go get <package@version> or edit the go.mod file and append the package along with the version you want to use.
Organize Dependencies
Unfortunately go does not differentiate between dev and test dependencies. It becomes cleaner to organize dev and test dependencies in their respective require clause which gives a clear view on existing set of dependencies. The goal is to keep the dependencies to a minimum and only add a dependency when absolutely required.
Updating Dependencies
The Makefile contains a rule called tidy which performs go mod tidy which ensures that the go.mod file matches the source code in the module. It adds any missing module requirements necessary to build the current module’s packages and dependencies, and it removes requirements on modules that don’t provide any relevant packages. It also adds any missing entries to go.sum and removes unnecessary entries.
make tidy
!!! warning Make sure that you test the code after you have updated the dependencies!
6.2.12 - Etcd Cluster Components
Etcd Cluster Components
For every Etcd cluster that is provisioned by etcd-druid it deploys a set of resources. Following sections provides information and code reference to each such resource.
StatefulSet
StatefulSet is the primary kubernetes resource that gets provisioned for an etcd cluster.
Replicas for the StatefulSet are derived from
Etcd.Spec.Replicasin the custom resource.Each pod comprises two containers:
etcd-wrapper: This is the main container which runs an etcd process.etcd-backup-restore: This is a side-container which does the following:- Orchestrates the initialization of etcd. This includes validation of any existing etcd data directory, restoration in case of corrupt etcd data directory files for a single-member etcd cluster.
- Periodically renews member lease.
- Optionally takes schedule and threshold based delta and full snapshots and pushes them to a configured object store.
- Orchestrates scheduled etcd-db defragmentation.
NOTE: This is not a complete list of functionalities offered out of
etcd-backup-restore.
Code reference: StatefulSet-Component
For detailed information on each container you can visit etcd-wrapper and etcd-backup-restore repositories.
ConfigMap
Every etcd member requires configuration with which it must be started. etcd-druid creates a ConfigMap which gets mounted onto the etcd-backup-restore container. etcd-backup-restore container will modify the etcd configuration and serve it to the etcd-wrapper container upon request.
Code reference: ConfigMap-Component
PodDisruptionBudget
An etcd cluster requires quorum for all write operations. Clients can additionally configure quorum based reads as well to ensure linearizable reads (kube-apiserver’s etcd client is configured for linearizable reads and writes). In a cluster of size 3, only 1 member failure is tolerated. Failure tolerance for an etcd cluster with replicas n is computed as (n-1)/2.
To ensure that etcd pods are not evicted more than its failure tolerance, etcd-druid creates a PodDisruptionBudget.
!!! note
For a single node etcd cluster a PodDisruptionBudget will be created, however pdb.spec.minavailable is set to 0 effectively disabling it.
Code reference: PodDisruptionBudget-Component
ServiceAccount
etcd-backup-restore container running as a side-car in every etcd-member, requires permissions to access resources like Lease, StatefulSet etc. A dedicated ServiceAccount is created per Etcd cluster for this purpose.
Code reference: ServiceAccount-Component
Role & RoleBinding
etcd-backup-restore container running as a side-car in every etcd-member, requires permissions to access resources like Lease, StatefulSet etc. A dedicated Role and RoleBinding is created and linked to the ServiceAccount created per Etcd cluster.
Code reference: Role-Component & RoleBinding-Component
Client & Peer Service
To enable clients to connect to an etcd cluster a ClusterIP Client Service is created. To enable etcd members to talk to each other(for discovery, leader-election, raft consensus etc.) etcd-druid also creates a Headless Service.
Code reference: Client-Service-Component & Peer-Service-Component
Member Lease
Every member in an Etcd cluster has a dedicated Lease that gets created which signifies that the member is alive. It is the responsibility of the etcd-backup-store side-car container to periodically renew the lease.
!!! note
Today the lease object is also used to indicate the member-ID and the role of the member in an etcd cluster. Possible roles are Leader, Member(which denotes that this is a member but not a leader). This will change in the future with EtcdMember resource.
Code reference: Member-Lease-Component
Delta & Full Snapshot Leases
One of the responsibilities of etcd-backup-restore container is to take periodic or threshold based snapshots (delta and full) of the etcd DB. Today etcd-backup-restore communicates the end-revision of the latest full/delta snapshots to etcd-druid operator via leases.
etcd-druid creates two Lease resources one for delta and another for full snapshot. This information is used by the operator to trigger snapshot-compaction jobs. Snapshot leases are also used to derive the health of backups which gets updated in the Status subresource of every Etcd resource.
In future these leases will be replaced by EtcdMember resource.
Code reference: Snapshot-Lease-Component
6.2.13 - Etcd Cluster Resource Protection
Etcd Cluster Resource Protection
etcd-druid provisions and manages kubernetes resources (a.k.a components) for each Etcd cluster. To ensure that each component’s specification is in line with the configured attributes defined in Etcd custom resource and to protect unintended changes done to any of these managed components a Validating Webhook is employed.
Etcd Components Webhook is the validating webhook which prevents unintended UPDATE and DELETE operations on all managed resources. Following sections describe what is prohibited and in which specific conditions the changes are permitted.
Configure Etcd Components Webhook
Prerequisite to enable the validation webhook is to configure the Webhook Server. Additionally you need to enable the Etcd Components validating webhook and optionally configure other options. You can look at all the options here.
What is allowed?
Modifications to managed resources under the following circumstances will be allowed:
CreateandConnectoperations are allowed and no validation is done.- Changes to a kubernetes resource (e.g. StatefulSet, ConfigMap etc) not managed by etcd-druid are allowed.
- Changes to a resource whose Group-Kind is amongst the resources managed by etcd-druid but does not have a parent
Etcdresource are allowed. - It is possible that an operator wishes to explicitly disable etcd-component protection. This can be done by setting
druid.gardener.cloud/disable-etcd-component-protectionannotation on anEtcdresource. If this annotation is present then changes to managed components will be allowed. - If
Etcdresource has a deletion timestamp set indicating that it is marked for deletion and is awaiting etcd-druid to delete all managed resources then deletion requests for all managed resources for this etcd cluster will be allowed if:- The deletion request has come from a
ServiceAccountassociated to etcd-druid. If not explicitly specified via--reconciler-service-accountthen a default-reconciler-service-account will be assumed. - The deletion request has come from a
ServiceAccountconfigured via--etcd-components-webhook-exempt-service-accounts.
- The deletion request has come from a
Leaseobjects are periodically updated by each etcd member pod. A singleServiceAccountis created for all members.Updateoperation onLeaseobjects from this ServiceAccount is allowed.- If an active reconciliation is in-progress then only allow operations that are initiated by etcd-druid.
- If no active reconciliation is currently in-progress, then allow updates to managed resource from
ServiceAccountsconfigured via--etcd-components-webhook-exempt-service-accounts.
6.2.14 - Etcd Druid Api
API Reference
Packages
config.druid.gardener.cloud/v1alpha1
ClientConnectionConfiguration
ClientConnectionConfiguration defines the configuration for constructing a client.Client to connect to k8s kube-apiserver.
Appears in:
| Field | Description | Default | Validation |
|---|---|---|---|
qps float | QPS controls the number of queries per second allowed for a connection. Setting this to a negative value will disable client-side rate limiting. | ||
burst integer | Burst allows extra queries to accumulate when a client is exceeding its rate. | ||
contentType string | ContentType is the content type used when sending data to the server from this client. | ||
acceptContentTypes string | AcceptContentTypes defines the Accept header sent by clients when connecting to the server, overriding the default value of ‘application/json’. This field will control all connections to the server used by a particular client. |
CompactionControllerConfiguration
CompactionControllerConfiguration defines the configuration for the compaction controller.
Appears in:
| Field | Description | Default | Validation |
|---|---|---|---|
enabled boolean | Enabled specifies whether backup compaction should be enabled. | ||
concurrentSyncs integer | ConcurrentSyncs is the max number of concurrent workers that can be run, each worker servicing a reconcile request. | ||
eventsThreshold integer | EventsThreshold denotes total number of etcd events to be reached upon which a backup compaction job is triggered. | ||
activeDeadlineDuration Duration | ActiveDeadlineDuration is the duration after which a running compaction job will be killed. | ||
metricsScrapeWaitDuration Duration | MetricsScrapeWaitDuration is the duration to wait for after compaction job is completed, to allow Prometheus metrics to be scraped |
ControllerConfiguration
ControllerConfiguration defines the configuration for the controllers.
Appears in:
| Field | Description | Default | Validation |
|---|---|---|---|
disableLeaseCache boolean | DisableLeaseCache disables the cache for lease.coordination.k8s.io resources. Deprecated: This field will be eventually removed. It is recommended to not use this. It has only been introduced to allow for backward compatibility with the old CLI flags. | ||
etcd EtcdControllerConfiguration | Etcd is the configuration for the Etcd controller. | ||
compaction CompactionControllerConfiguration | Compaction is the configuration for the compaction controller. | ||
etcdCopyBackupsTask EtcdCopyBackupsTaskControllerConfiguration | EtcdCopyBackupsTask is the configuration for the EtcdCopyBackupsTask controller. | ||
secret SecretControllerConfiguration | Secret is the configuration for the Secret controller. |
EtcdComponentProtectionWebhookConfiguration
EtcdComponentProtectionWebhookConfiguration defines the configuration for EtcdComponentProtection webhook. NOTE: At least one of ReconcilerServiceAccountFQDN or ServiceAccountInfo must be set. It is recommended to switch to ServiceAccountInfo.
Appears in:
| Field | Description | Default | Validation |
|---|---|---|---|
enabled boolean | Enabled indicates whether the EtcdComponentProtection webhook is enabled. | ||
reconcilerServiceAccountFQDN string | ReconcilerServiceAccountFQDN is the FQDN of the reconciler service account used by the etcd-druid operator. Deprecated: Please use ServiceAccountInfo instead and ensure that both Name and Namespace are set via projected volumes and downward API in the etcd-druid deployment spec. | ||
serviceAccountInfo ServiceAccountInfo | ServiceAccountInfo contains paths to gather etcd-druid service account information. | ||
exemptServiceAccounts string array | ExemptServiceAccounts is a list of service accounts that are exempt from Etcd Components Webhook checks. |
EtcdControllerConfiguration
EtcdControllerConfiguration defines the configuration for the Etcd controller.
Appears in:
| Field | Description | Default | Validation |
|---|---|---|---|
concurrentSyncs integer | ConcurrentSyncs is the max number of concurrent workers that can be run, each worker servicing a reconcile request. | ||
enableEtcdSpecAutoReconcile boolean | EnableEtcdSpecAutoReconcile controls how the Etcd Spec is reconciled. If set to true, then any change in Etcd spec will automatically trigger a reconciliation of the Etcd resource. If set to false, then an operator needs to explicitly set gardener.cloud/operation=reconcile annotation on the Etcd resource to trigger reconciliation of the Etcd spec. NOTE: Decision to enable it should be carefully taken as spec updates could potentially result in rolling update of the StatefulSet which will cause a minor downtime for a single node etcd cluster and can potentially cause a downtime for a multi-node etcd cluster. | ||
disableEtcdServiceAccountAutomount boolean | DisableEtcdServiceAccountAutomount controls the auto-mounting of service account token for etcd StatefulSets. | ||
etcdStatusSyncPeriod Duration | EtcdStatusSyncPeriod is the duration after which an event will be re-queued ensuring etcd status synchronization. | ||
etcdMember EtcdMemberConfiguration | EtcdMember holds configuration related to etcd members. |
EtcdCopyBackupsTaskControllerConfiguration
EtcdCopyBackupsTaskControllerConfiguration defines the configuration for the EtcdCopyBackupsTask controller.
Appears in:
| Field | Description | Default | Validation |
|---|---|---|---|
enabled boolean | Enabled specifies whether EtcdCopyBackupsTaskController should be enabled. | ||
concurrentSyncs integer | ConcurrentSyncs is the max number of concurrent workers that can be run, each worker servicing a reconcile request. |
EtcdMemberConfiguration
EtcdMemberConfiguration holds configuration related to etcd members.
Appears in:
| Field | Description | Default | Validation |
|---|---|---|---|
notReadyThreshold Duration | NotReadyThreshold is the duration after which an etcd member’s state is considered NotReady. | ||
unknownThreshold Duration | UnknownThreshold is the duration after which an etcd member’s state is considered Unknown. |
LeaderElectionConfiguration
LeaderElectionConfiguration defines the configuration for the leader election. It should be enabled when you deploy etcd-druid in HA mode. For single replica etcd-druid deployments it will not really serve any purpose.
Appears in:
| Field | Description | Default | Validation |
|---|---|---|---|
enabled boolean | Enabled specifies whether leader election is enabled. Set this to true when running replicated instances of the operator for high availability. | ||
leaseDuration Duration | LeaseDuration is the duration that non-leader candidates will wait after observing a leadership renewal until attempting to acquire leadership of the occupied but un-renewed leader slot. This is effectively the maximum duration that a leader can be stopped before it is replaced by another candidate. This is only applicable if leader election is enabled. | ||
renewDeadline Duration | RenewDeadline is the interval between attempts by the acting leader to renew its leadership before it stops leading. This must be less than or equal to the lease duration. This is only applicable if leader election is enabled. | ||
retryPeriod Duration | RetryPeriod is the duration leader elector clients should wait between attempting acquisition and renewal of leadership. This is only applicable if leader election is enabled. | ||
resourceLock string | ResourceLock determines which resource lock to use for leader election. This is only applicable if leader election is enabled. | ||
resourceName string | ResourceName determines the name of the resource that leader election will use for holding the leader lock. This is only applicable if leader election is enabled. |
LogConfiguration
LogConfiguration contains the configuration for logging.
Appears in:
| Field | Description | Default | Validation |
|---|---|---|---|
logLevel LogLevel | LogLevel is the level/severity for the logs. Must be one of [info,debug,error]. | ||
logFormat LogFormat | LogFormat is the output format for the logs. Must be one of [text,json]. |
LogFormat
Underlying type: string
LogFormat is the format of the log.
Appears in:
| Field | Description |
|---|---|
json | LogFormatJSON is the JSON log format. |
text | LogFormatText is the text log format. |
LogLevel
Underlying type: string
LogLevel represents the level for logging.
Appears in:
| Field | Description |
|---|---|
debug | LogLevelDebug is the debug log level, i.e. the most verbose. |
info | LogLevelInfo is the default log level. |
error | LogLevelError is a log level where only errors are logged. |
SecretControllerConfiguration
SecretControllerConfiguration defines the configuration for the Secret controller.
Appears in:
| Field | Description | Default | Validation |
|---|---|---|---|
concurrentSyncs integer | ConcurrentSyncs is the max number of concurrent workers that can be run, each worker servicing a reconcile request. |
Server
Server contains information for HTTP(S) server configuration.
Appears in:
| Field | Description | Default | Validation |
|---|---|---|---|
bindAddress string | BindAddress is the IP address on which to listen for the specified port. | ||
port integer | Port is the port on which to serve unsecured, unauthenticated access. |
ServerConfiguration
ServerConfiguration contains the server configurations.
Appears in:
| Field | Description | Default | Validation |
|---|---|---|---|
webhooks TLSServer | Webhooks is the configuration for the TLS webhook server. | ||
metrics Server | Metrics is the configuration for serving the metrics endpoint. |
ServiceAccountInfo
ServiceAccountInfo contains paths to gather etcd-druid service account information. Usually downward API and projected volumes are used in the deployment specification of etcd-druid to provide this information as mounted volume files.
Appears in:
| Field | Description | Default | Validation |
|---|---|---|---|
name string | Name is the name of the service account associated with etcd-druid deployment. | ||
namespace string | Namespace is the namespace in which the service account has been deployed. Usually this information is usually available at /var/run/secrets/kubernetes.io/serviceaccount/namespace. However, if automountServiceAccountToken is set to false then this file will not be available. |
TLSServer
TLSServer is the configuration for a TLS enabled server.
Appears in:
| Field | Description | Default | Validation |
|---|---|---|---|
bindAddress string | BindAddress is the IP address on which to listen for the specified port. | ||
port integer | Port is the port on which to serve unsecured, unauthenticated access. | ||
serverCertDir string | ServerCertDir is the path to a directory containing the server’s TLS certificate and key (the files must be named tls.crt and tls.key respectively). |
WebhookConfiguration
WebhookConfiguration defines the configuration for admission webhooks.
Appears in:
| Field | Description | Default | Validation |
|---|---|---|---|
etcdComponentProtection EtcdComponentProtectionWebhookConfiguration | EtcdComponentProtection is the configuration for EtcdComponentProtection webhook. |
druid.gardener.cloud/v1alpha1
Package v1alpha1 contains API Schema definitions for the druid v1alpha1 API group
Resource Types
BackupSpec
BackupSpec defines parameters associated with the full and delta snapshots of etcd.
Appears in:
| Field | Description | Default | Validation |
|---|---|---|---|
port integer | Port define the port on which etcd-backup-restore server will be exposed. | ||
tls TLSConfig | |||
image string | Image defines the etcd container image and tag | ||
store StoreSpec | Store defines the specification of object store provider for storing backups. | ||
resources ResourceRequirements | Resources defines compute Resources required by backup-restore container. More info: https://kubernetes.io/docs/concepts/configuration/manage-compute-resources-container/ | ||
compactionResources ResourceRequirements | CompactionResources defines compute Resources required by compaction job. More info: https://kubernetes.io/docs/concepts/configuration/manage-compute-resources-container/ | ||
fullSnapshotSchedule string | FullSnapshotSchedule defines the cron standard schedule for full snapshots. | Pattern: ^(\*|[1-5]?[0-9]|[1-5]?[0-9]-[1-5]?[0-9]|(?:[1-9]|[1-4][0-9]|5[0-9])\/(?:[1-9]|[1-4][0-9]|5[0-9]|60)|\*\/(?:[1-9]|[1-4][0-9]|5[0-9]|60))\s+(\*|[0-9]|1[0-9]|2[0-3]|[0-9]-(?:[0-9]|1[0-9]|2[0-3])|1[0-9]-(?:1[0-9]|2[0-3])|2[0-3]-2[0-3]|(?:[1-9]|1[0-9]|2[0-3])\/(?:[1-9]|1[0-9]|2[0-4])|\*\/(?:[1-9]|1[0-9]|2[0-4]))\s+(\*|[1-9]|[12][0-9]|3[01]|[1-9]-(?:[1-9]|[12][0-9]|3[01])|[12][0-9]-(?:[12][0-9]|3[01])|3[01]-3[01]|(?:[1-9]|[12][0-9]|30)\/(?:[1-9]|[12][0-9]|3[01])|\*\/(?:[1-9]|[12][0-9]|3[01]))\s+(\*|[1-9]|1[0-2]|[1-9]-(?:[1-9]|1[0-2])|1[0-2]-1[0-2]|(?:[1-9]|1[0-2])\/(?:[1-9]|1[0-2])|\*\/(?:[1-9]|1[0-2]))\s+(\*|[1-7]|[1-6]-[1-7]|[1-6]\/[1-7]|\*\/[1-7])$ | |
garbageCollectionPolicy GarbageCollectionPolicy | GarbageCollectionPolicy defines the policy for garbage collecting old backups | Enum: [Exponential LimitBased] | |
maxBackupsLimitBasedGC integer | MaxBackupsLimitBasedGC defines the maximum number of Full snapshots to retain in Limit Based GarbageCollectionPolicy All full snapshots beyond this limit will be garbage collected. | ||
garbageCollectionPeriod Duration | GarbageCollectionPeriod defines the period for garbage collecting old backups | Pattern: ^([0-9]+([.][0-9]+)?h)?([0-9]+([.][0-9]+)?m)?([0-9]+([.][0-9]+)?s)?([0-9]+([.][0-9]+)?d)?$Type: string | |
deltaSnapshotPeriod Duration | DeltaSnapshotPeriod defines the period after which delta snapshots will be taken | Pattern: ^([0-9]+([.][0-9]+)?h)?([0-9]+([.][0-9]+)?m)?([0-9]+([.][0-9]+)?s)?([0-9]+([.][0-9]+)?d)?$Type: string | |
deltaSnapshotMemoryLimit Quantity | DeltaSnapshotMemoryLimit defines the memory limit after which delta snapshots will be taken | ||
deltaSnapshotRetentionPeriod Duration | DeltaSnapshotRetentionPeriod defines the duration for which delta snapshots will be retained, excluding the latest snapshot set. The value should be a string formatted as a duration (e.g., ‘1s’, ‘2m’, ‘3h’, ‘4d’) | Pattern: ^([0-9]+([.][0-9]+)?h)?([0-9]+([.][0-9]+)?m)?([0-9]+([.][0-9]+)?s)?([0-9]+([.][0-9]+)?d)?$Type: string | |
compression CompressionSpec | SnapshotCompression defines the specification for compression of Snapshots. | ||
enableProfiling boolean | EnableProfiling defines if profiling should be enabled for the etcd-backup-restore-sidecar | ||
etcdSnapshotTimeout Duration | EtcdSnapshotTimeout defines the timeout duration for etcd FullSnapshot operation | Pattern: ^([0-9]+([.][0-9]+)?h)?([0-9]+([.][0-9]+)?m)?([0-9]+([.][0-9]+)?s)?([0-9]+([.][0-9]+)?d)?$Type: string | |
leaderElection LeaderElectionSpec | LeaderElection defines parameters related to the LeaderElection configuration. |
ClientService
ClientService defines the parameters of the client service that a user can specify
Appears in:
| Field | Description | Default | Validation |
|---|---|---|---|
annotations object (keys:string, values:string) | Annotations specify the annotations that should be added to the client service | ||
labels object (keys:string, values:string) | Labels specify the labels that should be added to the client service | ||
trafficDistribution string | TrafficDistribution defines the traffic distribution preference that should be added to the client service. More info: https://kubernetes.io/docs/reference/networking/virtual-ips/#traffic-distribution | Enum: [PreferClose] |
CompactionMode
Underlying type: string
CompactionMode defines the auto-compaction-mode: ‘periodic’ or ‘revision’. ‘periodic’ for duration based retention and ‘revision’ for revision number based retention.
Validation:
- Enum: [periodic revision]
Appears in:
| Field | Description |
|---|---|
periodic | Periodic is a constant to set auto-compaction-mode ‘periodic’ for duration based retention. |
revision | Revision is a constant to set auto-compaction-mode ‘revision’ for revision number based retention. |
CompressionPolicy
Underlying type: string
CompressionPolicy defines the type of policy for compression of snapshots.
Validation:
- Enum: [gzip lzw zlib]
Appears in:
| Field | Description |
|---|---|
gzip | GzipCompression is constant for gzip compression policy. |
lzw | LzwCompression is constant for lzw compression policy. |
zlib | ZlibCompression is constant for zlib compression policy. |
CompressionSpec
CompressionSpec defines parameters related to compression of Snapshots(full as well as delta).
Appears in:
| Field | Description | Default | Validation |
|---|---|---|---|
enabled boolean | |||
policy CompressionPolicy | Enum: [gzip lzw zlib] |
Condition
Condition holds the information about the state of a resource.
Appears in:
| Field | Description | Default | Validation |
|---|---|---|---|
type ConditionType | Type of the Etcd condition. | ||
status ConditionStatus | Status of the condition, one of True, False, Unknown. | ||
lastTransitionTime Time | Last time the condition transitioned from one status to another. | ||
lastUpdateTime Time | Last time the condition was updated. | ||
reason string | The reason for the condition’s last transition. | ||
message string | A human-readable message indicating details about the transition. |
ConditionStatus
Underlying type: string
ConditionStatus is the status of a condition.
Appears in:
| Field | Description |
|---|---|
True | ConditionTrue means a resource is in the condition. |
False | ConditionFalse means a resource is not in the condition. |
Unknown | ConditionUnknown means Gardener can’t decide if a resource is in the condition or not. |
Progressing | ConditionProgressing means the condition was seen true, failed but stayed within a predefined failure threshold. In the future, we could add other intermediate conditions, e.g. ConditionDegraded. Deprecated: Will be removed in the future since druid conditions will be replaced by metav1.Condition which has only three status options: True, False, Unknown. |
ConditionCheckError | ConditionCheckError is a constant for a reason in condition. Deprecated: Will be removed in the future since druid conditions will be replaced by metav1.Condition which has only three status options: True, False, Unknown. |
ConditionType
Underlying type: string
ConditionType is the type of condition.
Appears in:
| Field | Description |
|---|---|
Ready | ConditionTypeReady is a constant for a condition type indicating that the etcd cluster is ready. |
AllMembersReady | ConditionTypeAllMembersReady is a constant for a condition type indicating that all members of the etcd cluster are ready. |
AllMembersUpdated | ConditionTypeAllMembersUpdated is a constant for a condition type indicating that all members of the etcd cluster have been updated with the desired spec changes. |
BackupReady | ConditionTypeBackupReady is a constant for a condition type indicating that the etcd backup is ready. |
DataVolumesReady | ConditionTypeDataVolumesReady is a constant for a condition type indicating that the etcd data volumes are ready. |
Succeeded | EtcdCopyBackupsTaskSucceeded is a condition type indicating that a EtcdCopyBackupsTask has succeeded. |
Failed | EtcdCopyBackupsTaskFailed is a condition type indicating that a EtcdCopyBackupsTask has failed. |
CrossVersionObjectReference
CrossVersionObjectReference contains enough information to let you identify the referred resource.
Appears in:
| Field | Description | Default | Validation |
|---|---|---|---|
kind string | Kind of the referent | ||
name string | Name of the referent | ||
apiVersion string | API version of the referent |
ErrorCode
Underlying type: string
ErrorCode is a string alias representing an error code that identifies an error.
Appears in:
Etcd
Etcd is the Schema for the etcds API
| Field | Description | Default | Validation |
|---|---|---|---|
apiVersion string | druid.gardener.cloud/v1alpha1 | ||
kind string | Etcd | ||
metadata ObjectMeta | Refer to Kubernetes API documentation for fields of metadata. | ||
spec EtcdSpec | |||
status EtcdStatus |
EtcdConfig
EtcdConfig defines the configuration for the etcd cluster to be deployed.
Appears in:
| Field | Description | Default | Validation |
|---|---|---|---|
quota Quantity | Quota defines the etcd DB quota. | ||
snapshotCount integer | SnapshotCount defines the number of applied Raft entries to hold in-memory before compaction. More info: https://etcd.io/docs/v3.4/op-guide/maintenance/#raft-log-retention | ||
defragmentationSchedule string | DefragmentationSchedule defines the cron standard schedule for defragmentation of etcd. | Pattern: ^(\*|[1-5]?[0-9]|[1-5]?[0-9]-[1-5]?[0-9]|(?:[1-9]|[1-4][0-9]|5[0-9])\/(?:[1-9]|[1-4][0-9]|5[0-9]|60)|\*\/(?:[1-9]|[1-4][0-9]|5[0-9]|60))\s+(\*|[0-9]|1[0-9]|2[0-3]|[0-9]-(?:[0-9]|1[0-9]|2[0-3])|1[0-9]-(?:1[0-9]|2[0-3])|2[0-3]-2[0-3]|(?:[1-9]|1[0-9]|2[0-3])\/(?:[1-9]|1[0-9]|2[0-4])|\*\/(?:[1-9]|1[0-9]|2[0-4]))\s+(\*|[1-9]|[12][0-9]|3[01]|[1-9]-(?:[1-9]|[12][0-9]|3[01])|[12][0-9]-(?:[12][0-9]|3[01])|3[01]-3[01]|(?:[1-9]|[12][0-9]|30)\/(?:[1-9]|[12][0-9]|3[01])|\*\/(?:[1-9]|[12][0-9]|3[01]))\s+(\*|[1-9]|1[0-2]|[1-9]-(?:[1-9]|1[0-2])|1[0-2]-1[0-2]|(?:[1-9]|1[0-2])\/(?:[1-9]|1[0-2])|\*\/(?:[1-9]|1[0-2]))\s+(\*|[1-7]|[1-6]-[1-7]|[1-6]\/[1-7]|\*\/[1-7])$ | |
serverPort integer | |||
clientPort integer | |||
wrapperPort integer | |||
image string | Image defines the etcd container image and tag | ||
authSecretRef SecretReference | |||
metrics MetricsLevel | Metrics defines the level of detail for exported metrics of etcd, specify ’extensive’ to include histogram metrics. | Enum: [basic extensive] | |
resources ResourceRequirements | Resources defines the compute Resources required by etcd container. More info: https://kubernetes.io/docs/concepts/configuration/manage-compute-resources-container/ | ||
clientUrlTls TLSConfig | ClientUrlTLS contains the ca, server TLS and client TLS secrets for client communication to ETCD cluster | ||
peerUrlTls TLSConfig | PeerUrlTLS contains the ca and server TLS secrets for peer communication within ETCD cluster Currently, PeerUrlTLS does not require client TLS secrets for gardener implementation of ETCD cluster. | ||
etcdDefragTimeout Duration | EtcdDefragTimeout defines the timeout duration for etcd defrag call | Pattern: ^([0-9]+([.][0-9]+)?h)?([0-9]+([.][0-9]+)?m)?([0-9]+([.][0-9]+)?s)?([0-9]+([.][0-9]+)?d)?$Type: string | |
heartbeatDuration Duration | HeartbeatDuration defines the duration for members to send heartbeats. The default value is 10s. | Pattern: ^([0-9]+([.][0-9]+)?h)?([0-9]+([.][0-9]+)?m)?([0-9]+([.][0-9]+)?s)?$Type: string | |
clientService ClientService | ClientService defines the parameters of the client service that a user can specify |
EtcdCopyBackupsTask
EtcdCopyBackupsTask is a task for copying etcd backups from a source to a target store.
| Field | Description | Default | Validation |
|---|---|---|---|
apiVersion string | druid.gardener.cloud/v1alpha1 | ||
kind string | EtcdCopyBackupsTask | ||
metadata ObjectMeta | Refer to Kubernetes API documentation for fields of metadata. | ||
spec EtcdCopyBackupsTaskSpec | |||
status EtcdCopyBackupsTaskStatus |
EtcdCopyBackupsTaskSpec
EtcdCopyBackupsTaskSpec defines the parameters for the copy backups task.
Appears in:
| Field | Description | Default | Validation |
|---|---|---|---|
podLabels object (keys:string, values:string) | PodLabels is a set of labels that will be added to pod(s) created by the copy backups task. | ||
sourceStore StoreSpec | SourceStore defines the specification of the source object store provider for storing backups. | ||
targetStore StoreSpec | TargetStore defines the specification of the target object store provider for storing backups. | ||
maxBackupAge integer | MaxBackupAge is the maximum age in days that a backup must have in order to be copied. By default, all backups will be copied. | ||
maxBackups integer | MaxBackups is the maximum number of backups that will be copied starting with the most recent ones. | ||
waitForFinalSnapshot WaitForFinalSnapshotSpec | WaitForFinalSnapshot defines the parameters for waiting for a final full snapshot before copying backups. |
EtcdCopyBackupsTaskStatus
EtcdCopyBackupsTaskStatus defines the observed state of the copy backups task.
Appears in:
| Field | Description | Default | Validation |
|---|---|---|---|
conditions Condition array | Conditions represents the latest available observations of an object’s current state. | ||
observedGeneration integer | ObservedGeneration is the most recent generation observed for this resource. | ||
lastError string | LastError represents the last occurred error. |
EtcdMemberConditionStatus
Underlying type: string
EtcdMemberConditionStatus is the status of an etcd cluster member.
Appears in:
| Field | Description |
|---|---|
Ready | EtcdMemberStatusReady indicates that the etcd member is ready. |
NotReady | EtcdMemberStatusNotReady indicates that the etcd member is not ready. |
Unknown | EtcdMemberStatusUnknown indicates that the status of the etcd member is unknown. |
EtcdMemberStatus
EtcdMemberStatus holds information about etcd cluster membership.
Appears in:
| Field | Description | Default | Validation |
|---|---|---|---|
name string | Name is the name of the etcd member. It is the name of the backing Pod. | ||
id string | ID is the ID of the etcd member. | ||
role EtcdRole | Role is the role in the etcd cluster, either Leader or Member. | ||
status EtcdMemberConditionStatus | Status of the condition, one of True, False, Unknown. | ||
reason string | The reason for the condition’s last transition. | ||
lastTransitionTime Time | LastTransitionTime is the last time the condition’s status changed. |
EtcdRole
Underlying type: string
EtcdRole is the role of an etcd cluster member.
Appears in:
| Field | Description |
|---|---|
Leader | EtcdRoleLeader describes the etcd role Leader. |
Member | EtcdRoleMember describes the etcd role Member. |
EtcdSpec
EtcdSpec defines the desired state of Etcd
Appears in:
| Field | Description | Default | Validation |
|---|---|---|---|
selector LabelSelector | selector is a label query over pods that should match the replica count. It must match the pod template’s labels. More info: https://kubernetes.io/docs/concepts/overview/working-with-objects/labels/#label-selectors Deprecated: this field will be removed in the future. | ||
labels object (keys:string, values:string) | |||
annotations object (keys:string, values:string) | |||
etcd EtcdConfig | |||
backup BackupSpec | |||
sharedConfig SharedConfig | |||
schedulingConstraints SchedulingConstraints | |||
replicas integer | |||
priorityClassName string | PriorityClassName is the name of a priority class that shall be used for the etcd pods. | ||
storageClass string | StorageClass defines the name of the StorageClass required by the claim. More info: https://kubernetes.io/docs/concepts/storage/persistent-volumes#class-1 | ||
storageCapacity Quantity | StorageCapacity defines the size of persistent volume. | ||
volumeClaimTemplate string | VolumeClaimTemplate defines the volume claim template to be created | ||
runAsRoot boolean | RunAsRoot defines whether the securityContext of the pod specification should indicate that the containers shall run as root. By default, they run as non-root with user ’nobody’. |
EtcdStatus
EtcdStatus defines the observed state of Etcd.
Appears in:
| Field | Description | Default | Validation |
|---|---|---|---|
observedGeneration integer | ObservedGeneration is the most recent generation observed for this resource. | ||
etcd CrossVersionObjectReference | |||
conditions Condition array | Conditions represents the latest available observations of an etcd’s current state. | ||
lastErrors LastError array | LastErrors captures errors that occurred during the last operation. | ||
lastOperation LastOperation | LastOperation indicates the last operation performed on this resource. | ||
currentReplicas integer | CurrentReplicas is the current replica count for the etcd cluster. | ||
replicas integer | Replicas is the replica count of the etcd cluster. | ||
readyReplicas integer | ReadyReplicas is the count of replicas being ready in the etcd cluster. | ||
ready boolean | Ready is true if all etcd replicas are ready. | ||
labelSelector LabelSelector | LabelSelector is a label query over pods that should match the replica count. It must match the pod template’s labels. Deprecated: this field will be removed in the future. | ||
members EtcdMemberStatus array | Members represents the members of the etcd cluster | ||
peerUrlTLSEnabled boolean | PeerUrlTLSEnabled captures the state of peer url TLS being enabled for the etcd member(s) | ||
selector string | Selector is a label query over pods that should match the replica count. It must match the pod template’s labels. |
GarbageCollectionPolicy
Underlying type: string
GarbageCollectionPolicy defines the type of policy for snapshot garbage collection.
Validation:
- Enum: [Exponential LimitBased]
Appears in:
LastError
LastError stores details of the most recent error encountered for a resource.
Appears in:
| Field | Description | Default | Validation |
|---|---|---|---|
code ErrorCode | Code is an error code that uniquely identifies an error. | ||
description string | Description is a human-readable message indicating details of the error. | ||
observedAt Time | ObservedAt is the time the error was observed. |
LastOperation
LastOperation holds the information on the last operation done on the Etcd resource.
Appears in:
| Field | Description | Default | Validation |
|---|---|---|---|
type LastOperationType | Type is the type of last operation. | ||
state LastOperationState | State is the state of the last operation. | ||
description string | Description describes the last operation. | ||
runID string | RunID correlates an operation with a reconciliation run. Every time an Etcd resource is reconciled (barring status reconciliation which is periodic), a unique ID is generated which can be used to correlate all actions done as part of a single reconcile run. Capturing this as part of LastOperation aids in establishing this correlation. This further helps in also easily filtering reconcile logs as all structured logs in a reconciliation run should have the runID referenced. | ||
lastUpdateTime Time | LastUpdateTime is the time at which the operation was last updated. |
LastOperationState
Underlying type: string
LastOperationState is a string alias representing the state of the last operation.
Appears in:
| Field | Description |
|---|---|
Processing | LastOperationStateProcessing indicates that an operation is in progress. |
Succeeded | LastOperationStateSucceeded indicates that an operation has completed successfully. |
Error | LastOperationStateError indicates that an operation is completed with errors and will be retried. |
Requeue | LastOperationStateRequeue indicates that an operation is not completed and either due to an error or unfulfilled conditions will be retried. |
LastOperationType
Underlying type: string
LastOperationType is a string alias representing type of the last operation.
Appears in:
| Field | Description |
|---|---|
Create | LastOperationTypeCreate indicates that the last operation was a creation of a new Etcd resource. |
Reconcile | LastOperationTypeReconcile indicates that the last operation was a reconciliation of the spec of an Etcd resource. |
Delete | LastOperationTypeDelete indicates that the last operation was a deletion of an existing Etcd resource. |
LeaderElectionSpec
LeaderElectionSpec defines parameters related to the LeaderElection configuration.
Appears in:
| Field | Description | Default | Validation |
|---|---|---|---|
reelectionPeriod Duration | ReelectionPeriod defines the Period after which leadership status of corresponding etcd is checked. | Pattern: ^([0-9]+([.][0-9]+)?h)?([0-9]+([.][0-9]+)?m)?([0-9]+([.][0-9]+)?s)?([0-9]+([.][0-9]+)?d)?$Type: string | |
etcdConnectionTimeout Duration | EtcdConnectionTimeout defines the timeout duration for etcd client connection during leader election. | Pattern: ^([0-9]+([.][0-9]+)?h)?([0-9]+([.][0-9]+)?m)?([0-9]+([.][0-9]+)?s)?([0-9]+([.][0-9]+)?d)?$Type: string |
MetricsLevel
Underlying type: string
MetricsLevel defines the level ‘basic’ or ’extensive’.
Validation:
- Enum: [basic extensive]
Appears in:
| Field | Description |
|---|---|
basic | Basic is a constant for metrics level basic. |
extensive | Extensive is a constant for metrics level extensive. |
SchedulingConstraints
SchedulingConstraints defines the different scheduling constraints that must be applied to the pod spec in the etcd statefulset. Currently supported constraints are Affinity and TopologySpreadConstraints.
Appears in:
| Field | Description | Default | Validation |
|---|---|---|---|
affinity Affinity | Affinity defines the various affinity and anti-affinity rules for a pod that are honoured by the kube-scheduler. | ||
topologySpreadConstraints TopologySpreadConstraint array | TopologySpreadConstraints describes how a group of pods ought to spread across topology domains, that are honoured by the kube-scheduler. |
SecretReference
SecretReference defines a reference to a secret.
Appears in:
| Field | Description | Default | Validation |
|---|---|---|---|
dataKey string | DataKey is the name of the key in the data map containing the credentials. |
SharedConfig
SharedConfig defines parameters shared and used by Etcd as well as backup-restore sidecar.
Appears in:
| Field | Description | Default | Validation |
|---|---|---|---|
autoCompactionMode CompactionMode | AutoCompactionMode defines the auto-compaction-mode:‘periodic’ mode or ‘revision’ mode for etcd and embedded-etcd of backup-restore sidecar. | Enum: [periodic revision] | |
autoCompactionRetention string | AutoCompactionRetention defines the auto-compaction-retention length for etcd as well as for embedded-etcd of backup-restore sidecar. |
StorageProvider
Underlying type: string
StorageProvider defines the type of object store provider for storing backups.
Appears in:
StoreSpec
StoreSpec defines parameters related to ObjectStore persisting backups
Appears in:
| Field | Description | Default | Validation |
|---|---|---|---|
container string | Container is the name of the container the backup is stored at. | ||
prefix string | Prefix is the prefix used for the store. | ||
provider StorageProvider | Provider is the name of the backup provider. | ||
secretRef SecretReference | SecretRef is the reference to the secret which used to connect to the backup store. |
TLSConfig
TLSConfig hold the TLS configuration details.
Appears in:
| Field | Description | Default | Validation |
|---|---|---|---|
tlsCASecretRef SecretReference | |||
serverTLSSecretRef SecretReference | |||
clientTLSSecretRef SecretReference |
WaitForFinalSnapshotSpec
WaitForFinalSnapshotSpec defines the parameters for waiting for a final full snapshot before copying backups.
Appears in:
| Field | Description | Default | Validation |
|---|---|---|---|
enabled boolean | Enabled specifies whether to wait for a final full snapshot before copying backups. | ||
timeout Duration | Timeout is the timeout for waiting for a final full snapshot. When this timeout expires, the copying of backups will be performed anyway. No timeout or 0 means wait forever. |
6.2.15 - etcd Network Latency
Network Latency analysis: sn-etcd-sz vs mn-etcd-sz vs mn-etcd-mz
This page captures the etcd cluster latency analysis for below scenarios using the benchmark tool (build from etcd benchmark tool).
sn-etcd-sz -> single-node etcd single zone (Only single replica of etcd will be running)
mn-etcd-sz -> multi-node etcd single zone (Multiple replicas of etcd pods will be running across nodes in a single zone)
mn-etcd-mz -> multi-node etcd multi zone (Multiple replicas of etcd pods will be running across nodes in multiple zones)
PUT Analysis
Summary
sn-etcd-szlatency is ~20% less thanmn-etcd-szwhen benchmark tool with single client.mn-etcd-szlatency is less thanmn-etcd-mzbut the difference is~+/-5%.- Compared to
mn-etcd-sz,sn-etcd-szlatency is higher and gradually grows with more clients and larger value size. - Compared to
mn-etcd-mz,mn-etcd-szlatency is higher and gradually grows with more clients and larger value size. - Compared to
follower,leaderlatency is less, when benchmark tool with single client for all cases. - Compared to
follower,leaderlatency is high, when benchmark tool with multiple clients for all cases.
Sample commands:
# write to leader
benchmark put --target-leader --conns=1 --clients=1 --precise \
--sequential-keys --key-starts 0 --val-size=256 --total=10000 \
--endpoints=$ETCD_HOST
# write to follower
benchmark put --conns=1 --clients=1 --precise \
--sequential-keys --key-starts 0 --val-size=256 --total=10000 \
--endpoints=$ETCD_FOLLOWER_HOST
Latency analysis during PUT requests to etcd
In this case benchmark tool tries to put key with random 256 bytes value.
Benchmark tool loads key/value to
leaderwith single client .sn-etcd-szlatency (~0.815ms) is ~50% lesser thanmn-etcd-sz(~1.74ms ).mn-etcd-szlatency (~1.74ms ) is slightly lesser thanmn-etcd-mz(~1.8ms) but the difference is negligible (within same ms).
Number of keys Value size Number of connections Number of clients Target etcd server Average write QPS Average latency per request zone server name Test name 10000 256 1 1 leader 1220.0520 0.815ms eu-west-1c etcd-main-0 sn-etcd-sz 10000 256 1 1 leader 586.545 1.74ms eu-west-1a etcd-main-1 mn-etcd-sz 10000 256 1 1 leader 554.0155654442634 1.8ms eu-west-1a etcd-main-1 mn-etcd-mz
Benchmark tool loads key/value to
followerwith single client.mn-etcd-szlatency(~2.2ms) is 20% to 30% lesser thanmn-etcd-mz(~2.7ms).- Compare to
follower,leaderhas lower latency. Number of keys Value size Number of connections Number of clients Target etcd server Average write QPS Average latency per request zone server name Test name 10000 256 1 1 follower-1 445.743 2.23ms eu-west-1a etcd-main-0 mn-etcd-sz 10000 256 1 1 follower-1 378.9366747610789 2.63ms eu-west-1c etcd-main-0 mn-etcd-mz Number of keys Value size Number of connections Number of clients Target etcd server Average write QPS Average latency per request zone server name Test name 10000 256 1 1 follower-2 457.967 2.17ms eu-west-1a etcd-main-2 mn-etcd-sz 10000 256 1 1 follower-2 345.6586129825796 2.89ms eu-west-1b etcd-main-2 mn-etcd-mz
Benchmark tool loads key/value to
leaderwith multiple clients.sn-etcd-szlatency(~78.3ms) is ~10% greater thanmn-etcd-sz(~71.81ms).mn-etcd-szlatency(~71.81ms) is less thanmn-etcd-mz(~72.5ms) but the difference is negligible.Number of keys Value size Number of connections Number of clients Target etcd server Average write QPS Average latency per request zone server name Test name 100000 256 100 1000 leader 12638.905 78.32ms eu-west-1c etcd-main-0 sn-etcd-sz 100000 256 100 1000 leader 13789.248 71.81ms eu-west-1a etcd-main-1 mn-etcd-sz 100000 256 100 1000 leader 13728.446436395223 72.5ms eu-west-1a etcd-main-1 mn-etcd-mz
Benchmark tool loads key/value to
followerwith multiple clients.mn-etcd-szlatency(~69.8ms) is ~5% greater thanmn-etcd-mz(~72.6ms).- Compare to
leader,followerhas lower latency. Number of keys Value size Number of connections Number of clients Target etcd server Average write QPS Average latency per request zone server name Test name 100000 256 100 1000 follower-1 14271.983 69.80ms eu-west-1a etcd-main-0 mn-etcd-sz 100000 256 100 1000 follower-1 13695.98 72.62ms eu-west-1a etcd-main-1 mn-etcd-mz Number of keys Value size Number of connections Number of clients Target etcd server Average write QPS Average latency per request zone server name Test name 100000 256 100 1000 follower-2 14325.436 69.47ms eu-west-1a etcd-main-2 mn-etcd-sz 100000 256 100 1000 follower-2 15750.409490407475 63.3ms eu-west-1b etcd-main-2 mn-etcd-mz
In this case benchmark tool tries to put key with random 1 MB value.
Benchmark tool loads key/value to
leaderwith single client.sn-etcd-szlatency(~16.35ms) is ~20% lesser thanmn-etcd-sz(~20.64ms).mn-etcd-szlatency(~20.64ms) is less thanmn-etcd-mz(~21.08ms) but the difference is negligible..Number of keys Value size Number of connections Number of clients Target etcd server Average write QPS Average latency per request zone server name Test name 1000 1000000 1 1 leader 61.117 16.35ms eu-west-1c etcd-main-0 sn-etcd-sz 1000 1000000 1 1 leader 48.416 20.64ms eu-west-1a etcd-main-1 mn-etcd-sz 1000 1000000 1 1 leader 45.7517341664802 21.08ms eu-west-1a etcd-main-1 mn-etcd-mz
Benchmark tool loads key/value withto
followersingle client.mn-etcd-szlatency(~23.10ms) is ~10% greater thanmn-etcd-mz(~21.8ms).- Compare to
follower,leaderhas lower latency. Number of keys Value size Number of connections Number of clients Target etcd server Average write QPS Average latency per request zone server name Test name 1000 1000000 1 1 follower-1 43.261 23.10ms eu-west-1a etcd-main-0 mn-etcd-sz 1000 1000000 1 1 follower-1 45.7517341664802 21.8ms eu-west-1c etcd-main-0 mn-etcd-mz 1000 1000000 1 1 follower-1 45.33 22.05ms eu-west-1c etcd-main-0 mn-etcd-mz Number of keys Value size Number of connections Number of clients Target etcd server Average write QPS Average latency per request zone server name Test name 1000 1000000 1 1 follower-2 40.0518 24.95ms eu-west-1a etcd-main-2 mn-etcd-sz 1000 1000000 1 1 follower-2 43.28573155709838 23.09ms eu-west-1b etcd-main-2 mn-etcd-mz 1000 1000000 1 1 follower-2 45.92 21.76ms eu-west-1a etcd-main-1 mn-etcd-mz 1000 1000000 1 1 follower-2 35.5705 28.1ms eu-west-1b etcd-main-2 mn-etcd-mz
Benchmark tool loads key/value to
leaderwith multiple clients.sn-etcd-szlatency(~6.0375secs) is ~30% greater thanmn-etcd-sz``~4.000secs).mn-etcd-szlatency(~4.000secs) is less thanmn-etcd-mz(~ 4.09secs) but the difference is negligible.Number of keys Value size Number of connections Number of clients Target etcd server Average write QPS Average latency per request zone server name Test name 1000 1000000 100 300 leader 55.373 6.0375secs eu-west-1c etcd-main-0 sn-etcd-sz 1000 1000000 100 300 leader 67.319 4.000secs eu-west-1a etcd-main-1 mn-etcd-sz 1000 1000000 100 300 leader 65.91914167957594 4.09secs eu-west-1a etcd-main-1 mn-etcd-mz
Benchmark tool loads key/value to
followerwith multiple clients.mn-etcd-szlatency(~4.04secs) is ~5% greater thanmn-etcd-mz(~ 3.90secs).- Compare to
leader,followerhas lower latency. Number of keys Value size Number of connections Number of clients Target etcd server Average write QPS Average latency per request zone server name Test name 1000 1000000 100 300 follower-1 66.528 4.0417secs eu-west-1a etcd-main-0 mn-etcd-sz 1000 1000000 100 300 follower-1 70.6493461856332 3.90secs eu-west-1c etcd-main-0 mn-etcd-mz 1000 1000000 100 300 follower-1 71.95 3.84secs eu-west-1c etcd-main-0 mn-etcd-mz Number of keys Value size Number of connections Number of clients Target etcd server Average write QPS Average latency per request zone server name Test name 1000 1000000 100 300 follower-2 66.447 4.0164secs eu-west-1a etcd-main-2 mn-etcd-sz 1000 1000000 100 300 follower-2 67.53038086369484 3.87secs eu-west-1b etcd-main-2 mn-etcd-mz 1000 1000000 100 300 follower-2 68.46 3.92secs eu-west-1a etcd-main-1 mn-etcd-mz
Range Analysis
Sample commands are:
# Single connection read request with sequential keys
benchmark range 0 --target-leader --conns=1 --clients=1 --precise \
--sequential-keys --key-starts 0 --total=10000 \
--consistency=l \
--endpoints=$ETCD_HOST
# --consistency=s [Serializable]
benchmark range 0 --target-leader --conns=1 --clients=1 --precise \
--sequential-keys --key-starts 0 --total=10000 \
--consistency=s \
--endpoints=$ETCD_HOST
# Each read request with range query matches key 0 9999 and repeats for total number of requests.
benchmark range 0 9999 --target-leader --conns=1 --clients=1 --precise \
--total=10 \
--consistency=s \
--endpoints=https://etcd-main-client:2379
# Read requests with multiple connections
benchmark range 0 --target-leader --conns=100 --clients=1000 --precise \
--sequential-keys --key-starts 0 --total=100000 \
--consistency=l \
--endpoints=$ETCD_HOST
benchmark range 0 --target-leader --conns=100 --clients=1000 --precise \
--sequential-keys --key-starts 0 --total=100000 \
--consistency=s \
--endpoints=$ETCD_HOST
Latency analysis during Range requests to etcd
In this case benchmark tool tries to get specific key with random 256 bytes value.
Benchmark tool range requests to
leaderwith single client.sn-etcd-szlatency(~1.24ms) is ~40% greater thanmn-etcd-sz(~0.67ms).mn-etcd-szlatency(~0.67ms) is ~20% lesser thanmn-etcd-mz(~0.85ms).Number of requests Value size Number of connections Number of clients sequential-keys Consistency Target etcd server Average write QPS Average latency per request zone server name Test name 10000 256 1 1 true l leader 800.272 1.24ms eu-west-1c etcd-main-0 sn-etcd-sz 10000 256 1 1 true l leader 1173.9081 0.67ms eu-west-1a etcd-main-1 mn-etcd-sz 10000 256 1 1 true l leader 999.3020189178693 0.85ms eu-west-1a etcd-main-1 mn-etcd-mz Compare to consistency
Linearizable,Serializableis ~40% less for all casesNumber of requests Value size Number of connections Number of clients sequential-keys Consistency Target etcd server Average write QPS Average latency per request zone server name Test name 10000 256 1 1 true s leader 1411.229 0.70ms eu-west-1c etcd-main-0 sn-etcd-sz 10000 256 1 1 true s leader 2033.131 0.35ms eu-west-1a etcd-main-1 mn-etcd-sz 10000 256 1 1 true s leader 2100.2426362012025 0.47ms eu-west-1a etcd-main-1 mn-etcd-mz
Benchmark tool range requests to
followerwith single client .mn-etcd-szlatency(~1.3ms) is ~20% lesser thanmn-etcd-mz(~1.6ms).- Compare to
follower,leaderread request latency is ~50% less for bothmn-etcd-sz,mn-etcd-mz Number of requests Value size Number of connections Number of clients sequential-keys Consistency Target etcd server Average write QPS Average latency per request zone server name Test name 10000 256 1 1 true l follower-1 765.325 1.3ms eu-west-1a etcd-main-0 mn-etcd-sz 10000 256 1 1 true l follower-1 596.1 1.6ms eu-west-1c etcd-main-0 mn-etcd-mz - Compare to consistency
Linearizable,Serializableis ~50% less for all cases Number of requests Value size Number of connections Number of clients sequential-keys Consistency Target etcd server Average write QPS Average latency per request zone server name Test name 10000 256 1 1 true s follower-1 1823.631 0.54ms eu-west-1a etcd-main-0 mn-etcd-sz 10000 256 1 1 true s follower-1 1442.6 0.69ms eu-west-1c etcd-main-0 mn-etcd-mz 10000 256 1 1 true s follower-1 1416.39 0.70ms eu-west-1c etcd-main-0 mn-etcd-mz 10000 256 1 1 true s follower-1 2077.449 0.47ms eu-west-1a etcd-main-1 mn-etcd-mz
Benchmark tool range requests to
leaderwith multiple client.sn-etcd-szlatency(~84.66ms) is ~20% greater thanmn-etcd-sz(~73.95ms).mn-etcd-szlatency(~73.95ms) is more or less equal tomn-etcd-mz(~ 73.8ms).Number of requests Value size Number of connections Number of clients sequential-keys Consistency Target etcd server Average write QPS Average latency per request zone server name Test name 100000 256 100 1000 true l leader 11775.721 84.66ms eu-west-1c etcd-main-0 sn-etcd-sz 100000 256 100 1000 true l leader 13446.9598 73.95ms eu-west-1a etcd-main-1 mn-etcd-sz 100000 256 100 1000 true l leader 13527.19810605353 73.8ms eu-west-1a etcd-main-1 mn-etcd-mz Compare to consistency
Linearizable,Serializableis ~20% lesser for all casessn-etcd-szlatency(~69.37ms) is more or less equal tomn-etcd-sz(~69.89ms).mn-etcd-szlatency(~69.89ms) is slightly higher thanmn-etcd-mz(~67.63ms).Number of requests Value size Number of connections Number of clients sequential-keys Consistency Target etcd server Average write QPS Average latency per request zone server name Test name 100000 256 100 1000 true s leader 14334.9027 69.37ms eu-west-1c etcd-main-0 sn-etcd-sz 100000 256 100 1000 true s leader 14270.008 69.89ms eu-west-1a etcd-main-1 mn-etcd-sz 100000 256 100 1000 true s leader 14715.287354023869 67.63ms eu-west-1a etcd-main-1 mn-etcd-mz
Benchmark tool range requests to
followerwith multiple client.mn-etcd-szlatency(~60.69ms) is ~20% lesser thanmn-etcd-mz(~70.76ms).Compare to
leader,followerhas lower read request latency.Number of requests Value size Number of connections Number of clients sequential-keys Consistency Target etcd server Average write QPS Average latency per request zone server name Test name 100000 256 100 1000 true l follower-1 11586.032 60.69ms eu-west-1a etcd-main-0 mn-etcd-sz 100000 256 100 1000 true l follower-1 14050.5 70.76ms eu-west-1c etcd-main-0 mn-etcd-mz mn-etcd-szlatency(~86.09ms) is ~20 higher thanmn-etcd-mz(~64.6ms).- Compare to
mn-etcd-szconsistencyLinearizable,Serializableis ~20% higher.*
- Compare to
Compare to
mn-etcd-mzconsistencyLinearizable,Serializableis ~slightly less.Number of requests Value size Number of connections Number of clients sequential-keys Consistency Target etcd server Average write QPS Average latency per request zone server name Test name 100000 256 100 1000 true s follower-1 11582.438 86.09ms eu-west-1a etcd-main-0 mn-etcd-sz 100000 256 100 1000 true s follower-1 15422.2 64.6ms eu-west-1c etcd-main-0 mn-etcd-mz
Benchmark tool range requests to
leaderall keys.sn-etcd-szlatency(~678.77ms) is ~5% slightly lesser thanmn-etcd-sz(~697.29ms).mn-etcd-szlatency(~697.29ms) is less thanmn-etcd-mz(~701ms) but the difference is negligible.Number of requests Value size Number of connections Number of clients sequential-keys Consistency Target etcd server Average write QPS Average latency per request zone server name Test name 20 256 2 5 false l leader 6.8875 678.77ms eu-west-1c etcd-main-0 sn-etcd-sz 20 256 2 5 false l leader 6.720 697.29ms eu-west-1a etcd-main-1 mn-etcd-sz 20 256 2 5 false l leader 6.7 701ms eu-west-1a etcd-main-1 mn-etcd-mz - Compare to consistency
Linearizable,Serializableis ~5% slightly higher for all cases
- Compare to consistency
sn-etcd-szlatency(~687.36ms) is less thanmn-etcd-sz(~692.68ms) but the difference is negligible.mn-etcd-szlatency(~692.68ms) is ~5% slightly lesser thanmn-etcd-mz(~735.7ms).Number of requests Value size Number of connections Number of clients sequential-keys Consistency Target etcd server Average write QPS Average latency per request zone server name Test name 20 256 2 5 false s leader 6.76 687.36ms eu-west-1c etcd-main-0 sn-etcd-sz 20 256 2 5 false s leader 6.635 692.68ms eu-west-1a etcd-main-1 mn-etcd-sz 20 256 2 5 false s leader 6.3 735.7ms eu-west-1a etcd-main-1 mn-etcd-mz
Benchmark tool range requests to
followerall keysmn-etcd-sz(~737.68ms) latency is ~5% slightly higher thanmn-etcd-mz(~713.7ms).Compare to
leaderconsistencyLinearizableread request,followeris ~5% slightly higher.Number of requests Value size Number of connections Number of clients sequential-keys Consistency Target etcd server Average write QPS Average latency per request zone server name Test name 20 256 2 5 false l follower-1 6.163 737.68ms eu-west-1a etcd-main-0 mn-etcd-sz 20 256 2 5 false l follower-1 6.52 713.7ms eu-west-1c etcd-main-0 mn-etcd-mz mn-etcd-szlatency(~757.73ms) is ~10% higher thanmn-etcd-mz(~690.4ms).Compare to
followerconsistencyLinearizableread request,followerconsistencySerializableis ~3% slightly higher formn-etcd-sz.Compare to
followerconsistencyLinearizableread request,followerconsistencySerializableis ~5% less formn-etcd-mz.*Compare to
leaderconsistencySerializableread request,followerconsistencySerializableis ~5% less formn-etcd-mz. *Number of requests Value size Number of connections Number of clients sequential-keys Consistency Target etcd server Average write QPS Average latency per request zone server name Test name 20 256 2 5 false s follower-1 6.0295 757.73ms eu-west-1a etcd-main-0 mn-etcd-sz 20 256 2 5 false s follower-1 6.87 690.4ms eu-west-1c etcd-main-0 mn-etcd-mz
In this case benchmark tool tries to get specific key with random `1MB` value.
Benchmark tool range requests to
leaderwith single client.sn-etcd-szlatency(~5.96ms) is ~5% lesser thanmn-etcd-sz(~6.28ms).mn-etcd-szlatency(~6.28ms) is ~10% higher thanmn-etcd-mz(~5.3ms).Number of requests Value size Number of connections Number of clients sequential-keys Consistency Target etcd server Average write QPS Average latency per request zone server name Test name 1000 1000000 1 1 true l leader 167.381 5.96ms eu-west-1c etcd-main-0 sn-etcd-sz 1000 1000000 1 1 true l leader 158.822 6.28ms eu-west-1a etcd-main-1 mn-etcd-sz 1000 1000000 1 1 true l leader 187.94 5.3ms eu-west-1a etcd-main-1 mn-etcd-mz Compare to consistency
Linearizable,Serializableis ~15% less forsn-etcd-sz,mn-etcd-sz,mn-etcd-mzNumber of requests Value size Number of connections Number of clients sequential-keys Consistency Target etcd server Average write QPS Average latency per request zone server name Test name 1000 1000000 1 1 true s leader 184.95 5.398ms eu-west-1c etcd-main-0 sn-etcd-sz 1000 1000000 1 1 true s leader 176.901 5.64ms eu-west-1a etcd-main-1 mn-etcd-sz 1000 1000000 1 1 true s leader 209.99 4.7ms eu-west-1a etcd-main-1 mn-etcd-mz
Benchmark tool range requests to
followerwith single client.mn-etcd-szlatency(~6.66ms) is ~10% higher thanmn-etcd-mz(~6.16ms).Compare to
leader,followerread request latency is ~10% high formn-etcd-szCompare to
leader,followerread request latency is ~20% high formn-etcd-mzNumber of requests Value size Number of connections Number of clients sequential-keys Consistency Target etcd server Average write QPS Average latency per request zone server name Test name 1000 1000000 1 1 true l follower-1 150.680 6.66ms eu-west-1a etcd-main-0 mn-etcd-sz 1000 1000000 1 1 true l follower-1 162.072 6.16ms eu-west-1c etcd-main-0 mn-etcd-mz Compare to consistency
Linearizable,Serializableis ~15% less formn-etcd-sz(~5.84ms),mn-etcd-mz(~5.01ms).Compare to
leader,followerread request latency is ~5% slightly high formn-etcd-sz,mn-etcd-mzNumber of requests Value size Number of connections Number of clients sequential-keys Consistency Target etcd server Average write QPS Average latency per request zone server name Test name 1000 1000000 1 1 true s follower-1 170.918 5.84ms eu-west-1a etcd-main-0 mn-etcd-sz 1000 1000000 1 1 true s follower-1 199.01 5.01ms eu-west-1c etcd-main-0 mn-etcd-mz
Benchmark tool range requests to
leaderwith multiple clients.sn-etcd-szlatency(~1.593secs) is ~20% lesser thanmn-etcd-sz(~1.974secs).mn-etcd-szlatency(~1.974secs) is ~5% greater thanmn-etcd-mz(~1.81secs).Number of requests Value size Number of connections Number of clients sequential-keys Consistency Target etcd server Average write QPS Average latency per request zone server name Test name 1000 1000000 100 500 true l leader 252.149 1.593secs eu-west-1c etcd-main-0 sn-etcd-sz 1000 1000000 100 500 true l leader 205.589 1.974secs eu-west-1a etcd-main-1 mn-etcd-sz 1000 1000000 100 500 true l leader 230.42 1.81secs eu-west-1a etcd-main-1 mn-etcd-mz Compare to consistency
Linearizable,Serializableis more or less same forsn-etcd-sz(~1.57961secs),mn-etcd-mz(~1.8secs) not a big differenceCompare to consistency
Linearizable,Serializableis ~10% high formn-etcd-sz(~ 2.277secs).Number of requests Value size Number of connections Number of clients sequential-keys Consistency Target etcd server Average write QPS Average latency per request zone server name Test name 1000 1000000 100 500 true s leader 252.406 1.57961secs eu-west-1c etcd-main-0 sn-etcd-sz 1000 1000000 100 500 true s leader 181.905 2.277secs eu-west-1a etcd-main-1 mn-etcd-sz 1000 1000000 100 500 true s leader 227.64 1.8secs eu-west-1a etcd-main-1 mn-etcd-mz
Benchmark tool range requests to
followerwith multiple client.mn-etcd-szlatency is ~20% less thanmn-etcd-mz.Compare to
leaderconsistencyLinearizable,followerread request latency is ~15 less formn-etcd-sz(~1.694secs).Compare to
leaderconsistencyLinearizable,followerread request latency is ~10% higher formn-etcd-sz(~1.977secs).Number of requests Value size Number of connections Number of clients sequential-keys Consistency Target etcd server Average write QPS Average latency per request zone server name Test name 1000 1000000 100 500 true l follower-1 248.489 1.694secs eu-west-1a etcd-main-0 mn-etcd-sz 1000 1000000 100 500 true l follower-1 210.22 1.977secs eu-west-1c etcd-main-0 mn-etcd-mz Number of requests Value size Number of connections Number of clients sequential-keys Consistency Target etcd server Average write QPS Average latency per request zone server name Test name 1000 1000000 100 500 true l follower-2 205.765 1.967secs eu-west-1a etcd-main-2 mn-etcd-sz 1000 1000000 100 500 true l follower-2 195.2 2.159secs eu-west-1b etcd-main-2 mn-etcd-mz Number of requests Value size Number of connections Number of clients sequential-keys Consistency Target etcd server Average write QPS Average latency per request zone server name Test name 1000 1000000 100 500 true s follower-1 231.458 1.7413secs eu-west-1a etcd-main-0 mn-etcd-sz 1000 1000000 100 500 true s follower-1 214.80 1.907secs eu-west-1c etcd-main-0 mn-etcd-mz Number of requests Value size Number of connections Number of clients sequential-keys Consistency Target etcd server Average write QPS Average latency per request zone server name Test name 1000 1000000 100 500 true s follower-2 183.320 2.2810secs eu-west-1a etcd-main-2 mn-etcd-sz 1000 1000000 100 500 true s follower-2 195.40 2.164secs eu-west-1b etcd-main-2 mn-etcd-mz
Benchmark tool range requests to
leaderall keys.sn-etcd-szlatency(~8.993secs) is ~3% slightly lower thanmn-etcd-sz(~9.236secs).mn-etcd-szlatency(~9.236secs) is ~2% slightly lower thanmn-etcd-mz(~9.100secs).Number of requests Value size Number of connections Number of clients sequential-keys Consistency Target etcd server Average write QPS Average latency per request zone server name Test name 20 1000000 2 5 false l leader 0.5139 8.993secs eu-west-1c etcd-main-0 sn-etcd-sz 20 1000000 2 5 false l leader 0.506 9.236secs eu-west-1a etcd-main-1 mn-etcd-sz 20 1000000 2 5 false l leader 0.508 9.100secs eu-west-1a etcd-main-1 mn-etcd-mz Compare to consistency
Linearizableread request,followerforsn-etcd-sz(~9.secs) is a slight difference10ms.Compare to consistency
Linearizableread request,followerformn-etcd-sz(~9.113secs) is ~1% less, not a big difference.Compare to consistency
Linearizableread request,followerformn-etcd-mz(~8.799secs) is ~3% less, not a big difference.sn-etcd-szlatency(~9.secs) is ~1% slightly less thanmn-etcd-sz(~9.113secs).mn-etcd-szlatency(~9.113secs) is ~3% slightly higher thanmn-etcd-mz(~8.799secs).Number of requests Value size Number of connections Number of clients sequential-keys Consistency Target etcd server Average write QPS Average latency per request zone server name Test name 20 1000000 2 5 false s leader 0.51125 9.0003secs eu-west-1c etcd-main-0 sn-etcd-sz 20 1000000 2 5 false s leader 0.4993 9.113secs eu-west-1a etcd-main-1 mn-etcd-sz 20 1000000 2 5 false s leader 0.522 8.799secs eu-west-1a etcd-main-1 mn-etcd-mz
Benchmark tool range requests to
followerall keysmn-etcd-szlatency(~9.065secs) is ~1% slightly higher thanmn-etcd-mz(~9.007secs).Compare to
leaderconsistencyLinearizableread request,followeris ~1% slightly higher for both casesmn-etcd-sz,mn-etcd-mz.Number of requests Value size Number of connections Number of clients sequential-keys Consistency Target etcd server Average write QPS Average latency per request zone server name Test name 20 1000000 2 5 false l follower-1 0.512 9.065secs eu-west-1a etcd-main-0 mn-etcd-sz 20 1000000 2 5 false l follower-1 0.533 9.007secs eu-west-1c etcd-main-0 mn-etcd-mz Compare to consistency
Linearizableread request,followerformn-etcd-sz(~9.553secs) is ~5% high.Compare to consistency
Linearizableread request,followerformn-etcd-mz(~7.7433secs) is ~15% less.mn-etcd-sz(~9.553secs) latency is ~20% higher thanmn-etcd-mz(~7.7433secs).Number of requests Value size Number of connections Number of clients sequential-keys Consistency Target etcd server Average write QPS Average latency per request zone server name Test name 20 1000000 2 5 false s follower-1 0.4743 9.553secs eu-west-1a etcd-main-0 mn-etcd-sz 20 1000000 2 5 false s follower-1 0.5500 7.7433secs eu-west-1c etcd-main-0 mn-etcd-mz
NOTE: This Network latency analysis is inspired by etcd performance.
6.2.16 - EtcdMember Custom Resource
DEP-04: EtcdMember Custom Resource
Summary
Today, etcd-druid mainly acts as an etcd cluster provisioner, and seldom takes remediatory actions if the etcd cluster goes into an undesired state that needs to be resolved by a human operator. In other words, etcd-druid cannot perform day-2 operations on etcd clusters in its current form, and hence cannot carry out its full set of responsibilities as a true “operator” of etcd clusters. For etcd-druid to be fully capable of its responsibilities, it must know the latest state of the etcd clusters and their individual members at all times.
This proposal aims to bridge that gap by introducing EtcdMember custom resource allowing individual etcd cluster members to publish information/state (previously unknown to etcd-druid). This provides etcd-druid a handle to potentially take cluster-scoped remediatory actions.
Terminology
druid: etcd-druid - an operator for etcd clusters.
etcd-member: A single etcd pod in an etcd cluster that is realised as a StatefulSet.
backup-sidecar: It is the etcd-backup-restore sidecar container in each etcd-member pod.
NOTE: Term sidecar can now be confused with the latest definition in KEP-73. etcd-backup-restore container is currently not set as an
init-containeras proposed in the KEP but as a regular container in a multi-container [Pod](Pods | Kubernetes).leading-backup-sidecar: A backup-sidecar that is associated to an etcd leader.
restoration: It refers to an individual etcd-member restoring etcd data from an existing backup (comprising of full and delta snapshots). The authors have deliberately chosen to distinguish between restoration and learning. Learning refers to a process where a learner “learns” from an etcd-cluster leader.
Motivation
Sharing state of an individual etcd-member with druid is essential for diagnostics, monitoring, cluster-wide-operations and potential remediation. At present, only a subset of etcd-member state is shared with druid using leases. It was always meant as a stopgap arrangement as mentioned in the corresponding issue and is not the best use of leases.
There is a need to have a clear distinction between an etcd-member state and etcd cluster state since most of an etcd cluster state is often derived by looking at individual etcd-member states. In addition, actors which update each of these states should be clearly identified so as to prevent multiple actors updating a single resource holding the state of either an etcd cluster or an etcd-member. As a consequence, etcd-members should not directly update the Etcd resource status and would therefore need a new custom resource allowing each member to publish detailed information about its latest state.
Goals
- Introduce
EtcdMembercustom resource via which each etcd-member can publish information about its state. This enables druid to deterministically orchestrate out-of-turn operations like compaction, defragmentation, volume management etc. - Define and capture states, sub-states and deterministic transitions amongst states of an etcd-member.
- Today leases are misused to share member-specific information with druid. Their usage to share member state [leader, follower, learner], member-id, snapshot revisions etc should be removed.
Non-Goals
- Auto-recovery from quorum loss or cluster-split due to network partitioning.
- Auto-recovery of an etcd-member due to volume mismatch.
- Relooking at segregating responsiblities between
etcdandbackup-sidecarcontainers.
Proposal
This proposal introduces a new custom resource EtcdMember, and in the following sections describes different sets of information that should be captured as part of the new resource.
Etcd Member Metadata
Every etcd-member has a unique memberID and it is part of an etcd cluster which has a unique clusterID. In a well-formed etcd cluster every member must have the same clusterID. Publishing this information to druid helps in identifying issues when one or more etcd-members form their own individual clusters, thus resulting in multiple clusters where only one was expected. Issues Issue#419, Canary#4027, Canary#3973 are some such occurrences.
Today, this information is published by using a member lease. Both these fields are populated in the leases’ Spec.HolderIdentity by the backup-sidecar container.
The authors propose to publish member metadata information in EtcdMember resource.
id: <etcd-member id>
clusterID: <etcd cluster id>
NOTE: Druid would not do any auto-recovery when it finds out that there are more than one clusters being formed. Instead this information today will be used for diagnostic and alerting.
Etcd Member State Transitions
Each etcd-member goes through different States during its lifetime. State is a derived high-level summary of where an etcd-member is in its lifecycle. A SubState gives additional information about the state. This proposal extends the concept of states with the notion of a SubState, since State indicates a top-level state of an EtcdMember resource, which can have one or more SubStates.
While State is sufficient for many human operators, the notion of a SubState provides operators with an insight about the discrete stage of an etcd-member in its lifecycle. For example, consider a top-level State: Starting, which indicates that an etcd-member is starting. Starting is meant to be a transient state for an etcd-member. If an etcd-member remains in this State longer than expected, then an operator would require additional insight, which the authors propose to provide via SubState (in this case, the possible SubStates could be PendingLearner and Learner, which are detailed in the following sections).
At present, these states are not captured and only the final state is known - i.e the etcd-member either fails to come up (all re-attempts to bring up the pod via the StatefulSet controller has exhausted) or it comes up. Getting an insight into all its state transitions would help in diagnostics.
The status of an etcd-member at any given point in time can be best categorized as a combination of a top-level State and a SubState. The authors propose to introduce the following states and sub-states:
States and Sub-States
NOTE: Abbreviations have been used wherever possible, only to represent sub-states. These representations are chosen only for brevity and will have proper longer names.
| States | Sub-States | Description |
|---|---|---|
| New | - | Every newly created etcd-member will start in this state and is termed as the initial state or the start state. |
| Initializing | DBV-S (DBValidationSanity) | This state denotes that backup-restore container in etcd-member pod has started initialization. Sub-State DBV-S which is an abbreviation for DBValidationSanity denotes that currently sanity etcd DB validation is in progress. |
| Initializing | DBV-F (DBValidationFull) | This state denotes that backup-restore container in etcd-member pod has started initialization. Sub-State DBV-F which is an abbreviation for DBValidationFull denotes that currently full etcd DB validation is in progress. |
| Initializing | R (Restoration) | This state denotes that backup-restore container in etcd-member pod has started initialization. Sub-State R which is an abbreviation for Restoration denotes that DB validation failed and now backup-restore has commenced restoration of etcd DB from the backup (comprising of full snapshot and delta-snapshots). An etcd-member will transition to this sub-state only when it is part of a single-node etcd-cluster. |
| Starting (SI) | PL (PendingLearner) | An etcd-member can transition from Initializing state to PendingLearner state. In this state backup-restore container will optionally delete any existing etcd data directory and then attempts to add its peer etcd-member process as a learner. Since there can be only one learner at a time in an etcd cluster, an etcd-member could be in this state for some time till its request to get added as a learner is accepted. |
| Starting (SI) | Learner | When backup-restore is successfully able to add its peer etcd-member process as a Learner. In this state the etcd-member process will start its DB sync from an etcd leader. |
| Started (Sd) | Follower | A follower is a voting raft member. A Learner etcd-member will get promoted to a Follower once its DB is in sync with the leader. It could also become a follower if during a re-election it loses leadership and transitions from being a Leader to Follower. |
| Started (Sd) | Leader | A leader is an etcd-member which will handle all client write requests and linearizable read requests. A member could transition to being a Leader from an existing Follower role due to winning a leader election or for a single node etcd cluster it directly transitions from Initializing state to Leader state as there is no other member. |
In the following sub-sections, the state transitions are categorized into several flows making it easier to grasp the different transitions.
Top Level State Transitions
Following DFA represents top level state transitions (without any representation of sub-states). As described in the table above there are 4 top level states:
New- this is a start state for all newly created etcd-membersInitializing- In this state backup-restore will perform pre-requisite actions before it triggers the start of an etcd process. DB validation and optionally restoration is done in this state. Possible sub-states are:DBValidationSanity,DBValidationFullandRestorationStarting- Once the optional initialization is done backup-restore will trigger the start of an etcd process. It can either directly go toLearnersub-state or wait for getting added as a learner and therefore be inPendingLearnersub-state.Started- In this state the etcd-member is a full voting member. It can either be inLeaderorFollowersub-states.
Starting an Etcd-Member in a Single-Node Etcd Cluster
Following DFA represents the states, sub-states and transitions of a single etcd-member for a cluster that is bootstrapped from cluster size of 0 -> 1.
Addition of a New Etcd-Member in a Multi-Node Etcd Cluster
Following DFA represents the states, sub-states and transitions of an etcd cluster which starts with having a single member (Leader) and then one or more new members are added which represents a scale-up of an etcd cluster from 1 -> n, where n is odd.
Restart of a Voting Etcd-Member in a Multi-Node Etcd Cluster
Following DFA represents the states, sub-states and transitions when a voting etcd-member in a multi-node etcd cluster restarts.
NOTE: If the DB validation fails then data directory of the etcd-member is removed and etcd-member is removed from cluster membership, thus transitioning it to
Newstate. The state transitions fromNewstate are depicted by this section.
Deterministic Etcd Member Creation/Restart During Scale-Up
Bootstrap information:
When an etcd-member starts, then it needs to find out:
If it should join an existing cluster or start a new cluster.
If it should add itself as a
Learneror directly start as a voting member.
Issue with the current approach:
At present, this is facilitated by three things:
During scale-up, druid adds an annotation
gardener.cloud/scaled-to-multi-nodeto theStatefulSet. Each etcd-members looks up this annotation.backup-sidecar attempts to fetch etcd cluster member-list and checks if this etcd-member is already part of the cluster.
Size of the cluster by checking
initial-clusterin the etcd config.
Druid adds an annotation gardener.cloud/scaled-to-multi-node on the StatefulSet which is then shared by all etcd-members irrespective of the starting state of an etcd-member (as Learner or Voting-Member). This especially creates an issue for the current leader (often pod with index 0) during the scale-up of an etcd cluster as described in this issue.
It has been agreed that the current solution to this issue is a quick and dirty fix and needs to be revisited to be uniformly applied to all etcd-members. The authors propose to provide a more deterministic approach to scale-up using the EtcdMember resource.
New approach
Instead of adding an annotation gardener.cloud/scaled-to-multi-node on the StatefulSet, a new annotation druid.gardener.cloud/create-as-learner should be added by druid on an EtcdMember resource. This annotation will only be added to newly created members during scale-up.
Each etcd-member should look at the following to deterministically compute the bootstrap information specified above:
druid.gardener.cloud/create-as-learnerannotation on its respectiveEtcdMemberresource. This new annotation will be honored in the following cases:When an etcd-member is created for the very first time.
An etcd-member is restarted while it is in
Startingstate (PendingLearnerandLearnersub-states).
Etcd-cluster member list. to check if it is already part of the cluster.
Existing etcd data directory and its validity.
NOTE: When the etcd-member gets promoted to a voting-member, then it should remove the annotation on its respective
EtcdMemberresource.
TLS Enablement for Peer Communication
Etcd-members in a cluster use peer URL(s) to communicate amongst each other. If the advertised peer URL(s) for an etcd-member are updated then etcd mandates a restart of the etcd-member.
Druid only supports toggling the transport level security for the advertised peer URL(s). To indicate that the etcd process within the etcd-member has the updated advertised peer URL(s), an annotation member.etcd.gardener.cloud/tls-enabled is added by backup-sidecar container to the member lease object.
During the reconciliation run for an Etcd resource in druid, if reconciler detects a change in advertised peer URL(s) TLS configuration then it will watch for the above mentioned annotation on the member lease. If the annotation has a value of false then it will trigger a restart of the etcd-member pod.
The authors propose to publish member metadata information in EtcdMember resource and not misuse member leases.
peerTLSEnabled: <bool>
Monitoring Backup Health
Backup-sidecar takes delta and full snapshot both periodically and threshold based. These backed-up snapshots are essential for restoration operations for bootstrapping an etcd cluster from 0 -> 1 replicas. It is essential that leading-backup-sidecar container which is responsible for taking delta/full snapshots and uploading these snapshots to the configured backup store, publishes this information for druid to consume.
At present, information about backed-up snapshot (only latest-revision-number) is published by leading-backup-sidecar container by updating Spec.HolderIdentity of the delta-snapshot and full-snapshot leases.
Druid maintains conditions in the Etcd resource status, which include but are not limited to maintaining information on whether backups being taken for an etcd cluster are healthy (up-to-date) or stale (outdated in context to a configured schedule). Druid computes these conditions using information from full/delta snapshot leases.
In order to provide a holistic view of the health of backups to human operators, druid requires additional information about the snapshots that are being backed-up. The authors propose to not misuse leases and instead publish the following snapshot information as part EtcdMember custom resource:
snapshots:
lastFull:
timestamp: <time of full snapshot>
name: <name of the file that is uploaded>
size: <size of the un-compressed snapshot file uploaded>
startRevision: <start revision of etcd db captured in the snapshot>
endRevision: <end revision of etcd db captured in the snapshot>
lastDelta:
timestamp: <time of delta snapshot>
name: <name of the file that is uploaded>
size: <size of the un-compressed snapshot file uploaded>
startRevision: <start revision of etcd db captured in the snapshot>
endRevision: <end revision of etcd db captured in the snapshot>
While this information will primarily help druid compute accurate conditions regarding backup health from snapshot information and publish this to human operators, it could be further utilised by human operators to take remediatory actions (e.g. manually triggering a full or delta snapshot or further restarting the leader if the issue is still not resolved) if backup is unhealthy.
Enhanced Snapshot Compaction
Druid can be configured to perform regular snapshot compactions for etcd clusters, to reduce the total number of delta snapshots to be restored if and when a DB restoration for an etcd cluster is required. Druid triggers a snapshot compaction job when the accumulated etcd events in the latest set of delta snapshots (taken after the last full snapshot) crosses a specified threshold.
As described in Issue#591 scheduling compaction only based on number of accumulated etcd events is not sufficient to ensure a successful compaction. This is specifically targeted for kubernetes clusters where each etcd event is larger in size owing to large spec or status fields or respective resources.
Druid will now need information regarding snapshot sizes, and more importantly the total size of accumulated delta snapshots since the last full snapshot.
The authors propose to enhance the proposed snapshots field described in Use Case #3 with the following additional field:
snapshots:
accumulatedDeltaSize: <total size of delta snapshots since last full snapshot>
Druid can then use this information in addition to the existing revision information to decide to trigger an early snapshot compaction job. This effectively allows druid to be proactive in performing regular compactions for etcds receiving large events, reducing the probability of a failed snapshot compaction or restoration.
Enhanced Defragmentation
Reader is recommended to read Etcd Compaction & Defragmentation in order to understand the following terminology:
dbSize - total storage space used by the etcd database
dbSizeInUse - logical storage space used by the etcd database, not accounting for free pages in the DB due to etcd history compaction
The leading-backup-sidecar performs periodic defragmentations of the DBs of all the etcd-members in the cluster, controlled via a defragmentation cron schedule provided to each backup-sidecar. Defragmentation is a costly maintenance operation and causes a brief downtime to the etcd-member being defragmented, due to which the leading-backup-sidecar defragments each etcd-member sequentially. This ensures that only one etcd-member would be unavailable at any given time, thus avoiding an accidental quorum loss in the etcd cluster.
The authors propose to move the responsibility of orchestrating these individual defragmentations to druid due to the following reasons:
- Since each backup-sidecar only has knowledge of the health of its own etcd, it can only determine whether its own etcd can be defragmented or not, based on etcd-member health. Trying to defragment a different healthy etcd-member while another etcd-member is unhealthy would lead to a transient quorum loss.
- Each backup-sidecar is only a
sidecarto its own etcd-member, and by good design principles, it must not be performing any cluster-wide maintenance operations, and this responsibility should remain with the etcd cluster operator.
Additionally, defragmentation of an etcd DB becomes inevitable if the DB size exceeds the specified DB space quota, since the etcd DB then becomes read-only, ie no write operations on the etcd would be possible unless the etcd DB is defragmented and storage space is freed up. In order to automate this, druid will now need information about the etcd DB size from each member, specifically the leading etcd-member, so that a cluster-wide defragmentation can be triggered if the DB size reaches a certain threshold, as already described by this issue.
The authors propose to enhance each etcd-member to regularly publish information about the dbSize and dbSizeInUse so that druid may trigger defragmentation for the etcd cluster.
dbSize: <db-size> # e.g 6Gi
dbSizeInUse: <db-size-in-use> # e.g 3.5Gi
Difference between dbSize and dbSizeInUse gives a clear indication of how much storage space would be freed up if a defragmentation is performed. If the difference is not significant (based on a configurable threshold provided to druid), then no defragmentation should be performed. This will ensure that druid does not perform frequent defragmentations that do not yield much benefit. Effectively it is to maximise the benefit of defragmentation since this operations involves transient downtime for each etcd-member.
Monitoring Defragmentations
As discussed in the previous section, every etcd-member is defragmented periodically, and can also be defragmented based on the DB size reaching a certain threshold. It is beneficial for druid to have knowledge of this data from each etcd-member for the following reasons:
[Diagnostics] It is expected that
backup-sidecarwill push releveant metrics and configure alerts on these metrics.[Operational] Derive status of defragmentation at etcd cluster level. In case of partial failures for a subset of etcd-members druid can potentially re-trigger defragmentation only for those etcd-members.
The authors propose to capture this information as part of lastDefragmentation section in the EtcdMember resource.
lastDefragmentation:
startTime: <start time of defragmentation>
endTime: <end time of defragmentation>
status: <Succeeded | Failed>
message: <success or failure message>
initialDBSize: <size of etcd DB prior to defragmentation>
finalDBSize: <size of etcd DB post defragmentation>
NOTE: Defragmentation is a cluster-wide operation, and insights derived from aggregating defragmentation data from individual etcd-members would be captured in the
Etcdresource status
Monitoring Restorations
Each etcd-member may perform restoration of data multiple times throughout its lifecycle, possibly owing to data corruptions. It would be useful to capture this information as part of an EtcdMember resource, for the following use cases:
[Diagnostics] It is expected that
backup-sidecarwill push a metric indicating failure to restore.[Operational] Restoration from backup-bucket only happens for a single node etcd cluster. If restoration is failing then druid cannot take any remediatory actions since there is no etcd quorum.
The authors propose to capture this information under lastRestoration section in the EtcdMember resource.
lastRestoration:
status: <Failed | Success | In-Progress>
reason: <reason-code for status>
message: <human readable message for status>
startTime: <start time of restoration>
endTime: <end time of restoration>
Authors have considered the following cases to better understand how errors during restoration will be handled:
Case #1 - Failure to connect to Provider Object Store
At present full and delta snapshots are downloaded during restoration. If there is a failure then initialization status transitions to Failed followed by New which forces etcd-wrapper to trigger the initialization again. This in a way forces a retry and currently there is no limit on the number of attempts.
Authors propose to improve the retry logic but keep the overall behavior of not forcing a container restart the same.
Case #2 - Read-Only Mounted volume
If a mounted volume which is used to create the etcd data directory turns read-only then authors propose to capture this state via EtcdMember.
Authors propose that druid should initiate recovery by deleting the PVC for this etcd-member and letting StatefulSet controller re-create the Pod and the PVC. Removing PVC and deleting the pod is considered safe because:
- Data directory is present and is the DB is corrupt resulting in an un-usasble etcd.
- Data directory is not present but any attempt to create a directory structure fails due to
read-onlyFS.
In both these cases there is no side-effect of deleting the PVC and the Pod.
Case #3 - Revision mismatch
There is currently an issue in backup-sidecar which results in a revision mismatch in the snapshots (full/delta) taken by leading the backup-sidecar container. This results in a restoration failure. One occurance of such issue has been captured in Issue#583. This occurence points to a bug which should be fixed however there is a rare possibility that these snapshots (full/delta) get corrupted. In this rare situation, backup-sidecar should only raise an alert.
Authors propose that druid should not take any remediatory actions as this involves:
- Inspecting snapshots
- If the full snapshot is corrupt then a decision needs to be taken to recover from the last full snapshot as the base snapshot. This can result in data loss and therefore needs manual intervention.
- If a delta snapshot is corrupt, then recovery can be done till the corrupt revision in the delta snapshot. Since this will also result in a loss of data therefore this decision needs to be take by an operator.
Monitoring Volume Mismatches
Each etcd-member checks for possible etcd data volume mismatches, based on which it decides whether to start the etcd process or not, but this information is not captured anywhere today. It would be beneficial to capture this information as part of the EtcdMember resource so that a human operator may check this and manually fix the underlying problem with the wrong volume being attached or mounted to an etcd-member pod.
The authors propose to capture this information under volumeMismatches section in the EtcdMember resource.
volumeMismatches:
- identifiedAt: <time at which wrong volume mount was identified>
fixedAt: <time at which correct volume was mounted>
volumeID: <volume ID of wrong volume that got mounted>
numRestarts: <num of etcd-member restarts that were attempted>
Each entry under volumeMismatches will be for a unique volumeID. If there is a pod restart and it results in yet another unexpected volumeID (different from the already captured volumeIDs) then a new entry will get created. numRestarts denotes the number of restarts seen by the etcd-member for a specific volumeID.
Based on information from the volumeMismatches section, druid may choose to perform rudimentary remediatory actions as simple as restarting the member pod to force a possible rescheduling of the pod to a different node which could potentially force the correct volume to be mounted to the member.
Custom Resource API
Spec vs Status
Information that is captured in the etcd-member custom resource could be represented either as EtcdMember.Status or EtcdMemberState.Spec.
Gardener has a similar need to capture a shoot state and they have taken the decision to represent it via ShootState resource where the state or status of a shoot is captured as part of the Spec field in the ShootState custom resource.
The authors wish to instead align themselves with the K8S API conventions and choose to use EtcdMember custom resource and capture the status of each member in Status field of this resource. This has the following advantages:
Specrepresents a desired state of a resource and what is intended to be captured is theAs-Isstate of a resource whichStatusis meant to capture. Therefore, semantically usingStatusis the correct choice.Not mis-using
Specnow to representAs-Isstate provides us with a choice to extend the custom resource with any future need for aSpeca.k.a desired state.
Representing State Transitions
The authors propose to use a custom representation for states, sub-states and transitions.
Consider the following representation:
transitions:
- state: <name of the state that the etcd-member has transitioned to>
subState: <name of the sub-state if any>
reason: <reason code for the transition>
transitionTime: <time of transition to this state>
message: <detailed message if any>
As an example, consider the following transitions which represent addition of an etcd-member during scale-up of an etcd cluster, followed by a restart of the etcd-member which detects a corrupt DB:
status:
transitions:
- state: New
subState: New
reason: ClusterScaledUp
transitionTime: "2023-07-17T05:00:00Z"
message: "New member added due to etcd cluster scale-up"
- state: Starting
subState: PendingLearner
reason: WaitingToJoinAsLearner
transitionTime: "2023-07-17T05:00:30Z"
message: "Waiting to join the cluster as a learner"
- state: Starting
subState: Learner
reason: JoinedAsLearner
transitionTime: "2023-07-17T05:01:20Z"
message: "Joined the cluster as a learner"
- state: Started
subState: Follower
reason: PromotedAsVotingMember
transitionTime: "2023-07-17T05:02:00Z"
message: "Now in sync with leader, promoted as voting member"
- state: Initializing
subState: DBValidationFull
reason: DetectedPreviousUncleanExit
transitionTime: "2023-07-17T08:00:00Z"
message: "Detected previous unclean exit, requires full DB validation"
- state: New
subState: New
reason: DBCorruptionDetected
transitionTime: "2023-07-17T08:01:30Z"
message: "Detected DB corruption during initialization, removing member from cluster"
- state: Starting
subState: PendingLearner
reason: WaitingToJoinAsLearner
transitionTime: "2023-07-17T08:02:10Z"
message: "Waiting to join the cluster as a learner"
- state: Starting
subState: Learner
reason: JoinedAsLearner
transitionTime: "2023-07-17T08:02:20Z"
message: "Joined the cluster as a learner"
- state: Started
subState: Follower
reason: PromotedAsVotingMember
transitionTime: "2023-07-17T08:04:00Z"
message: "Now in sync with leader, promoted as voting member"
Reason Codes
The authors propose the following list of possible reason codes for transitions. This list is not exhaustive, and can be further enhanced to capture any new transitions in the future.
| Reason | Transition From State (SubState) | Transition To State (SubState) |
|---|---|---|
ClusterScaledUp | NewSingleNodeClusterCreated | nil | New |
DetectedPreviousCleanExit | New | Started (Leader) | Started (Follower) | Initializing (DBValidationSanity) |
DetectedPreviousUncleanExit | New | Started (Leader) | Started (Follower) | Initializing (DBValidationFull) |
DBValidationFailed | Initializing (DBValidationSanity) | Initializing (DBValidationFull) | Initializing (Restoration) | New |
DBValidationSucceeded | Initializing (DBValidationSanity) | Initializing (DBValidationFull) | Started (Leader) | Started (Follower) |
Initializing (Restoration)Succeeded | Initializing (Restoration) | Started (Leader) |
WaitingToJoinAsLearner | New | Starting (PendingLearner) |
JoinedAsLearner | Starting (PendingLearner) | Starting (Learner) |
PromotedAsVotingMember | Starting (Learner) | Started (Follower) |
GainedClusterLeadership | Started (Follower) | Started (Leader) |
LostClusterLeadership | Started (Leader) | Started (Follower) |
API
EtcdMember
The authors propose to add the EtcdMember custom resource API to etcd-druid APIs and initially introduce it with v1alpha1 version.
apiVersion: druid.gardener.cloud/v1alpha1
kind: EtcdMember
metadata:
labels:
gardener.cloud/owned-by: <name of parent Etcd resource>
name: <name of the etcd-member>
namespace: <namespace | will be the same as that of parent Etcd resource>
ownerReferences:
- apiVersion: druid.gardener.cloud/v1alpha1
blockOwnerDeletion: true
controller: true
kind: Etcd
name: <name of the parent Etcd resource>
uid: <UID of the parent Etcd resource>
status:
id: <etcd-member id>
clusterID: <etcd cluster id>
peerTLSEnabled: <bool>
dbSize: <db-size>
dbSizeInUse: <db-size-in-use>
snapshots:
lastFull:
timestamp: <time of full snapshot>
name: <name of the file that is uploaded>
size: <size of the un-compressed snapshot file uploaded>
startRevision: <start revision of etcd db captured in the snapshot>
endRevision: <end revision of etcd db captured in the snapshot>
lastDelta:
timestamp: <time of delta snapshot>
name: <name of the file that is uploaded>
size: <size of the un-compressed snapshot file uploaded>
startRevision: <start revision of etcd db captured in the snapshot>
endRevision: <end revision of etcd db captured in the snapshot>
accumulatedDeltaSize: <total size of delta snapshots since last full snapshot>
lastRestoration:
type: <FromSnapshot | FromLeader>
status: <Failed | Success | In-Progress>
startTime: <start time of restoration>
endTime: <end time of restoration>
lastDefragmentation:
startTime: <start time of defragmentation>
endTime: <end time of defragmentation>
reason:
message:
initialDBSize: <size of etcd DB prior to defragmentation>
finalDBSize: <size of etcd DB post defragmentation>
volumeMismatches:
- identifiedAt: <time at which wrong volume mount was identified>
fixedAt: <time at which correct volume was mounted>
volumeID: <volume ID of wrong volume that got mounted>
numRestarts: <num of pod restarts that were attempted>
transitions:
- state: <name of the state that the etcd-member has transitioned to>
subState: <name of the sub-state if any>
reason: <reason code for the transition>
transitionTime: <time of transition to this state>
message: <detailed message if any>
Etcd
Authors propose the following changes to the Etcd API:
- In the
Etcd.Statusresource API, member status is computed and stored. This field will be marked as deprecated and in a later version of druid it will be removed. In its place, the authors propose to introduce the following:
type EtcdStatus struct {
// MemberRefs contains references to all existing EtcdMember resources
MemberRefs []CrossVersionObjectReference
}
- In
Etcd.Statusresource API, PeerUrlTLSEnabled reflects the status of enabling TLS for peer communication across all etcd-members. Currentlty this field is not been used anywhere. In this proposal, the authors have also proposed that eachEtcdMemberresource should capture the status of TLS enablement of peer URL. The authors propose to relook at the need to have this field underEtcdStatus.
Lifecycle of an EtcdMember
Creation
Druid creates an EtcdMember resource for every replica in etcd.Spec.Replicas during reconciliation of an etcd resource. For a fresh etcd cluster this is done prior to creation of the StatefulSet resource and for an existing cluster which has now been scaled-up, it is done prior to updating the StatefulSet resource.
Updation
All fields in EtcdMember.Status are only updated by the corresponding etcd-member. Druid only consumes the information published via EtcdMember resources.
Deletion
Druid is responsible for deletion of all existing EtcdMember resources for an etcd cluster. There are three scenarios where an EtcdMember resource will be deleted:
Deletion of etcd resource.
Scale down of an etcd cluster to 0 replicas due to hibernation of the k8s control plane.
Transient scale down of an etcd cluster to 0 replicas to recover from a quorum loss.
Authors found no reason to retain EtcdMember resources when the etcd cluster is scale down to 0 replicas since the information contained in each EtcdMember resource would no longer represent the current state of each member and would thus be stale. Any controller in druid which acts upon the EtcdMember.Status could potentially take incorrect actions.
Reconciliation
Authors propose to introduce a new controller (let’s call it etcd-member-controller) which watches for changes to the EtcdMember resource(s). If a reconciliation of an Etcd resource is required as a result of change in EtcdMember status then this controller should enqueue an event and force a reconciliation via existing etcd-controller, thus preserving the single-actor-principal constraint which ensures deterministic changes to etcd cluster resources.
NOTE: Further decisions w.r.t responsibility segregation will be taken during implementation and will not be documented in this proposal.
Stale EtcdMember Status Handling
It is possible that an etcd-member is unable to update its respective EtcdMember resource. Following can be some of the implications which should be kept in mind while reconciling EtcdMember resource in druid:
- Druid sees stale state transitions (this assumes that the backup-sidecar attempts to update the state/sub-state in
etcdMember.status.transitionswith best attempt). There is currently no implication other than an operator seeing a stale state. dbSizeanddbSizeInUsecould not be updated. A consequence could be that druid continues to see high value fordbSize - dbSizeInUsefor a extended amount of time. Druid should ensure that it does not trigger repeated defragmentations.- If
VolumeMismatchesis stale, then druid should no longer attempt to recover by repeatedly restarting the pod. - Failed
restorationwas recorded last and further updates to this array failed. Druid should not repeatedly take full-snapshots. - If
snapshots.accumulatedDeltaSizecould not be updated, then druid should not schedule repeated compaction Jobs.
Reference
6.2.17 - Feature Gates in Etcd-Druid
Feature Gates in Etcd-Druid
This page contains an overview of the various feature gates an administrator can specify on etcd-druid.
Overview
Feature gates are a set of key=value pairs that describe etcd-druid features. You can turn these features on or off by passing them to the --feature-gates CLI flag in the etcd-druid command.
The following tables are a summary of the feature gates that you can set on etcd-druid.
- The “Since” column contains the etcd-druid release when a feature is introduced or its release stage is changed.
- The “Until” column, if not empty, contains the last etcd-druid release in which you can still use a feature gate.
- If a feature is in the Alpha or Beta state, you can find the feature listed in the Alpha/Beta feature gate table.
- If a feature is stable you can find all stages for that feature listed in the Graduated/Deprecated feature gate table.
- The Graduated/Deprecated feature gate table also lists deprecated and withdrawn features.
Feature Gates for Alpha or Beta Features
| Feature | Default | Stage | Since | Until |
|---|
Feature Gates for Graduated or Deprecated Features
| Feature | Default | Stage | Since | Until |
|---|---|---|---|---|
UseEtcdWrapper | false | Alpha | 0.19 | 0.21 |
UseEtcdWrapper | true | Beta | 0.22 | 0.24 |
UseEtcdWrapper | true | GA | 0.25 | 0.27 |
UseEtcdWrapper | Removed | 0.28 |
Using a Feature
A feature can be in Alpha, Beta or GA stage.
Alpha feature
- Disabled by default.
- Might be buggy. Enabling the feature may expose bugs.
- Support for feature may be dropped at any time without notice.
- The API may change in incompatible ways in a later software release without notice.
- Recommended for use only in short-lived testing clusters, due to increased risk of bugs and lack of long-term support.
Beta feature
- Enabled by default.
- The feature is well tested. Enabling the feature is considered safe.
- Support for the overall feature will not be dropped, though details may change.
- The schema and/or semantics of objects may change in incompatible ways in a subsequent beta or stable release. When this happens, we will provide instructions for migrating to the next version. This may require deleting, editing, and re-creating API objects. The editing process may require some thought. This may require downtime for applications that rely on the feature.
- Recommended for only non-critical uses because of potential for incompatible changes in subsequent releases.
Please do try Beta features and give feedback on them! After they exit beta, it may not be practical for us to make more changes.
General Availability (GA) feature
This is also referred to as a stable feature which should have the following characteristics:
- The feature is always enabled; you cannot disable it.
- The corresponding feature gate is no longer needed.
- Stable versions of features will appear in released software for many subsequent versions.
List of Feature Gates
| Feature | Description |
|---|---|
UseEtcdWrapper | Enables the use of etcd-wrapper image and a compatible version of etcd-backup-restore, along with component-specific configuration changes necessary for the usage of the etcd-wrapper image. |
6.2.18 - Getting Started Locally
Setup Etcd-Druid Locally
This document will guide you on how to setup etcd-druid on your local machine and how to provision and manage Etcd cluster(s).
00-Prerequisites
Before we can setup etcd-druid and use it to provision Etcd clusters, we need to prepare the development environment. Follow the Prepare Dev Environment Guide for detailed instructions.
01-Setting up KIND cluster
etcd-druid uses kind as it’s local Kubernetes engine. The local setup is configured for kind due to its convenience only. Any other Kubernetes setup would also work.
make kind-up
This command sets up a new Kind cluster and stores the kubeconfig at ./hack/kind/kubeconfig. Additionally, this command also deploys a local container registry as a docker container. This ensures faster image push/pull times. The local registry can be accessed as localhost:5001 for pushing and pulling images.
To target this newly created cluster, set the KUBECONFIG environment variable to the kubeconfig file.
export KUBECONFIG=$PWD/hack/kind/kubeconfig
Note: If you wish to configure kind cluster differently then you can directly invoke the script and check its help to know about all configuration options.
./hack/kind-up.sh -h
usage: kind-up.sh [Options]
Options:
--cluster-name <cluster-name> Name of the kind cluster to create. Default value is 'etcd-druid-e2e'
--skip-registry Skip creating a local docker registry. Default value is false.
--feature-gates <feature-gates> Comma separated list of feature gates to enable on the cluster.
02-Setting up etcd-druid
Configuring etcd-druid
Prior to deploying etcd-druid, it can be configured via CLI-args and environment variables.
- To configure CLI args you can modify
charts/druid/values.yaml. For example, if you wish toauto-reconcileany change done toEtcdCR, then you should setenableEtcdSpecAutoReconcileto true. By default this will be switched off. DRUID_E2E_TEST=true: sets specific configuration for etcd-druid for optimal e2e test runs, like a lower sync period for the etcd controller.
Deploying etcd-druid
Any variant of make deploy-* command uses helm and skaffold to build and deploy etcd-druid to the target Kubernetes cluster. In addition to deploying etcd-druid it will also install the Etcd CRD and EtcdCopyBackupTask CRD.
Regular mode
make deploy
The above command will use skaffold to build and deploy etcd-druid to the k8s kind cluster pointed to by KUBECONFIG environment variable.
Dev mode
make deploy-dev
This is similar to make deploy but additionally starts a skaffold dev loop. After the initial deployment, skaffold starts watching source files. Once it has detected changes, you can press any key to update the etcd-druid deployment.
Debug mode
make deploy-debug
This is similar to make deploy-dev but additionally configures containers in pods for debugging as required for each container’s runtime technology. The associated debugging ports are exposed and labelled so that they can be port-forwarded to the local machine. Skaffold disables automatic image rebuilding and syncing when using the debug mode as compared to dev mode.
Go debugging uses Delve. Please see the skaffold debugging documentation how to setup your IDE accordingly.
!!! note Resuming or stopping only a single goroutine (Go Issue 25578, 31132) is currently not supported, so the action will cause all the goroutines to get activated or paused.
This means that when a goroutine is paused on a breakpoint, then all the other goroutines are also paused. This should be kept in mind when using skaffold debug.
03-Configure Backup [Optional]
Deploying a Local Backup Store Emulator
!!! info This section is Optional and is only meant to describe steps to deploy a local object store which can be used for testing and development. If you either do not wish to enable backups or you wish to use remote (infra-provider-specific) object store then this section can be skipped.
An Etcd cluster provisioned via etcd-druid provides a capability to take regular delta and full snapshots which are stored in an object store. You can enable this functionality by ensuring that you fill in spec.backup.store section of the Etcd CR.
| Backup Store Variant | Setup Guide |
|---|---|
| Azure Object Storage Emulator | Manage Azurite (Steps 00-03) |
| S3 Object Store Emulator | Manage LocalStack (Steps 00-03) |
| GCS Object Store Emulator | Manage GCS Emulator (Steps 00-03) |
Setting up Cloud Provider Object Store Secret
!!! info This section is Optional. If you have disabled backup functionality or if you are using local storage or one of the supported object store emulators then you can skip this section.
A Kubernetes Secret needs to be created for cloud provider Object Store access. You can refer to the Secret YAML templates here. Replace the dummy values with the actual configuration and ensure that you have added the metadata.name and metadata.namespace to the secret.
!!! tip
* Secret should be deployed in the same namespace as the Etcd resource.
* All the values in the data field of the secret YAML should in base64 encoded format.
To apply the secret run:
kubectl apply -f <path/to/secret>
04-Preparing Etcd CR
Choose an appropriate variant of Etcd CR from examples directory.
If you wish to enable functionality to backup delta & full snapshots then uncomment spec.backup.store section.
# Configuration for storage provider
store:
secretRef:
name: etcd-backup-secret-name
container: object-storage-container-name
provider: aws # options: aws,azure,gcp,openstack,alicloud,dell,openshift,local
prefix: etcd-test
Brief explanation of the keys:
secretRef.nameis the name of the secret that was applied as mentioned above.store.containeris the object storage bucket name.store.provideris the bucket provider. Pick from the options mentioned in comment.store.prefixis the folder name that you want to use for your snapshots inside the bucket.
!!! tip For developer convenience we have provided object store emulator specific etcd CR variants which can be used as if as well.
05-Applying Etcd CR
Create the Etcd CR (Custom Resource) by applying the Etcd yaml to the cluster
kubectl apply -f <path-to-etcd-cr-yaml>
06-Verify the Etcd Cluster
To obtain information on the etcd cluster you can invoke the following command:
kubectl get etcd -o=wide
We adhere to a naming convention for all resources that are provisioned for an Etcd cluster. Refer to etcd-cluster-components document to get details of all resources that are provisioned.
Verify Etcd Pods’ Functionality
etcd-wrapper uses a distroless image, which lacks a shell. To interact with etcd, use an Ephemeral container as a debug container. Refer to this documentation for building and using an ephemeral container which gets attached to the etcd-wrapper pod.
# Put a key-value pair into the etcd
etcdctl put <key1> <value1>
# Retrieve all key-value pairs from the etcd db
etcdctl get --prefix ""
For a multi-node etcd cluster, insert the key-value pair using the etcd container of one etcd member and retrieve it from the etcd container of another member to verify consensus among the multiple etcd members.
07-Updating Etcd CR
Etcd CR can be updated with new changes. To ensure that etcd-druid reconciles the changes you can refer to options that etcd-druid provides here.
08-Cleaning up the setup
If you wish to only delete the Etcd cluster then you can use the following command:
kubectl delete etcd <etcd-name>
This will add the deletionTimestamp to the Etcd resource. At the time the creation of the Etcd cluster, etcd-druid will add a finalizer to ensure that it cleans up all Etcd cluster resources before the CR is removed.
finalizers:
- druid.gardener.cloud/etcd-druid
etcd-druid will automatically pick up the deletion event and attempt clean up Etcd cluster resources. It will only remove the finalizer once all resources have been cleaned up.
If you only wish to remove etcd-druid but retain the kind cluster then you can use the following make target:
make undeploy
If you wish to delete the kind cluster then you can use the following make target:
make kind-down
This cleans up the entire setup as the kind cluster gets deleted.
6.2.19 - Getting Started Locally
Developing etcd-druid locally
You can setup etcd-druid locally by following detailed instructions in this document.
- For best development experience you should use
make deploy-dev- this helps during development where you wish to make changes to the code base and with a key-press allow automatic re-deployment of the application to the target Kubernetes cluster. - In case you wish to start a debugging session then use
make deploy-debug- this will additionally disable leader election and prevent leases to expire and process to stop.
!!! info We leverage skaffold debug and skaffold dev features.
6.2.20 - Immutable etcd Cluster Backups
DEP-06: Immutable etcd Cluster Backups
Summary
This proposal introduces immutable backups for etcd clusters managed by etcd-druid. By leveraging cloud provider immutability features, backups taken by etcd-backup-restore can neither be modified nor deleted once created for a configurable retention duration (immutability period). This approach strengthens the reliability and fault tolerance of the etcd restoration process.
Terminology
- etcd-druid: An etcd operator that configures, provisions, reconciles, and monitors etcd clusters.
- etcd-backup-restore: A sidecar container that manages backups and restores of etcd cluster state. For more information, see the etcd-backup-restore documentation.
- WORM (Write Once, Read Many): A storage model in which data, once written, cannot be modified or deleted until certain conditions are met.
- Immutability: The property of an object that prevents it from being modified or deleted after creation.
- Immutability Period: The duration for which data must remain immutable before it can be modified or deleted.
- Bucket-Level Immutability: A policy that applies a uniform immutability period to all objects within a bucket.
- Object-Level Immutability: A policy that allows setting immutability periods individually for objects within a bucket, offering more granular control.
- Garbage Collection: The process of deleting old snapshot data that is no longer needed, in order to free up storage space. For more information, see the garbage collection documentation.
- Hibernation: A state in which an etcd cluster is scaled down to zero replicas, effectively pausing its operations. This is typically done to save costs when the cluster is not needed for an extended period. During hibernation, the cluster’s data remains intact, and it can be resumed to its previous state when required.
Motivation
etcd-druid provisions etcd clusters and manages their lifecycle. For every etcd cluster, consumers can enable periodic backups of the cluster state by configuring the spec.backup section in an Etcd custom resource. Periodic backups are taken via the etcd-backup-restore sidecar container that runs in each etcd member pod.
Periodic backups of an etcd cluster state ensure the ability to recover from a data loss or a quorum loss, enhancing reliability and fault tolerance. It is crucial that these backups, which are vital for restoring the etcd cluster, remain protected from any form of tampering, whether intentional or accidental. To safeguard the integrity of these backups, the authors recommend utilizing WORM protection, a feature offered by various cloud providers, to ensure the backups remain immutable and secure.
Goals
- Protect backup data against modifications and deletions post-creation through immutability policies offered by storage providers.
Non-Goals
- Implementing a mechanism to signal hibernation intent for handling snapshot immutability for hibernated etcd clusters, such as adding functionality via
etcd.specor annotations on theEtcdCR, to indicate when an etcd cluster should enter or exit hibernation, as discussed in gardener/etcd-druid#922. - Supporting immutable backups on storage providers that do not offer immutability features (e.g., OpenStack Swift).
Proposal
This proposal aims to improve backup storage integrity and security by using immutability features available on major cloud providers.
Supported Cloud Providers
- Google Cloud Storage (GCS): Bucket Lock
- Amazon S3 (S3): Object Lock
- Azure Blob Storage (ABS): Immutable Blob Storage
Note
Currently, Openstack object storage (swift) doesn’t support immutability for objects: https://blueprints.launchpad.net/swift/+spec/immutability-middleware.
Types of Immutability
- Object-Level Immutability: Allows setting immutability periods independently for each object within a bucket.
- Bucket-Level Immutability: Applies a uniform immutability policy to all objects in a bucket.
Comparison of Bucket-Level and Object-Level Immutability
| Feature | GCS | S3 | ABS |
|---|---|---|---|
| Can bucket-level immutability period be increased? | Yes | Yes* | Yes (only 5 times) |
| Can bucket-level immutability period be decreased? | No | Yes* | No |
| Is bucket-level immutability a prerequisite for object-level immutability? | No | Yes | Yes (for existing buckets) |
| Can object-level immutability period be increased? | Yes | Yes | Yes |
| Can object-level immutability period be decreased? | No | No | No |
| Support for enabling object-level immutability in existing buckets | No | Yes | Yes |
| Support for enabling object-level immutability in new buckets | Yes | Yes | Yes |
| Support for enabling bucket-level immutability in existing buckets | Yes | Yes | Yes |
| Support for enabling bucket-level immutability in new buckets | Yes | Yes | Yes |
| Precedence between bucket-level and object-level immutability periods | Max(bucket, object) | Object-level | Max(bucket, object) |
Note
In AWS S3, it is possible to increase and decrease the bucket-level immutability period; however, this action can be blocked by configuring specific bucket policy settings.
For GCS, object-level immutability is not yet supported for existing buckets; see this issue.
Recommended Approach
At the time of writing this proposal, these are the current limitations seen across providers:
- S3 and ABS: typically require bucket-level immutability as a prerequisite for object-level immutability.
- GCS does not currently support object-level immutability in existing buckets.
- ABS requires a migration process to enable version-level immutability on existing containers.
Consequently, the authors recommend bucket-level immutability. This approach simplifies configuration and ensures a uniform immutability policy for all backups in a bucket across all support providers.
Configuring Immutable Backups
Creating and configuring immutable buckets on providers is not handled by etcd-druid and must be done by the consumers. For a large-scale consumer like Gardener, provider extensions are leveraged to automate both the creation and configuration of buckets. For more details, see BackupBucket and refer to this issue.
Prerequisites
Configure or Update the Immutable Bucket
- Use your cloud provider’s CLI, SDK, or console to create (or update) a bucket/container with a WORM (write-once-read-many) immutability policy.
- Refer to the Configure Bucket-Level Immutability for step-by-step instructions on configuring or updating the immutable bucket across different cloud providers.
Provide Valid Credentials in a Kubernetes Secret
- The
storesection of theEtcdCR must reference aSecretcontaining valid credentials.apiVersion: druid.gardener.cloud/v1alpha1 kind: Etcd metadata: name: example-etcd spec: backup: store: prefix: etcd-backups container: my-immutable-backups # Bucket name provider: aws # Supported: aws, gcp, azure secretRef: name: etcd-backup-credentials # Reference to the Secret immutability: retentionType: bucket # Enables bucket-level immutability - Confirm that this secret has the proper permissions to upload and retrieve snapshots from the immutable bucket.
- See the Getting Started guide for an example.
Note
The
etcd-druiddoes not handle the rotation of cloud provider credentials. Credential rotation must be managed by the operator.
By following these steps, you will have set up an immutable bucket for storing etcd backups, along with the necessary references in your Etcd specification and Kubernetes secret.
Handling of Hibernated Clusters
When an etcd cluster remains hibernated beyond the bucket’s immutability period, backups might become mutable again, depending on the cloud provider (see Comparison of Storage Provider Properties). This could compromise the intended guarantees of immutability, exposing backups to accidental or malicious alterations.
As mentioned in gardener/etcd-druid#922, a clear hibernation signal is needed. Since etcd-druid does not currently support hibernation natively and addressing that is out of scope for this proposal, we focus solely on maintaining immutability.
Proposal
To mitigate the risk of backups becoming mutable during extended hibernation under bucket-level immutability, the authors propose the following approach:
Prerequisite: Cut-off Traffic and Take a Final Full Snapshot Before Hibernation
- Before scaling the etcd cluster down to zero replicas, the etcd controller removes etcd’s client ports (2379/2380) from the etcd Service to block application traffic.
- The etcd controller then triggers an on-demand full snapshot. This ensures that the latest state of the etcd cluster is captured and securely stored before hibernation begins.
Periodically Re-Upload the Snapshot
- Re-uploading the latest full snapshot resets its immutability period in the bucket, ensuring backups remain protected during hibernation.
- By default, the re-upload schedule follows
etcd.spec.backup.fullSnapshotSchedule. Currently, this interval cannot be customized exclusively for re-uploads; future enhancements may introduce a dedicated configuration parameter. - A new operator task type,
ExtendFullSnapshotImmutabilityTask, periodically calls a new CLI command,extend-snapshot-immutability, to re-upload the snapshot and extend its immutability. ExtendFullSnapshotImmutabilityTaskalso manages garbage collection, ensuring that only the latest immutable snapshots are retained while deleting older snapshots created by the task itself.
By capturing a final full snapshot before hibernation, periodically re-uploading it to preserve immutability, and removing stale backups, etcd backups remain safeguarded against accidental or malicious alterations until the cluster is resumed.
Important
Limitation: There is a potential edge case where a snapshot might become corrupted before hibernation or during the re-upload process by
ExtendFullSnapshotImmutabilityTask. If this happens, the process could repeatedly re-upload the same corrupted snapshot, failing to ensure a reliable backup.
An alternative solution could be to trigger the snapshot compaction which runs in separate pod and takes a fresh snapshot of the compacted etcd data and re-uploads it to the object store.
While this approach ensures that only valid snapshots are re-uploaded, it is resource-intensive, requiring an operational etcd instance even in hibernation. Given the high cost in terms of compute and memory, the authors recommend the snapshot re-upload approach as a more practical solution.
Etcd CR API Changes
A new field is introduced in Etcd.spec.backup.store to indicate the immutability strategy:
// StoreSpec defines parameters for storing etcd backups.
type StoreSpec struct {
// ...
// Immutability configuration for the backup store.
Immutability *ImmutabilitySpec `json:"immutability,omitempty"`
}
// ImmutabilitySpec defines immutability settings.
type ImmutabilitySpec struct {
// RetentionType indicates the type of immutability approach. For example, "bucket".
RetentionType string `json:"retentionType,omitempty"`
}
If immutability is not specified, etcd-druid will assume that the bucket is mutable, and no immutability-related logic applies. We have defined a new type to allow us future enhancements to the immutability specification.
etcd-backup-restore Enhancements
The authors propose adding new sub-command to the etcd-backup-restore CLI (etcdbrctl) to maintain immutability during hibernation and to clean up snapshots created by ExtendFullSnapshotImmutabilityTask:
extend-snapshot-immutability- Downloads the latest full snapshot from the object store.
- Renames the snapshot (for instance, updates its Unix timestamp) to avoid overwriting an existing immutable snapshot.
- Uploads the renamed snapshot back to object storage, thereby restarting its immutability timer.
- Introduces the
--gc-from-timestamp=<timestamp>parameter, where<timestamp>is the creation timestamp of the task. This ensures that only snapshots created by the task are subject to garbage collection.
As an alternative to the download/upload approach, the authors document the possibility of using provider APIs to perform a server-side object copy. This method could significantly reduce network costs and latency by directly copying the snapshot within the cloud provider’s infrastructure. While this option is not implemented in the current version, feasibility of server-side copy can be explored in etcd-backup-restore during implementation.
etcd Controller Enhancements
When a hibernation flow is initiated (by external tooling or higher-level operators), the etcd controller can:
- Remove etcd’s client ports (2379/2380) from the etcd Service to block application traffic.
- Trigger an on-demand full snapshot via an
EtcdOperatorTask. - Scale down the
StatefulSetreplicas to zero, provided the previous snapshot step is successful. - Create the
ExtendFullSnapshotImmutabilityTaskifetcd.spec.backup.store.immutability.retentionTypeis"bucket"and based onetcd.spec.backup.fullSnapshotSchedule.
Operator Task Enhancements
The ExtendFullSnapshotImmutabilityTask will create a cron job that:
- Runs
etcdbrctl extend-snapshot-immutability --gc-from-timestamp=<creation timestamp of task>to preserve the immutability period of the most recent snapshot. This command re-uploads the latest snapshot, effectively resetting its immutability period. Additionally, it removes any snapshots that have become mutable after the creation timestamp of the task.
By periodically re-uploading (extending) the latest snapshot during hibernation, the authors ensure that the immutability period is extended, and the backups remain protected throughout the hibernation period.
Lifecycle of ExtendFullSnapshotImmutabilityTask
The ExtendFullSnapshotImmutabilityTask is active during hibernation and is automatically managed by the etcd-controller. Its lifecycle is tied to the cluster’s hibernation state:
Task Creation
- When the etcd cluster enters hibernation (e.g., scaling down to zero replicas), the etcd controller:
- Triggers a final full snapshot.
- Creates the
ExtendFullSnapshotImmutabilityTaskto runextend-snapshot-immutability --gc-from-timestamp=<creation timestamp of this task>
- When the etcd cluster enters hibernation (e.g., scaling down to zero replicas), the etcd controller:
Task Deletion
- When the cluster resumes from hibernation (scales up to non-zero replicas), the controller:
- Deletes the
ExtendFullSnapshotImmutabilityTaskto stop extending snapshots. - Resumes the normal backup schedule defined in
spec.backup.fullSnapshotSchedule.
- Deletes the
- When the immutability configuration is removed from the
etcd.spec.backup.store, the controller:- Deletes the
ExtendFullSnapshotImmutabilityTaskto stop extending snapshots.
- Deletes the
- When the cluster resumes from hibernation (scales up to non-zero replicas), the controller:
Example Task Config
type ExtendFullSnapshotImmutabilityTaskConfig struct {
// Schedule defines a cron schedule (e.g., "0 0 * * *").
Schedule *string `json:"schedule,omitempty"`
}
Sample YAML:
spec:
config:
schedule: "0 0 * * *"
Disabling Immutability
If you remove the immutability configuration from etcd.spec.backup.store, hibernation-based immutability support no longer applies. However, once the bucket itself is locked at the provider level, it cannot be reverted to a mutable state. Any objects uploaded by etcd-backup-restore are still subject to the existing WORM policy.
If you genuinely require a mutable backup again, the recommended approach is:
- Use a new bucket. In your
Etcdcustom resource, reference a different bucket that does not have immutability enabled. - Use
EtcdCopyBackupsTask. If you want to start the cluster with a new bucket but retain old data, use theEtcdCopyBackupsTaskto copy existing backups from the old immutable bucket to the new mutable bucket. - Reconcile the
EtcdCR. After pointingetcd.spec.backup.storeto the new bucket,etcd-druidwill start storing backups there.
Note: Existing snapshots in the old immutable bucket remain locked according to the configured immutability period.
Compatibility
These changes are compatible with existing etcd clusters and current backup processes.
- Backward Compatibility:
- Clusters without immutable buckets continue to function without any changes.
- Forward Compatibility:
- Clusters can opt in to use immutable backups by configuring the bucket accordingly (as described in Configuring Immutable Backups) and setting
etcd.spec.backup.store.immutability.retentionType == "bucket". - The enhanced hibernation logic in the etcd controller is additive, meaning it does not interfere with existing workflows.
- Clusters can opt in to use immutable backups by configuring the bucket accordingly (as described in Configuring Immutable Backups) and setting
Impact for Operators
In scenarios where you want to exclude certain snapshots from an etcd restore, you previously could simply delete them from object storage. However, when bucket-level immutability is enabled, deleting existing immutable snapshots is no longer possible. To address this need, most cloud providers allow adding custom annotations or tags to objects—even immutable ones—so they can be logically excluded without physically removing them.
etcd-backup-restore supports ignoring snapshots based on annotations or tags, rather than deleting them. Operators can add the following key-value pair to any snapshot object to exclude it from future restores:
- Key:
x-etcd-snapshot-exclude - Value:
true
Because these tags or annotations do not modify the underlying snapshot data, they are permissible even for immutable objects. Once these annotations are in place, etcd-backup-restore will detect them and skip the tagged snapshots during restoration, thus preventing unwanted snapshots from being used. For more details, see the Ignoring Snapshots during Restoration.
Note
At the time of writing this proposal, this feature is not supported for AWS S3 buckets.
References
- GCS Bucket Lock
- AWS S3 Object Lock
- Azure Immutable Blob Storage
- etcd-backup-restore Documentation
- Gardener Issue: 10866
6.2.21 - Local e2e Tests
e2e Test Suite
Developers can run extended e2e tests, in addition to unit tests, for Etcd-Druid in or from their local environments. This is recommended to verify the desired behavior of several features and to avoid regressions in future releases.
The very same tests typically run as part of the component’s release job as well as on demand, e.g., when triggered by Etcd-Druid maintainers for open pull requests.
Testing Etcd-Druid automatically involves a certain test coverage for gardener/etcd-backup-restore
which is deployed as a side-car to the actual etcd container.
Prerequisites
The e2e test lifecycle is managed with the help of skaffold. Every involved step like setup,
deploy, undeploy or cleanup is executed against a Kubernetes cluster which makes it a mandatory prerequisite at the same time.
Only skaffold itself with involved docker, helm and kubectl executions as well as
the e2e-tests are executed locally. Required binaries are automatically downloaded if you use the corresponding make target,
as described in this document.
It’s expected that especially the deploy step is run against a Kubernetes cluster which doesn’t contain an Druid deployment or any left-overs like druid.gardener.cloud CRDs.
The deploy step will likely fail in such scenarios.
Tip: Create a fresh KinD cluster or a similar one with a small footprint before executing the tests.
Providers
The following providers are supported for e2e tests:
- AWS
- Azure
- GCP
- Local
Valid credentials need to be provided when tests are executed with mentioned cloud providers.
Flow
An e2e test execution involves the following steps:
| Step | Description |
|---|---|
setup | Create a storage bucket which is used for etcd backups (only with cloud providers). |
deploy | Build Docker image, upload it to registry (if remote cluster - see Docker build), deploy Helm chart (charts/druid) to Kubernetes cluster. |
test | Execute e2e tests as defined in test/e2e. |
undeploy | Remove the deployed artifacts from Kubernetes cluster. |
cleanup | Delete storage bucket and Druid deployment from test cluster. |
Make target
Executing e2e-tests is as easy as executing the following command with defined Env-Vars as desribed in the following section and as needed for your test scenario.
make test-e2e
Common Env Variables
The following environment variables influence how the flow described above is executed:
PROVIDERS: Providers used for testing (all,aws,azure,gcp,local). Multiple entries must be comma separated.Note: Some tests will use very first entry from env
PROVIDERSfor e2e testing (ex: multi-node tests). So for multi-node tests to use specific provider, specify that provider as first entry in envPROVIDERS.KUBECONFIG: Kubeconfig pointing to cluster where Etcd-Druid will be deployed (preferably KinD).TEST_ID: Some ID which is used to create assets for and during testing.STEPS: Steps executed bymaketarget (setup,deploy,test,undeploy,cleanup- default: all steps).
AWS Env Variables
AWS_ACCESS_KEY_ID: Key ID of the user.AWS_SECRET_ACCESS_KEY: Access key of the user.AWS_REGION: Region in which the test bucket is created.
Example:
make \
AWS_ACCESS_KEY_ID="abc" \
AWS_SECRET_ACCESS_KEY="xyz" \
AWS_REGION="eu-central-1" \
KUBECONFIG="$HOME/.kube/config" \
PROVIDERS="aws" \
TEST_ID="some-test-id" \
STEPS="setup,deploy,test,undeploy,cleanup" \
test-e2e
Azure Env Variables
STORAGE_ACCOUNT: Storage account used for managing the storage container.STORAGE_KEY: Key of storage account.
Example:
make \
STORAGE_ACCOUNT="abc" \
STORAGE_KEY="eHl6Cg==" \
KUBECONFIG="$HOME/.kube/config" \
PROVIDERS="azure" \
TEST_ID="some-test-id" \
STEPS="setup,deploy,test,undeploy,cleanup" \
test-e2e
GCP Env Variables
GCP_SERVICEACCOUNT_JSON_PATH: Path to the service account json file used for this test.GCP_PROJECT_ID: ID of the GCP project.
Example:
make \
GCP_SERVICEACCOUNT_JSON_PATH="/var/lib/secrets/serviceaccount.json" \
GCP_PROJECT_ID="xyz-project" \
KUBECONFIG="$HOME/.kube/config" \
PROVIDERS="gcp" \
TEST_ID="some-test-id" \
STEPS="setup,deploy,test,undeploy,cleanup" \
test-e2e
Local Env Variables
No special environment variables are required for running e2e tests with Local provider.
Example:
make \
KUBECONFIG="$HOME/.kube/config" \
PROVIDERS="local" \
TEST_ID="some-test-id" \
STEPS="setup,deploy,test,undeploy,cleanup" \
test-e2e
e2e test with local storage emulators [AWS, GCP, AZURE]
The above-mentioned e2e tests need storage from real cloud providers to be setup. But there are tools such as localstack, fake-gcs-server and azurite that enable developers to run e2e tests with emulators for AWS S3, Google GCS and Azure ABS respectively. We can provision a KIND cluster for running the e2e tests against. Thus, by using cloud storage emulators alongside the KIND cluster, we eliminate the need for any actual cloud provider infrastructure to be set up for running e2e tests.
How are the KIND cluster and Emulators set up
KIND or Kubernetes-In-Docker is a kubernetes cluster that is set up inside a docker container. This cluster is with limited capability as it does not have much compute power. But this cluster can easily be setup inside a container and can be tear down easily just by removing a container. That’s why KIND cluster is very easy to use for e2e tests. Makefile command helps to spin up a KIND cluster and use the cluster to run e2e tests.
Localstack setup
There is a docker image for localstack. The image is deployed as pod inside the KIND cluster through hack/e2e-test/infrastructure/localstack/localstack.yaml. Makefile takes care of deploying the yaml file in a KIND cluster.
The developer needs to run make ci-e2e-kind command. This command in turn runs hack/ci-e2e-kind.sh which spin up the KIND cluster and deploy localstack in it and then run the e2e tests using localstack as mock AWS storage provider. e2e tests are actually run on host machine but deploy the druid controller inside KIND cluster. Druid controller spawns multinode etcd clusters inside KIND cluster. e2e tests verify whether the druid controller performs its jobs correctly or not. Mock localstack storage is cleaned up after every e2e tests. That’s why the e2e tests need to access the localstack pod running inside KIND cluster. The network traffic between host machine and localstack pod is resolved via mapping localstack pod port to host port while setting up the KIND cluster via hack/e2e-test/infrastructure/kind/cluster.yaml
How to execute e2e tests with localstack and KIND cluster
Run the following make command to spin up a KinD cluster, deploy localstack and run the e2e tests with provider aws:
make ci-e2e-kind
Fake-GCS-Server setup
Fake-gcs-server is run inside a pod using this docker image in a KIND cluster.
The user needs to run make ci-e2e-kind-gcs to start the e2e tests for druid with GCS emulator as the object storage for etcd backups. The above command internally runs the script hack/ci-e2e-kind-gcs.sh which initializes the setup with required steps before going on to create a KIND cluster and deploy fakegcs in it and use that emulator to run e2e tests.
The fake-gcs-server running inside the pod serves HTTP requests at port-8000 and HTTPS requests at port-4443. As the e2e tests runs on the host machine while the emulator runs on KIND, both ports i.e 8000 & 4443 needs to be port-forwarded from the host machine to fake-gcs service running inside the KIND cluster. The port forwardings is defined in the hack/kind-up.sh file which is used to setup the KIND cluster.
How to execute e2e tests with fake-gcs-server and KIND cluster
Run the following make command to spin up a KinD cluster, deploy fakegcs and run the e2e tests with provider gcp:
make ci-e2e-kind-gcs
Azurite setup
Azurite is run inside a pod using this docker image (tag:latest) in a KIND cluster.
The user needs to run make ci-e2e-kind-azure to start the e2e tests for druid with Azurite as the object storage for etcd backups. The above command internally runs the script hack/ci-e2e-kind-azure.sh which initializes the setup with required steps before going on to create a KIND cluster and deploy Azurite in it and use that emulator to run e2e tests.
The azurite running inside the pod serves HTTP requests at port 10000. As the e2e tests runs on the host machine while the emulator runs on KIND cluster, the port 10000 needs to be port-forwarded from the host machine to azurite service running inside the KIND cluster. The port forwardings is defined in the hack/kind-up.sh file which is used to setup the KIND cluster.
How to execute e2e tests with Azurite and KIND cluster
Run the following make command to spin up a KinD cluster, deploy Azurite and run the e2e tests with provider azure:
make ci-e2e-kind-azure
6.2.22 - Manage Azurite Emulator
Manage Azure Blob Storage Emulator
This document is a step-by-step guide on how to configure, deploy and cleanup Azurite, the Azure Blob Storage emulator, within a kind cluster. This setup is ideal for local development and testing.
00-Prerequisites
Ensure that you have setup the development environment as per the documentation.
Note: It is assumed that you have already created kind cluster and the
KUBECONFIGis pointing to this Kubernetes cluster.
Installing Azure CLI
To interact with Azurite you must also install the Azure CLI (version >=2.55.0)
On macOS run:
brew install azure-cli
For other OS, please check the Azure CLI installation documentation.
01-Deploy Azurite
make deploy-azurite
The above make target will deploy Azure emulator in the target Kubernetes cluster.
02-Setup ABS Container
We will be using the azure-cli to create an ABS container. Export the connection string to enable azure-cli to connect to Azurite emulator.
export AZURE_STORAGE_CONNECTION_STRING="DefaultEndpointsProtocol=http;AccountName=devstoreaccount1;AccountKey=Eby8vdM02xNOcqFlqUwJPLlmEtlCDXJ1OUzFT50uSRZ6IFsuFq2UVErCz4I6tq/K1SZFPTOtr/KBHBeksoGMGw==;BlobEndpoint=http://127.0.0.1:10000/devstoreaccount1;"
To create an Azure Blob Storage Container in Azurite, run the following command:
az storage container create -n <container-name>
03-Configure Secret
Connection details for an Azure Object Store Container are put into a Kubernetes Secret. Apply the Kubernetes Secret manifest through:
kubectl apply -f examples/objstore-emulator/etcd-secret-azurite.yaml
Note: The secret created should be referred to in the
EtcdCR inspec.backup.store.secretRef.
04-Cleanup
To clean the setup, unset the environment variable set in step-03 above and delete the Azurite deployment:
unset AZURE_STORAGE_CONNECTION_STRING
kubectl delete -f ./hack/e2e-test/infrastructure/azurite/azurite.yaml
6.2.23 - Manage Gcs Emulator
Manage GCS Emulator
This document is a step-by-step guide on how to configure, deploy and cleanup GCS Emulator, within a kind cluster. GCS Emulator emulates Google Cloud Storage locally, which allows the Etcd cluster to interact with GCS. This setup is ideal for local development and testing.
00-Prerequisites
Ensure that you have setup the development environment as per the documentation.
Note: It is assumed that you have already created kind cluster and the
KUBECONFIGis pointing to this Kubernetes cluster.
Installing gsutil
To interact with GCS Emulator you must also install the gsutil utility. Follow the instructions here to install gsutil.
01-Deploy FakeGCS
Deploy FakeGCS onto the Kubernetes cluster using the command below:
make deploy-fakegcs
02-Setup GCS Bucket
To create a GCS bucket for Etcd backup purposes, execute the following command:
gsutil -o "Credentials:gs_json_host=127.0.0.1" -o "Credentials:gs_json_port=4443" -o "Boto:https_validate_certificates=False" mb "gs://etcd-bucket"
03-Configure Secret
Connection details for a GCS Object Store are put into a Kubernetes Secret. Apply the Kubernetes Secret manifest through:
kubectl apply -f examples/objstore-emulator/etcd-secret-fakegcs.yaml
Note: The secret created should be referred to in the
EtcdCR inspec.backup.store.secretRef.
04-Cleanup
To clean the setup, delete the FakeGCS deployment:
kubectl delete -f ./hack/e2e-test/infrastructure/fake-gcs-server/fake-gcs-server.yaml
6.2.24 - Manage S3 Emulator
Manage S3 Emulator
This document is a step-by-step guide on how to configure, deploy and cleanup LocalStack, within a kind cluster. LocalStack emulates AWS services locally, which allows the Etcd cluster to interact with AWS S3. This setup is ideal for local development and testing.
00-Prerequisites
Ensure that you have setup the development environment as per the documentation.
Note: It is assumed that you have already created kind cluster and the
KUBECONFIGis pointing to this Kubernetes cluster.
Installing AWS CLI
To interact with LocalStack you must also install the AWS CLI (version >=1.29.0 or version >=2.13.0)
On macOS run:
brew install awscli
For other OS, please check the AWS CLI installation documentation.
01-Deploy LocalStack
make deploy-localstack
The above make target will deploy LocalStack in the target Kubernetes cluster.
02-Setup S3 Bucket
Configure AWS CLI to interact with LocalStack by setting the necessary environment variables. This configuration redirects S3 commands to the LocalStack endpoint and provides the required credentials for authentication.
export AWS_ENDPOINT_URL_S3="http://localhost:4566"
export AWS_ACCESS_KEY_ID=ACCESSKEYAWSUSER
export AWS_SECRET_ACCESS_KEY=sEcreTKey
export AWS_DEFAULT_REGION=us-east-2
Create a S3 bucket using the following command:
aws s3api create-bucket --bucket <bucket-name> --region <region> --create-bucket-configuration LocationConstraint=<region> --acl private
To verify if the bucket has been created, you can use the following command:
aws s3api head-bucket --bucket <bucket-name>
03-Configure Secret
Connection details for an Azure S3 Object Store are put into a Kubernetes Secret. Apply the Kubernetes Secret manifest through:
kubectl apply -f examples/objstore-emulator/etcd-secret-localstack.yaml
Note: The secret created should be referred to in the
EtcdCR inspec.backup.store.secretRef.
04-Cleanup
To clean the setup,, unset the environment variable set in step-03 above and delete the LocalStack deployment:
unset AWS_ENDPOINT_URL_S3 AWS_ACCESS_KEY_ID AWS_SECRET_ACCESS_KEY AWS_DEFAULT_REGION
kubectl delete -f ./hack/e2e-test/infrastructure/localstack/localstack.yaml
6.2.25 - Managing Etcd Clusters
Managing ETCD Clusters
Create an Etcd Cluster
Creating an Etcd cluster can be done either by explicitly creating a manifest file or it can also be done programmatically. You can refer to and/or modify any sample Etcd manifest to create an etcd cluster. In order to programmatically create an Etcd cluster you can refer to the Golang API to create an Etcd custom resource and using a k8s client you can apply an instance of a Etcd custom resource targetting any namespace in a k8s cluster.
Prior to v0.23.0 version of etcd-druid, after creating an Etcd custom resource, you will have to annotate the resource with gardener.cloud/operation=reconcile in order to trigger a reconciliation for the newly created Etcd resource. Post v0.23.0 version of etcd-druid, there is no longer any need to explicitly trigger reconciliations for creating new Etcd clusters.
Track etcd cluster creation
In order to track the progress of creation of etcd cluster resources you can do the following:
status.lastOperationcan be monitored to check the status of reconciliation.Additional printer columns have been defined for
Etcdcustom resource. You can execute the following command to know if anEtcdcluster is ready/quorate.
kubectl get etcd <etcd-name> -n <namespace> -owide
# you will see additional columns which will indicate the state of an etcd cluster
NAME READY QUORATE ALL MEMBERS READY BACKUP READY AGE CLUSTER SIZE CURRENT REPLICAS READY REPLICAS
etcd-main true True True True 235d 3 3 3
You can additional monitor all etcd cluster resources that are created for every etcd cluster.
For etcd-druid version <v0.23.0 use the following command:
kubectl get all,cm,role,rolebinding,lease,sa -n <namespace> --selector=instance=<etcd-name>
For etcd-druid version >=v0.23.0 use the following command:
kubectl get all,cm,role,rolebinding,lease,sa -n <namespace> --selector=app.kubernetes.io/managed-by=etcd-druid,app.kubernetes.io/part-of=<etcd-name>
Update & Reconcile an Etcd Cluster
Edit the Etcd custom resource
To update an etcd cluster, you should usually only be updating the Etcd custom resource representing the etcd cluster.
You can make changes to the existing Etcd resource by invoking the following command:
kubectl edit etcd <etcd-name> -n <namespace>
This will open up the linked editor where you can make the edits.
Scale the Etcd cluster horizontally
To scale an etcd cluster horizontally, you can update the spec.replicas field in the Etcd custom resource. For example, to scale an etcd cluster to 5 replicas, you can run:
kubectl patch etcd <etcd-name> -n <namespace> --type merge -p '{"spec":{"replicas":5}}'
Alternatively, you can use the /scale subresource to scale an etcd cluster horizontally. For example, to scale an etcd cluster to 5 replicas, you can run:
kubectl scale etcd <etcd-name> -n <namespace> --replicas=5
!!! note While an Etcd cluster can be scaled out, it cannot be scaled in, i.e., the replicas cannot be decreased to a non-zero value. An Etcd cluster can still be scaled to 0 replicas, indicating that the cluster is to be “hibernated”. This is beneficial for use-cases where an etcd cluster is not needed for a certain period of time, and the user does not want to pay for the compute resources. A hibernated etcd cluster can be resumed later by scaling it back to a non-zero value. Please note that the data volumes backing an Etcd cluster will be retained during hibernation, and will still be charged for.
Scale the Etcd cluster vertically
To scale an Etcd cluster vertically, you can update the spec.etcd.resources and spec.backup.resources fields in the Etcd custom resource. For example, to scale an Etcd cluster’s etcd container to 2 CPU and 4Gi memory, you can run:
kubectl patch etcd <etcd-name> -n <namespace> --type merge -p '{"spec":{"etcd":{"resources":{"requests":{"cpu":"2","memory":"4Gi"}}}}}'
Additionally, you can use an external pod autoscaler such as vertical pod autoscaler to scale an Etcd cluster vertically. This is made possible by the /scale subresource on the Etcd custom resource.
!!! note Scaling an Etcd cluster vertically can potentially result in downtime, based on its failure tolerance. This is due to the fact that an etcd cluster is actuated by pods, and the pods need to be restarted in order to apply the new resource values. A multi-member etcd cluster can tolerate a failure of one member, but if the number of replicas is set to 1, then the etcd cluster will not be able to tolerate any failures. Therefore, it is recommended to scale a single-member etcd cluster vertically only when it is deemed necessary, and to monitor the cluster closely during the scaling process. A multi-member Etcd cluster can be scaled vertically, one member at a time. A pod disruption budget for this can ensure that the cluster can tolerate a certain number of failures. This pod disruption budget is automatically deployed and managed by etcd-druid for multi-member Etcd clusters, and it is recommended to not modify this PDB manually.
!!! note While the replicas and resources in an Etcd resource spec can be modified, please ensure to read the next section to understand when and how these changes are reconciled by etcd-druid.
Reconcile
There are two ways to control reconciliation of any changes done to Etcd custom resources.
Auto reconciliation
If etcd-druid has been deployed with auto-reconciliation then any change done to an Etcd resource will be automatically reconciled. You use --enable-etcd-spec-auto-reconcile CLI flag to enable auto-reconciliation of the etcd spec.
For a complete list of CLI args you can see this document.
Explicit reconciliation
If --enable-etcd-spec-auto-reconcile is set to false or not set at all, then any change to an Etcd resource will not be automatically reconciled. To trigger a reconcile you must set the following annotation on the Etcd resource:
kubectl annotate etcd <etcd-name> gardener.cloud/operation=reconcile -n <namespace>
This option is sometimes recommeded as you would like avoid auto-reconciliation of accidental changes to Etcd resources outside the maintenance time window, thus preventing a potential transient quorum loss due to misconfiguration, attach-detach issues of persistent volumes etc.
Overwrite Container OCI Images
To find out image versions of etcd-backup-restore and etcd-wrapper used by a specific version of etcd-druid one way is look for the image versions in images.yaml. There are times that you might wish to override these images that come bundled with etcd-druid. There are two ways in which you can do that:
Option #1
We leverage Overwrite ImageVector facility provided by gardener. This capability can be used without bringing in gardener as well. To illustrate this in context of etcd-druid you will create a ConfigMap with the following content:
apiVersion: v1
kind: ConfigMap
metadata:
name: etcd-druid-images-overwrite
namespace: <etcd-druid-namespace>
data:
images_overwrite.yaml: |
images:
- name: etcd-backup-restore
sourceRepository: github.com/gardener/etcd-backup-restore
repository: <your-own-custom-etcd-backup-restore-repo-url>
tag: "v<custom-tag>"
- name: etcd-wrapper
sourceRepository: github.com/gardener/etcd-wrapper
repository: <your-own-custom-etcd-wrapper-repo-url>
tag: "v<custom-tag>"
- name: alpine
repository: <your-own-custom-alpine-repo-url>
tag: "v<custom-tag>"
You can use images.yaml as a reference to create the overwrite images YAML ConfigMap.
Edit the etcd-druid Deployment with:
- Mount the
ConfigMap - Set
IMAGEVECTOR_OVERWRITEenvironment variable whose value must be the path you choose to mount theConfigMap.
To illustrate the changes you can see the following etcd-druid Deployment YAML:
apiVersion: apps/v1
kind: Deployment
metadata:
name: etcd-druid
namespace: <etcd-druid-namespace>
spec:
template:
spec:
containers:
- name: etcd-druid
env:
- name: IMAGEVECTOR_OVERWRITE
value: /imagevector-overwrite/images_overwrite.yaml
volumeMounts:
- name: etcd-druid-images-overwrite
mountPath: /imagevector-overwrite
volumes:
- name: etcd-druid-images-overwrite
configMap:
name: etcd-druid-images-overwrite
!!! info
Image overwrites specified in the mounted ConfigMap will be respected by successive reconciliations for this Etcd custom resource.
Option #2
We provide a generic way to suspend etcd cluster reconciliation via etcd-druid, allowing a human operator to take control. This option should be excercised only in case of troubleshooting or quick fixes which are not possible to do via the reconciliation loop in etcd-druid. However one of the use cases to use this option is to perhaps update the container image to apply a hot patch and speed up recovery of an etcd cluster.
Manually modify individual etcd cluster resources
etcd cluster resources are managed by etcd-druid and since v0.23.0 version of etcd-druid any changes to these managed resources are protected via a validating webhook. You can find more information about this webhook here. To be able to manually modify etcd cluster managed resources two things needs to be done:
- Annotate the target
Etcdresource suspending any reconciliation byetcd-druid. You can do this by invoking the following command:
kubectl annotate etcd <etcd-name> -n <namespace> druid.gardener.cloud/suspend-etcd-spec-reconcile=
- Add another annotation to the target
Etcdresource disabling managed resource protection via the webhook. You can do this by invoking the following command:
kubectl annotate etcd <etcd-name> -n <namespace> druid.gardener.cloud/disable-etcd-component-protection=
Now you are free to make changes to any managed etcd cluster resource.
!!! note
As long as the above two annotations are there, no reconciliation will be done for this etcd cluster by etcd-druid. Therefore it is essential that you remove this annotations eventually.
6.2.26 - Metrics
Monitoring
etcd-druid uses Prometheus for metrics reporting. The metrics can be used for real-time monitoring and debugging of compaction jobs.
The simplest way to see the available metrics is to cURL the metrics endpoint /metrics. The format is described here.
Follow the Prometheus getting started doc to spin up a Prometheus server to collect etcd metrics.
The naming of metrics follows the suggested Prometheus best practices. All compaction related metrics are put under namespace etcddruid and the respective subsystems.
Snapshot Compaction
These metrics provide information about the compaction jobs that run after some interval in shoot control planes. Studying the metrics, we can deduce how many compaction job ran successfully, how many failed, how many delta events compacted etc.
| Name | Description | Type |
|---|---|---|
| etcddruid_compaction_jobs_total | Total number of compaction jobs initiated by compaction controller. | Counter |
| etcddruid_compaction_jobs_current | Number of currently running compaction job. | Gauge |
| etcddruid_compaction_job_duration_seconds | Total time taken in seconds to finish a running compaction job. | Histogram |
| etcddruid_compaction_num_delta_events | Total number of etcd events to be compacted by a compaction job. | Gauge |
There are two labels for etcddruid_compaction_jobs_total metrics. The label succeeded shows how many of the compaction jobs are succeeded and label failed shows how many of compaction jobs are failed.
There are two labels for etcddruid_compaction_job_duration_seconds metrics. The label succeeded shows how much time taken by a successful job to complete and label failed shows how much time taken by a failed compaction job.
etcddruid_compaction_jobs_current metric comes with label etcd_namespace that indicates the namespace of the Etcd running in the control plane of a shoot cluster..
Etcd
These metrics are exposed by the etcd process that runs in each etcd pod.
The following list metrics is applicable to clustering of a multi-node etcd cluster. The full list of metrics exposed by etcd is available here.
| No. | Metrics Name | Description | Comments |
|---|---|---|---|
| 1 | etcd_disk_wal_fsync_duration_seconds | latency distributions of fsync called by WAL. | High disk operation latencies indicate disk issues. |
| 2 | etcd_disk_backend_commit_duration_seconds | latency distributions of commit called by backend. | High disk operation latencies indicate disk issues. |
| 3 | etcd_server_has_leader | whether or not a leader exists. 1: leader exists, 0: leader not exists. | To capture quorum loss or to check the availability of etcd cluster. |
| 4 | etcd_server_is_leader | whether or not this member is a leader. 1 if it is, 0 otherwise. | |
| 5 | etcd_server_leader_changes_seen_total | number of leader changes seen. | Helpful in fine tuning the zonal cluster like etcd-heartbeat time etc, it can also indicates the etcd load and network issues. |
| 6 | etcd_server_is_learner | whether or not this member is a learner. 1 if it is, 0 otherwise. | |
| 7 | etcd_server_learner_promote_successes | total number of successful learner promotions while this member is leader. | Might be helpful in checking the success of API calls called by backup-restore. |
| 8 | etcd_network_client_grpc_received_bytes_total | total number of bytes received from grpc clients. | Client Traffic In. |
| 9 | etcd_network_client_grpc_sent_bytes_total | total number of bytes sent to grpc clients. | Client Traffic Out. |
| 10 | etcd_network_peer_sent_bytes_total | total number of bytes sent to peers. | Useful for network usage. |
| 11 | etcd_network_peer_received_bytes_total | total number of bytes received from peers. | Useful for network usage. |
| 12 | etcd_network_active_peers | current number of active peer connections. | Might be useful in detecting issues like network partition. |
| 13 | etcd_server_proposals_committed_total | total number of consensus proposals committed. | A consistently large lag between a single member and its leader indicates that member is slow or unhealthy. |
| 14 | etcd_server_proposals_pending | current number of pending proposals to commit. | Pending proposals suggests there is a high client load or the member cannot commit proposals. |
| 15 | etcd_server_proposals_failed_total | total number of failed proposals seen. | Might indicates downtime caused by a loss of quorum. |
| 16 | etcd_server_proposals_applied_total | total number of consensus proposals applied. | Difference between etcd_server_proposals_committed_total and etcd_server_proposals_applied_total should usually be small. |
| 17 | etcd_mvcc_db_total_size_in_bytes | total size of the underlying database physically allocated in bytes. | |
| 18 | etcd_server_heartbeat_send_failures_total | total number of leader heartbeat send failures. | Might be helpful in fine-tuning the cluster or detecting slow disk or any network issues. |
| 19 | etcd_network_peer_round_trip_time_seconds | round-trip-time histogram between peers. | Might be helpful in fine-tuning network usage specially for zonal etcd cluster. |
| 20 | etcd_server_slow_apply_total | total number of slow apply requests. | Might indicate overloaded from slow disk. |
| 21 | etcd_server_slow_read_indexes_total | total number of pending read indexes not in sync with leader’s or timed out read index requests. |
The full list of metrics is available here.
Etcd-Backup-Restore
These metrics are exposed by the etcd-backup-restore container in each etcd pod.
The following list metrics is applicable to clustering of a multi-node etcd cluster. The full list of metrics exposed by etcd-backup-restore is available here.
| No. | Metrics Name | Description |
|---|---|---|
| 1. | etcdbr_cluster_size | to capture the scale-up/scale-down scenarios. |
| 2. | etcdbr_is_learner | whether or not this member is a learner. 1 if it is, 0 otherwise. |
| 3. | etcdbr_is_learner_count_total | total number times member added as the learner. |
| 4. | etcdbr_restoration_duration_seconds | total latency distribution required to restore the etcd member. |
| 5. | etcdbr_add_learner_duration_seconds | total latency distribution of adding the etcd member as a learner to the cluster. |
| 6. | etcdbr_member_remove_duration_seconds | total latency distribution removing the etcd member from the cluster. |
| 7. | etcdbr_member_promote_duration_seconds | total latency distribution of promoting the learner to the voting member. |
| 8. | etcdbr_defragmentation_duration_seconds | total latency distribution of defragmentation of each etcd cluster member. |
Prometheus supplied metrics
The Prometheus client library provides a number of metrics under the go and process namespaces.
6.2.27 - operator out-of-band tasks
DEP-05: Operator Out-of-band Tasks
Summary
This DEP proposes an enhancement to etcd-druid’s capabilities to handle out-of-band tasks, which are presently performed manually or invoked programmatically via suboptimal APIs. The document proposes the establishment of a unified interface by defining a well-structured API to harmonize the initiation of any out-of-band task, monitor its status, and simplify the process of adding new tasks and managing their lifecycles.
Terminology
etcd-druid: etcd-druid is an operator to manage the etcd clusters.
backup-sidecar: It is the etcd-backup-restore sidecar container running in each etcd-member pod of etcd cluster.
leading-backup-sidecar: A backup-sidecar that is associated to an etcd leader of an etcd cluster.
out-of-band task: Any on-demand tasks/operations that can be executed on an etcd cluster without modifying the Etcd custom resource spec (desired state).
Motivation
Today, etcd-druid mainly acts as an etcd cluster provisioner (creation, maintenance and deletion). In future, capabilities of etcd-druid will be enhanced via etcd-member proposal by providing it access to much more detailed information about each etcd cluster member. While we enhance the reconciliation and monitoring capabilities of etcd-druid, it still lacks the ability to allow users to invoke out-of-band tasks on an existing etcd cluster.
There are new learnings while operating etcd clusters at scale. It has been observed that we regularly need capabilities to trigger out-of-band tasks which are outside of the purview of a regular etcd reconciliation run. Many of these tasks are multi-step processes, and performing them manually is error-prone, even if an operator follows a well-written step-by-step guide. Thus, there is a need to automate these tasks.
Some examples of an on-demand/out-of-band tasks:
- Recover from a permanent quorum loss of etcd cluster.
- Trigger an on-demand full/delta snapshot.
- Trigger an on-demand snapshot compaction.
- Trigger an on-demand maintenance of etcd cluster.
- Copy the backups from one object store to another object store.
Goals
- Establish a unified interface for operator tasks by defining a single dedicated custom resource for
out-of-bandtasks. - Define a contract (in terms of prerequisites) which needs to be adhered to by any task implementation.
- Facilitate the easy addition of new
out-of-bandtask(s) through this custom resource. - Provide CLI capabilities to operators, making it easy to invoke supported
out-of-bandtasks.
Non-Goals
- In the current scope, capability to abort/suspend an
out-of-bandtask is not going to be provided. This could be considered as an enhancement based on pull. - Ordering (by establishing dependency) of
out-of-bandtasks submitted for the same etcd cluster has not been considered in the first increment. In a future version based on how operator tasks are used, we will enhance this proposal and the implementation.
Proposal
Authors propose creation of a new single dedicated custom resource to represent an out-of-band task. Etcd-druid will be enhanced to process the task requests and update its status which can then be tracked/observed.
Custom Resource Golang API
EtcdOperatorTask is the new custom resource that will be introduced. This API will be in v1alpha1 version and will be subject to change. We will be respecting Kubernetes Deprecation Policy.
// EtcdOperatorTask represents an out-of-band operator task resource.
type EtcdOperatorTask struct {
metav1.TypeMeta
metav1.ObjectMeta
// Spec is the specification of the EtcdOperatorTask resource.
Spec EtcdOperatorTaskSpec `json:"spec"`
// Status is most recently observed status of the EtcdOperatorTask resource.
Status EtcdOperatorTaskStatus `json:"status,omitempty"`
}
Spec
The authors propose that the following fields should be specified in the spec (desired state) of the EtcdOperatorTask custom resource.
- To capture the type of
out-of-bandoperator task to be performed,.spec.typefield should be defined. It can have values from all supportedout-of-bandtasks eg. “OnDemandSnaphotTask”, “QuorumLossRecoveryTask” etc. - To capture the configuration specific to each task, a
.spec.configfield should be defined of typestringas each task can have different input configuration.
// EtcdOperatorTaskSpec is the spec for a EtcdOperatorTask resource.
type EtcdOperatorTaskSpec struct {
// Type specifies the type of out-of-band operator task to be performed.
Type string `json:"type"`
// Config is a task specific configuration.
Config string `json:"config,omitempty"`
// TTLSecondsAfterFinished is the time-to-live to garbage collect the
// related resource(s) of task once it has been completed.
// +optional
TTLSecondsAfterFinished *int32 `json:"ttlSecondsAfterFinished,omitempty"`
// OwnerEtcdReference refers to the name and namespace of the corresponding
// Etcd owner for which the task has been invoked.
OwnerEtcdRefrence types.NamespacedName `json:"ownerEtcdRefrence"`
}
Status
The authors propose the following fields for the Status (current state) of the EtcdOperatorTask custom resource to monitor the progress of the task.
// EtcdOperatorTaskStatus is the status for a EtcdOperatorTask resource.
type EtcdOperatorTaskStatus struct {
// ObservedGeneration is the most recent generation observed for the resource.
ObservedGeneration *int64 `json:"observedGeneration,omitempty"`
// State is the last known state of the task.
State TaskState `json:"state"`
// Time at which the task has moved from "pending" state to any other state.
InitiatedAt metav1.Time `json:"initiatedAt"`
// LastError represents the errors when processing the task.
// +optional
LastErrors []LastError `json:"lastErrors,omitempty"`
// Captures the last operation status if task involves many stages.
// +optional
LastOperation *LastOperation `json:"lastOperation,omitempty"`
}
type LastOperation struct {
// Name of the LastOperation.
Name opsName `json:"name"`
// Status of the last operation, one of pending, progress, completed, failed.
State OperationState `json:"state"`
// LastTransitionTime is the time at which the operation state last transitioned from one state to another.
LastTransitionTime metav1.Time `json:"lastTransitionTime"`
// A human readable message indicating details about the last operation.
Reason string `json:"reason"`
}
// LastError stores details of the most recent error encountered for the task.
type LastError struct {
// Code is an error code that uniquely identifies an error.
Code ErrorCode `json:"code"`
// Description is a human-readable message indicating details of the error.
Description string `json:"description"`
// ObservedAt is the time at which the error was observed.
ObservedAt metav1.Time `json:"observedAt"`
}
// TaskState represents the state of the task.
type TaskState string
const (
TaskStateFailed TaskState = "Failed"
TaskStatePending TaskState = "Pending"
TaskStateRejected TaskState = "Rejected"
TaskStateSucceeded TaskState = "Succeeded"
TaskStateInProgress TaskState = "InProgress"
)
// OperationState represents the state of last operation.
type OperationState string
const (
OperationStateFailed OperationState = "Failed"
OperationStatePending OperationState = "Pending"
OperationStateCompleted OperationState = "Completed"
OperationStateInProgress OperationState = "InProgress"
)
Custom Resource YAML API
apiVersion: druid.gardener.cloud/v1alpha1
kind: EtcdOperatorTask
metadata:
name: <name of operator task resource>
namespace: <cluster namespace>
generation: <specific generation of the desired state>
spec:
type: <type/category of supported out-of-band task>
ttlSecondsAfterFinished: <time-to-live to garbage collect the custom resource after it has been completed>
config: <task specific configuration>
ownerEtcdRefrence: <refer to corresponding etcd owner name and namespace for which task has been invoked>
status:
observedGeneration: <specific observedGeneration of the resource>
state: <last known current state of the out-of-band task>
initiatedAt: <time at which task move to any other state from "pending" state>
lastErrors:
- code: <error-code>
description: <description of the error>
observedAt: <time the error was observed>
lastOperation:
name: <operation-name>
state: <task state as seen at the completion of last operation>
lastTransitionTime: <time of transition to this state>
reason: <reason/message if any>
Lifecycle
Creation
Task(s) can be created by creating an instance of the EtcdOperatorTask custom resource specific to a task.
Note: In future, either a
kubectlextension plugin or adruidctltool will be introduced. Dedicated sub-commands will be created for eachout-of-bandtask. This will drastically increase the usability for an operator for performing such tasks, as the CLI extension will automatically create relevant instance(s) ofEtcdOperatorTaskwith the provided configuration.
Execution
- Authors propose to introduce a new controller which watches for
EtcdOperatorTaskcustom resource. - Each
out-of-bandtask may have some task specific configuration defined in .spec.config. - The controller needs to parse this task specific config, which comes as a string, according to the schema defined for each task.
- For every
out-of-bandtask, a set ofpre-conditionscan be defined. These pre-conditions are evaluated against the current state of the target etcd cluster. Based on the evaluation result (boolean), the task is permitted or denied execution. - If multiple tasks are invoked simultaneously or in
pendingstate, then they will be executed in a First-In-First-Out (FIFO) manner.
Note: Dependent ordering among tasks will be addressed later which will enable concurrent execution of tasks when possible.
Deletion
Upon completion of the task, irrespective of its final state, Etcd-druid will ensure the garbage collection of the task custom resource and any other Kubernetes resources created to execute the task. This will be done according to the .spec.ttlSecondsAfterFinished if defined in the spec, or a default expiry time will be assumed.
Use Cases
Recovery from permanent quorum loss
Recovery from permanent quorum loss involves two phases - identification and recovery - both of which are done manually today. This proposal intends to automate the latter. Recovery today is a multi-step process and needs to be performed carefully by a human operator. Automating these steps would be prudent, to make it quicker and error-free. The identification of the permanent quorum loss would remain a manual process, requiring a human operator to investigate and confirm that there is indeed a permanent quorum loss with no possibility of auto-healing.
Task Config
We do not need any config for this task. When creating an instance of EtcdOperatorTask for this scenario, .spec.config will be set to nil (unset).
Pre-Conditions
- There should be a quorum loss in a multi-member etcd cluster. For a single-member etcd cluster, invoking this task is unnecessary as the restoration of the single member is automatically handled by the backup-restore process.
- There should not already be a permanent-quorum-loss-recovery-task running for the same etcd cluster.
Trigger on-demand snapshot compaction
Etcd-druid provides a configurable etcd-events-threshold flag. When this threshold is breached, then a snapshot compaction is triggered for the etcd cluster. However, there are scenarios where an ad-hoc snapshot compaction may be required.
Possible Scenarios
- If an operator anticipates a scenario of permanent quorum loss, they can trigger an
on-demand snapshot compactionto create a compacted full-snapshot. This can potentially reduce the recovery time from a permanent quorum loss. - As an additional benefit, a human operator can leverage the current implementation of snapshot compaction, which internally triggers
restoration. Hence, by initiating anon-demand snapshot compactiontask, the operator can verify the integrity of etcd cluster backups, particularly in cases of potential backup corruption or re-encryption. The success or failure of this snapshot compaction can offer valuable insights into these scenarios.
Task Config
We do not need any config for this task. When creating an instance of EtcdOperatorTask for this scenario, .spec.config will be set to nil (unset).
Pre-Conditions
- There should not be a
on-demand snapshot compactiontask already running for the same etcd cluster.
Note:
on-demand snapshot compactionruns as a separate job in a separate pod, which interacts with the backup bucket and not the etcd cluster itself, hence it doesn’t depend on the health of etcd cluster members.
Trigger on-demand full/delta snapshot
Etcd custom resource provides an ability to set FullSnapshotSchedule which currently defaults to run once in 24 hrs. DeltaSnapshotPeriod is also made configurable which defines the duration after which a delta snapshot will be taken.
If a human operator does not wish to wait for the scheduled full/delta snapshot, they can trigger an on-demand (out-of-schedule) full/delta snapshot on the etcd cluster, which will be taken by the leading-backup-restore.
Possible Scenarios
- An on-demand full snapshot can be triggered if scheduled snapshot fails due to any reason.
- Gardener Shoot Hibernation: Every etcd cluster incurs an inherent cost of preserving the volumes even when a gardener shoot control plane is scaled down, i.e the shoot is in a hibernated state. However, it is possible to save on hyperscaler costs by invoking this task to take a full snapshot before scaling down the etcd cluster, and deleting the etcd data volumes afterwards.
- Gardener Control Plane Migration: In gardener, a cluster control plane can be moved from one seed cluster to another. This process currently requires the etcd data to be replicated on the target cluster, so a full snapshot of the etcd cluster in the source seed before the migration would allow for faster restoration of the etcd cluster in the target seed.
Task Config
// SnapshotType can be full or delta snapshot.
type SnapshotType string
const (
SnapshotTypeFull SnapshotType = "full"
SnapshotTypeDelta SnapshotType = "delta"
)
type OnDemandSnapshotTaskConfig struct {
// Type of on-demand snapshot.
Type SnapshotType `json:"type"`
}
spec:
config: |
type: <type of on-demand snapshot>
Pre-Conditions
- Etcd cluster should have a quorum.
- There should not already be a
on-demand snapshottask running with the sameSnapshotTypefor the same etcd cluster.
Trigger on-demand maintenance of etcd cluster
Operator can trigger on-demand maintenance of etcd cluster which includes operations like etcd compaction, etcd defragmentation etc.
Possible Scenarios
- If an etcd cluster is heavily loaded, which is causing performance degradation of an etcd cluster, and the operator does not want to wait for the scheduled maintenance window then an
on-demand maintenancetask can be triggered which will invoke etcd-compaction, etcd-defragmentation etc. on the target etcd cluster. This will make the etcd cluster lean and clean, thus improving cluster performance.
Task Config
type OnDemandMaintenanceTaskConfig struct {
// MaintenanceType defines the maintenance operations need to be performed on etcd cluster.
MaintenanceType maintenanceOps `json:"maintenanceType`
}
type maintenanceOps struct {
// EtcdCompaction if set to true will trigger an etcd compaction on the target etcd.
// +optional
EtcdCompaction bool `json:"etcdCompaction,omitempty"`
// EtcdDefragmentation if set to true will trigger a etcd defragmentation on the target etcd.
// +optional
EtcdDefragmentation bool `json:"etcdDefragmentation,omitempty"`
}
spec:
config: |
maintenanceType:
etcdCompaction: <true/false>
etcdDefragmentation: <true/false>
Pre-Conditions
- Etcd cluster should have a quorum.
- There should not already be a duplicate task running with same
maintenanceType.
Copy Backups Task
Copy the backups(full and delta snapshots) of etcd cluster from one object store(source) to another object store(target).
Possible Scenarios
- In Gardener, the Control Plane Migration process utilizes the copy-backups task. This task is responsible for copying backups from one object store to another, typically located in different regions.
Task Config
// EtcdCopyBackupsTaskConfig defines the parameters for the copy backups task.
type EtcdCopyBackupsTaskConfig struct {
// SourceStore defines the specification of the source object store provider.
SourceStore StoreSpec `json:"sourceStore"`
// TargetStore defines the specification of the target object store provider for storing backups.
TargetStore StoreSpec `json:"targetStore"`
// MaxBackupAge is the maximum age in days that a backup must have in order to be copied.
// By default all backups will be copied.
// +optional
MaxBackupAge *uint32 `json:"maxBackupAge,omitempty"`
// MaxBackups is the maximum number of backups that will be copied starting with the most recent ones.
// +optional
MaxBackups *uint32 `json:"maxBackups,omitempty"`
}
spec:
config: |
sourceStore: <source object store specification>
targetStore: <target object store specification>
maxBackupAge: <maximum age in days that a backup must have in order to be copied>
maxBackups: <maximum no. of backups that will be copied>
Note: For detailed object store specification please refer here
Pre-Conditions
- There should not already be a
copy-backupstask running.
Note:
copy-backups-taskruns as a separate job, and it operates only on the backup bucket, hence it doesn’t depend on health of etcd cluster members.
Note:
copy-backups-taskhas already been implemented and it’s currently being used in Control Plane Migration butcopy-backups-taskwill be harmonized withEtcdOperatorTaskcustom resource.
Metrics
Authors proposed to introduce the following metrics:
etcddruid_operator_task_duration_seconds: Histogram which captures the runtime for each etcd operator task. Labels:- Key:
type, Value: all supported tasks - Key:
state, Value: One-Of {failed, succeeded, rejected} - Key:
etcd, Value: name of the target etcd resource - Key:
etcd_namespace, Value: namespace of the target etcd resource
- Key:
etcddruid_operator_tasks_total: Counter which counts the number of etcd operator tasks. Labels:- Key:
type, Value: all supported tasks - Key:
state, Value: One-Of {failed, succeeded, rejected} - Key:
etcd, Value: name of the target etcd resource - Key:
etcd_namespace, Value: namespace of the target etcd resource
- Key:
6.2.28 - Prepare Dev Environment
Prepare Dev Environment
This guide will provide with detailed instructions on installing all dependencies and tools that are required to start developing and testing etcd-druid.
[macOS only] Installing Homebrew
Hombrew is a popular package manager for macOS. You can install it by executing the following command in a terminal:
/bin/bash -c "$(curl -fsSL https://raw.githubusercontent.com/Homebrew/install/HEAD/install.sh)"
Installing Go
On macOS run:
brew install go
Alternatively you can also follow the Go installation documentation.
Installing Git
We use git as VCS which you need to install.
On macOS run:
brew install git
For other OS, please check the Git installation documentation.
Installing Docker
You need to have docker installed and running. This will allow starting a kind cluster or a minikube cluster for locally deploying etcd-druid.
On macOS run:
brew install docker
Alternatively you can also follow the Docker installation documentation.
Installing Kubectl
To interact with the local Kubernetes cluster you will need kubectl. On macOS run:
brew install kubernetes-cli
For other OS, please check the Kubectl installation documentation.
Other tools that might come in handy
To operate etcd-druid you do not need these tools but they usually come in handy when working with YAML/JSON files.
On macOS run:
# jq (https://jqlang.github.io/jq/) is a lightweight and flexible command-line JSON processor
brew install jq
# yq (https://mikefarah.gitbook.io/yq) is a lightweight and portable command-line YAML processor.
brew install yq
Get the sources
Clone the repository from Github into your $GOPATH.
mkdir -p $(go env GOPATH)/src/github.com/gardener
cd $(go env GOPATH)src/github.com/gardener
git clone https://github.com/gardener/etcd-druid.git
# alternatively you can also use `git clone git@github.com:gardener/etcd-druid.git`
6.2.29 - Prepare Helm Charts
Prepare etcd-druid Helm charts
etcd-druid operator can be deployed via helm charts. The charts can be found here. All Makefile deploy* targets employ skaffold which internally uses the same helm charts to deploy all resources to setup etcd-druid. In the following sections you will learn on the prerequisites, generated/copied resources and kubernetes resources that are deployed via helm charts to setup etcd-druid.
Prerequisite
Installing Helm
If you wish to directly use helm charts then please ensure that helm is already installed.
On macOS, you can install via brew:
brew install helm
For all other OS please check Helm installation instructions.
Installing OpenSSL
OpenSSL is used to generate PKI resources that are used to configure TLS connectivity with the webhook(s). On macOS, you can install via brew:
brew install openssl
For all other OS please check OpenSSL download instructions.
NOTE: On linux, the library is available via native package managers like
apt,yumetc. On Windows, you can get the installer here.
Generated/Copied resources
To leverage etcd-druid helm charts you need to ensure that the charts contains the required CRD yaml files and PKI resources.
CRDs
Heml-3 provides special status to CRDs. CRD YAML files should be placed in crds/ directory inside of a chart. Helm will attempt to load all the files in this directory. We now generate the CRDs and keep these at etcd-druid/api/core/v1alpha1/crds which serves as a single source of truth for all custom resource specifications under etcd-druid operator. These CRDs needs to be copied to etcd-druid/charts/crds.
PKI resources
Webhooks communicate over TLS with the kube-apiserver. It is therefore essential to generate PKI resources (CA certificate, Server certificate and Server key) to be used to configure Webhook configuration and mount it to the etcd-druid operator Deployment.
Kubernetes Resources
etcd-druid helm charts creates the following kubernetes resources:
| Resource | Description |
|---|---|
| ApiVersion: apps/v1 Kind: Deployment | This is the etcd-druid Deployment which runs etcd-druid operator. All reconcilers run as part of this operator. |
| ApiVersion: rbac.authorization.k8s.io/v1 Kind: ClusterRole | etcd-druid manages Etcd resources deployed across namespaces. A cluster role provides required roles to etcd-druid operator for all the resources that are created for an etcd cluster. |
| ApiVersion: v1 Kind: ServiceAccount | It defines a system user with which etcd-druid operator will function. The service account name will be configured in the Deployment at spec.template.spec.serviceAccountName |
| ApiVersion:rbac.authorization.k8s.io/v1 Kind: ClusterRoleBinding | Binds the cluster roles to the ServiceAccount thus associating all cluster roles to the system user with which etcd-druid operator will be run. |
| ApiVersion: v1 Kind: Service | ClusterIP service which will provide a logical endpoint to reach any etcd-druid pods. |
| ApiVersion: v1 Kind: Secret | A secret containing the webhook server certificate and key will be created and mounted onto the Deployment. |
| ApiVersion: admissionregistration.k8s.io/v1 Kind: ValidatingWebhookConfiguration | It is the validation webhook configuration. Currently there is only one webhook etcdcomponents . For more details see here. |
Chart Values
A values.yaml is defined which contains the default set of values for all configurable properties. You can change the values as per your needs. A few properties of note:
image
Points to the image URL that will be configured in etcd-druid Deployment. If you are building the image on your own and pushing it to the repository of your choice then ensure that you change the value accordingly.
webhookPKI
This YAML map contains paths to required PKI artifacts. If you are generating these on your own then ensure that you provide correct paths to these resources.
etcdComponentProtection
By default, this webhook is enabled. This is a good default for production environments. However, while you are actively developing then you can choose to disable this webhook.
If you have switched to using OperatorConfiguration then you must set enabledOperatorConfig to true (for backward compatibility reasons it is defaulted to false) and then control the enablement of EtcdComponentProctection webhook via operatorConfig.webhooks.etcdComponentProtection.enabled property.
If you have not yet switched to using OperatorConfiguration then you can control the enablement of this webhook via webhooks.etcdComponentProtection.enabled property.
Makefile target
A convenience Makefile target make prepare-helm-charts is provided which leverages OpenSSL to generate the required PKI artifacts.
If you wish to deploy etcd-druid in a specific namespace then prior to running this Makefile target you can run:
export NAMESPACE=<namespace>
!!! info
Specifying a namespace other than default will result in additional SAN being added in the webhook server certificate.
By default, the certificates generated have an expiry of 12h. If you wish to have a different expiry then prior to running this Makefile target you can run:
export CERT_EXPIRY=<duration-of-your-choice>
# example: export CERT_EXPIRY=6h
!!! note
If you are using make deploy* targets directly which leverages skaffold then Makefile target prepare-helm-charts will be invoked automatically.
6.2.30 - Production Setup Recommendations
Setting up etcd-druid in Production
You can get familiar with etcd-druid and all the resources that it creates by setting up etcd-druid locally by following the detailed guide. This document lists down recommendations for a productive setup of etcd-druid.
Helm Charts
You can use helm charts at this location to deploy druid. Values for charts are present here and can be configured as per your requirement. Following charts are present:
deployment.yaml- defines a kubernetes Deployment for etcd-druid. To configure the CLI flags for druid you can refer to this document which explains these flags in detail.serviceaccount.yaml- defines a kubernetes ServiceAccount which will serve as a technical user to which role/clusterroles can be bound.clusterrole.yaml- etcd-druid can manage multiple etcd clusters. In ahosted control planesetup (e.g. Gardener), one would typically create separate namespace per control-plane. This would require a ClusterRole to be defined which gives etcd-druid permissions to operate across namespaces. Packing control-planes via namespaces provides you better resource utilisation while providing you isolation from the data-plane (where the actual workload is scheduled).rolebinding.yaml- binds the ClusterRole defined indruid-clusterrole.yamlto the ServiceAccount defined inservice-account.yaml.service.yaml- defines aCluster IPService allowing other control-plane components to communicate tohttpendpoints exposed out of etcd-druid (e.g. enables prometheus to scrap metrics, validating webhook to be invoked upon change toEtcdCR etc.)secret-ca-crt.yaml- Contains the base64 encoded CA certificate used for the etcd-druid webhook server.secret-server-tls-crt.yaml- Contains the base64 encoded server certificate used for the etcd-druid webhook server.validating-webhook-config.yaml- Configuration for all webhooks that etcd-druid registers to the webhook server. At the time of writing this document EtcdComponents webhook gets registered.
Etcd cluster size
Recommendation from upstream etcd is to always have an odd number of members in an Etcd cluster.
Mounted Volume
All Etcd cluster member Pods provisioned by etcd-druid mount a Persistent Volume. A mounted persistent storage helps in faster recovery in case of single-member transient failures. etcd is I/O intensive and its performance is heavily dependent on the Storage Class. It is therefore recommended that high performance SSD drives be used.
At the time of writing this document etcd-druid provisions the following volume types:
| Cloud Provider | Type | Size |
|---|---|---|
| AWS | GP3 | 25Gi |
| Azure | Premium SSD | 33Gi |
| GCP | Performance (SSD) Persistent Disks (pd-ssd) | 25Gi |
Also refer: Etcd Disk recommendation.
Additionally, each cloud provider offers redundancy for managed disks. You should choose redundancy as per your availability requirement.
Backup & Restore
A permanent quorum loss or data-volume corruption is a reality in production clusters and one must ensure that data loss is minimized. Etcd clusters provisioned via etcd-druid offer two levels of data-protection
Via etcd-backup-restore all clusters started via etcd-druid get the capability to regularly take delta & full snapshots. These snapshots are stored in an object store. Additionally, a snapshot-compaction job is run to compact and defragment the latest snapshot, thereby reducing the time it takes to restore a cluster in case of a permanent quorum loss. You can read the detailed guide on how to restore from permanent quorum loss.
It is therefore recommended that you configure an Object store in the cloud/infra provider of your choice, enabled backup & restore functionality by filling in store configuration of an Etcd custom CR.
Ransomware protection
Ransomware is a form of malware designed to encrypt files on a device, rendering any files and the systems that rely on them unusable. All cloud providers (aws, gcp, azure) provide a feature of immutability that can be set at the bucket/object level which provides WORM access to objects as long as the bucket/lock retention duration.
All delta & full snapshots that are periodically taken by etcd-backup-restore are stored in Object store provided by a cloud provider. It is recommended that these backups be protected from ransomware protection by turning locking at the bucket/object level.
Security
Use Distroless Container Images
It is generally recommended to use a minimal base image which additionally reduces the attack surface. Google’s Distroless is one way to reduce the attack surface and also minimize the size of the base image. It provides the following benefits:
- Reduces the attack surface
- Minimizes vulnerabilities
- No shell
- Reduced size - only includes what is necessary
For every Etcd cluster provisioned by etcd-druid, distroless images are used as base images.
Enable TLS for Peer and Client communication
Generally you should enable TLS for peer and client communication for an Etcd cluster. To enable TLS CA certificate, server and client certificates needs to be generated.
You can refer to the list of TLS artifacts that are generated for an Etcd cluster provisioned by etcd-druid here.
Enable TLS for Druid Webhooks
If you choose to enable webhooks in etcd-druid then it is necessary to create a separate CA and server certificate to be used by the webhooks.
Rotate TLS artifacts
It is generally recommended to rotate all TLS certificates to reduce the chances of it getting leaked or have expired. Kubernetes does not support revocation of certificates (see issue#18982). One possible way to revoke certificates is to also revoke the entire chain including CA certificates.
Scaling etcd pods
etcd clusters cannot be scaled-out horizontly to meet the increased traffic/storage demand for the following reasons:
- There is a soft limit of 8GB and a hard limit of 10GB for the etcd DB beyond which perfomance and stability of etcd is not guaranteed.
- All members of etcd maintain the entire replica of the entire DB, thus scaling-out will not really help if the storage demand grows.
- Increasing the number of cluster members beyond 5 also increases the cost of consensus amongst now a larger quorum, increases load on the single leader as it needs to also participate in bringing up etcd learner.
Therefore the following is recommended:
- To meet the increased demand, configure a VPA. You have to be careful on selection of
containerPolicies,targetRef. - To meet the increased demand in storage etcd-druid already configures each etcd member to auto-compact and it also configures periodic defragmentation of the etcd DB. The only case this will not help is when you only have unique writes all the time.
!!! note
Care should be taken with usage of VPA. While it helps to vertically scale up etcd-member pods, it also can cause transient quorum loss. This is a direct consequence of the design of VPA - where recommendation is done by Recommender component, Updater evicts the pods that do not have the resources recommended by the Recommender and Admission Controller which updates the resources on the Pods. All these three components act asynchronously and can fail independently, so while VPA respects PDB’s it can easily enter into a state where updater evicts a pod while respecting PDB but the admission controller fails to apply the recommendation. The pod comes with a default resources which still differ from the recommended values, thus causing a repeat eviction. There are other race conditions that can also occur and one needs to be careful of using VPA for quorum based workloads.
High Availability
To ensure that an Etcd cluster is highly available, following is recommended:
Ensure that the Etcd cluster members are spread
Etcd cluster members should always be spread across nodes. This provides you failure tolerance at the node level. For failure tolerance of a zone, it is recommended that you spread the Etcd cluster members across zones.
We recommend that you use a combination of TopologySpreadConstraints and Pod Anti-Affinity. To set the scheduling constraints you can either specify these constraints using SchedulingConstraints in the Etcd custom resource or use a MutatingWebhook to dynamically inject these into pods.
An example of scheduling constraints for a multi-node cluster with zone failure tolerance will be:
topologySpreadConstraints:
- labelSelector:
matchLabels:
app.kubernetes.io/component: etcd-statefulset
app.kubernetes.io/managed-by: etcd-druid
app.kubernetes.io/name: etcd-main
app.kubernetes.io/part-of: etcd-main
maxSkew: 1
minDomains: 3
topologyKey: kubernetes.io/hostname
whenUnsatisfiable: DoNotSchedule
- labelSelector:
matchLabels:
app.kubernetes.io/component: etcd-statefulset
app.kubernetes.io/managed-by: etcd-druid
app.kubernetes.io/name: etcd-main
app.kubernetes.io/part-of: etcd-main
maxSkew: 1
minDomains: 3
topologyKey: topology.kubernetes.io/zone
whenUnsatisfiable: DoNotSchedule
For a 3 member etcd-cluster, the above TopologySpreadConstraints will ensure that the members will be spread across zones (assuming there are 3 zones -> minDomains=3) and no two members will be on the same node.
Optimize Network Cost
In most cloud providers there is no network cost (ingress/egress) for any traffic that is confined within a single zone. For Zonal failure tolerance, it will become imperative to spread the Etcd cluster across zones within a region. Knowing that an Etcd cluster members are quite chatty (leader election, consensus building for writes and linearizable reads etc.), this can add to the network cost.
One could evaluate using TopologyAwareRouting which reduces cross-zonal traffic thus saving costs and latencies.
!!! tip You can read about how it is done in Gardener here.
Metrics & Alerts
Monitoring etcd metrics is essential for fine tuning Etcd clusters. etcd already exports a lot of metrics. You can see the complete list of metrics that are exposed out of an Etcd cluster provisioned by etcd-druid here. It is also recommended that you configure an alert for etcd space quota alarms.
Hibernation
If you have a concept of hibernating kubernetes clusters, then following should be kept in mind:
- Before you bring down the
Etcdcluster, leverage the capability to take afull snapshotwhich captures the state of the etcd DB and stores it in the configured Object store. This ensures that when the cluster is woken up from hibernation it can restore from the last state with no data loss. - To save costs you should consider deleting the PersistentVolumeClaims associated to the StatefulSet pods. However, it must be ensured that you take a full snapshot as highlighted in the previous point.
- When the cluster is woken up from hibernation then you should do the following (assuming prior to hibernation the cluster had a size of 3 members):
- Start the
Etcdcluster with 1 replica. Let it restore from the last full snapshot. - Once the cluster reports that it is ready, only then increase the replicas to its original value (e.g. 3). The other two members will start up each as learners and post learning they will join as voting members (
Followers).
- Start the
Reference
- A nicely written blog post on
High Availability and Zone Outage Tolerationhas a lot of recommendations that one can borrow from.
6.2.31 - Raising A Pr
Raising a Pull Request
We welcome active contributions from the community. This document details out the things-to-be-done in order for us to consider a PR for review. Contributors should follow the guidelines mentioned in this document to minimize the time it takes to get the PR reviewed.
00-Prerequisites
In order to make code contributions you must setup your development environment. Follow the Prepare Dev Environment Guide for detailed instructions.
01-Raise an Issue
For every pull-request, it is mandatory to raise an Issue which should describe the problem in detail. We have created a few categories, each having its own dedicated template.
03-Prepare Code Changes
It is not recommended to create a branch on the main repository for raising pull-requests. Instead you must fork the
etcd-druidrepository and create a branch in the fork. You can follow the detailed instructions on how to fork a repository and set it up for contributions.Ensure that you follow the coding guidelines while introducing new code.
If you are making changes to the API then please read Changing-API documentation.
If you are introducing new go mod dependencies then please read Dependency Management documentation.
If you are introducing a new
Etcdcluster component then please read Add new Cluster Component documentation.For guidance on testing, follow the detailed instructions here.
Before you submit your PR, please ensure that the following is done:
Run
make checkwhich will do the following:- Runs
make format- this target will ensure a common formatting of the code and ordering of imports across all source files. - Runs
make manifests- this target will re-generate manifests if there are any changes in the API. - Only when the above targets have run without errorrs, then
make checkwill be run linters against the code. The rules for the linter are configured here.
- Runs
Ensure that all the tests pass by running the following
maketargets:make test-unit- this target will run all unit tests.make test-integration- this target will run all integration tests (controller level tests) usingenvtestframework.make ci-e2e-kindor any of its variants - these targets will run etcd-druid e2e tests.
!!! warning Please ensure that after introduction of new code the code coverage does not reduce. An increase in code coverage is always welcome.
If you add new features, make sure that you create relevant documentation under
/docs.
04-Raise a pull request
- Create Work In Progress [WIP] pull requests only if you need a clarification or an explicit review before you can continue your work item.
- Ensure that you have rebased your fork’s development branch with
upstreammain/master branch. - Squash all commits into a minimal number of commits.
- Fill in the PR template with appropriate details and provide the link to the
Issuefor which a PR has been raised. - If your patch is not getting reviewed, or you need a specific person to review it, you can @-reply a reviewer asking for a review in the pull request or a comment.
05-Post review
- If a reviewer requires you to change your commit(s), please test the changes again.
- Amend the affected commit(s) and force push onto your branch.
- Set respective comments in your GitHub review as resolved.
- Create a general PR comment to notify the reviewers that your amendments are ready for another round of review.
06-Merging a pull request
- Merge can only be done if the PR has approvals from atleast 2 reviewers.
- Add an appropriate release note detailing what is introduced as part of this PR.
- Before merging the PR, ensure that you squash and then merge.
6.2.32 - Recovering Etcd Clusters
Recovery from Quorum Loss
In an Etcd cluster, quorum is a majority of nodes/members that must agree on updates to a cluster state before the cluster can authorise the DB modification. For a cluster with n members, quorum is (n/2)+1. An Etcd cluster is said to have lost quorum when majority of nodes (greater than or equal to (n/2)+1) are unhealthy or down and as a consequence cannot participate in consensus building.
For a multi-node Etcd cluster quorum loss can either be Transient or Permanent.
Transient quorum loss
If quorum is lost through transient network failures (e.g. n/w partitions) or there is a spike in resource usage which results in OOM, etcd automatically and safely resumes (once the network recovers or the resource consumption has come down) and restores quorum. In other cases like transient power loss, etcd persists the Raft log to disk and replays the log to the point of failure and resumes cluster operation.
Permanent quorum loss
In case the quorum is lost due to hardware failures or disk corruption etc, automatic recovery is no longer possible and it is categorized as a permanent quorum loss.
Note: If one has capability to detect
Failednodes and replace them, then eventually new nodes can be launched and etcd cluster can recover automatically. But sometimes this is just not possible.
Recovery
At present, recovery from a permanent quorum loss is achieved by manually executing the steps listed in this section.
Note: In the near future etcd-druid will offer capability to automate the recovery from a permanent quorum loss via Out-Of-Band Operator Tasks. An operator only needs to ascertain that there is a permanent quorum loss and the etcd-cluster is beyond auto-recovery. Once that is established then an operator can invoke a task whose status an operator can check.
!!! warning Please note that manually restoring etcd can result in data loss. This guide is the last resort to bring an Etcd cluster up and running again.
00-Identify the etcd cluster
It is possible to shard the etcd cluster based on resource types using –etcd-servers-overrides CLI flag of kube-apiserver. Any sharding results in more than one etcd-cluster.
!!! info
In gardener, each shoot control plane has two etcd clusters, etcd-events which only stores events and etcd-main - stores everything else except events.
Identify the etcd-cluster which has a permanent quorum loss. Most of the resources of an etcd-cluster can be identified by its name. The resources of interest to recover from permanent quorum loss are: Etcd CR, StatefulSet, ConfigMap and PVC.
To identify the
ConfigMapresource use the following command:
kubectl get sts <sts-name> -o jsonpath='{.spec.template.spec.volumes[?(@.name=="etcd-config-file")].configMap.name}'
01-Prepare Etcd Resource to allow manual updates
To ensure that only one actor (in this case an operator) makes changes to the Etcd resource and also to the Etcd cluster resources, following must be done:
Add the annotation to the Etcd resource:
kubectl annotate etcd <etcd-name> -n <namespace> druid.gardener.cloud/suspend-etcd-spec-reconcile=
The above annotation will prevent any reconciliation by etcd-druid for this Etcd cluster.
Add another annotation to the Etcd resource:
kubectl annotate etcd <etcd-name> -n <namespace> druid.gardener.cloud/disable-etcd-component-protection=
The above annotation will allow manual edits to Etcd cluster resources that are managed by etcd-druid.
02-Scale-down Etcd StatefulSet resource to 0
kubectl scale sts <sts-name> --replicas=0 -n <namespace>
03-Delete all PVCs for the Etcd cluster
kubectl delete pvc -l instance=<sts-name> -n <namespace>
04-Delete All Member Leases
For a n member Etcd cluster there should be n member Lease objects. The lease names should start with the Etcd name.
Example leases for a 3 node Etcd cluster:
NAME HOLDER AGE
<etcd-name>-0 4c37667312a3912b:Member 1m
<etcd-name>-1 75a9b74cfd3077cc:Member 1m
<etcd-name>-2 c62ee6af755e890d:Leader 1m
Delete all the member leases.
kubectl delete lease <space separated lease names>
# Alternatively you can use label selector. From v0.23.0 onwards leases will have common set of labels
kubectl delete lease -l app.kubernetes.io.component=etcd-member-lease, app.kubernetes.io/part-of=<etcd-name> -n <namespace>
05-Modify ConfigMap
Prerequisite to scale up etcd-cluster from 0->1 is to change the fields initial-cluster, initial-advertise-peer-urls, and advertise-client-urls in the ConfigMap.
Assuming that prior to scale-down to 0, there were 3 members:
The initial-cluster field would look like the following (assuming that the name of the etcd resource is etcd-main):
# Initial cluster
initial-cluster: etcd-main-0=https://etcd-main-0.etcd-main-peer.default.svc:2380,etcd-main-1=https://etcd-main-1.etcd-main-peer.default.svc:2380,etcd-main-2=https://etcd-main-2.etcd-main-peer.default.svc:2380
Change the initial-cluster field to have only one member (in this case etcd-main-0). After the change it should look like:
# Initial cluster
initial-cluster: etcd-main-0=https://etcd-main-0.etcd-main-peer.default.svc:2380
The initial-advertise-peer-urls field would look like the following:
# Initial advertise peer urls
initial-advertise-peer-urls:
etcd-main-0:
- http://etcd-main-0.etcd-main-peer.default.svc:2380
etcd-main-1:
- http://etcd-main-1.etcd-main-peer.default.svc:2380
etcd-main-2:
- http://etcd-main-2.etcd-main-peer.default.svc:2380
Change the initial-advertise-peer-urls field to have only one member (in this case etcd-main-0). After the change it should look like:
# Initial advertise peer urls
initial-advertise-peer-urls:
etcd-main-0:
- http://etcd-main-0.etcd-main-peer.default.svc:2380
The advertise-client-urls field would look like the following:
advertise-client-urls:
etcd-main-0:
- http://etcd-main-0.etcd-main-peer.default.svc:2379
etcd-main-1:
- http://etcd-main-1.etcd-main-peer.default.svc:2379
etcd-main-2:
- http://etcd-main-2.etcd-main-peer.default.svc:2379
Change the advertise-client-urls field to have only one member (in this case etcd-main-0). After the change it should look like:
advertise-client-urls:
etcd-main-0:
- http://etcd-main-0.etcd-main-peer.default.svc:2379
06-Scale up Etcd cluster to size 1
kubectl scale sts <sts-name> -n <namespace> --replicas=1
07-Wait for Single-Member etcd cluster to be completely ready
To check if the single-member etcd cluster is ready check the status of the pod.
kubectl get pods <etcd-name-0> -n <namespace>
NAME READY STATUS RESTARTS AGE
<etcd-name>-0 2/2 Running 0 1m
If both containers report readiness (as seen above), then the etcd-cluster is considered ready.
08-Enable Etcd reconciliation and resource protection
All manual changes are now done. We must now re-enable etcd-cluster resource protection and also enable reconciliation by etcd-druid by doing the following:
kubectl annotate etcd <etcd-name> -n <namespace> druid.gardener.cloud/suspend-etcd-spec-reconcile-
kubectl annotate etcd <etcd-name> -n <namespace> druid.gardener.cloud/disable-etcd-component-protection-
09-Scale-up Etcd Cluster to 3 and trigger reconcile
Scale etcd-cluster to its original size (we assumed 3 below).
kubectl scale sts <sts-name> -n namespace --replicas=3
If etcd-druid has been set up with --enable-etcd-spec-auto-reconcile switched-off then to ensure reconciliation one must annotate Etcd resource with the following command:
# Annotate etcd CR to reconcile
kubectl annotate etcd <etcd-name> -n <namespace> gardener.cloud/operation="reconcile"
10-Verify Etcd cluster health
Check if all the member pods have both of their containers in Running state.
kubectl get pods -n <namespace> -l app.kubernetes.io/part-of=<etcd-name>
NAME READY STATUS RESTARTS AGE
<etcd-name>-0 2/2 Running 0 5m
<etcd-name>-1 2/2 Running 0 1m
<etcd-name>-2 2/2 Running 0 1m
Additionally, check if the Etcd CR is ready:
kubectl get etcd <etcd-name> -n <namespace>
NAME READY AGE
<etcd-name> true 13d
Check member leases, whose holderIdentity should reflect the member role. Check if all members are voting members (their role should either be Member or Leader). Monitor the leases for some time and check if the leases are getting updated. You can monitor the AGE field.
NAME HOLDER AGE
<etcd-name>-0 4c37667312a3912b:Member 1m
<etcd-name>-1 75a9b74cfd3077cc:Member 1m
<etcd-name>-2 c62ee6af755e890d:Leader 1m
6.2.33 - Securing Etcd Clusters
Securing etcd cluster
This document will describe all the TLS artifacts that are typically generated for setting up etcd-druid and etcd clusters in Gardener clusters. You can take inspiration from this and decide which communication lines are essential to be TLS enabled.
Communication lines
In order to undertand all the TLS artifacts that are required to setup etcd-druid and one or more etcd-clusters, one must have a clear view of all the communication channels that needs to be protected via TLS. In the diagram below all communication lines in a typical 3-node etcd cluster along with kube-apiserver and etcd-druid is illustrated.
!!! info For Gardener setup all the communication lines are TLS enabled.
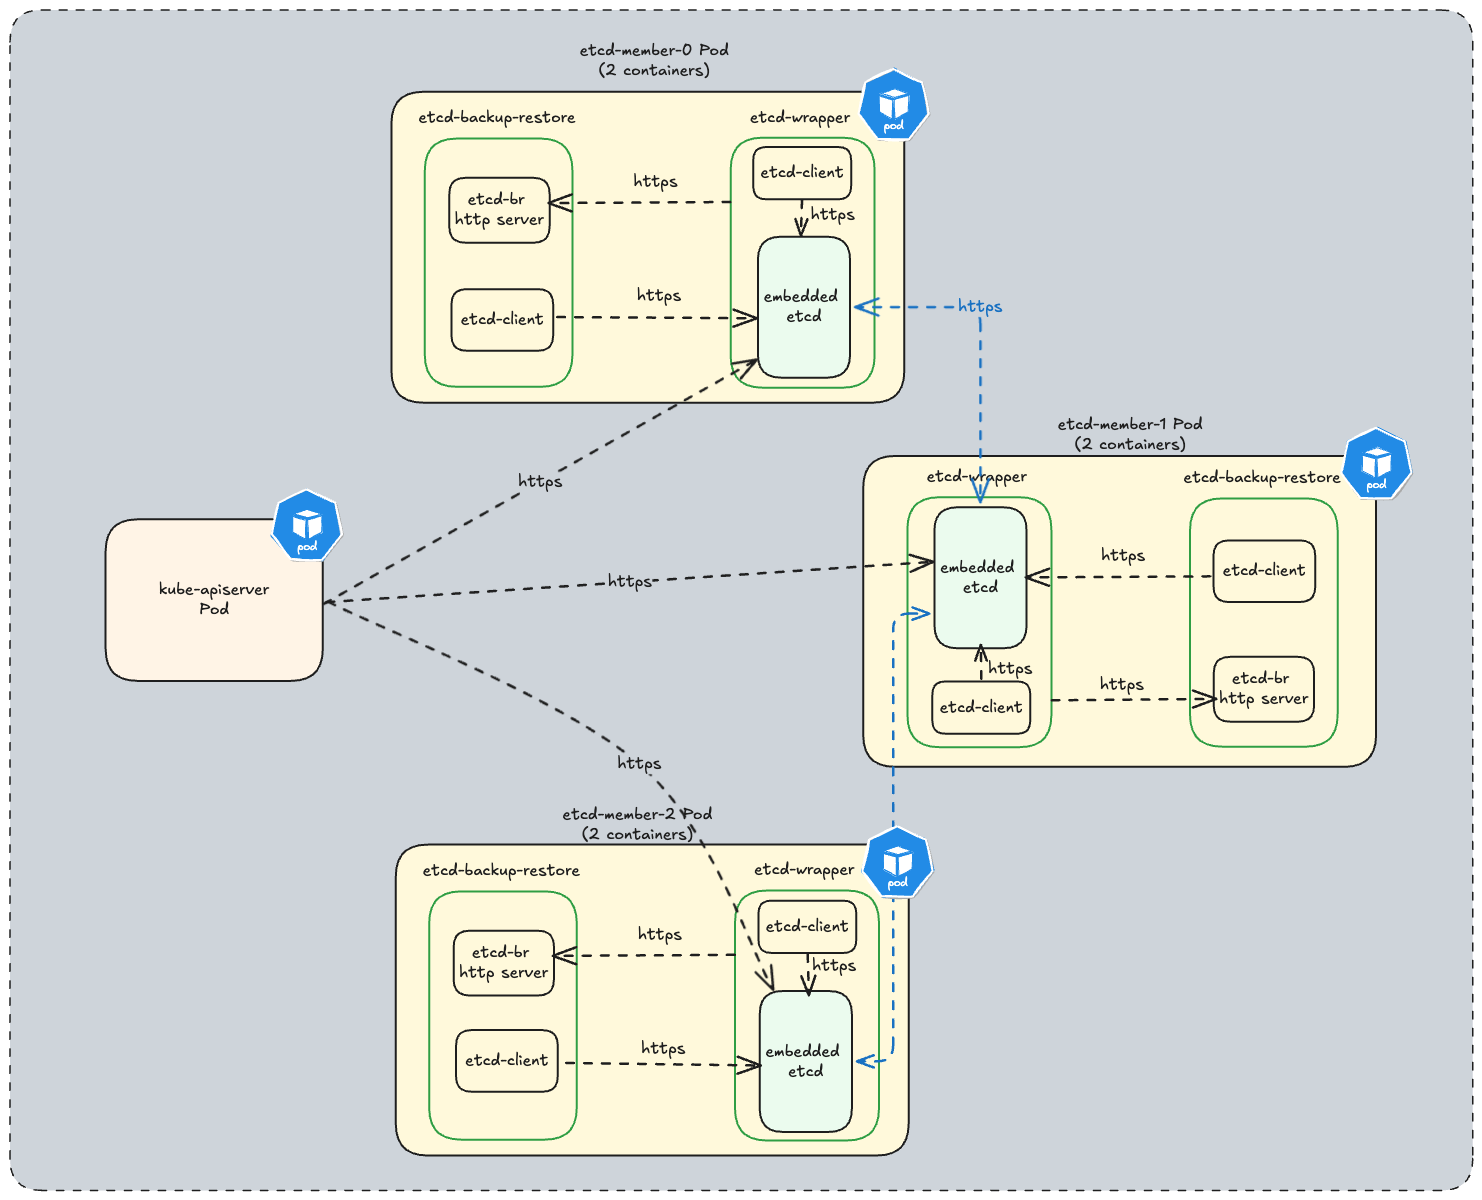
TLS artifacts
An etcd cluster setup by etcd-druid leverages the following TLS artifacts:
Certificate Authority used to sign server and client certificate key-pair for
etcd-backup-restorespecified viaetcd.spec.backup.tls.tlsCASecretRef.Server certificate key-pair specified via
etcd.spec.backup.tls.serverTLSSecretRefused byetcd-backup-restoreHTTPS server.Client certificate key-pair specified via
etcd.spec.backup.tls.clientTLSSecretRefused byetcd-wrapperto securely communicate to theetcd-backup-restoreHTTPS server.Certificate Authority used to sign server and client certificate key-pair for
etcdandetcd-wrapperspecified viaetcd.spec.etcd.clientUrlTls.tlsCASecretReffor etcd client communication.Server certificate key-pair specified via
etcd.spec.etcd.clientUrlTls.serverTLSSecretRefused byetcdandetcd-wrapperHTTPS servers.Client certificate key-pair specified via
etcd.spec.etcd.clientUrlTls.clientTLSSecretRefused by:etcd-wrapperandetcd-backup-restoreto securely communicate to theetcdHTTPS server.etcd-backup-restoreto securely communicate to theetcd-wrapperHTTPS server.
Certificate Authority used to sign server certificate key-pair for
etcdpeer communication specified viaetcd.spec.etcd.peerUrlTls.tlsCASecretRef.Server certificate key-pair specified via
etcd.spec.etcd.peerUrlTls.serverTLSSecretRefused foretcdpeer communication.
!!! note
TLS artifacts should be created prior to creating Etcd clusters. etcd-druid currently does not provide a convenience way to generate these TLS artifacts. etcd recommends to use cfssl to generate certificates. However you can use any other tool as well. We do provide a convenience script for local development here which can be used to generate TLS artifacts. Currently this script is part of etcd-wrapper github repository but we will harmonize these scripts to be used across all github projects under the etcd-druid ecosystem.
6.2.34 - Testing
Testing Strategy and Developer Guideline
Intent of this document is to introduce you (the developer) to the following:
- Libraries that are used to write tests.
- Best practices to write tests that are correct, stable, fast and maintainable.
- How to run tests.
The guidelines are not meant to be absolute rules. Always apply common sense and adapt the guideline if it doesn’t make much sense for some cases. If in doubt, don’t hesitate to ask questions during a PR review (as an author, but also as a reviewer). Add new learnings as soon as we make them!
For any new contributions tests are a strict requirement. Boy Scouts Rule is followed: If you touch a code for which either no tests exist or coverage is insufficient then it is expected that you will add relevant tests.
Common guidelines for writing tests
We use the
Testingpackage provided by the standard library in golang for writing all our tests. Refer to its official documentation to learn how to write tests usingTestingpackage. You can also refer to this example.We use gomega as our matcher or assertion library. Refer to Gomega’s official documentation for details regarding its installation and application in tests.
For naming the individual test/helper functions, ensure that the name describes what the function tests/helps-with. Naming is important for code readability even when writing tests - example-testcase-naming.
Introduce helper functions for assertions to make test more readable where applicable - example-assertion-function.
Introduce custom matchers to make tests more readable where applicable - example-custom-matcher.
Do not use
time.Sleepand friends as it renders the tests flaky.If a function returns a specific error then ensure that the test correctly asserts the expected error instead of just asserting that an error occurred. To help make this assertion consider using DruidError where possible. example-test-utility & usage.
Creating sample data for tests can be a high effort. Consider writing test utilities to generate sample data instead. example-test-object-builder.
If tests require any arbitrary sample data then ensure that you create a
testdatadirectory within the package and keep the sample data as files in it. From https://pkg.go.dev/cmd/go/internal/testThe go tool will ignore a directory named “testdata”, making it available to hold ancillary data needed by the tests.
Avoid defining shared variable/state across tests. This can lead to race conditions causing non-deterministic state. Additionally it limits the capability to run tests concurrently via
t.Parallel().Do not assume or try and establish an order amongst different tests. This leads to brittle tests as the codebase evolves.
If you need to have logs produced by test runs (especially helpful in failing tests), then consider using t.Log or t.Logf.
Unit Tests
- If you need a kubernetes
client.Client, prefer using fake client instead of mocking the client. You can inject errors when building the client which enables you test error handling code paths.- Mocks decrease maintainability because they expect the tested component to follow a certain way to reach the desired goal (e.g., call specific functions with particular arguments).
- All unit tests should be run quickly. Do not use envtest and do not set up a Kind cluster in unit tests.
- If you have common setup for variations of a function, consider using table-driven tests. See this as an example.
- An individual test should only test one and only one thing. Do not try and test multiple variants in a single test. Either use table-driven tests or write individual tests for each variation.
- If a function/component has multiple steps, its probably better to split/refactor it into multiple functions/components that can be unit tested individually.
- If there are a lot of edge cases, extract dedicated functions that cover them and use unit tests to test them.
Running Unit Tests
!!! info
For unit tests we are currently transitioning away from ginkgo to using golang native tests. The make test-unit target runs both ginkgo and golang native tests. Once the transition is complete this target will be simplified.
Run all unit tests
make test-unit
Run unit tests of specific packages:
# if you have not already installed gotestfmt tool then install it once.
# make test-unit target automatically installs this in ./hack/tools/bin. You can alternatively point the GOBIN to this directory and then directly invoke test-go.sh
> go install github.com/gotesttools/gotestfmt/v2/cmd/gotestfmt@v2.5.0
> ./hack/test-go.sh <package-1> <package-2>
De-flaking Unit Tests
If tests have sporadic failures, then trying running ./hack/stress-test.sh which internally uses stress tool.
# install the stress tool
go install golang.org/x/tools/cmd/stress@latest
# invoke the helper script to execute the stress test
./hack/stress-test.sh test-package=<test-package> test-func=<test-function> tool-params="<tool-params>"
An example invocation:
./hack/stress-test.sh test-package=./internal/utils test-func=TestRunConcurrentlyWithAllSuccessfulTasks tool-params="-p 10"
5s: 877 runs so far, 0 failures
10s: 1906 runs so far, 0 failures
15s: 2885 runs so far, 0 failures
...
stress tool will output a path to a file containing the full failure message when a test run fails.
Integration Tests (envtests)
Integration tests in etcd-druid use envtest. It sets up a minimal temporary control plane (etcd + kube-apiserver) and runs the test against it. Test suites (group of tests) start their individual envtest environment before running the tests for the respective controller/webhook. Before exiting, the temporary test environment is shutdown.
!!! info For integration-tests we are currently transitioning away from ginkgo to using golang native tests. All ginkgo integration tests can be found here and golang native integration tests can be found here.
- Integration tests in etcd-druid only targets a single controller. It is therefore advised that code (other than common utility functions should not be shared between any two controllers).
- If you are sharing a common
envtestenvironment across tests then it is recommended that an individual test is run in a dedicatednamespace. - Since
envtestis used to setup a minimum environment where no controller (e.g. KCM, Scheduler) other thanetcdandkube-apiserverruns, status updates to resources controller/reconciled by not-deployed-controllers will not happen. Tests should refrain from asserting changes to status. In case status needs to be set as part of a test setup then it must be done explicitly. - If you have common setup and teardown, then consider using TestMain -example.
- If you have to wait for resources to be provisioned or reach a specific state, then it is recommended that you create smaller assertion functions and use Gomega’s AsyncAssertion functions - example.
- Beware of the default
Eventually/Consistentlytimeouts / poll intervals: docs. - Don’t forget to call
{Eventually,Consistently}.Should(), otherwise the assertions always silently succeeds without errors: onsi/gomega#561
- Beware of the default
Running Integration Tests
make test-integration
Debugging Integration Tests
There are two ways in which you can debug Integration Tests:
Using IDE
All commonly used IDE’s provide in-built or easy integration with delve debugger. For debugging integration tests the only additional requirement is to set KUBEBUILDER_ASSETS environment variable. You can get the value of this environment variable by executing the following command:
# ENVTEST_K8S_VERSION is the k8s version that you wish to use for testing.
setup-envtest --os $(go env GOOS) --arch $(go env GOARCH) use $ENVTEST_K8S_VERSION -p path
!!! tip All integration tests usually have a timeout. If you wish to debug a failing integration-test then increase the timeouts.
Use standalone envtest
We also provide a capability to setup a stand-alone envtest and leverage the cluster to run individual integration-test. This allows you more control over when this k8s control plane is destroyed and allows you to inspect the resources at the end of the integration-test run using kubectl.
While you can use an existing cluster (e.g.,
kind), some test suites expect that no controllers and no nodes are running in the test environment (as it is the case inenvtesttest environments). Hence, using a full-blown cluster with controllers and nodes might sometimes be impractical, as you would need to stop cluster components for the tests to work.
To setup a standalone envtest and run an integration test against it, do the following:
# In a terminal session use the following make target to setup a standalone envtest
make start-envtest
# As part of output path to kubeconfig will be also be printed on the console.
# In another terminal session setup resource(s) watch:
kubectl get po -A -w # alternatively you can also use `watch -d <command>` utility.
# In another terminal session:
export KUBECONFIG=<envtest-kubeconfig-path>
export USE_EXISTING_K8S_CLUSTER=true
# run the test
go test -run="<regex-for-test>" <package>
# example: go test -run="^TestEtcdDeletion/test deletion of all*" ./test/it/controller/etcd
Once you are done the testing you can press Ctrl+C in the terminal session where you started envtest. This will shutdown the kubernetes control plane.
End-To-End (e2e) Tests
End-To-End tests are run using Kind cluster and Skaffold. These tests provide a high level of confidence that the code runs as expected by users when deployed to production.
Purpose of running these tests is to be able to catch bugs which result from interaction amongst different components within etcd-druid.
In CI pipelines e2e tests are run with S3 compatible LocalStack (in cases where backup functionality has been enabled for an etcd cluster).
In future we will only be using a file-system based local provider to reduce the run times for the e2e tests when run in a CI pipeline.
e2e tests can be triggered either with other cloud provider object-store emulators or they can also be run against actual/remove cloud provider object-store services.
In contrast to integration tests, in e2e tests, it might make sense to specify higher timeouts for Gomega’s AsyncAssertion calls.
Running e2e tests locally
Detailed instructions on how to run e2e tests can be found here.
6.2.35 - Updating Documentation
Updating Documentation
All documentation for etcd-druid resides in docs directory. If you wish to update the existing documentation or create new documentation files then read on.
Prerequisite: Setup Mkdocs locally
Material for Mkdocs is used to generate GitHub Pages from all the Markdown files present under the docs directory. To locally validate that the documentation renders correctly, it is recommended that you perform the following setup.
- Install python3 if not already installed.
- Setup a virtual environment via
python -m venv venv
- Activate the virtual environment
source venv/bin/activate
- In the virtual environment install the packages.
(venv) > pip install mkdocs-material
(venv) > pip install pymdown-extensions
(venv) > pip install mkdocs-glightbox
(venv) > pip install mkdocs-pymdownx-material-extras
!!! note Complete list of packages installed should be in sync with Github Actions Configuration.
- Serve the documentation
(venv) > mkdocs serve
You can now view the rendered documentation at localhost:8000. Any changes that you make to the docs will get hot-reloaded and you can immediately view the changes.
Updating Documentation
All documentation should be in markdown only. Ensure that you take care of the following:
- The index.md is the home page for the documentation rendered as Github Pages. Please do not remove this file.
- If you are using a new feature (that is not already used) by
Mkdocsthen ensure that it is properly configured in mkdocs.yml. Additionally, if new plugins or Markdown extensions are used, make sure that you update the Github Actions Configuration accordingly. - If new files are being added and you wish to show these files in Github Pages then ensure that you have added them under appropriate sections in the navigation section of
mkdocs.yml. - If you are linking to any file outside the docs directory then relative links will not work on Github Pages. Please get the
httpslink to the file or section of the file that you wish to link.
Raise a Pull Request
Once you have made the documentation changes then follow the guide on how to raise a PR.
!!! info Once the documentation update PR has been merged, you will be able to see the updated documentation here.
6.2.36 - Using Druid Client
Using Druid Golang Client
Etcd Druid provides a generated typed Golang client which can be used to invoke CRUD operations on Etcd and EtcdCopyBackupsTask custom resources.
A simple example is provided to demonstrate how an Etcd resource can be created using client package.
To run the example ensure that you have the following setup:
Follow the Getting Started Guide to set up a KIND cluster and deploy
etcd-druidoperator.Run the example:
go run examples/client/main.go
You should see the following output:
INFO Successfully created Etcd cluster Etcd=default/etcd-test
You can further list the resources that are created for an Etcd cluster.
See this document for information on all resources created for an Etcd cluster.
6.2.37 - Validating Etcd Clusters
CRD Validations for etcd
- The validations for the fields within the
etcdresource are done via kubebuilder markers for CRD validation. - The validations for clusters with kubernetes versions
>= 1.29are written using a combination of CEL expressions via thex-validationtag which provides a straightforward syntax to write validation rules for the fields, and pattern matching with the use of thevalidationtag. - The validations for clusters with kubernetes versions
< 1.29will not contain validations viaCELexpressions since this is GA for kubernetes version 1.29 or higher. - Upon any changes to the validation rules to the etcd resource, the
yamlfiles for the same can be generated by running themake generatecommand.
Validation rules:
Type Validation rules:
The validations for fields of types Duration(metav1.Duration) and cron expressions are done via regex matching. These use the validation:Pattern marker.(The checking for the Quantity(resource.Quantity) fields are done by default, hence, no explicit validation is needed for the fields of this type):
Duration fields:
'^([0-9]+([.][0-9]+)?h)?([0-9]+([.][0-9]+)?m)?([0-9]+([.][0-9]+)?s)?([0-9]+([.][0-9]+)?d)?$')Cron expression:
^(\*|[1-5]?[0-9]|[1-5]?[0-9]-[1-5]?[0-9]|(?:[1-9]|[1-4][0-9]|5[0-9])\/(?:[1-9]|[1-4][0-9]|5[0-9]|60)|\*\/(?:[1-9]|[1-4][0-9]|5[0-9]|60))\s+(\*|[0-9]|1[0-9]|2[0-3]|[0-9]-(?:[0-9]|1[0-9]|2[0-3])|1[0-9]-(?:1[0-9]|2[0-3])|2[0-3]-2[0-3]|(?:[1-9]|1[0-9]|2[0-3])\/(?:[1-9]|1[0-9]|2[0-4])|\*\/(?:[1-9]|1[0-9]|2[0-4]))\s+(\*|[1-9]|[12][0-9]|3[01]|[1-9]-(?:[1-9]|[12][0-9]|3[01])|[12][0-9]-(?:[12][0-9]|3[01])|3[01]-3[01]|(?:[1-9]|[12][0-9]|30)\/(?:[1-9]|[12][0-9]|3[01])|\*\/(?:[1-9]|[12][0-9]|3[01]))\s+(\*|[1-9]|1[0-2]|[1-9]-(?:[1-9]|1[0-2])|1[0-2]-1[0-2]|(?:[1-9]|1[0-2])\/(?:[1-9]|1[0-2])|\*\/(?:[1-9]|1[0-2]))\s+(\*|[1-7]|[1-6]-[1-7]|[1-6]\/[1-7]|\*\/[1-7])$- NOTE: The provided regex does not account for
special stringssuch as@yearlyor@monthly. Additionally, it fails to invalidate cases involving thestep operator (x/y)and therange operator (x-y), where the cron expression is considered valid even ifx > y. Please ensure these values are validated before passing the expression.
- NOTE: The provided regex does not account for
Update validations
These validations are triggered when an update operation is done on the etcd resource.
Immutable fields: The fields
etcd.spec.StorageClass,etcd.spec.StorageCapacityandetcd.spec.VolumeClaimTemplateare immutable. The immutability is enforced by the CEL expression :self == oldSelf.The value set for the field
etcd.spec.replicascan either be decreased to0or increased. This is enforced by the CEL expression:self==0 ? true : self < oldSelf ? false : true
Field validations
- The fields which expect only a particular set of values are checked by using the kubebuilder marker:
+kubebuilder:validation:Enum=<value1>;<value2>- The
etcd.spec.etcd.metricscan only be set as eitherbasicorextensive. - The
etcd.spec.backup.garbageCollectionPolicycan only be set asExponentialorLimitBased - The
etcd.spec.backup.compression.policycan only be set as eithergziporlzworzlib. - The
etcd.spec.sharedConfig.autoCompactionModecan only be set as eitherperiodicorrevision.
- The
The value of
etcd.spec.backup.garbageCollectionPeriodmust be greater thanetcd.spec.backup.deltaSnapshotPeriod. This is enforced by the CEL expression!(has(self.deltaSnapshotPeriod) && has(self.garbageCollectionPeriod)) || duration(self.deltaSnapshotPeriod).getSeconds() < duration(self.garbageCollectionPeriod).getSeconds(). The first part of the expression ensures that both the fields are present and then compares the values of the garbageCollectionPeriod and deltaSnapshotPeriod fields, if not, skips the check.The value of
etcd.spec.StorageCapacitymust be more than 3 times that of theetcd.spec.etcd.quotaif backups are enabled. If not, the value must be greater than that of theetcd.spec.etcd.quotafield. This is enforced by using the CEL expression:has(self.storageCapacity) && has(self.etcd.quota) ? (has(self.backup.store) ? quantity(self.storageCapacity).compareTo(quantity(self.etcd.quota).add(quantity(self.etcd.quota)).add(quantity(self.etcd.quota))) > 0 : quantity(self.storageCapacity).compareTo(quantity(self.etcd.quota)) > 0 ): trueThe check for whether backups are enabled or not is done by checking if the fieldetcd.spec.backup.storeexists.
6.2.38 - Version Compatibility Matrix
Version Compatibility
Kubernetes
We strongly recommend using etcd-druid with the supported kubernetes versions, published in this document.
The following is a list of kubernetes versions supported by the respective etcd-druid versions.
| etcd-druid version | Kubernetes version |
|---|---|
| >=v0.20 | >=v1.21 |
| >=v0.14 && <0.20 | All versions supported |
| <v0.14 | < v1.25 |
etcd-backup-restore & etcd-wrapper
| etcd-druid version | etcd-backup-restore version | etcd-wrapper version |
|---|---|---|
| >=v0.23.1 | >=v0.30.2 | >=v0.2.0 |
6.3 - Gardener Discovery Server
Gardener Discovery Server
A server capable of serving public metadata about different Gardener resources like shoot OIDC discovery documents and Gardener Workload Identity discovery.
Development
As a prerequisite you need to have a Garden cluster up and running. The easiest way to get started is to follow the Getting Started Locally Guide which explains how to setup Gardener for local development.
Once the Garden cluster is up and running, export the kubeconfig pointing to the cluster as an environment variable.
export KUBECONFIG=/path-to/garden-kubeconfig
You should be able to start the discovery server with the following command.
make start
Alternatively you can deploy the discovery server in the local cluster with the following command.
make server-up
6.3.1 - Api
Gardener Discovery Server API
The Gardener Discovery Server currently handles the following operations:
Garden Operations
Retrieve the OpenID Configuration of the Workload Identity Issuer of the Garden cluster
Request
GET /garden/workload-identity/issuer/.well-known/openid-configuration
Response
{
"issuer": "https://local.gardener.cloud/garden/workload-identity/issuer",
"jwks_uri": "https://local.gardener.cloud/garden/workload-identity/issuer/jwks",
"response_types_supported": [
"id_token"
],
"subject_types_supported": [
"public"
],
"id_token_signing_alg_values_supported": [
"RS256"
]
}
Retrieve the JWKS of the Workload Identity Issuer of the Garden cluster
Request
GET /garden/workload-identity/issuer/jwks
Response
{
"keys": [
{
"use": "sig",
"kty": "RSA",
"kid": "AvI...vWZ4",
"alg": "RS256",
"n": "1X1fsFJluuanoKq6c_...TUsX5bTv6c_c1xoqayFQc",
"e": "AQAB"
}
]
}
Shoot Operations
Retrieve the OpenID Configuration of a Shoot cluster
Request
GET /projects/{projectName}/shoots/{shootUID}/issuer/.well-known/openid-configuration
Response
{
"issuer": "https://local.gardener.cloud/projects/local/shoots/7b4ed380-2eea-4cf5-87d9-fd220727bb54/issuer",
"jwks_uri": "https://local.gardener.cloud/projects/local/shoots/7b4ed380-2eea-4cf5-87d9-fd220727bb54/issuer/jwks",
"response_types_supported": [
"id_token"
],
"subject_types_supported": [
"public"
],
"id_token_signing_alg_values_supported": [
"RS256"
]
}
Retrieve the JWKS of a Shoot cluster
Request
GET /projects/{projectName}/shoots/{shootUID}/issuer/jwks
Response
{
"keys": [
{
"use": "sig",
"kty": "RSA",
"kid": "AvI...vWZ4",
"alg": "RS256",
"n": "1X1fsFJluuanoKq6c_...TUsX5bTv6c_c1xoqayFQc",
"e": "AQAB"
}
]
}
Retrieve the CA of a Shoot cluster
Request
GET /projects/{projectName}/shoots/{shootUID}/cluster-ca
Response
{
"certs": "-----BEGIN CERTIFICATE-----\n...\n-----END CERTIFICATE-----\n"
}
6.4 - Machine Controller Manager
machine-controller-manager
Note One can add support for a new cloud provider by following Adding support for new provider.
Overview
Machine Controller Manager aka MCM is a group of cooperative controllers that manage the lifecycle of the worker machines. It is inspired by the design of Kube Controller Manager in which various sub controllers manage their respective Kubernetes Clients. MCM gives you the following benefits:
- seamlessly manage machines/nodes with a declarative API (of course, across different cloud providers)
- integrate generically with the cluster autoscaler
- plugin with tools such as the node-problem-detector
- transport the immutability design principle to machine/nodes
- implement e.g. rolling upgrades of machines/nodes
MCM supports following providers. These provider code is maintained externally (out-of-tree), and the links for the same are linked below:
It can easily be extended to support other cloud providers as well.
Example of managing machine:
kubectl create/get/delete machine vm1
Key terminologies
Nodes/Machines/VMs are different terminologies used to represent similar things. We use these terms in the following way
- VM: A virtual machine running on any cloud provider. It could also refer to a physical machine (PM) in case of a bare metal setup.
- Node: Native kubernetes node objects. The objects you get to see when you do a “kubectl get nodes”. Although nodes can be either physical/virtual machines, for the purposes of our discussions it refers to a VM.
- Machine: A VM that is provisioned/managed by the Machine Controller Manager.
Design of Machine Controller Manager
The design of the Machine Controller Manager is influenced by the Kube Controller Manager, where-in multiple sub-controllers are used to manage the Kubernetes clients.
Design Principles
It’s designed to run in the master plane of a Kubernetes cluster. It follows the best principles and practices of writing controllers, including, but not limited to:
- Reusing code from kube-controller-manager
- leader election to allow HA deployments of the controller
workqueuesand multiple thread-workersSharedInformersthat limit to minimum network calls, de-serialization and provide helpful create/update/delete events for resources- rate-limiting to allow back-off in case of network outages and general instability of other cluster components
- sending events to respected resources for easy debugging and overview
- Prometheus metrics, health and (optional) profiling endpoints
Objects of Machine Controller Manager
Machine Controller Manager reconciles a set of Custom Resources namely MachineDeployment, MachineSet and Machines which are managed & monitored by their controllers MachineDeployment Controller, MachineSet Controller, Machine Controller respectively along with another cooperative controller called the Safety Controller.
Machine Controller Manager makes use of 4 CRD objects and 1 Kubernetes secret object to manage machines. They are as follows:
| Custom ResourceObject | Description |
|---|---|
MachineClass | A MachineClass represents a template that contains cloud provider specific details used to create machines. |
Machine | A Machine represents a VM which is backed by the cloud provider. |
MachineSet | A MachineSet ensures that the specified number of Machine replicas are running at a given point of time. |
MachineDeployment | A MachineDeployment provides a declarative update for MachineSet and Machines. |
Secret | A Secret here is a Kubernetes secret that stores cloudconfig (initialization scripts used to create VMs) and cloud specific credentials. |
See here for CRD API Documentation
Components of Machine Controller Manager
| Controller | Description |
|---|---|
| MachineDeployment controller | Machine Deployment controller reconciles the MachineDeployment objects and manages the lifecycle of MachineSet objects. MachineDeployment consumes provider specific MachineClass in its spec.template.spec which is the template of the VM spec that would be spawned on the cloud by MCM. |
| MachineSet controller | MachineSet controller reconciles the MachineSet objects and manages the lifecycle of Machine objects. |
| Safety controller | There is a Safety Controller responsible for handling the unidentified or unknown behaviours from the cloud providers. Safety Controller:
|
Along with the above Custom Controllers and Resources, MCM requires the MachineClass to use K8s Secret that stores cloudconfig (initialization scripts used to create VMs) and cloud specific credentials. All these controllers work in an co-operative manner. They form a parent-child relationship with MachineDeployment Controller being the grandparent, MachineSet Controller being the parent, and Machine Controller being the child.
Development
To start using or developing the Machine Controller Manager, see the documentation in the /docs repository.
FAQ
An FAQ is available here.
cluster-api Implementation
cluster-apibranch of machine-controller-manager implements the machine-api aspect of the cluster-api project.- Link: https://github.com/gardener/machine-controller-manager/tree/cluster-api
- Once cluster-api project gets stable, we may make
masterbranch of MCM as well cluster-api compliant, with well-defined migration notes.
6.4.1 - Documents
6.4.1.1 - Apis
Specification
ProviderSpec Schema
Machine
Machine is the representation of a physical or virtual machine.
| Field | Type | Description | ||||||||||||
|---|---|---|---|---|---|---|---|---|---|---|---|---|---|---|
apiVersion | string | machine.sapcloud.io/v1alpha1 | ||||||||||||
kind | string | Machine | ||||||||||||
metadata | Kubernetes meta/v1.ObjectMeta | ObjectMeta for machine object Refer to the Kubernetes API documentation for the fields of themetadata field. | ||||||||||||
spec | MachineSpec | Spec contains the specification of the machine
| ||||||||||||
status | MachineStatus | Status contains fields depicting the status |
MachineClass
MachineClass can be used to templatize and re-use provider configuration across multiple Machines / MachineSets / MachineDeployments.
| Field | Type | Description |
|---|---|---|
apiVersion | string | machine.sapcloud.io/v1alpha1 |
kind | string | MachineClass |
metadata | Kubernetes meta/v1.ObjectMeta | (Optional)
Refer to the Kubernetes API documentation for the fields of the
metadata field. |
nodeTemplate | NodeTemplate | (Optional) NodeTemplate contains subfields to track all node resources and other node info required to scale nodegroup from zero |
credentialsSecretRef | Kubernetes core/v1.SecretReference | CredentialsSecretRef can optionally store the credentials (in this case the SecretRef does not need to store them). This might be useful if multiple machine classes with the same credentials but different user-datas are used. |
providerSpec | k8s.io/apimachinery/pkg/runtime.RawExtension | Provider-specific configuration to use during node creation. |
provider | string | Provider is the combination of name and location of cloud-specific drivers. |
secretRef | Kubernetes core/v1.SecretReference | SecretRef stores the necessary secrets such as credentials or userdata. |
MachineDeployment
MachineDeployment enables declarative updates for machines and MachineSets.
| Field | Type | Description | |||||||||||||||||||||||||||
|---|---|---|---|---|---|---|---|---|---|---|---|---|---|---|---|---|---|---|---|---|---|---|---|---|---|---|---|---|---|
apiVersion | string | machine.sapcloud.io/v1alpha1 | |||||||||||||||||||||||||||
kind | string | MachineDeployment | |||||||||||||||||||||||||||
metadata | Kubernetes meta/v1.ObjectMeta | (Optional) Standard object metadata. Refer to the Kubernetes API documentation for the fields of themetadata field. | |||||||||||||||||||||||||||
spec | MachineDeploymentSpec | (Optional) Specification of the desired behavior of the MachineDeployment.
| |||||||||||||||||||||||||||
status | MachineDeploymentStatus | (Optional) Most recently observed status of the MachineDeployment. |
MachineSet
MachineSet TODO
| Field | Type | Description | |||||||||||||||
|---|---|---|---|---|---|---|---|---|---|---|---|---|---|---|---|---|---|
apiVersion | string | machine.sapcloud.io/v1alpha1 | |||||||||||||||
kind | string | MachineSet | |||||||||||||||
metadata | Kubernetes meta/v1.ObjectMeta | (Optional)
Refer to the Kubernetes API documentation for the fields of the
metadata field. | |||||||||||||||
spec | MachineSetSpec | (Optional)
| |||||||||||||||
status | MachineSetStatus | (Optional) |
ClassSpec
(Appears on: MachineSetSpec, MachineSpec)
ClassSpec is the class specification of machine
| Field | Type | Description |
|---|---|---|
apiGroup | string | API group to which it belongs |
kind | string | Kind for machine class |
name | string | Name of machine class |
ConditionStatus
(string alias)
(Appears on: MachineDeploymentCondition, MachineSetCondition)
ConditionStatus are valid condition statuses
CurrentStatus
(Appears on: MachineStatus)
CurrentStatus contains information about the current status of Machine.
| Field | Type | Description |
|---|---|---|
phase | MachinePhase | |
timeoutActive | bool | |
lastUpdateTime | Kubernetes meta/v1.Time | Last update time of current status |
InPlaceUpdateMachineDeployment
(Appears on: MachineDeploymentStrategy)
InPlaceUpdateMachineDeployment specifies the spec to control the desired behavior of inplace update.
| Field | Type | Description |
|---|---|---|
UpdateConfiguration | UpdateConfiguration | (Members of |
orchestrationType | OrchestrationType | OrchestrationType specifies the orchestration type for the inplace update. |
LastOperation
(Appears on: MachineSetStatus, MachineStatus, MachineSummary)
LastOperation suggests the last operation performed on the object
| Field | Type | Description |
|---|---|---|
description | string | Description of the current operation |
errorCode | string | (Optional) ErrorCode of the current operation if any |
lastUpdateTime | Kubernetes meta/v1.Time | Last update time of current operation |
state | MachineState | State of operation |
type | MachineOperationType | Type of operation |
MachineConfiguration
(Appears on: MachineSpec)
MachineConfiguration describes the configurations useful for the machine-controller.
| Field | Type | Description |
|---|---|---|
drainTimeout | Kubernetes meta/v1.Duration | (Optional) MachineDraintimeout is the timeout after which machine is forcefully deleted. |
healthTimeout | Kubernetes meta/v1.Duration | (Optional) MachineHealthTimeout is the timeout after which machine is declared unhealhty/failed. |
creationTimeout | Kubernetes meta/v1.Duration | (Optional) MachineCreationTimeout is the timeout after which machinie creation is declared failed. |
inPlaceUpdateTimeout | Kubernetes meta/v1.Duration | (Optional) MachineInPlaceUpdateTimeout is the timeout after which in-place update is declared failed. |
disableHealthTimeout | *bool | (Optional) DisableHealthTimeout if set to true, health timeout will be ignored. Leading to machine never being declared failed. This is intended to be used only for in-place updates. |
maxEvictRetries | *int32 | (Optional) MaxEvictRetries is the number of retries that will be attempted while draining the node. |
nodeConditions | *string | (Optional) NodeConditions are the set of conditions if set to true for MachineHealthTimeOut, machine will be declared failed. |
MachineDeploymentCondition
(Appears on: MachineDeploymentStatus)
MachineDeploymentCondition describes the state of a MachineDeployment at a certain point.
| Field | Type | Description |
|---|---|---|
type | MachineDeploymentConditionType | Type of MachineDeployment condition. |
status | ConditionStatus | Status of the condition, one of True, False, Unknown. |
lastUpdateTime | Kubernetes meta/v1.Time | The last time this condition was updated. |
lastTransitionTime | Kubernetes meta/v1.Time | Last time the condition transitioned from one status to another. |
reason | string | The reason for the condition’s last transition. |
message | string | A human readable message indicating details about the transition. |
MachineDeploymentConditionType
(string alias)
(Appears on: MachineDeploymentCondition)
MachineDeploymentConditionType are valid conditions of MachineDeployments
MachineDeploymentSpec
(Appears on: MachineDeployment)
MachineDeploymentSpec is the specification of the desired behavior of the MachineDeployment.
| Field | Type | Description |
|---|---|---|
replicas | int32 | (Optional) Number of desired machines. This is a pointer to distinguish between explicit zero and not specified. Defaults to 0. |
selector | Kubernetes meta/v1.LabelSelector | (Optional) Label selector for machines. Existing MachineSets whose machines are selected by this will be the ones affected by this MachineDeployment. |
template | MachineTemplateSpec | Template describes the machines that will be created. |
strategy | MachineDeploymentStrategy | (Optional) The MachineDeployment strategy to use to replace existing machines with new ones. |
minReadySeconds | int32 | (Optional) Minimum number of seconds for which a newly created machine should be ready without any of its container crashing, for it to be considered available. Defaults to 0 (machine will be considered available as soon as it is ready) |
revisionHistoryLimit | *int32 | (Optional) The number of old MachineSets to retain to allow rollback. This is a pointer to distinguish between explicit zero and not specified. |
paused | bool | (Optional) Indicates that the MachineDeployment is paused and will not be processed by the MachineDeployment controller. |
rollbackTo | RollbackConfig | (Optional) DEPRECATED. The config this MachineDeployment is rolling back to. Will be cleared after rollback is done. |
progressDeadlineSeconds | *int32 | (Optional) The maximum time in seconds for a MachineDeployment to make progress before it is considered to be failed. The MachineDeployment controller will continue to process failed MachineDeployments and a condition with a ProgressDeadlineExceeded reason will be surfaced in the MachineDeployment status. Note that progress will not be estimated during the time a MachineDeployment is paused. This is not set by default, which is treated as infinite deadline. |
MachineDeploymentStatus
(Appears on: MachineDeployment)
MachineDeploymentStatus is the most recently observed status of the MachineDeployment.
| Field | Type | Description |
|---|---|---|
observedGeneration | int64 | (Optional) The generation observed by the MachineDeployment controller. |
replicas | int32 | (Optional) Total number of non-terminated machines targeted by this MachineDeployment (their labels match the selector). |
updatedReplicas | int32 | (Optional) Total number of non-terminated machines targeted by this MachineDeployment that have the desired template spec. |
readyReplicas | int32 | (Optional) Total number of ready machines targeted by this MachineDeployment. |
availableReplicas | int32 | (Optional) Total number of available machines (ready for at least minReadySeconds) targeted by this MachineDeployment. |
unavailableReplicas | int32 | (Optional) Total number of unavailable machines targeted by this MachineDeployment. This is the total number of machines that are still required for the MachineDeployment to have 100% available capacity. They may either be machines that are running but not yet available or machines that still have not been created. |
conditions | []MachineDeploymentCondition | Represents the latest available observations of a MachineDeployment’s current state. |
collisionCount | *int32 | (Optional) Count of hash collisions for the MachineDeployment. The MachineDeployment controller uses this field as a collision avoidance mechanism when it needs to create the name for the newest MachineSet. |
failedMachines | []*github.com/gardener/machine-controller-manager/pkg/apis/machine/v1alpha1.MachineSummary | (Optional) FailedMachines has summary of machines on which lastOperation Failed |
MachineDeploymentStrategy
(Appears on: MachineDeploymentSpec)
MachineDeploymentStrategy describes how to replace existing machines with new ones.
| Field | Type | Description |
|---|---|---|
type | MachineDeploymentStrategyType | (Optional) Type of MachineDeployment. Can be “Recreate” or “RollingUpdate”. Default is RollingUpdate. |
rollingUpdate | RollingUpdateMachineDeployment | (Optional) Rolling update config params. Present only if MachineDeploymentStrategyType = RollingUpdate.TODO: Update this to follow our convention for oneOf, whatever we decide it to be. |
inPlaceUpdate | InPlaceUpdateMachineDeployment | (Optional) InPlaceUpdate update config params. Present only if MachineDeploymentStrategyType = InPlaceUpdate. |
MachineDeploymentStrategyType
(string alias)
(Appears on: MachineDeploymentStrategy)
MachineDeploymentStrategyType are valid strategy types for rolling MachineDeployments
MachineOperationType
(string alias)
(Appears on: LastOperation)
MachineOperationType is a label for the operation performed on a machine object.
MachinePhase
(string alias)
(Appears on: CurrentStatus)
MachinePhase is a label for the condition of a machine at the current time.
MachineSetCondition
(Appears on: MachineSetStatus)
MachineSetCondition describes the state of a machine set at a certain point.
| Field | Type | Description |
|---|---|---|
type | MachineSetConditionType | Type of machine set condition. |
status | ConditionStatus | Status of the condition, one of True, False, Unknown. |
lastTransitionTime | Kubernetes meta/v1.Time | (Optional) The last time the condition transitioned from one status to another. |
reason | string | (Optional) The reason for the condition’s last transition. |
message | string | (Optional) A human readable message indicating details about the transition. |
MachineSetConditionType
(string alias)
(Appears on: MachineSetCondition)
MachineSetConditionType is the condition on machineset object
MachineSetSpec
(Appears on: MachineSet)
MachineSetSpec is the specification of a MachineSet.
| Field | Type | Description |
|---|---|---|
replicas | int32 | (Optional) |
selector | Kubernetes meta/v1.LabelSelector | (Optional) |
machineClass | ClassSpec | (Optional) |
template | MachineTemplateSpec | (Optional) |
minReadySeconds | int32 | (Optional) |
MachineSetStatus
(Appears on: MachineSet)
MachineSetStatus holds the most recently observed status of MachineSet.
| Field | Type | Description |
|---|---|---|
replicas | int32 | Replicas is the number of actual replicas. |
fullyLabeledReplicas | int32 | (Optional) The number of pods that have labels matching the labels of the pod template of the replicaset. |
readyReplicas | int32 | (Optional) The number of ready replicas for this replica set. |
availableReplicas | int32 | (Optional) The number of available replicas (ready for at least minReadySeconds) for this replica set. |
observedGeneration | int64 | (Optional) ObservedGeneration is the most recent generation observed by the controller. |
machineSetCondition | []MachineSetCondition | (Optional) Represents the latest available observations of a replica set’s current state. |
lastOperation | LastOperation | LastOperation performed |
failedMachines | []github.com/gardener/machine-controller-manager/pkg/apis/machine/v1alpha1.MachineSummary | (Optional) FailedMachines has summary of machines on which lastOperation Failed |
MachineSpec
(Appears on: Machine, MachineTemplateSpec)
MachineSpec is the specification of a Machine.
| Field | Type | Description |
|---|---|---|
class | ClassSpec | (Optional) Class contains the machineclass attributes of a machine |
providerID | string | (Optional) ProviderID represents the provider’s unique ID given to a machine |
nodeTemplate | NodeTemplateSpec | (Optional) NodeTemplateSpec describes the data a node should have when created from a template |
MachineConfiguration | MachineConfiguration | (Members of Configuration for the machine-controller. |
MachineState
(string alias)
(Appears on: LastOperation)
MachineState is a current state of the operation.
MachineStatus
(Appears on: Machine)
MachineStatus holds the most recently observed status of Machine.
| Field | Type | Description |
|---|---|---|
conditions | []Kubernetes core/v1.NodeCondition | Conditions of this machine, same as node |
lastOperation | LastOperation | Last operation refers to the status of the last operation performed |
currentStatus | CurrentStatus | Current status of the machine object |
lastKnownState | string | (Optional) LastKnownState can store details of the last known state of the VM by the plugins. It can be used by future operation calls to determine current infrastucture state |
MachineSummary
MachineSummary store the summary of machine.
| Field | Type | Description |
|---|---|---|
name | string | Name of the machine object |
providerID | string | ProviderID represents the provider’s unique ID given to a machine |
lastOperation | LastOperation | Last operation refers to the status of the last operation performed |
ownerRef | string | OwnerRef |
MachineTemplateSpec
(Appears on: MachineDeploymentSpec, MachineSetSpec)
MachineTemplateSpec describes the data a machine should have when created from a template
| Field | Type | Description | ||||||||||||
|---|---|---|---|---|---|---|---|---|---|---|---|---|---|---|
metadata | Kubernetes meta/v1.ObjectMeta | (Optional) Standard object’s metadata. More info: https://git.k8s.io/community/contributors/devel/sig-architecture/api-conventions.md#metadata Refer to the Kubernetes API documentation for the fields of themetadata field. | ||||||||||||
spec | MachineSpec | (Optional) Specification of the desired behavior of the machine. More info: https://git.k8s.io/community/contributors/devel/sig-architecture/api-conventions.md#spec-and-status
|
NodeTemplate
(Appears on: MachineClass)
NodeTemplate contains subfields to track all node resources and other node info required to scale nodegroup from zero
| Field | Type | Description |
|---|---|---|
capacity | Kubernetes core/v1.ResourceList | Capacity contains subfields to track all node resources required to scale nodegroup from zero |
instanceType | string | Instance type of the node belonging to nodeGroup |
region | string | Region of the expected node belonging to nodeGroup |
zone | string | Zone of the expected node belonging to nodeGroup |
architecture | *string | (Optional) CPU Architecture of the node belonging to nodeGroup |
NodeTemplateSpec
(Appears on: MachineSpec)
NodeTemplateSpec describes the data a node should have when created from a template
| Field | Type | Description | |||||||||||||||||||||
|---|---|---|---|---|---|---|---|---|---|---|---|---|---|---|---|---|---|---|---|---|---|---|---|
metadata | Kubernetes meta/v1.ObjectMeta | (Optional)
Refer to the Kubernetes API documentation for the fields of the
metadata field. | |||||||||||||||||||||
spec | Kubernetes core/v1.NodeSpec | (Optional) NodeSpec describes the attributes that a node is created with.
|
OrchestrationType
(string alias)
(Appears on: InPlaceUpdateMachineDeployment)
OrchestrationType specifies the orchestration type for the inplace update.
RollbackConfig
(Appears on: MachineDeploymentSpec)
RollbackConfig is the config to rollback a MachineDeployment
| Field | Type | Description |
|---|---|---|
revision | int64 | (Optional) The revision to rollback to. If set to 0, rollback to the last revision. |
RollingUpdateMachineDeployment
(Appears on: MachineDeploymentStrategy)
RollingUpdateMachineDeployment is the spec to control the desired behavior of rolling update.
| Field | Type | Description |
|---|---|---|
UpdateConfiguration | UpdateConfiguration | (Members of |
UpdateConfiguration
(Appears on: InPlaceUpdateMachineDeployment, RollingUpdateMachineDeployment)
UpdateConfiguration specifies the udpate configuration for the deployment strategy.
| Field | Type | Description |
|---|---|---|
maxUnavailable | k8s.io/apimachinery/pkg/util/intstr.IntOrString | (Optional) The maximum number of machines that can be unavailable during the update. Value can be an absolute number (ex: 5) or a percentage of desired machines (ex: 10%). Absolute number is calculated from percentage by rounding down. This can not be 0 if MaxSurge is 0. Example: when this is set to 30%, the old machine set can be scaled down to 70% of desired machines immediately when the update starts. Once new machines are ready, old machine set can be scaled down further, followed by scaling up the new machine set, ensuring that the total number of machines available at all times during the update is at least 70% of desired machines. |
maxSurge | k8s.io/apimachinery/pkg/util/intstr.IntOrString | (Optional) The maximum number of machines that can be scheduled above the desired number of machines. Value can be an absolute number (ex: 5) or a percentage of desired machines (ex: 10%). This can not be 0 if MaxUnavailable is 0. Absolute number is calculated from percentage by rounding up. Example: when this is set to 30%, the new machine set can be scaled up immediately when the update starts, such that the total number of old and new machines does not exceed 130% of desired machines. Once old machines have been killed, new machine set can be scaled up further, ensuring that total number of machines running at any time during the update is utmost 130% of desired machines. |
Generated with gen-crd-api-reference-docs
6.4.2 - Proposals
6.4.2.1 - Excess Reserve Capacity
Excess Reserve Capacity
Goal
Currently, autoscaler optimizes the number of machines for a given application-workload. Along with effective resource utilization, this feature brings concern where, many times, when new application instances are created - they don’t find space in existing cluster. This leads the cluster-autoscaler to create new machines via MachineDeployment, which can take from 3-4 minutes to ~10 minutes, for the machine to really come-up and join the cluster. In turn, application-instances have to wait till new machines join the cluster.
One of the promising solutions to this issue is Excess Reserve Capacity. Idea is to keep a certain number of machines or percent of resources[cpu/memory] always available, so that new workload, in general, can be scheduled immediately unless huge spike in the workload. Also, the user should be given enough flexibility to choose how many resources or how many machines should be kept alive and non-utilized as this affects the Cost directly.
Note
- We decided to go with Approach-4 which is based on low priority pods. Please find more details here: https://github.com/gardener/gardener/issues/254
- Approach-3 looks more promising in long term, we may decide to adopt that in future based on developments/contributions in autoscaler-community.
Possible Approaches
Following are the possible approaches, we could think of so far.
Approach 1: Enhance Machine-controller-manager to also entertain the excess machines
Machine-controller-manager currently takes care of the machines in the shoot cluster starting from creation-deletion-health check to efficient rolling-update of the machines. From the architecture point of view, MachineSet makes sure that X number of machines are always running and healthy. MachineDeployment controller smartly uses this facility to perform rolling-updates.
We can expand the scope of MachineDeployment controller to maintain excess number of machines by introducing new parallel independent controller named MachineTaint controller. This will result in MCM to include Machine, MachineSet, MachineDeployment, MachineSafety, MachineTaint controllers. MachineTaint controller does not need to introduce any new CRD - analogy fits where taint-controller also resides into kube-controller-manager.
Only Job of MachineTaint controller will be:
- List all the Machines under each MachineDeployment.
- Maintain taints of noSchedule and noExecute on
Xlatest MachineObjects. - There should be an event-based informer mechanism where MachineTaintController gets to know about any Update/Delete/Create event of MachineObjects - in turn, maintains the noSchedule and noExecute taints on all the latest machines.
- Why latest machines?
- Whenever autoscaler decides to add new machines - essentially ScaleUp event - taints from the older machines are removed and newer machines get the taints. This way X number of Machines immediately becomes free for new pods to be scheduled.
- While ScaleDown event, autoscaler specifically mentions which machines should be deleted, and that should not bring any concerns. Though we will have to put proper label/annotation defined by autoscaler on taintedMachines, so that autoscaler does not consider the taintedMachines for deletion while scale-down.
* Annotation on tainted node:
"cluster-autoscaler.kubernetes.io/scale-down-disabled": "true"
Implementation Details:
- Expect new optional field ExcessReplicas in
MachineDeployment.Spec. MachineDeployment controller now adds bothSpec.ReplicasandSpec.ExcessReplicas[if provided], and considers that as a standard desiredReplicas. - Current working of MCM will not be affected if ExcessReplicas field is kept nil. - MachineController currently reads the NodeObject and sets the MachineConditions in MachineObject. Machine-controller will now also read the taints/labels from the MachineObject - and maintains it on the NodeObject.
- Expect new optional field ExcessReplicas in
We expect cluster-autoscaler to intelligently make use of the provided feature from MCM.
- CA gets the input of min:max:excess from Gardener. CA continues to set the
MachineDeployment.Spec.Replicasas usual based on the application-workload. - In addition, CA also sets the
MachieDeployment.Spec.ExcessReplicas. - Corner-case: * CA should decrement the excessReplicas field accordingly when desiredReplicas+excessReplicas on MachineDeployment goes beyond max.
- CA gets the input of min:max:excess from Gardener. CA continues to set the
Approach 2: Enhance Cluster-autoscaler by simulating fake pods in it
- There was already an attempt by community to support this feature.
- Refer for details to: https://github.com/kubernetes/autoscaler/pull/77/files
Approach 3: Enhance cluster-autoscaler to support pluggable scaling-events
- Forked version of cluster-autoscaler could be improved to plug-in the algorithm for excess-reserve capacity.
- Needs further discussion around upstream support.
- Create golang channel to separate the algorithms to trigger scaling (hard-coded in cluster-autoscaler, currently) from the algorithms about how to to achieve the scaling (already pluggable in cluster-autoscaler). This kind of separation can help us introduce/plug-in new algorithms (such as based node resource utilisation) without affecting existing code-base too much while almost completely re-using the code-base for the actual scaling.
- Also this approach is not specific to our fork of cluster-autoscaler. It can be made upstream eventually as well.
Approach 4: Make intelligent use of Low-priority pods
- Refer to: pod-priority-preemption
- TL; DR:
- High priority pods can preempt the low-priority pods which are already scheduled.
- Pre-create bunch[equivivalent of X shoot-control-planes] of low-priority pods with priority of zero, then start creating the workload pods with better priority which will reschedule the low-priority pods or otherwise keep them in pending state if the limit for max-machines has reached.
- This is still alpha feature.
6.4.2.2 - GRPC Based Implementation of Cloud Providers
GRPC based implementation of Cloud Providers - WIP
Goal:
Currently the Cloud Providers’ (CP) functionalities ( Create(), Delete(), List() ) are part of the Machine Controller Manager’s (MCM)repository. Because of this, adding support for new CPs into MCM requires merging code into MCM which may not be required for core functionalities of MCM itself. Also, for various reasons it may not be feasible for all CPs to merge their code with MCM which is an Open Source project.
Because of these reasons, it was decided that the CP’s code will be moved out in separate repositories so that they can be maintained separately by the respective teams. Idea is to make MCM act as a GRPC server, and CPs as GRPC clients. The CP can register themselves with the MCM using a GRPC service exposed by the MCM. Details of this approach is discussed below.
How it works:
MCM acts as GRPC server and listens on a pre-defined port 5000. It implements below GRPC services. Details of each of these services are mentioned in next section.
Register()GetMachineClass()GetSecret()
GRPC services exposed by MCM:
Register()
rpc Register(stream DriverSide) returns (stream MCMside) {}
The CP GRPC client calls this service to register itself with the MCM. The CP passes the kind and the APIVersion which it implements, and MCM maintains an internal map for all the registered clients. A GRPC stream is returned in response which is kept open througout the life of both the processes. MCM uses this stream to communicate with the client for machine operations: Create(), Delete() or List().
The CP client is responsible for reading the incoming messages continuously, and based on the operationType parameter embedded in the message, it is supposed to take the required action. This part is already handled in the package grpc/infraclient.
To add a new CP client, import the package, and implement the ExternalDriverProvider interface:
type ExternalDriverProvider interface {
Create(machineclass *MachineClassMeta, credentials, machineID, machineName string) (string, string, error)
Delete(machineclass *MachineClassMeta, credentials, machineID string) error
List(machineclass *MachineClassMeta, credentials, machineID string) (map[string]string, error)
}
GetMachineClass()
rpc GetMachineClass(MachineClassMeta) returns (MachineClass) {}
As part of the message from MCM for various machine operations, the name of the machine class is sent instead of the full machine class spec. The CP client is expected to use this GRPC service to get the full spec of the machine class. This optionally enables the client to cache the machine class spec, and make the call only if the machine calass spec is not already cached.
GetSecret()
rpc GetSecret(SecretMeta) returns (Secret) {}
As part of the message from MCM for various machine operations, the Cloud Config (CC) and CP credentials are not sent. The CP client is expected to use this GRPC service to get the secret which has CC and CP’s credentials from MCM. This enables the client to cache the CC and credentials, and to make the call only if the data is not already cached.
How to add a new Cloud Provider’s support
Import the package grpc/infraclient and grpc/infrapb from MCM (currently in MCM’s “grpc-driver” branch)
- Implement the interface
ExternalDriverProviderCreate(): Creates a new machineDelete(): Deletes a machineList(): Lists machines
- Use the interface
MachineClassDataProviderGetMachineClass(): Makes the call to MCM to get machine class specGetSecret(): Makes the call to MCM to get secret containing Cloud Config and CP’s credentials
Example implementation:
Refer GRPC based implementation for AWS client: https://github.com/ggaurav10/aws-driver-grpc
6.4.2.3 - Hotupdate Instances
Hot-Update VirtualMachine tags without triggering a rolling-update
- Hot-Update VirtualMachine tags without triggering a rolling-update
Motivation
MCM Issue#750 There is a requirement to provide a way for consumers to add tags which can be hot-updated onto VMs. This requirement can be generalized to also offer a convenient way to specify tags which can be applied to VMs, NICs, Devices etc.
MCM Issue#635 which in turn points to MCM-Provider-AWS Issue#36 - The issue hints at other fields like enable/disable source/destination checks for NAT instances which needs to be hot-updated on network interfaces.
In GCP provider -
instance.ServiceAccountscan be updated without the need to roll-over the instance. See
Boundary Condition
All tags that are added via means other than MachineClass.ProviderSpec should be preserved as-is. Only updates done to tags in MachineClass.ProviderSpec should be applied to the infra resources (VM/NIC/Disk).
What is available today?
WorkerPool configuration inside shootYaml provides a way to set labels. As per the definition these labels will be applied on Node resources. Currently these labels are also passed to the VMs as tags. There is no distinction made between Node labels and VM tags.
MachineClass has a field which holds provider specific configuration and one such configuration is tags. Gardener provider extensions updates the tags in MachineClass.
- AWS provider extension directly passes the labels to the tag section of machineClass.
- Azure provider extension sanitizes the woker pool labels and adds them as tags in MachineClass.
- GCP provider extension sanitizes them, and then sets them as labels in the MachineClass. In GCP tags only have keys and are currently hard coded.
Let us look at an example of MachineClass.ProviderSpec in AWS:
providerSpec:
ami: ami-02fe00c0afb75bbd3
tags:
#[section-1] pool lables added by gardener extension
#########################################################
kubernetes.io/arch: amd64
networking.gardener.cloud/node-local-dns-enabled: "true"
node.kubernetes.io/role: node
worker.garden.sapcloud.io/group: worker-ser234
worker.gardener.cloud/cri-name: containerd
worker.gardener.cloud/pool: worker-ser234
worker.gardener.cloud/system-components: "true"
#[section-2] Tags defined in the gardener-extension-provider-aws
###########################################################
kubernetes.io/cluster/cluster-full-name: "1"
kubernetes.io/role/node: "1"
#[section-3]
###########################################################
user-defined-key1: user-defined-val1
user-defined-key2: user-defined-val2
Refer src for tags defined in
section-1. Refer src for tags defined insection-2. Tags insection-3are defined by the user.
Out of the above three tag categories, MCM depends section-2 tags (mandatory-tags) for its orphan collection and Driver’s DeleteMachineand GetMachineStatus to work.
ProviderSpec.Tags are transported to the provider specific resources as follows:
| Provider | Resources Tags are set on | Code Reference | Comment |
|---|---|---|---|
| AWS | Instance(VM), Volume, Network-Interface | aws-VM-Vol-NIC | No distinction is made between tags set on VM, NIC or Volume |
| Azure | Instance(VM), Network-Interface | azure-VM-parameters & azureNIC-Parameters | |
| GCP | Instance(VM), 1 tag: name (denoting the name of the worker) is added to Disk | gcp-VM & gcp-Disk | In GCP key-value pairs are called labels while network tags have only keys |
| AliCloud | Instance(VM) | aliCloud-VM |
What are the problems with the current approach?
There are a few shortcomings in the way tags/labels are handled:
- Tags can only be set at the time a machine is created.
- There is no distinction made amongst tags/labels that are added to VM’s, disks or network interfaces. As stated above for AWS same set of tags are added to all. There is a limit defined on the number of tags/labels that can be associated to the devices (disks, VMs, NICs etc). Example: In AWS a max of 50 user created tags are allowed. Similar restrictions are applied on different resources across providers. Therefore adding all tags to all devices even if the subset of tags are not meant for that resource exhausts the total allowed tags/labels for that resource.
- The only placeholder in shoot yaml as mentioned above is meant to only hold labels that should be applied on primarily on the Node objects. So while you could use the node labels for extended resources, using it also for tags is not clean.
- There is no provision in the shoot YAML today to add tags only to a subset of resources.
MachineClass Update and its impact
When Worker.ProviderConfig is changed then a worker-hash is computed which includes the raw ProviderConfig. This hash value is then used as a suffix when constructing the name for a MachineClass. See aws-extension-provider as an example. A change in the name of the MachineClass will then in-turn trigger a rolling update of machines. Since tags are provider specific and therefore will be part of ProviderConfig, any update to them will result in a rolling-update of machines.
Proposal
Shoot YAML changes
Provider specific configuration is set via providerConfig section for each worker pool.
Example worker provider config (current):
providerConfig:
apiVersion: aws.provider.extensions.gardener.cloud/v1alpha1
kind: WorkerConfig
volume:
iops: 10000
dataVolumes:
- name: kubelet-dir
snapshotID: snap-13234
iamInstanceProfile: # (specify either ARN or name)
name: my-profile
arn: my-instance-profile-arn
It is proposed that an additional field be added for tags under providerConfig. Proposed changed YAML:
providerConfig:
apiVersion: aws.provider.extensions.gardener.cloud/v1alpha1
kind: WorkerConfig
volume:
iops: 10000
dataVolumes:
- name: kubelet-dir
snapshotID: snap-13234
iamInstanceProfile: # (specify either ARN or name)
name: my-profile
arn: my-instance-profile-arn
tags:
vm:
key1: val1
key2: val2
..
# for GCP network tags are just keys (there is no value associated to them).
# What is shown below will work for AWS provider.
network:
key3: val3
key4: val4
Under tags clear distinction is made between tags for VMs, Disks, network interface etc. Each provider has a different allowed-set of characters that it accepts as key names, has different limits on the tags that can be set on a resource (disk, NIC, VM etc.) and also has a different format (GCP network tags are only keys).
TODO:
Check if worker.labels are getting added as tags on infra resources. We should continue to support it and double check that these should only be added to VMs and not to other resources.
Should we support users adding VM tags as node labels?
Provider specific WorkerConfig API changes
Taking
AWSprovider extension as an example to show the changes.
WorkerConfig will now have the following changes:
- A new field for tags will be introduced.
- Additional metadata for struct fields will now be added via
struct tags.
type WorkerConfig struct {
metav1.TypeMeta
Volume *Volume
// .. all fields are not mentioned here.
// Tags are a collection of tags to be set on provider resources (e.g. VMs, Disks, Network Interfaces etc.)
Tags *Tags `hotupdatable:true`
}
// Tags is a placeholder for all tags that can be set/updated on VMs, Disks and Network Interfaces.
type Tags struct {
// VM tags set on the VM instances.
VM map[string]string
// Network tags set on the network interfaces.
Network map[string]string
// Disk tags set on the volumes/disks.
Disk map[string]string
}
There is a need to distinguish fields within ProviderSpec (which is then mapped to the above WorkerConfig) which can be updated without the need to change the hash suffix for MachineClass and thus trigger a rolling update on machines.
To achieve that we propose to use struct tag hotupdatable whose value indicates if the field can be updated without the need to do a rolling update. To ensure backward compatibility, all fields which do not have this tag or have hotupdatable set to false will be considered as immutable and will require a rolling update to take affect.
Gardener provider extension changes
Taking AWS provider extension as an example. Following changes should be made to all gardener provider extensions
AWS Gardener Extension generates machine config using worker pool configuration. As part of that it also computes the workerPoolHash which is then used to create the name of the MachineClass.
Currently WorkerPoolHash function uses the entire providerConfig to compute the hash. Proposal is to do the following:
- Remove the code from function
WorkerPoolHash. - Add another function to compute hash using all immutable fields in the provider config struct and then pass that to
worker.WorkerPoolHashasadditionalData.
The above will ensure that tags and any other field in WorkerConfig which is marked with updatable:true is not considered for hash computation and will therefore not contribute to changing the name of MachineClass object thus preventing a rolling update.
WorkerConfig and therefore the contained tags will be set as ProviderSpec in MachineClass.
If only fields which have updatable:true are changed then it should result in update/patch of MachineClass and not creation.
Driver interface changes
Driver interface which is a facade to provider specific API implementations will have one additional method.
type Driver interface {
// .. existing methods are not mentioned here for brevity.
UpdateMachine(context.Context, *UpdateMachineRequest) error
}
// UpdateMachineRequest is the request to update machine tags.
type UpdateMachineRequest struct {
ProviderID string
LastAppliedProviderSpec raw.Extension
MachineClass *v1alpha1.MachineClass
Secret *corev1.Secret
}
If any
machine-controller-manager-provider-<providername>has not implementedUpdateMachinethen updates of tags on Instances/NICs/Disks will not be done. An error message will be logged instead.
Machine Class reconciliation
Current MachineClass reconciliation does not reconcile MachineClass resource updates but it only enqueues associated machines. The reason is that it is assumed that anything that is changed in a MachineClass will result in a creation of a new MachineClass with a different name. This will result in a rolling update of all machines using the MachineClass as a template.
However, it is possible that there is data that all machines in a MachineSet share which do not require a rolling update (e.g. tags), therefore there is a need to reconcile the MachineClass as well.
Reconciliation Changes
In order to ensure that machines get updated eventually with changes to the hot-updatable fields defined in the MachineClass.ProviderConfig as raw.Extension.
We should only fix MCM Issue#751 in the MachineClass reconciliation and let it enqueue the machines as it does today. We additionally propose the following two things:
Introduce a new annotation
last-applied-providerspecon every machine resource. This will capture the last successfully appliedMachineClass.ProviderSpecon this instance.Enhance the machine reconciliation to include code to hot-update machine.
In machine-reconciliation there are currently two flows triggerDeletionFlow and triggerCreationFlow. When a machine gets enqueued due to changes in MachineClass then in this method following changes needs to be introduced:
Check if the machine has last-applied-providerspec annotation.
Case 1.1
If the annotation is not present then there can be just 2 possibilities:
It is a fresh/new machine and no backing resources (VM/NIC/Disk) exist yet. The current flow checks if the providerID is empty and
Status.CurrenStatus.Phaseis empty then it enters into thetriggerCreationFlow.It is an existing machine which does not yet have this annotation. In this case call
Driver.UpdateMachine. If the driver returns no error then addlast-applied-providerspecannotation with the value ofMachineClass.ProviderSpecto this machine.
Case 1.2
If the annotation is present then compare the last applied provider-spec with the current provider-spec. If there are changes (check their hash values) then call Driver.UpdateMachine. If the driver returns no error then add last-applied-providerspec annotation with the value of MachineClass.ProviderSpec to this machine.
NOTE: It is assumed that if there are changes to the fields which are not marked as
hotupdatablethen it will result in the change of name for MachineClass resulting in a rolling update of machines. If the name has not changed + machine is enqueued + there is a change in machine-class then it will be change to a hotupdatable fields in the spec.
Trigger update flow can be done after reconcileMachineHealth and syncMachineNodeTemplates in machine-reconciliation.
There are 2 edge cases that needs attention and special handling:
Premise: It is identified that there is an update done to one or more hotupdatable fields in the MachineClass.ProviderSpec.
Edge-Case-1
In the machine reconciliation, an update-machine-flow is triggered which in-turn calls Driver.UpdateMachine. Consider the case where the hot update needs to be done to all VM, NIC and Disk resources. The driver returns an error which indicates a partial-failure. As we have mentioned above only when Driver.UpdateMachine returns no error will last-applied-providerspec be updated. In case of partial failure the annotation will not be updated. This event will be re-queued for a re-attempt. However consider a case where before the item is re-queued, another update is done to MachineClass reverting back the changes to the original spec.
| At T1 | At T2 (T2 > T1) | At T3 (T3> T2) |
|---|---|---|
| last-applied-providerspec=S1 MachineClass.ProviderSpec = S1 | last-applied-providerspec=S1 MachineClass.ProviderSpec = S2 Another update to MachineClass.ProviderConfig = S3 is enqueue (S3 == S1) | last-applied-providerspec=S1 Driver.UpdateMachine for S1-S2 update - returns partial failure Machine-Key is requeued |
At T4 (T4> T3) when a machine is reconciled then it checks that last-applied-providerspec is S1 and current MachineClass.ProviderSpec = S3 and since S3 is same as S1, no update is done. At T2 Driver.UpdateMachine was called to update the machine with S2 but it partially failed. So now you will have resources which are partially updated with S2 and no further updates will be attempted.
Edge-Case-2
The above situation can also happen when Driver.UpdateMachine is in the process of updating resources. It has hot-updated lets say 1 resource. But now MCM crashes. By the time it comes up another update to MachineClass.ProviderSpec is done essentially reverting back the previous change (same case as above). In this case reconciliation loop never got a chance to get any response from the driver.
To handle the above edge cases there are 2 options:
Option #1
Introduce a new annotation inflight-providerspec-hash . The value of this annotation will be the hash value of the MachineClass.ProviderSpec that is in the process of getting applied on this machine. The machine will be updated with this annotation just before calling Driver.UpdateMachine (in the trigger-update-machine-flow). If the driver returns no error then (in a single update):
last-applied-providerspecwill be updatedinflight-providerspec-hashannotation will be removed.
Option #2 - Preferred
Leverage Machine.Status.LastOperation with Type set to MachineOperationUpdate and State set to MachineStateProcessing This status will be updated just before calling Driver.UpdateMachine.
Semantically LastOperation captures the details of the operation post-operation and not pre-operation. So this solution would be a divergence from the norm.
6.4.2.4 - Initialize Machine
Post-Create Initialization of Machine Instance
Background
Today the driver.Driver facade represents the boundary between the the machine-controller and its various provider specific implementations.
We have abstract operations for creation/deletion and listing of machines (actually compute instances) but we do not correctly handle post-creation initialization logic. Nor do we provide an abstract operation to represent the hot update of an instance after creation.
We have found this to be necessary for several use cases. Today in the MCM AWS Provider, we already misuse driver.GetMachineStatus which is supposed to be a read-only operation obtaining the status of an instance.
Each AWS EC2 instance performs source/destination checks by default. For EC2 NAT instances these should be disabled. This is done by issuing a ModifyInstanceAttribute request with the
SourceDestCheckset tofalse. The MCM AWS Provider, decodes the AWSProviderSpec, readsproviderSpec.SrcAndDstChecksEnabledand correspondingly issues the call to modify the already launched instance. However, this should be done as an action after creating the instance and should not be part of the VM status retrieval.Similarly, there is a pending PR to add the
Ipv6AddessCountandIpv6PrefixCountto enable the assignment of an ipv6 address and an ipv6 prefix to instances. This requires constructing and issuing an AssignIpv6Addresses request after the EC2 instance is available.We have other uses-cases such as MCM Issue#750 where there is a requirement to provide a way for consumers to add tags which can be hot-updated onto instances. This requirement can be generalized to also offer a convenient way to specify tags which can be applied to VMs, NICs, Devices etc.
We have a need for “machine-instance-not-ready” taint as described in MCM#740 which should only get removed once the post creation updates are finished.
Objectives
We will split the fulfilment of this overall need into 2 stages of implementation.
Stage-A: Support post-VM creation initialization logic of the instance suing a proposed
Driver.InitializeMachineby permitting provider implementors to add initialization logic after VM creation, return with special new error codecodes.Initializationfor initialization errors and correspondingly support a new machine operation stageInstanceInitializationwhich will be updated in the machineLastOperation. The triggerCreationFlow - a reconciliation sub-flow of the MCM responsible for orchestrating instance creation and updating machine status will be changed to support this behaviour.Stage-B: Introduction of
Driver.UpdateMachineand enhancing the MCM, MCM providers and gardener extension providers to support hot update of instances throughDriver.UpdateMachine. The MCM triggerUpdationFlow - a reconciliation sub-flow of the MCM which is supposed to be responsible for orchestrating instance update - but currently not used, will be updated to invoke the providerDriver.UpdateMachineon hot-updates to to theMachineobject
Stage-A Proposal
Current MCM triggerCreationFlow
Today, reconcileClusterMachine which is the main routine for the Machine object reconciliation invokes triggerCreationFlow at the end when the machine.Spec.ProviderID is empty or if the machine.Status.CurrentStatus.Phase is empty or in CrashLoopBackOff
%%{ init: {
'themeVariables':
{ 'fontSize': '12px'}
} }%%
flowchart LR
other["..."]
-->chk{"machine ProviderID empty
OR
Phase empty or CrashLoopBackOff ?
"}--yes-->triggerCreationFlow
chk--noo-->LongRetry["return machineutils.LongRetry"]Today, the triggerCreationFlow is illustrated below with some minor details omitted/compressed for brevity
NOTES
- The
lastopbelow is an abbreviation formachine.Status.LastOperation. This, along with the machine phase is generally updated on theMachineobject just before returning from the method. - regarding
phase=CrashLoopBackOff|Failed. the machine phase may either beCrashLoopBackOffor move toFailedif the difference between current time and themachine.CreationTimestamphas exceeded the configuredMachineCreationTimeout.
%%{ init: {
'themeVariables':
{ 'fontSize': '12px'}
} }%%
flowchart TD
end1(("end"))
begin((" "))
medretry["return MediumRetry, err"]
shortretry["return ShortRetry, err"]
medretry-->end1
shortretry-->end1
begin-->AddBootstrapTokenToUserData
-->gms["statusResp,statusErr=driver.GetMachineStatus(...)"]
-->chkstatuserr{"Check statusErr"}
chkstatuserr--notFound-->chknodelbl{"Chk Node Label"}
chkstatuserr--else-->createFailed["lastop.Type=Create,lastop.state=Failed,phase=CrashLoopBackOff|Failed"]-->medretry
chkstatuserr--nil-->initnodename["nodeName = statusResp.NodeName"]-->setnodename
chknodelbl--notset-->createmachine["createResp, createErr=driver.CreateMachine(...)"]-->chkCreateErr{"Check createErr"}
chkCreateErr--notnil-->createFailed
chkCreateErr--nil-->getnodename["nodeName = createResp.NodeName"]
-->chkstalenode{"nodeName != machine.Name\n//chk stale node"}
chkstalenode--false-->setnodename["if unset machine.Labels['node']= nodeName"]
-->machinepending["if empty/crashloopbackoff lastop.type=Create,lastop.State=Processing,phase=Pending"]
-->shortretry
chkstalenode--true-->delmachine["driver.DeleteMachine(...)"]
-->permafail["lastop.type=Create,lastop.state=Failed,Phase=Failed"]
-->shortretry
subgraph noteA [" "]
permafail -.- note1(["VM was referring to stale node obj"])
end
style noteA opacity:0
subgraph noteB [" "]
setnodename-.- note2(["Proposal: Introduce Driver.InitializeMachine after this"])
endEnhancement of MCM triggerCreationFlow
Relevant Observations on Current Flow
- Observe that we always perform a call to
Driver.GetMachineStatusand only then conditionally perform a call toDriver.CreateMachineif there was was no machine found. - Observe that after the call to a successful
Driver.CreateMachine, the machine phase is set toPending, theLastOperation.Typeis currently set toCreateand theLastOperation.Stateset toProcessingbefore returning with aShortRetry. TheLastOperation.Descriptionis (unfortunately) set to the fixed message:Creating machine on cloud provider. - Observe that after an erroneous call to
Driver.CreateMachine, the machine phase is set toCrashLoopBackOfforFailed(in case of creation timeout).
The following changes are proposed with a view towards minimal impact on current code and no introduction of a new Machine Phase.
MCM Changes
- We propose introducing a new machine operation
Driver.InitializeMachinewith the following signaturetype Driver interface { // .. existing methods are omitted for brevity. // InitializeMachine call is responsible for post-create initialization of the provider instance. InitializeMachine(context.Context, *InitializeMachineRequest) error } // InitializeMachineRequest is the initialization request for machine instance initialization type InitializeMachineRequest struct { // Machine object whose VM instance should be initialized Machine *v1alpha1.Machine // MachineClass backing the machine object MachineClass *v1alpha1.MachineClass // Secret backing the machineClass object Secret *corev1.Secret } - We propose introducing a new MC error code
codes.Initializationindicating that the VM Instance was created but there was an error in initialization after VM creation. The implementor ofDriver.InitializeMachinecan return this error code, indicating thatInitializeMachineneeds to be called again. The Machine Controller will change the phase toCrashLoopBackOffas usual when encountering acodes.Initializationerror. - We will introduce a new machine operation stage
InstanceInitialization. In case of ancodes.Initializationerror- the
machine.Status.LastOperation.Descriptionwill be set toInstanceInitialization, machine.Status.LastOperation.ErrorCodewill be set tocodes.Initialization- the
LastOperation.Typewill be set toCreate - the
LastOperation.Stateset toFailedbefore returning with aShortRetry
- the
- The semantics of
Driver.GetMachineStatuswill be changed. If the instance associated with machine exists, but the instance was not initialized as expected, the provider implementations ofGetMachineStatusshould return an error:status.Error(codes.Initialization). - If
Driver.GetMachineStatusreturned an error encapsulatingcodes.InitializationthenDriver.InitializeMachinewill be invoked again in thetriggerCreationFlow. - As according to the usual logic, the main machine controller reconciliation loop will now re-invoke the
triggerCreationFlowagain if the machine phase isCrashLoopBackOff.
Illustration

AWS Provider Changes
Driver.InitializeMachine
The implementation for the AWS Provider will look something like:
- After the VM instance is available, check
providerSpec.SrcAndDstChecksEnabled, constructModifyInstanceAttributeInputand callModifyInstanceAttribute. In case of an error returncodes.Initializationinstead of the currentcodes.Internal - Check
providerSpec.NetworkInterfacesand ifIpv6PrefixCountis notnil, then constructAssignIpv6AddressesInputand callAssignIpv6Addresses. In case of an error returncodes.Initialization. Don’t use the genericcodes.Internal
The existing Ipv6 PR will need modifications.
Driver.GetMachineStatus
- If
providerSpec.SrcAndDstChecksEnabledisfalse, checkec2.Instance.SourceDestCheck. If it does not match then returnstatus.Error(codes.Initialization) - Check
providerSpec.NetworkInterfacesand ifIpv6PrefixCountis notnil, checkec2.Instance.NetworkInterfacesand check ifInstanceNetworkInterface.Ipv6Addresseshas a non-nil slice. If this is not the case then returnstatus.Error(codes.Initialization)
Instance Not Ready Taint
- Due to the fact that creation flow for machines will now be enhanced to correctly support post-creation startup logic, we should not scheduled workload until this startup logic is complete. Even without this feature we have a need for such a taint as described in MCM#740
- We propose a new taint
node.machine.sapcloud.io/instance-not-readywhich will be added as a node startup taint in gardener core KubeletConfiguration.RegisterWithTaints - The will will then removed by MCM in health check reconciliation, once the machine becomes fully ready. (when moving to
Runningphase) - We will add this taint as part of
--ignore-taintin CA - We will introduce a disclaimer / prerequisite in the MCM FAQ, to add this taint as part of kubelet config under
--register-with-taints, otherwise workload could get scheduled , before machine beomesRunning
Stage-B Proposal
Enhancement of Driver Interface for Hot Updation
Kindly refer to the Hot-Update Instances design which provides elaborate detail.
6.4.3 - To-Do
6.4.3.1 - Outline
Machine Controller Manager
CORE – ./machine-controller-manager(provider independent) Out of tree : Machine controller (provider specific) MCM is a set controllers:
Machine Deployment Controller
Machine Set Controller
Machine Controller
Machine Safety Controller
Questions and refactoring Suggestions
Refactoring
| Statement | FilePath | Status |
|---|---|---|
| ConcurrentNodeSyncs” bad name - nothing to do with node syncs actually. If its value is ’10’ then it will start 10 goroutines (workers) per resource type (machine, machinist, machinedeployment, provider-specific-class, node - study the different resource types. | cmd/machine-controller-manager/app/options/options.go | pending |
| LeaderElectionConfiguration is very similar to the one present in “client-go/tools/leaderelection/leaderelection.go” - can we simply used the one in client-go instead of defining again? | pkg/options/types.go - MachineControllerManagerConfiguration | pending |
| Have all userAgents as constant. Right now there is just one. | cmd/app/controllermanager.go | pending |
| Shouldn’t run function be defined on MCMServer struct itself? | cmd/app/controllermanager.go | pending |
| clientcmd.BuildConfigFromFlags fallsback to inClusterConfig which will surely not work as that is not the target. Should it not check and exit early? | cmd/app/controllermanager.go - run Function | pending |
A more direct way to create an in cluster config is using k8s.io/client-go/rest -> rest.InClusterConfig instead of using clientcmd.BuildConfigFromFlags passing empty arguments and depending upon the implementation to fallback to creating a inClusterConfig. If they change the implementation that you get affected. | cmd/app/controllermanager.go - run Function | pending |
| Introduce a method on MCMServer which gets a target KubeConfig and controlKubeConfig or alternatively which creates respective clients. | cmd/app/controllermanager.go - run Function | pending |
| Why can’t we use Kubernetes.NewConfigOrDie also for kubeClientControl? | cmd/app/controllermanager.go - run Function | pending |
| I do not see any benefit of client builders actually. All you need to do is pass in a config and then directly use client-go functions to create a client. | cmd/app/controllermanager.go - run Function | pending |
| Function: getAvailableResources - rename this to getApiServerResources | cmd/app/controllermanager.go | pending |
| Move the method which waits for API server to up and ready to a separate method which returns a discoveryClient when the API server is ready. | cmd/app/controllermanager.go - getAvailableResources function | pending |
| Many methods in client-go used are now deprecated. Switch to the ones that are now recommended to be used instead. | cmd/app/controllermanager.go - startControllers | pending |
| This method needs a general overhaul | cmd/app/controllermanager.go - startControllers | pending |
| If the design is influenced/copied from KCM then its very different. There are different controller structs defined for deployment, replicaset etc which makes the code much more clearer. You can see “kubernetes/cmd/kube-controller-manager/apps.go” and then follow the trail from there. - agreed needs to be changed in future (if time permits) | pkg/controller/controller.go | pending |
| I am not sure why “MachineSetControlInterface”, “RevisionControlInterface”, “MachineControlInterface”, “FakeMachineControl” are defined in this file? | pkg/controller/controller_util.go | pending |
IsMachineActive - combine the first 2 conditions into one with OR. | pkg/controller/controller_util.go | pending |
| Minor change - correct the comment, first word should always be the method name. Currently none of the comments have correct names. | pkg/controller/controller_util.go | pending |
| There are too many deep copies made. What is the need to make another deep copy in this method? You are not really changing anything here. | pkg/controller/deployment.go - updateMachineDeploymentFinalizers | pending |
| Why can’t these validations be done as part of a validating webhook? | pkg/controller/machineset.go - reconcileClusterMachineSet | pending |
Small change to the following if condition. else if is not required a simple else is sufficient. Code1 | ||
| pkg/controller/machineset.go - reconcileClusterMachineSet | pending | |
Why call these inactiveMachines, these are live and running and therefore active. | pkg/controller/machineset.go - terminateMachines | pending |
Clarification
| Statement | FilePath | Status |
|---|---|---|
| Why are there 2 versions - internal and external versions? | General | pending |
| Safety controller freezes MCM controllers in the following cases: * Num replicas go beyond a threshold (above the defined replicas) * Target API service is not reachable There seems to be an overlap between DWD and MCM Safety controller. In the meltdown scenario why is MCM being added to DWD, you could have used Safety controller for that. | General | pending |
| All machine resources are v1alpha1 - should we not promote it to beta. V1alpha1 has a different semantic and does not give any confidence to the consumers. | cmd/app/controllermanager.go | pending |
Shouldn’t controller manager use context.Context instead of creating a stop channel? - Check if signals (os.Interrupt and SIGTERM are handled properly. Do not see code where this is handled currently.) | cmd/app/controllermanager.go | pending |
| What is the rationale behind a timeout of 10s? If the API server is not up, should this not just block as it can anyways not do anything. Also, if there is an error returned then you exit the MCM which does not make much sense actually as it will be started again and you will again do the poll for the API server to come back up. Forcing an exit of MCM will not have any impact on the reachability of the API server in anyway so why exit? | cmd/app/controllermanager.go - getAvailableResources | pending |
There is a very weird check - availableResources[machineGVR] || availableResources[machineSetGVR] || availableResources[machineDeploymentGVR]Shouldn’t this be conjunction instead of disjunction? * What happens if you do not find one or all of these resources? Currently an error log is printed and nothing else is done. MCM can be used outside gardener context where consumers can directly create MachineClass and Machine and not create MachineSet / Maching Deployment. There is no distinction made between context (gardener or outside-gardener). | cmd/app/controllermanager.go - StartControllers | pending |
| Instead of having an empty select {} to block forever, isn’t it better to wait on the stop channel? | cmd/app/controllermanager.go - StartControllers | pending |
| Do we need provider specific queues and syncs and listers | pkg/controller/controller.go | pending |
| Why are resource types prefixed with “Cluster”? - not sure , check PR | pkg/controller/controller.go | pending |
| When will forgetAfterSuccess be false and why? - as per the current code this is never the case. - Himanshu will check | cmd/app/controllermanager.go - createWorker | pending |
| What is the use of “ExpectationsInterface” and “UIDTrackingContExpectations”? * All expectations related code should be in its own file “expectations.go” and not in this file. | pkg/controller/controller_util.go | pending |
| Why do we not use lister but directly use the controlMachingClient to get the deployment? Is it because you want to avoid any potential delays caused by update of the local cache held by the informer and accessed by the lister? What is the load on API server due to this? | pkg/controller/deployment.go - reconcileClusterMachineDeployment | pending |
| Why is this conversion needed? code2 | pkg/controller/deployment.go - reconcileClusterMachineDeployment | pending |
A deep copy of machineDeployment is already passed and within the function another deepCopy is made. Any reason for it? | pkg/controller/deployment.go - addMachineDeploymentFinalizers | pending |
What is an Status.ObservedGeneration?*Read more about generations and observedGeneration at: https://github.com/kubernetes/community/blob/master/contributors/devel/sig-architecture/api-conventions.md#metadata https://alenkacz.medium.com/kubernetes-operator-best-practices-implementing-observedgeneration-250728868792 Ideally the update to the ObservedGeneration should only be made after successful reconciliation and not before. I see that this is just copied from deployment_controller.go as is | pkg/controller/deployment.go - reconcileClusterMachineDeployment | pending |
Why and when will a MachineDeployment be marked as frozen and when will it be un-frozen? | pkg/controller/deployment.go - reconcileClusterMachineDeployment | pending |
| Shoudn’t the validation of the machine deployment be done during the creation via a validating webhook instead of allowing it to be stored in etcd and then failing the validation during sync? I saw the checks and these can be done via validation webhook. | pkg/controller/deployment.go - reconcileClusterMachineDeployment | pending |
| RollbackTo has been marked as deprecated. What is the replacement? code3 | pkg/controller/deployment.go - reconcileClusterMachineDeployment | pending |
| What is the max machineSet deletions that you could process in a single run? The reason for asking this question is that for every machineSetDeletion a new goroutine spawned. * Is the Delete call a synchrounous call? Which means it blocks till the machineset deletion is triggered which then also deletes the machines (due to cascade-delete and blockOwnerDeletion= true)? | pkg/controller/deployment.go - terminateMachineSets | pending |
If there are validation errors or error when creating label selector then a nil is returned. In the worker reconcile loop if the return value is nil then it will remove it from the queue (forget + done). What is the way to see any errors? Typically when we describe a resource the errors are displayed. Will these be displayed when we discribe a MachineDeployment? | pkg/controller/deployment.go - reconcileClusterMachineSet | pending |
If an error is returned by updateMachineSetStatus and it is IsNotFound error then returning an error will again queue the MachineSet. Is this desired as IsNotFound indicates the MachineSet has been deleted and is no longer there? | pkg/controller/deployment.go - reconcileClusterMachineSet | pending |
is machineControl.DeleteMachine a synchronous operation which will wait till the machine has been deleted? Also where is the DeletionTimestamp set on the Machine? Will it be automatically done by the API server? | pkg/controller/deployment.go - prepareMachineForDeletion | pending |
Bugs/Enhancements
| Statement + TODO | FilePath | Status |
|---|---|---|
| This defines QPS and Burst for its requests to the KAPI. Check if it would make sense to explicitly define a FlowSchema and PriorityLevelConfiguration to ensure that the requests from this controller are given a well-defined preference. What is the rational behind deciding these values? | pkg/options/types.go - MachineControllerManagerConfiguration | pending |
| In function “validateMachineSpec” fldPath func parameter is never used. | pkg/apis/machine/validation/machine.go | pending |
| If there is an update failure then this method recursively calls itself without any sort of delays which could lead to a LOT of load on the API server. (opened: https://github.com/gardener/machine-controller-manager/issues/686) | pkg/controller/deployment.go - updateMachineDeploymentFinalizers | pending |
We are updating filteredMachines by invoking syncMachinesNodeTemplates, syncMachinesConfig and syncMachinesClassKind but we do not create any deepCopy here. Everywhere else the general principle is when you mutate always make a deepCopy and then mutate the copy instead of the original as a lister is used and that changes the cached copy.Fix: SatisfiedExpectations check has been commented and there is a TODO there to fix it. Is there a PR for this? | pkg/controller/machineset.go - reconcileClusterMachineSet | pending |
Code references
1.1 code1
if machineSet.DeletionTimestamp == nil {
// manageReplicas is the core machineSet method where scale up/down occurs
// It is not called when deletion timestamp is set
manageReplicasErr = c.manageReplicas(ctx, filteredMachines, machineSet)
} else if machineSet.DeletionTimestamp != nil {
//FIX: change this to simple else without the if
1.2 code2
defer dc.enqueueMachineDeploymentAfter(deployment, 10*time.Minute)
* `Clarification`: Why is this conversion needed?
err = v1alpha1.Convert_v1alpha1_MachineDeployment_To_machine_MachineDeployment(deployment, internalMachineDeployment, nil)
1.3 code3
// rollback is not re-entrant in case the underlying machine sets are updated with a new
// revision so we should ensure that we won't proceed to update machine sets until we
// make sure that the deployment has cleaned up its rollback spec in subsequent enqueues.
if d.Spec.RollbackTo != nil {
return dc.rollback(ctx, d, machineSets, machineMap)
}
6.4.4 - FAQ
Frequently Asked Questions
The answers in this FAQ apply to the newest (HEAD) version of Machine Controller Manager. If you’re using an older version of MCM please refer to corresponding version of this document. Few of the answers assume that the MCM being used is in conjuction with cluster-autoscaler:
Table of Contents:
- Frequently Asked Questions
- Table of Contents:
- Basics
- How to?
- How to install MCM in a Kubernetes cluster?
- How to run MCM in different cluster setups?
- How to better control the rollout process of the worker nodes?
- How to scale down MachineDeployment by selective deletion of machines?
- How to force delete a machine?
- How to pause the ongoing rolling-update of the machinedeployment?
- How to delete machine object immedietly if I don’t have access to it?
- How to avoid garbage collection of your node?
- How to trigger rolling update of a machinedeployment?
- Internals
- What is the high level design of MCM?
- What are the different configuration options in MCM?
- What are the different timeouts/configurations in a machine’s lifecycle?
- How is the drain of a machine implemented?
- How are the stateful applications drained during machine deletion?
- How does
maxEvictRetriesconfiguration work withdrainTimeoutconfiguration? - What are the different phases of a machine?
- What health checks are performed on a machine?
- How does rate limiting replacement of machine work in MCM? How is it related to meltdown protection?
- How MCM responds when scale-out/scale-in is done during rolling update of a machinedeployment?
- How does MCM prioritize the machines for deletion on scale-down of machinedeployment?
- How some unhealthy machines are drained quickly?
- Troubleshooting
- Developer
- In the context of Gardener
Basics
What is Machine Controller Manager?
Machine Controller Manager aka MCM is a bunch of controllers used for the lifecycle management of the worker machines. It reconciles a set of CRDs such as Machine, MachineSet, MachineDeployment which depicts the functionality of Pod, Replicaset, Deployment of the core Kubernetes respectively. Read more about it at README.
- Gardener uses MCM to manage its Kubernetes nodes of the shoot cluster. However, by design, MCM can be used independent of Gardener.
Why is my machine deleted?
A machine is deleted by MCM generally for 2 reasons-
- Machine is unhealthy for at least
MachineHealthTimeoutperiod. The defaultMachineHealthTimeoutis 10 minutes.- By default, a machine is considered unhealthy if any of the following node conditions -
DiskPressure,KernelDeadlock,FileSystem,Readonlyis set totrue, orKubeletReadyis set tofalse. However, this is something that is configurable using the following flag.
- By default, a machine is considered unhealthy if any of the following node conditions -
- Machine is scaled down by the
MachineDeploymentresource.- This is very usual when an external controller cluster-autoscaler (aka CA) is used with MCM. CA deletes the under-utilized machines by scaling down the
MachineDeployment. Read more about cluster-autoscaler’s scale down behavior here.
- This is very usual when an external controller cluster-autoscaler (aka CA) is used with MCM. CA deletes the under-utilized machines by scaling down the
What are the different sub-controllers in MCM?
MCM mainly contains the following sub-controllers:
MachineDeployment Controller: Responsible for reconciling theMachineDeploymentobjects. It manages the lifecycle of theMachineSetobjects.MachineSet Controller: Responsible for reconciling theMachineSetobjects. It manages the lifecycle of theMachineobjects.Machine Controller: responsible for reconciling theMachineobjects. It manages the lifecycle of the actual VMs/machines created in cloud/on-prem. This controller has been moved out of tree. Please refer an AWS machine controller for more info - link.- Safety-controller: Responsible for handling the unidentified/unknown behaviors from the cloud providers. Please read more about its functionality below.
What is Safety Controller in MCM?
Safety Controller contains following functions:
- Orphan VM handler:
- It lists all the VMs in the cloud matching the
tagof given cluster name and maps the VMs with themachineobjects using theProviderIDfield. VMs without any backingmachineobjects are logged and deleted after confirmation. - This handler runs every 30 minutes and is configurable via machine-safety-orphan-vms-period flag.
- It lists all the VMs in the cloud matching the
- Freeze mechanism:
Safety Controllerfreezes theMachineDeploymentandMachineSetcontroller if the number ofmachineobjects goes beyond a certain threshold on top ofSpec.Replicas. It can be configured by the flag –safety-up or –safety-down and also machine-safety-overshooting-period.Safety Controllerfreezes the functionality of the MCM if either of thetarget-apiserveror thecontrol-apiserveris not reachable.Safety Controllerunfreezes the MCM automatically once situation is resolved to normal. Afreezelabel is applied onMachineDeployment/MachineSetto enforce the freeze condition.
How to?
How to install MCM in a Kubernetes cluster?
MCM can be installed in a cluster with following steps:
- Apply all the CRDs from here
- Apply all the deployment, role-related objects from here.
- Control cluster is the one where the
machine-*objects are stored. Target cluster is where all the node objects are registered.
- Control cluster is the one where the
How to run MCM in different cluster setups?
In the standard setup, MCM connects to the target cluster, i.e., the cluster that the machines should join. This is configured via the --target-kubeconfig flag.
If the flag is omitted or empty, it uses the in-cluster credentials (i.e., the pod’s ServiceAccount).
By default, MCM works with the Machine* resources in the target cluster, unless a different “control cluster” is configured via the --control-kubeconfig flag.
In standard Gardener Shoot clusters, MCM uses the Seed cluster as the control cluster for managing machines of the Shoot cluster (target cluster).
MCM can also be configured to run without a target cluster by specifying --target-kubeconfig=none.
This requires explicitly configuring a control cluster via --control-kubeconfig.
In this mode, MCM only provisions/deletes machines on the configured infrastructure without considering the target cluster’s Node objects.
As a consequence, MCM doesn’t create bootstrap tokens, doesn’t wait for Nodes to be registered/drained, and does not perform health checks for Machines.
Once the machine has been successfully created in the infrastructure, Machine.status.currentStatus.phase transitions to Available as a target state (see this section) – in contrast to the standard Pending and Running phases.
Accordingly, the owning MachineSet and MachineDeployment objects will have “available” replicas but no “ready” replicas as indicated in the corresponding status fields.
This mode is used for provisioning control plane machines of autonomous shoot clusters (gardenadm bootstrap command, medium-touch scenario).
How to better control the rollout process of the worker nodes?
MCM allows configuring the rollout of the worker machines using maxSurge and maxUnavailable fields. These fields are applicable only during the rollout process and means nothing in general scale up/down scenarios.
The overall process is very similar to how the Deployment Controller manages pods during RollingUpdate.
maxSurgerefers to the number of additional machines that can be added on top of theSpec.Replicasof MachineDeployment during rollout process.maxUnavailablerefers to the number of machines that can be deleted fromSpec.Replicasfield of the MachineDeployment during rollout process.
How to scale down MachineDeployment by selective deletion of machines?
During scale down, triggered via MachineDeployment/MachineSet, MCM prefers to delete the machine/s which have the least priority set.
Each machine object has an annotation machinepriority.machine.sapcloud.io set to 3 by default. Admin can reduce the priority of the given machines by changing the annotation value to 1. The next scale down by MachineDeployment shall delete the machines with the least priority first.
How to force delete a machine?
A machine can be force deleted by adding the label force-deletion: "True" on the machine object before executing the actual delete command. During force deletion, MCM skips the drain function and simply triggers the deletion of the machine. This label should be used with caution as it can violate the PDBs for pods running on the machine.
How to pause the ongoing rolling-update of the machinedeployment?
An ongoing rolling-update of the machine-deployment can be paused by using spec.paused field. See the example below:
apiVersion: machine.sapcloud.io/v1alpha1
kind: MachineDeployment
metadata:
name: test-machine-deployment
spec:
paused: true
It can be unpaused again by removing the Paused field from the machine-deployment.
How to delete machine object immedietly if I don’t have access to it?
If the user doesn’t have access to the machine objects (like in case of Gardener clusters) and they would like to replace a node immedietly then they can place the annotation node.machine.sapcloud.io/trigger-deletion-by-mcm: "true" on their node. This will start the replacement of the machine with a new node.
On the other hand if the user deletes the node object immedietly then replacement will start only after MachineHealthTimeout.
This annotation can also be used if the user wants to expedite the replacement of unhealthy nodes
NOTE:
node.machine.sapcloud.io/trigger-deletion-by-mcm: "false"annotation is NOT acted upon by MCM , neither does it mean that MCM will not replace this machine.- this annotation would delete the desired machine but another machine would be created to maintain
desired replicasspecified for the machineDeployment/machineSet. Currently if the user doesn’t have access to machineDeployment/machineSet then they cannot remove a machine without replacement.
How to avoid garbage collection of your node?
MCM provides an in-built safety mechanism to garbage collect VMs which have no corresponding machine object. This is done to save costs and is one of the key features of MCM. However, sometimes users might like to add nodes directly to the cluster without the help of MCM and would prefer MCM to not garbage collect such VMs. To do so they should remove/not-use tags on their VMs containing the following strings:
kubernetes.io/cluster/kubernetes.io/role/kubernetes-io-cluster-kubernetes-io-role-
How to trigger rolling update of a machinedeployment?
Rolling update can be triggered for a machineDeployment by updating one of the following:
.spec.template.annotations.spec.template.spec.class.name
Internals
What is the high level design of MCM?
Please refer the following document.
What are the different configuration options in MCM?
MCM allows configuring many knobs to fine-tune its behavior according to the user’s need. Please refer to the link to check the exact configuration options.
What are the different timeouts/configurations in a machine’s lifecycle?
A machine’s lifecycle is governed by mainly following timeouts, which can be configured here.
MachineDrainTimeout: Amount of time after which drain times out and the machine is force deleted. Default ~2 hours.MachineHealthTimeout: Amount of time after which an unhealthy machine is declaredFailedand the machine is replaced byMachineSetcontroller.MachineCreationTimeout: Amount of time after which a machine creation is declaredFailedand the machine is replaced by theMachineSetcontroller.NodeConditions: List of node conditions which if set to true forMachineHealthTimeoutperiod, the machine is declaredFailedand replaced byMachineSetcontroller.MaxEvictRetries: An integer number depicting the number of times a failed eviction should be retried on a pod during drain process. A pod is deleted aftermax-retries.
How is the drain of a machine implemented?
MCM imports the functionality from the upstream Kubernetes-drain library. Although, few parts have been modified to make it work best in the context of MCM. Drain is executed before machine deletion for graceful migration of the applications.
Drain internally uses the EvictionAPI to evict the pods and triggers the Deletion of pods after MachineDrainTimeout. Please note:
- Stateless pods are evicted in parallel.
- Stateful applications (with PVCs) are serially evicted. Please find more info in this answer below.
How are the stateful applications drained during machine deletion?
Drain function serially evicts the stateful-pods. It is observed that serial eviction of stateful pods yields better overall availability of pods as the underlying cloud in most cases detaches and reattaches disks serially anyways. It is implemented in the following manner:
- Drain lists all the pods with attached volumes. It evicts very first stateful-pod and waits for its related entry in Node object’s
.status.volumesAttachedto be removed by KCM. It does the same for all the stateful-pods. - It waits for
PvDetachTimeout(default 2 minutes) for a given pod’s PVC to be removed, else moves forward.
How does maxEvictRetries configuration work with drainTimeout configuration?
It is recommended to only set MachineDrainTimeout. It satisfies the related requirements. MaxEvictRetries is auto-calculated based on MachineDrainTimeout, if maxEvictRetries is not provided. Following will be the overall behavior of both configurations together:
- If
maxEvictRetriesisn’t set and onlymaxDrainTimeoutis set:- MCM auto calculates the
maxEvictRetriesbased on thedrainTimeout.
- MCM auto calculates the
- If
drainTimeoutisn’t set and onlymaxEvictRetriesis set:- Default
drainTimeoutand user providedmaxEvictRetriesfor each pod is considered.
- Default
- If both
maxEvictRetriesanddrainTimoeutare set:- Then both will be respected.
- If none are set:
- Defaults are respected.
What are the different phases of a machine?
A phase of a machine can be identified with Machine.Status.CurrentStatus.Phase. Following are the possible phases of a machine object:
Pending: Machine creation call has succeeded. MCM is waiting for machine to join the cluster.Available: Machine creation call has succeeded. MCM is running without a target cluster and does not wait for the machine to join the cluster.CrashLoopBackOff: Machine creation call has failed. MCM will retry the operation after a minor delay.Running: Machine creation call has succeeded. Machine has joined the cluster successfully and corresponding node doesn’t havenode.gardener.cloud/critical-components-not-readytaint.Unknown: Machine health checks are failing, e.g.,kubelethas stopped posting the status.Failed: Machine health checks have failed for a prolonged time. Hence it is declared failed byMachinecontroller in a rate limited fashion.Failedmachines get replaced immediately.Terminating: Machine is being terminated. Terminating state is set immediately when the deletion is triggered for themachineobject. It also includes time when it’s being drained.
NOTE: No phase means the machine is being created on the cloud-provider.
Below is a simple phase transition diagram:

What health checks are performed on a machine?
Health check performed on a machine are:
- Existense of corresponding node obj
- Status of certain user-configurable node conditions.
- These conditions can be specified using the flag
--node-conditionsfor OOT MCM provider or can be specified per machine object. - The default user configurable node conditions can be found here
- These conditions can be specified using the flag
Truestatus ofNodeReadycondition . This condition shows kubelet’s status
If any of the above checks fails , the machine turns to Unknown phase.
How does rate limiting replacement of machine work in MCM? How is it related to meltdown protection?
Currently MCM replaces only 1 Unknown machine at a time per machinedeployment. This means until the particular Unknown machine get terminated and its replacement joins, no other Unknown machine would be removed.
The above is achieved by enabling Machine controller to turn machine from Unknown -> Failed only if the above condition is met. MachineSet controller on the other hand marks Failed machine as Terminating immediately.
One reason for this rate limited replacement was to ensure that in case of network failures , where node’s kubelet can’t reach out to kube-apiserver , all nodes are not removed together i.e. meltdown protection.
In gardener context however, DWD is deployed to deal with this scenario, but to stay protected from corner cases, this mechanism has been introduced in MCM.
NOTE: Rate limiting replacement is not yet configurable
How MCM responds when scale-out/scale-in is done during rolling update of a machinedeployment?
Machinedeployment controller executes the logic of scaling BEFORE logic of rollout. It identifies scaling by comparing the deployment.kubernetes.io/desired-replicas of each machineset under the machinedeployment with machinedeployment’s .spec.replicas. If the difference is found for any machineSet, a scaling event is detected.
- Case
scale-out-> ONLY New machineSet is scaled out - Case
scale-in-> ALL machineSets(new or old) are scaled in , in proportion to their replica count , any leftover is adjusted in the largest machineSet.
During update for scaling event, a machineSet is updated if any of the below is true for it:
.spec.Replicasneeds updatedeployment.kubernetes.io/desired-replicasneeds update
Once scaling is achieved, rollout continues.
How does MCM prioritize the machines for deletion on scale-down of machinedeployment?
There could be many machines under a machinedeployment with different phases, creationTimestamp. When a scale down is triggered, MCM decides to remove the machine using the following logic:
- Machine with least value of
machinepriority.machine.sapcloud.ioannotation is picked up. - If all machines have equal priorities, then following precedence is followed:
- Terminating > Failed > CrashloopBackoff > Unknown > Pending > Available > Running
- If still there is no match, the machine with oldest creation time (.i.e. creationTimestamp) is picked up.
How some unhealthy machines are drained quickly?
If a node is unhealthy for more than the machine-health-timeout specified for the machine-controller, the controller
health-check moves the machine phase to Failed. By default, the machine-health-timeout is 10` minutes.
Failed machines have their deletion timestamp set and the machine then moves to the Terminating phase. The node
drain process is initiated. The drain process is invoked either gracefully or forcefully.
The usual drain process is graceful. Pods are evicted from the node and the drain process waits until any existing
attached volumes are mounted on new node. However, if the node Ready is False or the ReadonlyFilesystem is True
for greater than 5 minutes (non-configurable), then a forceful drain is initiated. In a forceful drain, pods are deleted
and VolumeAttachment objects associated with the old node are also marked for deletion. This is followed by the deletion of the
cloud provider VM associated with the Machine and then finally ending with the Node object deletion.
During the deletion of the VM we only delete the local data disks and boot disks associated with the VM. The disks associated with persistent volumes are left un-touched as their attach/de-detach, mount/unmount processes are handled by k8s attach-detach controller in conjunction with the CSI driver.
Troubleshooting
My machine is stuck in deletion for 1 hr, why?
In most cases, the Machine.Status.LastOperation provides information around why a machine can’t be deleted.
Though following could be the reasons but not limited to:
- Pod/s with misconfigured PDBs block the drain operation. PDBs with
maxUnavailableset to 0, doesn’t allow the eviction of the pods. Hence, drain/eviction is retried tillMachineDrainTimeout. DefaultMachineDrainTimeoutcould be as large as ~2hours. Hence, blocking the machine deletion.- Short term: User can manually delete the pod in the question, with caution.
- Long term: Please set more appropriate PDBs which allow disruption of at least one pod.
- Expired cloud credentials can block the deletion of the machine from infrastructure.
- Cloud provider can’t delete the machine due to internal errors. Such situations are best debugged by using cloud provider specific CLI or cloud console.
My machine is not joining the cluster, why?
In most cases, the Machine.Status.LastOperation provides information around why a machine can’t be created.
It could possibly be debugged with following steps:
- Firstly make sure all the relevant controllers like
kube-controller-manager,cloud-controller-managerare running. - Verify if the machine is actually created in the cloud. User can use the
Machine.Spec.ProviderIdto query the machine in cloud. - A Kubernetes node is generally bootstrapped with the cloud-config. Please verify, if
MachineDeploymentis pointing the correctMachineClass, andMachineClassis pointing to the correctSecret. The secret object contains the actual cloud-config inbase64format which will be used to boot the machine. - User must also check the logs of the MCM pod to understand any broken logical flow of reconciliation.
My rolling update is stuck, why?
The following can be the reason:
- Insufficient capacity for the new instance type the machineClass mentions.
- Old machines are stuck in deletion
- If you are using Gardener for setting up kubernetes cluster, then machine object won’t turn to
Runningstate untilnode-critical-componentsare ready. Refer this for more details.
Developer
How should I test my code before submitting a PR?
Developer can locally setup the MCM using following guide
Developer must also enhance the unit tests related to the incoming changes.
Developer can run the unit test locally by executing:
make test-unitDeveloper can locally run integration tests to ensure basic functionality of MCM is not altered.
I need to change the APIs, what are the recommended steps?
Developer should add/update the API fields at both of the following places:
Once API changes are done, auto-generate the code using following command:
make generate
Please ignore the API-violation errors for now.
How can I update the dependencies of MCM?
MCM uses gomod for depedency management.
Developer should add/udpate depedency in the go.mod file. Please run following command to automatically tidy the dependencies.
make tidy
In the context of Gardener
How can I configure MCM using Shoot resource?
All of the knobs of MCM can be configured by the workers section of the shoot resource.
- Gardener creates a
MachineDeploymentper zone for each worker-pool underworkerssection. workers.dataVolumesallows to attach multiple disks to a machine during creation. Refer the link.workers.machineControllerManagerallows configuration of multiple knobs of theMachineDeploymentfrom the shoot resource.
How is my worker-pool spread across zones?
Shoot resource allows the worker-pool to spread across multiple zones using the field workers.zones. Refer link.
Gardener creates one
MachineDeploymentper zone. EachMachineDeploymentis initiated with the following replica:MachineDeployment.Spec.Replicas = (Workers.Minimum)/(Number of availability zones)
6.4.5 - Adding Support for a Cloud Provider
Adding support for a new provider
Steps to be followed while implementing a new (hyperscale) provider are mentioned below. This is the easiest way to add new provider support using a blueprint code.
However, you may also develop your machine controller from scratch, which would provide you with more flexibility. First, however, make sure that your custom machine controller adheres to the Machine.Status struct defined in the MachineAPIs. This will make sure the MCM can act with higher-level controllers like MachineSet and MachineDeployment controller. The key is the Machine.Status.CurrentStatus.Phase key that indicates the status of the machine object.
Our strong recommendation would be to follow the steps below. This provides the most flexibility required to support machine management for adding new providers. And if you feel to extend the functionality, feel free to update our machine controller libraries.
Setting up your repository
- Create a new empty repository named
machine-controller-manager-provider-{provider-name}on GitHub username/project. Do not initialize this repository with a README. - Copy the remote repository
URL(HTTPS/SSH) to this repository displayed once you create this repository. - Now, on your local system, create directories as required. {your-github-username} given below could also be {github-project} depending on where you have created the new repository.
mkdir -p $GOPATH/src/github.com/{your-github-username} - Navigate to this created directory.
cd $GOPATH/src/github.com/{your-github-username} - Clone this repository on your local machine.
git clone git@github.com:gardener/machine-controller-manager-provider-sampleprovider.git - Rename the directory from
machine-controller-manager-provider-sampleprovidertomachine-controller-manager-provider-{provider-name}.mv machine-controller-manager-provider-sampleprovider machine-controller-manager-provider-{provider-name} - Navigate into the newly-created directory.
cd machine-controller-manager-provider-{provider-name} - Update the remote
originURL to the newly created repository’s URL you had copied above.git remote set-url origin git@github.com:{your-github-username}/machine-controller-manager-provider-{provider-name}.git - Rename GitHub project from
gardenerto{github-org/your-github-username}wherever you have cloned the repository above. Also, edit all occurrences of the wordsampleproviderto{provider-name}in the code. Then, use the hack script given below to do the same.make rename-project PROJECT_NAME={github-org/your-github-username} PROVIDER_NAME={provider-name} eg: make rename-project PROJECT_NAME=gardener PROVIDER_NAME=AmazonWebServices (or) make rename-project PROJECT_NAME=githubusername PROVIDER_NAME=AWS - Now, commit your changes and push them upstream.
git add -A git commit -m "Renamed SampleProvide to {provider-name}" git push origin master
Code changes required
The contract between the Machine Controller Manager (MCM) and the Machine Controller (MC) AKA driver has been documented here and the machine error codes can be found here. You may refer to them for any queries.
⚠️
- Keep in mind that there should be a unique way to map between machine objects and VMs. This can be done by mapping machine object names with VM-Name/ tags/ other metadata.
- Optionally, there should also be a unique way to map a VM to its machine class object. This can be done by tagging VM objects with tags/resource groups associated with the machine class.
Steps to integrate
- Update the
pkg/provider/apis/provider_spec.gospecification file to reflect the structure of theProviderSpecblob. It typically contains the machine template details in theMachineClassobject. Follow the sample spec provided already in the file. A sample provider specification can be found here. - Fill in the methods described at
pkg/provider/core.goto manage VMs on your cloud provider. Comments are provided above each method to help you fill them up with desiredREQUESTandRESPONSEparameters.- A sample provider implementation for these methods can be found here.
- Fill in the required methods
CreateMachine(), andDeleteMachine()methods. - Optionally fill in methods like
GetMachineStatus(),InitializeMachine,ListMachines(), andGetVolumeIDs(). You may choose to fill these once the working of the required methods seems to be working. GetVolumeIDs()expects VolumeIDs to be decoded from the volumeSpec based on the cloud provider.- There is also an OPTIONAL method
GenerateMachineClassForMigration()that helps in migration of{ProviderSpecific}MachineClasstoMachineClassCR (custom resource). This only makes sense if you have an existing implementation (in-tree) acting on different CRD types. You would like to migrate this. If not, you MUST return an error (machine error UNIMPLEMENTED) to avoid processing this step.
- Perform validation of APIs that you have described and make it a part of your methods as required at each request.
- Write unit tests to make it work with your implementation by running
make test.make test - Tidy the go dependencies.
make tidy - Update the sample YAML files on the
kubernetes/directory to provide sample files through which the working of the machine controller can be tested. - Update
README.mdto reflect any additional changes
Testing your code changes
Make sure $TARGET_KUBECONFIG points to the cluster where you wish to manage machines. Likewise, $CONTROL_NAMESPACE represents the namespaces where MCM is looking for machine CR objects, and $CONTROL_KUBECONFIG points to the cluster that holds these machine CRs.
- On the first terminal running at
$GOPATH/src/github.com/{github-org/your-github-username}/machine-controller-manager-provider-{provider-name},- Run the machine controller (driver) using the command below.
make start
- Run the machine controller (driver) using the command below.
- On the second terminal pointing to
$GOPATH/src/github.com/gardener,- Clone the latest MCM code
git clone git@github.com:gardener/machine-controller-manager.git - Navigate to the newly-created directory.
cd machine-controller-manager - Deploy the required CRDs from the machine-controller-manager repo,
kubectl apply -f kubernetes/crds - Run the machine-controller-manager in the
masterbranchmake start
- Clone the latest MCM code
- On the third terminal pointing to
$GOPATH/src/github.com/{github-org/your-github-username}/machine-controller-manager-provider-{provider-name}- Fill in the object files given below and deploy them as described below.
- Deploy the
machine-classkubectl apply -f kubernetes/machine-class.yaml - Deploy the
kubernetes secretif required.kubectl apply -f kubernetes/secret.yaml - Deploy the
machineobject and make sure it joins the cluster successfully.kubectl apply -f kubernetes/machine.yaml - Once the machine joins, you can test by deploying a machine-deployment.
- Deploy the
machine-deploymentobject and make sure it joins the cluster successfully.kubectl apply -f kubernetes/machine-deployment.yaml - Make sure to delete both the
machineandmachine-deploymentobjects after use.kubectl delete -f kubernetes/machine.yaml kubectl delete -f kubernetes/machine-deployment.yaml
Releasing your docker image
- Make sure you have logged into gcloud/docker using the CLI.
- To release your docker image, run the following.
make release IMAGE_REPOSITORY=<link-to-image-repo>
- A sample kubernetes deploy file can be found at
kubernetes/deployment.yaml. Update the same (with your desired MCM and MC images) to deploy your MCM pod.
6.4.6 - Deployment
Deploying the Machine Controller Manager into a Kubernetes cluster
As already mentioned, the Machine Controller Manager is designed to run as controller in a Kubernetes cluster. The existing source code can be compiled and tested on a local machine as described in Setting up a local development environment. You can deploy the Machine Controller Manager using the steps described below.
Prepare the cluster
- Connect to the remote kubernetes cluster where you plan to deploy the Machine Controller Manager using the kubectl. Set the environment variable KUBECONFIG to the path of the yaml file containing the cluster info.
- Now, create the required CRDs on the remote cluster using the following command,
$ kubectl apply -f kubernetes/crds
Build the Docker image
⚠️ Modify the
Makefileto refer to your own registry.
- Run the build which generates the binary to
bin/machine-controller-manager
$ make build
- Build docker image from latest compiled binary
$ make docker-image
- Push the last created docker image onto the online docker registry.
$ make push
- Now you can deploy this docker image to your cluster. A sample development file is provided. By default, the deployment manages the cluster it is running in. Optionally, the kubeconfig could also be passed as a flag as described in
/kubernetes/deployment/out-of-tree/deployment.yaml. This is done when you want your controller running outside the cluster to be managed from.
$ kubectl apply -f kubernetes/deployment/out-of-tree/deployment.yaml
- Also deploy the required clusterRole and clusterRoleBindings
$ kubectl apply -f kubernetes/deployment/out-of-tree/clusterrole.yaml
$ kubectl apply -f kubernetes/deployment/out-of-tree/clusterrolebinding.yaml
Configuring optional parameters while deploying
Machine-controller-manager supports several configurable parameters while deploying. Refer to the following lines, to know how each parameter can be configured, and what it’s purpose is for.
Usage
To start using Machine Controller Manager, follow the links given at usage here.
6.4.7 - Integration Tests
Integration tests
Usage
General setup & configurations
Integration tests for machine-controller-manager-provider-{provider-name} can be executed manually by following below steps.
- Clone the repository
machine-controller-manager-provider-{provider-name}on the local system. - Navigate to
machine-controller-manager-provider-{provider-name}directory and create adevsub-directory in it. - If the tags on instances & associated resources on the provider are of
Stringtype (for example, GCP tags on its instances are of typeStringand not key-value pair) then addTAGS_ARE_STRINGS := truein theMakefileand export it. For GCP this has already been hard coded in theMakefile.
Running the tests
- There is a rule
test-integrationin theMakefileof the provider repository, which can be used to start the integration test:$ make test-integration - This will ask for additional inputs. Most of them are self explanatory except:
- The script assumes that both the control and target clusters are already being created.
- In case of non-gardener setup (control cluster is not a gardener seed), the name of the machineclass must be
test-mc-v1and the value ofproviderSpec.secretRef.nameshould betest-mc-secret. - In case of azure,
TARGET_CLUSTER_NAMEmust be same as the name of the Azure ResourceGroup for the cluster. - If you are deploying the secret manually, a
Secretnamedtest-mc-secret(that contains the provider secret and cloud-config) in thedefaultnamespace of the Control Cluster should be created.
- The controllers log files (
mcm_process.logandmc_process.log) are stored in.ci/controllers-test/logsrepo and can be used later.
Adding Integration Tests for new providers
For a new provider, Running Integration tests works with no changes. But for the orphan resource test cases to work correctly, the provider-specific API calls and the Resource Tracker Interface (RTI) should be implemented. Please check machine-controller-manager-provider-aws for reference.
Extending integration tests
- Update ControllerTests to be extend the testcases for all providers. Common testcases for machine|machineDeployment creation|deletion|scaling are packaged into ControllerTests.
- To extend the provider specfic test cases, the changes should be done in the
machine-controller-manager-provider-{provider-name}repository. For example, to extended the testcases formachine-controller-manager-provider-aws, make changes totest/integration/controller/controller_test.goinside themachine-controller-manager-provider-awsrepository.commonscontains theClusterandClientsetobjects that makes it easy to extend the tests.
6.4.8 - Local Setup
Preparing the Local Development Setup (Mac OS X)
Conceptionally, the Machine Controller Manager is designed to run in a container within a Pod inside a Kubernetes cluster. For development purposes, you can run the Machine Controller Manager as a Go process on your local machine. This process connects to your remote cluster to manage VMs for that cluster. That means that the Machine Controller Manager runs outside a Kubernetes cluster which requires providing a Kubeconfig in your local filesystem and point the Machine Controller Manager to it when running it (see below).
Although the following installation instructions are for Mac OS X, similar alternate commands could be found for any Linux distribution.
Installing Golang environment
Install the latest version of Golang (at least v1.8.3 is required) by using Homebrew:
$ brew install golang
In order to perform linting on the Go source code, install Golint:
$ go get -u golang.org/x/lint/golint
Installing Docker (Optional)
In case you want to build Docker images for the Machine Controller Manager you have to install Docker itself. We recommend using Docker for Mac OS X which can be downloaded from here.
Setup Docker Hub account (Optional)
Create a Docker hub account at Docker Hub if you don’t already have one.
Local development
⚠️ Before you start developing, please ensure to comply with the following requirements:
- You have understood the principles of Kubernetes, and its components, what their purpose is and how they interact with each other.
- You have understood the architecture of the Machine Controller Manager
The development of the Machine Controller Manager could happen by targeting any cluster. You basically need a Kubernetes cluster running on a set of machines. You just need the Kubeconfig file with the required access permissions attached to it.
Installing the Machine Controller Manager locally
Clone the repository from GitHub.
$ git clone git@github.com:gardener/machine-controller-manager.git
$ cd machine-controller-manager
Prepare the cluster
- Connect to the remote kubernetes cluster where you plan to deploy the Machine Controller Manager using kubectl. Set the environment variable KUBECONFIG to the path of the yaml file containing your cluster info
- Now, create the required CRDs on the remote cluster using the following command,
$ kubectl apply -f kubernetes/crds.yaml
Getting started
Setup and Restore with Gardener
Setup
In gardener access to static kubeconfig files is no longer supported due to security reasons. One needs to generate short-lived (max TTL = 1 day) admin kube configs for target and control clusters. A convenience script/Makefile target has been provided to do the required initial setup which includes:
- Creating a temporary directory where target and control kubeconfigs will be stored.
- Create a request to generate the short lived admin kubeconfigs. These are downloaded and stored in the temporary folder created above.
- In gardener clusters
DWD (Dependency Watchdog)runs as an additional component which can interfere when MCM/CA is scaled down. To prevent that an annotationdependency-watchdog.gardener.cloud/ignore-scalingis added tomachine-controller-managerdeployment which preventsDWDfrom scaling up the deployment replicas. - Scales down
machine-controller-managerdeployment in the control cluster to 0 replica. - Creates the required
.envfile and populates required environment variables which are then used by theMakefilein bothmachine-controller-managerand inmachine-controller-manager-provider-<provider-name>projects. - Copies the generated and downloaded kubeconfig files for the target and control clusters to
machine-controller-manager-provider-<provider-name>project as well.
To do the above you can either invoke make gardener-setup or you can directly invoke the script ./hack/gardener_local_setup.sh. If you invoke the script with -h or --help option then it will give you all CLI options that one can pass.
Restore
Once the testing is over you can invoke a convenience script/Makefile target which does the following:
- Removes all generated admin kubeconfig files from both
machine-controller-managerand inmachine-controller-manager-provider-<provider-name>projects. - Removes the
.envfile that was generated as part of the setup from bothmachine-controller-managerand inmachine-controller-manager-provider-<provider-name>projects. - Scales up
machine-controller-managerdeployment in the control cluster back to 1 replica. - Removes the annotation
dependency-watchdog.gardener.cloud/ignore-scalingthat was added to preventDWDto scale up MCM.
To do the above you can either invoke make gardener-restore or you can directly invoke the script ./hack/gardener_local_restore.sh. If you invoke the script with -h or --help option then it will give you all CLI options that one can pass.
Setup and Restore without Gardener
Setup
If you are not running MCM components in a gardener cluster, then it is assumed that there is not going to be any DWD (Dependency Watchdog) component.
A convenience script/Makefile target has been provided to the required initial setup which includes:
- Copies the provided control and target kubeconfig files to
machine-controller-manager-provider-<provider-name>project. - Scales down
machine-controller-managerdeployment in the control cluster to 0 replica. - Creates the required
.envfile and populates required environment variables which are then used by theMakefilein bothmachine-controller-managerand inmachine-controller-manager-provider-<provider-name>projects.
To do the above you can either invoke make non-gardener-setup or you can directly invoke the script ./hack/non_gardener_local_setup.sh. If you invoke the script with -h or --help option then it will give you all CLI options that one can pass.
Restore
Once the testing is over you can invoke a convenience script/Makefile target which does the following:
- Removes all provided kubeconfig files from both
machine-controller-managerand inmachine-controller-manager-provider-<provider-name>projects. - Removes the
.envfile that was generated as part of the setup from bothmachine-controller-managerand inmachine-controller-manager-provider-<provider-name>projects. - Scales up
machine-controller-managerdeployment in the control cluster back to 1 replica.
To do the above you can either invoke make non-gardener-restore or you can directly invoke the script ./hack/non_gardener_local_restore.sh. If you invoke the script with -h or --help option then it will give you all CLI options that one can pass.
Once the setup is done then you can start the machine-controller-manager as a local process using the following Makefile target:
$ make start
I1227 11:08:19.963638 55523 controllermanager.go:204] Starting shared informers
I1227 11:08:20.766085 55523 controller.go:247] Starting machine-controller-manager
⚠️ The file dev/target-kubeconfig.yaml points to the cluster whose nodes you want to manage. dev/control-kubeconfig.yaml points to the cluster from where you want to manage the nodes from. However, dev/control-kubeconfig.yaml is optional.
The Machine Controller Manager should now be ready to manage the VMs in your kubernetes cluster.
⚠️ This is assuming that your MCM is built to manage machines for any in-tree supported providers. There is a new way to deploy and manage out of tree (external) support for providers whose development can be found here
Testing Machine Classes
To test the creation/deletion of a single instance for one particular machine class you can use the managevm cli. The corresponding INFRASTRUCTURE-machine-class.yaml and the INFRASTRUCTURE-secret.yaml need to be defined upfront. To build and run it
GO111MODULE=on go build -o managevm cmd/machine-controller-manager-cli/main.go
# create machine
./managevm --secret PATH_TO/INFRASTRUCTURE-secret.yaml --machineclass PATH_TO/INFRASTRUCTURE-machine-class.yaml --classkind INFRASTRUCTURE --machinename test
# delete machine
./managevm --secret PATH_TO/INFRASTRUCTURE-secret.yaml --machineclass PATH_TO/INFRASTRUCTURE-machine-class.yaml --classkind INFRASTRUCTURE --machinename test --machineid INFRASTRUCTURE:///REGION/INSTANCE_ID
Usage
To start using Machine Controller Manager, follow the links given at usage here.
6.4.9 - Machine
Creating/Deleting machines (VM)
Setting up your usage environment
- Follow the steps described here
Important :
Make sure that the
kubernetes/machine_objects/machine.yamlpoints to the same class name as thekubernetes/machine_classes/aws-machine-class.yaml.
Similarly
kubernetes/machine_objects/aws-machine-class.yamlsecret name and namespace should be same as that mentioned inkubernetes/secrets/aws-secret.yaml
Creating machine
- Modify
kubernetes/machine_objects/machine.yamlas per your requirement and create the VM as shown below:
$ kubectl apply -f kubernetes/machine_objects/machine.yaml
You should notice that the Machine Controller Manager has immediately picked up your manifest and started to create a new machine by talking to the cloud provider.
- Check Machine Controller Manager machines in the cluster
$ kubectl get machine
NAME STATUS AGE
test-machine Running 5m
A new machine is created with the name provided in the kubernetes/machine_objects/machine.yaml file.
- After a few minutes (~3 minutes for AWS), you should notice a new node joining the cluster. You can verify this by running:
$ kubectl get nodes
NAME STATUS AGE VERSION
ip-10-250-14-52.eu-east-1.compute.internal. Ready 1m v1.8.0
This shows that a new node has successfully joined the cluster.
Inspect status of machine
To inspect the status of any created machine, run the command given below.
$ kubectl get machine test-machine -o yaml
apiVersion: machine.sapcloud.io/v1alpha1
kind: Machine
metadata:
annotations:
kubectl.kubernetes.io/last-applied-configuration: |
{"apiVersion":"machine.sapcloud.io/v1alpha1","kind":"Machine","metadata":{"annotations":{},"labels":{"test-label":"test-label"},"name":"test-machine","namespace":""},"spec":{"class":{"kind":"AWSMachineClass","name":"test-aws"}}}
clusterName: ""
creationTimestamp: 2017-12-27T06:58:21Z
finalizers:
- machine.sapcloud.io/operator
generation: 0
initializers: null
labels:
node: ip-10-250-14-52.eu-east-1.compute.internal
test-label: test-label
name: test-machine
namespace: ""
resourceVersion: "12616948"
selfLink: /apis/machine.sapcloud.io/v1alpha1/test-machine
uid: 535e596c-ead3-11e7-a6c0-828f843e4186
spec:
class:
kind: AWSMachineClass
name: test-aws
providerID: aws:///eu-east-1/i-00bef3f2618ffef23
status:
conditions:
- lastHeartbeatTime: 2017-12-27T07:00:46Z
lastTransitionTime: 2017-12-27T06:59:16Z
message: kubelet has sufficient disk space available
reason: KubeletHasSufficientDisk
status: "False"
type: OutOfDisk
- lastHeartbeatTime: 2017-12-27T07:00:46Z
lastTransitionTime: 2017-12-27T06:59:16Z
message: kubelet has sufficient memory available
reason: KubeletHasSufficientMemory
status: "False"
type: MemoryPressure
- lastHeartbeatTime: 2017-12-27T07:00:46Z
lastTransitionTime: 2017-12-27T06:59:16Z
message: kubelet has no disk pressure
reason: KubeletHasNoDiskPressure
status: "False"
type: DiskPressure
- lastHeartbeatTime: 2017-12-27T07:00:46Z
lastTransitionTime: 2017-12-27T07:00:06Z
message: kubelet is posting ready status
reason: KubeletReady
status: "True"
type: Ready
currentStatus:
lastUpdateTime: 2017-12-27T07:00:06Z
phase: Running
lastOperation:
description: Machine is now ready
lastUpdateTime: 2017-12-27T07:00:06Z
state: Successful
type: Create
node: ip-10-250-14-52.eu-west-1.compute.internal
Delete machine
To delete the VM using the kubernetes/machine_objects/machine.yaml as shown below
$ kubectl delete -f kubernetes/machine_objects/machine.yaml
Now the Machine Controller Manager picks up the manifest immediately and starts to delete the existing VM by talking to the cloud provider. The node should be detached from the cluster in a few minutes (~1min for AWS).
6.4.10 - Machine Deployment
Maintaining machine replicas using machines-deployments
- Maintaining machine replicas using machines-deployments
Setting up your usage environment
Follow the steps described here
Important ⚠️
Make sure that the
kubernetes/machine_objects/machine-deployment.yamlpoints to the same class name as thekubernetes/machine_classes/aws-machine-class.yaml.
Similarly
kubernetes/machine_classes/aws-machine-class.yamlsecret name and namespace should be same as that mentioned inkubernetes/secrets/aws-secret.yaml
Creating machine-deployment
- Modify
kubernetes/machine_objects/machine-deployment.yamlas per your requirement. Modify the number of replicas to the desired number of machines. Then, create an machine-deployment.
$ kubectl apply -f kubernetes/machine_objects/machine-deployment.yaml
Now the Machine Controller Manager picks up the manifest immediately and starts to create a new machines based on the number of replicas you have provided in the manifest.
- Check Machine Controller Manager machine-deployments in the cluster
$ kubectl get machinedeployment
NAME READY DESIRED UP-TO-DATE AVAILABLE AGE
test-machine-deployment 3 3 3 0 10m
You will notice a new machine-deployment with your given name
- Check Machine Controller Manager machine-sets in the cluster
$ kubectl get machineset
NAME DESIRED CURRENT READY AGE
test-machine-deployment-5bc6dd7c8f 3 3 0 10m
You will notice a new machine-set backing your machine-deployment
- Check Machine Controller Manager machines in the cluster
$ kubectl get machine
NAME STATUS AGE
test-machine-deployment-5bc6dd7c8f-5d24b Pending 5m
test-machine-deployment-5bc6dd7c8f-6mpn4 Pending 5m
test-machine-deployment-5bc6dd7c8f-dpt2q Pending 5m
Now you will notice N (number of replicas specified in the manifest) new machines whose name are prefixed with the machine-deployment object name that you created.
- After a few minutes (~3 minutes for AWS), you would see that new nodes have joined the cluster. You can see this using
$ kubectl get nodes
NAME STATUS AGE VERSION
ip-10-250-20-19.eu-west-1.compute.internal Ready 1m v1.8.0
ip-10-250-27-123.eu-west-1.compute.internal Ready 1m v1.8.0
ip-10-250-31-80.eu-west-1.compute.internal Ready 1m v1.8.0
This shows how new nodes have joined your cluster
Inspect status of machine-deployment
To inspect the status of any created machine-deployment run the command below,
$ kubectl get machinedeployment test-machine-deployment -o yaml
You should get the following output.
apiVersion: machine.sapcloud.io/v1alpha1
kind: MachineDeployment
metadata:
annotations:
deployment.kubernetes.io/revision: "1"
kubectl.kubernetes.io/last-applied-configuration: |
{"apiVersion":"machine.sapcloud.io/v1alpha1","kind":"MachineDeployment","metadata":{"annotations":{},"name":"test-machine-deployment","namespace":""},"spec":{"minReadySeconds":200,"replicas":3,"selector":{"matchLabels":{"test-label":"test-label"}},"strategy":{"rollingUpdate":{"maxSurge":1,"maxUnavailable":1},"type":"RollingUpdate"},"template":{"metadata":{"labels":{"test-label":"test-label"}},"spec":{"class":{"kind":"AWSMachineClass","name":"test-aws"}}}}}
clusterName: ""
creationTimestamp: 2017-12-27T08:55:56Z
generation: 0
initializers: null
name: test-machine-deployment
namespace: ""
resourceVersion: "12634168"
selfLink: /apis/machine.sapcloud.io/v1alpha1/test-machine-deployment
uid: c0b488f7-eae3-11e7-a6c0-828f843e4186
spec:
minReadySeconds: 200
replicas: 3
selector:
matchLabels:
test-label: test-label
strategy:
rollingUpdate:
maxSurge: 1
maxUnavailable: 1
type: RollingUpdate
template:
metadata:
creationTimestamp: null
labels:
test-label: test-label
spec:
class:
kind: AWSMachineClass
name: test-aws
status:
availableReplicas: 3
conditions:
- lastTransitionTime: 2017-12-27T08:57:22Z
lastUpdateTime: 2017-12-27T08:57:22Z
message: Deployment has minimum availability.
reason: MinimumReplicasAvailable
status: "True"
type: Available
readyReplicas: 3
replicas: 3
updatedReplicas: 3
Health monitoring
Health monitor is also applied similar to how it’s described for machine-sets
Update your machines
Let us consider the scenario where you wish to update all nodes of your cluster from t2.xlarge machines to m5.xlarge machines. Assume that your current test-aws has its spec.machineType: t2.xlarge and your deployment test-machine-deployment points to this AWSMachineClass.
Inspect existing cluster configuration
- Check Nodes present in the cluster
$ kubectl get nodes
NAME STATUS AGE VERSION
ip-10-250-20-19.eu-west-1.compute.internal Ready 1m v1.8.0
ip-10-250-27-123.eu-west-1.compute.internal Ready 1m v1.8.0
ip-10-250-31-80.eu-west-1.compute.internal Ready 1m v1.8.0
- Check Machine Controller Manager machine-sets in the cluster. You will notice one machine-set backing your machine-deployment
$ kubectl get machineset
NAME DESIRED CURRENT READY AGE
test-machine-deployment-5bc6dd7c8f 3 3 3 10m
- Login to your cloud provider (AWS). In the VM management console, you will find N VMs created of type t2.xlarge.
Perform a rolling update
To update this machine-deployment VMs to m5.xlarge, we would do the following:
- Copy your existing aws-machine-class.yaml
cp kubernetes/machine_classes/aws-machine-class.yaml kubernetes/machine_classes/aws-machine-class-new.yaml
- Modify aws-machine-class-new.yaml, and update its metadata.name: test-aws2 and spec.machineType: m5.xlarge
- Now create this modified MachineClass
kubectl apply -f kubernetes/machine_classes/aws-machine-class-new.yaml
- Edit your existing machine-deployment
kubectl edit machinedeployment test-machine-deployment
- Update from spec.template.spec.class.name: test-aws to spec.template.spec.class.name: test-aws2
Re-check cluster configuration
After a few minutes (~3mins)
- Check nodes present in cluster now. They are different nodes.
$ kubectl get nodes
NAME STATUS AGE VERSION
ip-10-250-11-171.eu-west-1.compute.internal Ready 4m v1.8.0
ip-10-250-17-213.eu-west-1.compute.internal Ready 5m v1.8.0
ip-10-250-31-81.eu-west-1.compute.internal Ready 5m v1.8.0
- Check Machine Controller Manager machine-sets in the cluster. You will notice two machine-sets backing your machine-deployment
$ kubectl get machineset
NAME DESIRED CURRENT READY AGE
test-machine-deployment-5bc6dd7c8f 0 0 0 1h
test-machine-deployment-86ff45cc5 3 3 3 20m
- Login to your cloud provider (AWS). In the VM management console, you will find N VMs created of type t2.xlarge in terminated state, and N new VMs of type m5.xlarge in running state.
This shows how a rolling update of a cluster from nodes with t2.xlarge to m5.xlarge went through.
More variants of updates
- The above demonstration was a simple use case. This could be more complex like - updating the system disk image versions/ kubelet versions/ security patches etc.
- You can also play around with the maxSurge and maxUnavailable fields in machine-deployment.yaml
- You can also change the update strategy from rollingupdate to recreate
Undo an update
- Edit the existing machine-deployment
$ kubectl edit machinedeployment test-machine-deployment
- Edit the deployment to have this new field of spec.rollbackTo.revision: 0 as shown as comments in
kubernetes/machine_objects/machine-deployment.yaml - This will undo your update to the previous version.
Pause an update
- You can also pause the update while update is going on by editing the existing machine-deployment
$ kubectl edit machinedeployment test-machine-deployment
Edit the deployment to have this new field of spec.paused: true as shown as comments in
kubernetes/machine_objects/machine-deployment.yamlThis will pause the rollingUpdate if it’s in process
To resume the update, edit the deployment as mentioned above and remove the field spec.paused: true updated earlier
Delete machine-deployment
- To delete the VM using the
kubernetes/machine_objects/machine-deployment.yaml
$ kubectl delete -f kubernetes/machine_objects/machine-deployment.yaml
The Machine Controller Manager picks up the manifest and starts to delete the existing VMs by talking to the cloud provider. The nodes should be detached from the cluster in a few minutes (~1min for AWS).
6.4.11 - Machine Error Codes
Machine Error code handling
Notational Conventions
The keywords “MUST”, “MUST NOT”, “REQUIRED”, “SHALL”, “SHALL NOT”, “SHOULD”, “SHOULD NOT”, “RECOMMENDED”, “NOT RECOMMENDED”, “MAY”, and “OPTIONAL” are to be interpreted as described in RFC 2119 (Bradner, S., “Key words for use in RFCs to Indicate Requirement Levels”, BCP 14, RFC 2119, March 1997).
The key words “unspecified”, “undefined”, and “implementation-defined” are to be interpreted as described in the rationale for the C99 standard.
An implementation is not compliant if it fails to satisfy one or more of the MUST, REQUIRED, or SHALL requirements for the protocols it implements. An implementation is compliant if it satisfies all the MUST, REQUIRED, and SHALL requirements for the protocols it implements.
Terminology
| Term | Definition |
|---|---|
| CR | Custom Resource (CR) is defined by a cluster admin using the Kubernetes Custom Resource Definition primitive. |
| VM | A Virtual Machine (VM) provisioned and managed by a provider. It could also refer to a physical machine in case of a bare metal provider. |
| Machine | Machine refers to a VM that is provisioned/managed by MCM. It typically describes the metadata used to store/represent a Virtual Machine |
| Node | Native kubernetes Node object. The objects you get to see when you do a “kubectl get nodes”. Although nodes can be either physical/virtual machines, for the purposes of our discussions it refers to a VM. |
| MCM | Machine Controller Manager (MCM) is the controller used to manage higher level Machine Custom Resource (CR) such as machine-set and machine-deployment CRs. |
| Provider/Driver/MC | Provider (or) Driver (or) Machine Controller (MC) is the driver responsible for managing machine objects present in the cluster from whom it manages these machines. A simple example could be creation/deletion of VM on the provider. |
Pre-requisite
MachineClass Resources
MCM introduces the CRD MachineClass. This is a blueprint for creating machines that join a certain cluster as nodes in a certain role. The provider only works with MachineClass resources that have the structure described here.
ProviderSpec
The MachineClass resource contains a providerSpec field that is passed in the ProviderSpec request field to CMI methods such as CreateMachine. The ProviderSpec can be thought of as a machine template from which the VM specification must be adopted. It can contain key-value pairs of these specs. An example for these key-value pairs are given below.
| Parameter | Mandatory | Type | Description |
|---|---|---|---|
vmPool | Yes | string | VM pool name, e.g. TEST-WOKER-POOL |
size | Yes | string | VM size, e.g. xsmall, small, etc. Each size maps to a number of CPUs and memory size. |
rootFsSize | No | int | Root (/) filesystem size in GB |
tags | Yes | map | Tags to be put on the created VM |
Most of the ProviderSpec fields are not mandatory. If not specified, the provider passes an empty value in the respective Create VM parameter.
The tags can be used to map a VM to its corresponding machine object’s Name
The ProviderSpec is validated by methods that receive it as a request field for presence of all mandatory parameters and tags, and for validity of all parameters.
Secrets
The MachineClass resource also contains a secretRef field that contains a reference to a secret. The keys of this secret are passed in the Secrets request field to CMI methods.
The secret can contain sensitive data such as
cloud-credentialssecret data used to authenticate at the providercloud-initscripts used to initialize a new VM. The cloud-init script is expected to contain scripts to initialize the Kubelet and make it join the cluster.
Identifying Cluster Machines
To implement certain methods, the provider should be able to identify all machines associated with a particular Kubernetes cluster. This can be achieved using one/more of the below mentioned ways:
- Names of VMs created by the provider are prefixed by the cluster ID specified in the ProviderSpec.
- VMs created by the provider are tagged with the special tags like
kubernetes.io/cluster(for the cluster ID) andkubernetes.io/role(for the role), specified in the ProviderSpec. - Mapping
Resource Groupsto individual cluster.
Error Scheme
All provider API calls defined in this spec MUST return a machine error status, which is very similar to standard machine status.
Machine Provider Interface
- The provider MUST have a unique way to map a
machine objectto aVMwhich triggers the deletion for the corresponding VM backing the machine object. - The provider SHOULD have a unique way to map the
ProviderSpecof a machine-class to a uniqueCluster. This avoids deletion of other machines, not backed by the MCM.
CreateMachine
A Provider is REQUIRED to implement this interface method. This interface method will be called by the MCM to provision a new VM on behalf of the requesting machine object.
This call requests the provider to create a VM backing the machine-object.
If VM backing the
Machine.Namealready exists, and is compatible with the specifiedMachineobject in theCreateMachineRequest, the Provider MUST reply0 OKwith the correspondingCreateMachineResponse.The provider can OPTIONALLY make use of the MachineClass supplied in the
MachineClassin theCreateMachineRequestto communicate with the provider.The provider can OPTIONALLY make use of the secrets supplied in the
Secretin theCreateMachineRequestto communicate with the provider.The provider can OPTIONALLY make use of the
Status.LastKnownStatein theMachineobject to decode the state of the VM operation based on the last known state of the VM. This can be useful to restart/continue an operations which are mean’t to be atomic.The provider MUST have a unique way to map a
machine objectto aVM. This could be implicitly provided by the provider by letting you set VM-names (or) could be explicitly specified by the provider using appropriate tags to map the same.This operation SHOULD be idempotent.
The
CreateMachineResponsereturned by this method is expected to returnProviderIDthat uniquely identifys the VM at the provider. This is expected to match with the node.Spec.ProviderID on the node object.NodeNamethat is the expected name of the machine when it joins the cluster. It must match with the node name.LastKnownStateis an OPTIONAL field that can store details of the last known state of the VM. It can be used by future operation calls to determine current infrastucture state. This state is saved on the machine object.
// CreateMachine call is responsible for VM creation on the provider
CreateMachine(context.Context, *CreateMachineRequest) (*CreateMachineResponse, error)
// CreateMachineRequest is the create request for VM creation
type CreateMachineRequest struct {
// Machine object from whom VM is to be created
Machine *v1alpha1.Machine
// MachineClass backing the machine object
MachineClass *v1alpha1.MachineClass
// Secret backing the machineClass object
Secret *corev1.Secret
}
// CreateMachineResponse is the create response for VM creation
type CreateMachineResponse struct {
// ProviderID is the unique identification of the VM at the cloud provider.
// ProviderID typically matches with the node.Spec.ProviderID on the node object.
// Eg: gce://project-name/region/vm-ID
ProviderID string
// NodeName is the name of the node-object registered to kubernetes.
NodeName string
// LastKnownState represents the last state of the VM during an creation/deletion error
LastKnownState string
}
CreateMachine Errors
If the provider is unable to complete the CreateMachine call successfully, it MUST return a non-ok ginterface method code in the machine status. If the conditions defined below are encountered, the provider MUST return the specified machine error code. The MCM MUST implement the specified error recovery behavior when it encounters the machine error code.
| machine Code | Condition | Description | Recovery Behavior | Auto Retry Required |
|---|---|---|---|---|
| 0 OK | Successful | The call was successful in creating/adopting a VM that matches supplied creation request. The CreateMachineResponse is returned with desired values | N | |
| 1 CANCELED | Cancelled | Call was cancelled. Perform any pending clean-up tasks and return the call | N | |
| 2 UNKNOWN | Something went wrong | Not enough information on what went wrong | Retry operation after sometime | Y |
| 3 INVALID_ARGUMENT | Re-check supplied parameters | Re-check the supplied Machine.Name and ProviderSpec. Make sure all parameters are in permitted range of values. Exact issue to be given in .message | Update providerSpec to fix issues. | N |
| 4 DEADLINE_EXCEEDED | Timeout | The call processing exceeded supplied deadline | Retry operation after sometime | Y |
| 6 ALREADY_EXISTS | Already exists but desired parameters doesn’t match | Parameters of the existing VM don’t match the ProviderSpec | Create machine with a different name | N |
| 7 PERMISSION_DENIED | Insufficent permissions | The requestor doesn’t have enough permissions to create an VM and it’s required dependencies | Update requestor permissions to grant the same | N |
| 8 RESOURCE_EXHAUSTED | Resource limits have been reached | The requestor doesn’t have enough resource limits to process this creation request | Enhance resource limits associated with the user/account to process this | N |
| 9 PRECONDITION_FAILED | VM is in inconsistent state | The VM is in a state that is invalid for this operation | Manual intervention might be needed to fix the state of the VM | N |
| 10 ABORTED | Operation is pending | Indicates that there is already an operation pending for the specified machine | Wait until previous pending operation is processed | Y |
| 11 OUT_OF_RANGE | Resources were out of range | The requested number of CPUs, memory size, of FS size in ProviderSpec falls outside of the corresponding valid range | Update request paramaters to request valid resource requests | N |
| 12 UNIMPLEMENTED | Not implemented | Unimplemented indicates operation is not implemented or not supported/enabled in this service. | Retry with an alternate logic or implement this method at the provider. Most methods by default are in this state | N |
| 13 INTERNAL | Major error | Means some invariants expected by underlying system has been broken. If you see one of these errors, something is very broken. | Needs manual intervension to fix this | N |
| 14 UNAVAILABLE | Not Available | Unavailable indicates the service is currently unavailable. | Retry operation after sometime | Y |
| 16 UNAUTHENTICATED | Missing provider credentials | Request does not have valid authentication credentials for the operation | Fix the provider credentials | N |
The status message MUST contain a human readable description of error, if the status code is not OK.
This string MAY be surfaced by MCM to end users.
InitializeMachine
Provider can OPTIONALLY implement this driver call. Else should return a UNIMPLEMENTED status in error.
This interface method will be called by the MCM to initialize a new VM just after creation. This can be used to configure network configuration etc.
- This call requests the provider to initialize a newly created VM backing the machine-object.
- The
InitializeMachineResponsereturned by this method is expected to returnProviderIDthat uniquely identifys the VM at the provider. This is expected to match with thenode.Spec.ProviderIDon the node object.NodeNamethat is the expected name of the machine when it joins the cluster. It must match with the node name.
// InitializeMachine call is responsible for VM initialization on the provider.
InitializeMachine(context.Context, *InitializeMachineRequest) (*InitializeMachineResponse, error)
// InitializeMachineRequest encapsulates params for the VM Initialization operation (Driver.InitializeMachine).
type InitializeMachineRequest struct {
// Machine object representing VM that must be initialized
Machine *v1alpha1.Machine
// MachineClass backing the machine object
MachineClass *v1alpha1.MachineClass
// Secret backing the machineClass object
Secret *corev1.Secret
}
// InitializeMachineResponse is the response for VM instance initialization (Driver.InitializeMachine).
type InitializeMachineResponse struct {
// ProviderID is the unique identification of the VM at the cloud provider.
// ProviderID typically matches with the node.Spec.ProviderID on the node object.
// Eg: gce://project-name/region/vm-ID
ProviderID string
// NodeName is the name of the node-object registered to kubernetes.
NodeName string
}
InitializeMachine Errors
If the provider is unable to complete the InitializeMachine call successfully, it MUST return a non-ok machine code in the machine status.
If the conditions defined below are encountered, the provider MUST return the specified machine error code. The MCM MUST implement the specified error recovery behavior when it encounters the machine error code.
| machine Code | Condition | Description | Recovery Behavior | Auto Retry Required |
|---|---|---|---|---|
| 0 OK | Successful | The call was successful in initializing a VM that matches supplied initialization request. The InitializeMachineResponse is returned with desired values | N | |
| 5 NOT_FOUND | Timeout | VM Instance for Machine isn’t found at provider | Skip Initialization and Continue | N |
| 12 UNIMPLEMENTED | Not implemented | Unimplemented indicates operation is not implemented or not supported/enabled in this service. | Skip Initialization and continue | N |
| 13 INTERNAL | Major error | Means some invariants expected by underlying system has been broken. | Needs investigation and possible intervention to fix this | Y |
| 17 UNINITIALIZED | Failed Initialization | VM Instance could not be initializaed | Initialization is reattempted in next reconcile cycle | Y |
The status message MUST contain a human readable description of error, if the status code is not OK.
This string MAY be surfaced by MCM to end users.
DeleteMachine
A Provider is REQUIRED to implement this driver call. This driver call will be called by the MCM to deprovision/delete/terminate a VM backed by the requesting machine object.
If a VM corresponding to the specified machine-object’s name does not exist or the artifacts associated with the VM do not exist anymore (after deletion), the Provider MUST reply
0 OK.The provider SHALL only act on machines belonging to the cluster-id/cluster-name obtained from the
ProviderSpec.The provider can OPTIONALY make use of the secrets supplied in the
Secretsmap in theDeleteMachineRequestto communicate with the provider.The provider can OPTIONALY make use of the
Spec.ProviderIDmap in theMachineobject.The provider can OPTIONALLY make use of the
Status.LastKnownStatein theMachineobject to decode the state of the VM operation based on the last known state of the VM. This can be useful to restart/continue an operations which are mean’t to be atomic.This operation SHOULD be idempotent.
The provider must have a unique way to map a
machine objectto aVMwhich triggers the deletion for the corresponding VM backing the machine object.The
DeleteMachineResponsereturned by this method is expected to returnLastKnownStateis an OPTIONAL field that can store details of the last known state of the VM. It can be used by future operation calls to determine current infrastucture state. This state is saved on the machine object.
// DeleteMachine call is responsible for VM deletion/termination on the provider
DeleteMachine(context.Context, *DeleteMachineRequest) (*DeleteMachineResponse, error)
// DeleteMachineRequest is the delete request for VM deletion
type DeleteMachineRequest struct {
// Machine object from whom VM is to be deleted
Machine *v1alpha1.Machine
// MachineClass backing the machine object
MachineClass *v1alpha1.MachineClass
// Secret backing the machineClass object
Secret *corev1.Secret
}
// DeleteMachineResponse is the delete response for VM deletion
type DeleteMachineResponse struct {
// LastKnownState represents the last state of the VM during an creation/deletion error
LastKnownState string
}
DeleteMachine Errors
If the provider is unable to complete the DeleteMachine call successfully, it MUST return a non-ok machine code in the machine status. If the conditions defined below are encountered, the provider MUST return the specified machine error code.
| machine Code | Condition | Description | Recovery Behavior | Auto Retry Required |
|---|---|---|---|---|
| 0 OK | Successful | The call was successful in deleting a VM that matches supplied deletion request. | N | |
| 1 CANCELED | Cancelled | Call was cancelled. Perform any pending clean-up tasks and return the call | N | |
| 2 UNKNOWN | Something went wrong | Not enough information on what went wrong | Retry operation after sometime | Y |
| 3 INVALID_ARGUMENT | Re-check supplied parameters | Re-check the supplied Machine.Name and make sure that it is in the desired format and not a blank value. Exact issue to be given in .message | Update Machine.Name to fix issues. | N |
| 4 DEADLINE_EXCEEDED | Timeout | The call processing exceeded supplied deadline | Retry operation after sometime | Y |
| 7 PERMISSION_DENIED | Insufficent permissions | The requestor doesn’t have enough permissions to delete an VM and it’s required dependencies | Update requestor permissions to grant the same | N |
| 9 PRECONDITION_FAILED | VM is in inconsistent state | The VM is in a state that is invalid for this operation | Manual intervention might be needed to fix the state of the VM | N |
| 10 ABORTED | Operation is pending | Indicates that there is already an operation pending for the specified machine | Wait until previous pending operation is processed | Y |
| 12 UNIMPLEMENTED | Not implemented | Unimplemented indicates operation is not implemented or not supported/enabled in this service. | Retry with an alternate logic or implement this method at the provider. Most methods by default are in this state | N |
| 13 INTERNAL | Major error | Means some invariants expected by underlying system has been broken. If you see one of these errors, something is very broken. | Needs manual intervension to fix this | N |
| 14 UNAVAILABLE | Not Available | Unavailable indicates the service is currently unavailable. | Retry operation after sometime | Y |
| 16 UNAUTHENTICATED | Missing provider credentials | Request does not have valid authentication credentials for the operation | Fix the provider credentials | N |
The status message MUST contain a human readable description of error, if the status code is not OK.
This string MAY be surfaced by MCM to end users.
GetMachineStatus
A Provider can OPTIONALLY implement this driver call. Else should return a UNIMPLEMENTED status in error.
This call will be invoked by the MC to get the status of a machine.
This optional driver call helps in optimizing the working of the provider by avoiding unwanted calls to CreateMachine() and DeleteMachine().
- If a VM corresponding to the specified machine object’s
Machine.Nameexists on provider theGetMachineStatusResponsefields are to be filled similar to theCreateMachineResponse. - The provider SHALL only act on machines belonging to the cluster-id/cluster-name obtained from the
ProviderSpec. - The provider can OPTIONALY make use of the secrets supplied in the
Secretsmap in theGetMachineStatusRequestto communicate with the provider. - The provider can OPTIONALY make use of the VM unique ID (returned by the provider on machine creation) passed in the
ProviderIDmap in theGetMachineStatusRequest. - This operation MUST be idempotent.
// GetMachineStatus call get's the status of the VM backing the machine object on the provider
GetMachineStatus(context.Context, *GetMachineStatusRequest) (*GetMachineStatusResponse, error)
// GetMachineStatusRequest is the get request for VM info
type GetMachineStatusRequest struct {
// Machine object from whom VM status is to be fetched
Machine *v1alpha1.Machine
// MachineClass backing the machine object
MachineClass *v1alpha1.MachineClass
// Secret backing the machineClass object
Secret *corev1.Secret
}
// GetMachineStatusResponse is the get response for VM info
type GetMachineStatusResponse struct {
// ProviderID is the unique identification of the VM at the cloud provider.
// ProviderID typically matches with the node.Spec.ProviderID on the node object.
// Eg: gce://project-name/region/vm-ID
ProviderID string
// NodeName is the name of the node-object registered to kubernetes.
NodeName string
}
GetMachineStatus Errors
If the provider is unable to complete the GetMachineStatus call successfully, it MUST return a non-ok machine code in the machine status. If the conditions defined below are encountered, the provider MUST return the specified machine error code.
| machine Code | Condition | Description | Recovery Behavior | Auto Retry Required |
|---|---|---|---|---|
| 0 OK | Successful | The call was successful in getting machine details for given machine Machine.Name | N | |
| 1 CANCELED | Cancelled | Call was cancelled. Perform any pending clean-up tasks and return the call | N | |
| 2 UNKNOWN | Something went wrong | Not enough information on what went wrong | Retry operation after sometime | Y |
| 3 INVALID_ARGUMENT | Re-check supplied parameters | Re-check the supplied Machine.Name and make sure that it is in the desired format and not a blank value. Exact issue to be given in .message | Update Machine.Name to fix issues. | N |
| 4 DEADLINE_EXCEEDED | Timeout | The call processing exceeded supplied deadline | Retry operation after sometime | Y |
| 5 NOT_FOUND | Machine isn’t found at provider | The machine could not be found at provider | Not required | N |
| 7 PERMISSION_DENIED | Insufficent permissions | The requestor doesn’t have enough permissions to get details for the VM and it’s required dependencies | Update requestor permissions to grant the same | N |
| 9 PRECONDITION_FAILED | VM is in inconsistent state | The VM is in a state that is invalid for this operation | Manual intervention might be needed to fix the state of the VM | N |
| 11 OUT_OF_RANGE | Multiple VMs found | Multiple VMs found with matching machine object names | Orphan VM handler to cleanup orphan VMs / Manual intervention maybe required if orphan VM handler isn’t enabled. | Y |
| 12 UNIMPLEMENTED | Not implemented | Unimplemented indicates operation is not implemented or not supported/enabled in this service. | Retry with an alternate logic or implement this method at the provider. Most methods by default are in this state | N |
| 13 INTERNAL | Major error | Means some invariants expected by underlying system has been broken. If you see one of these errors, something is very broken. | Needs manual intervension to fix this | N |
| 14 UNAVAILABLE | Not Available | Unavailable indicates the service is currently unavailable. | Retry operation after sometime | Y |
| 16 UNAUTHENTICATED | Missing provider credentials | Request does not have valid authentication credentials for the operation | Fix the provider credentials | N |
| 17 UNINITIALIZED | Failed Initialization | VM Instance could not be initializaed | Initialization is reattempted in next reconcile cycle | N |
The status message MUST contain a human readable description of error, if the status code is not OK.
This string MAY be surfaced by MCM to end users.
ListMachines
A Provider can OPTIONALLY implement this driver call. Else should return a UNIMPLEMENTED status in error.
The Provider SHALL return the information about all the machines associated with the MachineClass.
Make sure to use appropriate filters to achieve the same to avoid data transfer overheads.
This optional driver call helps in cleaning up orphan VMs present in the cluster. If not implemented, any orphan VM that might have been created incorrectly by the MCM/Provider (due to bugs in code/infra) might require manual clean up.
- If the Provider succeeded in returning a list of
Machine.Namewith their correspondingProviderID, then return0 OK. - The
ListMachineResponsecontains a map ofMachineListwhose- Key is expected to contain the
ProviderID& - Value is expected to contain the
Machine.Namecorresponding to it’s kubernetes machine CR object
- Key is expected to contain the
- The provider can OPTIONALY make use of the secrets supplied in the
Secretsmap in theListMachinesRequestto communicate with the provider.
// ListMachines lists all the machines that might have been created by the supplied machineClass
ListMachines(context.Context, *ListMachinesRequest) (*ListMachinesResponse, error)
// ListMachinesRequest is the request object to get a list of VMs belonging to a machineClass
type ListMachinesRequest struct {
// MachineClass object
MachineClass *v1alpha1.MachineClass
// Secret backing the machineClass object
Secret *corev1.Secret
}
// ListMachinesResponse is the response object of the list of VMs belonging to a machineClass
type ListMachinesResponse struct {
// MachineList is the map of list of machines. Format for the map should be <ProviderID, MachineName>.
MachineList map[string]string
}
ListMachines Errors
If the provider is unable to complete the ListMachines call successfully, it MUST return a non-ok machine code in the machine status. If the conditions defined below are encountered, the provider MUST return the specified machine error code. The MCM MUST implement the specified error recovery behavior when it encounters the machine error code.
| machine Code | Condition | Description | Recovery Behavior | Auto Retry Required |
|---|---|---|---|---|
| 0 OK | Successful | The call for listing all VMs associated with ProviderSpec was successful. | N | |
| 1 CANCELED | Cancelled | Call was cancelled. Perform any pending clean-up tasks and return the call | N | |
| 2 UNKNOWN | Something went wrong | Not enough information on what went wrong | Retry operation after sometime | Y |
| 3 INVALID_ARGUMENT | Re-check supplied parameters | Re-check the supplied ProviderSpec and make sure that all required fields are present in their desired value format. Exact issue to be given in .message | Update ProviderSpec to fix issues. | N |
| 4 DEADLINE_EXCEEDED | Timeout | The call processing exceeded supplied deadline | Retry operation after sometime | Y |
| 7 PERMISSION_DENIED | Insufficent permissions | The requestor doesn’t have enough permissions to list VMs and it’s required dependencies | Update requestor permissions to grant the same | N |
| 12 UNIMPLEMENTED | Not implemented | Unimplemented indicates operation is not implemented or not supported/enabled in this service. | Retry with an alternate logic or implement this method at the provider. Most methods by default are in this state | N |
| 13 INTERNAL | Major error | Means some invariants expected by underlying system has been broken. If you see one of these errors, something is very broken. | Needs manual intervension to fix this | N |
| 14 UNAVAILABLE | Not Available | Unavailable indicates the service is currently unavailable. | Retry operation after sometime | Y |
| 16 UNAUTHENTICATED | Missing provider credentials | Request does not have valid authentication credentials for the operation | Fix the provider credentials | N |
The status message MUST contain a human readable description of error, if the status code is not OK.
This string MAY be surfaced by MCM to end users.
GetVolumeIDs
A Provider can OPTIONALLY implement this driver call. Else should return a UNIMPLEMENTED status in error.
This driver call will be called by the MCM to get the VolumeIDs for the list of PersistentVolumes (PVs) supplied.
This OPTIONAL (but recommended) driver call helps in serailzied eviction of pods with PVs while draining of machines. This implies applications backed by PVs would be evicted one by one, leading to shorter application downtimes.
- On succesful returnal of a list of
Volume-IDsfor all suppliedPVSpecs, the Provider MUST reply0 OK. - The
GetVolumeIDsResponseis expected to return a repeated list ofstringsconsisting of theVolumeIDsforPVSpecthat could be extracted. - If for any
PVthe Provider wasn’t able to identify theVolume-ID, the provider MAY chose to ignore it and return theVolume-IDsfor the rest of thePVsfor whom theVolume-IDwas found. - Getting the
VolumeIDfrom thePVSpecdepends on the Cloud-provider. You can extract this information by parsing thePVSpecbased on theProviderType - This operation MUST be idempotent.
// GetVolumeIDsRequest is the request object to get a list of VolumeIDs for a PVSpec
type GetVolumeIDsRequest struct {
// PVSpecsList is a list of PV specs for whom volume-IDs are required
// Plugin should parse this raw data into pre-defined list of PVSpecs
PVSpecs []*corev1.PersistentVolumeSpec
}
// GetVolumeIDsResponse is the response object of the list of VolumeIDs for a PVSpec
type GetVolumeIDsResponse struct {
// VolumeIDs is a list of VolumeIDs.
VolumeIDs []string
}
GetVolumeIDs Errors
| machine Code | Condition | Description | Recovery Behavior | Auto Retry Required |
|---|---|---|---|---|
| 0 OK | Successful | The call getting list of VolumeIDs for the list of PersistentVolumes was successful. | N | |
| 1 CANCELED | Cancelled | Call was cancelled. Perform any pending clean-up tasks and return the call | N | |
| 2 UNKNOWN | Something went wrong | Not enough information on what went wrong | Retry operation after sometime | Y |
| 3 INVALID_ARGUMENT | Re-check supplied parameters | Re-check the supplied PVSpecList and make sure that it is in the desired format. Exact issue to be given in .message | Update PVSpecList to fix issues. | N |
| 4 DEADLINE_EXCEEDED | Timeout | The call processing exceeded supplied deadline | Retry operation after sometime | Y |
| 12 UNIMPLEMENTED | Not implemented | Unimplemented indicates operation is not implemented or not supported/enabled in this service. | Retry with an alternate logic or implement this method at the provider. Most methods by default are in this state | N |
| 13 INTERNAL | Major error | Means some invariants expected by underlying system has been broken. If you see one of these errors, something is very broken. | Needs manual intervension to fix this | N |
| 14 UNAVAILABLE | Not Available | Unavailable indicates the service is currently unavailable. | Retry operation after sometime | Y |
The status message MUST contain a human readable description of error, if the status code is not OK.
This string MAY be surfaced by MCM to end users.
GenerateMachineClassForMigration
A Provider SHOULD implement this driver call, else it MUST return a UNIMPLEMENTED status in error.
This driver call will be called by the Machine Controller to try to perform a machineClass migration for an unknown machineClass Kind. This helps in migration of one kind of machineClass to another kind. For instance an machineClass custom resource of AWSMachineClass to MachineClass.
- On successful generation of machine class the Provider MUST reply
0 OK(or)nilerror. GenerateMachineClassForMigrationRequestexpects the provider-specific machine class (eg. AWSMachineClass) to be supplied as theProviderSpecificMachineClass. The provider is responsible for unmarshalling the golang struct. It also passes a reference to an existingMachineClassobject.- The provider is expected to fill in this
MachineClassobject based on the conversions. - An optional
ClassSpeccontaining thetype ClassSpec structis also provided to decode the provider info. GenerateMachineClassForMigrationis only responsible for filling up the passedMachineClassobject.- The task of creating the new
CRof the new kind (MachineClass) with the same name as the previous one and also annotating the old machineClass CR with a migrated annotation and migrating existing references is done by the calling library implicitly. - This operation MUST be idempotent.
// GenerateMachineClassForMigrationRequest is the request for generating the generic machineClass
// for the provider specific machine class
type GenerateMachineClassForMigrationRequest struct {
// ProviderSpecificMachineClass is provider specfic machine class object.
// E.g. AWSMachineClass
ProviderSpecificMachineClass interface{}
// MachineClass is the machine class object generated that is to be filled up
MachineClass *v1alpha1.MachineClass
// ClassSpec contains the class spec object to determine the machineClass kind
ClassSpec *v1alpha1.ClassSpec
}
// GenerateMachineClassForMigrationResponse is the response for generating the generic machineClass
// for the provider specific machine class
type GenerateMachineClassForMigrationResponse struct{}
MigrateMachineClass Errors
| machine Code | Condition | Description | Recovery Behavior | Auto Retry Required |
|---|---|---|---|---|
| 0 OK | Successful | Migration of provider specific machine class was successful | Machine reconcilation is retried once the new class has been created | Y |
| 12 UNIMPLEMENTED | Not implemented | Unimplemented indicates operation is not implemented or not supported/enabled in this provider. | None | N |
| 13 INTERNAL | Major error | Means some invariants expected by underlying system has been broken. If you see one of these errors, something is very broken. | Might need manual intervension to fix this | Y |
The status message MUST contain a human readable description of error, if the status code is not OK.
This string MAY be surfaced by MCM to end users.
Configuration and Operation
Supervised Lifecycle Management
- For Providers packaged in software form:
- Provider Packages SHOULD use a well-documented container image format (e.g., Docker, OCI).
- The chosen package image format MAY expose configurable Provider properties as environment variables, unless otherwise indicated in the section below. Variables so exposed SHOULD be assigned default values in the image manifest.
- A Provider Supervisor MAY programmatically evaluate or otherwise scan a Provider Package’s image manifest in order to discover configurable environment variables.
- A Provider SHALL NOT assume that an operator or Provider Supervisor will scan an image manifest for environment variables.
Environment Variables
- Variables defined by this specification SHALL be identifiable by their
MC_name prefix. - Configuration properties not defined by the MC specification SHALL NOT use the same
MC_name prefix; this prefix is reserved for common configuration properties defined by the MC specification. - The Provider Supervisor SHOULD supply all RECOMMENDED MC environment variables to a Provider.
- The Provider Supervisor SHALL supply all REQUIRED MC environment variables to a Provider.
Logging
- Providers SHOULD generate log messages to ONLY standard output and/or standard error.
- In this case the Provider Supervisor SHALL assume responsibility for all log lifecycle management.
- Provider implementations that deviate from the above recommendation SHALL clearly and unambiguously document the following:
- Logging configuration flags and/or variables, including working sample configurations.
- Default log destination(s) (where do the logs go if no configuration is specified?)
- Log lifecycle management ownership and related guidance (size limits, rate limits, rolling, archiving, expunging, etc.) applicable to the logging mechanism embedded within the Provider.
- Providers SHOULD NOT write potentially sensitive data to logs (e.g. secrets).
Available Services
- Provider Packages MAY support all or a subset of CMI services; service combinations MAY be configurable at runtime by the Provider Supervisor.
- This specification does not dictate the mechanism by which mode of operation MUST be discovered, and instead places that burden upon the VM Provider.
- Misconfigured provider software SHOULD fail-fast with an OS-appropriate error code.
Linux Capabilities
- Providers SHOULD clearly document any additionally required capabilities and/or security context.
Cgroup Isolation
- A Provider MAY be constrained by cgroups.
Resource Requirements
- VM Providers SHOULD unambiguously document all of a Provider’s resource requirements.
Deploying
- Recommended: The MCM and Provider are typically expected to run as two containers inside a common
Pod. - However, for the security reasons they could execute on seperate Pods provided they have a secure way to exchange data between them.
6.4.12 - Machine Set
Maintaining machine replicas using machines-sets
Setting up your usage environment
- Follow the steps described here
Important ⚠️
Make sure that the
kubernetes/machines_objects/machine-set.yamlpoints to the same class name as thekubernetes/machine_classes/aws-machine-class.yaml.
Similarly
kubernetes/machine_classes/aws-machine-class.yamlsecret name and namespace should be same as that mentioned inkubernetes/secrets/aws-secret.yaml
Creating machine-set
- Modify
kubernetes/machine_objects/machine-set.yamlas per your requirement. You can modify the number of replicas to the desired number of machines. Then, create an machine-set:
$ kubectl apply -f kubernetes/machine_objects/machine-set.yaml
You should notice that the Machine Controller Manager has immediately picked up your manifest and started to create a new machines based on the number of replicas you have provided in the manifest.
- Check Machine Controller Manager machine-sets in the cluster
$ kubectl get machineset
NAME DESIRED CURRENT READY AGE
test-machine-set 3 3 0 1m
You will see a new machine-set with your given name
- Check Machine Controller Manager machines in the cluster:
$ kubectl get machine
NAME STATUS AGE
test-machine-set-b57zs Pending 5m
test-machine-set-c4bg8 Pending 5m
test-machine-set-kvskg Pending 5m
Now you will see N (number of replicas specified in the manifest) new machines whose names are prefixed with the machine-set object name that you created.
- After a few minutes (~3 minutes for AWS), you should notice new nodes joining the cluster. You can verify this by running:
$ kubectl get nodes
NAME STATUS AGE VERSION
ip-10-250-0-234.eu-west-1.compute.internal Ready 3m v1.8.0
ip-10-250-15-98.eu-west-1.compute.internal Ready 3m v1.8.0
ip-10-250-6-21.eu-west-1.compute.internal Ready 2m v1.8.0
This shows how new nodes have joined your cluster
Inspect status of machine-set
- To inspect the status of any created machine-set run the following command:
$ kubectl get machineset test-machine-set -o yaml
apiVersion: machine.sapcloud.io/v1alpha1
kind: MachineSet
metadata:
annotations:
kubectl.kubernetes.io/last-applied-configuration: |
{"apiVersion":"machine.sapcloud.io/v1alpha1","kind":"MachineSet","metadata":{"annotations":{},"name":"test-machine-set","namespace":"","test-label":"test-label"},"spec":{"minReadySeconds":200,"replicas":3,"selector":{"matchLabels":{"test-label":"test-label"}},"template":{"metadata":{"labels":{"test-label":"test-label"}},"spec":{"class":{"kind":"AWSMachineClass","name":"test-aws"}}}}}
clusterName: ""
creationTimestamp: 2017-12-27T08:37:42Z
finalizers:
- machine.sapcloud.io/operator
generation: 0
initializers: null
name: test-machine-set
namespace: ""
resourceVersion: "12630893"
selfLink: /apis/machine.sapcloud.io/v1alpha1/test-machine-set
uid: 3469faaa-eae1-11e7-a6c0-828f843e4186
spec:
machineClass: {}
minReadySeconds: 200
replicas: 3
selector:
matchLabels:
test-label: test-label
template:
metadata:
creationTimestamp: null
labels:
test-label: test-label
spec:
class:
kind: AWSMachineClass
name: test-aws
status:
availableReplicas: 3
fullyLabeledReplicas: 3
machineSetCondition: null
lastOperation:
lastUpdateTime: null
observedGeneration: 0
readyReplicas: 3
replicas: 3
Health monitoring
- If you try to delete/terminate any of the machines backing the machine-set by either talking to the Machine Controller Manager or from the cloud provider, the Machine Controller Manager recreates a matching healthy machine to replace the deleted machine.
- Similarly, if any of your machines are unreachable or in an unhealthy state (kubelet not ready / disk pressure) for longer than the configured timeout (~ 5mins), the Machine Controller Manager recreates the nodes to replace the unhealthy nodes.
Delete machine-set
- To delete the VM using the
kubernetes/machine_objects/machine-set.yaml:
$ kubectl delete -f kubernetes/machine-set.yaml
Now the Machine Controller Manager has immediately picked up your manifest and started to delete the existing VMs by talking to the cloud provider. Your nodes should be detached from the cluster in a few minutes (~1min for AWS).
6.4.13 - Prerequisite
Setting up the usage environment
Important ⚠️
All paths are relative to the root location of this project repository.
Run the Machine Controller Manager either as described in Setting up a local development environment or Deploying the Machine Controller Manager into a Kubernetes cluster.
Make sure that the following steps are run before managing machines/ machine-sets/ machine-deploys.
Set KUBECONFIG
Using the existing Kubeconfig, open another Terminal panel/window with the KUBECONFIG environment variable pointing to this Kubeconfig file as shown below,
$ export KUBECONFIG=<PATH_TO_REPO>/dev/kubeconfig.yaml
Replace provider credentials and desired VM configurations
Open kubernetes/machine_classes/aws-machine-class.yaml and replace required values there with the desired VM configurations.
Similarily open kubernetes/secrets/aws-secret.yaml and replace - userData, providerAccessKeyId, providerSecretAccessKey with base64 encoded values of cloudconfig file, AWS access key id, and AWS secret access key respectively. Use the following command to get the base64 encoded value of your details
$ echo "sample-cloud-config" | base64
base64-encoded-cloud-config
Do the same for your access key id and secret access key.
Deploy required CRDs and Objects
Create all the required CRDs in the cluster using kubernetes/crds.yaml
$ kubectl apply -f kubernetes/crds.yaml
Create the class template that will be used as an machine template to create VMs using kubernetes/machine_classes/aws-machine-class.yaml
$ kubectl apply -f kubernetes/machine_classes/aws-machine-class.yaml
Create the secret used for the cloud credentials and cloudconfig using kubernetes/secrets/aws-secret.yaml
$ kubectl apply -f kubernetes/secrets/aws-secret.yaml
Check current cluster state
Get to know the current cluster state using the following commands,
- Checking aws-machine-class in the cluster
$ kubectl get awsmachineclass
NAME MACHINE TYPE AMI AGE
test-aws t2.large ami-123456 5m
- Checking kubernetes secrets in the cluster
$ kubectl get secret
NAME TYPE DATA AGE
test-secret Opaque 3 21h
- Checking kubernetes nodes in the cluster
$ kubectl get nodes
Lists the default set of nodes attached to your cluster
- Checking Machine Controller Manager machines in the cluster
$ kubectl get machine
No resources found.
- Checking Machine Controller Manager machine-sets in the cluster
$ kubectl get machineset
No resources found.
- Checking Machine Controller Manager machine-deploys in the cluster
$ kubectl get machinedeployment
No resources found.
6.4.14 - Testing And Dependencies
Dependency management
We use golang modules to manage golang dependencies. In order to add a new package dependency to the project, you can perform go get <PACKAGE>@<VERSION> or edit the go.mod file and append the package along with the version you want to use.
Updating dependencies
The Makefile contains a rule called tidy which performs go mod tidy.
go mod tidy makes sure go.mod matches the source code in the module. It adds any missing modules necessary to build the current module’s packages and dependencies, and it removes unused modules that don’t provide any relevant packages.
$ make tidy
The dependencies are installed into the go mod cache folder.
⚠️ Make sure you test the code after you have updated the dependencies!
6.5 - Network Problem Detector
Network Problem Detector
The Network Problem Detector performs network-related periodic checks between all nodes of a Kubernetes cluster, to its Kube API server and/or external endpoints. Checks are performed using TCP connections, HTTPS GET requests, DNS lookups (UDP), or Ping (ICMP).
Architecture
The Network Problem Detector (NWPD) consists of two daemon sets and a separate controller.
- one daemon set on the cluster network running a first set of agents on all worker nodes
- another daemon set on the host network running a second set of agents on all worker node
- the controller watches for changes on nodes and agent pods and updates the cluster config consumed by the agents.
A agent pod performs checks periodically as defined by the configuration in agent config ConfigMap.
The agents need to know about all nodes and agent pods on the cluster network for checking node-to-node communication.
But they don’t communicate with the kube apiserver to watch for resources.
Instead they rely on the information provided by the cluster config ConfigMap
which is mounted as a volume in the pod. This ConfigMap is updated by the NWPD controller, which watches for changes on
nodes and pods in the kube-system namespace. As soon as a kubelet discovers these changes, the agents see them as a file change.
The results of the checks are stored locally on the node filesystem for later inspection with the nwpdcli command line tool.
Additionally they are also exposed as metrics for scrapping by Prometheus.
By enabling the K8s exporter, the agents periodically patch the node conditions ClusterNetworkProblem and HostNetworkProblem in
the status of the node resources. If checks are failing, a summarising event is created too.
The K8s exporter is the only part of the agent which talks to the kube-apiserver.

Note: When the NWPD is deployed by the gardener-extension-shoot-networking-problemdetector, the NWPD controller is deployed in the shoot control plane.
Deployment
Get Started: Adhoc stand-alone deployment
To get started, the Network Problem Detector is deployed without integration with other tools.
Side remark:
This is the fatest way to get started with NWPD. In a productive environment, you may prefer to scrap the check results using Prometheus from metrics HTTP endpoints exposed by the agent pods. You may still follow this stand-alone installation, but you will need additional configuration on the Prometheus side which is not covered here. For more details see Access check results by Prometheus metrics below.
Here we rely on the local collection created by each agent on the node file system. This collection keeps the check results for the last several hours before they are garbage collected.
Follow these steps to deploy NWPD to a Kubernetes cluster:
Checkout the latest release and build the
nwpdcliwithmake build-localSet the
KUBECONFIGenvironment variable to the kubeconfig of the clusterApply the two daemon sets (one for the host network, one for the pod network) with
./nwpdcli deploy agentThis step will also provide a default configuration with jobs for the daemon sets on node and pod networks. See below for more details.
Note: Run
./nwpdcli deploy agent --helpto see more options.To enable automatic update of the configuration on changes of nodes and pod endpoints of the pod network daemon set, run the controller in a second shell with
./nwpdcli run-controllerAlternatively, install the agent controller with
./nwpdcli deploy controllerCollect the observations from all nodes with
./nwpdcli collectAggregate the observations in text or SVG form
./nwpdcli aggr --minutes 10 --svg-output aggr.html open aggr.html # to open the html on Mac OSYour may apply filters on time window, source, destination or job ID to restrict the aggregation. See
./nwpdcli aggr --helpfor more details.Optional: Repeat steps 5. and 6. anytime
Drill down with query for specific observations
If you need to drill down to specific observations, you may use
./nwpdcli query --helpRemove daemon sets with
./nwpdcli deploy agent --deleteOptional: Remove controller deployment with
./nwpdcli deploy controller --delete
Deployment in a Gardener landscape
The Network Problem Detector can be deployed automatically in a Gardener landscape. Please see project gardener-extension-shoot-networking-problemdetector for more details.
In this case, the check results are available as Prometheus metrics and can be accessed by a predefined Grafana dashboard.
Access check results by Prometheus metrics
Two metrics are exposed.
nwpd_aggregated_observationsThis is a counter vector with the total count of an observation (result of a check) and has these labels:src: name of node the checking agent is runningdest: name of the destination node or endpointjobid: job id of the job definitionstatus: result of the check, eitherokorfailed
nwpd_aggregated_observations_latency_secsThis is a gauge vector with the duration of the last successful observation in seconds and has these labels:src: name of node the checking agent is runningdest: name of the destination node or endpointjobid: job id of the job definition
Default Configuration of Check Jobs
Checks are defined as jobs using virtual command lines. These command lines are just Go routines executed periodically from the agent running in the pods of the two daemon sets. There are two daemon sets. One running in the host network (i.e. using the host network in the pod), the other one running in the cluster (=pod) network.
Default configuration
To examine the current default configuration, run the command
./nwpdcli deploy print-default-config
Job types
checkTCPPort [--period <duration>] [--scale-period] [--endpoints <host1:ip1:port1>,<host2:ip2:port2>,...] [--endpoints-of-pod-ds] [--node-port <port>] [--endpoint-internal-kube-apiserver] [--endpoint-external-kube-apiserver]Tries to open a connection to the given
IP:port. There are multipe variants:- using an explicit list of endpoints with
--endpoints - using the known pod endpoints of the pod network daemon set
- using a node port on all known nodes
- the cluster internal address of the kube-apiserver (IP address of
kubernetes.default.svc.cluster.local) - the external address of the kube-apiserver
The checks run in a robin round fashion after an initial random shuffle. The global default period between two checks can overwritten with the
--periodoption. With--scale-periodthe period length is increased by a factorsqrt(<number-of-nodes>)to reduce the number of checks per node.Note that known nodes and pod endpoints are only updated by the controller. Changes are applied as soon as the changed config maps are discovered by the kubelets. This typically happens within a minute.
- using an explicit list of endpoints with
checkHTTPSGet [--period <duration>] [--scale-period] [--endpoints <host1[:port1]>,<host2[:port2]>,...] [--endpoint-internal-kube-apiserver] [--endpoint-external-kube-apiserver]Tries to open a connection to the given
IP:port. There are multipe variants:- using an explicit list of endpoints with
--endpoints - the cluster internal address of the kube-apiserver
- the external address of the kube-apiserver
The checks run in a robin round fashion after an inital random shuffle. The global default period between two checks can overwritten with the
--periodoption. With--scale-periodthe period length is increased by a factorsqrt(<number-of-nodes>)to reduce the number of checks per node.- using an explicit list of endpoints with
nslookup [--period <duration>] [--scale-period] [--names host1,host2,...] [--name-internal-kube-apiserver"] [--name-external-kube-apiserver]Looks up hosts using the local resolver of the pod or the node (for agents running in the host network).
pingHost [--period <duration>] [--scale-period] [--hosts <host1:ip1>,<host2:ip2>,...]Robin round ping to all nodes or the provided host list. The node or host list is shuffled randomly on start. The global default period between two pings can overwritten with the
--periodoption.The pod needs
NET_ADMINcapabilities to be allowed to perform pings.
Default jobs for the daemon set on the host network
| Job ID | Job Type | Description |
|---|---|---|
https-n2api-ext | checkHTTPSGet | HTTPS Get check from all pods of the daemon set of the host network to the external address of the Kube API server. |
nslookup-n | nslookup | DNS Lookup of IP addresses for the domain name europe-docker.pkg.dev, and external name of Kube API server. |
tcp-n2api-ext | checkTCPPort | TCP connection check from all pods of the daemon set of the host network to the external address of the Kube API server. |
tcp-n2api-int | checkTCPPort | TCP connection check from all pods of the daemon set of the host network to the internal address of the Kube API server. |
tcp-n2n | checkTCPPort | TCP connection check from all pods of the daemon set of the host network to the node port used by the NWPD agent on the host network. |
tcp-n2p | checkTCPPort | TCP connection check from all pods of the daemon set of the host network to pod endpoints (pod IP, port of GRPC server) of the daemon set running in the pod network. |
tcp-n2n-ipv6 | checkTCPPort | TCP connection check from all pods of the daemon set of the host network to the node port used by the NWPD agent on the host network using the IPv6 address of the node. |
tcp-n2p-ipv6 | checkTCPPort | TCP connection check from all pods of the daemon set of the host network to pod IPv6 endpoints (IPv6 address of the pod, port of GRPC server) of the daemon set running in the pod network. |
| The job IDs of the default configuration on the host (=node) network are using the naming convention ` | ext | ipv6)]`. |
Default jobs for the daemon set on the cluster network
| Job ID | Job Type | Description |
|---|---|---|
https-p2api-ext | checkHTTPSGet | HTTPS Get check from all pods of the daemon set on the cluster network to the external address of the Kube API server. |
https-p2api-int | checkHTTPSGet | HTTPS Get check from all pods of the daemon set on the cluster network to the internal address of the Kube API server (kubernetes.default.svc.cluster.local.:443). |
nslookup-p | nslookup | Lookup of IP addresses for external DNS name europe-docker.pkg.dev, and internal and external names of Kube API server. |
tcp-p2api-ext | checkTCPPort | TCP connection check from all pods of the daemon set on the cluster network to the external address of the Kube API server. |
tcp-p2api-int | checkTCPPort | TCP connection check from all pods of the daemon set of the cluster network to the internal address of the Kube API server. |
tcp-p2n | checkTCPPort | TCP connection check from all pods of the daemon set of the cluster network to the node port used by the NWPD agent on the host network. |
tcp-p2p | checkTCPPort | TCP connection check from all pods of the daemon set of the cluster network to pod endpoints (pod IP, port of GRPC server) of the daemon set running in the pod network. |
tcp-p2n-ipv6 | checkTCPPort | TCP connection check from all pods of the daemon set of the cluster network to the node port used by the NWPD agent on the host network using the IPv6 address of the node. |
tcp-p2p-ipv6 | checkTCPPort | TCP connection check from all pods of the daemon set of the cluster network to pod IPv6 endpoints (IPv6 address of the pod, port of GRPC server) of the daemon set running in the pod network. |
The job IDs of the default configuration on the cluster (=pod) network are using the naming convention <jobtype-shortcut>-p[2<destination>][-(int|ext|ipv6)].
7 - Dashboard
Gardener Dashboard
![]()
![]()
Demo
Documentation
Gardener Dashboard Documentation
License
Copyright 2020 The Gardener Authors
7.1 - Architecture
Dashboard Architecture Overview
Overview
The dashboard frontend is a Single Page Application (SPA) built with Vue.js. The dashboard backend is a web server built with Express and Node.js. The backend serves the bundled frontend as static content. The dashboard uses Socket.IO to enable real-time, bidirectional and event-based communication between the frontend and the backend. For the communication from the backend to different kube-apiservers the http/2 network protocol is used. Authentication at the apiserver of the garden cluster is done via JWT tokens. These can either be an ID Token issued by an OpenID Connect Provider or the token of a Kubernetes Service Account.
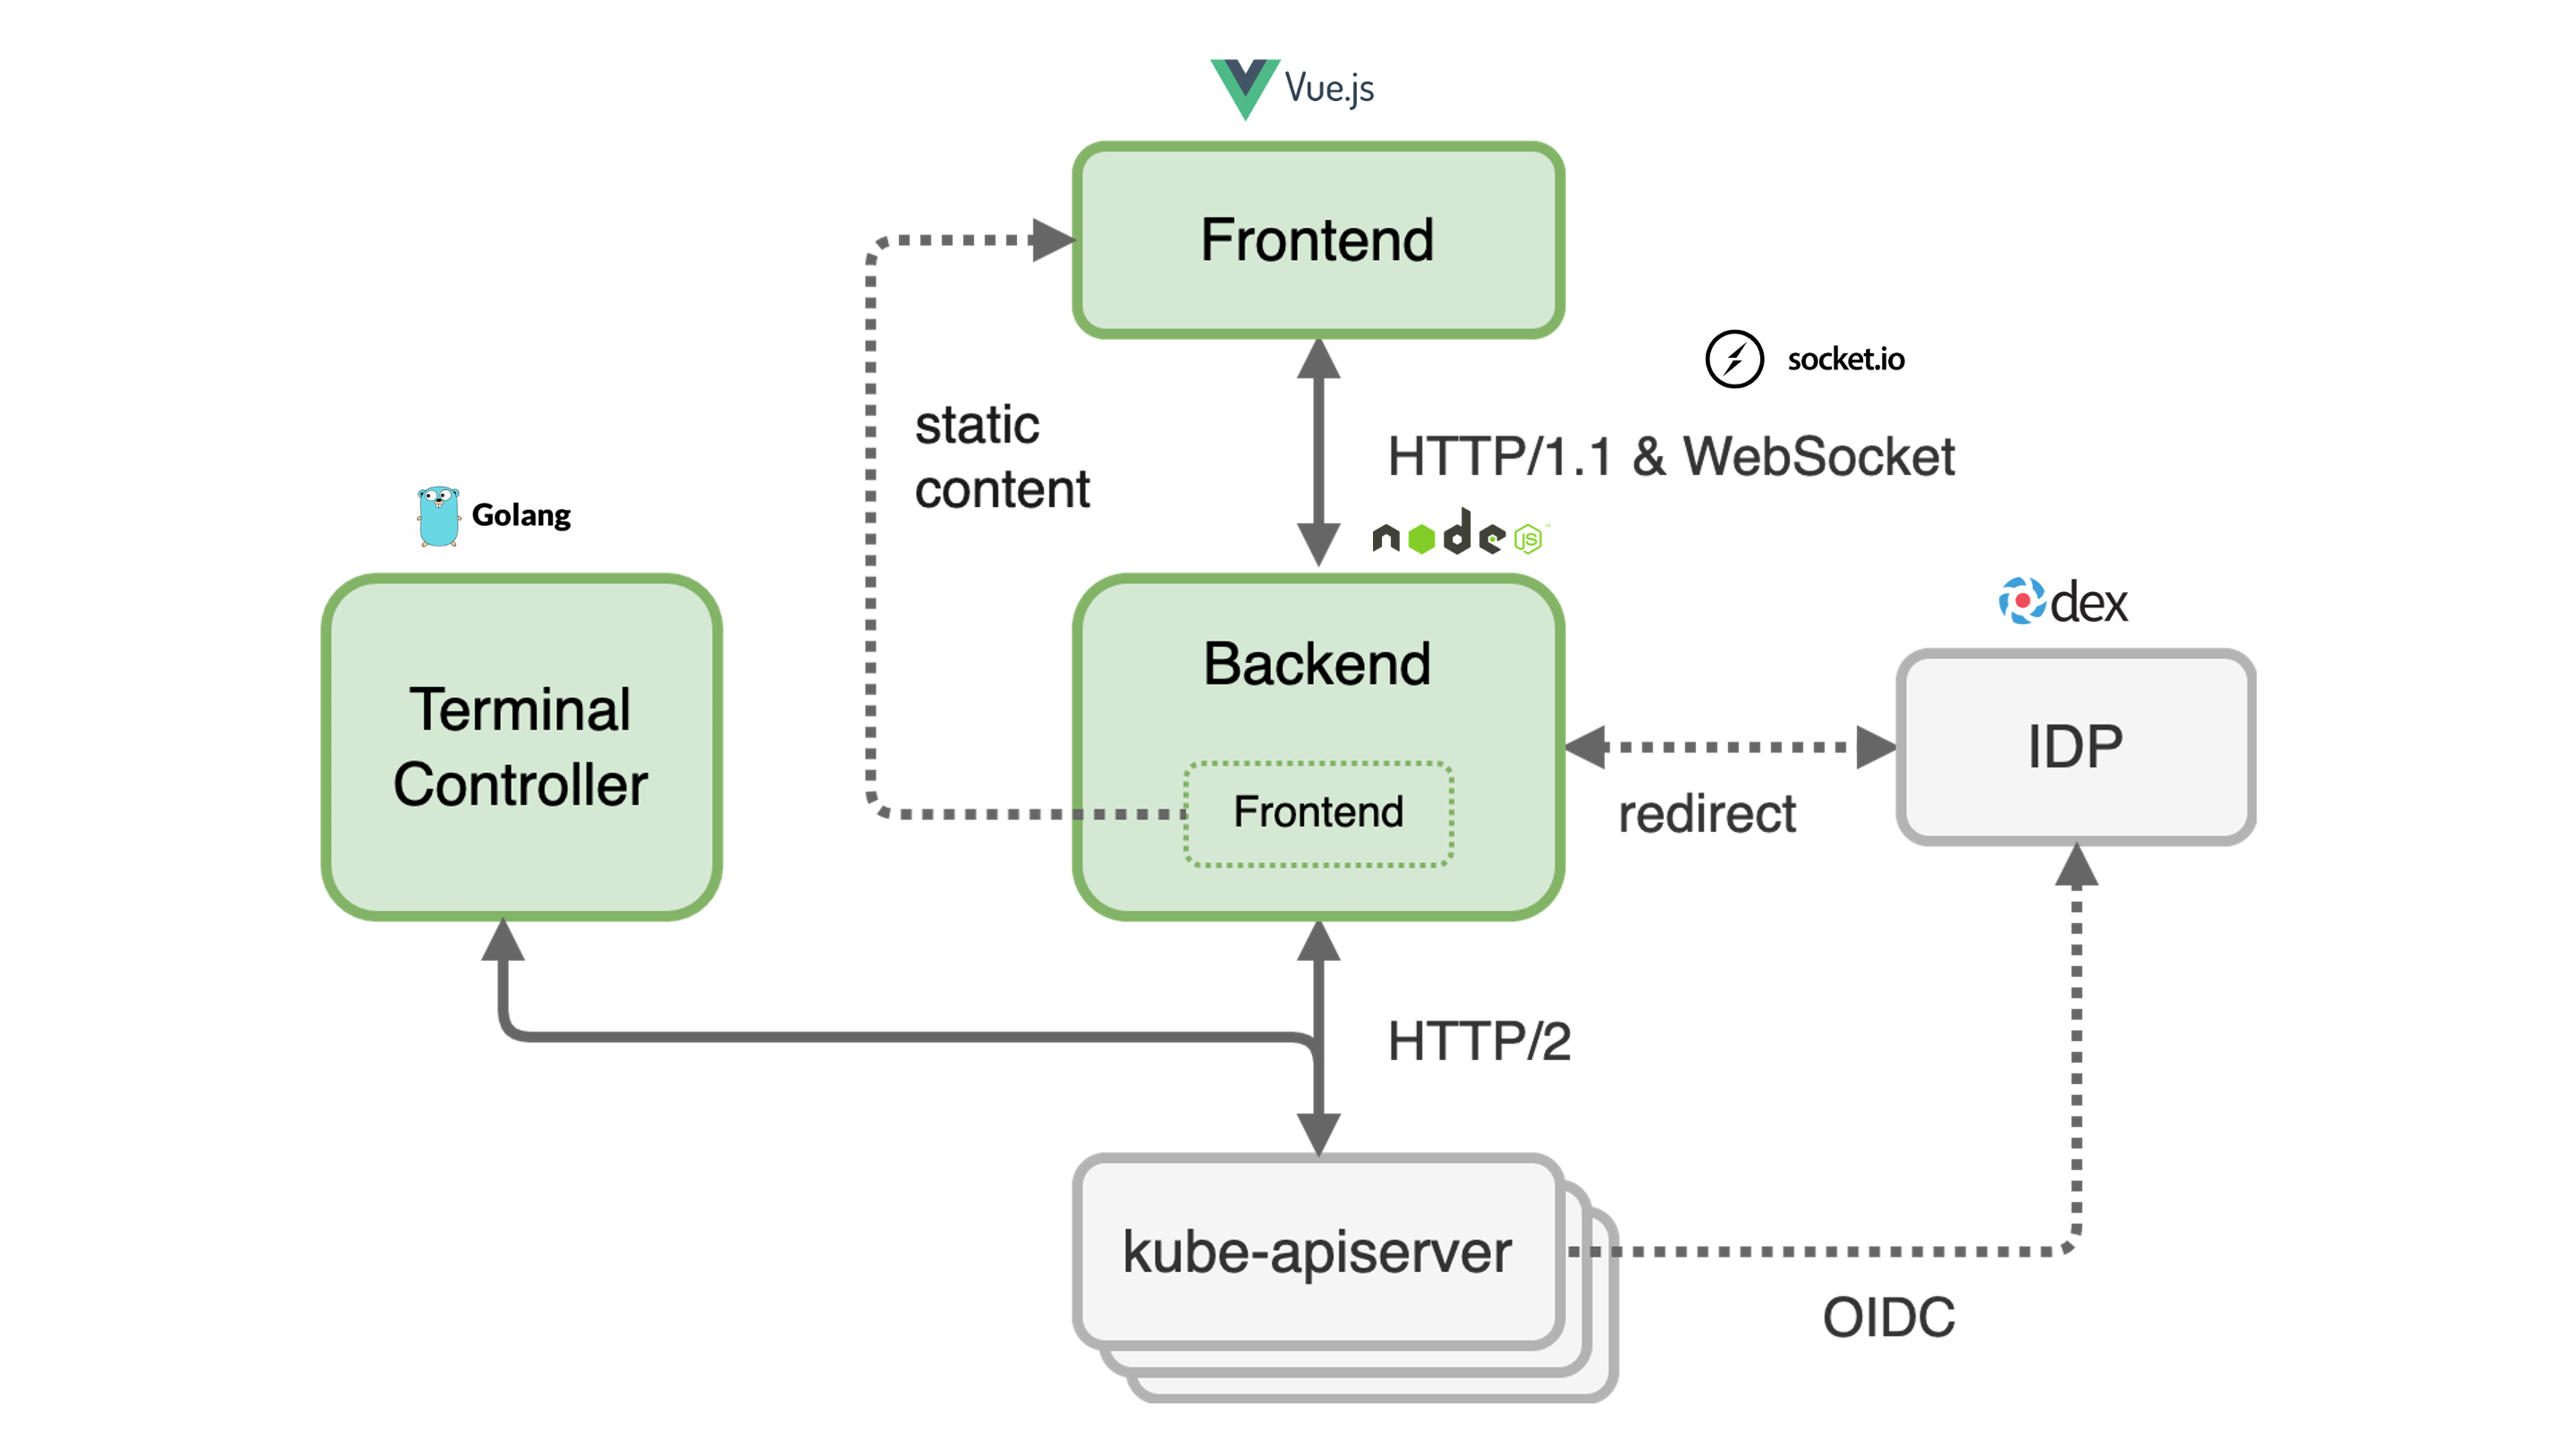
Frontend
The dashboard frontend consists of many Vue.js single file components that manage their state via a centralized store. The store defines mutations to modify the state synchronously. If several mutations have to be combined or the state in the backend has to be modified at the same time, the store provides asynchronous actions to do this job. The synchronization of the data with the backend is done by plugins that also use actions.
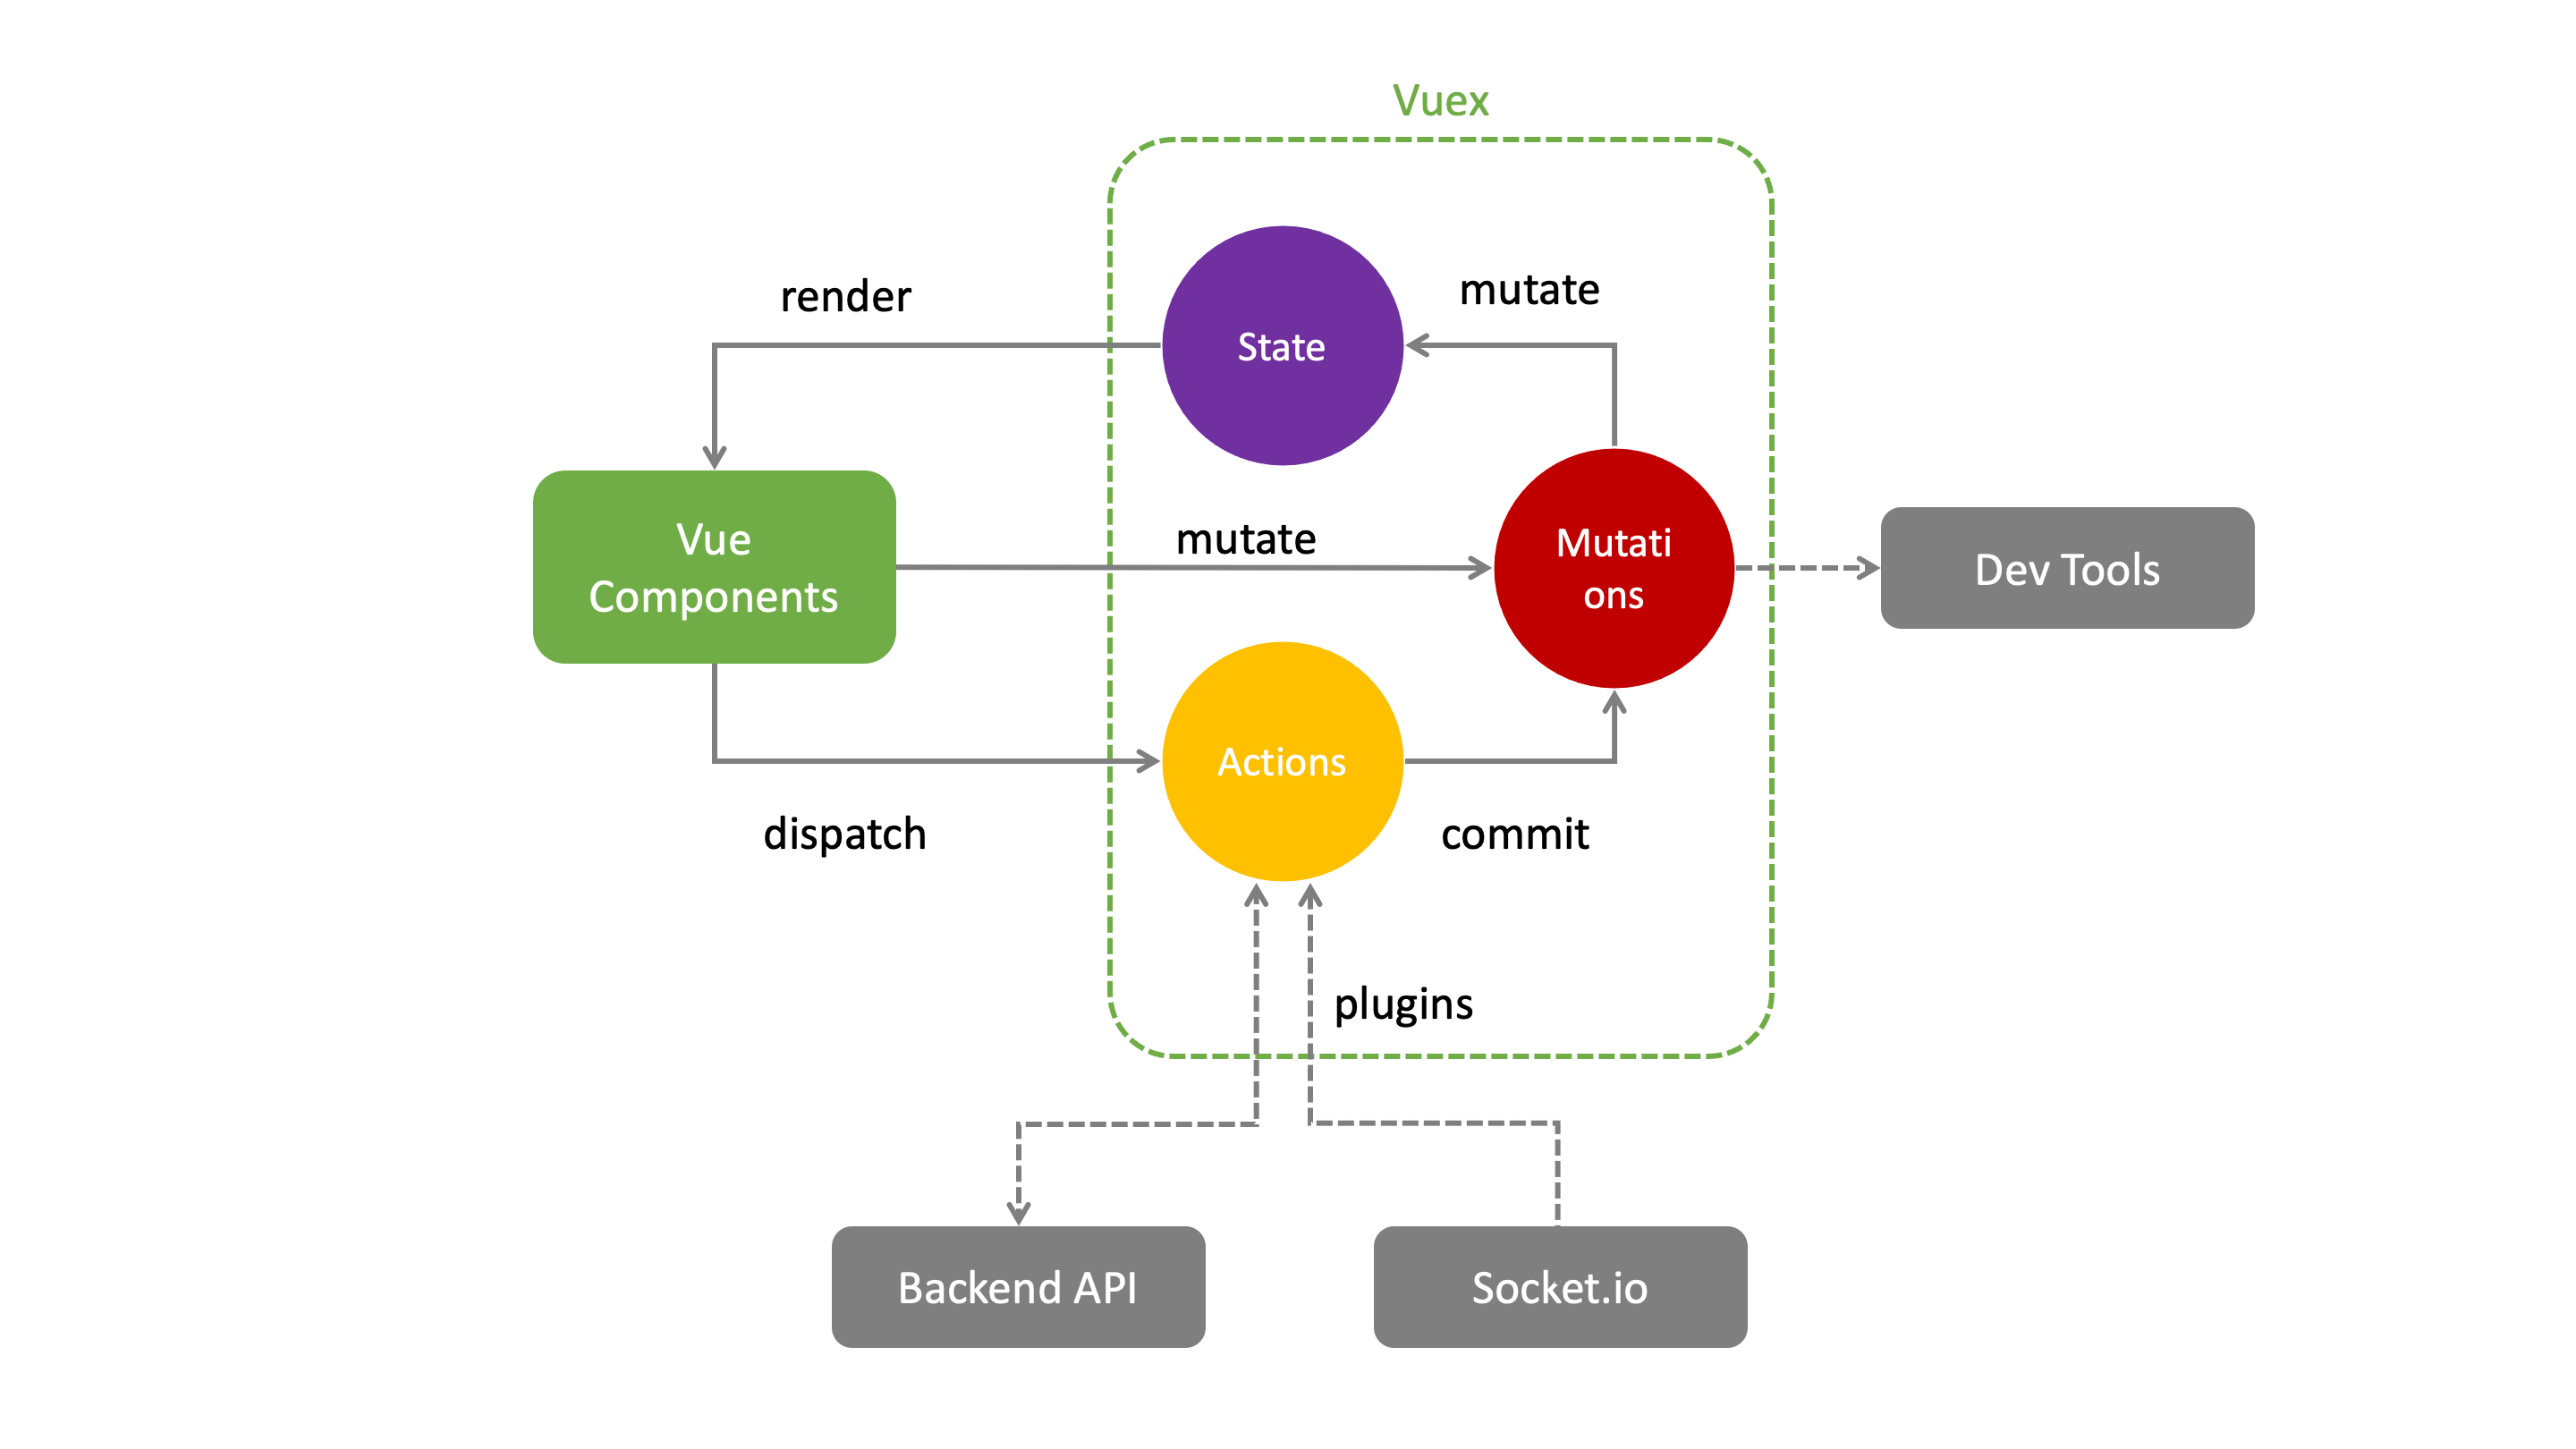
Backend
The backend is currently a monolithic Node.js application, but it performs several tasks that are actually independent.
- Static web server for the
frontendsingle page application - Forward real time events of the
apiserverto thefrontend - Provide an HTTP API
- Initiate and manage the end user login flow in order to obtain an ID Token
- Bidirectional integration with the GitHub issue management
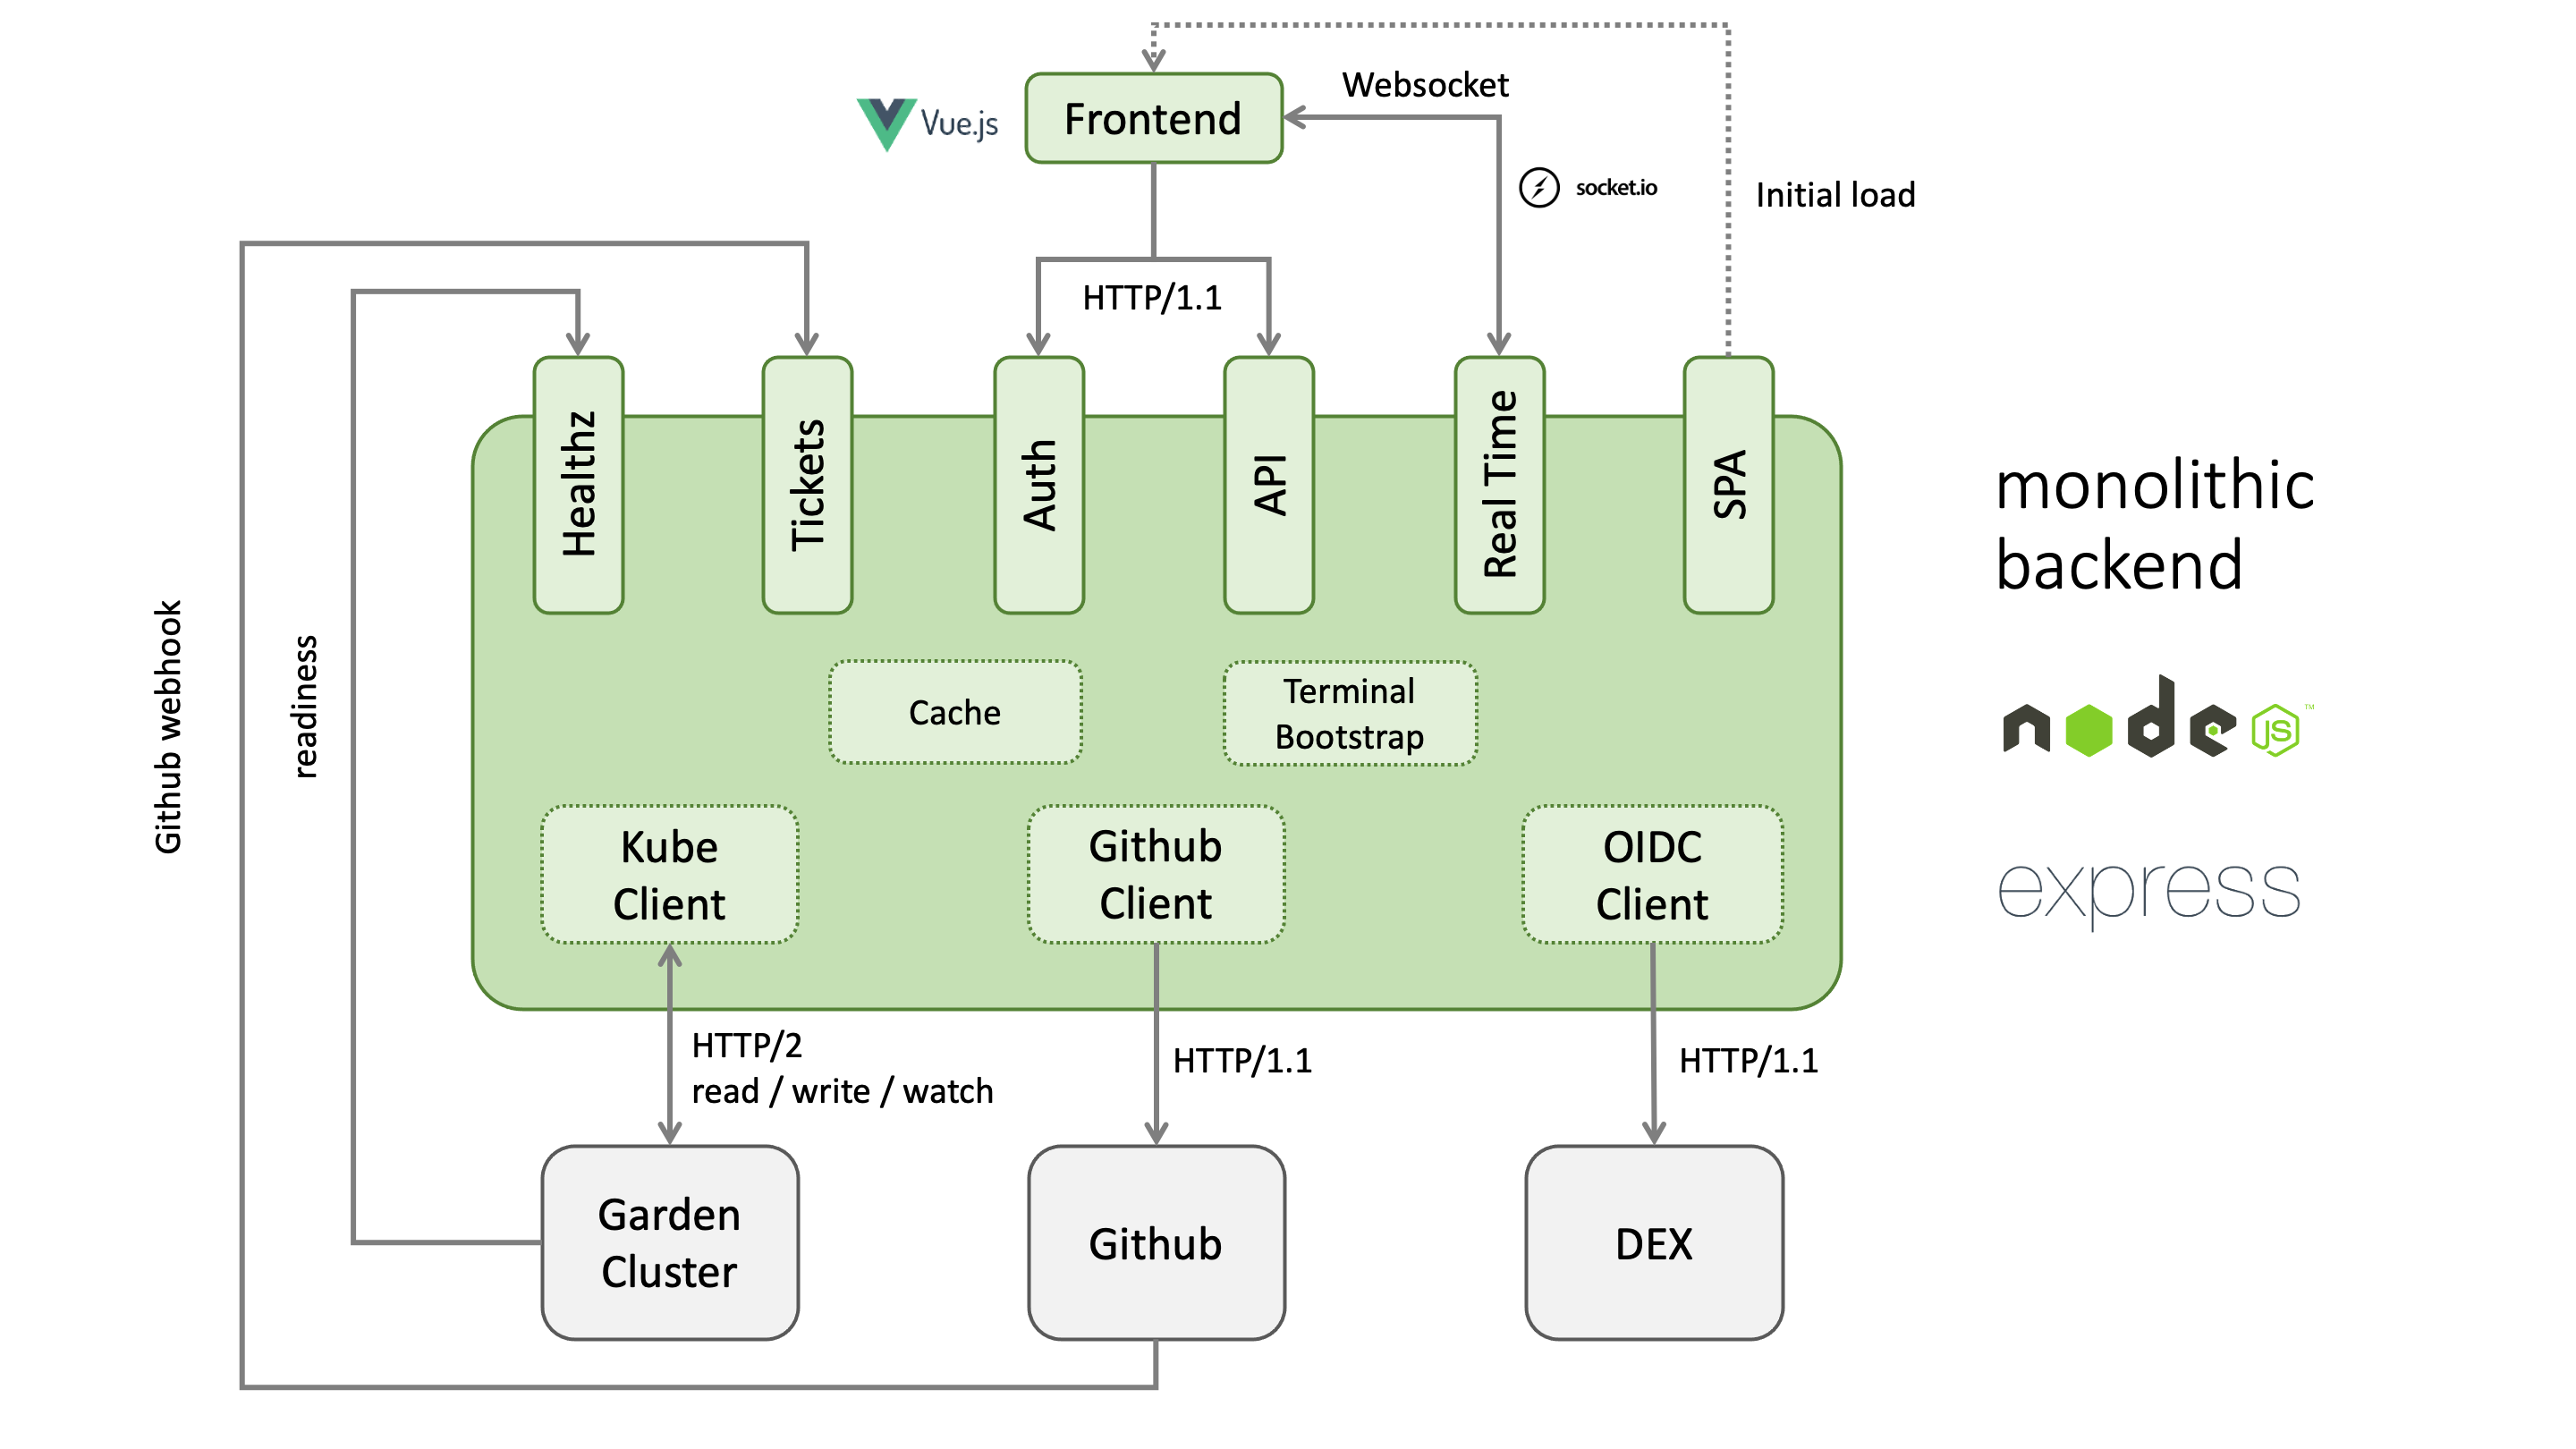
It is planned to split the backend into several independent containers to increase stability and performance.
Authentication
The following diagram shows the authorization code flow in the Gardener dashboard. When the user clicks the login button, he is redirected to the authorization endpoint of the openid connect provider. In the case of Dex IDP, authentication is delegated to the connected IDP. After a successful login, the OIDC provider redirects back to the dashboard backend with a one time authorization code. With this code, the dashboard backend can now request an ID token for the logged in user. The ID token is encrypted and stored as a secure httpOnly session cookie.
7.2 - Access Restrictions
Access Restrictions
For an overview and usage of access restrictions, refer to the Access Restrictions Usage Documentation.
Configuring the Dashboard
Operators can configure the Gardener Dashboard to define available access restrictions and their options. This configuration determines what is displayed to end-users in the Dashboard UI.
Configuration Methods
The Dashboard can be installed and configured in two ways:
- Via Helm Chart: Configuration is provided through the
values.yamlfile. - Via Gardener Operator: Configuration is provided through a ConfigMap referenced by the Gardener Operator.
1. Installing via Helm Chart
When installing the Dashboard via Helm chart, access restrictions are configured in the values.yaml file.
Example values.yaml:
accessRestriction:
noItemsText: No access restriction options available for region ${region} and cloud profile ${cloudProfileName} (${cloudProfileKind})
items:
- key: eu-access-only
display:
title: EU Access Only # Optional title; if not specified, `key` is used
description: Restricts access to EU regions only # Optional description displayed in a tooltip
input:
title: EU Access
description: |
This service is offered with our regular SLAs and 24x7 support for the control plane of the cluster. 24x7 support for cluster add-ons and nodes is only available if you meet the following conditions:
options:
- key: support.gardener.cloud/eu-access-for-cluster-addons
display:
visibleIf: true # Controls visibility based on a condition
input:
title: No personal data is used in resource names or contents
description: |
If you can't comply, only third-level support during usual 8x5 working hours in the EEA will be available for cluster add-ons.
inverted: false # Determines if the input value is inverted
- key: support.gardener.cloud/eu-access-for-cluster-nodes
display:
visibleIf: false # Controls visibility based on a condition
input:
title: No personal data is stored in Kubernetes volumes except certain types
description: |
If you can't comply, only third-level support during usual 8x5 working hours in the EEA will be available for node-related components.
inverted: true # Determines if the input value is inverted
2. Installing via Gardener Operator
When the Dashboard is installed via the Gardener Operator, access restrictions are configured in a separate ConfigMap referenced by the Operator using .spec.virtualCluster.gardener.gardenerDashboard.frontendConfigMapRef within the Garden resource.
Example ConfigMap:
apiVersion: v1
kind: ConfigMap
metadata:
name: gardener-dashboard-frontend
namespace: garden
data:
frontend-config.yaml: |
accessRestriction:
noItemsText: No access restriction options available for region ${region} and cloud profile ${cloudProfileName} (${cloudProfileKind})
items:
- key: eu-access-only
display:
title: EU Access Only
description: Restricts access to EU regions only
input:
title: EU Access
description: |
This service is offered with our regular SLAs and 24x7 support for the control plane of the cluster. 24x7 support for cluster add-ons and nodes is only available if you meet the following conditions:
options:
- key: support.gardener.cloud/eu-access-for-cluster-addons
display:
visibleIf: true
input:
title: No personal data is used in resource names or contents
description: |
If you can't comply, only third-level support during usual 8x5 working hours in the EEA will be available for cluster add-ons.
inverted: false
- key: support.gardener.cloud/eu-access-for-cluster-nodes
display:
visibleIf: false
input:
title: No personal data is stored in Kubernetes volumes except certain types
description: |
If you can't comply, only third-level support during usual 8x5 working hours in the EEA will be available for node-related components.
inverted: true
Understanding input and display
display:- Purpose: Defines how the access restriction and its options are presented in the Dashboard UI using chips.
- Properties:
title: Label shown on the chip. If not specified,keyis used.description: Tooltip content when hovering over the chip.visibleIf(for options): Determines if the option’s chip is displayed based on its value.
input:- Purpose: Configures the interactive elements (switches, checkboxes) that users interact with to enable or disable access restrictions and options.
- Properties:
title: Label for the input control.description: Detailed information or instructions for the input control.inverted(for options): Determines if the input value is inverted (trueorfalse). Wheninvertedistrue, the control behaves inversely (e.g., checked meansfalse).
No Access Restrictions Available
If no access restrictions are available for the selected region and cloud profile, the text specified in accessRestriction.noItemsText is displayed. Placeholders {region} and {cloudProfile} can be used in the text.
7.3 - Automating Project Resource Management
Overview
The project resource operations that are performed manually in the dashboard or via kubectl can be automated using the Gardener API and a Service Account authorized to perform them.
Create a Service Account
Prerequisites
- You are logged on to the Gardener Dashboard
- You have created a project
Steps
Select your project and choose MEMBERS from the menu on the left.
Locate the section Service Accounts and choose +.

Enter the service account details.
The following Roles are available:
| Role | Granted Permissions |
|---|---|
| Owner | Combines the Admin, UAM and Service Account Manager roles. There can only be one owner per project. You can change the owner on the project administration page. |
| Admin | Allows to manage resources inside the project (e.g. secrets, shoots, configmaps and similar) and to manage permissions for service accounts. Note that the Admin role has read-only access to service accounts. |
| Viewer | Provides read access to project details and shoots. Has access to shoots but is not able to create new ones. Cannot read cloud provider secrets. |
| UAM | Allows to add/modify/remove human users, service accounts or groups to/from the project member list. In case an external UAM system is connected via a service account, only this account should get the UAM role. |
| Service Account Manager | Allows to manage service accounts inside the project namespace and request tokens for them. The permissions of the created service accounts are instead managed by the Admin role. For security reasons this role should not be assigned to service accounts. In particular it should be ensured that the service account is not able to refresh service account tokens forever. |
- Choose CREATE.
Use the Service Account
To use the service account, download or copy its kubeconfig. With it you can connect to the API endpoint of your Gardener project.

Note: The downloaded
kubeconfigcontains the service account credentials. Treat with care.
Delete the Service Account
Choose Delete Service Account to delete it.

Related Links
7.4 - Connect Kubectl
Connect Kubectl
In Kubernetes, the configuration for accessing your cluster is in a format known as kubeconfig, which is stored as a file. It contains details such as cluster API server addresses and access credentials or a command to obtain access credentials from a kubectl credential plugin. In general, treat a kubeconfig as sensitive data. Tools like kubectl use the kubeconfig to connect and authenticate to a cluster and perform operations on it.
Learn more about kubeconfig and kubectl on kubernetes.io.
Tools
In this guide, we reference the following tools:
- kubectl: Command-line tool for running commands against Kubernetes clusters. It allows you to control various aspects of your cluster, such as creating or modifying resources, viewing resource status, and debugging your applications.
- kubelogin:
kubectlcredential plugin used for OIDC authentication, which is required for the (OIDC)Gardencluster kubeconfig - gardenlogin:
kubectlcredential plugin used forShootauthentication assystem:masters, which is required for the (gardenlogin)Shootcluster kubeconfig - gardenctl: Optional. Command-line tool to administrate one or many
Garden,SeedandShootclusters. Use this tool to setupgardenloginandgardenctlitself, configure access to clusters and configure cloud provider CLI tools.
Connect Kubectl to a Shoot Cluster
In order to connect to a Shoot cluster, you first have to install and setup gardenlogin.
You can obtain the kubeconfig for the Shoot cluster either by downloading it from the Gardener dashboard or by copying the gardenctl target command from the dashboard and executing it.
Setup Gardenlogin
Prerequisites
- You are logged on to the Gardener dashboard.
- The dashboard admin has configured OIDC for the dashboard.
- You have installed kubelogin
- You have installed gardenlogin
To setup gardenlogin, you need to:
Download Kubeconfig for the Garden Cluster
- Navigate to the
MY ACCOUNTpage on the dashboard by clicking on the user avatar ->MY ACCOUNT. - Under the
Accesssection, download the kubeconfig.
Configure Gardenlogin
Configure gardenlogin by following the installation instruction on the dashboard:
- Select your project from the dropdown on the left
- Choose
CLUSTERSand select your cluster in the list. - Choose the
Show information about gardenlogininfo icon and follow the configuration hints.
Important
Use the previously downloaded kubeconfig for the
Gardencluster as the kubeconfig path. Do not use thegardenloginShootcluster kubeconfig here.
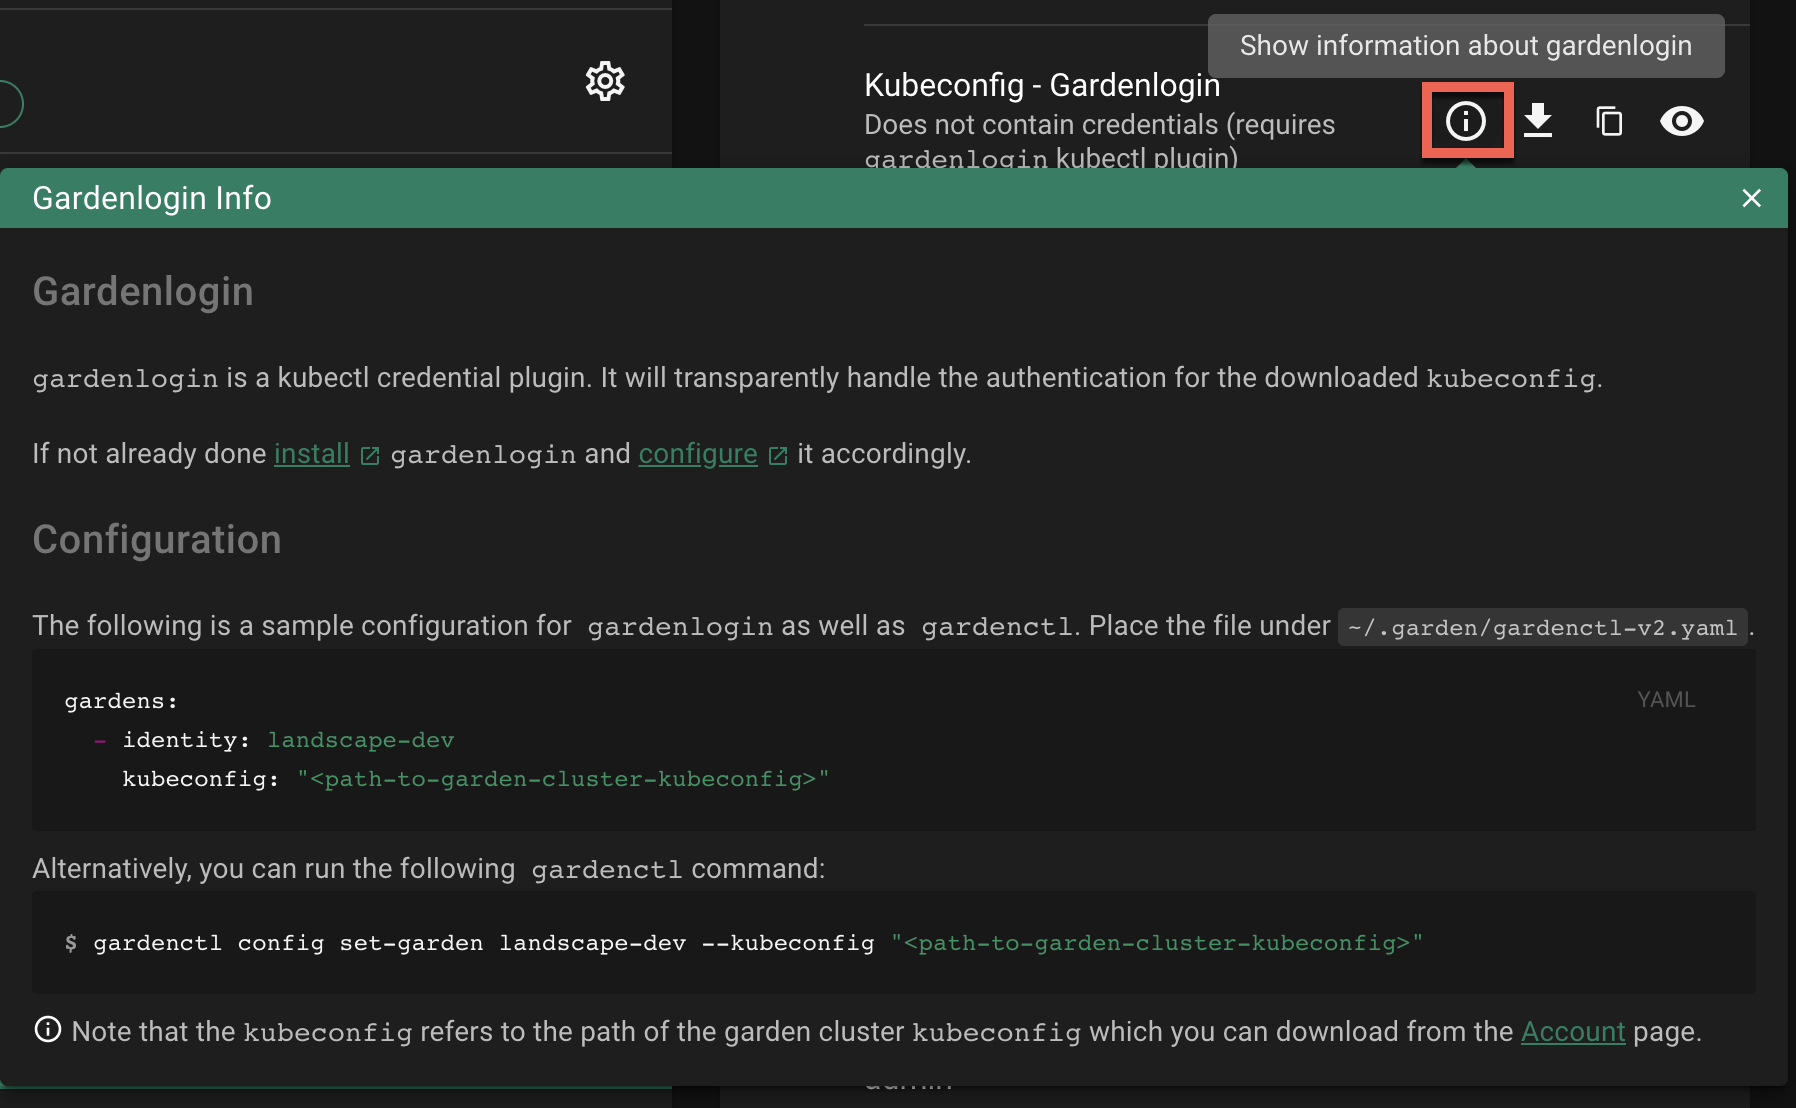
Download and Setup Kubeconfig for a Shoot Cluster
The gardenlogin kubeconfig for the Shoot cluster can be obtained in various ways:
- Copy and run the
gardenctl targetcommand from the dashboard - Download from the Gardener dashboard
Copy and Run gardenctl target Command
Using the gardenctl target command you can quickly set or switch between clusters. The command sets the scope for the next operation, e.g., it ensures that the KUBECONFIG env variable always points to the current targeted cluster.
To target a Shoot cluster:
Copy the
gardenctl targetcommand from the dashboard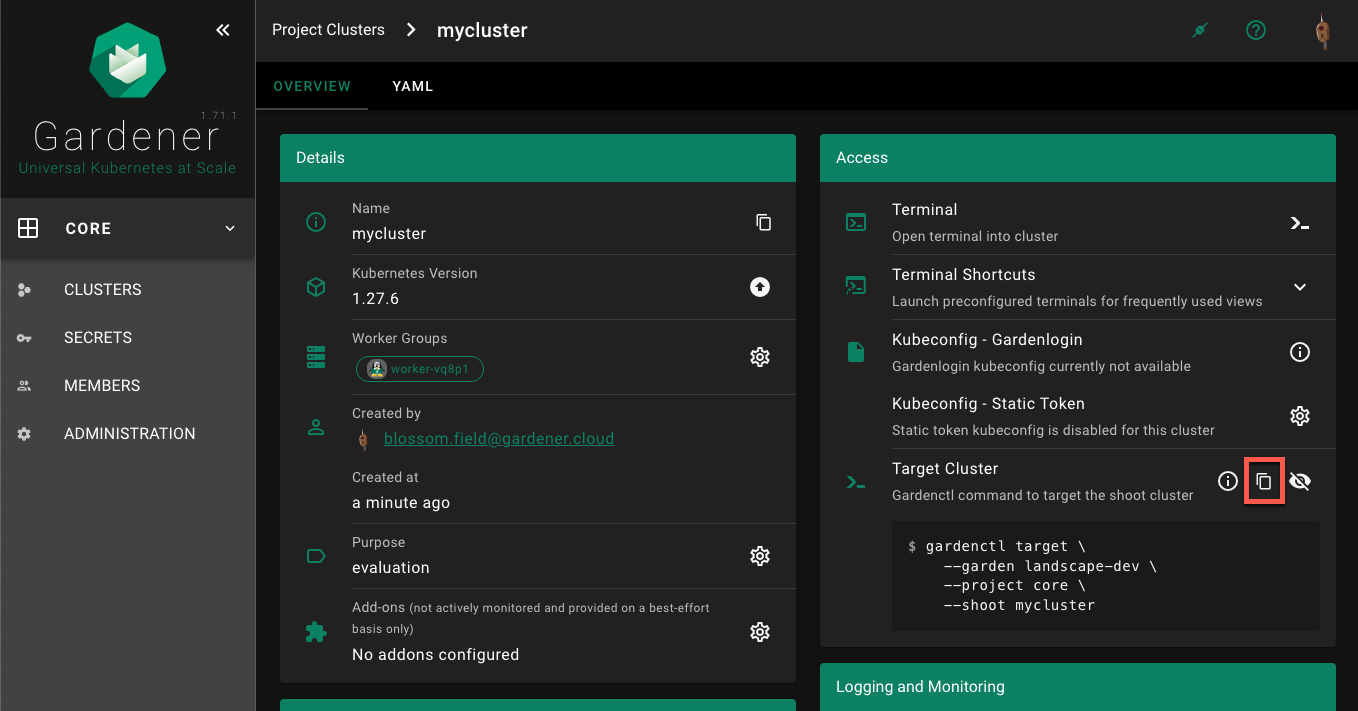
Paste and run the command in the terminal application, for example:
$ gardenctl target --garden landscape-dev --project core --shoot mycluster
Successfully targeted shoot "mycluster"
Your KUBECONFIG env variable is now pointing to the current target (also visible with gardenctl target view -o yaml). You can now run kubectl commands against your Shoot cluster.
$ kubectl get namespaces
The command connects to the cluster and list its namespaces.
KUBECONFIG Env Var not Setup Correctly
If your KUBECONFIG env variable does not point to the current target, you will see the following message after running the gardenctl target command:
WARN The KUBECONFIG environment variable does not point to the current target of gardenctl. Run `gardenctl kubectl-env --help` on how to configure the KUBECONFIG environment variable accordingly
In this case you would need to run the following command (assuming bash as your current shell). For other shells, consult the gardenctl kubectl-env –help documentation.
$ eval "$(gardenctl kubectl-env bash)"
Download from Dashboard
Select your project from the dropdown on the left, then choose
CLUSTERSand locate your cluster in the list. Choose the key icon to bring up a dialog with the access options.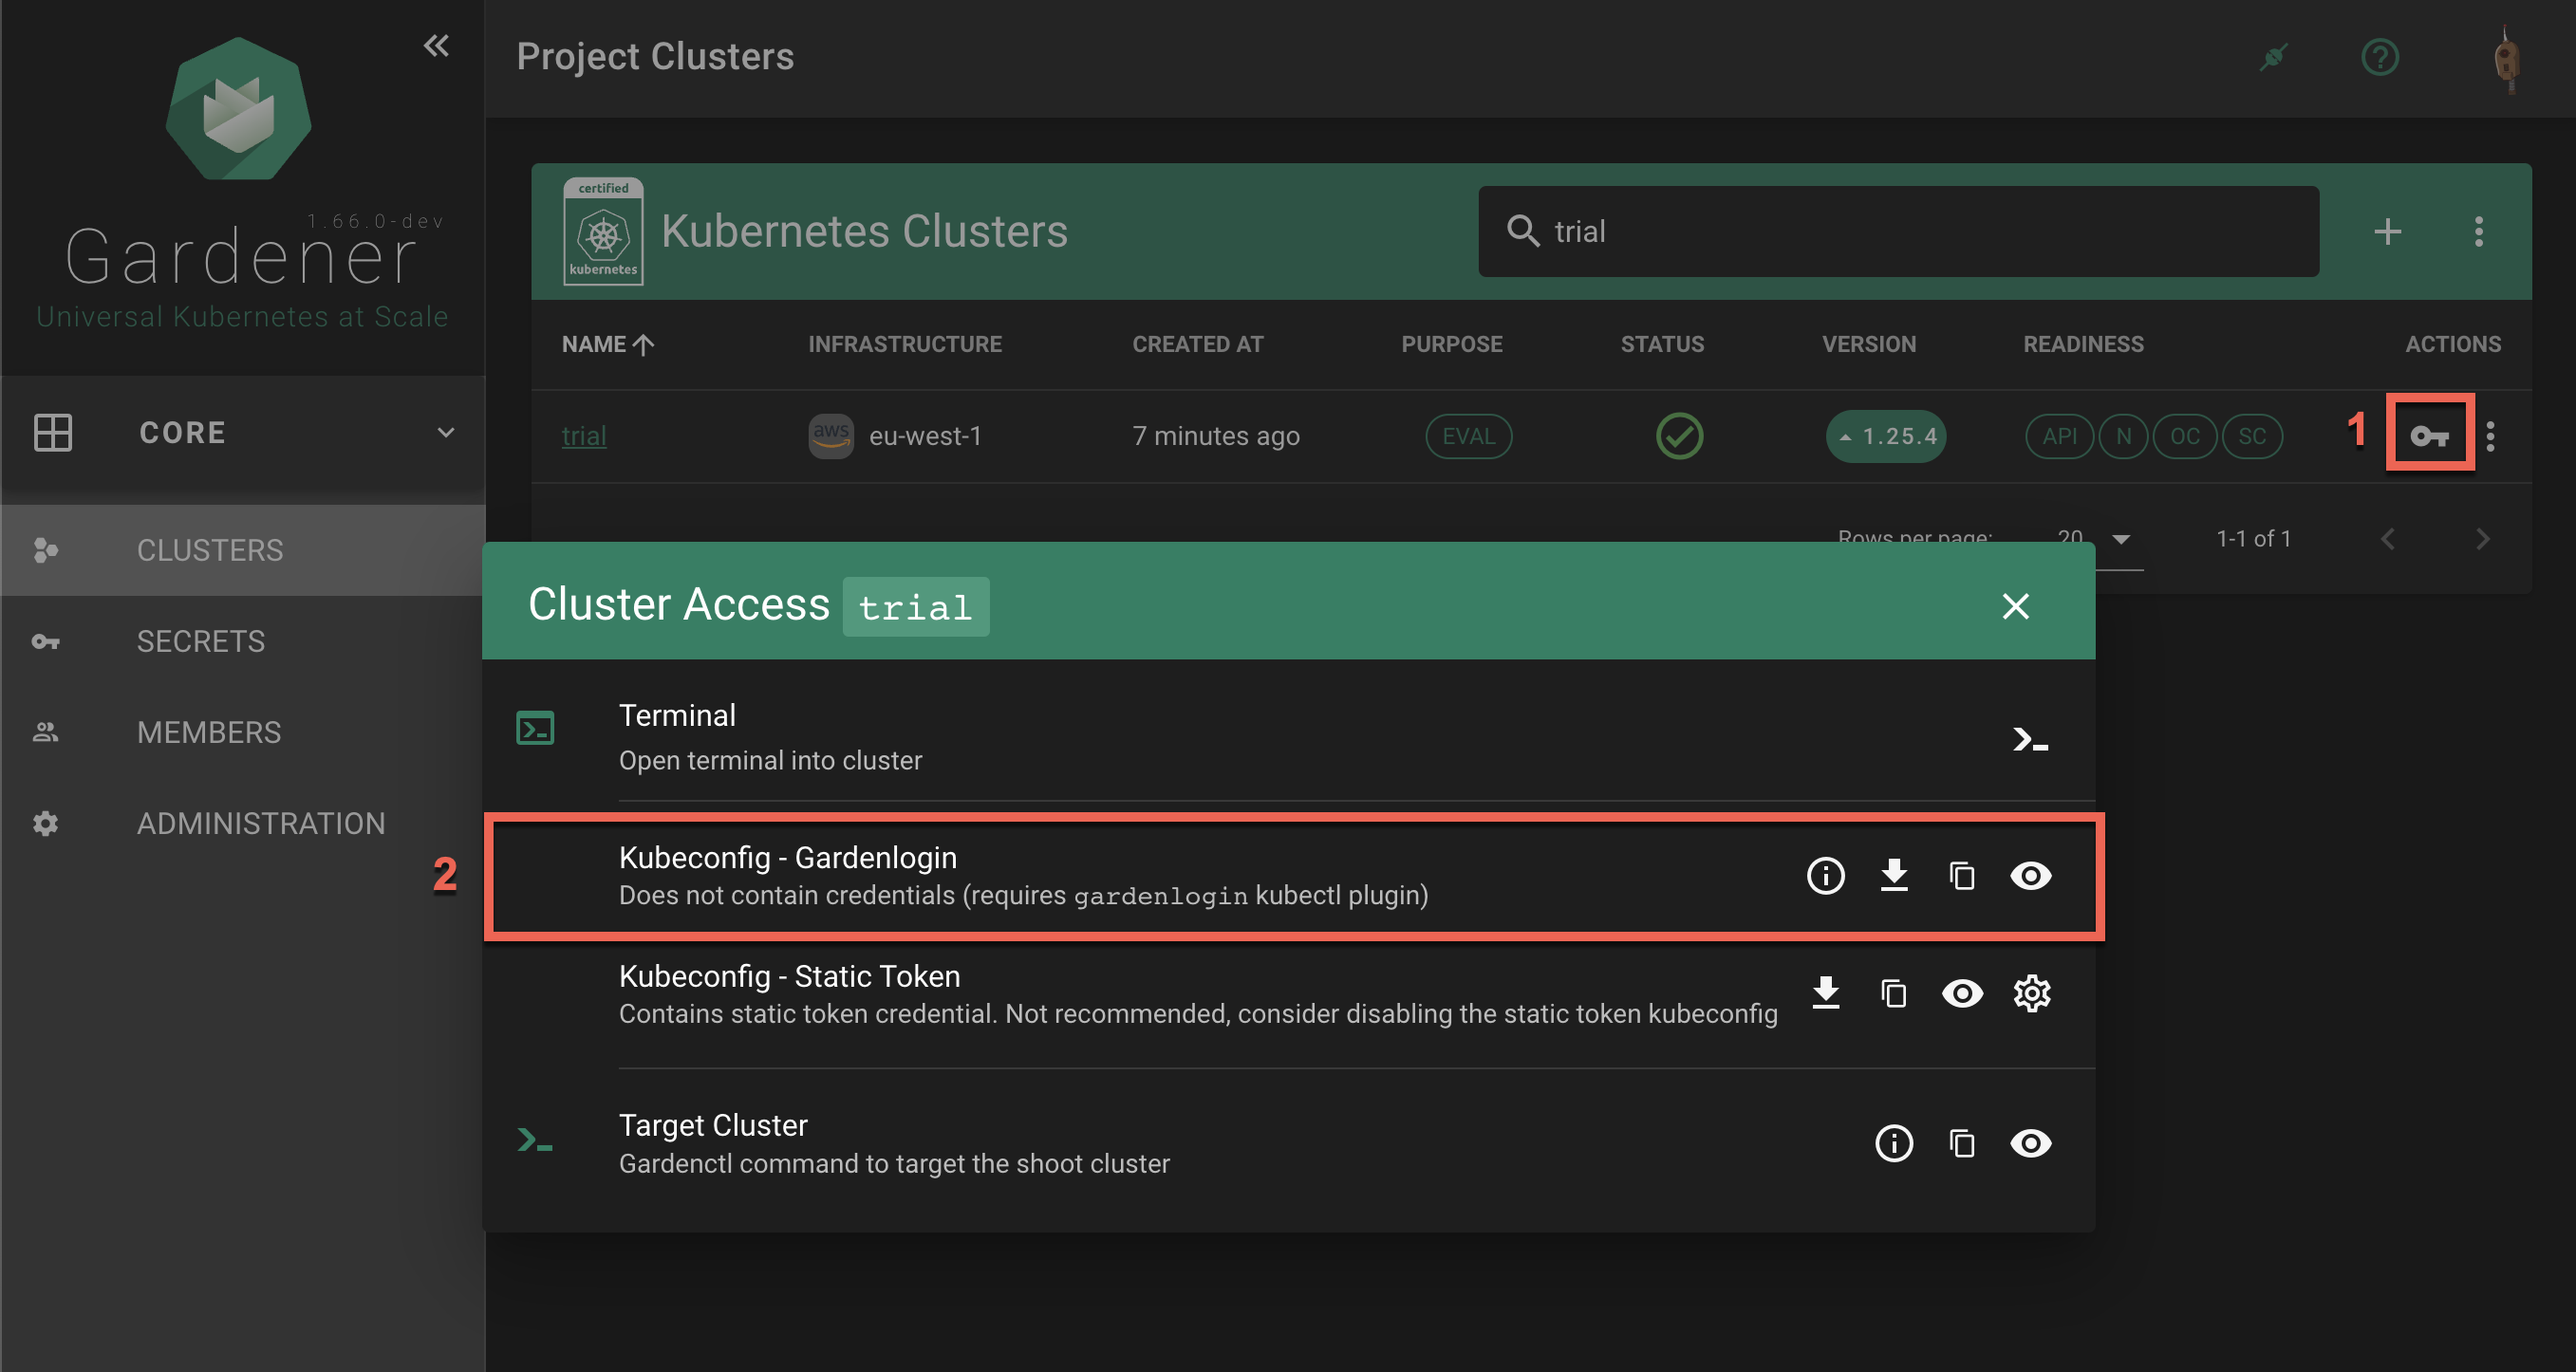
In the
Kubeconfig - Gardenloginsection the options are to show gardenlogin info, download, copy or view thekubeconfigfor the cluster.The same options are available also in the
Accesssection in the cluster details screen. To find it, choose a cluster from the list.
Choose the download icon to download the
kubeconfigas file on your local system.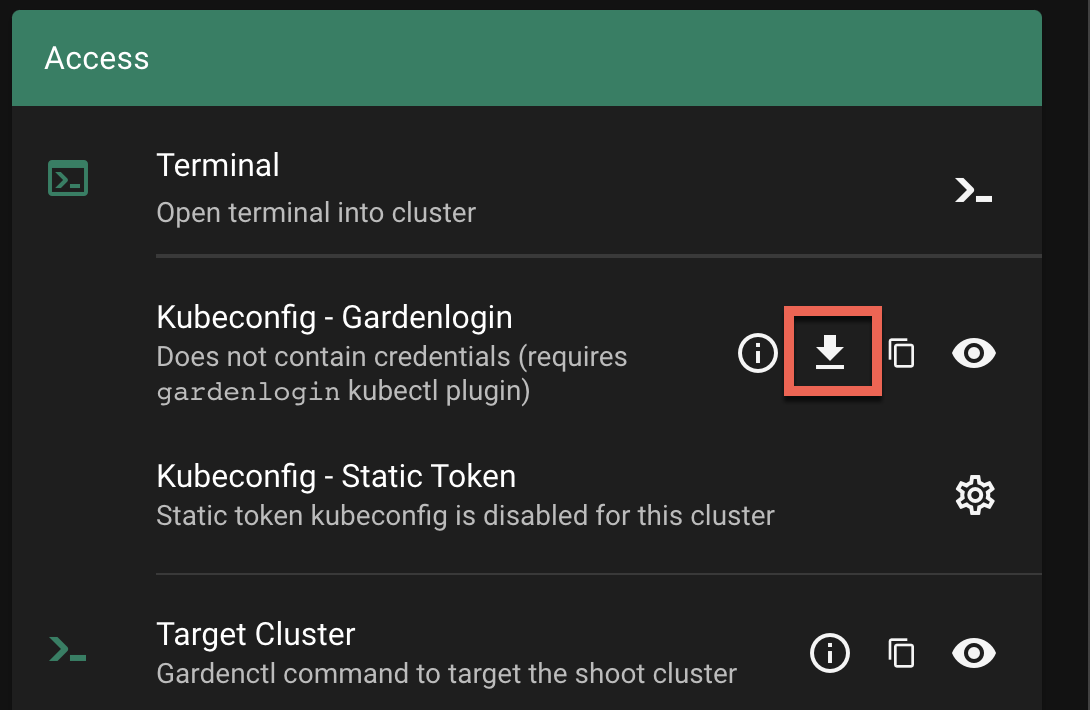
Connecting to the Cluster
In the following command, change <path-to-gardenlogin-kubeconfig> with the actual path to the file where you stored the kubeconfig downloaded in the previous step 2.
$ kubectl --kubeconfig=<path-to-gardenlogin-kubeconfig> get namespaces
The command connects to the cluster and list its namespaces.
Exporting KUBECONFIG environment variable
Since many kubectl commands will be used, it’s a good idea to take advantage of every opportunity to shorten the expressions. The kubectl tool has a fallback strategy for looking up a kubeconfig to work with. For example, it looks for the KUBECONFIG environment variable with value that is the path to the kubeconfig file meant to be used. Export the variable:
$ export KUBECONFIG=<path-to-gardenlogin-kubeconfig>
Again, replace <path-to-gardenlogin-kubeconfig> with the actual path to the kubeconfig for the cluster you want to connect to.
What’s next?
7.5 - Custom Fields
Custom Shoot Fields
The Dashboard supports custom shoot fields, which can be configured to be displayed on the cluster list and cluster details page. Custom fields do not show up on the ALL_PROJECTS page.
Project administration page:
Each custom field configuration is shown with its own chip.
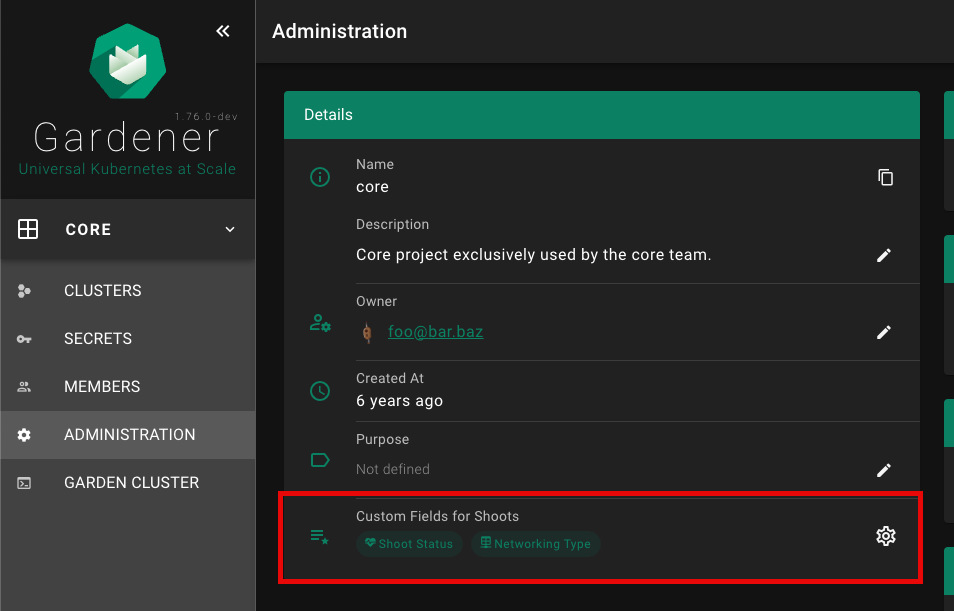
Click on the chip to show more details for the custom field configuration.
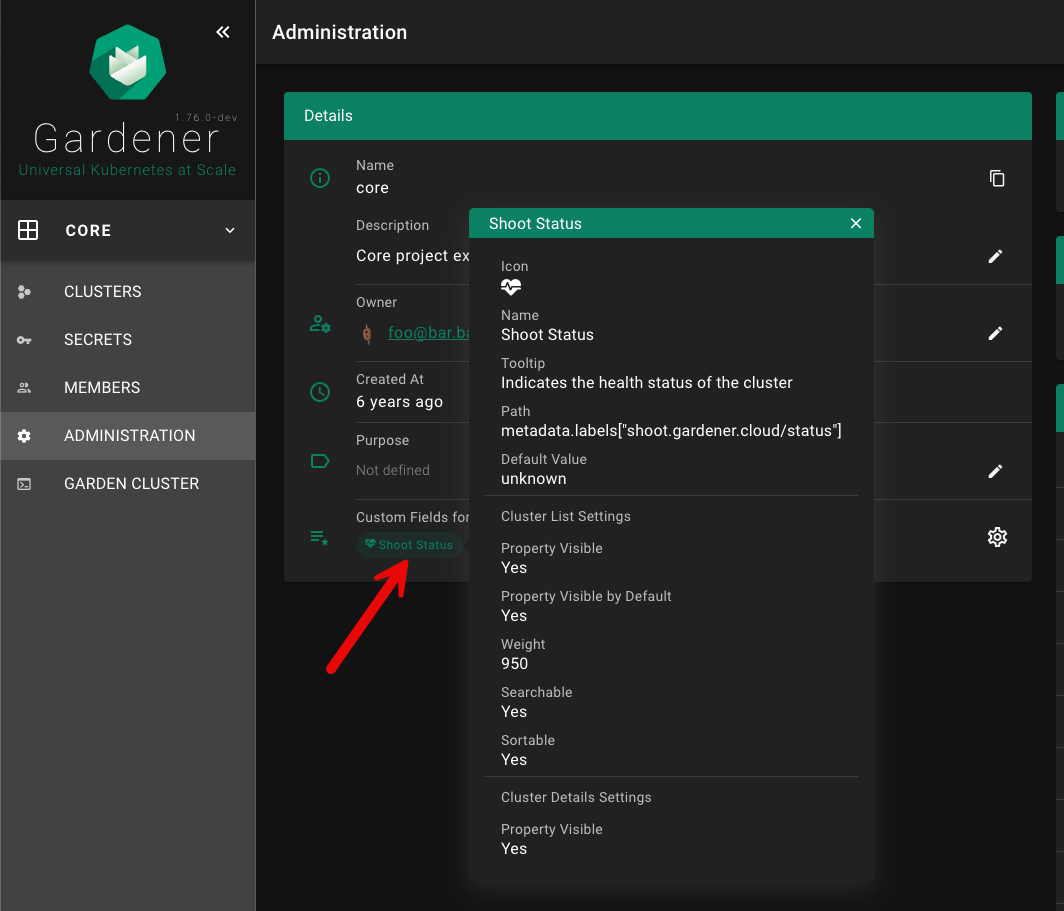
Custom fields can be shown on the cluster list, if showColumn is enabled. See configuration below for more details. In this example, a custom field for the Shoot status was configured.
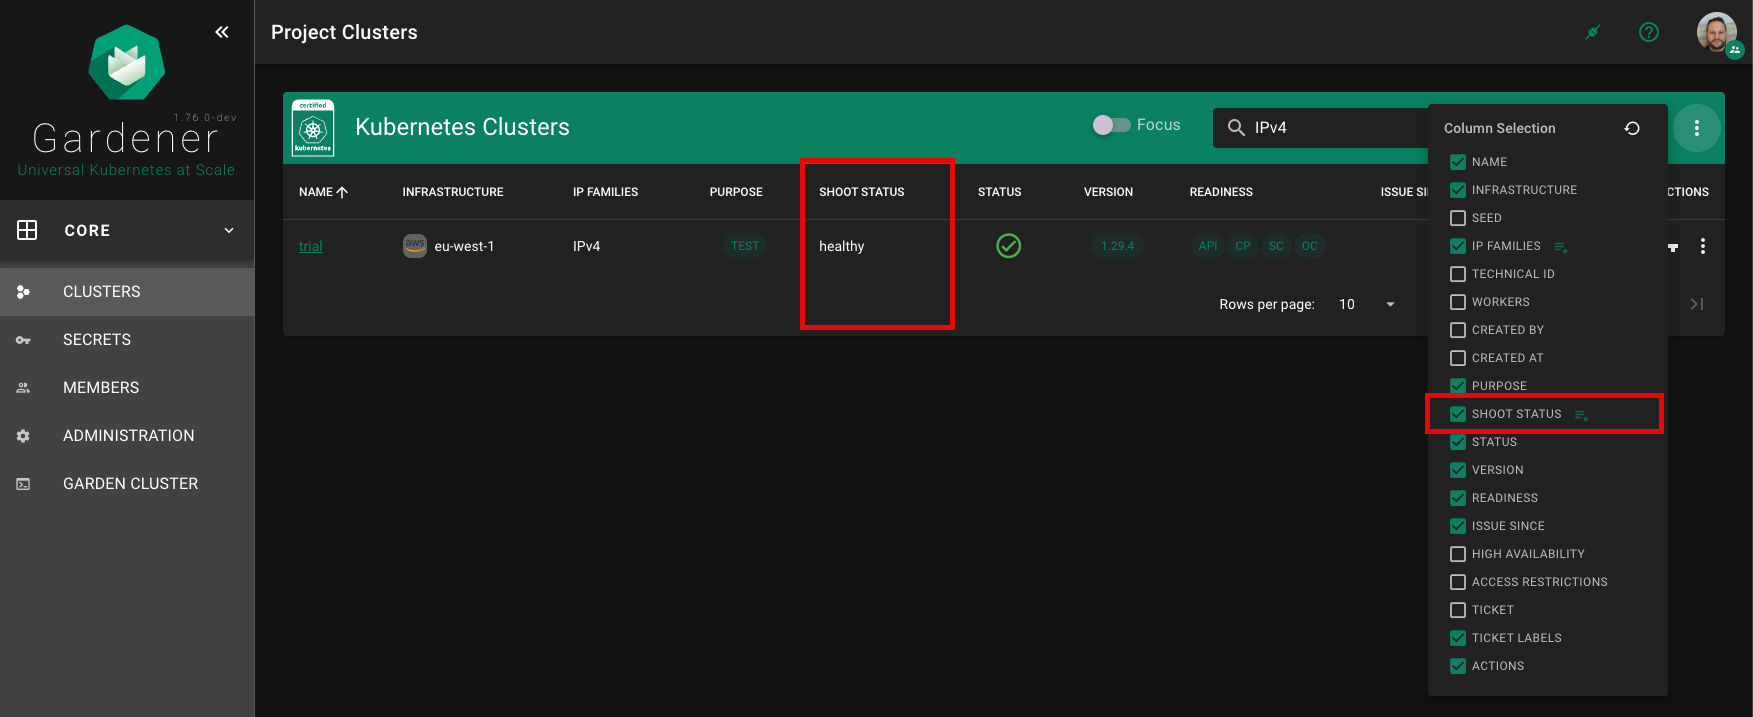
Custom fields can be shown in a dedicated card (Custom Fields) on the cluster details page, if showDetails is enabled. See configuration below for more details.
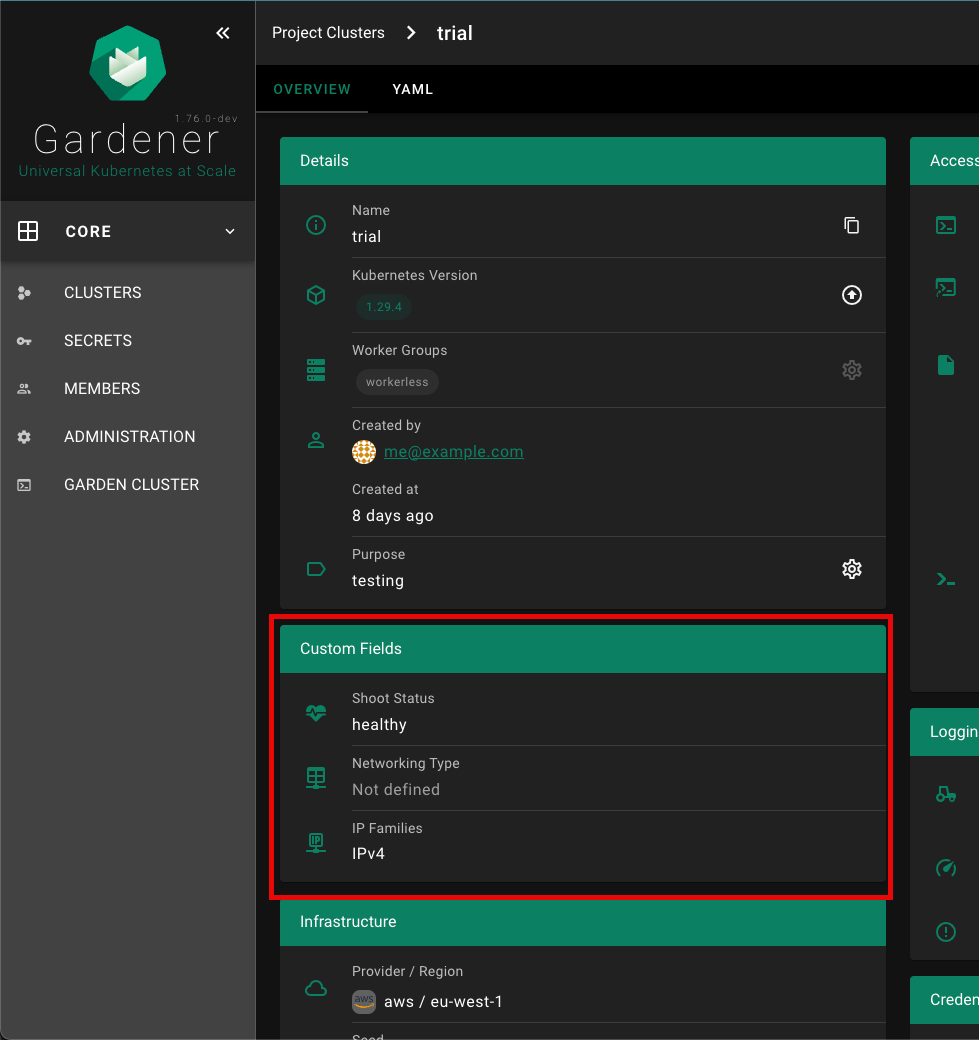
Configuration
| Property | Type | Default | Required | Description |
|---|---|---|---|---|
| name | String | ✔️ | Name of the custom field | |
| path | String | ✔️ | Path in shoot resource, of which the value must be of primitive type (no object / array). Use lodash get path syntax, e.g. metadata.labels["shoot.gardener.cloud/status"] or spec.networking.type | |
| icon | String | MDI icon for field on the cluster details page. See https://materialdesignicons.com/ for available icons. Must be in the format: mdi-<icon-name>. | ||
| tooltip | String | Tooltip for the custom field that appears when hovering with the mouse over the value | ||
| defaultValue | String/Number | Default value, in case there is no value for the given path | ||
| showColumn | Bool | true | Field shall appear as column in the cluster list | |
| columnSelectedByDefault | Bool | true | Indicates if field shall be selected by default on the cluster list (not hidden by default) | |
| weight | Number | 0 | Defines the order of the column. The built-in columns start with a weight of 100, increasing by 100 (200, 300, etc.) | |
| sortable | Bool | true | Indicates if column is sortable on the cluster list | |
| searchable | Bool | true | Indicates if column is searchable on the cluster list | |
| showDetails | Bool | true | Indicates if field shall appear in a dedicated card (Custom Fields) on the cluster details page |
Editor for Custom Shoot Fields
The Gardener Dashboard now includes an editor for custom shoot fields, allowing users to configure these fields directly from the dashboard without needing to use kubectl. This editor can be accessed from the project administration page.
Accessing the Editor
- Navigate to the project administration page.
- Scroll down to the
Custom Fields for Shootssection. - Click on the gear icon to open the configuration panel for custom fields.

Adding a New Custom Field
- In the
Configure Custom Fields for Shoot Clusterspanel, click on the+ ADD NEW FIELDbutton.
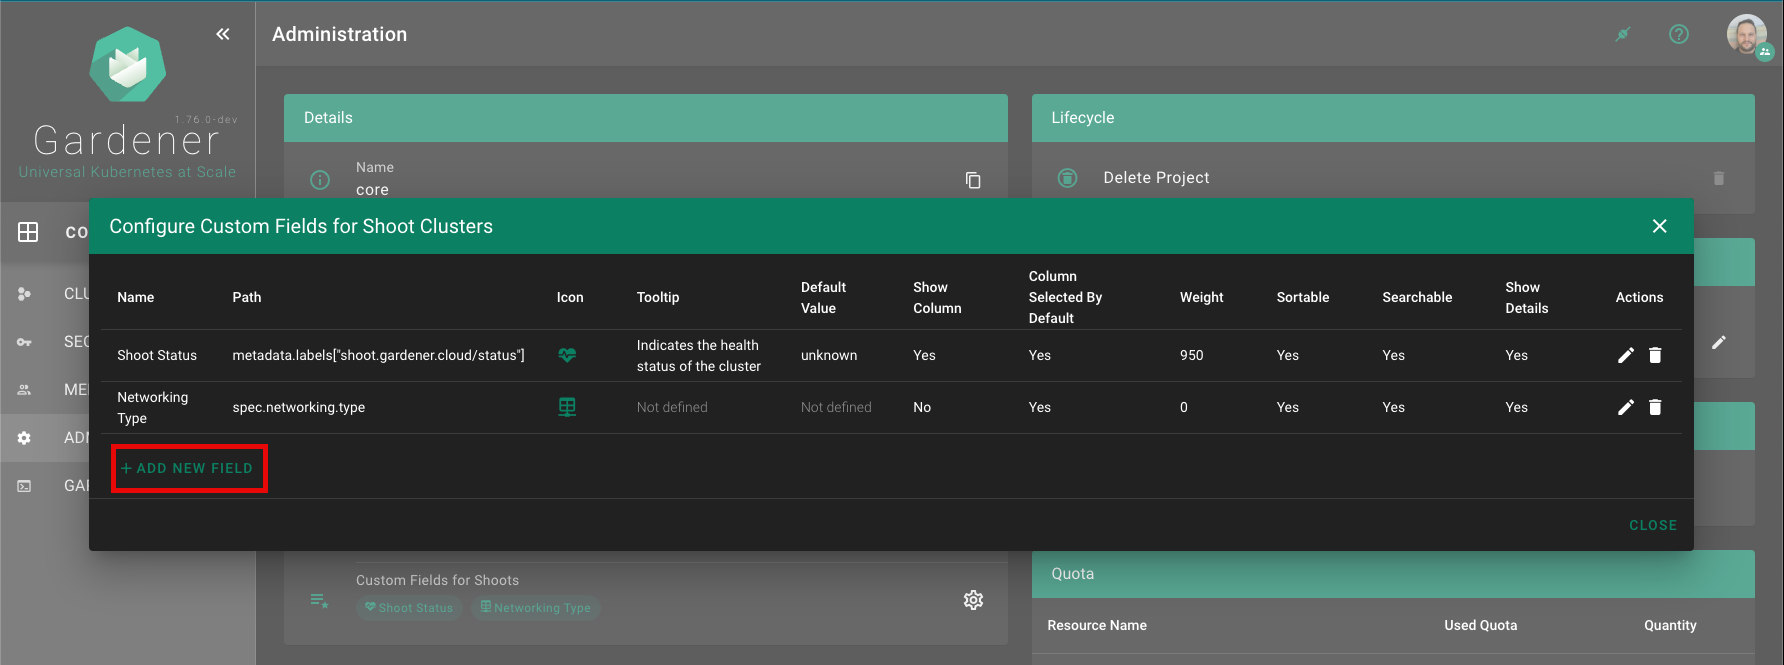
Fill in the details for the new custom field in the
Add New Fieldform. Refer to the Configuration section for detailed descriptions of each field.Click the
ADDbutton to save the new custom field.
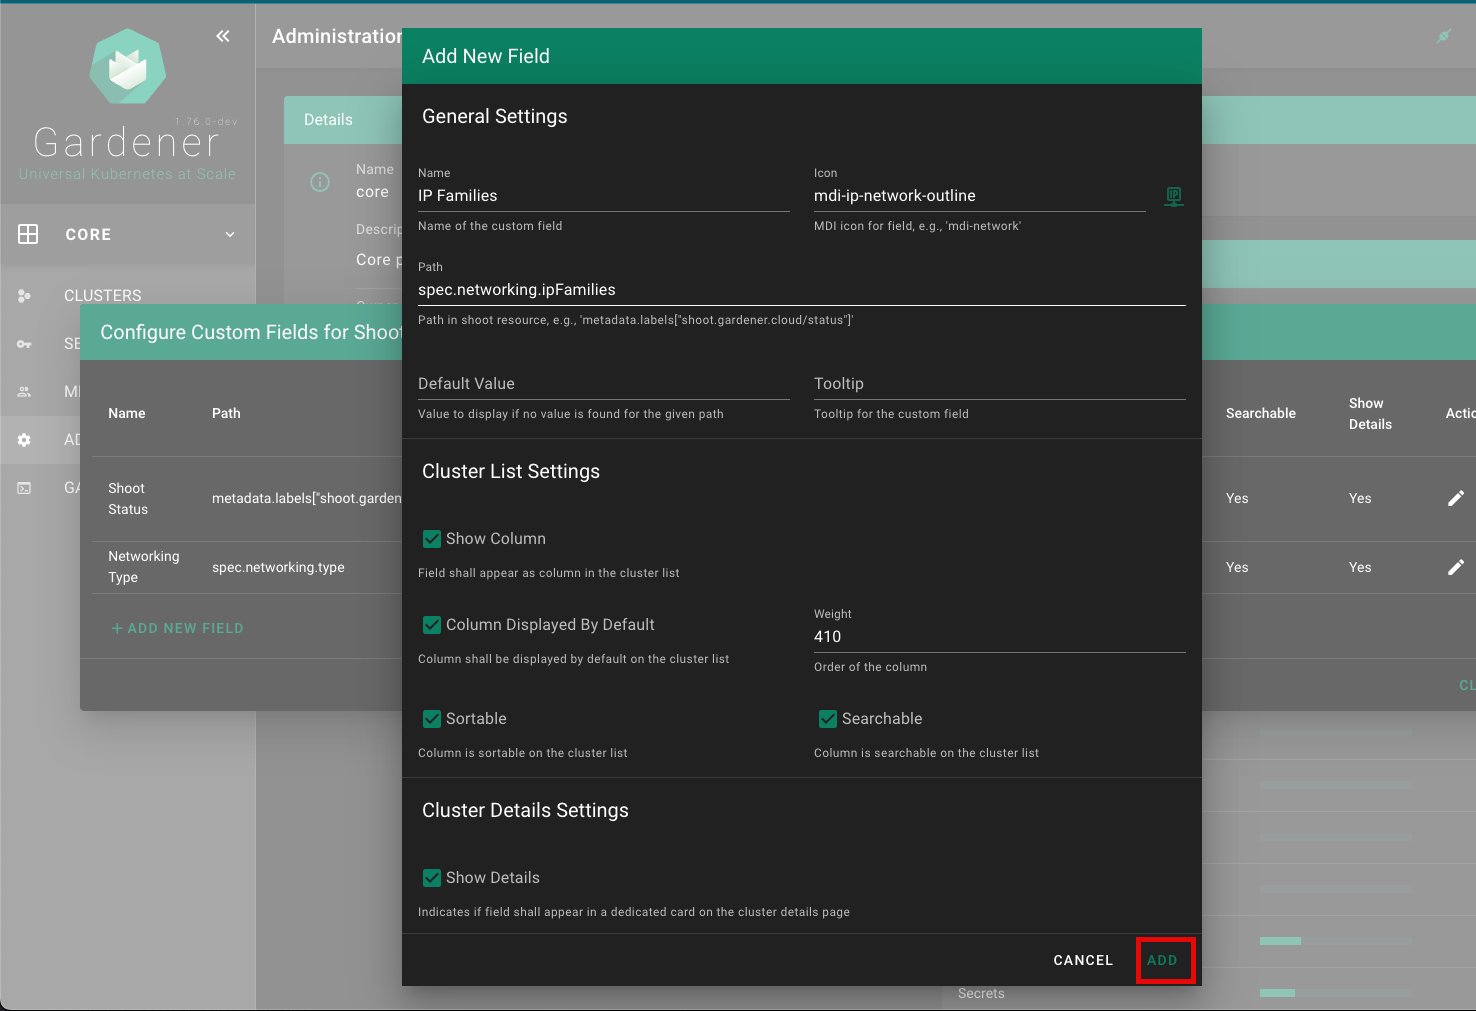
Example
Custom shoot fields can be defined per project by specifying metadata.annotations["dashboard.gardener.cloud/shootCustomFields"]. The following is an example project yaml:
apiVersion: core.gardener.cloud/v1beta1
kind: Project
metadata:
annotations:
dashboard.gardener.cloud/shootCustomFields: |
{
"shootStatus": {
"name": "Shoot Status",
"path": "metadata.labels[\"shoot.gardener.cloud/status\"]",
"icon": "mdi-heart-pulse",
"tooltip": "Indicates the health status of the cluster",
"defaultValue": "unknown",
"showColumn": true,
"columnSelectedByDefault": true,
"weight": 950,
"searchable": true,
"sortable": true,
"showDetails": true
},
"networking": {
"name": "Networking Type",
"path": "spec.networking.type",
"icon": "mdi-table-network",
"showColumn": false
}
}
7.6 - Customization
Theming and Branding
Motivation
Gardener landscape administrators should have the possibility to change the appearance and the branding of the Gardener Dashboard via configuration without the need to touch the code.
Branding
It is possible to change the branding of the Gardener Dashboard when using the helm chart in the frontendConfig.branding map. The following configuration properties are supported:
| name | description | default |
|---|---|---|
documentTitle | Title of the browser window | Gardener Dashboard |
productName | Name of the Gardener product | Gardener |
productTitle | Title of the Gardener product displayed below the logo. It could also contain information about the specific Gardener instance (e.g. Development, Canary, Live) | Gardener |
productTitleSuperscript | Superscript next to the product title. To supress the superscript set to false | Production version (e.g 1.73.1) |
productSlogan | Slogan that is displayed under the product title and on the login page | Universal Kubernetes at Scale |
productLogoUrl | URL for the product logo. You can also use data: scheme for development. For production it is recommended to provide static assets | /static/assets/logo.svg |
teaserHeight | Height of the teaser in the GMainNavigation component | 200 |
teaserTemplate | Custom HTML template to replace to teaser content | refer to GTeaser |
loginTeaserHeight | Height of the login teaser in the GLogin component | 260 |
loginTeaserTemplate | Custom HTML template to replace to login teaser content | refer to GLoginTeaser |
loginFooterHeight | Height of the login footer in the GLogin component | 24 |
loginFooterTemplate | Custom HTML template to replace to login footer content | refer to GLoginFooter |
loginHints | Links { title: string; href: string; } to product related sites shown below the login button | undefined |
oidcLoginTitle | Title of tabstrip for loginType OIDC | OIDC |
oidcLoginText | Text show above the login button on the OIDC tabstrip | Press Login to be redirected toconfigured OpenID Connect Provider. |
Colors
Gardener Dashboard has been built with Vuetify. We use Vuetify’s built-in theming support to centrally configure colors that are used throughout the web application.
Colors can be configured for both light and dark themes. Configuration is done via the helm chart, see the respective theme section there. Colors can be specified as HTML color code (e.g. #FF0000 for red) or by referencing a color (e.g grey.darken3 or shades.white) from Vuetify’s Material Design Color Pack.
The following colors can be configured:
| name | usage |
|---|---|
primary | icons, chips, buttons, popovers, etc. |
anchor | links |
main-background | main navigation, login page |
main-navigation-title | text color on main navigation |
toolbar-background | background color for toolbars in cards, dialogs, etc. |
toolbar-title | text color for toolbars in cards, dialogs, etc. |
action-button | buttons in tables and cards, e.g. cluster details page |
info | notification info popups, texts and status tags |
success | notification success popups, texts and status tags |
warning | notification warning popups, texts and status tags |
error | notification error popups, texts and status tags |
unknown | status tags with unknown severity |
| … | all other Vuetify theme colors |
If you use the helm chart, you can configure those with frontendConfig.themes.light for the light theme and frontendConfig.themes.dark for the dark theme. The customization example below shows a possible custom color theme configuration.
Logos and Icons
It is also possible to exchange the Dashboard logo and icons. You can replace the assets folder when using the helm chart in the frontendConfig.assets map.
Attention: You need to set values for all files as mapping the volume will overwrite all files. It is not possible to exchange single files.
The files have to be encoded as base64 for the chart - to generate the encoded files for the values.yaml of the helm chart, you can use the following shorthand with bash or zsh on Linux systems. If you use macOS, install coreutils with brew (brew install coreutils) or remove the -w0 parameter.
cat << EOF
###
### COPY EVERYTHING BELOW THIS LINE
###
assets:
favicon-16x16.png: |
$(cat frontend/public/static/assets/favicon-16x16.png | base64 -w0)
favicon-32x32.png: |
$(cat frontend/public/static/assets/favicon-32x32.png | base64 -w0)
favicon-96x96.png: |
$(cat frontend/public/static/assets/favicon-96x96.png | base64 -w0)
favicon.ico: |
$(cat frontend/public/static/assets/favicon.ico | base64 -w0)
logo.svg: |
$(cat frontend/public/static/assets/logo.svg | base64 -w0)
EOF
Then, swap in the base64 encoded version of your files where needed.
Customization Example
The following example configuration in values.yaml shows most of the possibilities to achieve a custom theming and branding:
global:
dashboard:
frontendConfig:
# ...
branding:
productName: Nucleus
productTitle: Nucleus
productSlogan: Supercool Cluster Service
teaserHeight: 160
teaserTemplate: |
<div
class="text-center px-2"
>
<a
href="/"
class="text-decoration-none"
>
<img
src="{{ productLogoUrl }}"
width="80"
height="80"
alt="{{ productName }} Logo"
class="pointer-events-none"
>
<div
class="font-weight-thin text-grey-lighten-4"
style="font-size: 32px; line-height: 32px; letter-spacing: 2px;"
>
{{ productTitle }}
</div>
<div class="text-body-1 font-weight-normal text-primary mt-1">
{{ productSlogan }}
</div>
</a>
</div>
loginTeaserHeight: 296
loginTeaserTemplate: |
<div
class="d-flex flex-column align-center justify-center bg-main-background-darken-1 pa-3"
style="min-height: {{ minHeight }}px"
>
<img
src="{{ productLogoUrl }}"
alt="Login to {{ productName }}"
width="140"
height="140"
class="mt-2"
>
<div class="text-h3 text-center font-weight-thin text-white mt-4">
{{ productTitle }}
</div>
<div class="text-h5 text-center font-weight-light text-primary mt-1">
{{ productSlogan }}
</div>
</div>
loginFooterTemplate: |
<div class="text-anchor text-caption">
Copyright 2023 by Nucleus Corporation
</div>
loginHints:
- title: Support
href: https://gardener.cloud
- title: Documentation
href: https://gardener.cloud/docs
oidcLoginTitle: IDS
oidcLoginText: Press LOGIN to be redirected to the Nucleus Identity Service.
themes:
light:
primary: '#354a5f'
anchor: '#5b738b'
main-background: '#354a5f'
main-navigation-title: '#f5f6f7'
toolbar-background: '#354a5f'
toolbar-title: '#f5f6f7'
action-button: '#354a5f'
dark:
primary: '#5b738b'
anchor: '#5b738b'
background: '#273849'
surface: '#1d2b37'
main-background: '#1a2733'
main-navigation-title: '#f5f6f7'
toolbar-background: '#0e1e2a'
toolbar-title: '#f5f6f7'
action-button: '#5b738b'
assets:
favicon-16x16.png: |
iVBORw0KGgoAAAANSUhEUgAAABAAAAAQCAMAAAAoLQ9TAAAABGdBTUEAALGPC/xhBQAAACBjSFJNAAB6JgAAgIQAAPoAAACA6AAAdTAAAOpgAAA6mAAAF3CculE8AAABHVBMVEUAAAALgGILgWIKgGILgGILgGILgGILgGILgGILgGILgGILgGILgGILgGILgGILgGILgGILgGILgGILgGILgGILgGILgGILgGILgGILgGILgGILgGILgGILgGILgGILgGILgGILgGILgGILgGILgGILgGILgGILgGILgGILgGILgGILgGILgGIMgGILgGILgGILgGILgGILgGILgGILgGILgGILgGILgGILgGILgGILgGILgGILgGILgGILgGILgGILgGILgGILgGILgGILgGILgGILgGILgGILgGILgGILgGILgGILgGILgGILgGILgGIKgGILgGILgGIKgGILgGILgGILgGILgGILgGILgGILgGILgGILgGILgGL///8Vq54LAAAAXXRSTlMAAAAAFmu96Pv0TRQ5NB0FLLn67j1X8fDdnSoR3CJC9cZx9/7ZtAna9rvFe28Cl552ZLDUIS7X5UnfVOrrOKS+Q7/Kz61IAwQKC8gVEwYIyQxgZQYCVn9+IFjR7/wm8JKCAAAAAWJLR0ReBNZhuwAAAAd0SU1FB+cKCgkYLrOE10YAAADMSURBVBjTXY7XUsIAFETvxhJQQwlEEhUlCEizVxANCIoQwAIobf//NyTjMDqcp5192D0ivwCra+uqz78h2NzSAkEgFNZJRqICYztmWju7YXrsxQX7B/OQsJOHqRiZzggCR8zmVJX5QpYsQnB8Qp6e+fTzC/LyCqLg+oa3d6lS+Z4VA/AOHx6dau3JqDeeX+ApKGi+tpy22+lCkYVWz3l7X5E/0KstFc2Pz/6iwMDVhvbXtz3U3MF8dDS2JtOZpz2bTqzxSEyd/9BN4RI/8jsrfdR558kAAAAldEVYdGRhdGU6Y3JlYXRlADIwMjMtMTAtMTBUMDk6MjQ6MzMrMDA6MDC+UDWaAAAAJXRFWHRkYXRlOm1vZGlmeQAyMDIzLTEwLTEwVDA5OjI0OjMzKzAwOjAwzw2NJgAAABJ0RVh0ZXhpZjpFeGlmT2Zmc2V0ADI2UxuiZQAAABh0RVh0ZXhpZjpQaXhlbFhEaW1lbnNpb24AMTUwO0W0KAAAABh0RVh0ZXhpZjpQaXhlbFlEaW1lbnNpb24AMTUwpkpVXgAAACB0RVh0c29mdHdhcmUAaHR0cHM6Ly9pbWFnZW1hZ2ljay5vcme8zx2dAAAAGHRFWHRUaHVtYjo6RG9jdW1lbnQ6OlBhZ2VzADGn/7svAAAAGHRFWHRUaHVtYjo6SW1hZ2U6OkhlaWdodAAxOTJAXXFVAAAAF3RFWHRUaHVtYjo6SW1hZ2U6OldpZHRoADE5MtOsIQgAAAAZdEVYdFRodW1iOjpNaW1ldHlwZQBpbWFnZS9wbmc/slZOAAAAF3RFWHRUaHVtYjo6TVRpbWUAMTY5NjkyOTg3M4YMipUAAAAPdEVYdFRodW1iOjpTaXplADBCQpSiPuwAAABWdEVYdFRodW1iOjpVUkkAZmlsZTovLy9tbnRsb2cvZmF2aWNvbnMvMjAyMy0xMC0xMC9kNzEyMWM2YzM2OTg3NmQ0MGUxY2EyMjVlYjg3MGZjYi5pY28ucG5nU19BKAAAAABJRU5ErkJggg==
favicon-32x32.png: |
iVBORw0KGgoAAAANSUhEUgAAACAAAAAgCAMAAABEpIrGAAAABGdBTUEAALGPC/xhBQAAACBjSFJNAAB6JgAAgIQAAPoAAACA6AAAdTAAAOpgAAA6mAAAF3CculE8AAACTFBMVEUAAAALgWIKil4LgGIKgGEMf2MNgGIMgGILgGEKgWEIhVwGgl8JgVwMgGMKgGMNgGEKf2EMgWMMf2ILhmILhGIKjFwHgmYMf2EKgWMGgGIKgGIIg2UAgGMCkGINfGIMfGILfmELfWELgGILgGILgGILgGILgGILgGILgGILgGILgGILgGILgGILgGILgGILgGIKgGILgGILgGILgGILgGILgGILgGILgGILgGILgGILgGILgWELgGILgGILgGILgGILgGILgGILgGILgGILgGILgGILgGIMgGILgGILgGILgGILgGILgGILgGILgGILgGILgGILgGILgGILgGILgGIKgWELgGILgGILgGIMgmILgGILgGILgGILgGILgGILgGILgGILgGILgGILgGILgGILgGILgGILgGILgGILgGILgGILgGILgGILgGILgGILgGILgGILgGILgGILgGILgGILgGILgGILgGILgGIKg2ALgGILgGILgGILgGILgGILgGILgGILgGILgGILgGILgGIMgGELgGILgGILgGILgGILgGILgGILgGILgGILgGILgWILgGILgGILgGILgGILgGILgGILgGIKgGILgGILgGILgGILgGILgGILgmIMgWELgGIHgWILgGIMgWIHgGILgGILgGILgGILgGILgGILgWMLgGILgGILgGILgGMLgGILgGILgGILgGILgGILgGILgGILgGILgGILgGILgGILgGILgGILgGILgGILgGILgGILgGILgGILgGILgGL///+Wa9azAAAAwnRSTlMAAAAAAAAAAAAAAAAAAAAAAAAAAAAAAAAAAAAAAAAAAAAAGVWDrNTs+v77InTF9YIGVs5sAjhdYk0wDwVv8PlPBan96sF/MwLoL5PhcAwgy8kTePiAAmj8nwJe7qbmlNNzNOTE3bfvfm3YdRS8pdcuQuLDEvFRKtmVAXx7A6KjCHE2LeVfBbPKZNxLlo2KqgOHuT9Hi6BZAna2mlwRAQGeAQ4BAemOJSYXAwsfIwNAY32d0L1BGjlq0fLzazoNcu0Jrf5EbikAAAABYktHRMOKaI5CAAAAB3RJTUUH5woKCRgus4TXRgAAAdNJREFUOMtjYMAEjExKyiqqauoamloqzJjSLKzaOrp6hyBAH1MBs4GhkeYhGDAGKmA2MTUzN7OwtGJjB8pzWNvYwqUP2dmDFDg4HjrkZOfs4urmzszJbIgkf8jDE6SAywvK9fbxZfbzR5I/FBAIVMDNHATjB4eEhoHtDw+GCEREMoKcFeUEUxGtHAOiYuPiIfwEZh6QgkRnEEcvSevQoeQUkLxylB1YPskS7Etm31QQLy09I/NQONAwrazsHIgBuQ5gBbzMPmBuXn5BIYguKlaGGFBSCg0m5rJysEBFZRWIqq6phRhQVw9TwNGgBRIo9/OMPXRIvbGpGSyv5gkPZ+biWpDvwlta2w4darfqAMt3dvHxIyJAqRsUgD3MvYcO9fVPAAXJxEkCgshRVD95ytSp04SAjoiYPiN55qzZc5iFUWNRRHTuPDFxoIL5C+oX1i/Ckg6AQAKsQFKKARegm4LF+BT4LHFeiscEafHiZctXyOBQICu3ctWK1WvWrF6xaq28LHpar1Fat37DxpxNKUlJKZs2z09fv2VrDSysRBR8t22ftWMnIjMAgeau+I279+xVFGFgqG/cN1MdRRKuaP9EHdMDDI5LDuEBzgcZDhEAlCsAAOGIeNYQEfj6AAAAJXRFWHRkYXRlOmNyZWF0ZQAyMDIzLTEwLTEwVDA5OjI0OjMzKzAwOjAwvlA1mgAAACV0RVh0ZGF0ZTptb2RpZnkAMjAyMy0xMC0xMFQwOToyNDozMyswMDowMM8NjSYAAAASdEVYdGV4aWY6RXhpZk9mZnNldAAyNlMbomUAAAAYdEVYdGV4aWY6UGl4ZWxYRGltZW5zaW9uADE1MDtFtCgAAAAYdEVYdGV4aWY6UGl4ZWxZRGltZW5zaW9uADE1MKZKVV4AAAAgdEVYdHNvZnR3YXJlAGh0dHBzOi8vaW1hZ2VtYWdpY2sub3JnvM8dnQAAABh0RVh0VGh1bWI6OkRvY3VtZW50OjpQYWdlcwAxp/+7LwAAABh0RVh0VGh1bWI6OkltYWdlOjpIZWlnaHQAMTkyQF1xVQAAABd0RVh0VGh1bWI6OkltYWdlOjpXaWR0aAAxOTLTrCEIAAAAGXRFWHRUaHVtYjo6TWltZXR5cGUAaW1hZ2UvcG5nP7JWTgAAABd0RVh0VGh1bWI6Ok1UaW1lADE2OTY5Mjk4NzOGDIqVAAAAD3RFWHRUaHVtYjo6U2l6ZQAwQkKUoj7sAAAAVnRFWHRUaHVtYjo6VVJJAGZpbGU6Ly8vbW50bG9nL2Zhdmljb25zLzIwMjMtMTAtMTAvZDcxMjFjNmMzNjk4NzZkNDBlMWNhMjI1ZWI4NzBmY2IuaWNvLnBuZ1NfQSgAAAAASUVORK5CYII=
favicon-96x96.png: |
iVBORw0KGgoAAAANSUhEUgAAAGAAAABgCAYAAADimHc4AAAABGdBTUEAALGPC/xhBQAAACBjSFJNAAB6JgAAgIQAAPoAAACA6AAAdTAAAOpgAAA6mAAAF3CculE8AAAABmJLR0QA/wD/AP+gvaeTAAAAB3RJTUUH5woKCRgus4TXRgAADuRJREFUeNrtnXuMXNV9xz/fc2dm3+uAwcEGg02IAwQIOC1xkrZGQQ0NiUpVaNVWRXjXJkLlj7RVEeA0Zmy3Uas0D6UoCZRXMIoSUNsoioQSqlBISQhpbew4xjwMNgYbG3vxvmZ2Hvf8+seZNbvE3r3z2J21mY80snfunXvPPd97f/d3fuf3u1e0mERndjUgQZySyGA6HTgHOANYAJwJLK78/5TKpxdoB9KVj4AyUARywDDwFvAN4D6A0ex9AKSafcBzgY71/ZiQM5uH2UJhHzD0QYxlwFnAQuA0oBuICB38zg8T/oUgRAroBOYTRFz8zn2/awXoWt8HwskzD+NCMy4DLQc+DJwl6AIyTO7UapkoTAwUVwJPTFjhXSVAT/ZmPMOITMbMn4OxwuBThE5fDHTM4O5LQO5xwE348l0jQFe2H08uA6kLDX8N8EngIqCH+s7ypBSB0RTgJ3x5cguQvYIe3gfykRnvM3QN8GfAB4G2WW5NARiKmaz2SStAV3YNRYaIsdNlugb4S+ByZtbMTMWY4IhhaIIROikF6MyuxmRRxrovAW4G/ojgiTSTnIkBeYd3bxuhk06Armw/yLdhugq4lXDWz4XjzIEdBiBlR790tW5tLtKd7cehDkzXA18CPsbc6HyAI5iGELz/9re/nLJxHRvWIAxQSlgXZp2YtQMZUBpwhhTWwYOVQQWwAiKPaSS2jqJTkVz232b06LrDYKoLb6uA2wgDqLmCAfuEigBb3QNHF0wpgPPjtspWAKuA00G9hBFhB5AW5io7KIXOZwQ0jHEYOBApfwDY25XtfwnsVaFhDwWBjQ/H66VzfR9ePiOvPzd0OyFcMJeIgdcRJWzygqSX5weA6wkjw2opA0eAN0H7DbYJfibY0bW+f/d7X75gdP+ybeQ/v6mmI+ta3wfOImJdDbqFudf5432wO0r5YhxPHnIkFWAUGKM2AVKEOMppwAXASqDPYBfGUweWPveoyulfdmy4cQDzPn/HvYk33LOxj0LBkU77i0F/Byyb9a5NxhjwaqngfLqrMGnBNDfh8evFRghRvUYQAfOA5cBfAXfL+Kbz8bURnELf1+je0JdoQ96LVNqfhulm4COz1Jm1cAA4KGcM3vrQpAXTCHA0lnSEEFJtNBHhZnkt8HUz+1LXOds+HnuXCWHh49OZXY33zsn0KeAa5o63cyxeB9481oKpBXjbXA0AQzPYQBHi7TcAdzlslbB5nXf007Oh/zdWbt/YjzPDyS/lqHMwp9mDahDAxk2Q7DAwOAsNTRHiNBuBWyTObBN0ZCeLkIoFThFwNfDbs9CuehgDngfyx1o4pQDxUS9UI8DhWWz0AuCvgbW5mIVCdG284ehCw2PmFxNMT88stqsW3kL8anTfmNcxYq7RVL+Mn3iWzBWXQRDqw4Rh/WyNnjPA+QJJtgXv8pkrL6Ft5XJKpImwq4AbaV5wLSm7gW9kutMDisoUH986aeG0nSnAiTLwCiGmPZv0AJ/FdL2HdosjDJGm3A18guBNNYocIWTcSAzYCQwgY+QLD/7GCtMK4JynHLtY8CLHsWMzzHzgJgeXp2JPxTNYDKxI0v4EHAF+BNwFvNbgtpeAX3jnB012zBWmPYChdQ/gnMdgP/BGgxuYlGVAXzmtUytjkw8Bi+rcZhnYCnyBELI+TPDEGskBYIvzLi5G6WOukPgMUmjgSw1uYFIccLW8PpmOyhFwMXBqHdsbA/4duEmObxFM2Z8QJuIbyU6D5w0o//3dxz2w6ZFhwRXdCVii3zSeBcCnSz46Fzgvcdt/k2HgHuBWr/hp75UhTFNe2OD2loHNiIOaYsY52UGYMFMR2E6wmc1iBaaPUXuoOQfcbbKN5t0eZymEX05wZ9M1bvN4HEY8qS2UplqpGhME8CvCsLoeSoQb+i8JA5RBkl9Vi4A/BpbUsN8i8LDEV62cOuicIdENug44t85jOhZbMJ7lUvjcuuOvlCh+4p3DeY/BHsEuQjpHrQjYJfE1sAEzLgKtAK6sdOxUY5P2ynrtNez3KeBfYvOvR2mwPNDOpcCnk/ZDFeSBH8dEBxyeL+r4Ed5EV0B+3T0gIeeGgSepz19OAVeacRNopFjU/ZJuAfoJeZOHpvitI9woowT7mchrwJ0Q7XBEmAfa1IlxLbVdTdOxS/BkRBxrUhbQsQ8oEc458D4WPA3sq7OBaeAzZqxta+NM7/2QSv5Jw24H1hMGfY2iBDxi8JgRm0+pYvDsYuAPaPzZ7wlX206A1DQCJD6Tio9vpu2K5YDGCLH8er0GR7C9eYn/JXIlobzENuAgcCkh87hedoD+wRm7zQlnBqIN6AP+sJo+SMhexD/HJXZGKRjOPjBtJyRGQJrUIeC/gZEGNLYbWAX6veLeqNIaG3OyR4CvMLU5SkIR+E9gu0lEisGEsLMJZ38tM3xT4YFHMXsmShsjd0w/512VAAYUKZrgv4DnGtToJcCazNnlM/CAPN40BnwHeITgT9fKy8CjBmMZ8ph3pIXM9AnC9Gij2Q087NCgJUw3rUqAkWy4mxt+N/AoTO3jJkTASkxXoVjmHcoYeAYQ9xJc31rwwE9NbJeMt7LfAaBsdgYhI7q3AW2fSAw8auIZD/j2ZJ511aNJ78pAVCAIsKtBjZ8PXIdFi0CMrL0fnAG2DXiY2oKAR4DHMBvFoLMyqWMhjjQT88fbEZtc2Y+YE2O33Z/oR1ULkF+3KRxGuFn+B40L4a4ALs+QoTPbh6WEYpUEP6TiUVTJS8AWIYtIo9DqNuAKQoZGIxkA7gLbbJEjty55ZkdN8RQhMHLAd4FnG3QQpwJXF91Yl4B0VAopX+Eqe4xwiSfFA78w8YYJ/NGfaiHwOzTW9SwD30c8grmSy1R3y6pJgJHsvZjAO54DNtGY+WIHfATTeSDKxRQixnB5hcFfNaHwPLAlNepGiAyTH/f9fwt4fwPaOpEtwDejOD7knRhe+2BVP655QiO37mycp0wwQz+gPm9lnCWYLk8N92IyUAR4LMTtX6xiO68DL8SdHlcWhvCR6yAk6zYyg2KP4MsRfos5FyIGVVL7jJKy4CAei/YjvkoYIddLD7C83DPYI+9w7cVKCaIdInhDSc3QPhRG01Yx/vK2iJBB0ahypAPAl5H9wMvFw9lkN913UteU3ui6+1C7USa1lZAO/kIDDuxS0BkAQ7c+FK4EFxfANpPcG9qLhbC5FIM5hJ1D48zPQcJA8UEz5aM6Atl1z6nms/eQspKX7EfAF6nOVByLc8HOlInOjTfg2kpYnDbQCyTLzisCu5BKAOYjpHIEXEJjfP/XgH+S9C2JQUgzuLb2LO+GpJiMZu/HjALY94DPA9vq2Fw36HylvHM+Yvi2hypGQwMkCwIWgT3OqayjU1HKEELotYSxx4kJ96LbBHeb+SHJMZq9q66+a5g7Npq9n87s6jHg+8KGCUUSH6X6eEsbcIGPleboGMMQDFUSA6ajBOz3sQ9D0RD87JZxNrXb/yHCwPPOlHjaG+WRGm3+O2loklUuey84Sj4V/RhxM/CvBD++Gh8+ApZYRbj27KrxhwHkCQOe6ShQmTYVLtyAjdOpbRI/B/wMWIv4mzGf+5+i+fJwgwpLYAay3HLr7sWVY/+37k9/bVgW7LPAnQQvZohkYvQKmwfgVHEjUUyy2NN4LQP2dix+PsmTuGJCFPYnwDqg38RdBvvjDd8lP014uVpmJKV7NHsfG7mPU/7x+pGBtZt+0ruh7xlvWgpcRkhxXEKI9XcSznhPONtGCO7d0+FvQ2bBlUxOnsqYxDhqczoIk0CeyfPPVvlulJA+vgf4NfAEYgtoH1DKVVE0Ui2zUaLPyuwPeYpNtNPlfOiIdsEpiC6MFBALcqAhk41iVgKLQQaGKQLoldlXgNXT7G6rwV8AO1BlC2KpjKsJiVedlfUKBNEPEdzK/YRw8oB3FGVYLkE8/4QQoF4616+GGgRoOyVGOFLvKTO2JxN571MGkQSG814Wx92upKKncNvMd/axmMtVJXXz1ue+PfHPmOqcgVnhpCrUPhFpCdBkWgI0mZYATaYlQJNpCdBkWgI0mZYATaYlQJNpCdBkWgI0mZYATaYlQJNpCdBkWgI0mZYATaYlQJM5GQU4IaZZxzmRpiSNkJp4mONX1ovwrpY5N/V4PE4kAXKERK/vJVjv1WY3tkWLFi1atJiOOeeydWTXEOOUodRmch1m1qaQst4GlqkUjkUEF3rcjfaVT1xJaSwCBYOCpILM54ukCxHe8tnq67hmklkXYF52DRGogKUMSzvRZnAapoXAArDxJ63PJ6SU9xJqx3oIz5bIELy38TfVQUjGLfH26wNHCC7rMCEje4Dgvh4ChVxQ2X7BIW8UhEptqByDDc6yQDMqQFd2FViMorbIzHowWwCcLjjLQr3WUsIjKMfTx3sJzwPqmIG2GSFzepQgyiBBlL3AK4IXLZQfvYl0UNKwxYUYRYw2OCV9Ig09yM71fRgmZ64dWQ/oLIzzCQ/GOJeQln428B7CmTz+4stmUnn7B0VCYcerhCzpl4HnEDvBXsM07OXHhCx3R2OqY6j34HuyNyKQl6UN5mO2FOw8wrN+PkR4uN742X0iDfogmLPxq+Q1Qn3Ys6CXkF4RHHamkoEN1/F+nKoF6M6uwuFdmVSv4AzBRRaeKX0RwawsItw0G/0gpGYTE2oK9hEqQbcLnjHYbvBGivKQx/mRKs3VtAL0ZvtxYe8pk80z0zLC2b2CUO2ykBPzDK+X8StkP/B/hKqerZK9INNgBGUPDE1TT3ZcAbqzawguX3yaifMwPk6oeryQcONsp/n2e65ghLq0vcAO4OeIp2S8BNEhsHjkON7VpA7sCpUoDujFuADso8DvEp4Rt4D66mzfTYwRyp42Az8F/RzxHMH78qMTas7Ukb2BjNooU+7EWEowLb9PuJEuYfbfOnqyUSB4Vc8SHrvzNOKVFKlc0QqkIrn3lq28nNDpKwnvDOukZV4aRRuhT5cBnwGex3iiTPmxSG5zykzfJtj1RZx8nstcQoRB5nKCE3OdmXakgKua3bJ3IRHBkVl8Ms4Jn1C0BGgyLQGaTEuAJtMSoMm0BGgyLQGaTEuAJtMSoMn8P4f/JnJ3AKQjAAAAJXRFWHRkYXRlOmNyZWF0ZQAyMDIzLTEwLTEwVDA5OjI0OjMzKzAwOjAwvlA1mgAAACV0RVh0ZGF0ZTptb2RpZnkAMjAyMy0xMC0xMFQwOToyNDozMyswMDowMM8NjSYAAAASdEVYdGV4aWY6RXhpZk9mZnNldAAyNlMbomUAAAAYdEVYdGV4aWY6UGl4ZWxYRGltZW5zaW9uADE1MDtFtCgAAAAYdEVYdGV4aWY6UGl4ZWxZRGltZW5zaW9uADE1MKZKVV4AAAAgdEVYdHNvZnR3YXJlAGh0dHBzOi8vaW1hZ2VtYWdpY2sub3JnvM8dnQAAABh0RVh0VGh1bWI6OkRvY3VtZW50OjpQYWdlcwAxp/+7LwAAABh0RVh0VGh1bWI6OkltYWdlOjpIZWlnaHQAMTkyQF1xVQAAABd0RVh0VGh1bWI6OkltYWdlOjpXaWR0aAAxOTLTrCEIAAAAGXRFWHRUaHVtYjo6TWltZXR5cGUAaW1hZ2UvcG5nP7JWTgAAABd0RVh0VGh1bWI6Ok1UaW1lADE2OTY5Mjk4NzOGDIqVAAAAD3RFWHRUaHVtYjo6U2l6ZQAwQkKUoj7sAAAAVnRFWHRUaHVtYjo6VVJJAGZpbGU6Ly8vbW50bG9nL2Zhdmljb25zLzIwMjMtMTAtMTAvZDcxMjFjNmMzNjk4NzZkNDBlMWNhMjI1ZWI4NzBmY2IuaWNvLnBuZ1NfQSgAAAAASUVORK5CYII=
favicon.ico: |
AAABAAEAEBAAAAEAIABoBAAAFgAAACgAAAAQAAAAIAAAAAEAIAAAAAAAAAQAAAAAAAAAAAAAAAAAAAAAAABigAv/YoAL/2KAC/9igAv/YoAL/2KAC/9igAv/YoAL/2KAC/9igAv/YoAL/2KAC/9igAv/YoAL/2KAC/9igAv/YoAL3WKAC/pigAv/YoAL/2KAC/9igAv/YoAL/2KAC/9igAv/YoAL/2KAC/9igAv/YoAL/2KAC/9igAv6YoAL3WKACyBigAtYYoALnWKAC9FigAvvYoAL/GKAC/9igAv/YoAL/2KAC/9igAv8YoAL72KAC9FigAudYoALWGKACyAAAAAAYoALAGKACwJigAsVYoALNGKAC1ZigAtxYoALfmKAC35igAtxYoALVmKACzRigAsVYoALAmKACwAAAAAAAAAAAAAAAAAAAAAAAAAAAAAAAABigAsAYoALBGKAC2BigAtlYoAKBmKACgAAAAAAAAAAAAAAAAAAAAAAAAAAAAAAAAAAAAAAAAAAAAAAAAAAAAAAYoALAGKACwhigAu/YoALyWKACgxigAoAAAAAAAAAAAAAAAAAAAAAAAAAAAAAAAAAAAAAAAAAAAAAAAAAAAAAAGKACwBigAsIYoALv2KAC8ligAoMYoAKAAAAAAAAAAAAAAAAAAAAAAAAAAAAAAAAAAAAAABhggoAYoALAGKACwRigAsKYoALC2KAC75igAvIYoALFGKACxNigAsGYoALAGGCCgAAAAAAAAAAAAAAAABigAsAYoALAGKACzhigAukYoALv2KAC0JigAu/YoALymKAC1digAvQYoALrmKAC0higAsDYoALAAAAAAAAAAAAYoALAGKACy5igAvXYoAL/2KAC+ZigAtJYoAL2WKAC99igAtUYoAL6mKAC/9igAvrYoALV2KACwBigAsAYoALAGKADAJigAuXYoAL/2KAC/9igAueYoALdmKAC/xigAv6YoALZGKAC7BigAv/YoAL/2KAC9RigAshYoALAGKACwBigAsdYoAL2mKAC/9igAv2YoALu2KAC+higAvoYoAL/2KAC8VigAt6YoAL9mKAC/9igAv/YoALb2KACwBigAsAYoALQWKAC/ZigAv/YoAL/2KAC/9igAvGYoALcWKAC/digAv+YoAL2WKAC/BigAv/YoAL/2KAC7RigAsJYoALAGKAC1digAvyYoAL8GKAC91igAueYoALKmKACxFigAu5YoAL/2KAC/9igAv/YoAL/2KAC/9igAvcYoALImKACwBigAsUYoALOGKACzRigAsdYoALBWKACwBigAsAYoALLGKAC7ligAv6YoAL/2KAC/9igAv/YoAL72KACz0AAAAAAAAAAAAAAAAAAAAAAAAAAAAAAAAAAAAAYoEKAGKACwBigAsVYoALa2KAC71igAvpYoAL+2KAC/RigAtNAAAAAAAAAAAAAAAAwAMAAPw/AAD8PwAA/D8AAPAPAADgAwAAwAMAAIABAACAAQAAgAAAAIAAAACDAAAA/4AAAA==
logo.svg: |
PHN2ZyB4bWxucz0iaHR0cDovL3d3dy53My5vcmcvMjAwMC9zdmciIHZpZXdCb3g9IjAgMCAyNCAyNCI+PHBhdGggZmlsbD0iIzBCODA2MiIgZD0iTTIsMjJWMjBDMiwyMCA3LDE4IDEyLDE4QzE3LDE4IDIyLDIwIDIyLDIwVjIySDJNMTEuMyw5LjFDMTAuMSw1LjIgNCw2LjEgNCw2LjFDNCw2LjEgNC4yLDEzLjkgOS45LDEyLjdDOS41LDkuOCA4LDkgOCw5QzEwLjgsOSAxMSwxMi40IDExLDEyLjRWMTdDMTEuMywxNyAxMS43LDE3IDEyLDE3QzEyLjMsMTcgMTIuNywxNyAxMywxN1YxMi44QzEzLDEyLjggMTMsOC45IDE2LDcuOUMxNiw3LjkgMTQsMTAuOSAxNCwxMi45QzIxLDEzLjYgMjEsNCAyMSw0QzIxLDQgMTIuMSwzIDExLjMsOS4xWiIgLz48L3N2Zz4=
Login Screen
In this example, the login screen now displays the custom logo in a different size. The product title is also shown, and the OIDC tabstrip title and text have been changed to a custom-specific one. Product-related links are displayed below the login button. The footer contains a copyright notice for the custom company.
Teaser in Main Navigation
The template approach is also used in this case to change the font-size and line-height of the product title and slogan. The product version (superscript) is omitted.
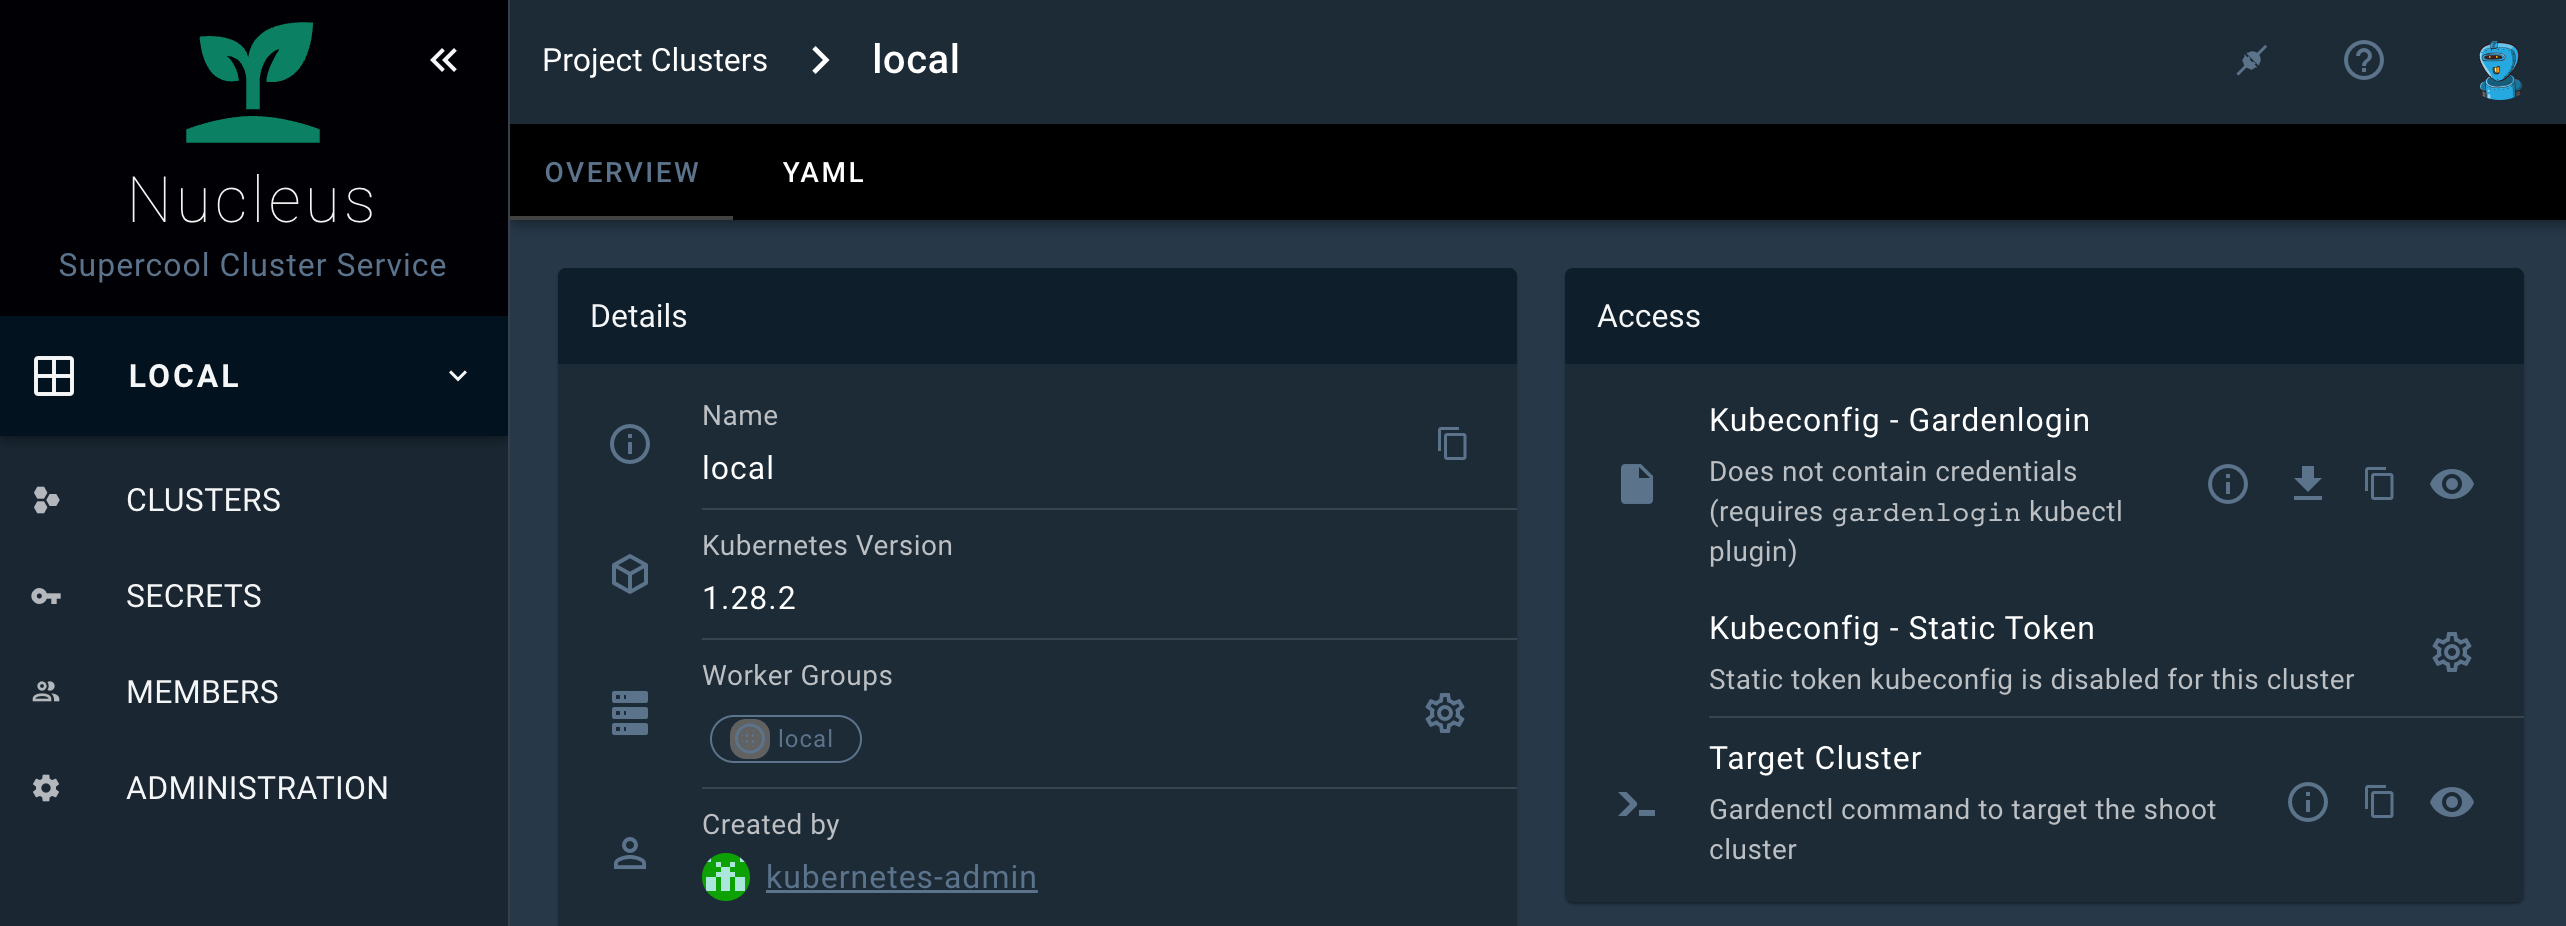
About Dialog
By changing the productLogoUrl and the productName, the changes automatically effect the apperance of the About Dialog and the document title.
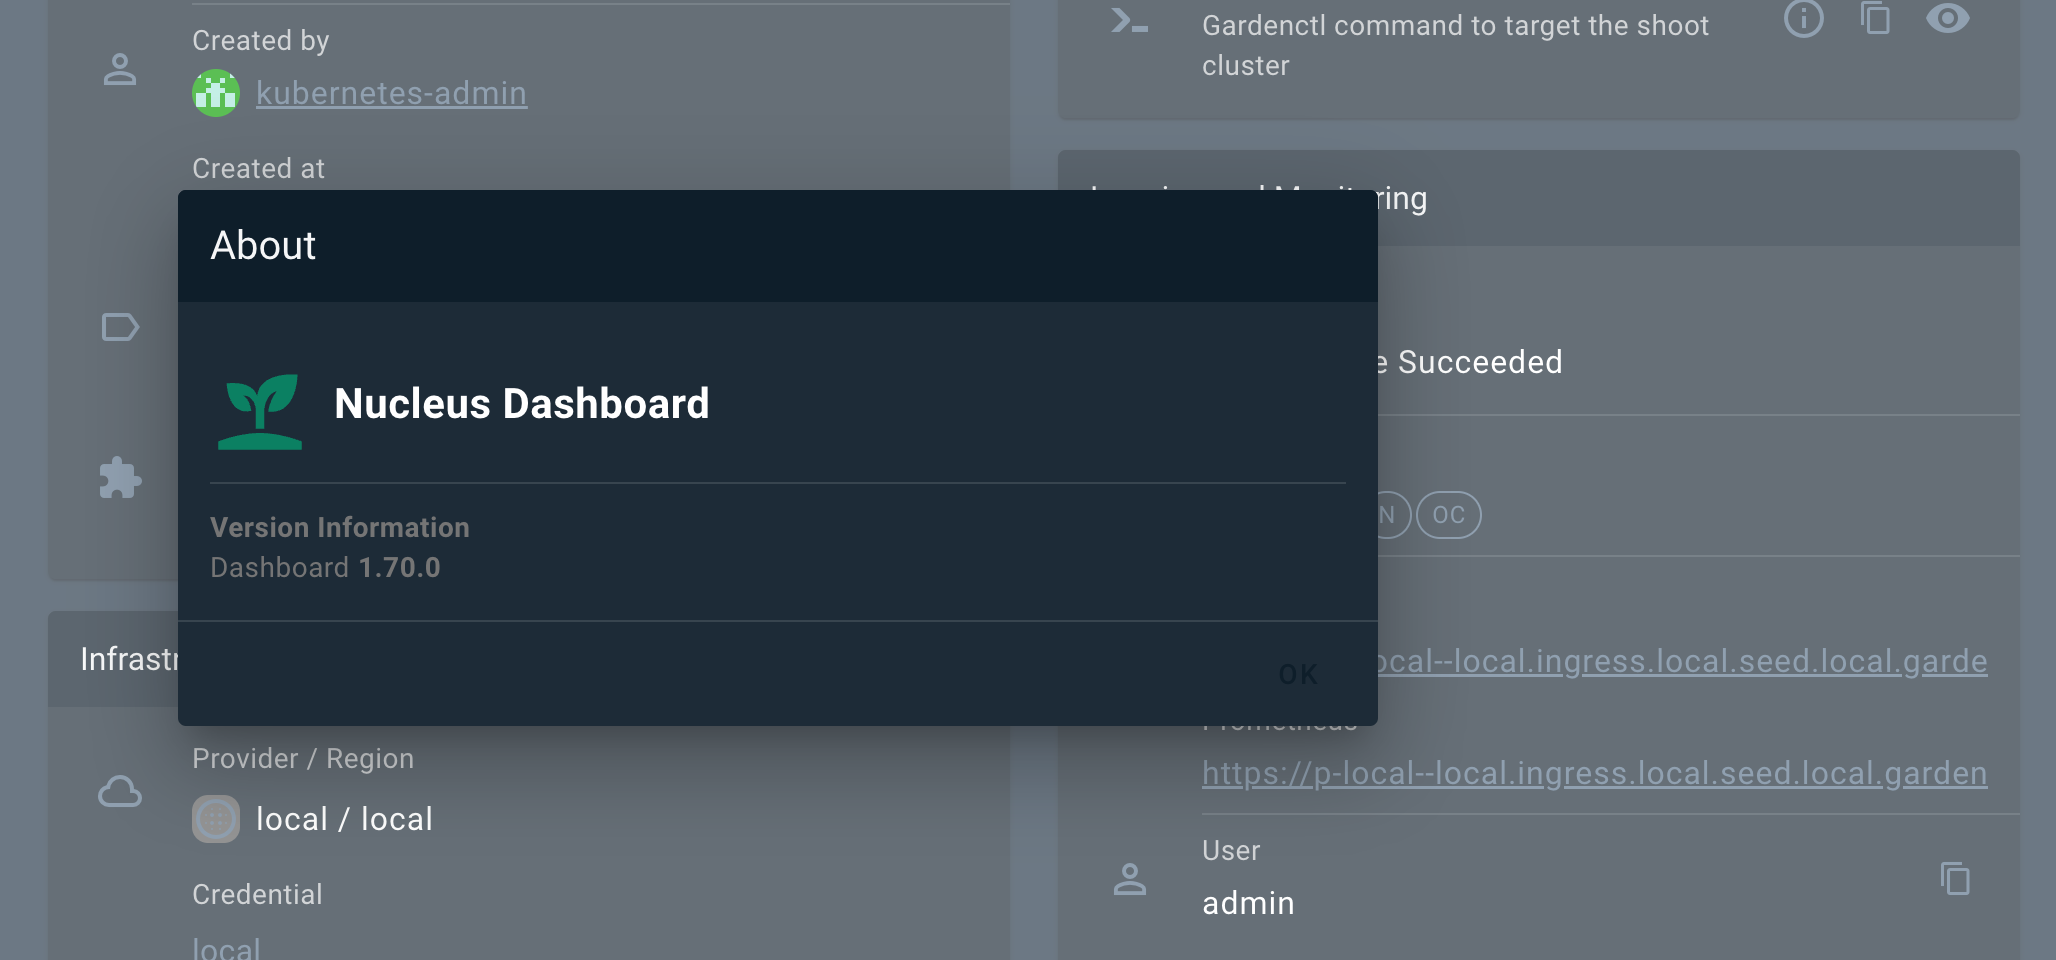
7.7 - Local Setup
Local development
![]()

Purpose
Develop new feature and fix bug on the Gardener Dashboard.
Requirements
- Yarn. For the required version, refer to
.engines.yarnin package.json. - Node.js. For the required version, refer to
.engines.nodein package.json.
Git Hooks with Husky
This repository uses a custom Husky setup to centrally manage Git hooks and ensure a consistent development workflow. Our Husky configuration is user-configurable and designed to help you by checking code quality and performing security checks before you commit or push changes.
How Our Husky Setup Works
- When you install dependencies with
yarn, Husky is set up automatically, but the actual hooks are only activated after your first commit attempt. - On your first commit, a
.husky/user-configfile is automatically created for you if it does not exist. This file lets you opt in or out of optional checks, such as:- ggshield: Secret scanning (requires a GitGuardian account)
- REUSE: License compliance (requires
pipxand thereusetool) - verify_on_push: Run the full verification script on every push (lint, tests, dependency checks)
- By default, Husky managed hooks are enabled, but optional checks are disabled. You can edit
.husky/user-configat any time to change your preferences. - The actual hook logic is implemented in the
.husky/pre-commitand.husky/pre-pushscripts.
Disabling Husky Managed Hooks
If you want to disable Husky managed hooks and reset your Git hooks path to the default location, run:
echo managed_hooks=false > .husky/user-config && git config --local --unset core.hooksPath
For more information, see the Husky documentation and our .husky/ directory for custom logic.
Steps
1. Clone repository
Clone the gardener/dashboard repository
git clone git@github.com:gardener/dashboard.git
2. Install dependencies
Run yarn at the repository root to install all dependencies.
cd dashboard
yarn
And build all project internal dependencies.
yarn workspace gardener-dashboard packages-build-all
3. Configuration
Place the Gardener Dashboard configuration under ${HOME}/.gardener/config.yaml or alternatively set the path to the configuration file using the GARDENER_CONFIG environment variable.
A local configuration example could look like follows:
port: 3030
logLevel: debug
logFormat: text
apiServerUrl: https://my-local-cluster # garden cluster kube-apiserver url - kubectl config view --minify -ojsonpath='{.clusters[].cluster.server}'
sessionSecret: c2VjcmV0 # symmetric key used for encryption
frontend:
dashboardUrl:
pathname: /api/v1/namespaces/kube-system/services/kubernetes-dashboard/proxy/
defaultHibernationSchedule:
evaluation:
- start: 00 17 * * 1,2,3,4,5
development:
- start: 00 17 * * 1,2,3,4,5
end: 00 08 * * 1,2,3,4,5
production: ~
4. Run it locally
The Gardener Dashboard backend server requires a kubeconfig for the Garden cluster. You can set it e.g. by using the KUBECONFIG environment variable.
If you want to run the Garden cluster locally, follow the getting started locally documentation.
Gardener Dashboard supports the local infrastructure provider that comes with the local Gardener cluster setup.
See 5. Login to the dashboard for more information on how to use the Dashboard with a local gardener or any other Gardener landscape.
Start the backend server (http://localhost:3030).
cd backend
export KUBECONFIG=/path/to/garden/cluster/kubeconfig.yaml
yarn serve
To start the frontend server, you have two options for handling the server certificate:
Recommended Method: Run
yarn setupin the frontend directory to generate a new self-signed CA and TLS server certificate before starting the frontend server for the first time. The CA is automatically added to the keychain on macOS. If you prefer not to add it to the keychain, you can use the--skip-keychainflag. For other operating systems, you will need to manually add the generated certificates to the local trust store.Alternative Method: If you prefer not to run
yarn setup, a temporary self-signed certificate will be generated automatically. This certificate will not be added to the keychain. Note that you will need to click through the insecure warning in your browser to access the dashboard.
We need to start a TLS dev server because we use cookie names with __Host- prefix. This requires the secure attribute to be set. For more information, see OWASP Host Prefix.
Start the frontend dev server (https://localhost:8443) with https and hot reload enabled.
cd frontend
# yarn setup
yarn serve
You can now access the UI on https://localhost:8443/
5. Login to the dashboard
To login to the dashboard you can either configure oidc, or alternatively login using a token:
To login using a token, first create a service account.
kubectl -n garden create serviceaccount dashboard-user
Assign it a role, e.g. cluster-admin.
kubectl set subject clusterrolebinding cluster-admin --serviceaccount=garden:dashboard-user
Get the token of the service account.
kubectl -n garden create token dashboard-user --duration 24h
Copy the token and login to the dashboard.
Build
Build docker image locally.
make build
Push
Push docker image to Google Container Registry.
make push
This command expects a valid gcloud configuration named gardener.
gcloud config configurations describe gardener
is_active: true
name: gardener
properties:
core:
account: john.doe@example.org
project: johndoe-1008
7.8 - Process
Hotfixes
This document describes how to contribute hotfixes
Cherry Picks
This section explains how to initiate cherry picks on hotfix branches within the gardener/dashboard repository.
Prerequisites
Before you initiate a cherry pick, make sure that the following prerequisites are accomplished.
- A pull request merged against the
masterbranch. - The hotfix branch exists (check in the branches section).
- Have the
gardener/dashboardrepository cloned as follows:- the
originremote should point to your fork (alternatively this can be overwritten by passingFORK_REMOTE=<fork-remote>). - the
upstreamremote should point to the Gardener GitHub org (alternatively this can be overwritten by passingUPSTREAM_REMOTE=<upstream-remote>).
- the
- Have
hubinstalled, e.g.brew install hubassuming you have a standard golang development environment. - A GitHub token which has permissions to create a PR in an upstream branch.
Initiate a Cherry Pick
Run the cherry-pick-script.
This example applies a master branch PR #1824 to the remote branch
upstream/hotfix-1.74:GITHUB_USER=<your-user> hack/cherry-pick-pull.sh upstream/hotfix-1.74 1824Be aware the cherry pick script assumes you have a git remote called
upstreamthat points at the Gardener GitHub org.You will need to run the cherry pick script separately for each patch release you want to cherry pick to. Cherry picks should be applied to all active hotfix branches where the fix is applicable.
When asked for your GitHub password, provide the created GitHub token rather than your actual GitHub password. Refer https://github.com/github/hub/issues/2655#issuecomment-735836048
7.9 - Project Operations
Project Operations
This section demonstrates how to use the standard Kubernetes tool for cluster operation kubectl for common cluster operations with emphasis on Gardener resources. For more information on kubectl, see kubectl on kubernetes.io.
Prerequisites
- You’re logged on to the Gardener Dashboard.
- You’ve created a cluster and its status is operational.
It’s recommended that you get acquainted with the resources in the Gardener API.
Using kubeconfig for remote project operations
The kubeconfig for project operations is different from the one for cluster operations. It has a larger scope and allows a different set of operations that are applicable for a project administrator role, such as lifecycle control on clusters and managing project members.
Depending on your goal, you can create a service account suitable for automation and use it for your pipelines, or you can get a user-specific kubeconfig and use it to manage your project resources via kubectl.
Downloading your kubeconfig
Kubernetes doesn’t offer an own resource type for human users that access the API server. Instead, you either have to manage unique user strings, or use an OpenID-Connect (OIDC) compatible Identity Provider (IDP) to do the job.
Once the latter is set up, each Gardener user can use the kubelogin plugin for kubectl to authenticate against the API server:
Set up
kubeloginif you don’t have it yet. More information: kubelogin setup.Open the menu at the top right of the screen, then choose MY ACCOUNT.

On the Access card, choose the arrow to see all options for the personalized command-line interface access.

The personal bearer token that is also offered here only provides access for a limited amount of time for one time operations, for example, in
curlcommands. Thekubeconfigprovided for the personalized access is used bykubeloginto grant access to the Gardener API for the user permanently by using a refresh token.Check that the right Project is chosen and keep the settings otherwise. Download the
kubeconfigfile and add its path to theKUBECONFIGenvironment variable.
You can now execute kubectl commands on the garden cluster using the identity of your user.
Note: You can also manage your Gardener project resources automatically using a Gardener service account. For more information, see Automating Project Resource Management.
List Gardener API resources
Using a
kubeconfigfor project operations, you can list the Gardner API resources using the following command:kubectl api-resources | grep gardenThe response looks like this:
backupbuckets bbc core.gardener.cloud false BackupBucket backupentries bec core.gardener.cloud true BackupEntry cloudprofiles cprofile,cpfl core.gardener.cloud false CloudProfile controllerinstallations ctrlinst core.gardener.cloud false ControllerInstallation controllerregistrations ctrlreg core.gardener.cloud false ControllerRegistration plants pl core.gardener.cloud true Plant projects core.gardener.cloud false Project quotas squota core.gardener.cloud true Quota secretbindings sb core.gardener.cloud true SecretBinding seeds core.gardener.cloud false Seed shoots core.gardener.cloud true Shoot shootstates core.gardener.cloud true ShootState terminals dashboard.gardener.cloud true Terminal clusteropenidconnectpresets coidcps settings.gardener.cloud false ClusterOpenIDConnectPreset openidconnectpresets oidcps settings.gardener.cloud true OpenIDConnectPresetEnter the following command to view the Gardener API versions:
kubectl api-versions | grep gardenThe response looks like this:
core.gardener.cloud/v1alpha1 core.gardener.cloud/v1beta1 dashboard.gardener.cloud/v1alpha1 settings.gardener.cloud/v1alpha1
Check your permissions
The operations on project resources are limited by the role of the identity that tries to perform them. To get an overview over your permissions, use the following command:
kubectl auth can-i --list | grep gardenThe response looks like this:
plants.core.gardener.cloud [] [] [create delete deletecollection get list patch update watch] quotas.core.gardener.cloud [] [] [create delete deletecollection get list patch update watch] secretbindings.core.gardener.cloud [] [] [create delete deletecollection get list patch update watch] shoots.core.gardener.cloud [] [] [create delete deletecollection get list patch update watch] terminals.dashboard.gardener.cloud [] [] [create delete deletecollection get list patch update watch] openidconnectpresets.settings.gardener.cloud [] [] [create delete deletecollection get list patch update watch] cloudprofiles.core.gardener.cloud [] [] [get list watch] projects.core.gardener.cloud [] [flowering] [get patch update delete] namespaces [] [garden-flowering] [get]Try to execute an operation that you aren’t allowed, for example:
kubectl get projectsYou receive an error message like this:
Error from server (Forbidden): projects.core.gardener.cloud is forbidden: User "system:serviceaccount:garden-flowering:robot" cannot list resource "projects" in API group "core.gardener.cloud" at the cluster scope
Working with projects
You can get the details for a project, where you (or the service account) is a member.
kubectl get project floweringThe response looks like this:
NAME NAMESPACE STATUS OWNER CREATOR AGE flowering garden-flowering Ready [PROJECT-ADMIN]@domain [PROJECT-ADMIN]@domain system 45mFor more information, see Project in the API reference.
To query the names of the members of a project, use the following command:
kubectl get project docu -o jsonpath='{.spec.members[*].name }'The response looks like this:
[PROJECT-ADMIN]@domain system:serviceaccount:garden-flowering:robotFor more information, see members in the API reference.
Working with clusters
The Gardener domain object for a managed cluster is called Shoot.
List project clusters
To query the clusters in a project:
kubectl get shoots
The output looks like this:
NAME CLOUDPROFILE VERSION SEED DOMAIN HIBERNATION OPERATION PROGRESS APISERVER CONTROL NODES SYSTEM AGE
geranium aws 1.18.3 aws-eu1 geranium.flowering.shoot.<truncated> Awake Succeeded 100 True True True True 74m
Create a new cluster
To create a new cluster using the command line, you need a YAML definition of the Shoot resource.
To get started, copy the following YAML definition to a new file, for example,
daffodil.yaml(or copy file shoot.yaml todaffodil.yaml) and adapt it to your needs.apiVersion: core.gardener.cloud/v1beta1 kind: Shoot metadata: name: daffodil namespace: garden-flowering spec: secretBindingName: trial-secretbinding-gcp cloudProfile: kind: CloudProfile name: gcp region: europe-west1 purpose: evaluation provider: type: gcp infrastructureConfig: kind: InfrastructureConfig apiVersion: gcp.provider.extensions.gardener.cloud/v1alpha1 networks: workers: 10.250.0.0/16 controlPlaneConfig: apiVersion: gcp.provider.extensions.gardener.cloud/v1alpha1 zone: europe-west1-c kind: ControlPlaneConfig workers: - name: cpu-worker maximum: 2 minimum: 1 maxSurge: 1 maxUnavailable: 0 machine: type: n1-standard-2 image: name: gardenlinux volume: type: pd-standard size: 50Gi zones: - europe-west1-c networking: type: calico pods: 100.96.0.0/11 nodes: 10.250.0.0/16 services: 100.64.0.0/13 maintenance: timeWindow: begin: 220000+0100 end: 230000+0100 autoUpdate: kubernetesVersion: true machineImageVersion: true hibernation: enabled: true schedules: - start: '00 17 * * 1,2,3,4,5' location: Europe/Kiev kubernetes: allowPrivilegedContainers: true kubeControllerManager: nodeCIDRMaskSize: 24 kubeProxy: mode: IPTables version: 1.18.3 addons: nginxIngress: enabled: false kubernetesDashboard: enabled: falseIn your new YAML definition file, replace the value of field
metadata.namespacewith your namespace following the conventiongarden-[YOUR-PROJECTNAME].Create a cluster using this manifest (with flag
--wait=falsethe command returns immediately, otherwise it doesn’t return until the process is finished):kubectl apply -f daffodil.yaml --wait=falseThe response looks like this:
shoot.core.gardener.cloud/daffodil createdIt takes 5–10 minutes until the cluster is created. To watch the progress, get all shoots and use the
-wflag.kubectl get shoots -w
For a more extended example, see Gardener example shoot manifest.
Delete cluster
To delete a shoot cluster, you must first annotate the shoot resource to confirm the operation with confirmation.gardener.cloud/deletion: "true":
Add the annotation to your manifest (
daffodil.yamlin the previous example):apiVersion: core.gardener.cloud/v1beta1 kind: Shoot metadata: name: daffodil namespace: garden-flowering annotations: confirmation.gardener.cloud/deletion: "true" spec: addons: ...Apply your changes of
daffodil.yaml.kubectl apply -f daffodil.yamlThe response looks like this:
shoot.core.gardener.cloud/daffodil configuredTrigger the deletion.
kubectl delete shoot daffodil --wait=falseThe response looks like this:
shoot.core.gardener.cloud "daffodil" deletedIt takes 5–10 minutes to delete the cluster. To watch the progress, get all shoots and use the
-wflag.kubectl get shoots -w
Get kubeconfig for a Shoot Cluster
To get the kubeconfig for a shoot cluster in Gardener from the command line, use one of the following methods:
Using
shoots/admin/kubeconfigSubresource:- You can obtain a temporary admin
kubeconfigby using theshoots/admin/kubeconfigsubresource. Detailed instructions can be found in the Gardener documentation here.
- You can obtain a temporary admin
Using
gardenctlandgardenlogin:gardenctlsimplifies targeting Shoot clusters. It automatically downloads akubeconfigthat uses thegardenloginkubectl auth plugin. This plugin transparently managesShootcluster authentication and certificate renewal without embedding any credentials in the kubeconfig file.- When installing
gardenctlvia Homebrew or Chocolatey,gardenloginwill be installed as a dependency. Refer to the installation instructions here. - Both tools can share the same configuration. To set up the tools, refer to the documentation here.
- To get the
kubeconfig, use either thetargetorkubeconfigcommand:Target Command: This command targets the specified Shoot cluster and automatically downloads the
kubeconfig.gardenctl target --garden landscape-dev --project my-project --shoot my-shootTo set the
KUBECONFIGenvironment variable to point to the downloadedkubeconfigfile, use the following command (for bash):eval $(gardenctl kubectl-env bash)Detailed instructions can be found here.
Kubeconfig Command: This command directly downloads the
kubeconfigfor the specified Shoot cluster and outputs it in raw format.gardenctl kubeconfig --garden landscape-dev --project my-project --shoot my-shoot --raw
- When installing
Related Links
7.10 - Terminal Shortcuts
Terminal Shortcuts
As user and/or gardener administrator you can configure terminal shortcuts, which are preconfigured terminals for frequently used views.
You can launch the terminal shortcuts directly on the shoot details screen.

You can view the definition of a terminal terminal shortcut by clicking on they eye icon
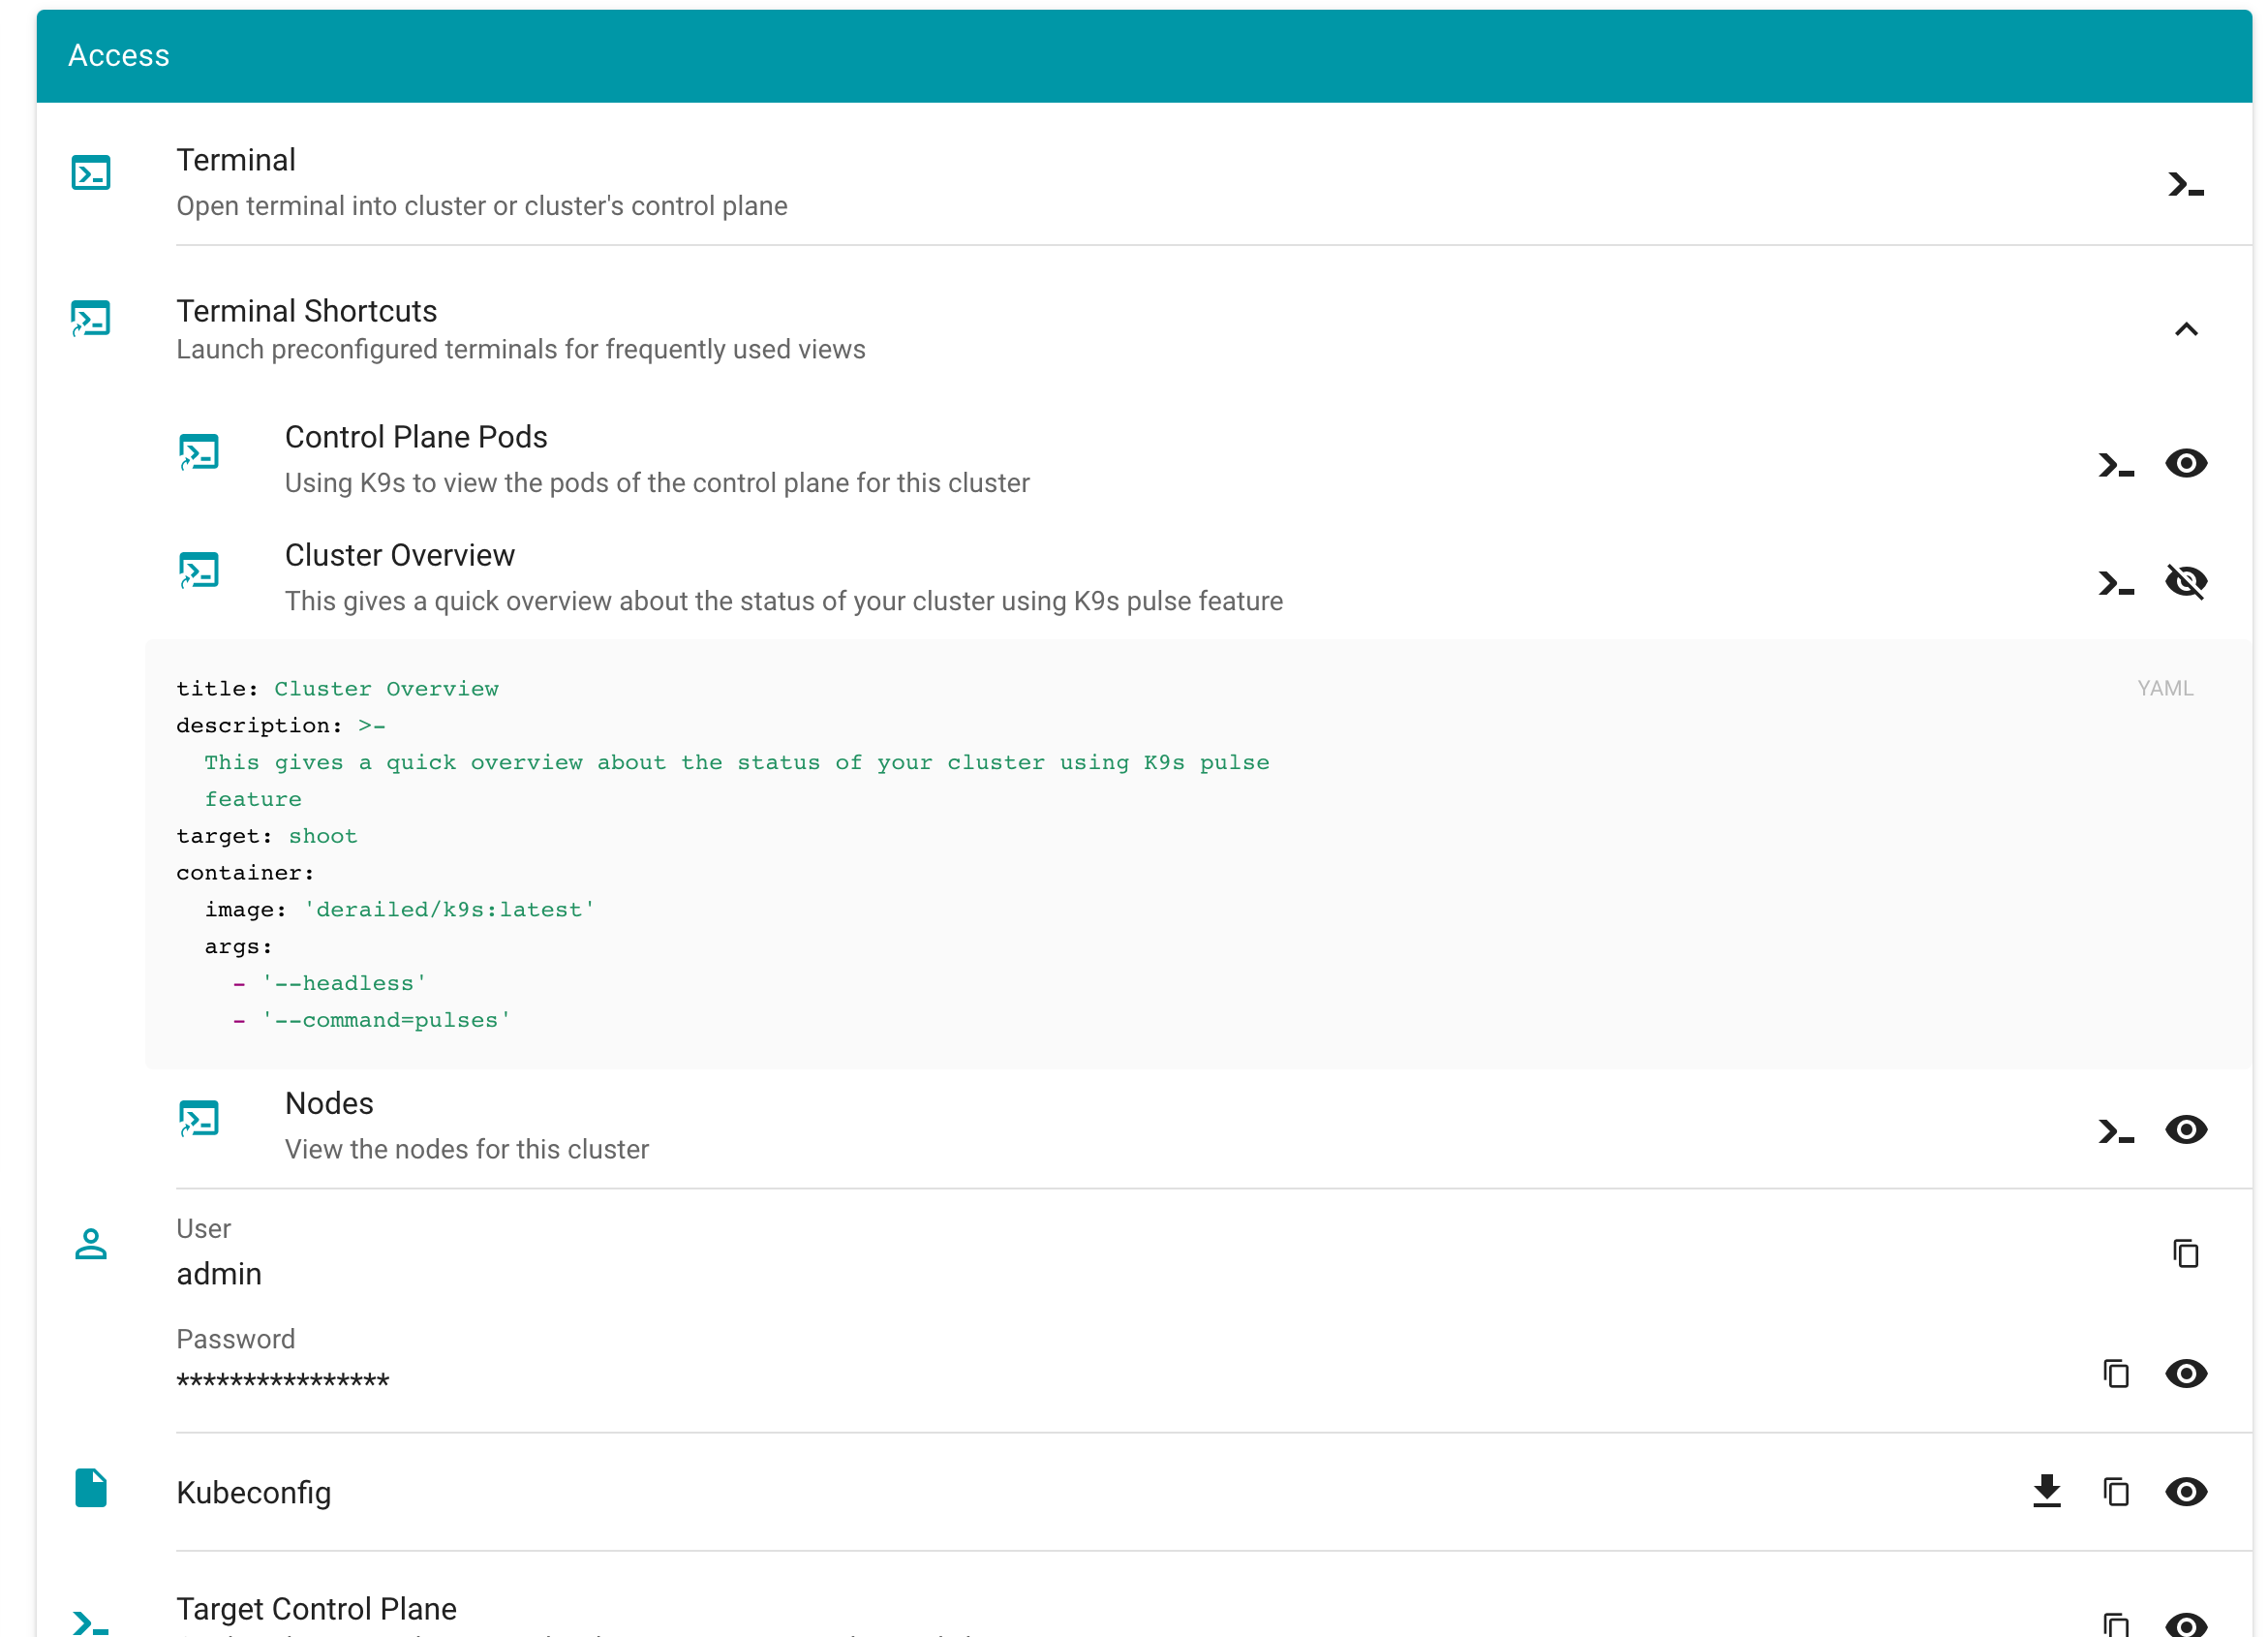
What also has improved is, that when creating a new terminal you can directly alter the configuration.
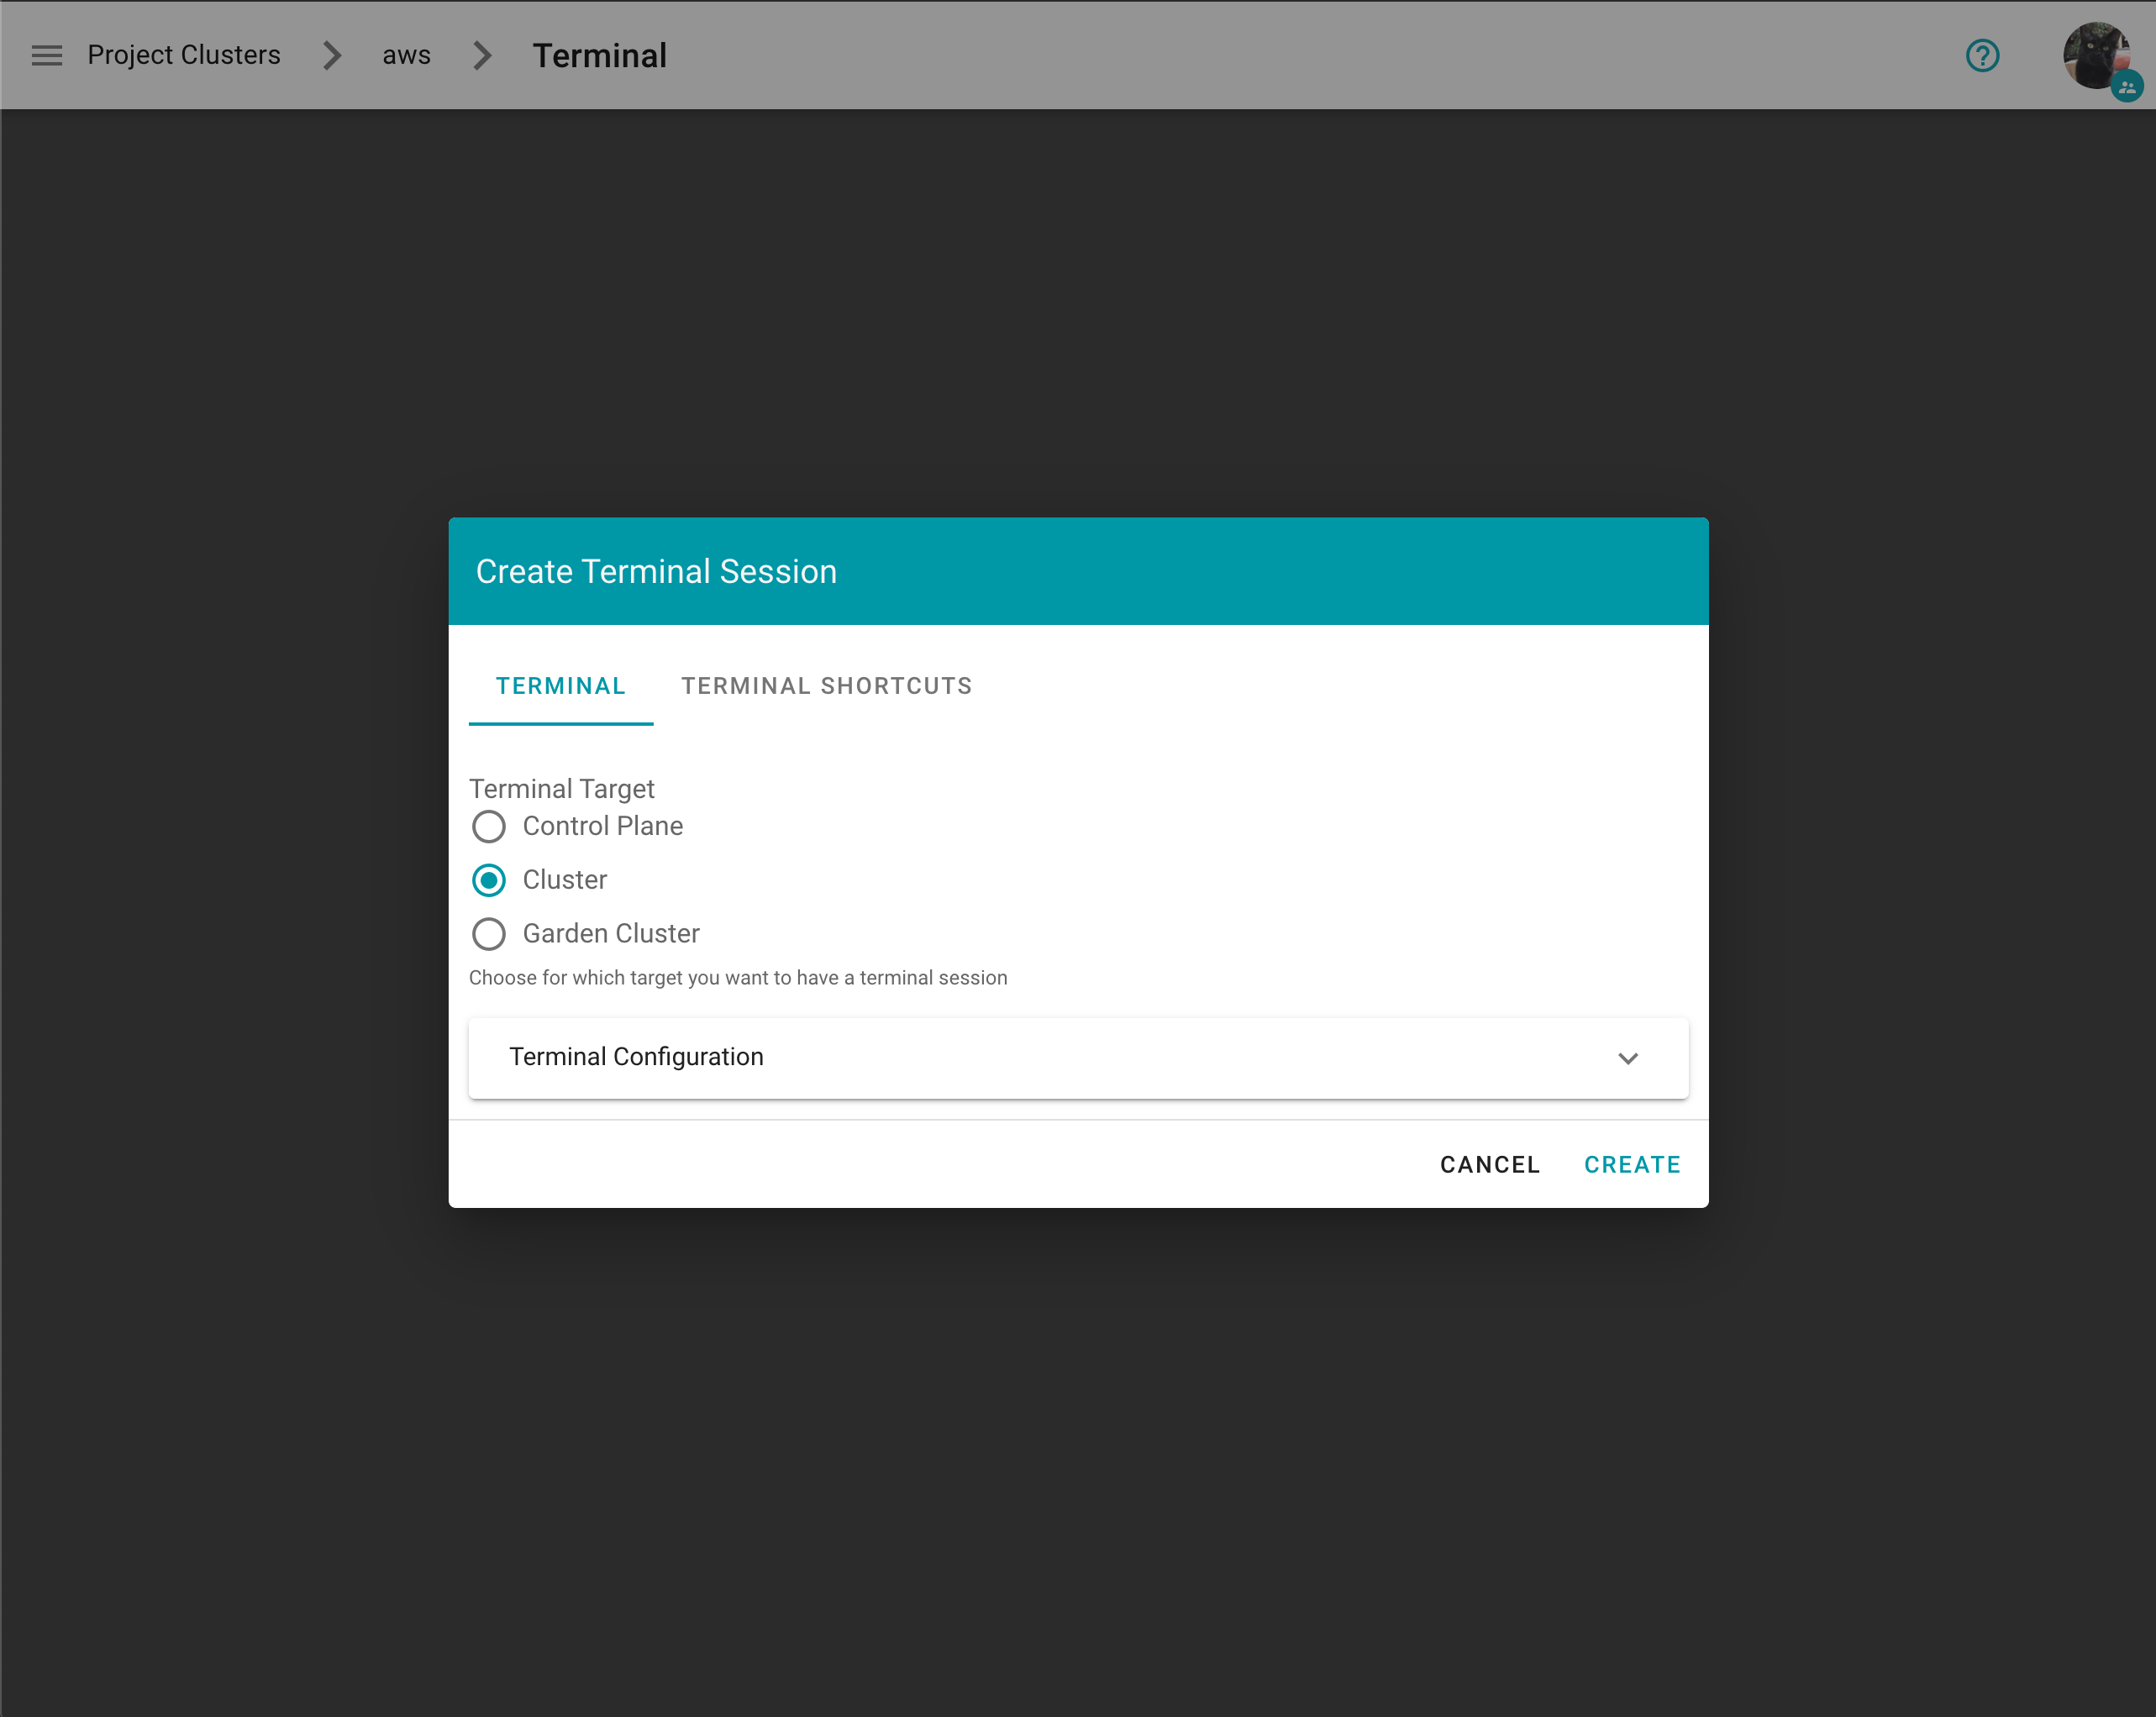
With expanded configuration

On the Create Terminal Session dialog you can choose one or multiple terminal shortcuts.
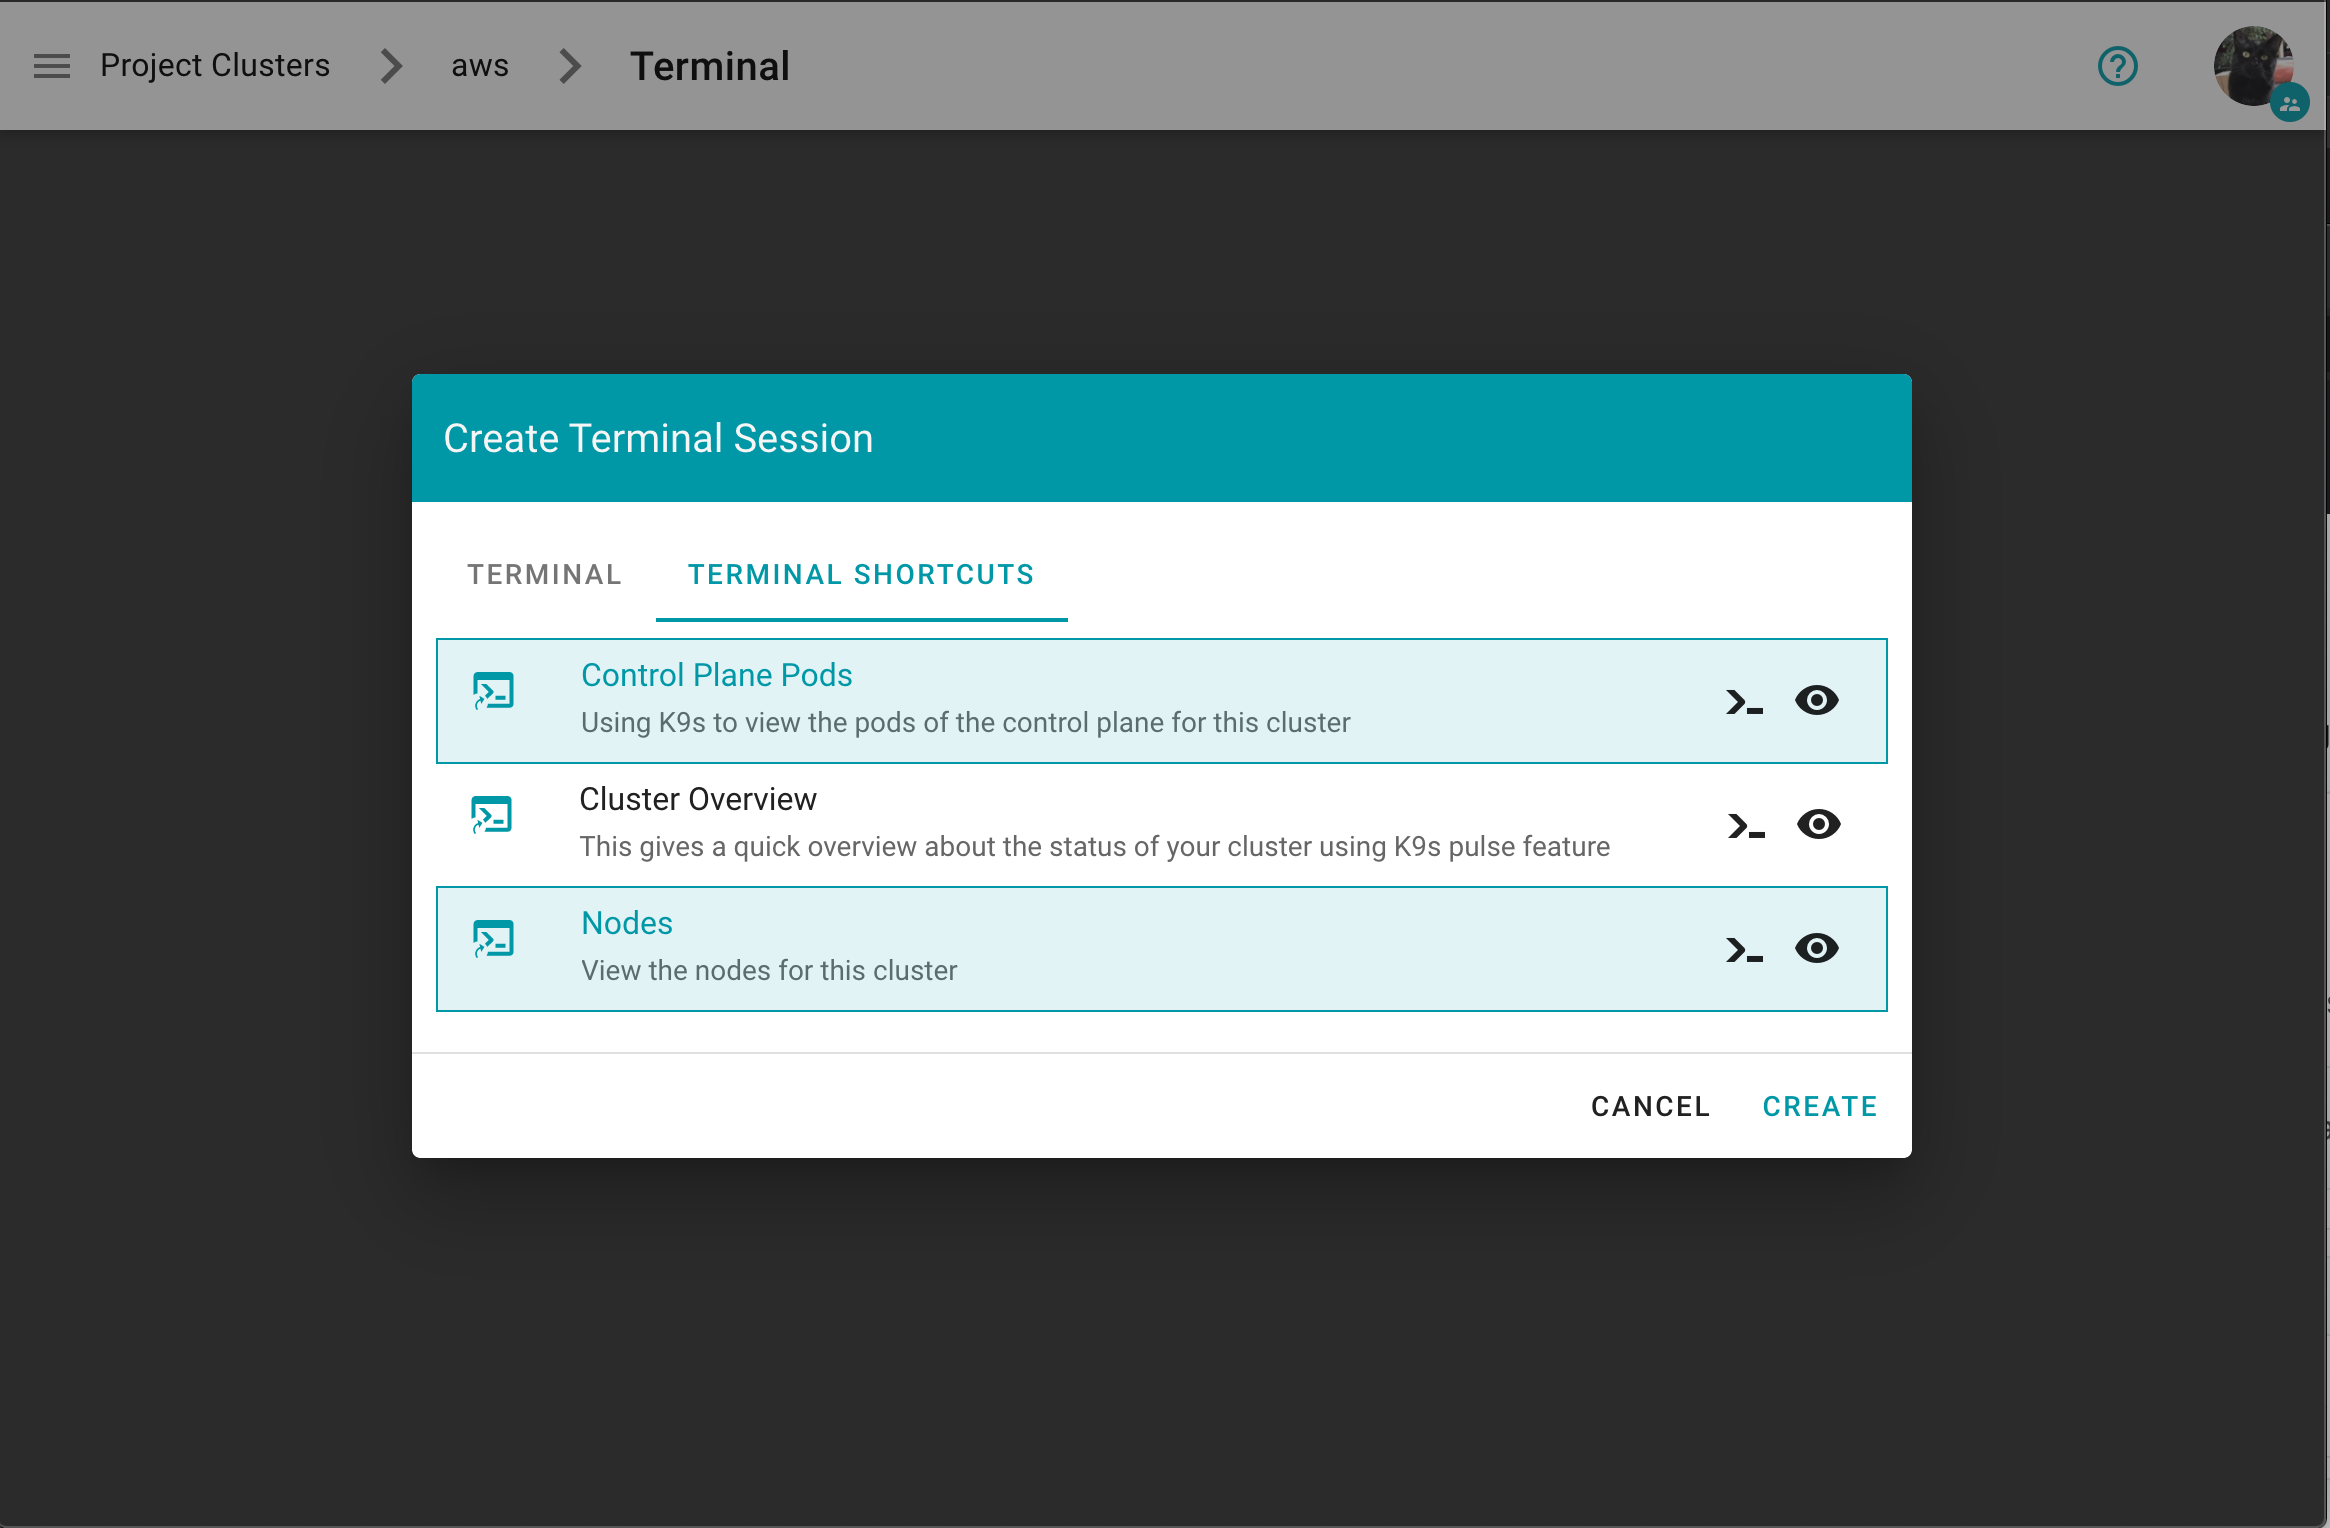
Project specific terminal shortcuts created (by a member of the project) have a project icon badge and are listed as Unverified.
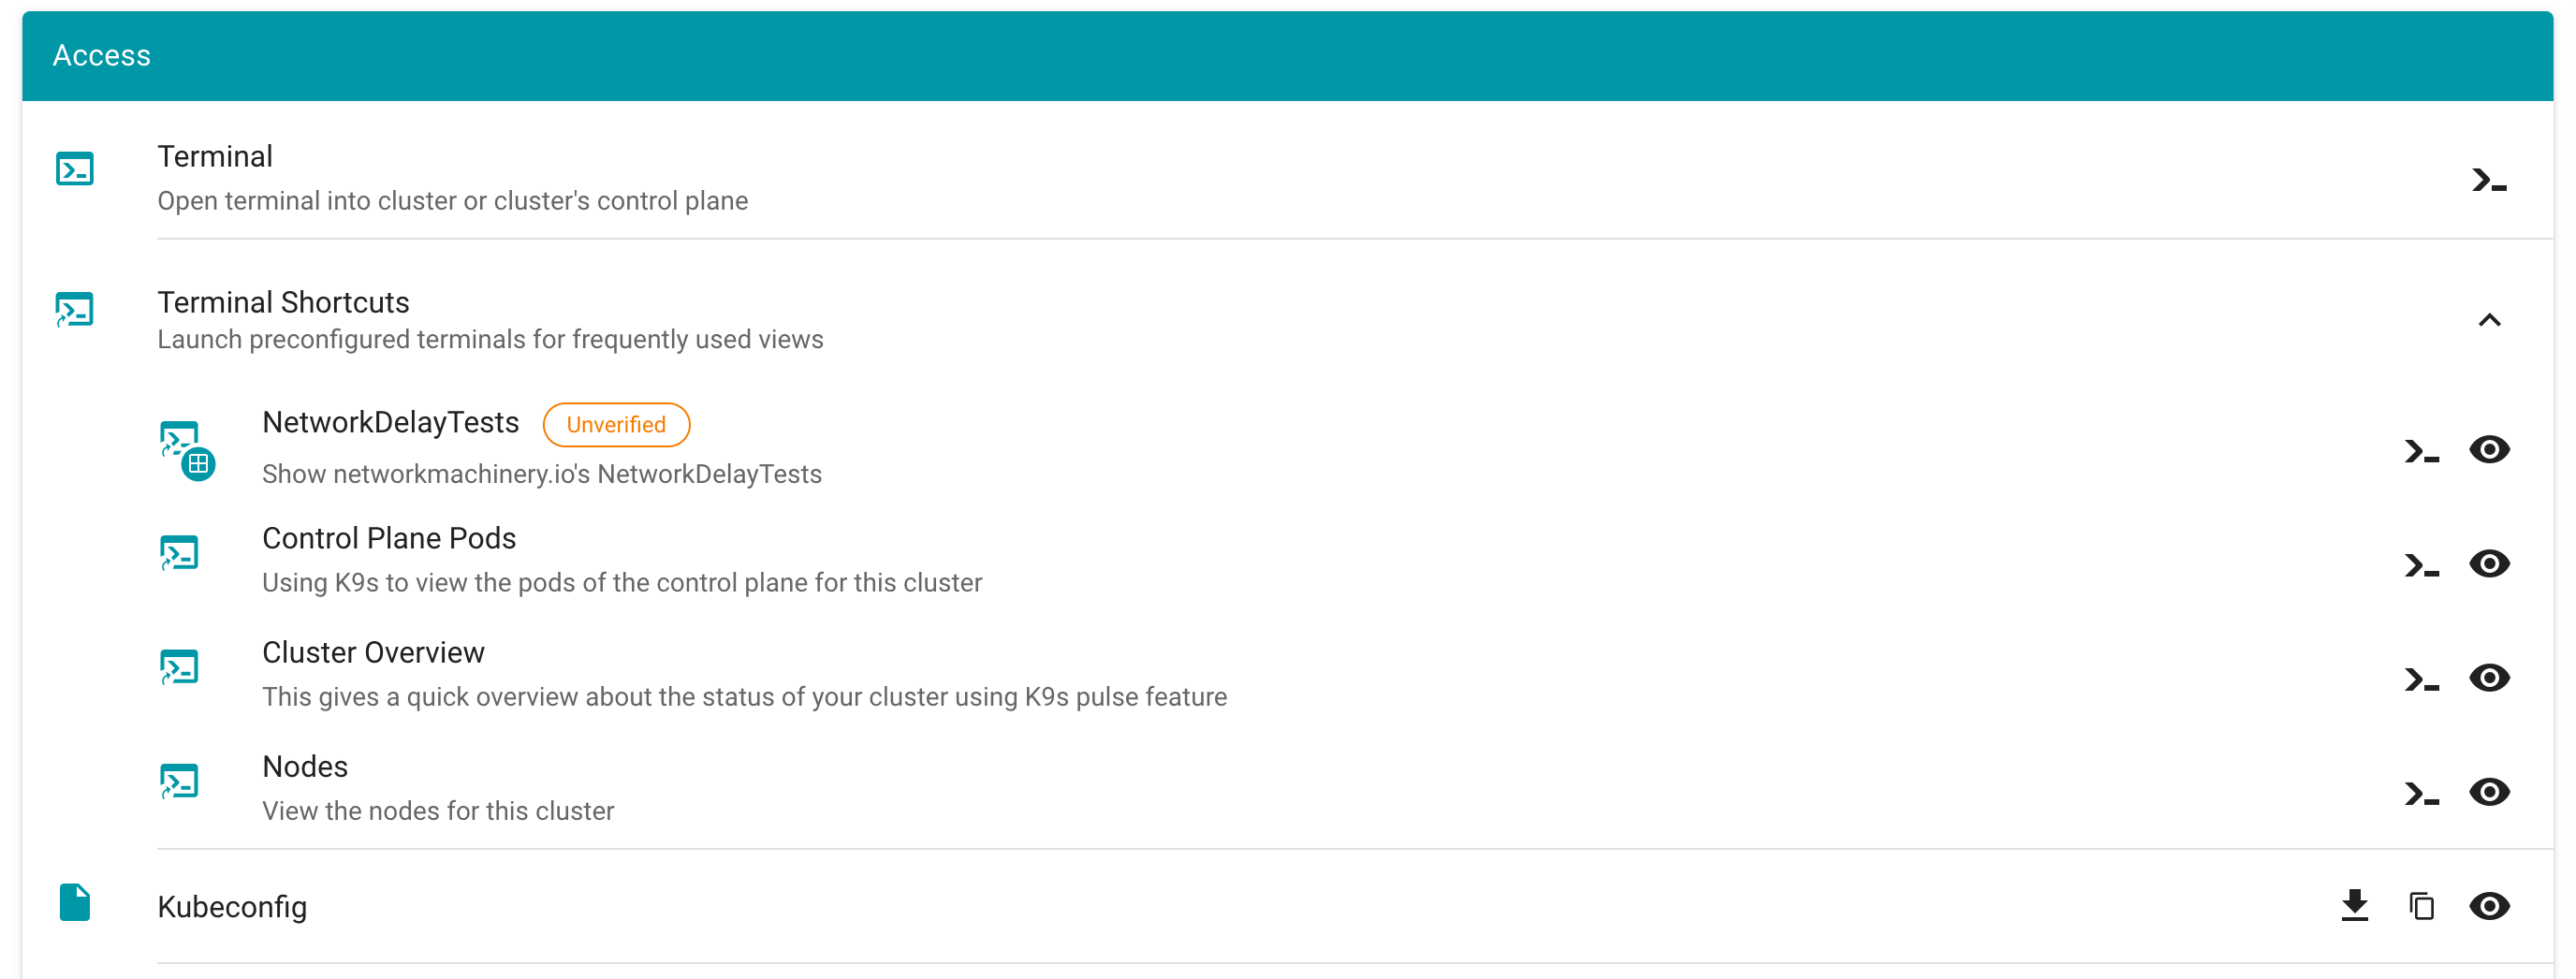
A warning message is displayed before a project specific terminal shortcut is ran informing the user about the risks.
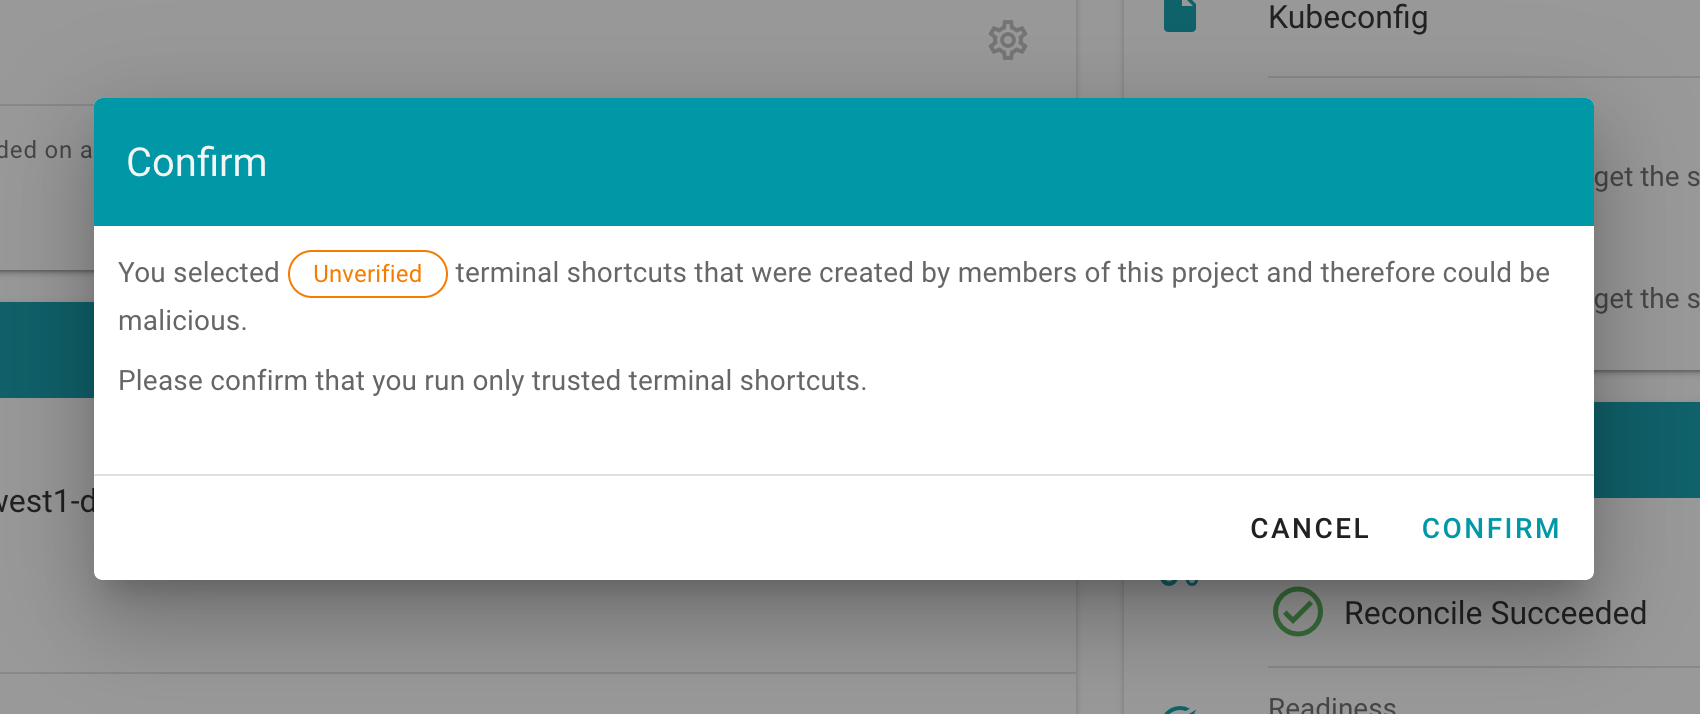
How to create a project specific terminal shortcut
Disclaimer: “Project specific terminal shortcuts” is experimental feature and may change in future releases (we plan to introduce a dedicated custom resource).
You need to create a secret with the name terminal.shortcuts within your project namespace, containing your terminal shortcut configurations. Under data.shortcuts you add a list of terminal shortcuts (base64 encoded).
Example terminal.shortcuts secret:
kind: Secret
type: Opaque
metadata:
name: terminal.shortcuts
namespace: garden-myproject
apiVersion: v1
data:
shortcuts: LS0tCi0gdGl0bGU6IE5ldHdvcmtEZWxheVRlc3RzCiAgZGVzY3JpcHRpb246IFNob3cgbmV0d29ya21hY2hpbmVyeS5pbydzIE5ldHdvcmtEZWxheVRlc3RzCiAgdGFyZ2V0OiBzaG9vdAogIGNvbnRhaW5lcjoKICAgIGltYWdlOiBxdWF5LmlvL2RlcmFpbGVkL2s5czpsYXRlc3QKICAgIGFyZ3M6CiAgICAtIC0taGVhZGxlc3MKICAgIC0gLS1jb21tYW5kPW5ldHdvcmtkZWxheXRlc3QKICBzaG9vdFNlbGVjdG9yOgogICAgbWF0Y2hMYWJlbHM6CiAgICAgIGZvbzogYmFyCi0gdGl0bGU6IFNjYW4gQ2x1c3RlcgogIGRlc2NyaXB0aW9uOiBTY2FucyBsaXZlIEt1YmVybmV0ZXMgY2x1c3RlciBhbmQgcmVwb3J0cyBwb3RlbnRpYWwgaXNzdWVzIHdpdGggZGVwbG95ZWQgcmVzb3VyY2VzIGFuZCBjb25maWd1cmF0aW9ucwogIHRhcmdldDogc2hvb3QKICBjb250YWluZXI6CiAgICBpbWFnZTogcXVheS5pby9kZXJhaWxlZC9rOXM6bGF0ZXN0CiAgICBhcmdzOgogICAgLSAtLWhlYWRsZXNzCiAgICAtIC0tY29tbWFuZD1wb3BleWU=
How to configure the dashboard with terminal shortcuts
Example values.yaml:
frontend:
features:
terminalEnabled: true
projectTerminalShortcutsEnabled: true # members can create a `terminal.shortcuts` secret containing the project specific terminal shortcuts
terminal:
shortcuts:
- title: "Control Plane Pods"
description: Using K9s to view the pods of the control plane for this cluster
target: cp
container:
image: quay.io/derailed/k9s:latest
- "--headless"
- "--command=pods"
- title: "Cluster Overview"
description: This gives a quick overview about the status of your cluster using K9s pulse feature
target: shoot
container:
image: quay.io/derailed/k9s:latest
args:
- "--headless"
- "--command=pulses"
- title: "Nodes"
description: View the nodes for this cluster
target: shoot
container:
image: quay.io/derailed/k9s:latest
command:
- bin/sh
args:
- -c
- sleep 1 && while true; do k9s --headless --command=nodes; done
# shootSelector:
# matchLabels:
# foo: bar
[...]
terminal: # is generally required for the terminal feature
container:
image: europe-docker.pkg.dev/gardener-project/releases/gardener/ops-toolbelt:0.26.0
containerImageDescriptions:
- image: /.*/ops-toolbelt:.*/
description: Run `ghelp` to get information about installed tools and packages
gardenTerminalHost:
seedRef: my-soil
garden:
operatorCredentials:
serviceAccountRef:
name: dashboard-terminal-admin
namespace: garden
7.11 - Testing
Testing
Jest
We use Jest JavaScript Testing Framework

- Jest can collect code coverage information
- Jest support snapshot testing out of the box
- All in One solution. Replaces Mocha, Chai, Sinon and Istanbul
- It works with Vue.js and Node.js projects
To execute all tests, simply run
yarn workspaces foreach --all run test
or to include test coverage generation
yarn workspaces foreach --all run test-coverage
You can also run tests for frontend, backend and charts directly inside the respective folder via
yarn test
Lint
We use ESLint for static code analyzing.
To execute, run
yarn workspaces foreach --all run lint
7.12 - Using Terminal
Using the Dashboard Terminal
The dashboard features an integrated web-based terminal to your clusters. It allows you to use kubectl without the need to supply kubeconfig. There are several ways to access it and they’re described on this page.
Prerequisites
- You are logged on to the Gardener Dashboard.
- You have created a cluster and its status is operational.
- The landscape administrator has enabled the terminal feature
- The cluster you want to connect to is reachable from the dashboard
On this page:
Open from cluster list
Choose your project from the menu on the left and choose CLUSTERS.
Locate a cluster for which you want to open a Terminal and choose the key icon.
In the dialog, choose the icon on the right of the Terminal label.
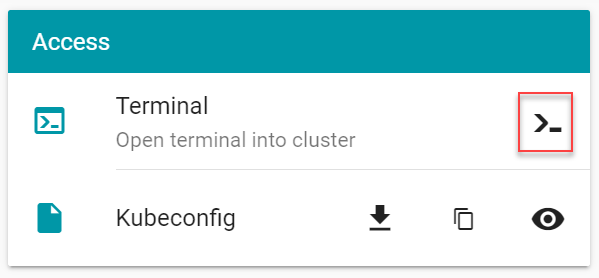
Open from cluster details page
Choose your project from the menu on the left and choose CLUSTERS.
Locate a cluster for which you want to open a Terminal and choose to display its details.
In the Access section, choose the icon on the right of the Terminal label.
Terminal
Opening up the terminal in either of the ways discussed here results in the following screen:
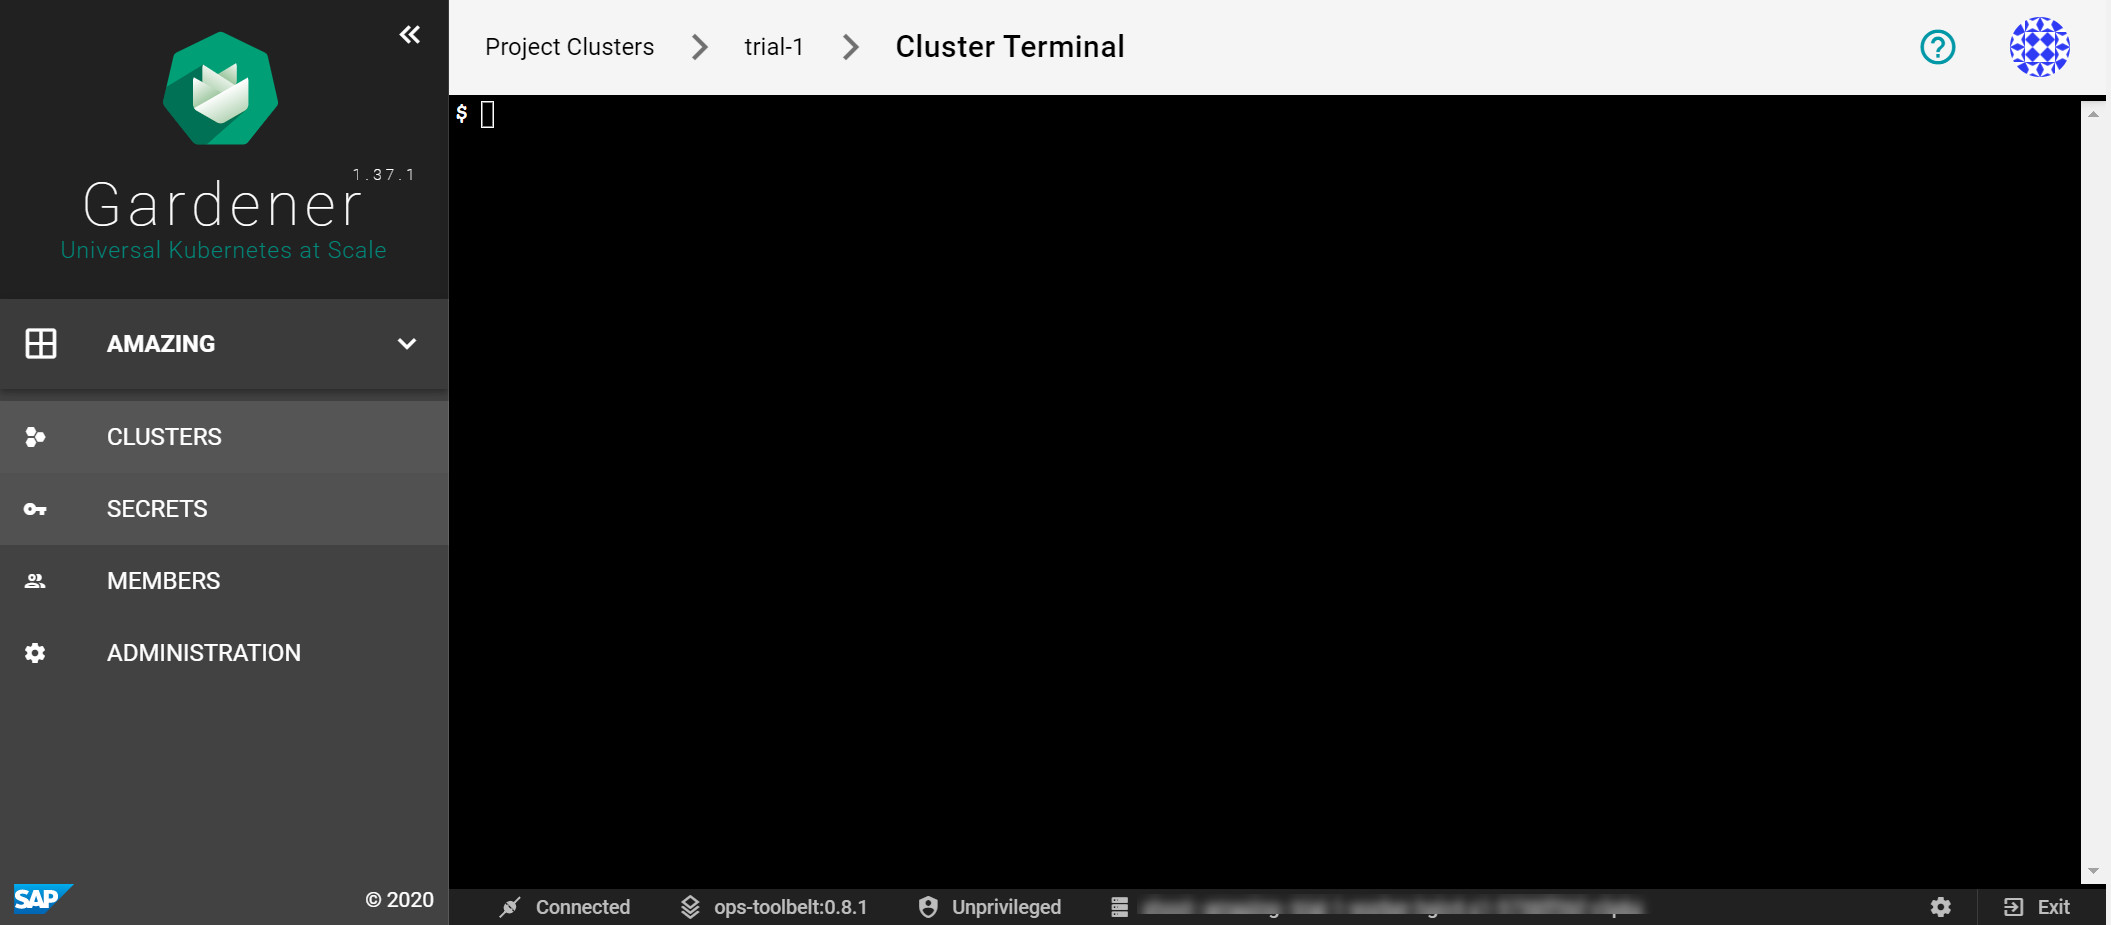
It provides a bash environment and range of useful tools and an installed and configured kubectl (with alias k) to use right away with your cluster.
Try to list the namespaces in the cluster.
$ k get ns
You get a result like this:
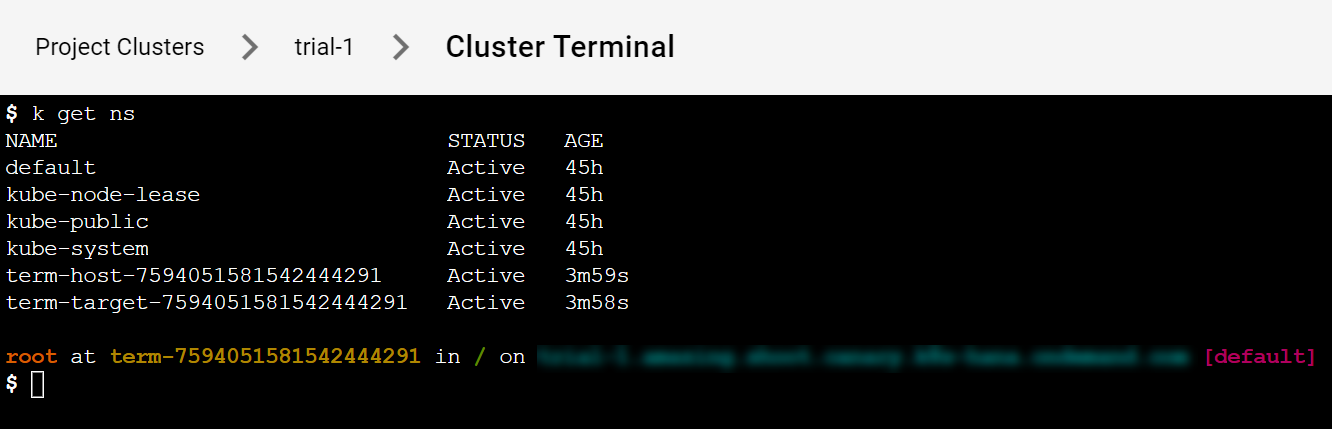
7.13 - Webterminals
Webterminals

Architecture Overview
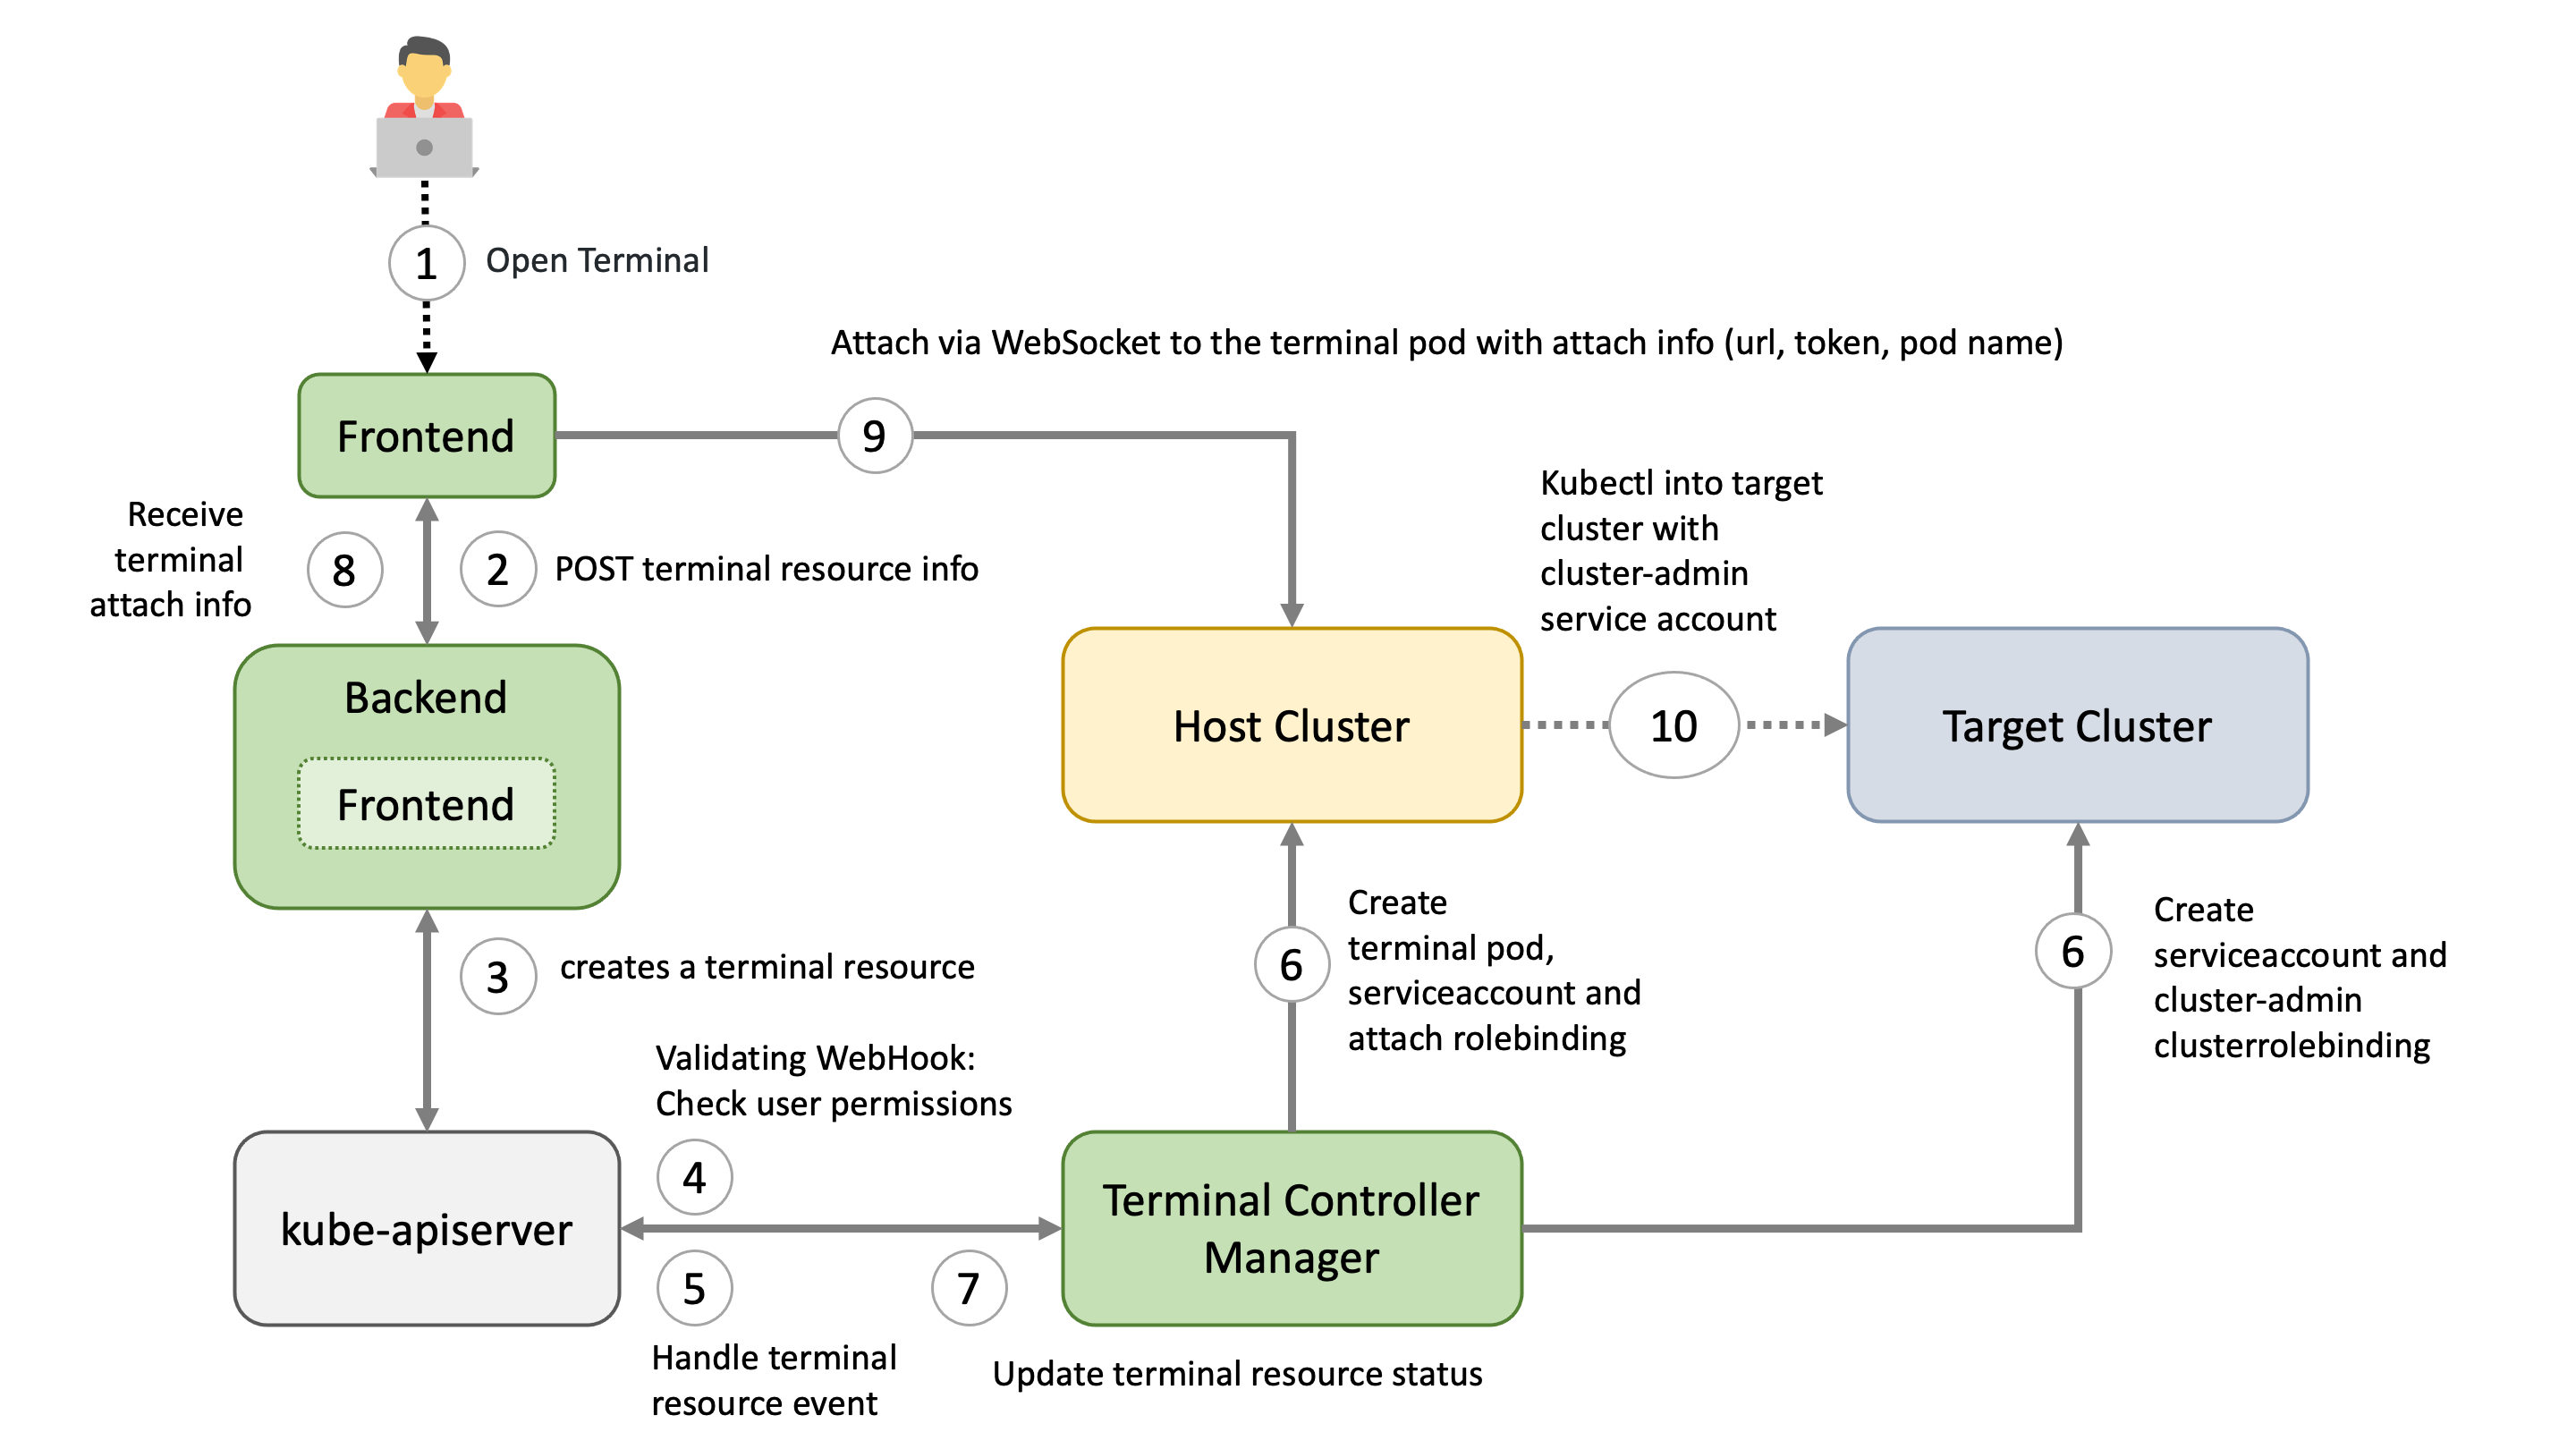
Motivation
We want to give garden operators and “regular” users of the Gardener dashboard an easy way to have a preconfigured shell directly in the browser.
This has several advantages:
- no need to set up any tools locally
- no need to download / store kubeconfigs locally
- Each terminal session will have its own “access” service account created. This makes it easier to see “who” did “what” when using the web terminals.
- The “access” service account is deleted when the terminal session expires
- Easy “privileged” access to a node (privileged container, hostPID, and hostNetwork enabled, mounted host root fs) in case of troubleshooting node. If allowed by PSP.
How it’s done - TL;DR
On the host cluster, we schedule a pod to which the dashboard frontend client attaches to (similar to kubectl attach). Usually the ops-toolbelt image is used, containing all relevant tools like kubectl. The Pod has a kubeconfig secret mounted with the necessary privileges for the target cluster - usually cluster-admin.
Target types
There are currently three targets, where a user can open a terminal session to:
- The (virtual) garden cluster - Currently operator only
- The shoot cluster
- The control plane of the shoot cluster - operator only
Host
There are different factors on where the host cluster (and namespace) is chosen by the dashboard:
- Depending on, the selected target and the role of the user (operator or “regular” user) the host is chosen.
- For performance / low latency reasons, we want to place the “terminal” pods as near as possible to the target kube-apiserver.
For example, the user wants to have a terminal for a shoot cluster. The kube-apiserver of the shoot is running in the seed-shoot-ns on the seed.
- If the user is an operator, we place the “terminal” pod directly in the seed-shoot-ns on the seed.
- However, if the user is a “regular” user, we don’t want to have “untrusted” workload scheduled on the seeds, that’s why the “terminal” pod is scheduled on the shoot itself, in a temporary namespace that is deleted afterwards.
Lifecycle of a Web Terminal Session
1. Browser / Dashboard Frontend - Open Terminal
User chooses the target and clicks in the browser on Open terminal button. A POST request is made to the dashboard backend to request a new terminal session.
2. Dashboard Backend - Create Terminal Resource
According to the privileges of the user (operator / enduser) and the selected target, the dashboard backend creates a terminal resource on behalf of the user in the (virtual) garden and responds with a handle to the terminal session.
3. Browser / Dashboard Frontend
The frontend makes another POST request to the dashboard backend to fetch the terminal session. The Backend waits until the terminal resource is in a “ready” state (timeout 10s) before sending a response to the frontend. More to that later.
4. Terminal Resource
The terminal resource, among other things, holds the information of the desired host and target cluster. The credentials to these clusters are declared as references (shootRef, serviceAccountRef). The terminal resource itself doesn’t contain sensitive information.
5. Admission
A validating webhook is in place to ensure that the user, that created the terminal resource, has the permission to read the referenced credentials. There is also a mutating webhook in place. Both admission configurations have failurePolicy: Fail.
6. Terminal-Controller-Manager - Apply Resources on Host & Target Cluster
Sidenote: The terminal-controller-manager has no knowledge about the gardener, its shoots, and seeds. In that sense it can be considered as independent from the gardener.
The terminal-controller-manager watches terminal resources and ensures the desired state on the host and target cluster. The terminal-controller-manager needs the permission to read all secrets / service accounts in the virtual garden.
As additional safety net, the terminal-controller-manager ensures that the terminal resource was not created before the admission configurations were created.
The terminal-controller-manager then creates the necessary resources in the host and target cluster.
- Target Cluster:
- “Access” service account + (cluster)rolebinding usually to
cluster-admincluster role- used from within the “terminal” pod
- “Access” service account + (cluster)rolebinding usually to
- Host Cluster:
- “Attach” service Account + rolebinding to “attach” cluster role (privilege to attach and get pod)
- will be used by the browser to attach to the pod
- Kubeconfig secret, containing the “access” token from the target cluster
- The “terminal” pod itself, having the kubeconfig secret mounted
- “Attach” service Account + rolebinding to “attach” cluster role (privilege to attach and get pod)
7. Dashboard Backend - Responds to Frontend
As mentioned in step 3, the dashboard backend waits until the terminal resource is “ready”. It then reads the “attach” token from the host cluster on behalf of the user.
It responds with:
- attach token
- hostname of the host cluster’s api server
- name of the pod and namespace
8. Browser / Dashboard Frontend - Attach to Pod
Dashboard frontend attaches to the pod located on the host cluster by opening a WebSocket connection using the provided parameter and credentials.
As long as the terminal window is open, the dashboard regularly annotates the terminal resource (heartbeat) to keep it alive.
9. Terminal-Controller-Manager - Cleanup
When there is no heartbeat on the terminal resource for a certain amount of time (default is 5m) the created resources in the host and target cluster are cleaned up again and the terminal resource will be deleted.
Browser Trusted Certificates for Kube-Apiservers
When the dashboard frontend opens a secure WebSocket connection to the kube-apiserver, the certificate presented by the kube-apiserver must be browser trusted. Otherwise, the connection can’t be established due to browser policy. Most kube-apiservers have self-signed certificates from a custom Root CA.
The Gardener project now handles the responsibility of exposing the kube-apiservers with browser trusted certificates for Seeds (gardener/gardener#7764) and Shoots (gardener/gardener#7712). For this to work, a Secret must exist in the garden namespace of the Seed cluster. This Secret should have a label gardener.cloud/role=controlplane-cert. The Secret is expected to contain the wildcard certificate for Seeds ingress domain.
Allowlist for Hosts
Motivation
When a user starts a terminal session, the dashboard frontend establishes a secure WebSocket connection to the corresponding kube-apiserver. This connection is controlled by the connectSrc directive of the content security policy, which governs the hosts that the browser can connect to.
By default, the connectSrc directive only permits connections to the same host. However, to enable the webterminal feature to function properly, connections to additional trusted hosts are required. This is where the allowedHostSourceList configuration becomes relevant. It directly impacts the connectSrc directive by specifying the hostnames that the browser is allowed to connect to during a terminal session. By defining this list, you can extend the range of terminal connections to include the necessary trusted hosts, while still preventing any unauthorized or potentially harmful connections.
Configuration
The allowedHostSourceList can be configured within the global.terminal section of the gardener-dashboard Helm values.yaml file. The list should consist of permitted hostnames (without the scheme) for terminal connections.
It is important to consider that the usage of wildcards follows the rules defined by the content security policy.
Here is an example of how to configure the allowedHostSourceList:
global:
terminal:
allowedHostSourceList:
- "*.seed.example.com"
In this example, any host under the seed.example.com domain is allowed for terminal connections.
7.14 - Working With Projects
Working with Projects
Overview
Projects are used to group clusters, onboard IaaS resources utilized by them, and organize access control. To work with clusters, first you need to create a project that they will belong to.
Creating Your First Project
Prerequisites
- You have access to the Gardener Dashboard and have permissions to create projects
Steps
Logon to the Gardener Dashboard and choose CREATE YOUR FIRST PROJECT.
Provide a project Name, and optionally a Description and a Purpose, and choose CREATE.
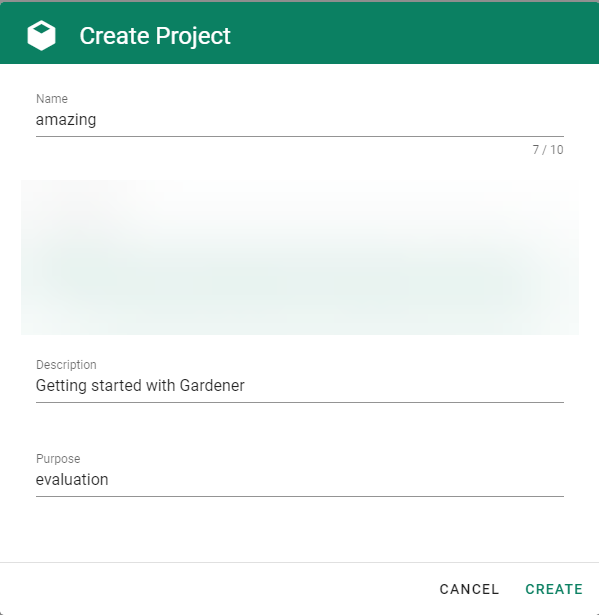
⚠️ You will not be able to change the project name later. The rest of the details will be editable.
Result
After completing the steps above, you will arrive at a similar screen:
Creating More Projects
If you need to create more projects, expand the Projects list dropdown on the left. When expanded, it reveals a CREATE PROJECT button that brings up the same dialog as above.
Rotating Your Project’s Secrets
After rotating your Gardener credentials and updating the corresponding secret in Gardener, you also need to reconcile all the shoots so that they can start using the updated secret. Updating the secret on its own won’t trigger shoot reconciliation and the shoot will use the old credentials until reconciliation, which is why you need to either trigger reconciliation or wait until it is performed in the next maintenance time window.
For more information, see Credentials Rotation for Shoot Clusters.
Deleting Your Project
When you need to delete your project, go to ADMINISTRATON, choose the trash bin icon and, confirm the operation.
8 - Gardenctl V2
gardenctl-v2
![]()
![]()
What is gardenctl?
gardenctl is a command-line client for the Gardener. It facilitates the administration of one or many garden, seed and shoot clusters. Use this tool to configure access to clusters and configure cloud provider CLI tools. It also provides support for accessing cluster nodes via ssh.
Installation
Install the latest release from Homebrew, Chocolatey or GitHub Releases.
Install using Package Managers
# Homebrew (macOS and Linux)
brew install gardener/tap/gardenctl-v2
# Chocolatey (Windows)
# default location C:\ProgramData\chocolatey\bin\gardenctl-v2.exe
choco install gardenctl-v2
Attention brew users: gardenctl-v2 uses the same binary name as the legacy gardenctl (gardener/gardenctl) CLI. If you have an existing installation you should remove it with brew uninstall gardenctl before attempting to install gardenctl-v2. Alternatively, you can choose to link the binary using a different name. If you try to install without removing or relinking the old installation, brew will run into an error and provide instructions how to resolve it.
Install from Github Release
If you install via GitHub releases, you need to
- put the
gardenctlbinary on your path - and install gardenlogin.
The other install methods do this for you.
# Example for macOS
# set operating system and architecture
os=darwin # choose between darwin, linux, windows
arch=amd64 # choose between amd64, arm64
# Get latest version. Alternatively set your desired version
version=$(curl -s https://raw.githubusercontent.com/gardener/gardenctl-v2/master/LATEST)
# Download gardenctl
curl -LO "https://github.com/gardener/gardenctl-v2/releases/download/${version}/gardenctl_v2_${os}_${arch}"
# Make the gardenctl binary executable
chmod +x "./gardenctl_v2_${os}_${arch}"
# Move the binary in to your PATH
sudo mv "./gardenctl_v2_${os}_${arch}" /usr/local/bin/gardenctl
Configuration
gardenctl requires a configuration file. The default location is in ~/.garden/gardenctl-v2.yaml.
You can modify this file directly using the gardenctl config command. It allows adding, modifying and deleting gardens.
Example config command:
# Adapt the path to your kubeconfig file for the garden cluster (not to be mistaken with your shoot cluster)
export KUBECONFIG=~/relative/path/to/kubeconfig.yaml
# Fetch cluster-identity of garden cluster from the configmap
cluster_identity=$(kubectl -n kube-system get configmap cluster-identity -ojsonpath={.data.cluster-identity})
# Configure garden cluster
gardenctl config set-garden $cluster_identity --kubeconfig $KUBECONFIG
This command will create or update a garden with the provided identity and kubeconfig path of your garden cluster.
Example Config
gardens:
- identity: landscape-dev # Unique identity of the garden cluster. See cluster-identity ConfigMap in kube-system namespace of the garden cluster
kubeconfig: ~/relative/path/to/kubeconfig.yaml
# name: my-name # An alternative, unique garden name for targeting
# context: different-context # Overrides the current-context of the garden cluster kubeconfig
# patterns: ~ # List of regex patterns for pattern targeting
Note
- To use the kubeconfigs for shoot clusters provided by
gardenctl, you need to have gardenlogin installed as akubectlauth plugin.- If your garden cluster kubeconfig uses OIDC authentication, ensure that you have the kubelogin
kubectlauth plugin installed.
Config Path Overwrite
- The
gardenctlconfig path can be overwritten with the environment variableGCTL_HOME. - The
gardenctlconfig name can be overwritten with the environment variableGCTL_CONFIG_NAME.
export GCTL_HOME=/alternate/garden/config/dir
export GCTL_CONFIG_NAME=myconfig # without extension!
# config is expected to be under /alternate/garden/config/dir/myconfig.yaml
Shell Session
The state of gardenctl is bound to a shell session and is not shared across windows, tabs or panes.
A shell session is defined by the environment variable GCTL_SESSION_ID. If this is not defined,
the value of the TERM_SESSION_ID environment variable is used instead. If both are not defined,
this leads to an error and gardenctl cannot be executed. The target.yaml and temporary
kubeconfig.*.yaml files are stored in the following directory ${TMPDIR}/garden/${GCTL_SESSION_ID}.
You can make sure that GCTL_SESSION_ID or TERM_SESSION_ID is always present by adding
the following code to your terminal profile ~/.profile, ~/.bashrc or comparable file.
bash and zsh: [ -n "$GCTL_SESSION_ID" ] || [ -n "$TERM_SESSION_ID" ] || export GCTL_SESSION_ID=$(uuidgen)
fish: [ -n "$GCTL_SESSION_ID" ] || [ -n "$TERM_SESSION_ID" ] || set -gx GCTL_SESSION_ID (uuidgen)
powershell: if ( !(Test-Path Env:GCTL_SESSION_ID) -and !(Test-Path Env:TERM_SESSION_ID) ) { $Env:GCTL_SESSION_ID = [guid]::NewGuid().ToString() }
Completion
Gardenctl supports completion that will help you working with the CLI and save you typing effort.
It will also help you find clusters by providing suggestions for gardener resources such as shoots or projects.
Completion is supported for bash, zsh, fish and powershell.
You will find more information on how to configure your shell completion for gardenctl by executing the help for
your shell completion command. Example:
gardenctl completion bash --help
Usage
Targeting
You can set a target to use it in subsequent commands. You can also overwrite the target for each command individually.
Note that this will not affect your KUBECONFIG env variable. To update the KUBECONFIG env for your current target see Configure KUBECONFIG section
Example:
# target control plane
gardenctl target --garden landscape-dev --project my-project --shoot my-shoot --control-plane
Find more information in the documentation.
Configure KUBECONFIG for Shoot Clusters
Generate a script that points KUBECONFIG to the targeted cluster for the specified shell. Use together with eval to configure your shell. Example for bash:
eval "$(gardenctl kubectl-env bash)"
To load the kubectl configuration for each bash session add the command at the end of the ~/.bashrc file.
Configure Cloud Provider CLIs
Generate the cloud provider CLI configuration script for the specified shell. Use together with eval to configure your shell. Example for bash:
eval "$(gardenctl provider-env bash)"
SSH
Establish an SSH connection to a Shoot cluster’s node.
gardenctl ssh my-node
9 - FAQ
9.1 - Can I run privileged containers?
While it is possible, we highly recommend not to use privileged containers in your productive environment.
9.2 - Can you backup your Kubernetes cluster resources?
Backing up your Kubernetes cluster is possible through the use of specialized software like Velero. Velero consists of a server side component and a client tool that allow you to backup or restore all objects in your cluster, as well as the cluster resources and persistent volumes.
9.3 - Can you migrate the content of one cluster to another cluster?
The migration of clusters or content from one cluster to another is out of scope for the Gardener project. For such scenarios you may consider using tools like Velero.
9.4 - How can you get the status of a shoot API server?
There are two ways to get the health information of a shoot API server.
- Try to reach the public endpoint of the shoot API server via
"https://api.<shoot-name>.<project-name>.shoot.<canary|office|live>.k8s-hana.ondemand.com/healthz"
The endpoint is secured, therefore you need to authenticate via basic auth or client cert. Both are available in the admin kubeconfig of the shoot cluster. Note that with those credentials you have full (admin) access to the cluster, therefore it is highly recommended to create custom credentials with some RBAC rules and bindings which only allow access to the /healthz endpoint.
- Fetch the shoot resource of your cluster via the programmatic API of the Gardener and get the availability information from the status. You need a kubeconfig for the Garden cluster, which you can get via the Gardener dashboard. Then you could fetch your shoot resource and query for the availability information via:
kubectl get shoot <shoot-name> -o json | jq -r '.status.conditions[] | select(.type=="APIServerAvailable")'
The availability information in the second scenario is collected by the Gardener. If you want to collect the information independently from Gardener, you should choose the first scenario.
If you want to archive a simple pull monitor in the AvS for a shoot cluster, you also need to use the first scenario, because with it you have a stable endpoint for the API server which you can query.
9.5 - How do you configure Multi-AZ worker pools for different extensions?
Configuration of Multi-AZ worker pools depends on the infrastructure.
The zone distribution for the worker pools can be configured generically across all infrastructures. You can find provider-specific details in the InfrastructureConfig section of each extension provider repository:
9.6 - How do you rotate IaaS keys for a running cluster?
End-users must provide credentials such that Gardener and Kubernetes controllers can communicate with the respective cloud provider APIs in order to perform infrastructure operations. These credentials should be regularly rotated.
How to do so is explained in Shoot Credentials Rotation.
9.7 - How to add K8S feature gates to my shoot cluster?
Adding a Feature Gate
In order to add a feature gate, add it as enabled to the appropriate section of the shoot.yaml file:
SectionName:
featureGates:
SomeKubernetesFeature: true
The available sections are kubelet, kubernetes, kubeAPIServer, kubeControllerManager, kubeScheduler, and kubeProxy.
For more detals, see the example shoot.yaml file.
What is the expected downtime when updating the shoot.yaml?
No downtime is expected after executing a shoot.yaml update.
9.8 - Reconciliation
What is impacted during a reconciliation?
Infrastructure and DNSRecord reconciliation are only done during usual reconciliation if there were relevant changes. Otherwise, they are only done during maintenance.
How do you steer a reconciliation?
Reconciliation is bound to the maintenance time window of a cluster. This means that your shoot will be reconciled regularly, without need for input.
Outside of the maintenance time window your shoot will only reconcile if you change the specification or if you explicitly trigger it. To learn how, see Trigger shoot operations.
9.9 - Upgrading Kubernetes Versions
How can I upgrade my cluster versions?
Upgrading your shoot cluster version can be done manually or by pressing the Upgrade button in the Dashboard.
In order to manually update your cluster, you need to change the value of kubernetes.version in your shoot spec. Some specifics:
- You must only increment by one minor version (
01.XX.01) at a time. Supported versions can be found in your garden cluster’s cloud profile. - You can increment by as many patch versions (
01.01.XX) as you would like at once. - Once your cluster has been upgraded, you cannot rollback to a previous version.
Warning
Before updating a cluster, you should be aware of the potential errors this might cause.
The following video will dive into a Kubernetes outage in production that Monzo experienced, its causes and effects, and the architectural and operational lessons learned.
It is therefore recommended to first update your test cluster and validate it before performing changes on a productive environment.
Can Kubernetes upgrade automatically?
There is no automatic migration of major/minor versions of Kubernetes. You need to update your clusters manually or press the Upgrade button in the Dashboard.
9.10 - What are the meanings of different DNS configuration options?
Can you adapt a DNS configuration to be used by the workload on the cluster (CoreDNS configuration)?
Yes, you can. Information on that can be found in Custom DNS Configuration.
How to use custom domain names using a DNS provider?
Creating custom domain names for the Gardener infrastructure DNS records using DNSRecords resources
With DNSRecords internal and external domain names of the kube-apiserver are set, as well as the deprecated ingress domain name and an “owner” DNS record for the owning seed.
For this purpose, you need either a provider extension supporting the needed resource kind DNSRecord/<provider-type> or a special extension.
All main providers support their respective IaaS specific DNS servers:
- AWS =>
DNSRecord/aws-route53 - GCP =>
DNSRecord/google-cloudns - Azure =>
DNSRecord/azure-dns - Openstack =>
DNSRecord/openstack-designate - AliCloud =>
DNSRecord/alicloud-dns
For Cloudflare there is a community extension existing.
For other providers like Netlify and infoblox there is currently no known supporting extension, however, they are supported for shoot-dns-service.
Creating domain names for cluster resources like ingress or services with services of type Loadbalancers and for TLS certificates
For this purpose, the shoot-dns-service extension is used (DNSProvider and DNSEntry resources).
You can read more on it in these documents:
10 - Glossary
Purpose
Synonyms and inconsistent writing style makes it hard for beginners to get into a new topic. This glossary aims to help users to get a better understanding of Gardener and authors to use the right terminology.
Contributions are most welcome!
If you would like to contribute please check first if your new term is already part of the Standardized Kubernetes Glossary, and if so refrain from adding it here. Whenever you see the need to explain Kubernetes terminology or to refer to Kubernetes concepts it is recommended that you link to the official Kubernetes documentation in your section.
Gardener Glossary
If you add anything to the list please keep it in alphabetical order.
| Term | Definition | Related Term |
|---|---|---|
| cloud provider secret | А resource storing confidential data used to authenticate Gardener and Kubernetes components for infrastructure operations. When a new cluster is created in a Gardener project, the project admin who creates the cluster specification must select the infrastructure secret that will be used to manage IaaS resources required for the new cluster. | secret |
| Gardener API server | An API server designed to run inside a Kubernetes cluster whose API it wants to extend. After registration, it is used to expose resources native to Gardener such as cloud profiles, shoots, seeds and secret bindings. | kube-apiserver |
| garden cluster control plane | A control plane that manages the overall creation, modification, and deletion of clusters. | control plane |
| Gardener controller manager | A component that runs next to the Gardener API server which runs several control loops that do not require talking to any seed or shoot cluster. | kube-controller-manager |
| Gardener project | A consolidation of project members, clusters, and secrets of the underlying IaaS provider used to organize teams and clusters in a meaningful way. | none |
| Gardener scheduler | A controller that watches newly created shoots and assigns a seed cluster to them. | kube-scheduler |
| gardenlet | An agent that manages seed clusters decentrally; reads the desired state from the Gardener API Server and updates the current state. The gardenlet has a similar role as the kubelet in Kubernetes, which manages the workload of a node decentrally; gardenlet manages the shoot clusters (workload) of a seed cluster instead. More information: gardenlet. | kubelet |
| garden cluster | A dedicated Kubernetes cluster that the Gardener control plane runs in. | cluster |
| project “Gardener” | An open source project that focuses on operating, monitoring, and managing Kubernetes clusters. | none |
| physical garden cluster | A physical cluster of the IaaS provider that is used to install Gardener in. | none |
| secretBinding | A resource that makes it possible for shoot clusters to connect to the cloud provider secret. | none |
| seed cluster | A cluster that hosts shoot cluster control planes as pods in order to manage shoot clusters. | node |
| shoot cluster | A Kubernetes runtime for the actual applications or services consisting of a shoot control plane running on the seed cluster and worker nodes hosting the actual workload. | pod |
| shoot cluster control plane | A Kubernetes control plane used to run the actual end-user workload. It is hosted in the form of pods on a seed cluster. | control plane |
| soil cluster | A cluster that is created manually and is used as host for other seeds. Sometimes it is technically impossible that Gardener can install shoot clusters on an infrastructure, for example, because the infrastructure is not supported or protected by a firewall. In such cases you can create a soil cluster on that infrastructure manually as a host for seed clusters. From inside the firewall, seed clusters can reach the garden cluster outside the firewall. This is possible since Gardener delegated cluster management to the Gardenlet. | none |
| virtual garden cluster | A cluster without any nodes that runs the Kubernetes API server, etcd, and stores Gardener metadata like projects, shoot resources, seed resources, secrets, and others. The virtual garden cluster is installed on the physical garden cluster (base cluster of IaaS provider) during the installation of Gardener. Thanks to the virtual garden cluster, Gardener has full control over all Gardener metadata. This full control simplifies the support for the backup, restore, recovery, migration, relocation, or recreation of this data, because it can be implemented independently from the underlying physical garden cluster. | none |
11 - Resources
Overview
Here you will find a curated list of awesome Kubernetes sources - tutorials, videos, courses, and more. The topic is inspired by @sindresorhus’ awesome.
Contributions are most welcome!
Setup
A Place That Marks the Beginning of a Journey
- Read the kubernetes.io documentation
- Take an online Udemy course
- Kubernetes Community Overview and Contributions Guide by Ihor Dvoretskyi
- Kubernetes: The Future of Cloud Hosting by Meteorhacks
- Kubernetes by Google by Gaston Pantana
- Application Containers: Kubernetes and Docker from Scratch by Keith Tenzer
- Learn the Kubernetes Key Concepts in 10 Minutes by Omer Dawelbeit
- The Children’s Illustrated Guide to Kubernetes by Deis :-)
- Docker Kubernetes Lab Handbook by Peng Xiao
Interactive Learning Environments
Learn Kubernetes using an interactive environment without requiring downloads or configuration
Massive Open Online Courses / Tutorials
List of available free online courses(MOOC) and tutorials
Courses
Tutorials
- Kubernetes Tutorials by Kubernetes Team
- Kubernetes By Example by OpenShift Team
- Kubernetes Tutorial by Tutorialspoint
Package Managers
RPC
RBAC
Secret Generation and Management
- Vault auth plugin backend: Kubernetes
- Vault controller
- kube-lego
- k8sec
- kubernetes-vault
- kubesec - Secure Secret management
Machine Learning
- TensorFlow k8s
- mxnet-operator - Tools for ML/MXNet on Kubernetes.
- kubeflow - Machine Learning Toolkit for Kubernetes.
- seldon-core - Open source framework for deploying machine learning models on Kubernetes
Raspberry Pi
Some of the awesome findings and experiments on using Kubernetes with Raspberry Pi.
11.1 - Videos
11.1.1 - Why Kubernetes
11.1.2 - High Performance Microservices with Kubernetes, Go, and gRPC
11.1.3 - Building Small Containers
11.1.4 - Organizing with Namespaces
11.1.5 - Readiness != Liveness
11.1.6 - The Ins and Outs of Networking
12 - Contribute
Contributing to Gardener
Welcome
Welcome to the Contributor section of Gardener. Here you can learn how it is possible for you to contribute your ideas and expertise to the project and have it grow even more.
Prerequisites
Before you begin contributing to Gardener, there are a couple of things you should become familiar with and complete first.
Code of Conduct
All members of the Gardener community must abide by the Contributor Covenant. Only by respecting each other can we develop a productive, collaborative community. Instances of abusive, harassing, or otherwise unacceptable behavior may be reported by contacting gardener.opensource@sap.com and/or a Gardener project maintainer.
Developer Certificate of Origin
Due to legal reasons, contributors will be asked to accept a Developer Certificate of Origin (DCO) before they submit the first pull request to this projects, this happens in an automated fashion during the submission process. We use the standard DCO text of the Linux Foundation.
License
Your contributions to Gardener must be licensed properly:
- Code contributions must be licensed under the Apache 2.0 License
- Documentation contributions must be licensed under the Creative Commons Attribution 4.0 International License
Contributing
Gardener uses GitHub to manage reviews of pull requests.
If you are a new contributor see: Steps to Contribute
If you have a trivial fix or improvement, go ahead and create a pull request.
If you plan to do something more involved, first discuss your ideas on our mailing list. This will avoid unnecessary work and surely give you and us a good deal of inspiration.
Relevant coding style guidelines are the Go Code Review Comments and the Formatting and style section of Peter Bourgon’s Go: Best Practices for Production Environments.
Steps to Contribute
Should you wish to work on an issue, please claim it first by commenting on the GitHub issue that you want to work on it. This is to prevent duplicated efforts from contributors on the same issue.
If you have questions about one of the issues, with or without the tag, please comment on them and one of the maintainers will clarify it.
We kindly ask you to follow the Pull Request Checklist to ensure reviews can happen accordingly.
Pull Request Checklist
Branch from the master branch and, if needed, rebase to the current master branch before submitting your pull request. If it doesn’t merge cleanly with master you may be asked to rebase your changes.
Commits should be as small as possible, while ensuring that each commit is correct independently (i.e., each commit should compile and pass tests).
Test your changes as thoroughly as possible before your commit them. Preferably, automate your testing with unit / integration tests. If tested manually, provide information about the test scope in the PR description (e.g., “Test passed: Upgrade K8s version from 1.14.5 to 1.15.2 on AWS, Azure, GCP, Alicloud, Openstack.”).
When creating the PR, make your Pull Request description as detailed as possible to help out the reviewers.
Create Work In Progress [WIP] pull requests only if you need a clarification or an explicit review before you can continue your work item.
If your patch is not getting reviewed or you need a specific person to review it, you can @-reply a reviewer asking for a review in the pull request or a comment, or you can ask for a review on our mailing list.
If you add new features, make sure that they are documented in the Gardener documentation.
If your changes are relevant for operators, consider to update the ops toolbelt image.
Post review:
- If a review requires you to change your commit(s), please test the changes again.
- Amend the affected commit(s) and force push onto your branch.
- Set respective comments in your GitHub review to resolved.
- Create a general PR comment to notify the reviewers that your amendments are ready for another round of review.
Contributing Bigger Changes
If you want to contribute bigger changes to Gardener, such as when introducing new API resources and their corresponding controllers, or implementing an approved Gardener Enhancement Proposal, follow the guidelines outlined in Contributing Bigger Changes.
Adding Already Existing Documentation
If you want to add documentation that already exists on GitHub to the website, you should update the central manifest instead of duplicating the content. To find out how to do that, see Adding Already Existing Documentation.
Issues and Planning
We use GitHub issues to track bugs and enhancement requests. Please provide as much context as possible when you open an issue. The information you provide must be comprehensive enough to reproduce that issue for the assignee. Therefore, contributors may use but aren’t restricted to the issue template provided by the Gardener maintainers.
Security Release Process
Community
Slack
We use the Gardener Project workspace for public communication related to the Gardener project. Check out the Community Bio for an invite link to join the workspace.
Historically, we used the #gardener channel in the Kubernetes workspace.
Mailing List
The mailing list is hosted through Google Groups. To receive the lists’ emails, join the group as you would any other Google Group.
Other
For additional channels where you can reach us, as well as links to our bi-weekly meetings, visit the Community page.
12.1 - Contributing Code
You are welcome to contribute code to Gardener in order to fix a bug or to implement a new feature.
The following rules govern code contributions:
- Contributions must be licensed under the Apache 2.0 License
- You need to sign the Contributor License Agreement. We are using CLA assistant providing a click-through workflow for accepting the CLA. For company contributors additionally the company needs to sign a corporate license agreement. See the following sections for details.
12.1.1 - Contributing Bigger Changes
Contributing Bigger Changes
Here are the guidelines you should follow when contributing larger changes to Gardener:
We strongly recommend to write a Gardener Enhancement Proposal (GEP) to get a common understanding what you want to achieve. This makes it easier for reviewers to understand the big picture.
Avoid proposing a big change in one single PR. Instead, split your work into multiple stages which are independently mergeable and create one PR for each stage. For example, if introducing a new API resource and its controller, these stages could be:
- API resource types, including defaults and generated code.
- API resource validation.
- API server storage.
- Admission plugin(s), if any.
- Controller(s), including changes to existing controllers. Split this phase further into different functional subsets if appropriate.
If you realize later that changes to artifacts introduced in a previous stage are required, by all means make them and explain in the PR why they were needed.
Consider splitting a big PR further into multiple commits to allow for more focused reviews. For example, you could add unit tests / documentation in separate commits from the rest of the code. If you have to adapt your PR to review feedback, prefer doing that also in a separate commit to make it easier for reviewers to check how their feedback has been addressed.
To make the review process more efficient and avoid too many long discussions in the PR itself, ask for a “main reviewer” to be assigned to your change, then work with this person to make sure he or she understands it in detail, and agree together on any improvements that may be needed. If you can’t reach an agreement on certain topics, comment on the PR and invite other people to join the discussion.
Even if you have a “main reviewer” assigned, you may still get feedback from other reviewers. In general, these “non-main reviewers” are advised to focus more on the design and overall approach rather than the implementation details. Make sure that you address any concerns on this level appropriately.
12.1.2 - CI/CD
CI/CD
As an execution environment for CI/CD workloads, we use Concourse.
We however abstract from the underlying “build executor” and instead offer a
Pipeline Definition Contract, through which components declare their build pipelines as
required.
In order to run continuous delivery workloads for all components contributing to the Gardener project, we operate a central service.
Typical workloads encompass the execution of tests and builds of a variety of technologies, as well as building and publishing container images, typically containing build results.
We are building our CI/CD offering around some principles:
- container-native - each workload is executed within a container environment. Components may customise used container images
- automation - pipelines are generated without manual interaction
- self-service - components customise their pipelines by changing their sources
- standardisation
Learn more on our: Build Pipeline Reference Manual
12.1.3 - Dependencies
Testing
We follow the BDD-style testing principles and are leveraging the Ginkgo framework along with Gomega as matcher library. In order to execute the existing tests, you can use
make test # runs tests
make verify # runs static code checks and test
There is an additional command for analyzing the code coverage of the tests. Ginkgo will generate standard Golang cover profiles which will be translated into a HTML file by the Go Cover Tool. Another command helps you to clean up the filesystem from the temporary cover profile files and the HTML report:
make test-cov
open gardener.coverage.html
make test-cov-clean
sigs.k8s.io/controller-runtime env test
Some of the integration tests in Gardener are using the sigs.k8s.io/controller-runtime/pkg/envtest package.
It sets up a temporary control plane (etcd + kube-apiserver) against the integration tests can run.
The test and test-cov rules in the Makefile prepare this env test automatically by downloading the respective binaries (if not yet present) and set the necessary environment variables.
You can also run go test or ginkgo without the test/test-cov rules.
In this case you have to set the KUBEBUILDER_ASSETS environment variable to the path that contains the etcd + kube-apiserver binaries or you need to have the binaries pre-installed under /usr/local/kubebuilder/bin.
Dependency Management
We are using go modules for depedency management.
In order to add a new package dependency to the project, you can perform go get <PACKAGE>@<VERSION> or edit the go.mod file and append the package along with the version you want to use.
Updating Dependencies
The Makefile contains a rule called revendor which performs go mod vendor and go mod tidy.
go mod vendor resets the main module’s vendor directory to include all packages needed to build and test all the main module’s packages. It does not include test code for vendored packages.
go mod tidy makes sure go.mod matches the source code in the module. It adds any missing modules necessary to build the current module’s packages and dependencies, and it removes unused modules that don’t provide any relevant packages.
make revendor
The dependencies are installed into the vendor folder which should be added to the VCS.
Warning
Make sure that you test the code after you have updated the dependencies!
12.1.4 - Security Release Process
Gardener Security Release Process
Gardener is a growing community of volunteers and users. The Gardener community has adopted this security disclosure and response policy to ensure we responsibly handle critical issues.
Gardener Security Team
Security vulnerabilities should be handled quickly and sometimes privately. The primary goal of this process is to reduce the total time users are vulnerable to publicly known exploits. The Gardener Security Team is responsible for organizing the entire response, including internal communication and external disclosure, but will need help from relevant developers and release managers to successfully run this process. The Gardener Security Team consists of the following volunteers:
- Vasu Chandrasekhara, (@vasu1124)
- Christian Cwienk, (@ccwienk)
- Donka Dimitrova, (@donistz)
- Eva Kuhnle-Heck (@HeckEK)
- Vedran Lerenc, (@vlerenc)
- Dirk Marwinski, (@marwinski)
- Jordan Jordanov, (@jordanjordanov)
- Philipp Heil, (@zkdev)
Disclosures
Private Disclosure Process
The Gardener community asks that all suspected vulnerabilities be privately and responsibly disclosed. If you’ve found a vulnerability or a potential vulnerability in Gardener, please let us know by writing an e-mail to secure@sap.com. We’ll send a confirmation e-mail to acknowledge your report, and we’ll send an additional e-mail when we’ve identified the issue positively or negatively.
Public Disclosure Process
If you know of a publicly disclosed vulnerability please IMMEDIATELY write an e-mail to secure@sap.com to inform the Gardener Security Team about the vulnerability so they may start the patch, release, and communication process.
If possible, the Gardener Security Team will ask the person making the public report if the issue can be handled via a private disclosure process (for example, if the full exploit details have not yet been published). If the reporter denies the request for private disclosure, the Gardener Security Team will move swiftly with the fix and release process. In extreme cases GitHub can be asked to delete the issue but this generally isn’t necessary and is unlikely to make a public disclosure less damaging.
Patch, Release, and Public Communication
For each vulnerability, a member of the Gardener Security Team will volunteer to lead coordination with the “Fix Team” and is responsible for sending disclosure e-mails to the rest of the community. This lead will be referred to as the “Fix Lead.” The role of the Fix Lead should rotate round-robin across the Gardener Security Team. Note that given the current size of the Gardener community it is likely that the Gardener Security Team is the same as the “Fix Team” (i.e., all maintainers).
The Gardener Security Team may decide to bring in additional contributors for added expertise depending on the area of the code that contains the vulnerability. All of the timelines below are suggestions and assume a private disclosure. The Fix Lead drives the schedule using his best judgment based on severity and development time.
If the Fix Lead is dealing with a public disclosure, all timelines become ASAP (assuming the vulnerability has a CVSS score >= 7; see below). If the fix relies on another upstream project’s disclosure timeline, that will adjust the process as well. We will work with the upstream project to fit their timeline and best protect our users.
Fix Team Organization
The Fix Lead will work quickly to identify relevant engineers from the affected projects and packages and CC those engineers into the disclosure thread. These selected developers are the Fix Team. The Fix Lead will give the Fix Team access to a private security repository to develop the fix.
Fix Development Process
The Fix Lead and the Fix Team will create a CVSS using the CVSS Calculator. The Fix Lead makes the final call on the calculated CVSS; it is better to move quickly than make the CVSS perfect.
The Fix Team will notify the Fix Lead that work on the fix branch is complete once there are LGTMs on all commits in the private repository from one or more maintainers.
If the CVSS score is under 7.0 (a medium severity score) the Fix Team can decide to slow the release process down in the face of holidays, developer bandwidth, etc. These decisions must be discussed on the private Gardener Security mailing list.
Fix Disclosure Process
With the fix development underway, the Fix Lead needs to come up with an overall communication plan for the wider community. This Disclosure process should begin after the Fix Team has developed a Fix or mitigation so that a realistic timeline can be communicated to users. The Fix Lead will inform the Gardener mailing list that a security vulnerability has been disclosed and that a fix will be made available in the future on a certain release date. The Fix Lead will include any mitigating steps users can take until a fix is available. The communication to Gardener users should be actionable. They should know when to block time to apply patches, understand exact mitigation steps, etc.
Fix Release Day
The Release Managers will ensure all the binaries are built, publicly available, and functional before the Release Date. The Release Managers will create a new patch release branch from the latest patch release tag + the fix from the security branch. As a practical example, if v0.12.0 is the latest patch release in gardener.git, a new branch will be created called v0.12.1 which includes only patches required to fix the issue. The Fix Lead will cherry-pick the patches onto the master branch and all relevant release branches. The Fix Team will LGTM and merge. The Release Managers will merge these PRs as quickly as possible.
Changes shouldn’t be made to the commits, even for a typo in the CHANGELOG, as this will change the git sha of the already built commits, leading to confusion and potentially conflicts as the fix is cherry-picked around branches. The Fix Lead will request a CVE from the SAP Product Security Response Team via email to cna@sap.com with all the relevant information (description, potential impact, affected version, fixed version, CVSS v3 base score, and supporting documentation for the CVSS score) for every vulnerability. The Fix Lead will inform the Gardener mailing list and announce the new releases, the CVE number (if available), the location of the binaries, and the relevant merged PRs to get wide distribution and user action.
As much as possible, this e-mail should be actionable and include links how to apply the fix to users environments; this can include links to external distributor documentation. The recommended target time is 4pm UTC on a non-Friday weekday. This means the announcement will be seen morning Pacific, early evening Europe, and late evening Asia. The Fix Lead will remove the Fix Team from the private security repository.
Retrospective
These steps should be completed after the Release Date. The retrospective process should be blameless.
The Fix Lead will send a retrospective of the process to the Gardener mailing list including details on everyone involved, the timeline of the process, links to relevant PRs that introduced the issue, if relevant, and any critiques of the response and release process. The Release Managers and Fix Team are also encouraged to send their own feedback on the process to the Gardener mailing list. Honest critique is the only way we are going to get good at this as a community.
Communication Channel
The private or public disclosure process should be triggered exclusively by writing an e-mail to secure@sap.com.
Gardener security announcements will be communicated by the Fix Lead sending an e-mail to the Gardener mailing list (reachable via gardener@googlegroups.com), as well as posting a link in the #general Slack channel (join the workspace here).
Public discussions about Gardener security announcements and retrospectives will primarily happen in the Gardener mailing list. Thus Gardener community members who are interested in participating in discussions related to the Gardener Security Release Process are encouraged to join the Gardener mailing list (how to find and join a group).
The members of the Gardener Security Team are subscribed to the private Gardener Security mailing list (reachable via gardener-security@googlegroups.com).
12.2 - Contributing Documentation
You are welcome to contribute documentation to Gardener.
The following rules govern documentation contributions:
- Contributions must be licensed under the Creative Commons Attribution 4.0 International License
- You need to sign the Contributor License Agreement. We are using CLA assistant providing a click-through workflow for accepting the CLA. For company contributors additionally the company needs to sign a corporate license agreement. See the following sections for details.
12.2.1 - Working with Images
Using images on the website has to contribute to the aesthetics and comprehensibility of the materials, with uncompromised experience when loading and browsing pages. That concerns crisp clear images, their consistent layout and color scheme, dimensions and aspect ratios, flicker-free and fast loading or the feeling of it, even on unreliable mobile networks and devices.
Image Production Guidelines
A good, detailed reference for optimal use of images for the web can be found at web.dev’s Fast Load Times topic. The following summarizes some key points plus suggestions for tools support.
You are strongly encouraged to use vector images (SVG) as much as possible. They scale seamlessly without compromising the quality and are easier to maintain.
If you are just now starting with SVG authoring, here are some tools suggestions: Figma (online/Win/Mac), Sketch (Mac only).
For raster images (JPG, PNG, GIF), consider the following requirements and choose a tool that enables you to conform to them:
- Be mindful about image size, the total page size and loading times.
- Larger images (>10K) need to support progressive rendering. Consult with your favorite authoring tool’s documentation to find out if and how it supports that.
- The site delivers the optimal media content format and size depending on the device screen size. You need to provide several variants (large screen, laptop, tablet, phone). Your authoring tool should be able to resize and resample images. Always save the largest size first and then downscale from it to avoid image quality loss.
If you are looking for a tool that conforms to those guidelines, IrfanView is a very good option.
Screenshots can be taken with whatever tool you have available. A simple Alt+PrtSc (Win) and paste into an image processing tool to save it does the job. If you need to add emphasized steps (1,2,3) when you describe a process on a screeshot, you can use Snaggit. Use red color and numbers. Mind the requirements for raster images laid out above.
Diagrams can be exported as PNG/JPG from a diagraming tool such as Visio or even PowerPoint. Pick whichever you are comfortable with to design the diagram and make sure you comply with the requirements for the raster images production above. Diagrams produced as SVG are welcome too if your authoring tool supports exporting in that format. In any case, ensure that your diagrams “blend” with the content on the site - use the same color scheme and geometry style. Do not complicate diagrams too much. The site also supports Mermaid diagrams produced with markdown and rendered as SVG. You don’t need special tools for them, but for more complex ones you might want to prototype your diagram wth Mermaid’s online live editor, before encoding it in your markdown. More tips on using Mermaid can be found in the Shortcodes documentation.
Using Images in Markdown
The standard for adding images to a topic is to use markdown’s . If the image is not showing properly, or if you wish to serve images close to their natural size and avoid scaling, then you can use HTML5’s <picture> tag.
Example:
<picture>
<!-- default, laptop-width-L max 1200px -->
<source srcset="image-link"
media="(min-width: 1000px)">
<!-- default, laptop-width max 1000px -->
<source srcset="image-link"
media="(min-width: 1400px)">
<!-- default, tablets-width max 750px -->
<source srcset="image-link"
media="(min-width: 750px)">
<!-- default, phones-width max 450px -->
<img src="image-link" />
</picture>
When deciding on image sizes, consider the breakpoints in the example above as maximum widths for each image variant you provide. Note that the site is designed for maximum width 1200px. There is no point to create images larger than that, since they will be scaled down.
For a nice overview on making the best use of responsive images with HTML5, please refer to the Responsive Images guide.
12.2.2 - Adding Already Existing Documentation
Overview
In order to add GitHub documentation to the website that is hosted outside of the main repository, you need to make changes to the central manifest. You can usually find it in the <organization-name>/<repo-name>/.docforge/ folder, for example gardener/documentation/.docforge.
Sample codeblock:
- dir: machine-controller-manager
structure:
- file: _index.md
frontmatter:
title: Machine Controller Manager
weight: 1
description: Declarative way of managing machines for Kubernetes cluster
source: https://github.com/gardener/machine-controller-manager/blob/master/README.md
- fileTree: https://github.com/gardener/machine-controller-manager/tree/master/docs
This short code snippet adds a whole repository worth of content and contains examples of some of the most important elements:
- dir: <dir-name>- the name of the directory in the navigation pathstructure:- required after usingdir; shows that the following lines contain a file structure- file: _index.md- the content will be a single file; also creates an index filefrontmatter:- allows for manual setting/overwriting of the various properties a file can havesource: <link>- where the content for thefileelement is located- fileTree: <link>- the content will be a whole folder; also gives the location of the content
Check the Notes and Tips section for useful advice when making changes to the manifest files.
Adding Existing Documentation
You can use the following templates in order to add documentation to the website that exists in other GitHub repositories.
Note
Proper indentation is incredibly important, as yaml relies on it for nesting!
Adding a Single File
You can add a single topic to the website by providing a link to it in the manifest.
- dir: <dir-name>
structure:
- file: <file-name>
frontmatter:
title: <topic-name>
description: <topic-description>
weight: <weight>
source: https://github.com/<path>/<file>
Example
- dir: dashboard
structure:
- file: _index.md
frontmatter:
title: Dashboard
description: The web UI for managing your projects and clusters
weight: 3
source: https://github.com/gardener/dashboard/blob/master/README.md
Adding Multiple Files
You can also add multiple topics to the website at once, either through linking a whole folder or a manifest than contains the documentation structure.
Note
If the content you want to add does not have an
_index.mdfile in it, it won’t show up as a single section on the website. You can fix this by adding the following after thestructure:element:
- file: _index.md
frontmatter:
title: <topic-name>
description: <topic-description>
weight: <weight>
Linking a Folder
- dir: <dir-name>
structure:
- fileTree: https://github.com/<path>/<folder>
Example
- dir: development
structure:
- fileTree: https://github.com/gardener/gardener/tree/master/docs/development
Linking a Manifest File
- dir: <dir-name>
structure:
- manifest: https://github.com/<path>/manifest.yaml
Example
- dir: extensions
structure:
- manifest: https://github.com/gardener/documentation/blob/master/.docforge/documentation/gardener-extensions/gardener-extensions.yaml
Notes and Tips
- If you want to place a file inside of an already existing directory in the main repo, you need to create a
direlement that matches its name. If one already exists, simply add your link to itsstructureelement. - You can chain multiple files, folders, and manifests inside of a single
structureelement. - For examples of
frontmatterelements, see the Style Guide.
12.2.3 - Formatting Guide
This page gives writing formatting guidelines for the Gardener documentation. For style guidelines, see the Style Guide.
These are guidelines, not rules. Use your best judgment, and feel free to propose changes to this document in a pull request.
Formatting of Inline Elements
| Type of Text | Formatting | Markdown Syntax |
|---|---|---|
| API Objects and Technical Components | code | Deploy a `Pod`. |
| New Terms and Emphasis | bold | Do **not** stop it. |
| Technical Names | code | Open file `root.yaml`. |
| User Interface Elements | italics | Choose *CLUSTERS*. |
| Inline Code and Inline Commands | code | For declarative management, use `kubectl apply`. |
| Object Field Names and Field Values | code | Set the value of `image` to `nginx:1.8`. |
| Links and References | link | Visit the [Gardener website](https://gardener.cloud/) |
| Headers | various | # API Server |
API Objects and Technical Components
When you refer to an API object, use the same uppercase and lowercase letters that are used in the actual object name, and use backticks (`) to format them. Typically, the names of API objects use camel case.
Don’t split the API object name into separate words. For example, use
PodTemplateList, not Pod Template List.
Refer to API objects without saying “object,” unless omitting “object” leads to an awkward construction.
| Do | Don’t |
|---|---|
The Pod has two containers. | The pod has two containers. |
The Deployment is responsible for… | The Deployment object is responsible for… |
A PodList is a list of Pods. | A Pod List is a list of pods. |
The gardener-control-manager has control loops… | The gardener-control-manager has control loops… |
The gardenlet starts up with a bootstrap kubeconfig having a bootstrap token that allows to create CertificateSigningRequest (CSR) resources. | The gardenlet starts up with a bootstrap kubeconfig having a bootstrap token that allows to create CertificateSigningRequest (CSR) resources. |
Note
Due to the way the website is built from content taken from different repositories, when editing or updating already existing documentation, you should follow the style used in the topic. When contributing new documentation, follow the guidelines outlined in this guide.
New Terms and Emphasis
Use bold to emphasize something or to introduce a new term.
| Do | Don’t |
|---|---|
| A cluster is a set of nodes … | A “cluster” is a set of nodes … |
| The system does not delete your objects. | The system does not(!) delete your objects. |
Technical Names
Use backticks (`) for filenames, technical componentes, directories, and paths.
| Do | Don’t |
|---|---|
Open file envars.yaml. | Open the envars.yaml file. |
Go to directory /docs/tutorials. | Go to the /docs/tutorials directory. |
Open file /_data/concepts.yaml. | Open the /_data/concepts.yaml file. |
User Interface Elements
When referring to UI elements, refrain from using verbs like “Click” or “Select with right mouse button”. This level of detail is hardly ever needed and also invalidates a procedure if other devices are used. For example, for a tablet you’d say “Tap on”.
Use italics when you refer to UI elements.
| UI Element | Standard Formulation | Markdown Syntax |
|---|---|---|
| Button, Menu path | Choose UI Element. | Choose *UI Element*. |
| Menu path, context menu, navigation path | Choose System > User Profile > Own Data. | Choose *System* \> *User Profile* \> *Own Data*. |
| Entry fields | Enter your password. | Enter your password. |
| Checkbox, radio button | Select Filter. | Select *Filter*. |
| Expandable screen elements | Expand User Settings. Collapse User Settings. | Expand *User Settings*.Collapse *User Settings*. |
Inline Code and Inline Commands
Use backticks (`) for inline code.
| Do | Don’t |
|---|---|
The kubectl run command creates a Deployment. | The “kubectl run” command creates a Deployment. |
For declarative management, use kubectl apply. | For declarative management, use “kubectl apply”. |
Object Field Names and Field Values
Use backticks (`) for field names, and field values.
| Do | Don’t |
|---|---|
Set the value of the replicas field in the configuration file. | Set the value of the “replicas” field in the configuration file. |
The value of the exec field is an ExecAction object. | The value of the “exec” field is an ExecAction object. |
Set the value of imagePullPolicy to Always. | Set the value of imagePullPolicy to “Always”. |
Set the value of image to nginx:1.8. | Set the value of image to nginx:1.8. |
Links and References
| Do | Don’t |
|---|---|
| Use a descriptor of the link’s destination: “For more information, visit Gardener’s website.” | Use a generic placeholder: “For more information, go here.” |
Use relative links when linking to content in the same repository: [Style Guide](../style-guide/_index.md) | Use absolute links when linking to content in the same repository: [Style Guide](https://github.com/gardener/documentation/blob/master/website/documentation/contribute/documentation/style-guide/_index.md) |
Another thing to keep in mind is that markdown links do not work in certain shortcodes (e.g., mermaid). To circumvent this problem, you can use HTML links.
Headers
- Use H1 for the title of the topic. (
# H1 Title) - Use H2 for each main section. (
## H2 Title) - Use H3 for any sub-section in the main sections. (
### H3 Title) - Avoid using H4-H6. Try moving the additional information to a new topic instead.
Code Snippet Formatting
Don’t Include the Command Prompt
| Do | Don’t |
|---|---|
kubectl get pods | $ kubectl get pods |
Separate Commands from Output
Verify that the pod is running on your chosen node:
kubectl get pods --output=wide
The output is similar to:
NAME READY STATUS RESTARTS AGE IP NODE
nginx 1/1 Running 0 13s 10.200.0.4 worker0
Placeholders
Use angle brackets for placeholders. Tell the reader what a placeholder represents, for example:
Display information about a pod:
kubectl describe pod <pod-name>
<pod-name> is the name of one of your pods.
Versioning Kubernetes Examples
Make code examples and configuration examples that include version information consistent with the accompanying text. Identify the Kubernetes version in the Prerequisites section.
Related Links
12.2.4 - Markdown
Hugo uses Markdown for its simple content format. However, there are a lot of things that Markdown doesn’t support well. You could use pure HTML to expand possibilities. A typical example is reducing the original dimensions of an image.
However, use HTML judicially and to the minimum extent possible. Using HTML in markdowns makes it harder to maintain and publish coherent documentation bundles. This is a job typically performed by a publishing platform mechanisms, such as Hugo’s layouts. Considering that the source documentation might be published by multiple platforms you should be considerate in using markup that may bind it to a particular one.
For the same reason, avoid inline scripts and styles in your content. If you absolutely need to use them and they are not working as expected, please create a documentation issue and describe your case.
Note
Markdown is great for its simplicity but may be also constraining for the same reason. Before looking at HTML to make up for that, first check the shortcodes for alternatives.
12.2.5 - Organization
The Gardener project implements the documentation-as-code paradigm. Essentially this means that:
- Documentation resides close to the code it describes - in the corresponding GitHub repositories. Only documentation with regards to cross-cutting concerns that cannot be affiliated to a specific component repository is hosted in the general gardener/documentation repository.
- We use tools to develop, validate and integrate documentation sources
- The change management process is largely automated with automatic validation, integration and deployment using docforge and docs-toolbelt.
- The documentation sources are intended for reuse and not bound to a specific publishing platform.
- The physical organization in a repository is irrelevant for the tool support. What needs to be maintained is the intended result in a docforge documentation bundle manifest configuration, very much like virtual machines configurations, that docforge can reliably recreate in any case.
- We use GitHub as distributed, versioning storage system and docforge to pull sources in their desired state to forge documentation bundles according to a desired specification provided as a manifest.
Content Organization
Documentation that can be affiliated to component is hosted and maintained in the component repository.
A good way to organize your documentation is to place it in a ‘docs’ folder and create separate subfolders per role activity. For example:
repositoryX
|_ docs
|_ usage
| |_ images
| |_ 01.png
| |_ hibernation.md
|_ operations
|_ deployment
Do not use folders just because they are in the template. Stick to the predefined roles and corresponding activities for naming convention. A system makes it easier to maintain and get oriented. While recommended, this is not a mandatory way of organizing the documentation.
- User:
usage - Operator:
operations - Gardener (service) provider:
deployment - Gardener Developer:
development - Gardener Extension Developer:
extensions
Publishing on gardener.cloud
The Gardener website is one of the multiple optional publishing channels where the source material might end up as documentation. We use docforge and automated integration and publish process to enable transparent change management.
To have documentation published on the website, it is necessary to use the docforge manifests available at gardener/documentation/.docforge and register a reference to your documentation. For more information, see Adding Existing Documentation.
Note
This is work in progress and we are transitioning to a more transparent way of integrating component documentation. This guide will be updated as we progress.
These manifests describe a particular publishing goal, i.e., using Hugo to publish on the website, and you will find out that they contain Hugo-specific front-matter properties.
Consult with the documentation maintainers for details. Use the #general channel in Slack or open a PR.
12.2.6 - Pull Request Description
Overview
When opening a pull request, it is best to give all the necessary details in order to help out the reviewers understand your changes and why you are proposing them. Here is the template that you will need to fill out:
**What this PR does / why we need it**:
<!-- Describe the purpose of this PR and what changes have been proposed in it -->
**Which issue(s) this PR fixes**:
Fixes #
<!-- If you are opening a PR in response to a specific issue, linking it will automatically
close the issue once the PR has been merged -->
**Special notes for your reviewer**:
<!-- Any additional information your reviewer might need to know to better process your PR -->
**Release note**:
<!-- Write your release note:
1. Enter your release note in the below block.
2. If no release note is required, just write "NONE" within the block.
Format of block header: <category> <target_group>
Possible values:
- category: improvement|noteworthy|action
- target_group: user|operator|developer
-->
```other operator
EXAMPLE
\```
Writing Release Notes
Some guidelines and tips for writing release notes include:
- Be as descriptive as needed.
- Only use lists if you are describing multiple different additions.
- You can freely use markdown formatting, including links.
You can find various examples in the Releases sections of the gardener/documentation and gardener/gardener repositories.
12.2.7 - Shortcodes
Shortcodes are the Hugo way to extend the limitations of Markdown before resorting to HTML. There are a number of built-in shortcodes available from Hugo. This list is extended with Gardener website shortcodes designed specifically for its content. Find a complete reference to the Hugo built-in shortcodes on its website.
Below is a reference to the shortcodes developed for the Gardener website.
Alerts
For alerts and other notes, use the standard Hugo blockquote syntax for alerts.
mermaid
The GitHub mermaid fenced code block syntax is used. You can find additional documentation at mermaid’s official website.
```mermaid
graph LR;
A[Hard edge] -->|Link text| B(Round edge)
B --> C{Decision}
C -->|One| D[Result one]
C -->|Two| E[Result two]
```
produces:
graph LR;
A[Hard edge] -->|Link text| B(Round edge)
B --> C{Decision}
C -->|One| D[Result one]
C -->|Two| E[Result two]Default settings can be overridden using the %%init%% header at the start of the diagram definition. See the mermaid theming documentation.
```mermaid
%%{init: {'theme': 'neutral', 'themeVariables': { 'mainBkg': '#eee'}}}%%
graph LR;
A[Hard edge] -->|Link text| B(Round edge)
B --> C{Decision}
C -->|One| D[Result one]
C -->|Two| E[Result two]
```
produces:
%%{init: {'theme': 'neutral', 'themeVariables': { 'mainBkg': '#eee'}}}%%
graph LR;
A[Hard edge] -->|Link text| B(Round edge)
B --> C{Decision}
C -->|One| D[Result one]
C -->|Two| E[Result two]12.2.8 - Style Guide
This page gives writing style guidelines for the Gardener documentation. For formatting guidelines, see the Formatting Guide.
These are guidelines, not rules. Use your best judgment, and feel free to propose changes to this document in a Pull Request.
Structure
Documentation Types Overview
The following table summarizes the types of documentation and their mapping to the UA taxonomy. Every topic you create will fall into one of these categories.
| Gardener Content Type | Definition | Example | Content | Comparable UA Content Type |
|---|---|---|---|---|
| Concept | Introduce a functionality or concept; covers background information. | Services | Overview, Relevant headings | Concept |
| Reference | Provide a reference, for example, list all command line options of gardenctl and what they are used for. | Overview of kubectl | Relevant headings | Reference |
| Task | A step-by-step description that allows users to complete a specific task. | Upgrading kubeadm clusters | Overview, Prerequisites, Steps, Result | Complex Task |
| Trail | Collection of all other content types to cover a big topic. | Custom Networking | None | Maps |
| Tutorial | A combination of many tasks that allows users to complete an example task with the goal to learn the details of a given feature. | Deploying Cassandra with a StatefulSet | Overview, Prerequisites, Tasks, Result | Tutorial |
See the Contributors Guide for more details on how to produce and contribute documentation.
Structure and File Names
When creating a new documentation topic or folder, it is important to adhere to a consistent and clear naming convention. This ensures that topics are easily identifiable and helps maintain a well-structured documentation repository. The title of your newly created content should be in dash-case (also known as kebab-case). This means each word in the file or folder name should be separated by a hyphen (-), and all letters should be in lowercase.
By default, this will also be the title of your topic in the website.
For example, a new-topic-title.md filename will generate the topic’s title as “New Topic Title”. You can customize the title by adding front matter to the top of your Markdown file.
If you would like to have a newly added folder appear in the website navigation, you need to add an _index.md file to it. As folders are hidden by default, this file will hold its title, description, weight, and other possible properties. For more information, see the Front Matter section.
Topic Structure
When creating a topic, you will need to follow a certain structure. A topic generally comprises of, in order:
- Metadata (Specific for
.mdfiles in Gardener) - Additional information about the topic - Title - A short, descriptive name for the topic
- Content - The main part of the topic. It contains all the information relevant to the user
- Concept content: Overview, Relevant headings
- Task content: Overview, Prerequisites, Steps, Result
- Reference content: Relevant headings
- Related Links (Optional) - A part after the main content that contains links that are not a part of the topic, but are still connected to it
You can use the provided content description files as a template for your own topics.
Front Matter
Front matter is metadata applied at the head of each content Markdown file. It is used to instruct the static site generator build process. The format is YAML and it must be enclosed in leading and trailing comment dashes (---).
Sample codeblock:
---
title: Getting Started
description: Guides to get you accustomed with Gardener
weight: 10
aliases: ["/docs/old-getting-started-url"]
---
<topic-content>
There are a number of predefined front matter properties, but not all of them are considered by the layouts developed for the website. The most essential ones to consider are:
titlethe content title that will be used as page title and in navigation structures. If not set, the title of the topic will be file name in uppercase (e.g.,new-topic-title.mdwill be rendered as “New Topic Title”).descriptiondescribes the content. For some content types such as documentation guides, it may be rendered in the UI.weighta positive integer number that controls the ordering of the content in navigation structures. The lower it is, the higher the topic will be on the page. Topics with no set weight are sorted in alphabetical order, with any weighted topics appearing above them.urlif specified, it will override the default url constructed from the file path to the content. Make sure the url you specify is consistent and meaningful. Prefer short paths. Do not provide redundant URLs!personaspecifies the type of user the topic is aimed towards. Use only a single persona per topic.persona: Users / Operators / Developersaliasesis an array of strings that contain the old paths to the topic. Useful in case you need to rename or change the location of a topic, but want to keep any existing bookmarks.
While this section will be automatically generated if your topic has a title header, adding more detailed information helps other users, developers, and technical writers better sort, classify and understand the topic.
By using a metadata section you can also skip adding a title header or overwrite it in the navigation section.
Alerts
If you want to add a note, tip or a warning to your topic, use the templates provides in the Shortcodes documentation.
Images
If you want to add an image to your topic, it is recommended to follow the guidelines outlined in the Images documentation.
General Tips
- Try to create a succinct title and an informative description for your topics
- If a topic feels too long, it might be better to split it into a few different ones
- Avoid having have more than ten steps in one a task topic
- When writing a tutorial, link the tasks used in it instead of copying their content
Language and Grammar
Language
- Gardener documentation uses US English
- Keep it simple and use words that non-native English speakers are also familiar with
- Use the Merriam-Webster Dictionary when checking the spelling of words
Writing Style
- Write in a conversational manner and use simple present tense
- Be friendly and refer to the person reading your content as “you”, instead of standard terms such as “user”
- Use an active voice - make it clear who is performing the action
Creating Titles and Headers
- Use title case when creating titles or headers
- Avoid adding additional formatting to the title or header
- Concept and reference topic titles should be simple and succinct
- Task and tutorial topic titles begin with a verb
Related Links
12.2.8.1 - Concept Topic Structure
Concept Title
(the topic title can also be placed in the frontmatter)
Overview
This section provides an overview of the topic and the information provided in it.
Relevant heading 1
This section gives the user all the information needed in order to understand the topic.
Relevant subheading
This adds additional information that belongs to the topic discussed in the parent heading.
Relevant heading 2
This section gives the user all the information needed in order to understand the topic.
Related Links
12.2.8.2 - Reference Topic Structure
Topic Title
(the topic title can also be placed in the frontmatter)
Content
This section gives the user all the information needed in order to understand the topic.
| Content Type | Definition | Example |
|---|---|---|
| Name 1 | Definition of Name 1 | Relevant link |
| Name 2 | Definition of Name 2 | Relevant link |
Related Links
12.2.8.3 - Task Topic Structure
Task Title
(the topic title can also be placed in the frontmatter)
Overview
This section provides an overview of the topic and the information provided in it.
Prerequisites
- Prerequisite 1
- Prerequisite 2
Steps
Avoid nesting headings directly on top of each other with no text inbetween.
- Describe step 1 here
- Describe step 2 here
You can use smaller sections within sections for related tasks
Avoid nesting headings directly on top of each other with no text inbetween.
- Describe step 1 here
- Describe step 2 here
Result
Screenshot of the final status once all the steps have been completed.
Related Links
Provide links to other relevant topics, if applicable. Once someone has completed these steps, what might they want to do next?