Contribute
Contributors guides for code and documentation
Contributing to Gardener
Welcome
Welcome to the Contributor section of Gardener. Here you can learn how it is possible for you to contribute your ideas and expertise to the project and have it grow even more.
Prerequisites
Before you begin contributing to Gardener, there are a couple of things you should become familiar with and complete first.
Code of Conduct
All members of the Gardener community must abide by the
Contributor Covenant.
Only by respecting each other can we develop a productive, collaborative community.
Instances of abusive, harassing, or otherwise unacceptable behavior may be reported by contacting gardener.opensource@sap.com and/or a Gardener project maintainer.
Developer Certificate of Origin
Due to legal reasons, contributors will be asked to accept a Developer Certificate of Origin (DCO) before they submit the first pull request to this projects, this happens in an automated fashion during the submission process. We use the standard DCO text of the Linux Foundation.
License
Your contributions to Gardener must be licensed properly:
Contributing
Gardener uses GitHub to manage reviews of pull requests.
Steps to Contribute
Should you wish to work on an issue, please claim it first by commenting on the GitHub issue that you want to work on it. This is to prevent duplicated efforts from contributors on the same issue.
If you have questions about one of the issues, with or without the tag, please comment on them and one of the maintainers will clarify it.
We kindly ask you to follow the Pull Request Checklist to ensure reviews can happen accordingly.
Pull Request Checklist
Branch from the master branch and, if needed, rebase to the current master branch before submitting your pull request. If it doesn’t merge cleanly with master you may be asked to rebase your changes.
Commits should be as small as possible, while ensuring that each commit is correct independently (i.e., each commit should compile and pass tests).
Test your changes as thoroughly as possible before your commit them. Preferably, automate your testing with unit / integration tests. If tested manually, provide information about the test scope in the PR description (e.g., “Test passed: Upgrade K8s version from 1.14.5 to 1.15.2 on AWS, Azure, GCP, Alicloud, Openstack.”).
When creating the PR, make your Pull Request description as detailed as possible to help out the reviewers.
Create Work In Progress [WIP] pull requests only if you need a clarification or an explicit review before you can continue your work item.
If your patch is not getting reviewed or you need a specific person to review it, you can @-reply a reviewer asking for a review in the pull request or a comment, or you can ask for a review on our mailing list.
If you add new features, make sure that they are documented in the Gardener documentation.
If your changes are relevant for operators, consider to update the ops toolbelt image.
Post review:
- If a review requires you to change your commit(s), please test the changes again.
- Amend the affected commit(s) and force push onto your branch.
- Set respective comments in your GitHub review to resolved.
- Create a general PR comment to notify the reviewers that your amendments are ready for another round of review.
Contributing Bigger Changes
If you want to contribute bigger changes to Gardener, such as when introducing new API resources and their corresponding controllers, or implementing an approved Gardener Enhancement Proposal, follow the guidelines outlined in Contributing Bigger Changes.
Adding Already Existing Documentation
If you want to add documentation that already exists on GitHub to the website, you should update the central manifest instead of duplicating the content. To find out how to do that, see Adding Already Existing Documentation.
Issues and Planning
We use GitHub issues to track bugs and enhancement requests. Please provide as much context as possible when you open an issue. The information you provide must be comprehensive enough to reproduce that issue for the assignee. Therefore, contributors may use but aren’t restricted to the issue template provided by the Gardener maintainers.
Security Release Process
See Security Release Process.
Slack
We use the Gardener Project workspace for public communication related to the Gardener project.
Check out the Community Bio for an invite link to join the workspace.
Historically, we used the #gardener channel in the Kubernetes workspace.
Mailing List
gardener@googlegroups.com
The mailing list is hosted through Google Groups. To receive the lists’ emails, join the group as you would any other Google Group.
Other
For additional channels where you can reach us, as well as links to our bi-weekly meetings, visit the Community page.
1 - Contributing Code
You are welcome to contribute code to Gardener in order to fix a bug or to implement a new feature.
The following rules govern code contributions:
- Contributions must be licensed under the Apache 2.0 License
- You need to sign the Contributor License Agreement. We are using CLA assistant providing a click-through workflow for accepting the CLA. For company contributors additionally the company needs to sign a corporate license agreement. See the following sections for details.
1.1 - Contributing Bigger Changes
Contributing Bigger Changes
Here are the guidelines you should follow when contributing larger changes to Gardener:
We strongly recommend to write a Gardener Enhancement Proposal (GEP) to get a common understanding what you want to achieve. This makes it easier for reviewers to understand the big picture.
Avoid proposing a big change in one single PR. Instead, split your work into multiple stages which are independently mergeable and create one PR for each stage. For example, if introducing a new API resource and its controller, these stages could be:
- API resource types, including defaults and generated code.
- API resource validation.
- API server storage.
- Admission plugin(s), if any.
- Controller(s), including changes to existing controllers. Split this phase further into different functional subsets if appropriate.
If you realize later that changes to artifacts introduced in a previous stage are required, by all means make them and explain in the PR why they were needed.
Consider splitting a big PR further into multiple commits to allow for more focused reviews. For example, you could add unit tests / documentation in separate commits from the rest of the code. If you have to adapt your PR to review feedback, prefer doing that also in a separate commit to make it easier for reviewers to check how their feedback has been addressed.
To make the review process more efficient and avoid too many long discussions in the PR itself, ask for a “main reviewer” to be assigned to your change, then work with this person to make sure he or she understands it in detail, and agree together on any improvements that may be needed. If you can’t reach an agreement on certain topics, comment on the PR and invite other people to join the discussion.
Even if you have a “main reviewer” assigned, you may still get feedback from other reviewers. In general, these “non-main reviewers” are advised to focus more on the design and overall approach rather than the implementation details. Make sure that you address any concerns on this level appropriately.
1.2 - CI/CD
CI/CD
As an execution environment for CI/CD workloads, we use Concourse.
We however abstract from the underlying “build executor” and instead offer a
Pipeline Definition Contract, through which components declare their build pipelines as
required.
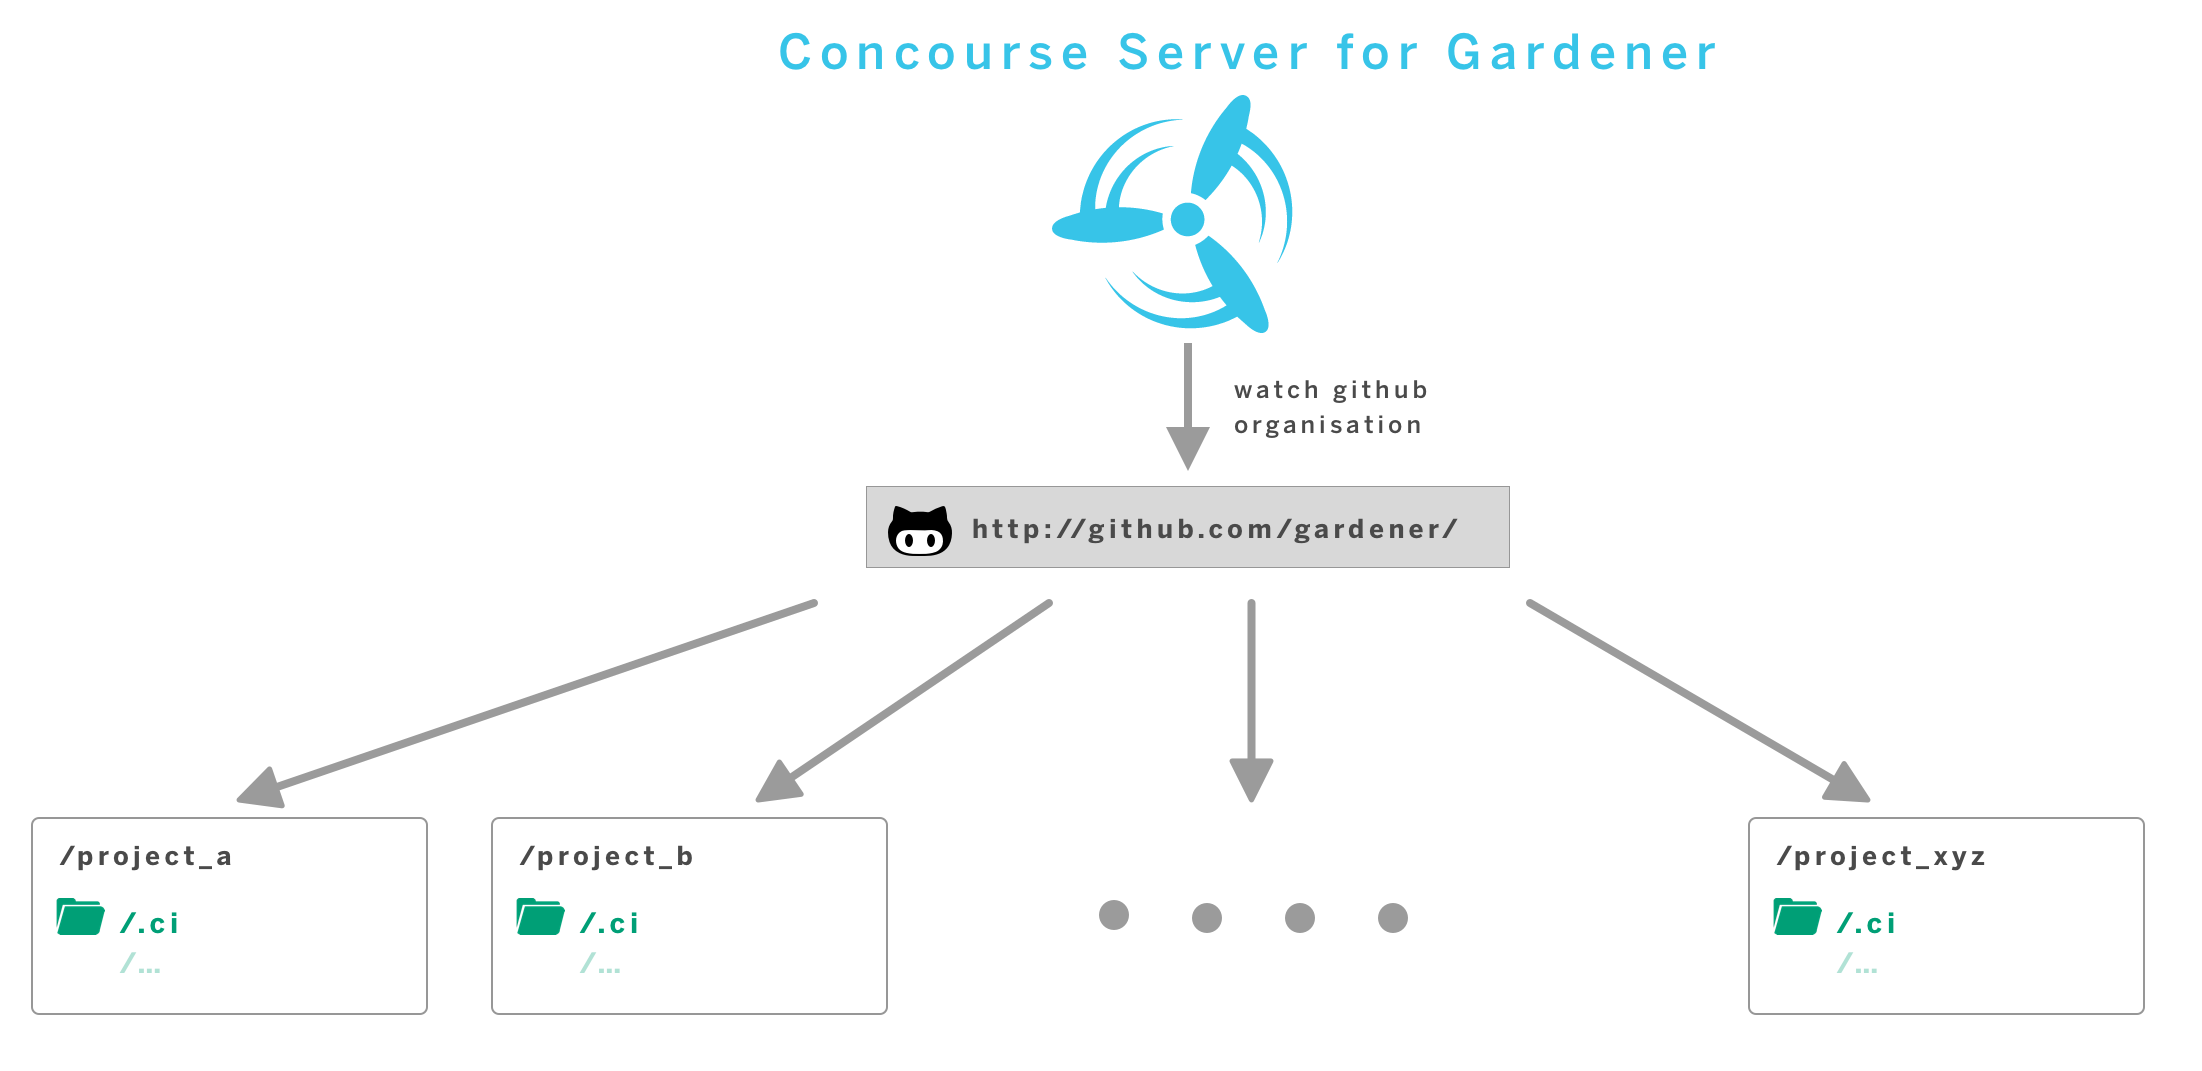
In order to run continuous delivery workloads for all components contributing to the
Gardener project, we operate a central service.
Typical workloads encompass the execution of tests and builds of a variety of technologies,
as well as building and publishing container images, typically containing build results.
We are building our CI/CD offering around some principles:
- container-native - each workload is executed within a container environment. Components may customise used container images
- automation - pipelines are generated without manual interaction
- self-service - components customise their pipelines by changing their sources
- standardisation
Learn more on our: Build Pipeline Reference Manual
1.3 - Dependencies
Testing
We follow the BDD-style testing principles and are leveraging the Ginkgo framework along with Gomega as matcher library. In order to execute the existing tests, you can use
make test         # runs tests
make verify       # runs static code checks and test
There is an additional command for analyzing the code coverage of the tests. Ginkgo will generate standard Golang cover profiles which will be translated into a HTML file by the Go Cover Tool. Another command helps you to clean up the filesystem from the temporary cover profile files and the HTML report:
make test-cov
open gardener.coverage.html
make test-cov-clean
sigs.k8s.io/controller-runtime env test
Some of the integration tests in Gardener are using the sigs.k8s.io/controller-runtime/pkg/envtest package.
It sets up a temporary control plane (etcd + kube-apiserver) against the integration tests can run.
The test and test-cov rules in the Makefile prepare this env test automatically by downloading the respective binaries (if not yet present) and set the necessary environment variables.
You can also run go test or ginkgo without the test/test-cov rules.
In this case you have to set the KUBEBUILDER_ASSETS environment variable to the path that contains the etcd + kube-apiserver binaries or you need to have the binaries pre-installed under /usr/local/kubebuilder/bin.
Dependency Management
We are using go modules for depedency management.
In order to add a new package dependency to the project, you can perform go get <PACKAGE>@<VERSION> or edit the go.mod file and append the package along with the version you want to use.
Updating Dependencies
The Makefile contains a rule called revendor which performs go mod vendor and go mod tidy.
go mod vendor resets the main module’s vendor directory to include all packages needed to build and test all the main module’s packages. It does not include test code for vendored packages.
go mod tidy makes sure go.mod matches the source code in the module. It adds any missing modules necessary to build the current module’s packages and dependencies, and it removes unused modules that don’t provide any relevant packages.
The dependencies are installed into the vendor folder which should be added to the VCS.
Make sure that you test the code after you have updated the dependencies!
1.4 - Security Release Process
Gardener Security Release Process
Gardener is a growing community of volunteers and users. The Gardener community has adopted this security disclosure and response policy to ensure we responsibly handle critical issues.
Gardener Security Team
Security vulnerabilities should be handled quickly and sometimes privately. The primary goal of this process is to reduce the total time users are vulnerable to publicly known exploits. The Gardener Security Team is responsible for organizing the entire response, including internal communication and external disclosure, but will need help from relevant developers and release managers to successfully run this process. The Gardener Security Team consists of the following volunteers:
Disclosures
Private Disclosure Process
The Gardener community asks that all suspected vulnerabilities be privately and responsibly disclosed. If you’ve found a vulnerability or a potential vulnerability in Gardener, please let us know by writing an e-mail to secure@sap.com. We’ll send a confirmation e-mail to acknowledge your report, and we’ll send an additional e-mail when we’ve identified the issue positively or negatively.
Public Disclosure Process
If you know of a publicly disclosed vulnerability please IMMEDIATELY write an e-mail to secure@sap.com to inform the Gardener Security Team about the vulnerability so they may start the patch, release, and communication process.
If possible, the Gardener Security Team will ask the person making the public report if the issue can be handled via a private disclosure process (for example, if the full exploit details have not yet been published). If the reporter denies the request for private disclosure, the Gardener Security Team will move swiftly with the fix and release process. In extreme cases GitHub can be asked to delete the issue but this generally isn’t necessary and is unlikely to make a public disclosure less damaging.
Patch, Release, and Public Communication
For each vulnerability, a member of the Gardener Security Team will volunteer to lead coordination with the “Fix Team” and is responsible for sending disclosure e-mails to the rest of the community. This lead will be referred to as the “Fix Lead.” The role of the Fix Lead should rotate round-robin across the Gardener Security Team. Note that given the current size of the Gardener community it is likely that the Gardener Security Team is the same as the “Fix Team” (i.e., all maintainers).
The Gardener Security Team may decide to bring in additional contributors for added expertise depending on the area of the code that contains the vulnerability. All of the timelines below are suggestions and assume a private disclosure. The Fix Lead drives the schedule using his best judgment based on severity and development time.
If the Fix Lead is dealing with a public disclosure, all timelines become ASAP (assuming the vulnerability has a CVSS score >= 7; see below). If the fix relies on another upstream project’s disclosure timeline, that will adjust the process as well. We will work with the upstream project to fit their timeline and best protect our users.
Fix Team Organization
The Fix Lead will work quickly to identify relevant engineers from the affected projects and packages and CC those engineers into the disclosure thread. These selected developers are the Fix Team. The Fix Lead will give the Fix Team access to a private security repository to develop the fix.
Fix Development Process
The Fix Lead and the Fix Team will create a CVSS using the CVSS Calculator. The Fix Lead makes the final call on the calculated CVSS; it is better to move quickly than make the CVSS perfect.
The Fix Team will notify the Fix Lead that work on the fix branch is complete once there are LGTMs on all commits in the private repository from one or more maintainers.
If the CVSS score is under 7.0 (a medium severity score) the Fix Team can decide to slow the release process down in the face of holidays, developer bandwidth, etc. These decisions must be discussed on the private Gardener Security mailing list.
Fix Disclosure Process
With the fix development underway, the Fix Lead needs to come up with an overall communication plan for the wider community. This Disclosure process should begin after the Fix Team has developed a Fix or mitigation so that a realistic timeline can be communicated to users. The Fix Lead will inform the Gardener mailing list that a security vulnerability has been disclosed and that a fix will be made available in the future on a certain release date. The Fix Lead will include any mitigating steps users can take until a fix is available. The communication to Gardener users should be actionable. They should know when to block time to apply patches, understand exact mitigation steps, etc.
Fix Release Day
The Release Managers will ensure all the binaries are built, publicly available, and functional before the Release Date. The Release Managers will create a new patch release branch from the latest patch release tag + the fix from the security branch. As a practical example, if v0.12.0 is the latest patch release in gardener.git, a new branch will be created called v0.12.1 which includes only patches required to fix the issue. The Fix Lead will cherry-pick the patches onto the master branch and all relevant release branches. The Fix Team will LGTM and merge. The Release Managers will merge these PRs as quickly as possible.
Changes shouldn’t be made to the commits, even for a typo in the CHANGELOG, as this will change the git sha of the already built commits, leading to confusion and potentially conflicts as the fix is cherry-picked around branches. The Fix Lead will request a CVE from the SAP Product Security Response Team via email to cna@sap.com with all the relevant information (description, potential impact, affected version, fixed version, CVSS v3 base score, and supporting documentation for the CVSS score) for every vulnerability. The Fix Lead will inform the Gardener mailing list and announce the new releases, the CVE number (if available), the location of the binaries, and the relevant merged PRs to get wide distribution and user action.
As much as possible, this e-mail should be actionable and include links how to apply the fix to users environments; this can include links to external distributor documentation. The recommended target time is 4pm UTC on a non-Friday weekday. This means the announcement will be seen morning Pacific, early evening Europe, and late evening Asia. The Fix Lead will remove the Fix Team from the private security repository.
Retrospective
These steps should be completed after the Release Date. The retrospective process should be blameless.
The Fix Lead will send a retrospective of the process to the Gardener mailing list including details on everyone involved, the timeline of the process, links to relevant PRs that introduced the issue, if relevant, and any critiques of the response and release process. The Release Managers and Fix Team are also encouraged to send their own feedback on the process to the Gardener mailing list. Honest critique is the only way we are going to get good at this as a community.
Communication Channel
The private or public disclosure process should be triggered exclusively by writing an e-mail to secure@sap.com.
Gardener security announcements will be communicated by the Fix Lead sending an e-mail to the Gardener mailing list (reachable via gardener@googlegroups.com), as well as posting a link in the #general Slack channel (join the workspace here).
Public discussions about Gardener security announcements and retrospectives will primarily happen in the Gardener mailing list. Thus Gardener community members who are interested in participating in discussions related to the Gardener Security Release Process are encouraged to join the Gardener mailing list (how to find and join a group).
The members of the Gardener Security Team are subscribed to the private Gardener Security mailing list (reachable via gardener-security@googlegroups.com).
2 - Contributing Documentation
You are welcome to contribute documentation to Gardener.
The following rules govern documentation contributions:
- Contributions must be licensed under the Creative Commons Attribution 4.0 International License
- You need to sign the Contributor License Agreement. We are using CLA assistant providing a click-through workflow for accepting the CLA. For company contributors additionally the company needs to sign a corporate license agreement. See the following sections for details.
2.1 - Working with Images
Using images on the website has to contribute to the aesthetics and comprehensibility of the materials, with uncompromised experience when loading and browsing pages. That concerns crisp clear images, their consistent layout and color scheme, dimensions and aspect ratios, flicker-free and fast loading or the feeling of it, even on unreliable mobile networks and devices.
Image Production Guidelines
A good, detailed reference for optimal use of images for the web can be found at web.dev’s Fast Load Times topic. The following summarizes some key points plus suggestions for tools support.
You are strongly encouraged to use vector images (SVG) as much as possible. They scale seamlessly without compromising the quality and are easier to maintain.
If you are just now starting with SVG authoring, here are some tools suggestions: Figma (online/Win/Mac), Sketch (Mac only).
For raster images (JPG, PNG, GIF), consider the following requirements and choose a tool that enables you to conform to them:
- Be mindful about image size, the total page size and loading times.
- Larger images (>10K) need to support progressive rendering. Consult with your favorite authoring tool’s documentation to find out if and how it supports that.
- The site delivers the optimal media content format and size depending on the device screen size. You need to provide several variants (large screen, laptop, tablet, phone). Your authoring tool should be able to resize and resample images. Always save the largest size first and then downscale from it to avoid image quality loss.
If you are looking for a tool that conforms to those guidelines, IrfanView is a very good option.
Screenshots can be taken with whatever tool you have available. A simple Alt+PrtSc (Win) and paste into an image processing tool to save it does the job. If you need to add emphasized steps (1,2,3) when you describe a process on a screeshot, you can use Snaggit. Use red color and numbers. Mind the requirements for raster images laid out above.
Diagrams can be exported as PNG/JPG from a diagraming tool such as Visio or even PowerPoint. Pick whichever you are comfortable with to design the diagram and make sure you comply with the requirements for the raster images production above. Diagrams produced as SVG are welcome too if your authoring tool supports exporting in that format. In any case, ensure that your diagrams “blend” with the content on the site - use the same color scheme and geometry style. Do not complicate diagrams too much. The site also supports Mermaid diagrams produced with markdown and rendered as SVG. You don’t need special tools for them, but for more complex ones you might want to prototype your diagram wth Mermaid’s online live editor, before encoding it in your markdown. More tips on using Mermaid can be found in the Shortcodes documentation.
Using Images in Markdown
The standard for adding images to a topic is to use markdown’s . If the image is not showing properly, or if you wish to serve images close to their natural size and avoid scaling, then you can use HTML5’s <picture> tag.
Example:
<picture>
    <!-- default, laptop-width-L max 1200px -->
    <source srcset="image-link"
            media="(min-width: 1000px)">
    <!-- default, laptop-width max 1000px -->
    <source srcset="image-link"
            media="(min-width: 1400px)">
    <!-- default, tablets-width max 750px -->
    <source srcset="image-link"
            media="(min-width: 750px)">
    <!-- default, phones-width max 450px -->
    <img src="image-link" />
</picture>
When deciding on image sizes, consider the breakpoints in the example above as maximum widths for each image variant you provide. Note that the site is designed for maximum width 1200px. There is no point to create images larger than that, since they will be scaled down.
For a nice overview on making the best use of responsive images with HTML5, please refer to the Responsive Images guide.
2.2 - Adding Already Existing Documentation
Overview
In order to add GitHub documentation to the website that is hosted outside of the main repository, you need to make changes to the central manifest. You can usually find it in the <organization-name>/<repo-name>/.docforge/ folder, for example gardener/documentation/.docforge.
Sample codeblock:
- dir: machine-controller-manager
  structure:
  - file: _index.md
    frontmatter:
      title: Machine Controller Manager
      weight: 1
      description: Declarative way of managing machines for Kubernetes cluster
    source: https://github.com/gardener/machine-controller-manager/blob/master/README.md
  - fileTree: https://github.com/gardener/machine-controller-manager/tree/master/docs
This short code snippet adds a whole repository worth of content and contains examples of some of the most important elements:
- dir: <dir-name> - the name of the directory in the navigation pathstructure: - required after using dir; shows that the following lines contain a file structure- file: _index.md - the content will be a single file; also creates an index filefrontmatter: - allows for manual setting/overwriting of the various properties a file can havesource: <link> - where the content for the file element is located- fileTree: <link> - the content will be a whole folder; also gives the location of the content
Check the Notes and Tips section for useful advice when making changes to the manifest files.
Adding Existing Documentation
You can use the following templates in order to add documentation to the website that exists in other GitHub repositories.
Proper indentation is incredibly important, as yaml relies on it for nesting!
Adding a Single File
You can add a single topic to the website by providing a link to it in the manifest.
- dir: <dir-name>
  structure:
  - file: <file-name>
    frontmatter:
      title: <topic-name>
      description: <topic-description>
      weight: <weight>
    source: https://github.com/<path>/<file>
Example
- dir: dashboard
  structure:
  - file: _index.md
    frontmatter:
      title: Dashboard
      description: The web UI for managing your projects and clusters
      weight: 3
    source: https://github.com/gardener/dashboard/blob/master/README.md
Adding Multiple Files
You can also add multiple topics to the website at once, either through linking a whole folder or a manifest than contains the documentation structure.
If the content you want to add does not have an _index.md file in it, it won’t show up as a single section on the website. You can fix this by adding the following after the structure: element:
- file: _index.md
  frontmatter:
    title: <topic-name>
    description: <topic-description>
    weight: <weight>
Linking a Folder
  - dir: <dir-name>
    structure:
    - fileTree: https://github.com/<path>/<folder>
Example
  - dir: development
    structure:
    - fileTree: https://github.com/gardener/gardener/tree/master/docs/development
Linking a Manifest File
- dir: <dir-name>
  structure:
  - manifest: https://github.com/<path>/manifest.yaml
Example
- dir: extensions
  structure:
  - manifest: https://github.com/gardener/documentation/blob/master/.docforge/documentation/gardener-extensions/gardener-extensions.yaml
Notes and Tips
- If you want to place a file inside of an already existing directory in the main repo, you need to create a
dir element that matches its name. If one already exists, simply add your link to its structure element. - You can chain multiple files, folders, and manifests inside of a single
structure element. - For examples of
frontmatter elements, see the Style Guide.
2.3 - Formatting Guide
This page gives writing formatting guidelines for the Gardener documentation. For style guidelines, see the Style Guide.
These are guidelines, not rules. Use your best judgment, and feel free to propose changes to this document in a pull request.
API Objects and Technical Components
When you refer to an API object, use the same uppercase and lowercase letters
that are used in the actual object name, and use backticks (`) to format them. Typically, the names of API
objects use camel case.
Don’t split the API object name into separate words. For example, use
PodTemplateList, not Pod Template List.
Refer to API objects without saying “object,” unless omitting “object”
leads to an awkward construction.
| Do | Don’t |
|---|
The Pod has two containers. | The pod has two containers. |
The Deployment is responsible for… | The Deployment object is responsible for… |
A PodList is a list of Pods. | A Pod List is a list of pods. |
The gardener-control-manager has control loops… | The gardener-control-manager has control loops… |
The gardenlet starts up with a bootstrap kubeconfig having a bootstrap token that allows to create CertificateSigningRequest (CSR) resources. | The gardenlet starts up with a bootstrap kubeconfig having a bootstrap token that allows to create CertificateSigningRequest (CSR) resources. |
Due to the way the website is built from content taken from different repositories, when editing or updating already existing documentation, you should follow the style used in the topic. When contributing new documentation, follow the guidelines outlined in this guide.
New Terms and Emphasis
Use bold to emphasize something or to introduce a new term.
| Do | Don’t |
|---|
| A cluster is a set of nodes … | A “cluster” is a set of nodes … |
| The system does not delete your objects. | The system does not(!) delete your objects. |
Technical Names
Use backticks (`) for filenames, technical componentes, directories, and paths.
| Do | Don’t |
|---|
Open file envars.yaml. | Open the envars.yaml file. |
Go to directory /docs/tutorials. | Go to the /docs/tutorials directory. |
Open file /_data/concepts.yaml. | Open the /_data/concepts.yaml file. |
User Interface Elements
When referring to UI elements, refrain from using verbs like “Click” or “Select with right mouse button”. This level of detail is hardly ever needed and also invalidates a procedure if other devices are used. For example, for a tablet you’d say “Tap on”.
Use italics when you refer to UI elements.
| UI Element | Standard Formulation | Markdown Syntax |
|---|
| Button, Menu path | Choose UI Element. | Choose *UI Element*. |
| Menu path, context menu, navigation path | Choose System > User Profile > Own Data. | Choose *System* \> *User Profile* \> *Own Data*. |
| Entry fields | Enter your password. | Enter your password. |
| Checkbox, radio button | Select Filter. | Select *Filter*. |
| Expandable screen elements | Expand User Settings.
Collapse User Settings. | Expand *User Settings*.
Collapse *User Settings*. |
Inline Code and Inline Commands
Use backticks (`) for inline code.
| Do | Don’t |
|---|
The kubectl run command creates a Deployment. | The “kubectl run” command creates a Deployment. |
For declarative management, use kubectl apply. | For declarative management, use “kubectl apply”. |
Object Field Names and Field Values
Use backticks (`) for field names, and field values.
| Do | Don’t |
|---|
Set the value of the replicas field in the configuration file. | Set the value of the “replicas” field in the configuration file. |
The value of the exec field is an ExecAction object. | The value of the “exec” field is an ExecAction object. |
Set the value of imagePullPolicy to Always. | Set the value of imagePullPolicy to “Always”. |
Set the value of image to nginx:1.8. | Set the value of image to nginx:1.8. |
Links and References
| Do | Don’t |
|---|
| Use a descriptor of the link’s destination: “For more information, visit Gardener’s website.” | Use a generic placeholder: “For more information, go here.” |
Use relative links when linking to content in the same repository: [Style Guide](../style-guide/_index.md) | Use absolute links when linking to content in the same repository: [Style Guide](https://github.com/gardener/documentation/blob/master/website/documentation/contribute/documentation/style-guide/_index.md) |
Another thing to keep in mind is that markdown links do not work in certain shortcodes (e.g., mermaid). To circumvent this problem, you can use HTML links.
- Use H1 for the title of the topic. (
# H1 Title) - Use H2 for each main section. (
## H2 Title) - Use H3 for any sub-section in the main sections. (
### H3 Title) - Avoid using H4-H6. Try moving the additional information to a new topic instead.
Don’t Include the Command Prompt
| Do | Don’t |
|---|
kubectl get pods | $ kubectl get pods |
Separate Commands from Output
Verify that the pod is running on your chosen node:
kubectl get pods --output=wide
The output is similar to:
NAME READY STATUS RESTARTS AGE IP NODE
nginx 1/1 Running 0 13s 10.200.0.4 worker0
Placeholders
Use angle brackets for placeholders. Tell the reader what a placeholder
represents, for example:
Display information about a pod:
kubectl describe pod <pod-name>
<pod-name> is the name of one of your pods.
Versioning Kubernetes Examples
Make code examples and configuration examples that include version information consistent with the accompanying text. Identify the Kubernetes version in the Prerequisites section.
2.4 - Markdown
Hugo uses Markdown for its simple content format. However, there are a lot of things that Markdown doesn’t support well. You could use pure HTML to expand possibilities. A typical example is reducing the original dimensions of an image.
However, use HTML judicially and to the minimum extent possible. Using HTML in markdowns makes it harder to maintain and publish coherent documentation bundles. This is a job typically performed by a publishing platform mechanisms, such as Hugo’s layouts. Considering that the source documentation might be published by multiple platforms you should be considerate in using markup that may bind it to a particular one.
For the same reason, avoid inline scripts and styles in your content. If you absolutely need to use them and they are not working as expected, please create a documentation issue and describe your case.
Markdown is great for its simplicity but may be also constraining for the same reason. Before looking at HTML to make up for that, first check the shortcodes for alternatives.
2.5 - Organization
The Gardener project implements the documentation-as-code paradigm. Essentially this means that:
- Documentation resides close to the code it describes - in the corresponding GitHub repositories. Only documentation with regards to cross-cutting concerns that cannot be affiliated to a specific component repository is hosted in the general gardener/documentation repository.
- We use tools to develop, validate and integrate documentation sources
- The change management process is largely automated with automatic validation, integration and deployment using docforge and docs-toolbelt.
- The documentation sources are intended for reuse and not bound to a specific publishing platform.
- The physical organization in a repository is irrelevant for the tool support. What needs to be maintained is the intended result in a docforge documentation bundle manifest configuration, very much like virtual machines configurations, that docforge can reliably recreate in any case.
- We use GitHub as distributed, versioning storage system and docforge to pull sources in their desired state to forge documentation bundles according to a desired specification provided as a manifest.
Content Organization
Documentation that can be affiliated to component is hosted and maintained in the component repository.
A good way to organize your documentation is to place it in a ‘docs’ folder and create separate subfolders per role activity. For example:
repositoryX
|_ docs
   |_ usage
   |  |_ images
   |     |_ 01.png
   |  |_ hibernation.md
   |_ operations
   |_ deployment
Do not use folders just because they are in the template. Stick to the predefined roles and corresponding activities for naming convention. A system makes it easier to maintain and get oriented. While recommended, this is not a mandatory way of organizing the documentation.
- User:
usage - Operator:
operations - Gardener (service) provider:
deployment - Gardener Developer:
development - Gardener Extension Developer:
extensions
Publishing on gardener.cloud
The Gardener website is one of the multiple optional publishing channels where the source material might end up as documentation. We use docforge and automated integration and publish process to enable transparent change management.
To have documentation published on the website, it is necessary to use the docforge manifests available at gardener/documentation/.docforge and register a reference to your documentation. For more information, see Adding Existing Documentation.
This is work in progress and we are transitioning to a more transparent way of integrating component documentation. This guide will be updated as we progress.
These manifests describe a particular publishing goal, i.e., using Hugo to publish on the website, and you will find out that they contain Hugo-specific front-matter properties.
Consult with the documentation maintainers for details. Use the #general channel in Slack or open a PR.
2.6 - Pull Request Description
Overview
When opening a pull request, it is best to give all the necessary details in order to help out the reviewers understand your changes and why you are proposing them. Here is the template that you will need to fill out:
**What this PR does / why we need it**:
<!-- Describe the purpose of this PR and what changes have been proposed in it -->
**Which issue(s) this PR fixes**:
Fixes #
<!-- If you are opening a PR in response to a specific issue, linking it will automatically
close the issue once the PR has been merged -->
**Special notes for your reviewer**:
<!-- Any additional information your reviewer might need to know to better process your PR -->
**Release note**:
<!--  Write your release note:
1. Enter your release note in the below block.
2. If no release note is required, just write "NONE" within the block.

Format of block header: <category> <target_group>
Possible values:
- category:       improvement|noteworthy|action
- target_group:   user|operator|developer
-->
```other operator
EXAMPLE
\```
Writing Release Notes
Some guidelines and tips for writing release notes include:
- Be as descriptive as needed.
- Only use lists if you are describing multiple different additions.
- You can freely use markdown formatting, including links.
You can find various examples in the Releases sections of the gardener/documentation and gardener/gardener repositories.
2.7 - Shortcodes
Shortcodes are the Hugo way to extend the limitations of Markdown before resorting to HTML. There are a number of built-in shortcodes available from Hugo. This list is extended with Gardener website shortcodes designed specifically for its content.
Find a complete reference to the Hugo built-in shortcodes on its website.
Below is a reference to the shortcodes developed for the Gardener website.
Alerts
For alerts and other notes, use the standard Hugo blockquote syntax for alerts.
mermaid
The GitHub mermaid fenced code block syntax is used. You can find additional documentation at mermaid’s official website.
```mermaid
graph LR;
    A[Hard edge] -->|Link text| B(Round edge)
    B --> C{Decision}
    C -->|One| D[Result one]
    C -->|Two| E[Result two]
```
produces:
graph LR;
    A[Hard edge] -->|Link text| B(Round edge)
    B --> C{Decision}
    C -->|One| D[Result one]
    C -->|Two| E[Result two]
Default settings can be overridden using the %%init%% header at the start of the diagram definition.
See the mermaid theming documentation.
```mermaid
%%{init: {'theme': 'neutral', 'themeVariables': { 'mainBkg': '#eee'}}}%%
graph LR;
    A[Hard edge] -->|Link text| B(Round edge)
    B --> C{Decision}
    C -->|One| D[Result one]
    C -->|Two| E[Result two]
```
produces:
%%{init: {'theme': 'neutral', 'themeVariables': { 'mainBkg': '#eee'}}}%%
graph LR;
    A[Hard edge] -->|Link text| B(Round edge)
    B --> C{Decision}
    C -->|One| D[Result one]
    C -->|Two| E[Result two]
2.8 - Style Guide
This page gives writing style guidelines for the Gardener documentation. For formatting guidelines, see the Formatting Guide.
These are guidelines, not rules. Use your best judgment, and feel free to propose changes to this document in a Pull Request.
Structure
Documentation Types Overview
The following table summarizes the types of documentation and their mapping to the UA taxonomy. Every topic you create will fall into one of these categories.
See the Contributors Guide for more details on how to produce and contribute documentation.
Structure and File Names
When creating a new documentation topic or folder, it is important to adhere to a consistent and clear naming convention. This ensures that topics are easily identifiable and helps maintain a well-structured documentation repository. The title of your newly created content should be in dash-case (also known as kebab-case). This means each word in the file or folder name should be separated by a hyphen (-), and all letters should be in lowercase.
By default, this will also be the title of your topic in the website.
For example, a new-topic-title.md filename will generate the topic’s title as “New Topic Title”. You can customize the title by adding front matter to the top of your Markdown file.
If you would like to have a newly added folder appear in the website navigation, you need to add an _index.md file to it. As folders are hidden by default, this file will hold its title, description, weight, and other possible properties. For more information, see the Front Matter section.
Topic Structure
When creating a topic, you will need to follow a certain structure. A topic generally comprises of, in order:
- Metadata (Specific for
.md files in Gardener) - Additional information about the topic - Title - A short, descriptive name for the topic
- Content - The main part of the topic. It contains all the information relevant to the user
- Related Links (Optional) - A part after the main content that contains links that are not a part of the topic, but are still connected to it
You can use the provided content description files as a template for your own topics.
Front Matter
Front matter is metadata applied at the head of each content Markdown file. It is used to instruct the static site generator build process. The format is YAML and it must be enclosed in leading and trailing comment dashes (---).
Sample codeblock:
---
title: Getting Started
description: Guides to get you accustomed with Gardener
weight: 10
aliases: ["/docs/old-getting-started-url"]
---

<topic-content>
There are a number of predefined front matter properties, but not all of them are considered by the layouts developed for the website. The most essential ones to consider are:
title the content title that will be used as page title and in navigation structures. If not set, the title of the topic will be file name in uppercase (e.g., new-topic-title.md will be rendered as “New Topic Title”).
description describes the content. For some content types such as documentation guides, it may be rendered in the UI.
weight a positive integer number that controls the ordering of the content in navigation structures. The lower it is, the higher the topic will be on the page. Topics with no set weight are sorted in alphabetical order, with any weighted topics appearing above them.
url if specified, it will override the default url constructed from the file path to the content. Make sure the url you specify is consistent and meaningful. Prefer short paths. Do not provide redundant URLs!
persona specifies the type of user the topic is aimed towards. Use only a single persona per topic.
persona: Users / Operators / Developers
aliases is an array of strings that contain the old paths to the topic. Useful in case you need to rename or change the location of a topic, but want to keep any existing bookmarks.
While this section will be automatically generated if your topic has a title header, adding more detailed information helps other users, developers, and technical writers better sort, classify and understand the topic.
By using a metadata section you can also skip adding a title header or overwrite it in the navigation section.
Alerts
If you want to add a note, tip or a warning to your topic, use the templates provides in the Shortcodes documentation.
Images
If you want to add an image to your topic, it is recommended to follow the guidelines outlined in the Images documentation.
General Tips
- Try to create a succinct title and an informative description for your topics
- If a topic feels too long, it might be better to split it into a few different ones
- Avoid having have more than ten steps in one a task topic
- When writing a tutorial, link the tasks used in it instead of copying their content
Language and Grammar
Language
- Gardener documentation uses US English
- Keep it simple and use words that non-native English speakers are also familiar with
- Use the Merriam-Webster Dictionary when checking the spelling of words
Writing Style
- Write in a conversational manner and use simple present tense
- Be friendly and refer to the person reading your content as “you”, instead of standard terms such as “user”
- Use an active voice - make it clear who is performing the action
Creating Titles and Headers
- Use title case when creating titles or headers
- Avoid adding additional formatting to the title or header
- Concept and reference topic titles should be simple and succinct
- Task and tutorial topic titles begin with a verb
2.8.1 - Concept Topic Structure
Describes the contents of a concept topic
Concept Title
(the topic title can also be placed in the frontmatter)
Overview
This section provides an overview of the topic and the information provided in it.
Relevant heading 1
This section gives the user all the information needed in order to understand the topic.
Relevant subheading
This adds additional information that belongs to the topic discussed in the parent heading.
Relevant heading 2
This section gives the user all the information needed in order to understand the topic.
2.8.2 - Reference Topic Structure
Describes the contents of a reference topic
Topic Title
(the topic title can also be placed in the frontmatter)
Content
This section gives the user all the information needed in order to understand the topic.
2.8.3 - Task Topic Structure
Describes the contents of a task topic
Task Title
(the topic title can also be placed in the frontmatter)
Overview
This section provides an overview of the topic and the information provided in it.
Prerequisites
- Prerequisite 1
- Prerequisite 2
Steps
Avoid nesting headings directly on top of each other with no text inbetween.
- Describe step 1 here
- Describe step 2 here
Avoid nesting headings directly on top of each other with no text inbetween.
- Describe step 1 here
- Describe step 2 here
Result
Screenshot of the final status once all the steps have been completed.
Provide links to other relevant topics, if applicable. Once someone has completed these steps, what might they want to do next?