Gardener Dashboard
![]()
![]()
Demo
Documentation
Gardener Dashboard Documentation
License
Copyright 2020 The Gardener Authors
This is the multi-page printable view of this section. Click here to print.
![]()
![]()
Gardener Dashboard Documentation
Copyright 2020 The Gardener Authors
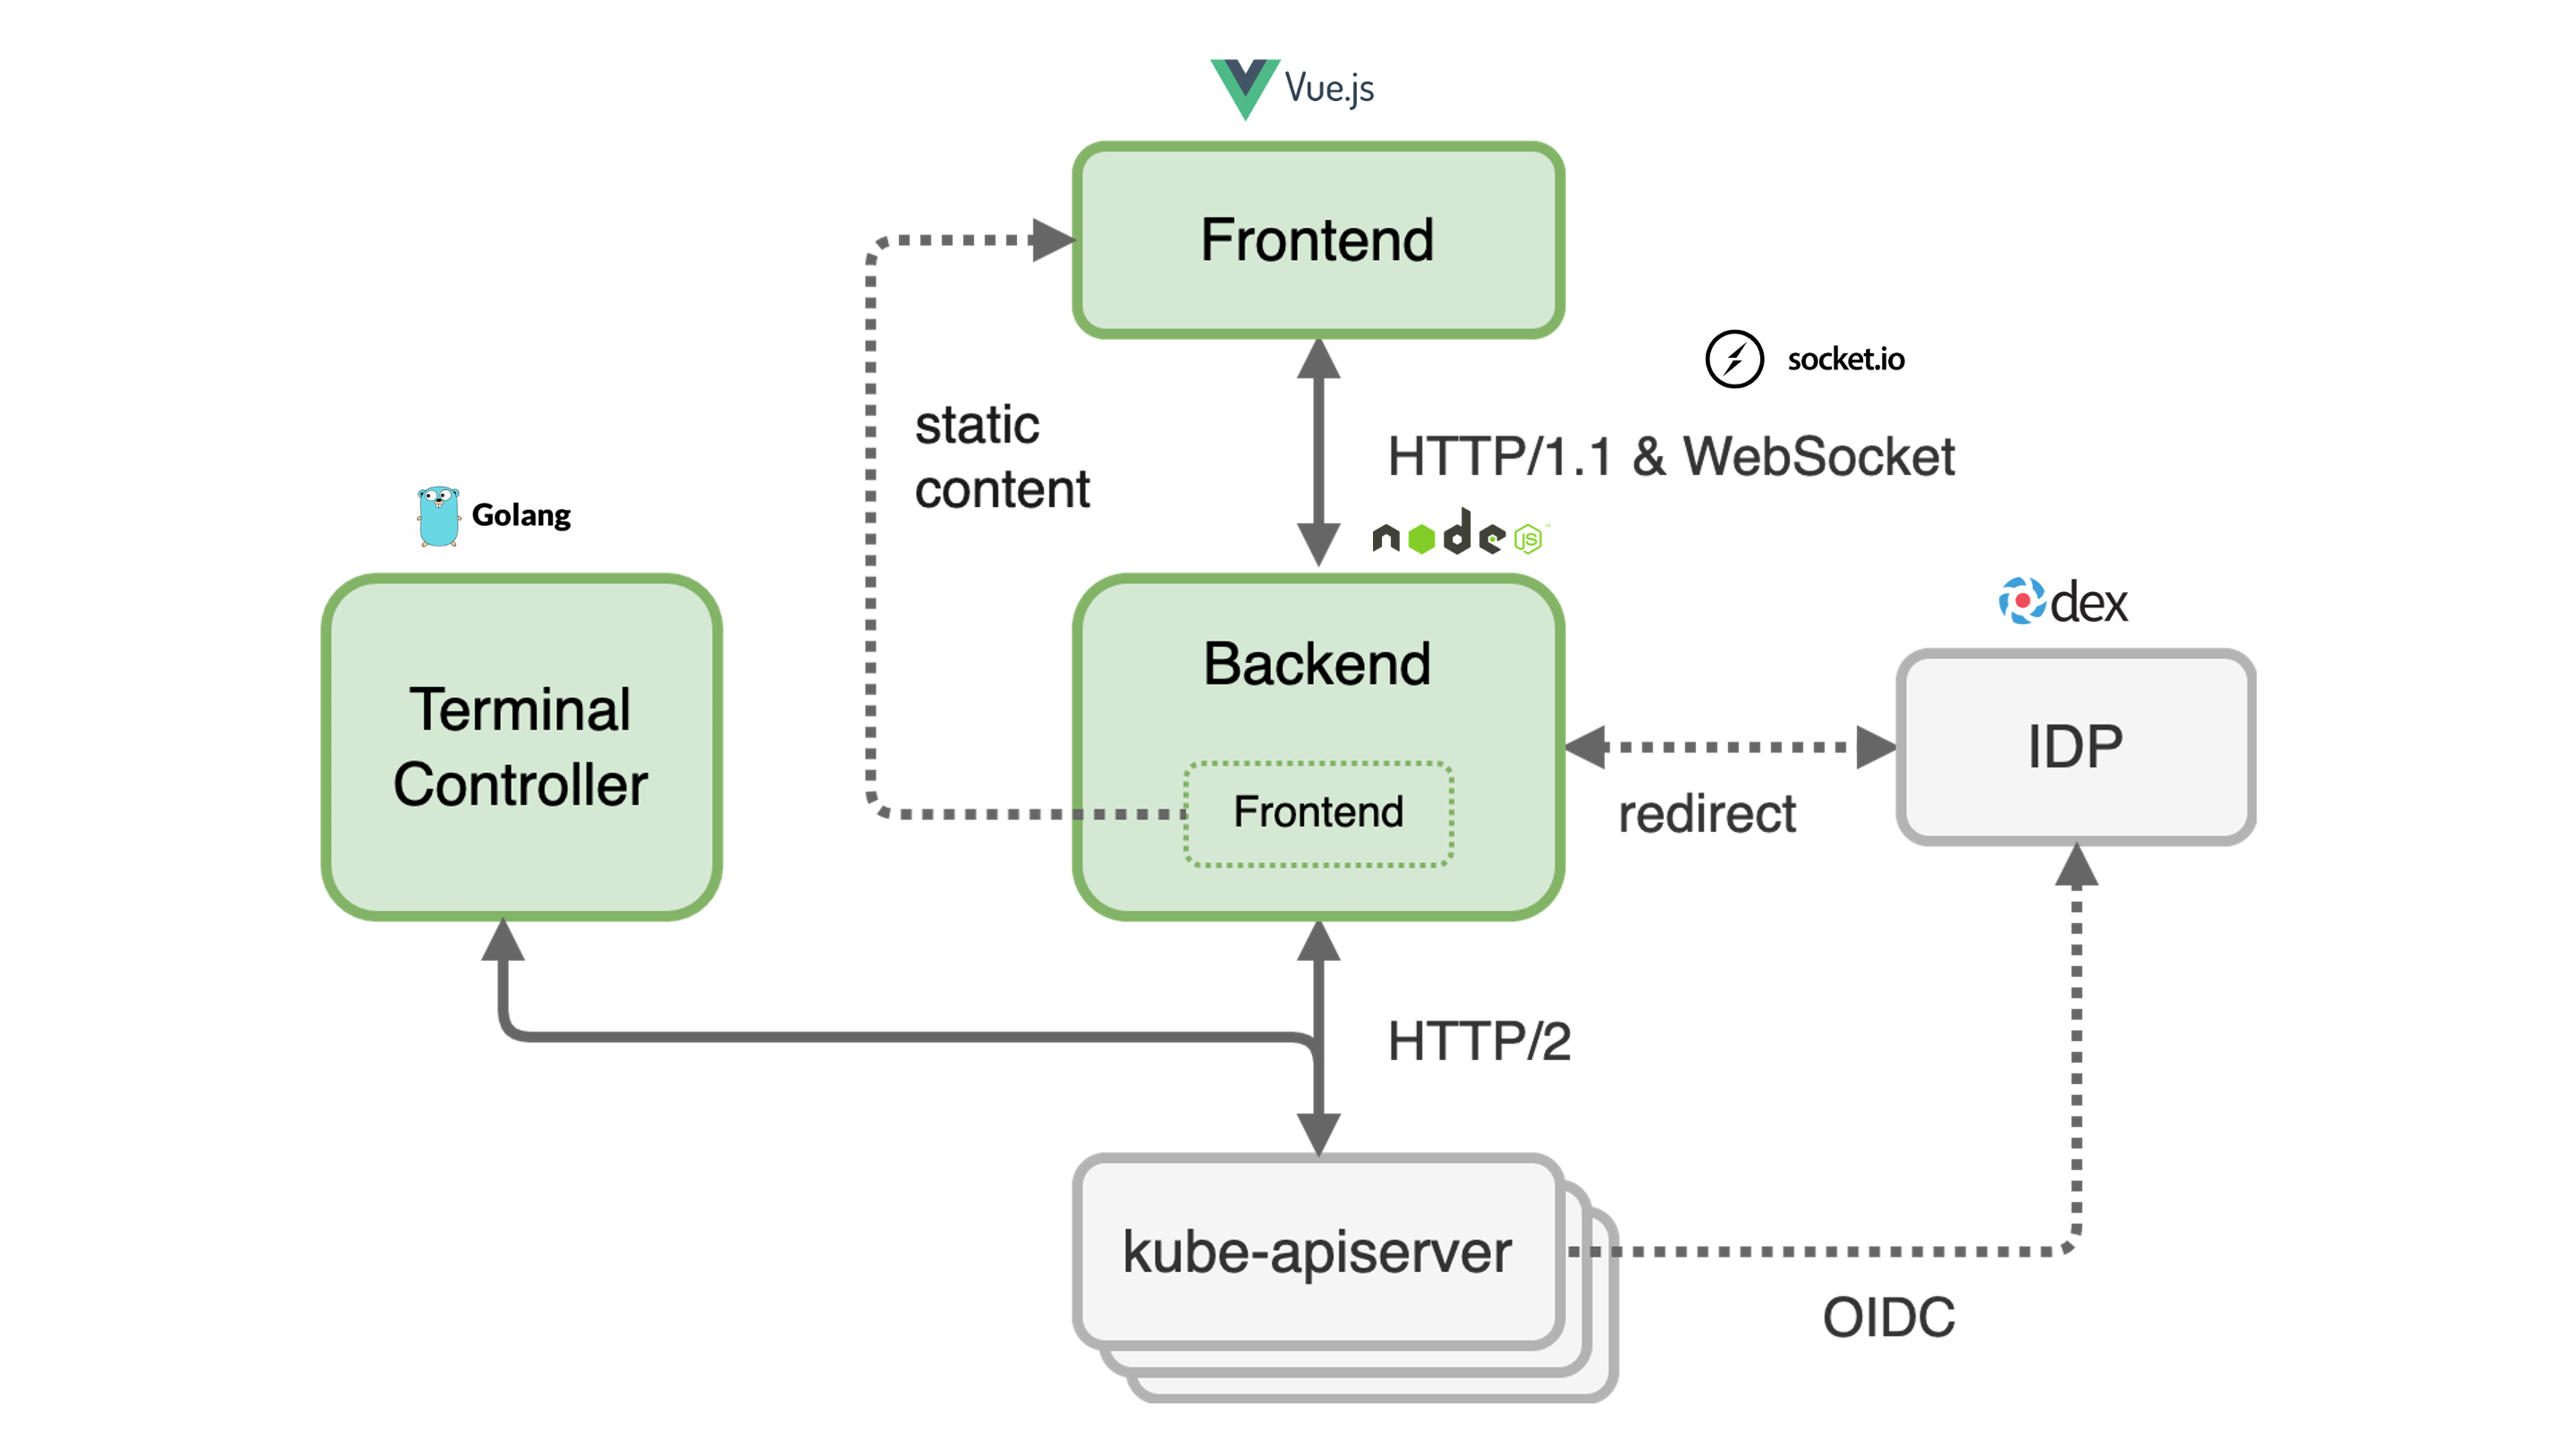
The dashboard frontend is a Single Page Application (SPA) built with Vue.js. The dashboard backend is a web server built with Express and Node.js. The backend serves the bundled frontend as static content. The dashboard uses Socket.IO to enable real-time, bidirectional and event-based communication between the frontend and the backend. For the communication from the backend to different kube-apiservers the http/2 network protocol is used. Authentication at the apiserver of the garden cluster is done via JWT tokens. These can either be an ID Token issued by an OpenID Connect Provider or the token of a Kubernetes Service Account.
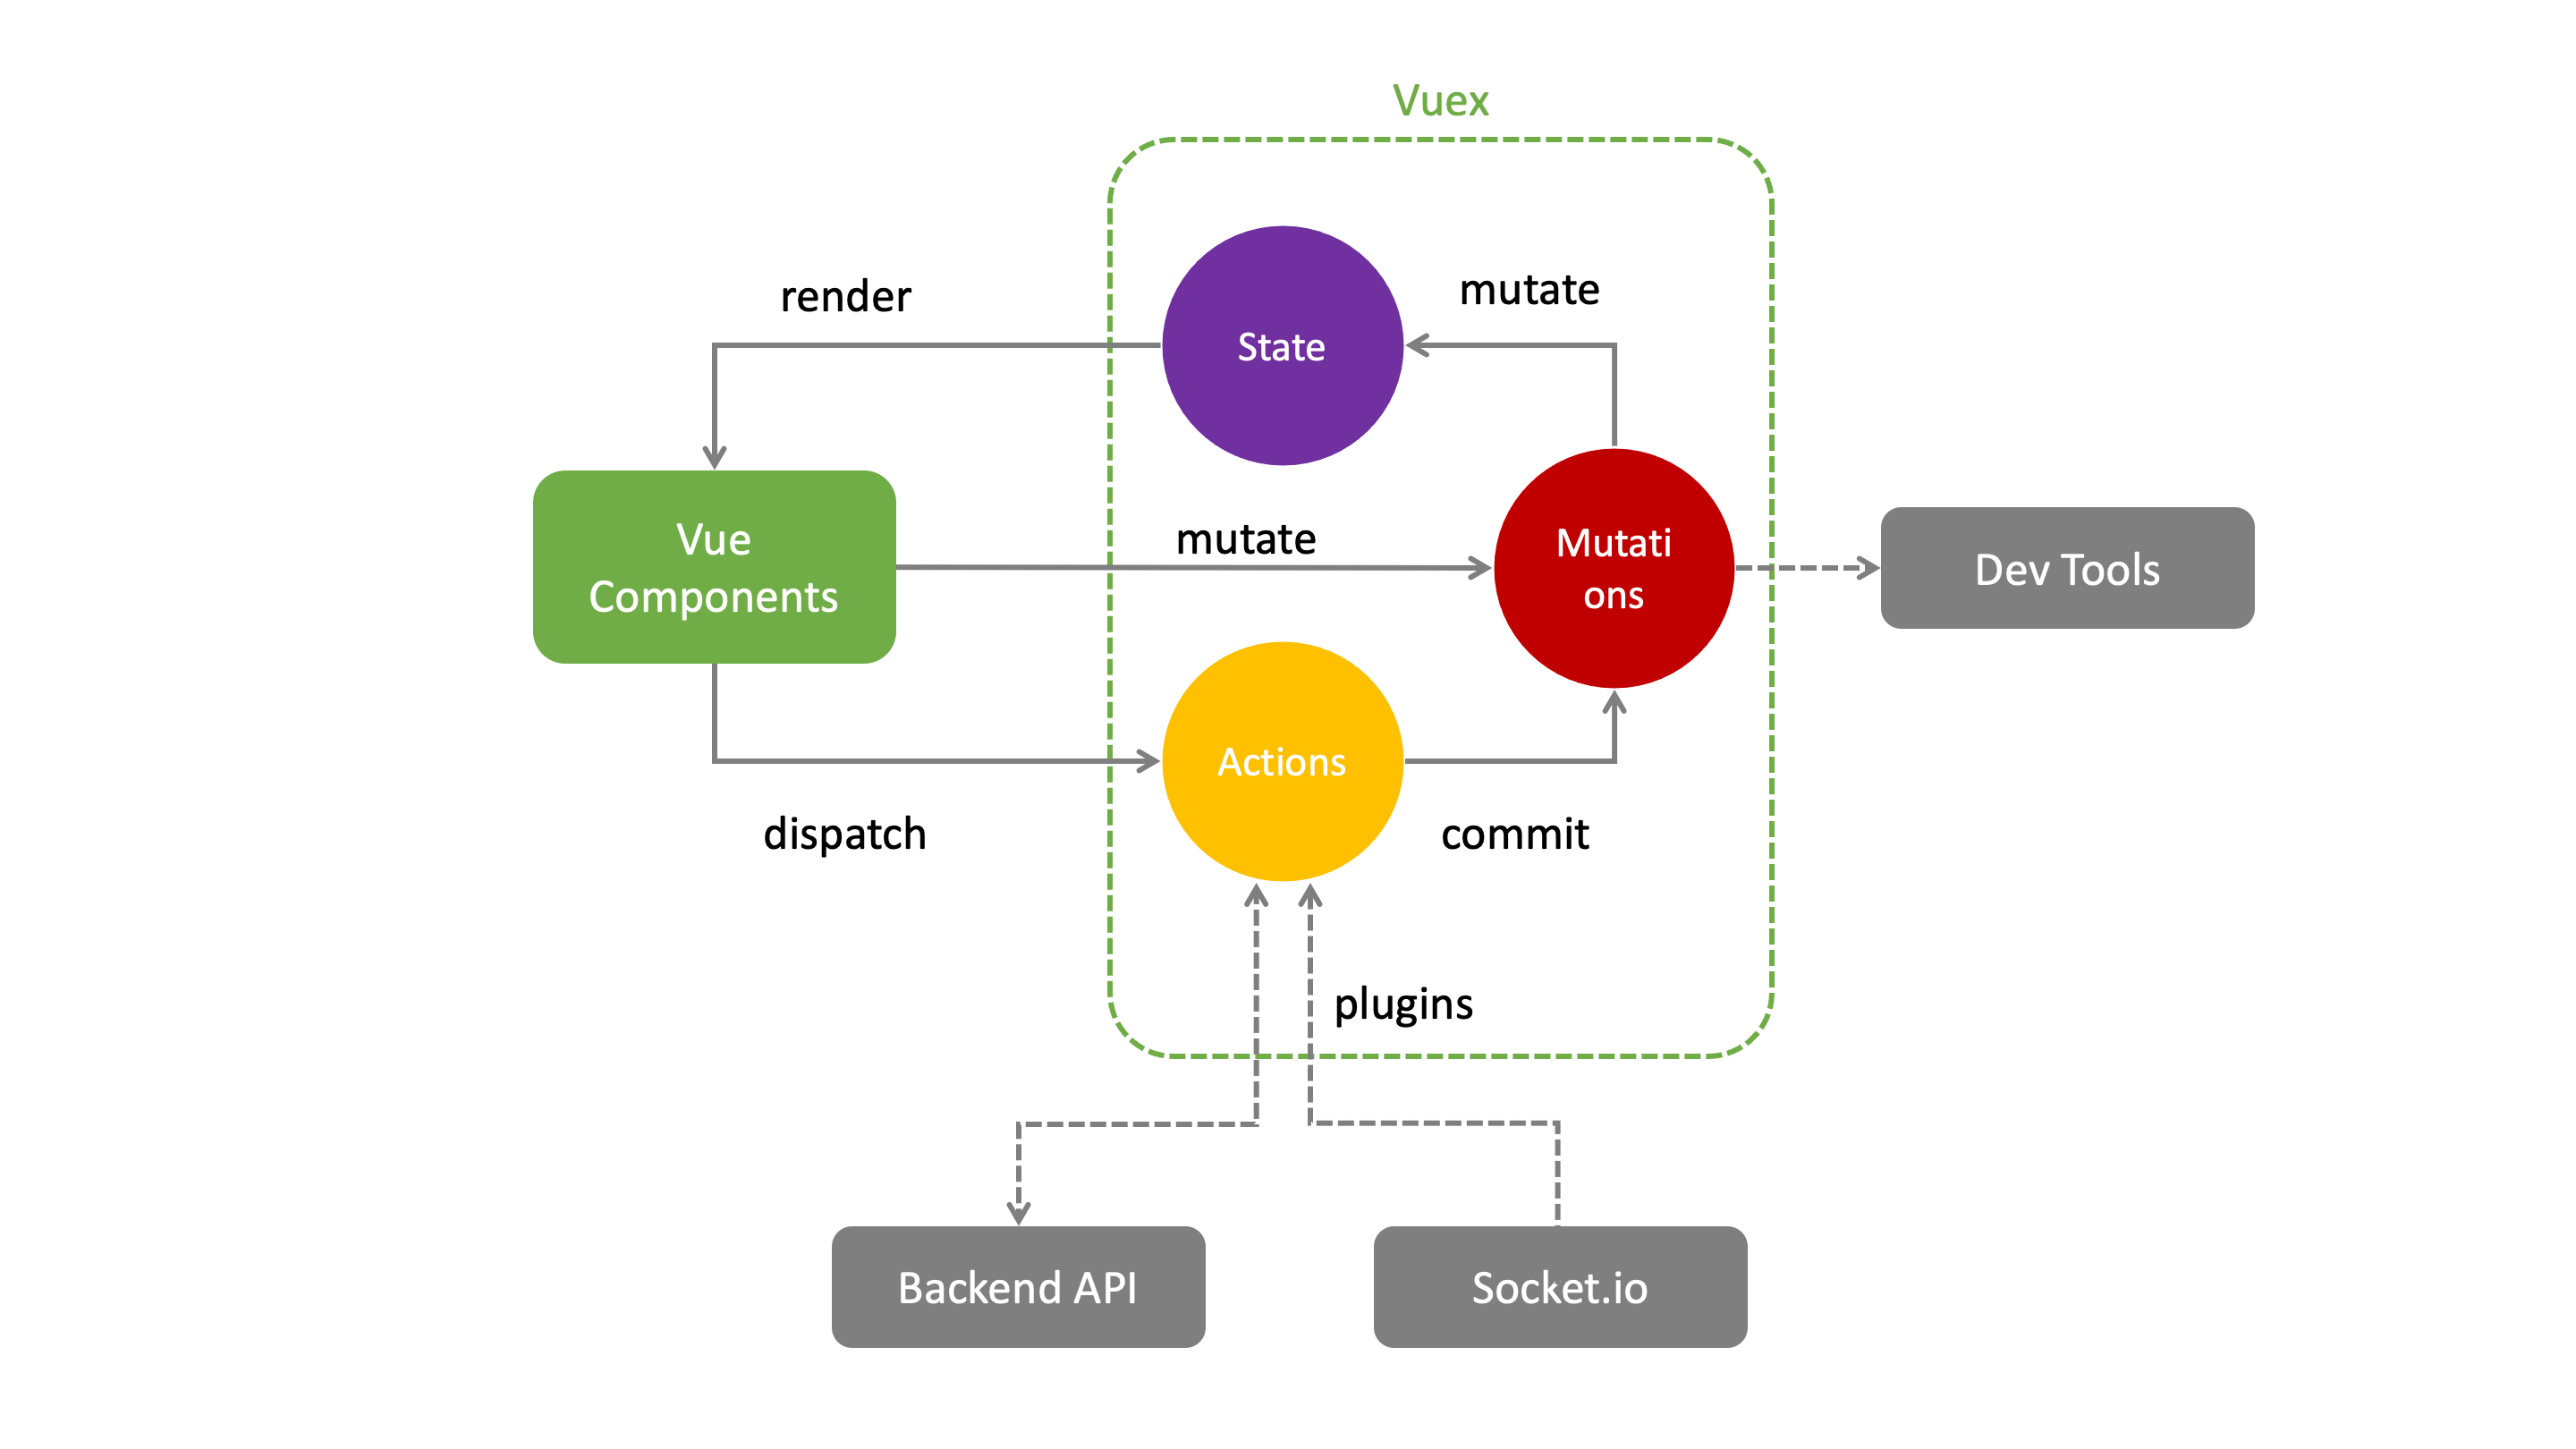
The dashboard frontend consists of many Vue.js single file components that manage their state via a centralized store. The store defines mutations to modify the state synchronously. If several mutations have to be combined or the state in the backend has to be modified at the same time, the store provides asynchronous actions to do this job. The synchronization of the data with the backend is done by plugins that also use actions.
The backend is currently a monolithic Node.js application, but it performs several tasks that are actually independent.
frontend single page applicationapiserver to the frontend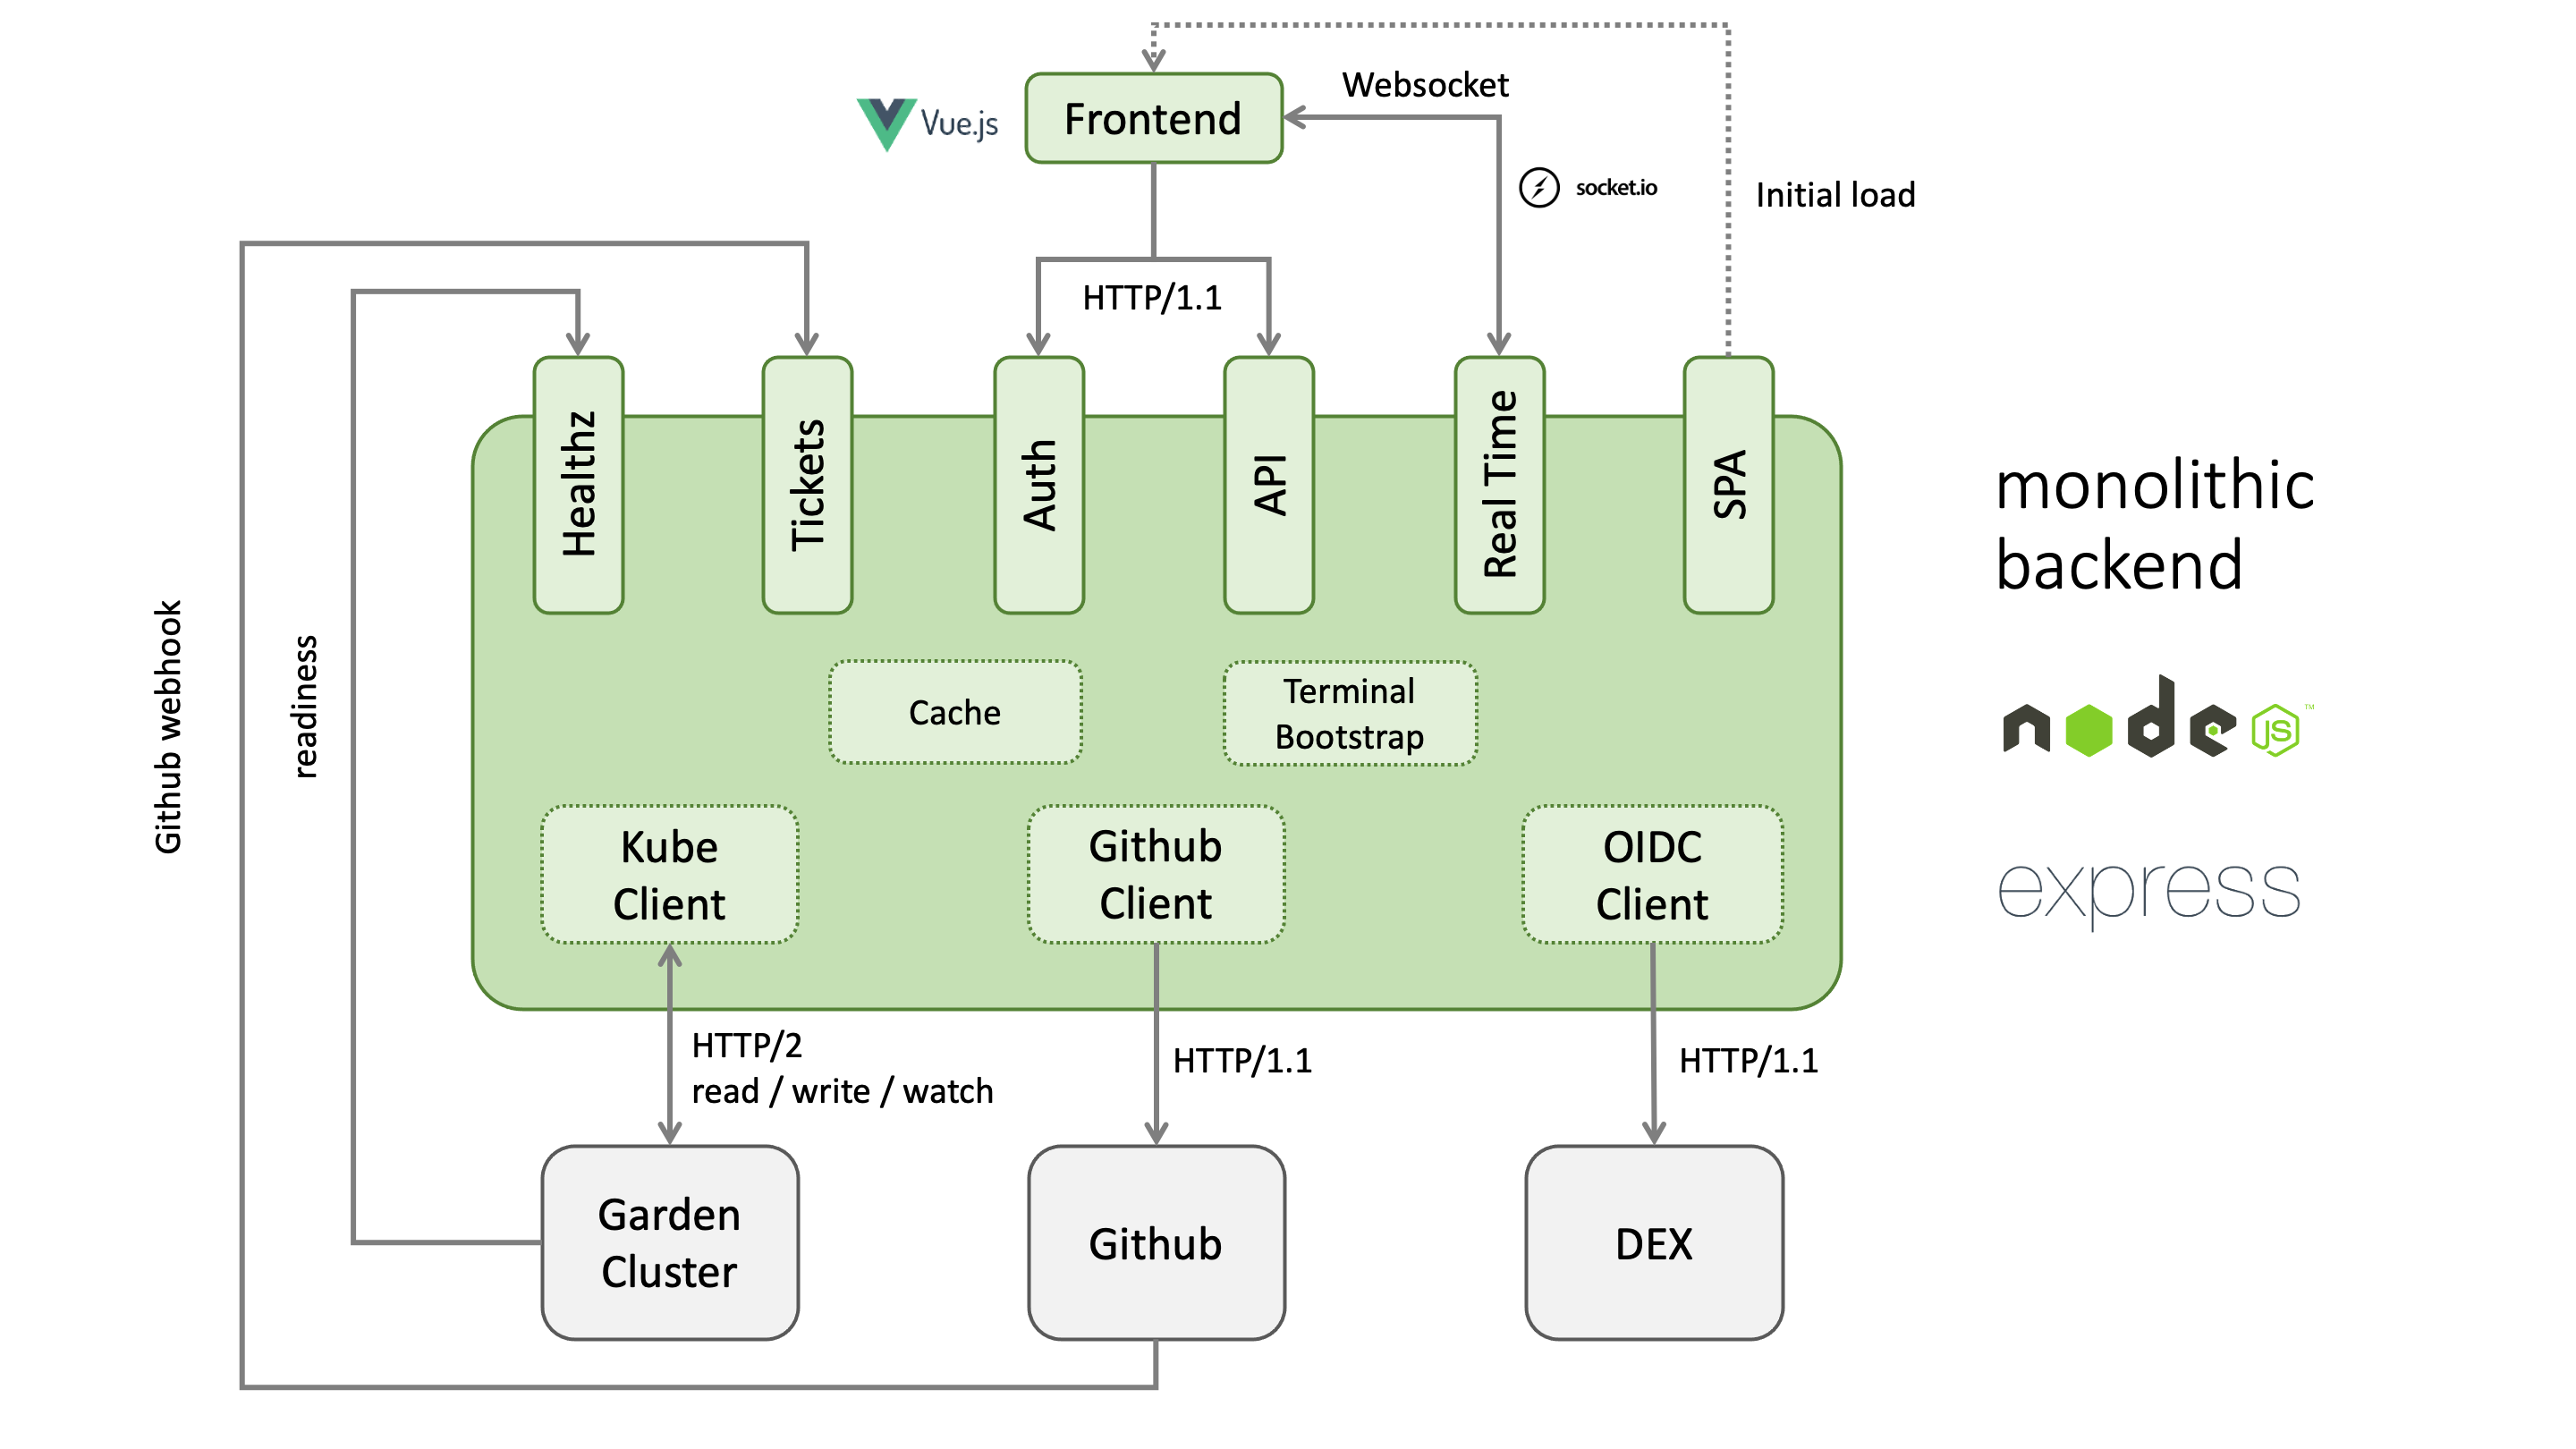
It is planned to split the backend into several independent containers to increase stability and performance.
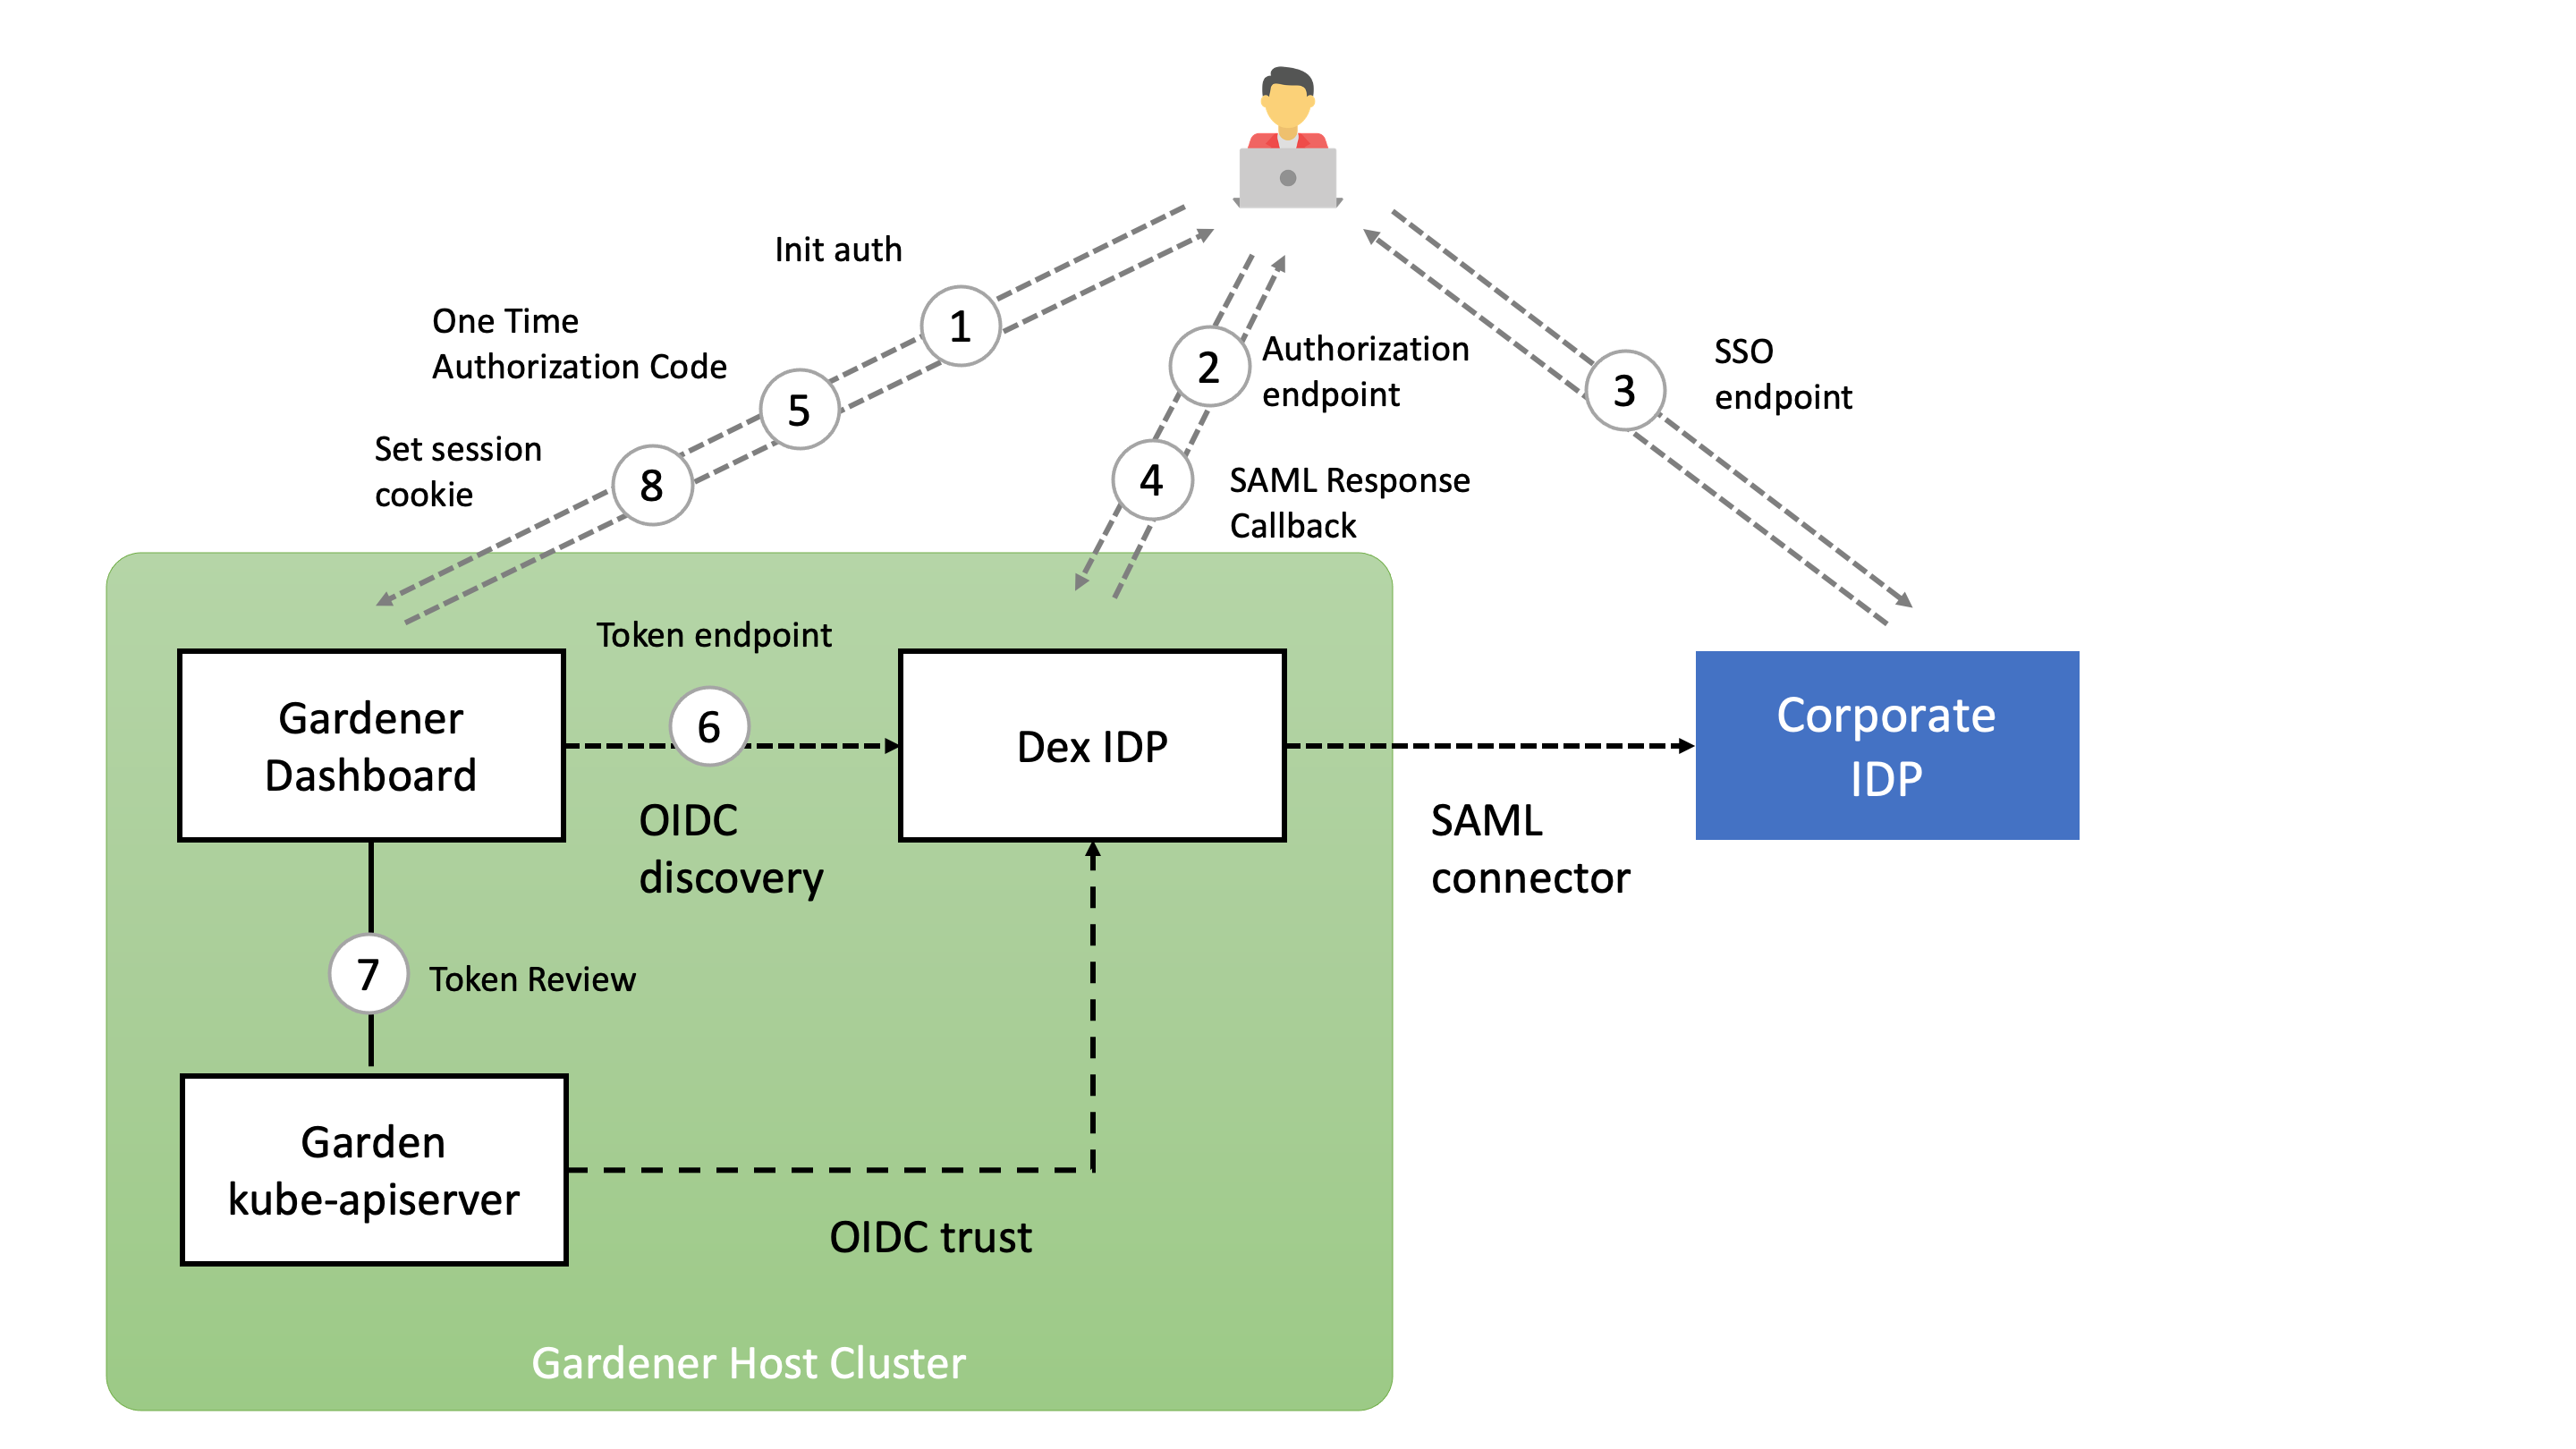
The following diagram shows the authorization code flow in the Gardener dashboard. When the user clicks the login button, he is redirected to the authorization endpoint of the openid connect provider. In the case of Dex IDP, authentication is delegated to the connected IDP. After a successful login, the OIDC provider redirects back to the dashboard backend with a one time authorization code. With this code, the dashboard backend can now request an ID token for the logged in user. The ID token is encrypted and stored as a secure httpOnly session cookie.
For an overview and usage of access restrictions, refer to the Access Restrictions Usage Documentation.
Operators can configure the Gardener Dashboard to define available access restrictions and their options. This configuration determines what is displayed to end-users in the Dashboard UI.
The Dashboard can be installed and configured in two ways:
values.yaml file.When installing the Dashboard via Helm chart, access restrictions are configured in the values.yaml file.
Example values.yaml:
accessRestriction:
  noItemsText: No access restriction options available for region ${region} and cloud profile ${cloudProfileName} (${cloudProfileKind})
  items:
  - key: eu-access-only
    display:
      title: EU Access Only # Optional title; if not specified, `key` is used
      description: Restricts access to EU regions only # Optional description displayed in a tooltip
    input:
      title: EU Access
      description: |
        This service is offered with our regular SLAs and 24x7 support for the control plane of the cluster. 24x7 support for cluster add-ons and nodes is only available if you meet the following conditions:
    options:
    - key: support.gardener.cloud/eu-access-for-cluster-addons
      display:
        visibleIf: true # Controls visibility based on a condition
      input:
        title: No personal data is used in resource names or contents
        description: |
          If you can't comply, only third-level support during usual 8x5 working hours in the EEA will be available for cluster add-ons.
        inverted: false # Determines if the input value is inverted
    - key: support.gardener.cloud/eu-access-for-cluster-nodes
      display:
        visibleIf: false # Controls visibility based on a condition
      input:
        title: No personal data is stored in Kubernetes volumes except certain types
        description: |
          If you can't comply, only third-level support during usual 8x5 working hours in the EEA will be available for node-related components.
        inverted: true # Determines if the input value is inverted
When the Dashboard is installed via the Gardener Operator, access restrictions are configured in a separate ConfigMap referenced by the Operator using .spec.virtualCluster.gardener.gardenerDashboard.frontendConfigMapRef within the Garden resource.
Example ConfigMap:
apiVersion: v1
kind: ConfigMap
metadata:
  name: gardener-dashboard-frontend
  namespace: garden
data:
  frontend-config.yaml: |
    accessRestriction:
      noItemsText: No access restriction options available for region ${region} and cloud profile ${cloudProfileName} (${cloudProfileKind})
      items:
      - key: eu-access-only
        display:
          title: EU Access Only
          description: Restricts access to EU regions only
        input:
          title: EU Access
          description: |
            This service is offered with our regular SLAs and 24x7 support for the control plane of the cluster. 24x7 support for cluster add-ons and nodes is only available if you meet the following conditions:
        options:
        - key: support.gardener.cloud/eu-access-for-cluster-addons
          display:
            visibleIf: true
          input:
            title: No personal data is used in resource names or contents
            description: |
              If you can't comply, only third-level support during usual 8x5 working hours in the EEA will be available for cluster add-ons.
            inverted: false
        - key: support.gardener.cloud/eu-access-for-cluster-nodes
          display:
            visibleIf: false
          input:
            title: No personal data is stored in Kubernetes volumes except certain types
            description: |
              If you can't comply, only third-level support during usual 8x5 working hours in the EEA will be available for node-related components.
            inverted: true
input and displaydisplay:
title: Label shown on the chip. If not specified, key is used.description: Tooltip content when hovering over the chip.visibleIf (for options): Determines if the option’s chip is displayed based on its value.input:
title: Label for the input control.description: Detailed information or instructions for the input control.inverted (for options): Determines if the input value is inverted (true or false). When inverted is true, the control behaves inversely (e.g., checked means false).If no access restrictions are available for the selected region and cloud profile, the text specified in accessRestriction.noItemsText is displayed. Placeholders {region} and {cloudProfile} can be used in the text.
The project resource operations that are performed manually in the dashboard or via kubectl can be automated using the Gardener API and a Service Account authorized to perform them.
Select your project and choose MEMBERS from the menu on the left.
Locate the section Service Accounts and choose +.

Enter the service account details.
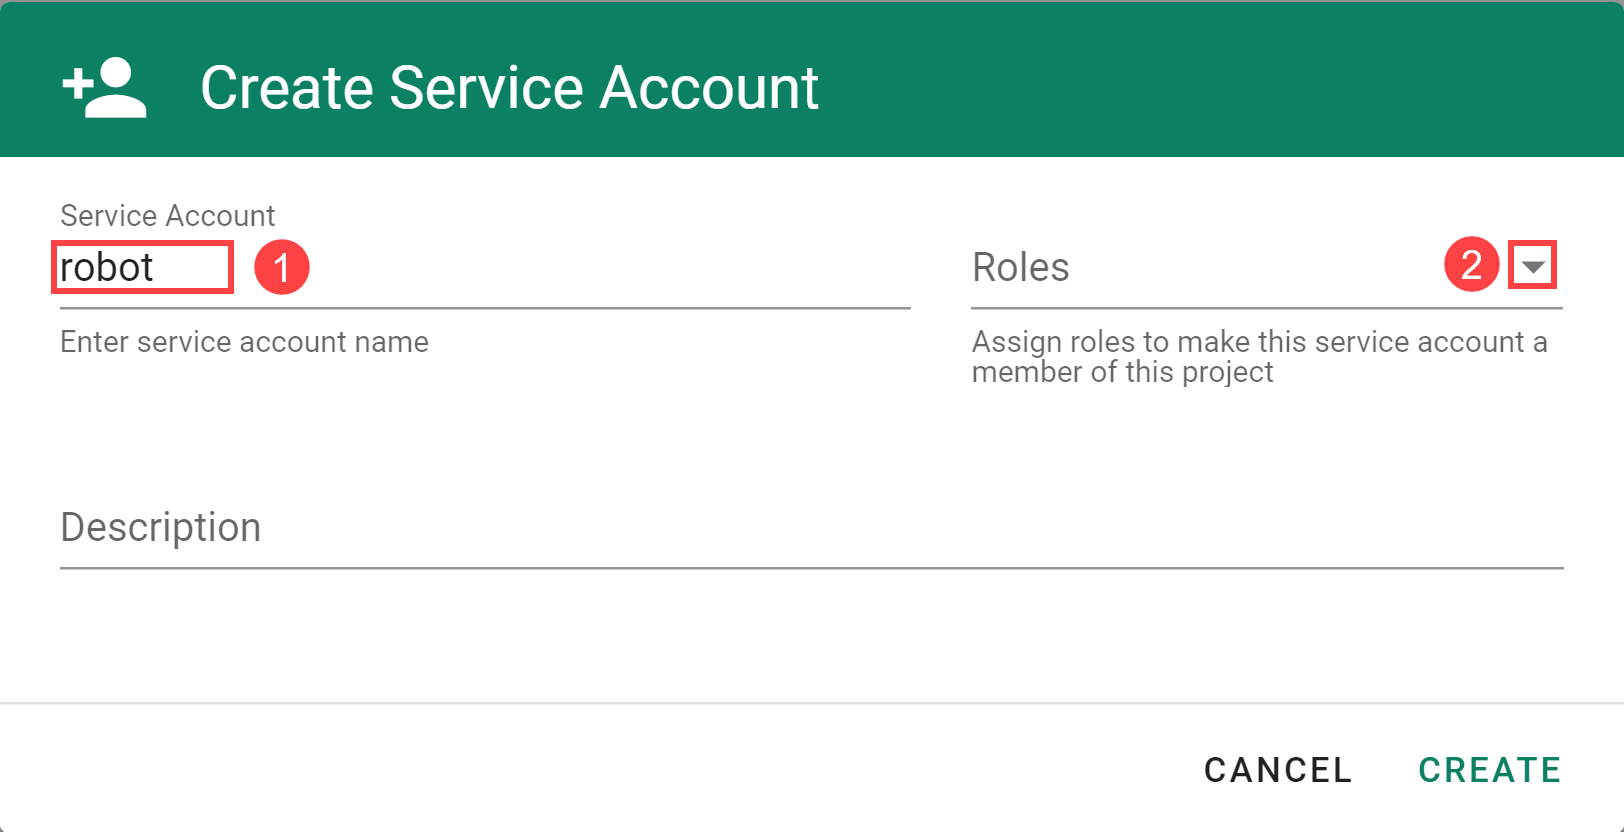
The following Roles are available:
| Role | Granted Permissions |
|---|---|
| Owner | Combines the Admin, UAM and Service Account Manager roles. There can only be one owner per project. You can change the owner on the project administration page. |
| Admin | Allows to manage resources inside the project (e.g. secrets, shoots, configmaps and similar) and to manage permissions for service accounts. Note that the Admin role has read-only access to service accounts. |
| Viewer | Provides read access to project details and shoots. Has access to shoots but is not able to create new ones. Cannot read cloud provider secrets. |
| UAM | Allows to add/modify/remove human users, service accounts or groups to/from the project member list. In case an external UAM system is connected via a service account, only this account should get the UAM role. |
| Service Account Manager | Allows to manage service accounts inside the project namespace and request tokens for them. The permissions of the created service accounts are instead managed by the Admin role. For security reasons this role should not be assigned to service accounts. In particular it should be ensured that the service account is not able to refresh service account tokens forever. |
To use the service account, download or copy its kubeconfig. With it you can connect to the API endpoint of your Gardener project.

Note: The downloaded
kubeconfigcontains the service account credentials. Treat with care.
Choose Delete Service Account to delete it.

In Kubernetes, the configuration for accessing your cluster is in a format known as kubeconfig, which is stored as a file. It contains details such as cluster API server addresses and access credentials or a command to obtain access credentials from a kubectl credential plugin. In general, treat a kubeconfig as sensitive data. Tools like kubectl use the kubeconfig to connect and authenticate to a cluster and perform operations on it.
Learn more about kubeconfig and kubectl on kubernetes.io.
In this guide, we reference the following tools:
kubectl credential plugin used for OIDC authentication, which is required for the (OIDC) Garden cluster kubeconfigkubectl credential plugin used for Shoot authentication as system:masters, which is required for the (gardenlogin) Shoot cluster kubeconfigGarden, Seed and Shoot clusters. Use this tool to setup gardenlogin and gardenctl itself, configure access to clusters and configure cloud provider CLI tools.In order to connect to a Shoot cluster, you first have to install and setup gardenlogin.
You can obtain the kubeconfig for the Shoot cluster either by downloading it from the Gardener dashboard or by copying the gardenctl target command from the dashboard and executing it.
To setup gardenlogin, you need to:
Garden ClusterMY ACCOUNT page on the dashboard by clicking on the user avatar -> MY ACCOUNT.Access section, download the kubeconfig.

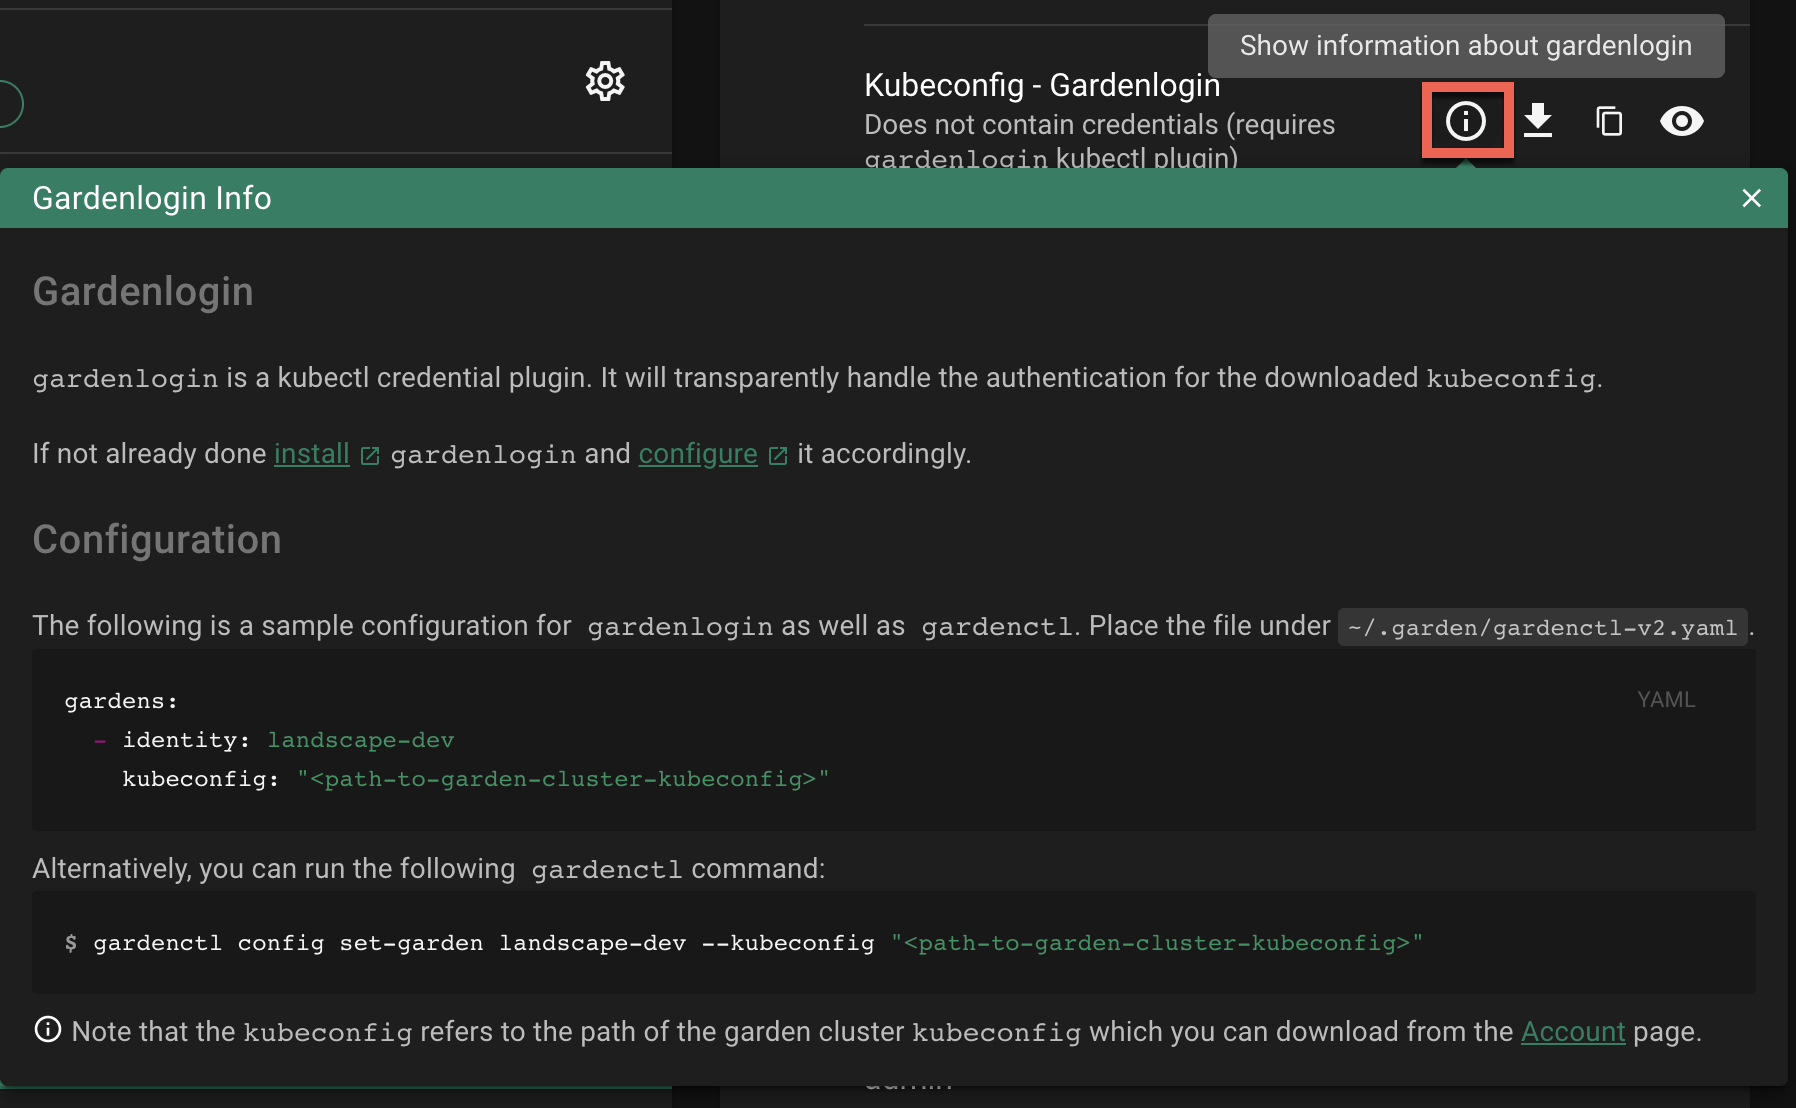
Configure gardenlogin by following the installation instruction on the dashboard:
CLUSTERS and select your cluster in the list.Show information about gardenlogin info icon and follow the configuration hints.Important
Use the previously downloaded kubeconfig for the
Gardencluster as the kubeconfig path. Do not use thegardenloginShootcluster kubeconfig here.
Shoot ClusterThe gardenlogin kubeconfig for the Shoot cluster can be obtained in various ways:
gardenctl target command from the dashboardgardenctl target CommandUsing the gardenctl target command you can quickly set or switch between clusters. The command sets the scope for the next operation, e.g., it ensures that the KUBECONFIG env variable always points to the current targeted cluster.
To target a Shoot cluster:
Copy the gardenctl target command from the dashboard
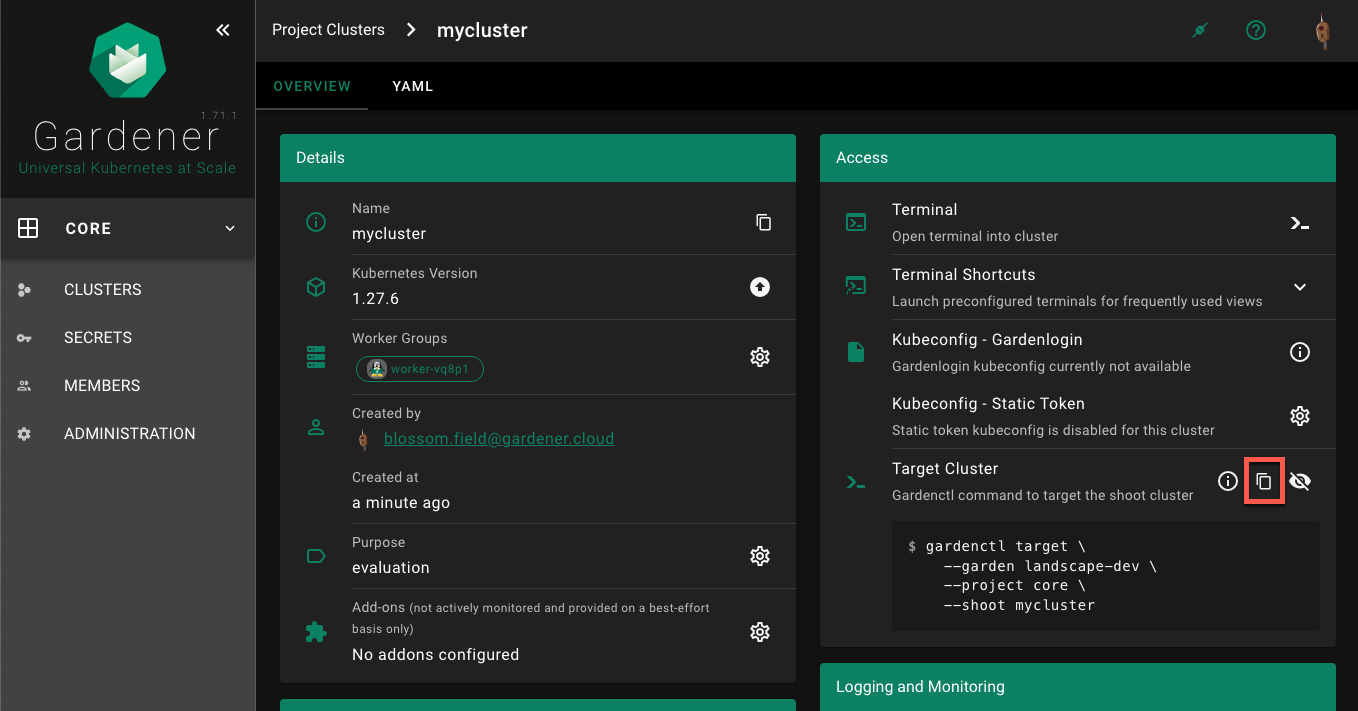
Paste and run the command in the terminal application, for example:
$ gardenctl target --garden landscape-dev --project core --shoot mycluster
Successfully targeted shoot "mycluster"
Your KUBECONFIG env variable is now pointing to the current target (also visible with gardenctl target view -o yaml). You can now run kubectl commands against your Shoot cluster.
$ kubectl get namespaces
The command connects to the cluster and list its namespaces.
If your KUBECONFIG env variable does not point to the current target, you will see the following message after running the gardenctl target command:
WARN The KUBECONFIG environment variable does not point to the current target of gardenctl. Run `gardenctl kubectl-env --help` on how to configure the KUBECONFIG environment variable accordingly
In this case you would need to run the following command (assuming bash as your current shell). For other shells, consult the gardenctl kubectl-env –help documentation.
$ eval "$(gardenctl kubectl-env bash)"
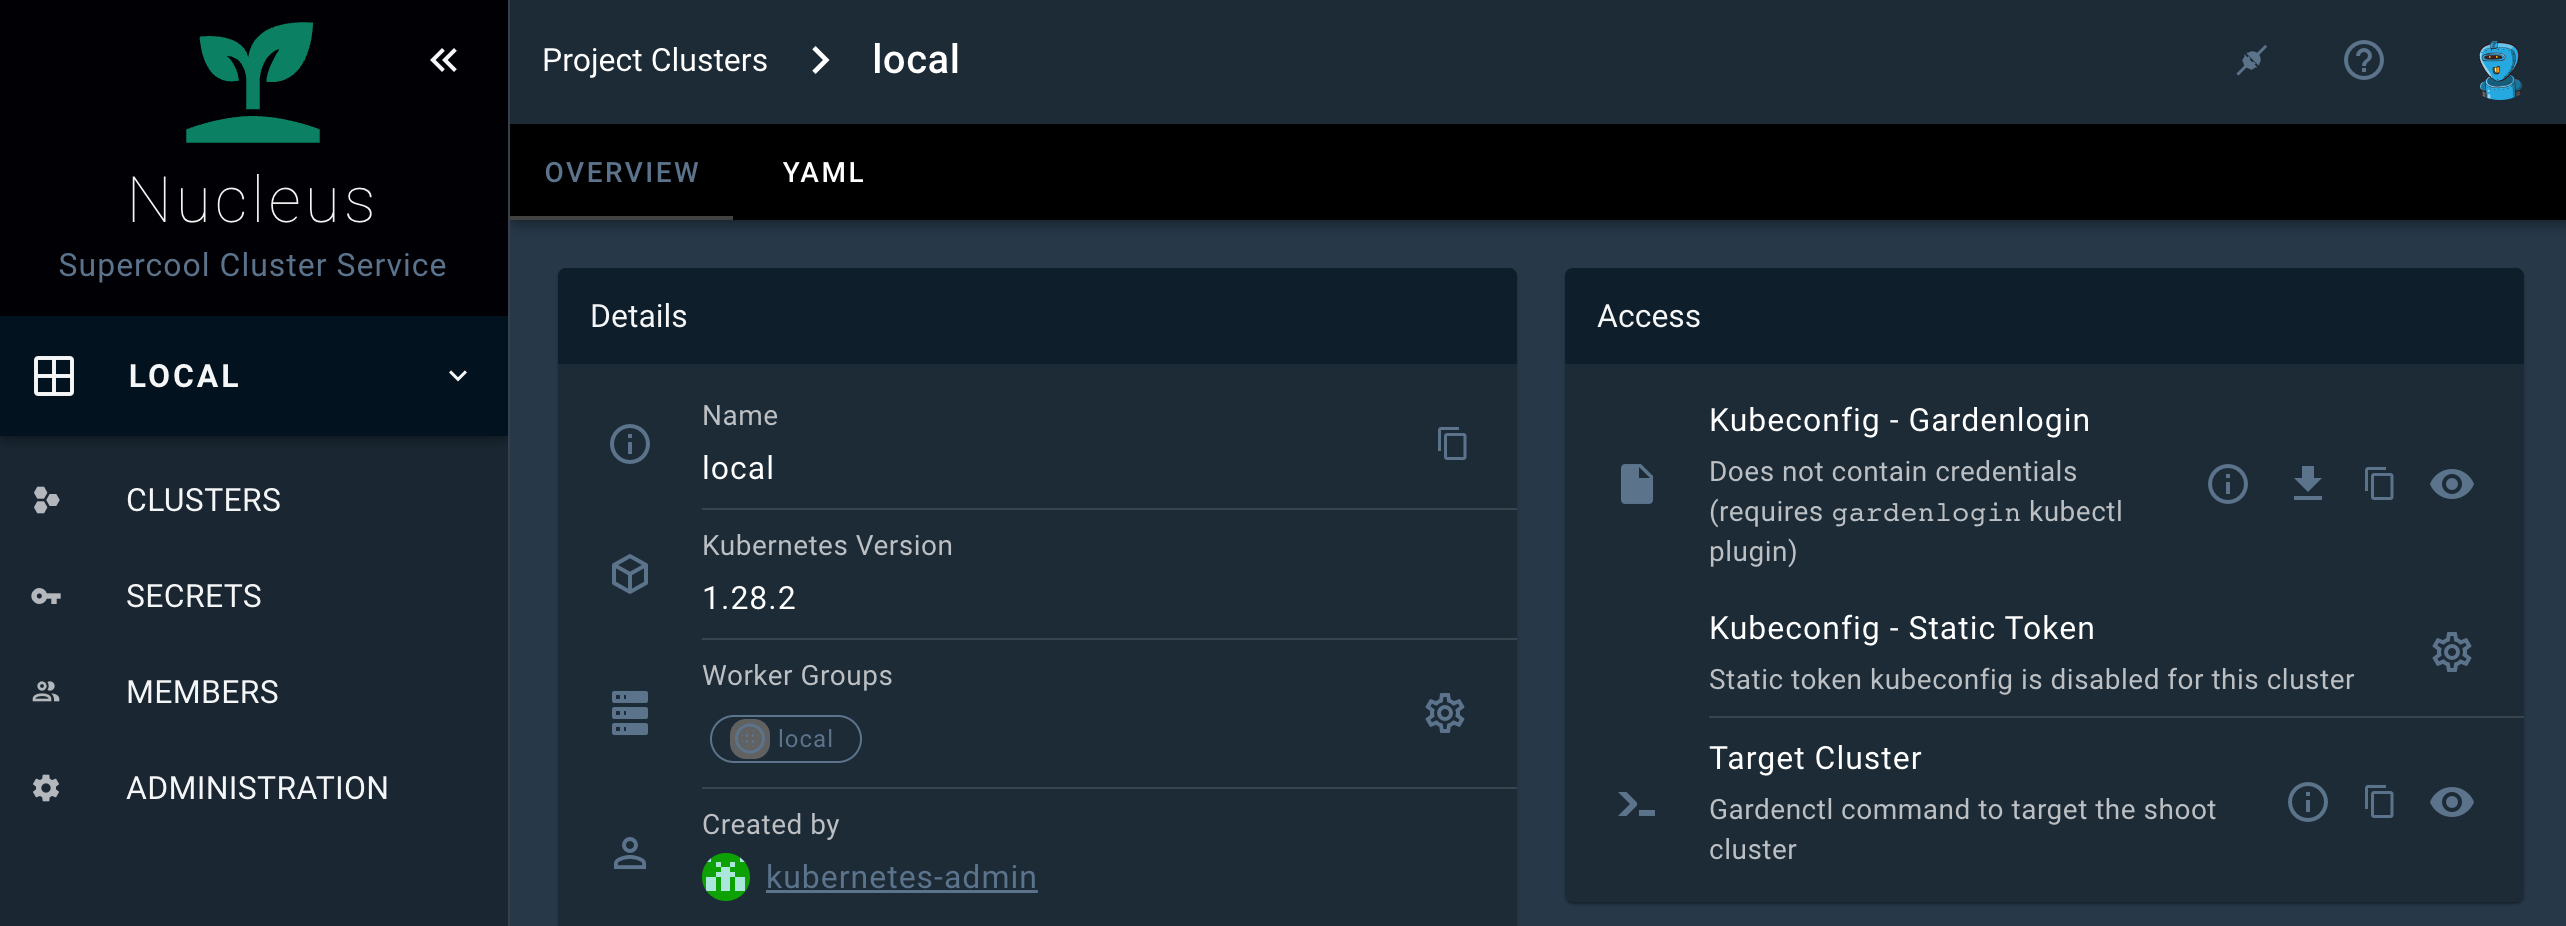
Select your project from the dropdown on the left, then choose CLUSTERS and locate your cluster in the list. Choose the key icon to bring up a dialog with the access options.
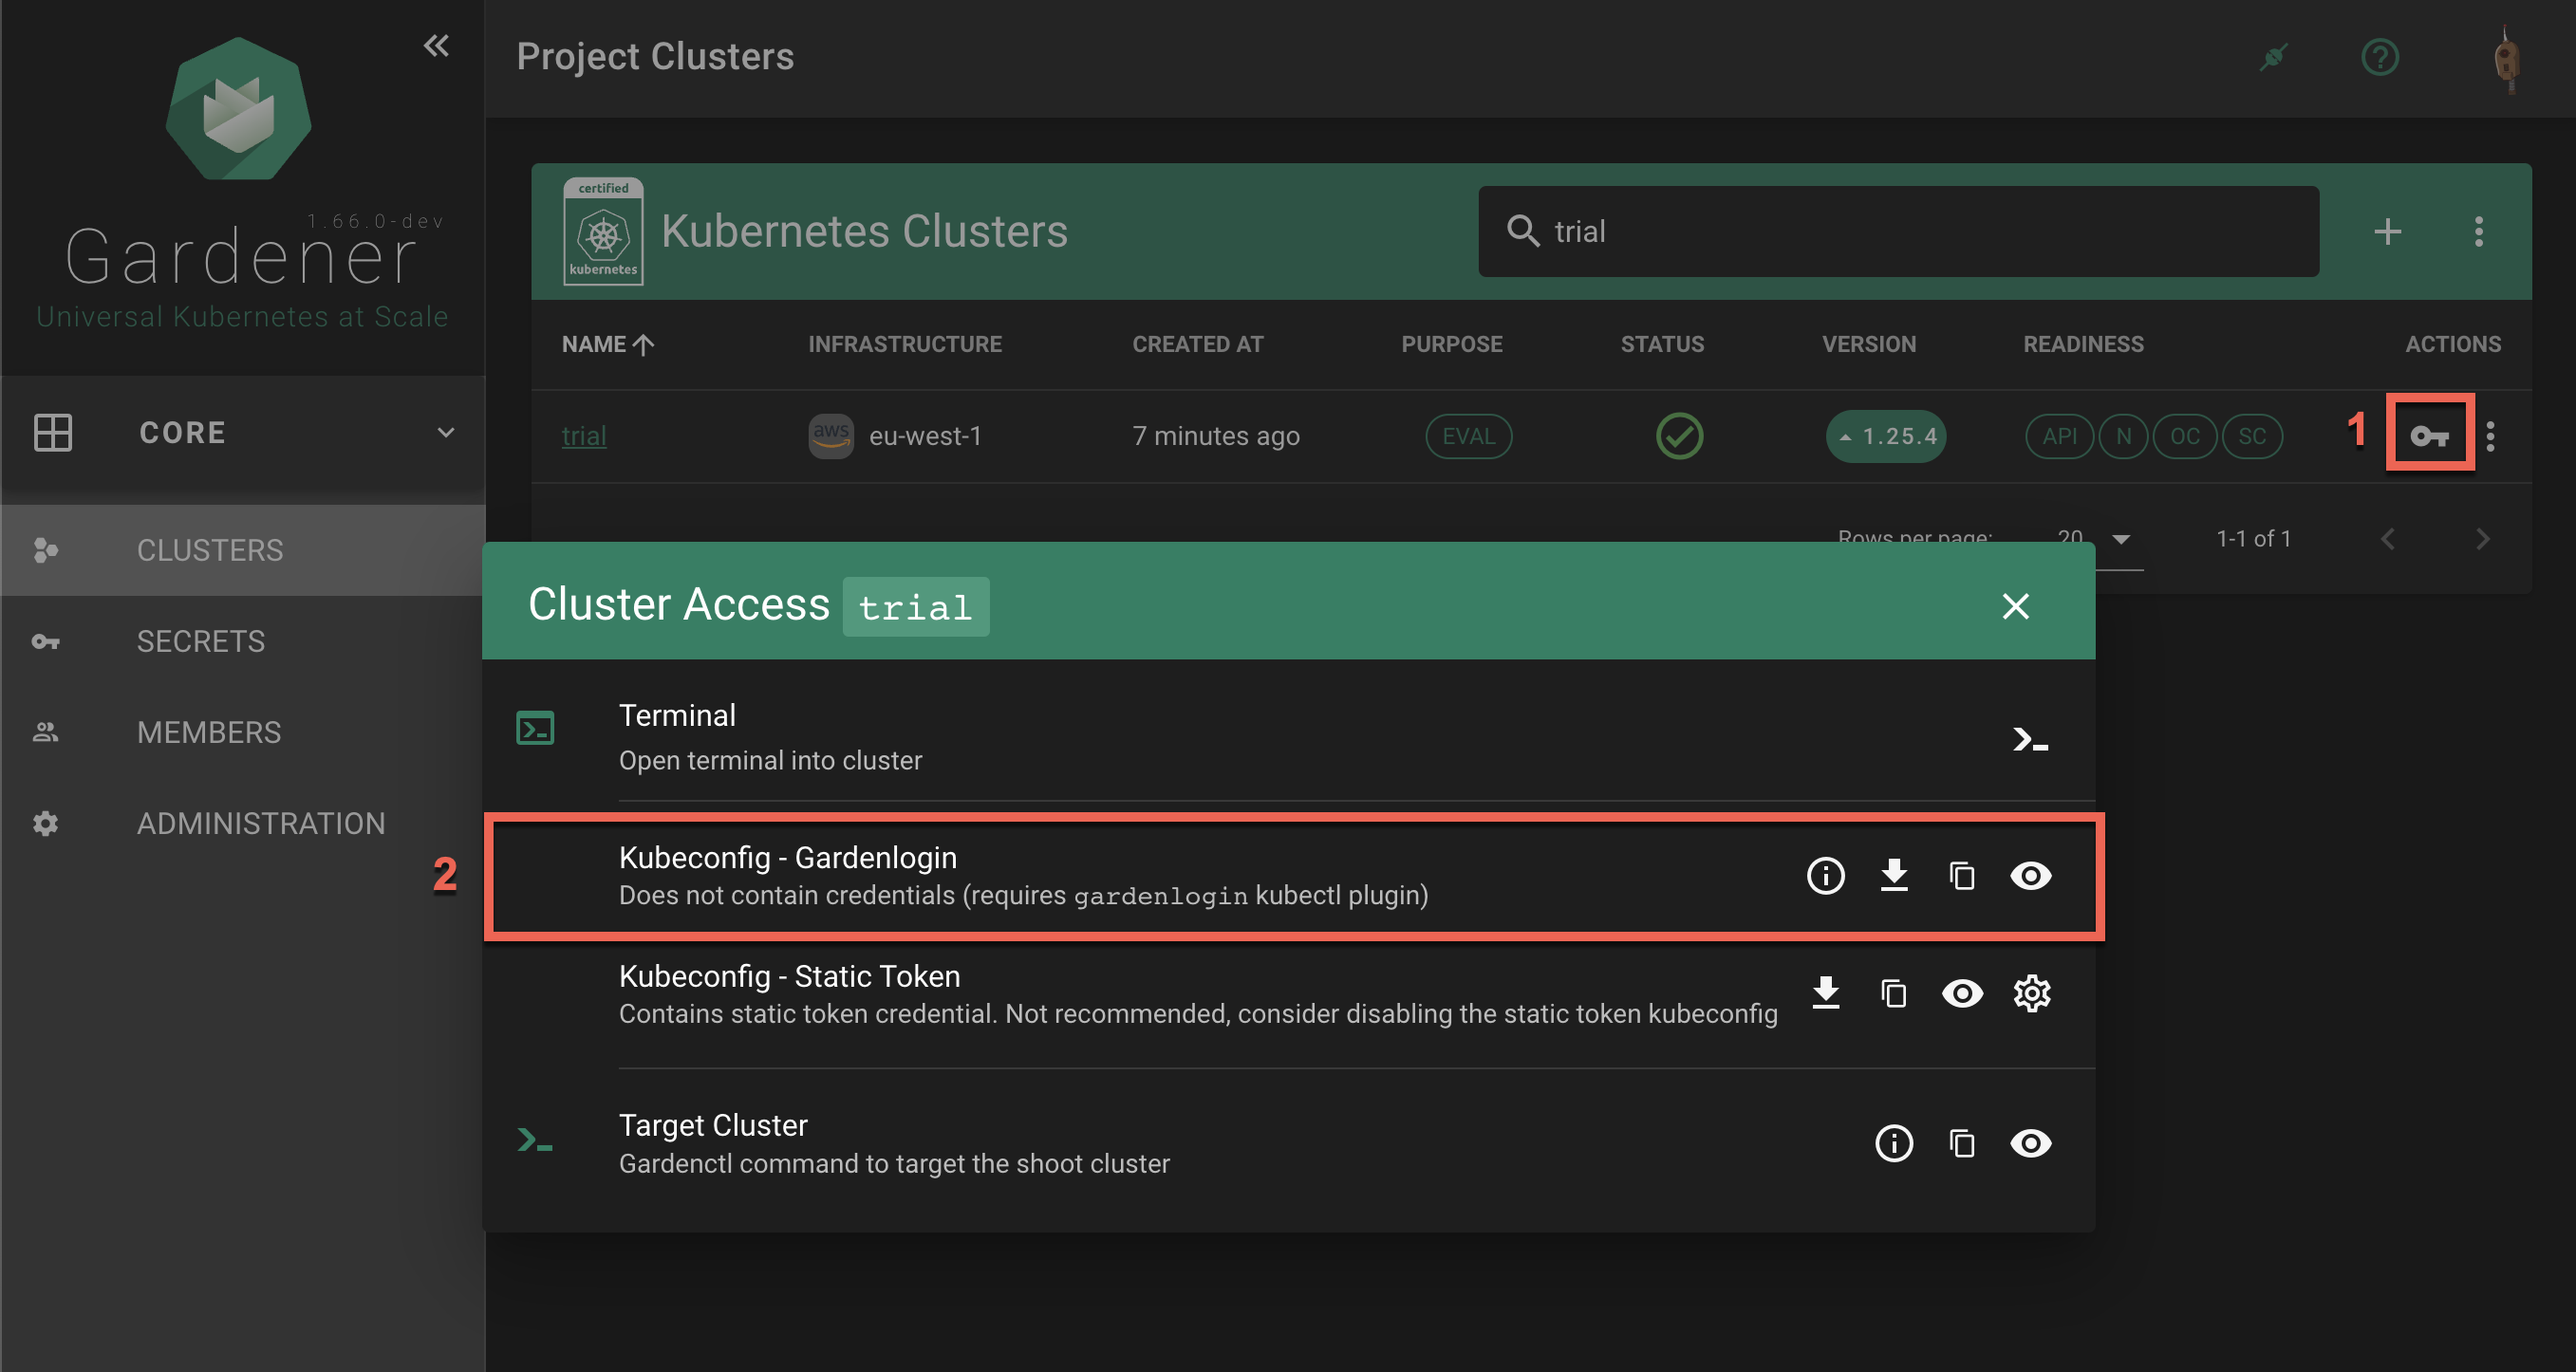
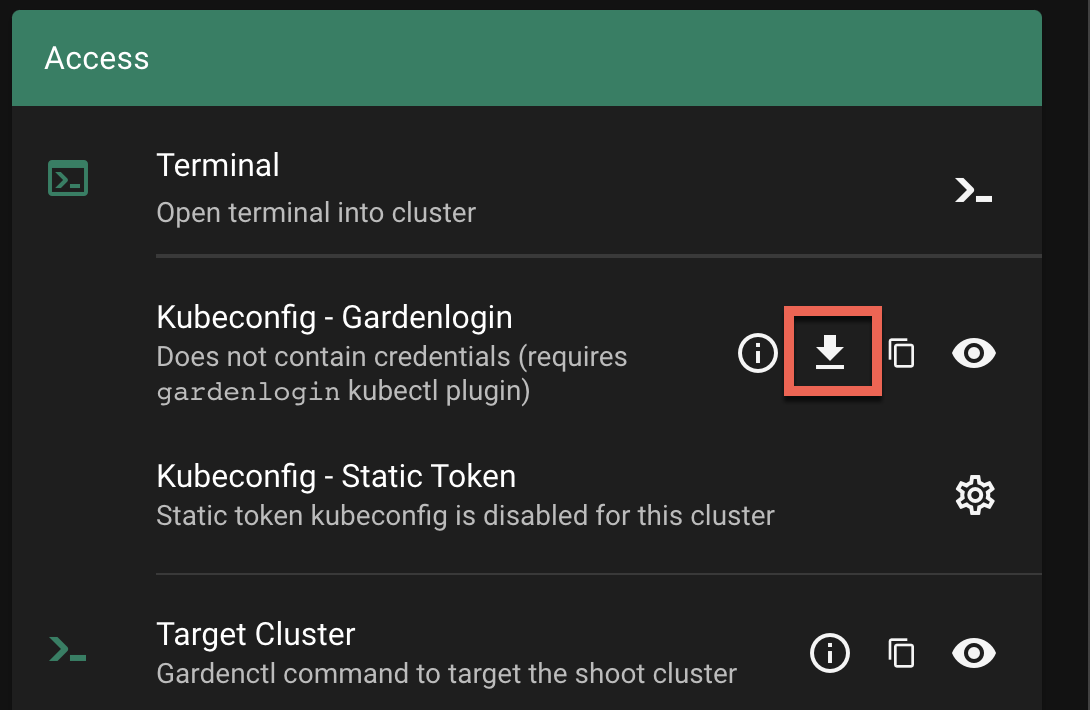
In the Kubeconfig - Gardenlogin section the options are to show gardenlogin info, download, copy or view the kubeconfig for the cluster.
The same options are available also in the Access section in the cluster details screen. To find it, choose a cluster from the list.

Choose the download icon to download the kubeconfig as file on your local system.
In the following command, change <path-to-gardenlogin-kubeconfig> with the actual path to the file where you stored the kubeconfig downloaded in the previous step 2.
$ kubectl --kubeconfig=<path-to-gardenlogin-kubeconfig> get namespaces
The command connects to the cluster and list its namespaces.
Since many kubectl commands will be used, it’s a good idea to take advantage of every opportunity to shorten the expressions. The kubectl tool has a fallback strategy for looking up a kubeconfig to work with. For example, it looks for the KUBECONFIG environment variable with value that is the path to the kubeconfig file meant to be used. Export the variable:
$ export KUBECONFIG=<path-to-gardenlogin-kubeconfig>
Again, replace <path-to-gardenlogin-kubeconfig> with the actual path to the kubeconfig for the cluster you want to connect to.
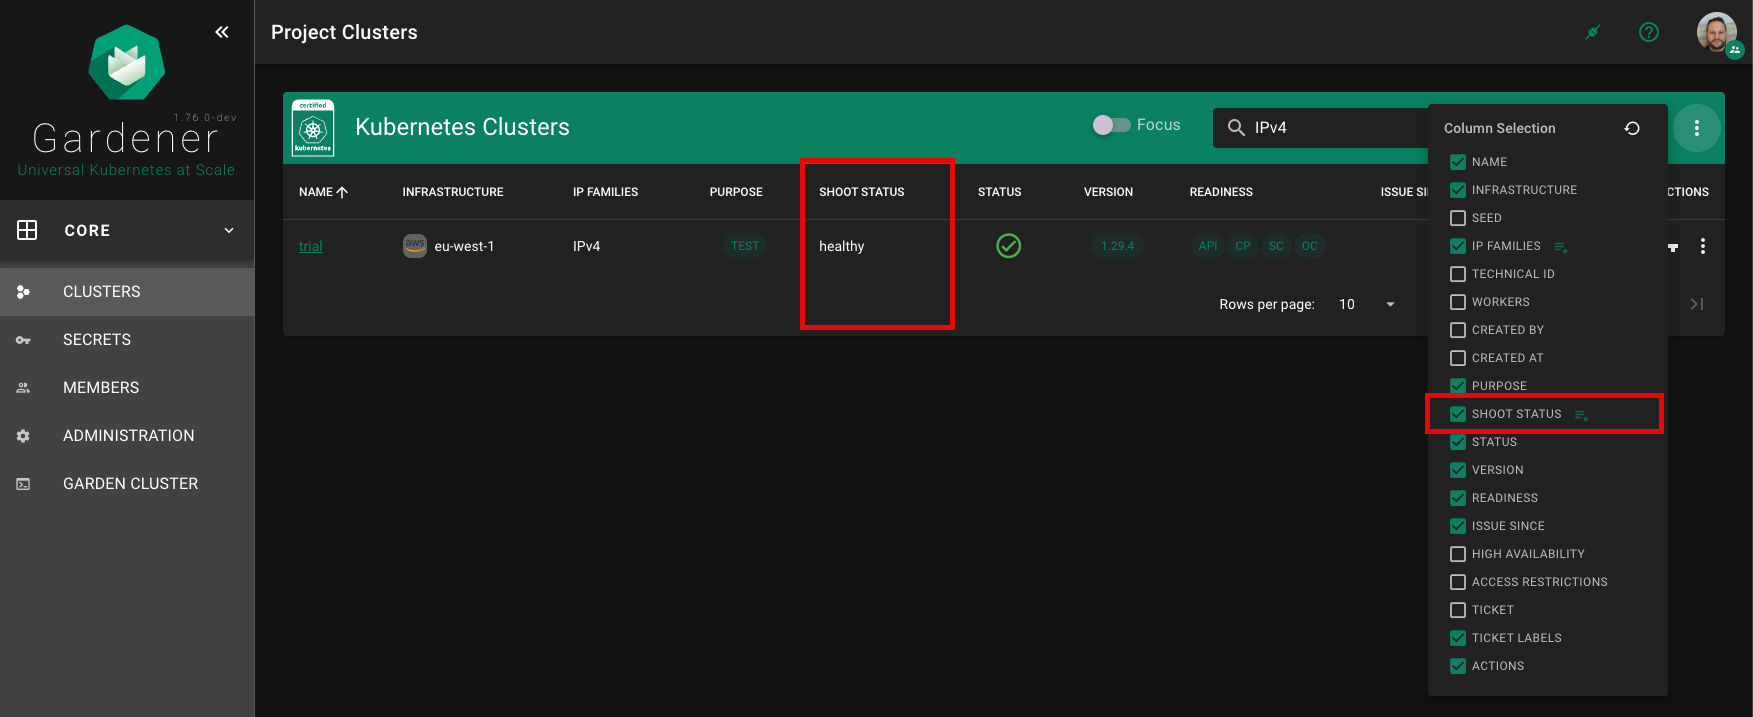
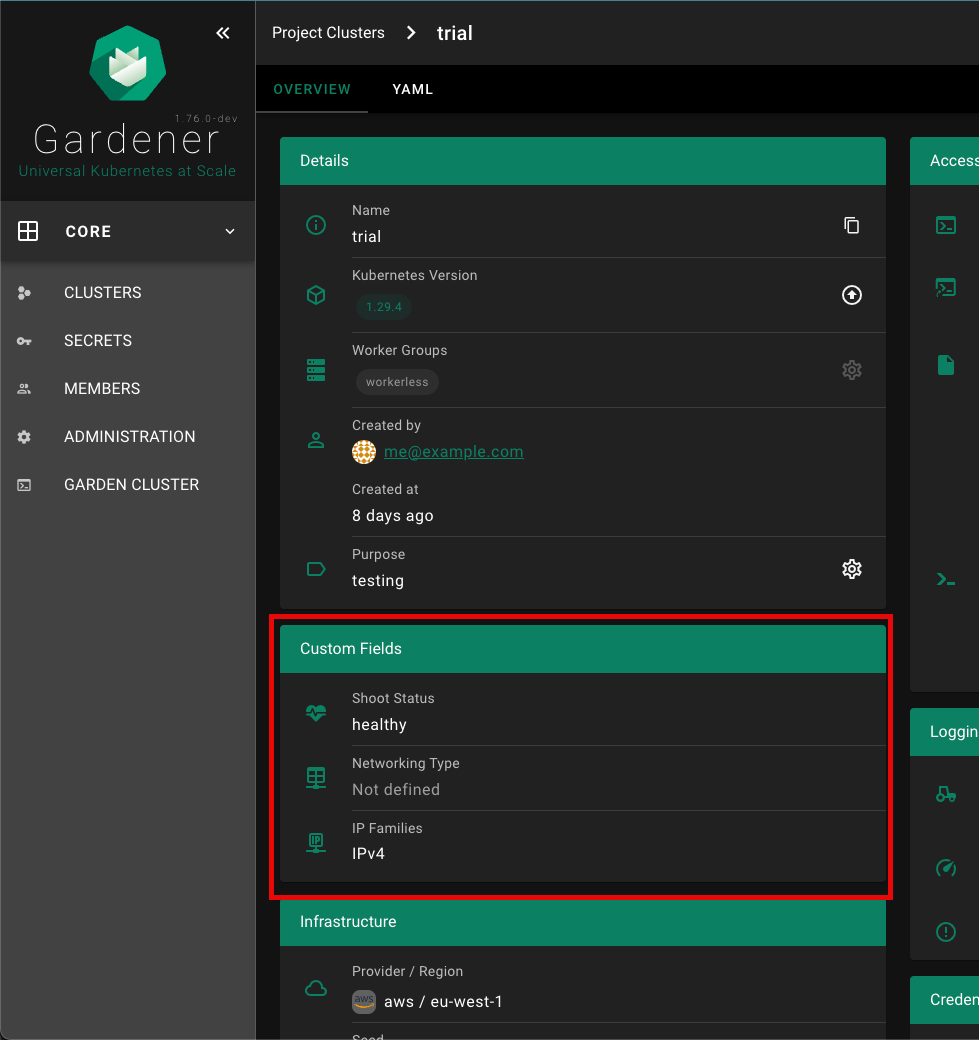
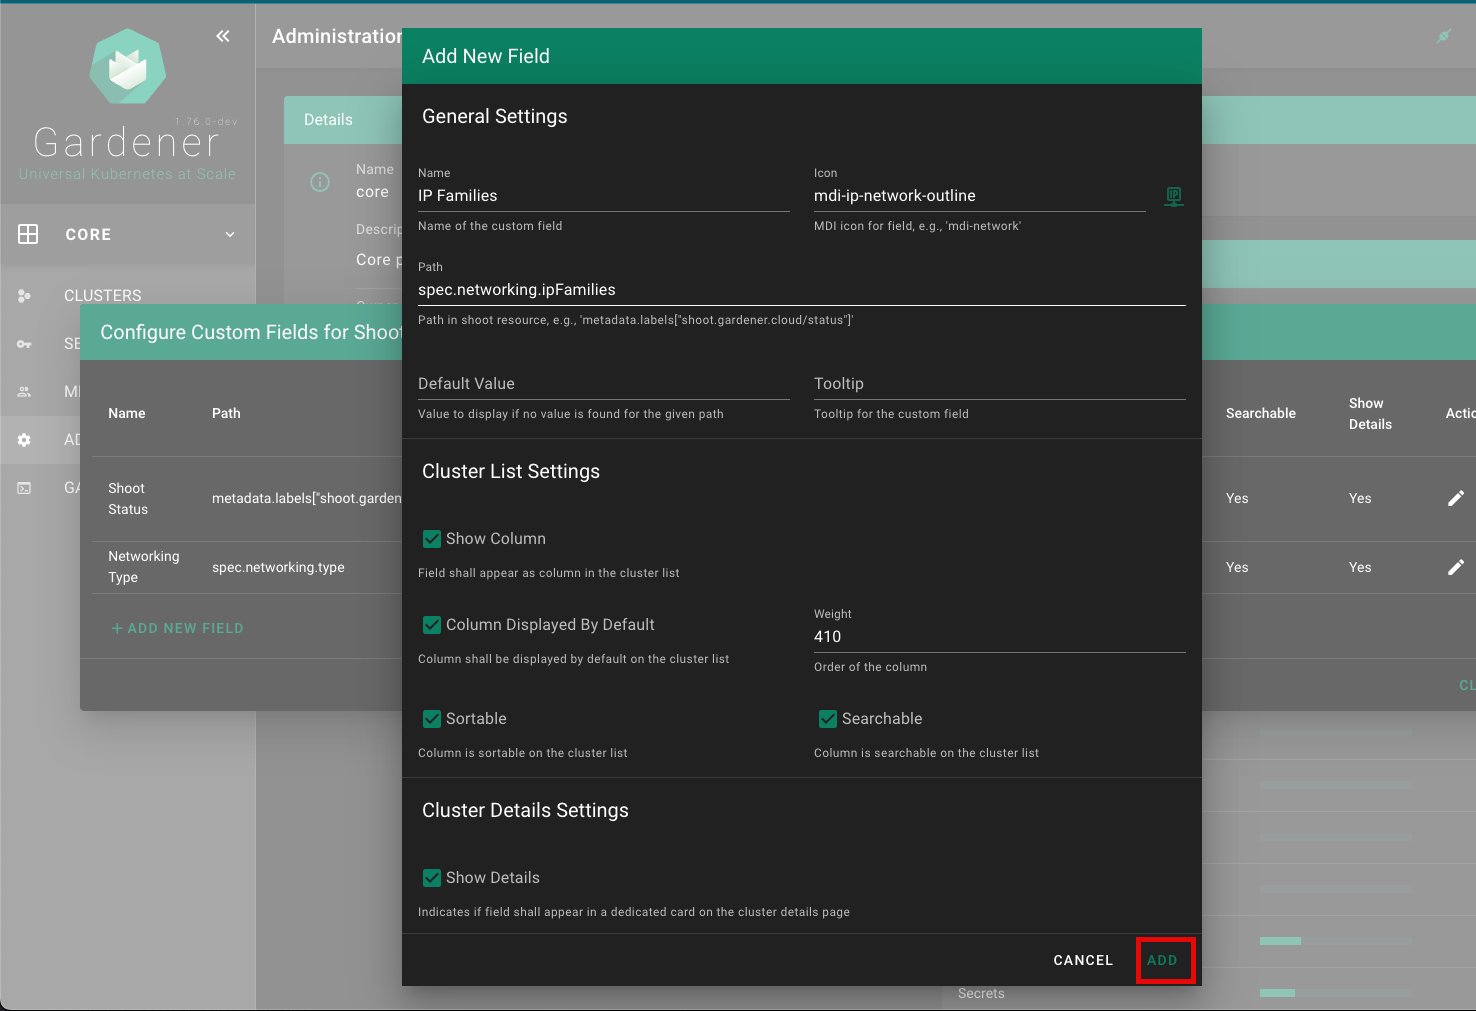
The Dashboard supports custom shoot fields, which can be configured to be displayed on the cluster list and cluster details page. Custom fields do not show up on the ALL_PROJECTS page.
Each custom field configuration is shown with its own chip.
Click on the chip to show more details for the custom field configuration.
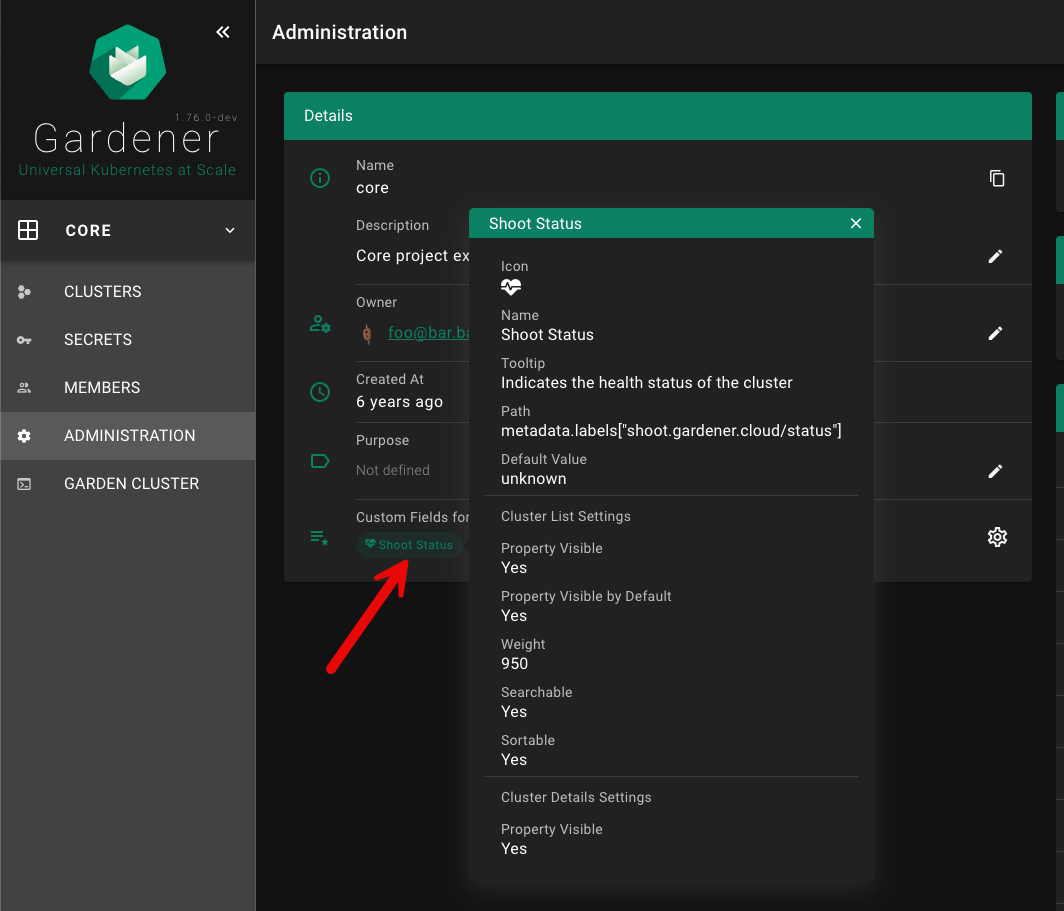
Custom fields can be shown on the cluster list, if showColumn is enabled. See configuration below for more details. In this example, a custom field for the Shoot status was configured.
Custom fields can be shown in a dedicated card (Custom Fields) on the cluster details page, if showDetails is enabled. See configuration below for more details.
| Property | Type | Default | Required | Description |
|---|---|---|---|---|
| name | String | ✔️ | Name of the custom field | |
| path | String | ✔️ | Path in shoot resource, of which the value must be of primitive type (no object / array). Use lodash get path syntax, e.g. metadata.labels["shoot.gardener.cloud/status"] or spec.networking.type | |
| icon | String | MDI icon for field on the cluster details page. See https://materialdesignicons.com/ for available icons. Must be in the format: mdi-<icon-name>. | ||
| tooltip | String | Tooltip for the custom field that appears when hovering with the mouse over the value | ||
| defaultValue | String/Number | Default value, in case there is no value for the given path | ||
| showColumn | Bool | true | Field shall appear as column in the cluster list | |
| columnSelectedByDefault | Bool | true | Indicates if field shall be selected by default on the cluster list (not hidden by default) | |
| weight | Number | 0 | Defines the order of the column. The built-in columns start with a weight of 100, increasing by 100 (200, 300, etc.) | |
| sortable | Bool | true | Indicates if column is sortable on the cluster list | |
| searchable | Bool | true | Indicates if column is searchable on the cluster list | |
| showDetails | Bool | true | Indicates if field shall appear in a dedicated card (Custom Fields) on the cluster details page |
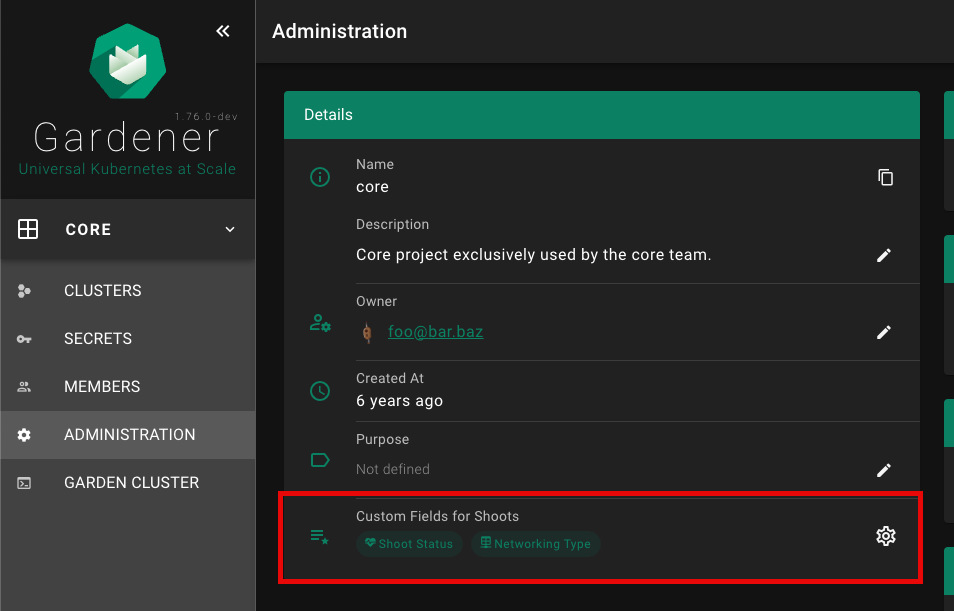
The Gardener Dashboard now includes an editor for custom shoot fields, allowing users to configure these fields directly from the dashboard without needing to use kubectl. This editor can be accessed from the project administration page.
Custom Fields for Shoots section.
Configure Custom Fields for Shoot Clusters panel, click on the + ADD NEW FIELD button.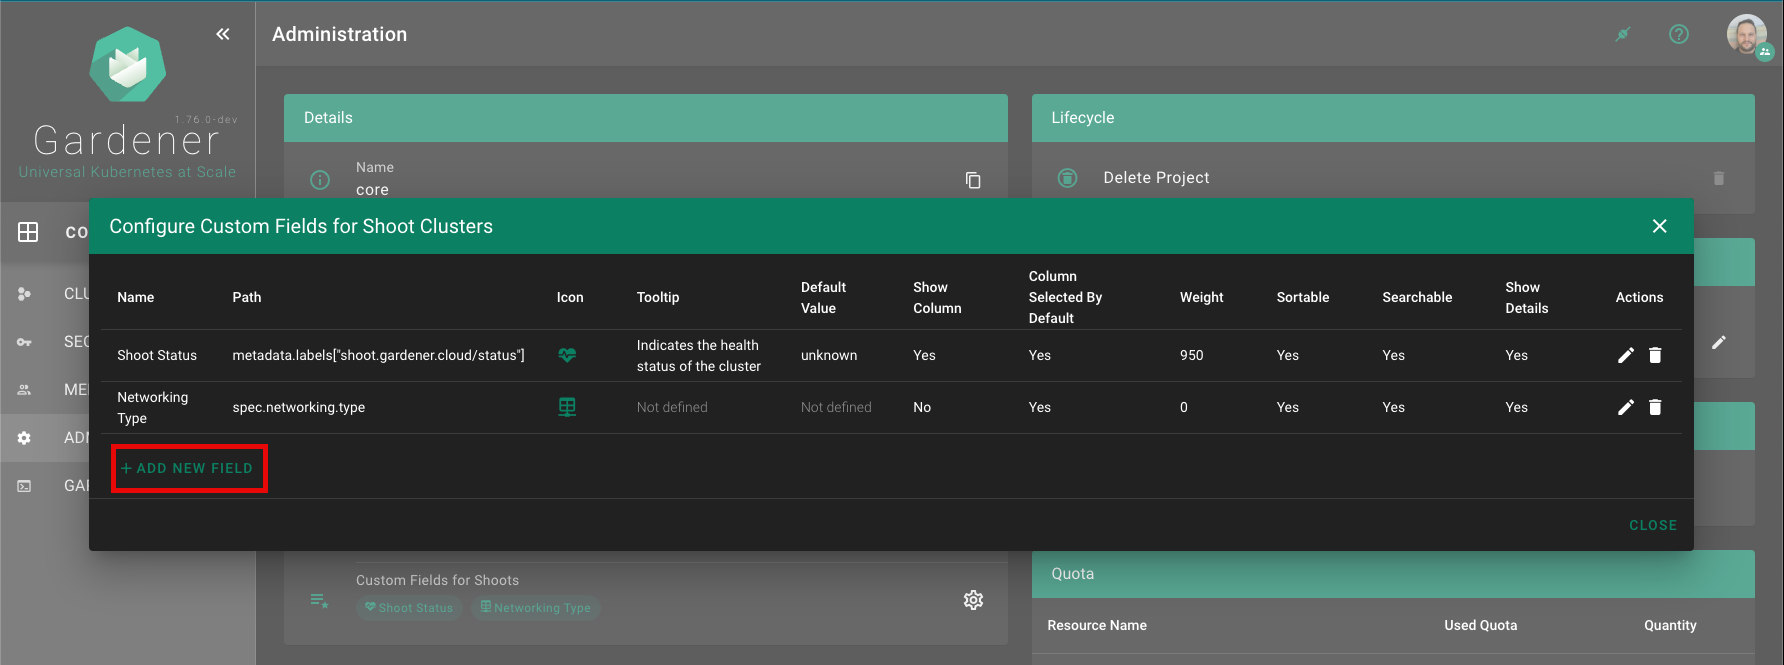
Fill in the details for the new custom field in the Add New Field form. Refer to the Configuration section for detailed descriptions of each field.
Click the ADD button to save the new custom field.
Custom shoot fields can be defined per project by specifying metadata.annotations["dashboard.gardener.cloud/shootCustomFields"]. The following is an example project yaml:
apiVersion: core.gardener.cloud/v1beta1
kind: Project
metadata:
  annotations:
    dashboard.gardener.cloud/shootCustomFields: |
      {
        "shootStatus": {
          "name": "Shoot Status",
          "path": "metadata.labels[\"shoot.gardener.cloud/status\"]",
          "icon": "mdi-heart-pulse",
          "tooltip": "Indicates the health status of the cluster",
          "defaultValue": "unknown",
          "showColumn": true,
          "columnSelectedByDefault": true,
          "weight": 950,
          "searchable": true,
          "sortable": true,
          "showDetails": true
        },
        "networking": {
          "name": "Networking Type",
          "path": "spec.networking.type",
          "icon": "mdi-table-network",
          "showColumn": false
        }
      }
Gardener landscape administrators should have the possibility to change the appearance and the branding of the Gardener Dashboard via configuration without the need to touch the code.
It is possible to change the branding of the Gardener Dashboard when using the helm chart in the frontendConfig.branding map. The following configuration properties are supported:
| name | description | default |
|---|---|---|
documentTitle | Title of the browser window | Gardener Dashboard |
productName | Name of the Gardener product | Gardener |
productTitle | Title of the Gardener product displayed below the logo. It could also contain information about the specific Gardener instance (e.g. Development, Canary, Live) | Gardener |
productTitleSuperscript | Superscript next to the product title. To supress the superscript set to false | Production version (e.g 1.73.1) |
productSlogan | Slogan that is displayed under the product title and on the login page | Universal Kubernetes at Scale |
productLogoUrl | URL for the product logo. You can also use data: scheme for development. For production it is recommended to provide static assets | /static/assets/logo.svg |
teaserHeight | Height of the teaser in the GMainNavigation component | 200 |
teaserTemplate | Custom HTML template to replace to teaser content | refer to GTeaser |
loginTeaserHeight | Height of the login teaser in the GLogin component | 260 |
loginTeaserTemplate | Custom HTML template to replace to login teaser content | refer to GLoginTeaser |
loginFooterHeight | Height of the login footer in the GLogin component | 24 |
loginFooterTemplate | Custom HTML template to replace to login footer content | refer to GLoginFooter |
loginHints | Links { title: string; href: string; } to product related sites shown below the login button | undefined |
oidcLoginTitle | Title of tabstrip for loginType OIDC | OIDC |
oidcLoginText | Text show above the login button on the OIDC tabstrip | Press Login to be redirected toconfigured OpenID Connect Provider. |
Gardener Dashboard has been built with Vuetify. We use Vuetify’s built-in theming support to centrally configure colors that are used throughout the web application.
Colors can be configured for both light and dark themes. Configuration is done via the helm chart, see the respective theme section there. Colors can be specified as HTML color code (e.g. #FF0000 for red) or by referencing a color (e.g grey.darken3 or shades.white) from Vuetify’s Material Design Color Pack.
The following colors can be configured:
| name | usage |
|---|---|
primary | icons, chips, buttons, popovers, etc. |
anchor | links |
main-background | main navigation, login page |
main-navigation-title | text color on main navigation |
toolbar-background | background color for toolbars in cards, dialogs, etc. |
toolbar-title | text color for toolbars in cards, dialogs, etc. |
action-button | buttons in tables and cards, e.g. cluster details page |
info | notification info popups, texts and status tags |
success | notification success popups, texts and status tags |
warning | notification warning popups, texts and status tags |
error | notification error popups, texts and status tags |
unknown | status tags with unknown severity |
| … | all other Vuetify theme colors |
If you use the helm chart, you can configure those with frontendConfig.themes.light for the light theme and frontendConfig.themes.dark for the dark theme. The customization example below shows a possible custom color theme configuration.
It is also possible to exchange the Dashboard logo and icons. You can replace the assets folder when using the helm chart in the frontendConfig.assets map.
Attention: You need to set values for all files as mapping the volume will overwrite all files. It is not possible to exchange single files.
The files have to be encoded as base64 for the chart - to generate the encoded files for the values.yaml of the helm chart, you can use the following shorthand with bash or zsh on Linux systems. If you use macOS, install coreutils with brew (brew install coreutils) or remove the -w0 parameter.
cat << EOF
  ###
  ### COPY EVERYTHING BELOW THIS LINE
  ###

  assets:
    favicon-16x16.png: |
      $(cat frontend/public/static/assets/favicon-16x16.png | base64 -w0)
    favicon-32x32.png: |
      $(cat frontend/public/static/assets/favicon-32x32.png | base64 -w0)
    favicon-96x96.png: |
      $(cat frontend/public/static/assets/favicon-96x96.png | base64 -w0)
    favicon.ico: |
      $(cat frontend/public/static/assets/favicon.ico | base64 -w0)
    logo.svg: |
      $(cat frontend/public/static/assets/logo.svg | base64 -w0)
EOF
Then, swap in the base64 encoded version of your files where needed.
The following example configuration in values.yaml shows most of the possibilities to achieve a custom theming and branding:
global:
dashboard:
frontendConfig:
# ...
branding:
productName: Nucleus
productTitle: Nucleus
productSlogan: Supercool Cluster Service
teaserHeight: 160
teaserTemplate: |
<div
class="text-center px-2"
>
<a
href="/"
class="text-decoration-none"
>
<img
src="{{ productLogoUrl }}"
width="80"
height="80"
alt="{{ productName }} Logo"
class="pointer-events-none"
>
<div
class="font-weight-thin text-grey-lighten-4"
style="font-size: 32px; line-height: 32px; letter-spacing: 2px;"
>
{{ productTitle }}
</div>
<div class="text-body-1 font-weight-normal text-primary mt-1">
{{ productSlogan }}
</div>
</a>
</div>
loginTeaserHeight: 296
loginTeaserTemplate: |
<div
class="d-flex flex-column align-center justify-center bg-main-background-darken-1 pa-3"
style="min-height: {{ minHeight }}px"
>
<img
src="{{ productLogoUrl }}"
alt="Login to {{ productName }}"
width="140"
height="140"
class="mt-2"
>
<div class="text-h3 text-center font-weight-thin text-white mt-4">
{{ productTitle }}
</div>
<div class="text-h5 text-center font-weight-light text-primary mt-1">
{{ productSlogan }}
</div>
</div>
loginFooterTemplate: |
<div class="text-anchor text-caption">
Copyright 2023 by Nucleus Corporation
</div>
loginHints:
- title: Support
href: https://gardener.cloud
- title: Documentation
href: https://gardener.cloud/docs
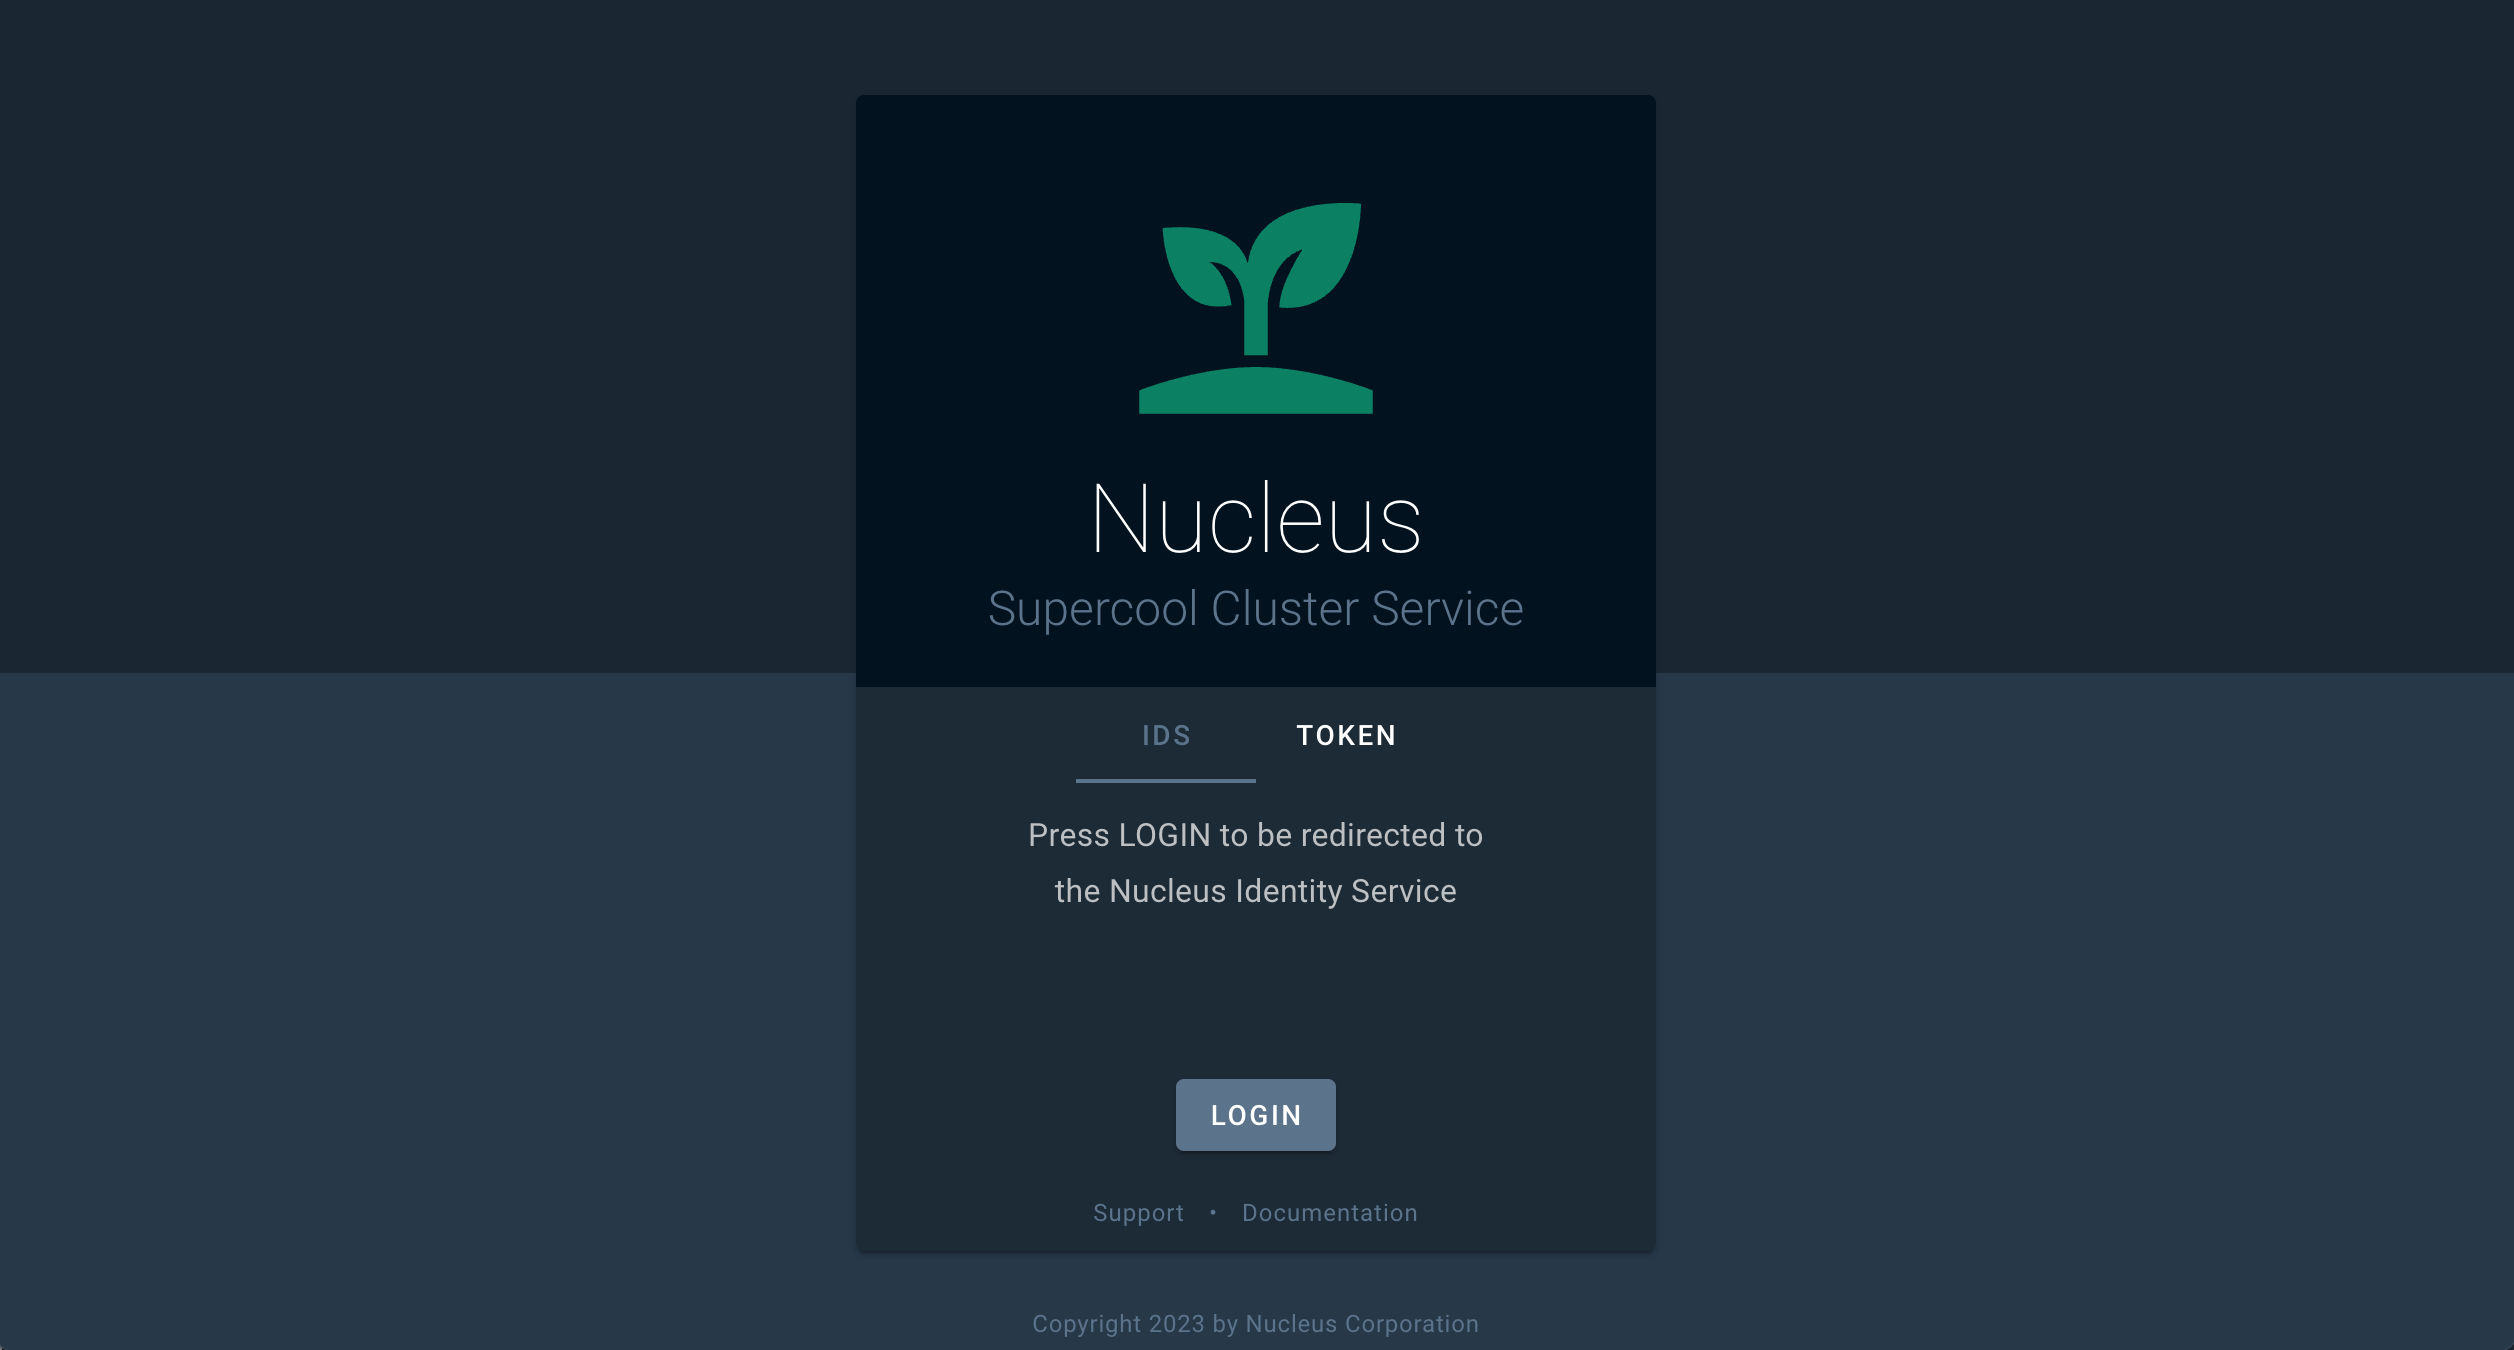
oidcLoginTitle: IDS
oidcLoginText: Press LOGIN to be redirected to the Nucleus Identity Service.
themes:
light:
primary: '#354a5f'
anchor: '#5b738b'
main-background: '#354a5f'
main-navigation-title: '#f5f6f7'
toolbar-background: '#354a5f'
toolbar-title: '#f5f6f7'
action-button: '#354a5f'
dark:
primary: '#5b738b'
anchor: '#5b738b'
background: '#273849'
surface: '#1d2b37'
main-background: '#1a2733'
main-navigation-title: '#f5f6f7'
toolbar-background: '#0e1e2a'
toolbar-title: '#f5f6f7'
action-button: '#5b738b'
assets:
favicon-16x16.png: |
iVBORw0KGgoAAAANSUhEUgAAABAAAAAQCAMAAAAoLQ9TAAAABGdBTUEAALGPC/xhBQAAACBjSFJNAAB6JgAAgIQAAPoAAACA6AAAdTAAAOpgAAA6mAAAF3CculE8AAABHVBMVEUAAAALgGILgWIKgGILgGILgGILgGILgGILgGILgGILgGILgGILgGILgGILgGILgGILgGILgGILgGILgGILgGILgGILgGILgGILgGILgGILgGILgGILgGILgGILgGILgGILgGILgGILgGILgGILgGILgGILgGILgGILgGILgGILgGILgGILgGIMgGILgGILgGILgGILgGILgGILgGILgGILgGILgGILgGILgGILgGILgGILgGILgGILgGILgGILgGILgGILgGILgGILgGILgGILgGILgGILgGILgGILgGILgGILgGILgGILgGILgGILgGIKgGILgGILgGIKgGILgGILgGILgGILgGILgGILgGILgGILgGILgGILgGL///8Vq54LAAAAXXRSTlMAAAAAFmu96Pv0TRQ5NB0FLLn67j1X8fDdnSoR3CJC9cZx9/7ZtAna9rvFe28Cl552ZLDUIS7X5UnfVOrrOKS+Q7/Kz61IAwQKC8gVEwYIyQxgZQYCVn9+IFjR7/wm8JKCAAAAAWJLR0ReBNZhuwAAAAd0SU1FB+cKCgkYLrOE10YAAADMSURBVBjTXY7XUsIAFETvxhJQQwlEEhUlCEizVxANCIoQwAIobf//NyTjMDqcp5192D0ivwCra+uqz78h2NzSAkEgFNZJRqICYztmWju7YXrsxQX7B/OQsJOHqRiZzggCR8zmVJX5QpYsQnB8Qp6e+fTzC/LyCqLg+oa3d6lS+Z4VA/AOHx6dau3JqDeeX+ApKGi+tpy22+lCkYVWz3l7X5E/0KstFc2Pz/6iwMDVhvbXtz3U3MF8dDS2JtOZpz2bTqzxSEyd/9BN4RI/8jsrfdR558kAAAAldEVYdGRhdGU6Y3JlYXRlADIwMjMtMTAtMTBUMDk6MjQ6MzMrMDA6MDC+UDWaAAAAJXRFWHRkYXRlOm1vZGlmeQAyMDIzLTEwLTEwVDA5OjI0OjMzKzAwOjAwzw2NJgAAABJ0RVh0ZXhpZjpFeGlmT2Zmc2V0ADI2UxuiZQAAABh0RVh0ZXhpZjpQaXhlbFhEaW1lbnNpb24AMTUwO0W0KAAAABh0RVh0ZXhpZjpQaXhlbFlEaW1lbnNpb24AMTUwpkpVXgAAACB0RVh0c29mdHdhcmUAaHR0cHM6Ly9pbWFnZW1hZ2ljay5vcme8zx2dAAAAGHRFWHRUaHVtYjo6RG9jdW1lbnQ6OlBhZ2VzADGn/7svAAAAGHRFWHRUaHVtYjo6SW1hZ2U6OkhlaWdodAAxOTJAXXFVAAAAF3RFWHRUaHVtYjo6SW1hZ2U6OldpZHRoADE5MtOsIQgAAAAZdEVYdFRodW1iOjpNaW1ldHlwZQBpbWFnZS9wbmc/slZOAAAAF3RFWHRUaHVtYjo6TVRpbWUAMTY5NjkyOTg3M4YMipUAAAAPdEVYdFRodW1iOjpTaXplADBCQpSiPuwAAABWdEVYdFRodW1iOjpVUkkAZmlsZTovLy9tbnRsb2cvZmF2aWNvbnMvMjAyMy0xMC0xMC9kNzEyMWM2YzM2OTg3NmQ0MGUxY2EyMjVlYjg3MGZjYi5pY28ucG5nU19BKAAAAABJRU5ErkJggg==
favicon-32x32.png: |
iVBORw0KGgoAAAANSUhEUgAAACAAAAAgCAMAAABEpIrGAAAABGdBTUEAALGPC/xhBQAAACBjSFJNAAB6JgAAgIQAAPoAAACA6AAAdTAAAOpgAAA6mAAAF3CculE8AAACTFBMVEUAAAALgWIKil4LgGIKgGEMf2MNgGIMgGILgGEKgWEIhVwGgl8JgVwMgGMKgGMNgGEKf2EMgWMMf2ILhmILhGIKjFwHgmYMf2EKgWMGgGIKgGIIg2UAgGMCkGINfGIMfGILfmELfWELgGILgGILgGILgGILgGILgGILgGILgGILgGILgGILgGILgGILgGILgGIKgGILgGILgGILgGILgGILgGILgGILgGILgGILgGILgGILgWELgGILgGILgGILgGILgGILgGILgGILgGILgGILgGILgGIMgGILgGILgGILgGILgGILgGILgGILgGILgGILgGILgGILgGILgGILgGIKgWELgGILgGILgGIMgmILgGILgGILgGILgGILgGILgGILgGILgGILgGILgGILgGILgGILgGILgGILgGILgGILgGILgGILgGILgGILgGILgGILgGILgGILgGILgGILgGILgGILgGILgGILgGIKg2ALgGILgGILgGILgGILgGILgGILgGILgGILgGILgGILgGIMgGELgGILgGILgGILgGILgGILgGILgGILgGILgGILgWILgGILgGILgGILgGILgGILgGILgGIKgGILgGILgGILgGILgGILgGILgmIMgWELgGIHgWILgGIMgWIHgGILgGILgGILgGILgGILgGILgWMLgGILgGILgGILgGMLgGILgGILgGILgGILgGILgGILgGILgGILgGILgGILgGILgGILgGILgGILgGILgGILgGILgGILgGILgGILgGL///+Wa9azAAAAwnRSTlMAAAAAAAAAAAAAAAAAAAAAAAAAAAAAAAAAAAAAAAAAAAAAGVWDrNTs+v77InTF9YIGVs5sAjhdYk0wDwVv8PlPBan96sF/MwLoL5PhcAwgy8kTePiAAmj8nwJe7qbmlNNzNOTE3bfvfm3YdRS8pdcuQuLDEvFRKtmVAXx7A6KjCHE2LeVfBbPKZNxLlo2KqgOHuT9Hi6BZAna2mlwRAQGeAQ4BAemOJSYXAwsfIwNAY32d0L1BGjlq0fLzazoNcu0Jrf5EbikAAAABYktHRMOKaI5CAAAAB3RJTUUH5woKCRgus4TXRgAAAdNJREFUOMtjYMAEjExKyiqqauoamloqzJjSLKzaOrp6hyBAH1MBs4GhkeYhGDAGKmA2MTUzN7OwtGJjB8pzWNvYwqUP2dmDFDg4HjrkZOfs4urmzszJbIgkf8jDE6SAywvK9fbxZfbzR5I/FBAIVMDNHATjB4eEhoHtDw+GCEREMoKcFeUEUxGtHAOiYuPiIfwEZh6QgkRnEEcvSevQoeQUkLxylB1YPskS7Etm31QQLy09I/NQONAwrazsHIgBuQ5gBbzMPmBuXn5BIYguKlaGGFBSCg0m5rJysEBFZRWIqq6phRhQVw9TwNGgBRIo9/OMPXRIvbGpGSyv5gkPZ+biWpDvwlta2w4darfqAMt3dvHxIyJAqRsUgD3MvYcO9fVPAAXJxEkCgshRVD95ytSp04SAjoiYPiN55qzZc5iFUWNRRHTuPDFxoIL5C+oX1i/Ckg6AQAKsQFKKARegm4LF+BT4LHFeiscEafHiZctXyOBQICu3ctWK1WvWrF6xaq28LHpar1Fat37DxpxNKUlJKZs2z09fv2VrDSysRBR8t22ftWMnIjMAgeau+I279+xVFGFgqG/cN1MdRRKuaP9EHdMDDI5LDuEBzgcZDhEAlCsAAOGIeNYQEfj6AAAAJXRFWHRkYXRlOmNyZWF0ZQAyMDIzLTEwLTEwVDA5OjI0OjMzKzAwOjAwvlA1mgAAACV0RVh0ZGF0ZTptb2RpZnkAMjAyMy0xMC0xMFQwOToyNDozMyswMDowMM8NjSYAAAASdEVYdGV4aWY6RXhpZk9mZnNldAAyNlMbomUAAAAYdEVYdGV4aWY6UGl4ZWxYRGltZW5zaW9uADE1MDtFtCgAAAAYdEVYdGV4aWY6UGl4ZWxZRGltZW5zaW9uADE1MKZKVV4AAAAgdEVYdHNvZnR3YXJlAGh0dHBzOi8vaW1hZ2VtYWdpY2sub3JnvM8dnQAAABh0RVh0VGh1bWI6OkRvY3VtZW50OjpQYWdlcwAxp/+7LwAAABh0RVh0VGh1bWI6OkltYWdlOjpIZWlnaHQAMTkyQF1xVQAAABd0RVh0VGh1bWI6OkltYWdlOjpXaWR0aAAxOTLTrCEIAAAAGXRFWHRUaHVtYjo6TWltZXR5cGUAaW1hZ2UvcG5nP7JWTgAAABd0RVh0VGh1bWI6Ok1UaW1lADE2OTY5Mjk4NzOGDIqVAAAAD3RFWHRUaHVtYjo6U2l6ZQAwQkKUoj7sAAAAVnRFWHRUaHVtYjo6VVJJAGZpbGU6Ly8vbW50bG9nL2Zhdmljb25zLzIwMjMtMTAtMTAvZDcxMjFjNmMzNjk4NzZkNDBlMWNhMjI1ZWI4NzBmY2IuaWNvLnBuZ1NfQSgAAAAASUVORK5CYII=
favicon-96x96.png: |
iVBORw0KGgoAAAANSUhEUgAAAGAAAABgCAYAAADimHc4AAAABGdBTUEAALGPC/xhBQAAACBjSFJNAAB6JgAAgIQAAPoAAACA6AAAdTAAAOpgAAA6mAAAF3CculE8AAAABmJLR0QA/wD/AP+gvaeTAAAAB3RJTUUH5woKCRgus4TXRgAADuRJREFUeNrtnXuMXNV9xz/fc2dm3+uAwcEGg02IAwQIOC1xkrZGQQ0NiUpVaNVWRXjXJkLlj7RVEeA0Zmy3Uas0D6UoCZRXMIoSUNsoioQSqlBISQhpbew4xjwMNgYbG3vxvmZ2Hvf8+seZNbvE3r3z2J21mY80snfunXvPPd97f/d3fuf3u1e0mERndjUgQZySyGA6HTgHOANYAJwJLK78/5TKpxdoB9KVj4AyUARywDDwFvAN4D6A0ex9AKSafcBzgY71/ZiQM5uH2UJhHzD0QYxlwFnAQuA0oBuICB38zg8T/oUgRAroBOYTRFz8zn2/awXoWt8HwskzD+NCMy4DLQc+DJwl6AIyTO7UapkoTAwUVwJPTFjhXSVAT/ZmPMOITMbMn4OxwuBThE5fDHTM4O5LQO5xwE348l0jQFe2H08uA6kLDX8N8EngIqCH+s7ypBSB0RTgJ3x5cguQvYIe3gfykRnvM3QN8GfAB4G2WW5NARiKmaz2SStAV3YNRYaIsdNlugb4S+ByZtbMTMWY4IhhaIIROikF6MyuxmRRxrovAW4G/ojgiTSTnIkBeYd3bxuhk06Armw/yLdhugq4lXDWz4XjzIEdBiBlR790tW5tLtKd7cehDkzXA18CPsbc6HyAI5iGELz/9re/nLJxHRvWIAxQSlgXZp2YtQMZUBpwhhTWwYOVQQWwAiKPaSS2jqJTkVz232b06LrDYKoLb6uA2wgDqLmCAfuEigBb3QNHF0wpgPPjtspWAKuA00G9hBFhB5AW5io7KIXOZwQ0jHEYOBApfwDY25XtfwnsVaFhDwWBjQ/H66VzfR9ePiOvPzd0OyFcMJeIgdcRJWzygqSX5weA6wkjw2opA0eAN0H7DbYJfibY0bW+f/d7X75gdP+ybeQ/v6mmI+ta3wfOImJdDbqFudf5432wO0r5YhxPHnIkFWAUGKM2AVKEOMppwAXASqDPYBfGUweWPveoyulfdmy4cQDzPn/HvYk33LOxj0LBkU77i0F/Byyb9a5NxhjwaqngfLqrMGnBNDfh8evFRghRvUYQAfOA5cBfAXfL+Kbz8bURnELf1+je0JdoQ96LVNqfhulm4COz1Jm1cAA4KGcM3vrQpAXTCHA0lnSEEFJtNBHhZnkt8HUz+1LXOds+HnuXCWHh49OZXY33zsn0KeAa5o63cyxeB9481oKpBXjbXA0AQzPYQBHi7TcAdzlslbB5nXf007Oh/zdWbt/YjzPDyS/lqHMwp9mDahDAxk2Q7DAwOAsNTRHiNBuBWyTObBN0ZCeLkIoFThFwNfDbs9CuehgDngfyx1o4pQDxUS9UI8DhWWz0AuCvgbW5mIVCdG284ehCw2PmFxNMT88stqsW3kL8anTfmNcxYq7RVL+Mn3iWzBWXQRDqw4Rh/WyNnjPA+QJJtgXv8pkrL6Ft5XJKpImwq4AbaV5wLSm7gW9kutMDisoUH986aeG0nSnAiTLwCiGmPZv0AJ/FdL2HdosjDJGm3A18guBNNYocIWTcSAzYCQwgY+QLD/7GCtMK4JynHLtY8CLHsWMzzHzgJgeXp2JPxTNYDKxI0v4EHAF+BNwFvNbgtpeAX3jnB012zBWmPYChdQ/gnMdgP/BGgxuYlGVAXzmtUytjkw8Bi+rcZhnYCnyBELI+TPDEGskBYIvzLi5G6WOukPgMUmjgSw1uYFIccLW8PpmOyhFwMXBqHdsbA/4duEmObxFM2Z8QJuIbyU6D5w0o//3dxz2w6ZFhwRXdCVii3zSeBcCnSz46Fzgvcdt/k2HgHuBWr/hp75UhTFNe2OD2loHNiIOaYsY52UGYMFMR2E6wmc1iBaaPUXuoOQfcbbKN5t0eZymEX05wZ9M1bvN4HEY8qS2UplqpGhME8CvCsLoeSoQb+i8JA5RBkl9Vi4A/BpbUsN8i8LDEV62cOuicIdENug44t85jOhZbMJ7lUvjcuuOvlCh+4p3DeY/BHsEuQjpHrQjYJfE1sAEzLgKtAK6sdOxUY5P2ynrtNez3KeBfYvOvR2mwPNDOpcCnk/ZDFeSBH8dEBxyeL+r4Ed5EV0B+3T0gIeeGgSepz19OAVeacRNopFjU/ZJuAfoJeZOHpvitI9woowT7mchrwJ0Q7XBEmAfa1IlxLbVdTdOxS/BkRBxrUhbQsQ8oEc458D4WPA3sq7OBaeAzZqxta+NM7/2QSv5Jw24H1hMGfY2iBDxi8JgRm0+pYvDsYuAPaPzZ7wlX206A1DQCJD6Tio9vpu2K5YDGCLH8er0GR7C9eYn/JXIlobzENuAgcCkh87hedoD+wRm7zQlnBqIN6AP+sJo+SMhexD/HJXZGKRjOPjBtJyRGQJrUIeC/gZEGNLYbWAX6veLeqNIaG3OyR4CvMLU5SkIR+E9gu0lEisGEsLMJZ38tM3xT4YFHMXsmShsjd0w/512VAAYUKZrgv4DnGtToJcCazNnlM/CAPN40BnwHeITgT9fKy8CjBmMZ8ph3pIXM9AnC9Gij2Q087NCgJUw3rUqAkWy4mxt+N/AoTO3jJkTASkxXoVjmHcoYeAYQ9xJc31rwwE9NbJeMt7LfAaBsdgYhI7q3AW2fSAw8auIZD/j2ZJ511aNJ78pAVCAIsKtBjZ8PXIdFi0CMrL0fnAG2DXiY2oKAR4DHMBvFoLMyqWMhjjQT88fbEZtc2Y+YE2O33Z/oR1ULkF+3KRxGuFn+B40L4a4ALs+QoTPbh6WEYpUEP6TiUVTJS8AWIYtIo9DqNuAKQoZGIxkA7gLbbJEjty55ZkdN8RQhMHLAd4FnG3QQpwJXF91Yl4B0VAopX+Eqe4xwiSfFA78w8YYJ/NGfaiHwOzTW9SwD30c8grmSy1R3y6pJgJHsvZjAO54DNtGY+WIHfATTeSDKxRQixnB5hcFfNaHwPLAlNepGiAyTH/f9fwt4fwPaOpEtwDejOD7knRhe+2BVP655QiO37mycp0wwQz+gPm9lnCWYLk8N92IyUAR4LMTtX6xiO68DL8SdHlcWhvCR6yAk6zYyg2KP4MsRfos5FyIGVVL7jJKy4CAei/YjvkoYIddLD7C83DPYI+9w7cVKCaIdInhDSc3QPhRG01Yx/vK2iJBB0ahypAPAl5H9wMvFw9lkN913UteU3ui6+1C7USa1lZAO/kIDDuxS0BkAQ7c+FK4EFxfANpPcG9qLhbC5FIM5hJ1D48zPQcJA8UEz5aM6Atl1z6nms/eQspKX7EfAF6nOVByLc8HOlInOjTfg2kpYnDbQCyTLzisCu5BKAOYjpHIEXEJjfP/XgH+S9C2JQUgzuLb2LO+GpJiMZu/HjALY94DPA9vq2Fw36HylvHM+Yvi2hypGQwMkCwIWgT3OqayjU1HKEELotYSxx4kJ96LbBHeb+SHJMZq9q66+a5g7Npq9n87s6jHg+8KGCUUSH6X6eEsbcIGPleboGMMQDFUSA6ajBOz3sQ9D0RD87JZxNrXb/yHCwPPOlHjaG+WRGm3+O2loklUuey84Sj4V/RhxM/CvBD++Gh8+ApZYRbj27KrxhwHkCQOe6ShQmTYVLtyAjdOpbRI/B/wMWIv4mzGf+5+i+fJwgwpLYAay3HLr7sWVY/+37k9/bVgW7LPAnQQvZohkYvQKmwfgVHEjUUyy2NN4LQP2dix+PsmTuGJCFPYnwDqg38RdBvvjDd8lP014uVpmJKV7NHsfG7mPU/7x+pGBtZt+0ruh7xlvWgpcRkhxXEKI9XcSznhPONtGCO7d0+FvQ2bBlUxOnsqYxDhqczoIk0CeyfPPVvlulJA+vgf4NfAEYgtoH1DKVVE0Ui2zUaLPyuwPeYpNtNPlfOiIdsEpiC6MFBALcqAhk41iVgKLQQaGKQLoldlXgNXT7G6rwV8AO1BlC2KpjKsJiVedlfUKBNEPEdzK/YRw8oB3FGVYLkE8/4QQoF4616+GGgRoOyVGOFLvKTO2JxN571MGkQSG814Wx92upKKncNvMd/axmMtVJXXz1ue+PfHPmOqcgVnhpCrUPhFpCdBkWgI0mZYATaYlQJNpCdBkWgI0mZYATaYlQJNpCdBkWgI0mZYATaYlQJNpCdBkWgI0mZYATaYlQJM5GQU4IaZZxzmRpiSNkJp4mONX1ovwrpY5N/V4PE4kAXKERK/vJVjv1WY3tkWLFi1atJiOOeeydWTXEOOUodRmch1m1qaQst4GlqkUjkUEF3rcjfaVT1xJaSwCBYOCpILM54ukCxHe8tnq67hmklkXYF52DRGogKUMSzvRZnAapoXAArDxJ63PJ6SU9xJqx3oIz5bIELy38TfVQUjGLfH26wNHCC7rMCEje4Dgvh4ChVxQ2X7BIW8UhEptqByDDc6yQDMqQFd2FViMorbIzHowWwCcLjjLQr3WUsIjKMfTx3sJzwPqmIG2GSFzepQgyiBBlL3AK4IXLZQfvYl0UNKwxYUYRYw2OCV9Ig09yM71fRgmZ64dWQ/oLIzzCQ/GOJeQln428B7CmTz+4stmUnn7B0VCYcerhCzpl4HnEDvBXsM07OXHhCx3R2OqY6j34HuyNyKQl6UN5mO2FOw8wrN+PkR4uN742X0iDfogmLPxq+Q1Qn3Ys6CXkF4RHHamkoEN1/F+nKoF6M6uwuFdmVSv4AzBRRaeKX0RwawsItw0G/0gpGYTE2oK9hEqQbcLnjHYbvBGivKQx/mRKs3VtAL0ZvtxYe8pk80z0zLC2b2CUO2ykBPzDK+X8StkP/B/hKqerZK9INNgBGUPDE1TT3ZcAbqzawguX3yaifMwPk6oeryQcONsp/n2e65ghLq0vcAO4OeIp2S8BNEhsHjkON7VpA7sCpUoDujFuADso8DvEp4Rt4D66mzfTYwRyp42Az8F/RzxHMH78qMTas7Ukb2BjNooU+7EWEowLb9PuJEuYfbfOnqyUSB4Vc8SHrvzNOKVFKlc0QqkIrn3lq28nNDpKwnvDOukZV4aRRuhT5cBnwGex3iiTPmxSG5zykzfJtj1RZx8nstcQoRB5nKCE3OdmXakgKua3bJ3IRHBkVl8Ms4Jn1C0BGgyLQGaTEuAJtMSoMm0BGgyLQGaTEuAJtMSoMn8P4f/JnJ3AKQjAAAAJXRFWHRkYXRlOmNyZWF0ZQAyMDIzLTEwLTEwVDA5OjI0OjMzKzAwOjAwvlA1mgAAACV0RVh0ZGF0ZTptb2RpZnkAMjAyMy0xMC0xMFQwOToyNDozMyswMDowMM8NjSYAAAASdEVYdGV4aWY6RXhpZk9mZnNldAAyNlMbomUAAAAYdEVYdGV4aWY6UGl4ZWxYRGltZW5zaW9uADE1MDtFtCgAAAAYdEVYdGV4aWY6UGl4ZWxZRGltZW5zaW9uADE1MKZKVV4AAAAgdEVYdHNvZnR3YXJlAGh0dHBzOi8vaW1hZ2VtYWdpY2sub3JnvM8dnQAAABh0RVh0VGh1bWI6OkRvY3VtZW50OjpQYWdlcwAxp/+7LwAAABh0RVh0VGh1bWI6OkltYWdlOjpIZWlnaHQAMTkyQF1xVQAAABd0RVh0VGh1bWI6OkltYWdlOjpXaWR0aAAxOTLTrCEIAAAAGXRFWHRUaHVtYjo6TWltZXR5cGUAaW1hZ2UvcG5nP7JWTgAAABd0RVh0VGh1bWI6Ok1UaW1lADE2OTY5Mjk4NzOGDIqVAAAAD3RFWHRUaHVtYjo6U2l6ZQAwQkKUoj7sAAAAVnRFWHRUaHVtYjo6VVJJAGZpbGU6Ly8vbW50bG9nL2Zhdmljb25zLzIwMjMtMTAtMTAvZDcxMjFjNmMzNjk4NzZkNDBlMWNhMjI1ZWI4NzBmY2IuaWNvLnBuZ1NfQSgAAAAASUVORK5CYII=
favicon.ico: |
AAABAAEAEBAAAAEAIABoBAAAFgAAACgAAAAQAAAAIAAAAAEAIAAAAAAAAAQAAAAAAAAAAAAAAAAAAAAAAABigAv/YoAL/2KAC/9igAv/YoAL/2KAC/9igAv/YoAL/2KAC/9igAv/YoAL/2KAC/9igAv/YoAL/2KAC/9igAv/YoAL3WKAC/pigAv/YoAL/2KAC/9igAv/YoAL/2KAC/9igAv/YoAL/2KAC/9igAv/YoAL/2KAC/9igAv6YoAL3WKACyBigAtYYoALnWKAC9FigAvvYoAL/GKAC/9igAv/YoAL/2KAC/9igAv8YoAL72KAC9FigAudYoALWGKACyAAAAAAYoALAGKACwJigAsVYoALNGKAC1ZigAtxYoALfmKAC35igAtxYoALVmKACzRigAsVYoALAmKACwAAAAAAAAAAAAAAAAAAAAAAAAAAAAAAAABigAsAYoALBGKAC2BigAtlYoAKBmKACgAAAAAAAAAAAAAAAAAAAAAAAAAAAAAAAAAAAAAAAAAAAAAAAAAAAAAAYoALAGKACwhigAu/YoALyWKACgxigAoAAAAAAAAAAAAAAAAAAAAAAAAAAAAAAAAAAAAAAAAAAAAAAAAAAAAAAGKACwBigAsIYoALv2KAC8ligAoMYoAKAAAAAAAAAAAAAAAAAAAAAAAAAAAAAAAAAAAAAABhggoAYoALAGKACwRigAsKYoALC2KAC75igAvIYoALFGKACxNigAsGYoALAGGCCgAAAAAAAAAAAAAAAABigAsAYoALAGKACzhigAukYoALv2KAC0JigAu/YoALymKAC1digAvQYoALrmKAC0higAsDYoALAAAAAAAAAAAAYoALAGKACy5igAvXYoAL/2KAC+ZigAtJYoAL2WKAC99igAtUYoAL6mKAC/9igAvrYoALV2KACwBigAsAYoALAGKADAJigAuXYoAL/2KAC/9igAueYoALdmKAC/xigAv6YoALZGKAC7BigAv/YoAL/2KAC9RigAshYoALAGKACwBigAsdYoAL2mKAC/9igAv2YoALu2KAC+higAvoYoAL/2KAC8VigAt6YoAL9mKAC/9igAv/YoALb2KACwBigAsAYoALQWKAC/ZigAv/YoAL/2KAC/9igAvGYoALcWKAC/digAv+YoAL2WKAC/BigAv/YoAL/2KAC7RigAsJYoALAGKAC1digAvyYoAL8GKAC91igAueYoALKmKACxFigAu5YoAL/2KAC/9igAv/YoAL/2KAC/9igAvcYoALImKACwBigAsUYoALOGKACzRigAsdYoALBWKACwBigAsAYoALLGKAC7ligAv6YoAL/2KAC/9igAv/YoAL72KACz0AAAAAAAAAAAAAAAAAAAAAAAAAAAAAAAAAAAAAYoEKAGKACwBigAsVYoALa2KAC71igAvpYoAL+2KAC/RigAtNAAAAAAAAAAAAAAAAwAMAAPw/AAD8PwAA/D8AAPAPAADgAwAAwAMAAIABAACAAQAAgAAAAIAAAACDAAAA/4AAAA==
logo.svg: |
PHN2ZyB4bWxucz0iaHR0cDovL3d3dy53My5vcmcvMjAwMC9zdmciIHZpZXdCb3g9IjAgMCAyNCAyNCI+PHBhdGggZmlsbD0iIzBCODA2MiIgZD0iTTIsMjJWMjBDMiwyMCA3LDE4IDEyLDE4QzE3LDE4IDIyLDIwIDIyLDIwVjIySDJNMTEuMyw5LjFDMTAuMSw1LjIgNCw2LjEgNCw2LjFDNCw2LjEgNC4yLDEzLjkgOS45LDEyLjdDOS41LDkuOCA4LDkgOCw5QzEwLjgsOSAxMSwxMi40IDExLDEyLjRWMTdDMTEuMywxNyAxMS43LDE3IDEyLDE3QzEyLjMsMTcgMTIuNywxNyAxMywxN1YxMi44QzEzLDEyLjggMTMsOC45IDE2LDcuOUMxNiw3LjkgMTQsMTAuOSAxNCwxMi45QzIxLDEzLjYgMjEsNCAyMSw0QzIxLDQgMTIuMSwzIDExLjMsOS4xWiIgLz48L3N2Zz4=
In this example, the login screen now displays the custom logo in a different size. The product title is also shown, and the OIDC tabstrip title and text have been changed to a custom-specific one. Product-related links are displayed below the login button. The footer contains a copyright notice for the custom company.
The template approach is also used in this case to change the font-size and line-height of the product title and slogan. The product version (superscript) is omitted.
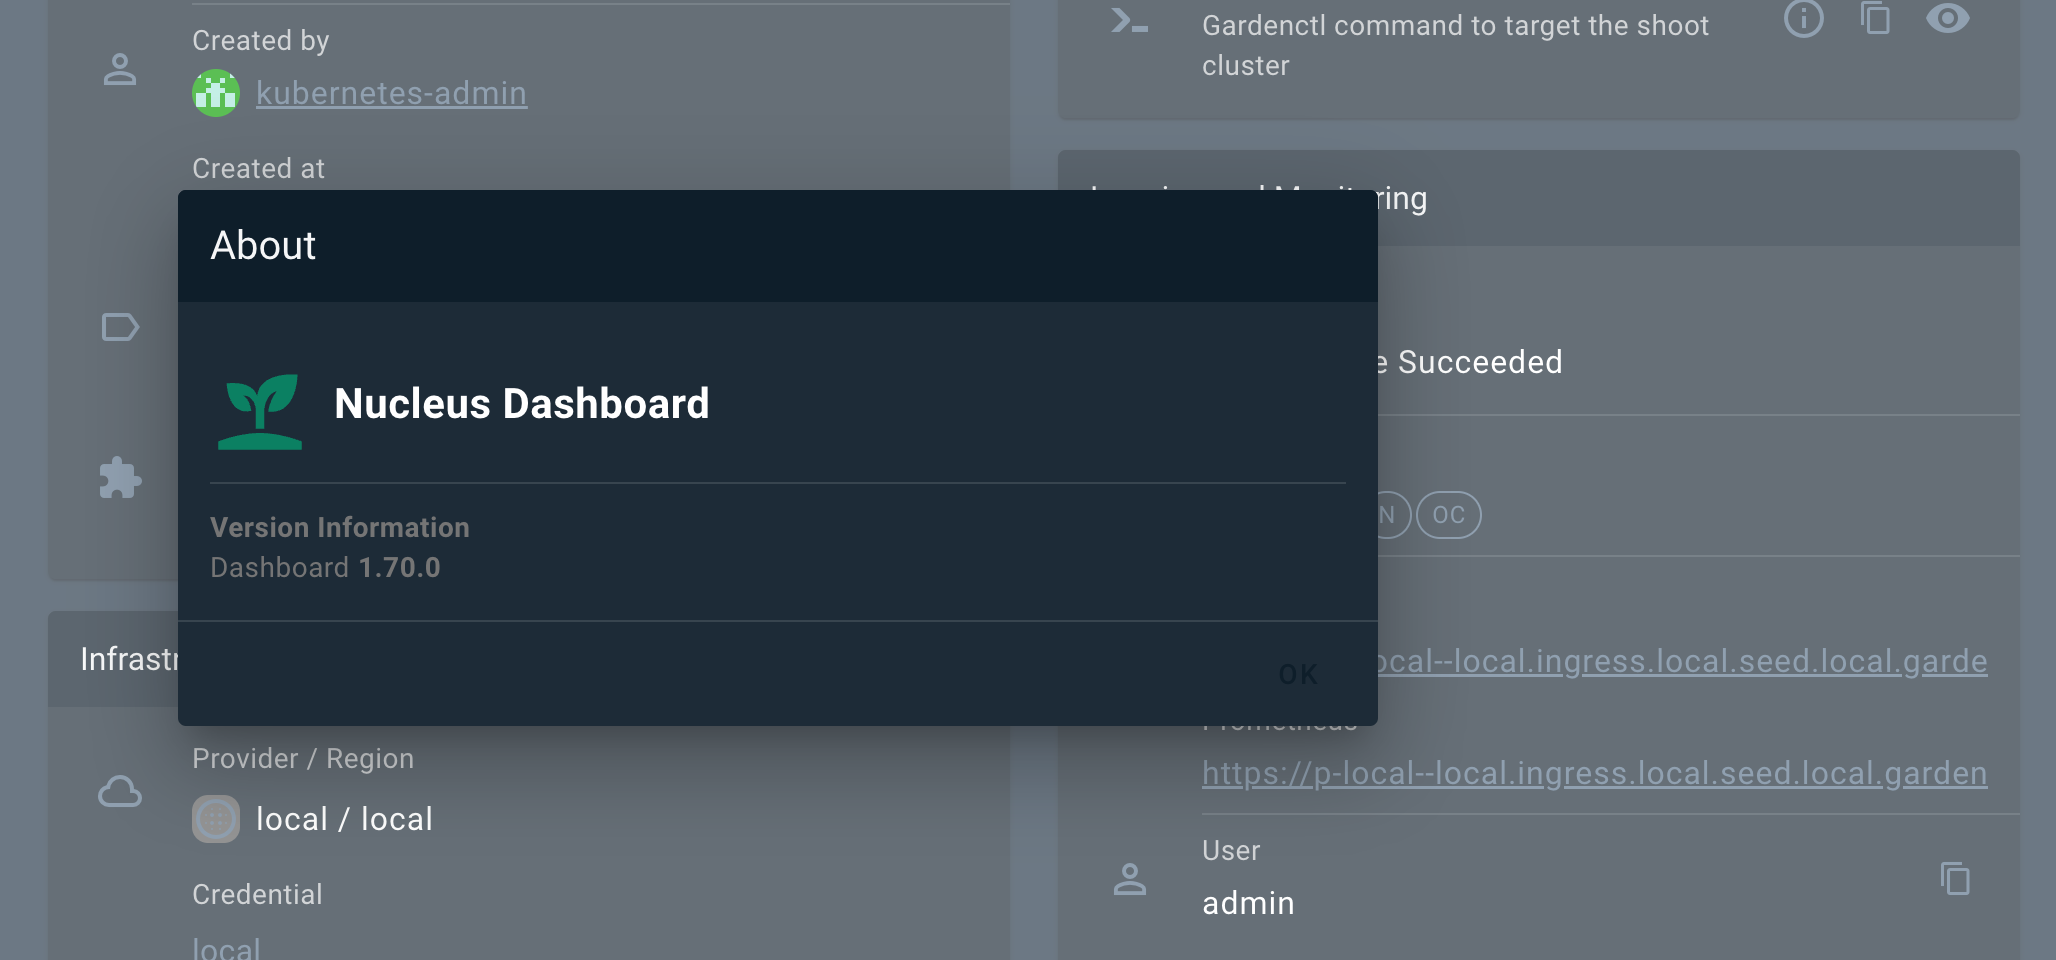
By changing the productLogoUrl and the productName, the changes automatically effect the apperance of the About Dialog and the document title.
![]()

Develop new feature and fix bug on the Gardener Dashboard.
.engines.yarn in package.json..engines.node in package.json.This repository uses a custom Husky setup to centrally manage Git hooks and ensure a consistent development workflow. Our Husky configuration is user-configurable and designed to help you by checking code quality and performing security checks before you commit or push changes.
yarn, Husky is set up automatically, but the actual hooks are only activated after your first commit attempt..husky/user-config file is automatically created for you if it does not exist. This file lets you opt in or out of optional checks, such as:pipx and the reuse tool).husky/user-config at any time to change your preferences..husky/pre-commit and .husky/pre-push scripts.If you want to disable Husky managed hooks and reset your Git hooks path to the default location, run:
echo managed_hooks=false > .husky/user-config && git config --local --unset core.hooksPath
For more information, see the Husky documentation and our .husky/ directory for custom logic.
Clone the gardener/dashboard repository
git clone git@github.com:gardener/dashboard.git
Run yarn at the repository root to install all dependencies.
cd dashboard
yarn
And build all project internal dependencies.
yarn workspace gardener-dashboard packages-build-all
Place the Gardener Dashboard configuration under ${HOME}/.gardener/config.yaml or alternatively set the path to the configuration file using the GARDENER_CONFIG environment variable.
A local configuration example could look like follows:
port: 3030
logLevel: debug
logFormat: text
apiServerUrl: https://my-local-cluster # garden cluster kube-apiserver url - kubectl config view --minify -ojsonpath='{.clusters[].cluster.server}'
sessionSecret: c2VjcmV0                # symmetric key used for encryption
frontend:
  dashboardUrl:
    pathname: /api/v1/namespaces/kube-system/services/kubernetes-dashboard/proxy/
  defaultHibernationSchedule:
    evaluation:
    - start: 00 17 * * 1,2,3,4,5
    development:
    - start: 00 17 * * 1,2,3,4,5
      end: 00 08 * * 1,2,3,4,5
    production: ~
The Gardener Dashboard backend server requires a kubeconfig for the Garden cluster. You can set it e.g. by using the KUBECONFIG environment variable.
If you want to run the Garden cluster locally, follow the getting started locally documentation.
Gardener Dashboard supports the local infrastructure provider that comes with the local Gardener cluster setup.
See 5. Login to the dashboard for more information on how to use the Dashboard with a local gardener or any other Gardener landscape.
Start the backend server (http://localhost:3030).
cd backend
export KUBECONFIG=/path/to/garden/cluster/kubeconfig.yaml
yarn serve
To start the frontend server, you have two options for handling the server certificate:
Recommended Method: Run yarn setup in the frontend directory to generate a new self-signed CA and TLS server certificate before starting the frontend server for the first time. The CA is automatically added to the keychain on macOS. If you prefer not to add it to the keychain, you can use the --skip-keychain flag. For other operating systems, you will need to manually add the generated certificates to the local trust store.
Alternative Method: If you prefer not to run yarn setup, a temporary self-signed certificate will be generated automatically. This certificate will not be added to the keychain. Note that you will need to click through the insecure warning in your browser to access the dashboard.
We need to start a TLS dev server because we use cookie names with __Host- prefix. This requires the secure attribute to be set. For more information, see OWASP Host Prefix.
Start the frontend dev server (https://localhost:8443) with https and hot reload enabled.
cd frontend
# yarn setup
yarn serve
You can now access the UI on https://localhost:8443/
To login to the dashboard you can either configure oidc, or alternatively login using a token:
To login using a token, first create a service account.
kubectl -n garden create serviceaccount dashboard-user
Assign it a role, e.g. cluster-admin.
kubectl set subject clusterrolebinding cluster-admin --serviceaccount=garden:dashboard-user
Get the token of the service account.
kubectl -n garden create token dashboard-user --duration 24h
Copy the token and login to the dashboard.
Build docker image locally.
make build
Push docker image to Google Container Registry.
make push
This command expects a valid gcloud configuration named gardener.
gcloud config configurations describe gardener
is_active: true
name: gardener
properties:
  core:
    account: john.doe@example.org
    project: johndoe-1008
This document describes how to contribute hotfixes
This section explains how to initiate cherry picks on hotfix branches within the gardener/dashboard repository.
Before you initiate a cherry pick, make sure that the following prerequisites are accomplished.
master branch.gardener/dashboard repository cloned as follows:origin remote should point to your fork (alternatively this can be overwritten by passing FORK_REMOTE=<fork-remote>).upstream remote should point to the Gardener GitHub org (alternatively this can be overwritten by passing UPSTREAM_REMOTE=<upstream-remote>).hub installed, e.g. brew install hub assuming you have a standard golang
development environment.Run the cherry-pick-script.
This example applies a master branch PR #1824 to the remote branch
upstream/hotfix-1.74:
GITHUB_USER=<your-user> hack/cherry-pick-pull.sh upstream/hotfix-1.74 1824
Be aware the cherry pick script assumes you have a git remote called
upstream that points at the Gardener GitHub org.
You will need to run the cherry pick script separately for each patch release you want to cherry pick to. Cherry picks should be applied to all active hotfix branches where the fix is applicable.
When asked for your GitHub password, provide the created GitHub token rather than your actual GitHub password. Refer https://github.com/github/hub/issues/2655#issuecomment-735836048
This section demonstrates how to use the standard Kubernetes tool for cluster operation kubectl for common cluster operations with emphasis on Gardener resources. For more information on kubectl, see kubectl on kubernetes.io.
It’s recommended that you get acquainted with the resources in the Gardener API.
kubeconfig for remote project operationsThe kubeconfig for project operations is different from the one for cluster operations. It has a larger scope and allows a different set of operations that are applicable for a project administrator role, such as lifecycle control on clusters and managing project members.
Depending on your goal, you can create a service account suitable for automation and use it for your pipelines, or you can get a user-specific kubeconfig and use it to manage your project resources via kubectl.
kubeconfigKubernetes doesn’t offer an own resource type for human users that access the API server. Instead, you either have to manage unique user strings, or use an OpenID-Connect (OIDC) compatible Identity Provider (IDP) to do the job.
Once the latter is set up, each Gardener user can use the kubelogin plugin for kubectl to authenticate against the API server:
Set up kubelogin if you don’t have it yet. More information: kubelogin setup.
Open the menu at the top right of the screen, then choose MY ACCOUNT.

On the Access card, choose the arrow to see all options for the personalized command-line interface access.

The personal bearer token that is also offered here only provides access for a limited amount of time for one time operations, for example, in
curlcommands. Thekubeconfigprovided for the personalized access is used bykubeloginto grant access to the Gardener API for the user permanently by using a refresh token.
Check that the right Project is chosen and keep the settings otherwise. Download the kubeconfig file and add its path to the KUBECONFIG environment variable.
You can now execute kubectl commands on the garden cluster using the identity of your user.
Note: You can also manage your Gardener project resources automatically using a Gardener service account. For more information, see Automating Project Resource Management.
Using a kubeconfig for project operations, you can list the Gardner API resources using the following command:
kubectl api-resources | grep garden
The response looks like this:
backupbuckets                     bbc             core.gardener.cloud            false        BackupBucket
backupentries                     bec             core.gardener.cloud            true         BackupEntry
cloudprofiles                     cprofile,cpfl   core.gardener.cloud            false        CloudProfile
controllerinstallations           ctrlinst        core.gardener.cloud            false        ControllerInstallation
controllerregistrations           ctrlreg         core.gardener.cloud            false        ControllerRegistration
plants                            pl              core.gardener.cloud            true         Plant
projects                                          core.gardener.cloud            false        Project
quotas                            squota          core.gardener.cloud            true         Quota
secretbindings                    sb              core.gardener.cloud            true         SecretBinding
seeds                                             core.gardener.cloud            false        Seed
shoots                                            core.gardener.cloud            true         Shoot
shootstates                                       core.gardener.cloud            true         ShootState
terminals                                         dashboard.gardener.cloud       true         Terminal
clusteropenidconnectpresets       coidcps         settings.gardener.cloud        false        ClusterOpenIDConnectPreset
openidconnectpresets              oidcps          settings.gardener.cloud        true         OpenIDConnectPreset
Enter the following command to view the Gardener API versions:
kubectl api-versions | grep garden
The response looks like this:
core.gardener.cloud/v1alpha1
core.gardener.cloud/v1beta1
dashboard.gardener.cloud/v1alpha1
settings.gardener.cloud/v1alpha1
The operations on project resources are limited by the role of the identity that tries to perform them. To get an overview over your permissions, use the following command:
kubectl auth can-i --list | grep garden
The response looks like this:
plants.core.gardener.cloud                      []                       []                 [create delete deletecollection get list patch update watch]
quotas.core.gardener.cloud                      []                       []                 [create delete deletecollection get list patch update watch]
secretbindings.core.gardener.cloud              []                       []                 [create delete deletecollection get list patch update watch]
shoots.core.gardener.cloud                      []                       []                 [create delete deletecollection get list patch update watch]
terminals.dashboard.gardener.cloud              []                       []                 [create delete deletecollection get list patch update watch]
openidconnectpresets.settings.gardener.cloud    []                       []                 [create delete deletecollection get list patch update watch]
cloudprofiles.core.gardener.cloud               []                       []                 [get list watch]
projects.core.gardener.cloud                    []                       [flowering]             [get patch update delete]
namespaces                                      []                       [garden-flowering]      [get]
Try to execute an operation that you aren’t allowed, for example:
kubectl get projects
You receive an error message like this:
Error from server (Forbidden): projects.core.gardener.cloud is forbidden: User "system:serviceaccount:garden-flowering:robot" cannot list resource "projects" in API group "core.gardener.cloud" at the cluster scope
You can get the details for a project, where you (or the service account) is a member.
kubectl get project flowering
The response looks like this:
NAME        NAMESPACE          STATUS   OWNER                    CREATOR                         AGE
flowering   garden-flowering   Ready    [PROJECT-ADMIN]@domain   [PROJECT-ADMIN]@domain system   45m
For more information, see Project in the API reference.
To query the names of the members of a project, use the following command:
kubectl get project docu -o jsonpath='{.spec.members[*].name }'
The response looks like this:
[PROJECT-ADMIN]@domain system:serviceaccount:garden-flowering:robot
For more information, see members in the API reference.
The Gardener domain object for a managed cluster is called Shoot.
To query the clusters in a project:
kubectl get shoots
The output looks like this:
NAME       CLOUDPROFILE   VERSION   SEED      DOMAIN                                 HIBERNATION   OPERATION   PROGRESS   APISERVER   CONTROL   NODES   SYSTEM   AGE
geranium   aws            1.18.3    aws-eu1   geranium.flowering.shoot.<truncated>   Awake         Succeeded   100        True        True      True    True     74m
To create a new cluster using the command line, you need a YAML definition of the Shoot resource.
To get started, copy the following YAML definition to a new file, for example, daffodil.yaml (or copy file shoot.yaml to daffodil.yaml) and adapt it to your needs.
apiVersion: core.gardener.cloud/v1beta1
kind: Shoot
metadata:
  name: daffodil
  namespace: garden-flowering
spec:
  secretBindingName: trial-secretbinding-gcp
  cloudProfile:
    kind: CloudProfile
    name: gcp
  region: europe-west1
  purpose: evaluation
  provider:
    type: gcp
    infrastructureConfig:
      kind: InfrastructureConfig
      apiVersion: gcp.provider.extensions.gardener.cloud/v1alpha1
      networks:
        workers: 10.250.0.0/16
    controlPlaneConfig:
      apiVersion: gcp.provider.extensions.gardener.cloud/v1alpha1
      zone: europe-west1-c
      kind: ControlPlaneConfig
    workers:
    - name: cpu-worker
      maximum: 2
      minimum: 1
      maxSurge: 1
      maxUnavailable: 0
      machine:
        type: n1-standard-2
        image:
          name: gardenlinux
      volume:
        type: pd-standard
        size: 50Gi
      zones:
        - europe-west1-c
  networking:
    type: calico
    pods: 100.96.0.0/11
    nodes: 10.250.0.0/16
    services: 100.64.0.0/13
  maintenance:
    timeWindow:
      begin: 220000+0100
      end: 230000+0100
    autoUpdate:
      kubernetesVersion: true
      machineImageVersion: true
  hibernation:
    enabled: true
    schedules:
      - start: '00 17 * * 1,2,3,4,5'
        location: Europe/Kiev
  kubernetes:
    allowPrivilegedContainers: true
    kubeControllerManager:
      nodeCIDRMaskSize: 24
    kubeProxy:
      mode: IPTables
    version: 1.18.3
  addons:
    nginxIngress:
      enabled: false
    kubernetesDashboard:
      enabled: false
In your new YAML definition file, replace the value of field metadata.namespace with your namespace following the convention garden-[YOUR-PROJECTNAME].
Create a cluster using this manifest (with flag --wait=false the command returns immediately, otherwise it doesn’t return until the process is finished):
kubectl apply -f daffodil.yaml --wait=false
The response looks like this:
shoot.core.gardener.cloud/daffodil created
It takes 5–10 minutes until the cluster is created. To watch the progress, get all shoots and use the -w flag.
kubectl get shoots -w
For a more extended example, see Gardener example shoot manifest.
To delete a shoot cluster, you must first annotate the shoot resource to confirm the operation with confirmation.gardener.cloud/deletion: "true":
Add the annotation to your manifest (daffodil.yaml in the previous example):
apiVersion: core.gardener.cloud/v1beta1
  kind: Shoot
  metadata:
    name: daffodil
    namespace: garden-flowering
    annotations:
      confirmation.gardener.cloud/deletion: "true"
  spec:
    addons:
...
Apply your changes of daffodil.yaml.
kubectl apply -f daffodil.yaml
The response looks like this:
shoot.core.gardener.cloud/daffodil configured
Trigger the deletion.
kubectl delete shoot daffodil --wait=false
The response looks like this:
shoot.core.gardener.cloud "daffodil" deleted
It takes 5–10 minutes to delete the cluster. To watch the progress, get all shoots and use the -w flag.
kubectl get shoots -w
kubeconfig for a Shoot ClusterTo get the kubeconfig for a shoot cluster in Gardener from the command line, use one of the following methods:
Using shoots/admin/kubeconfig Subresource:
kubeconfig by using the shoots/admin/kubeconfig subresource. Detailed instructions can be found in the Gardener documentation here.Using gardenctl and gardenlogin:
gardenctl simplifies targeting Shoot clusters. It automatically downloads a kubeconfig that uses the gardenlogin kubectl auth plugin. This plugin transparently manages Shoot cluster authentication and certificate renewal without embedding any credentials in the kubeconfig file.
gardenctl via Homebrew or Chocolatey, gardenlogin will be installed as a dependency. Refer to the installation instructions here.kubeconfig, use either the target or kubeconfig command:Target Command: This command targets the specified Shoot cluster and automatically downloads the kubeconfig.
gardenctl target --garden landscape-dev --project my-project --shoot my-shoot
To set the KUBECONFIG environment variable to point to the downloaded kubeconfig file, use the following command (for bash):
eval $(gardenctl kubectl-env bash)
Detailed instructions can be found here.
Kubeconfig Command: This command directly downloads the kubeconfig for the specified Shoot cluster and outputs it in raw format.
gardenctl kubeconfig --garden landscape-dev --project my-project --shoot my-shoot --raw
As user and/or gardener administrator you can configure terminal shortcuts, which are preconfigured terminals for frequently used views.
You can launch the terminal shortcuts directly on the shoot details screen.

You can view the definition of a terminal terminal shortcut by clicking on they eye icon
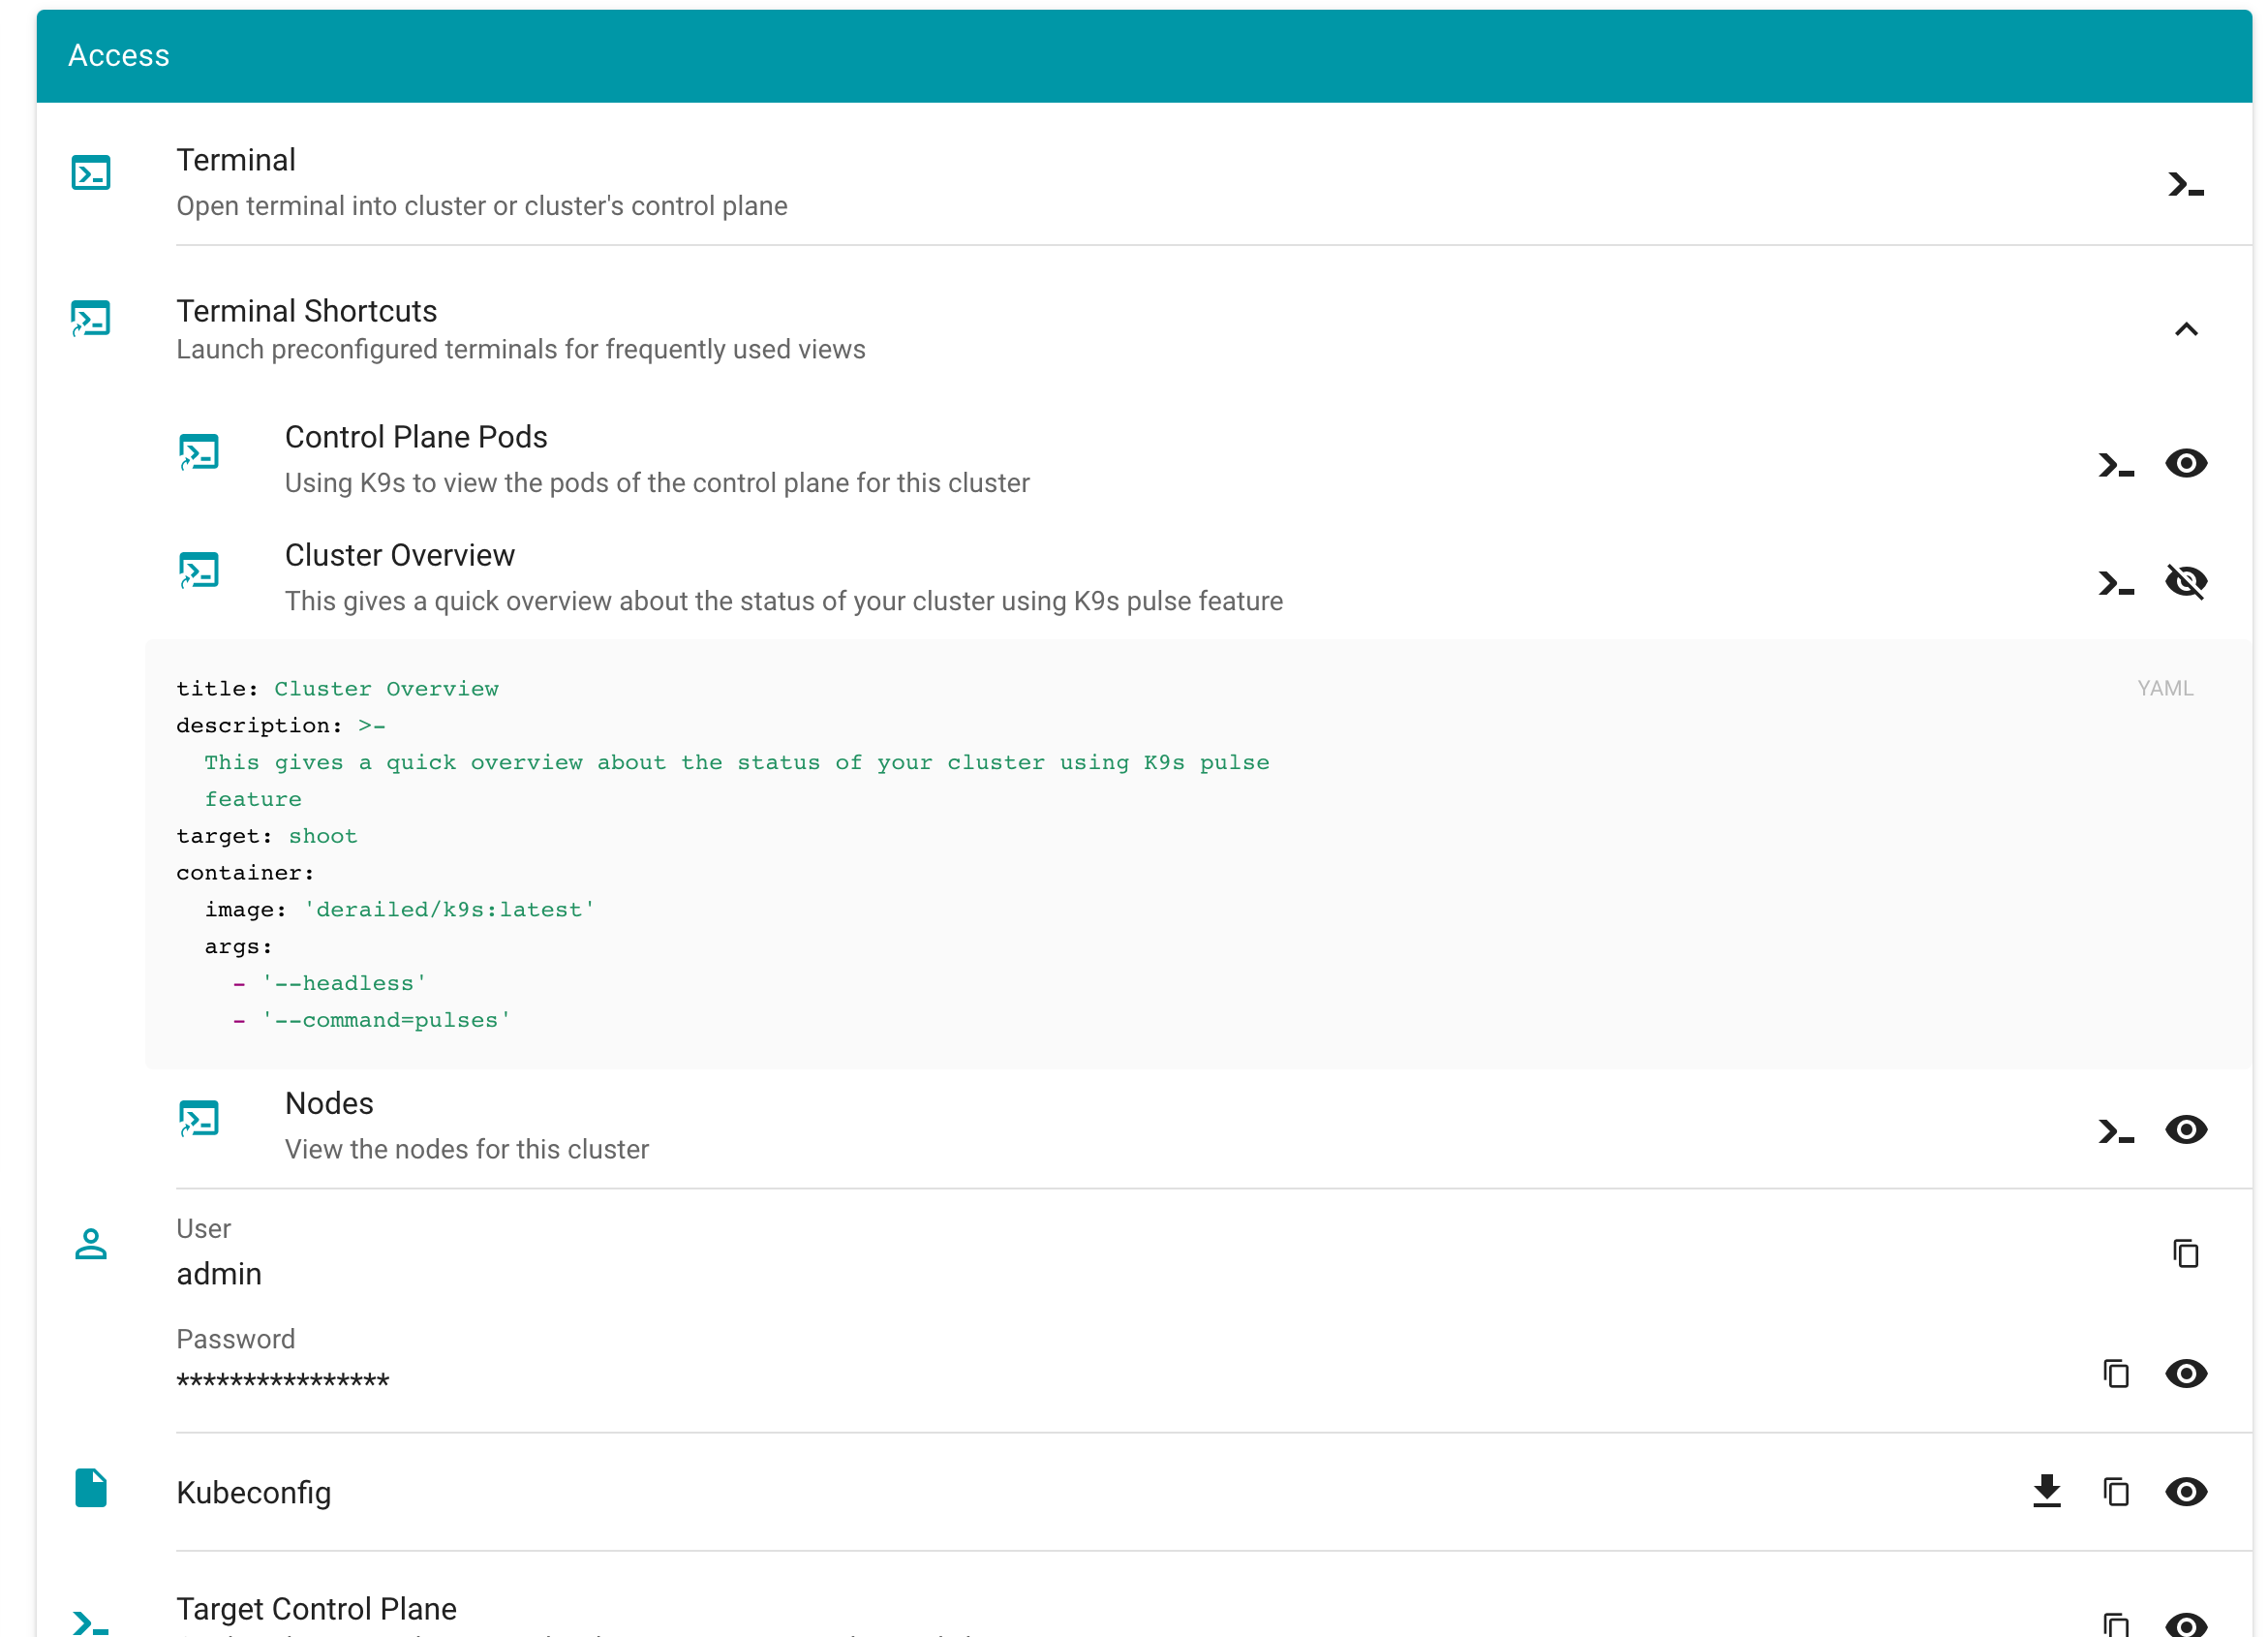
What also has improved is, that when creating a new terminal you can directly alter the configuration.
With expanded configuration

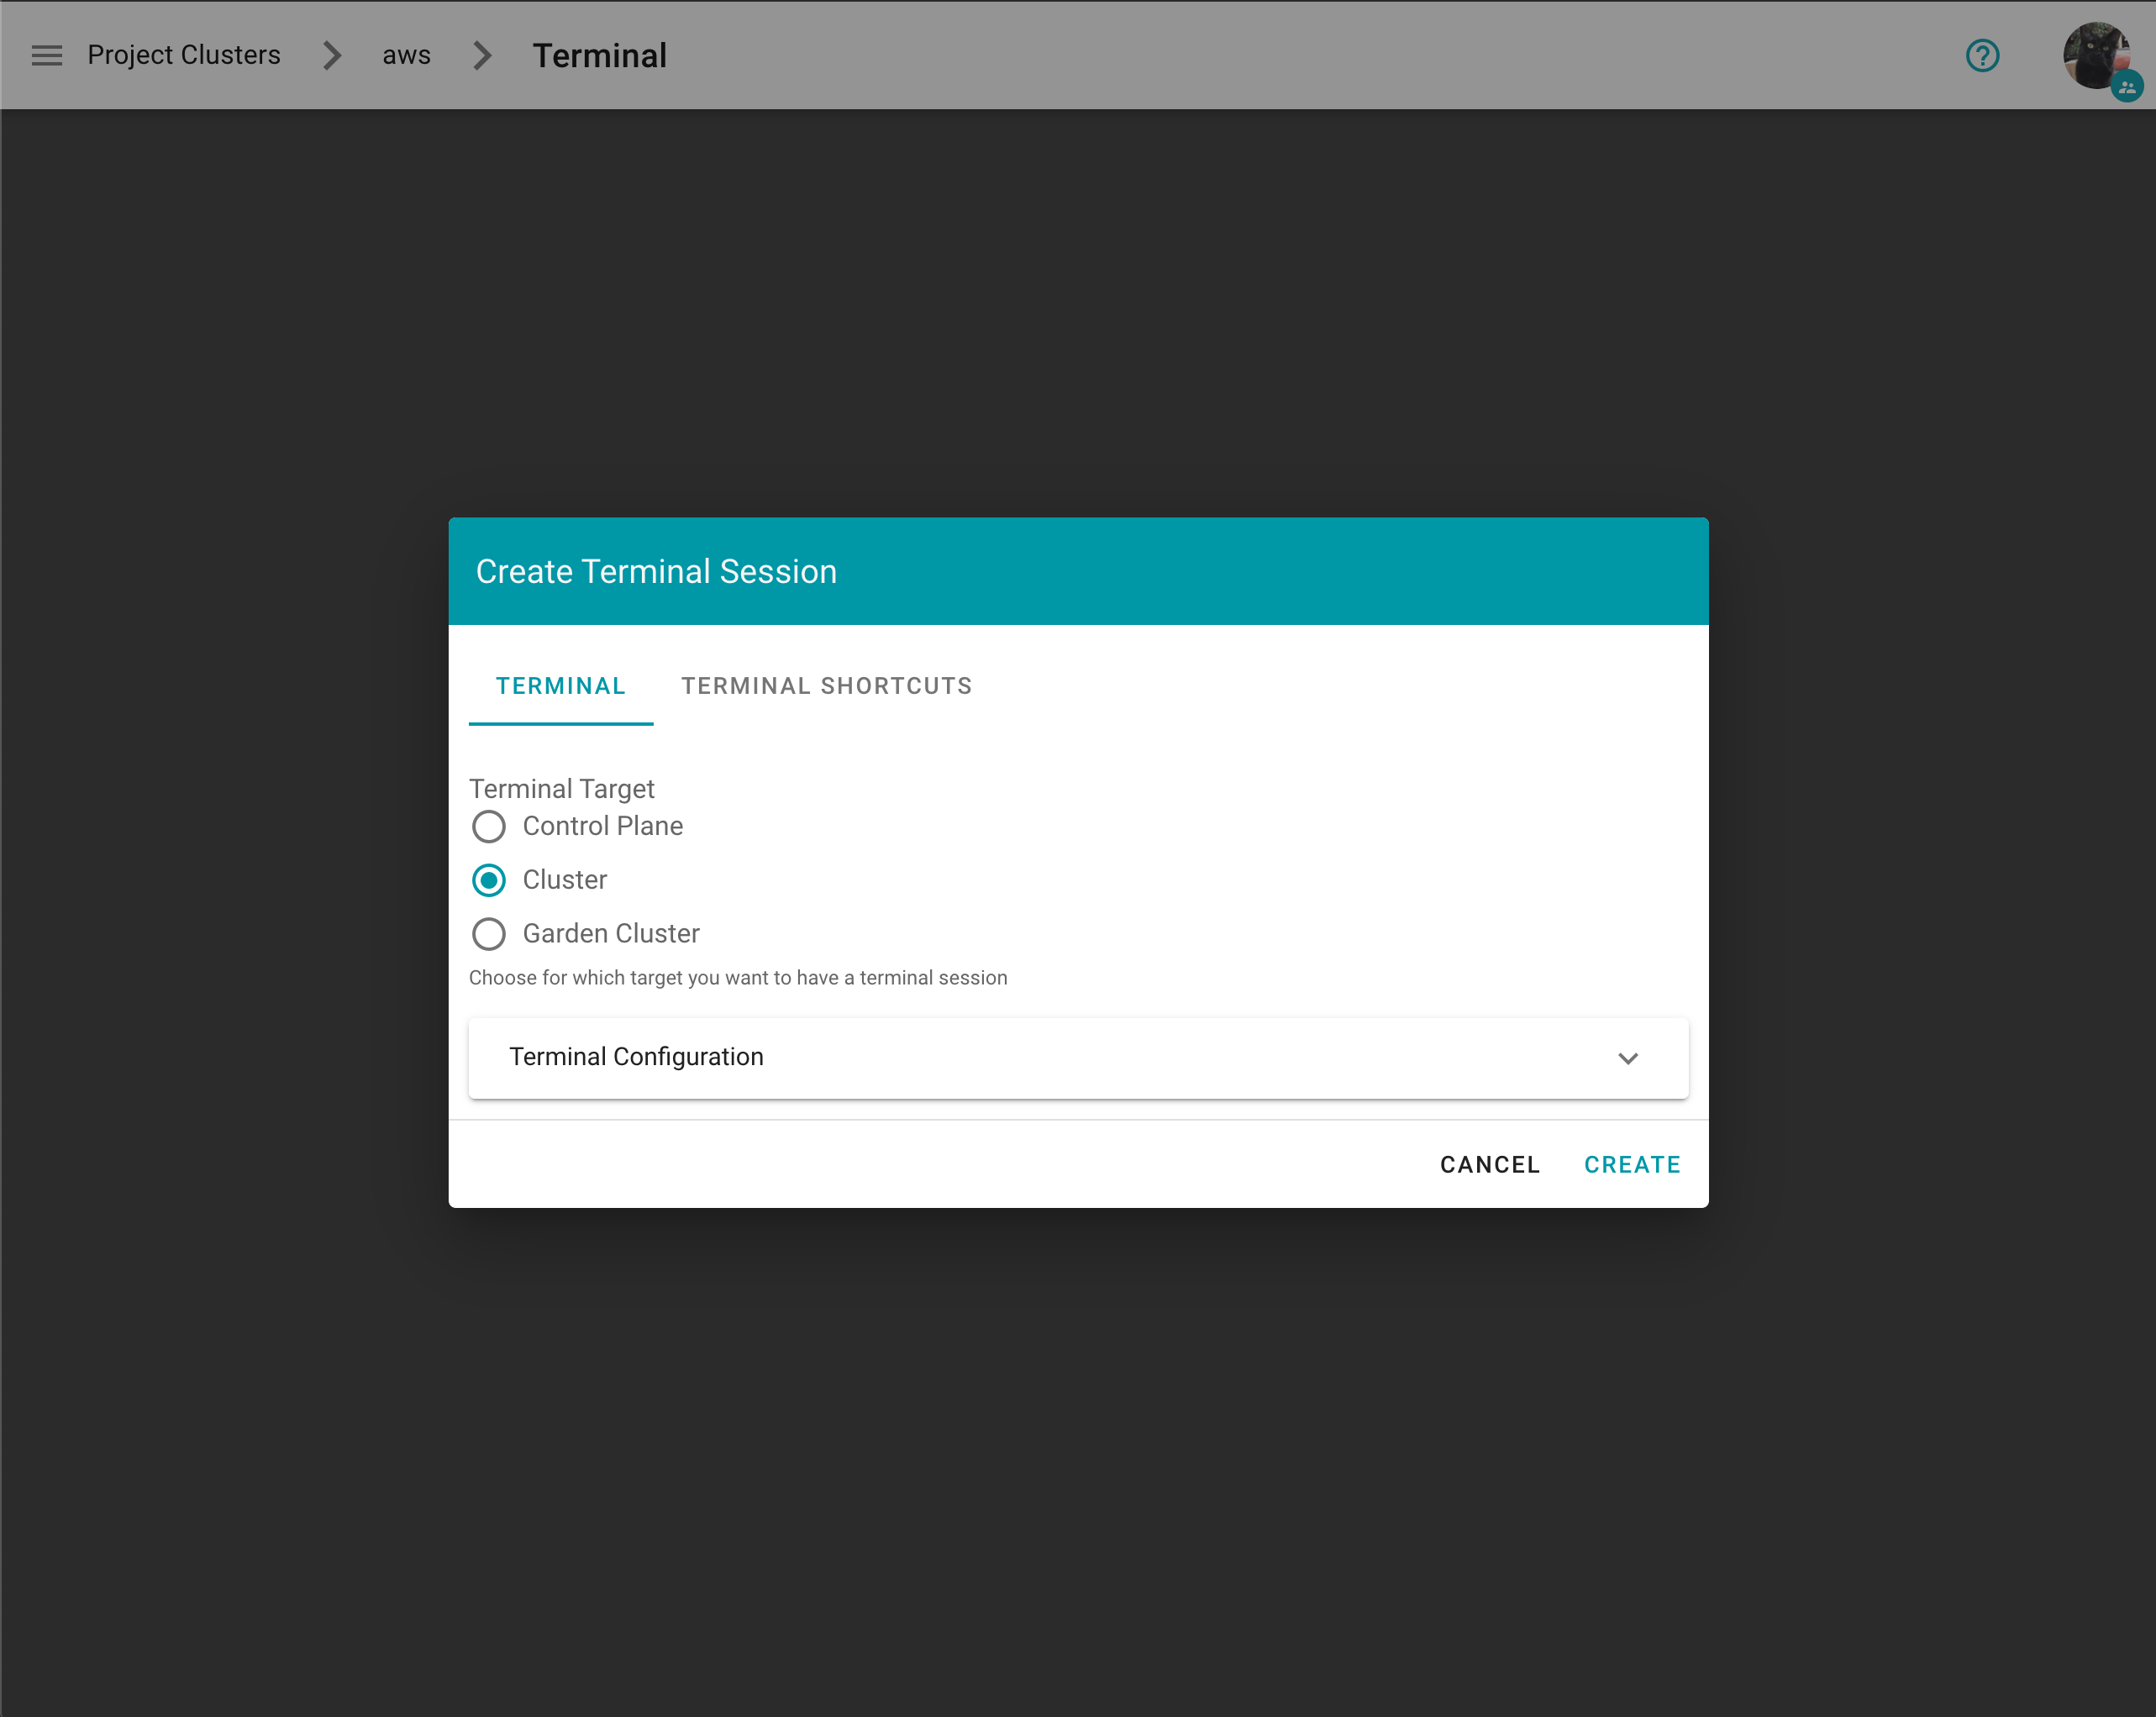
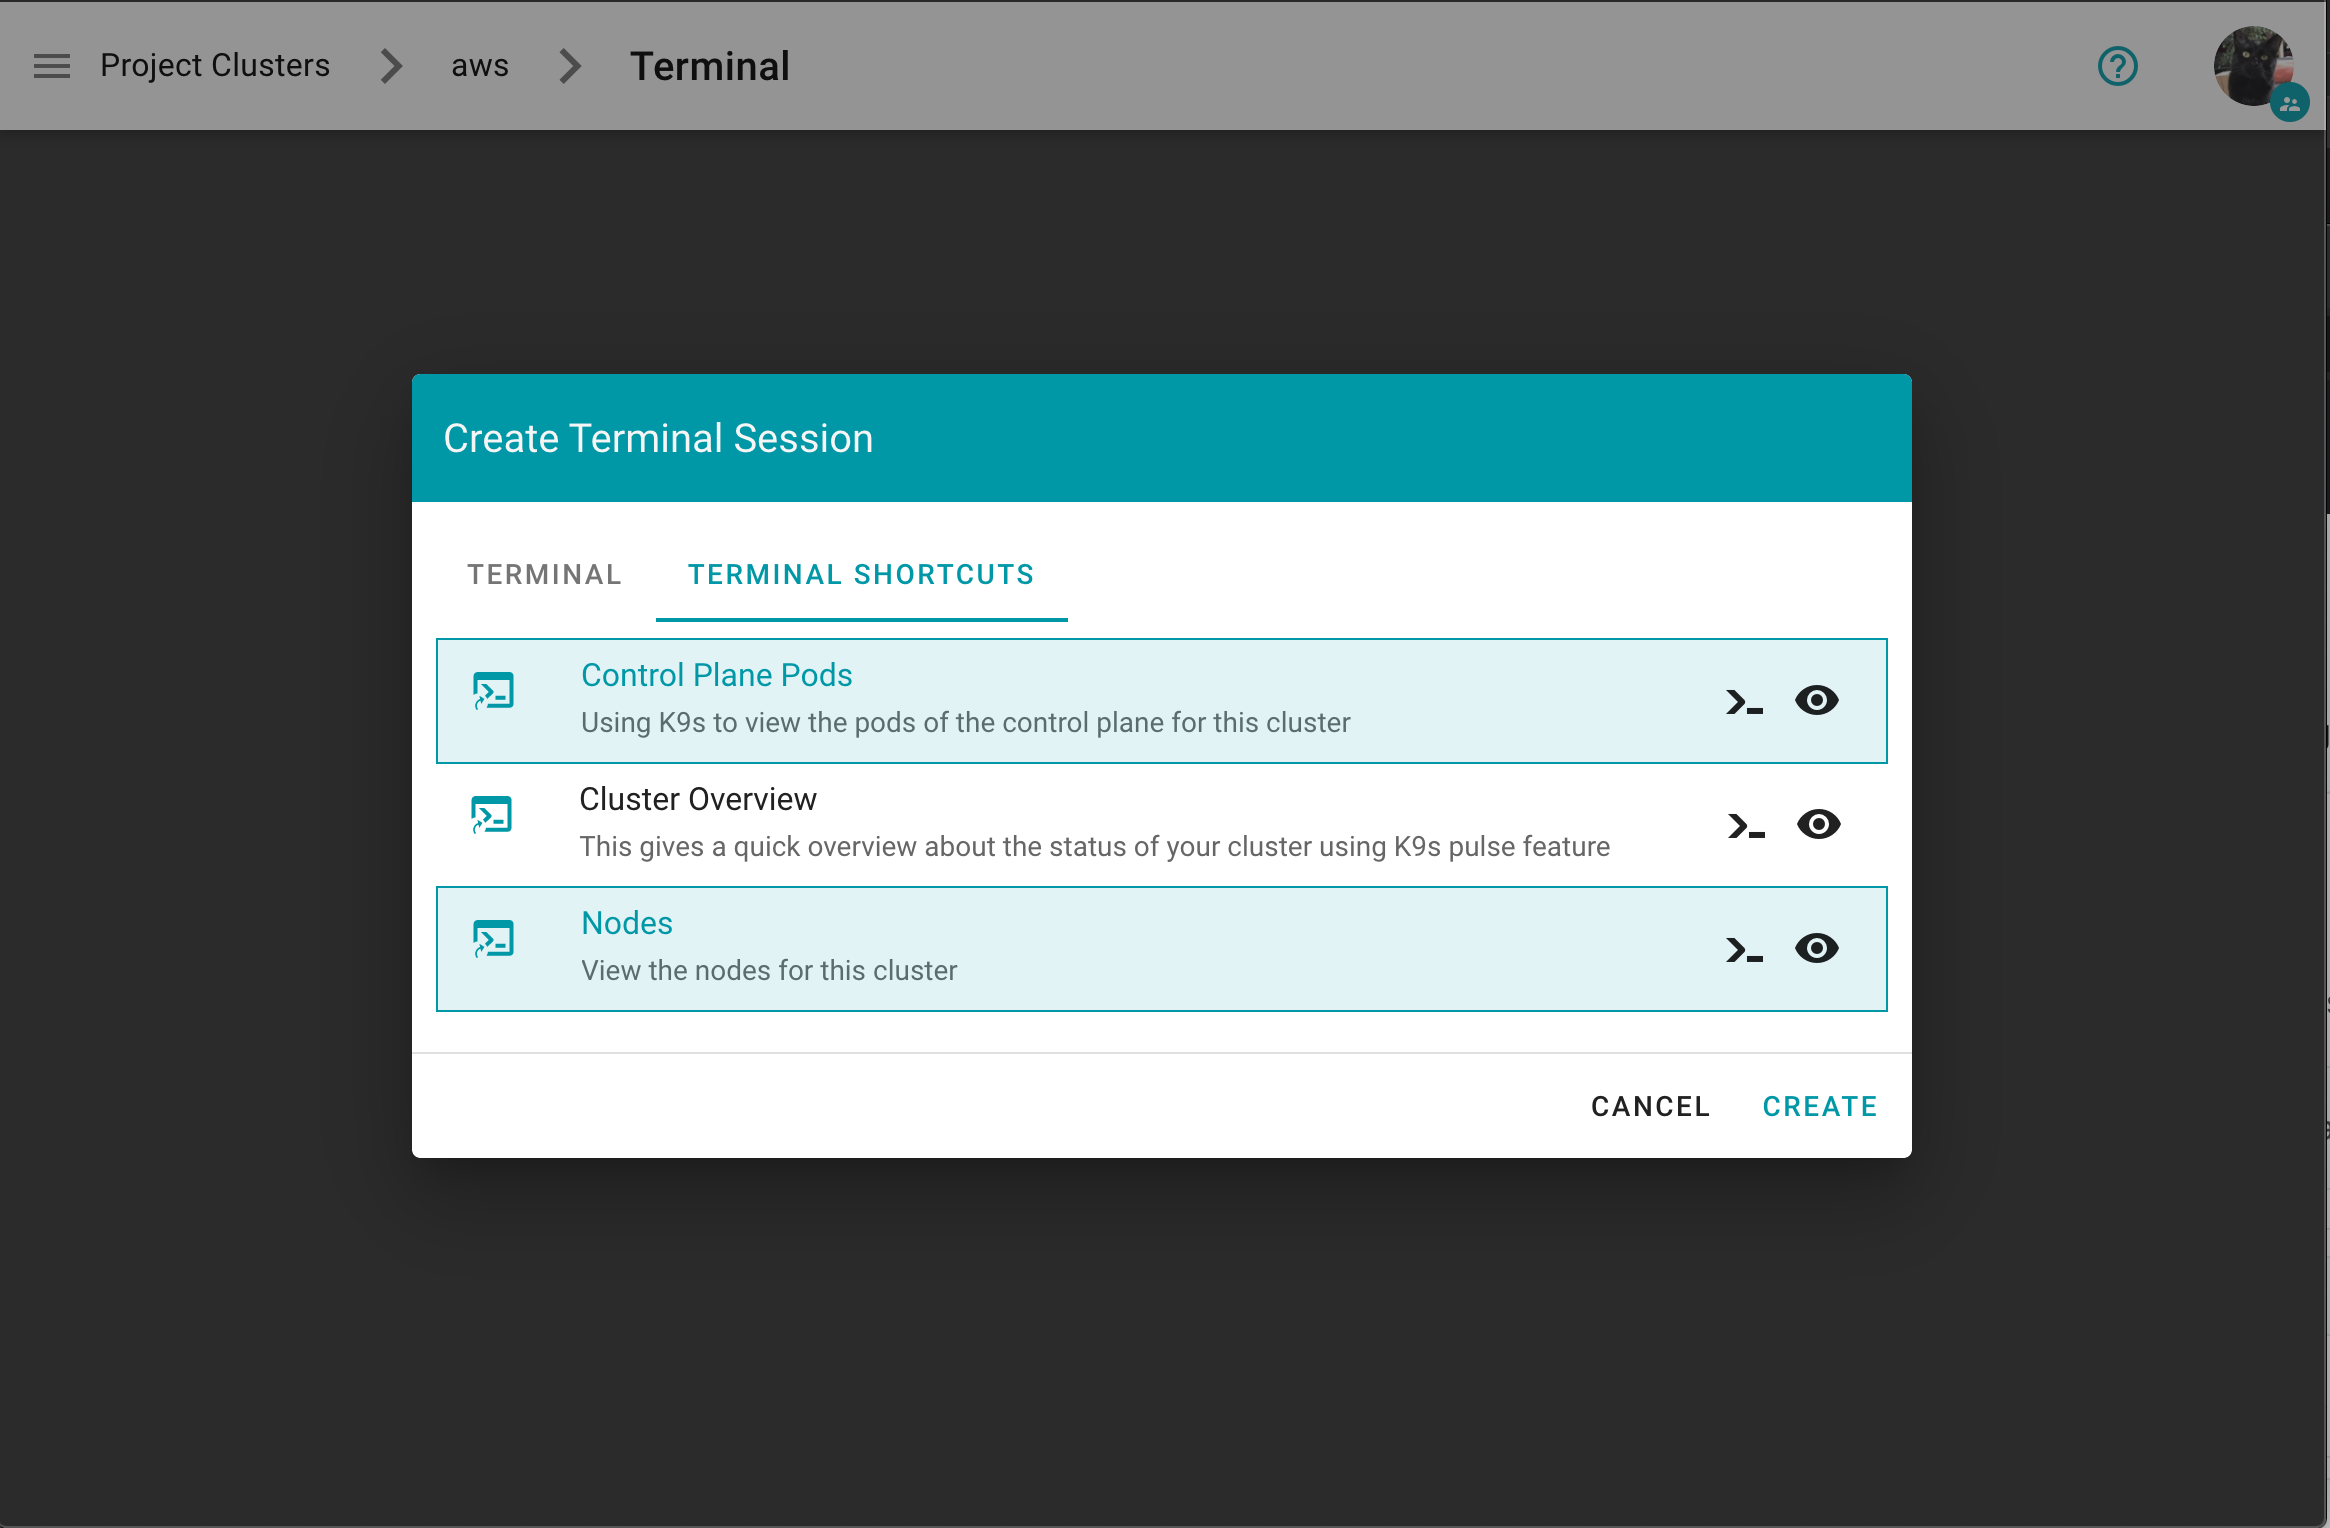
On the Create Terminal Session dialog you can choose one or multiple terminal shortcuts.
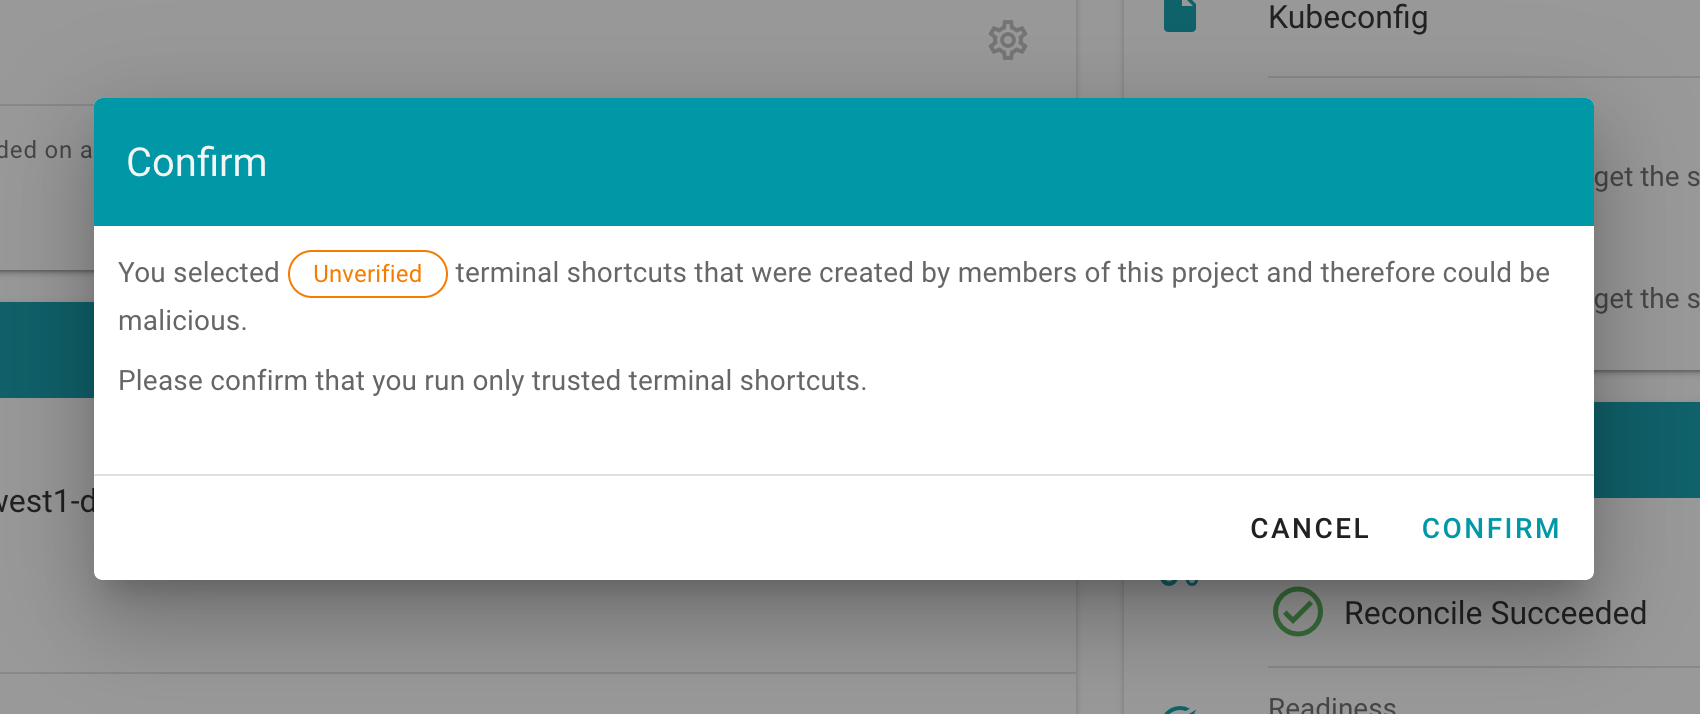
Project specific terminal shortcuts created (by a member of the project) have a project icon badge and are listed as Unverified.
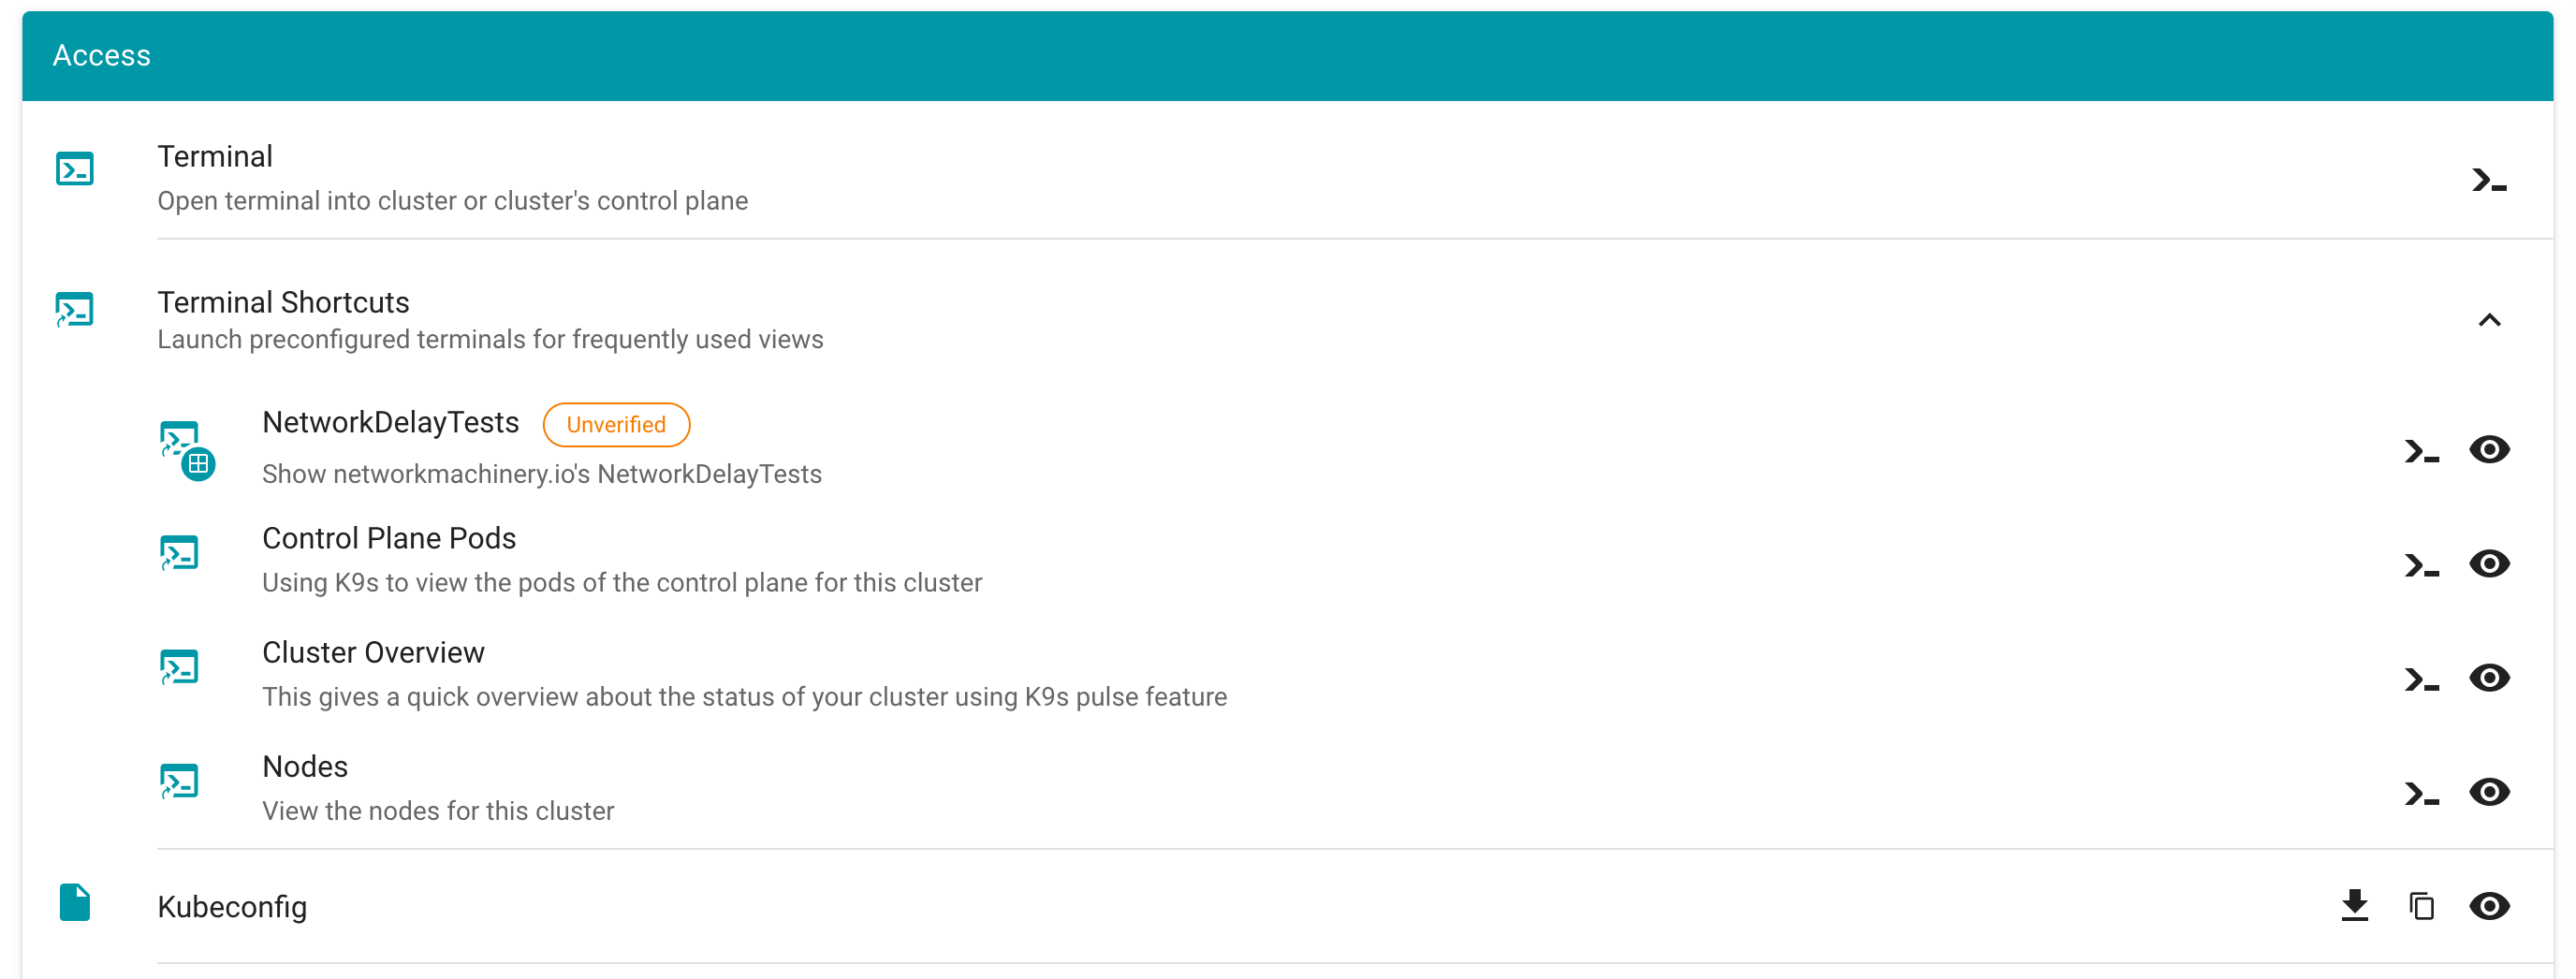
A warning message is displayed before a project specific terminal shortcut is ran informing the user about the risks.
How to create a project specific terminal shortcut
Disclaimer: “Project specific terminal shortcuts” is experimental feature and may change in future releases (we plan to introduce a dedicated custom resource).
You need to create a secret with the name terminal.shortcuts within your project namespace, containing your terminal shortcut configurations. Under data.shortcuts you add a list of terminal shortcuts (base64 encoded).
Example terminal.shortcuts secret:
kind: Secret
type: Opaque
metadata:
  name: terminal.shortcuts
  namespace: garden-myproject
apiVersion: v1
data:
  shortcuts: LS0tCi0gdGl0bGU6IE5ldHdvcmtEZWxheVRlc3RzCiAgZGVzY3JpcHRpb246IFNob3cgbmV0d29ya21hY2hpbmVyeS5pbydzIE5ldHdvcmtEZWxheVRlc3RzCiAgdGFyZ2V0OiBzaG9vdAogIGNvbnRhaW5lcjoKICAgIGltYWdlOiBxdWF5LmlvL2RlcmFpbGVkL2s5czpsYXRlc3QKICAgIGFyZ3M6CiAgICAtIC0taGVhZGxlc3MKICAgIC0gLS1jb21tYW5kPW5ldHdvcmtkZWxheXRlc3QKICBzaG9vdFNlbGVjdG9yOgogICAgbWF0Y2hMYWJlbHM6CiAgICAgIGZvbzogYmFyCi0gdGl0bGU6IFNjYW4gQ2x1c3RlcgogIGRlc2NyaXB0aW9uOiBTY2FucyBsaXZlIEt1YmVybmV0ZXMgY2x1c3RlciBhbmQgcmVwb3J0cyBwb3RlbnRpYWwgaXNzdWVzIHdpdGggZGVwbG95ZWQgcmVzb3VyY2VzIGFuZCBjb25maWd1cmF0aW9ucwogIHRhcmdldDogc2hvb3QKICBjb250YWluZXI6CiAgICBpbWFnZTogcXVheS5pby9kZXJhaWxlZC9rOXM6bGF0ZXN0CiAgICBhcmdzOgogICAgLSAtLWhlYWRsZXNzCiAgICAtIC0tY29tbWFuZD1wb3BleWU=
How to configure the dashboard with terminal shortcuts
Example values.yaml:
frontend:
  features:
    terminalEnabled: true
    projectTerminalShortcutsEnabled: true # members can create a `terminal.shortcuts` secret containing the project specific terminal shortcuts
  terminal:
    shortcuts:
    - title: "Control Plane Pods"
      description: Using K9s to view the pods of the control plane for this cluster
      target: cp
      container:
        image: quay.io/derailed/k9s:latest
        - "--headless"
        - "--command=pods"
    - title: "Cluster Overview"
      description: This gives a quick overview about the status of your cluster using K9s pulse feature
      target: shoot
      container:
        image: quay.io/derailed/k9s:latest
        args:
        - "--headless"
        - "--command=pulses"
    - title: "Nodes"
      description: View the nodes for this cluster
      target: shoot
      container:
        image: quay.io/derailed/k9s:latest
        command:
        - bin/sh
        args:
        - -c
        - sleep 1 && while true; do k9s --headless --command=nodes; done
#      shootSelector:
#        matchLabels:
#          foo: bar
[...]
terminal: # is generally required for the terminal feature
  container:
    image: europe-docker.pkg.dev/gardener-project/releases/gardener/ops-toolbelt:0.26.0
  containerImageDescriptions:
    - image: /.*/ops-toolbelt:.*/
      description: Run `ghelp` to get information about installed tools and packages
  gardenTerminalHost:
    seedRef: my-soil
  garden:
    operatorCredentials:
      serviceAccountRef:
        name: dashboard-terminal-admin
        namespace: garden
We use Jest JavaScript Testing Framework

To execute all tests, simply run
yarn workspaces foreach --all run test
or to include test coverage generation
yarn workspaces foreach --all run test-coverage
You can also run tests for frontend, backend and charts directly inside the respective folder via
yarn test
We use ESLint for static code analyzing.
To execute, run
yarn workspaces foreach --all run lint
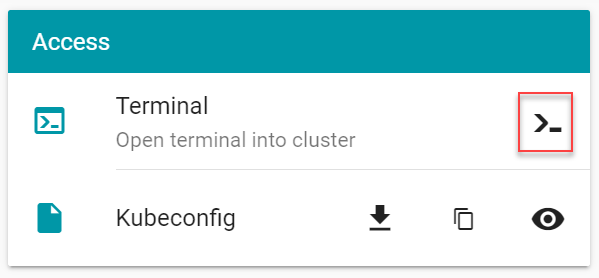
The dashboard features an integrated web-based terminal to your clusters. It allows you to use kubectl without the need to supply kubeconfig. There are several ways to access it and they’re described on this page.
On this page:
Choose your project from the menu on the left and choose CLUSTERS.
Locate a cluster for which you want to open a Terminal and choose the key icon.
In the dialog, choose the icon on the right of the Terminal label.
Choose your project from the menu on the left and choose CLUSTERS.
Locate a cluster for which you want to open a Terminal and choose to display its details.
In the Access section, choose the icon on the right of the Terminal label.
Opening up the terminal in either of the ways discussed here results in the following screen:
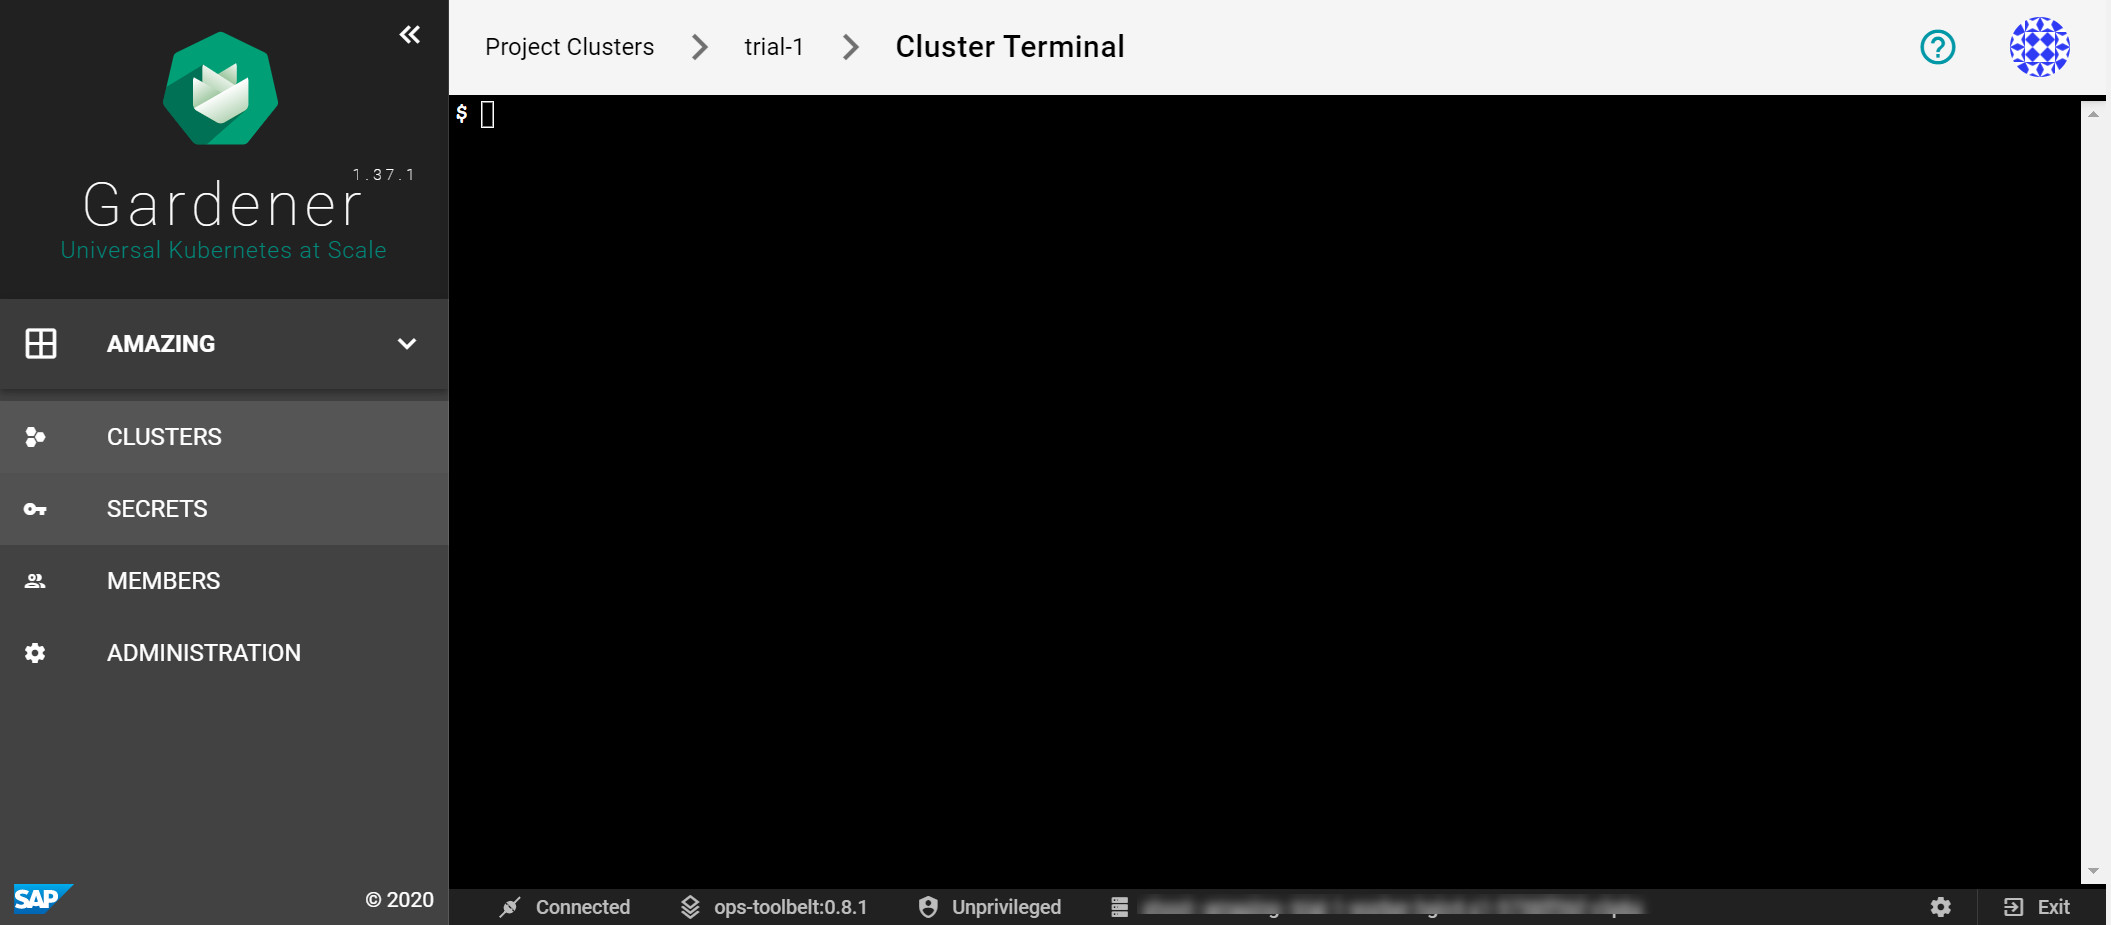
It provides a bash environment and range of useful tools and an installed and configured kubectl (with alias k) to use right away with your cluster.
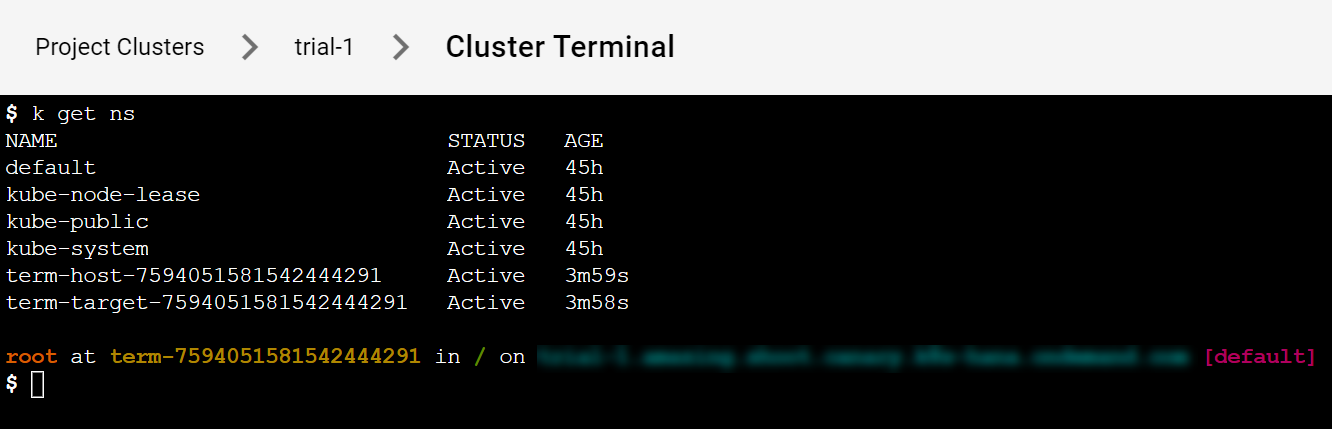
Try to list the namespaces in the cluster.
$ k get ns
You get a result like this:

We want to give garden operators and “regular” users of the Gardener dashboard an easy way to have a preconfigured shell directly in the browser.
This has several advantages:
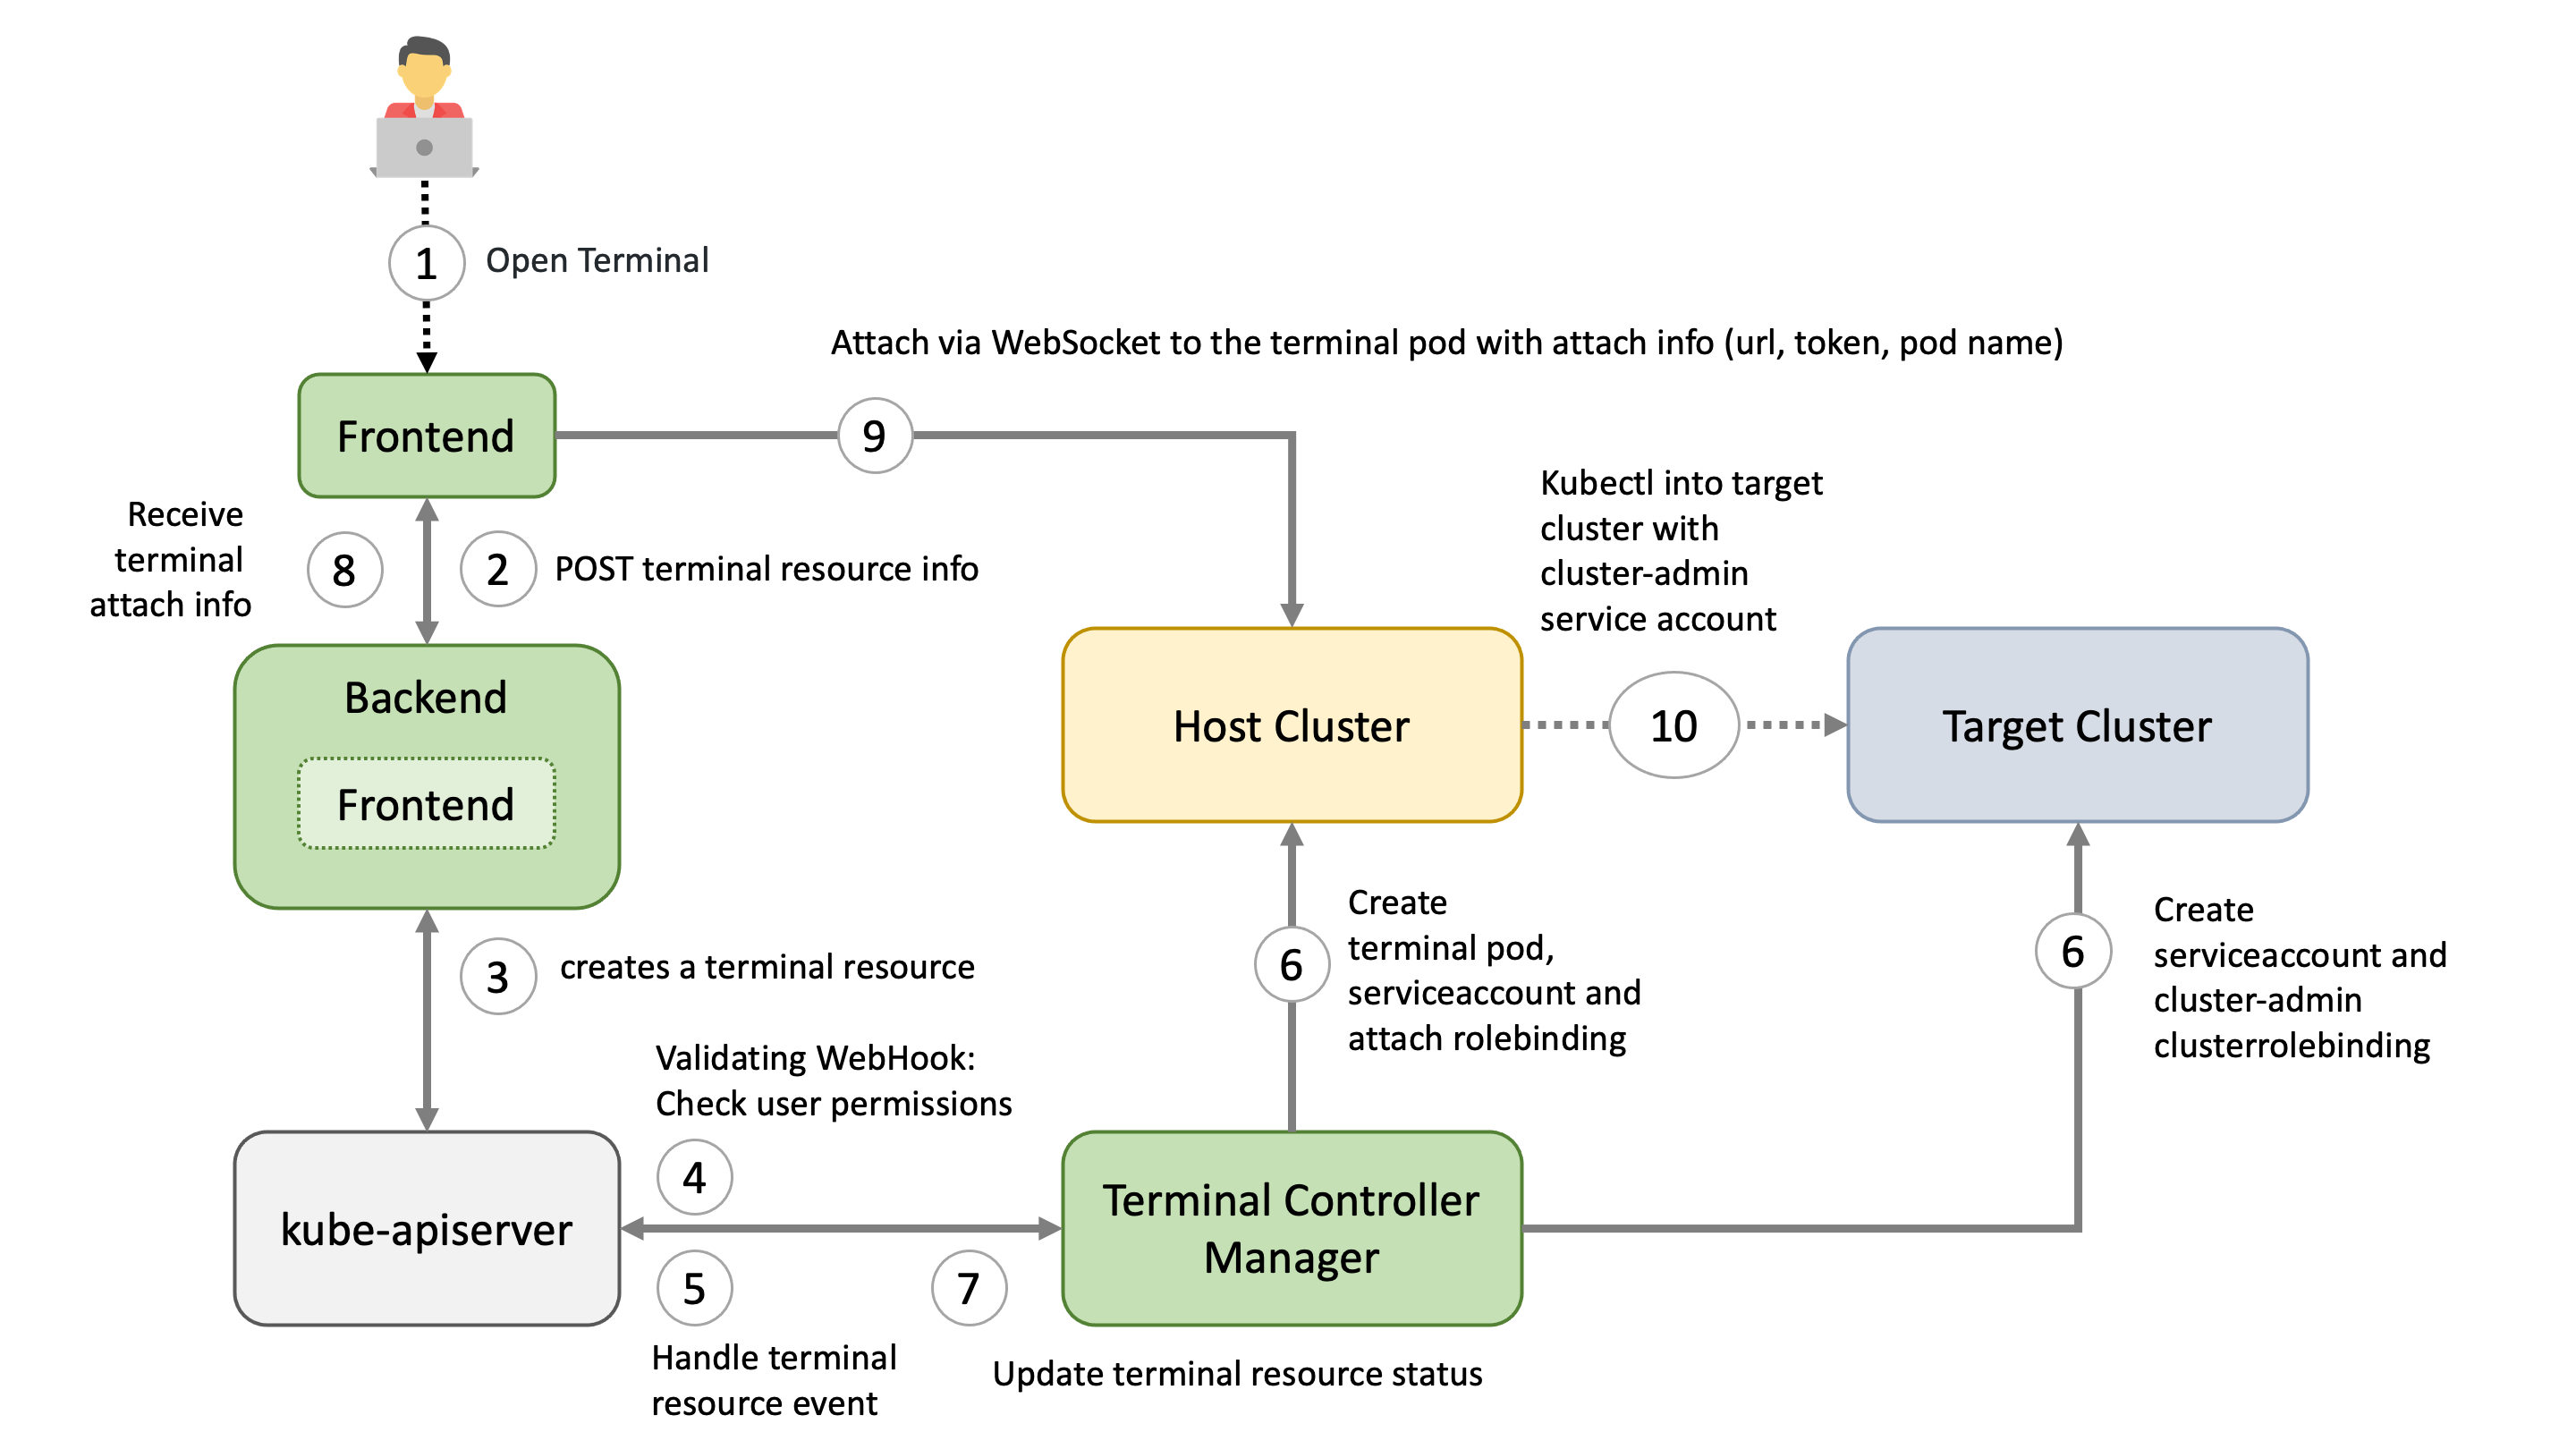
On the host cluster, we schedule a pod to which the dashboard frontend client attaches to (similar to kubectl attach). Usually the ops-toolbelt image is used, containing all relevant tools like kubectl. The Pod has a kubeconfig secret mounted with the necessary privileges for the target cluster - usually cluster-admin.
There are currently three targets, where a user can open a terminal session to:
There are different factors on where the host cluster (and namespace) is chosen by the dashboard:
For example, the user wants to have a terminal for a shoot cluster. The kube-apiserver of the shoot is running in the seed-shoot-ns on the seed.
User chooses the target and clicks in the browser on Open terminal button. A POST request is made to the dashboard backend to request a new terminal session.
According to the privileges of the user (operator / enduser) and the selected target, the dashboard backend creates a terminal resource on behalf of the user in the (virtual) garden and responds with a handle to the terminal session.
The frontend makes another POST request to the dashboard backend to fetch the terminal session. The Backend waits until the terminal resource is in a “ready” state (timeout 10s) before sending a response to the frontend. More to that later.
The terminal resource, among other things, holds the information of the desired host and target cluster. The credentials to these clusters are declared as references (shootRef, serviceAccountRef). The terminal resource itself doesn’t contain sensitive information.
A validating webhook is in place to ensure that the user, that created the terminal resource, has the permission to read the referenced credentials. There is also a mutating webhook in place. Both admission configurations have failurePolicy: Fail.
Sidenote: The terminal-controller-manager has no knowledge about the gardener, its shoots, and seeds. In that sense it can be considered as independent from the gardener.
The terminal-controller-manager watches terminal resources and ensures the desired state on the host and target cluster. The terminal-controller-manager needs the permission to read all secrets / service accounts in the virtual garden.
As additional safety net, the terminal-controller-manager ensures that the terminal resource was not created before the admission configurations were created.
The terminal-controller-manager then creates the necessary resources in the host and target cluster.
cluster-admin cluster roleAs mentioned in step 3, the dashboard backend waits until the terminal resource is “ready”. It then reads the “attach” token from the host cluster on behalf of the user.
It responds with:
Dashboard frontend attaches to the pod located on the host cluster by opening a WebSocket connection using the provided parameter and credentials.
As long as the terminal window is open, the dashboard regularly annotates the terminal resource (heartbeat) to keep it alive.
When there is no heartbeat on the terminal resource for a certain amount of time (default is 5m) the created resources in the host and target cluster are cleaned up again and the terminal resource will be deleted.
When the dashboard frontend opens a secure WebSocket connection to the kube-apiserver, the certificate presented by the kube-apiserver must be browser trusted. Otherwise, the connection can’t be established due to browser policy. Most kube-apiservers have self-signed certificates from a custom Root CA.
The Gardener project now handles the responsibility of exposing the kube-apiservers with browser trusted certificates for Seeds (gardener/gardener#7764) and Shoots (gardener/gardener#7712). For this to work, a Secret must exist in the garden namespace of the Seed cluster. This Secret should have a label gardener.cloud/role=controlplane-cert. The Secret is expected to contain the wildcard certificate for Seeds ingress domain.
When a user starts a terminal session, the dashboard frontend establishes a secure WebSocket connection to the corresponding kube-apiserver. This connection is controlled by the connectSrc directive of the content security policy, which governs the hosts that the browser can connect to.
By default, the connectSrc directive only permits connections to the same host. However, to enable the webterminal feature to function properly, connections to additional trusted hosts are required. This is where the allowedHostSourceList configuration becomes relevant. It directly impacts the connectSrc directive by specifying the hostnames that the browser is allowed to connect to during a terminal session. By defining this list, you can extend the range of terminal connections to include the necessary trusted hosts, while still preventing any unauthorized or potentially harmful connections.
The allowedHostSourceList can be configured within the global.terminal section of the gardener-dashboard Helm values.yaml file. The list should consist of permitted hostnames (without the scheme) for terminal connections.
It is important to consider that the usage of wildcards follows the rules defined by the content security policy.
Here is an example of how to configure the allowedHostSourceList:
global:
  terminal:
    allowedHostSourceList:
    - "*.seed.example.com"
In this example, any host under the seed.example.com domain is allowed for terminal connections.
Projects are used to group clusters, onboard IaaS resources utilized by them, and organize access control. To work with clusters, first you need to create a project that they will belong to.
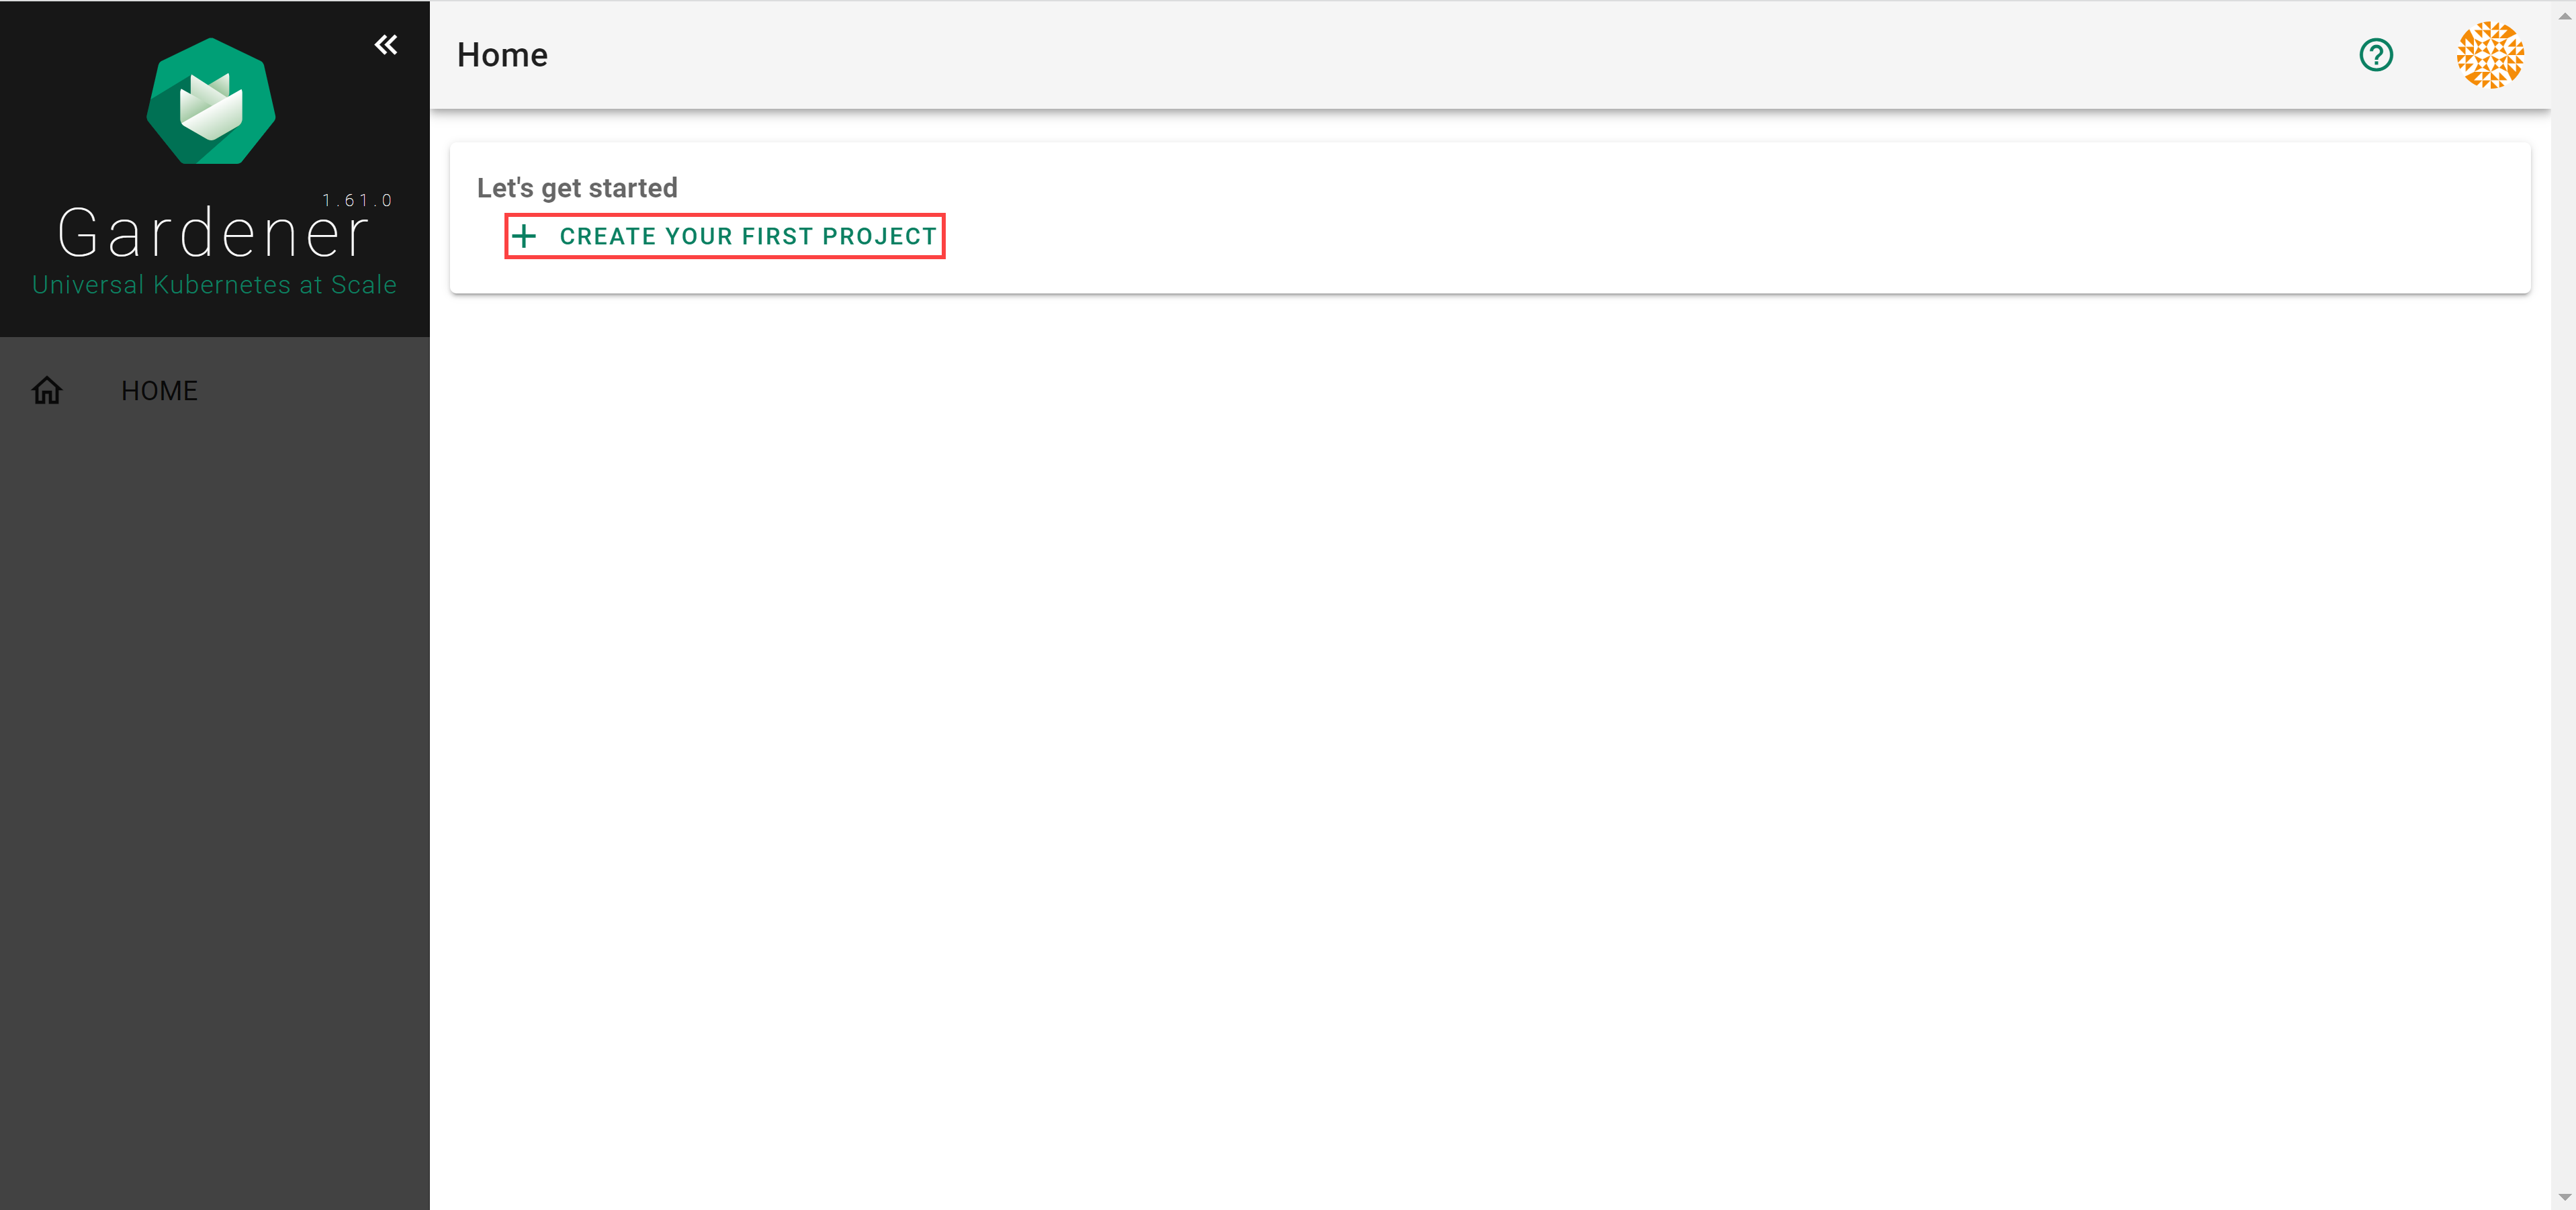
Logon to the Gardener Dashboard and choose CREATE YOUR FIRST PROJECT.
Provide a project Name, and optionally a Description and a Purpose, and choose CREATE.
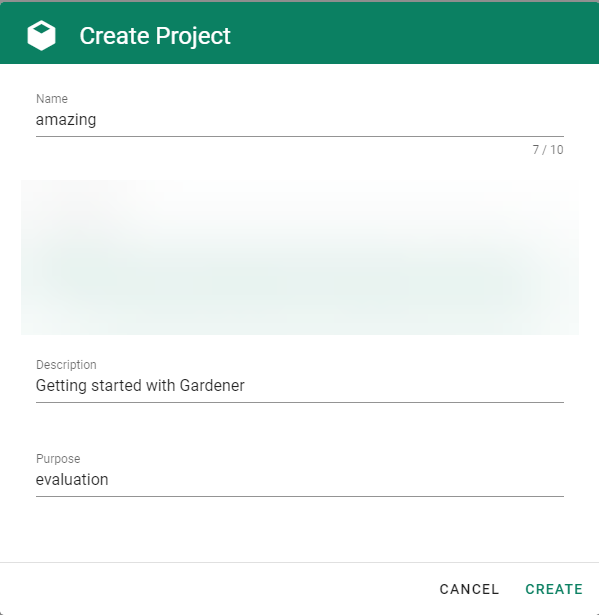
⚠️ You will not be able to change the project name later. The rest of the details will be editable.
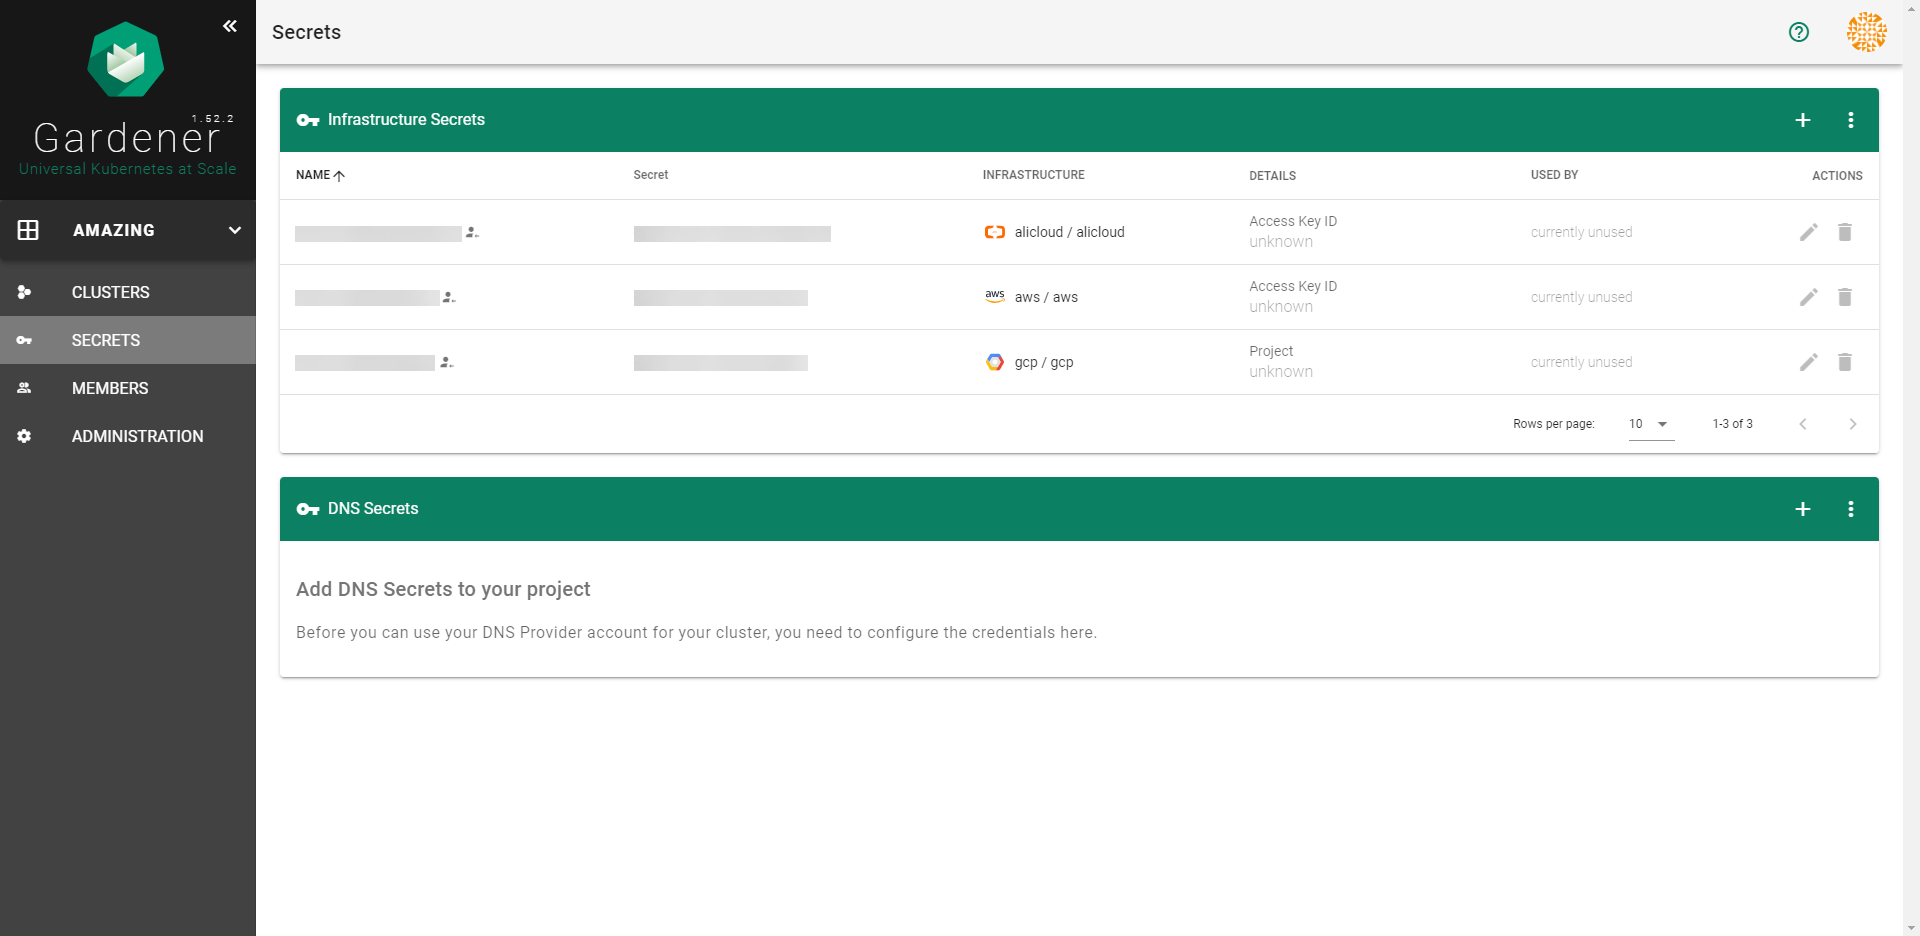
After completing the steps above, you will arrive at a similar screen:
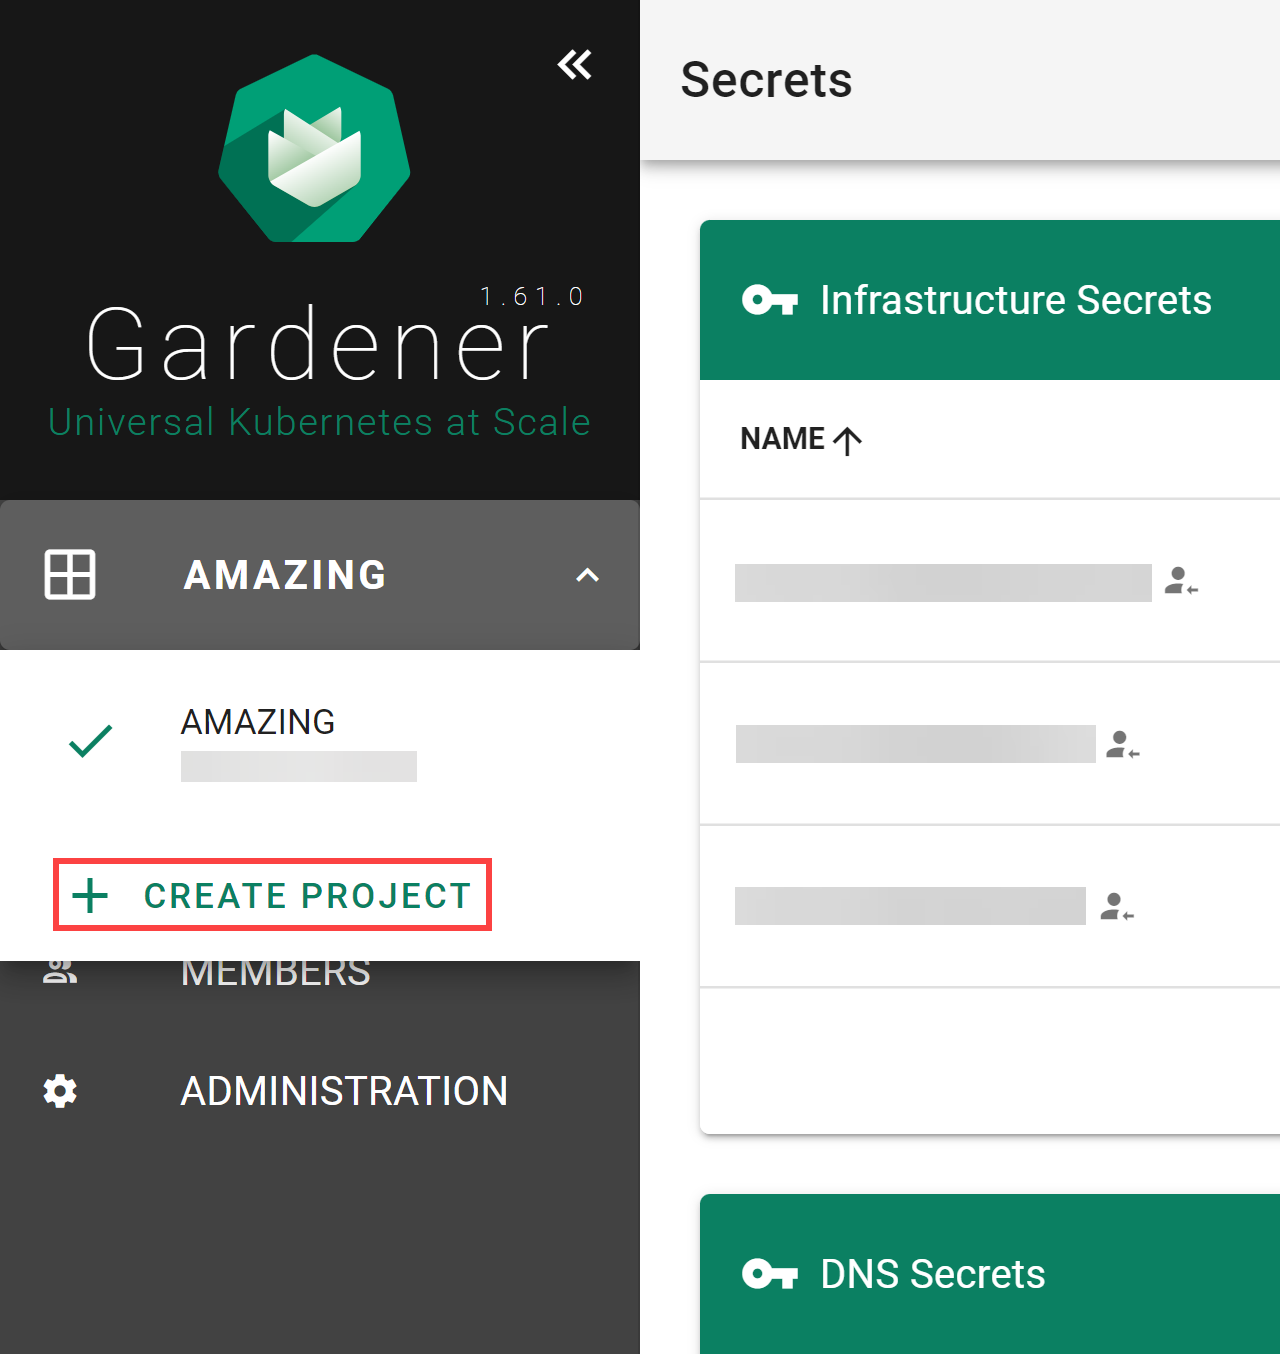
If you need to create more projects, expand the Projects list dropdown on the left. When expanded, it reveals a CREATE PROJECT button that brings up the same dialog as above.
After rotating your Gardener credentials and updating the corresponding secret in Gardener, you also need to reconcile all the shoots so that they can start using the updated secret. Updating the secret on its own won’t trigger shoot reconciliation and the shoot will use the old credentials until reconciliation, which is why you need to either trigger reconciliation or wait until it is performed in the next maintenance time window.
For more information, see Credentials Rotation for Shoot Clusters.
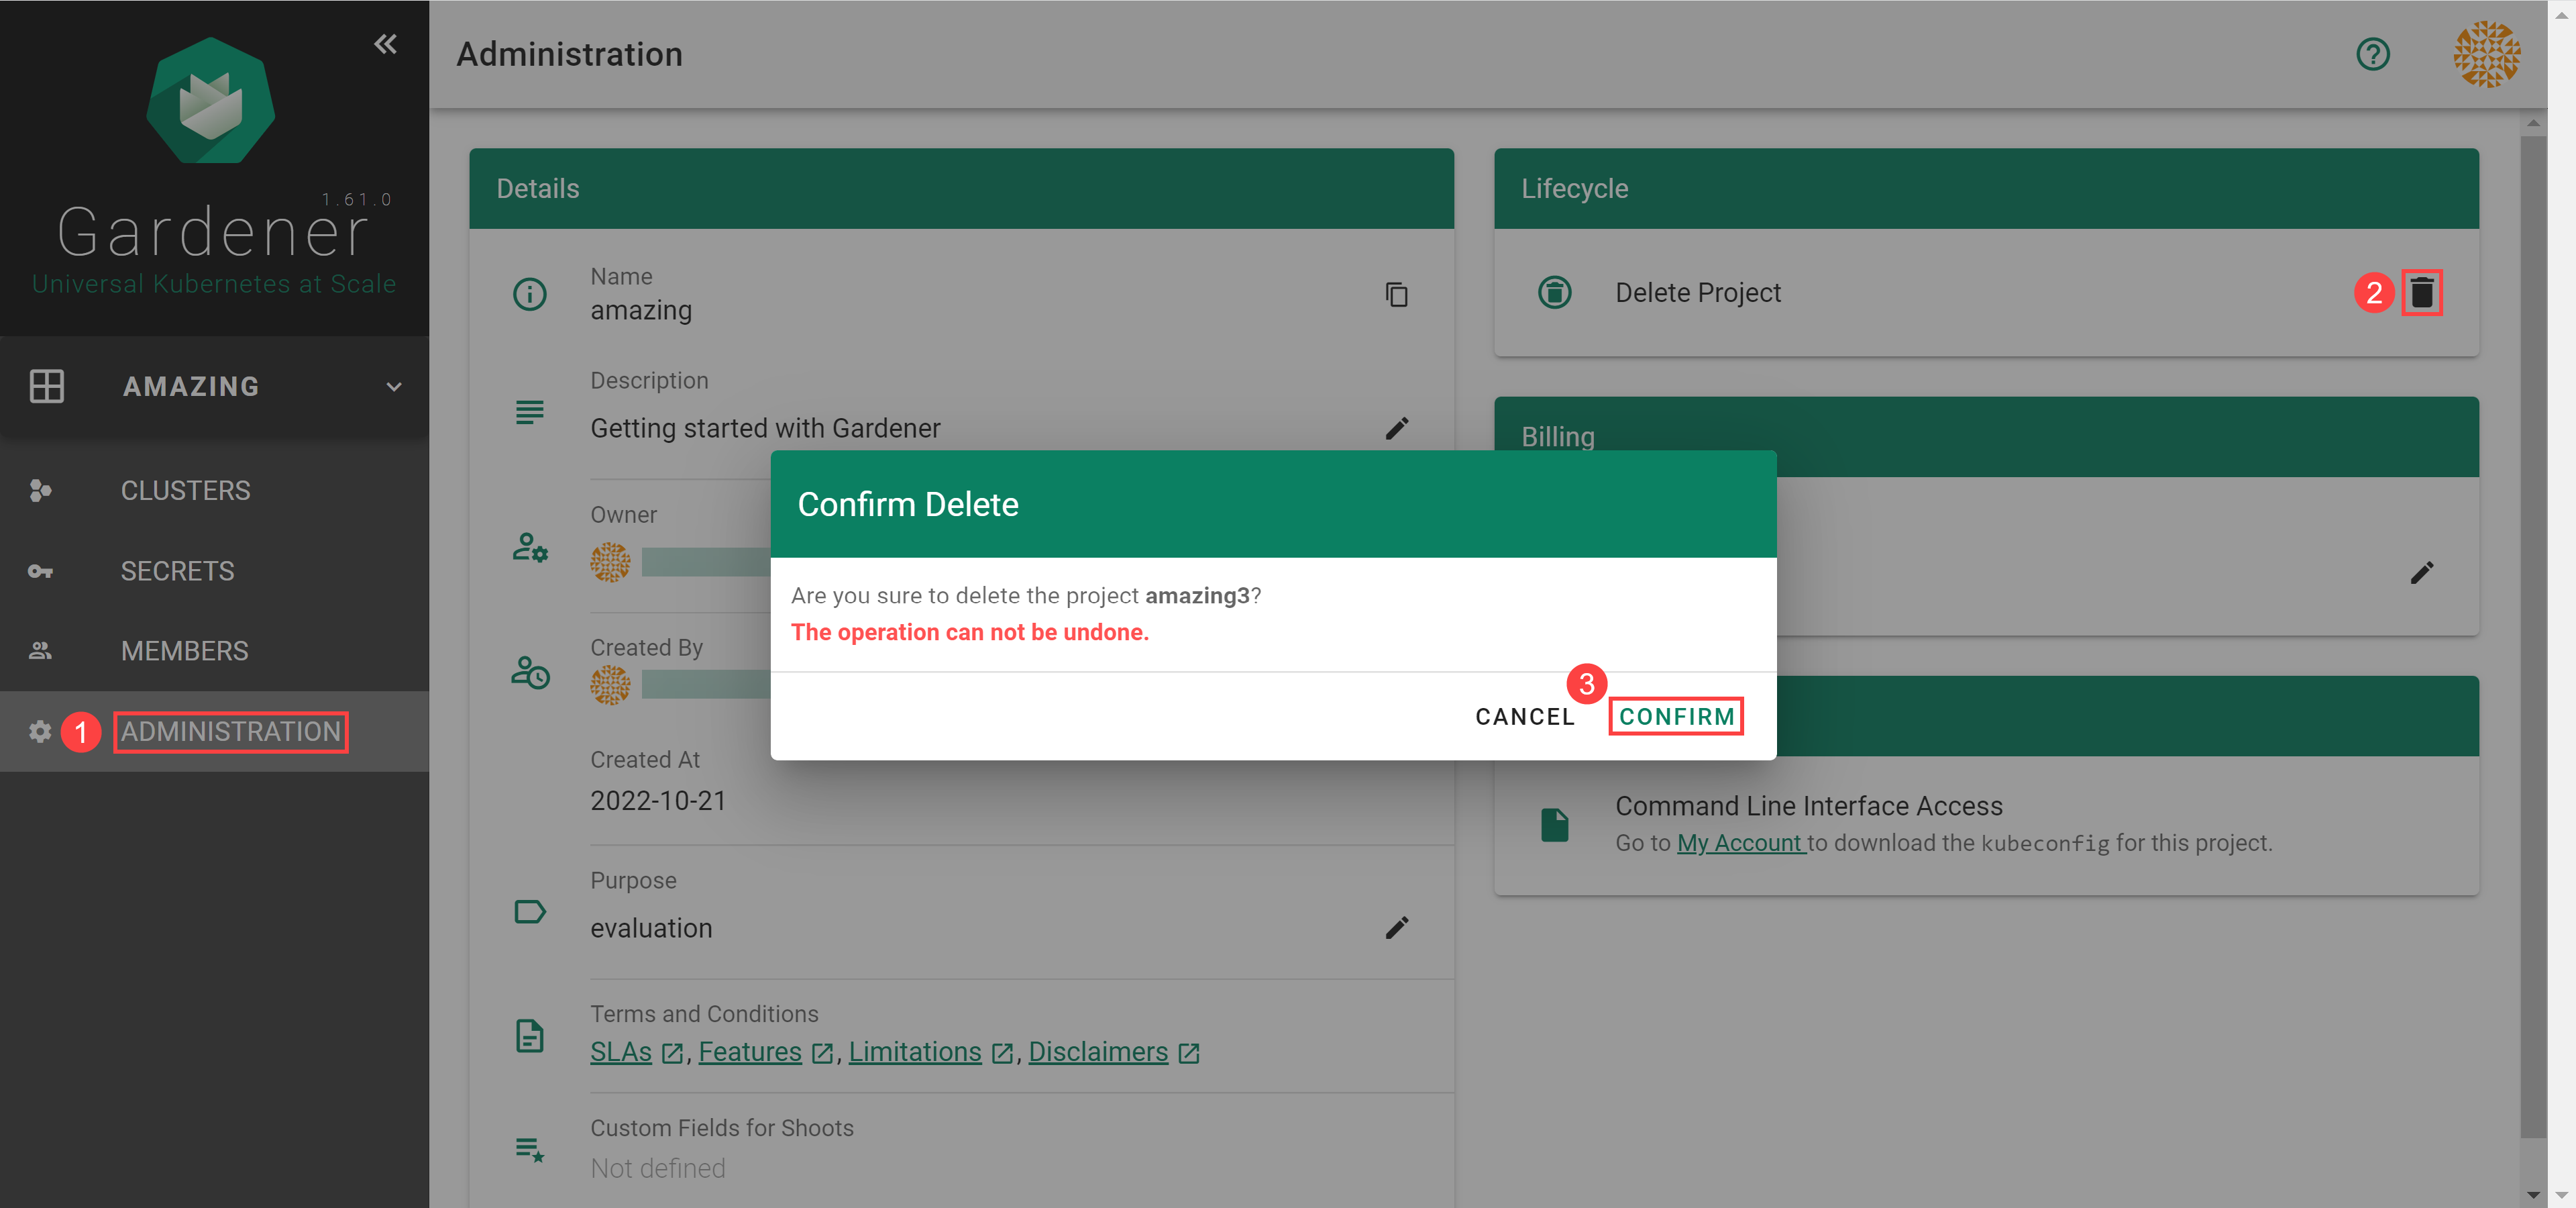
When you need to delete your project, go to ADMINISTRATON, choose the trash bin icon and, confirm the operation.