Project Gardener implements the automated management and operation of Kubernetes clusters as a service. Its main principle is to leverage Kubernetes concepts for all of its tasks.
Recently, most of the vendor specific logic has been developed in-tree. However, the project has grown to a size where it is very hard to extend, maintain, and test. With GEP-1 we have proposed how the architecture can be changed in a way to support external controllers that contain their very own vendor specifics. This way, we can keep Gardener core clean and independent.
Project Gardener implements the automated management and operation of Kubernetes clusters as a service.
Its main principle is to leverage Kubernetes concepts for all of its tasks.
Recently, most of the vendor specific logic has been developed in-tree.
However, the project has grown to a size where it is very hard to extend, maintain, and test.
With GEP-1 we have proposed how the architecture can be changed in a way to support external controllers that contain their very own vendor specifics.
This way, we can keep Gardener core clean and independent.
This controller implements Gardener’s extension contract for the Alicloud provider.
An example for a ControllerRegistration resource that can be used to register this controller to Gardener can be found here.
Please find more information regarding the extensibility concepts and a detailed proposal here.
Supported Kubernetes versions
This extension controller supports the following Kubernetes versions:
Version
Support
Conformance test results
Kubernetes 1.33
1.33.0+
N/A
Kubernetes 1.32
1.32.0+
Kubernetes 1.31
1.31.0+
Kubernetes 1.30
1.30.0+
Kubernetes 1.29
1.29.0+
Kubernetes 1.28
1.28.0+
Kubernetes 1.27
1.27.0+
Please take a look here to see which versions are supported by Gardener in general.
How to start using or developing this extension controller locally
You can run the controller locally on your machine by executing make start.
Static code checks and tests can be executed by running make verify. We are using Go modules for Golang package dependency management and Ginkgo/Gomega for testing.
Feedback and Support
Feedback and contributions are always welcome!
Please report bugs or suggestions as GitHub issues or reach out on Slack (join the workspace here).
Learn more!
Please find further resources about out project here:
1.1.1.1 - Create a Kubernetes Cluster on Alibaba Cloud with Gardener
Overview
Gardener allows you to create a Kubernetes cluster on different infrastructure providers. This tutorial will guide you through the process of creating a cluster on Alibaba Cloud.
You have access to the Gardener dashboard and have permissions to create projects.
Steps
Go to the Gardener dashboard and create a project.
To be able to add shoot clusters to this project, you must first create a technical user on Alibaba Cloud with sufficient permissions.
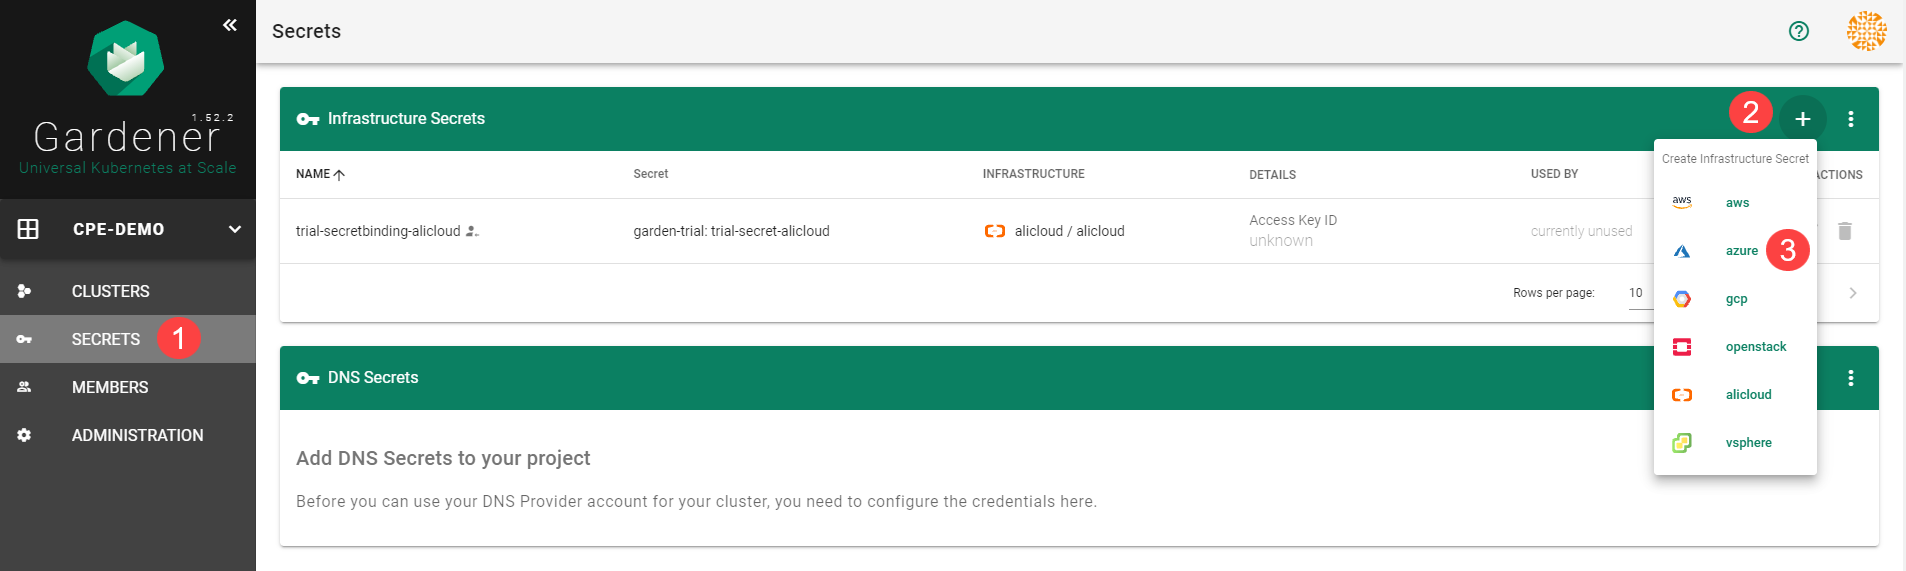
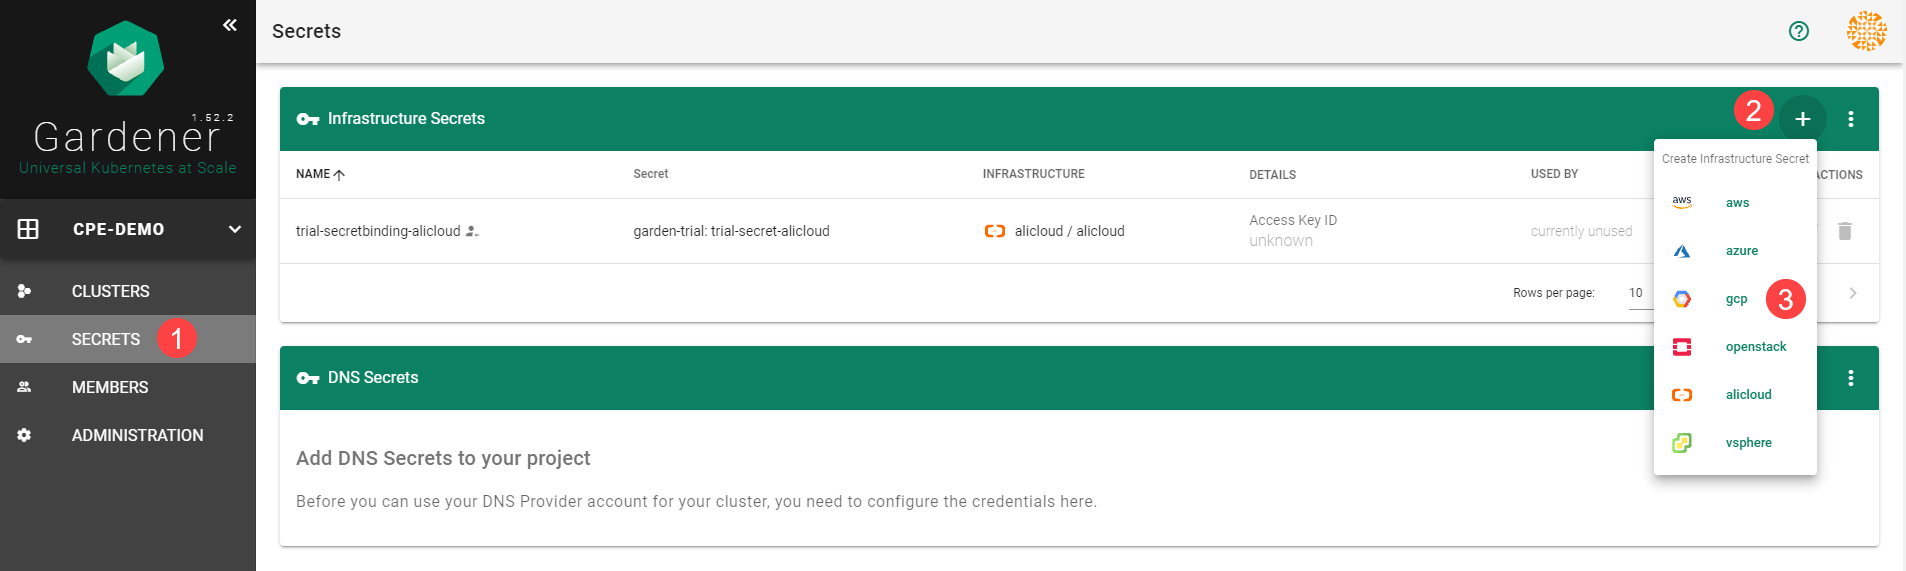
Choose Secrets, then the plus icon and select AliCloud.
To copy the policy for Alibaba Cloud from the Gardener dashboard, click on the help icon for Alibaba Cloud secrets, and choose copy .
Create a custom policy in Alibaba Cloud:
Log on to your Alibaba account and choose RAM > Permissions > Policies.
Enter the name of your policy.
Select Script.
Paste the policy that you copied from the Gardener dashboard to this custom policy.
Choose OK.
In the Alibaba Cloud console, create a new technical user:
Choose RAM > Users.
Choose Create User.
Enter a logon and display name for your user.
Select Open API Access.
Choose OK.
After the user is created, AccessKeyId and AccessKeySecret are generated and displayed. Remember to save them. The AccessKey is used later to create secrets for Gardener.
Assign the policy you created to the technical user:
Choose RAM > Permissions > Grants.
Choose Grant Permission.
Select Alibaba Cloud Account.
Assign the policy you’ve created before to the technical user.
Create your secret.
Type the name of your secret.
Copy and paste the Access Key ID and Secret Access Key you saved when you created the technical user on Alibaba Cloud.
Choose Add secret.
After completing these steps, you should see your newly created secret in the Infrastructure Secrets section.
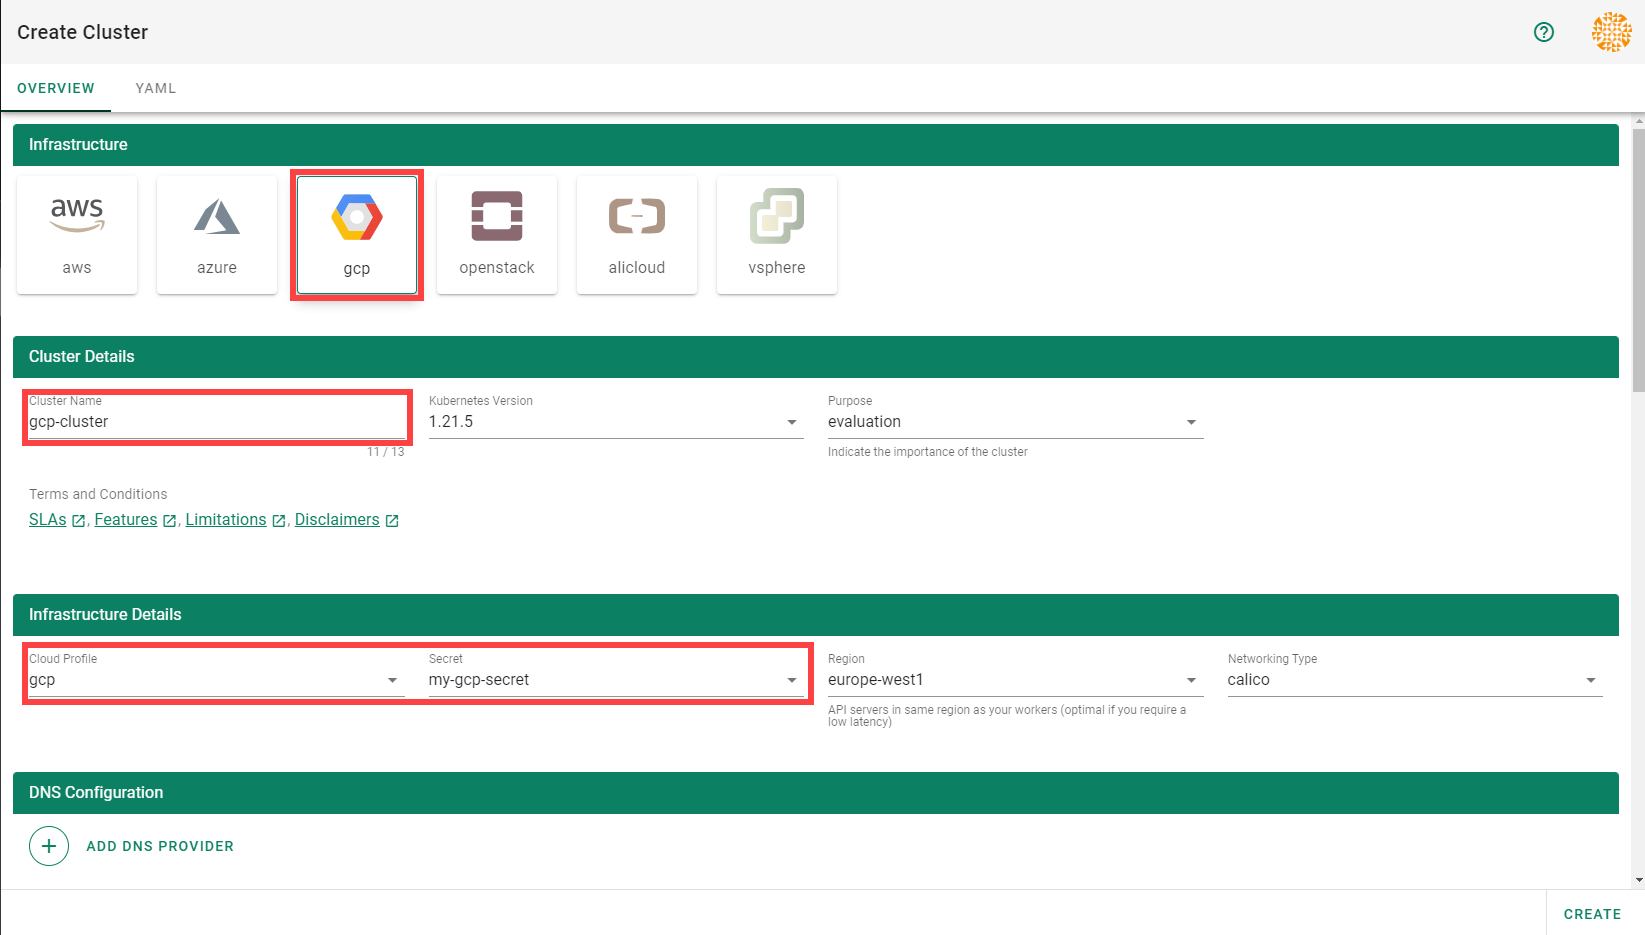
To create a new cluster, choose Clusters and then the plus sign in the upper right corner.
In the Create Cluster section:
Select AliCloud in the Infrastructure tab.
Type the name of your cluster in the Cluster Details tab.
Choose the secret you created before in the Infrastructure Details tab.
Choose Create.
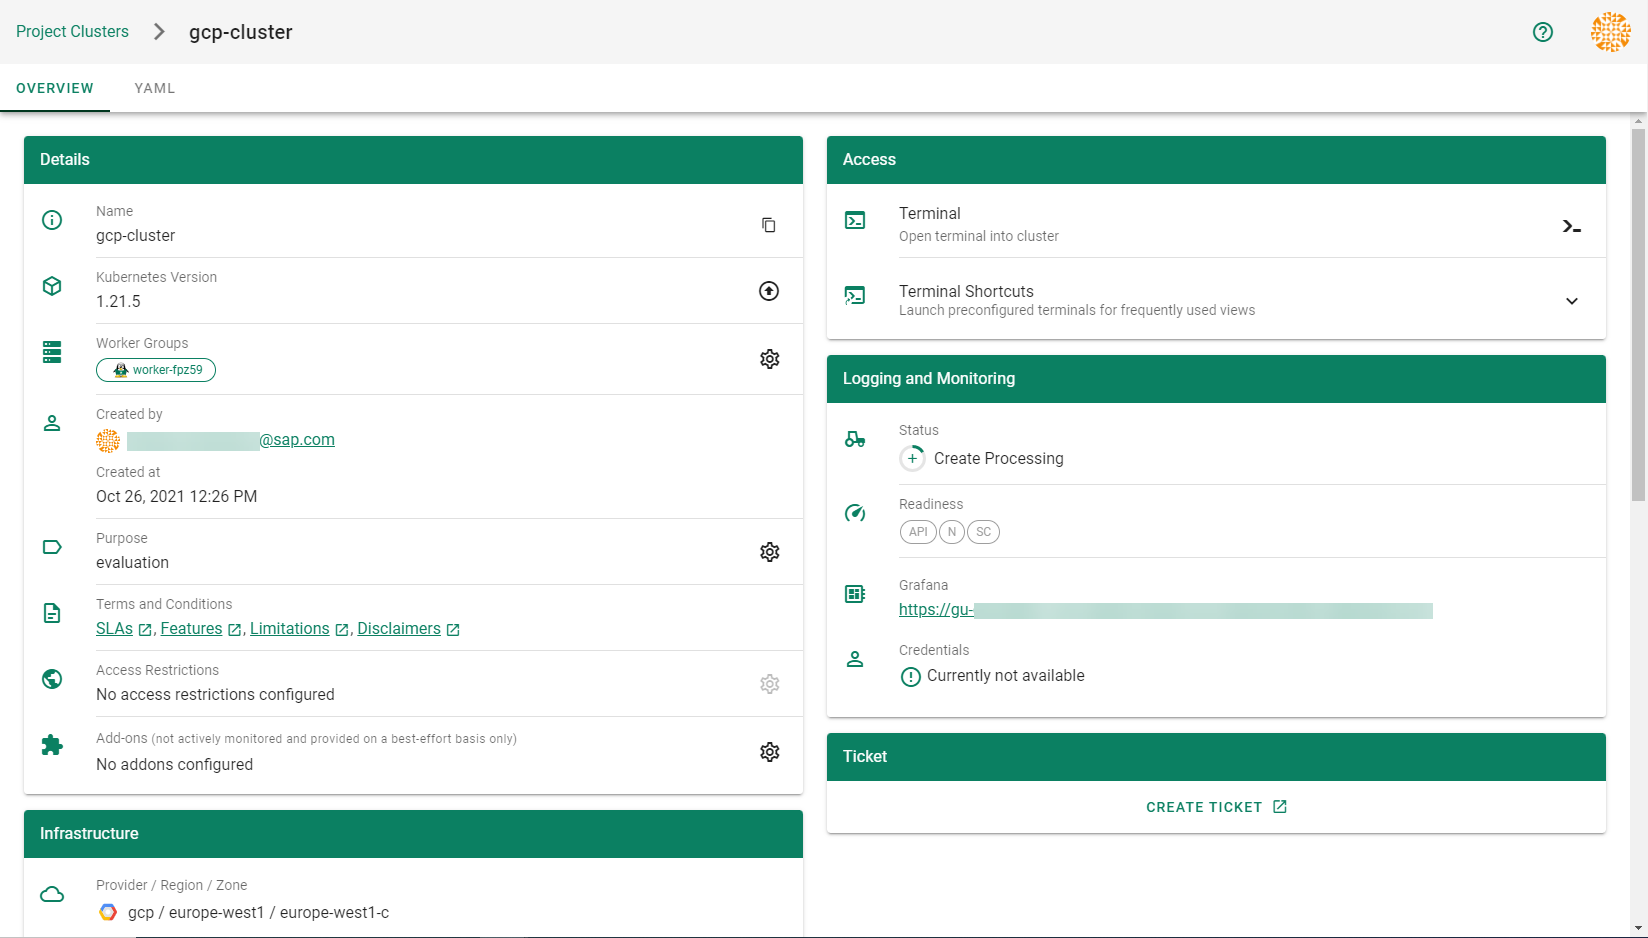
Wait for your cluster to get created.
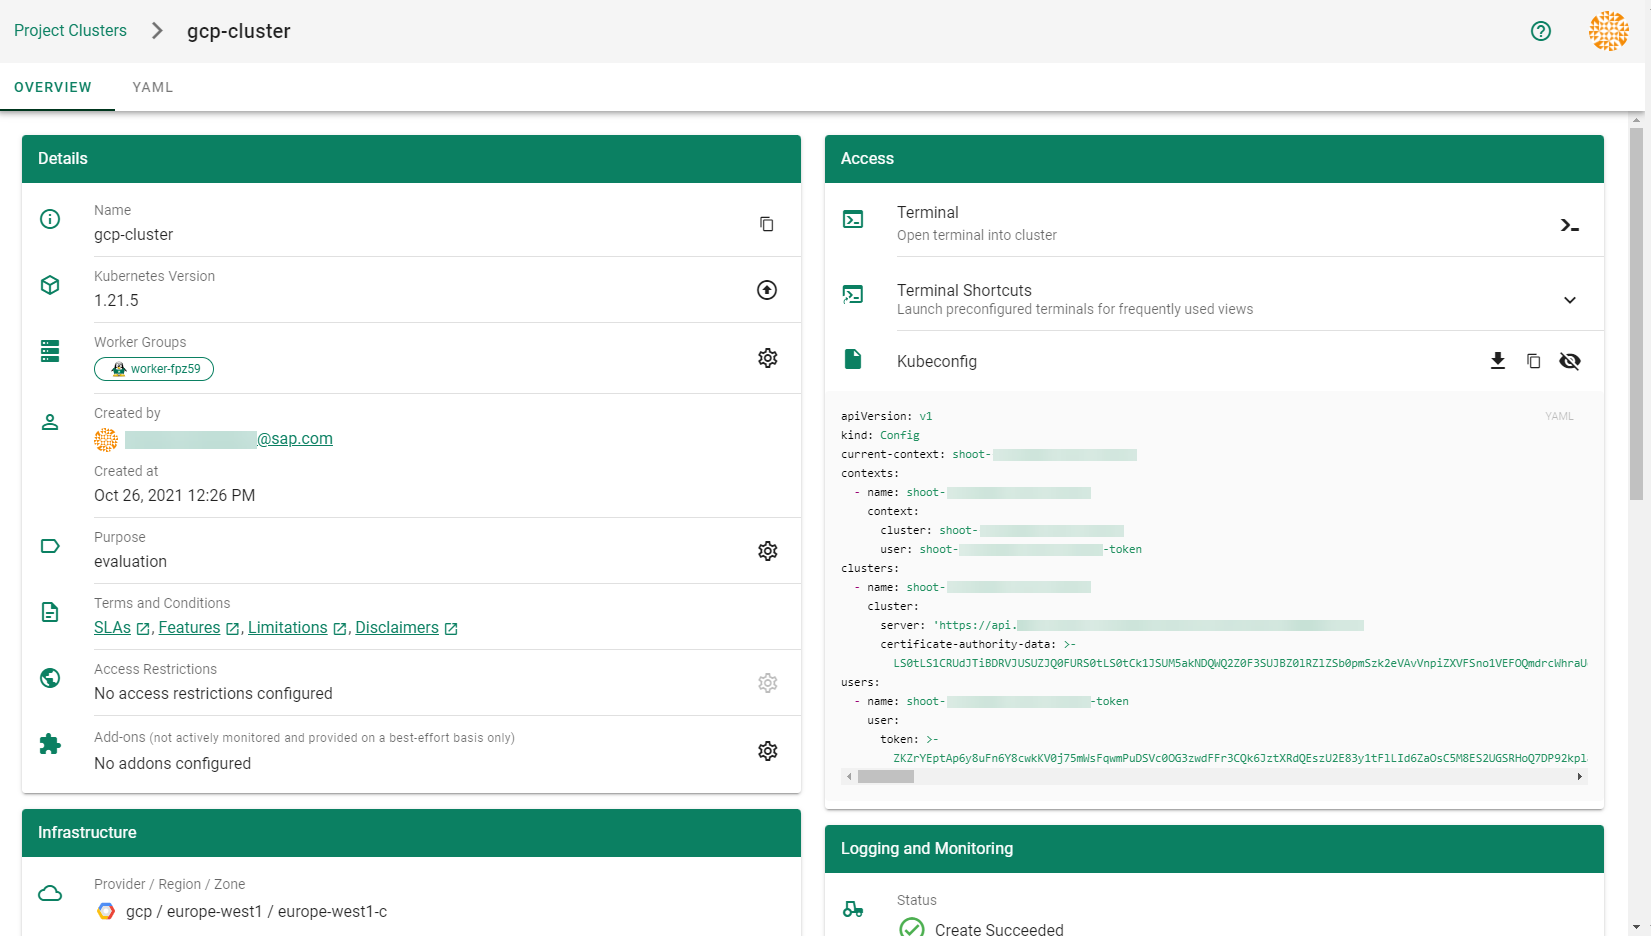
Result
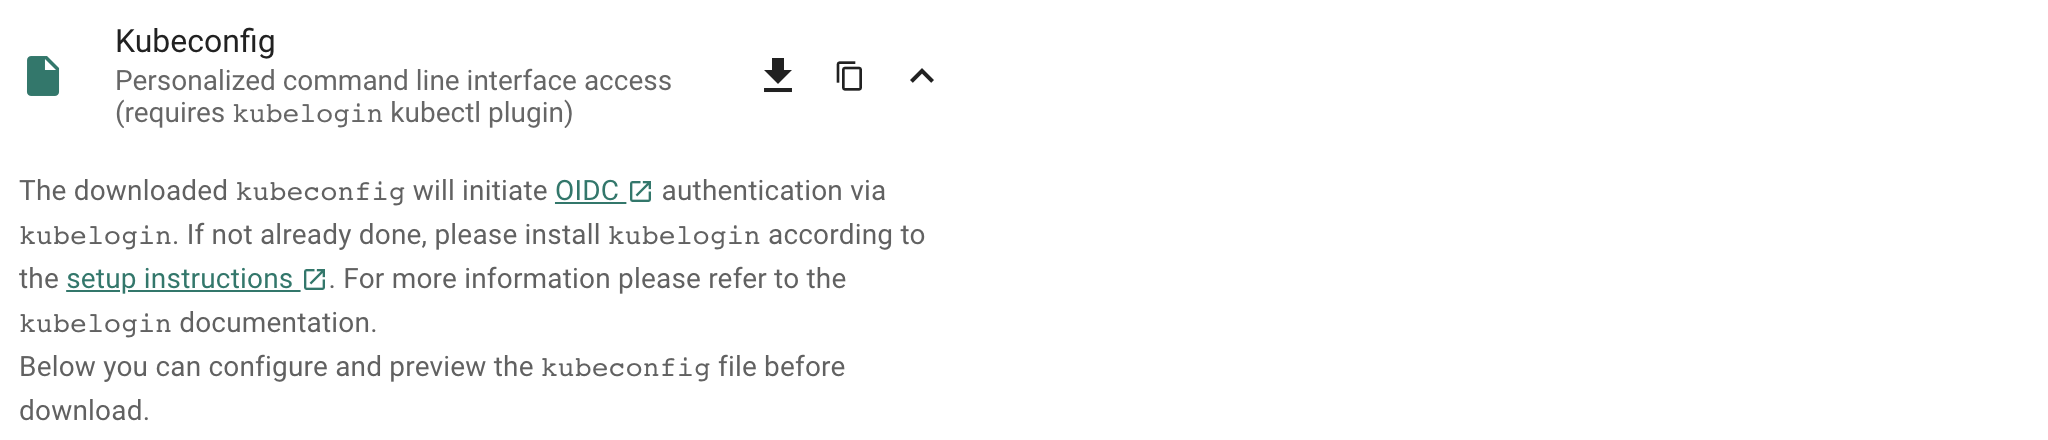
After completing the steps in this tutorial, you will be able to see and download the kubeconfig of your cluster. With it you can create shoot clusters on Alibaba Cloud.
The size of persistent volumes in your shoot cluster must at least be 20 GiB large. If you choose smaller sizes in your Kubernetes PV definition, the allocation of cloud disk space on Alibaba Cloud fails.
1.1.2 - Deployment
Deployment of the AliCloud provider extension
Disclaimer: This document is NOT a step by step installation guide for the AliCloud provider extension and only contains some configuration specifics regarding the installation of different components via the helm charts residing in the AliCloud provider extension repository.
Virtual Garden is not used, i.e., the runtime Garden cluster is also the target Garden cluster.
Automounted Service Account Token
The easiest way to deploy the gardener-extension-admission-alicloud component will be to not provide kubeconfig at all. This way in-cluster configuration and an automounted service account token will be used. The drawback of this approach is that the automounted token will not be automatically rotated.
This will allow for automatic rotation of the service account token by the kubelet. The configuration can be achieved by setting both .Values.global.serviceAccountTokenVolumeProjection.enabled: true and .Values.global.kubeconfig in the respective chart’s values.yaml file.
Virtual Garden is used, i.e., the runtime Garden cluster is different from the target Garden cluster.
Service Account
The easiest way to setup the authentication will be to create a service account and the respective roles will be bound to this service account in the target cluster. Then use the generated service account token and craft a kubeconfig which will be used by the workload in the runtime cluster. This approach does not provide a solution for the rotation of the service account token. However, this setup can be achieved by setting .Values.global.virtualGarden.enabled: true and following these steps:
Deploy the application part of the charts in the target cluster.
Get the service account token and craft the kubeconfig.
Set the crafted kubeconfig and deploy the runtime part of the charts in the runtime cluster.
Client Certificate
Another solution will be to bind the roles in the target cluster to a User subject instead of a service account and use a client certificate for authentication. This approach does not provide a solution for the client certificate rotation. However, this setup can be achieved by setting both .Values.global.virtualGarden.enabled: true and .Values.global.virtualGarden.user.name, then following these steps:
Generate a client certificate for the target cluster for the respective user.
Deploy the application part of the charts in the target cluster.
Craft a kubeconfig using the already generated client certificate.
Set the crafted kubeconfig and deploy the runtime part of the charts in the runtime cluster.
1.1.3 - Local Setup
admission-alicloud
admission-alicloud is an admission webhook server which is responsible for the validation of the cloud provider (Alicloud in this case) specific fields and resources. The Gardener API server is cloud provider agnostic and it wouldn’t be able to perform similar validation.
Follow the steps below to run the admission webhook server locally.
Make sure that the KUBECONFIG environment variable is pointing to the local garden cluster.
make start-admission
Setup the ValidatingWebhookConfiguration.
hack/dev-setup-admission-alicloud.sh will configure the webhook Service which will allow the kube-apiserver of your local cluster to reach the webhook server. It will also apply the ValidatingWebhookConfiguration manifest.
./hack/dev-setup-admission-alicloud.sh
You are now ready to experiment with the admission-alicloud webhook server locally.
1.1.4 - Operations
Using the Alicloud provider extension with Gardener as operator
The core.gardener.cloud/v1beta1.CloudProfile resource declares a providerConfig field that is meant to contain provider-specific configuration.
The core.gardener.cloud/v1beta1.Seed resource is structured similarly.
Additionally, it allows configuring settings for the backups of the main etcds’ data of shoot clusters control planes running in this seed cluster.
This document explains the necessary configuration for this provider extension. In addition, this document also describes how to enable the use of customized machine images for Alicloud.
CloudProfile resource
This section describes, how the configuration for CloudProfile looks like for Alicloud by providing an example CloudProfile manifest with minimal configuration that can be used to allow the creation of Alicloud shoot clusters.
CloudProfileConfig
The cloud profile configuration contains information about the real machine image IDs in the Alicloud environment (AMIs).
You have to map every version that you specify in .spec.machineImages[].versions here such that the Alicloud extension knows the AMI for every version you want to offer.
An example CloudProfileConfig for the Alicloud extension looks as follows:
Enable customized machine images for the Alicloud extension
Customized machine images can be created for an Alicloud account and shared with other Alicloud accounts.
The same customized machine image has different image ID in different regions on Alicloud.
If you need to enable encrypted system disk, you must provide customized machine images.
Administrators/Operators need to explicitly declare them per imageID per region as below:
End-users have to have the permission to use the customized image from its creator Alicloud account. To enable end-users to use customized images, the images are shared from Alicloud account of Seed operator with end-users’ Alicloud accounts. Administrators/Operators need to explicitly provide Seed operator’s Alicloud account access credentials (base64 encoded) as below:
This provider extension does not support any provider configuration for the Seed’s .spec.provider.providerConfig field.
However, it supports to managing of backup infrastructure, i.e., you can specify a configuration for the .spec.backup field.
Backup configuration
A Seed of type alicloud can be configured to perform backups for the main etcds’ of the shoot clusters control planes using Alicloud Object Storage Service.
The location/region where the backups will be stored defaults to the region of the Seed (spec.provider.region).
Please find below an example Seed manifest (partly) that configures backups using Alicloud Object Storage Service.
This document describes the configurable options for Alicloud and provides an example Shoot manifest with minimal configuration that can be used to create an Alicloud cluster (modulo the landscape-specific information like cloud profile names, secret binding names, etc.).
Alicloud Provider Credentials
In order for Gardener to create a Kubernetes cluster using Alicloud infrastructure components, a Shoot has to provide credentials with sufficient permissions to the desired Alicloud project.
Every shoot cluster references a SecretBinding or a CredentialsBinding which itself references a Secret, and this Secret contains the provider credentials of the Alicloud project.
The SecretBinding/CredentialsBinding is configurable in the Shoot cluster with the field secretBindingName/credentialsBindingName.
The required credentials for the Alicloud project are an AccessKey Pair associated with a Resource Access Management (RAM) User.
A RAM user is a special account that can be used by services and applications to interact with Alicloud Cloud Platform APIs.
Applications can use AccessKey pair to authorize themselves to a set of APIs and perform actions within the permissions granted to the RAM user.
Please make sure the provided credentials have the correct privileges. You can use the following Alicloud RAM policy document and attach it to the RAM user backed by the credentials you provided.
The infrastructure configuration mainly describes how the network layout looks like in order to create the shoot worker nodes in a later step, thus, prepares everything relevant to create VMs, load balancers, volumes, etc.
An example InfrastructureConfig for the Alicloud extension looks as follows:
The networks.vpc section describes whether you want to create the shoot cluster in an already existing VPC or whether to create a new one:
If networks.vpc.id is given then you have to specify the VPC ID of the existing VPC that was created by other means (manually, other tooling, …).
If networks.vpc.cidr is given then you have to specify the VPC CIDR of a new VPC that will be created during shoot creation.
You can freely choose a private CIDR range.
Either networks.vpc.id or networks.vpc.cidr must be present, but not both at the same time.
When networks.vpc.id is present, in addition, you can also choose to set networks.vpc.gardenerManagedNATGateway. It is by default false. When it is set to true,
Gardener will create an Enhanced NATGateway in the VPC and associate it with a VSwitch created in the first zone in the networks.zones.
Please note that when networks.vpc.id is present, and networks.vpc.gardenerManagedNATGateway is false or not set, you have to manually create an Enhance NATGateway
and associate it with a VSwitch that you manually created. In this case, make sure the worker CIDRs in networks.zones do not overlap with the one you created.
If a NATGateway is created manually and a shoot is created in the same VPC with networks.vpc.gardenerManagedNATGateway set true, you need to manually adjust the route rule accordingly.
You may refer to here.
The networks.zones section describes which subnets you want to create in availability zones.
For every zone, the Alicloud extension creates one subnet:
The workers subnet is used for all shoot worker nodes, i.e., VMs which later run your applications.
For every subnet, you have to specify a CIDR range contained in the VPC CIDR specified above, or the VPC CIDR of your already existing VPC.
You can freely choose these CIDR and it is your responsibility to properly design the network layout to suit your needs.
If you want to use multiple availability zones then add a second, third, … entry to the networks.zones[] list and properly specify the AZ name in networks.zones[].name.
Apart from the VPC and the subnets the Alicloud extension will also create a NAT gateway (only if a new VPC is created), a key pair, elastic IPs, VSwitches, a SNAT table entry, and security groups.
By default, the Alicloud extension will create a corresponding Elastic IP that it attaches to this NAT gateway and which is used for egress traffic.
The networks.zones[].natGateway.eipAllocationID field allows you to specify the Elastic IP Allocation ID of an existing Elastic IP allocation in case you want to bring your own.
If provided, no new Elastic IP will be created and, instead, the Elastic IP specified by you will be used.
⚠️ If you change this field for an already existing infrastructure then it will disrupt egress traffic while Alicloud applies this change, because the NAT gateway must be recreated with the new Elastic IP association.
Also, please note that the existing Elastic IP will be permanently deleted if it was earlier created by the Alicloud extension.
ControlPlaneConfig
The control plane configuration mainly contains values for the Alicloud-specific control plane components.
Today, the Alicloud extension deploys the cloud-controller-manager and the CSI controllers.
An example ControlPlaneConfig for the Alicloud extension looks as follows:
The csi.enableADController is used as the value of environment DISK_AD_CONTROLLER, which is used for AliCloud csi-disk-plugin. This field is optional. When a new shoot is creatd, this field is automatically set true. For an existing shoot created in previous versions, it remains unchanged. If there are persistent volumes created before year 2021, please be cautious to set this field true because they may fail to mount to nodes.
The cloudControllerManager.featureGates contains a map of explicitly enabled or disabled feature gates.
For production usage it’s not recommend to use this field at all as you can enable alpha features or disable beta/stable features, potentially impacting the cluster stability.
If you don’t want to configure anything for the cloudControllerManager simply omit the key in the YAML specification.
WorkerConfig
The Alicloud extension does not support a specific WorkerConfig. However, it supports additional data volumes (plus encryption) per machine.
By default (if not stated otherwise), all the disks are unencrypted.
For each data volume, you have to specify a name.
It also supports encrypted system disk.
However, only Customized image is currently supported to be used as a basic image for encrypted system disk.
Please be noted that the change of system disk encryption flag will cause reconciliation of a shoot, and it will result in nodes rolling update within the worker group.
The following YAML is a snippet of a Shoot resource:
Please find below an example Shoot manifest for two availability zones:
apiVersion: core.gardener.cloud/v1beta1
kind: Shoot
metadata:
name: johndoe-alicloud
namespace: garden-dev
spec:
cloudProfile:
name: alicloud
region: eu-central-1
secretBindingName: core-alicloud
provider:
type: alicloud
infrastructureConfig:
apiVersion: alicloud.provider.extensions.gardener.cloud/v1alpha1
kind: InfrastructureConfig
networks:
vpc:
cidr: 10.250.0.0/16
zones:
- name: eu-central-1a
workers: 10.250.0.0/26
- name: eu-central-1b
workers: 10.250.0.64/26
controlPlaneConfig:
apiVersion: alicloud.provider.extensions.gardener.cloud/v1alpha1
kind: ControlPlaneConfig
workers:
- name: worker-xoluy
machine:
type: ecs.sn2ne.large
minimum: 2
maximum: 4
volume:
size: 50Gi
type: cloud_efficiency
# NOTE: Below comment is for the case when encrypted field of an existing shoot is updated from false to true.# It will cause affected nodes to be rolling updated. Users must trigger a MAINTAIN operation of the shoot.# Otherwise, the shoot will fail to reconcile.# You could do it either via Dashboard or annotating the shoot with gardener.cloud/operation=maintain encrypted: true zones:
- eu-central-1a
- eu-central-1b
networking:
nodes: 10.250.0.0/16
type: calico
kubernetes:
version: 1.28.2
maintenance:
autoUpdate:
kubernetesVersion: true machineImageVersion: true addons:
kubernetesDashboard:
enabled: true nginxIngress:
enabled: true
Kubernetes Versions per Worker Pool
This extension supports gardener/gardener’s WorkerPoolKubernetesVersion feature gate, i.e., having worker pools with overridden Kubernetes versions since gardener-extension-provider-alicloud@v1.33.
Shoot CA Certificate and ServiceAccount Signing Key Rotation
This extension supports gardener/gardener’s ShootCARotation feature gate since gardener-extension-provider-alicloud@v1.36 and ShootSARotation feature gate since gardener-extension-provider-alicloud@v1.37.
1.2 - Provider AWS
Gardener extension controller for the AWS cloud provider
Project Gardener implements the automated management and operation of Kubernetes clusters as a service.
Its main principle is to leverage Kubernetes concepts for all of its tasks.
Recently, most of the vendor specific logic has been developed in-tree.
However, the project has grown to a size where it is very hard to extend, maintain, and test.
With GEP-1 we have proposed how the architecture can be changed in a way to support external controllers that contain their very own vendor specifics.
This way, we can keep Gardener core clean and independent.
This controller implements Gardener’s extension contract for the AWS provider.
An example for a ControllerRegistration resource that can be used to register this controller to Gardener can be found here.
Please find more information regarding the extensibility concepts and a detailed proposal here.
Supported Kubernetes versions
This extension controller supports the following Kubernetes versions:
Version
Support
Conformance test results
Kubernetes 1.33
1.33.0+
N/A
Kubernetes 1.32
1.32.0+
Kubernetes 1.31
1.31.0+
Kubernetes 1.30
1.30.0+
Kubernetes 1.29
1.29.0+
Kubernetes 1.28
1.28.0+
Kubernetes 1.27
1.27.0+
Please take a look here to see which versions are supported by Gardener in general.
Compatibility
The following lists known compatibility issues of this extension controller with other Gardener components.
AWS Extension
Gardener
Action
Notes
<= v1.15.0
>v1.10.0
Please update the provider version to > v1.15.0 or disable the feature gate MountHostCADirectories in the Gardenlet.
Applies if feature flag MountHostCADirectories in the Gardenlet is enabled. Shoots with CSI enabled (Kubernetes version >= 1.18) miss a mount to the directory /etc/ssl in the Shoot API Server. This can lead to not trusting external Root CAs when the API Server makes requests via webhooks or OIDC.
How to start using or developing this extension controller locally
You can run the controller locally on your machine by executing make start.
Static code checks and tests can be executed by running make verify. We are using Go modules for Golang package dependency management and Ginkgo/Gomega for testing.
Feedback and Support
Feedback and contributions are always welcome!
Please report bugs or suggestions as GitHub issues or reach out on Slack (join the workspace here).
Learn more!
Please find further resources about out project here:
Gardener allows you to create a Kubernetes cluster on different infrastructure providers. This tutorial will guide you through the process of creating a cluster on AWS.
Type in a username and select the access key credential type.
Choose Attach an existing policy.
Select GardenerAccess from the policy list.
Choose Next until you reach the Review section.
Note
After the user is created, Access key ID and Secret access key are generated and displayed. Remember to save them. The Access key ID is used later to create secrets for Gardener.
On the Gardener dashboard, choose Secrets and then the plus sign . Select AWS from the drop down menu to add a new AWS secret.
Create your secret.
Type the name of your secret.
Copy and paste the Access Key ID and Secret Access Key you saved when you created the technical user on AWS.
Choose Add secret.
After completing these steps, you should see your newly created secret in the Infrastructure Secrets section.
To create a new cluster, choose Clusters and then the plus sign in the upper right corner.
In the Create Cluster section:
Select AWS in the Infrastructure tab.
Type the name of your cluster in the Cluster Details tab.
Choose the secret you created before in the Infrastructure Details tab.
Choose Create.
Wait for your cluster to get created.
Result
After completing the steps in this tutorial, you will be able to see and download the kubeconfig of your cluster.
1.2.2 - Deployment
Deployment of the AWS provider extension
Disclaimer: This document is NOT a step by step installation guide for the AWS provider extension and only contains some configuration specifics regarding the installation of different components via the helm charts residing in the AWS provider extension repository.
Virtual Garden is not used, i.e., the runtime Garden cluster is also the target Garden cluster.
Automounted Service Account Token
The easiest way to deploy the gardener-extension-admission-aws component will be to not provide kubeconfig at all. This way in-cluster configuration and an automounted service account token will be used. The drawback of this approach is that the automounted token will not be automatically rotated.
Service Account Token Volume Projection
Another solution will be to use Service Account Token Volume Projection combined with a kubeconfig referencing a token file (see example below).
This will allow for automatic rotation of the service account token by the kubelet. The configuration can be achieved by setting both .Values.global.serviceAccountTokenVolumeProjection.enabled: true and .Values.global.kubeconfig in the respective chart’s values.yaml file.
Virtual Garden is used, i.e., the runtime Garden cluster is different from the target Garden cluster.
Service Account
The easiest way to setup the authentication will be to create a service account and the respective roles will be bound to this service account in the target cluster. Then use the generated service account token and craft a kubeconfig which will be used by the workload in the runtime cluster. This approach does not provide a solution for the rotation of the service account token. However, this setup can be achieved by setting .Values.global.virtualGarden.enabled: true and following these steps:
Deploy the application part of the charts in the target cluster.
Get the service account token and craft the kubeconfig.
Set the crafted kubeconfig and deploy the runtime part of the charts in the runtime cluster.
Client Certificate
Another solution will be to bind the roles in the target cluster to a User subject instead of a service account and use a client certificate for authentication. This approach does not provide a solution for the client certificate rotation. However, this setup can be achieved by setting both .Values.global.virtualGarden.enabled: true and .Values.global.virtualGarden.user.name, then following these steps:
Generate a client certificate for the target cluster for the respective user.
Deploy the application part of the charts in the target cluster.
Craft a kubeconfig using the already generated client certificate.
Set the crafted kubeconfig and deploy the runtime part of the charts in the runtime cluster.
Projected Service Account Token
This approach requires an already deployed and configured oidc-webhook-authenticator for the target cluster. Also the runtime cluster should be registered as a trusted identity provider in the target cluster. Then projected service accounts tokens from the runtime cluster can be used to authenticate against the target cluster. The needed steps are as follows:
Set .Values.global.virtualGarden.enabled: true and .Values.global.virtualGarden.user.name. Note: username value will depend on the trust configuration, e.g., <prefix>:system:serviceaccount:<namespace>:<serviceaccount>
Set .Values.global.serviceAccountTokenVolumeProjection.enabled: true and .Values.global.serviceAccountTokenVolumeProjection.audience. Note: audience value will depend on the trust configuration, e.g., <cliend-id-from-trust-config>.
Craft a kubeconfig (see example below).
Deploy the application part of the charts in the target cluster.
Deploy the runtime part of the charts in the runtime cluster.
Using IPv4/IPv6 (dual-stack) Ingress in an IPv4 single-stack cluster
Motivation
IPv6 adoption is continuously growing, already overtaking IPv4 in certain regions, e.g. India, or scenarios, e.g. mobile.
Even though most IPv6 installations deploy means to reach IPv4, it might still be beneficial to expose services
natively via IPv4 and IPv6 instead of just relying on IPv4.
Disadvantages of full IPv4/IPv6 (dual-stack) Deployments
Enabling full IPv4/IPv6 (dual-stack) support in a kubernetes cluster is a major endeavor. It requires a lot of changes
and restarts of all pods so that all pods get addresses for both IP families. A side-effect of dual-stack networking
is that failures may be hidden as network traffic may take the other protocol to reach the target. For this reason and
also due to reduced operational complexity, service teams might lean towards staying in a single-stack environment as
much as possible. Luckily, this is possible with Gardener and IPv4/IPv6 (dual-stack) ingress on AWS.
Simplifying IPv4/IPv6 (dual-stack) Ingress with Protocol Translation on AWS
Fortunately, the network load balancer on AWS supports automatic protocol translation, i.e. it can expose both IPv4 and
IPv6 endpoints while communicating with just one protocol to the backends. Under the hood, automatic protocol translation
takes place. Client IP address preservation can be achieved by using proxy protocol.
This approach enables users to expose IPv4 workload to IPv6-only clients without having to change the workload/service.
Without requiring invasive changes, it allows a fairly simple first step into the IPv6 world for services just requiring
ingress (incoming) communication.
Necessary Shoot Cluster Configuration Changes for IPv4/IPv6 (dual-stack) Ingress
To be able to utilize IPv4/IPv6 (dual-stack) Ingress in an IPv4 shoot cluster, the cluster needs to meet two preconditions:
dualStack.enabled needs to be set to true to configure VPC/subnet for IPv6 and add a routing rule for IPv6.
(This does not add IPv6 addresses to kubernetes nodes.)
loadBalancerController.enabled needs to be set to true as well to use the load balancer controller, which supports
dual-stack ingress.
When infrastructureConfig.networks.vpc.id is set to the ID of an existing VPC, please make sure that your VPC has an Amazon-provided IPv6 CIDR block added.
After adapting the shoot specification and reconciling the cluster, dual-stack load balancers can be created using
kubernetes services objects.
Creating an IPv4/IPv6 (dual-stack) Ingress
With the preconditions set, creating an IPv4/IPv6 load balancer is as easy as annotating a service with the correct
annotations:
In case the client IP address should be preserved, the following annotation can be used to enable proxy protocol.
(The pod receiving the traffic needs to be configured for proxy protocol as well.)
Please note that changing an existing Service to dual-stack may cause the creation of a new load balancer without
deletion of the old AWS load balancer resource. While this helps in a seamless migration by not cutting existing
connections it may lead to wasted/forgotten resources. Therefore, the (manual) cleanup needs to be taken into account
when migrating an existing Service instance.
DNS Considerations to Prevent Downtime During a Dual-Stack Migration
In case the migration of an existing service is desired, please check if there are DNS entries directly linked to the
corresponding load balancer. The migrated load balancer will have a new domain name immediately, which will not be ready
in the beginning. Therefore, a direct migration of the domain name entries is not desired as it may cause a short
downtime, i.e. domain name entries without backing IP addresses.
If there are DNS entries directly linked to the corresponding load balancer and they are managed by the
shoot-dns-service, you can identify this via
annotations with the prefix dns.gardener.cloud/. Those annotations can be linked to a Service, Ingress or
Gateway resources. Alternatively, they may also use DNSEntry or DNSAnnotation resources.
For a seamless migration without downtime use the following three step approach:
Temporarily prevent direct DNS updates
Migrate the load balancer and wait until it is operational
Allow DNS updates again
To prevent direct updates of the DNS entries when the load balancer is migrated add the annotation
dns.gardener.cloud/ignore: 'true' to all affected resources next to the other dns.gardener.cloud/... annotations
before starting the migration. For example, in case of a Service ensure that the service looks like the following:
Next, migrate the load balancer to be dual-stack enabled by adding/changing the corresponding annotations.
You have multiple options how to check that the load balancer has been provisioned successfully. It might be useful
to peek into status.loadBalancer.ingress of the corresponding Service to identify the load balancer:
Check in the AWS console for the corresponding load balancer provisioning state
Perform domain name lookups with nslookup/dig to check whether the name resolves to an IP address.
Call your workload via the new load balancer, e.g. using
curl --resolve <my-domain-name>:<port>:<IP-address> https://<my-domain-name>:<port>, which allows you to call your
service with the “correct” domain name without using actual name resolution.
Wait a fixed period of time as load balancer creation is usually finished within 15 minutes
Once the load balancer has been provisioned, you can remove the annotation dns.gardener.cloud/ignore: 'true' again
from the affected resources. It may take some additional time until the domain name change finally propagates
(up to one hour).
1.2.4 - Ipv6
Support for IPv6
Overview
Gardener supports different levels of IPv6 support in shoot clusters.
This document describes the differences between them and what to consider when using them.
In IPv6 Ingress for IPv4 Shoot Clusters, the focus is on how an existing IPv4-only shoot cluster can provide dual-stack services to clients.
Section IPv6-only Shoot Clusters describes how to create a shoot cluster that only supports IPv6.
Finally, Dual-Stack Shoot Clusters explains how to create a shoot cluster that supports both IPv4 and IPv6.
IPv6 Ingress for IPv4 Shoot Clusters
Per default, Gardener shoot clusters use only IPv4.
Therefore, they also expose their services only via load balancers with IPv4 addresses.
To allow external clients to also use IPv6 to access services in an IPv4 shoot cluster, the cluster needs to be configured to support dual-stack ingress.
The main benefit of this approach is that the existing cluster stays almost as is without major changes, keeping the operational simplicity.
It works very well for services that only require incoming communication, e.g. pure web services.
The main drawback is that certain scenarios, especially related to IPv6 callbacks, are not possible.
This means that services, which actively call to their clients via web hooks, will not be able to do so over IPv6.
Hence, those services will not be able to allow full-usage via IPv6.
IPv6-only Shoot Clusters
Motivation
IPv6-only shoot clusters are the best option to verify that services are fully IPv6-compatible.
While Dual-Stack Shoot Clusters may fall back on using IPv4 transparently, IPv6-only shoot clusters enforce the usage of IPv6 inside the cluster.
Therefore, it is recommended to check with IPv6-only shoot clusters if a workload is fully IPv6-compatible.
In addition to being a good testbed for IPv6 compatibility, IPv6-only shoot clusters may also be a desirable eventual target in the IPv6 migration as they allow to support both IPv4 and IPv6 clients while having a single-stack with the cluster.
Creating an IPv6-only Shoot Cluster
To create an IPv6-only shoot cluster, the following needs to be specified in the Shoot resource (see also here):
Please note that nodes, pods and services should not be specified in .spec.networking resource.
In contrast to that, it is still required to specify IPv4 ranges for the VPC and the public/internal subnets.
This is mainly due to the fact that public/internal load balancers still require IPv4 addresses as there are no pure IPv6-only load balancers as of now.
The ranges can be sized according to the expected amount of load balancers per zone/type.
The IPv6 address ranges are provided by AWS. It is ensured that the IPv6 ranges are globally unique und internet routable.
Load Balancer Configuration
The AWS Load Balancer Controller is automatically deployed when using an IPv6-only shoot cluster.
When creating a load balancer, the corresponding annotations need to be configured, see AWS Load Balancer Documentation - Network Load Balancer for details.
The AWS Load Balancer Controller allows dual-stack ingress so that an IPv6-only shoot cluster can serve IPv4 and IPv6 clients.
You can find an example here.
Warning
When accessing Network Load Balancers (NLB) from within the same IPv6-only cluster, it is crucial to add the annotation service.beta.kubernetes.io/aws-load-balancer-target-group-attributes: preserve_client_ip.enabled=false.
Without this annotation, if a request is routed by the NLB to the same target instance from which it originated, the client IP and destination IP will be identical.
This situation, known as the hair-pinning effect, will prevent the request from being processed.
(This also happens for internal load balancers in IPv4 clusters, but is mitigated by the NAT gateway for external IPv4 load balancers.)
Connectivity to IPv4-only Services
The IPv6-only shoot cluster can connect to IPv4-only services via DNS64/NAT64.
The cluster is configured to use the DNS64/NAT64 service of the underlying cloud provider.
This allows the cluster to resolve IPv4-only DNS names and to connect to IPv4-only services.
Please note that traffic going through NAT64 incurs the same cost as ordinary NAT traffic in an IPv4-only cluster.
Therefore, it might be beneficial to prefer IPv6 for services, which provide IPv4 and IPv6.
Dual-Stack Shoot Clusters
Motivation
Dual-stack shoot clusters support IPv4 and IPv6 out-of-the-box.
They can be the intermediate step on the way towards IPv6 for any existing (IPv4-only) clusters.
Creating a Dual-Stack Shoot Cluster
To create a dual-stack shoot cluster, the following needs to be specified in the Shoot resource:
Please note that the only change compared to an IPv4-only shoot cluster is the addition of IPv6 to the .spec.networking.ipFamilies field.
The order of the IP families defines the preference of the IP family.
In this case, IPv4 is preferred over IPv6, e.g. services specifying no IP family will get only an IPv4 address.
Bring your own VPC
To create an IPv6 shoot cluster or a dual-stack shoot within your own Virtual Private Cloud (VPC), it is necessary to have an Amazon-provided IPv6 CIDR block added to the VPC. This block can be assigned during the initial setup of the VPC, as illustrated in the accompanying screenshot.
An egress-only internet gateway is required for outbound internet traffic (IPv6) from the instances within your VPC. Please create one egress-only internet gateway and attach it to the VPC. Please also make sure that the VPC has an attached internet gateway and the following attributes set: enableDnsHostnames and enableDnsSupport as described under usage.
Migration of IPv4-only Shoot Clusters to Dual-Stack
To migrate an IPv4-only shoot cluster to Dual-Stack simply change the .spec.networking.ipFamilies field in the Shoot resource from IPv4 to IPv4, IPv6 as shown below.
You can find more information about the process and the steps required here.
Warning
Please note that the dual-stack migration requires the IPv4-only cluster to run in native routing mode, i.e. pod overlay network needs to be disabled.
The default quota of routes per route table in AWS is 50. This restricts the cluster size to about 50 nodes. Therefore, please adapt (if necessary) the routes per route table limit in the Amazon Virtual Private Cloud quotas accordingly before switching to native routing. The maximum setting is currently 1000.
Load Balancer Configuration
The AWS Load Balancer Controller is automatically deployed when using a dual-stack shoot cluster.
When creating a load balancer, the corresponding annotations need to be configured, see AWS Load Balancer Documentation - Network Load Balancer for details.
Warning
Please note that load balancer services without any special annotations will default to IPv4-only regardless how .spec.ipFamilies is set.
The AWS Load Balancer Controller allows dual-stack ingress so that a dual-stack shoot cluster can serve IPv4 and IPv6 clients.
You can find an example here.
Warning
When accessing external Network Load Balancers (NLB) from within the same cluster via IPv6 or internal NLBs via IPv4, it is crucial to add the annotation service.beta.kubernetes.io/aws-load-balancer-target-group-attributes: preserve_client_ip.enabled=false.
Without this annotation, if a request is routed by the NLB to the same target instance from which it originated, the client IP and destination IP will be identical.
This situation, known as the hair-pinning effect, will prevent the request from being processed.
1.2.5 - Local Setup
admission-aws
admission-aws is an admission webhook server which is responsible for the validation of the cloud provider (AWS in this case) specific fields and resources. The Gardener API server is cloud provider agnostic and it wouldn’t be able to perform similar validation.
Follow the steps below to run the admission webhook server locally.
Make sure that the KUBECONFIG environment variable is pointing to the local garden cluster.
make start-admission
Setup the ValidatingWebhookConfiguration.
hack/dev-setup-admission-aws.sh will configure the webhook Service which will allow the kube-apiserver of your local cluster to reach the webhook server. It will also apply the ValidatingWebhookConfiguration manifest.
./hack/dev-setup-admission-aws.sh
You are now ready to experiment with the admission-aws webhook server locally.
1.2.6 - Operations
Using the AWS provider extension with Gardener as operator
The core.gardener.cloud/v1beta1.CloudProfile resource declares a providerConfig field that is meant to contain provider-specific configuration.
Similarly, the core.gardener.cloud/v1beta1.Seed resource is structured.
Additionally, it allows to configure settings for the backups of the main etcds’ data of shoot clusters control planes running in this seed cluster.
This document explains what is necessary to configure for this provider extension.
CloudProfile resource
In this section we are describing how the configuration for CloudProfiles looks like for AWS and provide an example CloudProfile manifest with minimal configuration that you can use to allow creating AWS shoot clusters.
CloudProfileConfig
The cloud profile configuration contains information about the real machine image IDs in the AWS environment (AMIs).
You have to map every version that you specify in .spec.machineImages[].versions here such that the AWS extension knows the AMI for every version you want to offer.
For each AMI an architecture field can be specified which specifies the CPU architecture of the machine on which given machine image can be used.
An example CloudProfileConfig for the AWS extension looks as follows:
This provider extension does not support any provider configuration for the Seed’s .spec.provider.providerConfig field.
However, it supports to manage backup infrastructure, i.e., you can specify configuration for the .spec.backup field.
Backup configuration
Please find below an example Seed manifest (partly) that configures backups.
As you can see, the location/region where the backups will be stored can be different to the region where the seed cluster is running.
Please make sure that the provided credentials have the correct privileges. You can use the following AWS IAM policy document and attach it to the IAM user backed by the credentials you provided (please check the official AWS documentation as well):
Changes to the Shoot worker-pools are applied in-place where possible.
In case this is not possible a rolling update of the workers will be performed to apply the new configuration, as outlined in the Gardener documentation.
The exact fields that trigger this behavior are defined in the Gardener doc, with a few additions:
.spec.provider.workers[].providerConfig
.spec.provider.workers[].volume.encrypted
.spec.provider.workers[].dataVolumes[].size (only the affected worker pool)
.spec.provider.workers[].dataVolumes[].type (only the affected worker pool)
.spec.provider.workers[].dataVolumes[].encrypted (only the affected worker pool)
For now, if the feature gate NewWorkerPoolHashis enabled, the same fields are used.
This behavior might change once MCM supports in-place volume updates.
If updateStrategy is set to inPlace and NewWorkerPoolHashis enabled,
all the fields mentioned above except of the providerConifg are used.
If in-place-updates are enabled for a worker-pool, then updates to the fields that trigger rolling updates will be disallowed.
1.2.7 - Usage
Using the AWS provider extension with Gardener as an end-user
In this document we are describing how this configuration looks like for AWS and provide an example Shoot manifest with minimal configuration that you can use to create an AWS cluster (modulo the landscape-specific information like cloud profile names, secret binding names, etc.).
Accessing AWS APIs
In order for Gardener to create a Kubernetes cluster using AWS infrastructure components, a Shoot has to provide an authentication mechanism giving sufficient permissions to the desired AWS account.
Every shoot cluster references a SecretBinding or a CredentialsBinding.
Important
While SecretBindings can only reference Secrets, CredentialsBindings can also reference WorkloadIdentitys which provide an alternative authentication method.
WorkloadIdentitys do not directly contain credentials but are rather a representation of the workload that is going to access the user’s account.
If the user has configured OIDC Federation with Gardener’s Workload Identity Issuer then the AWS infrastructure components can access the user’s account without the need of preliminary exchange of credentials.
Important
The SecretBinding/CredentialsBinding is configurable in the Shoot cluster with the field secretBindingName/credentialsBindingName.
SecretBindings are considered legacy and will be deprecated in the future.
It is advised to use CredentialsBindings instead.
Provider Secret Data
Every shoot cluster references a SecretBinding or a CredentialsBinding which itself references a Secret, and this Secret contains the provider credentials of your AWS account.
This Secret must look as follows:
The AWS documentation explains the necessary steps to enable programmatic access, i.e. create access key ID and access key, for the user of your choice.
Warning
For security reasons, we recommend creating a dedicated user with programmatic access only.
Please avoid re-using a IAM user which has access to the AWS console (human user).
Depending on your AWS API usage it can be problematic to reuse the same AWS Account for different Shoot clusters in the same region due to rate limits.
Please consider spreading your Shoots over multiple AWS Accounts if you are hitting those limits.
AWS Workload Identity Federation
Users can choose to trust Gardener’s Workload Identity Issuer and eliminate the need for providing AWS Access Key credentials.
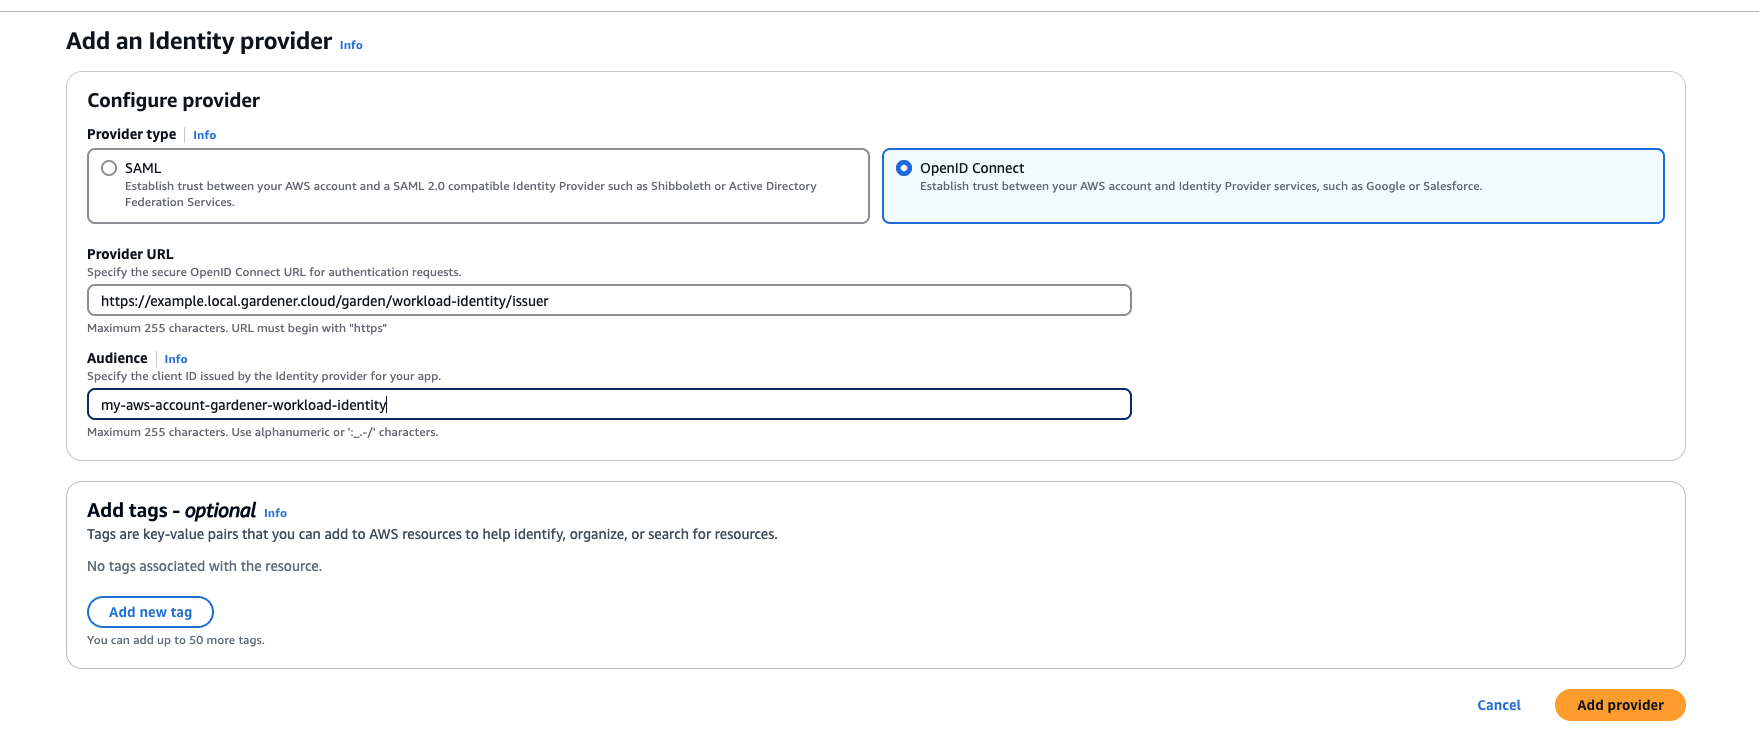
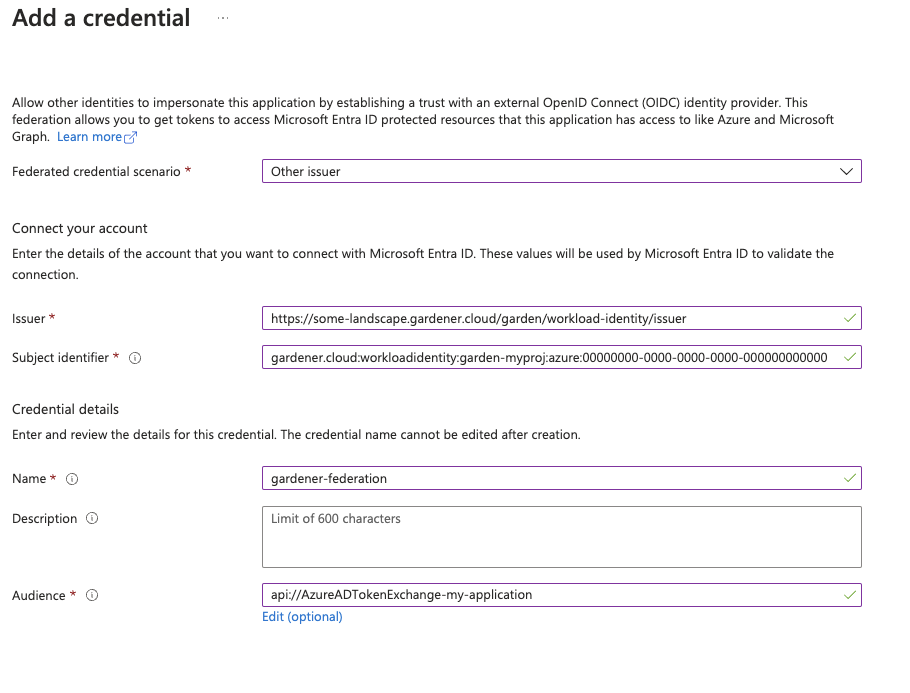
1. Configure OIDC Federation with Gardener’s Workload Identity Issuer.
Tip
You can retrieve Gardener’s Workload Identity Issuer URL directly from the Garden cluster by reading the contents of the Gardener Info ConfigMap.
kubectl -n gardener-system-public get configmap gardener-info -o yaml
Important
Use an audience that will uniquely identify the trust relationship between your AWS account and Gardener.
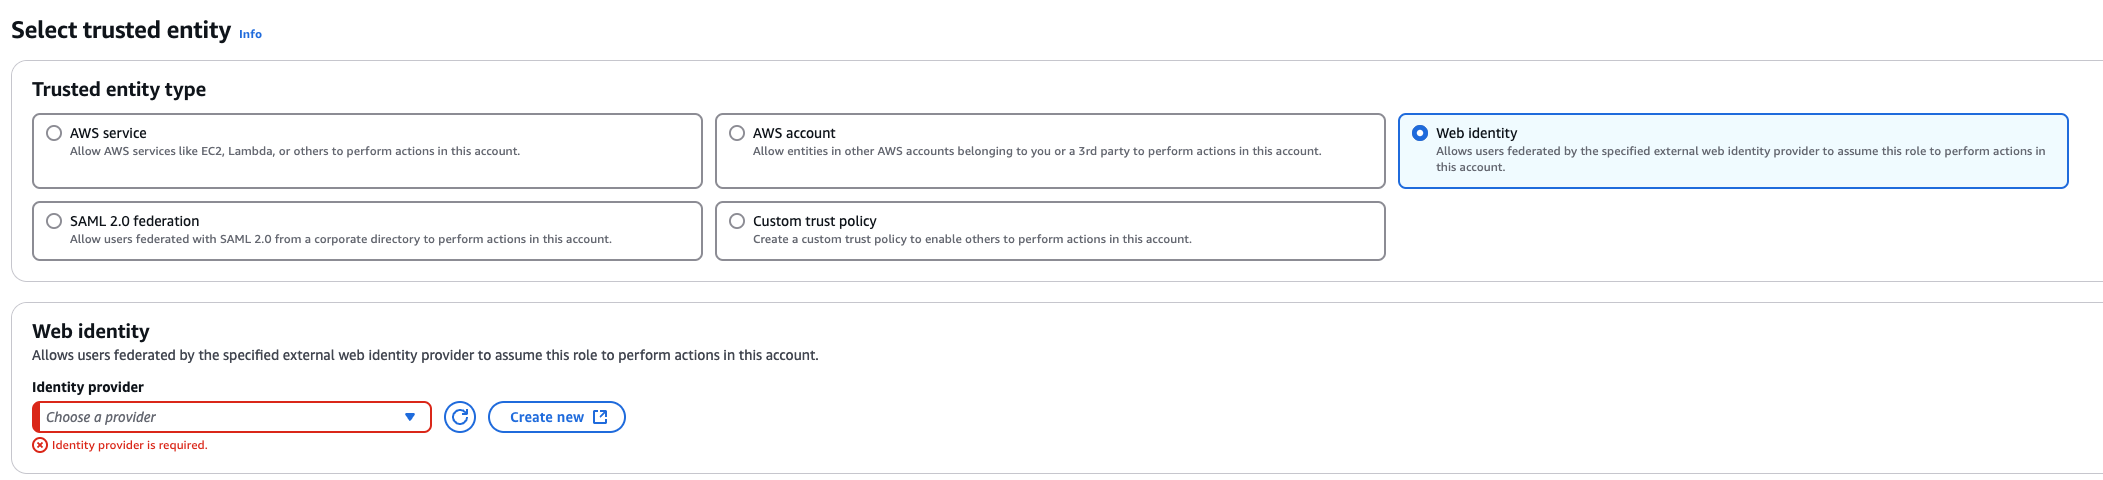
3. Create a role that trusts the external web identity.
In the Identity Provider dropdown menu choose the Gardener’s Workload Identity Provider.
Add the newly created policy that will grant the required permissions.
4. Configure the trust relationship.
Caution
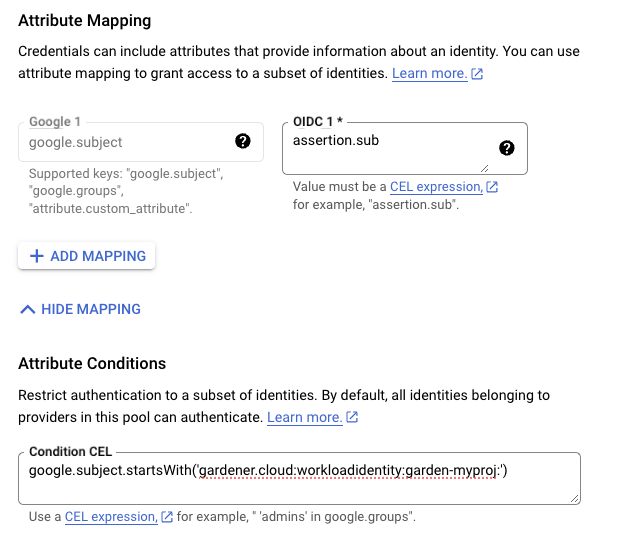
Remember to reduce the scope of the identities that can assume this role only to your own controlled identities!
In the example shown below WorkloadIdentitys that are created in the garden-myproj namespace and have the name aws will be authenticated and granted permissions.
Later on, the scope of the trust configuration can be reduced further by replacing the wildcard “*” with the actual id of the WorkloadIdentity and converting the “StringLike” condition to “StringEquals”.
This is currently not possible since we do not have the id of the WorkloadIdentity yet.
5. Create the WorkloadIdentity in the Garden cluster.
This step will require the ARN of the role that was created in the previous step.
The identity will be used by infrastructure components to authenticate against AWS APIs.
A sample of such resource is shown below:
Once created you can extract the whole subject of the workload identity and edit the created Role’s trust relationship configuration to also include the workload identity’s id.
Obtain the complete sub by running the following:
SUBJECT=$(kubectl -n garden-myproj get workloadidentity aws -o=jsonpath='{.status.sub}')echo "$SUBJECT"
6. Create a CredentialsBinding referencing the AWS WorkloadIdentity and use it in your Shoot definitions.
Please make sure that the provided credentials have the correct privileges. You can use the following AWS IAM policy document and attach it to the IAM user backed by the credentials you provided (please check the official AWS documentation as well):
The infrastructure configuration mainly describes how the network layout looks like in order to create the shoot worker nodes in a later step, thus, prepares everything relevant to create VMs, load balancers, volumes, etc.
An example InfrastructureConfig for the AWS extension looks as follows:
The enableECRAccess flag specifies whether the AWS IAM role policy attached to all worker nodes of the cluster shall contain permissions to access the Elastic Container Registry of the respective AWS account.
If the flag is not provided it is defaulted to true.
Please note that if the iamInstanceProfile is set for a worker pool in the WorkerConfig (see below) then enableECRAccess does not have any effect.
It only applies for those worker pools whose iamInstanceProfile is not set.
Click to expand the default AWS IAM policy document used for the instance profiles!
The dualStack.enabled flag specifies whether dual-stack or IPv4-only should be supported by the infrastructure.
When the flag is set to true an Amazon provided IPv6 CIDR block will be attached to the VPC.
All subnets will receive a /64 block from it and a route entry is added to the main route table to route all IPv6 traffic over the IGW.
The networks.vpc section describes whether you want to create the shoot cluster in an already existing VPC or whether to create a new one:
If networks.vpc.id is given then you have to specify the VPC ID of the existing VPC that was created by other means (manually, other tooling, …).
Please make sure that the VPC has attached an internet gateway - the AWS controller won’t create one automatically for existing VPCs. To make sure the nodes are able to join and operate in your cluster properly, please make sure that your VPC has enabled DNS Support, explicitly the attributes enableDnsHostnames and enableDnsSupport must be set to true.
If networks.vpc.cidr is given then you have to specify the VPC CIDR of a new VPC that will be created during shoot creation.
You can freely choose a private CIDR range.
Either networks.vpc.id or networks.vpc.cidr must be present, but not both at the same time.
networks.vpc.gatewayEndpoints is optional. If specified then each item is used as service name in a corresponding Gateway VPC Endpoint.
The networks.zones section contains configuration for resources you want to create or use in availability zones.
For every zone, the AWS extension creates three subnets:
The workers subnet is used for all shoot worker nodes, i.e., VMs which later run your applications.
For every subnet, you have to specify a CIDR range contained in the VPC CIDR specified above, or the VPC CIDR of your already existing VPC.
You can freely choose these CIDRs and it is your responsibility to properly design the network layout to suit your needs.
Also, the AWS extension creates a dedicated NAT gateway for each zone.
By default, it also creates a corresponding Elastic IP that it attaches to this NAT gateway and which is used for egress traffic.
The elasticIPAllocationID field allows you to specify the ID of an existing Elastic IP allocation in case you want to bring your own.
If provided, no new Elastic IP will be created and, instead, the Elastic IP specified by you will be used.
Warning
If you change this field for an already existing infrastructure then it will disrupt egress traffic while AWS applies this change.
The reason is that the NAT gateway must be recreated with the new Elastic IP association.
Also, please note that the existing Elastic IP will be permanently deleted if it was earlier created by the AWS extension.
You can configure Gateway VPC Endpoints by adding items in the optional list networks.vpc.gatewayEndpoints. Each item in the list is used as a service name and a corresponding endpoint is created for it. All created endpoints point to the service within the cluster’s region. For example, consider this (partial) shoot config:
The service name of the S3 Gateway VPC Endpoint in this example is com.amazonaws.eu-central-1.s3.
If you want to use multiple availability zones then add a second, third, … entry to the networks.zones[] list and properly specify the AZ name in networks.zones[].name.
Apart from the VPC and the subnets the AWS extension will also create DHCP options and an internet gateway (only if a new VPC is created), routing tables, security groups, elastic IPs, NAT gateways, EC2 key pairs, IAM roles, and IAM instance profiles.
The ignoreTags section allows to configure which resource tags on AWS resources managed by Gardener should be ignored during
infrastructure reconciliation. By default, all tags that are added outside of Gardener’s
reconciliation will be removed during the next reconciliation. This field allows users and automation to add
custom tags on AWS resources created and managed by Gardener without loosing them on the next reconciliation.
Tags can be ignored either by specifying exact key values (ignoreTags.keys) or key prefixes (ignoreTags.keyPrefixes).
In both cases it is forbidden to ignore the Name tag or any tag starting with kubernetes.io or gardener.cloud.
Please note though, that the tags are only ignored on resources created on behalf of the Infrastructure CR (i.e. VPC,
subnets, security groups, keypair, etc.), while tags on machines, volumes, etc. are not in the scope of this controller.
ControlPlaneConfig
The control plane configuration mainly contains values for the AWS-specific control plane components.
Today, the only component deployed by the AWS extension is the cloud-controller-manager.
An example ControlPlaneConfig for the AWS extension looks as follows:
The cloudControllerManager.featureGates contains a map of explicitly enabled or disabled feature gates.
For production usage it’s not recommend to use this field at all as you can enable alpha features or disable beta/stable features, potentially impacting the cluster stability.
If you don’t want to configure anything for the cloudControllerManager simply omit the key in the YAML specification.
The cloudControllerManager.useCustomRouteController controls if the custom routes controller should be enabled.
If enabled, it will add routes to the pod CIDRs for all nodes in the route tables for all zones.
The storage.managedDefaultClass controls if the default storage / volume snapshot classes are marked as default by Gardener. Set it to false to mark another storage / volume snapshot class as default without Gardener overwriting this change. If unset, this field defaults to true.
If the AWS Load Balancer Controller should be deployed, set loadBalancerController.enabled to true.
In this case, it is assumed that an IngressClass named alb is created by the user.
You can overwrite the name by setting loadBalancerController.ingressClassName.
Please note, that currently only the “instance” mode is supported.
Examples for Ingress and Service managed by the AWS Load Balancer Controller:
apiVersion: networking.k8s.io/v1
kind: IngressClass
metadata:
name: alb # default name if not specified by `loadBalancerController.ingressClassName`spec:
controller: ingress.k8s.aws/alb
This can be used to create a Network Load Balancer (NLB).
apiVersion: v1
kind: Service
metadata:
  annotations:
    # complete set of annotations: https://kubernetes-sigs.github.io/aws-load-balancer-controller/latest/guide/service/annotations/
    service.beta.kubernetes.io/aws-load-balancer-nlb-target-type: instance # target-type "ip" NOT supported in Gardener
    service.beta.kubernetes.io/aws-load-balancer-scheme: internet-facing
  name: ingress-nginx-controller
  namespace: ingress-nginx
  ...
spec:
  ...
  type: LoadBalancer
  loadBalancerClass: service.k8s.aws/nlb # mandatory to be managed by AWS Load Balancer Controller (otherwise the Cloud Controller Manager will act on it)
When using Network Load Balancers (NLB) as internal load balancers, it is crucial to add the annotation service.beta.kubernetes.io/aws-load-balancer-target-group-attributes: preserve_client_ip.enabled=false.
Without this annotation, if a request is routed by the NLB to the same target instance from which it originated, the client IP and destination IP will be identical.
This situation, known as the hairpinning effect, will prevent the request from being processed.
WorkerConfig
The AWS extension supports encryption for volumes plus support for additional data volumes per machine.
For each data volume, you have to specify a name.
By default, (if not stated otherwise), all the disks (root & data volumes) are encrypted.
Please make sure that your instance-type supports encryption.
If your instance-type doesn’t support encryption, you will have to disable encryption (which is enabled by default) by setting volume.encrpyted to false (refer below shown YAML snippet).
The following YAML is a snippet of a Shoot resource:
Additionally, it is possible to provide further AWS-specific values for configuring the worker pools. The additional configuration must be specified in the providerConfig field of the respective worker.
The configuration will be evaluated when the provider-aws will reconcile the worker pools for the respective shoot.
An example WorkerConfig for the AWS extension looks as follows:
spec:
  provider:
    workers:
      - name: cpu-worker
        ...
        providerConfig:
            apiVersion: aws.provider.extensions.gardener.cloud/v1alpha1
            kind: WorkerConfig
            volume:
              iops: 10000
              throughput: 200
            dataVolumes:
            - name: kubelet-dir
              iops: 12345
              throughput: 150
              snapshotID: snap-1234
            iamInstanceProfile: # (specify either ARN or name)
              name: my-profile
            instanceMetadataOptions:
              httpTokens: required
              httpPutResponseHopLimit: 2
            # arn: my-instance-profile-arn
            nodeTemplate: # (to be specified only if the node capacity would be different from cloudprofile info during runtime)
              capacity:
                cpu: 2 # inherited from pool's machine type if un-specified
                gpu: 0 # inherited from pool's machine type if un-specified
                memory: 50Gi # inherited from pool's machine type if un-specified
                ephemeral-storage: 10Gi # override to specify explicit ephemeral-storage for scale fro zero
                resource.com/dongle: 4 # Example of a custom, extended resource.
The .volume.iops is the number of I/O operations per second (IOPS) that the volume supports.
For io1 and gp3 volume type, this represents the number of IOPS that are provisioned for the volume.
For gp2 volume type, this represents the baseline performance of the volume and the rate at which the volume accumulates I/O credits for bursting. For more information about General Purpose SSD baseline performance, I/O credits, IOPS range and bursting, see Amazon EBS Volume Types (http://docs.aws.amazon.com/AWSEC2/latest/UserGuide/EBSVolumeTypes.html) in the Amazon Elastic Compute Cloud User Guide. Constraint: IOPS should be a positive value. Validation of IOPS (i.e. whether it is allowed and is in the specified range for a particular volume type) is done on aws side.
The volume.throughput is the throughput that the volume supports, in MiB/s. As of 16th Aug 2022, this parameter is valid only for gp3 volume types and will return an error from the provider side if specified for other volume types. Its current range of throughput is from 125MiB/s to 1000 MiB/s. To know more about throughput and its range, see the official AWS documentation here.
The .dataVolumes can optionally contain configurations for the data volumes stated in the Shoot specification in the .spec.provider.workers[].dataVolumes list.
The .name must match to the name of the data volume in the shoot.
It is also possible to provide a snapshot ID. It allows to restore the data volume from an existing snapshot.
The iamInstanceProfile section allows to specify the IAM instance profile name xor ARN that should be used for this worker pool.
If not specified, a dedicated IAM instance profile created by the infrastructure controller is used (see above).
The instanceMetadataOptions controls access to the instance metadata service (IMDS) for members of the worker. You can do the following operations:
access IMDSv1 (default)
access IMDSv2 - httpPutResponseHopLimit >= 2
access IMDSv2 only (restrict access to IMDSv1) - httpPutResponseHopLimit >=2, httpTokens = "required"
disable access to IMDS - httpTokens = "required"
Note
The accessibility of IMDS discussed in the previous point is referenced from the point of view of containers NOT running in the host network.
By default on host network IMDSv2 is already enabled (but not accessible from inside the pods).
It is currently not possible to create a VM with complete restriction to the IMDS service.
It is however possible to restrict access from inside the pods by setting httpTokens to required and not setting httpPutResponseHopLimit (or setting it to 1).
You can find more information regarding the options in the AWS documentation.
cpuOptions grants more finegrained control over the worker’s CPU configuration. It has two attributes:
coreCount: Specify a custom amount of cores the instance should be configured with.
threadsPerCore: How many threads should there be on each core. Set to 1 to disable multi-threading.
Note that if you decide to configure cpuOptionsboth these values need to be provided. For a list of valid combinations of these values refer to the AWS documentation.
Example Shoot manifest (one availability zone)
Please find below an example Shoot manifest for one availability zone:
Every AWS shoot cluster will be deployed with the AWS EBS CSI driver.
It is compatible with the legacy in-tree volume provisioner that was deprecated by the Kubernetes community and will be removed in future versions of Kubernetes.
End-users might want to update their custom StorageClasses to the new ebs.csi.aws.com provisioner.
CSI drivers usually have a different procedure for configuring this custom limit.
By default, the EBS CSI driver parses the machine type name and then decides the volume limit.
However, this is only a rough approximation and not good enough in most cases.
Specifying the volume attach limit via command line flag (--volume-attach-limit) is currently the alternative until a more sophisticated solution presents itself (dynamically discovering the maximum number of attachable volume per EC2 machine type, see also https://github.com/kubernetes-sigs/aws-ebs-csi-driver/issues/347).
The AWS extension allows the --volume-attach-limit flag of the EBS CSI driver to be configurable via aws.provider.extensions.gardener.cloud/volume-attach-limit annotation on the Shoot resource.
ℹ️ Please note: If the annotation is added to an existing Shoot, then reconciliation needs to be triggered manually (see Immediate reconciliation), as adding an annotation to a resource is not a change that leads to an increase of .metadata.generation in general.
Other CSI options
The newer versions of EBS CSI driver are not readily compatible with the use of XFS volumes on nodes using a kernel version <= 5.4.
A workaround was added that enables the use of a “legacy XFS” mode that introduces a backwards compatible volume formating for the older kernels.
You can enable this option for your shoot by annotating it with aws.provider.extensions.gardener.cloud/legacy-xfs=true.
ℹ️ Please note: If the annotation is added to an existing Shoot, then reconciliation needs to be triggered manually (see Immediate reconciliation), as adding an annotation to a resource is not a change that leads to an increase of .metadata.generation in general.
Support for VolumeAttributesClasses (Beta in k8s 1.31)
To have the CSI-driver configured to support the necessary features for VolumeAttributesClasses on AWS for shoots with a k8s-version of at least 1.31, use the aws.provider.extensions.gardener.cloud/enable-volume-attributes-class annotation on the shoot. Keep in mind to also enable the required feature flags and runtime-config on the common kubernetes controllers (as outlined in the link above) in the shoot-spec.
For more information and examples, see this markdown in the aws-ebs-csi-driver repository. Please take special note of the considerations mentioned.
Kubernetes Versions per Worker Pool
This extension supports gardener/gardener’s WorkerPoolKubernetesVersion feature gate, i.e., having worker pools with overridden Kubernetes versions since gardener-extension-provider-aws@v1.34.
Shoot CA Certificate and ServiceAccount Signing Key Rotation
This extension supports gardener/gardener’s ShootCARotation and ShootSARotation feature gates since gardener-extension-provider-aws@v1.36.
Flow Infrastructure Reconciler
The extension offers two different reconciler implementations for the infrastructure resource:
terraform-based
native Go SDK based (dubbed the “flow”-based implementation)
The default implementation currently is the terraform reconciler which uses the https://github.com/gardener/terraformer as the backend for managing the shoot’s infrastructure.
The “flow” implementation is a newer implementation that is trying to solve issues we faced with managing terraform infrastructure on Kubernetes. The goal is to have more control over the reconciliation process and be able to perform fine-grained tuning over it. The implementation is completely backwards-compatible and offers a migration route from the legacy terraformer implementation.
For most users there will be no noticeable difference. However for certain use-cases, users may notice a slight deviation from the previous behavior. For example, with flow-based infrastructure users may be able to perform certain modifications to infrastructure resources without having them reconciled back by terraform. Operations that would degrade the shoot infrastructure are still expected to be reverted back.
For the time-being, to take advantage of the flow reconciler users have to “opt-in” by annotating the shoot manifest with: aws.provider.extensions.gardener.cloud/use-flow="true". For existing shoots with this annotation, the migration will take place on the next infrastructure reconciliation (on maintenance window or if other infrastructure changes are requested). The migration is not revertible.
BackupBucket
Gardener manages etcd's backups for Shoot clusters using provider specific storage solutions. On AWS, this storage is implemented through AWS S3, which store the backups/snapshots of the etcd's cluster data.
The BackupBucket resource abstracts the backup infrastructure, enabling Gardener and its extension controllers to manage it seamlessly. This abstraction allows Gardener to create, delete, and maintain backup buckets across various cloud providers in a standardized manner.
The BackupBucket resource includes a spec field, which defines the configuration details for the backup bucket. These details include:
A region is reference to a region where the bucket should be created.
A secretRef is reference to the secret containing credentials for accessing the cloud provider.
A type field defines the storage provider type like aws, azure etc.
A providerConfig field defines provider specific configurations.
BackupBucketConfig
The BackupBucketConfig describes the configuration that needs to be passed over for creation of the backup bucket infrastructure. Configuration for immutability feature a.k.a object lock in S3 that can be set on the bucket are specified in BackupBucketConfig.
Immutability feature (WORM, i.e. write-once-read-many model) ensures that once backups is written to the bucket, it will prevent locked object versions from being permanently deleted, hence it cannot be modified or deleted for a specified period. This feature is crucial for protecting backups from accidental or malicious deletion, ensuring data safety and availability for restoration.
Note
With enabling S3 object lock, S3 versioning will also get enabled.
The Gardener extension provider for AWS supports creating bucket (and enabling already existing buckets if immutability configured) to use object lock feature provided by storage provider AWS S3.
Here is an example configuration for BackupBucketConfig:
retentionType: Specifies the type of retention policy. Currently, S3 supports object lock on bucket level as well as on object level. The allowed value is bucket, which applies the retention policy and retention period to the entire bucket. For more details, refer to the documentation. Objects in the bucket will inherit the retention period which is set on the bucket. Please refer here to see working of backups/snapshots with immutable feature.
retentionPeriod: Defines the duration for which object version in the bucket will remain immutable. AWS S3 only supports immutability durations in days or years, therefore this field must be set as multiple of 24h.
mode: Defines the mode for object locked enabled S3 bucket, S3 provides two retention modes that apply different levels of protection to objects:
Governance mode: Users with special permissions can overwrite, delete or alter object versions during retention period.
Compliance mode: No users(including root user) can overwrite, delete or alter object versions during retention period.
To configure a BackupBucket with immutability feature, include the BackupBucketConfig in the .spec.providerConfig of the BackupBucket resource.
Here is an example of configuring a BackupBucket S3 object lock with retentionPeriod set to 24h i.e 1 Day and with mode Compliance.
Once S3 Object Lock is enabled, it cannot be disabled, nor can S3 versioning. However, you can remove the default retention settings by removing the BackupBucketConfig from .spec.providerConfig.
1.3 - Provider Azure
Gardener extension controller for the Azure cloud provider
Project Gardener implements the automated management and operation of Kubernetes clusters as a service.
Its main principle is to leverage Kubernetes concepts for all of its tasks.
Recently, most of the vendor specific logic has been developed in-tree.
However, the project has grown to a size where it is very hard to extend, maintain, and test.
With GEP-1 we have proposed how the architecture can be changed in a way to support external controllers that contain their very own vendor specifics.
This way, we can keep Gardener core clean and independent.
This controller implements Gardener’s extension contract for the Azure provider.
An example for a ControllerRegistration resource that can be used to register this controller to Gardener can be found here.
Please find more information regarding the extensibility concepts and a detailed proposal here.
Supported Kubernetes versions
This extension controller supports the following Kubernetes versions:
Version
Support
Conformance test results
Kubernetes 1.33
1.33.0+
N/A
Kubernetes 1.32
1.32.0+
Kubernetes 1.31
1.31.0+
Kubernetes 1.30
1.30.0+
Kubernetes 1.29
1.29.0+
Kubernetes 1.28
1.28.0+
Kubernetes 1.27
1.27.0+
Please take a look here to see which versions are supported by Gardener in general.
How to start using or developing this extension controller locally
You can run the controller locally on your machine by executing make start.
Static code checks and tests can be executed by running make verify. We are using Go modules for Golang package dependency management and Ginkgo/Gomega for testing.
Feedback and Support
Feedback and contributions are always welcome!
Please report bugs or suggestions as GitHub issues or reach out on Slack (join the workspace here).
Learn more!
Please find further resources about out project here:
1.3.1.1 - Create a Kubernetes Cluster on Azure with Gardener
Overview
Gardener allows you to create a Kubernetes cluster on different infrastructure providers. This tutorial will guide you through the process of creating a cluster on Azure.
You have access to the Gardener dashboard and have permissions to create projects.
You have an Azure Service Principal assigned to your subscription.
Steps
Go to the Gardener dashboard and create a Project.
Get the properties of your Azure AD tenant, Subscription and Service Principal.
Before you can provision and access a Kubernetes cluster on Azure, you need to add the Azure service principal, AD tenant and subscription credentials in Gardener.
Gardener needs the credentials to provision and operate the Azure infrastructure for your Kubernetes cluster.
Ensure that the Azure service principal has the actions defined within the Azure Permissions within your Subscription assigned.
If no fine-grained permission/actions are required, then simply the built-in Contributor role can be assigned.
Access the Azure Portal and navigate to the Active Directory service.
Within the service navigate to App registrations and select your service principal. Copy the ClientID you see there.
Client Secret
Secrets for the Azure Account/Service Principal can be generated/rotated via the Azure Portal.
After copying your ClientID, in the Detail view of your Service Principal navigate to Certificates & secrets. In the section, you can generate a new secret.
Choose Secrets, then the plus icon and select Azure.
Create your secret.
Type the name of your secret.
Copy and paste the TenantID, SubscriptionID and the Service Principal credentials (ClientID and ClientSecret).
Choose Add secret.
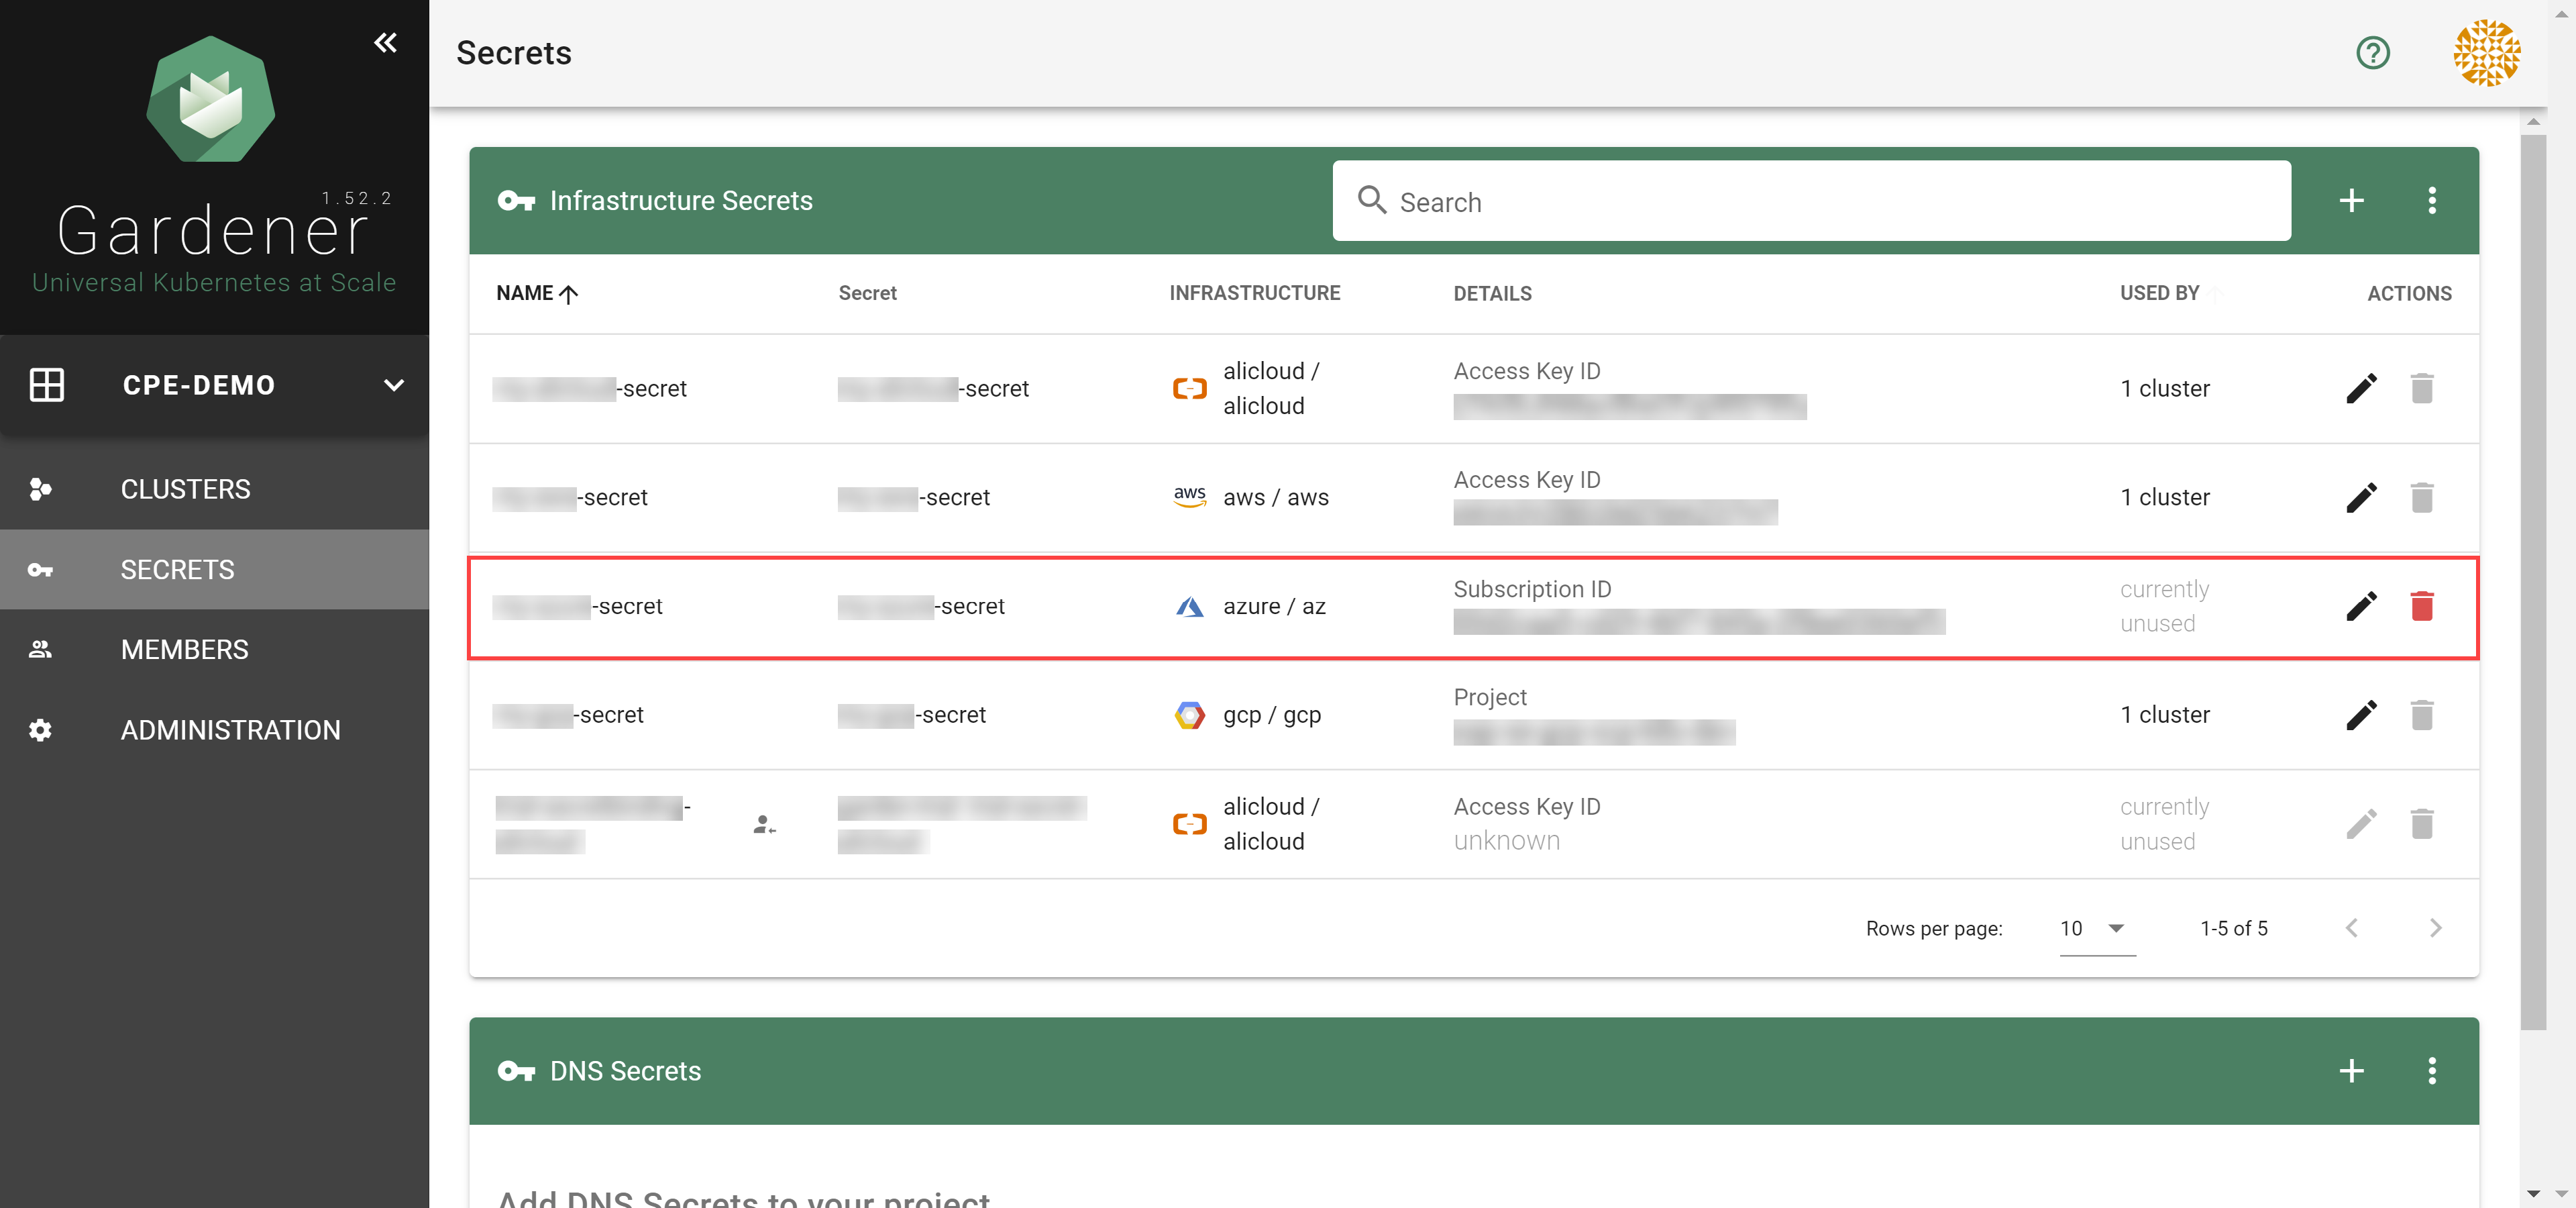
After completing these steps, you should see your newly created secret in the Infrastructure Secrets section.
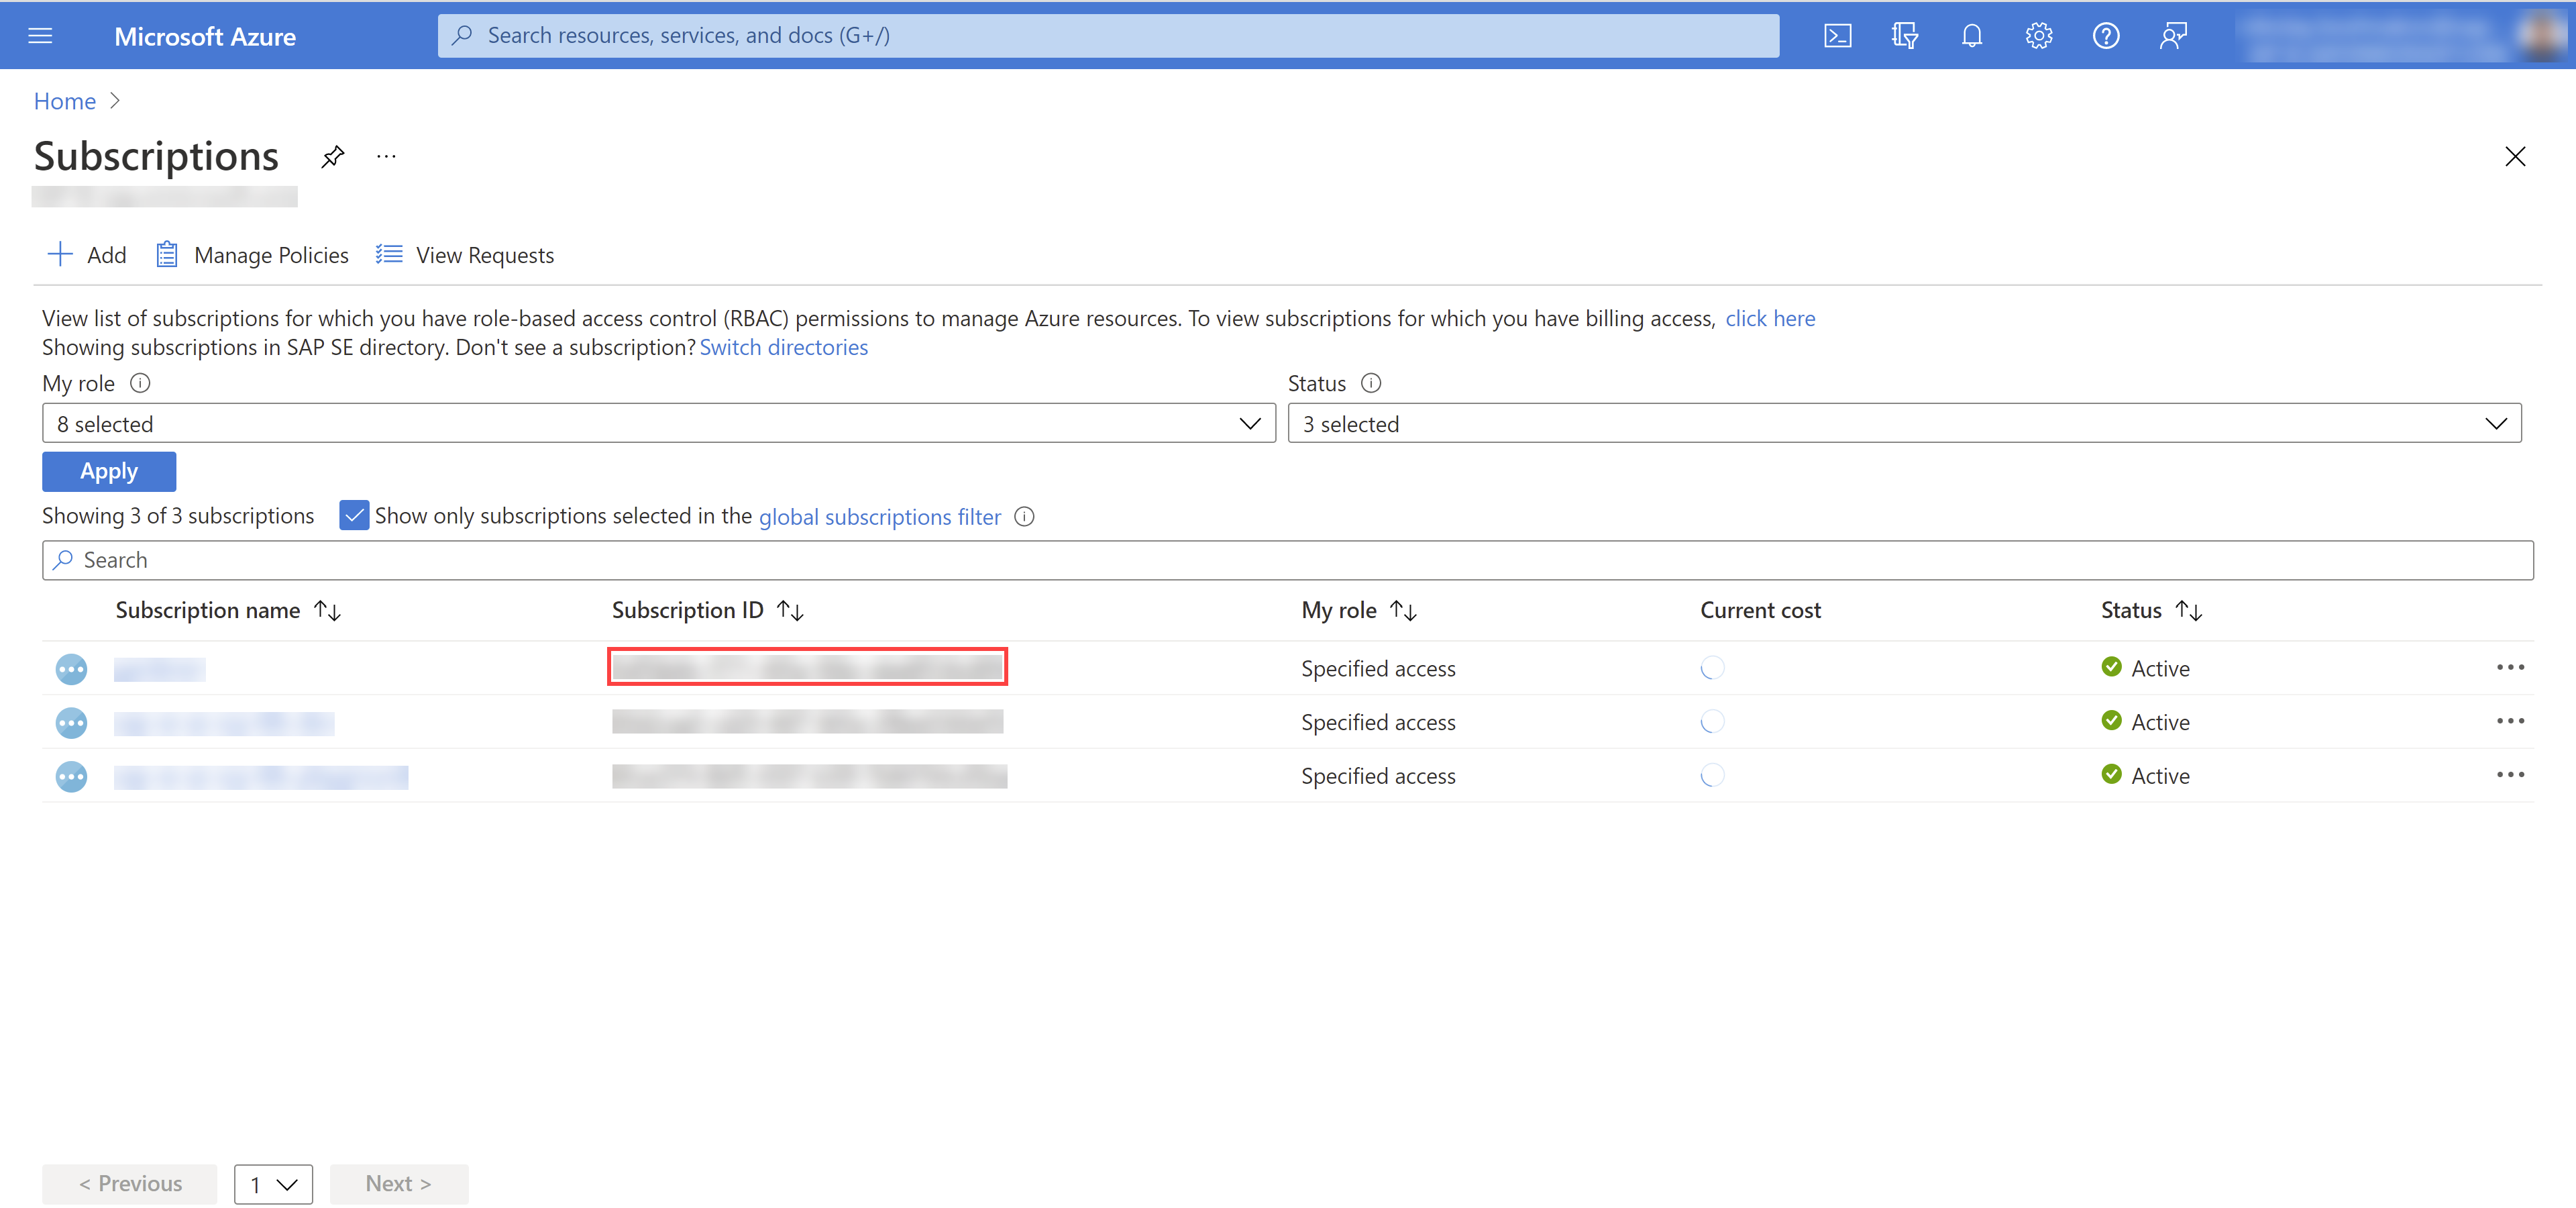
Register resource providers for your subscription.
Go to your Azure dashboard
Navigate to Subscriptions -> <your_subscription>
Pick resource providers from the sidebar
Register microsoft.Network
Register microsoft.Compute
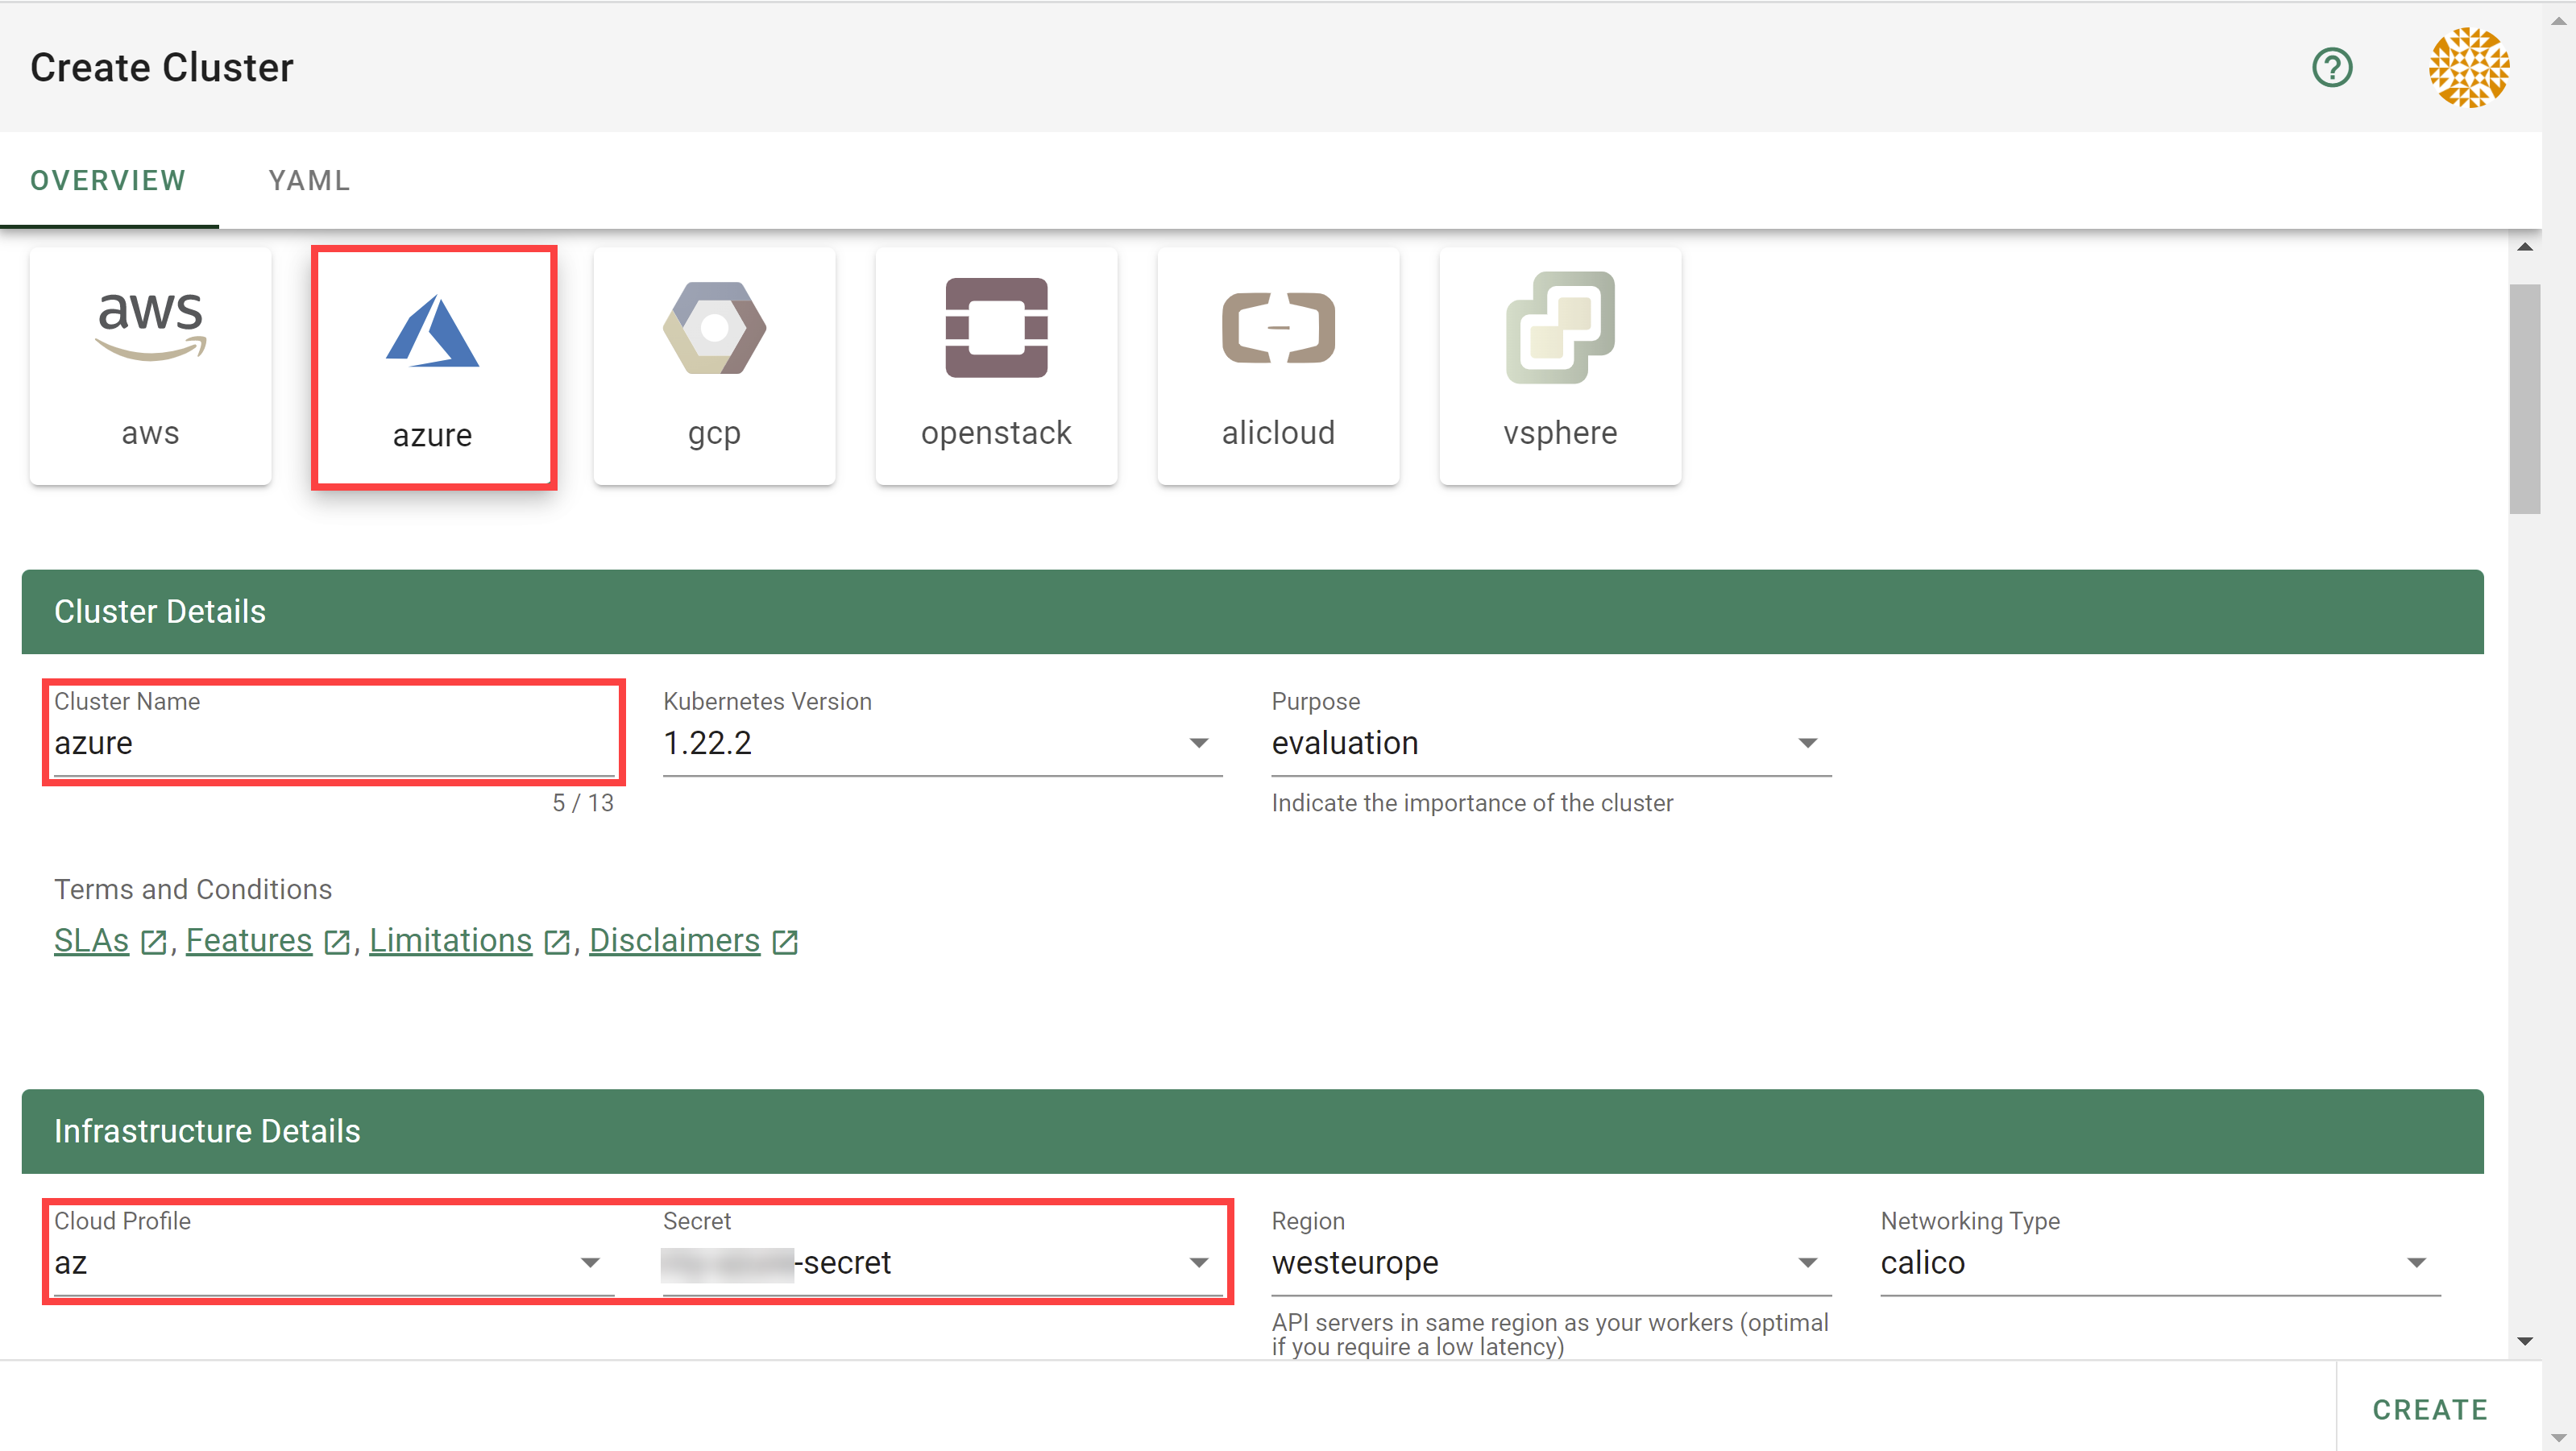
To create a new cluster, choose Clusters and then the plus sign in the upper right corner.
In the Create Cluster section:
Select Azure in the Infrastructure tab.
Type the name of your cluster in the Cluster Details tab.
Choose the secret you created before in the Infrastructure Details tab.
Choose Create.
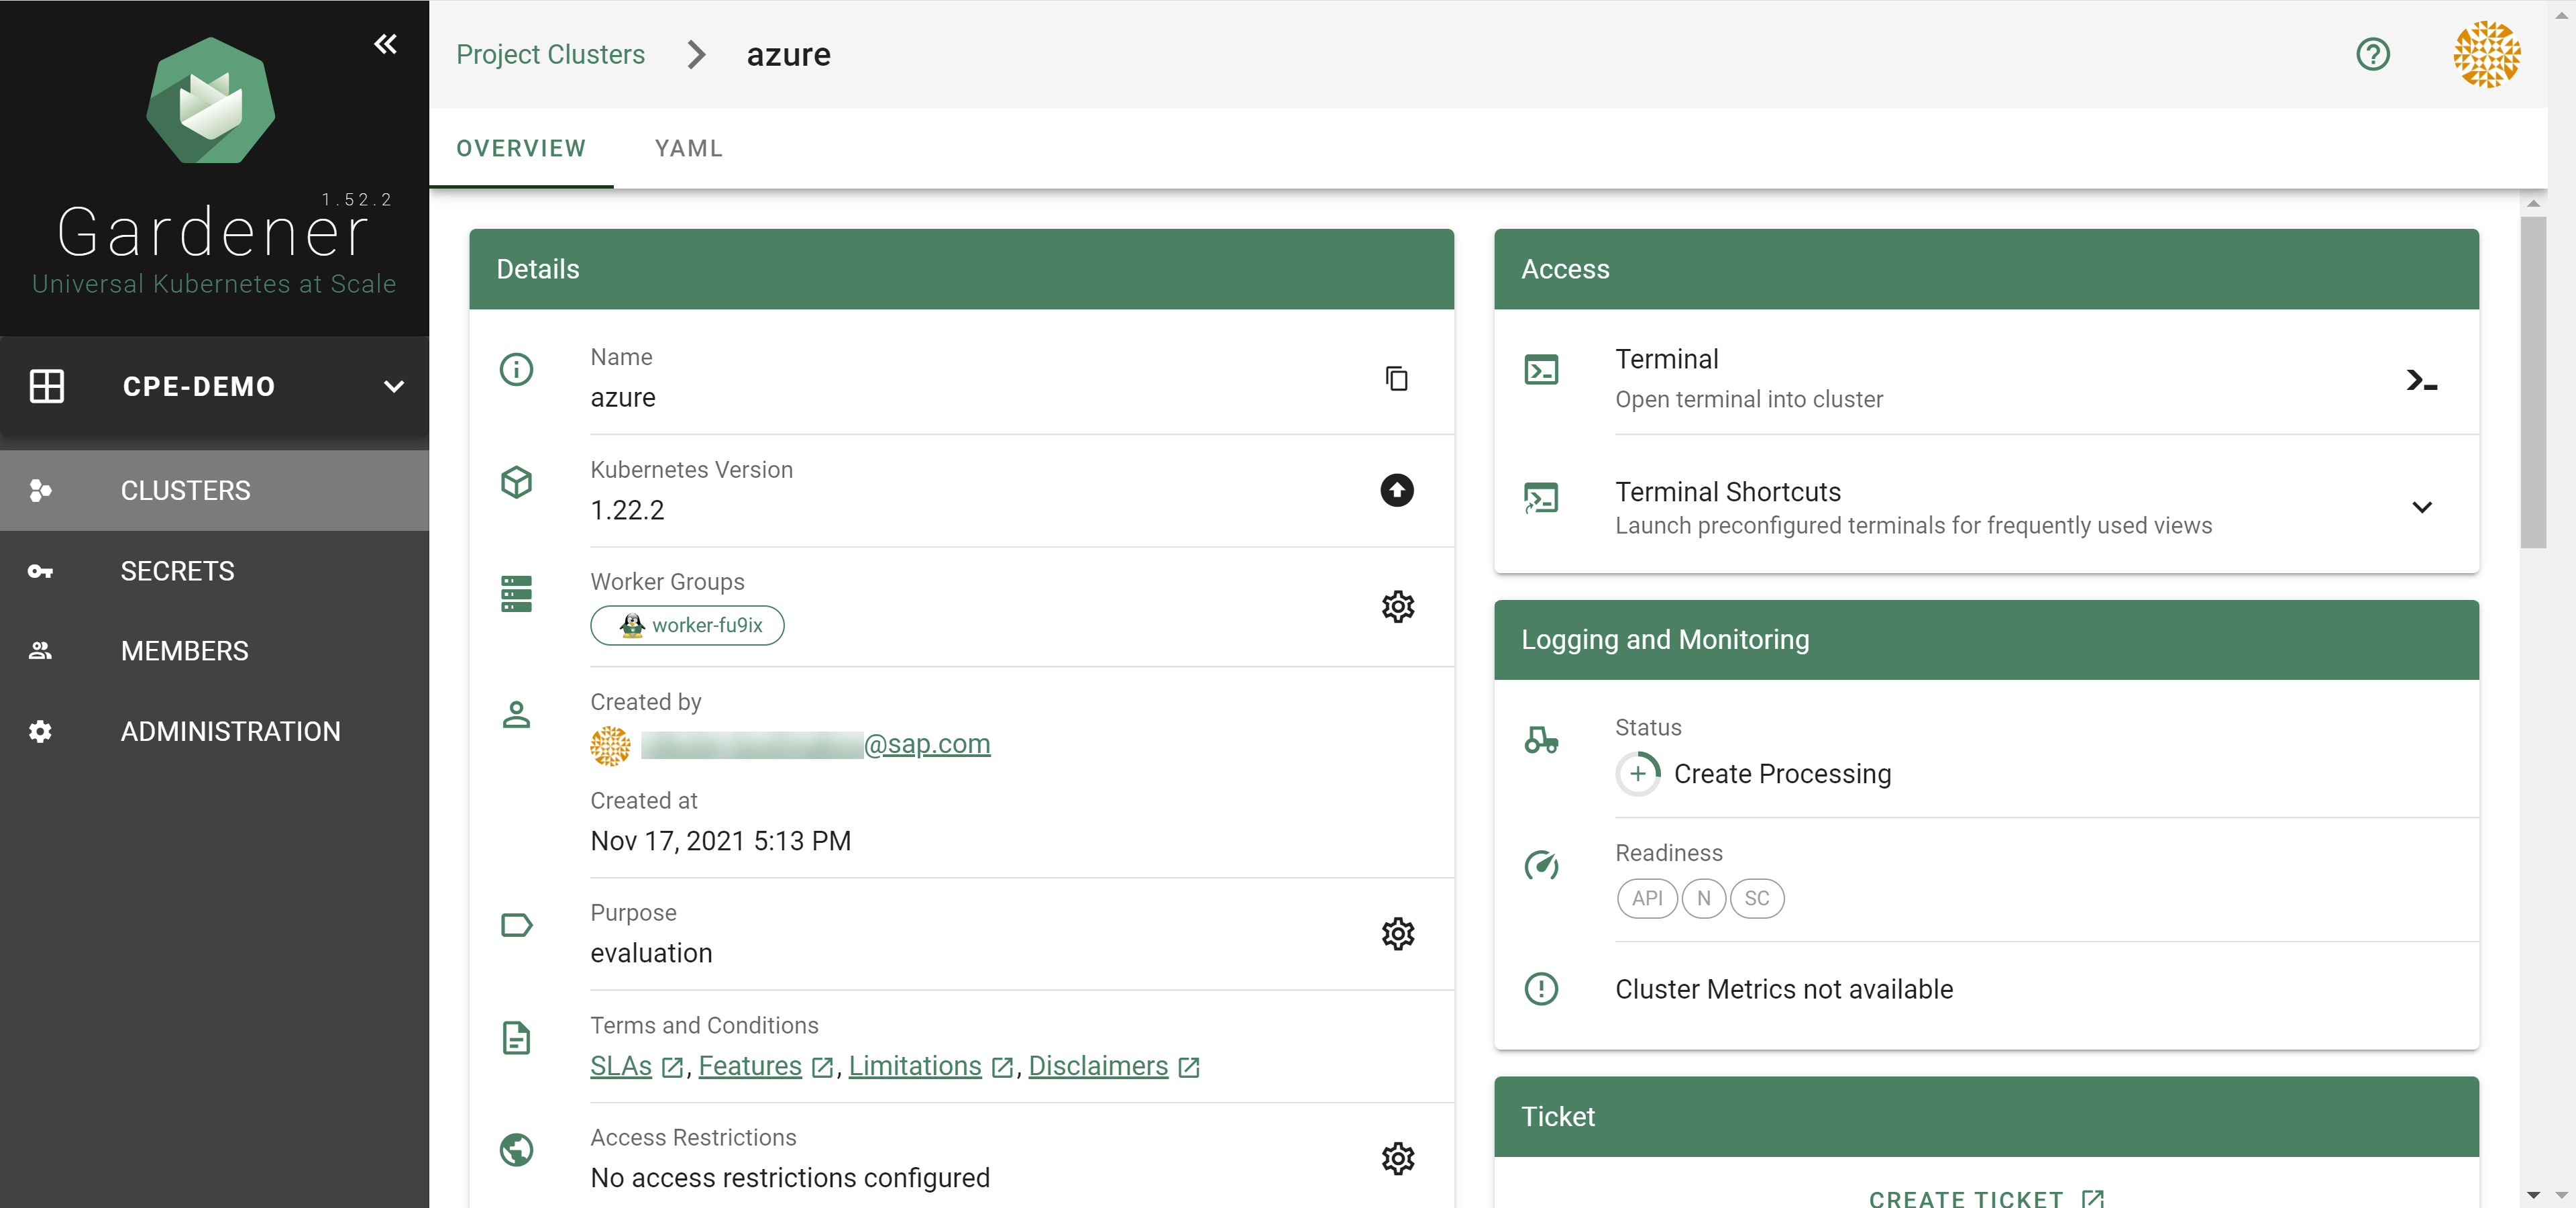
Wait for your cluster to get created.
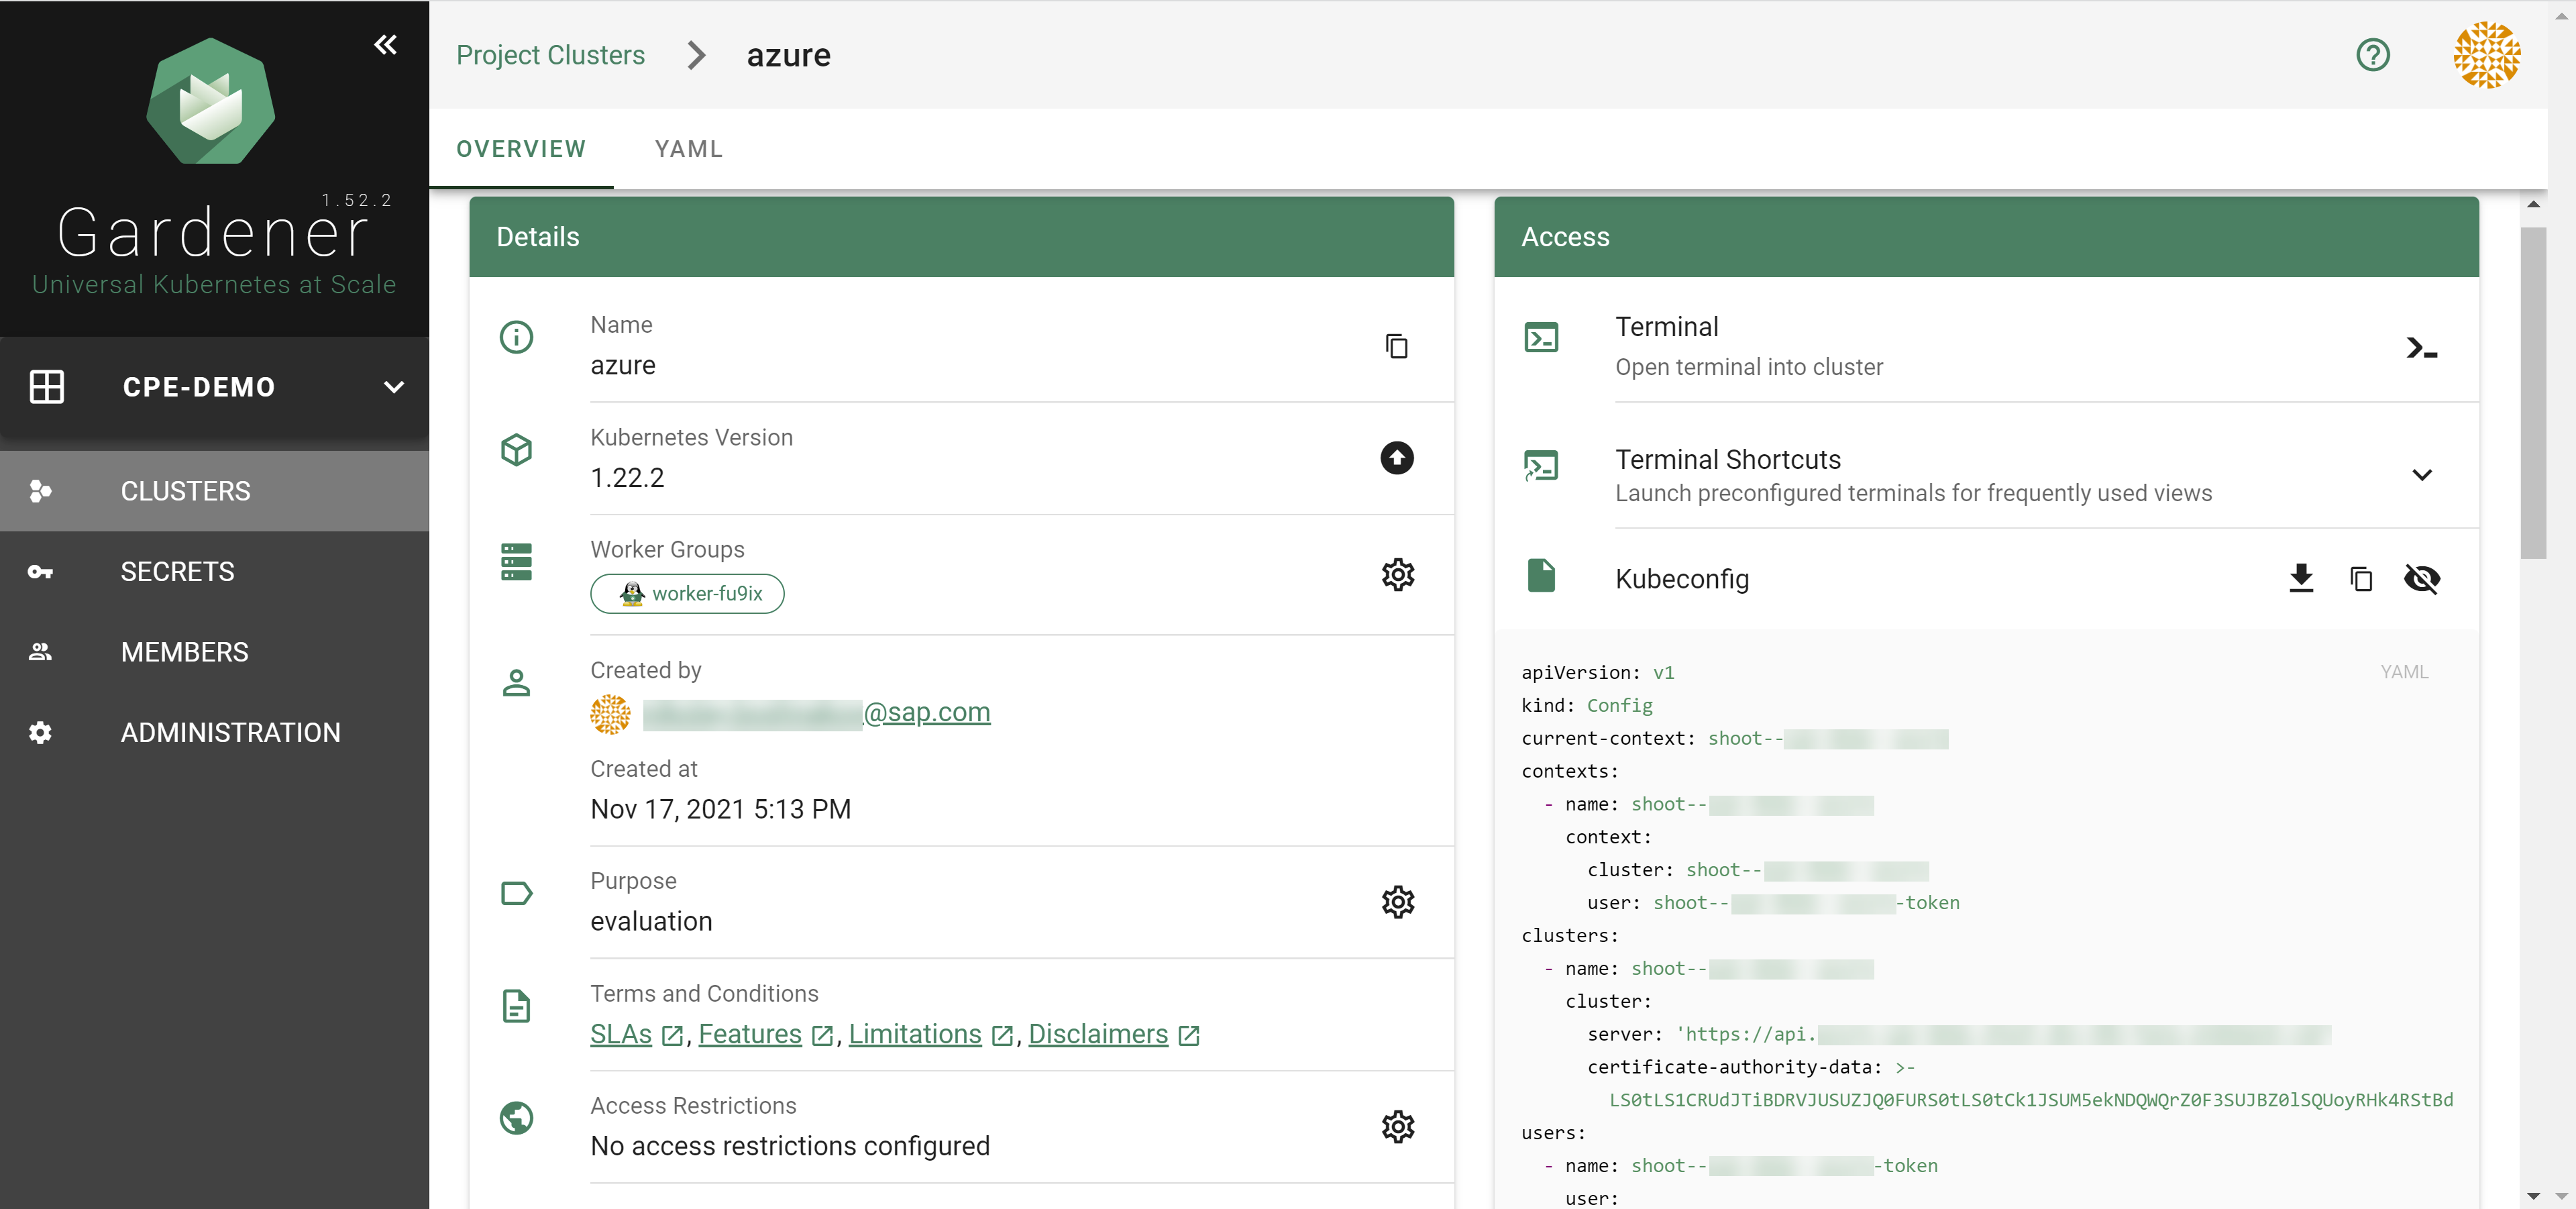
Result
After completing the steps in this tutorial, you will be able to see and download the kubeconfig of your cluster.
1.3.2 - Azure Permissions
Azure Permissions
The following document describes the required Azure actions manage a Shoot cluster on Azure split by the different Azure provider/services.
Be aware some actions are just required if particular deployment scenarios or features e.g. bring your own vNet, use Azure-file, let the Shoot act as Seed, immutable buckets, etc. should be used.
Microsoft.Compute
# Required if a non zonal cluster based on Availability Set should be used.
Microsoft.Compute/availabilitySets/delete
Microsoft.Compute/availabilitySets/read
Microsoft.Compute/availabilitySets/write

# Required to let Kubernetes manage Azure disks.
Microsoft.Compute/disks/delete
Microsoft.Compute/disks/read
Microsoft.Compute/disks/write

# Required for to fetch meta information about disk and virtual machines sizes.
Microsoft.Compute/locations/diskOperations/read
Microsoft.Compute/locations/operations/read
Microsoft.Compute/locations/vmSizes/read

# Required if csi snapshot capabilities should be used and/or the Shoot should act as a Seed.
Microsoft.Compute/snapshots/delete
Microsoft.Compute/snapshots/read
Microsoft.Compute/snapshots/write

# Required to let Gardener/Machine-Controller-Manager manage the cluster nodes/machines.
Microsoft.Compute/virtualMachines/delete
Microsoft.Compute/virtualMachines/read
Microsoft.Compute/virtualMachines/start/action
Microsoft.Compute/virtualMachines/write

# Required if a non zonal cluster based on VMSS Flex (VMO) should be used.
Microsoft.Compute/virtualMachineScaleSets/delete
Microsoft.Compute/virtualMachineScaleSets/read
Microsoft.Compute/virtualMachineScaleSets/write
Microsoft.ManagedIdentity
# Required if a user provided Azure managed identity should attached to the cluster nodes.
Microsoft.ManagedIdentity/userAssignedIdentities/assign/action
Microsoft.ManagedIdentity/userAssignedIdentities/read
Microsoft.MarketplaceOrdering
# Required if nodes/machines should be created with images hosted on the Azure Marketplace.
Microsoft.MarketplaceOrdering/offertypes/publishers/offers/plans/agreements/read
Microsoft.MarketplaceOrdering/offertypes/publishers/offers/plans/agreements/write
Microsoft.Network
# Required to let Kubernetes manage services of type 'LoadBalancer'.
Microsoft.Network/loadBalancers/backendAddressPools/join/action
Microsoft.Network/loadBalancers/delete
Microsoft.Network/loadBalancers/read
Microsoft.Network/loadBalancers/write

# Required in case the Shoot should use NatGateway(s).
Microsoft.Network/natGateways/delete
Microsoft.Network/natGateways/join/action
Microsoft.Network/natGateways/read
Microsoft.Network/natGateways/write

# Required to let Gardener/Machine-Controller-Manager manage the cluster nodes/machines.
Microsoft.Network/networkInterfaces/delete
Microsoft.Network/networkInterfaces/ipconfigurations/join/action
Microsoft.Network/networkInterfaces/ipconfigurations/read
Microsoft.Network/networkInterfaces/join/action
Microsoft.Network/networkInterfaces/read
Microsoft.Network/networkInterfaces/write

# Required to let Gardener maintain the basic infrastructure of the Shoot cluster and maintaing LoadBalancer services.
Microsoft.Network/networkSecurityGroups/delete
Microsoft.Network/networkSecurityGroups/join/action
Microsoft.Network/networkSecurityGroups/read
Microsoft.Network/networkSecurityGroups/write

# Required for managing LoadBalancers and NatGateways.
Microsoft.Network/publicIPAddresses/delete
Microsoft.Network/publicIPAddresses/join/action
Microsoft.Network/publicIPAddresses/read
Microsoft.Network/publicIPAddresses/write

# Required for managing the basic infrastructure of a cluster and maintaing LoadBalancer services.
Microsoft.Network/routeTables/delete
Microsoft.Network/routeTables/join/action
Microsoft.Network/routeTables/read
Microsoft.Network/routeTables/routes/delete
Microsoft.Network/routeTables/routes/read
Microsoft.Network/routeTables/routes/write
Microsoft.Network/routeTables/write

# Required to let Gardener maintain the basic infrastructure of the Shoot cluster.
# Only a subset is required for the bring your own vNet scenario.
Microsoft.Network/virtualNetworks/delete # not required for bring your own vnet
Microsoft.Network/virtualNetworks/read
Microsoft.Network/virtualNetworks/subnets/delete
Microsoft.Network/virtualNetworks/subnets/join/action
Microsoft.Network/virtualNetworks/subnets/read
Microsoft.Network/virtualNetworks/subnets/write
Microsoft.Network/virtualNetworks/write # not required for bring your own vnet
Microsoft.Resources
# Required to let Gardener maintain the basic infrastructure of the Shoot cluster.
Microsoft.Resources/subscriptions/resourceGroups/delete
Microsoft.Resources/subscriptions/resourceGroups/read
Microsoft.Resources/subscriptions/resourceGroups/write
Microsoft.Storage
# Required if Azure File should be used and/or if the Shoot should act as Seed.
Microsoft.Storage/operations/read
Microsoft.Storage/storageAccounts/blobServices/containers/delete
Microsoft.Storage/storageAccounts/blobServices/containers/read
Microsoft.Storage/storageAccounts/blobServices/containers/write
Microsoft.Storage/storageAccounts/blobServices/read
Microsoft.Storage/storageAccounts/delete
Microsoft.Storage/storageAccounts/listkeys/action
Microsoft.Storage/storageAccounts/read
Microsoft.Storage/storageAccounts/write

# Required if Shoot should act as Seed with immutable ABS containers.
Microsoft.Storage/storageAccounts/blobServices/containers/immutabilityPolicies/extend/action
Microsoft.Storage/storageAccounts/blobServices/containers/immutabilityPolicies/delete
Microsoft.Storage/storageAccounts/blobServices/containers/immutabilityPolicies/write
Microsoft.Storage/storageAccounts/blobServices/containers/immutabilityPolicies/lock/action
Microsoft.Storage/storageAccounts/blobServices/containers/immutabilityPolicies/read
Microsoft.Storage/storageAccounts/managementPolicies/delete
Microsoft.Storage/storageAccounts/managementPolicies/read
Microsoft.Storage/storageAccounts/managementPolicies/write

# Required to configure storage key rotation
Microsoft.Storage/storageAccounts/regeneratekey/action
1.3.3 - Deployment
Deployment of the Azure provider extension
Disclaimer: This document is NOT a step by step installation guide for the Azure provider extension and only contains some configuration specifics regarding the installation of different components via the helm charts residing in the Azure provider extension repository.
Virtual Garden is not used, i.e., the runtime Garden cluster is also the target Garden cluster.
Automounted Service Account Token
The easiest way to deploy the gardener-extension-admission-azure component will be to not provide kubeconfig at all. This way in-cluster configuration and an automounted service account token will be used. The drawback of this approach is that the automounted token will not be automatically rotated.
Virtual Garden is used, i.e., the runtime Garden cluster is different from the target Garden cluster.
Service Account
The easiest way to setup the authentication will be to create a service account and the respective roles will be bound to this service account in the target cluster. Then use the generated service account token and craft a kubeconfig which will be used by the workload in the runtime cluster. This approach does not provide a solution for the rotation of the service account token. However, this setup can be achieved by setting .Values.global.virtualGarden.enabled: true and following these steps:
Deploy the application part of the charts in the target cluster.
Get the service account token and craft the kubeconfig.
Set the crafted kubeconfig and deploy the runtime part of the charts in the runtime cluster.
Client Certificate
Another solution will be to bind the roles in the target cluster to a User subject instead of a service account and use a client certificate for authentication. This approach does not provide a solution for the client certificate rotation. However, this setup can be achieved by setting both .Values.global.virtualGarden.enabled: true and .Values.global.virtualGarden.user.name, then following these steps:
Generate a client certificate for the target cluster for the respective user.
Deploy the application part of the charts in the target cluster.
Craft a kubeconfig using the already generated client certificate.
Set the crafted kubeconfig and deploy the runtime part of the charts in the runtime cluster.
1.3.4 - Local Setup
admission-azure
admission-azure is an admission webhook server which is responsible for the validation of the cloud provider (Azure in this case) specific fields and resources. The Gardener API server is cloud provider agnostic and it wouldn’t be able to perform similar validation.
Follow the steps below to run the admission webhook server locally.
Make sure that the KUBECONFIG environment variable is pointing to the local garden cluster.
make start-admission
Setup the ValidatingWebhookConfiguration.
hack/dev-setup-admission-azure.sh will configure the webhook Service which will allow the kube-apiserver of your local cluster to reach the webhook server. It will also apply the ValidatingWebhookConfiguration manifest.
./hack/dev-setup-admission-azure.sh
You are now ready to experiment with the admission-azure webhook server locally.
1.3.5 - Operations
Using the Azure provider extension with Gardener as an operator
The core.gardener.cloud/v1beta1.CloudProfile resource declares a providerConfig field that is meant to contain provider-specific configuration.
The core.gardener.cloud/v1beta1.Seed resource is structured similarly.
Additionally, it allows configuring settings for the backups of the main etcds’ data of shoot clusters control planes running in this seed cluster.
This document explains the necessary configuration for the Azure provider extension.
CloudProfile resource
This section describes, how the configuration for CloudProfiles looks like for Azure by providing an example CloudProfile manifest with minimal configuration that can be used to allow the creation of Azure shoot clusters.
CloudProfileConfig
The cloud profile configuration contains information about the real machine image IDs in the Azure environment (image urn, id, communityGalleryImageID or sharedGalleryImageID).
You have to map every version that you specify in .spec.machineImages[].versions to an available VM image in your subscription.
The VM image can be either from the Azure Marketplace and will then get identified via a urn, it can be a custom VM image from a shared image gallery and is then identified sharedGalleryImageID, or it can be from a community image gallery and is then identified by its communityGalleryImageID. You can use id field also to specifiy the image location in the azure compute gallery (in which case it would have a different kind of path) but it is not recommended as it sometimes faces problems in cross subscription image sharing.
For each machine image version an architecture field can be specified which specifies the CPU architecture of the machine on which given machine image can be used.
An example CloudProfileConfig for the Azure extension looks as follows:
The cloud profile configuration contains information about the update via .countUpdateDomains[] and failure domain via .countFaultDomains[] counts in the Azure regions you want to offer.
The .machineTypes[] list contain provider specific information to the machine types e.g. if the machine type support Azure Accelerated Networking, see .machineTypes[].acceleratedNetworking.
Additionally, it contains the real machine image identifiers in the Azure environment. You can provide either URN for Azure Market Place images or id of Shared Image Gallery images.
When Shared Image Gallery is used, you have to ensure that the image is available in the desired regions and the end-user subscriptions have access to the image or to the whole gallery.
You have to map every version that you specify in .spec.machineImages[].versions here such that the Azure extension knows the machine image identifiers for every version you want to offer.
Furthermore, you can specify for each image version via .machineImages[].versions[].acceleratedNetworking if Azure Accelerated Networking is supported.
Example CloudProfile manifest
The possible values for .spec.volumeTypes[].name on Azure are Standard_LRS, StandardSSD_LRS and Premium_LRS. There is another volume type called UltraSSD_LRS but this type is not supported to use as os disk. If an end user select a volume type whose name is not equal to one of the valid values then the machine will be created with the default volume type which belong to the selected machine type. Therefore it is recommended to configure only the valid values for the .spec.volumeType[].name in the CloudProfile.
Please find below an example CloudProfile manifest:
This provider extension does not support any provider configuration for the Seed’s .spec.provider.providerConfig field.
However, it supports managing of backup infrastructure, i.e., you can specify a configuration for the .spec.backup field.
Backup configuration
A Seed of type azure can be configured to perform backups for the main etcds’ of the shoot clusters control planes using Azure Blob storage.
The location/region where the backups will be stored defaults to the region of the Seed (spec.provider.region), but can also be explicitly configured via the field spec.backup.region.
The region of the backup can be different from where the Seed cluster is running.
However, usually it makes sense to pick the same region for the backup bucket as used for the Seed cluster.
Please find below an example Seed manifest (partly) that configures backups using Azure Blob storage.
The referenced secret has to contain the provider credentials of the Azure subscription.
Please take a look here on how to create an Azure Application, Service Principle and how to obtain credentials.
The example below demonstrates how the secret has to look like.
The operators of the Gardener Azure extension can provide a list of managed service principals (technical users) that can be used for Azure Shoots.
This eliminates the need for users to provide own service principals for their clusters.
The user would need to grant the managed service principal access to their subscription with proper permissions.
As service principals are managed in an Azure Active Directory for each supported Active Directory, an own service principal needs to be provided.
In case the user provides an own service principal in the Shoot secret, this one will be used instead of the managed one provided by the operator.
Each managed service principal will be maintained in a Secret like that:
The user needs to provide in its Shoot secret a tenantID and subscriptionID.
The managed service principal will be assigned based on the tenantID.
In case there is a managed service principal secret with a matching tenantID, this one will be used for the Shoot.
If there is no matching managed service principal secret then the next Shoot operation will fail.
One of the benefits of having managed service principals is that the operator controls the lifecycle of the service principal and can rotate its secrets.
After the service principal secret has been rotated and the corresponding secret is updated, all Shoot clusters using it need to be reconciled or the last operation to be retried.
Rolling Update Triggers
Changes to the Shoot worker-pools are applied in-place where possible.
In case this is not possible a rolling update of the workers will be performed to apply the new configuration,
as outlined in the Gardener documentation.
The exact fields that trigger this behavior are defined in the Gardener doc,
with a few additions:
.spec.provider.workers[].providerConfig
.spec.provider.infrastructureConfig.identity
.spec.provider.infrastructureConfig.zoned
.spec.provider.workers[].dataVolumes[].size (only the affected worker pool)
.spec.provider.workers[].dataVolumes[].type (only the affected worker pool)
Additionally, if the VMO name of a worker pool changes, the worker pool will be rolled.
This can occur if the countFaultDomains field in the cloud profile is modified.
For now, if the feature gate NewWorkerPoolHashis enabled, the exact same fields are used.
This behavior may change once MCM supports in-place updates, such as volume updates.
1.3.6 - Usage
Using the Azure provider extension with Gardener as end-user
This document describes the configurable options for Azure and provides an example Shoot manifest with minimal configuration that can be used to create an Azure cluster (modulo the landscape-specific information like cloud profile names, secret binding names, etc.).
Azure Provider Credentials
In order for Gardener to create a Kubernetes cluster using Azure infrastructure components, a Shoot has to provide credentials with sufficient permissions to the desired Azure subscription.
Every shoot cluster references a SecretBinding or a CredentialsBinding.
SecretBindings reference a Secret while CredentialsBindings can reference a Secret or a WorkloadIdentity.
A Secret would contain the provider credentials of the Azure subscription while a WorkloadIdentity would be used to represent an identity of Gardener managed workload.
Important
The SecretBinding/CredentialsBinding is configurable in the Shoot cluster with the field secretBindingName/credentialsBindingName.
SecretBindings are considered legacy and will be deprecated in the future.
It is advised to use CredentialsBindings instead.
Please ensure that the Azure application (spn) has the IAM actions defined here assigned.
If no fine-grained permissions/actions required then simply assign the Contributor role.
The example below demonstrates how the secret containing the client credentials of the Azure Application has to look like:
Depending on your API usage it can be problematic to reuse the same Service Principal for different Shoot clusters due to rate limits.
Please consider spreading your Shoots over Service Principals from different Azure subscriptions if you are hitting those limits.
Managed Service Principals
The operators of the Gardener Azure extension can provide managed service principals.
This eliminates the need for users to provide an own service principal for a Shoot.
To make use of a managed service principal, the Azure secret of a Shoot cluster must contain only a subscriptionID and a tenantID field, but no clientID and clientSecret.
Removing those fields from the secret of an existing Shoot will also let it adopt the managed service principal.
Based on the tenantID field, the Gardener extension will try to assign the managed service principal to the Shoot.
If no managed service principal can be assigned then the next operation on the Shoot will fail.
Warning
The managed service principal need to be assigned to the users Azure subscription with proper permissions before using it.
Azure Workload Identity Federation
Users can choose to trust Gardener’s Workload Identity Issuer and eliminate the need for providing Azure credentials.
As a first step a resource of type WorkloadIdentity should be created in the Garden cluster and configured with the required Azure information.
This identity will be used by infrastructure components to authenticate against Azure APIs.
A sample of such resource is shown below:
apiVersion: security.gardener.cloud/v1alpha1
kind: WorkloadIdentity
metadata:
  name: azure
  namespace: garden-myproj
spec:
  audiences:
  # This is the audience that you configure during the creation of a federated credential
  - api://AzureADTokenExchange-my-application
  targetSystem:
    type: azure
    providerConfig:
      apiVersion: azure.provider.extensions.gardener.cloud/v1alpha1
      kind: WorkloadIdentityConfig
      clientID: 00000000-0000-0000-0000-000000000001 # This is the id of the application (client)
      tenantID: 00000000-0000-0000-0000-000000000002 # This is the id of the directory (tenant)
      subscriptionID: 00000000-0000-0000-0000-000000000003 # This is the id of the Azure subscription
Once created the WorkloadIdentity will get its own id which will be used to form the subject of the said WorkloadIdentity.
The subject can be obtained by running the following command:
kubectl -n garden-myproj get wi azure -o=jsonpath={.status.sub}
As a second step users should configure Workload Identity Federation so that their application trusts Gardener’s Workload Identity Issuer.
Tip
You can retrieve Gardener’s Workload Identity Issuer URL directly from the Garden cluster by reading the contents of the Gardener Info ConfigMap.
kubectl -n gardener-system-public get configmap -o yaml
In the shown example a WorkloadIdentity with name azure with id 00000000-0000-0000-0000-000000000000 from the garden-myproj namespace will be trusted by the Azure application.
Important
You should replace the subject indentifier in the example below with the subject that is populated in the status of the WorkloadIdentity, obtained in a previous step.
Please ensure that the Azure application (spn) has the proper IAM actions assigned.
If no fine-grained permissions/actions required then simply assign the Contributor role.
Once you have everything set you can create a CredentialsBinding that reference the WorkloadIdentity and configure your shoot to use it.
Please see the following examples:
The infrastructure configuration mainly describes how the network layout looks like in order to create the shoot worker nodes in a later step, thus, prepares everything relevant to create VMs, load balancers, volumes, etc.
An example InfrastructureConfig for the Azure extension looks as follows:
Currently, it’s not yet possible to deploy into existing resource groups.
The .resourceGroup.name field will allow specifying the name of an already existing resource group that the shoot cluster and all infrastructure resources will be deployed to.
Via the .zoned boolean you can tell whether you want to use Azure availability zones or not.
If you didn’t use zones in the past then an availability set was created and only basic load balancers were used.
Now VMSS-FLex (VMO) has become the default also for non-zonal clusters and only standard load balancers are used.
The networks.vnet section describes whether you want to create the shoot cluster in an already existing VNet or whether to create a new one:
If networks.vnet.name and networks.vnet.resourceGroup are given then you have to specify the VNet name and VNet resource group name of the existing VNet that was created by other means (manually, other tooling, …).
If networks.vnet.cidr is given then you have to specify the VNet CIDR of a new VNet that will be created during shoot creation.
You can freely choose a private CIDR range.
Either networks.vnet.name and neworks.vnet.resourceGroup or networks.vnet.cidr must be present, but not both at the same time.
The networks.vnet.ddosProtectionPlanID field can be used to specify the id of a ddos protection plan which should be assigned to the VNet. This will only work for a VNet managed by Gardener. For externally managed VNets the ddos protection plan must be assigned by other means.
If a vnet name is given and cilium shoot clusters are created without a network overlay within one vnet make sure that the pod CIDR specified in shoot.spec.networking.pods is not overlapping with any other pod CIDR used in that vnet.
Overlapping pod CIDRs will lead to disfunctional shoot clusters.
It’s possible to place multiple shoot cluster into the same vnet
The networks.workers section describes the CIDR for a subnet that is used for all shoot worker nodes, i.e., VMs which later run your applications.
The specified CIDR range must be contained in the VNet CIDR specified above, or the VNet CIDR of your already existing VNet.
You can freely choose this CIDR and it is your responsibility to properly design the network layout to suit your needs.
The networks.natGateway section contains configuration for the Azure NatGateway which can be attached to the worker subnet of a Shoot cluster. Here are some key information about the usage of the NatGateway for a Shoot cluster:
NatGateway usage is optional and can be enabled or disabled via .networks.natGateway.enabled.
If the NatGateway is not used then the egress connections initiated within the Shoot cluster will be nated via the LoadBalancer of the clusters (default Azure behaviour, see here).
NatGateway is only available for zonal clusters .zoned=true.
The NatGateway is currently not zone redundantly deployed. That mean the NatGateway of a Shoot cluster will always be in just one zone. This zone can be optionally selected via .networks.natGateway.zone.
Caution: Modifying the .networks.natGateway.zone setting requires a recreation of the NatGateway and the managed public ip (automatically used if no own public ip is specified, see below). That mean you will most likely get a different public ip for egress connections.
It is possible to bring own zonal public ip(s) via networks.natGateway.ipAddresses. Those public ip(s) need to be in the same zone as the NatGateway (see networks.natGateway.zone) and be of SKU standard. For each public ip the name, the resourceGroup and the zone need to be specified.
The field networks.natGateway.idleConnectionTimeoutMinutes allows the configuration of NAT Gateway’s idle connection timeout property. The idle timeout value can be adjusted from 4 minutes, up to 120 minutes. Omitting this property will set the idle timeout to its default value according to NAT Gateway’s documentation.
In the identity section you can specify an Azure user-assigned managed identity which should be attached to all cluster worker machines. With identity.name you can specify the name of the identity and with identity.resourceGroup you can specify the resource group which contains the identity resource on Azure. The identity need to be created by the user upfront (manually, other tooling, …). Gardener/Azure Extension will only use the referenced one and won’t create an identity. Furthermore the identity have to be in the same subscription as the Shoot cluster. Via the identity.acrAccess you can configure the worker machines to use the passed identity for pulling from an Azure Container Registry (ACR).
Caution: Adding, exchanging or removing the identity will require a rolling update of all worker machines in the Shoot cluster.
Apart from the VNet and the worker subnet the Azure extension will also create a dedicated resource group, route tables, security groups, and an availability set (if not using zoned clusters).
InfrastructureConfig with dedicated subnets per zone
Another deployment option for zonal clusters only, is to create and configure a separate subnet per availability zone. This network layout is recommended to users that require fine-grained control over their network setup. One prevalent usecase is to create a zone-redundant NAT Gateway deployment by taking advantage of the ability to deploy separate NAT Gateways for each subnet.
To use this configuration the following requirements must be met:
the zoned field must be set to true.
the networks.vnet section must not be empty and must contain a valid configuration. For existing clusters that were not using the networks.vnet section, it is enough if networks.vnet.cidr field is set to the current networks.worker value.
For each of the target zones a subnet CIDR range must be specified. The specified CIDR range must be contained in the VNet CIDR specified above, or the VNet CIDR of your already existing VNet. In addition, the CIDR ranges must not overlap with the ranges of the other subnets.
ServiceEndpoints and NatGateways can be configured per subnet. Respectively, when networks.zones is specified, the fields networks.workers, networks.serviceEndpoints and networks.natGateway cannot be set. All the configuration for the subnets must be done inside the respective zone’s configuration.
Migrating to zonal shoots with dedicated subnets per zone
For existing zonal clusters it is possible to migrate to a network layout with dedicated subnets per zone. The migration works by creating additional network resources as specified in the configuration and progressively roll part of your existing nodes to use the new resources. To achieve the controlled rollout of your nodes, parts of the existing infrastructure must be preserved which is why the following constraint is imposed:
One of your specified zones must have the exact same CIDR range as the current network.workers field. Here is an example of such migration:
The migration to shoots with dedicated subnets per zone is a one-way process. Reverting the shoot to the previous configuration is not supported.
During the migration a subset of the nodes will be rolled to the new subnets.
ControlPlaneConfig
The control plane configuration mainly contains values for the Azure-specific control plane components.
Today, the only component deployed by the Azure extension is the cloud-controller-manager.
An example ControlPlaneConfig for the Azure extension looks as follows:
The cloudControllerManager.featureGates contains a map of explicitly enabled or disabled feature gates.
For production usage it’s not recommend to use this field at all as you can enable alpha features or disable beta/stable features, potentially impacting the cluster stability.
If you don’t want to configure anything for the cloudControllerManager simply omit the key in the YAML specification.
storage contains options for storage-related control plane component.
storage.managedDefaultStorageClass is enabled by default and will deploy a storageClass and mark it as a default (via the storageclass.kubernetes.io/is-default-class annotation)
storage.managedDefaultVolumeSnapshotClass is enabled by default and will deploy a volumeSnapshotClass and mark it as a default (via the snapshot.storage.kubernetes.io/is-default-classs annotation)
In case you want to manage your own default storageClass or volumeSnapshotClass you need to disable the respective options above, otherwise reconciliation of the controlplane may fail.
WorkerConfig
The Azure extension supports encryption for volumes plus support for additional data volumes per machine.
Please note that you cannot specify the encrypted flag for Azure disks as they are encrypted by default/out-of-the-box.
For each data volume, you have to specify a name.
The following YAML is a snippet of a Shoot resource:
Additionally, it supports for other Azure-specific values and could be configured under .spec.provider.workers[].providerConfig
An example WorkerConfig for the Azure extension looks like:
apiVersion: azure.provider.extensions.gardener.cloud/v1alpha1
kind: WorkerConfig
nodeTemplate: # (to be specified only if the node capacity would be different from cloudprofile info during runtime) capacity:
cpu: 2
gpu: 1
memory: 50Gi
diagnosticsProfile:
enabled: true# storageURI: https://<storage-account-name>.blob.core.windows.net/dataVolumes:
- name: test-image
imageRef:
communityGalleryImageID: /CommunityGalleries/gardenlinux-13e998fe-534d-4b0a-8a27-f16a73aef620/Images/gardenlinux/Versions/1443.10.0
# sharedGalleryImageID: /SharedGalleries/82fc46df-cc38-4306-9880-504e872cee18-VSMP_MEMORYONE_GALLERY/Images/vSMP_MemoryONE/Versions/1062800168.0.0# id: /Subscriptions/2ebd38b6-270b-48a2-8e0b-2077106dc615/Providers/Microsoft.Compute/Locations/westeurope/Publishers/sap/ArtifactTypes/VMImage/Offers/gardenlinux/Skus/greatest/Versions/1443.10.0# urn: sap:gardenlinux:greatest:1443.10.0
The .nodeTemplate is used to specify resource information of the machine during runtime. This then helps in Scale-from-Zero.
Some points to note for this field:
Currently only cpu, gpu and memory are configurable.
a change in the value lead to a rolling update of the machine in the worker pool
all the resources needs to be specified
The .diagnosticsProfile is used to enable machine boot diagnostics (disabled per default).
A storage account is used for storing vm’s boot console output and screenshots.
If .diagnosticsProfile.StorageURI is not specified azure managed storage will be used (recommended way).
The .dataVolumes field is used to add provider specific configurations for dataVolumes.
.dataVolumes[].name must match with one of the names in workers.dataVolumes[].name.
To specify an image source for the dataVolume either use communityGalleryImageID, sharedGalleryImageID, id or urn as imageRef.
However, users have to make sure that the image really exists, there’s yet no check in place.
If the image does not exist the machine will get stuck in creation.
Example Shoot manifest (non-zoned)
Please find below an example Shoot manifest for a non-zoned cluster:
Every Azure shoot cluster will be deployed with the Azure Disk CSI driver and the Azure File CSI driver.
Kubernetes Versions per Worker Pool
This extension supports gardener/gardener’s WorkerPoolKubernetesVersion feature gate, i.e., having worker pools with overridden Kubernetes versions since gardener-extension-provider-azure@v1.25.
Shoot CA Certificate and ServiceAccount Signing Key Rotation
This extension supports gardener/gardener’s ShootCARotation and ShootSARotation feature gates since gardener-extension-provider-azure@v1.28.
Miscellaneous
Azure Accelerated Networking
All worker machines of the cluster will be automatically configured to use Azure Accelerated Networking if the prerequisites are fulfilled.
The prerequisites are that the cluster must be zoned, and the used machine type and operating system image version are compatible for Accelerated Networking.
Availability Set based shoot clusters will not be enabled for accelerated networking even if the machine type and operating system support it, this is necessary because all machines from the availability set must be scheduled on special hardware, more details can be found here.
Supported machine types are listed in the CloudProfile in .spec.providerConfig.machineTypes[].acceleratedNetworking and the supported operating system image versions are defined in .spec.providerConfig.machineImages[].versions[].acceleratedNetworking.
Support for other Azure instances
The provider extension can be configured to connect to Azure instances other than the public one by providing additional configuration in the CloudProfile:
If no configuration is specified the extension will default to the public instance.
Azure instances other than AzurePublic, AzureGovernment, or AzureChina are not supported at this time.
Disabling the automatic deployment of allow-{tcp,udp} loadbalancer services
Using the azure-cloud-controller-manager when a user first creates a loadbalancer service in the cluster, a new Load Balancer is created in Azure and all nodes of the cluster are registered as backend.
When a NAT Gateway is not used, then this Load Balancer is used as a NAT device for outbound traffic by using one of the registered FrontendIPs assigned to the k8s LB service.
In cases where a NATGateway is not used, provider-azure will deploy by default a set of 2 Load Balancer services in the kube-system.
These are responsible for allowing outbound traffic in all cases for UDP and TCP.
There is a way for users to disable the deployment of these additional LBs by using the azure.provider.extensions.gardener.cloud/skip-allow-egress="true" annotation on their shoot.
[!WARNING]
Disabling the system Load Balancers may affect the outbound of your shoot.
Before disabling them, users are highly advised to have created at least one Load Balancer for TCP and UDP or forward outbound traffic via a different route.
Support for VolumeAttributesClasses (Beta in k8s 1.31)
To have the CSI-driver configured to support the necessary features for VolumeAttributesClasses on Azure for shoots with a k8s-version greater than 1.31, use the azure.provider.extensions.gardener.cloud/enable-volume-attributes-class annotation on the shoot. Keep in mind to also enable the required feature flags and runtime-config on the common kubernetes controllers (as outlined in the link above) in the shoot-spec.
For more information and examples on how to configure the volume attributes class, see example provided in the the azuredisk-csi-driver repository.
Shoot clusters with VMSS Flexible Orchestration (VMSS Flex/VMO)
Azure VMSS Flex is the replacement of Azure AvailabilitySet for non-zoned Azure Shoot clusters as VMSS Flex come with less disadvantages like no blocking machine operations or compatibility with Standard SKU loadbalancer etc.
Now, Azure Shoot clusters are using VMSS Flex by default for non-zoned clusters.
In the past you used to need to do the following:
The InfrastructureConfig of the Shoot configuration need to contain .zoned=false
Some key facts about VMSS Flex based clusters:
Unlike regular non-zonal Azure Shoot clusters, which have a primary AvailabilitySet which is shared between all machines in all worker pools of a Shoot cluster, a VMSS Flex based cluster has an own VMSS for each workerpool
In case the configuration of the VMSS will change (e.g. amount of fault domains in a region change; configured in the CloudProfile) all machines of the worker pool need to be rolled
It is not possible to migrate an existing primary AvailabilitySet based Shoot cluster to VMSS Flex based Shoot cluster and vice versa
VMSS Flex based clusters are using Standard SKU LoadBalancers instead of Basic SKU LoadBalancers for AvailabilitySet based Shoot clusters
Migrating AvailabilitySet shoots to VMSS Flex
Azure plans to deprecate Basic SKU public IP addresses.
See the official announcement.
This will create issues with existing legacy non-zonal clusters since their existing LoadBalancers are using Basic SKU and they can’t directly migrate to Standard SKU.
Provider-azure is offering a migration path from availability sets to VMSS Flex.
You have to annotate your shoot with the following annotation: migration.azure.provider.extensions.gardener.cloud/vmo='true' and trigger the shoot Maintenance.
The process for the migration closely traces the process outlined by Azure
This will allow you to preserve your public IPs during the migration.
During this process there will be downtime that users need to plan. For the transition the Loadbalancer will have to be deleted and recreated.
Also all nodes will have to roll out to the VMSS flex workers.
The rollout is controlled by the worker’s MCM settings, but it is suggested that you speed up this process so that traffic to your cluster is restored as quickly as possible (for example by using higher maxUnavailable values)
BackupBucketConfig
Immutable Buckets
The extension provides a gated feature currently in alpha called enableImmutableBuckets.
To make use of this feature, and enable the extension to react to the configuration below, you will need to set config.featureGates.enableImmutableBuckets: true in your helm charts’ values.yaml. See values.yaml for an example.
Before enabling this feature, you will need to add additional permissions to your Azure credential. Please check the linked section in docs/usage/azure-permissions.md.
BackupBucketConfig describes the configuration that needs to be passed over for creation of the backup bucket infrastructure. Configuration like immutability (WORM, i.e. write-once-read-many) that can be set on the bucket are specified here. Objects in the bucket will inherit the immutability duration which is set on the bucket, and they can not be modified or deleted for that duration.
This extension supports creating (and migrating already existing buckets if enabled) to use container-level WORM policies.
retentionType: Specifies the type of retention policy. The allowed value is bucket, which applies the retention policy to the entire bucket. See the documentation.
retentionPeriod: Defines the duration for which objects in the bucket will remain immutable. Azure Blob Storage only supports immutability durations in days, therefore this field must be set as multiples of 24h.
locked: A boolean indicating whether the retention policy is locked. Once locked, the policy cannot be removed or shortened, ensuring immutability. Learn more about locking policies here.
To configure a BackupBucket with immutability, include the BackupBucketConfig in the ProviderConfig of the BackupBucket resource. If the locked field is set to true, the retention policy will be locked, preventing further changes. However, the retention interval can be lengthened for a locked policy up to five times, but it can’t be shortened.
Here is an example of configuring a BackupBucket with immutability:
Storage account key rotation is only enabled when the rotationConfig is configured.
A storage account in Azure is always created with 2 different keys.
Every triggered rotation by the BackupBucket controller will rotate the key that is not currently in use, and update the BackupBucket referenced secret to the new key.
In addition operators can annotate a BackupBucket with azure.provider.extensions.gardener.cloud/rotate=true to trigger a key rotation on the next reconciliation, regardless of the key’s age.
Options:
rotationPeriodDays: Defines the period after its creation that an storage account key should be rotated.
expirationPeriodDays: When specified it will install an expiration policy for keys in the Azure storage account.
Warning
A full rotation (a rotation of both storage account keys) is completed after 2*rotationPeriod.
It is suggested that the rotationPeriod is configured at least twice the maintenance interval of the shoots.
This will ensure that at least one active key is currently used by the etcd-backup pods.
1.4 - Provider Equinix Metal
Gardener extension controller for the Equinix Metal cloud provider
Project Gardener implements the automated management and operation of Kubernetes clusters as a service.
Its main principle is to leverage Kubernetes concepts for all of its tasks.
Recently, most of the vendor specific logic has been developed in-tree.
However, the project has grown to a size where it is very hard to extend, maintain, and test.
With GEP-1 we have proposed how the architecture can be changed in a way to support external controllers that contain their very own vendor specifics.
This way, we can keep Gardener core clean and independent.
This controller implements Gardener’s extension contract for the Equinix Metal provider.
An example for a ControllerRegistration resource that can be used to register this controller to Gardener can be found here.
Please find more information regarding the extensibility concepts and a detailed proposal here.
Supported Kubernetes versions
This extension controller supports the following Kubernetes versions:
Version
Support
Conformance test results
Kubernetes 1.31
untested
N/A
Kubernetes 1.30
untested
N/A
Kubernetes 1.29
untested
N/A
Kubernetes 1.28
untested
N/A
Kubernetes 1.27
untested
N/A
Please take a look here to see which versions are supported by Gardener in general.
How to start using or developing this extension controller locally
You can run the controller locally on your machine by executing make start.
Static code checks and tests can be executed by running make verify. We are using Go modules for Golang package dependency management and Ginkgo/Gomega for testing.
Caveats
You can use all available disks on your Equinix instance, but only under
certain conditions:
You must use Flatcar
You must have a homogenous worker pool (all workers use the same OS and
container engine)
You must set any value for DataVolume
Feedback and Support
Feedback and contributions are always welcome!
Please report bugs or suggestions as GitHub issues or reach out on Slack (join the workspace here).
Learn more!
Please find further resources about out project here:
In this document we are describing how this configuration looks like for Equinix Metal and provide an example CloudProfile manifest with minimal configuration that you can use to allow creating Equinix Metal shoot clusters.
Example CloudProfile manifest
Please find below an example CloudProfile manifest:
apiVersion: core.gardener.cloud/v1beta1
kind: CloudProfile
metadata:
  name: equinix-metal
spec:
  type: equinixmetal
  kubernetes:
    versions:
    - version: 1.27.2
      #expirationDate: "2023-03-15T23:59:59Z"
  machineImages:
  - name: flatcar
    versions:
    - version: 0.0.0-stable
  machineTypes:
  - name: t1.small
    cpu: "4"
    gpu: "0"
    memory: 8Gi
    usable: true
  regions: # List of offered metros
  - name: ny
    zones: # List of offered facilities within the respective metro
    - name: ewr1
    - name: ny5
    - name: ny7
  providerConfig:
    apiVersion: equinixmetal.provider.extensions.gardener.cloud/v1alpha1
    kind: CloudProfileConfig
    machineImages:
    - name: flatcar
      versions:
      - version: 0.0.0-stable
        id: flatcar_stable
      - version: 3510.2.2
        ipxeScriptUrl: https://stable.release.flatcar-linux.net/amd64-usr/3510.2.2/flatcar_production_packet.ipxe
CloudProfileConfig
The cloud profile configuration contains information about the real machine image IDs in the Equinix Metal environment (IDs).
You have to map every version that you specify in .spec.machineImages[].versions here such that the Equinix Metal extension knows the ID for every version you want to offer.
Equinix Metal supports two different options to specify the image:
Supported Operating System: Images that are provided by Equinix Metal. They are referenced by their ID (slug). See (Operating Systems Reference)[https://deploy.equinix.com/developers/docs/metal/operating-systems/supported/#operating-systems-reference] for all supported operating system and their ids.
Custom iPXE Boot: Equinix Metal supports passing custom iPXE scripts during provisioning, which allows you to install a custom operating system manually. This is useful if you want to have a custom image or want to pin to a specific version. See Custom iPXE Boot for details.
An example CloudProfileConfig for the Equinix Metal extension looks as follows:
In this document we are describing how this configuration looks like for Equinix Metal and provide an example Shoot manifest with minimal configuration that you can use to create an Equinix Metal cluster (modulo the landscape-specific information like cloud profile names, secret binding names, etc.).
Provider secret data
Every shoot cluster references a SecretBinding which itself references a Secret, and this Secret contains the provider credentials of your Equinix Metal project.
This Secret must look as follows:
The Equinix Metal extension will only create a key pair.
ControlPlaneConfig
The control plane configuration mainly contains values for the Equinix Metal-specific control plane components.
Today, the Equinix Metal extension deploys the cloud-controller-manager and the CSI controllers, however, it doesn’t offer any configuration options at the moment.
An example ControlPlaneConfig for the Equinix Metal extension looks as follows:
The .reservationIDs[] list contains the list of IDs of the reserved devices.
The .reservedDevicesOnly field indicates whether only reserved devices from the provided list of reservation IDs should be used when new machines are created.
It always will attempt to create a device from one of the reservation IDs.
If none is available, the behaviour depends on the setting:
true: return an error
false: request a regular on-demand device
The default value is false.
Example Shoot manifest
Please find below an example Shoot manifest:
apiVersion: core.gardener.cloud/v1beta1
kind: Shoot
metadata:
name: my-shoot
namespace: garden-dev
spec:
cloudProfileName: equinix-metal
region: ny # Corresponds to a metro secretBindingName: my-secret
provider:
type: equinixmetal
infrastructureConfig:
apiVersion: equinixmetal.provider.extensions.gardener.cloud/v1alpha1
kind: InfrastructureConfig
controlPlaneConfig:
apiVersion: equinixmetal.provider.extensions.gardener.cloud/v1alpha1
kind: ControlPlaneConfig
workers:
- name: worker-pool1
machine:
type: t1.small
minimum: 2
maximum: 2
volume:
size: 50Gi
type: storage_1
zones: # Optional list of facilities, all of which MUST be in the metro; if not provided, then random facilities within the metro will be chosen for each machine. - ewr1
- ny5
- name: reserved-pool
machine:
type: t1.small
minimum: 1
maximum: 2
providerConfig:
apiVersion: equinixmetal.provider.extensions.gardener.cloud/v1alpha1
kind: WorkerConfig
reservationIDs:
- reserved-device1
- reserved-device2
reservedDevicesOnly: true volume:
size: 50Gi
type: storage_1
networking:
type: calico
kubernetes:
version: 1.27.2
maintenance:
autoUpdate:
kubernetesVersion: true machineImageVersion: true addons:
kubernetesDashboard:
enabled: true nginxIngress:
enabled: true
⚠️ Note that if you specify multiple facilities in the .spec.provider.workers[].zones[] list then new machines are randomly created in one of the provided facilities.
Particularly, it is not ensured that all facilities are used or that all machines are equally or unequally distributed.
Kubernetes Versions per Worker Pool
This extension supports gardener/gardener’s WorkerPoolKubernetesVersion feature gate, i.e., having worker pools with overridden Kubernetes versions since gardener-extension-provider-equinix-metal@v2.2.
Shoot CA Certificate and ServiceAccount Signing Key Rotation
This extension supports gardener/gardener’s ShootCARotation feature gate since gardener-extension-provider-equinix-metal@v2.3 and ShootSARotation feature gate since gardener-extension-provider-equinix-metal@v2.4.
1.5 - Provider GCP
Gardener extension controller for the GCP cloud provider
Project Gardener implements the automated management and operation of Kubernetes clusters as a service.
Its main principle is to leverage Kubernetes concepts for all of its tasks.
Recently, most of the vendor specific logic has been developed in-tree.
However, the project has grown to a size where it is very hard to extend, maintain, and test.
With GEP-1 we have proposed how the architecture can be changed in a way to support external controllers that contain their very own vendor specifics.
This way, we can keep Gardener core clean and independent.
This controller implements Gardener’s extension contract for the GCP provider.
An example for a ControllerRegistration resource that can be used to register this controller to Gardener can be found here.
Please find more information regarding the extensibility concepts and a detailed proposal here.
Supported Kubernetes versions
This extension controller supports the following Kubernetes versions:
Version
Support
Conformance test results
Kubernetes 1.33
1.33.0+
N/A
Kubernetes 1.32
1.32.0+
Kubernetes 1.31
1.31.0+
Kubernetes 1.30
1.30.0+
Kubernetes 1.29
1.29.0+
Kubernetes 1.28
1.28.0+
Kubernetes 1.27
1.27.0+
Please take a look here to see which versions are supported by Gardener in general.
How to start using or developing this extension controller locally
You can run the controller locally on your machine by executing make start.
Static code checks and tests can be executed by running make verify. We are using Go modules for Golang package dependency management and Ginkgo/Gomega for testing.
Feedback and Support
Feedback and contributions are always welcome!
Please report bugs or suggestions as GitHub issues or reach out on Slack (join the workspace here).
Learn more!
Please find further resources about out project here:
1.5.1.1 - Create a Кubernetes Cluster on GCP with Gardener
Overview
Gardener allows you to create a Kubernetes cluster on different infrastructure providers. This tutorial will guide you through the process of creating a cluster on GCP.
Extend the GCP provider specific WorkerConfig section in the shoot YAML and support provider configuration for
data-disks to support data-disk creation from an image name by supplying an image name.
Proposal
Shoot Specification
At this current time, there is no support for provider specific configuration of data disks in an GCP shoot spec.
The below shows an example configuration at the time of this proposal:
In the above imgName specified in providerConfig.dataVolumes.image represents the image name of a previously created image created by a tool or process.
See Google Cloud Create Image.
The MCM GCP Provider will ensure when a VM instance is instantiated, that the data
disk(s) for the VM are created with the source image set to the provided imgName.
The mechanics of this is left to MCM GCP provider. See image param to --create-disk flag in
Google Cloud Instance Creation
1.5.3 - Deployment
Deployment of the GCP provider extension
Disclaimer: This document is NOT a step-by-step installation guide for the GCP provider extension and only contains some configuration specifics regarding the installation of different components via the helm charts residing in the GCP provider extension repository.
Virtual Garden is not used, i.e., the runtime Garden cluster is also the target Garden cluster.
Automounted Service Account Token
The easiest way to deploy the gardener-extension-admission-gcp component will be to not provide kubeconfig at all. This way in-cluster configuration and an automounted service account token will be used. The drawback of this approach is that the automounted token will not be automatically rotated.
Service Account Token Volume Projection
Another solution will be to use Service Account Token Volume Projection combined with a kubeconfig referencing a token file (see example below).
This will allow for automatic rotation of the service account token by the kubelet. The configuration can be achieved by setting both .Values.global.serviceAccountTokenVolumeProjection.enabled: true and .Values.global.kubeconfig in the respective chart’s values.yaml file.
Virtual Garden is used, i.e., the runtime Garden cluster is different from the target Garden cluster.
Service Account
The easiest way to setup the authentication will be to create a service account and the respective roles will be bound to this service account in the target cluster. Then use the generated service account token and craft a kubeconfig which will be used by the workload in the runtime cluster. This approach does not provide a solution for the rotation of the service account token. However, this setup can be achieved by setting .Values.global.virtualGarden.enabled: true and following these steps:
Deploy the application part of the charts in the target cluster.
Get the service account token and craft the kubeconfig.
Set the crafted kubeconfig and deploy the runtime part of the charts in the runtime cluster.
Client Certificate
Another solution will be to bind the roles in the target cluster to a User subject instead of a service account and use a client certificate for authentication. This approach does not provide a solution for the client certificate rotation. However, this setup can be achieved by setting both .Values.global.virtualGarden.enabled: true and .Values.global.virtualGarden.user.name, then following these steps:
Generate a client certificate for the target cluster for the respective user.
Deploy the application part of the charts in the target cluster.
Craft a kubeconfig using the already generated client certificate.
Set the crafted kubeconfig and deploy the runtime part of the charts in the runtime cluster.
Projected Service Account Token
This approach requires an already deployed and configured oidc-webhook-authenticator for the target cluster. Also the runtime cluster should be registered as a trusted identity provider in the target cluster. Then projected service accounts tokens from the runtime cluster can be used to authenticate against the target cluster. The needed steps are as follows:
Set .Values.global.virtualGarden.enabled: true and .Values.global.virtualGarden.user.name. Note: username value will depend on the trust configuration, e.g., <prefix>:system:serviceaccount:<namespace>:<serviceaccount>
Set .Values.global.serviceAccountTokenVolumeProjection.enabled: true and .Values.global.serviceAccountTokenVolumeProjection.audience. Note: audience value will depend on the trust configuration, e.g., <cliend-id-from-trust-config>.
Craft a kubeconfig (see example below).
Deploy the application part of the charts in the target cluster.
Deploy the runtime part of the charts in the runtime cluster.
This document provides an overview of dual-stack support for the Gardener GCP extension.
Furthermore it clarifies which components are utilized, how the infrastructure is setup and how a dual-stack cluster can be provisioned.
Overview
Gardener allows to create dual-stack clusters on GCP. In this mode, both IPv4 and IPv6 are supported within the cluster.
This significantly expands the available address space, enables seamless communication across both IPv4 and IPv6 environments, and ensures compliance with modern networking standards.
Key Components for Dual-Stack Support
Dual-Stack Subnets: Separate subnets are created for nodes and services, with explicit IPv4 and external IPv6 ranges.
Ingress-GCE: Responsible for creating dual-stack (IPv4,IPv6) Load Balancers.
Cloud Allocator: Manages the assignment of IPv4 and IPv6 ranges to nodes and pods.
Dual-Stack Subnets
When provisioning a dual-stack cluster, the GCP provider creates distinct subnets:
1. Node Subnet
Primary IPv4 Range: Used for IPv4 nodes.
Secondary IPv4 Range: Used for IPv4 pods.
External IPv6 Range: Auto-assigned with a /64 prefix. Each VM gets an interface with a /96 prefix.
Customization:
IPv4 ranges (pods and nodes) can be defined in the shoot object.
IPv6 ranges are automatically filled by the GCP provider.
2. Service Subnet
This subnet is dedicated to IPv6 services. It is created due to GCP’s limitation of not supporting IPv6 range reservations.
3. Internal Subnet (optional)
This subnet is dedicated for internal load balancer. Currently, only internal IPv4 loadbalancer are supported. They are provisioned by the Cloud Controller Manager (CCM).
Ingress-GCE
The ingress-gce is a mandatory component for dual-stack clusters. It is responsible for creating dual-stack (IPv4,IPv6) Load Balancers. This is necessary because the GCP Cloud Controller Manager does not support provisioning IPv6 Load Balancer.
Cloud Allocator
The Cloud Allocator is part of the GCP Cloud Controller Manager and plays a critical role in managing IPAM (IP Address Management) for dual-stack clusters.
Responsibilities
Assigning PODCIDRs to Node Objects: Ensures that both IPv4 and IPv6 pod ranges are correctly assigned to the node objects.
Leveraging Secondary IPv4 Range:
Uses the secondary IPv4 range in the node subnet to allocate pod IP ranges.
Assigns both IPv4 and IPv6 pod ranges in compliance with GCP’s networking model.
Operational Details
The Cloud Allocator assigns a /112 pod cidr range/subrange from the /96 cidr range assigned to each VM.
This ensures efficient utilization of IPv6 address space while maintaining compatibility with Kubernetes networking requirements.
Why Use a Secondary IPv4 Range for Pods?
The secondary IPv4 range is essential for:
Enabling the Cloud Allocator to function correctly in assigning IP ranges.
Supporting both IPv4 and IPv6 pods in dual-stack clusters.
Aligning with GCP CCM’s requirement to separate pod IP ranges within the node subnet.
Creating a Dual-Stack Cluster
To create a dual-stack cluster, both IP families (IPv4,IPv6) need to be specified under spec.networking.ipFamilies. Below is an example of a dual-stack shoot cluster configuration:
Migration of IPv4-Only Shoot Clusters to Dual-Stack
To migrate an IPv4-only shoot cluster to Dual-Stack simply change the .spec.networking.ipFamilies field in the Shoot resource from IPv4 to IPv4, IPv6 as shown below.
You can find more information about the process and the steps required here.
Warning
Please note that the dual-stack migration requires the IPv4-only cluster to run in native routing mode, i.e. pod overlay network needs to be disabled.
The default quota of static routes per VPC in GCP is 200. This restricts the cluster size. Therefore, please adapt (if necessary) the quota for the routes per VPC (STATIC_ROUTES_PER_NETWORK) in the gcp cloud console accordingly before switching to native routing.
After triggering the migration a constraint of type DualStackNodesMigrationReady is added to the shoot status. It is in state False until all nodes have an IPv4 and IPv6 address assigned.
Changing the ipFamilies field triggers immediately an infrastructure reconciliation, where the infrastructure is reconfigured to additionally support IPv6. During this infrastructure migration process the subnets get an external IPv6 range and the node subnet gets a secondary IPv4 range. Pod specific cloud routes are deleted from the VPC route table and alias IP ranges for the pod routes are added to the NIC of Kubernetes nodes/instances.
With the next node roll-out which is a manual step and will not be triggered automatically, all nodes will get an IPv6 address and an IPv6 prefix for pods assigned. When all nodes have IPv4 and IPv6 pod ranges, the status of the DualStackNodesMigrationReady constraint will be changed to True.
Once all nodes are migrated, the remaining control plane components and the Container Network Interface (CNI) are configured for dual-stack networking and the migration constraint is removed at the end of this step.
Load Balancer Service Configuration
To create a dual-stack LoadBalancer the spec.ipFamilies and spec.ipFamilyPolicy field needs to be specified in the Kubernetes service.
An example configuration is shown below:
The required annotation cloud.google.com/l4-rbs: enabled for ingress-gce is added automatically via webhook for services of type: LoadBalancer.
Internal Load Balancer
Internal IPv6 LoadBalancers are currently not supported.
To create internal IPv4 LoadBalancers, you can set one of the the following annotations:
"networking.gke.io/load-balancer-type=Internal"
"cloud.google.com/load-balancer-type=internal" (deprecated).
Internal load balancers are created by cloud-controller-manger and get an IPv4 address from the internal subnet.
1.5.5 - Local Setup
admission-gcp
admission-gcp is an admission webhook server which is responsible for the validation of the cloud provider (GCP in this case) specific fields and resources. The Gardener API server is cloud provider agnostic and it wouldn’t be able to perform similar validation.
Follow the steps below to run the admission webhook server locally.
Make sure that the KUBECONFIG environment variable is pointing to the local garden cluster.
make start-admission
Setup the ValidatingWebhookConfiguration.
hack/dev-setup-admission-gcp.sh will configure the webhook Service which will allow the kube-apiserver of your local cluster to reach the webhook server. It will also apply the ValidatingWebhookConfiguration manifest.
./hack/dev-setup-admission-gcp.sh
You are now ready to experiment with the admission-gcp webhook server locally.
1.5.6 - Operations
Using the GCP provider extension with Gardener as operator
The core.gardener.cloud/v1beta1.CloudProfile resource declares a providerConfig field that is meant to contain provider-specific configuration.
The core.gardener.cloud/v1beta1.Seed resource is structured similarly.
Additionally, it allows configuring settings for the backups of the main etcds’ data of shoot clusters control planes running in this seed cluster.
This document explains the necessary configuration for this provider extension.
CloudProfile resource
This section describes, how the configuration for CloudProfiles looks like for GCP by providing an example CloudProfile manifest with minimal configuration that can be used to allow the creation of GCP shoot clusters.
CloudProfileConfig
The cloud profile configuration contains information about the real machine image IDs in the GCP environment (image URLs).
You have to map every version that you specify in .spec.machineImages[].versions here such that the GCP extension knows the image URL for every version you want to offer.
For each machine image version an architecture field can be specified which specifies the CPU architecture of the machine on which given machine image can be used.
An example CloudProfileConfig for the GCP extension looks as follows:
If you want to allow that shoots can create VMs with local SSDs volumes then you have to specify the type of the disk with SCRATCH in the .spec.volumeTypes[] list.
Please find below an example CloudProfile manifest:
This provider extension does not support any provider configuration for the Seed’s .spec.provider.providerConfig field.
However, it supports to managing of backup infrastructure, i.e., you can specify a configuration for the .spec.backup field.
Backup configuration
A Seed of type gcp can be configured to perform backups for the main etcds’ of the shoot clusters control planes using Google Cloud Storage buckets.
The location/region where the backups will be stored defaults to the region of the Seed (spec.provider.region), but can also be explicitly configured via the field spec.backup.region.
The region of the backup can be different from where the seed cluster is running.
However, usually it makes sense to pick the same region for the backup bucket as used for the Seed cluster.
Please find below an example Seed manifest (partly) that configures backups using Google Cloud Storage buckets.
Changes to the Shoot worker-pools are applied in-place where possible.
In case this is not possible a rolling update of the workers will be performed to apply the new configuration,
as outlined in the Gardener documentation.
The exact fields that trigger this behaviour depend on whether the feature gate NewWorkerPoolHash is enabled.
If it is not enabled, only the fields mentioned in the Gardener doc plus the providerConfig are used.
If the feature gate is enabled, it’s the same with a few additions:
.spec.provider.workers[].dataVolumes[].name
.spec.provider.workers[].dataVolumes[].size
.spec.provider.workers[].dataVolumes[].type
We exclude .spec.provider.workers[].dataVolumes[].encrypted from the hash calculation because GCP disks are encrypted by default,
and the field does not influence disk encryption behavior.
Everything related to disk encryption is handled by the providerConfig.
1.5.7 - Usage
Using the GCP provider extension with Gardener as end-user
This document describes the configurable options for GCP and provides an example Shoot manifest with minimal configuration that can be used to create a GCP cluster (modulo the landscape-specific information like cloud profile names, secret binding names, etc.).
Accessing GCP APIs
In order for Gardener to create a Kubernetes cluster using GCP infrastructure components, a Shoot has to provide an authentication mechanism giving sufficient permissions to the desired GCP project.
Every shoot cluster references a SecretBinding or a CredentialsBinding.
Important
While SecretBindings can only reference Secrets, CredentialsBindings can also reference WorkloadIdentitys which provide an alternative authentication method.
WorkloadIdentitys do not directly contain credentials but are rather a representation of the workload that is going to access the user’s account.
If the user has configured Workload Identity Federation with Gardener’s Workload Identity Issuer then the GCP infrastructure components can access the user’s account without the need of preliminary exchange of credentials.
Important
The SecretBinding/CredentialsBinding is configurable in the Shoot cluster with the field secretBindingName/credentialsBindingName.
SecretBindings are considered legacy and will be deprecated in the future.
It is advised to use CredentialsBindings instead.
GCP Service Account Credentials
The required credentials for the GCP project are a Service Account Key to authenticate as a GCP Service Account.
A service account is a special account that can be used by services and applications to interact with Google Cloud Platform APIs.
Applications can use service account credentials to authorize themselves to a set of APIs and perform actions within the permissions granted to the service account.
Create a JSON Service Account key for the Service Account.
Provide it in the Secret (base64 encoded for field serviceaccount.json), that is being referenced by the SecretBinding in the Shoot cluster configuration.
Depending on your API usage it can be problematic to reuse the same Service Account Key for different Shoot clusters due to rate limits.
Please consider spreading your Shoots over multiple Service Accounts on different GCP projects if you are hitting those limits, see https://cloud.google.com/compute/docs/api-rate-limits.
GCP Workload Identity Federation
Users can choose to trust Gardener’s Workload Identity Issuer and eliminate the need for providing GCP Service Account credentials.
You can retrieve Gardener’s Workload Identity Issuer URL directly from the Garden cluster by reading the contents of the Gardener Info ConfigMap.
kubectl -n gardener-system-public get configmap gardener-info -o yaml
In the example attribute mapping shown below all WorkloadIdentitys that are created in the garden-myproj namespace will be authenticated.
Now that the Workload Identity Federation is configured the user should download the credential configuration file.
Important
If required, users can use a stricter mapping to authenticate only certain WorkloadIdentitys.
Please, refer to the attribute mappings documentation for more information.
As a next step a resource of type WorkloadIdentity should be created in the Garden cluster and configured with the information from the already downloaded credential configuration file.
This identity will be used to impersonate the Service Account in order to call GCP APIs.
Mind that the service_account_impersonation_url is probably not present in the downloaded credential configuration file.
You can use the example template or download a new credential configuration file once we grant the permission to the federated identity to impersonate the Service Account.
A sample of such resource is shown below:
apiVersion: security.gardener.cloud/v1alpha1
kind: WorkloadIdentity
metadata:
name: gcp
namespace: garden-myproj
spec:
audiences:
# This is the audience that you configure during workload identity pool creation - https://iam.googleapis.com/projects/<project_number>/locations/global/workloadIdentityPools/<pool_name>/providers/<provider_name>
targetSystem:
type: gcp
providerConfig:
apiVersion: gcp.provider.extensions.gardener.cloud/v1alpha1
kind: WorkloadIdentityConfig
projectID: gcp-project-name # This is the name of the project which the workload identity will access# Use the downloaded credential configuration file to set this field. The credential_source field is not important to Gardener and should be omitted. credentialsConfig:
universe_domain: "googleapis.com" type: "external_account" audience: "//iam.googleapis.com/projects/<project_number>/locations/global/workloadIdentityPools/<pool_name>/providers/<provider_name>" subject_token_type: "urn:ietf:params:oauth:token-type:jwt" service_account_impersonation_url: "https://iamcredentials.googleapis.com/v1/projects/-/serviceAccounts/<service_account_email>:generateAccessToken" token_url: "https://sts.googleapis.com/v1/token"
Now users should give permissions to the WorkloadIdentity to impersonate the Service Account.
In order to construct the principal that will be used for impersonation retrieve the subject of the created WorkloadIdentity.
SUBJECT=$(kubectl -n garden-myproj get workloadidentity gcp -o=jsonpath='{.status.sub}')echo "principal://iam.googleapis.com/projects/<project_number>/locations/global/workloadIdentityPools/<pool_name>/subject/$SUBJECT"
The principal template is also shown in the Google Console Workload Identity Pool UI.
Users should give this principal the Role Workload Identity User so that it can impersonate the Service Account.
One can do this through the Service Account Permissions tab, through the Google Console Workload Identity Pool UI or by using the gcloud cli.
As a final step create a CredentialsBinding referencing the GCP WorkloadIdentity and use it in your Shoot definitions.
One can omit the creation of Service Account and directly grant access to the federated identity’s principal, skipping the Service Account impersonation.
This although recommended, will not always work because federated identities do not fall under the allAuthenticatedUsers category and cannot access machine images that are not made available to allUsers.
This means that machine images should be made available to allUsers or permissions should be explicitly given to the federated identity in order for this to work.
GCP imposes some restrictions on which images can be accessible to allUsers.
As of now, Gardenlinux images are not published in a way that they can be accessed by allUsers.
See the following issue for more details https://github.com/gardenlinux/glci/issues/148.
InfrastructureConfig
The infrastructure configuration mainly describes how the network layout looks like in order to create the shoot worker nodes in a later step, thus, prepares everything relevant to create VMs, load balancers, volumes, etc.
An example InfrastructureConfig for the GCP extension looks as follows:
The networks.vpc section describes whether you want to create the shoot cluster in an already existing VPC or whether to create a new one:
If networks.vpc.name is given then you have to specify the VPC name of the existing VPC that was created by other means (manually, other tooling, …).
If you want to get a fresh VPC for the shoot then just omit the networks.vpc field.
If a VPC name is not given then we will create the cloud router + NAT gateway to ensure that worker nodes don’t get external IPs.
If a VPC name is given then a cloud router name must also be given, failure to do so would result in validation errors
and possibly clusters without egress connectivity.
If a VPC name is given and calico shoot clusters are created without a network overlay within one VPC make sure that the pod CIDR specified in shoot.spec.networking.pods is not overlapping with any other pod CIDR used in that VPC.
Overlapping pod CIDRs will lead to disfunctional shoot clusters.
The networks.workers section describes the CIDR for a subnet that is used for all shoot worker nodes, i.e., VMs which later run your applications.
The networks.internal section is optional and can describe a CIDR for a subnet that is used for internal load balancers,
The networks.cloudNAT.natIPNames is optional and is used to specify the names of the manual ip addresses which should be used by the nat gateway
The networks.cloudNAT.endpointIndependentMapping is optional and is used to define the endpoint mapping behavior. You can enable it or disable it at any point by toggling networks.cloudNAT.endpointIndependentMapping.enabled. By default, it is disabled.
networks.cloudNAT.enableDynamicPortAllocation is optional (default: false) and allows one to enable dynamic port allocation (https://cloud.google.com/nat/docs/ports-and-addresses#dynamic-port). Note that enabling this puts additional restrictions on the permitted values for networks.cloudNAT.minPortsPerVM and networks.cloudNAT.minPortsPerVM, namely that they now both are required to be powers of two. Also, maxPortsPerVM may not be given if dynamic port allocation is disabled.
networks.cloudNAT.udpIdleTimeoutSec, networks.cloudNAT.icmpIdleTimeoutSec, networks.cloudNAT.tcpEstablishedIdleTimeoutSec, networks.cloudNAT.tcpTransitoryIdleTimeoutSec, and networks.cloudNAT.tcpTimeWaitTimeoutSec give more fine-granular control over various timeout-values. For more details see https://cloud.google.com/nat/docs/public-nat#specs-timeouts.
The specified CIDR ranges must be contained in the VPC CIDR specified above, or the VPC CIDR of your already existing VPC.
You can freely choose these CIDRs and it is your responsibility to properly design the network layout to suit your needs.
The networks.flowLogs section describes the configuration for the VPC flow logs. In order to enable the VPC flow logs at least one of the following parameters needs to be specified in the flow log section:
networks.flowLogs.aggregationInterval an optional parameter describing the aggregation interval for collecting flow logs. For more details, see aggregation_interval reference.
networks.flowLogs.flowSampling an optional parameter describing the sampling rate of VPC flow logs within the subnetwork where 1.0 means all collected logs are reported and 0.0 means no logs are reported. For more details, see flow_sampling reference.
networks.flowLogs.metadata an optional parameter describing whether metadata fields should be added to the reported VPC flow logs. For more details, see metadata reference.
Apart from the VPC and the subnets the GCP extension will also create a dedicated service account for this shoot, and firewall rules.
ControlPlaneConfig
The control plane configuration mainly contains values for the GCP-specific control plane components.
Today, the only component deployed by the GCP extension is the cloud-controller-manager.
An example ControlPlaneConfig for the GCP extension looks as follows:
The zone field tells the cloud-controller-manager in which zone it should mainly operate.
You can still create clusters in multiple availability zones, however, the cloud-controller-manager requires one “main” zone.
⚠️ You always have to specify this field!
The cloudControllerManager.featureGates contains a map of explicitly enabled or disabled feature gates.
For production usage it’s not recommend to use this field at all as you can enable alpha features or disable beta/stable features, potentially impacting the cluster stability.
If you don’t want to configure anything for the cloudControllerManager simply omit the key in the YAML specification.
The members of the storage allows to configure the provided storage classes further.
If storage.managedDefaultStorageClass is enabled (the default), the default StorageClass deployed will be marked as default (via storageclass.kubernetes.io/is-default-class annotation).
Similarly, if storage.managedDefaultVolumeSnapshotClass is enabled (the default), the default VolumeSnapshotClass deployed will be marked as default.
In case you want to set a different StorageClass or VolumeSnapshotClass as default you need to set the corresponding option to false as at most one class should be marked as default in each case and the ResourceManager will prevent any changes from the Gardener managed classes to take effect.
Furthermore, the storage.csiFilestore.enabled field can be set to true to
enable the GCP Filestore CSI driver.
Additionally, you have to make sure that your IAM user has the permission roles/file.editor and
that the filestore API is enabled in your GCP project.
WorkerConfig
The worker configuration contains:
Local SSD interface for the additional volumes attached to GCP worker machines.
If you attach the disk with SCRATCH type, either an NVMe interface or a SCSI interface must be specified.
It is only meaningful to provide this volume interface if only SCRATCH data volumes are used.
Volume Encryption config that specifies values for kmsKeyName and kmsKeyServiceAccountName.
The kmsKeyName is the
key name of the cloud kms disk encryption key and must be specified if CMEK disk encryption is needed.
The kmsKeyServiceAccount is the service account granted the roles/cloudkms.cryptoKeyEncrypterDecrypter on the kmsKeyName
If empty, then the role should be given to the Compute Engine Service Agent Account. This CESA account usually has the name:
service-PROJECT_NUMBER@compute-system.iam.gserviceaccount.com. See: https://cloud.google.com/iam/docs/service-agents#compute-engine-service-agent
Prior to use, the operator should add IAM policy binding using the gcloud CLI:
Setting .spec.provider.workers[].(data)Volumes[].encrypted has no impact because GCP disks are encrypted by default.
Setting a volume image with dataVolumes.sourceImage.
However, this parameter should only be used with particular caution.
For example Gardenlinux works with filesystem LABELs only and creating another disk form the very same image causes the LABELs to be duplicated.
See: https://github.com/gardener/gardener-extension-provider-gcp/issues/323
Some hyperdisks allow adjustment of their default values for provisionedIops and provisionedThroughput.
Keep in mind though that Hyperdisk Extreme and Hyperdisk Throughput volumes can’t be used as boot disks.
Service Account with their specified scopes, authorized for this worker.
Service accounts created in advance that generate access tokens that can be accessed through the metadata server and used to authenticate applications on the instance.
Note: If you do not provide service accounts for your workers, the Compute Engine default service account will be used. For more details on the default account, see https://cloud.google.com/compute/docs/access/service-accounts#default_service_account.
If the DisableGardenerServiceAccountCreation feature gate is disabled, Gardener will create a shared service accounts to use for all instances. This feature gate is currently in beta and it will no longer be possible to re-enable the service account creation via feature gate flag.
GPU with its type and count per node. This will attach that GPU to all the machines in the worker grp
Note:
A rolling upgrade of the worker group would be triggered in case the acceleratorType or count is updated.
Some machineTypes like a2 family come with already attached gpu of a100 type and pre-defined count. If your workerPool consists of such machineTypes, please specify exact GPU configuration for the machine type as specified in Google cloud documentation. acceleratorType to use for families with attached gpu are stated below:
a2 family -> nvidia-tesla-a100
g2 family -> nvidia-l4
Sufficient quota of gpu is needed in the GCP project. This includes quota to support autoscaling if enabled.
GPU-attached machines can’t be live migrated during host maintenance events. Find out how to handle that in your application here
GPU count specified here is considered for forming node template during scale-from-zero in Cluster Autoscaler
The .nodeTemplate is used to specify resource information of the machine during runtime. This then helps in Scale-from-Zero.
Some points to note for this field:
Currently only cpu, gpu and memory are configurable.
a change in the value lead to a rolling update of the machine in the workerpool
all the resources needs to be specified
An example WorkerConfig for the GCP looks as follows:
apiVersion: gcp.provider.extensions.gardener.cloud/v1alpha1
kind: WorkerConfig
volume:
interface: NVME
encryption:
kmsKeyName: "projects/projectId/locations/<zoneName>/keyRings/<keyRingName>/cryptoKeys/alpha" kmsKeyServiceAccount: "user@projectId.iam.gserviceaccount.com"dataVolumes:
- name: test
sourceImage: projects/sap-se-gcp-gardenlinux/global/images/gardenlinux-gcp-gardener-prod-amd64-1443-3-c261f887
provisionedIops: 3000
provisionedThroughput: 140
serviceAccount:
email: foo@bar.com
scopes:
- https://www.googleapis.com/auth/cloud-platform
gpu:
acceleratorType: nvidia-tesla-t4
count: 1
nodeTemplate: # (to be specified only if the node capacity would be different from cloudprofile info during runtime) capacity:
cpu: 2
gpu: 1
memory: 50Gi
Every GCP shoot cluster will be deployed with the GCP PD CSI driver.
It is compatible with the legacy in-tree volume provisioner that was deprecated by the Kubernetes community and will be removed in future versions of Kubernetes.
End-users might want to update their custom StorageClasses to the new pd.csi.storage.gke.io provisioner.
Support for VolumeAttributesClasses (Beta in k8s 1.31)
To have the CSI-driver configured to support the necessary features for VolumeAttributesClasses on GCP for shoots with a k8s-version greater than 1.31, use the gcp.provider.extensions.gardener.cloud/enable-volume-attributes-class annotation on the shoot. Keep in mind to also enable the required feature flags and runtime-config on the common kubernetes controllers (as outlined in the link above) in the shoot-spec.
Kubernetes Versions per Worker Pool
This extension supports gardener/gardener’s WorkerPoolKubernetesVersion feature gate, i.e., having worker pools with overridden Kubernetes versions since gardener-extension-provider-gcp@v1.21.
Shoot CA Certificate and ServiceAccount Signing Key Rotation
This extension supports gardener/gardener’s ShootCARotation and ShootSARotation feature gates since gardener-extension-provider-gcp@v1.23.
BackupBucket
Gardener manages etcd backups for Shoot clusters using provider-specific backup storage solutions. On GCP, this storage is implemented through Google Cloud Storage (GCS) buckets, which store snapshots of the cluster’s etcd data.
The BackupBucket resource abstracts the backup infrastructure, enabling Gardener and its extension controllers to manage it seamlessly. This abstraction allows Gardener to create, delete, and maintain backup buckets across various cloud providers in a standardized manner.
The BackupBucket resource includes a spec field, which defines the configuration details for the backup bucket. These details include:
The region where the bucket should be created.
A reference to the secret containing credentials for accessing the cloud provider.
A ProviderConfig field for provider-specific configurations.
BackupBucketConfig
The BackupBucketConfig represents the configuration for a backup bucket. It includes an optional immutability configuration that enforces retention policies on the backup bucket.
The Gardener extension provider for GCP supports creating and managing immutable backup buckets by leveraging the bucket lock feature. Immutability ensures that once data is written to the bucket, it cannot be modified or deleted for a specified period. This feature is crucial for protecting backups from accidental or malicious deletion, ensuring data safety and availability for restoration.
Here is an example configuration for BackupBucketConfig:
retentionType: Specifies the type of retention policy. The allowed value is bucket, which applies the retention policy to the entire bucket. For more details, refer to the documentation.
retentionPeriod: Defines the duration for which objects in the bucket will remain immutable. The value should follow GCP-supported formats, such as "24h" for 24 hours. Refer to retention period formats for more information. The minimum retention period is 24 hours.
locked: A boolean indicating whether the retention policy is locked. Once locked, the policy cannot be removed or shortened, ensuring immutability. Learn more about locking policies here.
To configure a BackupBucket with immutability, include the BackupBucketConfig in the ProviderConfig of the BackupBucket resource. If the locked field is set to true, the retention policy will be locked, preventing the retention policy from being removed and the retention period from being reduced. However, it’s still possible to increase the retention period.
Here is an example of configuring a BackupBucket with immutability:
Project Gardener implements the automated management and operation of Kubernetes clusters as a service.
Its main principle is to leverage Kubernetes concepts for all of its tasks.
Recently, most of the vendor specific logic has been developed in-tree.
However, the project has grown to a size where it is very hard to extend, maintain, and test.
With GEP-1 we have proposed how the architecture can be changed in a way to support external controllers that contain their very own vendor specifics.
This way, we can keep Gardener core clean and independent.
This controller implements Gardener’s extension contract for the OpenStack provider.
An example for a ControllerRegistration resource that can be used to register this controller to Gardener can be found here.
Please find more information regarding the extensibility concepts and a detailed proposal here.
Supported Kubernetes versions
This extension controller supports the following Kubernetes versions:
Version
Support
Conformance test results
Kubernetes 1.33
1.33.0+
N/A
Kubernetes 1.32
1.32.0+
Kubernetes 1.31
1.31.0+
Kubernetes 1.30
1.30.0+
Kubernetes 1.29
1.29.0+
Kubernetes 1.28
1.28.0+
Kubernetes 1.27
1.27.0+
Please take a look here to see which versions are supported by Gardener in general.
Compatibility
The following lists known compatibility issues of this extension controller with other Gardener components.
OpenStack Extension
Gardener
Action
Notes
< v1.12.0
> v1.10.0
Please update the provider version to >= v1.12.0 or disable the feature gate MountHostCADirectories in the Gardenlet.
Applies if feature flag MountHostCADirectories in the Gardenlet is enabled. This is to prevent duplicate volume mounts to /usr/share/ca-certificates in the Shoot API Server.
How to start using or developing this extension controller locally
You can run the controller locally on your machine by executing make start.
Static code checks and tests can be executed by running make verify. We are using Go modules for Golang package dependency management and Ginkgo/Gomega for testing.
Feedback and Support
Feedback and contributions are always welcome!
Please report bugs or suggestions as GitHub issues or reach out on Slack (join the workspace here).
Learn more!
Please find further resources about out project here:
Disclaimer: This document is NOT a step by step installation guide for the OpenStack provider extension and only contains some configuration specifics regarding the installation of different components via the helm charts residing in the OpenStack provider extension repository.
Virtual Garden is not used, i.e., the runtime Garden cluster is also the target Garden cluster.
Automounted Service Account Token
The easiest way to deploy the gardener-extension-admission-openstack component will be to not provide kubeconfig at all. This way in-cluster configuration and an automounted service account token will be used. The drawback of this approach is that the automounted token will not be automatically rotated.
Service Account Token Volume Projection
Another solution will be to use Service Account Token Volume Projection combined with a kubeconfig referencing a token file (see example below).
This will allow for automatic rotation of the service account token by the kubelet. The configuration can be achieved by setting both .Values.global.serviceAccountTokenVolumeProjection.enabled: true and .Values.global.kubeconfig in the respective chart’s values.yaml file.
Virtual Garden is used, i.e., the runtime Garden cluster is different from the target Garden cluster.
Service Account
The easiest way to setup the authentication will be to create a service account and the respective roles will be bound to this service account in the target cluster. Then use the generated service account token and craft a kubeconfig which will be used by the workload in the runtime cluster. This approach does not provide a solution for the rotation of the service account token. However, this setup can be achieved by setting .Values.global.virtualGarden.enabled: true and following these steps:
Deploy the application part of the charts in the target cluster.
Get the service account token and craft the kubeconfig.
Set the crafted kubeconfig and deploy the runtime part of the charts in the runtime cluster.
Client Certificate
Another solution will be to bind the roles in the target cluster to a User subject instead of a service account and use a client certificate for authentication. This approach does not provide a solution for the client certificate rotation. However, this setup can be achieved by setting both .Values.global.virtualGarden.enabled: true and .Values.global.virtualGarden.user.name, then following these steps:
Generate a client certificate for the target cluster for the respective user.
Deploy the application part of the charts in the target cluster.
Craft a kubeconfig using the already generated client certificate.
Set the crafted kubeconfig and deploy the runtime part of the charts in the runtime cluster.
Projected Service Account Token
This approach requires an already deployed and configured oidc-webhook-authenticator for the target cluster. Also the runtime cluster should be registered as a trusted identity provider in the target cluster. Then projected service accounts tokens from the runtime cluster can be used to authenticate against the target cluster. The needed steps are as follows:
Set .Values.global.virtualGarden.enabled: true and .Values.global.virtualGarden.user.name. Note: username value will depend on the trust configuration, e.g., <prefix>:system:serviceaccount:<namespace>:<serviceaccount>
Set .Values.global.serviceAccountTokenVolumeProjection.enabled: true and .Values.global.serviceAccountTokenVolumeProjection.audience. Note: audience value will depend on the trust configuration, e.g., <cliend-id-from-trust-config>.
Craft a kubeconfig (see example below).
Deploy the application part of the charts in the target cluster.
Deploy the runtime part of the charts in the runtime cluster.
admission-openstack is an admission webhook server which is responsible for the validation of the cloud provider (OpenStack in this case) specific fields and resources. The Gardener API server is cloud provider agnostic and it wouldn’t be able to perform similar validation.
Follow the steps below to run the admission webhook server locally.
Make sure that the KUBECONFIG environment variable is pointing to the local garden cluster.
make start-admission
Setup the ValidatingWebhookConfiguration.
hack/dev-setup-admission-openstack.sh will configure the webhook Service which will allow the kube-apiserver of your local cluster to reach the webhook server. It will also apply the ValidatingWebhookConfiguration manifest.
./hack/dev-setup-admission-openstack.sh
You are now ready to experiment with the admission-openstack webhook server locally.
1.6.3 - Operations
Using the OpenStack provider extension with Gardener as operator
In this document we are describing how this configuration looks like for OpenStack and provide an example CloudProfile manifest with minimal configuration that you can use to allow creating OpenStack shoot clusters.
CloudProfileConfig
The cloud profile configuration contains information about the real machine image IDs in the OpenStack environment (image names).
You have to map every version that you specify in .spec.machineImages[].versions here such that the OpenStack extension knows the image ID for every version you want to offer.
It also contains optional default values for DNS servers that shall be used for shoots.
In the dnsServers[] list you can specify IP addresses that are used as DNS configuration for created shoot subnets.
Also, you have to specify the keystone URL in the keystoneURL field to your environment.
Additionally, you can influence the HTTP request timeout when talking to the OpenStack API in the requestTimeout field.
This may help when you have for example a long list of load balancers in your environment.
In case your OpenStack system uses Octavia for network load balancing then you have to set the useOctavia field to true such that the cloud-controller-manager for OpenStack gets correctly configured (it defaults to false).
Some hypervisors (especially those which are VMware-based) don’t automatically send a new volume size to a Linux kernel when a volume is resized and in-use.
For those hypervisors you can enable the storage plugin interacting with Cinder to telling the SCSI block device to refresh its information to provide information about it’s updated size to the kernel. You might need to enable this behavior depending on the underlying hypervisor of your OpenStack installation. The rescanBlockStorageOnResize field controls this. Please note that it only applies for Kubernetes versions where CSI is used.
Some openstack configurations do not allow to attach more volumes than a specific amount to a single node.
To tell the k8s scheduler to not over schedule volumes on a node, you can set nodeVolumeAttachLimit which defaults to 256.
Some openstack configurations have different names for volume and compute availability zones, which might cause pods to go into pending state as there are no nodes available in the detected volume AZ. To ignore the volume AZ when scheduling pods, you can set ignoreVolumeAZ to true (it defaults to false).
See CSI Cinder driver.
The cloud profile config also contains constraints for floating pools and load balancer providers that can be used in shoots.
If your OpenStack system supports server groups, the serverGroupPolicies property will enable your end-users to create shoots with workers where the nodes are managed by Nova’s server groups.
Specifying serverGroupPolicies is optional and can be omitted. If enabled, the end-user can choose whether or not to use this feature for a shoot’s workers. Gardener will handle the creation of the server group and node assignment.
To enable this feature, an operator should:
specify the allowed policy values (e.g. affintity, anti-affinity) in this section. Only the policies in the allow-list will be available for end-users.
make sure that your OpenStack project has enough server group capacity. Otherwise, shoot creation will fail.
If your OpenStack system has multiple volume-types, the storageClasses property enables the creation of kubernetes storageClasses for shoots.
Set storageClasses[].parameters.type to map it with an openstack volume-type. Specifying storageClasses is optional and can be omitted.
An example CloudProfileConfig for the OpenStack extension looks as follows:
Please note that it is possible to configure a region mapping for keystone URLs, floating pools, and load balancer providers.
Additionally, floating pools can be constrainted to a keystone domain by specifying the domain field.
Floating pool names may also contains simple wildcard expressions, like * or fp-pool-* or *-fp-pool. Please note that the * must be either single or at the beginning or at the end. Consequently, fp-*-pool is not possible/allowed.
The default behavior is that, if found, the regional (and/or domain restricted) entry is taken.
If no entry for the given region exists then the fallback value is the most matching entry (w.r.t. wildcard matching) in the list without a region field (or the keystoneURL value for the keystone URLs).
If an additional floating pool should be selectable for a region and/or domain, you can mark it as non constraining
with setting the optional field nonConstraining to true.
Multiple loadBalancerProviders can be specified in the CloudProfile. Each provider may specify a region constraint for where it can be used.
If at least one region specific entry exists in the CloudProfile, the shoot’s specified loadBalancerProvider must adhere to the list of the available providers of that region. Otherwise, one of the non-regional specific providers should be used.
Each entry in the loadBalancerProviders must be uniquely identified by its name and if applicable, its region.
The loadBalancerClasses field is an optional list of load balancer classes which can be when the corresponding floating pool network is choosen. The load balancer classes can be configured in the same way as in the ControlPlaneConfig in the Shoot resource, therefore see here for more details.
Some OpenStack environments don’t need these regional mappings, hence, the region and keystoneURLs fields are optional.
If your OpenStack environment only has regional values and it doesn’t make sense to provide a (non-regional) fallback then simply
omit keystoneURL and always specify region.
If Gardener creates and manages the router of a shoot cluster, it is additionally possible to specify that the enable_snat field is set to true via useSNAT: true in the CloudProfileConfig.
On some OpenStack enviroments, there may be the need to set options in the file /etc/resolv.conf on worker nodes.
If the field resolvConfOptions is set, a systemd service will be installed which copies /run/systemd/resolve/resolv.conf
on every change to /etc/resolv.conf and appends the given options.
Example CloudProfile manifest
Please find below an example CloudProfile manifest:
apiVersion: core.gardener.cloud/v1beta1
kind: CloudProfile
metadata:
name: openstack
spec:
type: openstack
kubernetes:
versions:
- version: 1.32.0
- version: 1.31.1
expirationDate: "2026-03-31T23:59:59Z" machineImages:
- name: coreos
versions:
- version: 2135.6.0
architectures: # optional, defaults to [amd64] - amd64
- arm64
machineTypes:
- name: medium_4_8
cpu: "4" gpu: "0" memory: 8Gi
architecture: amd64 # optional, defaults to amd64 storage:
class: standard
type: default
size: 40Gi
- name: medium_4_8_arm
cpu: "4" gpu: "0" memory: 8Gi
architecture: arm64
storage:
class: standard
type: default
size: 40Gi
regions:
- name: europe-1
zones:
- name: europe-1a
- name: europe-1b
- name: europe-1c
providerConfig:
apiVersion: openstack.provider.extensions.gardener.cloud/v1alpha1
kind: CloudProfileConfig
machineImages:
- name: coreos
versions:
- version: 2135.6.0
# Fallback to image name if no region mapping is found# Only works for amd64 and is strongly discouraged. Prefer image IDs! image: coreos-2135.6.0
regions:
- name: europe
id: "1234-amd64" architecture: amd64 # optional, defaults to amd64 - name: europe
id: "1234-arm64" architecture: arm64
- name: asia
id: "5678-amd64" architecture: amd64
keystoneURL: https://url-to-keystone/v3/
constraints:
floatingPools:
- name: fp-pool-1
loadBalancerProviders:
- name: haproxy
Rolling Update Triggers
Changes to the Shoot worker-pools are applied in-place where possible.
In case this is not possible a rolling update of the workers will be performed to apply the new configuration,
as outlined in the Gardener documentation.
The exact fields that trigger this behavior are defined in the Gardener doc,
with a few additions:
.spec.provider.workers[].providerConfig.serverGroup (ID of the server group)
.spec.provider.workers[].providerConfig.MachineLabels[] (if MachineLabels.triggerRollingUpdate is set to true)
The featuregate NewWorkerPoolHash has no impact on the hash calculation for now.
1.6.4 - Usage
Using the OpenStack provider extension with Gardener as end-user
In this document we are describing how this configuration looks like for OpenStack and provide an example Shoot manifest with minimal configuration that you can use to create an OpenStack cluster (modulo the landscape-specific information like cloud profile names, secret binding names, etc.).
Provider Secret Data
Every shoot cluster references a SecretBinding or a CredentialsBinding which itself references a Secret, and this Secret contains the provider credentials of your OpenStack tenant.
This Secret must look as follows:
⚠️ Depending on your API usage it can be problematic to reuse the same provider credentials for different Shoot clusters due to rate limits.
Please consider spreading your Shoots over multiple credentials from different tenants if you are hitting those limits.
InfrastructureConfig
The infrastructure configuration mainly describes how the network layout looks like in order to create the shoot worker nodes in a later step, thus, prepares everything relevant to create VMs, load balancers, volumes, etc.
An example InfrastructureConfig for the OpenStack extension looks as follows:
The floatingPoolName is the name of the floating pool you want to use for your shoot.
If you don’t know which floating pools are available look it up in the respective CloudProfile.
With floatingPoolSubnetName you can explicitly define to which subnet in the floating pool network (defined via floatingPoolName) the router should be attached to.
networks.id is an optional field. If it is given, you can specify the uuid of an existing private Neutron network (created manually, by other tooling, …) that should be reused. A new subnet for the Shoot will be created in it.
If a networks.id is given and calico shoot clusters are created without a network overlay within one network make sure that the pod CIDR specified in shoot.spec.networking.pods is not overlapping with any other pod CIDR used in that network.
Overlapping pod CIDRs will lead to disfunctional shoot clusters.
The networks.router section describes whether you want to create the shoot cluster in an already existing router or whether to create a new one:
If networks.router.id is given then you have to specify the router id of the existing router that was created by other means (manually, other tooling, …).
If you want to get a fresh router for the shoot then just omit the networks.router field.
In any case, the shoot cluster will be created in a new subnet.
The networks.workers section describes the CIDR for a subnet that is used for all shoot worker nodes, i.e., VMs which later run your applications.
You can freely choose these CIDRs and it is your responsibility to properly design the network layout to suit your needs.
Apart from the router and the worker subnet the OpenStack extension will also create a network, router interfaces, security groups, and a key pair.
The optional networks.shareNetwork.enabled field controls the creation of a share network. This is only needed if shared
file system storage (like NFS) should be used. Note, that in this case, the ControlPlaneConfig needs additional configuration, too.
ControlPlaneConfig
The control plane configuration mainly contains values for the OpenStack-specific control plane components.
Today, the only component deployed by the OpenStack extension is the cloud-controller-manager.
An example ControlPlaneConfig for the OpenStack extension looks as follows:
The loadBalancerProvider is the provider name you want to use for load balancers in your shoot.
If you don’t know which types are available look it up in the respective CloudProfile.
The loadBalancerClasses field contains an optional list of load balancer classes which will be available in the cluster. Each entry can have the following fields:
name to select the load balancer class via the kubernetes service annotationsloadbalancer.openstack.org/class=name
purpose with values default or private
The configuration of the default load balancer class will be used as default for all other kubernetes loadbalancer services without a class annotation
The configuration of the private load balancer class will be also set to the global loadbalancer configuration of the cluster, but will be overridden by the default purpose
floatingNetworkID can be specified to receive an ip from an floating/external network, additionally the subnet in this network can be selected via
floatingSubnetName can be either a full subnet name or a regex/glob to match subnet name
floatingSubnetTags a comma seperated list of subnet tags
floatingSubnetID the id of a specific subnet
subnetID can be specified by to receive an ip from an internal subnet (will not have an effect in combination with floating/external network configuration)
The cloudControllerManager.featureGates contains a map of explicitly enabled or disabled feature gates.
For production usage it’s not recommended to use this field at all as you can enable alpha features or disable beta/stable features, potentially impacting the cluster stability.
If you don’t want to configure anything for the cloudControllerManager simply omit the key in the YAML specification.
The optional storage.csiManila.enabled field is used to enable the deployment of the CSI Manila driver to support NFS persistent volumes.
In this case, please ensure to set networks.shareNetwork.enabled=true in the InfrastructureConfig, too.
Additionally, if CSI Manila driver is enabled, for each availability zone a NFS StorageClass will be created on the shoot
named like csi-manila-nfs-<zone>.
WorkerConfig
Each worker group in a shoot may contain provider-specific configurations and options. These are contained in the providerConfig section of a worker group and can be configured using a WorkerConfig object.
An example of a WorkerConfig looks as follows:
apiVersion: openstack.provider.extensions.gardener.cloud/v1alpha1
kind: WorkerConfig
serverGroup:
policy: soft-anti-affinity
# nodeTemplate: # (to be specified only if the node capacity would be different from cloudprofile info during runtime)# capacity:# cpu: 2# gpu: 0# memory: 50Gi# machineLabels:# - name: my-label# value: foo# - name: my-rolling-label# value: bar# triggerRollingOnUpdate: true # means any change of the machine label value will trigger rolling of all machines of the worker pool
ServerGroups
When you specify the serverGroup section in your worker group configuration, a new server group will be created with the configured policy for each worker group that enabled this setting and all machines managed by this worker group will be assigned as members of the created server group.
For users to have access to the server group feature, it must be enabled on the CloudProfile by your operator.
Existing clusters can take advantage of this feature by updating the server group configuration of their respective worker groups. Worker groups that are already configured with server groups can update their setting to change the policy used, or remove it altogether at any time.
Users must be aware that any change to the server group settings will result in a rolling deployment of new nodes for the affected worker group.
Please note the following restrictions when deploying workers with server groups:
The serverGroup section is optional, but if it is included in the worker configuration, it must contain a valid policy value.
The available policy values that can be used, are defined in the provider specific section of CloudProfile by your operator.
Certain policy values may induce further constraints. Using the affinity policy is only allowed when the worker group utilizes a single zone.
MachineLabels
The machineLabels section in the worker group configuration allows to specify additional machine labels. These labels are added to the machine
instances only, but not to the node object. Additionally, they have an optional triggerRollingOnUpdate field. If it is set to true, changing the label value
will trigger a rolling of all machines of this worker pool.
Node Templates
Node templates allow users to override the capacity of the nodes as defined by the server flavor specified in the CloudProfile’s machineTypes. This is useful for certain dynamic scenarios as it allows users to customize cluster-autoscaler’s behavior for these workergroup with their provided values.
Example Shoot manifest (one availability zone)
Please find below an example Shoot manifest for one availability zone:
Every OpenStack shoot cluster will be deployed with the OpenStack Cinder CSI driver.
It is compatible with the legacy in-tree volume provisioner that was deprecated by the Kubernetes community and will be removed in future versions of Kubernetes.
End-users might want to update their custom StorageClasses to the new cinder.csi.openstack.org provisioner.
Kubernetes Versions per Worker Pool
This extension supports gardener/gardener’s WorkerPoolKubernetesVersion feature gate, i.e., having worker pools with overridden Kubernetes versions since gardener-extension-provider-openstack@v1.23.
Shoot CA Certificate and ServiceAccount Signing Key Rotation
This extension supports gardener/gardener’s ShootCARotation and ShootSARotation feature gates since gardener-extension-provider-openstack@v1.26.
2 - Operating System Extensions
Gardener extension controllers for the supported operating systems
2.1 - CoreOS/FlatCar OS
Gardener extension controller for the CoreOS/FlatCar Container Linux operating system
Project Gardener implements the automated management and operation of Kubernetes clusters as a service. Its main principle is to leverage Kubernetes concepts for all of its tasks.
Recently, most of the vendor specific logic has been developed in-tree. However, the project has grown to a size where it is very hard to extend, maintain, and test. With GEP-1 we have proposed how the architecture can be changed in a way to support external controllers that contain their very own vendor specifics. This way, we can keep Gardener core clean and independent.
This controller operates on the OperatingSystemConfig resource in the extensions.gardener.cloud/v1alpha1 API group. It supports CoreOS Container Linux and Flatcar Container Linux (“a friendly fork of CoreOS Container Linux”).
After reconciliation the resulting data will be stored in a secret within the same namespace (as the config itself might contain confidential data). The name of the secret will be written into the resource’s .status field:
The secret has one data key cloud_config that stores the generation.
An example for a ControllerRegistration resource that can be used to register this controller to Gardener can be found here.
Please find more information regarding the extensibility concepts and a detailed proposal here.
How to start using or developing this extension controller locally
You can run the controller locally on your machine by executing make start. Please make sure to have the kubeconfig to the cluster you want to connect to ready in the ./dev/kubeconfig file.
Static code checks and tests can be executed by running make verify. We are using Go modules for Golang package dependency management and Ginkgo/Gomega for testing.
Feedback and Support
Feedback and contributions are always welcome!
Please report bugs or suggestions as GitHub issues or reach out on Slack (join the workspace here).
Learn more!
Please find further resources about out project here:
If the second option applies to your use-case please make sure that your VPC has enabled DNS Support. Otherwise CoreOS based nodes aren’t able to join or operate in your cluster properly.
After reconciliation the resulting data will be stored in a secret within the same namespace (as the config itself might contain confidential data). The name of the secret will be written into the resource’s .status field:
The secret has one data key cloud_config that stores the generation.
An example for a ControllerRegistration resource that can be used to register this controller to Gardener can be found here.
Please find more information regarding the extensibility concepts and a detailed proposal here.
How to start using or developing this extension controller locally
You can run the controller locally on your machine by executing make start. Please make sure to have the kubeconfig to the cluster you want to connect to ready in the ./dev/kubeconfig file.
Static code checks and tests can be executed by running make verify. We are using Go modules for Golang package dependency management and Ginkgo/Gomega for testing.
Feedback and Support
Feedback and contributions are always welcome!
Please report bugs or suggestions as GitHub issues or reach out on Slack (join the workspace here).
Learn more!
Please find further resources about out project here:
This controller operates on the OperatingSystemConfig resource in the extensions.gardener.cloud/v1alpha1 API group. It manages those objects that are requesting SUSE Container Host configuration, i.e. suse-chost type:
It is also capable of supporting the vSMP MemoryOne operating system with the memoryone-chost type. Please find more information here.
After reconciliation the resulting data will be stored in a secret within the same namespace (as the config itself might contain confidential data). The name of the secret will be written into the resource’s .status field:
The secret has one data key cloud_config that stores the generation.
An example for a ControllerRegistration resource that can be used to register this controller to Gardener can be found here.
Please find more information regarding the extensibility concepts and a detailed proposal here.
How to start using or developing this extension controller locally
You can run the controller locally on your machine by executing make start. Please make sure to have the kubeconfig to the cluster you want to connect to ready in the ./dev/kubeconfig file.
Static code checks and tests can be executed by running make verify. We are using Go modules for Golang package dependency management and Ginkgo/Gomega for testing.
Feedback and Support
Feedback and contributions are always welcome!
Please report bugs or suggestions as GitHub issues or reach out on Slack (join the workspace here).
Learn more!
Please find further resources about out project here:
If the second option applies to your use-case please make sure that your VPC has enabled DNS Support. Otherwise SuSE CHost based nodes aren’t able to join or operate in your cluster properly.
This extension controller is also capable of generating user-data for the vSMP MemoryOne operating system in conjunction with SuSE CHost.
It reacts on the memoryone-chost extension type.
Additionally, it allows certain customizations with the following configuration:
Please note that vSMP MemoryOne only works for EC2 bare-metal instance types such as M5d, R5, C5, C5d, etc. - please consult the EC2 instance types overview page and the documentation of vSMP MemoryOne to find out whether the instance type in question is eligible.
Generating an AWS snapshot ID for the CHost/CHost operating system
The following script will help to generate the snapshot ID on AWS.
It runs in the region that is selected in your $HOME/.aws/config file.
Consequently, if you want to generate the snapshot in multiple regions, you have to run in multiple times after configuring the respective region using aws configure.
This controller operates on the OperatingSystemConfig resource in the extensions.gardener.cloud/v1alpha1 API group. It manages those objects that are requesting Ubuntu OS configuration (.spec.type=ubuntu). An experimental support for Ubuntu Pro is added (.spec.type=ubuntu-pro):
After reconciliation the resulting data will be stored in a secret within the same namespace (as the config itself might contain confidential data). The name of the secret will be written into the resource’s .status field:
The secret has one data key cloud_config that stores the generation.
An example for a ControllerRegistration resource that can be used to register this controller to Gardener can be found here.
Please find more information regarding the extensibility concepts and a detailed proposal here.
How to start using or developing this extension controller locally
You can run the controller locally on your machine by executing make start.
Static code checks and tests can be executed by running make verify. We are using Go modules for Golang package dependency management and Ginkgo/Gomega for testing.
Feedback and Support
Feedback and contributions are always welcome!
Please report bugs or suggestions as GitHub issues or reach out on Slack (join the workspace here).
Learn more!
Please find further resources about out project here:
If the second option applies to your use-case please make sure that your VPC has enabled DNS Support. Otherwise Ubuntu based nodes aren’t able to join or operate in your cluster properly.
This controller operates on the Network resource in the extensions.gardener.cloud/v1alpha1 API group. It manages those objects that are requesting Calico Networking configuration (.spec.type=calico):
Please find a concrete example in the example folder. All the Calico specific configuration
should be configured in the providerConfig section. If additional configuration is required, it should be added to
the networking-calico chart in controllers/networking-calico/charts/internal/calico/values.yaml and corresponding code
parts should be adapted (for example in controllers/networking-calico/pkg/charts/utils.go).
Once the network resource is applied, the networking-calico controller would then create all the necessary managed-resources which should be picked
up by the gardener-resource-manager which will then apply all the
network extensions resources to the shoot cluster.
Finally after successful reconciliation an output similar to the one below should be expected.
The following table lists known compatibility issues of this extension controller with other Gardener components.
Calico Extension
Gardener
Action
Notes
>= v1.30.0
< v1.63.0
Please first update Gardener components to >= v1.63.0.
Without the mentioned minimum Gardener version, Calico Pods are not only scheduled to dedicated system component nodes in the shoot cluster.
How to start using or developing this extension controller locally
You can run the controller locally on your machine by executing make start. Please make sure to have the kubeconfig pointed to the cluster you want to connect to.
Static code checks and tests can be executed by running make verify. We are using Go modules for Golang package dependency management and Ginkgo/Gomega for testing.
Feedback and Support
Feedback and contributions are always welcome!
Please report bugs or suggestions as GitHub issues or reach out on Slack (join the workspace here).
Learn more!
Please find further resources about out project here:
Disclaimer: This document is NOT a step by step deployment guide for the networking Calico extension and only contains some configuration specifics regarding the deployment of different components via the helm charts residing in the networking Calico extension repository.
Virtual Garden is not used, i.e., the runtime Garden cluster is also the target Garden cluster.
Automounted Service Account Token
The easiest way to deploy the gardener-extension-admission-calico component will be to not provide kubeconfig at all. This way in-cluster configuration and an automounted service account token will be used. The drawback of this approach is that the automounted token will not be automatically rotated.
This will allow for automatic rotation of the service account token by the kubelet. The configuration can be achieved by setting both .Values.global.serviceAccountTokenVolumeProjection.enabled: true and .Values.global.kubeconfig in the respective chart’s values.yaml file.
Virtual Garden is used, i.e., the runtime Garden cluster is different from the target Garden cluster.
Service Account
The easiest way to setup the authentication will be to create a service account and the respective roles will be bound to this service account in the target cluster. Then use the generated service account token and craft a kubeconfig which will be used by the workload in the runtime cluster. This approach does not provide a solution for the rotation of the service account token. However, this setup can be achieved by setting .Values.global.virtualGarden.enabled: true and following these steps:
Deploy the application part of the charts in the target cluster.
Get the service account token and craft the kubeconfig.
Set the crafted kubeconfig and deploy the runtime part of the charts in the runtime cluster.
Client Certificate
Another solution will be to bind the roles in the target cluster to a User subject instead of a service account and use a client certificate for authentication. This approach does not provide a solution for the client certificate rotation. However, this setup can be achieved by setting both .Values.global.virtualGarden.enabled: true and .Values.global.virtualGarden.user.name, then following these steps:
Generate a client certificate for the target cluster for the respective user.
Deploy the application part of the charts in the target cluster.
Craft a kubeconfig using the already generated client certificate.
Set the crafted kubeconfig and deploy the runtime part of the charts in the runtime cluster.
Projected Service Account Token
This approach requires an already deployed and configured oidc-webhook-authenticator for the target cluster. Also the runtime cluster should be registered as a trusted identity provider in the target cluster. Then projected service accounts tokens from the runtime cluster can be used to authenticate against the target cluster. The needed steps are as follows:
Set .Values.global.virtualGarden.enabled: true and .Values.global.virtualGarden.user.name. Note: username value will depend on the trust configuration, e.g., <prefix>:system:serviceaccount:<namespace>:<serviceaccount>
Set .Values.global.serviceAccountTokenVolumeProjection.enabled: true and .Values.global.serviceAccountTokenVolumeProjection.audience. Note: audience value will depend on the trust configuration, e.g., <cliend-id-from-trust-config>.
Craft a kubeconfig (see example below).
Deploy the application part of the charts in the target cluster.
Deploy the runtime part of the charts in the runtime cluster.
Using the Calico networking extension with Gardener as operator
This document explains configuration options supported by the networking-calico extension.
Run calico-node in non-privileged and non-root mode
Feature State: Alpha
Motivation
Running containers in privileged mode is not recommended as privileged containers run with all linux capabilities enabled and can access the host’s resources. Running containers in privileged mode opens number of security threats such as breakout to underlying host OS.
Support for non-privileged and non-root mode
The Calico project has a preliminary support for running the calico-node component in non-privileged mode (see this guide). Similar to Tigera Calico operator the networking-calico extension can also run calico-node in non-privileged and non-root mode. This feature is controller via feature gate named NonPrivilegedCalicoNode. The feature gates are configured in the ControllerConfiguration of networking-calico. The corresponding ControllerDeployment configuration that enables the NonPrivilegedCalicoNode would look like:
The support for the non-privileged mode in the Calico project is not ready for productive usage. The upstream documentation states that in non-privileged mode the support for features added after Calico v3.21 is not guaranteed.
Calico in non-privileged mode does not support eBPF dataplane. That’s why when eBPF dataplane is enabled, calico-node has to run in privileged mode (even when the NonPrivilegedCalicoNode feature gate is enabled).
(At the time of writing this guide) there is the following issue projectcalico/calico#5348 that is not addressed.
(At the time of writing this guide) the upstream adoptions seems to be low. The Calico charts and manifest in projectcalico/calico run calico-node in privileged mode.
3.1.3 - Shoot Overlay Network
Enable / disable overlay network for shoots with Calico
Gardener can be used with or without the overlay network.
The default configuration of shoot clusters is without overlay network.
Understanding overlay network
The Overlay networking permits the routing of packets between multiples pods located on multiple nodes, even if the pod and the node network are not the same.
This is done through the encapsulation of pod packets in the node network so that the routing can be done as usual. We use ipip encapsulation with calico as default in case the overlay network is enabled. This (simply put) sends an IP packet as workload in another IP packet.
In order to simplify the troubleshooting of problems and reduce the latency of packets traveling between nodes, the overlay network is disabled by default as stated above for all new clusters.
This means that the routing is done directly through the VPC routing table. Basically, when a new node is created, it is assigned a slice (usually a /24) of the pod network. All future pods in that node are going to be in this slice. Then, the cloud-controller-manager updates the cloud provider router to add the new route (all packets within the network slice as destination should go to that node).
This has the advantage of:
Doing less work for the node as encapsulation takes some CPU cycles.
The maximum transmission unit (MTU) is slightly bigger resulting in slightly better performance, i.e. potentially more workload bytes per packet.
More direct and simpler setup, which makes the problems much easier to troubleshoot.
In the case where multiple shoots are in the same VPC and the overlay network is disabled, if the pod’s network is not configured properly, there is a very strong chance that some pod IP address might overlap, which is going to cause all sorts of funny problems. So, if someone asks you how to avoid that, they need to make sure that the podCIDRs for each shoot do not overlap with each other.
Enabling the overlay network
In certain cases, the overlay network might be preferable if, for example, the customer wants to create multiple clusters in the same VPC without ensuring there’s no overlap between the pod networks.
To enable the overlay network, add the following to the shoot’s YAML:
You can look at any of the old nodes. If there are tunl0 devices at least at some point in time the overlay network was used.
Another way is to look into the Network object in the shoot’s control plane namespace on the seed (see example above).
Do we have some documentation somewhere on how to do the migration?
No, not yet. The migration from no overlay to overlay is fairly simply by just setting the configuration as specified above. The other way is more complicated as the Network configuration needs to be changed AND the local routes need to be cleaned.
Unfortunately, the change will be rolled out slowly (one calico-node at a time). Hence, it implies some network outages during the migration.
AWS implementation
On AWS, it is not possible to use the cloud-controller-manager for managing the routes as it does not support multiple route tables, which Gardener creates. Therefore, a custom controller is created to manage the routes.
3.1.4 - Usage
Using the Networking Calico extension with Gardener as end-user
In this document we are describing how this configuration looks like for Calico and provide an example Shoot manifest with minimal configuration that you can use to create a cluster.
Calico Typha
Calico Typha is an optional component of Project Calico designed to offload the Kubernetes API server. The Typha daemon sits between the datastore (such as the Kubernetes API server which is the one used by Gardener managed Kubernetes) and many instances of Felix. Typha’s main purpose is to increase scale by reducing each node’s impact on the datastore. You can opt-out Typha via .spec.networking.providerConfig.typha.enabled=false of your Shoot manifest. By default the Typha is enabled.
EBPF Dataplane
Calico can be run in ebpf dataplane mode. This has several benefits, calico scales to higher troughput, uses less cpu per GBit and has native support for kubernetes services (without needing kube-proxy).
To switch to a pure ebpf dataplane it is recommended to run without an overlay network. The following configuration can be used to run without an overlay and without kube-proxy.
An example ebpf dataplane NetworkingConfig manifest:
Please note that the default settings for calico’s ebpf dataplane may interfere with
accelerated networking in azure
rendering nodes with accelerated networking unusable in the network. The reason for this is that calico does not ignore
the accelerated networking interface enP... as it should, but applies its ebpf programs to it. A simple mitigation for
this is to adapt the FelixConfigurationdefault and ensure that the bpfDataIfacePattern does not include enP....
Per default bpfDataIfacePattern is not set. The default value for this option can be found
here.
For example, you could apply the following change:
Autoscaling defines how the calico components are automatically scaled. It allows to use either static resource assignment, vertical pod or cluster-proportional autoscaler (default: cluster-proportional).
The cluster-proportional autoscaling mode is preferable when conditions require minimal disturbances and vpa mode for improved cluster resource utilization. Static resource assignments causes no disruptions due to autoscaling, but has no dynamics to handle changing demands.
Please note VPA must be enabled on the shoot as a pre-requisite to enabling vpa mode.
An example NetworkingConfig manifest for vertical pod autoscaling:
An example NetworkingConfig manifest for static resource assignment:
apiVersion: calico.networking.extensions.gardener.cloud/v1alpha1
kind: NetworkConfig
autoScaling:
  mode: "static"
  resources:
    node:
      cpu: 100m
      memory: 100Mi
    typha:
      cpu: 100m
      memory: 100Mi
ℹ️ Please note that in static mode, you have the option to configure the resource requests for calico-node and calico-typha. If not specified, default settings will be used.
If the resource requests are chosen too low, it might impact the stability/performance of the cluster.
Specifying the resource requests for any other autoscaling mode has no effect.
Example NetworkingConfig manifest
An example NetworkingConfig for the Calico extension looks as follows:
Known Limitations in conjunction with NodeLocalDNS
If NodeLocalDNS is active in a shoot cluster, which uses calico as CNI without overlay network, it may be impossible to block DNS traffic to the cluster DNS server via network policy. This is due to FELIX_CHAININSERTMODE being set to APPEND instead of INSERT in case SNAT is being applied to requests to the infrastructure DNS server. In this scenario the iptables rules of NodeLocalDNS already accept the traffic before the network policies are checked.
This only applies to traffic directed to NodeLocalDNS. If blocking of all DNS traffic is desired via network policy the pod dnsPolicy should be changed to Default so that the cluster DNS is not used. Alternatives are usage of overlay network or disabling of NodeLocalDNS.
3.2 - Cilium CNI
Gardener extension controller for the Cilium CNI network plugin
This controller operates on the Network resource in the extensions.gardener.cloud/v1alpha1 API group. It manages those objects that are requesting cilium Networking configuration (.spec.type=cilium):
Please find a concrete example in the example folder. All the cilium specific configuration
should be configured in the providerConfig section. If additional configuration is required, it should be added to
the networking-cilium chart in controllers/networking-cilium/charts/internal/cilium/values.yaml and corresponding code
parts should be adapted (for example in controllers/networking-cilium/pkg/charts/utils.go).
Once the network resource is applied, the networking-cilium controller would then create all the necessary managed-resources which should be picked
up by the gardener-resource-manager which will then apply all the
network extensions resources to the shoot cluster.
Finally after successful reconciliation an output similar to the one below should be expected.
How to start using or developing this extension controller locally
You can run the controller locally on your machine by executing make start. Please make sure to have the kubeconfig pointed to the cluster you want to connect to.
Static code checks and tests can be executed by running make verify. We are using Go modules for Golang package dependency management and Ginkgo/Gomega for testing.
Feedback and Support
Feedback and contributions are always welcome!
Please report bugs or suggestions as GitHub issues or reach out on Slack (join the workspace here).
Learn more!
Please find further resources about out project here:
In this document we are describing how this configuration looks like for Cilium and provide an example Shoot manifest with minimal configuration that you can use to create a cluster.
Cilium Hubble
Hubble is a fully distributed networking and security observability platform build on top of Cilium and BPF. It is optional and is deployed to the cluster when enabled in the NetworkConfig.
If the dashboard is not externally exposed
The hubble.enabled field describes whether hubble should be deployed into the cluster or not (default).
The debug field describes whether you want to run cilium in debug mode or not (default), change this value to true to use debug mode.
The tunnel field describes the encapsulation mode for communication between nodes. Possible values are vxlan (default), geneve or disabled.
The bpfSocketLBHostnsOnly.enabled field describes whether socket LB will be skipped for services when inside a pod namespace (default), in favor of service LB at the pod interface. Socket LB is still used when in the host namespace. This feature is required when using cilium with a service mesh like istio or linkerd.
Setting the field cni.exclusive to false might be useful when additional plugins, such as Istio or Linkerd, wish to chain after Cilium. This action disables the default behavior of Cilium, which is to overwrite changes to the CNI configuration file.
The egressGateway.enabled field describes whether egress gateways are enabled or not (default). To use this feature kube-proxy must be disabled. This can be done with the following configuration in the Shoot:
spec:
  kubernetes:
    kubeProxy:
      enabled: false
The egress gateway feature is only supported in gardener with an overlay network (shoot.spec.networking.providerConfig.overlay.enabled: true) at the moment. This is due to the reason that bpf masquerading is required for the egress gateway feature. Once the overlay network is enabled bpf.masquerade is set to true in the cilium configmap.
The snatToUpstreamDNS.enabled field describes whether the traffic to the upstream dns server should be masqueraded or not (default). This is needed on some infrastructures where traffic to the dns server with the pod CIDR range is blocked.
Example Shoot manifest
Please find below an example Shoot manifest with cilium networking configuration:
If you would like to see a provider specific shoot example, please check out the documentation of the well-known extensions. A list of them can be found here.
High Availabilty
The cilium-operator operates in high availability (HA) mode when the worker group in the shoot specification is configured with a minimum of at least two nodes as shown in the following example:
Project Gardener implements the automated management and operation of Kubernetes clusters as a service. Its main principle is to leverage Kubernetes concepts for all of its tasks.
Recently, most of the vendor specific logic has been developed in-tree. However, the project has grown to a size where it is very hard to extend, maintain, and test. With GEP-1 we have proposed how the architecture can be changed in a way to support external controllers that contain their very own vendor specifics. This way, we can keep Gardener core clean and independent.
How to use this Controller
This controller operates on the ContainerRuntime resource in the extensions.gardener.cloud/v1alpha1 API group.
It manages objects that are requesting (.spec.type=gvisor) to enable the gVisor container runtime sandbox for a worker pool of a shoot cluster.
The ContainerRuntime can be configured in the shoot manifest in .spec.povider.workers[].cri.containerRuntimes an example can be found here:
gVisor can be configured with additional configuration flags by adding them to the configFlags field in the providerConfig.
Right now the following flags are supported and all other flags are ignored:
debug: "true": This enables debug logs for runsc. The logs are written to /var/log/runsc/<containerd-id>/<command>-gvisor.log on the node.
net-raw: "true": This is required for some applications that need to use raw sockets, such as traceroute, or istio init conainers.
nvproxy: "true": Run GPU enabled containers in your gVisor sandbox. This flag is required for the NVIDIA GPU device plugin to work with gVisor.
How to start using or developing this extension controller locally
You can run the controller locally on your machine by executing make start. Please make sure to have the kubeconfig to the cluster you want to connect to ready in the ./dev/kubeconfig file.
Static code checks and tests can be executed by running make verify. We are using Go modules for Golang package dependency management and Ginkgo/Gomega for testing.
Feedback and Support
Feedback and contributions are always welcome!
Please report bugs or suggestions as GitHub issues or reach out on Slack (join the workspace here).
Learn more!
Please find further resources about out project here:
Project Gardener implements the automated management and operation of Kubernetes clusters as a service. Its main principle is to leverage Kubernetes concepts for all of its tasks.
Recently, most of the vendor specific logic has been developed in-tree. However, the project has grown to a size where it is very hard to extend, maintain, and test. With GEP-1 we have proposed how the architecture can be changed in a way to support external controllers that contain their very own vendor specifics. This way, we can keep Gardener core clean and independent.
Configuration
Example configuration for this extension controller:
apiVersion: shoot-cert-service.extensions.config.gardener.cloud/v1alpha1
kind: Configuration
issuerName: gardener
restrictIssuer: true# restrict issuer to any sub-domain of shoot.spec.dns.domain (default)acme:
email: john.doe@example.com
server: https://acme-v02.api.letsencrypt.org/directory
# privateKey: | # Optional key for Let's Encrypt account.# -----BEGIN BEGIN RSA PRIVATE KEY-----# ...# -----END RSA PRIVATE KEY-----
When an extension resource is reconciled, the extension controller will create an instance of Cert-Management as well as an Issuer with the ACME information provided in the configuration above. These resources are placed inside the shoot namespace on the seed. Also, the controller takes care about generating necessary RBAC resources for the seed as well as for the shoot.
Please note, this extension controller relies on the Gardener-Resource-Manager to deploy k8s resources to seed and shoot clusters, i.e. it never deploys them directly.
How to start using or developing this extension controller locally
You can run the controller locally on your machine by executing make start. Please make sure to have the kubeconfig to the cluster you want to connect to ready in the ./dev/kubeconfig file.
Static code checks and tests can be executed by running make verify. We are using Go modules for Golang package dependency management and Ginkgo/Gomega for testing.
Feedback and Support
Feedback and contributions are always welcome!
Please report bugs or suggestions as GitHub issues or reach out on Slack (join the workspace here).
Learn more!
Please find further resources about out project here:
How to change the alerting on expiring certificates
Changing alerting settings
Certificates are normally renewed automatically 30 days before they expire.
As a second line of defense, there is an alerting in Prometheus activated if the certificate is a few days
before expiration. By default, the alert is triggered 15 days before expiration.
You can configure the days in the providerConfig of the extension.
Setting it to 0 disables the alerting.
In this example, the days are changed to 3 days before expiration.
5.1.2 - Manage certificates with Gardener for default domain
Use the Gardener cert-management to get fully managed, publicly trusted TLS certificates
Manage certificates with Gardener for default domain
Introduction
Dealing with applications on Kubernetes which offer a secure service endpoints (e.g. HTTPS) also require you to enable a
secured communication via SSL/TLS. With the certificate extension enabled, Gardener can manage commonly trusted X.509 certificate for your application
endpoint. From initially requesting certificate, it also handeles their renewal in time using the free Let’s Encrypt API.
There are two senarios with which you can use the certificate extension
You want to use a certificate for a subdomain the shoot’s default DNS (see .spec.dns.domain of your shoot resource, e.g. short.ingress.shoot.project.default-domain.gardener.cloud). If this is your case, please keep reading this article.
Before you start this guide there are a few requirements you need to fulfill:
You have an existing shoot cluster
Since you are using the default DNS name, all DNS configuration should already be done and ready.
Issue a certificate
Every X.509 certificate is represented by a Kubernetes custom resource certificate.cert.gardener.cloud in your cluster. A Certificate resource may be used to initiate a new certificate request as well as to manage its lifecycle. Gardener’s certificate service regularly checks the expiration timestamp of Certificates, triggers a renewal process if necessary and replaces the existing X.509 certificate with a new one.
Your application should be able to reload replaced certificates in a timely manner to avoid service disruptions.
Certificates can be requested via 3 resources type
Ingress
Service (type LoadBalancer)
certificate (Gardener CRD)
If either of the first 2 are used, a corresponding Certificate resource will automatically be created.
Using an ingress Resource
apiVersion: networking.k8s.io/v1
kind: Ingress
metadata:
name: amazing-ingress
annotations:
cert.gardener.cloud/purpose: managed
#cert.gardener.cloud/issuer: custom-issuer # optional to specify custom issuer (use namespace/name for shoot issuers)#cert.gardener.cloud/follow-cname: "true" # optional, same as spec.followCNAME in certificates#cert.gardener.cloud/secret-labels: "key1=value1,key2=value2" # optional labels for the certificate secret#cert.gardener.cloud/preferred-chain: "chain name" # optional to specify preferred-chain (value is the Subject Common Name of the root issuer)#cert.gardener.cloud/private-key-algorithm: ECDSA # optional to specify algorithm for private key, allowed values are 'RSA' or 'ECDSA'#cert.gardener.cloud/private-key-size: "384" # optional to specify size of private key, allowed values for RSA are "2048", "3072", "4096" and for ECDSA "256" and "384"spec: tls:
- hosts:
# Must not exceed 64 characters. - short.ingress.shoot.project.default-domain.gardener.cloud
# Certificate and private key reside in this secret. secretName: tls-secret
rules:
- host: short.ingress.shoot.project.default-domain.gardener.cloud
http:
paths:
- pathType: Prefix
path: "/" backend:
service:
name: amazing-svc
port:
number: 8080
Using a service type LoadBalancer
apiVersion: v1
kind: Service
metadata:
annotations:
cert.gardener.cloud/purpose: managed
# Certificate and private key reside in this secret. cert.gardener.cloud/secretname: tls-secret
# You may add more domains separated by commas (e.g. "service.shoot.project.default-domain.gardener.cloud, amazing.shoot.project.default-domain.gardener.cloud") dns.gardener.cloud/dnsnames: "service.shoot.project.default-domain.gardener.cloud" dns.gardener.cloud/ttl: "600"#cert.gardener.cloud/issuer: custom-issuer # optional to specify custom issuer (use namespace/name for shoot issuers)#cert.gardener.cloud/follow-cname: "true" # optional, same as spec.followCNAME in certificates#cert.gardener.cloud/secret-labels: "key1=value1,key2=value2" # optional labels for the certificate secret#cert.gardener.cloud/preferred-chain: "chain name" # optional to specify preferred-chain (value is the Subject Common Name of the root issuer)#cert.gardener.cloud/private-key-algorithm: ECDSA # optional to specify algorithm for private key, allowed values are 'RSA' or 'ECDSA'#cert.gardener.cloud/private-key-size: "384" # optional to specify size of private key, allowed values for RSA are "2048", "3072", "4096" and for ECDSA "256" and "384" name: test-service namespace: default
spec:
ports:
- name: http
port: 80
protocol: TCP
targetPort: 8080
type: LoadBalancer
Using the custom Certificate resource
apiVersion: cert.gardener.cloud/v1alpha1
kind: Certificate
metadata:
  name: cert-example
  namespace: default
spec:
  commonName: short.ingress.shoot.project.default-domain.gardener.cloud
  secretRef:
    name: tls-secret
    namespace: default
  # Optionnal if using the default issuer
  issuerRef:
    name: garden
If you’re interested in the current progress of your request, you’re advised to consult the description, more specifically the status attribute in case the issuance failed.
Request a wildcard certificate
In order to avoid the creation of multiples certificates for every single endpoints, you may want to create a wildcard certificate for your shoot’s default cluster.
Please note that this can also be achived by directly adding an annotation to a Service type LoadBalancer. You could also create a Certificate object with a wildcard domain.
5.1.3 - Manage certificates with Gardener for public domain
Use the Gardener cert-management to get fully managed, publicly trusted TLS certificates
Manage certificates with Gardener for public domain
Introduction
Dealing with applications on Kubernetes which offer a secure service endpoints (e.g. HTTPS) also require you to enable a
secured communication via SSL/TLS. With the certificate extension enabled, Gardener can manage commonly trusted X.509 certificate for your application
endpoint. From initially requesting certificate, it also handeles their renewal in time using the free Let’s Encrypt API.
There are two senarios with which you can use the certificate extension
You want to use a certificate for a subdomain the shoot’s default DNS (see .spec.dns.domain of your shoot resource, e.g. short.ingress.shoot.project.default-domain.gardener.cloud). If this is your case, please see Manage certificates with Gardener for default domain
You want to use a certificate for a custom domain. If this is your case, please keep reading this article.
Prerequisites
Before you start this guide there are a few requirements you need to fulfill:
Your custom zone is resolvable with a public resolver via the internet (e.g. 8.8.8.8)
You have a custom DNS provider configured and working (see “DNS Providers”)
As part of the Let’s EncryptACME challenge validation process, Gardener sets a DNS TXT entry and Let’s Encrypt checks if it can both resolve and authenticate it. Therefore, it’s important that your DNS-entries are publicly resolvable. You can check this by querying e.g. Googles public DNS server and if it returns an entry your DNS is publicly visible:
# returns the A record for cert-example.example.com using Googles DNS server (8.8.8.8)dig cert-example.example.com @8.8.8.8 A
DNS provider
In order to issue certificates for a custom domain you need to specify a DNS provider which is permitted to create DNS records for subdomains of your requested domain in the certificate. For example, if you request a certificate for host.example.com your DNS provider must be capable of managing subdomains of host.example.com.
DNS providers are normally specified in the shoot manifest. To learn more on how to configure one, please see the DNS provider documentation.
Issue a certificate
Every X.509 certificate is represented by a Kubernetes custom resource certificate.cert.gardener.cloud in your cluster. A Certificate resource may be used to initiate a new certificate request as well as to manage its lifecycle. Gardener’s certificate service regularly checks the expiration timestamp of Certificates, triggers a renewal process if necessary and replaces the existing X.509 certificate with a new one.
Your application should be able to reload replaced certificates in a timely manner to avoid service disruptions.
Certificates can be requested via 3 resources type
Ingress
Service (type LoadBalancer)
Gateways (both Istio gateways and from the Gateway API)
Certificate (Gardener CRD)
If either of the first 2 are used, a corresponding Certificate resource will be created automatically.
Using an Ingress Resource
apiVersion: networking.k8s.io/v1
kind: Ingress
metadata:
name: amazing-ingress
annotations:
cert.gardener.cloud/purpose: managed
# Optional but recommended, this is going to create the DNS entry at the same time dns.gardener.cloud/class: garden
dns.gardener.cloud/ttl: "600"#cert.gardener.cloud/commonname: "*.example.com" # optional, if not specified the first name from spec.tls[].hosts is used as common name#cert.gardener.cloud/dnsnames: "" # optional, if not specified the names from spec.tls[].hosts are used#cert.gardener.cloud/follow-cname: "true" # optional, same as spec.followCNAME in certificates#cert.gardener.cloud/secret-labels: "key1=value1,key2=value2" # optional labels for the certificate secret#cert.gardener.cloud/issuer: custom-issuer # optional to specify custom issuer (use namespace/name for shoot issuers)#cert.gardener.cloud/preferred-chain: "chain name" # optional to specify preferred-chain (value is the Subject Common Name of the root issuer)#cert.gardener.cloud/private-key-algorithm: ECDSA # optional to specify algorithm for private key, allowed values are 'RSA' or 'ECDSA'#cert.gardener.cloud/private-key-size: "384" # optional to specify size of private key, allowed values for RSA are "2048", "3072", "4096" and for ECDSA "256" and "384"spec:
tls:
- hosts:
# Must not exceed 64 characters. - amazing.example.com
# Certificate and private key reside in this secret. secretName: tls-secret
rules:
- host: amazing.example.com
http:
paths:
- pathType: Prefix
path: "/" backend:
service:
name: amazing-svc
port:
number: 8080
Replace the hosts and rules[].host value again with your own domain and adjust the remaining Ingress attributes in accordance with your deployment (e.g. the above is for an istio Ingress controller and forwards traffic to a service1 on port 80).
Using a Service of type LoadBalancer
apiVersion: v1
kind: Service
metadata:
annotations:
cert.gardener.cloud/secretname: tls-secret
dns.gardener.cloud/dnsnames: example.example.com
dns.gardener.cloud/class: garden
# Optional dns.gardener.cloud/ttl: "600" cert.gardener.cloud/commonname: "*.example.example.com" cert.gardener.cloud/dnsnames: ""#cert.gardener.cloud/follow-cname: "true" # optional, same as spec.followCNAME in certificates#cert.gardener.cloud/secret-labels: "key1=value1,key2=value2" # optional labels for the certificate secret#cert.gardener.cloud/issuer: custom-issuer # optional to specify custom issuer (use namespace/name for shoot issuers)#cert.gardener.cloud/preferred-chain: "chain name" # optional to specify preferred-chain (value is the Subject Common Name of the root issuer)#cert.gardener.cloud/private-key-algorithm: ECDSA # optional to specify algorithm for private key, allowed values are 'RSA' or 'ECDSA'#cert.gardener.cloud/private-key-size: "384" # optional to specify size of private key, allowed values for RSA are "2048", "3072", "4096" and for ECDSA "256" and "384" name: test-service
namespace: default
spec:
ports:
- name: http
port: 80
protocol: TCP
targetPort: 8080
type: LoadBalancer
apiVersion: cert.gardener.cloud/v1alpha1
kind: Certificate
metadata:
name: cert-example
namespace: default
spec:
commonName: amazing.example.com
secretRef:
name: tls-secret
namespace: default
# Optionnal if using the default issuer issuerRef:
name: garden
# If delegated domain for DNS01 challenge should be used. This has only an effect if a CNAME record is set for# '_acme-challenge.amazing.example.com'.# For example: If a CNAME record exists '_acme-challenge.amazing.example.com' => '_acme-challenge.writable.domain.com',# the DNS challenge will be written to '_acme-challenge.writable.domain.com'.#followCNAME: true# optionally set labels for the secret#secretLabels:# key1: value1# key2: value2# Optionally specify the preferred certificate chain: if the CA offers multiple certificate chains, prefer the chain with an issuer matching this Subject Common Name. If no match, the default offered chain will be used.#preferredChain: "ISRG Root X1"# Optionally specify algorithm and key size for private key. Allowed algorithms: "RSA" (allowed sizes: 2048, 3072, 4096) and "ECDSA" (allowed sizes: 256, 384)# If not specified, RSA with 2048 is used.#privateKey:# algorithm: ECDSA# size: 384
Supported attributes
Here is a list of all supported annotations regarding the certificate extension:
Path
Annotation
Value
Required
Description
N/A
cert.gardener.cloud/purpose:
managed
Yes when using annotations
Flag for Gardener that this specific Ingress or Service requires a certificate
spec.commonName
cert.gardener.cloud/commonname:
E.g. “*.demo.example.com” or “special.example.com”
Certificate and Ingress : No Service: Yes, if DNS names unset
Specifies for which domain the certificate request will be created. If not specified, the names from spec.tls[].hosts are used. This entry must comply with the 64 character limit.
spec.dnsNames
cert.gardener.cloud/dnsnames:
E.g. “special.example.com”
Certificate and Ingress : No Service: Yes, if common name unset
Additional domains the certificate should be valid for (Subject Alternative Name). If not specified, the names from spec.tls[].hosts are used. Entries in this list can be longer than 64 characters.
spec.secretRef.name
cert.gardener.cloud/secretname:
any-name
Yes for certificate and Service
Specifies the secret which contains the certificate/key pair. If the secret is not available yet, it’ll be created automatically as soon as the certificate has been issued.
spec.issuerRef.name
cert.gardener.cloud/issuer:
E.g. gardener
No
Specifies the issuer you want to use. Only necessary if you request certificates for custom domains.
N/A
cert.gardener.cloud/revoked:
true otherwise always false
No
Use only to revoke a certificate, see reference for more details
spec.followCNAME
cert.gardener.cloud/follow-cname
E.g. true
No
Specifies that the usage of a delegated domain for DNS challenges is allowed. Details see Follow CNAME.
spec.preferredChain
cert.gardener.cloud/preferred-chain
E.g. ISRG Root X1
No
Specifies the Common Name of the issuer for selecting the certificate chain. Details see Preferred Chain.
spec.secretLabels
cert.gardener.cloud/secret-labels
for annotation use e.g. key1=value1,key2=value2
No
Specifies labels for the certificate secret.
spec.privateKey.algorithm
cert.gardener.cloud/private-key-algorithm
RSA, ECDSA
No
Specifies algorithm for private key generation. The default value is depending on configuration of the extension (default of the default is RSA). You may request a new certificate without privateKey settings to find out the concrete defaults in your Gardener.
spec.privateKey.size
cert.gardener.cloud/private-key-size
"256", "384", "2048", "3072", "4096"
No
Specifies size for private key generation. Allowed values for RSA are 2048, 3072, and 4096. For ECDSA allowed values are 256 and 384. The default values are depending on the configuration of the extension (defaults of the default values are 3072 for RSA and 384 for ECDSA respectively).
Request a wildcard certificate
In order to avoid the creation of multiples certificates for every single endpoints, you may want to create a wildcard certificate for your shoot’s default cluster.
Please note that this can also be achived by directly adding an annotation to a Service type LoadBalancer. You could also create a Certificate object with a wildcard domain.
Using a custom Issuer
Most Gardener deployment with the certification extension enabled have a preconfigured garden issuer. It is also usually configured to use Let’s Encrypt as the certificate provider.
If you need a custom issuer for a specific cluster, please see Using a custom Issuer
Quotas
For security reasons there may be a default quota on the certificate requests per day set globally in the controller
registration of the shoot-cert-service.
The default quota only applies if there is no explicit quota defined for the issuer itself with the field
requestsPerDayQuota, e.g.:
kind: Shoot
...
spec:
  extensions:
  - type: shoot-cert-service
    providerConfig:
      apiVersion: service.cert.extensions.gardener.cloud/v1alpha1
      kind: CertConfig
      issuers:
        - email: your-email@example.com
          name: custom-issuer # issuer name must be specified in every custom issuer request, must not be "garden"
          server: 'https://acme-v02.api.letsencrypt.org/directory'
          requestsPerDayQuota: 10
DNS Propagation
As stated before, cert-manager uses the ACME challenge protocol to authenticate that you are the DNS owner for the domain’s certificate you are requesting.
This works by creating a DNS TXT record in your DNS provider under _acme-challenge.example.example.com containing a token to compare with. The TXT record is only applied during the domain validation.
Typically, the record is propagated within a few minutes. But if the record is not visible to the ACME server for any reasons, the certificate request is retried again after several minutes.
This means you may have to wait up to one hour after the propagation problem has been resolved before the certificate request is retried. Take a look in the events with kubectl describe ingress example for troubleshooting.
Character Restrictions
Due to restriction of the common name to 64 characters, you may to leave the common name unset in such cases.
Another possibility to request certificates for custom domains is a dedicated issuer.
Note: This is only needed if the default issuer provided by Gardener is restricted to shoot related domains or you are using domain names not visible to public DNS servers. Which means that your senario most likely doesn’t require your to add an issuer.
The custom issuers are specified normally in the shoot manifest. If the shootIssuers feature is enabled, it can alternatively be defined in the shoot cluster.
Custom issuer in the shoot manifest
kind: Shoot
...
spec:
extensions:
- type: shoot-cert-service
providerConfig:
apiVersion: service.cert.extensions.gardener.cloud/v1alpha1
kind: CertConfig
issuers:
- email: your-email@example.com
name: custom-issuer # issuer name must be specified in every custom issuer request, must not be "garden" server: 'https://acme-v02.api.letsencrypt.org/directory' privateKeySecretName: my-privatekey # referenced resource, the private key must be stored in the secret at `data.privateKey` (optionally, only needed as alternative to auto registration) #precheckNameservers: # to provide special set of nameservers to be used for prechecking DNSChallenges for an issuer#- dns1.private.company-net:53#- dns2.private.company-net:53" #shootIssuers:# if true, allows to specify issuers in the shoot cluster#enabled: true resources:
- name: my-privatekey
resourceRef:
apiVersion: v1
kind: Secret
name: custom-issuer-privatekey # name of secret in Gardener project
If you are using an ACME provider for private domains, you may need to change the nameservers used for
checking the availability of the DNS challenge’s TXT record before the certificate is requested from the ACME provider.
By default, only public DNS servers may be used for this purpose.
At least one of the precheckNameservers must be able to resolve the private domain names.
Using the custom issuer
To use the custom issuer in a certificate, just specify its name in the spec.
The ControllerRegistration contains a reference to the Helm chart which eventually deploy the shoot-cert-service to seed clusters.
It offers some configuration options, mainly to set up a default issuer for shoot clusters.
With a default issuer, pre-existing Let’s Encrypt accounts can be used and shared with shoot clusters (See Integration Guide - One Account or Many?).
Tip
Please keep the Let’s Encrypt Rate Limits in mind when using this shared account model. Depending on the amount of shoots and domains it is recommended to use an account with increased rate limits.
apiVersion: operator.gardener.cloud/v1alpha1
kind: Extension
metadata:
annotations:
security.gardener.cloud/pod-security-enforce: baseline
name: extension-shoot-cert-service
spec:
deployment:
extension:
helm:
ociRepository:
ref: ... # OCI reference to the Helm chart injectGardenKubeconfig: true policy: Always
values:
certificateConfig:
defaultIssuer:
name: default-issuer
acme:
email: some.user@example.com
# optional private key for the Let's Encrypt account#privateKey: |-#-----BEGIN RSA PRIVATE KEY-----#...#-----END RSA PRIVATE KEY----- server: https://acme-v02.api.letsencrypt.org/directory
# altenatively to `acme`, you can use a self-signed root or intermediate certificate for providing self-signed certificates# ca:# certificate: |# -----BEGIN CERTIFICATE-----# ...# -----END CERTIFICATE-----# certificateKey: |# -----BEGIN PRIVATE KEY-----# ...# -----END PRIVATE KEY-----# defaultRequestsPerDayQuota: 50# precheckNameservers: 8.8.8.8,8.8.4.4# caCertificates: | # optional custom CA certificates when using private ACME provider# -----BEGIN CERTIFICATE-----# ...# -----END CERTIFICATE-----# -----BEGIN CERTIFICATE-----# ...# -----END CERTIFICATE----- shootIssuers:
enabled: false# if true, allows specifying issuers in the shoot clusters deactivateAuthorizations: true# if true, enables flag --acme-deactivate-authorizations in cert-controller-manager skipDNSChallengeValidation: false# if true, skips dns-challenges in cert-controller-manager# The following values are only needed if the extension should be deployed on the runtime cluster. runtimeClusterValues:
certificateConfig:
defaultIssuer:
# typically the same values as at .spec.deployment.values.certificateConfig.defaultIssuer ...
resources:
- autoEnable:
- shoot # if set, the extension is enabled for all shoots by default clusterCompatibility:
- shoot
kind: Extension
type: shoot-cert-service
workerlessSupported: true - clusterCompatibility:
- garden
- seed
kind: Extension
lifecycle:
delete: AfterKubeAPIServer
reconcile: BeforeKubeAPIServer
type: controlplane-cert-service
Providing Trusted TLS Certificate for Garden Runtime Cluster
The shoot-cert-service can provide the TLS secret labeled with gardener.cloud/role: garden-cert in the garden namespace to be used by the Gardener API server.
See Trusted TLS Certificate for Garden Runtime Cluster for more information.
For this purpose, the extension must be deployed on the runtime cluster. Several configuration steps are needed:
Provide the spec.runtimeClusterValues values in the extension.operator.gardener.cloud resource in the operator extension.
Add the extension with type controlplane-cert-service to the Garden resource on the Garden runtime cluster.
If you only want to deploy the cert-controller-manager in the garden namespace, you can set generateControlPlaneCertificate to false.
If generateControlPlaneCertificate is set to true, the current values spec.virtualCluster.dns.domains and spec.runtimeCluster.ingress.domains from the Garden resource are read, and the certificate is created/updated in the garden namespace.
The certificate will be reconciled by the cert-controller-manager to provide the TLS secret with the label gardener.cloud/role: garden-cert in the garden namespace.
Additionally, the extension provides a webhook to mutate the virtual-garden-kube-apiserver deployment in the garden namespace.
It will manage the --tls-sni-cert-key command line arguments and patches the volume/volume mount with the TLS secret.
Only the secondary domain names will be used for the SNI certificate, as the self-signed certificate of the first domain name is provided by the Gardener operator.
Example for resulting domains of the certificate
If the Garden resource contains the following values:
then the Certificate will be created with these wildcard domain names:
*.primary.garden.example.com
*.secondary.foo.example.com
*.ingress.garden.example.com
Providing Trusted TLS Certificate for Shoot Control Planes
The shoot-cert-service can provide the TLS secret labeled with gardener.cloud/role: controlplane-cert in the garden namespace on the seeds.
See Trusted TLS Certificate for Shoot Control Planes for more information.
For this purpose, the extension must be enabled for the seed(s) by adding the controlplane-cert-service type to the Seed manifest:
The certificate will contain the wildcard domain name using the base domain name from the .spec.ingress.domain value of the Seed resource.
ControllerRegistration
Note
Using a ControllerRegistration / ControllerDeployment directly is not recommended if your Gardener landscape has a virtual Garden cluster.
In this case, please use an extension.operator.gardener.cloud resource as described above.
The Gardener operator will then take care of the ControllerRegistration and ControllerDeployment for you.
The ControllerRegistration contains a Helm chart which eventually deploy the shoot-cert-service to seed clusters. It offers some configuration options, mainly to set up a default issuer for shoot clusters. With a default issuer, pre-existing Let’s Encrypt accounts can be used and shared with shoot clusters (See “One Account or Many?” of the Integration Guide).
Please keep the Let’s Encrypt Rate Limits in mind when using this shared account model. Depending on the amount of shoots and domains it is recommended to use an account with increased rate limits.
apiVersion: core.gardener.cloud/v1beta1
kind: ControllerRegistration
...
values:
certificateConfig:
defaultIssuer:
acme:
email: foo@example.com
privateKey: |- -----BEGIN RSA PRIVATE KEY-----
...
-----END RSA PRIVATE KEY----- server: https://acme-v02.api.letsencrypt.org/directory
name: default-issuer
# restricted: true # restrict default issuer to any sub-domain of shoot.spec.dns.domain# defaultRequestsPerDayQuota: 50# precheckNameservers: 8.8.8.8,8.8.4.4# caCertificates: | # optional custom CA certificates when using private ACME provider# -----BEGIN CERTIFICATE-----# ...# -----END CERTIFICATE-----## -----BEGIN CERTIFICATE-----# ...# -----END CERTIFICATE----- shootIssuers:
enabled: false# if true, allows to specify issuers in the shoot clusters
Enablement
If the shoot-cert-service should be enabled for every shoot cluster in your Gardener managed environment, you need to auto enable it in the ControllerRegistration:
apiVersion: core.gardener.cloud/v1beta1
kind: ControllerRegistration
...
  resources:
  - kind: Extension
    type: shoot-cert-service
    autoEnable:
    - shoot # if set, the extension is enabled for all shoots by default
    clusterCompatibility:
    - shoot
    workerlessSupported: true
Alternatively, you’re given the option to only enable the service for certain shoots:
If you try my instructions and fail, then read the alternative title of this tutorial as “Shoot yourself in the foot with Gardener, custom Domains, Istio and Certificates”.
First Things First
Login to your Gardener landscape, setup a project with adequate infrastructure credentials and then navigate to your account. Note down the name of your secret. I chose the GCP infrastructure from the vast possible options that my Gardener provides me with, so i had named the secret as shoot-operator-gcp.
From the Access widget (leave the default settings) download your personalized kubeconfig into ~/.kube/kubeconfig-garden-myproject. Follow the instructions to setup kubelogin:
For convinience, let us set an alias command with
alias kgarden="kubectl --kubeconfig ~/.kube/kubeconfig-garden-myproject.yaml"
kgarden now gives you all botanical powers and connects you directly with your Gardener.
You should now be able to run kgarden get shoots, automatically get an oidc token, and list already running clusters/shoots.
Prepare your Custom Domain
I am going to use Cloud Flare as programmatic DNS of my custom domain mydomain.io. Please follow detailed instructions from Cloud Flare on how to delegate your domain (the free account does not support delegating subdomains). Alternatively, AWS Route53 (and most others) support delegating subdomains.
I needed to follow these instructions and created the following secret:
Apply this secret into your project with kgarden create -f cloudflare-mydomain-io.yaml.
Our External DNS Manager also supports Amazon Route53, Google CloudDNS, AliCloud DNS, Azure DNS, or OpenStack Designate. Check it out.
Prepare Gardener Extensions
I now need to prepare the Gardener extensions shoot-dns-service and shoot-cert-service and set the parameters accordingly.
Note
Please note, that the availability of Gardener Extensions depends on how your administrator has configured the Gardener landscape. Please contact your Gardener administrator in case you experience any issues during activation.
The following snippet allows Gardener to manage my entire custom domain, whereas with the include: attribute I restrict all dynamic entries under the subdomain gsicdc.mydomain.io:
Adjust the snipplets with your parameters (don’t forget your email). And please use the mydomain-staging issuer while you are testing and learning. Otherwise, Let’s Encrypt will rate limit your frequent requests and you can wait a week until you can continue.
Remember I chose to create the Shoot on GCP, so below is the simplest declarative shoot or cluster order document. Notice that I am referring to the infrastructure credentials with shoot-operator-gcp and I combined the above snippets into the yaml file:
Create your cluster and wait for it to be ready (about 5 to 7min).
$ kgarden create -f gsicdc.yaml
shoot.core.gardener.cloud/gsicdc created

$ kgarden get shoot gsicdc --watch
NAME     CLOUDPROFILE   VERSION   SEED   DOMAIN                                        HIBERNATION   OPERATION    PROGRESS   APISERVER     CONTROL       NODES     SYSTEM    AGE
gsicdc   gcp            1.28.2    gcp    gsicdc.myproject.shoot.devgarden.cloud   Awake         Processing   38         Progressing   Progressing   Unknown   Unknown   83s
...
gsicdc   gcp            1.28.2    gcp    gsicdc.myproject.shoot.devgarden.cloud   Awake         Succeeded    100        True          True          True          False         6m7s
Get access to your freshly baked cluster and set your KUBECONFIG:
$ kgarden get secrets gsicdc.kubeconfig -o jsonpath={.data.kubeconfig} | base64 -d >kubeconfig-gsicdc.yaml

$ export KUBECONFIG=$(pwd)/kubeconfig-gsicdc.yaml
$ kubectl get all
NAME                 TYPE        CLUSTER-IP   EXTERNAL-IP   PORT(S)   AGE
service/kubernetes   ClusterIP   100.64.0.1   <none>        443/TCP   89m
Install Istio
Please follow the Istio installation instructions and download istioctl. If you are on a Mac, I recommend:
brew install istioctl
I want to install Istio with a default profile and SDS enabled. Furthermore I pass the following annotations to the service object istio-ingressgateway in the istio-system namespace.
With these annotations three things now happen automatically:
The External DNS Manager, provided to you as a service (dns.gardener.cloud/class: garden), picks up the request and creates the wildcard DNS entry *.gsicdc.mydomain.io with a time to live of 120sec at your DNS provider. My provider Cloud Flare is very very quick (as opposed to some other services). You should be able to verify the entry with dig lovemygardener.gsicdc.mydomain.io within seconds.
The Certificate Management picks up the request as well and initiates a DNS01 protocol exchange with Let’s Encrypt; using the staging environment referred to with the issuer behind mydomain-staging.
After aproximately 70sec (give and take) you will receive the wildcard certificate in the wildcard-tls secret in the namespace istio-system.
Note
Notice, that the namespace for the certificate secret is often the cause of many troubleshooting sessions: the secret must reside in the same namespace of the gateway.
Verify that setup is working and that DNS and certificates have been created/delivered:
$ kubectl -n istio-system describe service istio-ingressgateway
<snip>
Events:
  Type    Reason                Age                From                     Message
  ----    ------                ----               ----                     -------
  Normal  EnsuringLoadBalancer  58s                service-controller       Ensuring load balancer
  Normal  reconcile             58s                cert-controller-manager  created certificate object istio-system/istio-ingressgateway-service-pwqdm
  Normal  cert-annotation       58s                cert-controller-manager  wildcard-tls: cert request is pending
  Normal  cert-annotation       54s                cert-controller-manager  wildcard-tls: certificate pending: certificate requested, preparing/waiting for successful DNS01 challenge
  Normal  cert-annotation       28s                cert-controller-manager  wildcard-tls: certificate ready
  Normal  EnsuredLoadBalancer   26s                service-controller       Ensured load balancer
  Normal  reconcile             26s                dns-controller-manager   created dns entry object shoot--core--gsicdc/istio-ingressgateway-service-p9qqb
  Normal  dns-annotation        26s                dns-controller-manager   *.gsicdc.mydomain.io: dns entry is pending
  Normal  dns-annotation        21s (x3 over 21s)  dns-controller-manager   *.gsicdc.mydomain.io: dns entry active

$ dig lovemygardener.gsicdc.mydomain.io

; <<>> DiG 9.10.6 <<>> lovemygardener.gsicdc.mydomain.io
<snip>
;; ANSWER SECTION:
lovemygardener.gsicdc.mydomain.io. 120 IN A	35.195.120.62
<snip>
There you have it, the wildcard-tls certificate is ready and the *.gsicdc.mydomain.io dns entry is active. Traffic will be going your way.
Handy Tools to Install
Another set of fine tools to use are kapp (formerly known as k14s), k9s and HTTPie. While we are at it, let’s install them all. If you are on a Mac, I recommend:
Networking is a central part of Kubernetes, but it can be challenging to understand exactly how it is expected to work. You should learn about Kubernetes networking, and first try to debug problems yourself. With a solid managed cluster from Gardener, it is always PEBCAK!
Kubernetes Ingress is a subject that is evolving to much broader standard. Please watch Evolving the Kubernetes Ingress APIs to GA and Beyond for a good introduction. In this example, I did not want to use the Kubernetes Ingress compatibility option of Istio. Instead, I used VirtualService and Gateway from the Istio’s API group networking.istio.io/v1 directly, and enabled istio-injection generically for the namespace.
I use httpbin as service that I want to expose to the internet, or where my ingress should be routed to (depends on your point of view, I guess).
Quod erat demonstrandum.
The proof of exchanging the issuer is now left to the reader.
Tip
Remember that the certificate is actually not valid because it is issued from the Let’s encrypt staging environment. Thus, we needed “curl -k” or “http –verify no”.
Hint: use the interactive k9s tool.
Cleanup
Remove the cloud native application:
$ kapp ls
Apps in namespace 'default'Name Namespaces Lcs Lca
httpbin (cluster),production true 17m
$ kapp delete -a httpbin
...
Continue? [yN]: y
...
11:47:47PM: ---- waiting complete [8/8 done] ----
Succeeded
Note: The sample service is not used in the following steps. It is deployed for illustration purposes only.
To use it with certificates, you have to add an HTTPS port for it.
Using a Gateway as a source
Deploy the Gateway API configuration including a single exposed route (i.e., /get):
kubectl create namespace istio-ingress
kubectl apply -f - <<EOF
apiVersion: gateway.networking.k8s.io/v1beta1
kind: Gateway
metadata:
name: gateway
namespace: istio-ingress
annotations:
#cert.gardener.cloud/dnsnames: "*.example.com" # alternative if you want to control the dns names explicitly.
cert.gardener.cloud/purpose: managed
spec:
gatewayClassName: istio
listeners:
- name: default
hostname: "*.example.com" # this is used by cert-controller-manager to extract DNS names
port: 443
protocol: HTTPS
allowedRoutes:
namespaces:
from: All
tls: # important: tls section must be defined with exactly one certificateRefs item
certificateRefs:
- name: foo-example-com
---
apiVersion: gateway.networking.k8s.io/v1beta1
kind: HTTPRoute
metadata:
name: http
namespace: default
spec:
parentRefs:
- name: gateway
namespace: istio-ingress
hostnames: ["httpbin.example.com"] # this is used by cert-controller-manager to extract DNS names too
rules:
- matches:
- path:
type: PathPrefix
value: /get
backendRefs:
- name: httpbin
port: 8000
EOF
You should now see a created Certificate resource similar to:
If the Gateway resource is annotated with cert.gardener.cloud/purpose: managed,
hostnames from all referencing HTTPRoute resources are automatically extracted.
These resources don’t need an additional annotation.
Deploy the Gateway API configuration including a single exposed route (i.e., /get):
kubectl create namespace istio-ingress
kubectl apply -f - <<EOF
apiVersion: gateway.networking.k8s.io/v1beta1
kind: Gateway
metadata:
name: gateway
namespace: istio-ingress
annotations:
cert.gardener.cloud/purpose: managed
spec:
gatewayClassName: istio
listeners:
- name: default
hostname: null # not set
port: 443
protocol: HTTPS
allowedRoutes:
namespaces:
from: All
tls: # important: tls section must be defined with exactly one certificateRefs item
certificateRefs:
- name: foo-example-com
---
apiVersion: gateway.networking.k8s.io/v1beta1
kind: HTTPRoute
metadata:
name: http
namespace: default
spec:
parentRefs:
- name: gateway
namespace: istio-ingress
hostnames: ["httpbin.example.com"] # this is used by dns-controller-manager to extract DNS names too
rules:
- matches:
- path:
type: PathPrefix
value: /get
backendRefs:
- name: httpbin
port: 8000
EOF
This should show a similar Certificate resource as above.
5.1.8 - Istio Gateways
Using annotated Istio Gateway and/or Istio Virtual Service as Source
This tutorial describes how to use annotated Istio Gateway resources as source for Certificate resources.
Note: If you are using a KinD cluster, the istio-ingressgateway service may be pending forever.
$ kubectl -n istio-system get svc istio-ingressgateway
NAME TYPE CLUSTER-IP EXTERNAL-IP PORT(S) AGE
istio-ingressgateway LoadBalancer 10.96.88.189 <pending> 15021:30590/TCP,80:30185/TCP,443:30075/TCP,31400:30129/TCP,15443:30956/TCP 13m
In this case, you may patch the status for demo purposes (of course it still would not accept connections)
$ cat <<EOF | kubectl apply -f -
apiVersion: networking.istio.io/v1
kind: Gateway
metadata:
name: httpbin-gateway
namespace: istio-system
annotations:
#cert.gardener.cloud/dnsnames: "*.example.com" # alternative if you want to control the dns names explicitly.
cert.gardener.cloud/purpose: managed
spec:
selector:
istio: ingressgateway # use Istio default gateway implementation
servers:
- port:
number: 443
name: http
protocol: HTTPS
hosts:
- "httpbin.example.com" # this is used by the dns-controller-manager to extract DNS names
tls:
credentialName: my-tls-secret
EOF
You should now see a created Certificate resource similar to:
If the Gateway resource is annotated with cert.gardener.cloud/purpose: managed,
hosts from all referencing VirtualServices resources are automatically extracted.
These resources don’t need an additional annotation.
Configure routes for traffic entering via the Gateway:
$ cat <<EOF | kubectl apply -f -
apiVersion: networking.istio.io/v1
kind: VirtualService
metadata:
name: httpbin
namespace: default
spec:
hosts:
- "httpbin.example.com" # this is used by dns-controller-manager to extract DNS names
gateways:
- istio-system/httpbin-gateway
http:
- match:
- uri:
prefix: /status
- uri:
prefix: /delay
route:
- destination:
port:
number: 8000
host: httpbin
EOF
This should show a similar Certificate resource as above.
5.2 - Access Control List Extension
Gardener Access Control List Extension
An Access Control List (ACL) is a list of permissions attached to an object, specifying which users or system processes are granted or denied access to that object.
Gardener utilizes the ACL extension to control access to shoot clusters using an allow-list mechanism, allowing you to specify which IP addresses or CIDR blocks are allowed to access the Kubernetes API and other services in the shoot cluster.
This extension supports multiple ingress namespaces, enhancing its flexibility for various deployment scenarios. The extension leverages Istio’s envoy proxy to insert additional configuration that limits access to specific clusters, impacting different external traffic flows such as Kubernetes API listeners, service listeners, and VPN listeners.
The extension’s functionality and limitations are intricately managed to handle different access types effectively, ensuring robust security for Kubernetes API servers.
Note
The ACL extension is not part of Gardener and is maintained by STACKIT in their own GitHub organization.
Project Gardener implements the automated management and operation of Kubernetes clusters as a service. Its main principle is to leverage Kubernetes concepts for all of its tasks.
Recently, most of the vendor specific logic has been developed in-tree. However, the project has grown to a size where it is very hard to extend, maintain, and test. With GEP-1 we have proposed how the architecture can be changed in a way to support external controllers that contain their very own vendor specifics. This way, we can keep Gardener core clean and independent.
How to start using or developing this extension controller locally
You can run the controller locally on your machine by executing make start. Please make sure to have the kubeconfig to the cluster you want to connect to ready in the ./dev/kubeconfig file.
Static code checks and tests can be executed by running make verify. We are using Go modules for Golang package dependency management and Ginkgo/Gomega for testing.
Feedback and Support
Feedback and contributions are always welcome!
Please report bugs or suggestions as GitHub issues or reach out on Slack (join the workspace here).
Learn more!
Please find further resources about out project here:
Gardener allows Shoot clusters to request DNS names for Ingresses and Services out of the box.
To support this the gardener must be installed with the shoot-dns-service
extension.
This extension uses the seed’s dns management infrastructure to maintain DNS
names for shoot clusters. So, far only the external DNS domain of a shoot
(already used for the kubernetes api server and ingress DNS names) can be used
for managed DNS names.
Operator Extension
Using an operator extension resource (extension.operator.gardener.cloud) is the recommended way to deploy the shoot-dns-service extension.
It is possible to decide whether the extension should be always available for all shoots or whether the extension must be separately enabled per shoot.
To enable the extension for all shoots, the autoEnable field must be set to [shoot] in the Extension resource.
apiVersion: operator.gardener.cloud/v1alpha1
kind: Extension
metadata:
annotations:
security.gardener.cloud/pod-security-enforce: baseline
name: extension-shoot-dns-service
spec:
deployment:
admission:
runtimeCluster:
helm:
ociRepository:
ref: ... # OCI reference to the Helm chart virtualCluster:
helm:
ociRepository:
ref: ... # OCI reference to the Helm chart extension:
helm:
ociRepository:
ref: ... # OCI reference to the Helm chart resources:
- autoEnable:
- shoot # if set, the extension is enabled for all shoots by default clusterCompatibility:
- shoot
kind: Extension
type: shoot-dns-service
workerlessSupported: true
Providing Base Domains usable for a Shoot
So, far only the external DNS domain of a shoot already used
for the kubernetes api server and ingress DNS names can be used for managed
DNS names. This is either the shoot domain as subdomain of the default domain
configured for the gardener installation, or a dedicated domain with dedicated
access credentials configured for a dedicated shoot via the shoot manifest.
Alternatively, you can specify DNSProviders and its credentials
Secret directly in the shoot, if this feature is enabled.
By default, DNSProvider replication is disabled, but it can be enabled globally in the ControllerDeployment
or for a shoot cluster in the shoot manifest (details see further below).
If the shoot DNS feature is not globally enabled by default (depends on the
extension registration on the garden cluster), it must be enabled per shoot.
To enable the feature for a shoot, the shoot manifest must explicitly add the
shoot-dns-service extension.
It is necessary that the Gardener installation your shoot cluster runs in is equipped with a shoot-dns-service extension. This extension uses the seed’s dns management infrastructure to maintain DNS names for shoot clusters. Please ask your Gardener operator if the extension is available in your environment.
Shoot Feature Gate
In some Gardener setups the shoot-dns-service extension is not enabled globally and thus must be configured per shoot cluster. Please adapt the shoot specification by the configuration shown below to activate the extension individually.
Have created and correctly configured a DNS Provider (Please consult this page for more information)
Have a basic understanding of DNS (see link under References)
There are 2 types of DNS that you can use within Kubernetes :
internal (usually managed by coreDNS)
external (managed by a public DNS provider).
This page, and the extension, exclusively works for external DNS handling.
Gardener allows 2 way of managing your external DNS:
Manually, which means you are in charge of creating / maintaining your Kubernetes related DNS entries
Via the Gardener DNS extension
Gardener DNS extension
The managed external DNS records feature of the Gardener clusters makes all this easier. You do not need DNS service provider specific knowledge, and in fact you do not need to leave your cluster at all to achieve that. You simply annotate the Ingress / Service that needs its DNS records managed and it will be automatically created / managed by Gardener.
Managed external DNS records are supported with the following DNS provider types:
aws-route53
azure-dns
azure-private-dns
google-clouddns
openstack-designate
alicloud-dns
cloudflare-dns
Request DNS records for Ingress resources
To request a DNS name for Ingress, Service or Gateway (Istio or Gateway API) objects in the shoot cluster it must be annotated with the DNS class garden and an annotation denoting the desired DNS names.
Example for an annotated Ingress resource:
apiVersion: networking.k8s.io/v1
kind: Ingress
metadata:
name: amazing-ingress
annotations:
# Let Gardener manage external DNS records for this Ingress. dns.gardener.cloud/dnsnames: special.example.com # Use "*" to collects domains names from .spec.rules[].host dns.gardener.cloud/ttl: "600" dns.gardener.cloud/class: garden
# If you are delegating the certificate management to Gardener, uncomment the following line#cert.gardener.cloud/purpose: managedspec:
rules:
- host: special.example.com
http:
paths:
- pathType: Prefix
path: "/" backend:
service:
name: amazing-svc
port:
number: 8080
# Uncomment the following part if you are delegating the certificate management to Gardener#tls:# - hosts:# - special.example.com# secretName: my-cert-secret-name
For an Ingress, the DNS names are already declared in the specification. Nevertheless the dnsnames annotation must be present. Here a subset of the DNS names of the ingress can be specified. If DNS names for all names are desired, the value all can be used.
Keep in mind that ingress resources are ignored unless an ingress controller is set up. Gardener does not provide an ingress controller by default. For more details, see Ingress Controllers and Service in the Kubernetes documentation.
Request DNS records for service type LoadBalancer
Example for an annotated Service (it must have the type LoadBalancer) resource:
apiVersion: v1
kind: Service
metadata:
name: amazing-svc
annotations:
# Let Gardener manage external DNS records for this Service. dns.gardener.cloud/dnsnames: special.example.com
dns.gardener.cloud/ttl: "600" dns.gardener.cloud/class: garden
spec:
selector:
app: amazing-app
ports:
- protocol: TCP
port: 80
targetPort: 8080
type: LoadBalancer
It is also possible to create a DNS entry via the Kubernetes resource called DNSEntry:
apiVersion: dns.gardener.cloud/v1alpha1
kind: DNSEntry
metadata:
annotations:
# Let Gardener manage this DNS entry. dns.gardener.cloud/class: garden
name: special-dnsentry
namespace: default
spec:
dnsName: special.example.com
ttl: 600
targets:
- 1.2.3.4
If one of the accepted DNS names is a direct subname of the shoot’s ingress domain, this is already handled by the standard wildcard entry for the ingress domain. Therefore this name should be excluded from the dnsnames list in the annotation. If only this DNS name is configured in the ingress, no explicit DNS entry is required, and the DNS annotations should be omitted at all.
You can check the status of the DNSEntry with
$ kubectl get dnsentry
NAME DNS TYPE PROVIDER STATUS AGE
mydnsentry special.example.com aws-route53 default/aws Ready 24s
As soon as the status of the entry is Ready, the provider has accepted the new DNS record. Depending on the provider and your DNS settings and cache, it may take up to 24 hours for the new entry to be propagated over all internet.
Request DNS records for Service/Ingress resources using a DNSAnnotation resource
In rare cases it may not be possible to add annotations to a Service or Ingress resource object.
E.g.: the helm chart used to deploy the resource may not be adaptable for some reasons or some automation is used, which always restores the original content of the resource object by dropping any additional annotations.
In these cases, it is recommended to use an additional DNSAnnotation resource in order to have more flexibility that DNSentry resources. The DNSAnnotation resource makes the DNS shoot service behave as if annotations have been added to the referenced resource.
For the Ingress example shown above, you can create a DNSAnnotation resource alternatively to provide the annotations.
Note that the DNSAnnotation resource itself needs the dns.gardener.cloud/class=garden annotation. This also only works for annotations known to the DNS shoot service (see Accepted External DNS Records Annotations).
Here are all the accepted annotations related to the DNS extension:
Annotation
Description
dns.gardener.cloud/dnsnames
Mandatory for service and ingress resources, accepts a comma-separated list of DNS names if multiple names are required. For ingress you can use the special value '*'. In this case, the DNS names are collected from .spec.rules[].host.
dns.gardener.cloud/class
Mandatory, in the context of the shoot-dns-service it must always be set to garden.
dns.gardener.cloud/ttl
Recommended, overrides the default Time-To-Live of the DNS record.
dns.gardener.cloud/cname-lookup-interval
Only relevant if multiple domain name targets are specified. It specifies the lookup interval for CNAMEs to map them to IP addresses (in seconds)
dns.gardener.cloud/realms
Internal, for restricting provider access for shoot DNS entries. Typcially not set by users of the shoot-dns-service.
dns.gardener.cloud/ip-stack
Only relevant for provider type aws-route53 if target is an AWS load balancer domain name. Can be set for service, ingress and DNSEntry resources. It specify which DNS records with alias targets are created instead of the usual CNAME records. If the annotation is not set (or has the value ipv4), only an A record is created. With value dual-stack, both A and AAAA records are created. With value ipv6 only an AAAA record is created.
dns.gardener.cloud/ignore
Optional, with the possible values: true, reconcile, or full. For values true and reconcile, the reconciliation is skipped. true is an alias for reconcile. For value full both reconciliation and deletion operations are skipped.
dns.gardener.cloud/target-hard-ignore
Optional, for a generated target DNSEntry to ignore it on reconciliation. It is not propagated from source objects to the target DNSEntry. Important: The entry is even ignored on deletion, so use with caution to avoid orphaned entries.
For services, behaves similar to dns.gardener.cloud/ip-stack=dual-stack.
loadbalancer.openstack.org/load-balancer-address
Internal, for services only: support for PROXY protocol on Openstack (which needs a hostname as ingress). Typcially not set by users of the shoot-dns-service.
If one of the accepted DNS names is a direct subdomain of the shoot’s ingress domain, this is already handled by the standard wildcard entry for the ingress domain. Therefore, this name should be excluded from the dnsnames list in the annotation. If only this DNS name is configured in the ingress, no explicit DNS entry is required, and the DNS annotations should be omitted at all.
Troubleshooting
General DNS tools
To check the DNS resolution, use the nslookup or dig command.
$ nslookup special.your-domain.com
or with dig
$ dig +short special.example.com
Depending on your network settings, you may get a successful response faster using a public DNS server (e.g. 8.8.8.8, 8.8.4.4, or 1.1.1.1)
dig @8.8.8.8 +short special.example.com
DNS record events
The DNS controller publishes Kubernetes events for the resource which requested the DNS record (Ingress, Service, DNSEntry). These events reveal more information about the DNS requests being processed and are especially useful to check any kind of misconfiguration, e.g. requests for a domain you don’t own.
Events for a successfully created DNS record:
$ kubectl describe service my-service
Events:
Type Reason Age From Message
---- ------ ---- ---- -------
Normal dns-annotation 19s dns-controller-manager special.example.com: dns entry is pending
Normal dns-annotation 19s (x3 over 19s) dns-controller-manager special.example.com: dns entry pending: waiting for dns reconciliation
Normal dns-annotation 9s (x3 over 10s) dns-controller-manager special.example.com: dns entry active
Please note, events vanish after their retention period (usually 1h).
DNSEntry status
DNSEntry resources offer a .status sub-resource which can be used to check the current state of the object.
Status of a erroneous DNSEntry.
status:
message: No responsible provider found
observedGeneration: 3
provider: remote
state: Error
Gardener can manage DNS records on your behalf, so that you can request them via different resource types (see here) within the shoot cluster. The domains for which you are permitted to request records, are however restricted and depend on the DNS provider configuration.
Shoot provider
By default, every shoot cluster is equipped with a default provider. It is the very same provider that manages the shoot cluster’s kube-apiserver public DNS record (DNS address in your Kubeconfig).
You are permitted to request any sub-domain of .dns.domain that is not already taken (e.g. api.shoot.project.default-domain.gardener.cloud, *.ingress.shoot.project.default-domain.gardener.cloud) with this provider.
Additional providers
If you need to request DNS records for domains not managed by the default provider, additional providers can
be configured in the shoot specification.
Alternatively, if it is enabled, it can be added as DNSProvider resources to the shoot cluster.
Additional providers in the shoot specification
To add a providers in the shoot spec, you need set them in the spec.dns.providers list.
Please consult the API-Reference to get a complete list of supported fields and configuration options.
Referenced secrets should exist in the project namespace in the Garden cluster and must comply with the provider specific credentials format. The External-DNS-Management project provides corresponding examples (20-secret-<provider-name>-credentials.yaml) for known providers.
Additional providers as resources in the shoot cluster
If it is not enabled globally, you have to enable the feature in the shoot manifest:
The External-DNS-Management project provides examples with more details for DNSProviders (30-provider-<provider-name>.yaml)
and credential Secrets (20-secret-<provider-name>.yaml) at https://github.com/gardener/external-dns-management//examples
for all supported provider types.
5.3.4 - Gateway Api Gateways
Using annotated Gateway API Gateway and/or HTTPRoutes as Source
This tutorial describes how to use annotated Gateway API resources as source for DNSEntries with the Gardener shoot-dns-service extension.
The dns-controller-manager supports the resources Gateway and HTTPRoute.
Install Istio on your cluster
Using a new or existing shoot cluster, follow the Istio Kubernetes Gateway API to
install the Gateway API and to install Istio.
These are the typical commands for the Istio installation with the Kubernetes Gateway API:
Deploy the Gateway API configuration including a single exposed route (i.e., /get):
kubectl create namespace istio-ingress
kubectl apply -f - <<EOF
apiVersion: gateway.networking.k8s.io/v1
kind: Gateway
metadata:
name: gateway
namespace: istio-ingress
annotations:
dns.gardener.cloud/dnsnames: "*.example.com"
dns.gardener.cloud/class: garden
spec:
gatewayClassName: istio
listeners:
- name: default
hostname: "*.example.com" # this is used by dns-controller-manager to extract DNS names
port: 80
protocol: HTTP
allowedRoutes:
namespaces:
from: All
---
apiVersion: gateway.networking.k8s.io/v1
kind: HTTPRoute
metadata:
name: http
namespace: default
spec:
parentRefs:
- name: gateway
namespace: istio-ingress
hostnames: ["httpbin.example.com"] # this is used by dns-controller-manager to extract DNS names too
rules:
- matches:
- path:
type: PathPrefix
value: /get
backendRefs:
- name: httpbin
port: 8000
EOF
You should now see events in the namespace of the gateway:
$ kubectl -n istio-system get events --sort-by={.metadata.creationTimestamp}
LAST SEEN TYPE REASON OBJECT MESSAGE
...
38s Normal dns-annotation service/gateway-istio httpbin.example.com: created dns entry object shoot--foo--bar/gateway-istio-service-zpf8n
38s Normal dns-annotation service/gateway-istio httpbin.example.com: dns entry pending: waiting for dns reconciliation
38s Normal dns-annotation service/gateway-istio httpbin.example.com: dns entry is pending
36s Normal dns-annotation service/gateway-istio httpbin.example.com: dns entry active
Using a HTTPRoute as a source
If the Gateway resource is annotated with dns.gardener.cloud/dnsnames: "*", hostnames from all referencing HTTPRoute resources
are automatically extracted. These resources don’t need an additional annotation.
Deploy the Gateway API configuration including a single exposed route (i.e., /get):
kubectl create namespace istio-ingress
kubectl apply -f - <<EOF
apiVersion: gateway.networking.k8s.io/v1
kind: Gateway
metadata:
name: gateway
namespace: istio-ingress
annotations:
dns.gardener.cloud/dnsnames: "*"
dns.gardener.cloud/class: garden
spec:
gatewayClassName: istio
listeners:
- name: default
hostname: null # not set
port: 80
protocol: HTTP
allowedRoutes:
namespaces:
from: All
---
apiVersion: gateway.networking.k8s.io/v1
kind: HTTPRoute
metadata:
name: http
namespace: default
spec:
parentRefs:
- name: gateway
namespace: istio-ingress
hostnames: ["httpbin.example.com"] # this is used by dns-controller-manager to extract DNS names too
rules:
- matches:
- path:
type: PathPrefix
value: /get
backendRefs:
- name: httpbin
port: 8000
EOF
$ cat <<EOF | kubectl apply -f -
apiVersion: networking.istio.io/v1alpha3
kind: Gateway
metadata:
name: httpbin-gateway
namespace: istio-system
annotations:
dns.gardener.cloud/dnsnames: "*"
dns.gardener.cloud/class: garden
spec:
selector:
istio: ingressgateway # use Istio default gateway implementation
servers:
- port:
number: 80
name: http
protocol: HTTP
hosts:
- "httpbin.example.com" # this is used by the dns-controller-manager to extract DNS names
EOF
Configure routes for traffic entering via the Gateway:
$ cat <<EOF | kubectl apply -f -
apiVersion: networking.istio.io/v1alpha3
kind: VirtualService
metadata:
name: httpbin
namespace: default
spec:
hosts:
- "httpbin.example.com" # this is also used by the dns-controller-manager to extract DNS names
gateways:
- istio-system/httpbin-gateway
http:
- match:
- uri:
prefix: /status
- uri:
prefix: /delay
route:
- destination:
port:
number: 8000
host: httpbin
EOF
You should now see events in the namespace of the gateway:
$ kubectl -n istio-system get events --sort-by={.metadata.creationTimestamp}
LAST SEEN TYPE REASON OBJECT MESSAGE
...
38s Normal dns-annotation gateway/httpbin-gateway httpbin.example.com: created dns entry object shoot--foo--bar/httpbin-gateway-gateway-zpf8n
38s Normal dns-annotation gateway/httpbin-gateway httpbin.example.com: dns entry pending: waiting for dns reconciliation
38s Normal dns-annotation gateway/httpbin-gateway httpbin.example.com: dns entry is pending
36s Normal dns-annotation gateway/httpbin-gateway httpbin.example.com: dns entry active
Using a VirtualService as a source
If the Gateway resource is annotated with dns.gardener.cloud/dnsnames: "*", hosts from all referencing VirtualServices resources
are automatically extracted. These resources don’t need an additional annotation.
Configure routes for traffic entering via the Gateway:
$ cat <<EOF | kubectl apply -f -
apiVersion: networking.istio.io/v1alpha3
kind: VirtualService
metadata:
name: httpbin
namespace: default
spec:
hosts:
- "httpbin.example.com" # this is used by dns-controller-manager to extract DNS names
gateways:
- istio-system/httpbin-gateway
http:
- match:
- uri:
prefix: /status
- uri:
prefix: /delay
route:
- destination:
port:
number: 8000
host: httpbin
EOF
This should show a similar events as above.
To get the targets to the extracted DNS names, the shoot-dns-service controller is able to gather information from the kubernetes service of the Istio Ingress Gateway.
Note: It is also possible to set the targets my specifying an Ingress resource using the dns.gardener.cloud/ingress annotation on the Istio Ingress Gateway resource.
Note: It is also possible to set the targets manually by using the dns.gardener.cloud/targets annotation on the Istio Ingress Gateway resource.
Project Gardener implements the automated management and operation of Kubernetes clusters as a service.
Its main principle is to leverage Kubernetes concepts for all of its tasks.
Recently, most of the vendor specific logic has been developed in-tree.
However, the project has grown to a size where it is very hard to extend, maintain, and test.
With GEP-1 we have proposed how the architecture can be changed in a way to support external controllers that contain their very own vendor specifics.
This way, we can keep Gardener core clean and independent.
This controller implements Gardener’s extension contract for the shoot-networking-filter extension.
An example for a ControllerRegistration resource that can be used to register this controller to Gardener can be found here.
Please find more information regarding the extensibility concepts and a detailed proposal here.
When an extension resource is reconciled, if the optional workers field is not used, the extension controller will create a daemonset egress-filter-applier on the shoot containing a Dockerfile container.
If the optional workers field is used, the extension controller will create one daemonset egress-filter-applier-<worker name> per each worker group on the shoot.
See the usage documentation for more details on how to configure the extension on a shoot cluster.
Please note, this extension controller relies on the Gardener-Resource-Manager to deploy k8s resources to seed and shoot clusters.
How to start using or developing this extension controller locally
You can run the controller locally on your machine by executing make start.
We are using Go modules for Golang package dependency management and Ginkgo/Gomega for testing.
Feedback and Support
Feedback and contributions are always welcome!
Please report bugs or suggestions as GitHub issues or reach out on Slack (join the workspace here).
Learn more!
Please find further resources about out project here:
Gardener allows shoot clusters to filter egress traffic on node level. To support this the Gardener must be installed with the shoot-networking-filter extension.
Configuration
To generally enable the networking filter for shoot objects the shoot-networking-filter extension must be registered by providing an appropriate extension registration in the garden cluster.
Here it is possible to decide whether the extension should be always available for all shoots or whether the extension must be separately enabled per shoot.
If the extension should be used for all shoots the globallyEnabled flag should be set to true.
An example of a ControllerRegistration for the shoot-networking-filter can be found at controller-registration.yaml.
The ControllerRegistration contains a Helm chart which eventually deploys the shoot-networking-filter to seed clusters. It offers some configuration options, mainly to set up a static filter list or provide the configuration for downloading the filter list from a service endpoint.
apiVersion: core.gardener.cloud/v1beta1
kind: ControllerDeployment
...
values:
egressFilter:
blackholingEnabled: true filterListProviderType: static
staticFilterList:
- network: 1.2.3.4/31
policy: BLOCK_ACCESS
- network: 5.6.7.8/32
policy: BLOCK_ACCESS
- network: ::2/128
policy: BLOCK_ACCESS
#filterListProviderType: download#downloaderConfig:# endpoint: https://my.filter.list.server/lists/policy# oauth2Endpoint: https://my.auth.server/oauth2/token# refreshPeriod: 1h## if the downloader needs an OAuth2 access token, client credentials can be provided with oauth2Secret#oauth2Secret:# clientID: 1-2-3-4# clientSecret: secret!!## either clientSecret of client certificate is required# client.crt.pem: |# -----BEGIN CERTIFICATE-----# ...# -----END CERTIFICATE-----# client.key.pem: |# -----BEGIN PRIVATE KEY-----# ...# -----END PRIVATE KEY-----
Enablement for a Shoot
If the shoot networking filter is not globally enabled by default (depends on the extension registration on the garden cluster), it can be enabled per shoot. To enable the service for a shoot, the shoot manifest must explicitly add the shoot-networking-filter extension.
If the shoot networking filter is globally enabled by default, it can be disabled per shoot. To disable the service for a shoot, the shoot manifest must explicitly state it.
Register Shoot Networking Filter Extension in Shoot Clusters
Introduction
Within a shoot cluster, it is possible to enable the networking filter. It is necessary that the Gardener installation your shoot cluster runs in is equipped with a shoot-networking-filter extension. Please ask your Gardener operator if the extension is available in your environment.
Shoot Feature Gate
In most of the Gardener setups the shoot-networking-filter extension is not enabled globally and thus must be configured per shoot cluster. Please adapt the shoot specification by the configuration shown below to activate the extension individually.
If the shoot networking filter is globally enabled by default, it can be disabled per shoot. To disable the service for a shoot, the shoot manifest must explicitly state it.
By default, the networking filter only filters egress traffic. However, if you enable blackholing, incoming traffic will also be blocked.
You can enable blackholing on a per-shoot basis.
Ingress traffic can only be blocked by blackhole routing, if the source IP address is preserved. On Azure, GCP and AliCloud this works by default.
The default on AWS is a classic load balancer that replaces the source IP by it’s own IP address. Here, a network load balancer has to be
configured adding the annotation service.beta.kubernetes.io/aws-load-balancer-type: "nlb" to the service.
On OpenStack, load balancers don’t preserve the source address.
When you disable blackholing in an existing shoot, the associated blackhole routes will be removed automatically.
Conversely, when you re-enable blackholing again, the iptables-based filter rules will be removed and replaced by blackhole routes.
Ingress Filtering per Worker Group
You can optionally enable or disable ingress filtering for specified worker groups.
For example, you may want to disable blackholing in general but enable it for a worker group hosting an external API.
You can do so by using an optional workers field:
Project Gardener implements the automated management and operation of Kubernetes clusters as a service.
Its main principle is to leverage Kubernetes concepts for all of its tasks.
Recently, most of the vendor specific logic has been developed in-tree.
However, the project has grown to a size where it is very hard to extend, maintain, and test.
With GEP-1 we have proposed how the architecture can be changed in a way to support external controllers that contain their very own vendor specifics.
This way, we can keep Gardener core clean and independent.
This controller implements Gardener’s extension contract for the shoot-lakom-service extension.
An example for a ControllerRegistration resource that can be used to register this controller to Gardener can be found here.
Please find more information regarding the extensibility concepts and a detailed proposal here.
Lakom Admission Controller
Lakom is kubernetes admission controller which purpose is to implement cosign image signature verification against public cosign key. It also takes care to resolve image tags to sha256 digests. It also caches all OCI artifacts to reduce the load toward the OCI registry.
When an extension resource is reconciled, the extension controller will create an instance of lakom admission controller. These resources are placed inside the shoot namespace on the seed. Also, the controller takes care about generating necessary RBAC resources for the seed as well as for the shoot.
Please note, this extension controller relies on the Gardener-Resource-Manager to deploy k8s resources to seed and shoot clusters.
How to start using or developing this extension controller locally
The Lakom admission controller can be configured with make dev-setup and started with make start-lakom.
You can run the lakom extension controller locally on your machine by executing make start.
If you’d like to develop Lakom using a local cluster such as KinD, make sure your KUBECONFIG environment variable is targeting the local Garden cluster.
Add 127.0.0.1 garden.local.gardener.cloud to your /etc/hosts. You can then run:
make extension-up
This will trigger a skaffold deployment that builds the images, pushes them to the registry and installs the helm charts from /charts.
We are using Go modules for Golang package dependency management and Ginkgo/Gomega for testing.
Feedback and Support
Feedback and contributions are always welcome!
Please report bugs or suggestions as GitHub issues or reach out on Slack (join the workspace here).
Learn more
Please find further resources about out project here:
Gardener allows Shoot clusters to use Lakom admission controller for cosign image signing verification. To support this the Gardener must be installed with the shoot-lakom-service extension.
Configuration
To generally enable the Lakom service for shoot objects the shoot-lakom-service extension must be registered by providing an appropriate extension registration in the garden cluster.
Here it is possible to decide whether the extension should be always available for all shoots or whether the extension must be separately enabled per shoot.
If the extension should be used for all shoots the globallyEnabled flag should be set to true.
If the shoot Lakom service is not globally enabled by default (depends on the extension registration on the garden cluster), it can be enabled per shoot. To enable the service for a shoot, the shoot manifest must explicitly add the shoot-lakom-service extension.
If the shoot Lakom service is globally enabled by default, it can be disabled per shoot. To disable the service for a shoot, the shoot manifest must explicitly state it.
Lakom is kubernetes admission controller which purpose is to implement
cosign image signature verification with
public cosign key. It also takes care to resolve image tags to sha256 digests. A
built-in cache mechanism can be enabled to reduce the load toward the OCI
registry.
Flags
Lakom admission controller is configurable via command line flags. The trusted
cosign public keys and the associated algorithms associated with them are set
viq configuration file provided with the flag --lakom-config-path.
Flag Name
Description
Default Value
--bind-address
Address to bind to
“0.0.0.0”
--cache-refresh-interval
Refresh interval for the cached objects
30s
--cache-ttl
TTL for the cached objects. Set to 0, if cache has to be disabled
10m0s
--contention-profiling
Enable lock contention profiling, if profiling is enabled
false
--health-bind-address
Bind address for the health server
“:8081”
-h, --help
help for lakom
--insecure-allow-insecure-registries
If set, communication via HTTP with registries will be allowed.
false
--insecure-allow-untrusted-images
If set, the webhook will just return warning for the images without trusted signatures.
false
--kubeconfig
Paths to a kubeconfig. Only required if out-of-cluster.
--lakom-config-path
Path to file with lakom configuration containing cosign public keys used to verify the image signatures
--metrics-bind-address
Bind address for the metrics server
“:8080”
--port
Webhook server port
9443
--profiling
Enable profiling via web interface host:port/debug/pprof/
false
--tls-cert-dir
Directory with server TLS certificate and key (must contain a tls.crt and tls.key file
--use-only-image-pull-secrets
If set, only the credentials from the image pull secrets of the pod are used to access the OCI registry. Otherwise, the node identity and docker config are also used.
false
--version
prints version information and quits; –version=vX.Y.Z… sets the reported version
Lakom Cosign Public Keys Configuration File
Lakom cosign public keys configuration file should be YAML or JSON formatted. It
can set multiple trusted keys, as each key must be given a name. The supported
types of public keys are RSA, ECDSA and Ed25519. The RSA keys can be
additionally configured with a signature verification algorithm specifying the
scheme and hash function used during signature verification. As of now ECDSA
and Ed25519 keys cannot be configured with specific algorithm.
publicKeys:
- name: example-public-key
algorithm: RSASSA-PSS-SHA256
key: |- -----BEGIN PUBLIC KEY-----
MFwwDQYJKoZIhvcNAQEBBQADSwAwSAJBAPeQXbIWMMXYV+9+j9b4jXTflnpfwn4E
GMrmqYVhm0sclXb2FPP5aV/NFH6SZdHDZcT8LCNsNgxzxV4N+UE/JIsCAwEAAQ==
-----END PUBLIC KEY-----
key is the cryptographic public key that will be used for image signature validation.
Supported RSA Signature Verification Algorithms
RSASSA-PKCS1-v1_5-SHA256: uses RSASSA-PKCS1-v1_5 scheme with SHA256 hash func
RSASSA-PKCS1-v1_5-SHA384: uses RSASSA-PKCS1-v1_5 scheme with SHA384 hash func
RSASSA-PKCS1-v1_5-SHA512: uses RSASSA-PKCS1-v1_5 scheme with SHA512 hash func
RSASSA-PSS-SHA256: uses RSASSA-PSS scheme with SHA256 hash func
RSASSA-PSS-SHA384: uses RSASSA-PSS scheme with SHA384 hash func
RSASSA-PSS-SHA512: uses RSASSA-PSS scheme with SHA512 hash func
Supported Resources for Verification
By default, Lakom validates only Pod resources in the clusters that it covers.
However, it also has the capabilities to validate the following Gardener specific resources:
controllerdeployments.core.gardener.cloud/v1
gardenlets.seedmanagement.gardener.cloud/v1alpha1
extensions.operator.gardener.cloud/v1alpha1
Important
When deploying Lakom via the helm chart in /charts/lakom, the admissionConfig.rules key
can be fully customized to include any of the listed resources above.
Make sure that they are registered with the same group & versions as the ones listed above.
Any difference will cause Lakom to skip validation and approve the request,
making it a security risk.
5.5.3 - Oci Registries
OCI Registries
This document aims to introduce the reader to the general architecture of OCI
Registries, their history and jargon that might be encountered.
History of Container Registries
Most readers might be familiar with the container registry that was introduced
by Docker. It aims to provide a way for developers to store and distribute
container images that can be used for running applications in containers.
In the beginning, the registry was meant to only host images in a way that the
different layers of the image could be downloaded in parallel, while being
assembled on the client side.
In June 2015, multiple companies agreed to standardize the container image format,
including its distribution and runtime. This was the birth of the Open Container
Initiative (OCI).
Understanding OCI Registries
The most important document that pertains to OCI Registries in the case of Lakom is the OCI
distribution spec.
It outlines the way that artifacts shall be stored and fetched from a registry
that adheres to the OCI standard.
OCI Registries are meant to store content. While in the beginning the main
problem that they were trying to solve was image storage, during the evolution
of the image registry concept, a decision was made to make it more general
for storage of any form of objects, sometimes called artifacts.
An artifact is an abstract idea of multiple components that together describe
how an object is built along with storing metadata about the object.
To implement this, every OCI registry has to expose an API for creating
3 types of objects:
Blobs
Manifests
Tags
Blobs
A blob is just a set of bytes. Nothing more. The important part about blobs
is that they are content addressable. Content Addressable Storage (CAS)
is a method of storing data in such a way that the address of the data is derived
from the data itself. This means that if you store the same blob twice, it will
be stored only once, and the address of the blob will be the same. This is achieved
by using the digest of the blob as the address.
This is the actual mechanism for allowing images to be optimal in terms of storage.
Since most images begin by depending on the same base image, this means that
it can be stored only once and referenced by multiple images.
Manifests
A manifest is just a JSON document. It is stored separately from the blobs.
But similarly to the blobs, it is also content addressable. The manifest gets
formatted to a canonical form and then hashed. The hash becomes the address of
the manifest.
Where manifests become powerful is when they are used to reference to other
manifests or blobs. These references are called OCI Content Descriptors.
For example, the Image Manifest that most readers would be familiar with contains
a list of layers that are used to build the image. Each layer is a reference to
a blob.
An additional reference outside the layer references is used for storing
additional configuration. More info can be found in the official OCI Image Manifest spec.
The term artifact is just a generalization over the Image Manifest idea.
The Image Manifest has a specific format that can be found in the aforementioned OCI Image Manifest spec.
The important field is the .config.mediaType field. Based on the official guidelines,
it can be used for defining types other than an image. More info can be found here.
Combining all of these ideas, we can see that artifacts can be represented by 1
specific object - a manifest. That manifest, based on the media type in the config, can be
interpreted by different programs for their specific use case. Eg. a Helm chart.
Helm charts specifically have a mediaType of application/vnd.cncf.helm.config.v1+json.
Layers, too, have a media type. The media type of a layer when the artifact
is a helm chart is one of:
More info specifically on Helm charts as OCI Artifacts can be found here: Helm OCI MediaTypes.
Tags
While manifests and blobs being content addressable is nice, it becomes hard
to address them in a human-readable format. Tags allow us to add a reference
to a given manifest that differs from the digest of the object.
Normally, whenever we push an image to a registry, if we don’t give it an
explicit tag, the registry would most likely give it the tag latest. This,
actually is not mandatory based on the distribution spec. Manifests don’t
require that they have a tag.
Multiple tags can point to the same manifest.
Cosign
Cosign is generally a part of the bigger project called sigstore.
Sigstore is an “open-source project for improving software supply chain security”.
It aims for developers to have a hassle-free way to sign their artifacts while
leveraging other components that add additional layers of security to the
signature process. Eg. Rekor and Fulcio.
Cosign is a CLI tool aiming to tie all the components of sigstore together.
In our specific case, we use it only as a format for creating signatures and
then verifying them. In theory, we wouldn’t need to use Cosign for this, but
it uses a popular format for the signatures and the libraries help us
save work.
In the context of Lakom, what interests us is how Cosign signs OCI artifacts
and how it stores them.
The signing process in a nutshell is the following – Sign(sha256(SimpleSigningPayload(sha256(Image Manifest)))), where:
Image Manifest is what it says. Just the manifest of the image (artifact).
sha256 is the hashing algorithm used.
SimpleSigningPayload is the interesting part here. Instead of just signing the
hash of the manifest itself, the hash itself is packed into a JSON doc that
is called the SimpleSigningPayload. Example payload:
We can see that the hash of the manifest is stored in the Docker-manifest-digest.
Now this object is the one that gets signed using our private key. The signed
version of this objest is the one that gets stored and gets used for
verification.
Storage of the signature is done via an image manifest that gets uploaded
in the same repo as the image, but tagged with sha256-<container-image-digest>.sig.
Thus, the signature discovery mechanism is to just fetch the image digest
that is tagged with the aforementioned tag.
More info on this whole process can be found here.
Lakom relies on the cosign libraries to automate this whole process. When
validating an artifact, if we know its digest, we can fetch the signature and
verify it. If the signature is valid, we can be sure that the artifact has not
been tampered with.
5.5.4 - Shoot Extension
Introduction
This extension implements cosign image verification. It is strictly limited only to the kubernetes system components deployed by Gardener and other Gardener Extensions in the kube-system namespace of a shoot cluster.
Shoot Feature Gate
In most of the Gardener setups the shoot-lakom-service extension is enabled globally and thus can be configured per shoot cluster. Please adapt the shoot specification by the configuration shown below to disable the extension individually.
The scope field instruct lakom which pods to validate. The possible values are:
KubeSystem
Lakom will validate all pods in the kube-system namespace.
KubeSystemManagedByGardener
Lakom will validate all pods in the kube-system namespace that are annotated with “managed-by/gardener”. This is the default value.
Cluster
Lakom will validate all pods in all namespaces.
TrustedKeysResourceName
Lakom, by default, tries to verify only workloads that belong to Gardener. Because of this, the only public keys that it uses to do its job are the ones for the Gardener workload.
If you’d like to use Lakom as a tool for verifying your own workload, you’ll need to add your own public keys to the ones that Lakom is already using. This can be achieved using Gardener referenced resources. More information about the keys and their format can be found here.
Simply:
Create a secret in your project namespace that contains a field keys with your keys as a value. Example keys:
- name: example-client-key1
algorithm: RSASSA-PSS-SHA256
key: |-
-----BEGIN PUBLIC KEY-----
MFwwDQYJKoZIhvcNAQEBBQADSwAwSAJBAPeQXbIWMMXYV+9+j9b4jXTflnpfwn4E
GMrmqYVhm0sclXb2FPP5aV/NFH6SZdHDZcT8LCNsNgxzxV4N+UE/JIsCAwEAAQ==
-----END PUBLIC KEY-----
- name: example-client-key2
algorithm: RSASSA-PSS-SHA256
key: |-
-----BEGIN PUBLIC KEY-----
MFwwDQYJKoZIhvcNAQEBBQADSwAwSAJBAPeQXbIWMMXYV+9+j9b4jXTflnpfwn4E
GMrmqYVhm0sclXb2FPP5aV/NFH6SZdHDZcT8LCNsNgxzxV4N+UE/JIsCAwEAAQ==
-----END PUBLIC KEY-----
Add a reference to your secret via the resources field in the shoot spec as shown above.
Add the name of your referenece in trustedKeysResourceName in the provider config as shown above.
Now, whenever Lakom tries to verify a Pod, it will make sure to use your public keys as well.
5.6 - Networking Problem Detector
Gardener extension for deploying network problem detector
Project Gardener implements the automated management and operation of Kubernetes clusters as a service.
Its main principle is to leverage Kubernetes concepts for all of its tasks.
Recently, most of the vendor specific logic has been developed in-tree.
However, the project has grown to a size where it is very hard to extend, maintain, and test.
With GEP-1 we have proposed how the architecture can be changed in a way to support external controllers that contain their very own vendor specifics.
This way, we can keep Gardener core clean and independent.
This controller implements Gardener’s extension contract for the shoot-networking-problemdetector extension.
An example for a ControllerRegistration resource that can be used to register this controller to Gardener can be found here.
Please find more information regarding the extensibility concepts and a detailed proposal here.
Extension Resources
Currently there is nothing to specify in the extension spec.
When an extension resource is reconciled, the extension controller will create two daemonsets nwpd-agent-pod-net and nwpd-agent-node-net deploying
the “network problem detector agent”.
These daemon sets perform and collect various checks between all nodes of the Kubernetes cluster, to its Kube API server and/or external endpoints.
Checks are performed using TCP connections, PING (ICMP) or mDNS (UDP).
More details about the network problem detector agent can be found in its repository gardener/network-problem-detector.
Please note, this extension controller relies on the Gardener-Resource-Manager to deploy k8s resources to seed and shoot clusters.
How to start using or developing this extension controller locally
You can run the controller locally on your machine by executing make start.
We are using Go modules for Golang package dependency management and Ginkgo/Gomega for testing.
Feedback and Support
Feedback and contributions are always welcome!
Please report bugs or suggestions as GitHub issues or reach out on Slack (join the workspace here).
Learn more!
Please find further resources about out project here:
Gardener allows shoot clusters to add network problem observability using the network problem detector.
To support this the Gardener must be installed with the shoot-networking-problemdetector extension.
Configuration
To generally enable the networking problem detector for shoot objects the shoot-networking-problemdetector extension must be registered by providing an appropriate extension registration in the garden cluster.
Here it is possible to decide whether the extension should be always available for all shoots or whether the extension must be separately enabled per shoot.
If the extension should automatically be used for all shoots the autoEnable field should be set to [shoot].
An example of a ControllerRegistration for the shoot-networking-problemdetector can be found at controller-registration.yaml.
The ControllerRegistration contains a Helm chart which eventually deploys the shoot-networking-problemdetector to seed clusters. It offers some configuration options, mainly to set up a static filter list or provide the configuration for downloading the filter list from a service endpoint.
If the shoot network problem detector is not globally enabled by default (depends on the extension registration on the garden cluster), it can be enabled per shoot. To enable the service for a shoot, the shoot manifest must explicitly add the shoot-networking-problemdetector extension.
If the shoot network problem detector is globally enabled by default, it can be disabled per shoot. To disable the service for a shoot, the shoot manifest must explicitly state it.
Register Shoot Networking Filter Extension in Shoot Clusters
Introduction
Within a shoot cluster, it is possible to enable the network problem detector. It is necessary that the Gardener installation your shoot cluster runs in is equipped with a shoot-networking-problemdetector extension. Please ask your Gardener operator if the extension is available in your environment.
Shoot Feature Gate
In most of the Gardener setups the shoot-networking-problemdetector extension is not enabled globally and thus must be configured per shoot cluster. Please adapt the shoot specification by the configuration shown below to activate the extension individually.
If the shoot network problem detector is globally enabled by default, it can be disabled per shoot. To disable the service for a shoot, the shoot manifest must explicitly state it.
As a cluster owner, you might need audit logs on a Shoot node level. With these audit logs you can track actions on your nodes like privilege escalation, file integrity, process executions, and who is the user that performed these actions. Such information is essential for the security of your Shoot cluster. Linux operating systems collect such logs via the auditd and journald daemons. However, these logs can be lost if they are only kept locally on the operating system. You need a reliable way to send them to a remote server where they can be stored for longer time periods and retrieved when necessary.
Rsyslog offers a solution for that. It gathers and processes logs from auditd and journald and then forwards them to a remote server. Moreover, rsyslog can make use of the RELP protocol so that logs are sent reliably and no messages are lost.
The shoot-rsyslog-relp extension is used to configure rsyslog on each Shoot node so that the following can take place:
Rsyslog reads logs from the auditd and journald sockets.
The logs are filtered based on the program name, syslog severity and content of the message.
The logs are enriched with metadata containing the name of the Project in which the Shoot is created, the name of the Shoot, the UID of the Shoot, and the hostname of the node on which the log event occurred.
The enriched logs are sent to the target remote server via the RELP protocol.
The following graph shows a rough outline of how that looks in a Shoot cluster:
Shoot Configuration
The extension is not globally enabled and must be configured per Shoot cluster. The Shoot specification has to be adapted to include the shoot-rsyslog-relp extension configuration, which specifies the target server to which logs are forwarded, its port, and some optional rsyslog settings described in the examples below.
Below is an example shoot-rsyslog-relp extension configuration as part of the Shoot spec:
kind: Shoot
metadata:
name: bar
namespace: garden-foo
...
spec:
extensions:
- type: shoot-rsyslog-relp
providerConfig:
apiVersion: rsyslog-relp.extensions.gardener.cloud/v1alpha1
kind: RsyslogRelpConfig
# Set the target server to which logs are sent. The server must support the RELP protocol. target: some.rsyslog-relp.server
# Set the port of the target server. port: 10250
# Define rules to select logs from which programs and with what syslog severity# are forwarded to the target server. loggingRules:
- severity: 4
programNames: ["kubelet", "audisp-syslog"]
# Set regular expression to match or exclude messages based on their content.# messageContent:# regex: "foo"# exclude: "bar" - severity: 1
programNames: ["audisp-syslog"]
# Define an interval of 90 seconds at which the current connection is broken and re-established.# By default this value is 0 which means that the connection is never broken and re-established. rebindInterval: 90
# Set the timeout for relp sessions to 90 seconds. If set too low, valid sessions may be considered# dead and tried to recover. timeout: 90
# Set how often an action is retried before it is considered to have failed.# Failed actions discard log messages. Setting `-1` here means that messages are never discarded. resumeRetryCount: -1
# Configures rsyslog to report continuation of action suspension, e.g. when the connection to the target# server is broken. reportSuspensionContinuation: true# Add tls settings if tls should be used to encrypt the connection to the target server. tls:
enabled: true# Use `name` authentication mode for the tls connection. authMode: name
# Only allow connections if the server's name is `some.rsyslog-relp.server` permittedPeer:
- "some.rsyslog-relp.server"# Reference to the resource which contains certificates used for the tls connection.# It must be added to the `.spec.resources` field of the Shoot. secretReferenceName: rsyslog-relp-tls
# Instruct librelp on the Shoot nodes to use the gnutls tls library. tlsLib: gnutls
# Add auditConfig settings if you want to customize node level auditing. auditConfig:
enabled: true# Reference to the resource which contains the audit configuration.# It must be added to the `.spec.resources` field of the Shoot. configMapReferenceName: audit-config
resources:
# Add the rsyslog-relp-tls secret in the resources field of the Shoot spec. - name: rsyslog-relp-tls
resourceRef:
apiVersion: v1
kind: Secret
name: rsyslog-relp-tls-v1
- name: audit-config
resourceRef:
apiVersion: v1
kind: ConfigMap
name: audit-config-v1
...
Choosing Which Log Messages to Send to the Target Server
The .loggingRules field defines rules about which logs should be sent to the target server. When a log is processed by rsyslog, it is compared against the list of rules in order. If the program name, the syslog severity of the log messages and the message content matches the rule, the message is forwarded to the target server. The following table describes the syslog severity and their corresponding codes:
Numerical Severity
Code
0 Emergency: system is unusable
1 Alert: action must be taken immediately
2 Critical: critical conditions
3 Error: error conditions
4 Warning: warning conditions
5 Notice: normal but significant condition
6 Informational: informational messages
7 Debug: debug-level messages
Below is an example with a .loggingRules section that will only forward logs from the kubelet program with syslog severity of 6 or lower that don’t contain “bar” and any other program with syslog severity of 2 or lower:
Securing the Communication to the Target Server with TLS
The communication to the target server is not encrypted by default. To enable encryption, set the .tls.enabled field in the shoot-rsyslog-relp extension configuration to true. In this case, an immutable secret which contains the TLS certificates used to establish the TLS connection to the server must be created in the same project namespace as your Shoot.
The Secret must be referenced in the Shoot’s .spec.resources field and the corresponding resource entry must be referenced in the .tls.secretReferenceName of the shoot-rsyslog-relp extension configuration:
You can set a few additional parameters for the TLS connection: .tls.authMode, tls.permittedPeer, and tls.tlsLib. Refer to the rsyslog documentation for more information on these parameters:
The shoot-rsyslog-relp extension also allows you to configure the Audit Daemon (auditd) on the Shoot nodes.
By default, the audit rules located under the /etc/audit/rules.d directory on your Shoot’s nodes will be moved to /etc/audit/rules.d.original and the following rules will be placed under the /etc/audit/rules.d directory: 00-base-config.rules, 10-privilege-escalation.rules, 11-privilege-special.rules, 12-system-integrity.rules. Next, augerules --load will be called and the audit daemon (auditd) restarted so that the new rules can take effect.
Alternatively, you can define your own auditd rules to be placed on your Shoot’s nodes by using the following configuration:
apiVersion: rsyslog-relp.extensions.gardener.cloud/v1alpha1
kind: Auditd
auditRules: | ## First rule - delete all existing rules
-D
## Now define some custom rules
-a exit,always -F arch=b64 -S setuid -S setreuid -S setgid -S setregid -F auid>0 -F auid!=-1 -F key=privilege_escalation
-a exit,always -F arch=b64 -S execve -S execveat -F euid=0 -F auid>0 -F auid!=-1 -F key=privilege_escalation
In this case the original rules are also backed up in the /etc/audit/rules.d.original directory.
To deploy this configuration, it must be embedded in an immutable ConfigMap.
Note
The data key storing this configuration must be named auditd.
After creating such a ConfigMap, it must be included in the Shoot’s spec.resources array and then referenced from the providerConfig.auditConfig.configMapReferenceName field in the shoot-rsyslog-relp extension configuration.
Finally, by setting providerConfig.auditConfig.enabled to false in the shoot-rsyslog-relp extension configuration, the original audit rules on your Shoot’s nodes will not be modified and auditd will not be restarted.
Examples on how the providerConfig.auditConfig.enabled field functions are given below:
The following deploys the extension default audit rules as of today:
providerConfig:
auditConfig:
enabled: true
The following deploys only the rules specified in the referenced ConfigMap:
Learn how to set up a development environment using own Seed clusters on an existing Kubernetes cluster
Deploying Rsyslog Relp Extension Remotely
This document will walk you through running the Rsyslog Relp extension controller on a remote seed cluster and the rsyslog relp admission component in your local garden cluster for development purposes. This guide uses Gardener’s setup with provider extensions and builds on top of it.
If you encounter difficulties, please open an issue so that we can make this process easier.
Make sure you are running Gardener version >= 1.95.0 or the latest version of the master branch.
Setting up the Rsyslog Relp Extension
Important: Make sure that your KUBECONFIG env variable is targeting the local Gardener cluster!
The location of the Gardener project from the Gardener setup is expected to be under the same root as this repository (e.g. ~/go/src/github.com/gardener/). If this is not the case, the location of Gardener project should be specified in GARDENER_REPO_ROOT environment variable:
In case you have added additional Seeds you can specify the seed name:
make remote-extension-up SEED_NAME=<seed-name>
Creating a Shoot Cluster
Once the above step is completed, you can create a Shoot cluster. In order to create a Shoot cluster, please create your own Shoot definition depending on providers on your Seed cluster.
Configuring the Shoot Cluster and deploying the Rsyslog Relp Echo Server
To be able to properly test the rsyslog relp extension you need a running rsyslog relp echo server to which logs from the Shoot nodes can be sent. To deploy the server and configure the rsyslog relp extension on your Shoot cluster you can run:
make configure-shoot SHOOT_NAME=<shoot-name> SHOOT_NAMESPACE=<shoot-namespace>
This command will deploy an rsyslog relp echo server in your Shoot cluster in the rsyslog-relp-echo-server namespace.
It will also add configuration for the shoot-rsyslog-relp extension to your Shoot spec by patching it with ./example/extension/<shoot-name>--<shoot-namespace>--extension-config-patch.yaml. This file is automatically copied from extension-config-patch.yaml.tmpl in the same directory when you run make configure-shoot for the first time. The file also includes explanations of the properties you should set or change.
The command will also deploy the rsyslog-relp-tls secret in case you wish to enable tls.
Tearing Down the Development Environment
To tear down the development environment, delete the Shoot cluster or disable the shoot-rsyslog-relp extension in the Shoot’s specification. When the extension is not used by the Shoot anymore, you can run:
make remote-extension-down
The make target will delete the ControllerDeployment and ControllerRegistration of the extension, and the shoot-rsyslog-relp admission helm deployment.
5.7.3 - Getting Started
Deploying Rsyslog Relp Extension Locally
This document will walk you through running the Rsyslog Relp extension and a fake rsyslog relp service on your local machine for development purposes. This guide uses Gardener’s local development setup and builds on top of it.
If you encounter difficulties, please open an issue so that we can make this process easier.
Prerequisites
Make sure that you have a running local Gardener setup. The steps to complete this can be found here.
Make sure you are running Gardener version >= 1.74.0 or the latest version of the master branch.
Setting up the Rsyslog Relp Extension
Important: Make sure that your KUBECONFIG env variable is targeting the local Gardener cluster!
make extension-up
This will build the shoot-rsyslog-relp, shoot-rsyslog-relp-admission, and shoot-rsyslog-relp-echo-server images and deploy the needed resources and configurations in the garden cluster. The shoot-rsyslog-relp-echo-server will act as development replacement of a real rsyslog relp server.
Creating a Shoot Cluster
Once the above step is completed, we can deploy and configure a Shoot cluster with default rsyslog relp settings.
kubectl apply -f ./example/shoot.yaml
Once the Shoot’s namespace is created, we can create a networkpolicy that will allow egress traffic from the rsyslog on the Shoot’s nodes to the rsyslog-relp-echo-server that serves as a fake rsyslog target server.
Currently, the Shoot’s nodes run Ubuntu, which does not have the rsyslog-relp and auditd packages installed, so the configuration done by the extension has no effect.
Once the Shoot is created, we have to manually install the rsyslog-relp and auditd packages:
Changes to the rsyslog relp extension can be applied to the local environment by repeatedly running the make recipe.
make extension-up
Tearing Down the Development Environment
To tear down the development environment, delete the Shoot cluster or disable the shoot-rsyslog-relp extension in the Shoot’s spec. When the extension is not used by the Shoot anymore, you can run:
make extension-down
This will delete the ControllerRegistration and ControllerDeployment of the extension, the shoot-rsyslog-relp-admission deployment, and the rsyslog-relp-echo-server deployment.
Maintaining the Publicly Available Image for the rsyslog-relp Echo Server
The testmachinery tests use an rsyslog-relp-echo-server image from a publicly available repository. The one which is currently used is eu.gcr.io/gardener-project/gardener/extensions/shoot-rsyslog-relp-echo-server:v0.1.0.
Sometimes it might be necessary to update the image and publish it, e.g. when updating the alpine base image version specified in the repository’s Dokerfile.
To do that:
Bump the version with which the image is built in the Makefile.
Build the shoot-rsyslog-relp-echo-server image:
make echo-server-docker-image
Once the image is built, push it to gcr with:
make push-echo-server-image
Finally, bump the version of the image used by the testmachinery tests here.
Create a PR with the changes.
5.7.4 - Monitoring
Monitoring
The shoot-rsyslog-relp extension exposes metrics for the rsyslog service running on a Shoot’s nodes so that they can be easily viewed by cluster owners and operators in the Shoot’s Prometheus and Plutono instances. The exposed monitoring data offers valuable insights into the operation of the rsyslog service and can be used to detect and debug ongoing issues. This guide describes the various metrics, alerts and logs available to cluster owners and operators.
Metrics
Metrics for the rsyslog service originate from its impstats module. These include the number of messages in the various queues, the number of ingested messages, the number of processed messages by configured actions, system resources used by the rsyslog service, and others. More information about them can be found in the impstats documentation and the statistics counter documentation. They are exposed via the node-exporter running on each Shoot node and are scraped by the Shoot’s Prometheus instance.
These metrics can also be viewed in a dedicated dashboard named Rsyslog Stats in the Shoot’s Plutono instance. You can select the node for which you wish the metrics to be displayed from the Node dropdown menu (by default metrics are summed over all nodes).
Following is a list of all exposed rsyslog metrics. The name and origin labels can be used to determine wether the metric is for: a queue, an action, plugins or system stats; the node label can be used to determine the node the metric originates from:
rsyslog_pstat_submitted
Number of messages that were submitted to the rsyslog service from its input. Currently rsyslog uses the /run/systemd/journal/syslog socket as input.
Type: Counter
Labels: namenodeorigin
rsyslog_pstat_processed
Number of messages that are successfully processed by an action and sent to the target server.
Type: Counter
Labels: namenodeorigin
rsyslog_pstat_failed
Number of messages that could not be processed by an action nor sent to the target server.
Type: Counter
Labels: namenodeorigin
rsyslog_pstat_suspended
Total number of times an action suspended itself. Note that this counts the number of times the action transitioned from active to suspended state. The counter is no indication of how long the action was suspended or how often it was retried.
Type: Counter
Labels: namenodeorigin
rsyslog_pstat_suspended_duration
The total number of seconds this action was disabled.
Type: Counter
Labels: namenodeorigin
rsyslog_pstat_resumed
The total number of times this action resumed itself. A resumption occurs after the action has detected that a failure condition does no longer exist.
Type: Counter
Labels: namenodeorigin
rsyslog_pstat_utime
User time used in microseconds.
Type: Counter
Labels: namenodeorigin
rsyslog_pstat_stime
System time used in microsends.
Type: Counter
Labels: namenodeorigin
rsyslog_pstat_maxrss
Maximum resident set size
Type: Gauge
Labels: namenodeorigin
rsyslog_pstat_minflt
Total number of minor faults the task has made per second, those which have not required loading a memory page from disk.
Type: Counter
Labels: namenodeorigin
rsyslog_pstat_majflt
Total number of major faults the task has made per second, those which have required loading a memory page from disk.
Type: Counter
Labels: namenodeorigin
rsyslog_pstat_inblock
Filesystem input operations.
Type: Counter
Labels: namenodeorigin
rsyslog_pstat_oublock
Filesystem output operations.
Type: Counter
Labels: namenodeorigin
rsyslog_pstat_nvcsw
Voluntary context switches.
Type: Counter
Labels: namenodeorigin
rsyslog_pstat_nivcsw
Involuntary context switches.
Type: Counter
Labels: namenodeorigin
rsyslog_pstat_openfiles
Number of open files.
Type: Counter
Labels: namenodeorigin
rsyslog_pstat_size
Messages currently in queue.
Type: Gauge
Labels: namenodeorigin
rsyslog_pstat_enqueued
Total messages enqueued.
Type: Counter
Labels: namenodeorigin
rsyslog_pstat_full
Times queue was full.
Type: Counter
Labels: namenodeorigin
rsyslog_pstat_discarded_full
Messages discarded due to queue being full.
Type: Counter
Labels: namenodeorigin
rsyslog_pstat_discarded_nf
Messages discarded when queue not full.
Type: Counter
Labels: namenodeorigin
rsyslog_pstat_maxqsize
Maximum size queue has reached.
Type: Gauge
Labels: namenodeorigin
rsyslog_augenrules_load_success
Shows whether the augenrules --load command was executed successfully or not on the node.
Type: Gauge
Labels: node
Alerts
There are three alerts defined for the rsyslog service in the Shoot’s Prometheus instance:
RsyslogTooManyRelpActionFailures
This indicates that the cumulative failure rate in processing relp action messages is greater than 2%. In other words, it compares the rate of processed relp action messages to the rate of failed relp action messages and fires an alert when the following expression evaluates to true:
This indicates that no messages are being sent to the upstream rsyslog target by the relp action. An alert is fired when the following expression evaluates to true:
This indicates that augenrules --load was not executed successfully when called to load the configured audit rules. You should check if the auditd configuration you provided is valid. An alert is fired when the following expression evaluates to true:
absent(rsyslog_augenrules_load_success == 1)
Users can subscribe to these alerts by following the Gardener alerting guide.
Logging
There are two ways to view the logs of the rsyslog service running on the Shoot’s nodes - either using the Explore tab of the Shoot’s Plutono instance, or ssh-ing directly to a node.
To view logs in Plutono, navigate to the Explore tab and select vali from the Explore dropdown menu. Afterwards enter the following vali query:
Notice that you cannot use the unit label to filter for the rsyslog.service unit logs. Instead, you have to grep for the service as displayed in the example above.
To view logs when directly ssh-ing to a node in the Shoot cluster, use either of the following commands on the node:
systemctl status rsyslog
journalctl -u rsyslog
5.7.5 - Shoot Rsyslog Relp
Developer Docs for Gardener Shoot Rsyslog Relp Extension
This document outlines how Shoot reconciliation and deletion works for a Shoot with the shoot-rsyslog-relp extension enabled.
Shoot Reconciliation
This section outlines how the reconciliation works for a Shoot with the shoot-rsyslog-relp extension enabled.
Extension Enablement / Reconciliation
This section outlines how the extension enablement/reconciliation works, e.g., the extension has been added to the Shoot spec.
As part of the Shoot reconciliation flow, the gardenlet deploys the Extension resource.
The shoot-rsyslog-relp extension reconciles the Extension resource. pkg/controller/lifecycle/actuator.go contains the implementation of the extension.Actuator interface. The reconciliation of an Extension of type shoot-rsyslog-relp only deploys the necessary monitoring configuration - the shoot-rsyslog-relp-dashboards ConfigMap which contains the definitions for: Plutono dashboard for the Rsyslog component, and the shoot-shoot-rsyslog-relpServiceMonitor and PrometheusRule resources which contains the definitions for: scraping metrics by prometheus, alerting rules.
As part of the Shoot reconciliation flow, the gardenlet deploys the OperatingSystemConfig resource.
The shoot-rsyslog-relp extension serves a webhook that mutates the OperatingSystemConfig resource for Shoots having the shoot-rsyslog-relp extension enabled (the corresponding namespace gets labeled by the gardenlet with extensions.gardener.cloud/shoot-rsyslog-relp=true). pkg/webhook/operatingsystemconfig/ensurer.go contains implementation of the genericmutator.Ensurer interface.
The webhook renders the 60-audit.conf.tpl template script and appends it to the OperatingSystemConfig files. When rendering the template, the configuration of the shoot-rsyslog-relp extension is used to fill in the required template values. The file is installed as /var/lib/rsyslog-relp-configurator/rsyslog.d/60-audit.conf on the host OS.
The webhook appends the audit rules to the OperatingSystemConfig. The files are installed under /var/lib/rsyslog-relp-configurator/rules.d on the host OS.
If the user has specified alternative audit rules in a config map reference, the webhook fetches the referenced ConfigMap from the Shoot’s control plane namespace and decodes the value of its auditd data key into an object of type Auditd. It then takes the auditRules defined in the object and places those under the /var/lib/rsyslog-relp-configurator/rules.d directory in a single file.
The webhook renders the configure-rsyslog.tpl.sh script and appends it to the OperatingSystemConfig files. This script is installed as /var/lib/rsyslog-relp-configurator/configure-rsyslog.sh on the host OS. It keeps the configuration of the rsyslog systemd service up-to-date by copying /var/lib/rsyslog-relp-configurator/rsyslog.d/60-audit.conf to /etc/rsyslog.d/60-audit.conf, if /etc/rsyslog.d/60-audit.conf does not exist or the files differ. The script also takes care of syncing the audit rules in /etc/audit/rules.d with the ones installed in /var/lib/rsyslog-relp-configurator/rules.d and restarts the auditd systemd service if necessary.
The webhook renders the process-rsyslog-pstats.tpl.sh and appends it to the OperatingSystemConfig files. This script receives metrics from the rsyslog process, transforms them, and writes them to /var/lib/node-exporter/textfile-collector/rsyslog_pstats.prom so that they can be collected by the node-exporter.
As part of the Shoot reconciliation, before the shoot-rsyslog-relp extension is deployed, the gardenlet copies all Secret and ConfigMap resources referenced in .spec.resources[] to the Shoot’s control plane namespace on the Seed.
When the .tls.enabled field is true in the shoot-rsyslog-relp extension configuration, a value for .tls.secretReferenceName must also be specified so that it references a named resource reference in the Shoot’s .spec.resources[] array.
The webhook appends the data of the referenced Secret in the Shoot’s control plane namespace to the OperatingSystemConfig files.
The webhook appends the rsyslog-configurator.service unit to the OperatingSystemConfig units. The unit invokes the configure-rsyslog.sh script every 15 seconds.
Extension Disablement
This section outlines how the extension disablement works, i.e., the extension has to be removed from the Shoot spec.
As part of the Shoot reconciliation flow, the gardenlet destroys the Extension resource because it is no longer needed.
As part of the deletion flow, the shoot-rsyslog-relp extension deploys the rsyslog-relp-configuration-cleaner DaemonSet to the Shoot cluster to clean up the existing rsyslog configuration and revert the audit rules.
Shoot Deletion
This section outlines how the deletion works for a Shoot with the shoot-rsyslog-relp extension enabled.
As part of the Shoot deletion flow, the gardenlet destroys the Extension resource.
In the Shoot deletion flow, the Extension resource is deleted after the Worker resource. Hence, there is no need to deploy the rsyslog-relp-configuration-cleaner DaemonSet to the Shoot cluster to clean up the existing rsyslog configuration and revert the audit rules.
5.8 - OpenID Connect Services
Gardener extension controller for OpenID Connect services for shoot clusters
Project Gardener implements the automated management and operation of Kubernetes clusters as a service.
Its main principle is to leverage Kubernetes concepts for all of its tasks.
Recently, most of the vendor specific logic has been developed in-tree.
However, the project has grown to a size where it is very hard to extend, maintain, and test.
With GEP-1 we have proposed how the architecture can be changed in a way to support external controllers that contain their very own vendor specifics.
This way, we can keep Gardener core clean and independent.
This controller implements Gardener’s extension contract for the shoot-oidc-service extension.
An example for a ControllerRegistration resource that can be used to register this controller to Gardener can be found here.
Please find more information regarding the extensibility concepts and a detailed proposal here.
Compatibility
The following lists compatibility requirements of this extension controller with regards to other Gardener components.
OIDC Extension
Gardener
Notes
== v0.15.0
>= 1.60.0 <= v1.64.0
A typical side-effect when running Gardener < v1.63.0 is an unexpected scale-down of the OIDC webhook from 2 -> 1.
When an extension resource is reconciled, the extension controller will create an instance of OIDC Webhook Authenticator. These resources are placed inside the shoot namespace on the seed. Also, the controller takes care about generating necessary RBAC resources for the seed as well as for the shoot.
Please note, this extension controller relies on the Gardener-Resource-Manager to deploy k8s resources to seed and shoot clusters.
How to start using or developing this extension controller locally
You can run the controller locally on your machine by executing make start.
We are using Go modules for Golang package dependency management and Ginkgo/Gomega for testing.
Feedback and Support
Feedback and contributions are always welcome!
Please report bugs or suggestions as GitHub issues or reach out on Slack (join the workspace here).
Learn more!
Please find further resources about out project here:
Gardener allows Shoot clusters to dynamically register OpenID Connect providers. To support this the Gardener must be installed with the shoot-oidc-service extension.
Configuration
To generally enable the OIDC service for shoot objects the shoot-oidc-service extension must be registered by providing an appropriate extension registration in the garden cluster.
Here it is possible to decide whether the extension should be always available for all shoots or whether the extension must be separately enabled per shoot.
If the extension should be used for all shoots the globallyEnabled flag should be set to true.
If the shoot OIDC service is not globally enabled by default (depends on the extension registration on the garden cluster), it can be enabled per shoot. To enable the service for a shoot, the shoot manifest must explicitly add the shoot-oidc-service extension.
If the shoot OIDC service is globally enabled by default, it can be disabled per shoot. To disable the service for a shoot, the shoot manifest must explicitly state it.
Register OpenID Connect provider in Shoot Clusters
Introduction
Within a shoot cluster, it is possible to dynamically register OpenID Connect providers. It is necessary that the Gardener installation your shoot cluster runs in is equipped with a shoot-oidc-service extension. Please ask your Gardener operator if the extension is available in your environment.
Important
Kubernetes v1.29 introduced support for Structured Authentication.
Gardener allows the use of this feature for shoot clusters with Kubernetes version >= 1.30.
Structured Authentication should be preferred over the Gardener OIDC Extension in case:
In most of the Gardener setups the shoot-oidc-service extension is not enabled globally and thus must be configured per shoot cluster. Please adapt the shoot specification by the configuration shown below to activate the extension individually.
In order to register an OpenID Connect provider an openidconnect resource should be deployed in the shoot cluster.
Caution
It is strongly recommended to NOT disable prefixing since it may result in unwanted impersonations.
The rule of thumb is to always use meaningful and unique prefixes for both username and groups.
A good way to ensure this is to use the name of the openidconnect resource as shown in the example below.
Caution
It is strongly recommended to have unique issuer URLs across all openidconnects and other places that might contain issuer URL configurations related to authentication (e.g. Structured Authentication even forbids that).
Users handled by an issuer must be identified in a consistent, predictable and unique way!
apiVersion: authentication.gardener.cloud/v1alpha1
kind: OpenIDConnect
metadata:
name: abc
spec:
# issuerURL is the URL the provider signs ID Tokens as.# This will be the "iss" field of all tokens produced by the provider and is used for configuration discovery. issuerURL: https://abc-oidc-provider.example
# clientID is the audience for which the JWT must be issued for, the "aud" field. clientID: my-shoot-cluster
# usernameClaim is the JWT field to use as the user's username. usernameClaim: sub
# usernamePrefix, if specified, causes claims mapping to username to be prefix with the provided value.# A value "oidc:" would result in usernames like "oidc:john".# If not provided, the prefix defaults to "( .metadata.name )/". The value "-" can be used to disable all prefixing. usernamePrefix: "abc:"# groupsClaim, if specified, causes the OIDCAuthenticator to try to populate the user's groups with an ID Token field.# If the groupsClaim field is present in an ID Token the value must be a string or list of strings.# groupsClaim: groups# groupsPrefix, if specified, causes claims mapping to group names to be prefixed with the value.# A value "oidc:" would result in groups like "oidc:engineering" and "oidc:marketing".# If not provided, the prefix defaults to "( .metadata.name )/".# The value "-" can be used to disable all prefixing.# groupsPrefix: "abc:"# caBundle is a PEM encoded CA bundle which will be used to validate the OpenID server's certificate. If unspecified, system's trusted certificates are used.# caBundle: <base64 encoded bundle># supportedSigningAlgs sets the accepted set of JOSE signing algorithms that can be used by the provider to sign tokens.# The default value is RS256.# supportedSigningAlgs:# - RS256# requiredClaims, if specified, causes the OIDCAuthenticator to verify that all the# required claims key value pairs are present in the ID Token.# requiredClaims:# customclaim: requiredvalue# maxTokenExpirationSeconds if specified, sets a limit in seconds to the maximum validity duration of a token.# Tokens issued with validity greater that this value will not be verified.# Setting this will require that the tokens have the "iat" and "exp" claims.# maxTokenExpirationSeconds: 3600# jwks if specified, provides an option to specify JWKS keys offline.# jwks:# keys is a base64 encoded JSON webkey Set. If specified, the OIDCAuthenticator skips the request to the issuer's jwks_uri endpoint to retrieve the keys.# keys: <base64 encoded jwks>
5.9 - Registry Cache
Gardener extension controller which deploys pull-through caches for container registries.
Learn what is the use-case for a pull-through cache, how to enable it and configure it
Configuring the Registry Cache Extension
Introduction
Use Case
For a Shoot cluster, the containerd daemon of every Node goes to the internet and fetches an image that it doesn’t have locally in the Node’s image cache. New Nodes are often created due to events such as auto-scaling (scale up), rolling update, or replacement of unhealthy Node. Such a new Node would need to pull all of the images of the Pods running on it from the internet because the Node’s cache is initially empty. Pulling an image from a registry produces network traffic and registry costs. To avoid these network traffic and registry costs, you can use the registry-cache extension to run a registry as pull-through cache.
The following diagram shows a rough outline of how an image pull looks like for a Shoot cluster without registry cache:
Solution
The registry-cache extension deploys and manages a registry in the Shoot cluster that runs as pull-through cache. The used registry implementation is distribution/distribution.
How does it work?
When the extension is enabled, a registry cache for each configured upstream is deployed to the Shoot cluster. Along with this, the containerd daemon on the Shoot cluster Nodes gets configured to use as a mirror the Service IP address of the deployed registry cache. For example, if a registry cache for upstream docker.io is requested via the Shoot spec, then containerd gets configured to first pull the image from the deployed cache in the Shoot cluster. If this image pull operation fails, containerd falls back to the upstream itself (docker.io in that case).
The first time an image is requested from the pull-through cache, it pulls the image from the configured upstream registry and stores it locally, before handing it back to the client. On subsequent requests, the pull-through cache is able to serve the image from its own storage.
Note
The used registry implementation (distribution/distribution) supports mirroring of only one upstream registry.
The following diagram shows a rough outline of how an image pull looks like for a Shoot cluster with registry cache:
Shoot Configuration
The extension is not globally enabled and must be configured per Shoot cluster. The Shoot specification has to be adapted to include the registry-cache extension configuration.
Below is an example of registry-cache extension configuration as part of the Shoot spec:
The providerConfig.caches field contains information about the registry caches to deploy. It is a required field. At least one cache has to be specified.
The providerConfig.caches[].upstream field is the remote registry host to cache. It is a required field.
The value must be a valid DNS subdomain (RFC 1123) and optionally a port (i.e. <host>[:<port>]). It must not include a scheme.
The providerConfig.caches[].remoteURL optional field is the remote registry URL. If configured, it must include an https:// or http:// scheme.
If the field is not configured, the remote registry URL defaults to https://<upstream>. In case the upstream is docker.io, it defaults to https://registry-1.docker.io.
The providerConfig.caches[].volume field contains settings for the registry cache volume.
The registry-cache extension deploys a StatefulSet with a volume claim template. A PersistentVolumeClaim is created with the configured size and StorageClass name.
The providerConfig.caches[].volume.size field is the size of the registry cache volume. Defaults to 10Gi. The size must be a positive quantity (greater than 0).
This field is immutable. See Increase the cache disk size on how to resize the disk.
The extension defines alerts for the volume. More information about the registry cache alerts and how to enable notifications for them can be found in the alerts documentation.
The providerConfig.caches[].volume.storageClassName field is the name of the StorageClass used by the registry cache volume.
This field is immutable. If the field is not specified, then the default StorageClass will be used.
The providerConfig.caches[].garbageCollection.ttl field is the time to live of a blob in the cache. If the field is set to 0s, the garbage collection is disabled. Defaults to 168h (7 days). See the Garbage Collection section for more details.
The providerConfig.caches[].secretReferenceName is the name of the reference for the Secret containing the upstream registry credentials. To cache images from a private registry, credentials to the upstream registry should be supplied. For more details, see How to provide credentials for upstream registry.
Note
It is only possible to provide one set of credentials for one private upstream registry.
The providerConfig.caches[].proxy.httpProxy field represents the proxy server for HTTP connections which is used by the registry cache. It must include an https:// or http:// scheme.
The providerConfig.caches[].proxy.httpsProxy field represents the proxy server for HTTPS connections which is used by the registry cache. It must include an https:// or http:// scheme.
The providerConfig.caches[].http.tls field indicates whether TLS is enabled for the HTTP server of the registry cache. Defaults to true.
When the registry cache receives a request for an image that is not present in its local store, it fetches the image from the upstream, returns it to the client and stores the image in the local store. The registry cache runs a scheduler that deletes images when their time to live (ttl) expires. When adding an image to the local store, the registry cache also adds a time to live for the image. The ttl defaults to 168h (7 days) and is configurable. The garbage collection can be disabled by setting the ttl to 0s. Requesting an image from the registry cache does not extend the time to live of the image. Hence, an image is always garbage collected from the registry cache store when its ttl expires.
At the time of writing this document, there is no functionality for garbage collection based on disk size - e.g., garbage collecting images when a certain disk usage threshold is passed.
The garbage collection cannot be enabled once it is disabled. This constraint is added to mitigate distribution/distribution#4249.
Increase the Cache Disk Size
When there is no available disk space, the registry cache continues to respond to requests. However, it cannot store the remotely fetched images locally because it has no free disk space. In such case, it is simply acting as a proxy without being able to cache the images in its local store. The disk has to be resized to ensure that the registry cache continues to cache images.
There are two alternatives to enlarge the cache’s disk size:
[Alternative 1] Resize the PVC
To enlarge the PVC’s size, perform the following steps:
Make sure that the KUBECONFIG environment variable is targeting the correct Shoot cluster.
Find the PVC name to resize for the desired upstream. The below example fetches the PVC for the docker.io upstream:
kubectl -n kube-system get pvc -l upstream-host=docker.io
Patch the PVC’s size to the desired size. The below example patches the size of a PVC to 10Gi:
Drawback of this approach: The cache’s size in the Shoot spec (providerConfig.caches[].size) diverges from the PVC’s size.
[Alternative 2] Remove and Readd the Cache
There is always the option to remove the cache from the Shoot spec and to readd it again with the updated size.
Drawback of this approach: The already cached images get lost and the cache starts with an empty disk.
High Availability
By default the registry cache runs with a single replica. This fact may lead to concerns for the high availability such as “What happens when the registry cache is down? Does containerd fail to pull the image?”. As outlined in the How does it work? section, containerd is configured to fall back to the upstream registry if it fails to pull the image from the registry cache. Hence, when the registry cache is unavailable, the containerd’s image pull operations are not affected because containerd falls back to image pull from the upstream registry.
In special cases where this is not enough it is possible to set providerConfig.caches[].highAvailability.enabled to true. This will add the label high-availability-config.resources.gardener.cloud/type=server to the StatefulSet and it will be scaled to 2 replicas. Appropriate Pod Topology Spread Constraints will be added to the registry cache Pods according to the Shoot cluster configuration. See also High Availability of Deployed Components. Pay attention that each registry cache replica uses its own volume, so each registry cache pulls the image from the upstream and stores it in its volume.
Possible Pitfalls
The used registry implementation (the Distribution project) supports mirroring of only one upstream registry. The extension deploys a pull-through cache for each configured upstream.
us-docker.pkg.dev, europe-docker.pkg.dev, and asia-docker.pkg.dev are different upstreams. Hence, configuring pkg.dev as upstream won’t cache images from us-docker.pkg.dev, europe-docker.pkg.dev, or asia-docker.pkg.dev.
Limitations
Images that are pulled before a registry cache Pod is running or before a registry cache Service is reachable from the corresponding Node won’t be cached - containerd will pull these images directly from the upstream.
The reasoning behind this limitation is that a registry cache Pod is running in the Shoot cluster. To have a registry cache’s Service cluster IP reachable from containerd running on the Node, the registry cache Pod has to be running and kube-proxy has to configure iptables/IPVS rules for the registry cache Service. If kube-proxy hasn’t configured iptables/IPVS rules for the registry cache Service, then the image pull times (and new Node bootstrap times) will be increased significantly. For more detailed explanations, see point 2. and gardener/gardener-extension-registry-cache#68.
That’s why the registry configuration on a Node is applied only after the registry cache Service is reachable from the Node. The gardener-node-agent.service systemd unit sends requests to the registry cache’s Service. Once the registry cache responds with HTTP 200, the unit creates the needed registry configuration file (hosts.toml).
As a result, for images from Shoot system components:
On Shoot creation with the registry cache extension enabled, a registry cache is unable to cache all of the images from the Shoot system components. Usually, until the registry cache Pod is running, containerd pulls from upstream the images from Shoot system components (before the registry configuration gets applied).
On new Node creation for existing Shoot with the registry cache extension enabled, a registry cache is unable to cache most of the images from Shoot system components. The reachability of the registry cache Service requires the Service network to be set up, i.e., the kube-proxy for that new Node to be running and to have set up iptables/IPVS configuration for the registry cache Service.
containerd requests will time out in 30s in case kube-proxy hasn’t configured iptables/IPVS rules for the registry cache Service - the image pull times will increase significantly.
containerd is configured to fall back to the upstream itself if a request against the cache fails. However, if the cluster IP of the registry cache Service does not exist or if kube-proxy hasn’t configured iptables/IPVS rules for the registry cache Service, then containerd requests against the registry cache time out in 30 seconds. This significantly increases the image pull times because containerd does multiple requests as part of the image pull (HEAD request to resolve the manifest by tag, GET request for the manifest by SHA, GET requests for blobs)
Example: If the Service of a registry cache is deleted, then a new Service will be created. containerd’s registry config will still contain the old Service’s cluster IP. containerd requests against the old Service’s cluster IP will time out and containerd will fall back to upstream.
Image pull of docker.io/library/alpine:3.13.2 from the upstream takes ~2s while image pull of the same image with invalid registry cache cluster IP takes ~2m.2s.
Image pull of eu.gcr.io/gardener-project/gardener/ops-toolbelt:0.18.0 from the upstream takes ~10s while image pull of the same image with invalid registry cache cluster IP takes ~3m.10s.
Learn what is the use-case for a registry mirror, how to enable and configure it
Configuring the Registry Mirror Extension
Introduction
Use Case
containerd allows registry mirrors to be configured. Use cases are:
Usage of public mirror(s) - for example, circumvent issues with the upstream registry such as rate limiting, outages, and others.
Usage of private mirror(s) - for example, reduce network costs by using a private mirror running in the same network.
Solution
The registry-mirror extension allows the registry mirror configuration to be configured via the Shoot spec directly.
How does it work?
When the extension is enabled, the containerd daemon on the Shoot cluster Nodes gets configured to use the requested mirrors as a mirror. For example, if for the upstream docker.io the mirror https://mirror.gcr.io is configured in the Shoot spec, then containerd gets configured to first pull the image from the mirror (https://mirror.gcr.io in that case). If this image pull operation fails, containerd falls back to the upstream itself (docker.io in that case).
The providerConfig.mirrors field contains information about the registry mirrors to configure. It is a required field. At least one mirror has to be specified.
The providerConfig.mirror[].upstream field is the remote registry host to mirror. It is a required field.
The value must be a valid DNS subdomain (RFC 1123) and optionally a port (i.e. <host>[:<port>]). It must not include a scheme.
The providerConfig.mirror[].hosts field represents the mirror hosts to be used for the upstream. At least one mirror host has to be specified.
The providerConfig.mirror[].hosts[].host field is the mirror host. It is a required field.
The value must include a scheme - http:// or https://.
The providerConfig.mirror[].hosts[].capabilities field represents the operations a host is capable of performing. This also represents the set of operations for which the mirror host may be trusted to perform. Defaults to ["pull"]. The supported values are pull and resolve.
See the capabilities field documentation for more information on which operations are considered trusted ones against public/private mirrors.
5.9.3 - Deploying Registry Cache Extension in Gardener's Local Setup with Provider Extensions
Learn how to set up a development environment using own Seed clusters on an existing Kubernetes cluster
Deploying Registry Cache Extension in Gardener’s Local Setup with Provider Extensions
Make sure that your KUBECONFIG environment variable is targeting the local Gardener cluster.
The location of the Gardener project from the Gardener setup step is expected to be under the same root (e.g. ~/go/src/github.com/gardener/). If this is not the case, the location of Gardener project should be specified in GARDENER_REPO_ROOT environment variable:
In case you have added additional Seeds you can specify the seed name:
make remote-extension-up SEED_NAME=<seed-name>
The corresponding make target will build the extension image, push it into the Seed cluster image registry, and deploy the registry-cache ControllerDeployment and ControllerRegistration resources into the kind cluster.
The container image in the ControllerDeployment will be the image that was build and pushed into the Seed cluster image registry.
The make target will then deploy the registry-cache admission component. It will build the admission image, push it into the kind cluster image registry, and finally install the admission component charts to the kind cluster.
Creating a Shoot Cluster
Once the above step is completed, you can create a Shoot cluster. In order to create a Shoot cluster, please create your own Shoot definition depending on providers on your Seed cluster.
Tearing Down the Development Environment
To tear down the development environment, delete the Shoot cluster or disable the registry-cache extension in the Shoot’s specification. When the extension is not used by the Shoot anymore, you can run:
make remote-extension-down
The make target will delete the ControllerDeployment and ControllerRegistration of the extension, and the registry-cache admission helm deployment.
Learn how to set up a local development environment
Deploying Registry Cache Extension Locally
Prerequisites
Make sure that you have a running local Gardener setup. The steps to complete this can be found in the Deploying Gardener Locally guide.
Setting up the Registry Cache Extension
Make sure that your KUBECONFIG environment variable is targeting the local Gardener cluster. When this is ensured, run:
make extension-up
The corresponding make target will build the extension image, load it into the kind cluster Nodes, and deploy the registry-cache ControllerDeployment and ControllerRegistration resources. The container image in the ControllerDeployment will be the image that was build and loaded into the kind cluster Nodes.
The make target will then deploy the registry-cache admission component. It will build the admission image, load it into the kind cluster Nodes, and finally install the admission component charts to the kind cluster.
Creating a Shoot Cluster
Once the above step is completed, you can create a Shoot cluster.
To tear down the development environment, delete the Shoot cluster or disable the registry-cache extension in the Shoot’s specification. When the extension is not used by the Shoot anymore, you can run:
make extension-down
The make target will delete the ControllerDeployment and ControllerRegistration of the extension, and the registry-cache admission helm deployment.
Alternative Setup Using the gardener-operator Local Setup
Alternatively, you can deploy the registry-cache extension in the gardener-operator local setup. To do this, make sure you are have a running local setup based on Alternative Way to Set Up Garden and Seed Leveraging gardener-operator. The KUBECONFIG environment variable should target the operator local KinD cluster (i.e. <path_to_gardener_project>/example/gardener-local/kind/operator/kubeconfig).
Creating the registry-cache Extension.operator.gardener.cloud resource:
make extension-operator-up
The corresponding make target will build the registry-cache admission and extension container images, OCI artifacts for the admission runtime and application charts, and the extension chart. Then, the container images and the OCI artifacts are pushed into the default skaffold registry (i.e. garden.local.gardener.cloud:5001). Next, the registry-cache Extension.operator.gardener.cloud resource is deployed into the KinD cluster. Based on this resource the gardener-operator will deploy the registry-cache admission component, as well as the registry-cache ControllerDeployment and ControllerRegistration resources.
Creating a Shoot Cluster
To create a Shoot cluster the KUBECONFIG environment variable should target virtual garden cluster (i.e. <path_to_gardener_project>/example/operator/virtual-garden/kubeconfig) and then execute:
Delete the registry-cache Extension.operator.gardener.cloud resource
Make sure the environment variable KUBECONFIG points to the operator’s local KinD cluster and then run:
make extension-operator-down
The corresponding make target will delete the Extension.operator.gardener.cloud resource. Consequently, the gardener-operator will delete the registry-cache admission component and registry-cache ControllerDeployment and ControllerRegistration resources.
5.9.5 - Developer Docs for Gardener Extension Registry Cache
Learn about the inner workings
Developer Docs for Gardener Extension Registry Cache
This document outlines how Shoot reconciliation and deletion works for a Shoot with the registry-cache extension enabled.
Shoot Reconciliation
This section outlines how the reconciliation works for a Shoot with the registry-cache extension enabled.
Extension Enablement / Reconciliation
This section outlines how the extension enablement/reconciliation works, e.g., the extension has been added to the Shoot spec.
As part of the Shoot reconciliation flow, the gardenlet deploys the Extension resource.
The registry-cache extension reconciles the Extension resource. pkg/controller/cache/actuator.go contains the implementation of the extension.Actuator interface. The reconciliation of an Extension of type registry-cache consists of the following steps:
The registry-cache extension deploys resources to the Shoot cluster via ManagedResource. For every configured upstream, it creates a StatefulSet (with PVC), Service, and other resources.
It lists all Services from the kube-system namespace that have the upstream-host label. It will return an error (and retry in exponential backoff) until the Services count matches the configured registries count.
When there is a Service created for each configured upstream registry, the registry-cache extension populates the Extension resource status. In the Extension status, for each upstream, it maintains an endpoint (in the format http://<cluster-ip>:5000) which can be used to access the registry cache from within the Shoot cluster. <cluster-ip> is the cluster IP of the registry cache Service. The cluster IP of a Service is assigned by the Kubernetes API server on Service creation.
As part of the Shoot reconciliation flow, the gardenlet deploys the OperatingSystemConfig resource.
The registry-cache extension serves a webhook that mutates the OperatingSystemConfig resource for Shoots having the registry-cache extension enabled (the corresponding namespace gets labeled by the gardenlet with extensions.gardener.cloud/registry-cache=true). pkg/webhook/cache/ensurer.go contains an implementation of the genericmutator.Ensurer interface.
The webhook appends or updates RegistryConfig entries in the OperatingSystemConfig CRI configuration that corresponds to configured registry caches in the Shoot. The RegistryConfig readiness probe is enabled so that gardener-node-agent creates a hosts.toml containerd registry configuration file when all RegistryConfig hosts are reachable.
Extension Disablement
This section outlines how the extension disablement works, i.e., the extension has to be removed from the Shoot spec.
As part of the Shoot reconciliation flow, the gardenlet destroys the Extension resource because it is no longer needed.
The extension deletes the ManagedResource containing the registry cache resources.
The OperatingSystemConfig resource will not be mutated and no RegistryConfig entries will be added or updated. The gardener-node-agent detects that RegistryConfig entries have been removed or changed and deletes or updates corresponding hosts.toml configuration files under /etc/containerd/certs.d folder.
Shoot Deletion
This section outlines how the deletion works for a Shoot with the registry-cache extension enabled.
As part of the Shoot deletion flow, the gardenlet destroys the Extension resource.
The extension deletes the ManagedResource containing the registry cache resources.
5.9.6 - How to provide credentials for upstream registry?
How to provide credentials for upstream registry?
In Kubernetes, to pull images from private container image registries you either have to specify an image pull Secret (see Pull an Image from a Private Registry) or you have to configure the kubelet to dynamically retrieve credentials using a credential provider plugin (see Configure a kubelet image credential provider). When pulling an image, the kubelet is providing the credentials to the CRI implementation. The CRI implementation uses the provided credentials against the upstream registry to pull the image.
The registry-cache extension is using the Distribution project as pull through cache implementation. The Distribution project does not use the provided credentials from the CRI implementation while fetching an image from the upstream. Hence, the above-described scenarios such as configuring image pull Secret for a Pod or configuring kubelet credential provider plugins don’t work out of the box with the pull through cache provided by the registry-cache extension.
Instead, the Distribution project supports configuring only one set of credentials for a given pull through cache instance (for a given upstream).
This document describe how to supply credentials for the private upstream registry in order to pull private image with the registry cache.
How to configure the registry cache to use upstream registry credentials?
Create an immutable Secret with the upstream registry credentials in the Garden cluster:
For Artifact Registry, the username is _json_key and the password is the service account key in JSON format. To base64 encode the service account key, copy it and run:
echo -n $SERVICE_ACCOUNT_KEY_JSON | base64 -w0
Add the newly created Secret as a reference to the Shoot spec, and then to the registry-cache extension configuration.
In the registry-cache configuration, set the secretReferenceName field. It should point to a resource reference under spec.resources. The resource reference itself points to the Secret in project namespace.
The above step will trigger a Shoot reconciliation. Wait for it to complete.
Make sure that the old Secret is no longer referenced by any Shoot cluster. Finally, delete the Secret containing the old credentials (e.g., ro-docker-secret-v1).
Delete the corresponding old credentials from the cloud provider account.
Possible Pitfalls
The registry cache is not protected by any authentication/authorization mechanism. The cached images (incl. private images) can be fetched from the registry cache without authentication/authorization. Note that the registry cache itself is not exposed publicly.
The registry cache provides the credentials for every request against the corresponding upstream. In some cases, misconfigured credentials can prevent the registry cache to pull even public images from the upstream (for example: invalid service account key for Artifact Registry). However, this behaviour is controlled by the server-side logic of the upstream registry.
Do not remove the image pull Secrets when configuring credentials for the registry cache. When the registry-cache is not available, containerd falls back to the upstream registry. containerd still needs the image pull Secret to pull the image and in this way to have the fallback mechanism working.
5.9.7 - Observability
Registry Cache Observability
The registry-cache extension exposes metrics for the registry caches running in the Shoot cluster so that they can be easily viewed by cluster owners and operators in the Shoot’s Prometheus and Plutono instances. The exposed monitoring data provides an overview of the performance of the pull-through caches, including hit rate and network traffic data.
The Registry Caches dashboard in the Shoot’s Plutono instance contains several panels which are built using the registry cache metrics. From the Registry dropdown menu you can select the upstream for which you wish the metrics to be displayed (by default, metrics are summed for all upstream registries).
Following is a list of all exposed registry cache metrics. The upstream_host label can be used to determine the upstream host to which the metrics are related, while the type label can be used to determine weather the metric is for an image blob or an image manifest:
registry_proxy_requests_total
The number of total incoming request received.
Type: Counter
Labels: upstream_hosttype
registry_proxy_hits_total
The number of total cache hits; i.e. the requested content exists in the registry cache’s image store and it is served from there (upstream is not contacted at all for serving the requested content).
Type: Counter
Labels: upstream_hosttype
registry_proxy_misses_total
The number of total cache misses; i.e. the requested content does not exist in the registry cache’s image store and it is fetched from the upstream.
Type: Counter
Labels: upstream_hosttype
registry_proxy_pulled_bytes_total
The size of total bytes that the registry cache has pulled from the upstream.
Type: Counter
Labels: upstream_hosttype
registry_proxy_pushed_bytes_total
The size of total bytes pushed to the registry cache’s clients.
Type: Counter
Labels: upstream_hosttype
Alerts
There are two alerts defined for the registry cache PersistentVolume in the Shoot’s Prometheus instance:
RegistryCachePersistentVolumeUsageCritical
This indicates that the registry cache PersistentVolume is almost full and less than 5% is free. When there is no available disk space, no new images will be cached. However, image pull operations are not affected. An alert is fired when the following expression evaluates to true:
This indicates that the registry cache PersistentVolume is expected to fill up within four days based on recent sampling. An alert is fired when the following expression evaluates to true:
Users can subscribe to these alerts by following the Gardener alerting guide.
Logging
To view the registry cache logs in Plutono, navigate to the Explore tab and select vali from the Explore dropdown menu. Afterwards enter the following vali query:
{container_name="registry-cache"} to view the logs for all registries.
{pod_name=~"registry-<upstream_host>.+"} to view the logs for specific upstream registry.


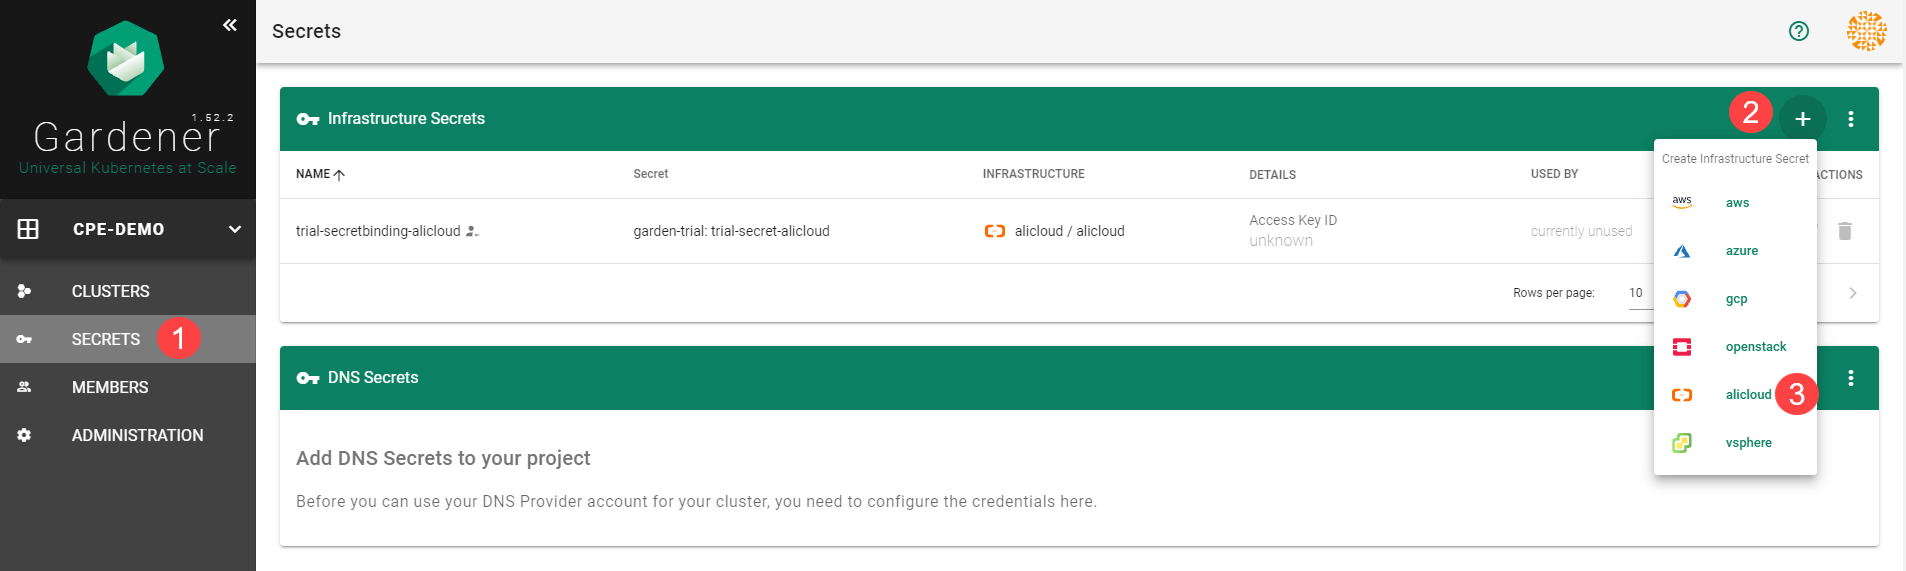
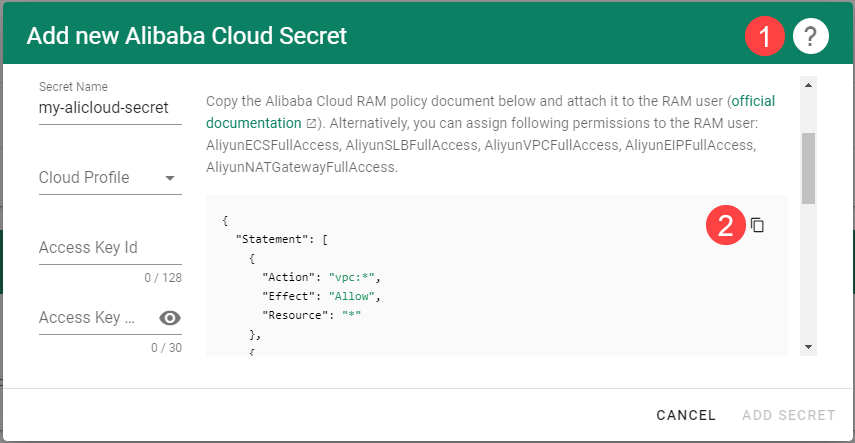
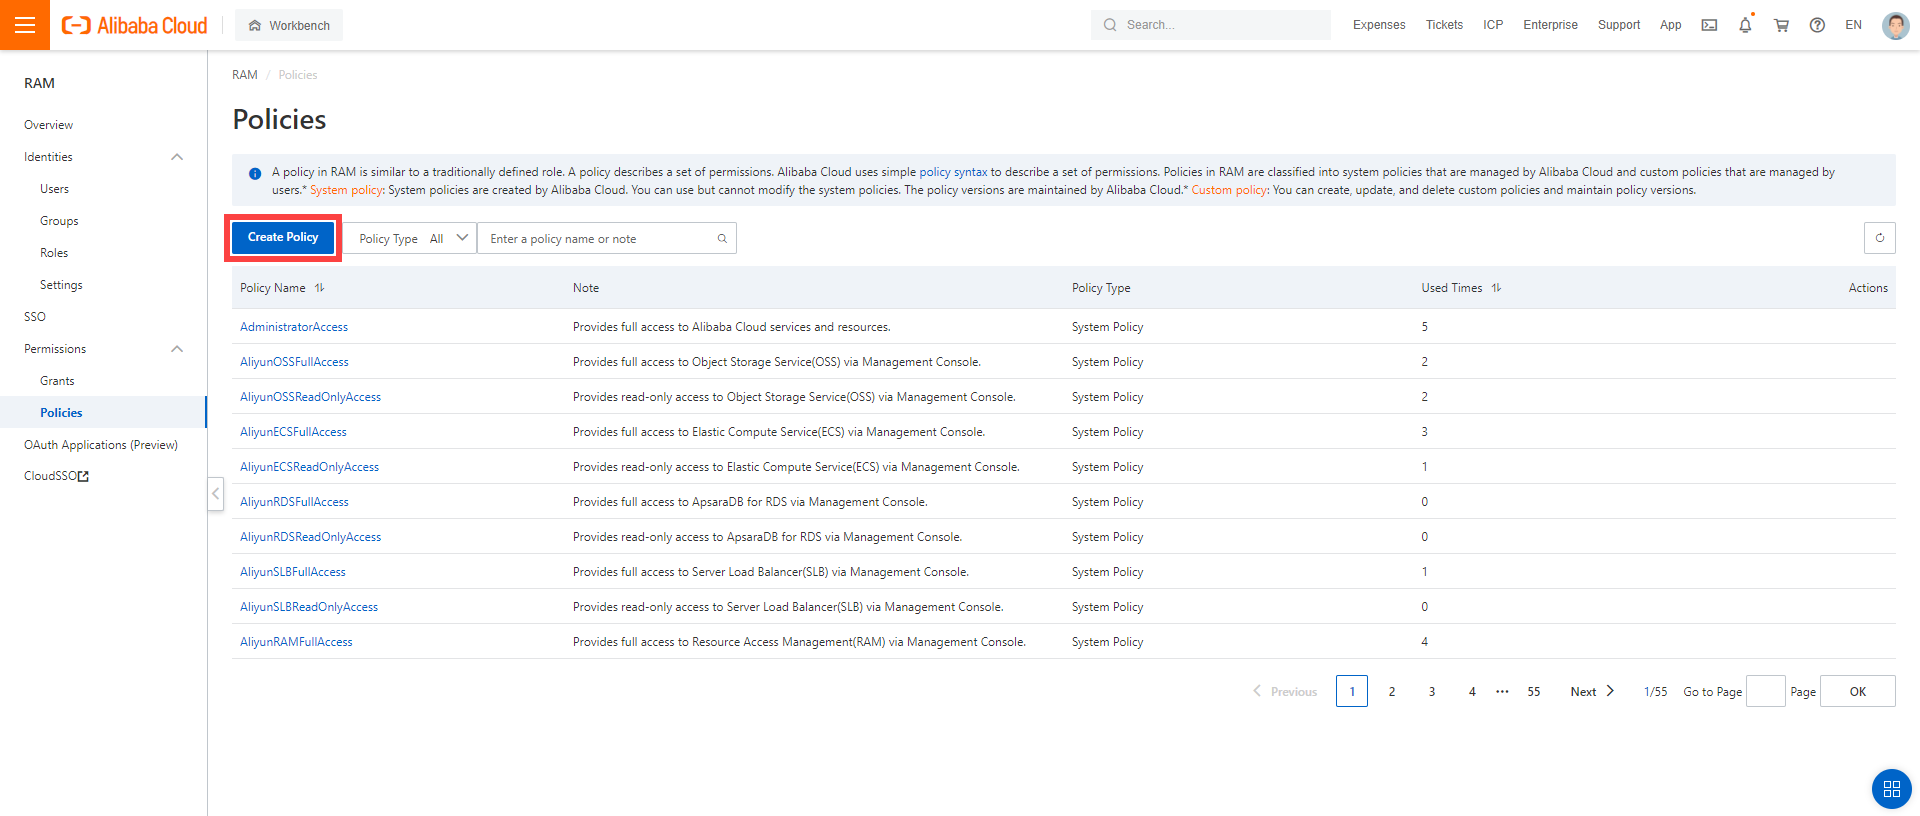
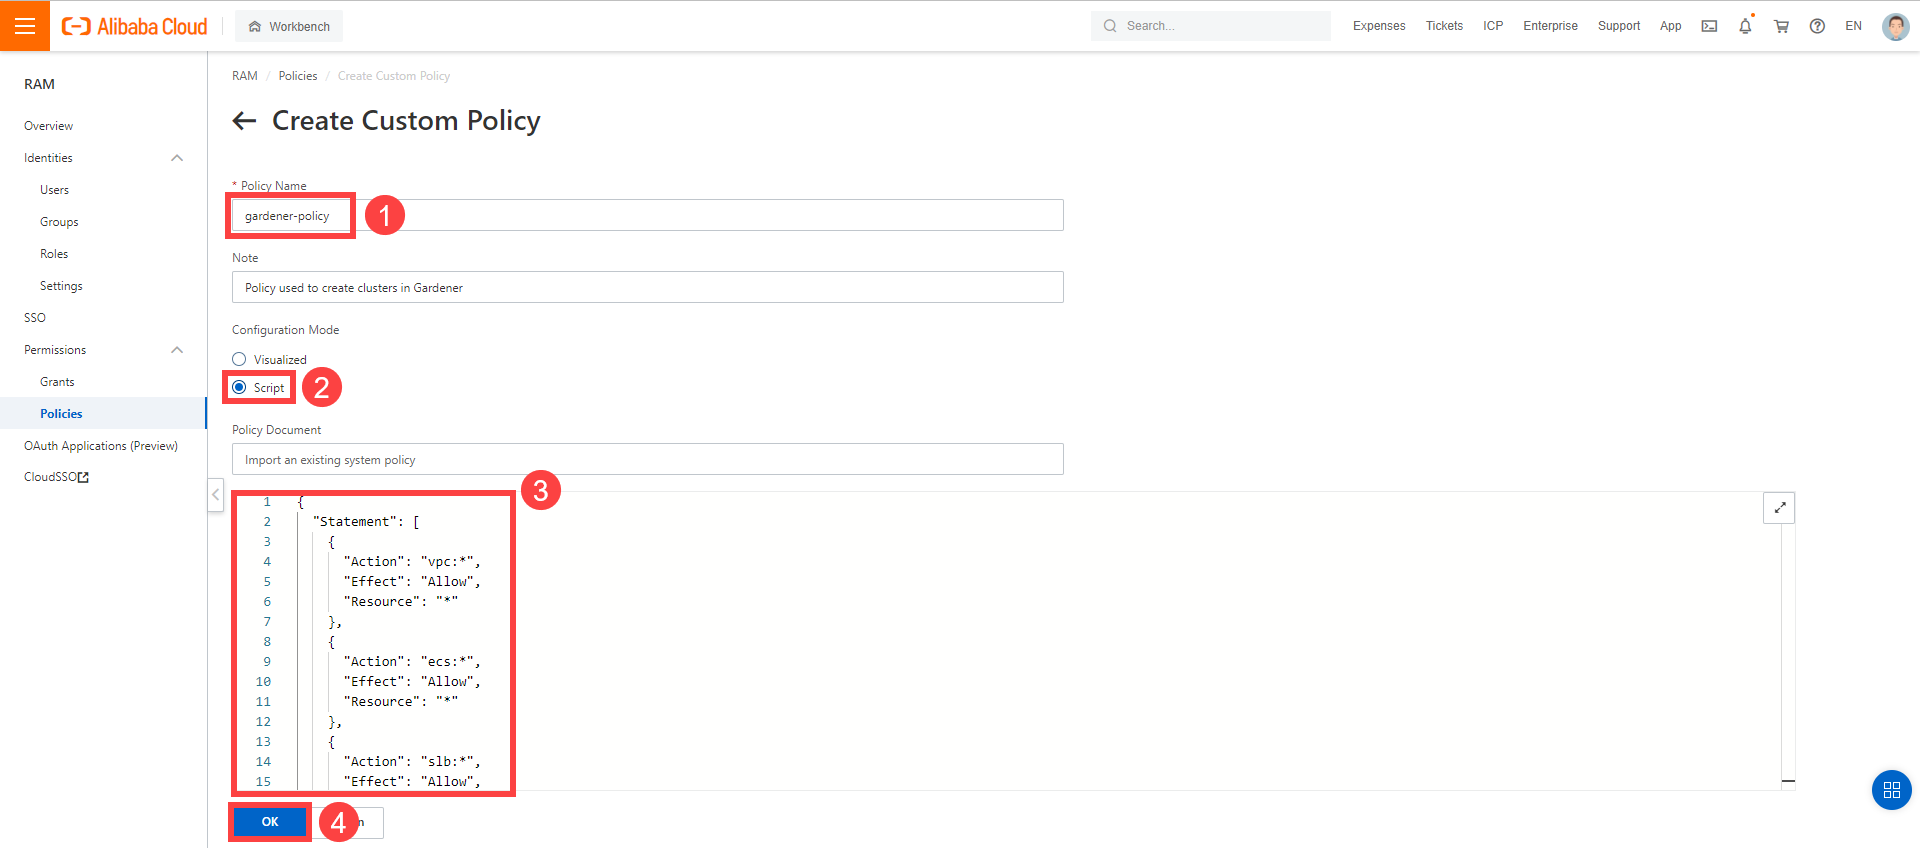
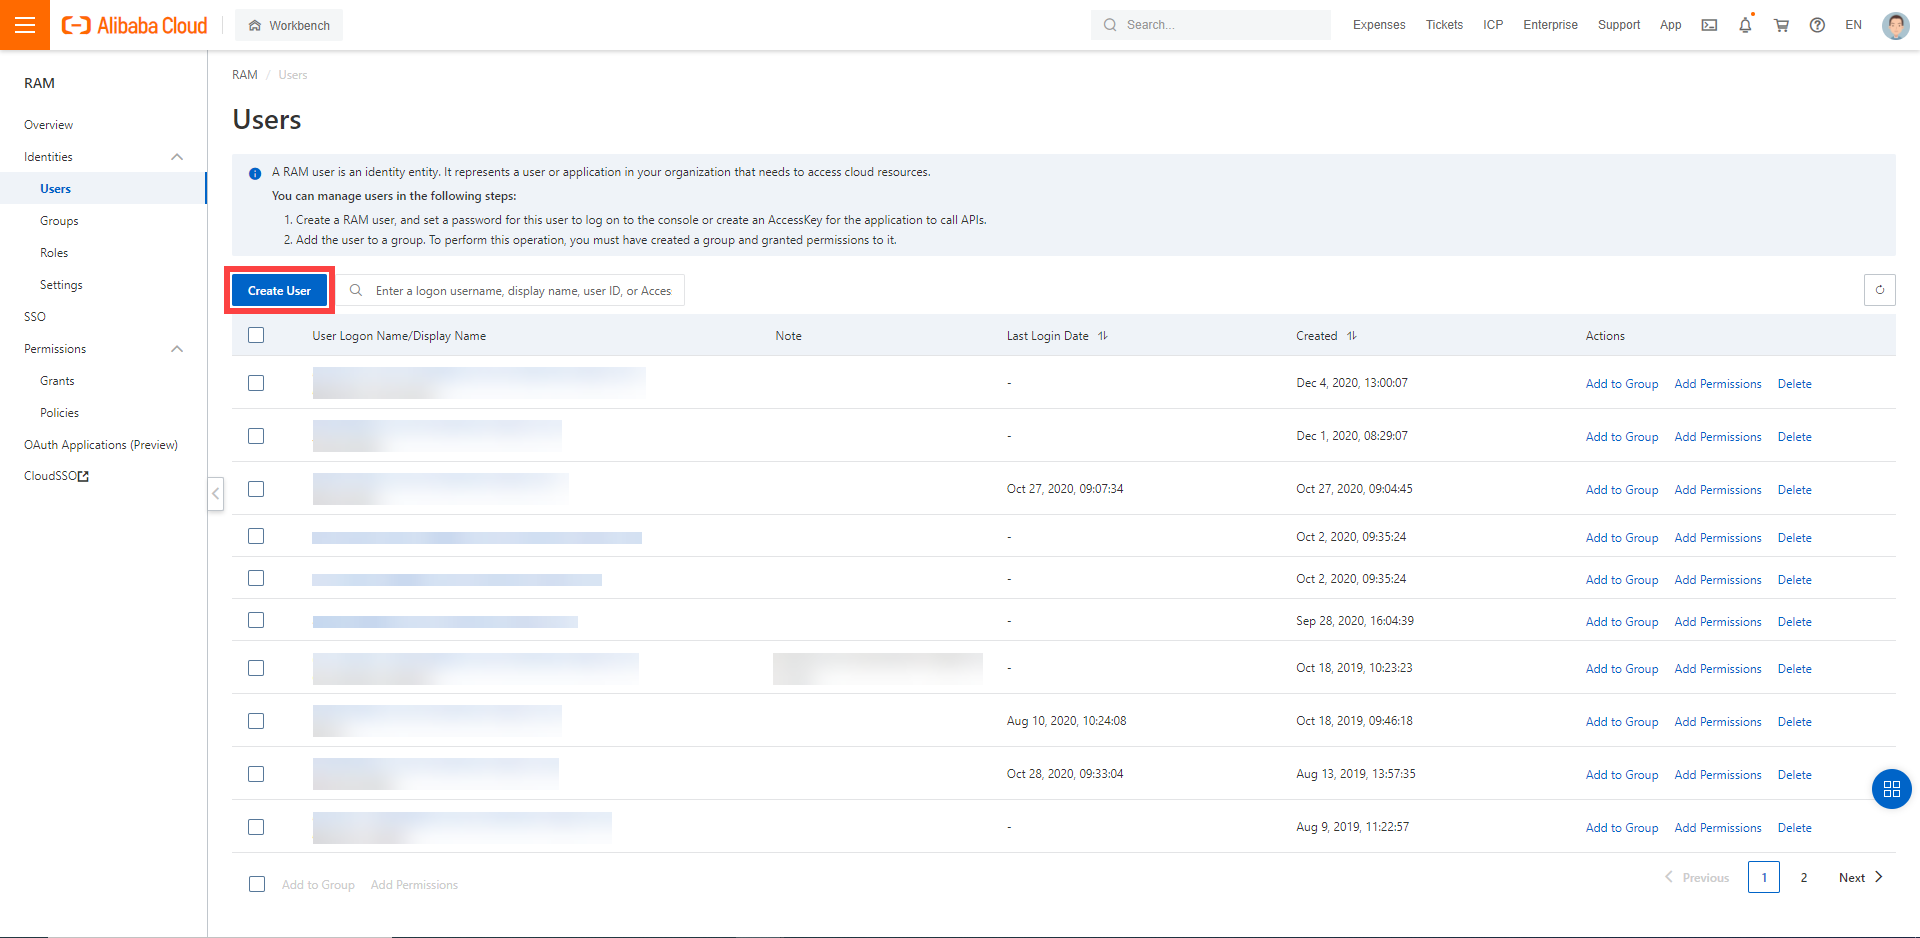
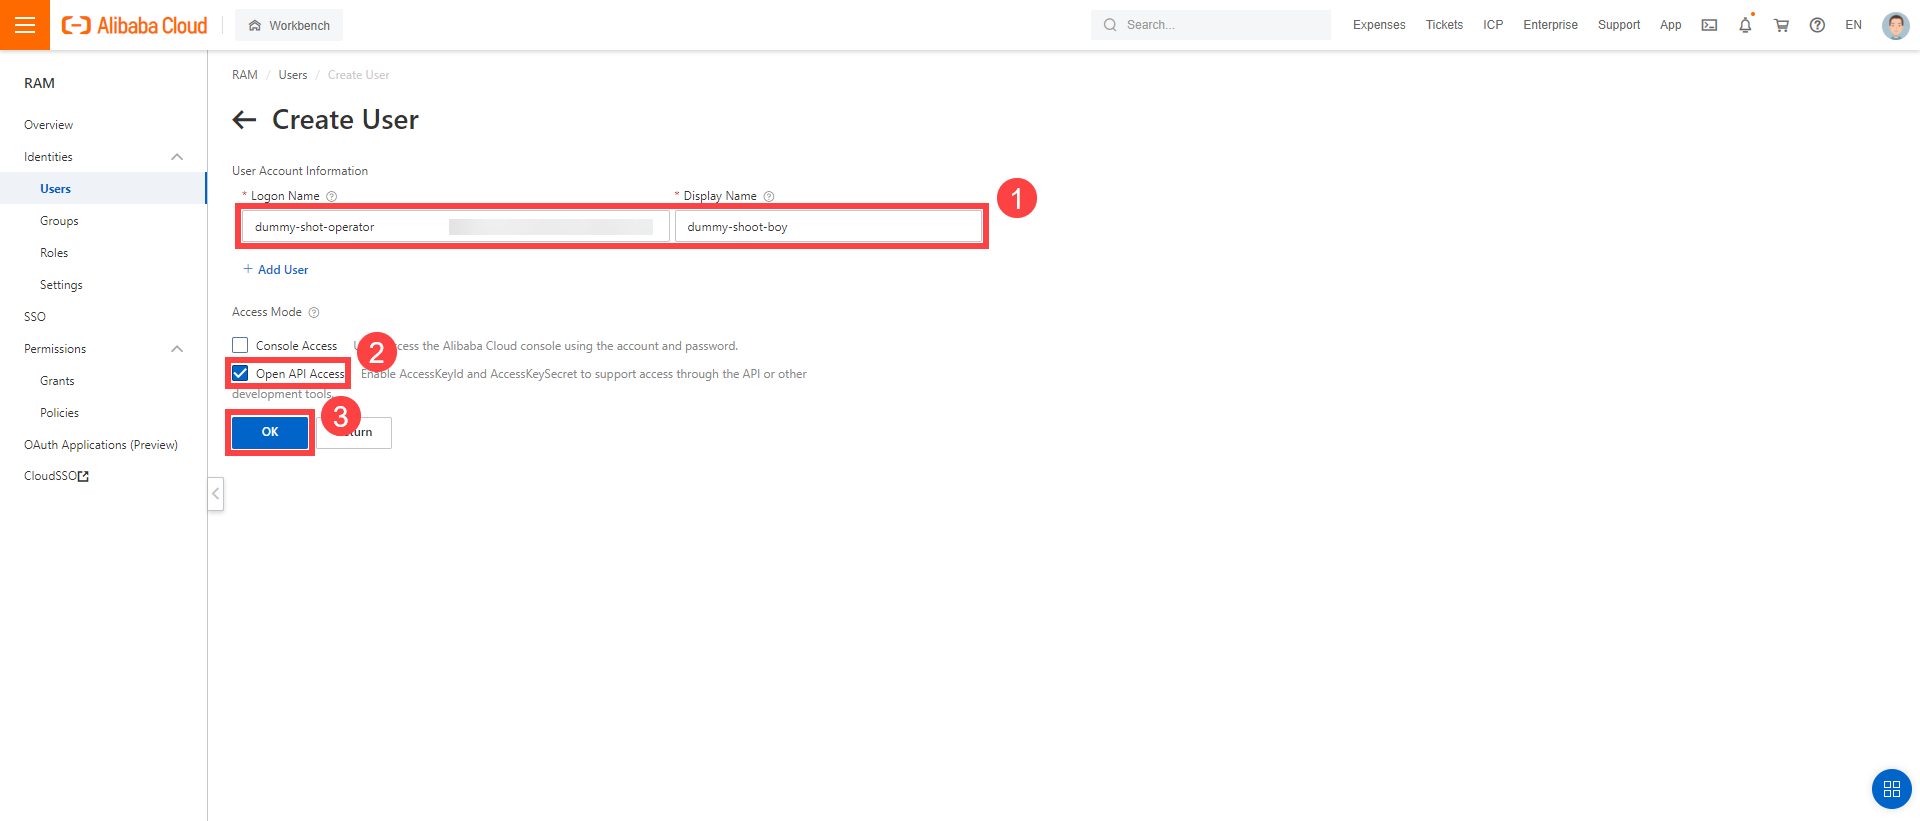


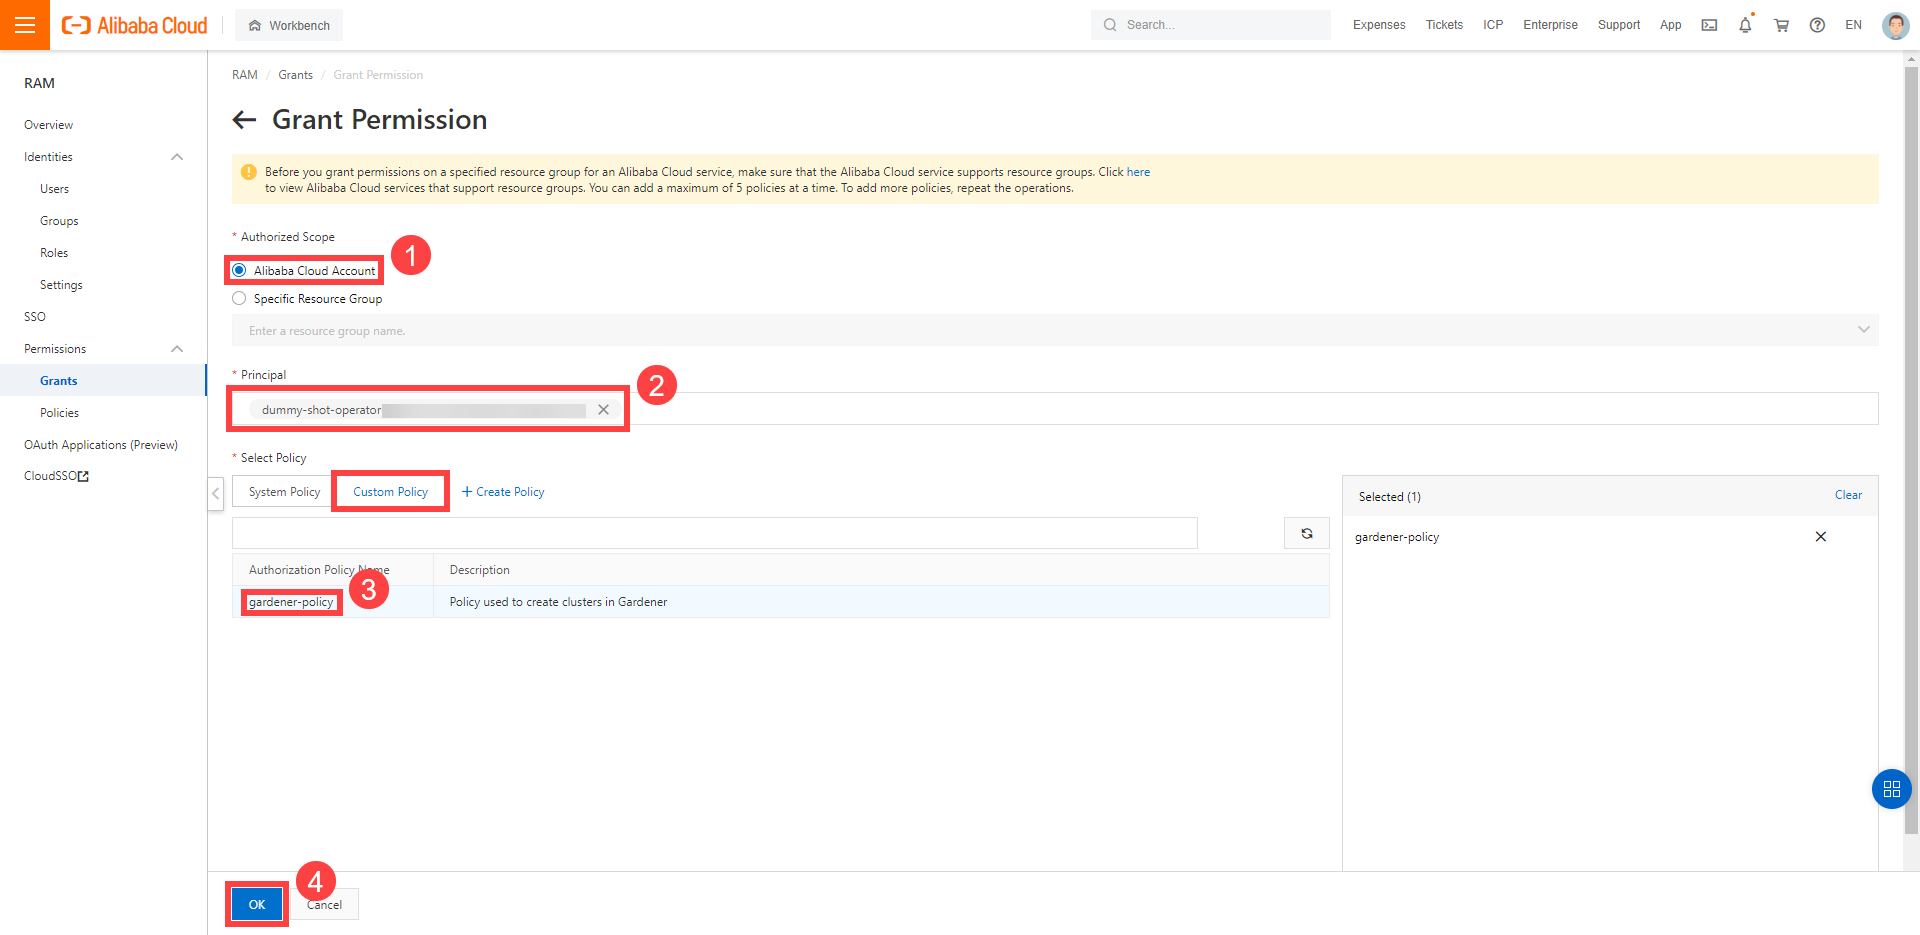
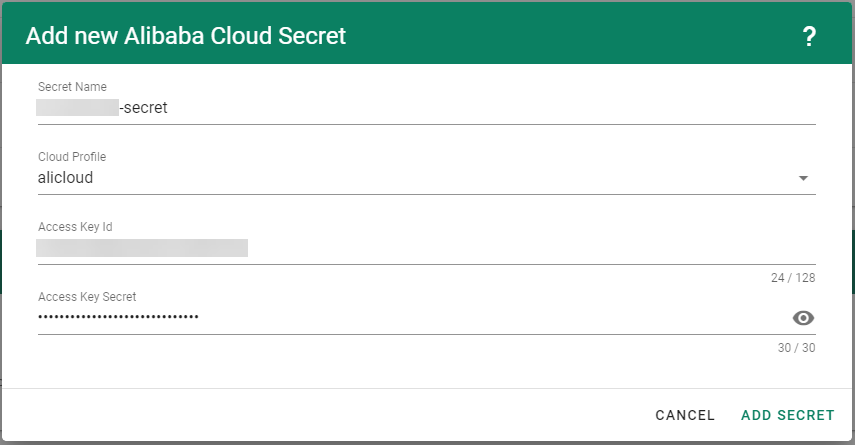
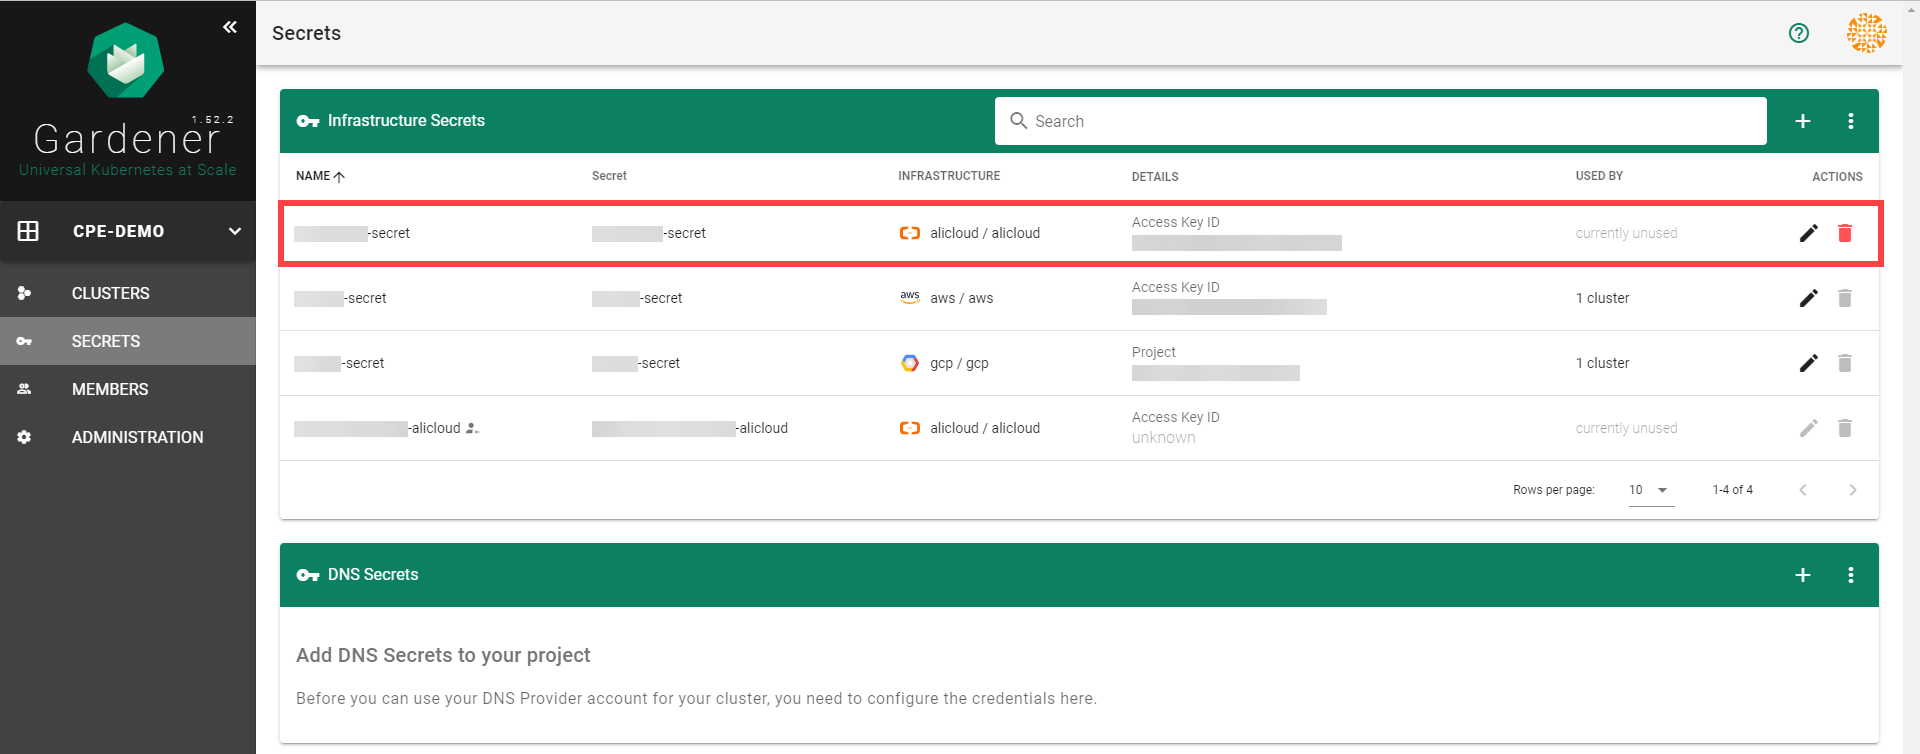


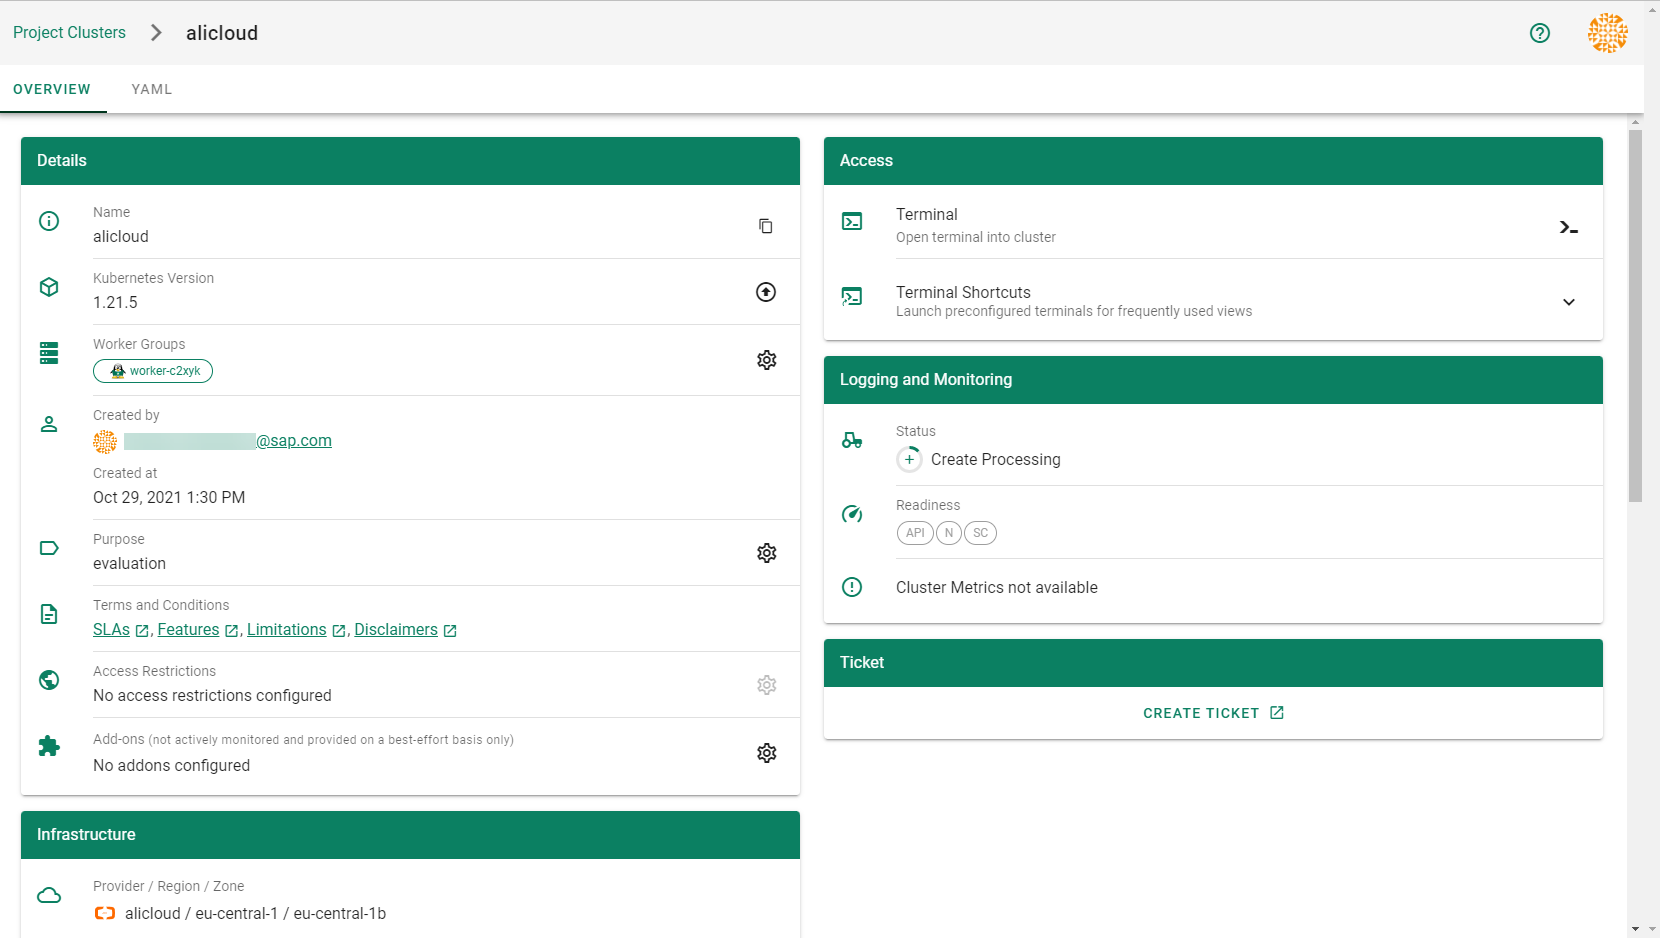

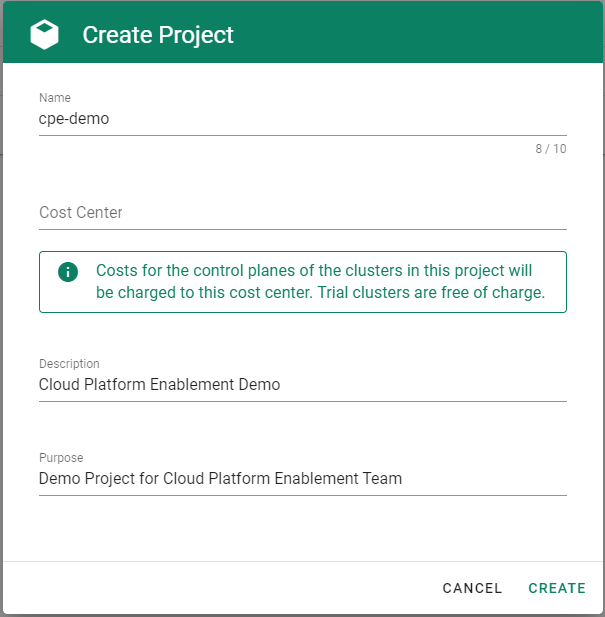

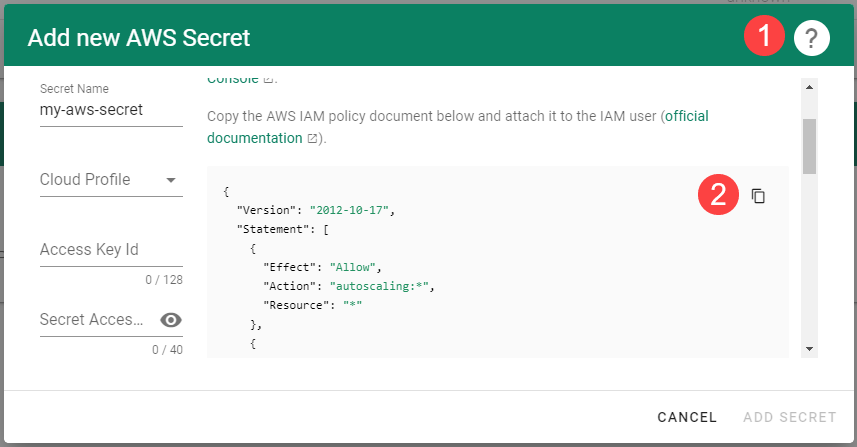
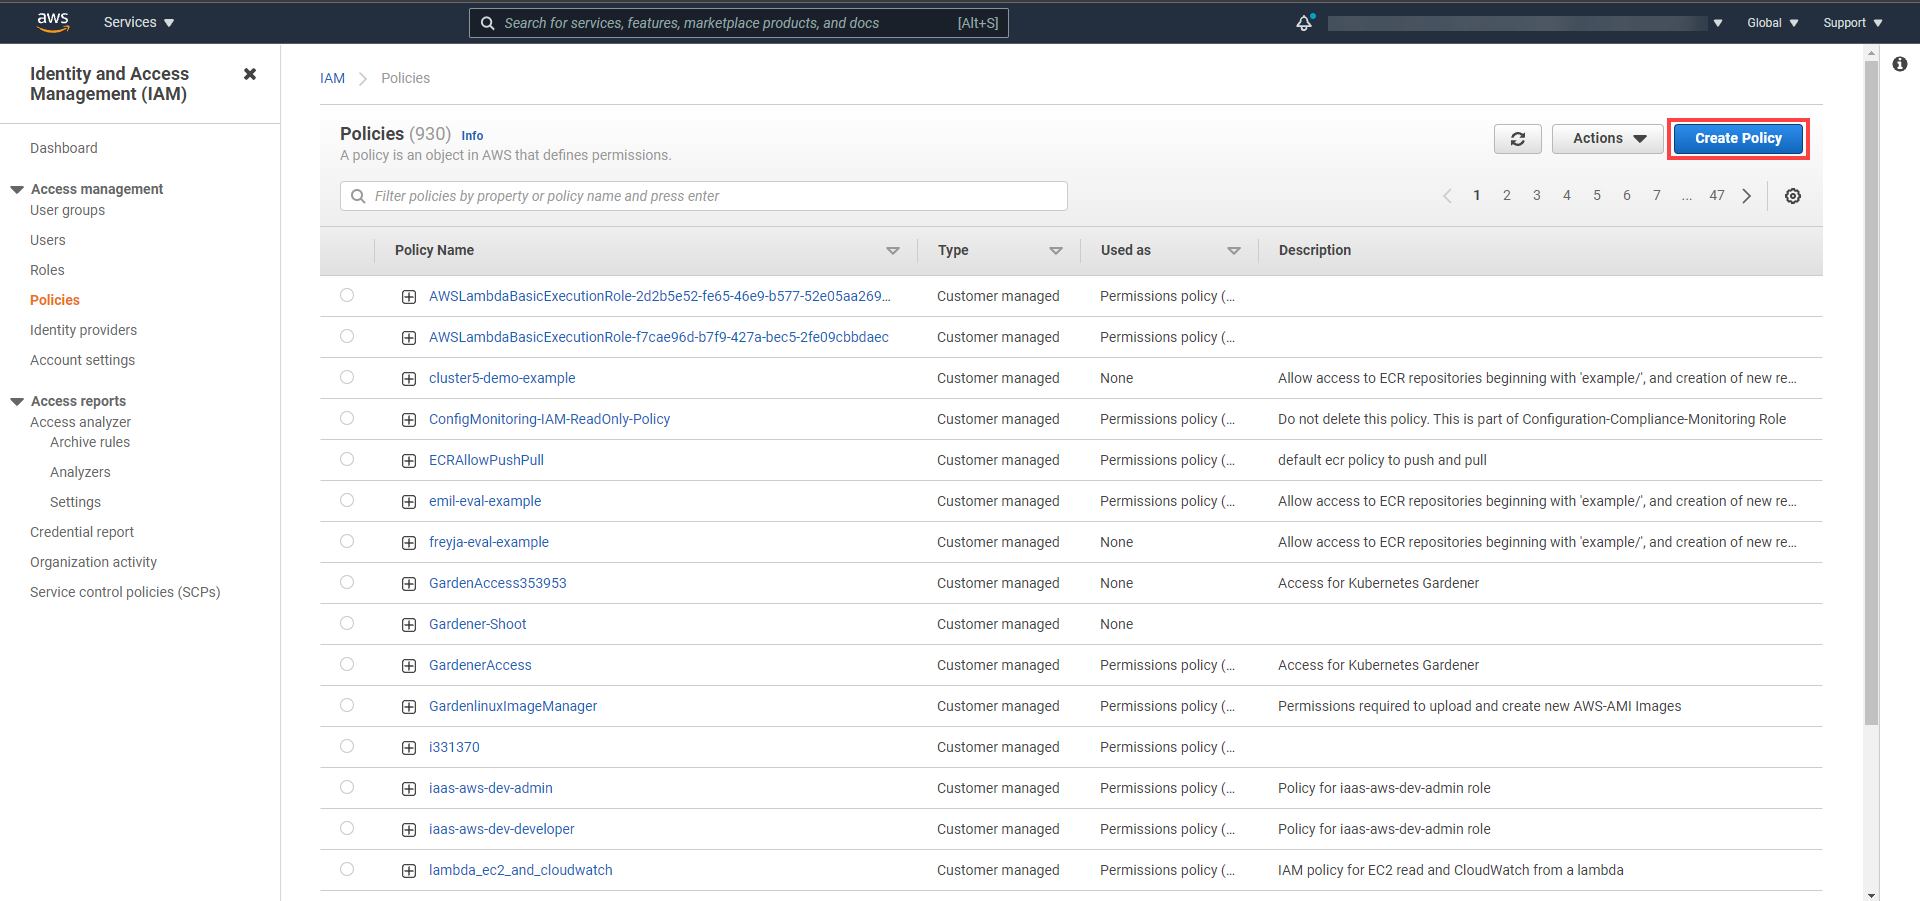
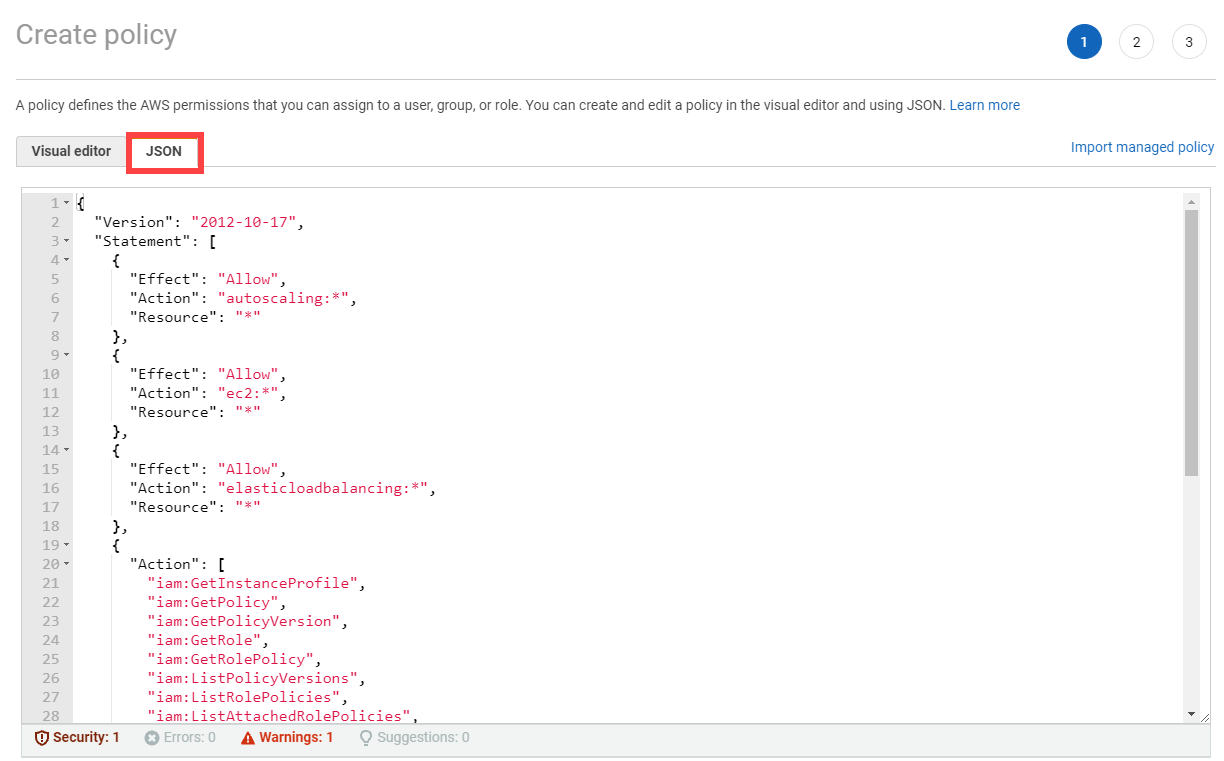

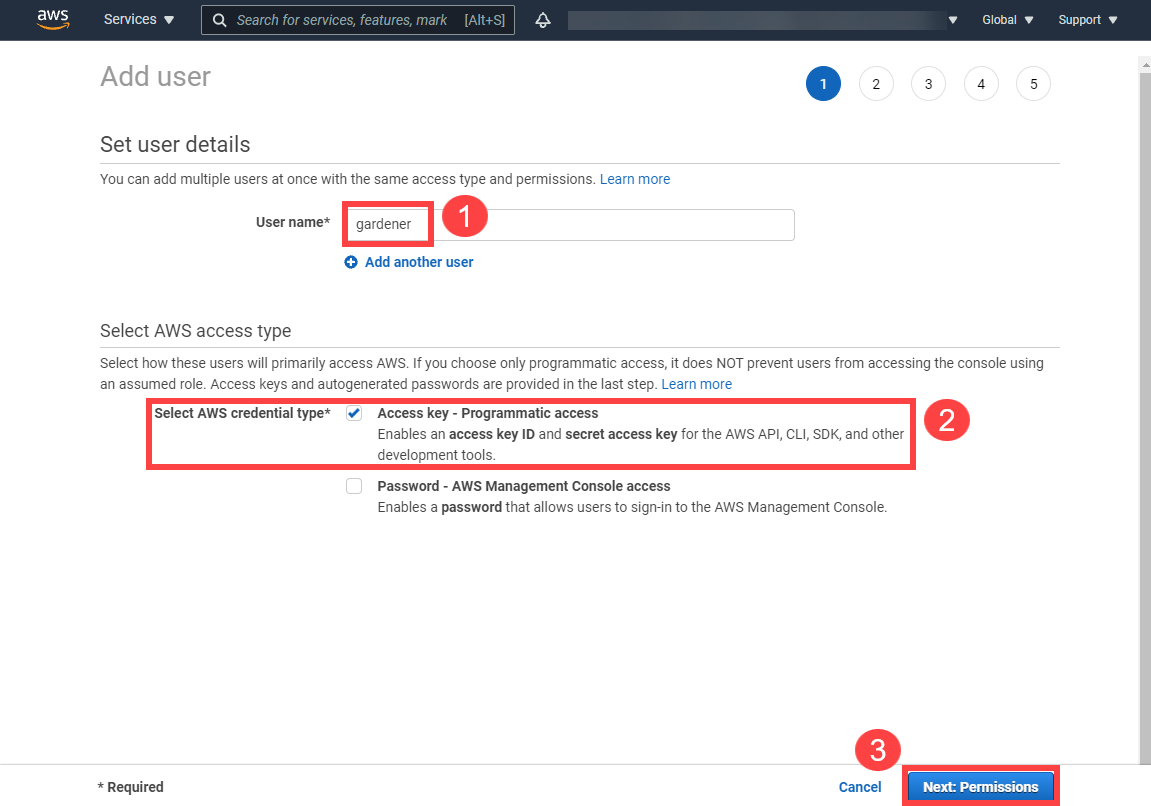
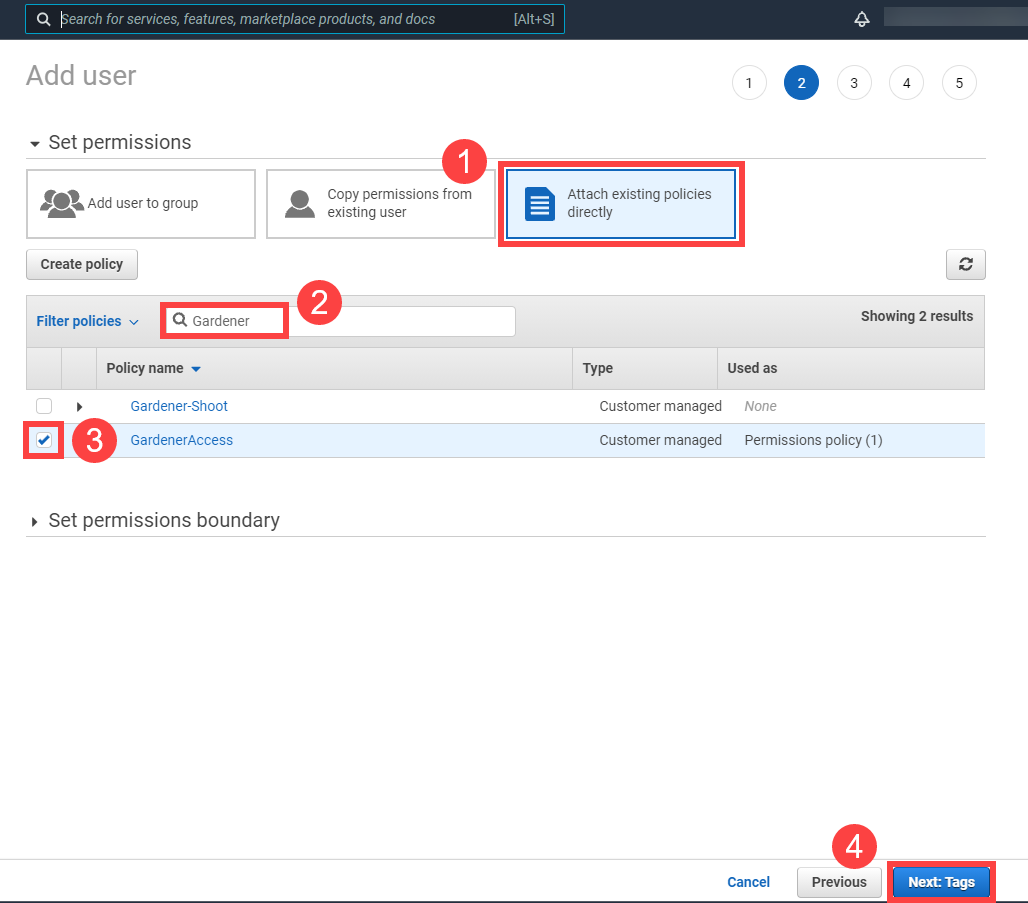
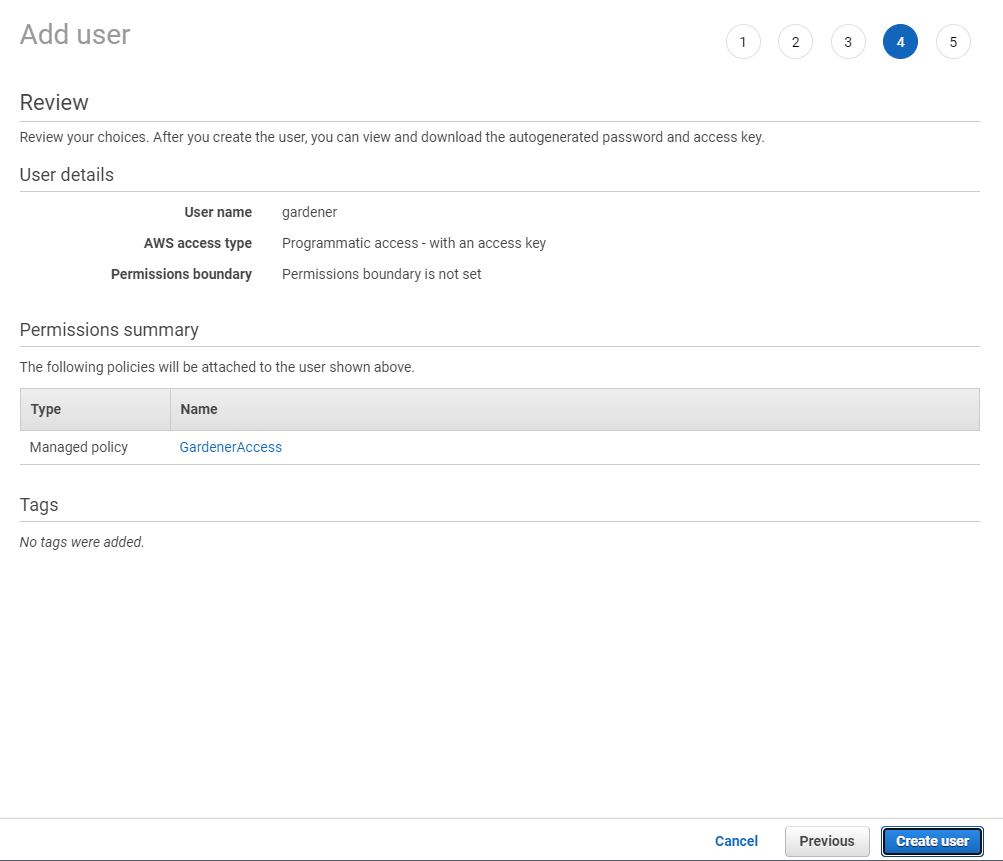
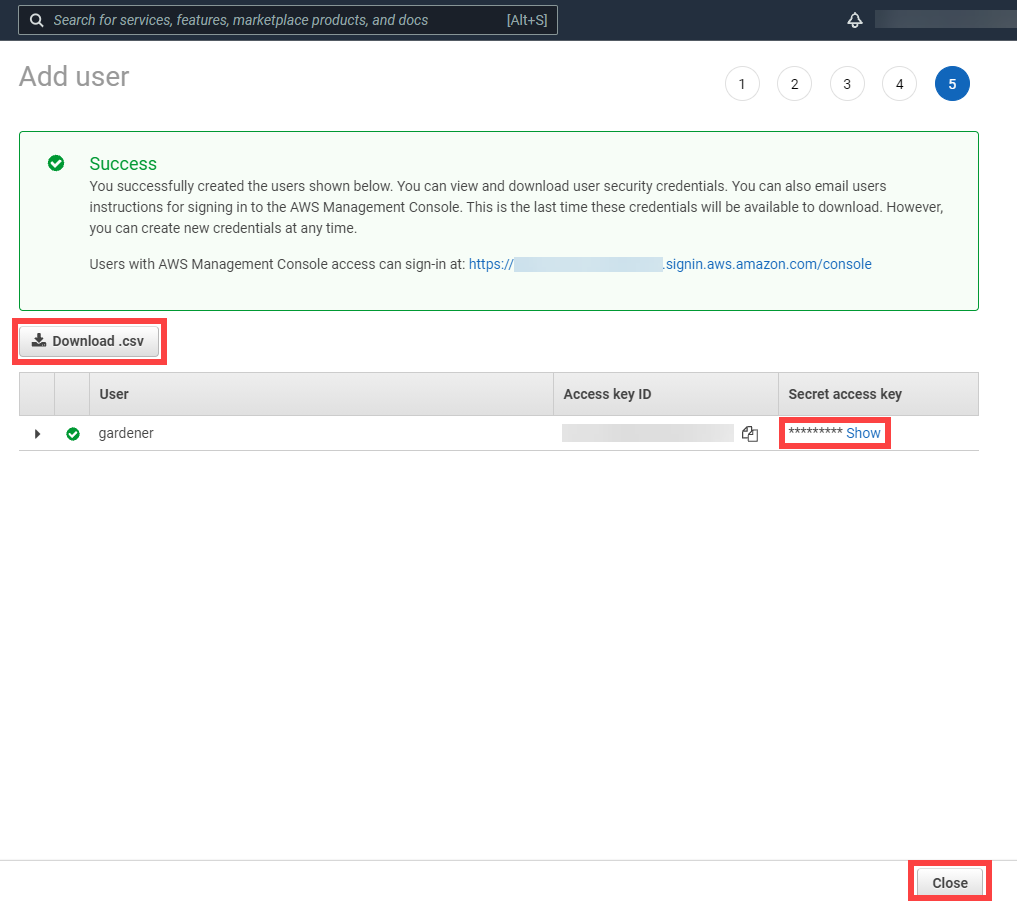

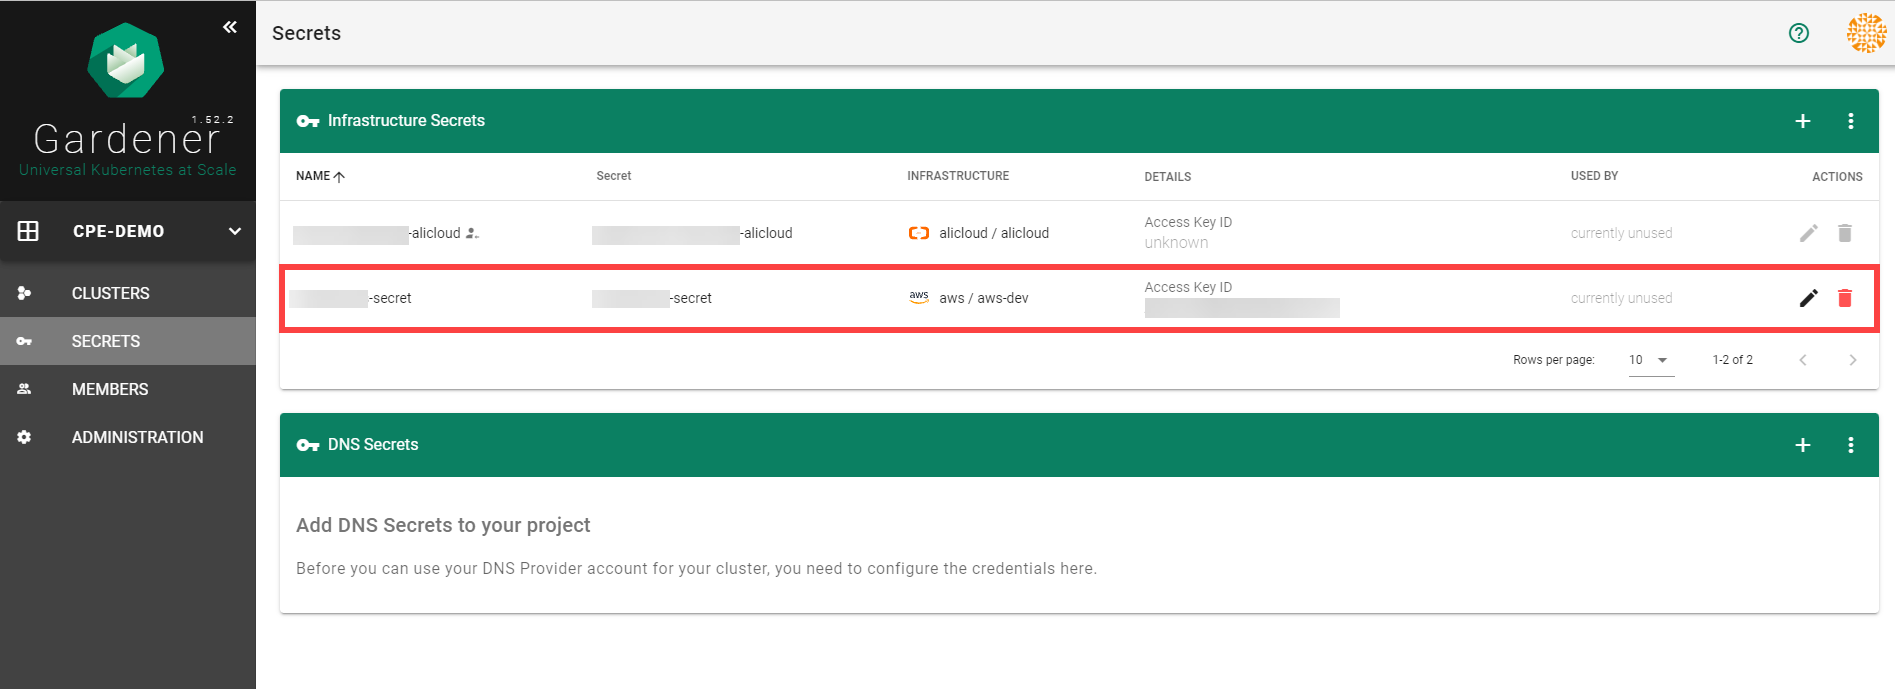

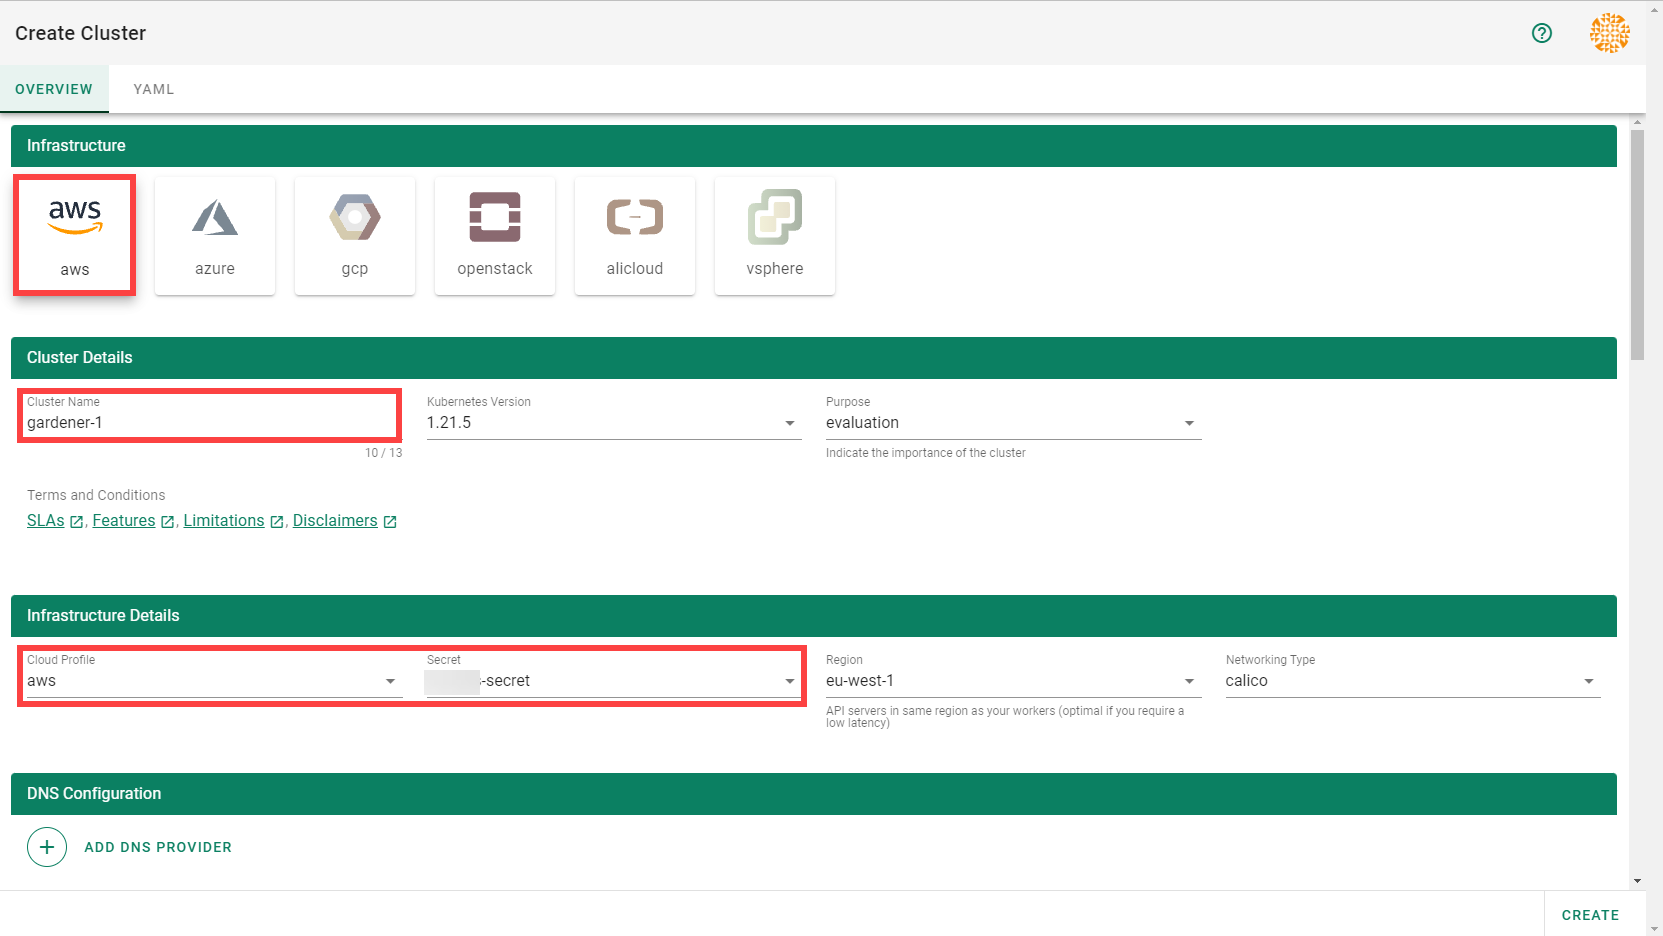
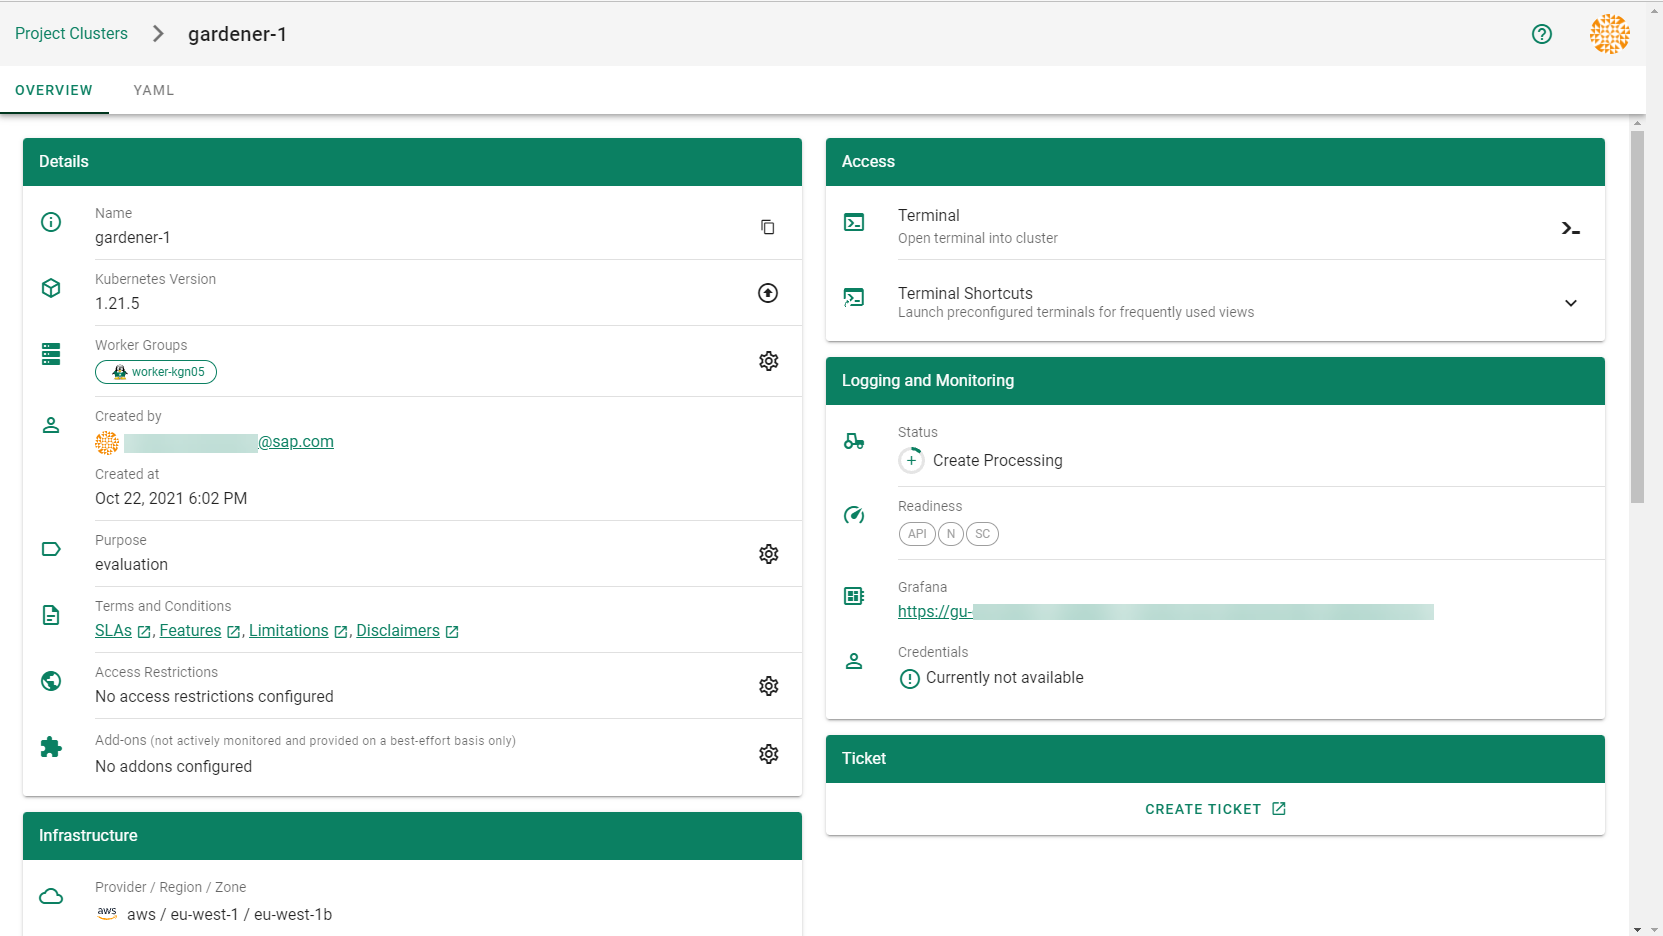
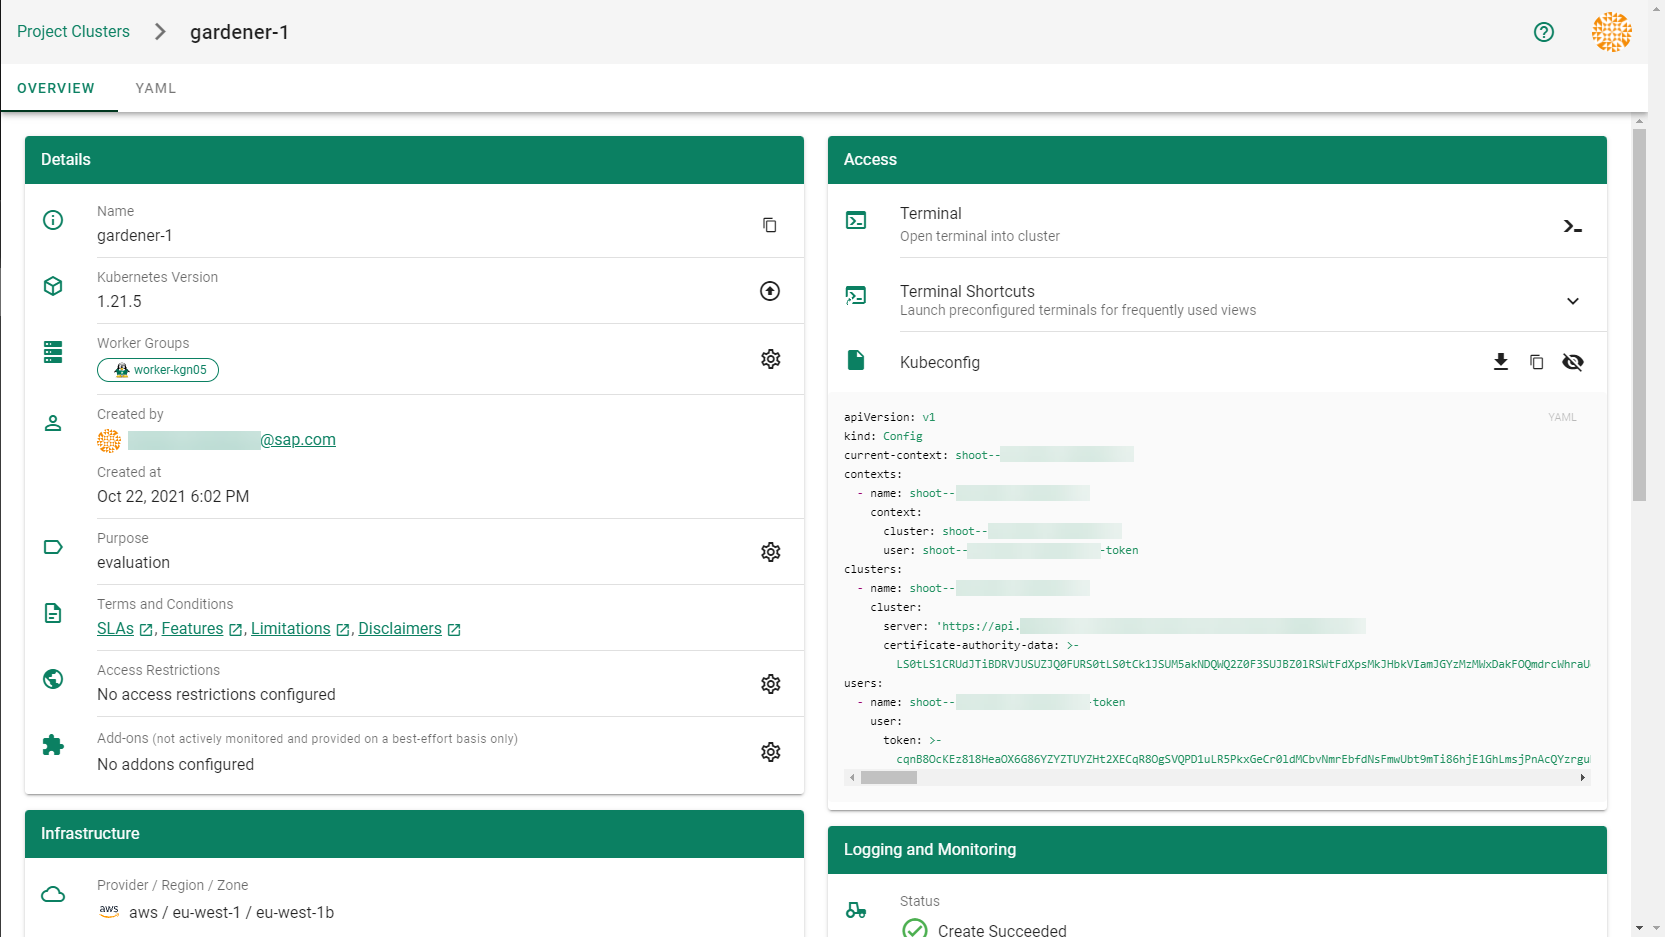
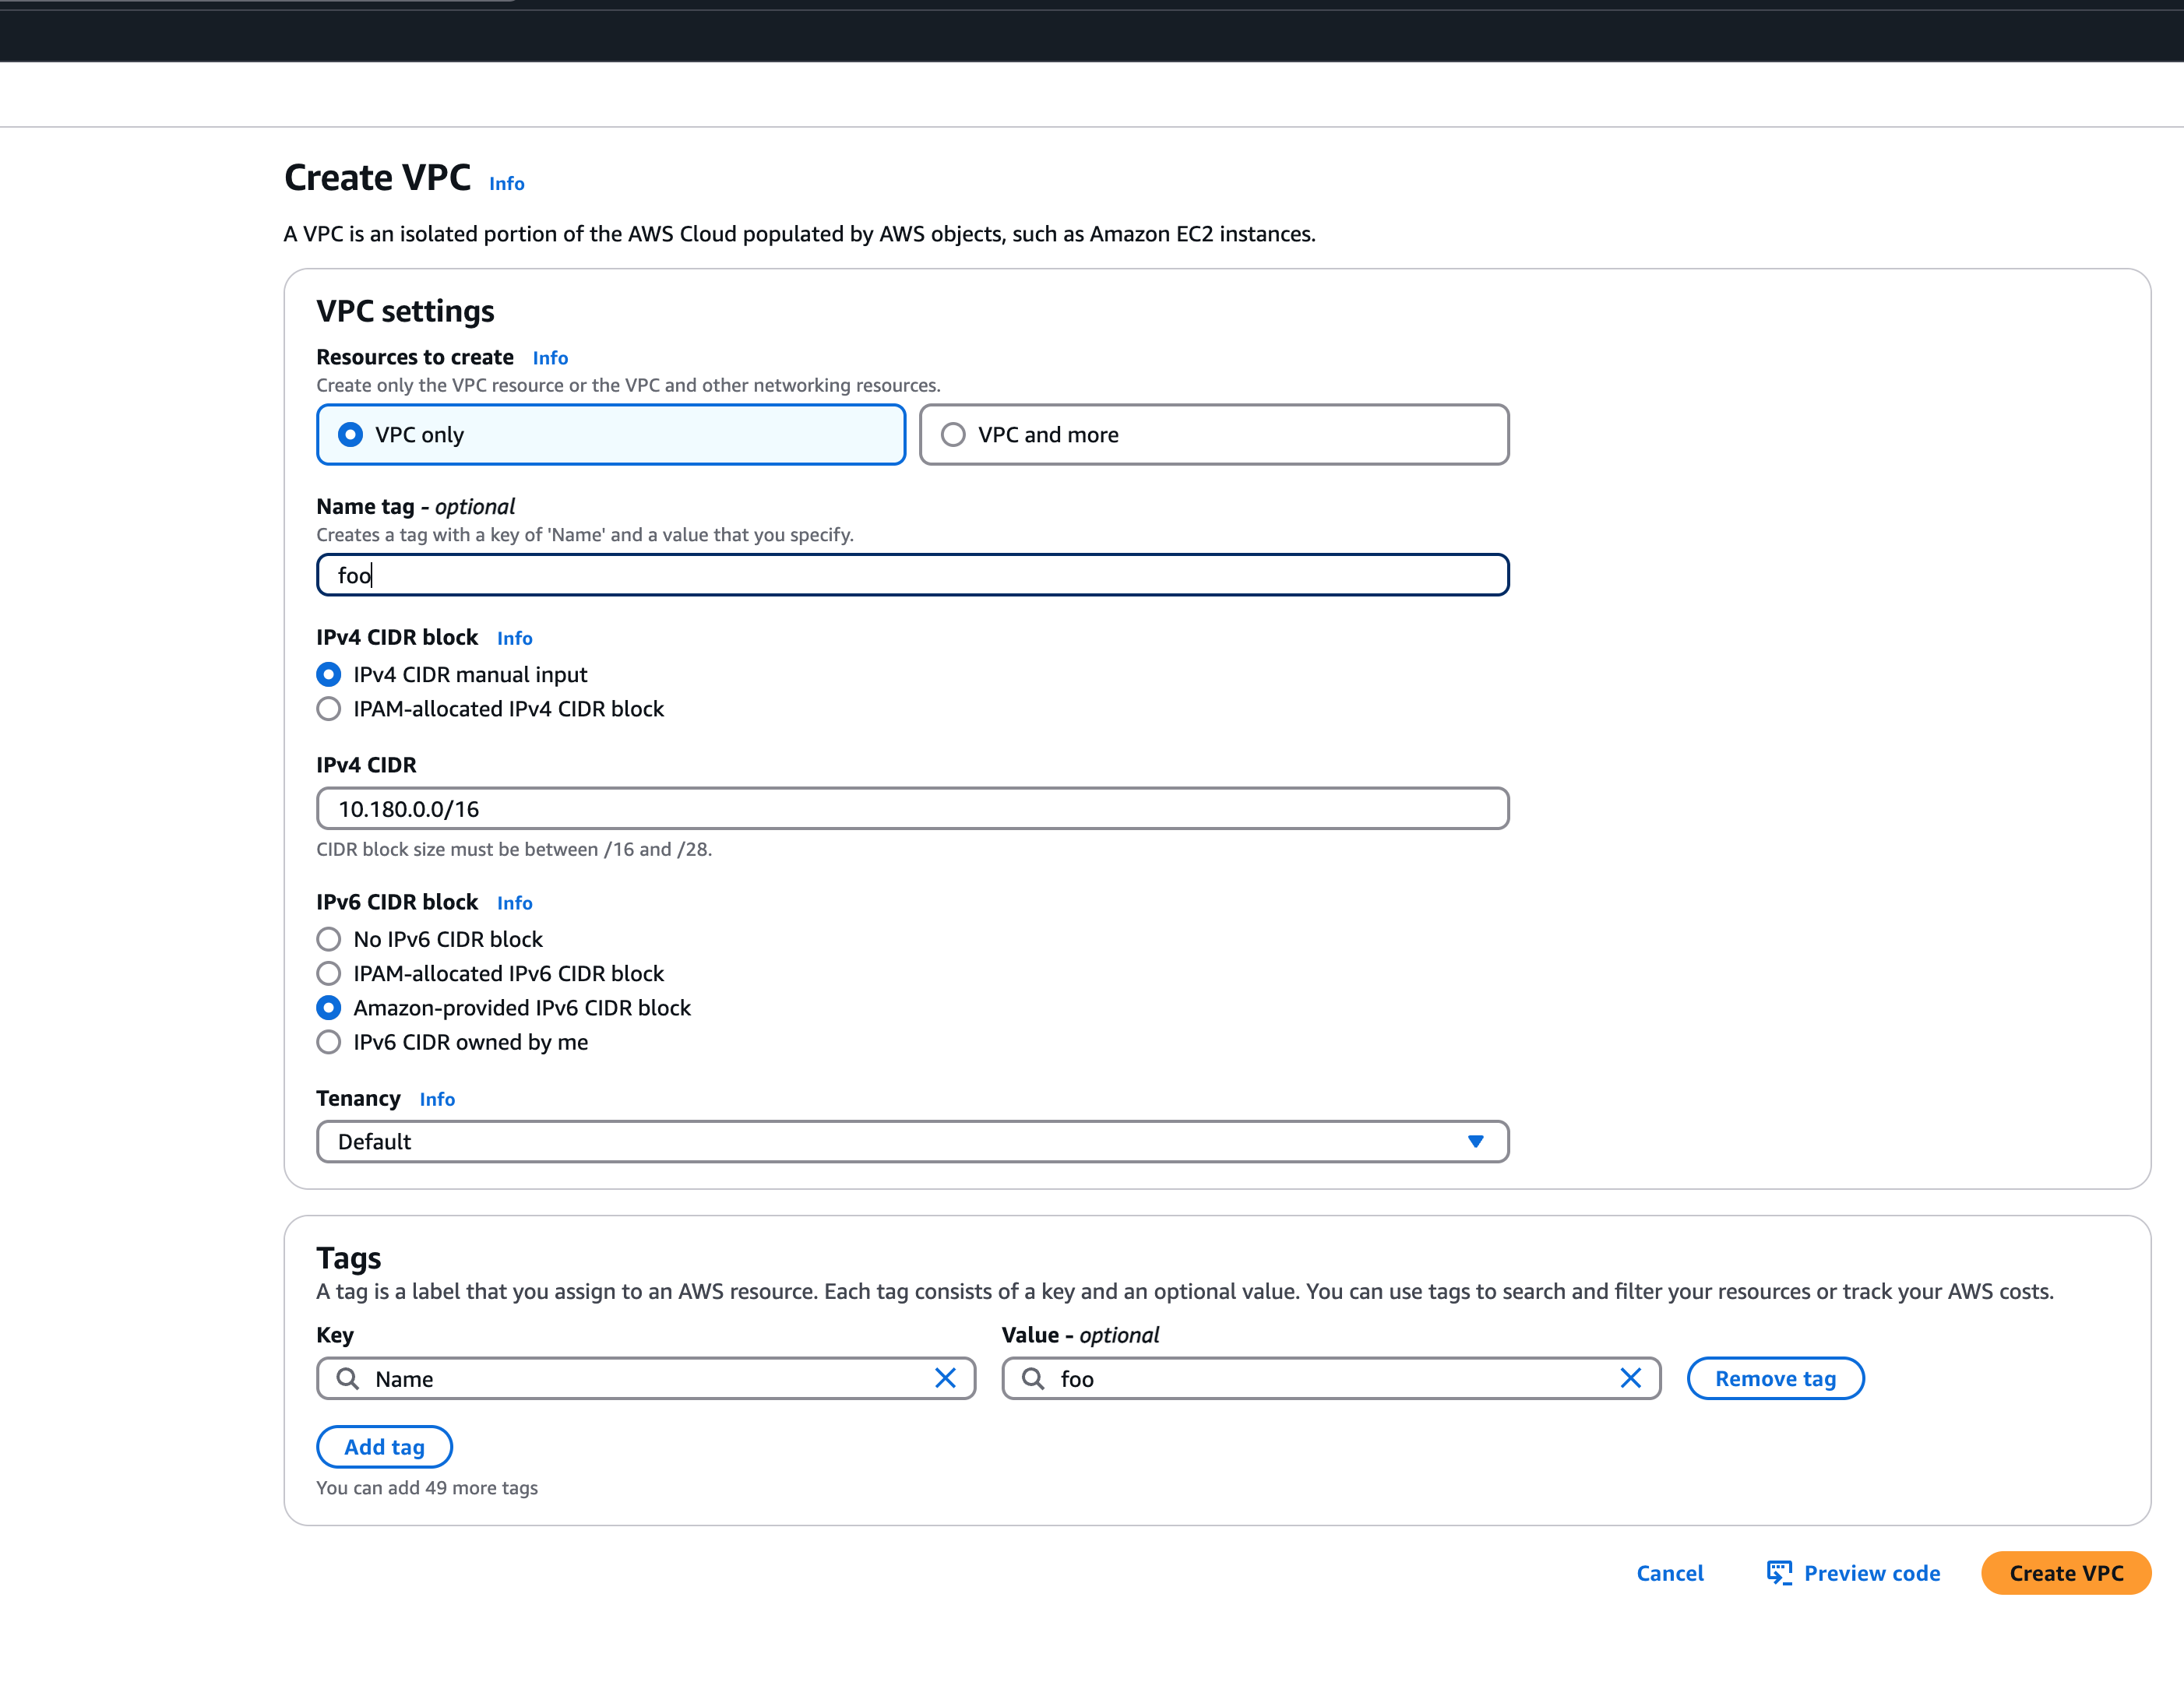 An egress-only internet gateway is required for outbound internet traffic (IPv6) from the instances within your VPC. Please create one egress-only internet gateway and attach it to the VPC. Please also make sure that the VPC has an attached internet gateway and the following attributes set: