Project Gardener implements the automated management and operation of Kubernetes clusters as a service.
Its main principle is to leverage Kubernetes concepts for all of its tasks.
Recently, most of the vendor specific logic has been developed in-tree.
However, the project has grown to a size where it is very hard to extend, maintain, and test.
With GEP-1 we have proposed how the architecture can be changed in a way to support external controllers that contain their very own vendor specifics.
This way, we can keep Gardener core clean and independent.
This controller implements Gardener’s extension contract for the AWS provider.
An example for a ControllerRegistration resource that can be used to register this controller to Gardener can be found here.
Please find more information regarding the extensibility concepts and a detailed proposal here.
Supported Kubernetes versions
This extension controller supports the following Kubernetes versions:
Version
Support
Conformance test results
Kubernetes 1.33
1.33.0+
N/A
Kubernetes 1.32
1.32.0+
Kubernetes 1.31
1.31.0+
Kubernetes 1.30
1.30.0+
Kubernetes 1.29
1.29.0+
Kubernetes 1.28
1.28.0+
Kubernetes 1.27
1.27.0+
Please take a look here to see which versions are supported by Gardener in general.
Compatibility
The following lists known compatibility issues of this extension controller with other Gardener components.
AWS Extension
Gardener
Action
Notes
<= v1.15.0
>v1.10.0
Please update the provider version to > v1.15.0 or disable the feature gate MountHostCADirectories in the Gardenlet.
Applies if feature flag MountHostCADirectories in the Gardenlet is enabled. Shoots with CSI enabled (Kubernetes version >= 1.18) miss a mount to the directory /etc/ssl in the Shoot API Server. This can lead to not trusting external Root CAs when the API Server makes requests via webhooks or OIDC.
How to start using or developing this extension controller locally
You can run the controller locally on your machine by executing make start.
Static code checks and tests can be executed by running make verify. We are using Go modules for Golang package dependency management and Ginkgo/Gomega for testing.
Feedback and Support
Feedback and contributions are always welcome!
Please report bugs or suggestions as GitHub issues or reach out on Slack (join the workspace here).
Learn more!
Please find further resources about out project here:
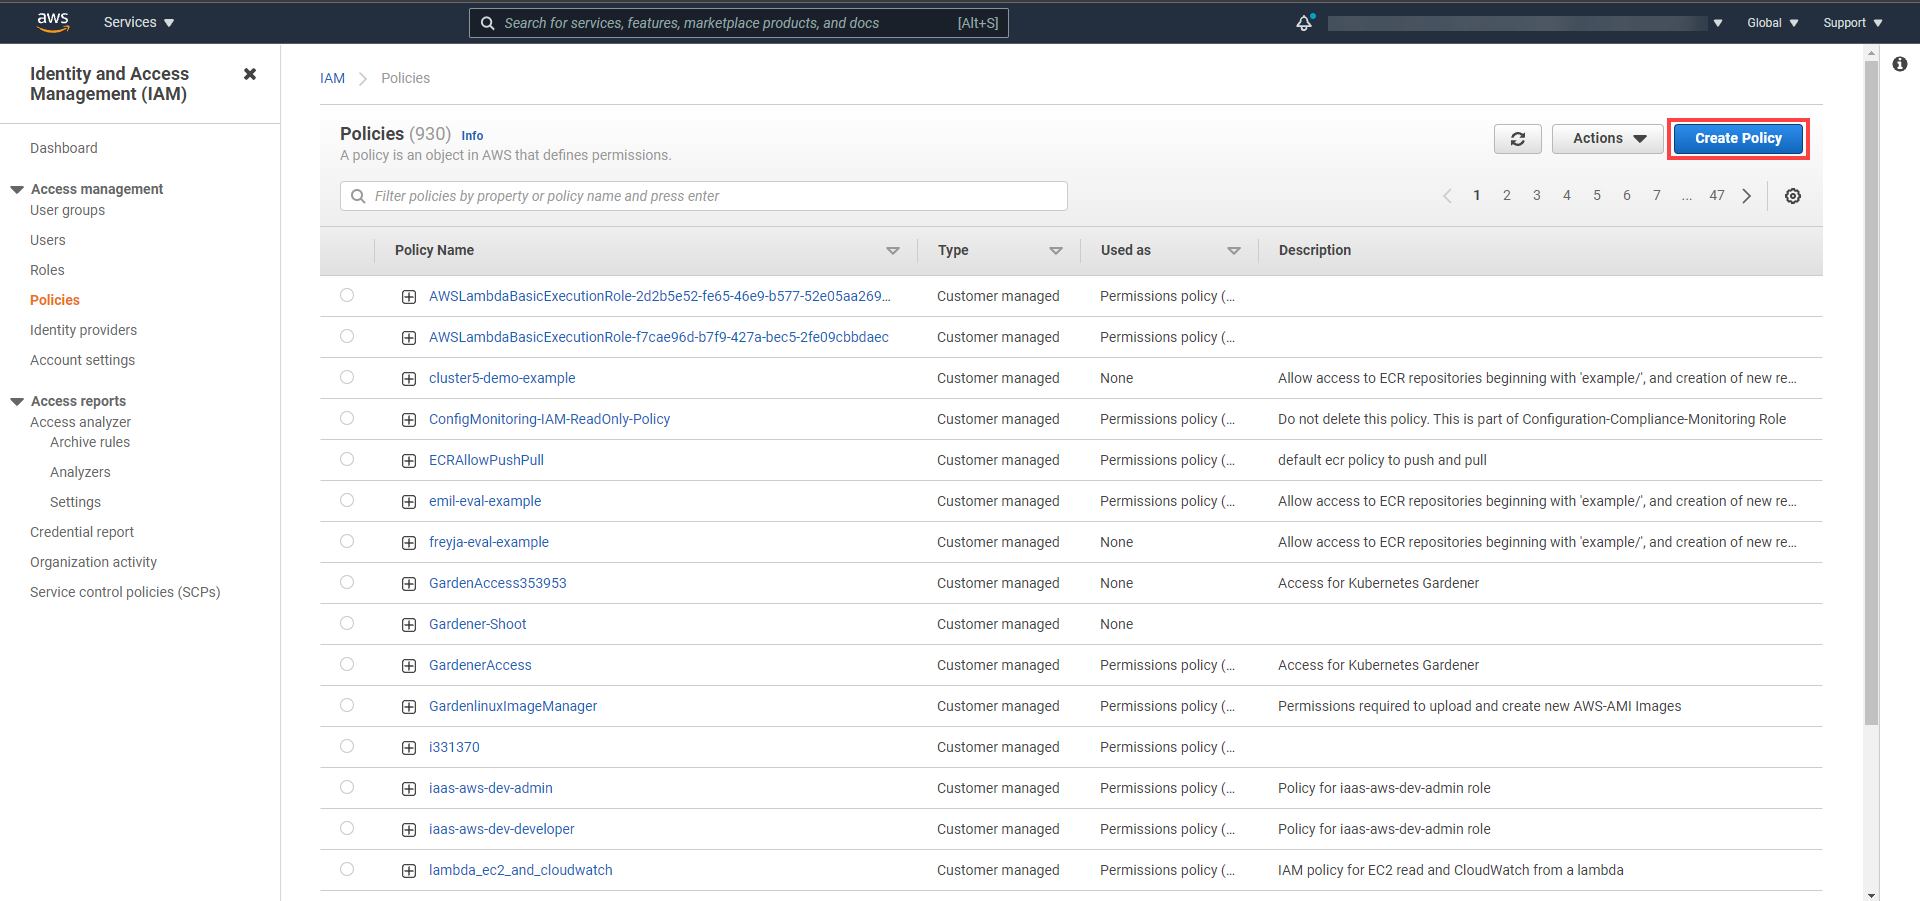
Gardener allows you to create a Kubernetes cluster on different infrastructure providers. This tutorial will guide you through the process of creating a cluster on AWS.
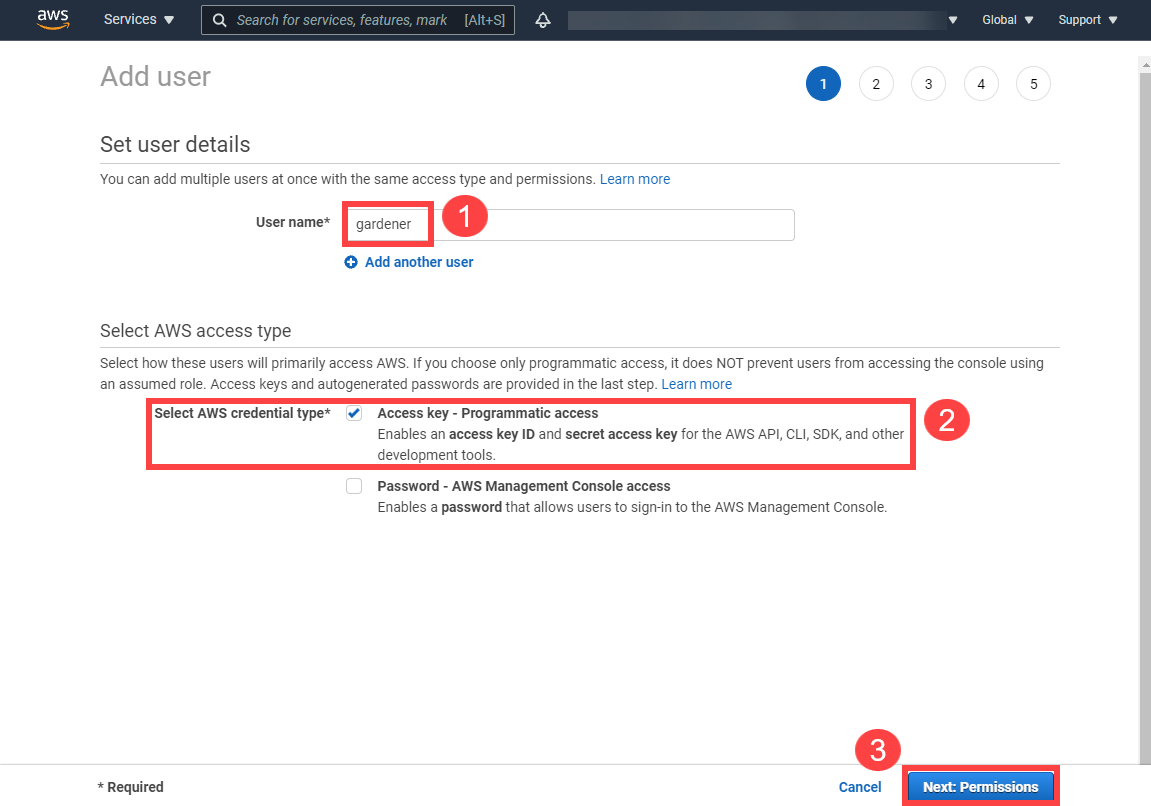
Type in a username and select the access key credential type.
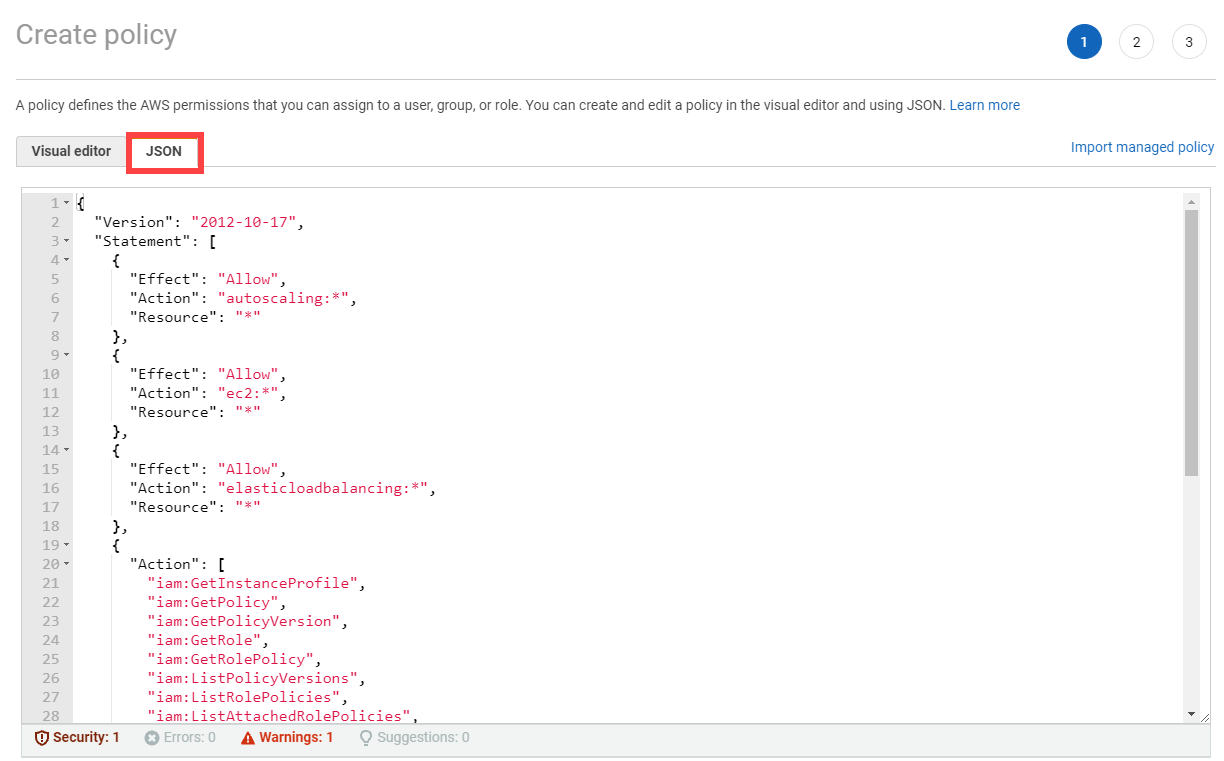
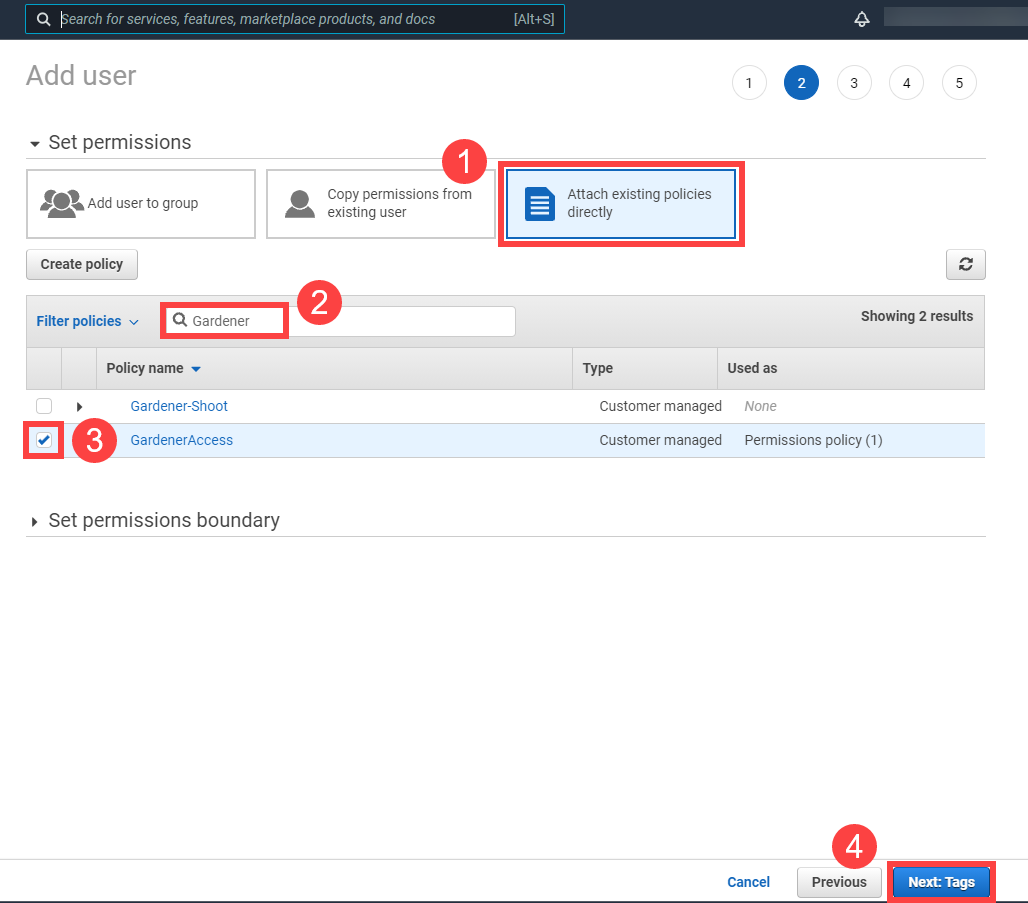
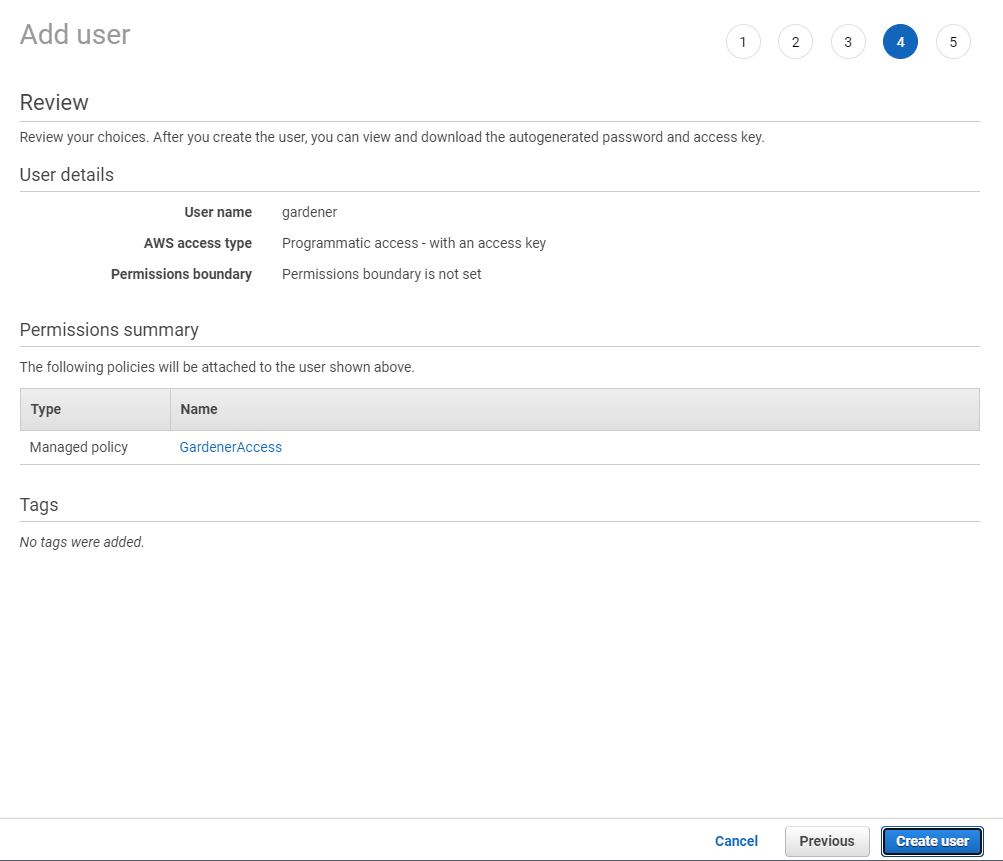
Choose Attach an existing policy.
Select GardenerAccess from the policy list.
Choose Next until you reach the Review section.
Note
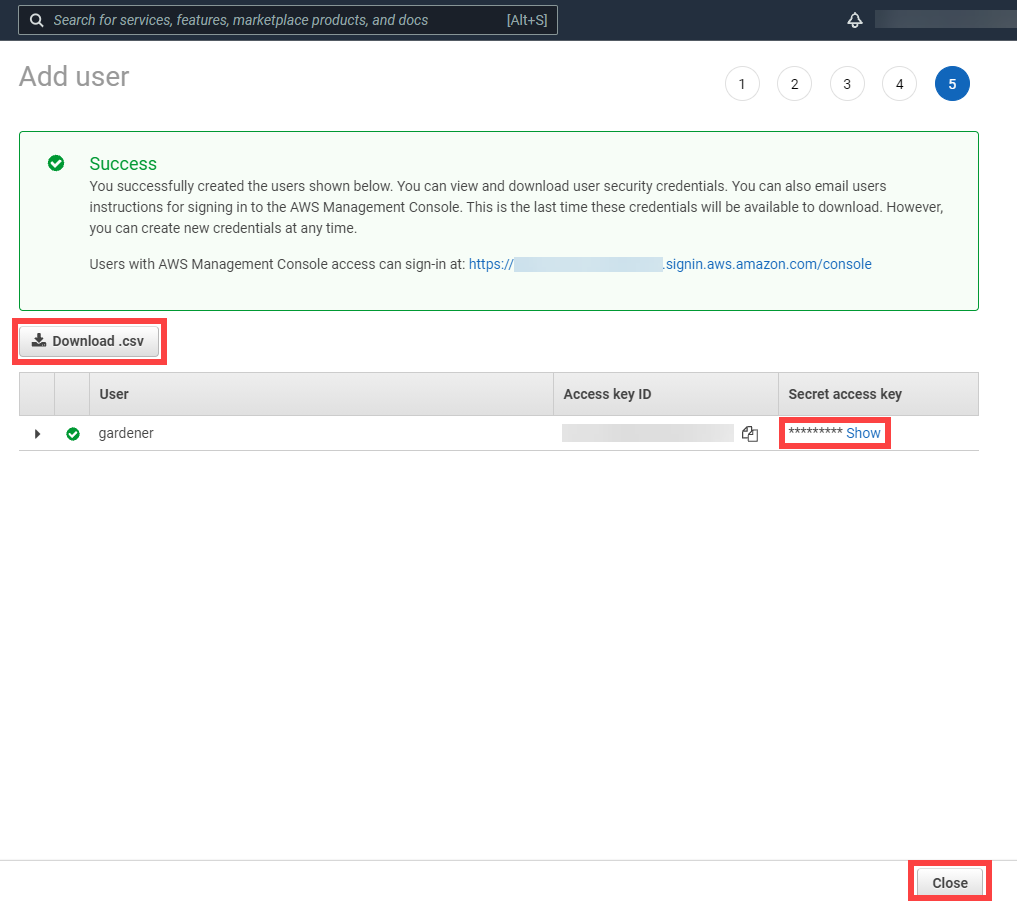
After the user is created, Access key ID and Secret access key are generated and displayed. Remember to save them. The Access key ID is used later to create secrets for Gardener.
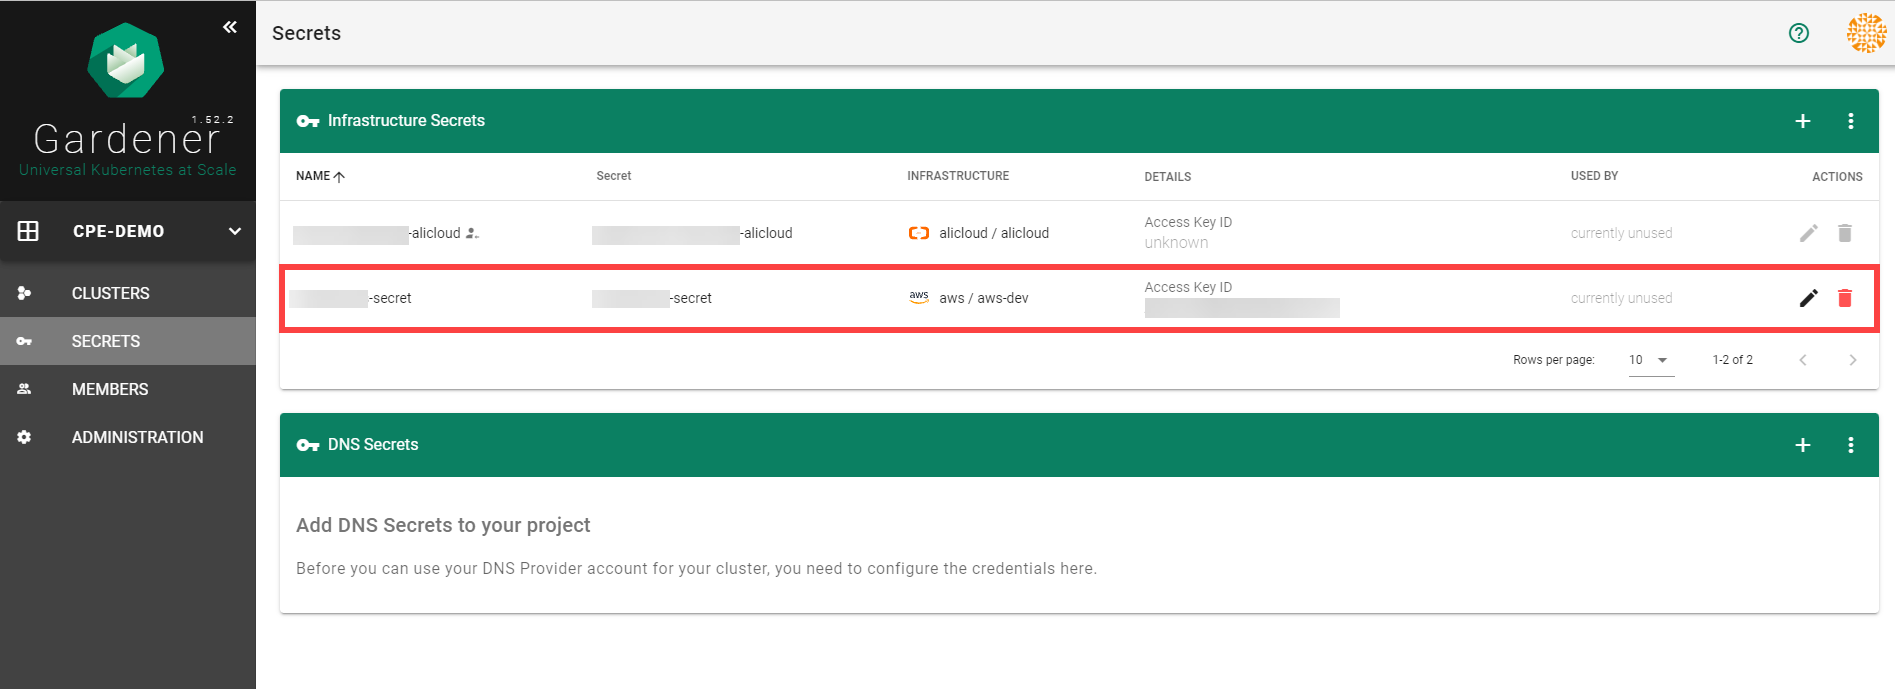
On the Gardener dashboard, choose Secrets and then the plus sign . Select AWS from the drop down menu to add a new AWS secret.
Create your secret.
Type the name of your secret.
Copy and paste the Access Key ID and Secret Access Key you saved when you created the technical user on AWS.
Choose Add secret.
After completing these steps, you should see your newly created secret in the Infrastructure Secrets section.
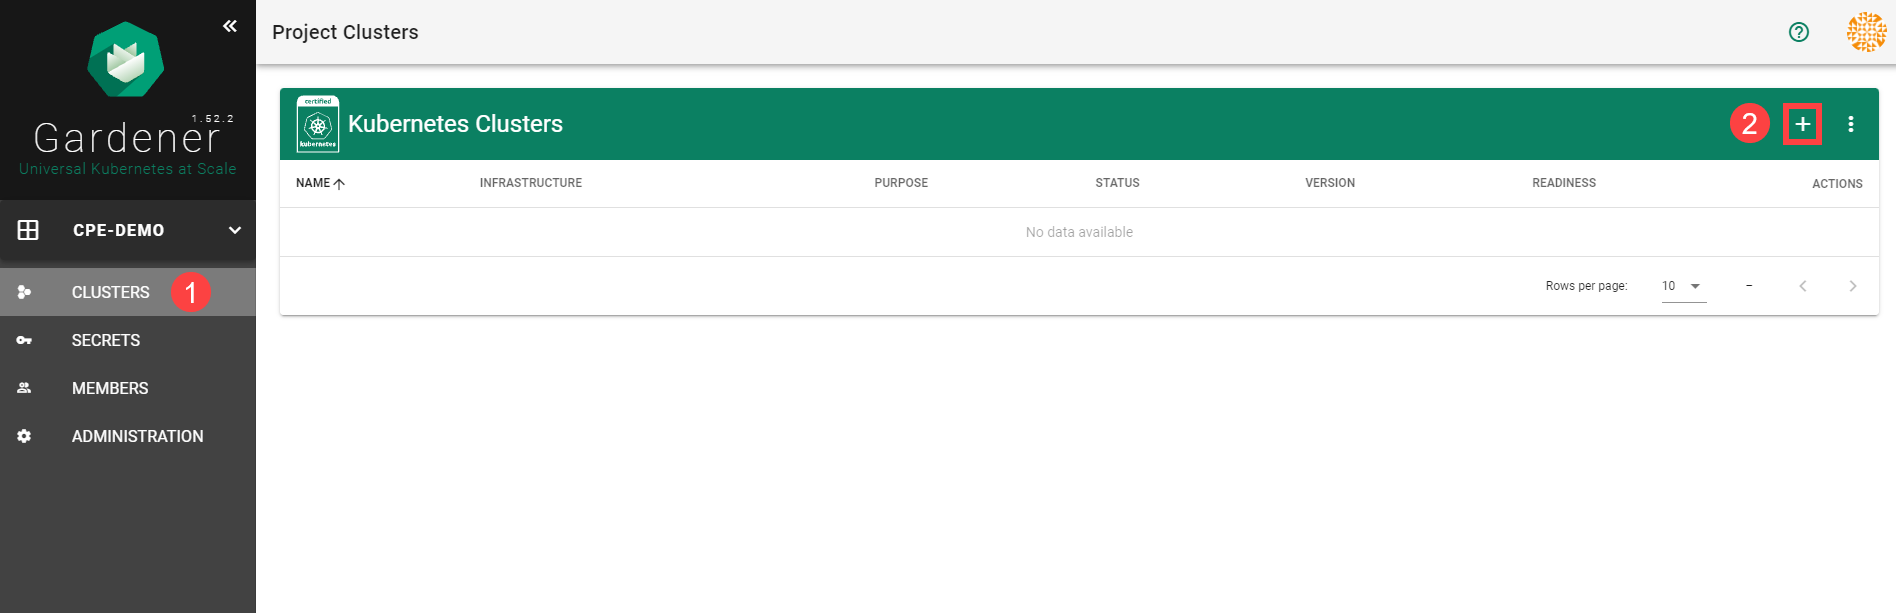
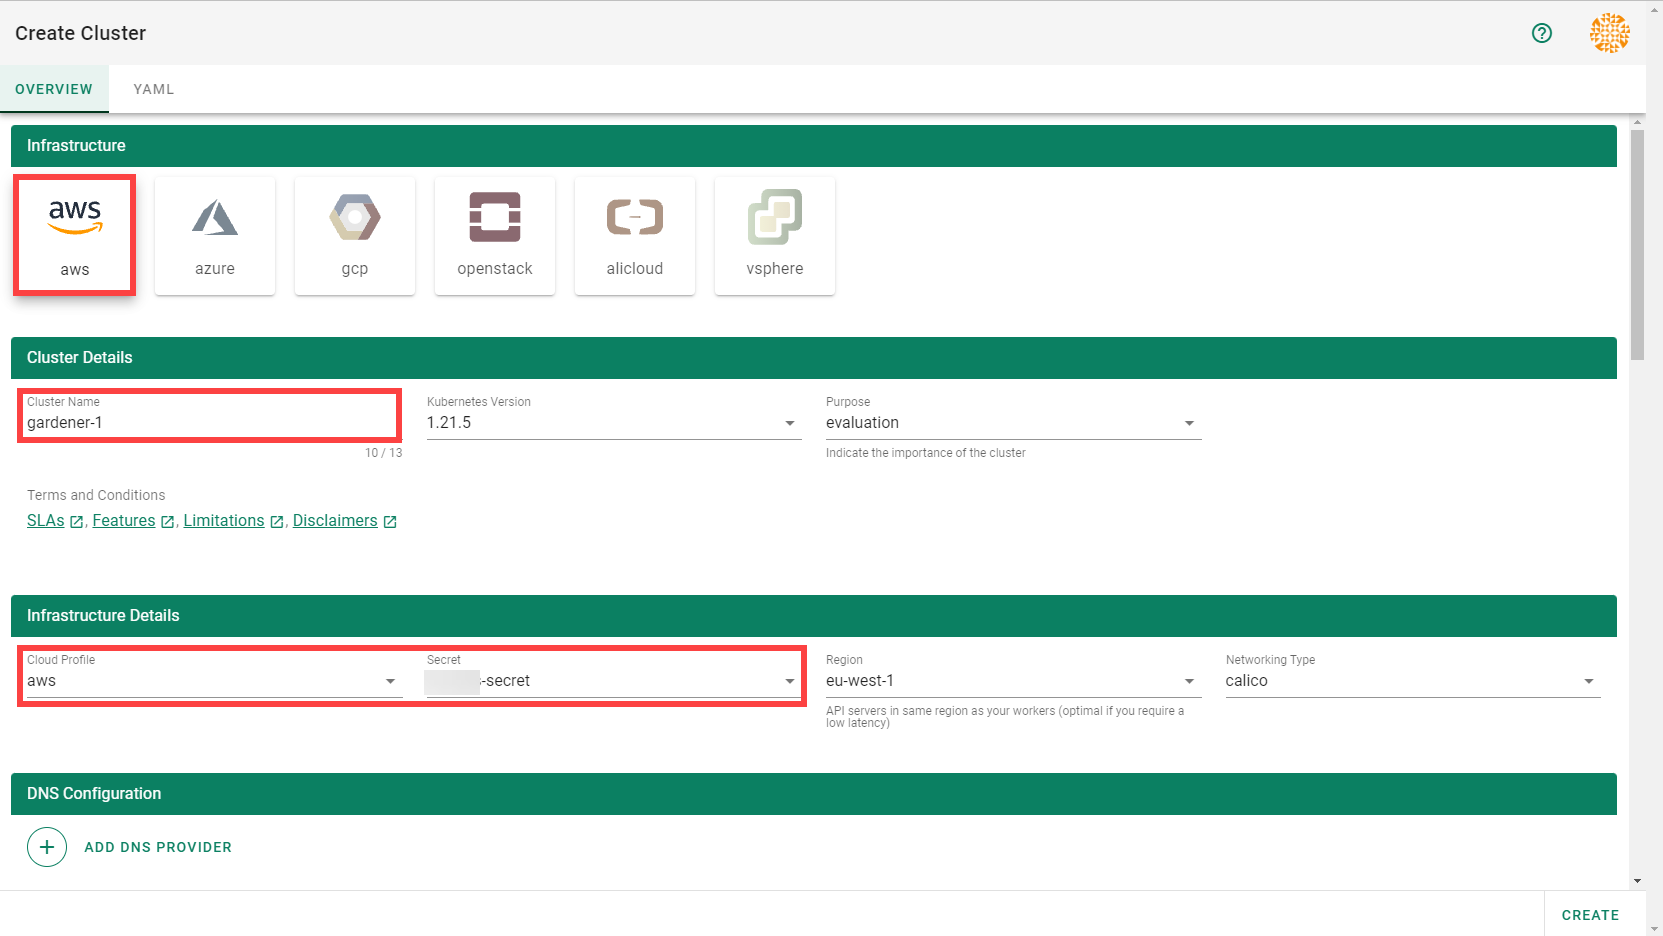
To create a new cluster, choose Clusters and then the plus sign in the upper right corner.
In the Create Cluster section:
Select AWS in the Infrastructure tab.
Type the name of your cluster in the Cluster Details tab.
Choose the secret you created before in the Infrastructure Details tab.
Choose Create.
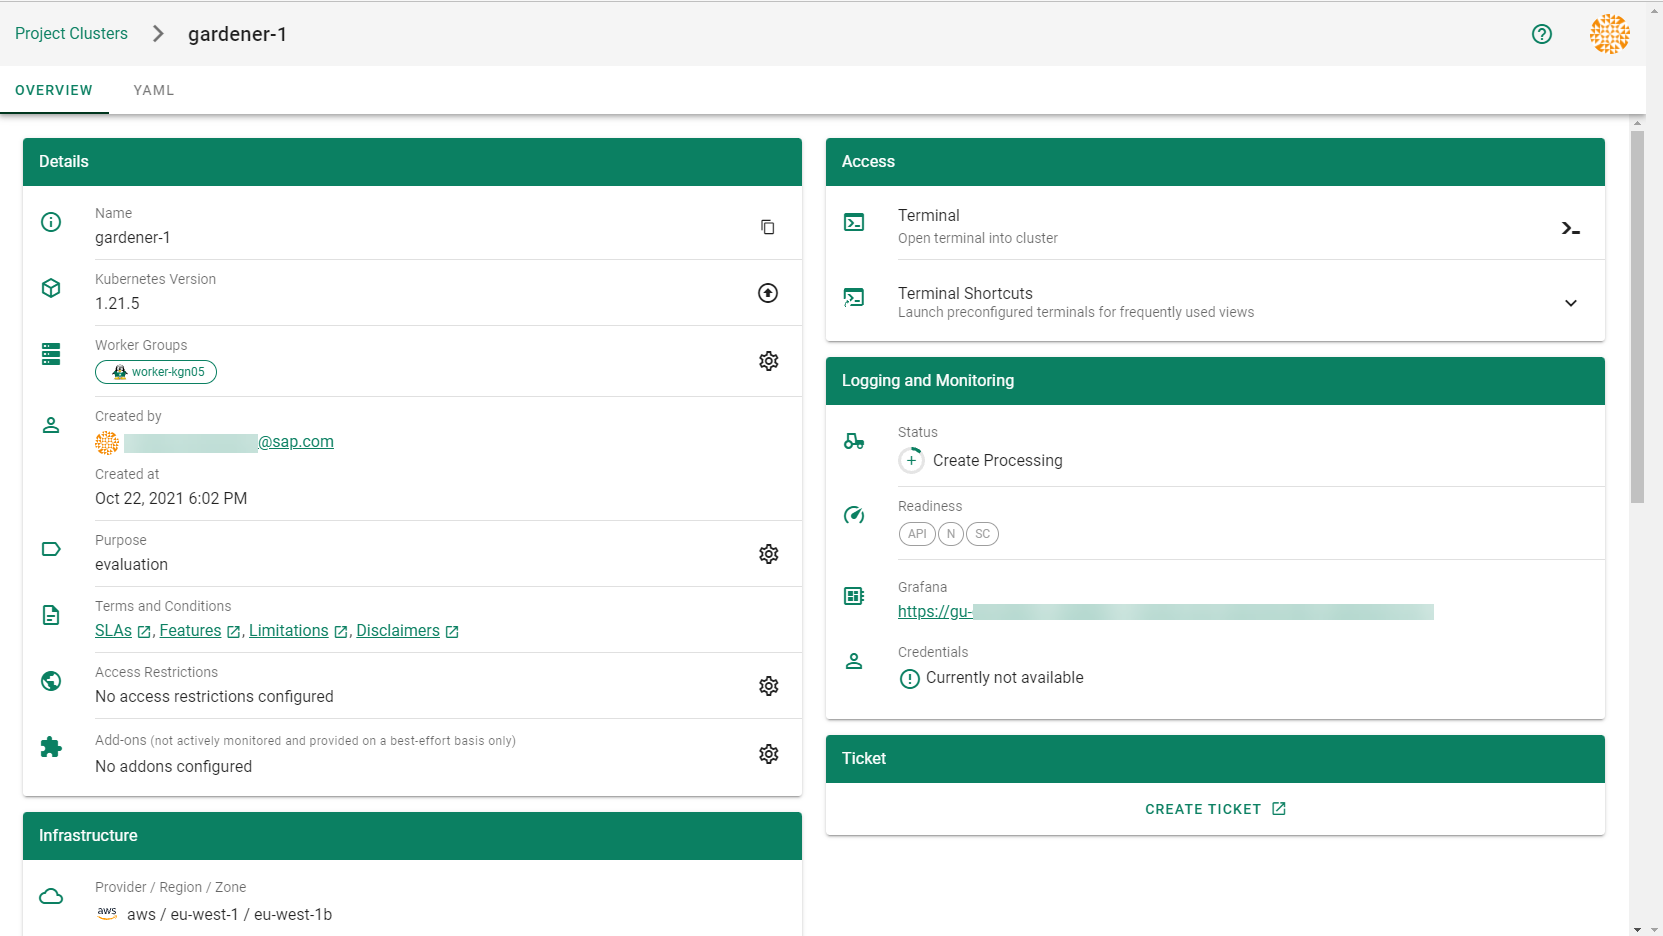
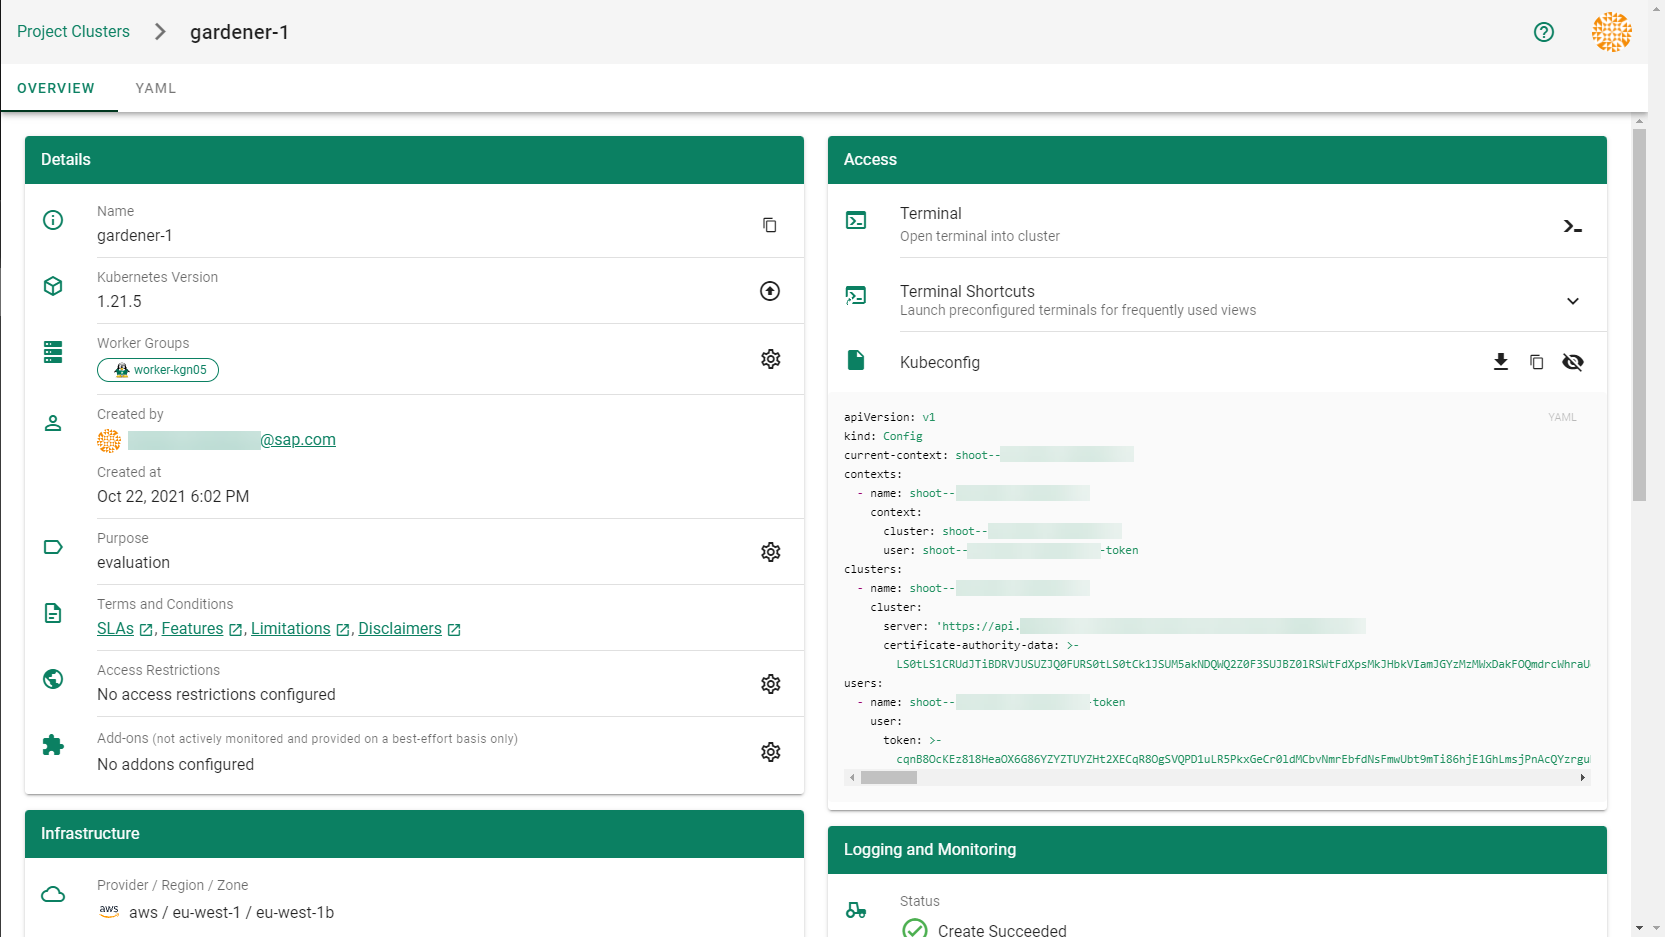
Wait for your cluster to get created.
Result
After completing the steps in this tutorial, you will be able to see and download the kubeconfig of your cluster.
2 - Deployment
Deployment of the AWS provider extension
Disclaimer: This document is NOT a step by step installation guide for the AWS provider extension and only contains some configuration specifics regarding the installation of different components via the helm charts residing in the AWS provider extension repository.
Virtual Garden is not used, i.e., the runtime Garden cluster is also the target Garden cluster.
Automounted Service Account Token
The easiest way to deploy the gardener-extension-admission-aws component will be to not provide kubeconfig at all. This way in-cluster configuration and an automounted service account token will be used. The drawback of this approach is that the automounted token will not be automatically rotated.
Service Account Token Volume Projection
Another solution will be to use Service Account Token Volume Projection combined with a kubeconfig referencing a token file (see example below).
This will allow for automatic rotation of the service account token by the kubelet. The configuration can be achieved by setting both .Values.global.serviceAccountTokenVolumeProjection.enabled: true and .Values.global.kubeconfig in the respective chart’s values.yaml file.
Virtual Garden is used, i.e., the runtime Garden cluster is different from the target Garden cluster.
Service Account
The easiest way to setup the authentication will be to create a service account and the respective roles will be bound to this service account in the target cluster. Then use the generated service account token and craft a kubeconfig which will be used by the workload in the runtime cluster. This approach does not provide a solution for the rotation of the service account token. However, this setup can be achieved by setting .Values.global.virtualGarden.enabled: true and following these steps:
Deploy the application part of the charts in the target cluster.
Get the service account token and craft the kubeconfig.
Set the crafted kubeconfig and deploy the runtime part of the charts in the runtime cluster.
Client Certificate
Another solution will be to bind the roles in the target cluster to a User subject instead of a service account and use a client certificate for authentication. This approach does not provide a solution for the client certificate rotation. However, this setup can be achieved by setting both .Values.global.virtualGarden.enabled: true and .Values.global.virtualGarden.user.name, then following these steps:
Generate a client certificate for the target cluster for the respective user.
Deploy the application part of the charts in the target cluster.
Craft a kubeconfig using the already generated client certificate.
Set the crafted kubeconfig and deploy the runtime part of the charts in the runtime cluster.
Projected Service Account Token
This approach requires an already deployed and configured oidc-webhook-authenticator for the target cluster. Also the runtime cluster should be registered as a trusted identity provider in the target cluster. Then projected service accounts tokens from the runtime cluster can be used to authenticate against the target cluster. The needed steps are as follows:
Set .Values.global.virtualGarden.enabled: true and .Values.global.virtualGarden.user.name. Note: username value will depend on the trust configuration, e.g., <prefix>:system:serviceaccount:<namespace>:<serviceaccount>
Set .Values.global.serviceAccountTokenVolumeProjection.enabled: true and .Values.global.serviceAccountTokenVolumeProjection.audience. Note: audience value will depend on the trust configuration, e.g., <cliend-id-from-trust-config>.
Craft a kubeconfig (see example below).
Deploy the application part of the charts in the target cluster.
Deploy the runtime part of the charts in the runtime cluster.
Using IPv4/IPv6 (dual-stack) Ingress in an IPv4 single-stack cluster
Motivation
IPv6 adoption is continuously growing, already overtaking IPv4 in certain regions, e.g. India, or scenarios, e.g. mobile.
Even though most IPv6 installations deploy means to reach IPv4, it might still be beneficial to expose services
natively via IPv4 and IPv6 instead of just relying on IPv4.
Disadvantages of full IPv4/IPv6 (dual-stack) Deployments
Enabling full IPv4/IPv6 (dual-stack) support in a kubernetes cluster is a major endeavor. It requires a lot of changes
and restarts of all pods so that all pods get addresses for both IP families. A side-effect of dual-stack networking
is that failures may be hidden as network traffic may take the other protocol to reach the target. For this reason and
also due to reduced operational complexity, service teams might lean towards staying in a single-stack environment as
much as possible. Luckily, this is possible with Gardener and IPv4/IPv6 (dual-stack) ingress on AWS.
Simplifying IPv4/IPv6 (dual-stack) Ingress with Protocol Translation on AWS
Fortunately, the network load balancer on AWS supports automatic protocol translation, i.e. it can expose both IPv4 and
IPv6 endpoints while communicating with just one protocol to the backends. Under the hood, automatic protocol translation
takes place. Client IP address preservation can be achieved by using proxy protocol.
This approach enables users to expose IPv4 workload to IPv6-only clients without having to change the workload/service.
Without requiring invasive changes, it allows a fairly simple first step into the IPv6 world for services just requiring
ingress (incoming) communication.
Necessary Shoot Cluster Configuration Changes for IPv4/IPv6 (dual-stack) Ingress
To be able to utilize IPv4/IPv6 (dual-stack) Ingress in an IPv4 shoot cluster, the cluster needs to meet two preconditions:
dualStack.enabled needs to be set to true to configure VPC/subnet for IPv6 and add a routing rule for IPv6.
(This does not add IPv6 addresses to kubernetes nodes.)
loadBalancerController.enabled needs to be set to true as well to use the load balancer controller, which supports
dual-stack ingress.
When infrastructureConfig.networks.vpc.id is set to the ID of an existing VPC, please make sure that your VPC has an Amazon-provided IPv6 CIDR block added.
After adapting the shoot specification and reconciling the cluster, dual-stack load balancers can be created using
kubernetes services objects.
Creating an IPv4/IPv6 (dual-stack) Ingress
With the preconditions set, creating an IPv4/IPv6 load balancer is as easy as annotating a service with the correct
annotations:
In case the client IP address should be preserved, the following annotation can be used to enable proxy protocol.
(The pod receiving the traffic needs to be configured for proxy protocol as well.)
Please note that changing an existing Service to dual-stack may cause the creation of a new load balancer without
deletion of the old AWS load balancer resource. While this helps in a seamless migration by not cutting existing
connections it may lead to wasted/forgotten resources. Therefore, the (manual) cleanup needs to be taken into account
when migrating an existing Service instance.
DNS Considerations to Prevent Downtime During a Dual-Stack Migration
In case the migration of an existing service is desired, please check if there are DNS entries directly linked to the
corresponding load balancer. The migrated load balancer will have a new domain name immediately, which will not be ready
in the beginning. Therefore, a direct migration of the domain name entries is not desired as it may cause a short
downtime, i.e. domain name entries without backing IP addresses.
If there are DNS entries directly linked to the corresponding load balancer and they are managed by the
shoot-dns-service, you can identify this via
annotations with the prefix dns.gardener.cloud/. Those annotations can be linked to a Service, Ingress or
Gateway resources. Alternatively, they may also use DNSEntry or DNSAnnotation resources.
For a seamless migration without downtime use the following three step approach:
Temporarily prevent direct DNS updates
Migrate the load balancer and wait until it is operational
Allow DNS updates again
To prevent direct updates of the DNS entries when the load balancer is migrated add the annotation
dns.gardener.cloud/ignore: 'true' to all affected resources next to the other dns.gardener.cloud/... annotations
before starting the migration. For example, in case of a Service ensure that the service looks like the following:
Next, migrate the load balancer to be dual-stack enabled by adding/changing the corresponding annotations.
You have multiple options how to check that the load balancer has been provisioned successfully. It might be useful
to peek into status.loadBalancer.ingress of the corresponding Service to identify the load balancer:
Check in the AWS console for the corresponding load balancer provisioning state
Perform domain name lookups with nslookup/dig to check whether the name resolves to an IP address.
Call your workload via the new load balancer, e.g. using
curl --resolve <my-domain-name>:<port>:<IP-address> https://<my-domain-name>:<port>, which allows you to call your
service with the “correct” domain name without using actual name resolution.
Wait a fixed period of time as load balancer creation is usually finished within 15 minutes
Once the load balancer has been provisioned, you can remove the annotation dns.gardener.cloud/ignore: 'true' again
from the affected resources. It may take some additional time until the domain name change finally propagates
(up to one hour).
4 - Ipv6
Support for IPv6
Overview
Gardener supports different levels of IPv6 support in shoot clusters.
This document describes the differences between them and what to consider when using them.
In IPv6 Ingress for IPv4 Shoot Clusters, the focus is on how an existing IPv4-only shoot cluster can provide dual-stack services to clients.
Section IPv6-only Shoot Clusters describes how to create a shoot cluster that only supports IPv6.
Finally, Dual-Stack Shoot Clusters explains how to create a shoot cluster that supports both IPv4 and IPv6.
IPv6 Ingress for IPv4 Shoot Clusters
Per default, Gardener shoot clusters use only IPv4.
Therefore, they also expose their services only via load balancers with IPv4 addresses.
To allow external clients to also use IPv6 to access services in an IPv4 shoot cluster, the cluster needs to be configured to support dual-stack ingress.
The main benefit of this approach is that the existing cluster stays almost as is without major changes, keeping the operational simplicity.
It works very well for services that only require incoming communication, e.g. pure web services.
The main drawback is that certain scenarios, especially related to IPv6 callbacks, are not possible.
This means that services, which actively call to their clients via web hooks, will not be able to do so over IPv6.
Hence, those services will not be able to allow full-usage via IPv6.
IPv6-only Shoot Clusters
Motivation
IPv6-only shoot clusters are the best option to verify that services are fully IPv6-compatible.
While Dual-Stack Shoot Clusters may fall back on using IPv4 transparently, IPv6-only shoot clusters enforce the usage of IPv6 inside the cluster.
Therefore, it is recommended to check with IPv6-only shoot clusters if a workload is fully IPv6-compatible.
In addition to being a good testbed for IPv6 compatibility, IPv6-only shoot clusters may also be a desirable eventual target in the IPv6 migration as they allow to support both IPv4 and IPv6 clients while having a single-stack with the cluster.
Creating an IPv6-only Shoot Cluster
To create an IPv6-only shoot cluster, the following needs to be specified in the Shoot resource (see also here):
Please note that nodes, pods and services should not be specified in .spec.networking resource.
In contrast to that, it is still required to specify IPv4 ranges for the VPC and the public/internal subnets.
This is mainly due to the fact that public/internal load balancers still require IPv4 addresses as there are no pure IPv6-only load balancers as of now.
The ranges can be sized according to the expected amount of load balancers per zone/type.
The IPv6 address ranges are provided by AWS. It is ensured that the IPv6 ranges are globally unique und internet routable.
Load Balancer Configuration
The AWS Load Balancer Controller is automatically deployed when using an IPv6-only shoot cluster.
When creating a load balancer, the corresponding annotations need to be configured, see AWS Load Balancer Documentation - Network Load Balancer for details.
The AWS Load Balancer Controller allows dual-stack ingress so that an IPv6-only shoot cluster can serve IPv4 and IPv6 clients.
You can find an example here.
Warning
When accessing Network Load Balancers (NLB) from within the same IPv6-only cluster, it is crucial to add the annotation service.beta.kubernetes.io/aws-load-balancer-target-group-attributes: preserve_client_ip.enabled=false.
Without this annotation, if a request is routed by the NLB to the same target instance from which it originated, the client IP and destination IP will be identical.
This situation, known as the hair-pinning effect, will prevent the request from being processed.
(This also happens for internal load balancers in IPv4 clusters, but is mitigated by the NAT gateway for external IPv4 load balancers.)
Connectivity to IPv4-only Services
The IPv6-only shoot cluster can connect to IPv4-only services via DNS64/NAT64.
The cluster is configured to use the DNS64/NAT64 service of the underlying cloud provider.
This allows the cluster to resolve IPv4-only DNS names and to connect to IPv4-only services.
Please note that traffic going through NAT64 incurs the same cost as ordinary NAT traffic in an IPv4-only cluster.
Therefore, it might be beneficial to prefer IPv6 for services, which provide IPv4 and IPv6.
Dual-Stack Shoot Clusters
Motivation
Dual-stack shoot clusters support IPv4 and IPv6 out-of-the-box.
They can be the intermediate step on the way towards IPv6 for any existing (IPv4-only) clusters.
Creating a Dual-Stack Shoot Cluster
To create a dual-stack shoot cluster, the following needs to be specified in the Shoot resource:
Please note that the only change compared to an IPv4-only shoot cluster is the addition of IPv6 to the .spec.networking.ipFamilies field.
The order of the IP families defines the preference of the IP family.
In this case, IPv4 is preferred over IPv6, e.g. services specifying no IP family will get only an IPv4 address.
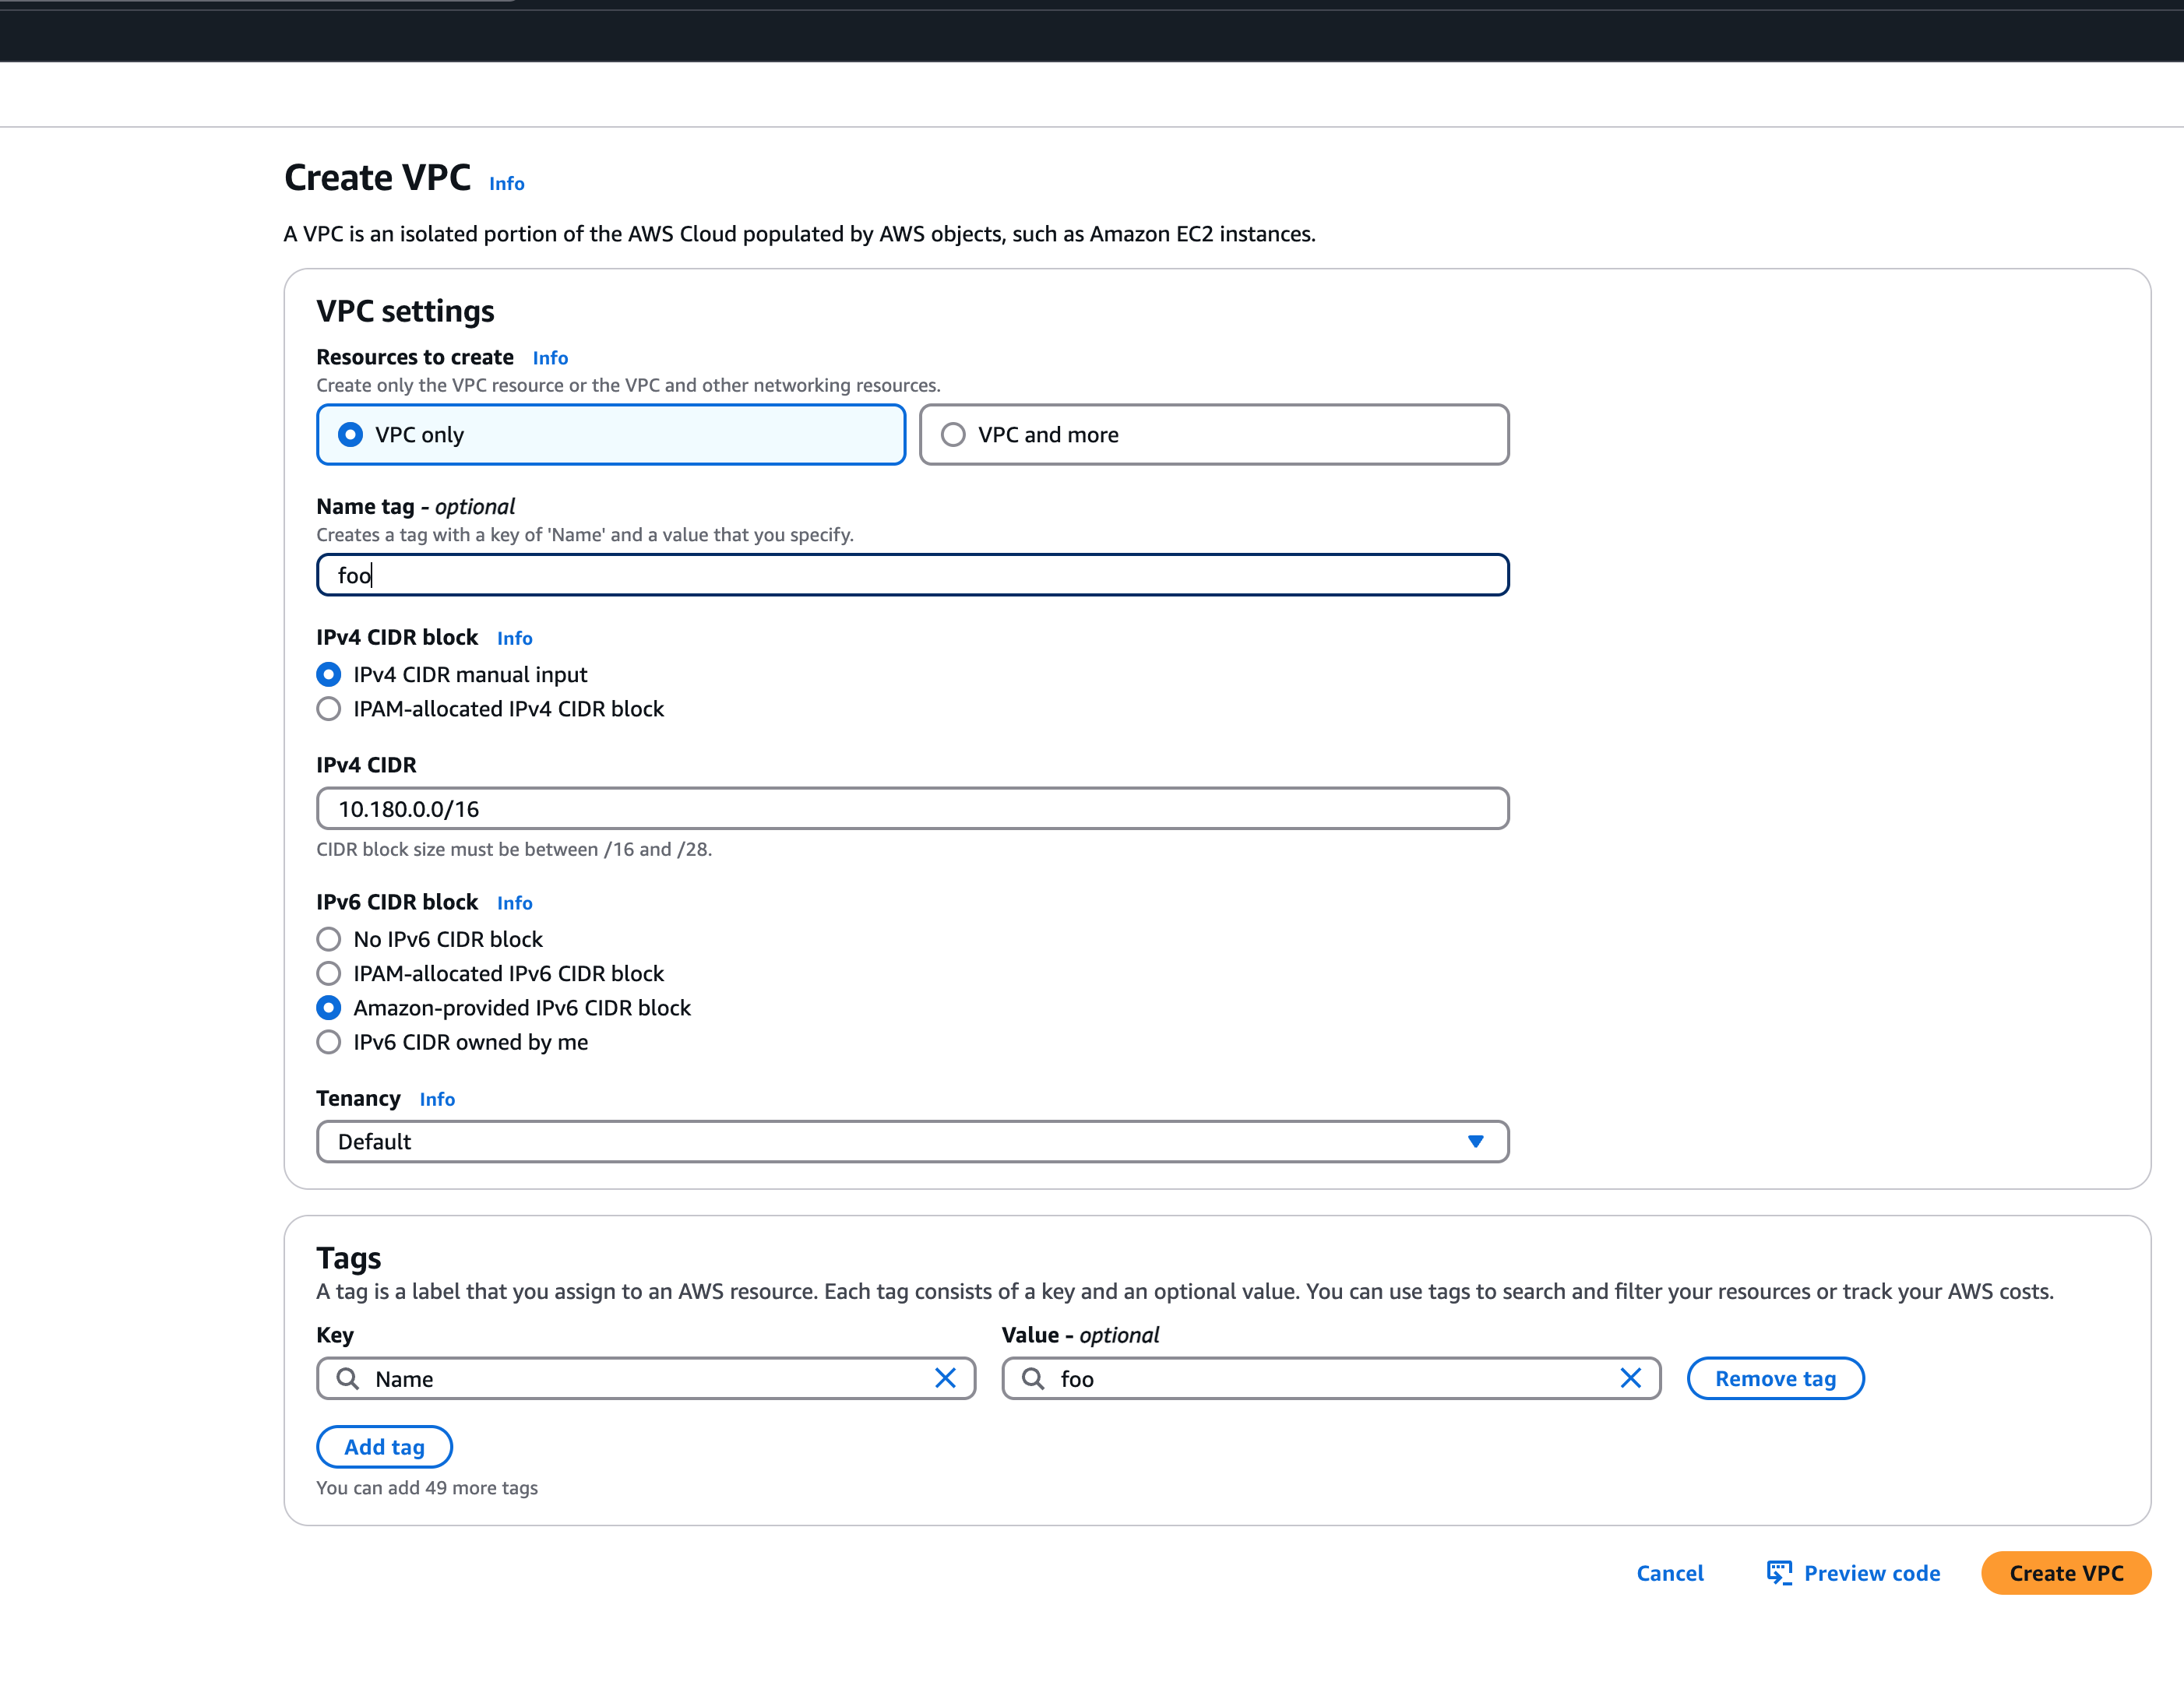
Bring your own VPC
To create an IPv6 shoot cluster or a dual-stack shoot within your own Virtual Private Cloud (VPC), it is necessary to have an Amazon-provided IPv6 CIDR block added to the VPC. This block can be assigned during the initial setup of the VPC, as illustrated in the accompanying screenshot.
An egress-only internet gateway is required for outbound internet traffic (IPv6) from the instances within your VPC. Please create one egress-only internet gateway and attach it to the VPC. Please also make sure that the VPC has an attached internet gateway and the following attributes set: enableDnsHostnames and enableDnsSupport as described under usage.
Migration of IPv4-only Shoot Clusters to Dual-Stack
To migrate an IPv4-only shoot cluster to Dual-Stack simply change the .spec.networking.ipFamilies field in the Shoot resource from IPv4 to IPv4, IPv6 as shown below.
You can find more information about the process and the steps required here.
Warning
Please note that the dual-stack migration requires the IPv4-only cluster to run in native routing mode, i.e. pod overlay network needs to be disabled.
The default quota of routes per route table in AWS is 50. This restricts the cluster size to about 50 nodes. Therefore, please adapt (if necessary) the routes per route table limit in the Amazon Virtual Private Cloud quotas accordingly before switching to native routing. The maximum setting is currently 1000.
Load Balancer Configuration
The AWS Load Balancer Controller is automatically deployed when using a dual-stack shoot cluster.
When creating a load balancer, the corresponding annotations need to be configured, see AWS Load Balancer Documentation - Network Load Balancer for details.
Warning
Please note that load balancer services without any special annotations will default to IPv4-only regardless how .spec.ipFamilies is set.
The AWS Load Balancer Controller allows dual-stack ingress so that a dual-stack shoot cluster can serve IPv4 and IPv6 clients.
You can find an example here.
Warning
When accessing external Network Load Balancers (NLB) from within the same cluster via IPv6 or internal NLBs via IPv4, it is crucial to add the annotation service.beta.kubernetes.io/aws-load-balancer-target-group-attributes: preserve_client_ip.enabled=false.
Without this annotation, if a request is routed by the NLB to the same target instance from which it originated, the client IP and destination IP will be identical.
This situation, known as the hair-pinning effect, will prevent the request from being processed.
5 - Local Setup
admission-aws
admission-aws is an admission webhook server which is responsible for the validation of the cloud provider (AWS in this case) specific fields and resources. The Gardener API server is cloud provider agnostic and it wouldn’t be able to perform similar validation.
Follow the steps below to run the admission webhook server locally.
Make sure that the KUBECONFIG environment variable is pointing to the local garden cluster.
make start-admission
Setup the ValidatingWebhookConfiguration.
hack/dev-setup-admission-aws.sh will configure the webhook Service which will allow the kube-apiserver of your local cluster to reach the webhook server. It will also apply the ValidatingWebhookConfiguration manifest.
./hack/dev-setup-admission-aws.sh
You are now ready to experiment with the admission-aws webhook server locally.
6 - Operations
Using the AWS provider extension with Gardener as operator
The core.gardener.cloud/v1beta1.CloudProfile resource declares a providerConfig field that is meant to contain provider-specific configuration.
Similarly, the core.gardener.cloud/v1beta1.Seed resource is structured.
Additionally, it allows to configure settings for the backups of the main etcds’ data of shoot clusters control planes running in this seed cluster.
This document explains what is necessary to configure for this provider extension.
CloudProfile resource
In this section we are describing how the configuration for CloudProfiles looks like for AWS and provide an example CloudProfile manifest with minimal configuration that you can use to allow creating AWS shoot clusters.
CloudProfileConfig
The cloud profile configuration contains information about the real machine image IDs in the AWS environment (AMIs).
You have to map every version that you specify in .spec.machineImages[].versions here such that the AWS extension knows the AMI for every version you want to offer.
For each AMI an architecture field can be specified which specifies the CPU architecture of the machine on which given machine image can be used.
An example CloudProfileConfig for the AWS extension looks as follows:
This provider extension does not support any provider configuration for the Seed’s .spec.provider.providerConfig field.
However, it supports to manage backup infrastructure, i.e., you can specify configuration for the .spec.backup field.
Backup configuration
Please find below an example Seed manifest (partly) that configures backups.
As you can see, the location/region where the backups will be stored can be different to the region where the seed cluster is running.
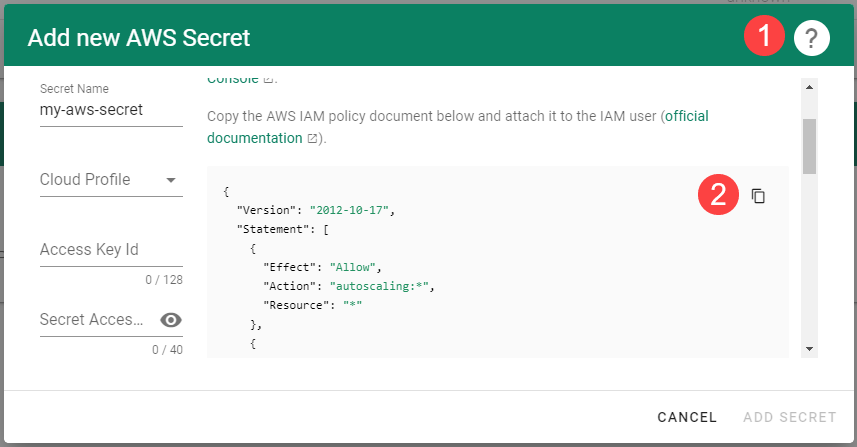
Please make sure that the provided credentials have the correct privileges. You can use the following AWS IAM policy document and attach it to the IAM user backed by the credentials you provided (please check the official AWS documentation as well):
Changes to the Shoot worker-pools are applied in-place where possible.
In case this is not possible a rolling update of the workers will be performed to apply the new configuration, as outlined in the Gardener documentation.
The exact fields that trigger this behavior are defined in the Gardener doc, with a few additions:
.spec.provider.workers[].providerConfig
.spec.provider.workers[].volume.encrypted
.spec.provider.workers[].dataVolumes[].size (only the affected worker pool)
.spec.provider.workers[].dataVolumes[].type (only the affected worker pool)
.spec.provider.workers[].dataVolumes[].encrypted (only the affected worker pool)
For now, if the feature gate NewWorkerPoolHashis enabled, the same fields are used.
This behavior might change once MCM supports in-place volume updates.
If updateStrategy is set to inPlace and NewWorkerPoolHashis enabled,
all the fields mentioned above except of the providerConifg are used.
If in-place-updates are enabled for a worker-pool, then updates to the fields that trigger rolling updates will be disallowed.
7 - Usage
Using the AWS provider extension with Gardener as an end-user
In this document we are describing how this configuration looks like for AWS and provide an example Shoot manifest with minimal configuration that you can use to create an AWS cluster (modulo the landscape-specific information like cloud profile names, secret binding names, etc.).
Accessing AWS APIs
In order for Gardener to create a Kubernetes cluster using AWS infrastructure components, a Shoot has to provide an authentication mechanism giving sufficient permissions to the desired AWS account.
Every shoot cluster references a SecretBinding or a CredentialsBinding.
Important
While SecretBindings can only reference Secrets, CredentialsBindings can also reference WorkloadIdentitys which provide an alternative authentication method.
WorkloadIdentitys do not directly contain credentials but are rather a representation of the workload that is going to access the user’s account.
If the user has configured OIDC Federation with Gardener’s Workload Identity Issuer then the AWS infrastructure components can access the user’s account without the need of preliminary exchange of credentials.
Important
The SecretBinding/CredentialsBinding is configurable in the Shoot cluster with the field secretBindingName/credentialsBindingName.
SecretBindings are considered legacy and will be deprecated in the future.
It is advised to use CredentialsBindings instead.
Provider Secret Data
Every shoot cluster references a SecretBinding or a CredentialsBinding which itself references a Secret, and this Secret contains the provider credentials of your AWS account.
This Secret must look as follows:
The AWS documentation explains the necessary steps to enable programmatic access, i.e. create access key ID and access key, for the user of your choice.
Warning
For security reasons, we recommend creating a dedicated user with programmatic access only.
Please avoid re-using a IAM user which has access to the AWS console (human user).
Depending on your AWS API usage it can be problematic to reuse the same AWS Account for different Shoot clusters in the same region due to rate limits.
Please consider spreading your Shoots over multiple AWS Accounts if you are hitting those limits.
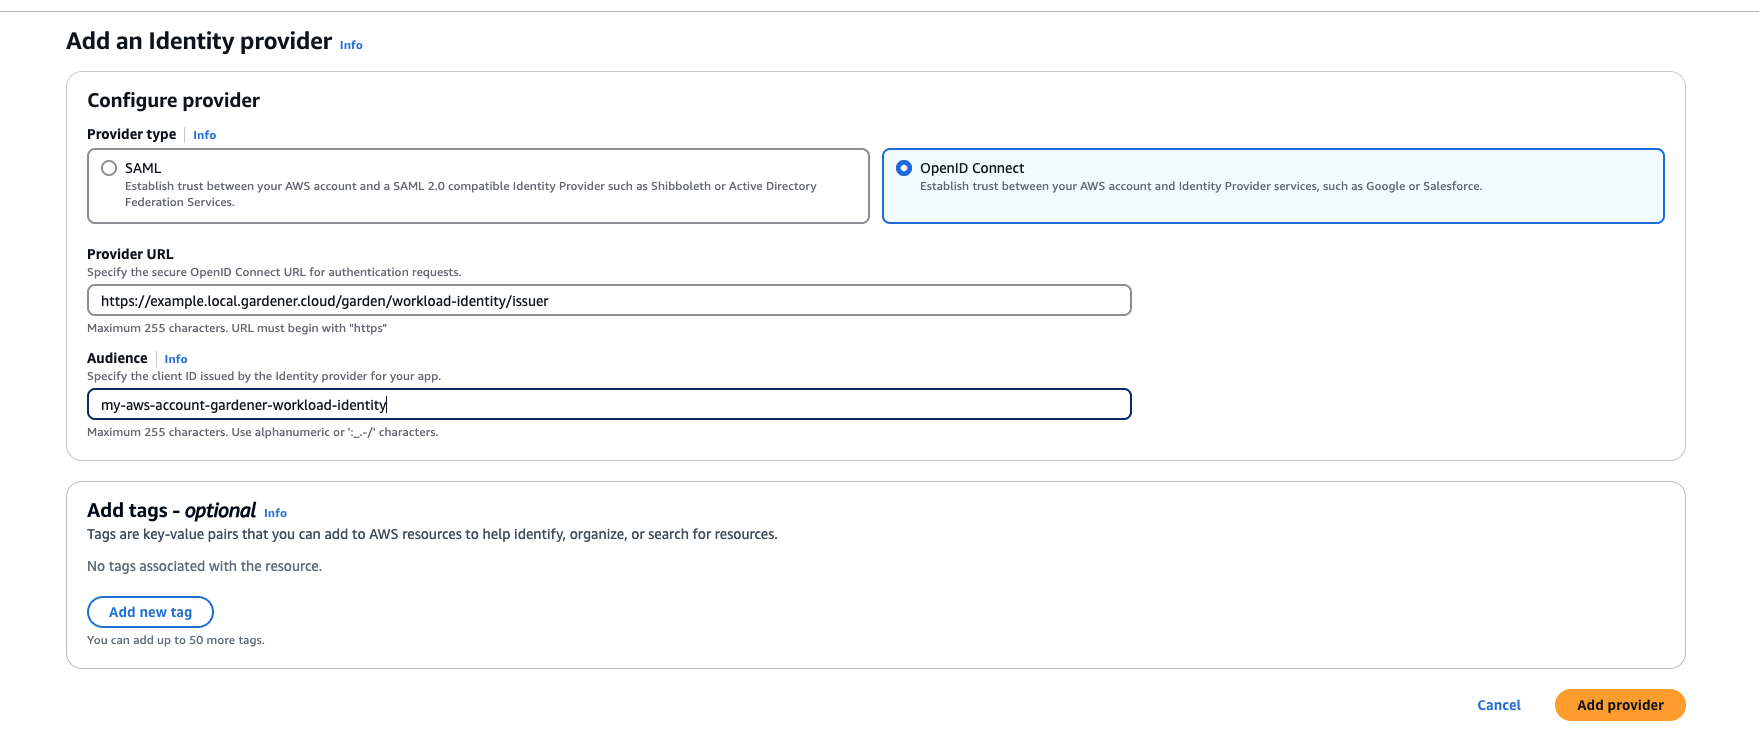
AWS Workload Identity Federation
Users can choose to trust Gardener’s Workload Identity Issuer and eliminate the need for providing AWS Access Key credentials.
1. Configure OIDC Federation with Gardener’s Workload Identity Issuer.
Tip
You can retrieve Gardener’s Workload Identity Issuer URL directly from the Garden cluster by reading the contents of the Gardener Info ConfigMap.
kubectl -n gardener-system-public get configmap gardener-info -o yaml
Important
Use an audience that will uniquely identify the trust relationship between your AWS account and Gardener.
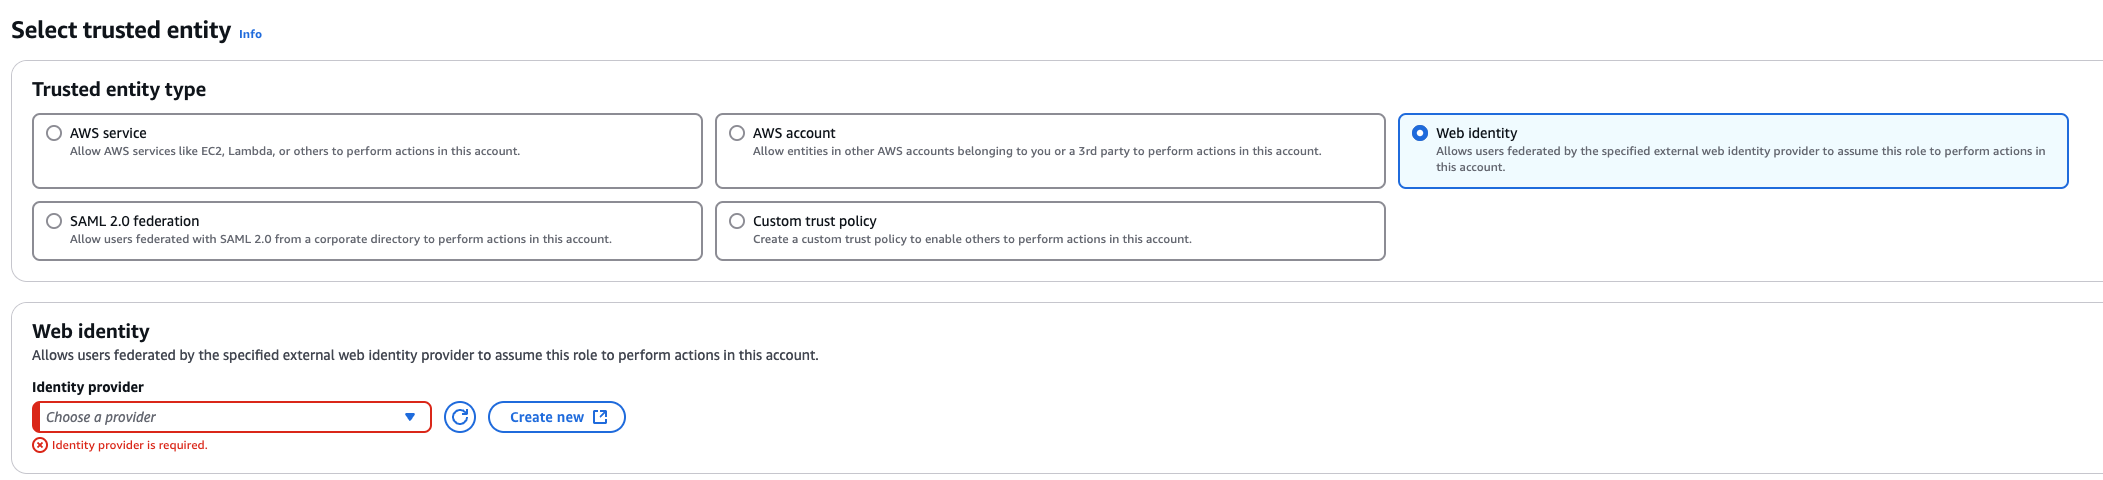
3. Create a role that trusts the external web identity.
In the Identity Provider dropdown menu choose the Gardener’s Workload Identity Provider.
Add the newly created policy that will grant the required permissions.
4. Configure the trust relationship.
Caution
Remember to reduce the scope of the identities that can assume this role only to your own controlled identities!
In the example shown below WorkloadIdentitys that are created in the garden-myproj namespace and have the name aws will be authenticated and granted permissions.
Later on, the scope of the trust configuration can be reduced further by replacing the wildcard “*” with the actual id of the WorkloadIdentity and converting the “StringLike” condition to “StringEquals”.
This is currently not possible since we do not have the id of the WorkloadIdentity yet.
5. Create the WorkloadIdentity in the Garden cluster.
This step will require the ARN of the role that was created in the previous step.
The identity will be used by infrastructure components to authenticate against AWS APIs.
A sample of such resource is shown below:
Once created you can extract the whole subject of the workload identity and edit the created Role’s trust relationship configuration to also include the workload identity’s id.
Obtain the complete sub by running the following:
SUBJECT=$(kubectl -n garden-myproj get workloadidentity aws -o=jsonpath='{.status.sub}')echo "$SUBJECT"
6. Create a CredentialsBinding referencing the AWS WorkloadIdentity and use it in your Shoot definitions.
Please make sure that the provided credentials have the correct privileges. You can use the following AWS IAM policy document and attach it to the IAM user backed by the credentials you provided (please check the official AWS documentation as well):
The infrastructure configuration mainly describes how the network layout looks like in order to create the shoot worker nodes in a later step, thus, prepares everything relevant to create VMs, load balancers, volumes, etc.
An example InfrastructureConfig for the AWS extension looks as follows:
The enableECRAccess flag specifies whether the AWS IAM role policy attached to all worker nodes of the cluster shall contain permissions to access the Elastic Container Registry of the respective AWS account.
If the flag is not provided it is defaulted to true.
Please note that if the iamInstanceProfile is set for a worker pool in the WorkerConfig (see below) then enableECRAccess does not have any effect.
It only applies for those worker pools whose iamInstanceProfile is not set.
Click to expand the default AWS IAM policy document used for the instance profiles!
The dualStack.enabled flag specifies whether dual-stack or IPv4-only should be supported by the infrastructure.
When the flag is set to true an Amazon provided IPv6 CIDR block will be attached to the VPC.
All subnets will receive a /64 block from it and a route entry is added to the main route table to route all IPv6 traffic over the IGW.
The networks.vpc section describes whether you want to create the shoot cluster in an already existing VPC or whether to create a new one:
If networks.vpc.id is given then you have to specify the VPC ID of the existing VPC that was created by other means (manually, other tooling, …).
Please make sure that the VPC has attached an internet gateway - the AWS controller won’t create one automatically for existing VPCs. To make sure the nodes are able to join and operate in your cluster properly, please make sure that your VPC has enabled DNS Support, explicitly the attributes enableDnsHostnames and enableDnsSupport must be set to true.
If networks.vpc.cidr is given then you have to specify the VPC CIDR of a new VPC that will be created during shoot creation.
You can freely choose a private CIDR range.
Either networks.vpc.id or networks.vpc.cidr must be present, but not both at the same time.
networks.vpc.gatewayEndpoints is optional. If specified then each item is used as service name in a corresponding Gateway VPC Endpoint.
The networks.zones section contains configuration for resources you want to create or use in availability zones.
For every zone, the AWS extension creates three subnets:
The workers subnet is used for all shoot worker nodes, i.e., VMs which later run your applications.
For every subnet, you have to specify a CIDR range contained in the VPC CIDR specified above, or the VPC CIDR of your already existing VPC.
You can freely choose these CIDRs and it is your responsibility to properly design the network layout to suit your needs.
Also, the AWS extension creates a dedicated NAT gateway for each zone.
By default, it also creates a corresponding Elastic IP that it attaches to this NAT gateway and which is used for egress traffic.
The elasticIPAllocationID field allows you to specify the ID of an existing Elastic IP allocation in case you want to bring your own.
If provided, no new Elastic IP will be created and, instead, the Elastic IP specified by you will be used.
Warning
If you change this field for an already existing infrastructure then it will disrupt egress traffic while AWS applies this change.
The reason is that the NAT gateway must be recreated with the new Elastic IP association.
Also, please note that the existing Elastic IP will be permanently deleted if it was earlier created by the AWS extension.
You can configure Gateway VPC Endpoints by adding items in the optional list networks.vpc.gatewayEndpoints. Each item in the list is used as a service name and a corresponding endpoint is created for it. All created endpoints point to the service within the cluster’s region. For example, consider this (partial) shoot config:
The service name of the S3 Gateway VPC Endpoint in this example is com.amazonaws.eu-central-1.s3.
If you want to use multiple availability zones then add a second, third, … entry to the networks.zones[] list and properly specify the AZ name in networks.zones[].name.
Apart from the VPC and the subnets the AWS extension will also create DHCP options and an internet gateway (only if a new VPC is created), routing tables, security groups, elastic IPs, NAT gateways, EC2 key pairs, IAM roles, and IAM instance profiles.
The ignoreTags section allows to configure which resource tags on AWS resources managed by Gardener should be ignored during
infrastructure reconciliation. By default, all tags that are added outside of Gardener’s
reconciliation will be removed during the next reconciliation. This field allows users and automation to add
custom tags on AWS resources created and managed by Gardener without loosing them on the next reconciliation.
Tags can be ignored either by specifying exact key values (ignoreTags.keys) or key prefixes (ignoreTags.keyPrefixes).
In both cases it is forbidden to ignore the Name tag or any tag starting with kubernetes.io or gardener.cloud.
Please note though, that the tags are only ignored on resources created on behalf of the Infrastructure CR (i.e. VPC,
subnets, security groups, keypair, etc.), while tags on machines, volumes, etc. are not in the scope of this controller.
ControlPlaneConfig
The control plane configuration mainly contains values for the AWS-specific control plane components.
Today, the only component deployed by the AWS extension is the cloud-controller-manager.
An example ControlPlaneConfig for the AWS extension looks as follows:
The cloudControllerManager.featureGates contains a map of explicitly enabled or disabled feature gates.
For production usage it’s not recommend to use this field at all as you can enable alpha features or disable beta/stable features, potentially impacting the cluster stability.
If you don’t want to configure anything for the cloudControllerManager simply omit the key in the YAML specification.
The cloudControllerManager.useCustomRouteController controls if the custom routes controller should be enabled.
If enabled, it will add routes to the pod CIDRs for all nodes in the route tables for all zones.
The storage.managedDefaultClass controls if the default storage / volume snapshot classes are marked as default by Gardener. Set it to false to mark another storage / volume snapshot class as default without Gardener overwriting this change. If unset, this field defaults to true.
If the AWS Load Balancer Controller should be deployed, set loadBalancerController.enabled to true.
In this case, it is assumed that an IngressClass named alb is created by the user.
You can overwrite the name by setting loadBalancerController.ingressClassName.
Please note, that currently only the “instance” mode is supported.
Examples for Ingress and Service managed by the AWS Load Balancer Controller:
apiVersion: networking.k8s.io/v1
kind: IngressClass
metadata:
name: alb # default name if not specified by `loadBalancerController.ingressClassName`spec:
controller: ingress.k8s.aws/alb
This can be used to create a Network Load Balancer (NLB).
apiVersion: v1
kind: Service
metadata:
  annotations:
    # complete set of annotations: https://kubernetes-sigs.github.io/aws-load-balancer-controller/latest/guide/service/annotations/
    service.beta.kubernetes.io/aws-load-balancer-nlb-target-type: instance # target-type "ip" NOT supported in Gardener
    service.beta.kubernetes.io/aws-load-balancer-scheme: internet-facing
  name: ingress-nginx-controller
  namespace: ingress-nginx
  ...
spec:
  ...
  type: LoadBalancer
  loadBalancerClass: service.k8s.aws/nlb # mandatory to be managed by AWS Load Balancer Controller (otherwise the Cloud Controller Manager will act on it)
When using Network Load Balancers (NLB) as internal load balancers, it is crucial to add the annotation service.beta.kubernetes.io/aws-load-balancer-target-group-attributes: preserve_client_ip.enabled=false.
Without this annotation, if a request is routed by the NLB to the same target instance from which it originated, the client IP and destination IP will be identical.
This situation, known as the hairpinning effect, will prevent the request from being processed.
WorkerConfig
The AWS extension supports encryption for volumes plus support for additional data volumes per machine.
For each data volume, you have to specify a name.
By default, (if not stated otherwise), all the disks (root & data volumes) are encrypted.
Please make sure that your instance-type supports encryption.
If your instance-type doesn’t support encryption, you will have to disable encryption (which is enabled by default) by setting volume.encrpyted to false (refer below shown YAML snippet).
The following YAML is a snippet of a Shoot resource:
Additionally, it is possible to provide further AWS-specific values for configuring the worker pools. The additional configuration must be specified in the providerConfig field of the respective worker.
The configuration will be evaluated when the provider-aws will reconcile the worker pools for the respective shoot.
An example WorkerConfig for the AWS extension looks as follows:
spec:
  provider:
    workers:
      - name: cpu-worker
        ...
        providerConfig:
            apiVersion: aws.provider.extensions.gardener.cloud/v1alpha1
            kind: WorkerConfig
            volume:
              iops: 10000
              throughput: 200
            dataVolumes:
            - name: kubelet-dir
              iops: 12345
              throughput: 150
              snapshotID: snap-1234
            iamInstanceProfile: # (specify either ARN or name)
              name: my-profile
            instanceMetadataOptions:
              httpTokens: required
              httpPutResponseHopLimit: 2
            # arn: my-instance-profile-arn
            nodeTemplate: # (to be specified only if the node capacity would be different from cloudprofile info during runtime)
              capacity:
                cpu: 2 # inherited from pool's machine type if un-specified
                gpu: 0 # inherited from pool's machine type if un-specified
                memory: 50Gi # inherited from pool's machine type if un-specified
                ephemeral-storage: 10Gi # override to specify explicit ephemeral-storage for scale fro zero
                resource.com/dongle: 4 # Example of a custom, extended resource.
The .volume.iops is the number of I/O operations per second (IOPS) that the volume supports.
For io1 and gp3 volume type, this represents the number of IOPS that are provisioned for the volume.
For gp2 volume type, this represents the baseline performance of the volume and the rate at which the volume accumulates I/O credits for bursting. For more information about General Purpose SSD baseline performance, I/O credits, IOPS range and bursting, see Amazon EBS Volume Types (http://docs.aws.amazon.com/AWSEC2/latest/UserGuide/EBSVolumeTypes.html) in the Amazon Elastic Compute Cloud User Guide. Constraint: IOPS should be a positive value. Validation of IOPS (i.e. whether it is allowed and is in the specified range for a particular volume type) is done on aws side.
The volume.throughput is the throughput that the volume supports, in MiB/s. As of 16th Aug 2022, this parameter is valid only for gp3 volume types and will return an error from the provider side if specified for other volume types. Its current range of throughput is from 125MiB/s to 1000 MiB/s. To know more about throughput and its range, see the official AWS documentation here.
The .dataVolumes can optionally contain configurations for the data volumes stated in the Shoot specification in the .spec.provider.workers[].dataVolumes list.
The .name must match to the name of the data volume in the shoot.
It is also possible to provide a snapshot ID. It allows to restore the data volume from an existing snapshot.
The iamInstanceProfile section allows to specify the IAM instance profile name xor ARN that should be used for this worker pool.
If not specified, a dedicated IAM instance profile created by the infrastructure controller is used (see above).
The instanceMetadataOptions controls access to the instance metadata service (IMDS) for members of the worker. You can do the following operations:
access IMDSv1 (default)
access IMDSv2 - httpPutResponseHopLimit >= 2
access IMDSv2 only (restrict access to IMDSv1) - httpPutResponseHopLimit >=2, httpTokens = "required"
disable access to IMDS - httpTokens = "required"
Note
The accessibility of IMDS discussed in the previous point is referenced from the point of view of containers NOT running in the host network.
By default on host network IMDSv2 is already enabled (but not accessible from inside the pods).
It is currently not possible to create a VM with complete restriction to the IMDS service.
It is however possible to restrict access from inside the pods by setting httpTokens to required and not setting httpPutResponseHopLimit (or setting it to 1).
You can find more information regarding the options in the AWS documentation.
cpuOptions grants more finegrained control over the worker’s CPU configuration. It has two attributes:
coreCount: Specify a custom amount of cores the instance should be configured with.
threadsPerCore: How many threads should there be on each core. Set to 1 to disable multi-threading.
Note that if you decide to configure cpuOptionsboth these values need to be provided. For a list of valid combinations of these values refer to the AWS documentation.
Example Shoot manifest (one availability zone)
Please find below an example Shoot manifest for one availability zone:
Every AWS shoot cluster will be deployed with the AWS EBS CSI driver.
It is compatible with the legacy in-tree volume provisioner that was deprecated by the Kubernetes community and will be removed in future versions of Kubernetes.
End-users might want to update their custom StorageClasses to the new ebs.csi.aws.com provisioner.
CSI drivers usually have a different procedure for configuring this custom limit.
By default, the EBS CSI driver parses the machine type name and then decides the volume limit.
However, this is only a rough approximation and not good enough in most cases.
Specifying the volume attach limit via command line flag (--volume-attach-limit) is currently the alternative until a more sophisticated solution presents itself (dynamically discovering the maximum number of attachable volume per EC2 machine type, see also https://github.com/kubernetes-sigs/aws-ebs-csi-driver/issues/347).
The AWS extension allows the --volume-attach-limit flag of the EBS CSI driver to be configurable via aws.provider.extensions.gardener.cloud/volume-attach-limit annotation on the Shoot resource.
ℹ️ Please note: If the annotation is added to an existing Shoot, then reconciliation needs to be triggered manually (see Immediate reconciliation), as adding an annotation to a resource is not a change that leads to an increase of .metadata.generation in general.
Other CSI options
The newer versions of EBS CSI driver are not readily compatible with the use of XFS volumes on nodes using a kernel version <= 5.4.
A workaround was added that enables the use of a “legacy XFS” mode that introduces a backwards compatible volume formating for the older kernels.
You can enable this option for your shoot by annotating it with aws.provider.extensions.gardener.cloud/legacy-xfs=true.
ℹ️ Please note: If the annotation is added to an existing Shoot, then reconciliation needs to be triggered manually (see Immediate reconciliation), as adding an annotation to a resource is not a change that leads to an increase of .metadata.generation in general.
Support for VolumeAttributesClasses (Beta in k8s 1.31)
To have the CSI-driver configured to support the necessary features for VolumeAttributesClasses on AWS for shoots with a k8s-version of at least 1.31, use the aws.provider.extensions.gardener.cloud/enable-volume-attributes-class annotation on the shoot. Keep in mind to also enable the required feature flags and runtime-config on the common kubernetes controllers (as outlined in the link above) in the shoot-spec.
For more information and examples, see this markdown in the aws-ebs-csi-driver repository. Please take special note of the considerations mentioned.
Kubernetes Versions per Worker Pool
This extension supports gardener/gardener’s WorkerPoolKubernetesVersion feature gate, i.e., having worker pools with overridden Kubernetes versions since gardener-extension-provider-aws@v1.34.
Shoot CA Certificate and ServiceAccount Signing Key Rotation
This extension supports gardener/gardener’s ShootCARotation and ShootSARotation feature gates since gardener-extension-provider-aws@v1.36.
Flow Infrastructure Reconciler
The extension offers two different reconciler implementations for the infrastructure resource:
terraform-based
native Go SDK based (dubbed the “flow”-based implementation)
The default implementation currently is the terraform reconciler which uses the https://github.com/gardener/terraformer as the backend for managing the shoot’s infrastructure.
The “flow” implementation is a newer implementation that is trying to solve issues we faced with managing terraform infrastructure on Kubernetes. The goal is to have more control over the reconciliation process and be able to perform fine-grained tuning over it. The implementation is completely backwards-compatible and offers a migration route from the legacy terraformer implementation.
For most users there will be no noticeable difference. However for certain use-cases, users may notice a slight deviation from the previous behavior. For example, with flow-based infrastructure users may be able to perform certain modifications to infrastructure resources without having them reconciled back by terraform. Operations that would degrade the shoot infrastructure are still expected to be reverted back.
For the time-being, to take advantage of the flow reconciler users have to “opt-in” by annotating the shoot manifest with: aws.provider.extensions.gardener.cloud/use-flow="true". For existing shoots with this annotation, the migration will take place on the next infrastructure reconciliation (on maintenance window or if other infrastructure changes are requested). The migration is not revertible.
BackupBucket
Gardener manages etcd's backups for Shoot clusters using provider specific storage solutions. On AWS, this storage is implemented through AWS S3, which store the backups/snapshots of the etcd's cluster data.
The BackupBucket resource abstracts the backup infrastructure, enabling Gardener and its extension controllers to manage it seamlessly. This abstraction allows Gardener to create, delete, and maintain backup buckets across various cloud providers in a standardized manner.
The BackupBucket resource includes a spec field, which defines the configuration details for the backup bucket. These details include:
A region is reference to a region where the bucket should be created.
A secretRef is reference to the secret containing credentials for accessing the cloud provider.
A type field defines the storage provider type like aws, azure etc.
A providerConfig field defines provider specific configurations.
BackupBucketConfig
The BackupBucketConfig describes the configuration that needs to be passed over for creation of the backup bucket infrastructure. Configuration for immutability feature a.k.a object lock in S3 that can be set on the bucket are specified in BackupBucketConfig.
Immutability feature (WORM, i.e. write-once-read-many model) ensures that once backups is written to the bucket, it will prevent locked object versions from being permanently deleted, hence it cannot be modified or deleted for a specified period. This feature is crucial for protecting backups from accidental or malicious deletion, ensuring data safety and availability for restoration.
Note
With enabling S3 object lock, S3 versioning will also get enabled.
The Gardener extension provider for AWS supports creating bucket (and enabling already existing buckets if immutability configured) to use object lock feature provided by storage provider AWS S3.
Here is an example configuration for BackupBucketConfig:
retentionType: Specifies the type of retention policy. Currently, S3 supports object lock on bucket level as well as on object level. The allowed value is bucket, which applies the retention policy and retention period to the entire bucket. For more details, refer to the documentation. Objects in the bucket will inherit the retention period which is set on the bucket. Please refer here to see working of backups/snapshots with immutable feature.
retentionPeriod: Defines the duration for which object version in the bucket will remain immutable. AWS S3 only supports immutability durations in days or years, therefore this field must be set as multiple of 24h.
mode: Defines the mode for object locked enabled S3 bucket, S3 provides two retention modes that apply different levels of protection to objects:
Governance mode: Users with special permissions can overwrite, delete or alter object versions during retention period.
Compliance mode: No users(including root user) can overwrite, delete or alter object versions during retention period.
To configure a BackupBucket with immutability feature, include the BackupBucketConfig in the .spec.providerConfig of the BackupBucket resource.
Here is an example of configuring a BackupBucket S3 object lock with retentionPeriod set to 24h i.e 1 Day and with mode Compliance.
Once S3 Object Lock is enabled, it cannot be disabled, nor can S3 versioning. However, you can remove the default retention settings by removing the BackupBucketConfig from .spec.providerConfig.


 An egress-only internet gateway is required for outbound internet traffic (IPv6) from the instances within your VPC. Please create one egress-only internet gateway and attach it to the VPC. Please also make sure that the VPC has an attached internet gateway and the following attributes set: