Deploying Gardener Locally
This document will walk you through deploying Gardener on your local machine. If you encounter difficulties, please open an issue so that we can make this process easier.
Overview
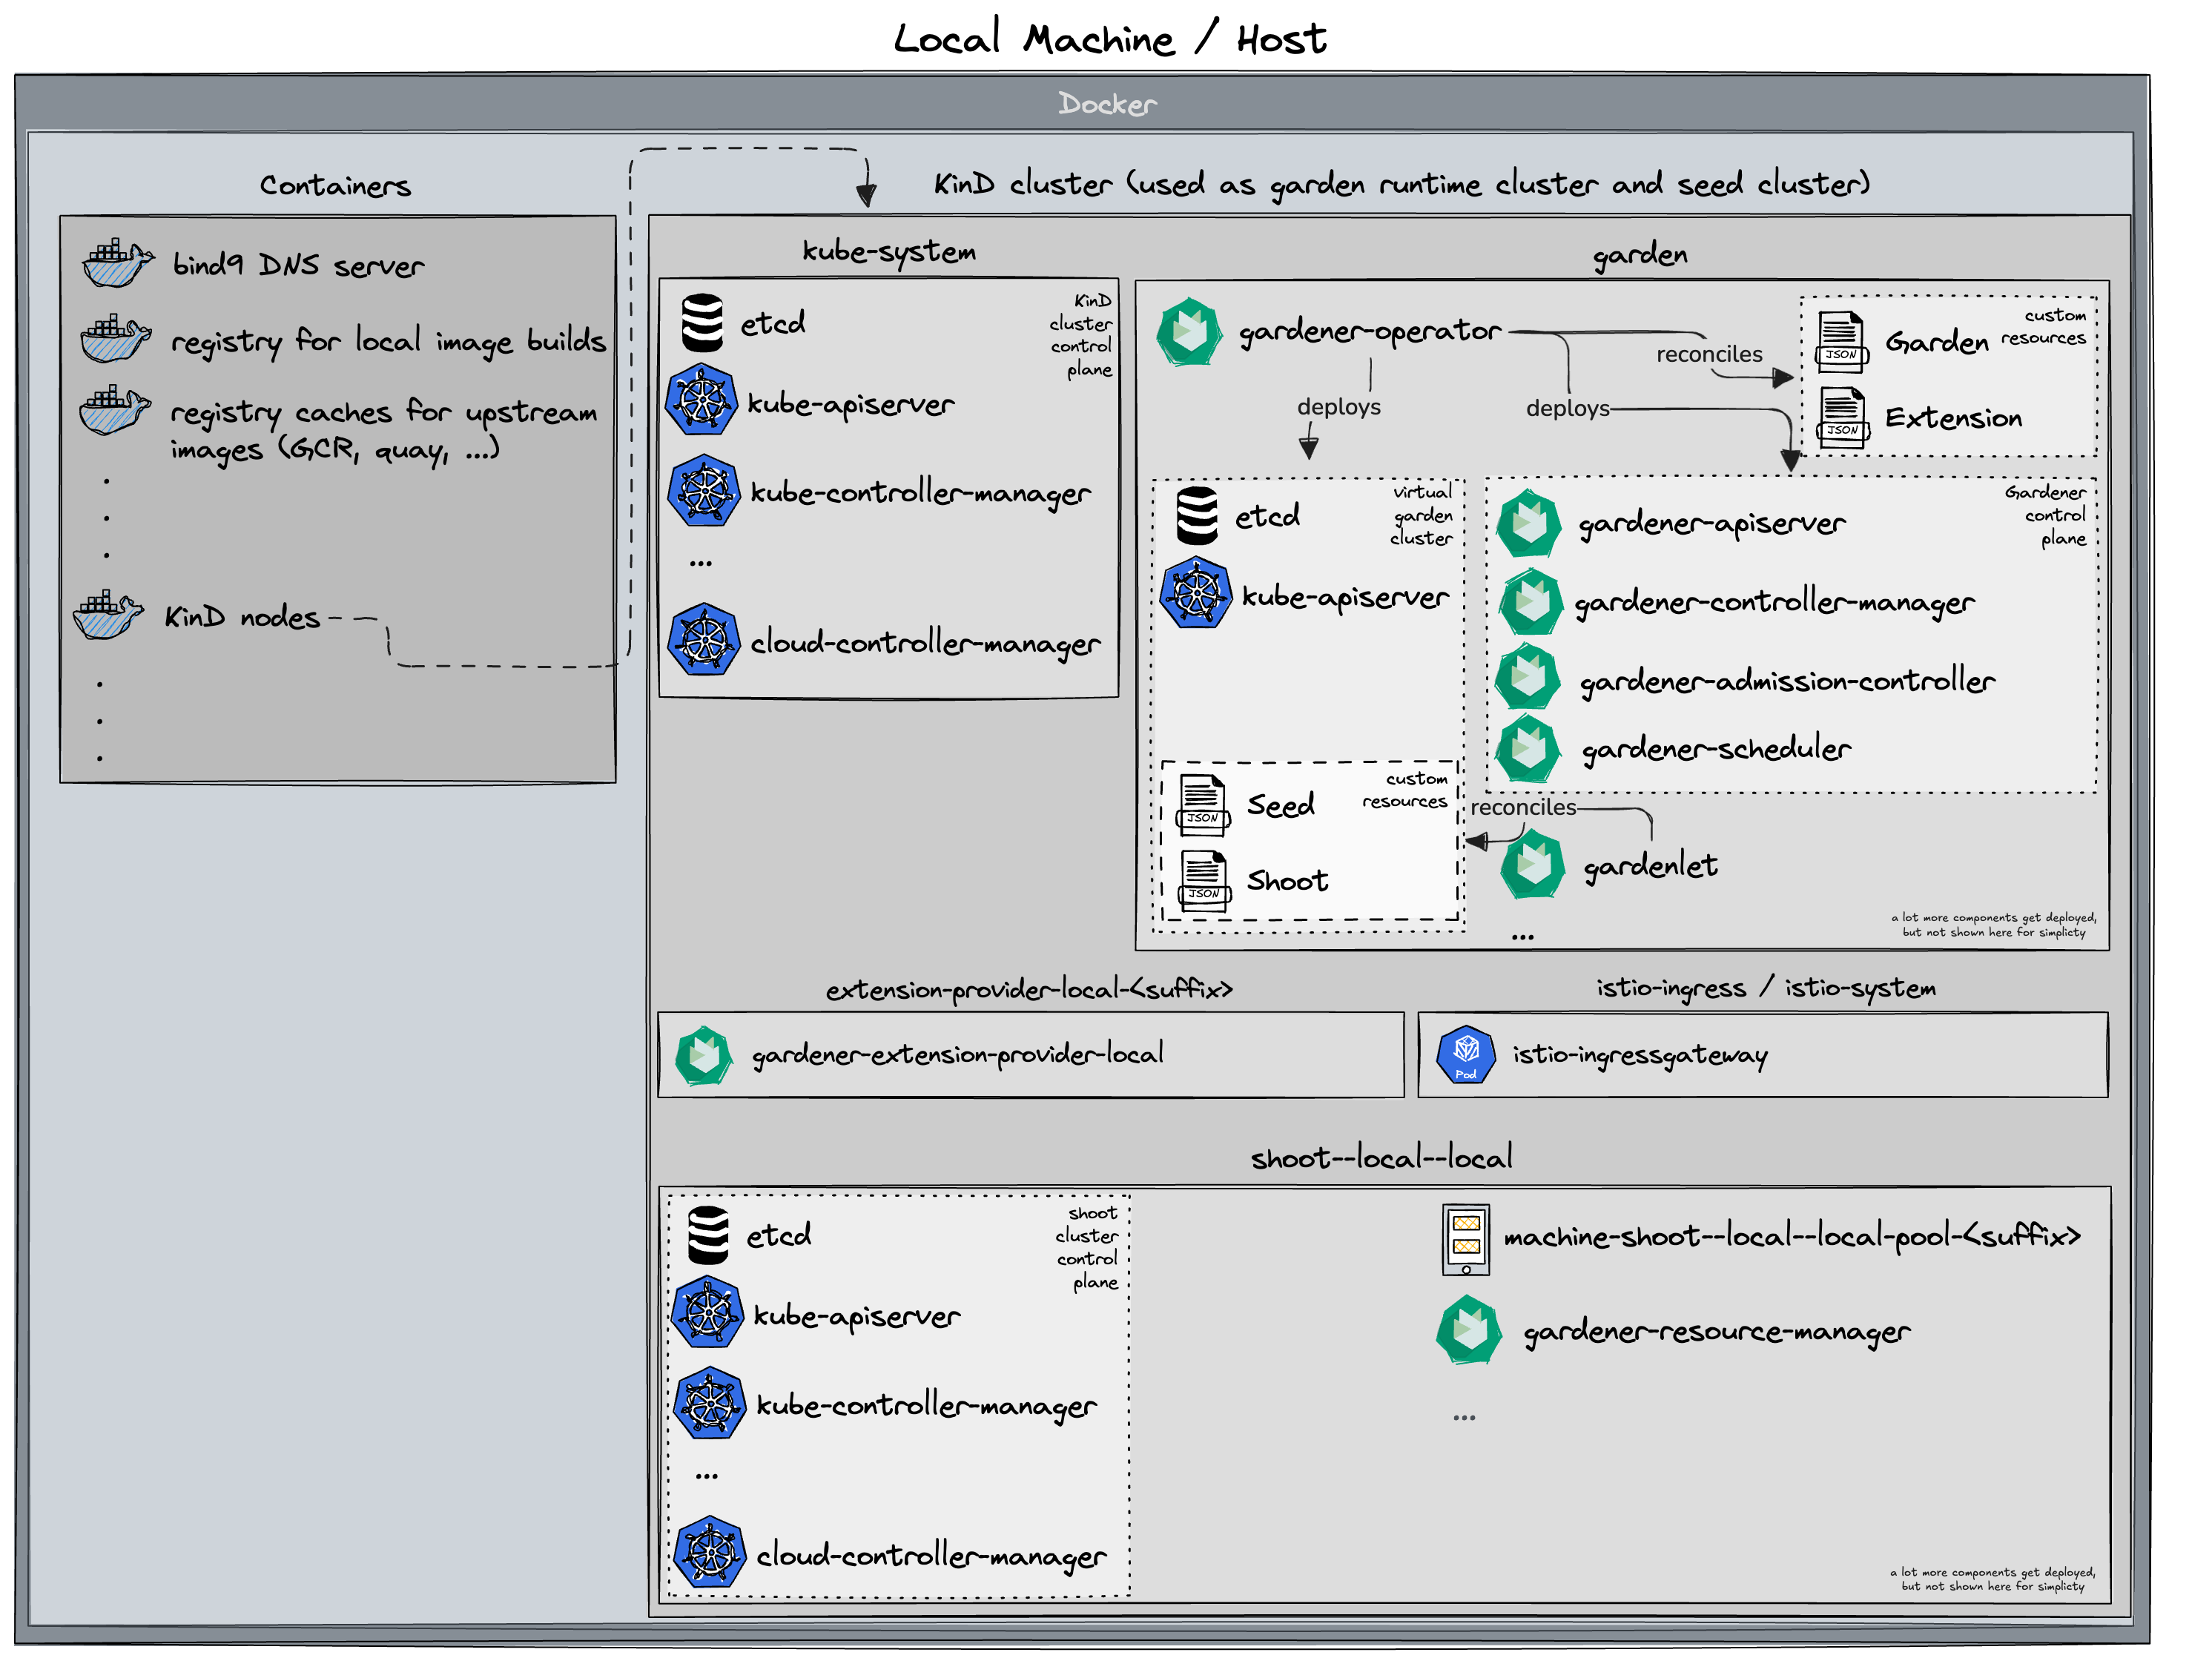
Gardener runs in any Kubernetes cluster. In this guide, we will start a KinD cluster which is used as both garden and seed cluster (please refer to the architecture overview) for simplicity.
Based on Skaffold, the container images for all required components will be built and deployed into the cluster (via their Helm charts).
Alternatives
When deploying Gardener on your local machine you might face several limitations:
- Your machine doesn't have enough compute resources (see prerequisites) for hosting a second seed cluster or multiple shoot clusters.
- Testing Gardener's IPv6 features requires a Linux machine and native IPv6 connectivity to the internet, but you're on macOS or don't have IPv6 connectivity in your office environment or via your home ISP.
In these cases, you might want to check out one of the following options that run the setup described in this guide elsewhere for circumventing these limitations:
- remote local setup: deploy on a remote pod for more compute resources
- dev box on Google Cloud: deploy on a Google Cloud machine for more compute resource and/or simple IPv4/IPv6 dual-stack networking
Prerequisites
- Make sure that you have followed the Local Setup guide up until the Get the sources step.
- Make sure your Docker daemon is up-to-date, up and running and has enough resources (at least
8CPUs and8Gimemory; see here how to configure the resources for Docker for Mac).Please note that 8 CPU / 8Gi memory might not be enough for more than two
Shootclusters, i.e., you might need to increase these values if you want to run additionalShoots. If you plan on following the optional steps to create a second seed cluster, the required resources will be more - at least10CPUs and18Gimemory. Additionally, please configure at least120Giof disk size for the Docker daemon. Tip: You can clean up unused data withdocker system dfanddocker system prune -a.
Setting Up the KinD Cluster (Garden and Seed)
make kind-upIf you want to set up an IPv6 KinD cluster, use
make kind-up IPFAMILY=ipv6instead.
This command sets up a new KinD cluster named gardener-local and stores the kubeconfig in the ./dev-setup/kubeconfigs/runtime/kubeconfig file.
It might be helpful to copy this file to
$HOME/.kube/config, since you will need to target this KinD cluster multiple times. Alternatively, make sure to set yourKUBECONFIGenvironment variable to./dev-setup/kubeconfigs/runtime/kubeconfigfor all future steps viaexport KUBECONFIG=$PWD/dev-setup/kubeconfigs/runtime/kubeconfig.
After setting up Gardener, the kubeconfig for the virtual garden cluster will be available at ./dev-setup/kubeconfigs/virtual-garden/kubeconfig.
All following steps assume that you are using the runtime cluster kubeconfig.
Additionally, this command also deploys a local container registry to the cluster, as well as a few registry mirrors, that are set up as a pull-through cache for all upstream registries Gardener uses by default. This is done to speed up image pulls across local clusters.
The local registry can now be accessed either via localhost:5001 or registry.local.gardener.cloud:5001 for pushing and pulling. The storage directories of the registries are mounted to the host machine under dev/local-registry. With this, mirrored images don't have to be pulled again after recreating the cluster.
It may also be necessary to mark the registry in Docker as an insecure registry to ensure that Docker establishes the connection via HTTP. This can be achieved by adding the registry accordingly in the /etc/docker/daemon.json file:
{ "insecure-registries":["registry.local.gardener.cloud:5001"] }The command also deploys a default calico installation as the cluster's CNI implementation with NetworkPolicy support (the default kindnet CNI doesn't provide NetworkPolicy support). Furthermore, it deploys the metrics-server in order to support HPA and VPA on the seed cluster.
After a restart of your host, the loopback IP addresses that were created for the kind cluster could be removed. To avoid recreating the cluster, there is a script that can be used to easily bring back the addresses.
./dev-setup/infra.sh setup-loopback-devicesDepending on the cluster you are using for your local dev setup you might have to:
- Replace the value for
--cluster-namewith the name of the kind cluster you are using for your local dev setup.- Add the
--ip-family <ipv4|ipv6|dual>flag if you want to set upipv6ordualstack IPs (ipv4is the default value).- Add the
--multi-zonalflag if you want to set up IPs for a multi-zonal cluster.
Setting Up IPv6 Single-Stack Networking (optional)
We need to configure NAT for outgoing traffic from the kind network to the internet. After executing make kind-up IPFAMILY=ipv6, execute the following command to set up the corresponding iptables rules:
ip6tables -t nat -A POSTROUTING -o $(ip route | grep '^default') -s fd00:10::/64 -j MASQUERADESetting Up Gardener
make gardener-upIf you want to set up an IPv6 ready Gardener, use
make gardener-up IPFAMILY=ipv6instead.
This will first build the base images (which might take a bit if you do it for the first time). Afterwards, the Gardener resources will be deployed into the cluster.
Developing Gardener
make gardener-devThis is similar to make gardener-up but additionally starts a skaffold dev loop. After the initial deployment, skaffold starts watching source files. Once it has detected changes, press any key to trigger a new build and deployment of the changed components.
Tip: you can set the SKAFFOLD_MODULE environment variable to select specific modules of the skaffold configuration (see skaffold.yaml) that skaffold should watch, build, and deploy. This significantly reduces turnaround times during development.
For example, if you want to develop changes to gardenlet:
# initial deployment of all components
make gardener-up
# start iterating on gardenlet without deploying other components
make gardener-dev SKAFFOLD_MODULE=gardenlet
Debugging Gardener
make gardener-debugThis is using skaffold debugging features. In the Gardener case, Go debugging using Delve is the most relevant use case. Please see the skaffold debugging documentation how to set up your IDE accordingly or check the examples below (GoLand, VS Code).
SKAFFOLD_MODULE environment variable is working the same way as described for Developing Gardener. However, skaffold is not watching for changes when debugging, because it would like to avoid interrupting your debugging session.
For example, if you want to debug gardenlet:
# initial deployment of all components
make gardener-up
# start debugging gardenlet without deploying other components
make gardener-debug SKAFFOLD_MODULE=gardenlet
In debugging flow, skaffold builds your container images, reconfigures your pods and creates port forwardings for the Delve debugging ports to your localhost. The default port is 56268. If you debug multiple pods at the same time, the port of the second pod will be forwarded to 56269 and so on. Please check your console output for the concrete port-forwarding on your machine.
Note: Resuming or stopping only a single goroutine (Go Issue 25578, 31132) is currently not supported, so the action will cause all the goroutines to get activated or paused. (vscode-go wiki)
This means that when a goroutine of gardenlet (or any other gardener-core component you try to debug) is paused on a breakpoint, all the other goroutines are paused. Hence, when the whole gardenlet process is paused, it can not renew its lease and can not respond to the liveness and readiness probes. Skaffold automatically increases timeoutSeconds of liveness and readiness probes to 600. Anyway, we were facing problems when debugging that pods have been killed after a while.
Thus, leader election, health and readiness checks for gardener-admission-controller, gardener-apiserver, gardener-controller-manager, gardener-scheduler,gardenlet and operator are disabled when debugging.
If you have similar problems with other components which are not deployed by skaffold, you could temporarily turn off the leader election and disable liveness and readiness probes there too.
Debugging in GoLand
- Edit your Run/Debug Configurations.
- Add a new Go Remote configuration.
- Set the port to
56268(or any increment of it when debugging multiple components). - Recommended: Change the behavior of On disconnect to Leave it running.
Debugging in VS Code
- Create or edit your
.vscode/launch.jsonconfiguration. - Add the following configuration:
{
  "name": "go remote",
  "type": "go",
  "request": "attach",
  "mode": "remote",
  "port": 56268, // or any increment of it when debugging multiple components
  "host": "127.0.0.1"
}
Since the ko builder is used in Skaffold to build the images, it's not necessary to specify the cwd and remotePath options as they match the workspace folder (ref).
Creating a Shoot Cluster
NOTE
The following steps assume that you are using the kubeconfig that points to the virtual garden cluster: export KUBECONFIG=$PWD/dev-setup/kubeconfigs/virtual-garden/kubeconfig.
You can wait for the Seed to be ready by running:
./hack/usage/wait-for.sh seed local GardenletReady SeedSystemComponentsHealthy ExtensionsReadyAlternatively, you can run kubectl get seed local and wait for the STATUS to indicate readiness:
NAME    STATUS   PROVIDER   REGION   AGE     VERSION       K8S VERSION
local   Ready    local      local    4m42s   vX.Y.Z-dev    v1.28.1
In order to create a first shoot cluster, just run:
kubectl apply -f example/provider-local/shoot.yamlYou can wait for the Shoot to be ready by running:
NAMESPACE=garden-local ./hack/usage/wait-for.sh shoot local APIServerAvailable ControlPlaneHealthy ObservabilityComponentsHealthy EveryNodeReady SystemComponentsHealthyAlternatively, you can run kubectl -n garden-local get shoot local and wait for the LAST OPERATION to reach 100%:
NAME    CLOUDPROFILE   PROVIDER   REGION   K8S VERSION   HIBERNATION   LAST OPERATION            STATUS    AGE
local   local          local      local   1.28.1        Awake         Create Processing (43%)   healthy   94s
If you don't need any worker pools, you can create a workerless Shoot by running:
kubectl apply -f example/provider-local/shoot-workerless.yaml(Optional): You could also execute a simple e2e test (creating and deleting a shoot) by running:
make test-e2e-local-simpleAccessing the Shoot Cluster
To access the Shoot, you can acquire a kubeconfig by using the shoots/adminkubeconfig subresource.
For convenience a helper script is provided in the hack directory. By default, the script will generate an admin kubeconfig for a Shoot named "local" in the garden-local namespace valid for one hour.
./hack/usage/generate-kubeconfig.sh > admin-kubeconf.yamlTo generate a viewer kubeconfig instead of an admin kubeconfig, use the --viewer flag:
./hack/usage/generate-kubeconfig.sh --viewer > viewer-kubeconf.yamlNOTE
Keep in mind that using a VPN on your local machine could cause problems with the setup, and the shoot's kubeconfig could fail with connection issues. If you experience connection problems using the shoot's kubeconfig, try disabling the VPN first.
If you want to change the default namespace or shoot name, you can do so by passing different values as arguments.
./hack/usage/generate-kubeconfig.sh --namespace <namespace> --shoot-name <shootname> > admin-kubeconf.yamlTo access an Ingress resource from the Seed, use the Ingress host with port 8448 (https://<ingress-host>:8448, for example https://gu-local--local.ingress.local.seed.local.gardener.cloud:8448).
(Optional): Setting Up a Second Seed Cluster
There are cases where you would want to create a second seed cluster in your local setup. For example, if you want to test the control plane migration feature. The following steps describe how to do that.
Start by setting up the second KinD cluster:
make kind2-upThis command sets up a new KinD cluster named gardener-local2 and stores its kubeconfig in the ./dev-setup/kubeconfigs/seed2/kubeconfig file.
In order to deploy required resources in the KinD cluster that you just created, run:
make seed2-upThe following steps assume that you are using the kubeconfig that points to the virtual garden cluster: export KUBECONFIG=$PWD/dev-setup/kubeconfigs/virtual-garden/kubeconfig.
You can wait for the local2 Seed to be ready by running:
./hack/usage/wait-for.sh seed local2 GardenletReady SeedSystemComponentsHealthy ExtensionsReadyAlternatively, you can run kubectl get seed local2 and wait for the STATUS to indicate readiness:
NAME    STATUS   PROVIDER   REGION   AGE     VERSION       K8S VERSION
local2  Ready    local      local    4m42s   vX.Y.Z-dev    v1.25.1
If you want to perform control plane migration, you can follow the steps outlined in Control Plane Migration to migrate the shoot cluster to the second seed you just created.
Deleting the Shoot Cluster
./hack/usage/delete shoot local garden-local(Optional): Tear Down the Second Seed Cluster
make kind2-downTear Down the Gardener Environment
make kind-downRemote Local Setup
Just like Prow is executing the KinD-based e2e tests in a K8s pod, it is possible to interactively run this KinD based Gardener development environment, aka "local setup", in a "remote" K8s pod.
k apply -f docs/deployment/content/remote-local-setup.yaml
k exec -it remote-local-setup-0 -- sh

tmux a
Caveats
Please refer to the TMUX documentation for working effectively inside the remote-local-setup pod.
To access Plutono, Prometheus or other components in a browser, two port forwards are needed:
The port forward from the laptop to the pod:
k port-forward remote-local-setup-0 3000The port forward in the remote-local-setup pod to the respective component:
k port-forward -n shoot--local--local deployment/plutono 3000