This is the multi-page printable view of this section. Click here to print.
Networking
1 - Custom DNS Configuration
Custom DNS Configuration
Gardener provides Kubernetes-Clusters-As-A-Service where all the system components (e.g., kube-proxy, networking, dns) are managed. As a result, Gardener needs to ensure and auto-correct additional configuration to those system components to avoid unnecessary down-time.
In some cases, auto-correcting system components can prevent users from deploying applications on top of the cluster that requires bits of customization, DNS configuration can be a good example.
To allow for customizations for DNS configuration (that could potentially lead to downtime) while having the option to “undo”, we utilize the import plugin from CoreDNS [1].
which enables in-line configuration changes.
How to use
To customize your CoreDNS cluster config, you can simply edit a ConfigMap named coredns-custom in the kube-system namespace.
By editing, this ConfigMap, you are modifying CoreDNS configuration, therefore care is advised.
For example, to apply new config to CoreDNS that would point all .global DNS requests to another DNS pod, simply edit the configuration as follows:
apiVersion: v1
kind: ConfigMap
metadata:
  name: coredns-custom
  namespace: kube-system
data:
  istio.server: |
    global:8053 {
            errors
            cache 30
            forward . 1.2.3.4
        }
  corefile.override: |
         # <some-plugin> <some-plugin-config>
         debug
         whoami
The port number 8053 in global:8053 is the specific port that CoreDNS is bound to and cannot be changed to any other port if it should act on ordinary name resolution requests from pods. Otherwise, CoreDNS will open a second port, but you are responsible to direct the traffic to this port. kube-dns service in kube-system namespace will direct name resolution requests within the cluster to port 8053 on the CoreDNS pods.
Moreover, additional network policies are needed to allow corresponding ingress traffic to CoreDNS pods.
In order for the destination DNS server to be reachable, it must listen on port 53 as it is required by network policies. Other ports are only possible if additional network policies allow corresponding egress traffic from CoreDNS pods.
It is important to have the ConfigMap keys ending with *.server (if you would like to add a new server) or *.override
if you want to customize the current server configuration (it is optional setting both).
Warning
Be careful when overriding plugins log, forward or cache.
- Increasing log level can lead to increased load/reduced throughput.
- Changing the forward target may lead to unexpected results.
- Playing with the cache settings can impact the timeframe how long it takes for changes to become visible.
*.override and *.server data points from coredns-custom ConfigMap are imported into Corefile as follows.
Please consult coredns plugin documentation for potential side-effects.
.:8053 {
  health {
      lameduck 15s
  }
  ready
  [search-rewrites]
  kubernetes[clusterDomain]in-addr.arpa ip6.arpa {
      pods insecure
      fallthrough in-addr.arpa ip6.arpa
      ttl 30
  }
  prometheus :9153
  loop
  import custom/*.override
  errors
  log . {
      class error
  }
  forward . /etc/resolv.conf
  cache 30
  reload
  loadbalance round_robin
}
import custom/*.server
[Optional] Reload CoreDNS
As Gardener is configuring the reload plugin of CoreDNS a restart of the CoreDNS components is typically not necessary to propagate ConfigMap changes. However, if you don’t want to wait for the default (30s) to kick in, you can roll-out your CoreDNS deployment using:
kubectl -n kube-system rollout restart deploy coredns
This will reload the config into CoreDNS.
The approach we follow here was inspired by AKS’s approach [2].
Anti-Pattern
Applying a configuration that is in-compatible with the running version of CoreDNS is an anti-pattern (sometimes plugin configuration changes, simply applying a configuration can break DNS).
If incompatible changes are applied by mistake, simply delete the content of the ConfigMap and re-apply.
This should bring the cluster DNS back to functioning state.
Node Local DNS
Custom DNS configuration] may not work as expected in conjunction with NodeLocalDNS.
With NodeLocalDNS, ordinary DNS queries targeted at the upstream DNS servers, i.e. non-kubernetes domains,
will not end up at CoreDNS, but will instead be directly sent to the upstream DNS server. Therefore, configuration
applying to non-kubernetes entities, e.g. the istio.server block in the
custom DNS configuration example, may not have any effect with NodeLocalDNS enabled.
If this kind of custom configuration is required, forwarding to upstream DNS has to be disabled.
This can be done by setting the option (spec.systemComponents.nodeLocalDNS.disableForwardToUpstreamDNS) in the Shoot resource to true:
...
spec:
  ...
  systemComponents:
    nodeLocalDNS:
      enabled: true
      disableForwardToUpstreamDNS: true
...
References
[1] Import plugin [2] AKS Custom DNS
2 - DNS Search Path Optimization
DNS Search Path Optimization
DNS Search Path
Using fully qualified names has some downsides, e.g., it may become harder to move deployments from one landscape to the next. It is far easier and simple to rely on short/local names, which may have different meaning depending on the context they are used in.
The DNS search path allows for the usage of short/local names. It is an ordered list of DNS suffixes to append to short/local names to create a fully qualified name.
If a short/local name should be resolved, each entry is appended to it one by one to check whether it can be resolved. The process stops when either the name could be resolved or the DNS search path ends. As the last step after trying the search path, the short/local name is attempted to be resolved on it own.
DNS Option ndots
As explained in the section above, the DNS search path is used for short/local names to create fully
qualified names. The DNS option ndots specifies how many dots (.) a name needs to have to be considered fully qualified.
For names with less than ndots dots (.), the DNS search path will be applied.
DNS Search Path, ndots, and Kubernetes
Kubernetes tries to make it easy/convenient for developers to use name resolution. It provides several means to address a
service, most notably by its name directly, using the namespace as suffix, utilizing <namespace>.svc as suffix or as a
fully qualified name as <service>.<namespace>.svc.cluster.local (assuming cluster.local to be the cluster domain).
This is why the DNS search path is fairly long in Kubernetes, usually consisting of <namespace>.svc.cluster.local,
svc.cluster.local, cluster.local, and potentially some additional entries coming from the local network of the cluster.
For various reasons, the default ndots value in the context of Kubernetes is with 5, also fairly large. See
this comment for a more detailed description.
DNS Search Path/ndots Problem in Kubernetes
As the DNS search path is long and ndots is large, a lot of DNS queries might traverse the DNS search path. This results
in an explosion of DNS requests.
For example, consider the name resolution of the default kubernetes service kubernetes.default.svc.cluster.local. As this
name has only four dots, it is not considered a fully qualified name according to the default ndots=5 setting. Therefore,
the DNS search path is applied, resulting in the following queries being created
kubernetes.default.svc.cluster.local.some-namespace.svc.cluster.localkubernetes.default.svc.cluster.local.svc.cluster.localkubernetes.default.svc.cluster.local.cluster.localkubernetes.default.svc.cluster.local.network-domain- …
In IPv4/IPv6 dual stack systems, the amount of DNS requests may even double as each name is resolved for IPv4 and IPv6.
General Workarounds/Mitigations
Kubernetes provides the capability to set the DNS options for each pod (see Pod DNS config for details). However, this has to be applied for every pod (doing name resolution) to resolve the problem. A mutating webhook may be useful in this regard. Unfortunately, the DNS requirements may be different depending on the workload. Therefore, a general solution may difficult to impossible.
Another approach is to use always fully qualified names and append a dot (.) to the name to prevent the name resolution
system from using the DNS search path. This might be somewhat counterintuitive as most developers are not used to the
trailing dot (.). Furthermore, it makes moving to different landscapes more difficult/error-prone.
Gardener Specific Workarounds/Mitigations
Gardener allows users to customize their DNS configuration. CoreDNS allows several approaches to deal with the requests generated by the DNS search path. Caching is possible as well as query rewriting. There are also several other plugins available, which may mitigate the situation.
Gardener DNS Query Rewriting
As explained above, the application of the DNS search path may lead to the undesired
creation of DNS requests. Especially with the default setting of ndots=5, seemingly fully qualified names pointing to
services in the cluster may trigger the DNS search path application.
Gardener allows to automatically rewrite some obviously incorrect DNS names, which stem from an application of the DNS search
path to the most likely desired name. This will automatically rewrite requests like service.namespace.svc.cluster.local.svc.cluster.local to
service.namespace.svc.cluster.local.
In case the applications also target services for name resolution, which are outside of the cluster and have less than ndots dots,
it might be helpful to prevent search path application for them as well. One way to achieve it is by adding them to the
commonSuffixes:
...
spec:
  ...
  systemComponents:
    coreDNS:
      rewriting:
        commonSuffixes:
        - gardener.cloud
        - example.com
...
DNS requests containing a common suffix and ending in .svc.cluster.local are assumed to be incorrect application of the DNS
search path. Therefore, they are rewritten to everything ending in the common suffix. For example, www.gardener.cloud.svc.cluster.local
would be rewritten to www.gardener.cloud.
Please note that the common suffixes should be long enough and include enough dots (.) to prevent random overlap with
other DNS queries. For example, it would be a bad idea to simply put com on the list of common suffixes, as there may be
services/namespaces which have com as part of their name. The effect would be seemingly random DNS requests. Gardener
requires that common suffixes contain at least one dot (.) and adds a second dot at the beginning. For instance, a common
suffix of example.com in the configuration would match *.example.com.
Since some clients verify the host in the response of a DNS query, the host must also be rewritten.
For that reason, we can’t rewrite a query for service.dst-namespace.svc.cluster.local.src-namespace.svc.cluster.local or
www.example.com.src-namespace.svc.cluster.local, as for an answer rewrite src-namespace would not be known.
3 - Dual-stack network migration
Dual-Stack Network Migration
This document provides a guide for migrating IPv4-only or IPv6-only Gardener shoot clusters to dual-stack networking (IPv4 and IPv6).
Overview
Dual-stack networking allows clusters to operate with both IPv4 and IPv6 protocols. This configuration is controlled via the spec.networking.ipFamilies field, which accepts the following values:
[IPv4][IPv6][IPv4, IPv6][IPv6, IPv4]
Key Considerations
- Adding a new protocol is only allowed as the second element in the array, ensuring the primary protocol remains unchanged.
- Migration involves multiple reconciliation runs to ensure a smooth transition without disruptions.
Preconditions
Gardener supports multiple different network configurations, including running with pod overlay network or native routing. Currently, there is only native routing as supported operating mode for dual-stack networking in Gardener. This means that the pod overlay network needs to be disabled before starting the dual-stack migration. Otherwise, pod-to-pod cross-node communication may not work as expected after the migration.
At the moment, this only affects IPv4-only clusters, which should be migrated to dual-stack networking. IPv6-only clusters always use native routing.
You can check whether your cluster uses overlay network or native routing by looking for spec.networking.providerConfig.overlay.enabled in your cluster’s manifest. If it is set to true or not present, the cluster is using the pod overlay network. If it is set to false, the cluster is using native routing.
Please note that there are infrastructure-specific limitations with regards to cluster size due to one route being added per node. Therefore, please consult the documentation of your infrastructure if your cluster should grow beyond 50 nodes and adapt the route limit quotas accordingly before switching to native routing.
To disable the pod overlay network and thereby switch to native routing, adjust your cluster specification as follows:
spec:
  ...
  networking:
    providerConfig:
      overlay:
        enabled: false
  ...
Migration Process
The migration process should usually take place during the corresponding shoot maintenance time window. If you wish to run the migration process earlier, then you need to roll the nodes yourself and then trigger a reconcile so that the status of the DualStackNodesMigrationReady constraint is set to true. Once this is the case a new reconcile needs to be triggered to update the final components as described in step 5.
Step 1: Update Networking Configuration
Modify the spec.networking.ipFamilies field to include the desired dual-stack configuration. For example, change [IPv4] to [IPv4, IPv6].
Step 2: Infrastructure Reconciliation
Changing the ipFamilies field triggers an infrastructure reconciliation. This step applies necessary changes to the underlying infrastructure to support dual-stack networking.
Step 3: Control Plane Updates
Depending on the infrastructure, control plane components will be updated or reconfigured to support dual-stack networking.
Step 4: Node Rollout
Nodes must support the new network protocol. However, node rollout is a manual step and is not triggered automatically. It should be performed during a maintenance window to minimize disruptions. Over time, this step may occur automatically, for example, during Kubernetes minor version updates that involve node replacements.
Cluster owners can monitor the progress of this step by checking the DualStackNodesMigrationReady constraint in the shoot status. During shoot reconciliation, the system verifies if all nodes support dual-stack networking and updates the migration state accordingly.
Step 5: Final Reconciliation
Once all nodes are migrated, the remaining control plane components and the Container Network Interface (CNI) are configured for dual-stack networking. The migration constraint is removed at the end of this step.
Post-Migration Behavior
After completing the migration:
- The shoot cluster supports dual-stack networking.
- New pods will receive IP addresses from both address families.
- Existing pods will only receive a second IP address upon recreation.
- If full dual-stack networking is required all pods need to be rolled.
4 - ExposureClasses
ExposureClasses
The Gardener API server provides a cluster-scoped ExposureClass resource.
This resource is used to allow exposing the control plane of a Shoot cluster in various network environments like restricted corporate networks, DMZ, etc.
Background
The ExposureClass resource is based on the concept for the RuntimeClass resource in Kubernetes.
A RuntimeClass abstracts the installation of a certain container runtime (e.g., gVisor, Kata Containers) on all nodes or a subset of the nodes in a Kubernetes cluster.
See Runtime Class for more information.
In contrast, an ExposureClass abstracts the ability to expose a Shoot clusters control plane in certain network environments (e.g., corporate networks, DMZ, internet) on all Seeds or a subset of the Seeds.
Example: RuntimeClass and ExposureClass
apiVersion: node.k8s.io/v1
kind: RuntimeClass
metadata:
  name: gvisor
handler: gvisorconfig
# scheduling:
#   nodeSelector:
#     env: prod
---
kind: ExposureClass
metadata:
  name: internet
handler: internet-config
# scheduling:
#   seedSelector:
#     matchLabels:
#       network/env: internet
Similar to RuntimeClasses, ExposureClasses also define a .handler field reflecting the name reference for the corresponding CRI configuration of the RuntimeClass and the control plane exposure configuration for the ExposureClass.
The CRI handler for RuntimeClasses is usually installed by an administrator (e.g., via a DaemonSet which installs the corresponding container runtime on the nodes).
The control plane exposure configuration for ExposureClasses will be also provided by an administrator.
This exposure configuration is part of the gardenlet configuration, as this component is responsible to configure the control plane accordingly.
See the gardenlet Configuration ExposureClass Handlers section for more information.
The RuntimeClass also supports the selection of a node subset (which have the respective controller runtime binaries installed) for pod scheduling via its .scheduling section.
The ExposureClass also supports the selection of a subset of available Seed clusters whose gardenlet is capable of applying the exposure configuration for the Shoot control plane accordingly via its .scheduling section.
Usage by a Shoot
A Shoot can reference an ExposureClass via the .spec.exposureClassName field.
⚠️ When creating a
Shootresource, the Gardener scheduler will try to assign theShootto aSeedwhich will host its control plane.
The scheduling behaviour can be influenced via the .spec.seedSelectors and/or .spec.tolerations fields in the Shoot.
ExposureClasses can also contain scheduling instructions.
If a Shoot is referencing an ExposureClass, then the scheduling instructions of both will be merged into the Shoot.
Those unions of scheduling instructions might lead to a selection of a Seed which is not able to deal with the handler of the ExposureClass and the Shoot creation might end up in an error.
In such case, the Shoot scheduling instructions should be revisited to check that they are not interfering with the ones from the ExposureClass.
If this is not feasible, then the combination with the ExposureClass might not be possible and you need to contact your Gardener administrator.
Example: Shoot and ExposureClass scheduling instructions merge flow
- Assuming there is the following
Shootwhich is referencing theExposureClassbelow:
apiVersion: core.gardener.cloud/v1beta1
kind: Shoot
metadata:
  name: abc
  namespace: garden-dev
spec:
  exposureClassName: abc
  seedSelectors:
    matchLabels:
      env: prod
---
apiVersion: core.gardener.cloud/v1beta1
kind: ExposureClass
metadata:
  name: abc
handler: abc
scheduling:
  seedSelector:
    matchLabels:
      network: internal
- Both
seedSelectorswould be merged into theShoot. The result would be the following:
apiVersion: core.gardener.cloud/v1beta1
kind: Shoot
metadata:
  name: abc
  namespace: garden-dev
spec:
  exposureClassName: abc
  seedSelectors:
    matchLabels:
      env: prod
      network: internal
- Now the Gardener Scheduler would try to find a
Seedwith those labels.
- If there are no Seeds with matching labels for the seed selector, then the
Shootwill be unschedulable. - If there are Seeds with matching labels for the seed selector, then the Shoot will be assigned to the best candidate after the scheduling strategy is applied, see Gardener Scheduler.
- If the
Seedis not able to serve theExposureClasshandlerabc, then the Shoot will end up in error state. - If the
Seedis able to serve theExposureClasshandlerabc, then theShootwill be created.
- If the
gardenlet Configuration ExposureClass Handlers
The gardenlet is responsible to realize the control plane exposure strategy defined in the referenced ExposureClass of a Shoot.
Therefore, the GardenletConfiguration can contain an .exposureClassHandlers list with the respective configuration.
Example of the GardenletConfiguration:
exposureClassHandlers:
- name: internet-config
  loadBalancerService:
    annotations:
      loadbalancer/network: internet
- name: internal-config
  loadBalancerService:
    annotations:
      loadbalancer/network: internal
  sni:
    ingress:
      namespace: ingress-internal
      labels:
        network: internal
Each gardenlet can define how the handler of a certain ExposureClass needs to be implemented for the Seed(s) where it is responsible for.
The .name is the name of the handler config and it must match to the .handler in the ExposureClass.
All control planes on a Seed are exposed via a load balancer, either a dedicated one or a central shared one.
The load balancer service needs to be configured in a way that it is reachable from the target network environment.
Therefore, the configuration of load balancer service need to be specified, which can be done via the .loadBalancerService section.
The common way to influence load balancer service behaviour is via annotations where the respective cloud-controller-manager will react on and configure the infrastructure load balancer accordingly.
The control planes on a Seed will be exposed via a central load balancer and with Envoy via TLS SNI passthrough proxy.
In this case, the gardenlet will install a dedicated ingress gateway (Envoy + load balancer + respective configuration) for each handler on the Seed.
The configuration of the ingress gateways can be controlled via the .sni section in the same way like for the default ingress gateways.
5 - KUBERNETES_SERVICE_HOST Environment Variable Injection
KUBERNETES_SERVICE_HOST Environment Variable Injection
In each Shoot cluster’s kube-system namespace a DaemonSet called apiserver-proxy is deployed. It routes traffic to the upstream Shoot Kube APIServer. See the APIServer SNI GEP for more details.
To skip this extra network hop, a mutating webhook called apiserver-proxy.networking.gardener.cloud is deployed next to the API server in the Seed. It adds a KUBERNETES_SERVICE_HOST environment variable to each container and init container that do not specify it. See the webhook repository for more information.
Opt-Out of Pod Injection
In some cases it’s desirable to opt-out of Pod injection:
- DNS is disabled on that individual Pod, but it still needs to talk to the kube-apiserver.
- Want to test the
kube-proxyandkubeletin-cluster discovery.
Opt-Out of Pod Injection for Specific Pods
To opt out of the injection, the Pod should be labeled with apiserver-proxy.networking.gardener.cloud/inject: disable, e.g.:
apiVersion: apps/v1
kind: Deployment
metadata:
  name: nginx
  labels:
    app: nginx
spec:
  replicas: 1
  selector:
    matchLabels:
      app: nginx
  template:
    metadata:
      labels:
        app: nginx
        apiserver-proxy.networking.gardener.cloud/inject: disable
    spec:
      containers:
      - name: nginx
        image: nginx:1.14.2
        ports:
        - containerPort: 80
Opt-Out of Pod Injection on Namespace Level
To opt out of the injection of all Pods in a namespace, you should label your namespace with apiserver-proxy.networking.gardener.cloud/inject: disable, e.g.:
apiVersion: v1
kind: Namespace
metadata:
  labels:
    apiserver-proxy.networking.gardener.cloud/inject: disable
  name: my-namespace
or via kubectl for existing namespace:
kubectl label namespace my-namespace apiserver-proxy.networking.gardener.cloud/inject=disable
Note: Please be aware that it’s not possible to disable injection on a namespace level and enable it for individual pods in it.
Opt-Out of Pod Injection for the Entire Cluster
If the injection is causing problems for different workloads and ignoring individual pods or namespaces is not possible, then the feature could be disabled for the entire cluster with the alpha.featuregates.shoot.gardener.cloud/apiserver-sni-pod-injector annotation with value disable on the Shoot resource itself:
apiVersion: core.gardener.cloud/v1beta1
kind: Shoot
metadata:
  annotations:
    alpha.featuregates.shoot.gardener.cloud/apiserver-sni-pod-injector: 'disable'
  name: my-cluster
or via kubectl for existing shoot cluster:
kubectl label shoot my-cluster alpha.featuregates.shoot.gardener.cloud/apiserver-sni-pod-injector=disable
Note: Please be aware that it’s not possible to disable injection on a cluster level and enable it for individual pods in it.
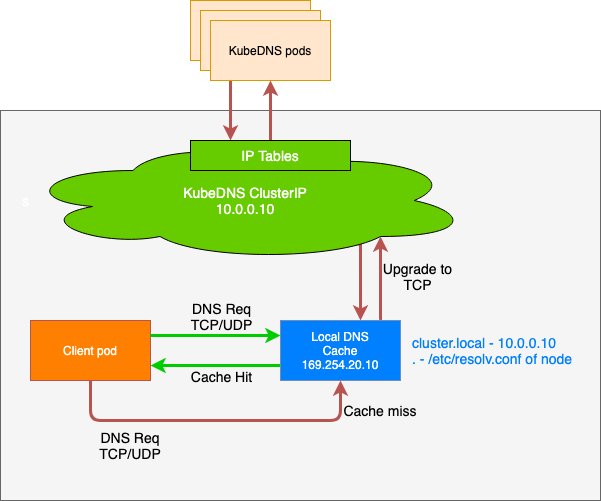
6 - NodeLocalDNS Configuration
NodeLocalDNS Configuration
This is a short guide describing how to enable DNS caching on the shoot cluster nodes.
Background
Currently in Gardener we are using CoreDNS as a deployment that is auto-scaled horizontally to cover for QPS-intensive applications. However, doing so does not seem to be enough to completely circumvent DNS bottlenecks such as:
- Cloud provider limits for DNS lookups.
- Unreliable UDP connections that forces a period of timeout in case packets are dropped.
- Unnecessary node hopping since CoreDNS is not deployed on all nodes, and as a result DNS queries end-up traversing multiple nodes before reaching the destination server.
- Inefficient load-balancing of services (e.g., round-robin might not be enough when using IPTables mode)
- and more …
To workaround the issues described above, node-local-dns was introduced. The architecture is described below. The idea is simple:
- For new queries, the connection is upgraded from UDP to TCP and forwarded towards the cluster IP for the original CoreDNS server.
- For previously resolved queries, an immediate response from the same node where the requester workload / pod resides is provided.
Configuring NodeLocalDNS
All that needs to be done to enable the usage of the node-local-dns feature is to set the corresponding option (spec.systemComponents.nodeLocalDNS.enabled) in the Shoot resource to true:
...
spec:
  ...
  systemComponents:
    nodeLocalDNS:
      enabled: true
...
It is worth noting that:
- When migrating from IPVS to IPTables, existing pods will continue to leverage the node-local-dns cache.
- When migrating from IPtables to IPVS, only newer pods will be switched to the node-local-dns cache.
- During the reconfiguration of the node-local-dns there might be a short disruption in terms of domain name resolution depending on the setup. Usually, DNS requests are repeated for some time as UDP is an unreliable protocol, but that strictly depends on the application/way the domain name resolution happens. It is recommended to let the shoot be reconciled during the next maintenance period.
- Enabling or disabling node-local-dns triggers a rollout of all shoot worker nodes, see also this document.
For more information about node-local-dns, please refer to the KEP or to the usage documentation.
Known Issues
Custom DNS configuration may not work as expected in conjunction with NodeLocalDNS.
Please refer to Custom DNS Configuration.
7 - Shoot Networking Configurations
Shoot Networking Configurations
This document contains network related information for Shoot clusters.
Pod Network
A Pod network is imperative for any kind of cluster communication with Pods not started within the Node’s host network. More information about the Kubernetes network model can be found in the Cluster Networking topic.
Gardener allows users to configure the Pod network’s CIDR during Shoot creation:
apiVersion: core.gardener.cloud/v1beta1
kind: Shoot
spec:
  networking:
    type: <some-network-extension-name> # {calico,cilium}
    pods: 100.96.0.0/16
    nodes: ...
    services: ...
⚠️ The
networking.podsIP configuration is immutable and cannot be changed afterwards. Please consider the following paragraph to choose a configuration which will meet your demands.
One of the network plugin’s (CNI) tasks is to assign IP addresses to Pods started in the Pod network. Different network plugins come with different IP address management (IPAM) features, so we can’t give any definite advice how IP ranges should be configured. Nevertheless, we want to outline the standard configuration.
Information in .spec.networking.pods matches the –cluster-cidr flag of the Kube-Controller-Manager of your Shoot cluster.
This IP range is divided into smaller subnets, also called podCIDRs (default mask /24) and assigned to Node objects .spec.podCIDR.
Pods get their IP address from this smaller node subnet in a default IPAM setup.
Thus, it must be guaranteed that enough of these subnets can be created for the maximum amount of nodes you expect in the cluster.
Example 1
Pod network: 100.96.0.0/16
nodeCIDRMaskSize: /24
-------------------------

Number of podCIDRs: 256 --> max. Node count
Number of IPs per podCIDRs: 256
With the configuration above a Shoot cluster can at most have 256 nodes which are ready to run workload in the Pod network.
Example 2
Pod network: 100.96.0.0/20
nodeCIDRMaskSize: /24
-------------------------

Number of podCIDRs: 16 --> max. Node count
Number of IPs per podCIDRs: 256
With the configuration above a Shoot cluster can at most have 16 nodes which are ready to run workload in the Pod network.
Beside the configuration in .spec.networking.pods, users can tune the nodeCIDRMaskSize used by Kube-Controller-Manager on shoot creation.
A smaller IP range per node means more podCIDRs and thus the ability to provision more nodes in the cluster, but less available IPs for Pods running on each of the nodes.
apiVersion: core.gardener.cloud/v1beta1
kind: Shoot
spec:
  kubernetes:
    kubeControllerManager:
      nodeCIDRMaskSize: 24 # (default)
⚠️ The
nodeCIDRMaskSizeconfiguration is immutable and cannot be changed afterwards.
Example 3
Pod network: 100.96.0.0/20
nodeCIDRMaskSize: /25
-------------------------

Number of podCIDRs: 32 --> max. Node count
Number of IPs per podCIDRs: 128
With the configuration above, a Shoot cluster can at most have 32 nodes which are ready to run workload in the Pod network.
Reserved Networks
Some network ranges are reserved for specific use-cases in the communication between seeds and shoots.
| IPv | CIDR | Name | Purpose |
|---|---|---|---|
| IPv6 | fd8f:6d53:b97a:1::/96 | Default VPN Range | |
| IPv4 | 240.0.0.0/8 | Kube-ApiServer Mapping Range | Used for the kubernetes.default.svc.cluster.local service in a shoot |
| IPv4 | 241.0.0.0/8 | Seed Pod Mapping Range | Used for allowing overlapping IPv4 networks between shoot and seed. Requires non-HA control plane. Only used within the vpn pods |
| IPv4 | 242.0.0.0/8 | Shoot Node Mapping Range | Used for allowing overlapping IPv4 networks between shoot and seed. Requires non-HA control plane. Only used within the vpn pods |
| IPv4 | 243.0.0.0/8 | Shoot Service Mapping Range | Used for allowing overlapping IPv4 networks between shoot and seed. Requires non-HA control plane. Only used within the vpn pods |
| IPv4 | 244.0.0.0/8 | Shoot Pod Mapping Range | Used for allowing overlapping IPv4 networks between shoot and seed. Requires non-HA control plane. Only used within the vpn pods |
⚠️ Do not use any of the CIDR ranges mentioned above for any of the node, pod or service networks. Gardener will prevent their creation. Pre-existing shoots using reserved ranges will still work, though it is recommended to recreate them with compatible network ranges.
Overlapping IPv4 Networks between Seed and Shoot
By default, the seed and shoot clusters must have non-overlapping IPv4 network ranges and gardener will enforce disjunct ranges. However, under certain conditions it is possible to allow overlapping IPv4 network ranges:
- The shoot cluster must have a non-highly-available VPN, usually implicitly selected by having a non-highly-available control plane.
- The shoot cluster need be either single-stack IPv4 or dual-stack IPv4/IPv6.
- The shoot cluster networks don’t use the reserved ranges mentioned above.
Note: single-stack IPv6 shoots are usually not affected due to the vastly larger address space. However, Gardener still enforces the non-overlapping condition for IPv6 networks to avoid any potential issues.
If all conditions are met, the seed and shoot clusters can have overlapping (IPv4) network ranges. The potentially overlapping ranges are mapped to the reserved ranges mentioned above within the VPN network, i.e., double network address translation (NAT) is used .