Getting Started
Gardener onboarding materials
Welcome to the Gardener Getting Started section! Here you will be able to get accustomed to the way Gardener functions and learn how its components work together in order to seamlessly run Kubernetes clusters on various hyperscalers.
The following topics aim to be useful to both complete beginners and those already somewhat familiar with Gardener. While the content is structured, with Introduction serving as the starting point, if you’re feeling confident in your knowledge, feel free to skip to a topic you’re more interested in.
1 - Introduction to Gardener
Problem Space
Let’s discuss the problem space first. Why does anyone need something like Gardener?
Running Software
The starting point is this rather simple question: Why would you want to run some software?
Typically, software is run with a purpose and not just for the sake of running it. Whether it is a digital ledger, a company’s inventory or a blog - software provides a service to its user.
Which brings us to the way this software is being consumed. Traditionally, software has been shipped on physical / digital media to the customer or end user. There, someone had to install, configure, and operate it. In recent times, the pattern has shifted. More and more solutions are operated by the vendor or a hosting partner and sold as a service ready to be used.
But still, someone needs to install, configure, and maintain it - regardless of where it is installed. And of course, it will run forever once started and is generally resilient to any kind of failures.
For smaller installations things like maintenance, scaling, debugging or configuration can be done in a semi-automatic way. It’s probably no fun and most importantly, only a limited amount of instances can be taken care of - similar to how one would take care of a pet.
But when hosting services at scale, there is no way someone can do all this manually at acceptable costs. So we need some vehicle to easily spin up new instances, do lifecycle operations, get some basic failure resilience, and more. How can we achieve that?
Solution Space 1 - Kubernetes
Let’s start solving some of the problems described earlier with Container technology and Kubernetes.
Containers
Container technology is at the core of the solution space. A container forms a vehicle that is shippable, can easily run in any supported environment and generally adds a powerful abstraction layer to the infrastructure.
However, plain containers do not help with resilience or scaling. Therefore, we need another system for orchestration.
Orchestration
“Classical” orchestration that just follows the “notes” and moves from state A to state B doesn’t solve all of our problems as there are a lot of events from the environment that we should react to. Especially if they can lead to a broken system. We need something else.
Kubernetes operates on the principle of “desired state”. With it, you write a construction plan, then have controllers cycle through “observe -> analyze -> act” and transition the actual to the desired state. Those reconciliations ensure that whatever breaks there is a path back to a healthy state.
Summary
Containers (famously brought to the mainstream as “Docker”) and Kubernetes are the ingredients of a fundamental shift in IT. Similar to how the Operating System layer enabled the decoupling of software and hardware, container-related technologies provide an abstract interface to any kind of infrastructure platform for the next-generation of applications.
Solution Space 2 - Gardener
So, Kubernetes solves a lot of problems. But how do you get a Kubernetes cluster?
Either:
- Buy a cluster as a service from an external vendor
- Run a Gardener instance and host yourself a cluster with its help
Essentially, it was a “make or buy” decision that led to the founding of Gardener.
The Reason Why We Choose to “Make It”
Gardener allows to run Kubernetes clusters on various hyperscalers. It offers the same set of basic configuration options independent of the chosen infrastructure. This kind of harmonization supports any multi-vendor strategy while reducing adoption costs for the individual teams. Just imagine having to deal with multiple vendors all offering vastly different Kubernetes clusters.
Of course, there are plenty more reasons - from acquiring operational knowledge to having influence on the developed features - that made the pendulum swing towards “make it”.
What exactly is Gardener?

Gardener is a system to manage Kubernetes clusters. It is driven by the same “desired state” pattern as Kubernetes itself. In fact, it is using Kubernetes to run Kubernetes.
A user may “desire” clusters with specific configuration on infrastructures such as GCP, AWS, Azure, Alicloud, Openstack, vsphere, … and Gardener will make sure to create such a cluster and keep it running.
If you take this rather simplistic principle of reconciliation and add the feature-richness of Gardener to it, you end up with universal Kubernetes at scale.
Whether you need fleet management at minimal TCO or to look for a highly customizable control plane - we have it all.
On top of that, Gardener-managed Kubernetes clusters fulfill the conformance standard set out by the CNCF and we submit our test results for certification.
Have a look at the CNCF map for more information or dive into the testgrid directly.
Gardener itself is open-source. Under the umbrella of github.com/gardener we develop the core functionalities as well as the extensions and you are welcome to contribute (by opening issues, feature requests or submitting code).
Last time we counted, there were already 131 projects. That’s actually more projects than members of the organization.
As of today, there are multiple adopters of Gardener, among which are SAP, STACKIT, Telekom, and Finanz Informatik Technologie Services GmbH. For a full list of adopters, see the Adopters page.
2 - Architecture
Kubeception
Kubeception - Kubernetes in Kubernetes in Kubernetes
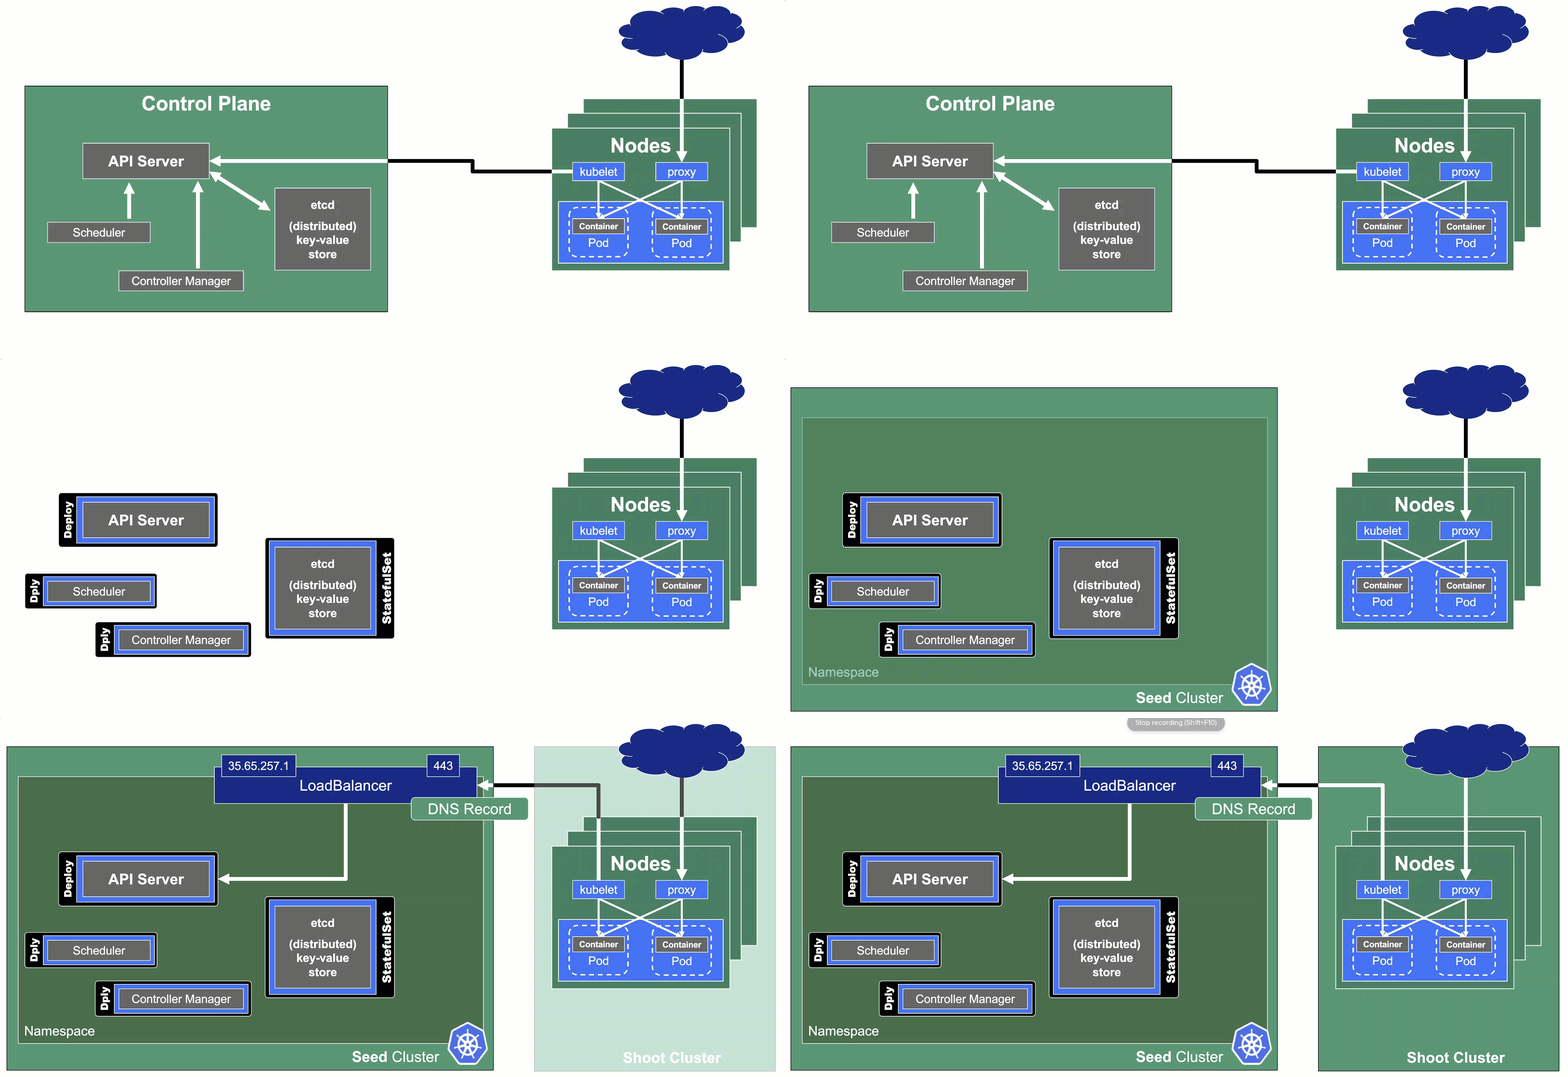
In the classic setup, there is a dedicated host / VM to host the master components / control plane of a Kubernetes cluster. However, these are just normal programs that can easily be put into containers. Once in containers, Kubernetes Deployments and StatefulSets (for the etcd) can be made to watch over them. And by putting all that into a separate, dedicated Kubernetes cluster you get Kubernetes on Kubernetes, aka Kubeception (named after the famous movie Inception with Leonardo DiCaprio).
But what are the advantages of running Kubernetes on Kubernetes?
- It makes use of resources more reasonably. Instead of providing a dedicated computer or virtual machine for the control plane of a Kubernetes cluster - which will probably never be the right size but either too small or too big - you can dynamically scale the individual control plane components based on demand and maximize resource usage by combining the control planes of multiple Kubernetes clusters.
- It helps introducing a first layer of high availability. What happens if the API server suddenly stops responding to requests? In a traditional setup, someone would have to find out and manually restart the API server. In the Kubeception model, the API server is a Kubernetes Deployment and of course, it has sophisticated liveness- and readiness-probes. Should the API server fail, its liveness-probe will fail too and the pod in question simply gets restarted automatically - sometimes even before anybody would have noticed about the API server being unresponsive.
- By running the control plane in a separate cluster where the user does not have access we reduce the possibility for the user to unintentionally modify the control plane resources (pods, secrets, configmaps, …) and break the cluster
In Gardener’s terminology, the cluster hosting the control plane components is called a seed cluster. The cluster that end users actually use (and whose control plane is hosted in the seed) is called a shoot cluster.
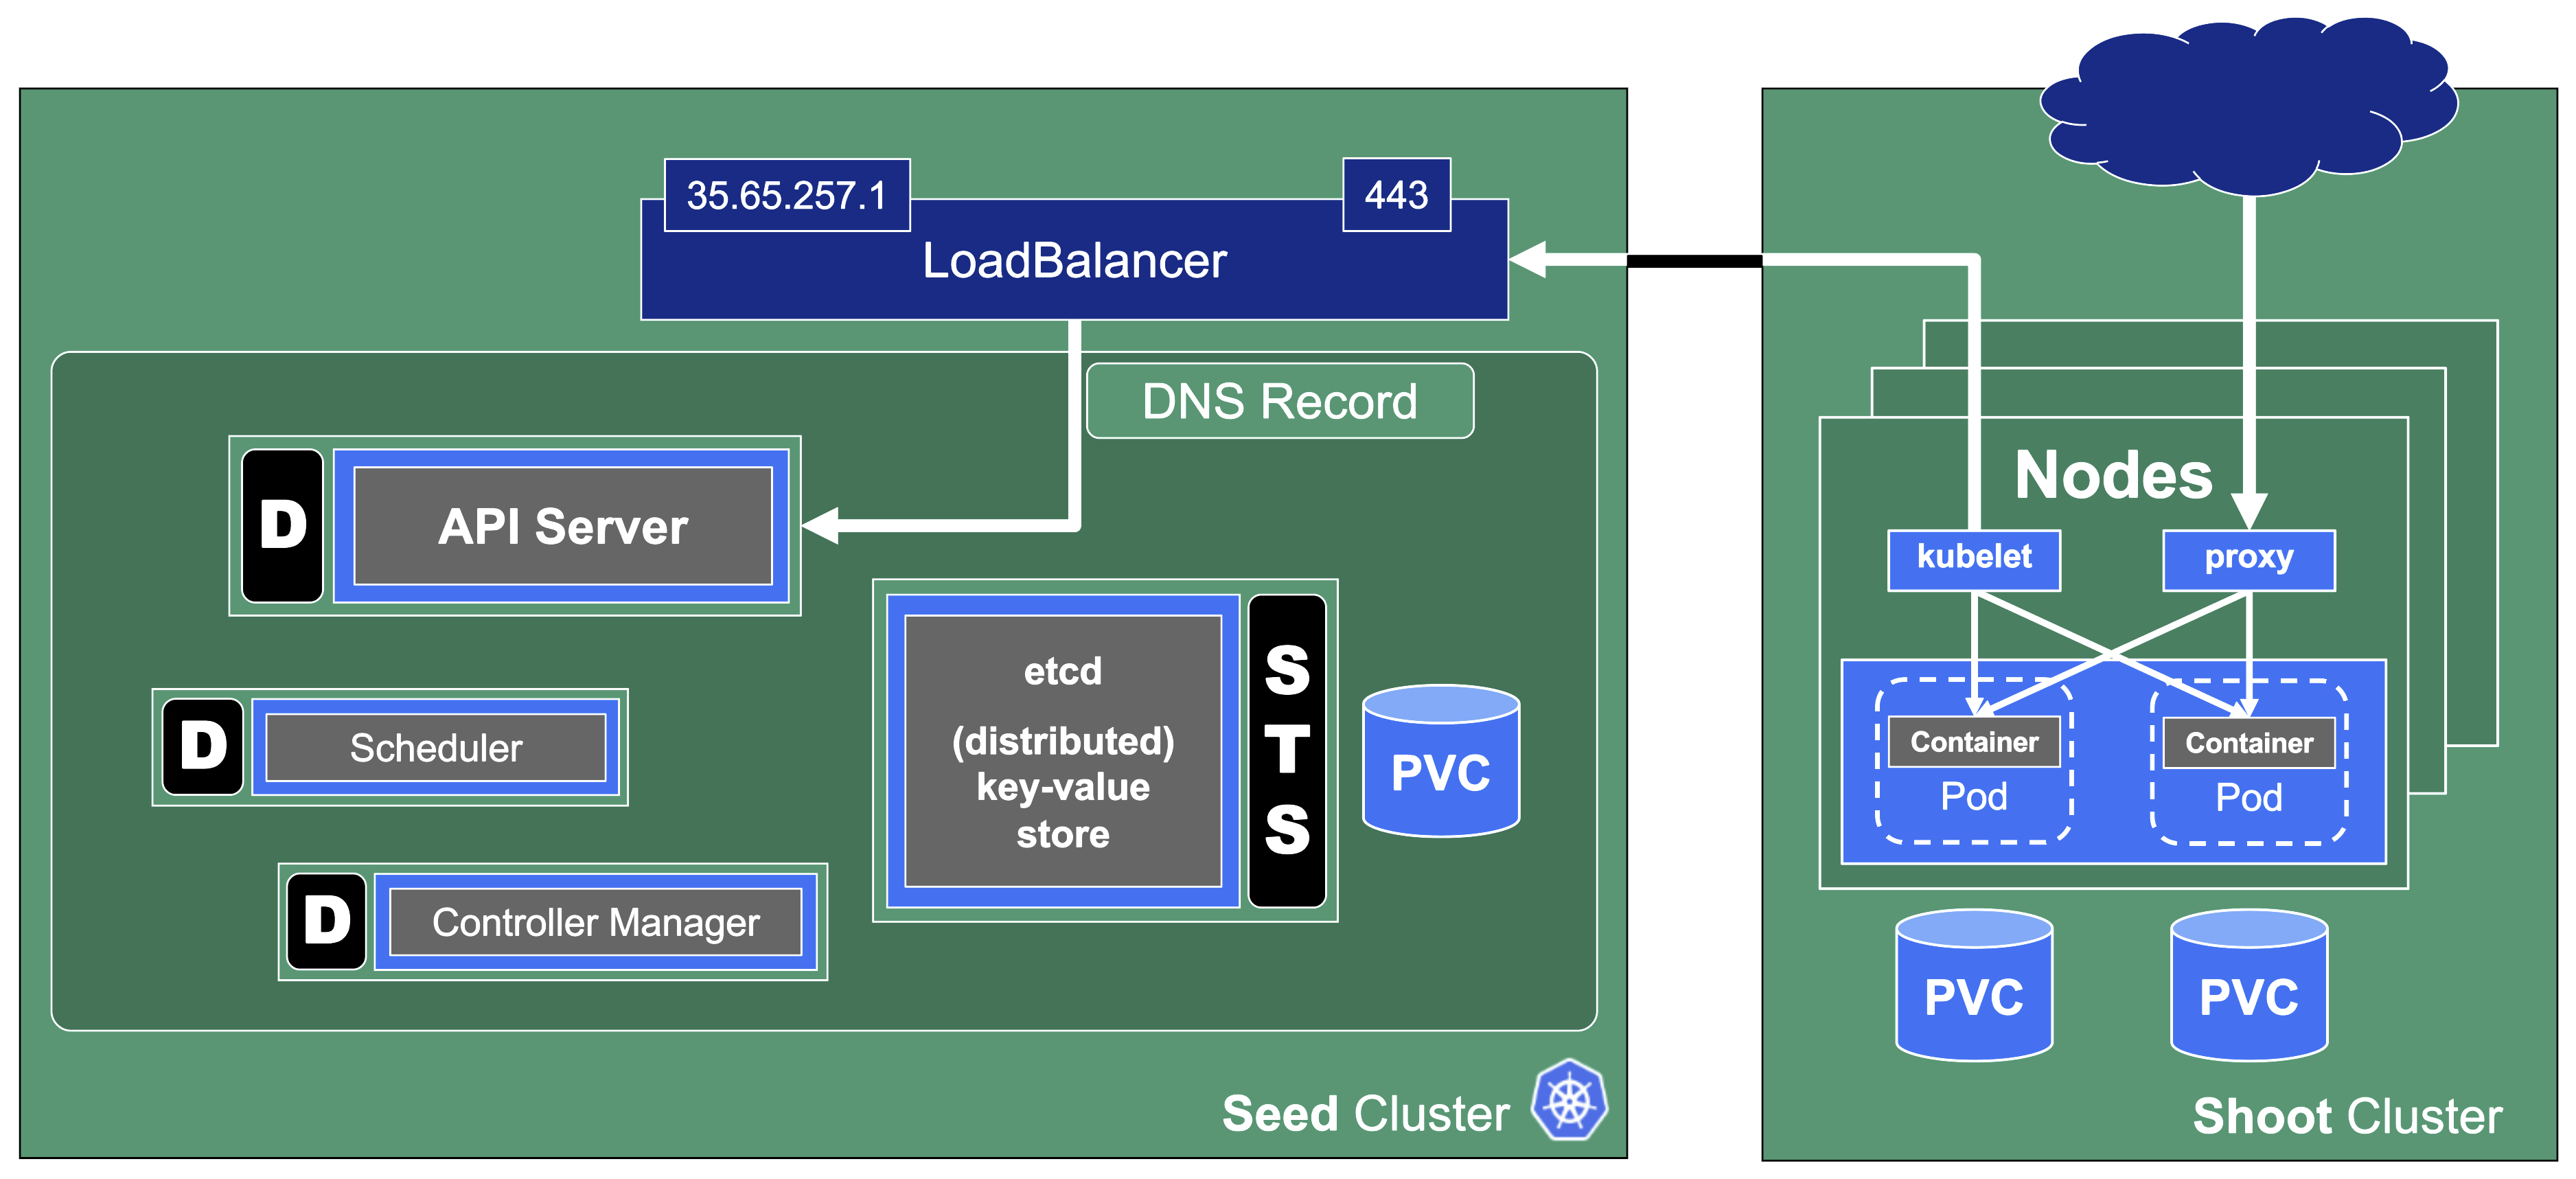
The worker nodes of a shoot cluster are plain, simple virtual machines in a hyperscaler (EC2 instances in AWS, GCE instances in GCP or ECS instances in Alibaba Cloud). They run an operating system, a container runtime (e.g., containerd), and the kubelet that gets configured during node bootstrap to connect to the shoot’s API server. The API server in turn runs in the seed cluster and is exposed through an ingress. This connection happens over public internet and is - of course - TLS encrypted.
In other terms: you use Kubernetes to run Kubernetes.
Cluster Hierarchy in Gardener
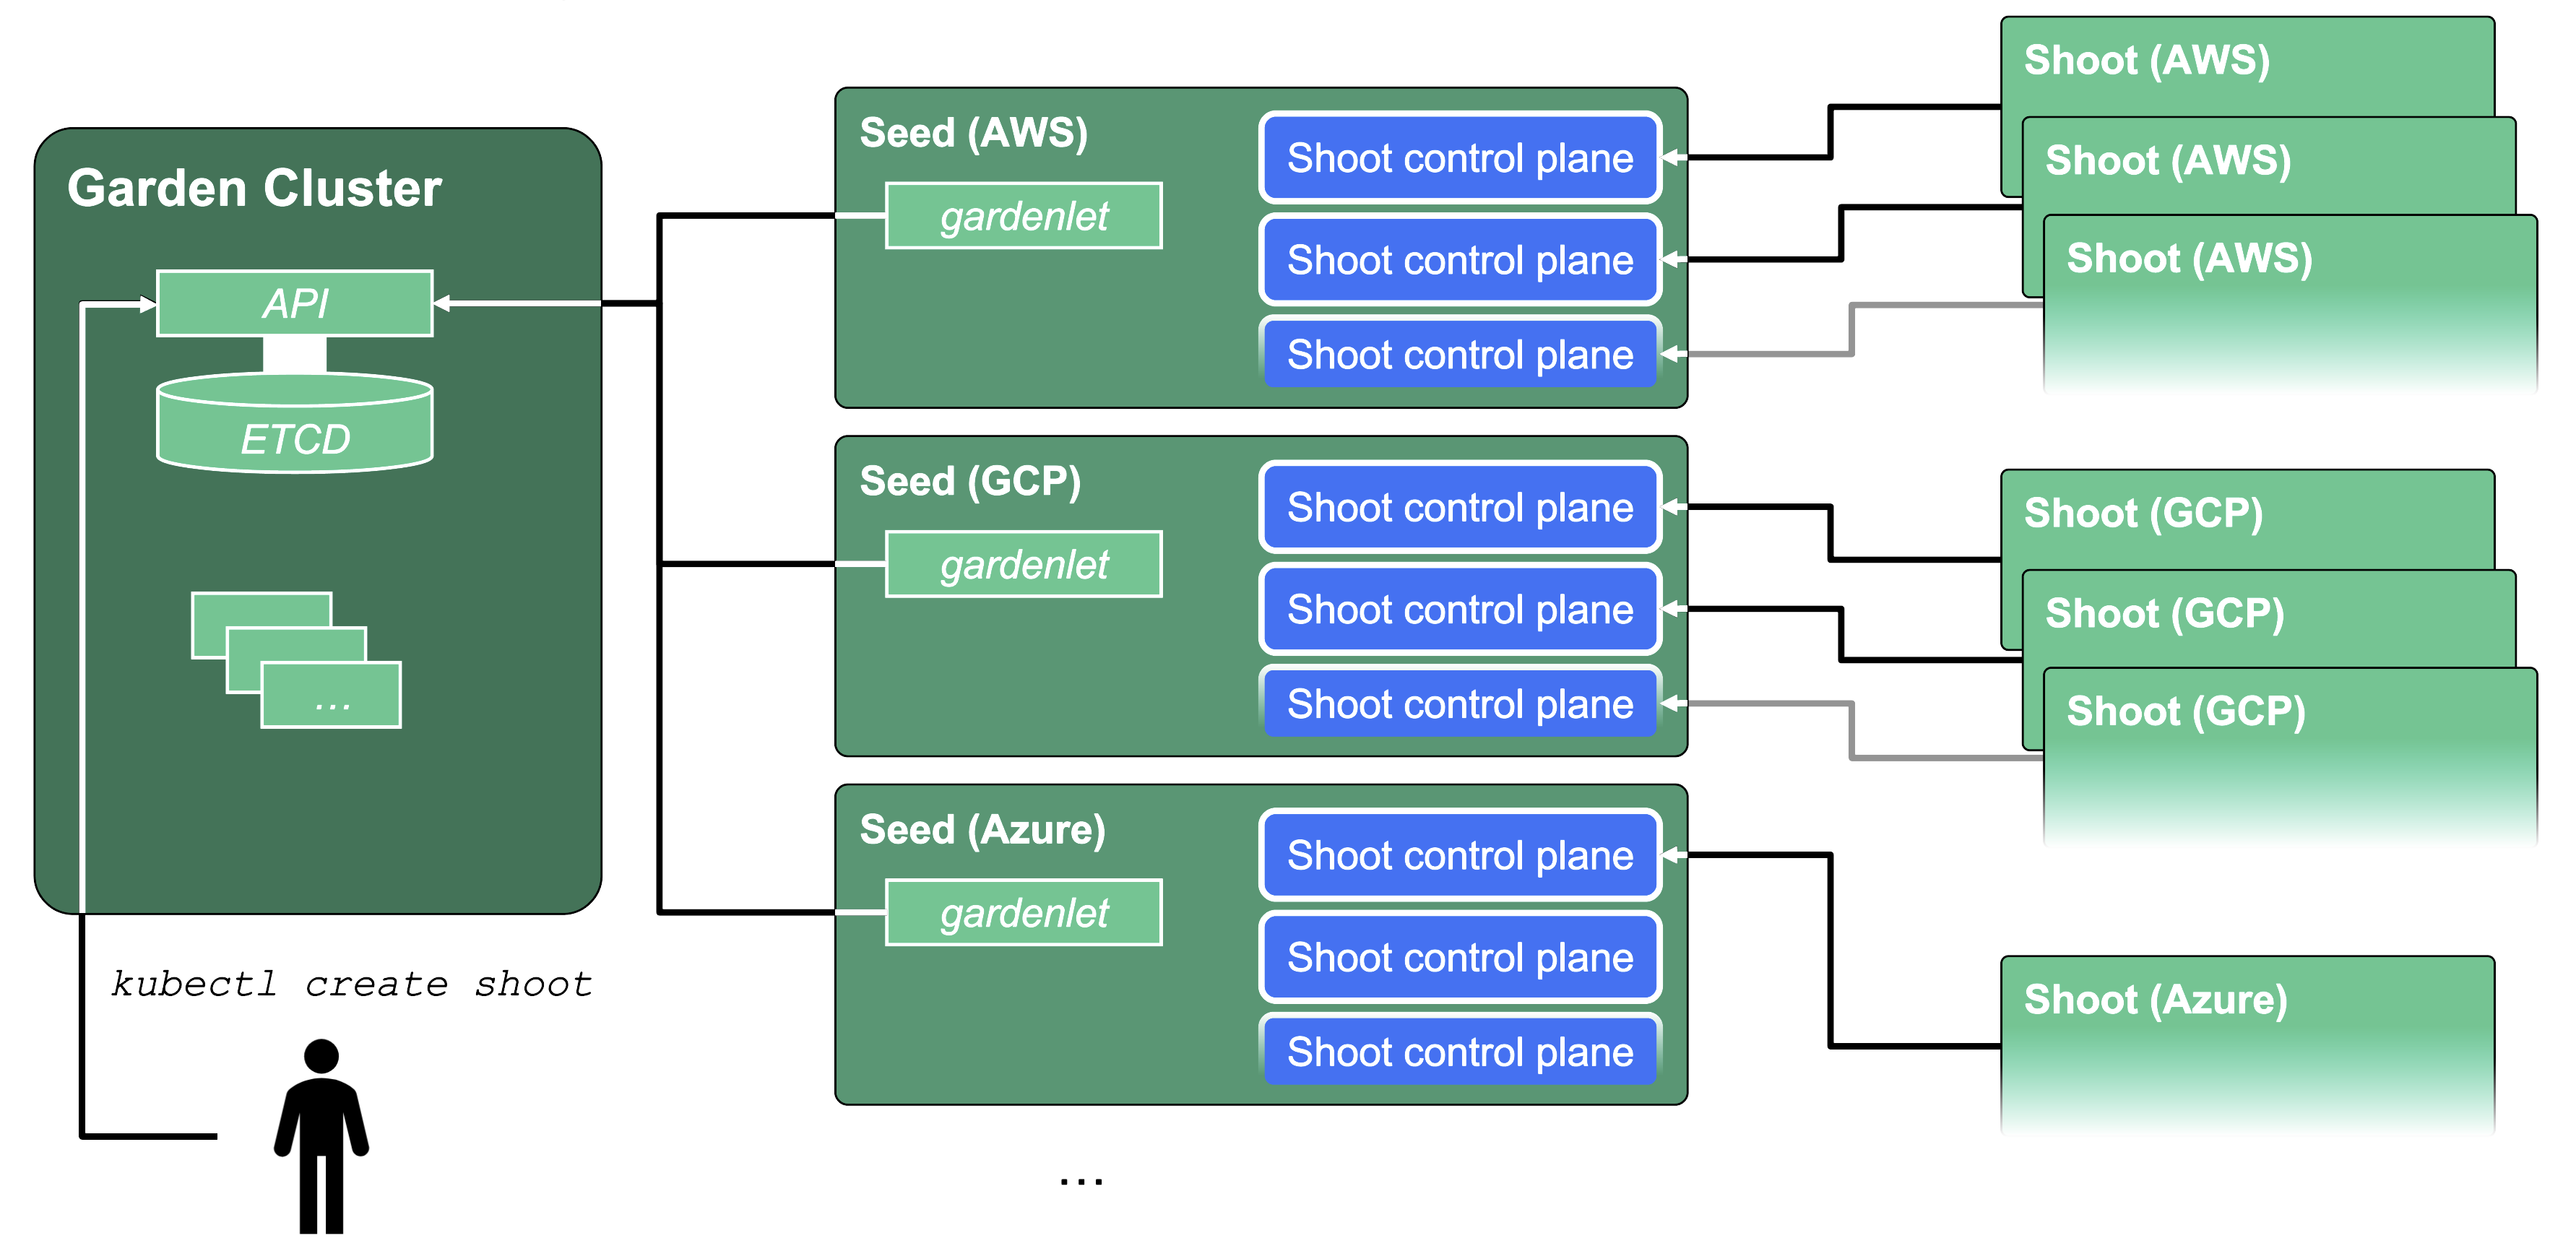
Gardener uses many Kubernetes clusters to eventually provide you with your very own shoot cluster.
At the heart of Gardener’s cluster hierarchy is the garden cluster. Since Gardener is 100% Kubernetes native, a Kubernetes cluster is needed to store all Gardener related resources. The garden cluster is actually nodeless - it only consists of a control plane, an API server (actually two), an etcd, and a bunch of controllers. The garden cluster is the central brain of a Gardener landscape and the one you connect to in order to create, modify or delete shoot clusters - either with kubectl and a dedicated kubeconfig or through the Gardener dashboard.
The seed clusters are next in the hierarchy - they are the clusters which will host the “kubeceptioned” control planes of the shoot clusters. For every hyperscaler supported in a Gardener landscape, there would be at least one seed cluster. However, to reduce latencies as well as for scaling, Gardener landscapes have several different seeds in different regions across the globe to keep the distance between control planes and actual worker nodes small.
Finally, there are the shoot clusters - what Gardener is all about. Shoot clusters are the clusters which you create through Gardener and which your workload gets deployed to.
Gardener Components Overview

From a very high level point of view, the important components of Gardener are:
The Gardener API Endpoint
You can connect to the Gardener API Endpoint (i.e., the API server in the garden cluster) either through the dashboard or with kubectl, given that you have a proper kubeconfig for it.
The Seeds Running the Shoot Cluster Control Planes
Inside each seed is one of the most important controllers in Gardener - the gardenlet. It spawns many other controllers, which will eventually create all resources for a shoot cluster, including all resources on the cloud providers such as virtual networks, security groups, and virtual machines.
Gardener’s API Endpoint
Kubernetes’ API can be extended - either by CRDs or by API aggregation.
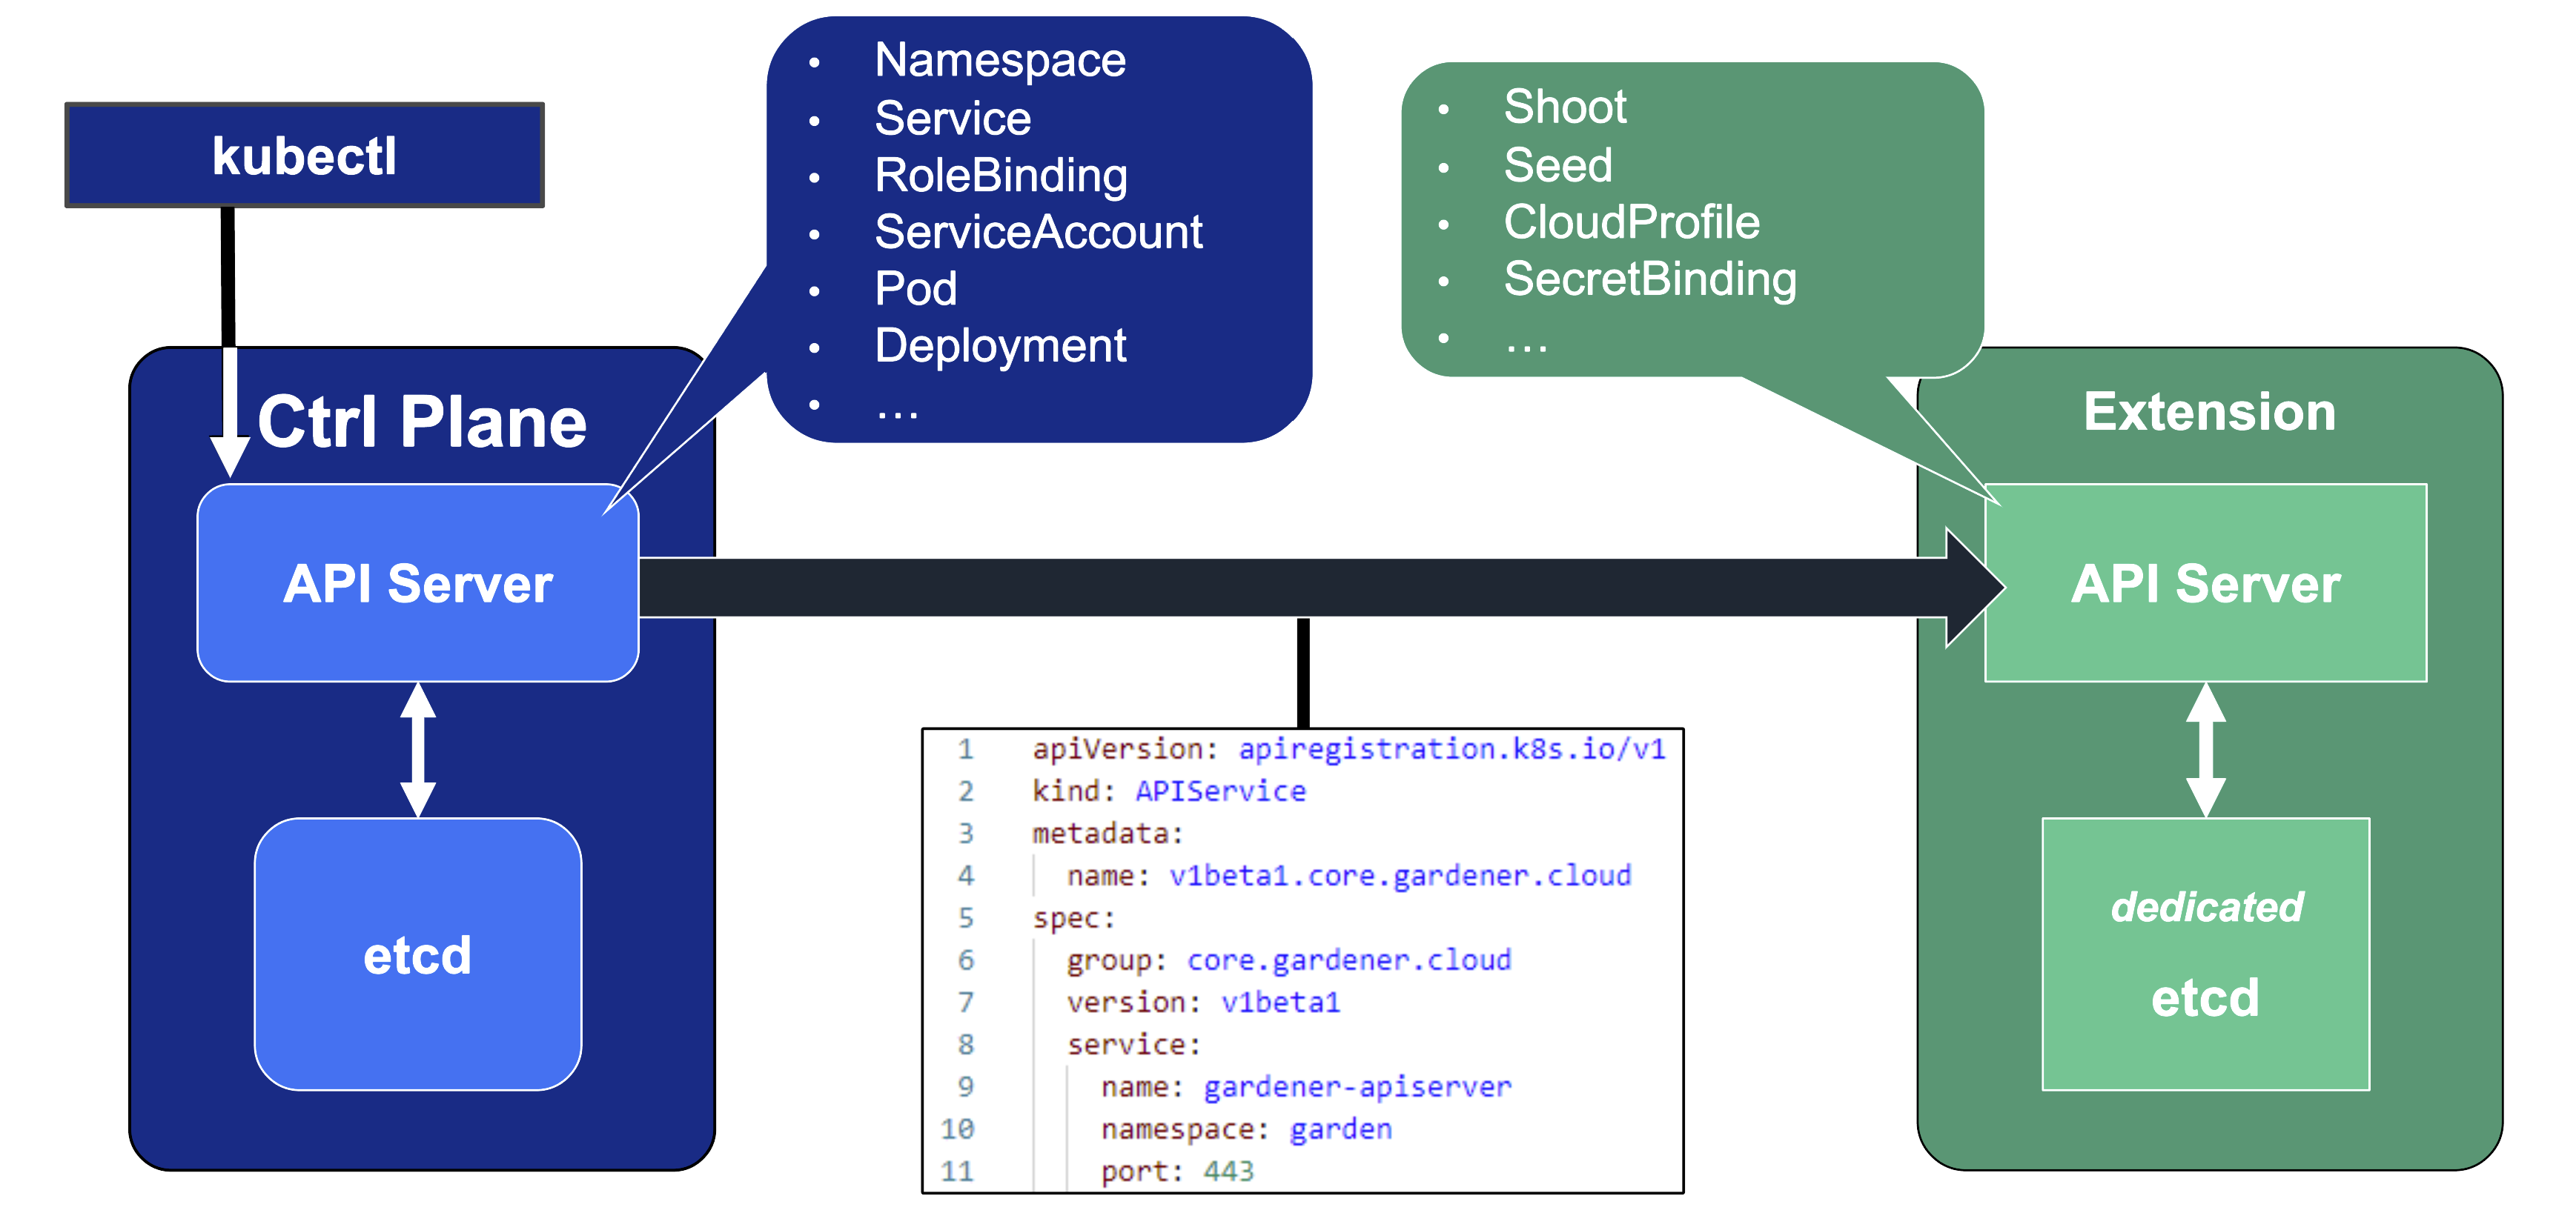
API aggregation involves setting up a so called extension-API-server and registering it with the main Kubernetes API server. The extension API server will then serve resources of custom-defined API groups on its own. While the main Kubernetes API server is still used to handle RBAC, authorization, namespacing, quotas, limits, etc., all custom resources will be delegated to the extension-API-server. This is done through an APIService resource in the main API server - it specifies that, e.g., the API group core.gardener.cloud is served by a dedicated extension-API-server and all requests concerning this API group should be forwarded the specified IP address or Kubernetes service name. Extension API servers can persist their resources in their very own etcd but they do not have to - instead, they can use the main API servers etcd as well.
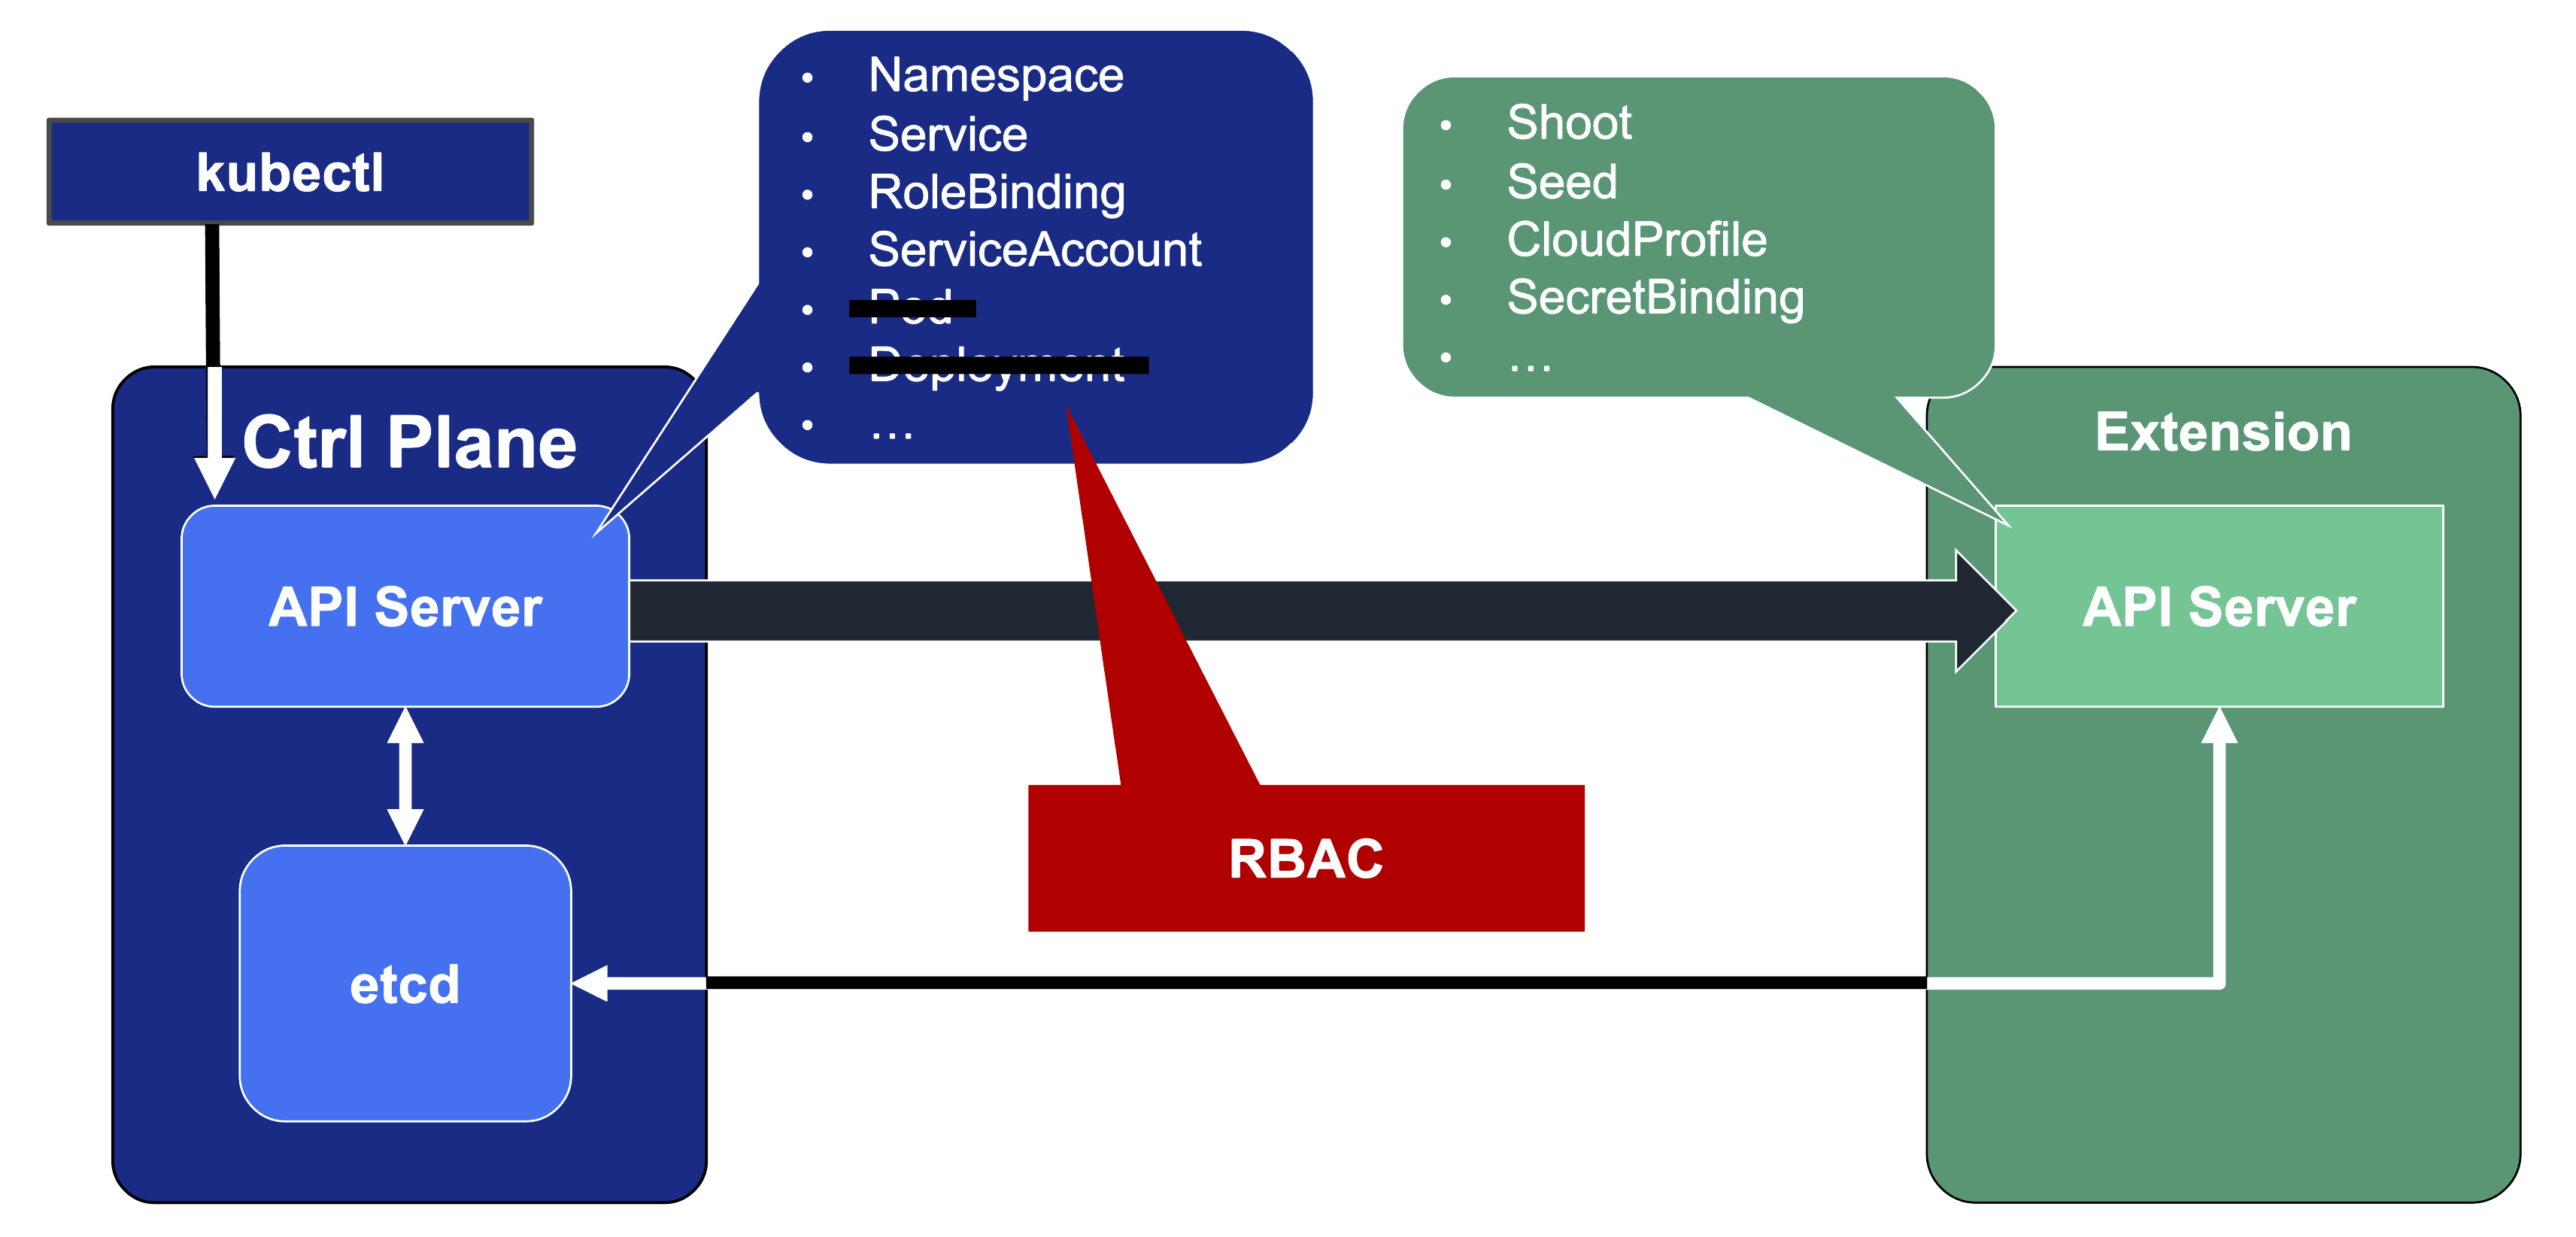
Gardener uses its very own extension API server for its resources like Shoot, Seed, CloudProfile, SecretBinding, etc… However, Gardener does not set up a dedicated etcd for its own extension API server - instead, it reuses the existing etcd of the main Kubernetes API server. This is absolutely possible since the resources of Gardener’s API are part of the API group gardener.cloud and thus will not interfere with any resources of the main Kubernetes API in etcd.
In case you are interested, you can read more on:
Gardener API Resources
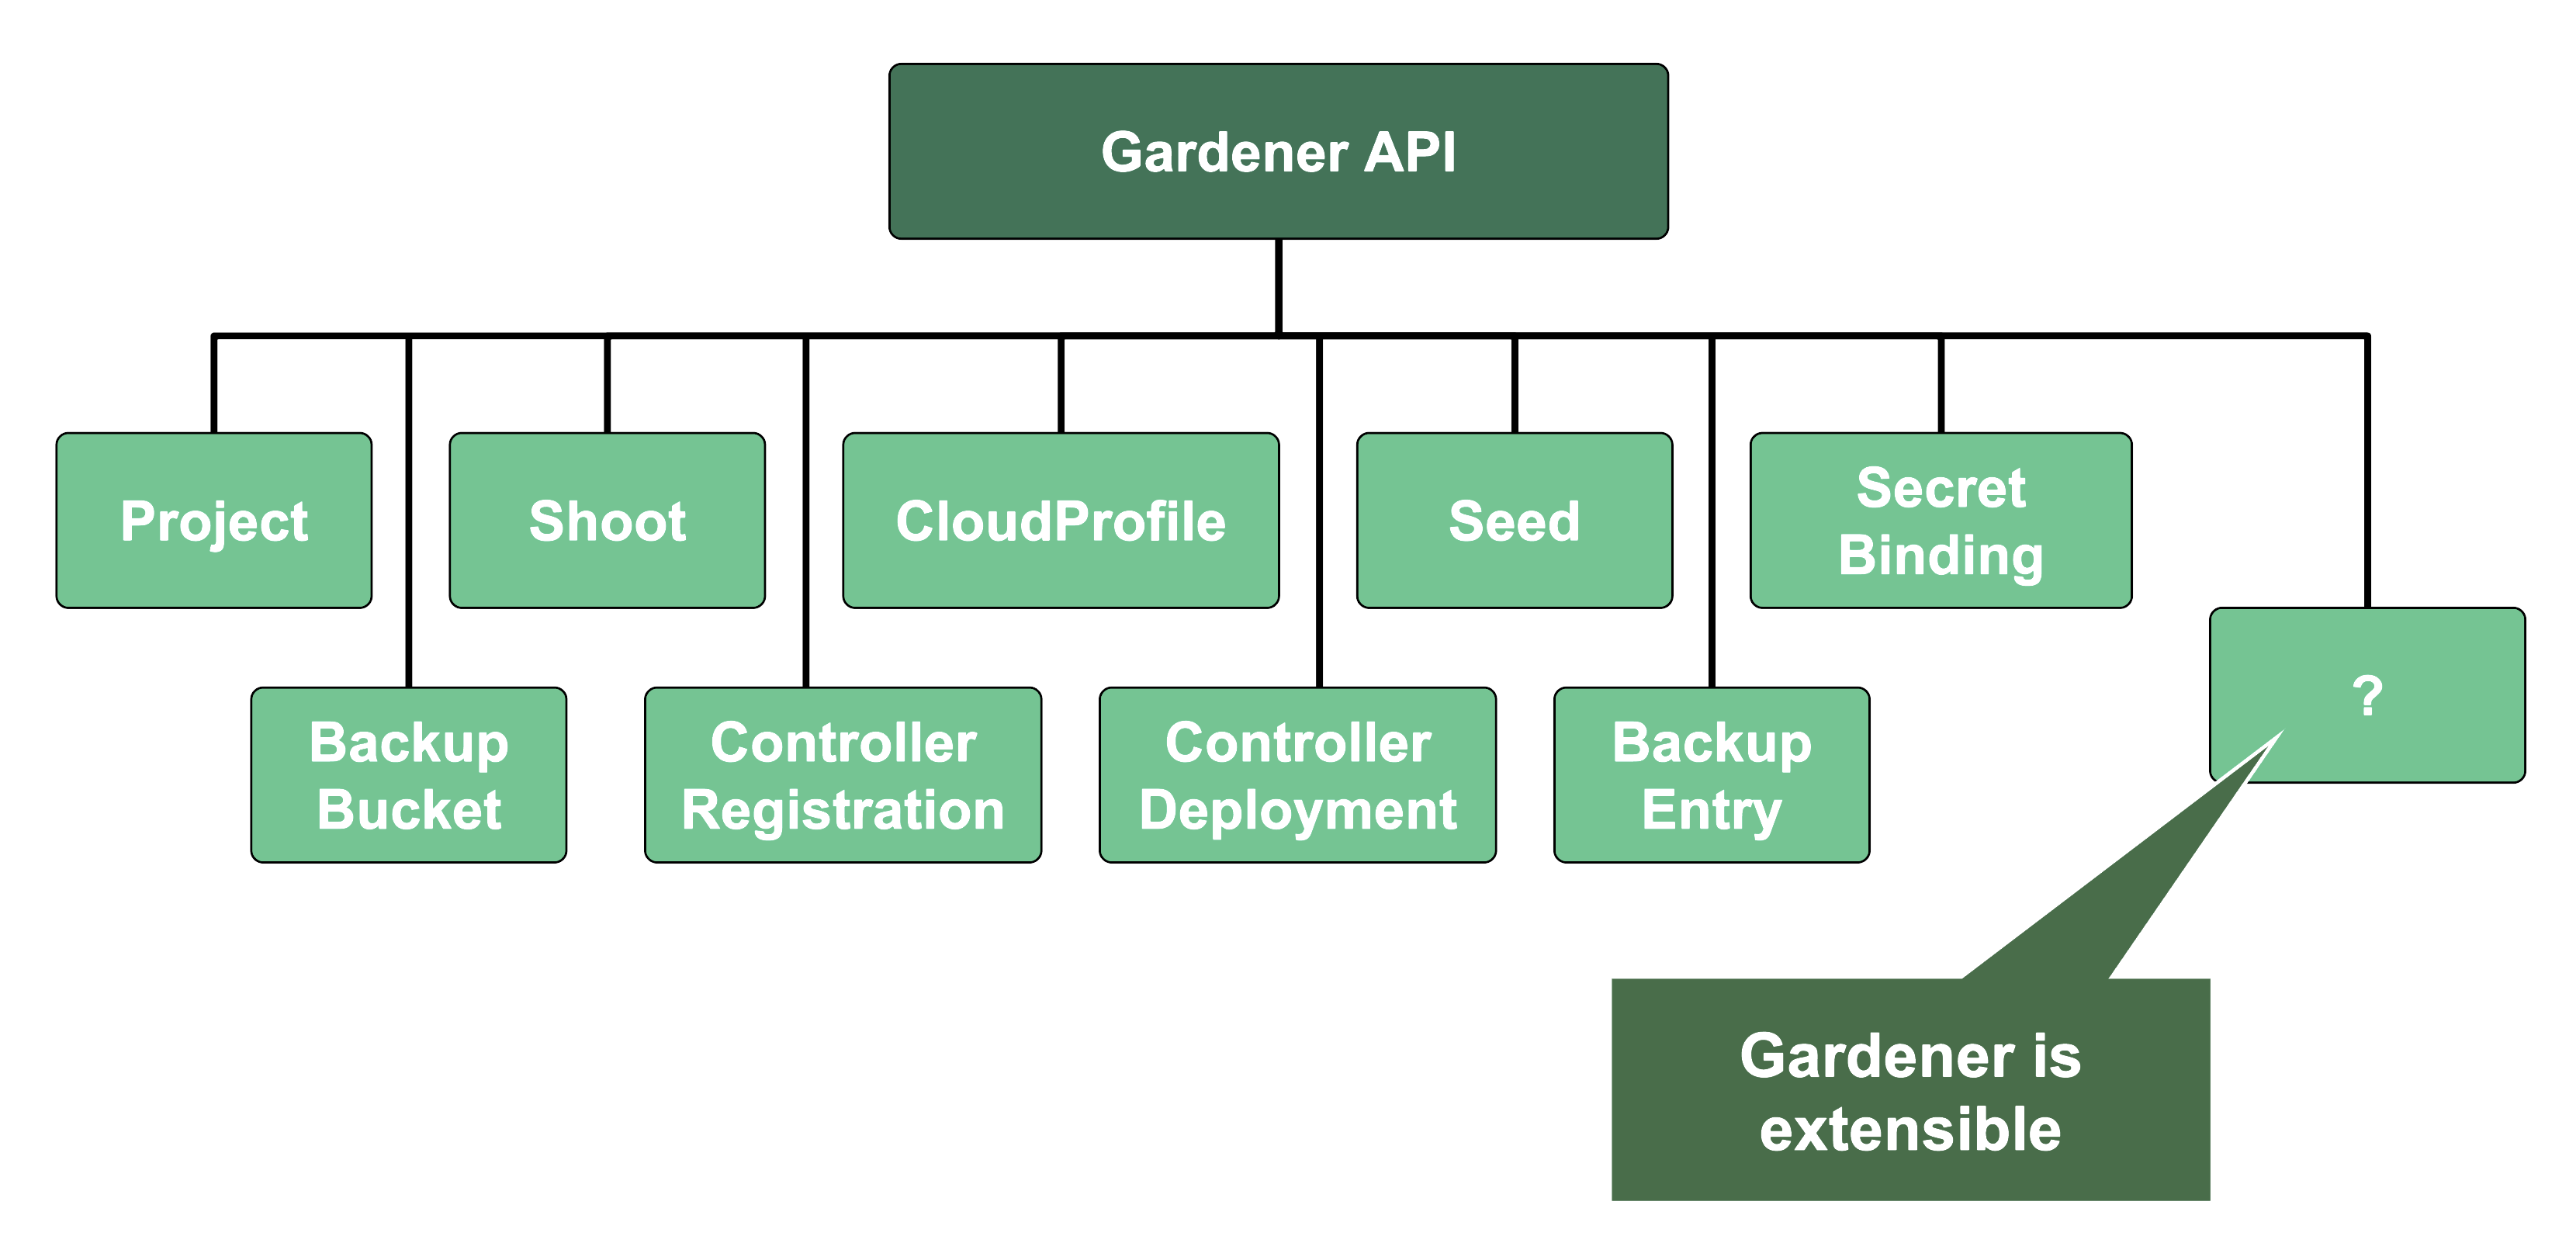
Since Gardener’s API endpoint is a regular Kubernetes cluster, it would theoretically serve all resources from the Kubernetes core API, including Pods, Deployments, etc. However, Gardener implements RBAC rules and disables certain controllers that make these resources inaccessible. Objects like Secrets, Namespaces, and ResourceQuotas are still available, though, as they play a vital role in Gardener.
In addition, through Gardener’s extension API server, the API endpoint also serves Gardener’s custom resources like Projects, Shoots, CloudProfiles, Seeds, SecretBindings (those are relevant for users), ControllerRegistrations, ControllerDeployments, BackupBuckets, BackupEntries (those are relevant to an operator), etc.
3 - Gardener Projects
Overview

Gardener is all about Kubernetes clusters, which we call shoots. However, Gardener also does user management, delicate permission management and offers technical accounts to integrate its services into other infrastructures. It allows you to create several quotas and it needs credentials to connect to cloud providers. All of these are arranged in multiple fully contained projects, each of which belongs to a dedicated user and / or group.
Projects on YAML Level
Projects are a Kubernetes resource which can be expressed by YAML. The resource specification can be found in the API reference documentation.
A project’s specification defines a name, a description (which is a free-text field), a purpose (again, a free-text field), an owner, and members. In Gardener, user management is done on a project level. Therefore, projects can have different members with certain roles.
In Gardener, a user can have one of five different roles: owner, admin, viewer, UAM, and service account manager. A member with the viewer role can see and list all clusters but cannot create, delete or modify them. For that, a member would need the admin role. Another important role would be the uam role - members with that role are allowed to manage members and technical users for a project. The owner of a project is allowed to do all of that, regardless of what other roles might be assigned to him.
Projects are getting reconciled by Gardener’s project-controller, a component of Gardener’s controller manager. The status of the last reconcilation, along with any potential failures, will be recorded in the project’s status field.
For more information, see Projects.
In case you are interested, you can also view the source code for:
Gardener Projects and Kubernetes Namespaces
Each Gardener project corresponds to a Kubernetes namespace and all project specific resources are placed into it.
Even though projects are a dedicated Kubernetes resource, every project also corresponds to a dedicated namespace in the garden cluster. All project resources - including shoots - are placed into this namespace.
You can ask Gardener to use a specific namespace name in the project manifest but usually, this field should be left empty. The namespace then gets created automatically by Gardener’s project-controller, with its name getting generated from the project’s name, prefixed by “garden-”.
ResourceQuotas - if any - will be enforced on the project namespace.
Since all Gardener resources are custom Kubernetes resources, the usual and well established concept of resourceQuotas in Kubernetes can also be applied to Gardener resources. With a resourceQuota that sets a hard limit on, e.g., count/shoots.core.gardener.cloud, you can restrict the number of shoot clusters that can be created in a project.
Infrastructure Secrets
For Gardener to create all relevant infrastructure that a shoot cluster needs inside a cloud provider, it needs to know how to authenticate to the cloud provider’s API. This is done through regular secrets.

Through the Gardener dashboard, secrets can be created for each supported cloud provider (using the dashboard is the preferred way, as it provides interactive help on what information needs to be placed into the secret and how the corresponding user account on the cloud provider should be configured). All of that is stored in a standard, opaque Kubernetes secret.
Inside of a shoot manifest, a reference to that secret is given so that Gardener knows which secret to use for a given shoot. Consequently, different shoots, even though they are in the same project, can be created on multiple different cloud provider accounts. However, instead of referring to the secret directly, Gardener introduces another layer of indirection called a SecretBinding.
In the shoot manifest, we refer to a SecretBinding and the SecretBinding in turn refers to the actual secret.
SecretBindings
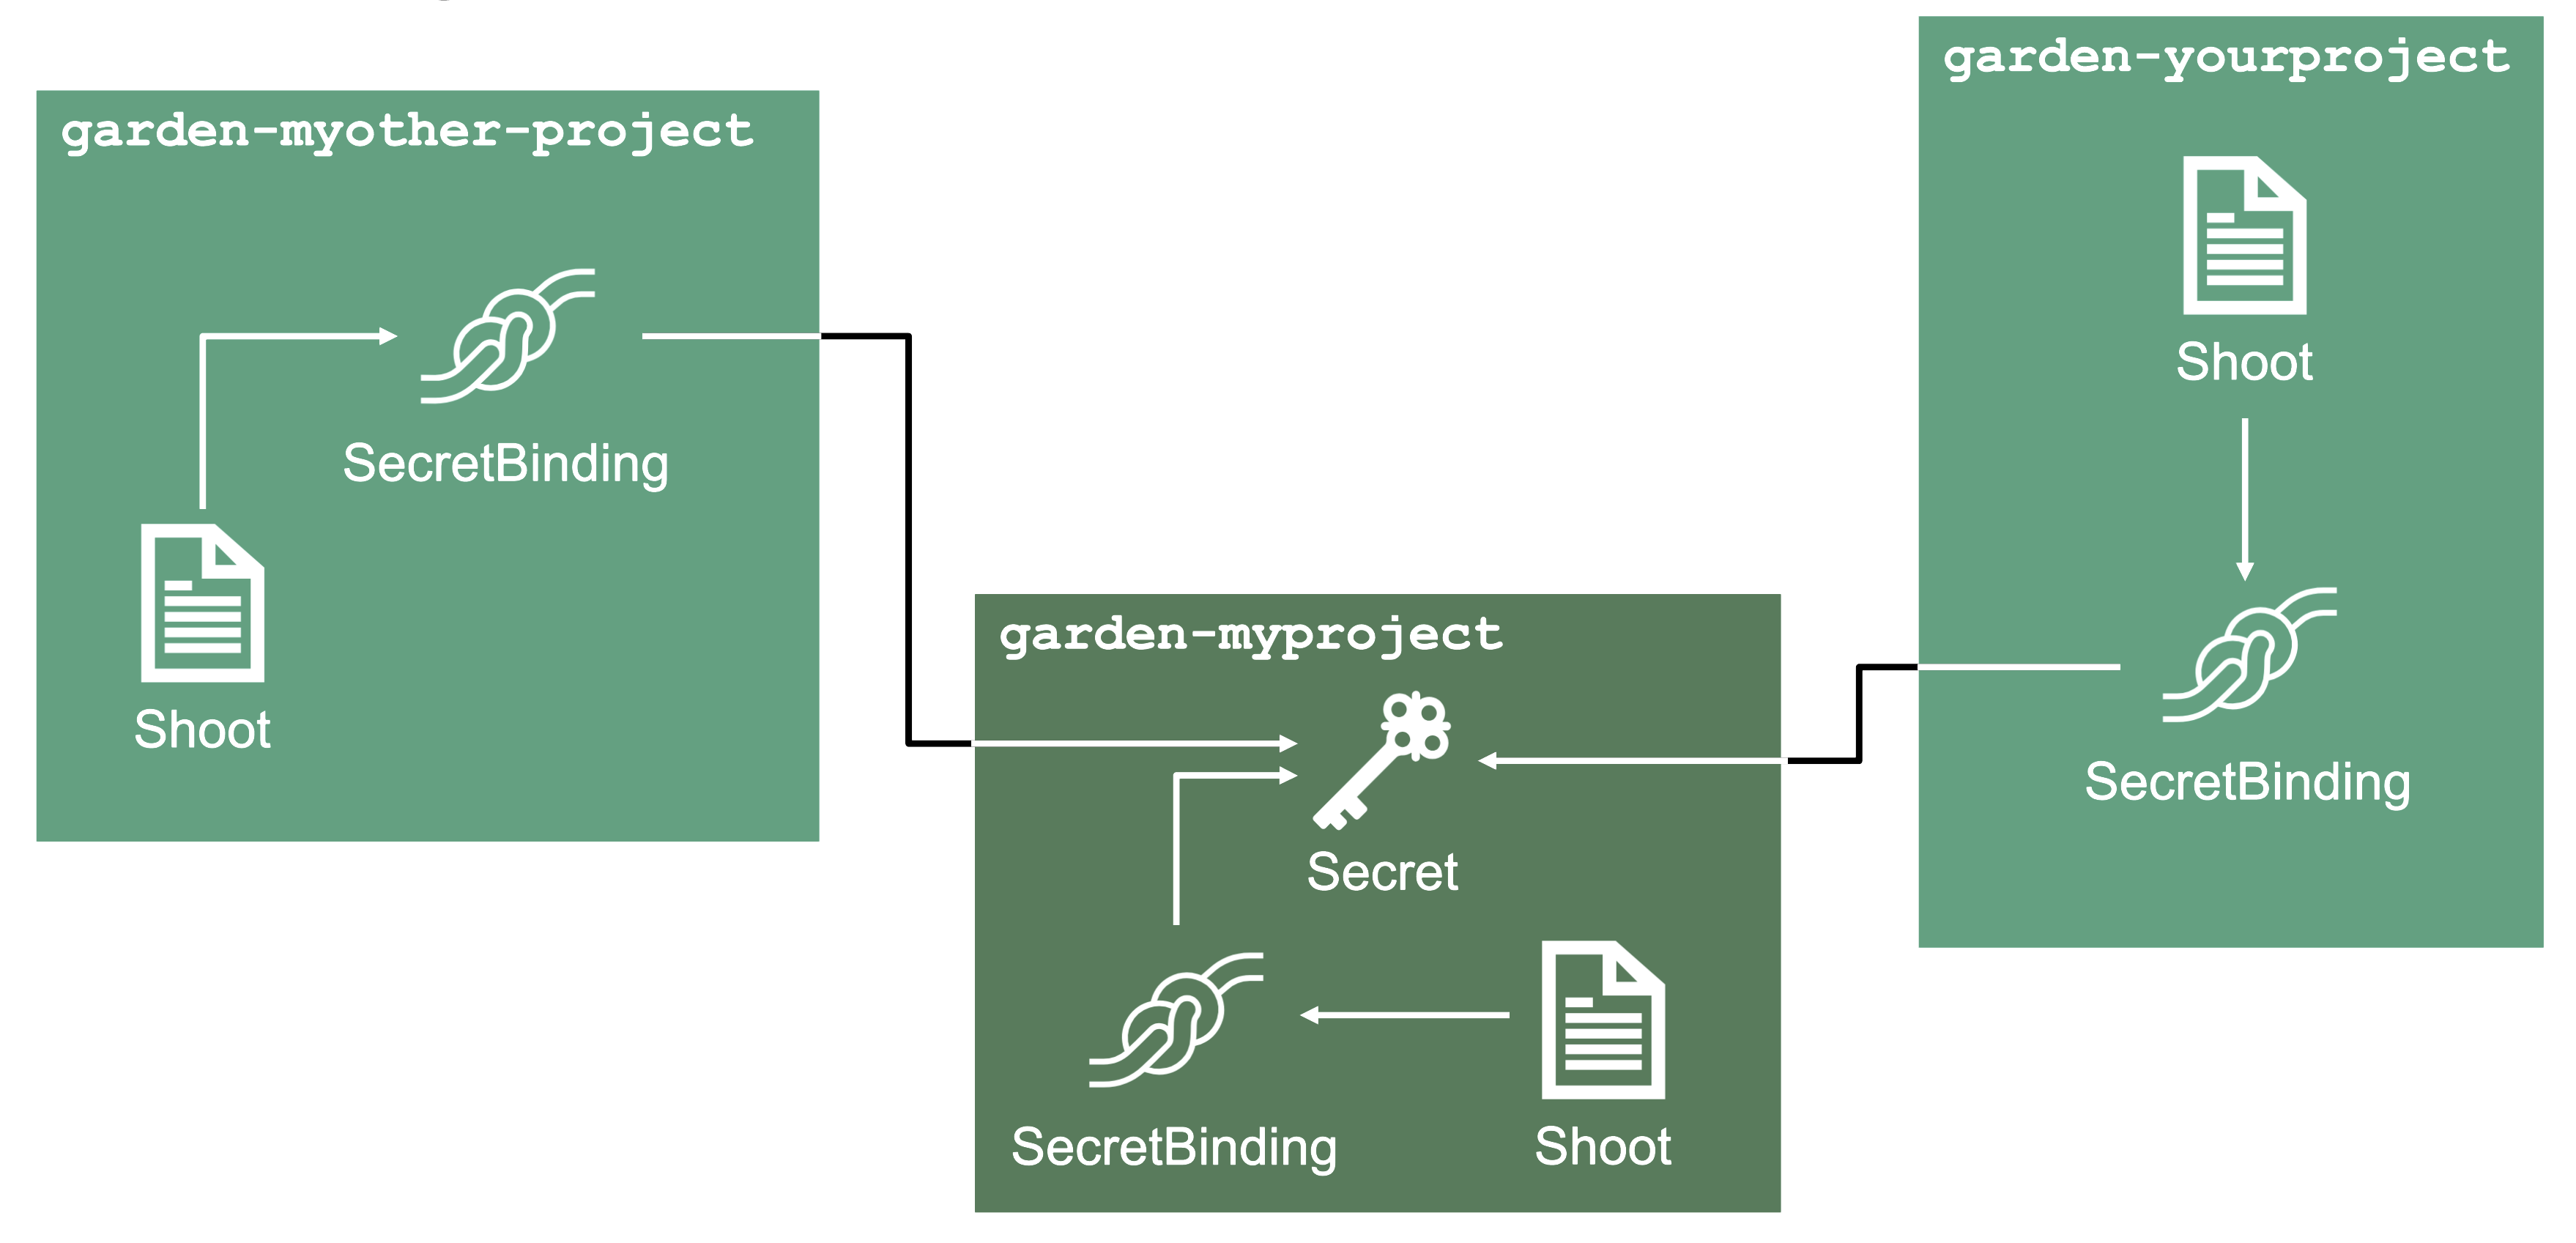
With SecretBindings, it is possible to reference the same infrastructure secret in different projects across namespaces. This has the following advantages:
- Infrastructure secrets can be kept in one project (and thus namespace) with limited access. Through SecretsBindings, the secrets can be used in other projects (and thus namespaces) without being able to read their contents.
- Infrastructure secrets can be kept at one central place (a dedicated project) and be used by many other projects. This way, if a credential rotation is required, they only need to be changed in the secrets at that central place and not in all projects that reference them.
Service Accounts
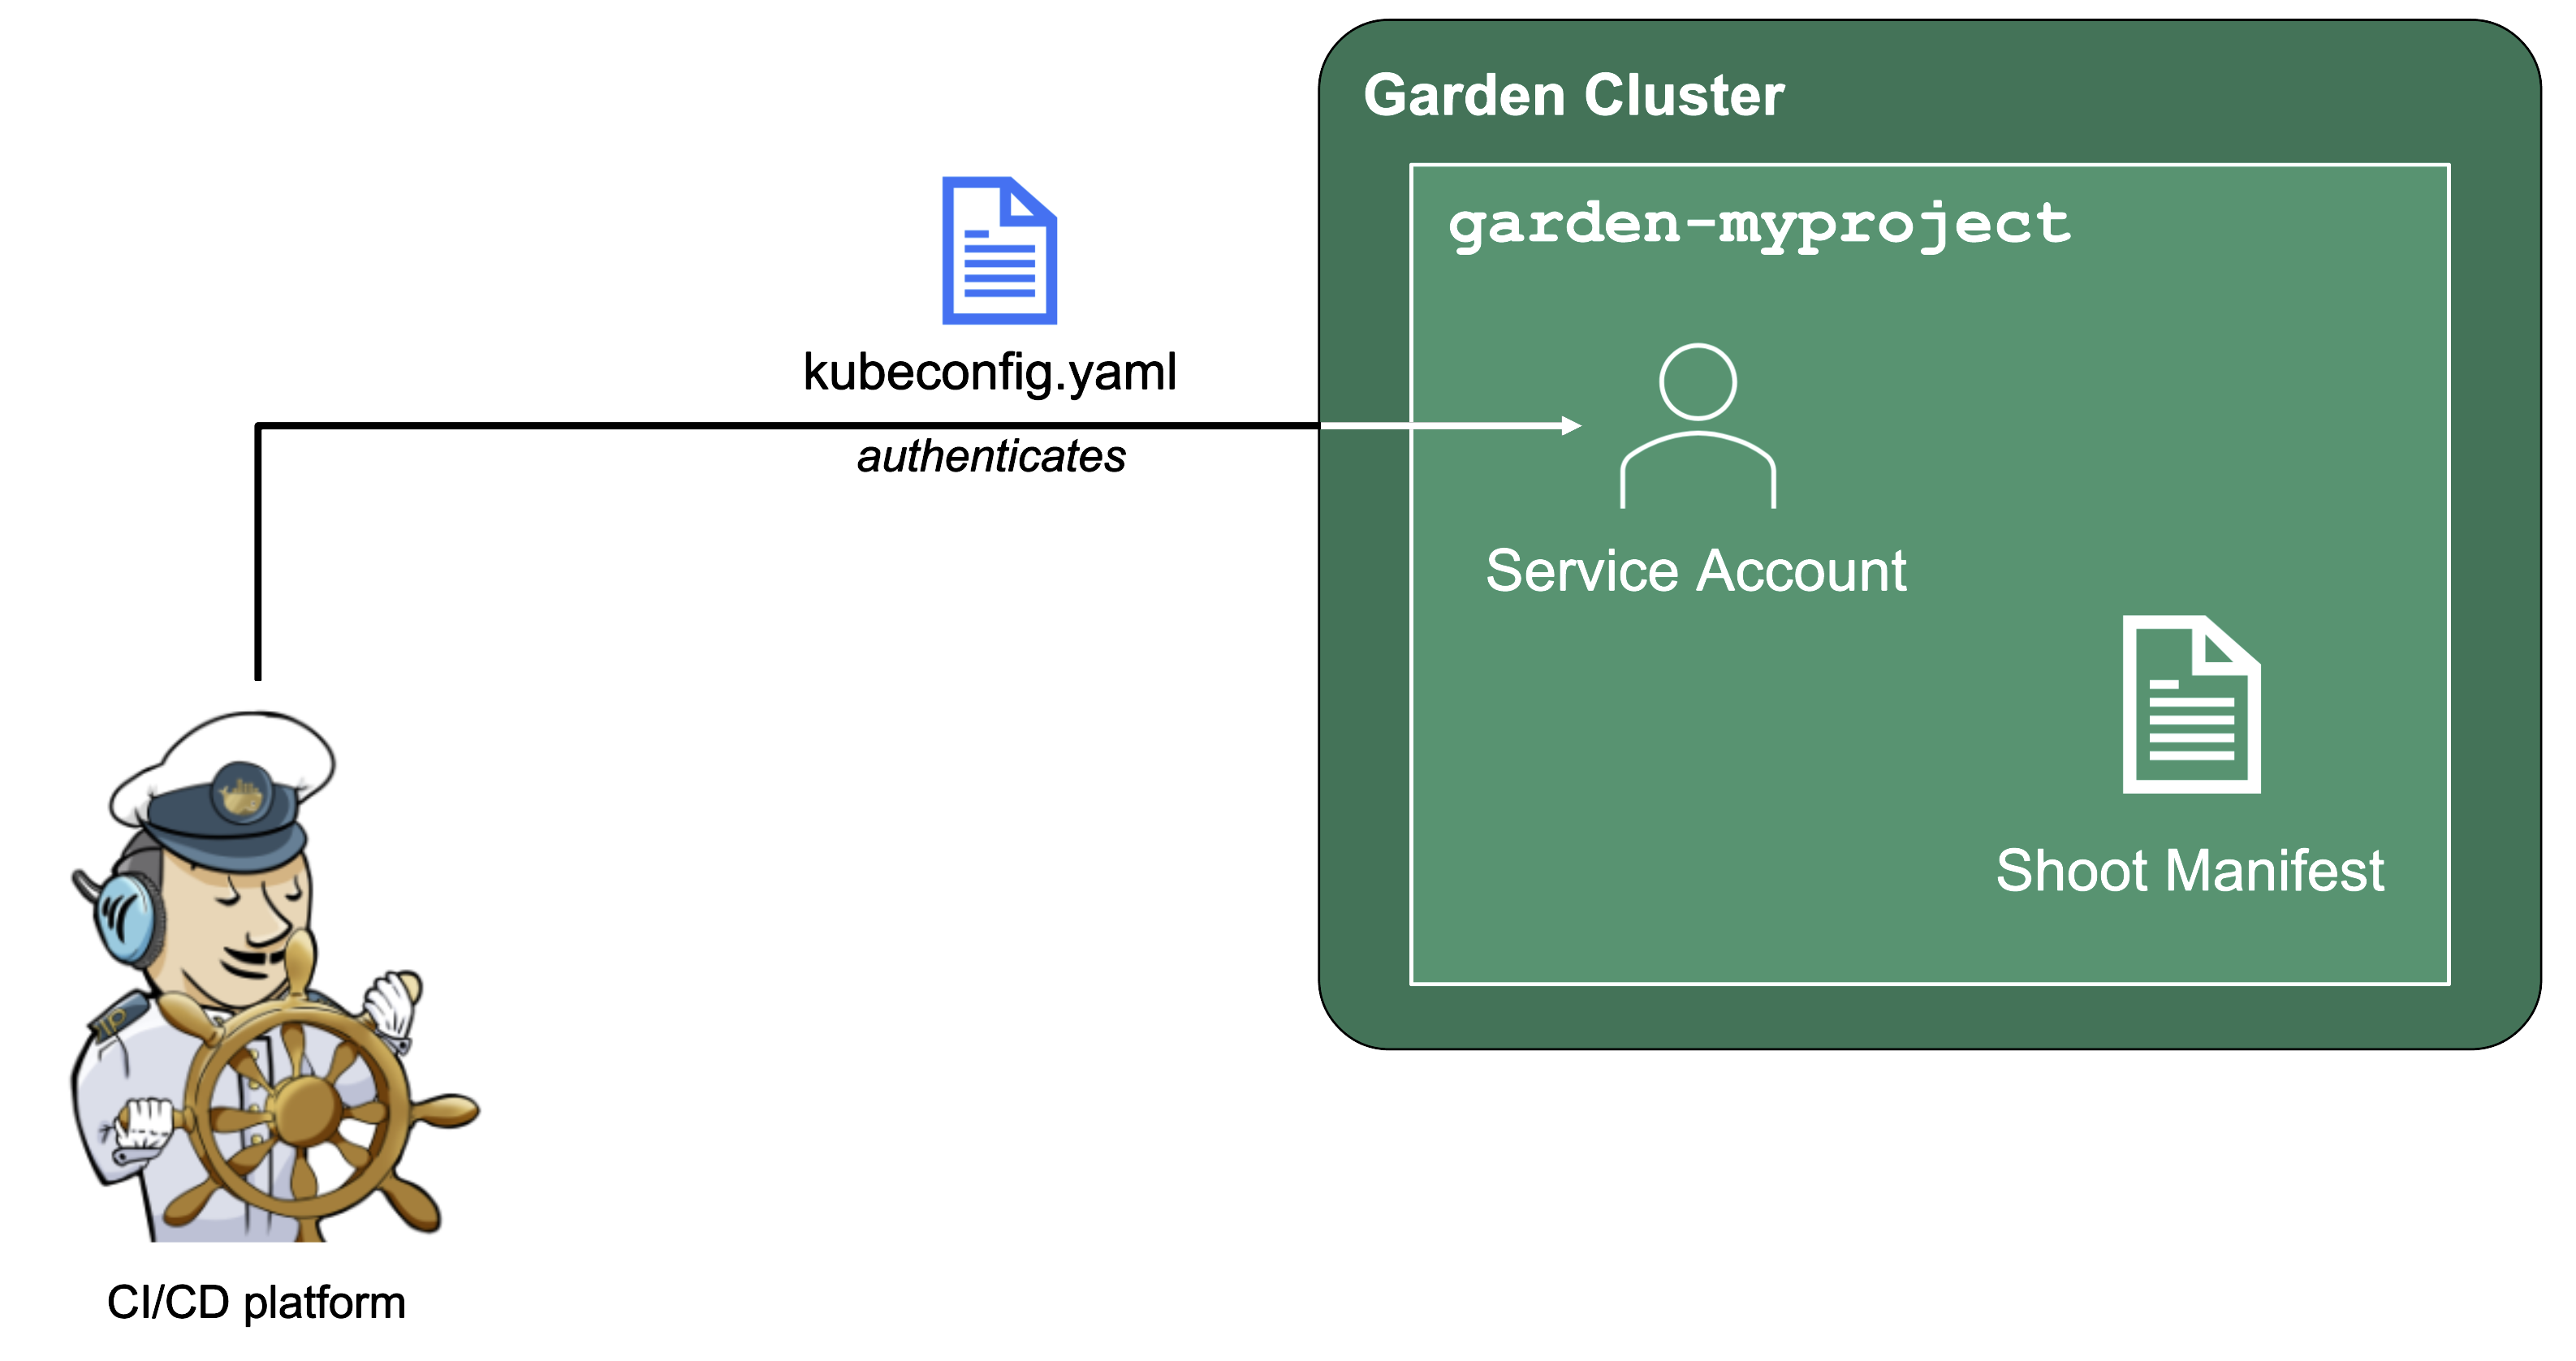
Since Gardener is 100% Kubernetes, it can be easily used in a programmatic way - by just sending the resource manifest of a Gardener resource to its API server. To do so, a kubeconfig file and a (technical) user that the kubeconfig maps to are required.
Next to project members, a project can have several service accounts - simple Kubernetes service accounts that are created in a project’s namespace. Consequently, every service account will also have its own, dedicated kubeconfig and they can be granted different roles through RoleBindings.
To integrate Gardener with other infrastructure or CI/CD platforms, one can create a service account, obtain its kubeconfig and then automatically send shoot manifests to the Gardener API server. With that, Kubernetes clusters can be created, modified or deleted on the fly whenever they are needed.
4 - Gardener Shoots
Overview
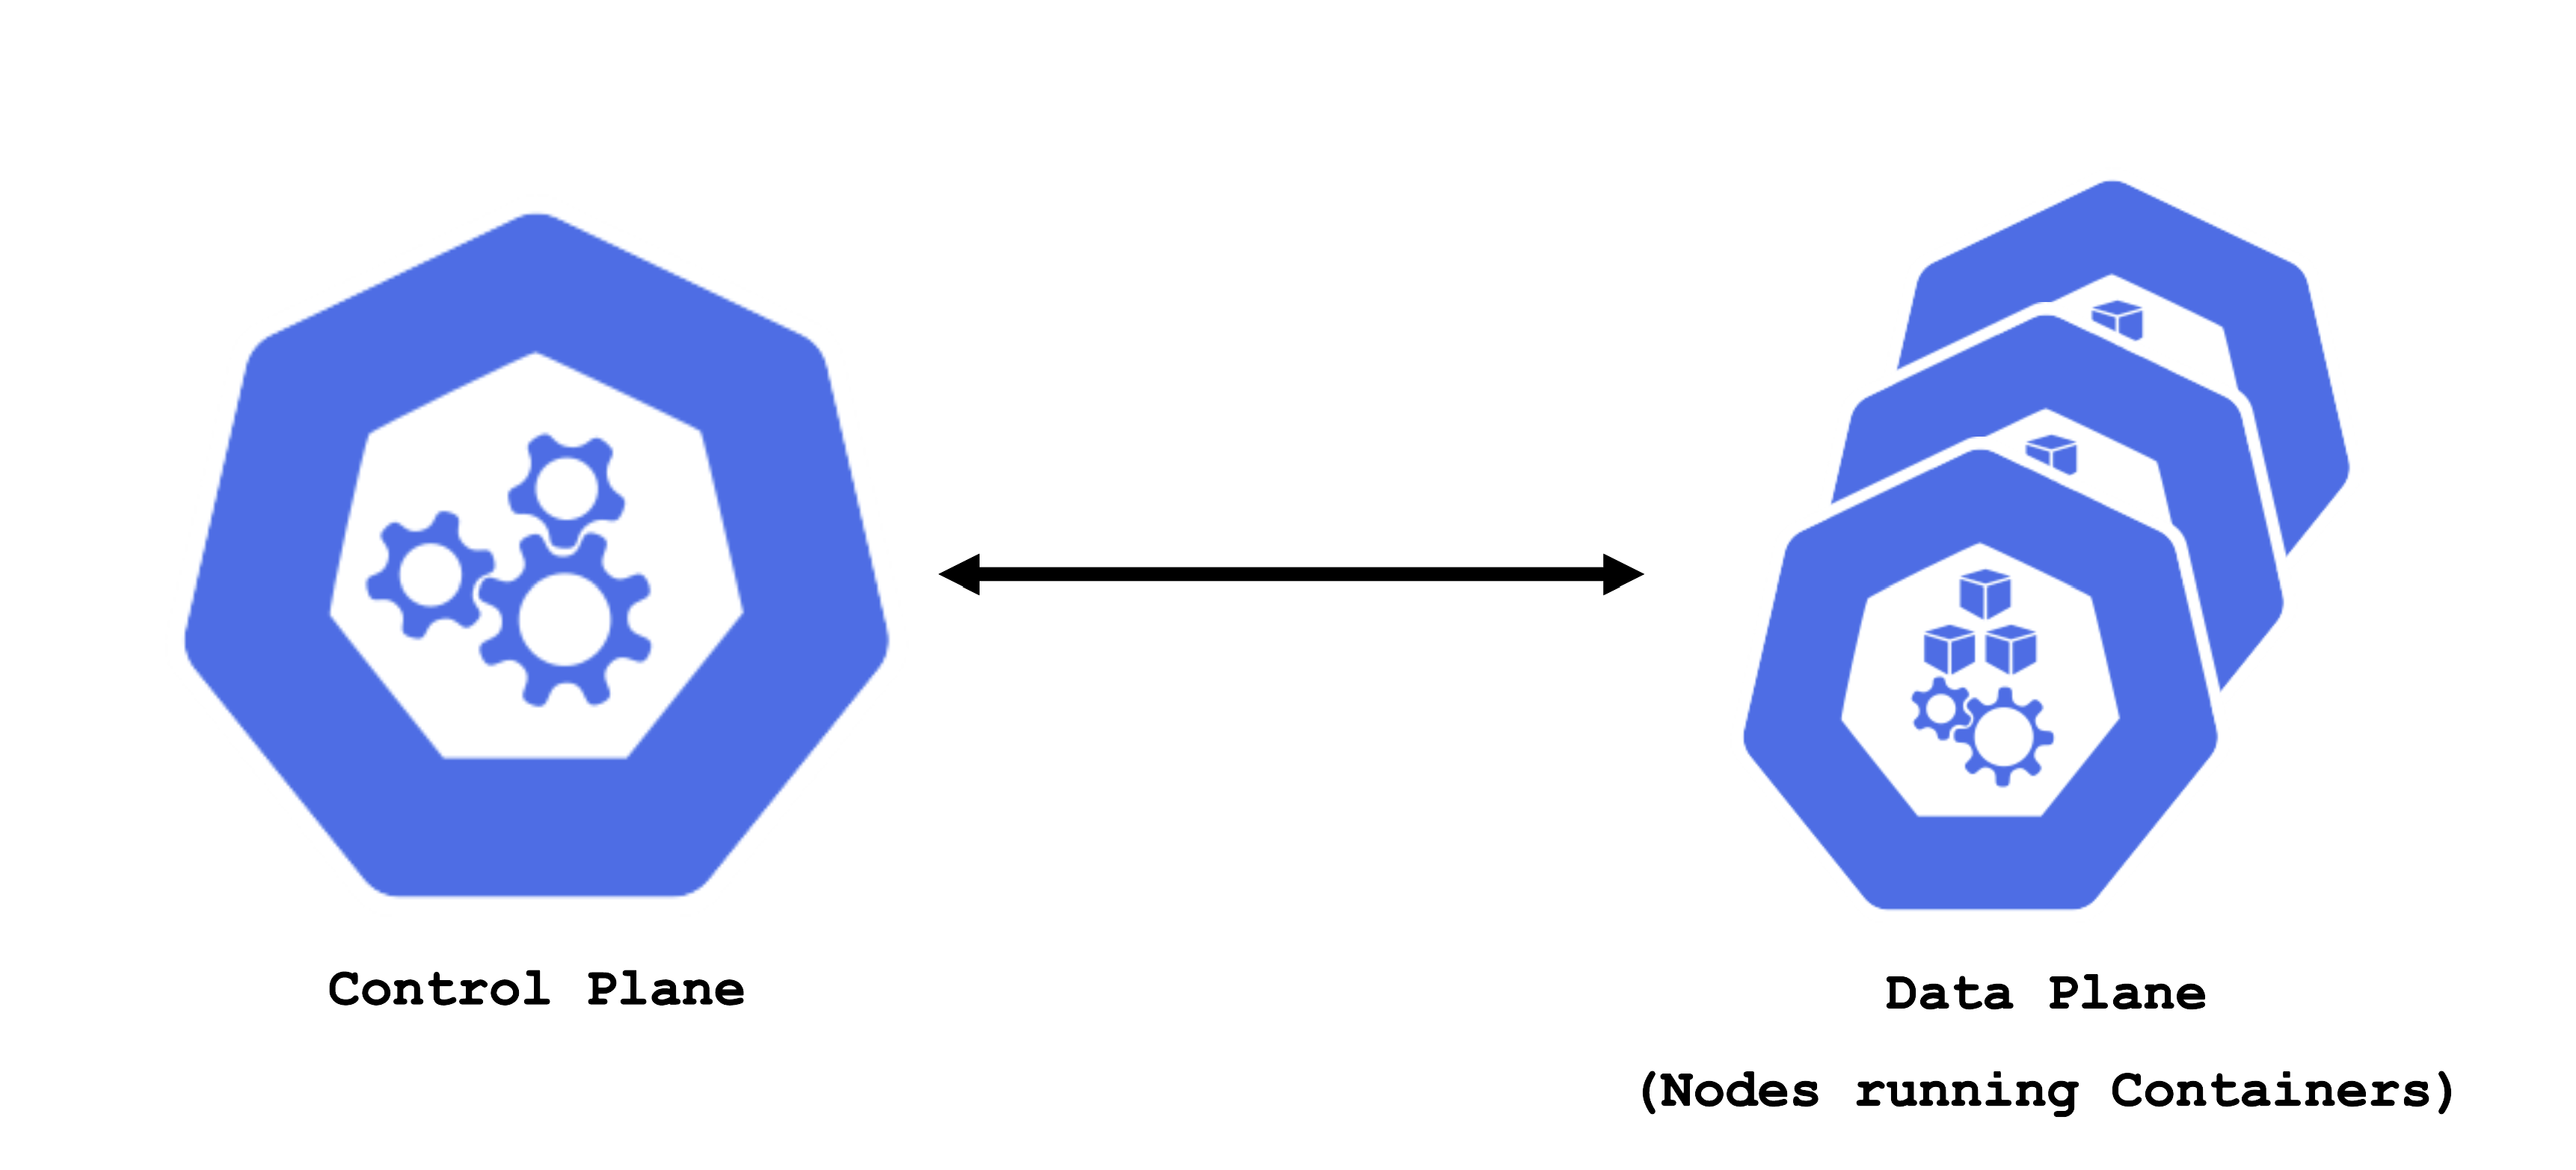
A Kubernetes cluster consists of a control plane and a data plane. The data plane runs the actual containers on worker nodes (which translate to physical or virtual machines). For the control and data plane to work together properly, lots of components need matching configuration.
Some configurations are standardized but some are also very specific to the needs of a cluster’s user / workload. Ideally, you want a properly configured cluster with the possibility to fine-tune some settings.
Concept of a “Shoot”
In Gardener, Kubernetes clusters (with their control plane and their data plane) are called shoot clusters or simply shoots.
For Gardener, a shoot is just another Kubernetes resource. Gardener components watch it and act upon changes (e.g., creation). It comes with reasonable default settings but also allows fine-tuned configuration. And on top of it, you get a status providing health information, information about ongoing operations, and so on.
Luckily there is a dashboard to get started.
Basic Configuration Options
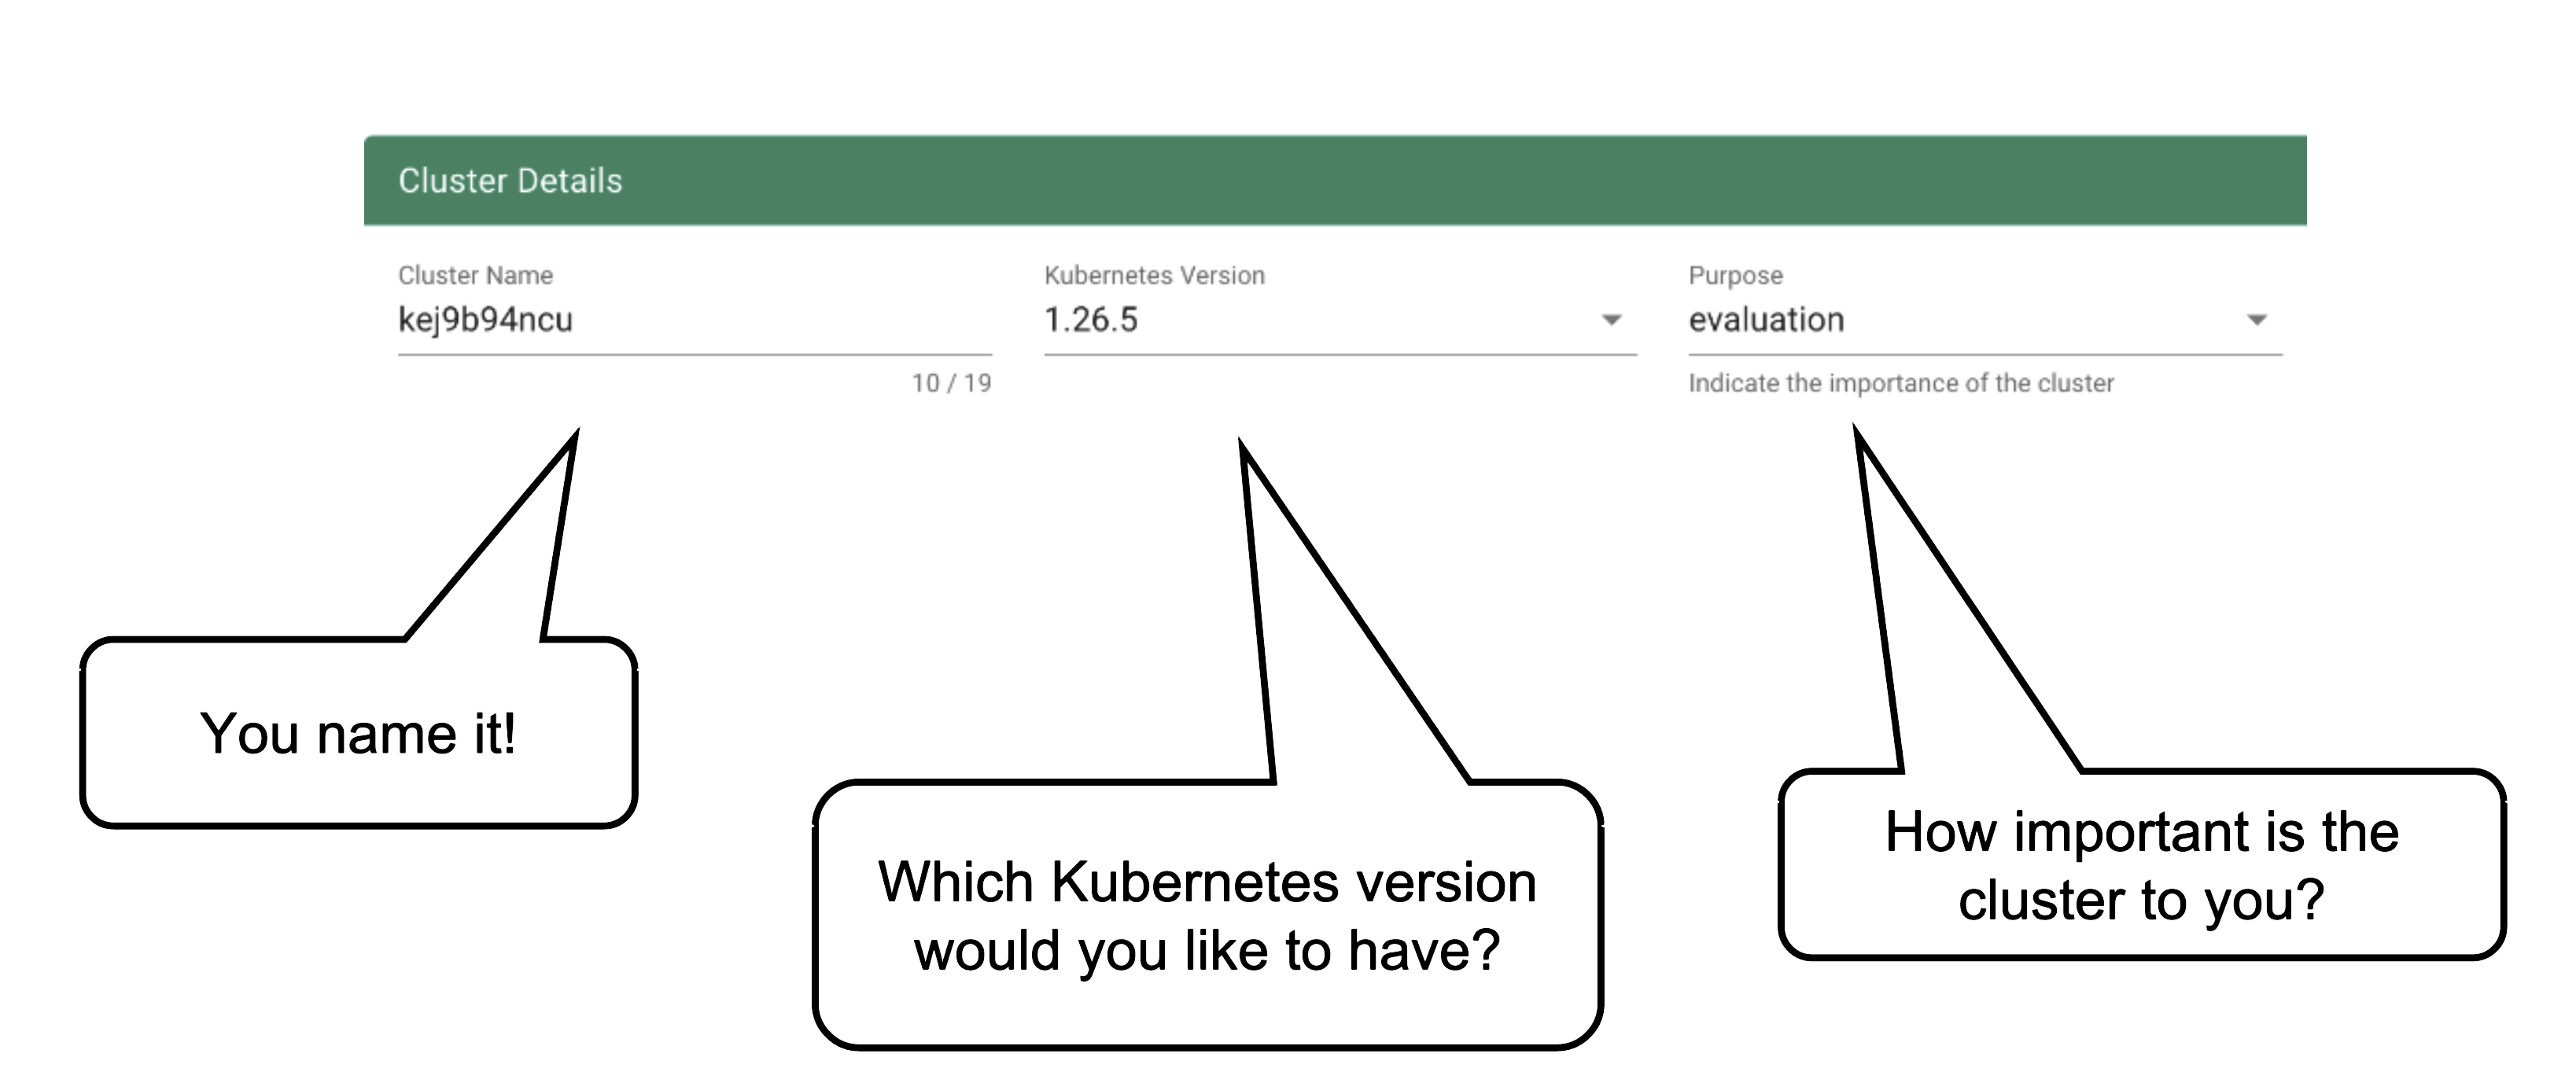
Every cluster needs a name - after all, it is a Kubernetes resource and therefore unique within a namespace.
The Kubernetes version will be used as a starting point. Once a newer version is available, you can always update your existing clusters (but not downgrade, as this is not supported by Kubernetes in general).
The “purpose” affects some configuration (like automatic deployment of a monitoring stack or setting up certain alerting rules) and generally indicates the importance of a cluster.
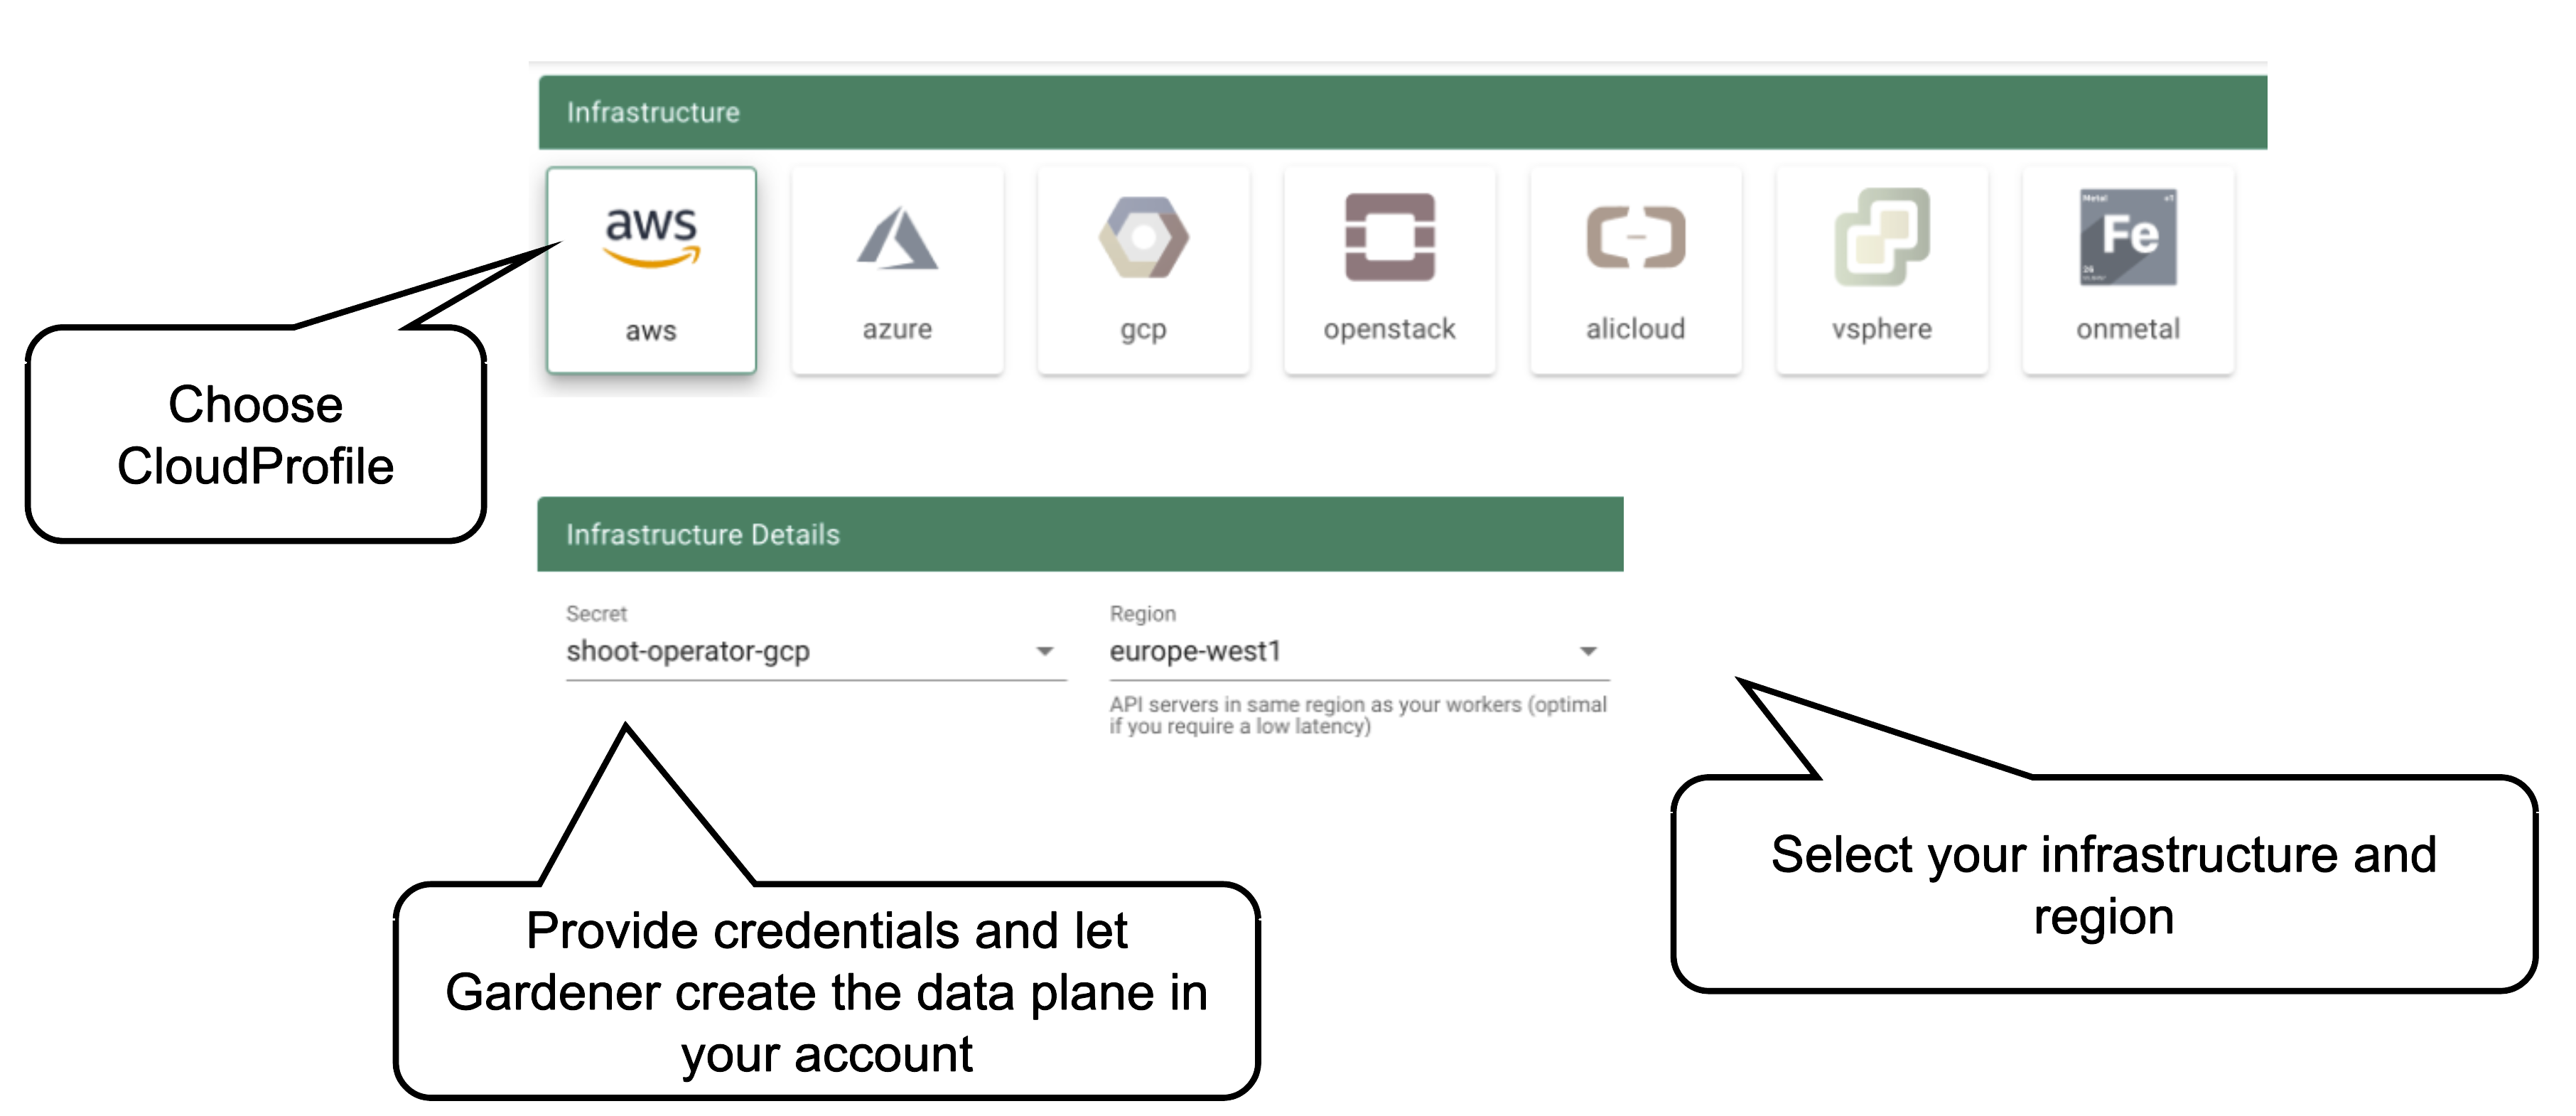
Start by selecting the infrastructure you want to use. The choice will be mapped to a cloud profile that contains provider specific information like the available (actual) OS images, zones and regions or machine types.
Each data plane runs in an infrastructure account owned by the end user. By selecting the infrastructure secret containing the accounts credentials, you are granting Gardener access to the respective account to create / manage resources.
Changing the account after the creation of a cluster is not possible. The credentials can be updated with a new key or even user but have to stay within the same account.
Currently, there is no way to move a single cluster to a different account. You would rather have to re-create a cluster and migrate workloads by different means.
As part of the infrastructure you chose, the region for data plane has to be chosen as well. The Gardener scheduler will try to place the control plane on a seed cluster based on a minimal distance strategy. See Gardener Scheduler for more details.
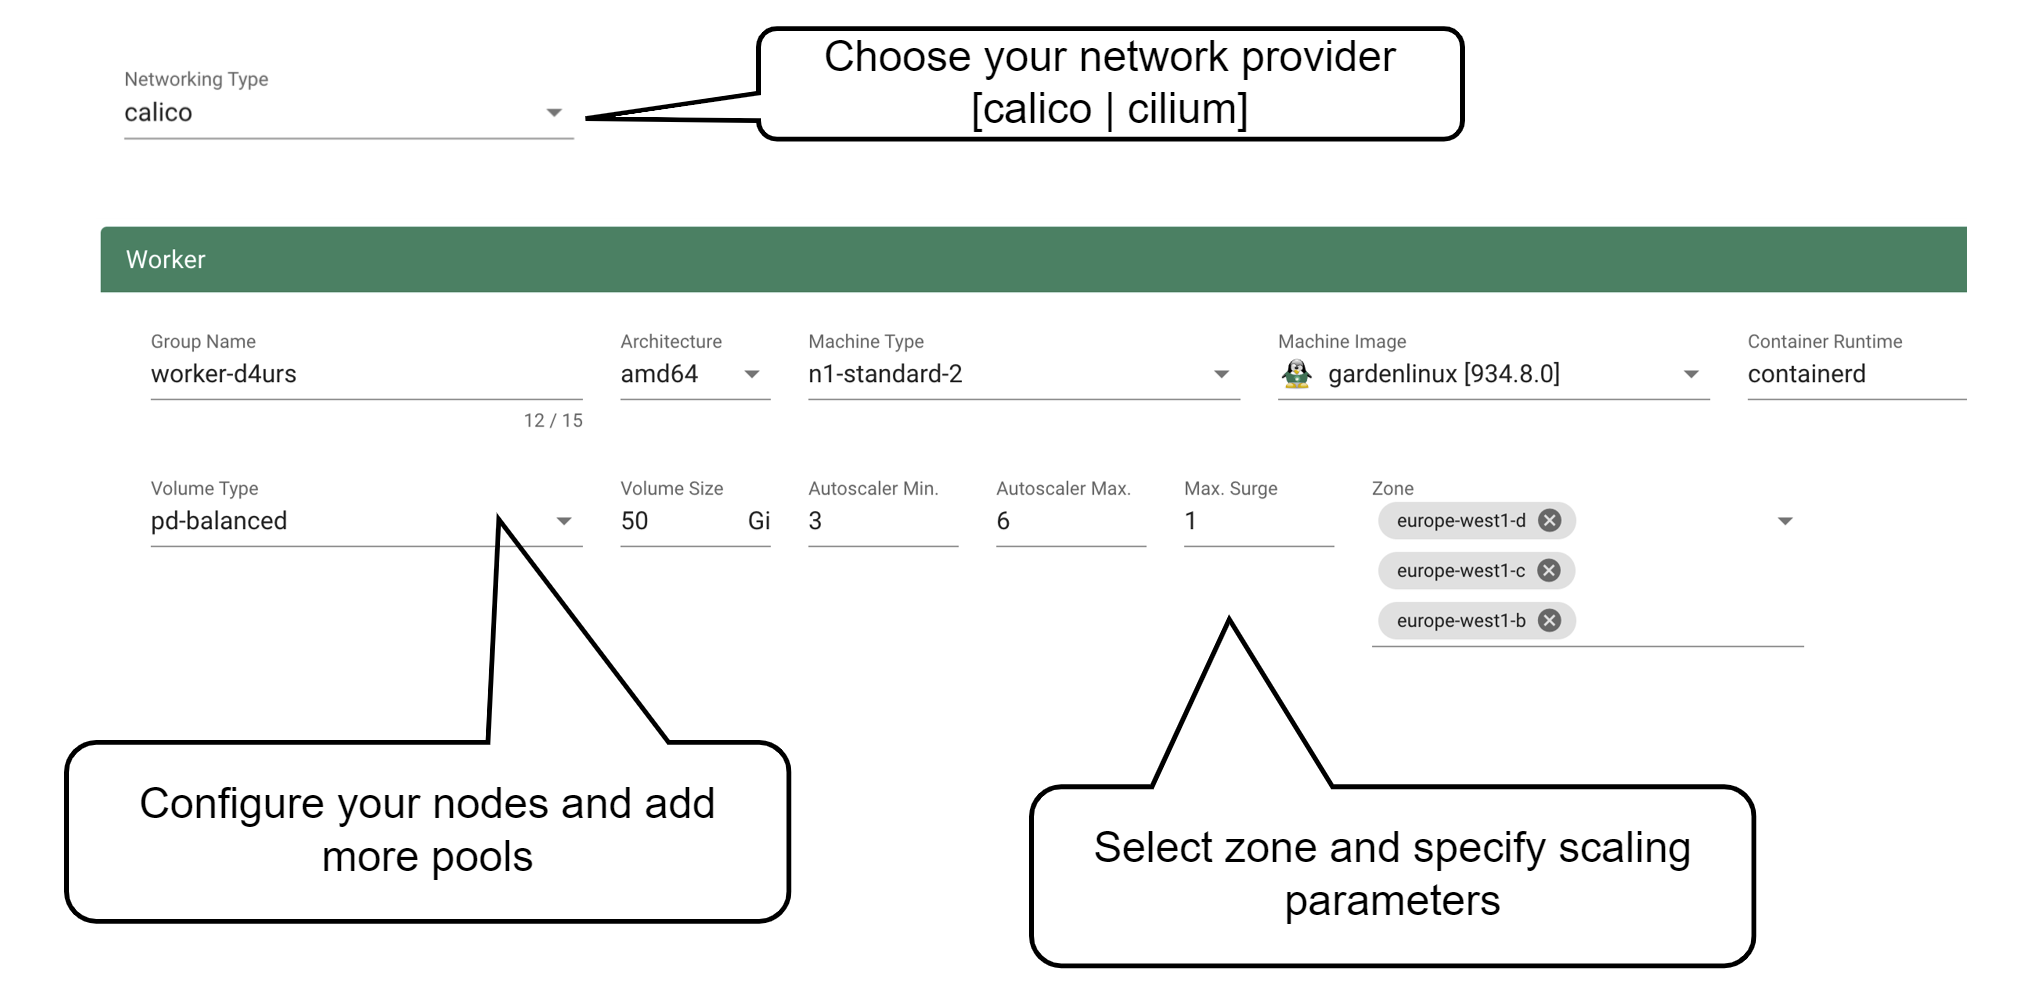
Up next, the networking provider (CNI) for the cluster has to be selected. At the point of writing, it is possible to choose between Calico and Cilium. If not specified in the shoot’s manifest, default CIDR ranges for nodes, services, and pods will be used.
In order to run any workloads in your cluster, you need nodes. The worker section lets you specify the most important configuration options. For beginners, the machine type is probably the most relevant field, together with the machine image (operating system).
The machine type is provider-specific and configured in the cloud profile. Check your respective cloud profile if you’re missing a machine type. Maybe it is available in general but unavailable in your selected region.
The operating system your machines will run is the next thing to choose. Debian-based GardenLinux is the best choice for most use cases.
Other specifications for the workers include the volume type and size. These settings affect the root disk of each node. Therefore we would always recommend to use an SSD-based type to avoid i/o issues.
Some machine types (e.g., bare-metal machine types on OpenStack) require you to omit the volume type and volume size settings.
The autoscaler parameter defines the initial elasticity / scalability of your cluster. The cluster-autoscaler will add more nodes up to the maximum defined here when your workload grows and remove nodes in case your workload shrinks. The minimum number of nodes should be equal to or higher than the number of zones. You can distribute the nodes of a worker pool among all zones available to your cluster. This is the first step in running HA workloads.
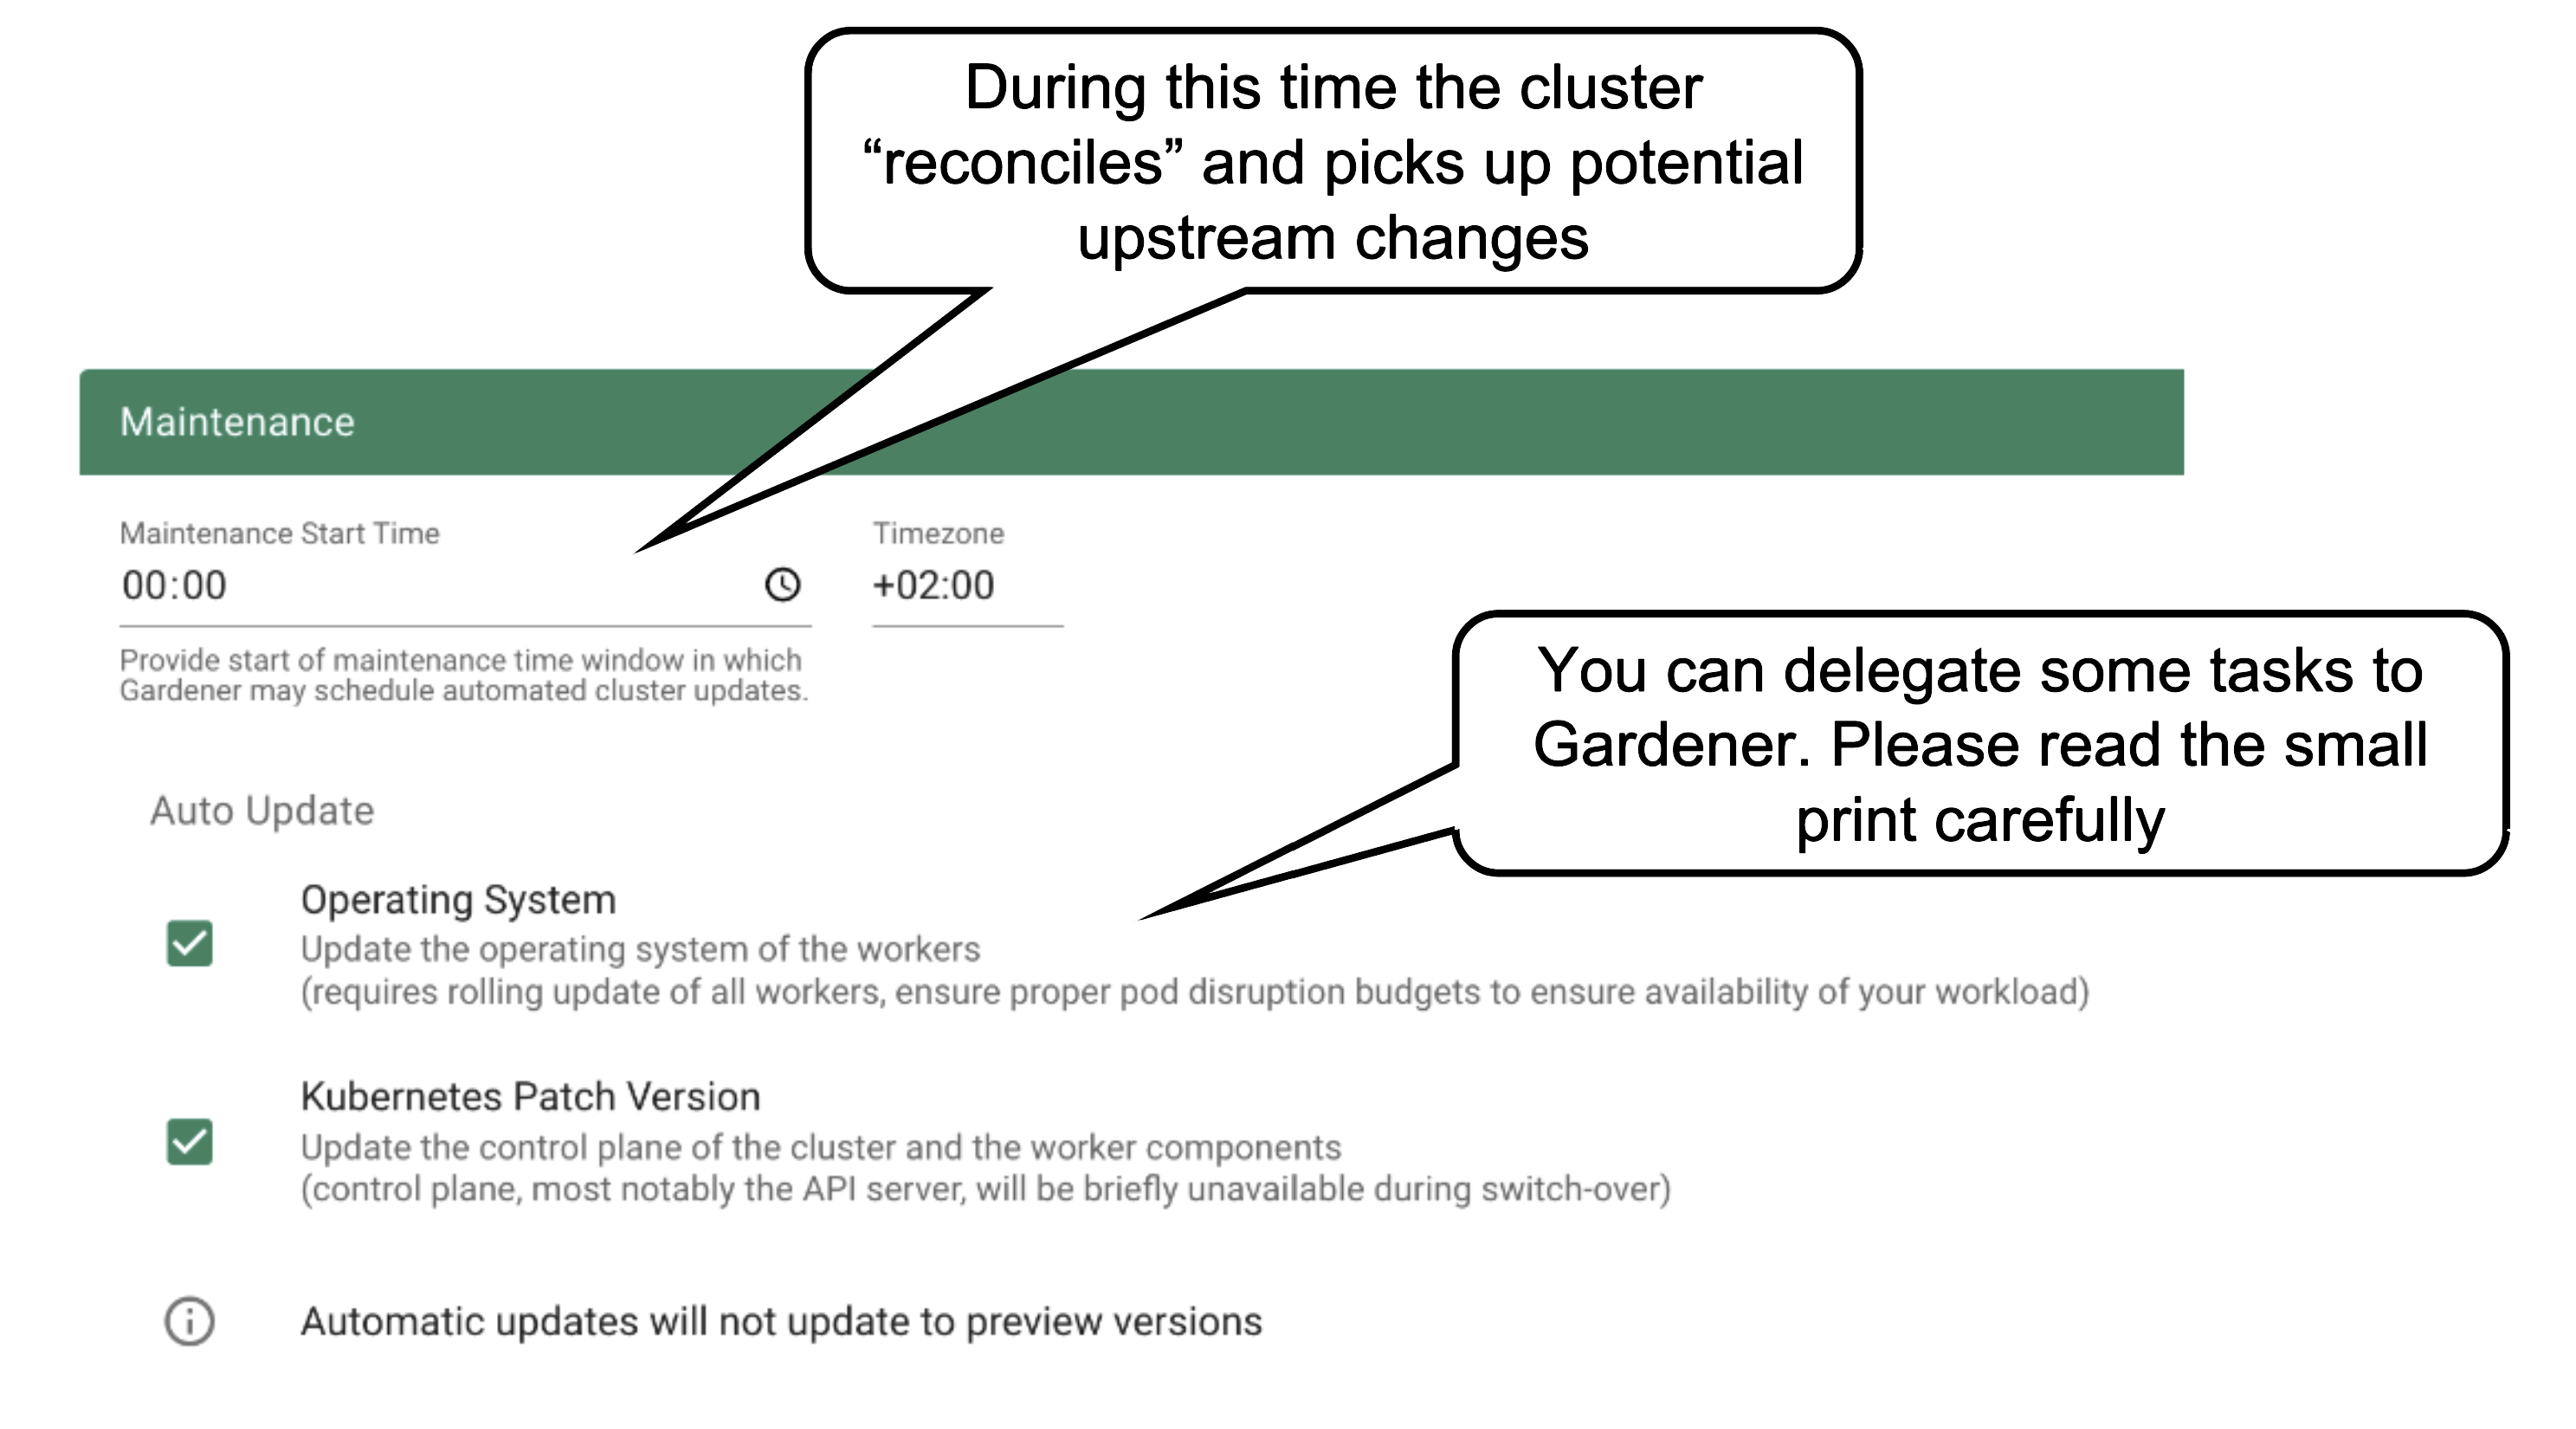
Once per day, all clusters reconcile. This means all controllers will check if there are any updates they have to apply (e.g., new image version for ETCD). The maintenance window defines when this daily operation will be triggered. It is important to understand that there is no opt-out for reconciliation.
It is also possible to confine updates to the shoot spec to be applied only during this time. This can come in handy when you want to bundle changes or prevent changes to be applied outside a well-known time window.
You can allow Gardener to automatically update your cluster’s Kubernetes patch version and/or OS version (of the nodes). Take this decision consciously! Whenever a new Kubernetes patch version or OS version is set to supported in the respective cloud profile, auto update will upgrade your cluster during the next maintenance window. If you fail to (manually) upgrade the Kubernetes or OS version before they expire, force-upgrades will take place during the maintenance window.
Result
The result of your provided inputs and a set of conscious default values is a shoot resource that, once applied, will be acted upon by various Gardener components. The status section represents the intermediate steps / results of these operations. A typical shoot creation flow would look like this:
- Assign control plane to a seed.
- Create infrastructure resources in the data plane account (e.g., VPC, gateways, …)
- Deploy control plane incl. DNS records.
- Create nodes (VMs) and bootstrap kubelets.
- Deploy kube-system components to nodes.
How to Access a Shoot

Static credentials for shoots were discontinued in Gardener with Kubernetes v1.27. Short lived credentials need to be used instead. You can create/request tokens directly via Gardener or delegate authentication to an identity provider.
A short-lived admin kubeconfig can be requested by using kubectl. If this is something you do frequently, consider switching to gardenlogin, which helps you with it.
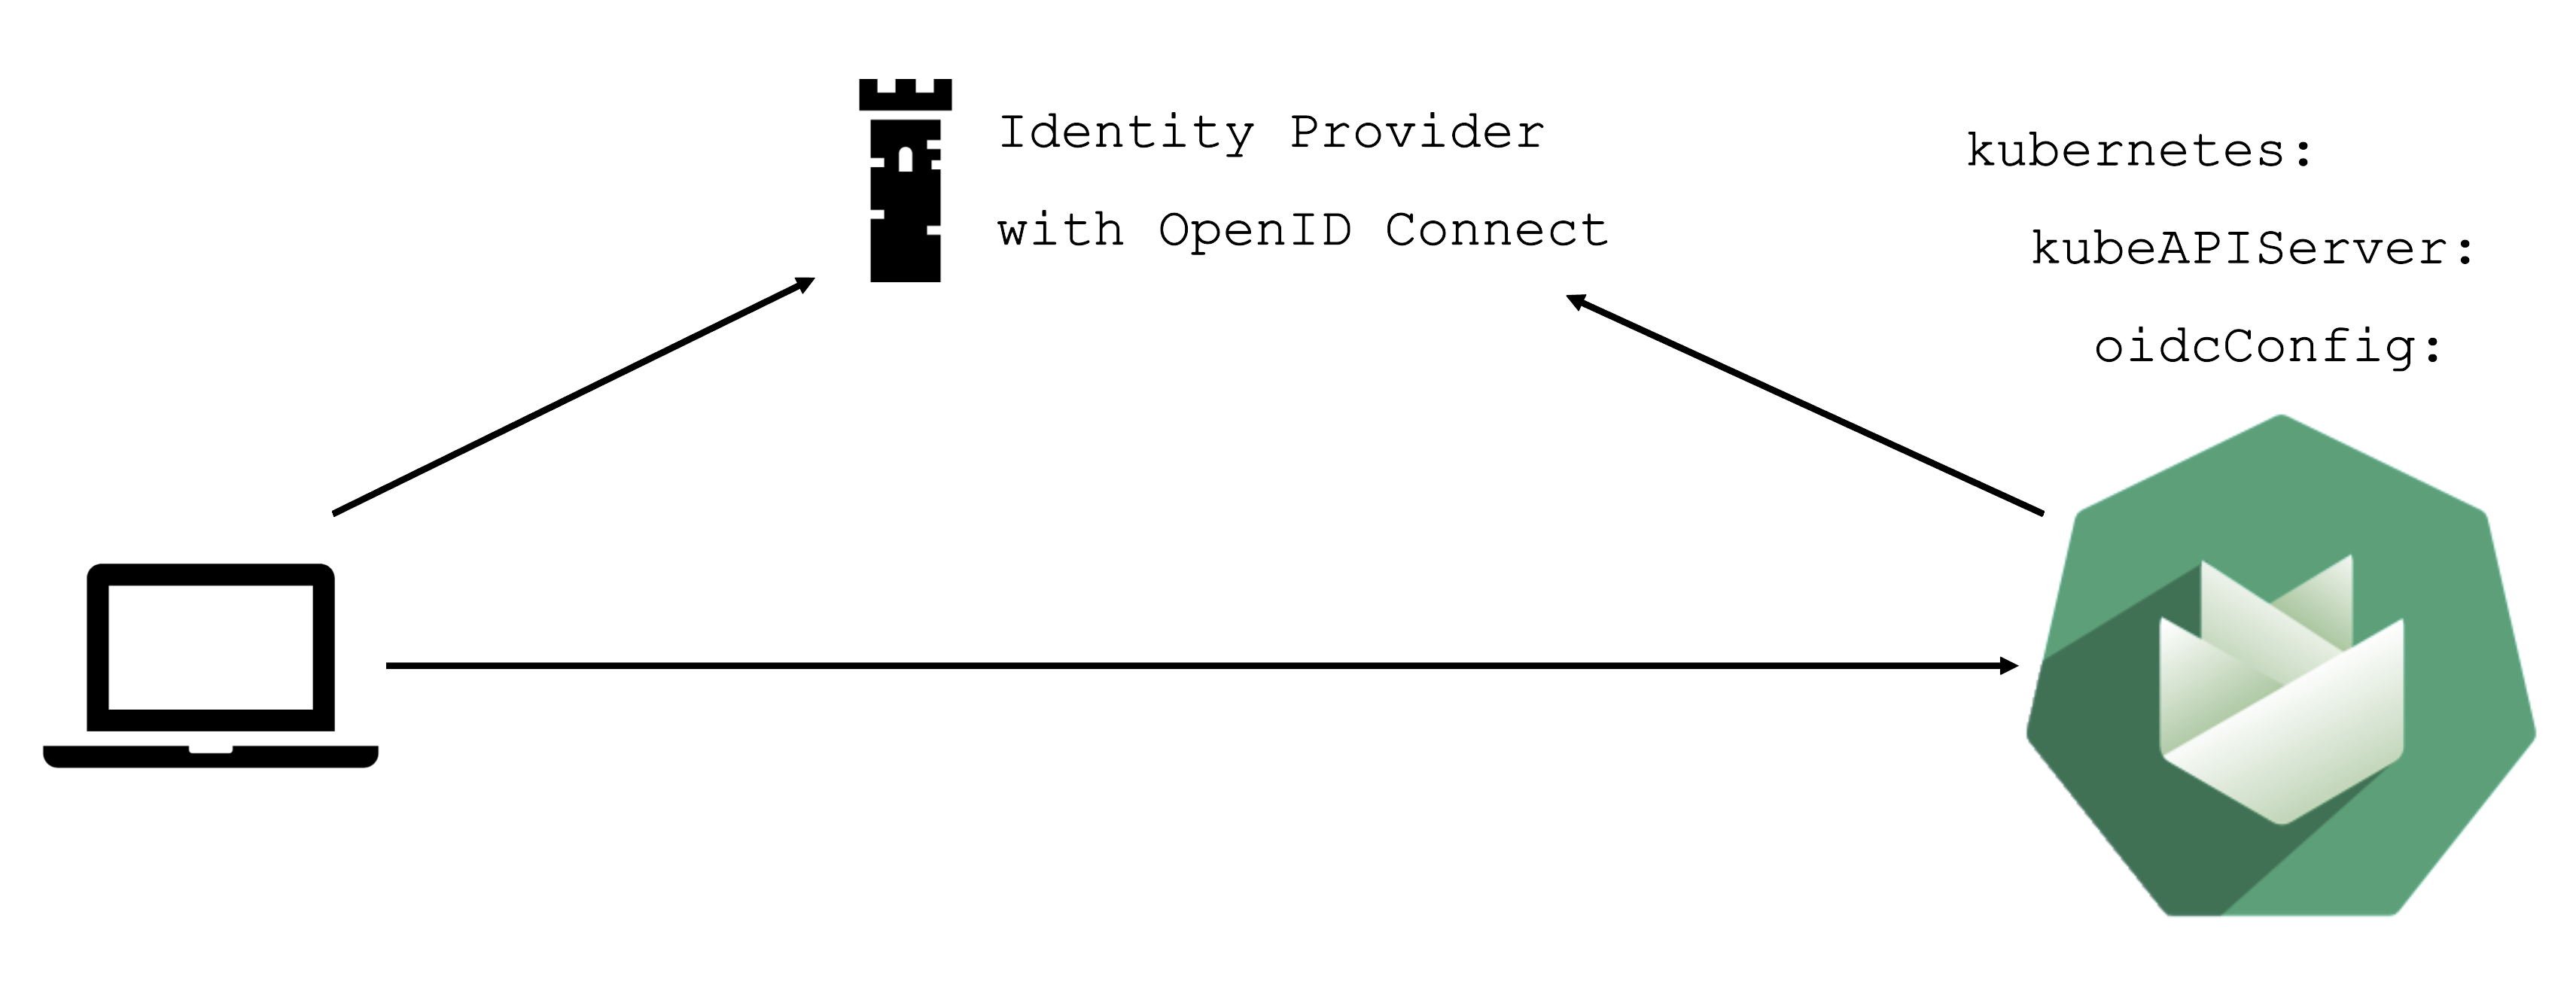
An alternative is to use an identity provider and issue OIDC tokens.
With the basic configuration options having been introduced, it is time to discuss more possibilities. Gardener offers a variety of options to tweak the control plane’s behavior - like defining an event TTL (default 1h), adding an OIDC configuration or activating some feature gates. You could alter the scheduling profile and define an audit logging policy. In addition, the control plane can be configured to run in HA mode (applied on a node or zone level), but keep in mind that once you enable HA, you cannot go back.
In case you have specific requirements for the cluster internal DNS, Gardener offers a plugin mechanism for custom core DNS rules or optimization with node-local DNS. For more information, see Custom DNS Configuration and NodeLocalDNS Configuration.
Another category of configuration options is dedicated to the nodes and the infrastructure they are running on. Every provider has their own perks and some of them are exposed. Check the detailed documentation of the relevant extension for your infrastructure provider.
You can fine-tune the cluster-autoscaler or help the kubelet to cope better with your workload.
Worker Pools
There are a couple of ways to configure a worker pool. One of them is to set everything in the Gardener dashboard. However, only a subset of options is presented there.

A slightly more complex way is to set the configuration through the yaml file itself.
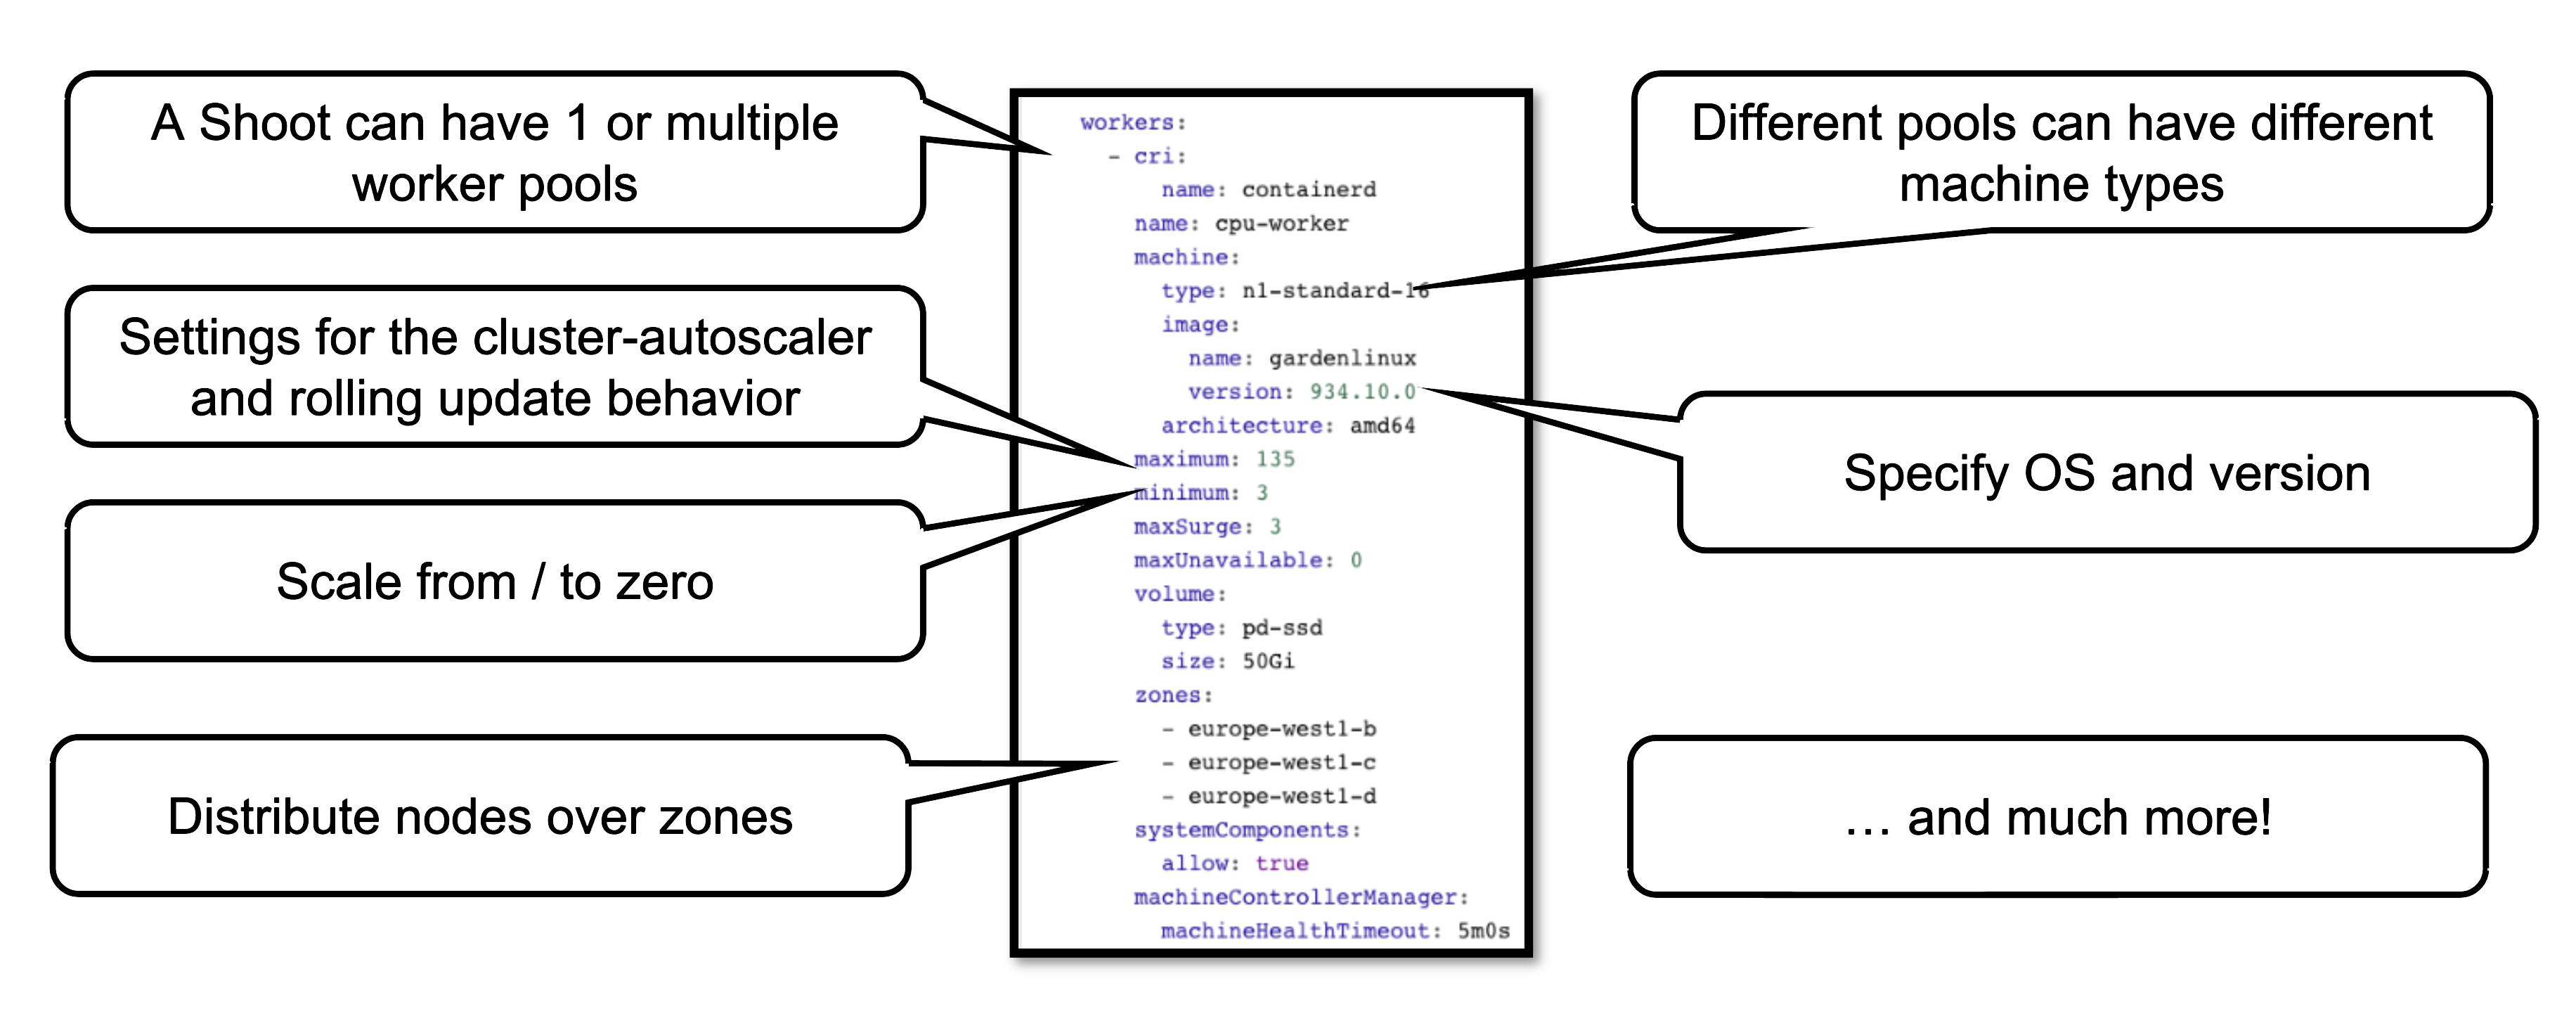
This allows you to configure much more properties of a worker pool, like the timeout after which an unhealthy machine is getting replaced. For more options, see the Worker API reference.
How to Change Things
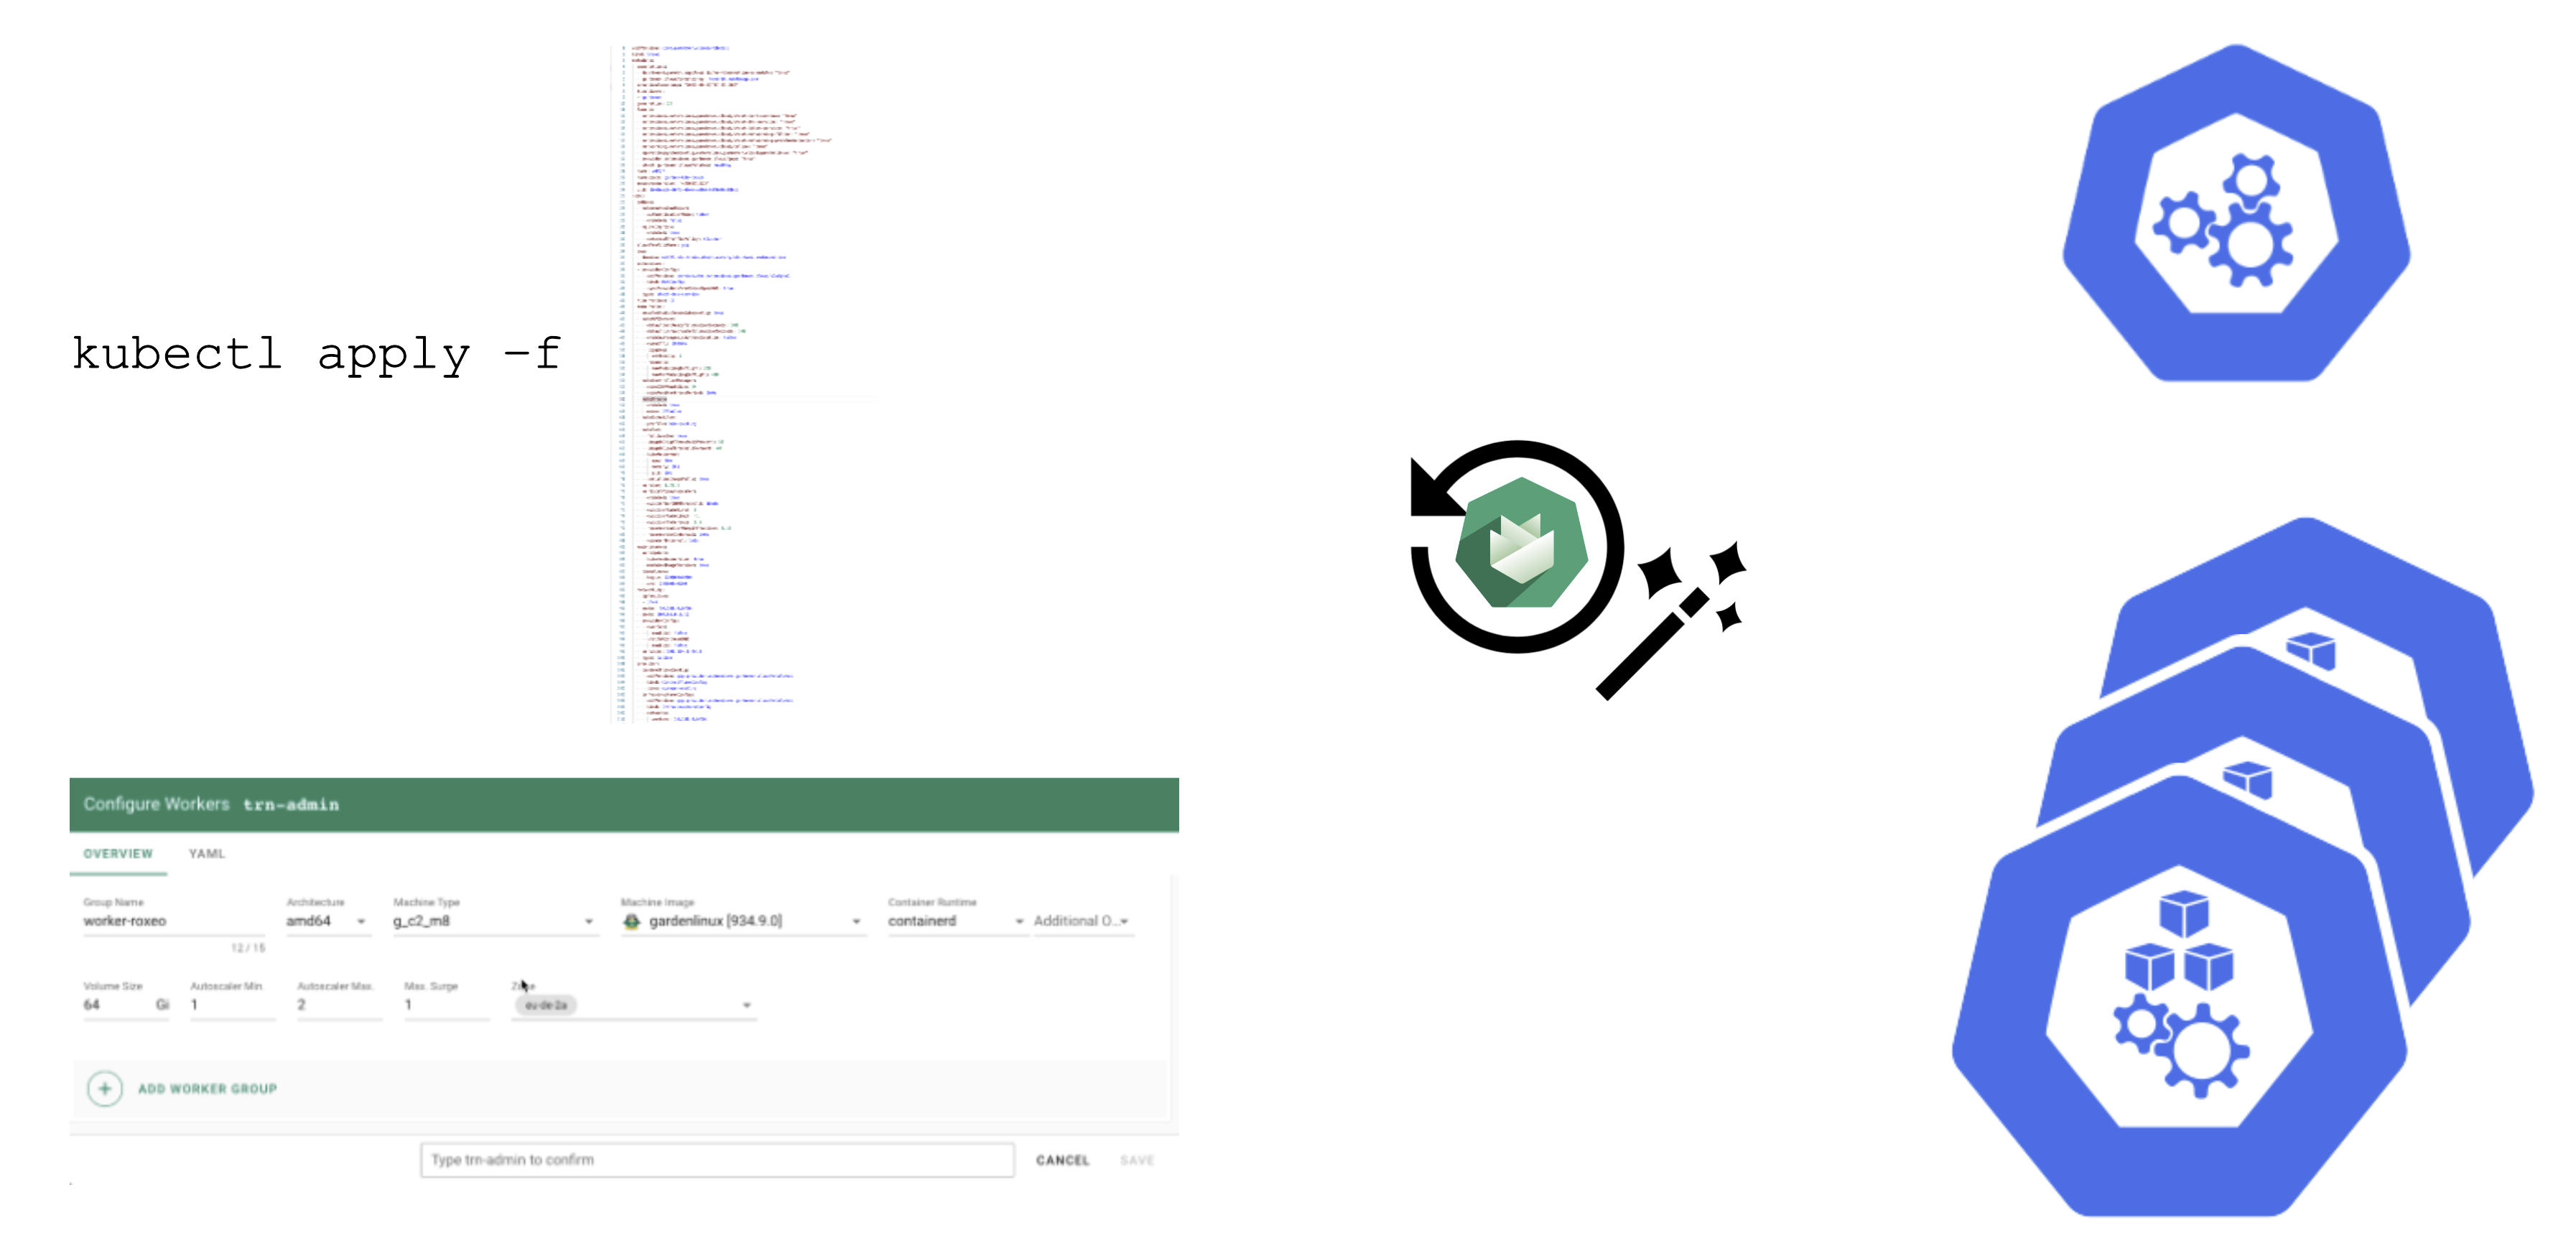
Since a shoot is just another Kubernetes resource, changes can be applied via kubectl. For convenience, the basic settings are configurable via the dashboard’s UI. It also has a “yaml” tab where you can alter all of the shoot’s specification in your browser. Once applied, the cluster will reconcile eventually and your changes become active (or cause an error).
Immutability in a Shoot
While Gardener allows you to modify existing shoot clusters, it is important to remember that not all properties of a shoot can be changed after it is created.
For example, it is not possible to move a shoot to a different infrastructure account. This is mainly rooted in the fact that discs and network resources are bound to your account.
Another set of options that become immutable are most of the network aspects of a cluster. On an infrastructure level the VPC cannot be changed and on a cluster level things like the pod / service cidr ranges, together with the nodeCIDRmask, are set for the lifetime of the cluster.
Some other things can be changed, but not reverted. While it is possible to add more zones to a cluster on an infrastructure level (assuming that an appropriate CIDR range is available), removing zones is not supported. Similarly, upgrading Kubernetes versions is comparable to a one-way ticket. As of now, Kubernetes does not support downgrading. Lastly, the HA setting of the control plane is immutable once specified.
Crazy Botany
Since remembering all these options can be quite challenging, here is very helpful resource - an example shoot with all the latest options 🎉
5 - Control Plane Components
Overview
A cluster has a data plane and a control plane. The data plane is like a space station. It has certain components which keep everyone / everything alive and can operate autonomously to a certain extent. However, without mission control (and the occasional delivery of supplies) it cannot share information or receive new instructions.
So let’s see what the mission control (control plane) of a Kubernetes cluster looks like.
Kubeception
Kubeception - Kubernetes in Kubernetes in Kubernetes
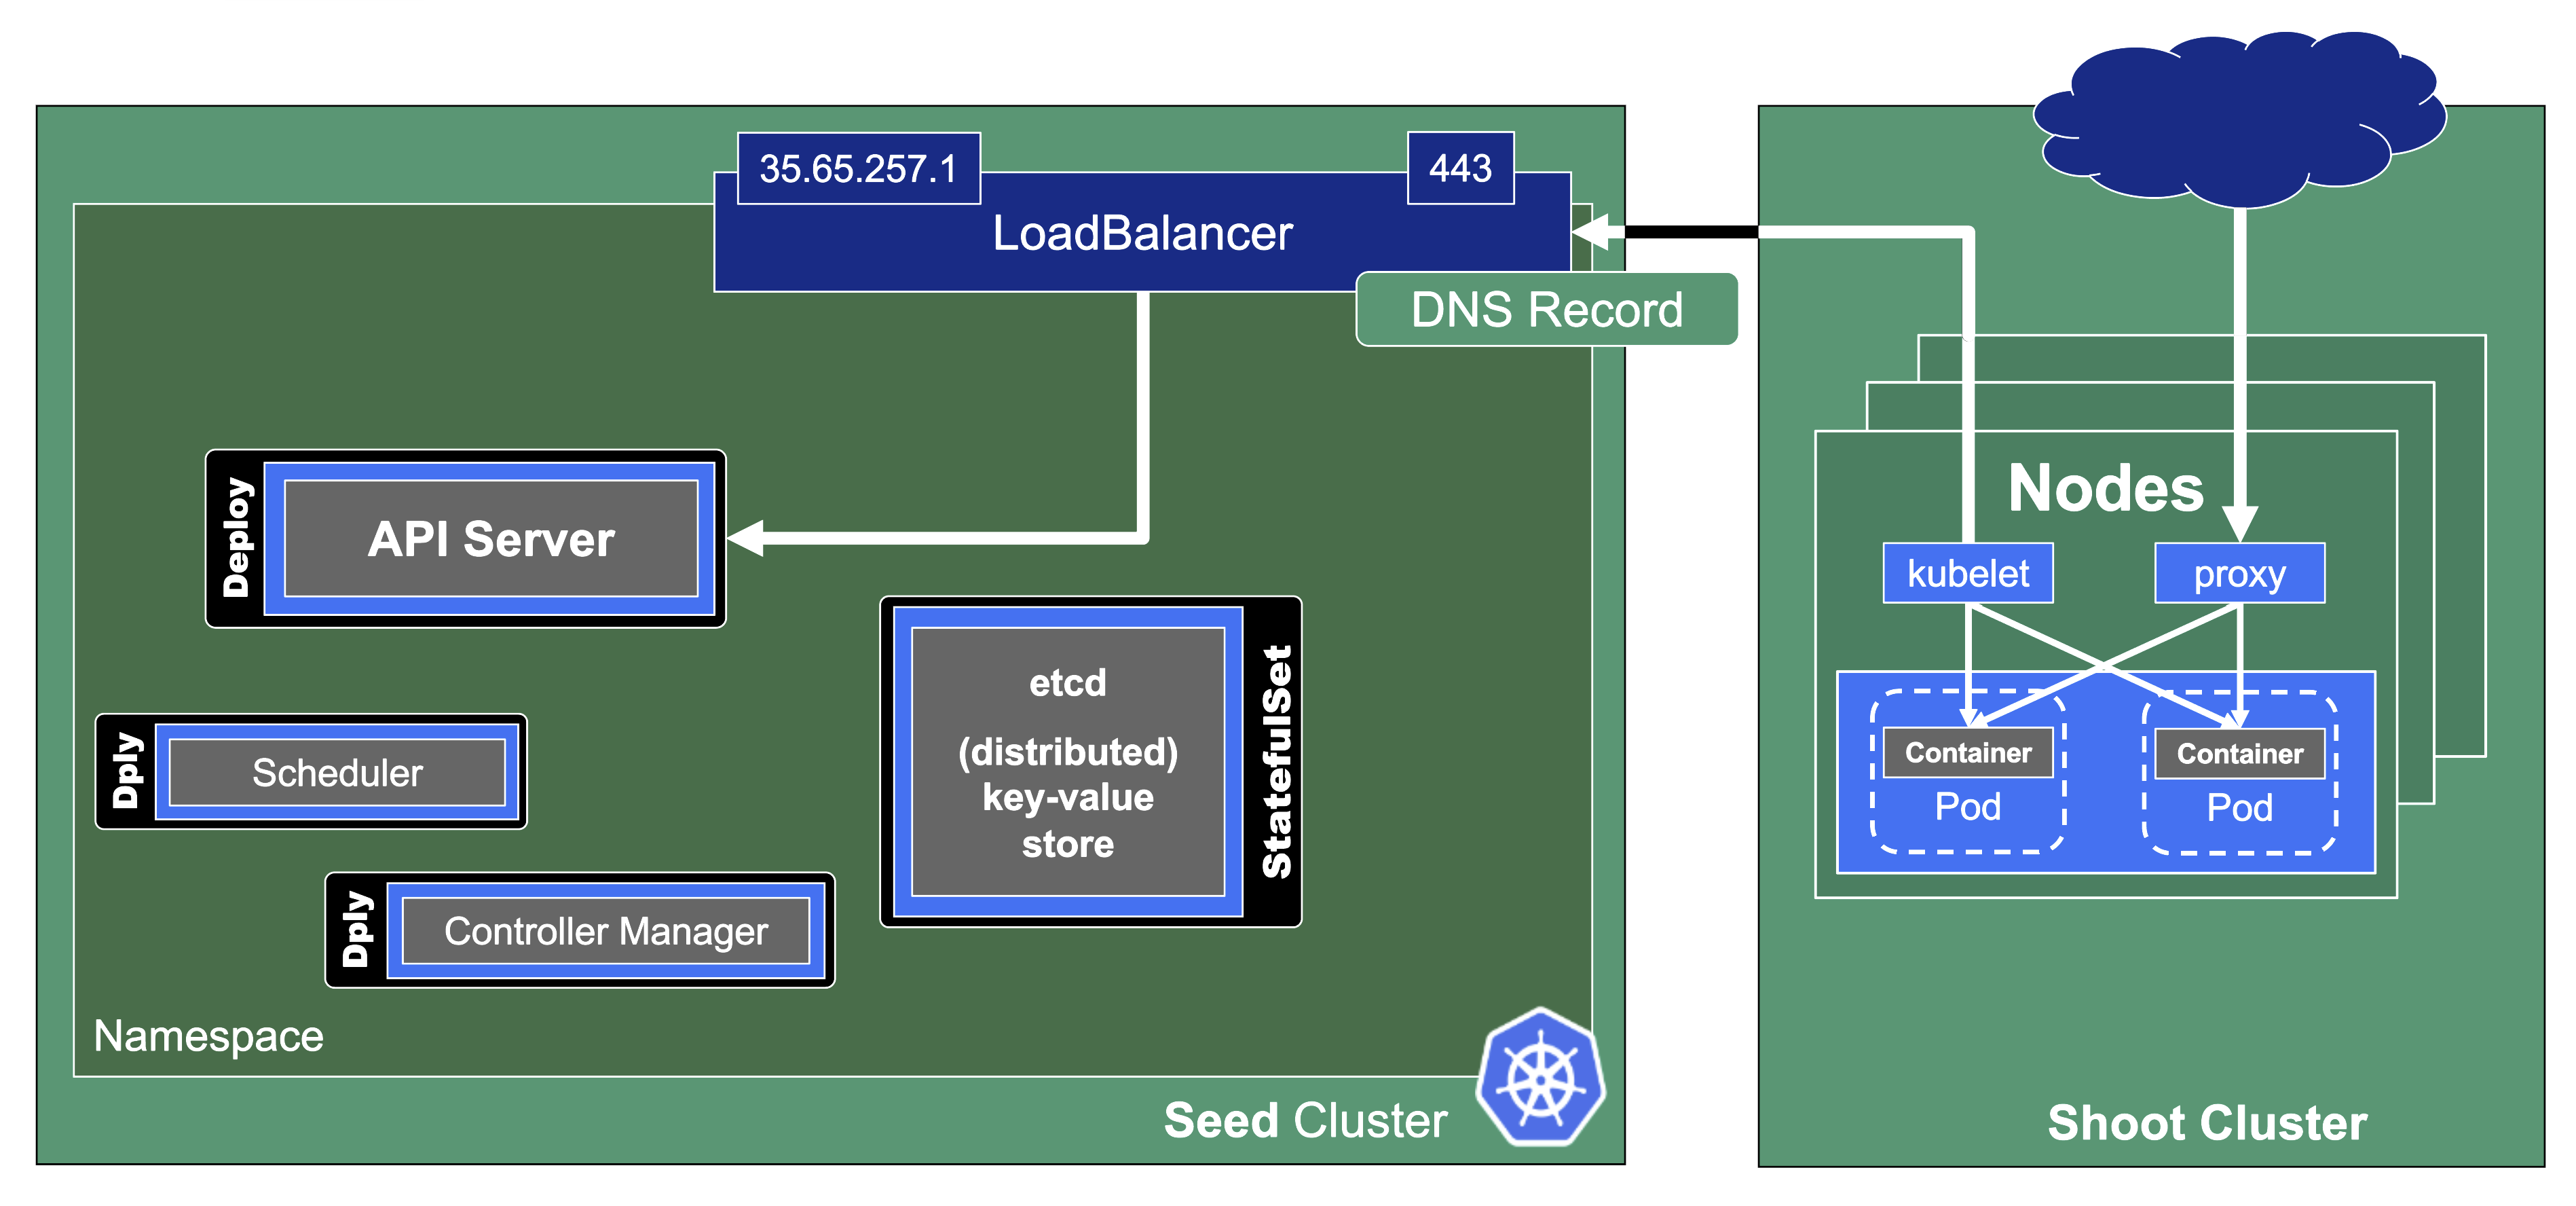
In the classic setup, there is a dedicated host / VM to host the master components / control plane of a Kubernetes cluster. However, these are just normal programs that can easily be put into containers. Once in containers, we can make Kubernetes Deployments and StatefulSets (for the etcd) watch over them. And now we put all that into a separate, dedicated Kubernetes cluster - et voilà, we have Kubernetes in Kubernetes, aka Kubeception (named after the famous movie Inception with Leonardo DiCaprio).
In Gardener’s terminology, the cluster hosting the control plane components is called a seed cluster. The cluster that end users actually use (and whose control plane is hosted in the seed) is called a shoot cluster.
Control Plane Components on the Seed
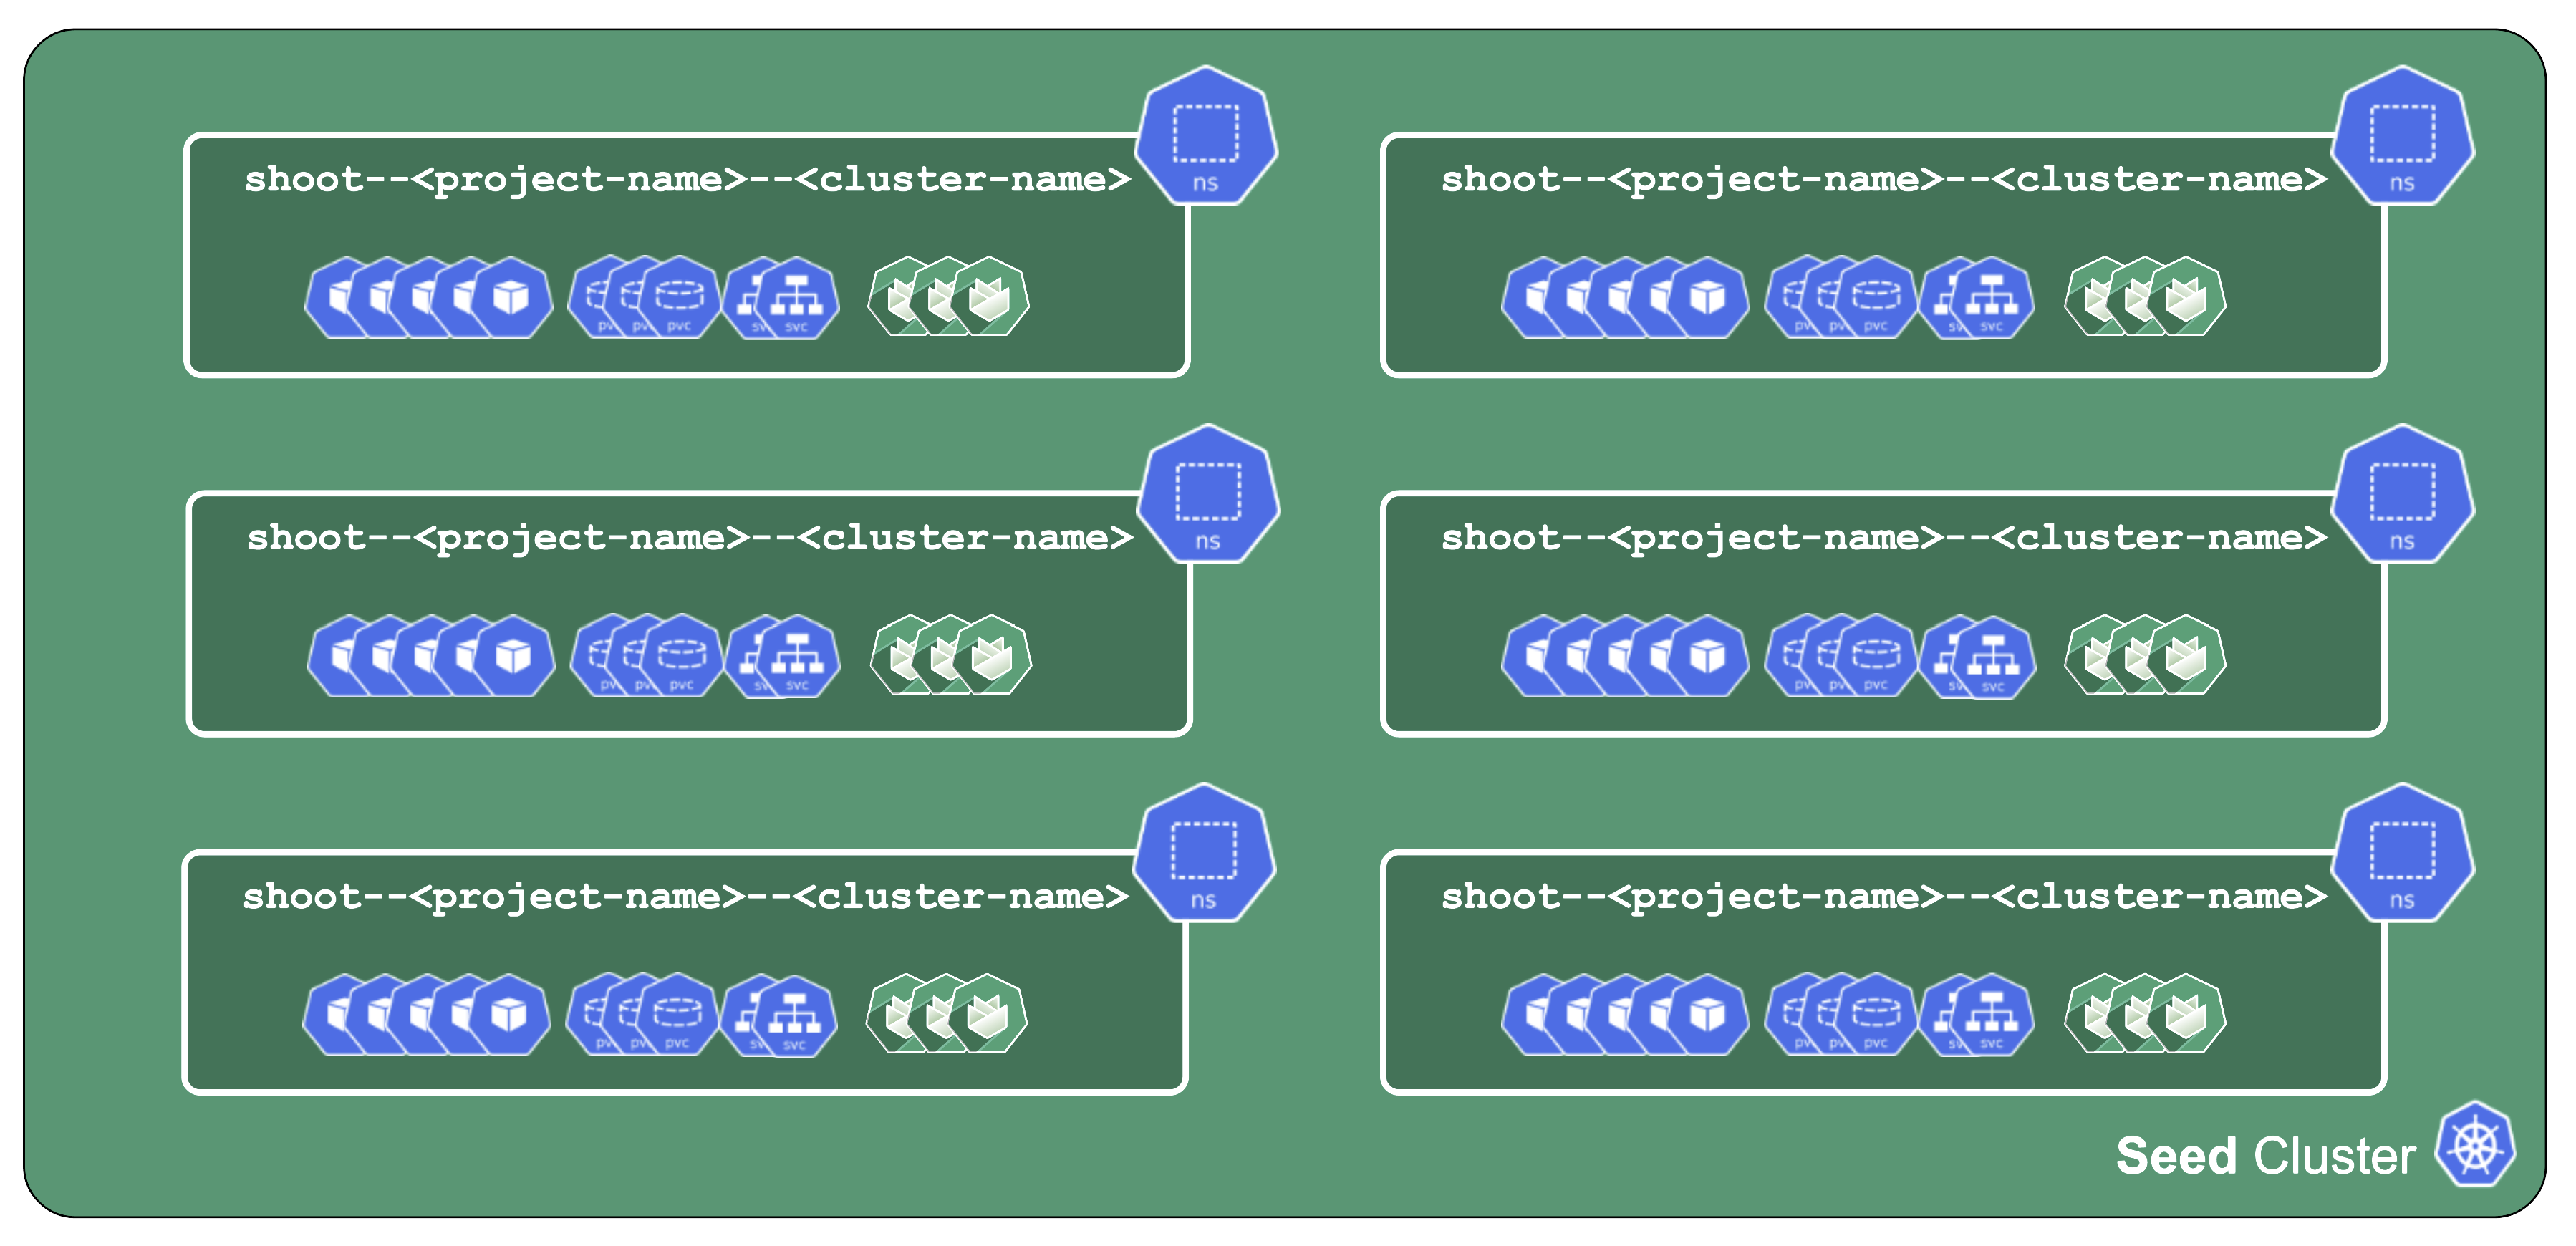
All control-plane components of a shoot cluster run in a dedicated namespace on the seed.
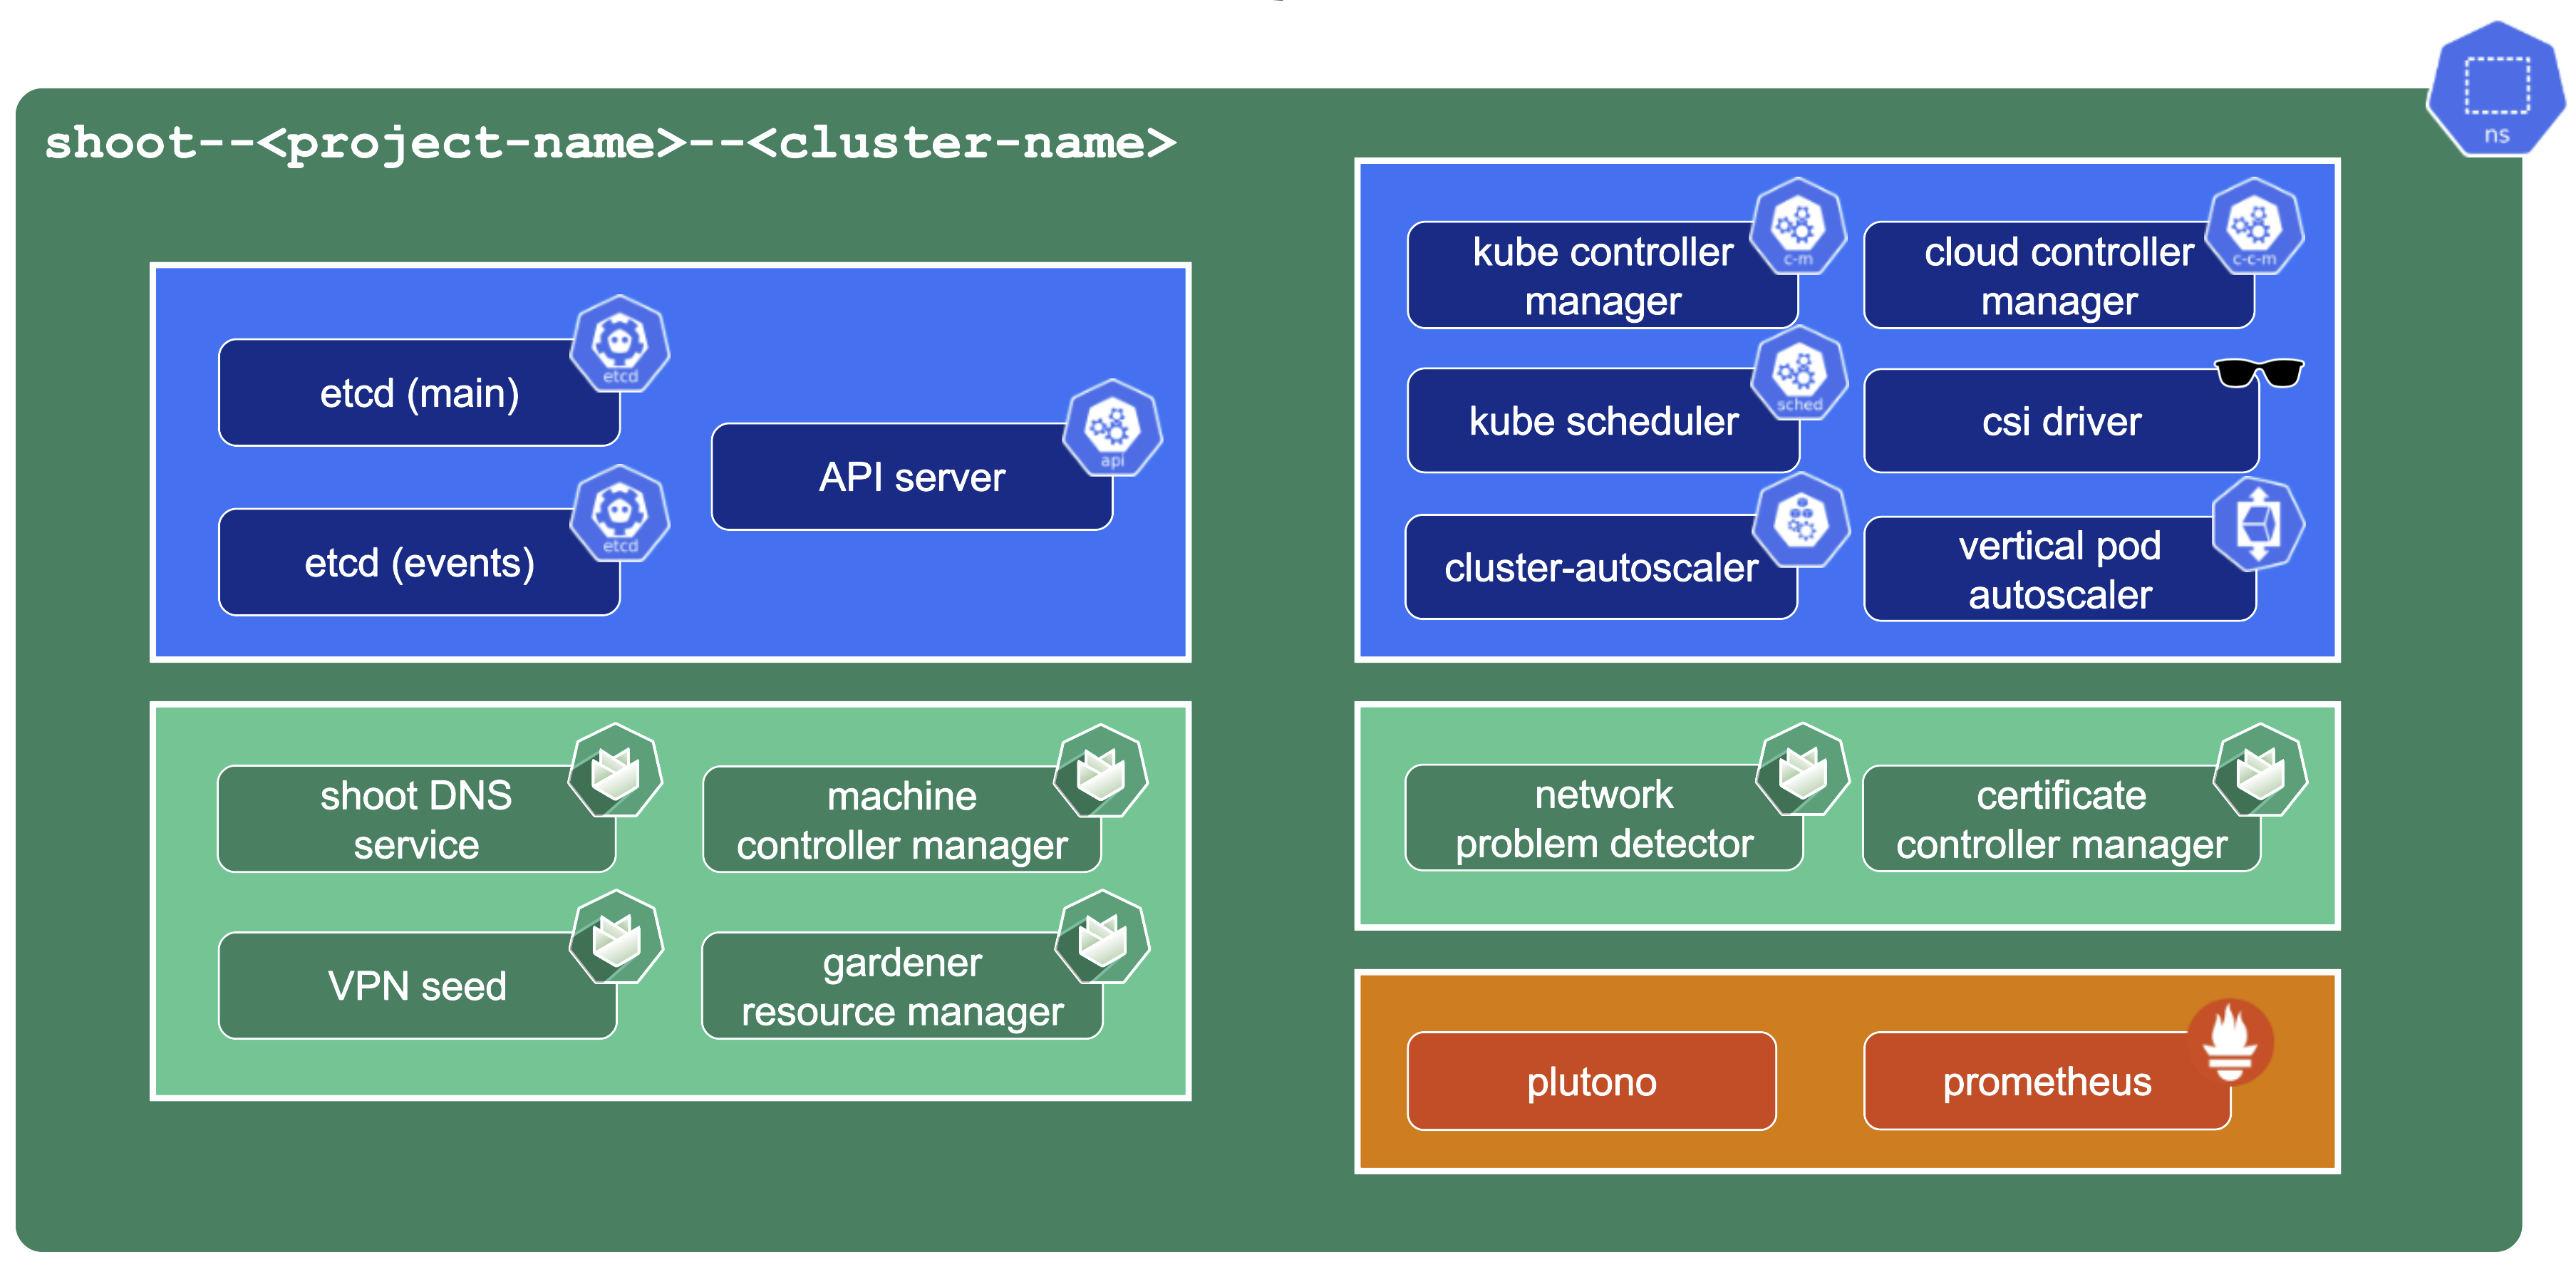
A control plane has lots of components:
- Everything needed to run vanilla Kubernetes
- etcd main & events (split for performance reasons)
- Kube-.*-manager
- CSI driver
Additionally, we deploy components needed to manage the cluster:
- Gardener Resource Manager (GRM)
- Machine Controller Manager (MCM)
- DNS Management
- VPN
There is also a set of components making our life easier (logging, monitoring) or adding additional features (cert manager).
Core Components
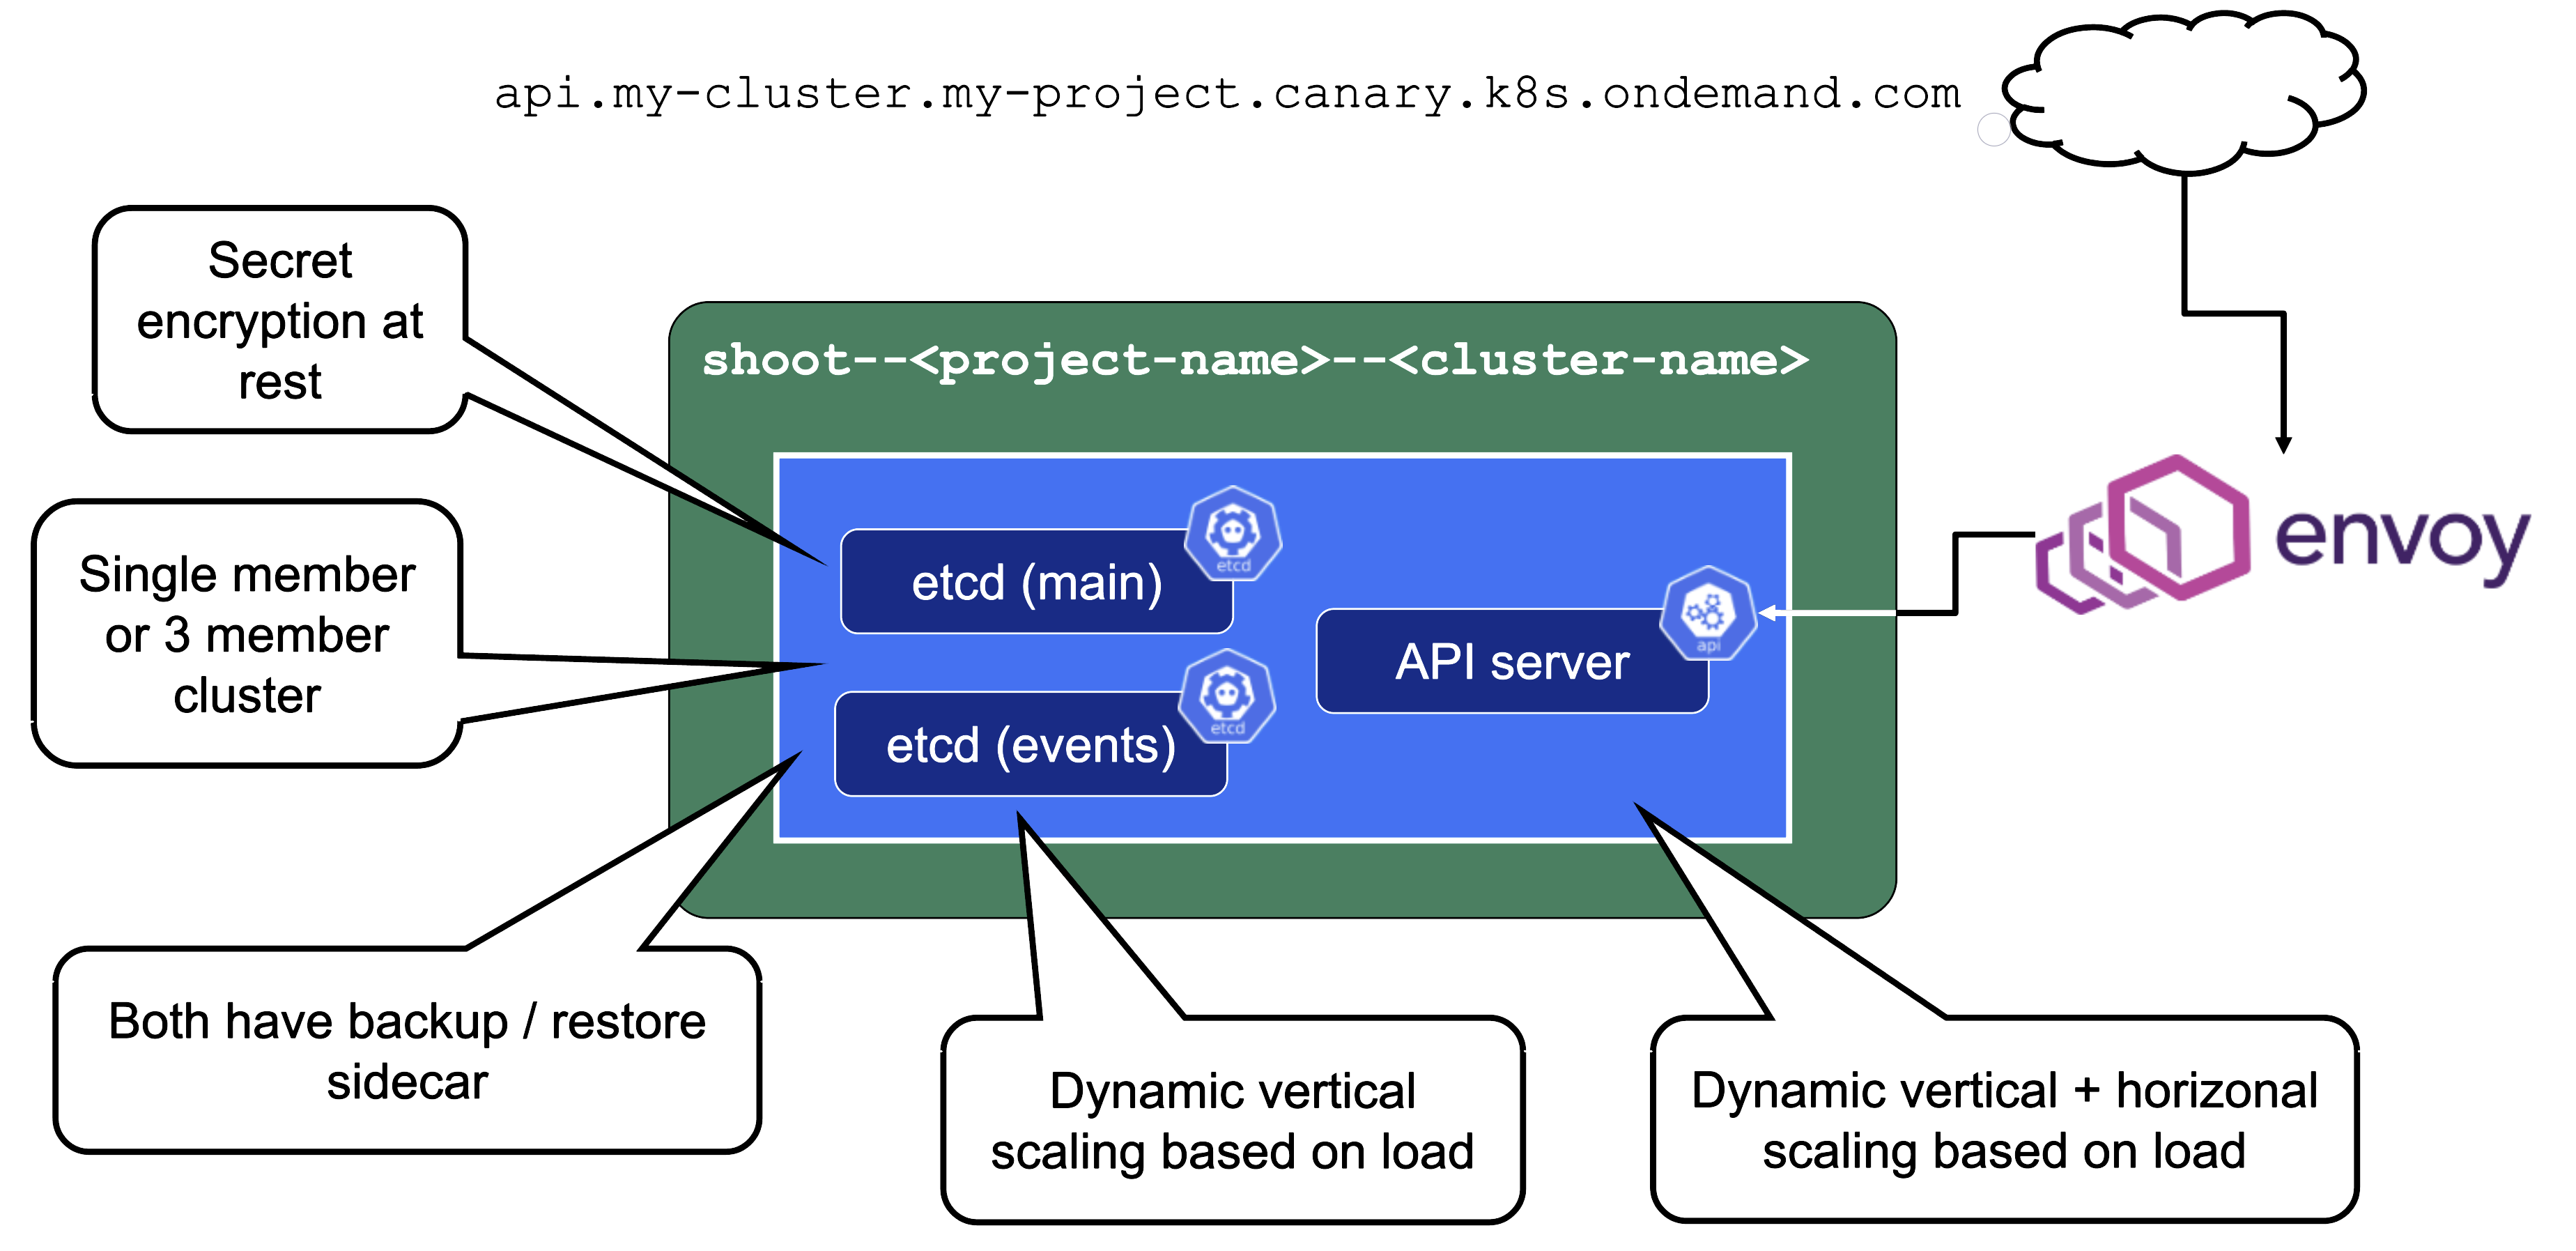
Let’s take a close look at the API server as well as etcd.
Secrets are encrypted at rest. When asking etcd for the data, the reply is still encrypted. Decryption is done by the API server which knows the necessary key.
For non-HA clusters etcd has only 1 replica, while for HA clusters there are 3 replicas.
One special remark is needed for Gardener’s deployment of etcd. The pods coming from the etcd-main StatefulSet contain two containers - one runs etcd, the other runs a program that periodically backs up etcd’s contents to an object store that is set up per seed cluster to make sure no data is lost. After all, etcd is the Achilles heel of all Kubernetes clusters. The backup container is also capable of performing a restore from the object store as well as defragment and compact the etcd datastore. For performance reasons, Gardener stores Kubernetes events in a separate etcd instance. By default, events are retained for 1h but can be kept longer if defined in the shoot.spec.
The kube API server (often called “kapi”) scales both horizontally and vertically.
The kube API server is not directly exposed / reachable via its public hostname. Instead, Gardener runs a single LoadBalancer service backed by an istio gateway / envoy, which uses SNI to forward traffic.
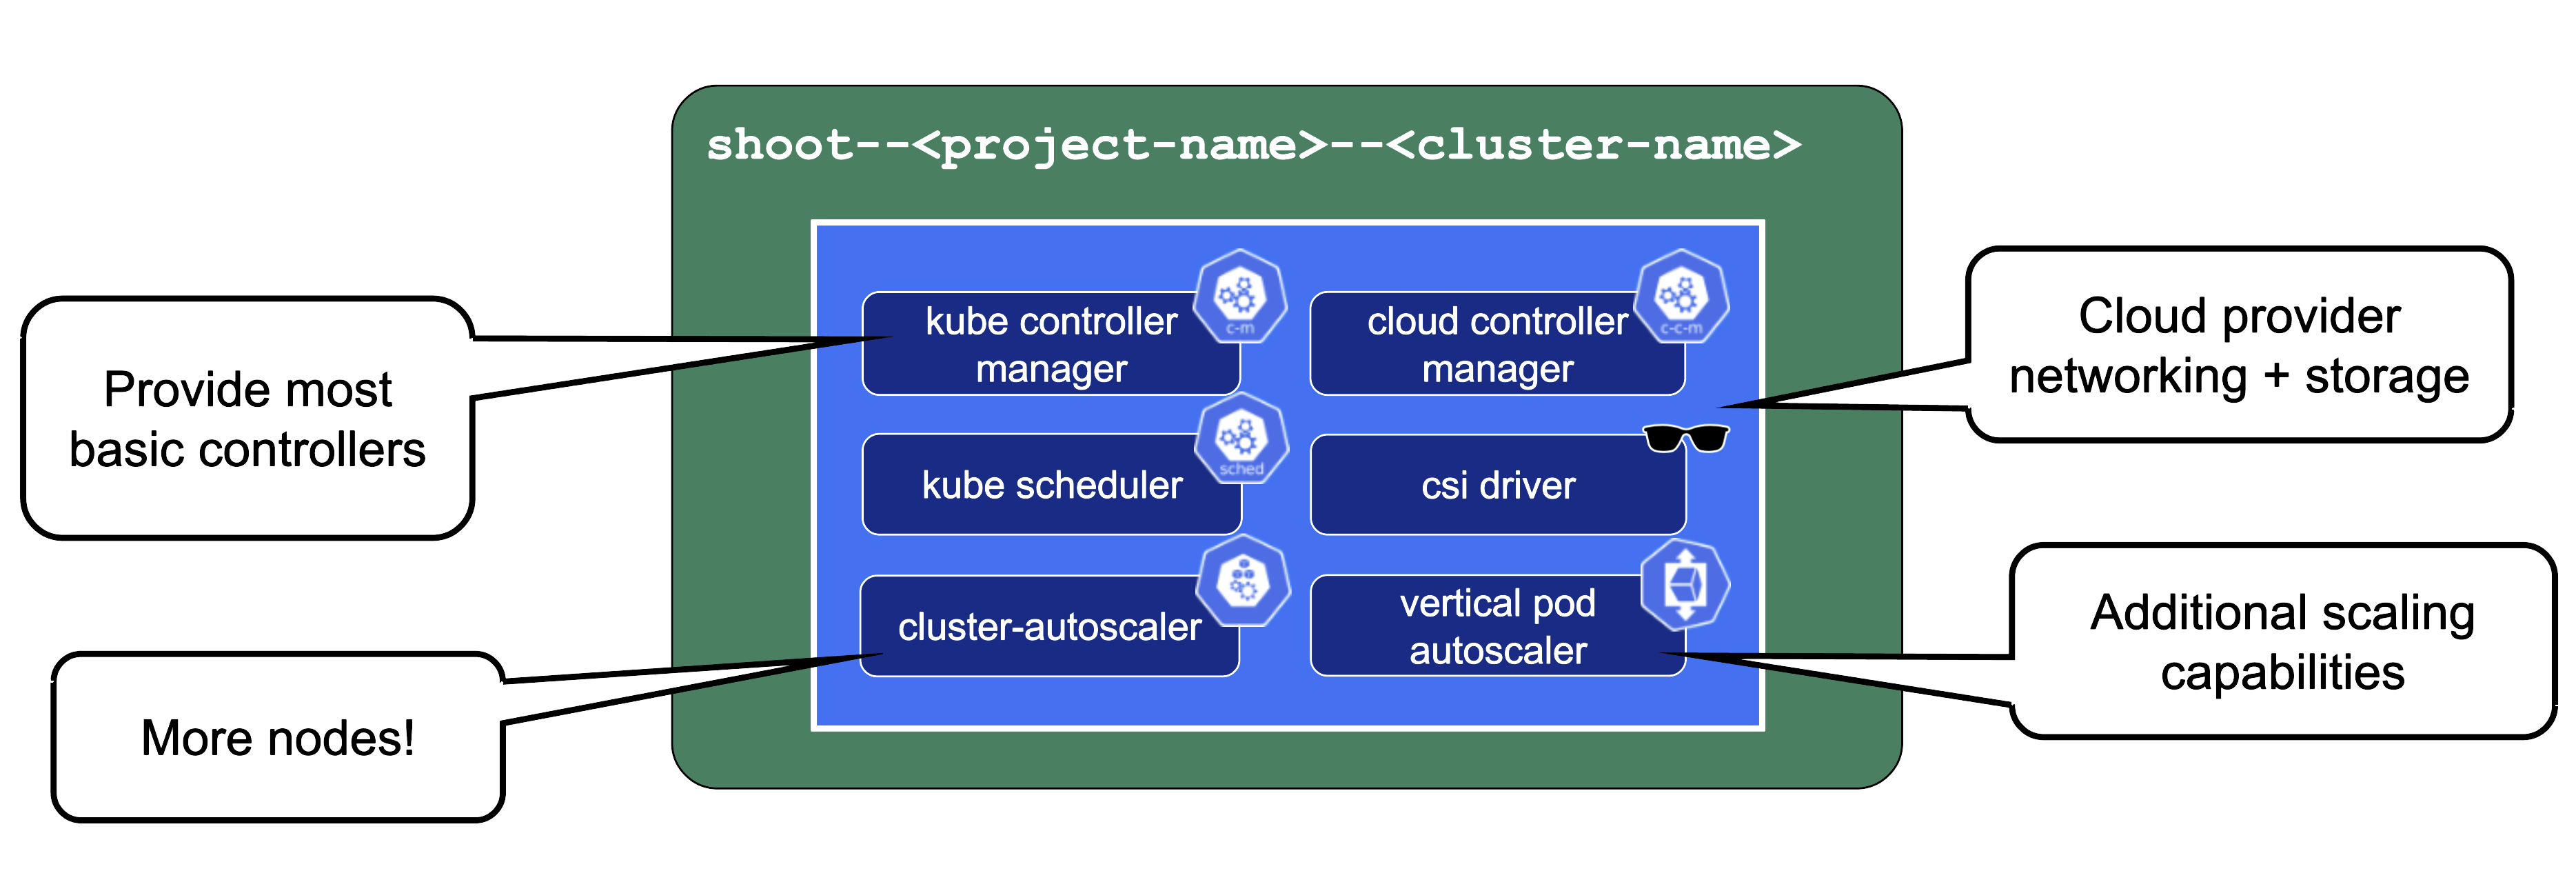
The kube-controller-manager (aka KCM) is the component that contains all the controllers for the core Kubernetes objects such as Deployments, Services, PVCs, etc.
The Kubernetes scheduler will assign pods to nodes.
The Cloud Controller Manager (aka CCM) is the component that contains all functionality to talk to Cloud environments (e.g., create LoadBalancer services).
The CSI driver is the storage subsystem of Kubernetes. It provisions and manages anything related to persistence.
Without the cluster autoscaler, nodes could not be added or removed based on current pressure on the cluster resources. Without the VPA, pods would have fixed resource limits that could not change on demand.
Gardener-Specific Components
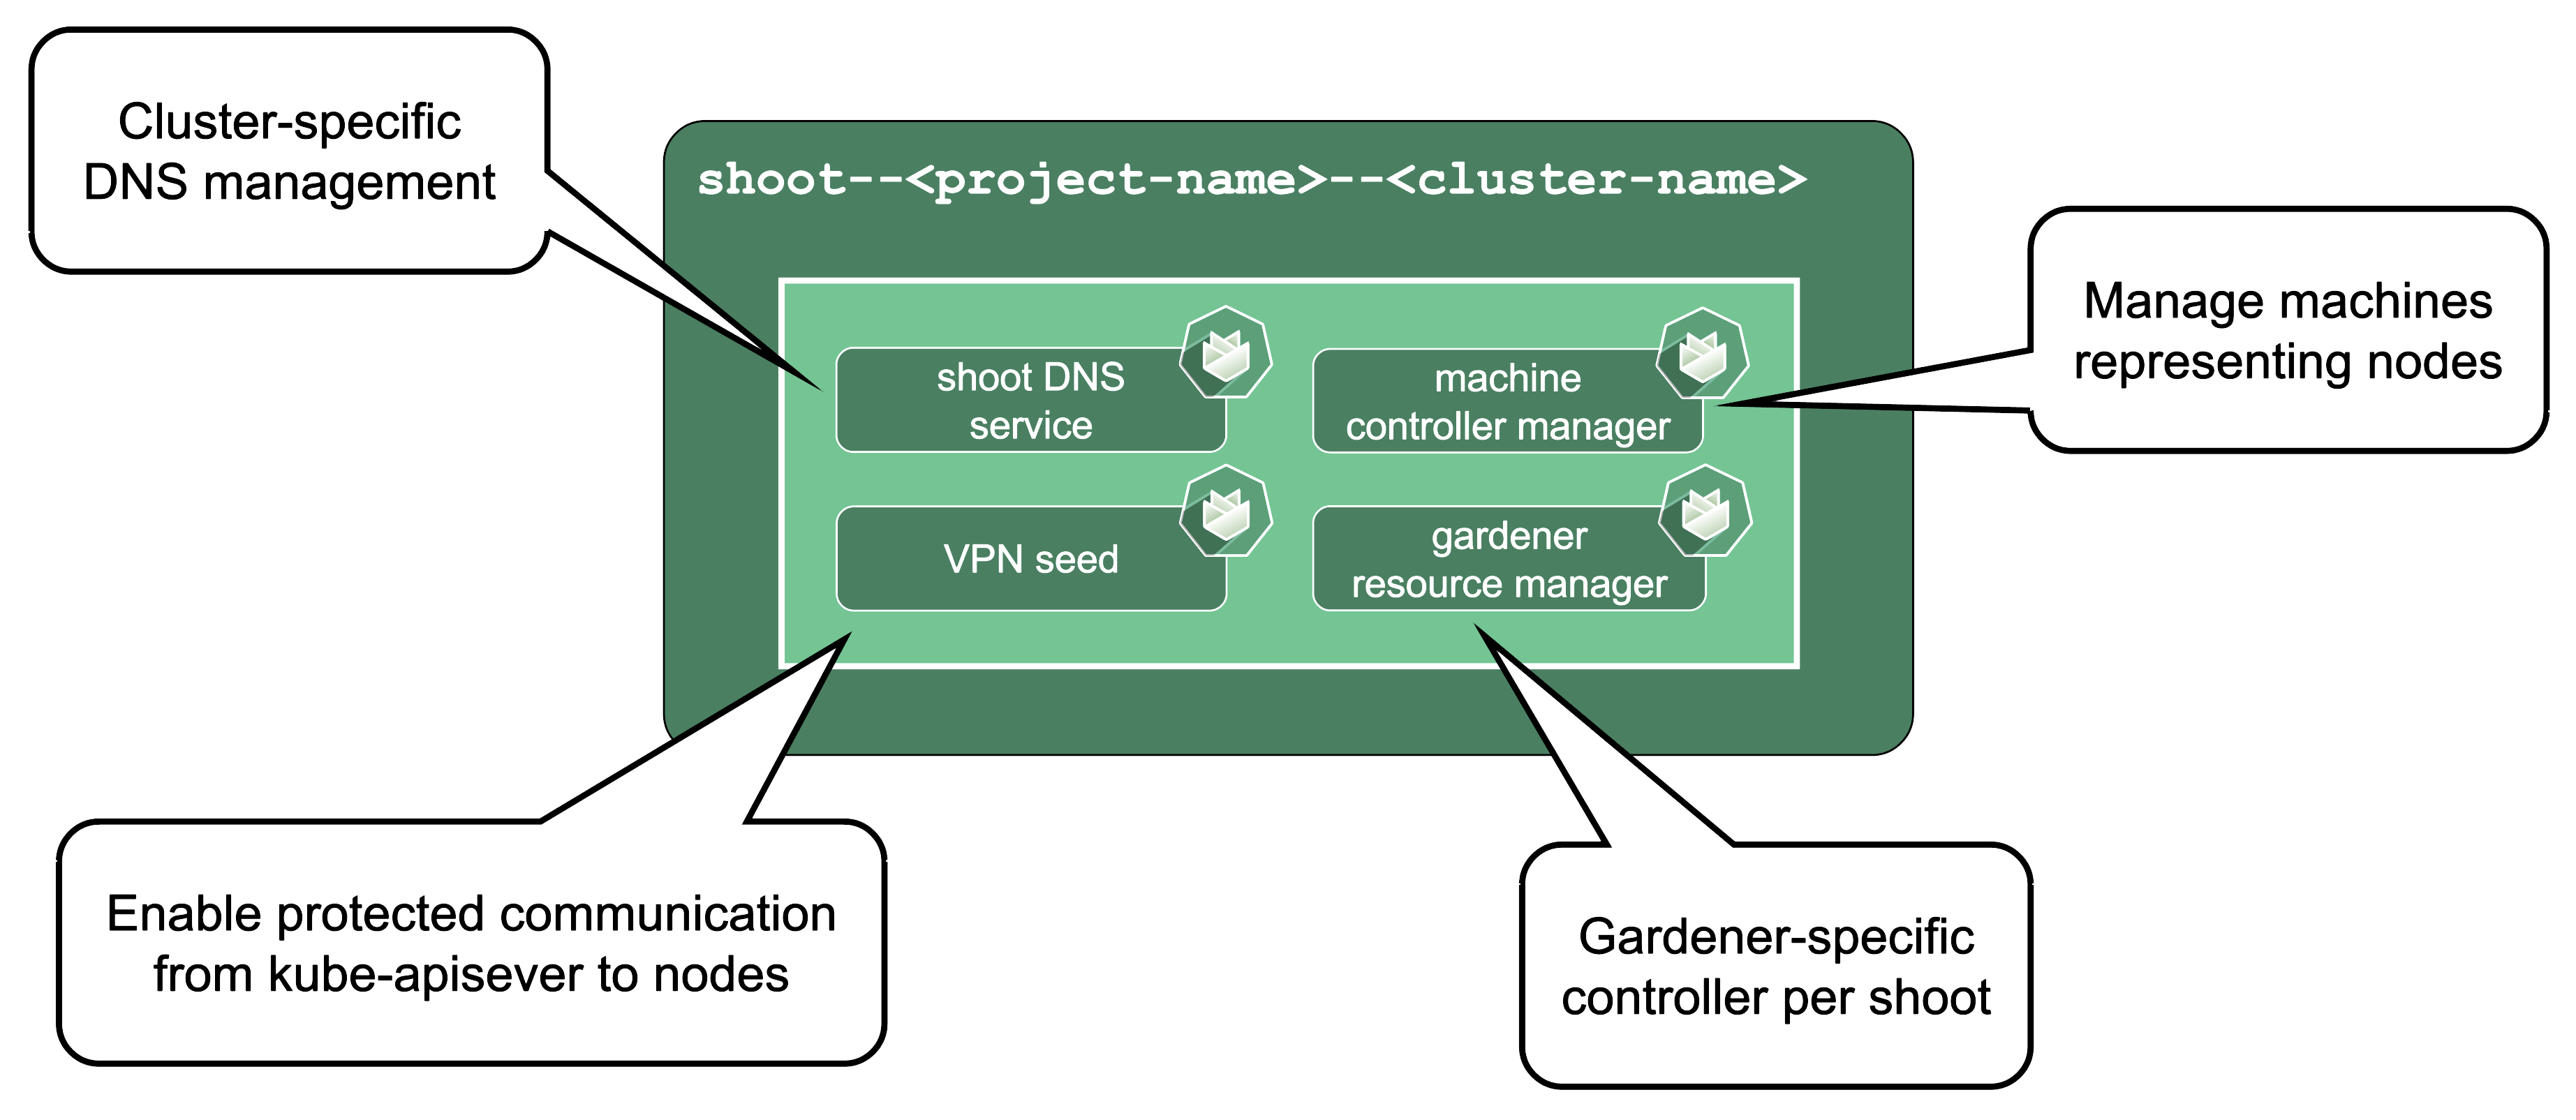
Shoot DNS service: External DNS management for resources within the cluster.
Machine Controller Manager: Responsible for managing VMs which will become nodes in the cluster.
Virtual Private Network deployments (aka VPN): Almost every communication between Kubernetes controllers and the API server is unidirectional - the controllers are given a kubeconfig and will establish a connection to the API server, which is exposed to all nodes of the cluster through a LoadBalancer. However, there are a few operations that require the API server to connect to the kubelet instead (e.g., for every webhook, when using kubectl exec or kubectl logs). Since every good Kubernetes cluster will have its worker nodes shielded behind firewalls to reduce the attack surface, Gardener establishes a VPN connection from the shoot’s internal network to the API server in the seed. For that, every shoot, as well as every control plane namespace in the seed, have openVPN pods in them that connect to each other (with the connection being established from the shoot to the seed).
Gardener Resource Manager: Tooling to deploy and manage Kubernetes resources required for cluster functionality.
Machines
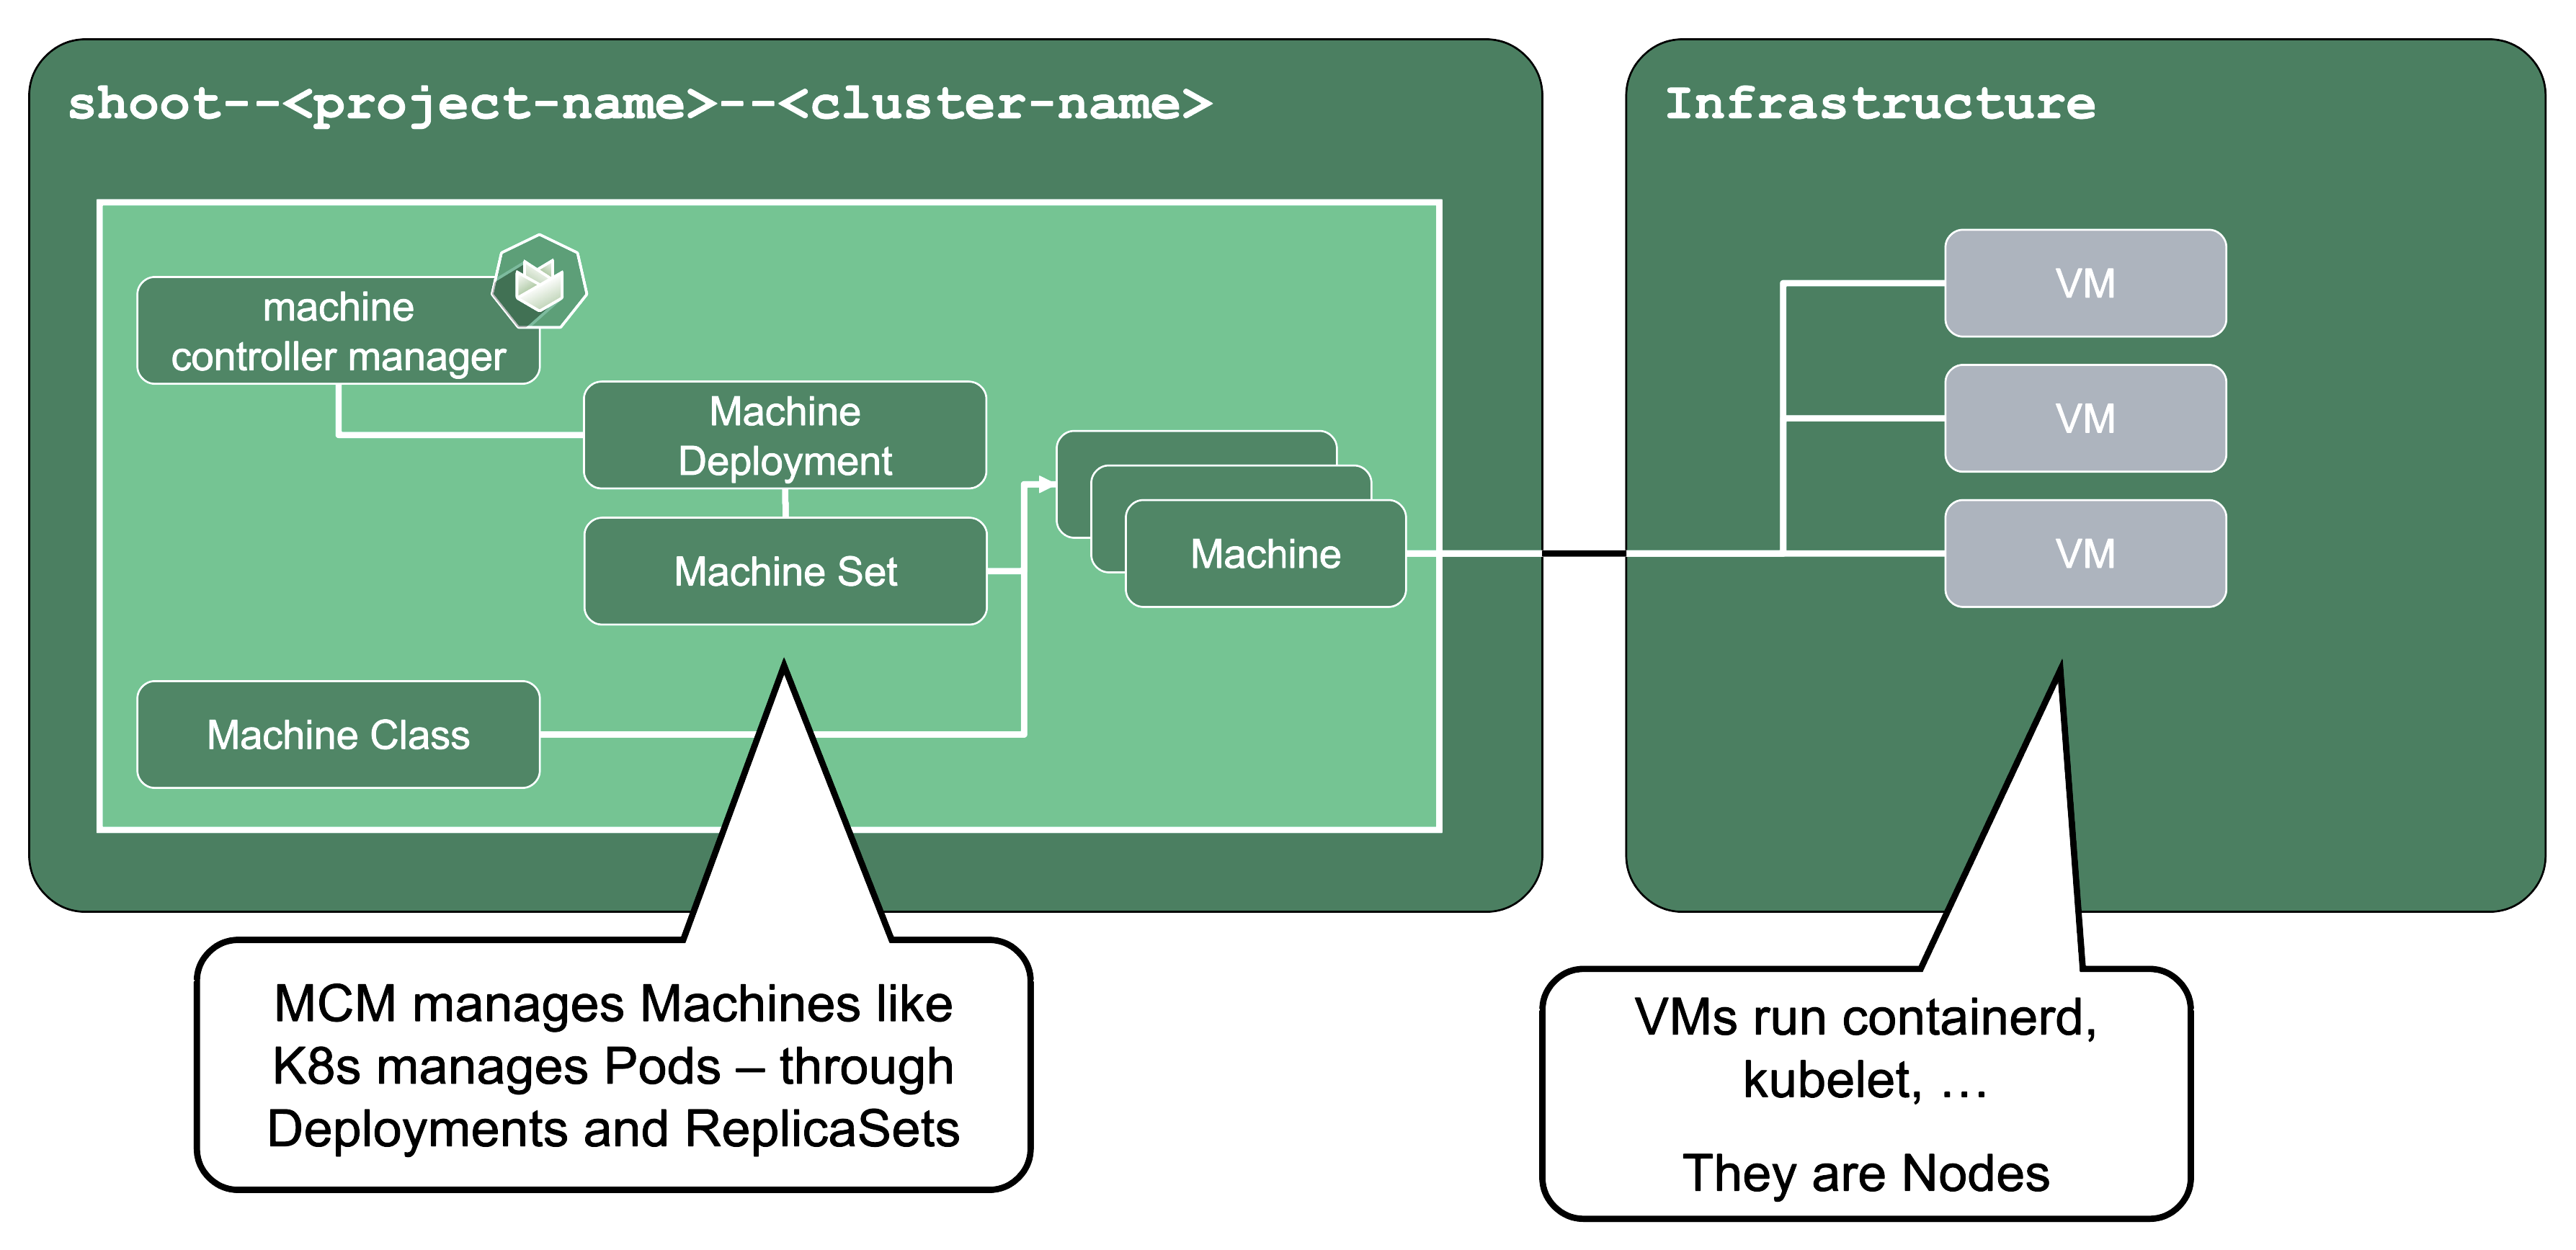
Machine Controller Manager (aka MCM):
The machine controller manager, which lives on the seed in a shoot’s control plane namespace, is the key component responsible for provisioning and removing worker nodes for a Kubernetes cluster. It acts on MachineClass, MachineDeployment, and MachineSet resources in the seed (think of them as the equivalent of Deployments and ReplicaSets) and controls the lifecycle of machine objects. Through a system of plugins, the MCM is the component that phones to the cloud provider’s API and bootstraps virtual machines.
For more information, see MCM and Cluster-autoscaler.
ManagedResources
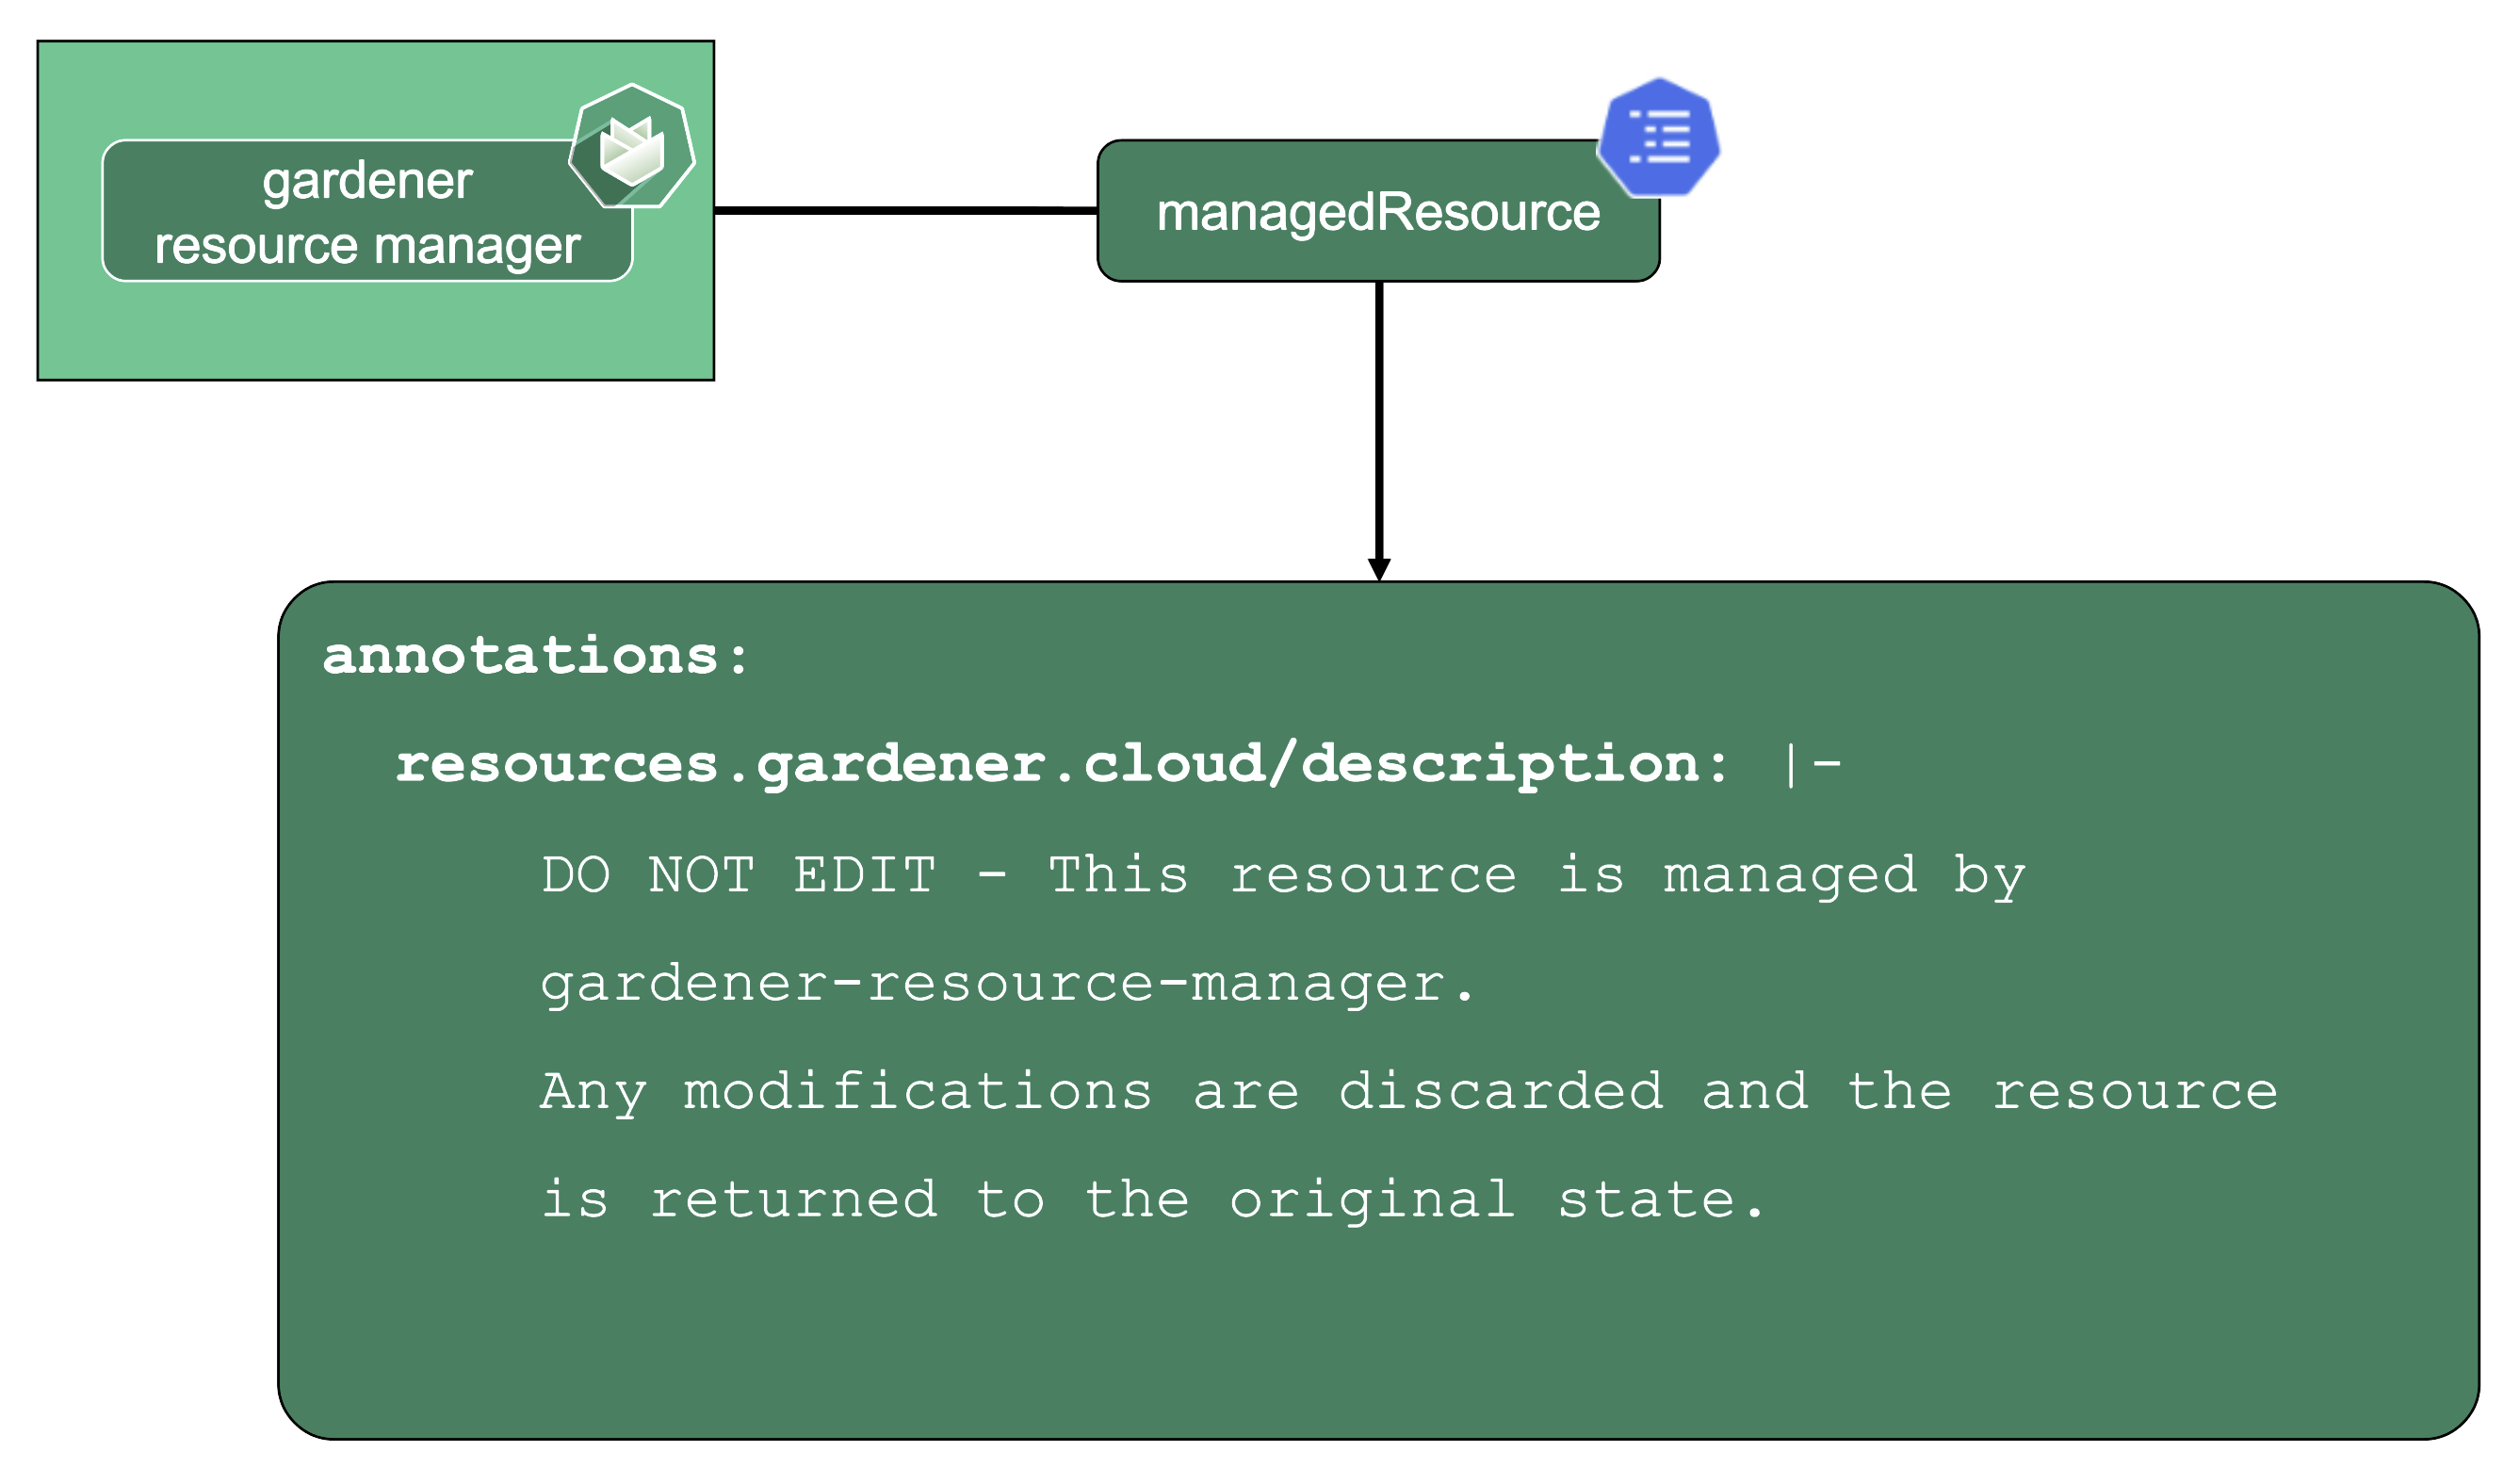
Gardener Resource Manager (aka GRM):
Gardener not only deploys components into the control plane namespace of the seed but also to the shoot (e.g., the counterpart of the VPN). Together with the components in the seed, Gardener needs to have a way to reconcile them.
Enter the GRM - it reconciles on ManagedResources objects, which are descriptions of Kubernetes resources which are deployed into the seed or shoot by GRM. If any of these resources are modified or deleted by accident, the usual observe-analyze-act cycle will revert these potentially malicious changes back to the values that Gardener envisioned. In fact, all the components found in a shoot’s kube-system namespace are ManagedResources governed by the GRM. The actual resource definition is contained in secrets (as they may contain “secret” data), while the ManagedResources contain a reference to the secret containing the actual resource to be deployed and reconciled. Another benefit of using ManagedResources is that when deleted, it will ensure that its resources will be cleaned up (useful if a finalizer of a resource remains for some reason). Also, it provides out of the box healthchecks for some resources (e.g., Pod, Deployment, DaemonSet, … ) that, if failing, will be propagated to the shoot status.
DNS Records - “Internal” and “External”
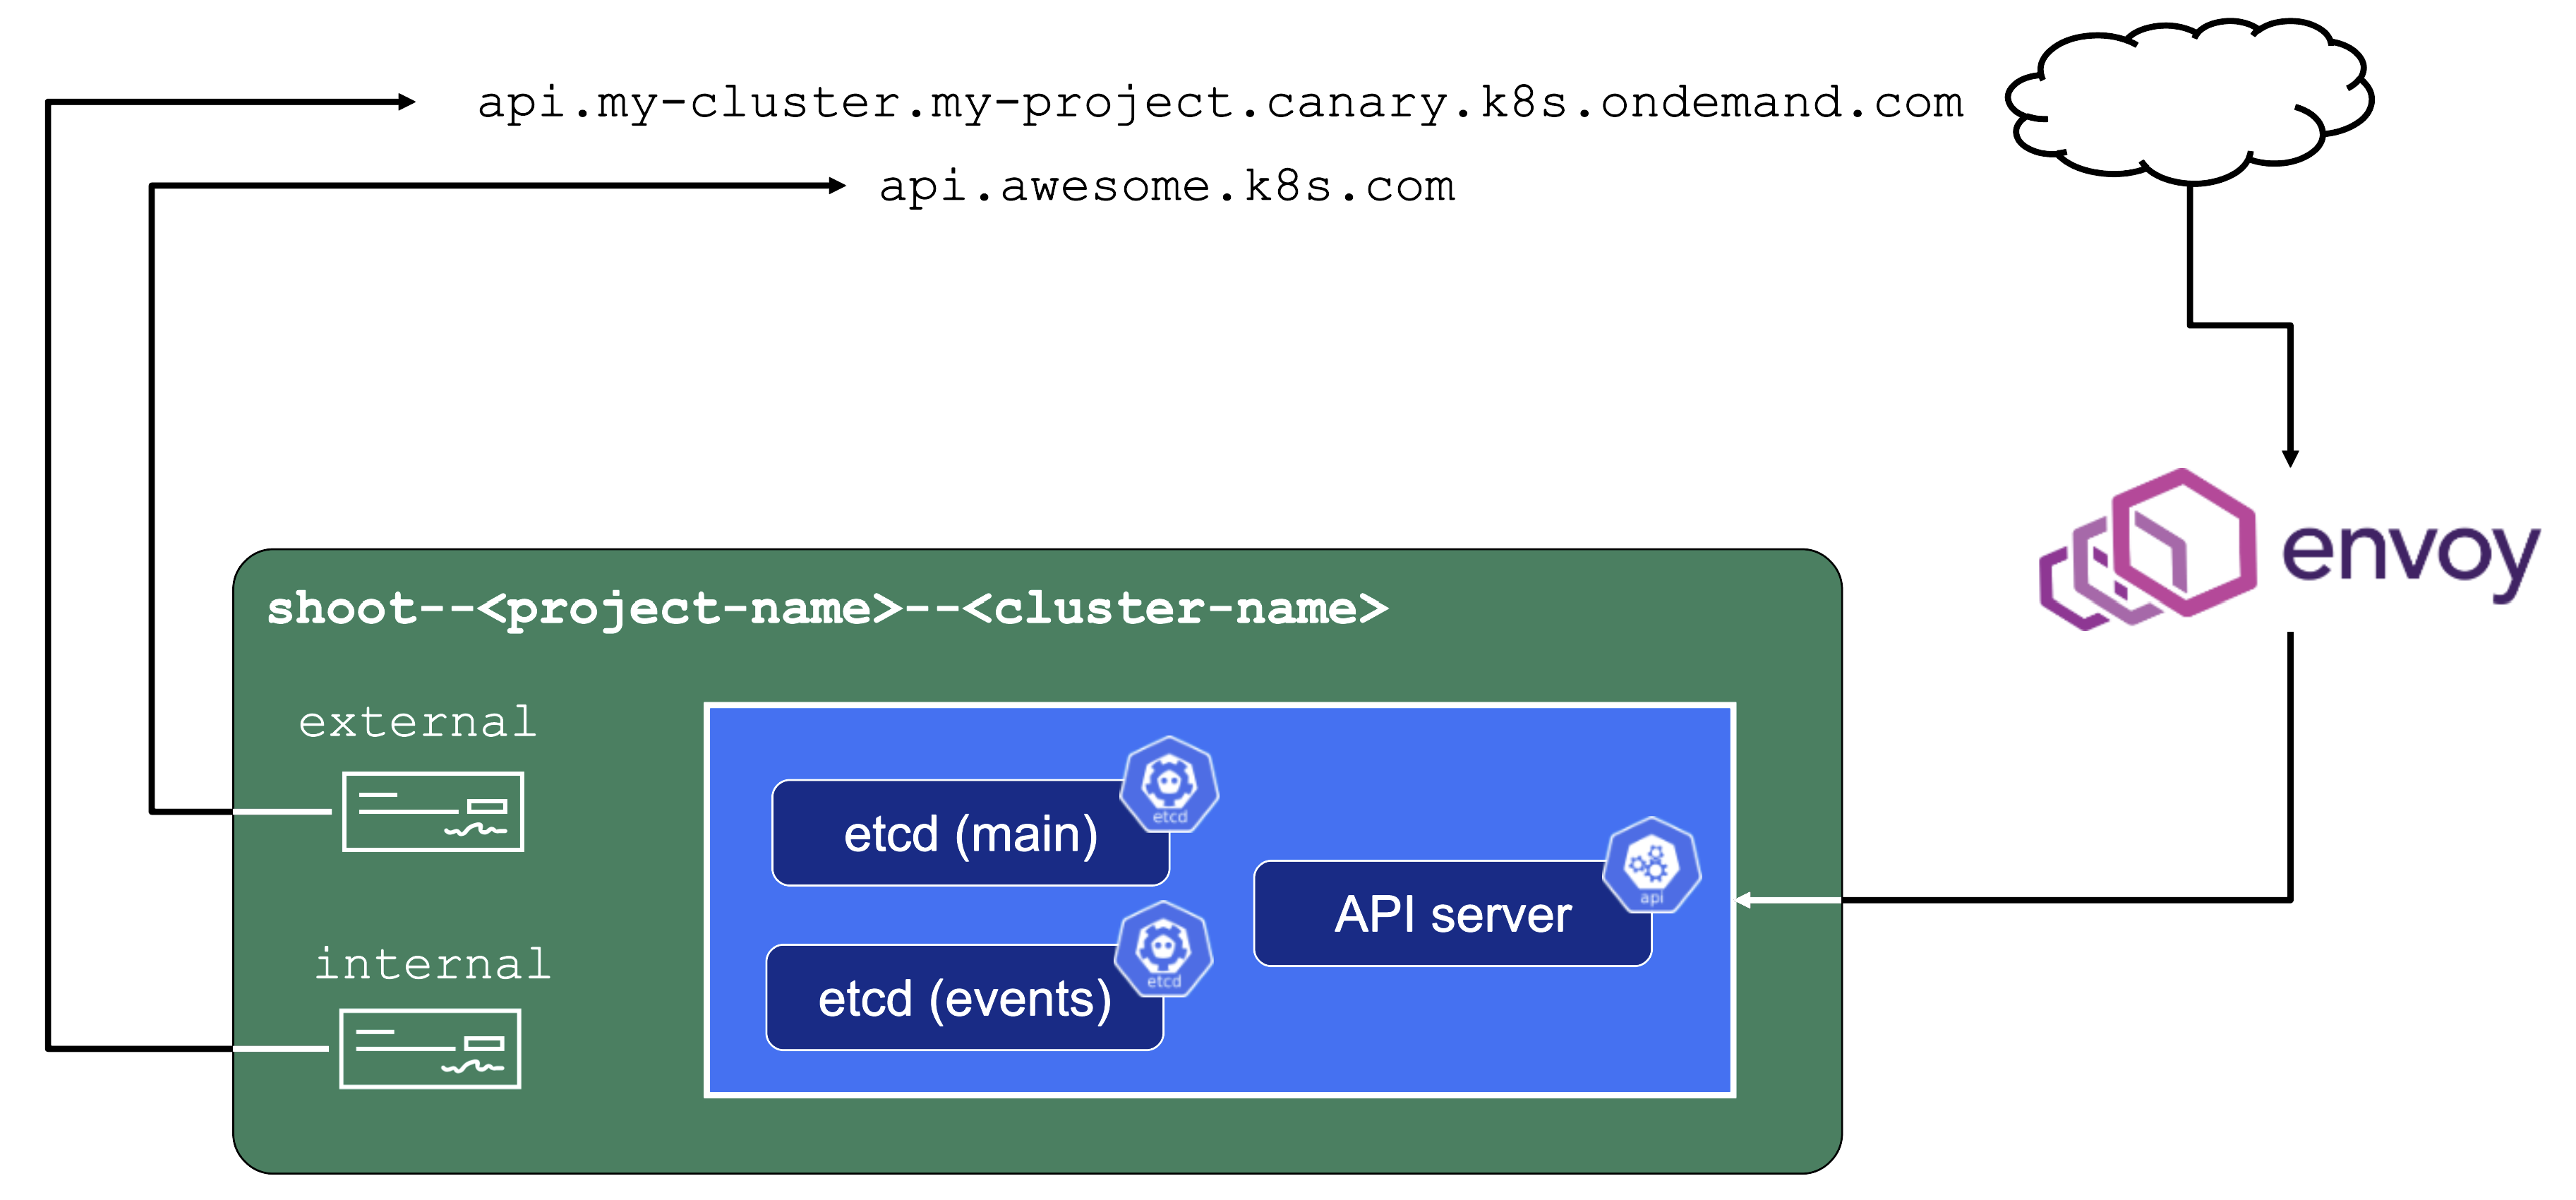
The internal domain name is used by all Gardener components to talk to the API server. Even though it is called “internal”, it is still publicly routable.
But most importantly, it is pre-defined and not configurable by the end user.
Therefore, the “external” domain name exists. It is either a user owned domain or can be pre-defined for a Gardener landscape. It is used by any end user accessing the cluster’s API server.
For more information, see Contract: DNSRecord Resources.
Features and Observability
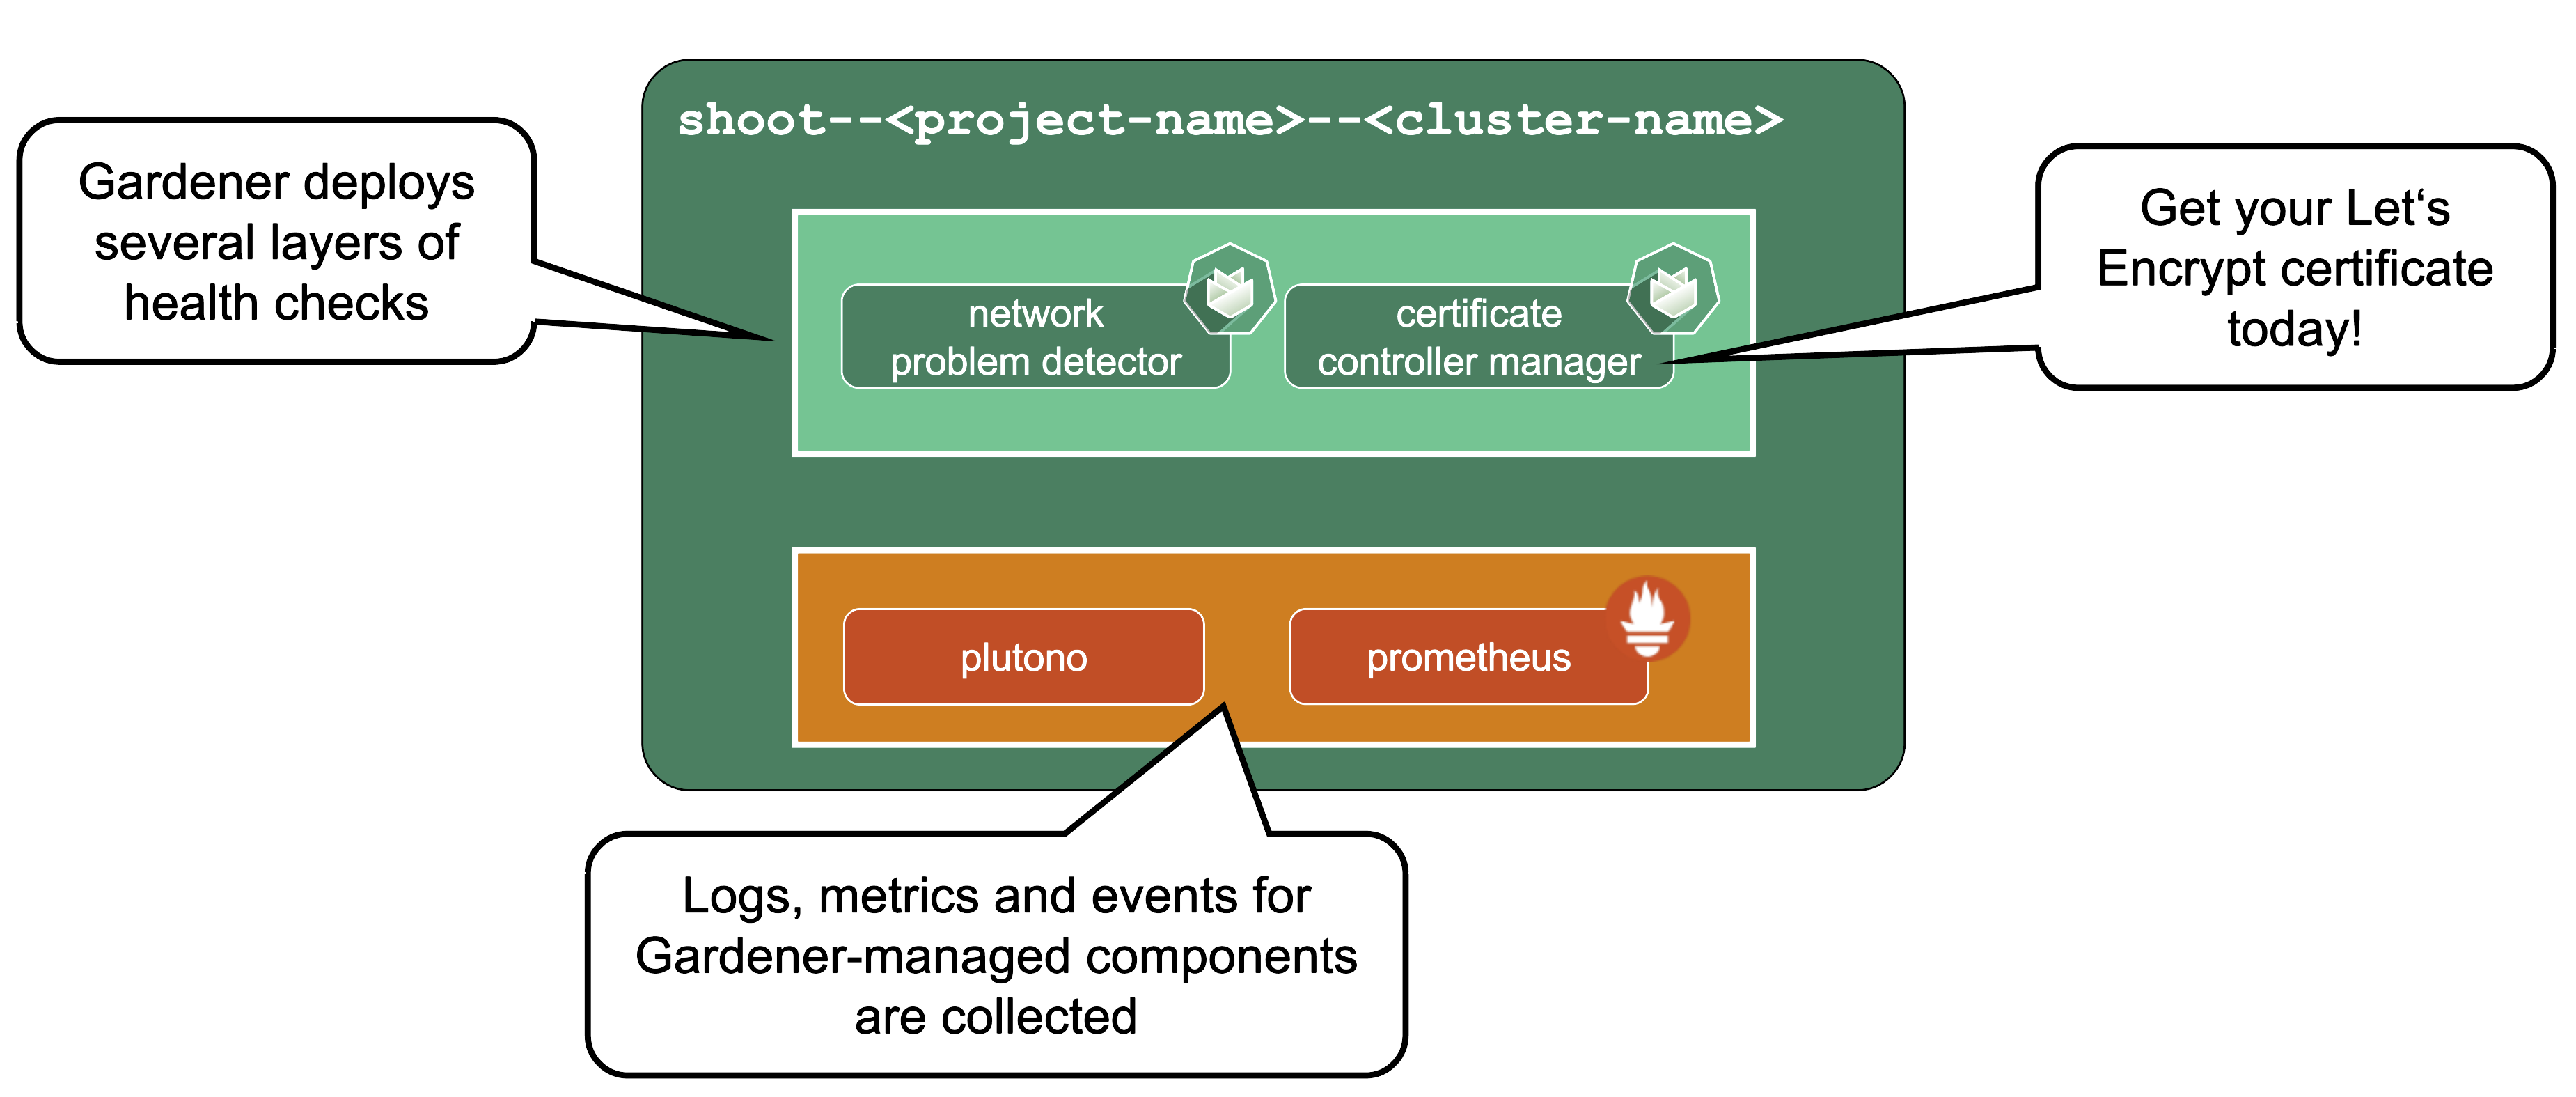
Gardener runs various health checks to ensure that the cluster works properly. The Network Problem Detector gives information about connectivity within the cluster and to the API server.
Certificate Management: allows to request certificates via the ACME protocol (e.g., issued by Let’s Encrypt) from within the cluster. For detailed information, have a look at the cert-manager project.
Observability stack: Gardener deploys observability components and gathers logs and metrics for the control-plane & kube-system namespace. Also provided out-of-the-box is a UI based on Plutono (fork of Grafana) with pre-defined dashboards to access and query the monitoring data. For more information, see Observability.
HA Control Plane
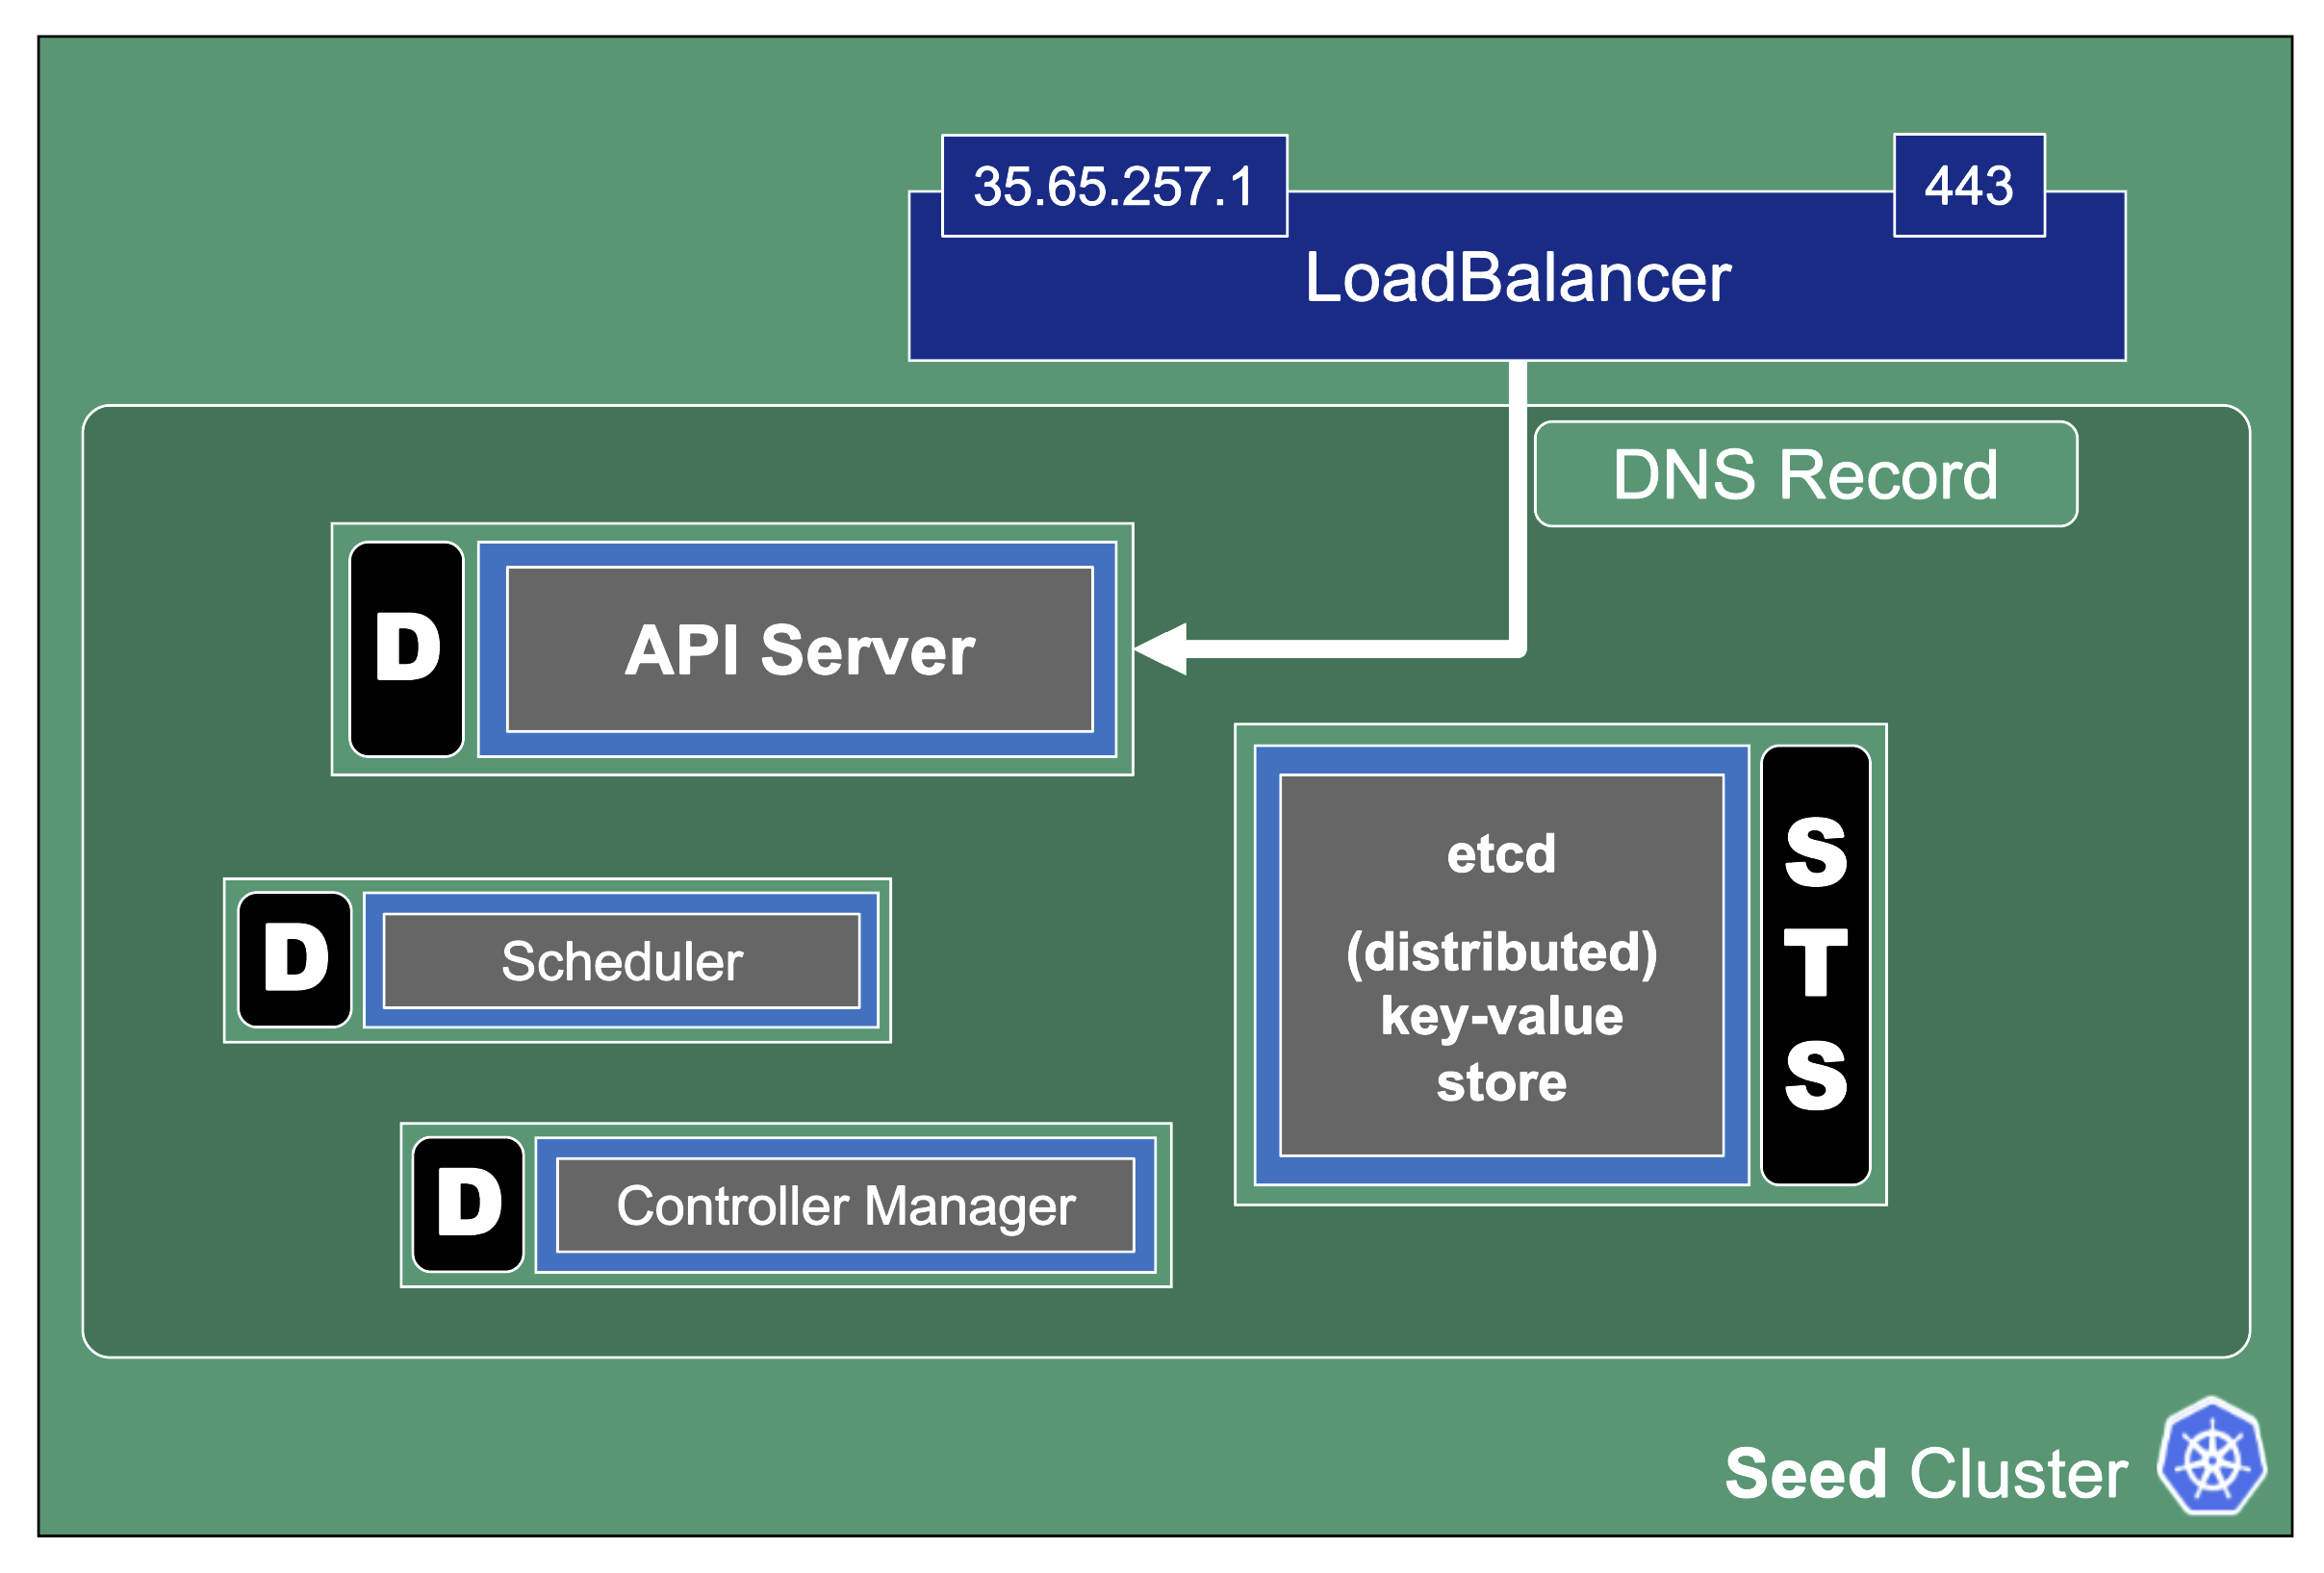
As the title indicates, the HA control plane feature is only about the control plane. Setting up the data plane to span multiple zones is part of the worker spec of a shoot.
HA control planes can be configured as part of the shoot’s spec. The available types are:
Both work similarly and just differ in the failure domain the concepts are applied to.
For detailed guidance and more information, see the High Availability Guides.
Zonal HA Control Planes
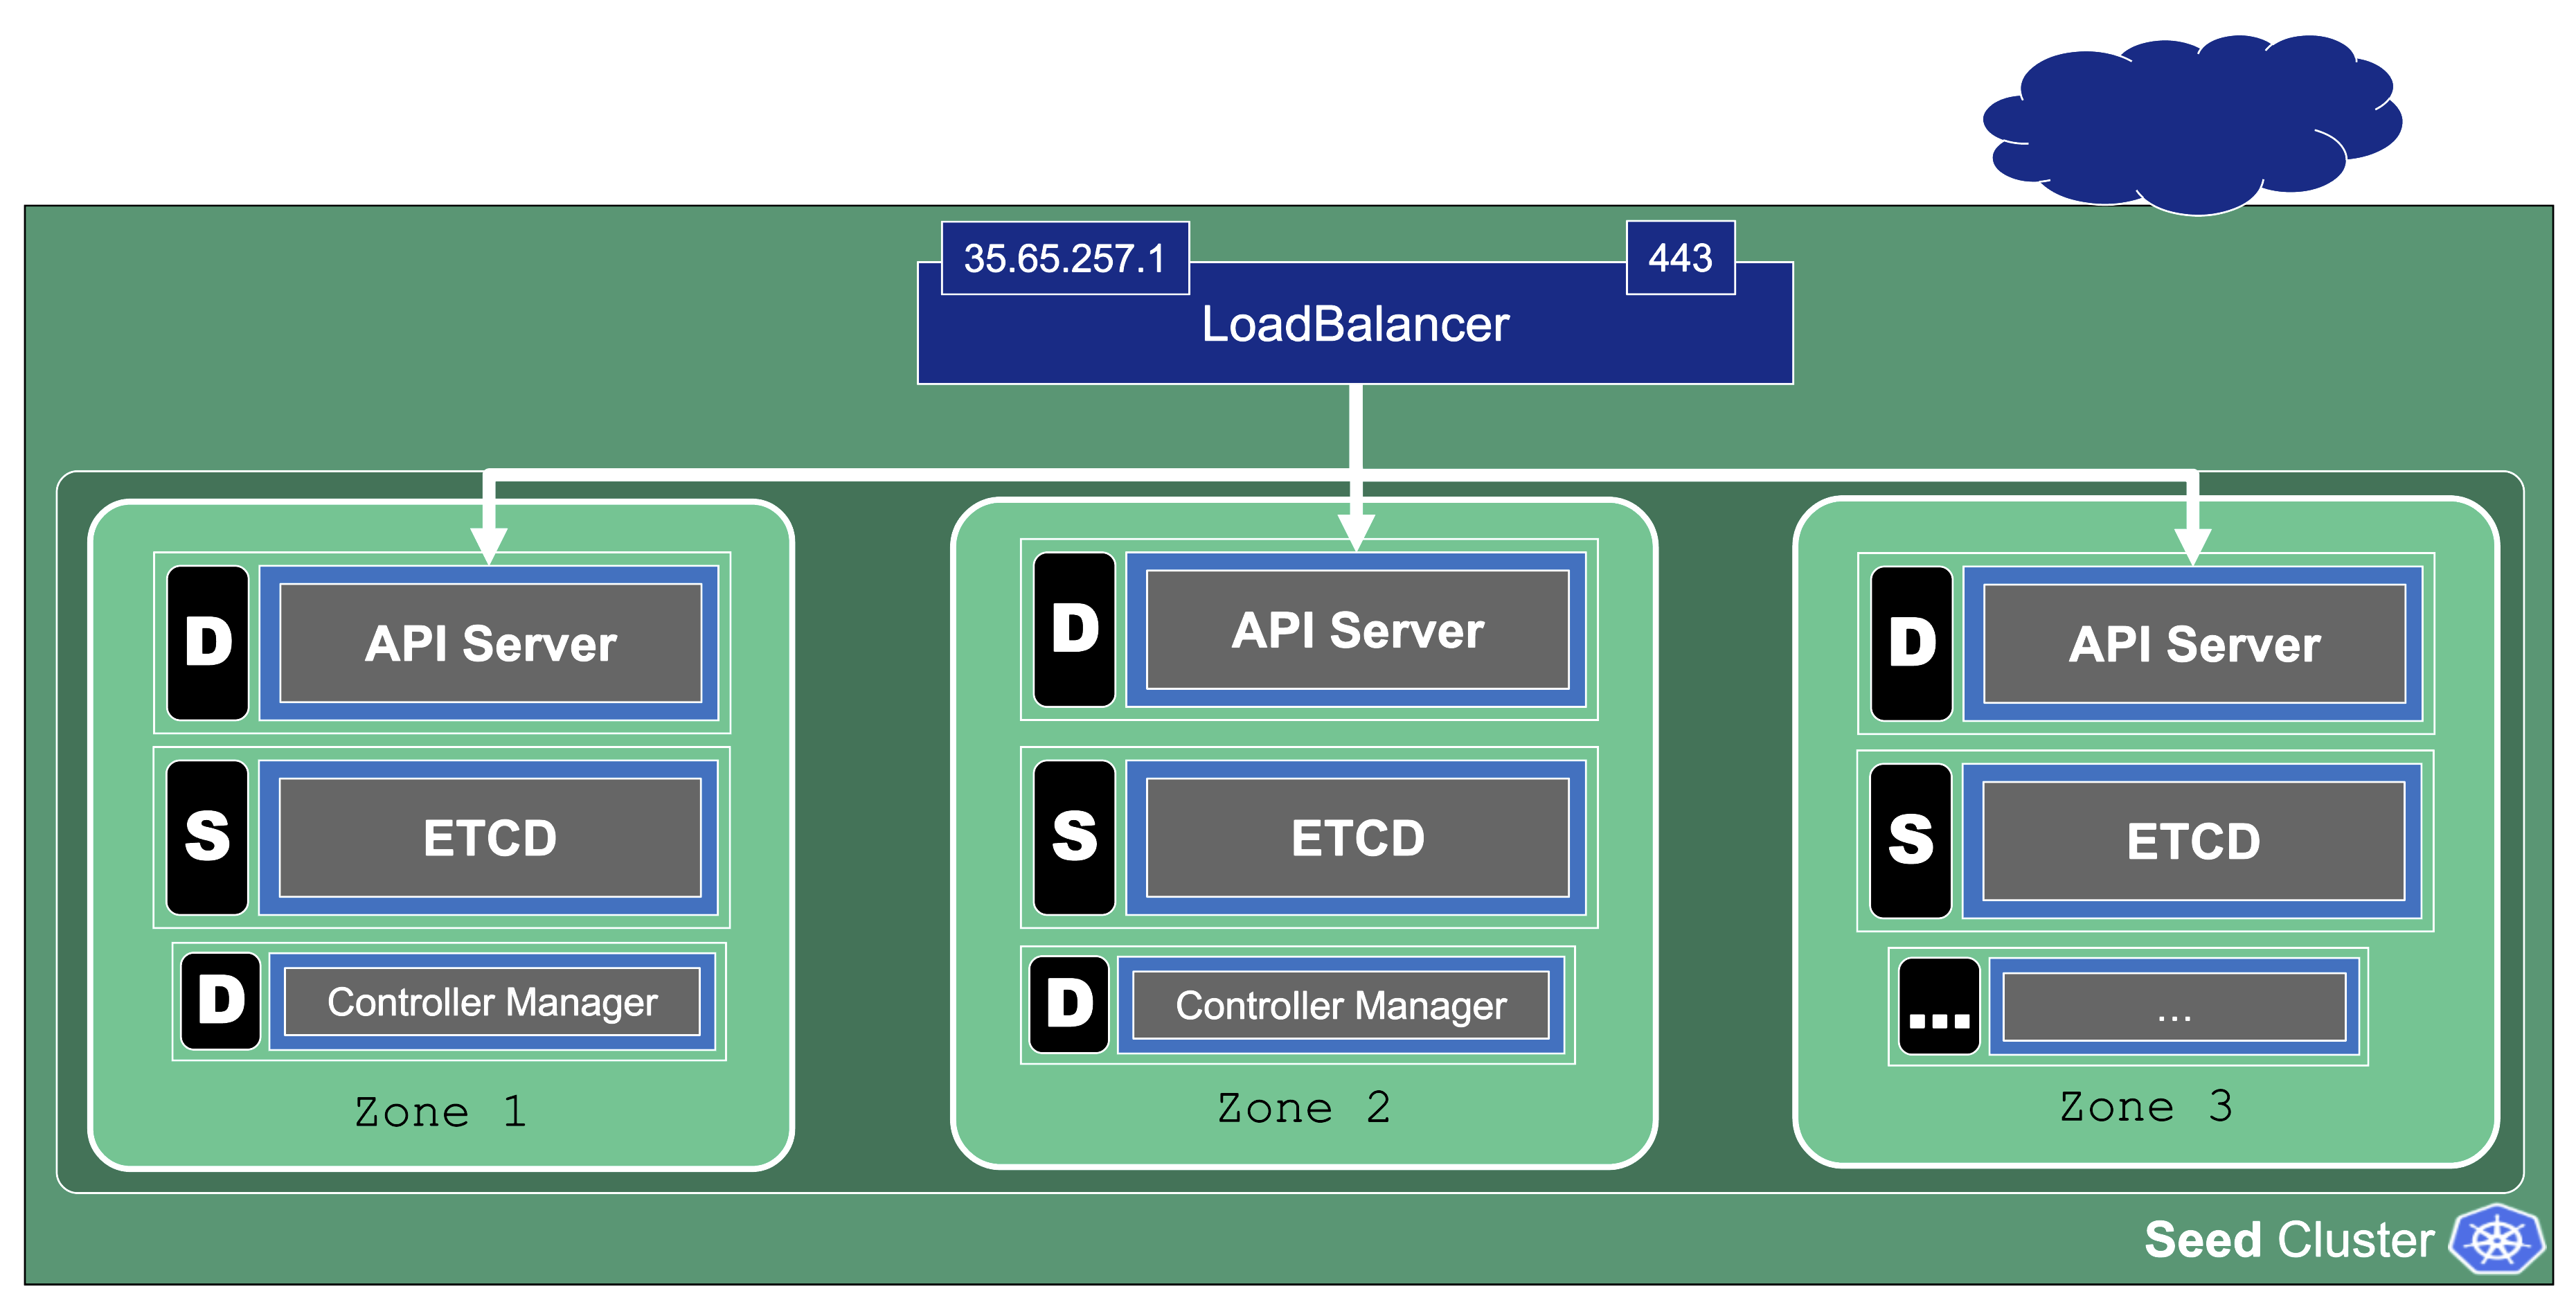
Zonal HA is the most likely setup for shoots with purpose: production.
The starting point is a regular (non-HA) control plane. etcd and most controllers are singletons and the kube-apiserver might have been scaled up to several replicas.
To get to an HA setup we need:
- A minimum of 3 replicas of the API server
- 3 replicas for etcd (both main and events)
- A second instance for each controller (e.g., controller manager, csi-driver, scheduler, etc.) that can take over in case of failure (active / passive).
To distribute those pods across zones, well-known concepts like PodTopologySpreadConstraints or Affinities are applied.
kube-system Namespace
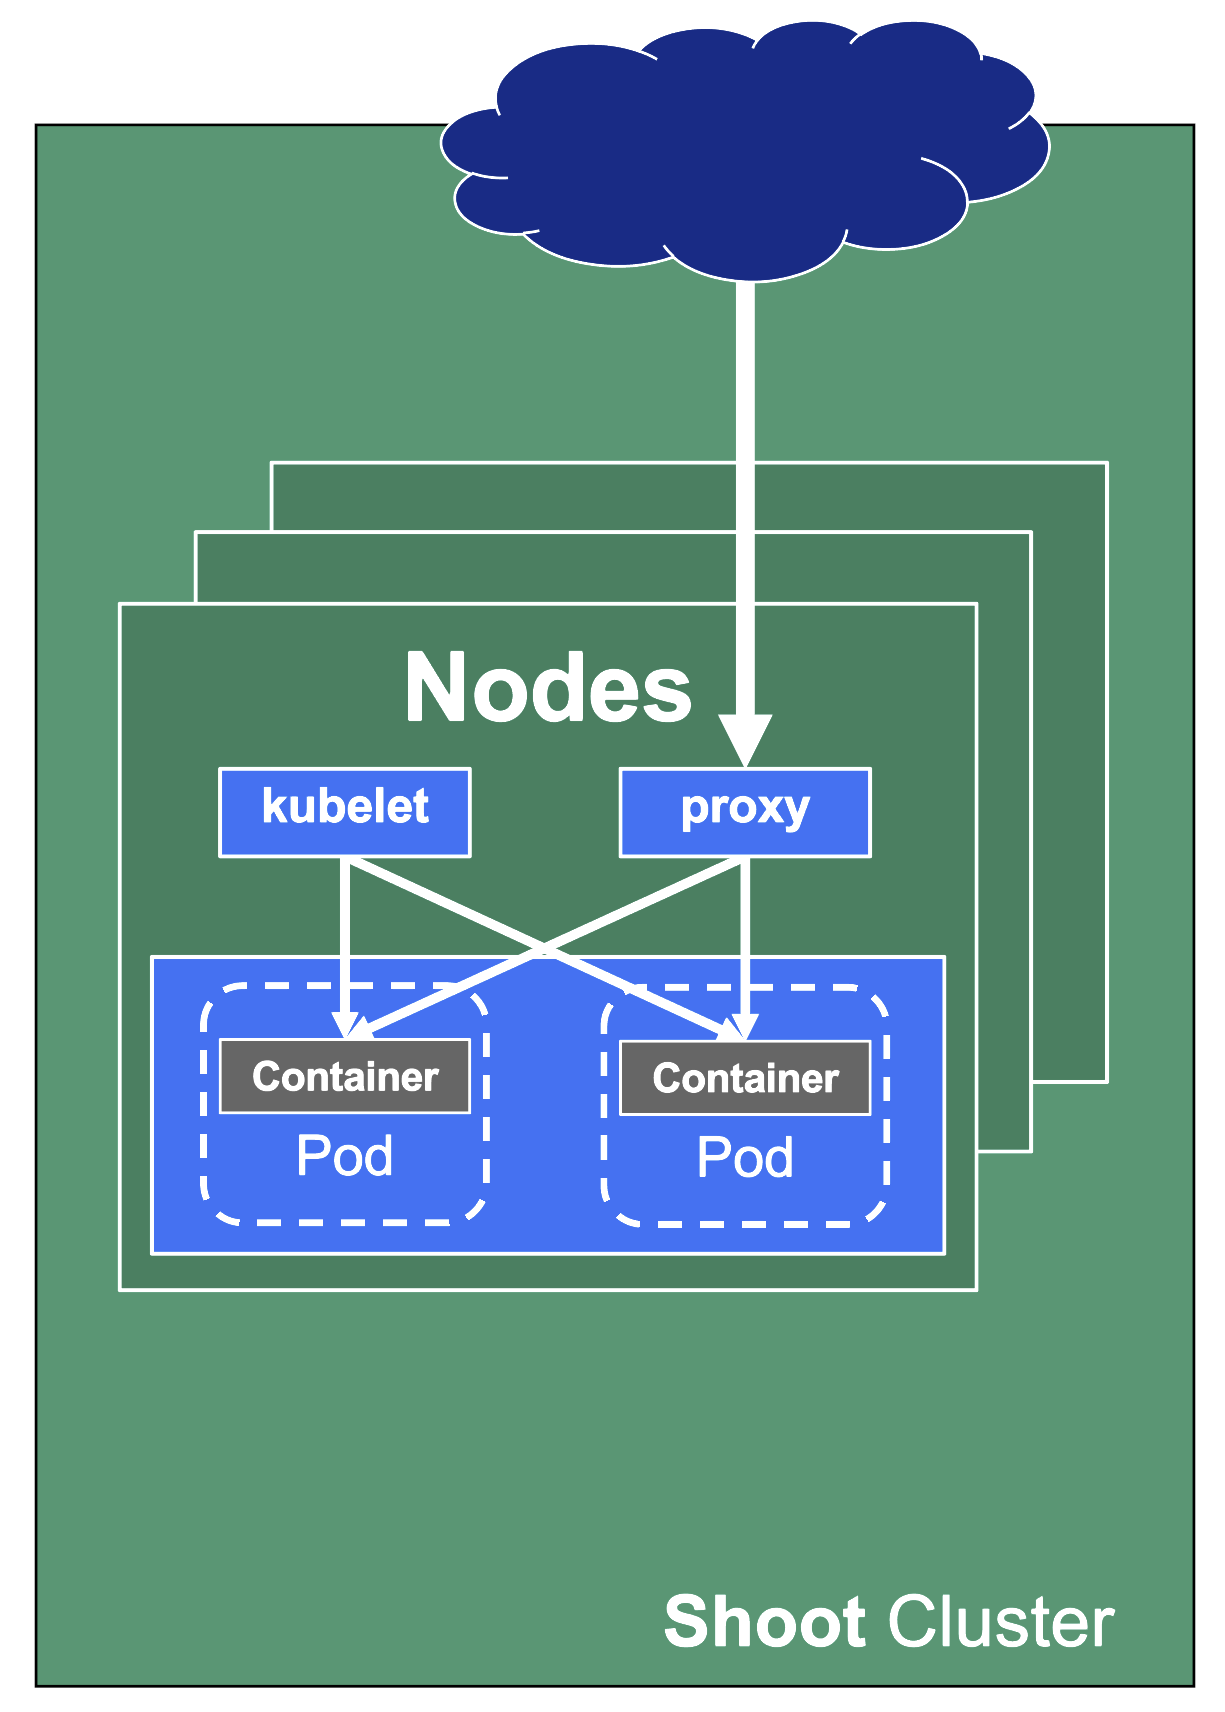
For a fully functional cluster, a few components need to run on the data plane side of the diagram. They all exist in the kube-system namespace. Let’s have a closer look at them.
Networking
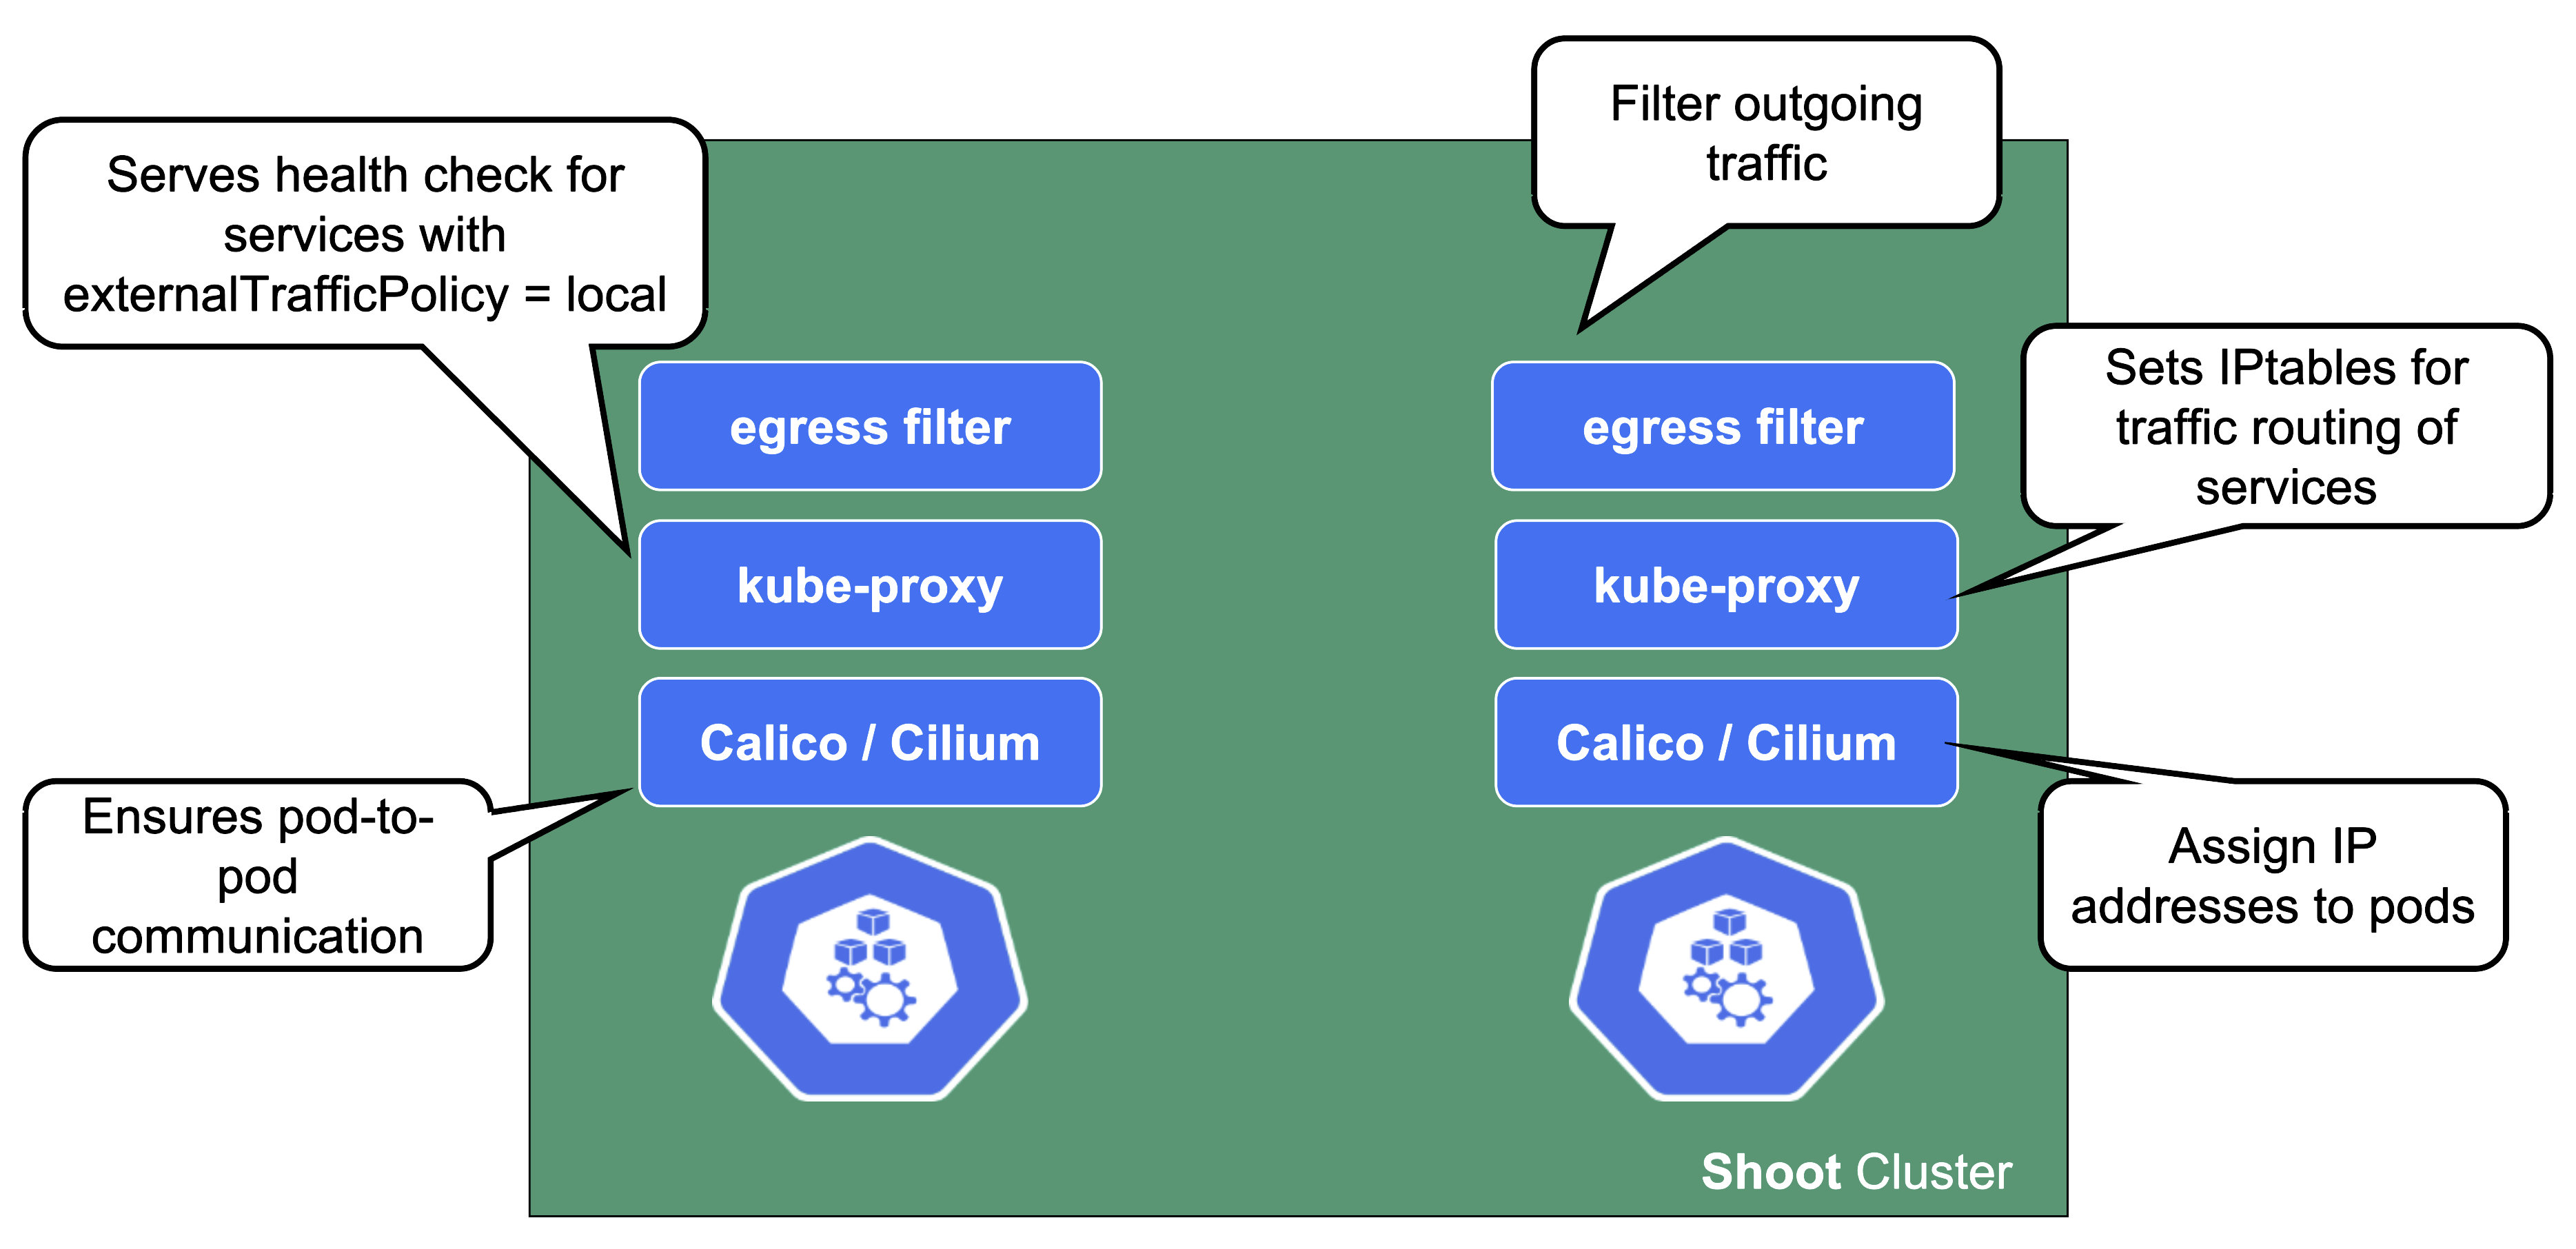
On each node we need a CNI (container network interface) plugin. Gardener offers Calico or Cilium as network provider for a shoot. When using Calico, a kube-proxy is deployed. Cilium does not need a kube-proxy, as it takes care of its tasks as well.
The CNI plugin ensures pod-to-pod communication within the cluster. As part of it, it assigns cluster-internal IP addresses to the pods and manages the network devices associated with them. When an overlay network is enabled, calico will also manage the routing of pod traffic between different nodes.
On the other hand, kube-proxy implements the actual service routing (cilium can do this as well and no kube-proxy is needed). Whenever packets go to a service’s IP address, they are re-routed based on IPtables rules maintained by kube-proxy to reach the actual pods backing the service. kube-proxy operates on endpoint-slices and manages IPtables on EVERY node. In addition, kube-proxy provides a health check endpoint for services with externalTrafficPolicy=local, where traffic only gets to nodes that run a pod matching the selector of the service.
The egress filter implements basic filtering of outgoing traffic in order to satisfy standard policy compliance requirements.
And what happens if the pods crashloop, are missing or otherwise broken?
Well, in case kube-proxy is broken, service traffic will degrade over time (depending on the pod churn rate and how many kube-proxy pods are broken).
When calico is failing on a node, no new pods can start there as they don’t get any IP address assigned. It might also fail to add routes to newly added nodes. Depending on the error, deleting the pod might help.
DNS System
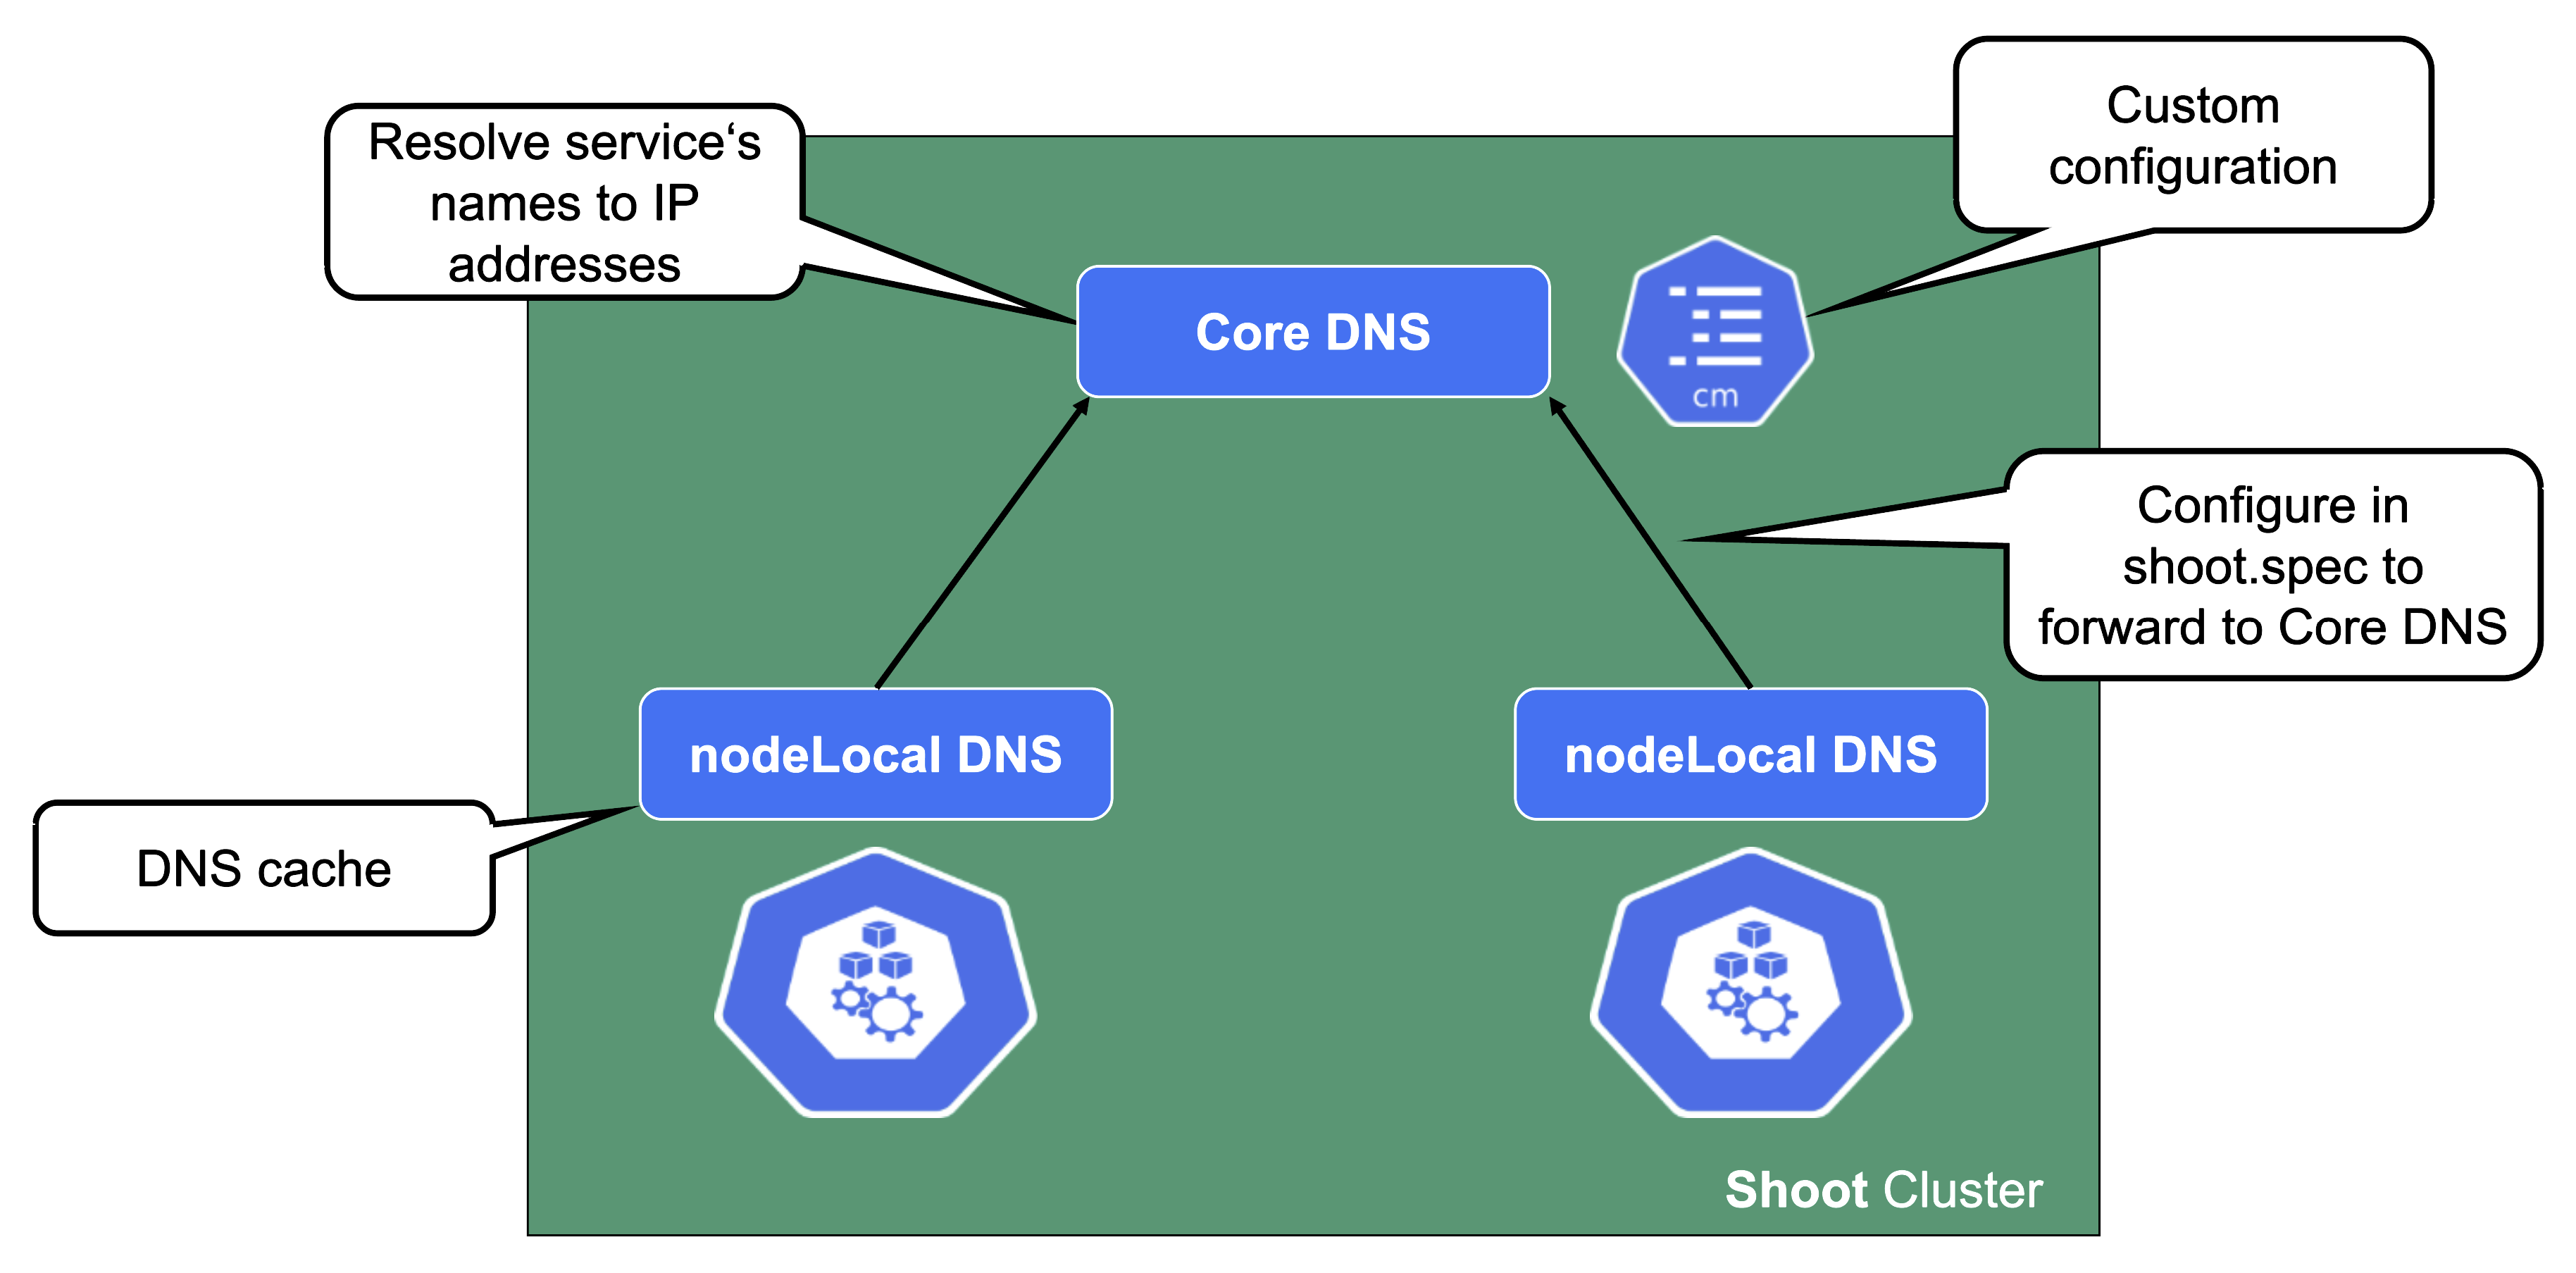
For a normal service in Kubernetes, a cluster-internal DNS record that resolves to the service’s ClusterIP address is being created. In Gardener (similar to most other Kubernetes offerings) CoreDNS takes care of this aspect. To reduce the load when it comes to upstream DNS queries, Gardener deploys a DNS cache to each node by default. It will also forward queries outside the cluster’s search domain directly to the upstream DNS server. For more information, see NodeLocalDNS Configuration and DNS autoscaling.
In addition to this optimization, Gardener allows custom DNS configuration to be added to CoreDNS via a dedicated ConfigMap.
In case this customization is related to non-Kubernetes entities, you may configure the shoot’s NodeLocalDNS to forward to CoreDNS instead of upstream (disableForwardToUpstreamDNS: true).
A broken DNS system on any level will cause disruption / service degradation for applications within the cluster.
Health Checks and Metrics
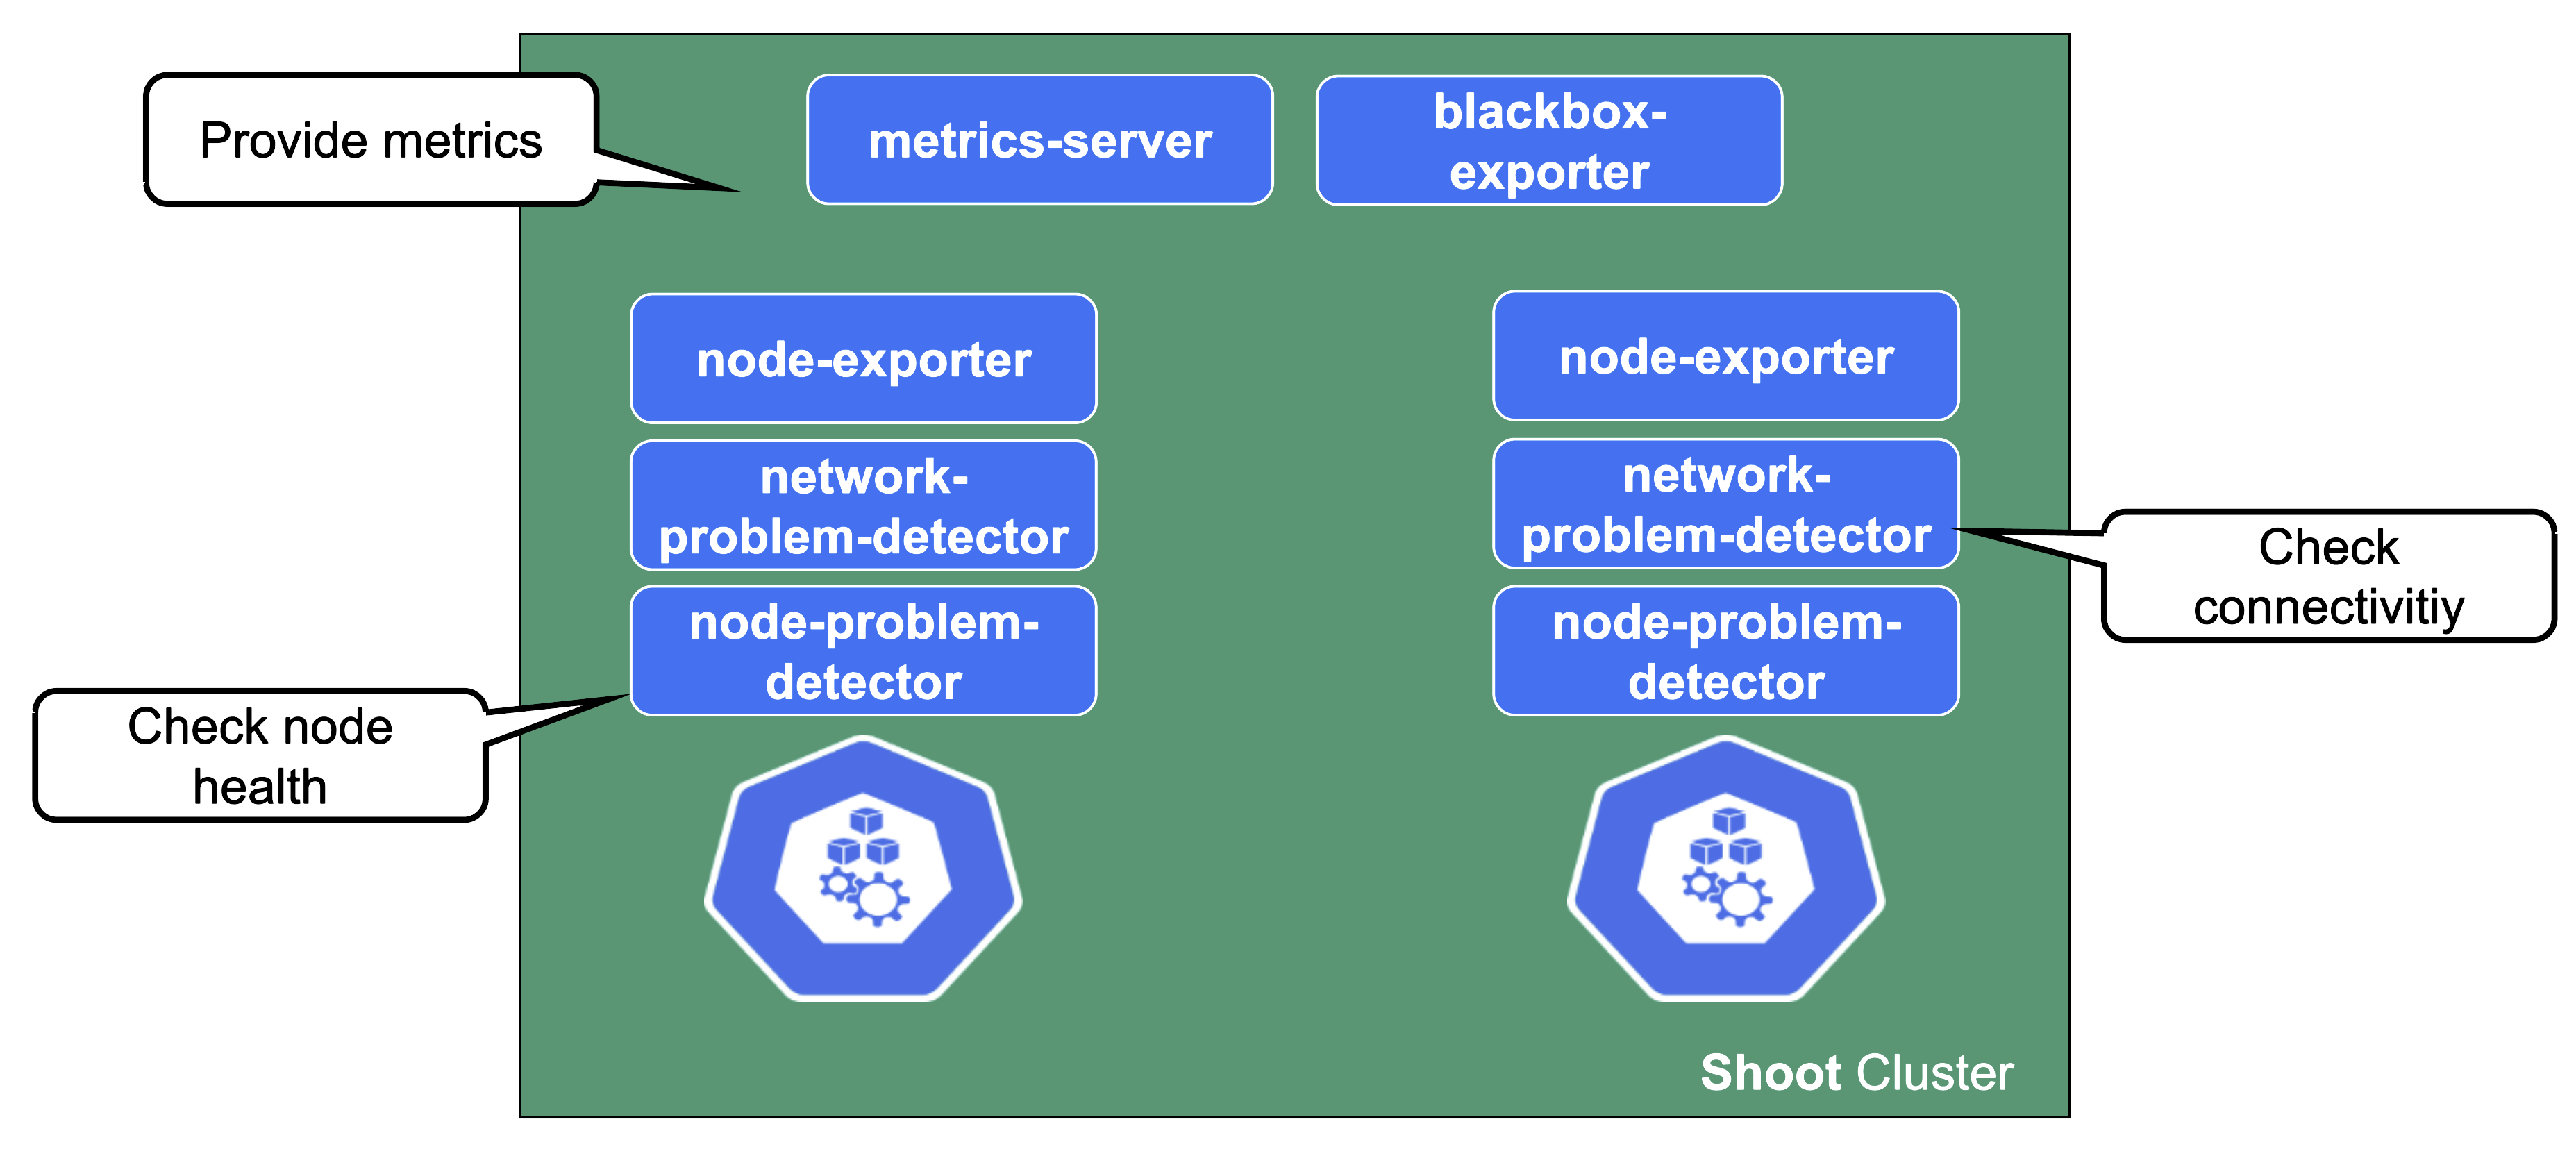
Gardener deploys probes checking the health of individual nodes. In a similar fashion, a network health check probes connectivity within the cluster (node to node, pod to pod, pod to api-server, …).
They provide the data foundation for Gardener’s monitoring stack together with the metrics collecting / exporting components.
Connectivity Components
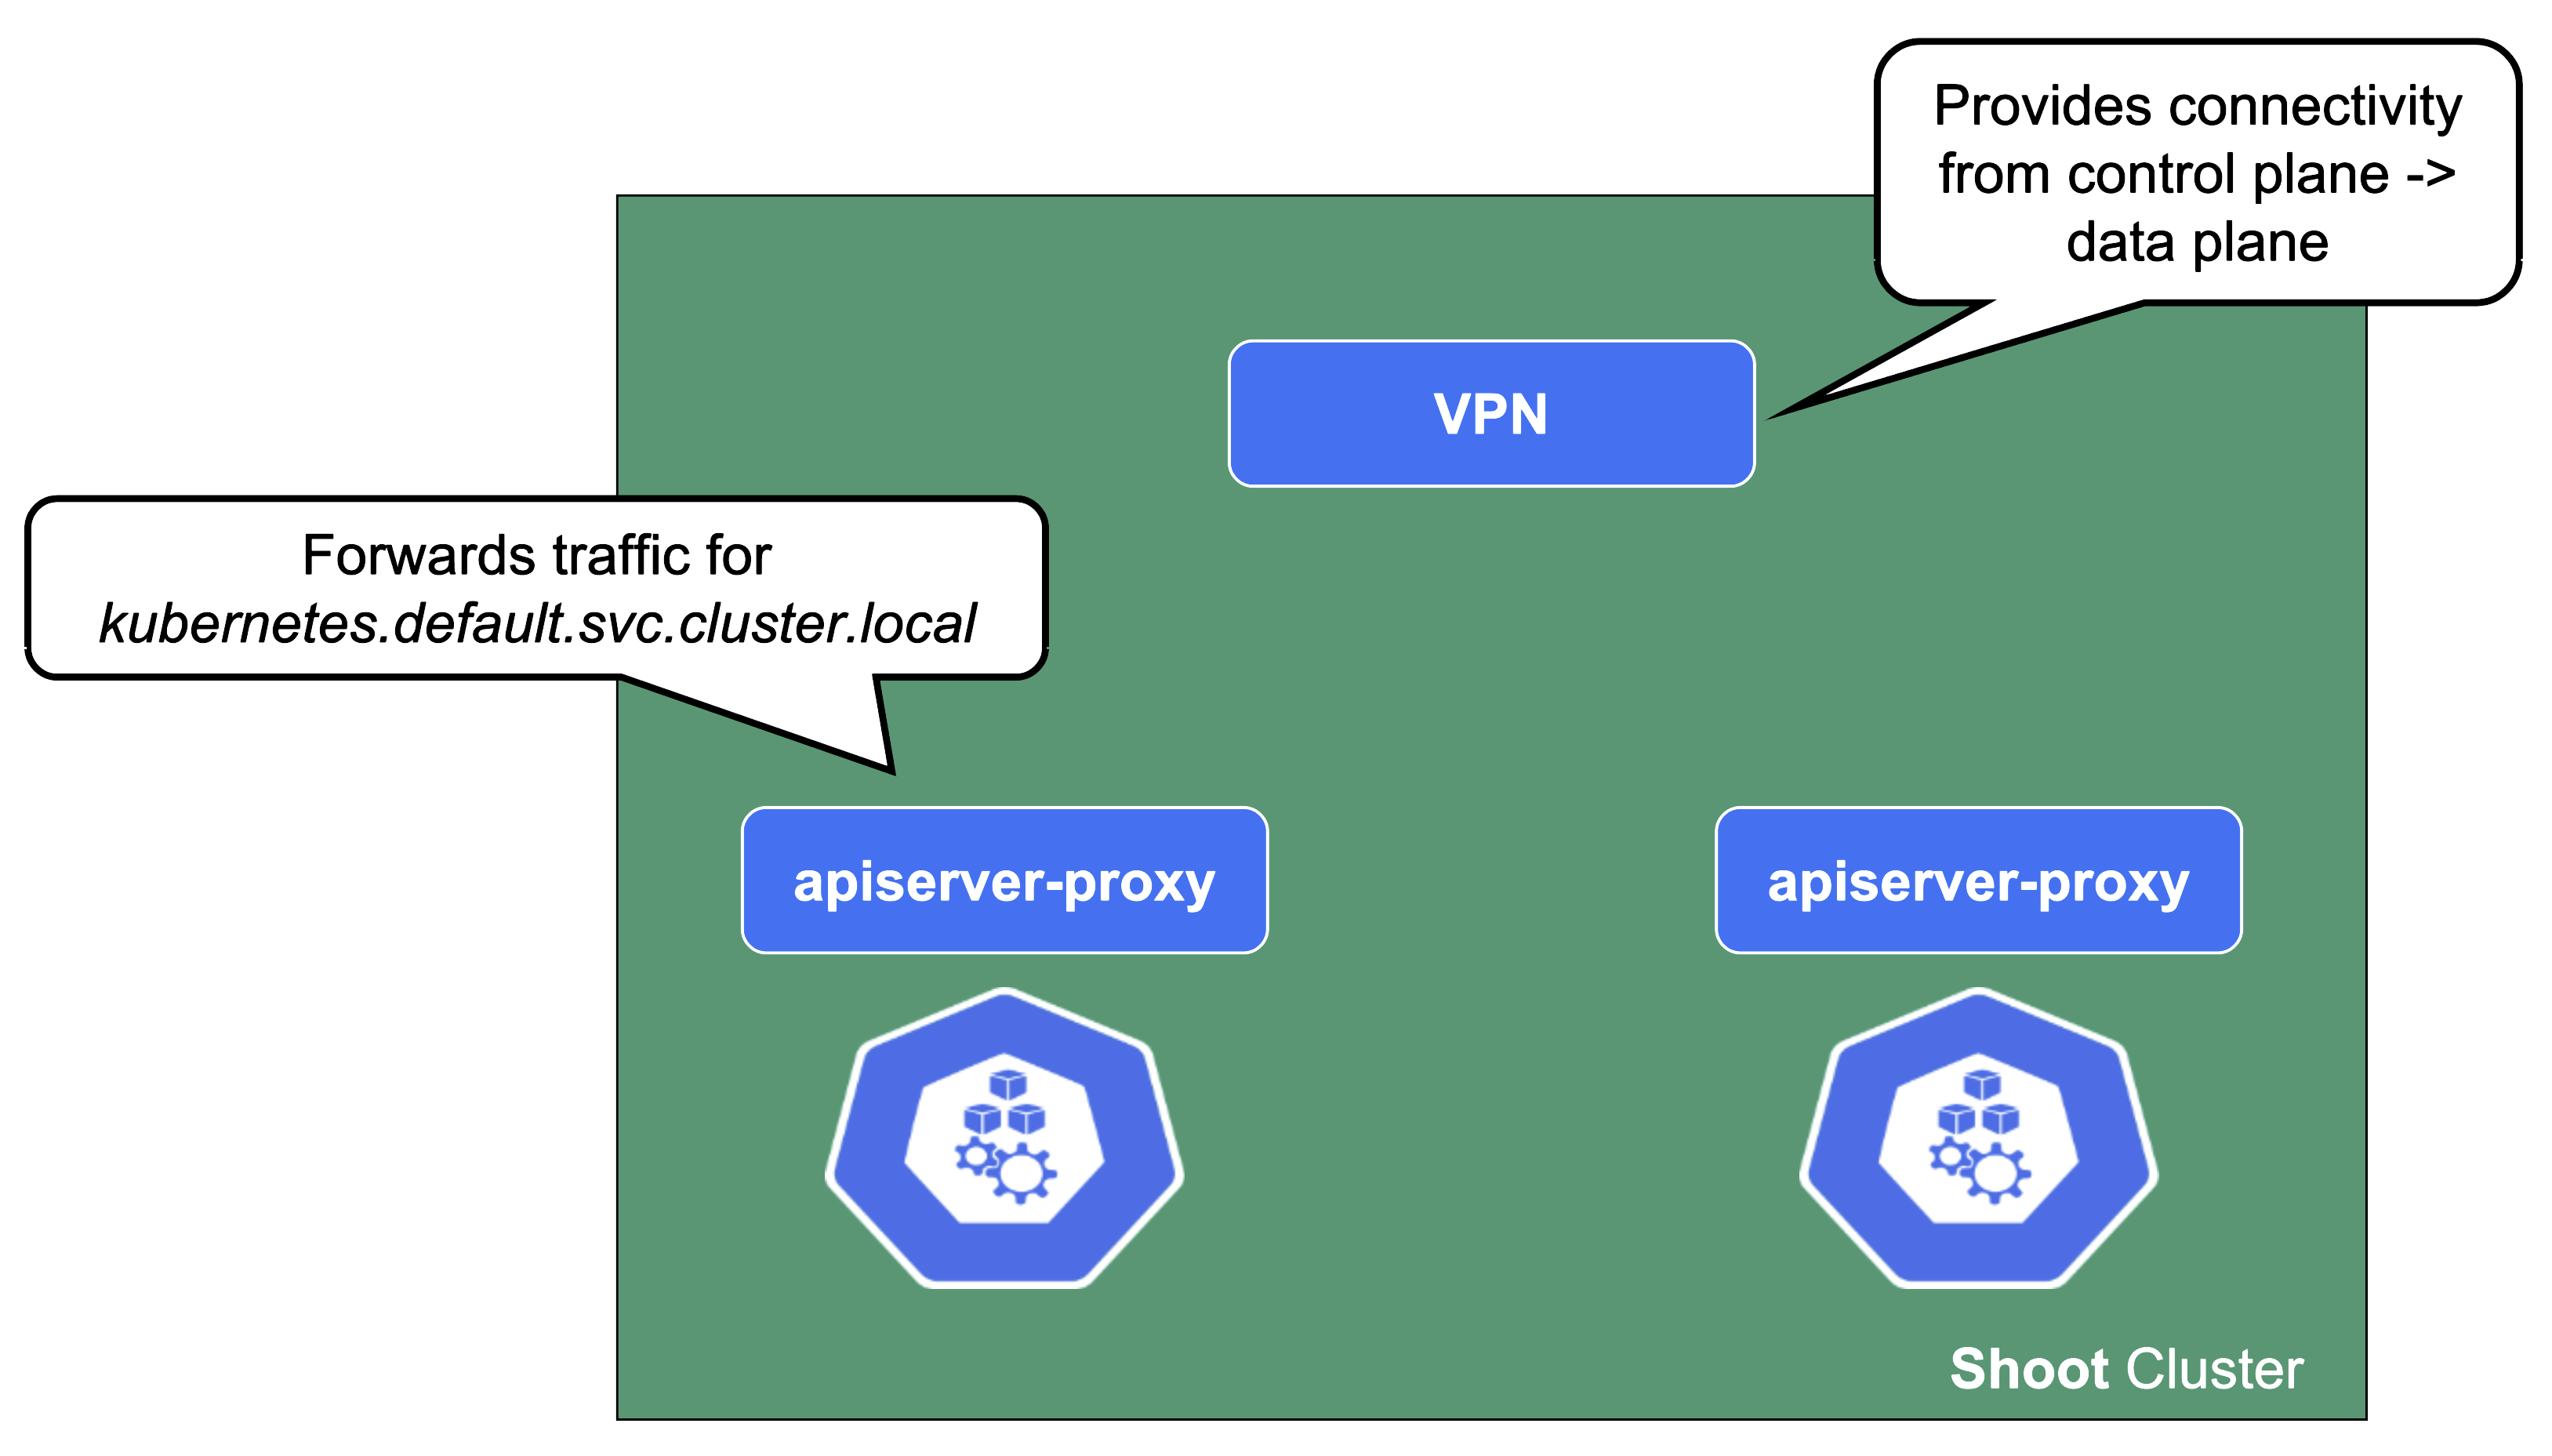
From the perspective of the data plane, the shoot’s API server is reachable via the cluster-internal service kubernetes.default.svc.cluster.local. The apiserver-proxy intercepts connections to this destination and changes it so that the traffic is forwarded to the kube-apiserver service in the seed cluster. For more information, see kube-apiserver via apiserver-proxy.
The second component here is the VPN shoot. It initiates a VPN connection to its counterpart in the seed. This way, there is no open port / Loadbalancer needed on the data plane. The VPN connection is used for any traffic flowing from the control plane to the data plane. If the VPN connection is broken, port-forwarding or log querying with kubectl will not work. In addition, webhooks will stop functioning properly.
csi-driver
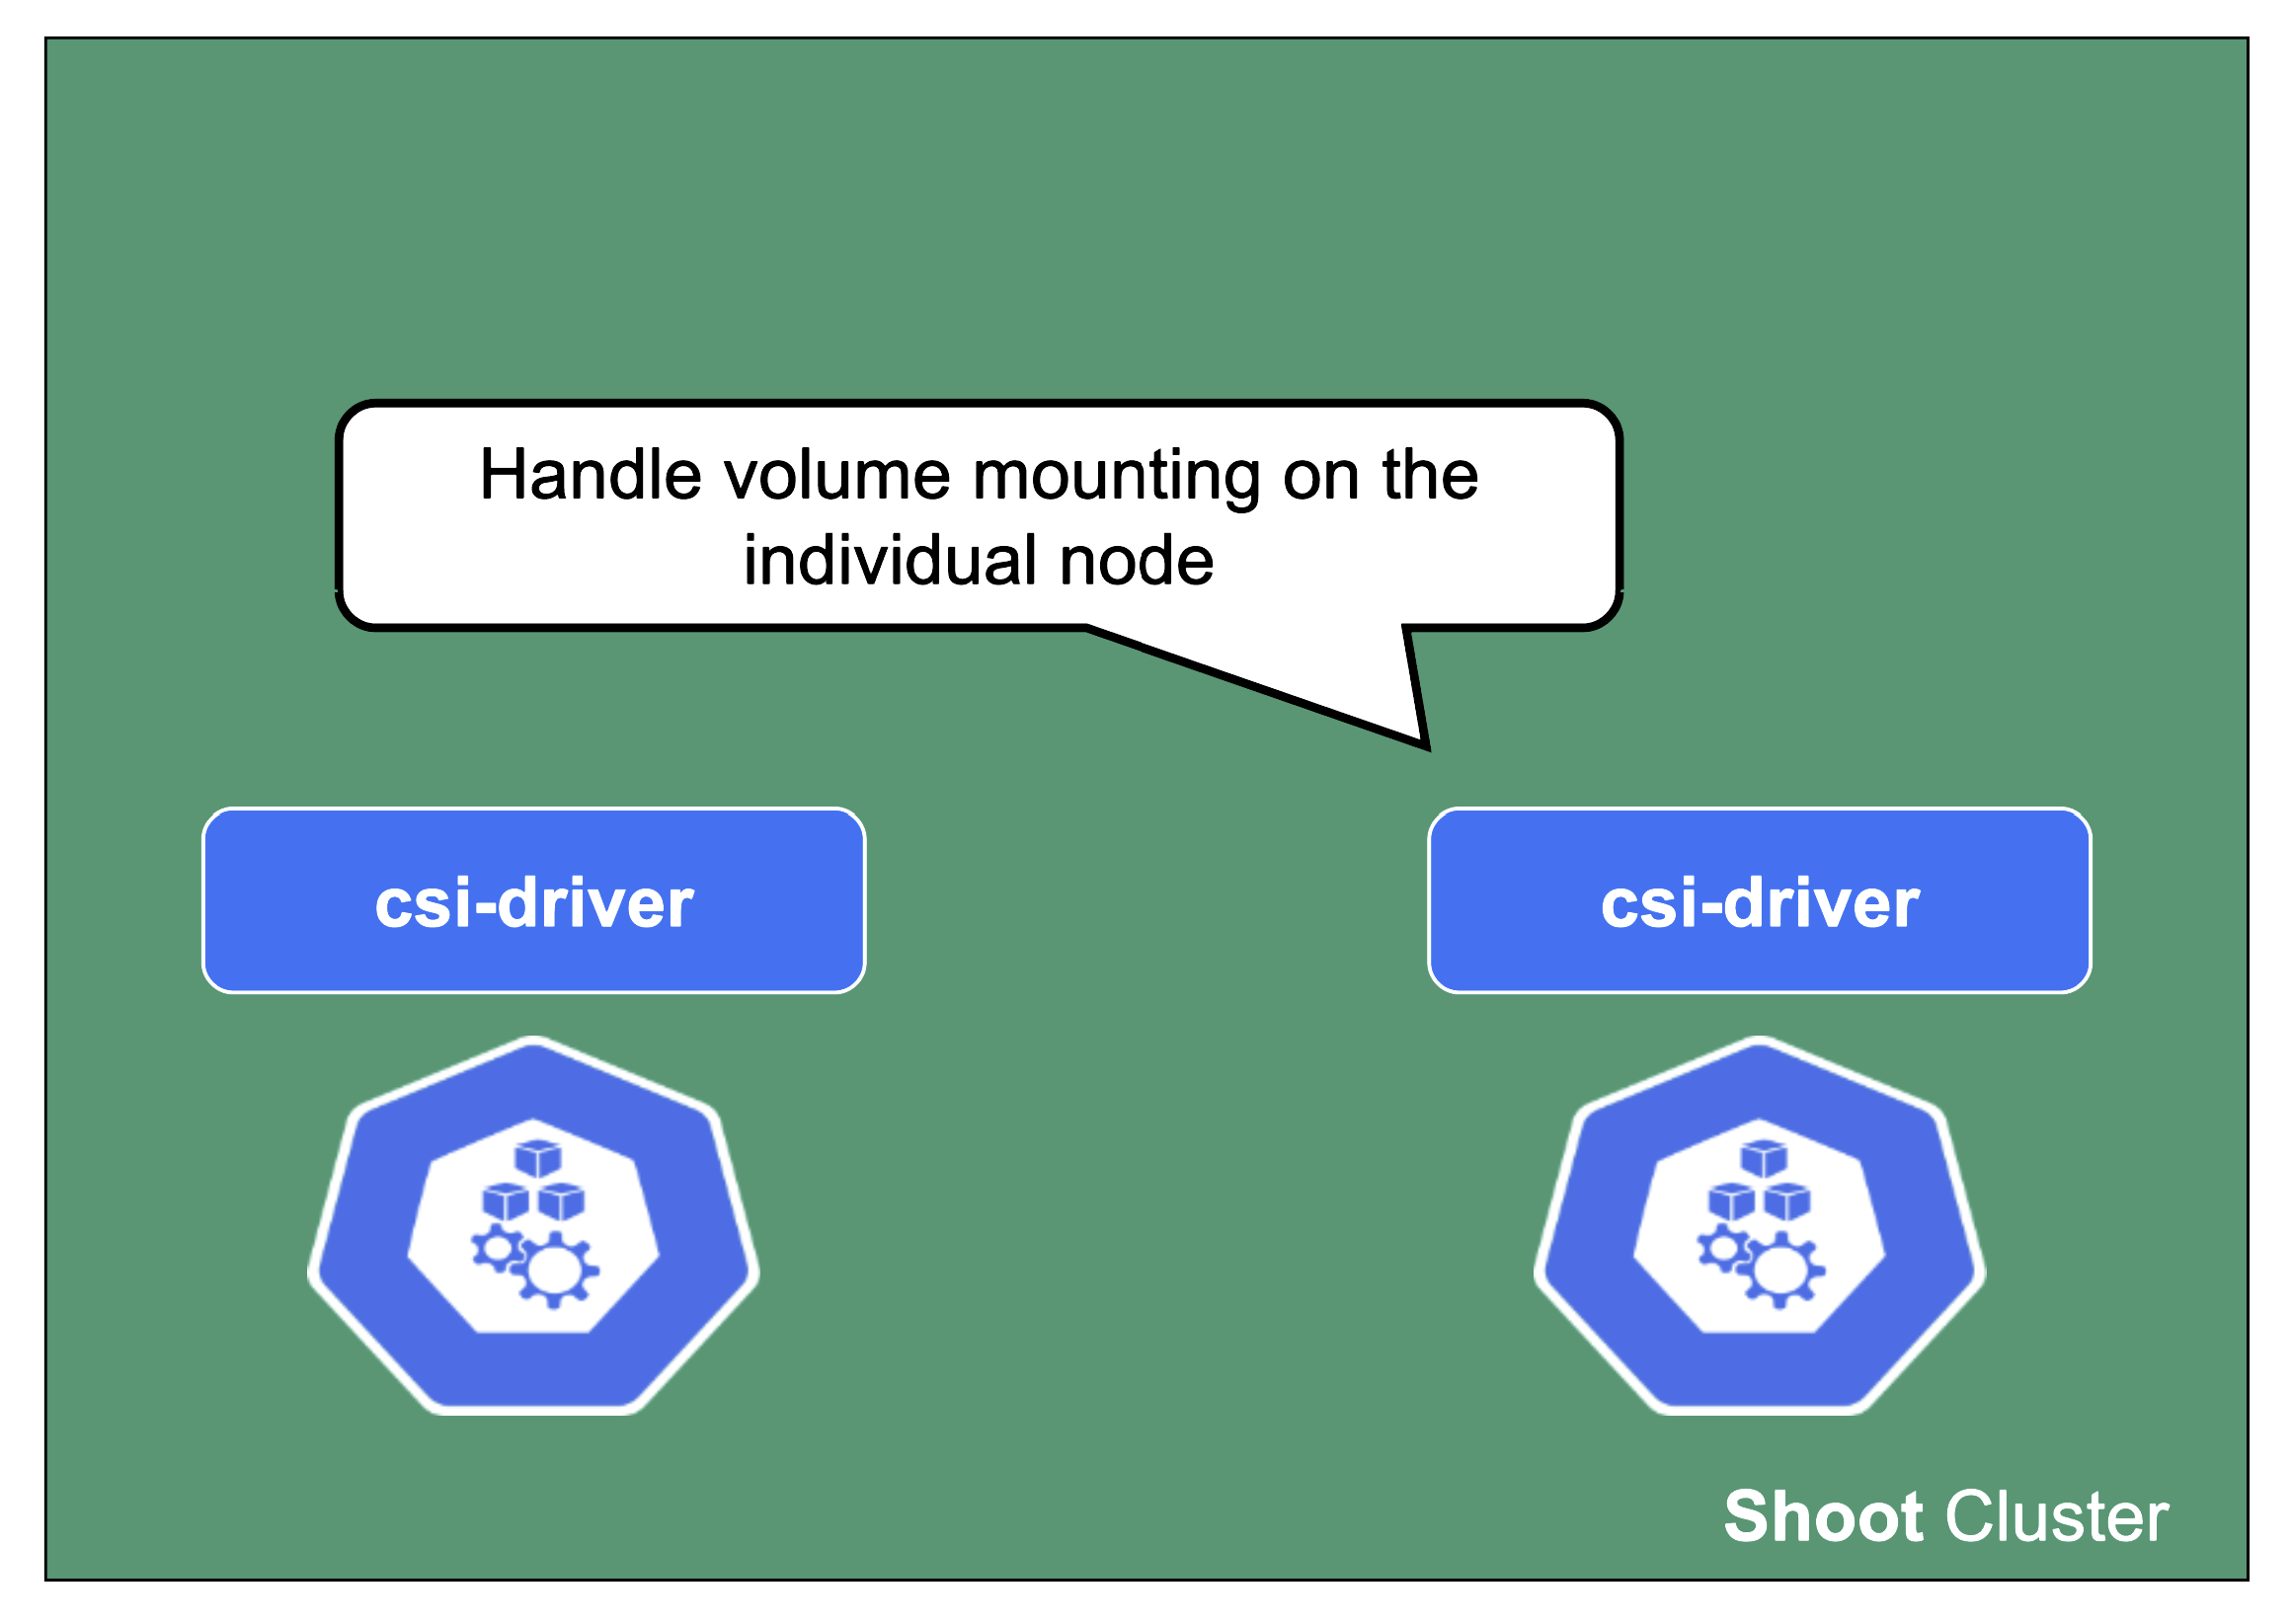
The last component to mention here is the csi-driver that is deployed as a Daemonset to all nodes. It registers with the kubelet and takes care of the mounting of volume types it is responsible for.
6 - Shoot Lifecycle
Reconciliation in Kubernetes and Gardener
The starting point of all reconciliation cycles is the constant observation of both the desired and actual state. A component would analyze any differences between the two states and try to converge the actual towards the desired state using appropriate actions. Typically, a component is responsible for a single resource type but it also watches others that have an implication on it.
As an example, the Kubernetes controller for ReplicaSets will watch pods belonging to it in order to ensure that the specified replica count is fulfilled. If one pod gets deleted, the controller will create a new pod to enforce the desired over the actual state.
This is all standard behaviour, as Gardener is following the native Kubernetes approach. All elements of a shoot cluster have a representation in Kubernetes resources and controllers are watching / acting upon them.
If we pick up the example of the ReplicaSet - a user typically creates a deployment resource and the ReplicaSet is implicitly generated on the way to create the pods. Similarly, Gardener takes the user’s intent (shoot) and creates lots of domain specific resources on the way. They all reconcile and make sure their actual and desired states match.
Updating the Desired State of a Shoot
Based on the shoot’s specifications, Gardener will create network resources on a hyperscaler, backup resources for the ETCD, credentials, and other resources, but also representations of the worker pools. Eventually, this process will result in a fully functional Kubernetes cluster.
If you change the desired state, Gardener will reconcile the shoot and run through the same cycle to ensure the actual state matches the desired state.
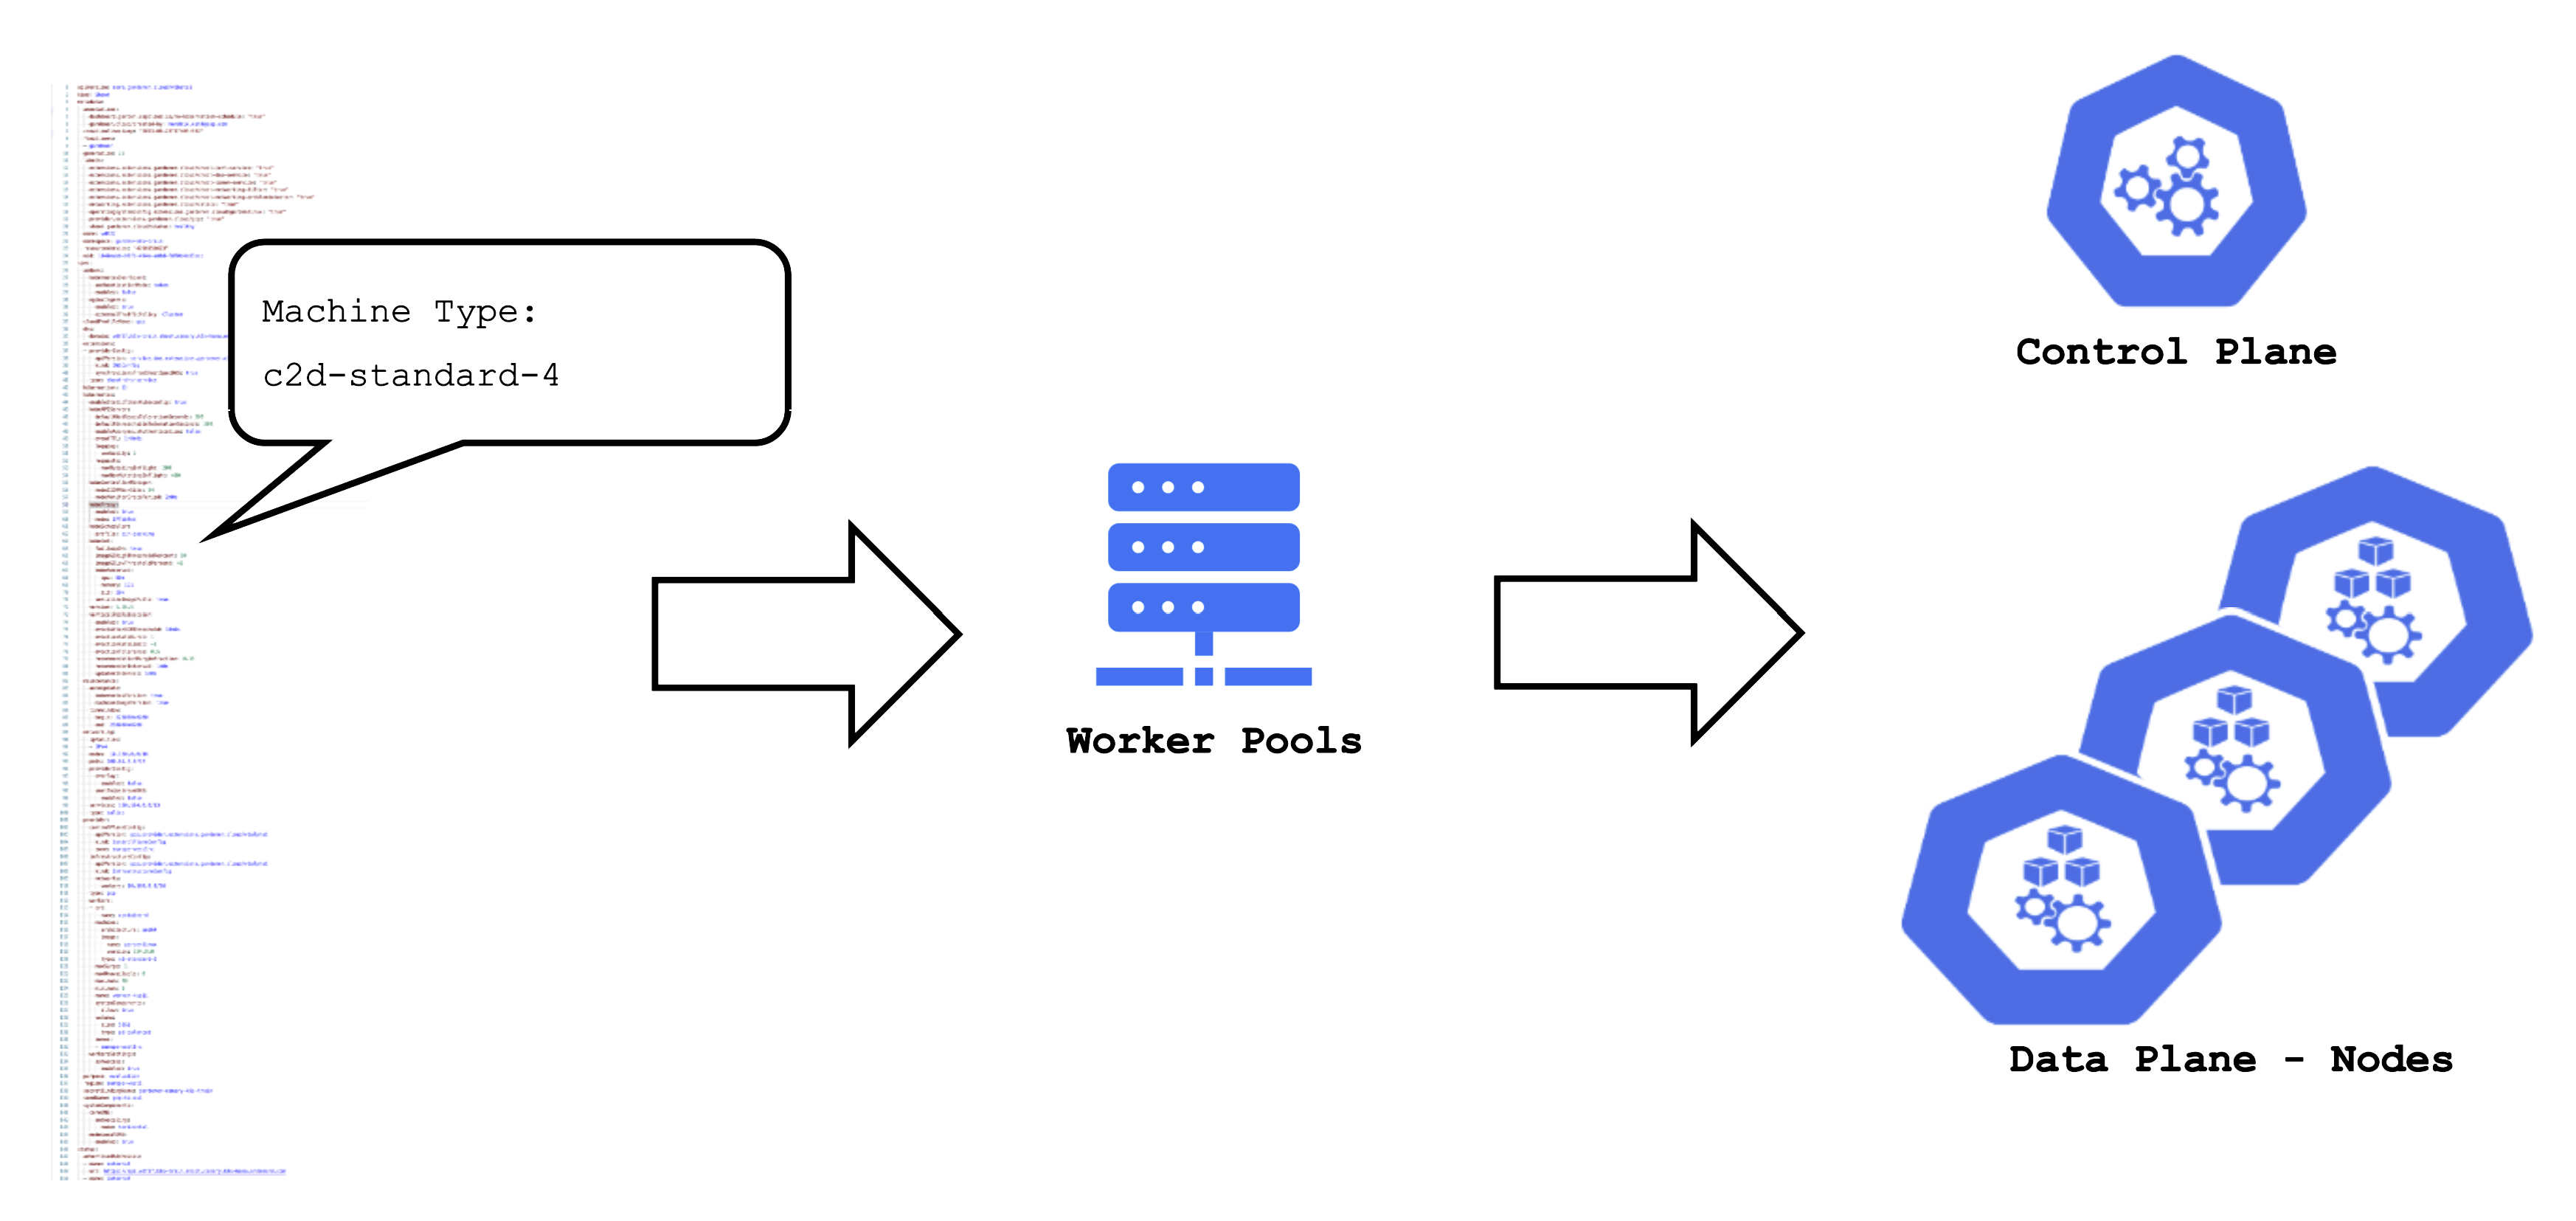
For example, the (infrastructure-specific) machine type can be changed within the shoot resource. The following reconciliation will pick up the change and initiate the creation of new nodes with a different machine type and the removal of the old nodes.
Maintenance Window and Daily Reconciliation
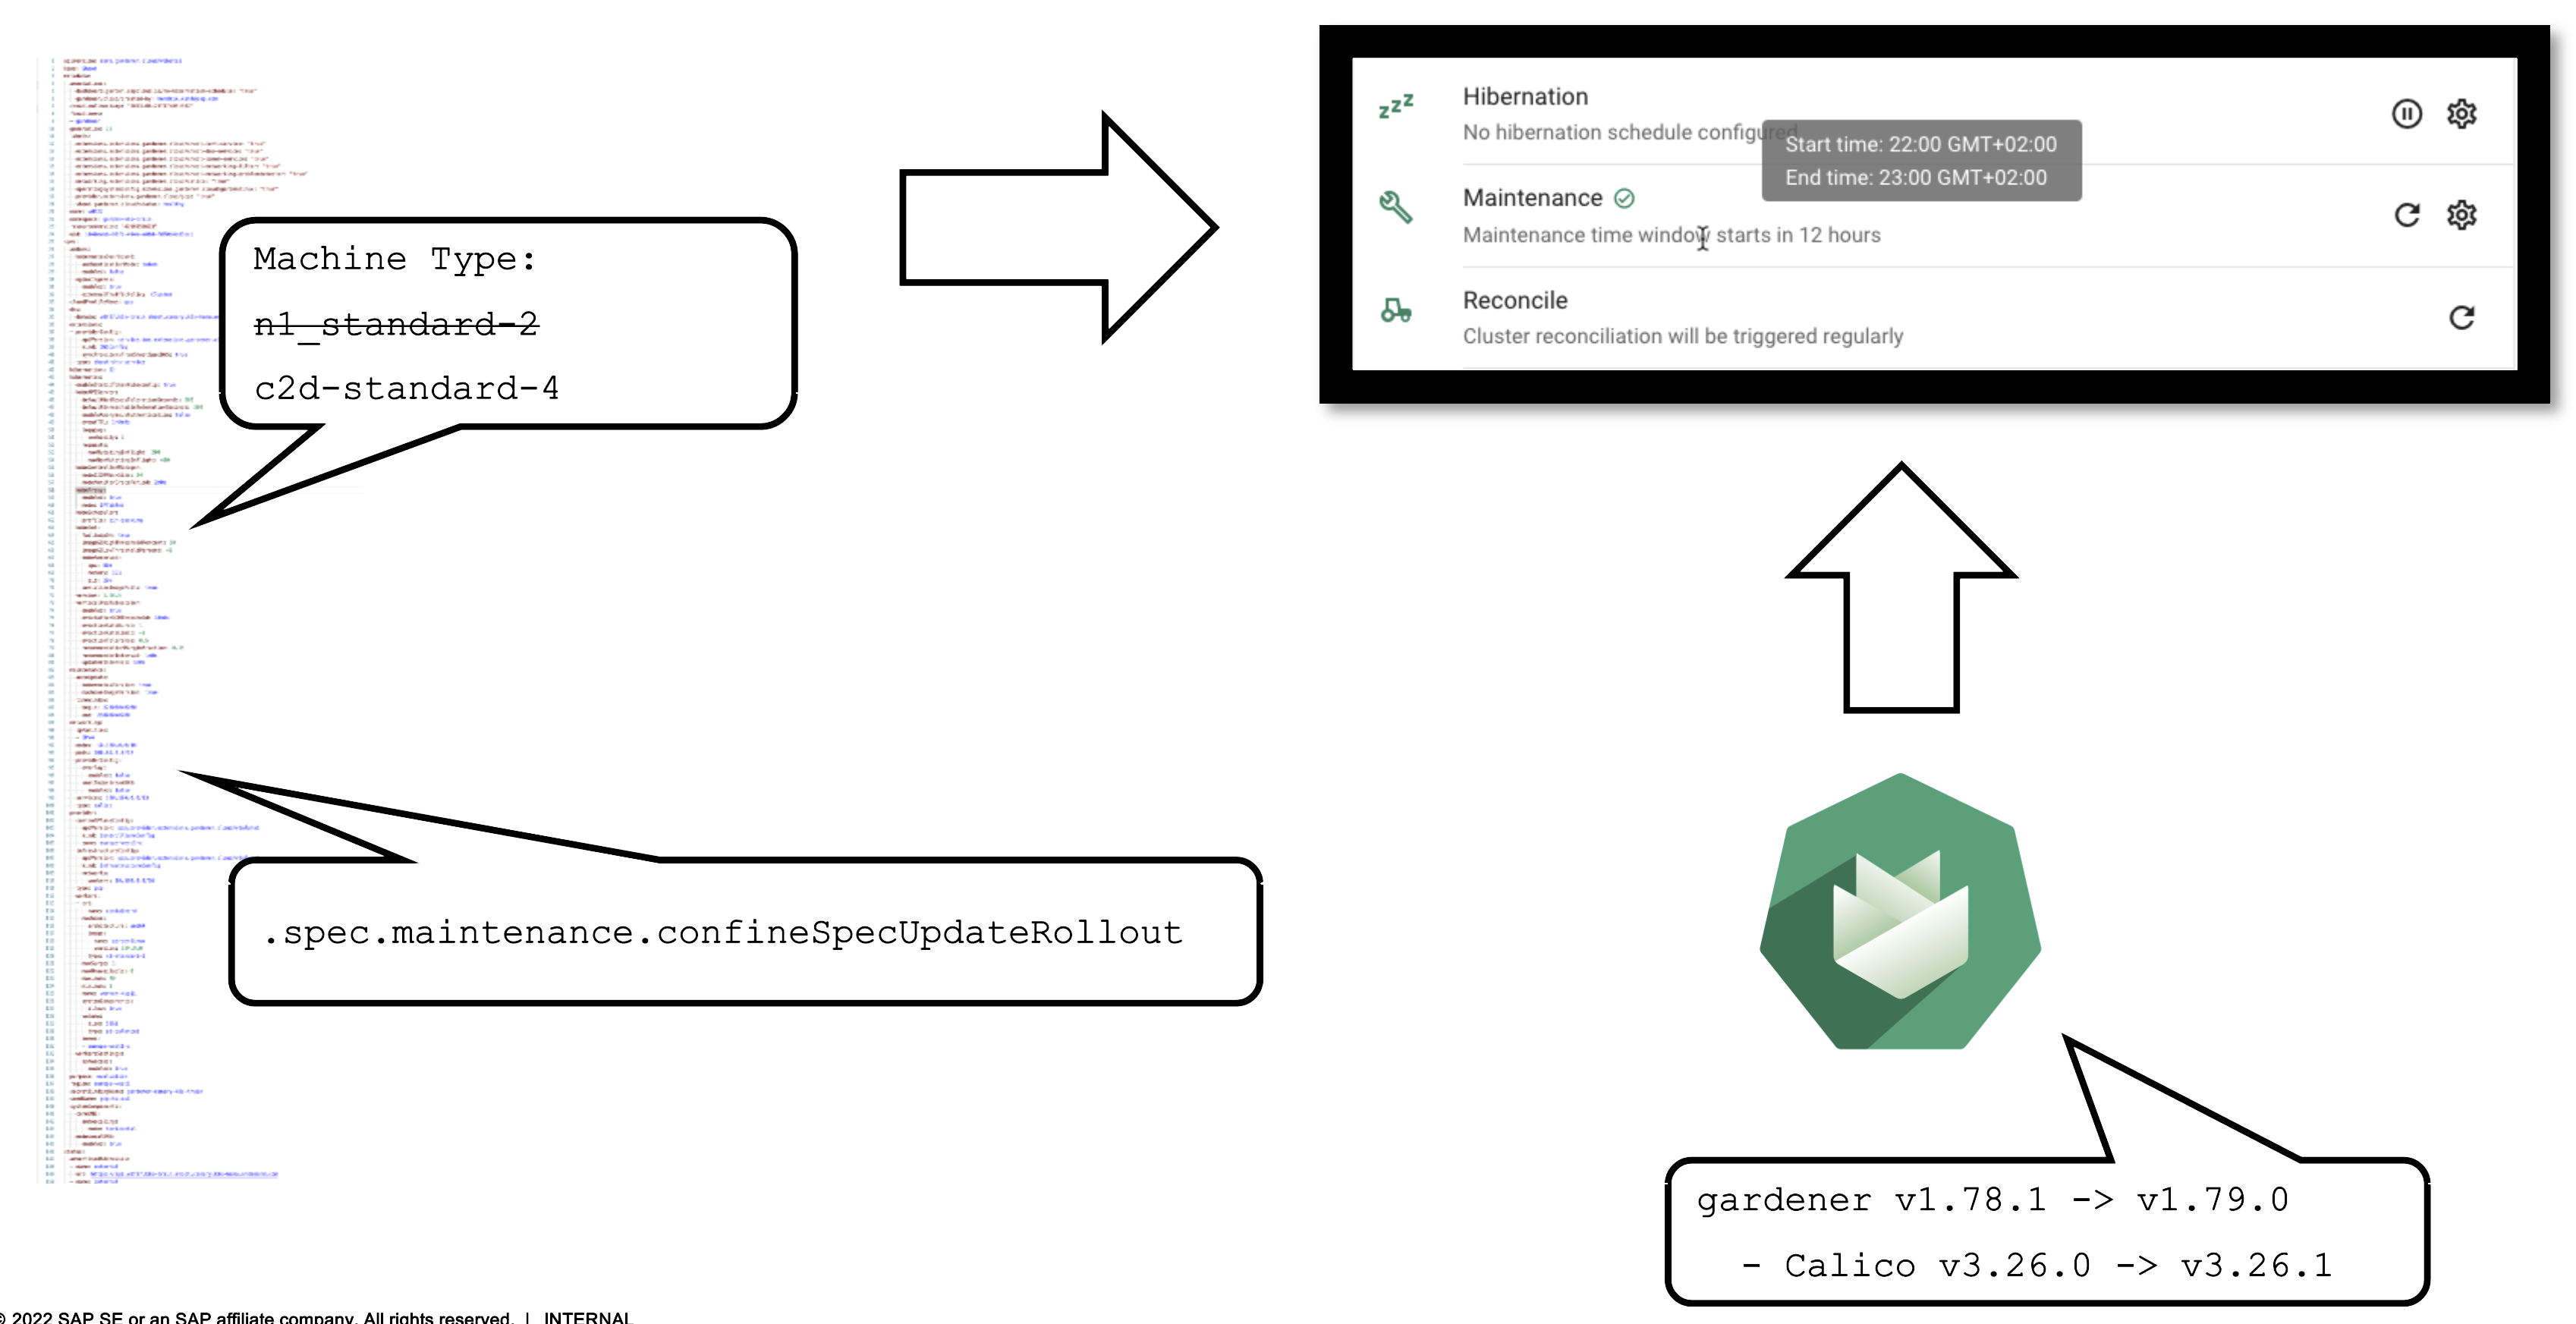
EVERY shoot cluster reconciles once per day during the so-called “maintenance window”. You can confine the rollout of spec changes to this window.
Additionally, the daily reconciliation will help pick up all kind of version changes. When a new Gardener version was rolled out to the landscape, shoot clusters will pick up any changes during their next reconciliation. For example, if a new Calico version is introduced to fix some bug, it will automatically reach all shoots.
Impact of a Change
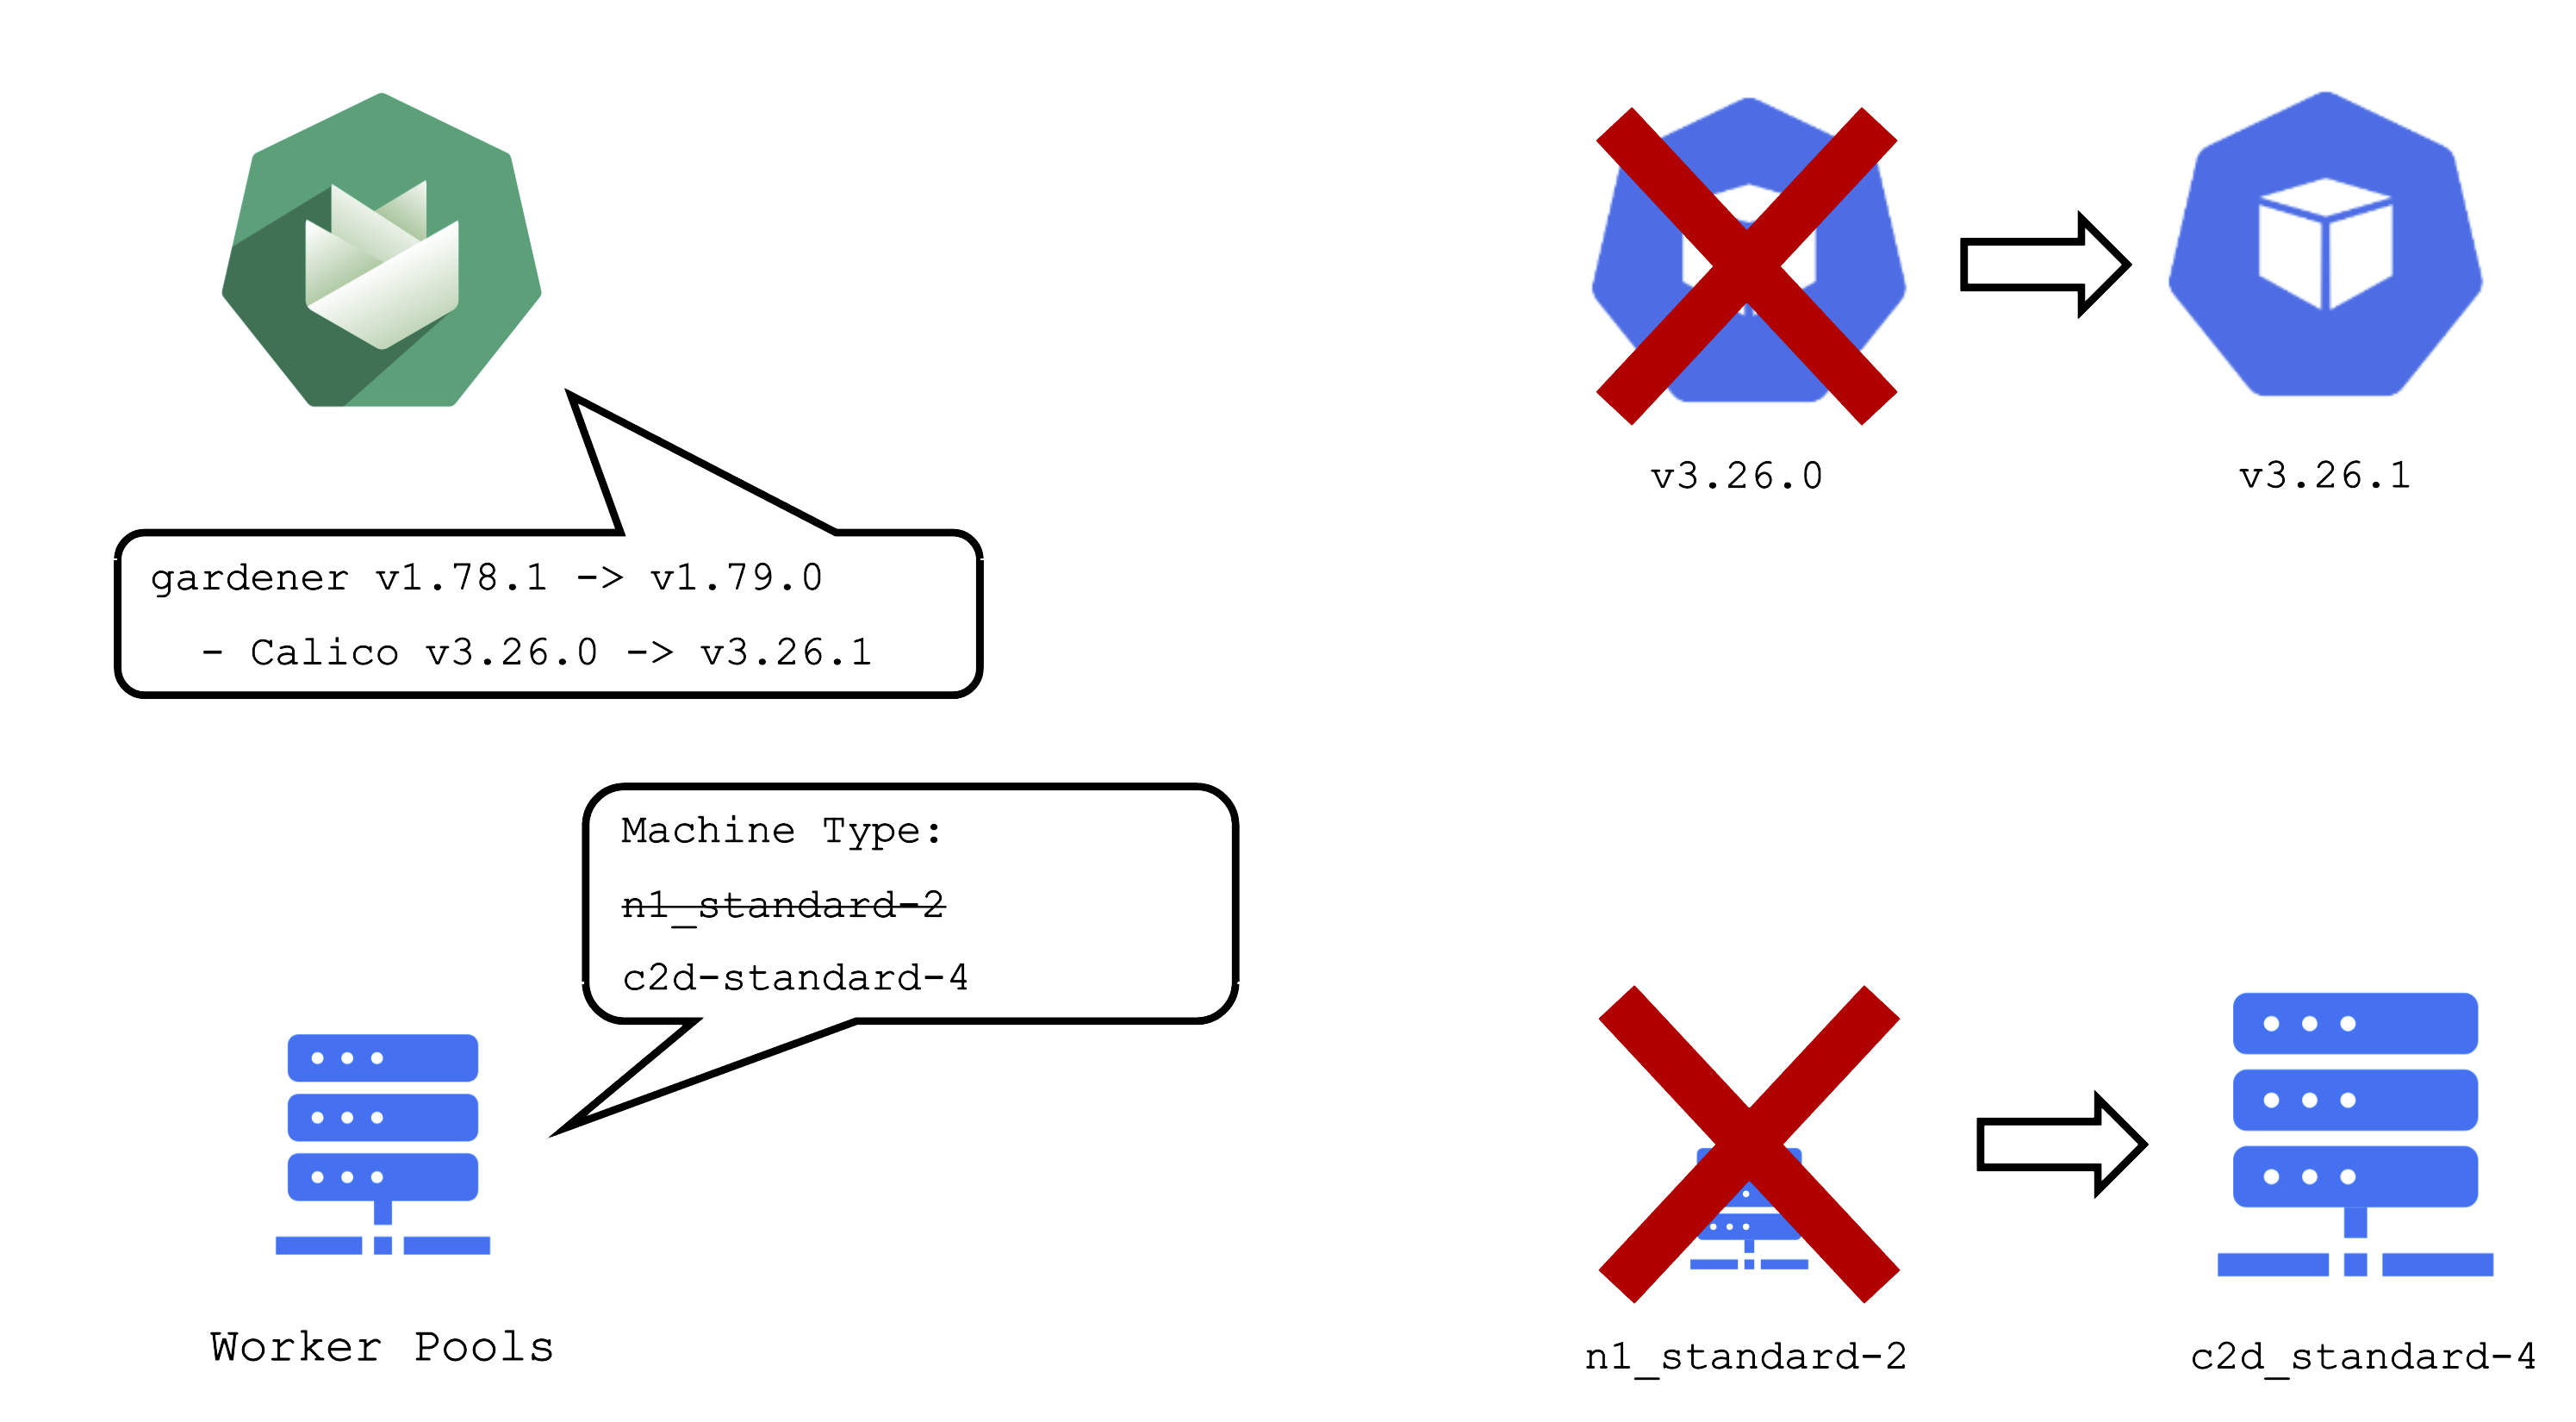
It is important to be aware of the impacts that a change can have on a cluster and the workloads within it.
An operator pushing a new Gardener version with a new calico image to a landscape will cause all calico pods to be re-created. Another example would be the rollout of a new etcd backup-restore image. This would cause etcd pods to be re-created, rendering a non-HA control plane unavailable until etcd is up and running again.
When you change the shoot spec, it can also have significant impact on the cluster. Imagine that you have changes the machine type of a worker pool. This will cause new machines to be created and old machines to be deleted. Or in other words: all nodes will be drained, the pods will be evicted and then re-created on newly created nodes.
Kubernetes Version Update (Minor + Patch)
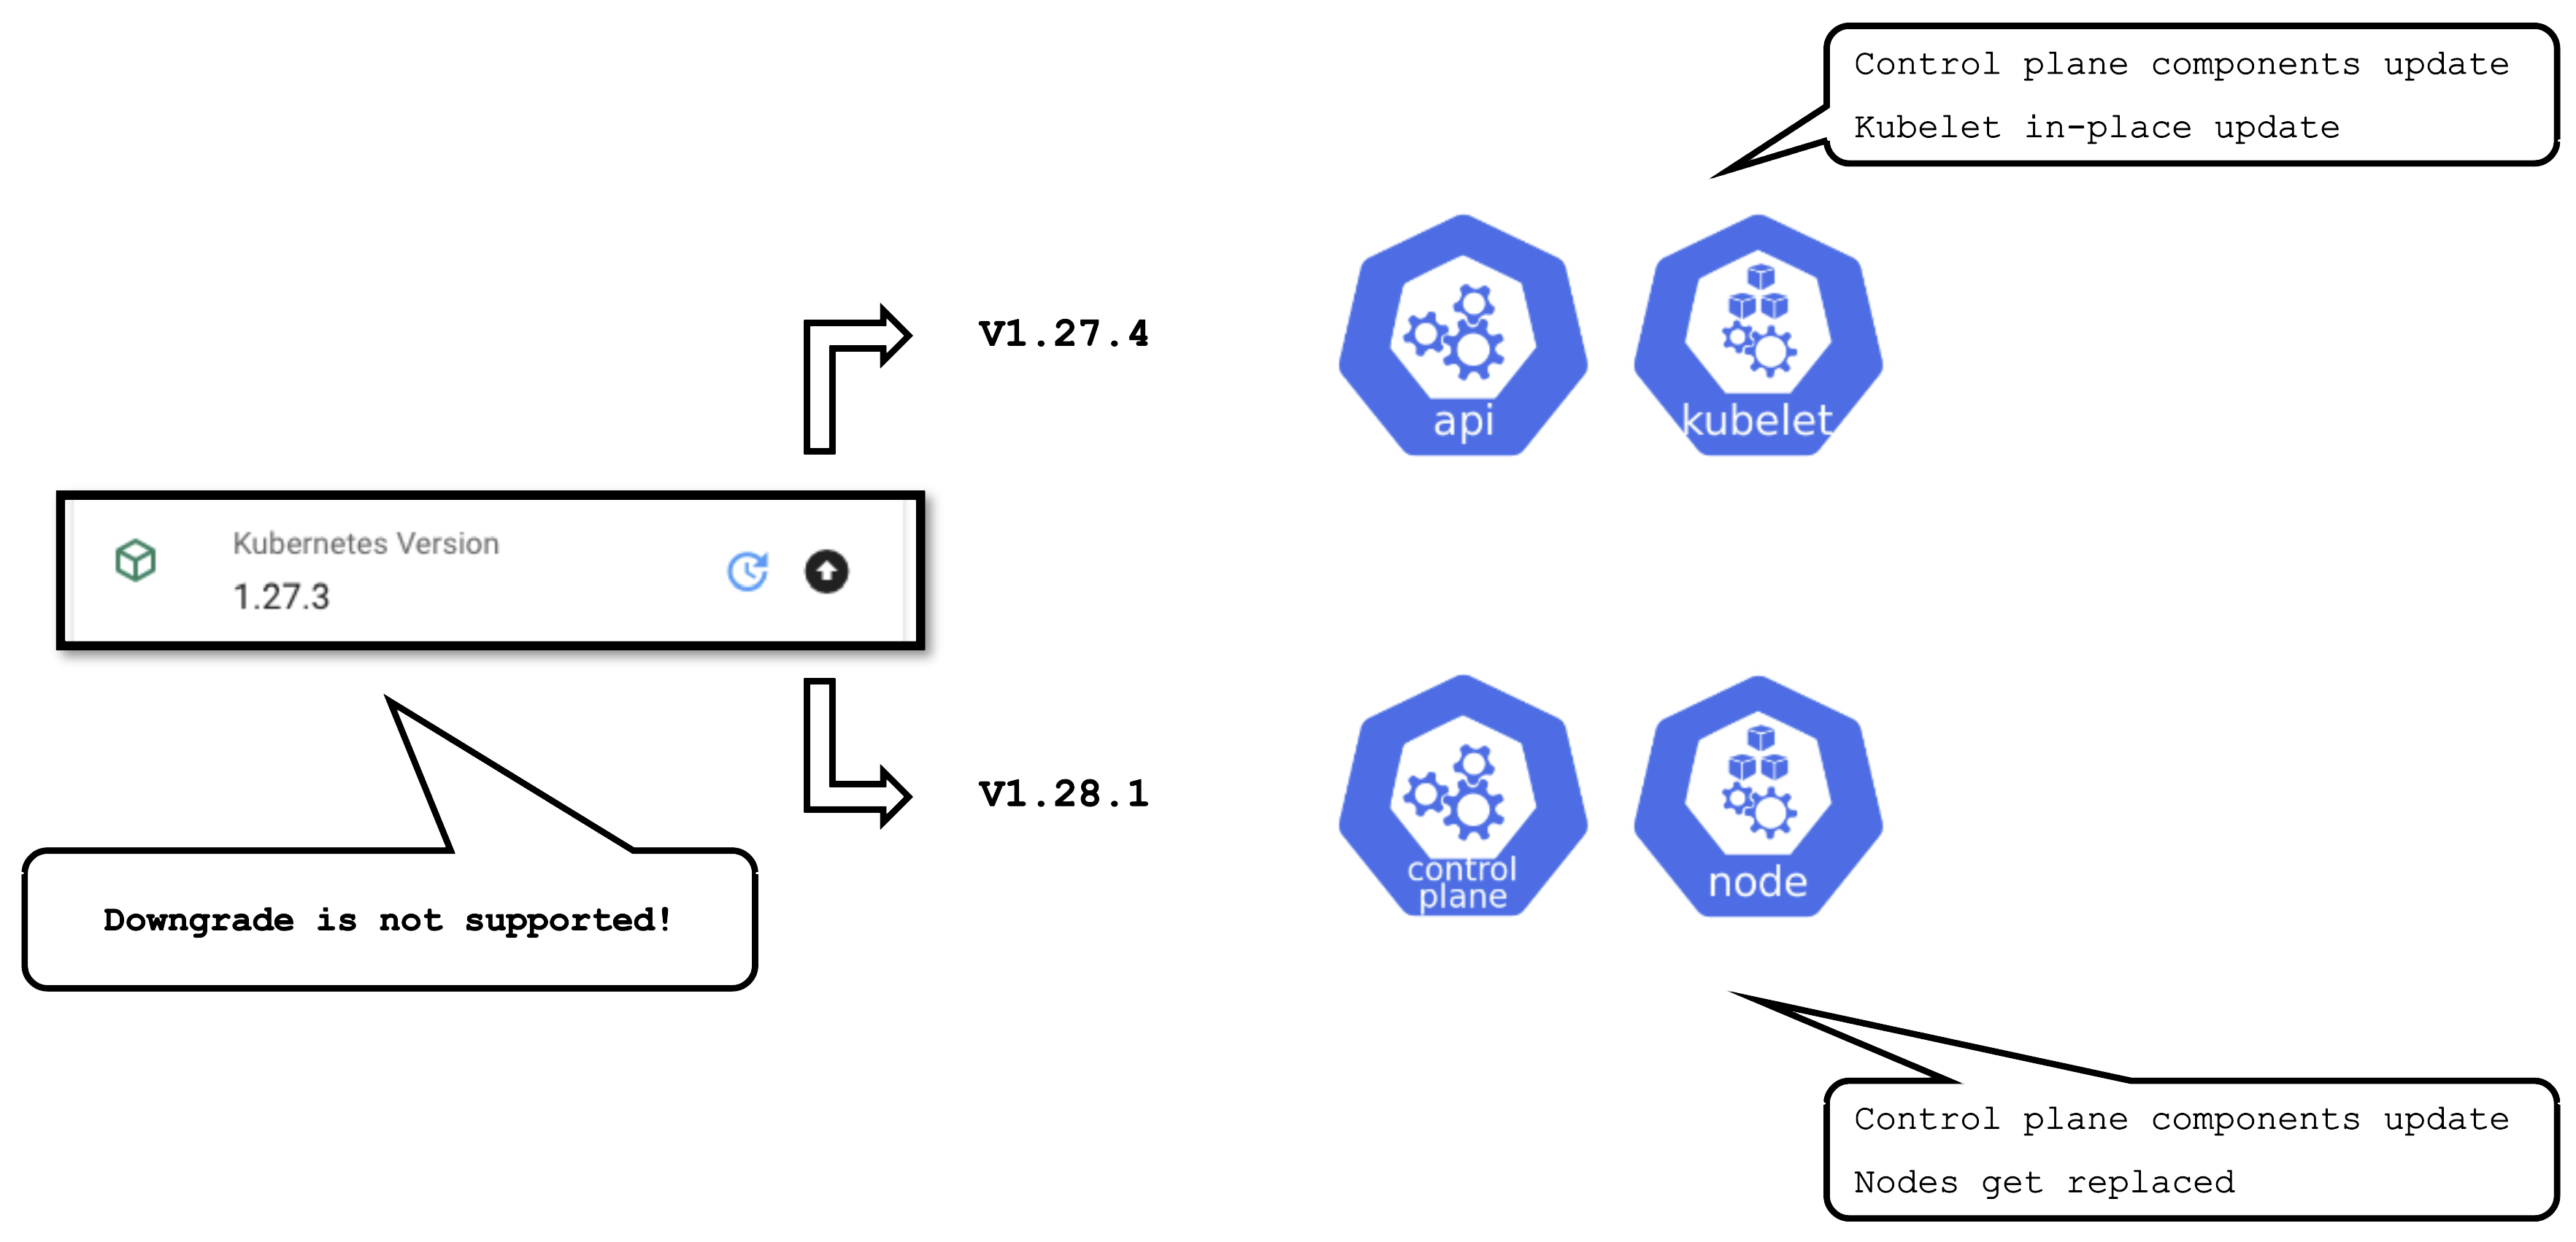
Some operations are rather common and have to be performed on a regular basis. Updating the Kubernetes version is one them. Patch updates cause relatively little disruption, as only the control-plane pods will be re-created with new images and the kubelets on all nodes will restart.
A minor version update is more impactful - it will cause all nodes to be recreated and rolls components of the control plane.
OS Version Update
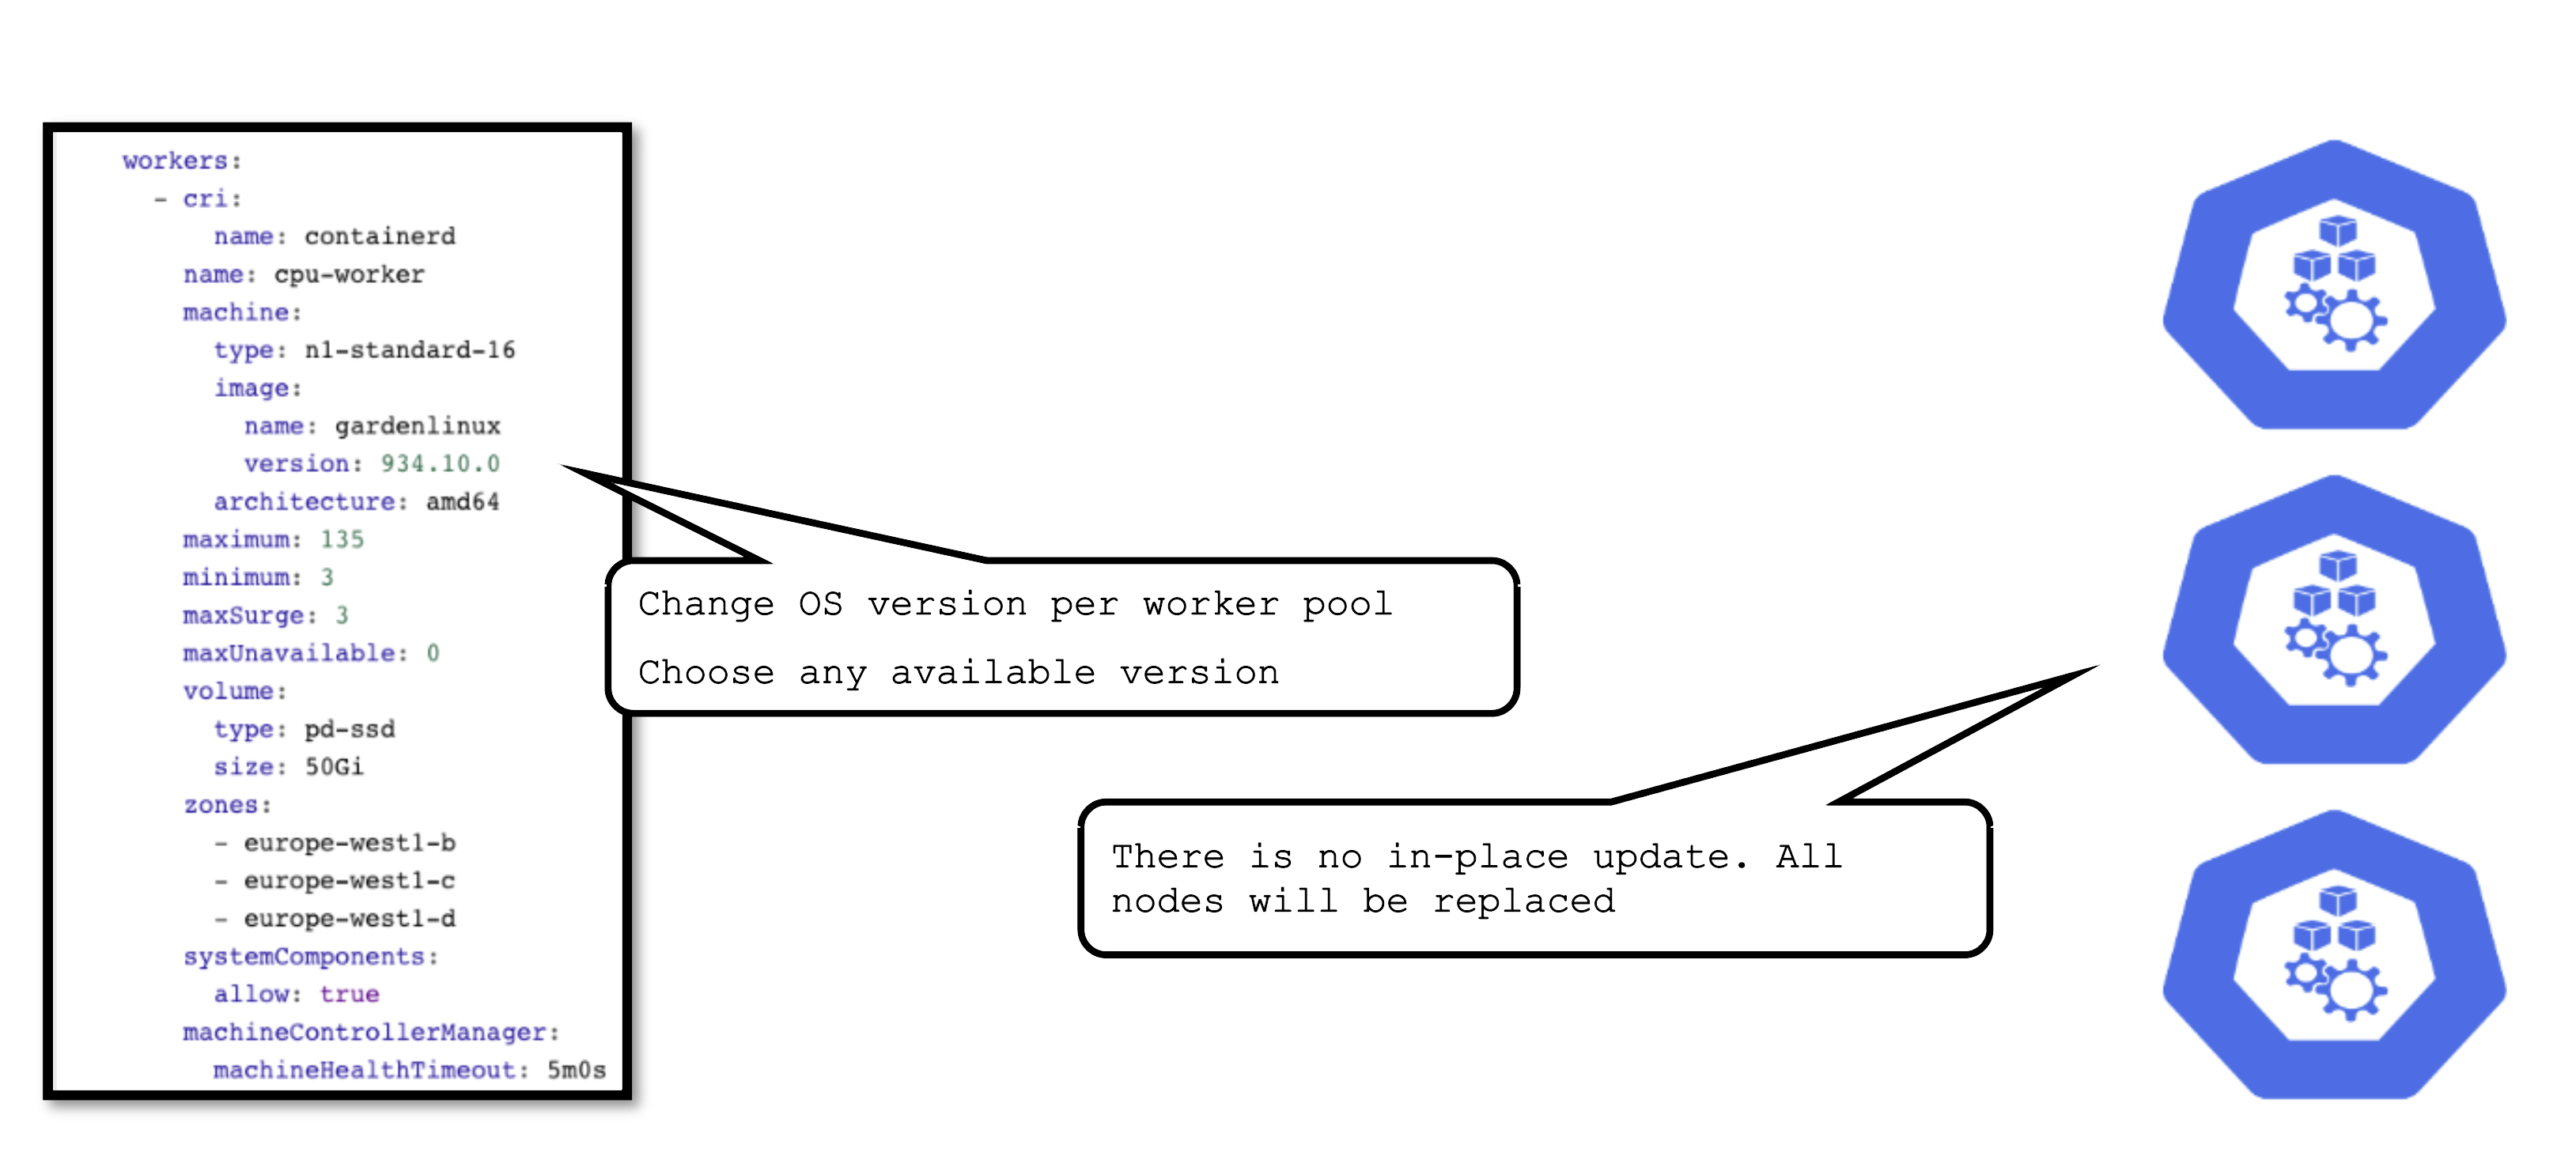
The OS version is defined for each worker pool and can be changed per worker pool. You can freely switch back and forth. However, as there is no in-place update, each change will cause the entire worker pool to roll and nodes will be replaced.
For OS versions different update strategies can be configured. Please check the documentation for details.
Available Versions
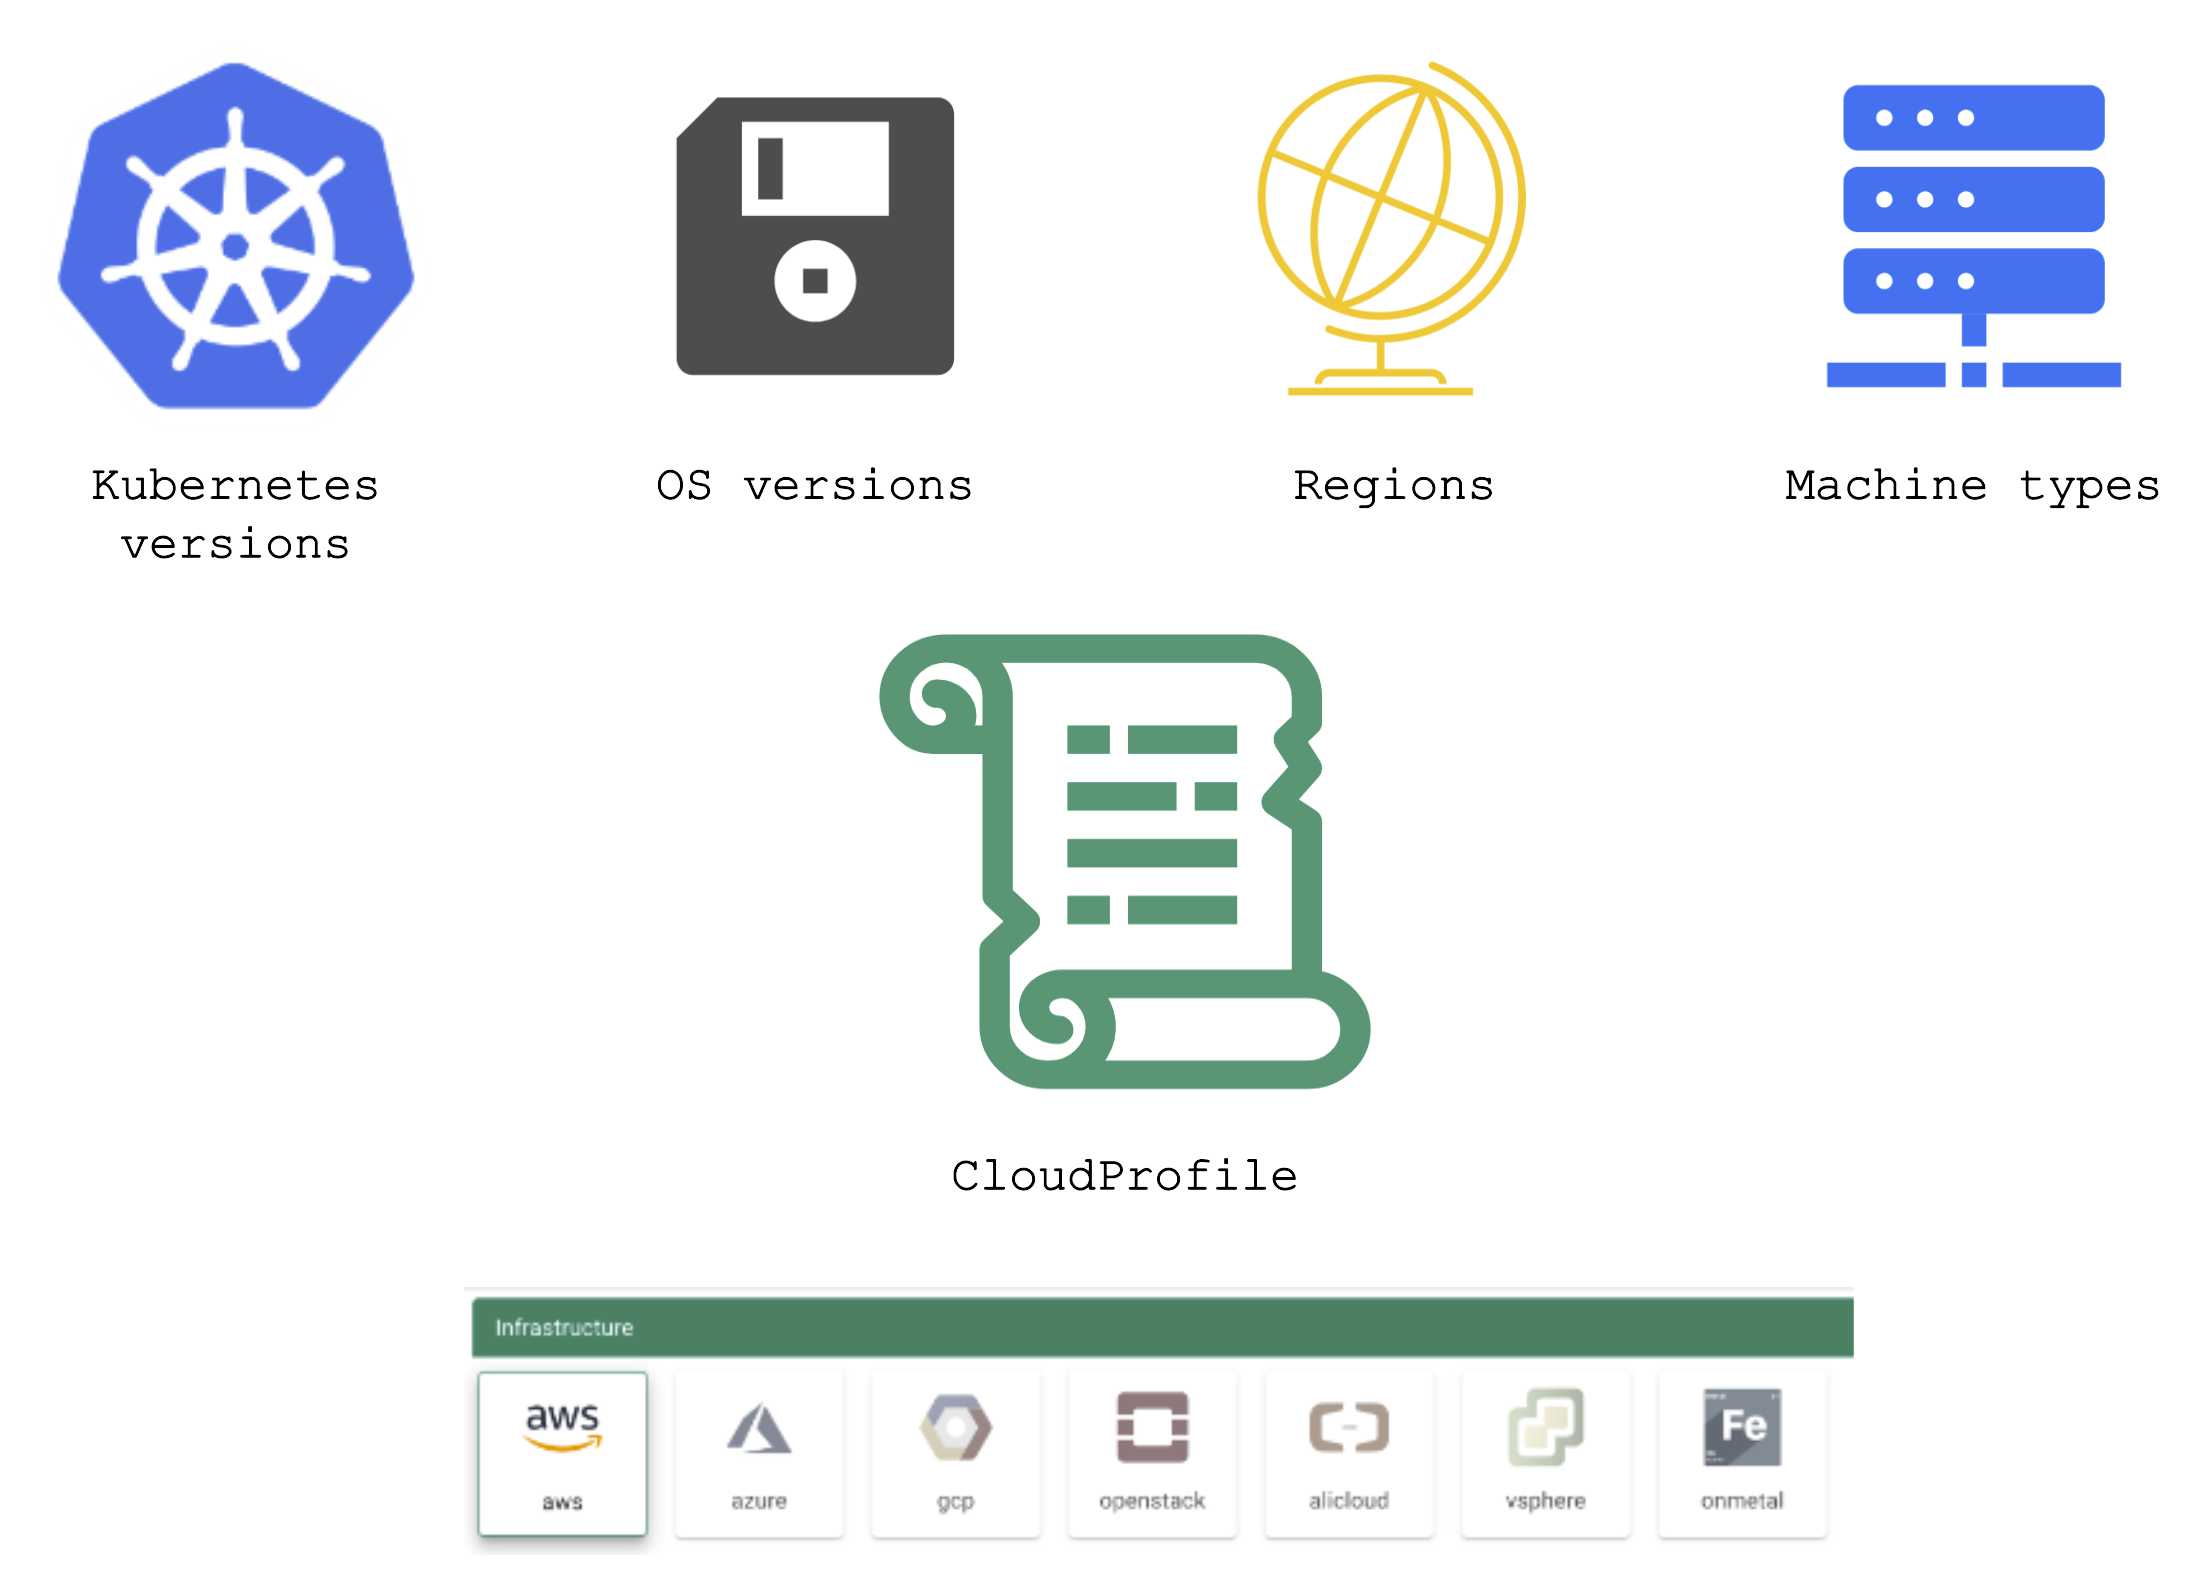
Gardener has a dedicated resource to maintain a list of available versions – the so-called cloudProfile.
A cloudProfile provides information about supported:
- Kubernetes versions
- OS versions (and where to find those images)
- Regions (and their zones)
- Machine types
Each shoot references a cloudProfile in order to obtain information about available / possible versions and configurations.
Version Classifications
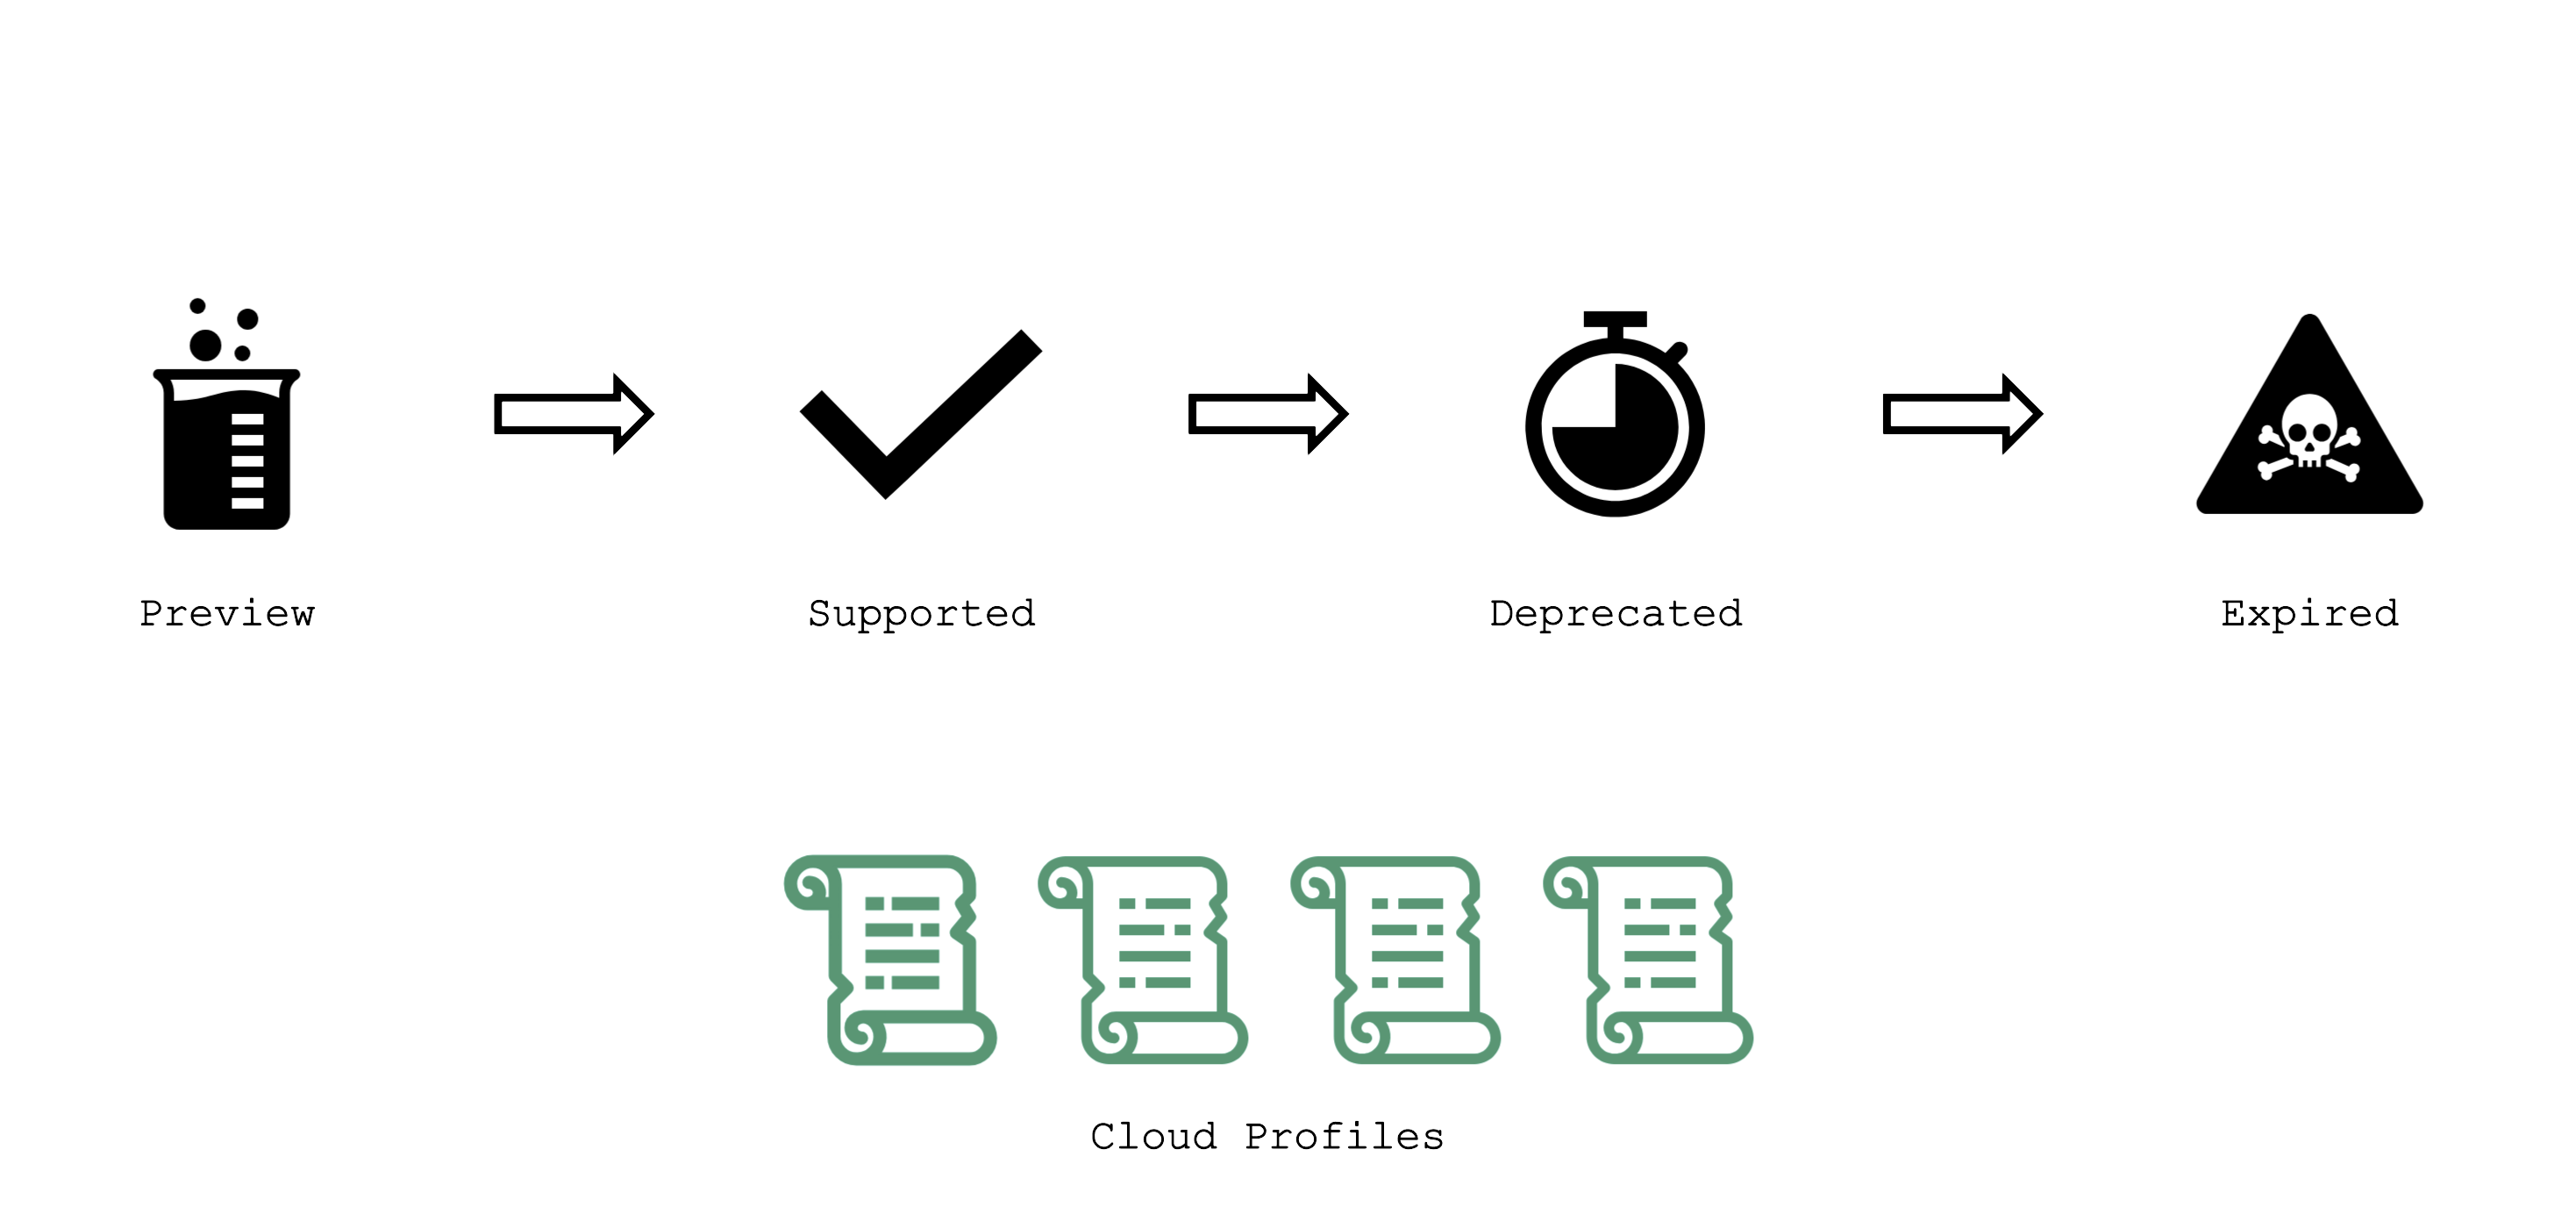
Gardener has the following classifications for Kubernetes and OS image versions:
preview: still in testing phase (several versions can be in preview at the same time)
supported: recommended version
deprecated: a new version has been set to “supported”, updating is recommended (might have an expiration date)
expired: cannot be used anymore, clusters using this version will be force-upgraded
Version information is maintained in the relevant cloud profile resource. There might be circumstances where a version will never become supported but instead move to deprecated directly. Similarly, a version might be directly introduced as supported.
AutoUpdate / Forced Updates
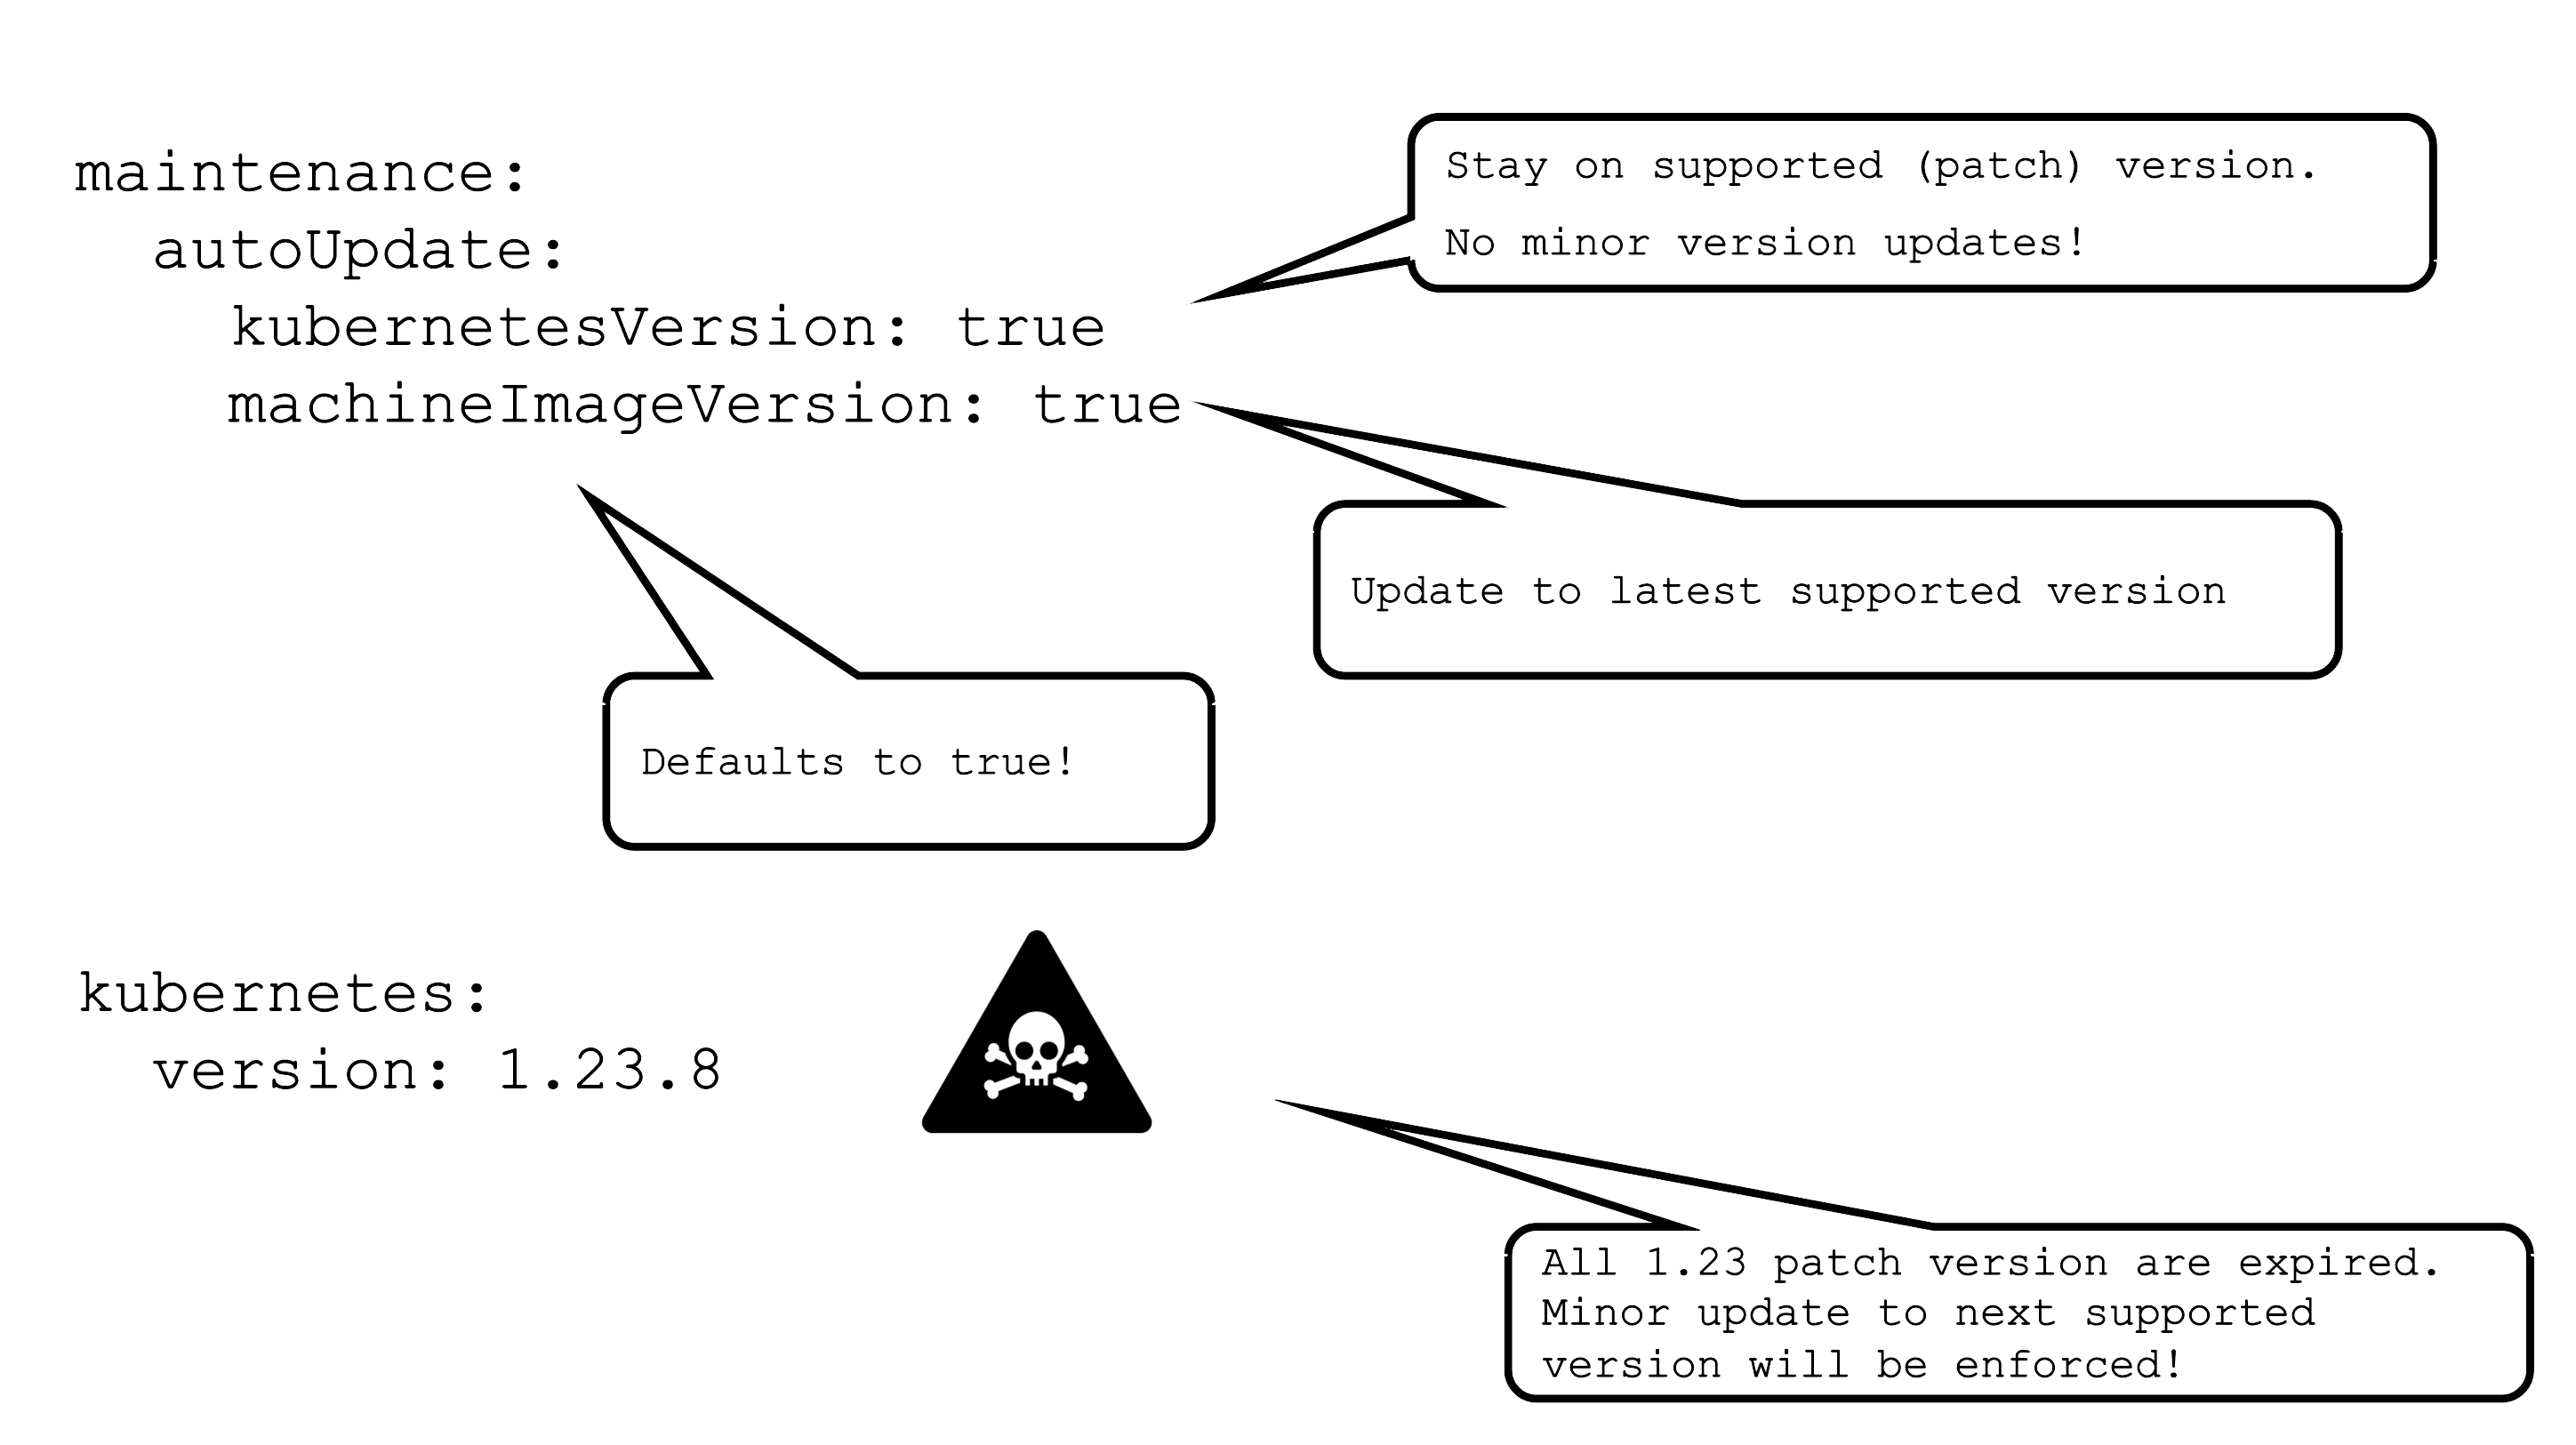
AutoUpdate for a machine image version will update all node pools to the latest supported version based on the defined update strategy. Whenever a new version is set to supported, the cluster will pick it up during its next maintenance window.
For Kubernetes versions the mechanism is the same, but only applied to patch version. This means that the cluster will be kept on the latest supported patch version of a specific minor version.
In case a version used in a cluster expires, there is a force update during the next maintenance window. In a worst case scenario, 2 minor versions expire simultaneously. Then there will be two consecutive minor updates enforced.
For more information, see Shoot Kubernetes and Operating System Versioning in Gardener.
Applying Changes to a Seed
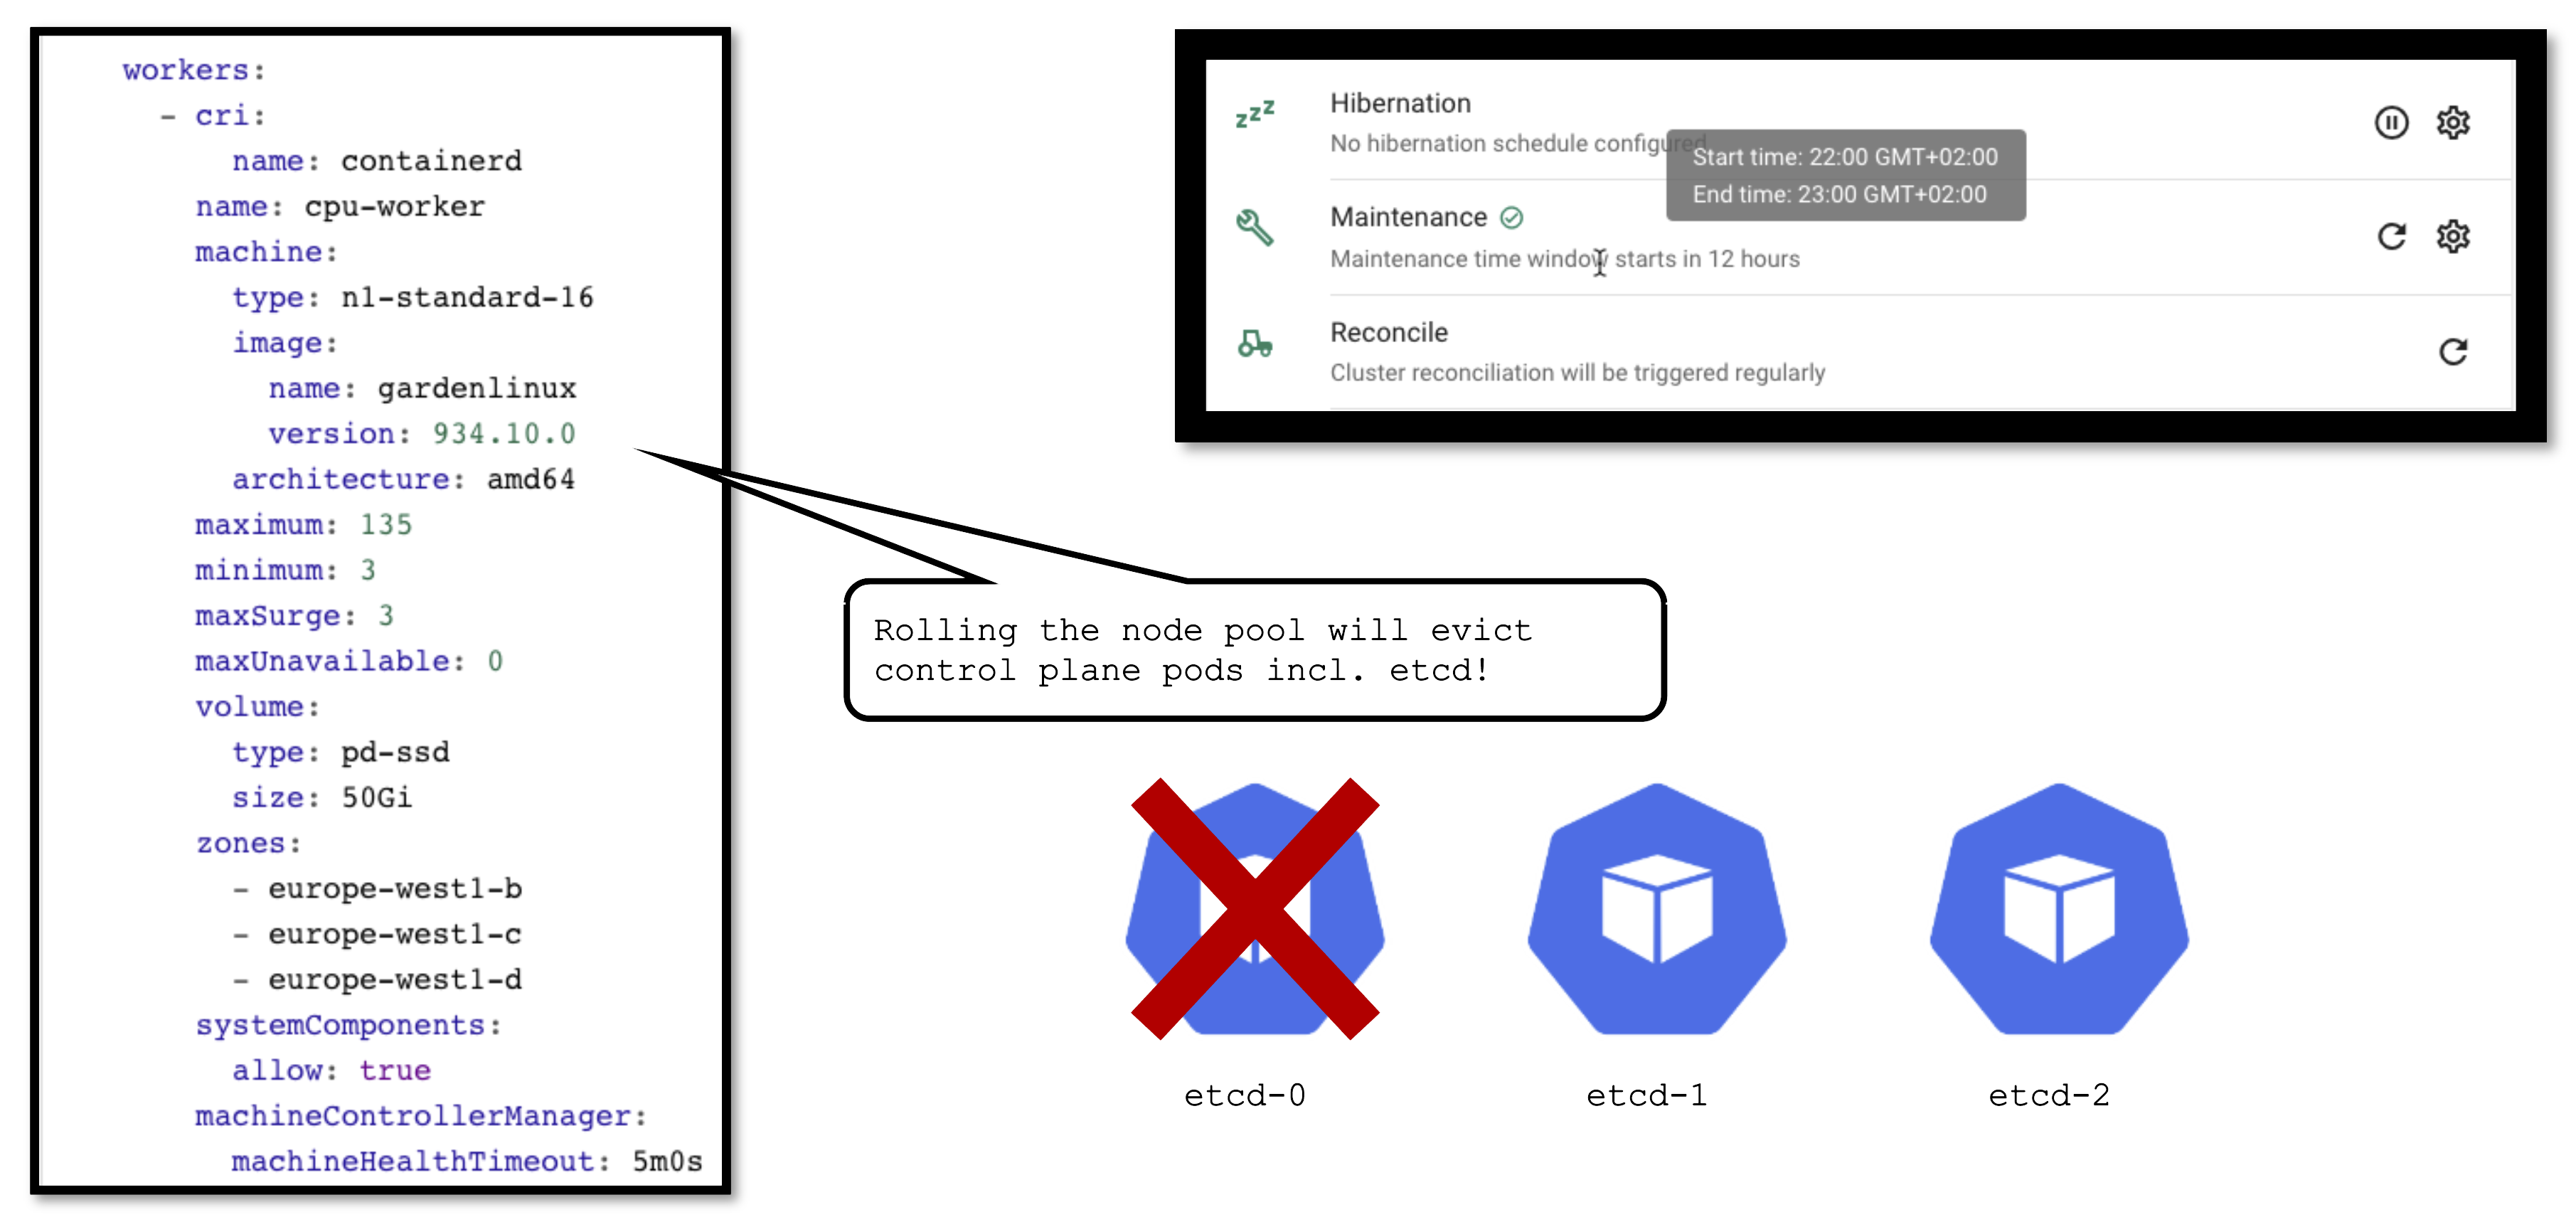
It is important to keep in mind that a seed is just another Kubernetes cluster. As such, it has its own lifecycle (daily reconciliation, maintenance, etc.) and is also a subject to change.
From time to time changes need to be applied to the seed as well. Some (like updating the OS version) cause the node pool to roll. In turn, this will cause the eviction of ALL pods running on the affected node. If your etcd is evicted and you don’t have a highly available control plane, it will cause downtime for your cluster. Your workloads will continue to run ,of course, but your cluster’s API server will not function until the etcd is up and running again.
7 - Observability
Overview
Gardener offers out-of-the-box observability for the control plane, Gardener managed system-components, and the nodes of a shoot cluster.
Having your workload survive on day 2 can be a challenge. The goal of this topic is to give you the tools with which to observe, analyze, and alert when the control plane or system components of your cluster become unhealthy. This will let you guide your containers through the storm of operating in a production environment.
7.1 - Components
Core Components
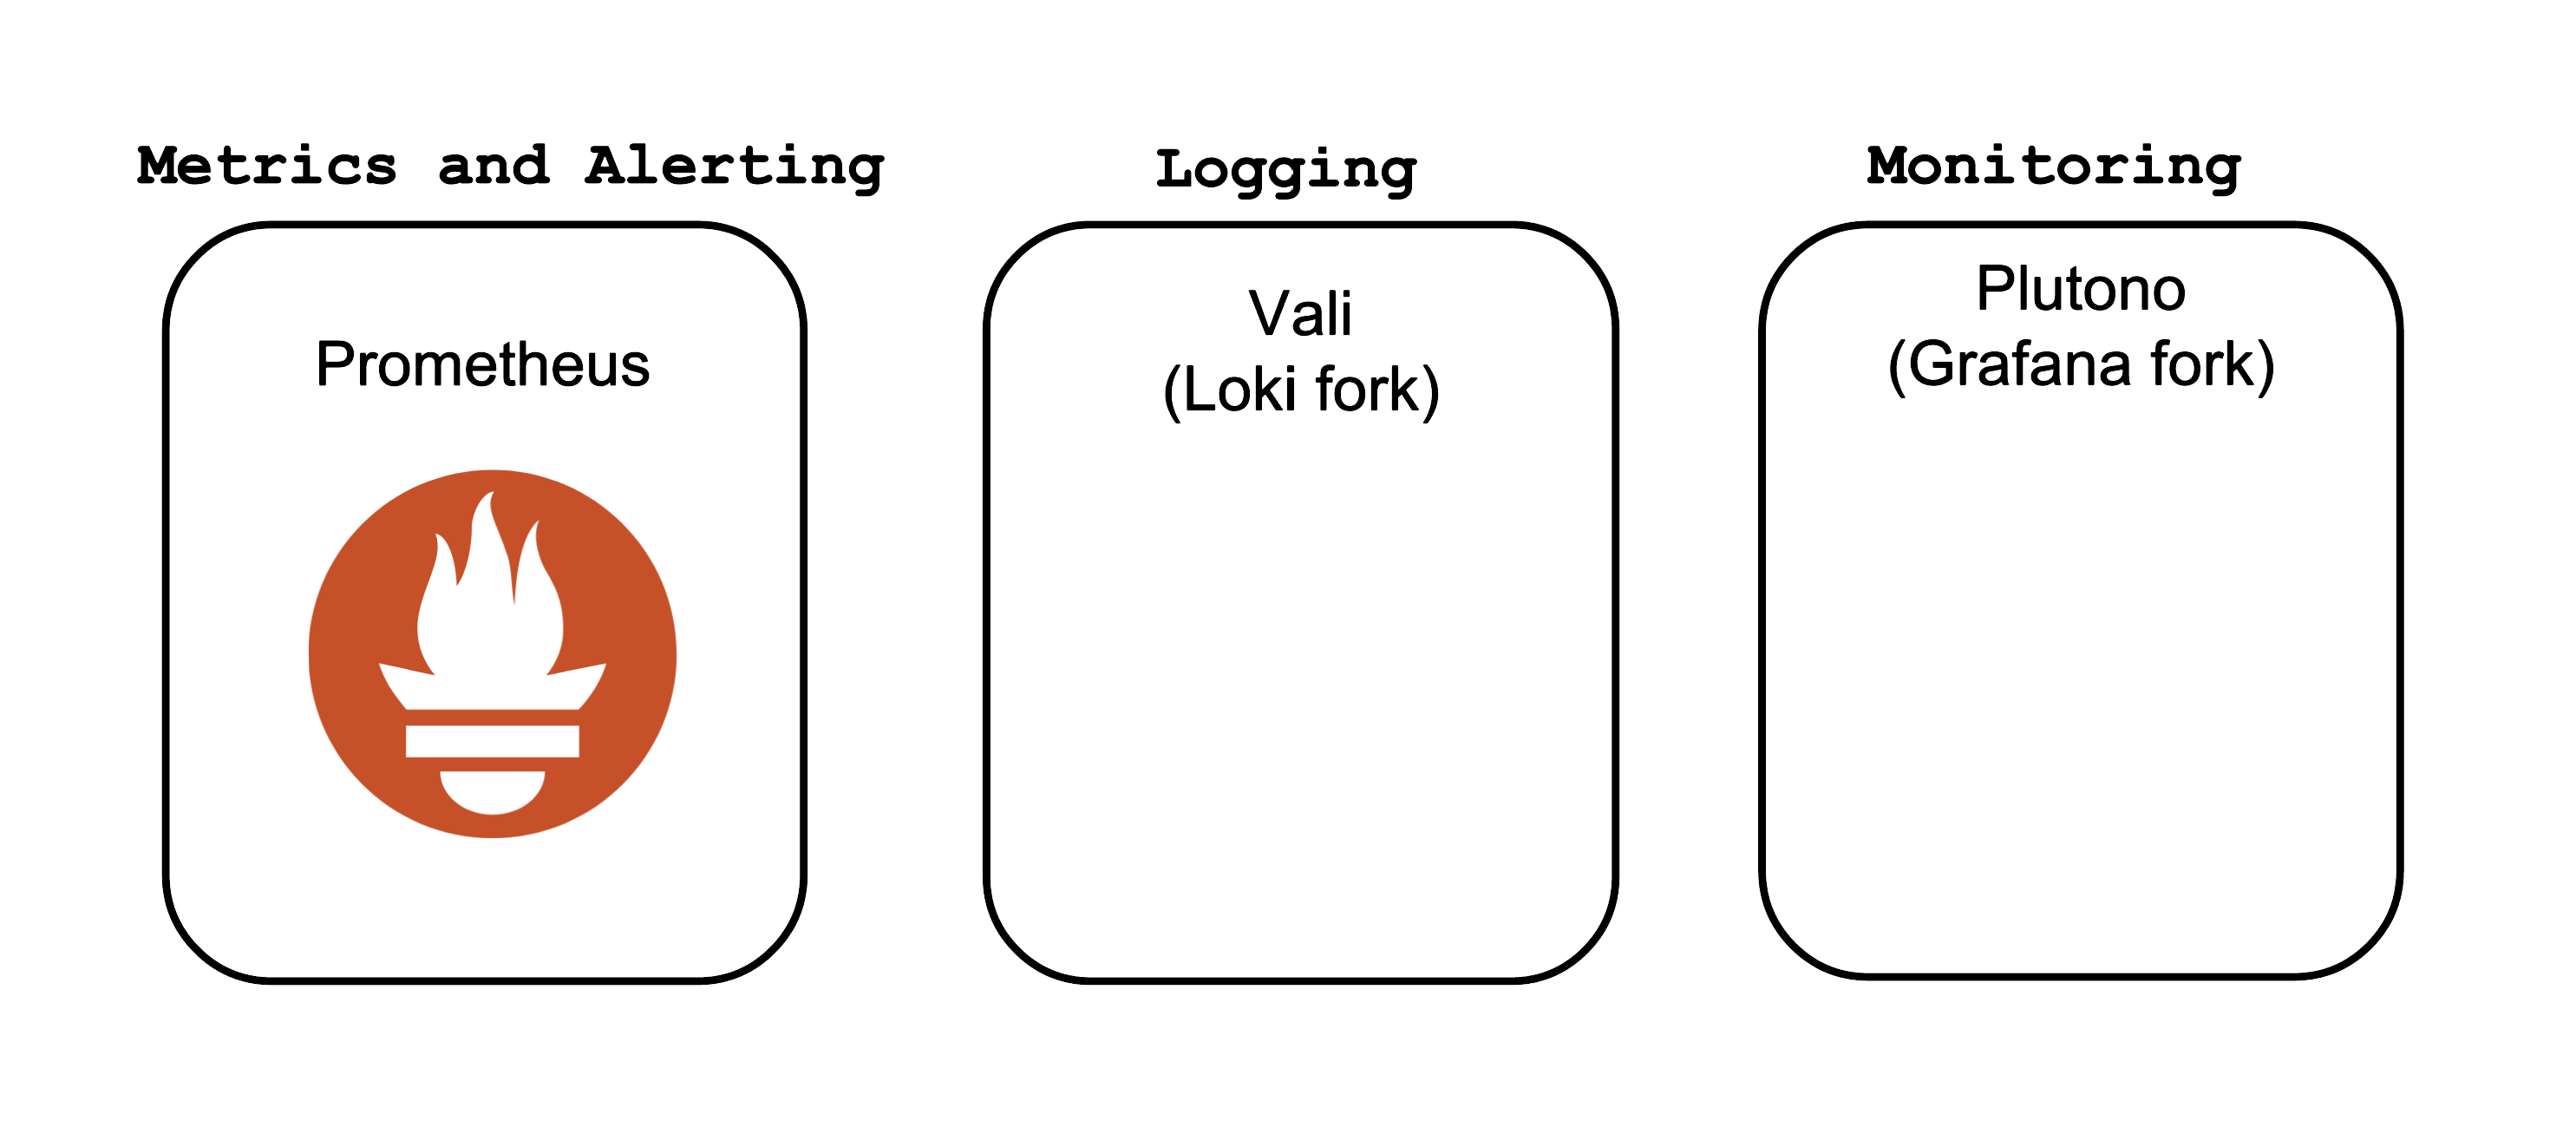
The core Observability components which Gardener offers out-of-the-box are:
- Prometheus - for Metrics and Alerting
- Vali - a Loki fork for Logging
- Plutono - a Grafana fork for Dashboard visualization
Both forks are done from the last version with an Apache license.
Control Plane Components on the Seed
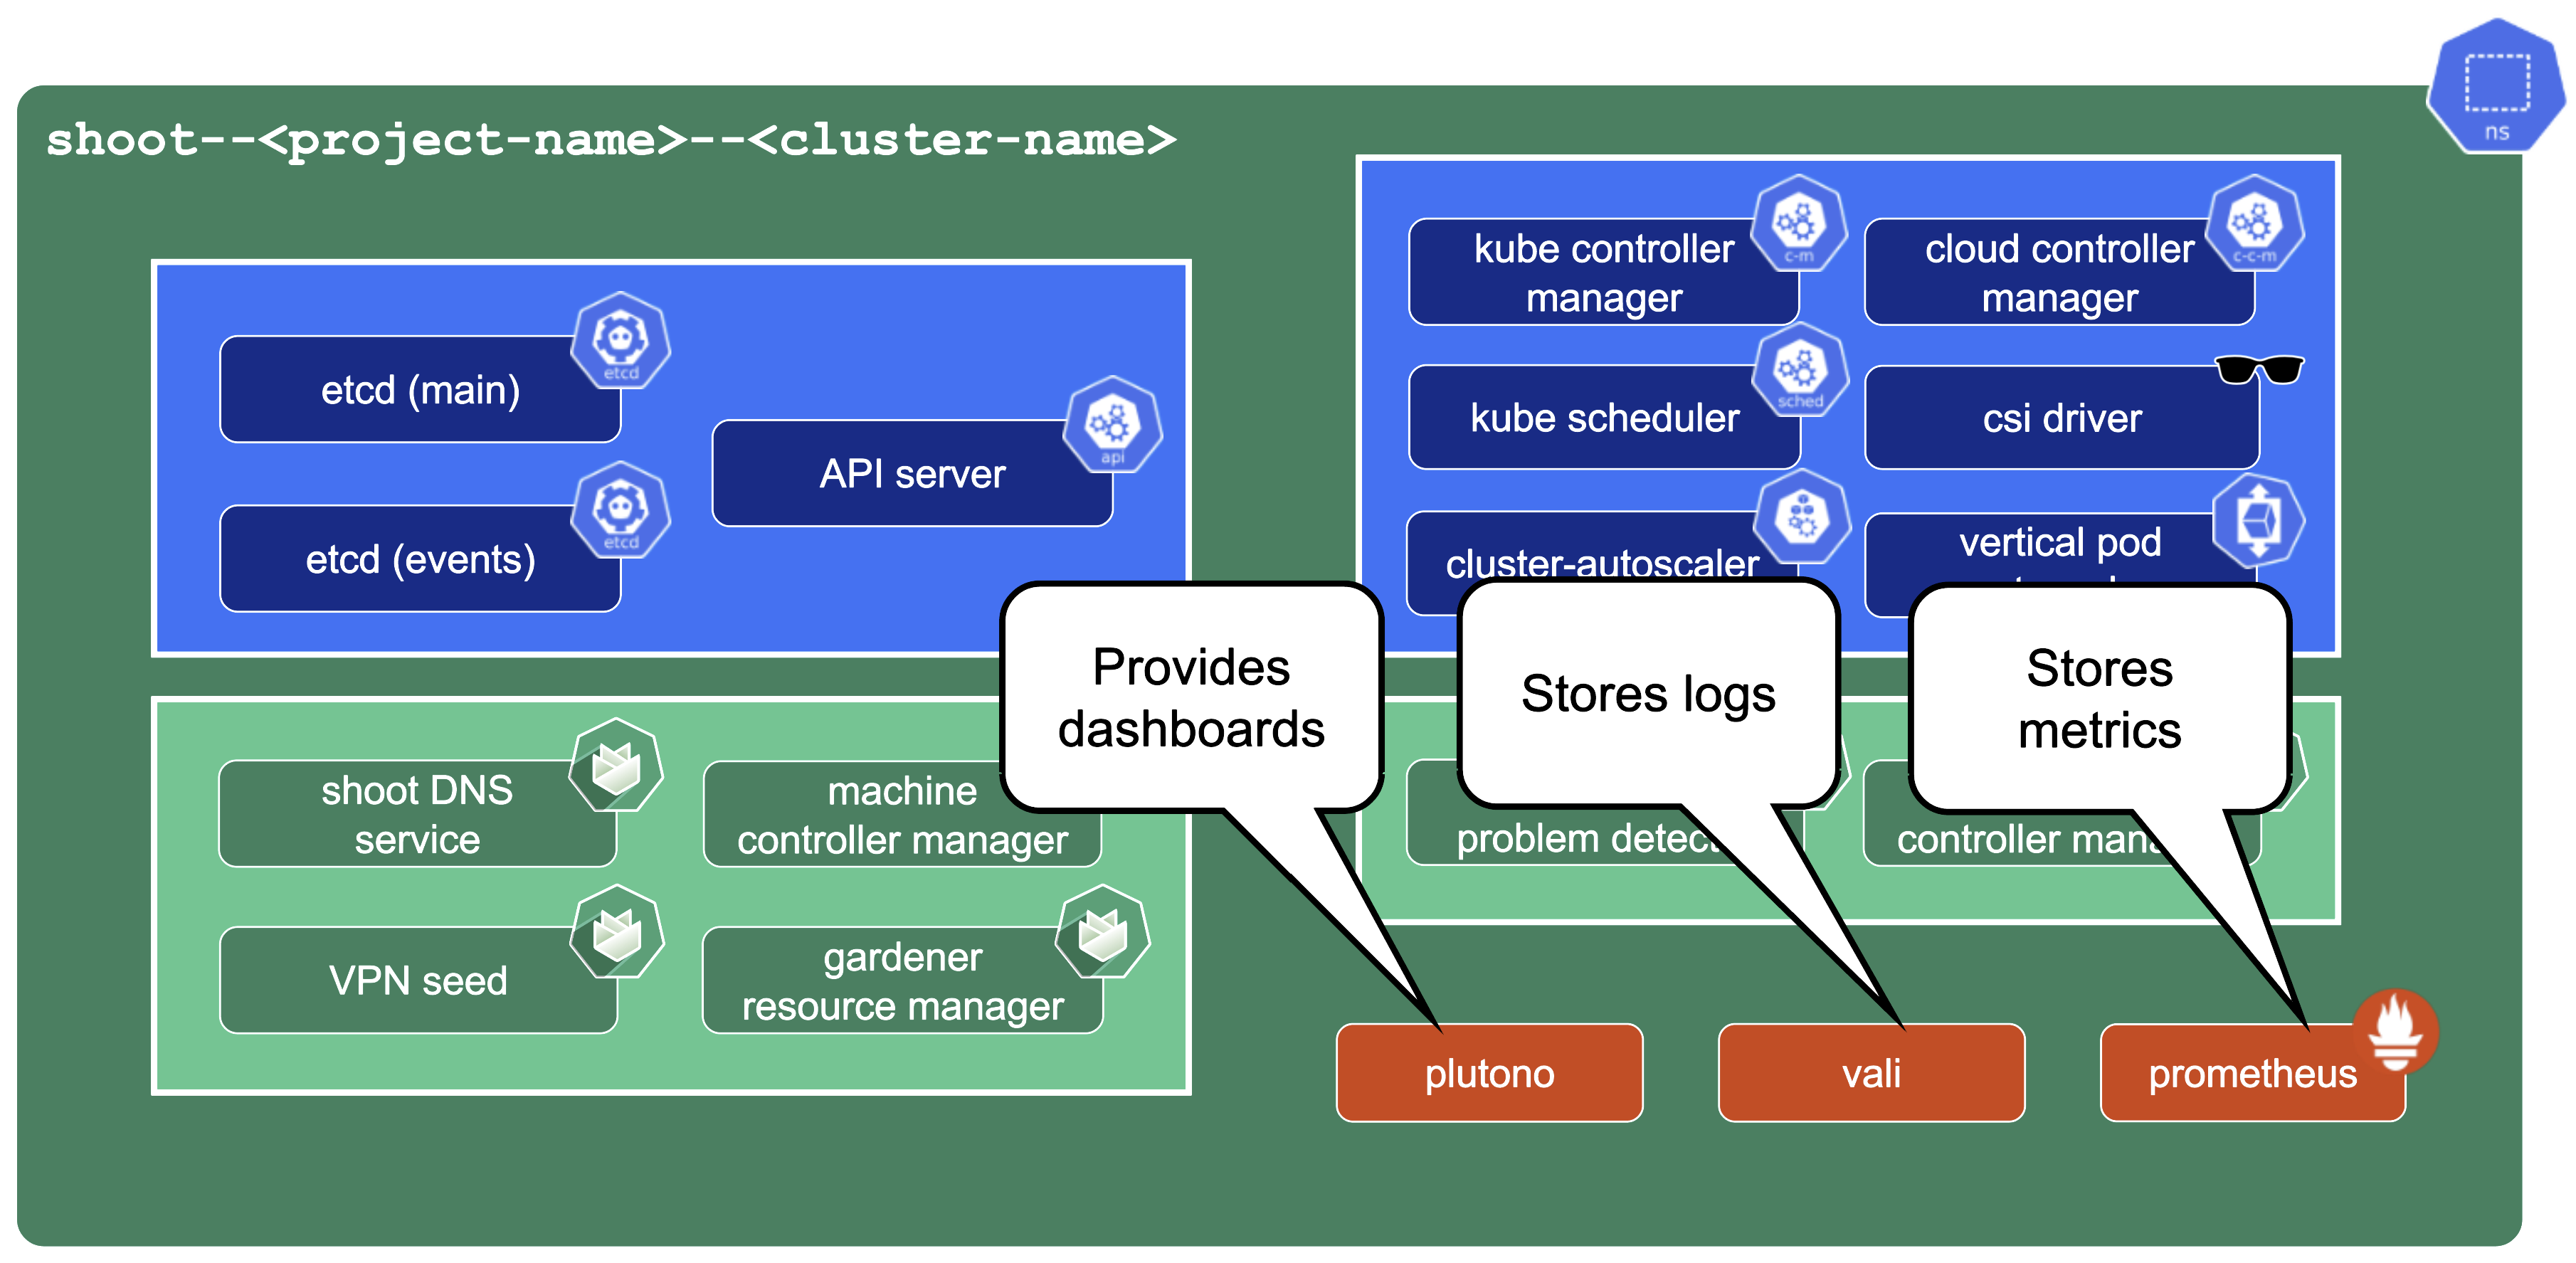
Prometheus, Plutono, and Vali are all located in the seed cluster. They run next to the control plane of your cluster.
The next sections will explore those components in detail.
Gardener only provides monitoring for Gardener-deployed components. If you need logging or monitoring for your workload, then you need to deploy your own monitoring stack into your shoot cluster.
Gardener only provides a monitoring stack if the cluster is not of purpose: testing. For more information, see Shoot Cluster Purpose.
Logging into Plutono
Let us start by giving some visual hints on how to access Plutono. Plutono allows us to query logs and metrics and visualize those in form of dashboards. Plutono is shipped ready-to-use with a Gardener shoot cluster.
In order to access the Gardener provided dashboards, open the Plutono link provided in the Gardener dashboard. You will be automatically logged in through OIDC based authentication:
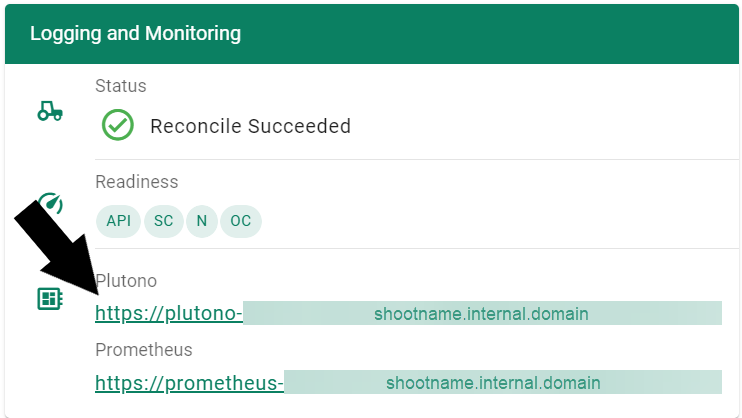
Access is still possible via the non-OIDC ingress using the credentials from the <clustername>.monitoring secret. It contains the HTTP basic auth credentials in base64-encoded form, as well as the Plutono ingress URL. The Plutono URL is present as an annotation on the .monitoring secret. It can be fetched with kubectl get secret <clustername>.monitoring -o jsonpath="{.metadata.annotations.url}". The Prometheus URL can be derived from the Plutono URL by replacing the gu prefix with p.
Accessing the Dashboards
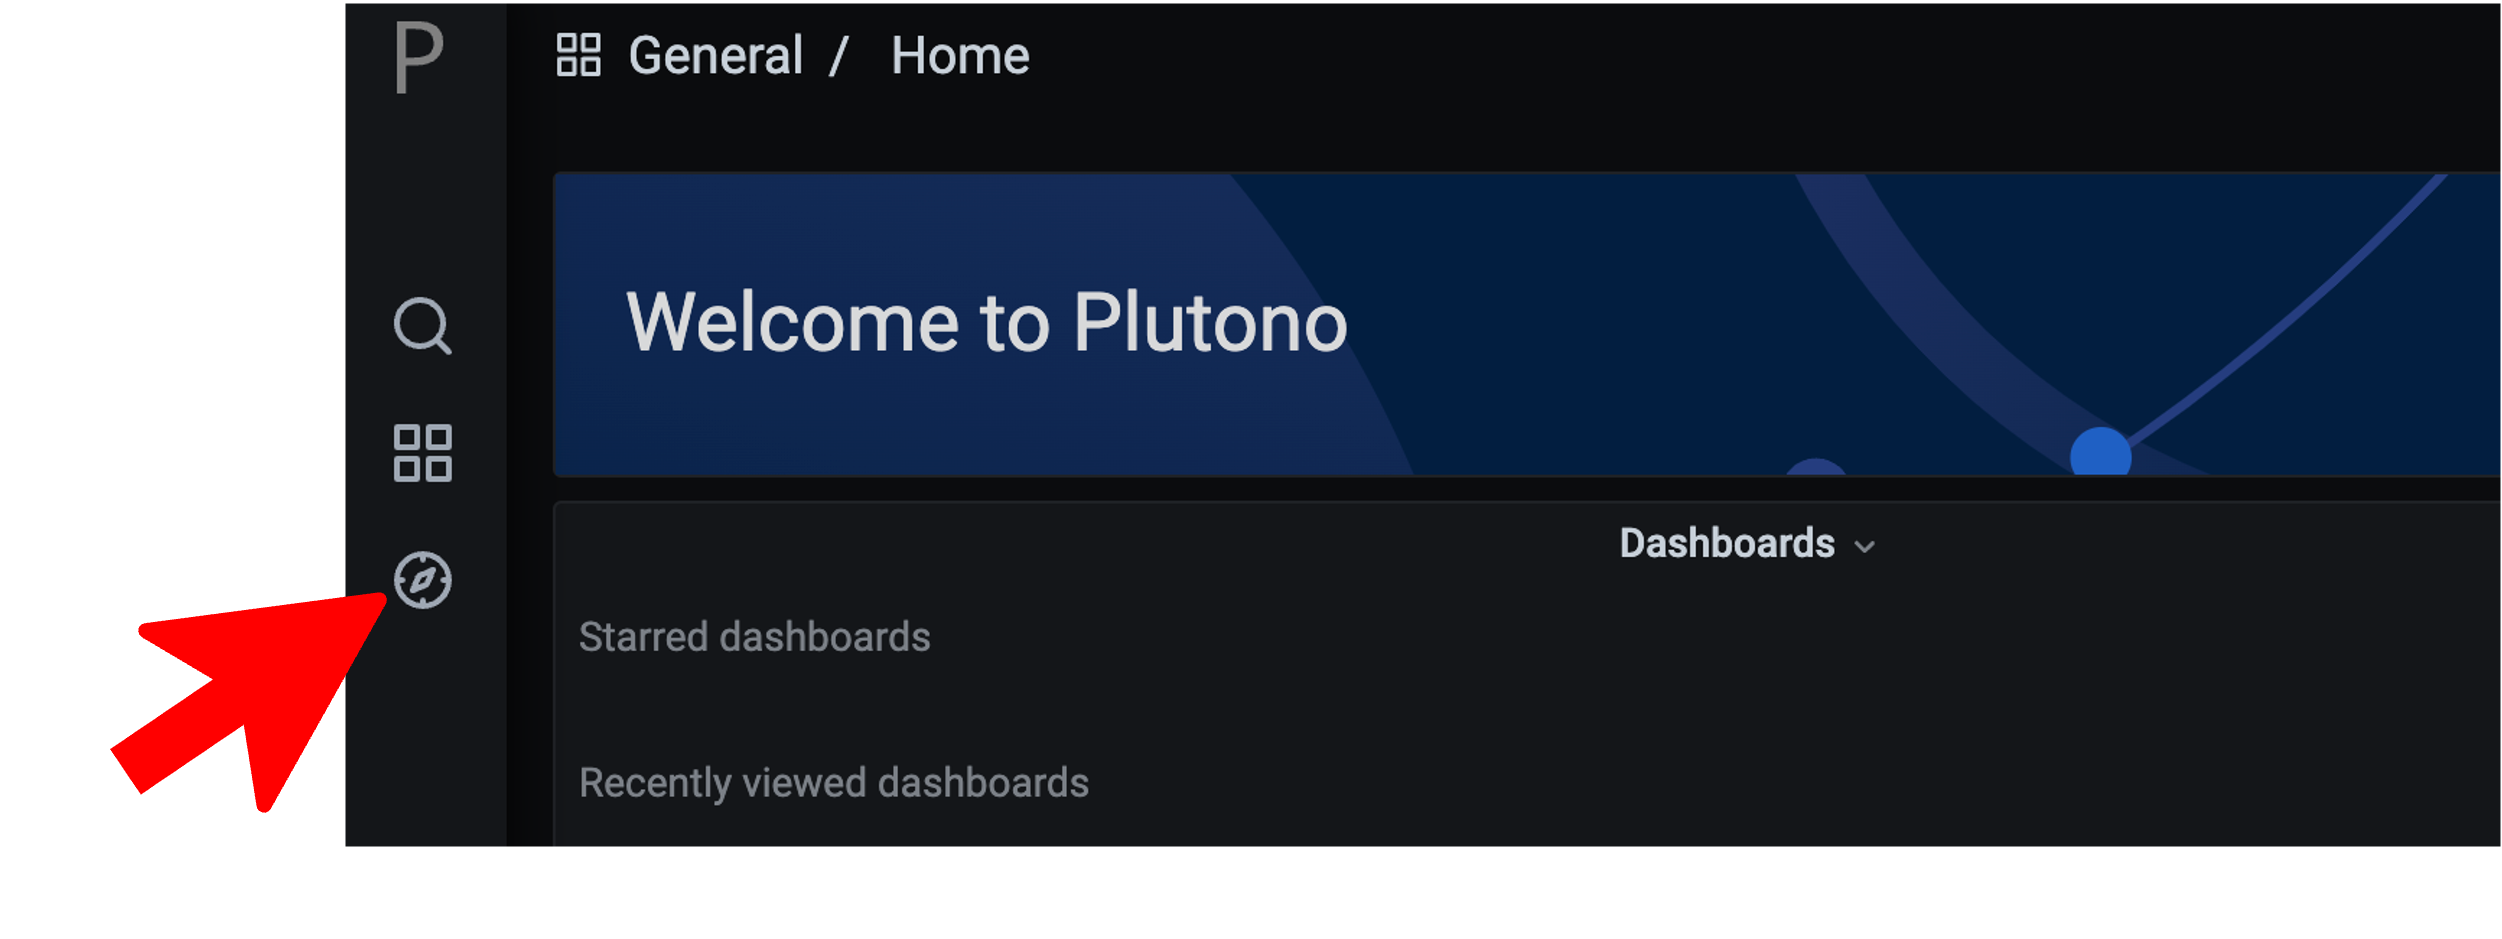
After logging in, you will be greeted with a Plutono welcome screen. Navigate to General/Home, as depicted with the red arrow in the next picture:

Then you will be able to select the dashboards. Some interesting ones to look at are:
- The
Kubernetes Control Plane Status dashboard allows you to check control plane availability during a certain time frame. - The
API Server dashboard gives you an overview on which requests are done towards your apiserver and how long they take. - With the
Node Details dashboard you can analyze CPU/Network pressure or memory usage for nodes. - The
Network Problem Detector dashboard illustrates the results of periodic networking checks between nodes and to the APIServer.
Here is a picture with the Kubernetes Control Plane Status dashboard.
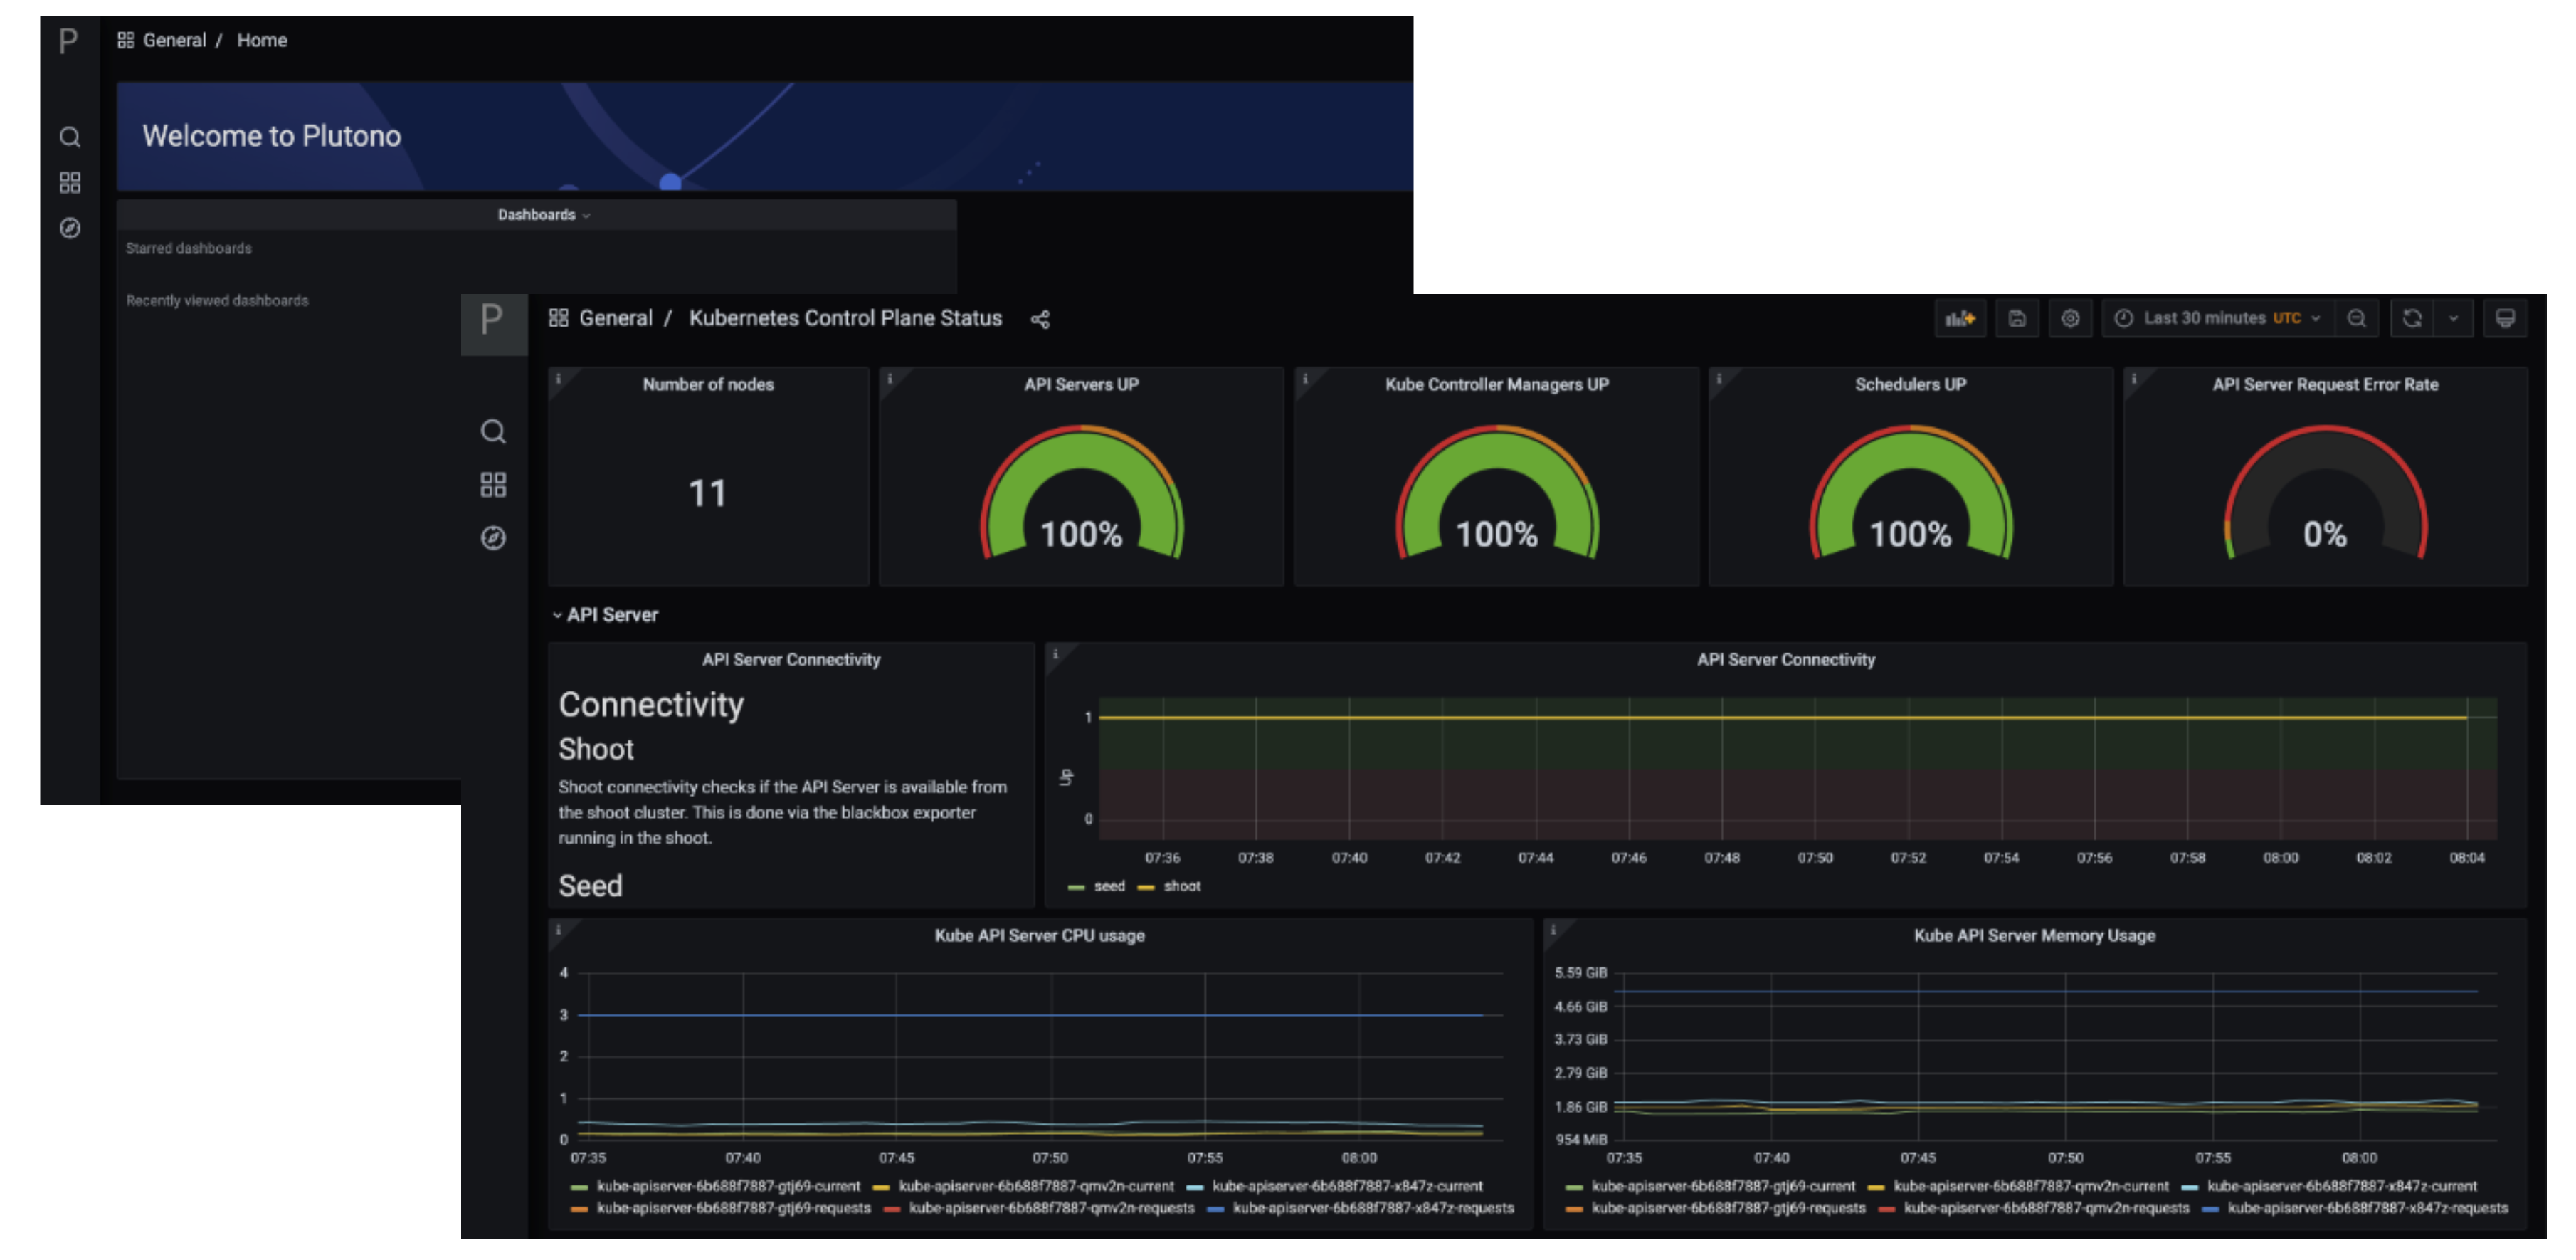
Prometheus
Prometheus is a monitoring system and a time series database. It can be queried using PromQL, the so called Prometheus Querying Language.

This example query describes the current uptime status of the kube apiserver.
Prometheus and Plutono
Time series data from Prometheus can be made visible with Plutono. Here we see how the query above which describes the uptime of a Kubernetes cluster is visualized with a Plutono dashboard.
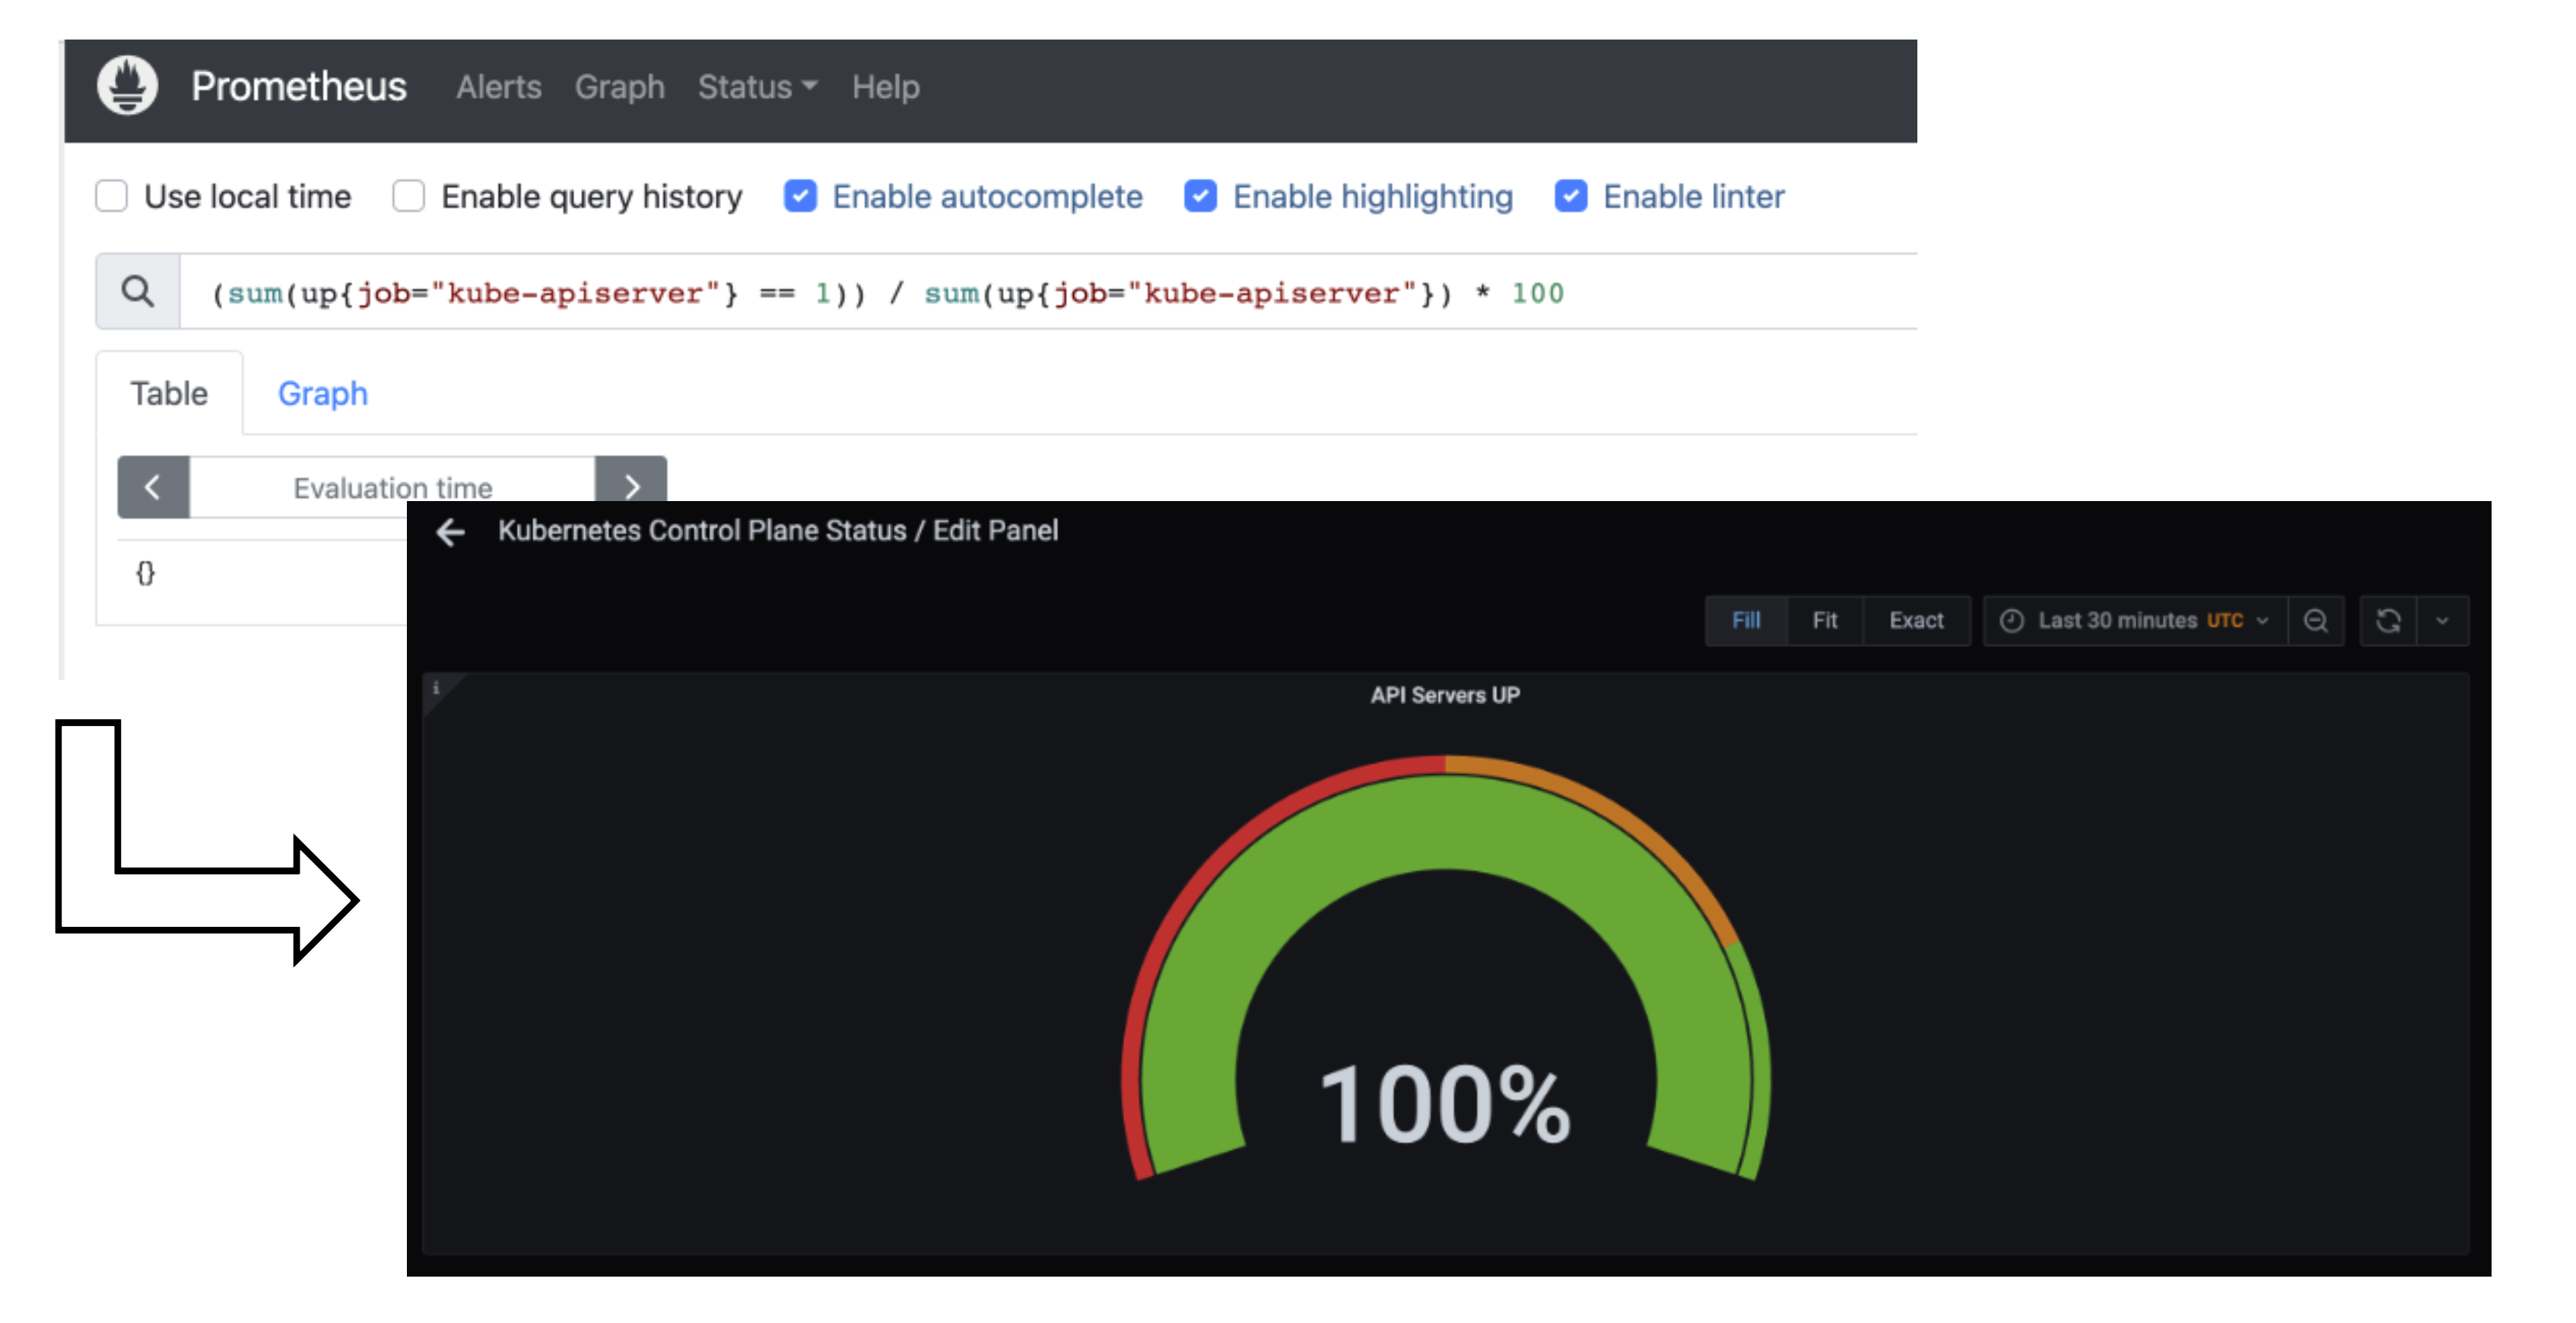
Vali Logs via Plutono
Vali is our logging solution. In order to access the logs provided by Vali, you need to:
Log into Plutono.
Choose Explore, which is depicted as the little compass symbol:
- Select
Vali at the top left, as shown here:

There you can browse logs or events of the control plane components.
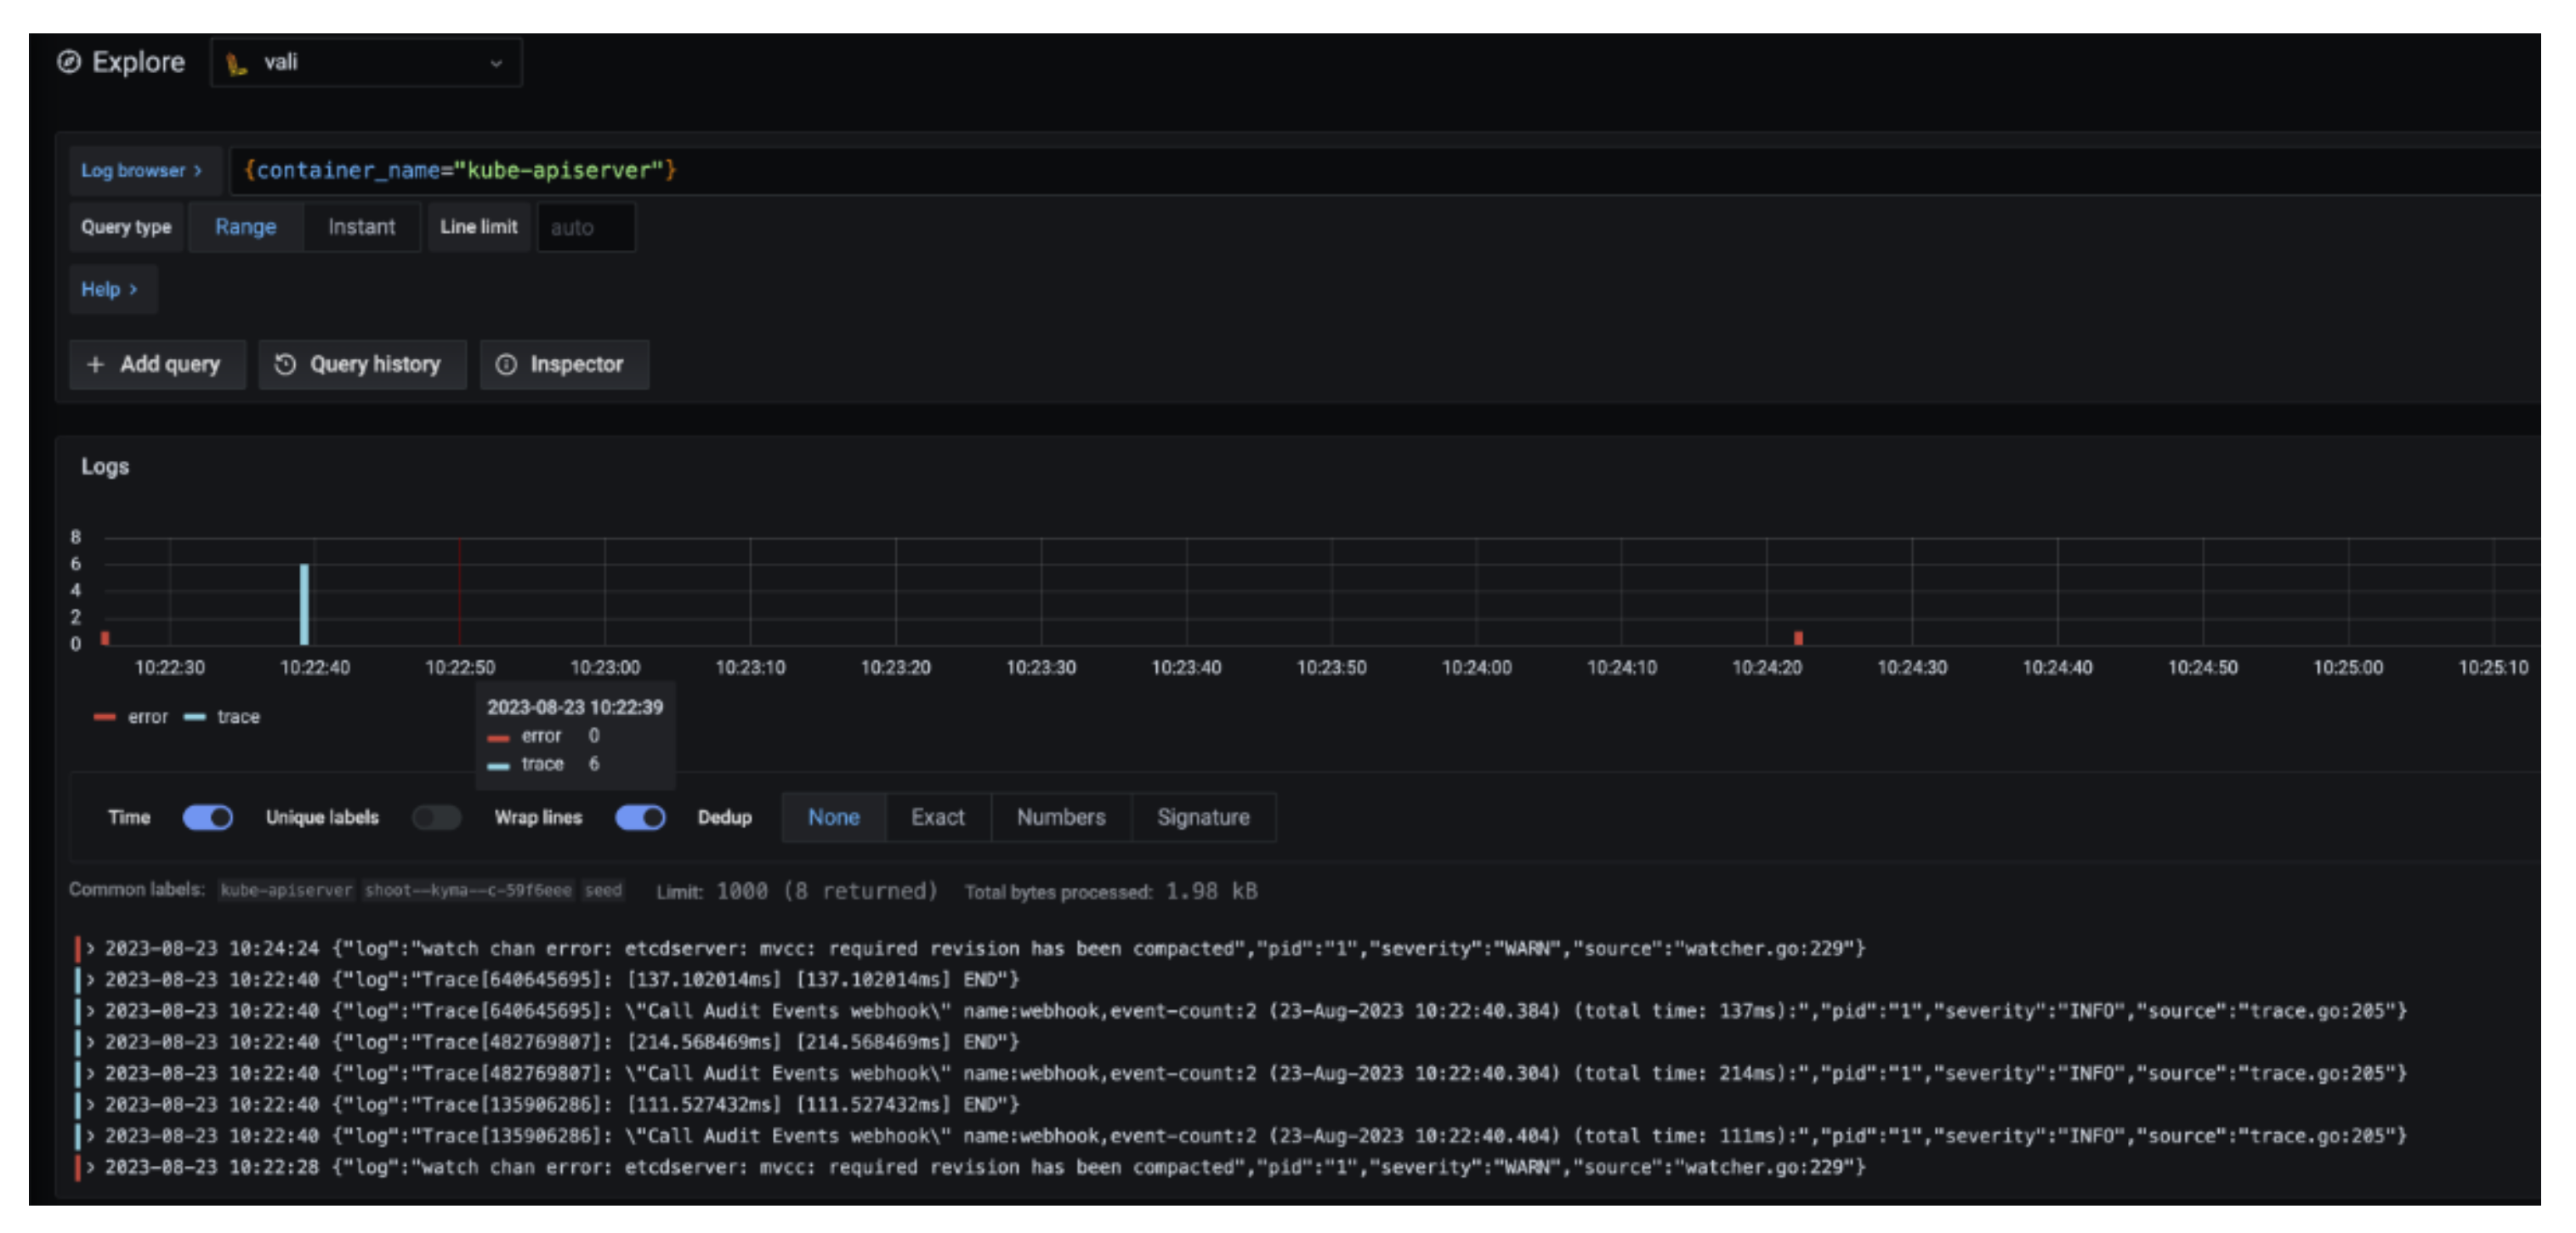
Here are some examples of helpful queries:
{container_name="cluster-autoscaler" } to get cluster-autoscaler logs and see why certain node groups were scaled up.{container_name="kube-apiserver"} |~ "error" to get the logs of the kube-apiserver container and filter for errors.{unit="kubelet.service", nodename="ip-123"} to get the kubelet logs of a specific node.{unit="containerd.service", nodename="ip-123"} to retrieve the containerd logs for a specific node.
Choose Help > in order to see what options exist to filter the results.
For more information on how to retrieve K8s events from the past, see How to Access Logs.
Detailed View
Data Flow
Our monitoring and logging solutions Vali and Prometheus both run next to the control plane of the shoot cluster.
Data Flow - Logging
The following diagram allows a more detailed look at Vali and the data flow.
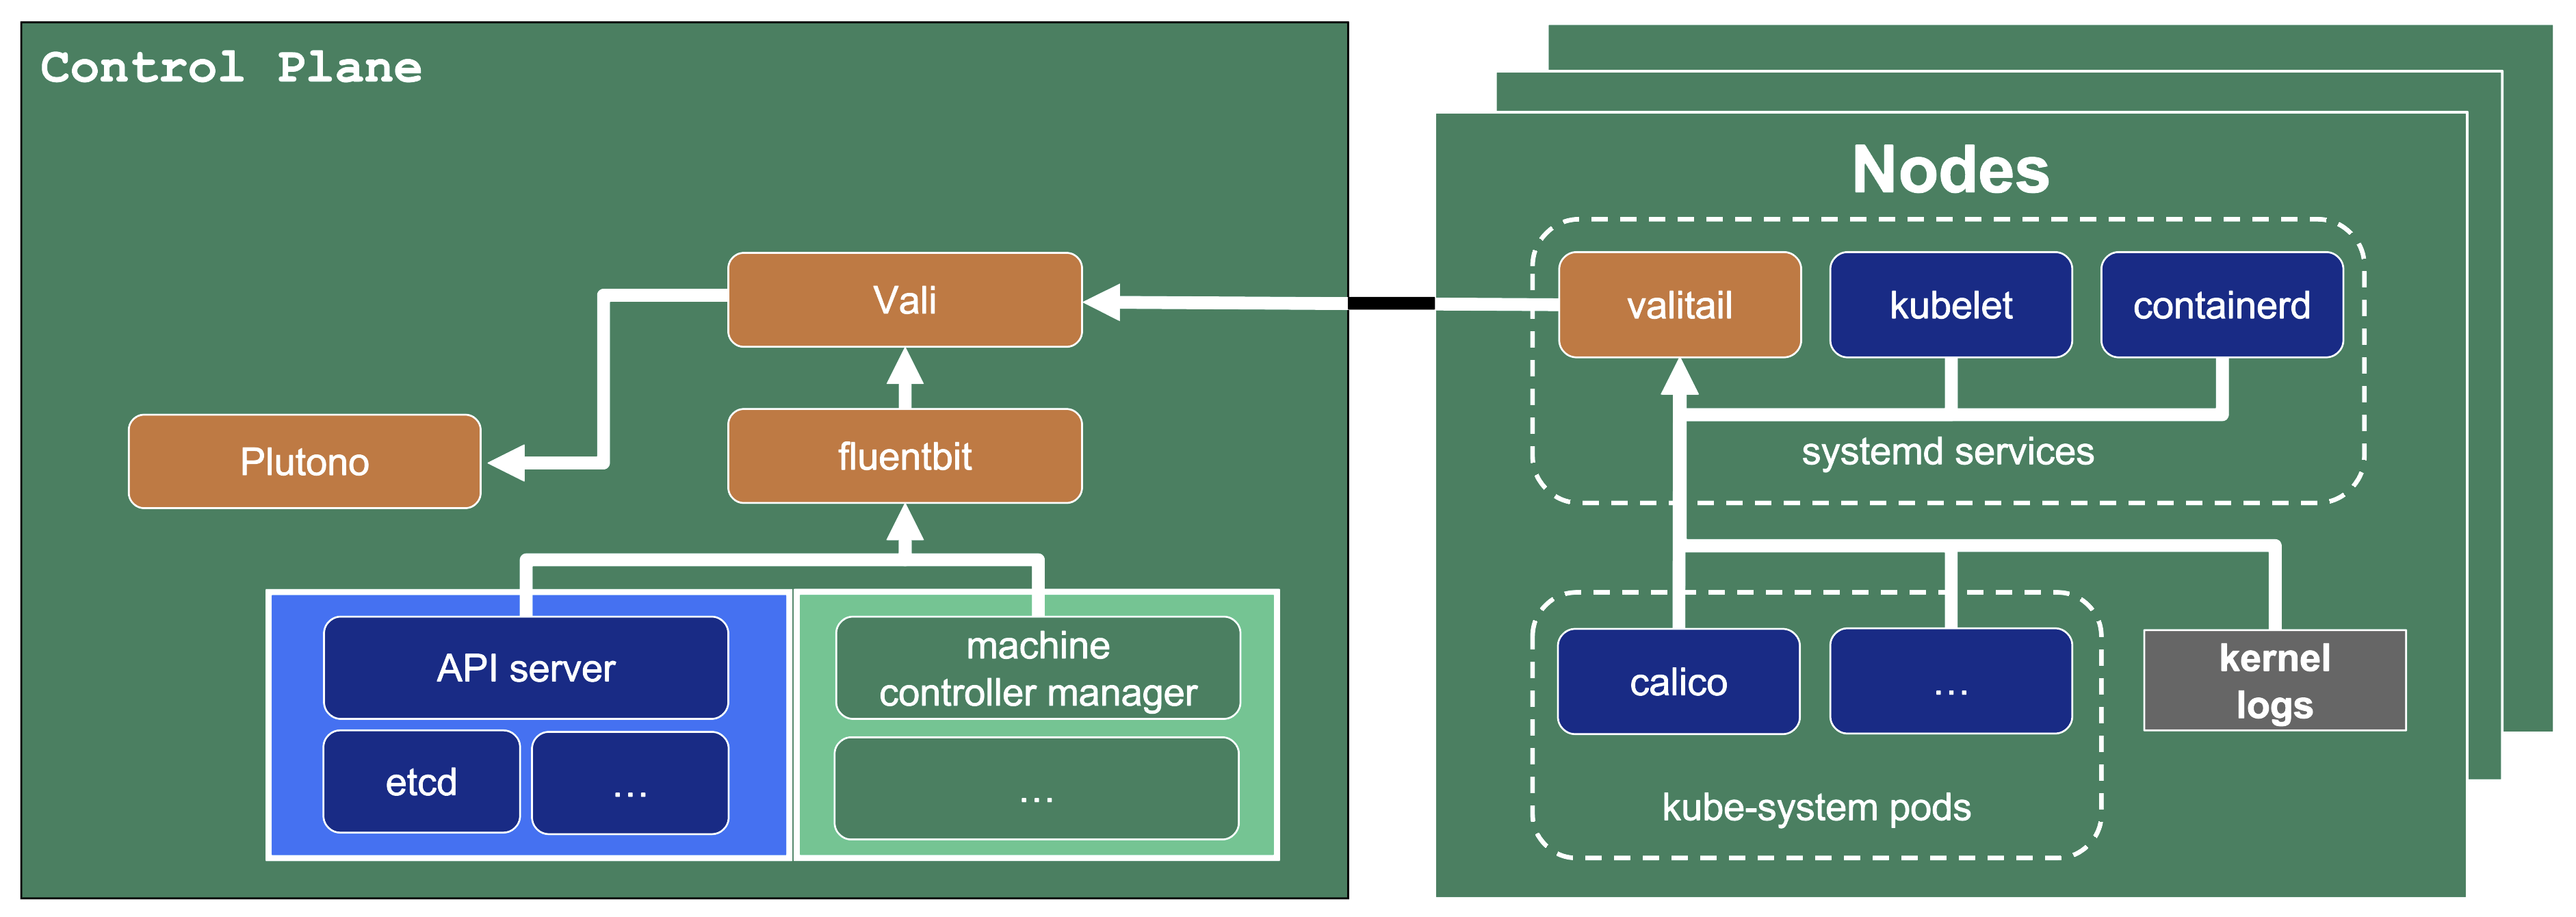
On the very left, we see Plutono as it displays the logs. Vali is aggregating the logs from different sources.
Valitail and Fluentbit send the logs to Vali, which in turn stores them.
Valitail
Valitail is a systemd service that runs on each node. It scrapes kubelet, containerd, kernel logs, and the logs of the pods in the kube-system namespace.
Fluentbit
Fluentbit runs as a daemonset on each seed node. It scrapes logs of the kubernetes control plane components, like apiserver or etcd.
It also scrapes logs of the Gardener deployed components which run next to the control plane of the cluster, like the machine-controller-manager or the cluster autoscaler. Debugging those components, for example, would be helpful when finding out why certain worker groups got scaled up or why nodes were replaced.
Data Flow - Monitoring
Next to each shoot’s control plane, we deploy an instance of Prometheus in the seed.
Gardener uses Prometheus for storing and accessing shoot-related metrics and alerting.
The diagram below shows the data flow of metrics.
Plutono uses PromQL queries to query data from Prometheus. It then visualises those metrics in dashboards.
Prometheus itself scrapes various targets for metrics, as seen in the diagram below by the arrows pointing to the Prometheus instance.
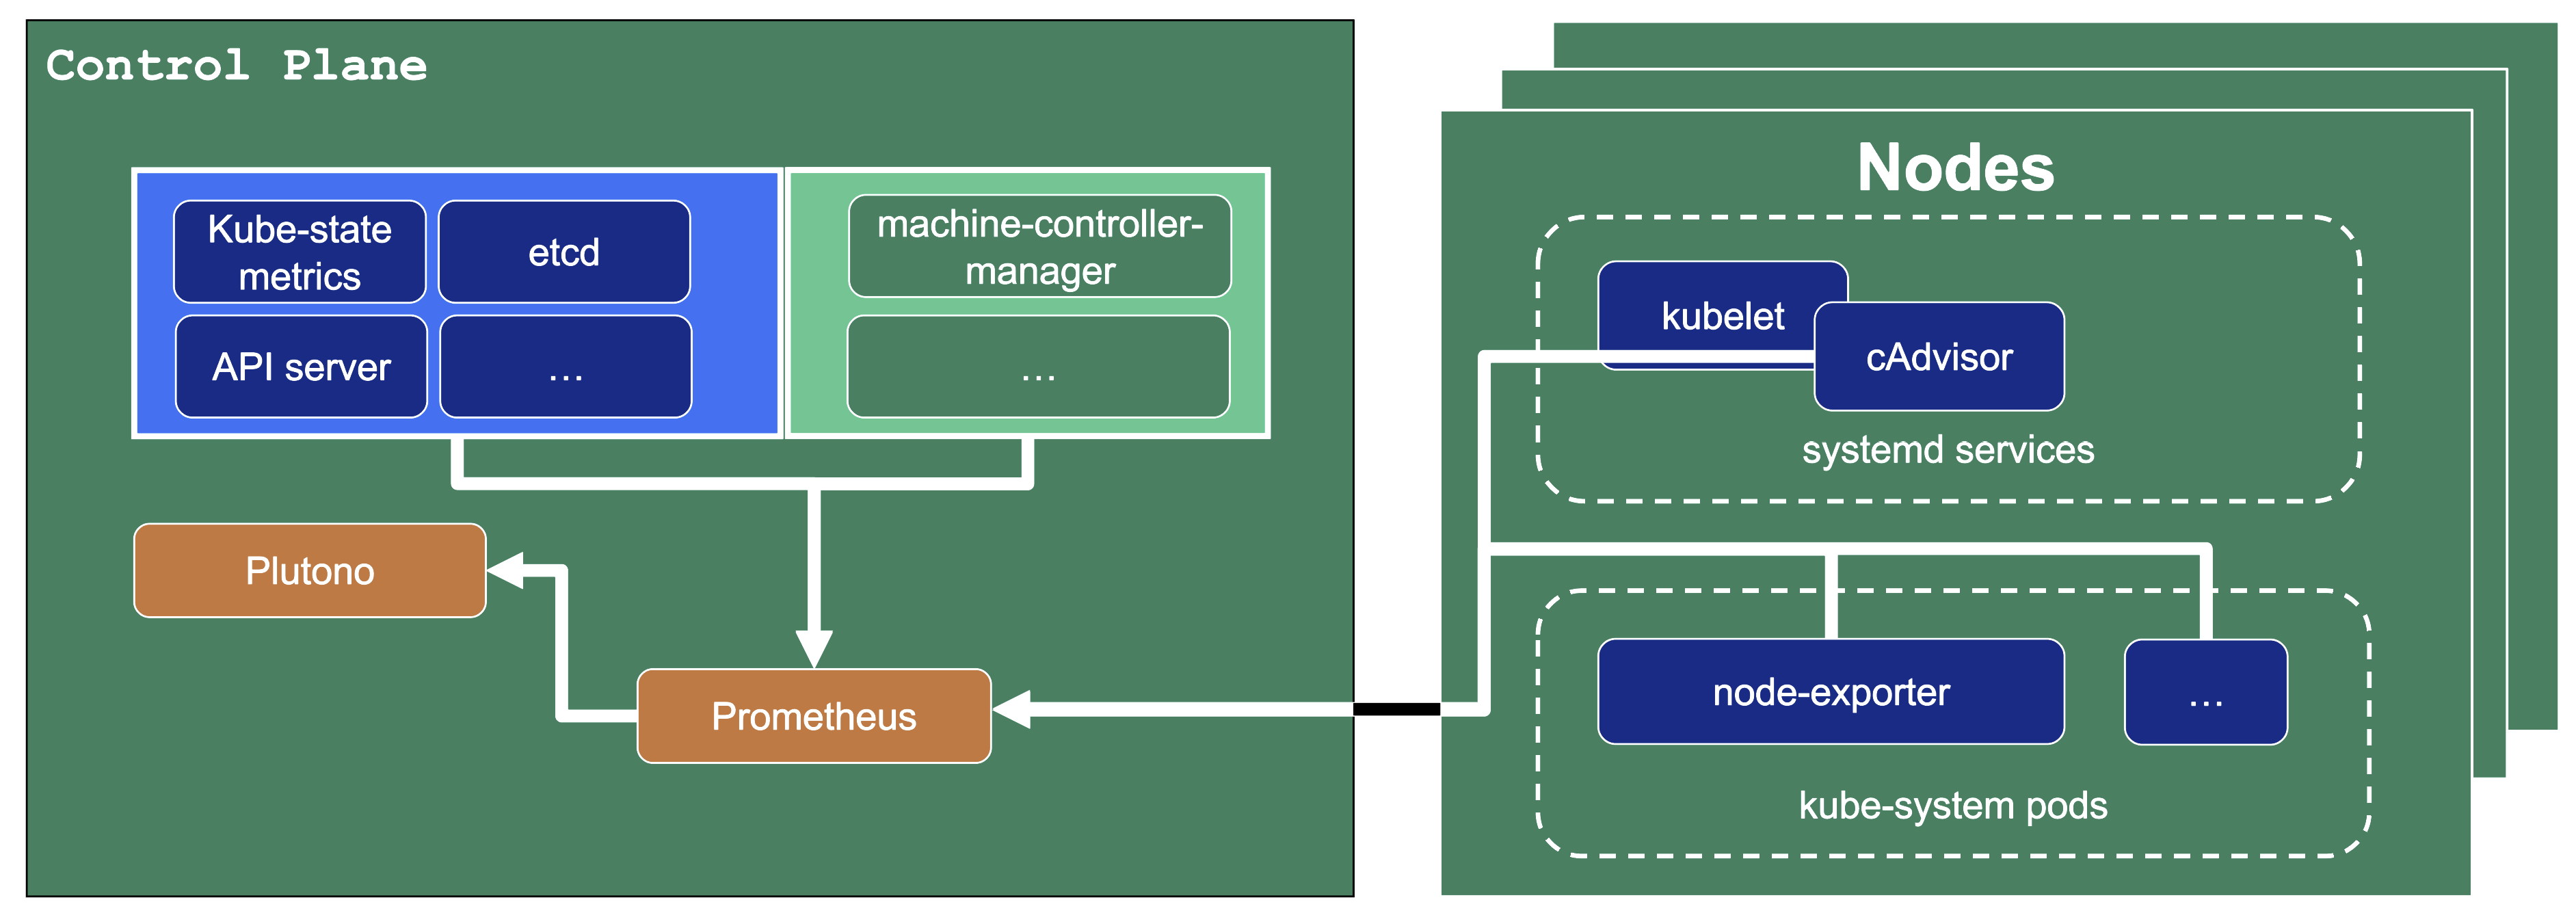
Let us have a look what metrics we scrape for debugging purposes:
Container performance metrics
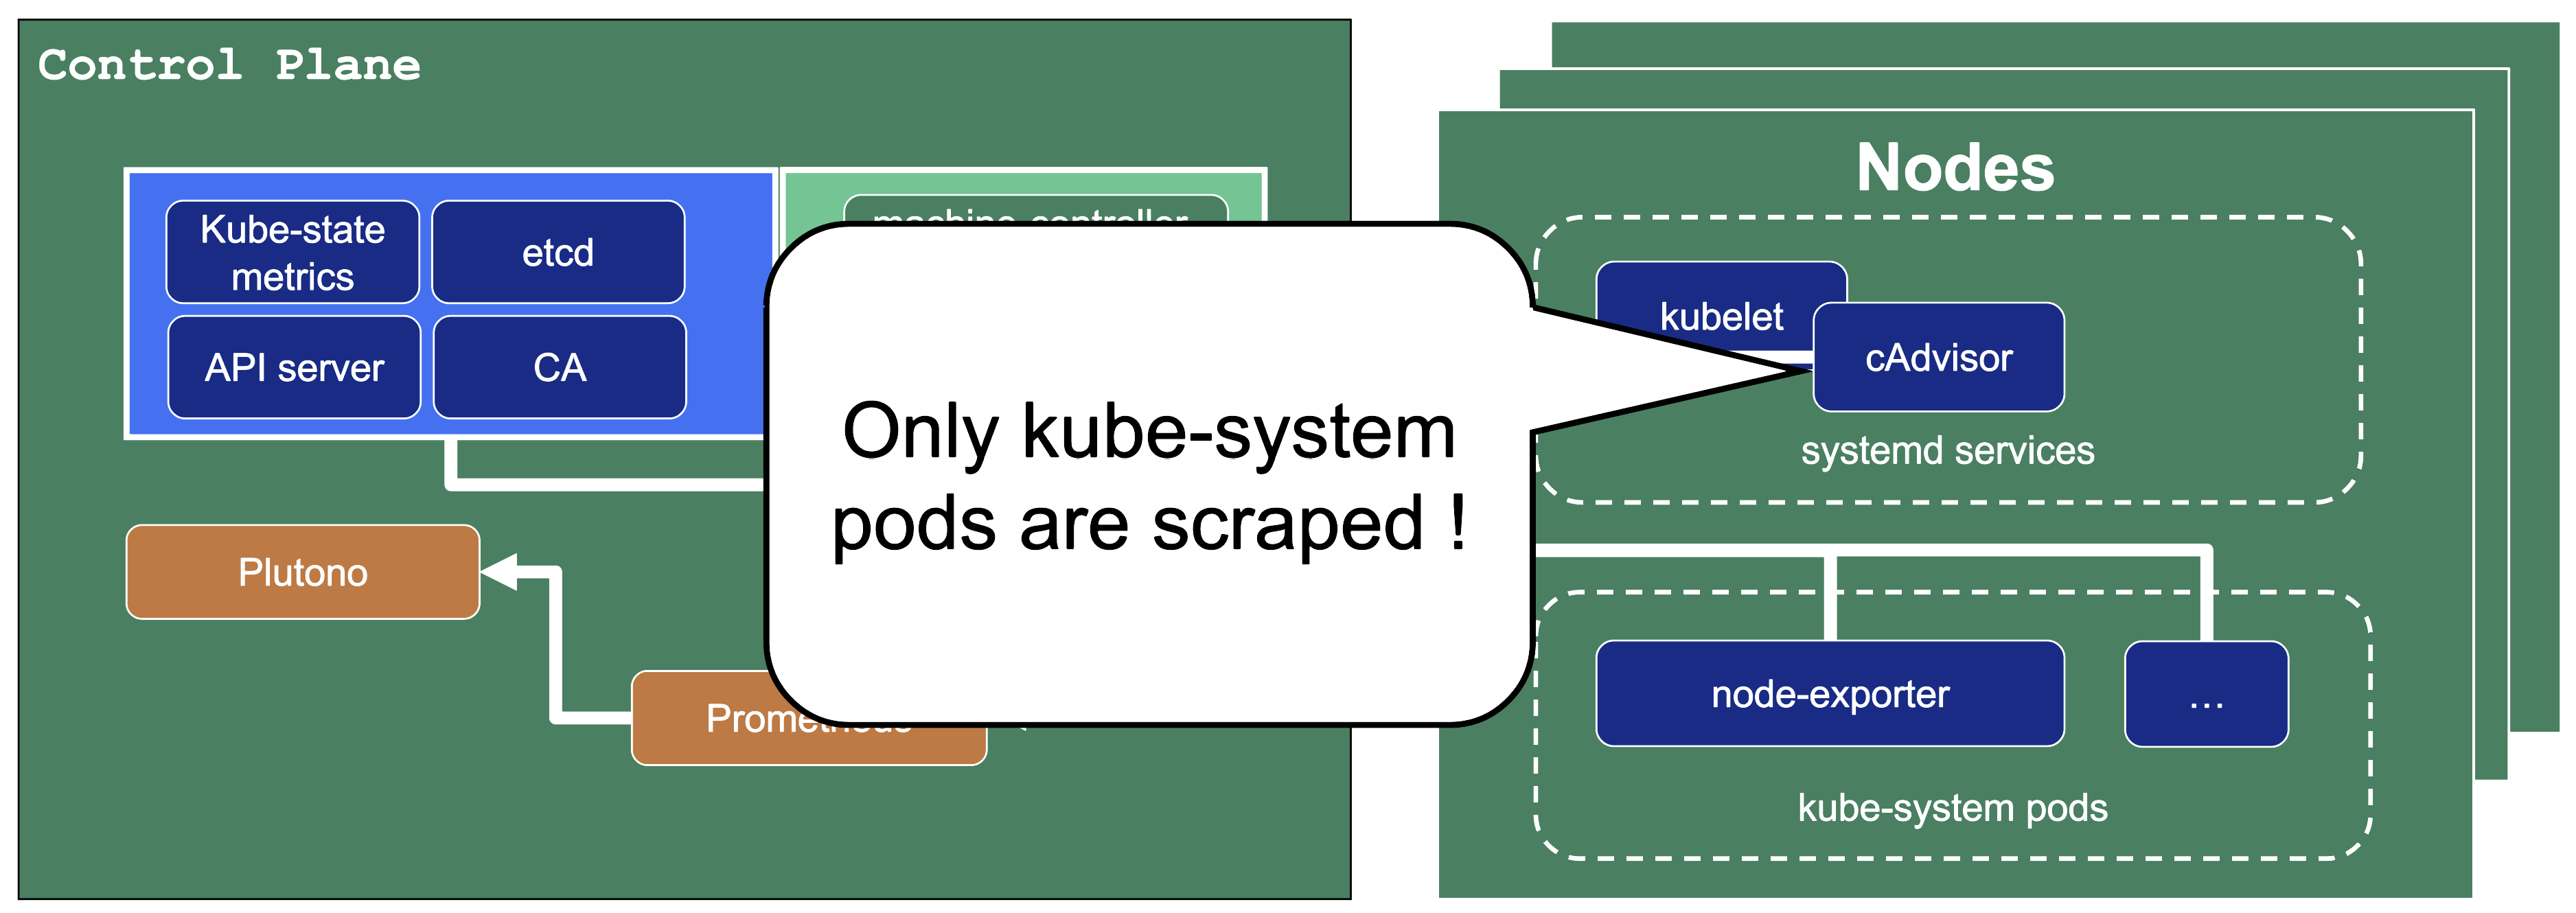
cAdvisor is an open-source agent integrated into the kubelet binary that monitors resource usage and analyzes the performance of containers. It collects statistics about the CPU, memory, file, and network usage for all containers running on a given node. We use it to scrape data for all pods running in the kube-system namespace in the shoot cluster.
Hardware and kernel-related metrics
The Prometheus Node Exporter runs as a daemonset in the kube-system namespace of your shoot cluster. It exposes a wide variety of hardware and kernel-related metrics. Some of the metrics we scrape are, for example, the current usage of the filesystem (node_filesystem_free_bytes) or current CPU usage (node_cpu_seconds_total). Both can help you identify if nodes are running out of hardware resources, which could lead to your workload experiencing downtimes.
Control plane component specific metrics
The different control plane pods (for example, etcd, API server, and kube-controller-manager) emit metrics over the /metrics endpoint. This includes metrics like how long webhooks take, the request count of the apiserver and storage information, like how many and what kind of objects are stored in etcd.
Metrics about the state of Kubernetes objects
kube-state-metrics is a simple service that listens to the Kubernetes API server and generates metrics about the state of the objects. It is not concerned with metrics about the Kubernetes components, but rather it exposes metrics calculated from the status of Kubernetes objects (for example, resource requests or health of pods).
In the following image a few example metrics, which are exposed by the various components, are listed:
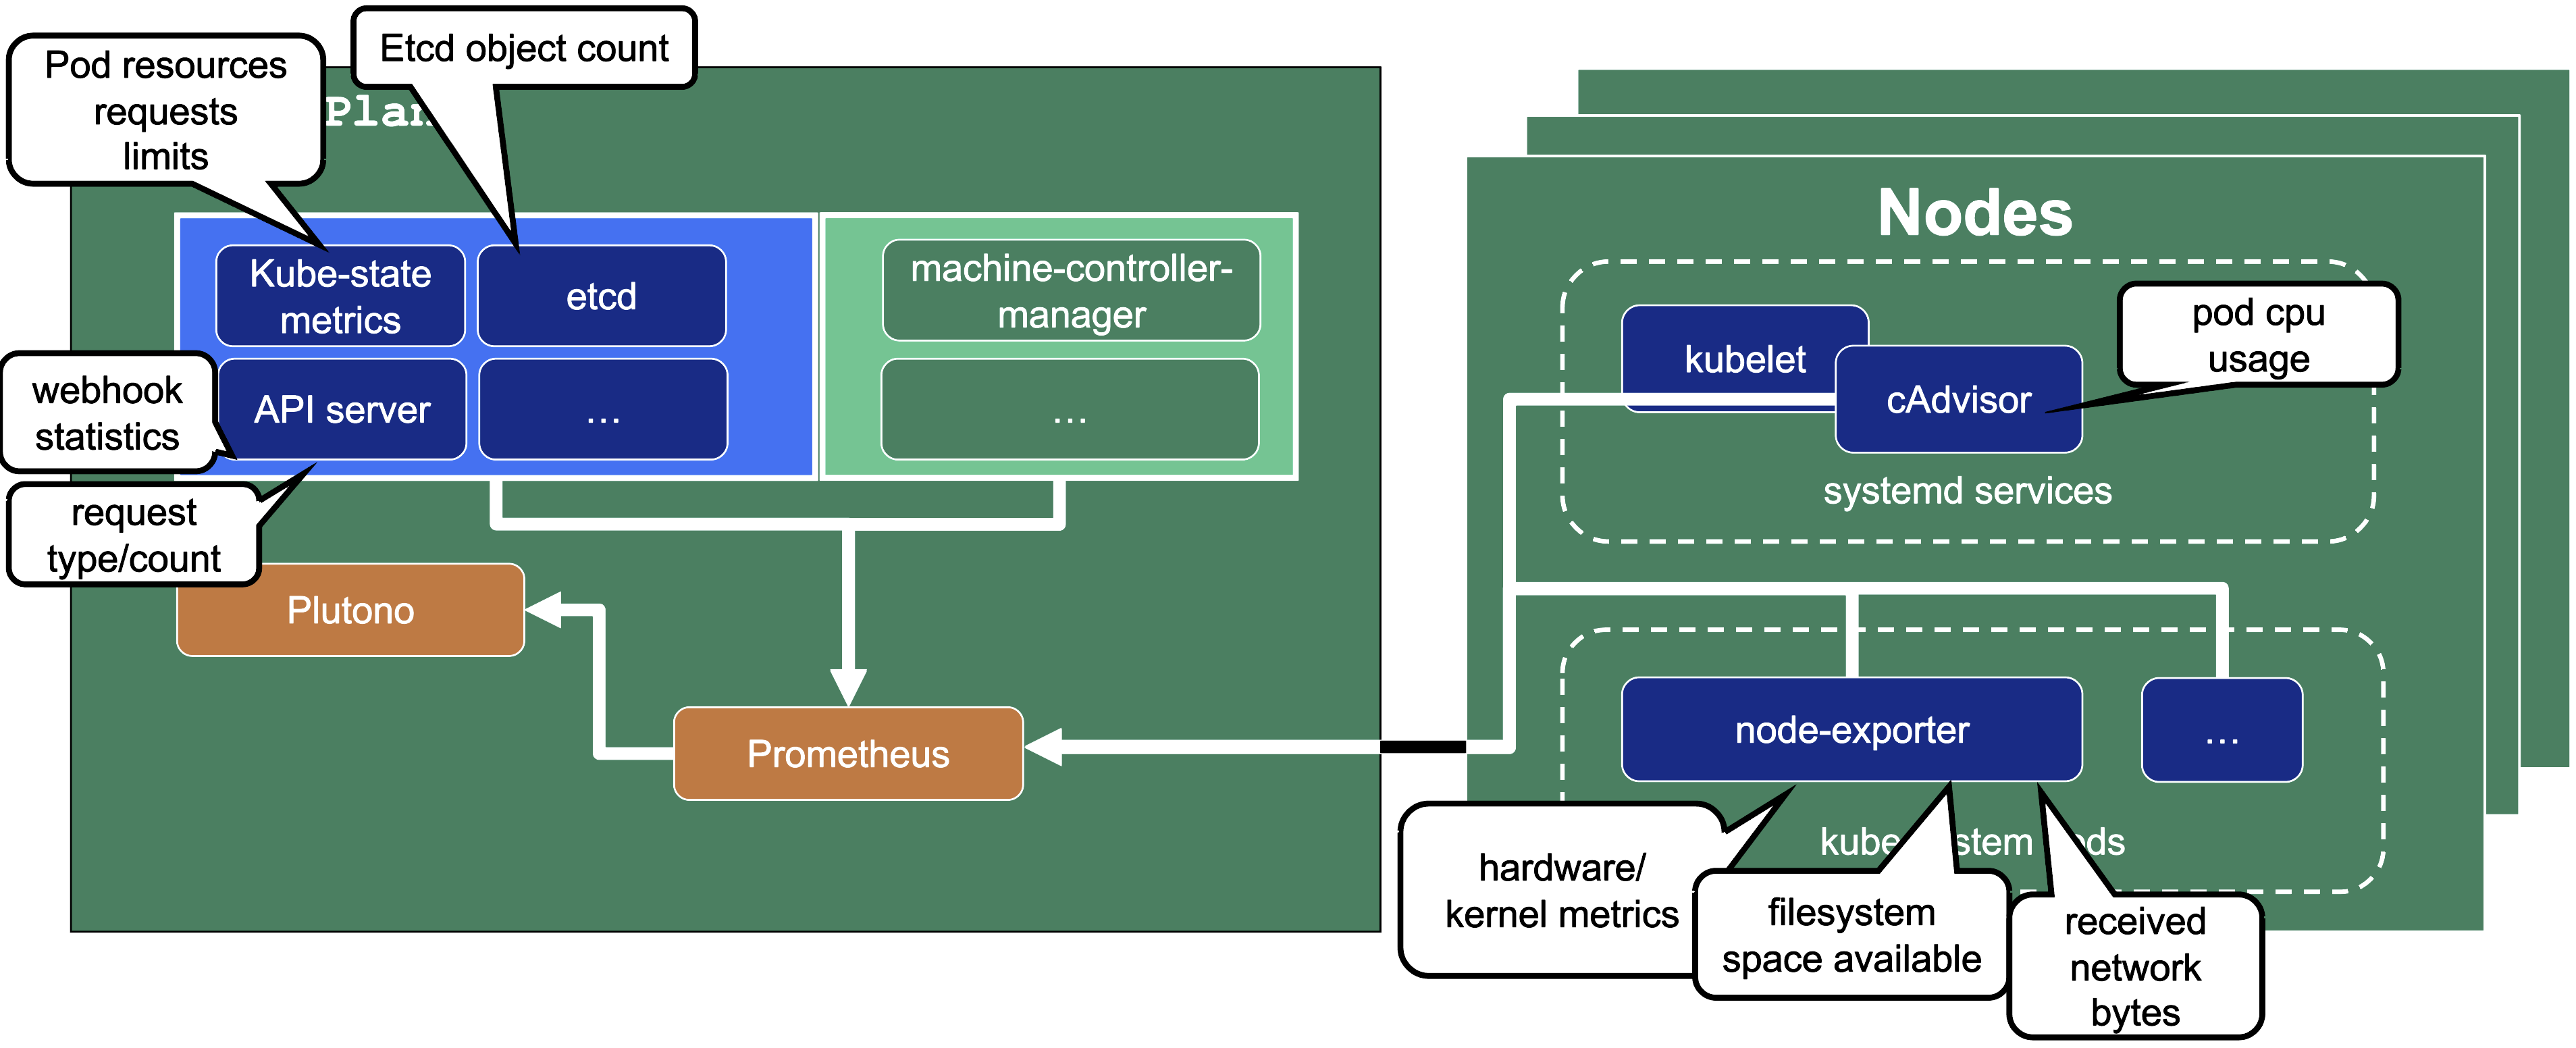
We only store metrics for Gardener deployed components. Those include the Kubernetes control plane, Gardener managed system components (e.g., pods) in the kube-system namespace of the shoot cluster or systemd units on the nodes. We do not gather metrics for workload deployed in the shoot cluster. This is also shown in the picture below.
This means that for any workload you deploy into your shoot cluster, you need to deploy monitoring and logging yourself.
Logs or metrics are kept up to 14 days or when a configured space limit is reached.
7.2 - Alerts
Overview
In this overview, we want to present two ways to receive alerts for control plane and Gardener managed system-components:
- Predefined Gardener alerts
- Custom alerts
Predefined Control Plane Alerts
In the shoot spec it is possible to configure emailReceivers. On this email address you will automatically receive email notifications for predefined alerts of your control plane. Such alerts are deployed in the shoot Prometheus and have visibility owner or all. For more alert details, shoot owners can use this visibility to find these alerts in their shoot Prometheus UI.
spec:
  monitoring:
    alerting:
      emailReceivers:
      - john.doe@example.com
For more information, see Alerting.
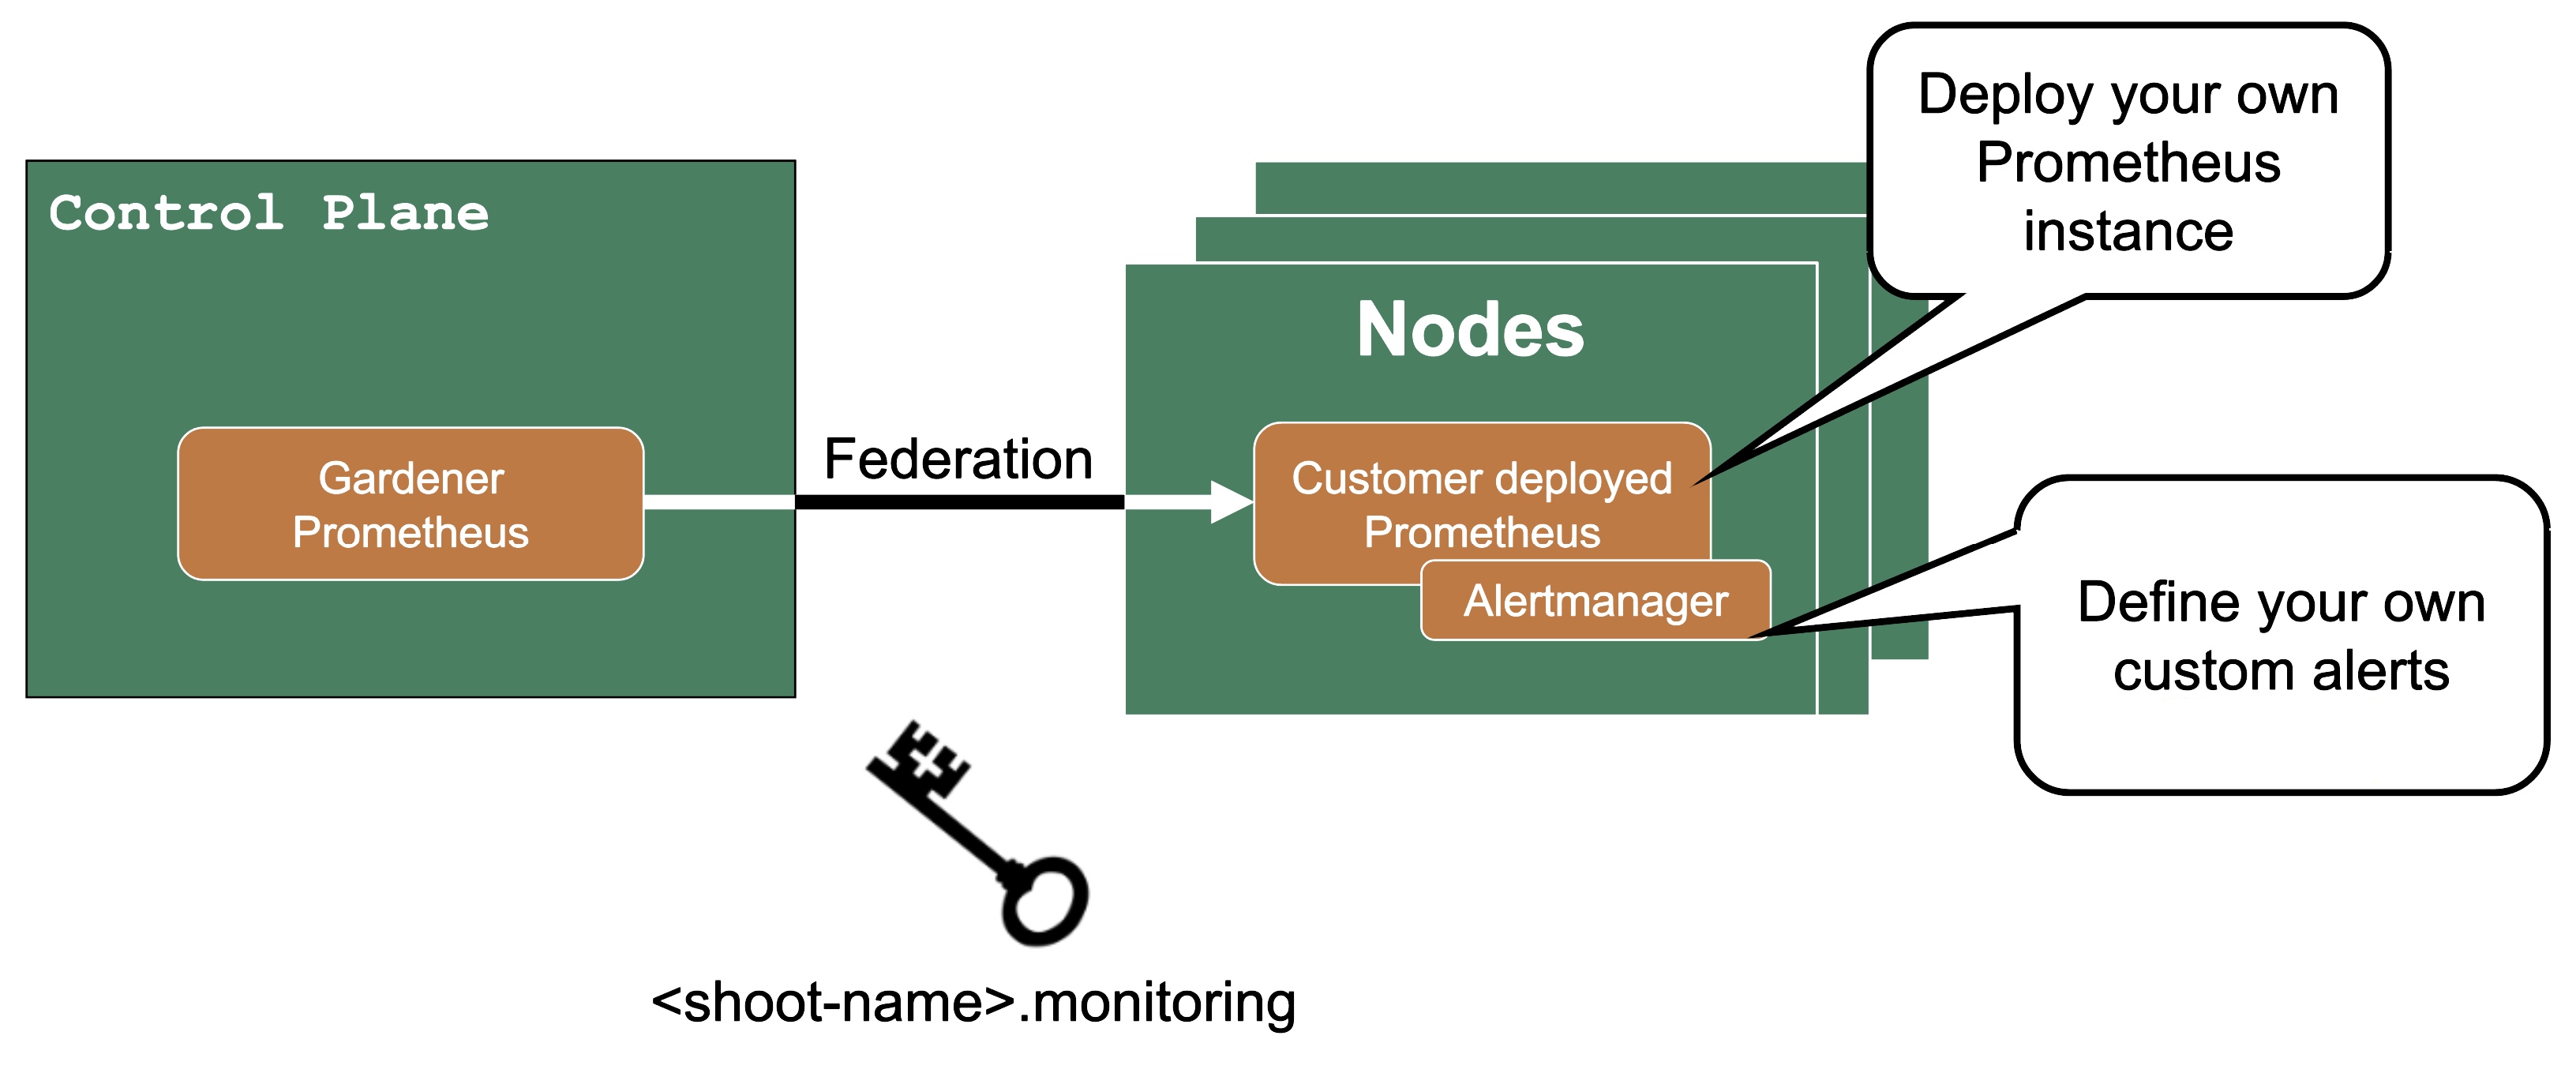
Custom Alerts – Federation
If you need more customization for alerts for control plane metrics, you have the option to deploy your own Prometheus into your shoot cluster.
Then you can use federation, which is a Prometheus feature, to forward the metrics from the Gardener managed Prometheus to your custom deployed Prometheus. Since as a shoot owner you do not have access to the control plane pods, this is the only way to get those metrics.
The credentials and endpoint for the Gardener managed Prometheus are exposed over the Gardener dashboard or programmatically in the garden project as a secret (<shoot-name>.monitoring).
7.3 - Shoot Status
Overview
In this topic you can see various shoot statuses and how you can use them to monitor your shoot cluster.
Shoot Status - Conditions
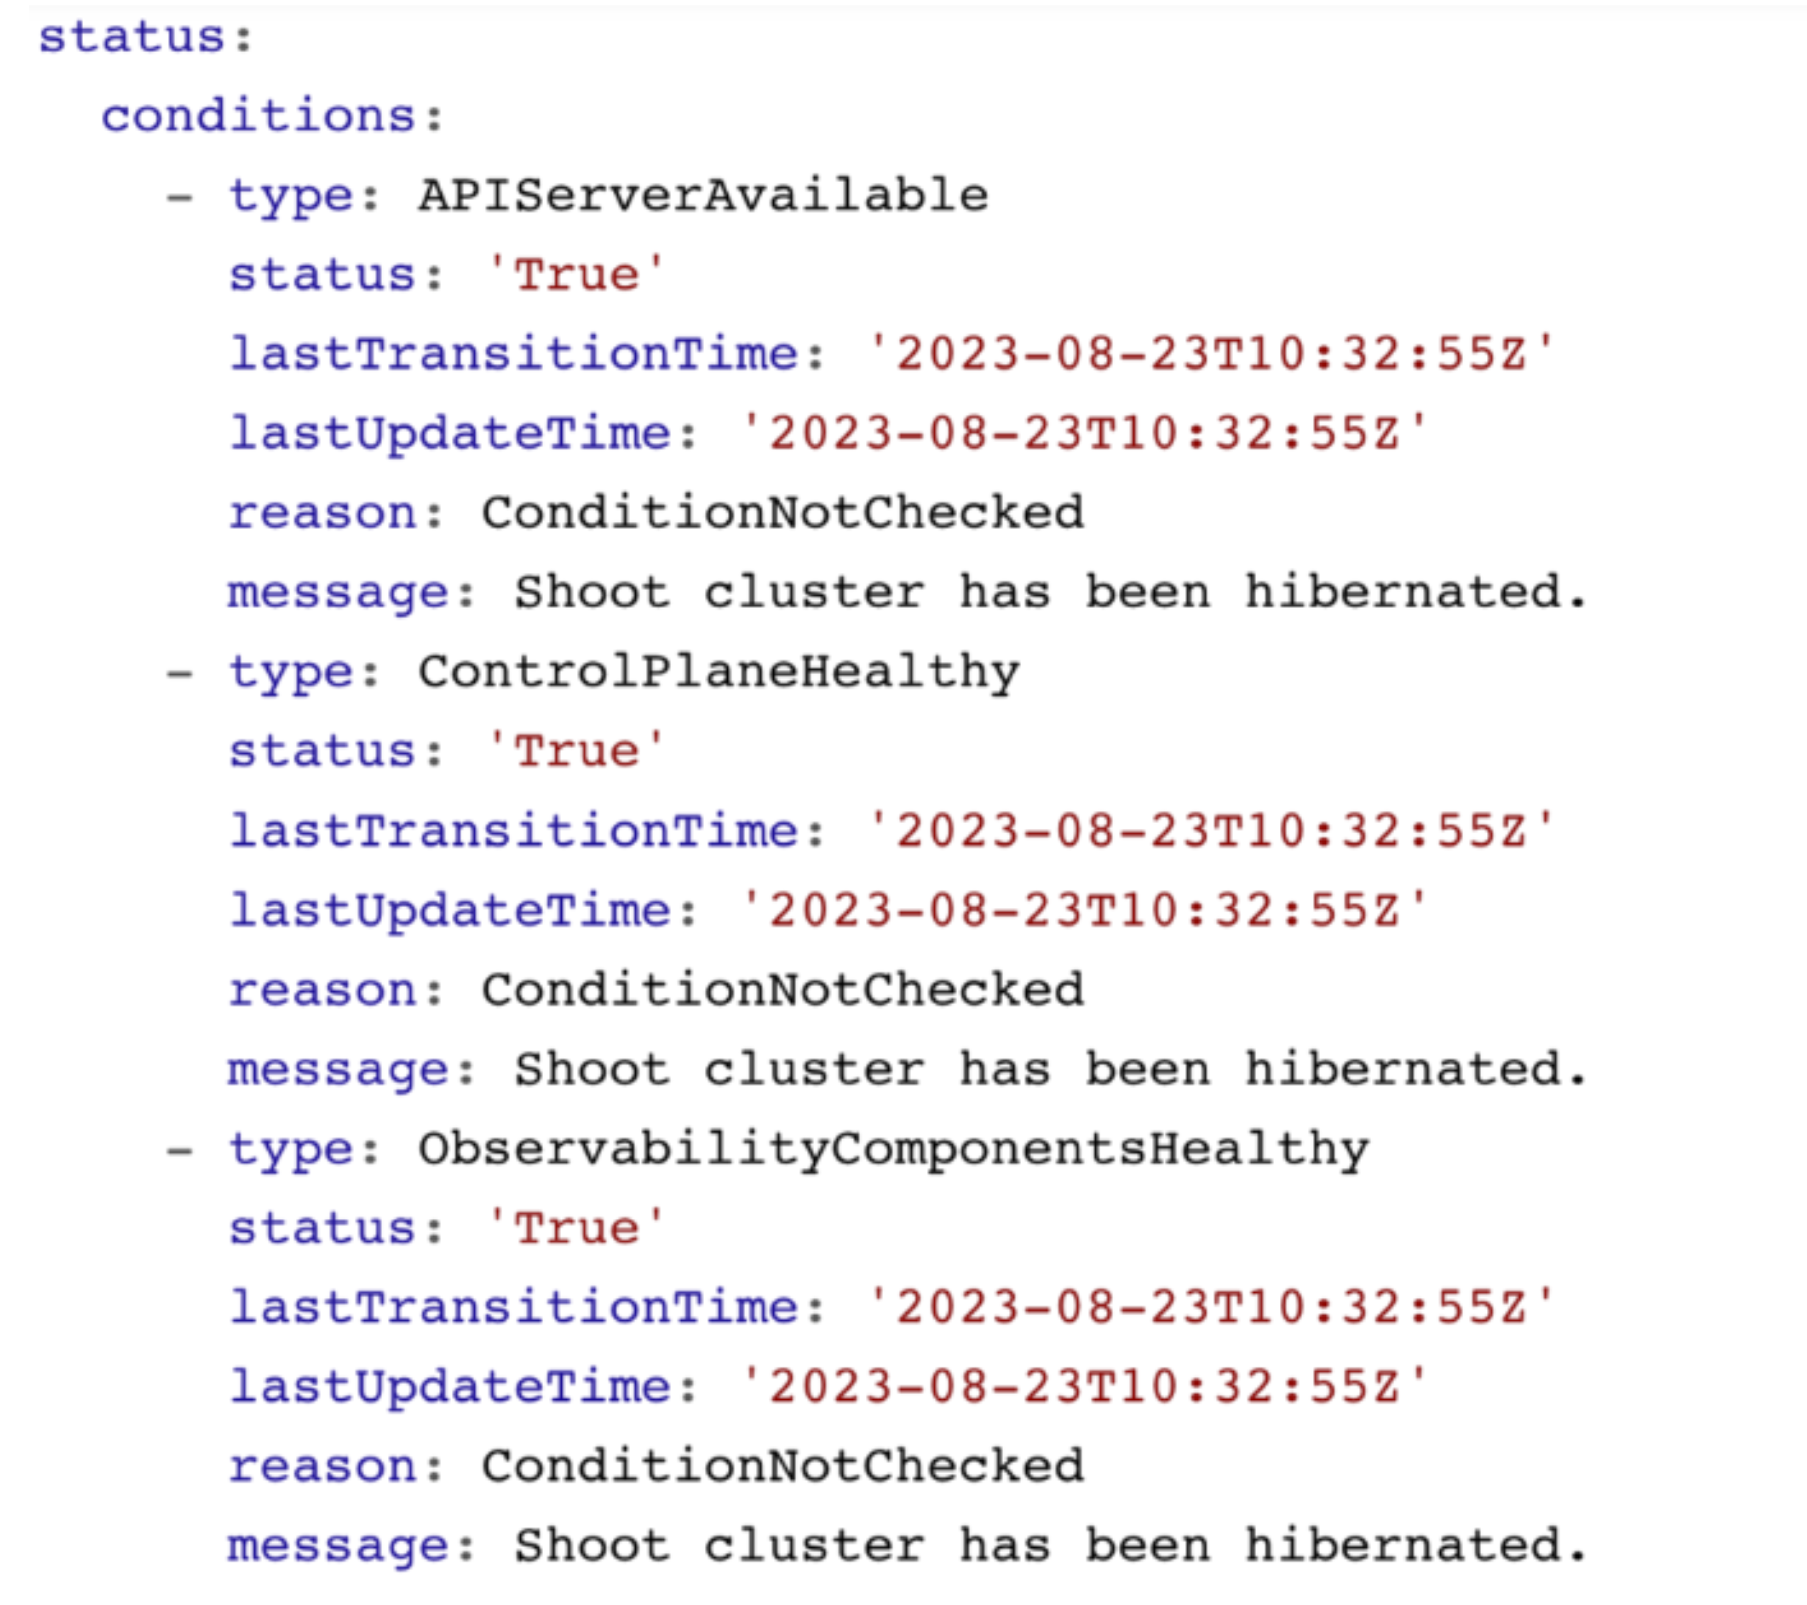
You can retrieve the shoot status by using kubectl get shoot -oyaml
It contains conditions, which give you information about the healthiness of your cluster. Those conditions are also forwarded to the Gardener dashboard and show your cluster as healthy or unhealthy.
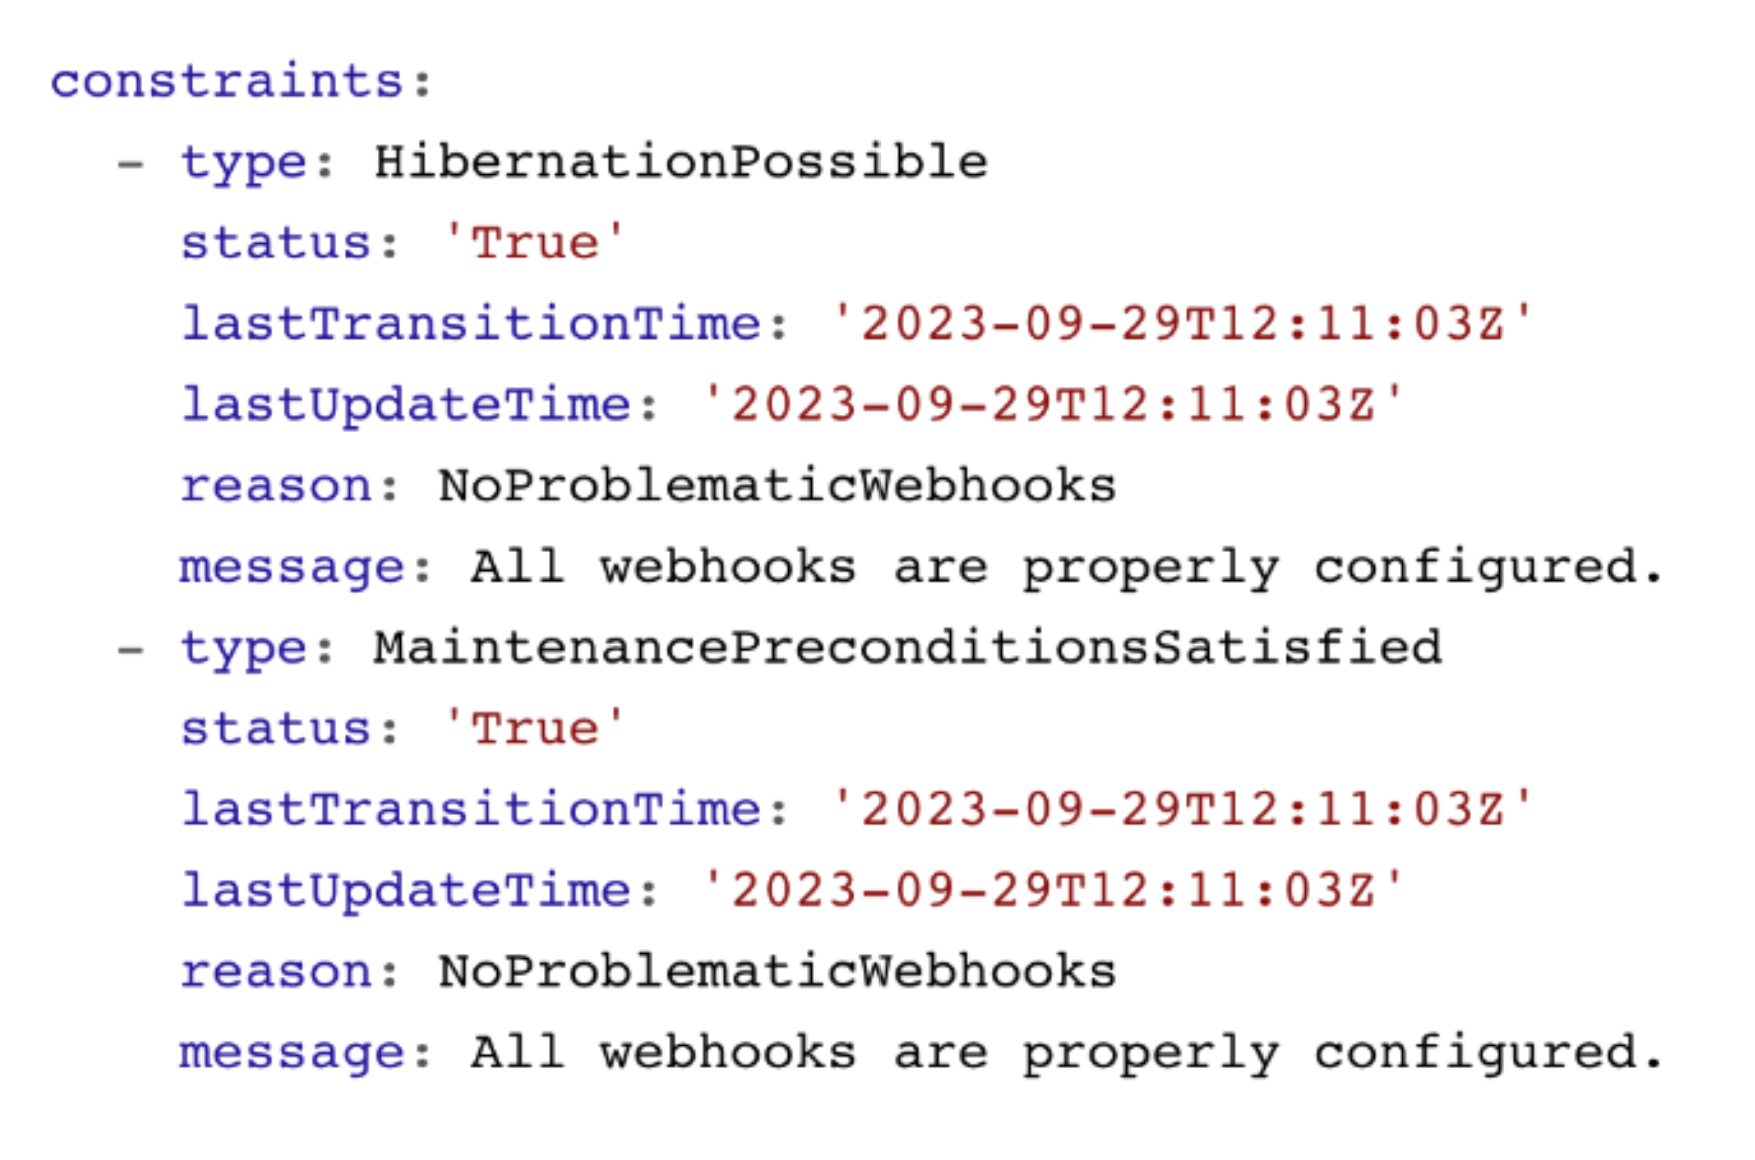
Shoot Status - Constraints
The shoot status also contains constraints. If these constraints are met, your cluster operations are impaired and the cluster is likely to fail at some point. Please watch them and act accordingly.
Shoot Status - Last Operation
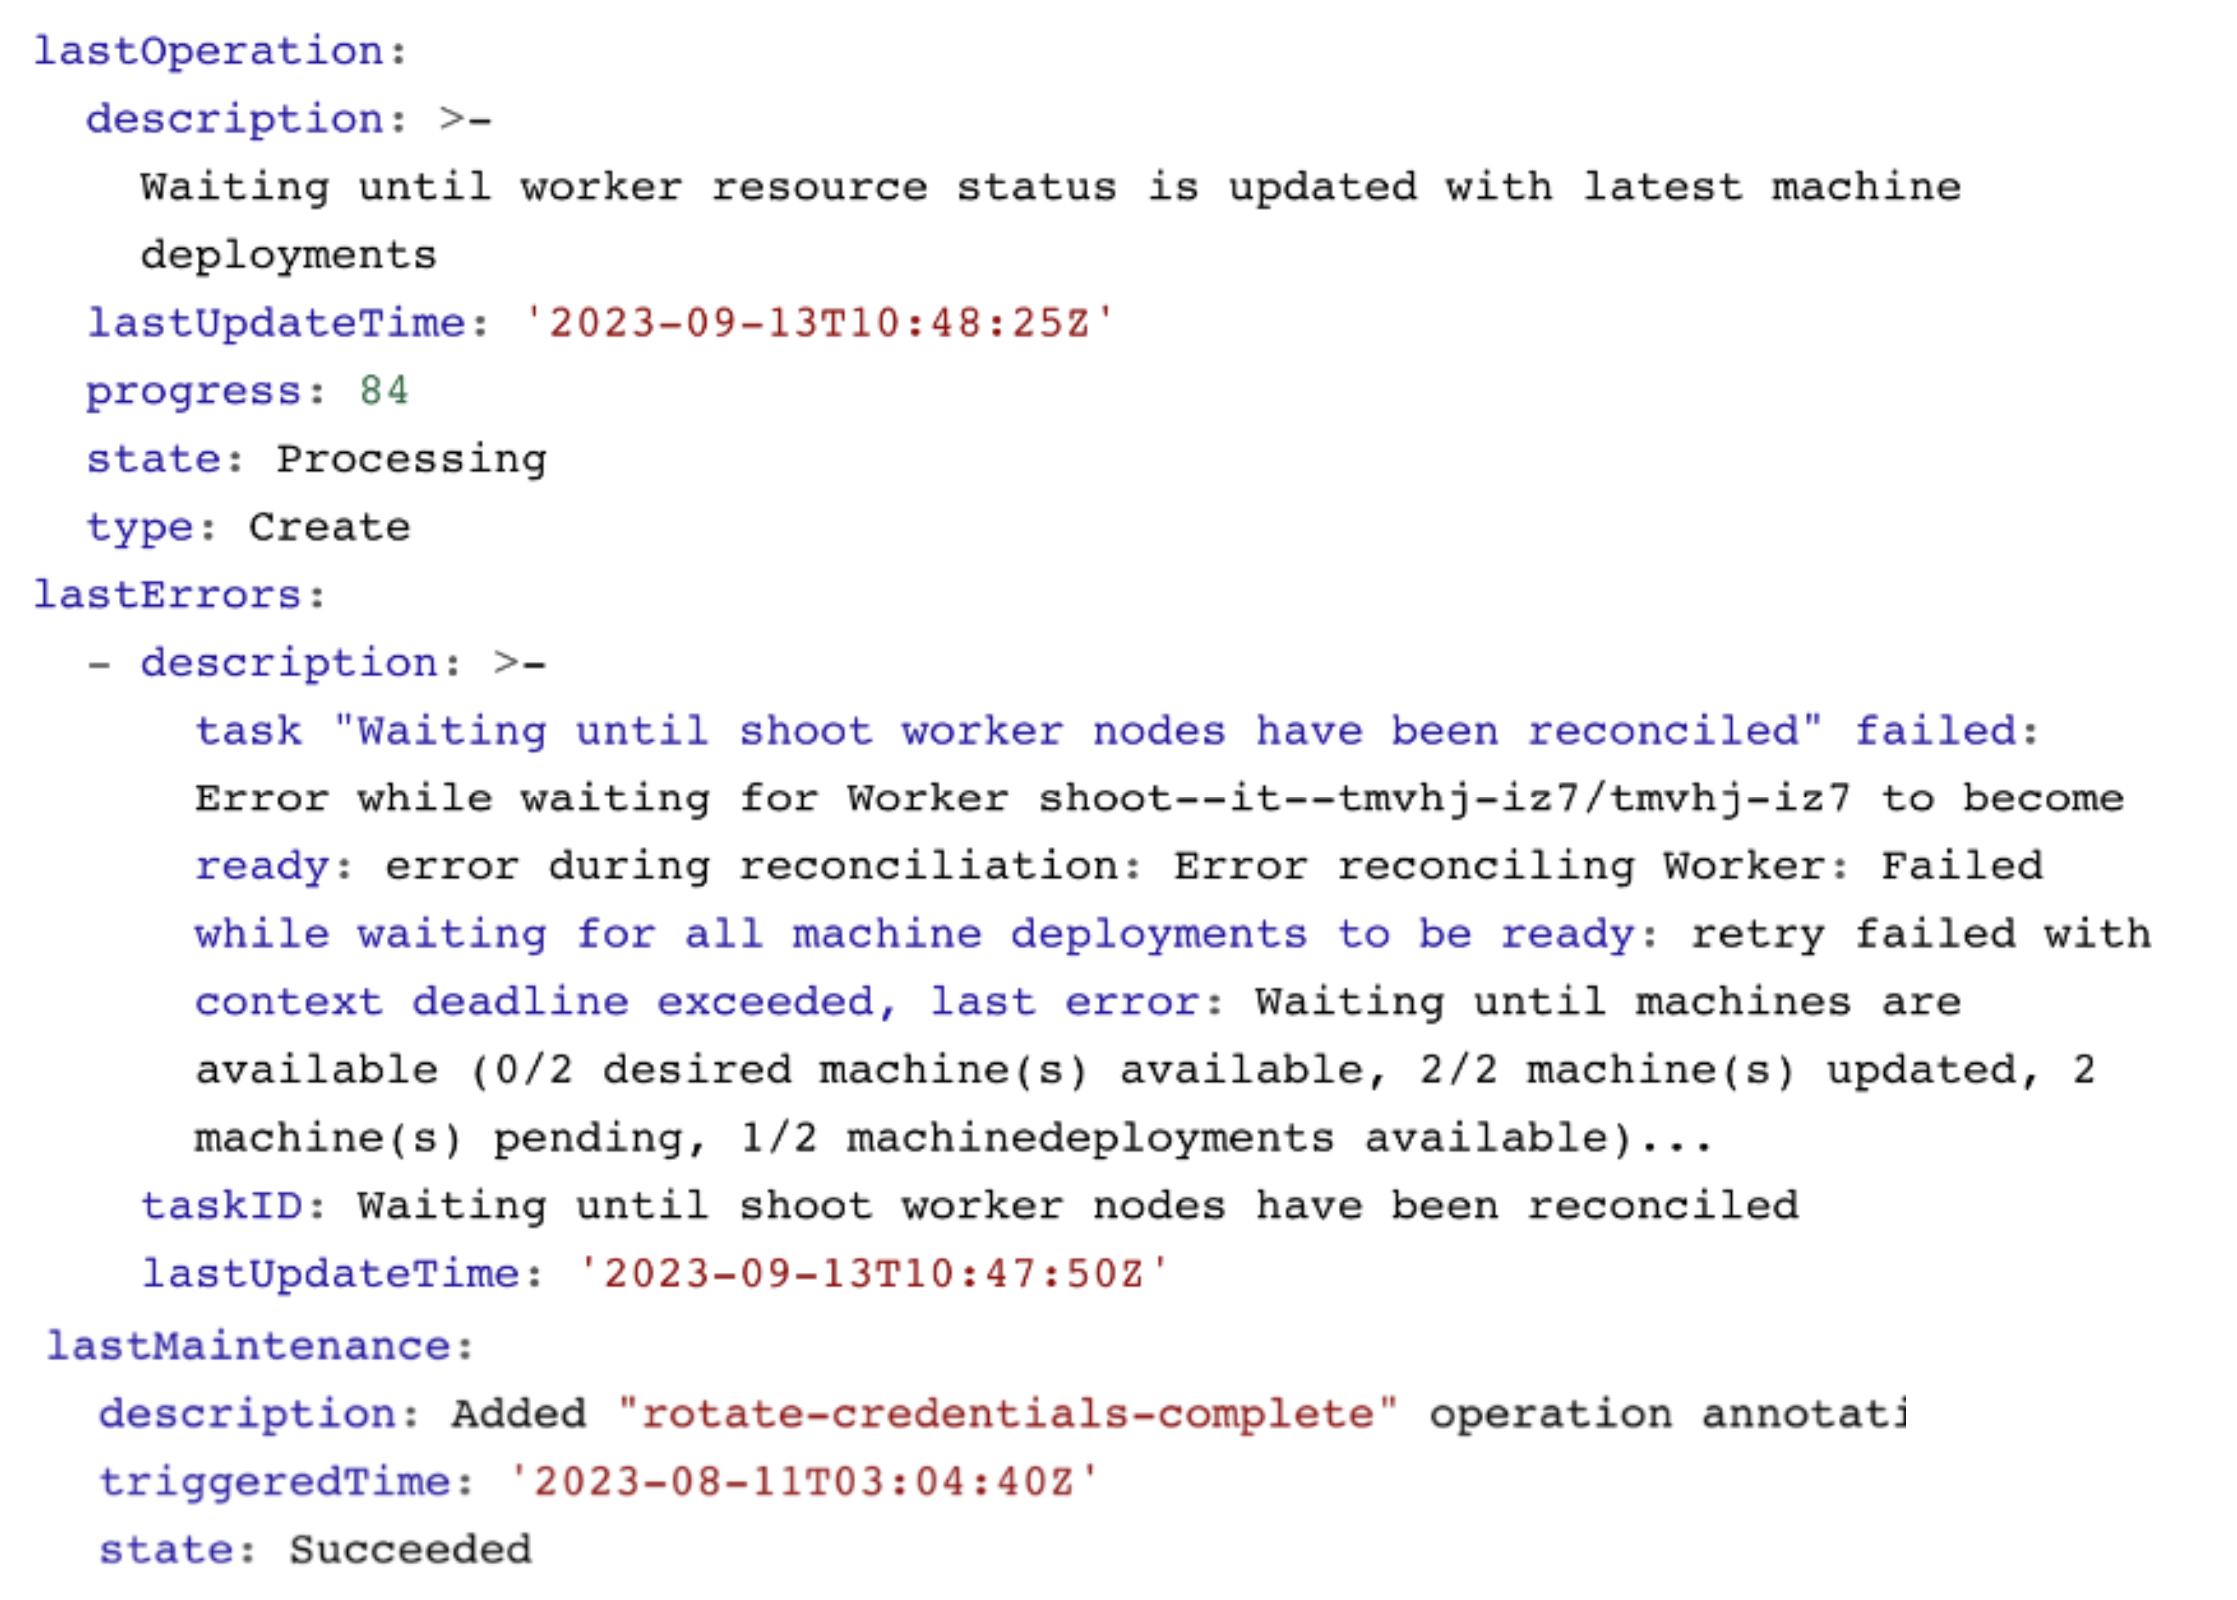
The lastOperation, lastErrors, and lastMaintenance give you information on what was last happening in your clusters. This is especially useful when you are facing an error.
In this example, nodes are being recreated and not all machines have reached the desired state yet.
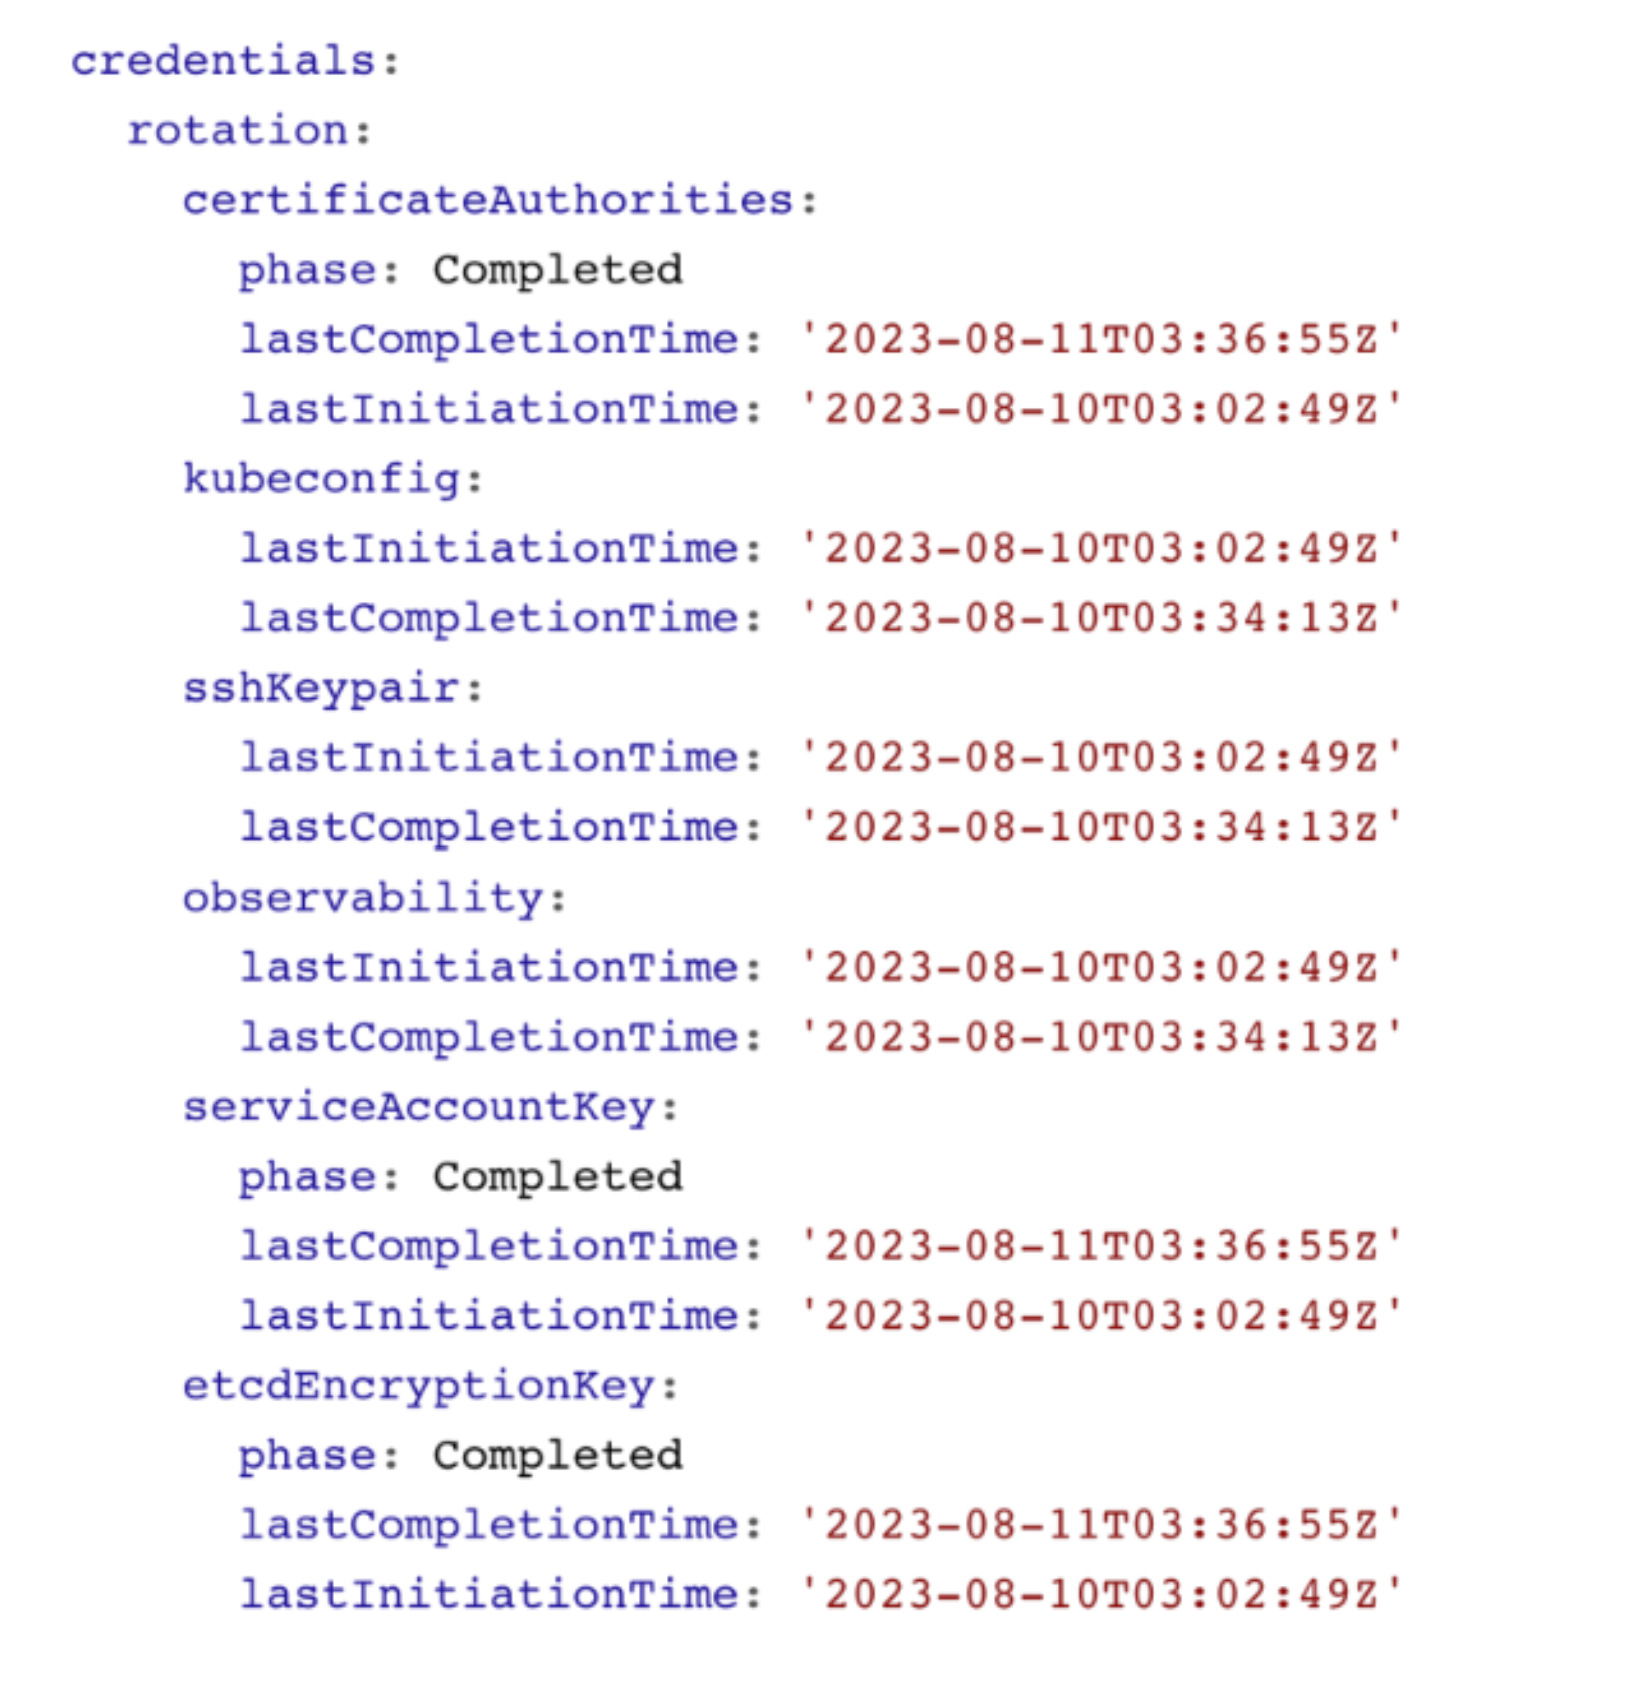
Shoot Status - Credentials Rotation
You can also see the status of the last credentials rotation. Here you can also programmatically derive when the last rotation was down in order to trigger the next rotation.
8 - Features
8.1 - Hibernation
Hibernation
Some clusters need to be up all the time - typically, they would be hosting some kind of production workload. Others might be used for development purposes or testing during business hours only. Keeping them up and running all the time is a waste of money. Gardener can help you here with its “hibernation” feature. Essentially, hibernation means to shut down all components of a cluster.
How Hibernation Works
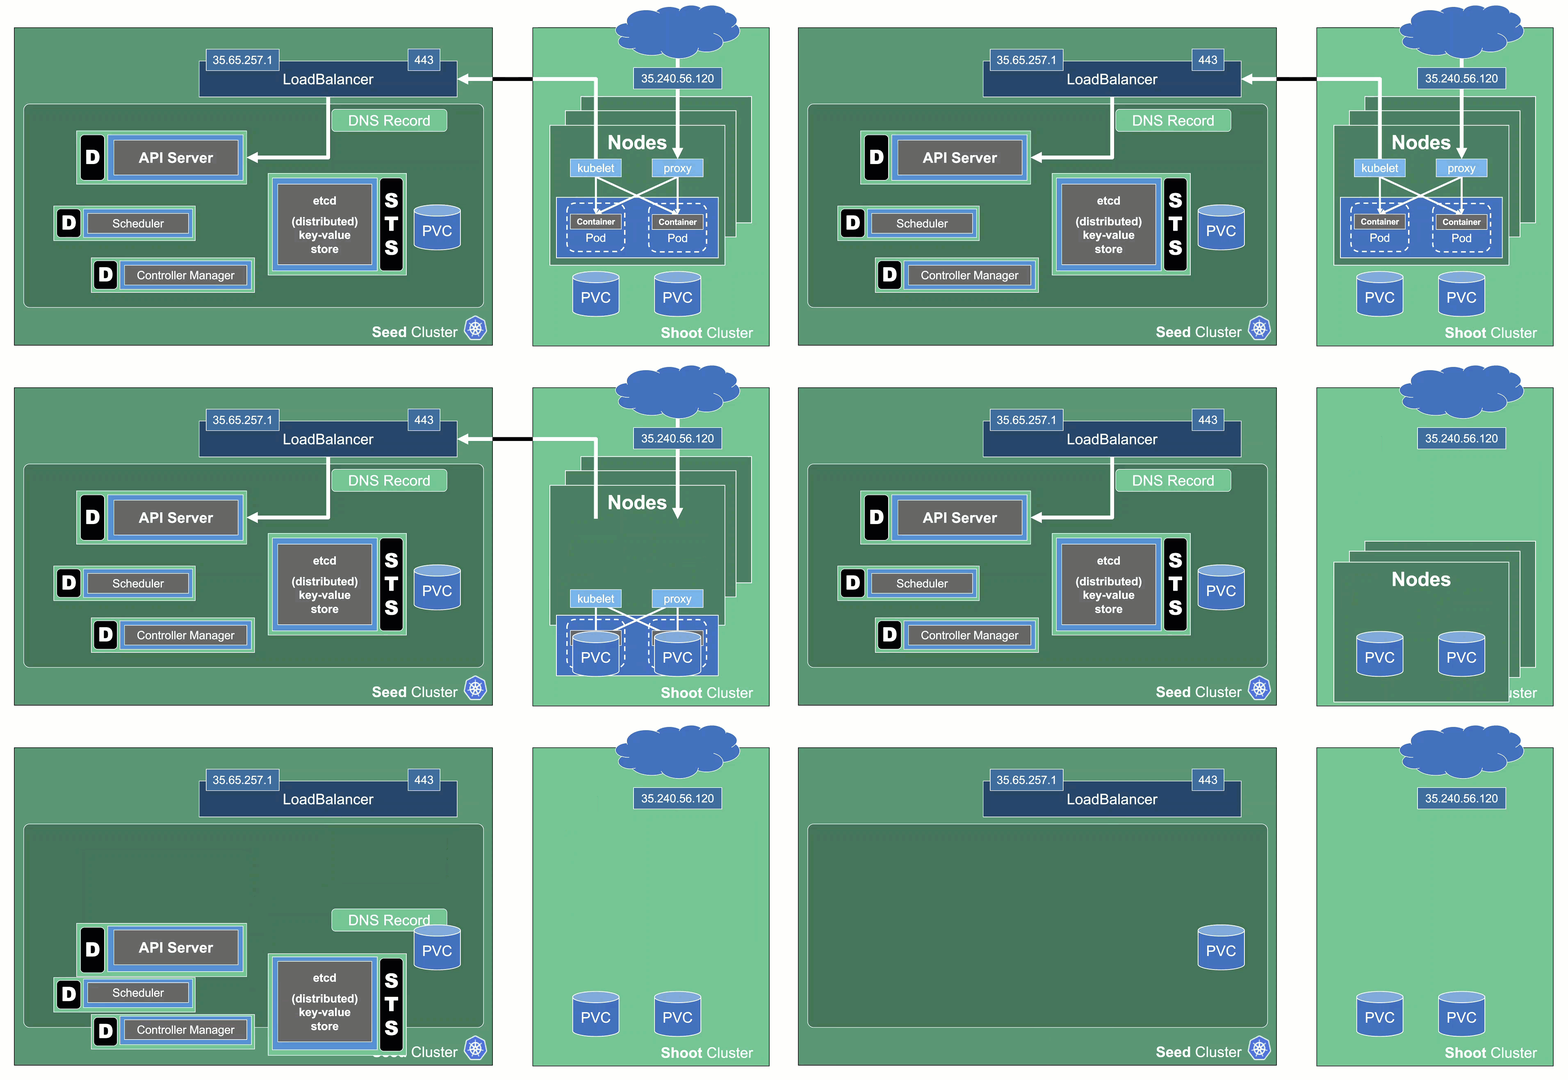
The hibernation flow for a shoot attempts to reduce the resources consumed as much as possible. Hence everything not state-related is being decommissioned.
Data Plane
All nodes will be drained and the VMs will be deleted. As a result, all pods will be “stuck” in a Pending state since no new nodes are added. Of course, PVC / PV holding data is not deleted.
Services of type LoadBalancer will keep their external IP addresses.
Control Plane
All components will be scaled down and no pods will remain running. ETCD data is kept safe on the disk.
The DNS records routing traffic for the API server are also destroyed. Trying to connect to a hibernated cluster via kubectl will result in a DNS lookup failure / no-such-host message.
When waking up a cluster, all control plane components will be scaled up again and the DNS records will be re-created. Nodes will be created again and pods scheduled to run on them.
The easiest way to configure hibernation schedules is via the dashboard. Of course, this is reflected in the shoot’s spec and can also be maintained there. Before a cluster is hibernated, constraints in the shoot’s status will be evaluated. There might be conditions (mostly revolving around mutating / validating webhooks) that would block a successful wake-up. In such a case, the constraint will block hibernation in the first place.
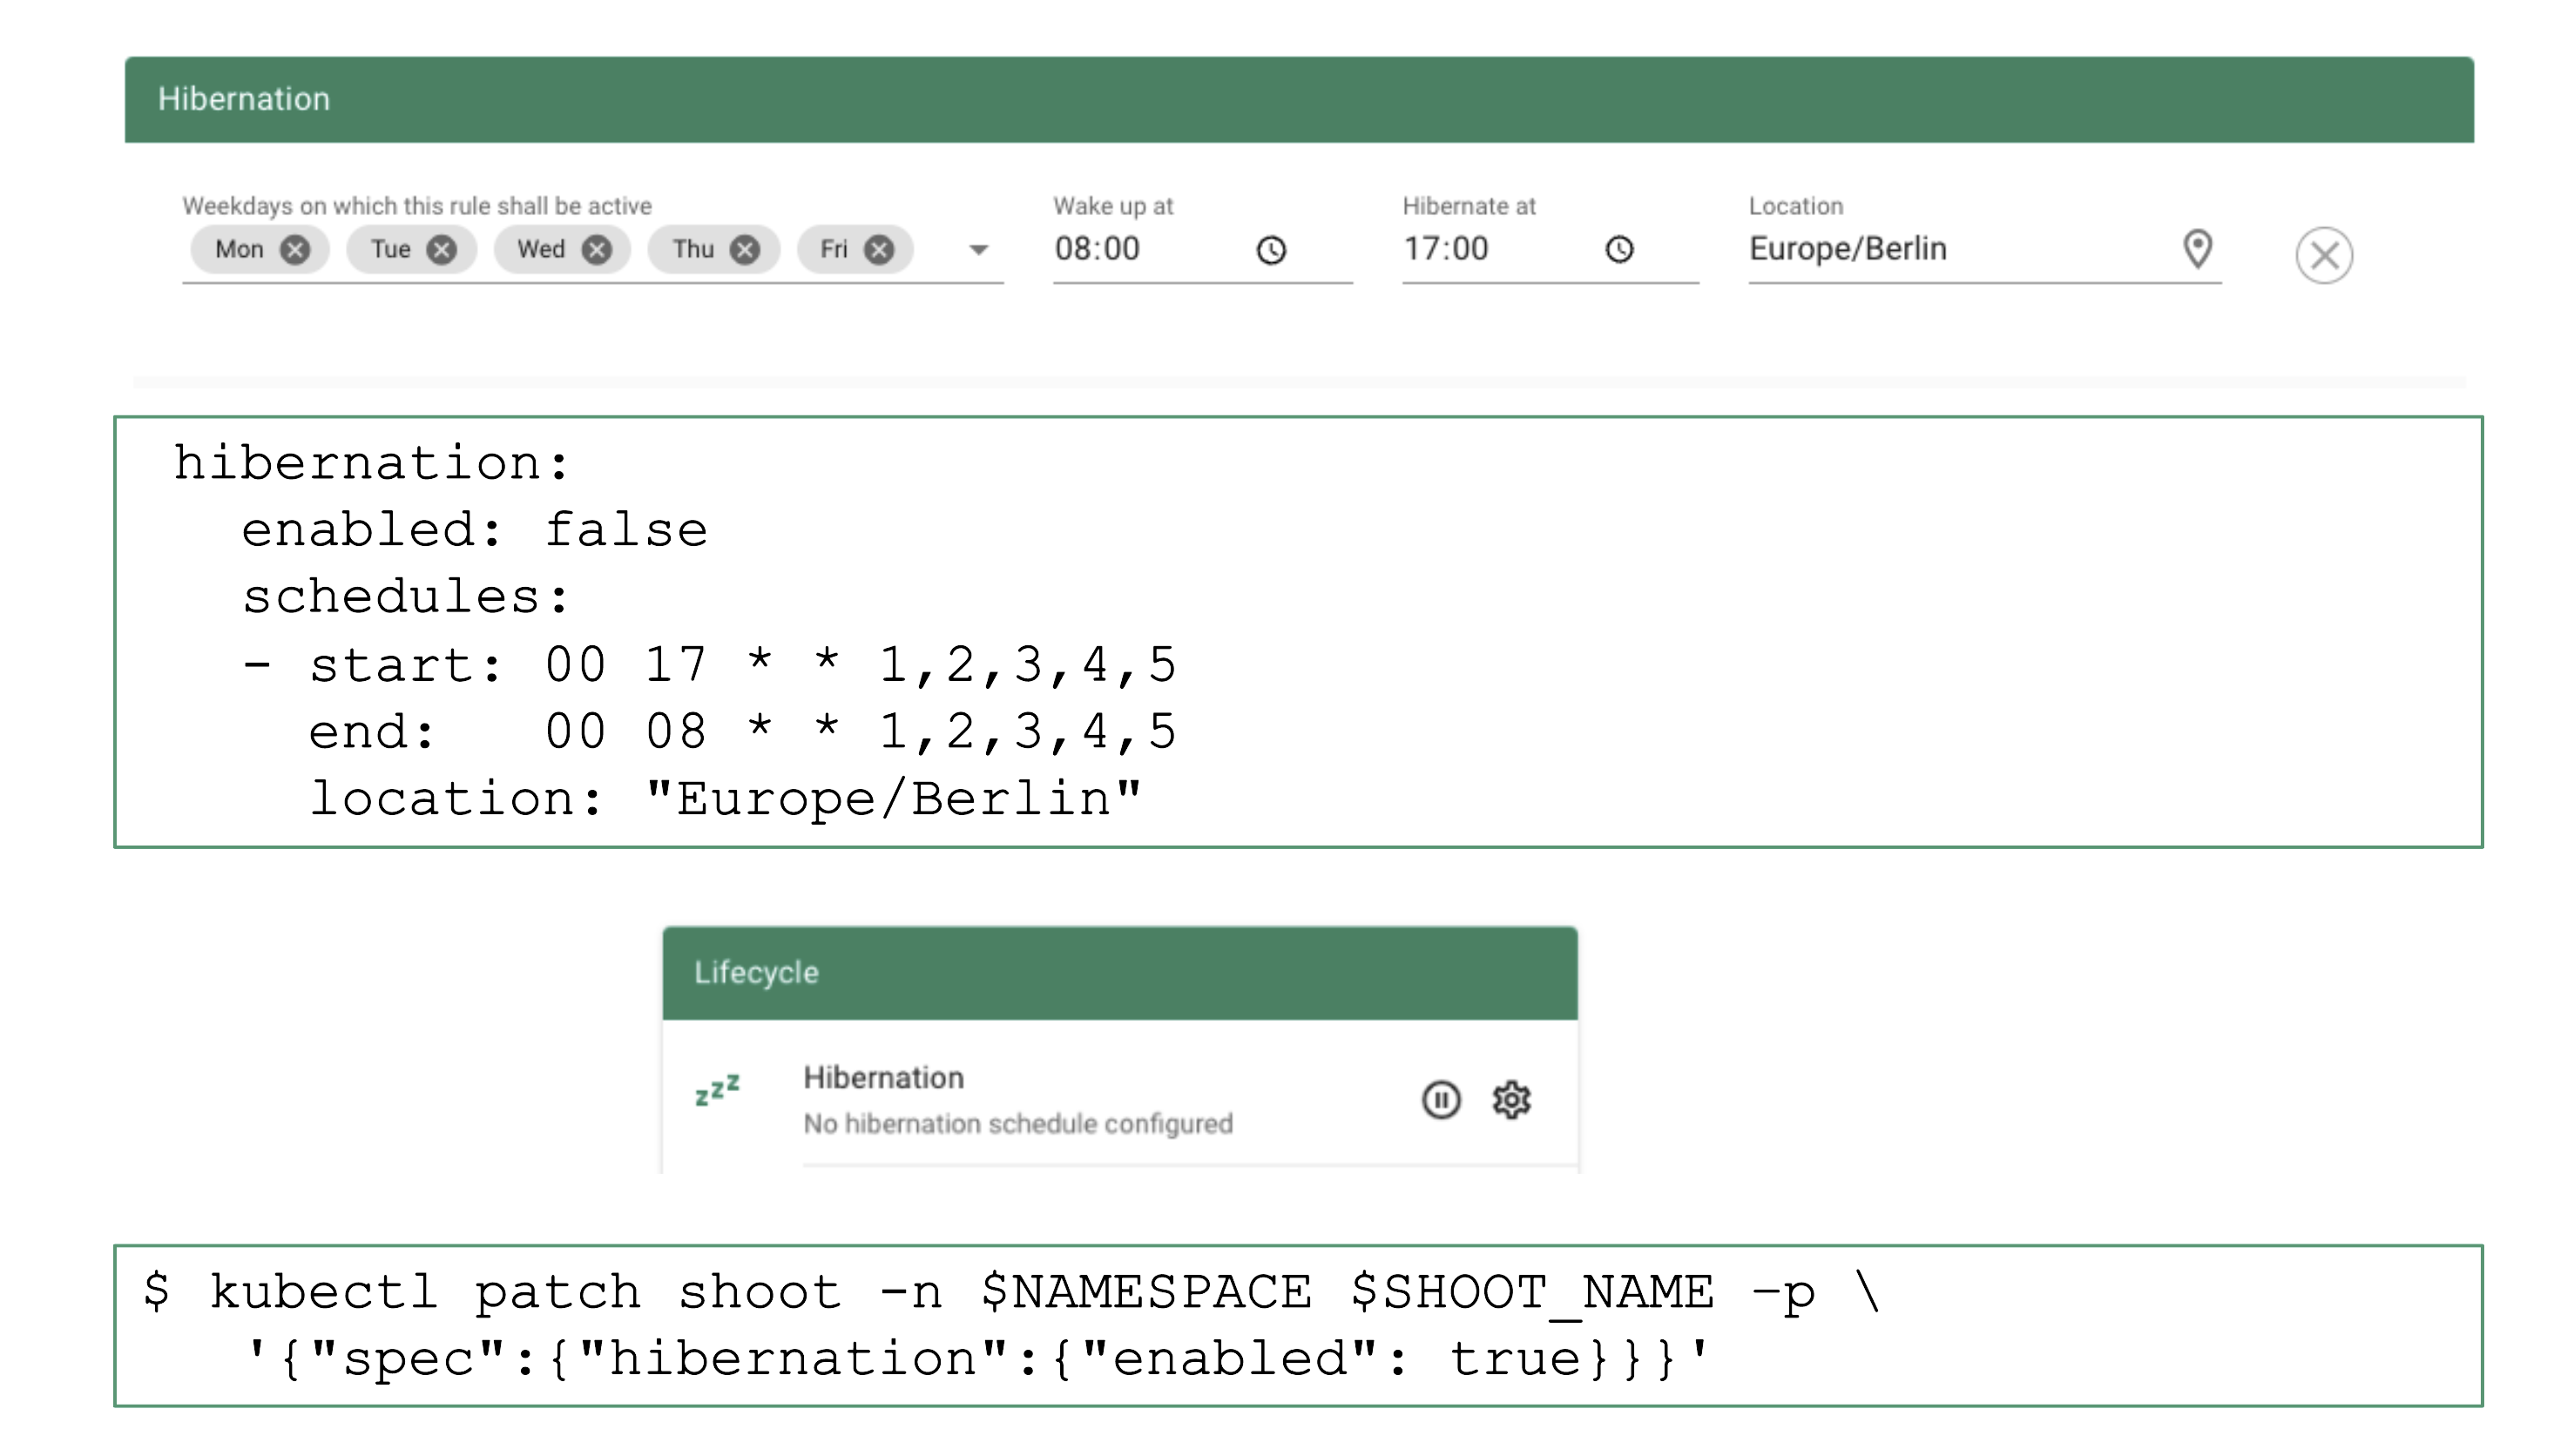
To wake-up or hibernate a shoot immediately, the dashboard can be used or a patch to the shoot’s spec can be applied directly.
8.2 - Workerless Shoots
Controlplane as a Service
Sometimes, there may be use cases for Kubernetes clusters that don’t require pods but only features of the control plane. Gardener can create the so-called “workerless” shoots, which are exactly that. A Kubernetes cluster without nodes (and without any controller related to them).
In a scenario where you already have multiple clusters, you can use it for orchestration (leases) or factor out components that require many CRDs.
As part of the control plane, the following components are deployed in the seed cluster for workerless shoot:
- etcds
- kube-apiserver
- kube-controller-manager
- gardener-resource-manager
- Logging and monitoring components
- Extension components (to find out if they support workerless shoots, see the Extensions documentation)
8.3 - Credential Rotation
Keys
There are plenty of keys in Gardener.
The ETCD needs one to store resources like secrets encrypted at rest.
Gardener generates certificate authorities (CAs) to ensure secured communication between the various components and actors and service account tokens are signed with a dedicated key.
There is also an SSH key pair to allow debugging of nodes and the observability stack has its own passwords too.

All of these keys share a common property: they are managed by Gardener.
Rotating them, however, is potentially very disruptive.
Hence, Gardener does not do it automatically, but offers you means to perform these tasks easily.
For a single cluster, you may conveniently use the dashboard.
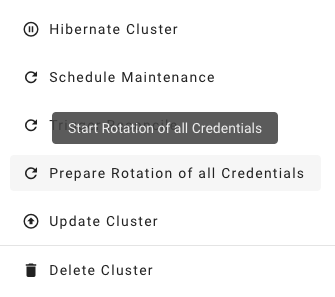
Where possible, the rotation happens in two phases - Preparing and Completing.
Prepare Rotation of All Credentials
The Preparing phase introduces new keys while the old ones are still valid.
Users can safely exchange keys / CA bundles wherever they are used.
It is possible to start the preparation by annotating the shoot resource accordingly:
kubectl -n <shoot-namespace> annotate shoot <shoot-name> gardener.cloud/operation=rotate-credentials-start
Complete Rotation of All Credentials
Afterward, the Completing phase will invalidate the old keys / CA bundles.
Annotate the shoot resource accordingly:
kubectl -n <shoot-namespace> annotate shoot <shoot-name> gardener.cloud/operation=rotate-credentials-complete
Rotation Phases
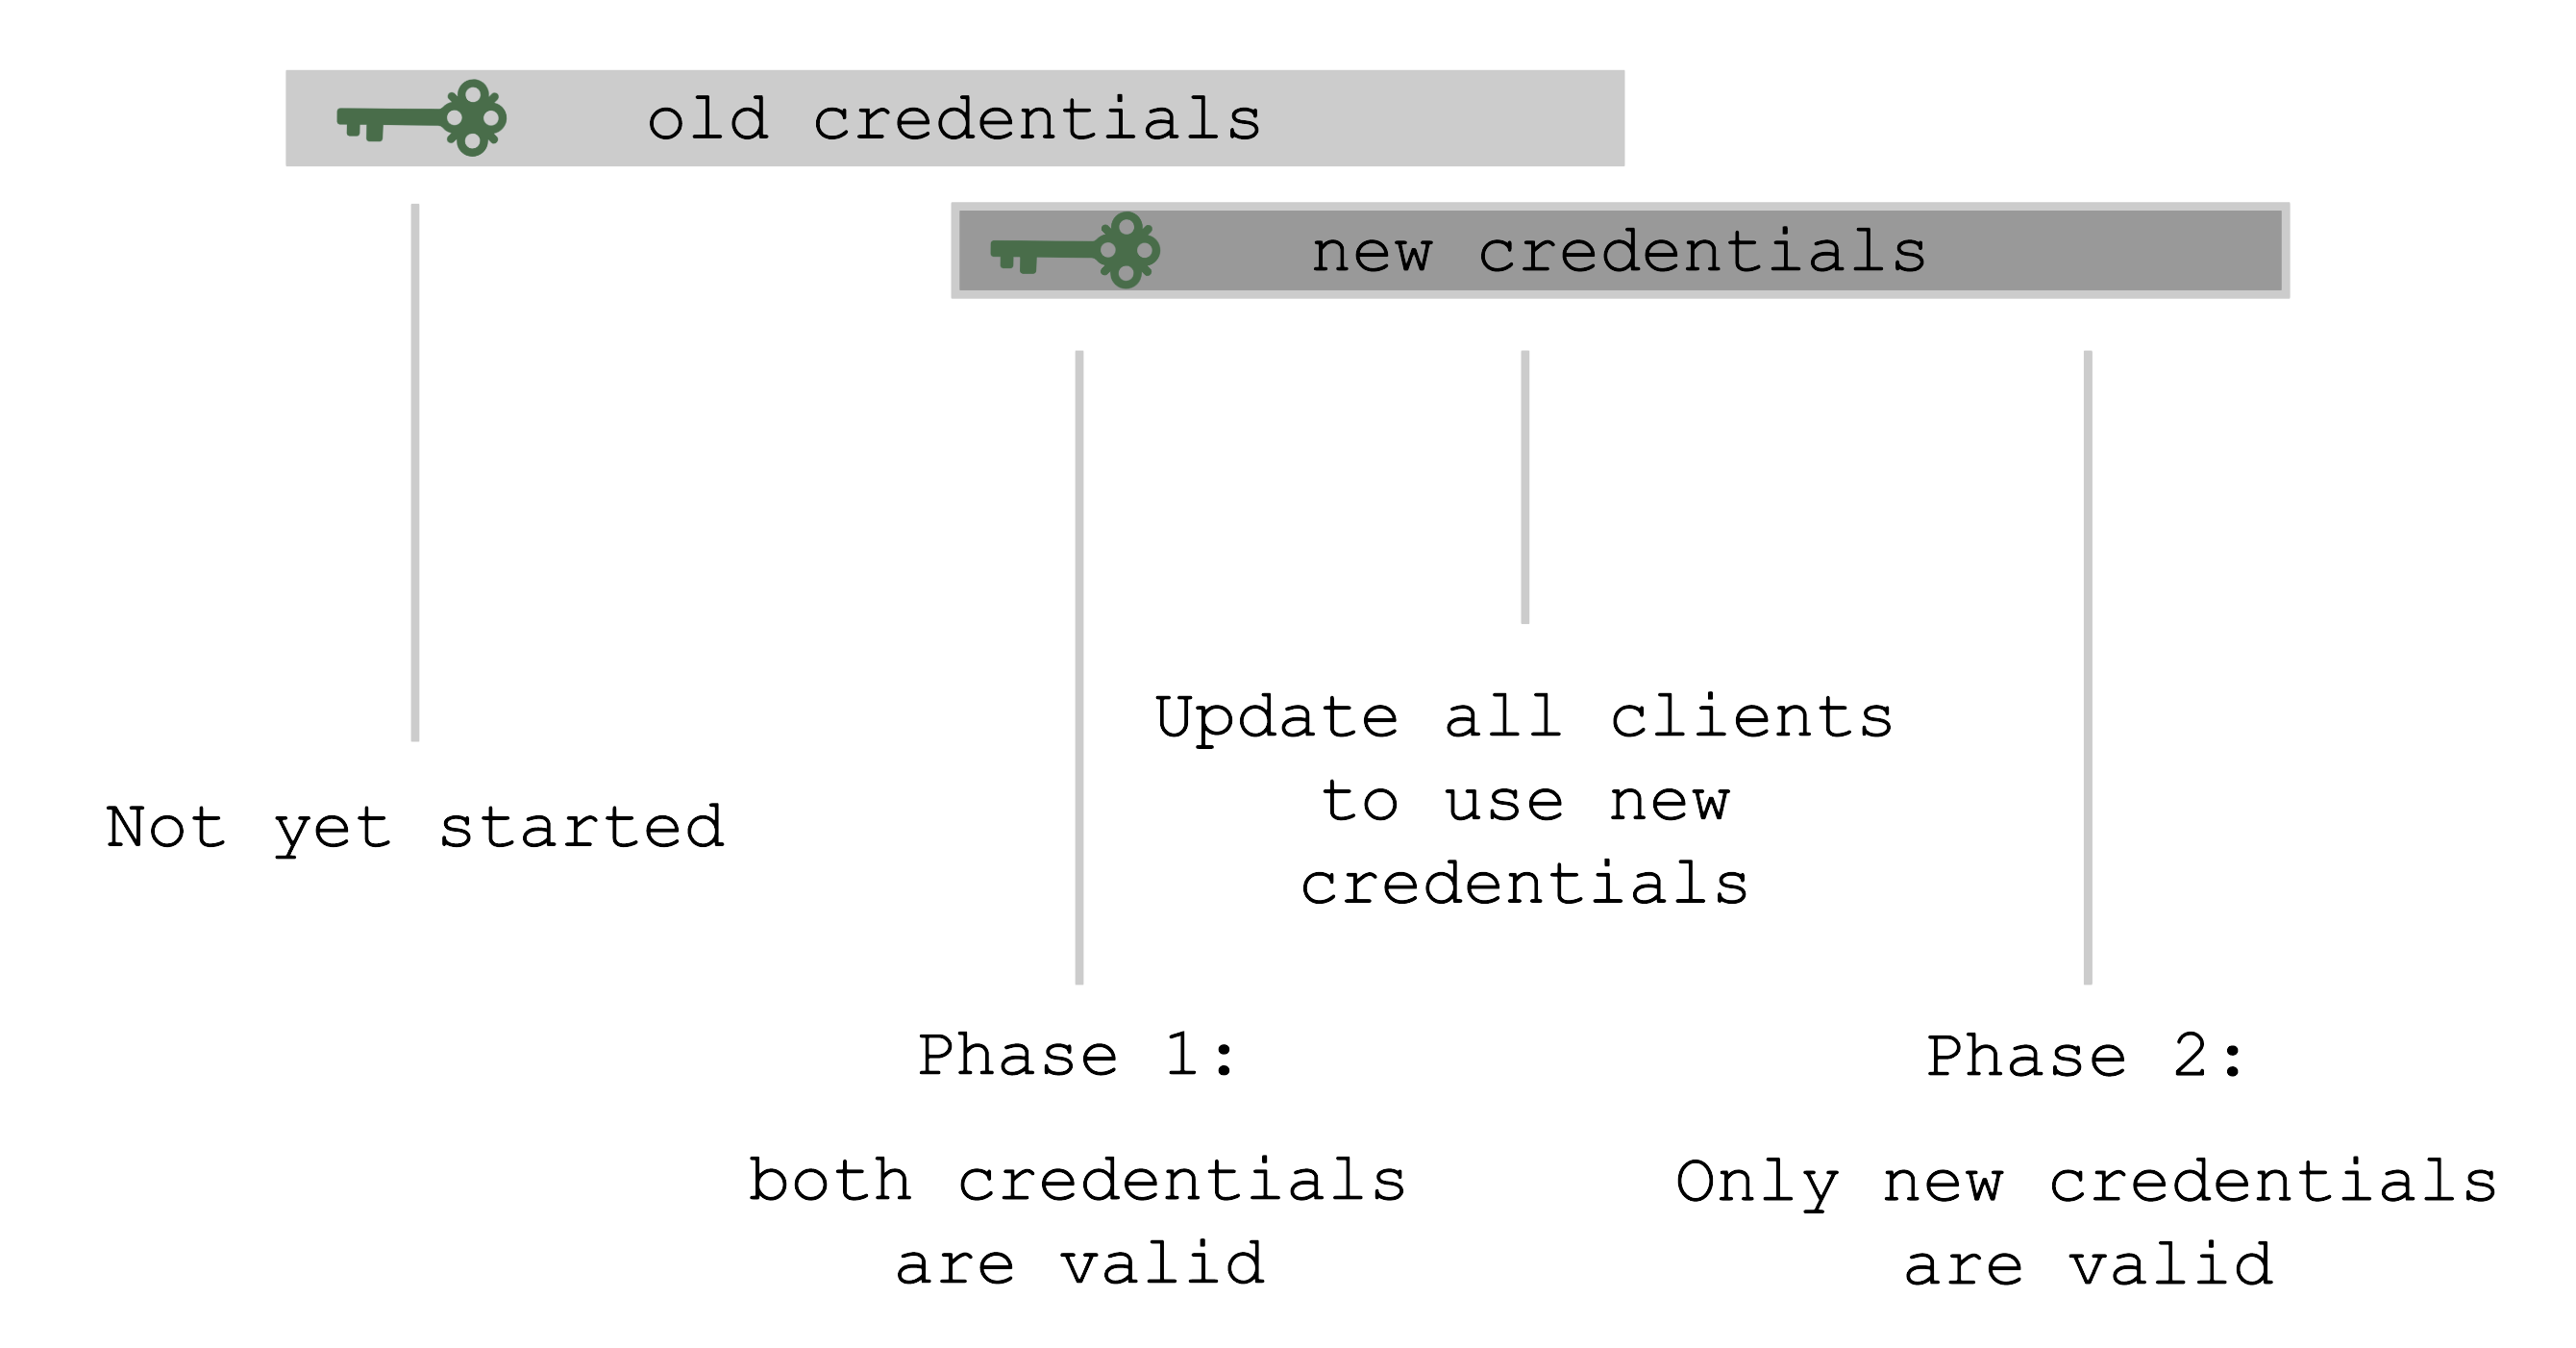
At the beginning, only the old set of credentials exists.
By triggering the rotation, new credentials are created in the Preparing phase and both sets are valid.
Now, all clients have to update and start using the new credentials.
Only afterward it is safe to trigger the Completing phase, which invalidates the old credentials.
The shoot’s status will always show the current status / phase of the rotation.
For more information, see Credentials Rotation for Shoot Clusters.
User-Provided Credentials
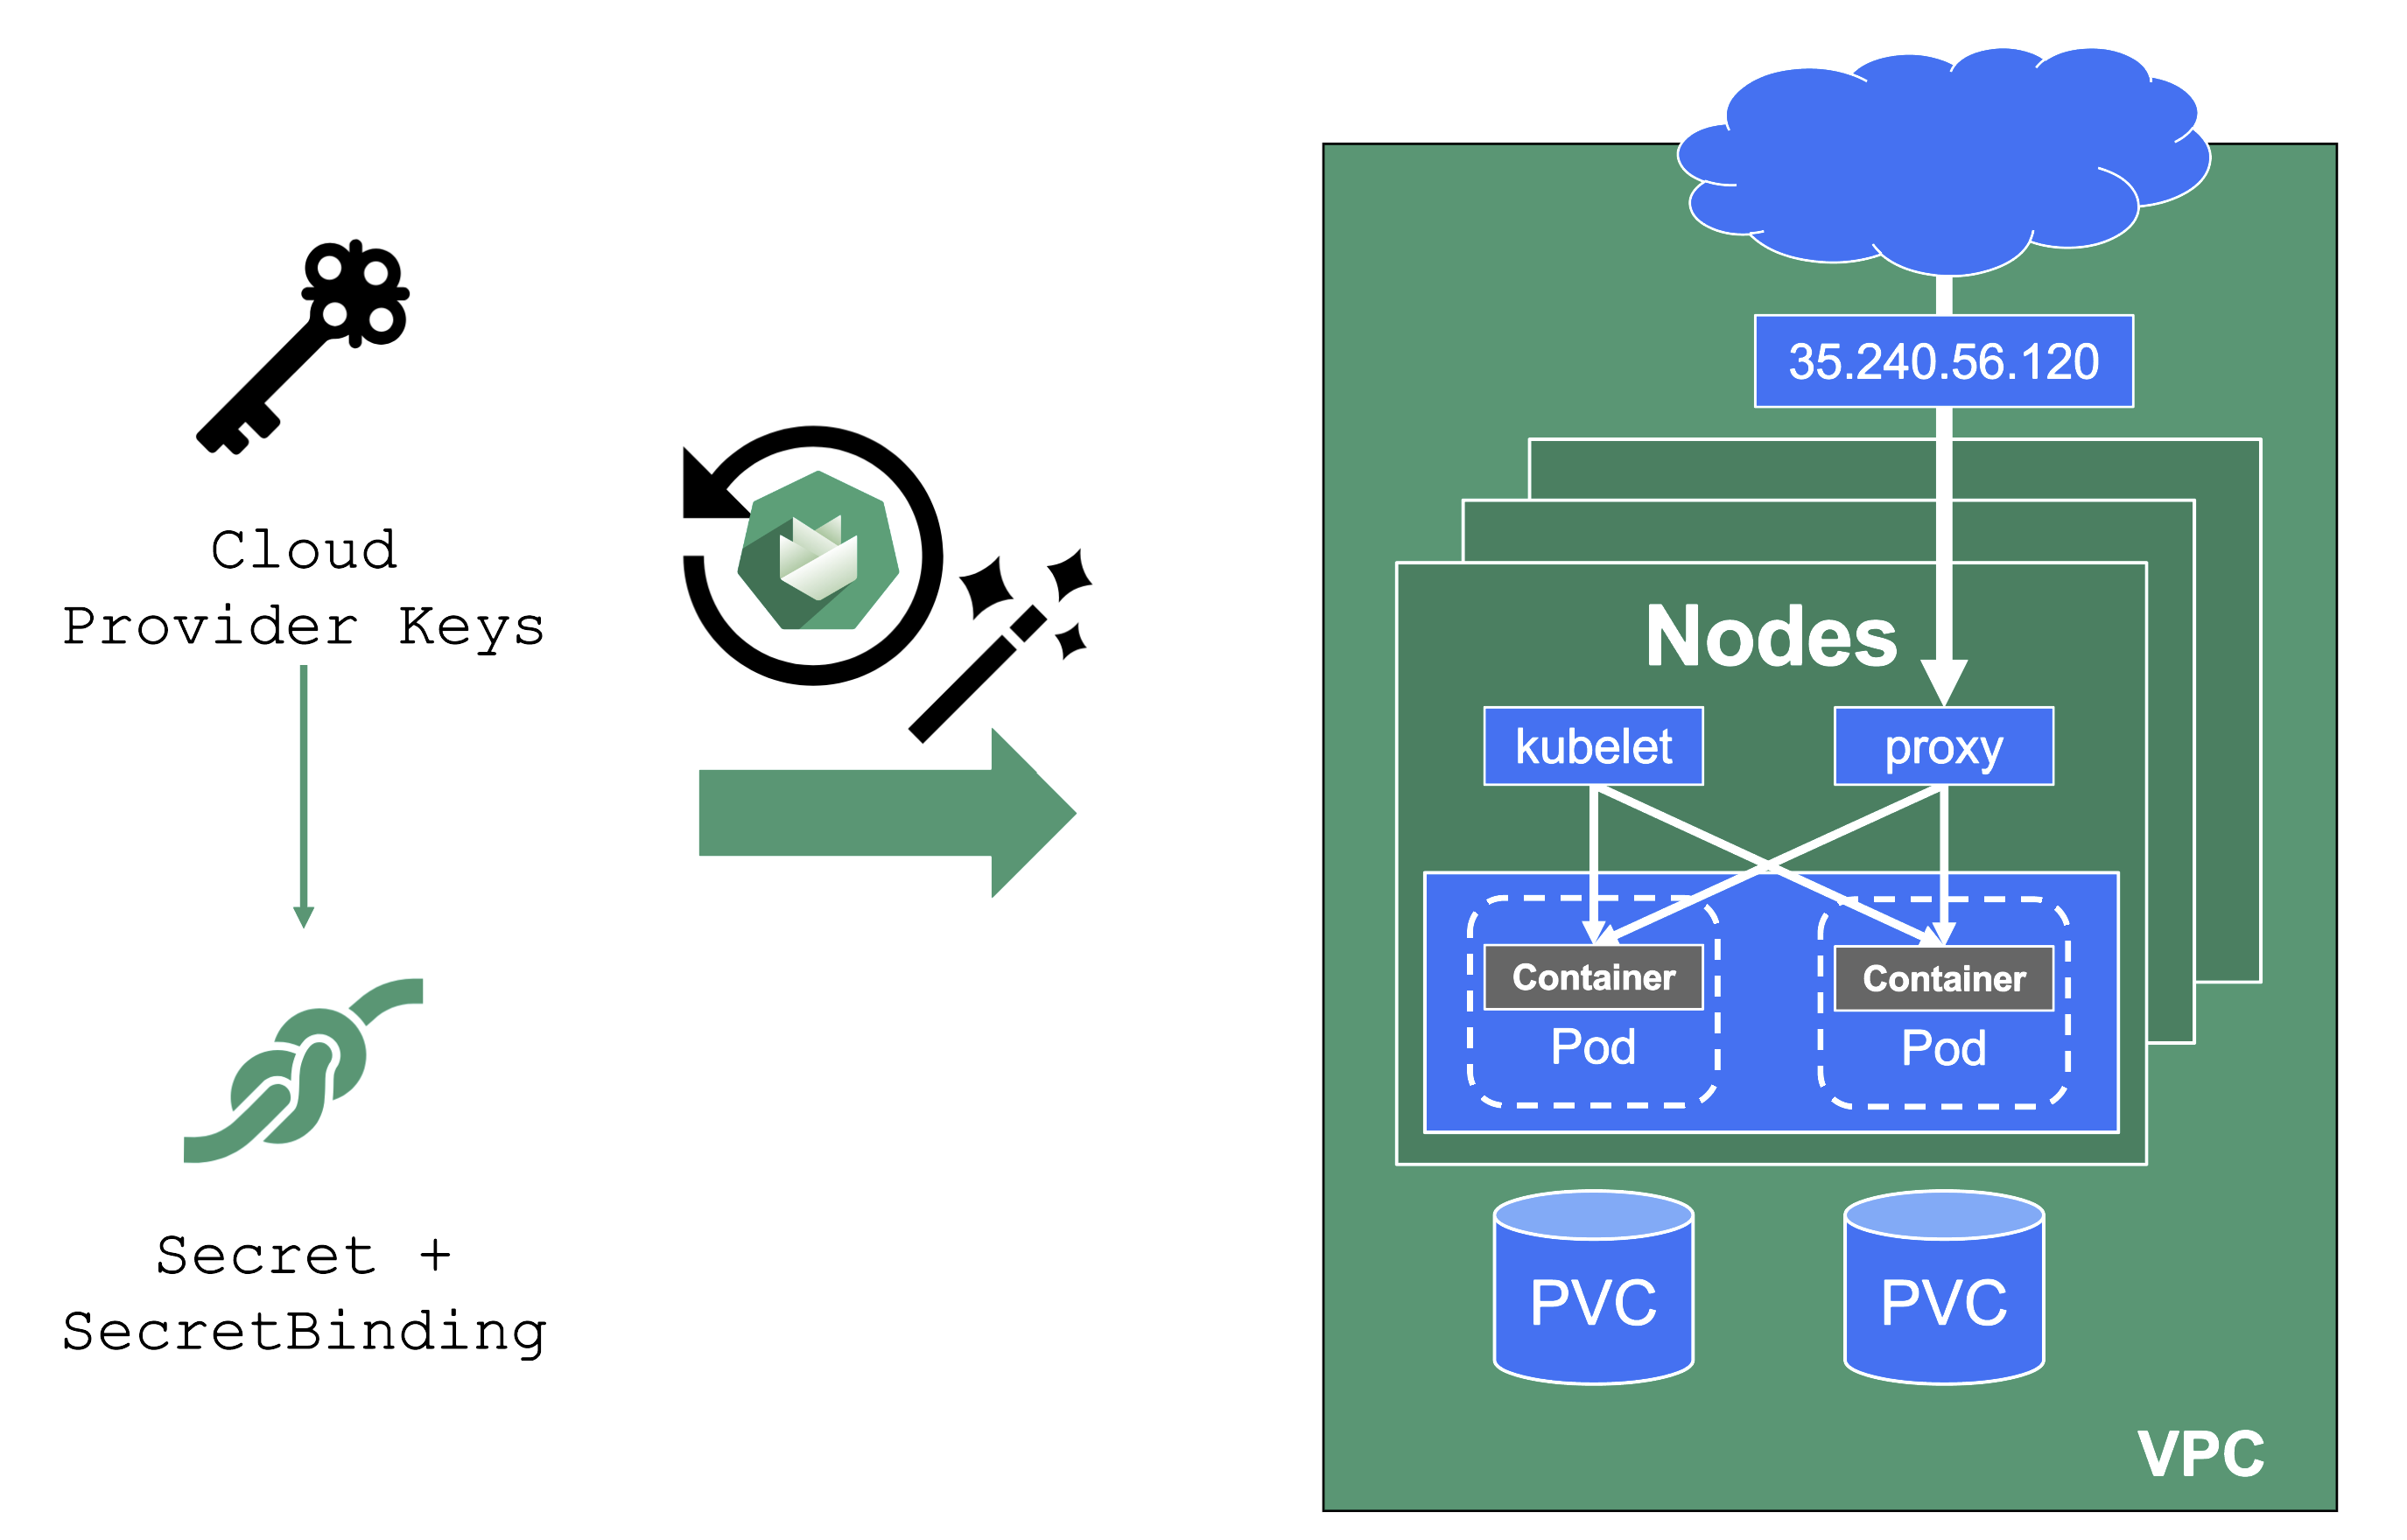
You grant Gardener permissions to create resources by handing over cloud provider keys.
These keys are stored in a secret and referenced to a shoot via a SecretBinding.
Gardener uses the keys to create the network for the cluster resources, routes, VMs, disks, and IP addresses.
When you rotate credentials, the new keys have to be stored in the same secret and the shoot needs to reconcile successfully to ensure the replication to every controller.
Afterward, the old keys can be deleted safely from Gardener’s perspective.
While the reconciliation can be triggered manually, there is no need for it (if you’re not in a hurry).
Each shoot reconciles once within 24h and the new keys will be picked up during the next maintenance window.
It is not possible to move a shoot to a different infrastructure account (at all!).
8.4 - External DNS Management
External DNS Management
When you deploy to Kubernetes, there is no native management of external DNS. Instead, the cloud-controller-manager requests (mostly IPv4) addresses for every service of type LoadBalancer. Of course, the Ingress resource helps here, but how is the external DNS entry for the ingress controller managed?
Essentially, some sort of automation for DNS management is missing.
Automating DNS Management
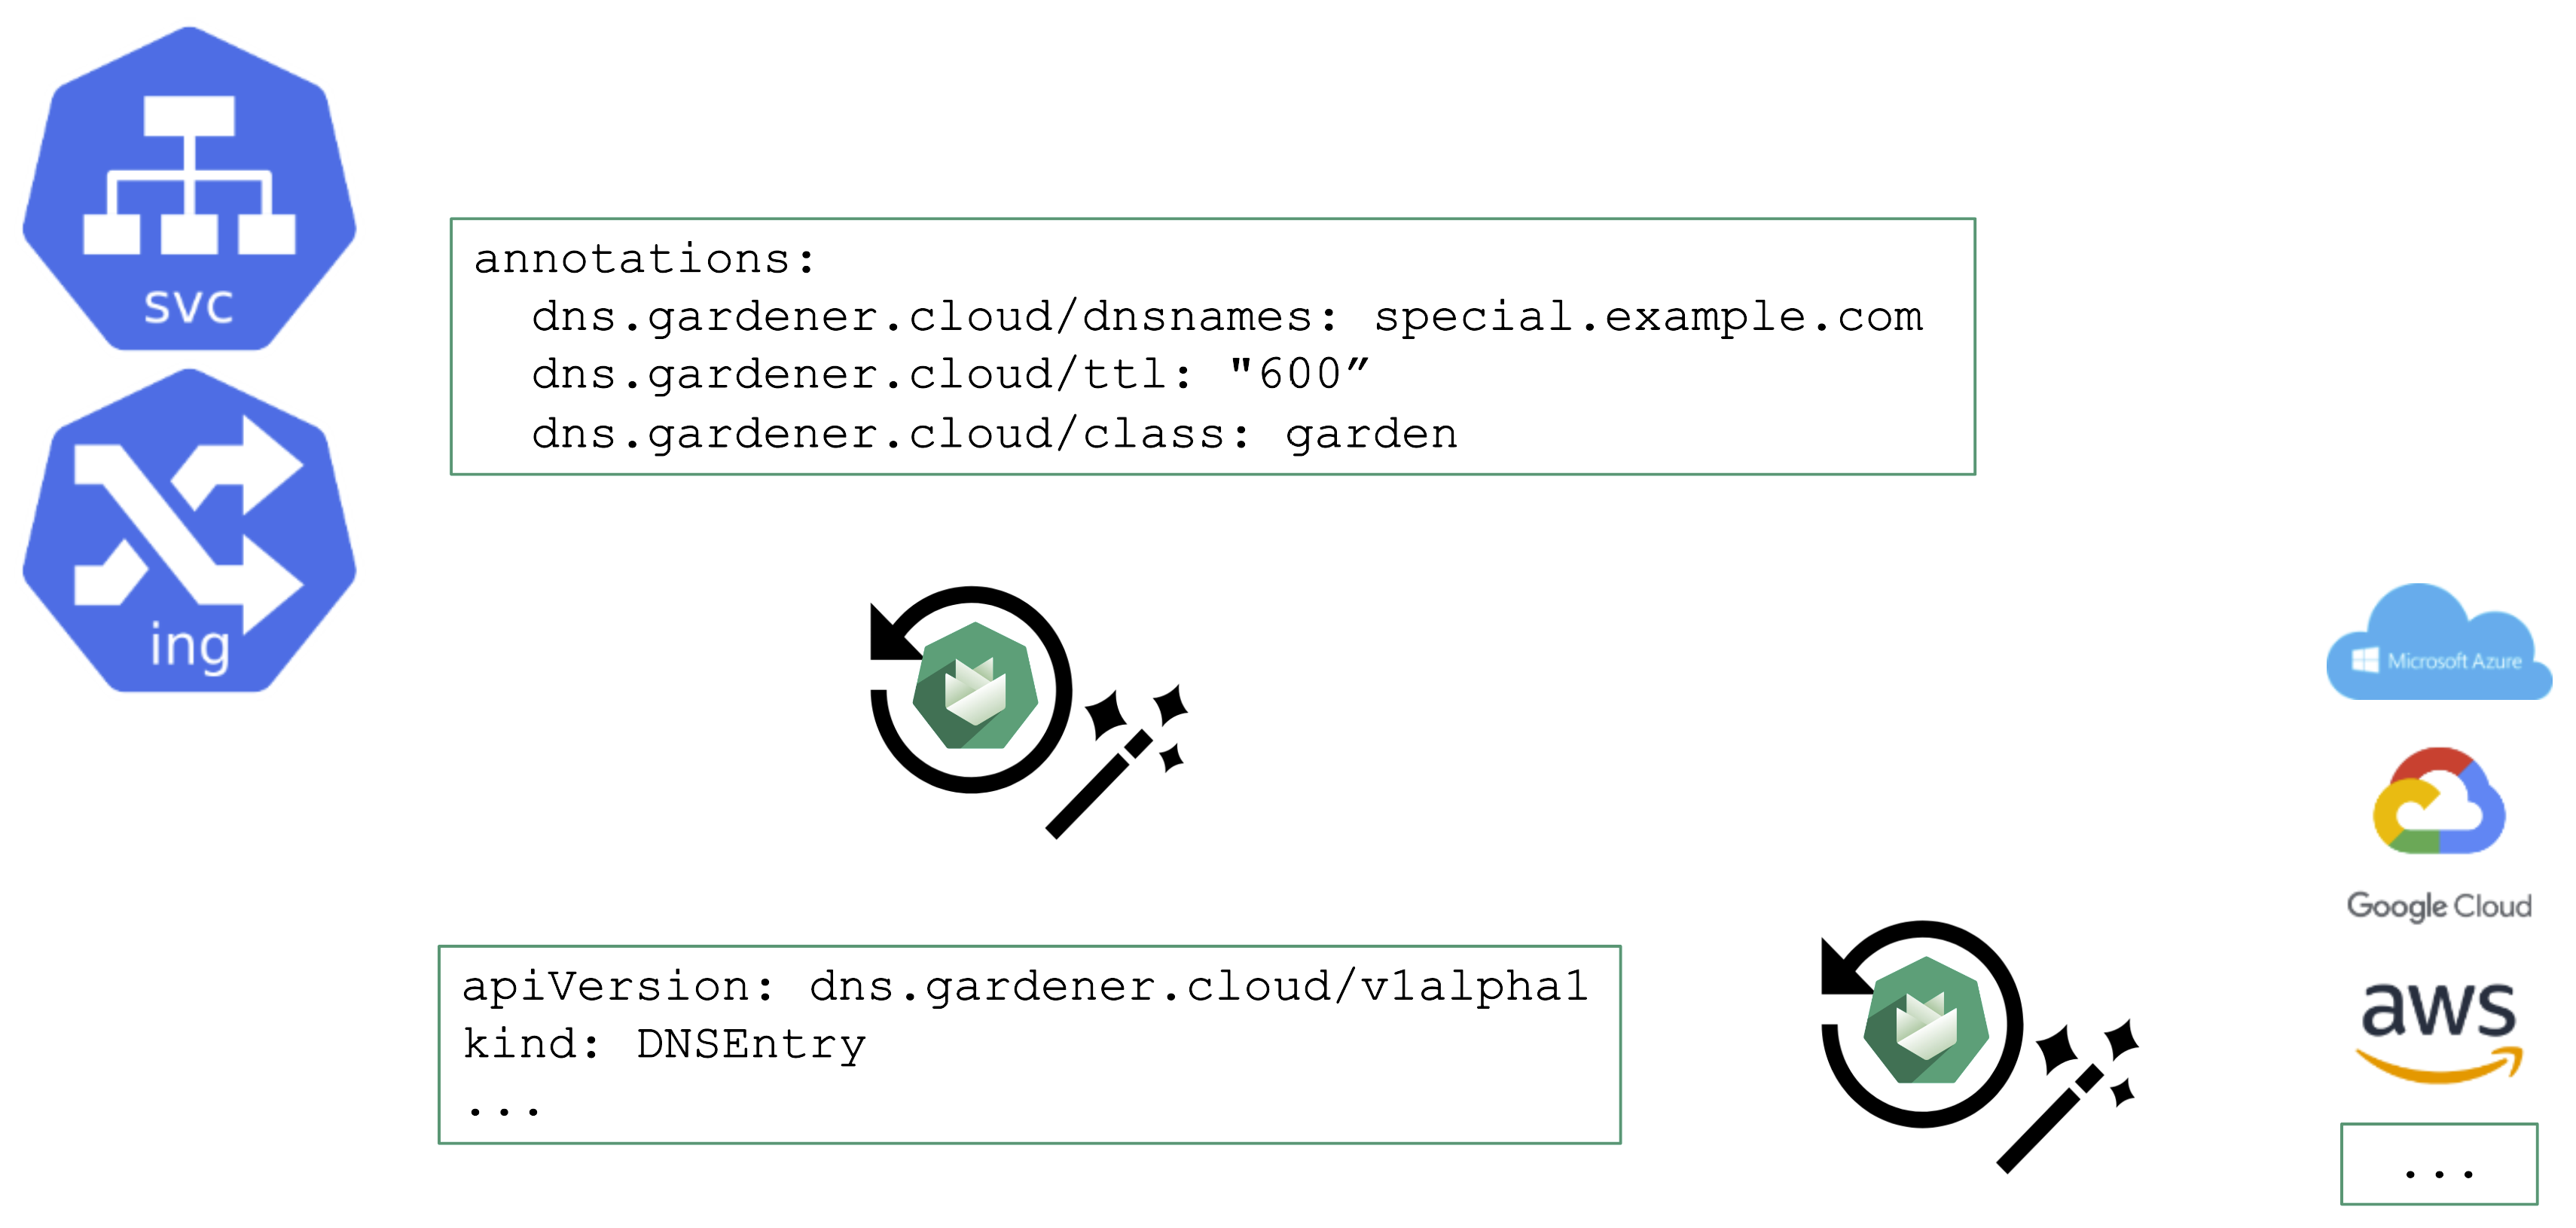
From a user’s perspective, it is desirable to work with already known resources and concepts. Hence, the DNS management offered by Gardener plugs seamlessly into Kubernetes resources and you do not need to “leave” the context of the shoot cluster.
To request a DNS record creation / update, a Service or Ingress resource is annotated accordingly. The shoot-dns-service extension will (if configured) will pick up the request and create a DNSEntry resource + reconcile it to have an actual DNS record created at a configured DNS provider. Gardener supports the following providers:
- aws-route53
- azure-dns
- azure-private-dns
- google-clouddns
- openstack-designate
- alicloud-dns
- cloudflare-dns
For more information, see DNS Names.
DNS Provider
For the above to work, we need some ingredients. Primarily, this is implemented via a so-called DNSProvider. Every shoot has a default provider that is used to set up the API server’s public DNS record. It can be used to request sub-domains as well.
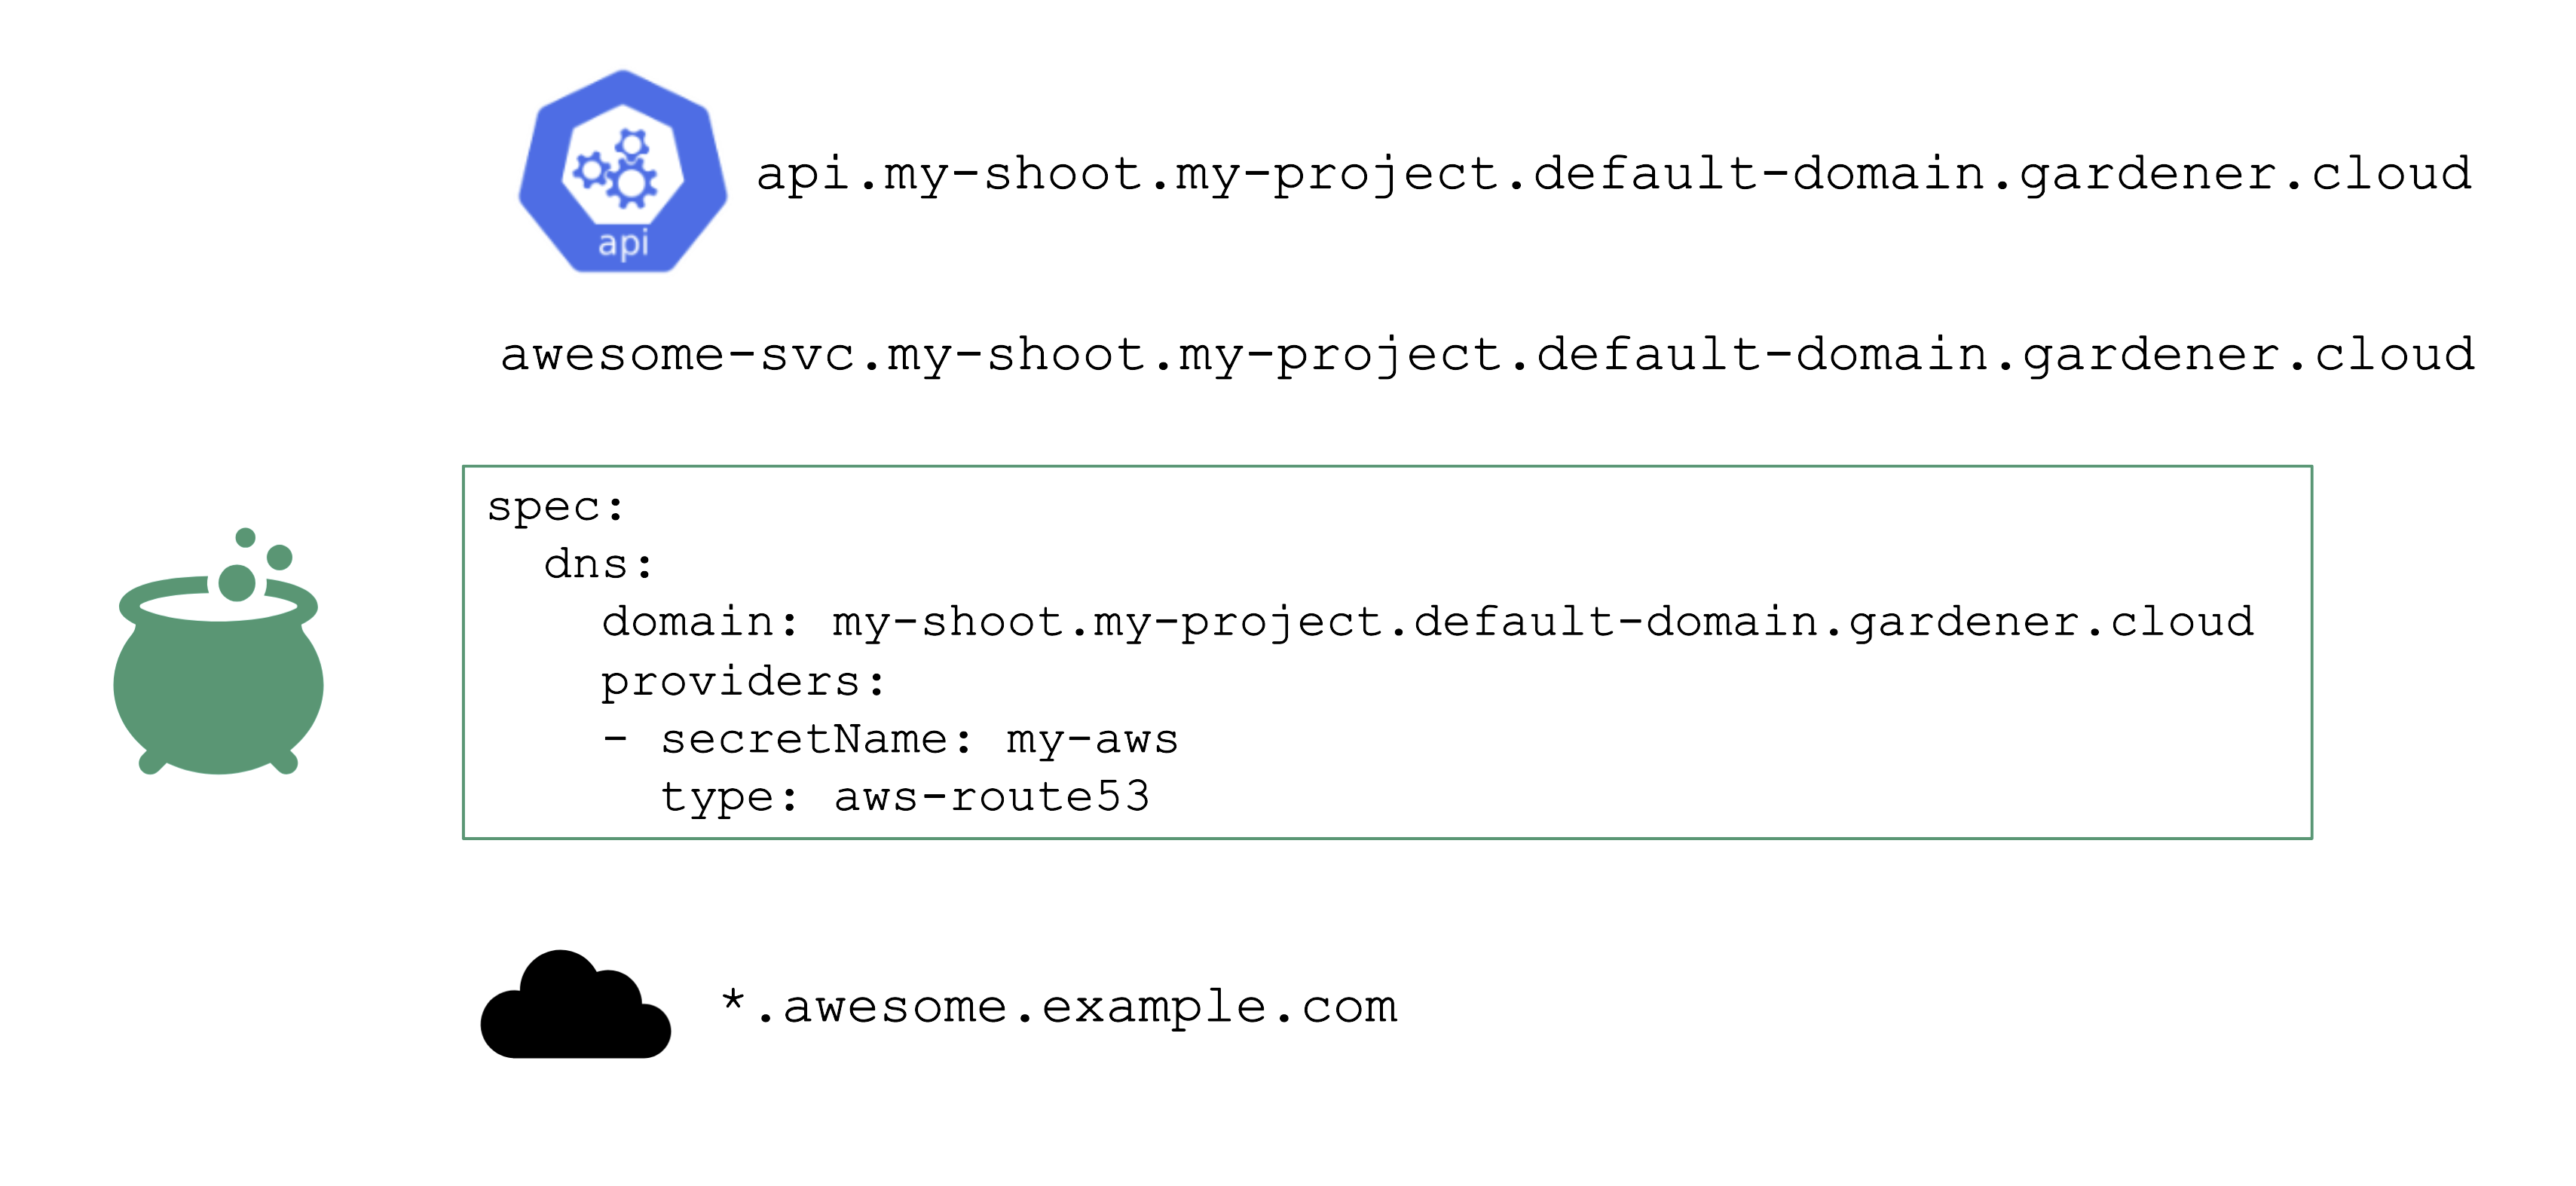
In addition, a shoot can reference credentials to a DNS provider. Those can be used to manage custom domains.
Please have a look at the documentation for further details.
8.5 - Certificate Management
Certificate Management
For proper consumption, any service should present a TLS certificate to its consumers. However, self-signed certificates are not fit for this purpose - the certificate should be signed by a CA trusted by an application’s userbase. Luckily, Issuers like Let’s Encrypt and others help here by offering a signing service that issues certificates based on the ACME challenge (Automatic Certificate Management Environment).
There are plenty of tools you can use to perform the challenge. For Kubernetes, cert-manager certainly is the most common, however its configuration is rather cumbersome and error prone. So let’s see how a Gardener extension can help here.
Manage Certificates with Gardener
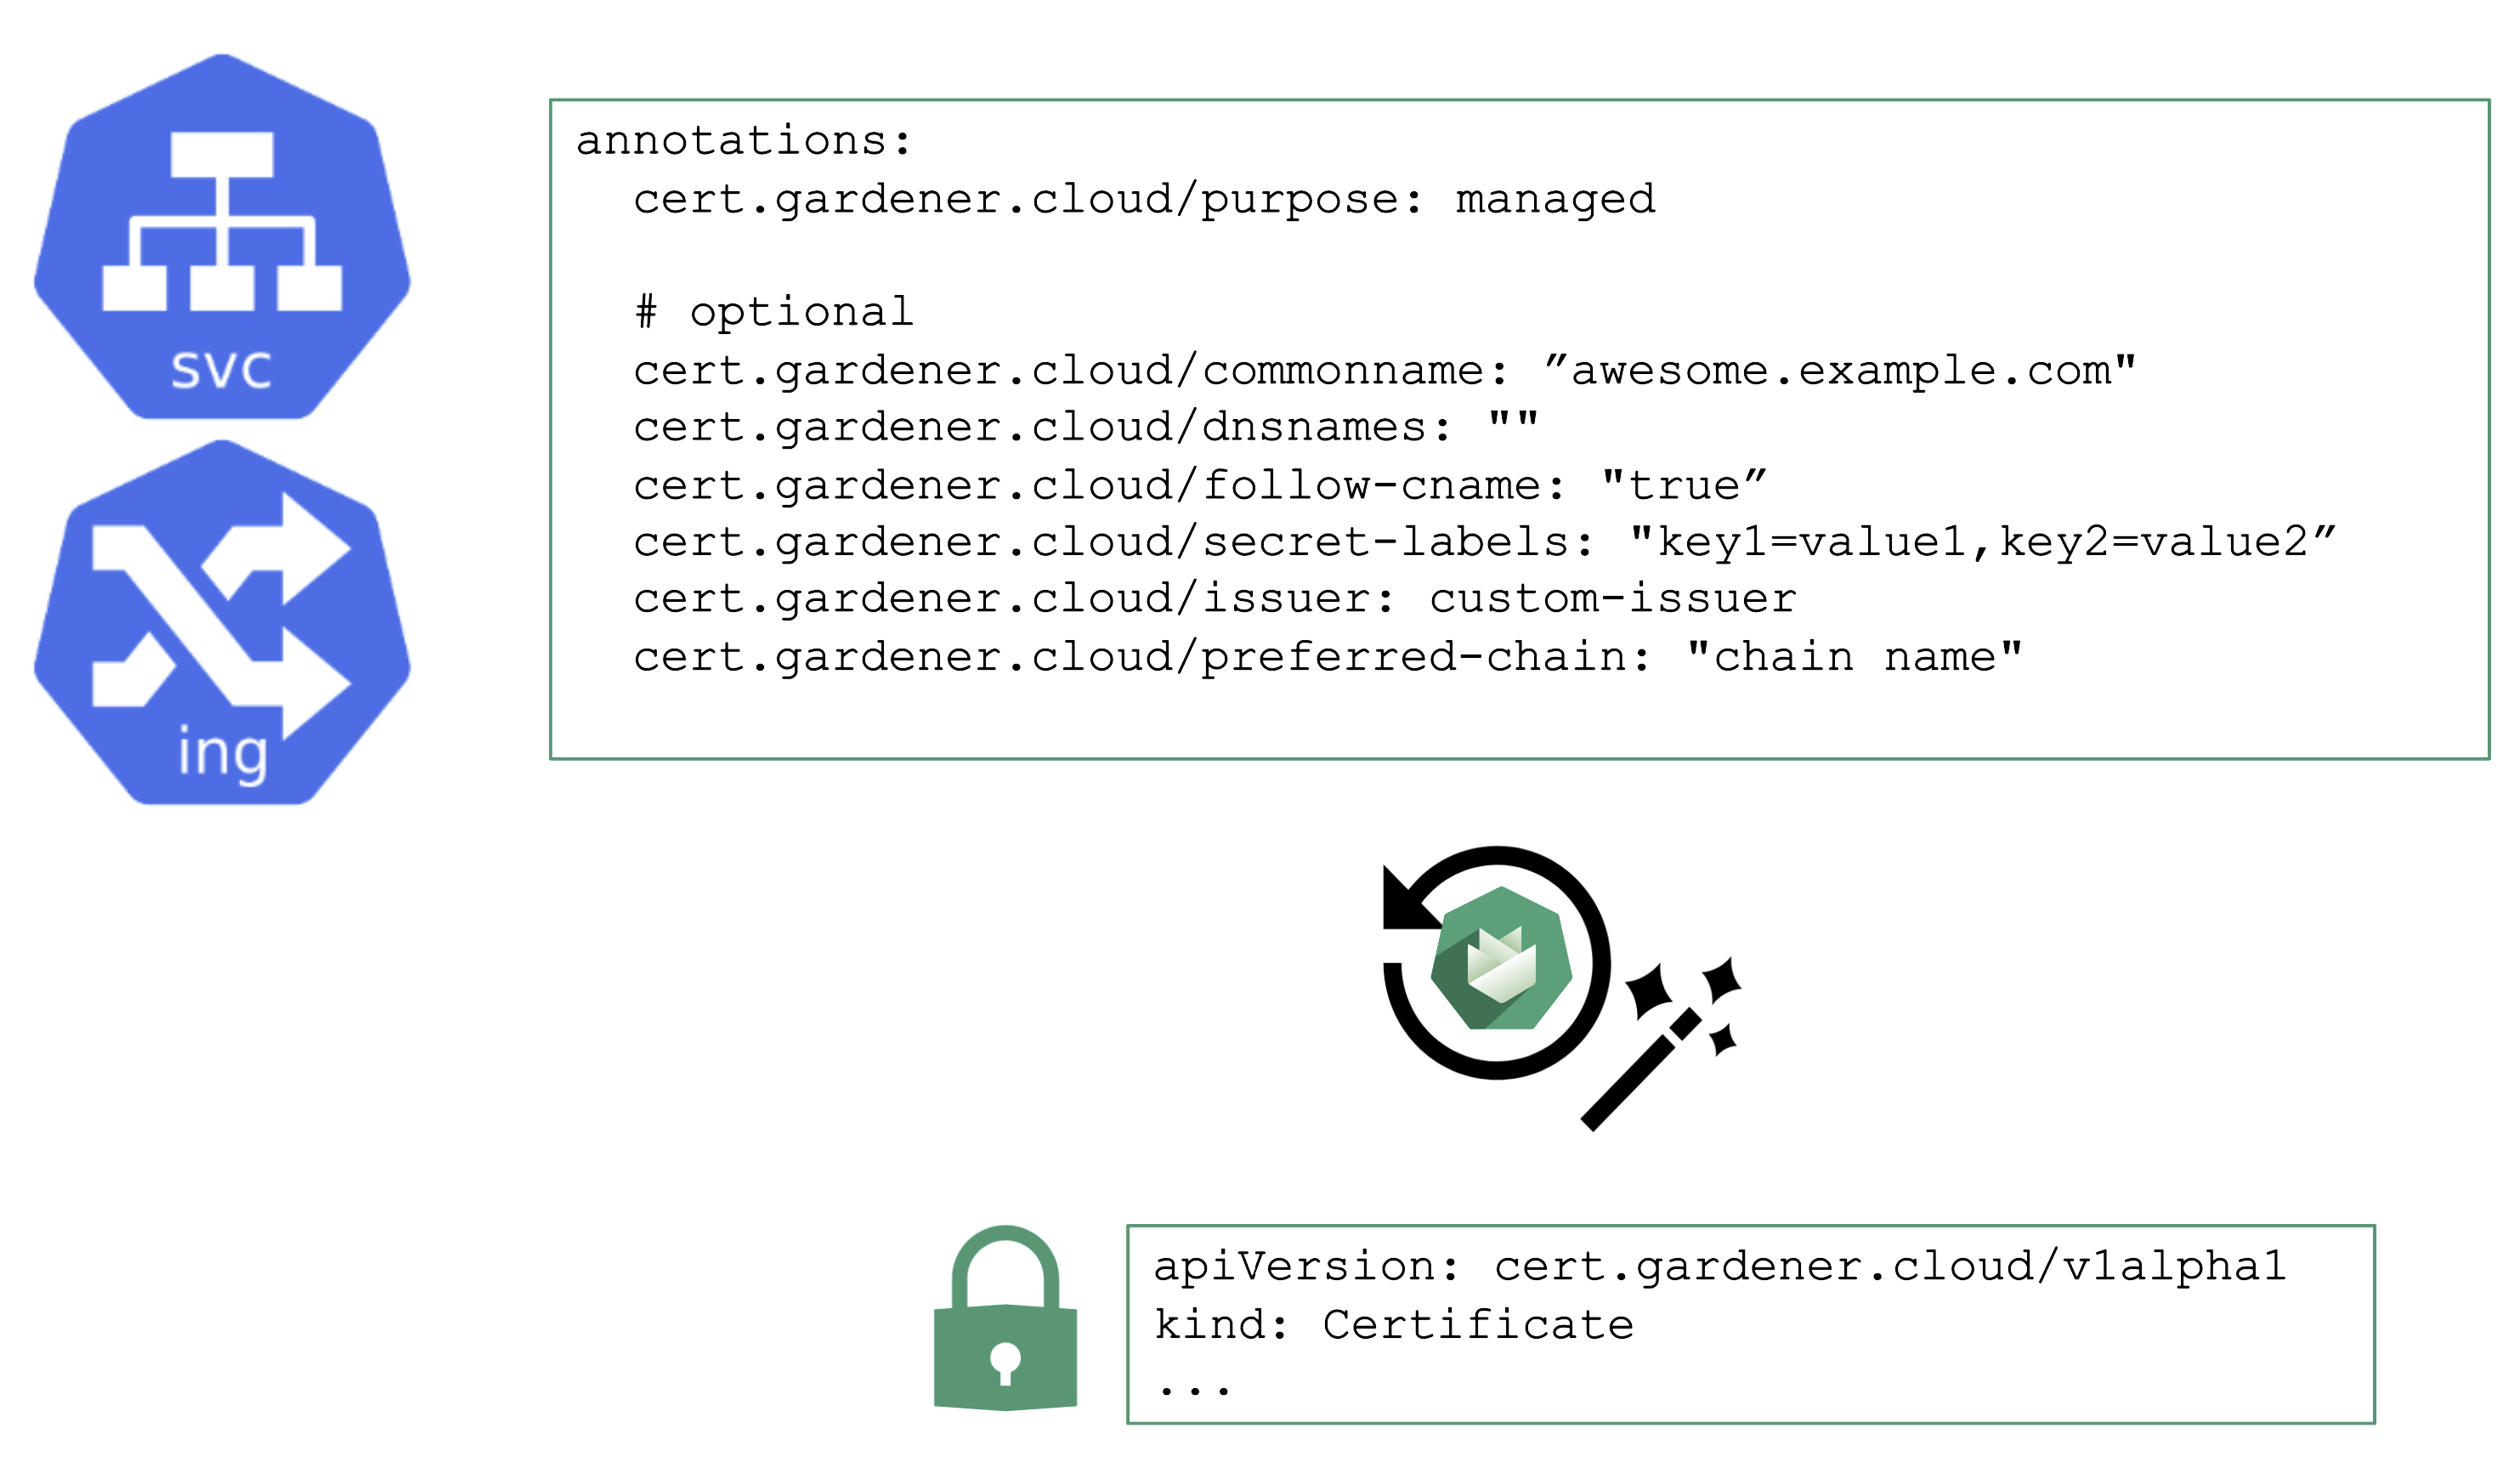
You may annotate a Service or Ingress resource to trigger the cert-manager to request a certificate from the any configured issuer (e.g. Let’s Encrypt) and perform the challenge. A Gardener operator can add a default issuer for convenience.
With the DNS extension discussed previously, setting up the DNS TXT record for the ACME challenge is fairly easy. The requested certificate can be customized by the means of several other annotations known to the controller. Most notably, it is possible to specify SANs via cert.gardener.cloud/dnsnames to accommodate domain names that have more than 64 characters (the limit for the CN field).
The user’s request for a certificate manifests as a certificate resource. The status, issuer, and other properties can be checked there.
Once successful, the resulting certificate will be stored in a secret and is ready for usage.
With additional configuration, it is also possible to define custom issuers of certificates.
For more information, see the Manage certificates with Gardener for public domain topic and the cert-management repository.
8.6 - Vertical Pod Autoscaler
Vertical Pod Autoscaler
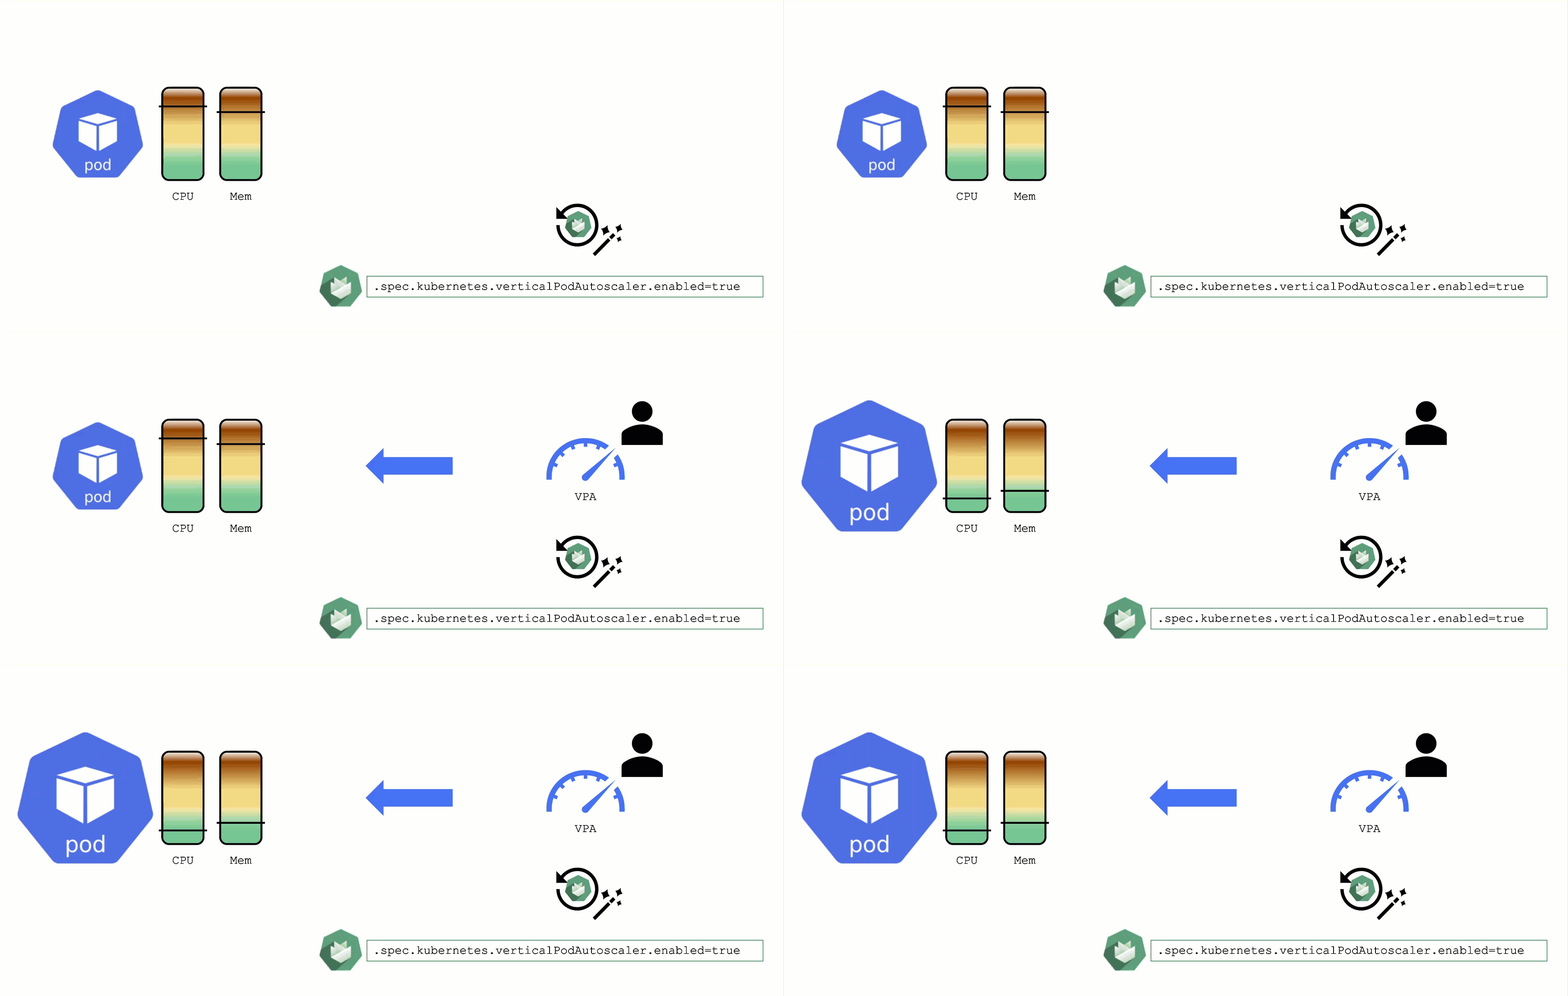
When a pod’s resource CPU or memory grows, it will hit a limit eventually. Either the pod has resource limits specified or the node will run short of resources. In both cases, the workload might be throttled or even terminated. When this happens, it is often desirable to increase the request or limits. To do this autonomously within certain boundaries is the goal of the Vertical Pod Autoscaler project.
Since it is not part of the standard Kubernetes API, you have to install the CRDs and controller manually. With Gardener, you can simply flip the switch in the shoot’s spec and start creating your VPA objects.
Please be aware that VPA and HPA operate in similar domains and might interfere.
A controller & CRDs for vertical pod auto-scaling can be activated via the shoot’s spec.
8.7 - Cluster Autoscaler
Obtaining Aditional Nodes
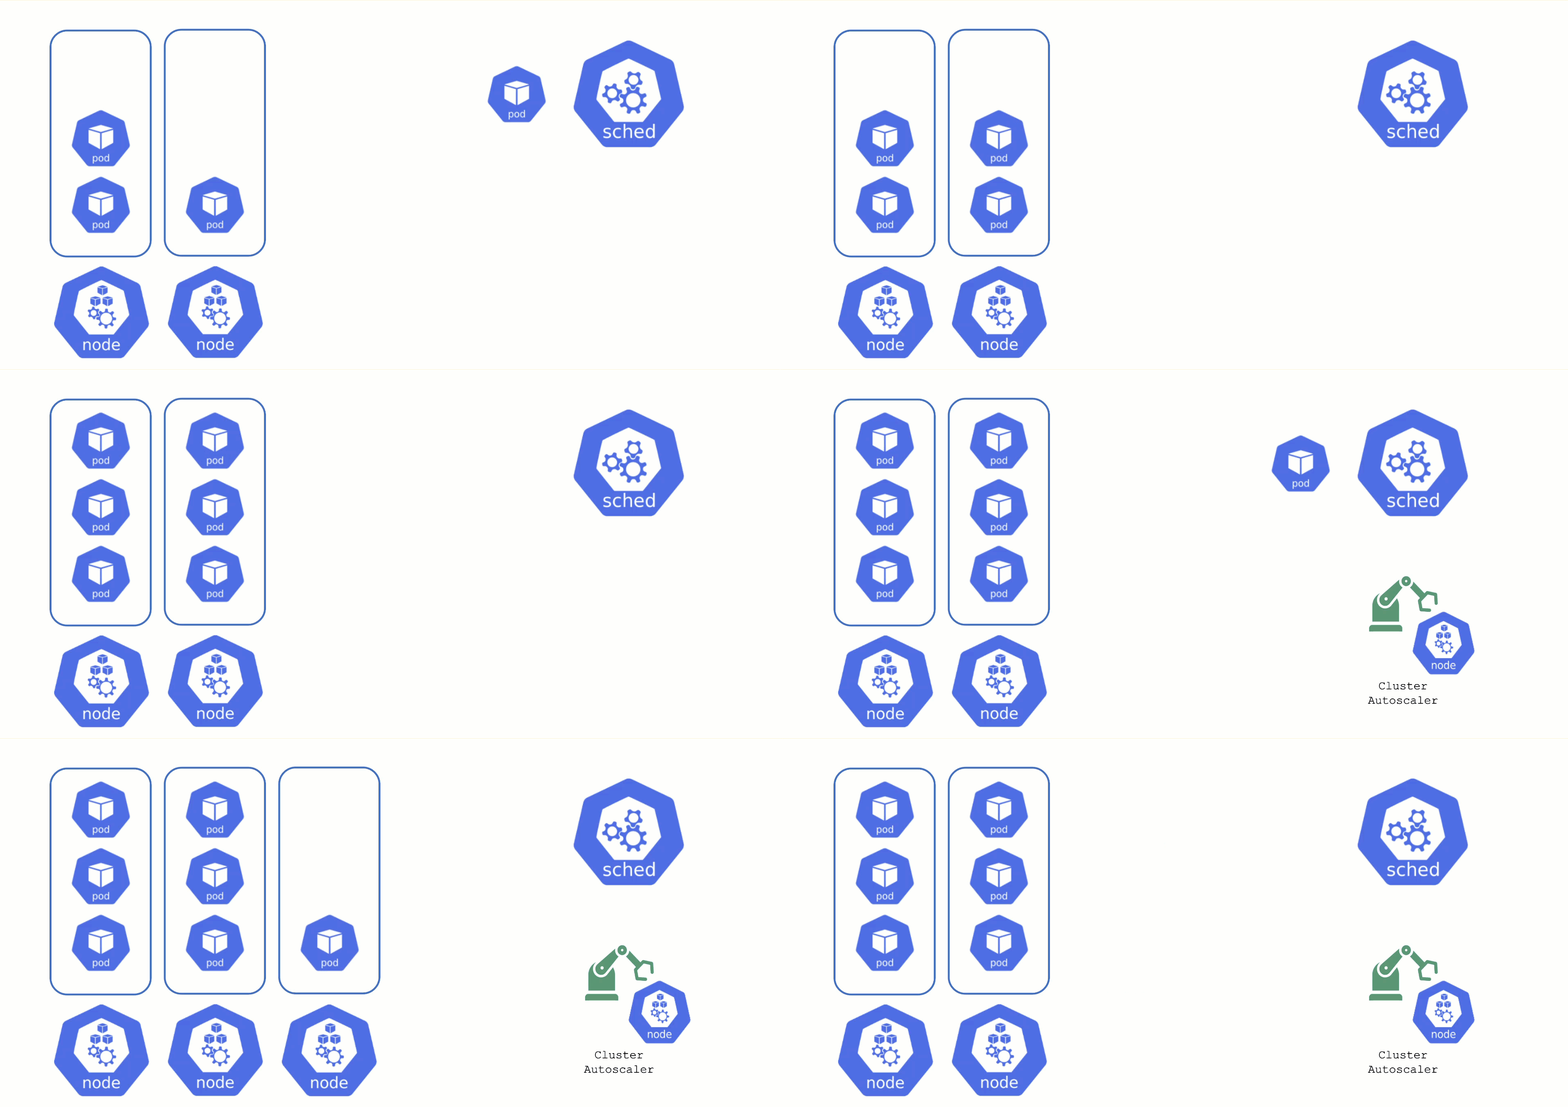
The scheduler will assign pods to nodes, as long as they have capacity (CPU, memory, Pod limit, # attachable disks, …). But what happens when all nodes are fully utilized and the scheduler does not find any suitable target?
Option 1: Evict other pods based on priority. However, this has the downside that other workloads with lower priority might become unschedulable.
Option 2: Add more nodes. There is an upstream Cluster Autoscaler project that does exactly this. It simulates the scheduling and reacts to pods not being schedulable events. Gardener has forked it to make it work with machine-controller-manager abstraction of how node (groups) are defined in Gardener.
The cluster autoscaler respects the limits (min / max) of any worker pool in a shoot’s spec. It can also scale down nodes based on utilization thresholds. For more details, see the autoscaler documentation.
Scaling by Priority
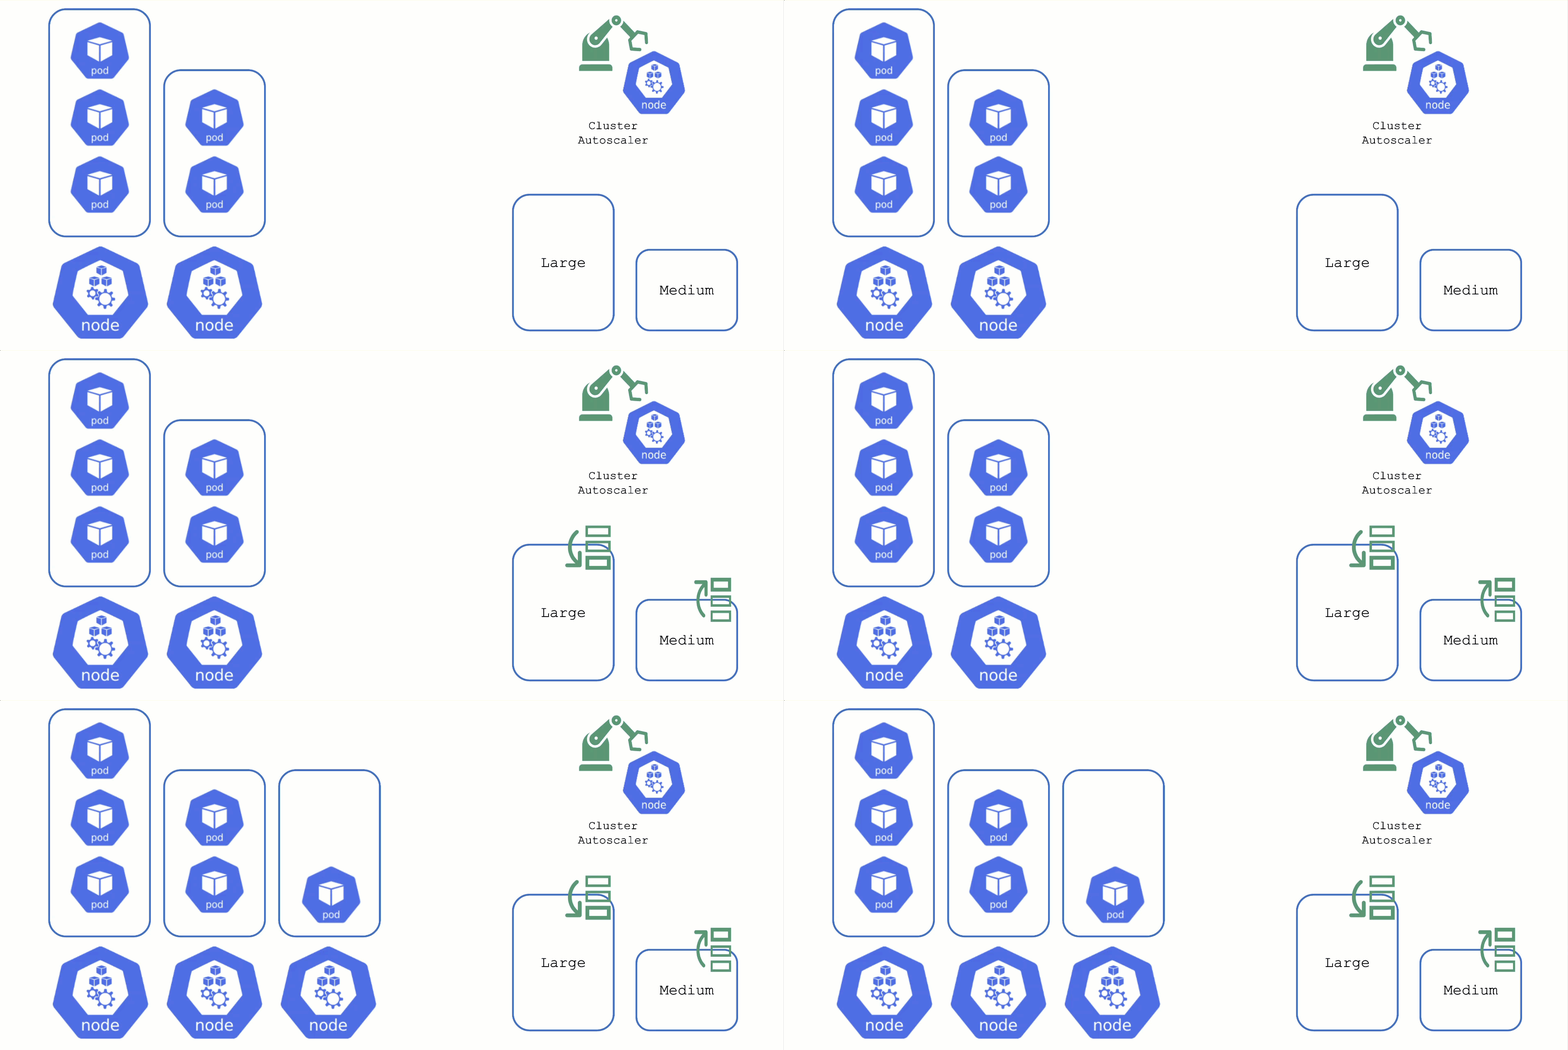
For clusters with more than one node pool, the cluster autoscaler has to decide which group to scale up. By default, it randomly picks from the available / applicable. However, this behavior is customizable by the use of so-called expanders.
This section will focus on the priority based expander.
Each worker pool gets a priority and the cluster autoscaler will scale up the one with the highest priority until it reaches its limit.
To get more information on the current status of the autoscaler, you can check a “status” configmap in the kube-system namespace with the following command:
kubectl get cm -n kube-system cluster-autoscaler-status -oyaml
To obtain information about the decision making, you can check the logs of the cluster-autoscaler pod by using the shoot’s monitoring stack.
For more information, see the cluster-autoscaler FAQ and the Priority based expander for cluster-autoscaler topic.
9 - Common Pitfalls
Architecture
Containers will NOT fix a broken architecture!
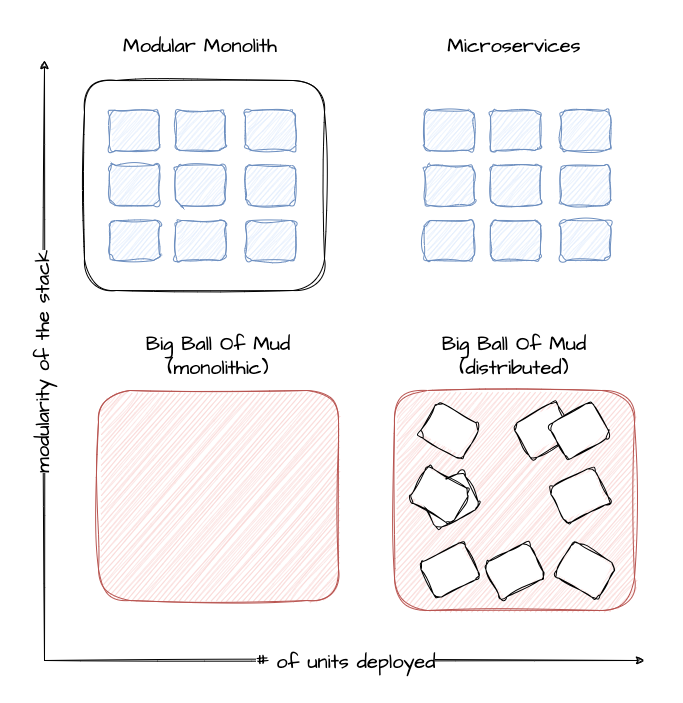
Running a highly distributed system has advantages, but of course, those come at a cost. In order to succeed, one would need:
- Logging
- Tracing
- No singleton
- Tolerance to failure of individual instances
- Automated config / change management
- Kubernetes knowledge
Scalability
Most scalability dimensions are interconnected with others. If a cluster grows beyond reasonable defaults, it can still function very well. But tuning it comes at the cost of time and can influence stability negatively.
Take the number of nodes and pods, for example. Both are connected and you cannot grow both towards their individual limits, as you would face issues way before reaching any theoretical limits.
Reading the Scalability of Gardener Managed Kubernetes Clusters guide is strongly recommended in order to understand the topic of scalability within Kubernetes and Gardener.
A Small Sample of Things That Can Grow Beyond Reasonable Limits
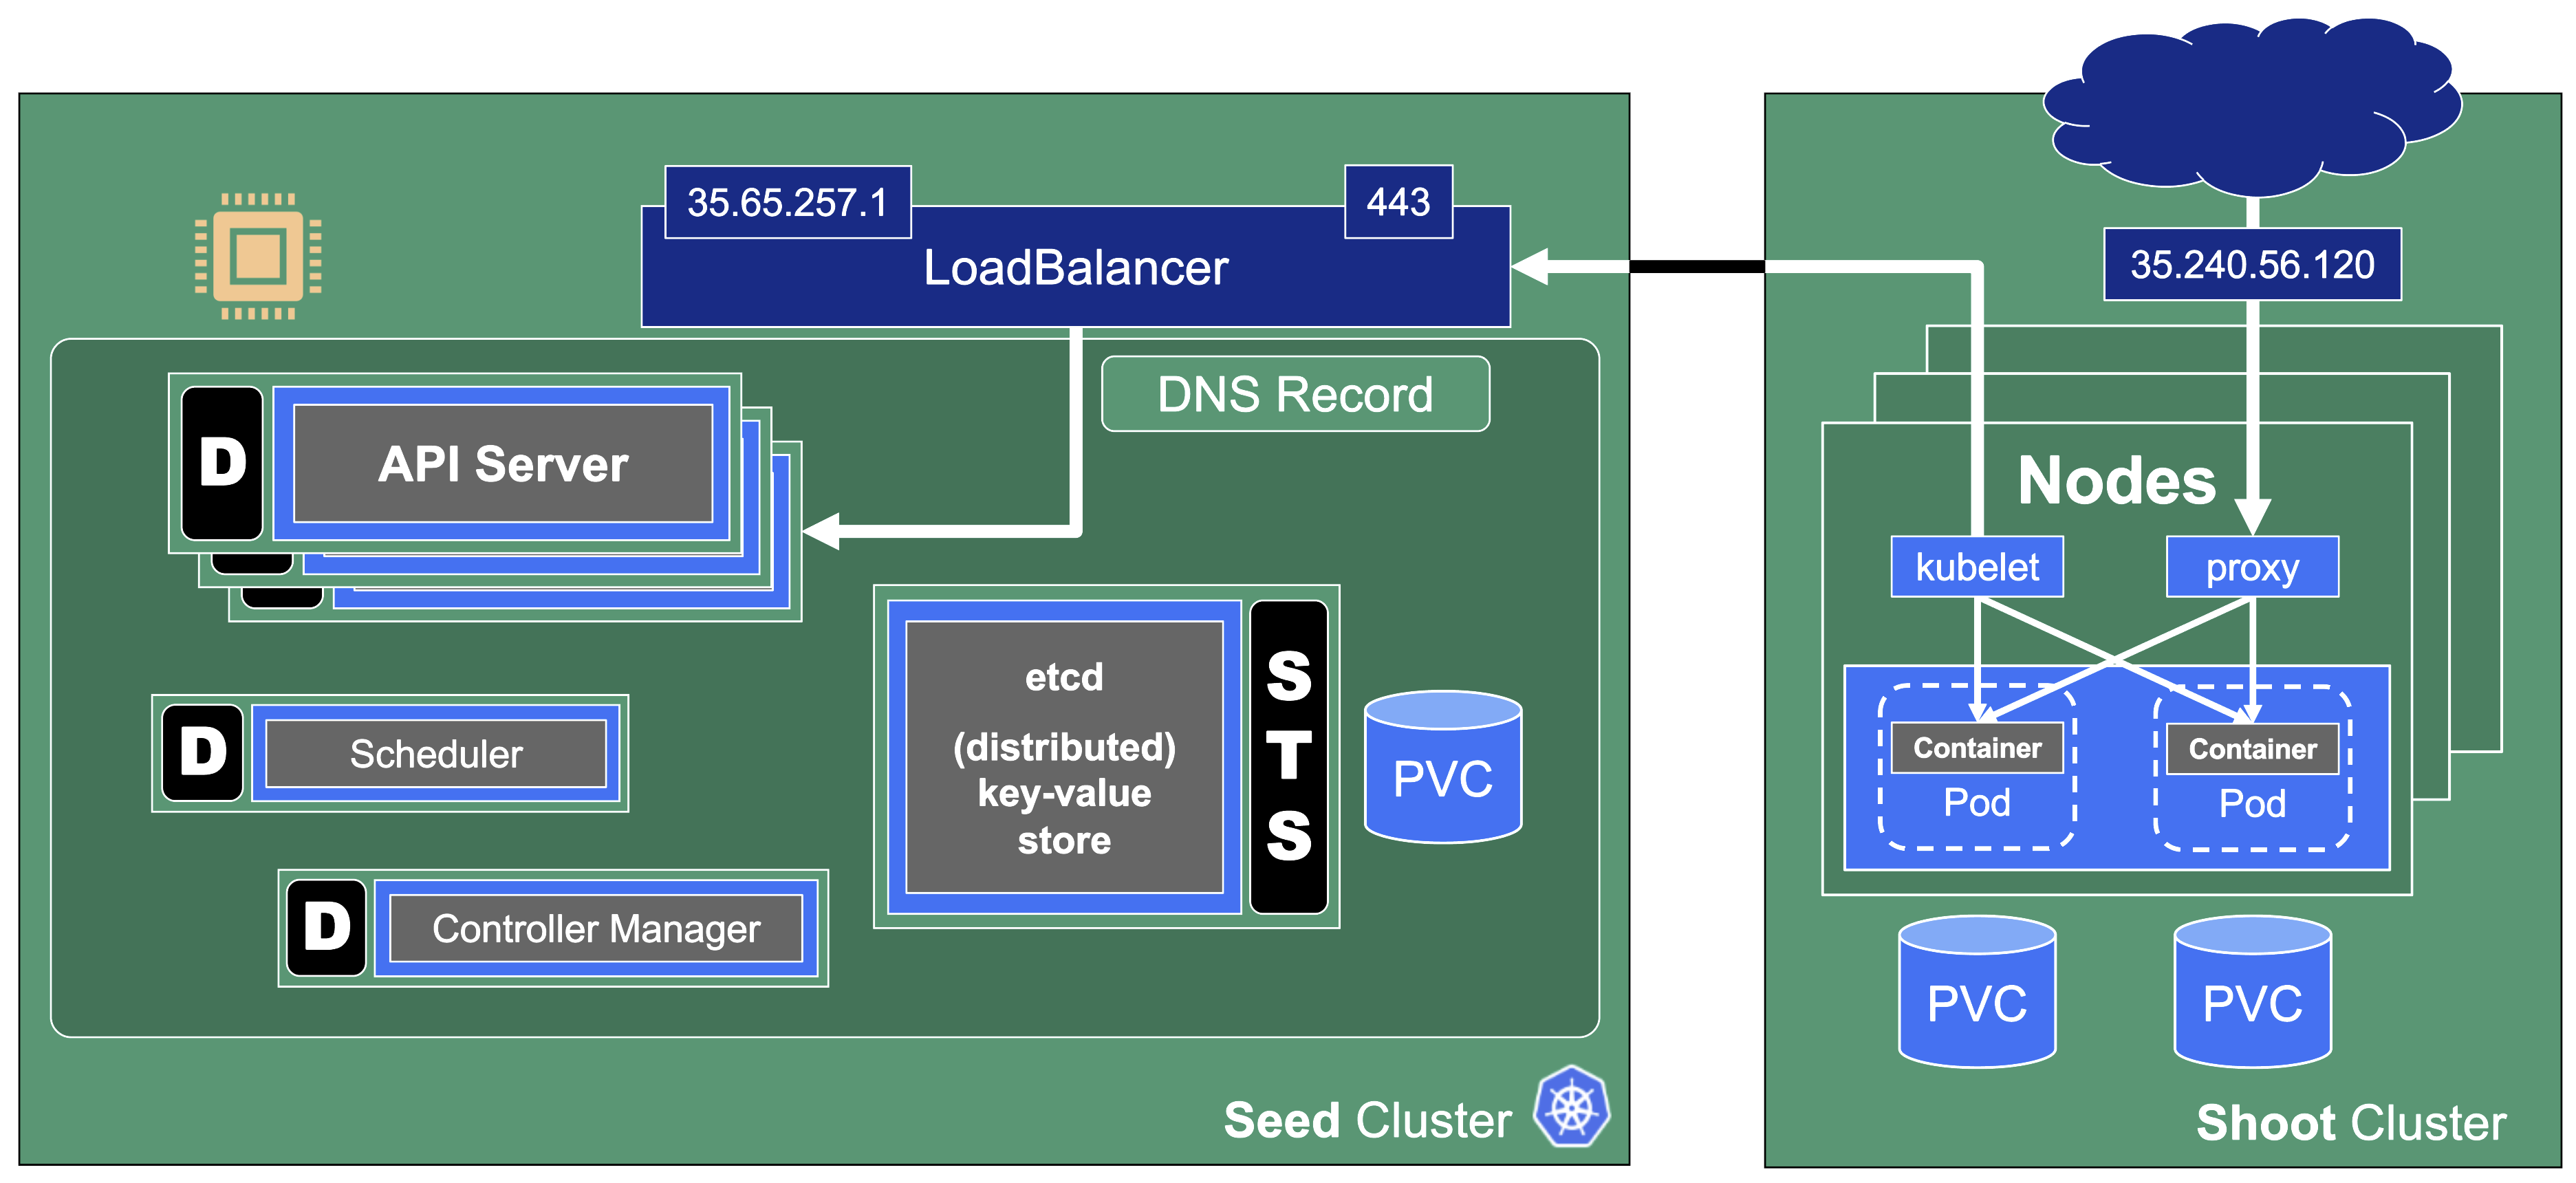
When scaling a cluster, there are plenty of resources that can be exhausted or reach a limit:
- The API server will be scaled horizontally and vertically by Gardener. However, it can still consume too much resources to fit onto a single node on the seed. In this case, you can only reduce the load on the API server. This should not happen with regular usage patterns though.
- ETCD disk space: 8GB is the limit. If you have too many resources or a high churn rate, a cluster can run out of ETCD capacity. In such a scenario it will stop working until defragmented, compacted, and cleaned up.
- The number of nodes is limited by the network configuration (pod cidr range & node cidr mask). Also, there is a reasonable number of nodes (300) that most workloads should not exceed. It is possible to go beyond but doing so requires careful tuning and consideration of connected scaling dimensions (like the number of pods per node).
The availability of your cluster is directly impacted by the way you use it.
Infrastructure Capacity and Quotas

Sometimes requests cannot be fulfilled due to shortages on the infrastructure side. For example, a certain instance type might not be available and new Kubernetes nodes of this type cannot be added. It is a good practice to use the cluster-autoscaler’s priority expander and have a secondary node pool.
Sometimes, it is not the physical capacity but exhausted quotas within an infrastructure account that result in limits. Obviously, there should be sufficient quota to create as many VMs as needed. But there are also other resources that are created in the infrastructure that need proper quotas:
- Loadbalancers
- VPC
- Disks
- Routes (often forgotten, but very important for clusters without overlay network; typically defaults to around 50 routes, meaning that 50 nodes is the maximum a cluster can have)
- …
NodeCIDRMaskSize
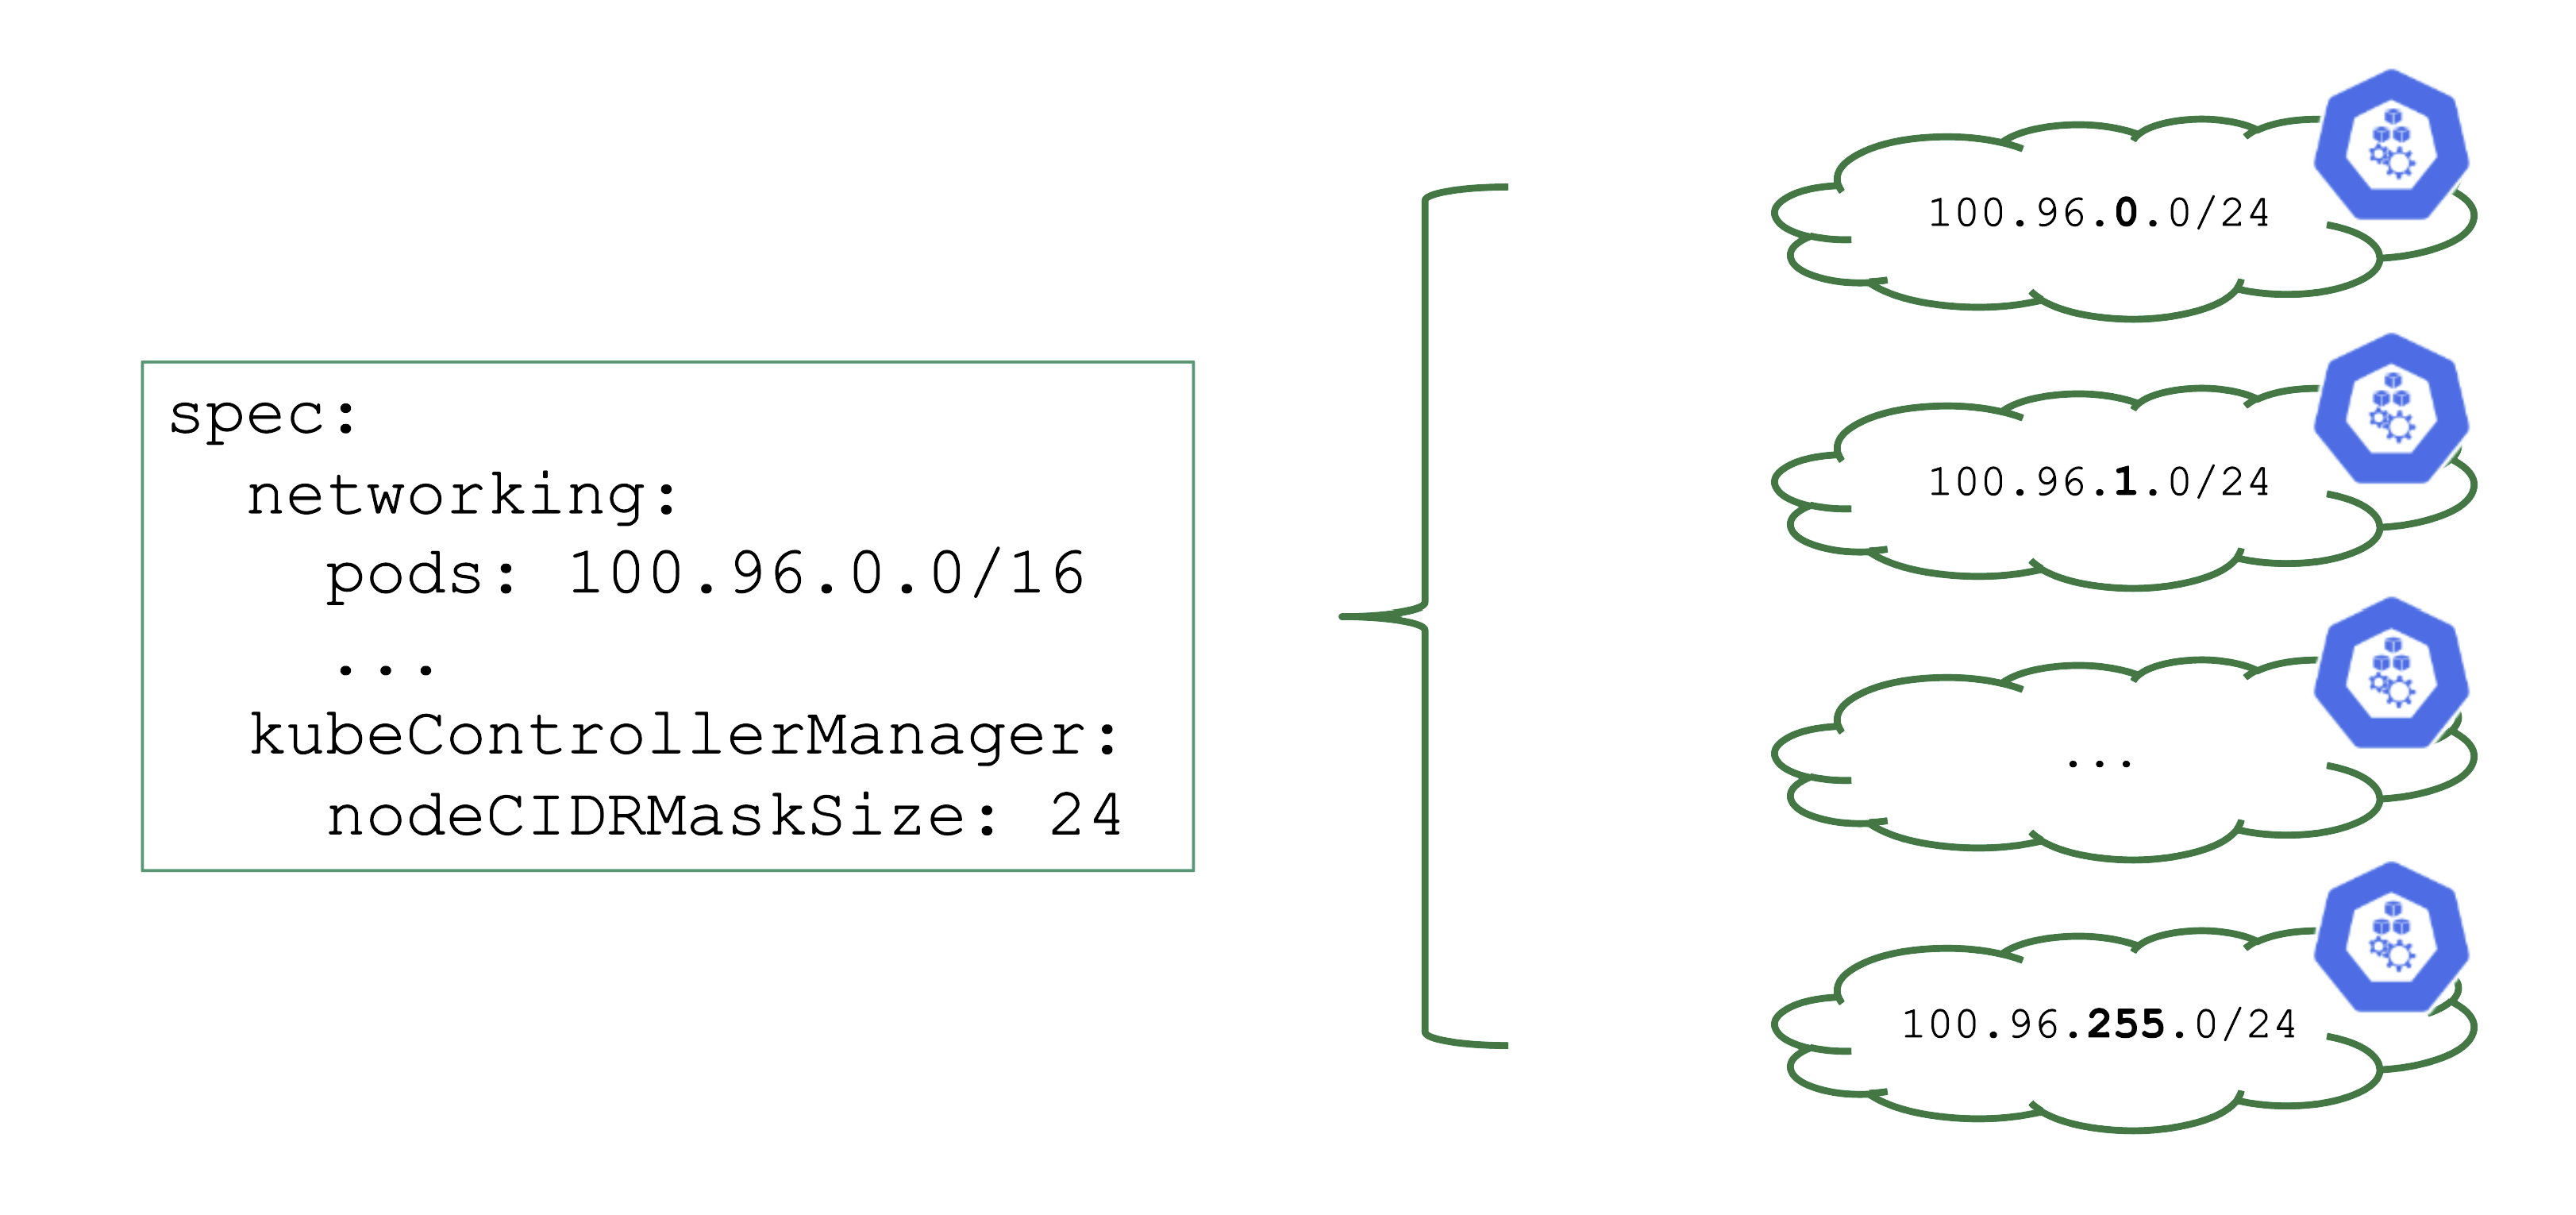
Upon cluster creation, there are several settings that are network related. For example, the address space for Pods has to be defined. In this case, it is a /16 subnet that includes a total of 65.536 hosts. However, that does not imply that you can easily use all addresses at the same point in time.
As part of the Kubernetes network setup, the /16 network is divided into smaller subnets and each node gets a distinct subnet. The size of this subnet defaults to /24. It can also be specified (but not changed later).
Now, as you create more nodes, you have a total of 256 subnets that can be assigned to nodes, thus limiting the total number of nodes of this cluster to 256.
For more information, see Shoot Networking.
Overlapping VPCs
Avoid Overlapping CIDR Ranges in VPCs
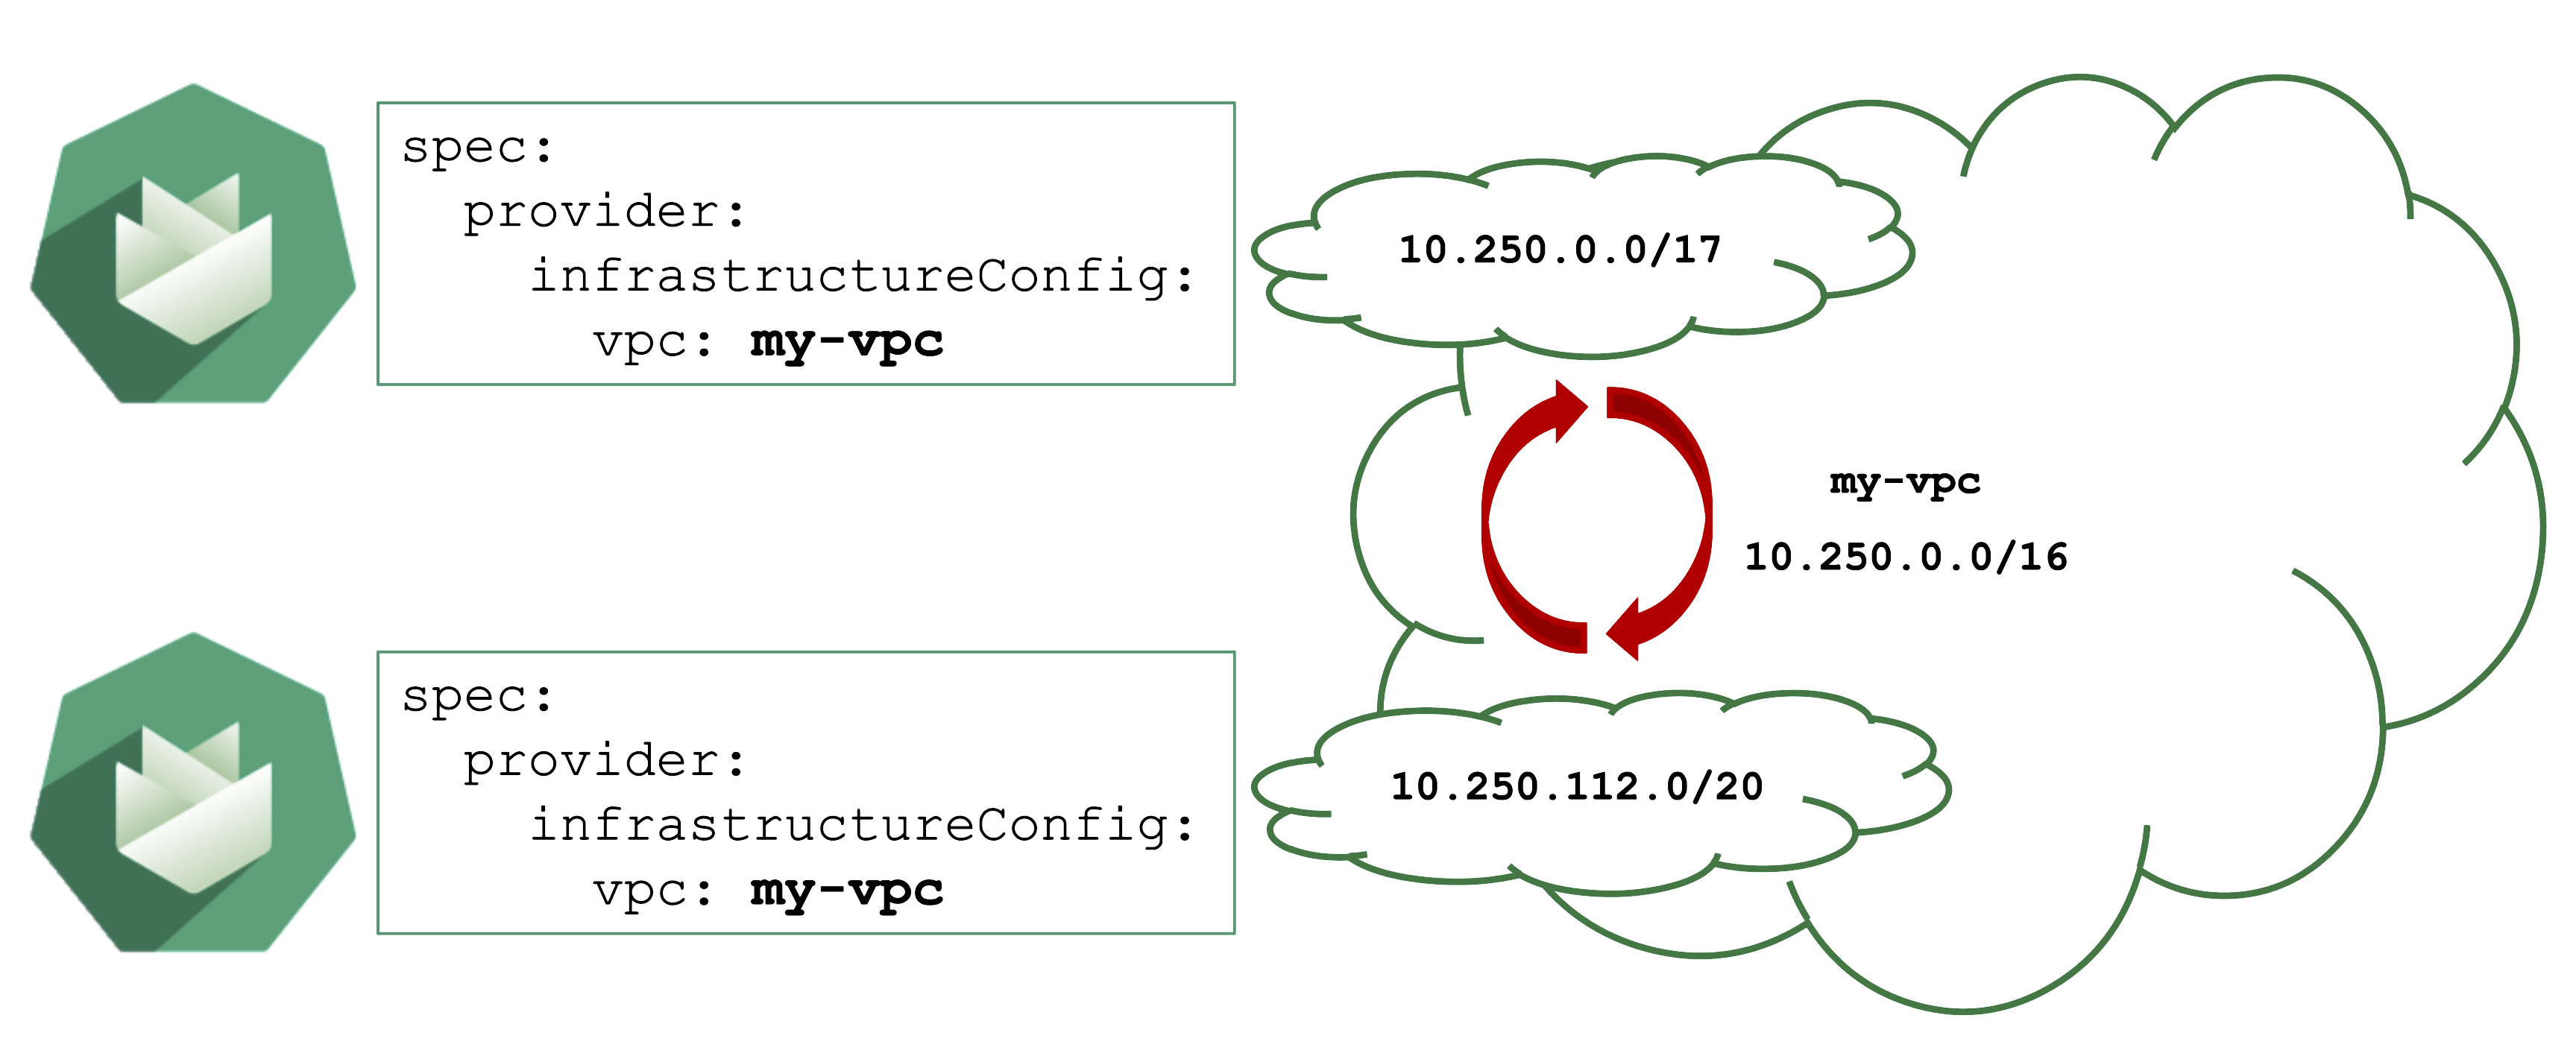
Gardener can create shoot cluster resources in an existing / user-created VPC. However, you have to make sure that the CIDR ranges used by the shoots nodes or subnets for zones do not overlap with other shoots deployed to the same VPC.
In case of an overlap, there might be strange routing effects, and packets ending up at a wrong location.
Expired Credentials
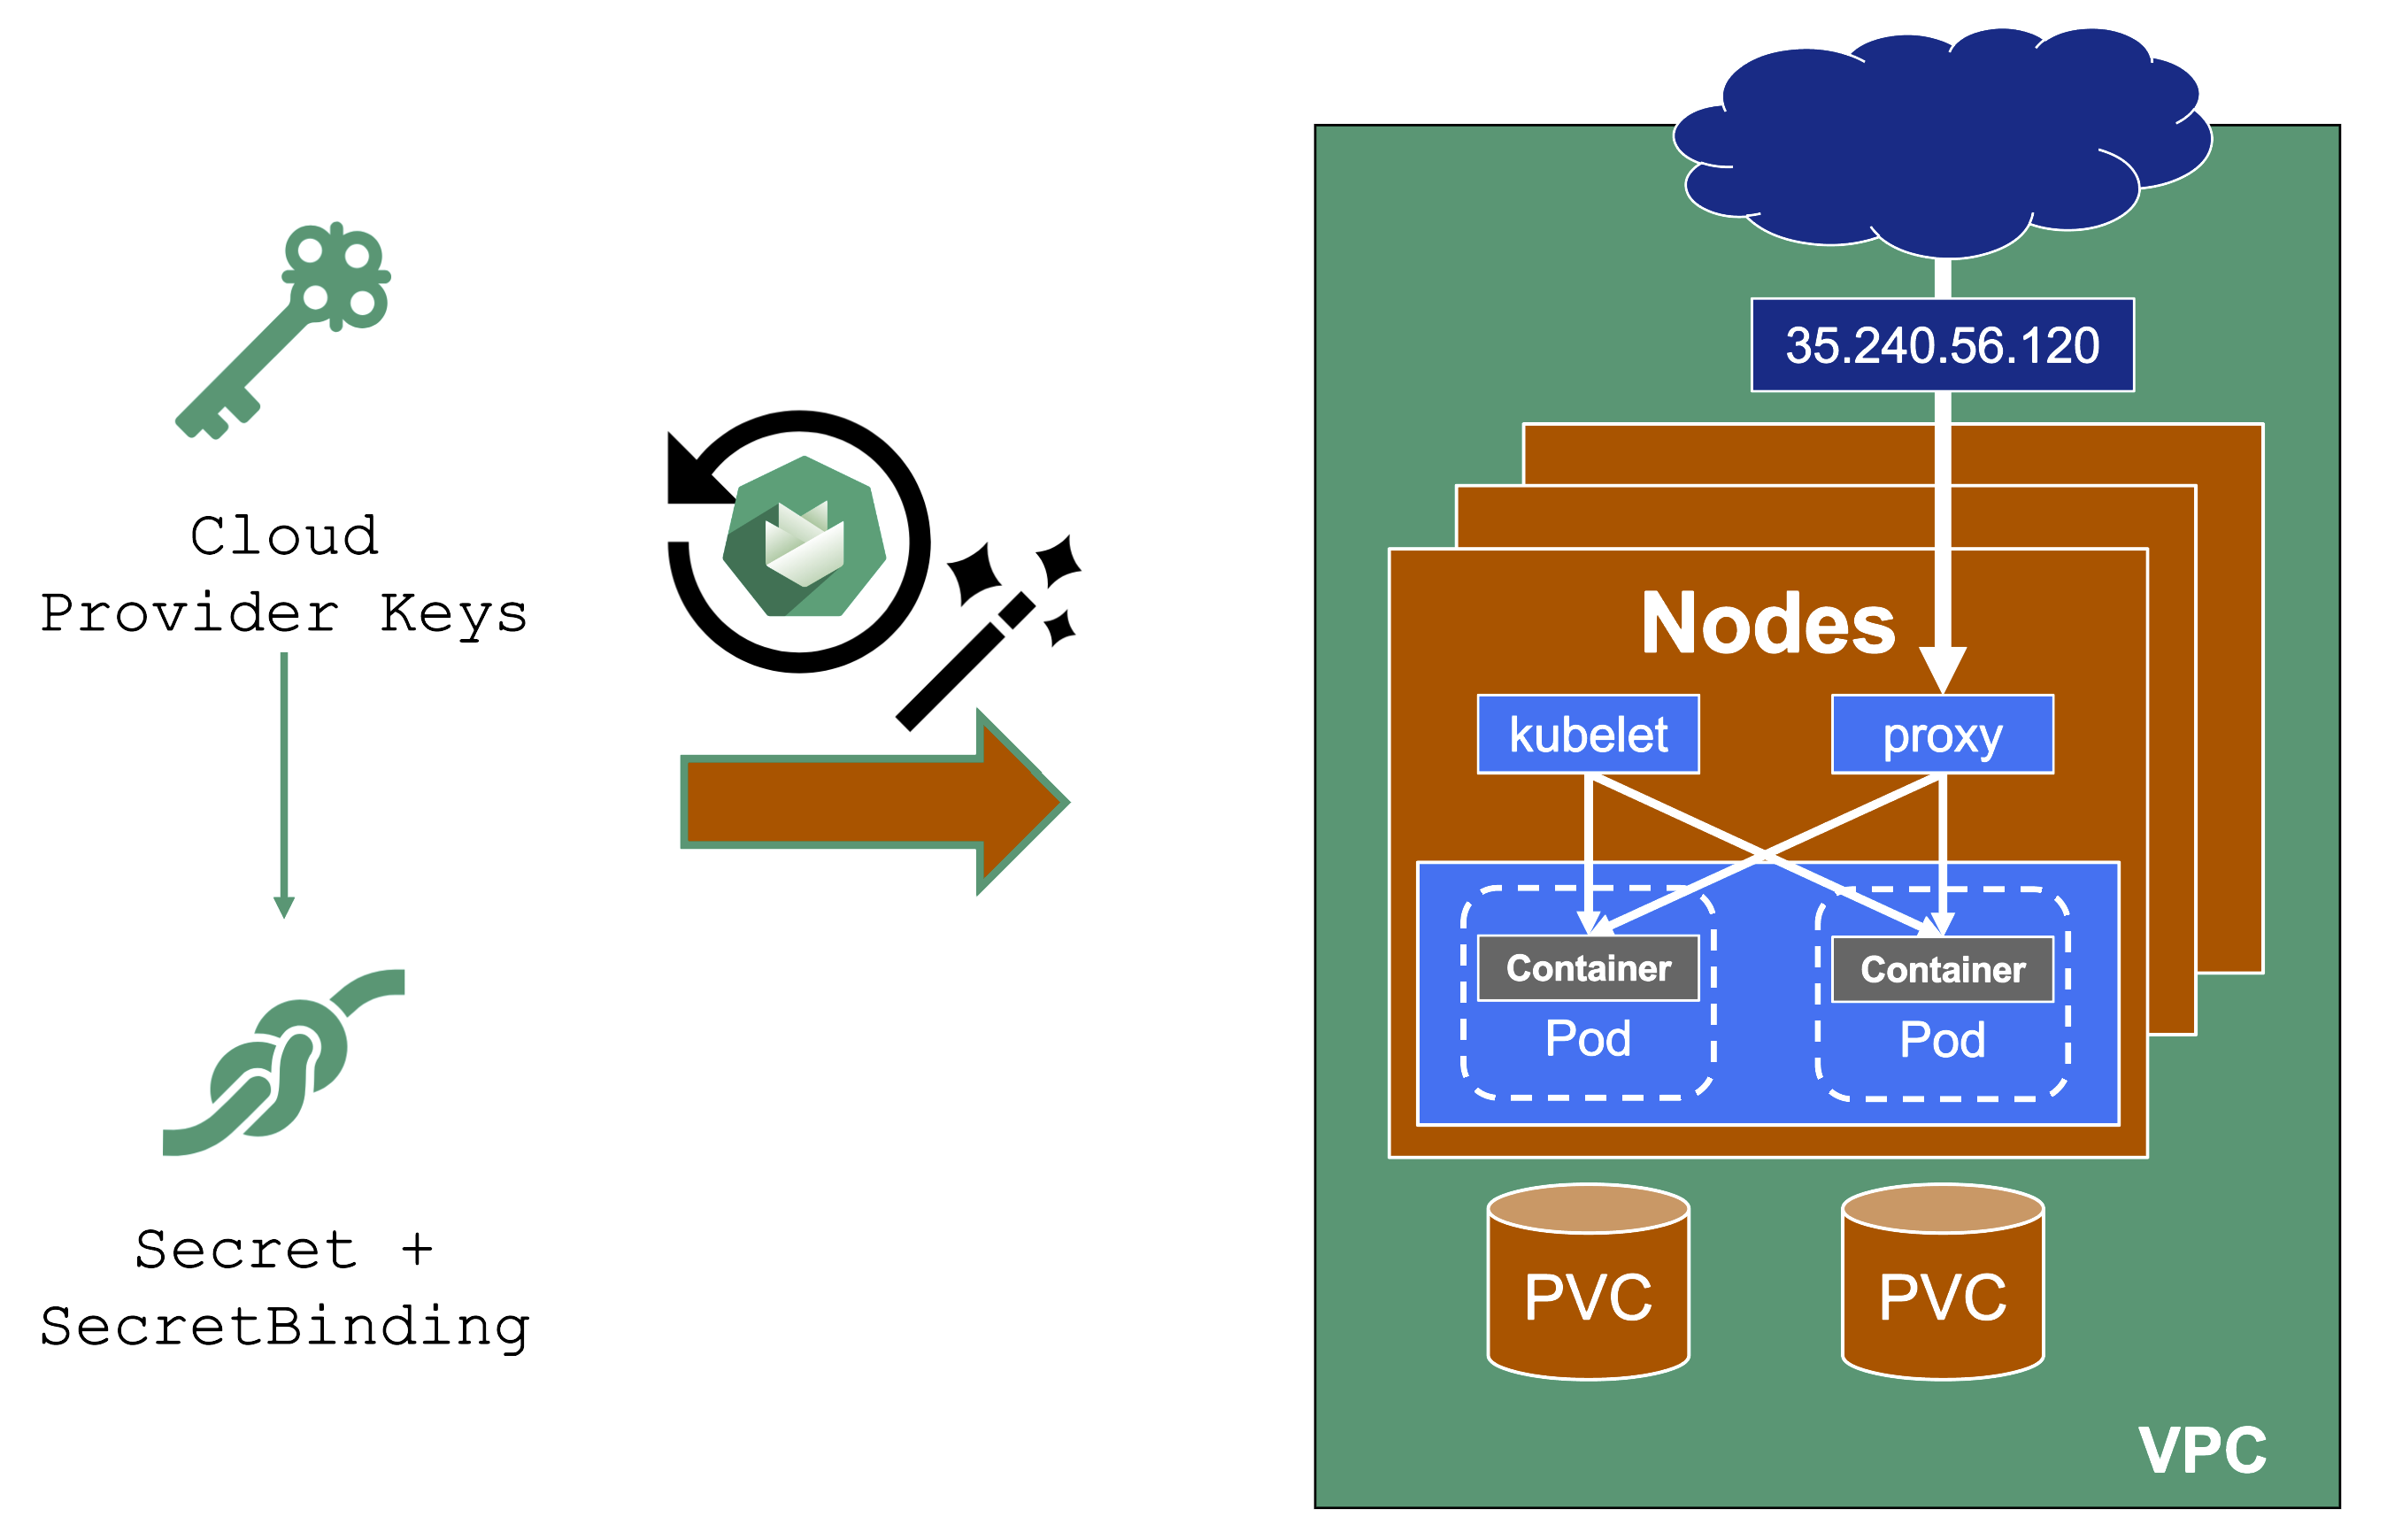
Credentials expire or get revoked. When this happens to the actively used infrastructure credentials of a shoot, the cluster will stop working after a while. New nodes cannot be added, LoadBalancers cannot be created, and so on.
You can update the credentials stored in the project namespace and reconcile the cluster to replicate the new keys to all relevant controllers. Similarly, when doing a planned rotation one should wait until the shoot reconciled successfully before invalidating the old credentials.
AutoUpdate Breaking Clusters
Gardener can automatically update a shoot’s Kubernetes patch version, when a new patch version is labeled as “supported”. Automatically updating of the OS images works in a similar way. Both are triggered by the “supported” classification in the respective cloud profile and can be enabled / disabled as part a shoot’s spec.
Additionally, when a minor Kubernetes / OS version expires, Gardener will force-update the shoot to the next supported version.
Turning on AutoUpdate for a shoot may be convenient but comes at the risk of potentially unwanted changes. While it is possible to switch to another OS version, updates to the Kubernetes version are a one way operation and cannot be reverted.
Control the version lifecycle separately for any cluster that hosts important workload.
Node Draining
Node Draining and Pod Disruption Budget
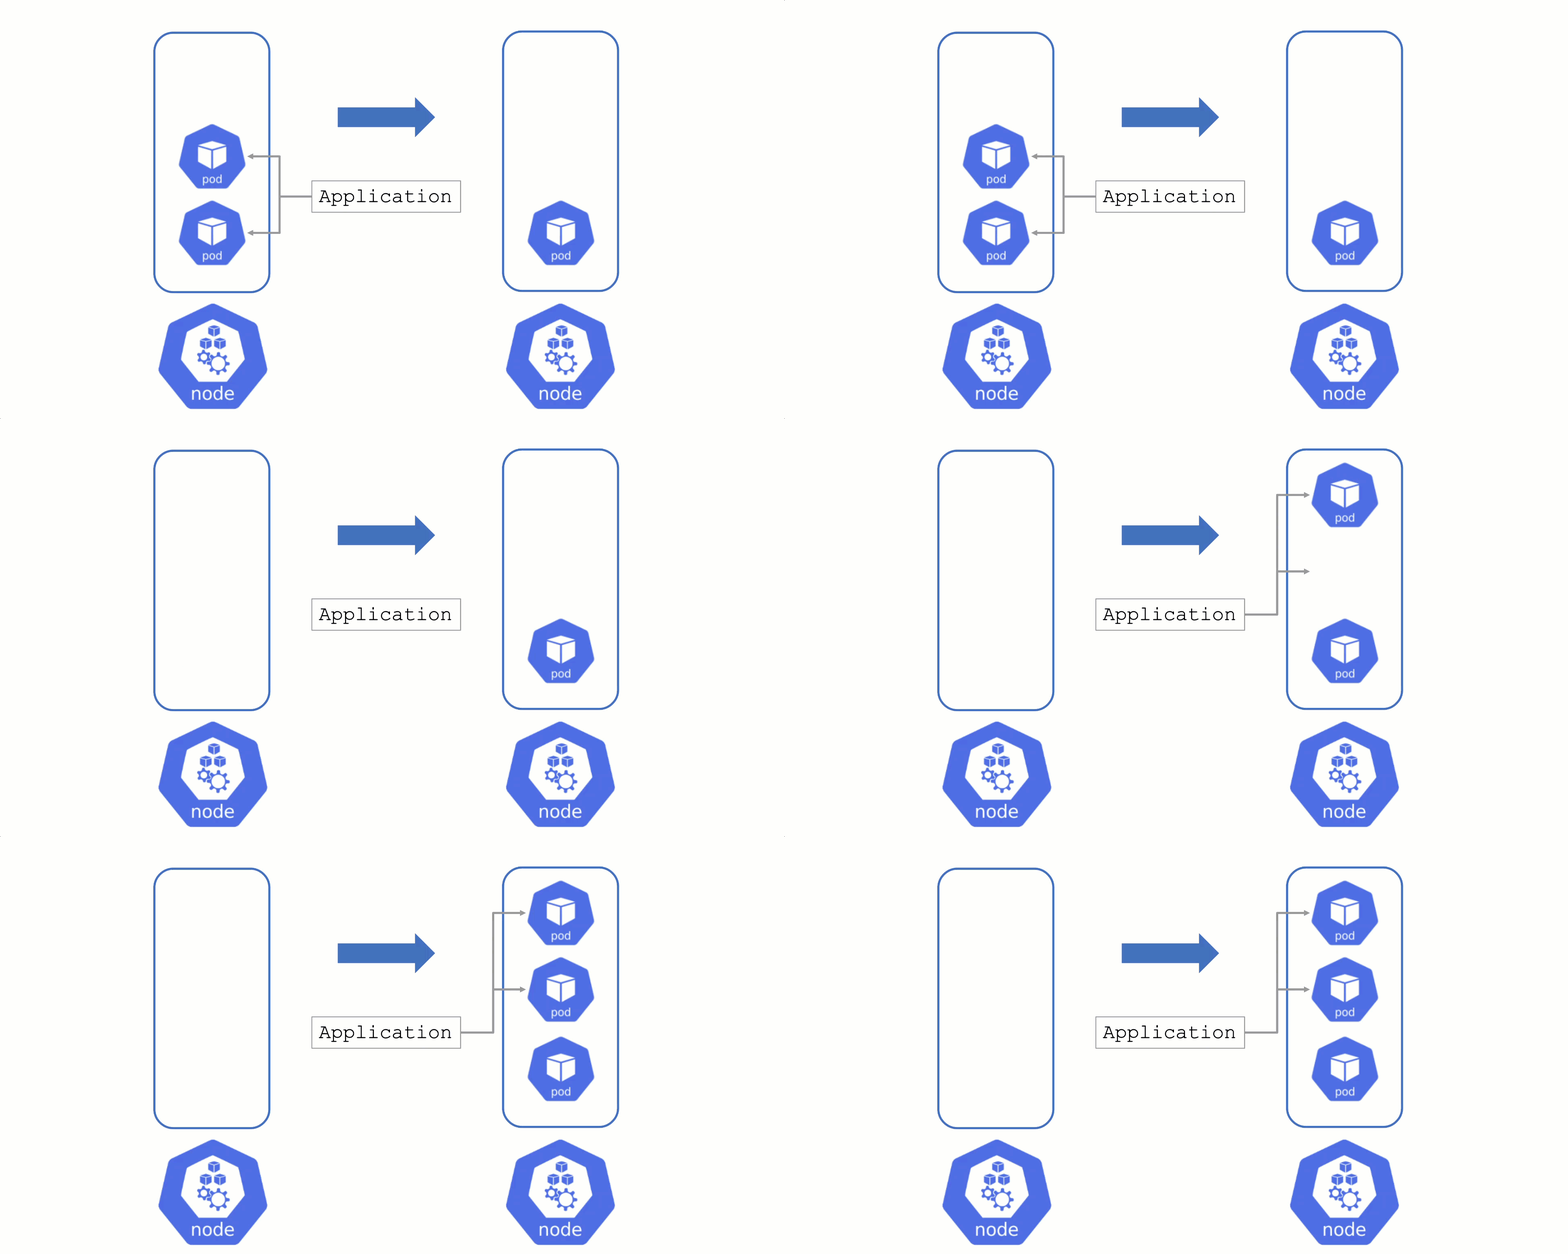
Typically, nodes are drained when:
- There is a update of the OS / Kubernetes minor version
- An Operator cordons & drains a node
- The cluster-autoscaler wants to scale down
Without a PodDistruptionBudget, pods will be terminated as fast as possible. If an application has 2 out of 2 replicas running on the drained node, this will probably cause availability issues.
Node Draining with PDB
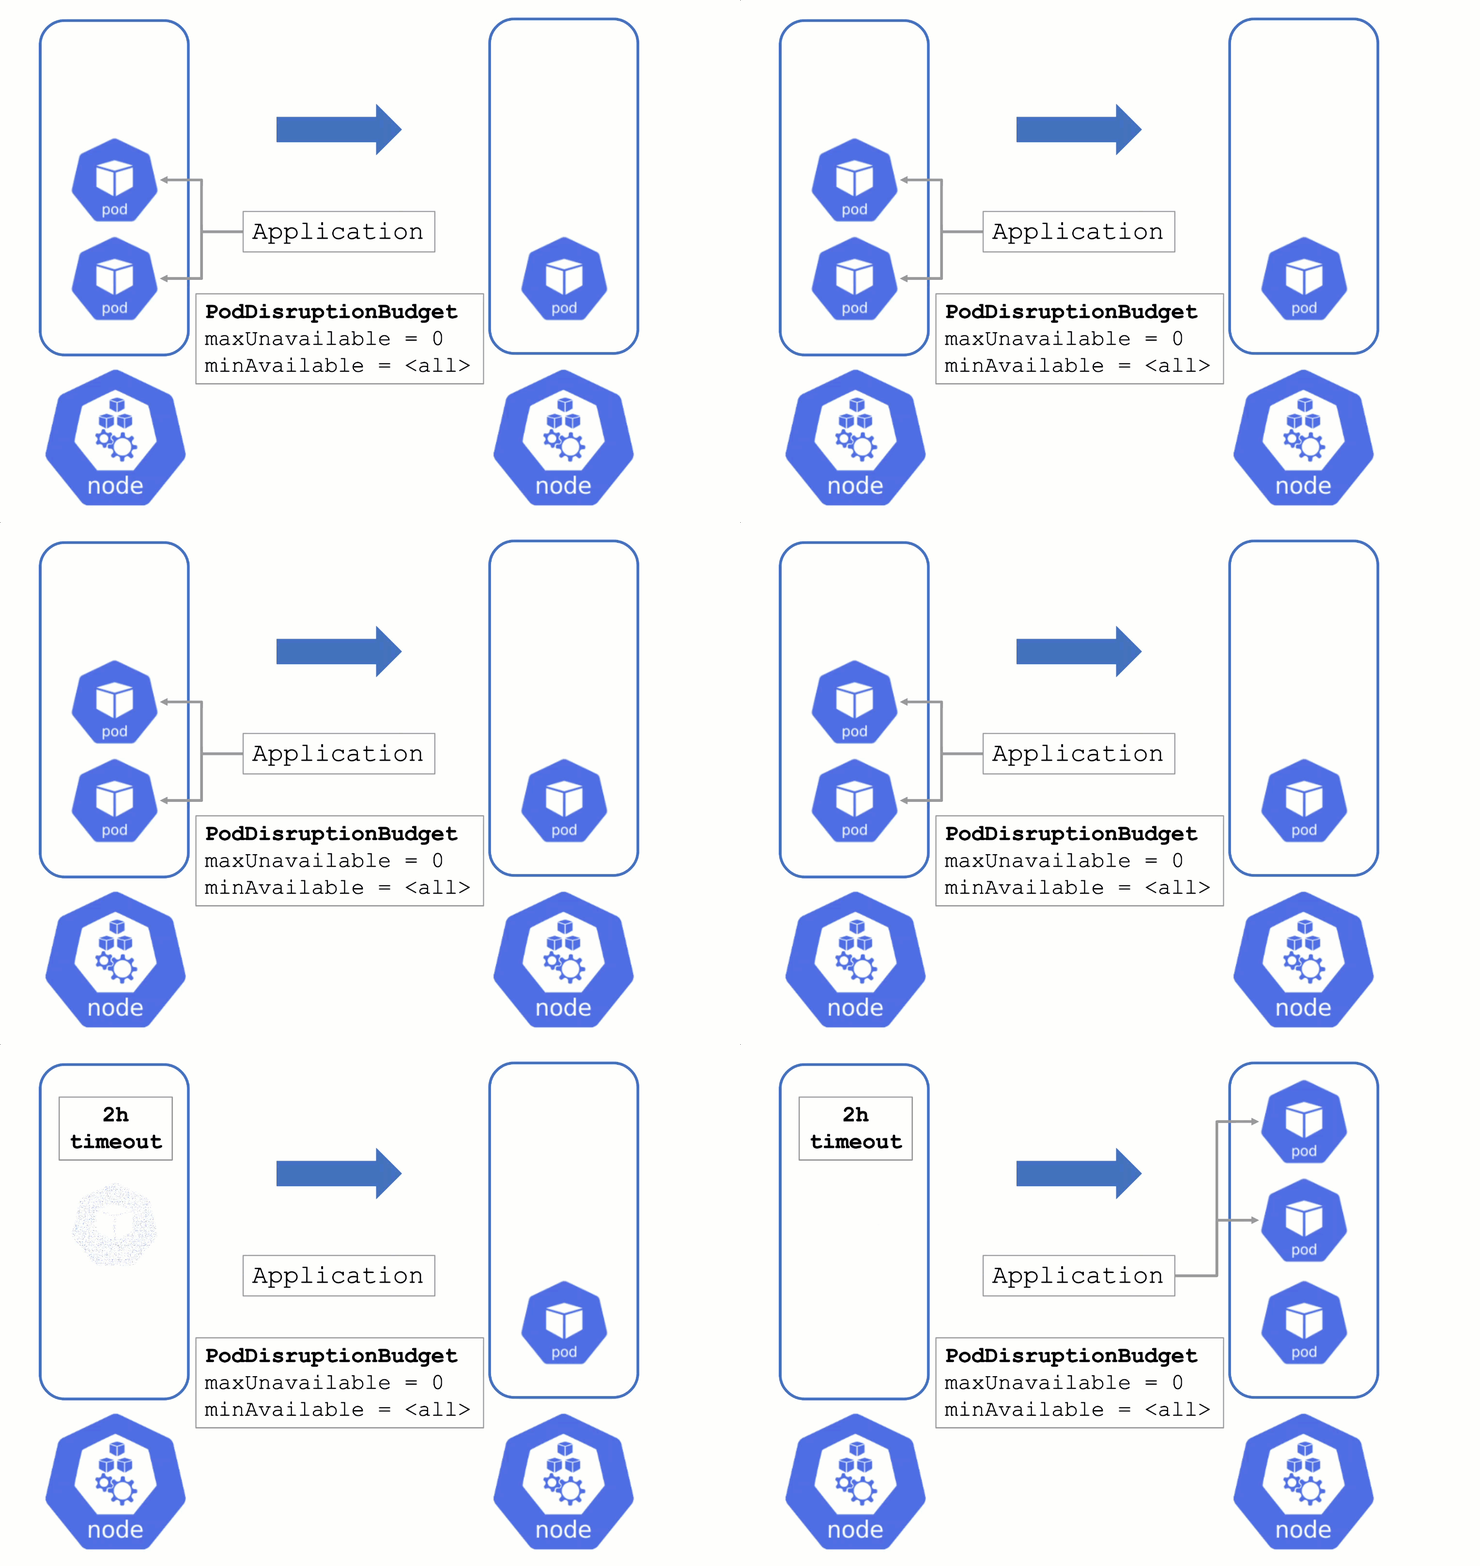
PodDisruptionBudgets can help to manage a graceful node drain. However, if no disruptions are allowed there, the node drain will be blocked until it reaches a timeout. Only then will the nodes be terminated but without respecting PDB thresholds.
Configure PDBs and allow disruptions.
Pod Resource Requests and Limits
Resource Consumption
Pods consume resources and, of course, there are only so many resources available on a single node. Setting requests will make the scheduling much better, as the scheduler has more information available.
Specifying limits can help, but can also limit an application in unintended ways. A recommendation to start with:
- Do not set CPU limits (CPU is compressible and throttling is really hard to detect)
- Set memory limits and monitor OOM kills / restarts of workload (typically detectable by container status exit code 137 and corresponding events). This will decrease the likelihood of OOM situations on the node itself. However, for critical workloads it might be better to have uncapped growth and rather risk a node going OOM.
Next, consider if assigning the workload to quality of service class guaranteed is needed. Again - this can help or be counterproductive. It is important to be aware of its implications. For more information, see Pod Quality of Service Classes.
Tune shoot.spec.Kubernetes.kubeReserved to protect the node (kubelet) in case of a workload pod consuming too much resources. It is very helpful to ensure a high level of stability.
If the usage profile changes over time, the VPA can help a lot to adapt the resource requests / limits automatically.
Webhooks
User-Deployed Webhooks in Kubernetes
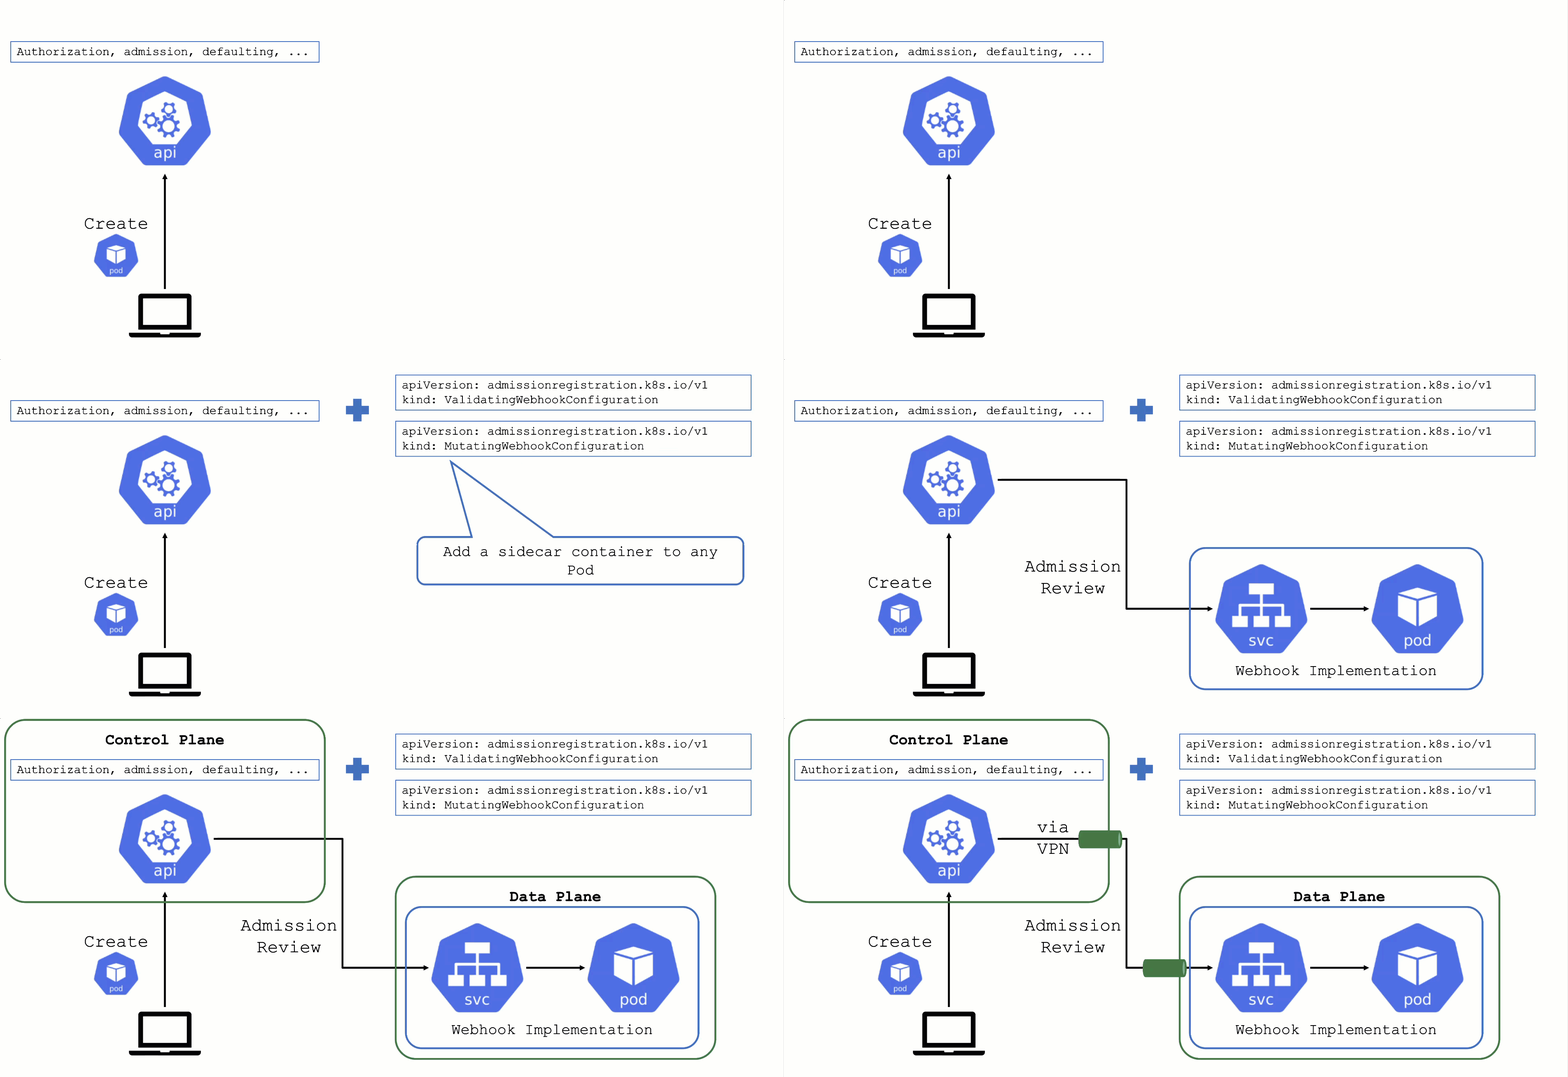
By default, any request to the API server will go through a chain of checks. Let’s take the example of creating a pod.
When the resource is submitted to the API server, it will be checked against the following validations:
- Is the user authorized to perform this action?
- Is the pod definitionactually valid?
- Are the specified values allowed?
Additionally, there is the defaulting - like the injection of the default service account’s name, if nothing else is specified.
This chain of admission control and mutation can be enhanced by the user. Read about dynamic admission control for more details.
ValidatingWebhookConfiguration: allow or deny requests based on custom rules
MutatingWebhookConfiguration: change а resource before it is actually stored in etcd (that is, before any other controller acts upon)
Both ValidatingWebhookConfiguration as well as MutatingWebhookConfiguration resources:
- specify for which resources and operations these checks should be executed.
- specify how to reach the webhook server (typically a service running on the data plane of a cluster)
- rely on a webhook server performing a review and reply to the
admissionReview request
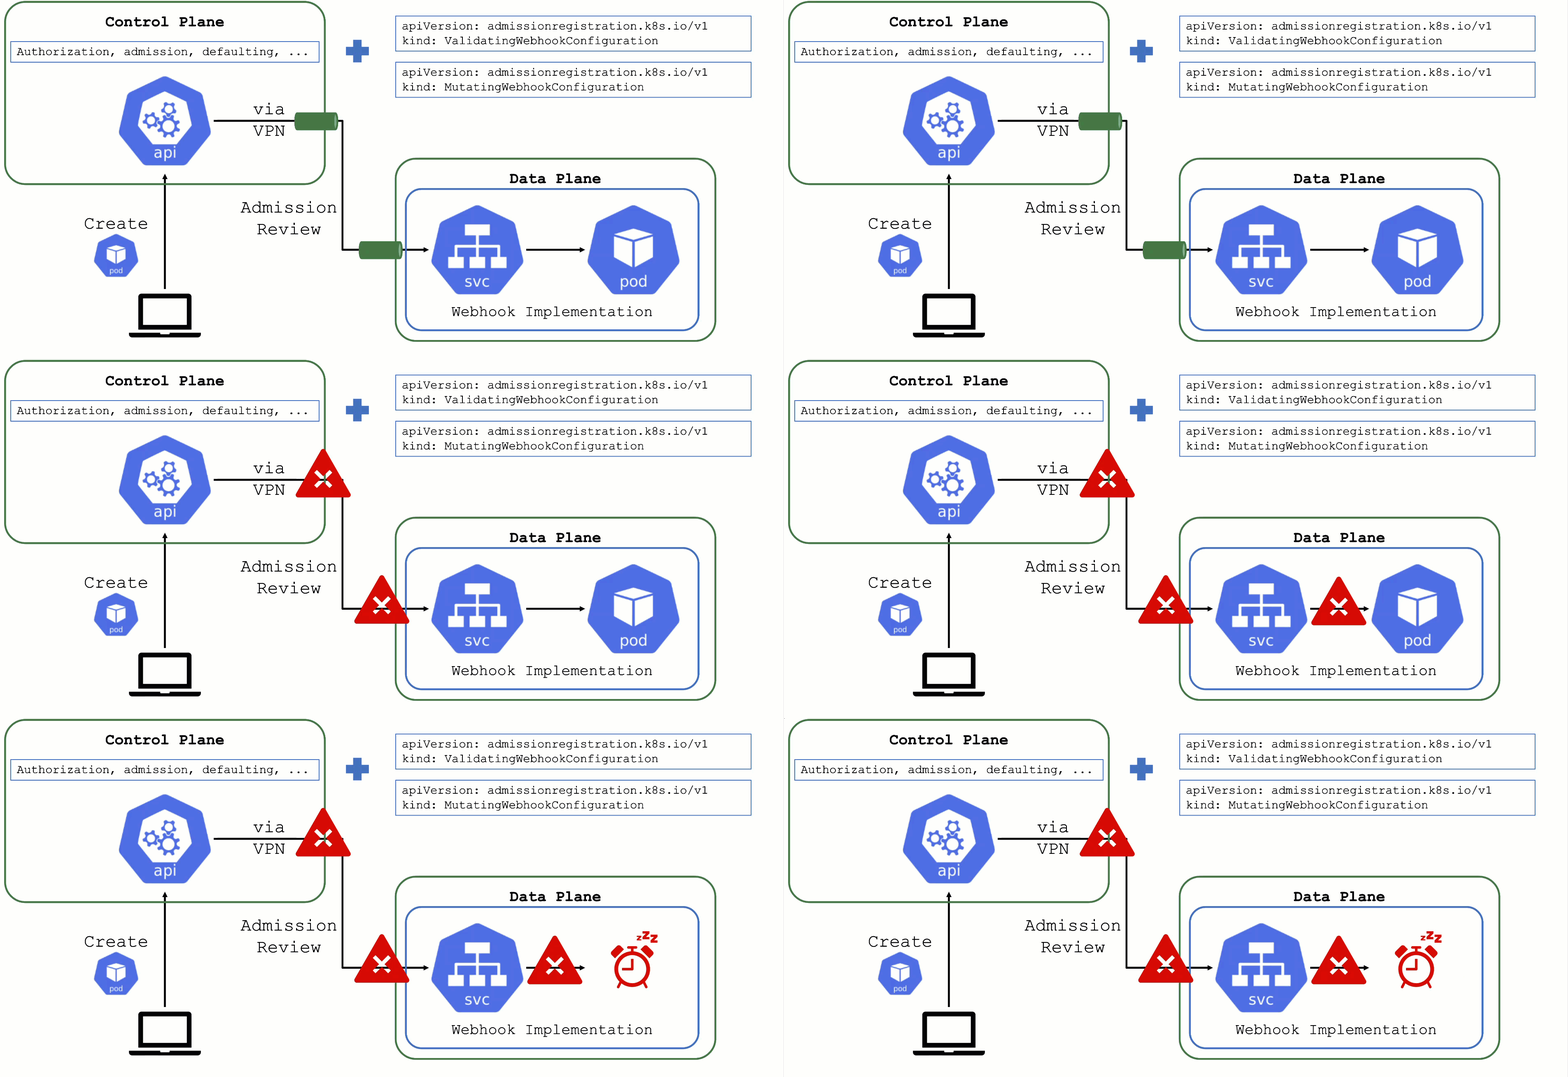
What could possibly go wrong?
Due to the separation of control plane and data plane in Gardener’s architecture, webhooks have the potential to break a cluster.
If the webhook server is not responding in time with a valid answer, the request should timeout and the failure policy is invoked. Depending on the scope of the webhook, frequent failures may cause downtime for applications.
Common causes for failure are:
- The call to the webhook is made through the VPN tunnel. VPN / connection issues can happen both on the side of the seed as well as the shoot and would render the webhook unavailable from the perspective of the control plane.
- The traffic cannot reach the pod (network issue, pod not available)
- The pod is processing too slow (e.g., because there are too many requests)
Timeout

Webhooks are a very helpful feature of Kubernetes. However, they can easily be configured to break a shoot cluster. Take the timeout, for example. High timeouts (>15s) can lead to blocking requests of control plane components. That’s because most control-plane API calls are made with a client-side timeout of 30s, so if a webhook has timeoutSeconds=30, the overall request might still fail as there is overhead in communication with the API server and other potential webhooks.
Webhooks (esp. mutating) may be called sequentially and thus adding up their individual timeouts. Even with a faliurePolicy=ignore the timeout will stop the request.
Recommendations
Problematic webhooks are reported as part of a shoot’s status. In addition to timeouts, it is crucial to exclude the kube-system namespace and (potentially non-namespaced) resources that are necessary for the cluster to function properly. Those should not be subject to a user-defined webhook.
In particular, a webhook should not operate on:
- the
kube-system namespace Endpoints or EndpointSlicesNodesPodSecurityPoliciesClusterRolesClusterRoleBindingsCustomResourceDefinitionsApiServicesCertificateSigningRequestsPriorityClasses
Example:
A webhook checks node objects upon creation and has a failurePolicy: fail. If the webhook does not answer in time (either due to latency or because there is no pod serving it), new nodes cannot join the cluster.
For more information, see Shoot Status.
Conversion Webhooks
Who installs a conversion webhook?
If you have written your own CustomResourceDefinition (CRD) and made a version upgrade, you will also have consciously written & deployed the conversion webhook.
However, sometimes, you simply use helm or kustomize to install a (third-party) dependency that contains CRDs. Of course, those can contain conversion webhooks as well. As a user of a cluster, please make sure to be aware what you deploy.
CRD with a Conversion Webhook
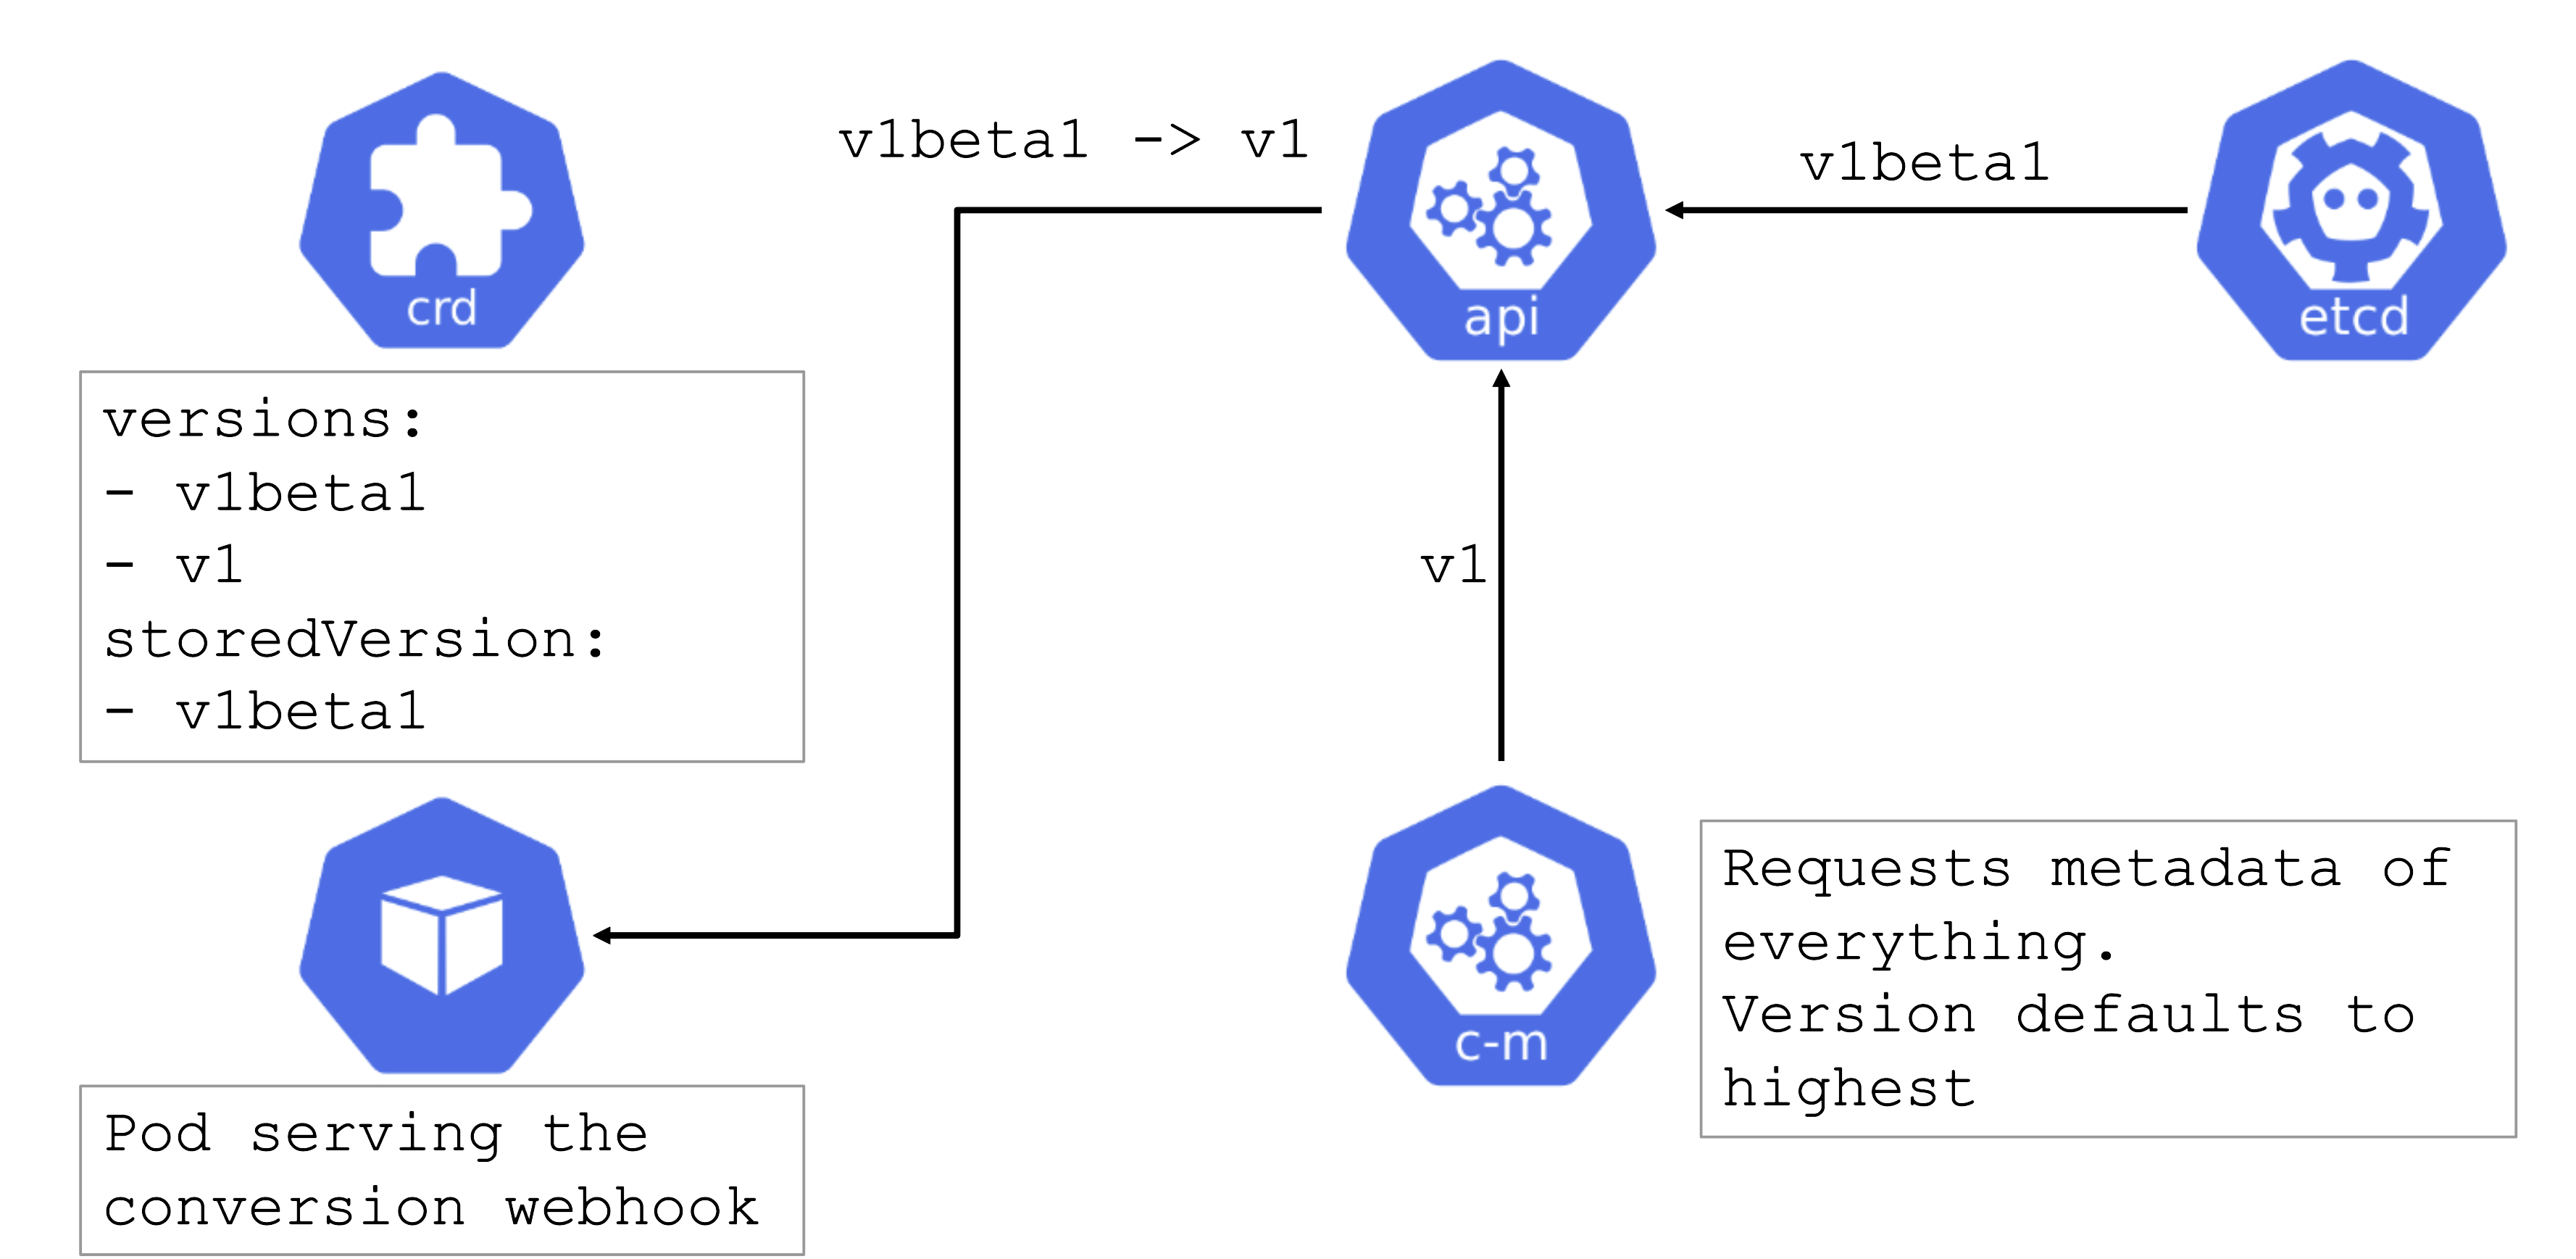
Conversion webhooks are tricky. Similarly to regular webhooks, they should have a low timeout. However, they cannot be remediated automatically and can cause errors in the control plane. For example, if a webhook is invoked but not available, it can block the garbage collection run by the kube-controller-manager.
In turn, when deleting something like a deployment, dependent resources like pods will not be deleted automatically.
Try to avoid conversion webhooks. They are valid and can be used, but should not stay in place forever. Complete the upgrade to a new version of the CRD as soon as possible.
For more information, see the Webhook Conversion, Upgrade Existing Objects to a New Stored Version, and Version Priority topics in the Kubernetes documentation.


