This is the multi-page printable view of this section. Click here to print.
Administer Client (Shoot) Clusters
1 - Scalability of Gardener Managed Kubernetes Clusters
Have you ever wondered how much more your Kubernetes cluster can scale before it breaks down?
Of course, the answer is heavily dependent on your workloads. But be assured, any cluster will break eventually. Therefore, the best mitigation is to plan for sharding early and run multiple clusters instead of trying to optimize everything hoping to survive with a single cluster. Still, it is helpful to know when the time has come to scale out. This document aims at giving you the basic knowledge to keep a Gardener-managed Kubernetes cluster up and running while it scales according to your needs.
Welcome to Planet Scale, Please Mind the Gap!
For a complex, distributed system like Kubernetes it is impossible to give absolute thresholds for its scalability. Instead, the limit of a cluster’s scalability is a combination of various, interconnected dimensions.
Let’s take a rather simple example of two dimensions - the number of Pods per Node and number of Nodes in a cluster. According to the scalability thresholds documentation, Kubernetes can scale up to 5000 Nodes and with default settings accommodate a maximum of 110 Pods on a single Node. Pushing only a single dimension towards its limit will likely harm the cluster. But if both are pushed simultaneously, any cluster will break way before reaching one dimension’s limit.
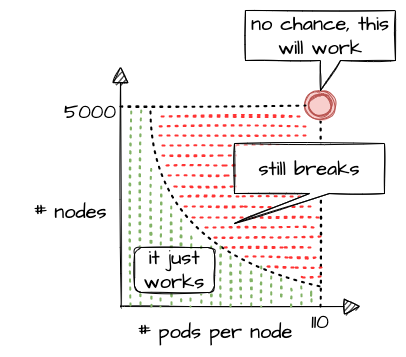
What sounds rather straightforward in theory can be a bit trickier in reality. While 110 Pods is the default limit, we successfully pushed beyond that and in certain cases run up to 200 Pods per Node without breaking the cluster. This is possible in an environment where one knows and controls all workloads and cluster configurations. It still requires careful testing, though, and comes at the cost of limiting the scalability of other dimensions, like the number of Nodes.
Of course, a Kubernetes cluster has a plethora of dimensions. Thus, when looking at a simple questions like “How many resources can I store in ETCD?”, the only meaningful answer must be: “it depends”
The following sections will help you to identify relevant dimensions and how they affect a Gardener-managed Kubernetes cluster’s scalability.
“Official” Kubernetes Thresholds and Scalability Considerations
To get started with the topic, please check the basic guidance provided by the Kubernetes community (specifically SIG Scalability):
Furthermore, the problem space has been discussed in a KubeCon talk, the slides for which can be found here. You should at least read the slides before continuing.
Essentially, it comes down to this:
If you promise to:
- correctly configure your cluster
- use extensibility features “reasonably”
- keep the load in the cluster within recommended limits
Then we promise that your cluster will function properly.
With that knowledge in mind, let’s look at Gardener and eventually pick up the question about the number of objects in ETCD raised above.
Gardener-Specific Considerations
The following considerations are based on experience with various large clusters that scaled in different dimensions. Just as explained above, pushing beyond even one of the limits is likely to cause issues at some point in time (but not guaranteed). Depending on the setup of your workloads however, it might work unexpectedly well. Nevertheless, we urge you take conscious decisions and rather think about sharding your workloads. Please keep in mind - your workload affects the overall stability and scalability of a cluster significantly.
ETCD
The following section is based on a setup where ETCD Pods run on a dedicated Node pool and each Node has 8 vCPU and 32GB memory at least.
ETCD has a practical space limit of 8 GB. It caps the number of objects one can technically have in a Kubernetes cluster.
Of course, the number is heavily influenced by each object’s size, especially when considering that secrets and configmaps may store up to 1MB of data. Another dimension is a cluster’s churn rate. Since ETCD stores a history of the keyspace, a higher churn rate reduces the number of objects. Gardener runs compaction every 30min and defragmentation once per day during a cluster’s maintenance window to ensure proper ETCD operations. However, it is still possible to overload ETCD. If the space limit is reached, ETCD will only accept READ or DELETE requests and manual interaction by a Gardener operator is needed to disarm the alarm, once you got below the threshold.
To avoid such a situation, you can monitor the current ETCD usage via the “ETCD” dashboard of the monitoring stack. It gives you the current DB size, as well as historical data for the past 2 weeks. While there are improvements planned to trigger compaction and defragmentation based on DB size, an ETCD should not grow up to this threshold. A typical, healthy DB size is less than 3 GB.
Furthermore, the dashboard has a panel called “Memory”, which indicates the memory usage of the etcd pod(s). Using more than 16GB memory is a clear red flag, and you should reduce the load on ETCD.
Another dimension you should be aware of is the object count in ETCD. You can check it via the “API Server” dashboard, which features a “ETCD Object Counts By Resource” panel. The overall number of objects (excluding events, as they are stored in a different etcd instance) should not exceed 100k for most use cases.
Kube API Server
The following section is based on a setup where kube-apiserver run as Pods and are scheduled to Nodes with at least 8 vCPU and 32GB memory.
Gardener can scale the Deployment of a kube-apiserver horizontally and vertically. Horizontal scaling is limited to a certain number of replicas and should not concern a stakeholder much. However, the CPU / memory consumption of an individual kube-apiserver pod poses a potential threat to the overall availability of your cluster. The vertical scaling of any kube-apiserver is limited by the amount of resources available on a single Node. Outgrowing the resources of a Node will cause a downtime and render the cluster unavailable.
In general, continuous CPU usage of up to 3 cores and 16 GB memory per kube-apiserver pod is considered to be safe. This gives some room to absorb spikes, for example when the caches are initialized. You can check the resource consumption by selecting kube-apiserver Pods in the “Kubernetes Pods” dashboard. If these boundaries are exceeded constantly, you need to investigate and derive measures to lower the load.
Further information is also recorded and made available through the monitoring stack. The dashboard “API Server Request Duration and Response Size” provides insights into the request processing time of kube-apiserver Pods. Related information like request rates, dropped requests or termination codes (e.g., 429 for too many requests) can be obtained from the dashboards “API Server” and “Kubernetes API Server Details”. They provide a good indicator for how well the system is dealing with its current load.
Reducing the load on the API servers can become a challenge. To get started, you may try to:
- Use immutable secrets and configmaps where possible to save watches. This pays off, especially when you have a high number of
Nodesor just lots of secrets in general. - Applications interacting with the K8s API: If you know an object by its name, use it. Using label selector queries is expensive, as the filtering happens only within the
kube-apiserverand notetcd, hence all resources must first pass completely frometcdtokube-apiserver. - Use (single object) caches within your controllers. Check the “Use cache for ShootStates in Gardenlet” issue for an example.
Nodes
When talking about the scalability of a Kubernetes cluster, Nodes are probably mentioned in the first place… well, obviously not in this guide. While vanilla Kubernetes lists 5000 Nodes as its upper limit, pushing that dimension is not feasible. Most clusters should run with fewer than 300 Nodes. But of course, the actual limit depends on the workloads deployed and can be lower or higher. As you scale your cluster, be extra careful and closely monitor ETCD and kube-apiserver.
The scalability of Nodes is subject to a range of limiting factors. Some of them can only be defined upon cluster creation and remain immutable during a cluster lifetime. So let’s discuss the most important dimensions.
CIDR:
Upon cluster creation, you have to specify or use the default values for several network segments. There are dedicated CIDRs for services, Pods, and Nodes. Each defines a range of IP addresses available for the individual resource type. Obviously, the maximum of possible Nodes is capped by the CIDR for Nodes.
However, there is a second limiting factor, which is the pod CIDR combined with the nodeCIDRMaskSize. This mask is used to divide the pod CIDR into smaller subnets, where each blocks gets assigned to a node. With a /16 pod network and a /24 nodeCIDRMaskSize, a cluster can scale up to 256 Nodes. Please check Shoot Networking for details.
Even though a /24 nodeCIDRMaskSize translates to a theoretical 256 pod IP addresses per Node, the maxPods setting should be less than 1/2 of this value. This gives the system some breathing room for churn and minimizes the risk for strange effects like mis-routed packages caused by immediate re-use of IPs.
Cloud provider capacity:
Most of the time, Nodes in Kubernetes translate to virtual machines on a hyperscaler. An attempt to add more Nodes to a cluster might fail due to capacity issues resulting in an error message like this:
Cloud provider message - machine codes error: code = [Internal] message = [InsufficientInstanceCapacity: We currently do not have sufficient <instance type> capacity in the Availability Zone you requested. Our system will be working on provisioning additional capacity.
In heavily utilized regions, individual clusters are competing for scarce resources. So before choosing a region / zone, try to ensure that the hyperscaler supports your anticipated growth. This might be done through quota requests or by contacting the respective support teams.
To mitigate such a situation, you may configure a worker pool with a different Node type and a corresponding priority expander as part of a shoot’s autoscaler section. Please consult the Autoscaler FAQ for more details.
Rolling of Node pools:
The overall number of Nodes is affecting the duration of a cluster’s maintenance. When upgrading a Node pool to a new OS image or Kubernetes version, all machines will be drained and deleted, and replaced with new ones. The more Nodes a cluster has, the longer this process will take, given that workloads are typically protected by PodDisruptionBudgets. Check Shoot Updates and Upgrades for details. Be sure to take this into consideration when planning maintenance.
Root disk:
You should be aware that the Node configuration impacts your workload’s performance too. Take the root disk of a Node, for example. While most hyperscalers offer the usage of HDD and SSD disks, it is strongly recommended to use SSD volumes as root disks. When there are lots of Pods on a Node or workloads making extensive use of emptyDir volumes, disk throttling becomes an issue. When a disk hits its IOPS limits, processes are stuck in IO-wait and slow down significantly. This can lead to a slow-down in the kubelet’s heartbeat mechanism and result in Nodes being replaced automatically, as they appear to be unhealthy. To analyze such a situation, you might have to run tools like iostat, sar or top directly on a Node.
Switching to an I/O optimized instance type (if offered for your infrastructure) can help to resolve issue. Please keep in mind that disks used via PersistentVolumeClaims have I/O limits as well. Sometimes these limits are related to the size and/or can be increased for individual disks.
Cloud Provider (Infrastructure) Limits
In addition to the already mentioned capacity restrictions, a cloud provider may impose other limitations to a Kubernetes cluster’s scalability. One category is the account quota defining the number of resources allowed globally or per region. Make sure to request appropriate values that suit your needs and contain a buffer, for example for having more Nodes during a rolling update.
Another dimension is the network throughput per VM or network interface. While you may be able to choose a network-optimized Node type for your workload to mitigate issues, you cannot influence the available bandwidth for control plane components. Therefore, please ensure that the traffic on the ETCD does not exceed 100MB/s. The ETCD dashboard provides data for monitoring this metric.
In some environments the upstream DNS might become an issue too and make your workloads subject to rate limiting. Given the heterogeneity of cloud providers incl. private data centers, it is not possible to give any thresholds. Still, the “CoreDNS” and “NodeLocalDNS” dashboards can help to derive a workload’s usage pattern. Check the DNS autoscaling and NodeLocalDNS documentations for available configuration options.
Webhooks
While webhooks provide powerful means to manage a cluster, they are equally powerful in breaking a cluster upon a malfunction or unavailability. Imagine using a policy enforcing system like Kyverno or Open Policy Agent Gatekeeper. As part of the stack, both will deploy webhooks which are invoked for almost everything that happens in a cluster. Now, if this webhook gets either overloaded or is simply not available, the cluster will stop functioning properly.
Hence, you have to ensure proper sizing, quick processing time, and availability of the webhook serving Pods when deploying webhooks. Please consult Dynamic Admission Control (Availability and Timeouts sections) for details. You should also be aware of the time added to any request that has to go through a webhook, as the kube-apiserver sends the request for mutation / validation to another pod and waits for the response. The more resources being subject to an external webhook, the more likely this will become a bottleneck when having a high churn rate on resources. Within the Gardener monitoring stack, you can check the extra time per webhook via the “API Server (Admission Details)” dashboard, which has a panel for “Duration per Webhook”.
In Gardener, any webhook timeout should be less than 15 seconds. Due to the separation of Kubernetes data-plane (shoot) and control-plane (seed) in Gardener, the extra hop from kube-apiserver (control-plane) to webhook (data-plane) is more expensive. Please check Shoot Status for more details.
Custom Resource Definitions
Using Custom Resource Definitions (CRD) to extend a cluster’s API is a common Kubernetes pattern and so is writing an operator to act upon custom resources. Writing an efficient controller reduces the load on the kube-apiserver and allows for better scaling. As a starting point, you might want to read Gardener’s Kubernetes Clients Guide.
Another problematic dimension is the usage of conversion webhooks when having resources stored in different versions. Not only do they add latency (see Webhooks) but can also block the kube-controllermanager’s garbage collection. If a conversion webhook is unavailable, the garbage collector fails to list all resources and does not perform any cleanup. In order to avoid such a situation, it is highly recommended to use conversion webhooks only when necessary and complete the migration to a new version as soon as possible.
Conclusion
As outlined by SIG Scalability, it is quite impossible to give limits or even recommendations fitting every individual use case. Instead, this guide outlines relevant dimensions and gives rather conservative recommendations based on usage patterns observed. By combining this information, it is possible to operate and scale a cluster in stable manner.
While going beyond is certainly possible for some dimensions, it significantly increases the risk of instability. Typically, limits on the control-plane are introduced by the availability of resources like CPU or memory on a single machine and can hardly be influenced by any user. Therefore, utilizing the existing resources efficiently is key. Other parameters are controlled by a user. In these cases, careful testing may reveal actual limits for a specific use case.
Please keep in mind that all aspects of a workload greatly influence the stability and scalability of a Kubernetes cluster.
2 - Authenticating with an Identity Provider
Prerequisites
Please read the following background material on Authenticating.
Overview
Kubernetes on its own doesn’t provide any user management. In other words, users aren’t managed through Kubernetes resources. Whenever you refer to a human user it’s sufficient to use a unique ID, for example, an email address. Nevertheless, Gardener project owners can use an identity provider to authenticate user access for shoot clusters in the following way:
- Configure an Identity Provider using OpenID Connect (OIDC).
- Configure a local kubectl oidc-login to enable
oidc-login. - Configure the shoot cluster to share details of the OIDC-compliant identity provider with the Kubernetes API Server.
- Authorize an authenticated user using role-based access control (RBAC).
- Verify the result
Note
Gardener allows administrators to modify aspects of the control plane setup. It gives administrators full control of how the control plane is parameterized. While this offers much flexibility, administrators need to ensure that they don’t configure a control plane that goes beyond the service level agreements of the responsible operators team.Configure an Identity Provider
Create a tenant in an OIDC compatible Identity Provider. For simplicity, we use Auth0, which has a free plan.
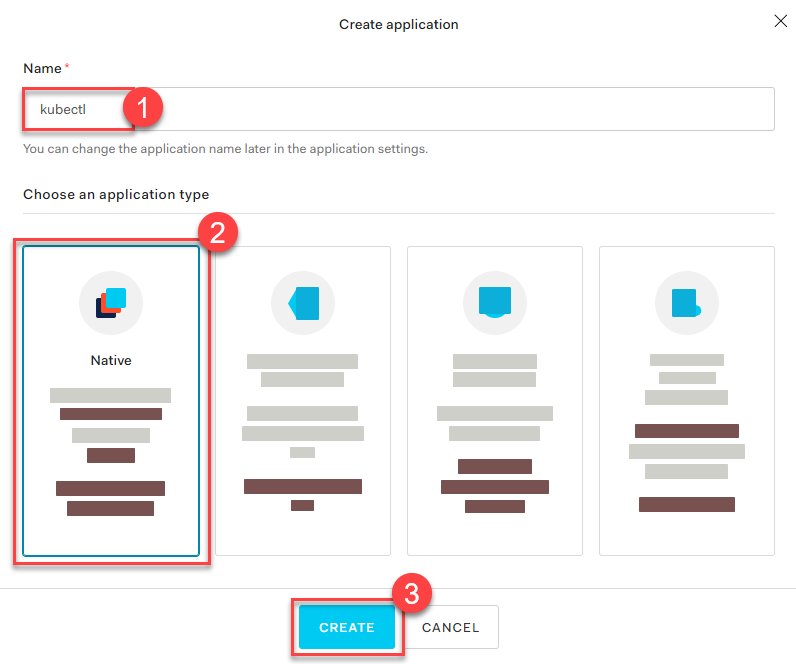
In your tenant, create a client application to use authentication with
kubectl: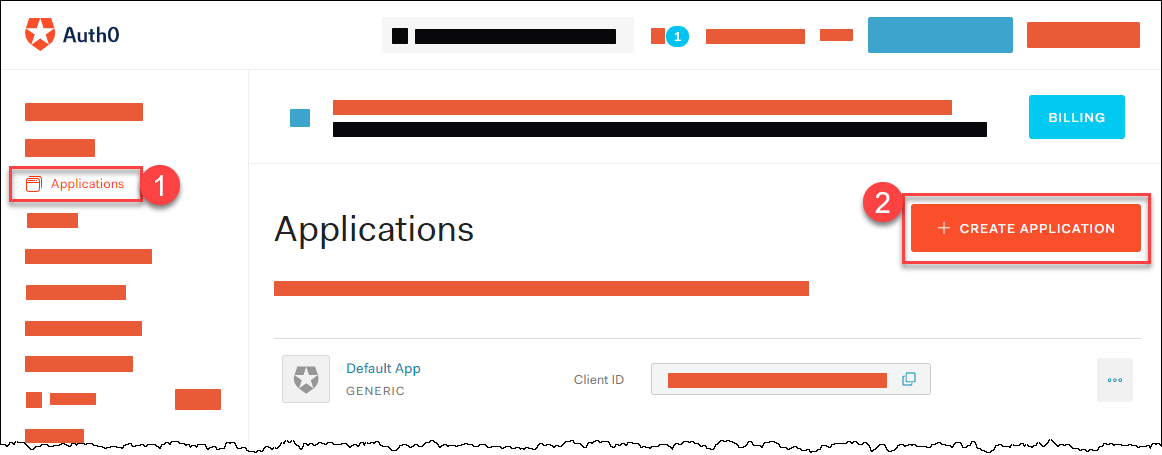
Provide a Name, choose Native as application type, and choose CREATE.
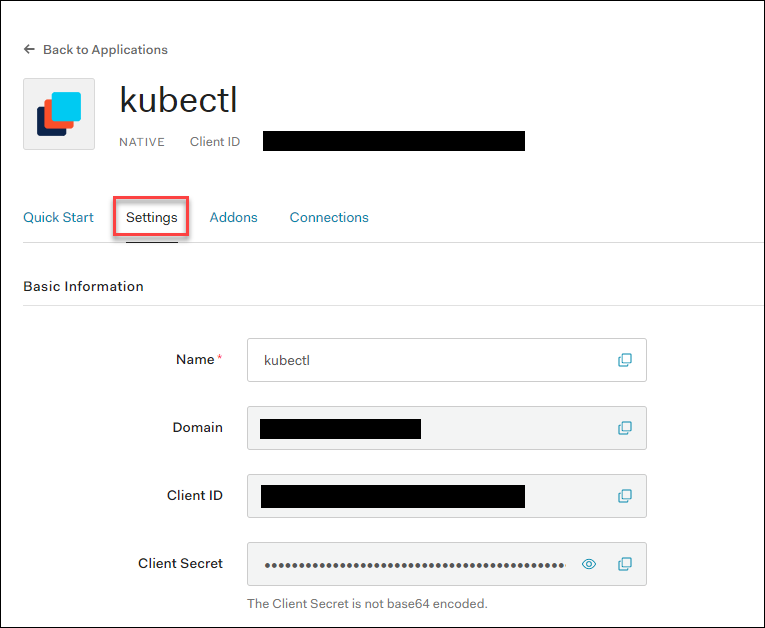
In the tab Settings, copy the following parameters to a local text file:
Domain
Corresponds to the issuer in OIDC. It must be an
https-secured endpoint (Auth0 requires a trailing/at the end). For more information, see Issuer Identifier.Client ID
Client Secret
Configure the client to have a callback url of
http://localhost:8000. This callback connects to your localkubectl oidc-loginplugin:
Save your changes.
Verify that
https://<Auth0 Domain>/.well-known/openid-configurationis reachable.Choose Users & Roles > Users > CREATE USERS to create a user with a user and password:
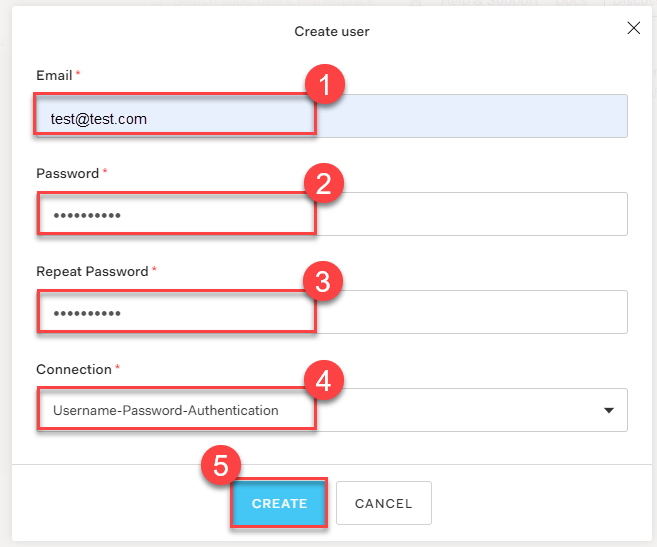
Note
Users must have a verified email address.Configure a Local kubectl oidc-login
Install the
kubectlplugin oidc-login. We highly recommend the krew installation tool, which also makes other plugins easily available.kubectl krew install oidc-loginThe response looks like this:
Updated the local copy of plugin index.
Installing plugin: oidc-login
CAVEATS:
\
|  You need to setup the OIDC provider, Kubernetes API server, role binding and kubeconfig.
|  See https://github.com/int128/kubelogin for more.
/
Installed plugin: oidc-login
Prepare a
kubeconfigfor later use:cp ~/.kube/config ~/.kube/config-oidcModify the configuration of
~/.kube/config-oidcas follows:apiVersion: v1 kind: Config ... contexts: - context: cluster: shoot--project--mycluster user: my-oidc name: shoot--project--mycluster ... users: - name: my-oidc user: exec: apiVersion: client.authentication.k8s.io/v1beta1 command: kubectl args: - oidc-login - get-token - --oidc-issuer-url=https://<Issuer>/ - --oidc-client-id=<Client ID> - --oidc-client-secret=<Client Secret> - --oidc-extra-scope=email,offline_access,profile
To test our OIDC-based authentication, the context shoot--project--mycluster of ~/.kube/config-oidc is used in a later step. For now, continue to use the configuration ~/.kube/config with administration rights for your cluster.
Configure the Shoot Cluster
Modify the shoot cluster YAML as follows, using the client ID and the domain (as issuer) from the settings of the client application you created in Auth0:
kind: Shoot
apiVersion: garden.sapcloud.io/v1beta1
metadata:
  name: mycluster
  namespace: garden-project
...
spec:
  kubernetes:
    kubeAPIServer:
      oidcConfig:
        clientID: <Client ID>
        issuerURL: "https://<Issuer>/"
        usernameClaim: email
This change of the Shoot manifest triggers a reconciliation. Once the reconciliation is finished, your OIDC configuration is applied. It doesn’t invalidate other certificate-based authentication methods. Wait for Gardener to reconcile the change. It can take up to 5 minutes.
Authorize an Authenticated User
In Auth0, you created a user with a verified email address, test@test.com in our example. For simplicity, we authorize a single user identified by this email address with the cluster role view:
apiVersion: rbac.authorization.k8s.io/v1
kind: ClusterRoleBinding
metadata:
  name: viewer-test
roleRef:
  apiGroup: rbac.authorization.k8s.io
  kind: ClusterRole
  name: view
subjects:
- apiGroup: rbac.authorization.k8s.io
  kind: User
  name: test@test.com
As administrator, apply the cluster role binding in your shoot cluster.
Verify the Result
To step into the shoes of your user, use the prepared
kubeconfigfile~/.kube/config-oidc, and switch to the context that usesoidc-login:cd ~/.kube export KUBECONFIG=$(pwd)/config-oidc kubectl config use-context `shoot--project--mycluster`kubectldelegates the authentication to pluginoidc-loginthe first time the user useskubectlto contact the API server, for example:kubectl get allThe plugin opens a browser for an interactive authentication session with Auth0, and in parallel serves a local webserver for the configured callback.
Enter your login credentials.
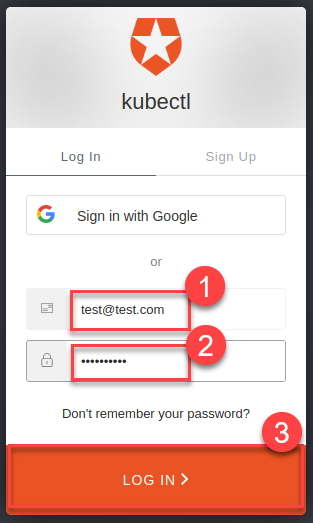
You should get a successful response from the API server:
Opening in existing browser session.
NAME                 TYPE        CLUSTER-IP   EXTERNAL-IP   PORT(S)   AGE
service/kubernetes   ClusterIP   100.64.0.1   <none>        443/TCP   86m
Note
After a successful login, kubectl uses a token for authentication so that you don’t have to provide user and password for every new kubectl command. How long the token is valid can be configured. If you want to log in again earlier, reset plugin oidc-login:
- Delete directory
~/.kube/cache/oidc-login. - Delete the browser cache.
To see if your user uses the cluster role
view, do some checks withkubectl auth can-i.The response for the following commands should be
no:kubectl auth can-i create clusterrolebindingskubectl auth can-i get secretskubectl auth can-i describe secretsThe response for the following commands should be
yes:kubectl auth can-i list podskubectl auth can-i get pods
If the last step is successful, you’ve configured your cluster to authenticate against an identity provider using OIDC.
Related Links
3 - Backup and Restore of Kubernetes Objects
TL;DR
Note
Details of the description might change in the near future since Heptio was taken over by VMWare which might result in different GitHub repositories or other changes. Please don’t hesitate to inform us in case you encounter any issues.In general, Backup and Restore (BR) covers activities enabling an organization to bring a system back in a consistent state, e.g., after a disaster or to setup a new system. These activities vary in a very broad way depending on the applications and its persistency.
Kubernetes objects like Pods, Deployments, NetworkPolicies, etc. configure Kubernetes internal components and might as well include external components like load balancer and persistent volumes of the cloud provider. The BR of external components and their configurations might be difficult to handle in case manual configurations were needed to prepare these components.
To set the expectations right from the beginning, this tutorial covers the BR of Kubernetes deployments which might use persistent volumes. The BR of any manual configuration of external components, e.g., via the cloud providers console, is not covered here, as well as the BR of a whole Kubernetes system.
This tutorial puts the focus on the open source tool Velero (formerly Heptio Ark) and its functionality to explain the BR process.
Basically, Velero allows you to:
- backup and restore your Kubernetes cluster resources and persistent volumes (on-demand or scheduled)
- backup or restore all objects in your cluster, or filter resources by type, namespace, and/or label
- by default, all persistent volumes are backed up (configurable)
- replicate your production environment for development and testing environments
- define an expiration date per backup
- execute pre- and post-activities in a container of a pod when a backup is created (see Hooks)
- extend Velero by Plugins, e.g., for Object and Block store (see Plugins)
Velero consists of a server side component and a client tool. The server components consists of Custom Resource Definitions (CRD) and controllers to perform the activities. The client tool communicates with the K8s API server to, e.g., create objects like a Backup object.
The diagram below explains the backup process. When creating a backup, Velero client makes a call to the Kubernetes API server to create a Backup object (1). The BackupController notices the new Backup object, validates the object (2) and begins the backup process (3). Based on the filter settings provided by the Velero client it collects the resources in question (3). The BackupController creates a tar ball with the Kubernetes objects and stores it in the backup location, e.g., AWS S3 (4) as well as snapshots of persistent volumes (5).
The size of the backup tar ball corresponds to the number of objects in etcd. The gzipped archive contains the Json representations of the objects.

Note
As of the writing of this tutorial, Velero or any other BR tool for Shoot clusters is not provided by Gardener.Getting Started
At first, clone the Velero GitHub repository and get the Velero client from the releases or build it from source via make all in the main directory of the cloned GitHub repository.
To use an AWS S3 bucket as storage for the backup files and the persistent volumes, you need to:
- create a S3 bucket as the backup target
- create an AWS IAM user for Velero
- configure the Velero server
- create a secret for your AWS credentials
For details about this setup, check the Set Permissions for Velero documentation. Moreover, it is possible to use other supported storage providers.
Note
Per default, Velero is installed in the namespacevelero. To change the namespace, check the documentation.Velero offers a wide range of filter possibilities for Kubernetes resources, e.g filter by namespaces, labels or resource types. The filter settings can be combined and used as include or exclude, which gives a great flexibility for selecting resources.
Note
Carefully set labels and/or use namespaces for your deployments to make the selection of the resources to be backed up easier. The best practice would be to check in advance which resources are selected with the defined filter.Exemplary Use Cases
Below are some use cases which could give you an idea on how to use Velero. You can also check Velero’s documentation for other introductory examples.
Helm Based Deployments
To be able to use Helm charts in your Kubernetes cluster, you need to install the Helm client helm and the server component tiller. Per default the server component is installed in the namespace kube-system. Even if it is possible to select single deployments via the filter settings of Velero, you should consider to install tiller in a separate namespace via helm init --tiller-namespace <your namespace>. This approach applies as well for all Helm charts to be deployed - consider separate namespaces for your deployments as well by using the parameter --namespace.
To backup a Helm based deployment, you need to backup both Tiller and the deployment. Only then the deployments could be managed via Helm. As mentioned above, the selection of resources would be easier in case they are separated in namespaces.
Separate Backup Locations
In case you run all your Kubernetes clusters on a single cloud provider, there is probably no need to store the backups in a bucket of a different cloud provider. However, if you run Kubernetes clusters on different cloud provider, you might consider to use a bucket on just one cloud provider as the target for the backups, e.g., to benefit from a lower price tag for the storage.
Per default, Velero assumes that both the persistent volumes and the backup location are on the same cloud provider. During the setup of Velero, a secret is created using the credentials for a cloud provider user who has access to both objects (see the policies, e.g., for the AWS configuration).
Now, since the backup location is different from the volume location, you need to follow these steps (described here for AWS):
configure as documented the volume storage location in
examples/aws/06-volumesnapshotlocation.yamland provide the user credentials. In this case, the S3 related settings like the policies can be omittedcreate the bucket for the backup in the cloud provider in question and a user with the appropriate credentials and store them in a separate file similar to
credentials-arkcreate a secret which contains two credentials, one for the volumes and one for the backup target, e.g., by using the command
kubectl create secret generic cloud-credentials --namespace heptio-ark --from-file cloud=credentials-ark --from-file backup-target=backup-arkconfigure in the deployment manifest
examples/aws/10-deployment.yamlthe entries involumeMounts,envandvolumesaccordingly, e.g., for a cluster running on AWS and the backup target bucket on GCP a configuration could look similar to:Note
Some links might get broken in the near future since Heptio was taken over by VMWare which might result in different GitHub repositories or other changes. Please don’t hesitate to inform us in case you encounter any issues.Example Velero deployment
# Copyright 2017 the Heptio Ark contributors.
#
# Licensed under the Apache License, Version 2.0 (the "License");
# you may not use this file except in compliance with the License.
# You may obtain a copy of the License at
#
#     http://www.apache.org/licenses/LICENSE-2.0
#
# Unless required by applicable law or agreed to in writing, software
# distributed under the License is distributed on an "AS IS" BASIS,
# WITHOUT WARRANTIES OR CONDITIONS OF ANY KIND, either express or implied.
# See the License for the specific language governing permissions and
# limitations under the License.

---
apiVersion: apps/v1beta1
kind: Deployment
metadata:
  namespace: velero
  name: velero
spec:
  replicas: 1
  template:
    metadata:
      labels:
        component: velero
      annotations:
        prometheus.io/scrape: "true"
        prometheus.io/port: "8085"
        prometheus.io/path: "/metrics"
    spec:
      restartPolicy: Always
      serviceAccountName: velero
      containers:
        - name: velero
          image: gcr.io/heptio-images/velero:latest
          command:
            - /velero
          args:
            - server
          volumeMounts:
            - name: cloud-credentials
              mountPath: /credentials
            - name: plugins
              mountPath: /plugins
            - name: scratch
              mountPath: /scratch
          env:
            - name: AWS_SHARED_CREDENTIALS_FILE
              value: /credentials/cloud
            - name: GOOGLE_APPLICATION_CREDENTIALS
              value: /credentials/backup-target
            - name: VELERO_SCRATCH_DIR
              value: /scratch
      volumes:
        - name: cloud-credentials
          secret:
            secretName: cloud-credentials
        - name: plugins
          emptyDir: {}
        - name: scratch
          emptyDir: {}
finally, configure the backup storage location in
examples/aws/05-backupstoragelocation.yamlto use, in this case, a GCP bucket
Limitations
Below is a potentially incomplete list of limitations. You can also consult Velero’s documentation to get up to date information.
- Only full backups of selected resources are supported. Incremental backups are not (yet) supported. However, by using filters it is possible to restrict the backup to specific resources
- Inconsistencies might occur in case of changes during the creation of the backup
- Application specific actions are not considered by default. However, they might be handled by using Velero’s Hooks or Plugins
4 - Create / Delete a Shoot Cluster
Create a Shoot Cluster
As you have already prepared an example Shoot manifest in the steps described in the development documentation, please open another Terminal pane/window with the KUBECONFIG environment variable pointing to the Garden development cluster and send the manifest to the Kubernetes API server:
kubectl apply -f your-shoot-aws.yaml
You should see that Gardener has immediately picked up your manifest and has started to deploy the Shoot cluster.
In order to investigate what is happening in the Seed cluster, please download its proper Kubeconfig yourself (see next paragraph). The namespace of the Shoot cluster in the Seed cluster will look like that: shoot-johndoe-johndoe-1, whereas the first johndoe is your namespace in the Garden cluster (also called “project”) and the johndoe-1 suffix is the actual name of the Shoot cluster.
To connect to the newly created Shoot cluster, you must download its Kubeconfig as well. Please connect to the proper Seed cluster, navigate to the Shoot namespace, and download the Kubeconfig from the kubecfg secret in that namespace.
Delete a Shoot Cluster
In order to delete your cluster, you have to set an annotation confirming the deletion first, and trigger the deletion after that. You can use the prepared delete shoot script which takes the Shoot name as first parameter. The namespace can be specified by the second parameter, but it is optional. If you don’t state it, it defaults to your namespace (the username you are logged in with to your machine).
./hack/usage/delete shoot johndoe-1 johndoe
(the hack bash script can be found at GitHub)
Configure a Shoot Cluster Aalert Receiver
The receiver of the Shoot alerts can be configured from the .spec.monitoring.alerting.emailReceivers section in the Shoot specification. The value of the field has to be a list of valid mail addresses.
The alerting for the Shoot clusters is handled by the Prometheus Alertmanager. The Alertmanager will be deployed next to the control plane when the Shoot resource specifies .spec.monitoring.alerting.emailReceivers and if a SMTP secret exists.
If the field gets removed then the Alertmanager will be also removed during the next reconcilation of the cluster. The opposite is also valid if the field is added to an existing cluster.
5 - Create a Shoot Cluster Into an Existing AWS VPC
Overview
Gardener can create a new VPC, or use an existing one for your shoot cluster. Depending on your needs, you may want to create shoot(s) into an already created VPC. The tutorial describes how to create a shoot cluster into an existing AWS VPC. The steps are identical for Alicloud, Azure, and GCP. Please note that the existing VPC must be in the same region like the shoot cluster that you want to deploy into the VPC.
TL;DR
If .spec.provider.infrastructureConfig.networks.vpc.cidr is specified, Gardener will create a new VPC with the given CIDR block and respectively will delete it on shoot deletion.
If .spec.provider.infrastructureConfig.networks.vpc.id is specified, Gardener will use the existing VPC and respectively won’t delete it on shoot deletion.
Note
It’s not recommended to create a shoot cluster into a VPC that is managed by Gardener (that is created for another shoot cluster). In this case the deletion of the initial shoot cluster will fail to delete the VPC because there will be resources attached to it.
Gardener won’t delete any manually created (unmanaged) resources in your cloud provider account.
1. Configure the AWS CLI
The aws configure command is a convenient way to setup your AWS CLI. It will prompt you for your credentials and settings which will be used in the following AWS CLI invocations:
aws configure
AWS Access Key ID [None]: <ACCESS_KEY_ID>
AWS Secret Access Key [None]: <SECRET_ACCESS_KEY>
Default region name [None]: <DEFAULT_REGION>
Default output format [None]: <DEFAULT_OUTPUT_FORMAT>
2. Create a VPC
Create the VPC by running the following command:
aws ec2 create-vpc --cidr-block <cidr-block>
{
  "Vpc": {
      "VpcId": "vpc-ff7bbf86",
      "InstanceTenancy": "default",
      "Tags": [],
      "CidrBlockAssociations": [
          {
              "AssociationId": "vpc-cidr-assoc-6e42b505",
              "CidrBlock": "10.0.0.0/16",
              "CidrBlockState": {
                  "State": "associated"
              }
          }
      ],
      "Ipv6CidrBlockAssociationSet": [],
      "State": "pending",
      "DhcpOptionsId": "dopt-38f7a057",
      "CidrBlock": "10.0.0.0/16",
      "IsDefault": false
  }
}
Gardener requires the VPC to have enabled DNS support, i.e the attributes enableDnsSupport and enableDnsHostnames must be set to true. enableDnsSupport attribute is enabled by default, enableDnsHostnames - not. Set the enableDnsHostnames attribute to true:
aws ec2 modify-vpc-attribute --vpc-id vpc-ff7bbf86 --enable-dns-hostnames
3. Create an Internet Gateway
Gardener also requires that an internet gateway is attached to the VPC. You can create one by using:
aws ec2 create-internet-gateway
{
    "InternetGateway": {
        "Tags": [],
        "InternetGatewayId": "igw-c0a643a9",
        "Attachments": []
    }
}
and attach it to the VPC using:
aws ec2 attach-internet-gateway --internet-gateway-id igw-c0a643a9 --vpc-id vpc-ff7bbf86
4. Create the Shoot
Prepare your shoot manifest (you could check the example manifests). Please make sure that you choose the region in which you had created the VPC earlier (step 2). Also, put your VPC ID in the .spec.provider.infrastructureConfig.networks.vpc.id field:
spec:
  region: <aws-region-of-vpc>
  provider:
    type: aws
    infrastructureConfig:
      apiVersion: aws.provider.extensions.gardener.cloud/v1alpha1
      kind: InfrastructureConfig
      networks:
        vpc:
          id: vpc-ff7bbf86
    # ...
Apply your shoot manifest:
kubectl apply -f your-shoot-aws.yaml
Ensure that the shoot cluster is properly created:
kubectl get shoot $SHOOT_NAME -n $SHOOT_NAMESPACE
NAME           CLOUDPROFILE   VERSION   SEED   DOMAIN           OPERATION   PROGRESS   APISERVER   CONTROL   NODES   SYSTEM   AGE
<SHOOT_NAME>   aws            1.15.0    aws    <SHOOT_DOMAIN>   Succeeded   100        True        True      True    True     20m
6 - Fix Problematic Conversion Webhooks
Reasoning
Custom Resource Definition (CRD) is what you use to define a Custom Resource. This is a powerful way to extend Kubernetes capabilities beyond the default installation, adding any kind of API objects useful for your application.
The CustomResourceDefinition API provides a workflow for introducing and upgrading to new versions of a CustomResourceDefinition. In a scenario where a CRD adds support for a new version and switches its spec.versions.storage field to it (i.e., from v1beta1 to v1), existing objects are not migrated in etcd. For more information, see Versions in CustomResourceDefinitions.
This creates a mismatch between the requested and stored version for all clients (kubectl, KCM, etc.). When the CRD also declares the usage of a conversion webhook, it gets called whenever a client requests information about a resource that still exists in the old version. If the CRD is created by the end-user, the webhook runs on the shoot side, whereas controllers / kapi-servers run separated, as part of the control-plane. For the webhook to be reachable, a working VPN connection seed -> shoot is essential. In scenarios where the VPN connection is broken, the kube-controller-manager eventually stops its garbage collection, as that requires it to list v1.PartialObjectMetadata for everything to build a dependency graph. Without the kube-controller-manager’s garbage collector, managed resources get stuck during update/rollout.
Breaking Situations
When a user upgrades to failureTolerance: node|zone, that will cause the VPN deployments to be replaced by statefulsets. However, as the VPN connection is broken upon teardown of the deployment, garbage collection will fail, leading to a situation that is stuck until an operator manually tackles it.
Such a situation can be avoided if the end-user has correctly configured CRDs containing conversion webhooks.
Checking Problematic CRDs
In order to make sure there are no version problematic CRDs, please run the script below in your shoot. It will return the name of the CRDs in case they have one of the 2 problems:
- the returned version of the CR is different than what is maintained in the
status.storedVersionsfield of the CRD. - the
status.storedVersionsfield of the CRD has more than 1 version defined.
#!/bin/bash

set -e -o pipefail

echo "Checking all CRDs in the cluster..."
for p in $(kubectl get crd | awk 'NR>1' | awk '{print $1}'); do
  strategy=$(kubectl get crd "$p" -o json | jq -r .spec.conversion.strategy)

  if [ "$strategy" == "Webhook" ]; then
     crd_name=$(kubectl get crd "$p" -o json | jq -r .metadata.name)

     number_of_stored_versions=$(kubectl get crd "$crd_name" -o json  | jq '.status.storedVersions | length')

      if [[ "$number_of_stored_versions" == 1 ]]; then
         returned_cr_version=$(kubectl get "$crd_name" -A -o json |  jq -r '.items[] | .apiVersion'  | sed 's:.*/::')
         if [ -z "$returned_cr_version" ]; then
           continue
         else
           variable=$(echo "$returned_cr_version" | xargs -n1 | sort -u | xargs)
           present_version=$(kubectl get crd "$crd_name" -o json  |  jq -cr '.status.storedVersions |.[]')
           if [[ $variable != "$present_version" ]]; then
             echo "ERROR: Stored version differs from the version that CRs are being returned. $crd_name with conversion webhook needs to be fixed"
           fi
         fi
      fi

      if [[ "$number_of_stored_versions" -gt 1 ]]; then
         returned_cr_version=$(kubectl get "$crd_name" -A -o json |  jq -r '.items[] | .apiVersion'  | sed 's:.*/::')
         if [ -z "$returned_cr_version" ]; then
           continue
         else
           echo "ERROR: Too many stored versions defined. $crd_name with conversion webhook needs to be fixed"
         fi
      fi
  fi
done
echo "Problematic CRDs are reported above."
Resolve CRDs
Below we give the steps needed to be taken in order to fix the CRDs reported by the script above.
Inspect all your CRDs that have conversion webhooks in place. If you have more than 1 version defined in its spec.status.storedVersions field, then initiate migration as described in Option 2 in the Upgrade existing objects to a new stored version guide.
For convenience, we have provided the necessary steps below.
Note
Please test the following steps on a non-productive landscape to make sure that the new CR version doesn’t break any of your existing workloads.Please check/set the old CR version to
storage:falseand set the new CR version tostorage:true.For the sake of an example, let’s consider the two versions
v1beta1(old) andv1(new).Before:
spec:
versions:
- name: v1beta1
......
storage: true

- name: v1
......
storage: false
After:
spec:
versions:
- name: v1beta1
......
storage: false

- name: v1
......
storage: true
Convert
custom-resourcesto the newest version.kubectl get <custom-resource-name> -A -ojson | k apply -f -Patch the CRD to keep only the latest version under storedVersions.
kubectl patch customresourcedefinitions <crd-name> --subresource='status' --type='merge' -p '{"status":{"storedVersions":["your-latest-cr-version"]}}'
7 - GPU Enabled Cluster
Disclaimer
Be aware, that the following sections might be opinionated. Kubernetes, and the GPU support in particular, are rapidly evolving, which means that this guide is likely to be outdated sometime soon. For this reason, contributions are highly appreciated to update this guide.
Create a Cluster
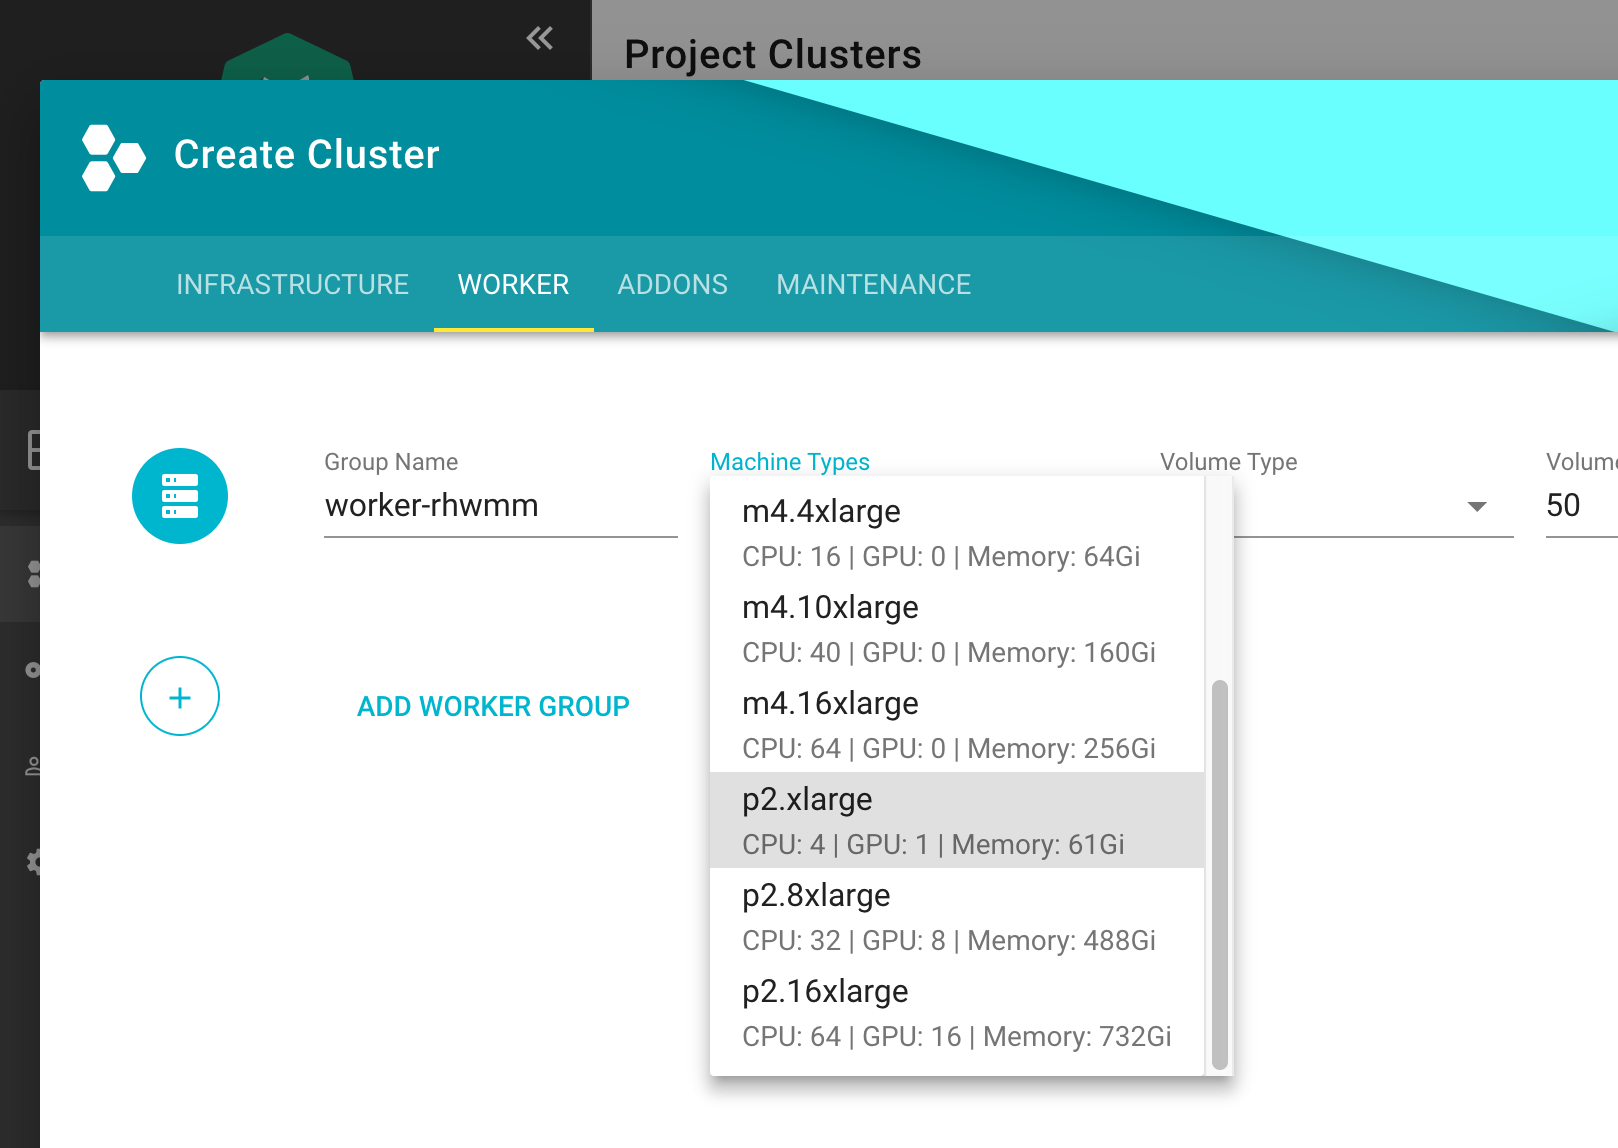
First thing first, let’s create a Kubernetes (K8s) cluster with GPU accelerated nodes. In this example we will use an AWS p2.xlarge EC2 instance because it’s the cheapest available option at the moment. Use such cheap instances for learning to limit your resource costs. This costs around 1€/hour per GPU
Install NVidia Driver as Daemonset
apiVersion: apps/v1
kind: DaemonSet
metadata:
  name: nvidia-driver-installer
  namespace: kube-system
  labels:
    k8s-app: nvidia-driver-installer
spec:
  selector:
    matchLabels:
      name: nvidia-driver-installer
      k8s-app: nvidia-driver-installer
  template:
    metadata:
      labels:
        name: nvidia-driver-installer
        k8s-app: nvidia-driver-installer
    spec:
      hostPID: true
      initContainers:
      - image: squat/modulus:4a1799e7aa0143bcbb70d354bab3e419b1f54972
        name: modulus
        args:
        - compile
        - nvidia
        - "410.104"
        securityContext:
          privileged: true
        env:
        - name: MODULUS_CHROOT
          value: "true"
        - name: MODULUS_INSTALL
          value: "true"
        - name: MODULUS_INSTALL_DIR
          value: /opt/drivers
        - name: MODULUS_CACHE_DIR
          value: /opt/modulus/cache
        - name: MODULUS_LD_ROOT
          value: /root
        - name: IGNORE_MISSING_MODULE_SYMVERS
          value: "1"
        volumeMounts:
        - name: etc-coreos
          mountPath: /etc/coreos
          readOnly: true
        - name: usr-share-coreos
          mountPath: /usr/share/coreos
          readOnly: true
        - name: ld-root
          mountPath: /root
        - name: module-cache
          mountPath: /opt/modulus/cache
        - name: module-install-dir-base
          mountPath: /opt/drivers
        - name: dev
          mountPath: /dev
      containers:
      - image: "gcr.io/google-containers/pause:3.1"
        name: pause
      tolerations:
      - key: "nvidia.com/gpu"
        effect: "NoSchedule"
        operator: "Exists"
      volumes:
      - name: etc-coreos
        hostPath:
          path: /etc/coreos
      - name: usr-share-coreos
        hostPath:
          path: /usr/share/coreos
      - name: ld-root
        hostPath:
          path: /
      - name: module-cache
        hostPath:
          path: /opt/modulus/cache
      - name: dev
        hostPath:
          path: /dev
      - name: module-install-dir-base
        hostPath:
          path: /opt/drivers
Install Device Plugin
apiVersion: apps/v1
kind: DaemonSet
metadata:
  name: nvidia-gpu-device-plugin
  namespace: kube-system
  labels:
    k8s-app: nvidia-gpu-device-plugin
    #addonmanager.kubernetes.io/mode: Reconcile
spec:
  selector:
    matchLabels:
      k8s-app: nvidia-gpu-device-plugin
  template:
    metadata:
      labels:
        k8s-app: nvidia-gpu-device-plugin
      annotations:
        scheduler.alpha.kubernetes.io/critical-pod: ''
    spec:
      priorityClassName: system-node-critical
      volumes:
      - name: device-plugin
        hostPath:
          path: /var/lib/kubelet/device-plugins
      - name: dev
        hostPath:
          path: /dev
      containers:
      - image: "k8s.gcr.io/nvidia-gpu-device-plugin@sha256:08509a36233c5096bb273a492251a9a5ca28558ab36d74007ca2a9d3f0b61e1d"
        command: ["/usr/bin/nvidia-gpu-device-plugin", "-logtostderr", "-host-path=/opt/drivers/nvidia"]
        name: nvidia-gpu-device-plugin
        resources:
          requests:
            cpu: 50m
            memory: 10Mi
          limits:
            cpu: 50m
            memory: 10Mi
        securityContext:
          privileged: true
        volumeMounts:
        - name: device-plugin
          mountPath: /device-plugin
        - name: dev
          mountPath: /dev
  updateStrategy:
    type: RollingUpdate
Test
To run an example training on a GPU node, first start a base image with Tensorflow with GPU support & Keras:
apiVersion: apps/v1
kind: Deployment
metadata:
  name: deeplearning-workbench
  namespace: default
spec:
  replicas: 1
  selector:
    matchLabels:
      app: deeplearning-workbench
  template:
    metadata:
      labels:
        app: deeplearning-workbench
    spec:
      containers:
      - name: deeplearning-workbench
        image: afritzler/deeplearning-workbench
        resources:
          limits:
            nvidia.com/gpu: 1
      tolerations:
      - key: "nvidia.com/gpu"
        effect: "NoSchedule"
        operator: "Exists"
Note
the tolerations section above is not required if you deploy the ExtendedResourceToleration admission controller to your cluster. You can do this in the kubernetes section of your Gardener cluster shoot.yaml as follows:
  kubernetes:
    kubeAPIServer:
      admissionPlugins:
      - name: ExtendedResourceToleration
Now exec into the container and start an example Keras training:
kubectl exec -it deeplearning-workbench-8676458f5d-p4d2v -- /bin/bash
cd /keras/example
python imdb_cnn.py
Related Links
- Andreas Fritzler from the Gardener Core team for the R&D, who has provided this setup.
- Build and install NVIDIA driver on CoreOS
- Nvidia Device Plugin
8 - Shoot Cluster Maintenance
Overview
Day two operations for shoot clusters are related to:
- The Kubernetes version of the control plane and the worker nodes
- The operating system version of the worker nodes
Note
When referring to an update of the “operating system version” in this document, the update of the machine image of the shoot cluster’s worker nodes is meant. For example, Amazon Machine Images (AMI) for AWS.The following table summarizes what options Gardener offers to maintain these versions:
| Auto-Update | Forceful Updates | Manual Updates | |
|---|---|---|---|
| Kubernetes version | Patches only | Patches and consecutive minor updates only | yes |
| Operating system version | yes | yes | yes |
Allowed Target Versions in the CloudProfile
Administrators maintain the allowed target versions that you can update to in the CloudProfile for each IaaS-Provider. Users with access to a Gardener project can check supported target versions with:
kubectl get cloudprofile [IAAS-SPECIFIC-PROFILE] -o yaml
| Path | Description | More Information |
|---|---|---|
spec.kubernetes.versions | The supported Kubernetes version major.minor.patch. | Patch releases |
spec.machineImages | The supported operating system versions for worker nodes |
Both the Kubernetes version and the operating system version follow semantic versioning that allows Gardener to handle updates automatically.
For more information, see Semantic Versioning.
Impact of Version Classifications on Updates
Gardener allows to classify versions in the CloudProfile as preview, supported, deprecated, or expired. During maintenance operations, preview versions are excluded from updates, because they’re often recently released versions that haven’t yet undergone thorough testing and may contain bugs or security issues.
For more information, see Version Classifications.
Let Gardener Manage Your Updates
The Maintenance Window
Gardener can manage updates for you automatically. It offers users to specify a maintenance window during which updates are scheduled:
- The time interval of the maintenance window can’t be less than 30 minutes or more than 6 hours.
- If there’s no maintenance window specified during the creation of a shoot cluster, Gardener chooses a maintenance window randomly to spread the load.
You can either specify the maintenance window in the shoot cluster specification (.spec.maintenance.timeWindow) or the start time of the maintenance window using the Gardener dashboard (CLUSTERS > [YOUR-CLUSTER] > OVERVIEW > Lifecycle > Maintenance).
Auto-Update and Forceful Updates
To trigger updates during the maintenance window automatically, Gardener offers the following methods:
Auto-update:
Gardener starts an update during the next maintenance window whenever there’s a version available in theCloudProfilethat is higher than the one of your shoot cluster specification, and that isn’t classified aspreviewversion. For Kubernetes versions, auto-update only updates to higher patch levels.You can either activate auto-update on the Gardener dashboard (CLUSTERS > [YOUR-CLUSTER] > OVERVIEW > Lifecycle > Maintenance) or in the shoot cluster specification:
.spec.maintenance.autoUpdate.kubernetesVersion: true.spec.maintenance.autoUpdate.machineImageVersion: true
Forceful updates:
In the maintenance window, Gardener compares the current version given in the shoot cluster specification with the version list in theCloudProfile. If the version has an expiration date and if the date is before the start of the maintenance window, Gardener starts an update to the highest version available in theCloudProfilethat isn’t classified aspreviewversion. The highest version inCloudProfilecan’t have an expiration date. For Kubernetes versions, Gardener only updates to higher patch levels or consecutive minor versions.
If you don’t want to wait for the next maintenance window, you can annotate the shoot cluster specification with shoot.gardener.cloud/operation: maintain. Gardener then checks immediately if there’s an auto-update or a forceful update needed.
Note
Forceful version updates are executed even if the auto-update for the Kubernetes version(or the auto-update for the machine image version) is deactivated (set tofalse).With expiration dates, administrators can give shoot cluster owners more time for testing before the actual version update happens, which allows for smoother transitions to new versions.
Kubernetes Update Paths
The bigger the delta of the Kubernetes source version and the Kubernetes target version, the better it must be planned and executed by operators. Gardener only provides automatic support for updates that can be applied safely to the cluster workload:
| Update Type | Example | Update Method |
|---|---|---|
| Patches | 1.10.12 to 1.10.13 | auto-update or Forceful update |
| Update to consecutive minor version | 1.10.12 to 1.11.10 | Forceful update |
| Other | 1.10.12 to 1.12.0 | Manual update |
Gardener doesn’t support automatic updates of nonconsecutive minor versions, because Kubernetes doesn’t guarantee updateability in this case. However, multiple minor version updates are possible if not only the minor source version is expired, but also the minor target version is expired. Gardener then updates the Kubernetes version first to the expired target version, and waits for the next maintenance window to update this version to the next minor target version.
Warning
The administrator who maintains theCloudProfile has to ensure that the list of Kubernetes versions consists of consecutive minor versions, for example, from 1.10.x to 1.11.y. If the minor version increases in bigger steps, for example, from 1.10.x to 1.12.y, then the shoot cluster updates will fail during the maintenance window.Manual Updates
To update the Kubernetes version or the node operating system manually, change the .spec.kubernetes.version field or the .spec.provider.workers.machine.image.version field correspondingly.
Manual updates are required if you would like to do a minor update of the Kubernetes version. Gardener doesn’t do such updates automatically, as they can have breaking changes that could impact the cluster workload.
Manual updates are either executed immediately (default) or can be confined to the maintenance time window.
Choosing the latter option causes changes to the cluster (for example, node pool rolling-updates) and the subsequent reconciliation to only predictably happen during a defined time window (available since Gardener version 1.4).
For more information, see Confine Specification Changes/Update Roll Out.
Warning
Before applying such an update on minor or major releases, operators should check for all the breaking changes introduced in the target Kubernetes release changelog.Examples
In the examples for the CloudProfile and the shoot cluster specification, only the fields relevant for the example are shown.
Auto-Update of Kubernetes Version
Let’s assume that the Kubernetes versions 1.10.5 and 1.11.0 were added in the following CloudProfile:
spec:
  kubernetes:
    versions:
    - version: 1.11.0
    - version: 1.10.5
    - version: 1.10.0
Before this change, the shoot cluster specification looked like this:
spec:
  kubernetes:
    version: 1.10.0
  maintenance:
    timeWindow:
      begin: 220000+0000
      end: 230000+0000
    autoUpdate:
      kubernetesVersion: true
As a consequence, the shoot cluster is updated to Kubernetes version 1.10.5 between 22:00-23:00 UTC. Your shoot cluster isn’t updated automatically to 1.11.0, even though it’s the highest Kubernetes version in the CloudProfile, because Gardener only does automatic updates of the Kubernetes patch level.
Forceful Update Due to Expired Kubernetes Version
Let’s assume the following CloudProfile exists on the cluster:
spec:
  kubernetes:
    versions:
    - version: 1.12.8
    - version: 1.11.10
    - version: 1.10.13
    - version: 1.10.12
      expirationDate: "2019-04-13T08:00:00Z"
Let’s assume the shoot cluster has the following specification:
spec:
  kubernetes:
    version: 1.10.12
  maintenance:
    timeWindow:
      begin: 220000+0100
      end: 230000+0100
    autoUpdate:
      kubernetesVersion: false
The shoot cluster specification refers to a Kubernetes version that has an expirationDate. In the maintenance window on 2019-04-12, the Kubernetes version stays the same as it’s still not expired. But in the maintenance window on 2019-04-14, the Kubernetes version of the shoot cluster is updated to 1.10.13 (independently of the value of .spec.maintenance.autoUpdate.kubernetesVersion).
Forceful Update to New Minor Kubernetes Version
Let’s assume the following CloudProfile exists on the cluster:
spec:
  kubernetes:
    versions:
    - version: 1.12.8
    - version: 1.11.10
    - version: 1.11.09
    - version: 1.10.12
      expirationDate: "2019-04-13T08:00:00Z"
Let’s assume the shoot cluster has the following specification:
spec:
  kubernetes:
    version: 1.10.12
  maintenance:
    timeWindow:
      begin: 220000+0100
      end: 230000+0100
    autoUpdate:
      kubernetesVersion: false
The shoot cluster specification refers a Kubernetes version that has an expirationDate. In the maintenance window on 2019-04-14, the Kubernetes version of the shoot cluster is updated to 1.11.10, which is the highest patch version of minor target version 1.11 that follows the source version 1.10.
Automatic Update from Expired Machine Image Version
Let’s assume the following CloudProfile exists on the cluster:
spec:
  machineImages:
  - name: coreos
    versions:
    - version: 2191.5.0
    - version: 2191.4.1
    - version: 2135.6.0
      expirationDate: "2019-04-13T08:00:00Z"
Let’s assume the shoot cluster has the following specification:
spec:
  provider:
    type: aws
    workers:
    - name: name
      maximum: 1
      minimum: 1
      maxSurge: 1
      maxUnavailable: 0
      image:
        name: coreos
        version: 2135.6.0
        type: m5.large
      volume:
        type: gp2
        size: 20Gi
  maintenance:
    timeWindow:
      begin: 220000+0100
      end: 230000+0100
    autoUpdate:
      machineImageVersion: false
The shoot cluster specification refers a machine image version that has an expirationDate. In the maintenance window on 2019-04-12, the machine image version stays the same as it’s still not expired. But in the maintenance window on 2019-04-14, the machine image version of the shoot cluster is updated to 2191.5.0 (independently of the value of .spec.maintenance.autoUpdate.machineImageVersion) as version 2135.6.0 is expired.
9 - Tailscale
Access the Kubernetes apiserver from your tailnet
Overview
If you would like to strengthen the security of your Kubernetes cluster even further, this guide post explains how this can be achieved.
The most common way to secure a Kubernetes cluster which was created with Gardener is to apply the ACLs described in the Gardener ACL Extension repository or to use ExposureClass, which exposes the Kubernetes apiserver in a corporate network not exposed to the public internet.
However, those solutions are not without their drawbacks. Managing the ACL extension becomes fairly difficult with the growing number of participants, especially in a dynamic environment and work from home scenarios, and using ExposureClass requires you to first have a corporate network suitable for this purpose.
But there is a solution which bridges the gap between these two approaches by the use of a mesh VPN based on WireGuard
Tailscale
Tailscale is a mesh VPN network which uses Wireguard under the hood, but automates the key exchange procedure. Please consult the official tailscale documentation for a detailed explanation.
Target Architecture

Installation
In order to be able to access the Kubernetes apiserver only from a tailscale VPN, you need this steps:
- Create a tailscale account and ensure MagicDNS is enabled.
- Create an OAuth ClientID and Secret OAuth ClientID and Secret. Don’t forget to create the required tags.
- Install the tailscale operator tailscale operator.
If all went well after the operator installation, you should be able to see the tailscale operator by running tailscale status:
# tailscale status
...
100.83.240.121  tailscale-operator   tagged-devices linux   -
...
Expose the Kubernetes apiserver
Now you are ready to expose the Kubernetes apiserver in the tailnet by annotating the service which was created by Gardener:
kubectl annotate -n default kubernetes tailscale.com/expose=true tailscale.com/hostname=kubernetes
It is required to kubernetes as the hostname, because this is part of the certificate common name of the Kubernetes apiserver.
After annotating the service, it will be exposed in the tailnet and can be shown by running tailscale status:
# tailscale status
...
100.83.240.121  tailscale-operator   tagged-devices linux   -
100.96.191.87   kubernetes           tagged-devices linux   idle, tx 19548 rx 71656
...
Modify the kubeconfig
In order to access the cluster via the VPN, you must modify the kubeconfig to point to the Kubernetes service exposed in the tailnet, by changing the server entry to https://kubernetes.
---
apiVersion: v1
clusters:
  - cluster:
      certificate-authority-data: <base64 encoded secret>
      server: https://kubernetes
    name: my-cluster
...
Enable ACLs to Block All IPs
Now you are ready to use your cluster from every device which is part of your tailnet. Therefore you can now block all access to the Kubernetes apiserver with the ACL extension.
Caveats
Multiple Kubernetes Clusters
You can actually not join multiple Kubernetes Clusters to join your tailnet because the kubernetes service in every cluster would overlap.
Headscale
It is possible to host a tailscale coordination by your own if you do not want to rely on the service tailscale.com offers. The headscale project is a open source implementation of this.
This works for basic tailscale VPN setups, but not for the tailscale operator described here, because headscale does not implement all required API endpoints for the tailscale operator.
The details can be found in this Github Issue.