Get a Shell to a Gardener Shoot Worker Node
Overview
To troubleshoot certain problems in a Kubernetes cluster, operators need access to the host of the Kubernetes node. This can be required if a node misbehaves or fails to join the cluster in the first place.
With access to the host, it is for instance possible to check the kubelet logs and interact with common tools such as systemctl and journalctl.
The first section of this guide explores options to get a shell to the node of a Gardener Kubernetes cluster. The options described in the second section do not rely on Kubernetes capabilities to get shell access to a node and thus can also be used if an instance failed to join the cluster.
This guide only covers how to get access to the host, but does not cover troubleshooting methods.
- Overview
- Get a Shell to an Operational Cluster Node
- SSH Access to a Node That Failed to Join the Cluster
- Cleanup
Get a Shell to an Operational Cluster Node
The following describes four different approaches to get a shell to an operational Shoot worker node. As a prerequisite to troubleshooting a Kubernetes node, the node must have joined the cluster successfully and be able to run a pod. All of the described approaches involve scheduling a pod with root permissions and mounting the root filesystem.
Gardener Dashboard
Prerequisite: the terminal feature is configured for the Gardener dashboard.
- Navigate to the cluster overview page and find the
Terminalin theAccesstile.

Select the target Cluster (Garden, Seed / Control Plane, Shoot cluster) depending on the requirements and access rights (only certain users have access to the Seed Control Plane).
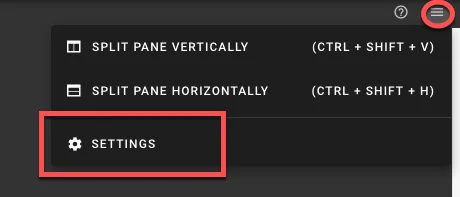
- To open the terminal configuration, interact with the top right-hand corner of the screen.
- Set the Terminal Runtime to "Privileged". Also, specify the target node from the drop-down menu.
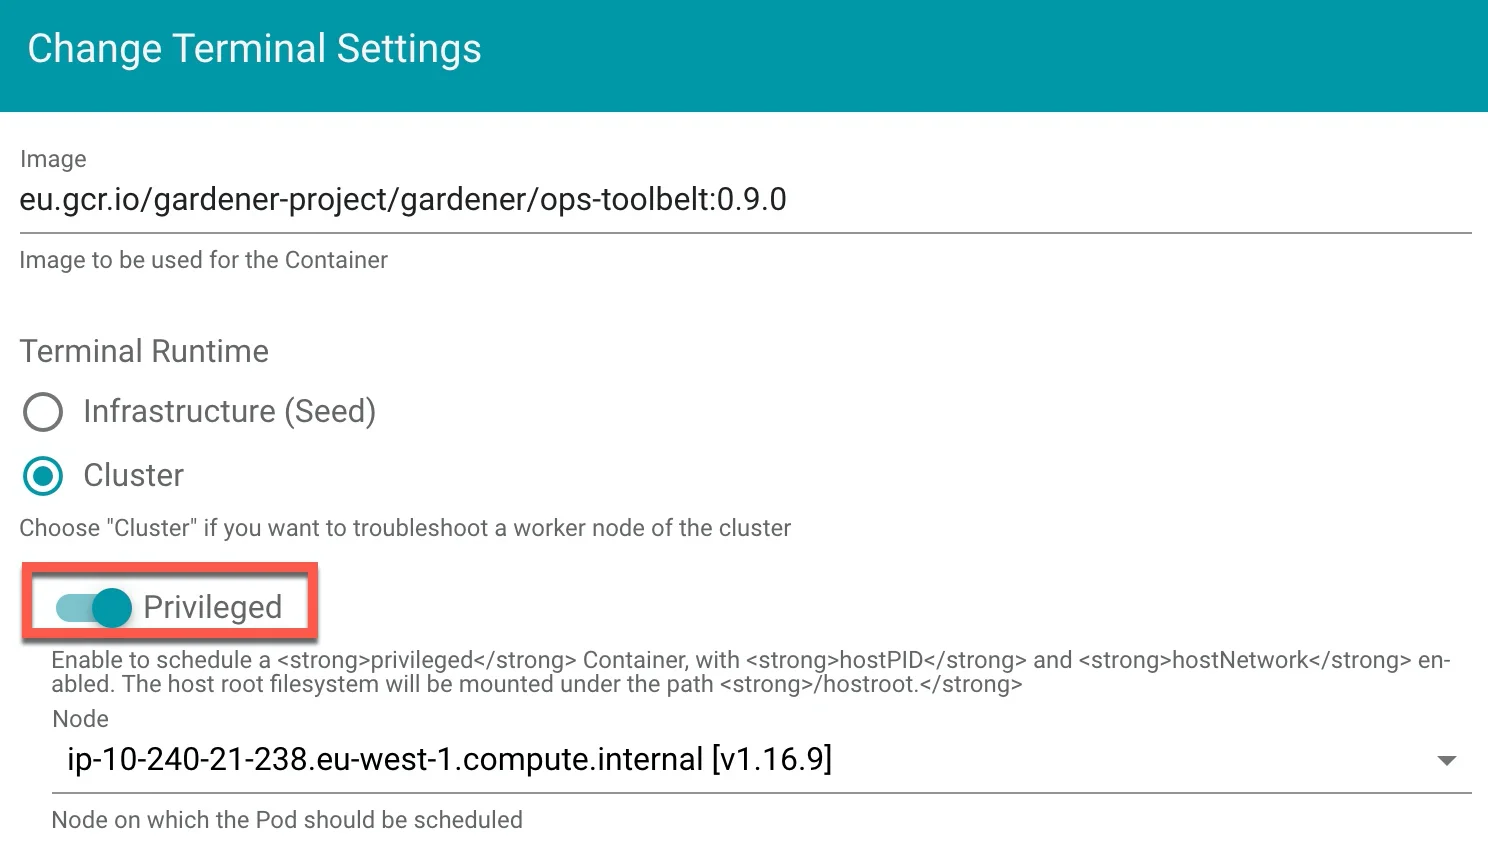
#### Result
The Dashboard then schedules a pod and opens a shell session to the node.
To get access to the common binaries installed on the host, prefix the command with chroot /hostroot. Note that the path depends on where the root path is mounted in the container. In the default image used by the Dashboard, it is under /hostroot.

Gardener Ops Toolbelt
Prerequisite: kubectl is available.
The Gardener ops-toolbelt can be used as a convenient way to deploy a root pod to a node. The pod uses an image that is bundled with a bunch of useful troubleshooting tools. This is also the same image that is used by default when using the Gardener Dashboard terminal feature as described in the previous section.
The easiest way to use the Gardener ops-toolbelt is to execute the ops-pod script in the hacks folder. To get root shell access to a node, execute the aforementioned script by supplying the target node name as an argument:
<path-to-ops-toolbelt-repo>/hacks/ops-pod <target-node>Custom Root Pod
Alternatively, a pod can be assigned to a target node and a shell can be opened via standard Kubernetes means. To enable root access to the node, the pod specification requires proper securityContext and volume properties.
For instance, you can use the following pod manifest, after changing <target-node-name> with the name of the node you want this pod attached to:
apiVersion: v1
kind: Pod
metadata:
  name: privileged-pod
  namespace: default
spec:
  nodeSelector:
    kubernetes.io/hostname: <target-node-name>
  containers:
  - name: busybox
    image: busybox
    stdin: true
    securityContext:
      privileged: true
    volumeMounts:
    - name: host-root-volume
      mountPath: /host
      readOnly: true
  volumes:
  - name: host-root-volume
    hostPath:
      path: /
  hostNetwork: true
  hostPID: true
  restartPolicy: Never
SSH Access to a Node That Failed to Join the Cluster
This section explores two options that can be used to get SSH access to a node that failed to join the cluster. As it is not possible to schedule a pod on the node, the Kubernetes-based methods explored so far cannot be used in this scenario.
Additionally, Gardener typically provisions worker instances in a private subnet of the VPC, hence - there is no public IP address that could be used for direct SSH access.
For this scenario, cloud providers typically have extensive documentation (e.g., AWS & GCP and in some cases tooling support). However, these approaches are mostly cloud provider specific, require interaction via their CLI and API or sometimes the installation of a cloud provider specific agent on the node.
Alternatively, gardenctl can be used providing a cloud provider agnostic and out-of-the-box support to get ssh access to an instance in a private subnet. Currently gardenctl supports AWS, GCP, Openstack, Azure and Alibaba Cloud.
Identifying the Problematic Instance
First, the problematic instance has to be identified. In Gardener, worker pools can be created in different cloud provider regions, zones, and accounts.
The instance would typically show up as successfully started / running in the cloud provider dashboard or API and it is not immediately obvious which one has a problem. Instead, we can use the Gardener API / CRDs to obtain the faulty instance identifier in a cloud-agnostic way.
Gardener uses the Machine Controller Manager to create the Shoot worker nodes. For each worker node, the Machine Controller Manager creates a Machine CRD in the Shoot namespace in the respective Seed cluster. Usually the problematic instance can be identified, as the respective Machine CRD has status pending.
The instance / node name can be obtained from the Machine .status field:
kubectl get machine <machine-name> -o json | jq -r .status.nodeThis is all the information needed to go ahead and use gardenctl ssh to get a shell to the node. In addition, the used cloud provider, the specific identifier of the instance, and the instance region can be identified from the Machine CRD.
Get the identifier of the instance via:
kubectl get machine <machine-name> -o json | jq -r .spec.providerID // e.g aws:///eu-north-1/i-069733c435bdb4640The identifier shows that the instance belongs to the cloud provider aws with the ec2 instance-id i-069733c435bdb4640 in region eu-north-1.
To get more information about the instance, check out the MachineClass (e.g., AWSMachineClass) that is associated with each Machine CRD in the Shoot namespace of the Seed cluster.
The AWSMachineClass contains the machine image (ami), machine-type, iam information, network-interfaces, subnets, security groups and attached volumes.
Of course, the information can also be used to get the instance with the cloud provider CLI / API.
gardenctl ssh
Using the node name of the problematic instance, we can use the gardenctl ssh command to get SSH access to the cloud provider instance via an automatically set up bastion host. gardenctl takes care of spinning up the bastion instance, setting up the SSH keys, ports and security groups and opens a root shell on the target instance. After the SSH session has ended, gardenctl deletes the created cloud provider resources.
Use the following commands:
First, target a Garden cluster containing all the Shoot definitions.
shgardenctl target garden <target-garden>Target an available Shoot by name. This sets up the context, configures the
kubeconfigfile of the Shoot cluster and downloads the cloud provider credentials. Subsequent commands will execute in this context.shgardenctl target shoot <target-shoot>This uses the cloud provider credentials to spin up the bastion and to open a shell on the target instance.
shgardenctl ssh <target-node>
SSH with a Manually Created Bastion on AWS
In case you are not using gardenctl or want to control the bastion instance yourself, you can also manually set it up. Despite some cloud provider specifics, they can be generalized to the following list:
- Open port 22 on the target instance.
- Create an instance / VM in a public subnet (the bastion instance needs to have a public IP address).
- Set-up security groups and roles, and open port 22 for the bastion instance.
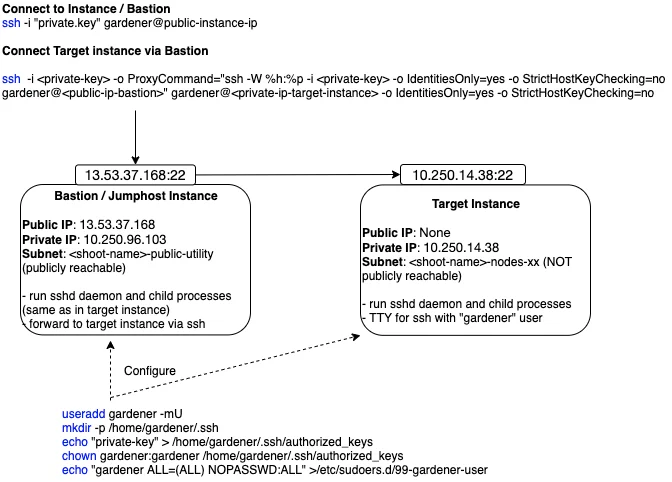
The following diagram shows an overview of how the SSH access to the target instance works:
This guide demonstrates the setup of a bastion on AWS.
Prerequisites:
- The
AWS CLIis set up. - Obtain target
instance-id(see Identifying the Problematic Instance). - Obtain the VPC ID the Shoot resources are created in. This can be found in the
InfrastructureCRD in theShootnamespace in theSeed. - Make sure that port 22 on the target instance is open (default for Gardener deployed instances).
Extract security group via:
shaws ec2 describe-instances --instance-ids <instance-id>Check for rule that allows inbound connections on port 22:
shaws ec2 describe-security-groups --group-ids=<security-group-id>If not available, create the rule with the following comamnd:
shaws ec2 authorize-security-group-ingress --group-id <security-group-id> --protocol tcp --port 22 --cidr 0.0.0.0/0
Create the Bastion Security Group
The common name of the security group is
<shoot-name>-bsg. Create the security group:shaws ec2 create-security-group --group-name <bastion-security-group-name> --description ssh-access --vpc-id <VPC-ID>Optionally, create identifying tags for the security group:
shaws ec2 create-tags --resources <bastion-security-group-id> --tags Key=component,Value=<tag>Create a permission in the bastion security group that allows ssh access on port 22:
shaws ec2 authorize-security-group-ingress --group-id <bastion-security-group-id> --protocol tcp --port 22 --cidr 0.0.0.0/0Create an IAM role for the bastion instance with the name
<shoot-name>-bastions:shaws iam create-role --role-name <shoot-name>-bastionsThe content should be:
json{ "Version": "2012-10-17", "Statement": [ { "Effect": "Allow", "Action": [ "ec2:DescribeRegions" ], "Resource": [ "*" ] } ] }Create the instance profile and name it
<shoot-name>-bastions:shaws iam create-instance-profile --instance-profile-name <name>Add the created role to the instance profile:
shaws iam add-role-to-instance-profile --instance-profile-name <instance-profile-name> --role-name <role-name>
Create the Bastion Instance
Next, in order to be able to ssh into the bastion instance, the instance has to be set up with a user with a public ssh key. Create a user gardener that has the same Gardener-generated public ssh key as the target instance.
First, we need to get the public part of the
Shootssh-key. The ssh-key is stored in a secret in the the project namespace in the Garden cluster. The name is:<shoot-name>.ssh-keypair. Get the key via:shkubectl get secret <shoot-name>.ssh-keypair -o json | jq -r .data.\"id_rsa.pub\"A script handed over as
user-datato the bastionec2instance, can be used to create thegardeneruser and add the ssh-key. For your convenience, you can use the following script to generate theuser-data.sh#!/bin/bash -eu saveUserDataFile () { ssh_key=$1 cat > gardener-bastion-userdata.sh <<EOF #!/bin/bash -eu id gardener || useradd gardener -mU mkdir -p /home/gardener/.ssh echo "$ssh_key" > /home/gardener/.ssh/authorized_keys chown gardener:gardener /home/gardener/.ssh/authorized_keys echo "gardener ALL=(ALL) NOPASSWD:ALL" >/etc/sudoers.d/99-gardener-user EOF } if [ -p /dev/stdin ]; then read -r input cat | saveUserDataFile "$input" else pbpaste | saveUserDataFile "$input" fiUse the script by handing-over the public ssh-key of the
Shootcluster:shkubectl get secret <shoot-name>.ssh-keypair -o json | jq -r .data.\"id_rsa.pub\" | ./generate-userdata.shThis generates a file called
gardener-bastion-userdata.shin the same directory containing theuser-data.The following information is needed to create the bastion instance:
bastion-IAM-instance-profile-name- Use the created instance profile with the name
<shoot-name>-bastions
image-id- It is possible to use the same image-id as the one used for the target instance (or any other image). Has cloud provider specific format (AWS:
ami).
ssh-public-key-name- This is the ssh key pair already created in the Shoot's cloud provider account by Gardener during the
InfrastructureCRD reconciliation. - The name is usually:
<shoot-name>-ssh-keypair
subnet-id- Choose a subnet that is attached to an
Internet GatewayandNAT Gateway(bastion instance must have a public IP). - The Gardener created public subnet with the name
<shoot-name>-public-utility-<xy>can be used. Please check the created subnets with the cloud provider.
bastion-security-group-id- Use the id of the created bastion security group.
file-path-to-userdata- Use the filepath to the
user-datafile generated in the previous step.
bastion-instance-name- Optionally, you can tag the instance.
- Usually
<shoot-name>-bastions
- Use the created instance profile with the name
Create the bastion instance via:
shec2 run-instances \ --iam-instance-profile \ Name=<bastion-IAM-instance-profile-name> \ --image-id <image-id> \ --count 1 \ --instance-type t3.nano \ --key-name <ssh-public-key-name> \ --security-group-ids <bastion-security-group-id> \ --subnet-id <subnet-id> \ --associate-public-ip-address \ --user-data <file-path-to-userdata> \ --tag-specifications "ResourceType=instance,Tags=[{Key=Name,Value=<bastion-instance-name>},{Key=component,Value=<mytag>}] ResourceType=volume,Tags=[{Key=component,Value=<mytag>}]"Capture the
instance-idfrom the response and wait until theec2instance is running and has a public IP address.
Connecting to the Target Instance
Save the private key of the ssh-key-pair in a temporary local file for later use:
shumask 077 kubectl get secret <shoot-name>.ssh-keypair -o json | jq -r .data.\"id_rsa\" | base64 -d > id_rsa.keyUse the private ssh key to ssh into the bastion instance:
shssh -i <path-to-private-key> gardener@<public-bastion-instance-ip>If that works, connect from your local terminal to the target instance via the bastion:
shssh -i <path-to-private-key> \ -o ProxyCommand="ssh -W %h:%p -i <private-key> -o IdentitiesOnly=yes -o StrictHostKeyChecking=no gardener@<public-ip-bastion>" \ gardener@<private-ip-target-instance> \ -o IdentitiesOnly=yes \ -o StrictHostKeyChecking=no
Cleanup
Do not forget to cleanup the created resources. Otherwise Gardener will eventually fail to delete the Shoot.