Dependency Watchdog
A watchdog which actively looks out for disruption and recovery of critical services
Dependency Watchdog


Overview
A watchdog which actively looks out for disruption and recovery of critical services. If there is a disruption then it will prevent cascading failure by conservatively scaling down dependent configured resources and if a critical service has just recovered then it will expedite the recovery of dependent services/pods.
Avoiding cascading failure is handled by Prober component and expediting recovery of dependent services/pods is handled by Weeder component. These are separately deployed as individual pods.
Current Limitation & Future Scope
Although in the current offering the Prober is tailored to handle one such use case of kube-apiserver connectivity, but the usage of prober can be extended to solve similar needs for other scenarios where the components involved might be different.
Start using or developing the Dependency Watchdog
See our documentation in the /docs repository, please find the index here.
Feedback and Support
We always look forward to active community engagement.
Please report bugs or suggestions on how we can enhance dependency-watchdog to address additional recovery scenarios on GitHub issues
1 - Concepts
1.1 - Prober
Prober
Overview
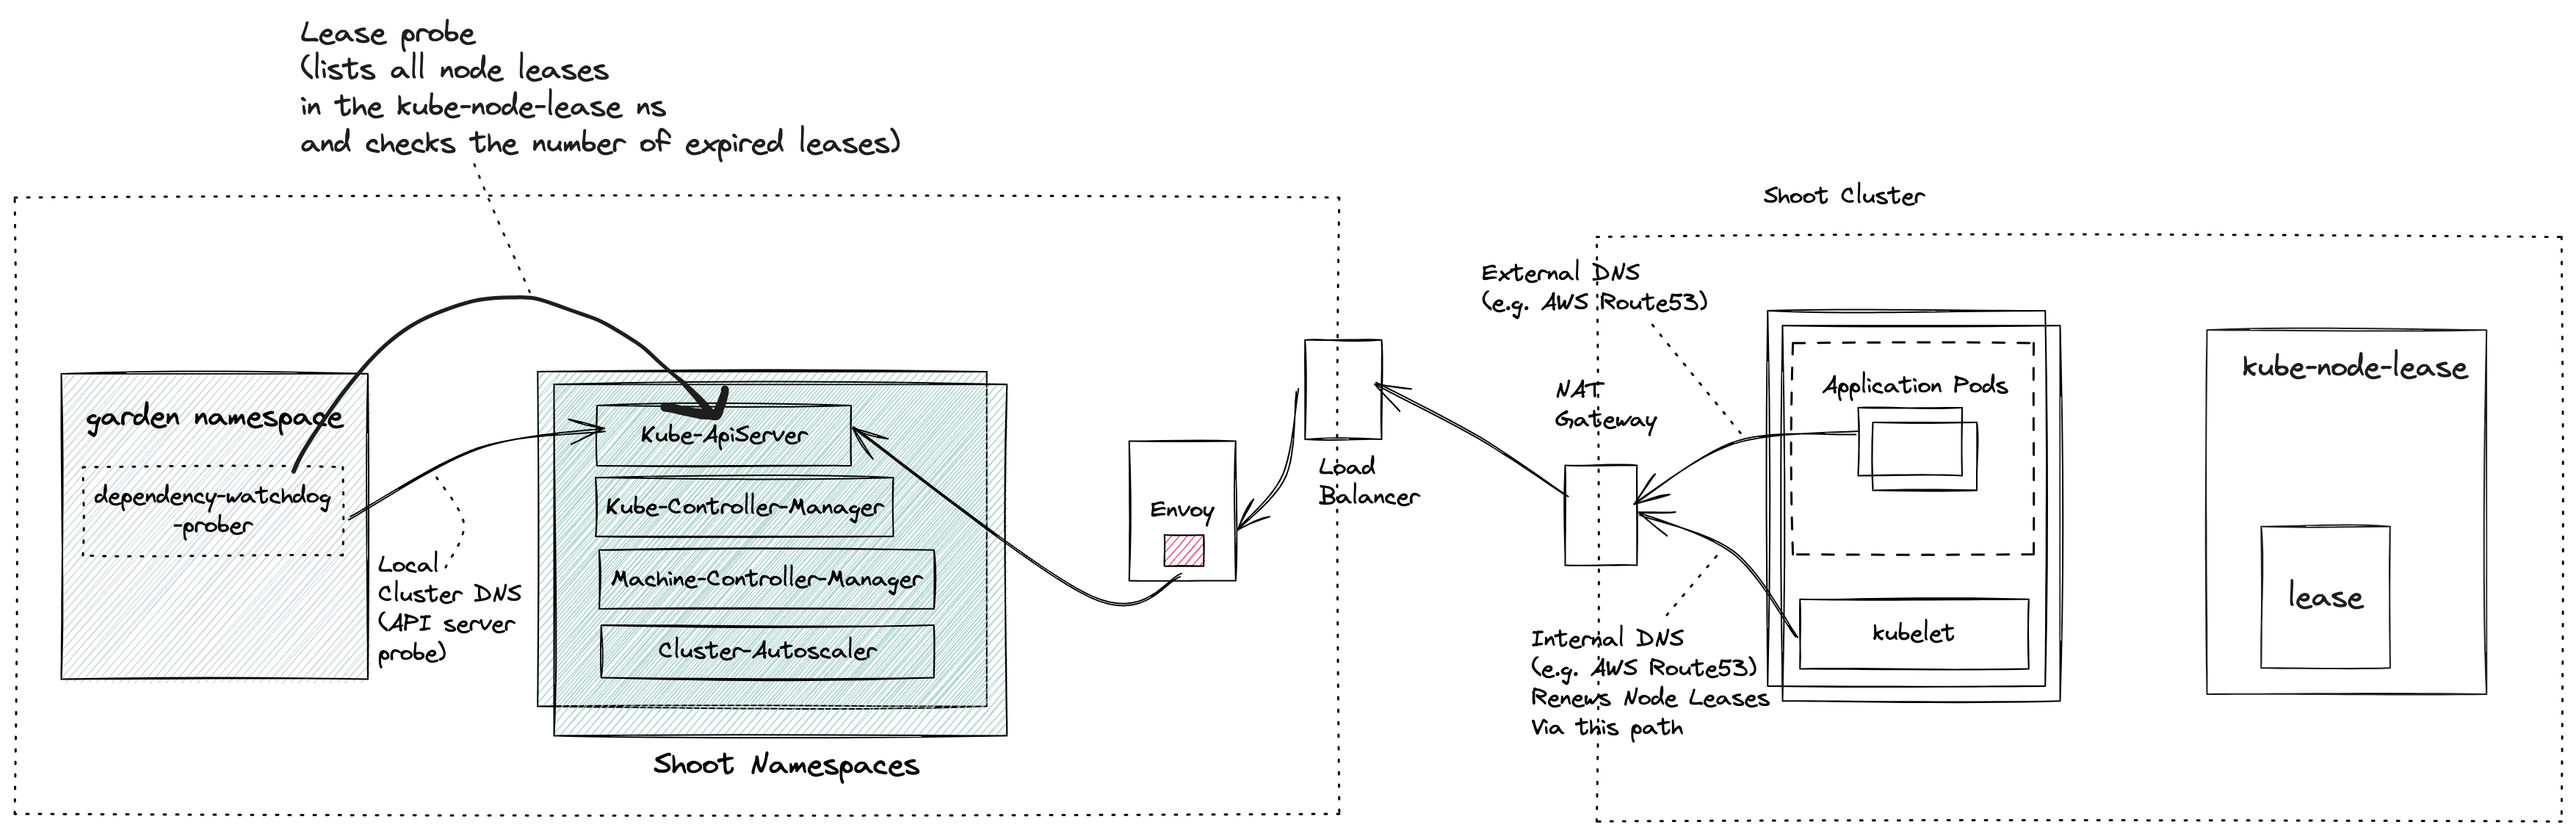
Prober starts asynchronous and periodic probes for every shoot cluster. The first probe is the api-server probe which checks the reachability of the API Server from the control plane. The second probe is the lease probe which is done after the api server probe is successful and checks if the number of expired node leases is below a certain threshold.
If the lease probe fails, it will scale down the dependent kubernetes resources. Once the connectivity to kube-apiserver is reestablished and the number of expired node leases are within the accepted threshold, the prober will then proactively scale up the dependent kubernetes resources it had scaled down earlier. The failure threshold fraction for lease probe
and dependent kubernetes resources are defined in configuration that is passed to the prober.
Origin
In a shoot cluster (a.k.a data plane) each node runs a kubelet which periodically renewes its lease. Leases serve as heartbeats informing Kube Controller Manager that the node is alive. The connectivity between the kubelet and the Kube ApiServer can break for different reasons and not recover in time.
As an example, consider a large shoot cluster with several hundred nodes. There is an issue with a NAT gateway on the shoot cluster which prevents the Kubelet from any node in the shoot cluster to reach its control plane Kube ApiServer. As a consequence, Kube Controller Manager transitioned the nodes of this shoot cluster to Unknown state.
Machine Controller Manager which also runs in the shoot control plane reacts to any changes to the Node status and then takes action to recover backing VMs/machine(s). It waits for a grace period and then it will begin to replace the unhealthy machine(s) with new ones.
This replacement of healthy machines due to a broken connectivity between the worker nodes and the control plane Kube ApiServer results in undesired downtimes for customer workloads that were running on these otherwise healthy nodes. It is therefore required that there be an actor which detects the connectivity loss between the the kubelet and shoot cluster’s Kube ApiServer and proactively scales down components in the shoot control namespace which could exacerbate the availability of nodes in the shoot cluster.
Dependency Watchdog Prober in Gardener
Prober is a central component which is deployed in the garden namespace in the seed cluster. Control plane components for a shoot are deployed in a dedicated shoot namespace for the shoot within the seed cluster.
NOTE: If you are not familiar with what gardener components like seed, shoot then please see the appendix for links.
Prober periodically probes Kube ApiServer via two separate probes:
- API Server Probe: Local cluster DNS name which resolves to the ClusterIP of the Kube Apiserver
- Lease Probe: Checks for number of expired leases to be within the specified threshold. The threshold defines the limit after which DWD can say that the kubelets are not able to reach the API server.
Behind the scene
For all active shoot clusters (which have not been hibernated or deleted or moved to another seed via control-plane-migration), prober will schedule a probe to run periodically. During each run of a probe it will do the following:
- Checks if the Kube ApiServer is reachable via local cluster DNS. This should always succeed and will fail only when the Kube ApiServer has gone down. If the Kube ApiServer is down then there can be no further damage to the existing shoot cluster (barring new requests to the Kube Api Server).
- Only if the probe is able to reach the Kube ApiServer via local cluster DNS, will it attempt to check the number of expired node leases in the shoot. The node lease renewal is done by the Kubelet, and so we can say that the lease probe is checking if the kubelet is able to reach the API server. If the number of expired node leases reaches
the threshold, then the probe fails.
- If and when a lease probe fails, then it will initiate a scale-down operation for dependent resources as defined in the prober configuration. While scaling down the resource prober will annotate the deployment of the resource with
dependency-watchdog.gardener.cloud/meltdown-protection-active. This annotation can be checked to ensure not to scale up these resources during a regular shoot maintenance or an out-of-band shoot reconciliation. - In subsequent runs it will keep performing the lease probe. If it is successful, then it will start the scale-up operation for dependent resources as defined in the configuration. It shall also remove the
dependency-watchdog.gardener.cloud/meltdown-protection-active from deployment metadata of all scaled up resources.
Manual Intervention/Override of DWD behavior: j
In case where you don’t want DWD to act on a resource during a meltdown, you can annotate the said resource deployment with "dependency-watchdog.gardener.cloud/ignore-scaling" annotation. This will ensure that prober will not act on such resource. When this ignore scaling annotation is put by an operator, the dependency-watchdog.gardener.cloud/meltdown-protection-active annotation shall be removed to avoid any ambiguity.
Prober lifecycle
A reconciler is registered to listen to all events for Cluster resource.
When a Reconciler receives a request for a Cluster change, it will query the extension kube-api server to get the Cluster resource.
In the following cases it will either remove an existing probe for this cluster or skip creating a new probe:
- Cluster is marked for deletion.
- Hibernation has been enabled for the cluster.
- There is an ongoing seed migration for this cluster.
- If a new cluster is created with no workers.
- If an update is made to the cluster by removing all workers (in other words making it worker-less).
If none of the above conditions are true and there is no existing probe for this cluster then a new probe will be created, registered and started.
Probe failure identification
DWD probe can either be a success or it could return an error. If the API server probe fails, the lease probe is not done and the probes will be retried. If the error is a TooManyRequests error due to requests to the Kube-API-Server being throttled,
then the probes are retried after a backOff of backOffDurationForThrottledRequests.
If the lease probe fails, then the error could be due to failure in listing the leases. In this case, no scaling operations are performed. If the error in listing the leases is a TooManyRequests error due to requests to the Kube-API-Server being throttled,
then the probes are retried after a backOff of backOffDurationForThrottledRequests.
If there is no error in listing the leases, then the Lease probe fails if the number of expired leases reaches the threshold fraction specified in the configuration.
A lease is considered expired in the following scenario:-
time.Now() >= lease.Spec.RenewTime + (p.config.KCMNodeMonitorGraceDuration.Duration * expiryBufferFraction)
Here, lease.Spec.RenewTime is the time when current holder of a lease has last updated the lease. config is the probe config generated from the configuration and
KCMNodeMonitorGraceDuration is amount of time which KCM allows a running Node to be unresponsive before marking it unhealthy (See ref)
. expiryBufferFraction is a hard coded value of 0.75. Using this fraction allows the prober to intervene before KCM marks a node as unknown, but at the same time allowing kubelet sufficient retries to renew the node lease (Kubelet renews the lease every 10s See ref).
Appendix
1.2 - Weeder
Weeder
Overview
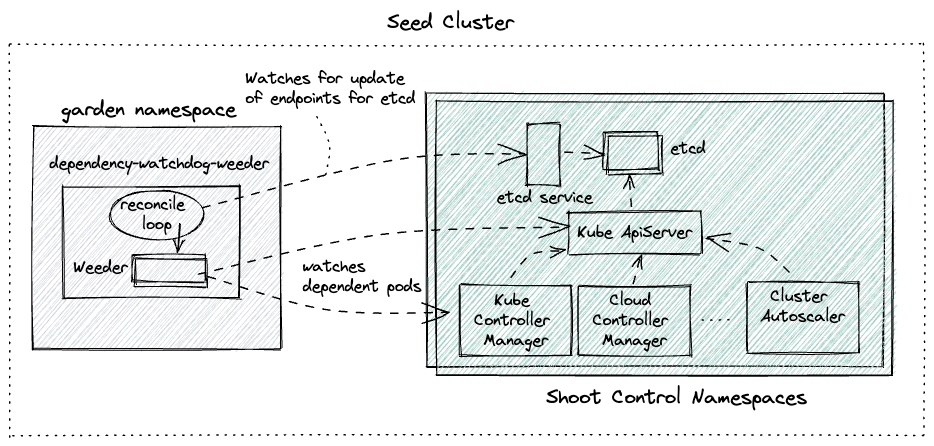
Weeder watches for an update to service endpoints and on receiving such an event it will create a time-bound watch for all configured dependent pods that need to be actively recovered in case they have not yet recovered from CrashLoopBackoff state. In a nutshell it accelerates recovery of pods when an upstream service recovers.
An interference in automatic recovery for dependent pods is required because kubernetes pod restarts a container with an exponential backoff when the pod is in CrashLoopBackOff state. This backoff could become quite large if the service stays down for long. Presence of weeder would not let that happen as it’ll restart the pod.
Prerequisites
Before we understand how Weeder works, we need to be familiar with kubernetes services & endpoints.
NOTE: If a kubernetes service is created with selectors then kubernetes will create corresponding endpoint resource which will have the same name as that of the service. In weeder implementation service and endpoint name is used interchangeably.
Config
Weeder can be configured via command line arguments and a weeder configuration. See configure weeder.
Internals
Weeder keeps a watch on the events for the specified endpoints in the config. For every endpoints a list of podSelectors can be specified. It cretes a weeder object per endpoints resource when it receives a satisfactory Create or Update event. Then for every podSelector it creates a goroutine. This goroutine keeps a watch on the pods with labels as per the podSelector and kills any pod which turn into CrashLoopBackOff. Each weeder lives for watchDuration interval which has a default value of 5 mins if not explicitly set.
To understand the actions taken by the weeder lets use the following diagram as a reference.
 Let us also assume the following configuration for the weeder:
watchDuration: 2m0s
servicesAndDependantSelectors:
  etcd-main-client: # name of the service/endpoint for etcd statefulset that weeder will receive events for.
    podSelectors: # all pods matching the label selector are direct dependencies for etcd service
      - matchExpressions:
          - key: gardener.cloud/role
            operator: In
            values:
              - controlplane
          - key: role
            operator: In
            values:
              - apiserver
  kube-apiserver: # name of the service/endpoint for kube-api-server pods that weeder will receive events for.
    podSelectors: # all pods matching the label selector are direct dependencies for kube-api-server service
      - matchExpressions:
          - key: gardener.cloud/role
            operator: In
            values:
              - controlplane
          - key: role
            operator: NotIn
            values:
              - main
              - apiserver
Only for the sake of demonstration lets pick the first service -> dependent pods tuple (etcd-main-client as the service endpoint).
- Assume that there are 3 replicas for etcd statefulset.
- Time here is just for showing the series of events
t=0 -> all etcd pods go downt=10 -> kube-api-server pods transition to CrashLoopBackOfft=100 -> all etcd pods recover togethert=101 -> Weeder sees Update event for etcd-main-client endpoints resourcet=102 -> go routine created to keep watch on kube-api-server podst=103 -> Since kube-api-server pods are still in CrashLoopBackOff, weeder deletes the pods to accelerate the recovery.t=104 -> new kube-api-server pod created by replica-set controller in kube-controller-manager
Points to Note
- Weeder only respond on
Update events where a notReady endpoints resource turn to Ready. Thats why there was no weeder action at time t=10 in the example above.notReady -> no backing pod is ReadyReady -> atleast one backing pod is Ready
- Weeder doesn’t respond on
Delete events - Weeder will always wait for the entire
watchDuration. If the dependent pods transition to CrashLoopBackOff after the watch duration or even after repeated deletion of these pods they do not recover then weeder will exit. Quality of service offered via a weeder is only Best-Effort.
2 - Deployment
2.1 - Configure
Prober
Dependency watchdog prober command takes command-line-flags which are meant to fine-tune the prober. In addition a ConfigMap is also mounted to the container which provides tuning knobs for the all probes that the prober starts.
Command line arguments
Prober can be configured via the following flags:
| Flag Name | Type | Required | Default Value | Description |
|---|
| kube-api-burst | int | No | 10 | Burst to use while talking with kubernetes API server. The number must be >= 0. If it is 0 then a default value of 10 will be used |
| kube-api-qps | float | No | 5.0 | Maximum QPS (queries per second) allowed when talking with kubernetes API server. The number must be >= 0. If it is 0 then a default value of 5.0 will be used |
| concurrent-reconciles | int | No | 1 | Maximum number of concurrent reconciles |
| config-file | string | Yes | NA | Path of the config file containing the configuration to be used for all probes |
| metrics-bind-addr | string | No | “:9643” | The TCP address that the controller should bind to for serving prometheus metrics |
| health-bind-addr | string | No | “:9644” | The TCP address that the controller should bind to for serving health probes |
| enable-leader-election | bool | No | false | In case prober deployment has more than 1 replica for high availability, then it will be setup in a active-passive mode. Out of many replicas one will become the leader and the rest will be passive followers waiting to acquire leadership in case the leader dies. |
| leader-election-namespace | string | No | “garden” | Namespace in which leader election resource will be created. It should be the same namespace where DWD pods are deployed |
| leader-elect-lease-duration | time.Duration | No | 15s | The duration that non-leader candidates will wait after observing a leadership renewal until attempting to acquire leadership of a led but unrenewed leader slot. This is effectively the maximum duration that a leader can be stopped before it is replaced by another candidate. This is only applicable if leader election is enabled. |
| leader-elect-renew-deadline | time.Duration | No | 10s | The interval between attempts by the acting master to renew a leadership slot before it stops leading. This must be less than or equal to the lease duration. This is only applicable if leader election is enabled. |
| leader-elect-retry-period | time.Duration | No | 2s | The duration the clients should wait between attempting acquisition and renewal of a leadership. This is only applicable if leader election is enabled. |
You can view an example kubernetes prober deployment YAML to see how these command line args are configured.
Prober Configuration
A probe configuration is mounted as ConfigMap to the container. The path to the config file is configured via config-file command line argument as mentioned above. Prober will start one probe per Shoot control plane hosted within the Seed cluster. Each such probe will run asynchronously and will periodically connect to the Kube ApiServer of the Shoot. Configuration below will influence each such probe.
You can view an example YAML configuration provided as data in a ConfigMap here.
| Name | Type | Required | Default Value | Description |
|---|
| kubeConfigSecretName | string | Yes | NA | Name of the kubernetes Secret which has the encoded KubeConfig required to connect to the Shoot control plane Kube ApiServer via an internal domain. This typically uses the local cluster DNS. |
| probeInterval | metav1.Duration | No | 10s | Interval with which each probe will run. |
| initialDelay | metav1.Duration | No | 30s | Initial delay for the probe to become active. Only applicable when the probe is created for the first time. |
| probeTimeout | metav1.Duration | No | 30s | In each run of the probe it will attempt to connect to the Shoot Kube ApiServer. probeTimeout defines the timeout after which a single run of the probe will fail. |
| backoffJitterFactor | float64 | No | 0.2 | Jitter with which a probe is run. |
| dependentResourceInfos | []prober.DependentResourceInfo | Yes | NA | Detailed below. |
| kcmNodeMonitorGraceDuration | metav1.Duration | Yes | NA | It is the node-monitor-grace-period set in the kcm flags. Used to determine whether a node lease can be considered expired. |
| nodeLeaseFailureFraction | float64 | No | 0.6 | is used to determine the maximum number of leases that can be expired for a lease probe to succeed. |
DependentResourceInfo
If a lease probe fails, then it scales down the dependent resources defined by this property. Similarly, if the lease probe is now successful, then it scales up the dependent resources defined by this property.
Each dependent resource info has the following properties:
| Name | Type | Required | Default Value | Description |
|---|
| ref | autoscalingv1.CrossVersionObjectReference | Yes | NA | It is a collection of ApiVersion, Kind and Name for a kubernetes resource thus serving as an identifier. |
| optional | bool | Yes | NA | It is possible that a dependent resource is optional for a Shoot control plane. This property enables a probe to determine the correct behavior in case it is unable to find the resource identified via ref. |
| scaleUp | prober.ScaleInfo | No | | Captures the configuration to scale up this resource. Detailed below. |
| scaleDown | prober.ScaleInfo | No | | Captures the configuration to scale down this resource. Detailed below. |
NOTE: Since each dependent resource is a target for scale up/down, therefore it is mandatory that the resource reference points a kubernetes resource which has a scale subresource.
ScaleInfo
How to scale a DependentResourceInfo is captured in ScaleInfo. It has the following properties:
| Name | Type | Required | Default Value | Description |
|---|
| level | int | Yes | NA | Detailed below. |
| initialDelay | metav1.Duration | No | 0s (No initial delay) | Once a decision is taken to scale a resource then via this property a delay can be induced before triggering the scale of the dependent resource. |
| timeout | metav1.Duration | No | 30s | Defines the timeout for the scale operation to finish for a dependent resource. |
Determining target replicas
Prober cannot assume any target replicas during a scale-up operation for the following reasons:
- Kubernetes resources could be set to provide highly availability and the number of replicas could wary from one shoot control plane to the other. In gardener the number of replicas of pods in shoot namespace are controlled by the shoot control plane configuration.
- If Horizontal Pod Autoscaler has been configured for a kubernetes dependent resource then it could potentially change the
spec.replicas for a deployment/statefulset.
Given the above constraint lets look at how prober determines the target replicas during scale-down or scale-up operations.
Scale-Up: Primary responsibility of a probe while performing a scale-up is to restore the replicas of a kubernetes dependent resource prior to scale-down. In order to do that it updates the following for each dependent resource that requires a scale-up:
spec.replicas: Checks if dependency-watchdog.gardener.cloud/replicas is set. If it is, then it will take the value stored against this key as the target replicas. To be a valid value it should always be greater than 0.- If
dependency-watchdog.gardener.cloud/replicas annotation is not present then it falls back to the hard coded default value for scale-up which is set to 1. - Removes the annotation
dependency-watchdog.gardener.cloud/replicas if it exists.
Scale-Down: To scale down a dependent kubernetes resource it does the following:
- Adds an annotation
dependency-watchdog.gardener.cloud/replicas and sets its value to the current value of spec.replicas. - Updates
spec.replicas to 0.
Level
Each dependent resource that should be scaled up or down is associated to a level. Levels are ordered and processed in ascending order (starting with 0 assigning it the highest priority). Consider the following configuration:
dependentResourceInfos:
  - ref:
      kind: "Deployment"
      name: "kube-controller-manager"
      apiVersion: "apps/v1"
    scaleUp:
      level: 1
    scaleDown:
      level: 0
  - ref:
      kind: "Deployment"
      name: "machine-controller-manager"
      apiVersion: "apps/v1"
    scaleUp:
      level: 1
    scaleDown:
      level: 1
  - ref:
      kind: "Deployment"
      name: "cluster-autoscaler"
      apiVersion: "apps/v1"
    scaleUp:
      level: 0
    scaleDown:
      level: 2
Let us order the dependent resources by their respective levels for both scale-up and scale-down. We get the following order:
Scale Up Operation
Order of scale up will be:
- cluster-autoscaler
- kube-controller-manager and machine-controller-manager will be scaled up concurrently after cluster-autoscaler has been scaled up.
Scale Down Operation
Order of scale down will be:
- kube-controller-manager
- machine-controller-manager after (1) has been scaled down.
- cluster-autoscaler after (2) has been scaled down.
Disable/Ignore Scaling
A probe can be configured to ignore scaling of configured dependent kubernetes resources.
To do that one must set dependency-watchdog.gardener.cloud/ignore-scaling annotation to true on the scalable resource for which scaling should be ignored.
Weeder
Dependency watchdog weeder command also (just like the prober command) takes command-line-flags which are meant to fine-tune the weeder. In addition a ConfigMap is also mounted to the container which helps in defining the dependency of pods on endpoints.
Command Line Arguments
Weeder can be configured with the same flags as that for prober described under command-line-arguments section
You can find an example weeder deployment YAML to see how these command line args are configured.
Weeder Configuration
Weeder configuration is mounted as ConfigMap to the container. The path to the config file is configured via config-file command line argument as mentioned above. Weeder will start one go routine per podSelector per endpoint on an endpoint event as described in weeder internal concepts.
You can view the example YAML configuration provided as data in a ConfigMap here.
| Name | Type | Required | Default Value | Description |
|---|
| watchDuration | *metav1.Duration | No | 5m0s | The time duration for which watch is kept on dependent pods to see if anyone turns to CrashLoopBackoff |
| servicesAndDependantSelectors | map[string]DependantSelectors | Yes | NA | Endpoint name and its corresponding dependent pods. More info below. |
DependantSelectors
If the service recovers from downtime, then weeder starts to watch for CrashLoopBackOff pods. These pods are identified by info stored in this property.
| Name | Type | Required | Default Value | Description |
|---|
| podSelectors | []*metav1.LabelSelector | Yes | NA | This is a list of Label selector |
2.2 - Monitor
Monitoring
Work In Progress
We will be introducing metrics for Dependency-Watchdog-Prober and Dependency-Watchdog-Weeder. These metrics will be pushed to prometheus. Once that is completed we will provide details on all the metrics that will be supported here.
3 - Contribution
How to contribute?
Contributions are always welcome!
In order to contribute ensure that you have the development environment setup and you familiarize yourself with required steps to build, verify-quality and test.
Setting up development environment
Installing Go
Minimum Golang version required: 1.18.
On MacOS run:
For other OS, follow the installation instructions.
Installing Git
Git is used as version control for dependency-watchdog. On MacOS run:
If you do not have git installed already then please follow the installation instructions.
Installing Docker
In order to test dependency-watchdog containers you will need a local kubernetes setup. Easiest way is to first install Docker. This becomes a pre-requisite to setting up either a vanilla KIND/minikube cluster or a local Gardener cluster.
On MacOS run:
brew install -cash docker
For other OS, follow the installation instructions.
Installing Kubectl
To interact with the local Kubernetes cluster you will need kubectl. On MacOS run:
brew install kubernetes-cli
For other IS, follow the installation instructions.
Get the sources
Clone the repository from Github:
git clone https://github.com/gardener/dependency-watchdog.git
Using Makefile
For every change following make targets are recommended to run.
# build the code changes
> make build
# ensure that all required checks pass
> make verify # this will check formatting, linting and will run unit tests
# if you do not wish to run tests then you can use the following make target.
> make check
All tests should be run and the test coverage should ideally not reduce.
Please ensure that you have read testing guidelines.
Before raising a pull request ensure that if you are introducing any new file then you must add licesence header to all new files. To add license header you can run this make target:
> make add-license-headers
# This will add license headers to any file which does not already have it.
NOTE: Also have a look at the Makefile as it has other targets that are not mentioned here.
Raising a Pull Request
To raise a pull request do the following:
- Create a fork of dependency-watchdog
- Add dependency-watchdog as upstream remote via
git remote add upstream https://github.com/gardener/dependency-watchdog
- It is recommended that you create a git branch and push all your changes for the pull-request.
- Ensure that while you work on your pull-request, you continue to rebase the changes from upstream to your branch. To do that execute the following command:
git pull --rebase upstream master
- We prefer clean commits. If you have multiple commits in the pull-request, then squash the commits to a single commit. You can do this via
interactive git rebase command. For example if your PR branch is ahead of remote origin HEAD by 5 commits then you can execute the following command and pick the first commit and squash the remaining commits.
git rebase -i HEAD~5 #actual number from the head will depend upon how many commits your branch is ahead of remote origin master
4 - Dwd Using Local Garden
Dependency Watchdog with Local Garden Cluster
Setting up Local Garden cluster
A convenient way to test local dependency-watchdog changes is to use a local garden cluster.
To setup a local garden cluster you can follow the setup-guide.
Dependency Watchdog resources
As part of the local garden installation, a local seed will be available.
Dependency Watchdog resources created in the seed
Namespaced resources
In the garden namespace of the seed cluster, following resources will be created:
| Resource (GVK) | Name |
|---|
| {apiVersion: v1, Kind: ServiceAccount} | dependency-watchdog-prober |
| {apiVersion: v1, Kind: ServiceAccount} | dependency-watchdog-weeder |
| {apiVersion: apps/v1, Kind: Deployment} | dependency-watchdog-prober |
| {apiVersion: apps/v1, Kind: Deployment} | dependency-watchdog-weeder |
| {apiVersion: v1, Kind: ConfigMap} | dependency-watchdog-prober-* |
| {apiVersion: v1, Kind: ConfigMap} | dependency-watchdog-weeder-* |
| {apiVersion: rbac.authorization.k8s.io/v1, Kind: Role} | gardener.cloud:dependency-watchdog-prober:role |
| {apiVersion: rbac.authorization.k8s.io/v1, Kind: Role} | gardener.cloud:dependency-watchdog-weeder:role |
| {apiVersion: rbac.authorization.k8s.io/v1, Kind: RoleBinding} | gardener.cloud:dependency-watchdog-prober:role-binding |
| {apiVersion: rbac.authorization.k8s.io/v1, Kind: RoleBinding} | gardener.cloud:dependency-watchdog-weeder:role-binding |
| {apiVersion: resources.gardener.cloud/v1alpha1, Kind: ManagedResource} | dependency-watchdog-prober |
| {apiVersion: resources.gardener.cloud/v1alpha1, Kind: ManagedResource} | dependency-watchdog-weeder |
| {apiVersion: v1, Kind: Secret} | managedresource-dependency-watchdog-weeder |
| {apiVersion: v1, Kind: Secret} | managedresource-dependency-watchdog-prober |
Cluster resources
| Resource (GVK) | Name |
|---|
| {apiVersion: rbac.authorization.k8s.io/v1, Kind: ClusterRole} | gardener.cloud:dependency-watchdog-prober:cluster-role |
| {apiVersion: rbac.authorization.k8s.io/v1, Kind: ClusterRole} | gardener.cloud:dependency-watchdog-weeder:cluster-role |
| {apiVersion: rbac.authorization.k8s.io/v1, Kind: ClusterRoleBinding} | gardener.cloud:dependency-watchdog-prober:cluster-role-binding |
| {apiVersion: rbac.authorization.k8s.io/v1, Kind: ClusterRoleBinding} | gardener.cloud:dependency-watchdog-weeder:cluster-role-binding |
Dependency Watchdog resources created in Shoot control namespace
| Resource (GVK) | Name |
|---|
| {apiVersion: v1, Kind: Secret} | dependency-watchdog-prober |
| {apiVersion: resources.gardener.cloud/v1alpha1, Kind: ManagedResource} | shoot-core-dependency-watchdog |
Dependency Watchdog resources created in the kube-node-lease namespace of the shoot
| Resource (GVK) | Name |
|---|
| {apiVersion: rbac.authorization.k8s.io/v1, Kind: Role} | gardener.cloud:target:dependency-watchdog |
| {apiVersion: rbac.authorization.k8s.io/v1, Kind: RoleBinding} | gardener.cloud:target:dependency-watchdog |
These will be created by the GRM and will have a managed resource named shoot-core-dependency-watchdog in the shoot namespace in the seed.
Update Gardener with custom Dependency Watchdog Docker images
Build, Tag and Push docker images
To build dependency watchdog docker images run the following make target:
Local gardener hosts a docker registry which can be access at localhost:5001. To enable local gardener to be able to access the custom docker images you need to tag and push these images to the embedded docker registry. To do that execute the following commands:
> docker images
# Get the IMAGE ID of the dependency watchdog images that were built using docker-build make target.
> docker tag <IMAGE-ID> localhost:5001/europe-docker.pkg.dev/gardener-project/public/gardener/dependency-watchdog-prober:<TAGNAME>
> docker push localhost:5001/europe-docker.pkg.dev/gardener-project/public/gardener/dependency-watchdog-prober:<TAGNAME>
Update ManagedResource
Garden resource manager will revert back any changes that are done to the kubernetes deployment for dependency watchdog. This is quite useful in live landscapes where only tested and qualified images are used for all gardener managed components. Any change therefore is automatically reverted.
However, during development and testing you will need to use custom docker images. To prevent garden resource manager from reverting the changes done to the kubernetes deployment for dependency watchdog components you must update the respective managed resources first.
# List the managed resources
> kubectl get mr -n garden | grep dependency
# Sample response
dependency-watchdog-weeder            seed    True      True      False         26h
dependency-watchdog-prober            seed    True      True      False         26h
# Lets assume that you are currently testing prober and would like to use a custom docker image
> kubectl edit mr dependency-watchdog-prober -n garden
# This will open the resource YAML for editing. Add the annotation resources.gardener.cloud/ignore=true
# Reference: https://github.com/gardener/gardener/blob/master/docs/concepts/resource-manager.md
# Save the YAML file.
When you are done with your testing then you can again edit the ManagedResource and remove the annotation. Garden resource manager will revert back to the image with which gardener was initially built and started.
Update Kubernetes Deployment
Find and update the kubernetes deployment for dependency watchdog.
> kubectl get deploy -n garden | grep dependency
# Sample response
dependency-watchdog-weeder            1/1     1            1           26h
dependency-watchdog-prober            1/1     1            1           26h

# Lets assume that you are currently testing prober and would like to use a custom docker image
> kubectl edit deploy dependency-watchdog-prober -n garden
# This will open the resource YAML for editing. Change the image or any other changes and save.
5 - Testing
Testing Strategy and Developer Guideline
Intent of this document is to introduce you (the developer) to the following:
- Category of tests that exists.
- Libraries that are used to write tests.
- Best practices to write tests that are correct, stable, fast and maintainable.
- How to run each category of tests.
For any new contributions tests are a strict requirement. Boy Scouts Rule is followed: If you touch a code for which either no tests exist or coverage is insufficient then it is expected that you will add relevant tests.
These are the following tools that were used to write all the tests (unit + envtest + vanilla kind cluster tests), it is preferred not to introduce any additional tools / test frameworks for writing tests:
Gomega
We use gomega as our matcher or assertion library. Refer to Gomega’s official documentation for details regarding its installation and application in tests.
Testing Package from Standard Library
We use the Testing package provided by the standard library in golang for writing all our tests. Refer to its official documentation to learn how to write tests using Testing package. You can also refer to this example.
Writing Tests
Common for All Kinds
- For naming the individual tests (
TestXxx and testXxx methods) and helper methods, make sure that the name describes the implementation of the method. For eg: testScalingWhenMandatoryResourceNotFound tests the behaviour of the scaler when a mandatory resource (KCM deployment) is not present. - Maintain proper logging in tests. Use
t.log() method to add appropriate messages wherever necessary to describe the flow of the test. See this for examples. - Make use of the
testdata directory for storing arbitrary sample data needed by tests (YAML manifests, etc.). See this package for examples.
Table-driven tests
We need a tabular structure in two cases:
- When we have multiple tests which require the same kind of setup:- In this case we have a
TestXxxSuite method which will do the setup and run all the tests. We have a slice of test struct which holds all the tests (typically a title and run method). We use a for loop to run all the tests one by one. See this for examples. - When we have the same code path and multiple possible values to check:- In this case we have the arguments and expectations in a struct. We iterate through the slice of all such structs, passing the arguments to appropriate methods and checking if the expectation is met. See this for examples.
Env Tests
Env tests in Dependency Watchdog use the sigs.k8s.io/controller-runtime/pkg/envtest package. It sets up a temporary control plane (etcd + kube-apiserver) and runs the test against it. The code to set up and teardown the environment can be checked out here.
These are the points to be followed while writing tests that use envtest setup:
All tests should be divided into two top level partitions:
- tests with common environment (
testXxxCommonEnvTests) - tests which need a dedicated environment for each one. (
testXxxDedicatedEnvTests)
They should be contained within the TestXxxSuite method. See this for examples. If all tests are of one kind then this is not needed.
Create a method named setUpXxxTest for performing setup tasks before all/each test. It should either return a method or have a separate method to perform teardown tasks. See this for examples.
The tests run by the suite can be table-driven as well.
Use the envtest setup when there is a need of an environment close to an actual setup. Eg: start controllers against a real Kubernetes control plane to catch bugs that can only happen when talking to a real API server.
NOTE: It is currently not possible to bring up more than one envtest environments. See issue#1363. We enforce running serial execution of test suites each of which uses a different envtest environments. See hack/test.sh.
Vanilla Kind Cluster Tests
There are some tests where we need a vanilla kind cluster setup, for eg:- The scaler.go code in the prober package uses the scale subresource to scale the deployments mentioned in the prober config. But the envtest setup does not support the scale subresource as of now. So we need this setup to test if the deployments are scaled as per the config or not.
You can check out the code for this setup here. You can add utility methods for different kubernetes and custom resources in there.
These are the points to be followed while writing tests that use Vanilla Kind Cluster setup:
- Use this setup only if there is a need of an actual Kubernetes cluster(api server + control plane + etcd) to write the tests. (Because this is slower than your normal
envTest setup) - Create
setUpXxxTest similar to the one in envTest. Follow the same structural pattern used in envTest for writing these tests. See this for examples.
Run Tests
To run unit tests, use the following Makefile target
To run KIND cluster based tests, use the following Makefile target
make kind-tests # these tests will be slower as it brings up a vanilla KIND cluster
To view coverage after running the tests, run :
go tool cover -html=cover.out
Flaky tests
If you see that a test is flaky then you can use make stress target which internally uses stress tool
make stress test-package=<test-package> test-func=<test-func> tool-params="<tool-params>"
An example invocation:
make stress test-package=./internal/util test-func=TestRetryUntilPredicateWithBackgroundContext tool-params="-p 10"
The make target will do the following:
- It will create a test binary for the package specified via
test-package at /tmp/pkg-stress.test directory. - It will run
stress tool passing the tool-params and targets the function test-func.